

Equity by La Crosse 75904 User Manual

PM Light
Indicator
Alarm Light
Indicator
ALARM
Alarm Clock with USB Port
Model 75904
Please read this before operating the clock
PM
Alarm
On/O
Time
Display
USB Port
Alarm Time MinuteSnooze Hour
ALARM
USB
TIME MINUTE HOUR
Features
• USB port for charging electronic devices
• Bright blue 1.8” LED display
• Loud alarm in ascending steps
• Repeat 9 minute snooze
• Requires 2 "AAA" batteries for back-up
• Power supply : AC 120V, 60 Hz adaptor, UL approved (supplied)
Power Supply
When the AC cord is plugged in the display will go to 12:00 am.
P.M. indicator
A dot appears in the upper left hand corner of the display indicating that the time shown is P.M.
Alarm ON. indicator
A dot appears in the lower left hand of the display indicating that the alarm has been activated.
Time setting
- Hold down the TIME button and press the HOUR button continuously to forward the hours to your
desired hour setting.
- Hold down the TIME button down and press the MINUTE button continuously to forward the minutes
to your desired minute setting.
Remember to set the correct AM or PM time. The PM light indicator will light up for PM time.
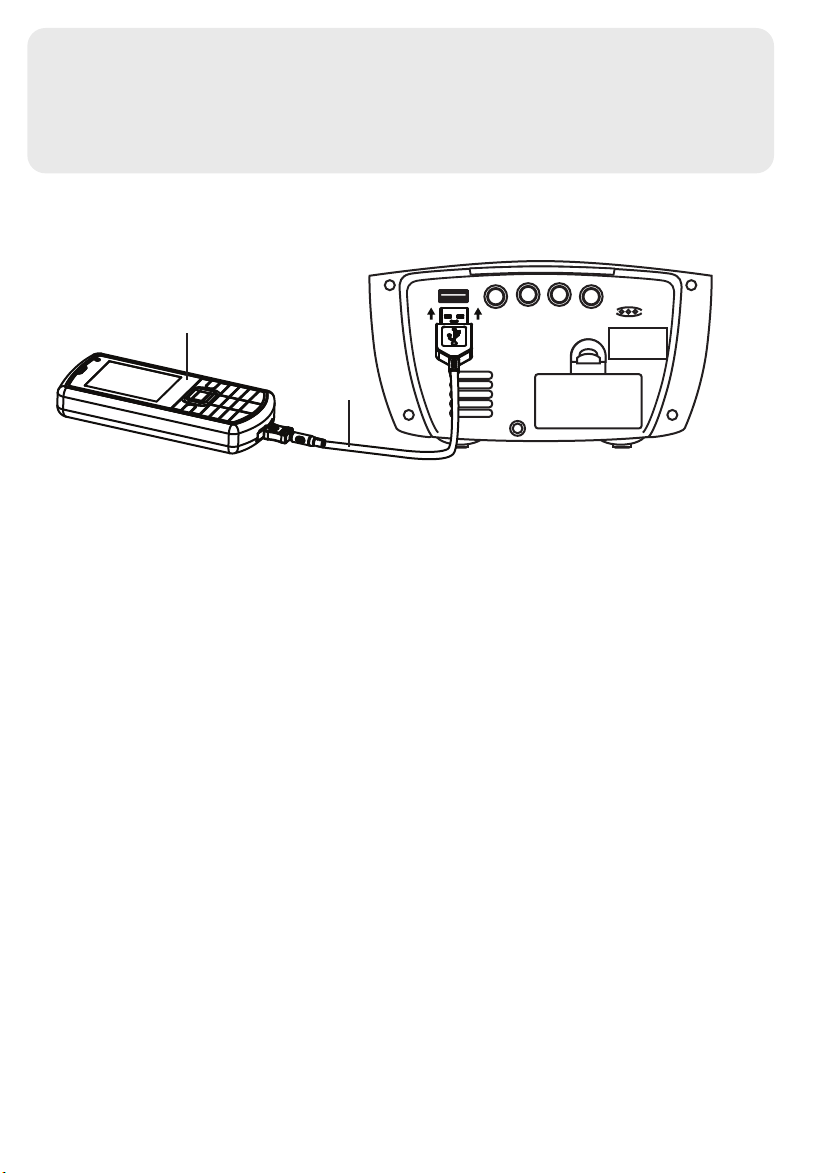
USB charging port
Charge a cell phone, mp3 player, camera or other portable device, or power any USB powered device
with the USB charging port. Use the USB cable that came with the portable device to connect to the
USB charging port. The USB port will provide power of up to 5V 700 mA, which is enough to charge
most portable devices overnight. Tablet computers and other devices requiring high charging current
may take longer than overnight to fully charge. High current devices like tablets will receive a trickle
charge that might not show as charging on the tablet’s display.
For additional support regarding the USB charging feature please visit:
www.equitybylacrosse.com/contact-customer-support
ALARM
TIME MINUTE HOUR
Cellphone
(not included)
USB Cable
(not included)
USB
Alarm time setting
- Hold the ALARM button down and press the HOUR button continuously to forward the time to your
desired hour setting.
- Hold the ALARM button down and press the MINUTE button continuously to forward the time to your
desired minute setting.
Remember to set the correct AM or PM time. Move the ALARM ON/OFF switch to the ON position to
activate the alarm. The ALARM light indicator will light up when the Alarm is activated.
Alarm Operation and Snooze
Slide the ON/OFF switch to the ON position. When the alarm sounds, press the snooze bar to get an
extra 9 minutes of sleep.
Battery Backup
Insert two "AAA" batteries into the battery compartment at the backside of clock.
If the AC power is interrupted the LED display will not light-up but the alarm will sound at the preset
alarm time. If you choose not to install backup batteries, the display will ash 12:00 when power is
restored and the time and alarm will need to be set again.
Battery Warning
Clean the battery contacts and also those of the device prior to battery installation. Follow the polarity
(+) and (-) to place battery.
Do not mix old and new batteries.
Do not mix Alkaline, Standard (Carbon - Zinc), or Rechargeable (Nickel - Cadmium) batteries.
Incorrect battery placement will damage the clock movement and battery may leak.
Exhausted battery is to be removed from the product.
Remove batteries from equipment which is not to be used for an extended period of time.
Do not dispose of batteries in re. Batteries may explode or leak.
FCC INFORMATION:
This equipment has been tested and found to comply with the limits for a Class B digital device,
pursuant to Part 15 of the FCC Rules.
This device complies with Part 15 of the FCC Rules. Operation is subject to the following two conditions:
(1) This device may not cause harmful interference, and
(2) This device must accept any interference received, including interference that may cause undesired
operation.
 Loading...