

Page 1
AM/FM DIGITAL LED
CLOCK RADIO
Model 30111
Instruction Manual
SAFETY INSTRUCTIONS
1. Read instructions- All the safety and operating
instructions should be read before the appliance
is operated.
2. Retain instruction- The safety and operating
instructions should be retained for future
reference.
3. Heed Warnings- All warnings and cautions on
the appliance and in the operating instructions
should be adhered to.
4. Follow instructions- All operating and use
instructions should be followed.
5. Water and Moisture: The appliance should not
be used near water e.g. near a bathtub,
washbowl, kitchen sink, laundry tub, in a wet
basement, or near a swimming pool or lake.
6. Wall or ceiling mounting- The appliance should
not be mounted to a wall or ceiling.
7. Ventilation- The appliance should be situated so
that its location or position does not interfere
with its proper ventilation. For example, the
appliance should not be situated on a bed, sofa,
rug, or similar surface that may block the
ventilation openings, or placed in a built-in
installation such as a bookcase or cabinet, that
may impede on the flow of air through the
ventilation openings.
8. Heat- The appliance should be situated away
from heat sources such as radiators, heat
registers, stoves or other appliances (including
amplifiers) that produce heat.
9. Power Sources- The product should be operated
only with the type of power supply indicated on
the marking label. If you are not sure of the type
of power supplied to your home, consult your
product dealer, or local power company. For
products intended to operate from battery power, or
other sources, refer to the operating instructions.
10. Grounding Polarization- The product may be
equipped with a polarized alternating current line
plug (a plug having one blade wider than the other).
This plug will only fit into the power outlet one way.
This is a safety feature. If you are unable to insert the
plug fully into the outlet, try reversing the plug. If
the plug should fail to fit, contact your electrician to
replace your obsolete outlet. Do not defeat the safety
purpose of the polarizing plug.
11. Power Cord Protection- Power supply cords should
be routed so that they are not likely to be walked on
or pinched by items placed upon or against them,
paying particular attention to the cords at the plug,
outlet, and the point where the cord exits the
appliance.
12. Cleaning- The appliance should be cleaned only as
recommended by the manufacturer.
13. Non-use Periods- The power cord of the appliance
should be unplugged from the outlet when left
unused for a long period of time.
14. Object and Liquid Entry- Care should be taken so
that objects do not fall into the case and liquids are
not spilled into the case though product openings.
15. Damage Requiring Service- Unplug this product
from the wall outlet and take it to qualified service
personnel under the following conditions.
a. When the power supply cord or plug is damaged
b. If liquid has been spilled into, or objects have
fallen into the product.
c. If the products has been exposed to rain or water.
d. If the product does not operate when used
according to the operating instructions, adjust only
those controls that are covered by the operating
instructions as an improper adjustment of other
controls may interfere with the product’s normal
operation.
e. If the product has been dropped or damaged in any
way.
f. When the product exhibits a distinct change in
performance that indicates a need for service.
16. Servicing- The user should not attempt to service the
product beyond that described in the operating
instructions. All servicing should be referred to
qualified service personnel.
Please help in preservation of the environment and return
used batteries to an authorized depot.
Remove the battery from the clock if you do not intend to
use for an extended period of time.
Warning: Changes or modifications to this unit not
expressly approved by the party responsible for
compliance could void the user’s authority to operate the
equipment.
Two Year Limited Warranty (U.S.A)
Equity products are warranted for two years from the date
of consumer purchase against defects in material and
workmanship. During this period, such defects will be
repaired, or the product will be replaced at Equity’s
option, without charge. This warranty does not cover
damage caused by misuse or negligence. ALL IMPLIED
WARRANTIES, INCLUDING BUT NOT LIMITED
TO IMPLIED WARRANTIES OR FITNESS AND
MERCHANTABILITY, ARE LIMITED IN DURATION
TO A PERIOD ENDING TWO YEARS FROM DATE
OF PURCHASE. Some states do not allow limitations on
how long an implied warranty lasts so the above
limitation may not apply to you. This warranty gives you
specific legal rights and you may also have other rights
which vary from State to State.
If your product is not working properly, please send:
-the product
-A letter explaining the problem
-and $5.00 for postage and handling to:
Equity by La Crosse
Warranty Department
2817 Losey Blvd. S
La Crosse, WI 54601
Made in China Printed in China
CAUTION: TO REDUCE
THE RISK OF ELECTRIC
SHOCK, DO NOT
REMOVE COVER (OR
BACK). NO USER
SERVICEABLE PARTS
INSIDE. REFER
SERVICING TO
QUALIFIED SERVICE
PERSONNEL.
The lighting flash
with arrowhead
symbol, with an
equilateral triangle is
intented to alert the
user of the presence
of uninsulated
dangerous voltage
within the product's
enclosure that may
be of sufficient
magnitude to
constitute a risk of
electric shock to
persons.
The exclamation
point within an
equilateral triangle
to intended to alert
the user of presence
of important
operating and
maintenance
(servicing)
instruction. In the
literature
accompanying the
appliance.
CAUTION
RISK OF ELECTRIC SHOCK
DO NOT OPEN
CAUTION: TO PREVENT ELECTRIC SHOCK, MATCH THE WIDE
BLADE OF PLUG TO WIDE SLOT, MAKE SURE TO FULLY
INSERT THE PLUG BLADES INTO AN ELECTRICAL OUTLET.
WARNING: TO REDUCE THE RISK OF FIRE OR ELECTRICAL
SHOCK, D O NOT EXPOSE THE APPLIANC E TO RAIN O R
MOISTURE.
Equity 301111 I/M_r• (A4 size) • 11/4/2014 • AT
297x210mm
®
12:08
Page 2
12: 0 8
Equity 301111 I/M_r• (A4 size) • 11/4/2014 • AT
1.
2.
3.
4.
5.
6.
7.
8.
9.
10.
11.
12.
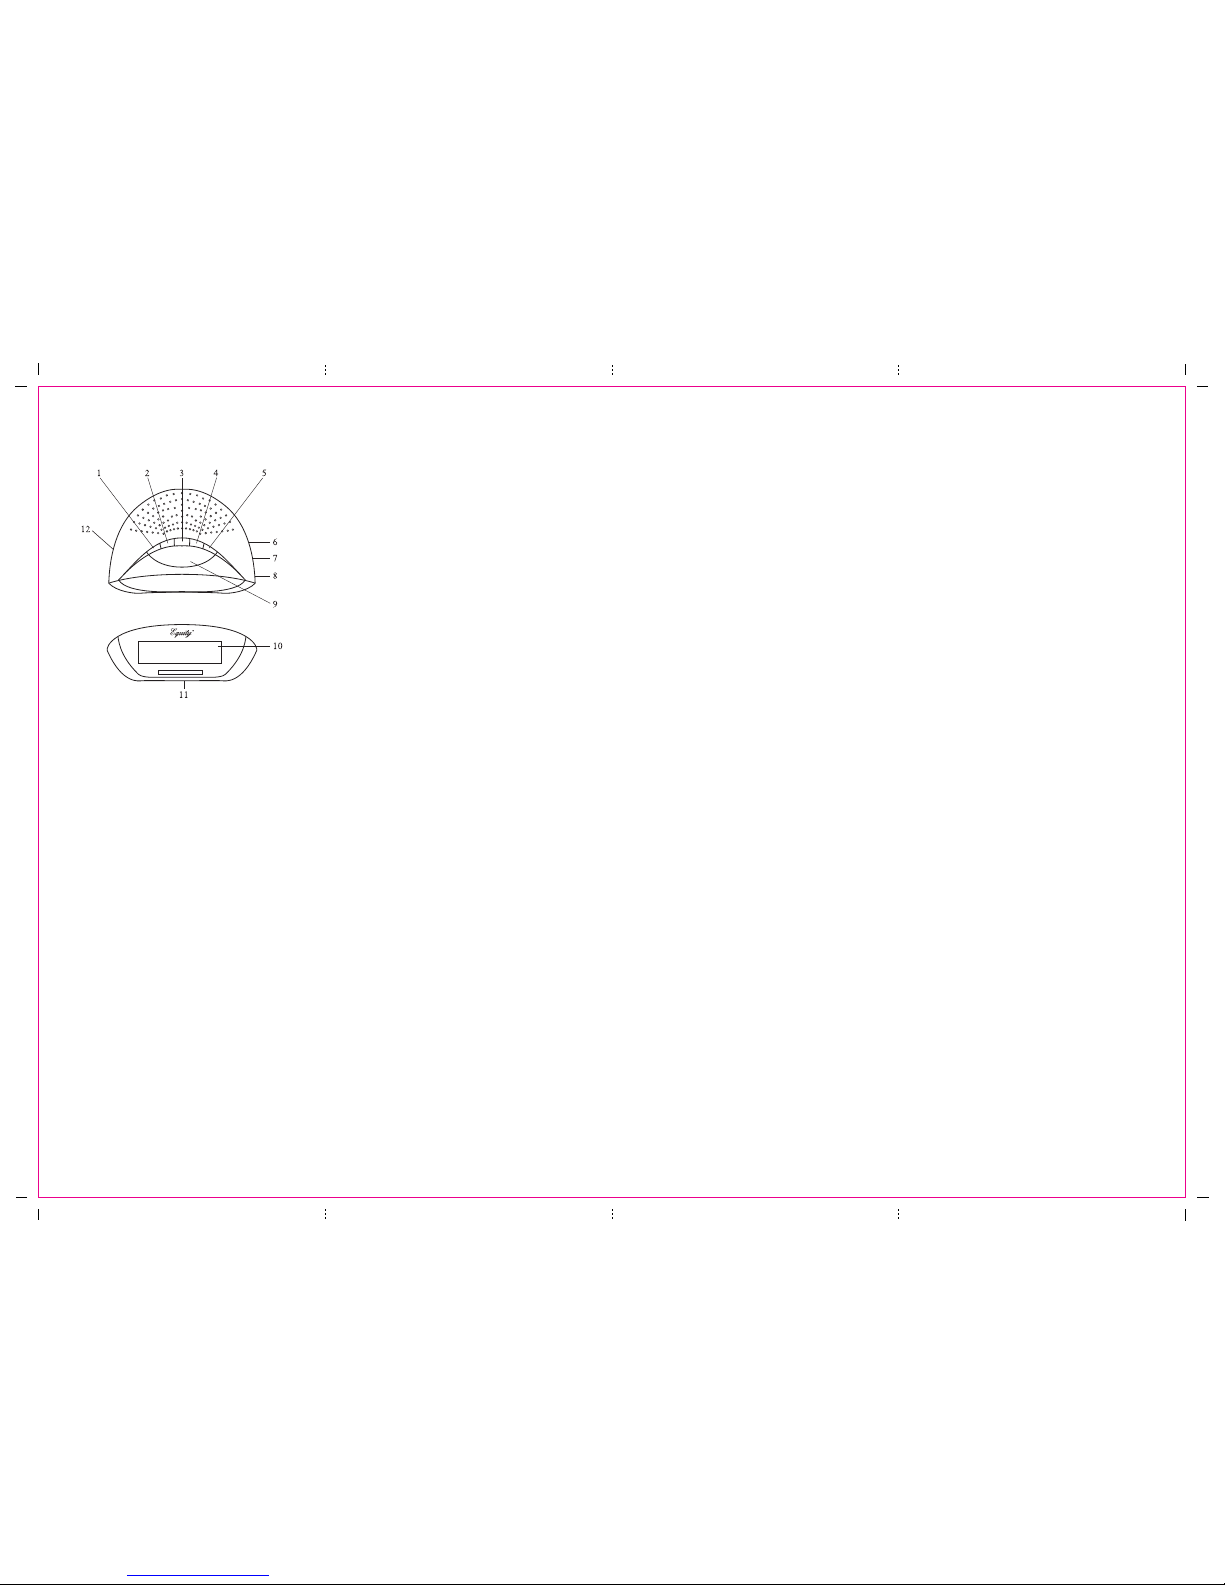
TIME SET BUTTON
HOUR SET BUTTON
MINUTE SET BUTTON
ALARM SET/OFF BUTTON
SLEEP BUTTON
VOLUME/BUZZ SWITCH
AM/FM BAND SELECTOR
TUNING KNOB
SNOOZE BUTTON
RED LED DISPLAY
BATTERY COMPARTMENT
AUTO/OFF/ON SWITCH
4. Sleep Set Button: Press this button to display the
number of minutes (1 minute to 1 hour and 59
minutes) where the radio will sound and
automatically turn off after the requested time has
expired.
5. HOUR and MINUTE BUTTON: Use these buttons
to set the time, set the alarm, and set the Sleep
function.
6. AM/FM BAND SELECTOR: Slide the selector to
either AM or FM to select the desired radio band.
7. VOLUME CONTROL KNOB: To regulate the
loudness of the radio, rotate the Volume Control
Knob clockwise to the desired position. If you wish
to be awakened by the “BUZZER” rotate the control
counter-clockwise until a “click” sound is heard.
8. TUNING KNOB: Turn this knob to the desired radio
station.
9. SNOOZE BUTTON: When you are awakened by the
music or buzzer but wish to sleep a few more
minutes, simply touch the “SNOOZE” button and it
will shut off the music or buzzer for 7-10 minutes
before the music or buzzer sounds again. This can be
repeated several times.
TO SET THE TIME
1. Press the time set button together with the HOUR or
MINUTE button to set the correct time.
Note: Repeat the above steps if you run past the correct
time. A red dot appears in the lower left hand corner of the
display indicating that the time shown is PM time.
TO SET THE ALARM
1. Press the Alarm set button to check the alarm time
2. Press the Alarm set button together with the HOUR
or MINUTE button to adjust the alarm time paying
close attention to the PM indicator.
Note: A red dot appears in the lower left hand corner of
the display indicating that the time shown is PM time.
TO PLAY THE RADIO
1. Slide the AUTO/OFF/ON switch to the “ON”
position.
2. Slide AM/FM band switch to desired band.
3. Select the desired radio station by turning the tuning
knob
4. Adjust the Volume to the desired listening level.
TO WAKE TO RADIO
1. Set the alarm as previously instructed.
2. Turn the radio on and select the desired radio station
and volume setting as previously instructed.
3. Slide the AUTO/OFF/ON Switch to the “AUTO”
position. Your clock is now set to turn on the radio
automatically at the preselected alarm time.
POWER SOURCE
Plug the AC cord into an AC 120V/60Hz power
outlet. The unit is now working and the display will
blink to show you it is operating, but not yet set.
OPERATING INSTRUCTIONS
1. AUTO/OFF/ON/SWITCH: Slide the switch to
turn the radio “ON”, “OFF” or to “AUTO”
position. When the switch is in the “AUTO”
position, it will permit automatic turning “ON”
and “OFF” according to the sleep and alarm
settings.
2. TIME SET BUTTON: Press this button
simultaneously with the HOUR or MINUTE
button to set the desired time.
3. ALARM SET BUTTON: Press this button
simultaneously with the HOUR or MINUTE
button to set the desired wake up time.
TO WAKE TO BUZZER
1. Follow steps 1 through 3 under “TO WAKE TO
RADIO”.
2. Rotate the VOLUME/BUZZ switch to the “BUZZ”
position. You will be awakened at the pre-selected
alarm time by the buzzer tone. To turn the BUZZER
off, slide the AUTO/OFF/ON switch to the “OFF”
position or press ALARM SET/OFF button.
TO TURN THE ALARM OFF
To turn the alarm off so that it sounds again the next day,
press the ALARM/SET/OFF button. To turn the alarm
off so that it does not sound the next day, slide the
AUTO/OFF/ON switch to the “OFF” position.
SLEEP CONTROL
1. Turn the AUTO/OFF/ON switch to the “AUTO” or
“OFF” position
2. Press the SLEEP button to display the sleep time.
The display will indicate 59 minutes. If you wish the
radio to play for a shorter period of time, simply
press the SLEEP button together with the MINUTE
button to set the desired time period, or if you wish
the radio to play longer, press the SLEEP button
along with the HOUR button to play for up to 1 hour
and 59 minutes (MAX).
3. Press the SLEEP button. The radio will turn on
automatically and will turn itself off when the pre-set
time has passed.
NOTE: The maximum sleep time is 1 hour 59 minutes.
The radio will be switched off automatically when the sleep
time expires. To turn the radio off before expiration of the
sleep time, simply press the SNOOZE button.
BATTERY BACKUP
Your clock has a battery backup feature in case of power
failure. A 9 volt battery (not included) is required. You
must put in a battery to ensure the battery backup
feature is ready in case of power failure. If power fails,
the backup battery will automatically continue operation
of the clock and maintain actual time. However the
display will not be lit. During actual power failure the
alarm function will not be operational. When electrical
power is restored, the display will light up again and
alarm time set previously is restored. The battery will
maintain timekeeping for approximately 8 hours during
power failure or interruption.
Note: Remove the battery if the clock is to be unplugged
for a long period of time to avoid unnecessary battery
drain.
SPECIFICATIONS
Power Source : AC 120V/60Hz
Radio Band Frequency : AM 530-1700 KHz,
FM 88-108 MHz
Clock Display : 0.6” LED Display
Battery Backup : 1 “9V” Battery
297x210mm
 Loading...