

equipmed FreeRoam User Manual

Electric Mobility Scooter –
FreeRoam
User Manual
[Revision 2.0 May 2017]
READ THIS MANUAL CA REFULLY BEFORE USE AND KEEP FOR FUTU RE RE FERENCE – FAILURE TO DO SO
MAY RESULT IN INJURY, PROPERT Y DAMAGE AND MAY VOID WARRANTY. • Produ cts covered by this manual
may vary in appearance, assembly, inclusions, specifications, description and packaging.
E&OE © 2017 Equipmed

Electric Mobility Scooter – FreeRoam
It is important that you read and
General Work Area Safety
Reduce speed when making sharp turns.
Safety
Safety messages are designed to alert you to possible dangers or hazards that could cause death, inj ury or
equipment or property damage if not understood or followed. Safety messages have the following symbols:
You WILL be KILLED or
SERIOUSLY INJURED if you
do not follow instructions.
understand the instruction manual before
use and keep the manual in a safe place
for future reference. Safety information
presented here is generic in nature – some
advice may not be applicable to every
piece of equipment.
All safety precautions must be observed to
reduce the risk of personal injury when
operating the equipment.
The term “equipment" refers to your
product, be it electrical mains, battery or
petrol engine powered.
IMPORTANT – Handle the equipment
safely and carefully.
BEFORE USE - If you are not familiar with
the safe operation/handling of this
equipment, or are in any way unsure of any
aspect of suitability or correct use it for
your application, you should complete
training conducted by a person or
organization qualified in safe use and
operation of this equipment, including
fuel/electrical handl ing and saf ety.
WARNINGS
• Read all safety warnings and all
instructions. Failure to follow warnings
and instructions may result in electric
shock, fire and/or serious injur y.
• Never run a combustion engine in
confined areas.
• Do not operate the equipment in
flammable or explosive environments,
such as in the presence of flammable
liquids, gases or dust. Engine and
equipment may create sparks or heat
that may ignite vapours, dust etc.
• Keep clear of moving parts.
• This equipment may be a potential
source of electric shock if misused.
• Do not operate the equipment if it is
damaged, malfunctioning or is in an
excessively worn state.
• Do not allow others to use the
equipment unless they have read this
manual and are adequately trained.
• When using the equipment, basic
safety precautions detailed here must
always be followed to reduce the risk
of fire, electric shock, personal injury
and material damage.
• When wiring electrically powered
equipment, follow all electrical and
safety codes.
• Ensure all power sources conform to
equipment voltage requirements and
are disconnected before connecting
equipment.
You CAN be KILLED or
SERIOUSLY INJURED if you do
not follow inst r uctions .
Work areas should be clean and well it.
Do not operate the equipment if
bystanders, animals etc. are within
operating range of the equipment or the
general work area.
Personal Safety
Keep packaging away from children - risk
of suffocation! Operators must use the
equipment correctly. When using the
equipment, consider conditions and pay
due care to persons and property.
Do not attempt to lift or move a power
scooter by any of its removable parts.
Personal injury and damage to the power
scooter may result.
Do not drive the scooter on a major
roadway.
Avoid driving in the dark or in times of
limited vision.
Do not connect any electrical or
mechanical devices to the scooter. Doing
so may cause personal injury or damage to
equipment, and voids the manufacturer’s
warranty.
Do not operate the scooter if it is not
functioning properly. Contact the
manufacturer or an authorised service
personnel.
Influence of Medication or Alcohol
Check with your physician if you are taking
any medications that may affect your ability
to operate your power scooter safely.
Do not operate your scooter while you are
under the influence of alcohol, as it impairs
your ability to operate your power scooter
in a safe manner.
General E quipment Use and Car e
Make sure that your weight does not
exceed the recommended weight limit of
the scooter.
Always ensure that the power is switched
off, when getting on or off the scooter.
When getting on and off the scooter, do not
step on the foot rest.
Keep your feet on the foot rest always
while driving.
Be aware of the environment around you
when choosing a desired speed. For indoor
environments, we recommend that you
select the slowest speed setting. For
outdoor environments, select a speed that
is comfortable for you to control the scooter
safely.
You CAN be INJURED if you do
not follow instructions or
equipment damage may occur.
Do not switch off the power when the scooter
is still moving forward. This will bring the
scooter to an extremely abrupt stop.
Avoid jerky stop/start motions as it will result
in excessive battery drain and increase tyre
wear. To break in an emergency, simply
release the forward/reverse lever.
Make sure that the wheel release lever is in
driving mode prior to operation.
Make sure that the forward/reverse lever is in
the proper position according to your desire d
direction.
Ramps and Curbs (Sidewalks)
Use extra caution when driving down a slope.
Never drive across a slope.
Do not turn sharply on a slope.
Do not drive in reverse on a slope or on a
bumpy surface.
When driving over a curb or raised surface,
make sure that the bottom of the scooter has
sufficient clearance
Product Use and Care
WARNING!
This product may feature one or more or a
combination of; nuts, bolts, screws, clips,
fasteners and/or locking, fi xing or safet y
mechanisms. These items/mechanisms
require checking/inspection to ensure they
are tight or correctly secured and are
operating correctly. Failure to adequately
check this produ ct before each use may
result in serious injury due to fall, loss of
control, loss of balance, loss of footing,
tripping, crushing and/or impact. Additionally,
regular inspection/ servic ing s hould be
performed by a person who is qualified and
competent in servicing this prod uct - intervals
will vary depending on product usage.
Consult a qualified person to determine
inspection/service intervals after
communicating details of your usage to them.
E&OE © 2017 Equipmed 2

Electric Mobility Scooter – FreeRoam
Table of Contents
Safety ................................................................................................................................................... 2
Assem bly and Disassembly ............................................................................................................. 4
Assembly ................................................................................................................................................... 4
Disassembly ............................................................................................................................................... 4
Operation ............................................................................................................................................ 5
Tiller Console Components ........................................................................................................................ 5
Key Switch ........................................................................................................................................... 5
Throttle Control Lever .......................................................................................................................... 5
Horn Button ......................................................................................................................................... 5
Battery Condition Meter ....................................................................................................................... 5
Speed Adjustment Dial ........................................................................................................................ 5
Lower Tiller Components ........................................................................................................................... 6
Tiller Adjustment Knob......................................................................................................................... 6
Seat Adjustments ................................................................................................................................ 6
Rear Section Components ......................................................................................................................... 7
Manual Freewheel Lever ..................................................................................................................... 7
Anti-Tip Wheels ................................................................................................................................... 7
Motor/Trans-axle Assembly ................................................................................................................. 7
Charger Power Cord Receptacle ......................................................................................................... 8
Off-Board Battery Charger ................................................................................................................... 8
Batteries and Charging .............................................................................................................................. 8
Reading Your Battery Voltage ............................................................................................................. 8
Charging Precautions .......................................................................................................................... 9
Maintenance ..................................................................................................................................... 11
Tire Condition and Tread Wear ................................................................................................................ 11
Wheel Replacement ................................................................................................................................. 11
Cleaning and Disinfecting ........................................................................................................................ 11
Battery Terminal Connections .................................................................................................................. 11
Console, Charger, and Electronics........................................................................................................... 11
Wiring Harnesses ..................................................................................................................................... 11
Storage .................................................................................................................................................... 11
Proper Disposal of Your Scooter .............................................................................................................. 12
Troubleshooting ............................................................................................................................... 12
Specifications ................................................................................................................................... 14
E&OE © 2017 Equipmed 3
Electric Mobility Scooter – FreeRoam
Assembly and Disassem bly
Assembly
To assemble the Scooter:
1. Loosen the tiller adjustment knob, raise the tiller to its desired position, and re-tighten the tiller
adjustment knob.
2. Turn the tiller lock knob to its UNLOCKED position.
3. Install the battery pack and battery compartment cover.
4. Install the seat.
5. Install the basket.
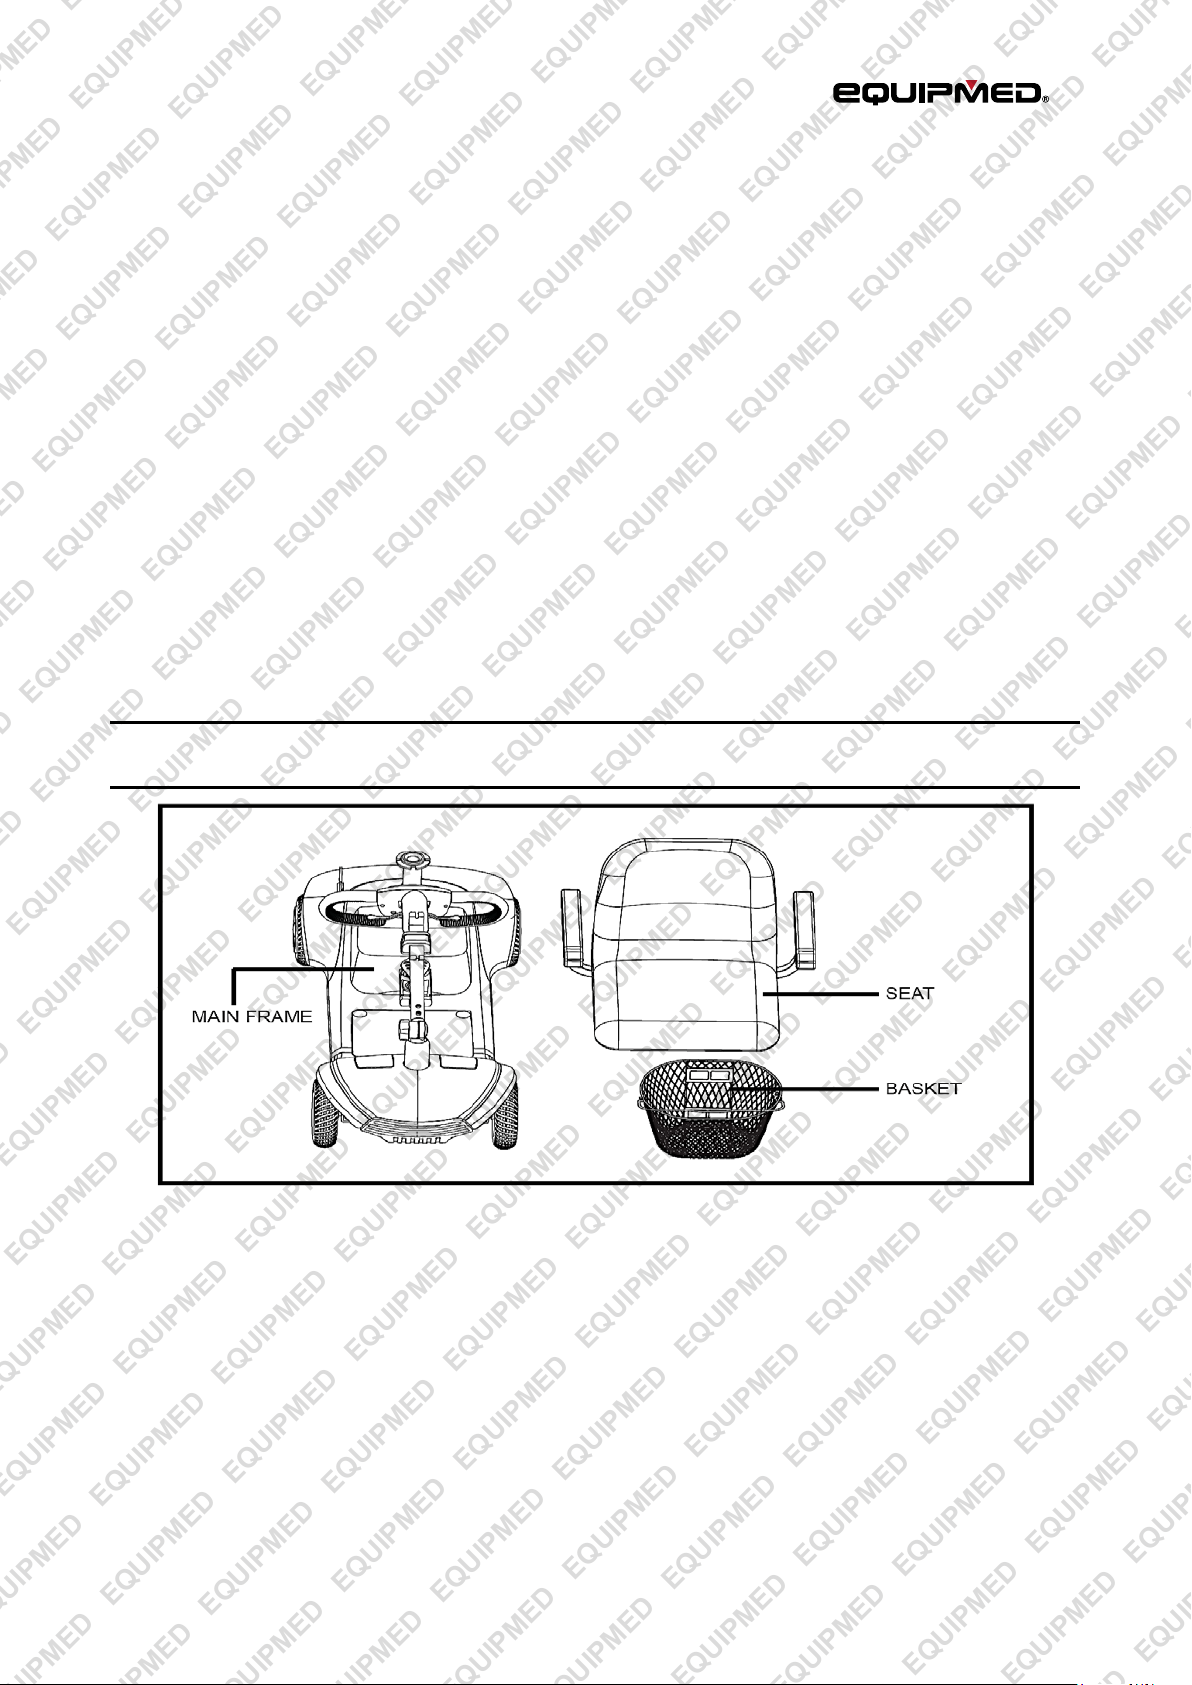
Disassembly
You can disassemble the Scooter into five pieces: the seat, main frame, battery pack, battery compartment
cover, and basket. See image below. No tools are required to disassemble or assembl e your Scooter, but
keep in mind that the disassembled sections of the Scooter take up more floor space than the assembled
unit. Always disassemble or assembl e your Scooter on a level, dry surface with sufficient room for you to
work and move around your Scooter-about 5 feet in all directions. Remember that some Scooter
components are heavy and you may need assistance when lifting them.
WARNING! Do not lift beyond your physical capability. Ask for assistance when necessary while
disassembling or assembling your Scooter.
To disassemble the Scooter:
1. Turn the tiller lock knob to its locked position. See Your Scooter section.
2. Remove the seat by lifting it straight up and off the Scooter.
3. Remove the basket by lifting it straight up and off the securement bracket.
4. Remove the battery pack. Re-install the battery compartment cover during transport to protect from
damage.
5. Loosen the tiller adjustment knob and lower the tiller to its lowest point, then tighten the tiller adjustment
knob.
E&OE © 2017 Equipmed 4
Electric Mobility Scooter – FreeRoam
Operation
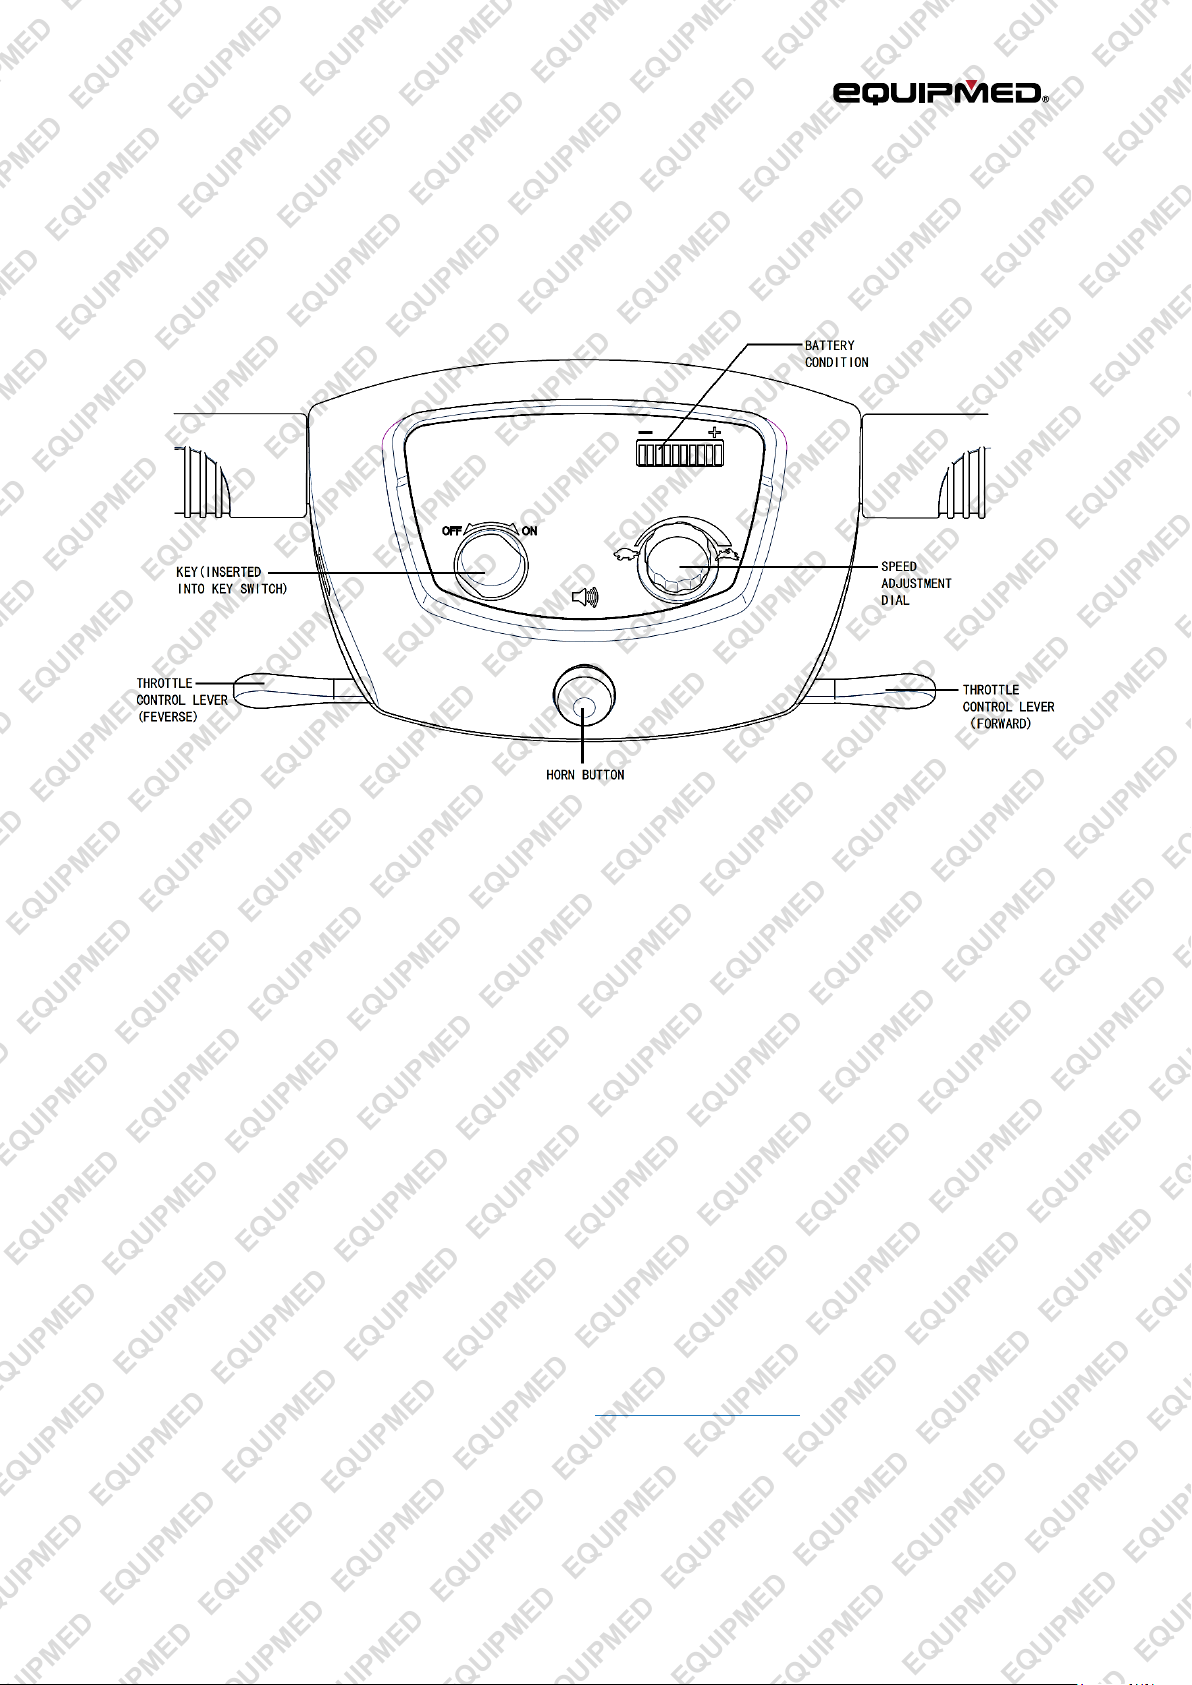
Tiller Console Components
The tiller console houses all controls needed to drive your Scooter, including the key switch, throttle control
lever, horn button, speed adjustment dial, and the battery condition meter. See image below.
Key S witch
•
Insert the key into the key switch and turn it clockwise to power up (turn on) your Scooter.
•
Turn the key counter clockwise to power down (turn off) your Scooter.
Throttle Control Lever
This lever allows you to control the forward speed and the reverse speed of your Scooter up to the maximum
speed you have set with the speed adjustment dial.
•
Place your right hand on the right-hand gr ip and your left hand on the left-hand grip.
•
Use your right index finger to pull the right side of the lever to disengage your Scooter’s brakes and
move forward.
•
Release the lever and allow your Scooter to come to a complete stop before pushing the other side of
the lever to move in reverse.
•
When the throttle is completely released, it automatically returns to the centre “stop” position and
engages your Scooter’s brakes.
Horn Button
This button activates a warning horn. The Scooter must be “on” for the horn to be operational. Do not
hesitate to use the warning horn when doing so may prevent accident or injury.
Battery Condition Meter
When the key is fully inserted into the key switch, this meter indicates approximate battery strength. For
further information on the battery condition meter, see Batteries and Charging section.
Speed Adjustment Dial
This dial allows you to preselect and limit your Scooter’s top speed.
•
The image of the hare represents the fastest speed setting.
•
The image of the tortoise represents the slowest speed setting.
E&OE © 2017 Equipmed 5
 Loading...