

Equipex DRIC-2500, DRIC-3000, DRIC-3600, D1 IM-3600, D1 IC-3600 Operation Manual [en, fr]
...Page 1
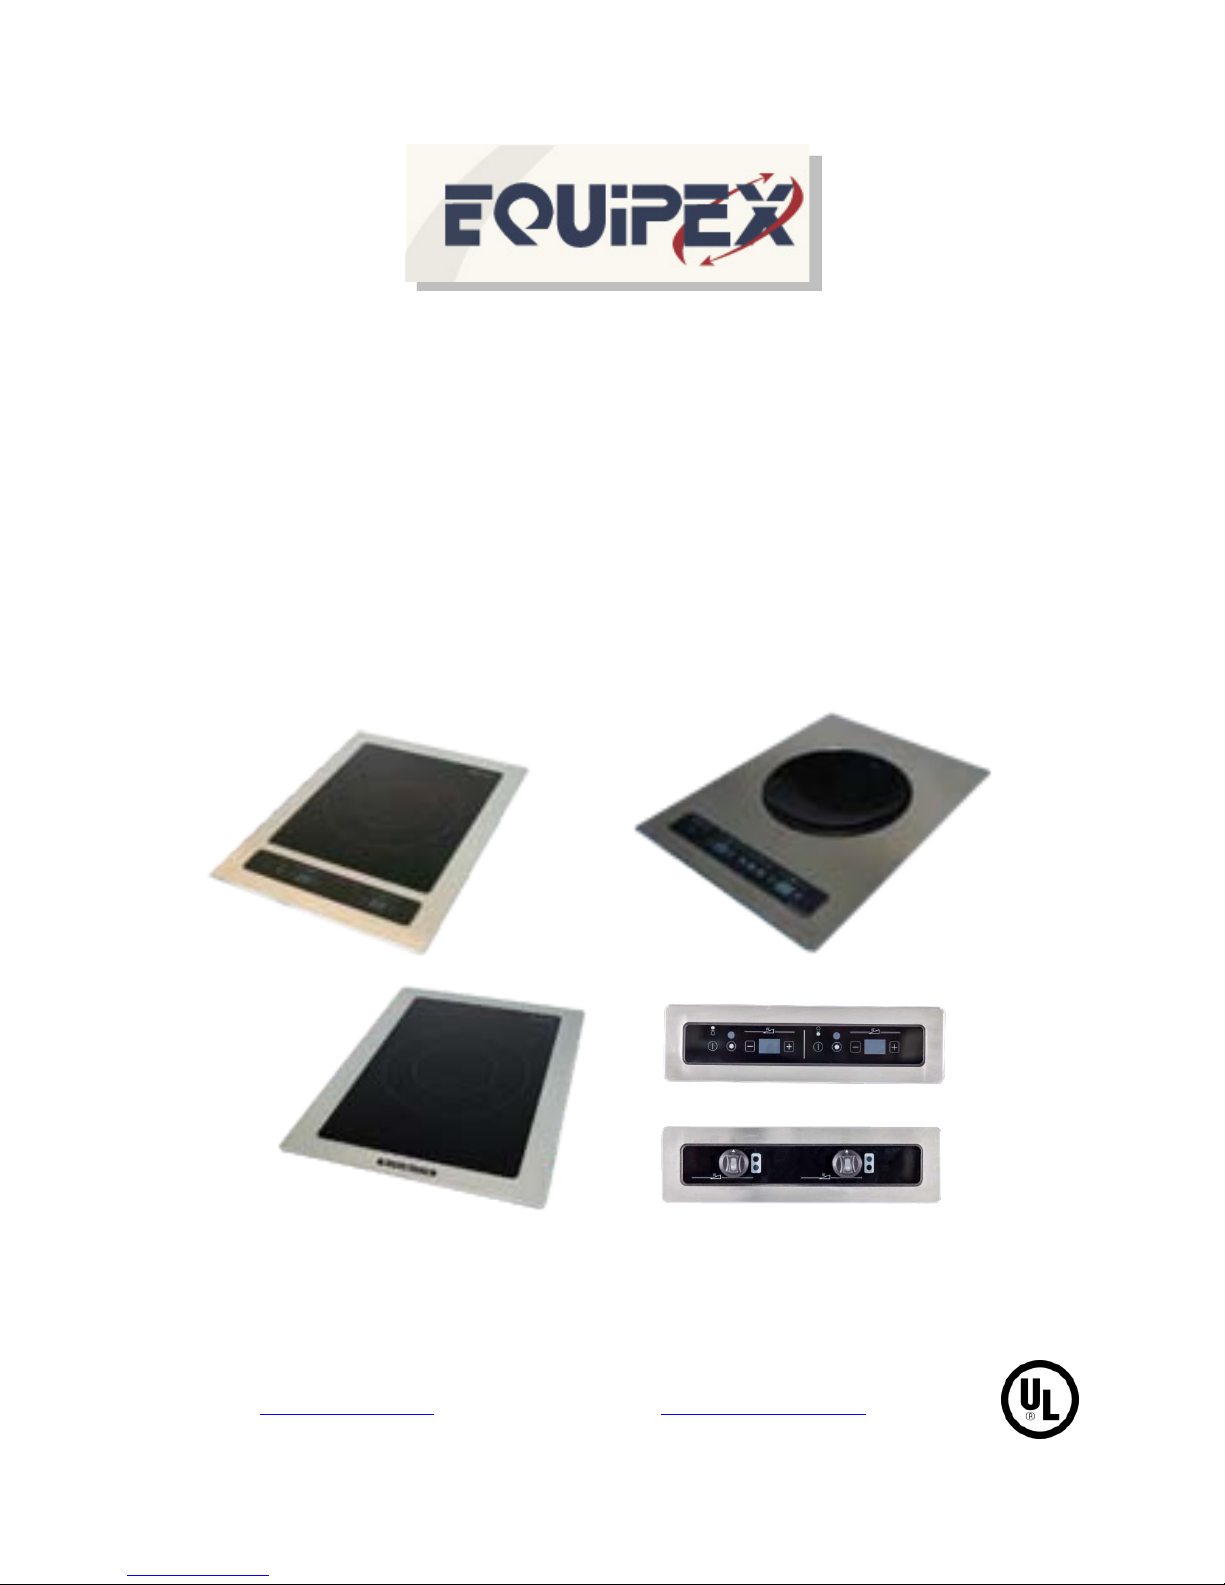
Operation Manual
For
Induction Cookers
BIOLINE BUILT IN
765 Westminster Street Providence, Rhode Island 02903 U.S.A.
Tel: (401) 273-3300 Fax: (401) 273-3328
www.equipex.com e-mail: [email protected]
8/21/15
Page 2

IMPORTANT SAFEGUARDS
When using electrical appliances, basic safety precautions should always be followed,
including the following:
1. Read all the instructions before use.
2. The appliance should not be used to store anything.
3. Never use appliance with a cracked glass surface. If the glass surface should
crack, disconnect the appliance immediately to avoid the risk of electric shock.
4. Never use aluminum foil for cooking, or put products packaged with aluminum or
frozen in aluminum packs directly onto the appliance. The aluminum will melt
and damage your appliance.
5. Be careful when wearing objects such as rings, watches or anything similar
which can heat up if placed very close to the cooker when using the appliance.
6. Do not touch hot surfaces; use handles or knobs.
7. To avoid electric shock, do not immerse the power cord, or any part of the unit, in
any liquid.
8. This appliance is not intended for use by persons (including children) with
reduced physical, sensory or mental capabilities, or with lack of experience or
knowledge, unless they have supervision or have been given prior instructions
concerning the use of the device by the person responsible for their safety.
9. Please keep away from children.
10. Unplug appliance from the electrical outlet when not in use, and before cleaning.
Allow appliance to cool before installing or removing any parts or accessories,
and before cleaning.
11. Do not operate any appliance with a damaged cord or plug, or if appliance should
sustain damage, or malfunction in any way. In this event, return appliance to the
manufacturer for ex am ination, repair or adjust ment.
12. The use of accessories and/or attachments not recommended by the appliance
manufacturer may cause injury or damage to the appliance, and may void your
warranty.
13. Use only induction ready cookware of the type and size recommended.
14. Do not use outdoors.
15. Do not allow the power cord to hang over the edge of a table or counter, or to be
exposed to hot surfaces, as damage may occur.
16. Do not place appliance on or near a burner, or in a heated oven.
17. To disconnect an appliance, first turn all controls to the ‘off’ position; then unplug
the power cord from the wall outlet.
18. Do not use appliance other than for its intended use.
19. SAVE THESE INSTRUCTIONS FOR LATER USE!
Page 3

GARANTIES IMPORTANTES
Lorsque vous utilisez les appareils électriques, des précautions de base doivent
toujours être suivies, y compris les suivants:
1. Lire toutes les instructions avant de l'utiliser.
2. L'appareil ne doit pas être utilisé pour stocker n'importe quoi.
3. Ne jamais utiliser appareil avec un fissuré surface en verre. Si la surface de verre
devrait crack, débrancher l'appareil immédiatement afin d'éviter le risque de choc
électrique.
4. Ne jamais utiliser d'aluminium pour la cuisson, ou placer des produits emballés
avec de l'aluminium ou gelés en aluminium packs directement sur l'appareil.
L'aluminium va fondre et endommager votre appareil.
5. Soyez prudent lorsque vous portez objets tels que des bagues, montres ou
quelque chose de similaire qui peut chauffer si placé très près de la cuisinière
lors de l'utilisation de l'appareil.
6. Ne touchez pas les surfaces chaudes; utilisation des poignées ou des boutons.
7. Pour éviter tout risque de choc électrique, ne pas immerger le cordon
d'alimentation, ou de n'importe quelle partie de l'unité, dans un quelconque
liquide.
8. Cet appareil n'est pas destiné à être utilisé par des personnes (notamment des
enfants) avec capacités physiques, sensorielles ou intellectuelles sont réduites,
ou par manque d'expérience ou de connaissances, à moins qu'ils ont supervision
ou n'a pas reçu au préalable les instructions concernant l'utilisat ion de l'appare il
par la personne responsable de Leur sécurité.
9. Se il vous plaît garder loin des enfants.
10. Débranchez l'appareil de la prise électrique lorsque vous ne l'utilisez pas, et
avant de le nettoyer. Appliance permettent de refroidir avant d'installer ou de
retirer des pièces ou des accessoires, et avant de le nettoyer.
11. Ne fonctionnent pas n'importe quel appareil avec une prise ou un cordon
d'alimentation endommagé, ou si l'appareil doit subir des dégâts, ou de
dysfonctionnement d'une manière ou d'une autre. Dans ce cas, retour appareil
au service autorisé le plus proche pour examen, réparation ou réglage.
12. L'utilisation d'accessoires et/ou des accessoires non recommandés par le
fabricant de l'appareil peut provoquer des blessures ou endommager l'appareil et
annuler votre garantie.
13. Utilisez uniquement vaisselle du type et de la taille recommandée.
14. Ne pas utiliser à l'extérieur.
15. Ne laissez pas le cordon d'alimentation pendre au bord d'une table ou d'un
compteur, ou d'être exposés aux surfaces chaudes, car vous risqueriez de les
endommager.
16. Ne placez aucun appareil sur ou près d'un brûleur, ou dans un four chaud.
17. Pour débrancher l'appareil, mettez d'abord toutes les commandes sur la position
'arrêt' ; puis débranchez le cordon d'alimentation de la prise murale.
18. Ne pas utiliser appareil autre que pour son usage prévu.
19.CONSERVEZ CES INSTRUCTIONS POUR UNE UTILISATION ULTÉRIEURE
Page 4

INTRODUCTION
Models DRIC 2500, DRIC 3000, DRIC 3600, D1 IM 3600, D1 IC 3600 and DWIC
3600 induct i on cookers are designed to offer fast, high quality cooking. They are
constructed of food service quality stainless steel for commercial applications, and
tinted tempered (safety) vitroceramic gla ss. A ll units requir e indu ct ion rea dy pans t o
operate. The units an d touch ac ti vat ed contr ol pa nels are fully se aled on top to
prevent liqu id intr us ion. Contr ols inc l ude an on-off power butt on, + an d – but tons to
raise an d lower the t emp erat ure, po wer output or power l eve l setti ng, a timer, a
butto n to switch disp lay between po wer and temperature and t w o on e touc h
programmable power buttons. Display indicators allow for precise control of the
temper atur e/p o wer and tim er sett in gs.
Specifications:
Model Electrical Plug
Configuration
DRIC-2500 208/240V, 50/60 Hz, 1 PH, 2.5KW, 10.5/12A NEMA-6-20P
DRIC-3000 208/240V, 50/60 Hz, 1 PH, 3KW, 12.5/14.5A NEMA-6-20P
DRIC-3600 208/240V, 50/60 Hz, 1 PH, 3.6KW, 15/17.5A NEMA-L6-30P
DWIC-3600 208/240V, 50/60 Hz, 1 PH, 3.6KW, 15/17.5A NEMA-L6-30P
D1 IM-3600 208/240V, 50/60 Hz, 1 PH, 3.6KW, 15/17.5A NEMA-L6-30P
D1 IC-3600 208/240V, 50/60 Hz, 1 PH, 3.6KW, 15/17.5A NEMA-L6-30P
All mo de ls ar e r equ ire d to be i nst a lled o n a dedi cat ed c i rc uit rat ed no t less t ha n 2 5% o ver
the m aximum cu rr ent in dic ate d fo r th at m ode l abov e, in ac co rd ance w ith N EC st an dar ds.
Plug e nd s have b een ap pr opr iat el y in sta ll ed t o me et t he se r equ irem ent s.
INSTALLATION
The
Induction Cooker
of 208/240V, si n gle -phase, 50/60Hz. DO NOT pl ace th e unit in a damp area or ne ar
steam sources, or where heat from other equipment may affect the unit, by ra ising its
internal temperature. When positioning the appliance, make sure that the bottom
ventilation holes are not blocked. Maintain 2” clearance at each side, rear and top of
the appliance.
needs to be connected to a gro unded outlet o f proper voltage
Page 5

La cuisson par indu ction doi t être con nec té à une prise de t erre de ten sion co rrec te de
208/240V, monophasé, 50/6 0 Hz. NE pl acez P AS l 'appar ei l dans un endroit humide ou
à proximité de vapeur sources, ou où la chaleur provenant d'autres appareils peut avoir
une incidence sur l'unité, en augmentant sa température interne. Lors du
posit i onnement de l' appare i l, assure z-vou s que le bas orifices de vent i lation ne sont pas
obstrués. Maintenir 2" de dégagement de chaque côté, à l'arrière et le dessus de
l'appareil.
Step 1: The cut out
Dimensions of the unit are: 440 mm x 580 mm. Height varies regarding model.
Dimensions of the cut out need to be: 410 mm (16-9/64”) x 550 mm (21-11/16”).
Page 6

Step 2: Insert the unit
Carefully place the unit into the opening to check fit. If any adjustments
to the opening size are necessary, make them before proceeding to the
next step.
Page 7
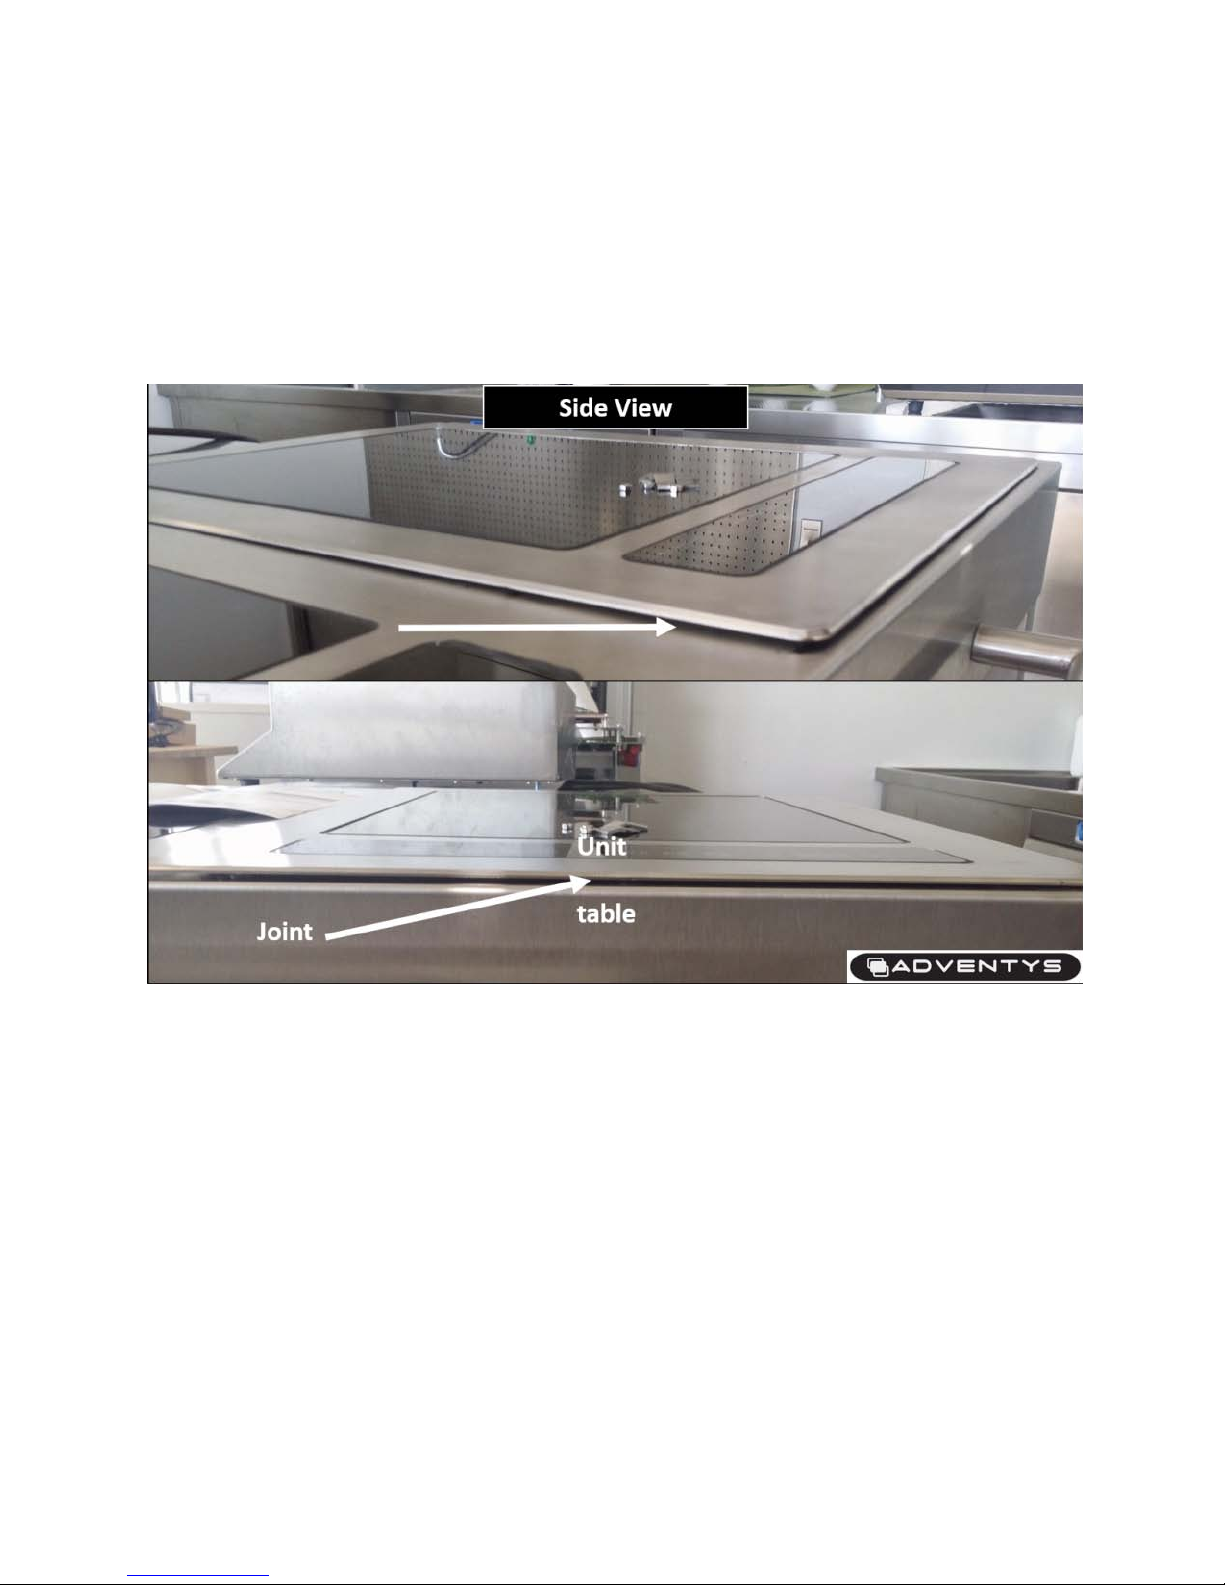
Step 3: Seali ng the unit to the c ountertop
Remove the unit, turn it upside down and place it on a surface which
will protect the glass from being scratched. Place a bead of NSF
approved high temperature sealant entirely around the outer edge of
the underside of the unit to create the joint. Place the unit back into the
opening and carefully push into place.
Page 8
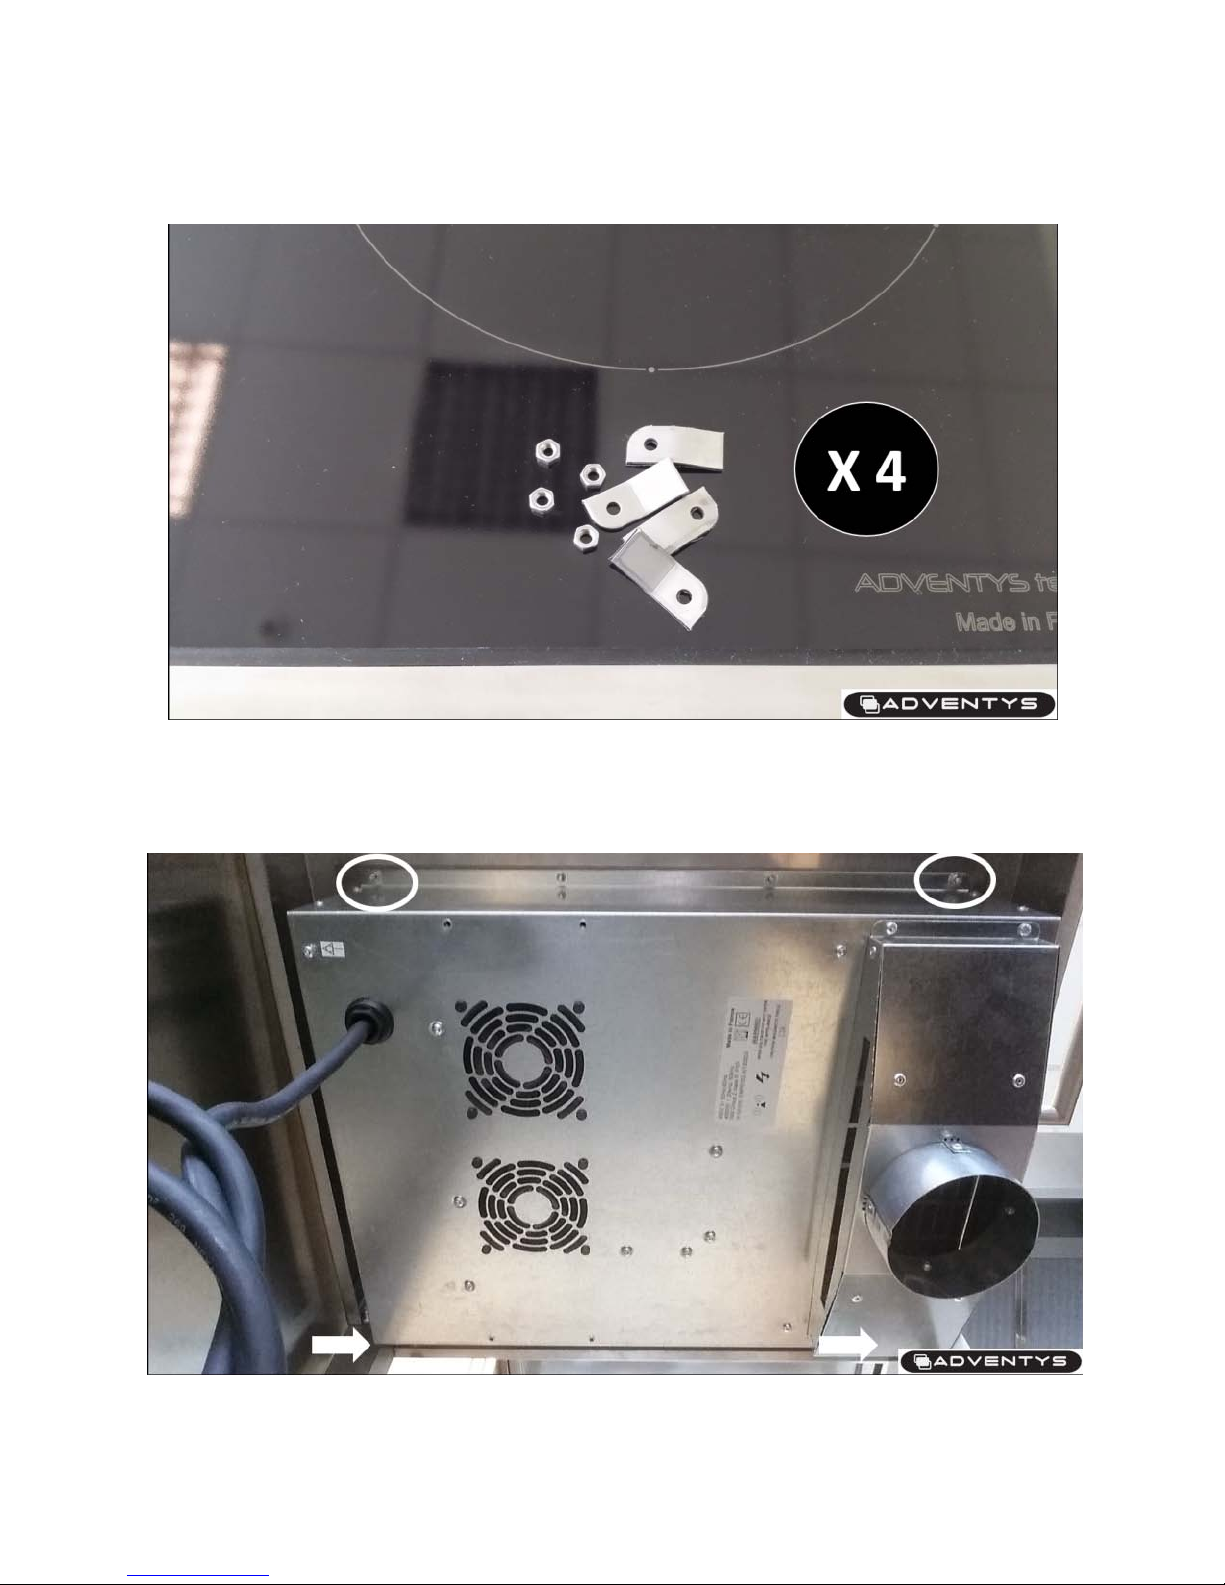
Step 4: Mounting
Mounting Hardware included.
Hardware placement, four locations.
Page 9
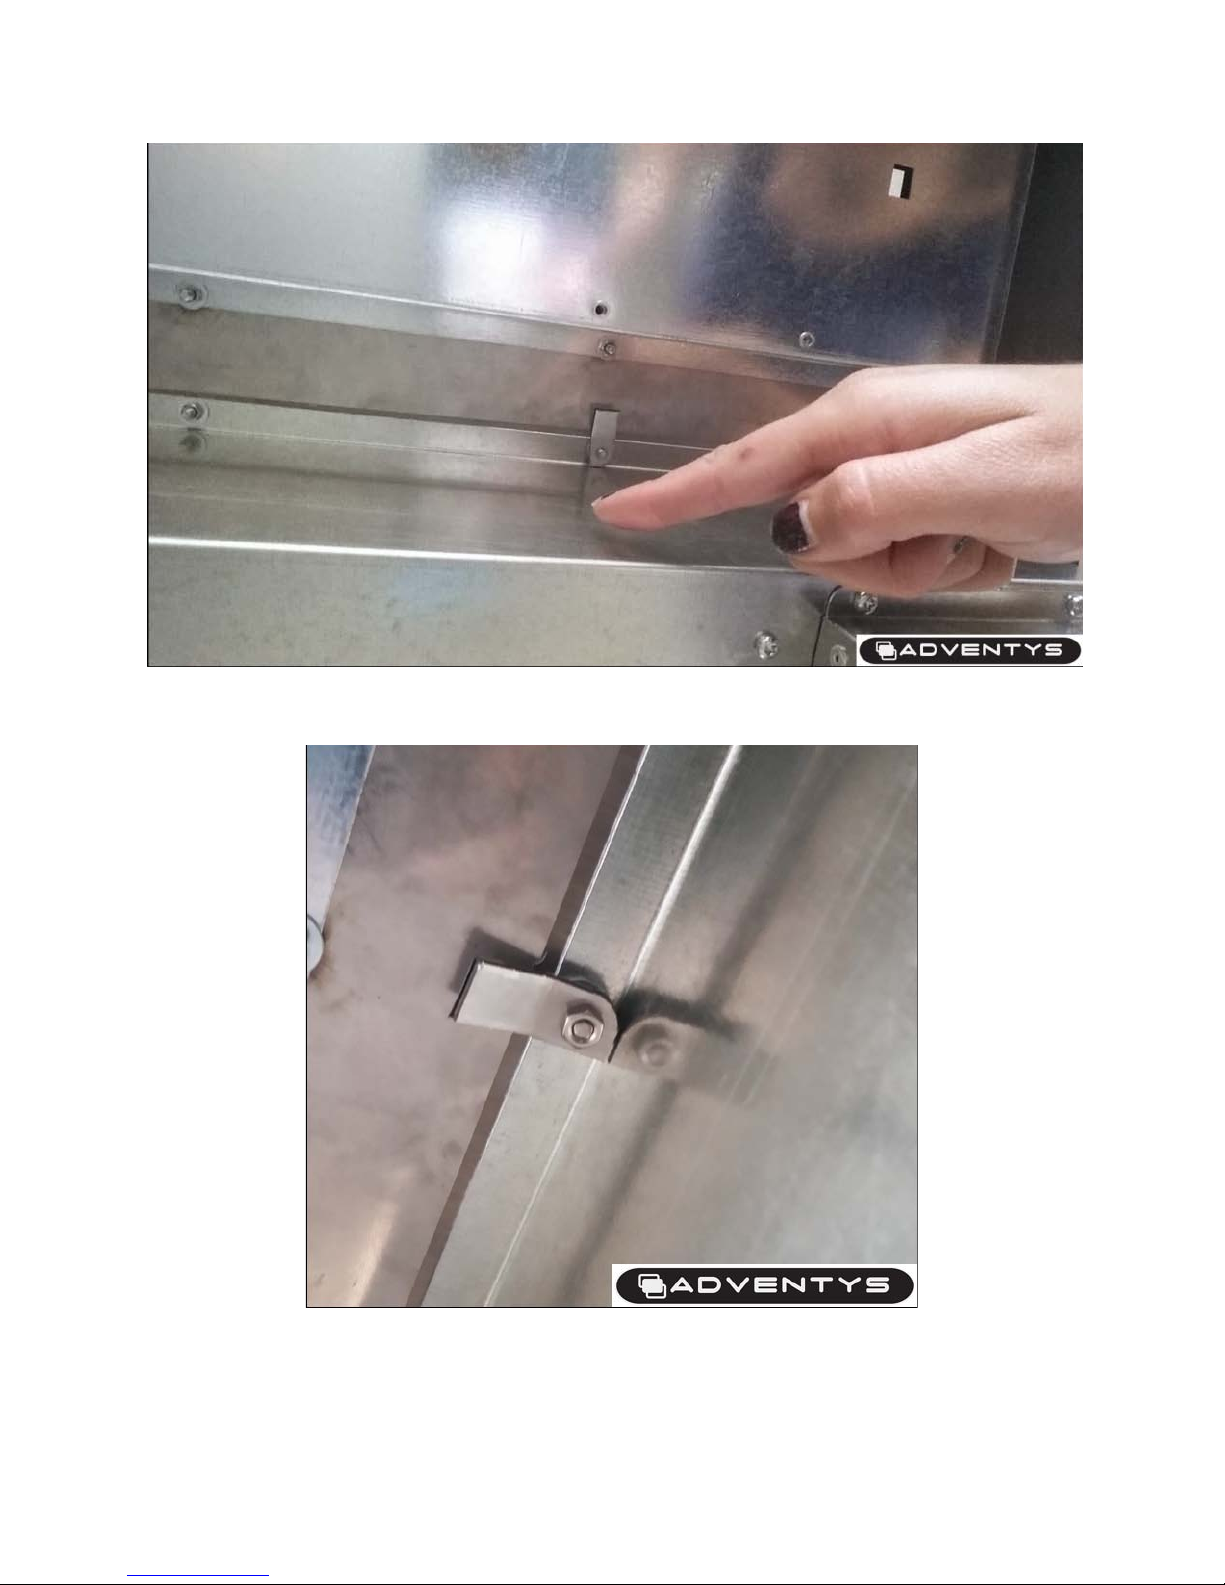
Place the mounting bracket over the screw as shown.
Thread the nut over the screw and hand tighten. Do this for all four
locations, and then tighten firmly being careful not to over tighten.
Page 10
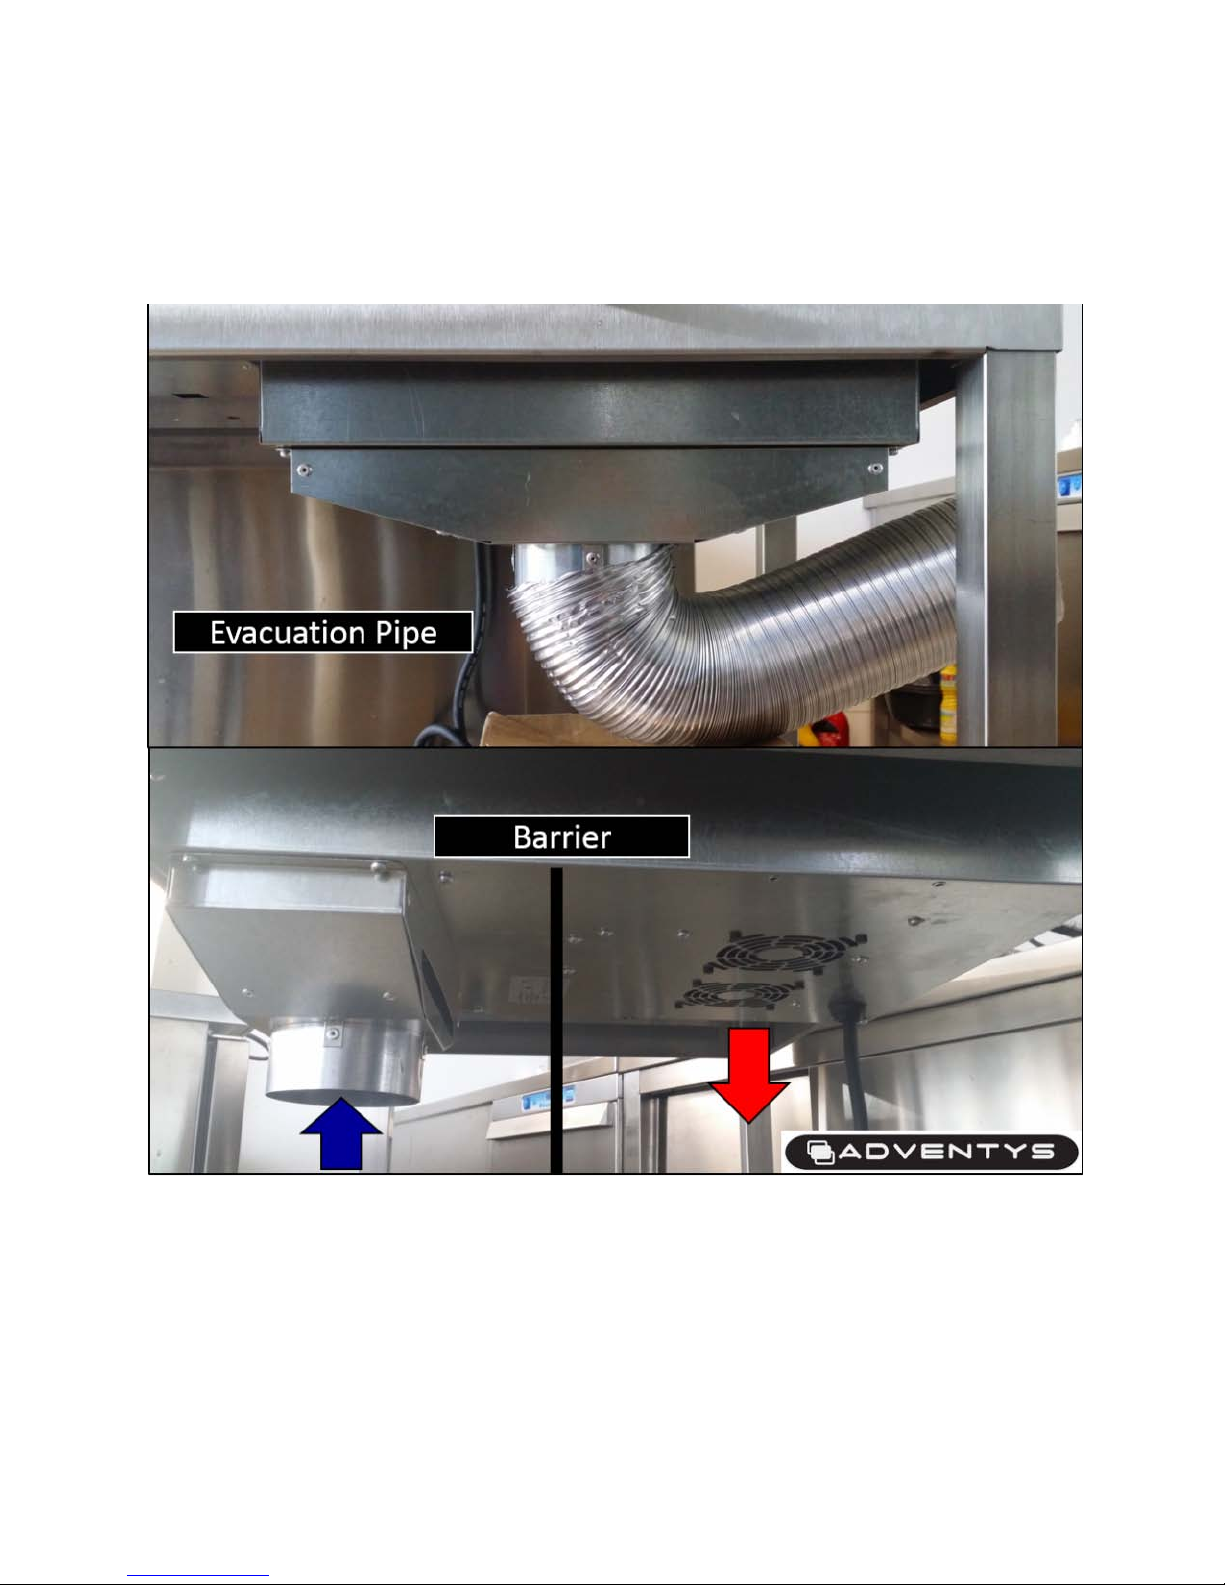
Step 5: Ventil ation
To insure proper ventilation, make sure there is 13 cm (5”) between the bottom of the unit and the
surface below.
If necessary, a vent pipe can be added to the unit to bring cooler air directly to the air intake of the
induction cooker.
The units should not be installed in a completely enclosed environment.
If desired, a barrier can be constructed between the cool air entry and the hot air exhaust to prevent
cool & hot air mixing together.
Page 11
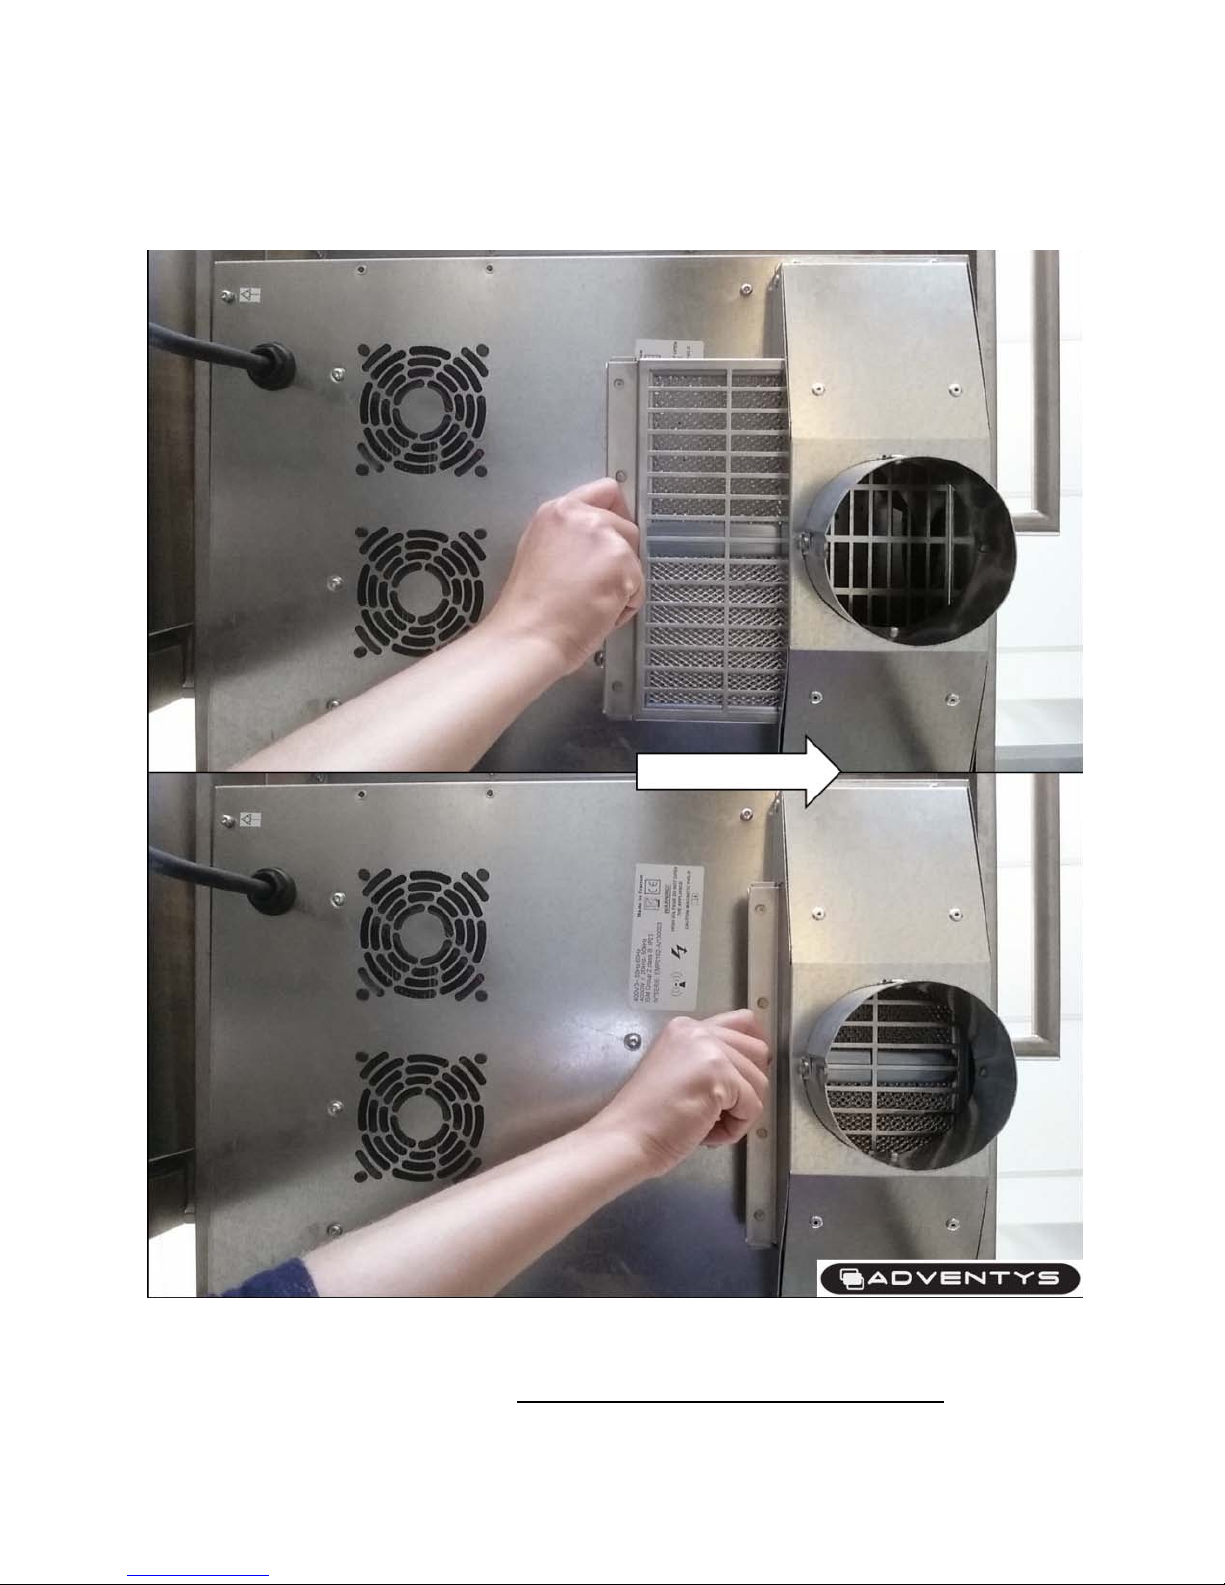
Step 6: Filtration
Insert the drawer with the two filters in it.
Remove and clean at least once a month:
DO NOT USE THE PRODUCT WITHOUT FILTERS.
Page 12
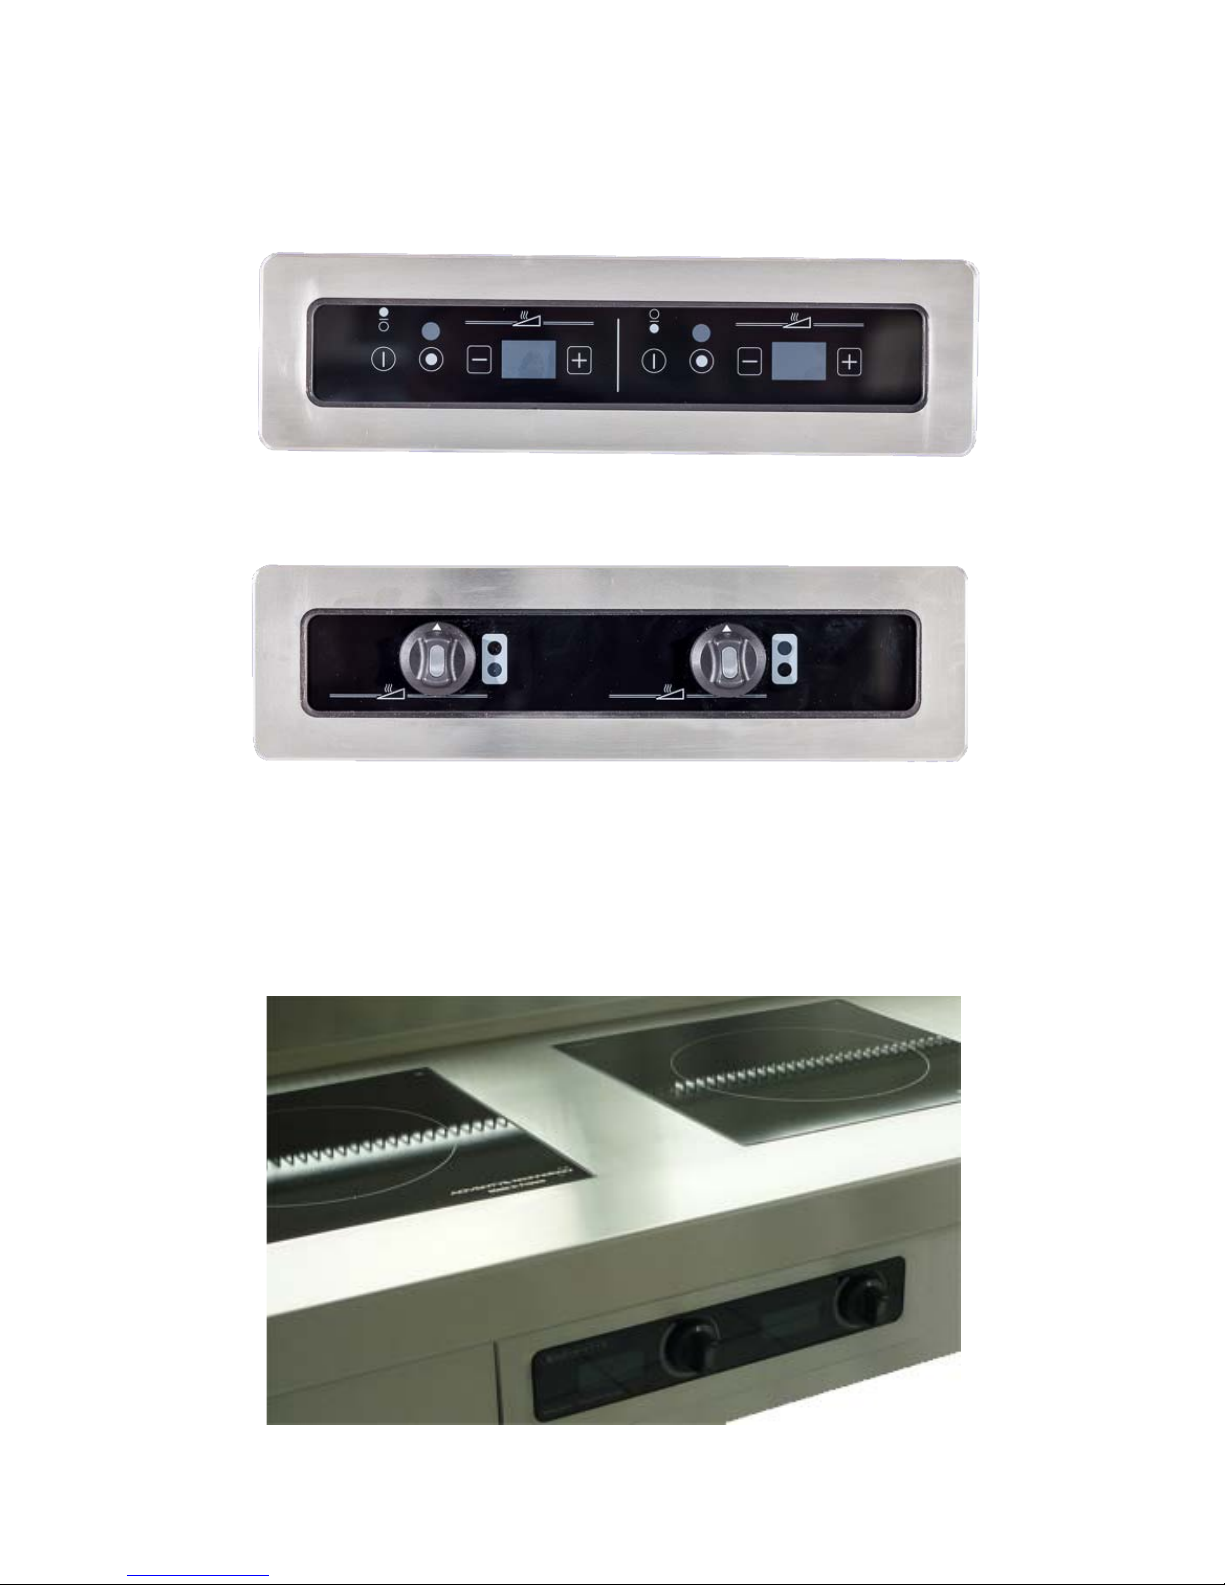
Optional: Separate Control Panel
If using the optional separate control panel, it will need to be mounted in
the same fashion as the base unit. The panel can be mounted
horizontally in the countertop, or vertically in the face of the counter if
the countertop supports this method.
Page 13

The cutout dimension for the separate control panel is 370 mm (149/16”) x 72 mm (2-7/8”). Maximum distance from the base unit is
determined by the length of the included ribbon cable. Mounting is
slightly different, as six 6 mm (15/64”) holes will need to be drilled for
the mounting bolts to pass through the countertop. NSF approved high
temperature sealant is still required. Attach the nuts and connect the
ribbon cable to the base unit.
ASSEMBLY
The Induction Cooker comes from the factory completely assembled. It may be
shipped with plastic exterior protective film, all of which must be removed before
operation. DO NOT operate the appliance prior to removing the protective film
completely.
NE PAS faire fonctionner l'appareil avant de retirer le film de protection
complètement
OPERATION
Page 14

For all modles except the separate remote with knob(s) only, Touch the On/Off button,
mark ed wi t h t he f ami l iar v ert ic al l i ne wit hi n a c i r cl e sy mb ol , t o t urn th e uni t o n. T he u ni t wi ll
perf orm a pow er on self-test, a nd th en the di splay wi ll read 0. The appli ance wi ll n ot heat a
pan a t this st age. Pr ess and h old the + butto n until d esired t emperat ure, pow er level or
power out put l ev el in wat ts i s re ach ed. A lt erna tely , th e set ti ng c an be adj ust ed wi th s ingl e
taps o f the ‘+ ’ or ‘–‘ butto ns, for slow er incr ease/ decr ease. The P1 and P 2 pres et but tons
may also be used to c o nt rol t h e unit.
The display can be set to represent wattage, temperature i n Fahrenheit or Celsius or a
numerical value from 1 t o 25. T o sho w temperature, pres s the T
0
button on the panel. The
temperature indicator above the display will light. To change between Fahrenheit and
Celsius, hold the ‘+’ and ‘-‘ buttons simultaneously for several seconds, until the display
switches over . P ress the T
0
again t o retur n to watta ge display. Wh en th e temp erat ur e light
is not lit, the display can be switched between wattage and power level, which is a
numeri c al se tting o f 1 t hro ug h 2 5 by a gai n hol d i ng t he ‘ +’ a nd ‘ -‘ b utt ons si m ul t ane o usl y f or
sever al secon ds, until the displ ay switch es over. Onc e a number a ppears in the di splay,
the u nit wil l begi n t o he at i f a pan i s i n plac e, or wi ll flas h sl owl y if no pan i s i n pl ace. Th e
induct io n coi l i s not oper ati ng i f the dis play is f las hi ng. I f the dis play fl ashes wi th a p an o n
the cook top, it is either not an induction ready pan or it is smaller than about 4 ¾”
(120mm ), and cannot be detected.
It is no t nec es sar y t o s et the ti m er f or t h e u ni t t o o per at e , bu t i f d esi re d, t he uni t ca n b e s et
to tur n off in one minut e incr eme nts, u p to 9 9 minu tes. T he ti mer i s set t he s ame way as
the temperature/power settings
Touc h the pow er butto n again t o turn th e unit off . The fan will c ontinue t o run for a short
time to cool the unit, and then will shut off.
The kn ob only rem ote has be en designe d for extrem ely sim ple operat ion, like a standard
stovet op. Tur n the knob c lockwis e to the d esired s etting t o turn on and begin operat ion.
The further the knob is turned, the highe r the heat setting, up to max.
PROGRAMMI NG THE ONE TOUCH BUT TO NS P 1 AND P 2
Whether setting temperature, power level or power output in watts, the process is the
same. F ir st , s el ect t h e d esi r ed s et ti ng us i n g th e ‘+ ’ and ‘ -‘ but tons ( a nd s et t h e ti mer , i f y ou
so choose), then press and hold one of the two programmable quick touch buttons for
several seconds, until the unit beeps. Your desired setting is now saved, and can be
selected with a single t ouch of t his button in the future.
Page 15

COOKWARE
Your induc t ion c ooker oper ates using induc t ion ready cookware . There are two me thods to
test if your cookware is induction ready. First, if a magnet sticks to the bottom, it is
induction ready. Second, set the unit to a power output/ power level/temperature set ting,
place the pan on the surface, and the display remai ns on steadily without blinking, your
cookware is induction ready. In addition, your Equipex Induction Cooker has a handy
featur e, w hich al lo ws yo u to test the q uali ty of t he pan, as det ail ed bel ow. Cook ware wi th a
thick flat b ase is m ore des irabl e, as it wil l he at bett er. T here is a wi de vari ety of i n ducti on
ready c ook war e avai la ble . Diff er ent q uali ty c ook ware wil l hav e dif fer ent c ooki n g profi les at
the s ame setti ng. A p oor qual ity po t set on full po wer wil l take m uch lon ger to boil wa ter
than a hig h quality p ot, even if set at a lower tempera ture. Rememb er, the unit does not
heat up; the induction coil causes an excitation in the molecules of the cookware itself,
achieving much faster heating, and allowing much quicker changes. Recommended
cookware s hould generally be 3, 5 or 7 ply throughout the bottom and body of the pan.
Pans m ust be ferr omagn et ic. Cast i r on co okwar e is general ly sui tabl e for i nduction c ooking.
Some single ply steel wok pans are suitable for induction wok cookers.
PAN QUALITY TESTING
Firs t, t urn the unit on and sel ect th e wattage display mode as outl ined abov e. Next, pl ace
the pa n fi lle d with 1” – 2” of water on the Induction Cooker, and then set the wattage at
maxim um. Fin ally, press a nd hol d the P1 an d P2 pr es et buttons si multaneously. The
display will change from its maximum wattage setting, to the maximum pan conductivity for
the ti m e that b oth buttons are held. The c loser this number is to the m ax imum s etting, the
better the quality of the cookware you are testing. For inst a nce, a reading of 29 75 on a
3000-watt machine means the pan is of very high quality.
Care and mainten ance
•
Avoid knock s and impacts against glass cook top . The glass is very strong, but it is not
unbreakable.
•
Avoid friction of cookware on the cook top, which could scratch glass and wear of
screen printing on the surface.
•
Do not use cookware with rough or uneven bases, which may scratch the vitroceramic
glass.
•
Place your cookware in the center of the hob for proper operation.
•
Do not leave emp ty cookware on the cook ing zone with the unit in operation, as this
could cause the cookwa re to o verhea t and warp.
•
Do not heat an unopened can of food a s it ma y burst.
•
If using very little liquid in cookware with a non-stick coating, such as Teflon, do no t
preheat on very high power.
•
The maximum power level should only be used for bo iling.
•
Metal objects, such as cutlery, cooking utensils or even jewelry should not be p laced on
the appliance as the y can get very hot, very quickly.
•
Physical damage, m isuse o r abus e t o the appliance are not covered under the
warranty.
Page 16

WARNING: Disconnect (unplug) elect rical power cord before cleaning
Cleaning i s very i mportant i n maintai ning a s afe and well wor king m achine. The met al filt er,
located under you applianc e, protects y our appliance fr om dust and grease, and s hould be
cleaned at l east once a w eek. It can be cl eaned i n a si nk using s oap and water, or put i nto
the dishwas her. Use a cl oth or spon ge dampe ned sl ightl y with a soap and water m ixtur e to
clean al l exterior stainles s s t eel surfaces and glass. Us e a c lean li nt -free cloth to r em ov e t h e
excess wat er. Make sure no water enters the unit thr ough venti lation hol es. A gl as s sc r aper
can be used on the cook top for stubborn stains. Glass cook top cleaner is also widely
available, and can be used on the glass only to aid in cleaning.
DO NOT
use an ab rasi ve spon ge
DO NOT wash the induction machine under running water
DO NOT spray t he exteri or housing with any liquid
DO NOT allow water to drip into the housing or onto electrical components
You should inspect all parts on a regular basis to ensure that all is in proper working order. If a
part is damaged, have the unit repaired by the manufacturer
prior to returning the unit to
operation. If you need any further assistance, please consult our website at
http://www.equipex.com/, or call us at 1-800-649-7885 and ask for customer service.
Page 17

Entretien et maintenance
•
Éviter les chocs et impacts contre verre cook top. Le verre est très fort, mais il n'est pas
incassable.
•
Éviter le frottement de vaisselle sur la cuisinière, qui risqueraient de rayer en verre et de
l'usure des impressions d'écran sur la surface.
•
N'utilisez pas d'ustensiles ou inégales, bases qui peuvent rayer le verre vitrocéramique.
•
Placez votre vaisselle dans le centre de la plaque chauffante pour un fonctionnement
correct.
•
Do not leave emp ty cookware on the cook ing zone with the unit in operation, as th is
could cause the cookwa re to o verhea t and warp.
•
Ne pas chauffer un non ouverts peuvent de la nourriture comme il peut éclater.
•
Si vous utilisez t rès peu de liquide vaisselle avec un re vête ment antiadhésif, tels que le
Téflon, ne pas préchauffer sur puissance très élevée.
•
Le niveau de pu issan ce ma x imum do it ê t re u t ilisé uniquement pour l'ébullition.
•
Objets métalliques, tels que des couverts, des ustensiles de cuisine ou même bijoux ne
doit être placé sur l'appareil, car ils peuvent être très chauds, très rapidement.
•
Les dommages maté riels, mauvaise utilisation ou une utilisation abusive de l'appareil
sont pas couverts par la garantie.
AVERTISSEMENT : Déconnecter (débranch ez) cordon d'alimentation électriqu e avant
de le nettoyer
Le nettoyage es t très important de maintenir la sécu rité et le bien de la machine. Le filtre en
métal, situé sous votre appareil, protège votre appareil de la pouss ière et de la graisse, et do it
être nettoyé au moins une fois par semaine. Il peut être nettoyé dans un évier en utilisant du
savon et de l'eau, ou de le mettre dans le lave-vaisselle. Utilise z un chif fon ou une éponge
légèrement humidifié avec de l'eau et au savon mé lange pour nettoyer l'extérieur en acier
inoxydable et du ve rre. Utiliser un chiffon propre et non pelucheux pour enlever l'excédent
d'eau. Assurez-vous que l'eau ne pénètre dans l'unité par les orifices de ventilat ion. Un ver re
racloir peut être utilisé sur la surface de cuisson pour les taches tenaces. Verre cook top
cleaner est également largement d isponible, et peu t être utilisé sur le ve rre un iquement pour
faciliter le nettoyage.
NE PAS util i se r un e épo ng e ab ra sive
NE PAS lav er l a ma ch in e à in du ctio n so us l 'e a u cou rante
Ne vapori sez pa s le b oî ti er e xté ri eu r av ec t ou t liquid
Ne laiss ez p as l 'eau de s' écou le r dans le c art er o u su r les composants electriques
Vous devez inspecter toutes les pièces sur une base régulière afin de s'assurer que tout est en
ordre de fonctionnement. Si une pièce est endommagée, faire réparer l'appareil par un service
agréé agence avant de renvoyer l'unité à l'opération. Si vous n'arrivez pas à trouver un
organisme de service dans votre région, veuillez consulter notre site web à
http://www.equipex.com/, ou appelez-nous au 1-800-649-7885 et de demander au service à la
clientèle.
Page 18

Troubleshooting
PROBLEM
POSSIBLE CAUSES
ACTION
switching on
unit on
outlet wiring bad
again
appliance is switched off
fuse
control panel
stuck on
for service
ventilated
is displayed
keeps blinking
of the cookware
not damage the unit
away
A light blinks when
No power when turning
Fan runs for a few
minutes after the
The unit is not working.
The lights on the control
panel are off
“F” then “-“ appears on the
“F” then “7” appears on
the control panel
Normal operation Nothing
No power at outlet or
The unit is cooling down;
normal operation
There is not power to the
appliance, no power to
outlet or blown internal
A control panel button is
The circuit board is
overheating
Correct problem and test
Restore power to outlet or
return unit for service
Clean front panel or return
Make sure fan is operating
and unit is properly
Nothing
The appliance is not
functioning, another code
After turning unit on the
set cook level indicator
The cookware is making
noise during cooking
There is a slight odor
during first operation
Problem with circuit board Call service center
Cookware not induction
ready or too small
This is a vibrat io n
generated by the induction
This is normal with any
new appliance
See cookware section
This is normal with some
types of cookware and will
After using for about 30
minutes the odor will go
If the glass crack s discontin ue us e, unplug the unit immediately
and contact the manufacturer.
Page 19

LIMITED WARRANTY
Your new EQUIPEX product is warranted to the original purchaser for a period of three
years from the date of shipment by Equipex. All non-mechanical products such as pans
are warranted for defects for a period of 90 days from shipment by Equipex.
This limited warranty is against defects from original factory imperfections in
material and/or workmanship and includes labor for replacement of defective parts,
provided repairs are performed by the manufacturer. Our obligation under this
warranty is limited to repairing or replacing any part or parts thereof. The
CUSTOMER must inform the manufacturer of warranty coverage and provide a copy
of the dated sales or delivery receipt BEFORE WARRANTY REPAIRS BEGIN.
Replacement parts and accessories are warranted for ninety (90) days from the date of
purchase when purchased separately and will be verified by dated sales receipt or
packing slip for that item. All parts or accessories replaced under warranty must be
returned to the manufacturer.
This warranty applies only to equipment under normal use and service in the U.S.A.
and Canada. It does not apply to any item that has been repaired or al tered in any
way so as, in the judgment of EQUIPEX, to affect its reliability.
In many cases, the unit or parts requiring service may be replaced with a new or rebuilt
unit/part at the discretion of Equipex. Equipex will pay for the freight both ways on the
unit/part requiring service and the replacement unit/part. Customer is responsible for
packing the unit/part being returned in the packaging sent by Equipex, affixing shipping
labels and noting appropriate RMA designation on the exterior of the box. A standby
credit card authorization may be required to assure the return of the original unit.
Please coordinate the details with the Equipex customer service department.
Any material, labor and related costs associated with removal of the product for repair or
replacement, including electrical, sealing, cabinetry, sheet metal, fuse replacement,
breaker resetting and/or any other expenses, are not covered by this warranty.
Page 20

THE FOLLOWING ARE NOT COVERED UNDER WARRANTY:
1. Damage caused by abuse, misuse or dropping or other similar incidental damage
caused by, or as a result of, customer failure to follow assembly, operation, cleaning,
user maintenance or storage instructions. Broken vitroceramic tops are considered
abuse and ar e no t cove r e d un der w ar r anty.
2. Labor to replace inoperative parts such as fuses, bulbs, plugs or racks due to normal
wear and tear or abuse.
3. Materials or labor to repair scratched, stained, chipped, pitted, dented or discolored
surfaces, attachme nts or acc essori es.
4. Materials and labor to remove and/or re-install induction cooker(s) from the areas in
which it(they) is(are) installed, including work related to, but not limited to sneeze
guards, electrical services, countertops of any style, size or nature, caulking, cutting,
patchin g, fi ni sh work, etc.
5. Labor charges to install or test attachments or accessories, which are replaced for any
reason.
6. SHIPPING DAMAGES. Visible and hidden damages are the responsibility of the
freight carrier. The consignee must file the claim promptly against the carrier.
KEEP ALL ORIGINAL CONTAINERS AND PACKAGING MATERIAL FOR
CARRIER INSPE CTIO N.
7. Products placed or stored in the equipment are not subject to this warranty and no
responsibility is assumed thereof.
THIS WARRANTY IS GIVEN EXPRESSLY AND IN LIEU OF ALL OTHER
WARRANTIES, EXPRESSED OR IMPLIED, FOR MERCHANTABILITY AND FOR
FITNESS TOWARD A PARTICULAR PURPOSE AND CONSTITUTES THE ONLY
WARRANTY MADE BY EQUIPEX, LLC. IT NEITHER ASSUMES, NOR AUTHORIZES ANY
PERSON TO ASSUME FOR US, ANY OTHER LIAB IL IT Y IN C O NNE C T IO N W IT H T HE S ALE
OF THE SUBJECT EQUIPMENT . THE REP AI R OR REPLAC E MENT O F THE E QUI PME NT IS THE
SOLE REMEDY FOR ANY BREACH OF WARRANTY. IN NO WAY SHALL EQUIPEX BE
RES PO NSIBL E FOR ANY ADDI TIO NAL D AMAG ES, CONS EQUE NTI AL DA MAGE S O R DAM AGES
OF ANY KIND OR NATURE, WHETHER DIRECT OR INDIRECT.
For service, pleas e call EQUIPEX at 1-800-649-7885, menu option # 3
765 Westminster Street Providence, Rhode Island 02903 U.S.A.
Tel: (401) 273-3300 Fax: (401) 273-3328
www.equipex.com e-mail: [email protected]
 Loading...