

Page 1
USB 2.0 All-in-One Cable
13335
Page 2

Overview
Congratulations on your purchase of the 133355, a USB file transfer cable.
Nowadays, more and more people own more than two computers. Due to space limitations,
most people choose NetBooks or Tablet PCs as their second computer.
provides a simple and easy solution which lets you share the keyboard and mouse usage
with another computer. In addition, 133355 also supports clipboard sharing and
high-speed file/data transfer between two computers. You can easily browse, copy and
transfer files and folders between two computers via the USB port.
System Requirements
• PC running Microsoft Windows 2000 SP3 / Win XP / Vista / Win 7 (32-bit or 64-bit)
• Intel Pentium II Processor or later
• 512MB RAM or higher
• Hard disk space requirement of at least 100MB
• Built-in USB port 1.1 or 2.0
133355
Features
• No installation CD is required, simply plug-and-play.
• Keyboard and mouse sharing.
• Single cable solution for files transfer.
• Clipboard sharing.
• Drag-and-drop user-friendly interface.
Page 3
Getting Started
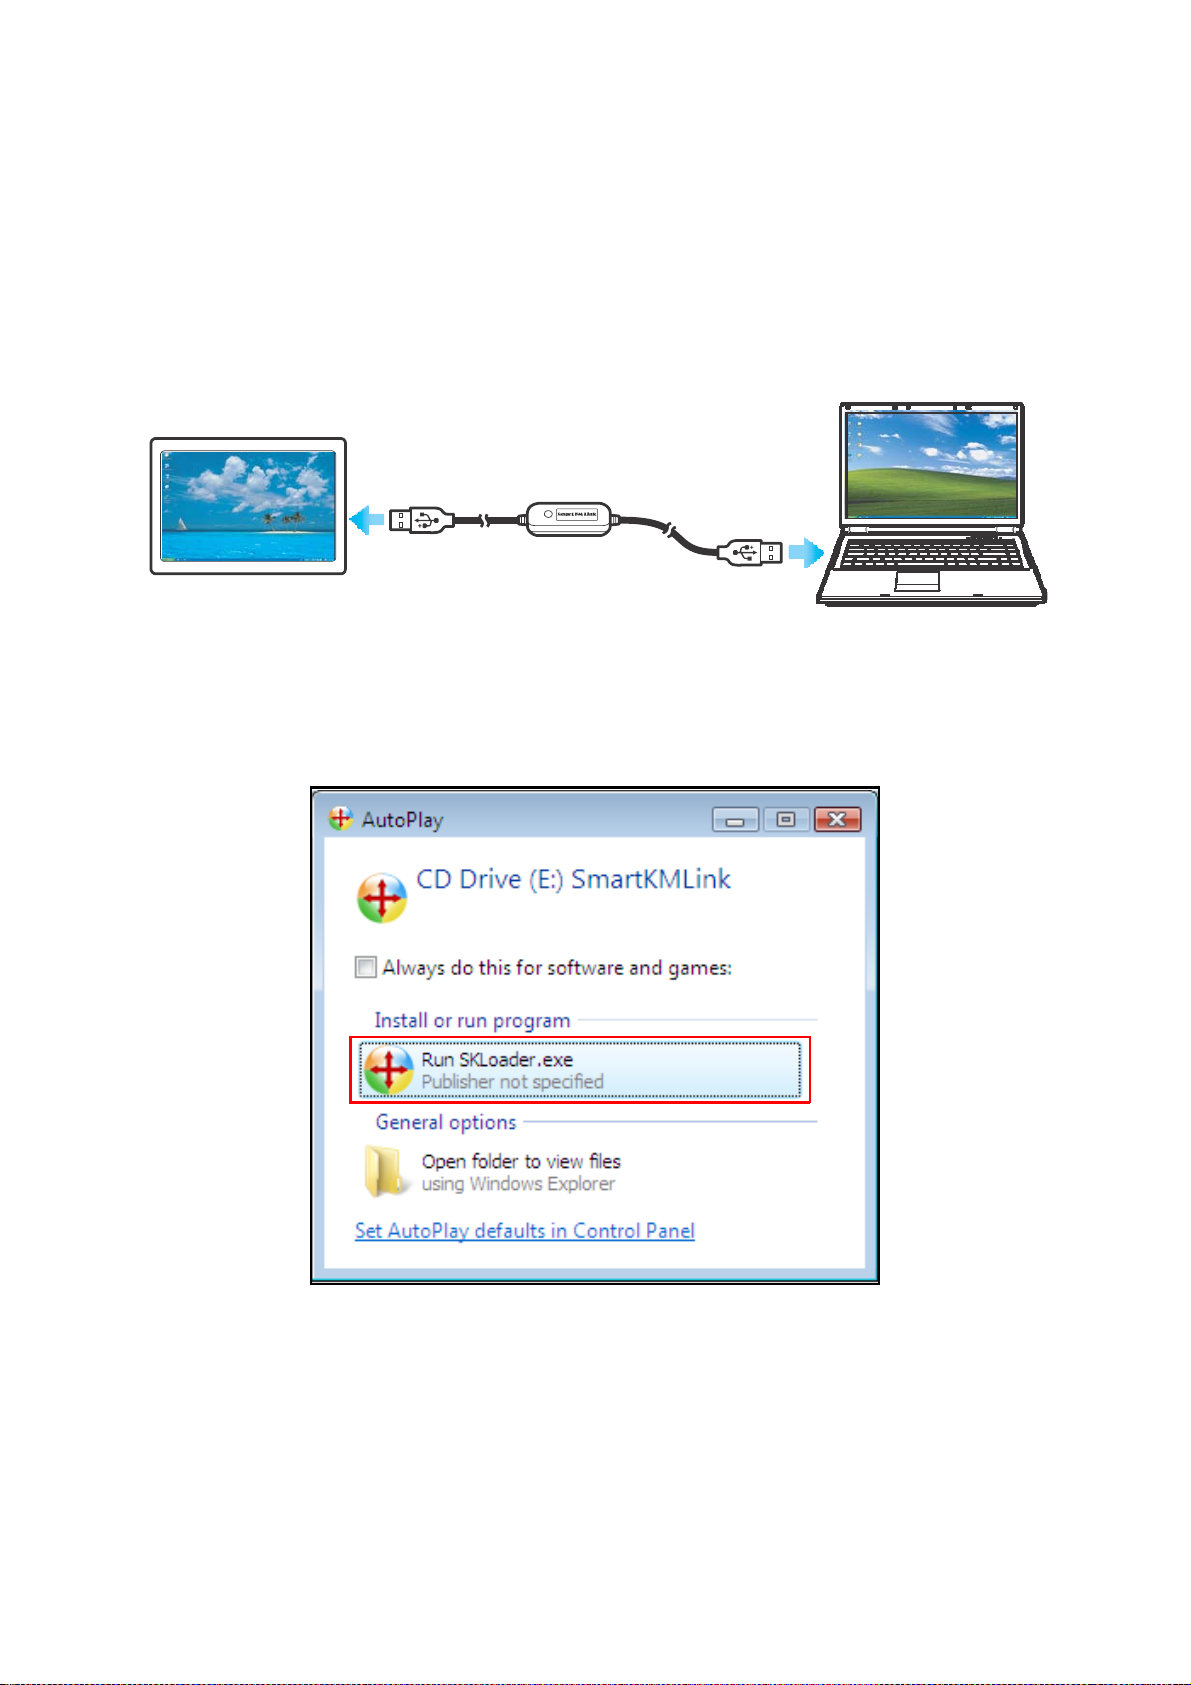
With simple plug-and-play feature, you can easily connect the two computers via the USB
port.
Follow these steps to configure Smart KM Link connection and start with its application:
1. Connect one end of the Smart KM Link to a standard USB port on one of the two
computers you are connecting.
2. Connect the other end of the Smart KM Link to a USB port on the second computer.
3. Wait until Windows has finished installing the device driver software on both
computers.
4. Windows may ask you to select Autoplay options. Click on the option “Run
SKLoader.exe”.
Page 4
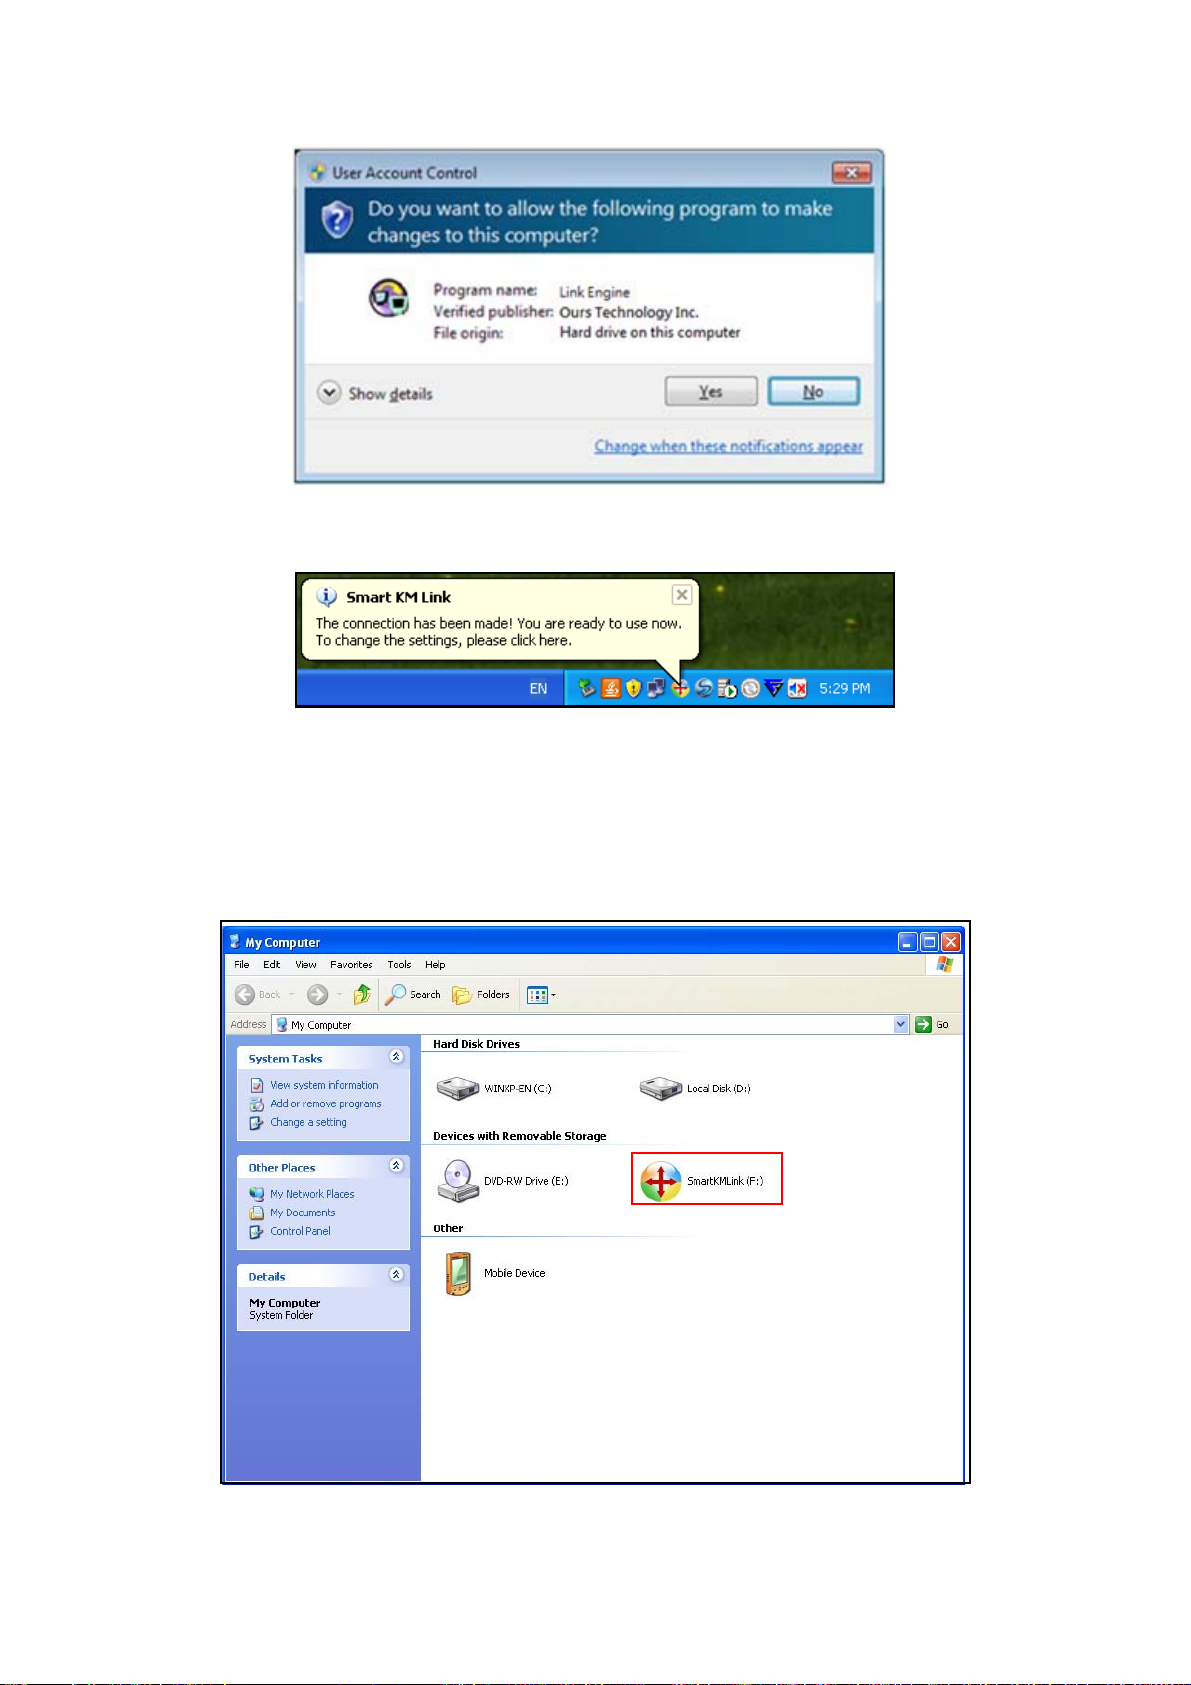
5. If the “User Account Control” window appears on the screen, click Yes to continue.
6. You are now ready to operate the Smart KM Link application. A pop-up message
appears at the bottom right of the screen.
Troubleshooting:
If the Smart KM Link application fails to start automatically, do any of the following:
• Check that each connector on the USB cable is correctly inserted on your two
computers.
• Go to My Computer and double-click the Smart KM Link icon to start the application.
Page 5
Changing the Settings
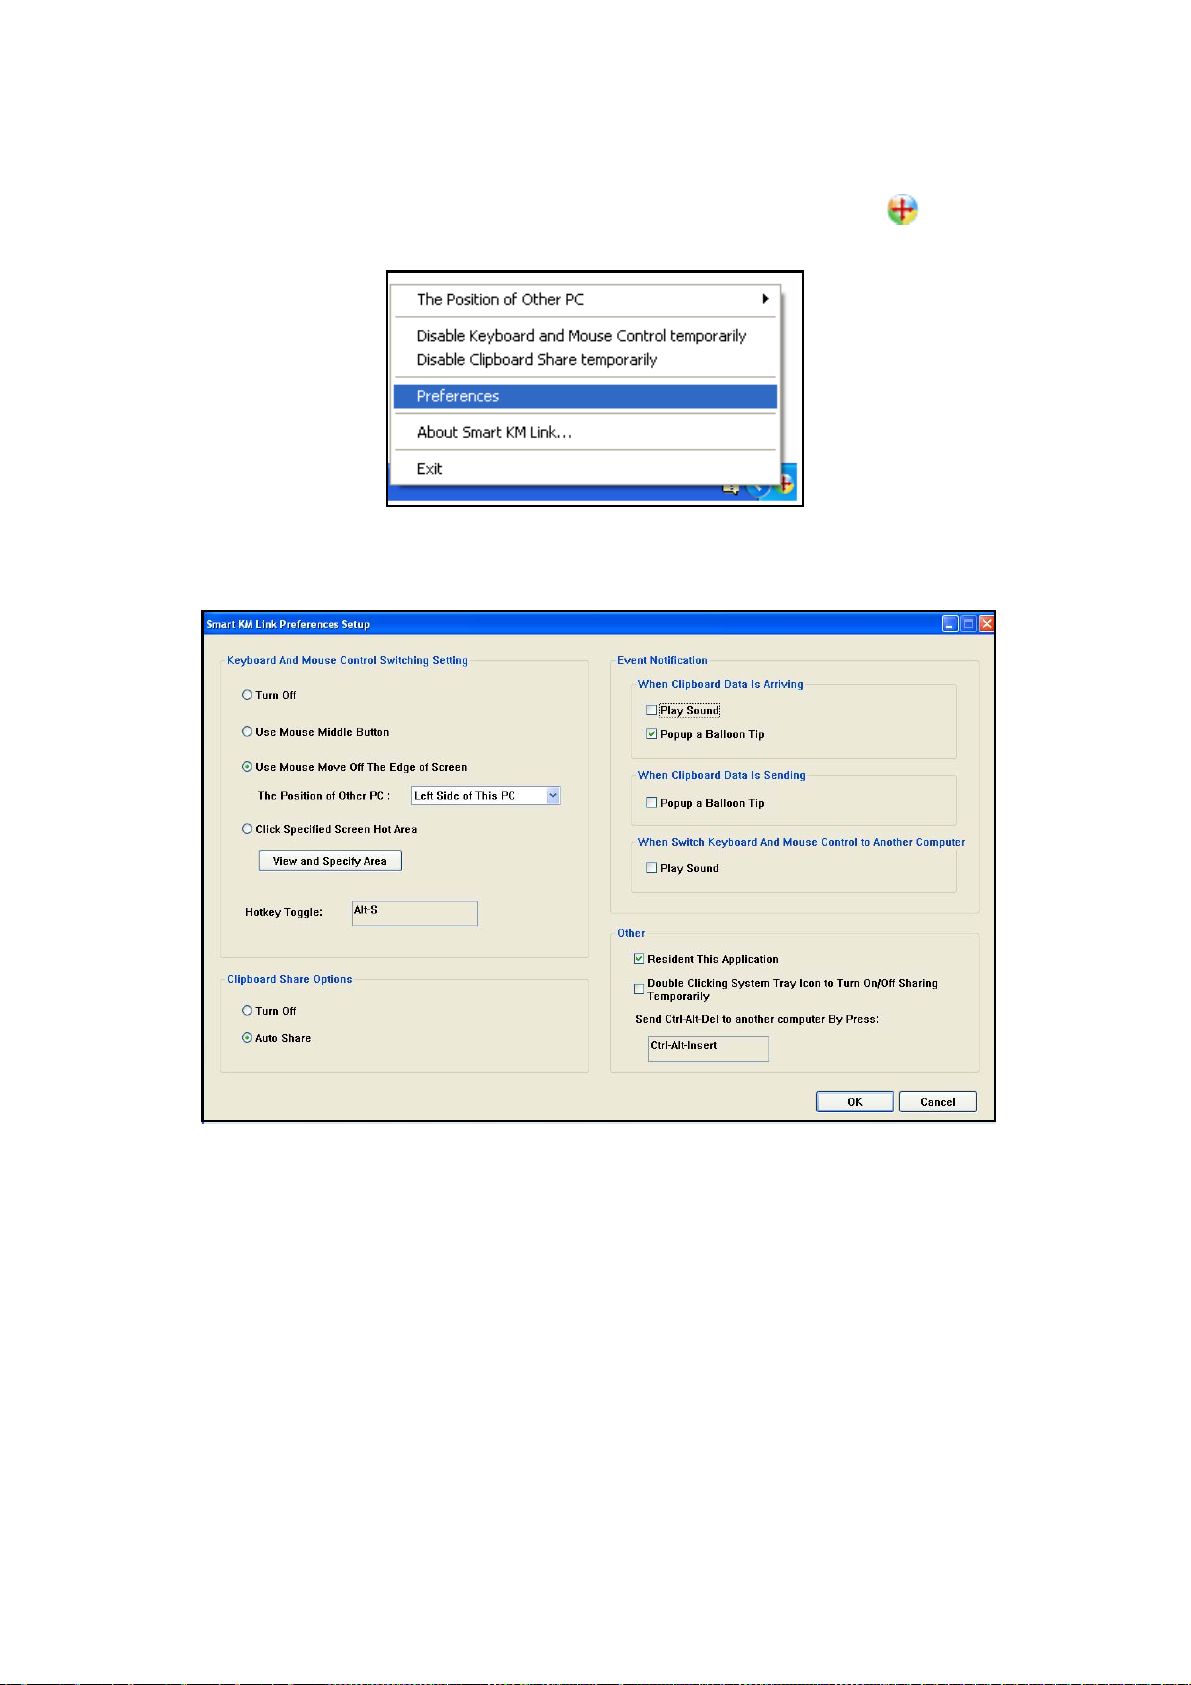
To customize the Smart KM Link settings, click the Smart KM Link icon ( ) at the bottom
right of the screen. Select Preferences.
The Preferences Setup screen is displayed.
Keyboard & Mouse Control Switching Settings
This option allows you to switch the control of keyboard and mouse from one computer to
another.
Select one of the following options:
• Turn Off
Disable keyboard and mouse switch.
• Use Mouse Middle Button
Click the middle button of the mouse to switch the keyboard and mouse control from
one computer to another.
Page 6
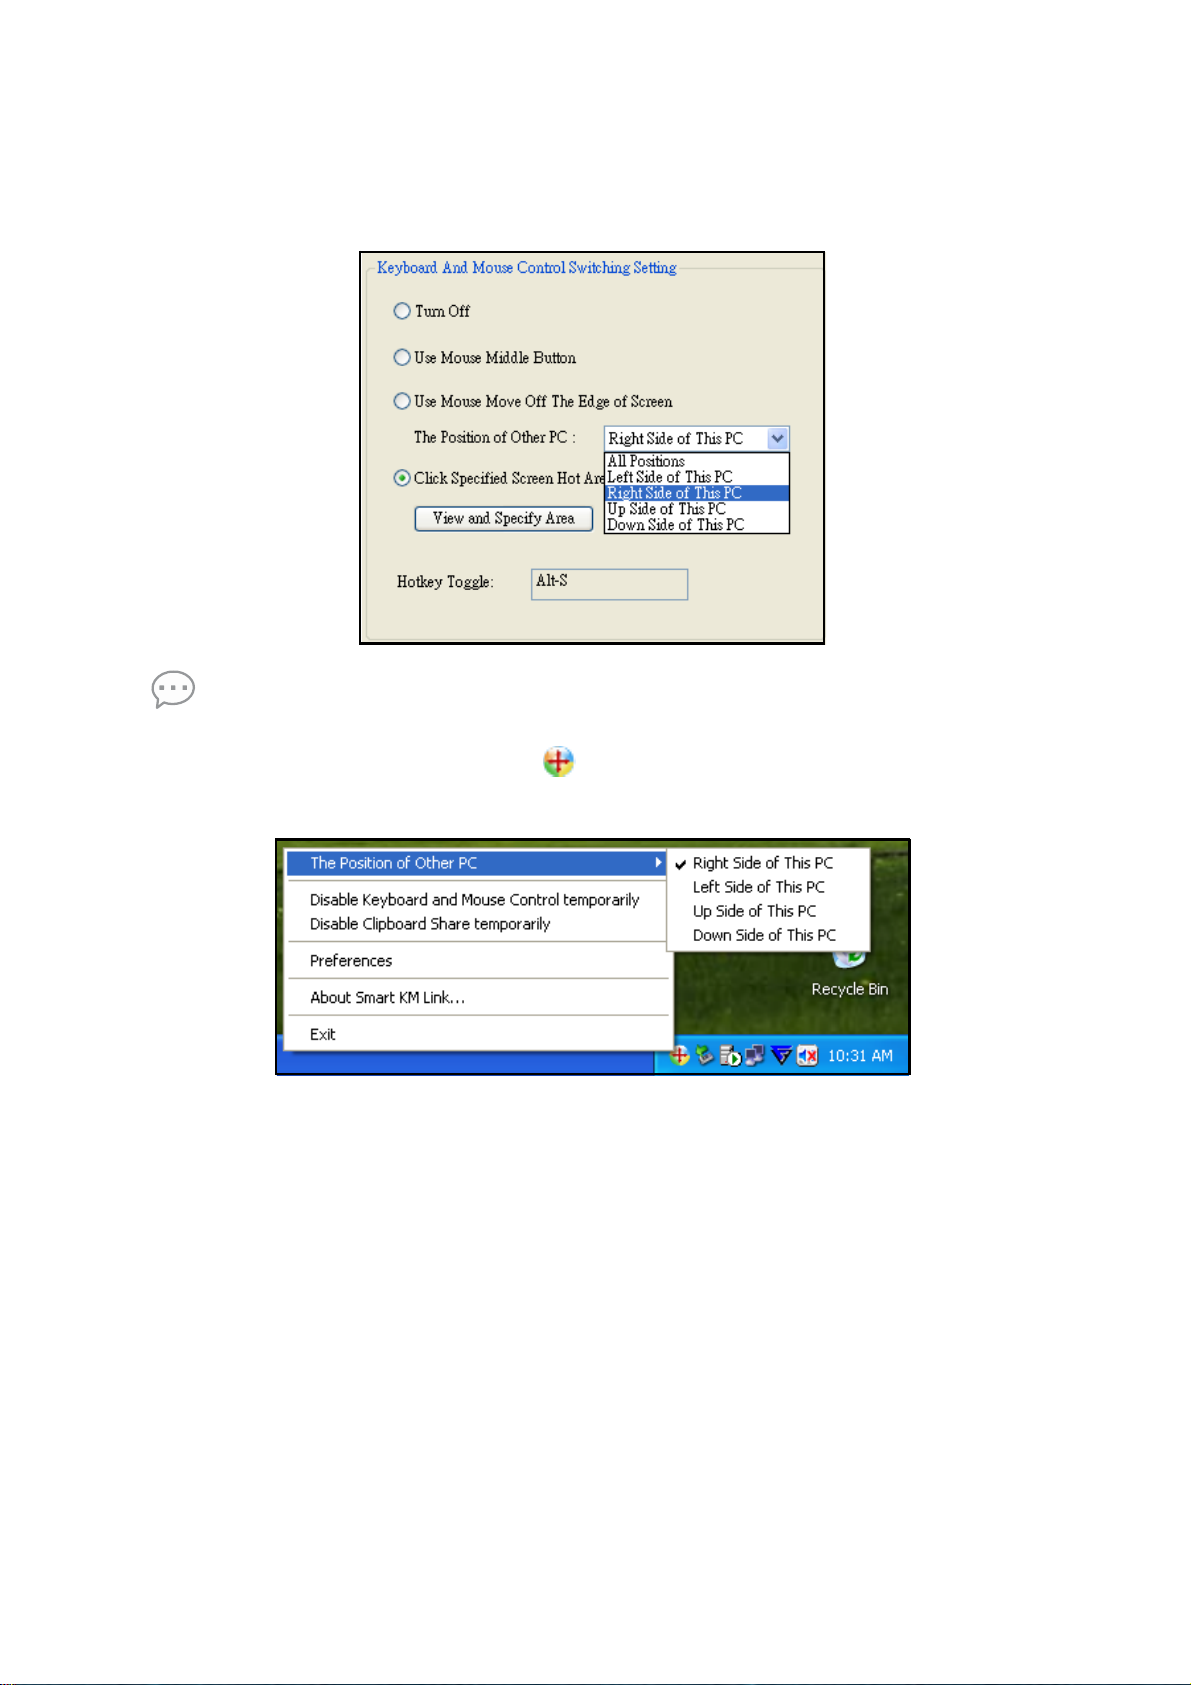
• Use Mouse Move Off the Edge of Screen
Select this option to switch the control of keyboard and mouse from one computer to
another by moving the mouse off the edge of the screen.
Select the desired position. Click on the pull-down menu to see more options.
Tips:
You can also change this setting on the pop-up menu that appears on the screen when
you click the Smart KM Link icon ( ). Select The Position of Other PC , and then
select one of the options.
Page 7
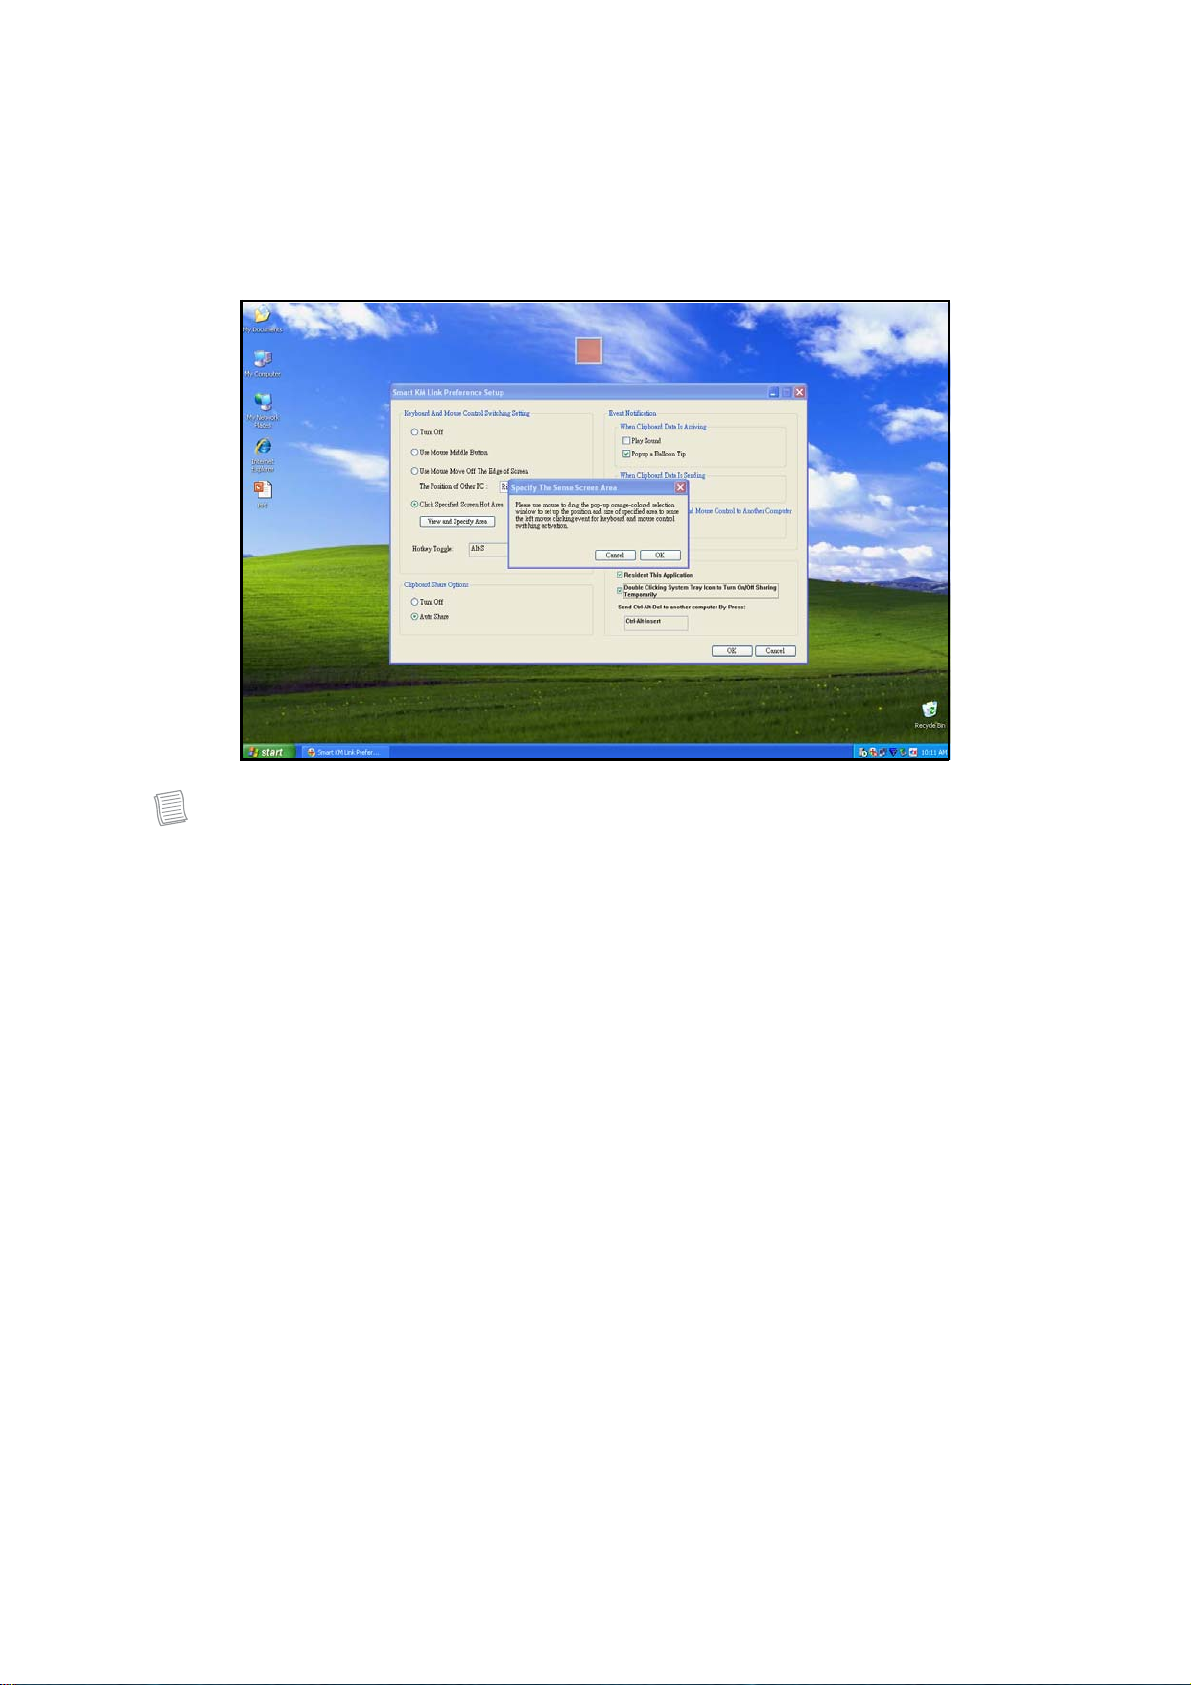
• Click Specified Screen Hot Area
Select this option to set a "hot area". When the “hot area” is clicked, the keyboard and
mouse control switches from one computer to another.
To specify the “hot area”, click View and Specify Area. Then drag the orange frame to
the location that you want to specify as “hot area”.
When done, click OK.
Note: This function is designed for touch panel computers. Just touch the “hot area”
to switch the keyboard and mouse control from one computer to another.
• Hotkey
Press both [Alt+S] buttons on the keyboard to activate the control switching.
Clipboard Share Options
This option allows you to enable or disable the clipboard sharing. With clipboard sharing
feature, you can easily copy or paste clipboard contents between the two computers.
• Turn Off
Disable keyboard and mouse switch.
• Auto Share
Enable the automatic sharing between the two computers.
Page 8
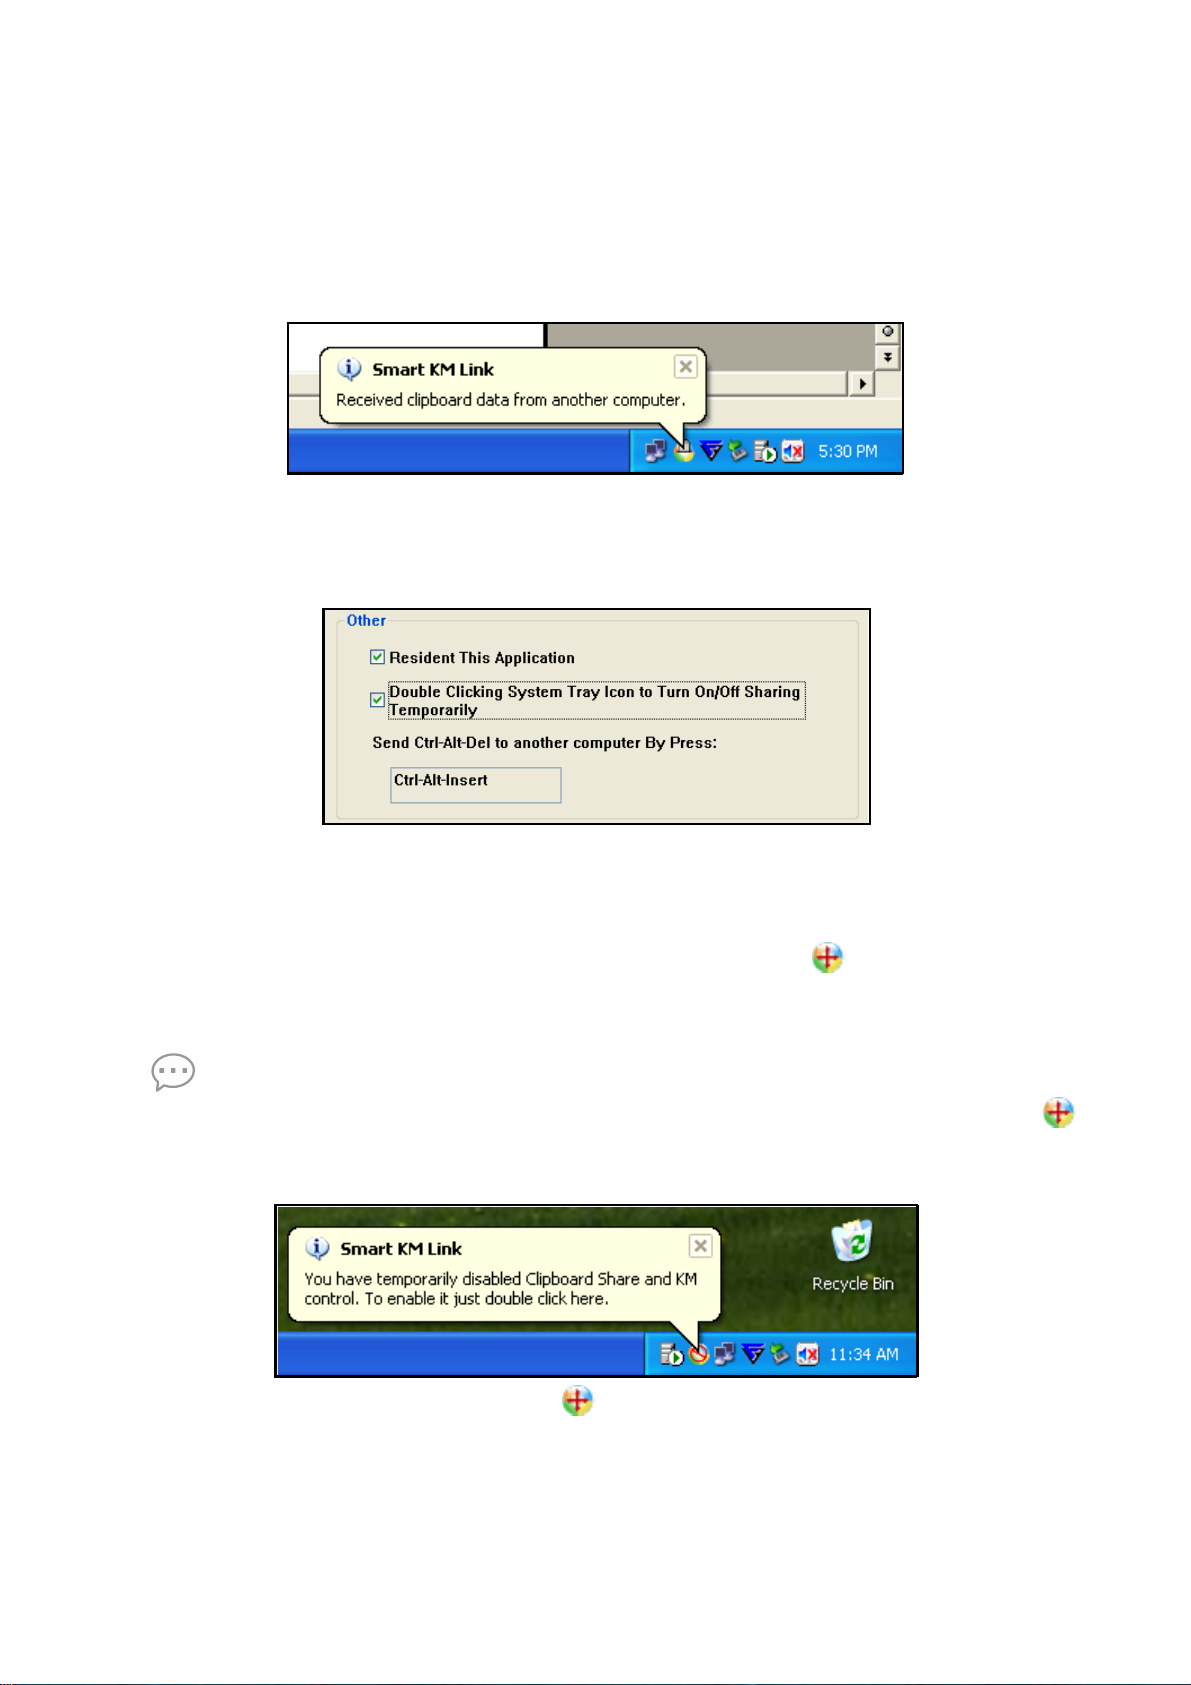
Event Notifications
This option allows you to set the type of notification when receiving/sending clipboard data
or switching the keyboard or mo
sound or to display a pop-up balloon tip.
For example, a pop-up balloon tip appears when you copy data from the first computer and
paste the data to the second computer.
use control to another computer. You can set either to play
Other Settings
You can set the following for three settings:
• If you check on “Resident This Application”, the program automatically starts up after
you plug in the device.
• To enable the temporarily disable clipboard sharing and KM (keyboard and mouse)
control functions by double-clicking the Smart KM Link icon (
the screen, check “Double Clicking System Tray Icon to Turn On/Off Sharing
Temporarily”.
Tips:
When the above function is enabled, you can double-click the Smart KM Link icon ( )
to temporarily disable clipboard sharing and KM (keyboard and mouse) control
functions.
Double-click the Smart KM Link icon ( ) again to enable the two functions.
• Alternative keys option for the [Ctrl-Alt-Del] command for another computer.
) at the bottom right of
Page 9
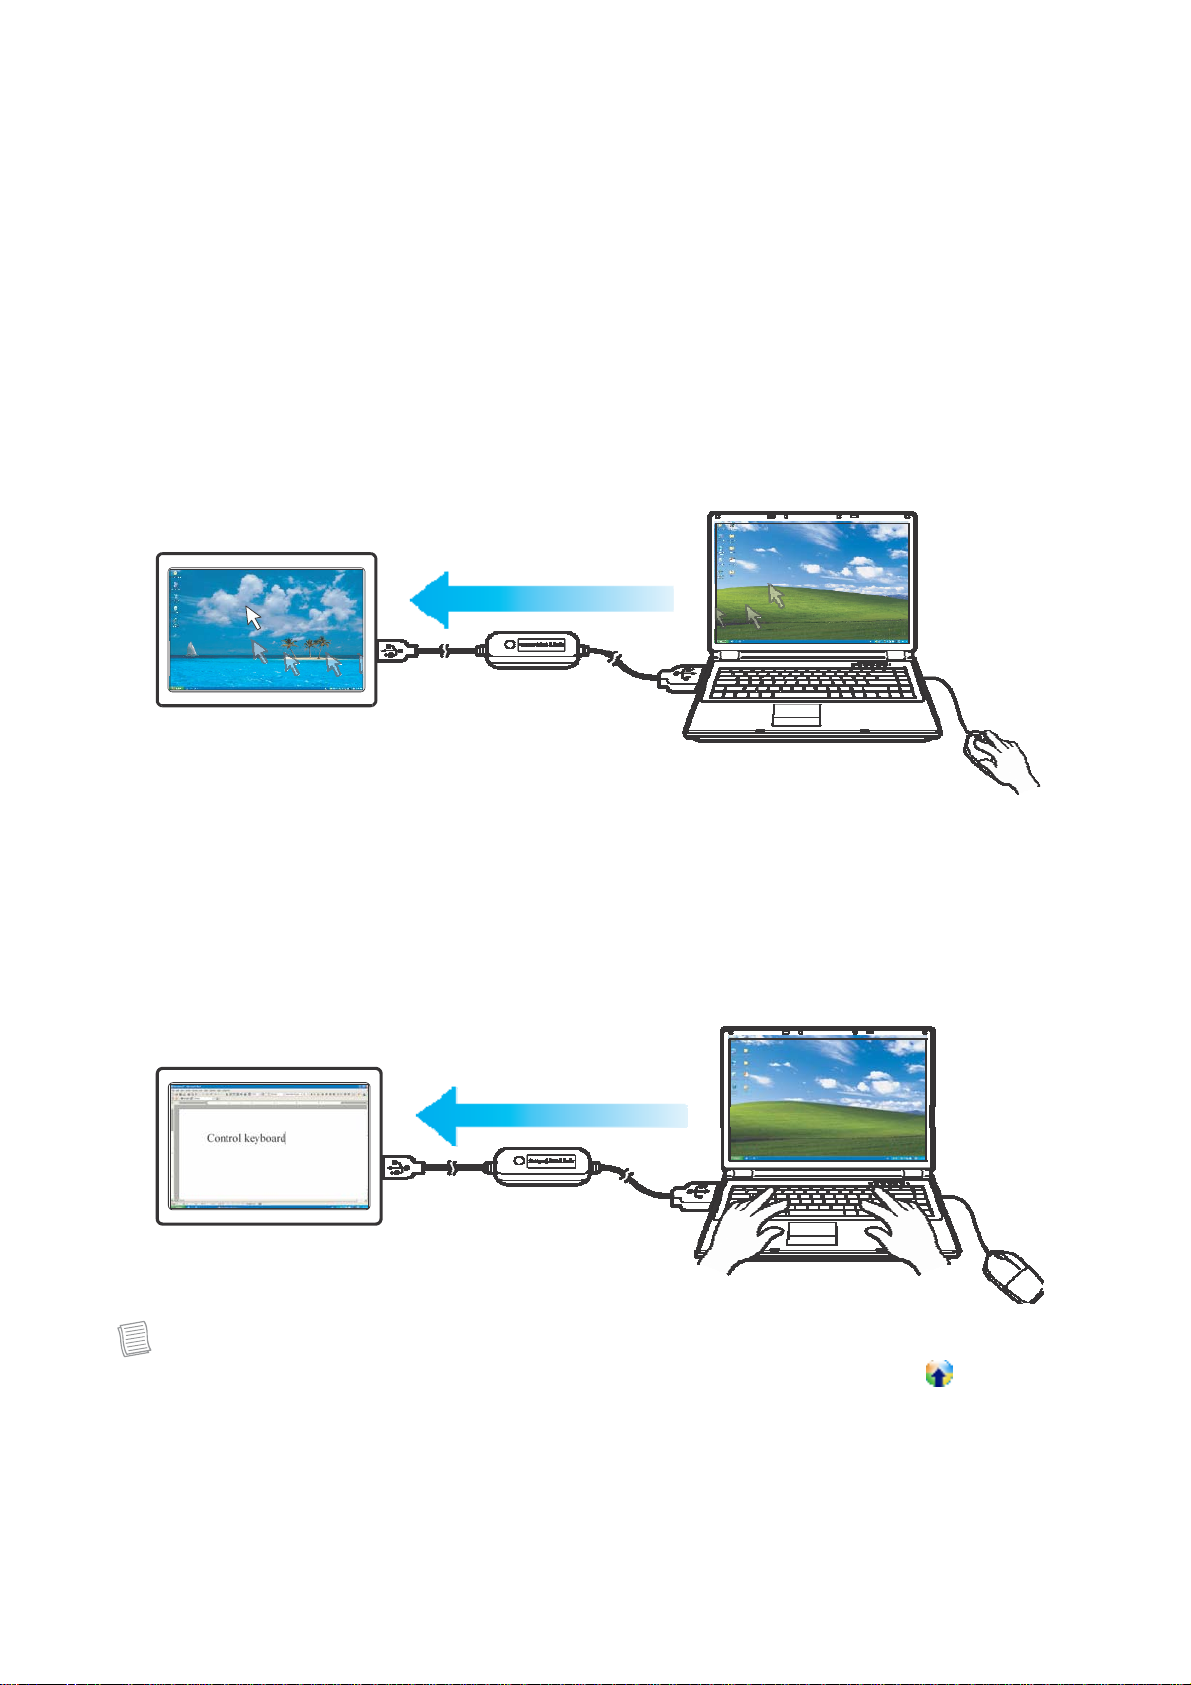
Sharing Keyboard and Mouse
After you have configured the settings on the previous section, now you can start using
your computers.
To switch the cursor location to another computer:
The action depends on the prior setting that you have chosen on the “Keyboard & Mouse
Control Switching Settings” on page 6.
If you set Use Mouse Move Off the Edge of Screen > Left Side of this PC, move the
mouse until the edge of the left side screen. The cursor is now at your second computer
and you can start using your second computer with the mouse.
To switch the keyboard usage to another computer:
1. Move the cursor to your second computer.
2. Open any editing software such as WORD, EXCEL, Power Point, etc.
3. Use your first computer keyboard to enter the text on the file.
Note: The Smart KM Link icon varies depending on the function. For example, when
switching the keyboard or mouse control to another computer, the icon
appears at the bottom right of the screen.
Page 10
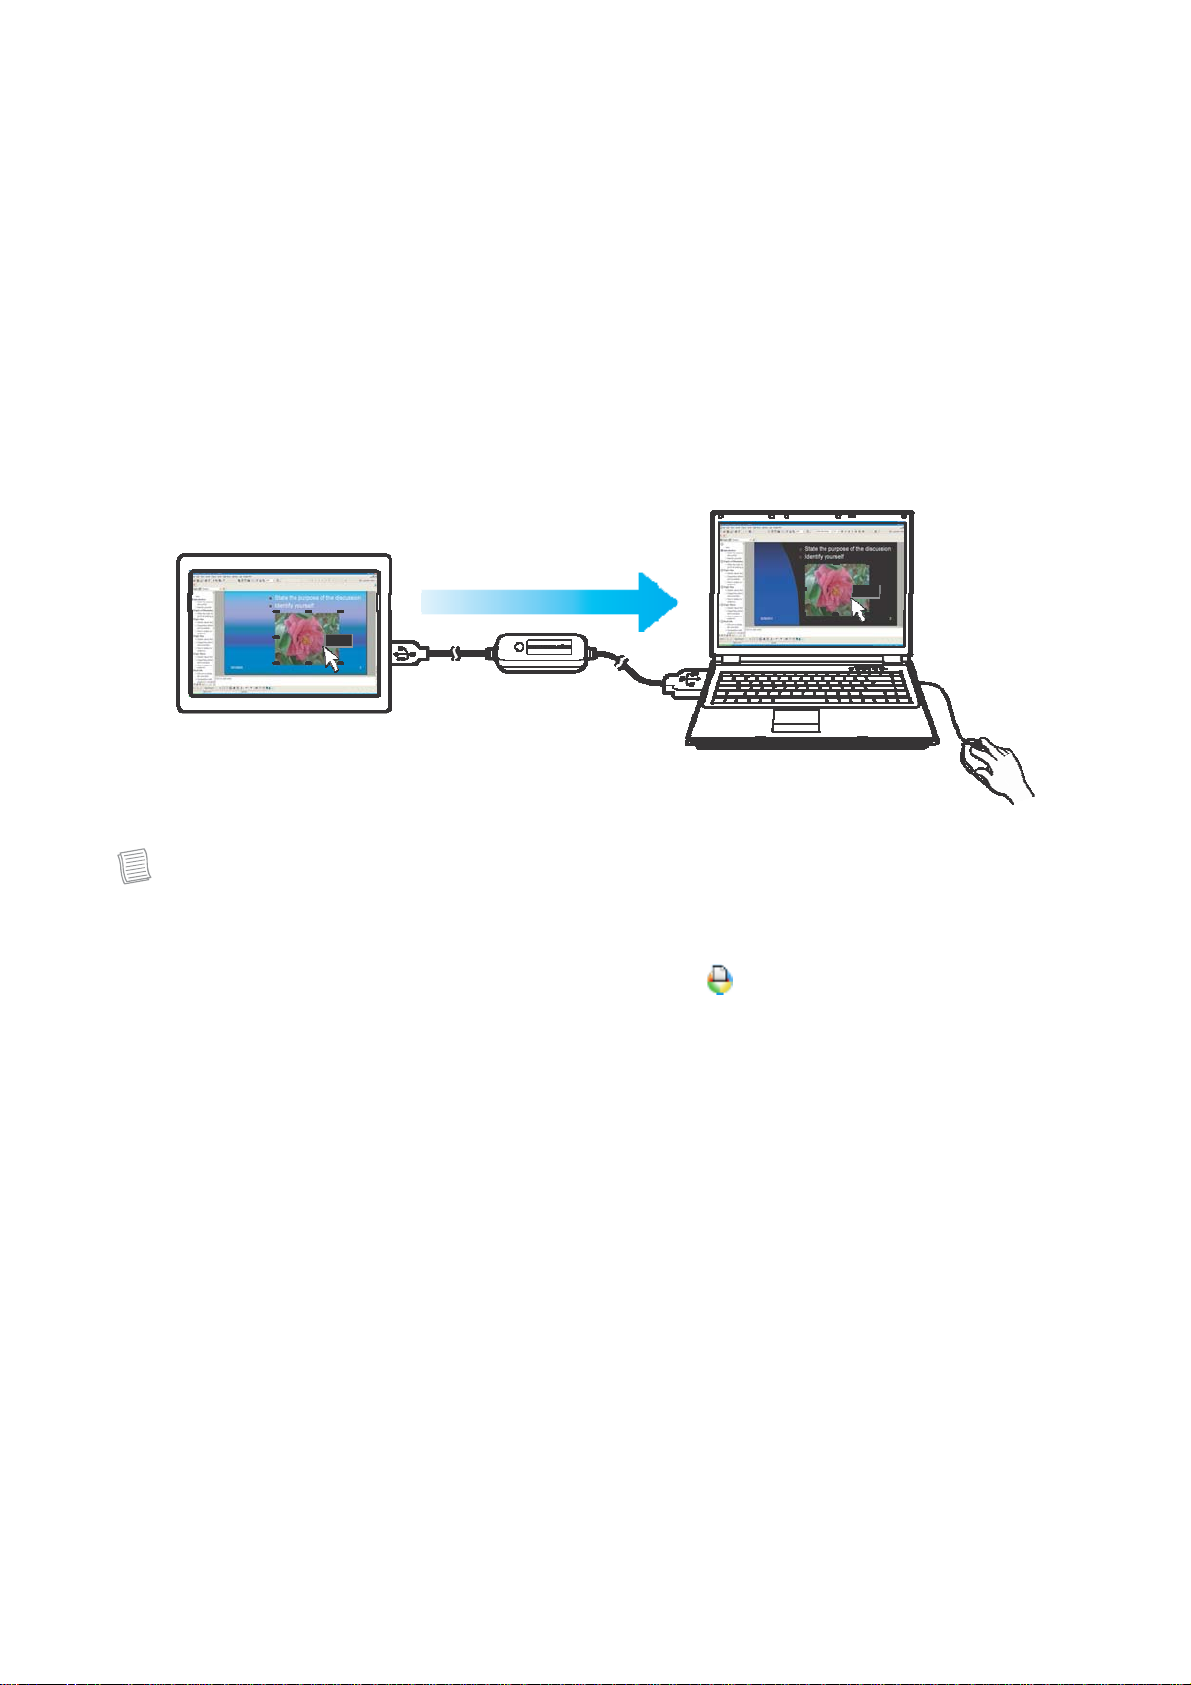
Clipboard Sharing
With the clipboard sharing feature, you can easily edit, copy or paste clipboard contents
between the two computers.
For example, to copy an image file on PPT(Power Point) file to another another PP
T file on
the other computer:
1. Open the “source” file and right-click on the image that you want to copy, and select
Copy.
2. Move the cursor to the other computer, and open the “destination” file.
3. Move the cursor to the location that you want to place the picture, and right-click, then
select Paste.
Paste
Copy
Note:
• You can also do the same way as above to copy text or files.
• The Smart KM Link icon varies depending on the function. For example, when
receiving clipboard data from another computer, the icon appears at the bottom right
of the screen.
Page 11
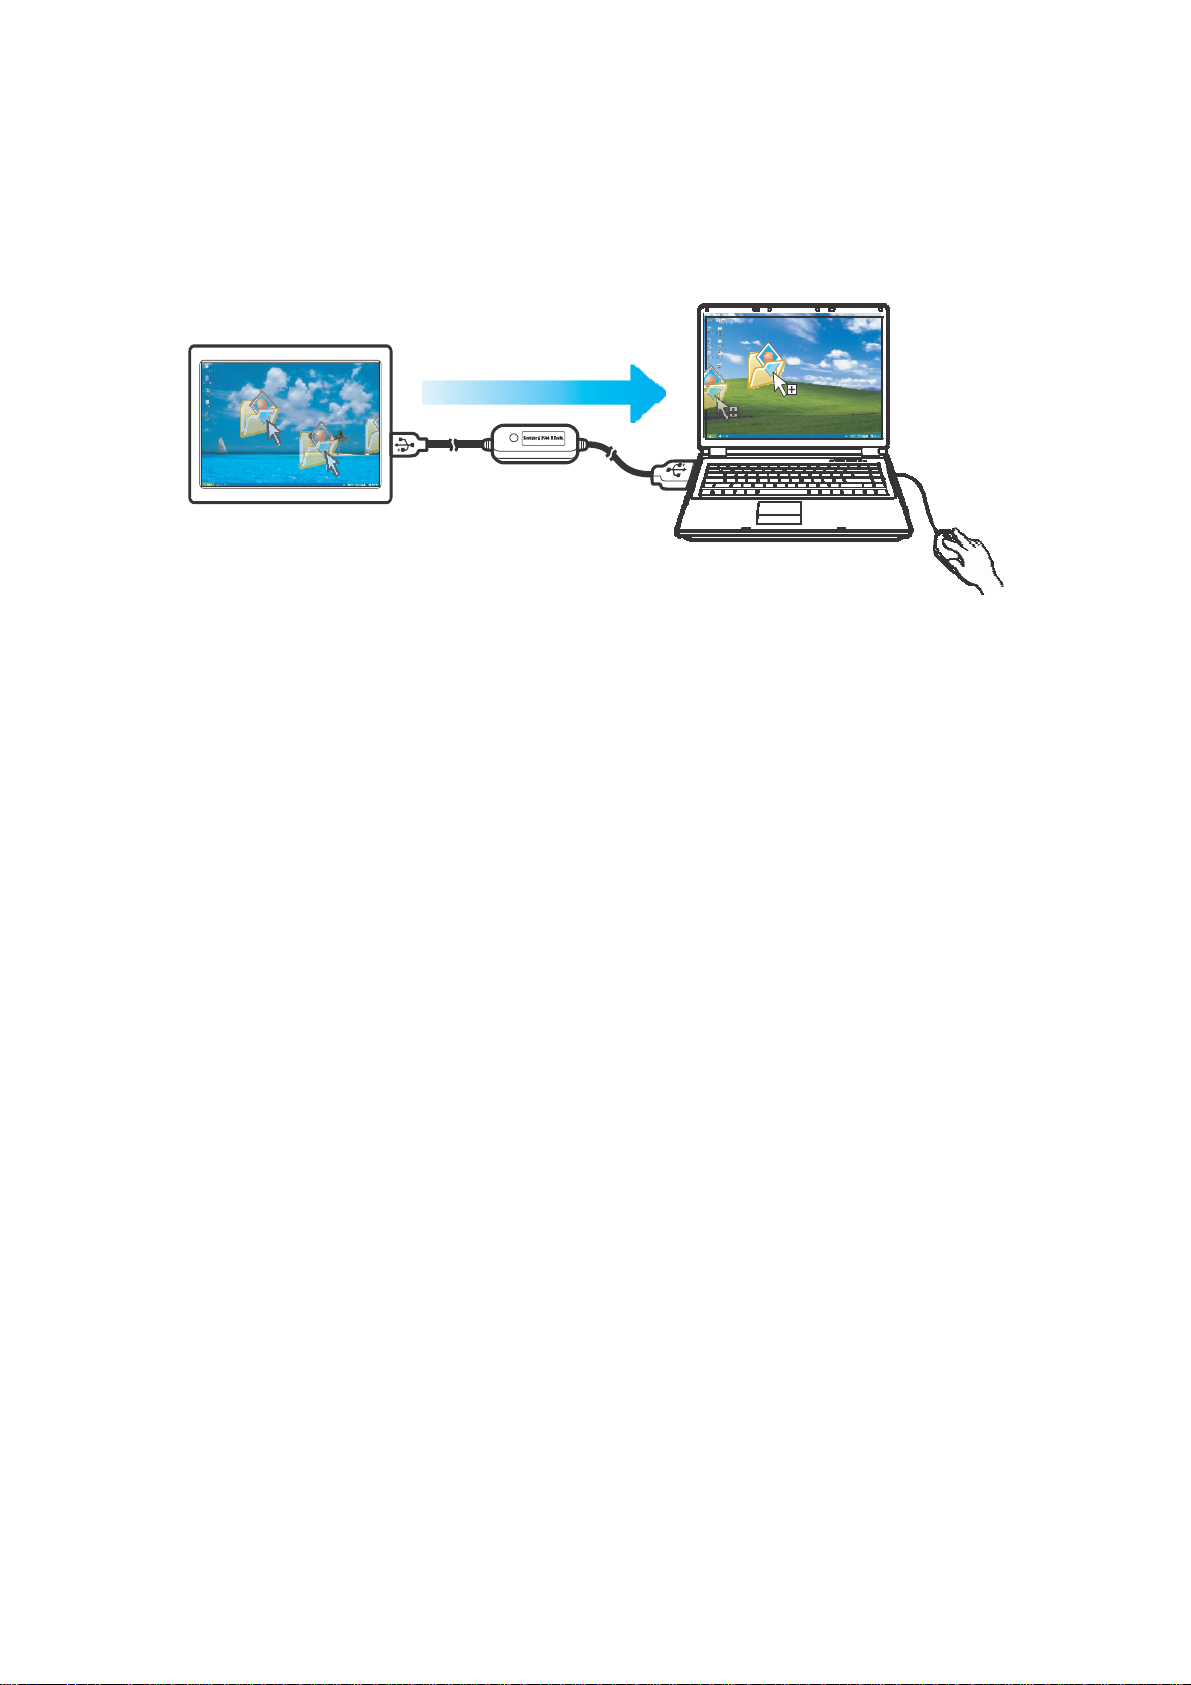
File Transferring
With the keyboard and mouse sharing function, it is easy to manage files between the two
computers. Simply drag and drop the file or folder between the two computers to transfer
files.
Besides using the drag and drop method, you can also do the following to transfer files
between the two computers:
• Copy & Paste:
1. Right-click on the file that you want to copy, and select Copy.
2. Move the cursor to the other computer.
3. Move the cursor to the location that you want to place the file, and right-click, then
select Paste.
• Keyboard’s hotkeys:
1. Click on the file that you want to copy, and press the [Ctrl+C] buttons.
2. Move the cursor to the other computer.
3. Move the cursor to the location that you want to place the file, and press the [Ctrl+V]
buttons to paste the copied file to another computer
.
Page 12
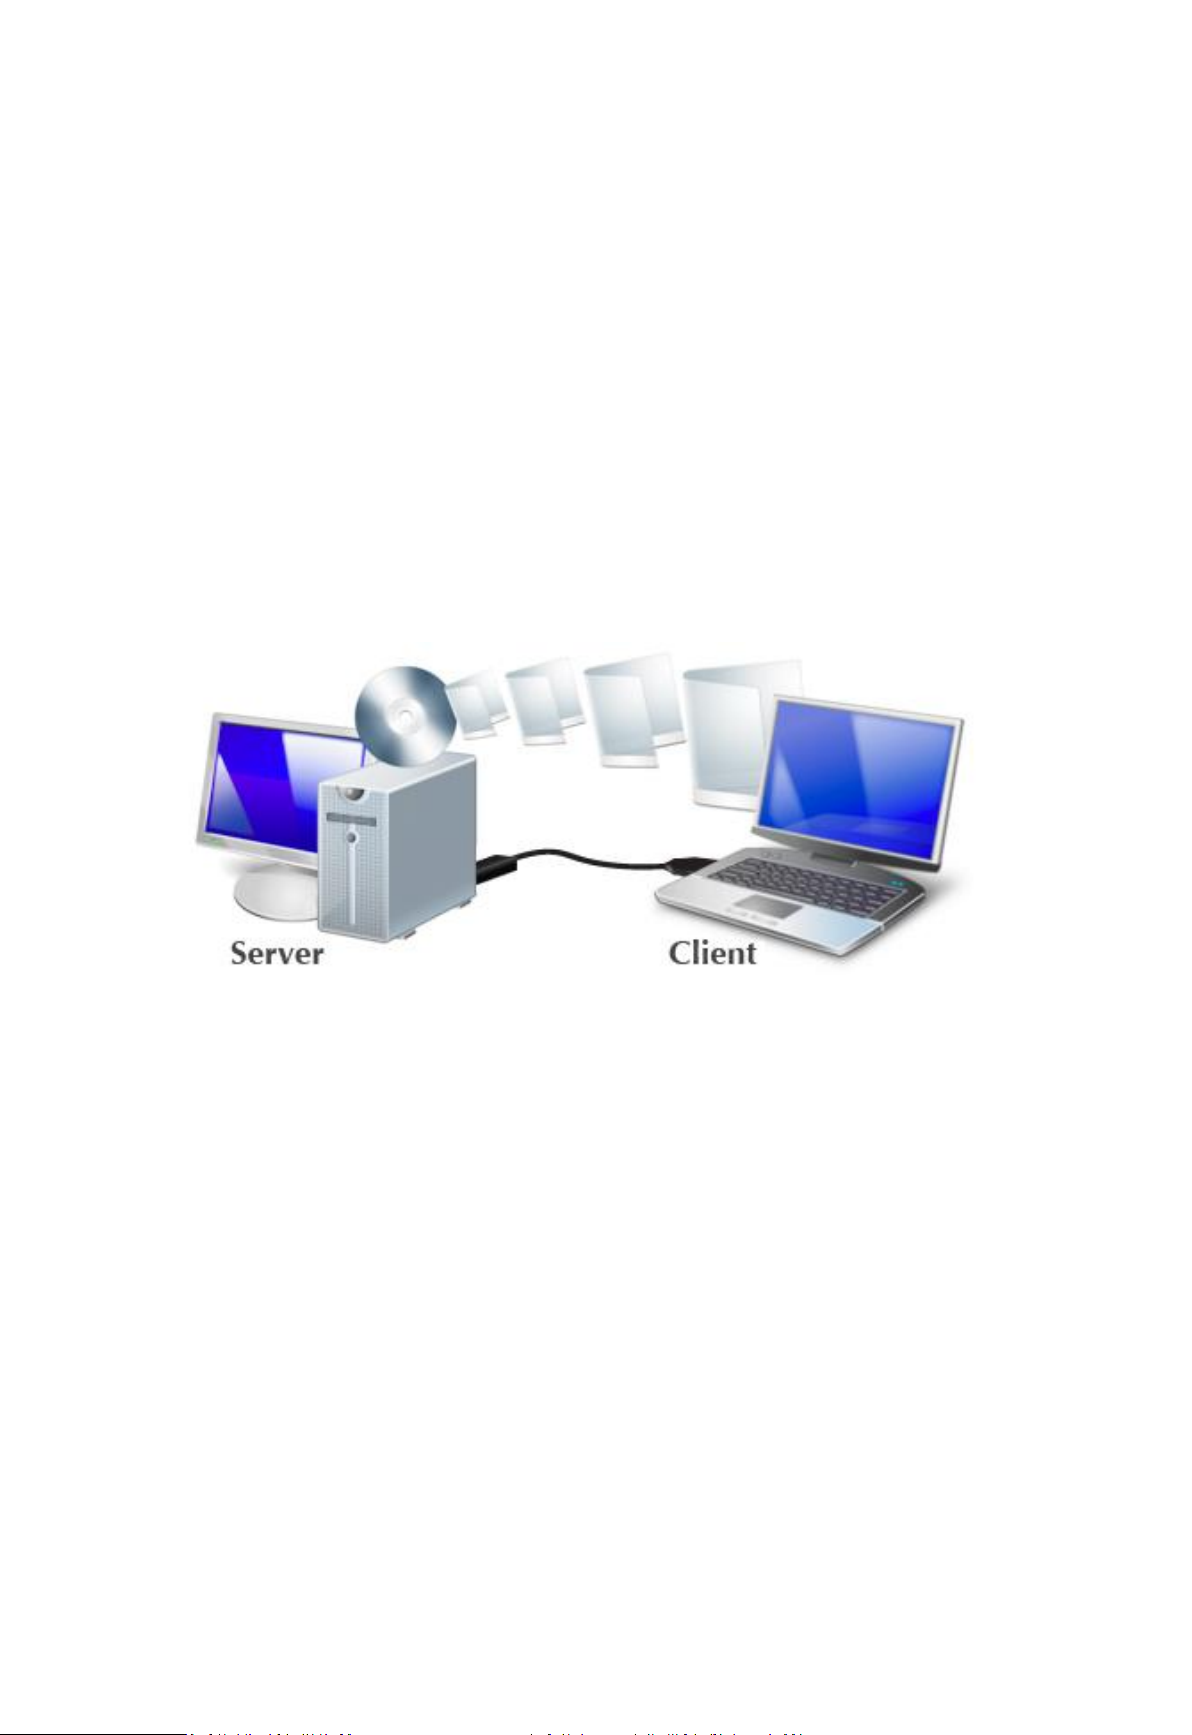
Introduction
Most of the latest ultra thin Notebooks, NetBooks, ultra-mobile PCs or Tablet PCs come without a CD,
DVD, or Blue-Ray disc drive due to cost and space limitations. Without a built-in optical disc drive
(ODD), users need some other way to access their CDs or DVDs. The EzODD provides a simple and
easy solution which lets you access an optical disc drive on another computer through an
easy-to-use, high-speed USB 2.0 connection.
When you use the EzODD product to connect your computer to another one with a built-in ODD, you
can enjoy all the functions available from the ODD, including playing music, watching movies,
burning to disc, backing up important data, installing software from a CD, and even rebooting your
computer from an external disc drive when everything else fails.
No installation CD is required, simply plug and play.
Access an optical disc drive on another computer using EzODD.
System Requirements
Server Computer System Requirements (with built-in ODD)
PC running Microsoft Windows 2000 SP3/ Win XP/ Vista/ Win 7 (32-bit or 64-bit)
Intel® Pentium® II Processor or later
512MB RAM or higher
Hard disk space requirement of at least 100 MB
Built-in USB port 1.1 or 2.0
Client Computer Hardware Requirements (without built-in ODD)
PC (Windows/Linux)
Mac
Built-in USB port 1.1 or 2.0
Page 13
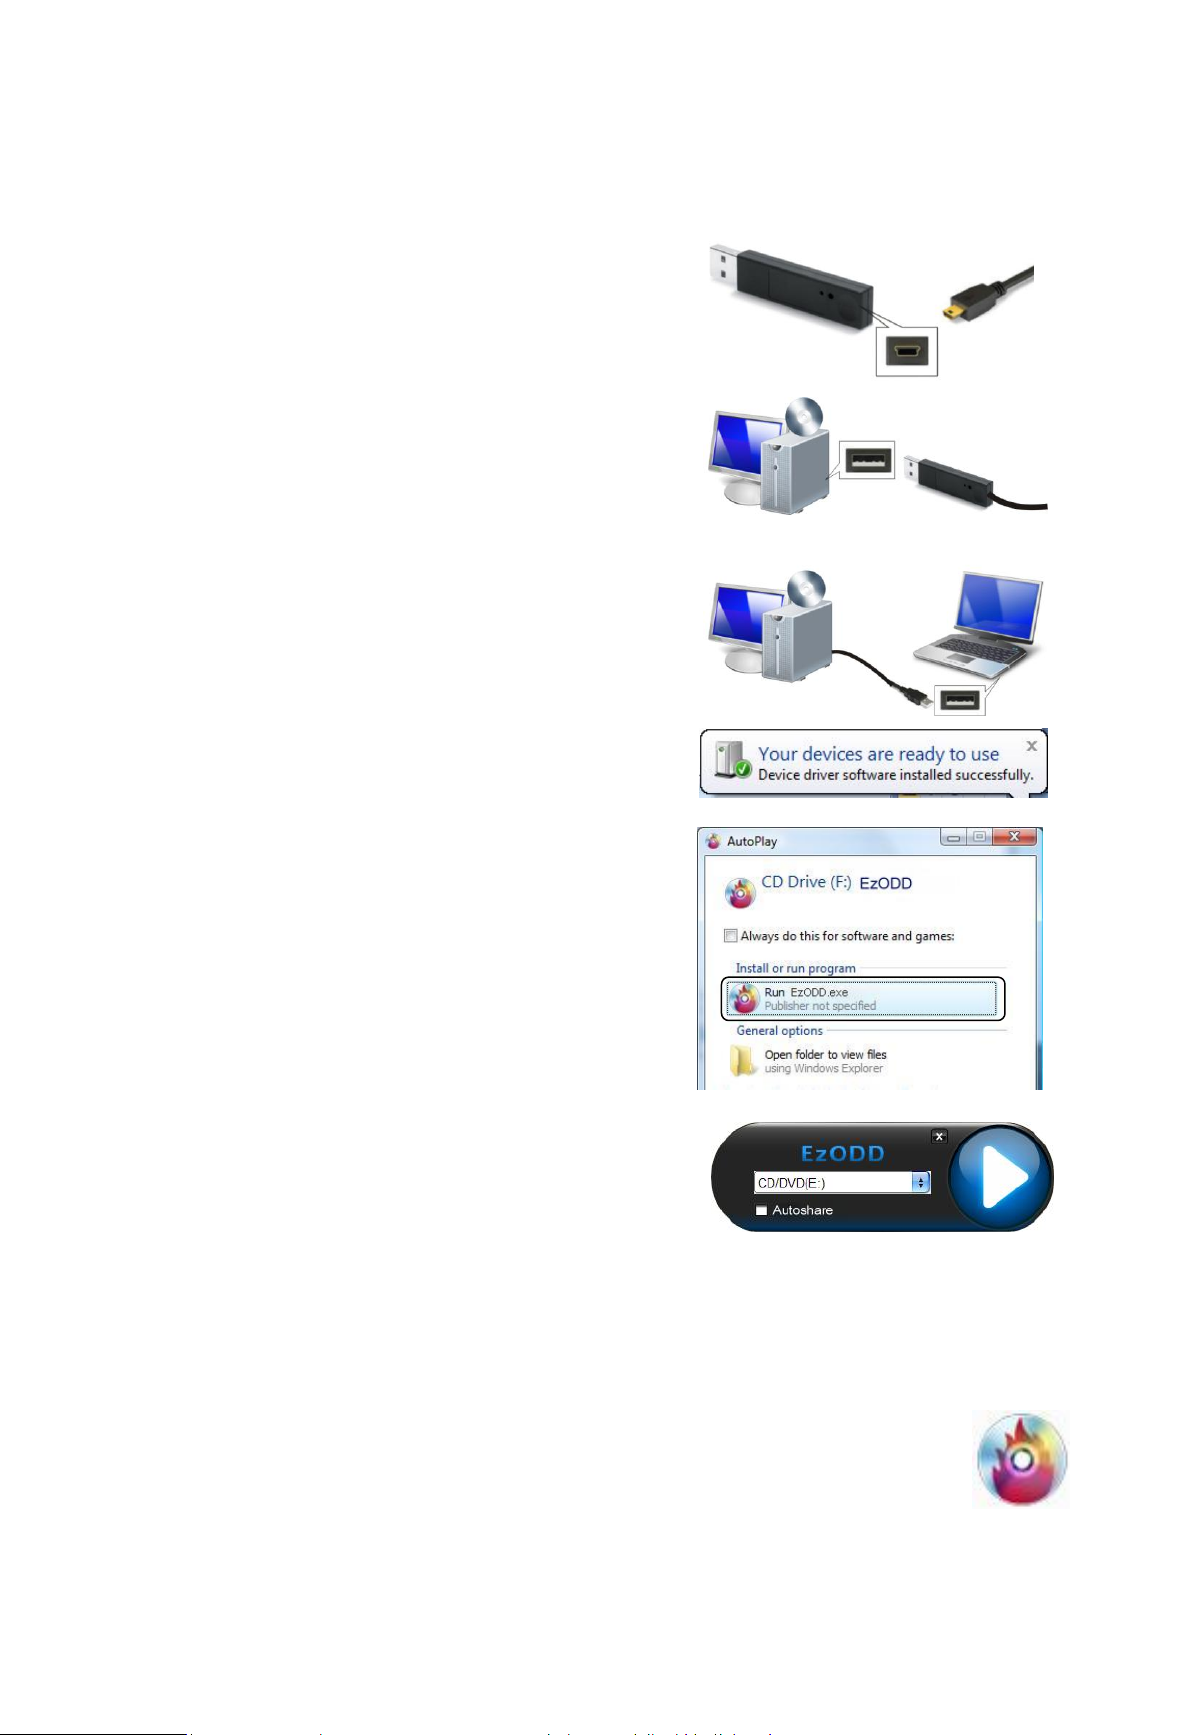
Getting Started
Follow these steps to use your computer to access an optical disc drive installed on another
computer.
1. Connect the mini USB connector on the USB cable
provided in the package to the mini USB port on the
back of the EzODD stick.
2. Connect the EzODD stick to a standard USB port on one
of the two computers you are connecting. You can
connect the stick to either computer.
3. Connect the standard-sized connector on the USB cable
to a USB port on a second computer.
4. Wait until Windows has finished installing device driver
software on both computers.
5. Windows may ask you to select Autoplay options, in
which case click on the option “Run EzODD.exe”.
6. The EzODD application will open on both computers.
Close the application that appears on the computer
without an optical disc drive.
7. You are now ready to operate the EzODD application.
Troubleshooting:
If the EzODD application fails to start automatically:
1. Check that each connector on the USB cable is correctly inserted and that the USB stick is
correctly inserted into the USB port on your computer.
2. Open “My Computer” on the computer with the optical disc drive installed (the server
computer), and double click the EzODD icon to start the application.
3. If that fails, right click the icon, select “Open” and double click “EzODD.exe”.
Page 14
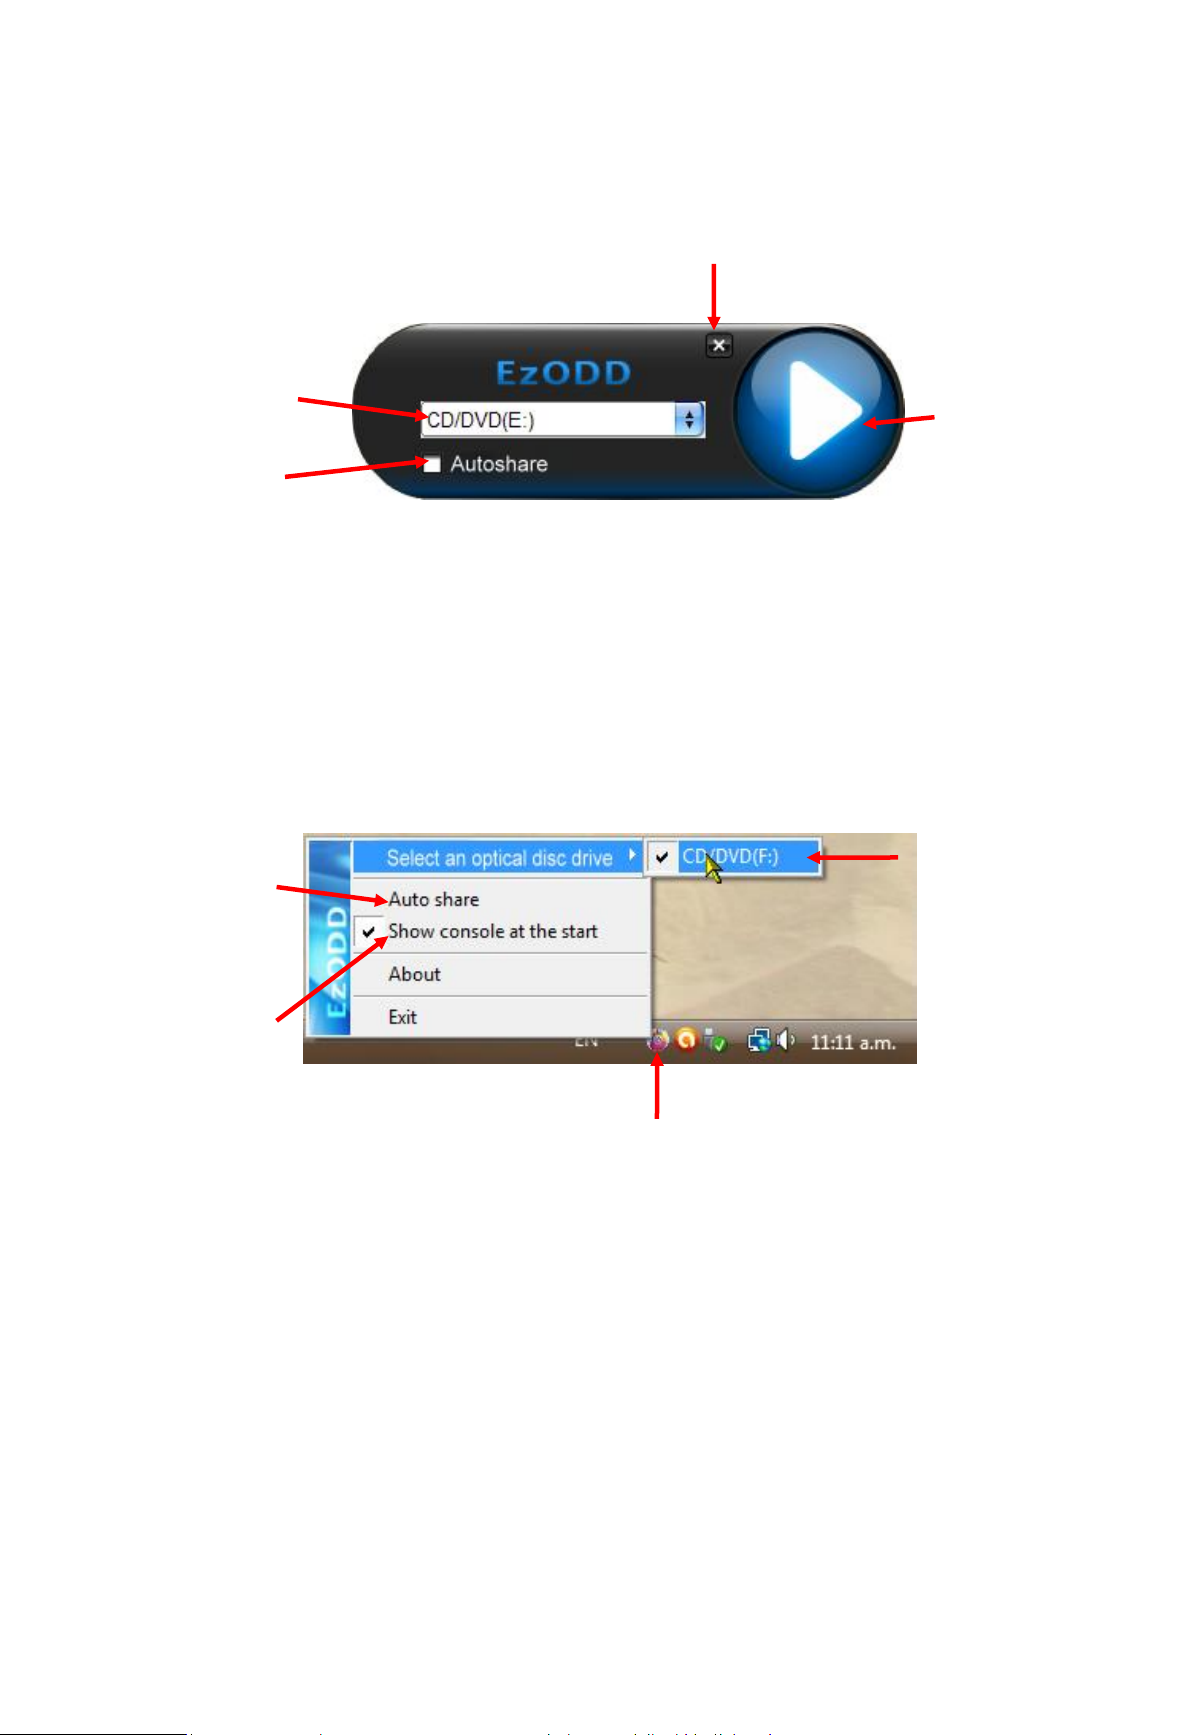
Using the EzODD Application
Minimize the application.
Select the optical
disc drive you want
to share.
Start sharing the
ODD.
Automatically
share the ODD.
Right-click the Redirect icon
to display options.
Automatically
share the ODD
on application
start-up.
Select the optical
disc drive you want
to share.
Show/hide the
application
console.
The EzODD application has the following functions:
Figure 1: EzODD application
Right-clicking the system tray icon in the bottom right-hand corner of your screen also lets you
operate the EzODD console application.
Figure 2: EzODD console option
Page 15
Sharing ODD on the Server Computer
Use the EzODD application that appears on the server computer (with the optical disc drive you
want to share).
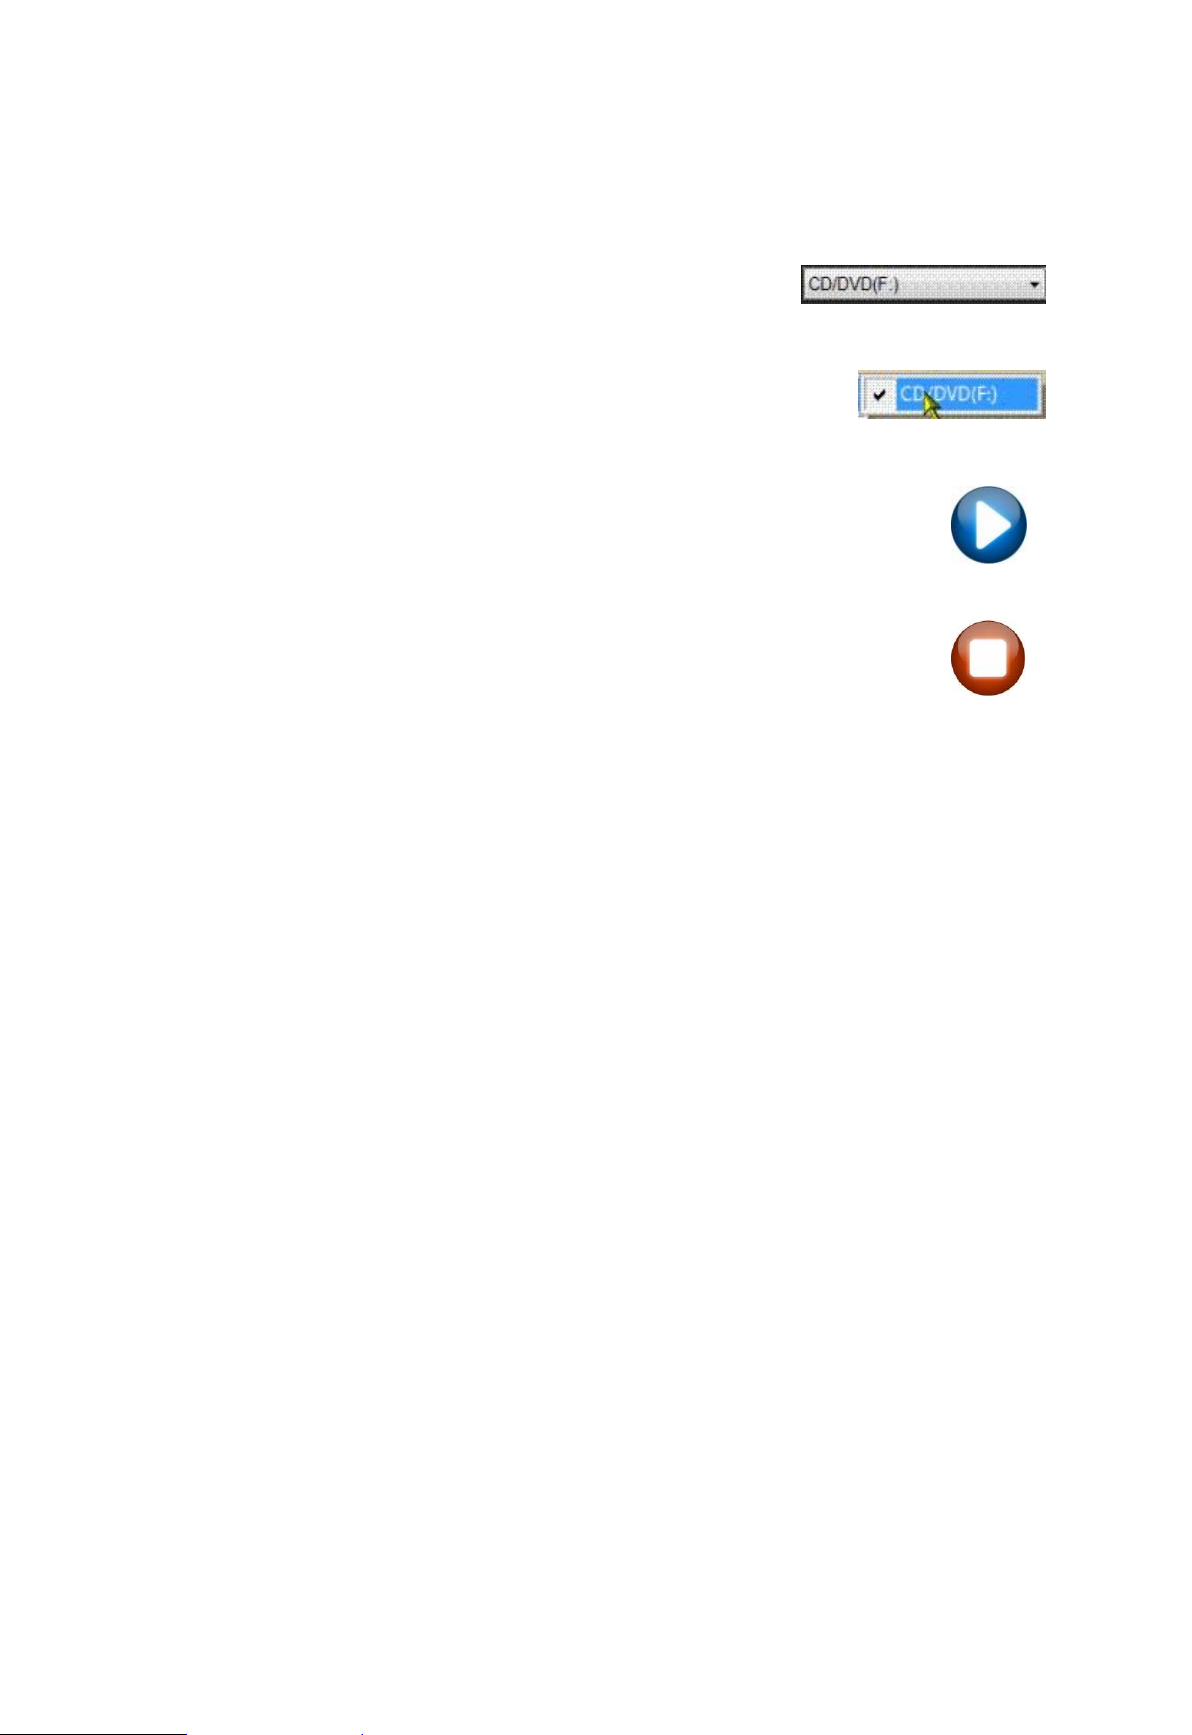
1. In the application, select an optical disc drive by clicking on the
drive name in the drop-down list of disc drives.
You can also select an optical disc drive by right-clicking on the EzODD
icon in the system tray in the bottom right-hand corner of your screen.
Then, click on Select ODD and select the disc drive you want to share (see
Figure 2).
2. Click on the start button to start sharing the disc drive you selected. This may take a
few seconds.
3. Check the “My Computer” folder on the second computer (the client computer). An
additional disc drive icon should appear, representing the optical disc drive you are remotely
accessing.
4. Click on this icon to access the remote optical disc drive.
5. To finish accessing the remote optical disc drive, click the stop button.
Troubleshooting:
If the drive you want to access is not available, check if the EzODD application is running on the
server computer.
Automatic Sharing
You can set the EzODD application so that sharing the ODD is automatically started on the server
computer after finishing the connection.
Set the application so you can access the optical disc drive automatically on application start-up
by clicking on the Auto share checkbox (see Figure 1).
You can also access the optical disc drive automatically by selecting Auto share in the console
application (see Figure 2), accessed from the system tray icon on the bottom right of your
screen.
To turn off this feature, click the Auto share checkbox in the application (see Figure 1) to clear it,
or click Auto share in the console application (see Figure 2) to deselect it.
Hiding the Application
You can also set the EzODD application to run in the background without any visible icons from when
you start your computer.
1. To open the EzODD console application, double click the application icon in the system tray in
the bottom right-hand corner of your screen.
2. Click the Show console at the start option to deselect it.
 Loading...