

Page 1
VPN Tracker 6
The Complete Manual
Page 2

© 2011 equinux AG and equinux USA, Inc. All rights reserved.
Under copyright law, this manual may not be copied, in whole or in part,
without the written consent of equinux AG or equinux USA, Inc. Your rights
to the software are governed by the accompanying software license
agreement.
The equinux logo is a trademark of equinux AG and equinux USA, Inc., registered in the U.S. and other countries. Other product and company names
mentioned herein may be trademarks and/or registered trademarks of their
respective companies.
equinux shall have absolutely no liability for any direct or indirect, special or
other consequential damages in connection with the use of this document
or any change to the router in general, including without limitation, any lost
profits, business, or data, even if equinux has been advised of the possibility
of such damages.
Every effort has been made to ensure that the information in this manual is
accurate. equinux is not responsible for printing or clerical errors.
Manual revision 7
Created using Apple Pages.
www.equinux.com
2
Page 3

Which Manual is Right for You?
We offer two manuals for VPN Tracker:
VPN Tracker 6 – The Complete Manual (this document)
‣
For VPN administrators and advanced users
‣
Covers setting up your VPN gateway, configuring a connection, exporting
and deploying VPN Tracker and describes every setting and option.
VPN Tracker 6 User Guide
‣
For regular users who want to get the most out of VPN Tracker
‣
Covers using Secure Desktop, accessing your file servers, printers and
other common tasks
Select “Help > User Guide” in VPN Tracker to read the User Guide.
3
Page 4

Contents
..............................................................Exporting Connections 37
Deploying Connections 40
...........................................................VPN Tracker 6 at a Glance 5
..............................................................Introducing VPN Tracker 6
...................................................................................What’s New? 7
....................................................................VPN Tracker Editions 9
............................................................................Getting Started 11
Installing VPN Tracker 11
Activating VPN Tracker 11
..........................................Migrating from Previous Versions 14
.......................................................................VPN Crash Course 15
.....................................................................Getting Connected 16
Actions and Export 18
...............................................Connecting to an Existing VPN 20
......................................Setup without Configuration Guide 22
.....................................................................Managing Licenses 42
..........................................................................Troubleshooting 44
.....................................................................Settings Reference 47
Basic Tab 47
Advanced Tab 53
Actions Tab 59
Export Tab 59
VPN Tracker Preferences 60
......................................................................................Appendix 62
..............................................Choosing the Right VPN Device 62
..........................................................L2TP / PPTP Connections 63
.............Accessing Files, Printers and Databases over VPN 64
......................VPN and Network Address Translation (NAT) 67
....................................................................................Certificates 70
.............................................................Importing Connections 24
........Secure Desktop: The Easy Way to Access Your Office 25
........................................................Working with VPN Tracker 33
Managing Your Connections 33
VPN Connection Status 34
Actions 34
Menu Bar Item 35
Dashboard Widget 36
Using Smart Cards 74
.......................................................................Further Resources 77
...................................................................Keyboard Shortcuts 78
4
Page 5
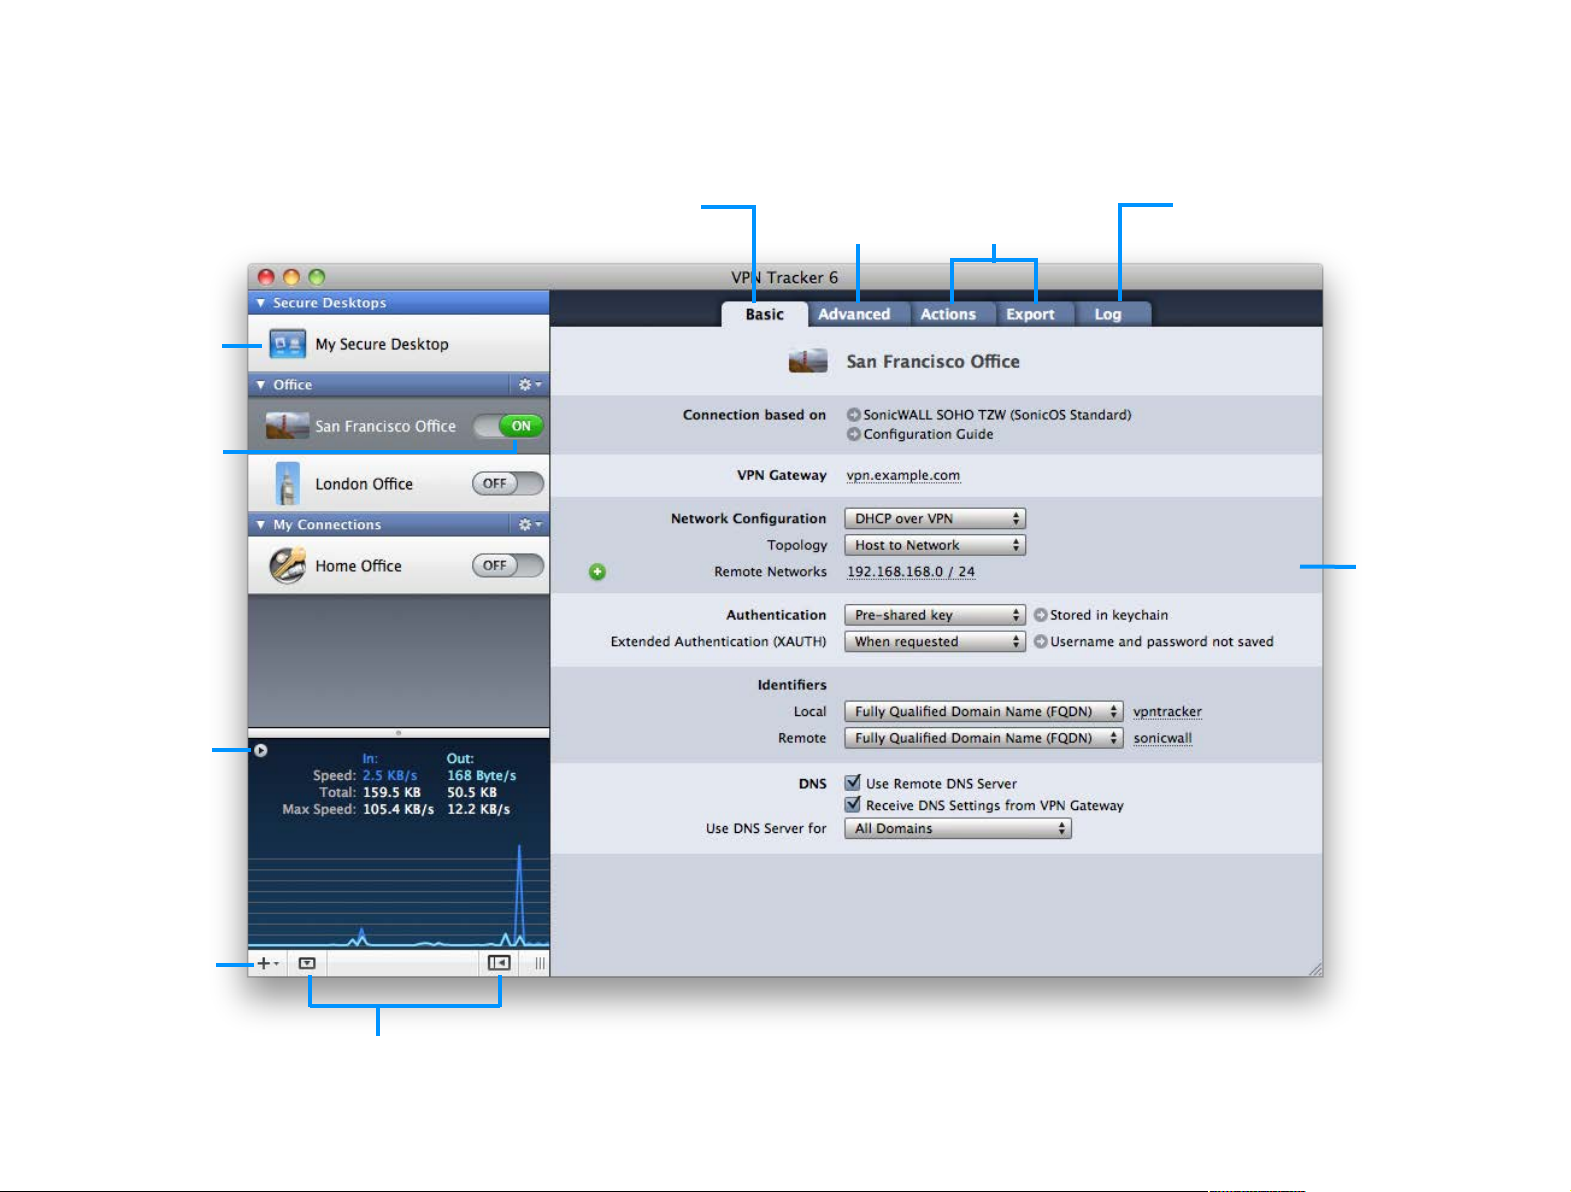
VPN Tracker 6 at a Glance
off.
ers, websites and more.
Basic
Basic settings of your VPN
connection, such as the
VPN gateway that is used.
Secure Desktop
Everything you need to
work over VPN in one
place: Applications, serv-
On/Off Switch
Connect and disconnect
your VPN connection by
sliding its switch on or
Status Area
See what’s happening
on your VPN connection. Click the arrow
button for additional
details.
Advanced
Advanced settings
such as encryption
algorithms.
Actions and Export
Automate frequent
tasks and export
connections.
Log
Get troubleshooting
advice and see what
VPN Tracker is doing.
Connection Details
The settings of the
selected VPN connection. VPN Tracker ships
with device profiles for
many VPN gateways, so
only the settings relevant for your VPN
gateway are shown.
Add Items
Add a new VPN connection, group or Secure
Desktop
Toggle Details
Display or hide your connection details, your Secure
Desktop, or the status area
5
Page 6

Introducing VPN Tracker
This manual contains lots of great tips. You can easily spot them
by looking for the light bulb icon.
If you are setting up not just VPN Tracker, but also a VPN gateway, this icon points out recommended settings and things you
need to pay attention to when setting up a VPN gateway.
This exclamation mark warns you when there is a setting or action where you need to take particular care.
Welcome to VPN Tracker, the leading VPN client on Mac.
Whether you are new to VPN or a seasoned VPN guru, this
manual will help you get started with VPN Tracker.
New to VPN Tracker?
‣
See how to install VPN Tracker and how to activate your license (or get a
free trial) in →#Getting Started
‣
Learn about VPN Basics in our →#VPN Crash Course and then move straight
to →#Getting Connected
‣
Explore how using your VPN is a breeze with →#Secure Desktop
Upgrading to VPN Tracker 6?
‣
See how to →#Upgrade Your License to VPN Tracker 6 and how VPN Tracker
automatically takes care of →#Migrating from Previous Versions
‣
Explore →#What’s New in VPN Tracker 6
‣
Check out the new →#Secure Desktop – the starting point of your VPN
Conventions Used in This Document
Links to External Websites
Sometimes you will be able to find more information on external websites.
Clicking links to websites will open the website in your web browser:
http://equinux.com
Links to Other Parts of this Manual
A →#Link will take you to another place in the manual. Simply click it if you
are reading this manual on your computer.
Tips and Tricks
Advice for Setting up Your VPN Gateway
System Administrators and IT Departments
‣
Learn how to connect to your existing VPN gateway or set up everything
from scratch in →#Getting Connected
‣
See how easy it is to deploy VPN Tracker in big or small organizations by
#Exporting Connections, creating customized VPN Tracker applications,
→
and →#Managing Licenses
‣
At the end of this manual you can find a complete →#Settings Reference
that describes every setting in VPN Tracker in detail
Warnings
Getting Help
VPN Tracker makes VPN simple. However, computer networking and VPNs can
be complex and tricky at times, so we have also built in tools and helpful fea-
tures that will assist you if you ever run into problems. Check out →#Troubleshooting for more information.
6
Page 7
What’s New?
With VPN Tracker 6, working on the go is not only more
secure, it's more comfortable too. Use Secure Desktop to
access everything you need in a single location: Read emails,
access file servers, open applications, run scripts and more.
New and improved features
Security
VPN Tracker is built with the security of your connection in mind. We have integrated the latest security standards to make VPN Tracker secure and ready
for the future.
VPN Tracker takes full advantage of Snow Leopard's new security features including Apple's Service Management framework. As the market-leading VPN
solution for Mac, VPN Tracker also includes the latest security algorithms, including the SHA-2 family of hash algorithms.
Secure Desktop
Your Secure Desktop is the starting point for all your VPN-based work: With a
single click VPN Tracker will automatically connect to your VPN and open the
applications, file servers or webpages that are part of your daily workflow.
In addition to Diffie-Hellman Groups 1, 2, and 5, VPN Tracker now also supports Diffie-Hellman Groups 14 to 18 with up to 8192 bits for key exchange.
Simplified Configuration
VPN Tracker has been vastly refined to make configuring and editing VPN
connections easier and more intuitive. We have not only updated the device
profiles but also substantially simplified the settings. We were also sure to in-
clude a direct link to each device's configuration guide when selecting a device. It's everything you need to know, right where it needs to be.
Endless Connections
VPN Tracker has been optimized for continuous operation. Those annoying
disconnection error messages resulting from interrupted connections are a
thing of the past. With improved rekeying, automatic DHCP renewal and sup-
port for Dead-peer-detection, VPN Tracker works hard to keep you connected.
Ready for the Future
As the market-leading VPN solution for Mac OS X, VPN Tracker consistently
one step ahead. We have optimized VPN Tracker for Mac OS X Snow Leopard.
It supports 64 bit mode and is ready for the Internet of tomorrow with support for IPv6.
Export Secure Desktops
The new Secure Desktop in VPN Tracker 6 makes it easy to organize everything you need for working over VPN. And of course, Secure Desktops can be
exported so you can provide your users a standardized environment where
they'll find everything they need to get right to work.
7
Page 8

Edition Changes
We’ve heard your feedback and have substantially boosted the Player Edition’s
capabilities:
VPN Tracker 6 Player Edition now supports any configuration created by VPN
Tracker 6 Professional Edition – even when using advanced features such as
AES-256, smart cards and SonicWALL Simple Client Provisioning.
Upgrading to VPN Tracker 6
If you currently own VPN Tracker 5, you can easily upgrade to VPN Tracker 6
and take advantage of all these great new features.
To see your upgrade options:
http://www.equinux.com/goto/upgradevpntracker
The equinux License Manger will now show you all available VPN Tracker license upgrades.
8
Page 9

VPN Tracker Editions
Regardless of the Edition you have purchased, you can always
download and use the same copy of the VPN Tracker applica-
tion. Your license will automatically unlock all the features included in your edition.
A note about VPN Tracker Player Edition
VPN Tracker Player Edition supports any connection created by VPN Tracker
Professional Edition. Simply import the connection, and you’re done!
Using the deployment features in Professional Edition, you can create custom VPN Tracker applications that contain the connections your users need.
If you plan to deploy VPN Tracker Player Edition within your organization
you will need at least one Professional Edition license to set up VPN connections for your users.
If some of your users have a need to set up or modify their own VPN connections, they will need Professional or Personal Edition licenses.
We offer three different editions of VPN Tracker to fit different
requirements. Find out which edition is right for you.
Personal Edition
VPN Tracker Personal edition is designed for individual users. It supports the
most commonly used VPN encryption standards and features.
Professional Edition
VPN Tracker Professional Edition adds advanced features such as AppleScript
support, military-grade encryption, smart card support, and the ability to connect to multiple networks and VPN gateways at the same time.
Professional Edition can export VPN connections and even create customized
copies of VPN Tracker that include connections and licenses to make large-
scale rollouts a breeze.
Player Edition
VPN Tracker Player Edition can import and use VPN connections that have
been prepared using VPN Tracker Professional Edition. It is the ideal low-cost
solution for organizations with a large number of Mac VPN users.
Do I need VPN Tracker Professional Edition?
Your connection requires a VPN Tracker Professional Edition license (instead of
the Personal Edition), if it uses one of the following:
‣
Multiple remote networks
‣
AES-192 or AES-256
‣
SonicWALL Simple Client Provisioning
‣
Diffie-Hellman Groups 14-18
‣
SHA-2 (SHA-256 or SHA-512)
‣
IPv6
‣
Network to Network connection (i.e. connecting two networks using VPN
Tracker as a site-to-site VPN gateway)
Professional Edition helps you get your job done!
VPN Tracker Professional Edition is a great asset if you are a system or network
administrator, or are working with multiple VPN connections:
‣
Export VPN connections for yourself and other users, and even create a customized version of VPN Tracker that already includes a license and a preconfigured VPN connection for your users.
‣
Simultaneously connect to more than one VPN gateway, control your Mac
OS X L2TP/PPTP VPN, and organize your VPN connections.
‣
AppleScript lets you automate common tasks with VPN Tracker.
Note: In order to use Player Edition, you will need at least one Professional
Edition license in your organization.
9
Page 10

VPN Tracker Editions Compared
Professional
Personal
Player
General
Set up and edit connections
✔
✔
Import only
Export & Deployment
✔––
Connect to multiple VPNs simultaneously
✔––
Organize your connections in groups
✔
–
Import only
AppleScript✔–
✔
Integration of Mac OS X PPTP/L2TP VPN
✔––
Connectivity
Connect to a single remote network
✔✔✔
Connect to multiple remote networks
✔–✔
Tunnel all traffic (Host to Everywhere)
✔✔✔
Connect two sites (Network to Network)
✔––
SonicWALL Simple Client Provisioning
✔–✔
IPv6 Support
✔–✔
Authentication
Pre-Shared Key, X.509 Certificates
✔✔✔
Smart cards and PKI token
✔–✔
Extended Authentication (XAUTH)
✔✔✔
Hybrid Mode Authentication
✔–✔
Professional
Personal
Player
Security
DES, 3DES, AES-128 encryption
✔✔✔
AES-192, AES-256 encryption
✔–✔
SHA-1, MD5 hash algorithms
✔✔✔
SHA-2 hash algorithms
✔–✔
Diffie-Hellman (DH) groups
✔✔✔
Diffie-Hellman (DH) groups 14 - 18
✔–✔
Technical Support
✔
✔
Support
through Profes-
sional Edition
10
Page 11
Getting Started
If you set up your VPN connection during your free demo period, VPN Tracker will keep all your settings and details once you
activate a purchased license.
This chapter shows you how to install VPN Tracker, and how
to activate your license. If you do not have a license yet, don’t
worry – we’ll also show you how to get a demo key to try
VPN Tracker for free.
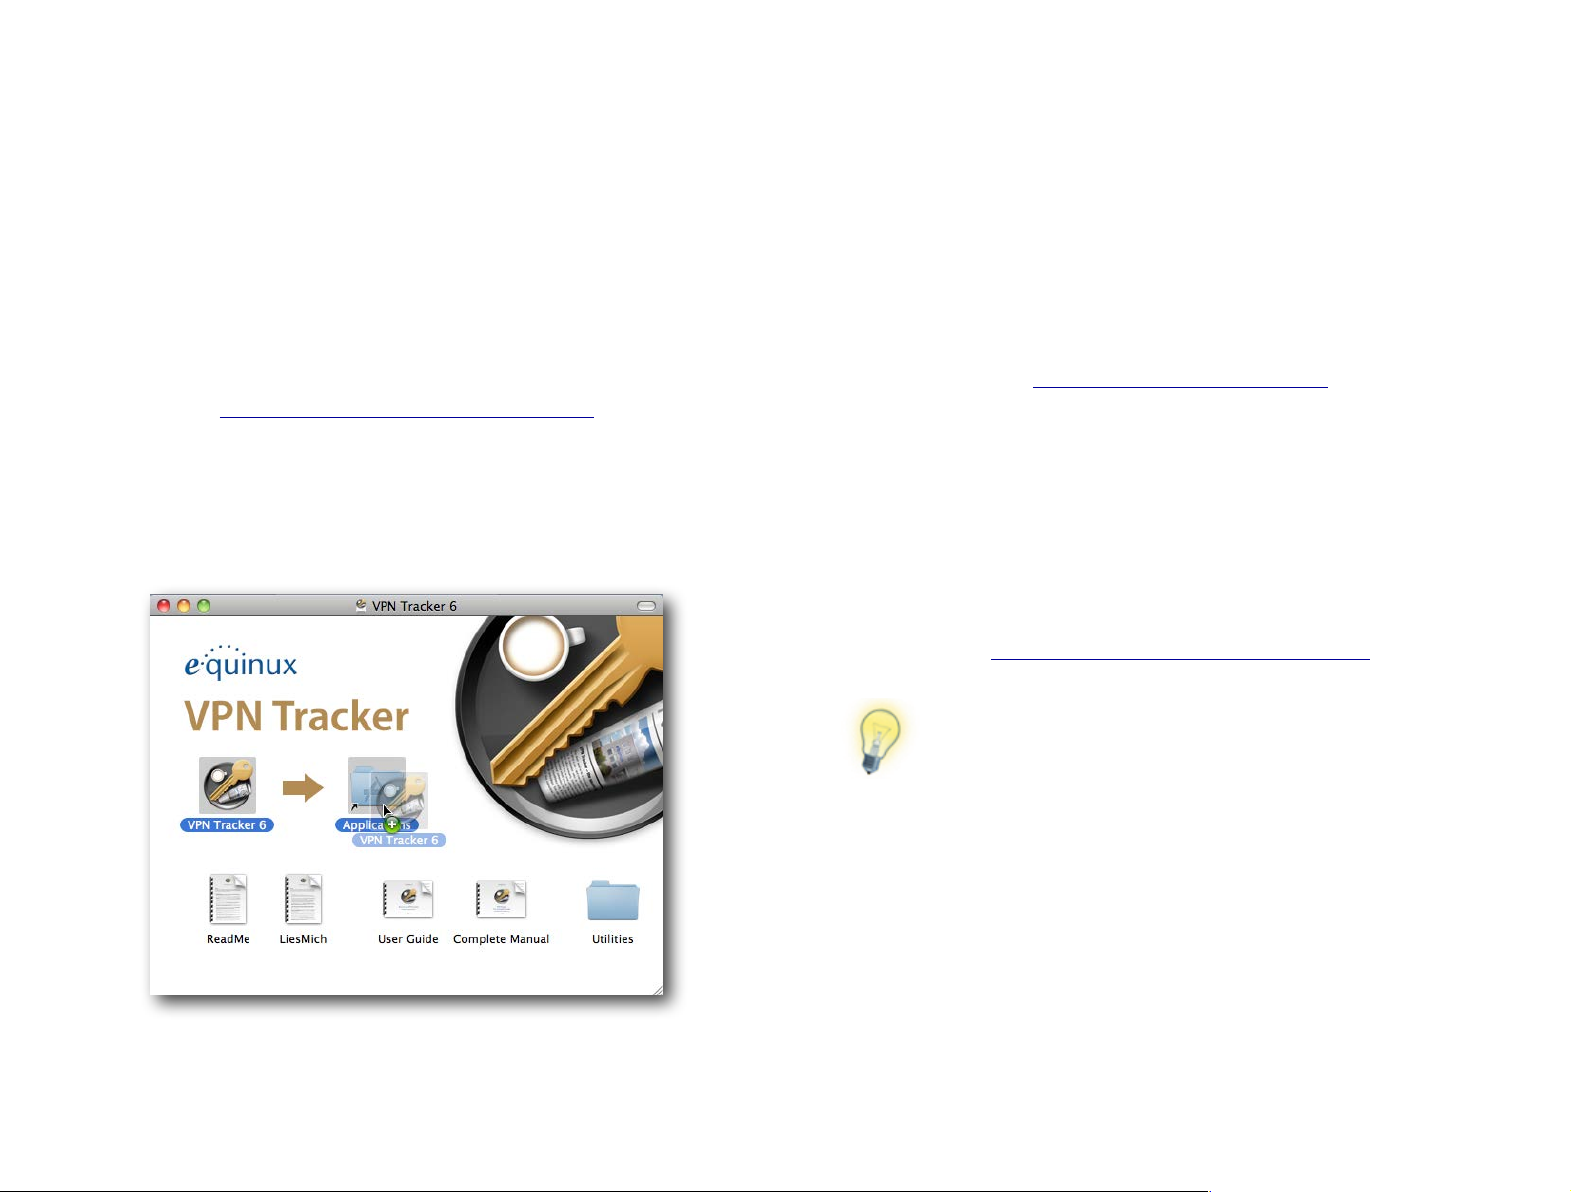
Installing VPN Tracker
You can always download the latest version of VPN Tracker from the equinux
website:
http://equinux.com/vpntracker/download
There is only one single download for all editions of VPN Tracker.
Once your download has finished, double click the downloaded “VPN Tracker
6.dmg” disk image file, if it doesn’t open automatically. Then simply drag the
VPN Tracker icon into your applications folder.
Activating VPN Tracker
Activating VPN Tracker is quick and easy. You can activate your license in a few
seconds over any internet connection.
How many licenses do I need?
VPN Tracker is licensed per-machine, so each Mac you want to run VPN Tracker
on will need its own license. Licenses can be bought in the equinux Online
Store or at your nearest equinux reseller. You can find your nearest reseller
with our Reseller Locator:
http://equinux.com/goto/reseller
Testing VPN Tracker
If you want to make sure VPN Tracker works with your connection and meets
your expectations before purchasing, you can request a free demo key. This
will give you access to all VPN Tracker Professional Edition features, except exporting connections.
To request your free demo key, please go to the following webpage:
http://equinux.com/goto/vpntrackerdemo
Open your Applications folder and double-click VPN Tracker 6 to open it.
When opening VPN Tracker for the first time, you will be prompted for the
user name and password of an administrator on your Mac.
To activate your demo:
‣
Open VPN Tracker
‣
Create a new equinux ID if this is your first equinux software, or sign in with
your existing equinux ID
‣
Enter your demo key when prompted
Once you’re satisfied VPN Tracker suits your needs, you can purchase a full
license right from within VPN Tracker.
11
Page 12
To purchase a license:
Entering a name and email address will make it easier for you to
keep track of who is using which license – particularly useful if
you have a large number of VPN Tracker users in your organization.
‣
Select VPN Tracker > Buy VPN Tracker from the menu bar
‣
Choose an edition
‣
Follow the instructions to purchase a license
If you prefer, you can also purchase VPN Tracker in our online Store:
http://equinux.com/goto/buyvpntracker
Activating a License from the equinux Online Store
Activating a Retail Box
To activate a retail box of VPN Tracker:
‣
Open VPN Tracker
‣
In case you still have time left on your demo period, choose “VPN Tracker 6
> Activate VPN Tracker” from the menu
‣
Create a new equinux ID if this is your first equinux software, or sign in with
your existing equinux ID
‣
Enter the activation code on your Quick Start booklet
‣
Enter the name of the user who will be using this particular license
To activate a license bought in our online store:
‣
Open VPN Tracker
‣
In case you still have time left on your demo period, choose “VPN Tracker 6
> Activate VPN Tracker” from the menu
‣
Enter your equinux ID and password in the new window that will open
‣
Select the license you would like to use on this Mac
‣
Enter the name of the user who will be using this particular license
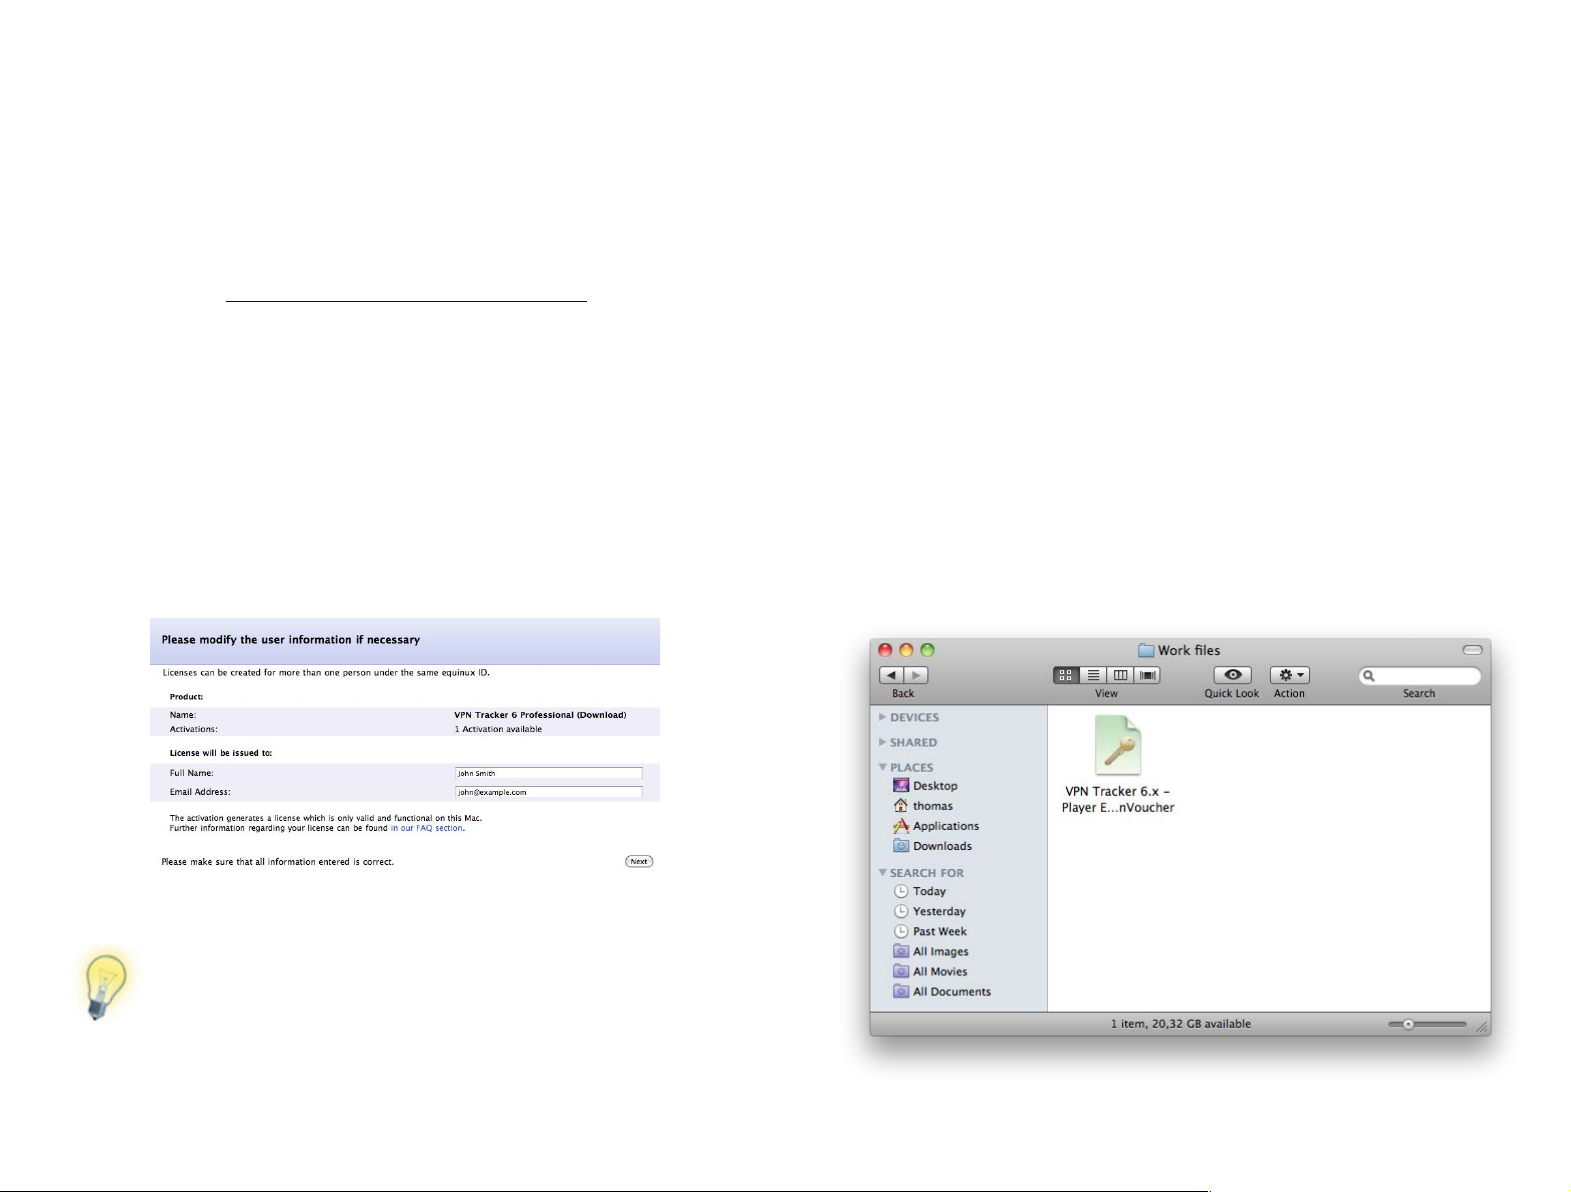
Activating with a License Voucher
If you received your VPN Tracker license from your organization, you probably
were given a license voucher file to activate.
To activate using a license voucher file:
‣
Locate the license voucher in Finder and double-click the file to begin the
activation.
12
Page 13
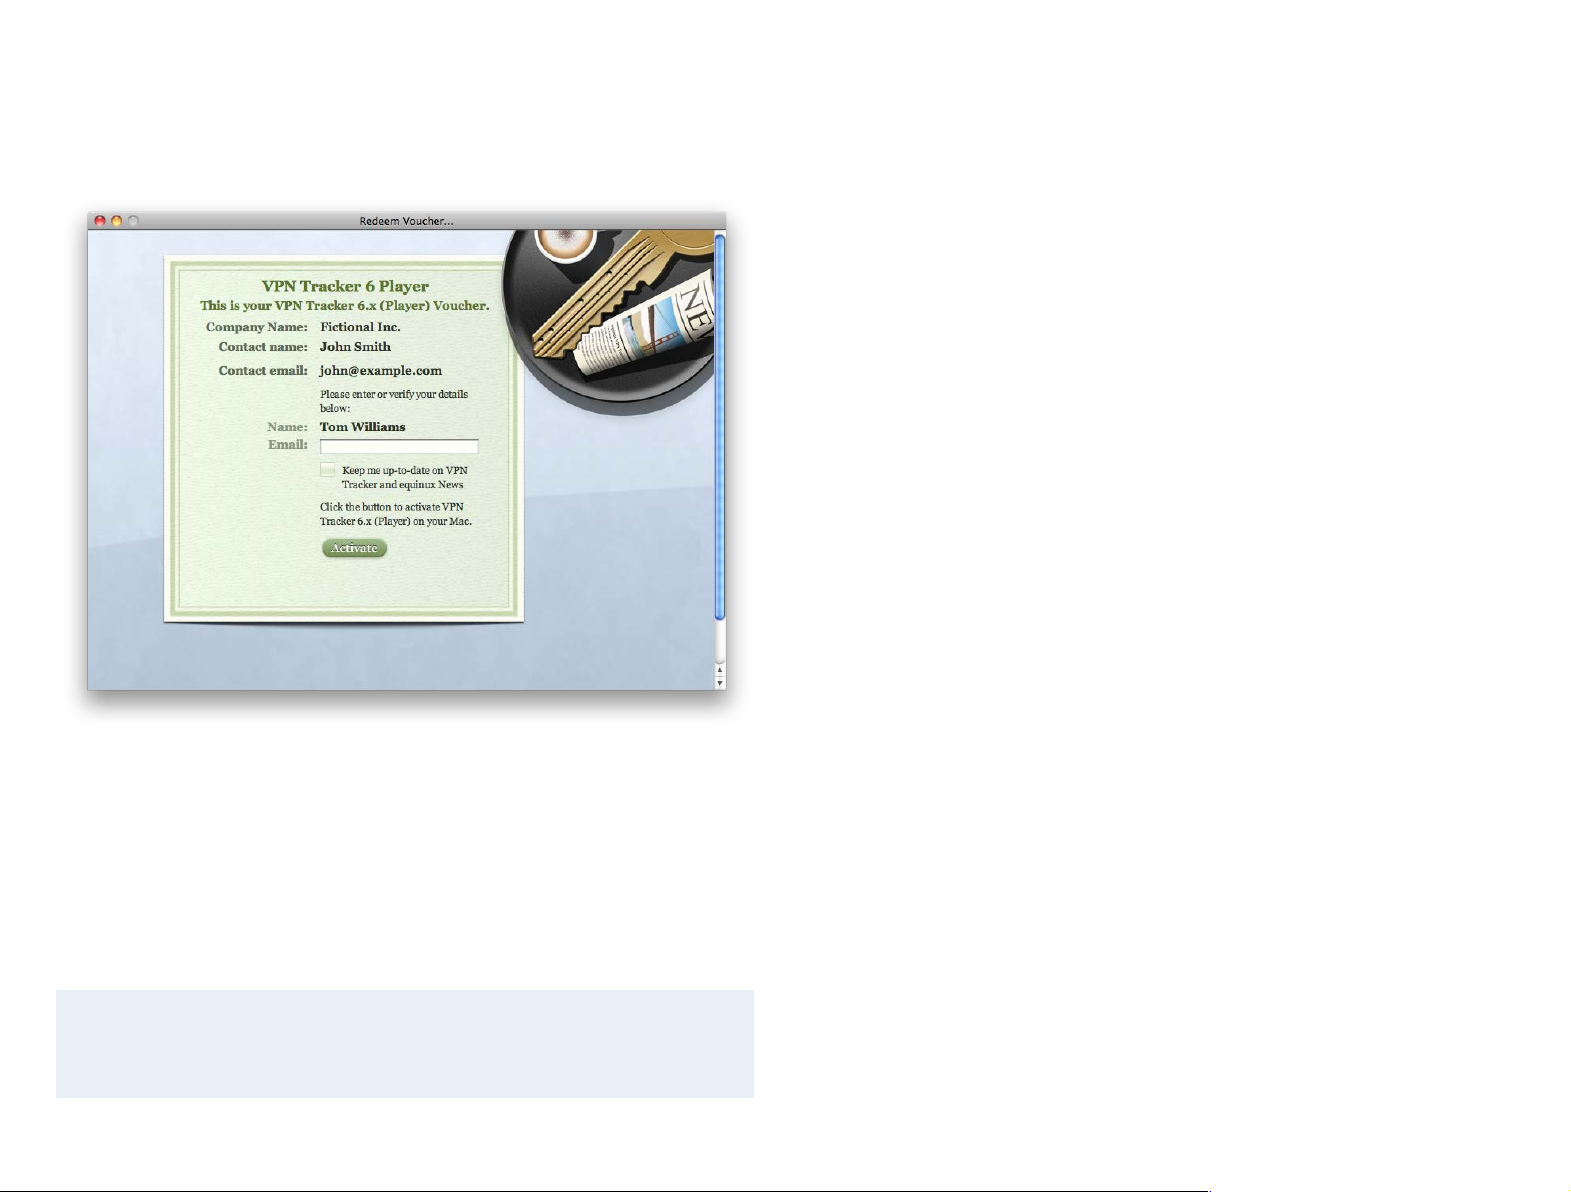
‣
Broken Mac? Stolen Mac?
If your old Mac is broken or unavailable, you can also reset your license online. Please read →#Resetting Licenses for details.
Some license vouchers are password-protected. If you are prompted for a
password, enter the license password. If you don’t know your license pass-
word, ask your whoever gave you the voucher, they should know.
‣
Click Activate to complete your license activation
Managing Licenses
If you are in charge of VPN Tracker licenses at your company, our License
Manager can help you deploy, move and manage those licenses. Please see
Managing Licenses for more information.
→#
Changing Computers
If you'd like to change computers, you can easily move your license:
‣
Select VPN Tracker > Deactivate VPN Tracker from the menu bar on your old
Mac
‣
Once deactivated, you'll be able to activate your new Mac straight away.
Simply follow the activation instructions above.
‣
Enjoy your new Mac!
13
Page 14
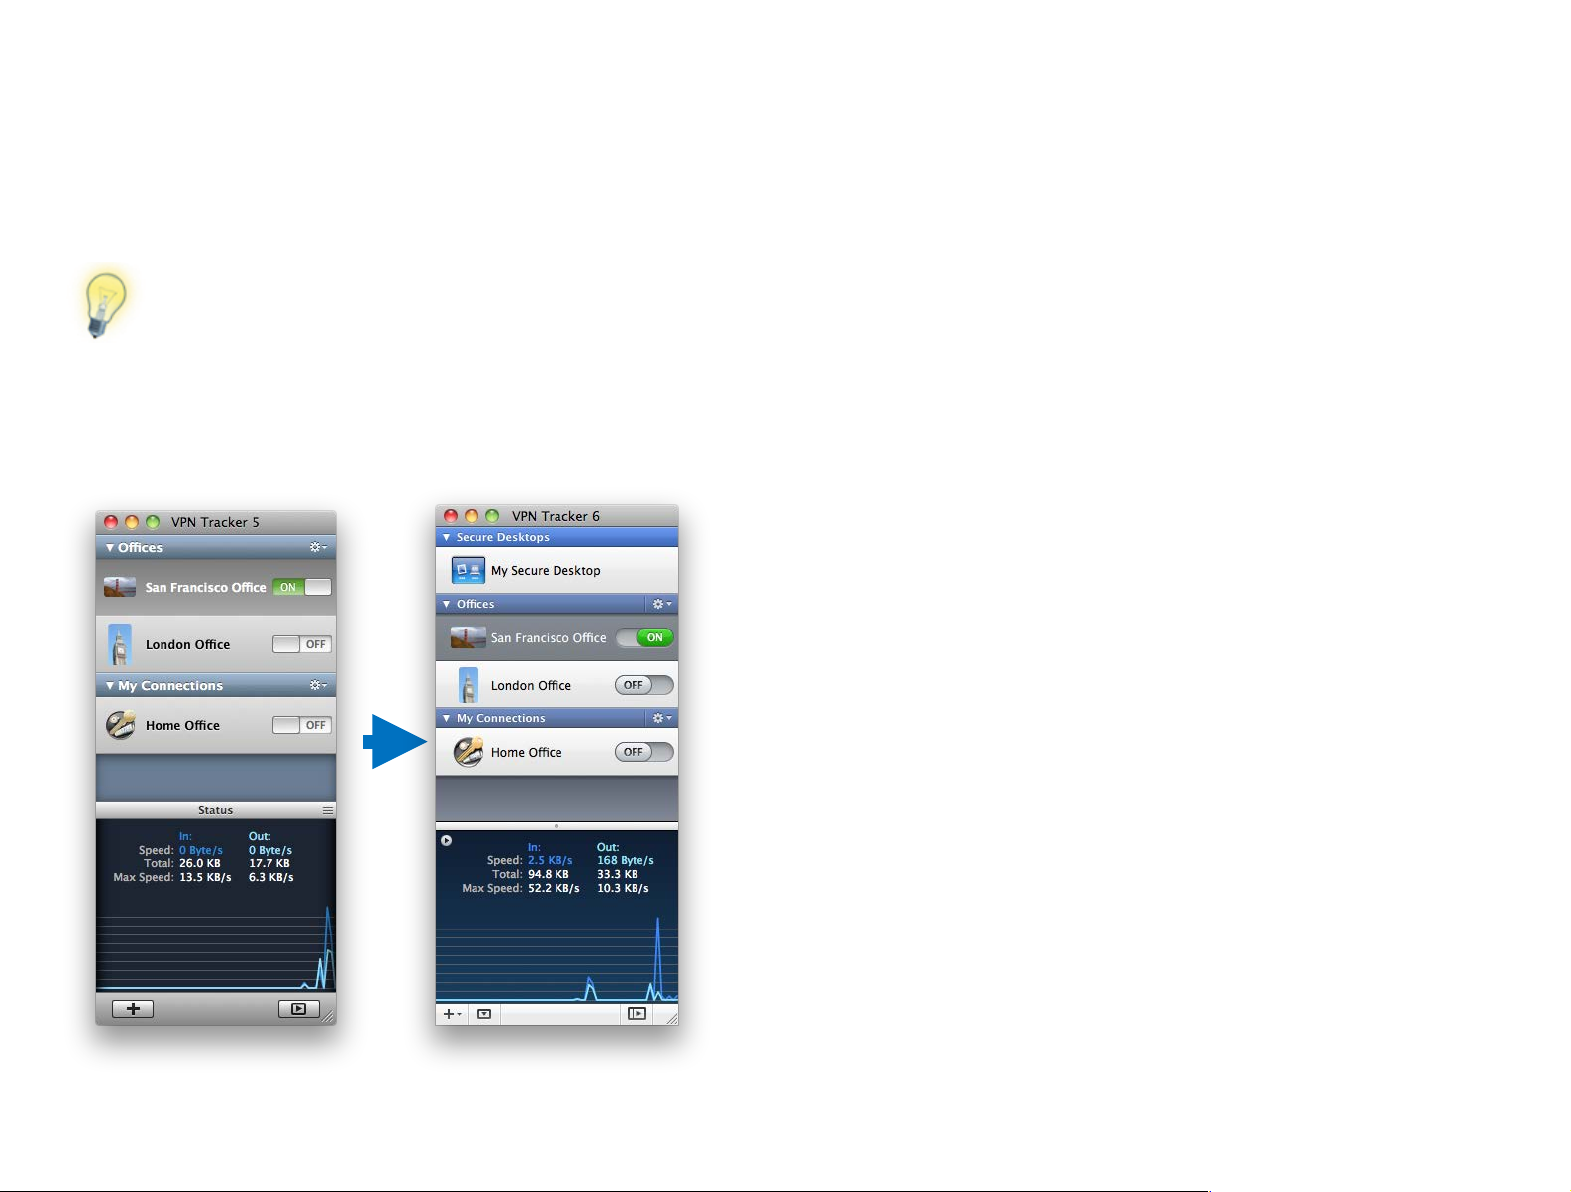
Migrating from Previous Versions
If you are evaluating VPN Tracker 6 and have not yet purchased
the upgrade, don’t worry – your existing connections and settings in previous versions of VPN Tracker remain untouched.
No matter which version you are coming from, it’s easy to
migrate all your settings to VPN Tracker 6 to continue
working without interruption.
If you ever want to migrate your connections again, you can tell VPN Tracker
to repeat the migration to ensure you have the latest connections and set-
tings from VPN Tracker 5: “Tools > Migrate from VPN Tracker 5”. Please note
that this migration will replace all connections in VPN Tracker 6
VPN Tracker 4 (and 3)
Your existing connections and settings are automatically migrated to VPN
Tracker 6 when you open it for the first time. Any certificates you may have
been using will be added automatically to your Mac OS X keychain.
VPN Tracker 5
Your existing connections and settings are automatically migrated to VPN
Tracker 6 when you open it for the first time.
You will find your migrated connections in their own connection group
named “VPN Tracker 4” (or “VPN Tracker 3” ) in VPN Tracker.
If you have already been using VPN Tracker 5, your VPN Tracker 4 (and VPN
Tracker 3) connections are not automatically migrated. If you want to have
them available in VPN Tracker 6, simply choose “Tools > Migrate from VPN
Tracker 3 / 4” from the menu.
14
Page 15
VPN Crash Course
Is this your first time working with a VPN? Read this chapter
to get you up to speed.
VP...What?
VPN Tracker allows your Mac to securely connect to another network over the
Internet. Even if your office is located in San Francisco and you're on a busi-
ness trip in New York, you can work with your applications and files, as if you
were in your office.
How does it work?
As the name implies, VPN Tracker uses VPN (Virtual Private Network) technology to create a connection between your Mac and your remote network. And
unlike normal Internet connections, a VPN Tracker connection is strongly encrypted. You could think of a VPN as a highly-secure tunnel through the Inter-
net, your very own "secure line" to your office.
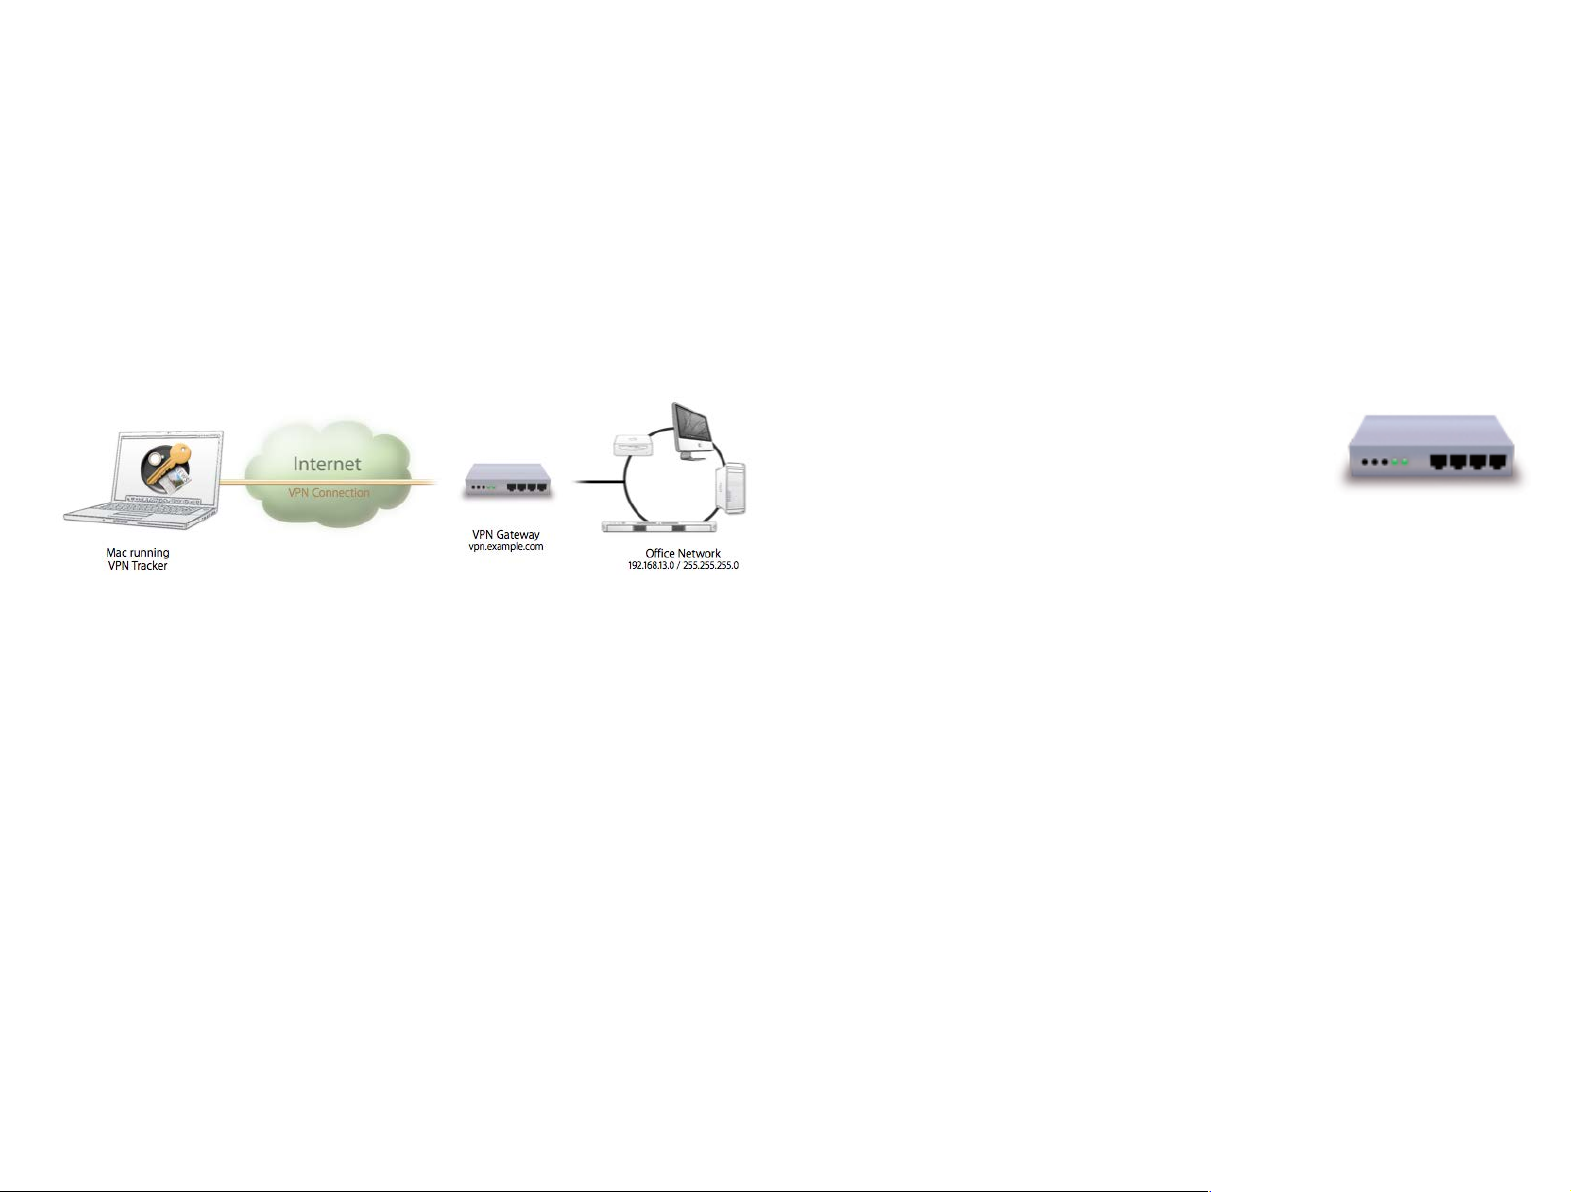
In order to use a VPN, you'll need your Mac running VPN Tracker, and a VPNcapable device on the other end of the connection. A VPN firewall or a router
with built-in VPN capabilities is commonly used at the remote location to accept your incoming VPN connection.
What do I need?
To create a VPN connection from your Mac, you need three things:
‣
VPN Tracker
‣
An Internet connection
‣
A VPN gateway
If you’re reading this, you probably already have VPN Tracker and an Internet
connection for your Mac. So what about a VPN gateway?
VPN Gateway
A VPN gateway is a hardware device (or in some cases
specialized software running on a regular computer)
that accepts incoming VPN connections, creating a
secure tunnel between its local network and your
Mac. In most cases, a VPN firewall or a router with
built-in VPN capabilities will act as the VPN gateway.
If there are existing VPN users in your organization you probably already have
a properly configured VPN gateway. If not, don’t worry – check out the chap-
ter on →#Choosing the Right VPN Device for some tips on what to look for
when buying a VPN gateway.
What kind of VPN connections does VPN Tracker support?
VPN Tracker supports industry standard IPsec VPN connections. IPsec VPN is
fast, secure, and supported by a great variety of devices. In addition, VPN
Tracker also seamlessly integrates Mac OS X L2TP VPN connections, as well as
legacy PPTP connections. For more information, please refer to chapter →
L2TP / PPTP Connections.
Once you have set up your connection in VPN Tracker and on the device at
your remote location, you are ready to connect and start working remotely
using your normal tools and applications.
15
Page 16
Getting Connected
If a configuration guide is available for your device and you are
setting up your VPN gateway as well as VPN Tracker, you can go
straight to the guide and follow it. Then continue with the chapters →#Secure Desktop and →#Working with VPN Tracker for more
information on how to use your VPN connection.
VPN Tracker can also use L2TP or PPTP connections created by
Mac OS X. For more information, please see→#L2TP / PPTP.
Next we’ll walk you through setting up your VPN connection
in VPN Tracker. Don’t worry if you do not know yet what to
configure – simply follow along for now, there’ll be a lot more
specific information later on.
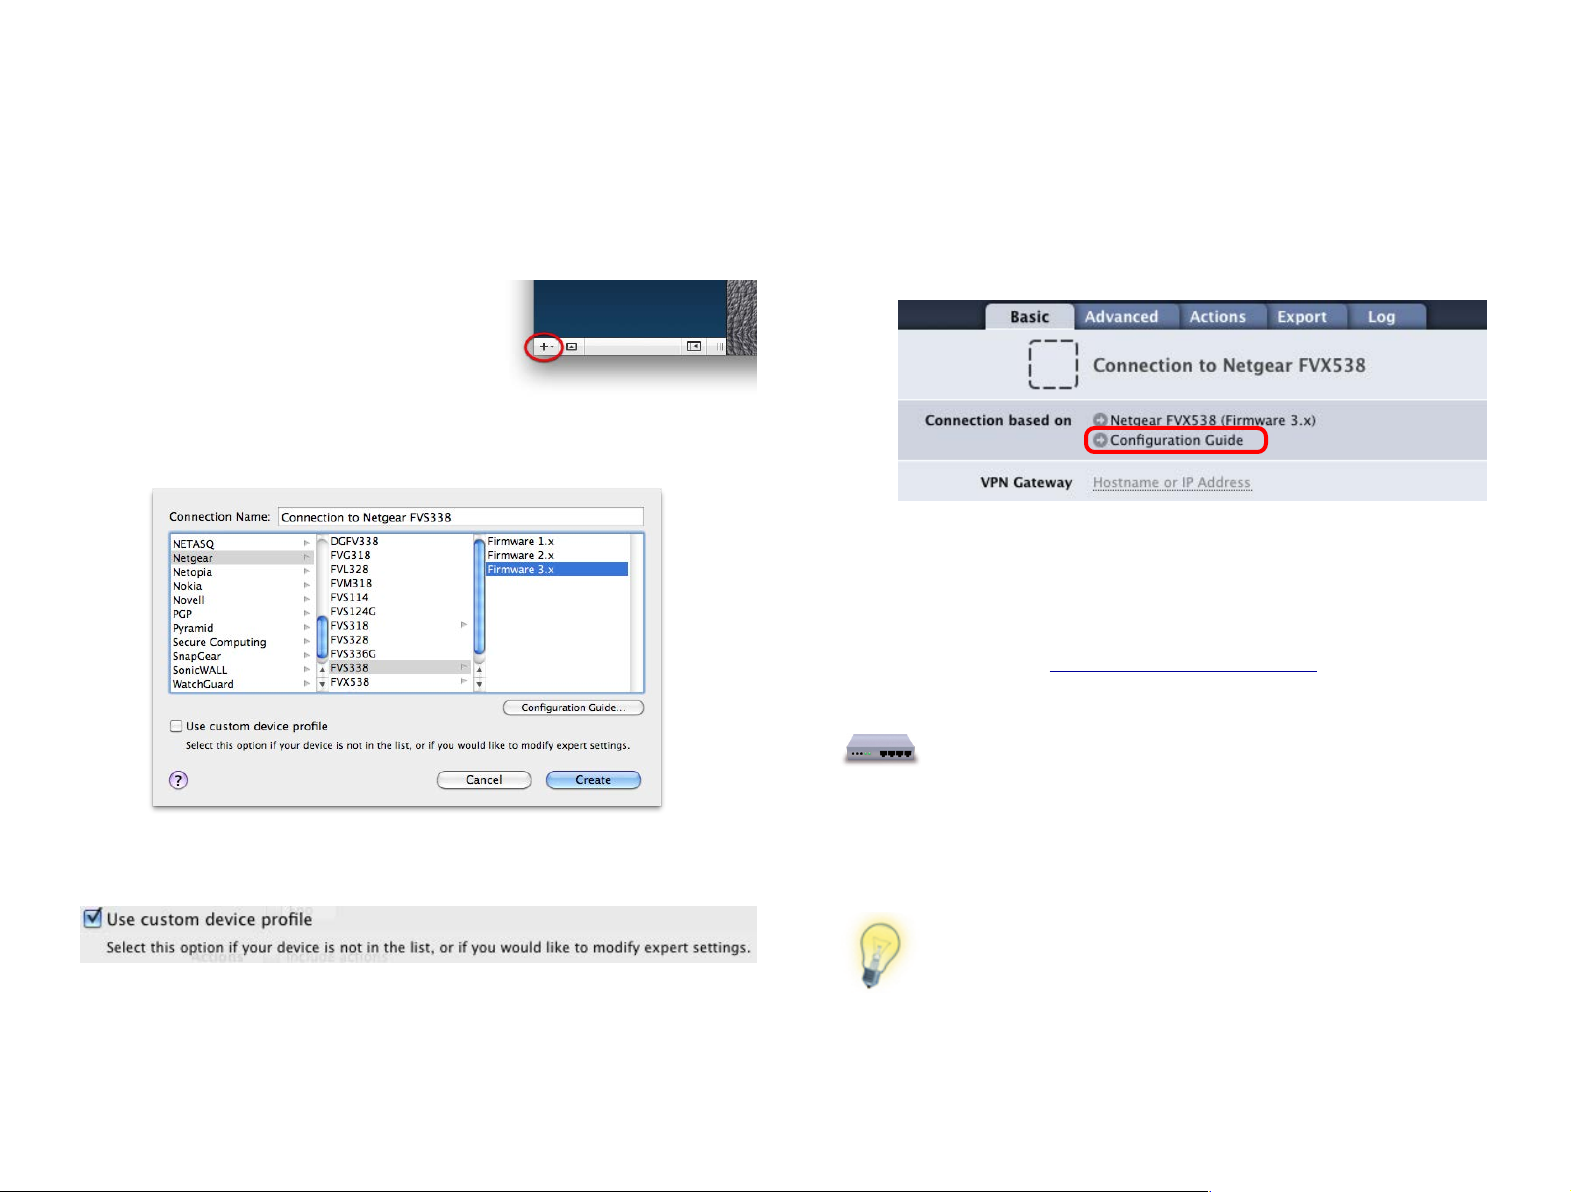
Add a New Connection
‣
Click the button in the lower left hand corner of the VPN Tracker window
‣
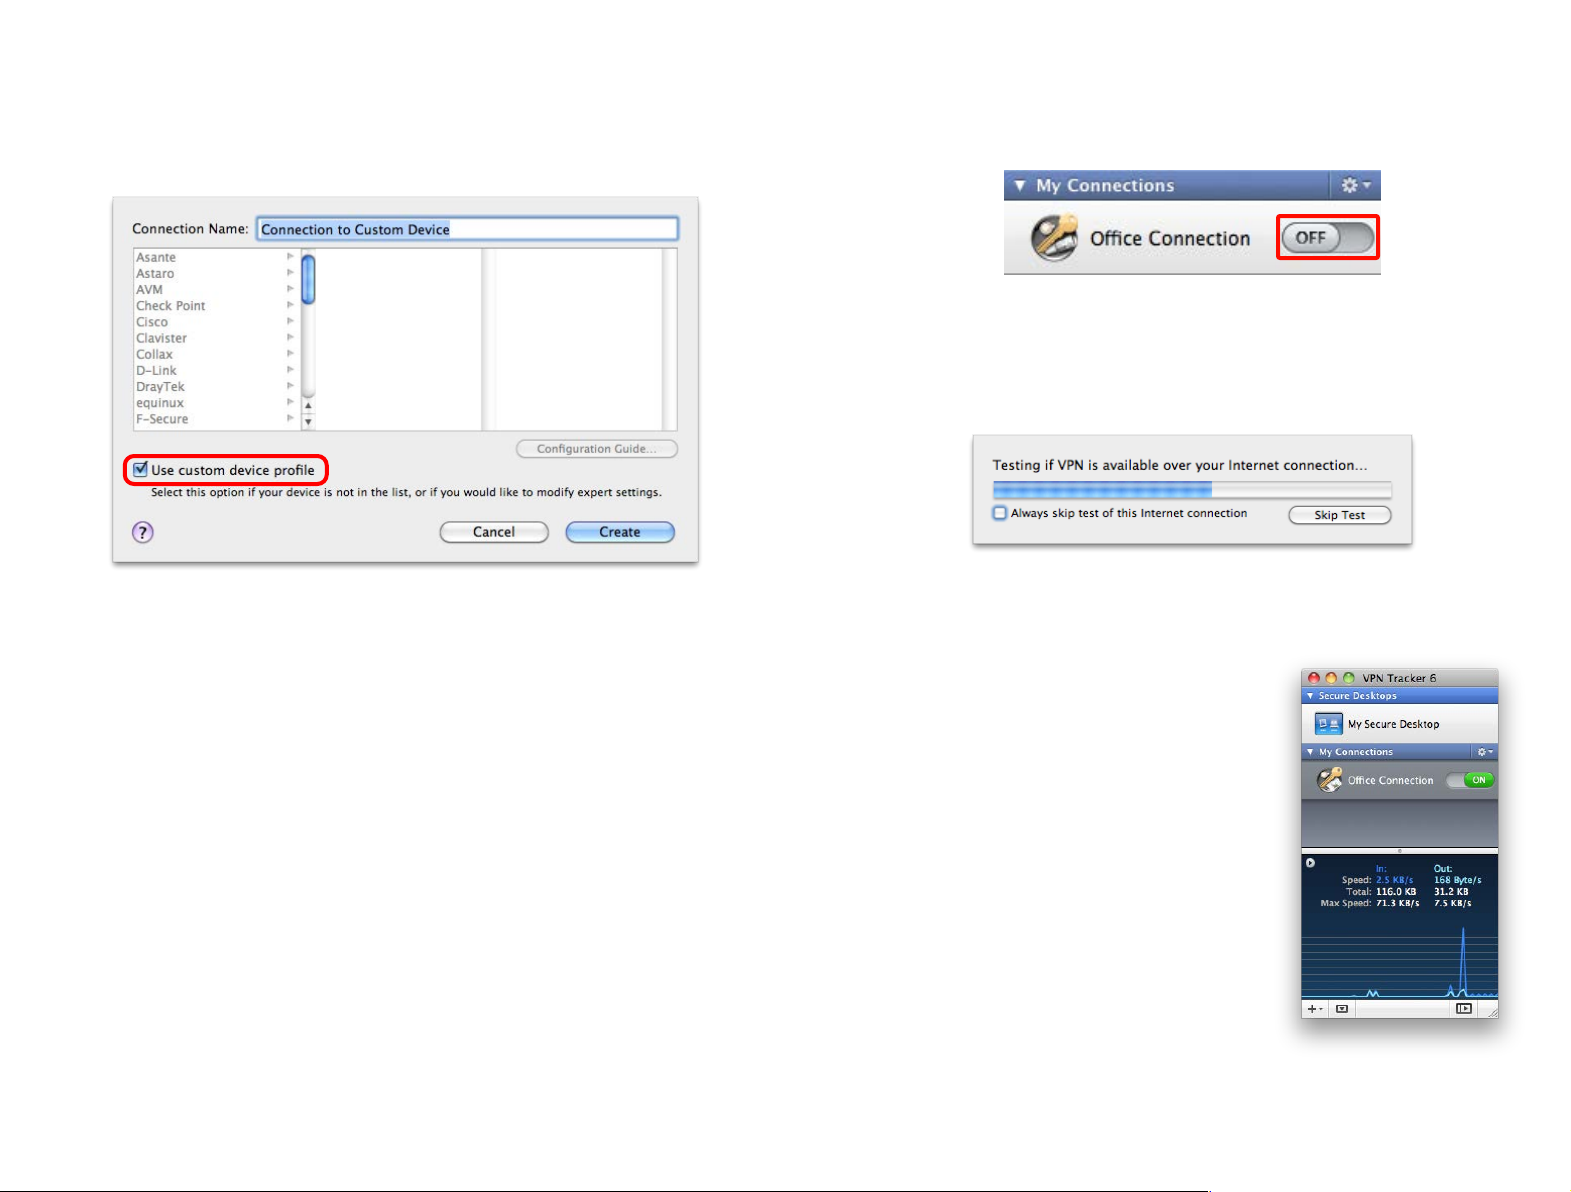
You will see a list of device profiles. We have
device profiles for all the VPN gateways that
VPN Tracker has been tested with. Select your VPN gateway from the list.
Find Your Configuration Guide
Our engineers have tested a large number of VPN gateways with VPN Tracker.
For many of these, detailed configuration guides are available. Now is a good
time to check whether a configuration guide is available for your device.
In VPN Tracker
‣
Click “Configuration Guide” on the Basic tab.
‣
You will be taken to the configuration guide for your device, if available.
On the Web
All configuration guides are also available on our website:
If your VPN gateway is not listed, don’t worry. For now, simply check the box
“Use custom device profile”.
‣
Click “Create” to add the new connection
16
http://vpntracker.com/interop
Page 17
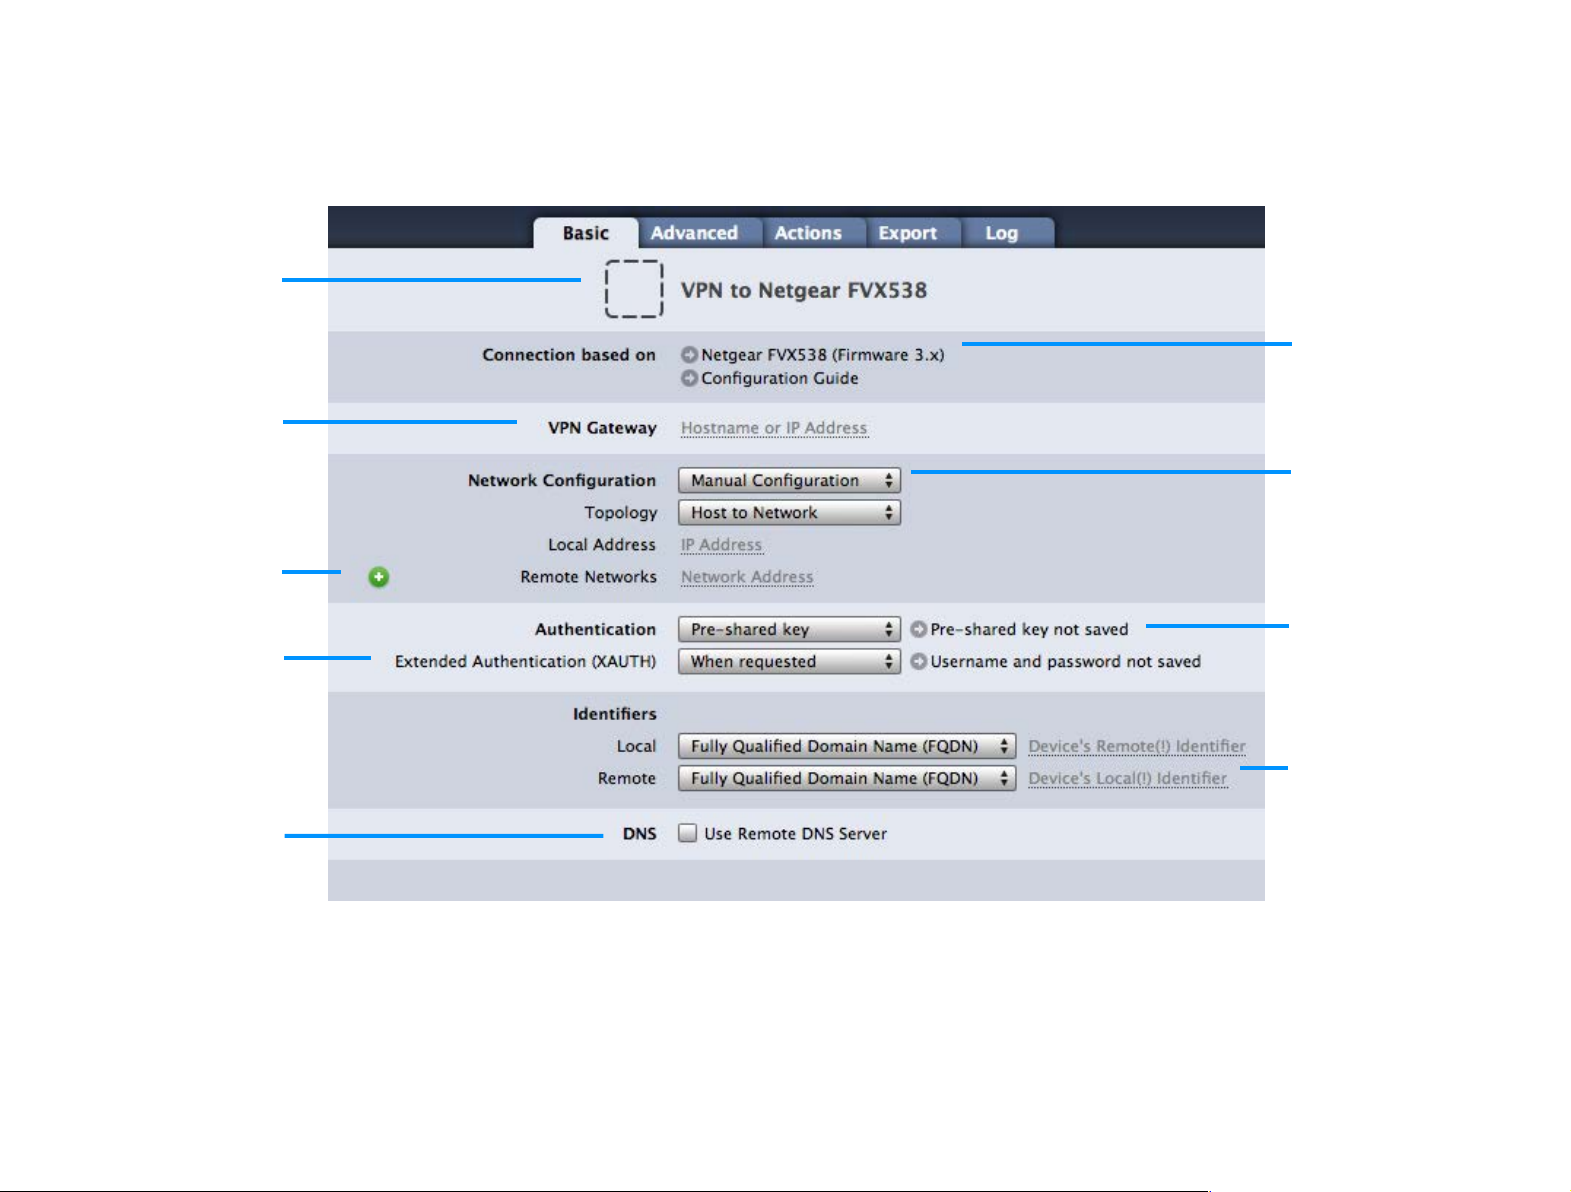
Basic Settings
Device Profile
Click to change the device
profile this connection is
based on. Click “Configuration Guide” for detailed
setup instructions.
Network Configuration
Select manual configuration
or one of the automatic
configuration options (not
available on all devices).
VPN Gateway
Enter the public IP address
or hostname for your VPN
gateway, e.g 1.2.3.4 or
vpn.example.com
Authentication
Choose whether to use a
pre-shared key, certificates
or hybrid mode for authentication.
Extended Authentication
VPN Tracker will prompt you
for username and password
if your VPN gateway requests Extended Authentication (XAUTH).
Identifiers
Select the type and enter
the local and remote identifiers.
Note: The identifiers need to
be entered in reverse, e.g.
“local” in VPN Tracker is what
is configured as “remote” on
your VPN gateway.
DNS
VPN Tracker can use a DNS
server on the remote network over VPN. It is not necessary to configure remote
DNS right away, you can
always do so later.
Remote Networks
Enter the remote network(s)
your are connecting to
through VPN.
Connection Name and Icon
Customize the icon by
dragging an image onto the
placeholder. To change the
name, choose “Connection >
Rename” from the menu.
Let’s take a closer look at the essential settings that VPN Tracker needs to connect to your VPN gateway. Depending on your device, some settings may not be
shown. Don’t be afraid if you don’t know what to fill in just, we’ll cover each setting in detail later in this chapter.
17
Page 18
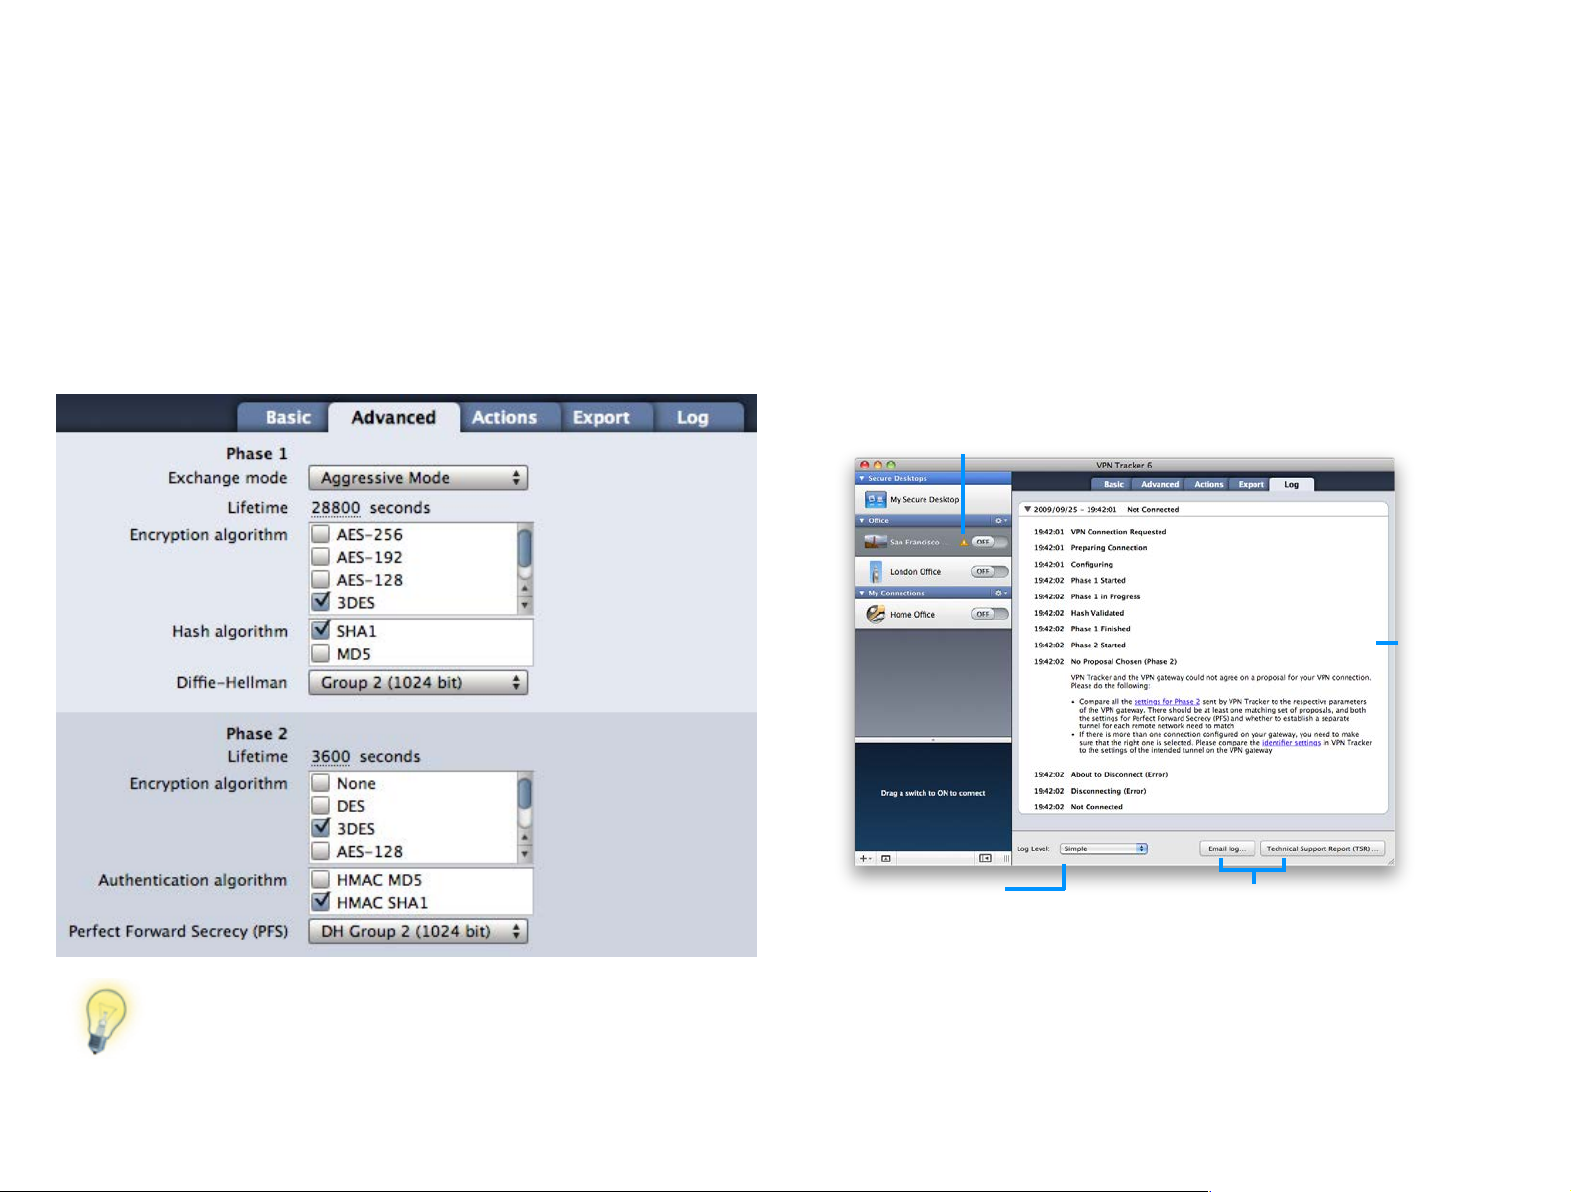
Advanced Settings
VPN gateways sometimes use different terms for phase 1 and 2:
Phase 1 is sometimes also called “IKE”, while phase 2 may also be
called “VPN” or “IPsec”. To learn more about each setting on the
Advanced tab, check out the →#Settings Reference.
If you are connecting to one of the devices VPN Tracker has been tested with
and are following the configuration guide, you most likely won’t need to
change any advanced settings.
However, if you are not following a configuration guide (or have modified the
default VPN configuration on your VPN gateway), or if you are using a custom
device profile in VPN Tracker, you will probably need to adjust some advanced
settings: Make sure the settings for phase 1 and phase 2 in VPN Tracker match
exactly what is set up on your VPN gateway. You can ignore the other settings
in the Advanced tab for now.
Actions and Export
These settings are not relevant to VPN connectivity, so we will skip them for
now. They are covered in detail in →#Working with VPN Tracker and →#Export-
ing Connections
Log
The log shows what is going on when VPN Tracker establishes a connection. If
there is ever a problem with your connection, the log will help you resolve it
quickly by giving you detailed suggestions specific to the problem at hand.
Status Indicator
Click the warning triangle to open the
log and view suggestions
Suggestions
Try the suggestions to fix
the problem.
18
Log Level
View more detailed logging
and error information.
Email Log /
Technical Support Report
Send your log or a full Technical Support Report to your IT
helpdesk or equinux support.
Page 19

If you need additional help, you can email the log or a full Technical Support
A Technical Support Report contains the settings and logs necessary for resolving technical problems (confidential informa-
tion, such as passwords and certificates are not included in a
Technical Support Report). If you contact equinux technical
support, always include a Technical Support Report.
Report straight from the Log tab.
Completing Setup
Now that you have a basic idea about how to set up a connection in VPN
Tracker, you’re ready to apply it to your specific situation.
If you have configuration access to your VPN gateway...
If you are setting up VPN Tracker as well as your VPN gateway, first check if
your VPN gateway has been tested with VPN Tracker and if there is a configu-
ration guide available (see →#Find Your Configuration Guide).
If a configuration guide is available, follow it (if your VPN gateway already has
a VPN configuration, use the configuration guide and the →#Settings Reference
to help you configure VPN Tracker for your specific setup).
If no configuration guide is available for your device, or if you are working
with an untested device, skip ahead to →#Setup without Configuration Guide.
If you are connecting to an existing VPN and don’t have configuration
access to the VPN gateway:
If you are configuring VPN Tracker to connect to an existing VPN (e.g. one that
Windows users in your organization already connect to), there’s some infor-
mation that you will need to gather about your VPN gateway. The next section
on →#Connecting to an Existing VPN has detailed instructions.
19
Page 20

Connecting to an Existing VPN
Lonely Mac User in a World of Windows?
We often hear from VPN Tracker users who work in predominately
Windows-based organizations. It’s often difficult for them to get help, as
their IT help desk isn’t set up to support Mac users.
If you’re the only person in your organization who has escaped the dark
side, we know you might not have much help setting up your connection.
But never fear, we’re here to help!
To find out more about your VPN gateway’s configuration, your first stop
should be your VPN gateway’s administrator. Your network administrator,
your IT department or your help desk are good places to ask.
If your VPN gateway’s administrator cannot help you, you may be able to
find some of the settings in another VPN client that has already been configured, for example on a Windows PC.
If you have any questions about specific settings, please refer to
the →#Settings Reference in this manual. For some settings, it is
even possible to “guess” them – the reference will tell you if and
how.
When connecting to an existing VPN, your goal is to
configure VPN Tracker to match the settings on your VPN
gateway. In order to do so, you will need information about
the VPN gateway’s configuration.
‣
Your username and password (if Extended Authentication (XAUTH) is used)
‣
The settings for phase 1 and 2 (encryption algorithms etc.)
2
Configure VPN Tracker
‣
Create a new VPN connection if you have not yet done so (see → Add a
New Connection for additional information)
‣
Enter the settings you obtained in the Basic and – if necessary – Advanced
tabs
Connect
‣
Click the on/off slider to connect the VPN
‣
You will always need the following information:
‣
Your VPN gateway’s public IP address or hostname (e.g. “1.2.3.4” or
“vpn.example.com”)
‣
The brand and model of your company’s VPN gateway
‣
The pre-shared key
In most cases, you will also need one or more of the following:
‣
The address of the network you are connecting to through VPN
‣
The local identifier
1 If you have very specific configuration information (e.g. the complete phase 1 and 2 settings), knowing the model and manufacturer may not be necessary.
2 Not required for some SonicWALL devices
3 Not required for Cisco devices with Cisco EasyVPN
2
or certificate
2
1
3
20
If you are using VPN Tracker for the first time with your current Internet
connection, VPN Tracker will test your connection so it can adjust settings
to your Internet connection’s capabilities. Wait for the test to complete.
Page 21
‣
If prompted, enter your pre-shared key and Extended Authentication
(XAUTH) user name and password.
Connected?
Great! Continue with the chapters →#Secure Desktop and →#Working with VPN
Tracker to find out how to use your VPN connection.
Problems?
If there is a problem connecting, VPN Tracker will give you helpful advice and
troubleshooting tips. To learn more about troubleshooting VPN connections,
visit the chapter →#Troubleshooting
21
Page 22

Setup without Configuration Guide
It is a good idea to carefully choose the address of the VPN
gateway’s LAN network if you plan to access it through VPN. To
avoid later address conflicts, use a private network that is not
used very frequently (e.g. 192.168.142.0/24, or 10.42.23.0/24).
If any other settings are required by your VPN gateway in order
to set up a basic VPN connection, check the →#Settings Refer-
ence in this manual and your VPN gateway’s documentation for
more information on what to configure.
Nearly all IPsec VPN gateways can be used with VPN Tracker,
even if they’re not specifically listed as a supported model.
Set up Your VPN Gateway
As a first step, set up your VPN gateway so it is connected to the Internet and
to the internal network you would like to access through VPN Tracker. Please
refer to your VPN gateway’s manual for more information on how to do this.
Once you have completed the initial setup of your VPN gateway, it is time to
configure VPN. Always go for a very simple configuration first. You can always
change it into a more sophisticated setup later.
If your VPN gateway’s manual has instructions for setting up a VPN connection, follow it. If possible, set up a connection with the following properties:
‣
For most VPN gateways, you will have to configure the network(s) VPN users can access. This setting may be called “local endpoint”, or “policy”.
Enter the address of the network you would like to access. Usually this will
be the same as the VPN gateway’s LAN network (e.g. 192.168.142.0/24). This
setting will later be configured in VPN Tracker as the Remote Network.
‣
Most VPN gateways will also ask you to configure the “remote endpoint” of
the VPN. The remote endpoint is the address VPN clients will be using when
connected through VPN.
If possible, set this to “any address” (sometimes also referred to as
“0.0.0.0/0”). If your VPN gateway requires a single address to be entered,
this will mean that only one VPN client can use this VPN connection at a
time. It also means that you will have to take the address you configure on
the VPN gateway, and enter it in VPN Tracker as the Local Address.
‣
Finally, write down your VPN gateway’s public (WAN) IP address or host
name. If your VPN gateway’s public IP address is dynamic, you might want
to get it signed up to a dynamic DNS service so you can always refer to it
by host name.
‣
Choose pre-shared key authentication. For now, use a pre-shared key that
is not too complex to avoid typos. But don’t forget to change it to a very
strong password once you’ve got the basic connection working!
‣
Use Aggressive Mode. Only select Main Mode if your device does not offer
Aggressive Mode.
‣
Choose Fully-qualified domain name (FQDN) identifiers, if possible. With
most devices, you can enter any identifier you want, it doesn’t have to be a
valid domain name. Good choices would be:
Local identifier: vpngateway.local
Remote identifier: vpntracker.local
‣
Encryption algorithms: If possible, use 3DES or AES-128 for now.
‣
Hash/Authentication algorithms: Use SHA-1 for now.
‣
Select Diffie-Hellman (DH) group 2 (1024 bit).
‣
Enable Perfect Forward Secrecy (PFS) using DH group 2 (1024 bit)
22
Page 23
Configure VPN Tracker
Once you have your VPN gateway set up, enter the settings in VPN Tracker. For
your connection, use a custom device profile to have access to all settings.
Once you’ve added your connection, begin entering your settings. Refer to
#Getting Connected to see where required settings are located. Also check
→
the →#Setting Reference if you are unsure about a specific setting.
Connect
‣
Click the on/off slider to connect the VPN
‣
If you are using VPN Tracker for the first time with your current Internet
connection, VPN Tracker will test your connection so it can adjust settings
to your Internet connection’s capabilities. Wait for the test to complete.
‣
If prompted, enter your pre-shared key and Extended Authentication
(XAUTH) user name and password.
Connected?
Please note:
‣
The identifiers are swapped in VPN Tracker. What is local from the VPN
gateway’s perspective, is remote from VPN Tracker’s perspective, and vice
versa. You can set the remote identifier to “Don’t verify remote identifier” so
you don’t have to deal with it for now.
‣
If you were able to select the algorithms and Diffie-Hellman (DH) groups
suggested earlier, you will not have to modify any setting on the Advanced
tab. However, if the suggested settings were not available on your device,
make sure to customize the phase 1 and 2 settings so they match what is
configured on your VPN gateway.
Great! Continue with the chapters →#Secure
Desktop and →#Working with VPN Tracker to find
out how to use your VPN connection.
Problems?
If there is a problem connecting, VPN Tracker will
give you helpful advice and troubleshooting tips.
To learn more about troubleshooting VPN con-
nections, visit the chapter →#Troubleshooting
23
Page 24
Importing Connections
Find out how to import a connection that you have been
given by your VPN administrator
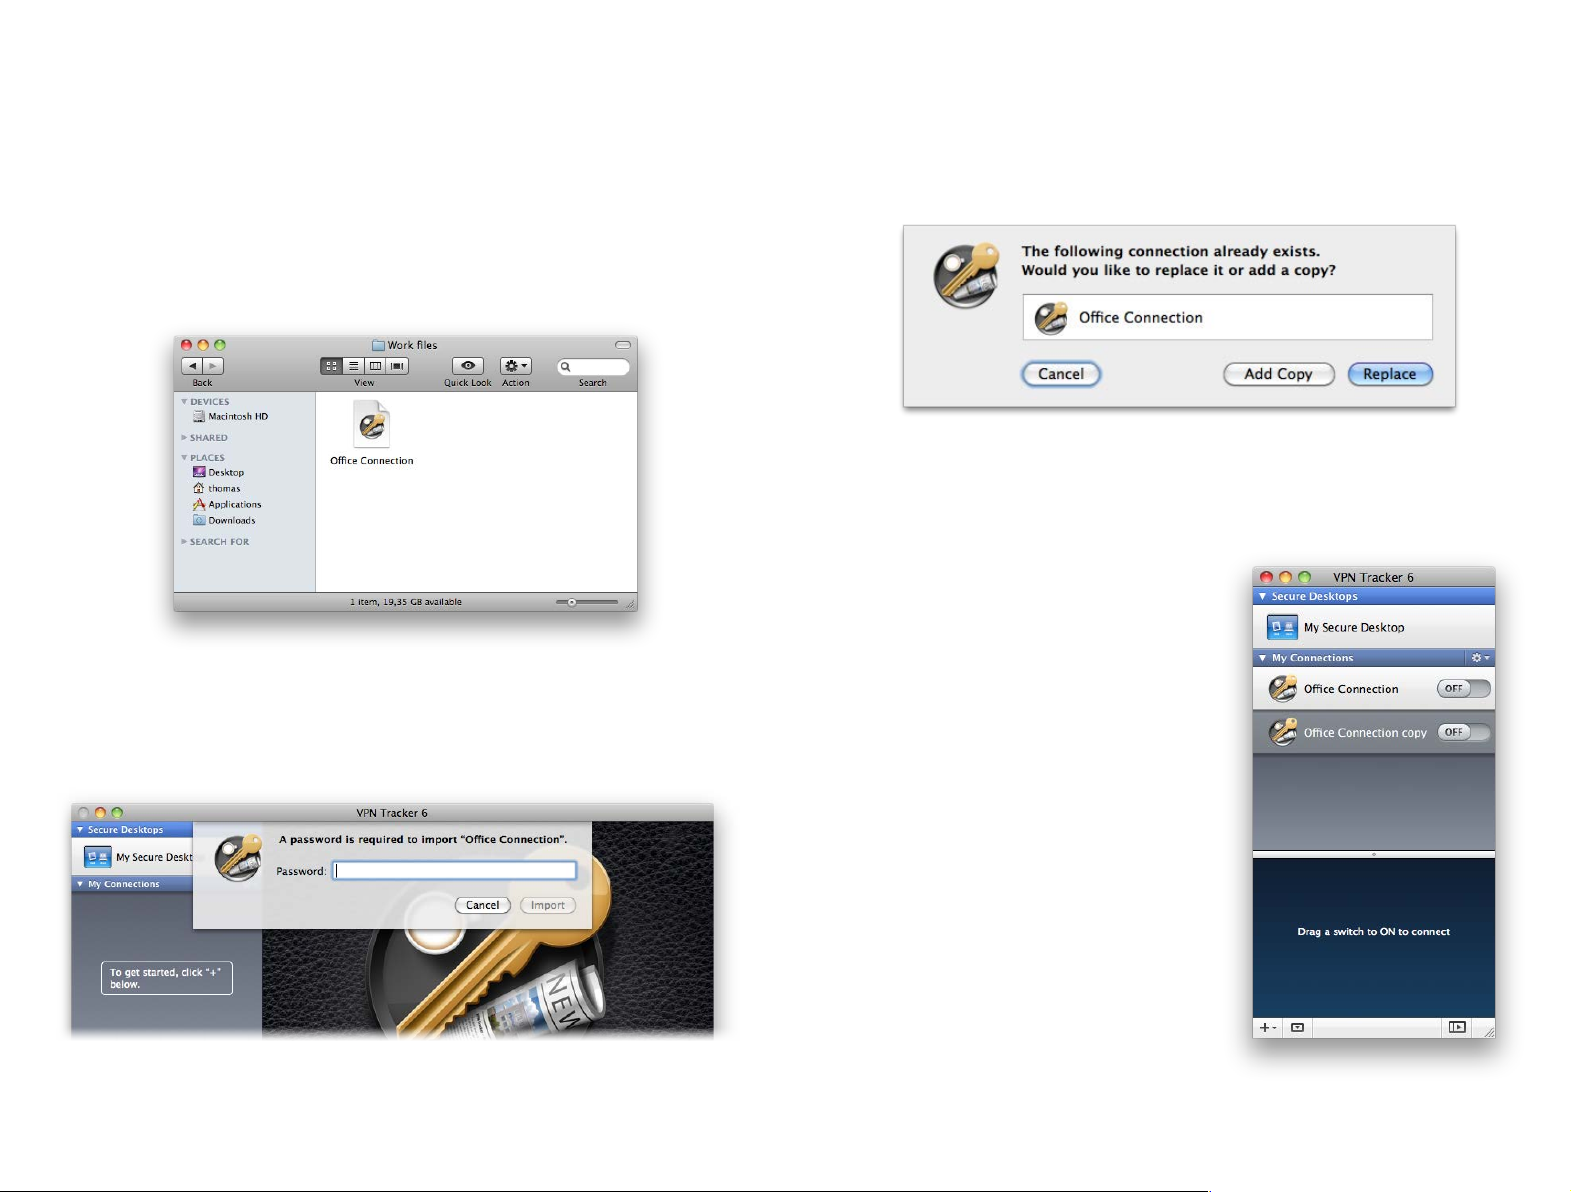
Import the Connection
‣
Locate the connection file in Finder and double-click it
‣
You will be asked to enter a password. This password is set by your IT de-
partment or VPN administrator. Please contact the person that gave you
the connection file if you’re unsure what the import password is.
Replacing Existing Connections
If your imported connection already exists, you will be asked whether you
want to replace your existing connection, or if you would prefer to add this
connection as a copy:
Replacing a connection
If your new connection replaces your existing connection, click “Replace”. Your
existing connection will be overwritten.
Adding a copy
If you would prefer to keep your existing
connection as well, click “Add Copy”.
The imported connection will be further
down in your connection list and will have
the word “copy” appended to its name, e.g.
“Office Connection copy”.
Replacing an existing Secure
Desktop
Connection files can also include Secure
Desktops. If the included Secure Desktop
already exists, you will again be asked
whether you would prefer to replace it or
add a the new Secure Desktop as a copy.
24
Page 25

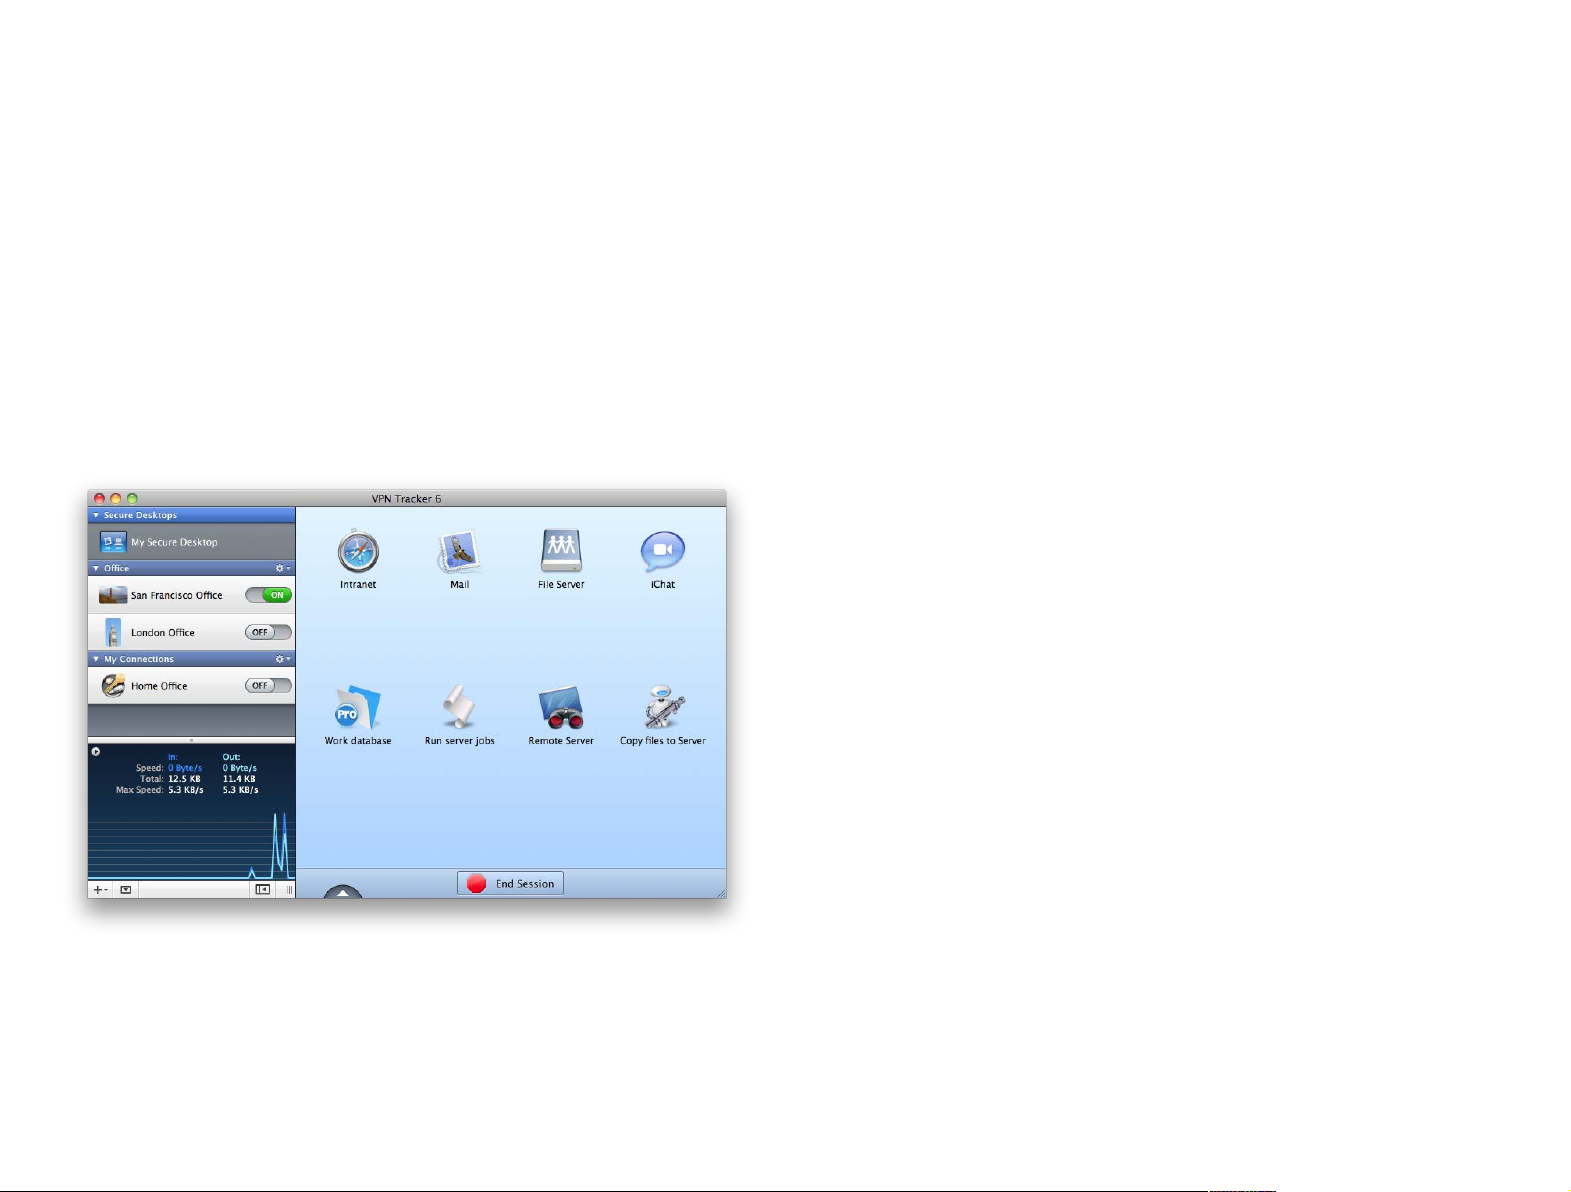
Secure Desktop: The Easy Way to Access Your Office
Connect to file servers, use the applications you need, and much more. And stop thinking about VPN connections.
Secure Desktop Items
Click an icon to launch an application, connect
to a server etc. VPN Tracker will automatically
take care of connecting your VPN.
Secure Desktop Background
Drag in a picture while in
edit mode, to give your Secure Desktop a personal
touch. Or choose any color
you like.
Edit your Secure Desktop
Click the triangle to drag new items to your
Secure Desktop, and edit existing ones.
25
End Session
When you’re done working over VPN,
click the “End Session” button to take care
of closing and disconnecting everything.
Page 26

Setting up your Secure Desktop
Make sure you have set up your VPN connection first. To learn
how to set up your VPN connection, refer to the chapter →#Get-
ting Connected.
Working over a VPN connection used to be a hassle. First you needed to connect to your VPN. Then you went to Finder in order to connect to your file
servers, and finally, you could open the applications you need and get to
work.
Not any more! VPN Tracker 6 is designed with your workflow in mind: You click
to open the application. VPN Tracker does the rest.
Building your Secure Desktop with the Assistant
To add items to your Secure Desktop, select it from the top left corner of the
VPN Tracker window and then click “Build Secure Desktop”. VPN Tracker will
guide you through selecting applications, file servers and websites for your
Secure Desktop. Of course you can always modify your Secure Desktop later.
Adding Applications to Your Secure Desktop
The Secure Desktop Assistant will suggest a few commonly used applications.
If your application is not among them, click “Other Application…” to add the
application you want to use.
You can also add applications to your Secure Desktop later, so don’t worry
about them now if you’re not sure.
26
Page 27

Adding File Servers to Your Secure Desktop
You can also connect to your file server via the Finder. → Accessing Files, Printers and Databases has more details.
I don’t know my file server’s IP address. Can’t I just browse for my file
servers via the Finder Sidebar?
For technical reasons, when using a VPN connection, your servers won’t
show up in the Finder sidebar. If you don’t have your file server’s IP address,
you can easily find it out next time you’re
in your office network:
Open “Tools > Ping Host” and enter your
file server’s name. After a few seconds,
VPN Tracker should tell you the file
server’s IP address. Again, this will only
work when you’re actually in your office
network, not if you’re connect via VPN.
If you would like to access a file server, enter the details in the Secure Desktop
Assistant.
To connect to a Mac-based (AFP) file server:
‣
Type the IP address (e.g. 192.168.14.4) of your server.
To connect to a Windows-based (SMB) server:
Type “smb://” followed by the IP address (e.g. “smb://192.168.14.4”) of your
1
server
1
Adding Websites to Your Secure Desktop
If you have intranet websites that you need to access over VPN, you can add
those to your Secure Desktop as well. Just enter your website URLs when
prompted by the Secure Desktop Assistant.
1 If your connection is set up to use remote DNS, you may also be able to enter a DNS hostname, e.g. “files.intranet.example.com”
27
Page 28

Working with Secure Desktop
You can also use Secure Desktop while you are in your VPN’s remote network (e.g. at the office). Refer to → Direct Link Detection
to learn how to teach VPN Tracker not to connect your VPN there.
Now you have set up your Secure Desktop with the applications and file servers you need, you’re ready to get to work.
Starting a Secure Desktop Session
Click one of the icons on your Secure Desktop to start working with that application, file server or website. VPN Tracker will automatically connect any
necessary VPN connections, and then open your application, connect to your
file server, website, or whatever else you have requested to be done.
Editing Your Secure Desktop
You can easily add, modify or remove Secure Desktop items.
To edit your Secure Desktop:
‣
Make sure the Secure Desktop you would like to edit is selected.
‣
Click the triangle at the bottom of the Secure Desktop to switch to edit
mode
‣
A drawer with new items will open. Drag an item to your Secure Desktop to
add it. Or drag an existing item off your Secure Desktop to remove it.
Ending a Secure Desktop Session
Once you’re done working over VPN, simply end your session by clicking the
large red button at the bottom of the window. VPN Tracker will take care of
disconnecting file servers and disconnecting your VPN connections.
To modify an item in edit mode,
simply click it. You can then change
the VPN connection that is required
for this item to work, or change
what the item does. If it’s an application, you can also choose to quit
this application automatically when
you end your Secure Desktop session.
Once you have finished configuring your Secure Desktop, click the triangle
again to leave the edit mode.
28
Page 29

Accessing FileMaker via Secure Desktop
Apple Remote Desktop needs to be installed on your Mac to use
it. If you do not have Apple Remote Desktop, you can use Screen
Sharing. Turn to the the next page to see how.
Accessing your Mac with Apple Remote Desktop
Secure Desktop makes it easy to access FileMaker over your VPN connection.
To add your FileMaker database:
‣
Click the triangle at the bottom of the Secure Desktop to
switch to edit mode
‣
Drag the FileMaker icon onto your Secure Desktop
‣
While you’re still in edit mode, click the FileMaker icon to
enter your database settings:
You can remotely control or observe Macs in your remote network, using Apple’s Remote Desktop application. From your Secure Desktop, you can connect
to a specific Mac using Remote Desktop.
To access your Mac using Remote Desktop:
‣
Click the arrow at the bottom of the Secure Desktop to
switch to edit mode
‣
Drag the Remote Desktop icon onto your Secure Desktop
‣
While you’re in edit mode, click the Remote Desktop icon
‣
Choose whether you want to “Observe” or “Control” your remote Mac
‣
Enter the name or IP address of the Mac you want to control. Make sure
this Mac is listed in your Apple Remote Desktop application.
‣
Click the arrow again to leave edit mode
Once you’ve configured everything, click the arrow again to leave edit mode.
Now just click your FileMaker icon to start a new Secure Desktop session and
VPN Tracker will connect to your VPN, launch FileMaker and open your database.
When you end the Secure Desktop session, VPN Tracker will close any open
databases for you, before quitting FileMaker.
Click the Remote Desktop icon and Secure Desktop will connect you directly
to your Mac in your remote network.
29
Page 30

Accessing Your Macs with Screen Sharing
Accessing Your PC with Microsoft Remote Desktop
You can also remotely control a Mac using the Screen Sharing utility built-in
to OS X
will connect to your VPN, open Screen Sharing and take you directly to your
remote Mac’s desktop.
To access your Mac using Screen Sharing:
‣
‣
‣
‣
‣
1
. Add a Screen Sharing item to your Secure Desktop and VPN Tracker
Click the triangle at the bottom of the Secure Desktop to
switch to edit mode
Drag the Screen Sharing icon onto your Secure Desktop
While you’re in edit mode, click the Screen Sharing icon
Enter the IP address of the Mac you want to control
Click the arrow again to leave edit mode
If you have a Windows PC in your office (or in another remote network), Secure Desktop can connect you directly to it. First, make sure that Microsoft
Remote Desktop has been configured and that you can access your PC using
it. Next you can add your remote PC directly to your Secure Desktop.
To access your PC using Microsoft Remote Desktop Connection:
‣
Click the triangle at the bottom of the Secure Desktop to
switch to edit mode
‣
Drag the Microsoft Remote Desktop icon to your Secure
Desktop
‣
While in edit mode, click the Microsoft Remote Desktop icon
‣
Click Select and browse to your Documents > RDC connections folder
‣
Select one of the Microsoft Remote Desktop connection (.rdp) files
‣
Click the arrow again to leave edit mode
Click the Screen Sharing icon and Secure Desktop will connect you directly to
your Mac in your remote network.
1 Requires Mac OS X 10.5 or higher
Now you can access your remote Windows PC simply by clicking the Microsoft Remote Desktop icon on your Secure Desktop.
30
Page 31

Give Windows Applications Access to your VPN
VMWare or Parallels needs to be installed on your Mac and set up
to share your Mac’s Internet connection so your Windows programs can use the VPN connection.
Secure Desktop Preview
1
Do you have Windows applications that require VPN access? VPN Tracker can
share your Mac’s VPN connection with VMware Fusion or Parallels Desktop.
You can can even start Windows programs directly from your Secure Desktop.
To add Windows applications to your Secure Desktop
‣
Click the triangle at the bottom of the Secure Desktop to
switch to edit mode
‣
Open a Finder window and go to your virtual machine’s
applications folder (e.g. Documents > Virtual Machines >
Your Windows Machine > Applications)
‣
Drag an application icon from the Finder onto your Secure Desktop
‣
Click the arrow again to leave edit mode
You can easily take a glance at the details of your Secure Desktop items: Simply hit your space bar and move your mouse over your items.
VPN Tracker will automatically establish a VPN connection and open your
Windows program in VMWare or Parallels whenever you click the new icon for
your Windows application on your Secure Desktop.
1 Secure Desktop Preview requires Mac OS X 10.5 or 10.6
Multiple Secure Desktops
You can have multiple Secure Desktops, e.g. one for each client you need to
connect to.
To create additional Secure Desktops
‣
Choose Secure Desktop > New Secure Desktop
31
Page 32

Customize the appearance of your Secure Desktop
You can give your Secure Desktop a personal touch, by adding your own picture, choosing your own background and changing icons.
To customize your Secure Desktop icon
Drag an image onto the Secure Desktop icon in your Connection list.
To customize your Secure Desktop icons
‣
Click the triangle at the bottom of the Secure Desktop to switch to edit
mode
‣
Drag an image onto one of your Secure Desktop icons
To customize your Secure Desktop background
‣
Click the triangle at the bottom of the Secure Desktop to switch to edit
mode
‣
Drag an image to your Secure Desktop
or
‣
Right-click or Ctrl-click the Secure Desktop area
‣
Select a background image or background color
‣
Enjoy the view!
32
Page 33

Working with VPN Tracker
Find out about other VPN Tracker features that will help you
work more productively with your VPN connections.
Managing Your Connections
At this point, you probably already have your first VPN Tracker connection. You
can see your connection in the connection list on the left-hand side of the
VPN Tracker window. In the connection list you can manage, group, rename –
and most importantly, connect and disconnect your connections.
Adding More Connections
To create a new connection, click the ‘+’ icon
in the lower left hand corner of the window.
VPN Tracker will ask you to pick your device’s
manufacturer and model. You can also enter
a name for the connection.
For more information on creating a new
connection, please refer to the → Getting
Connected chapter.
Organizing Connections in Groups
If you have a lot of connections, it will be useful to divide your connections up
into groups, e.g. by client, by branch office, by geographical location etc.
To create a new group: Click and hold the ‘+’ icon and select ‘New group’.
You can drag & drop connections between groups to rearrange them.
If you would like to connect, disconnect or reconnect an entire group of connections simultaneously, click the gear icon next to your group and select one
of the options from the menu.
Renaming and Editing Connections
To rename or edit a connection, simply select right-click or ctrl-click it in your
connection list and select ‘Rename’ or ‘Edit’.
Connection Icons
If you select your connection’s basic tab, you can drag an image to the rectangular image placeholder. This image will be used in the connection list.
Drag an image
here to set a new
icon.
33
Page 34

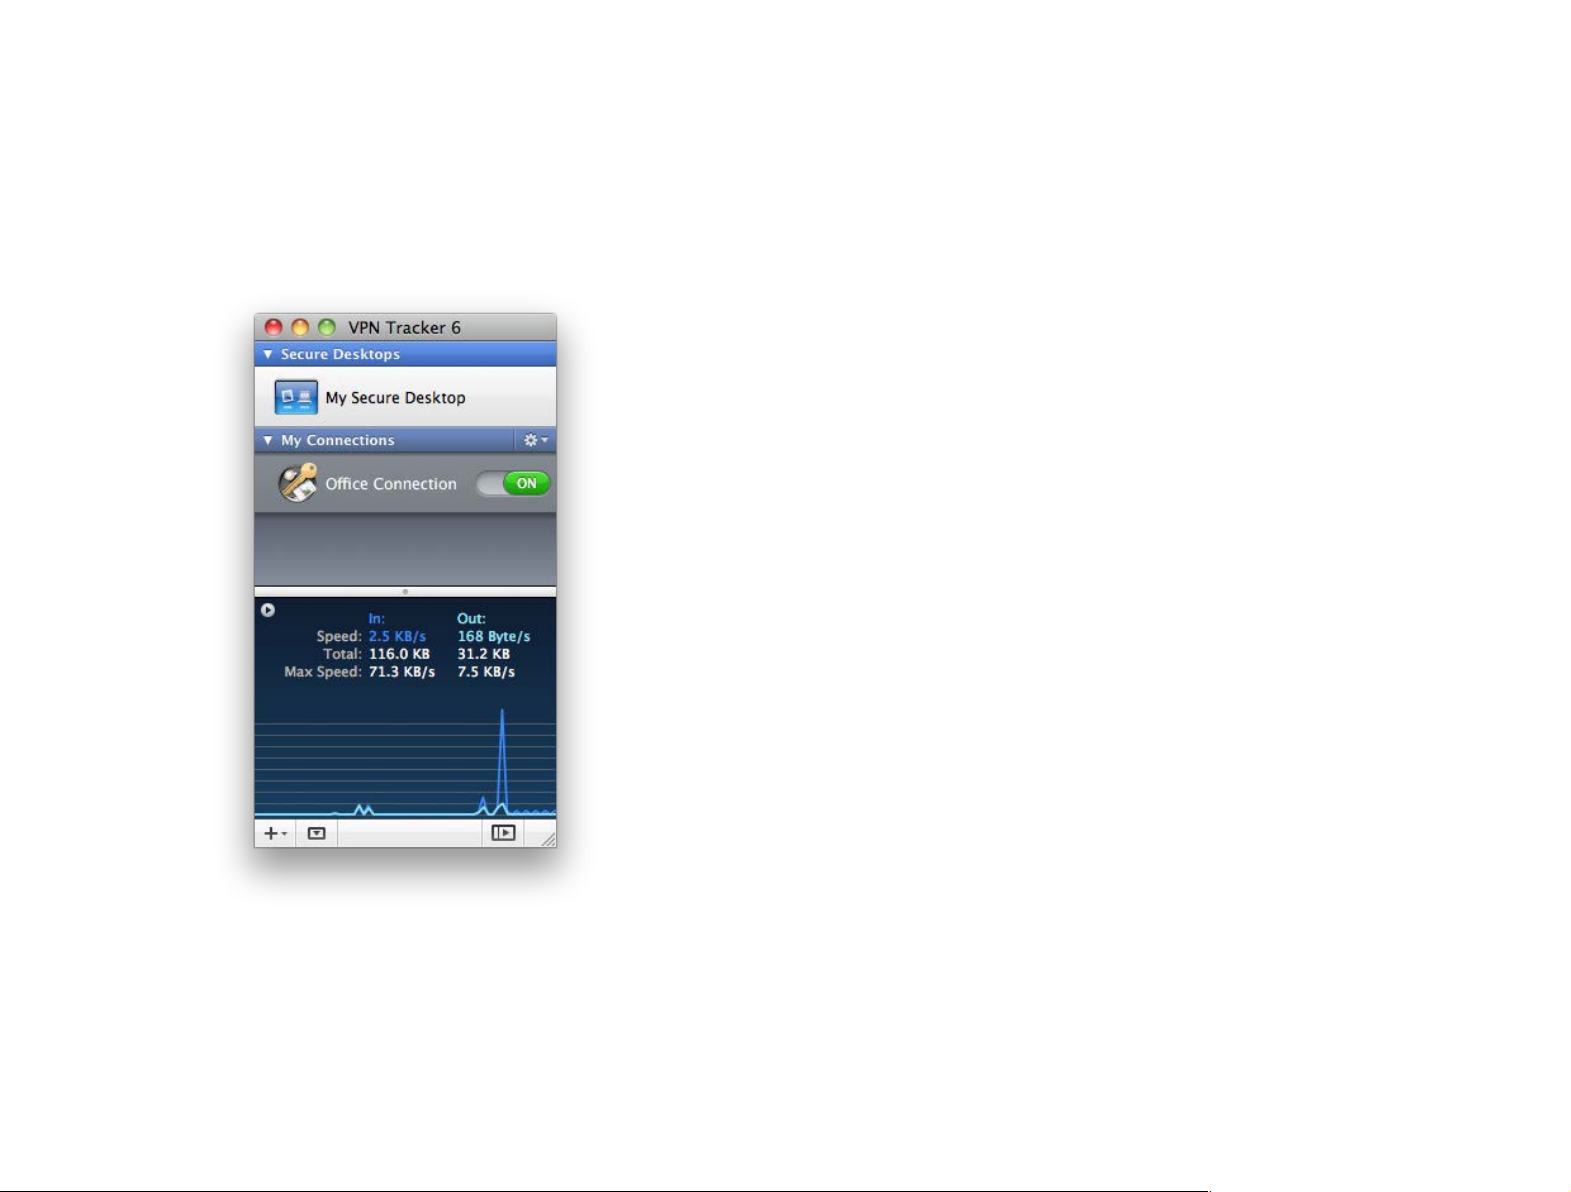
VPN Connection Status
At the bottom of the connection list you can see the status of your connection. The traffic graph lets you know how much data is being sent and re-
ceived over your VPN connection.
The info area just above the graph will tell you the current throughput of your
connection, the amount of data currently being transferred and the top
throughput transferred over your VPN connection.
Click the
triangle to
toggle between connection, network or VPN
info.
Click to hide or show the
connection status
The graph indicates
the amount of traffic
currently being transferred over the VPN
connection
Actions
VPN Tracker can connect and disconnect VPNs based on your current location
or network environment. You can also execute specific tasks after establishing
or before stopping a connection.
Login Item
Enable this option to automatically launch VPN Tracker and connect your VPN
whenever you log in to your Mac.
Locations
Hide the Details
If you only want to see your connections and the connection status, you can
hide the entire right part (the connection details) of your VPN Tracker window.
To hide or show the connection details:
‣
Click the details toggle at the bottom of the connection list
Click to hide or show the
connection details.
If you use multiple network locations on your Mac (System Preferences >
Network), VPN Tracker can automatically connect or disconnect your VPN
connection, depending on the current network location.
‣
Switch the slider to “On” to automatically connect in this location
‣
Switch the slider to “Off” to automatically disconnect in this location
Airport Networks
VPN Tracker will automatically connect to your VPN whenever your Mac connects to the wireless networks you have specified.
34
Page 35

Actions after Connecting
You can use Actions in addition to your Secure Desktop to always perform a certain action after a VPN is connected, no mat-
ter which item is used on the Secure Desktop. For example, if
you have several applications in your Secure Desktop that require a file server to be connected, add your file server here to
always connect it when the VPN is connected.
Actions can also be AppleScript or shell scripts. There is no limit
to what you can do!
VPN Tracker can take care of any tasks that need to be performed after the
VPN connects.
For example, if you use your VPN connection to check your emails, you can ask
VPN Tracker to automatically check for new messages as soon as the connection has been established. Or if you always need to connect to a file server,
enter it here to make sure it’s available any time you connect the VPN.
Actions after Disconnecting
If there’s anything that needs to be taken care of before the VPN is disconnected, add it here.
For example, if you would like to make sure all file servers are safely disconnected before disconnecting the VPN, use the “Disconnect Servers in this VPN”
1
action
.
Menu Bar Item
You can also control VPN Tracker directly from your menu bar, allowing you
full control over your VPN connection, without having to leave the application
you’re working in.
The stop button will disconnect any file
servers and end all VPN connections.
Access your Secure
Desktop items from
the menu bar.
Click to start or stop
a connection. Check
mark indicate established connections.
The key in menu bar icon will turn
black, when you’re connected.
Actions that can take a long time have a timeout to make sure VPN Tracker
does not keep trying forever.
1 If you are using Secure Desktop, you don’t have to worry about disconnecting your servers. However, if you sometimes connect through the Finder, adding this action can be very useful.
35
Page 36

Dashboard Widget
VPN Tracker also offers a handy Dashboard widget with which you can start
and stop your VPN connections.
Growl Support
Growl is a popular open-source notification system. If Growl is installed on
your Mac, you can turn on Growl notifications.
To install the widget:
‣
Open the “VPN Tracker 6.dmg” disk image
‣
Open the Utilities folder on the disk image
‣
Double click the widget and confirm the installation
Once the widget has been added to your Dashboard, you can launch VPN
Tracker and connect or disconnect each connections by sliding the on / off
switch.
Every time something interesting happens to your VPN, you will see a little
window pop up.
You tell VPN Tracker on what occassions to display a Growl notification in the
VPN Tracker Preferences:
To customize the look & feel of your Growl notifications go to “System Preferences > Growl”.
You can find more information about Growl and a download on the Growl
project website:
36
http://growl.info
Page 37

Exporting Connections
Export or Deployment?
Export creates a connection file. Users need to have previously installed
and licensed VPN Tracker on their Macs in order to use the connection file.
A connection file can include one or more connections, as well as Secure
Desktops.
Deployment lets you create a customized VPN Tracker application that already contains a user’s license and connection. The user simply needs to
drag this application to their Applications folder, everything else happens
automatically.
VPN Tracker can export multiple connections in a single file.
Simply select the connections you would like to export (hold
down the Cmd key to select more than one), and choose File >
Export.
Whether you’re quickly exporting a VPN connection for a coworker, or rolling out VPN Tracker to hundreds of users, VPN
Tracker’s sophisticated export and deployment system is
there to help.
Exporting a Connection
Once you have set up and tested a VPN connection, you can export your connection for other VPN Tracker users.
‣
Select a file format. To be able to export Secure Desktops or connections
that make use of VPN Tracker 6 features, select “VPN Tracker 6”. If you are
exporting for VPN Tracker 5 users, select “VPN Tracker 5 and 6”
‣
Set an encryption password for the file. Users of this connection will be required to enter the password once when importing the connection
To export a connection
‣
Select the connection
‣
Choose Export Connection… from the File menu
37
Page 38

Locking Exported Connections
The Mac OS X keychain is a very secure way of storing passwords. However, users will be able to see the pre-shared key via
the Mac OS X Keychain Access application.
XAUTH credentials are always added to the user’s keychain
upon import.
VPN Tracker offers several ways of locking down and protecting your connection information when you export or deploy connections.
You can configure your export settings by selecting a connection and then
going to the Export tab. There you can password-protect the connection, adjust which information is visible to the user, etc. All security settings are ex-
plained in more detail in →#Export Settings Explained.
Export Settings Explained
Pre-Shared Key
Include pre-shared key from keychain
If you have saved the pre-shared key in your keychain, VPN Tracker can include this pre-shared key with the exported connection. When imported, the
pre-shared key will not be automatically added to the user’s keychain, so users
will not be able to see the pre-shared key.
Add the pre-shared key to the keychain when importing
Check this option to move the key into the user’s keychain when importing
the connection.
Exporting a Secure Desktop
You can also export a pre-configured Secure Desktop for your users, along
with their connection. Just check the Secure Desktop(s) you would like in-
clude with the exported connection file.
Extended Authentication (XAUTH)
If you are using Extended Authentication (XAUTH), you can also include a
user’s XAUTH credentials (username and password) in the exported connection. Select whether you would like to include the username and password
stored in your keychain, or be asked for an XAUTH username and password
when exporting the connection.
38
Page 39

Security
Unlocking a Locked Connection
A locked connection has a padlock icon in the top right corner of the window. Click it to enter the unlock password and access all settings.
window.
You can configure Direct Link Detection so your users are able
to use Secure Desktop even when no VPN is required, e.g.
when connected directly to the office network.
Secure Desktop
Don’t allow settings to be changed
This settings prevents users from making accidental or undesirable changes
to their VPN connections. The connection is “locked”. Users will be able to see
the connection settings, but will not be able to modify them.
Hide settings and detailed logs
Hides the Basic and Advanced tabs, as well as the more detailed log levels.
Only basic logging and troubleshooting information is displayed. Technical
Support Reports cannot be created unless an unlock password is set.
Temporarily permit editing with unlock password
With an unlock password, the connection can be unlocked temporarily, for
example if an administrator needs to make changes at a user’s computer. If
you check this option, entering an unlock password is required.
If you have configured a Secure Desktop, you can choose to include it in your
connection file as well. This is useful for users unaccustomed to working over
a VPN connection: You can pre-configure the Secure Desktop with all network
shares, websites, databases, and applications they need, allowing the users to
work in a familiar environment.
Actions
If you have configured actions to be executed when the connection is connected or disconnected, you can include them as well. Any settings you have
configured in your connection’s “Actions” tab will be included.
Contact info
If your VPN users run into any issues, they can email you a Technical Support
Report with details about their connection settings, local internet connection
and VPN logs. The email address you enter as your contact info will be set as
the default recipient of the report.
Temporarily unlock a
locked connection by clicking the padlock in the upper right corner of the
39
Page 40

Other Day-to-Day Considerations
Using Certificates in Connections
If your connection uses certificates for authentication, keep in mind that the
certificates are not included with the exported connection. You’ll need to dis-
tribute the certificates as you would normally do.
VPN Tracker will automatically attempt to use the same certificates on the
Mac the connection is imported on. If they are not available, the user will be
prompted to select new certificates. For additional information, please refer to
#Certificates.
→
Deploying Connections
To make things as easy as possible for your users, you can create a custom
version of the VPN Tracker application that includes your connections and a
license. That way, your VPN users will have everything they need.
Before Deployment
Before beginning deployment, make sure your connection works and that you
can access the network resources your users will need. Also configure your
export settings, and don’t forget to add your internal IT help-desk email ad-
dress, so your users’ Technical Support Reports are sent directly to you, should
there be any problems.
Overwriting Existing Connections
If you have made changes to an connection that you already distributed to
your users earlier, it’s a good idea to re-use the same connection when ex-
porting (don’t create a new one).
That way your users will be prompted to replace their existing connection
with the updated one, instead of ending up with another copy, and in the end
not knowing which connection is the current one.
Select a connection to deploy
‣
Select the connection you want to deploy in the connection list
‣
Select “File > Prepare Deployment”
‣
Choose where you would like to store the disk images that contain the custom VPN Tracker application
‣
Enter an import password and confirm it. This is the password your users
will need to enter before they can use the included connection.
40
Page 41

Add licenses for each VPN user
‣
Log in with the equinux ID and password that contains your organization's
licenses in the new window
‣
Select a license for each VPN user by clicking the ‘+’ button. Entering some
or all of the optional information will make it easier for you to manage li-
censes later.
After you have selected your licenses, VPN Tracker will create a custom disk
image for each user. If you have chosen to email the disk images, VPN Tracker
will automatically open Apple Mail with messages for your users. Otherwise,
you can find the disk images in the folder you selected at the beginning.
Each disk image has a customized copy of the VPN Tracker application that
already contains the license and connections your users need, ready to be
simply copied to the Applications folder.
The disk image also includes a simplified version of this manual, that explains
VPN Tracker’s main features and answers many frequently asked questions.
41
Page 42

Managing Licenses
Resetting a license through the License Manager only permitted
a limited number of times. If you have reset a license too often,
you will need to wait until we can reset the license for you. To
avoid this, please deactivate within the application if possible.
If you have a lot of VPN Tracker licenses and users, you need an easy way to
keep track of them all. The equinux License Manager lets you do just that:
‣
Go to http://my.equinux.com
‣
Sign in with your equinux ID and password
Once you’re logged in, you’ll now be able to view and manage all your software licenses:
To issue a new voucher:
‣
Click the “Issue Voucher” button
‣
Select a license for each VPN user by clicking the ‘+’ button and entering a
name, email address and message for your users, as well as a password to
protect the voucher
‣
Then either send the voucher directly to the user, or download it on your
computer, so you can send it to them yourself.
If you go back to your license overview page, you’ll notice the status on the
licenses you selected has been changed to “Voucher issued”. Once your user
redeems the voucher, it will be shown as “Licensed”.
Deactivating Licenses
If a license has been activated on a certain
Mac, you can deactivate that license at any
time from within the application:
You’ll be able to reuse the license immediately on another Mac.
Resetting Licenses
Activating Licenses
A license can be activated directly using your equinux ID and password.
Please refer to →#Activating VPN Tracker for more information.
Issuing License Vouchers
If you want to give a user a license, without giving them your equinux ID and
password, you can issue them a voucher. Once you’ve created a voucher, it can
be emailed to a user and redeemed by double-clicking it.
If you’re unable to deactivate a license because the Mac is unavailable or broken, or if you need to cancel a voucher you
issued, you can reset the license via the License Manager.
To reset a license:
‣
Log in to the License Manager: http://my.equinux.com
‣
Select “Reset license” from the menu on the left
‣
Select the license from the drop down menu
‣
Confirm that you want to reset this license
42
Page 43

Upgrading Licenses
If you would like to upgrade from an older version of VPN Tracker, or you
would like to upgrade from VPN Tracker Personal a different VPN Tracker Edi-
tion, you can do so right from within the License Manager.
To upgrade a license:
‣
Log in to the License Manager: http://my.equinux.com
‣
Find the license(s) you want to upgrade
‣
Click “Upgrade Details” to see the available upgrades
43
Page 44

Troubleshooting
In most cases, your connection will work fine if you follow the
instructions in this manual. However, computer networking
and VPNs are complex topics, and problems do occur. Read
On/Off Slider goes back to “Off” after a while
this chapter to learn how to resolve them.
VPN Not Connecting
If the slider goes back to “Off”, there is likely a problem with your settings in
VPN Tracker.
On/Off Slider goes back to “Off” right away
‣
Make sure you have entered all required information
‣
VPN Tracker will highlight fields that are missing or have obviously incor-
rect information
‣
Click the warning triangle to be taken to the log tab
‣
Depending on the problem, VPN Tracker will display detailed suggestions
for a solution
‣
Go through the suggestions step-by-step to find and resolve the problem
44
Page 45

No Access to the Remote Network
Browsing the Network – Bonjour and VPN
Bonjour is the technology that makes your file servers appear in your
Finder’s sidebar. It depends on broadcasts on the local network. These
broadcasts do not travel over VPN. If you are connecting to servers over
VPN, you will therefore need to use their IP address (or DNS host name, if
using remote DNS).
To learn more about how to connect to servers over VPN, see →#Secure
Desktop and →#Accessing Files, Printers and Databases
About Subnet Masks and Routing Prefixes
A network mask determines the size of the network. For IPv4 networks, it
can be written in two ways: As a subnet mask (e.g. 255.255.255.0) or as a
routing prefix (e.g /24). For IPv4 it does not make a difference which one is
used. If you enter a subnet mask, VPN Tracker will automatically convert it to
a routing prefix.
Lets take a look at the network 192.168.42.0 / 255.255.255.0 (which is the
same as 192.168.42.0/24). This network contains all IP addresses that begin
with 192.168.42., for example 192.168.42.1 and 192.168.42.99. It does not contain 192.168.43.1 or 10.1.2.3.
If you find yourself in a situation where your VPN appears to be connected,
but you cannot access resources (servers, email, etc.) in the remote network,
check the following points to resolve the problem:
Connect to an IP address (instead of a host name)
Check that the IP address you are connecting to is part of
the VPN’s remote network
Check that the IP address you are connecting to is actually part of the remote
network(s). Also double-check the network mask that you have configured for
the remote network(s) in VPN Tracker.
If you are not connecting to the resource by IP address (e.g. 192.168.10.1), but
are using a host name (e.g. server.example.com), please try using the IP address instead.
If the connection works when using the IP address, but not when using a host
name, please make sure that the DNS server configured on your Mac’s is able
to resolve this host name to an IP address, or configure a suitable remote DNS
server in VPN Tracker.
Make sure the host you are trying to reach knows where to
send replies
This one is a little more complex to check. Start with checking if your local IP
address is part of the remote network:
‣
Connect the VPN
‣
Click the little arrow button in the status view to switch to the IP address
‣
Compare the Local IP and the network(s) listed under Remote IP. Is the Local IP part of these?
45
Page 46

If your local IP is part of the remote network(s):
‣
Are you connecting to a SonicWALL with SonicWALL Simple Client Provi-
sioning or DHCP over VPN?
‣
Are you connecting to a Cisco VPN gateway with Cisco EasyVPN?
If you answered yes to one of these questions, it’s perfectly OK for the local IP
to be part of the remote network(s).
‣
Are you using Mode Config to connect to your VPN gateway?
Check your VPN gateway’s documentation about how to set up the IP address
pool for Mode Config and whether your device supports “ARP Proxy”. If it does
not, or if the setup instructions tell you to use an IP address pool that is not
part of your VPN gateway’s local network(s), please change the VPN gateway’s
IP address pool for Mode Config to one that is not part of the VPN gateway’s
local network(s).
If the local IP is not part of the remote network(s):
‣
Is your VPN gateway the default gateway (router) of its network?
If it is not, you will have to ensure that responses to all IP addresses used by
VPN clients are routed to the VPN gateway, either by adding a general route
on the network’s default gateway, or by adding individual routes on each host
that VPN clients need to communicate with.
Further Questions?
You can find the latest news and compatibility information on our support
and FAQ website:
http://equinux.com/support
Contacting Technical Support
If you can’t resolve your issue with the information available on our website or
in this guide and would like to contact Technical Support through our website, please be sure to include the following information:
‣
The manufacturer and model and firmware revision of the VPN gateway
‣
A Technical Support Report from VPN Tracker (Help > Generate Technical
Support Report)
‣
Screenshots of what you have configured on your VPN gateway, in particular
all VPN-related settings
‣
A detailed description of the problem and the troubleshooting steps you
have already taken
46
Page 47

Settings Reference
Related Settings: Advanced > IPv6 > Use IPv6 VPN gateway address when
available
Availability: always
VPN Gateway Setting: WAN IP address, public IP address, external IP address
Related Settings: Basic > Network Configuration > Local Address
Basic > Remote DNS > Receive DNS Settings from VPN Gateway
Availability: Depending on the selected device profile. Use a custom device
profile to be able to select any method.
VPN Gateway Setting: Mode Config, Config Mode, IKE-CFG
VPN Gateway
This chapter describes the settings available in VPN Tracker.
Settings are grouped by location and sorted from top to
bottom as they occur in VPN Tracker. Where possible, related
settings and the corresponding settings on a VPN gateway
(and the terms different vendors use) are also included.
Basic Tab
The public IP address or host name of the VPN gateway that VPN Tracker connects to.
Network Configuration
VPN Tracker supports a number of vendor-specific and vendor-independent
automatic configuration methods. In addition, manual configuration of all settings is also possible.
Mode Config
A vendor-independent automatic configuration method that is capable of
transmitting the settings for the local address and the remote DNS settings
(DNS servers and search domain).
The "active" and "passive" variants may be used to resolve problems when the
general Mode Config setting does not work with a particular device.
Cisco EasyVPN
An extension of Mode Config for Cisco devices that is also capable of transmitting the Remote Network(s) and Perfect Forward Secrecy (PFS) setting. If
you are using EasyVPN with a custom device profile, make sure to turn on
"Identify as Cisco Unity Client" on the Advanced tab.
47
Page 48

The "passive" variant can be used to resolve problems when the general
Related Settings: Basic > Network Configuration > Local Address
Basic > Network Configuration > Remote Networks
Basic > Remote DNS > Receive DNS Settings from VPN Gateway
Advanced > Interoperability > Cisco > Identify as Cisco Unity Client
Availability: Depending on the selected device profile. Use a custom device
profile to be able to select any method.
Related Settings: Basic > Network Configuration > Local Address
Basic > Remote DNS > Receive DNS Settings from VPN Gateway
Availability: Depending on the selected device profile. Use a custom device
profile to be able to select any method.
VPN Gateway Setting: GroupVPN > Client > Virtual Adapter Setting > DHCP
Lease (or DHCP Lease or Manual Configuration)
Related Settings: Basic > Remote DNS > Receive DNS Settings from VPN
Gateway
Availability: Depending on the selected device profile. Use a custom device
profile to be able to select any method. Requires VPN Tracker Professional or
Player Edition.
VPN Gateway Setting: No special settings are required to enable SonicWALL
Simple Client Provisioning on a SonicWALL with a properly configured and
enabled GroupVPN. SonicWALL Simple Client Provisioning with VPN Tracker
is supported on most current SonicWALL devices (usually those running
SonicOS Enhanced 4.x or newer). Refer to the VPN Tracker website for details.
Related Settings: Basic > Network Configuration > Local Address / Network
Basic > Network Configuration > Remote Network / Address
Availability: Depending on the selected device profile. Use a custom device
profile to be able to select any method. Network to Network requires VPN
Tracker Professional Edition.
EasyVPN setting does not work with a particular device.
SonicWALL DHCP over VPN
An automatic configuration method implemented by SonicWALL devices that
is capable of transmitting the settings for the Local Address and the Remote
DNS settings (DNS servers and search domain).
Topology
In most cases, the topology should be set to Host to Network. This means that
a single host (= your Mac) connects to one or more remote networks through
VPN.
Other possible topologies are:
Host to Everywhere
A single host tunneling all its Internet traffic through VPN. This is equivalent to
a Host to Network connection with a remote network of 0.0.0.0/0.
For Host to Everywhere to work, the VPN gateway must accept a policy with a
0.0.0.0/0 endpoint, and also take care of the routing and Network Address
Translation (NAT) for the VPN client when it tries to access the Internet.
Network to Network
A (local) network being connected to another (remote) network, with the Mac
running VPN Tracker acting as the local VPN gateway, and another VPN gateway at the remote end. This can be used to connect a branch or home office
with multiple computers to a main office. The Mac running VPN Tracker needs
to have routing enabled and has to be configured as the router for the other
computers that are to use the VPN.
SonicWALL Simple Client Provisioning (SCP)
An automatic configuration method implemented by SonicWALL devices that
can supply all settings of a VPN connection.
Host to Host
A single host (= your Mac) accessing another single host (e.g. a single file
server, email server etc.) through VPN.
Host to Host (Transport)
A single host (= your Mac) accessing another single host (e.g. a single file
server, email server etc.) through a transport mode tunnel.
48
Page 49

Local Address
Related Settings: Basic > Topology, Basic > Network Configuration
Availability: Not available when an automatic configuration method is being
used. When a Network to Network topology is used, the setting is called “Local Networks” and describes the local network(s) to which the VPN tunnel
applies.
VPN Gateway Setting: Remote (IP) address, peer (IP) address, remote endpoint, remote network
Related Settings: “Establish a separate tunnel for each remote network”
Availability: Not available when EasyVPN or SonicWALL Simple Client Provi-
sioning are used. When a Host to Host topology is used, the setting is called
“Remote Address” and describes the single remote address the VPN tunnel
applies to. Connecting to multiple remote networks requires VPN Tracker
Professional or Player Edition.
VPN Gateway Setting: Local (IP) address, local endpoint, local network
The IP address the Mac running VPN Tracker uses in the remote network when
connected through VPN
network interface will be used.
In order to avoid two clients coming in through VPN using the same IP, always
set a unique local address for each client when you have multiple VPN users.
The IP address should be from a
the remote network(s) of the VPN connection.
1
. If left empty, the current IP address of the Mac's en0
#private subnet, and must not be part of
→
Remote Networks
The network(s) the VPN connects to2. All traffic destined for these network(s)
will be tunneled over the VPN.
A network can be entered in CIDR notation (e.g. 192.168.42.0/24) or – for IPv4
connections – using the subnet mask (e.g. 192.168.42.0/255.255.255.0).
Always make sure you are using a correct network address. VPN Tracker will
try to help you with this, so if what you entered changes after pressing enter,
check that you have entered a correct network address, e.g. 192.168.42.0/24
and not 192.168.42.254/24.
Authentication
The authentication method VPN Tracker uses. Three methods are available:
Pre-Shared Key
The VPN client is authenticated using a shared password, the pre-shared key.
This authentication method is used most frequently.
It is possible to store the pre-shared key in the Mac OS X keychain, or be
prompted every time the VPN connections.
Certificate
The VPN client and the VPN gateway mutually authenticate using X.509 certificates (RSA signatures). This method is very secure, but requires a proper
infrastructure for creating and distributing certificates, and a VPN gateway
that supports it.
The client's certificate and private key (also called an "identity") need to be
present in the Mac OS X keychain. The VPN gateway's certificate can in most
cases be sent by the VPN gateway, but it is also possible to add it to the local
keychain and set that specific certificate in VPN Tracker.
Hybrid Mode
The VPN gateway authenticates itself with a certificate, and the user authenticates themselves through Extended Authentication (XAUTH). This method is
supported by some vendors (e.g. Check Point) and considered more secure
than using an Aggressive Mode connection with just a pre-shared key.
1 In IPsec terms: the local endpoint of the IPsec Security Association (SA)
2 In IPsec terms: the remote endpoint of the IPsec Security Association (SA)
49
Page 50

The VPN gateway's certificate can in most cases be sent by the VPN gateway,
Related Settings: (certificates only) Advanced > Certificates
(pre-shared key only) Advanced > Phase 1 Diffie-Hellman Group, Advanced >
Additional Settings > Credentials > Display credentials prompt
Availability: According to the selected device profile. Hybrid-Mode authentication and smart card-based authentication requires VPN Tracker Professional or Player Edition.
VPN Gateway Setting: (Pre-Shared Key) Pre-shared secret, shared secret,
password, key
(Certificates) X.509 certificates, RSA signatures
With most VPN gateways, XAUTH can be set to "When requested", even if it is not used: When the VPN gateway requests
XAUTH to be performed, VPN Tracker will ask for the appropriate
credentials, if the VPN gateway does not request XAUTH, nothing will happen. However, there are VPN gateways that need
XAUTH specifically turned on or off, that's where the "Off" and
"Always" settings can help.
Related Settings: Advanced > Additional Settings > Credentials
Availability: According to the selected device profile.
VPN Gateway Setting: XAUTH, user authentication
It is crucial that the Local Identifier in VPN Tracker matches what
the VPN gateway expects, otherwise the VPN gateway will not
be able to identify the connection, and refuse or silently drop it.
Related Settings: Basic > Network > Local Address (for “Local IP Address”)
Basic > Authentication > Certificates (for “Local/Remote Certificate”)
Availability: Identifiers are not configurable when SonicWALL Simple Client
Provisioning is used.
VPN Gateway Setting: The local identifier from VPN Tracker's perspective is
the remote identifier from the VPN gateway's perspective, and vice versa.
Therefore you will normally have to swap the identifiers configured on the
VPN gateway when entering them in VPN Tracker:
Local Identifier:
Remote Identifier:
Remote Identifier (or client/peer identifier/identity/ID)
Local Identifier (or own/my identifier/identity/ID)
but it is also possible to add it to the local keychain and set that specific certificate in VPN Tracker.
Extended Authentication (XAUTH)
Extended authentication is a way of authenticating individual users on top of
one of the general authentication methods, pre-shared key or certificates (hybrid mode already incorporates XAUTH). In its basic form, XAUTH asks for a
username and password, however it is also possible for the VPN gateway to
ask for pass-codes (such as the ones generated by RSA SecurID tokens) etc.
It is possible to store the XAUTH username and password in the Mac OS X
keychain, or be prompted every time the VPN connections.
Identifiers
The identifiers are small pieces of identifying information that VPN Tracker and
the VPN gateway use to recognize each other.
Local Identifier
The identifier that VPN Tracker uses to identify itself to the VPN gateway.
IP Address
An IP address is used for identification. Make sure to enter the IP address the
VPN gateway expects.
Local Endpoint IP Address
Same as “IP Address”, but VPN Tracker will automatically use the IP address of
the local endpoint of the VPN. That means that the “Local Address” setting is
used, if configured, otherwise the IP address of the Mac’s en0 network interface is used.
Fully Qualified Domain Name (FQDN)
A fully qualified domain name (FQDN) is used for identification (e.g.
vpntracker.example.com). Make sure to enter the FQDN the VPN gateway expects.
50
Page 51

Email (User FQDN)
Availability: always
An email address is used for identification (e.g. vpntracker@example.com).
Make sure to enter the email address the VPN gateway expects.
Fully Qualified Domain Name (FQDN)
A fully qualified domain name (FQDN) is used for identification (e.g.
vpn.example.com). Make sure to enter the FQDN the VPN gateway sends.
Some VPN gateways use the type “Email (User FQDN)” even though the identifier is not a valid email address, but a username (e.g. johndoe). To accommodate such devices, VPN Tracker does not require the identifier to actually be
an email address.
Key ID
An identifier for vendor-specific use. Most notably, many Cisco devices use
this for the group name of the connecting user.
ASN.1 DN
An ASN.1 Distinguished Name (DN) is used for identification. Make sure to enter the distinguished name the VPN gateway expects.
Local Certificate
The identifier is the ASN.1 Distinguished Name taken from the subject of the
local certificate (only possible when using certificates for authentication).
Remote Identifier
The identifier that VPN Tracker should expect from the VPN gateway. VPN
Tracker will compare the actual identifier sent by the VPN gateway to the one
configured here. If the identifiers do not match, the connection attempt will
be stopped and an error displayed in the log.
Don’t verify remote identifier
Turn off identifier verification. Identifier verification provides some minor security benefits, but is more relevant for the VPN gateway’s side. It is usually ok to
turn off identifier verification temporarily while setting up and testing a connection.
Email (User FQDN)
An email address is used for identification (e.g. vpnservice@example.com).
Make sure to enter the email address the VPN gateway sends.
Some VPN gateways use the type “Email (User FQDN)” even though the identifier is not a valid email address. To accommodate such devices, VPN Tracker
does not require the identifier to actually be an email address.
Key ID
An identifier for vendor-specific use.
ASN.1 DN
An ASN.1 Distinguished Name (DN) is used for identification. Make sure to enter the distinguished name the VPN gateway sends.
Remote Certificate
The identifier is the ASN.1 Distinguished Name taken from the subject of the
remote certificate (only possible when using certificates for authentication).
DNS
Use Remote DNS Server
VPN Tracker can use a name (DNS) server in the remote network of the VPN to
look up certain (or all) host names. This is useful if your organization operates
an internal DNS server that can look up host names of computers on the in-
ternal network.
IP Address
An IP address is used for identification. Make sure to enter the IP address the
VPN gateway sends.
Remote Endpoint IP Address
Same as “IP Address”, but VPN Tracker will automatically use the IP address VPN
Tracker connects to.
Receive DNS Settings from VPN Gateway
When checked, VPN Tracker will use the DNS settings transmitted by the VPN
gateway during automatic configuration. To see if your VPN gateway transmits
such information, turn off Remote DNS, then connect. VPN Tracker will show a
message in the log suggesting to turn on Remote DNS if settings have been
transmitted.
51
Page 52

Related Settings: Basic > Network > Automatic Configuration
Basic > DNS > Use Remote DNS Server
Availability: Available if an automatic configuration method is selected and
“Use Remote DNS Server” is turned on.
DNS Servers
Related Settings: Basic > DNS > Use Remote DNS Server
Basic > DNS > Use DNS Server for
Availability: Available if “Use Remote DNS Server” is turned on, and “Receive
DNS Settings from VPN Gateway” is turned off.
Related Settings: Basic > DNS > Use Remote DNS Server
Basic > DNS > Use DNS Server for
Availability: Available if “Use Remote DNS Server” is turned on, and “Receive
DNS Settings from VPN Gateway” is turned off.
When using this option, it is important to make sure the VPN
connection and the remote DNS server are correctly configured:
If one or both are not working, the Mac will appear to be cut off
from the Internet while the VPN is active.
Related Settings: Basic > DNS > Search Domains
Basic > DNS > Use Receive DNS Settings from VPN Gateway
Availability: Available if “Use Remote DNS Server” is turned on.
The IP address of a remote DNS server. To enter more than one server, click
the plus button to get additional input fields.
Search Domains
The search domain(s) to use. To enter more than one search domain, click the
plus button to get additional input fields.
If “Use DNS Server for” is set to “Search Domains”, the search domain(s) will also
be used to determine the domains the remote DNS server is being used for.
Search Domains
The remote DNS server is used only for looking up host names that are part of
the search domain(s). At least one search domain must be configured.
“Receive DNS Settings from VPN gateway” only: If the VPN gateway transmits a
search domain, the remote DNS server is used only for looking up host names
that are part of the search domain(s). If no search domain is transmitted, the
remote DNS server is used for every DNS lookup on this Mac while the VPN is
connected.
Use DNS Server for
This setting determines the scope of the remote DNS server(s). It is possible to
use the remote DNS server(s) for all DNS lookups, or just for hosts in a specific
domain.
All Domains
While the VPN is connected, the remote DNS server is used for every DNS
lookup on this Mac, not just hosts that are part of the remote network.
52
Page 53

Advanced Tab
Related Settings: Basic > Authentication
Availability: Phase 1 settings are not configurable when SonicWALL Simple
Client Provisioning is used.
VPN Gateway Setting: Phase 1 proposals, phase 1, IKE
An IPsec VPN connection is established in two phases. In each phase, VPN
Tracker sends the algorithms it is willing to use, as well as a few other settings
to the VPN gateway. The VPN gateway then selects one set of algorithms
(“proposal”), or responds with an error if it does not agree to use any of the
proposed algorithms.
At first glance, it would seem a good idea to simply offer all possible algorithms to the VPN gateway, hoping that it will agree with at least one set of
proposals. However, there are several problems with this approach:
‣
Selecting too many algorithms causes data packets on the network to be
so large they need to be split up ("fragmented"). Many VPN gateways outright refuse these fragmented VPN packets, and intermediate routers often
have difficulties with fragmented VPN data packets as well.
‣
Some VPN gateways refuse connection attempts that offer a large number
of algorithms, probably as an intrusion prevention measure.
‣
It may be desirable to offer only algorithms providing a very high level of
security.
In the device profiles shipping with VPN Tracker, two or three algorithms that
are most commonly used with a given device have been selected. This in-
creases the chance of a successful connection, even if the exact configuration
is not known (while still keeping the data packets small enough to not be
fragmented). If you know your VPN gateway’s configuration, it is best to simply select the exact algorithms your VPN gateway is set up to use.
Phase 1
Using the pre-shared key or RSA signatures, VPN Tracker and the VPN gateway
negotiate encryption keys with which the set up of the actual VPN tunnel
(phase 2) will be secured, and verify each other’s identity.
53
Page 54

Exchange Mode
For VPN clients connecting from dynamic IP addresses or from
behind a NAT router, choose Aggressive Mode.
If you are setting up your VPN gateway from scratch: It is common to select a lifetime of between 1 and 24 hours (3600 to
86400 seconds).
Related Settings: Advanced > Additional Settings > Proposal conflict resolution
If you are setting up your VPN gateway from scratch: Since each
VPN gateway uses different hardware and has a different selec-
tion of algorithms available, it is not possible to make a general
recommendation which algorithm to use. Please refer to your
VPN gateway's documentation and/or data sheet to see which
algorithms are recommended to provide good security and performance. The algorithm most commonly used is 3DES. AES-256
is considered to be the most secure algorithm.
In case you do not know what is configured on your VPN gateway, it is possible to select more than a single algorithm. VPN
Tracker will then offer all selected algorithms to the VPN gateway and negotiate which one to use. To avoid fragmentation of
network packets or triggering intrusion prevention mechanisms
on VPN gateways, it is not recommended to select more than
two or three algorithms
Availability: AES-192 and AES-256 require VPN Tracker Professional or Player
Edition.
If you are setting up your VPN gateway from scratch: Choose
SHA-1 whenever possible. If you own a recently released device,
it is possible that it already supports SHA-2, which offers additional security. Only use MD5 if no other algorithm is available.
In case you do not know what is configured on your VPN gateway, it is possible to select both SHA-1 and MD5 here, most VPN
gateways will be able to negotiate which one they want to use.
Availability: SHA-2 algorithms (SHA-256, SHA-384, and SHA-512) require VPN
Tracker Professional or Player Edition.
The Exchange Mode determines how the initial steps of establishing a VPN
connection take place. The setting must match the exchange mode selected
on the VPN gateway.
Aggressive Mode
Aggressive Mode is faster and requires less information, in particular, it does
not require the IP address of the connecting client to be known prior to connecting.
Main Mode
Main Mode is more secure but often requires the IP address of the connecting
client to be known beforehand.
Lifetime
For security reasons, the encryption keys of a VPN connection are periodically
re-negotiated. The lifetime determines when this takes place. The setting must
match the lifetime for phase 1 on the VPN gateway, however a misconfiguration will usually not show up right away, but only be recognizable when the
re-negotiation does not work properly.
Hash Algorithm
The hash algorithm used for phase 1 of the connection. It must match the
algorithm configured on the VPN gateway for phase 1.
Encryption Algorithm
The encryption algorithm to use for phase 1 of the connection. It must match
the algorithm configured on the VPN gateway for phase 1.
54
Page 55

Diffie-Hellman (DH) Key Exchange
If you are setting up your VPN gateway from scratch: Choose at
least "Group 2 (1024 bit)" whenever possible. Many VPN gate-
ways support up to "Group 5 (1536 bit)", some recent high-end
devices up to "Group 18 (8192 bit)".
Availability: DH groups 14 to 18 require VPN Tracker Professional or Player
Edition.
Related Settings: Basic > Authentication
Availability: Phase 2 settings are not configurable when SonicWALL Simple
Client Provisioning is used.
VPN Gateway Setting: Phase 2 proposals, phase 2, IPsec, VPN, tunnel
If you are setting up your VPN gateway from scratch: The lifetime
for phase 2 can be different from the phase 1 lifetime (it is fre-
quently set shorter than the lifetime for phase 1).
If you are setting up your VPN gateway from scratch: The encryption algorithm for phase 2 can be different from the phase 1
encryption algorithm. For VPN gateways with very limited hardware, it may be appropriate to choose a less secure but better
performing algorithm here, and set a more secure algorithm for
phase 1.
Availability: AES-192 and AES-256 require VPN Tracker Professional or Player
Edition.
Do not select "No authentication", unless you have a very special
setup that does not support using authentication.
Availability: SHA-2 algorithms (SHA-256, SHA-384, and SHA-512) require VPN
Tracker Professional or Player Edition.
The key length to use for the Diffie-Hellman key exchange. It must match the
key length (group) selected on the VPN gateway for phase 1. If you are getting
inexplicable errors about an incorrect pre-shared key, double-check that the
Diffie-Hellman group matches the VPN gateway’s configuration.
Phase 2
This second phase of the connection establishes the actual VPN tunnel.
All settings here must match the respective setting on the VPN gateway.
Encryption Algorithm
This is the algorithm used for encrypting the actual data that goes over the
connection. See Advanced > Phase 1 > Encryption Algorithm for more infor-
mation.
Authentication Algorithm
See Advanced > Phase 1 > Hash Algorithm.
Lifetime
For security reasons, the encryption keys of a VPN connection are periodically
re-negotiated. The lifetime determines when this takes place. The setting must
match the lifetime for phase 2 on the VPN gateway, however a misconfiguration will usually not show up right away, but only be recognizable when the
re-negotiation does not work properly.
Perfect Forward Secrecy (PFS)
Using Perfect Forward Secrecy provides additional security when encryption
keys are re-negotiated. The setting must match what is configured on your
VPN gateway.
55
Page 56

If you are setting up your VPN gateway from scratch: Using Perfect Forward Secrecy is recommended. If possible, use at least
"Group 2 (1024 bit)".
If you are using a Cisco device with Easy VPN: Cisco devices can transmit their
Related Settings: Some devices will automatically use the same group here
as in Phase 1 > Diffie-Hellman (DH) Key Exchange
Availability: DH groups 14 to 18 require VPN Tracker Professional or Player
Edition.
Related Settings: Basic > Network > Remote Networks
Advanced > Interoperability > Establish a Shared Tunnel to 0.0.0.0/0 for SplitTunneling
Availability: The setting is only available when connecting to multiple remote networks and no DHCP over VPN (SonicWALL) is being used.
Related Settings: Basic > Authentication > Certificate
Availability: The setting is only available when certificates are used for
authentication.
Related Settings: Basic > Authentication > Certificate
Availability: The setting is only available when certificates are used for
authentication.
Do not turn off this option except for debugging purposes!
Related Settings: Basic > Authentication > Certificate
Availability: The setting is only available when certificates are used for
authentication.
Availability: always
Perfect Forward Secrecy preference, and VPN Tracker will use Perfect Forward
Secrecy when requested by a Cisco VPN gateway.
Send Request for Remote Certificate
If turned on, VPN Tracker will request the VPN gateway’s certificate. This setting should normally be turned on. Only turn off this setting if your VPN
gateway has trouble dealing with certificate requests from connecting clients.
Establish a separate phase 2 tunnel for each remote network
When connecting to multiple remote networks, VPN Tracker can either establish a separate VPN tunnel (Security Association, SA) for each network, or tun-
nel all traffic over a single tunnel. The single tunnel will use the first remote
network as the endpoint.
Which setting to use depends on the VPN gateway. Try connecting with the
default setting first. If you find that only one of multiple configured remote
networks is accessible when the VPN is connected, try changing the setting.
Certificates
Send Certificate
If turned on, VPN Tracker will send the local certificate to the VPN gateway.
This setting should normally be turned on. Only turn off this setting if your
VPN gateway has trouble dealing with certificates sent by connecting clients.
Verify Remote Certificate
This setting can be used to temporarily disable certificate verification for debugging purposes.
NAT-Traversal
Set NAT-Traversal to "Detect Automatically".
There are some very specific circumstances in which you may need to change
the setting, please read and understand →#VPN and Network Address Transla-
tion (NAT), before making any changes to this setting.
56
Page 57

Connection Timeout
Availability: always
Availability: According to the selected device profile.
Related Settings: Advanced > Interoperability > Perform active Dead Peer
Detection
Availability: According to the selected device profile.
Related Settings: Advanced > Interoperability > Advertise as Dead Peer De-
tection Capable
Availability: According to the selected device profile.
Related Settings: Basic > Network Configuration
Availability: Only available with a custom device profile or a Cisco device
profile when using Mode Config or EasyVPN.
Availability: Only available using a custom device profile. The setting is not
necessary when using one of the Cisco device profiles.
The default settings are more than sufficient for most setups. Only in extreme
network environments with high packet loss or extremely high latency will
you have to increase the timeout (and/or the number of times VPN Tracker
attempts to resend a packet).
Interoperability
Send INITIAL-CONTACT Message
For some devices it is necessary to send this message when establishing a
VPN connection in order to tell the VPN gateway to clean up “old” VPN con-
nections. However, some devices will disconnect other VPN users upon receiving this message (in particular if multiple VPN users connect from the same
public IP address, or when users share an XAUTH account).
Advertise as Dead Peer Detection Capable
VPN Tracker supports Dead Peer Detection (DPD) to detect if the other end of
the connection is no longer responding. When this setting is turned on, VPN
Tracker will tell the VPN gateway that it supports Dead Peer Detection.
For most VPN gateways (whether they support Dead Peer Detection or not)
this option should be turned on. Only turn it off if you suspect that VPN
Tracker offering to perform Dead Peer Detection causes a problem on the VPN
gateway, or if the VPN gateway’s Dead Peer Detection implementation is
broken.
Perform active Dead Peer Detection every ... seconds, if necessary
If the VPN gateway is Dead Peer Detection capable, but does not perform
Dead Peer Detection itself, VPN Tracker can perform Dead Peer Detection.
For most VPN gateways (whether they support Dead Peer Detection or not)
this option should be turned on. Only turn it off if you suspect that VPN
Tracker performing Dead Peer Detection causes problems (such as unexpected disconnects).
Use ... as the Application Version during Mode Config
When performing Mode Config (or EasyVPN), VPN Tracker will identify itself as
“VPN Tracker 6”. Identifying as a different client or version may be necessary to
work together with some VPN gateways.
To identify as a specific client, simply enter its name and version, e.g. “Cisco
Systems VPN Client 4.8.0:Linux”.
Send Cisco Unity Vendor ID
This setting is necessary in order to use certain Cisco-specific extensions, such
as EasyVPN. Turn on this setting if you are connecting to a Cisco device using
a custom device profile (it is not necessary to use this setting when using one
of the Cisco device profiles shipping with VPN Tracker).
57
Page 58

Send Cisco Firewall Attribute during Mode Config
Related Settings: Basic > Network Configuration
Availability: Only available with custom device profiles or Cisco device pro-
files when using EasyVPN (or Mode Config with the “Send Cisco Unity Vendor ID” option turned on).
Related Settings: Basic > Network Configuration
Advanced > Phase 2 > Establish a separate phase 2 tunnel for each remote
network
Availability: Available when EasyVPN is used and “Establish a separate
phase#2 tunnel for each remote network” is turned off.
Related Settings: Basic > VPN Gateway
Availability: According to the selected device profile.
Related Settings: Basic > Network > Remote Network(s)
Availability: always
When checked, VPN Tracker will send a special attribute indicating the presence of a firewall. This may help to successfully connect to some Cisco de-
vices.
Establish a Shared Tunnel to 0.0.0.0/0 for Split-Tunneling
When checked, VPN Tracker will establish a single tunnel (Security Association,
SA) to 0.0.0.0/0 and set suitable routes to achieve split-tunneling. This can no-
ticeably speed up connecting to a Cisco VPN gateway with multiple remote
networks using EasyVPN.
IPv6
Prefer IPv6 VPN gateway address, if available
You will not normally need to change this setting. If your VPN gateway is
reachable through IPv6 and its host name resolves to an IPv4 address as well
as to an IPv6 address, VPN Tracker will use the IPv6 address if this setting is
turned on.
Additional Settings
Direct Link Detection
This setting helps VPN Tracker detect when your Mac is physically attached to
the network you normally connect to through VPN.
For example, if you use your MacBook at the office without VPN, and from
home with VPN, you can teach VPN Tracker to recognize when you are con-
nected to your office network. This lets you to use Secure Desktop in the office just as if you were at home connected through VPN, because Secure
Desktop knows that it can directly launch any item you choose, there is no
need to first connect the VPN.
To teach VPN Tracker to recognize a direct link to your remote network:
‣
Physically connect your Mac to the remote network of your VPN connection (e.g. if you connect to your office through VPN, connect your Mac to
the office network). Direct link detection also works with wireless networks.
‣
Open VPN Tracker and go to Advanced > Additional Settings > Direct Link
Detection
‣
Click “Use Current Router”
VPN Tracker will detect the local router’s unique hardware address (MAC address) and remember it. The next time you are connected to this network, VPN
Tracker will know that no VPN is needed.
If you have a very complex network, you can teach VPN Tracker about more
than one router. Simply click the green plus button to add more input fields.
Display credentials prompt for ... seconds
When VPN Tracker prompts for VPN connection passwords (pre-shared key,
Extended Authentication (XAUTH) credentials), the password prompts are only
displayed for a limited amount of time.
If necessary, this setting lets you increase the time a password prompt is being displayed. This can be useful for accessibility purposes, or when dealing
58
Page 59

with devices that request the next passcode from a passcode generator token
Related Settings: Advanced > Phase 2 > Lifetime
Advanced > Phase 2 > Perfect Forward Secrecy (PFS)
Availability: always
Availability: always
(which can take up to 1 minute).
Do not increase the timeout unless you have a specific reason to do so. Most
devices will no longer expect a password after 15-60 seconds and thus the
connection attempt will fail if entering a password takes too much time.
Cache XAUTH credentials until VPN is disconnected
When re-negotiating encryption keys, VPN Tracker also has to perform Extended Authentication (XAUTH) again. If you check this option, VPN Tracker
will cache your XAUTH username and password for the entire duration of the
connection, even if they are not stored in keychain. You will not have to enter
your password again when the encryption keys are re-negotiated.
Proposal Conflict Resolution
When VPN Tracker and the VPN gateway disagree about the lifetime or the
Perfect Forward Secrecy (PFS) setting, VPN Tracker can choose to accept the
VPN gateway’s proposal instead of insisting on its own settings (in which case
the connection attempt would fail).
Use remote proposals
VPN Tracker will use whatever settings the VPN gateway suggests, even if they
are less secure
Manually set MTU for network used by VPN
VPN Tracker normally uses an MTU (maximum transfer unit) of 1280 bytes. In
extremely rare circumstances it may be necessary to decrease the MTU further
in order to avoid fragmentation of network packets.
If you have to decrease the MTU, please be aware that the MTU in VPN Tracker
needs to be set to 52 bytes less than the actual MTU that can be used.
Use remote proposals if more secure (strict)
VPN Tracker will use the settings the VPN gateway suggests if they are at least
as secure as the current settings in VPN Tracker
Use remote proposals if more secure
VPN Tracker will use the settings the VPN gateway suggests if they are at least
as secure as the current settings in VPN Tracker. If the lifetime mismatches and
the VPN gateway's lifetime is longer, VPN Tracker will attempt to use its own
(shorter) lifetime. While this will allow initial connectivity, it may lead to the
connection being dropped unexpectedly later on.
Never use remote proposals
VPN Tracker will treat a mismatch as an error and stop connecting.
Actions Tab
The actions tab is explained in detail in →#Working with VPN Tracker
Export Tab
A description of the export settings can be found →#Exporting Connections.
59
Page 60

VPN Tracker Preferences
Update
VPN Tracker can automatically check for updates so you never miss out on
important improvements to VPN Tracker. When an update is available, you will
be asked if you would like to download and install the update.
Growl
VPN Tracker can use the Growl notification system to notify you when something important happens to your VPN connection. Check or uncheck these
settings to configure how VPN Tracker uses Growl.
Network Ports
VPN Tracker normally uses network port 500, the default port for IPsec VPN,
and port 4500 for NAT-Traversal. Usually, you will not need to (and should not)
change these port numbers.
However, there may be cases when another application, such as another IPsec
VPN client (or Back to My Mac) is already using these ports. Should this happen, VPN Tracker will alert you:
60
Page 61

What should I do when I get an alert that other software is already
using the standard VPN network ports?
If you do not need to use the other software (e.g. another VPN client or
Back to My Mac), simply quit VPN Tracker, disable the other software, and
then open VPN Tracker again.
If you would like to use the other software together with VPN Tracker, click
continue and see if your VPN connection continues to work. If it does, you
can select “Always Use Other Ports” the next time you see this alert.
If you ever want to revert back to the standard VPN network ports, open
Preferences and check both “Use fixed port for IKE” and “Use fixed port for
NAT-Traversal”, and make sure they are set to 500 and 4500, respectively
VPN Status
Use this setting to enable and disable the status menu in the menu bar of
your Mac.
Testing VPN Availability
VPN Tracker automatically tests if VPN is available over your current Internet
connection before attempting to connect to your VPN. Testing occurs only
once for any given Internet connection – for example, the first time you attempt to connect from a hotel’s Internet access, VPN Tracker will test the
Internet connection. When returning to that hotel a few months later, VPN
Tracker will usually not have to test again.
Disabling VPN Availability Testing
It is highly recommended to let VPN Tracker test unknown Internet connections for their VPN availability: If VPN Tracker knows what NAT-Traversal
mechanisms are supported by your current Internet connection, VPN Tracker
will be able to avoid many common connectivity issues automatically.
However, if you are using VPN Tracker to secure access to internal networks
from another internal network (e.g. securing a corporate wireless network), it
may be necessary to disable testing (entirely or just when connected to this
particular network).
For all Internet connections:
‣
Open Preferences
‣
Uncheck “Test VPN Capabilities of Unknown Internet Connections”
For the current Internet connection:
‣
Open the VPN Availability Test (Tools > VPN Availability Test)
‣
Click “More Details”
‣
Check “Ignore test result”
You can also choose to skip the test while the test is in progress.
To reset all skipped Internet connections and start testing again, click the but-
ton “Forget Skipped Locations” in Preferences.
Testing your Internet connection enables VPN Tracker to adjust its NATTraversal settings according to what your current Internet connection sup-
ports. For more information about NAT-Traversal and how VPN Tracker is testing an Internet connection, see →#VPN and Network Address Translation (NAT)
61
Page 62

Appendix
Apple Airport Base Stations
AirPort base stations are only capable of passing through VPN connections,
but do not provide VPN services (i.e. act as a VPN gateway) themselves. If
you are using an AirPort base station, you will need to buy a dedicated VPN
gateway to replace or work alongside your Airport base station.
Choosing the Right VPN Device
What You’re Looking For
Whether you’re shopping for a new device or are trying to find out if your existing router can act as a VPN gateway, these are the magic words you’ll want
to look for – if they’re mentioned in the manual or data sheet, the device is
probably suitable:
‣
IPsec VPN
‣
IPsec Tunnels
‣
IPsec VPN Access
‣
<any number of> IPsec Tunnels
‣
<any number of> IPsec VPN connections
‣
<any number of> IPsec VPN users
‣
<any number of> IPsec SAs
Misleading Feature Names
If a device only lists one or more of the following features, it probably cannot
act as a VPN gateway:
If your device provides these types of VPNs, it is possible to use the limited
VPN client built-in to Mac OS X to connect to the device. VPN Tracker lets you
control these connections from inside VPN Tracker.
Other VPN types, such as OpenVPN and proprietary SSL VPNs are not sup-
ported.
Recommended Devices
Now for the big question: Which device do we recommend?
Unfortunately there is no generic answer to this question. There are a lot of
factors you’ll need to consider, such as the number of VPN users you need to
support, the type of Internet connection you have, etc.
The technical support team at equinux has extensive experience with a large
number of VPN gateways, so please feel free to email us with a brief outline of
your requirements, or a list of devices you're considering, and we'll be happy
to give you our take on them!
http://equinux.com/support
‣
IPsec Passthrough
‣
VPN Passthrough
‣
IPsec NAT-Traversal
These features indicate that the device is capable of letting IPsec VPN connections pass through. They do not indicate whether the device is capable of of-
fering VPN services itself.
Other Types of VPNs
‣
L2TP or L2TP/IPsec
‣
PPTP
62
Page 63

L2TP / PPTP Connections
Mac OS X L2TP/PPTP VPN connections are always associated
with a specific network location. VPN Tracker therefore only
shows those VPN connections that belong to the current network location (System Preferences > Network > Location).
Find out how to integrate LT2P / PPTP connections within
VPN Tracker.
OS X has a built-in VPN client, that can connect to L2TP and PPTP VPN gateways. VPN Tracker automatically integrates those connections, so you can easily use all your VPN connections from one place.
To create new L2TP / PPTP VPN connections:
You can add new connections in System Preferences. Go to the “Network”
pane and click the ‘+’ icon. Select “VPN” as your interface type and choose the
appropriate VPN protocol for your connection.
Working with L2TP / PPTP VPN Connections in VPN Tracker
Any VPN connections you have set up in System Preferences will automatically
show up in a separate group within VPN Tracker’s connection list. Just click the
slider to connect or disconnect your L2TP or PPTP connection.
Then, enter your VPN connection settings. For further information, please click
the question mark icon to open the Mac OS X Help documentation.
63
Page 64

Accessing Files, Printers and
Secure Desktop or Finder? Your Choice!
The new Secure Desktop in VPN Tracker 6 lets you connect to file servers
right from within VPN Tracker. However, if you wish, you can still use the
Finder to connect to your file servers.
I don’t know my file server’s IP address. Can’t I just access my file servers
via the Finder Sidebar?
For technical reasons, when using a VPN connection, your servers won’t
show up in the Finder sidebar. If you don’t have your file server’s IP address,
you can easily find it out next time you’re
in your office network:
Open Tools > Ping Host and enter your
file server’s name. After a few seconds,
VPN Tracker should tell you the file
server’s IP address. Again, this will only
work when you’re actually in your office
network, not if you’re connect via VPN.
Databases over VPN
Using Finder to Connect to File Servers
To connect to your server or file share:
‣
Switch to Finder by clicking its icon in the Dock
‣
Choose Go > Connect to Server from the menu bar on top of your screen.
You can also use the keyboard shortcut ⌘-K
The following steps depend on the kind of server you’re connecting to.
To connect to a Mac (AFP) server:
‣
Type the IP address (e.g. 192.168.42.4)
To connect to a Windows (SMB) server:
‣
Type “smb://” followed by the IP address (e.g. 192.168.42.4)
and click “Connect”
1
of your server and click “Connect”
1
of your server
1 If your VPN connection uses remote DNS, you can also use a DNS host name instead of an IP address.
Afterwards, you may need to enter your username and password to access
the server.
64
Page 65

Printing over VPN
It is possible to print to network printers over VPN. To be able to do so, make
sure to add the printer by IP address (or DNS host name, if using remote DNS
in VPN Tracker). Since Bonjour does not work through VPN, it is not possible to
use printers that have been added using Bonjour.
To check if your printer is using Bonjour:
‣
Open System Preferences “Print & Fax”
‣
Click “Options & Supplies”
To add the printer using its IP address:
To help your Mac auto-detect the printer type, make sure you are either locally at your remote network (i.e. where the printer is already working), or
connected to the VPN.
‣
Open System Preferences “Print & Fax”
‣
Click the plus button to add a new printer
‣
If the URL starts with “mdns://” your printer is a Bonjour printer and you will
need to add it again using its IP address.
65
‣
Select whether your printer is an IPP, LPD or HP JetDirect printer (your
printer’s administrator or its manual will be able to tell you which it is)
‣
Enter your printer’s IP address
‣
Wait until the system has determined your printer type. This is only possible
if the printer is reachable and responding.
‣
Click OK to confirm the printer selection
Page 66

FileMaker over VPN
If you work with FileMaker, we recommend using VPN Tracker’s →#Secure
Desktop to connect to your database over VPN. If you prefer, you can also ac-
cess your database directly from FileMaker, if you prefer.
To access a remote database in FileMaker:
‣
Open FileMaker
‣
Choose “File > Open Remote...“
‣
Select “View > Favorite Hosts”
‣
Click “Add“
‣
Host’s Internet Address: Enter the IP address of your FileMaker server (if
you are using remote DNS in VPN Tracker, it is also possible to use the
server’s host name instead)
‣
Favorite Host’s Name (optional): Enter a name for this FileMaker server so
you will recognize it later
‣
Click “Save”
‣
Select a database from the list of available Files and click “Open”
66
Page 67

VPN and Network Address
First IP Address
Last IP Address
Number of IP Addresses
192.168.0.0
192.168.255.255
65.536
10.0.0.0
10.255.255.255
16.777.216
172.16.0.0
172.31.255.255
1.048.576
moment! Instead, it makes a few changes to the sender’s information in the
request:
Translation (NAT)
VPN Tracker provides sophisticated tools to handle VPN
connections through routers that perform Network Address
Translation (NAT). This chapter explains in detail what
Network Address Translation is, the different NAT-Traversal
methods available, and how VPN Tracker assists you to make
NAT-Traversal as seamless as possible.
Private IP Addresses
In the early years of the Internet, each computer had a worldwide unique IP
address. When it became clear that the Internet was growing rapidly and
would soon run out of IP addresses, certain blocks of IP addresses were reserved for use on private networks. These private IP addresses can be used
over and over again in different private networks, they do not have to be
unique worldwide.
The following IP address ranges are reserved for private use:
‣
It replaces the private IP address of the sender with its own public IP ad-
dress.
‣
If necessary, it changes the outgoing network port number so no other
computer communicating with the recipient of the request uses the same
network port (it also remembers which port was used by which computer
on its private network).
It then forwards the request to the Internet.
When responses come back, the process needs to be reversed The response
will come back on the same network port the request was sent out. The router
can therefore easily look up which computer sent the original request.
‣
The router replaces the recipient of the response with the private IP ad-
dress of the computer who sent the original request.
‣
If it had to change the network port, the router puts back the original net-
work port.
It then forwards the response to its private network.
The entire process is called Network Address Translation (NAT ). If you have a
DSL or wireless router (e.g. an AirPort Base Station) at home, it is very likely
performing Network Address Translation. In most offices, hotels, and Internet
cafes you will be connecting to a private network that has a NAT router for
accessing the Internet.
Network Address Translation (NAT)
When a computer with a private IP address accesses the Internet, it sends the
request through its local router. The local router cannot simply forward the
request to the Internet: The sender’s private IP address is not unique outside
its particular private network, in fact there can be millions of computers on
the Internet worldwide that have the same private IP address at any given
NAT-Traversal
Network Address Translation can be a problem for VPN connections: For the
actual communication across the VPN, a network protocol called ESP is used.
Unless the TCP and UDP network protocols you may be familiar with, ESP
works independent of network ports. Since NAT depends on being able to use
network ports to identify the recipient of an incoming response, it cannot
work with ESP.
Several methods to deal with this have been developed. To use one of these
methods, it must be supported by both the router performing NAT and the
VPN gateway.
67
Page 68

IPSec Passthrough
The simplest method is called IPSec Passthrough. It works with all VPN gate-
1
. NAT routers supporting this method will just send ESP responses back
ways
to the last host who contacted the VPN gateway. Most routers have some limi-
tation on their IPsec Passthrough capability, for example it will often not work
if more than a single host needs to establish a VPN connection (to the same
VPN gateway).
NAT-Traversal (Early Drafts)
NAT-Traversal is the most flexible method. VPN Tracker simply wraps the VPN
communication (ESP) into regular UDP packets (which have port numbers).
The NAT router can then handle these UDP packets like it would do with any
UDP communication. On the other side, the VPN gateway needs to remove
the UDP “wrapper” before it can handle the VPN communication.
For NAT-Traversal to work, it needs to be specifically supported by the VPN
gateway and the local NAT router. The requirement for support from the VPN
gateway is obvious – it has to know that it needs to unwrap the UDP packets
before it sees the regular VPN communication. For the NAT router, it is less
obvious why they would need special support for NAT-Traversal. However,
older or less sophisticated VPN gateways often do not support NAT-Traversal.
They will simply discard UDP packets on this network port. To deal with this
problem, the final NAT-Traversal standard (RFC) changes the network port for
performing NAT-Traversal.
NAT-Traversal (RFC Standard)
Testing for NAT-Traversal Support
To successfully establish a VPN connection, VPN Tracker needs to know which
methods are supported by the VPN gateway and the local NAT router.
Finding out what the VPN gateway supports is very easy: The VPN gateway
will automatically tell VPN Tracker what it supports when a connection is being established.
For the NAT router, it's more difficult: Some will list it in their data sheet, for
others, it is only possible to find out by actually testing. Fortunately, you won’t
have to worry about this: VPN Tracker has a test built right in. This test is run
every time VPN Tracker encounters a new NAT router (it's the progress bar you
see before the VPN connection is established). Even though it may take a
short moment, it's very important to run the test! It only needs to run once at
any given location.
What does the test do?
The test connects to a VPN gateway at equinux using all three methods. VPN
Tracker remembers which methods worked, and from then on it will only use
the working methods.
The final NAT-Traversal standard (as well as late draft revisions) switch to network port 4500 as soon as NAT-Traversal is performed. This allows even rout-
ers built on the assumption that network port 500 is for ESP only to handle
with NAT-Traversal.
The final NAT-Traversal standard works with most NAT-routers and is also supported by many recent VPN gateways. However, older or less sophisticated
VPN gateways often do not support NAT-Traversal.
1 Some devices permit IPsec Passthrough to be turned off. In that case, it will obviously not work.
When is the automatic test not sufficient?
The automatic test will work in almost all situations. It will help you to get
hassle-free VPN connectivity at Internet cafes, hotels, airports – basically everywhere where you have little time and encounter NAT routers that may not
support all NAT-Traversal methods.
There is one specific situations in which the availability test may not give accurate results: Communication to your VPN gateway goes through a different
router than Internet traffic, or is treated differently (firewall rules etc.). Since
68
Page 69

the VPN gateway used for availability testing is located on the Internet, the
test results reflect the connectivity from your location to VPN gateways on the
Internet, but may not be accurate for the connection to your VPN gateway
that is handled differently.
In that case, you can open the VPN Availability Test and tell VPN Tracker to ignore the test results for this specific location.
To disable testing entirely, go to →#VPN Tracker Preferences.
What if my local router changes? What if a firmware upgrade changes its capabilities?
If you exchange the router for a different device, VPN Tracker will notice
automatically (it uses the router's hardware address (MAC) to remember
where it tested).
If only the firmware is updated, or you are using an Internet connection where
NAT-Traversal happens off-site at your Internet Service Provider (ISP), VPN
Tracker cannot detect it. In that case, please open the VPN Availability Test and
repeat the test.
69
Page 70

Certificates
What about Tokens?
We are using the term “smart card” to describe both an actual smart card
that is placed into a card reader, and a USB token with a non-removable
smart card chip that plugs directly into your Mac. From VPN Tracker’s perspective, there is no difference if the smart card chip is accessed through a
card reader, or built into a USB token.
There is also a another type of token on the market: These tokens generate
a one-time code (e.g. RSA SecurID). When using such tokens, the VPN gate-
way usually request the code through Extended Authentication (XAUTH). To
use such tokens in VPN Tracker, simply set up your VPN gateway according
to your vendor’s instructions and enable XAUTH in VPN Tracker.
This chapter describes how VPN Tracker can be integrated in
a PKI (Public Key Infrastructure) using digital certificates or
smart cards.
Getting Started
To use certificates with VPN Tracker, you will need certificates and a VPN
gateway that can authenticate users through X.509 certificates (RSA signa-
tures).
Obtaining Certificates
If you have an existing Public Key Infrastructure (PKI) that uses certificates:
‣
Certificates (and private keys for the client/user certificates) need to be
available in a format supported by the Mac OS X keychain. If your users already have their certificates in their Mac OS X keychain, there’s nothing that
needs to be done.
If you have an existing Public Key Infrastructure (PKI) that uses smart cards:
‣
Software is required to make your smart card certificates available in Mac
OS X through the keychain. If you have already installed your vendor’s
driver or software, you can easily determine if it satisfies this requirement
by checking if your smart card appears as a keychain in the Mac OS X Keychain Access application (Applications > Utilities > Keychain Access)
‣
If your vendor does not provide the necessary software, there may be a
third party solution available
If you do not have an existing Public Key Infrastructure (PKI) in place:
‣
Use the Certificate Assistant built into the Mac OS X Keychain Access application to create certificates (Keychain Access > Certificate Assistant). Some
VPN gateways also can create and export certificates.
VPN Gateway Prerequisites
‣
Your VPN gateway must support the use of authentication based on digital
certificates (X.509 certificates)
‣
Configure your VPN gateway for certificate-based authentication. Refer to
your vendor’s documentation for details.
Certificate Management in Mac OS X
To use certificates with VPN Tracker, the certificates must be
available in a keychain. This chapter therefore will first cover
the basics of certificate management using the keychain on
Mac OS X, before showing how to include certificates in
VPN Tracker.
In Mac OS X, certificates (and their private keys) are stored in keychains. Keychains are managed using the Keychain Access application (found in Applica-
tions > Utilities).
A keychain protects the private key by only permitting access if the keychain
has been unlocked using the appropriate password. Also, if applications attempt to access a private key in a keychain for the first time, the user is asked
to permit access, even if the keychain is unlocked. By default, a user has a single keychain, the login keychain, protected with their password. It is possible
to change the login keychain’s password to a different one, and to create additional keychains.
70
Page 71

Importing Certificates
Certificate Authorities (CAs) on Mac OS X 10.4 Tiger
On Mac OS X 10.4, certificate authorities must be placed in the X.509 Anchors keychain. It is not possible to set certificate authorities as trusted that
are not in this special keychain.
Certificates can be imported into a Mac OS X keychain using any of the usual
certificate formats (PEM, DER, PKCS#7, PKCS#12). To import a certificate, simply
double-click the certificate file, or choose “File > Import Items...” in Keychain
Access.
If the certificate contains a private key and the certificate file is protected by a
password, you will be asked for this password:
If the certificate contained a private key, you will see both the certificate and
its private key in the list after importing. A combination of a certificate and its
private key is called an identity in Mac OS X.
If only the public part of the certificate was imported, you will see only the
certificate listed after importing.
Checking a Certificate’s Trust
Keychain Access easily lets you see if a given certificate is trusted, and if not,
why not. Simply select the certificate and examine the top part of the Key-
chain Access window (if the details are not visible, use “View > Show Summary” to display them):
Importing Certificate Authorities
Importing a certificate authority works the same as importing a regular certificate. After importing, you will be asked if you want to trust this certificate
authority. If you choose “Always Trust”, certificates signed by this certificate
authority will be trusted automatically in the future.
71
Page 72

Which Certificates Do I Need?
You can easily check if a private key is available for a given certificate by selecting the “My Certificates” category in the left col-
umn in Keychain Access. If a certificate appears there, it has a
private key available.
Make sure your VPN gateway is already configured for
certificate-based (X.509 certificates / RSA signatures) authentication before starting to configure VPN Tracker.
To use certificate-based authentication in VPN Tracker, you will need the following certificates in your Mac OS X keychain:
VPN Client:
‣
VPN client (VPN user) certificate and
‣
Private key belonging to the VPN client (VPN user) certificate
VPN Gateway (optional):
‣
VPN gateway’s certificate (without the private key) or
‣
Certificate authority (CA) that signed the VPN gateway’s certificate. Its certificate must be set as trusted on your Mac. The VPN gateway must be ca-
pable of sending its actual certificate upon connection initiation, which is
the case for almost all VPN gateways
Selecting Certificates in VPN Tracker
If you have not yet done so, set the authentication method to “Certificates”.
In the certificate selection window, select your certificate(s). The certificate
selection window opens automatically if you are not yet using certificates. If
you have already selected some certificates earlier, click the “Edit” button on
the Basic tab.
72
Page 73

Local Certificate
Inspecting a Certificate
Click the triangle to see the details for the selected certificate.
Even though CA certificates may show up in the list, you should
selecting a CA certificate as the remote certificate will not work.
Certificates and Exported Connections
Certificates are never included in an exported connection, since most organizations with a PKI infrastructure already have well-established (and se-
cure) procedures of distributing certificates to users in place. The exported
connection does include the information which certificates were selected.
When exporting for use with a Personal or Professional Edition license:
‣
If the selected certificates are present on the recipient’s Mac, VPN Tracker
will use these certificates
‣
If the selected certificated do not exist on the recipient’s Mac, the recipient will be able to select different certificates
When exporting for use with a Player Edition license, or when exporting a
locked connection:
‣
The recipient will not be able to edit their VPN connection settings. It is
therefore important to select the correct certificates before exporting
Certificate Identifier Types
A “Local (Remote) Certificate” identifier will technically be sent as an identifier of type ASN.1 Distinguished Name (DN). On your VPN gateway, such an
identifier may also be called simply Distinguished Name or Subject.
The local certificate is the certificate you are using to identify to the VPN
gateway as a user/client. It is sometimes called client certificate or user certifi-
cate. A private key is required for the local certificate, since it must sign messages to the VPN gateway.
If you cannot find your certificate here even though you have imported it into
the Mac OS X keychain, make sure the corresponding private key is also available in the keychain. You can easily check that by selecting the “My Certifi-
cates” category in Keychain Access. If it does not appear there, the private key
is missing.
Identifiers Based on Certificates
It is possible to use the information from certificates as an identifier for the
VPN connection. To do this, set the Local (Remote) Identifier to Local (Remote)
Remote Certificate
The remote certificate is the VPN gateway’s certificate. A private key is not
needed. There are two options:
‣
Select your VPN gateway’s certificate or
‣
Select “Use certificate supplied by peer”
gateway sends upon connecting, and verify it against the certificate
authorities installed on your Mac. If verification fails, you will be prompted
to verify the certificate manually.
1
to use the certificate the VPN
Certificate". VPN Tracker will then use the certificate’s information (such as
subject, organization, country etc.) as the identifier for the connection.
Advanced Certificate Settings
1 Locked connections require the VPN gateway certificate or a trusted CA that signed the certificate. If your VPN gateway is not capable of transmitting its certificate, the certificate is always required.
There are several settings on the Advanced tab that influence how certificates
are verified. These options should usually be left enabled. For more informa-
tion, see the →#Settings Reference
73
Page 74

Using Smart Cards
Storing certificates on a smart card provides even more security than using
certificate-based authentication with certificates stored locally on your Mac.
This chapter shows how to set up smart card based authentication with VPN
Tracker using Aladdin eToken.
Vendor Software Installation
To access your smart card on your Mac, you will first have to install the software provided by your smart card vendor. The following steps show the software installation for Aladdin eToken.
Step 1 – Start the installation
Step 2 – Follow the installation wizard
Step 3 – Finish the installation by logging out
‣
The installation program will guide you through the necessary installation
steps
‣
Make sure to carefully read all instructions
74
‣
When the installation has finished, you will have to log out (and log back
in) to complete the installation.
‣
The installation will provide you with two software applications. The PKI-
Monitor allows you to monitor the attached eToken devices, and the eTo-
ken Properties application lets you configure your eToken and import cer-
tificates onto the device.
‣
Please refer to your vendor’s documentation for additional details on how
to set up your smart card or token.
Page 75

Verifying Access
To verify that you are indeed able to access your smart card or token through
the Mac OS X keychain, start the Keychain Access application. You should be
able to find your token in the keychain list on the left (use “View > Show Keychain List” if the keychain list is not displayed).
If you have not done so yet, import or create your certificates on the smart
card now. The best way to do this is through the software tools provided by
your smart card vendor (such as through the eToken Properties application
when using Aladdin eToken). Make sure that the private key for your client/
user certificate is also present on the smart card. You can easily verify this by
selecting the “My Certificates” category in Keychain Access. If the certificate is
displayed there, the private key is available.
Selecting Smart Card Certificates in VPN Tracker
Selecting a certificate located on a smart card works exactly the same as selecting a regular certificate. Please refer to “Selecting Certificates in VPN
Tracker” for details.
75
Page 76

Troubleshooting Certificates
If you do not have the possibility to recreate the certificate, put
the offending certificate into a separate keychain
Most errors can be resolved quickly by carefully following the hints given by
VPN Tracker in its log. However, here are some frequently asked questions that
cannot be covered by the log hints.
My connection works fine, but I am prompted for my keychain password or
keychain access permission every time I connect
‣
If you are using a smart card, this behavior is inherent to the way smart
cards work, storing the access code is not possible
‣
If you are using normal certificates stored in your keychain, please make
sure the Mac OS X keychain subsystem has write access to the keychain
that your certificate and private key are stored in, and to the folder the keychain is in. You can run the Keychain First Aid tool that is part of Keychain
Access (Keychain Access > Keychain First Aid) to verify permissions.
My certificate is only in the Remote Certificate list, however, I want to select
it as the Local Certificate
A certificate that is to be used as the local certificate must have its private key
stored in the keychain (or on the smart card). If a certificate does not have a
private key available, it will not be displayed in the Local Certificates list.
I cannot add my certificate to the keychain: Keychain Access keeps
complaining that the certificate already exists, but I searched for it and it is
not there!
A certificate is uniquely identified by the combination of issuer (i.e. the certificate authority signing it), and the serial number. If your keychain already contains a certificate issued by the same certificate authority with the same serial
number, it will not be possible to add another certificate with the same issuer
and serial number combination, even though the rest of the certificate may
be completely different.
Unfortunately, it is fairly easy to accidentally create certificates with duplicate
serial numbers when using the Mac OS X Certificate Assistant. There are two
possible ways of resolving this problem:
‣
Recreate the certificate using an unused serial number (in Certificate Assistant, check the box “Let me override defaults” to modify the serial number)
I followed the advice in the log and double-checked my configuration, but
the connection still fails
Before contacting technical support, please run the Keychain First Aid tool
that is part of Keychain Access (Keychain Access > Keychain First Aid). Then try
connecting again. Also double-check that you have selected the correct certificates. A certificate authority (CA) certificate should never be selected as the
local or remote certificate.
If the problem persists, and you need to contact us, please include the following information with your support request:
‣
A Technical Support Report from VPN Tracker (Help > Generate Technical
Support Report)
‣
Screenshots of the VPN configuration on your VPN gateway, if possible
‣
The output of the Terminal command
ferred), or screenshots of the details of all certificates used with the con-
nection: In Keychain Access, select each certificate and choose “File > Get
Info”. Make sure the details are visible (click the triangle, if necessary) and
take a screenshot of the details.
security dump-keychain (pre-
76
Page 77

Further Resources
VPN Tracker
VPN Tracker Interoperability Website
Lists device compatibility and provides configuration guides for many popular
VPN gateway devices.
http://vpntracker.com/interop
VPN Tracker Support Website
Large database of Frequently Asked Questions (FAQs), as well as downloads
and the possibility to contact technical support.
http://vpntracker.com/support
Computer Networking and VPNs
The TCP/IP Guide
An book on networking and the most popular networking protocols. Also
available for free to read online.
http://www.tcpipguide.com
Wikipedia
‣
Internet Protocol (IP)
http://en.wikipedia.org/wiki/Internet_Protocol
‣
Subnets and Network Addressing:
http://en.wikipedia.org/wiki/Subnetwork
‣
Private IP Addresses
http://en.wikipedia.org/wiki/Private_network
‣
Network Address Translation (NAT)
http://en.wikipedia.org/wiki/Network_address_translation
‣
DNS
http://en.wikipedia.org/wiki/Domain_Name_System
‣
IPsec
http://en.wikipedia.org/wiki/IPsec
77
Page 78

Keyboard Shortcuts
Action
Shortcut
Managing connections
Start connection
⌘-Return
Reconnect
⌘-Option-Return
New Connection
⌘-N
New Connection Group
⌘-Option-N
Delete Connection
⌘-⌫
New Secure Desktop
⌘-Shift-N
Edit Secure Desktop
⌘-Shift-E
Tools
Test VPN Availability
⌘-Option-W
Ping Host…
⌘-Option-P
Show global log window
⌘-Option-L
Export & Deployment
Import Connection…
⌘-Option-i
Export Connection…
⌘-E
Prepare Deployment…
⌘-Option-Control-D
Action
Shortcut
Window shortcuts
Show / Hide Connection window
⌘-1
Show / Hide Connection Details
⌘-i
Application shortcuts
Preferences…
⌘-,
Hide VPN Tracker
⌘-H
Hide Others
⌘-Option-H
Close Window
⌘-W
Minimize Window
⌘-M
Quit VPN Tracker
⌘-Q
Here are some of the most useful keyboard shortcuts
supported by VPN Tracker.
78
 Loading...