

Equila TONAL EQ Instruction Manual
EQUILA
Instruction Manual
V1.0.1
Rack Extension for Reason
Instruction Manual

Page 2
EQUILA
Instruction Manual
V1.0.1
Contents
Page Subject
3: Thank You, Acknowledgements & Dedications
4: Introduction
5: A brief guide to Equila
9 : Working with Equila
12: Using the Dual Function Display
13: Selecting the different slopes and using the controls
14: CV Inputs & controls
15: MIDI Implementation chart
16: How to ‘latch’ your own MIDI via Remote Overriding
18: Appendix 1: Instrument frequency ranges
20: Appendix 2: EQ Tables
22: Licence Agreement

Page 3
EQUILA
Instruction Manual
V1.0.1
THANK YOU
We thank you for expressing your confidence by purchasing one of our equalizers; in this case the
Equila 3 Band Tonal EQ. This 2-channel high-quality equalizer was designed with our experience of
both filtering capabilities in the digital realm as well as the crafting of audio for all types of users;
producers, engineers and artists alike.
We hope you continue to enjoy using Equila in your projects for now and for future.
Lab:One Recordings © 2017
ACKNOWLEDGEMENTS
Thanks to all of the Lab One Alpha Team for all the testing, comments, suggestions and feedback, as
well as aiding us to bring our products to you.
Propellerhead Software (for Reason, the SDK and the concept of the Re)
Presets designed by:
DEDICATIONS
This Re is dedicated to all the Propellerhead Reason users & forum threaders, friends, & colleagues
we have spoken to over the years.
DjFresha: Thanks goes out to my studio buddies; Dos aka Ocro, Dj EQ, for the support & feedback,
shouts go out to all who know me; Ben ‘Devious’, Andy ‘Ruthless’, Scott ‘Sniper’, the REBIRTH crew
and SCHTUM massive (Pete C, Kalist, Aybee), and all who continue to work with and support us.
Also not forgetting my family for the support, and last but by no means least, my wife Alicia who
now enjoys the fact that we can bring products to your guys faster is now a happy bunny :D
Now let’s get into Equila….

Page 4
EQUILA
Instruction Manual
V1.0.1
In
InIn
Introduction
troductiontroduction
troduction
Equila is a dedicated rack unit, built as a Rack Extension for the Propellerhead Reason environment.
This device has a maximum of what would be 1U space in the real world – the classic 19in rack unit.
Being a Rack Extension (Re), this gives you various options of versatility within your projects.
Equila features at a glance:
3 band stereo-linked filters, dedicated to their audio spectrum regions
(Low, Mid and High band ranges)
2 Filter modes for Low and High bands (shelving and passing)
2 slope modes for all 3 bands (12dB/octave & 24dB/octave)
Frequency multiplier for Mid band, to allow high frequency control
Dedicated CV controls linking to all knob controls
Dual Function Display, for input & output metering, plus EQ curve plot mode
‘Ears only’ mode to disable the display
True stereo processing (allowing for dual mono inputs to be process together)
EQ enable mode
Warmth function with pre- and post-EQ routing
Rear ‘state’ indicator for the device (perfect for back-of-the-rack users)
All these controls are adjustable to suit your application, and these settings can be stored as part of
a Combinator preset (when combined) as well as settings stored within your project. Due to the
minimal amount of controls needed, the need for presets is not required due to the efficiency and
speed you can dial in your settings.
Equila features two audio inputs and two audio outputs, which are processed independently; this
allows you to have two totally separate signals being processed together at the same time using
one set of controls. Mono operation is also an option (see ‘How to connect audio’ section).
For reference, the 3 band ranges of Equila are:
Low band: 20Hz to 300Hz
Mid band: 200Hz to 5kHz / 800Hz to 20kHz (with frequency multiplier active)
High band: 1.5kHz to 16kHz
Equila is designed to be a transparent effect, meaning that if no adjustments are made on the
device, the audio passing through the effect is ‘clean’ and has not been affected by the equalisation
filters or the low pass or high pass filters. This is the ideal, so that no coloration is applied to the
sound.
Page 5
EQUILA
Instruction Manual
V1.0.1
A brief guide of Equila
Equila is based on a 3 band equalizer unit that may be commonly found on console units as well as
19in rack units.
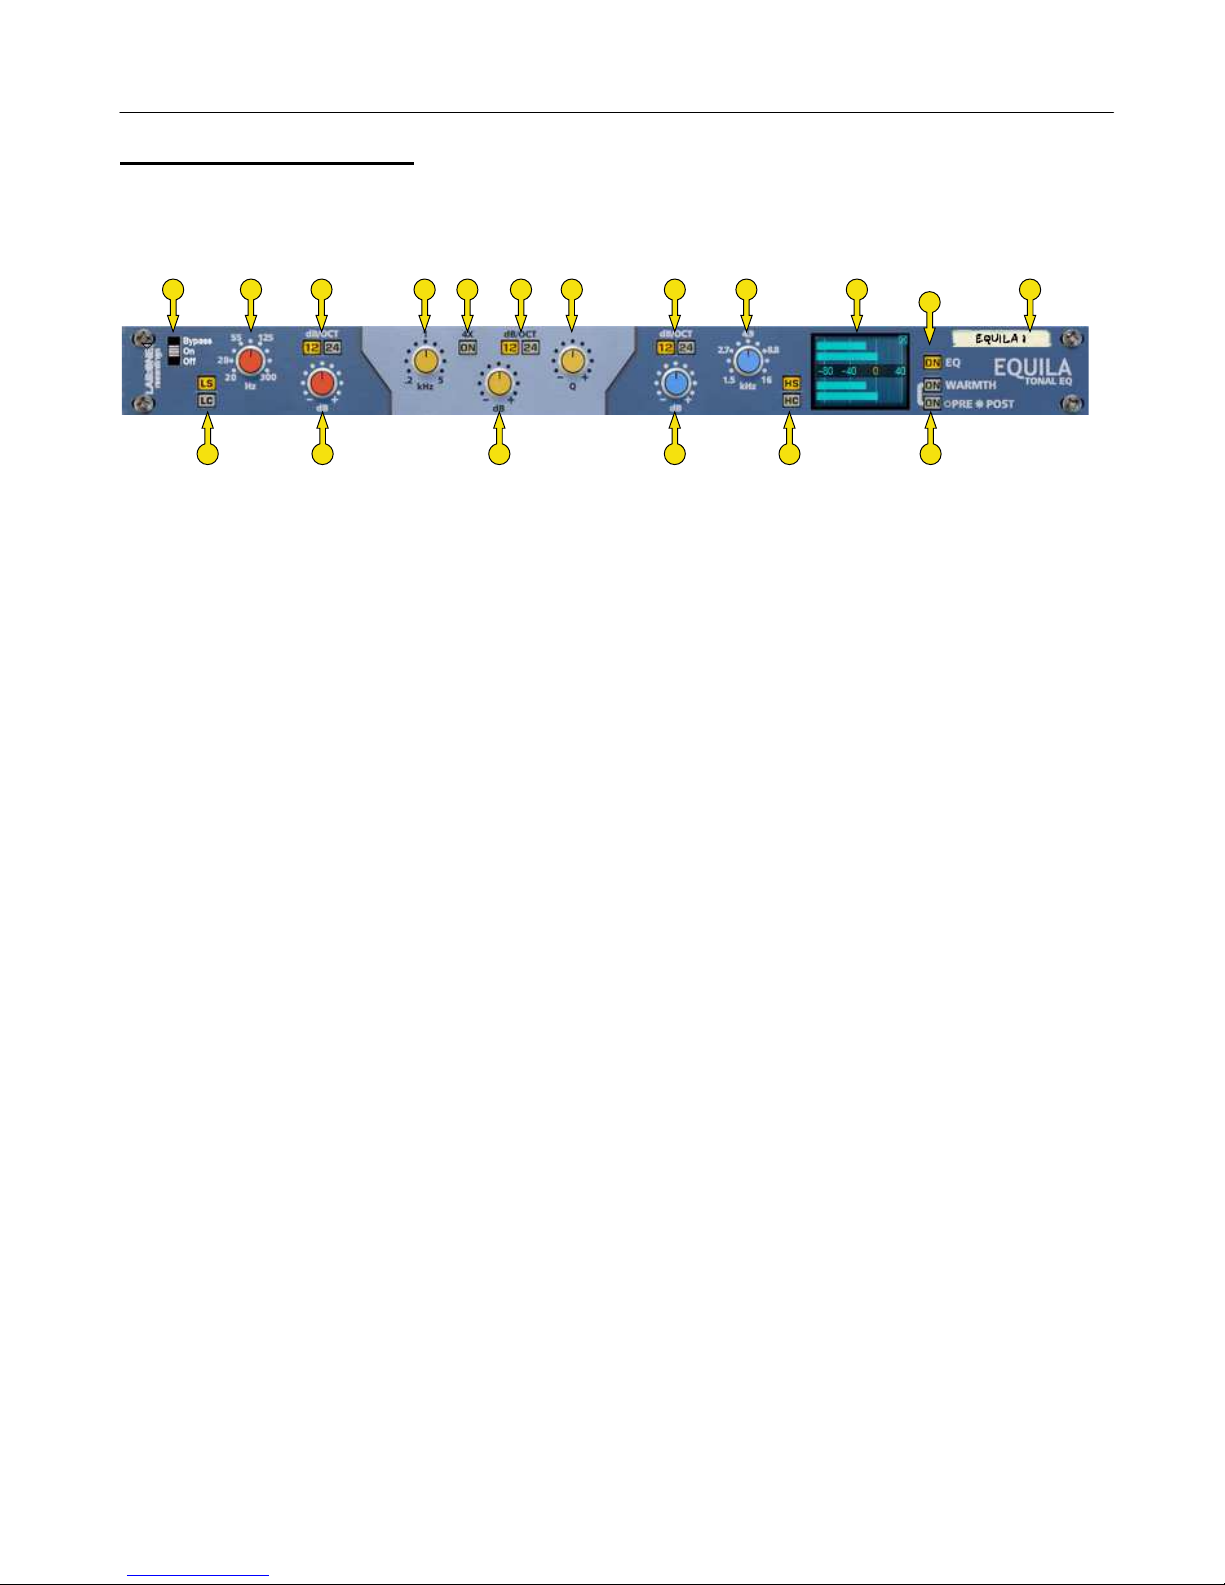
A C D F G J K L
N
Q T
R
B E M P SH
The Front Panel
A] Bypass Switch (Bypass effect / Enable effect / Disable effect)
B] Low Band Filter mode selector
C] Low Band Frequency
D] Low Band Slope
E] Low Band Gain
F] Mid Band Frequency
G] Mid Band Frequency Multiplier
H] Mid Band Gain
J] Mid Band Slope
K] Mid Band Resonance
L] High Band Slope
M] High Band Gain
N] High Band Frequency
P] High Band Filter mode selector
Q] Dual Function Display
R] EQ Enable
S] Warmth Enable and Routing mode
T] Device Label
The folded front view includes the Bypass switch (A) and the Device Label (T).

Page 6
EQUILA
Instruction Manual
V1.0.1
Each band comes with a frequency setting. This determines the point of ‘action’ where the filter starts to
work on the signal. Depending on the Slope, the Mode, the Frequency and in the case of the Mid Band
Resonance control determines the final effect on the processed audio.
Low Pass and High Pass filters attenuate the signal below (for Low) and above (for High) up to the
frequency centre. This can help to remove rumble when using Low Pass, while cutting harsh or headroom
eating high end frequiencies can give you more level to play with.
Low Shelf and High Shelf filters work very much alike the tone controls you find on high grade studio
equipment to more commonly found consumer equipment such as radios, TVs, home stereo systems and
personal audio devices. Boosting or cutting with shelf filters can make equalizing sound more natural
than Low Pass / High Pass filters, which can make the listening experience more enjoyable.
The Mid Band filter is a parametric EQ filter which can be very broad (low Q, 12dB setting) to very tight
(high Q, 24dB setting) which can allow a wide range of applications, from a mid-frequency tone control
style setting to a surgical treatment tool.
Each band employs a gain control of +/-18dB level. When used with the Low Pass / High Pass filters, the
signal post filter can be attenuated. This can be useful if you find that cutting some frequencies results in
a lower signal level so the gain control can readjust the level back up. NOTE: CARE MUST BE TAKEN
WHEN SWITCHING FILTER MODES WITH HIGH GAIN. If you wish to change modes, stop audio processing,
change the mode and be aware of the gain control setting before applying to your signal. This method
will ensure that you save your speakers but more importantly your ears.
The Warmth function introduces a more ‘analog’ style sound akin a real-world rack counterpart.
Warmth also allows for high drive without overloading (softclipping). The routing option allows you
to choose if you want to apply warmth to the signal post EQ processing or pre-EQ processing. The
key difference is that when in POST mode, the warmth level is a constant, whilst in pre-EQ mode the
warmth function is applied to the signal then the EQ controls can affect the ‘warmed up’ audio. Try
this out to see which you prefer.
The EQ Button allows you to bypass the equalization process within Equila, so you could use just the
Warmth section on audio alone.
The Dual Function Display allows the user to change the view of Equila from the EQ plot chart to
audio metering, by simply clicking the display.
Page 7
EQUILA
Instruction Manual
V1.0.1
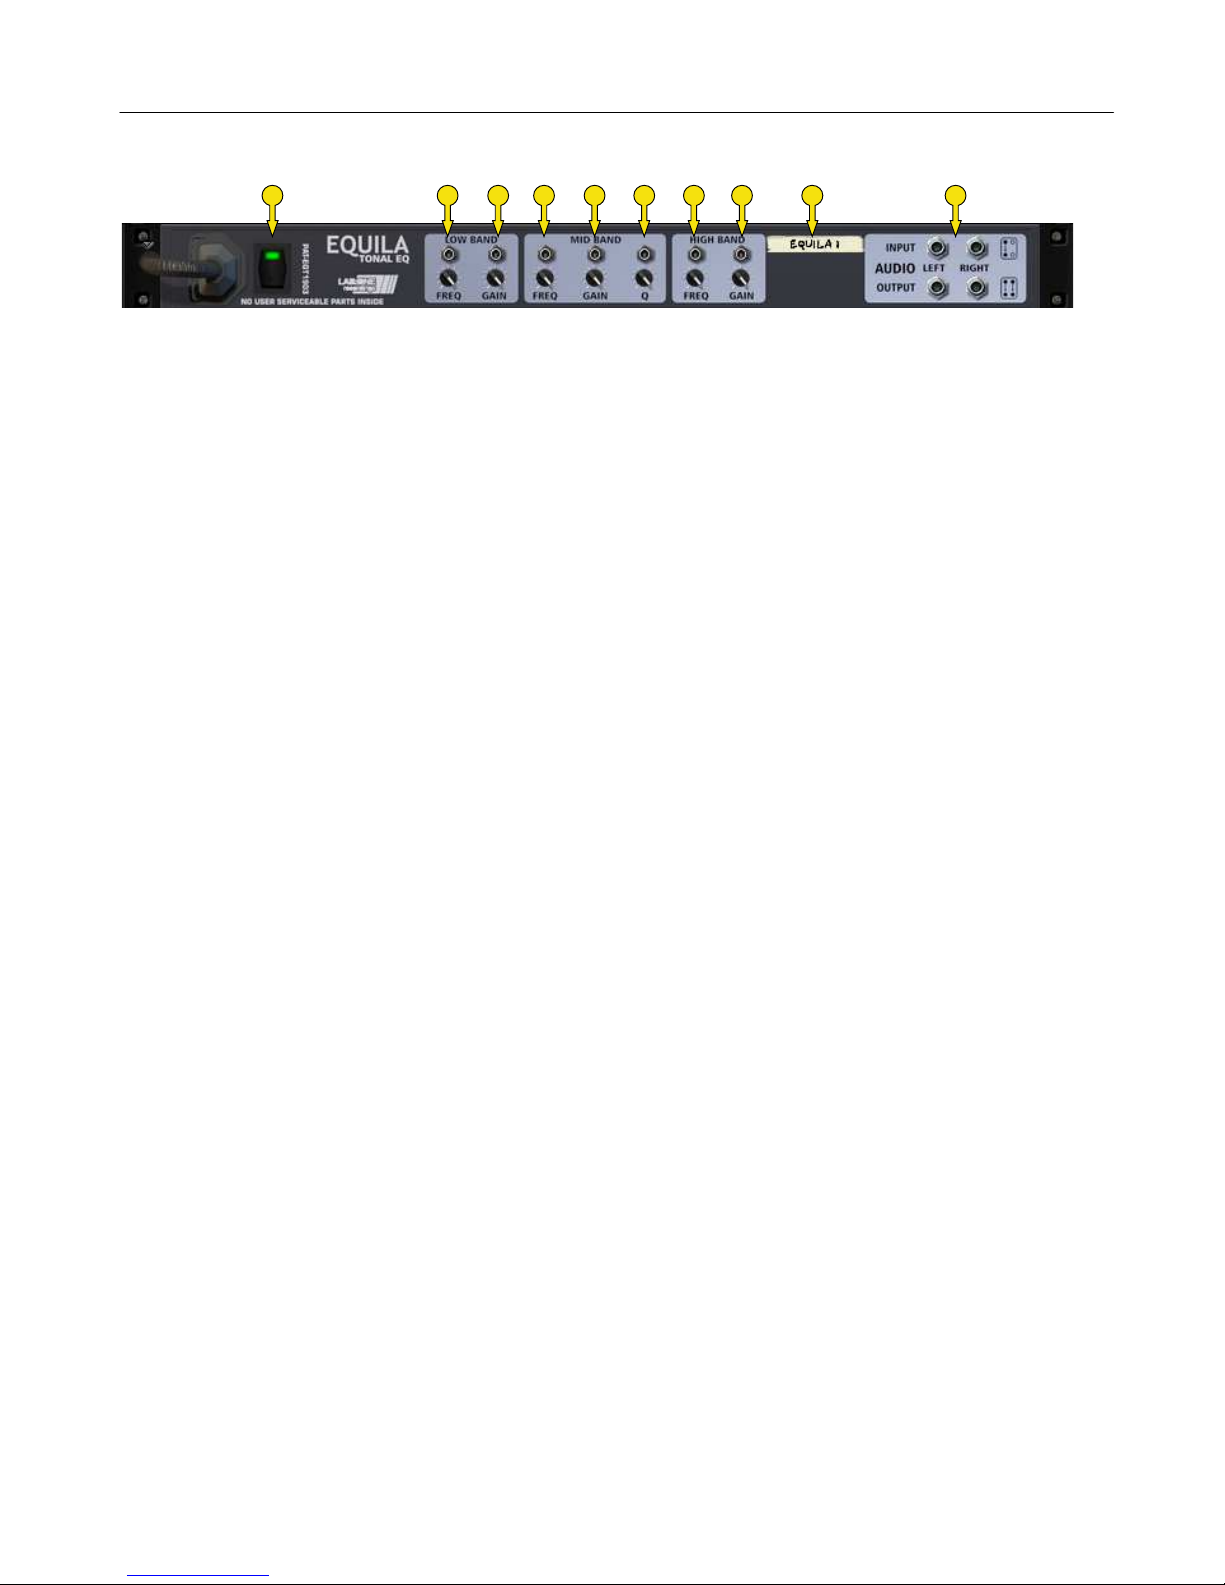
A B C D E F G H J K
The Back Panel
A] State indicator
B] Low Band Frequency CV + trim controls
C] Low Band Gain CV + trim controls
D] Mid Band Frequency CV + trim controls
E] Mid Band Gain CV + trim controls
F] Mid Band Q CV + trim controls
G] High Band Frequency CV + trim controls
H] High Band Gain CV + trim controls
J] Device Label
K] Audio Input & Output sockets
The Audio Inputs & Outputs [K] are used to connect Equila to various modules within the Propellerhead
Reason environment, in a form of either an insert or a send effect
Connecting up the audio sockets can be done automatically by Reason, or can be manually done to your
own requirements. Mono devices, when connecting a new Equila to them, can automatically route their
mono signal in to the left channel, and the left output of Equila is connected to the originally wired
socket of the mono device, closing the audio loop. Stereo devices can automatically connect their outputs
to the left and right inputs of Equila, and Equila completes the audio chain by connecting its outputs to
the originally connected stereo pair sockets.
Each audio socket processes the audio separately from each other within Equila. Left and right channels
never mix within Equila. This ensures that if you have two separate mono devices connected to Equila,
the settings on Equila affect both channels at the same time with the same amount of equalization
effect.

Page 8
EQUILA
Instruction Manual
V1.0.1
How to connect audio
To connect Equila you can use Reason’s own auto-connection system, and Equila will decide the best
way to auto-wire; if you have a mono-output device (Subtractor, for example), and you wish to add
Equila to it, Equila will auto-connect the Subtractor output to the Left input, and then continue to
route the Left output of the Equila to the Left input of the mix-channel (or next device in your
processing chain).
You can do any of the following to create Equila;
a) right-click (Win) / CTRL-click (Mac) on the device, select ‘Create Device’, choose sub-menu ‘Studio
Effects’, and select ‘Equila 3 Band Tonal EQ’ from the listing.
b) with the device selected, use the ‘Create’, select ‘Create Device’, choose sub-menu ‘Studio Effects’
and select ‘Equila 3 Band Tonal EQ’ from the listing
c) using the Tool Palette in Reason (F8), select ‘Studio Effects’ when in the ‘Devices’ tab, and locate
the ‘Equila 3 Band Tonal EQ’ device, click on the icon and drag it to the device you wish to add it to.
 Loading...