

Page 1
®
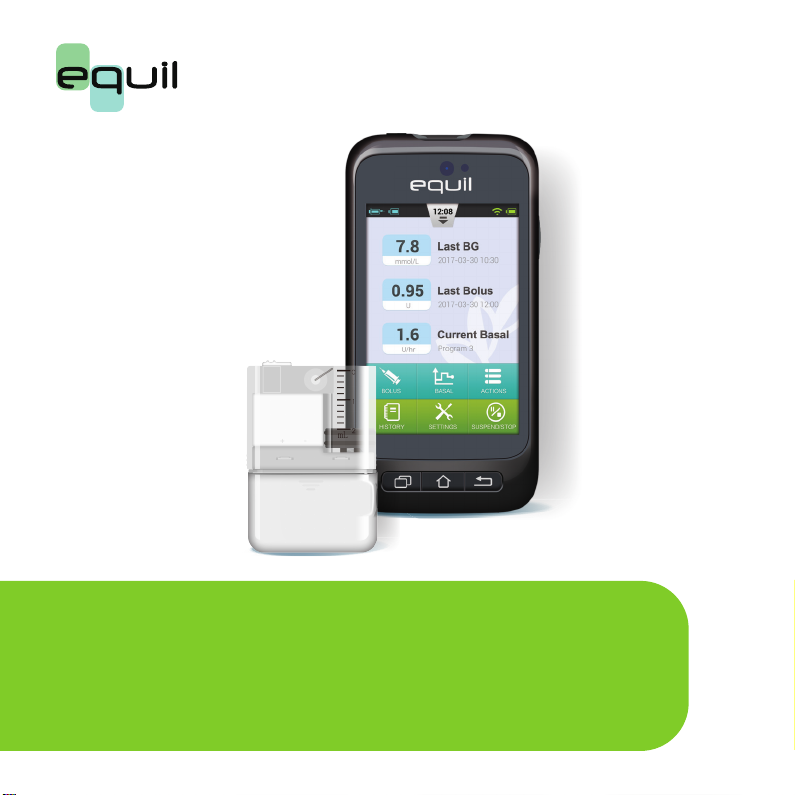
Patch Insulin Pump System
MTM-I
Patch Insulin Pump System
Instruction Manual
Page 2

Table of Contents
1 Foreward 1
2 Brief Introduction 1
2.1 Indications 1
2.2 Patients 1
2.3 Contraindications 2
2.4 Before Use 2
2.5 How to Use This Guide 3
2.6 Getting Help 3
2.7 Prepare for Emergencies 4
2.8 Insulin Pump Precautions 4
2.9 Portable Diabetes Assistant
(PDA) Precautions 5
2.10 Blood Glucose Test Module
Precautions 5
2.11 Important Safety Information 6
3 Component Descriptions 8
3.1 Pump System Components 8
3.2 Accessories 8
4 Getting Started 11
4.1 PDA Setup
11
4.2 Charging the Batteries 15
4.3 Settings Wizard 17
4.4 Home Screen 24
4.5 Lock Screen 27
5
Basal Rate Adjustment 29
5.1
Understanding Basal Rate
5.2 Base Basal Rate 29
5.3
Editing Basal Programs (List Display)
5.4
Editing Basal Programs (Graph Display)
5.5 Activating a Basal Program
5.6 Temporary Basal Rate 35
5.7 Settings 36
6
Boluses 38
6.1 Understanding Boluses 38
6.2 Manual Boluses 38
6.3 Bolus Presets 39
6.4 Extended Boluses 41
6.5 Quick Bolus 44
6.6 Canceling a Bolus 46
6.7 Settings 47
29
29
33
34
Page 3

7
Therapy Setup 49
7.1
Infusion Set Setup 49
7.2
Removing the Infusion Set 51
7.3
Filling the Reservoir 51
7.4
Assembling Reservoir to Pump
7.5
Disassembling the Reservoir 55
8 Replacing the Patch Pump
9 Replacing the Reservoir
9.1 Setup 64
10
The Built-in Blood Glucose Meter 70
10.1 Operating Principle 70
10.2 Application 70
10.3 Blood Sampling 70
10.4 Lancet Removal 73
10.5 Ejecting Test Strips 75
10.6 Testing Blood Glucose 75
10.7 Comparing Meter and Lab
Results 77
10.8 Quality Control Tests 78
10.9 Entering Your Glucose
54
56
64
Reading Manually
10.10 Settings 82
10.11 Blood Glucose Meter
Troubleshotting
11 Bolus Calculator 85
11.1 Introduction 85
11.2 Using the Bolus Calculator
11.3 Settings 89
12 History 91
12.1
Viewing Your History 91
12. 2
Historical Averages 93
13 General Settings 95
13.1 Time and Date 95
13.2 About the System 95
13.3 Language 96
13.4 Memory Card 96
13.5 Display 96
13.6 User Settings 97
13.7 Bluetooth 97
14
Additional Features 100
81
84
86
Page 4

14.1 Audio Player 100
14.2 Auto-Off 100
14.3 Food Database 100
15
Suspend/Resume 101
15.1 How to Suspend/Resume
16
Alarms and Troubleshooting
16.1 Patch Pump Alarms
16.2 PDA Alarms
16.3 Alarm System Delay 107
17
Maintenance 108
17.1
Cleaning 108
17. 2
Avoid Extreme Temperatures
17. 3
Avoid Immersion in Water
17.4
Test Strips 109
17. 5
Control Solution
17.6
X-Ray, MRI, and CT Scans
17.7
Wireless Connection 112
17. 8
Precautions 112
17.9
Disposal 113
17.10 Transportation 113
17.11 Storage 113
101
103
105
106
108
109
110
112
17.12 Other Considerations 114
18 Specifications 115
18.1 General Specifications 115
18.2 Delivery 116
18.3 Blood Glucose Meter 116
18.4 Bolus Calculator 117
18.5 Bolus Delivery 117
18.6 Infusion Precision 117
18.7 Occlusion Detection
(Maximum Infusion Pressure) 118
18.8 Occlusion Alarm Time 118
18.9 Overdose/Underdose 118
18.10
Electromagnetic
Compatibility 119
19
Appendix 124
19.1 Symbols 124
Page 5

1 Foreward
2 Introduction
Thank you for choosing the Equil
patch insulin pump system. We believe
that Equil
of your diabetes and will help you live a
healthy and active life.
you understand insulin pump therapy and
the operation of your Equil® patch pump.
We strongly recommend that you work
closely with your healthcare professional
to ensure you understand the pump
functions and can begin therapy safely and
effectively.
1
®
will help you gain better control
This user guide is designed to help
Equil® Patch Insu lin Pump System
®
2.1 Indications
This product is intended for
subcutaneous (beneath the skin) delivery
of insulin at set and variable rates for
the management of diabetes mellitus
in persons requiring insulin and for the
quantitative measurement of glucose in
fresh whole capillary blood (in vitro).
2.2 Patients
This insulin pump system is suitable
•
for patients with diabetes requiring shortterm or long-term insulin pump therapy.
The blood glucose test func tion of
•
the portable controller is suitable for
measuring the blood sugar level of whole
blood samples that meet the following
requirements:
Hematocrit range of 30% to 55%.
1
Triglyceride concentration does
2
not exceed 3,000 mg/dL or cholesterol
Page 6

concentration does not exceed 500 mg/dL.
Non-critically ill patients (such as those
3
with severe dehydration or ketoacidosis,
etc.).
2.3 Contraindications
Patients who:
Are unwilling to receive insulin
•
treatment.
Are unable to control their blood
•
glucose, or unwilling to implant
a cannula.
Suffer from alcoholism, drug
•
abuse, severe mental disorders (such as
depression,schizophrenia).
Suffer from allergies, including
•
allergies to insulin and severe skin
irritation.
Are unconscious.
•
Unable to understand or master
•
insulin therapy concepts.
Have severe hearing or vision
•
impairment.
Are elderly and living alone.
•
Are children too young to administer
•
diabetes therapy themselves.
2.4 Before Use
Before starting to use your Equil
system, your healthcare professional
should provide some impor tant
information regarding the management
of your diabetes. If you have further
questions regarding this information,
please contact your healthcare
professional for more guidance.
Basal Rate
1
Basal insulin is administered to
maintain target blood glucose levels
when not eating. You can conf igure up to
three basal programs with Equil, which
can help you adapt to different situations
(for example, workdays, weekends, and
sick days). Each basal program can be
configured with up 48 scheduled basal rate
changes within one day. However, if you
are new to using an insulin pump, you may
decide to only use one or two basal rates
during the day.
Active Insulin Time
2
The length of time that insulin
Equil® Patch Insu lin Pump System
2
Page 7
remains active and available in your body
after a correction bolus. Quick acting U100
Insulin should be used in the pump.
3
Target Blood Glucose Level
Insulin pump therapy requires a
target blood glucose level. The purpose of
an insulin pump is to keep the patient’s
blood glucose within a target blood
glucose level range.
Insulin Sensitivity Factor
4
How much one unit of insulin can
decrease blood glucose level. This number
is used to calculate bolus injection
amounts.
Carbohydrate Ratio
5
The number of grams of
carbohydrates that can be covered or
disposed by 1 unit of insulin.
2.5 How to Use This Guide
We recommend that you read this
user guide thoroughly. Your healthcare
professional can help you understand the
usage in even greater detail.
Please read this user guide carefully
in the correct chapter order. In many cases
subsequent chapters refer to information
detailed in previous chapters.
Note
This user guide shows sample
screens only. Your personal
diabetes controller (PDA) screens
may be slightly different.
2.6 Getting Help
This user guide describes the insulin
pump system in great detail. However, you
should still consult with your healthcare
provider for guidance. New users should
consult a healthcare professional to help
with first time setup and training of the
insulin pump system.
Please seek help from your healthcare
professional if you encounter problems.
MicroTech can provide technical support
for the device, but cannot provide
treatment advice for your medical
condition.
Equil® Patch Insu lin Pump System
3
Page 8

2.7 Prepare for Emergencies
Patients with diabetes should always
carry an emergency kit to quickly respond
to any diabetes emergencies. Your
emergency kit should include the following
items:
Blood glucose test strips
•
Ketone test supplies
•
1-2 sets of pump disposables
•
(reservoirs, infusion sets, etc.)
PDA and Pump battery chargers
•
Alcohol prep swabs
•
Backup pump battery
•
Vial of rapid acting U-100 insulin that is
•
approved for your pump
Syringes for manually injecting insulin
•
Glucose tablets or another fast-acting
•
source of carbohydrates
Instruc tions from your healthcare
•
provider about how much insulin to
administer if the pump is interrupted as
well as your healthcare provider/doctor’s
phone number in case of emergency
2.8 Insulin Pump Precautions
The pump is used to administer
insulin for people with diabetes. If it is used
improperly, it could cause life-threatening
situations.
Before using the pump, please read
•
the user guide carefully. Patients must
be trained by a professional healthcare
provider and should only use the pump
after they have mastered the operation.
Your healthcare professional should
•
develop a custom insulin delivery scheme
made for you. Your healthcare professional
will adjust the settings and observe the
effectiveness, possibly monitoring your
blood glucose four times a day until the
therapy is stable.
You should keep in frequent contact
•
with your healthcare professional. Basic
pump adjustments should be made under
close supervision with a qualified person.
You should have suf ficient knowledge
•
of diabetes, and how to regulate your
blood glucose level using insulin delivery
and diet. You should understand the
Equil® Patch Insu lin Pump System
4
Page 9

effects of hyper and hypoglycemia and
how to prevent these conditions.
If the pump fails to deliver your needed
•
insulin, immediately stop using the system
and consider using your emergency kit
to supplement insulin. Contact your
healthcare provider and/or MicroTech
support.
Please be sure to operate in strict
•
accordance with this instruction manual,
because failure to follow the instructions
can cause problems. The company will try
to assist, but does not bear the various
related legal obligations arising from
misuse.
This product can only be used to
administer U-100 insulin.
Only MicroTech Medical disposable
supplies should be used with the pump.
2.9 Portable Diabetes Assistant
(PDA) Precautions
The PDA is the main interface for the
entire system. Please note the following
precautions:
Do not let others handle your
•
PDA, except your qualified healthcare
professional.
Please keep the battery charged .
•
Do not drop or get wet as this could
•
cause a malfunction.
2.10 Blood Glucose Test Module
Precautions
This module should only be used in
•
vitro and can only be used with MicroTech's
Exactive EQ blood sugar test strips. Use
of other brand test strips will result in
incorrect test results.
The blood glucose test func tion can
•
only be used to determine blood glucose
levels using whole blood samples. Do not
use serum or plasma samples.
The blood glucose test func tion is not
•
intended for neonatal applications.
Test results may not be accurate for
•
blood hematocrit of more than 55% or
below 30%.
Blood containing high levels of vitamin
•
C or other reducing agents can lead to
Equil® Patch Insu lin Pump System
5
Page 10

inaccurate results.
The blood glucose meter test range is
•
1.1-33.3mmol/L (20-600 mg/dL).
Triglycerides above 3,000 mg/dL and
•
cholesterol above 500 mg/dL will lead to
inaccurate test results.
Patients with serious illness (such as
•
severe dehydration or ketoacidosis) are
not suitable for measuring blood sugar
using the blood sugar test system.
The blood glucose meter is only
•
suitable for clinical screening tests or
family self-monitoring. The test results
cannot be referred to as confirmed cases.
In order to ensure the accuracy of the
results, the test results can be further
confirmed by other methods, such as
biochemical methods.
As with all diagnostic reagents, test
•
results must be linked with a professional
doctor’s diagnosis from the other clinical
symptoms.
Carefully process waste caused by
•
blood glucose tests according to the
relevant local laws and regulations,
because blood samples are considered a
biohazard.
2.11 Important Safety
Information
2.11.1 Do Not Immerse the
Pump in Water
The patch pump is water resistant
and splashproof (IPX4). Do not fully
submerge the pump in water. If you plan to
bathe, swim, or participate in other water
activities, please suspend insulin delivery
and remove the pump from the base. After
you finish your activities, you may re-apply
the pump to the base and continue pump
therapy.
If the pump is accidentally dropped
in water, use a soft clean towel to dry the
pump as soon as possible. If you believe
that water has entered the pump, or if
you obser ve any other possible pump
malfunction, please remove the pump
from the base, check your blood glucose
level and take precautions as necessar y.
Symptoms of high blood glucose include
fatigue, excessive thirst and nausea. You
should always contact your healthcare
Equil® Patch Insu lin Pump System
6
Page 11

professional if you experience excessively
high or low blood glucose levels, or if you
have any questions about your care.
2.11.2 Static Electricity
The insulin pump system is resistant
to normal levels of static electricity (ESD),
but high levels of shock may cause a
software reset which can interrupt insulin
deliver y.
ESD are more likely in situations
where the relative humidity is very low,
such as inside a heated building during
the winter in areas where it is cold
outside. If you suspec t that your pump
ailed,follow the instruc tions listed in
has f
Chapter 16: Alarms and Troubleshooting.
2.11.3 FCC Information
This equipment has been tested and found
to comply with the limits for a Class B digital
device, pursuant to part 15 of the FCC Rules.
These limits are designed to provide reasonable
protection against harmful interference in a
residential installation.This equipment generates,
uses and can radiate radio frequency energy and,
if not installed and used in accordance with the
instructions, may cause harmful interference to
radio communications.
However, there is no guarantee that interference
will not occur in a particular installation.If
this equipment does cause harmful interference to
radio or television reception, which can be
determined by turning the equipment off and on,
the user is encouraged to try to correct the
interference by one or more of the following
measures:
Reorient or relocate the receiving antenna.
•
Increase the separation between the equipment and
•
receiver.
Connect the equipment into an outlet on a circuit
•
different from that to which the receiver is
connected.
Consult your local RadioShack store or an
•
experienced radio/TV technician for help.
Changes or modifications not expressly approved by
the party responsible for compliance could
void the user's authority to operate the equipment.
This device complies with part 15 of FCC Rules.
Operation is subject to the following two conditions:
(1)This device may not cause harmful
interference, and (2)this device must accept any
interference received, including interference that
may cause undesired operation.
Equil® Patch Insuli n Pump System
7
Page 12
Component Descriptions
3
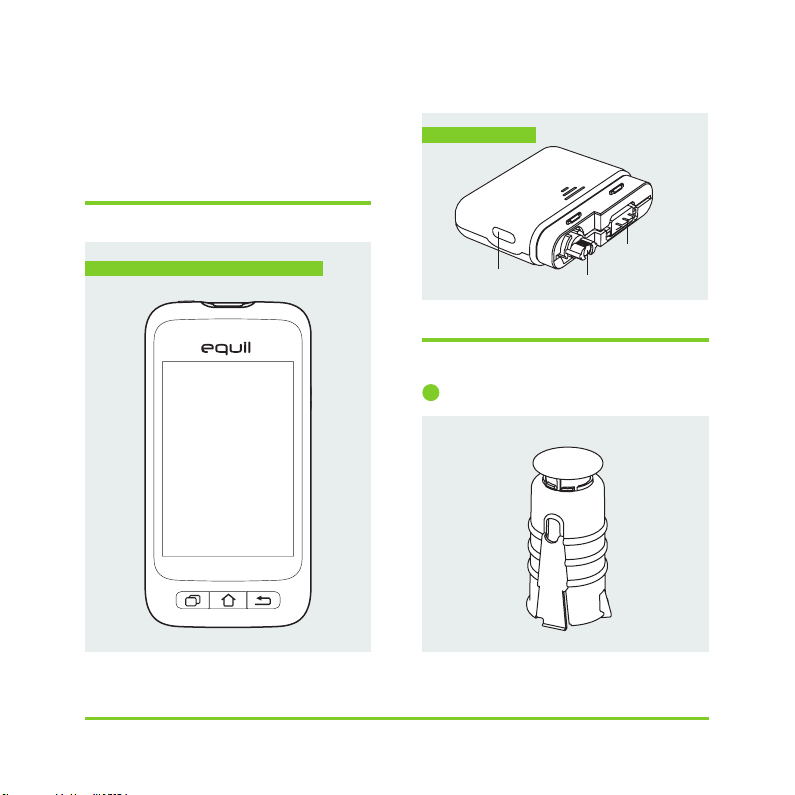
Pump System Components
3.1
Porta ble Diabetes A ssistant (PDA)
Patch Pump
Bolus But ton
3.2 Accessories
1
Cannula Inserter
Batter y Contacts
Motor Syste m
Equil® Patch Insu lin Pump System
8
Page 13
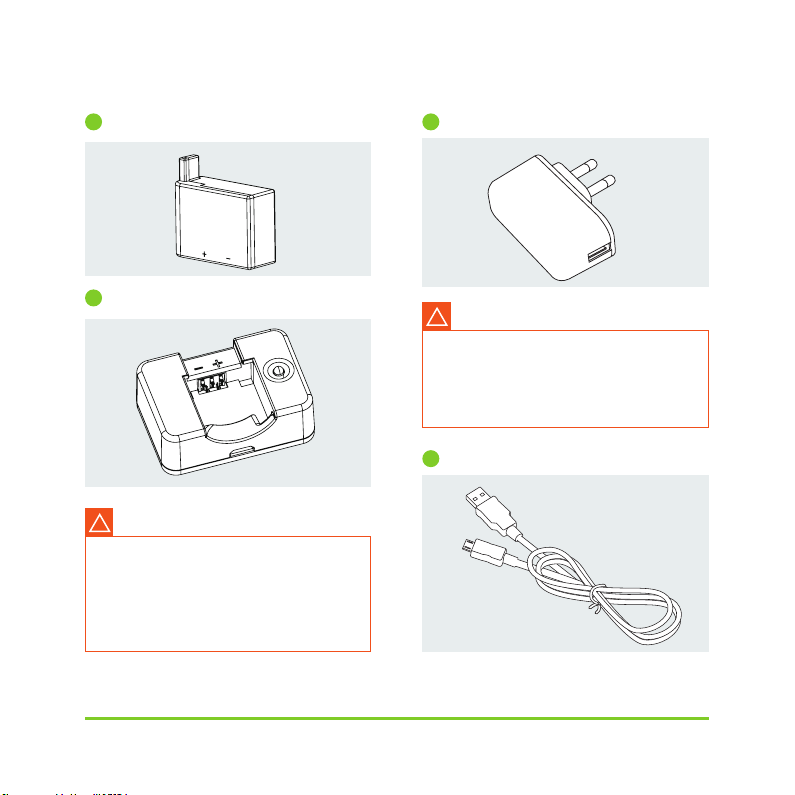
2
Pump Battery
Pump Battery Charger
3
Warning
!
Use only accessories and disposables
that are manufactured by MicroTech
Medical, or with the Equil brand name.
Use of non-standard components can
be unsafe.
4
PDA Charger
Warning
!
The included charger can be used in
wall outlets rated at AC 110V-250V 5060Hz. Connection to outlets that are
outside this range can cause damage.
PDA Charging Cable
5
Equil® Patch Insu lin Pump System
9
Page 14

Note
Only use MicroTech's electrical
components and accessories. Other
accessories may lead safety problems,
including inaccurate insulin delivery.
MicroTech cannot be liable for problems
arising from the use of third party
accessories
Patc h Pump:M TM-1
•
Portable Diabetes Assistant (PDA):
•
MTM-2
Cannula Inserter
•
Pump Battery
•
Pump Battery Charger
•
PDA Charger
•
PDA Charging Cable
•
Equil® Patch Insu lin Pump System
10
Page 15
4 Getting Started
4.1 PDA Setup
1
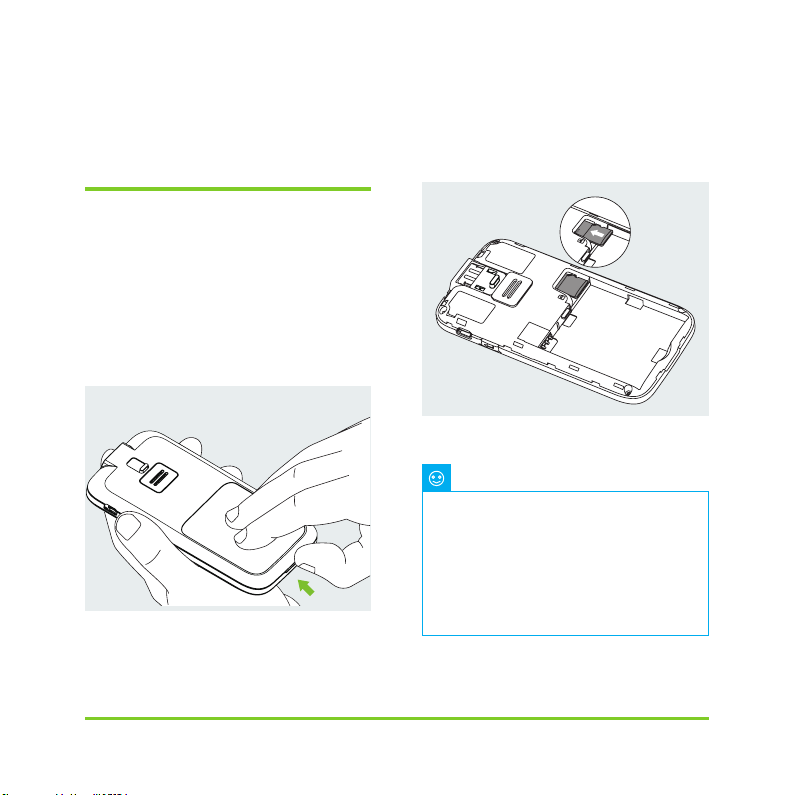
Remove the battery cover: Holding
the PDA firmly with one hand, pry up
the battery cover by inserting your
fingernail until the slot shown in
Figure 4.
Finger Ho ld
Figure 4
2
Insert a microSD memory card:
Insert memory into the slot as shown
in Figure 5.
Figu re 5
Note
The micr oSD memory card m ust be
inser ted with the bat tery removed . A microSD
card is no t provided with yo ur pump packag e,
but you may p rovide your own. T he microSD
card is no t needed for the p rimary func tions
of the pum p system. Howeve r, s econdary
funct ions such as data tr ansfer capab ility and
MP3 player f unctions wil l not work correc tly
withou t a memory card i nserted.
Equil® Patch Insu lin Pump System
11
Page 16
3
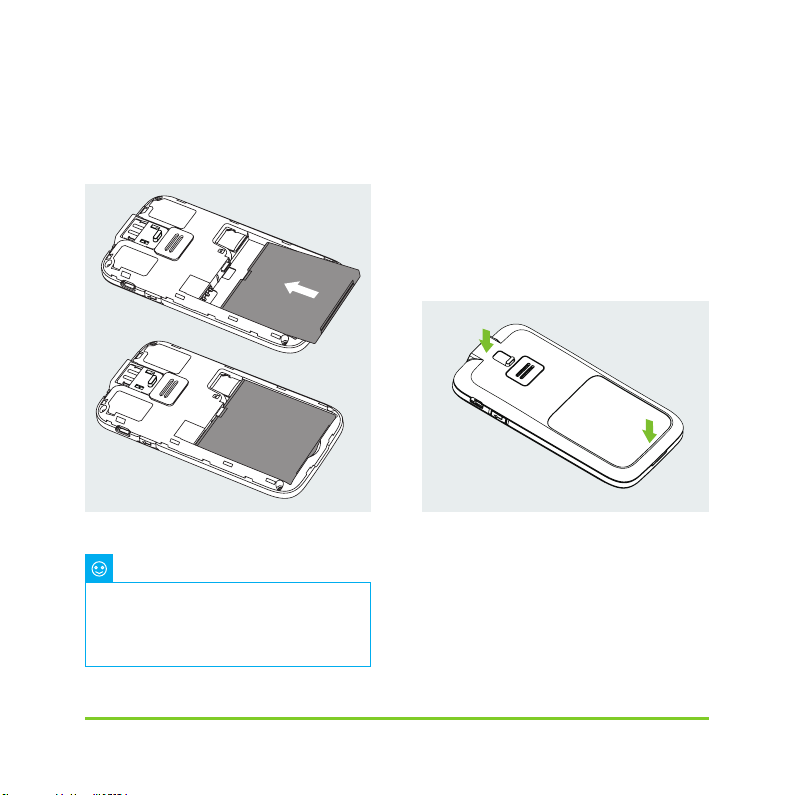
Insert the Battery: Install the
battery in the orientation shown in
Figure 6.
Figu re
6
Note
Use only batteries and chargers from
MicroTech Medical. Use of third party
accessories may cause unexpected
behaviour and will void your warranty.
4
Replace the Battery Cover:
Replace the battery cover to the
position shown in Figure 7. The
battery cover should be attached
securely around the perimeter of the
PDA, and you may hear a snap sound
as the hooks engage.
Figu re
7
5
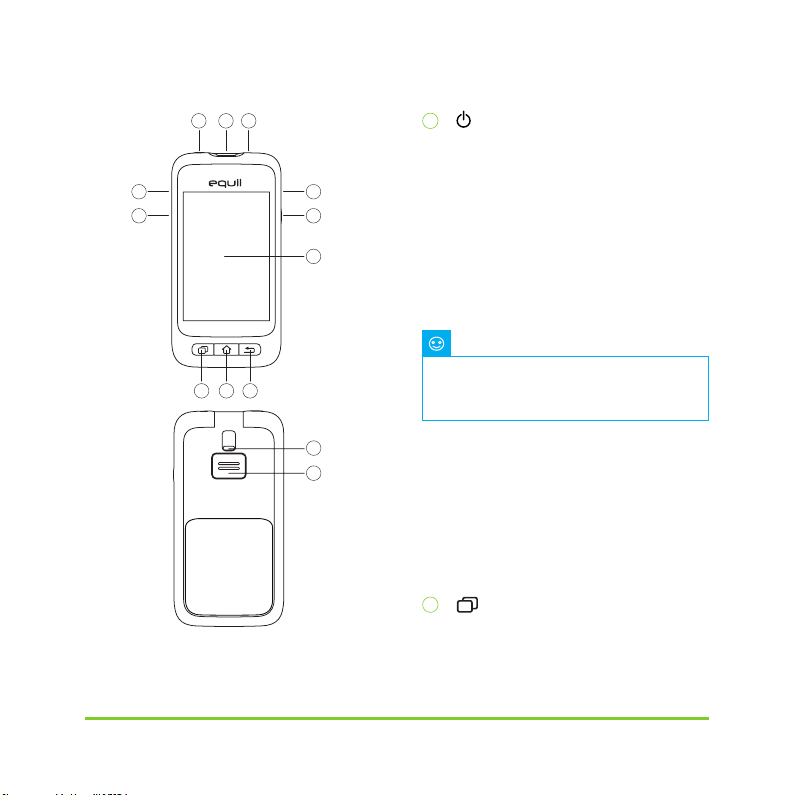
The PDA controls are shown in
Figure 8:
Equil® Patch Insu lin Pump System
12
Page 17
10 11
1
1
(Power Button)
Power On:Press and hold this key and the
PDA will vibrate, begin the startup process,
5
6
9
7
8
and enter the home screen after about 30
seconds.
Screen Off: If the PDA display is on,
pressing the Power Button will turn off the
LCD display and the PDA will enter standby
mode.
Note
The PDA display will also turn off and
2 3 4
enter standby mode after a preset time.
See Section 13.6 for more information.
Figu re
Equil® Patch Insu lin Pump System
13
12
13
Screen On: When in standby, pressing the
power button will turn on the display and
present the lock screen.
Power Off: If the display is on, press and
hold the power button to open a dialogue
box to confirm that you would like to turn
off the device.
2
(Help Button)
8
If you need help with commands or
functions of the PDA, you can press the
Page 18
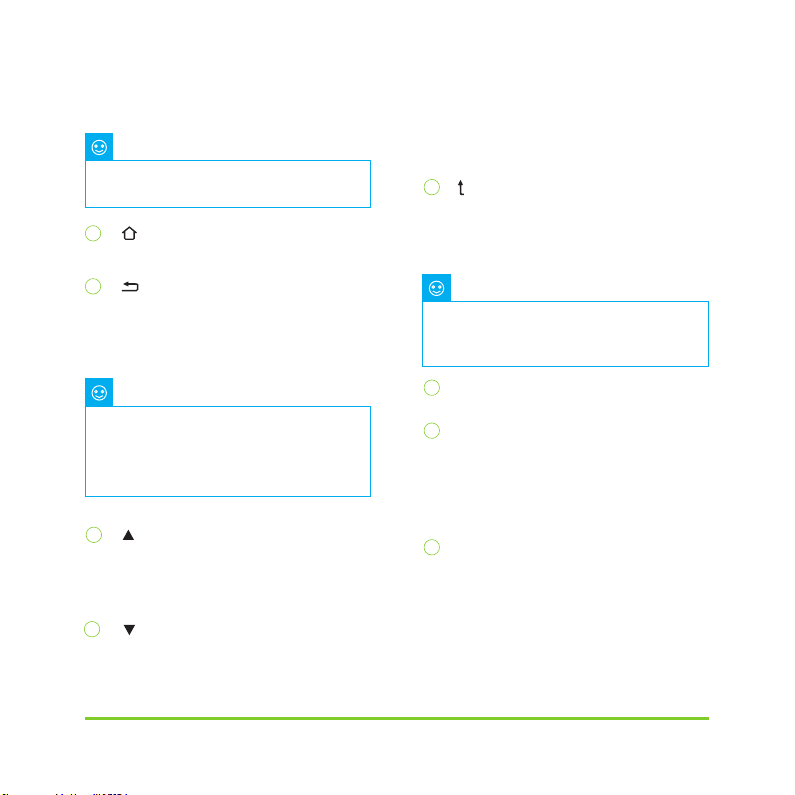
help button for more information.
Note
The help button works in the Home,
Basal, Bolus and History screens.
3
(Home Screen Button)
Press this to return to the home screen.
4
(Back Button)
Press this to return to the previous screen,
or close a dialog box.
Note
Some functions, such as the change
reservoir wizard, will not allow you to
return to the home screen or return to a
previous screen before completion.
5
(Up Button)
This can be used to navigate the interface
without using the touchscreen. Choose up
to change selection.
6
(Down Button)
This can be used to navigate the interface
without using the touchscreen. Choose
down to change selection.
7
(Enter (Select) Button)
This can be used to navigate the interface
without the touchscreen. Choose the
Enter button to select an action.
Note
The Enter button also can be used
for special functions, as explained in
subsequent chapters.
8
Display
3.2 inch color display with touchscreen.
9
Charger/Data Port
Connect the PDA charger to this port to
replenish the battery. This port can also
be used to transfer data to a personal
computer using a data cable.
10
Blood Glucose Test Strip Port
Inserting the correct MicroTech blood
glucose test strip into this port will activate
the blood glucose test menu. For more
information on how to use the blood
glucose meter, refer to chapter 10.
Equil® Patch Insu lin Pump System
14
Page 19
3.5mm Headphone Jack
11
12
Test Strip Ejector
Used to eject a blood glucose test strip.
See section 10.5 .
13
Speaker
4.2 Charging the Batteries
The patch pump and PDA batteries
should be fully charged before use.
Note
Use only batteries and chargers from
MicroTech Medical. Use of third party
accessories may cause unexpected
behavior and will void your warranty.
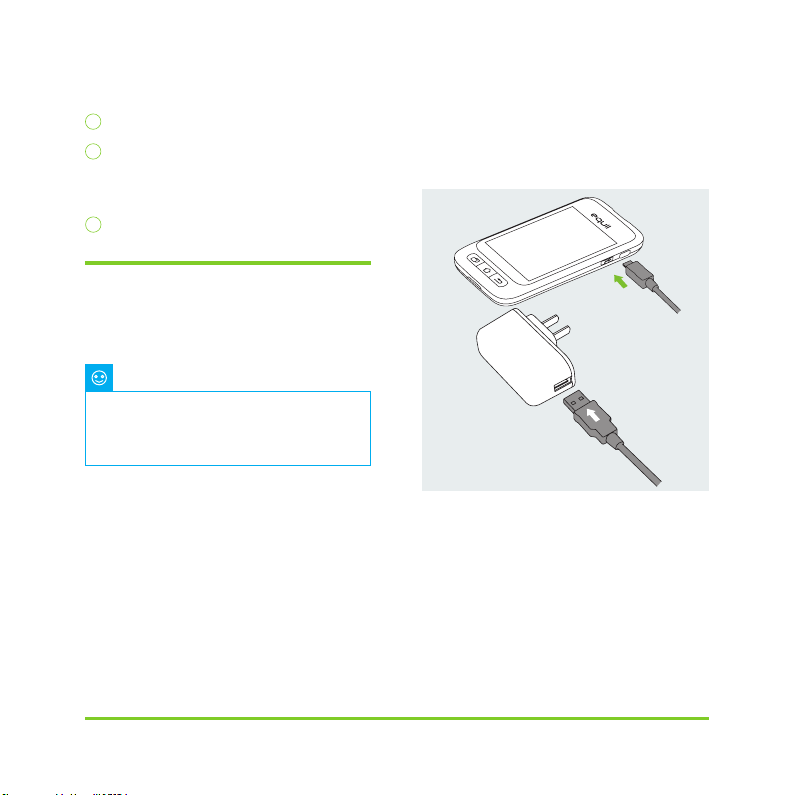
Insert the small end of the cable into the
2
PDA, and the large end of the cable into the
PDA charger as shown in Figure 9.
4.2.1 PDA Charger
The PDA battery can only be charged
1
while inside the PDA. The PDA may be
on or off during the charging process,
however, the battery will charge faster if
the controller is of f.
Equil® Patch Insu lin Pump System
15
Figu re
9
Connect the PDA charger to a power
3
outlet.
If the PDA is on, the battery icon will
change to the charging icon. If the PDA is
off, a charging animation will appear.
Page 20
Note
If the PDA battery charger does
not work, do not try to repair. Please
contact your dealer for repair or
replacement.
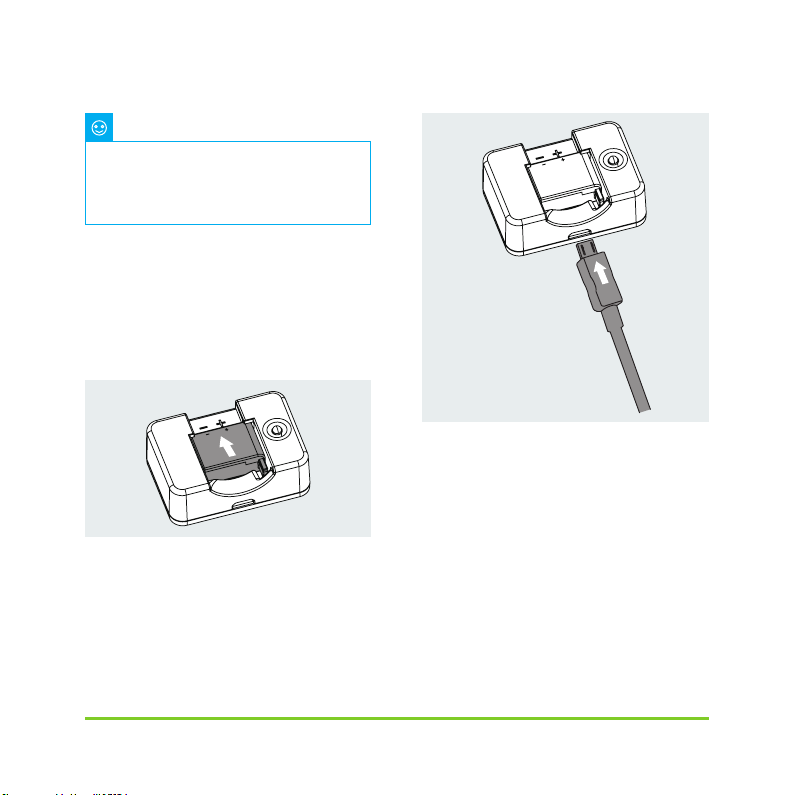
4.2.2
Patch Pump Battery Charger
The patch pump battery is inserted into
1
the charger as shown in Figure 10. You
should hear a click sound indicating that
the battery is correctly inserted.
Figu re 10
Insert the small end of the cable into the
2
pump battery charger as shown in Figure
11. The large end of the cable should be
inserted into the PDA charger.
Fig u re 11
Plug the PDA charger into a wall outlet,
3
and the blue LED will turn on, indicating
that the battery is charging. The indicator
will flash if the charger is faulty.
When the battery is fully charged,
4
the blue LED will turn off and you can
disassemble the cable, pump battery
charger, and PDA
charger.
Equil® Patch Insu lin Pump System
16
Page 21
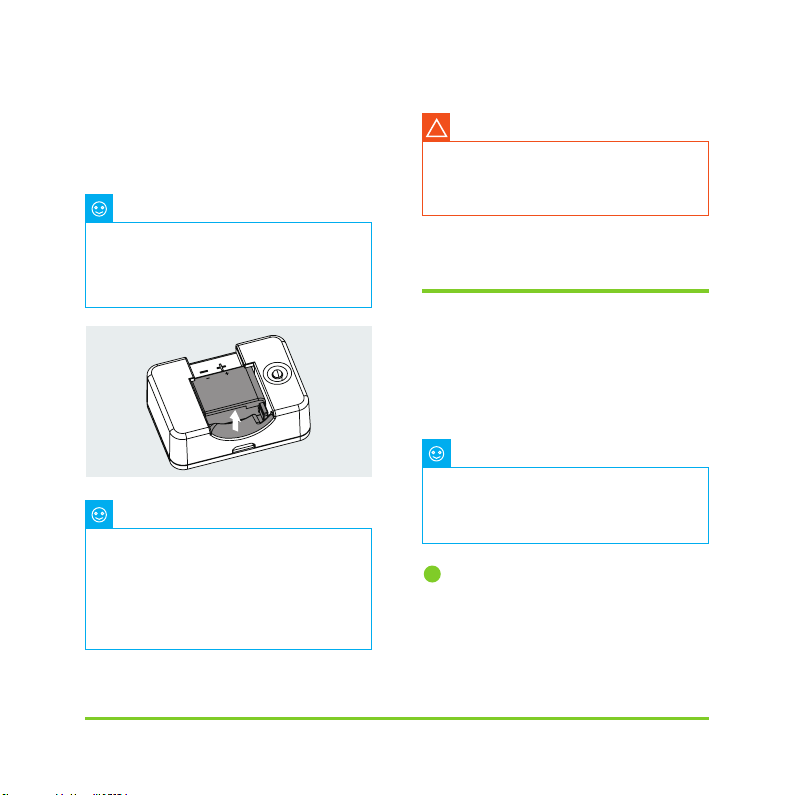
Remove the pump battery as shown
5
in Figure 12: lift the battery up from the
charger groove
.
Note
If the battery is fully charged, do
not leave it inside the charger while
disconnected from a wall outlet. Doing
so may slowly deplete the battery.
Figu re 12
Note
A full battery should be stored
properly inside an insulated package.
Storing a bat tery with metal objects
may cause a short circuit, resulting in
a decrease in capacity or even batter y
damage.
Warning
!
Do not touch any metal part of the
charger when plugged into a wall outlet
as it is a potential shock hazard.
4.3 Settings Wizard
Turn on the PDA by pressing the power
button. The first time you turn on the PDA,
you will see the Settings Wizard which will
guide you through basic setup options.
Note
When you are in the Settings Wizard,
the Home button and Back button will
not work until you finish the Wizard.
Time and Date Settings
1
After entering the Settings Wizard, you
will be presented with the Time and Date
setup screen shown in Figure 13.
Equil® Patch Insu lin Pump System
17
Page 22
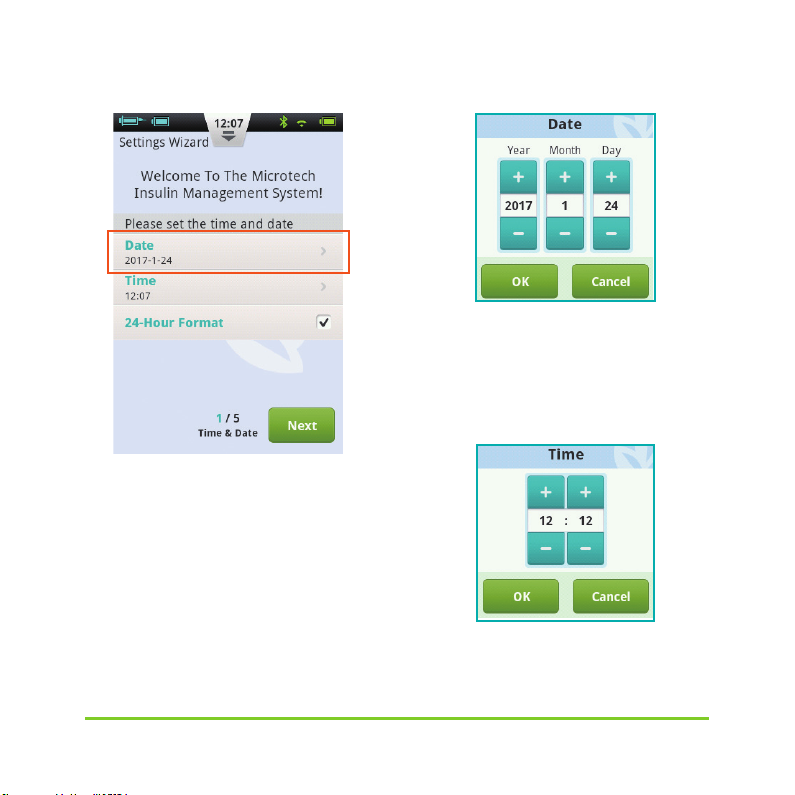
Figu re 13
a) Choose the Date setting to open a dialog
box (Figure 14) that can be used to input
the correct date. Use the “+” and “-”
buttons to selec t the date, choose OK to
save and exit or Cancel to exit without
saving.
Figu re 14
b) Choose the Time setting to open a dialog
box (Fig. 15) that can be used to input the
time. Use the “+” and “-“ buttons to
select the time, choose OK to save and exit
or Cancel to exit without saving.
Figu re 15
Equil® Patch Insu lin Pump System
18
Page 23
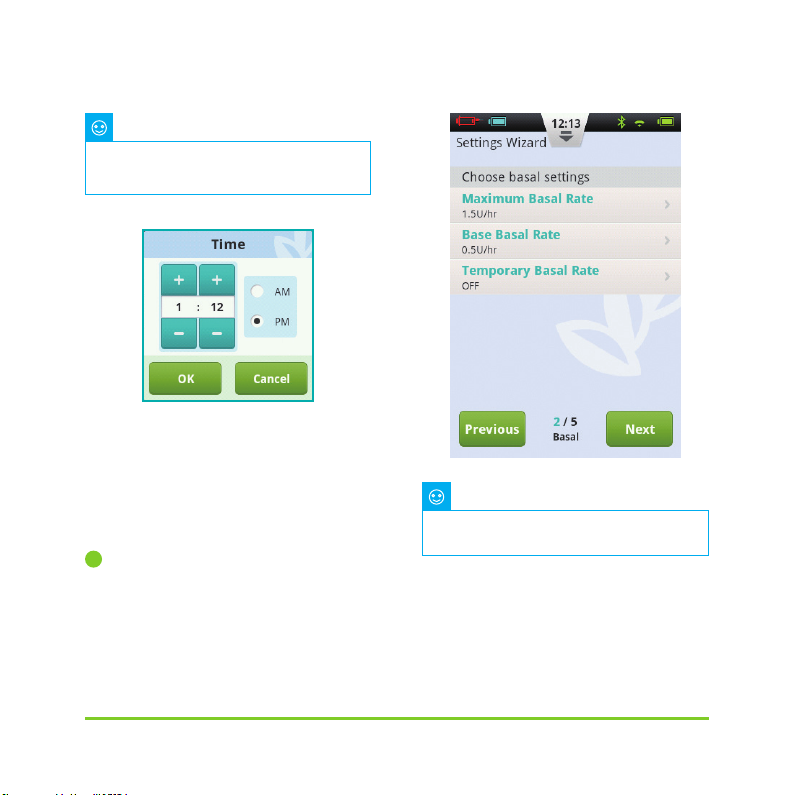
Note
If the 12 hour format is chosen, am
and pm will be shown.
Figu re 16
c) If 24-Hour Format is checked, the time
and history data will be displayed in 24
hour format. Uncheck the box to use 12hour format.
2
Basic Basal Settings
The second screen in the Settings
Wizard shows the basic basal settings
(Figure 17).
Note
For a more detailed description of
basal rates, see Section 5.1
a) Choose the Maximum Basal Rate setting
to open a dialog box (Figure 18) that can
be used to input the maximum basal rate.
Use the “+” and “-“ buttons to select
Figu re 17
Equil® Patch Insu lin Pump System
19
Page 24
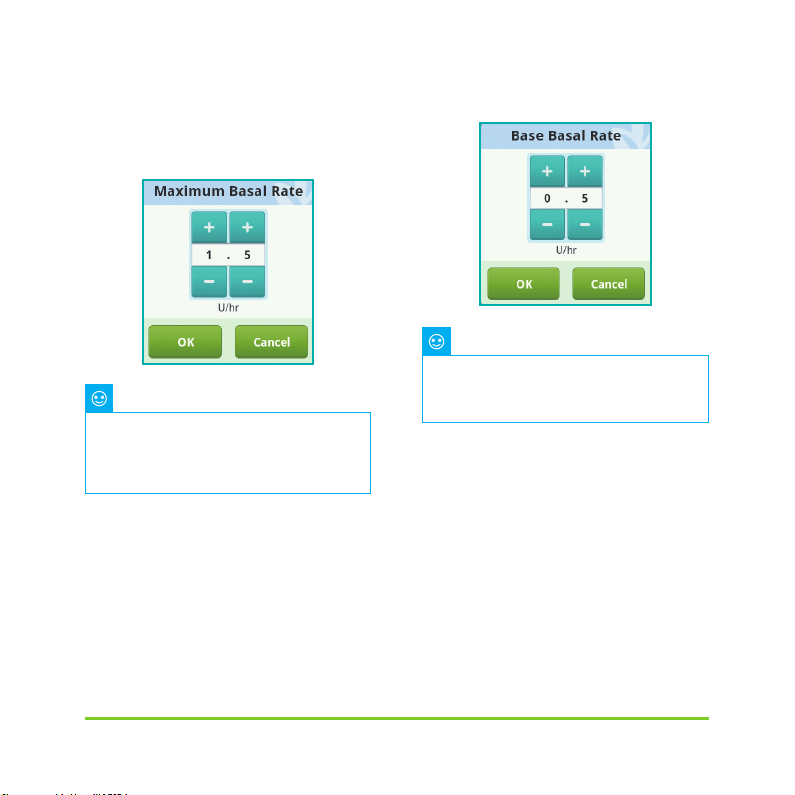
the appropriate maximum rate. Choose
“OK” to save and exit or “Cancel” to
exit without saving.
Note
Figu re 18
This feature is used to limit the
maximum amount of basal delivery
that can be administered by accident or
misoperation.
b) Choose the Base Basal Rate setting to
open a dialog box (Figure 19) that can be
used to input your base basal rate. Use
the “+” and “-“ buttons to select the
appropriate value. Choose OK to save and
exit or Cancel to exit without saving.
Note
Figu re 19
This value is the most frequently
used basal rate, and all other rates will
be calculated based on this base rate.
c) Choose the Temporary Basal Rate
setting to open a dialog box (Figure 20) that
will give you options.
Off: Temporary basal rates are disabled.
The temporary basal rate controls will be
greyed out.
U/hr: Temporary basal rates will be
displayed in units of insulin delivered per
hour.
Equil® Patch Insu lin Pump System
20
Page 25
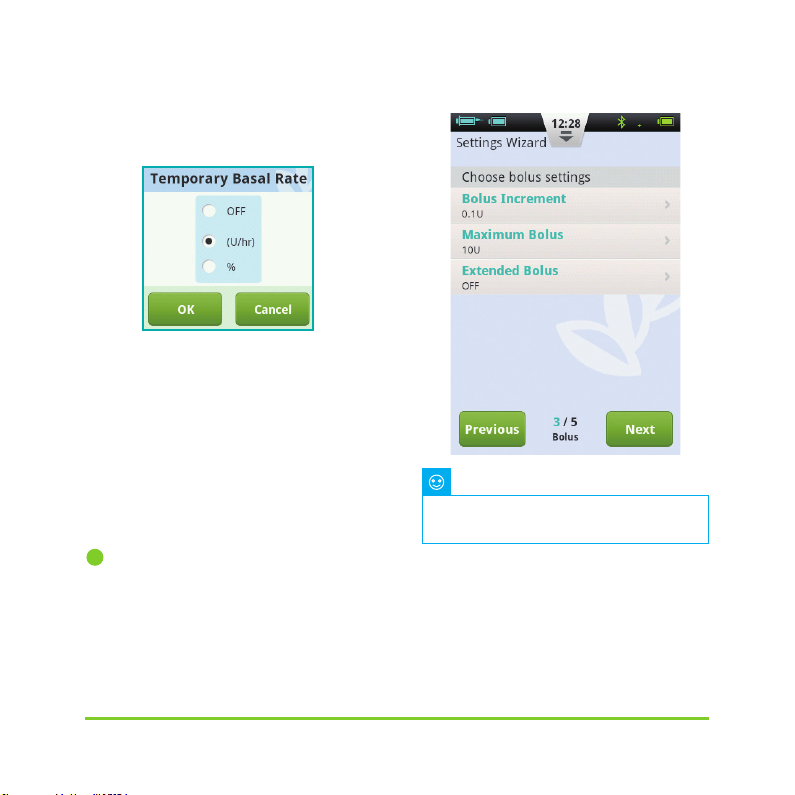
%: Temporary basal rates will be displayed
relative to your current basal rate.
Figu re 20
After you have finished choosing the
Basic Basal settings, choose Nex t to
enter the third Settings Wizard screen,
or Previous to enter the previous setting
screen.
Basic Bolus Settings
3
The third screen in the Settings Wizard
shows the Basic Bolus settings (Figure 21).
Note
Figu re 21
For a more detailed description of
boluses, see Section 6.1
The Bolus Increment setting (Figure 22)
a)
allows you to set the interval used when
increasing or decreasing bolus amounts.
Equil® Patch Insu lin Pump System
21
Page 26
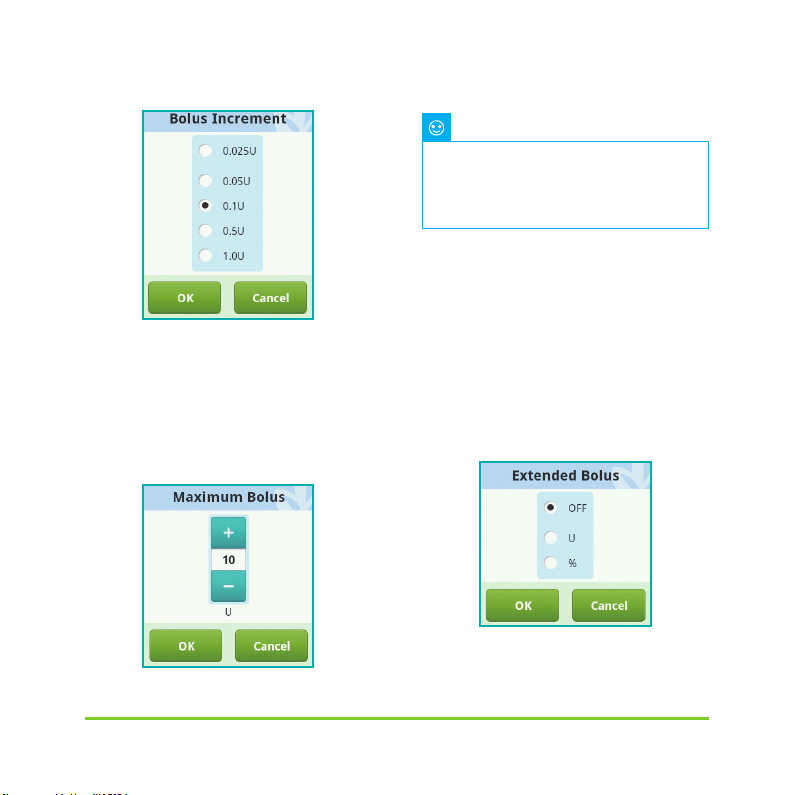
Figu re 22
b) The Maximum Bolus setting allows you
to set an upper limit on the amount of
insulin given in a single bolus (Figure 23).
Use the “+” and “-“ buttons to select
the value. Choose OK to save and exit or
Cancel to exit without saving.
Figu re 23
Note
This feature is used to limit the
maximum amount of bolus delivery
that can be administered by accident or
misoperation.
c) Choose the Extended Bolus setting to
open a dialog box (Figure 24) that will give
you options.
Off: Extended Bolus function is disabled.
Extended Bolus controls will be greyed
out.
U: Amount now will be shown in U (units of
Insulin).
%: Amount now will be shown as a
percentage of the entire bolus.
Figu re 24
Equil® Patch Insu lin Pump System
22
Page 27
After you have finished choosing the
Basic Bolus settings, choose Nex t to enter
the fourth Settings Wizard screen, or Back
to enter the previous setting screen.
4
Advanced Bolus Settings
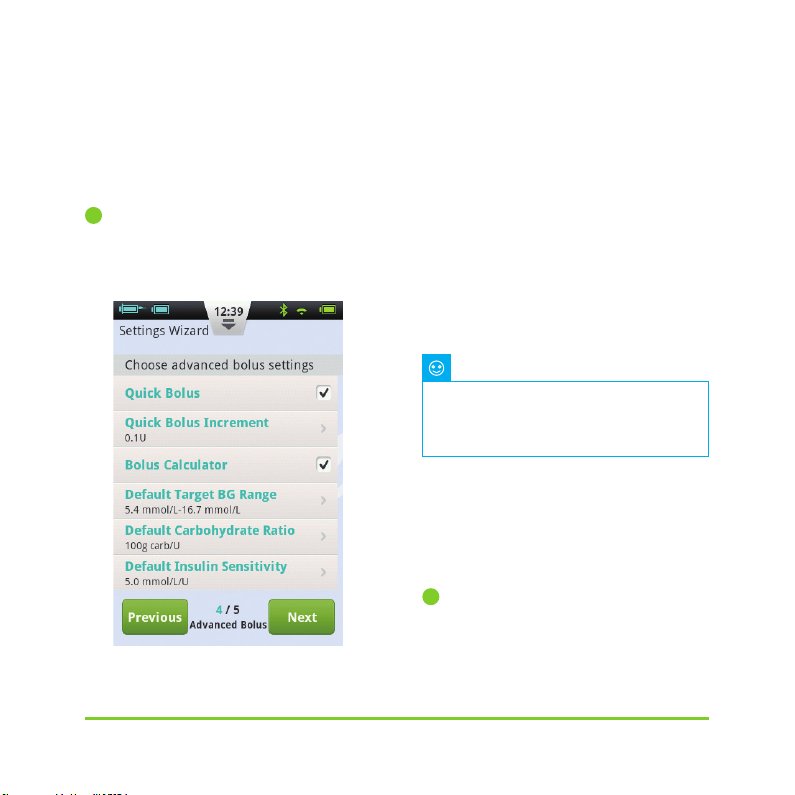
The fourth screen in the Settings Wizard
shows the Advanced Bolus Settings (Figure
25).
Figu re 25
a) The Quick Bolus function allows the
user to administer a bolus using only
one button. This feature is turned off by
default. For more detailed information
about this feature, see Section 6.7
b) The Bolus Calculator can help the user
decide on the size of a bolus by taking into
account blood glucose levels and other
parameters. This feature is turned off by
default. For more detailed information
about this feature, see Section 11.3
Note
These two features are relatively
advanced and MicroTech recommends
proper training and practice before
using these features.
After you have finished choosing the
Advanced Bolus settings, choose Next
to enter the f ifth Settings Wizard screen,
or Previous to enter the previous setting
screen.
5
Alert Options
The fif th screen in the Set tings Wizard
shows the Alert Options (Figure 26). If you
Equil® Patch Insu lin Pump System
23
Page 28
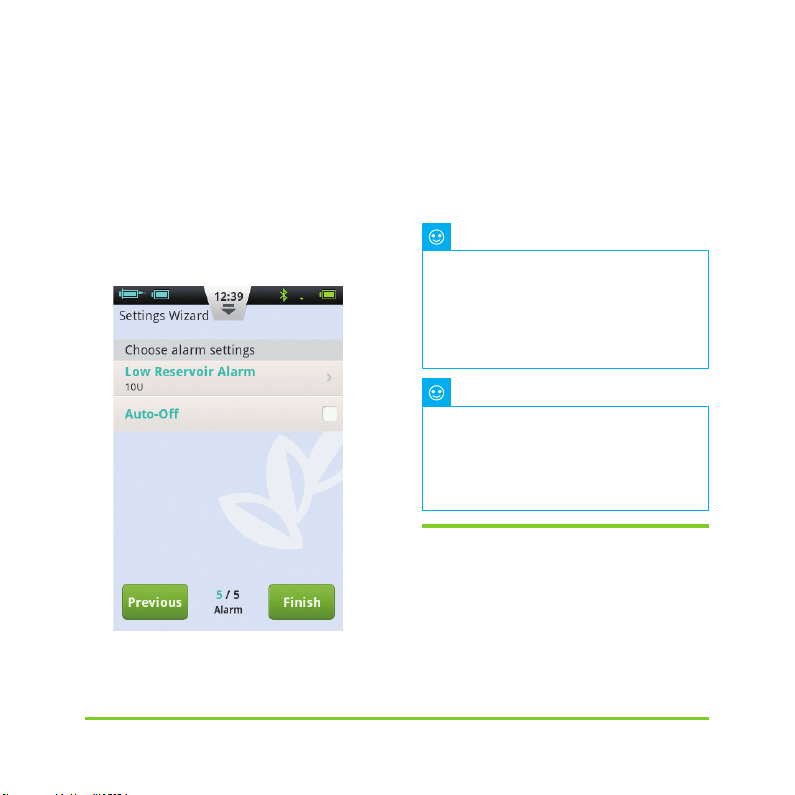
choose the Low Reser voir Alert Threshold
setting, a dialog box will open that allows
you to choose when the device will give
you an alert warning when the amount of
insulin remaining in the reservoir is low
and that you should consider filling a new
reservoir. Use the “+” and “-” buttons
to select the appropriate value.
Figu re 26
After you have completed the Settings
Wizard, choose Finish to finalize your
settings and return to the Home Screen. To
continue modifying set tings on previous
screens, choose Previous.
Note
After you complete the Settings
Wizard, you can use all of the basic
functions of the pump system.
However, please read the additional
sections of this user guide as they
describe the features in greater detail.
Note
After you complete the Settings
Wizard for the first time, you may return
to the Wizard by going to the Home
Screen and choosing Settings and then
Settings Wizard.
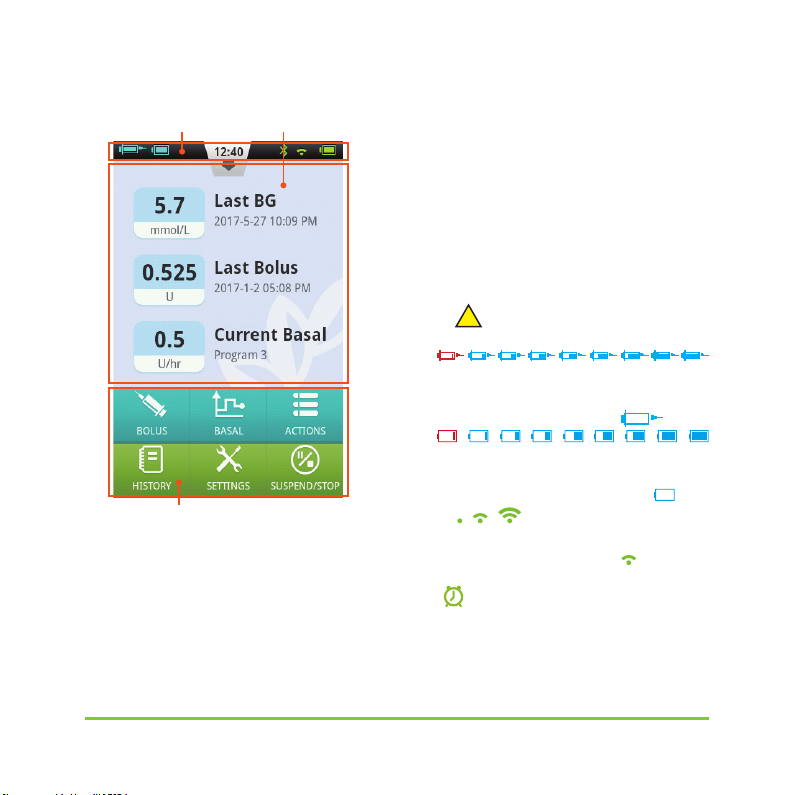
4.4 Home Screen
The Home Screen is shown in Figure 27.
It is divided into three main sections: the
Status Bar, Information Display Area, and
Function Buttons.
Equil® Patch Insu lin Pump System
24
Page 29
Status Bar Information Display Area
Function Buttons
Figu re 27
Status Bar:
The Status Bar contains icons that
describe the status of the pump and PDA.
The icons shown on the left are generally
related to the pump (blue), and the icons
on the right are generally related to the
PDA (green). Each Icon in the Status Bar is
described below:
•
Username:Displays the name of the
user.
•
Insulin Pump Serial Number: Displays
the serial number of the pump that is
currently connected
•
Alert icon: If an alert appears, this
!
icon will appear on the status bar.
•
Insulin Remaining:Shows how much
insulin remains by varying degree;if PDA
wireless link is poor it displays
•
Pump Battery Level:Shows the pump's
batter y level status in var ying degrees; if
PDA wireless link is poor, it displays? 。
•
Shows the wireless link strength between
pump and PDA. It dispalys
connection is totally lost.
•
Blood Glucose Test Reminder
(BG Reminder):This icon will appear on
the status bar if a Test Reminder has been
programmed.
Wireless Link Status:
?
when the
!
。
Equil® Patch Insu lin Pump System
25
Page 30
•
PDA Battery Level:Shows the PDA's
batter y level status in var ying degree. If
thePDA is charging, it displays .
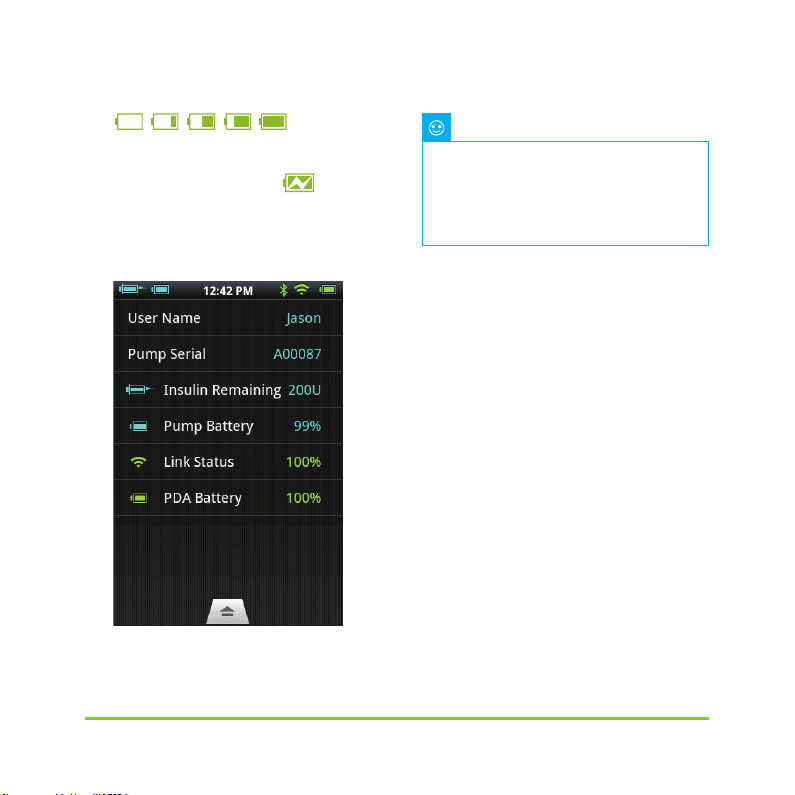
Press the button at the middle of the
Status Bar and it will enlarge as in Figure
28.
Figu re 28
Note
If more than one BG Reminder has
been programmed, only the next BG
Reminder is shown in the enlarged
Status Bar. If no BG Reminders are
programmed, nothing is shown.
Information Display Area:
Normally the Information Display Area
shows the three most important pieces
of information regarding your condition:
your last blood glucose level, the last bolus
administered, and the current basal rate.
During special functions (bolus delivery,
temporary basal rates, and suspend mode)
the Information Display Area will show the
status of those functions until the ac tions
are completed.
Function Buttons:
Bolus: Pressing this button takes you to
1
the Bolus Screen where you can administer
a normal or extended bolus.
Basal: Pressing this button takes you
2
to the Basal Screen where you can adjust
your basal programs or star t a temporary
Equil® Patch Insu lin Pump System
26
Page 31
basal rate.
Actions: Pressing this button takes
3
you to the Actions Screen where you can
start a new reser voir, initiate a new pump,
manually enter your blood glucose level,
access the food library, or access the music
player.
History:Takes you to therapy history
4
and historical averages.
Settings:Press this to go to the Settings
5
Menu.
Suspend/Resume: Pressing this button
6
allows you to quickly suspend or resume
insulin delivery.
Note
For more detailed information,
please refer to subsequent chapters of
this user guide explaining the functions
in greater detail.
4.5 Lock Screen
If you press the power button to turn
the display off, or the display turns off
automatically after a period of non-use,
the display can be turned on again by
pressing the power button. The PDA will
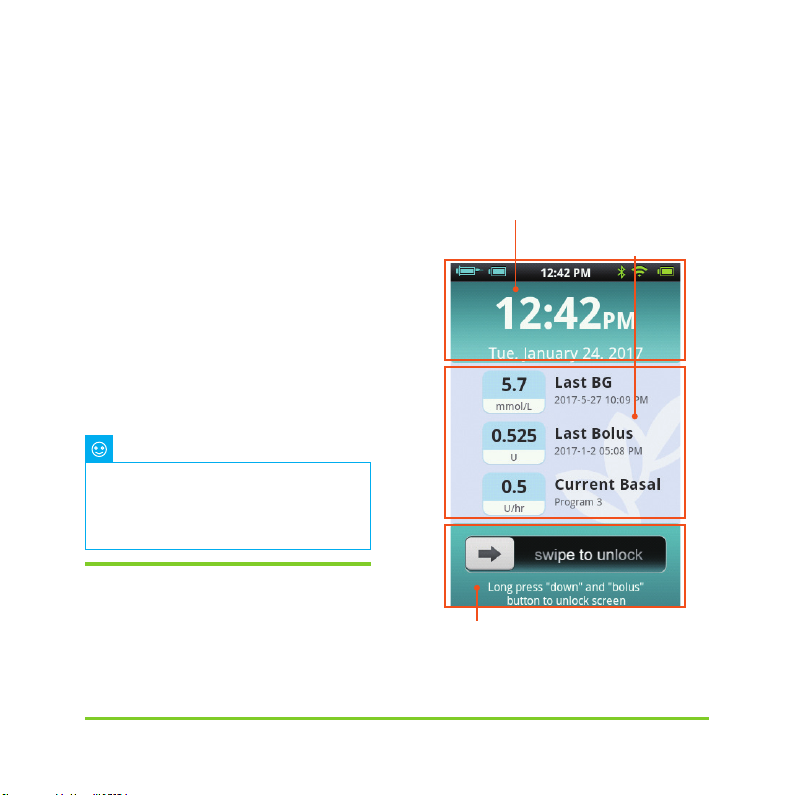
enter the lock screen as shown in Figure 29.
Time and Date
Information Display Area
Unlock Area
Figure 29
Equil® Patch Insu lin Pump System
27
Page 32

The Lock Screen is divided into three
main sections: Time and Date, Information
Display Area, and the Unlock Area.
Time and Date Display Area
Displays the current time, day, date and
yea r.
Information Display Area
Shows your last blood glucose level, the
last bolus administered, and the current
basal rate; or that status of a special
function.
Note
The content of the Information
Display Area in the Home Screen is
identical.
Unlock Area
Unlock the device by swiping from left to
right in this area.
Note
You can also unlock the PDA by
simultaneously holding the Down and
Enter buttons.
Equil® Patch Insu lin Pump System
28
Page 33
5 Basal Rate Adjustment
5.1 Understanding Basal Rate
Basal insulin is the pump’s way to
simulate the secretion of non-mealtime
insulin. Even if a non-diabetic person
fasts all day, there still is a small amount of
insulin secreted. The pump’s basal insulin
is used to simulate the micro-secretions of
insulin.
5.2 Base Basal Rate
We have already set up the base basal
rate in the Settings Wizard. The base basal
rate is the default basal rate for your basal
programs. In the next sec tions you will
learn to edit a basal program by modifying
the base basal rate in different time
periods.
5.3
Editing Basal Programs (List
Display)
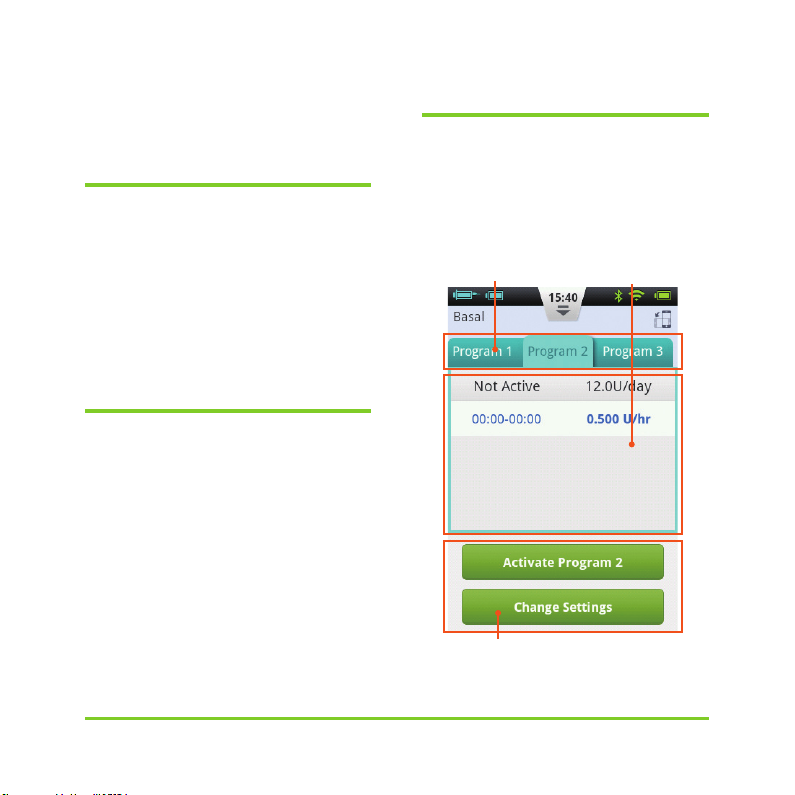
In the Home Screen, press the basal
function button to enter the basal screen
shown in Figure 30. You will see three Basal
Program Tabs, a Basal Time Period List,
and Basal Program Action buttons.
Basal Program Tabs
Basal Time Period List
Equil® Patch Insu lin Pump System
29
Basal Program Action Buttons
Figure 30
Page 34
Note
When the PDA is in portrait
orientation, the List Display is shown.
If the PDA is rotated into landscape
orientation, you will enter the Graph
Display. However, if you are editing
a particular time period, rotating the
display will not change the Display until
you have completed the entry。
When you first use the Basal Screen,
no basal program is active. If you
choose to activate one of the three
basal programs, the previous basal rate
will automatically stop.
1
Browsing Settings
You can look at Basal Program Settings
by reviewing the Basal Time Period List.
Swipe up or down in this area to scroll and
see hidden list entries.
Reviewing Basal Programs
2
The PDA provides the ability to run one
of three basal programs. You can review
different basal programs by choosing one
of the Basal Program Tabs.
Quick Basal Program Setup
3
The pump provides a Quick Basal
Program Setup option. By entering your
total daily basal insulin and choosing
a 6 or 24 hour time period, the PDA can
automatically create a Basal Program for
you.
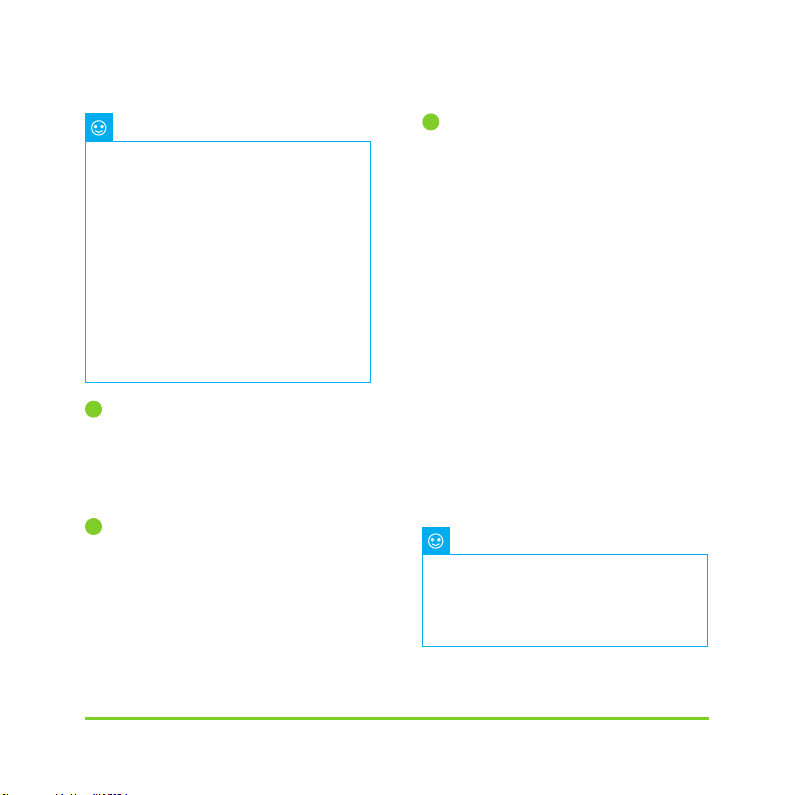
Select the appropriate Basal Program
Tab and the choose Change Settings to edit
the program (Figure 31). Choose the top
row and a window will pop-up for you to
enter your total basal amount and which
time period you would like (6 or 24 time
periods). After entering these settings,
the system will automatically assign Basal
Time Periods to the Basal Program. Now
you can fur ther edit the Basal Time Periods
according to your needs.
Note
The Quick Basal Program
Setup is only an estimate of your
daily basal needs. Consult your
doctor for more specific dosages.
Equil® Patch Insu lin Pump System
30
Page 35
Figu re 31
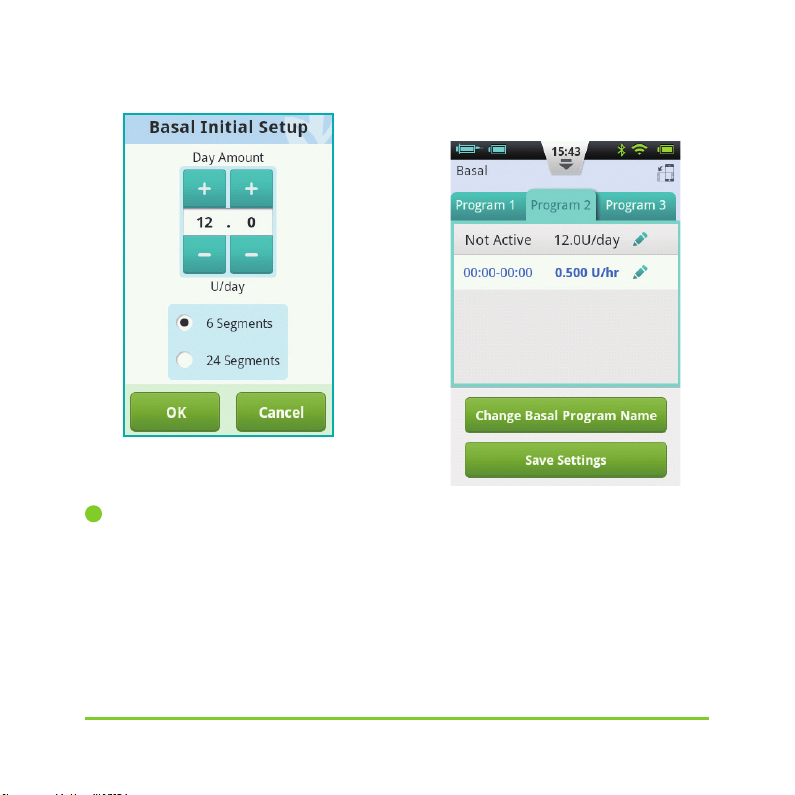
screen as shown in Figure 32.
Editing Basal Programs
4
a) Add new basal rate:The base basal
rate was set in the Settings Wizard, so by
default all 24 hours of the basal program
are set to this delivery rate. To add a
new basal time period, press the Change
Settings button to enter the basal edit
Equil® Patch Insu lin Pump System
31
Figu re 32
Page 36
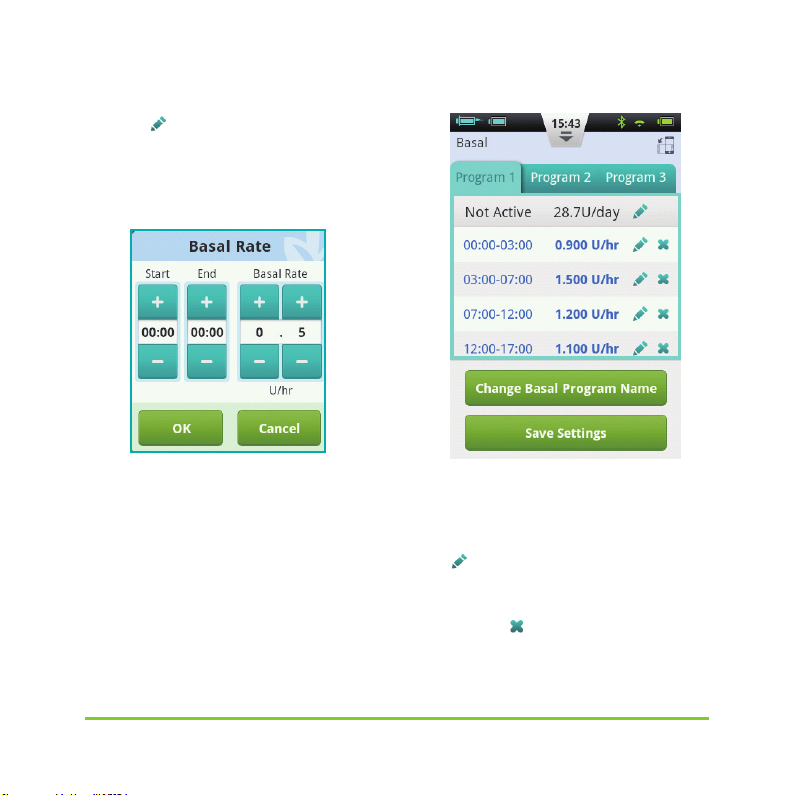
Press the button to add a new basal
time period (Figure 33). After editing is
complete (Figure 34), the base rate time
will automatically be divided into multiple
time periods.
Figure 33
Figu re 34
b) Editing a basal time period: You can
edit a basal time period entr y by pressing
the icon.
c)Deleting a basal time period: You can
delete a basal time period entry by
pressing the icon. The time period will
revert to the base basal rate.
Equil® Patch Insu lin Pump System
32
Page 37
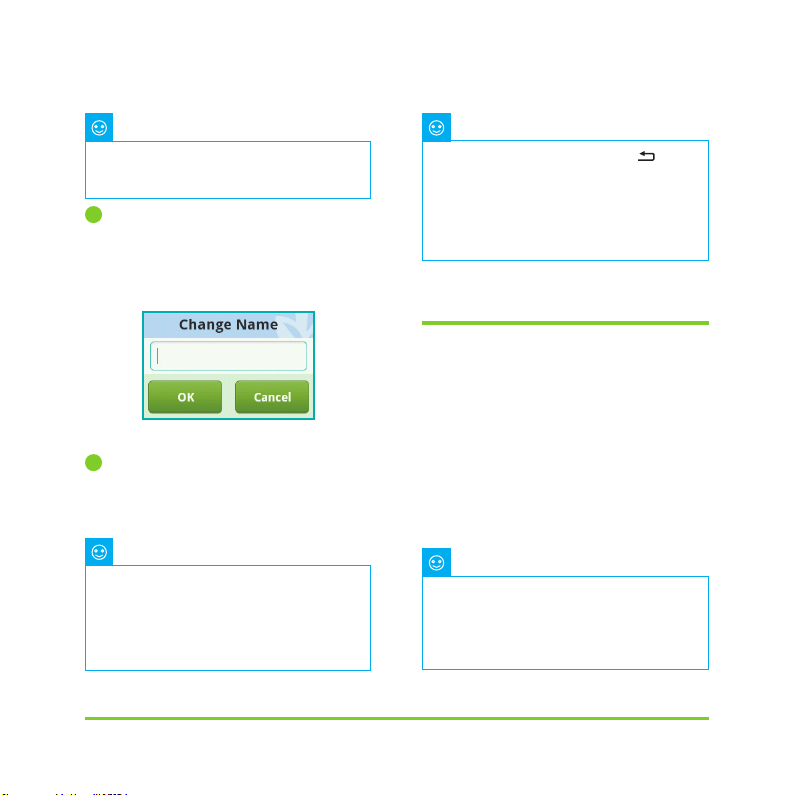
Note
After deleting a basal time period,
the PDA may merge adjacent basal time
periods if the basal rates are the same.
Changing the Basal Program
5
Name
Press the Change Basal Program Name
button to open the Change Name dialog
box (Fig 35). Change to the desired name .
Figu re 35
Saving Settings
6
After you have completed editing the
basal program, press Save Settings to save
and exit the Basal Edit screen.
Note
If you have edited a basal program
that is currently running on the pump, a
dialog box will open asking if you would
like to send the updated program to the
pump. Choose OK to update and save
or Cancel to return to the Basal Edit
screen.
Note
If you press the Back button( ),
while in the Basal Edit screen, a dialog
box will open to confirm that you would
like to exit. Choose OK to discard your
changes. Choose Cancel to continue
editing.
5.4 Editing Basal Programs
(Graph Display)
From the Home Screen, press the Basal
Function Button to enter the Basal Screen,
then choose the correct Basal Program
tab and then rotate the PDA to landscape
orientation. This will activate the Basal
Program graph display as shown in Figure
36.
Note
Before editing the graph display,
please review the functions of the list
display to better understand the graph
display functions.
Equil® Patch Insu lin Pump System
33
Page 38
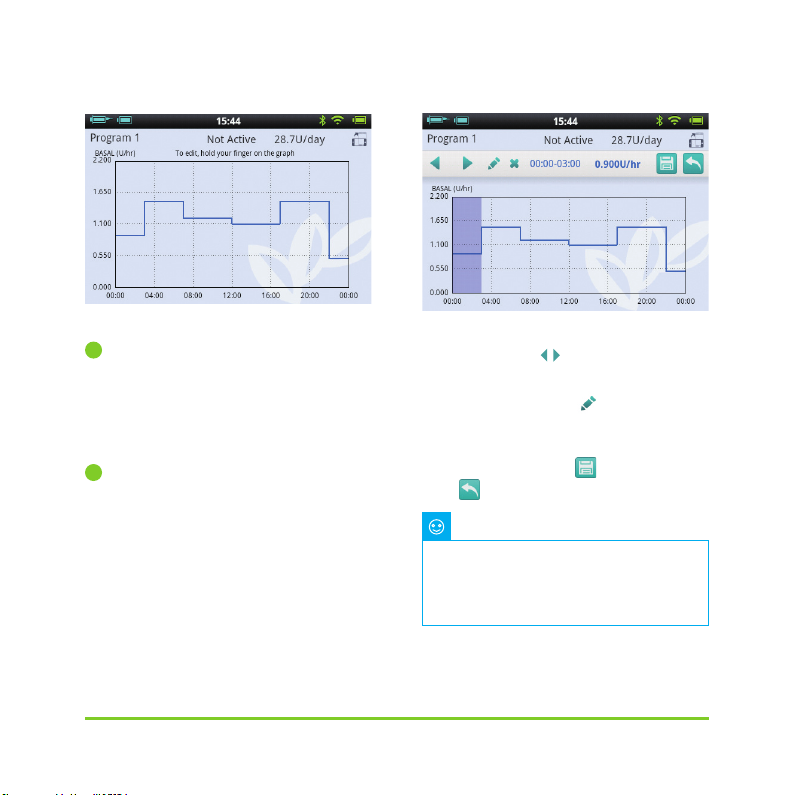
Figure 36
1
Reviewing Basal Programs
The vertical axis of the char t represents
the basal rate while the horizontal axis
represents the time, which shows 24 hours
of the day.
2
Add a Basal Time Period
a) In the graph display, press and hold
on any area of the graph to enter the edit
mode as in Figure 37. The highlighted area
is the period to be edited.
Figure 37
b) By pressing the buttons, or the
touchscreen, you can choose a different
basal time period.Press to pop up the
Basal Rate Setting window as shown in
Figure 34.
c) When finished, press to save and
then to exit the editor mode.
Note
You cannot switch between Basal
Programs in Graph Display mode. You
must return to List Display to change
Basal Program.
Equil® Patch Insu lin Pump System
3 4
Page 39

Note
If you have edited a basal program
that is currently running on the pump, a
dialog box will open asking if you would
like to send the updated program to the
pump. Choose OK to update and save
or Cancel to return to the Basal Edit
screen.
5.5 Activating a Basal Program
From the Home Screen, press the Basal
Function Button to enter the Basal Screen
shown in Figure 31. Select the correct basal
program by choosing the correct tab. Press
the “Activate <Program Name>” button,
and confirm using the dialog box.
Note
After completing the Settings Wizard
for the first time, you must start basal
deliver y by activating a basal program.
Afterward, ac tivating a new basal
program will supercede any programs
that were previously running.
Note
When a basal program is running,
the Activate Program button inside the
running program's tab will change from
to Temporary Basal Rate (see Chapter
5.6).
5.6 Temporary Basal Rate
Normally, your basal rate does
not require frequent changes, but in
certain circumstances you may want to
temporarily administer a different basal
rate to avoid low or high blood sugars.
1
You should consider to decrease
your basal rate if your physical activit y
decreases on non-work days, if you are
eating foods high in protein and fat, if
you are experiencing woman’s monthly
hormone changes, taking drugs, or have
postprandial hyperglycemia.
2
You should consider to increase your
basal rate: during strenuous exercise,
in periods of rapid weight loss, when in
abnormal environmental conditions (such
as hot tubs, saunas, etc.), or while drinking
alcohol.
Equil® Patch Insu lin Pump System
35
Page 40
Note
Each person’s physical condition is
different. Set your temporary basal rate
carefully under your doctor's guidance.
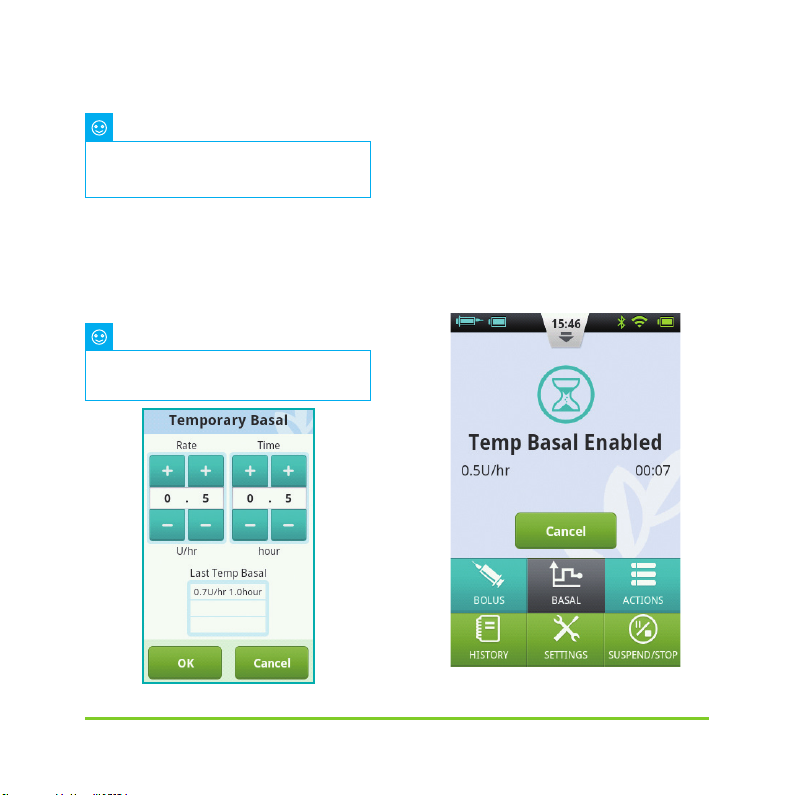
From the Home Screen, press the basal
function button to enter the Basal Screen,
make sure that the Current Basal Program
tab is open, and press the Temporar y Basal
Rate button to bring up a temporary basal
rate settings dialog box (Figure 38).
Note
The Rate can either be set in U/hr or
by % of the current basal rate. For more
info about settings, see chapter 5.7
Enter your temporar y basal rate and
the amount of time. Press the Begin utton
and the PDA will send the command to the
pump to administer a temporar y basal
rate. When the command is completed, the
PDA will automatically return to the Home
Screen where the Information Display
Area will show the current status of your
temporary basal rate (Figure 39).
Figu re 38
Figu re 39
Equil® Patch Insu lin Pump System
36
Page 41
Note
By default, the Temporary Basal Rate
function is off. If the button is greyed
out, activate the function using the
settings menu (Chapter 5.7)
5.7 Settings
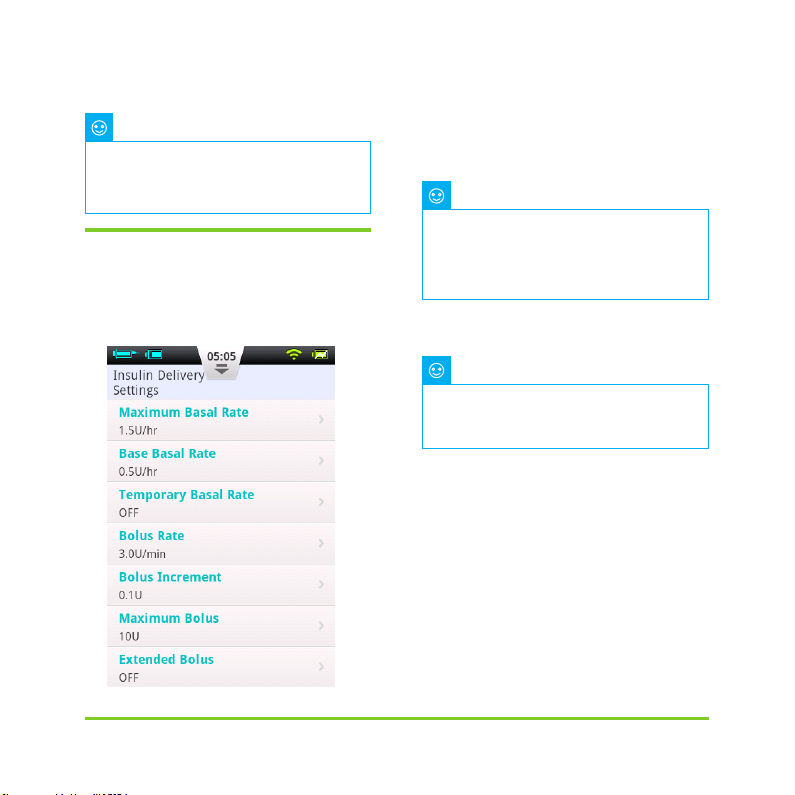
From the Home Screen, choose
“Settings – Insulin Delivery Settings”
as shown in Figure 40 to change delivery
settings.
Figu re 40
Maximum Basal Rate: Used to limit the
1
maximum basal rate that can be set in the
Basal Menu
Note
This feature is used to limit the
maximum amount of bolus delivery
that can be administered by accident or
misoperation.
Base Basal Rate: Used to enter the
2
Base Basal Rate (Chapter 5.2)
Note
Setting this value to the most used
basal rate will simplify creating Basal
Programs.
Temporary Basal Rate: Choose to
3
adjust settings for temporary basal rates.
a) Off: Turn off the Temporary Basal Rate
function. The corresponding Temporary
Basal Rate button will be greyed out.
b) U/hr: Temporar y Basal Rate will be
displayed in U/hr.
c) %: Temporary Basal Rate will be
displayed as a % of the current basal rate.
Equil® Patch Insu lin Pump System
37
Page 42
6 Boluses
6.1 Understanding Boluses
Diabetics have elevated blood sugar
levels after meals, requiring bolus doses
of insulin to lower blood sugar levels. A
bolus refers to the amount of insulin that is
quickly infused before a meal.
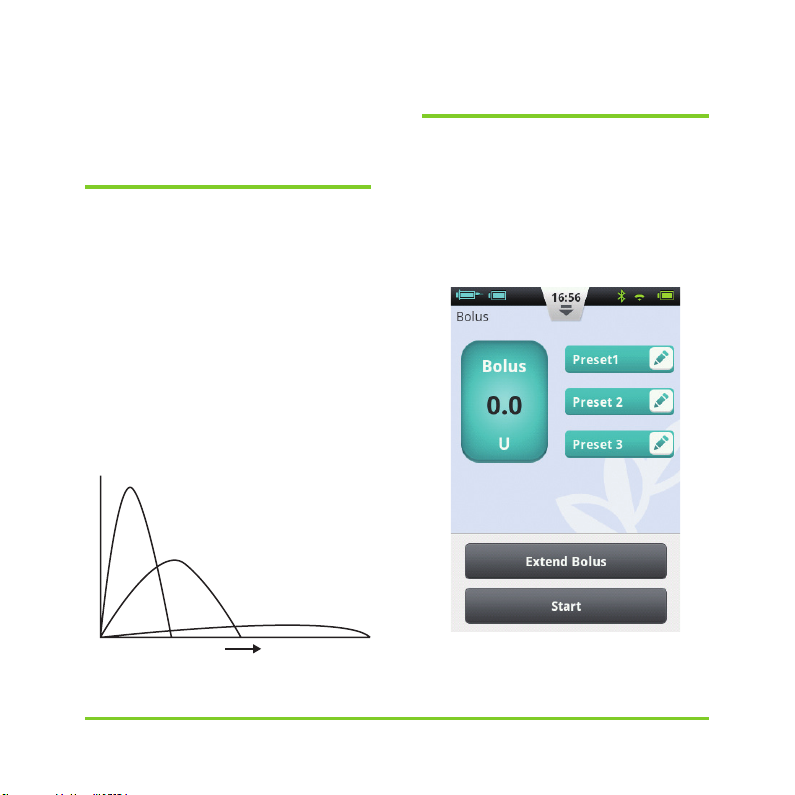
Carbohydrates, proteins, and fats all
affect your blood glucose level differently
(Fig. 41). There are two types of boluses
that can be administered to handle
different types of food intake.
Blood
Sugar
Carbohydrate
Protein
Fat
Time
Figu re 41
6.2 Manual Boluses
Manual boluses are used to offset high
blood glucose levels.
From the Home Screen, choose the
Bolus button to enter the Bolus Screen
(Figure 42) .
Figu re 42
Equil® Patch Insu lin Pump System
38
Page 43
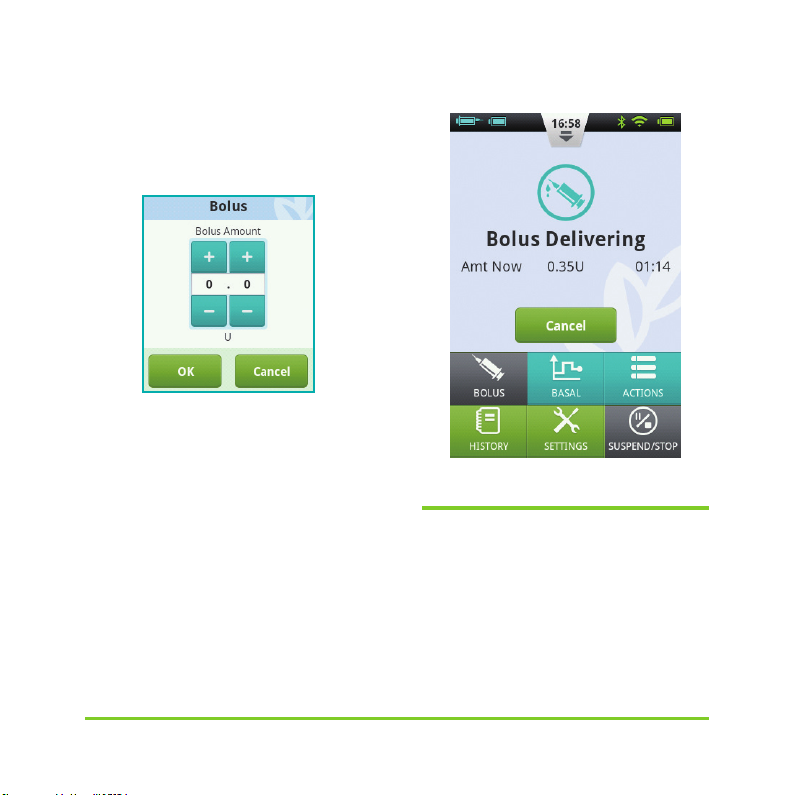
Choose the Bolus button in the upper
left corner to open the dialog box (Figure
43). Choose your bolus size and press OK.
Figu re 43
If the Bolus amount is not 0, the Start
button will be green, and you can choose
the Start button to begin to administer the
bolus. A confirmation window will open to
confirm the amount, choose OK to confirm
and the PDA will send a command to the
pump to start delivery.
While the pump is delivering, the PDA
will rever t to the Home Screen and display
the bolus status (Figure 44).
Figu re 44
6.3 Bolus Presets
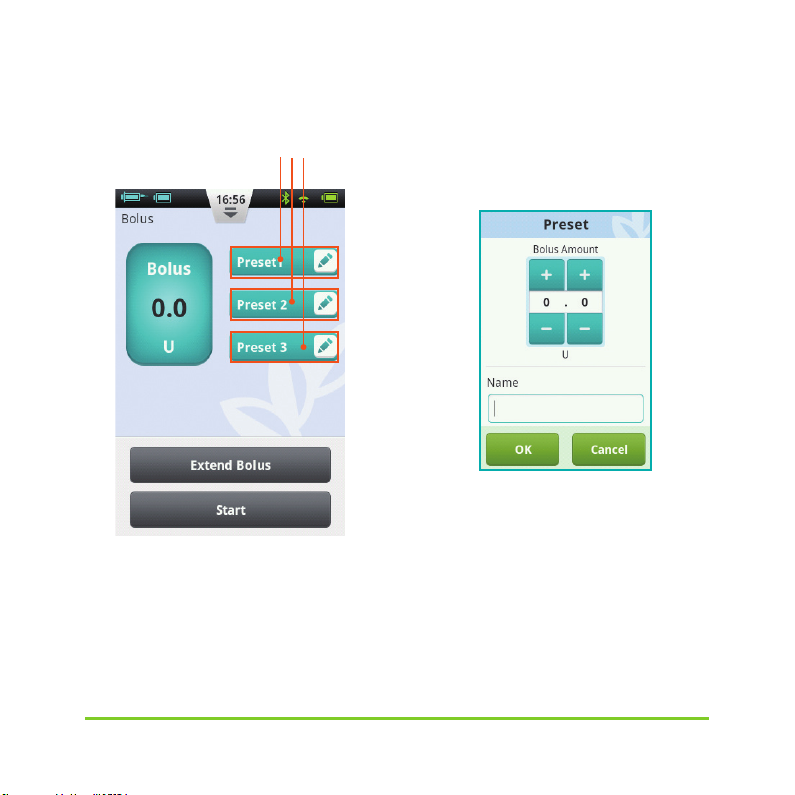
The Bolus Screen contains three
programmable preset boluses (Figure 45).
Equil® Patch Insu lin Pump System
39
Page 44
3 Bolus Presets
Figu re 45
You can set up each of the three preset
boluses (they are empty by default).
Add Preset: If a preset is empty, you
1
may press any where on the button to open
the Preset dialog box (Figure 46). Edit the
parameters to create a new Preset.
Figu re 46
Using a Preset:If a Preset is already
2
programmed, press the lef t area of the
button and the value will appear in the
bolus amount to the far left. A small arrow
will appear that links the preset that has
been chosen to the bolus amount (Figure
Equil® Patch Insu lin Pump System
4 0
Page 45
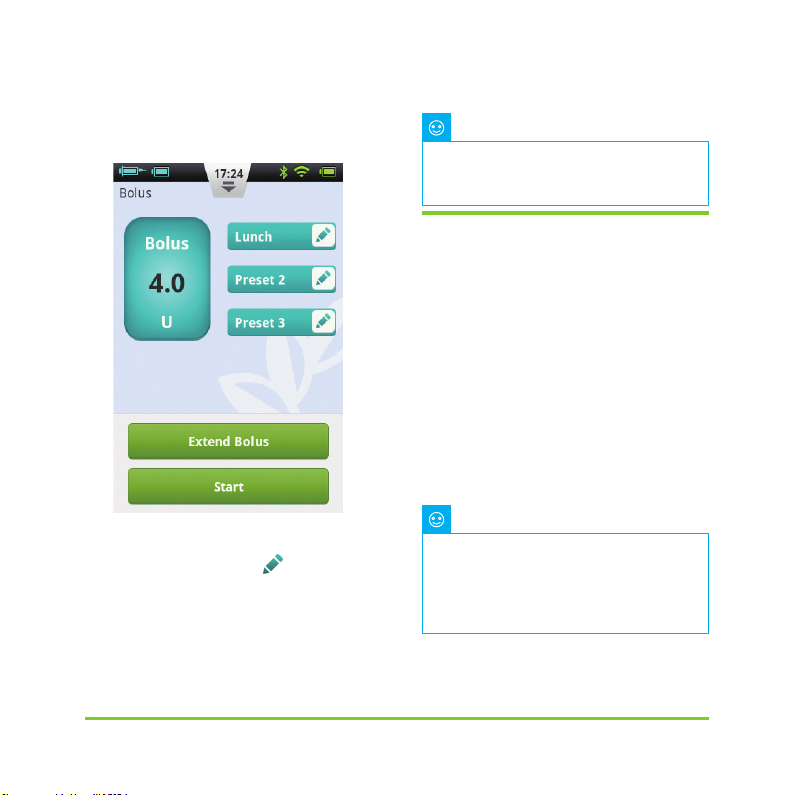
47). You can administer the bolus now by
pressing the Start button as in Section
Figu re 47
Edit Preset:Press the icon to open
3
the Preset settings dialog box. Change the
settings, and press OK to save.
6.2.
Note
All three presets can be administered
in any order, but only one can be
administered at a time.
6.4 Extended Boluses
6.4.1 Extended Bolus with
Amount Now
An Extended Bolus with Amount
Now can be useful when you eat meals
with both rapidly and slowly absorbed
carbohydrates such as some fast foods.
An Extended Bolus With Amount Now
is a bolus that is administered in two
stages – an amount immediately, and the
remainder over an extended period of
time.
Note
This feature requires a detailed
understanding one’s carbohydrate
absorption rate. Please consult with
your professional healthcare provider
before using this feature.
From the Home Screen, choose the
Equil® Patch Insu lin Pump System
41
Page 46
Bolus button to enter the Bolus Screen and
then enter a bolus amount (Section 6.2).
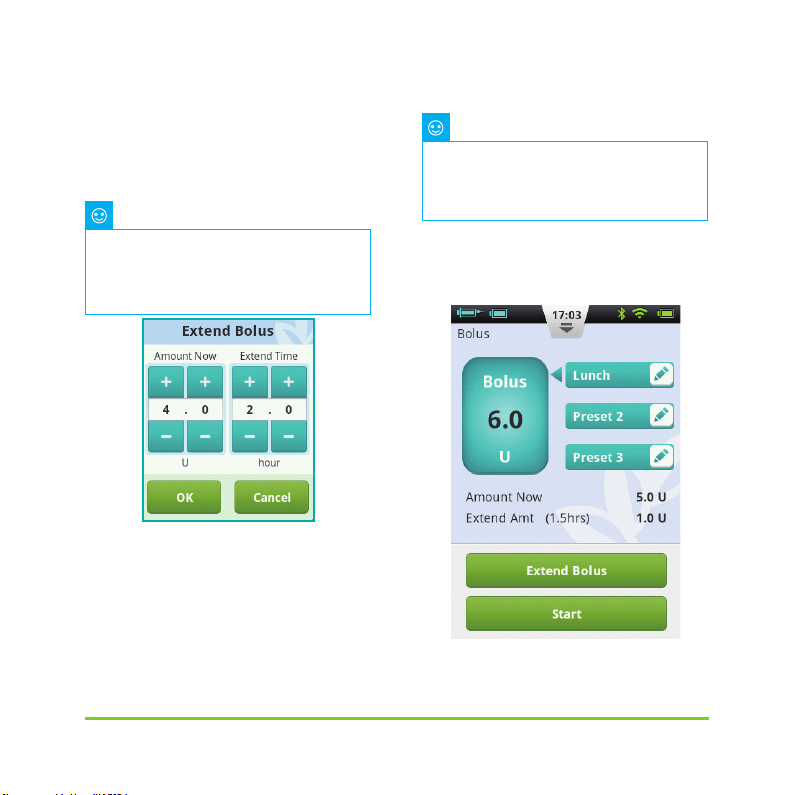
Press Extend Bolus to open the Extend
Bolus window (Figure 48).
Note
By default, the Extend Bolus function
is off. If the button is greyed out, be
sure to activate the function using the
settings menu (Section 6.7).
Figu re 48
Amount N ow: the bolus amo unt to be
administered immediately
Exte nd amount = Total Bolu s – Amount Now
Exte nd Time: The time p eriod over whic h the
exten ded amount will be admin istered.
Note
The Amount Now can be set in
absolute units (U) or relative to the total
bolus amount (%). See Section 6.7 to
change this setting.
Press OK to accept this setting and
go back to the Bolus Screen. The Bolus
Screen will now display the Amount Now
and Extend Time (Figure 49).
Figu re 49
Equil® Patch Insu lin Pump System
42
Page 47
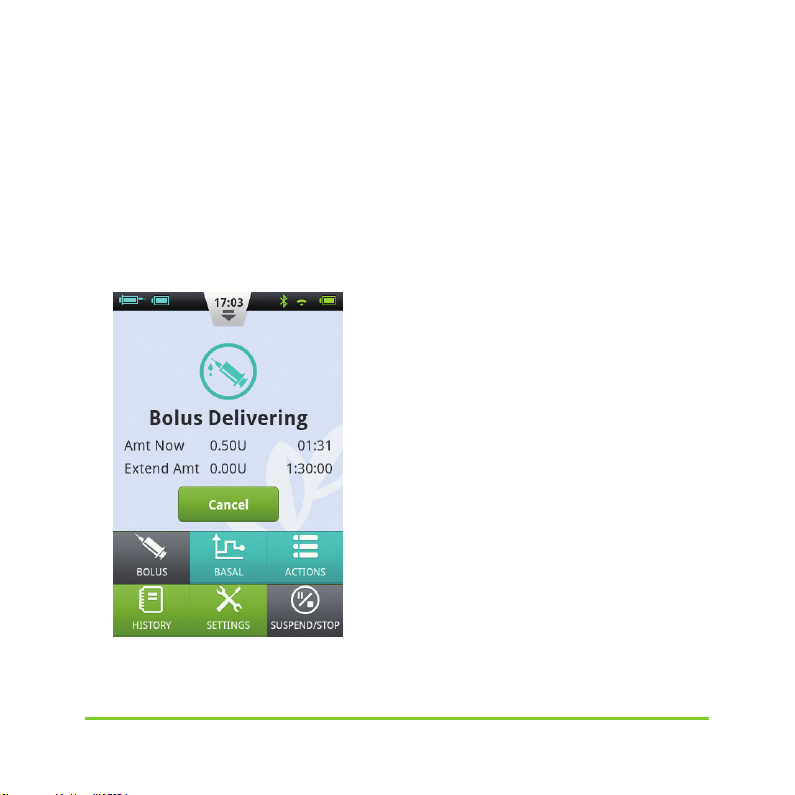
Choose the Start button to begin to
administer the bolus. A confirmation
window will open to confirm the amount,
choose OK to confirm and the PDA will
send a command to the pump to start
deliver y. While the pump is delivering, the
PDA will revert to the Home Screen and
display the bolus status (Figure 50).
Figu re 50
6.4.2 Extended Bolus Without
Amount Now
An Extended Bolus Without Amount
Now can be useful when you have eaten a
long meal with extended snacking, have
delayed digestion due to gastroparesis or
for meals high in fat. The Extended Bolus
Without Amount Now can be administered
over a time period of 30 minutes and 8
hours.
Before using this feature, please read
section 6.4.1. To administer an Extended
Bolus Without Amount Now, set the
Amount Now to 0 (zero). No immediate
bolus will be administered, and the total
bolus amount will be administered over
the time period specified.
Equil® Patch Insu lin Pump System
43
Page 48
6.5 Quick Bolus
The Equil patch insulin pump system has
a Quick Bolus feature that allows the user
to administer a bolus without using the
touchscreen or looking at the PDA Display.
This feature can be handy if you forget your
PDA, or would like to administer a bolus
discretely.
Note
By default, the Quick Bolus function
is off. To enable, be sure to activate
the function using the settings menu
(Section 6.7)
6.5.1 Quick Bolus Using the PDA
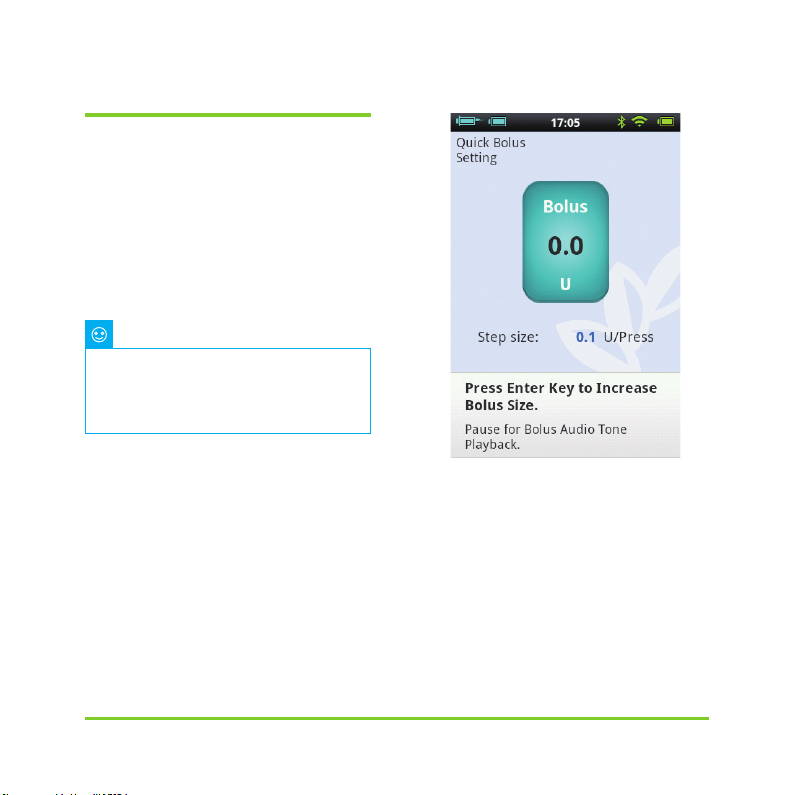
While in the Lock Screen, press and
1
hold the Enter (Select) button for about 3
seconds. The PDA will give an audible alert
and enter the Quick Bolus screen (Figure
51).
Figu re 51
The next time you press the Enter
2
(Select) button the bolus size will increase
by a predetermined increment. This
increment can be set in the settings menu
(Section 6.7). Also, every time you press
the Enter (Select) button, you will hear
Equil® Patch Insu lin Pump System
4 4
Page 49

a beep from the PDA to confirm that you
have pressed the button. Each time you
press the button, the tone will ascend in
pitch (up to 5, and then repeating) to help
you remember the number of times you
have pressed the button.
Note
The maximum number of increments
for a quick bolus is 20.
Note
If there is no activity for 10 seconds,
the PDA will revert to the Lock Screen.
After you have set the correct bolus
3
amount by pressing the Enter (Select)
button the appropriate amount of times,
wait for 3 seconds and the PDA will repeat
the audible tones back for you to confirm
the correct number of bolus increments.
If the number of tones is correct, press the
Enter (Select) button one last time, and the
bolus will be administered.
Note
If you would like to cancel, simply
press the Back button or wait 10
seconds for the system to rever t to the
lock screen
When the pump receives the bolus
correctly, you will hear a confirmation
tone and the bolus will start. The PDA will
automatically return to the main screen,
displaying the bolus and time remaining.
6.5.2 Quick Bolus Using the Pump
Administering a Quick Bolus on the
pump is similar to administering a Quick
Bolus on the PDA.
Press and hold the Bolus button on the
1
patch pump. The pump will give an audible
alert which indicates that you can enter a
quick bolus amount.
With each subsequent button press, the
2
bolus size will increase by a predetermined
increment. This increment can be set
Equil® Patch Insu lin Pump System
45
Page 50

in the settings menu (Section 6.7). Also,
every time you press the Enter (Select)
button, you will hear a beep from the
pump to conf irm that you have pressed the
button. Each time you press the button,
the tone will ascend in pitch (up to 5, and
then repeating) to help you remember
the number of times you have pressed the
button.
Note
The maximum number of increments
for a Quick Bolus is 20.
Note
If there is no activity for 10 seconds,
the pump exits the Quick Bolus mode.
After you have set the correct bolus
3
amount, wait for 3 seconds and the pump
will repeat the audible tones back for you
to confirm the correct number of bolus
increments. If the number of tones is
correct, press the pump button one last
time, and the bolus will be administered.
Note
If you would like to cancel, simply
wait 10 seconds for the system to exit
the Quick Bolus mode.
6.6 Canceling a Bolus
A bolus can be stopped during delivery.
This can be helpful, for example, if you
notice that the bolus size is incorrect, or if
your meal plans change.
When the bolus is being administered,
the Home Screen is displayed and bolus
information is shown in the Information
Display Area.
Press the Cancel button and a
confirmation window will appear. Press
OK to confirm. You can also cancel a bolus
by pressing and holding the Quick Bolus
button on the pump.
Note
Cancelling a bolus deliver y will
cancel the total bolus (Amount Now and
Extended amount).
Equil® Patch Insu lin Pump System
4 6
Page 51
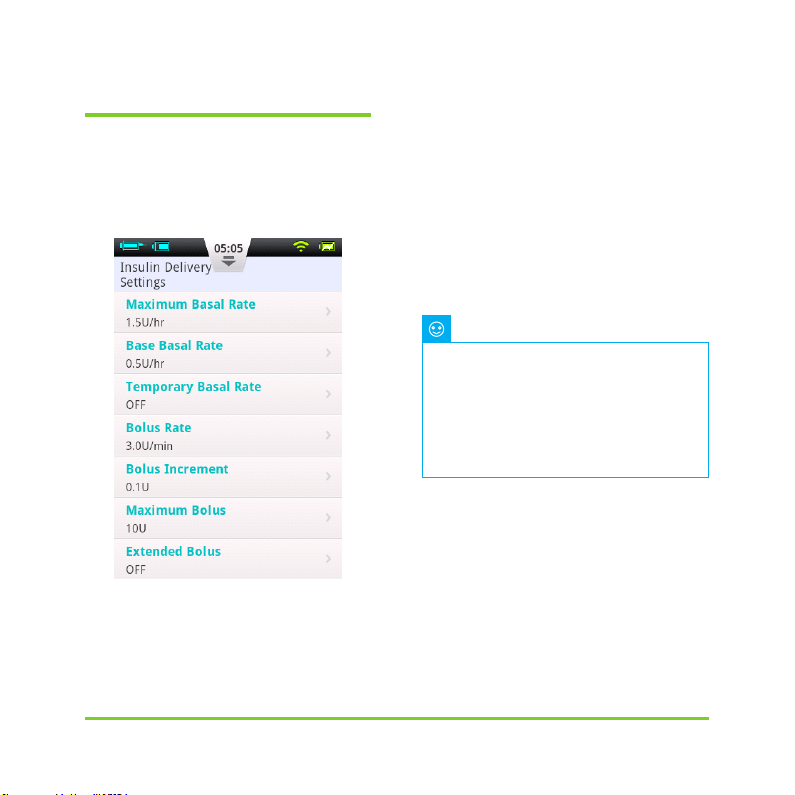
6.7 Settings
From the Home Screen, the Bolus
settings can be found at "Settings - Bolus
Settings" as shown in Figure 52.
Figu re 52
Bolus Rate: The normal bolus delivery
1
rate is 3.0U/min. Use this menu to
decrease the bolus rate to 1.5U/min.
Bolus Increment Setting: This is the
2
amount that the requested bolus changes
when pressing the "+" or "-" button.
Maximum Bolus Setting: This is the
3
maximum bolus that the user can choose
in the bolus menu.
Note
This feature is used to reduce the
possibility of overdosage caused
by mistake. Try to set this value as
the maximum bolus that you would
normally give. Set ting this value too
high increase the risk of overdosage by
misoperation.
Extended Bolus Settings:
4
a) OFF: Extended bolus function is off,
and corresponding button will be greyed
out (default)
b) U: The Amount Now will be displayed
in Units of insulin (U).
c) %: The Amount Now will be displayed
Equil® Patch Insu lin Pump System
47
Page 52

as a % of the total bolus amount.
Quick Bolus Settings: Check the
5
checkbox next to Quick Bolus to enable
the Quick Bolus function. Additional Quick
Bolus settings will be activated.
a) Quick Bolus Increment: Sets the
amount that the bolus increases with ever y
Quick Bolus button press.
Equil® Patch Insu lin Pump System
4 8
Page 53
7 Therapy Setup
7.1 Infusion Set Setup
First wash your hands and the infusion
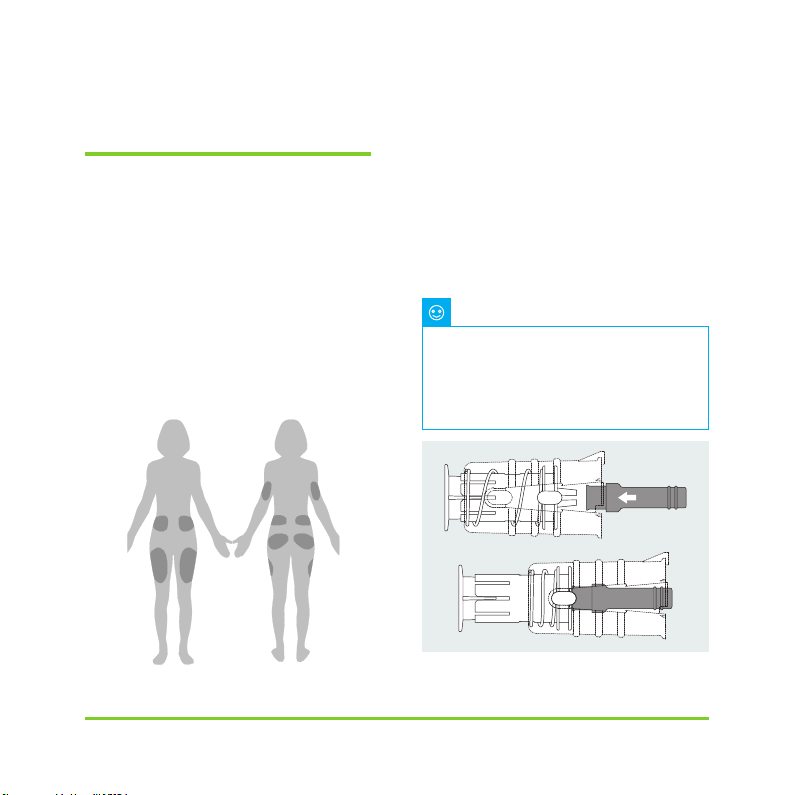
1
site and let everything dr y. Remove the
pump base from its packaging and place
it on one of the suggested areas shown in
Fig. 53 (abdomen, upper arm, thigh, lower
back, etc.) Avoid sites that may rub against
other objects like belts, waistbands or
tight clothing. Also make sure that your
infusion site is at least 2-3cm away from
your navel. Do not use the abdomen if you
are late in pregnancy.
Open the cannula pack as indicated on
2
the packaging. Push the cannula assembly
into the cannula inserter as shown in
Figure 54 until the cannula assembly is in
the cocked position and you hear a click.
You should see that the cannula assembly
is connected firmly to the cannula inserter
and the inserter is held firmly in the cocked
position.
Note
Infusion sets are comprised of a
cannula pack and base. Be sure to
use only infusion accessories from
MicroTech such as HRN-S-60, HRN-S-90,
HRN-H-45, or HRN-H-65.
Front
Figure 53
Equil® Patch Insu lin Pump System
49
Back
Figu re 54
Page 54
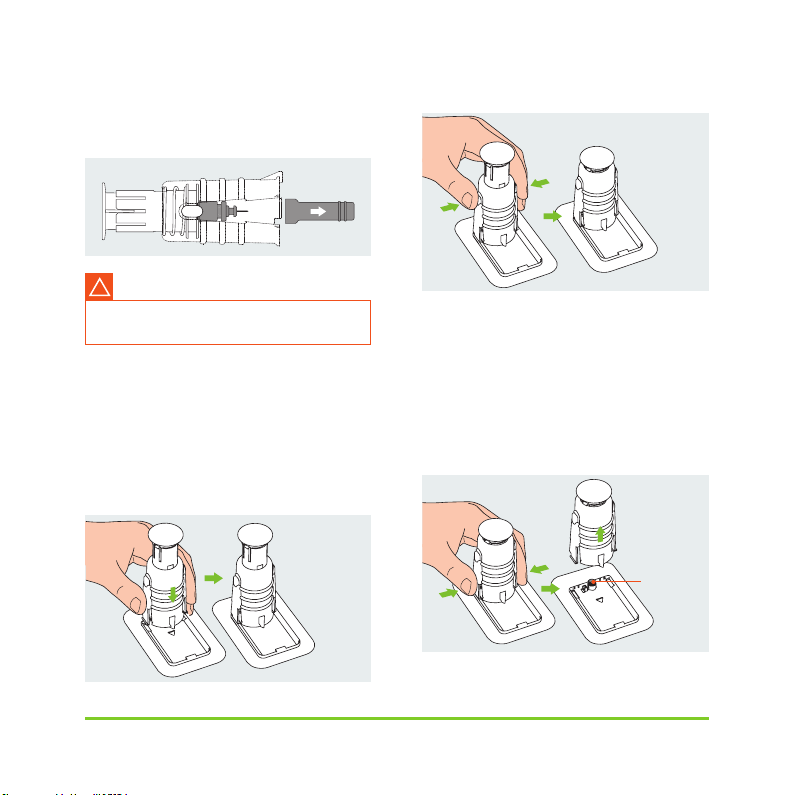
Remove the protective sleeve as shown
3
in Figure 55.
Figure 55
Warning
!
Exercise caution when the needle is
exposed !
Place the inserter onto the pump base
4
as shown in Figure 56. Use the triangle
on the inserter to orient it correctly in
relation to the pump base. Push the two
snaps into the pump base until it securely
held together. Press the two white buttons
toward each other and the cannula will be
inserted into the base and infusion site.
Figu re 56
Release the inserter from the pump
5
base by pushing the two hooks toward
each other as shown in Figure 57. If the
inserted needle or needle base remains on
the cannula, carefully remove it from the
infusion site. Place the protective sleeve
back onto the cannula assembly.
Cannula
Figu re 57
Equil® Patch Insu lin Pump System
50
Page 55
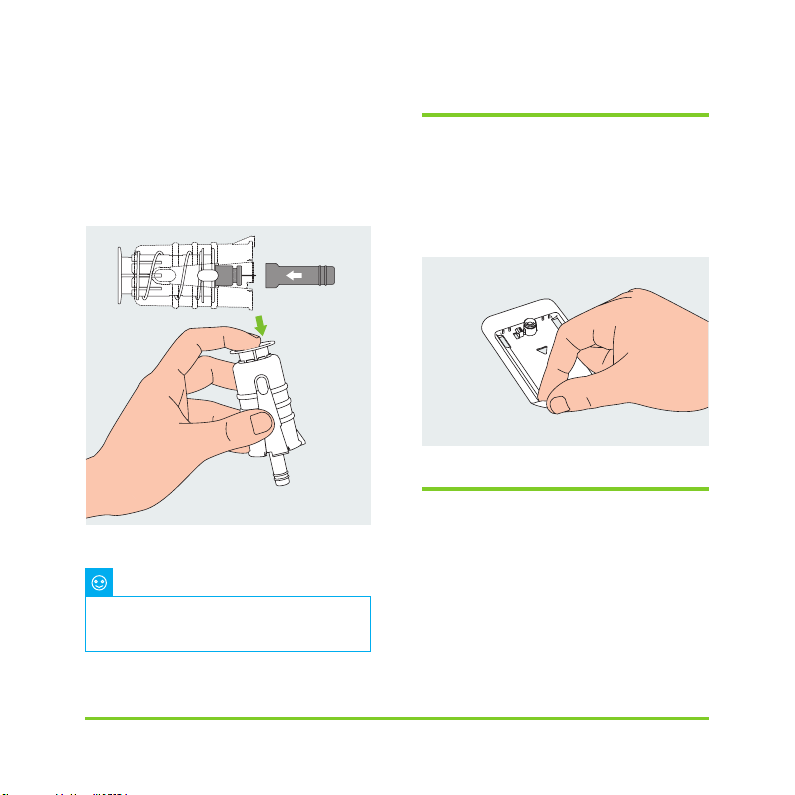
If the needle remains in the inserter,
6
place the protective sleeve back onto the
needle hub. Firmly push the top of the
inserter to eject the needle hub (Figure 58)
and dispose of properly.
Figu re 58
Note
Dispose of the insertion needle
properly in a medical sharps container.
7.2 Removing the Infusion Set
Peel up one end of the tape as shown in
Figure 59 and continue to peel away from
the skin until the entire infusion set has
been removed.
Figu re 59
7.3 Filling the Reservoir
Remove the new reservoir from the
1
packaging.
Use an alcohol wipe to clean the insulin
2
vial and then attach it to the fill adapter as
in Figure 60.
Equil® Patch Insu lin Pump System
51
Page 56
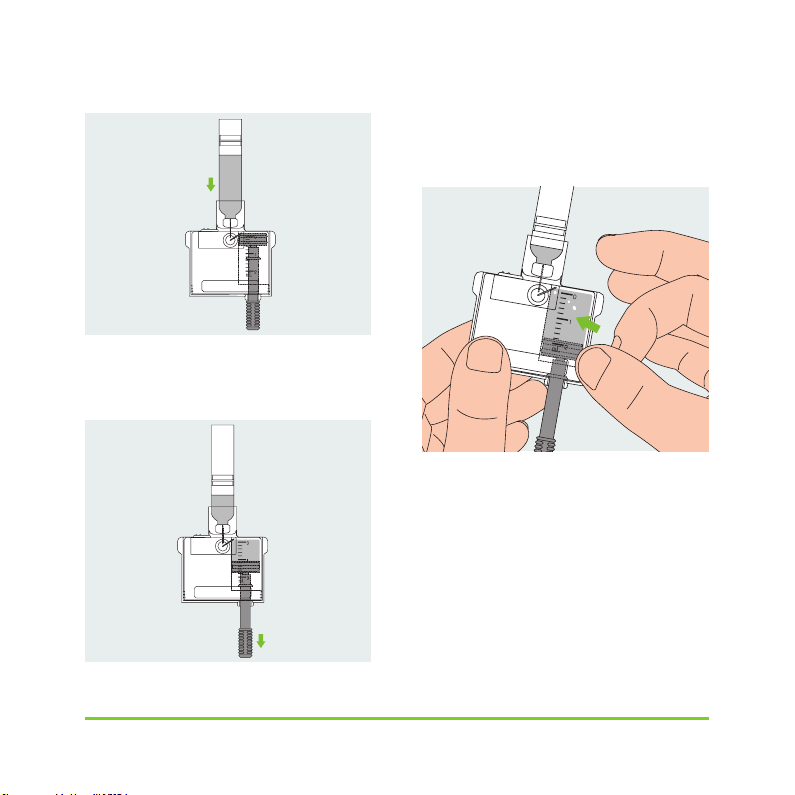
Figu re 60
With the insulin vial on top, slowly
3
pull the pullrod and draw insulin into the
reservoir as in Figure 61.
Figu re 61
Tap the side of the reservoir to
4
encourage any air bubbles to rise to the top
of the reservoir (Figure 62).
Figu re 62
Push the pullrod slowly to ejec t the
5
bubbles back into the vial, and then slowly
pull to draw more insulin into the reservoir.
Repeat until the reservoir has enough
insulin and there are no air bubbles (Figure
63).
Equil® Patch Insu lin Pump System
52
Page 57
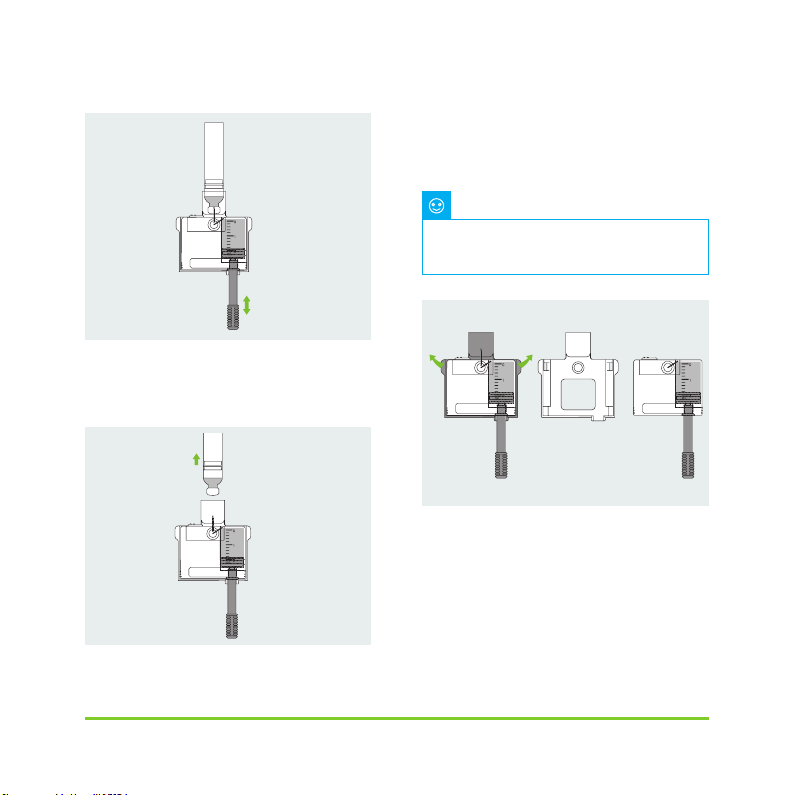
Figu re 63
Remove the insulin vial from the f ill
6
adapter (Figure 64).
Figu re 64
Pull the two release tabs (shown in
7
Figure 65) away from the reservoir to
release the fill adapter.
Note
The fill adapter contains a needle,
please dispose of properly.
Figu re 65
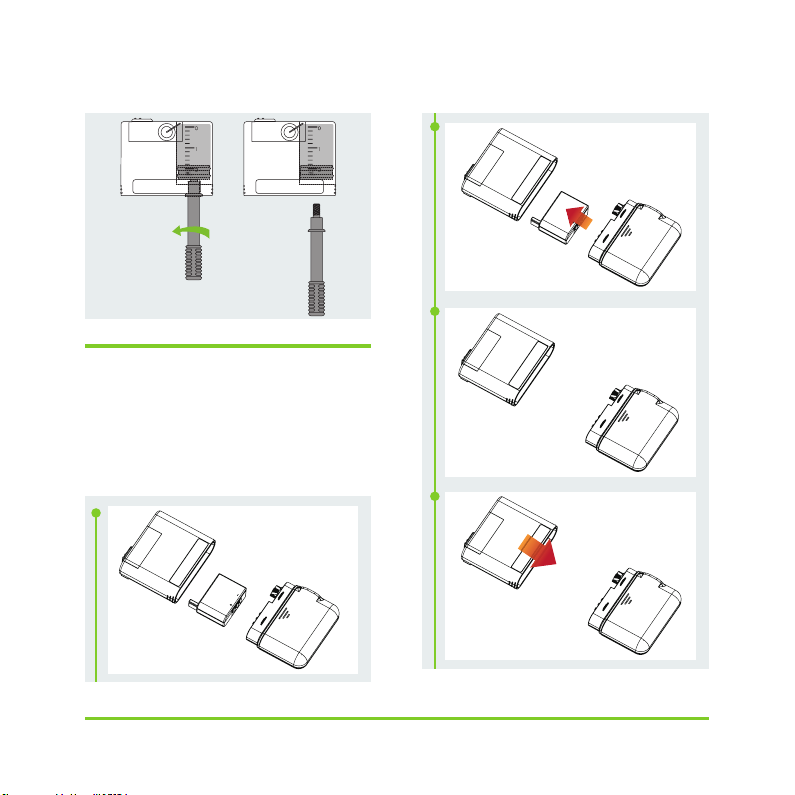
Remove the pullrod by unscrewing it
8
counterclockwise (Figure 66)
Equil® Patch Insu lin Pump System
53
Page 58
图
65
Figu re 66
7.4 Assembling Reservoir to
Pump
Figure 77 illustrates the sequence to
attach the reser voir and battery to the
pump. Always install a fully charged
batter y with a newly filled reser voir.
Equil® Patch Insu lin Pump System
5 4
Page 59
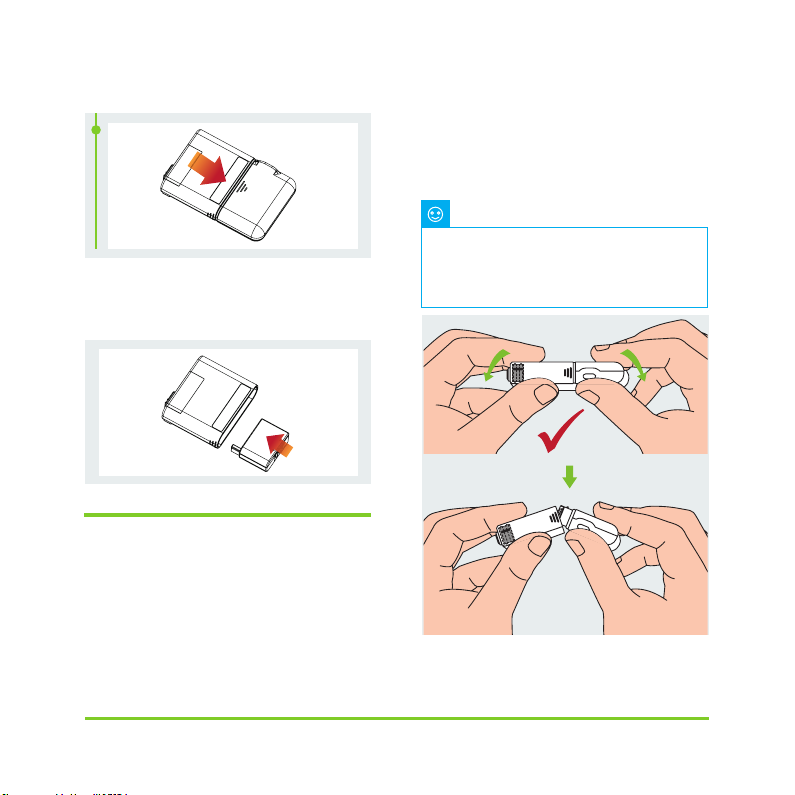
Figu re 67
Be sure that the battery is inserted in the
orientation shown in Figure 67.
Figu re 68
7.5
Disassembling the Reservoir
Holding the pump and reservoir in the
orientation shown in Figure 69, bend the
assembly along the seam line as shown
until the reservoir separates from the
pump. Be sure to recharge the battery
immediately to make sure that a fresh
batter y is always installed with a new
reservoir. Dispose of the used reservoir in a
medical sharps container.
Note
Pay close attention to the orientation
of the pump during disassembly.
Incorrect disassembly may cause
damage.
Figu re 69
Equil® Patch Insu lin Pump System
55
Page 60
8 Replacing the Patch
Pump
Warning
!
Before continuing, please make
sure you are familiar with frequently
used pump setup operations such as
installing/removing an infusion set,
filling a new reservoir, and assembling/
disassembling the reservoir (Chapter 7).
This section explains how to connect a
new patch pump to the PDA or replace an
old one.
From the Home Screen, choose the
1
Actions button and then the New Pump
button to enter the New Pump Wizard
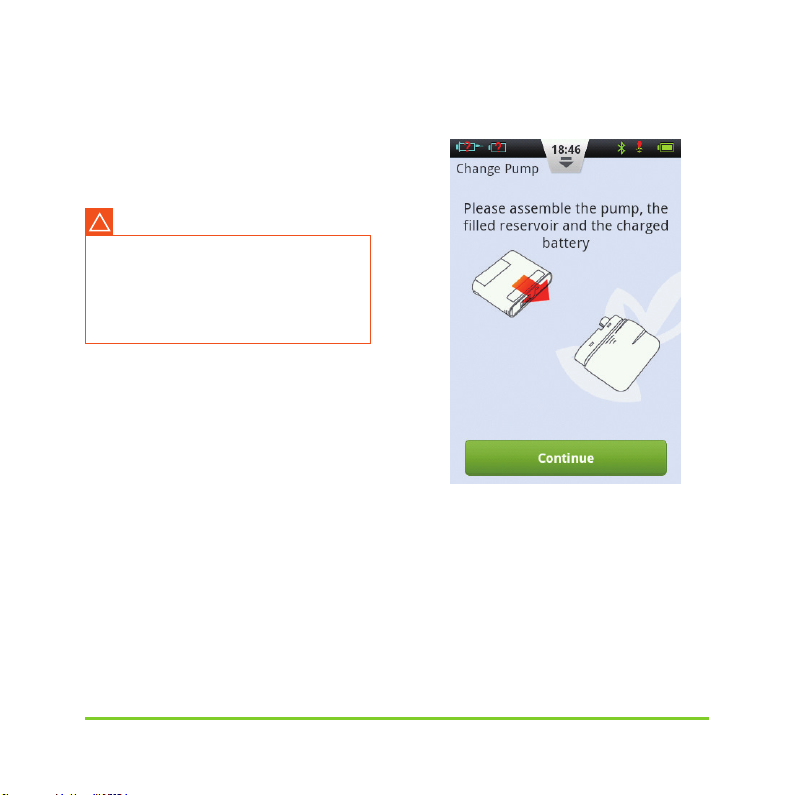
a) If this is your first time using the wizard
to connect your pump, the wizard will
start with Figure 70. Apply a new infusion
set(Chapter 7.3), Assemble a filled
reservoir and a charged bat tery to the
pump as shown in the animation (Figure
73). Press Continue to go to the next page.
Equil® Patch Insu lin Pump System
56
 Loading...