

Equicom 200 meter Camera System Installation Instructions Manual

Equicom cctv Ltd
– www.cctvcameras.ie – 0818 286 266
Installation Instructions – 200 meter multiple wireless camera system
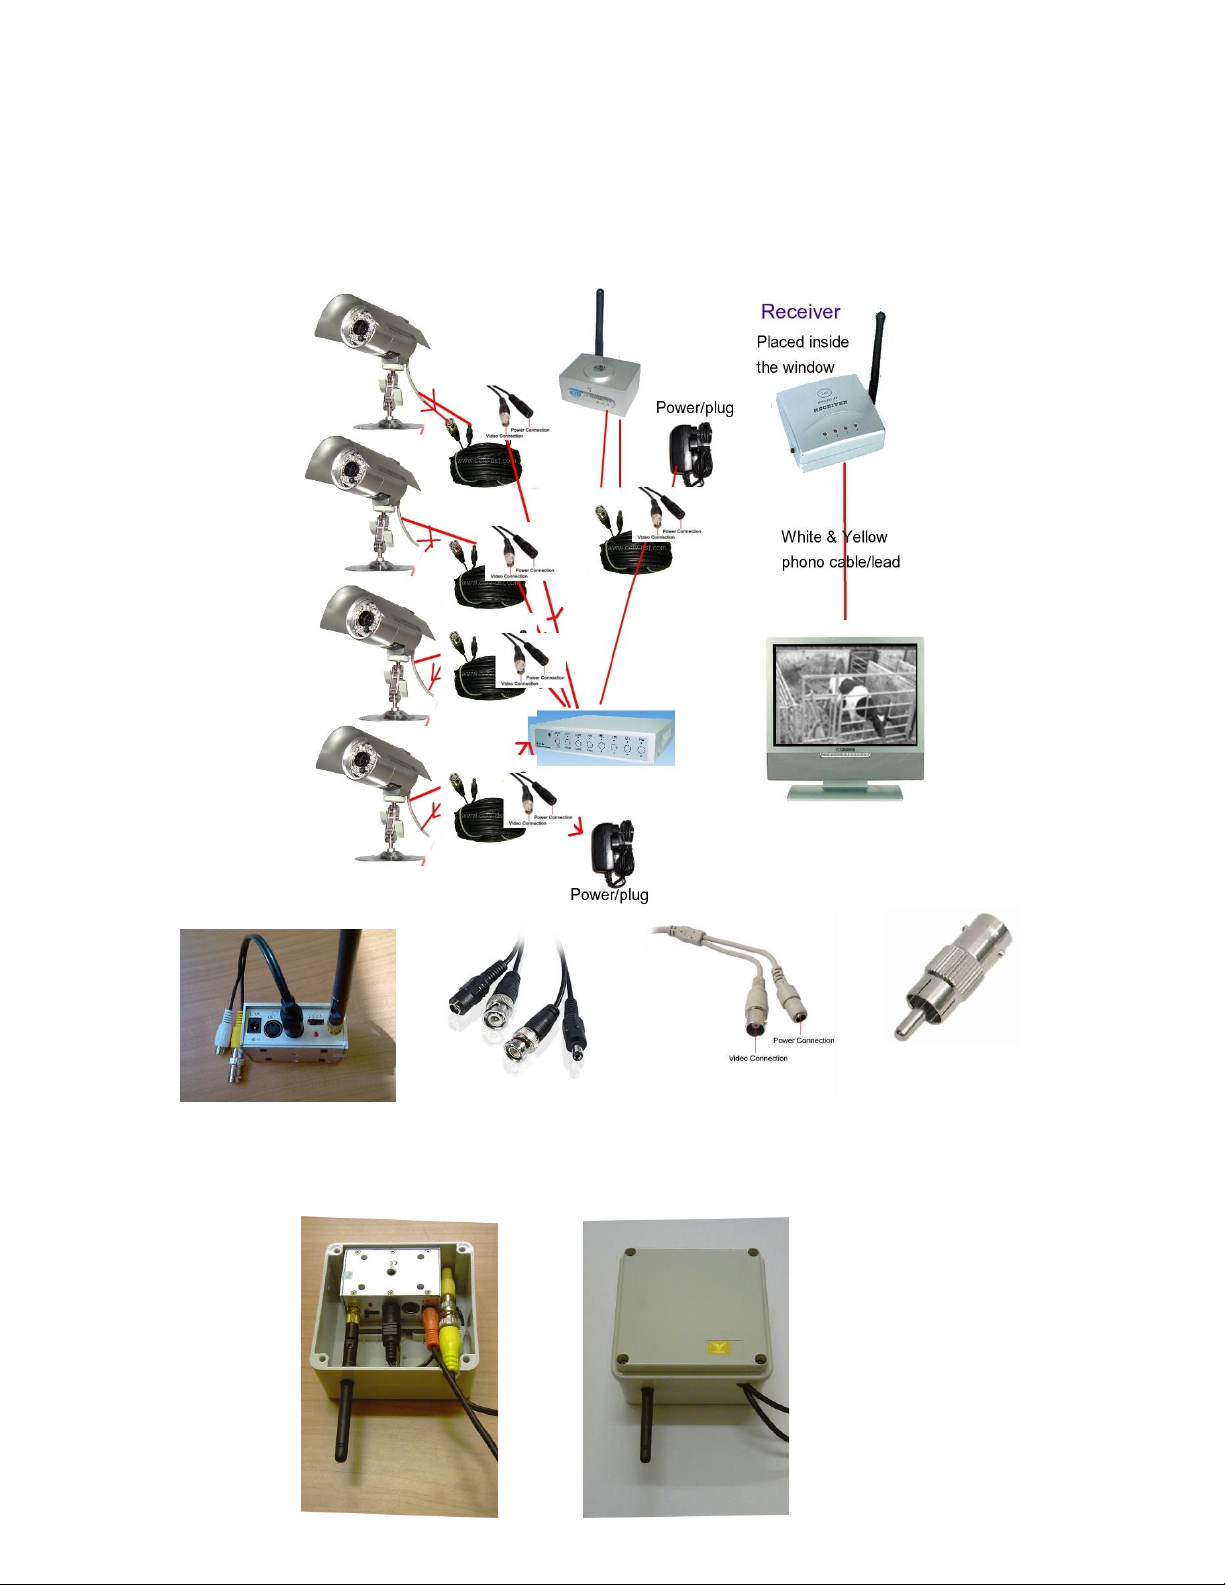
For each camera in your system
1. Locate the position where you want the camera placed.
2. Attach the bracket to the wall.
3. Screw in the camera on to the stand provided, the camera can be mounted from below or above.
4. Screw this to the metal disc and adjust camera position.
5. With the 20 metre power signal cable provided connect one side (2 connections) to the camera, then connect
the other side (signal connector) to the appropriate connection on the back of the multiplexer (cam1, cam2
etc). Using the 12v 5amp power adaptor with 4way splitter connect these to the female power connection by
the multiplexer thus powering the camera’s through the 20m of power/signal cable.
When you have completed this for each camera it is then time to connect the transmitter to the multiplexer.
6. Screw the black aerial on to the transmitter (small grey box), Always ensure that the aerial is attached
before turning power on.
7. Attach the transmitter to the desired location. The transmitter must be placed in a water proof or IP rated box
with the aerial sticking out the bottom towards the ground. There should be a line of sight between the
transmitter and receiver.
8. Using one side of the 20m power/signal cable (see diagram) connect both connections into the transmitter,
one of the cables connections will plug into the power connection for the transmitter, the other connection
will connect to the yellow connector with the male to female rca connector attached, on the small lead in the
transmitter box which goes to the IN connection on the transmitter, see diagram of back of transmitter.
9. With the other end of 20m power/signal cable connect the signal connector to the mon out connection on the
back of the multiplexor. The power connector will then connect to the power adapter for the transmitter (12v
1000ma), plug this adapter into the power socket, thus powering up the transmitter through the 20m
power/signal cable.
10. Put the transmitter on to a channel, say 4
11. Connect one end of the black AV cable (1m in length approx) to the receiver. Connect the receiver to the
TV using this AV cable, the yellow jack plug goes to the yellow phono socket in your TV and if you have a
microphone connect the white jack plug to the white audio phono socket in your TV. Put the receiver onto the
same channel as the transmitter, say 4 , and plug the receiver to the power (12 volt 1000ma)
12. Turn on the television and press TV/AV button and you should have your camera’s picture on the screen.
13. With a wireless system the multiplexer sits in the calving shed, we would recommend that the multiplexer
be set up to display auto scroll, this is where it can show a quad screen (all cameras on the screen at once),
then goes to camera 1 full screen on the TV for so many seconds (which the user defines), then on to camera
2 and so on. This can be done using the AUTOSEQ SET menu option that can be found in the DISPLAY
SET option, see user manual that comes with the multiplexer.
We would recommend that you first set it up in your home, and become familiar with its workings before you set it up
in the shed.
The multiplexer box is ideally an indoor item and not water proof so should be treated as a household electrical item
and ideally placed away from moisture and inside a damp proof area or wooden box.
Setting up the transmitter outside:
Drill a hole with an 8mm bit on the far left of the transmitter’s waterproof housing box, this hole is used to allow the
antenna to stick out of the transmitter housing box (upside down). Then on the far right hand side, drill in a groove
three quarters of an inch deep with the 8mm bit (this will enable the cables to enter/leave the transmitter housing box).
Attach the transmitter’s short black cable with the yellow and white ends to the AV IN socket on the transmitter. Then
attach the transmitter’s antenna. Then place the transmitter inside the waterproof box with the antenna coming out
through the hole. Then attach the signal part of the 20m power signal cable to the short transmitter cable (yellow end).
Tuck the yellow part length-ways along the right hand side of the box. Then connect the power connector on the 20m
power signal cable into the power socket on the transmitter (as seen in diagram). Then screw on the lid of the box
tightly with the four screws. This box should be attached where it would have direct line of sight with the receiver
(nothing blocking the view between the two). When this is being attached to a shed or building, it should be attached to
a piece of timber or insulated pole and the plastic housing of the transmitter should not be in direct contact with any
metal or steel. It must be placed outside of the building and not inside, even if it has line of sight from the inside, as any
metal-frame building can distort/disrupt radio waves. When attaching/mounting the transmitter in its box/housing, the
box must be placed upside down, with the antenna facing towards the ground, so as to ensure that no water enters the
waterproof transmitter housing. If the antenna is facing upwards, then water can enter the housing through the holes,
and the box will fill with water and damage the transmitter.
It is recommended also to seal the excess space in the holes the cables are coming out of with a waterproof sealant, to
Back of transmitter
Power/signal cable left
side is for the multiplexor,
right for transmitter &
cameras
Camera connections
Male to female rca
connector
help ensure the waterproofing of the system and increase the longevity/lifespan of the system. If you need to set up the
receiver outside to achieve line of sight with the transmitter then outdoor waterproof boxes for the receiver and receiver
extension cables are available.
It is also possible to connect a dvr (with or with out a hard drive) to your broadband, then connect the camera
to this and view your camera system live over the internet or on a mobile phone.
Microphone installation (optional):
A microphone is also able to run off this system if required.
This cable 20m in length has 3 connectors on either end, One for power (red) one for signal (yellow) and one for audio
(white), (sometimes a separate power signal cable with one for power & one for signal only is included instead. Attach
this cable to the power and the microphone, the microphone then goes to the white plug on the small lead on the
transmitter, and on the receiver the white lead goes to the white phono socket on the tv.
200 Meter transmitter in Box with lid attached,
Outdoor waterproof box antenna must face ground
& holes in box must be sealed.
 Loading...