

Page 1
R01PS
User Manual
Version: V 1.0 November, 2012
The Do’s and Don’ts Common Fault Analysis
▲ Do not place the product in high temperature, high humidity, dust, salt spray
or other severe environment. Do not make it exposed in the rain, which may
cause fault.
▲ Do not press the LCD Display, the outdoor device lens or the top black ball,
otherwise it will cause hardware damage. Once the lens or LCD screen is
broken, please be careful scratch yourself, prevent LCD liquid from entering
your eyes.
▲During the installation, please operate it carefully, do not pull the yellow FPC
cable hard to damage it. The damage caused by improper operation is not in
Warranty.
▲ Please use the manufacturer standard charger to ensure normal usage and
system safe.
▲ Please refer to the User Manual when you install battery, Micro SD card, FPC
connection and insert USB cable. Please take care of the direction or polarity to
protect the hardware and system from the improper insertion.
▲ Please do confirm the door thickness and choose the proper screws as per
User Manual to protect the device from the improper screws.
1. If you can’t drive the screws in place or can’t fix the outdoor
device, it may be due to the screws, please confirm the door
thickness again and choose the proper screws.
2. After pressing the Preview Key, it shows Device not Ready,
Failure, etc., it may be due to the FPC cable not connected with the
monitor properly or destroyed, please connect the FPC cable
again. If it is still inoperative, maybe the FPC cable damaged, need
to change the FPC cable or outdoor device.
3. Under the conditions of Mcro SD card insertion, when you take
photo/video, it show Please insert Micro SD card, please reinsert
the card. If it is still inoperative, please change the card.
4. If the monitor LED flashes regularly (approx.1 time per 3
seconds), which alert Low Battery, please charge timely.
5. If the monitor alarms continuously, no display with pressing the
Preview Key, the yellow FPC may not be connected properly or
damaged. Please connect the FPC cable again, if it is still
inoperative, it maybe the FPC cable or connector destroyed.
Installations
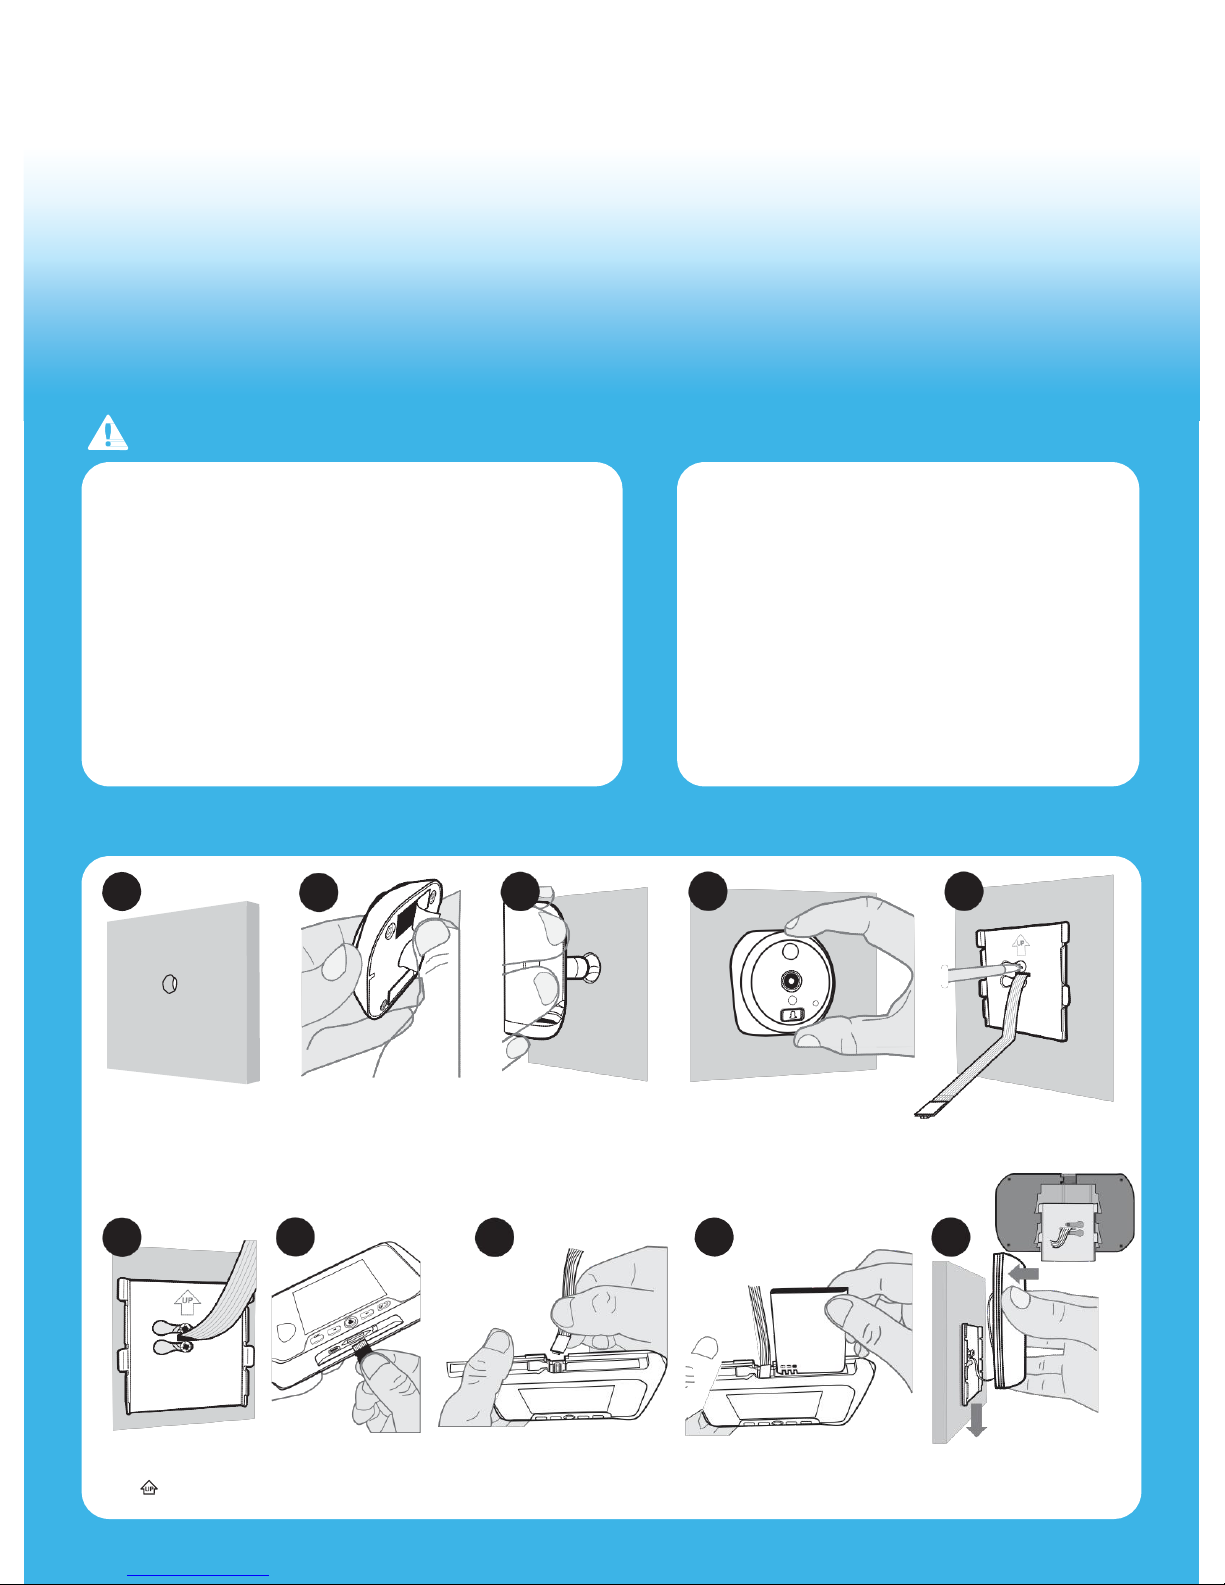
1 2 3 4 5
Remove the traditional
peephole viewer or open a
new hole (recommend hole
size approx.20mm)
Tear off the foam of the
adhesive on the back of
the outdoor device.
Choose the right screws
according to the door thickness,
drive 5 circles slightly, then
make the outdoor device go
through the hole.
Ensure the doorbell downward,
fix onto the door with adhesive.
Tidy the FPC cable, make
it go through the rectangle
hole of the steel bracket.
6 7 8 9 10
Drive the screws tightly and
fix the steel bracket, please
notice.
Insert the Micro SD card.
Please notice the front, back
and direction of the card.
Open the battery cover and
fasten the FPC cable. Please
take care of the connection
direction
Install the battery and fasten
the cover. Please take care of
the polarity.
Fasten the monitor with
the steel bracket.
Page 2
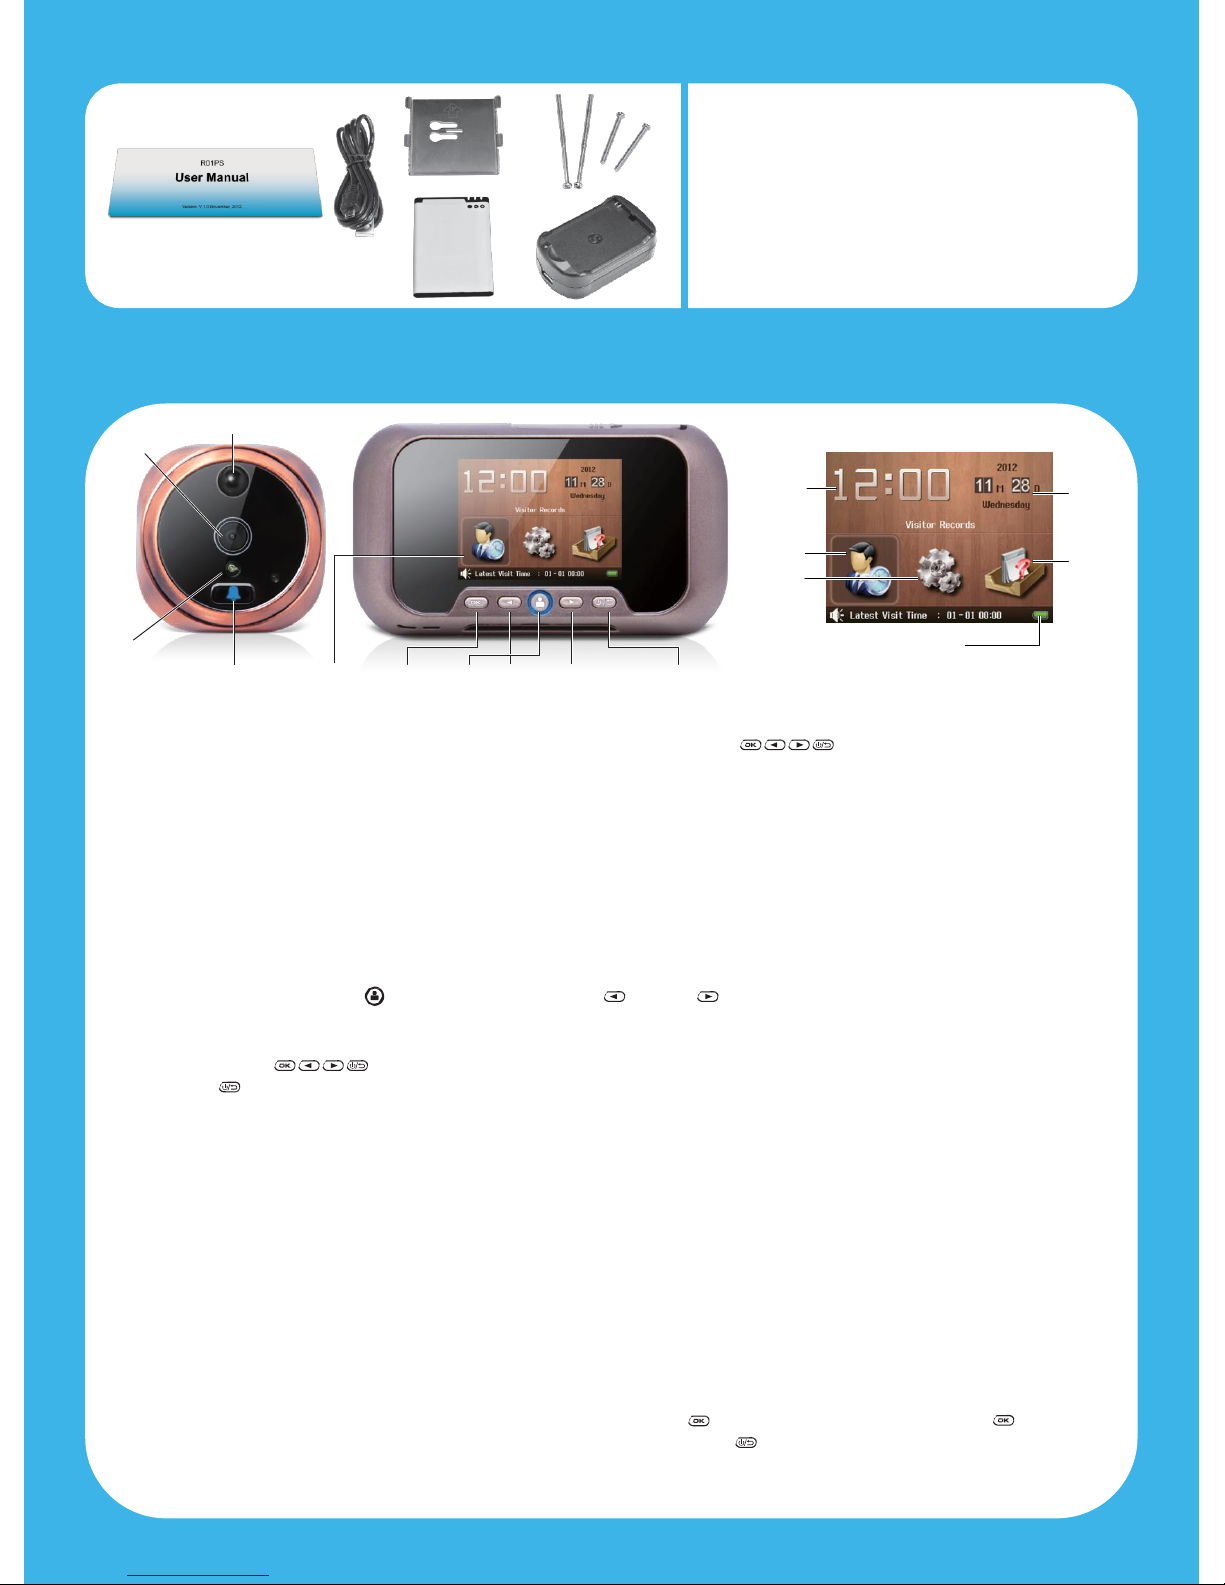
Accessaries
Data
sheet
★ Indoor
device:135×76×17mm
★ Outdoor
device:60×60×15.5mm
★ Hole
size:12mm ~ 58mm
③ ④
★ Door
thickness:35mm ~ 105mm
【Remarks】Door
thickness
35mm~65mm,
please
choose
35mm screws. Door size
65mm~95mm,
please choose
65mm
screws. Door thickness over
95mm,
please choose
approx.
①
②
80mm M3
screws.
⑤ ⑥
★
Working
Voltage: DC 3.5V ~ 5V
Instructions
Camera
Detector
Time
Date
Records
Settings
Readme
Infrared
Doorbell
LCD
OK
Preview
Left Right Switch on or
off/back
Power
Outdoor part Indoor part
Indoor device UI
◆ Main menu: Calendar/Clock, Records, Settings, Readme. Please click these four buttons:
◆ Records:t
he software will auto create folders by the system time and date and the visitors’ image/video will be auto named and stored by the
system time and date, which easy for your checking.The Records format is [A/M] Y/M/D – H/M/S, A means auto detection and photo shooting/video
recording, M means manually record image/video. For example[M]20121101-162956.jpg, means it is a manual recording at 16:29:56 on November
1,2012.
◆ Charge: the device uses rechargeable lithium battery, the battery mark will be red when it’ s in low battery, meanwhile, the monitor LED will flash
regular(1 time per 3 seconds), please charge timely under this condition. Two optional charge ways: Charge by USB cable connected with monitor
USB interface and Charge by charger.
Notes: If you choose to charge by charger, please reset the system time after installing the battery.
◆ LED: While someone at your door, the doorbell LED will flash or light on(Optional), meanwhile, the monitor LED will light on. When no one there,
the LED will auto light off within several seconds. The LED will be in breathing in normal condition.
◆ Preview: Press Preview button into preview interface, press Left and Right to zoom the outdoor scene.
◆ Settings:
Time&Date: Press to set time and date, then
press
Back button to complete the
settings.
Record Mode:
image
or video, details as
follows:
☆
Image(640×480):【Default】
☆
Image(320×240)
☆
Video(3 seconds)
☆
Video(5 seconds)
☆
Video(10
seconds):【not recommended
for
energy-saving】
Intelligent Detection:
6
Detection
Settings:
◎ 1
seconds
◎ 3
seconds
◎ 5
seconds
◎ 15
seconds
◎
Off:
6
Alarm Settings:
◎ 20
seconds
◎ 30
seconds
◎ Off
6
Detection Sensitivity
◎
Low
◎
Middle
◎
High
I
Notes
I
For
energy-sa ving
and lon g
stand by,
ple ase d o not
choose high
mode.
Doorbell Answering: whi le
someon e rin g
the
door be ll ,
the
monitor LED auto light
on(Default),
or
manually
light
on(Optional).
Back light control: LCD auto light off time is 5
seconds (Default).
Memory card format
Factory Default
◆ Records: Pre ss the doorbell button,
th e mo nitor will
shoo
t
image
or r ec ord vid eo
(opti on al ), mean wh il e,
play music an
d
display
the outdoor
scene.
◆ Readme: Installation
Guide,
System Information and
Contacts
◆ Delete image/video: reco
rds→file
s→image/video, to Press
OK
button long time, it will show Delete?, to Press OK to
delete,
to Press Back to
cancel.
 Loading...