

Page 1

OPERATOR INSTRUCTION MANUAL
EQUALIZER INTERNATIONAL LTD
www.equalizerinternational.com
HYDRAULIC
VERTICAL
LIFTING WEDGES
VLW18TE
VLW18TI
Page 2

OPERATOR INSTRUCTION MANUAL
IM_VLW_Rev16_A4 (colour)
VLW18TE; VLW18TI
HYDRAULIC VERTICAL LIFTING WEDGES
1
CONTENTS
1. INTRODUCTION
2. TOOL SAFETY
2.1 GENERAL SAFETY
2.2 PERSONNEL COMPETENCY
2.3 DISCLAIMER
2.4 DEFINITION OF TERMS
2.5 HAZARDS
3. TOOL CAPABILITIES
4. VLW18TE HYDRAULIC VERTICAL LIFTING WEDGE
4.1 HOW THE VLW18TE WORKS
4.2 TOOL FUNCTION
4.3 USING THE STEPPED BLOCK ACCESSORY
4.4 KIT CONTENTS
4.5 TOOL DIMENSIONS
4.6 TOOL MAINTENANCE
5. VLW18TI INTEGRAL HYDRAULIC VERTICAL LIFTING WEDGE
5.1 HOW THE VLW18TI WORKS
5.2 TOOL FUNCTION
5.3 USING THE STEPPED BLOCK ACCESSORY
5.4 KIT CONTENTS
5.5 TOOL DIMENSIONS
5.6 TOOL MAINTENANCE
7. TROUBLESHOOTING
7.1 VLW18TE TROUBLESHOOTING
7.2 VLW18TI TROUBLESHOOTING
8. REGULATORY INFORMATION
8.1 REGISTERED HEAD OFFICE
9. PARTS LISTS & SERVICE KITS
03/11/2017
Page 3

OPERATOR INSTRUCTION MANUAL
IM_VLW_Rev16_A4 (colour)
VLW18TE; VLW18TI
HYDRAULIC VERTICAL LIFTING WEDGES
2
1.
INTRODUCTION
The Equalizer VLW18TE/TI Hydraulic Vertical Lifting
Wedge is an aid for assisting with the lifting and
installation of plant and heavy equipment.
● Access gap required:
9.5 mm (0.37”)
● Lifting force:
10,000 psi (700 bar) = 18 T (180 kN)
It is essential that the user familiarises themselves
with the contents of this manual prior to using the
tool.
This manual contains information for the following
tools:
• VLW18TE Hydr aulic Vertical Lifting Wedge
• VLW18TI Integr al Hydr aulic Vertical Lifting W edge
2.
SAFETY INFORMATION
2.1
GENERAL SAFETY
These instructions cover the safe operation and
maintenance of THE EQUALIZER VLW18TE and
VLW18TI HYDRAULIC VERTICAL LIFTING WEDGES.
The use of these tools should be as part of a broader
task-based risk assessment, which should be carried
out by the operation supervisor or other competent
person.
Failure to comply with the safety information
contained within this manual could result in personal
injury or equipment damage. Read all instructions,
warnings and cautions carefully, and follow all safet y
precautions.
The safety of the operator, any assisting personnel
and the general public is of paramount importance.
Always work in accordance with applicable national,
local, site & company-wide safety procedures.
2.2
PERSONNEL COMPETENCY
Only personnel deemed competent in the use of
mechanical and hydraulic equipment should use
these tools.
2.3
DISCLAIMER
Equalizer cannot be held responsible for injury or
damage resulting from unsafe product use, lack of
maintenance or incorrect product and/or system
operation. If in doubt as to the safety precautions
and applications, contact Equalizer using the contact
details at the back of this manual.
Page 4

OPERATOR INSTRUCTION MANUAL
IM_VLW_Rev16_A4 (colour)
VLW18TE; VLW18TI
HYDRAULIC VERTICAL LIFTING WEDGES
3
2.4
DEFINITION OF TERMS
A CAUTION is used to indicate correct operating or
maintenance procedures and practices to prevent damage
to, or destruction of equipment or other property.
A WARNING indicates a potential danger that requires
correct procedures or practices to avoid personal injury.
A DANGER is only used when your action or lack of action
may cause serious injury or even death.
DO: an illustration showing how the tool should
be used.
DON’T: an illustration showing an incorrect way
to use a tool.
2.5
HAZARDS
WARNING: ensure all hydraulic components
are rated to a safe working pressure of 700 bar
(10 000 psi).
WARNING: Do not overload equipment. The
risk of hydraulic overloading can be minimised
by using the Equalizer Hand Pump, which has a
factory-set safety valve preventing the safe
working pressure being exceeded.
If alternative hydraulic pumps are used, ensure
that there are adequate systems to limit the
working pressure to 700 bar (10 000 psi).
CAUTION: ensure components are protected
from external sources of damage, such as
excessive heat, ame, movingmachine parts,
sharp edges and corrosive chemicals.
CAUTION: Take care to avoid sharp bends and
kinks in hydraulic hoses. Bends and kinks can
cause severe back-up pressure and cause hose
failure. Protect hoses from dropped objects; a
sharp impact may cause internal damage to
hose wire strands. Protect hoses from crush
risks, such as heavy objects or vehicles; crush
damage can cause hose failure.
WARNING: Applying pressure to a damaged
hose may cause it to rupture.
WARNING: Immediately replace worn or
damaged parts. Use only genuine Equalizer
parts from approved distributors or service
centres. Equalizer parts have been engineered
andmanufacturedtobet-for-purpose.
DANGER: To minimise risk of personal injury
keep hands and feet away from the tool and
workpiece during operation.
WARNING: Always wear suitable clothing and
Personal Protective Equipment (PPE).
WARNING: Do not handle pressurised hoses;
escaping oil under pressure can penetrate the
skin, causing serious injury. Seek medical
attention immediately if oil penetration is
suspected.
WARNING: Only pressurize complete and fully
connected hydraulic systems. Do not pressurize
systems that contain unconnected couplers.
CAUTION: Do not lift hydraulic equipment by
the hoses or couplers. Use only the designated
carrying handles.
CAUTION: Lubricate tools as directed in this
manual prior to operation. Use only approved
lubricants of high quality , following the lubricant
manufacturers instructions.
Page 5

OPERATOR INSTRUCTION MANUAL
IM_VLW_Rev16_A4 (colour)
VLW18TE; VLW18TI
HYDRAULIC VERTICAL LIFTING WEDGES
4
3.
TOOL CAPABILITIES
The EQUALIZER VLW18TE and VLW18TI hydraulic
vertical lifting wedges will generate 18 Tons (180 kN)
lifting force from 10,000 psi (700 bar) of hydraulic
pressure. The tools require a minimum access
gapof9.5mm(0.37”)ontherststepandwilllift
vertically.
Using two VLW18TE/TI wedges will allow a lift of 36
Tons
Using four VLW18TE/TI wedges will allow a loft of
72 Tons
Page 6
OPERATOR INSTRUCTION MANUAL
IM_VLW_Rev16_A4 (colour)
VLW18TE; VLW18TI
HYDRAULIC VERTICAL LIFTING WEDGES
5
4.
VLW18TE
HYDRAULIC VERTICAL
LIFTING WEDGE
4.1
HOW THE VLW18TE WORKS
The hydraulic hose and hand pump are attached to
the tool and the tool is inserted into the access gap
The hand pump is primed which powers the
hydraulics that lift the load
The load is secured using the safety block
4.2
VLW18TE TOOL FUNCTION
The operation procedure is exactly the same for both
the VLW18TE Mini and Standard Kits. The VLW18TE
Mini Kit does not contain either a 10,000 psi (700
bar) hydraulic hand pump or a 10,000 psi (700 bar)
hydraulic hose. These items will come from the user’s
inventory.
1. Assemble the kit by connecting one end of the
hydraulic hose to the hand pump, and the other
end to the hydraulic cylinder.
HAND
PUMP
HYDRAULIC
CYLINDER
HYDRAULIC
HOSE
CONNECT
2. Ensure the access gap under the item to be lifted
measures 9.5 mm (0.37”) or greater.
MIN.
9.5 mm
(0.37”)
Page 7
OPERATOR INSTRUCTION MANUAL
IM_VLW_Rev16_A4 (colour)
VLW18TE; VLW18TI
HYDRAULIC VERTICAL LIFTING WEDGES
6
3. Place the wedge under the item to be lifted. The
step to be used must be fully inserted into the
access gap - ensure that the heel of the step is in
contact with the outer surface of the object to be
lifted and that the wedge is positioned centrally.
4. Close the return valve on the hand pump (by
turning clockwise) and advance the wedge by
priming the pump.
N.B. The HP350S Hand Pump has a self contained nonvented oil system. This means that the pump will function
without the need for an air vent to be opened. This allows
the pump to be used verticaly, horizontaly or upsides down
should the situation require. Having no open vent eliminates
the risk of hydraulic oil spillage during use.
PRIME
PUMP
RETURN
VALVE
5. Once the item has been lifted to the desired
height, or to the maximum height on the step
used, the safety block should be inserted into the
gap. Secure the load by releasing the pressure
onto the block.
SAFETY
BLOCK
6. If required, the wedge should then be re-inserted on the next step and steps 3 - 5 repeated to
lift the item further.
WARNING: Never place ngers under an
item being lifted.
Always ensure that both the wedge and the
safety block are inserted under the item until
the heel of the step is in contact with the side of
the item to be lifted and the step is positioned
centrally
(see VLW18TE TOOL FUNCTION step 3)
WARNING: Care should be taken not to dr op
any of the component parts when removing
them from the lifted load. This action will
prevent injuries to either the operator’s lower
limbs, or to passers by.
Page 8
OPERATOR INSTRUCTION MANUAL
IM_VLW_Rev16_A4 (colour)
VLW18TE; VLW18TI
HYDRAULIC VERTICAL LIFTING WEDGES
7
4.3
USING THE STEPPED BLOCK
ACCESSORY
The Equalizer Stepped Block enables the VLW18TE
Hydraulic Vertical Lifting Wedge to be used to lift an
item with a larger gap, and will lift the item further
with less penetration
Attach the stepped block to the tool using the M6
countersunk screw
STEPPED
BLOCK
COUNTERSUNK
SCREW
Insert the tool under the item to be lifted. Ensure
there is a minimum hold of 15 mm (0.59”) and that
the full width of the block is used
MIN.
15 mm
(0.59”)
Page 9

OPERATOR INSTRUCTION MANUAL
IM_VLW_Rev16_A4 (colour)
VLW18TE; VLW18TI
HYDRAULIC VERTICAL LIFTING WEDGES
8
4.4
VLW18TE KIT CONTENTS
MINI KIT COMPONENTS
Product Code: VLW18TEMIN
1 x VLW18TE Wedgehead
1 x 10,000 psi (700 bar) Hydraulic Cylinder
1 x Safety Block
1 x Stepped Block
1 x Instruction Manual
1 x Hex Key
1 x Countersunk Screw
1 x Cardboard Packaging
Packaging Dimensions:
145 x 170 x 365mm
(5.71” x 6.69” x 14.37”)
Tool only Weight: 8.5 kg (18.7 lb)
Gross Kit Weight: 9.8 kg (21.5 lb)
STANDARD KIT COMPONENTS
Product Code: VLW18TESTDSPB
1 x VLW18TE Wedgehead
1 x 10,000 psi (700 bar) Hydraulic Hose, 2 m
(78.75”)
1 x 10,000 psi (700 bar) Hydraulic Cylinder
1 x 10,000 psi (700 bar)
HP350S Sealed Hand Pump with Gauge
1 x Safety Block
1 x Stepped Block
1 x Hex Key
1 x Countersunk Screw
1 x Instruction Manual
1 x Carry-Case
Carry Case Dimensions:
920 x 520 x 210mm
(36.22” x 20.47” x 8.26”)
Tool only Weight: 8.5 kg (18.7 lb)
Gross Kit Weight: 21.5 kg (47.4 lb)
Page 10
OPERATOR INSTRUCTION MANUAL
IM_VLW_Rev16_A4 (colour)
VLW18TE; VLW18TI
HYDRAULIC VERTICAL LIFTING WEDGES
9
4.5
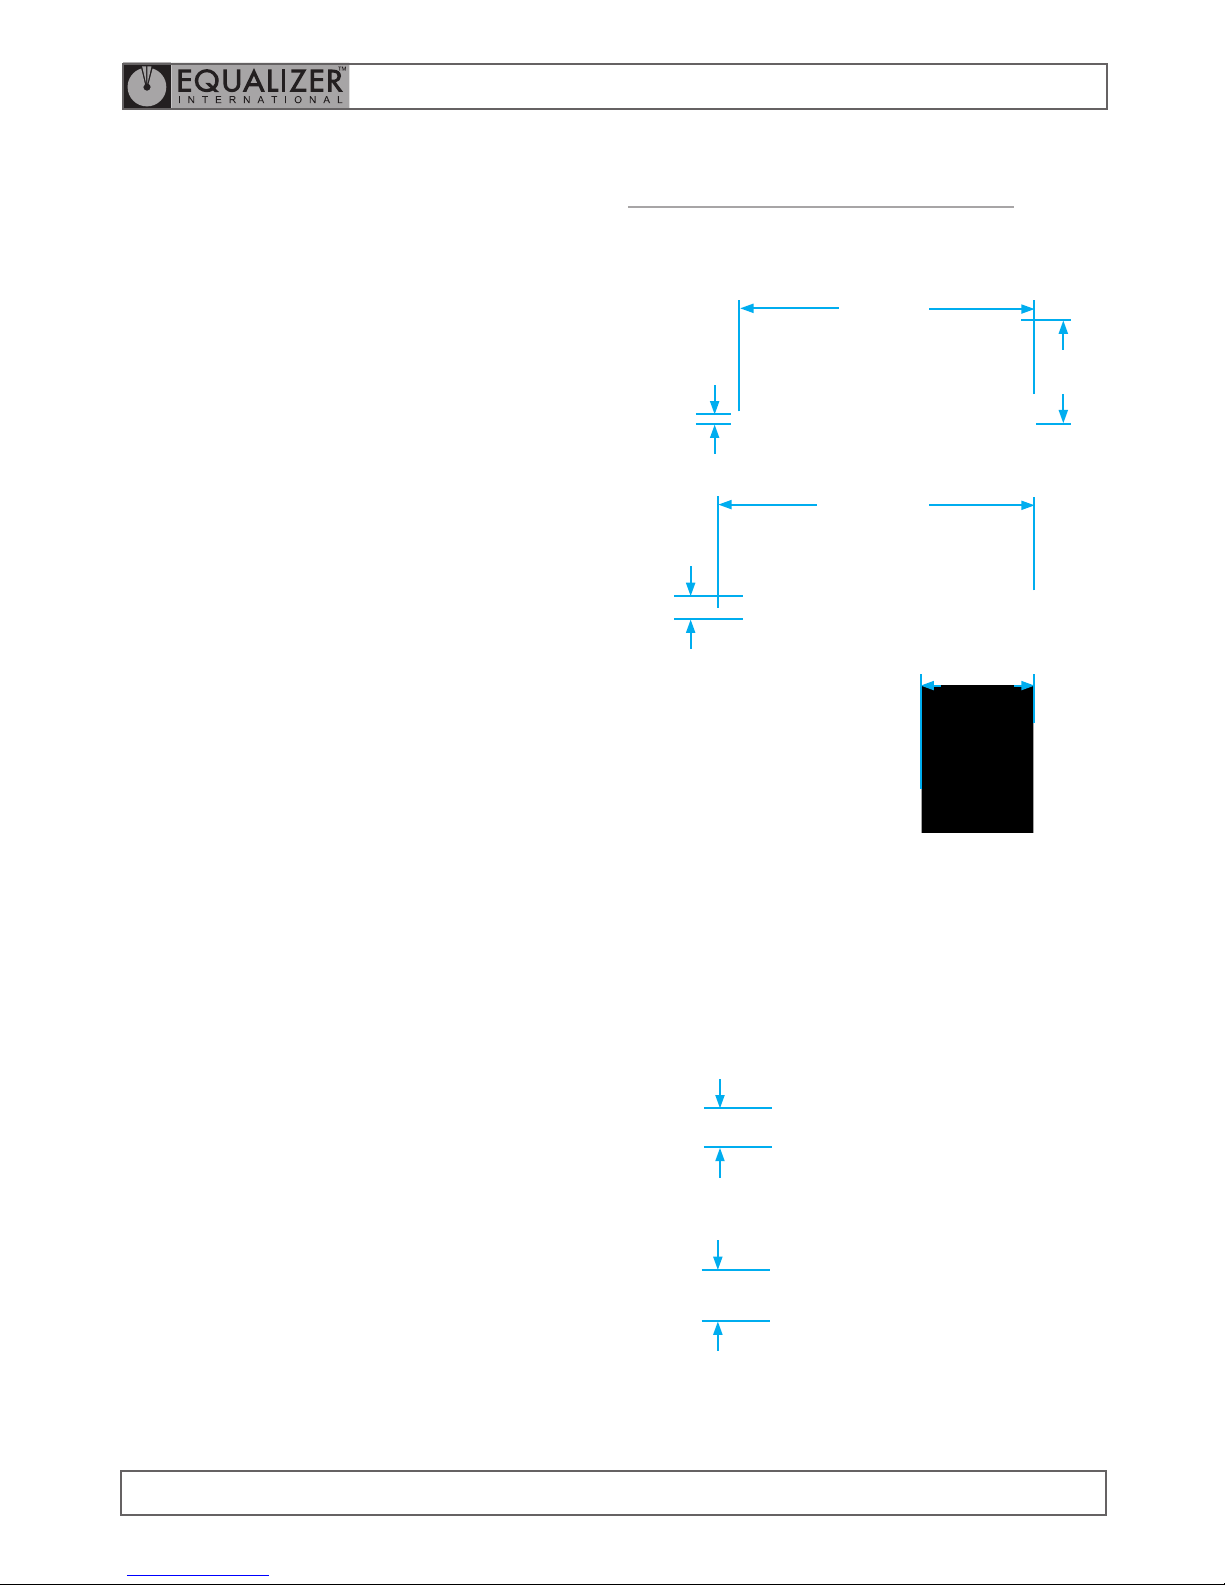
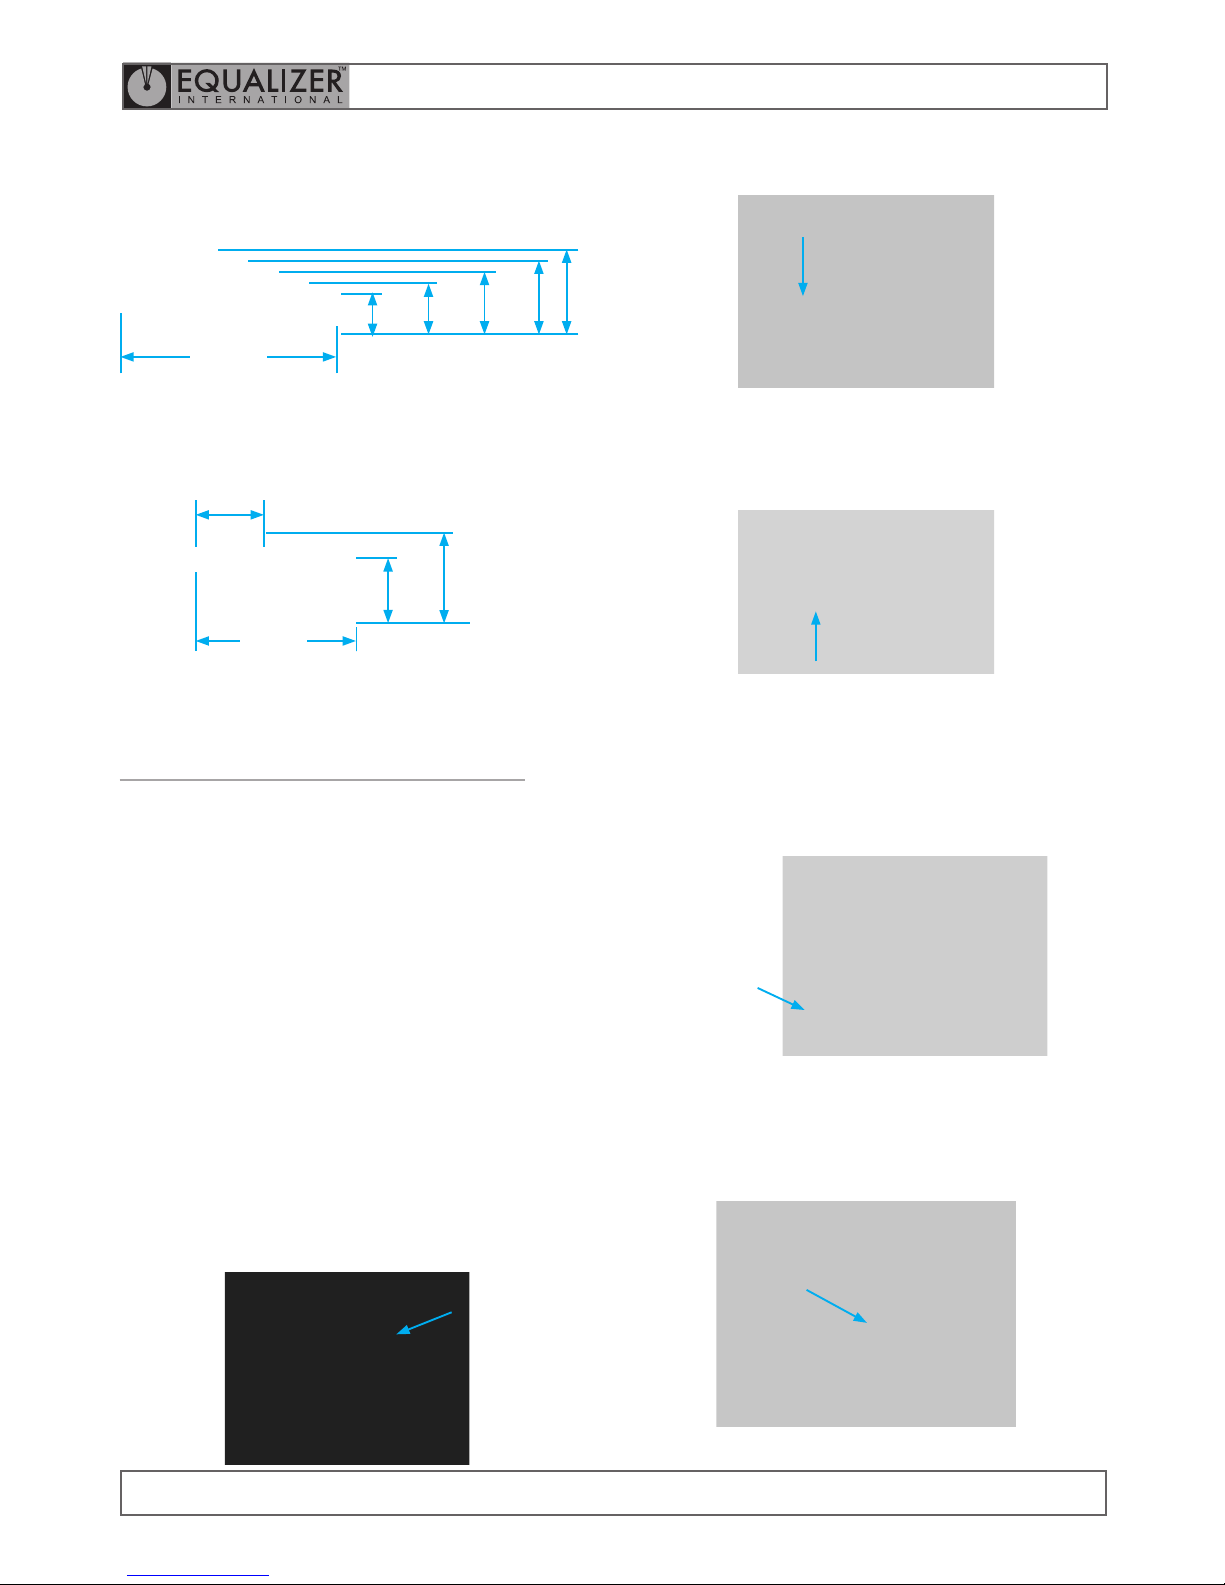
VLW18TE TOOL DIMENSIONS
MINIMUM EXTENSION
335 mm
13.19”
121 mm
4.76”
9.5 mm
0.37”
376 mm
14.80”
29.5 mm
1.16”
140 mm
5.50”
MAXIMUM EXTENSION
(USING STEPPED BLOCK)
39.5 mm
1.50”
59.5 mm
2.34”
MAXI KIT COMPONENTS
Product Code: VLW18TEMAXSPB
2 x VLW18TE Wedgeheads
2 x 10,000 psi (700 bar) Hydraulic Hoses, 2 m
(78.75”)
2 x 10,000 psi (700 bar) Hydraulic Cylinders
1 x 10,000 psi (700 bar)
HP350D Sealed Hand Pump with Gauges
2 x Safety Blocks
2 x Stepped Blocks
2 x Hex Key
2 x Countersunk Screw
1 x Instruction Manual
1 x Carry-Case
Carry-Case Dimensions:
920 x 520 x 210mm
(36.22” x 20.47” x 8.26”)
Tool only Weight: 8.5 kg (18.7 lb)
Gross Kit Weight: 33 kg (72.8 lb)
Page 11
OPERATOR INSTRUCTION MANUAL
IM_VLW_Rev16_A4 (colour)
VLW18TE; VLW18TI
HYDRAULIC VERTICAL LIFTING WEDGES
10
• Screw the grease nipple into the jaw, attach the
grease gun and squeeze grease into the wedge
• Screw the grease nipple into the base of the tool,
attach the grease gun and squeeze grease into
the wedge
OR
• Connect the hose to the wedge and advance the
wedge forward, smear grease onto the surfaces
of the wedge
GREASE
GREASING THE SLIDE PINS
• Simply smear some grease into the slots. Also
ensure the slide pins are free from grit.
GREASE
SAFETY BLOCK
139 mm
5.47”
27 mm
1.06”
34 mm
1.34”
41 mm
1.61”
48 mm
1.89”
55 mm
2.17”
STEPPED BLOCK
63.8 mm
2.51”
31.7 mm
1.25”
30 mm
1.18”
38 mm
1.51”
4.6
VLW18TE TOOL MAINTENANCE
• On return from each job and before allocation
against subsequent work the completeness of
the Equalizer VLW18TE kit must be established
and items examined to ensure that they are
serviceable.
• Any missing or damaged items are to be replaced
as soon as possible and prior to the tool being
used again.
• Store the tool in a cool dry place and ensure all
machined surfaces are greased
• Grease all moving parts each and every time the
tool is used:
GREASING THE WEDGE
• Remo ve the grease nipple from the handle of the
tool
GREASE
NIPPLE
Page 12
OPERATOR INSTRUCTION MANUAL
IM_VLW_Rev16_A4 (colour)
VLW18TE; VLW18TI
HYDRAULIC VERTICAL LIFTING WEDGES
11
5.2
VLW18TI TOOL FUNCTION
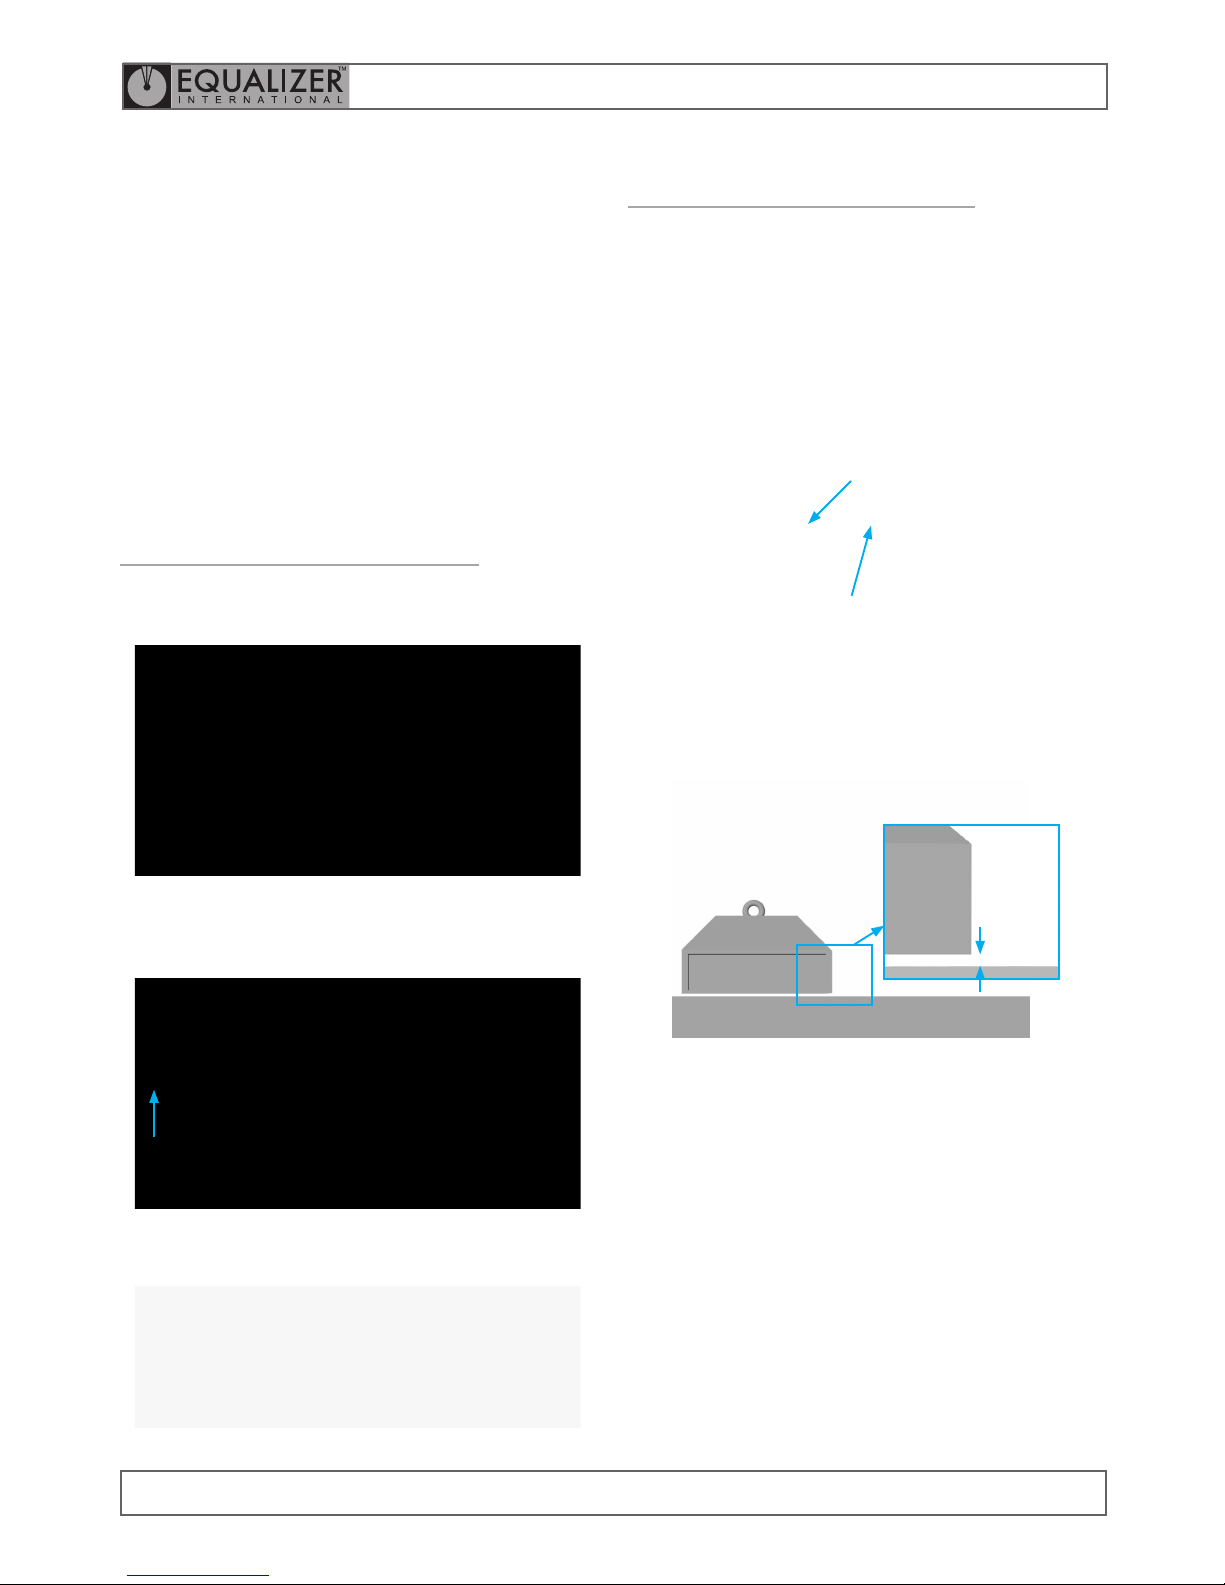
1. Before installing the wedge, ensure that it is
fully retracted and tighten the return valve in a
clockwise direction to the closed position.
Also ensure the air vent is not obstructed in any
way as this will result in a vacuum within the
system and the wedge will not advance.
RETURN
VALVE
AIR VENT
2. Ensure the access gap under the item to be lifted
measures 9.5 mm (0.37”) or greater.
MIN.
9.5 mm
(0.37”)
5.
VLW18TI
INTEGRAL HYDRAULIC
VERTICAL LIFTING
WEDGE
5.1
HOW THE VLW18TI WORKS
The tool is inserted into the access gap
The hand pump is primed which powers the
hydraulics that lift the load
The load is secured using the safety block
Page 13
OPERATOR INSTRUCTION MANUAL
IM_VLW_Rev16_A4 (colour)
VLW18TE; VLW18TI
HYDRAULIC VERTICAL LIFTING WEDGES
12
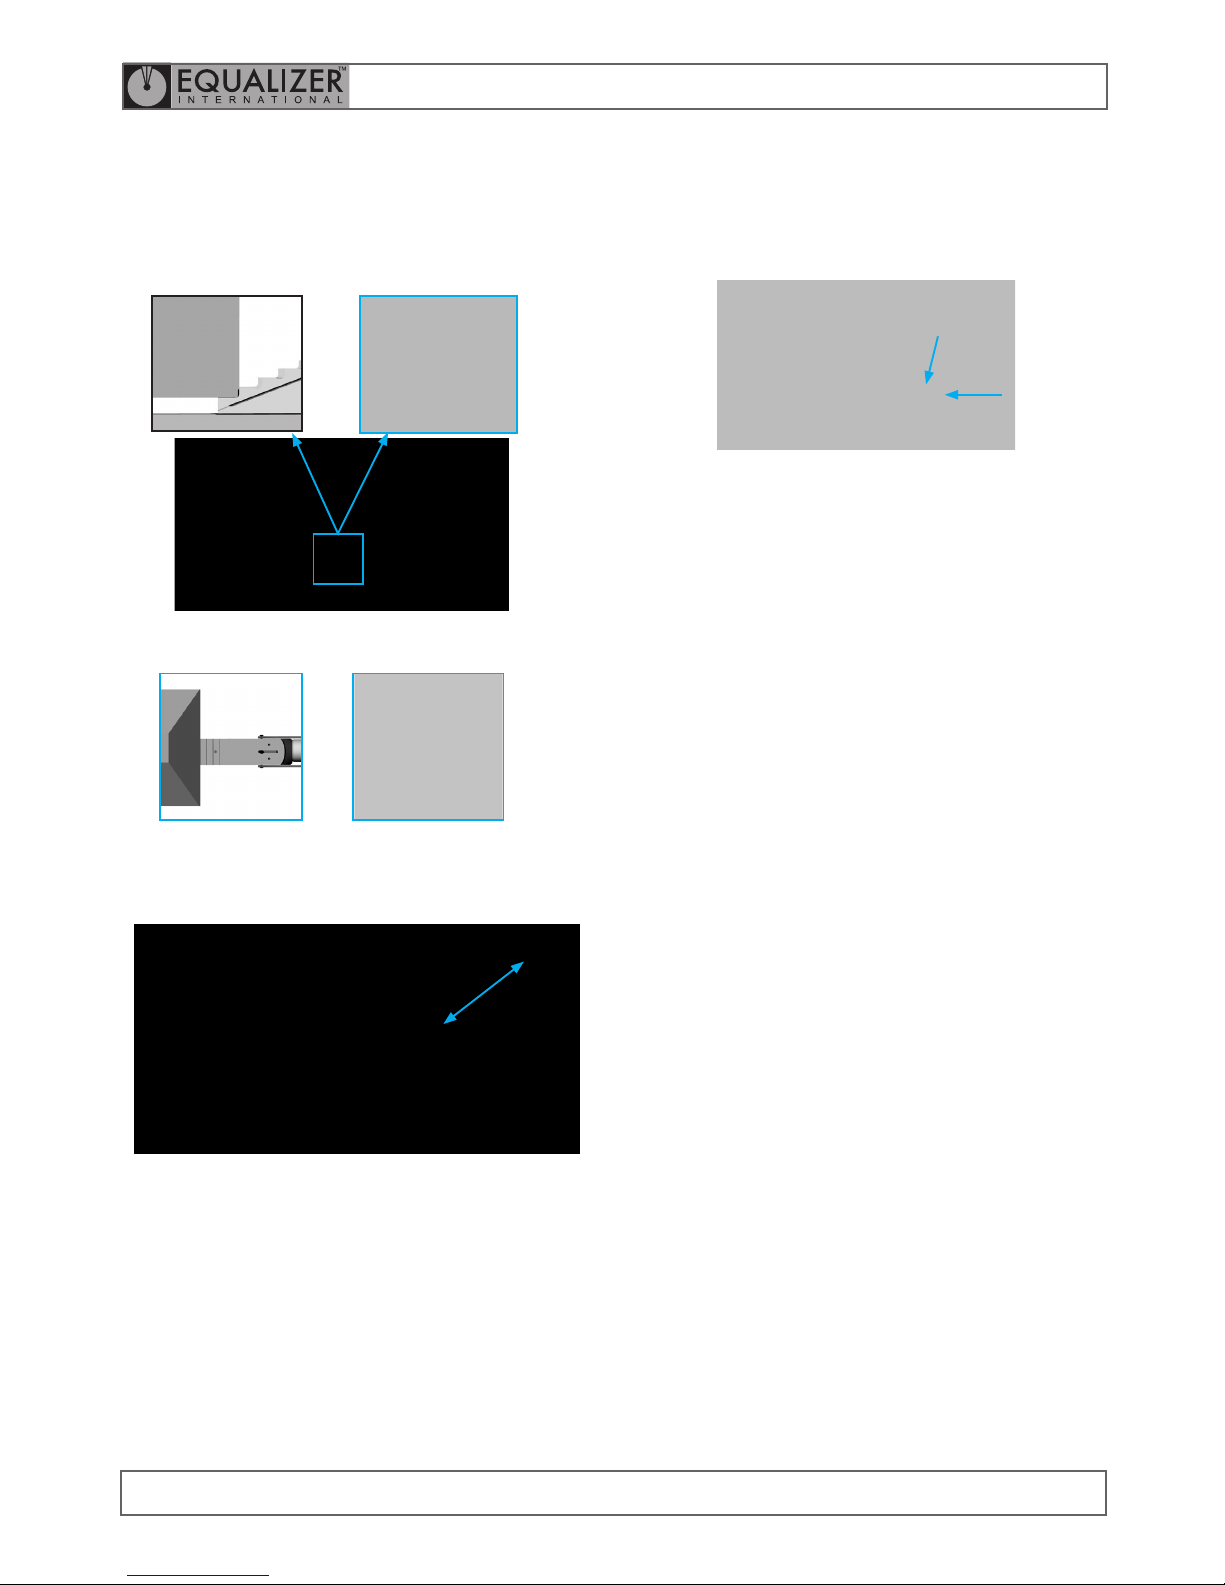
5. Once the item has been lifted to the desired
height, or to the maximum height on the step
used, the safety block should be inserted into the
gap. Secure the load by releasing the pressure
onto the block.
SAFETY
BLOCK
6. If required, the wedge should then be re-inserted on the next step and steps 3 - 5 repeated to
lift the item further.
WARNING: Never place ngers under an
item being lifted.
Always ensure that both the wedge and the
safety block are inserted under the item until
the heel of the step is in contact with the side of
the item to be lifted and the step is positioned
centrally
(see VLW18TI TOOL FUNCTION step 3)
WARNING: Care should be taken not to drop
any of the component parts when removing
them from the lifted load. This action will
prevent injuries to either the operator’s lower
limbs, or to passers by.
3. Place the wedge under the item to be lifted. The
step to be used must be fully inserted into the
access gap - ensure that the heel of the step is in
contact with the outer surface of the object to be
lifted and that the wedge is positioned centrally.
4. Advance the wedge by priming the pump.
PRIME
PUMP
Page 14
OPERATOR INSTRUCTION MANUAL
IM_VLW_Rev16_A4 (colour)
VLW18TE; VLW18TI
HYDRAULIC VERTICAL LIFTING WEDGES
13
5.3
USING THE STEPPED BLOCK
ACCESSORY
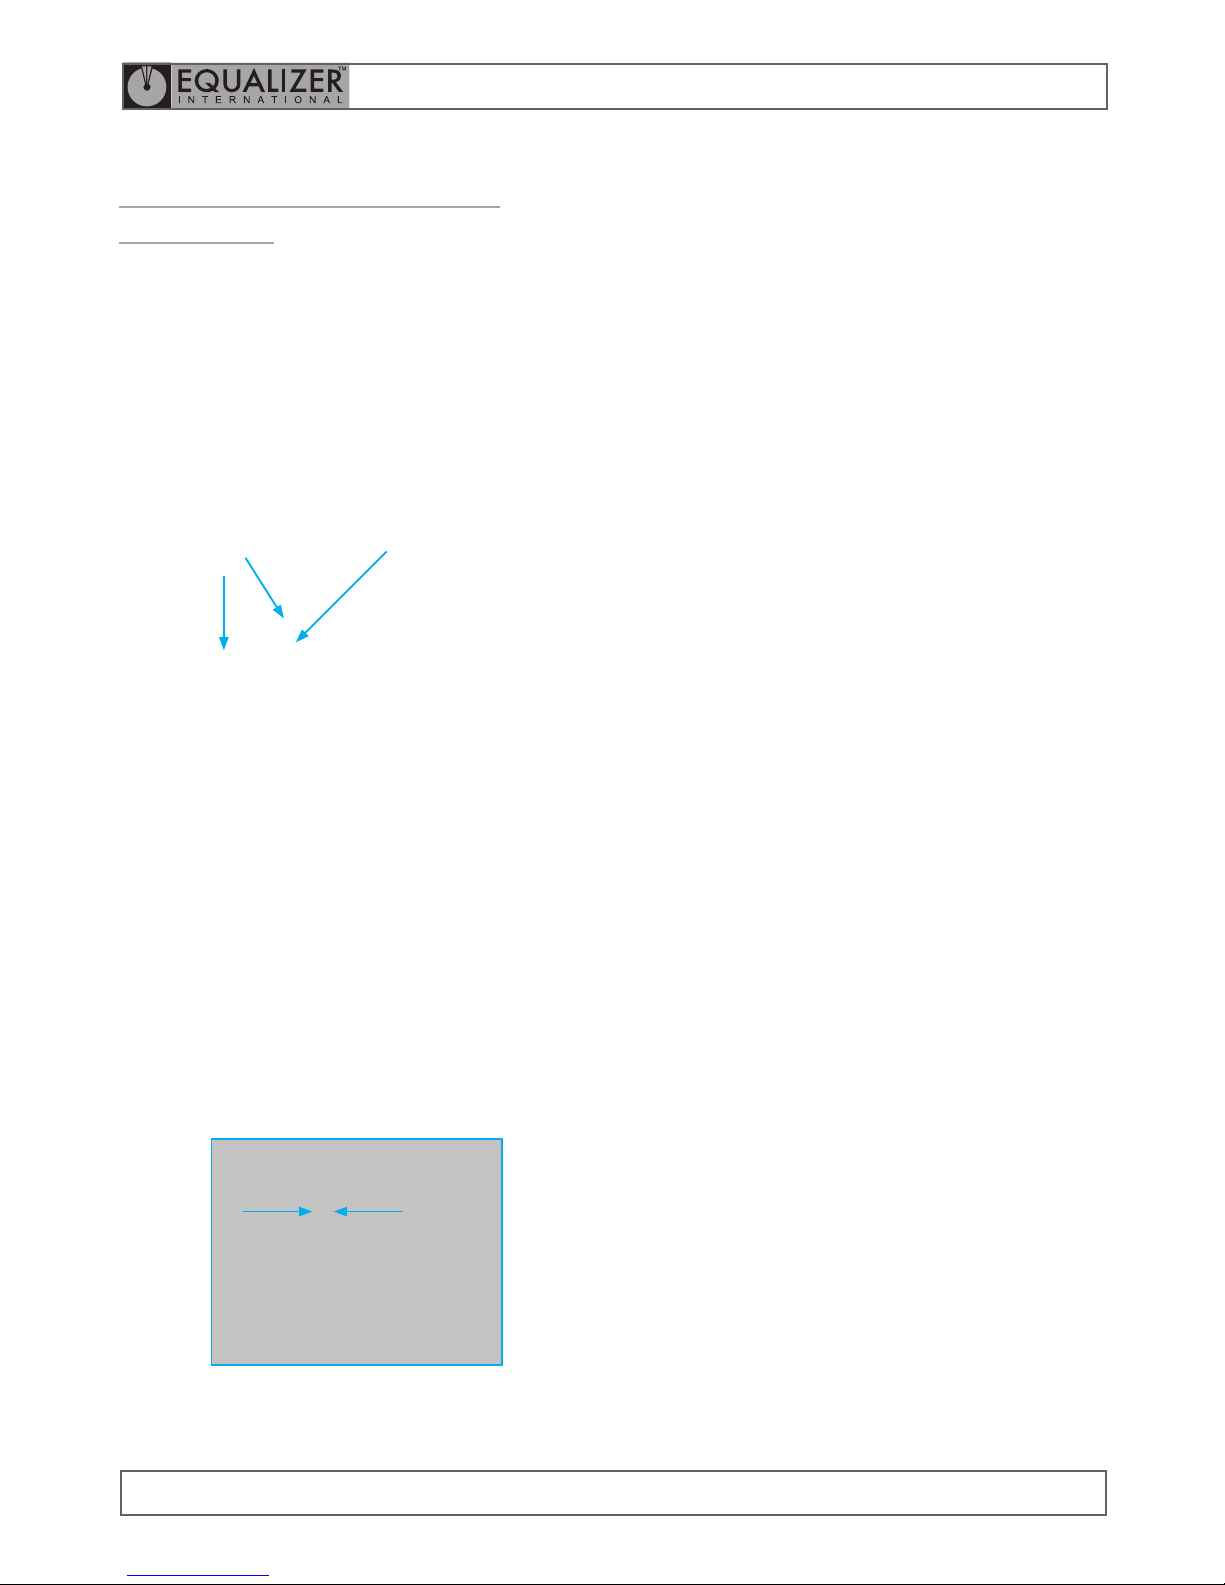
The Equalizer Stepped Block enables the VLW18TI
Integral Hydraulic Vertical Lifting Wedge to be used
to lift an item with a larger gap, and will lift the
item further with less penetration
Attach the stepped block to the tool using the M6
countersunk screw
STEPPED
BLOCK
COUNTERSUNK
SCREW
Insert the tool under the item to be lifted. Ensure
there is a minimum hold of 15 mm (0.59”) and that
the full width of the block is used
MIN.
15 mm
(0.59”)
Page 15
OPERATOR INSTRUCTION MANUAL
IM_VLW_Rev16_A4 (colour)
VLW18TE; VLW18TI
HYDRAULIC VERTICAL LIFTING WEDGES
14
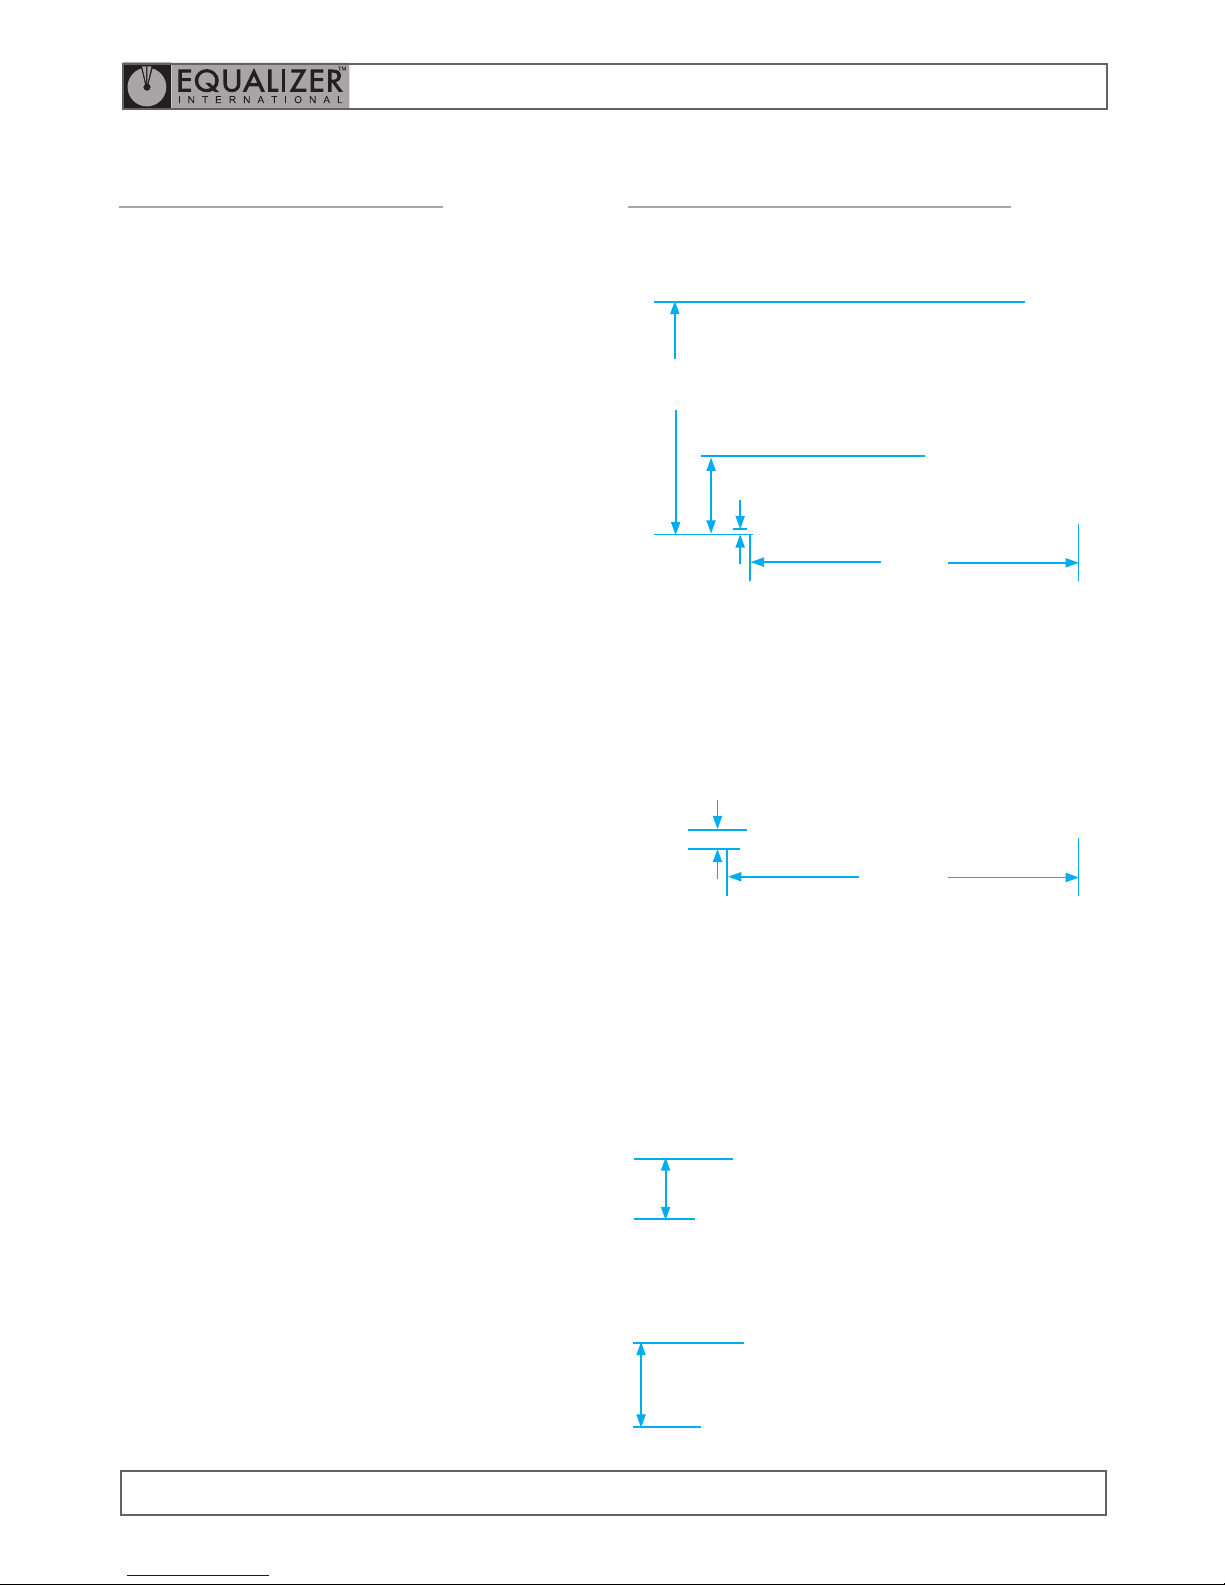
5.5
VLW18TI TOOL DIMENSIONS
MINIMUM EXTENSION
380 mm
14.95”
126 mm
4.98”
9.5 mm
0.37”
535 mm
21.04”
29.5 mm
1.16”
575 mm
22.62”
MAXIMUM EXTENSION
(USING STEPPED BLOCK)
39.5 mm
1.56”
59.5 mm
2.34”
5.4
VLW18TI KIT CONTENTS
KIT COMPONENTS
Product Code: VLW18TISPB
1 x VLW18TI Wedgehead
1 x 10,000 psi (700 bar) Integral Hydraulic Pump/
Cylinder
1 x Safety Block
1 x Stepped Block
1 x Hex Key
1 x Countersunk Screw
1 x Instruction Manual
1 x Carry-Case
Carry Case Dimensions:
580 x 340 x 180mm
(22.8” x 13.4” x 7.1”)
Tool only Weight: 10 kg (22 lbs)
Gross Kit Weight: 13.5 kg (29.8 lbs)
Page 16
OPERATOR INSTRUCTION MANUAL
IM_VLW_Rev16_A4 (colour)
VLW18TE; VLW18TI
HYDRAULIC VERTICAL LIFTING WEDGES
15
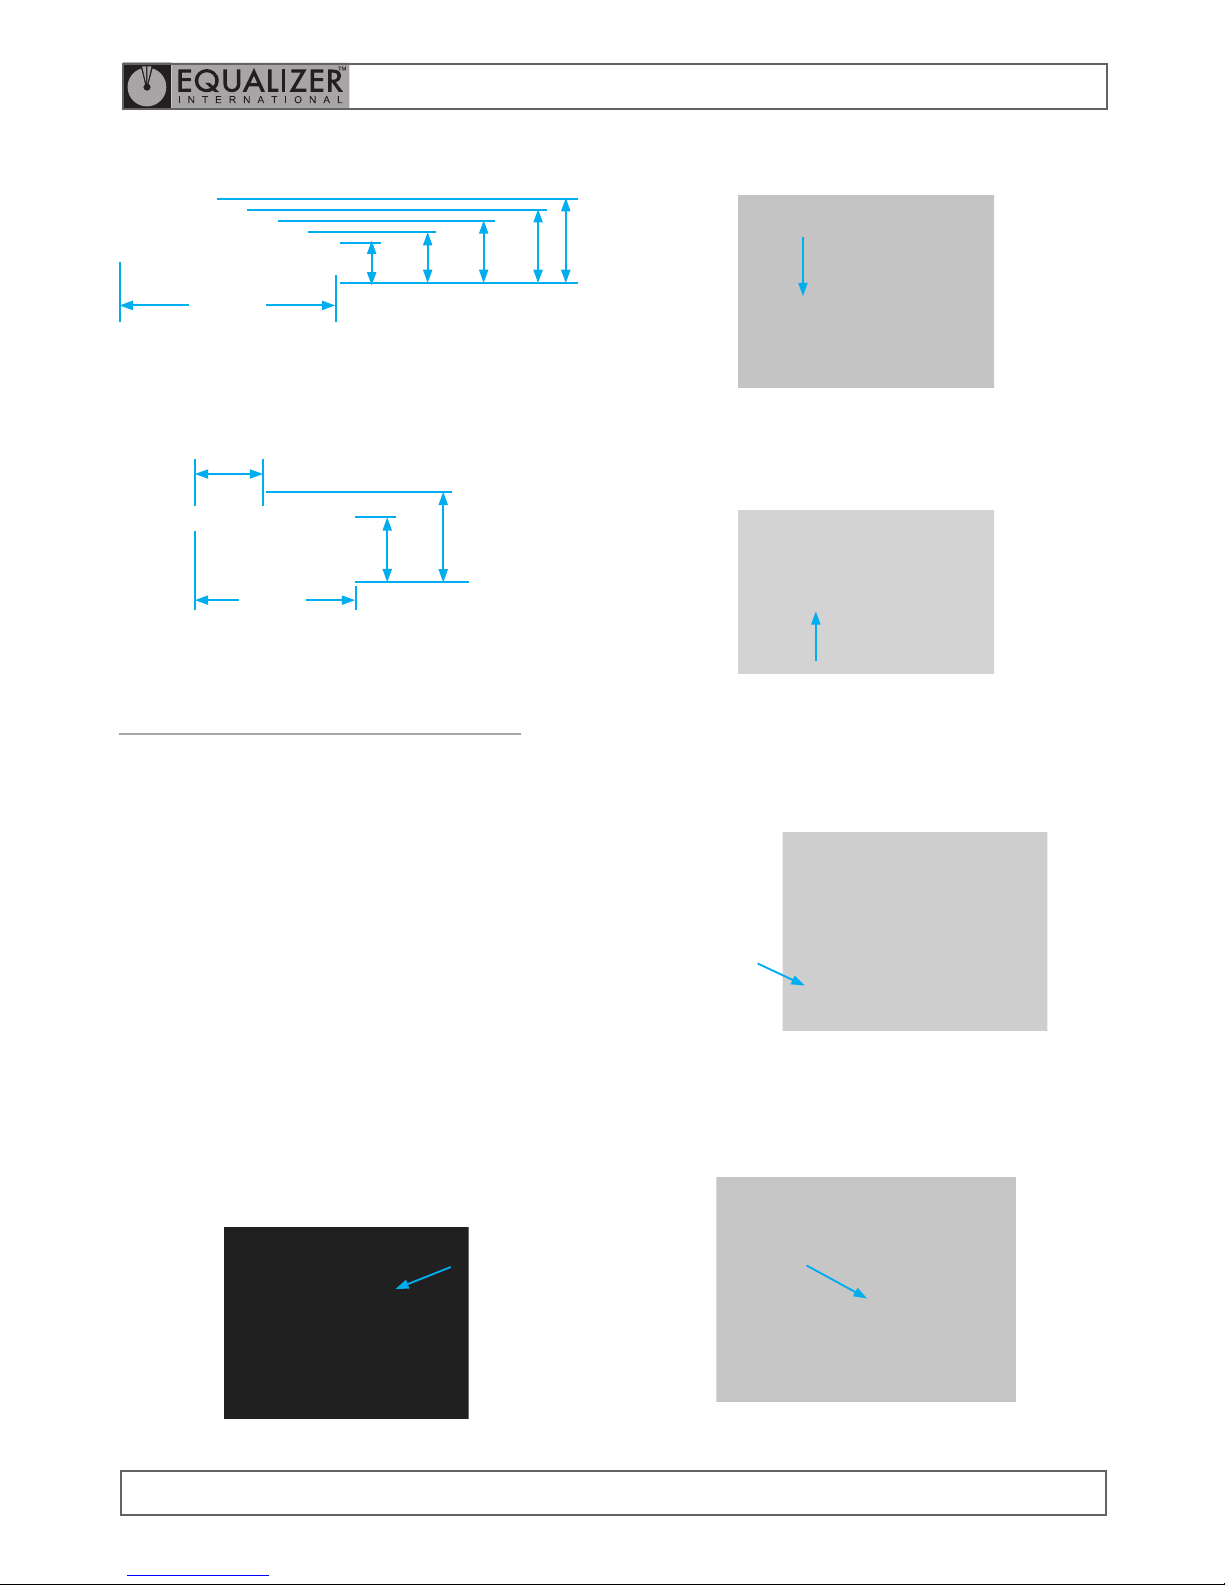
• Screw the grease nipple into the jaw, attach the
grease gun and squeeze grease into the wedge
• Screw the grease nipple into the base of the tool,
attach the grease gun and squeeze grease into
the wedge
OR
• Advance the wedge forward, smear grease onto
the surfaces of the wedge
GREASE
GREASING THE SLIDE PINS
• Simply smear some grease into the slots. Also
ensure the slide pins are free from grit.
GREASE
SAFETY BLOCK
139 mm
5.47”
27 mm
1.06”
34 mm
1.34”
41 mm
1.61”
48 mm
1.89”
55 mm
2.17”
STEPPED BLOCK
63.8 mm
2.51”
31.7 mm
1.25”
30 mm
1.18”
38 mm
1.51”
5.6
VLW18TI TOOL MAINTENANCE
• On return from each job and before allocation
against subsequent work the completeness of
the Equalizer VLW18TI kit must be established
and items examined to ensure that they are
serviceable.
• Any missing or damaged items are to be replaced
as soon as possible and prior to the tool being
used again.
• Store the tool in a cool dry place and ensure all
machined surfaces are greased
• Grease all moving parts each and every time the
tool is used:
GREASING THE WEDGE
• Remo ve the grease nipple from the handle of the
tool
GREASE
NIPPLE
Page 17
OPERATOR INSTRUCTION MANUAL
IM_VLW_Rev16_A4 (colour)
VLW18TE; VLW18TI
HYDRAULIC VERTICAL LIFTING WEDGES
16
HOSES ARE CONNECTED AND THE TOOL
ADVANCES WITH MAXIMUM PRESSURE ON
THE PUMP HANDLE BUT THE LOAD WILL NOT
LIFT
POSSIBLE CAUSE:
The pressure required to lift the load is greater than
that of the tools you are using.
RECOMMENDED ACTION:
Add another tool and try again.
HOSES ARE CONNECTED AND THE TOOL
ADVANCES BUT THERE IS MINIMAL
PRESSURE ON THE PUMP HANDLE; THE
HANDLE IS RISING BACK OF ITS OWN
ACCORD
POSSIBLE CAUSE:
There is dirt or a damaged valve seat within the
pump unit.
RECOMMENDED ACTION:
The pump should be sent to an authorised Equalizer
distributor for repair.
7.
TROUBLESHOOTING
7.1
VLW18TE TROUBLESHOOTING
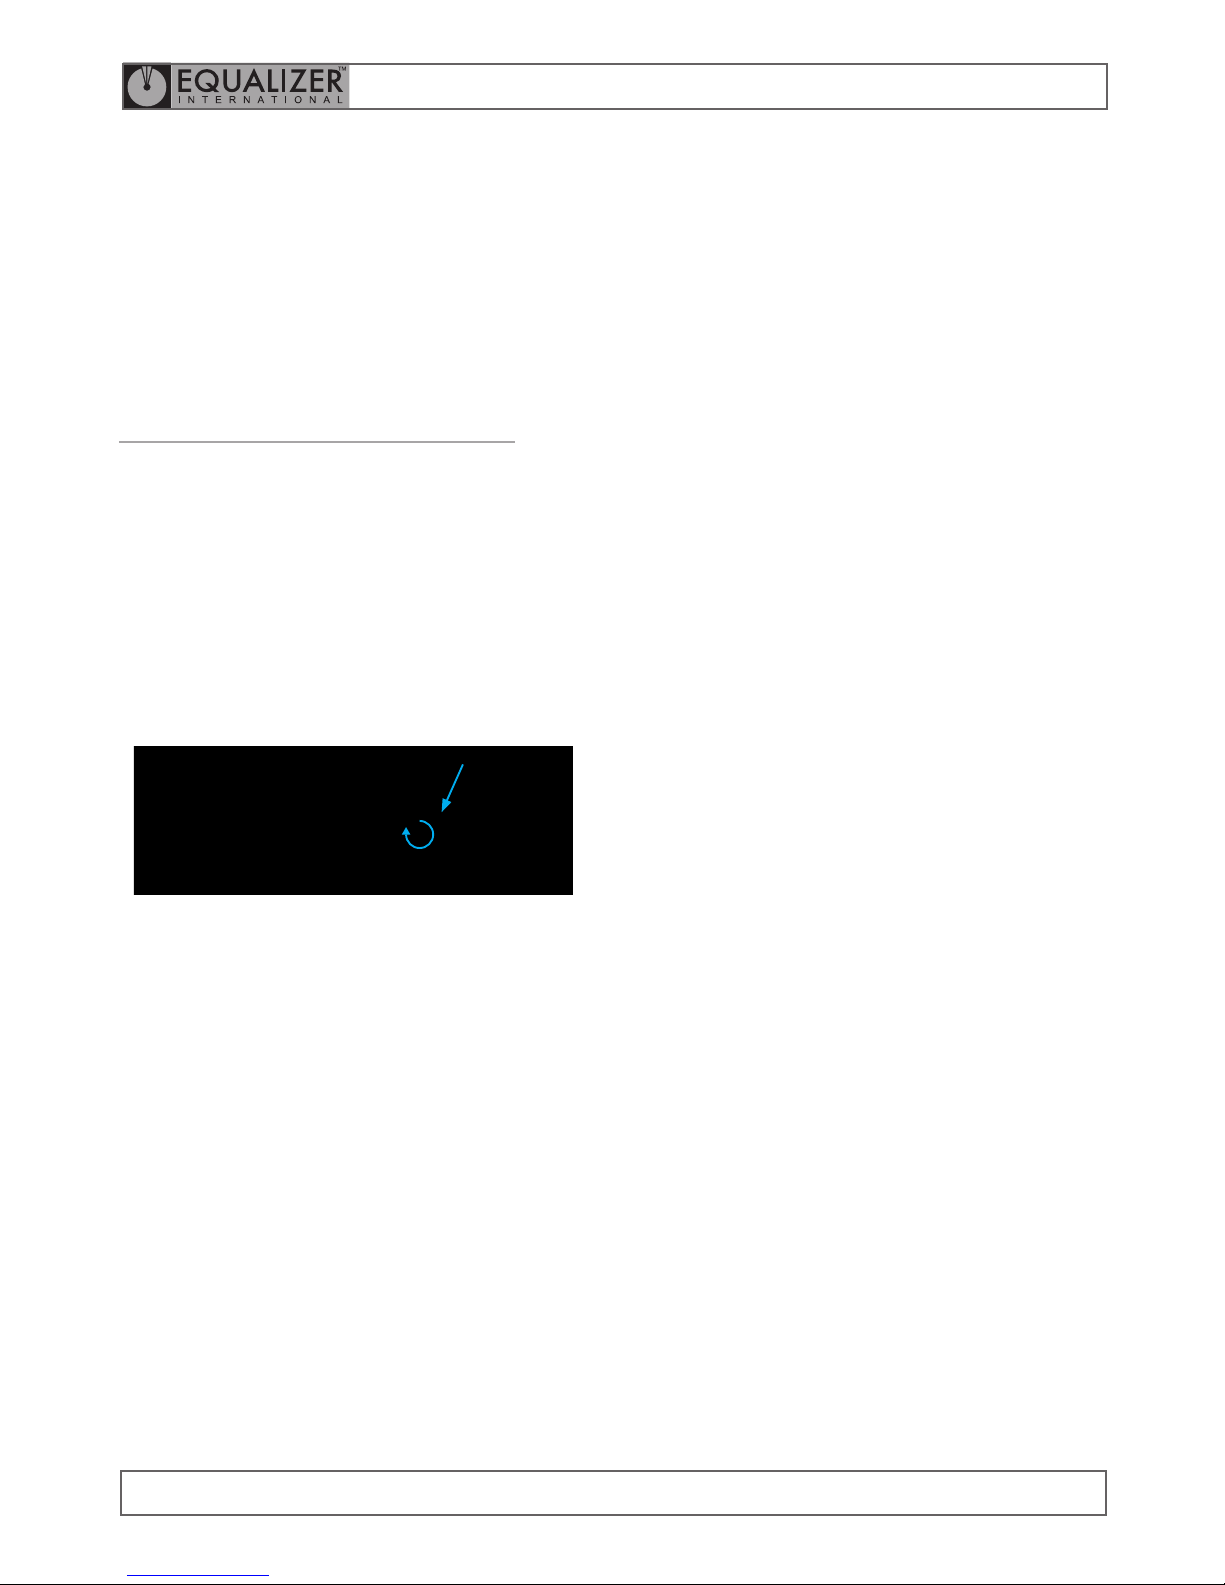
HOSES ARE CONNECTED BUT THE TOOL DOES
NOT ADVANCE. THE PRESSURE ON THE PUMP
HANDLE IS MINIMAL
POSSIBLE CAUSE:
The release valve is in the retract (open) position.
RECOMMENDED ACTION:
Close the release valve .
CLOSE RELEASE
VALVE
HOSES ARE CONNECTED AND THE PUMP
QUICKLY REACHES MAXIMUM PRESSURE
BUT THE TOOL HAS NOT ADVANCED
POSSIBLE CAUSE:
One or more of the connectors are not fully tightened
and the hydraulic oil cannot pass through from the
pump to the cylinder.
RECOMMENDED ACTION:
Check all connectors are fully tightened and the
release valve is in the fully closed position.
Page 18
OPERATOR INSTRUCTION MANUAL
IM_VLW_Rev16_A4 (colour)
VLW18TE; VLW18TI
HYDRAULIC VERTICAL LIFTING WEDGES
17
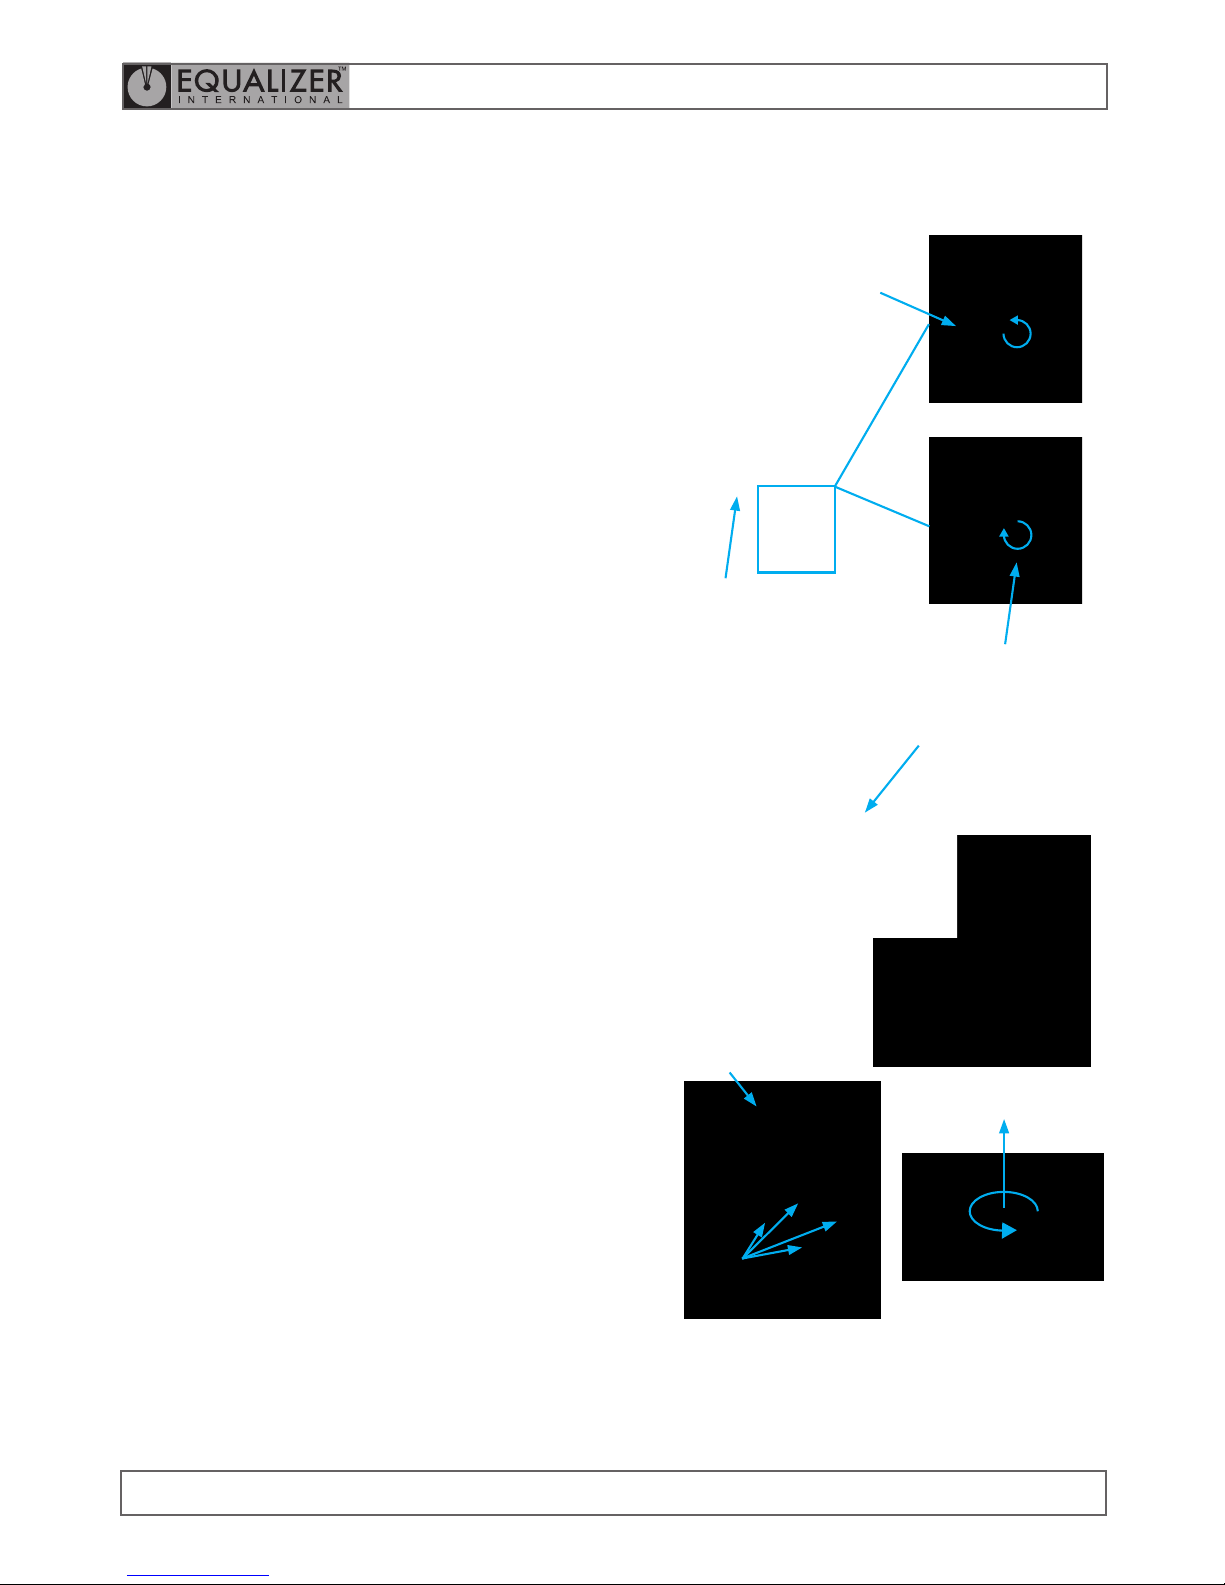
AIRLOCK REMOVAL PROCEDURE:
CLOSE RELEASE
VALVE
OPEN RELEASE
VALVE
NUTS
MAIN
HANDLE
OIL
RESERVOIR
ACTUATOR
COUPLER
THE WEDGE IS ADVANCING BUT DOES NOT
REACH FULL PRESSURE.
POSSIBLE CAUSE:
Air could be present in the hydraulic system.
RECOMMENDED ACTION:
Follow the airlock removal procedure:
1. Connect the hand pump to the tool with the
hydraulic hose.
2. Close the release valve on the pump, and prime
the pump until the hydraulic cylinder is fully
extended and a small pressure is achieved
3. With the hand pump held above the tool and
the tool in an upright position, open the release
valve causing any air that is within the system to
be forced up through the pump and vented into
the oil reservoir
4. Repeat steps 1 - 3 three or four times to ensure
that all air is removed from the system and the
tool will reach full working pressure
5. Disconnect the hand pump from the hydraulic
hose, grip the baseplate of the hand pump body
in a vice with the pump body vertical and the
main handle at the top
6. Remove the four nuts holding the main handle
and lift off
7. Gripthe rellingplug with pliersand extract it
by pulling and twisting simultaneously. Ensure
the reservoir body is held down when removing
therelling plugas pullingup onthe reservoir
body will release the bladder within, and oil will
spill out.
8. Fill the reservoir to the top with a good quality
hydraulic oil of the grade 15 cSt
9. Reinsert the relling plug, wipe away any oil,
and reassemble by reversing the disassembly
process
Page 19

OPERATOR INSTRUCTION MANUAL
IM_VLW_Rev16_A4 (colour)
VLW18TE; VLW18TI
HYDRAULIC VERTICAL LIFTING WEDGES
18
7.2
VLW18TI TROUBLESHOOTING
WEDGE ADVANCES 50% AND THEN STOPS
FUNCTIONING
POSSIBLE CAUSE:
A sticker has been placed over the air vent
RECOMMENDED ACTION:
Remove sticker
POSSIBLE CAUSE:
Theoperatoriscoveringtheairventwithhisnger
while operating the pump
RECOMMENDED ACTION:
One hand should be on the handle of the tool while
the other hand operates the pump handle
POSSIBLE CAUSE:
The air vent has become blocked with dirt
RECOMMENDED ACTION:
Carefully unblock the air vent using a small blunt
object
NO WEDGE MOVEMENT
POSSIBLE CAUSE:
Air lock within system
RECOMMENDED ACTION:
Open release valve and prime pump to circulate oil
around the system
POSSIBLE CAUSE:
Insufcientoil
RECOMMENDED ACTION:
Rellwithcleanoilandbleedsystem
POSSIBLE CAUSE:
Release valve open
RECOMMENDED ACTION:
Close release valve
POSSIBLE CAUSE:
Air accumulates around pump inlet when used
upside down
RECOMMENDED ACTION:
Bleed out air from reservoir. Look for any oil leaks
on reservoir which may indicate a perished bladder.
Refer to an approved Equalizer distributor for f urther
instructions.
POSSIBLE CAUSE:
Inlet check or intermediate valve ball stuck
RECOMMENDED ACTION:
Dismantle check valve, free and clean balls. Refer
to an approved Equalizer distributor for further
instructions.
WEDGE MOVES BUT UNDER LOAD FEELS AS
IF IT IS NOT REACHING FULL PRESSURE
POSSIBLE CAUSE:
Intermediate valve not seating / relief valve leaking
RECOMMENDED ACTION:
Check ball for dirt then re-seat using a hammer and
punch. Refer to an approved Equalizer distributor
for further instructions.
PRESSURE LEAKS AWAY, HANDLE RISES OF
ITS OWN ACCORD
POSSIBLE CAUSE:
Outlet check valve leaking
RECOMMENDED ACTION:
Check ball for dirt then re-seat using a hammer and
punch. Refer to an approved Equalizer distributor
for further instructions.
Page 20

OPERATOR INSTRUCTION MANUAL
IM_VLW_Rev16_A4 (colour)
VLW18TE; VLW18TI
HYDRAULIC VERTICAL LIFTING WEDGES
19
PRESSURE LEAKS AWAY, HANDLE REMAINS
STATIC
POSSIBLE CAUSE:
Release valve leaking
RECOMMENDED ACTION:
Release lever may not be tight enough. Refer
to an approved Equalizer distributor for further
instructions.
POSSIBLE CAUSE:
Piston seal leaking
RECOMMENDED ACTION:
Look for oil leaking from cylinder bearing. Refer
to an approved Equalizer distributor for further
instructions.
POSSIBLE CAUSE:
Leaks on cylinder or pump body
RECOMMENDED ACTION:
Check blanking plugs for leaks, tighten. Refer
to an approved Equalizer distributor for further
instructions.
SPONGY ACTION
POSSIBLE CAUSE:
Air in system
RECOMMENDED ACTION:
Bleed system. Refer to an approved Equalizer
distributor for further instructions.
Page 21

OPERATOR INSTRUCTION MANUAL
IM_VLW_Rev16_A4 (colour)
VLW18TE; VLW18TI
HYDRAULIC VERTICAL LIFTING WEDGES
20
8.
REGULATORY
INFORMATION
8.1
REGISTERED HEAD OFFICE
EQUALIZER INTERNATIONAL LTD.
Equalizer House
Claymore Drive
Aberdeen
Scotland
AB23 8GD
9.
PARTS LISTS
& SERVICE KITS
Page 22
OPERATOR INSTRUCTION MANUAL
IM_VLW_Rev16_A4 (colour)
VLW18TE; VLW18TI
HYDRAULIC VERTICAL LIFTING WEDGES
21
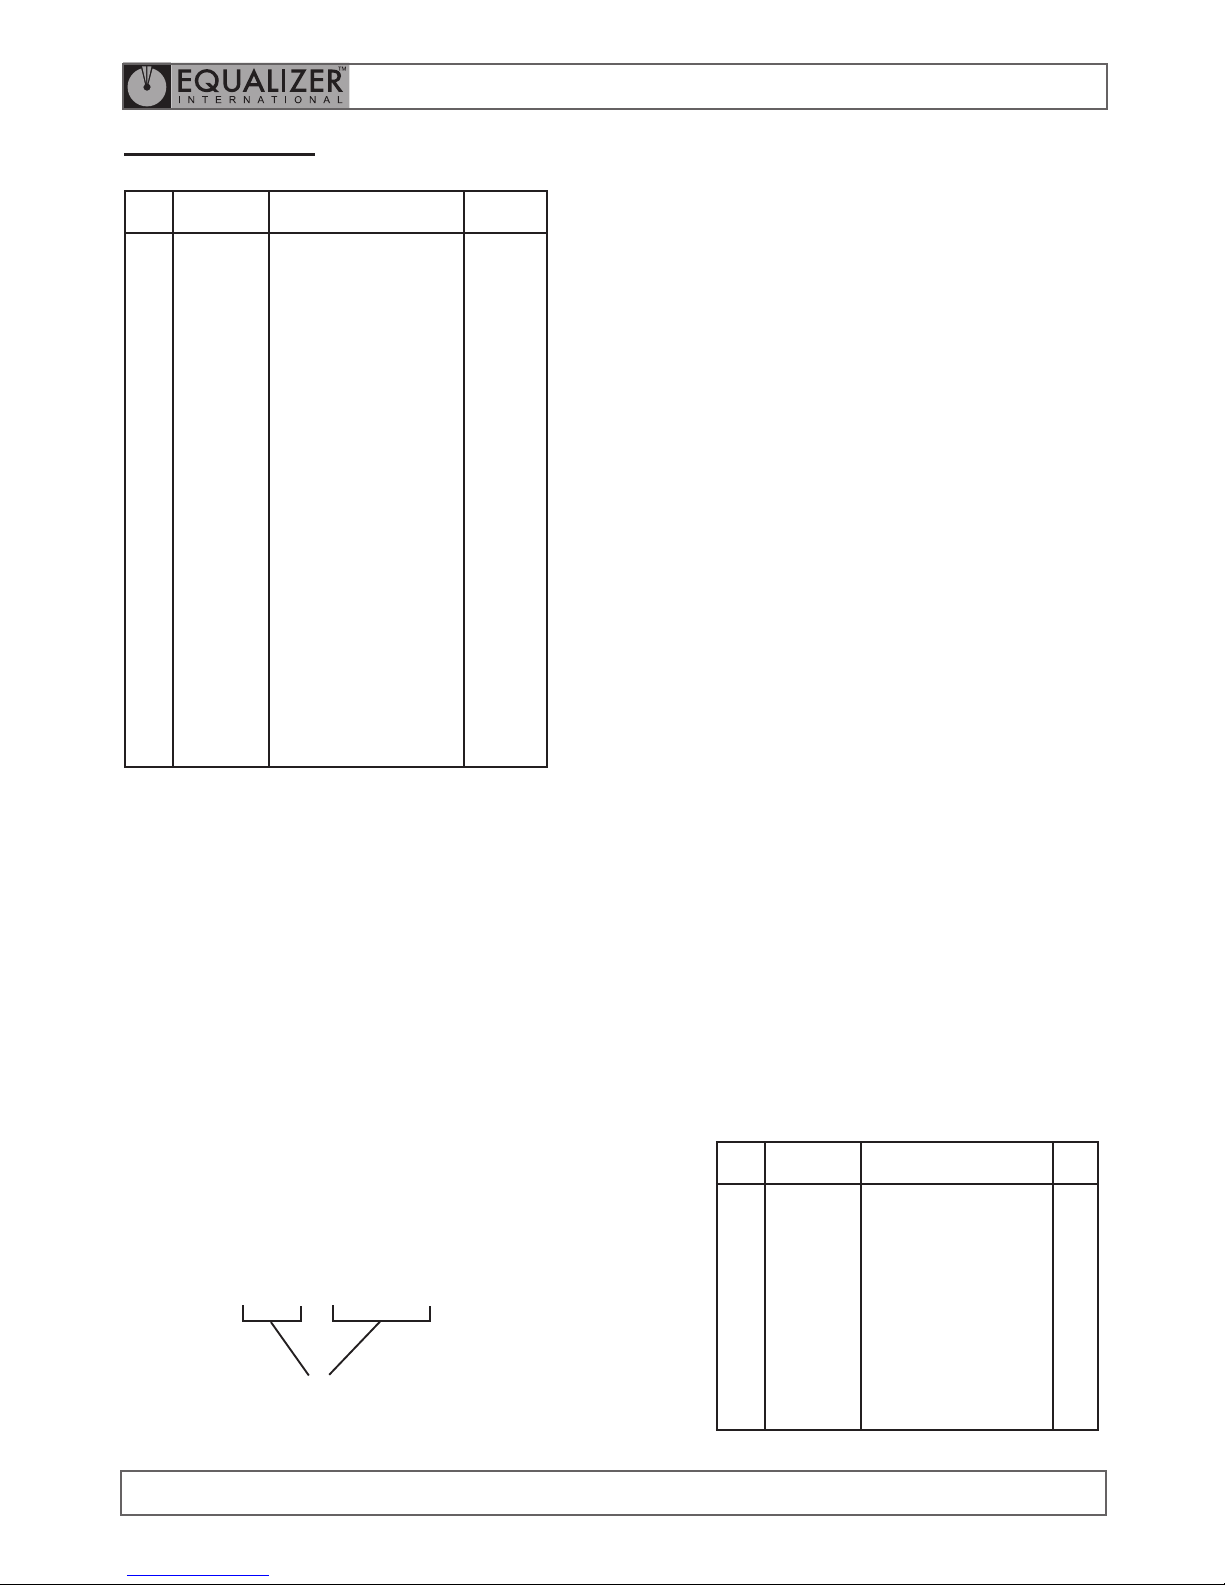
VLW18TE TOOL
ITEM
NO.
PART NO DESCRIPTION QTY.
01
02
03
04
05
06
07
08
09
10
11
12
13
14
15
16
17
18
19
20
21
22
23
24
25
26
27
28
29
30
31
060101-01
060701-01
070012-01
070014-01
070053-01
070054-01
070098-01
201203-01
300401-01
301003-01
301201-01
301301-01
310601-01
402701-01
402902-01
500101-01
500201-01
500302-01
500401-01
500503-01
501101-01
501201-01
501301-01
501401-01
501601-01
501901-01
502301-01
503201-01
503301-01
503401-01
503501-01
WHITE PLASTIC CAP
4 MM ALLEN KEY
SERIAL NO STICKER
PINCH POINT STICKER
WRAP AROUND STICKER
QC SEALED TOP STICKER
EQUALIZER LOGO
BLACK HANDLE SLEEVE
M5X6 SCKT SCREW
HYDRAULIC CYLINDER
SPIROL PIN
M6X12 GRUB SCREW
M6 GREASE NIPPLE
M5 SCKT HEAD SCREW
SCREW FOR HANDLE
MAIN BODY
TOP PLATE
WEDGE C-W TAIL
GUIDE PIN
PUSH PIN MK III
HANDLE LEFT
HANDLE RIGHT
HANDLE BAR
SAFETY BLOCK
WASHER FOR TAIL
STEP BLOCK
GRUB SCREW
SLOT PLUG
WASHER 10 MM
WASHER 6MM
SPACER
01 set of 2
01 each
01 each
02 each
01 each
02 each
01 each
01 each
01 set of 2
01 each
01 set of 4
01 each
01 each
01 each
01 set of 5
01 each
01 each
01 each
01 set of 2
01 each
01 each
01 each
01 each
01 each
01 each
01 each
01 each
01 each
01 set of 2
01 set of 2
01 set of 2
ITEM
NO.
PART NO DESCRIPTION QTY.
04
02
13
03
10
12
05
06
07
11
08
09
300901-01
301011-01
301012-01
510701-01
510704-01
510707-01
510709-01
301403-01
HYDRAULIC COUPLER
CYLINDER BASE
SPRING
PISTON ROD
SPRING LOCK
SCREW
FASTEN NUT
SERVICE KIT:
- O-RING
- BACK-UP RING
- GASKET SEAL
- SPLIT RING
- WIPER
01
01
01
01
02
02
01
01
01
02
01
01
SERVICE KIT
301403-01
Page 23
OPERATOR INSTRUCTION MANUAL
IM_VLW_Rev16_A4 (colour)
VLW18TE; VLW18TI
HYDRAULIC VERTICAL LIFTING WEDGES
22
innovation
www.equalizerinternational.com
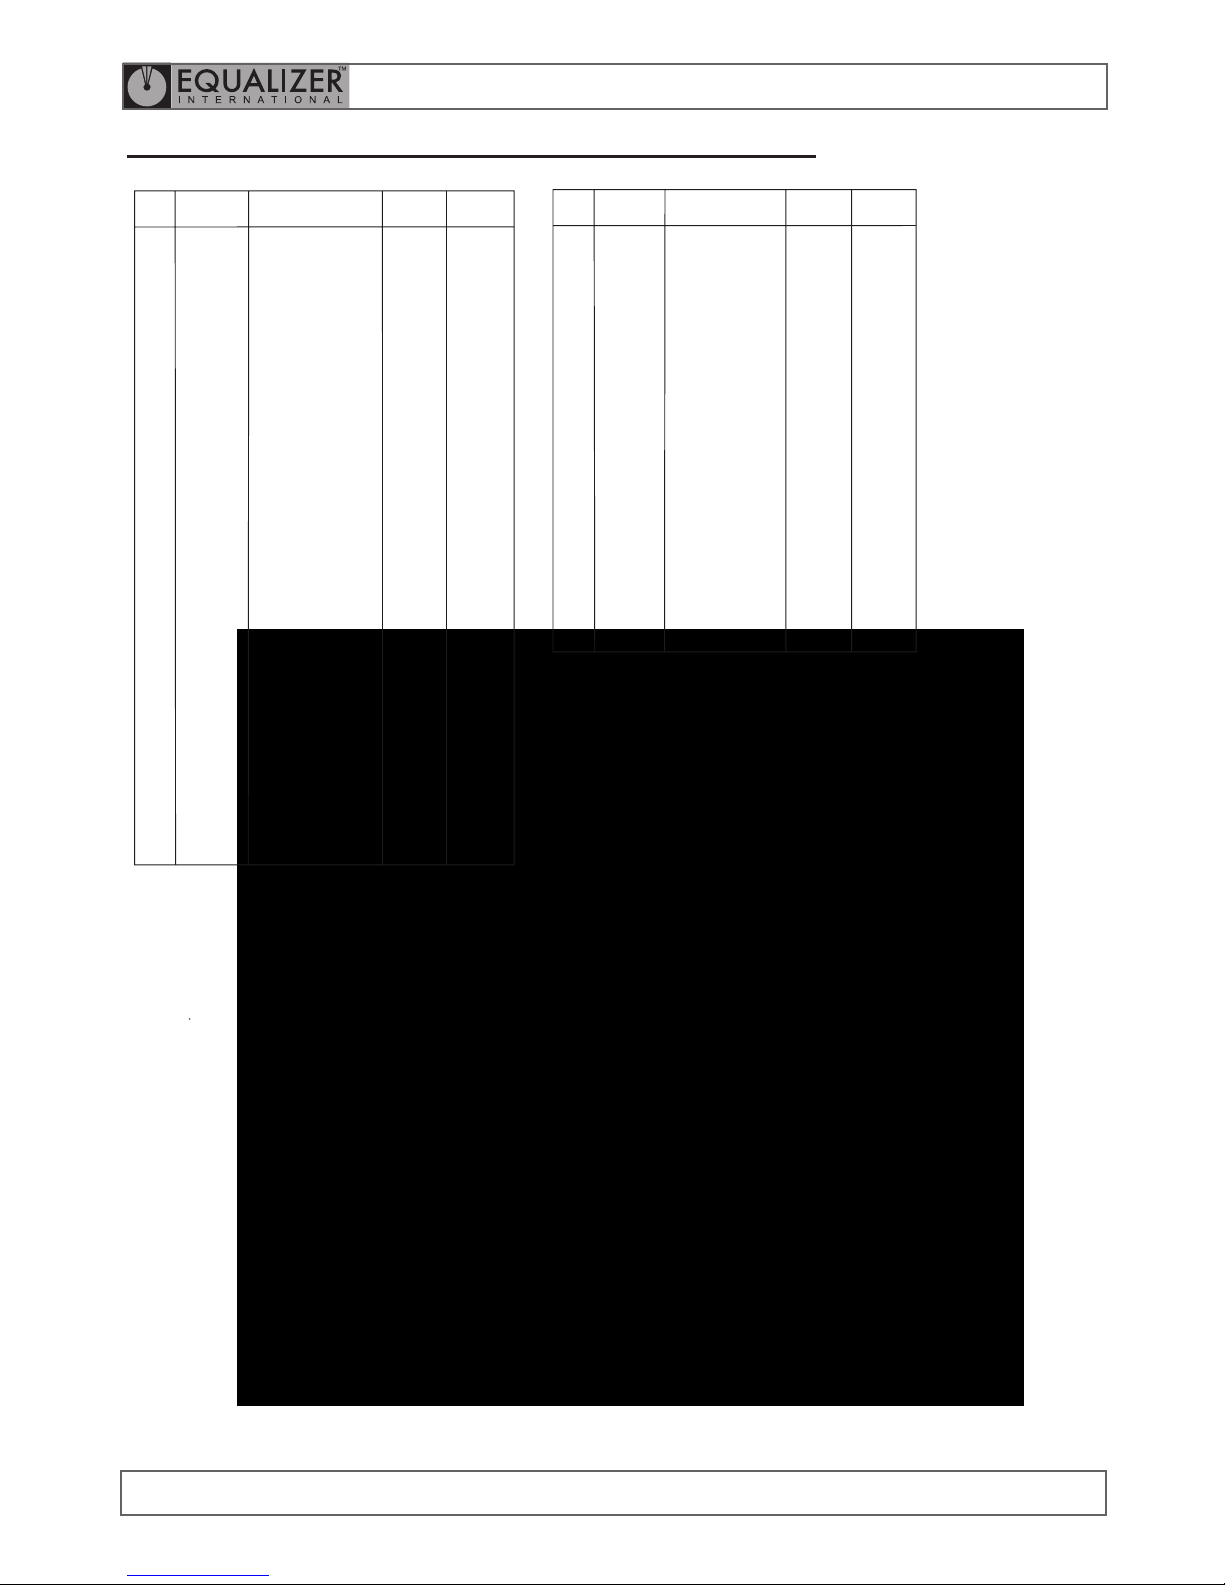
DESCRIPTION
PUMP HOUSING
SERVICE KIT A:
- OIL FILTER
- O-RING
- RESERVOIR BLADDER
- REFILLING PLUG
RESERVOIR
SERVICE KIT B:
- TAIL BASE
- SCREW
- SPRING WASHER
SERVICE KIT C:
- O-RING
- BACK-UP RING
- PUMP PISTON
- SNAP RING
- O-RING
- BACK-UP RING
- PUMP PISTON
SERVICE KIT D:
- HANDLE
- YOKE
- PISTON PIN
- YOKE PIN
- RETAINING RING
SERVICE KIT E:
- YOKE BASE
- SPRING PIN
SERVICE KIT F:
- RELEASE VALVE
SCREW
- WASHER
- SEAL
- SCREW
- RELEASE KNOB
- COUPLERS
- CHECK BALL
SERVICE KIT G:
- SPRING
- STEEL BALL
- OUTLET BALL SPRING
- COPPER WASHER
- VALVE COVER SCREW
- STEEL BALL
PART No.
710101-01
715100-01
710601-01
725200-01
715300-01
715400-01
715500-01
715600-01
715700-01
KIT
QUANTITY
01
01
01
01
01
04
04
01
01
01
01
01
01
01
01
01
01
01
01
01
01
01
01
01
01
01
01
01
02
02
02
02
02
02
ITEM
01
02
03
04
05
06
07
08
09
11
12
13
14
15
16
17
18
19
20
21
22
25
26
27
28
29
30
31
32
33
34
35
36
37
38
39
DESCRIPTION
SERVICE KIT H:
- STEEL BALL
- SPRING END CAP
- L.P. SPRING
- O-RING
- OVERLOAD COVER
SCREW
- CAP
- OVERLOAD COVER
SCREW
SERVICE KIT I:
- BASE PLATE
- SCREW
PART No.
715800-01
715900-01
KIT
QUANTITY
01
01
01
02
01
02
01
01
02
ITEM
40
41
42
43
44
45
46
50
51
HP350S HYDRAULIC SINGLE PORT SEALED HAND PUMP
- NUT
0410
- HANDLE GRIP
0123
- SCREW
0124
- CONE SEAT0 147
- CONE 0148
- LONG SEPARATOR
SPRING
0149
SERVICE KIT K:
- SCREW
- SCREW
716100-01
04
01
52
53
SERVICE KIT L:
- GAUGE COUPLER
MALE
- GAUGE
716200-01
01
01
54
55
SERVICE KIT M:
- GAUGE COUPLER
FEMALE
- COUPLER
716300-01
01
01
56
57
- GAUGE PORT
ADAPTOR
01
58
PUMP
QUANTITY
01
01
01
02
01
02
01
01
02
01
01
01
03
01
01
01
01
01
01
PUMP
QUANTITY
01
01
01
01
01
01
01
04
04
01
01
01
01
01
01
01
01
01
01
01
01
01
01
01
01
01
01
01
01
01
02
02
02
02
02
02
04
01
01
- SCREW
- CHECK BALL
01
04
24
33
01
03
Page 24
OPERATOR INSTRUCTION MANUAL
IM_VLW_Rev16_A4 (colour)
VLW18TE; VLW18TI
HYDRAULIC VERTICAL LIFTING WEDGES
23
VLW18TI TOOL
ITEM
NO.
PART NO DESCRIPTION QTY.
01
02
03
04
05
06
07
08
09
10
11
12
13
14
15
16
17
18
19
20
21
22
23
24
25
26
27
28
29
30
060701-01
070012-01
070014-01
070054-01
070098-01
070249-01
201203-01
300401-01
301201-01
301301-01
310601-01
402701-01
402902-01
500101-01
500201-01
500302-01
500401-01
500503-01
501101-01
501201-01
501301-01
501401-01
501601-01
501901-01
502301-01
503201-01
503301-01
503401-01
503501-01
510701-01
4 MM ALLEN KEY
SERIAL NO STICKER
PINCH POINT STICKER
QC SEALED TOP STICKER
EQUALIZER LOGO
READ INSTR. STICKER
BLACK HANDLE SLEEVE
M5X6 SCKT SCREW
SPIROL PIN
M6X12 GRUB SCREW
M6 GREASE NIPPLE
M5 SCKT HEAD SCREW
SCREW FOR HANDLE
MAIN BODY
TOP PLATE
WEDGE C-W TAIL
GUIDE PIN
PUSH PIN MK III
HANDLE LEFT
HANDLE RIGHT
HANDLE BAR
SAFETY BLOCK
WASHER FOR TAIL
STEP BLOCK
GRUB SCREW
SLOT PLUG
WASHER 10 MM
WASHER 6MM
SPACER
INT. PUMP & CYLINDER
01 each
01 each
02 each
02 each
01 each
01 each
01 each
01 set of 2
01 set of 4
01 each
01 each
01 each
01 set of 5
01 each
01 each
01 each
01 set of 2
01 each
01 each
01 each
01 each
01 each
01 each
01 each
01 each
01 each
01 set of 2
01 set of 2
01 set of 2
01 each
Page 25
OPERATOR INSTRUCTION MANUAL
IM_VLW_Rev16_A4 (colour)
VLW18TE; VLW18TI
HYDRAULIC VERTICAL LIFTING WEDGES
24
INTEGRAL HYDRAULIC PUMP/CYLINDER serial no: 11187 onwards
ITEM
NO.
PART NO DESCRIPTION QTY.
ITEM
NO.
PART NO DESCRIPTION QTY.
ITEM
NO.
PART NO DESCRIPTION QTY.
01
02
03
04
05
06
07
08
09
10
11
12
13
14
15
16
17
18
372301-01
342401-01
372501-01
372601-01
372901-01
373001-01
373101-01
373201-01
373301-01
373401-01
375101-01
376901-01
377101-01
510701-01
510708-01
510709-01
510712-01
510713-01
BLADDER HOUSING
PISTON HOUSING CAP
SWIVEL CLEVIS
RETAINING NUT
CLEVIS PIN
RETAINING RING
LINK CONNECTOR
CLEVIS SCREW
ANTI-LOOSEN NUT
HANDLE ROD
CYLINDER BASE
PUMP PISTON HOUSING
HANDLE CLEVIS
PISTON ROD
PULLER BODY
FASTEN NUT
ROLL PIN
HANDLE GRIP
01
01
01
01
02
04
01
01
01
01
01
01
01
01
01
01
01
01
19
20
21
22
23
24
25
26
27
28
29
30
31
32
33
34
35
375010-01 SERVICE KIT A
OIL FILL SCREW
STEEL BALL
O-RING
RELIEF VALVE SCREW
RELIEF VALVE KNOB
WASHER
O-RING
BACK UP RING
RESERVOIR BLADDER
O-RING
PUMP PISTON ROD
OVERLOAD COVER SCREW
CAP
O-RING
O-RING
FIXING SCREW
01
01
01
03
01
01
01
02
01
01
01
01
01
01
01
01
01
36
21
38
39
40
41
42
43
44
45
46
47
48
49
50
51
52
53
54
55
56
57
375020-01
510700-01
SERVICE KIT C
STEEL BALL
SPRING
SCREW
BACK-UP RING
O-RING
PIN
GASKET SEAL
SPRING LOCK
CONE SEAT
CONE
LONG SEPARATOR SPRING
SERVICE KIT D
O-RING
BACK-UP RING
SCREW
STOP COLLAR
SPRING CLOCK
SPRING
SPLIT RING
SCREW
WIPER
01
02
02
01
01
01
01
01
01
01
01
01
01
01
01
01
01
01
01
01
01
01
Page 26
EQUALIZER INTERNATIONAL LTD.
Head Office
Equalizer House
Claymore Drive
Aberdeen
Scotland
UK
AB23 8GD
t: +44 (0) 1224 701970
f: +44 (0) 1224 823791
Houston Office
1330 Yale Street
Houston TX 77008
USA
t: +1 (713) 927-1840
www.equalizerinternational.com
 Loading...