

Page 1
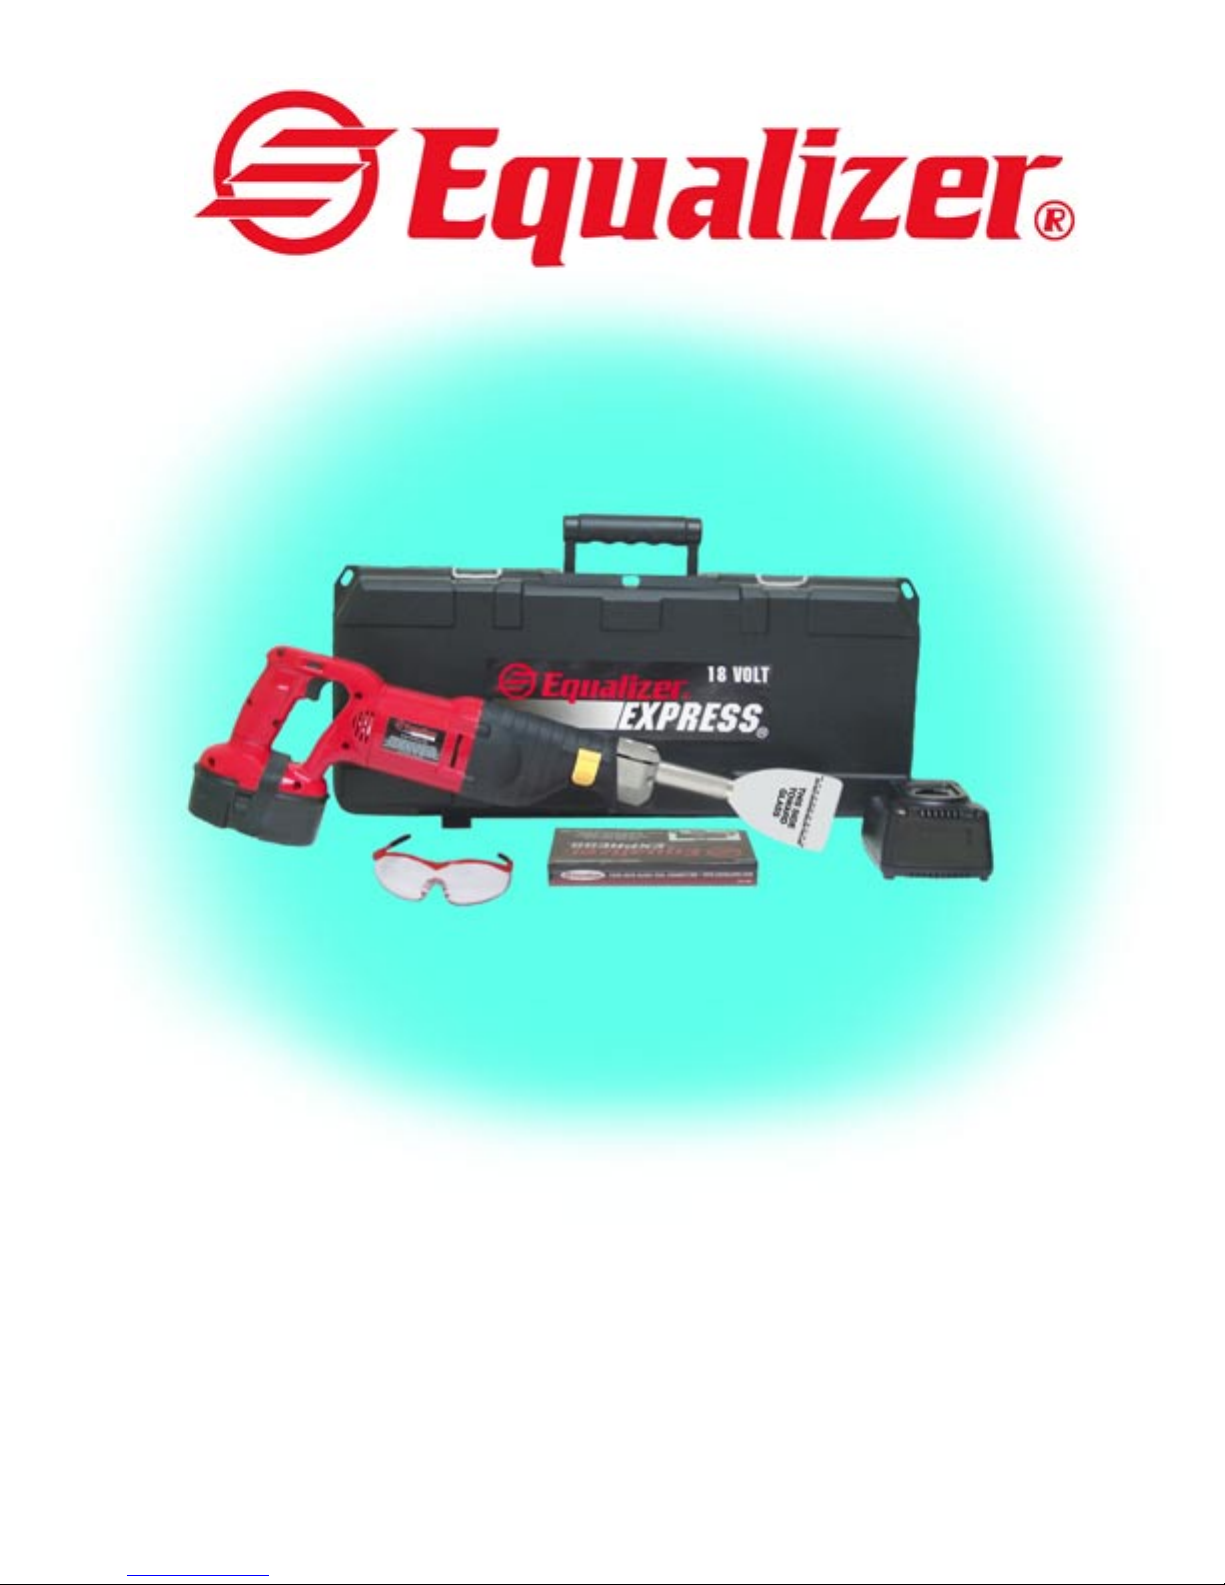
18-Volt Battery Powered
Equalizer
Users Guide & Exploded View
DTE1000 • DTA1007
© 2004 Equalizer Industries, Inc.
® Express
®
Page 2
Express® 18-Volt Users Guide
The Sheath
Tool Description
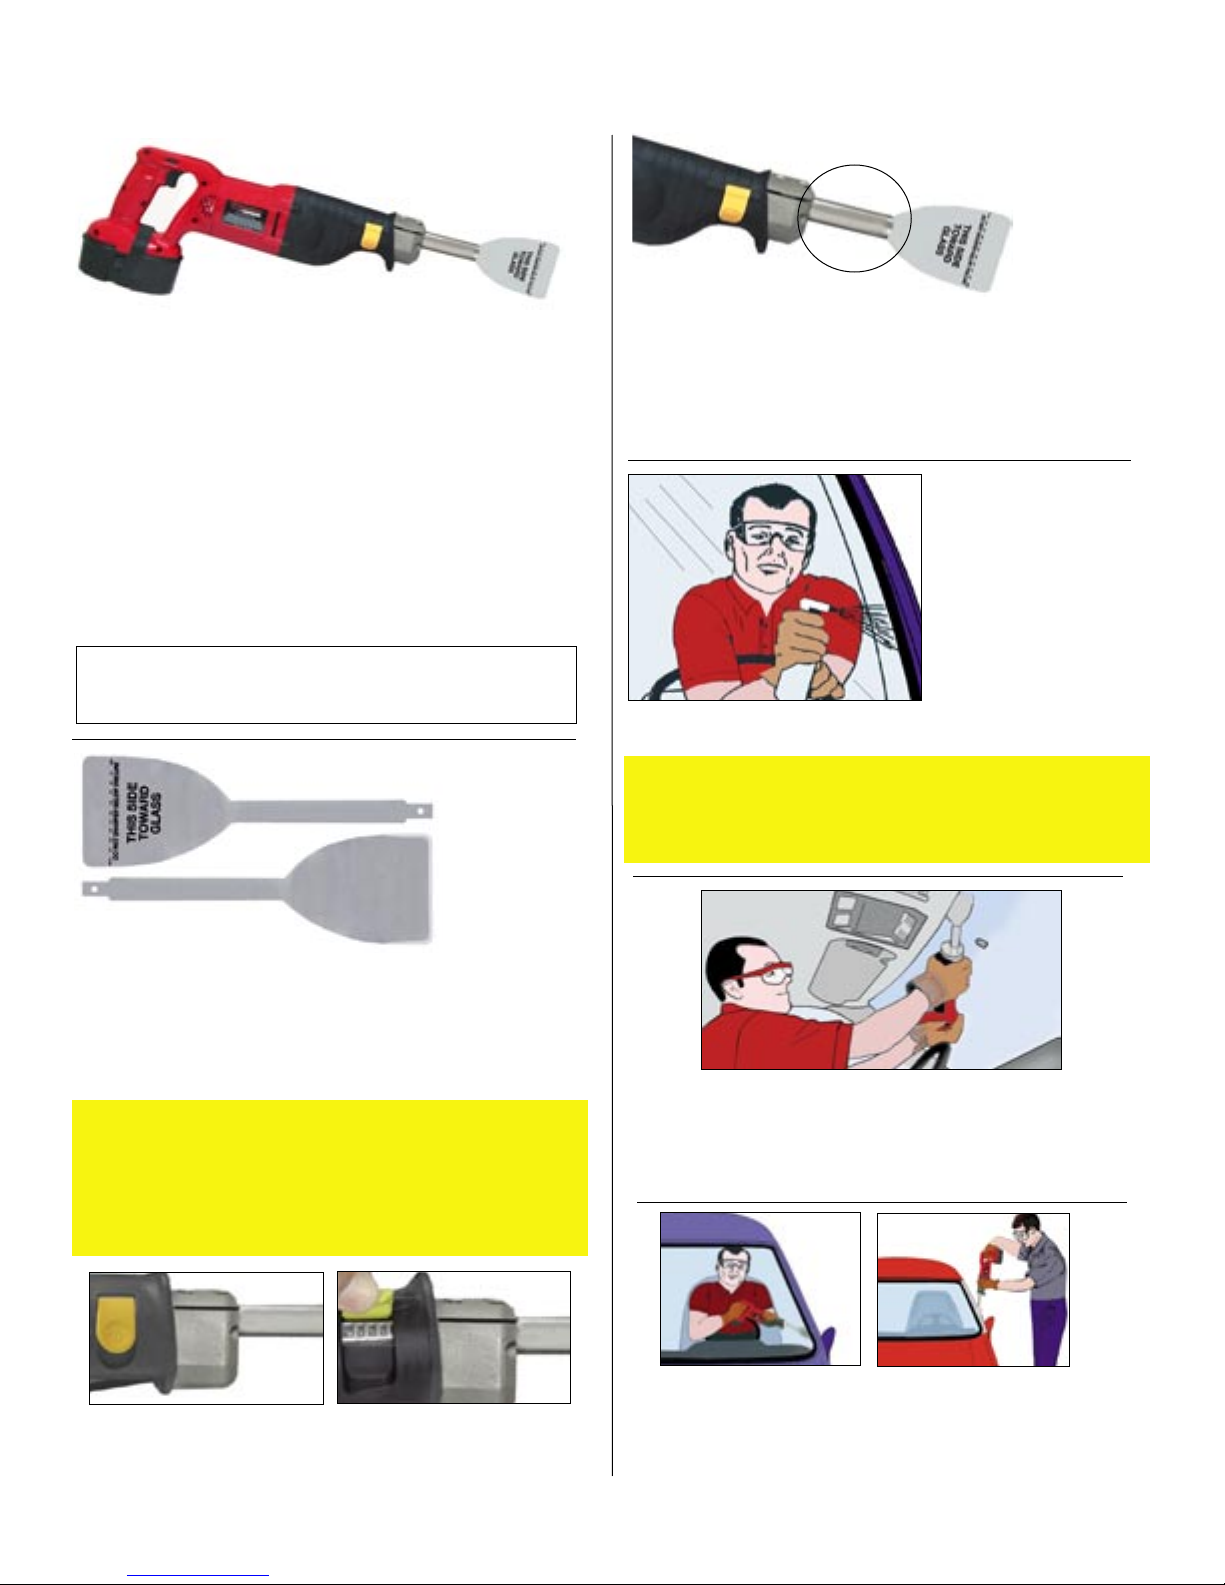
The Equalizer® Express® 18-Volt cordless tool is a multipurpose auto glass removal tool, designed primarily for inside
use on bonded auto glass parts. It may be used outside on
A-pillars for windshields of some vehicle models, and on
all broken tempered parts. The blade shaft is enclosed in a
sheath which protects interior car parts. Most of the cutting is
accomplished on the end of the blade, therefore the operator
utilizes upper torso muscles, making the tool easy to operate
and ergonomically friendly. The Equalizer® Express® 18-Volt
cordless toolʼs specific blade stroke length and dynamic twoway cutting power slices through the toughest urethane adhesive with ease.
Voltage . . . . . . . . . . . . . . . . . . . . . . . . . . . . . . . . . 18 Volts
Battery . . . . . . . . . . . . . . . . . . . . . . . . . . . . . .DW9096XR+
Strokes Per Minute . . . . . . . . . . . . . . . . . . . . . . . . . 0-2,800
The Blade
The blade is
very thin and
flexible, allowing for curved
cutting angles.
It is sharpened
on three sides
and on a single plane. The blade must be properly orientated
(flat side rides against the glass). When properly orientated
the bladeʼs sharpening design causes the blade to cut along the
bottom surface of the glass, thereby protecting headliners and
mouldings from damage.
Caution!
Discard the blade when it has been sharpened down to the line
that says - DO NOT SHARPEN BELOW THIS LINE. Using a
blade that has been sharpened below this line will eliminate the
flexibility of the blade and damage the tool. The blade is extremely sharp and can cut even when the tool is not in operation!
The sheath provides protection for the dash and interior vehicle
parts. Since the cutting is done by the end of the blade, the
sheath remains free of contaminants. No cleaning is necessary.
To keep the sheath cool we recommend that you periodically
apply a light film of high heat grease to the blade part that is
inside the sheath.
Proper Use
Begin the cutting pro-
cess by spraying the
entire cutting area and
blade with plenty of
water. Lubrication is
vital for maximum cutting ease. Failure to use
water lubricant increases
cutting friction and will
cause tool damage. Periodically spray the blade with water.
Rust Prevention
To prevent rust caused by water droplets, every day place
a few drops of oil into the sheath and allow it to run down
into the blade holder.
Start cutting from the inside top center of the glass and cut
toward the A-pillars. Keep the blade properly orientated and
flat against the glass. Reverse and cut from the top center of
the glass toward the other A-pillar. Relax and let the tool do
the work.
The blade is installed by lifting the quick connect lever, fully
inserting the shaft of the blade into the sheath, and pressing
the quick connect lever back down.
Next, from the inside (or outside on some vehicle models), cut
the sides from top to bottom. After both sides are cut, insert two
PUMPER™s (Equalizer® LB779) to increase the cutting angle,
thereby improving cutting ease. For an even greater cutting angle,
slightly deflate the PUMPER™s then fold in half & re-insert.
2
Page 3
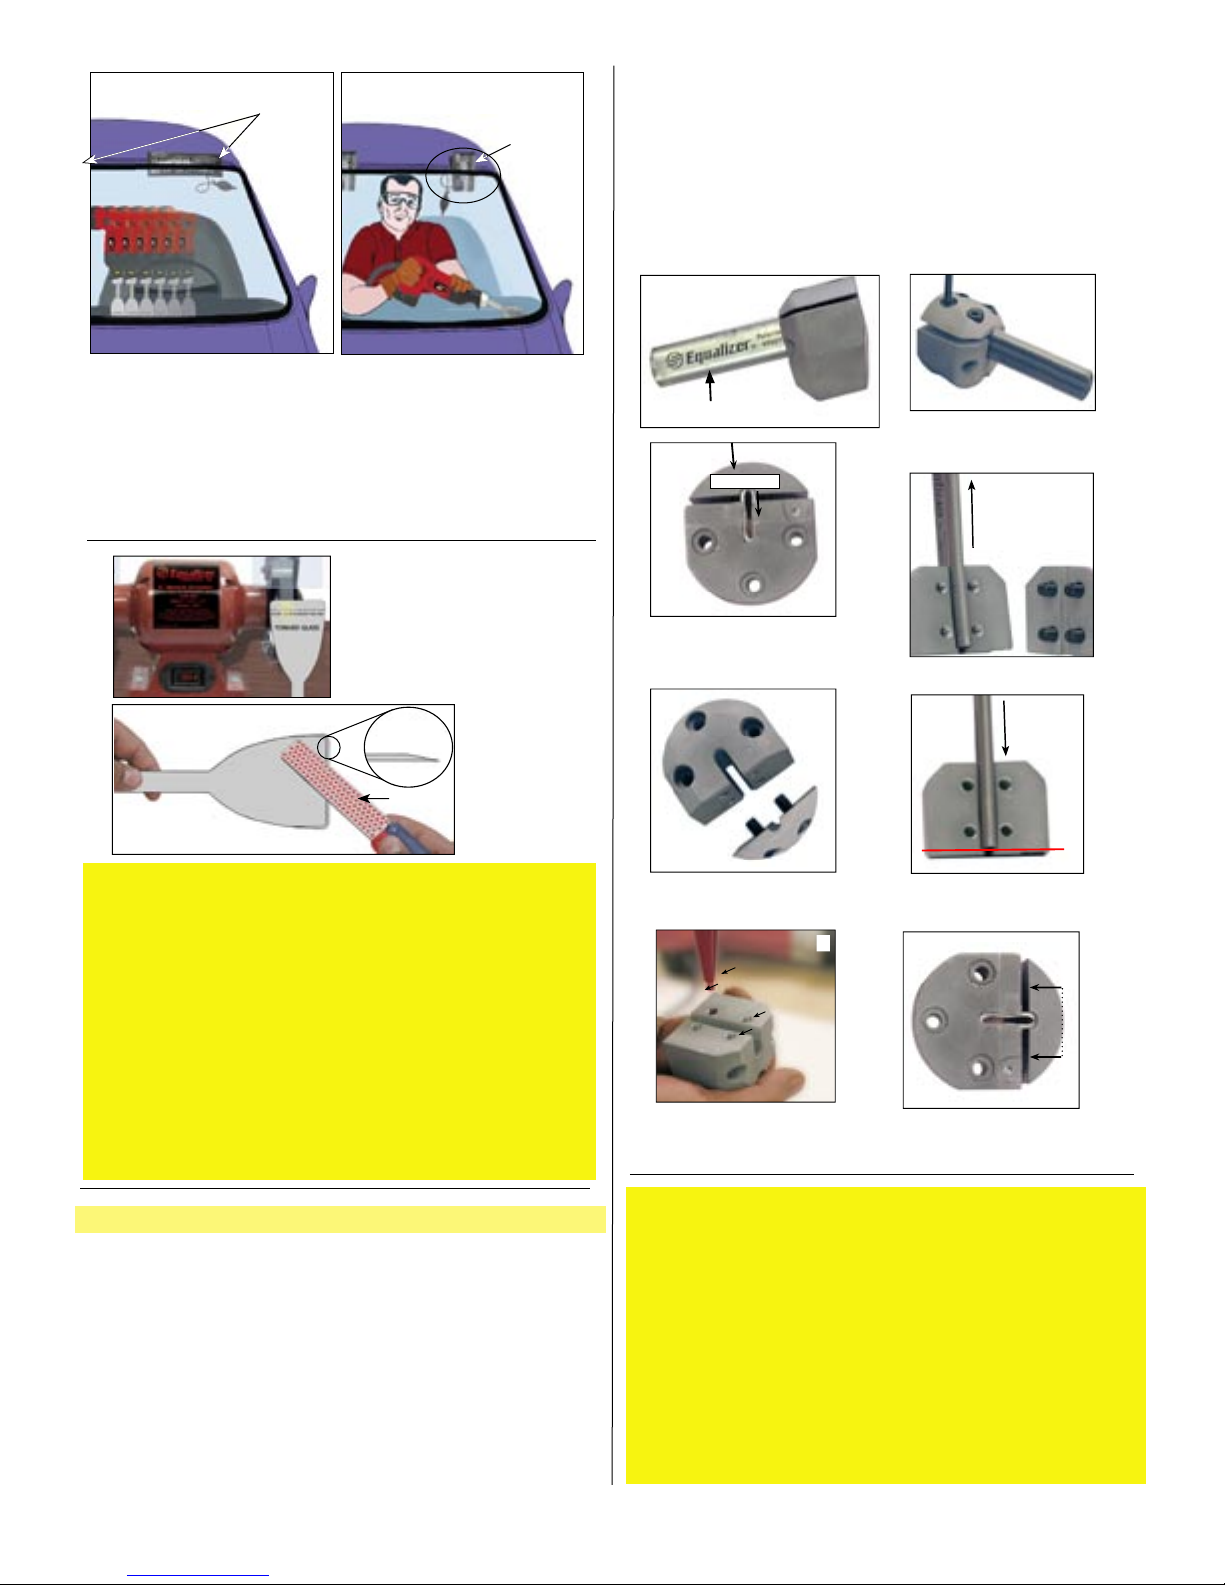
Figure 1
™
Pumper
Use one on each side.
LB779
Figure 2
Pumper™ can be folded in half to increase
distance of outward
pressure.
sheath until it touches the stops, but
the sheath stops (D,E). 5. Place a drop of red Loctite
do not insert the sheath past
®
in each screw
hole to secure the screws and keep them from loosening from vibration
(F). 6. Reassemble the sheath holder; be sure to install all four screws
so the gap is the same width on both sides of the sheath retainer (G).
CAUTION! Forcing sheath past the stops or overtightening the top
screws will damage your tool. Tools presented for repair with stops
destroyed or removed will not be repaired under warranty.
A
The plunge cut
The angle cut
After the sides are loose, cut the bottom of the glass loose, utilizing one or a combination of two cutting methods.
Figure 1. The plunge cut. Cut straight down, move over three
inches and repeat this process until finished cutting.
Figure 2. The angle cut. Turn the tool at roughly a 45-degree
angle and cut along the bottom until finished.
Every ten removals
Figure 3
Between each
BI1038
Blade Sharpening
A sharp blade is crucial for effective cutting action and tool longev-
ity. A dull blade will destroy the drive mechanism in your Equalizer®
Express® 18-Volt --keep the blade sharp. Sharpen the blade between
each removal with a diamond file (Equalizer® part number BI1038).
Be careful to maintain the original sharpening angle (see Figure 3).
Every ten removals, re-sharpen the blade on a bench grinder. Keeping
a sharp blade will help the tool cut faster. A sharp blade will reduce
vibration, increasing the life of the tool and reducing the fatigue of
the operator. Most tool damage is caused because the blade has not
been kept sharp. We will not warranty tools when the blade has not
been kept sharp. Do your part to prolong the life of this tool and
keep the blade sharp!
removal
ES1406
stops
Sheath
UNDERSIDE view of
holder and sheath stops
Top view of open
holder
Use a drop of red
®
Loctite
in each hole.
Loosen screws with
B
3/16” hex wrench.
C
Remove old sheath.
D
E
Insert new sheath
until it hits stops.
F
G
Assure gap is even
on both sides.
IMPORTANT -- PLEASE READ CAREFULLY!
Changing the Sheath
The sheath is not adjustable! The four top screws are secured in place
with Loctite
be removed unless you are replacing the sheath. Please be aware that
some force may be required to remove these screws. If difficulty is
encountered, to prevent stripping of the screws we recommend warm
ing the sheath retainer with a heat gun or other warming device. 1.
Loosen the screws with a 3/16” hex wrench (A). 2. Make note of the
built-in sheath stops located at the back of the sheath holder (B).
is very important!
®
to prevent loosening from vibration, and are not meant to
3. Remove the old sheath (C). 4. Insert the new
This
General Safety Information
1. Always wear safety glasses and safety gloves when using the
Equalizer® Express® 18-volt tool.
2. Do not activate Equalizer® tools until they are in the cutting position.
Disengage the tool and let it stop before taking it out of the urethane.
3. The blade is sharp and can cut even when the tool is not running.
4. Do not force the tool. Put light forward pressure on the tool.
Let it do the work.
-
5. Consider your work environment. Do not use or expose power
tools to rain or damp weather.
6. Disconnect the battery from cordless tools before servicing and
when changing accessories.
7. Stay Alert!! Watch what you are doing. Use common sense.
3
Page 4
Important Instructions For Your Equalizer® Express® 18-Volt Battery& Charger
Equalizer® Express
®
Battery Use and Care
Take care when loading the battery into the tool. Do NOT
slam the battery into the Equalizer® Express® tool. Gently
press the battery into place. Depending on cutting conditions
and operator skill, a fully charged battery should remove about
three windshields.
The batteries are the most sensitive part of the Equalizer
Express® tool. Please, carefully read these detailed instructions
about proper battery charging and care.
Fig. 1
Fig. 2
®
Tune-Up Procedure
At the end of every two weeks, completely discharge your battery. Batteries can develop a memory which will shorten the
working time they can be used. The tune-up procedure will
eliminate the memory build-up.
1. Hold or tie down the trigger & let the tool run until it stops.
2. Wait 20 minutes then repeat (tool will only run a
short time the second time).
3. Allow the battery to cool completely, then
recharge.
Important Safety Instructions About the
Battery and Chargers
Warning: When using the Equalizer® Express® there are basic
safety precautions that should be followed to reduce risk of
fire, electric shock and personal injury, including the following:
• Do not incinerate the battery pack even if it is severely
damaged or is completely worn out. The battery pack can
explode in a fire.
• A small leakage of liquid from the battery pack cells may
occur under extreme usage or temperature conditions. This
does not indicate a failure. However, if the outer seal is broken
and this leakage gets on your skin--
A. Wash quickly with soap and water.
DW9116 Charger
The DW9116 battery charger is designed to use standard household
120 volt AC 60 Hz power. The use of other power sources like, but
not limited to, those that convert DC to AC is not recommended and
will destroy the internal circuitry of the DW-9116 charger. If you do
not use standard household 120 volt AC, 60 Hz power then only use
a true sine wave inverter.
DW9109 12-Volt Automotive Charger
The DW9109 battery charger is designed to plug into the cigarette
lighter or power point of a vehicle and use 12 volt DC power. Do not
use AC power. The use of any other power source, such as a device
to convert AC to DC power, is not recommended and may cause
serious damage to the circuitry of the DW-9109 charger.
Charging Procedure
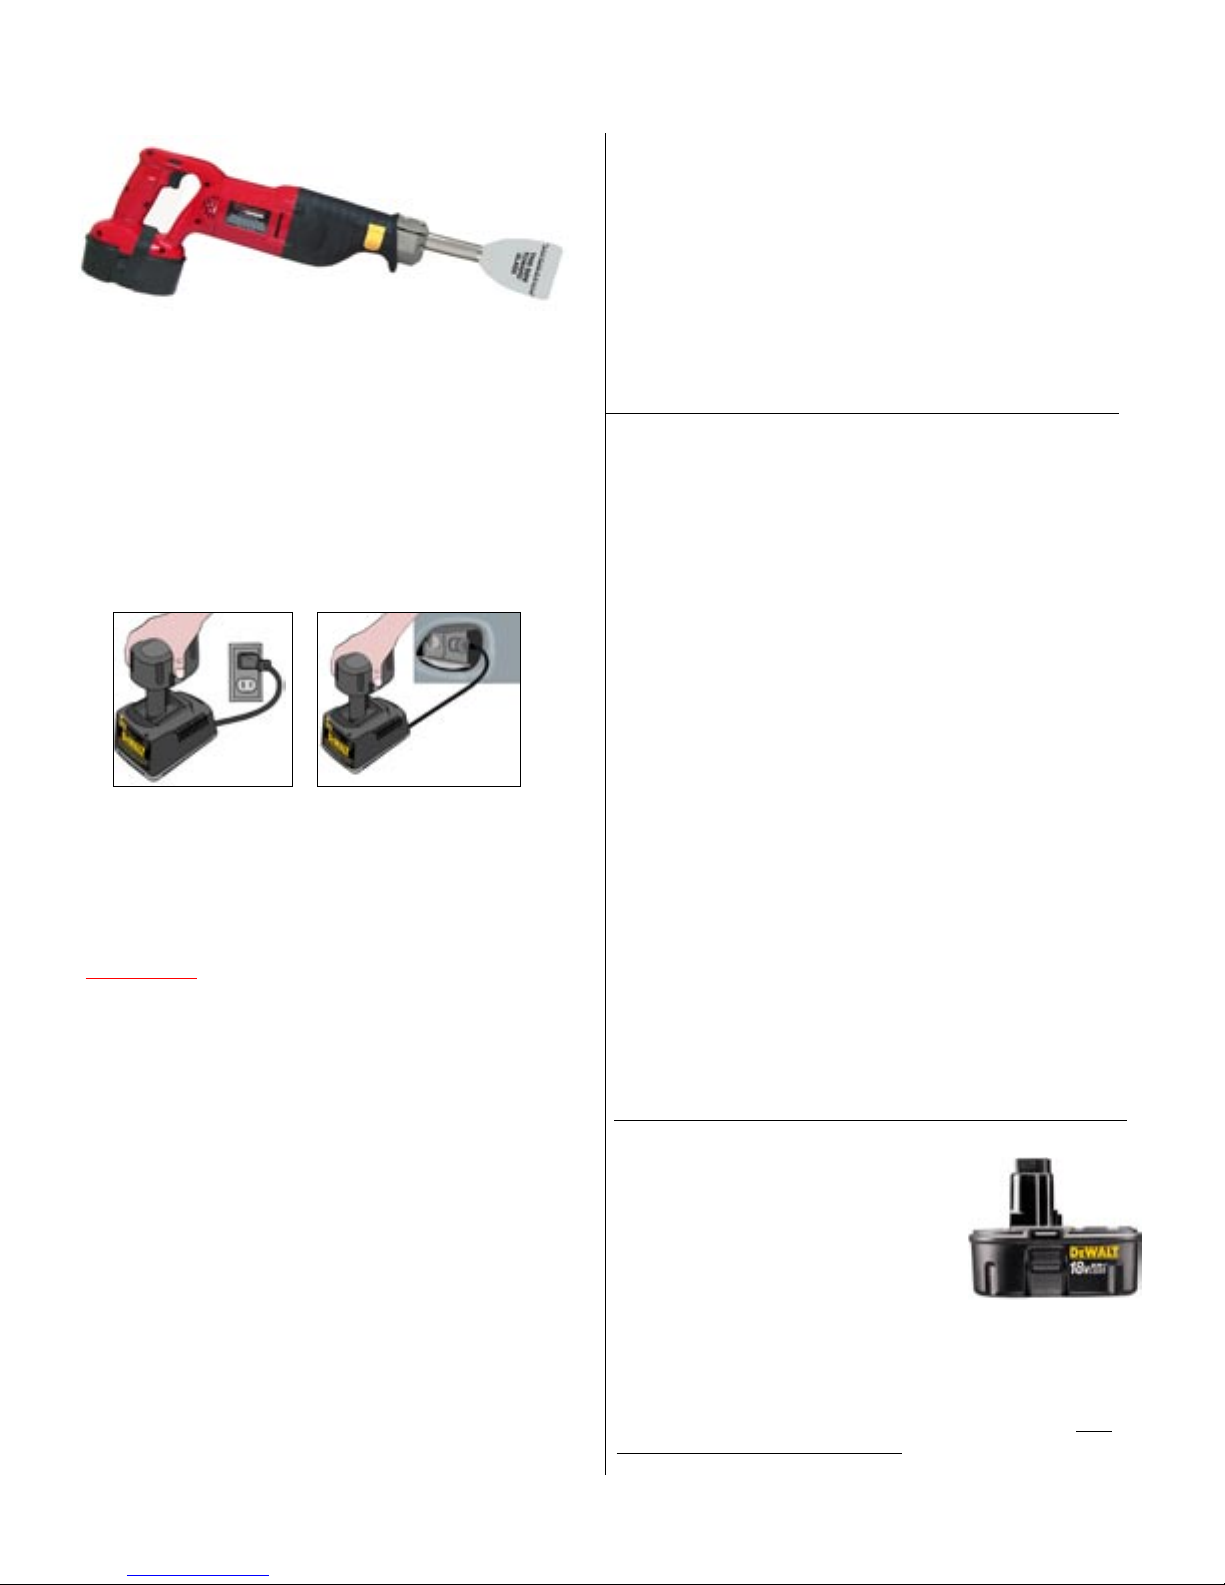
1. Plug the charger into an appropriate power outlet.
2.
Insert the battery pack into the charger, as shown in
Fig. 1 and Fig. 2, making sure the pack is fully seated in
the charger. The red (charging) light will blink continously,
indicating that the charging process has started.
3.
The battery pack will be fully charged in about 1
hour. The completion of charge will be indicated by
the red light remaining ON continuously. The pack is
fully charged and may be used at this time or left in the charger.
B. Neutralize with mild acid such as lemon juice or vinegar.
C. If battery liquid gets into your eyes, flush them with
clean water for a minimum of 10 minutes and seek
immediate medical attention.
(Medical Note: The liquid is a 25%-30% solution of potassium
hydroxide.)
• Never attempt to open the battery pack for any reason. If the
plastic housing of the battery pack breaks or cracks, immedi
ately discontinue use and do not recharge.
• Do not carry extra, charged battery packs in aprons, pockets, or
tool boxes along with other metal objects. Battery pack could
be short circuited, causing damage to the battery pack and pos
sibly causing severe burn or fire.
Battery (DeWalt DW9096XR+)
Read this very carefully! There are sev-
eral off-the-shelf batteries that will fit the
Equalizer® Express®. This toolʼs battery
is a DeWalt DW9096XR+ and it feeds
electricity to the motor and runs it backwards so it will stop quickly. Other batter-
ies will feed too much electricity into the switch and can cause
the drive mechanism to unwind. Some do not send enough and
can cause the switch to be destroyed. The threads are clockwise
and when too much counterclockwise force is applied the threads
can unscrew, freeze the tool and cause permanent damage. Use
only DeWalt DW9096XR+ batteries.
4
Page 5
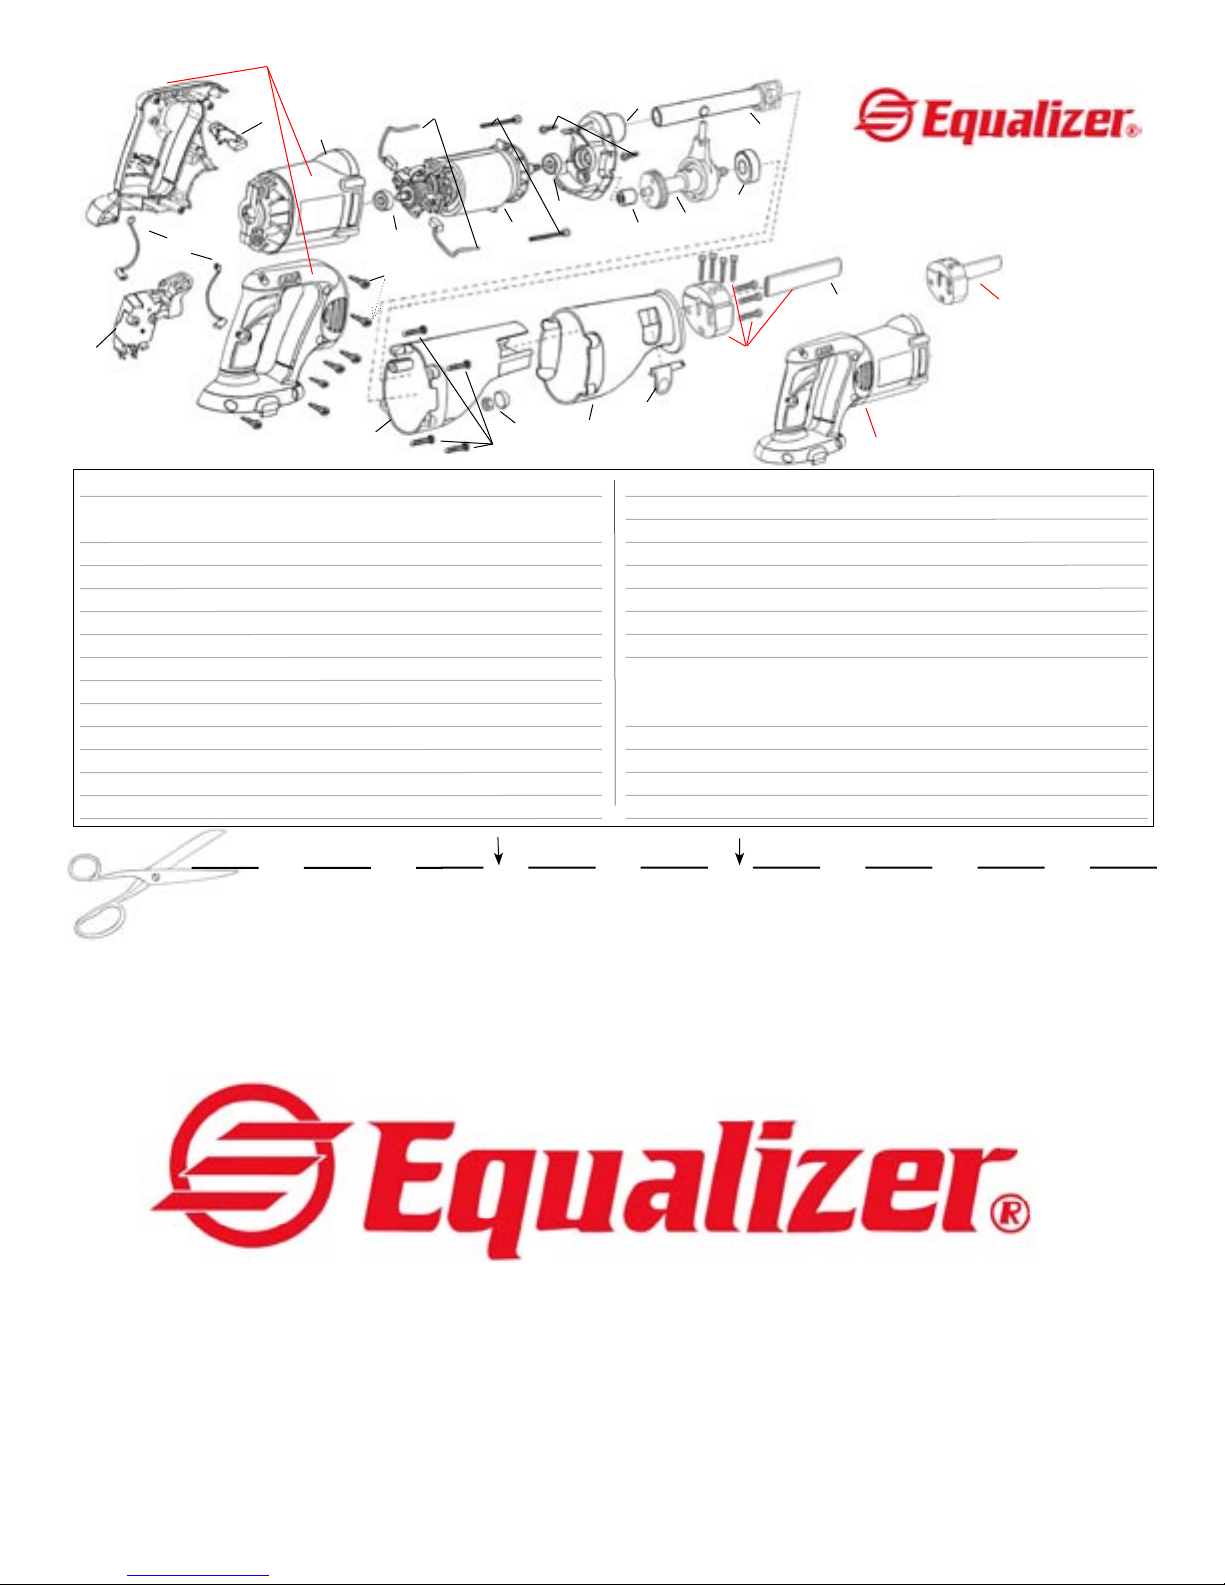
I-3451
1
I-3452
Field case
1
2500
I-1001
Part No.
2500
2501
2502
2503
2504
2505
2506
2507
2508
2509
2510
2511
2512
2504
2502
2712
2501
I-3451
I-3452
I-1105
Description Required
18V Express replacement handle set
(includes gear case & 2 handles)
Lead wires (set of 2)
Rear armature bearing
Gear case cover
Brushes (set of 2)
Armature assembly
Armature retaining screws (set of 2)
Gear case cover screws (set of 2)
Output shaft with blade retainer
Rear wobble drive assembly bearing
Wobble drive assembly (with gear)
Front wobble drive assembly bearing
Gear case cover screws (set of 4)
2506
2505
2512
2513
2507
2516
1
1 set
1
1
1 set
1
1 set
1 set
1
1
1
1
1 set
2514
2503
2510
2509
2515
Part No.
2513
2514
2515
2516
2712
ES1406
I-1001
I-1101
I-1105
2508
Model DTE1000
2511
ES1406
I-1101
2500
Description Required
Wobble drive retainer nut & cover (set)
Gear case cover boot
Blade release latch
Front armature bearing
Housing screws (6 large, 1 small)
Sheath
Switch, 18 volt
Complete sheath clamp assembly
(includes two-piece sheath clamp,
all screws and a sheath)
Gear case
Switch lock
I-1101
1
1
1
1
1 set
1
1
1
1
Detach and return
www.equalizer.com
Page 6
WARRANTY
All Equalizer® Express® tools are warrantied for one year to be free of factory defects. Warranty does not apply to abuse,
misuse, or normal wear and tear. We will repair or replace, at our option, any defective part. Tools are repaired and sent
back the same day they are received.
If you feel your tool is covered under warranty, the entire tool, including all blades, must be returned to:
EQUALIZER INDUSTRIES, INC.
1304 WEST INDUSTRIAL BOULEVARD
ROUND ROCK, TEXAS 78681
If you want a tool repaired, but are not seeking to have it repaired under warranty we would still like for you to
return the complete tool including the blades.
Equalizer Industries, Inc., reserves the right to refuse to repair, at our expense, any tool which has not been properly maintained as specified in the Users Guide. Particularly important are the following:
1. KEEP THE BLADES SHARP!!!!! This is the one thing most technicians WILL NOT do and it WILL damage the tool.
2. Use a cutting lubricant. If you are using the short cut method (not recommended by anyone anymore) use only clean
water as a cutting lubricant.
3. DO NOT HIT THE PINCHWELD. THIS WILL DESTROY THE DRIVE MECHANISM OF YOUR TOOL.
If you have any questions about your tool, call us toll free at 1-800-334-1334 or fax us at (512) 388-4188.
TOOL SERIAL NUMBER
KEEP THIS FOR YOUR RECORDS
Detach and return
WARRANTY REGISTRATION
Please PRINT clearly and fill in all of the blanks.
TOOL SERIAL #_____________________________________________________________
TOOL TYPE________________________________________________________________
DATE YOU PURCHASED THIS TOOL______________________________
YOUR COMPANY___________________________________________________________
ADDRESS________________________________________________________________
CITY________________________________STATE______________ZIP CODE________
TELEPHONE NUMBER ( )____________________________________________
YOUR NAME_________________________
YOUR POSITION______________________
PURCHASED FROM_________________________________________________________
THEIR ADDRESS______________________________________________________
CITY, STATE, ZIP___________________________________________________
 Loading...