

Page 1
18-Volt Battery Powered
Equalizer
Users Guide & Exploded View
ECT113 • ECT115 • EFT116 • EFT117
READ THIS FIRST! Keep sheaths clean on the inside! To prevent extensive tool damage, do not allow sheath to hit
blade mount! Set the blade to the proper depth, and do not hit the pinchweld on the outside of the vehicle! Cut wide
urethane in 3/4” stages! Grease main drive gear every 3 months, using high heat grease!
© 2004 Equalizer Industries, Inc.
ECT113_ECT115_Fre_User_Guide Rev 5/1/04
® Freedom
Page 2
Removing Auto Gass With Your Equalizer
Description
The Equalizer® Freedom is an interior auto
glass cut out knife. They are designed to
cut the urethane bonding which holds most
modern auto glass in cars. The .020” thick
blade reciprocates inside a metal sheath.
This sheath protects the dash and garnish
mouldings and regulates the depth at which
the blade cuts. The blade is exposed only
1/2 inch to 1-1/2 inches on the end, depending on how you adjust the blade. The blade
length is adjustable because different cars
have different widths of urethane bonding.
Patented Worldwide
The Blade
The blade is made of mild steel so it will not
shatter. If it bends, use a pair of pliers and
straighten it. To sharpen the blade simply
grind the edge on a bench grinder, belt sander,
or use a file or honing stone. You do not have
to remove the blade to sharpen it. Be sure
to disconnect electric tools from the power
source, disconnect air tools from air pressure
and remove the battery from cordless tools.
WARNING!
Our blade material is a special made material. It has rounded edges so it will not bind
in the sheath. It has the correct Rockwell
hardness so it will not buckle inside the
sheath. The use of any material other than
our blades will cause damage to the sheath
and drive unit and will void your warranty.
Blade Replacement
A hex screw holds the
blade in place. Loosen
the screw and pull the
blade out of the sheath.
Insert a new blade and
tighten the screw tightly
against the blade. The
blade retaining screw is
accessible through the side of the base on all
Equalizer® tools.
Caution
When you are changing the blade and sheath
at the same time, be sure to put the sheath in
and tighten it first, then install the blade. If you
install and tighten the blade first, the sheath can
bind against it and damage the tool.
Urethane
Blade Appearance From Inside
Looking Out
Put The Blade In
Correctly
Look at how the
blade is installed
when you receive
your Equalizer®
Freedom and always
Side View
put it in the same
way. The flat side
rides against the
glass. This method
of installing the blade is important because
the unique way the blade is sharpened
makes it hug the glass and cut the urethane
where it is easier to cut. The only exception
to the above is when the glass is encapsulated or has mouldings bonded to the glass.
If you are trying to take an encapsulated
glass out without breaking it, turn the blade
around so the flat side will hug the pinchweld. If you do not do this the blade may cut
into the plastic and damage the moulding.
Sheath Up For
Longer Blade
Sheath Down For
Shorter Blade
Adjusting Blade Length
To adjust the length the blade comes out
of the sheath, loosen the sheath retainer
screws 1/2 turn and pull the sheath down.
Pulling the sheath down in the clamp
decreases the length the blade comes out
of the sheath. Putting the sheath higher in
the sheath clamp increases the length the
blade comes out. Always use the correct
size blade for the correct sheath (example:
4-inch blade in 4-inch sheath, 8-inch blade
in 8-inch sheath). Never adjust the blade
length with the tool plugged in or running.
2
®
Freedom
Patented Worldwide
The Sheath
The sheath is a unique patented idea that
makes Equalizer® tools work. The sheath is
a protective sleeve that surrounds the blade
so the blade will not damage the dash or
garnish mouldings. The sheath is designed
to help you regulate the length of the
blade. This is important to keep the blade
from hitting the pinchweld on the outside.
Sheaths are available in 4-inch, 8-inch and
12-inch sizes. The 4 inch is most commonly used around quarter glasses where
there is not much vertical height. The 8
inch is the most commonly used size when
removing windshields or back glasses. The
12 inch is useful when reaching far below
the dash on vehicles where the windshield
extends below the hood.
Changing The Sheath
The sheath is held in
place by four hex head
screws. To change
the sheath, loosen the
screws and pull the
sheath out of the sheath
clamp. Insert the new
sheath and tighten
the screws. Use care not to overtighten the
screws and crush the sheath. Crushing the
sheath can cause the blade to bind and damage the drive unit.
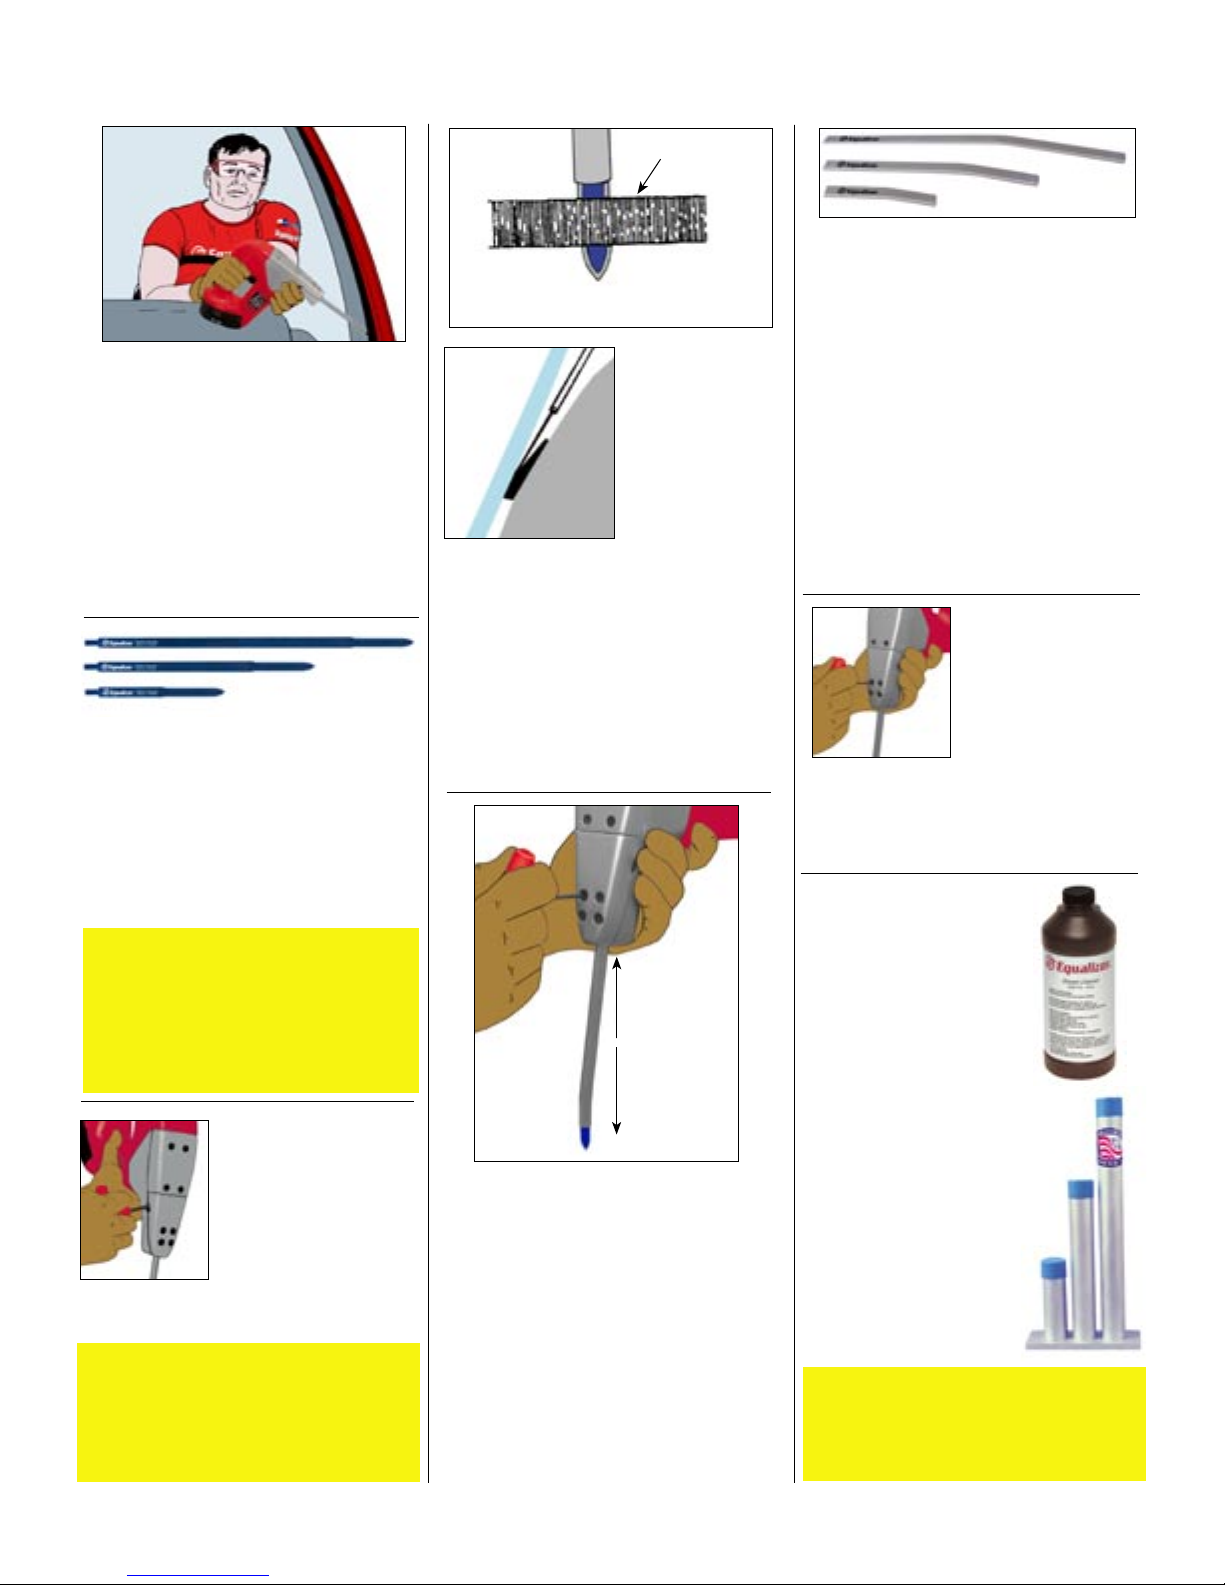
Sheath Maintenance
If urethane or butyl is
pulled up into the sheath it
can be cleaned by removing the sheath and soaking
it in a solvent. We recommend using Equalizer
®
Sheath Cleaner SCS775.
Avoid the use of harsh
cleaners such as lacquer
thinner or similar “hot”
cleaners. We also recommend our Sheath Cleaning
Container ESC780. Its
unique design keeps you
from wasting cleaner,
stores the sheaths in a
sealed container, and holds
the sheath in an upright
position so the urethane
or butyl will drain out the
bottom of the sheath.
Caution
Keep the sheath clean inside! Failure to do
so can put excess strain on the drive unit and
damage it. We will not warranty tools damaged in this way!
Page 3

Removing Auto Gass With Your Equalizer
®
Freedom
Plunge Cuts & Cutting
Start the Equalizer
®
Freedom with the blade
a short distance from the urethane. Then,
with the tool running at full speed, push
the blade into the urethane. This is called
a plunge cut. Grip the tool firmly and do
not allow it to kick back. Plunge cutting
works better with the tool running at full
speed. Plunge cutting is possible because
the blade is sharp around the end. After the
plunge cut you can cut in either direction
because the blade is sharp on both sides.
Glass
Right
Dash
Glass
Wrong
Dash
Proper Tool Use
The sheath is curved so the drive unit
can be held away from the glass. This
curvature keeps the blade from bending as it comes out of the sheath. Not
holding the Equalizer
®
Freedom so
the blade goes straight in and out can
cause excessive friction, overheating
the blade and causing it to break. This
is extremely important on all blades,
but more important on serrated blades.
Holding the tool incorrectly can break
serrated blades.
Use Cutting Lubricant
The use of Equalizer® Cutting Lubricant
ECL784 will improve the cutting action and
reduce drag on the Equalizer® blade. It will
also keep the blade and sheath from getting
hot. Cutting lubricant will greatly reduce the
amount of urethane and butyl that is pulled up
into the sheath.
Warning
Cutting lubricant contains soap and certain
solutions that could contaminate urethane. Do
not use cutting lubricant if you do not intend to
remove the old urethane. Cured urethane can
contain air bubbles that will allow cutting lubricant to flow inside urethane and contaminate it.
If you intend to “short cut” then do not use cutting lubricant. Use clean uncontaminated water.
Remove & Replace Windshields,
Side Glasses & Back Glasses
Remove and replace windshields without breaking them. Because of the thin
blade (it is actually .002” thinner than
a normal piece of cut-out wire) you can
use your Equalizer® Freedom to remove
auto glass without breaking it. Keep
the blade moving and use Equalizer®
Cutting Lubricant. Use a utility knife
to cut down to the pinchweld, on the
outside, taking care not to let the knife
cut into the paint. Use your Equalizer®
Freedom to cut the glass loose from
the urethane. On bonded encapsulated
parts, turn the blade over so the flat side
is against the pinchweld. If the blade is
not turned over it can cut into the plastic encapsulation and damage it.
3
Right Hand
Use
Right Or Left Hand Use
All Equalizer® tools can be set up for right
or left hand use. The Equalizer® line of
tools are shipped set up for right hand use.
To convert them to left hand use, take the
blade and sheath out and turn them in the
opposite direction. Be sure they are both
reinstalled properly, so the flat side of the
blade rides up against the glass.
General Safety Information
1.
Always wear safety glasses and safety
gloves when using Equalizer
2. Do not activate Equalizer
are in the cutting position. Disengage
the tool and let it stop before taking it out
of the urethane.
3.
The blade is sharp and can cut even
when the tool is not running.
4.
Do not force the tool. Put light for ward pressure on the tool. Let it do
the work.
5.
Consider your work environment. Do
not use or expose power tools to rain
or damp weather.
6. Disconnect the battery from cordless
tools before servicing and when chang ing accessories.
7.
Stay Alert!! Watch what you are doing.
Use common sense.
Left Hand
Use
®
®
tools until they
tools.
Important information about
your Equalizer
Voltage
Battery
Strokes Per Minute
®
Freedom
DW9096XR+
18 volts
0-4,000
Page 4

Important Instructions For Your Equalizer® Freedom
Battery & Charger
Tune-Up Procedure
At the end of every two weeks, completely discharge your
battery. Batteries can develop a memory which will shorten
the working time they can be used. The tune-up procedure will
Equalizer® Freedom
Battery Use and Care
Take care when loading the battery into the tool. Do NOT
slam the battery into the Equalizer® Freedom. Gently press
the battery into place. Depending on cutting conditions and
operator skill, a fully charged battery should remove about
three windshields.
The batteries are the most sensitive part of the Equalizer®
Freedom. Please, carefully read these detailed instructions
about proper battery charging and care.
Fig. 1
Fig. 2
DW9116 Charger
The DW9116 battery charger is designed to use standard household
120 volt AC 60 Hz power. The use of other power sources like, but
not limited to, those that convert DC to AC is not recommended and
will destroy the internal circuitry of the DW9116 charger. If you do
not use standard household 120 volt AC, 60 Hz power then only
use a true sine wave inverter.
DW9109 Charger
The DW9109 battery charger is designed to plug into the cigarette
lighter or power point of a vehicle and use 12 volt DC power. Do not
use AC power. The use of any other power source, such as a device
to convert AC to DC power, is not recommended and may cause
serious damage to the circuitry of the DW-9109 charger.
Charging Procedure
1. Plug the charger into an appropriate power outlet.
2. Insert the battery pack into the charger, as shown in Fig. 1 and
Fig. 2, making sure the pack is fully seated in the charger. The red
(charging) light will blink continuously indicating that the charging
process has started.
3. The battery pack will be fully charged in about 1 hour. The
completion of charge will be indicated by the red light remaining ON continuously. The pack is fully charged and may be used at
this time or left in the charger.
eliminate the memory build-up.
1. Hold or tie down the trigger & let the tool run until it stops.
2. Wait 20 minutes then repeat (tool will only run a short time
the second time).
3. Allow the battery to cool completely, then recharge.
Important Safety Instructions About the
Battery and Chargers
Warning: When using the Equalizer® Freedom there are
basic safety precautions that should be followed to reduce
risk of fire, electric shock and personal injury, including the
following:
• Do not incinerate the battery pack even if it is severely dam-
aged or is completely worn out. The battery pack can explode
in a fire.
• A small leakage of liquid from the battery pack cells may
occur under extreme usage or temperature conditions. This
does not indicate a failure. However, if the outer seal is broken
and this leakage gets on your skin--
A. Wash quickly with soap and water.
B. Neutralize with mild acid such as lemon juice or vinegar.
C. If battery liquid gets into your eyes, flush them with
clean water for a minimum of 10 minutes and seek
immediate medical attention.
(Medical Note: The liquid is a 25%-30% solution of potassium
hydroxide.)
• Never attempt to open the battery pack for any reason. If the
plastic housing of the battery pack breaks or cracks, immediately discontinue use and do not recharge.
• Do not carry extra, charged battery packs in aprons, pock-
ets, or tool boxes along with other metal objects. Battery pack
could be short circuited, causing damage to the battery pack
and possibly causing severe burn or fire.
Battery (DeWalt DW9096XR+)
Read this very carefully! There are sev-
eral off-the-shelf batteries that will fit the
Equalizer® Freedom. This toolʼs battery is
a DeWalt DW9096XR+ and it feeds electricity to the motor and runs it backwards
so it will stop quickly. Other batteries
will feed too much electricity into the switch and can cause
the drive mechanism to unwind. Some do not send enough
and can cause the switch to be destroyed. The threads are
clockwise and when too much counterclockwise force is applied
the threads can unscrew, freeze the tool and cause permanent
damage. Use only DeWalt DW9096XR+ batteries.
4
Page 5

Models ECT113, ECT115,
EFT116, EFT117
I-1802
3159
4151*
I-1812
*Previously 3158
I-1804
4200
4200A
**Previously 3157
3153
I-1822
3151
3156
I-1807
3154
I-3058
I-1001
(3154)
I-2109**
***Combines Previous I-1000, I-1801, I-1806, 3150
DW9096XR
Part No. Description Required
DW9096XR 18 volt battery 1
I-1001 Fixed-position trigger 1
I-1802 Cover plate 1
I-1804 Gasket 1
I-1807 Housing (includes both sides) 1
I-1812 Sheath holder 1
I-1822 Plunger holding assembly 1
3160
***
I-2109 Wiring harness 2
I-3058 Bearing 1
3151 Plunger assembly (includes screws) 1
3152
3152 Motor attaching screws 4
3153 Housing & cover plate screw 1
3154 Housing locking screws 2
3156 Plastic retaining screw 7
3159 Cover plate screws 4
3160 Drive motor assembly (includes
motor, gear drive assembly,
grommet, gear-to-motor screws)
4151 Sheath holder screws 4
I-1807
4200 Blade retaining screw 1
4200A Blade mount retaining screws 4
Detach and return
www.equalizer.com
Page 6

WARRANTY
The Equalizer® Freedom is warrantied for one year. These tools are warrantied to be free of FACTORY DEFECTS.
Warranty does not apply to abuse, misuse, or normal wear and tear. Note! The Freedom battery DW9096XR can
wear out after 1200 charges. This is not a factory defect. We will repair or replace, at our option, any defective part.
Tools are repaired and sent back the same day they are received.
If you feel your tool is covered under warranty, the entire tool, including any sheaths, blades, cases, straps, batteries and chargers, must be returned to:
EQUALIZER INDUSTRIES, INC.
1304 WEST INDUSTRIAL BOULEVARD
ROUND ROCK, TEXAS 78681
If you want a tool repaired but are not seeking to have it repaired under warranty, it is not necessary to include
blades and sheaths.
Equalizer Industries, Inc., reserves the right to refuse to repair, at our expense, any tool which has not been properly maintained as specified in the Users Guide. Particularly important are the following:
1. Keep the inside of the sheaths clean. We recommend using Equalizer® Sheath Cleaner.
2. Use only Equalizer® Blades.
3. Set the blade to the proper depth to prevent it from hitting the pinchweld.
If you have any questions about your tool, call us toll free at 1-800-334-1334 or fax us at (512) 388-4188.
TOOL SERIAL #
Detach and return
WARRANTY REGISTRATION
Please PRINT clearly and fill in all of the blanks.
TOOL SERIAL #_____________________________________________________________
TOOL TYPE________________________________________________________________
DATE YOU PURCHASED THIS TOOL______________________________
YOUR COMPANY___________________________________________________________
ADDRESS________________________________________________________________
CITY________________________________STATE______________ZIP CODE________
TELEPHONE NUMBER ( )____________________________________________
YOUR NAME_________________________
YOUR POSITION______________________
PURCHASED FROM_________________________________________________________
THEIR ADDRESS______________________________________________________
CITY, STATE, ZIP___________________________________________________
 Loading...