

Epygi QX50, QX2000, QX200 Administrator's Manual
Manual II: Administrator’s Guide
Edition 2, October 2014
SW Release 6.0.1 and higher

QX50/QX200/QX2000 Manual II: Administrator’s Guide
Notice to Users
This document, in whole or in part, may not be reproduced, translated or reduced to any machine-readable for m without prior written approval.
Epygi provides no warranty with regard to this document or other information contained herein and hereby expressly disclaims any implied warranties of
merchantability or fitness for any particular purpose in regard to this document or such information. In no event shall Epygi be liable for any incidental,
consequential or special damages, whether based on tort, contract or otherwise, arising out of or in connection with this document or other information
contained herein or the use thereof.
Copyright and Trademarks
Copyright © 2003-2014 Epygi Technologies, LTD. All Rights Reserved. Quadro and QX are registered trademarks of Epygi Technologies, LTD. Microsoft,
Windows and the Windows logo are registered trademarks of Microsoft Corporation. All other trademarks and brand names ar e the property of their
respective proprietors.
Emergency 911 Calls
YOU EXPRESSLY ACKNOWLEDGE THAT EMERGENCY 911 CALLS MAY NOT FUNCTION WHEN USING QUADRO OR QX AND THAT EPYGI TECHNOLOGIES,
LTD. OR ANY AFFILIATES (AGENTS) SUBSIDIARIES, PARTNERS OR EMPLOYEES ARE NOT LIABLE FOR SUCH CALLS.
Limited Warranty
Epygi Technologies, LTD. (‘Epygi’) warrants to the original end-user purchaser every Quadro and QX to be free from physical defects in material and
workmanship under normal use for a period of one (1) year from the date of purchase (proof of purchase required) or two (2) years from the date of
purchase (proof of purchase required) for products purchased in the European Union (EU). If Epygi receives notice of such defects, Epygi will, at its
discretion, either repair or replace products that prove to be defective.
This warranty shall not apply to defects caused by (i) failure to follow Epygi’s installation, operation or maintenance instructions; (ii) external power
sources such as a power line, telephone line or connected equipment; (iii) products that have been serviced or modified by a party other than Epygi or an
authorized Epygi service center; (iv) products that have had their original manufacturer’s serial numbers altered, defaced or deleted; (v) damage due to
lightning, fire, flood or other acts of nature.
In no event shall Epygi’s liability exceed the price paid for the product from direct, indirect, special, incidental or consequential damages resulting from the
use of the product, its accompanying software or its documentation. Epygi offers no refunds for its products. Epygi makes no warranty or representation,
expressed, implied or statutory with respect to its products or the contents or use of this documentation and all accompanying software, and specifically
disclaims its quality, performance, merchantability or fitness for any particular purpose.
Return Policy
If the product proves to be defective during this warranty period, please contact the establishment where the unit was purchased. The Integrator will
provide guidance on how to return the unit in accordance with its established procedures. Epygi will provide the Return Merchandise Authorization
Number to your retailer.
Please provide a copy of your original proof of purchase. Upon receiving the defective unit, Epygi, or its service center, will use commercially reasonable
efforts to ship the repaired or a replacement unit within ten business days after receipt of the returned product. Actual delivery times may vary depending
on customer location. The Distributor is responsible for shipping and handling charges when shipping to Epygi.
European Limited Warranty
The European Limited Warranty is the same as the Limited Warranty above, except the warranty period is for two years from the date of purchase.
Extended Warranty
Extended Warranty Option
Epygi offers an extended warranty program available for purchase by end users. This option is available at the time of purchase, extending the users
original warranty for an additional three (3) years. Combined with the original warranty, the extended warranty would offer a total of five (5) y ears
protection for European end users and four (4) years protection for non-European end users.
Extended Warranty Statement
Epygi Technologies, LTD. extends its Limited Warranty for an additional period of thr ee (3) years from the date of the termination of the original Limited
Warranty period (proof of purchase required).
Epygi reserves the right to revise or update its products, pricing, software, or documentation without obligation to notify any individual or entity. Please
direct all inquiries to:
Epygi Technologies, LTD.
1400 Preston Road, Suite 300, Plano, Texas 75093
QX50/QX200/QX2000; (SW Version 6.0.x) 2

QX50/QX200/QX2000 Manual II: Administrator’s Guide
Administrative Council for Ter minal Attachments (ACTA) Custome r Information
This equipment complies with Part 68 of the FCC rules and the requirements adopted by the ACTA. Located on the equipment is a label that contains,
among other information, the ACTA registration number and ringer equivalence number (REN). If requested, this information must be provided to the
telephone company.
The REN is used to determine the quantity of devices which may be connected to the telephone line. Excessive REN’s on the telephone line may result in
the devices not ringing in response to an incoming call. I n most, but not all areas, the sum of the REN’s should not exceed five (5.0). To be certain of the
number of devices that may be connected to the line, as determined by the total REN’s contact the telephone company to determine the maximum REN for
the calling area.
This equipment cannot be used on the telephone company-provided coin service. Connection to Party Line Service is subject to State Tariffs.
If this equipment causes harm to the telephone network, the telephone company will notify you in advance that temporary discontinuance of service may
be required. If advance notice isn’t practical, the telephone company will notify the customer as soon as possible. Also, you will be advised of your right
the file a complaint with the FCC if you believe it is necessary.
The telephone company may make changes in its facilities, equipment, operations, or procedures that could affect the operation of the equipment. If this
happens, the telephone company will provide advance notice in order for you to make the necessary modifications in order to maintain uninterrupted
service.
If trouble is experienced with this equipment, please contact EPYGI TECHNOLOGIES, LTD.
If the trouble is causing harm to the telephone network, the telephone company may request you to remove the equipment from the network until the
problem is resolved.
Electrical Safety Advisory
To reduce the risk of damaging power surges, we recommend you install an AC surge arrestor in the AC outlet from which the Quadro or QX is powered.
Industry Canada Statement
This product meets the applicable Industry Canada technical specifications.
Safety Information
Before using the Quadro or QX, please review and ensure the following safety instructions are adhered to:
• To prevent fire or shock hazard, do not expose your Quadro or QX to rain or moisture.
• To avoid electrical shock, do not open the Quadro or QX. Refer servicing to qualified personnel only.
• Never install wiring during a lightning storm.
• Never install telephone jacks in wet locations unless the jack is specified for wet locations.
• Never touch uninsulated telephone wire or terminals unless the telephone line has been disconnected at the network interface.
• Use caution when installing or modifying cable or telephone lines.
• Avoid using your Quadro or QX during an electrical storm.
• Do not use your Quadro, QX or telephone to report a gas leak in the vicinity of the leak.
• An electrical outlet should be as close as possible to the unit and easily accessible.
Emergency Services
The use of VoIP telephony is made available through IP networks such as the Internet and is dependent upon a constant source of electricity, network
availability and proper operation of the equipment. If a power outage, network disruption or equipment failure occurs, the VoIP telephony service could
be disabled. User understands that in any of those events the Quadro or QX may not be able to support 911 emergency services, and further, such services
may only be available via the user's regular telephone line or mobile lines that are not connected to the Quadro or QX. User further acknowledges that any
interruption in the supply or delivery of electricity, network availability or equipment failure is beyond Epygi's control and Epygi shall have no
responsibility for losses arising from such interruption.
Music on Hold Copyright
The default Music on Hold on the Quadro or QX is a 22 second fragment from Chopin's Nocturne O p.9 #2 performed by Marina Var danyan and kindly
provided to Epygi Technologies, LTD. The recording is royalty free.
Complian ce with Laws
You may not use the Epygi Materials for any illegal purpose or in any manner that violates applicable domestic or foreign law. You are responsible for
compliance with all do mestic and foreign laws governing Voice over Internet Protocol (VoIP) calls.
QX50/QX200/QX2000; (SW Version 6.0.x) 3

QX50/QX200/QX2000 Manual II: Administrator’s Guide
Table of Contents
Manual I: see Installation Guide
Step-by-step guide to install and configure QX IP PBX basically.
Manual II: Administrator's Guide
About this Administrator's Guide ..................................................................................................................................................................................8
QX IP PBX’s Graphical Interface .....................................................................................................................................................................................9
Dashboard – Administrator’s Main Page ............................................................................................................................................................................................. 9
Administrator’s Menus .................................................................................................................................................................................................. 10
Setup Menu ....................................................................................................................................................................................................................... 10
Basic Setup ................................................................................................................................................................................................................................................. 11
System (LAN) – System Configuration Wizard ........................................................................................................................................................................................................... 11
Internet (WAN) - Internet Configuration Wizard ...................................................................................................................................................................................................... 12
Needed Bandwidth for IP Calls.................................................................................................................................................................................................................................... 14
Date and Time Settings......................................................................................................................................................................................................................................................... 15
System Mail Settings – Email (SMTP) ............................................................................................................................................................................................................................. 16
SMS Settings – Short Text Messaging ............................................................................................................................................................................................................................. 17
System Security ......................................................................................................................................................................................................................................... 18
Licensed Features..................................................................................................................................................................................................................................... 18
Feature Keys ............................................................................................................................................................................................................................................................................. 18
Free Trial Activation.............................................................................................................................................................................................................................................................. 19
Redundancy ............................................................................................................................................................................................................................................... 20
Language Pack ........................................................................................................................................................................................................................................... 20
Update Languages for IP Phones ...................................................................................................................................................................................................................................... 21
Extensions Menu ............................................................................................................................................................................................................. 22
Extensions Management......................................................................................................................................................................................................................... 23
Add Extension .......................................................................................................................................................................................................................................................................... 24
User Extension Settings ................................................................................................................................................................................................................................................. 25
Pickup Group Extension Settings ............................................................................................................................................................................................................................... 32
Call Park Extension Settings ......................................................................................................................................................................................................................................... 34
Paging Group Extension Settings ............................................................................................................................................................................................................................... 36
ACD Group Extension Settings .................................................................................................................................................................................................................................... 37
Recording Box Extension Settings ............................................................................................................................................................................................................................. 40
Recording Box .................................................................................................................................................................................................................................................................... 42
Attendant Extension Settings ...................................................................................................................................................................................................................................... 43
Extension Codecs .............................................................................................................................................................................................................................................................. 49
Call Park and Directed Call Park Service ................................................................................................................................................................................................................. 51
Barge In Service ................................................................................................................................................................................................................................................................ 51
Add Multiple Extensions ...................................................................................................................................................................................................................................................... 52
User Extensio n Bulk Import ............................................................................................................................................................................................................................................... 52
Conferences................................................................................................................................................................................................................................................ 53
Conferences Management ................................................................................................................................................................................................................................................... 54
Add Conference ....................................................................................................................................................................................................................................................................... 55
Email Default Settings........................................................................................................................................................................................................................................................... 55
Upload Un iversal Extension Recordings ............................................................................................................................................................................................ 55
Upload Universal Extension Recordings - Hold music ....................................................................................................................................................................................... 56
Extensions Directory ............................................................................................................................................................................................................................... 56
Receptionist Manage ment ..................................................................................................................................................................................................................... 57
ACD Management ..................................................................................................................................................................................................................................... 60
Authorized Phones Database ................................................................................................................................................................................................................ 64
Call Back Services ............................................................................................................................................................................................................................................................. 65
Interfaces Menu ............................................................................................................................................................................................................... 67
QX50/QX200/QX2000; (SW Version 6.0.x) 4

QX50/QX200/QX2000 Manual II: Administrator’s Guide
IP Lines ........................................................................................................................................................................................................................................................ 68
IP Line Settings ........................................................................................................................................................................................................................................................................ 69
Supported SIP P hones .......................................................................................................................................................................................................................................................... 69
Programmable Keys Configuration ................................................................................................................................................................................................................................. 70
IP Phone Templates ............................................................................................................................................................................................................................................................... 71
IP Phones Logo ........................................................................................................................................................................................................................................................................ 72
FXS Gateways ........................................................................................................................................................................................................................................................................... 73
FXS Lines ..................................................................................................................................................................................................................................................... 74
FXS (On-board) Line Settings ............................................................................................................................................................................................................................................ 74
Diagnostic Loopback ............................................................................................................................................................................................................................................................. 75
Hot Desking......................................................................................................................................................................................................................................................................... 75
FXO Settings ............................................................................................................................................................................................................................................... 76
E1/T1 Trunk Settings .............................................................................................................................................................................................................................. 77
Incoming Interdigit Service ................................................................................................................................................................................................................................................ 84
ISDN Trunk Settings ................................................................................................................................................................................................................................. 85
External PSTN Gateways......................................................................................................................................................................................................................... 89
Authorization Parameters................................................................................................................................................................................................................................................... 89
Telephony Menu .............................................................................................................................................................................................................. 90
VoIP Carrier Wizard ................................................................................................................................................................................................................................ 91
Call Routing Table .................................................................................................................................................................................................................................... 92
Call Routing ............................................................................................................................................................................................................................................................................... 99
Local AAA Table ................................................................................................................................................................................................................................................................... 100
Global Speed Dial Directory............................................................................................................................................................................................................................................. 100
Allowed Characters and Wildcards ........................................................................................................................................................................................................................ 101
Best Matching Algorithm ............................................................................................................................................................................................................................................ 102
Entering SIP Addresses Correctly ................................................................................................................................................................................................................................. 105
SIP Tunnel Settings ............................................................................................................................................................................................................................................................. 105
Class of Service ..................................................................................................................................................................................................................................................................... 106
Call Recording Settings .........................................................................................................................................................................................................................107
NAT Traversal Settings .........................................................................................................................................................................................................................109
General Settings ................................................................................................................................................................................................................................................................... 109
SIP Parameters ..................................................................................................................................................................................................................................................................... 109
RTP Parameters ................................................................................................................................................................................................................................................................... 109
STUN Parameters ................................................................................................................................................................................................................................................................ 110
NAT Exclusion ....................................................................................................................................................................................................................................................................... 110
RTP Settings .............................................................................................................................................................................................................................................111
SIP Settings ...............................................................................................................................................................................................................................................112
SIP Aliases .............................................................................................................................................................................................................................................................................. 113
TLS Certificates..................................................................................................................................................................................................................................................................... 113
Advanced Settings ..................................................................................................................................................................................................................................113
Voice Mail Co mmon Settings ........................................................................................................................................................................................................................................... 113
RTP Streaming Channels .................................................................................................................................................................................................................................................. 114
Gain Control ........................................................................................................................................................................................................................................................................... 114
3PCC Settings ........................................................................................................................................................................................................................................................................ 115
RADIUS Client Settings ...................................................................................................................................................................................................................................................... 115
Dial Timeout .......................................................................................................................................................................................................................................................................... 117
Call Quality Notification .................................................................................................................................................................................................................................................... 117
Firewall Menu ................................................................................................................................................................................................................118
Firewall .....................................................................................................................................................................................................................................................119
Firewall and NAT ................................................................................................................................................................................................................................................................. 119
Advanced Firewall Settings ............................................................................................................................................................................................................................................. 119
IDS Log ..................................................................................................................................................................................................................................................................................... 119
Filtering Rules .........................................................................................................................................................................................................................................120
View All Filtering Rules ..................................................................................................................................................................................................................................................... 120
Incoming Traffic/Port Forwarding............................................................................................................................................................................................................................... 121
Outgoing Traffic ................................................................................................................................................................................................................................................................... 121
Management Access ........................................................................................................................................................................................................................................................... 121
Call Control Access .............................................................................................................................................................................................................................................................. 121
QX50/QX200/QX2000; (SW Version 6.0.x) 5

QX50/QX200/QX2000 Manual II: Administrator’s Guide
SIP Access ............................................................................................................................................................................................................................................................................... 122
Blocked IPs ............................................................................................................................................................................................................................................................................. 122
Allowed IPs ............................................................................................................................................................................................................................................................................ 122
Custom Services ......................................................................................................................................................................................................................................123
Service Pool Configuration .............................................................................................................................................................................................................................................. 123
IP Groups ..................................................................................................................................................................................................................................................124
IP Pool Configuration ......................................................................................................................................................................................................................................................... 124
SIP IDS Settings .......................................................................................................................................................................................................................................126
Network Menu................................................................................................................................................................................................................127
IP Routing Configuration ......................................................................................................................................................................................................................128
IP Static Routes ..................................................................................................................................................................................................................................................................... 128
IP Policy Routes .................................................................................................................................................................................................................................................................... 128
PPTP/L2TP Routes ............................................................................................................................................................................................................................................................. 129
DHCP Settings ..........................................................................................................................................................................................................................................129
DHCP Server .......................................................................................................................................................................................................................................................................... 130
DHCP Advanced Settings .................................................................................................................................................................................................................................................. 131
DHCP Leases .......................................................................................................................................................................................................................................................................... 131
DHCP Settings for the VLAN Interface ......................................................................................................................................................................................................................... 132
DNS Settings .............................................................................................................................................................................................................................................132
DNS Server Settings ............................................................................................................................................................................................................................................................ 132
Dynamic DNS Settings ....................................................................................................................................................................................................................................................... 133
PPP/ PPTP Settings ................................................................................................................................................................................................................................134
Advanced PPP Settings ...................................................................................................................................................................................................................................................... 134
SNMP Settings ..........................................................................................................................................................................................................................................135
Global SNMP Settings ......................................................................................................................................................................................................................................................... 135
SNMP Trap Settings ............................................................................................................................................................................................................................................................ 136
VLAN Configuration ...............................................................................................................................................................................................................................136
VPN Configuration ..................................................................................................................................................................................................................................137
IPSec Configuration ............................................................................................................................................................................................................................................................ 137
PPTP/L2TP Configuration ............................................................................................................................................................................................................................................... 140
Status Menu ....................................................................................................................................................................................................................144
System Status ...........................................................................................................................................................................................................................................145
General Information ........................................................................................................................................................................................................................................................... 145
Network Status ..................................................................................................................................................................................................................................................................... 145
Lines Status ............................................................................................................................................................................................................................................................................ 145
Memory Status ...................................................................................................................................................................................................................................................................... 147
Hardware Status .................................................................................................................................................................................................................................................................. 147
SIP Registration Status ...................................................................................................................................................................................................................................................... 148
IP Lines Registration Status............................................................................................................................................................................................................................................. 148
License Status ....................................................................................................................................................................................................................................................................... 148
Events ........................................................................................................................................................................................................................................................149
System Events ....................................................................................................................................................................................................................................................................... 149
Event Settings ....................................................................................................................................................................................................................................................................... 149
Call History ...............................................................................................................................................................................................................................................150
Successful, Missed and Unsuccessful Calls ................................................................................................................................................................................................................ 150
Call History Settings ........................................................................................................................................................................................................................................................... 151
CDR Archive ........................................................................................................................................................................................................................................................................... 152
Archiving Settings ............................................................................................................................................................................................................................................................... 153
RTP Statistics......................................................................................................................................................................................................................................................................... 154
FAX Statistics ......................................................................................................................................................................................................................................................................... 155
Conference History ................................................................................................................................................................................................................................155
Conferences ........................................................................................................................................................................................................................................................................... 155
Successful Calls and Unsuccessful Outgoing Calls .................................................................................................................................................................................................. 156
CDR Settings .......................................................................................................................................................................................................................................................................... 156
LAN/WAN ..................................................................................................................................................................................................................................................157
LAN and WAN Interface Statistics................................................................................................................................................................................................................................. 157
Statistics ....................................................................................................................................................................................................................................................158
Network Transfer ................................................................................................................................................................................................................................................................ 158
QX50/QX200/QX2000; (SW Version 6.0.x) 6

QX50/QX200/QX2000 Manual II: Administrator’s Guide
PSTN Channel Usage........................................................................................................................................................................................................................................................... 159
Maintenance Menu .......................................................................................................................................................................................................160
Diagnostics ...............................................................................................................................................................................................................................................161
Security Diagnostics ........................................................................................................................................................................................................................................................... 161
Call Capture............................................................................................................................................................................................................................................................................ 161
Ping ........................................................................................................................................................................................................................................................................................... 162
Traceroute .............................................................................................................................................................................................................................................................................. 163
System Logs ..............................................................................................................................................................................................................................................163
System Logs Settings .......................................................................................................................................................................................................................................................... 163
Remote Logs Settings ......................................................................................................................................................................................................................................................... 164
Logs Archive .............................................................................................................................................................................................................................................164
User Rights Management......................................................................................................................................................................................................................165
Users ......................................................................................................................................................................................................................................................................................... 165
Roles ......................................................................................................................................................................................................................................................................................... 166
Backup/Restore ......................................................................................................................................................................................................................................166
Automatic Bac kup ............................................................................................................................................................................................................................................................... 167
Download Legible Configuration ................................................................................................................................................................................................................................... 167
Upload Legible Configuration ......................................................................................................................................................................................................................................... 168
Firmware Update....................................................................................................................................................................................................................................168
Upload Firmware ................................................................................................................................................................................................................................................................. 169
Get Firmware From Server .............................................................................................................................................................................................................................................. 170
Automatic Firmware Update........................................................................................................................................................................................................................................... 171
Reboot ...................................................................................................................................................................................................................................................................................... 171
Registration Form ............................................................................................................................................................................................................................................................... 172
Appendix: PBX Services for QX IP PBX’s Administrator .....................................................................................................................................173
Appendix: Conference Services for Moderators and Participants ..................................................................................................................174
Appendix: System Default Values .............................................................................................................................................................................176
Administrator Settings..........................................................................................................................................................................................................................176
Extension Settings ..................................................................................................................................................................................................................................182
Appendix: Moderator's Menus ..................................................................................................................................................................................184
Conference Moderator’s Main Page...................................................................................................................................................................................................184
Conference Progress ..............................................................................................................................................................................................................................185
Recorded Conferences ..........................................................................................................................................................................................................................186
Conference Settings ...............................................................................................................................................................................................................................187
General Settings ................................................................................................................................................................................................................................................................... 187
Recording Settings .............................................................................................................................................................................................................................................................. 188
Customization ....................................................................................................................................................................................................................................................................... 189
Participants ............................................................................................................................................................................................................................................................................ 190
New Participants Configuration .............................................................................................................................................................................................................................. 191
Handset Added Participants Configuration......................................................................................................................................................................................................... 192
Schedule .................................................................................................................................................................................................................................................................................. 192
Send Notification Mail........................................................................................................................................................................................................................................................ 193
Appendix: Software License Agreement .................................................................................................................................................................194
Manual III: see Extension User's Guide
Describes detailed the menus available for extension users and includes further all call codes at a glance.
QX50/QX200/QX2000; (SW Version 6.0.x) 7

QX50/QX200/QX2000 Manual II: Administrator’s Guide
About this Administrator's Guide
The QX IP PBX Manual is divided into three parts:
• Manual-I: Installation Guide gives step-by-step instructions to provision the QX IP PBX and configure the phone extensions with the Epygi SIP Server.
After successfully configuring the QX IP PBX, users will be able to make SIP phone calls to remote QX IP PBX devices, make local calls to the PSTN and
to access the Internet from devices connected to the LAN.
• Manual-II: Administrator's Guide explains all QX IP PBX management menus available for administrators only. It includes a list of all System Default
Values.
• Manual-III: Extension User's Guide explains all QX IP PBX management menus available for extension users. A list of all call codes can be found there,
too.
This guide contains many example screen illustrations. Since QX IP PBXs offer a wide variety of features and functionality, the example screens shown may
not appear exactly the same for your particular QX IP PBX as they appear in this manual. The example screens are for illustrative and explanatory
purposes, and should not be construed to represent your own unique environment.
QX IP PBX’s Graphical Interface describes to the QX IP PBX's graphical user interface and explains all recurrent buttons.
Administrator’s Menus explains the Administrator's management pages according to the menu structure shown on the main page of the QX IP PBX
management.
Appendix: PBX Services for QX IP PBX’s Administrator explains PBX features for administrator accessible from the handset.
Appendix: System Default Values lists all factory defaults.
Appendix: Moderator's Me nus explains all menus that can be accessed and configured by conference moderators. (Applicable if the Conference Server
and/or the Video Conferencing features are activated on the system.)
Appendix: Software License Agreement includes the contract for using QX IP PBX's hardware and software.
QX50/QX200/QX2000; (SW Version 6.0.x) 8

QX50/QX200/QX2000 Manual II: Administrator’s Guide
QX IP PBX’s Graphical Interface
Dashboard – Administrator’s Main Page
When the administrator logs in, the Epygi QX Management page is displayed with a table of active calls (including information about call peers, call
duration and start time) at the startup. The number of total active calls is displayed below the table.
The button Terminate next to each active call is used to terminate the corresponding call.
The Start Recording button next to each active call (except for calls to Auto Attendant) is used to manually start the recording of the corresponding call.
Once the call recording is started, the button changes to Stop now used to manually stop the call recording. The call recording can be restarted again if
needed.
The following main menus are available on Epygi QX50/QX200/QX2000: Setup, Extensions, Interfaces, Telephony, Firewall, Network, Status and
Maintenance. By clicking on menus the administrator may access the settings in each respective category and perform actions specific to each category.
The following menus may additionally occur when pressing to the PBX or Conference extensions:
• Your Extension (see Manual III: Extension User’s Guide)
• Conference
The Return link is used to return to the Epygi QX50/QX200/QX 2000 Management page.
Fig.II- 1: Ep ygi QX IP PBX Management page
The functional button Renew Wan IP Address appears on the administrator’s main QX IP PBX Management page if the QX IP PBX device acts as a DHCP
client. The Renew WAN IP Address button is used to obtain a new WAN IP address in case, e.g., the QX IP PBX moves to another network.
The button Pending Events will be displayed in the upper right corner of the Administrator’s Main Menu page. Clicking on the butto n will lead to the
Events page that can be also accessed from the
Language selection is available only when the custom Language Pack has been uploaded and it is used to enable custom language for QX GUI or returning
back to the default language - English.
The list of Users currently logged in is seen in the lower right corner of the Administrator's Main Menu. Information about IP address user accessed QX
IP PBX GUI from, the username user is logged in and the time until the next automatically logout is provided herein. The current versio n of the QX IP PBX's
firmware and of its boot loader is also available here. The idle session timeout is set to 20 minutes. If no action is performed during that time, user will be
automatically moved to the Login page and will be requested to lo gin again.
Log Out is used to close the session between the user PC and QX and to leave the QX Web Management or to enter the management with another login.
QX50/QX200/QX2000; (SW Version 6.0.x) 9
Status Menu.
QX50/QX200/QX2000 Manual II: Administrator’s Guide
Administrator’s Menus
Setup Menu
The Setup Menu consists of the following sections:
•
Basic Setup
−
For QX50/QX200 - System (LAN)
−
For QX2000 – System Configuration Wizard
−
For QX50/QX200 - Internet (WA N)
−
For QX2000 – Uplink Configuration Wizard
−
Date and Time
−
Email (SMTP)
−
Short Text Messaging (SMS)
•
System Security
•
Licensed Features
−
Feature Keys
−
Free Trial Activation
•
Redundancy
•
Language Pack
Fig.II- 2: Setup Menu page
QX50/QX200/QX2000; (SW Version 6.0.x) 10

QX50/QX200/QX2000 Manual II: Administrator’s Guide
DHCP Settings for the LAN are described in the chapters
It is strongly recommended to leave the
Fig.II- 3: System Configuration Wizard – Getting Started page
The
page contains the host name, IP
address and Subnet Mask information about the QX IP PBX
Fig.II- 4: System Configuration Wizard - System Configuration page
Basic Setup
System (LAN) – System Configuration Wizard
The System Configuration Wizard allows the administrator to define the QX IP PBX’s Local Area Network settings and to specify regional configuratio n
settings to make QX IP PBX operational in its LAN. The System Configuration Wizard MUST be run upon QX IP PBX's first startup to make sure that it
works properly in its network environment. The Wizard allows navigating through the following basic configuration parameters and settings:
• System Configuration (see below)
• DHCP Settings for the LAN Interface
• Regional Settings and Preferences (see below)
• Emergency Codes and PSTN Access Code Settings (see below)
below. The LAN configuration and regional settings will be
described later in this chapter.
Please Note:
factory default settings if their meanings are not fully
clear to the administrator.
System Configuration
LAN interface. These settings make QX IP PBX available to the
internal network.
The System Configuration page offers the following input
options:
Host Name requires a host name for the QX IP PBX device.
Domain Name requires the LAN side domain name which the
QX IP PBX belongs to.
IP Address requires the QX IP PBX host address for the LAN
interface.
Subnet Mask requires the QX IP PBX hosts’ Subnet Mask.
QX50/QX200/QX2000; (SW Version 6.0.x) 11
QX50/QX200/QX2000 Manual II: Administrator’s Guide
The
are used to select
will support Daylight
Fig.II- 5: System Configuration Wizard - Regional Settings page
The
and
are
used to configure the emergency dial plan.
Fig.II- 6: System Configuration Wizard - Emergency Codes and PSTN Access Code Settings page
Regional Settings and Preferences
settings specific to the location of the QX IP PBX. This is
important for the functionality of the voice subsystem.
The Regional Settings and Preferences page has two drop
down lists to select the Your Locale (location) and a
corresponding Timezone. QX IP PBX
Savings (DST) correction if it is available for the selected time
zone.
This page also has a manipulation radio button group to
choose:
• System Language – selection is available only when the
custom Language Pack has been uploaded and it is used
to enable custom language for system voice messages or
returning back to the default language English.
Emergency Codes
PSTN Access Code Settings
The Emergency Codes text field requires the PSTN numbers
of the emergency or lifeline services. Multiple emergency
codes, separated by commas, can be inserted in this field. For
each emergency code, a routing pattern will be generated in
the Call Routing Table, which will allow faster and easier calls
to emergency destinations.
The PSTN Access Code drop down list allows you to select the
prefix code for accessing the PSTN line in the routing mode.
Dialing the digits inserted in this text field will provide the
PSTN dial tone when dialed from the handset.
Internet (WAN) - Internet Configuration Wizard
The Internet Configuration Wizard (Uplink Configu ration Wizard in case of QX2000) allows the administrator to configure the WAN interface settings
and to adjust QX IP PBX’s connectivity with an external network. The Internet Configuration Wizard MUST be run for QX IP PBX to be connected to
the Internet.
QX50/QX200/QX2000; (SW Version 6.0.x) 12
QX50/QX200/QX2000 Manual II: Administrator’s Guide
All the settings of the
are
described in the chapters below except those for the IP
factory default settings if their meanings are not fully
Fig.II- 7: Internet Configuration Wizard – Getting Star ted page
For Protocols
(available only for QX50/QX200):
DNS Settings
For Protocols
(available only for QX50/QX200):
WAN Interface Configuration (see below)
DNS Settings
For Protocols
:
DNS Settings
page offers the following
•
•
•
Internet Configuration Wizard
settings, which will be described in this chapter.
Attention: It is strongly recommended not to change the
clear to an administrator.
The Wizard allows navigating through the following basic configuration parameters and settings:
• Uplink configuration (see below)
PPPoE
•
PPP/ PPTP Settings
WAN Interface Configuration (see below)
•
•
PPTP
• WAN IP Configuratio n (see below)
• PPP/ PPTP Settings
•
•
Ethernet
• WAN IP Configuration
• WAN Interface
Configuration (see below)
•
The Uplink Configuration page allows you to select the QX
IP PBX‘s WAN interface connection type and its bandwidth
settings. These settings will make QX IP PBX available to the
external network.
Depending on the Uplink Interface Protocol selection, the
page following the Uplink Configuration page is different.
Thus if PPPoE is selected, the next page will be PPP
Configuration, while selecting Ethernet will bring up the
WAN IP Configuration page.
The Uplink Configuration
compone nts:
The WAN Interface Protocol radio buttons are used to
choose the protocol depending on the requirements of the
ISP (Internet Service Provider):
PPPoE (available only for QX50/QX200) - turns on
the PPP over an Ethernet connection.
PPTP (available only for QX50/QX200) – turns on
the Point to Point Tunneling Protocol (PPTP)
interface used for the connection between QX IP
PBX and ADSL modem. A fixed IP address
configuration is needed in this case.
Ethernet - turns on the Ethernet connection
The WAN Interface Bandwidth settings allow the specification of the upstream and downstream speeds in kbit/s, helping to assure the quality of IP calls.
An IP call looses the voice quality if there is no available bandwidth. When approaching the limits of bandwidth capacity, another IP call will be declined.
The bandwidth provided by the ISP has to be specified in the text fields Upstream Speed and Downstream Speed. The default entry in both fields is
100000, the maximum bandwidth of a 100 Mb Ethernet. You may see the required bandwidth in the chapter
The Min Data Rate text field requires the amount of upstream bandwidth that ought to remain for data applications even if voice applications use the
entire available upstream bandwidth. The value selected here needs to be smaller than the upstream bandwidth and is measured in kbit/s.
Fig.II- 8: Internet Configuration Wizard - Uplink Configuration page
Needed Bandwidth for IP Calls.
QX50/QX200/QX2000; (SW Version 6.0.x) 13
QX50/QX200/QX2000 Manual II: Administrator’s Guide
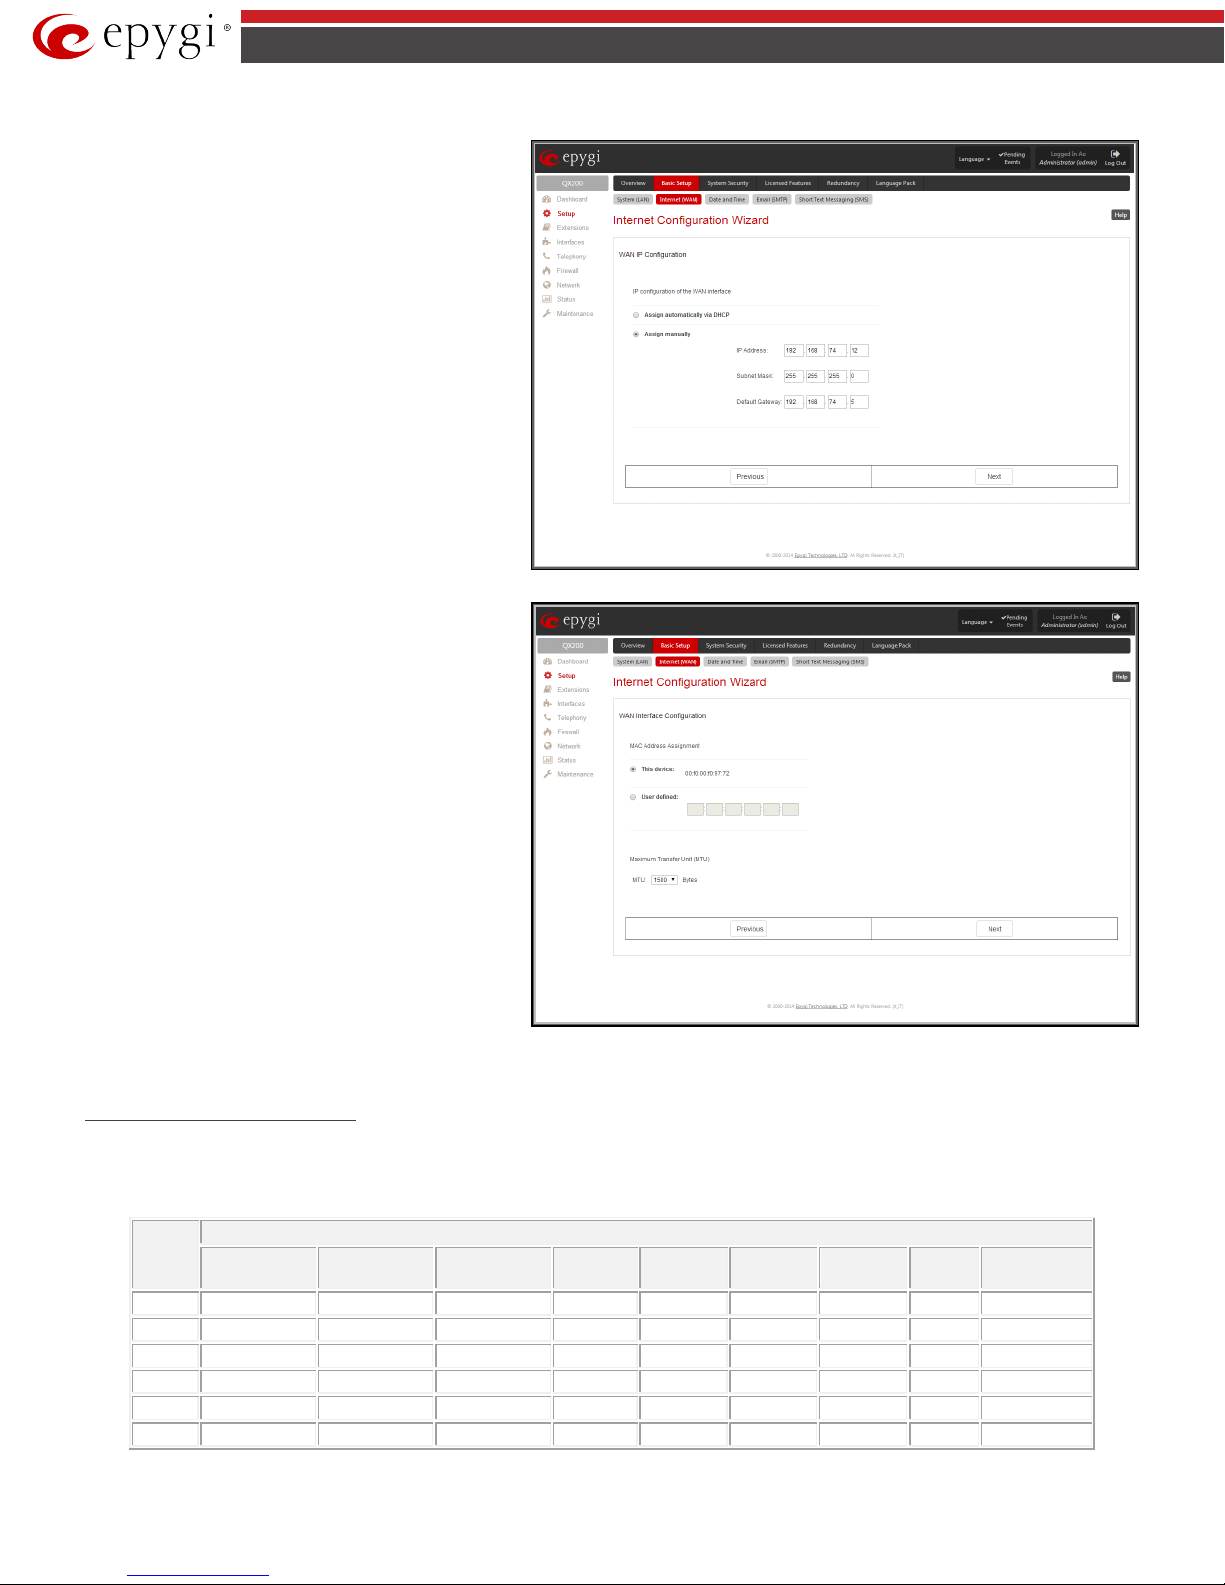
The
radio-button selection
switches to automatic retrieval of the WAN IP address from a
Fig.II- 9: Internet Configuration Wizard - WAN IP Configuration page
The
page may be used to
modify the MAC address of the QX IP PBX. This might be
Fig.II- 10: Internet Configuration Wizard – WAN Interface Configuration page
Packet
Needed bandwidth in kbit/s using the Codecs:
G.711u/G.711
10
105
58
66
74
82
50 - 105
74
20
84
37
45
53
61
29 - 84
53
30
76
30
38
45
53
22
27
76
45
40
74
27
34
42
50
19 - 74
42
50
71
25
32
40
48
17 - 71
40
60
67
22
30
37
45
15
20
67
37
The WAN IP Configuration page is only displayed if Ethernet or PPTP has been selected to be the uplink protocol. It offers the following components:
Assign automatically via DHCP
DHCP server at the ISP/uplink.
Please Note: DHCP referred to here is the one that runs on
the provider’s side and not the QX IP PBX’s personal DHCP
server.
The Assign Manually radio-button switches to the manual
adjustment of IP settings. This selection requests the
following parameters:
IP Address requires the IP address for the QX IP PBX WAN
interface.
Subnet Mask requires the subnet mask for the QX IP PBX
device WAN interface.
Default Gateway requires the IP address of the router where
all packets are to be sent to, for example, to the router of the
provider.
WAN Interface Configuration
necessary if the ISP (Internet Service Provider) requires a
specified MAC address, for example, for authentication. This
page offers the following components:
MAC Address Assignment manipulation radio-buttons:
• This Device turns to the default MAC address of the QX
IP PBX.
• User Defined requires user defined MAC Address.
The MTU drop down list allows you to select the maximum
packet size on the Ethernet (in bytes). MTU is used to
fragment the packets before transmitting them to the
network. The MTU preferred value is dependent on the
Ethernet connection. The default MTU size is 1500 Bytes for
Ethernet and 1400 Bytes for PPPoE.
Needed Bandwidth for IP Calls
The bandwidth required by an IP call depends on the codecs used and these specifications are listed in the tables below:
Required Bandwidth for Standard Packets:
Size in
msec.
QX50/QX200/QX2000; (SW Version 6.0.x) 14
a
G.726-16
G.726-24 G.726-32 G.726-40 G.729a iLBC-13.33 G.722
G.722.1
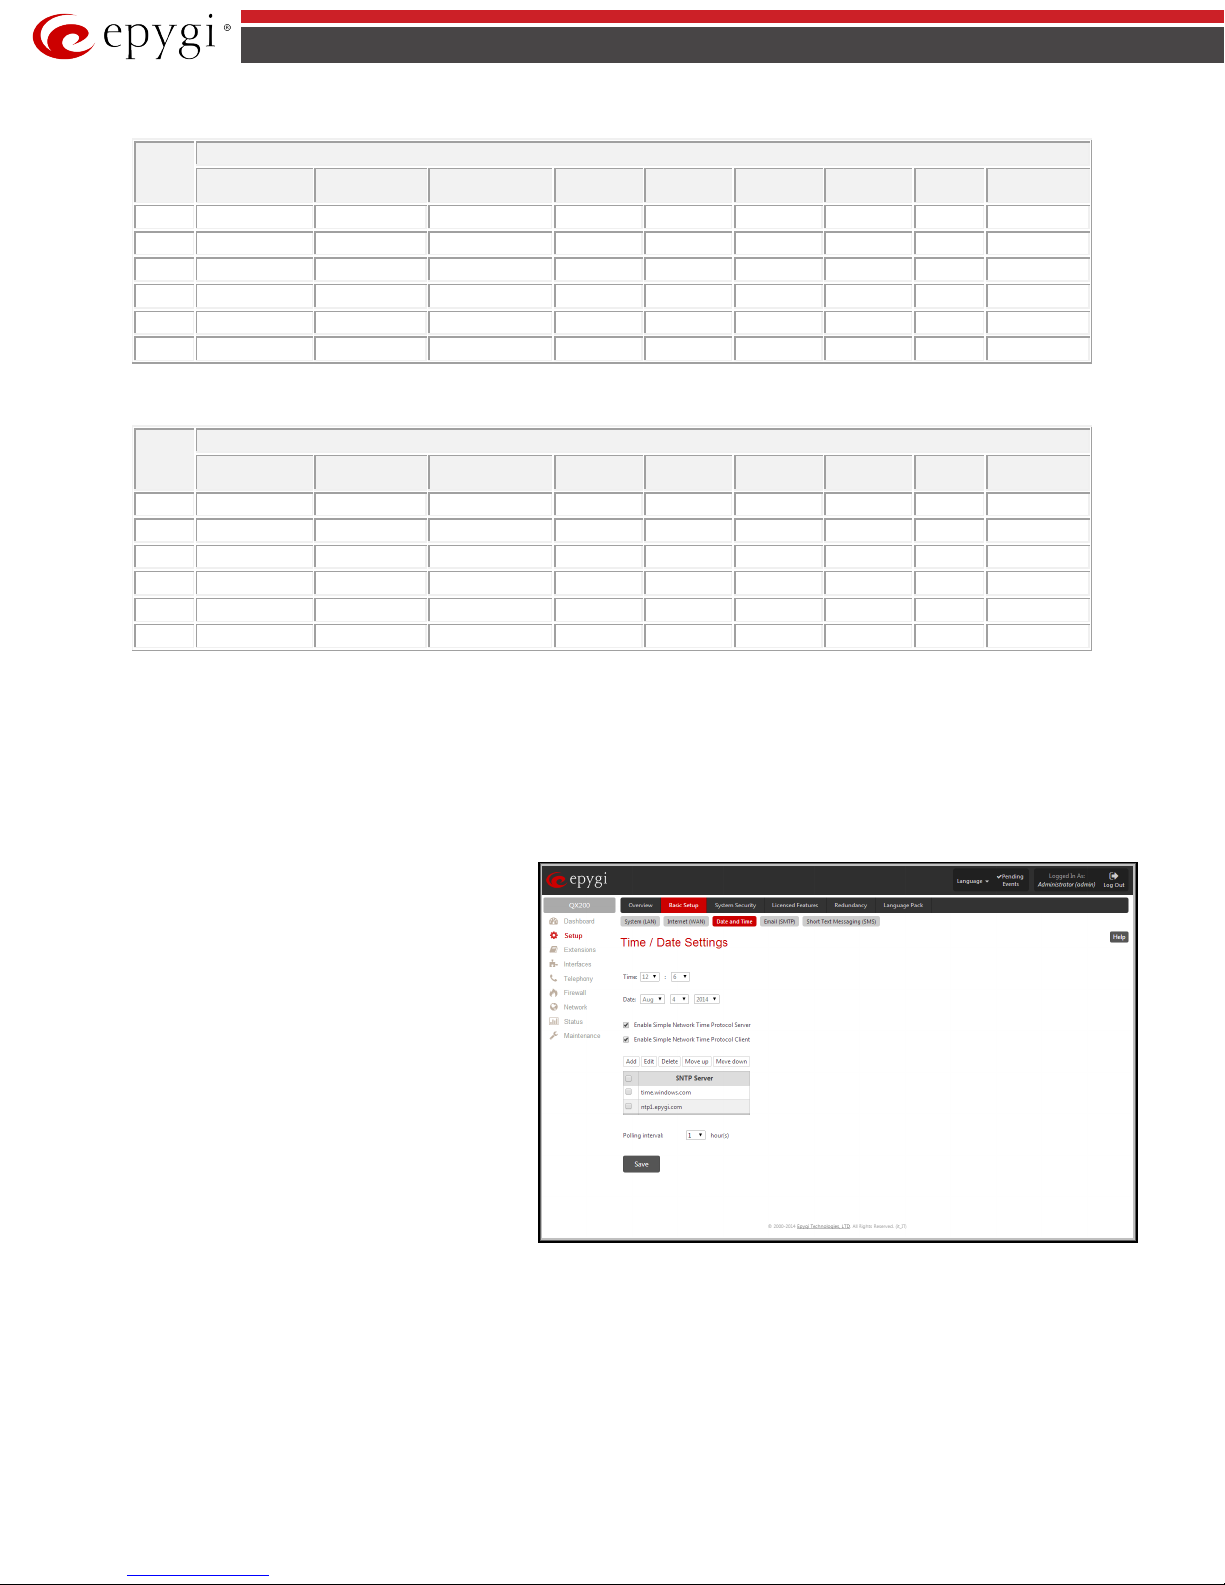
QX50/QX200/QX2000 Manual II: Administrator’s Guide
Packet
Needed bandwidth in kbit/s using the Codecs:
10
114
66
74
82
90
58 - 114
82
20
89
41
49
57
65
33 - 89
57
30
81
33
41
49
57
26
31
81
49
40
76
28
36
44
52
20 - 76
44
50
74
26
34
42
50
18 - 74
42
60
72
24
32
40
48
16
22
72
40
msec.
10
148
98
105
118
124
92 - 148
118
20
105
59
65
74
81
49 - 105
74
30
90
43
52
60
66
35
41
90
60
40
85
38
45
53
61
30 - 85
53
50
80
34
41
48
56
26 - 80
48
60
74
29
37
45
52
22
26
74
45
enables the
SNTP (Simple Network Time Protocol) server on QX IP PBX,
FQDN (Full
Needed Bandwidth for Encrypted Packets when using a SRTP:
Size in
G.711u/G.711a G.726-16
msec.
Required Bandwidth for Encrypted Packets when a VPN is used:
Packet
Size in
G.711u/G.711a G.726-16
G.726-24
Needed bandwidth in kbit/s using the Codecs:
G.726-24
G.726-32 G.726-40 G.729a iLBC-13.33 G.722 G.722.1
G.726-32 G.726-40 G.729a iLBC-13.33 G.722 G.722.1
Date and Time Settings
The Date and Time page provides information about the current system time and date. The settings may be updated through the international time and
date servers.
Time is used to set the local time (hour, minute).
Date is used to set the date (month, day, year).
Enable Simple Network Time Protocol Server
thus QX IP PBX becomes the timeserver for its LAN.
Enable Simple Network Time Protocol Client enables the
SNTP client on the QX IP PBX, thus QX IP PBX becomes a client
to an external timeserver. A checkbox disables Date and Time
drop down lists and enables the following parameters:
The SNTP Servers table lists all defined NTP Servers.
The Add functio nal button opens an Add SNTP Server page
where a new NTP server can be defined. This page offers the
NTP Server radio butto ns that are used to choose between a
manual and a predefined NTP server.
Qualified Domain Name) or its IP address.
• Manual requires the NTP server’s
• Predefined is used to select the NTP server’s host
address from the drop down list, where the most
common NTP servers are listed.
Fig.II- 11: Date and Time Settings page
QX50/QX200/QX2000; (SW Version 6.0.x) 15
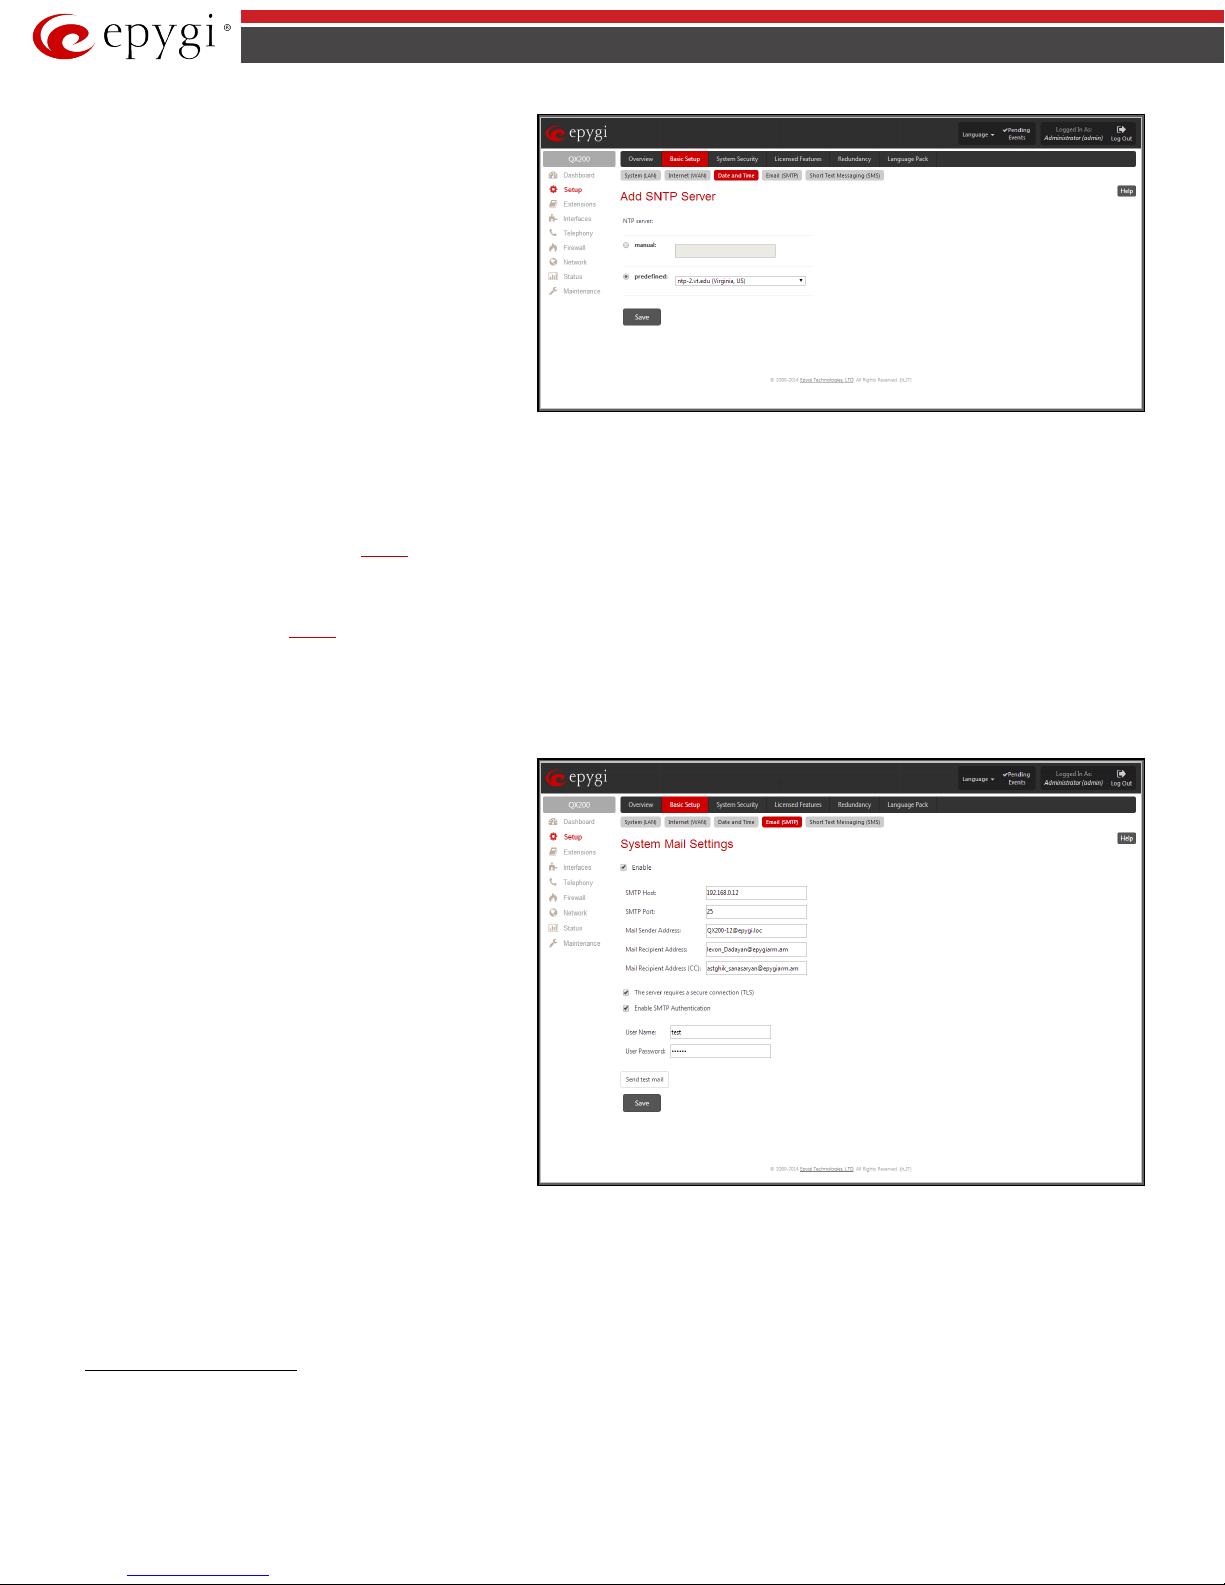
QX50/QX200/QX2000 Manual II: Administrator’s Guide
The
and
functional buttons are used to
Fig.II- 12: Add SNTP Server page
requires the SMTP host port number.
Fig.II- 13: Sys tem Mail Settings page
Move Up
Move Down
sort NTP servers in the order they need to be accessed. If the
NTP server in the first position of the SNTP Servers table does
not answer, NTP server in the next position will try to be
reached.
Please Note: You can add another NTP server to the list if the
defined NTP servers are not functional (for example, QX IP
PBX's date/time is not being updated automatically).
Polling Interval indicates the time interval for the periodical
synchronization between the timeserver and QX IP PBX. It
counts in hours.
Attention: Date and Time Settings will be reset if QX IP PBX has lost power.
System Mail Settings – Email (SMTP)
The Ema il (SMT P) page allows you to send warnings automatically about the board status or problems to the administrator. System events that require
email notification are selected on the
transmission to the extension user’s mailing account.
QX IP PBX may automatically generate emails to the administrator:
• If events specified in the
Events list occur
• If voice mails are set from the Voice Mail Settings (see Manual III: Extension User’s Guide) to be sent as e-mail
With the Enable checkbox system mail sending and voice messages transmission to the extension user's mailbox could be enabled.
SMTP Host requires the IP address or host name of the Simple Mail Transfer Protocol (SMTP) server. This SMTP server is part of your mail server that you
normally use to receive and send mails.
Events page. System mail must be enabled and the SMTP server needs to be configured for voice message
SMTP Port
Mail Sender Address text field requires the source address
for the QX IP PBX notification emails. The email address
defined here should be an existing valid email address
registered on the selected SMTP server or it should have
permission to use that particular SMTP server for e-mail
transmission.
Mail Recipient Address text field requires an active email
address where system emails will be delivered. The e-mail
recipient here can be a QX IP PBX administrator or someone
responsible for network and system problems.
Mail Recipient Address (CC) text field requires an active
email address where a carbon copy (CC) of the system e-mails
will be delivered.
The server requires a secure connection (TLS) must be
selected if the specified SMTP server requires secure
connection using TLS. If the specified SMTP server allows
using both secure and unsecure connections then this selection
forces to establish the secure connection.
Enable SMTP Authentication must be selected if the specified SMTP server requires authentication. In this case authentication User Name and User
Password configured on the SMTP server should be defined in the corresponding text fields.
Attention: The following symbols are not allowed for the Password field: '$', '(', ')','/', '`', '&', '\', '''.
With the button Send test mail a test mail can be sent to the defined email address to verify the settings. This button will be enabled if correct values have
been submitted and saved o n this page.
To configure the System Mail
1. Enable the system mail sending by the Enable checkbox selection.
2. Update or set the SMTP host in the SMTP Host text field.
3. Update or set the e-mail sender address in the Mail Sender Address text field.
4. Update or set the e-mail address in the Mail Recipient Address text field.
5. Enable the secure connection (TLS) if the specified SMTP server requires secure connection.
QX50/QX200/QX2000; (SW Version 6.0.x) 16
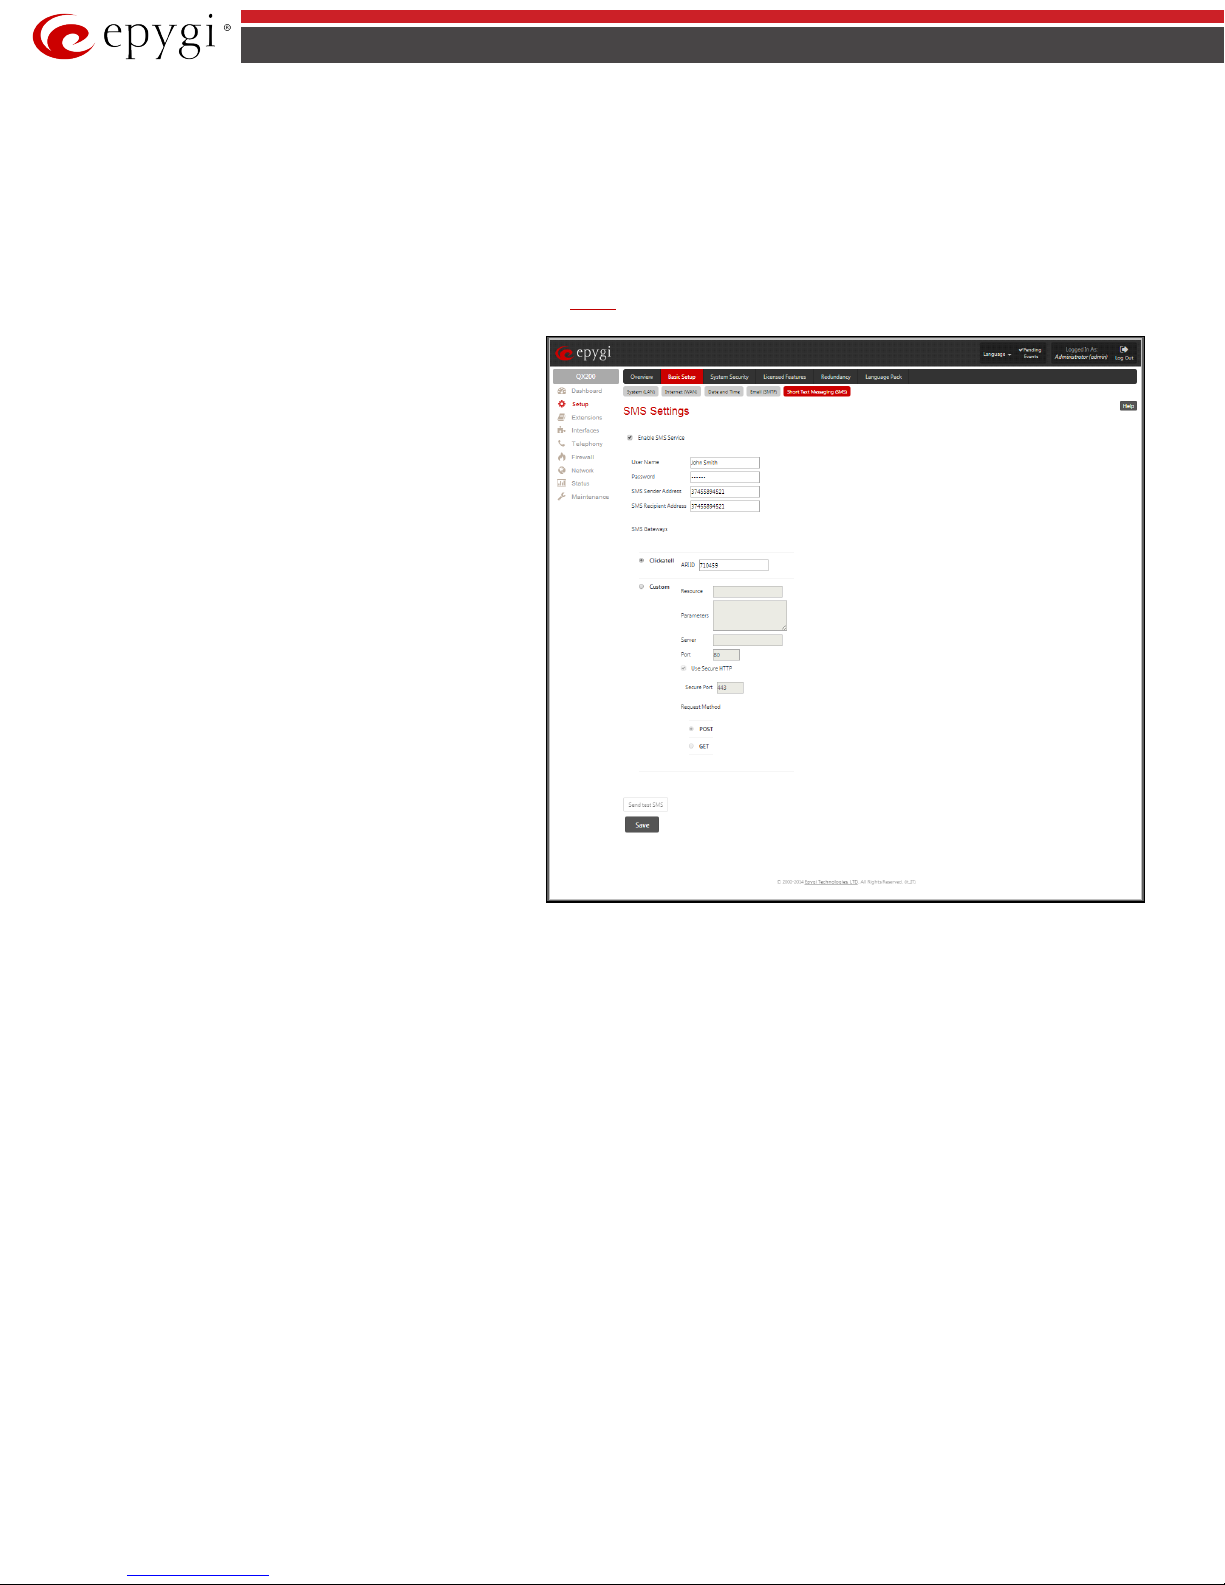
QX50/QX200/QX2000 Manual II: Administrator’s Guide
enables the SMS service on the QX IP PBX.
Fig.II- 14: SMS Set tings page
6. Enable SMTP Authentication if it is required on the server.
7. Insert into the corresponding text fields an authentication User Name and User Password defined by your SMTP server.
8. Press the Save button to submit these settings.
9. Use the Send Test Mail button to send a test e-mail with the configured settings.
SMS Settings – Short Text Messaging
The SMS Settings are used to configure the SMS parameters that will allow QX IP PBX to send the voice mail notificatio ns or event notifications via SMS to
the extension user’s mobile phone. Every extension user can enable voice mail notifications when a new voice mail is received and they can to define their
own mobile numbers from the Voice Mail Settings or to set the certain
notifications, the SMS service should be enabled and SMS settings should be configured from this page.
Enable SMS Service
User Name and Password text fields require the authentication
settings of the SMS server.
SMS Sender Address requires the source address for the QX IP
PBX notification SMS. The address defined in this field will be
seen in the “From” field of the SMS delivered to the mobile
phone.
SMS Recipient Address requires a destination mobile number
for a test SMS.
SMS Gateway manipulation radio buttons allow to select
between pre-defined Clickatell SMS gateway and the custom
defined SMS gateways.
Events notificatio n to be delivered per SMS. However, for QX IP PBX to deliver SMS
• Clickatell – this selection allows to use a pre-defined SMS gateway. Selection enables the A PI ID text field which indicates a Clicatell specific
parameter obtained from the server and should match on both sides.
• Custom – this selection allows to use a custom SMS gateway. Selection requires following parameters to be inserted:
Resource text field requires the HTTP resource name on the SMS gateway, for example: /http/sms.cgi.
Parameters text field requires the parameters to be submitted to the resource address. The value of this field represents a string with tokens
(separated by percent (%) symbols) inside. Each token indicates a value of the certain field on this page. The value is dependent on the SMS
gateway requirements. For example:
user=%username%&password=%password%&to=%to%&from=%fro m%&text=%text%
Send Test SMS is used to send a test SMS to the defined SMS Recipient Address. This button will be enabled if correct values have been submitted and
saved on this page.
QX50/QX200/QX2000; (SW Version 6.0.x) 17
The tokens are the strings that have the following dependencies from the field in this page:
%username% – indicates the username defined in the field Username
%password% – indicates the password defined in the field Password
%to% - indicates the password defined in the fiel d SMS Recipient Address
%from% - indicates the password defined in the field SMS Sender Address
%text% - indicates the SMS text generated by QX IP PBX (voice mail notification, event notification, etc.)
Server text field requires the IP address or the host name of the SMS gateway.
Port text field requires the port number of the SMS gateway.
Use Secure HTTP checkbox enables access to SMS server via HTTPS. Checkbox selection enables a Secure Port text field that requires the
port number for HTTPS traffic.
Request Method manipulation radio buttons allow to select the HTTP request method used by QX IP PBX the access the SMS gateway: POST
or GET.
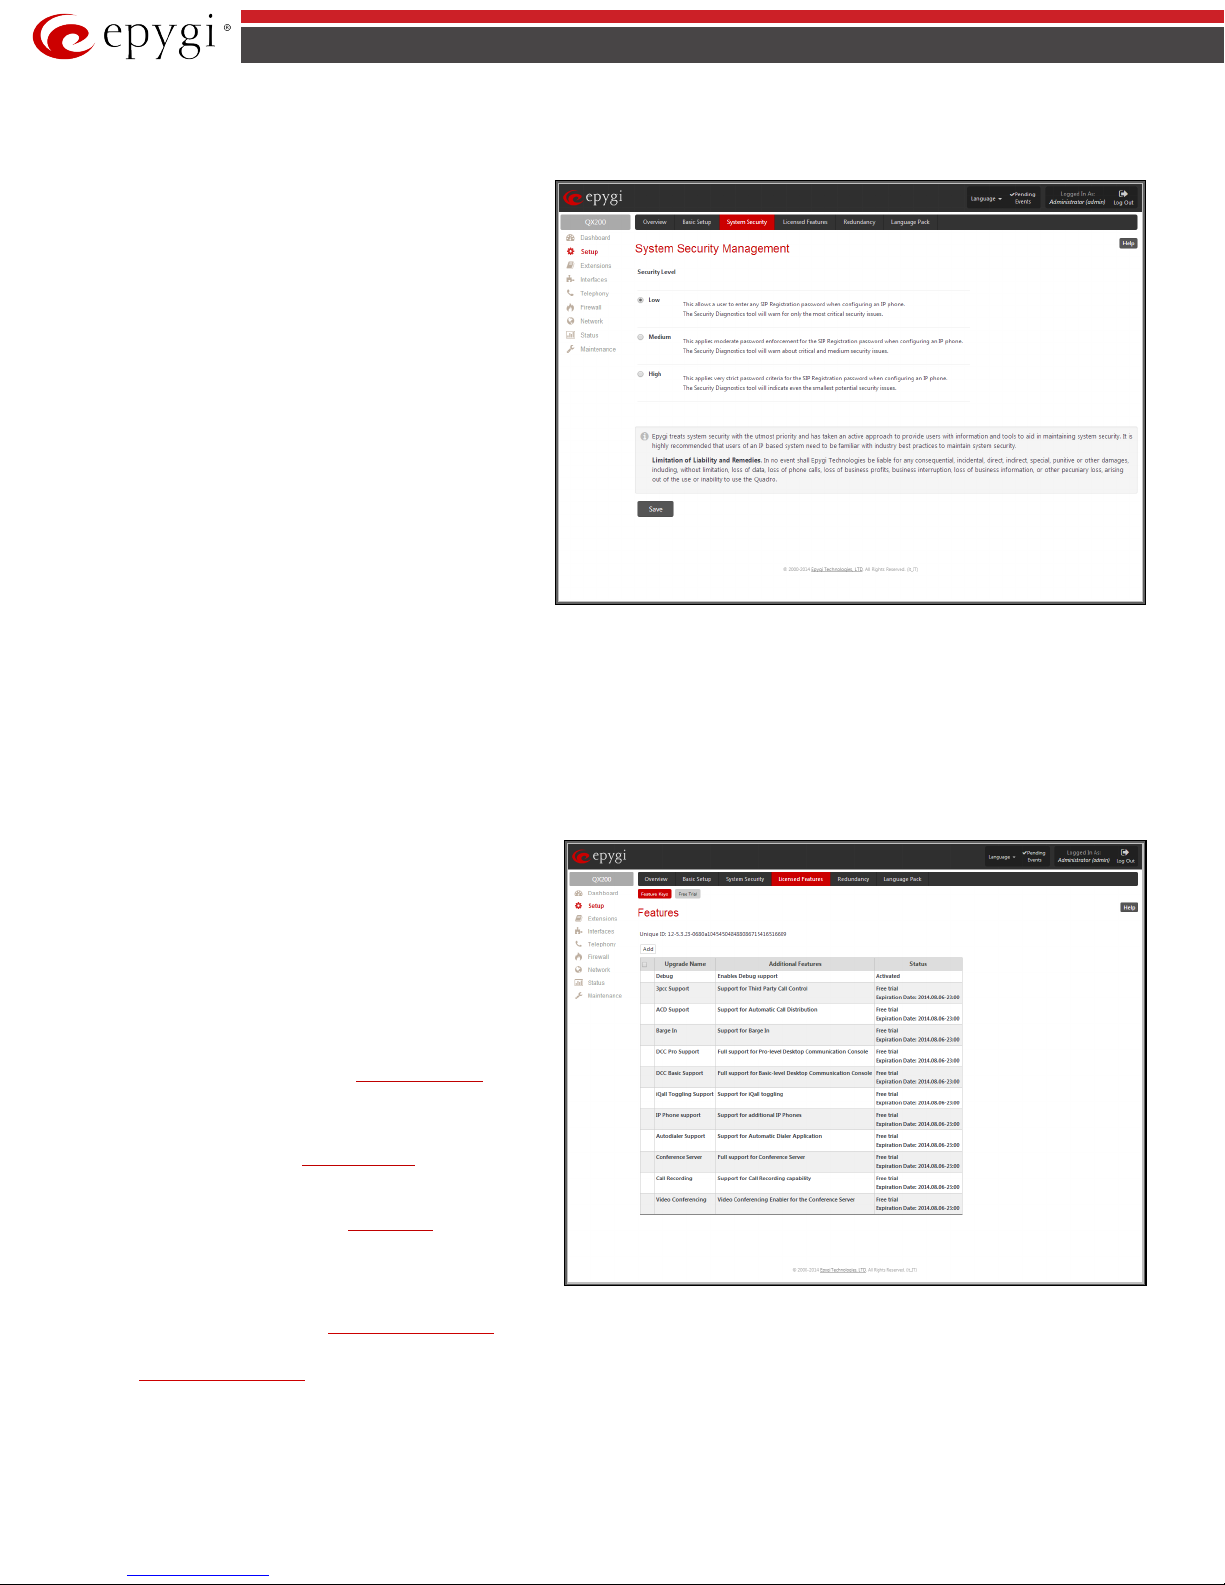
QX50/QX200/QX2000 Manual II: Administrator’s Guide
The
page includes the following
compone nts:
to lower than "High".
- the feature is currently not available.
level Desktop Communication Console (the application
description can be found at Epygi Technical Support).
System Security
The System Security Management offers a possibility of managing the global security levels.
System Security Management
The Security Level table - allows selecting the Security Level
defining requirements to the IP Lines' password strength and the
Security Report granularity. The security levels are as follows:
• Low - There are no specific restrictions on the strength of
the saved password. Only the critical warnings on the Call
Routing Rules to PSTN and IP-PSTN, disabled Firewall and
IDS will be generated in Security Report.
• Medium - The minimum strength of the IP Line passwords
should be "good". The Security Report will generate
warnings on all unsecured Call Routing rules, IP Line
passwords, Firewall level (if it is set to lower than
"Medium") and disabled IDS.
• High - The minimum strength of the IP Line passwords
should be "strong". The Security Report will generate
warnings on the IP Line passwords, disabled IDS,
unsecured SIP, and unsecured Routing Rules to SIP, PSTN
and IP-PSTN and also regarding the Firewall level if it is set
Fig.II- 15: System Security Managemen t page
Licensed Features
Feature Keys
This page lists all features that may be activated by a software key, characterized by a Feature Description and provided with its Status:
Following features may be activated via the software key:
• No Key Found
• Reboot Needed - the feature key has been entered and QX
IP PBX needs to be rebooted.
• Activated - the feature is now available on the QX IP PBX.
• Debug – enables SSH connection towards the QX IP PBX
for debugging purposes.
• 3pcc Support - enables Third Party Call Control feature on
the QX IP PBX. The feature allows the call controlling
applications running on a user PC to remotely initiate and
handle calls on the QX IP PBX and to subscribe for certain
event notifications from the QX IP PBX.
• ACD Support - enables the ACD Management feature
which provides contact center solution for queuing and
automatic distribution of the calls between contact center
agents.
• Barge In – enables the Barge In Service on the QX IP PBX.
The feature allows the PBX users to participate to the third
party's calls while remaining imperceptible.
• Redundancy – activates the Redundancy feature on the
QX2000. Redundancy feature is readily available for the
QX50/QX200 by default, without a software license key.
• DCC Pro Support - allows run with QX IP PBX the Pro-
Fig.II- 16: Features page
• DCC Basic Support - allows run with QX IP PBX the Basic-level Desktop Communication Console (the application description can be found at
Epygi Technical Support).
• iQall Toggling Support - this feature enables users to alternate the call from their mobile device iPhone running iQall to their desk phone without
the call being dropped.
QX50/QX200/QX2000; (SW Version 6.0.x) 18
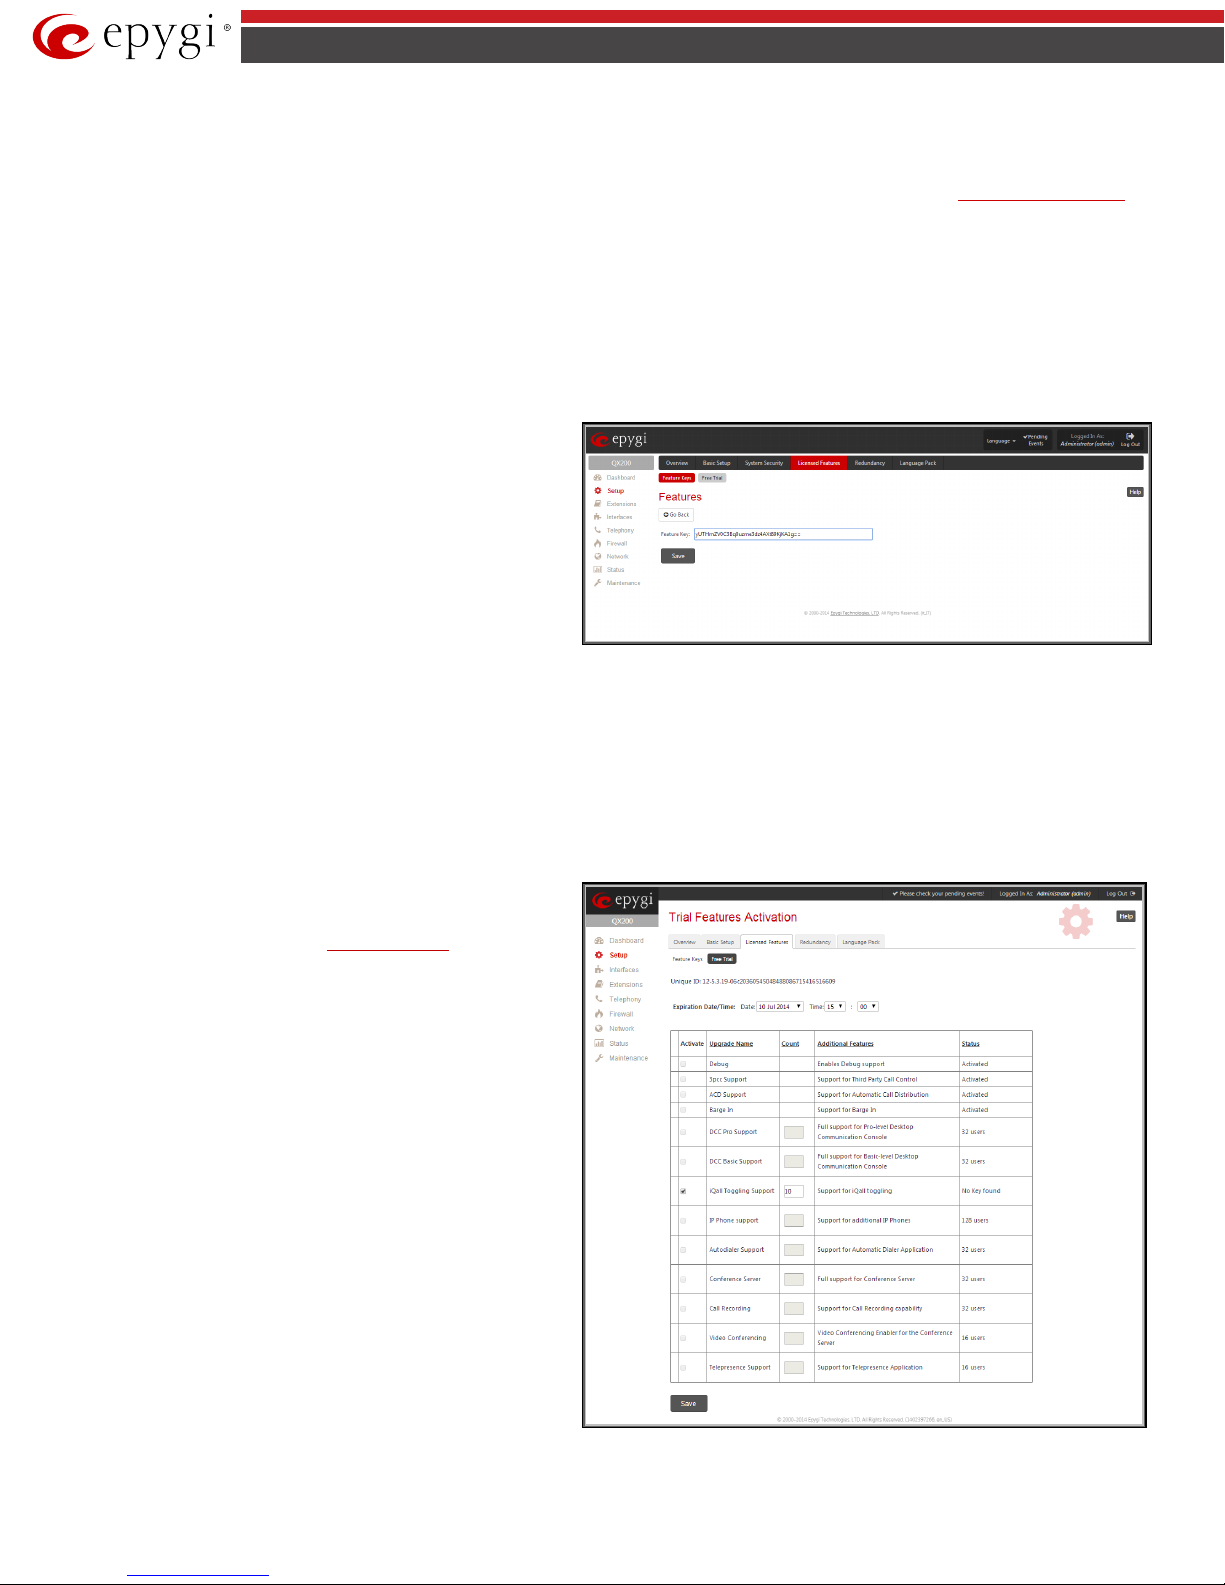
QX50/QX200/QX2000 Manual II: Administrator’s Guide
To enter a
click
. A page with the
text
field is opened. Enter the key and press
. The status of the
User has to select the appropriate checkboxes
under
column, specify the needed count under
the number for simultaneous call
conference calls.
Fig.II- 18: Trial Features Activation page
• IP Phone Support - enables additional IP phones support on the Epygi QX50/QX200/QX2000. This feature key allows activating up to 8, 16 or 32
additional IP lines for QX50, up to 8, 16, 32, 64 or 128 additional IP lines for QX200 and up to 8, 16, 32, 64 or 128 additional IP lines for QX2000
which will bring to a maximum 2000 total IP lines for QX2000.
• Autodialer Support - allows run with QX IP PBX the Autodialer application (the application description can be found at Epygi Technical Support).
• Conference Server - activates the conferencing feature allowing the system to act as a standalone conference server. This allows up to 16 person
conference calls for QX50, up to 32 person conference calls for QX200 and up to 288 conference calls for QX2000 to be set up and offers a bundle
of helpful features to easily manage the conferences.
• Call Recording – activates the Call Recording feature which is used to record PBX, SIP or PSTN calls on the QX IP PBX and save the recordings
into the local recording box or upload to the remote server.
Please Note: When using Call Recording on the QX50/QX200 it is advisable to use an SD memory card to expand the system memory.
• Video Conferencing – activates the Video Conferencing feature on the system. This allows up to 16 person video conference calls on QX200, up to
8 person video conference calls on QX50 and up to 104 video conference calls on QX2000. The other participants of conferences can use only audio
connection.
Feature Key,
selected feature entry will change to Reboot needed. Reboot the QX
IP PBX and the feature will receive the status Activated.
To receive a Feature Key, register the QX IP PBX device and send a
corresponding request to Epygi's Technical Support. This request
must include the Unique ID that is displayed in the Features page
above the features list.
Add
Feature Key
Save
Fig.II- 17: Features A dd page
Free Trial Activation
This page allows activating the QX IP PBX optional features for a trial. This page lists all QX IP PBX features that may be activated for a trial, characterized
by a Feature Description and provided with its Status.
Expiration Date/Time used to specify the trial period. Upon expiring the specified period the QX IP PBX will reboot and trial features will disable.
Activate
Column and save. The QX IP PBX will reboot and trial features
activate. The syntax for values under Count is the following:
• IP Phone support - the number for additional IP lines.
• ACD support - enables the ACD Management feature support
on the system.
• 3pcc Support - enables the 3pcc feature support on the
system.
• Barge In Support - enables the Barge In feature support on
the system.
• Redundancy - enables the Redundancy feature support on
the QX2000.
• Call recording -
recordings.
• DCC Pro Support - the number for licensed Pro-level DCC
extensions.
• DCC Basic Support - the number for licensed Basic-level DCC
extensions.
• DCC Basic Support - the number for licensed Basic-level DCC
extensions.
• iQall Toggling Support - the number for licensed iQall
extensions.
• Autodialer Support - the number of maximum simultaneous
Auto Dialer calls.
• Conference Server - the number for maximum conference
calls.
• Video Conferencing - the number for maximum video
Count
QX50/QX200/QX2000; (SW Version 6.0.x) 19
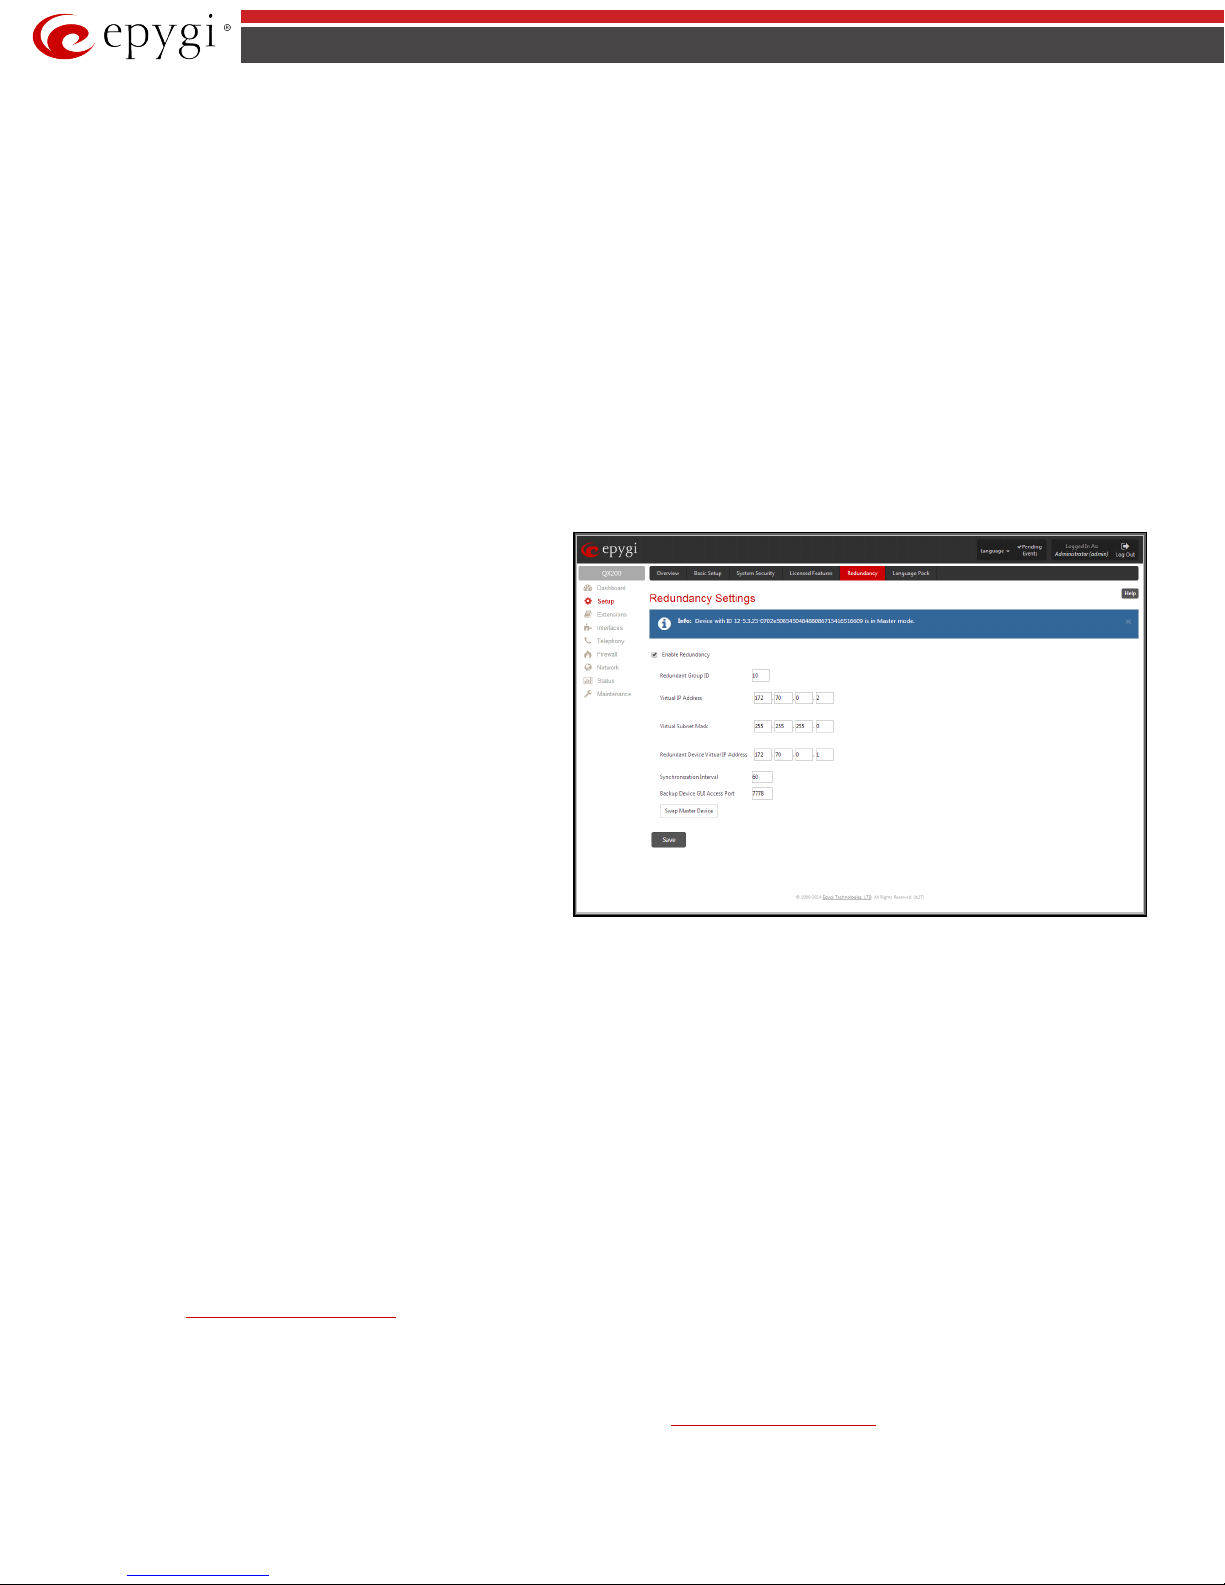
QX50/QX200/QX2000 Manual II: Administrator’s Guide
checkbox is used to enable the redundancy
functionality on the QX IP PBX.
Fig.II- 19: Redundancy Settings page
Redundancy
Redundancy feature is used to increase QX IP PBX device availability using second QX IP PBX as a backup unit. This requires two units running the same
firmware version and connected to each other through Ethernet or LAN ports, depending on the device model.
The idea of redundancy is to ensure uninterrupted functio nality of the QX IP PBX. The Redundancy Settings should be configured on both QX IP PBXs. One
of the QX IP PBXs is configured as a master, the second one as a backup unit.
Please Note: To setup a redundant network, you should first startup the master device with all attached IP phones and other devices, make sure it works
normally and then startup the backup device.
If the master device becomes unavailable, which can be caused by power loss, reboot or network malconfiguration, the second QX IP PBX becomes
automatically available and starts to run as a master device. Depending on the configuration, the second QX IP PBX can remain master or go to the backup
mode once the first device becomes available again.
Attention: During failover procedure all active calls will be disconnected and the system will be out of service during 2-5 minutes (depending on the
number of IP phones connected to the system), which is needed for running the applications and rebooting the phones. If there are IP phones in the
network that are not auto configured by QX IP PBX (IP phones not supported by Epygi) or IP phones with the changed login name and password, you will
need to reboot them manually. After failover the license keys, firmware and language pack are not being transferred from the master to backup QX IP PBX
therefore, so make sure both QX IP PBXs are configured identically in the redundant network before enabling redundancy mechanism.
When you login to the device which runs in a backup mode, only Redundancy Settings are available. All other GUI configuration settings are non editable
and automatically synchronized with the master device's configuration.
To ensure the interaction between the master and slave devices, corresponding configuration should be done in the Redundancy Settings on both devices.
Enable Redundancy
Active Device Mode drop down list is only present on backup
device and is used to adjust the behavior of the backup device
during unavailability of master device. When Active is selected,
backup device will become master once the original master device
became unavailable. When Passive is selected, backup device stops
its synchronization with the master device and will not take over
the control ev en when the original master got failed unless Swap
Master Device button is pressed on the master QX IP PBX. The
Passive mode is used for firmware update or language pack
updates on master device when a reboot is required. After the
reboot of master device, the Active Device Mode on the backup
device should be changed back to Active to restore the redundant
network functionality.
Redundant Group ID text field unique ID (values 1 and up) identifying master and backup devices. The same value must be set on both QX IP P BXs.
Virtual IP Address text fields require the virtual IP address of the device where the configuration is done. Virtual Subnet Mask text fields require the
virtual subnet mask of the device where the configuration is done. These two parameters identify an alternate IP network of the LAN interface which stays
unchanged when the device switches its mode (from master to bac kup or vice versa). The configuration and voice data synchronization daemon uses this
IP address to communicate with the second QX IP PBX.
Redundant Device Virtual IP Address text fields require an alternate IP address of the LAN interface of the second QX IP PBX.
Synchronization Interval text field requires the period of time (in seconds) between two consecutive configuration and voice data synchronizations fro m
master to backup device.
Backup Device GUI Access Port text field (available only for QX50/QX200) is present on the master device only and requires the port used for accessing
the GUI of the backup device through master.
Swap Master Device button is used for manual swapping of functionality of master and backup devices. This action will result in rebooting the current
master. After rebooting the current master device will start running in a backup mode. Switching the backup to master starts all applications on QX IP PBX
and causes all IP phones to reboot. The swapping takes around 1 minute however another 1-3 minutes are required in order to reboot all the IP phones
connected to redundant system. If backup device before swapping was in passive mode then after swapping the master will start running as backup in
passive mode, otherwise if it was in active mode then master will start running as backup in active mode.
Download system logs link is only present on backup device and is used to download system logs to the local PC as a *.tar archive file. These logs can then
be used by the
Epygi Technical Support Office to determine the problem that has occurred on your QX IP P BX.
Language Pack
The Language Pack page allows you to upload a custom language for GUI and Voice Messages of the QX IP PBX. The language of voice messages can be
switched to the custom Language Pack language from the GUI setting page in the
changed to the custom Language Pack language from the radio buttons on the login page.
QX50/QX200/QX2000; (SW Version 6.0.x) 20
System Configuration Wizard. The language of GUI session can be
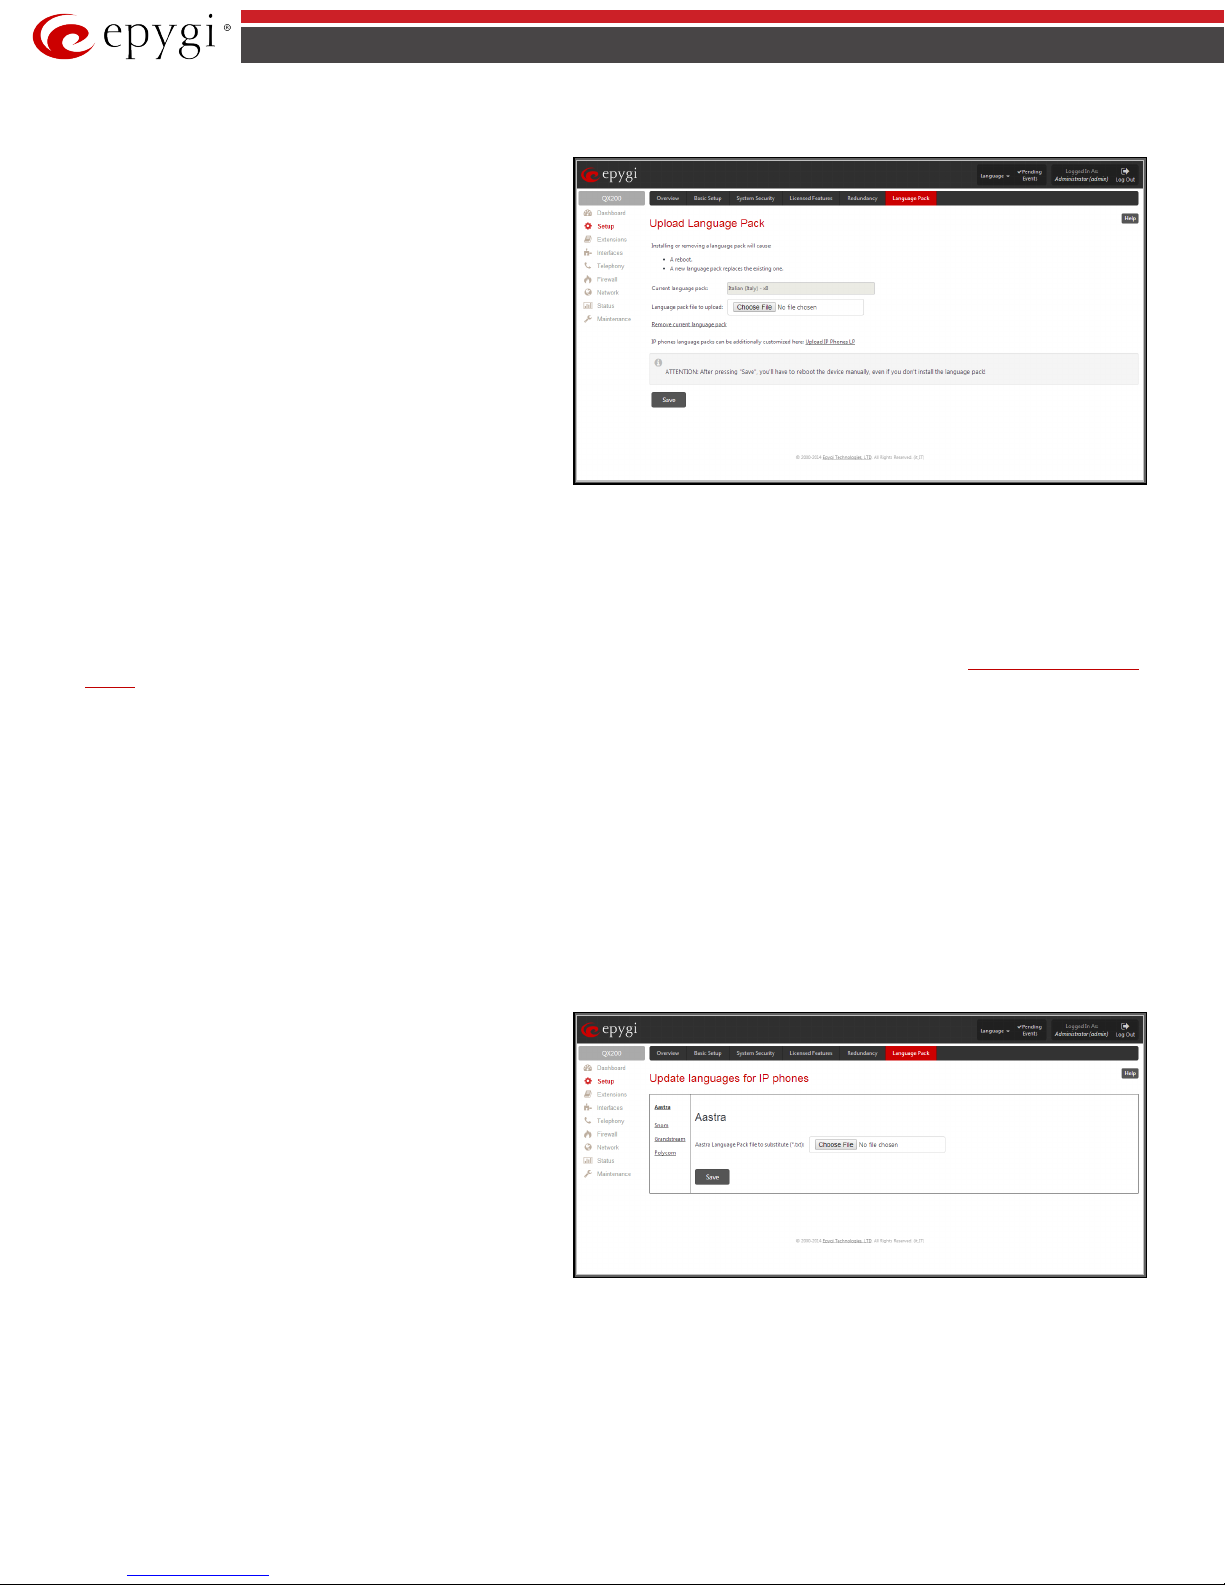
QX50/QX200/QX2000 Manual II: Administrator’s Guide
Uploading a Language Pack will cause the loss of the following data:
All voice mails and custom voice messages (only when
Fig.II- 20: Language Pack page
Pressing the
button will stop some vital processes
on the IP Phone, therefore you will need to reboot your phone
Fig.II- 21: Update Languages for IP Phones page
Uploading a language pack will also change the language of some supported IP phones (Aastra, snom v.6.x, Grandstream GXP2000). After a custom
Language Pack is uploaded onto the system, reboot the IP phone to load a matching language onto the phone.
•
embedded memory storage is used)
• Call History (only when embedded memory storage is used)
• Pending Events (only when embedded memory storage is
used)
• Transfer Statistics
Please Note: Only one custom Language Pack can be uploaded at
the time. Uploading a Language Pack will remove the existing one (if
applicable) and will reboot the QX IP P BX.
The Current Language Pack field displays read-only information about the custom language pack uploaded. When no custom language pack is uploaded,
the field indicates “No Language Pack installed”.
Below, there is a Language Pack File to Upload text field that displays the selected image filename. The Choose File button is used to browse the custom
language pack to be uploaded.
The Remove Current Language Pack link is only seen when a custom language pack is uploaded and is used to remove it from the system.
The Custom languages for IP phones link is only seen when a custom language pack is uploaded and is used to move to the
Phones page where a custom language pack may me uploaded to the IP phone.
Pressing Save will start uploading the custom language pack to the board.
Attention: Pressing the Save button will stop some vital processes on the QX IP PBX, therefore you will need to reboot your device manually even if you
have cancelled the language pack update procedure on the following steps.
The next page displayed will show verification of the language pack being uploaded and asks for confirmation to overwrite the existing custom language
pack (if applicable). After final confirmation, the system will upload the selected custom Language Pack and it will reboot.
Update Languages for IP
Update Languages for IP Phones
The Update Languages for IP Phones page is used to upload a custom language pack to the IP phone. This page only contains those IP phones that
support custom language pack uploading from the QX IP PBX.
To upload the custom language pack, go to your IP phone related page and Choo se File the custom language pack file. Save the changes to upload the
custom language pack to the IP phone.
Attention:
manually even if you have cancelled the language pack update
procedure on the following steps.
The next page displayed will show verification of the language pack being uploaded and asks for confirmation to overwrite the existing custom language
pack (if applicable). After final confirmation, QX IP PBX will upload the selected custom Language Pack to your IP phone. You should then reboot your
phone to make the new language pack active.
Save
QX50/QX200/QX2000; (SW Version 6.0.x) 21
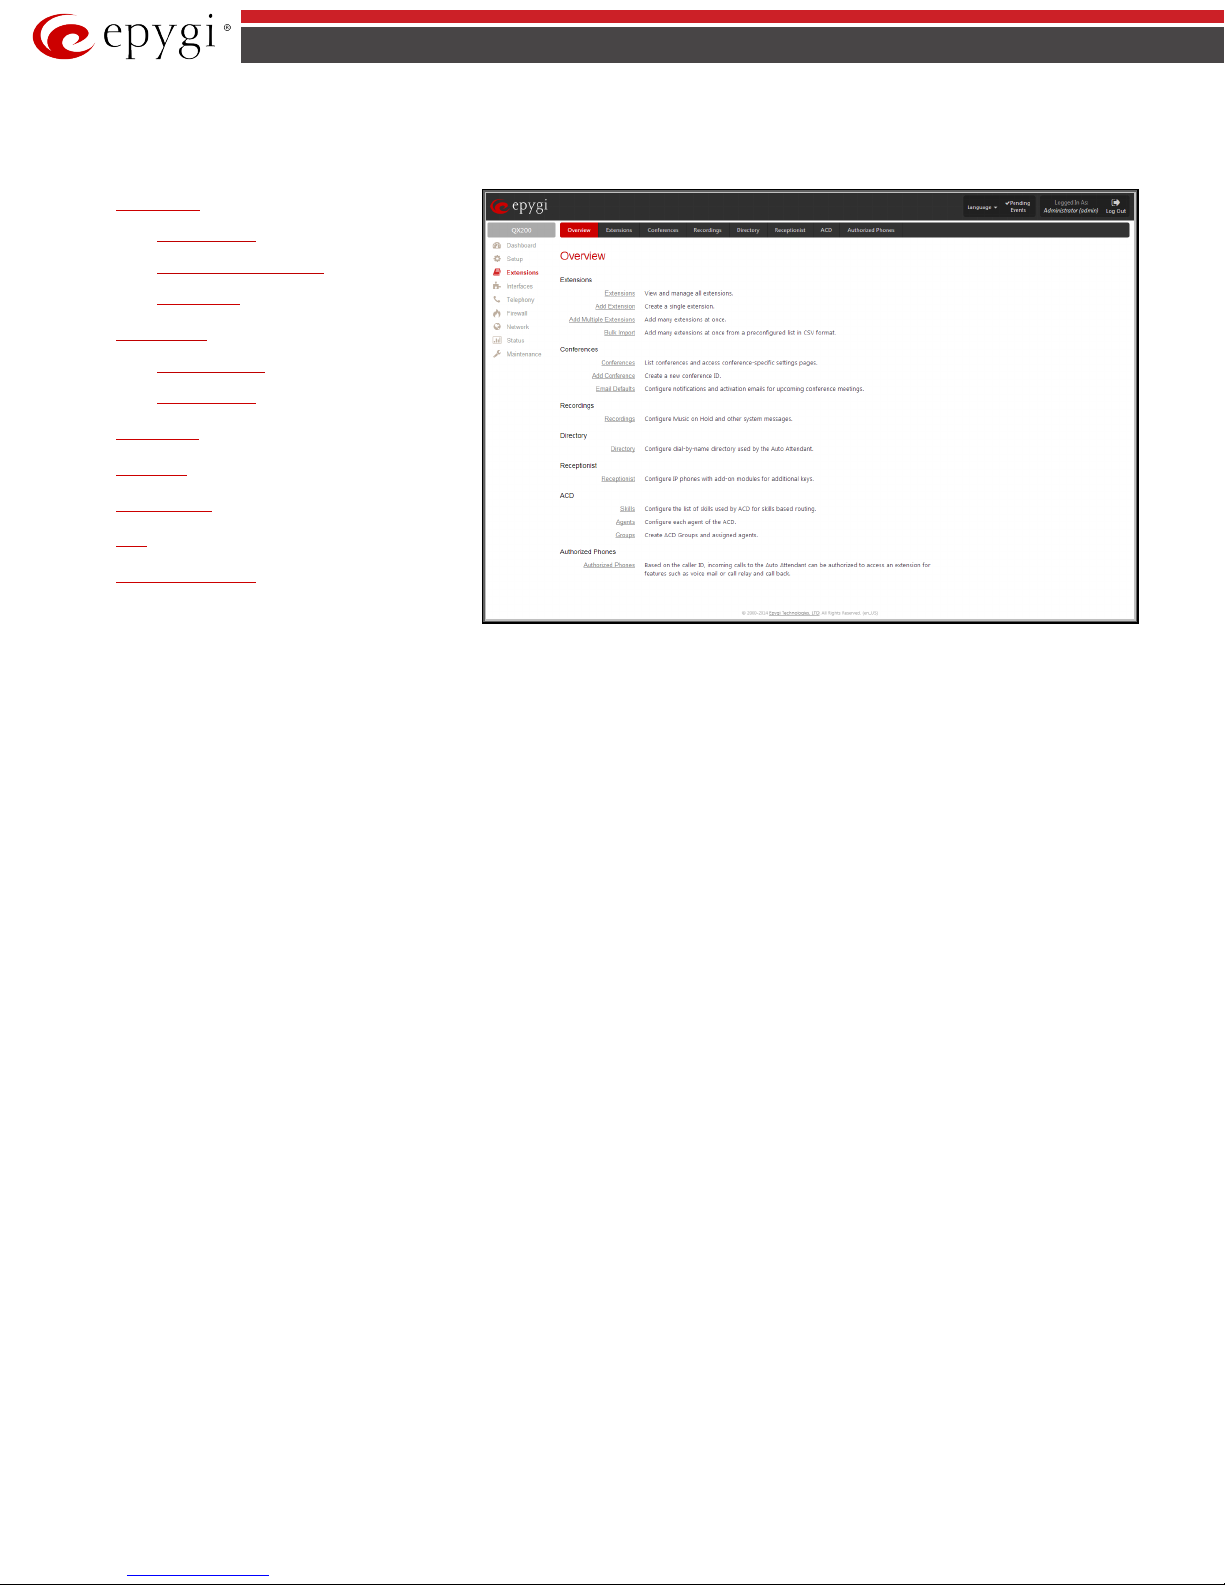
QX50/QX200/QX2000 Manual II: Administrator’s Guide
Extensions Menu
The Extensions menu allows you to configure the following settings:
• Extensions
− Add Extension
− Add Multiple Extensions
− Bulk Import
• Conferences
− Add Conference
− Email Defaults
• Recordings
• Directory
• Receptionist
• ACD
• Authorized Phones
Fig.II- 22: Extensions Menu page
QX50/QX200/QX2000; (SW Version 6.0.x) 22
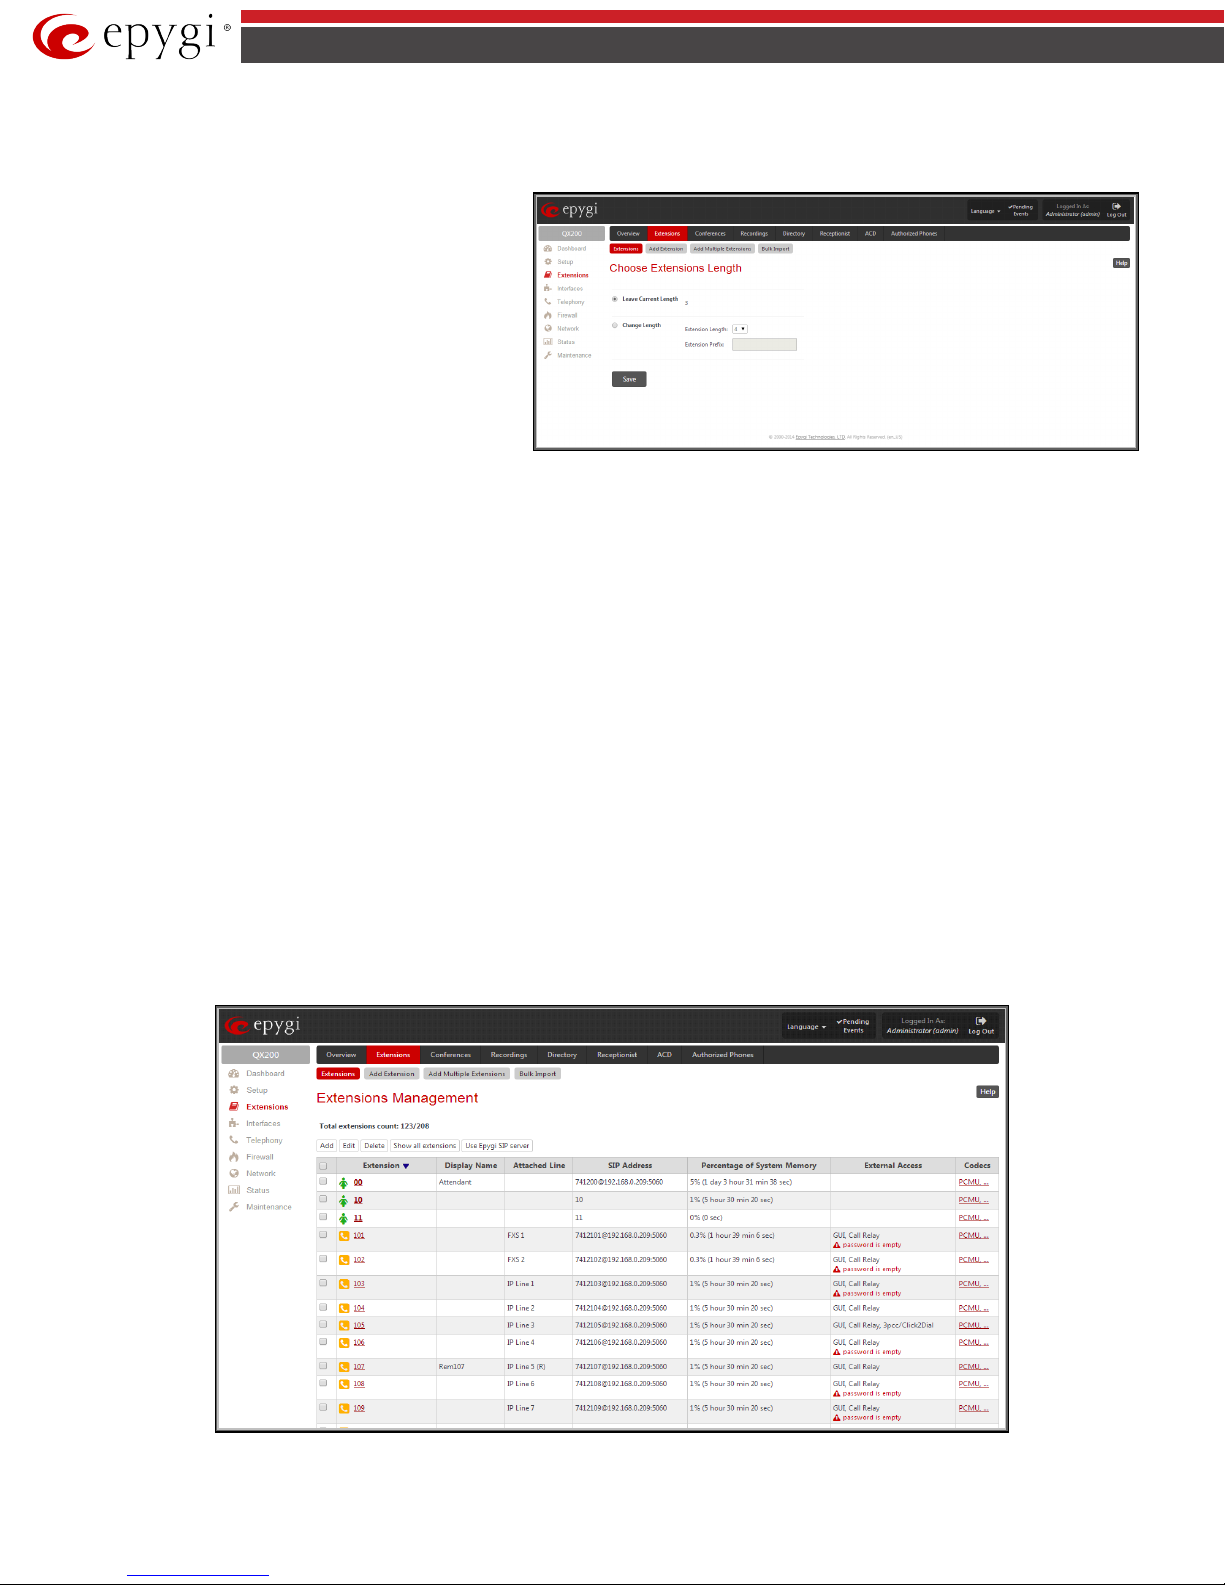
QX50/QX200/QX2000 Manual II: Administrator’s Guide
When this page is accessed for the first time after the QX IP
Fig.II- 23: Extensions Management - A dd Entry page
Extensions Management
The Extensions Management page is used to create a variety of extensions and auto attendants on the QX IP PBX. From this page, by clicking on the user
extension, the Administrator can go to the extension settings pages.
PBX’s initial boot-up or the default configuration settings
restore, an intermediate page is displayed.
The Change Extension Length page is used to define the
extension settings applicable to all extensions on the QX IP
PBX. This page disappears once being saved.
The Change Extension Length page consists of a radiobutton selection:
• Leave Current Length radio-button selection is used to leave the current length of extensions on the QX IP PBX. Per default the extensions
length o n the QX50/QX200 is 3 and o n the QX2000 is 4. In front of this selection, the actual configured length of extensions is displayed.
• Change Length radio-button selection is used to change the actual length of extensions on the QX IP PBX. This selection enables the following
information to be defined:
The Extension Length drop-down list requires you to choose the length of the extensions on the QX IP PBX. This number will apply to all
existing extensions on the QX IP PBX as well as to any newly created extensions. The length of the extension can be 3, 4 or 5.
The Extension Prefix text field is used to define a prefix with which all existing extensions on the QX IP PBX as well as to any newly
created extensions should start. The prefix cannot start with the digits 0 or 9, otherwise an error message appears.
Please Note: By saving the settings on the Change Extension Length page, all existing extensions will lose the custom voice messages and voice mails in
the voice mailbox. The device will be rebooted. You will not be automatically redirected to the login page, so you need to access it manually again when
reboot ends. After the reboot, the Change Extension Length page will disappear and the Extensions Management page will be displayed. The Change
Extension Length page will not appear again unless the default configuration settings are restored on the device.
Two types of user extensions, active and inactive, can be created on the QX IP PBX. Active extensions are those that are attached to a line, can place and
receive calls and use available telephony services. Inactive extensions are those that are not attached to the line. They can use some available telephony
services but they cannot place and receive calls. Instead, inactive extensions have a voice mailbox available to store the messages from callers.
QX50/QX200 has two available FXS lines.
Attendant extensions are dedicated to the IVR system on the QX IP PBX. These extensions are used by callers to reach QX IP PBX’s users and use the
remote access and call relay services. It is possible to create Auto Attendants with the custom scenarios. By default, QX IP PBX has one Auto Attendant
extension (00) which is undeletable.
Attention: QX50 is limited to 200 extensions, QX200 is limited to 400 extensions and QX2000 is limited to 2400 extensions.
The Extensions table is a list of all extensions and their parameters.
Fig.II- 24: Extensions Management page
QX50/QX200/QX2000; (SW Version 6.0.x) 23
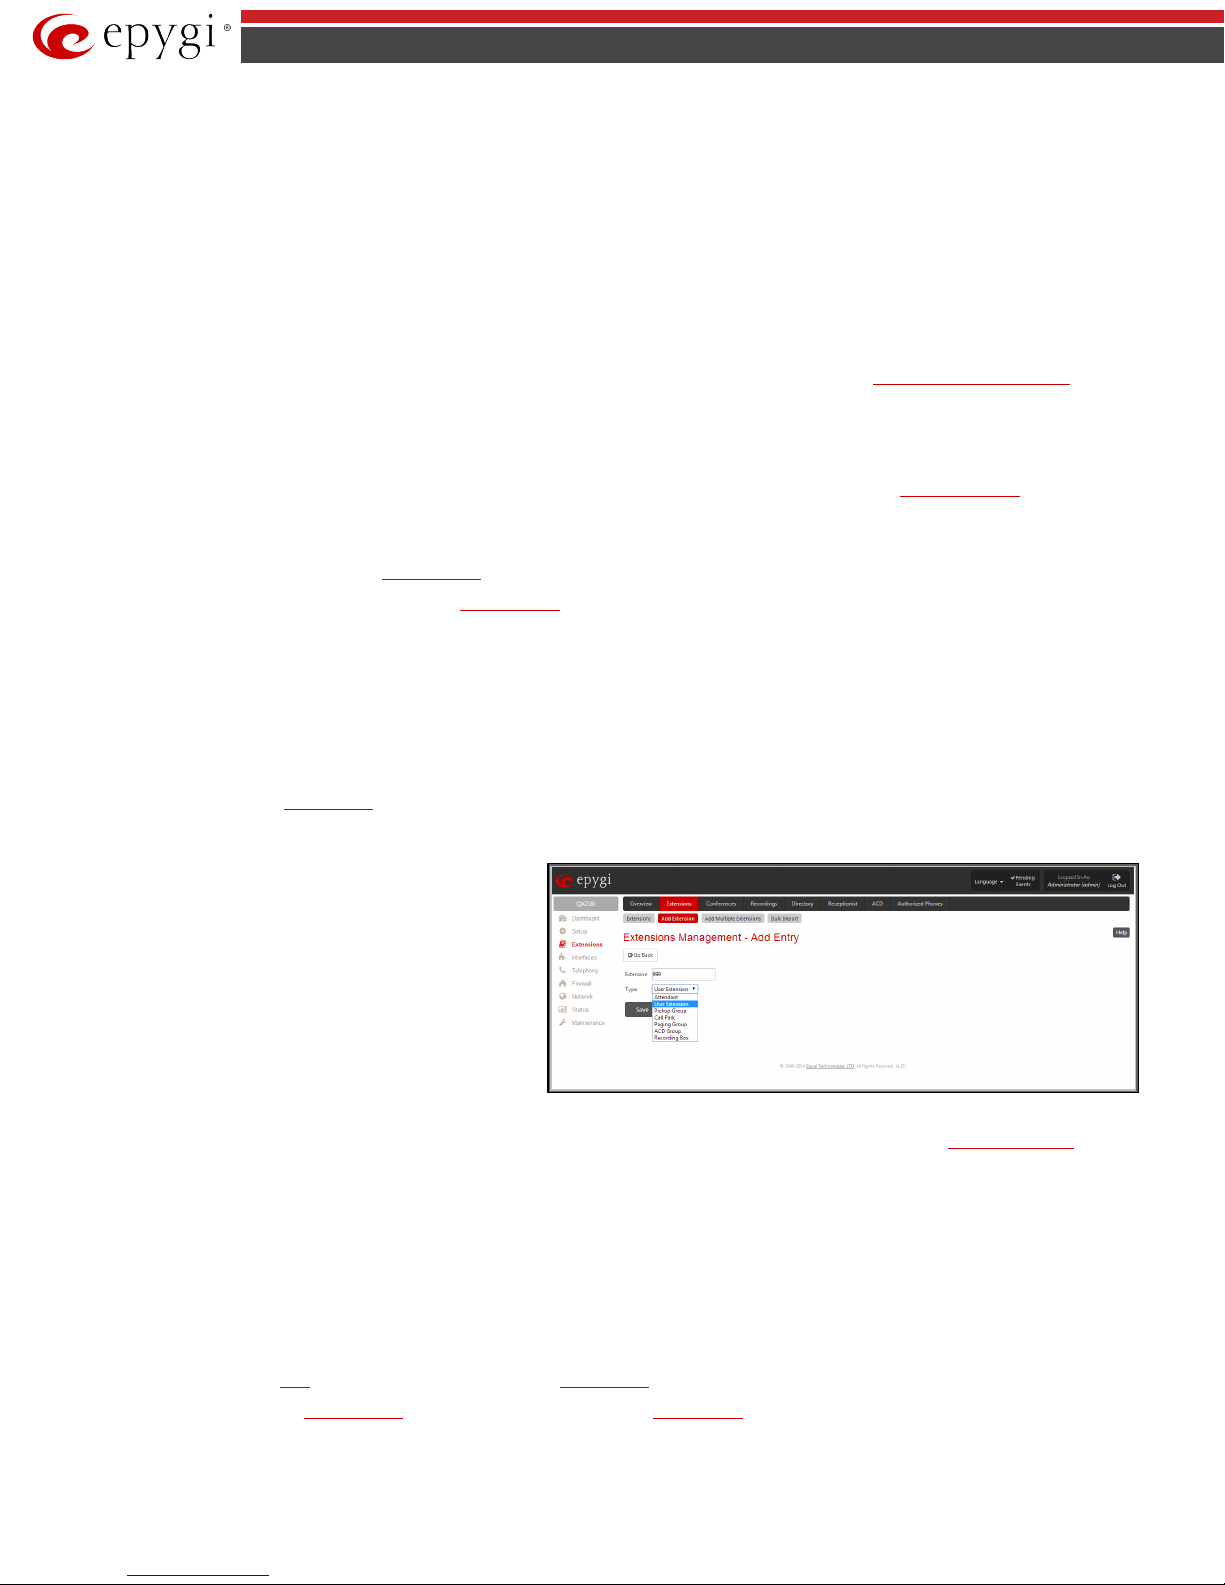
QX50/QX200/QX2000 Manual II: Administrator’s Guide
tab opens the
page where the type and number of the new extension
Fig.II- 25: Extensions Management - Add Entry page
The following columns are present in the table:
• Extension - lists user or attendant extensions on the QX IP PBX. This number is used for internal PBX calls.
• Display Name - indicates an optional display name to identify the caller.
• Attached Line - indicates the FXS or IP line corresponding extension it is attached to. “R” is displayed in this column when SIP Re mote
Extension (see below) functionality is enabled on the extension.
• SIP Address - displays the SIP address of the corresponding extensio n. The column displays the full SIP address, (i.e., username@sipserver:port)
when the Registrat ion on SIP Server checkbox is selected. If registration is disabled, the SIP address will be displayed in the following format:
“username, Proxy: sipserver:port”. If no SIP registration server or SIP server port is defined, corresponding information will not be include d in
this column. If no username is defined, the extension number will be displayed instead.
• Percentage of System Memory - indicates the user space (in percentages) configured for each extension. The actual available duratio n (in
minutes) for the extension voice mails, uploaded/recorded greetings and blocking messages is also displayed here. The available minutes
corresponding to the selected user space are dependent on the Voice Recording codec selected from the
example, for the same amount of marked out user space, selection of the G726 voice recording codec will provide more space for voice mails and
user defined voice greetings than the G711 codec selection.
Voice Mail Common Settings page. For
• External Access - indicates whether the GUI Login, 3pcc/Click2Dial login or Call Relay options are enabled on the extension.
• Codecs – column lists the short information (full information is seen in the tool tip) about extension specific voice Codecs. Extension codec ’s can
be accessed and modified by clicking on the link of the corresponding extension’s Codecs. The link leads to the
Clicking on each user extension in the Extensions table will o pen the extension specific Your Extension menu (see Manual III: Extension User’s Guide).
The Pickup Group, Call Park and Paging Group extensions are displayed without a link in the Extensions Management table and extension pages.
Additionally, the supplementary services configuration pages will not be accessible for this type of extensions. Clic king on the Recording Box extension
will move to the corresponding extension’s
To add an extension click on the Add button or use the
Edit opens the Edit Entry page where a newly created user or attendant extension settings might be adjusted. To operate with Edit, one or more record(s)
have to be selected, otherwise the “No records selected” error message will appear.
The Edit Entry page consists of two frames. In the left frame settings groups are listed. Clicking on the corresponding settings group displays their
configuration options in the right frame.
Please Note: Save changes before moving among settings groups.
Hide extensions attached to disabled IP lines functional button is used to hide extensions which are attached to the disabled IP lines. When this
functional button is pressed, it transforms to Show all extensions functional butto n, which is used to show all hidden extensio ns. To enable the lines,
install a feature key from the
Feature Keys page.
Recording Box where the recorded calls can be managed.
Add Extension tab (see below).
Extension Codecs page.
Add Extension
Add Extension
Entry
should be defined. This page consists of the following
compone nts:
The Extension text field is used to enter a new extension
number. If non-digit symbols have been entered, the error
“Incorrect Extension: no symbol characters allowed” will
appear. If an extension with the same number already exists in
the Extensions Management table, the error “Extension already
exists” will appear.
Please Note: Extension number cannot start with the digits 0. You can add extensions of up to 20 digits long. However, the Call Routing Table won’t be
adjusted automatically; you may need to manually adjust the routing rules for extensions in custom length.
The Type drop down list is used to select the type of the extension to be created (for details see below). The following values are available in this list:
• Attendant
• User Extension
• Pickup Group
• Call Park
• Paging Group
• ACD Group (if the
• Recording Box (if the Call Recording feature is previously activated from Feature Keys page)
Extensions Management - Add
ACD feature is previously activated from Feature Keys page)
QX50/QX200/QX2000; (SW Version 6.0.x) 24
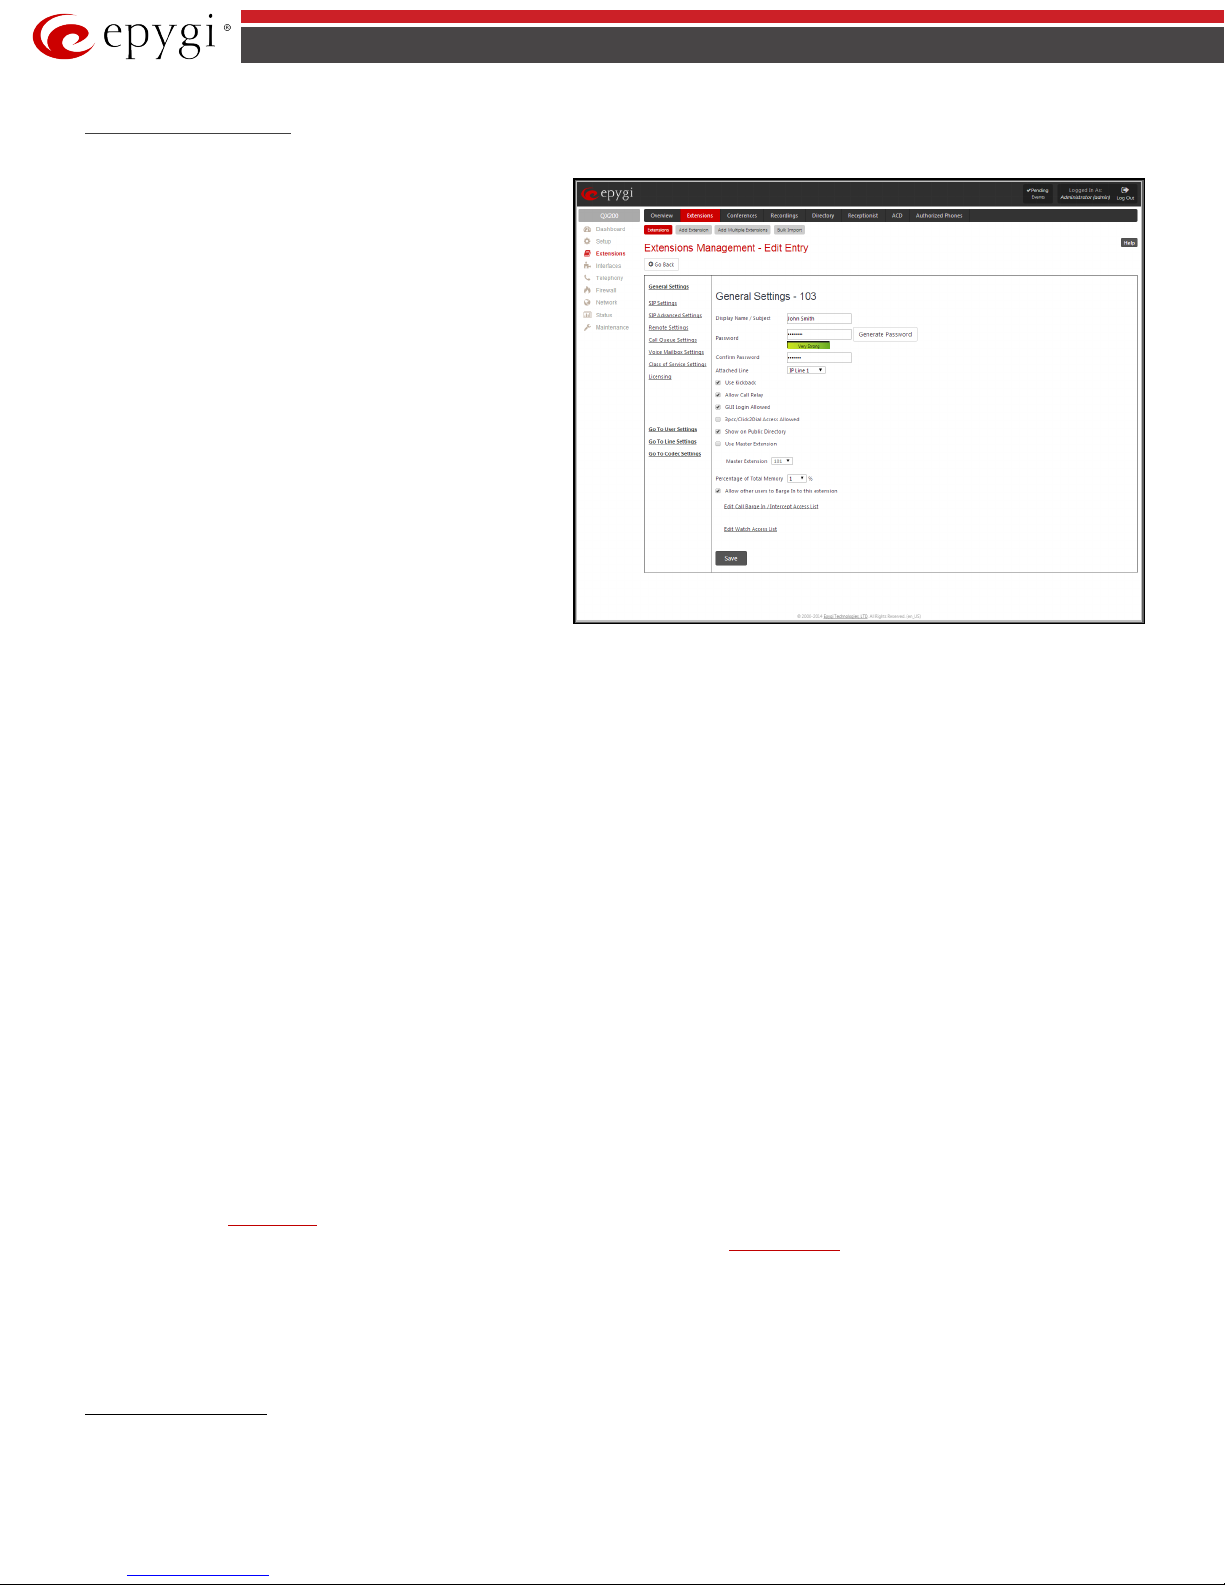
QX50/QX200/QX2000 Manual II: Administrator’s Guide
Fig.II- 26: Extensions Management - Ed it Entry – General Settings page
User Extension Settings
1. General Settings
This group requires extension‘s personal information and has the
following components:
Display Na me is an optional parameter used to recognize the caller.
Usually the display name appears on the called party’s phone
display when a call is made or a voice mail is sent.
Password requires a password for the new extension. The
extension password may only contain digits. If non-numeric
symbols are entered, the “Incorrect Password: no symbol characters
allowed” error will prevent creating the extension.
If you are unable to define a strong password, press Generate
Password to use one of system defined strong passwords. The
Password field is checked against its strength and you may see how
strong is your inserted password right below that field.
Confirm Password requires a password confirmation. If the input
is not corresponding to the one in the Extension Password field,
the “Incorrect Password confirm” error will appear.
Attached Line lists all free lines an extension may be attached.
Please Note: Extensions cannot be detached from the line if the SIP Remote Extension service is enabled on it. To detach the extension from the line,
disable the SIP Remote Extension service on the extension first.
Use Kickback checkbox enables the Kickback service on the extension for the blind call transfer. When the extension transfers the call to the other
extension and if there is no answer from the destination side, the call will automatically get back to the extension who initiated the transfer instead of
getting into the destination's voice mailbox or being disconnected.
Allow Call Relay enables the current extension to be used to access the Call Relay service in the QX IP PBX’s Auto Attendant. It is recommended to define a
proper and no n-empty password when enabling this feature in order to protect the Call Relay service from an unauthenticated access.
GUI Login Allowed checkbox enables the current extension to be used to access the QX IP PBX via WEB interface by extension name and password.
3pcc/Click2Dial Access Allowed checkbox enables the current extension to be used with applications based on QX IP PBX 3PCC interface and QX IP PBX
Click to Dial application.
With the Show on Public Directory checkbox enabled, the details of the corresponding extension will be displayed in the User Settings table on the Main
Page of the Extension’s Web Management (accessed by the extension’s login, see Manual III – Extension User’s Guide). Besides this, the details of the
extension will be displayed in the Public Directories on the snom and Aastra SIP phones. Leave this checkbox unselected if the extension is reserved or not
used, or when the extension serves as an intermediate unit for call forwarding, etc.
The Percentage of Total Memory drop down list allows you to select the space for the extension’s voice mails and uploaded/recorded greetings and
blocking messages. The maximum value in the drop down list is equal to the maximum available space for voice messages on QX IP PBX . Whe n editing an
existing extension and decreasing the voice mailbox size, the system will check the present amount of voice mails in the mailbox of the extension. If the
memory required for these voice mails exceeds the size entered, the system will suggest either to remove all voice messages from the extension’s voice
mailbox or to select a larger size so that the existing voice messages can be stored in the mailbox.
The Enable Rin ging Simulation checkbox is available on virtual extensions only and enables extra ring tones played to the caller before the voice mail of
the called virtual extension gets activated. If this checkbox is not enabled, the voice mailbox will get activated immediately the call arrives. T he ring tones
will be played during the timeout specified in the Ringing Simulation Timeout text field.
The Edit Call Intercept Access List link leads you to the page where the extensions that are allowed to intercept calls should be defined.
The Allow other users to Barge In to this extension checkbox and the Edit Call Barge In / Intercept Access List link appears only if a Barge In feature
is activated from the
• The Allow other users to Barge In to this extension checkbox is used to enable the
Feature Keys page.
Barge In Service on the extension.
• The Edit Call Barge In / Intercept Access List link leads you to the Call Barge In / Intercept Access List page where the extensions that are
allowed to barge in to the current extension or intercept calls should be defined.
Please Note: After activating Barge In feature, the extensions that are previously configured to intercept calls from the Call Intercept Access List page,
will be automatically redirected to the Call Barge In / Intercept Access List page along with the Barge In options.
The Edit Watch Access List link leads you to the page where the extensions that are allowed to watch calls should be defined.
Call Intercept Access List
The Call Intercept Access List page is used to define a list of extensions that are capable to intercept the current extension calls and to define the
appropriate permissions.
QX50/QX200/QX2000; (SW Version 6.0.x) 25
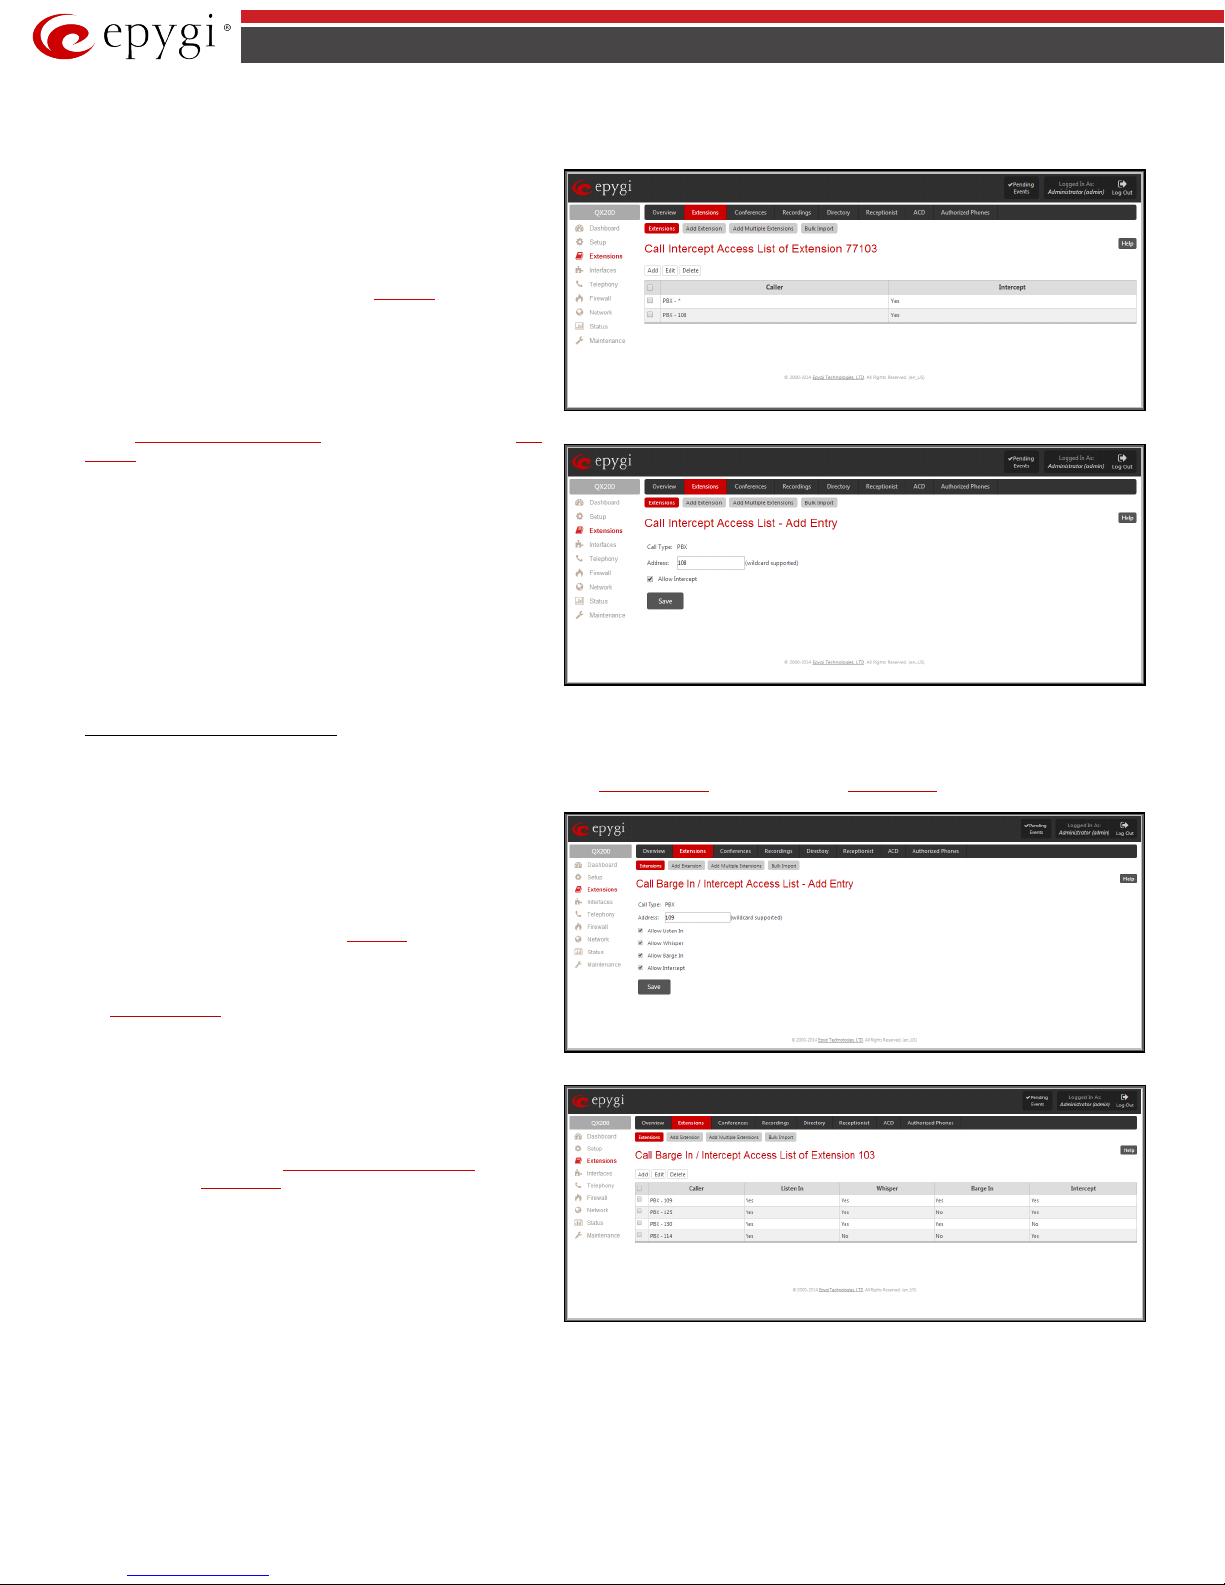
QX50/QX200/QX2000 Manual II: Administrator’s Guide
This page contains the following functional buttons:
Fig.II- 28: Call Intercept Access List - Add Entry
Call Barge In/Intercept Access List
to define the appropriate permissions. This page is only available when the Barge In Service is enabled from the Feature Keys page.
This page contains the following functional buttons:
Fig.II- 30: Call Barge In/Intercept Access List - Add Entry
The Call Intercept service allows you to intercept the calls assigned to an individual extension. The extensions that are allowed to intercept calls are
defined in the Call Intercept Access List. With the special feature codes (for details, see Feature Codes in the Manual III – Extension User’s Guide), you
may pick up a ringing call of the extension.
Add functional button opens an Add Entry page where extensions
may be added to the Call Intercept Access List.
This page requires the extension number in the Address text field
that will be allowed to intercept calls. The
wildcard is supported in
the Address field to add a group of extensions with one entry.
The Allow Intercept checkbox on this page allows to select the
Intercept option for the added extension:
Attention: Intercepted calls are not displayed in Active Calls table
Administrator’s Main Page , nor are registered in the Call
on the
Fig.II- 27: Call Intercept Access List
History.
The Call Barge In / Intercept Access List page is used to define a list of extensions that are capable to Barge In/Intercept the current extension calls an d
Add functional button opens an Add Entry page where extensions
may be added to the Call Barge In / Intercept Access List. This
page requires the extension number in the Address text field that
will be allowed to intercept calls. The
wildcard is supported in the
Address field to add a group of extensions with one entry.
The checkboxes on this page allow to select one or more options of
Barge In Service and Call Intercept for the extension:
the
• Allow Listen In
• Allow Whisper
• Allow Barge In
• Allow Intercept
Attention: Barge In/Call Intercept calls are not displayed in
Active Calls table on the
registered in the
Call History.
Administrator’s Main Page, nor are
Fig.II- 29: Call Barge In/Intercept Access List
QX50/QX200/QX2000; (SW Version 6.0.x) 26
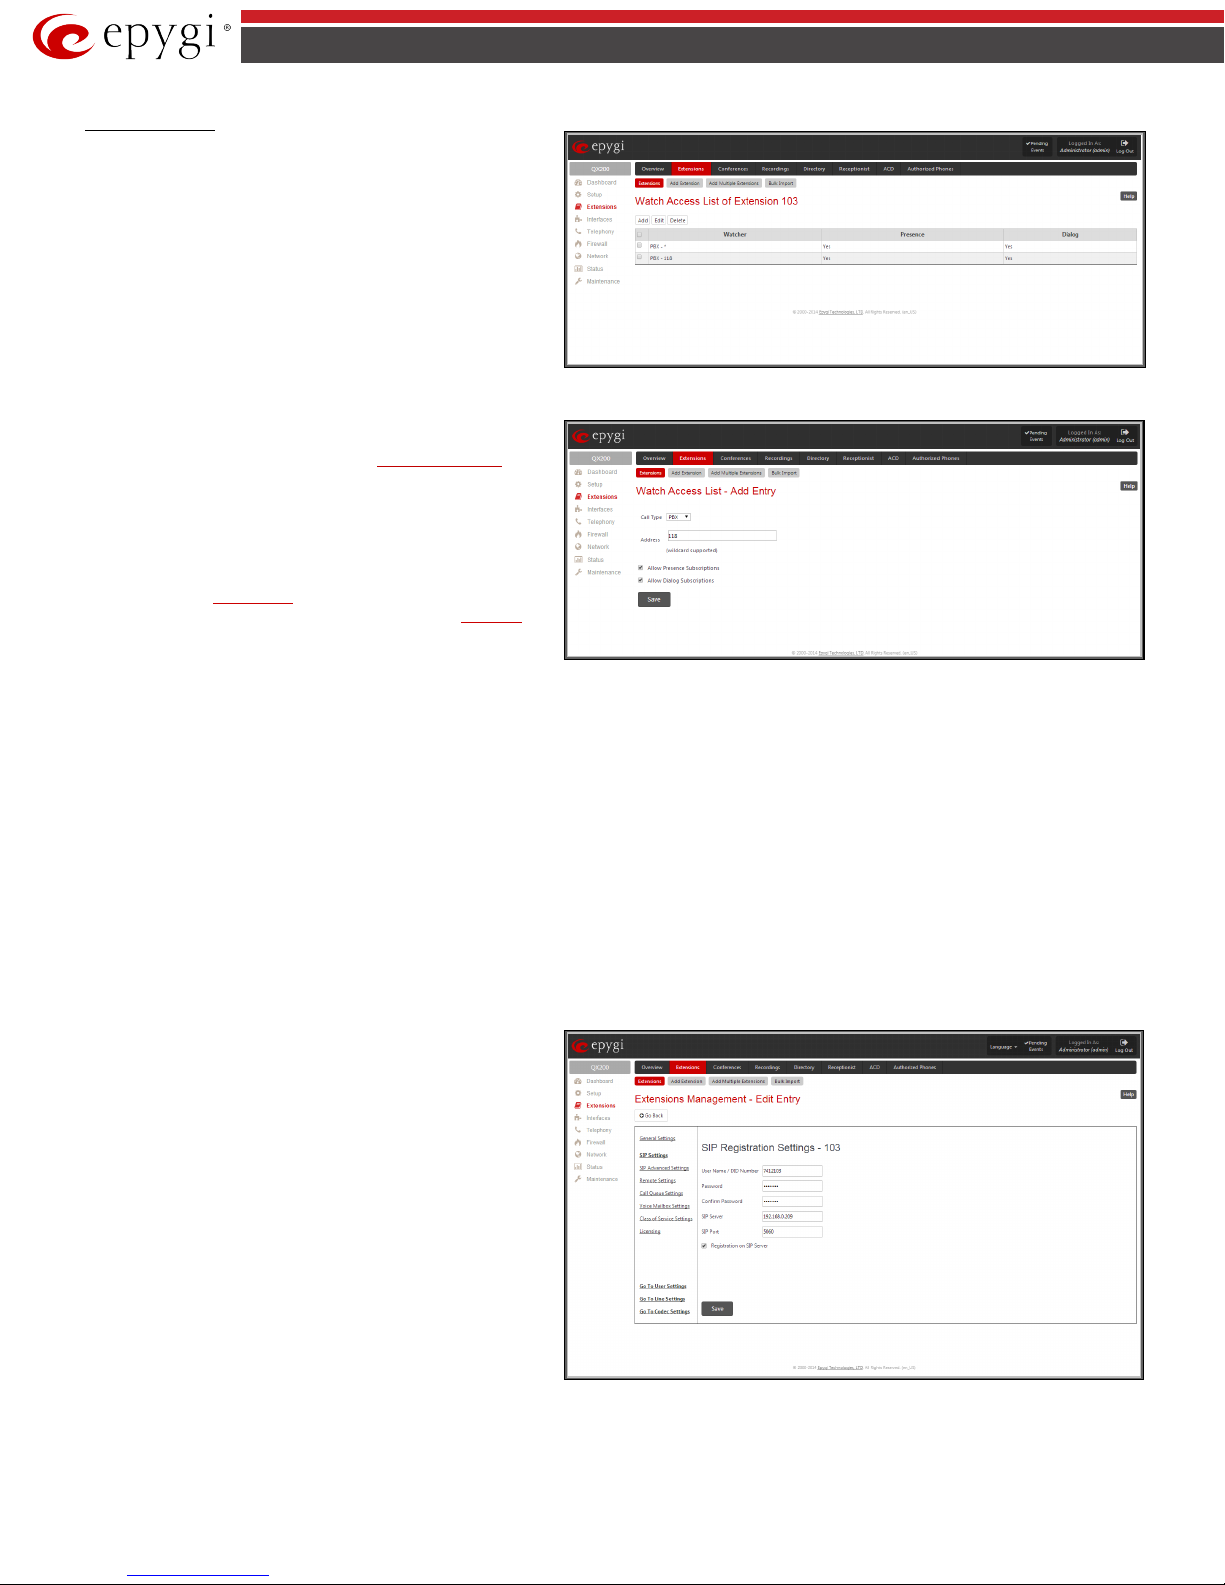
QX50/QX200/QX2000 Manual II: Administrator’s Guide
Fig.II- 32: Watch Access List - Ad d Entry page
field.
is the registration user name on the
external SIP server or the DID number from the ITSP. The user
Fig.II- 33: Extensions Management - Edit Entry – SIP Settings page
Watch Access List
The Watch Access List page is used to define a list of extensions
that are capable to watch the current extension calls and to define
the appropriate permissions.
This page contains the following functional buttons:
Add functional button opens the Watch Access List - Add Entry
page where extensions may be added to the Watch Access List.
The Watch Access List - Add Entry page consists of the following
compone nts:
• Call Type lists the available call types:
PBX - local calls to QX IP PBX's extensions.
SIP - calls through a SIP server.
Auto - used for undefined call types. The destination
(independent o n whether it is a PBX number or a SIP
address) will be reached through the
Call Routing Table.
Fig.II- 31: Watch Access List page
• The Address text field is used to define the address where
the call will be redirected. The value in this field is strictly
dependent on the Call Type defined in the same named drop
down list. If the PBX call type is selected, the QX IP PBX
extension number should be defined in this field. For the SIP
call type, the
type, a routing pattern needs to be defined.
allowed in this field.
The checkboxes on this page allow to select one or more options of the Watch Access List for the extension:
SIP address should be defined. For the Auto call
wildcard is
• Allow Presence Subscriptions
• Allow Dialog Subscriptions
Edit opens a page Watch A ccess List-Edit Entry where the permissions of the added extensions may be modified.
2. SIP Settings
This page provides two functions. It allows an extension on the QX IP PBX to register to an external SIP server. The registration to the external SIP server
(e.g. ITSP) is usually required before the server will allow the call to be received. This page also allows for incoming SIP calls to ring an extension. Upon
receiving a SIP Invite from an external SIP server, the QX IP PBX will look to match the called number with the settings in the User Name/DID Number
QX50/QX200/QX2000; (SW Version 6.0.x) 27
User Name/DID Number
name needs to be unique on the external SIP server. This field
length is limited to 32 symbols.
Password indicates the password for the extension registration
on a SIP server.
Confirm Password is used to confirm the password. If the entered
password does not correspond to the one entered in the
Password field, the error message “The passwords do not matc h.
Please try again” will appear.
SIP Server indicates the address of the SIP server. The field is not limited regarding symbol usage or length. It can be either an IP address such as
192.168.0.26 or a host address such as sip.epygi.com.
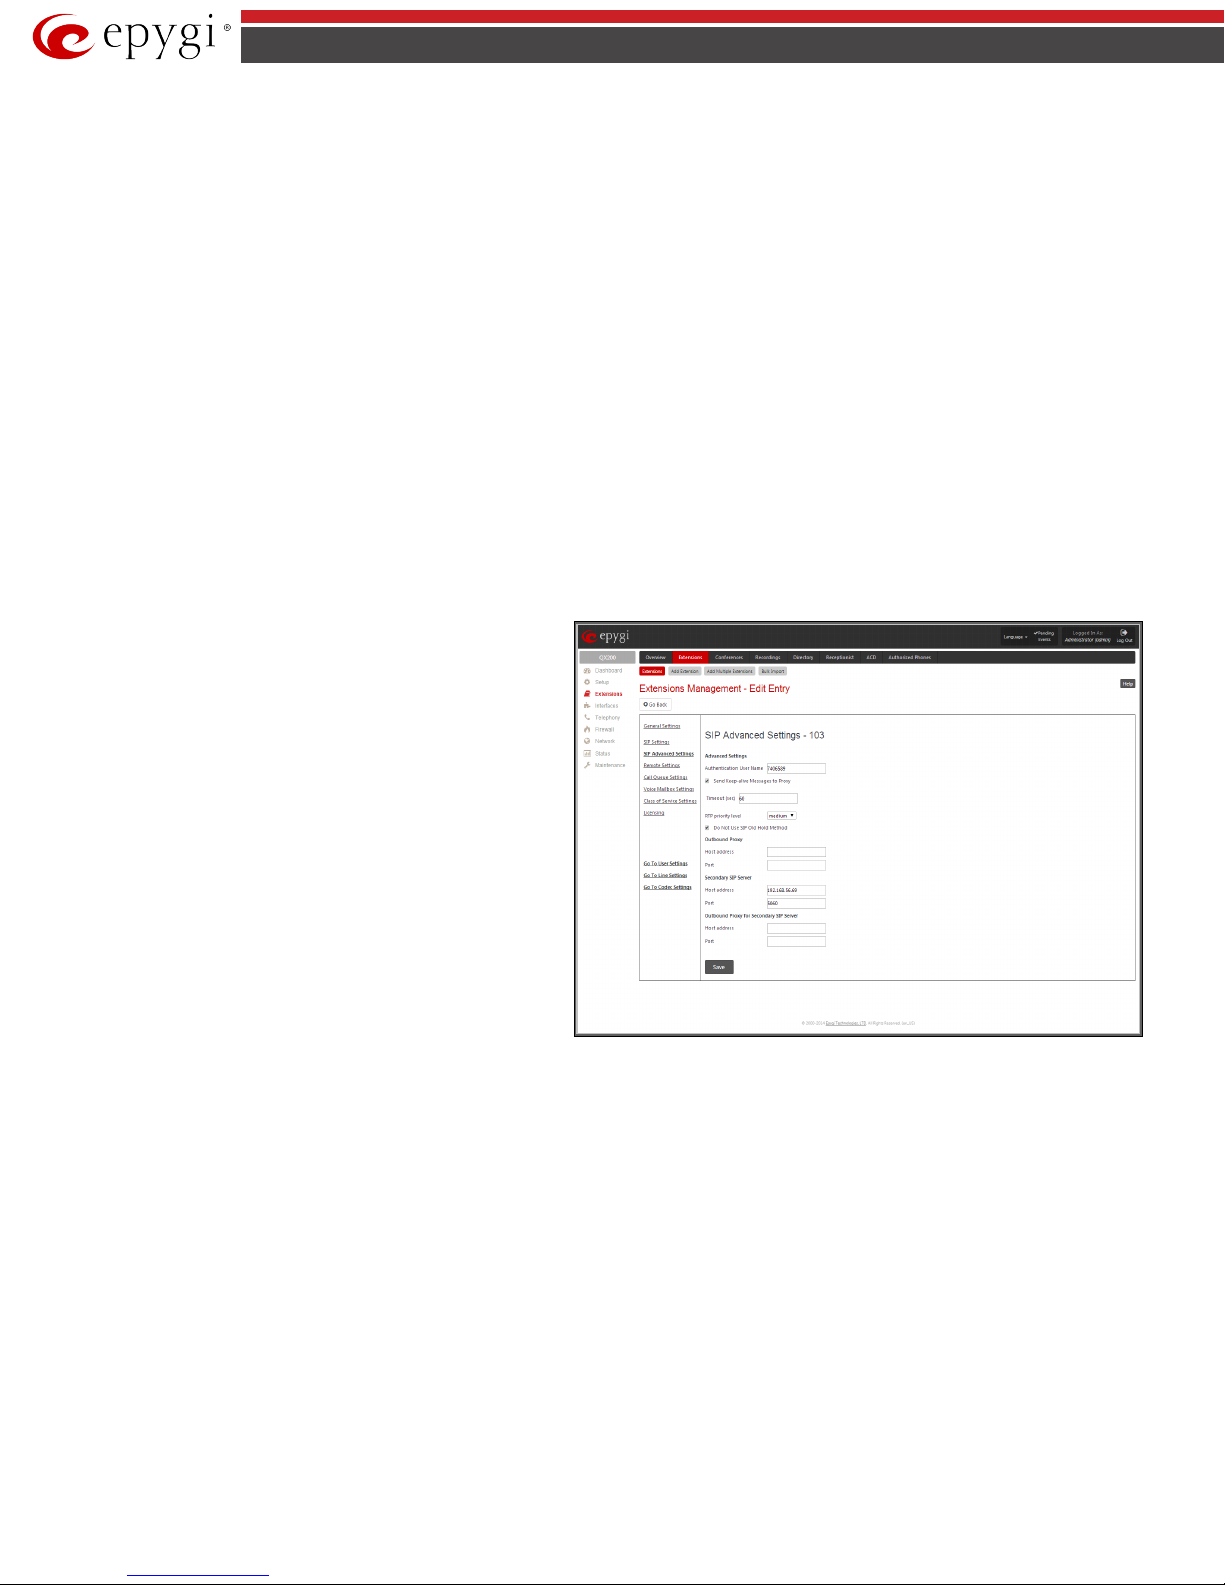
QX50/QX200/QX2000 Manual II: Administrator’s Guide
enables the SIP registration
server accessibility to the verification mechanism.
provided by the SIP servers’ providers and are used by QX IP PBX to
reach the selected SIP servers.
Fig.II- 34: Extensions Management - Edit Entry – Advanced SIP Settings page
SIP Port indicates the port number to connect to the SIP server. The SIP server port may only contain digit values, otherwise the error message “SIP
Server Port is incorrect” will be displayed when applying the extension settings. If the SIP server port is not specified, QX IP PBX will access the SIP server
through the default port 5060.
Registration on SIP Server enables the SIP server registration option. If the extension has already been registered on an SIP server, its IP address will be
displayed in brackets.
Please Note: If the ITSP does not require each DID to uniquely register to the external SIP server, then only enter the DID number in the User Name/DID
Number field. The other fields are not required.
3. SIP Advanced Settings
This group is used to configure advanced SIP settings (Outbound Proxy, Secondary SIP Server and Outbound Proxy for the Secondary SIP Server settings
and to define other SIP server specific settings).
The SIP Outbound proxy is an SIP server where all the SIP requests and other SIP messages are transferred. Some SIP servers use an outbound proxy
server to escape restrictions of NAT. For example, Free World Dialup service uses an Outbound Proxy server. If an Outbound proxy is specified for an
extension, all SIP calls originating from that extension are made through that outbound proxy, i.e., all requests are sent to that outbound proxy, even those
made by Speed Calling.
The Secondary SIP Server acts as an alternative SIP registration server when the primary SIP Registration Server is inaccessible. If the connection with the
primary SIP server fails, QX IP PBX will automatically start sending SIP messages to the Secondary SIP Server. It will switch back to the primary SIP server
as soon as the connection is reestablished.
Authentication User Name requires an identification parameter to reach the SIP server. It should be provided by the SIP service provider and can be
requested for some SIP servers only. For others, the field should be left empty.
Send Keep-alive Messages to Proxy
Timeout
indicates the timeout between two attempts for the SIP registration
server accessibility verification. If no reply is received from the
primary SIP server within this timeout, the Secondary SIP server
will be contacted. When the primary SIP server recovers, SIP
packets will resume being sent to it.
The RTP Priority Level drop down list is used to select the priority
(low, medium or high) of the RTP packets sent from a
corresponding extension. RTP packets with higher priority will be
sent first in case of heavy traffic.
The Do Not Use SIP Old Hold Method checkbox enables the new
recommended method of call hold in SIP, in which case the hold
request is indicated with the "a=sendonly" media attribute, rather
than with the IP address of 0.0.0.0 used before. The checkbox should
be enabled if the remote party does not recognize hold requests
initiated fro m the QX IP PBX.
A group of Host address and Port text fields respectively require
the host address (IP address or the host name) and the port
numbers of the Outbound Proxy, Secondary SIP Server and the
Outbound Proxy for the Secondary SIP Server. These settings are
4. Remote Settings
This group is used to configure SIP Remote Extension functionality. This is an advanced telephony feature that allows QX IP PBX users to remotely
operate QX IP PBX. Users need to register a hardware or software SIP phone on the QX IP PBX by defining the QX IP PBX’s global IP address and an
appropriate Username/Password. A registered SIP Remote phone can act fully as a phone connected locally to QX IP PBX, i.e. it can use QX IP PBX’s PBX
features, place and receive calls, access voice mails, etc.
The Enable checkbox activates the SIP Remote Extension’s functionality.
Please Note: SIP Remote Extension functionality may be enabled only for active (attached to an onboard FXS or IP line) extensions.
Identification parameters used by the remote SIP device for registration on the QX IP PBX should be defined in the Username and Password text fields.
They should match on both QX IP PBX and SIP phone for a successful connection. The Password field is chec ked against its strength and you may see how
strong is your inserted password right below that field. To achieve the well protected strong password minimum 8 characters of letters in upper and
lower case, symbols and numbers should be used. If you are unable to define a strong password, press Generate Password to use one of system defined
strong passwords.
Line Appearance text field requires a number of simultaneous calls supported by the SIP phone.
When the Enable RTP Proxy checkbox is selected, incoming and outgoing RTP streams to and from the remote SIP phone will be routed through QX IP
PBX. When the checkbox is not selected, RTP packets will be moving directly between peers.
QX50/QX200/QX2000; (SW Version 6.0.x) 28
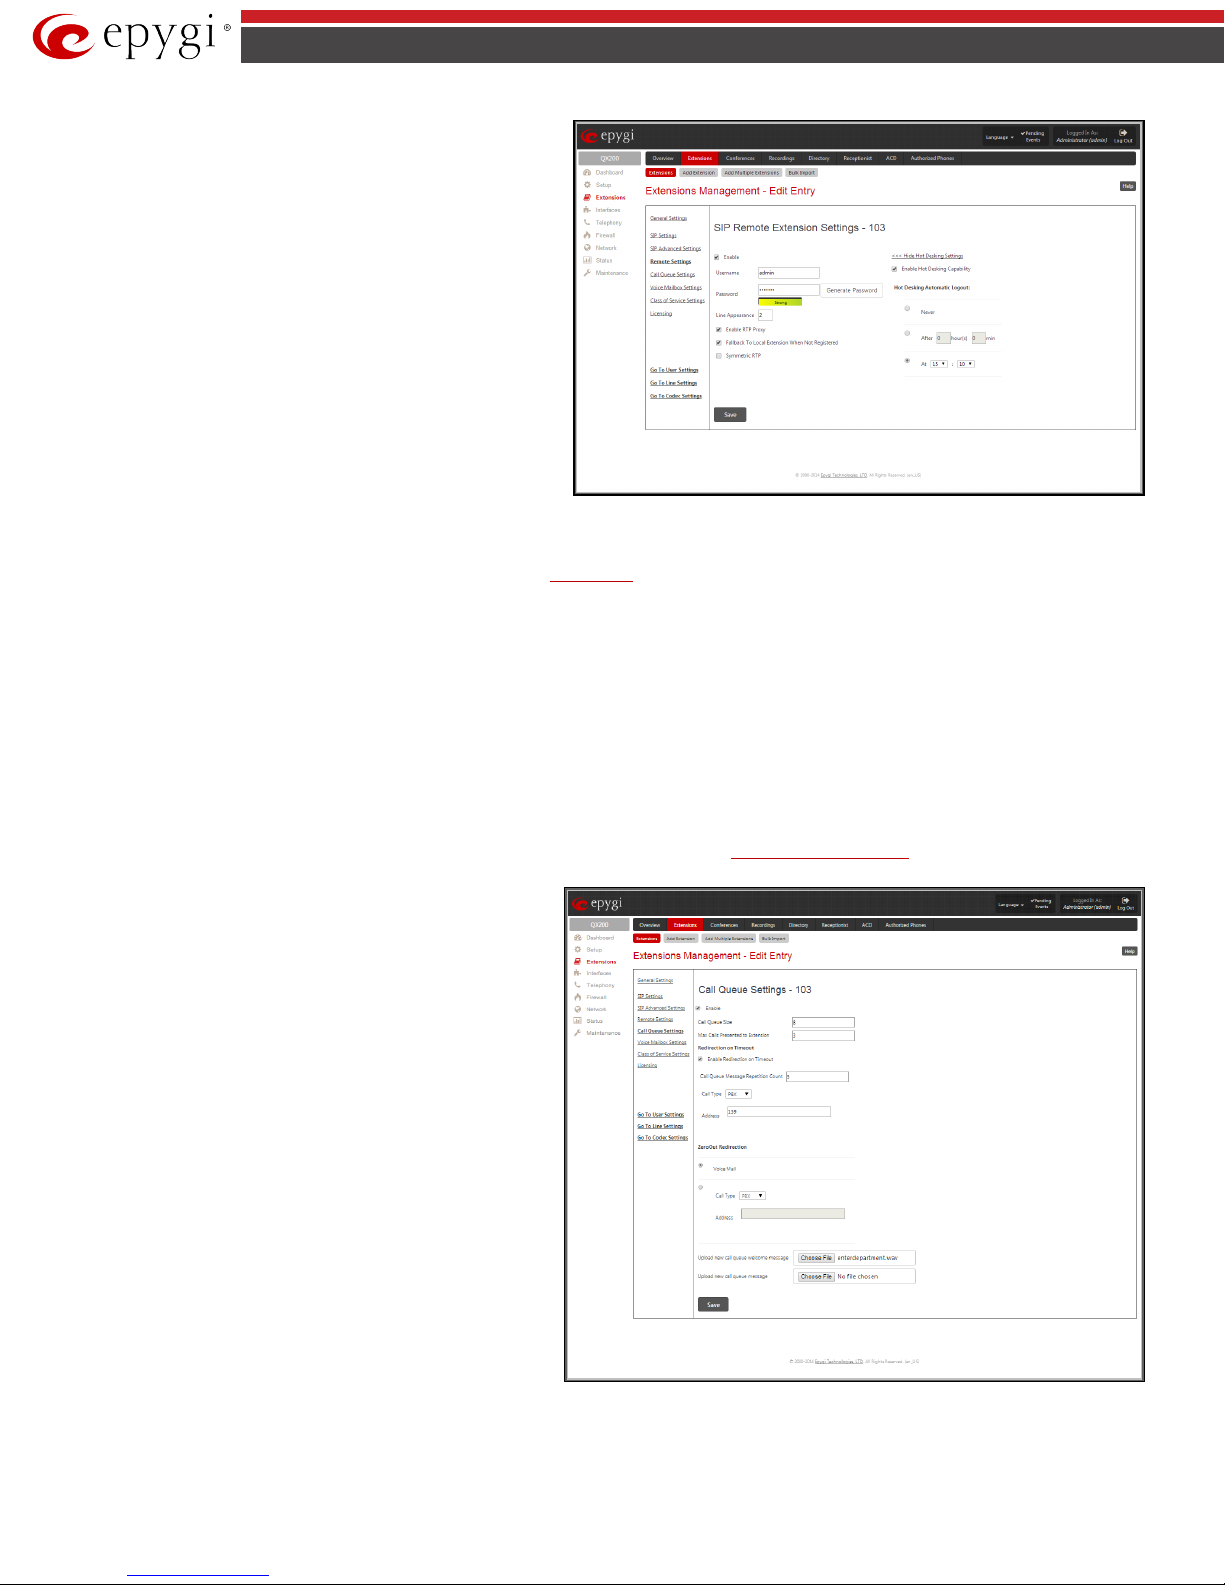
QX50/QX200/QX2000 Manual II: Administrator’s Guide
When the
checkbox is selected, incoming calls towards the corresponding
Fig.II- 35: Extensions Management - Edit Entry – Remote Settings page
The
checkbox activates the Call Queue functionality on the
extension.
queue. This will avoid the caller to wait in the queue for too long.
This checkbox selection enables the following components:
Fig.II- 36: Extensions Management - Edit Entry – Call Queue Settings page
Fallback To Local Extension When Not Registered
extension on the QX IP PBX will be forwarded to the remote SIP
phone only if it is registered. Otherwise, when the remote SIP phone
is unregistered, incoming calls will be routed to the line extension it
is attached to. When this checkbox is not selected, all incoming calls
will be routed to the remote SIP phone only if it is registered.
Otherwise, if the remote SIP phone is unregistered, calls will be
forwarded to the extension’s voice mailbox.
The Symmetric RTP checkbox should be selected when the remote
extension is located behind the symmetrical NAT.
The Show Hot Desking Settings and H ide Hot Desking Settings links are correspondingly used to show or hide the Hot Desking settings on this page.
The Enable Hot Desking Capability checkbox is used to enable the
The Hot Desking Automatic Logout section is used to configure Hot Desking functionality expiration on the corresponding extension. This may be useful
when someone who logged in to the public phone with this extensio n forgot to log out after using it. With this option enabled, once the expiration time
arrives, the extension will automatically log out from the public phone.
The following options are available:
Hot Desking feature on the corresponding remote extension.
• Never – the extension will never expire and will remain logged in to the public phone.
• After the defined period of time – requires the period after which the extension will automatically log out from the public phone.
• At the certain moment – requires the moment (hour and minute) when the extension will automatically log out from the public phone.
5. Call Queue Settings
This group is used to configure the Call Queue service that allows multiple incoming calls to be kept in the queue when being on the line and enables the
calls to be answered in the order they have been received. This feature can be also used within
Enable
Receptionist Management (see below for more details).
The Call Queue Size text field requires the length of the call queue.
This is the maximum number of calls that will be accepted into the
queue and kept on hold while the extension user is on a call. If a
maximum number of calls are already held in the call queue, the
next incoming call will be routed to the extension’s Voice Mail, if
enabled, or will be disconnected.
Please Note: By configuring Call Queue size, Call Forwarding if
Busy and Voice Mail telephony services will not take effect on the
corresponding extension until the call queue is not filled. These
telephony services will affect only the calls out of the call queue.
The Max Calls Presented to Extension text field requires the
maximum number of active calls on the line. For example, if 1 is
configured in this field and the extension is in use, the next
incoming call will go to the call queue. If 2 is configured in this field
and extension is in use, the next incoming call alert will be heard in
the background (if Call Waiting service is enabled on the
corresponding extension) and the extension will hold the first call
to answer the second one or they can be joined for a call
conference. However, the next incoming call will again go to the
call queue.
Enable Redirection Timeout checkbox is used to enable the call
redirection to the other destination after some time spent in the
Call Queue Message Repetition Count text field requires the number of call queue messages (played during the caller is in the queue) after w hich the call
in the queue will be automatically redirected to the destination defined below.
QX50/QX200/QX2000; (SW Version 6.0.x) 29

QX50/QX200/QX2000 Manual II: Administrator’s Guide
Call Type lists the available call types:
• PBX - local calls to QX IP PBX’s extensions
• SIP – calls through a SIP server
• PSTN – calls to a global telephone network
• Auto – used for undefined call types. The destination (independent on whether it is a PBX number, a SIP address or a PSTN number) will be
reached through the
The Address text field is used to define the address where the call will be redirected. The value in this field is strictly dependent on the Call Type defined
in the same named drop down list. If the PBX call type is selected, the QX IP PBX extension number should be defined in this field. For the SIP call type, the
SIP address should be defined, for the PSTN call type, the PSTN user number should be defined here. For the Auto call type, a routing pattern needs to be
defined.
The ZeroOut Redirection radio buttons are used to enable the call redirection to the extension voice mailbox or other destination after some time spent
in the queue. This will avoid the caller to wait in the queue for too long.
Call Routing Table.
• The Voice Mail radio button selection allows the user to redirect the call to the extensions voicemail.
• The second radio button selection allows the callers to redirect the call to the specified destination instead of holding in the extension's queue.The
caller will then be automatically transferred to the destination specified in this page. This selection activates the following fields to be inserted:
Call Type lists the available call types:
o PBX - local calls to QX IP PBX's extensions.
o SIP - calls through a SIP server.
o PSTN - calls to a global telephone network.
o Auto - used for undefined call types. The destination (independent on whether it is a PBX number, a SIP address or a PSTN number)
will be reached through the Call Routing Table.
The Address text field is used to define the address where the call will be redirected. The value in this field is strictly dependent on the Call Type
defined in the same named drop down list. If the P BX call type is selected, the QX IP PBX extension number should be defined in this field. For the SIP
call type, the
pattern needs to be defined.
SIP address should be defined, for the PSTN call type, the PSTN user number should be defined here. For the Auto call ty pe, a routing
wildcard is allowed in this field.
Please Note: To activate the ZeroOut Redirection feature, the caller should dial 0 digit.
Upload new call queue welcome message allows updating the active Call Queue welcome message (played when a caller joins the extension’s call
queue), downloading it to the PC, or restoring the default one.
The Remove call queue welcome message functio nal link appears only when the custom call queue welcome message is already uploaded and is used to
remove it and restore the default call queue welcome message.
The Download call queue welcome message functional link appears only when the custom call queue welcome message is already uploaded and is used
to download it to PC and opens the file chooser window where the saving location can be specified.
Upload new call queue message allows updating the active call queue message (played when a caller is being held in the queue), downloading it to the
PC, or restoring the default one.
The Remove call queue message functional link appears only when the custom call queue message is already uploaded and is used to remove it and
restore the default call queue welcome message.
The Download call queue message functional link appears only when the custom call queue message is already uploaded and is used to download it to
PC and opens the file chooser window where the saving location can be specified.
Choose File button opens the file chooser window to browse for a new Call Queue welcome message file. The uploaded files should to be in PCMU (CCITT
u-law, 8 kHz, 8 bit Mono) wave format, otherwise the system will prevent uploading it with the “Invalid audio file, or format is not supported” warning
message. The system also prevents uploading if there is not enough memory available for the corresponding extension, which will cause the “You do not
have enough space” warning message.
6. Voice Mailbox Settings
This group is used to configure voice mailbox storage and consists of a group of manipulatio n radio buttons to define the location where voice mails will
be collected.
• Disable Voice Mail – disables the Voice Mail service for the corresponding extension. With this selection, the extension user will be unable to reach
their Voice Mail Settings, but will be able to access their Voice Mailbox and manage the existing voice mails.
• Use Internal Voice Mail – enables the Voice Mail service for the corresponding extension and defines the QX IP PBX’s internal storage as a location
for the Voice Mails.
This selection also allows you to manipulate with the Voice Mailbox Settings used by the extension’s user to setup perso nal settings (the password,
the voice mail greeting message and the user’s name for Extensions Directory) from the handset. By default, the Voice Mailbox Settings is enabled
when the QX IP PBX’s is in the factory reset state. It can be manually enabled from this page by pressing the Activate button. When the Voice Mail is
activated, the extension’s user is prompted to insert personal settings as he/she enters his/her Voice Mailbox for the first time. Unless the required
information is not inserted, the button is changed to Deactivate and the Configuration Wizard Status becomes Activated. Use Deactivate button
to stop Voice Mail Configurat ion W izard. When the user inserted the required information, the Configuration Wizard Status on this page is
QX50/QX200/QX2000; (SW Version 6.0.x) 30
 Loading...