

Page 1

Refilling the Epson T032120, T032220, T032320, T032420, T032520, T042220, T042320, T042420, T042520 ink jet cartridges.
We have spent a great deal of time learning about the inner working of these particular cartridges. Having taken apart some 20 cartridges and torn apart two printers has given us a unique perspective as to how well the
cartridges were designed.
The C80 cartridges are designed to work without the need for sponges. This is done though a series of chambers that contain air an ink. The multiple chamber cartridge works using pressue and is (in my opinion) a most
impressive cartridge.
Below is the magenta cartridge that has had its side wall remove. This is the wall opposite the label side. As you can see there are chambers and paths throughout the cartridge. At first glance this is all very confusing.
The cartridge has several distinct chambers that allow ink to flow in a regular pattern throughout the cartridge and actually allow ink to move UP the cartridge. Below you can see the six chambers as we defined them.
The largest chamber which appears above in very faint yellow runs throughout the cartridges and contains more ink than the entire remaining portion of the cartridge combined.
Below you'll see the amounts of ink in cc's (cubic centimeters). If you are wondering how accurate these numbers are, we believe these to be plus or minus no more than .2cc
The total volume of ink as we have withdrawn from the cartridge does not exceed 18cc. We believe though that this may be as much as 1cc higher than the actual amount of ink.
In contrast to how much ink is in the cartridge is how much of the ink is usable. In all of our testing no cartridge after use contained less than 4cc. This means that the usable ink within the cartridge is about 14cc.
The remaining 4cc was trapped or sat in the red and blue portions of the cartridge. We expect that this was part of the process that ensured that no air was capable of getting into these chambers and ink flowed properly.
Page 2
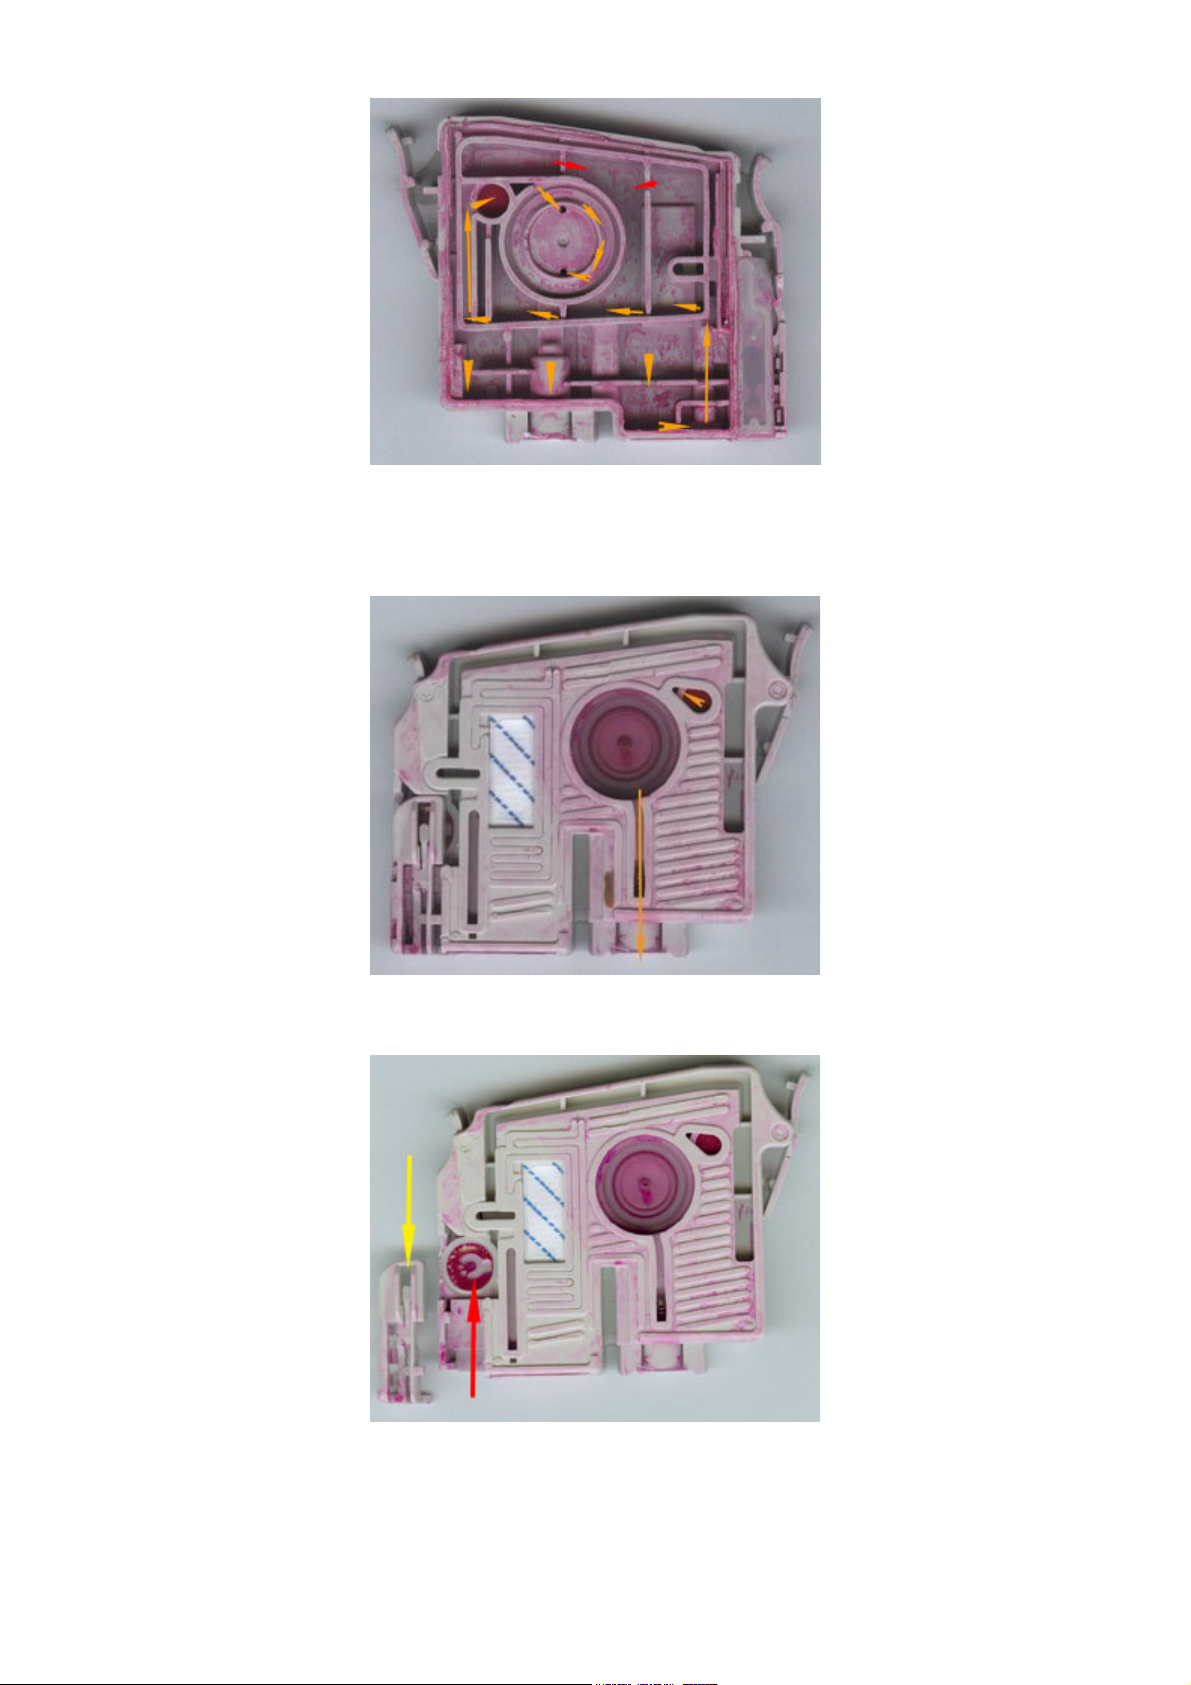
Ink from the bottom of the cartridge actually flows up the cartridge. To the best of my knowledge this is the first ink jet cartridge that does not use gravity to feed into into the print head area or exit port if you will.
The path as show above starts at the bottom of the cartridge and works its way up a small tube. Once in the tube it exits out into a chamber (second level of cartridge on far right) where it feeds into another chamber (chamber
directly to the left) and yet another two chambers before finally working up another tube. Finally the ink exits this side of the cartridge (show below) through the only sponge material.
The ink is passed back into this side of the cartridge and then enters the circular area. Once in this area it once again feeds into the other side of the cartridge before entering the exit tube. (shown below)
OK. Now you see that this is a very complex cartridge. There are several fail safes that make refilling these cartridges a bit difficult. The first fail-safe is the "plastic vent puncture pin" located on the lower left portion of the
picture with the yellow arrow. Once you insert a cartridge into your printer the pin punctures the plastic covering the air vent (show with red arrow)
The original fill ho les of the ink ca rtridge are on the bottom of the cartridge. This makes the standard "use the same holes as the manufacturer did" a bit difficult. The holes would need to be completely sealed for proper use.
Page 3

The cartridge uses a double wall design that makes refilling very tough. You can attempt to refill by only drilling and filling through one wall, but the the refill becomes q uite ineffect ive as you can not get enough ink into the
cartridge . Drilling through both walls makes the refill troublesome as you need to attempt to do one of two things to actually get the refill to work.
The first thing that you need to do if attempting this method of refilling is to drill two holes. One fo r the ink to be injecte d and the other for air to escape as ink is being injected. This requires two seals once the refill is completed.
To me, this double wall is a design benefit to Epson and a method of making refilling more tedious if not problematic.
The multi chamber conf iguration also make s refilling quite p roblematic. Attempting to get ink into all o f the chambers is rea lly impossible simply by drilling a h ole in the top.
Now, you are probably wondering why I even bothered to write this article since there seems to be no way to easily refill the cartridges. Oh, but there is. You just need to be a bit more patient.
Now we have already discussed some of the disadvantages of refilling the Epson ca rtridges for the C80, C82, 960, 200 and other printers that use these cartridges.
Where is the light at the end of the tunnel?
In my opinion it comes in the form of aftermarket cartridges. If you have not yet purchased one of these yet you may want to try one. There are a variety of companies manufacturing aftermarket cartridges for the Epson printers
listed above.
But this is only the beginning of the story. For the aftermarket industry to manufacture cartridges for the Epson printers they had to come up with a design that was different from Epson's design. Epson has a patent on this new
design. The aftermarket cartridge makers could not simply duplicate the cartridges.
If you purchase just about any aftermarket cartridge and open it up what you will find is a sponge. Yes, the tried and true sponge that has been so beneficial for so many cartridges for so long.
Below I have images of two different cartridge manufactures aftermarket versions of the OEM cartridge. Both of these cartridges use a sponge material to retain ink instead of multiple chambers and pressure.
We all know that sponge based cartridges are easy to refill. The only thin g you really need to do is replenish to existing sponge.
I have outlined below the refill process for these cartridges using a third party sponge based cartridge.
Page 4

1. Tape the bottom of the cartridge. Using any decent grade adhesive tape seal the bottom of the cartridge.*
2. Locate the original fill hole on the top of the cartridge. This can actually be accomplished by running a screw driver along the top of the cartridge or even a screw eye (show on the upper right of the picture). Typically you'll
find the orig inal fill hole when you locate an indentation on the label. In many cases you'll also find that the cartridges have two layers of plastic seals. The first and topmost is not really a seal, but an identification label. The
second one below the identification label is the true cartridge seal. In the case of the cartridge above I was able to completely remove the original top label and move it to the side of the cartridge exposing the original fill hole.
3. Once you have lo cated the original f ill hole you can use a screw eye or drill bit and reopen the original fill hole.
4. Fill your injector with th e desired amount of ink.
5. Inject ink into the cartridge slowly (slower than that)
6. Seal the top of the cartridge.
A very simple process that is far less susce ptible to failure.
As a matter of f act in our testing we were able to achie ve at 96% success rate over 9 users refilling 45 differen t cartridges nearly 300 times.
Our success rate by the way with the OEM cartridges came to 9% (22 cartridges were refilled and 2 functioned).
This now brings us to the final problem and Epson's most infamous of late... The Chip.
To get an Epson cartridge to function properly your printer must be capable of seeing that the cartridge is present. This is done by the ridiculous intellidge chip. The chip located on the front of the cartridge will fail once a
cartridge is used up (used up according to the printer).
Though resetters are available for these chips they are designed to work with OEM chips only and not the third party chips.
I would like to make mention that Epson printers are designed to recognize non-OEM chips. Typically when you insert a non-OEM cartridge a message will pop up stating the cartridge is not an Epson cartridge.
This is where the fun really begins. Take a look at the image below. This scan of three chips shows the Epson original chip and two aftermarket ch ips. If you are atte mpting to refill and want to be very successful at it you need
to acquire aftermarket cartridges that are using the same sized chips as Epson chips.
Why the same size? Once you have refilled your aftermarket cartridge you are going to replace the aftermarket chip with the OEM chip from your original Epson cartridge. Then using a chip resetter reset the chip.
The image below simply shows the replaced chips. The cartridge below is an aftermarket cartridge that now contains the Epson chip. The real cool part of doing all t his is that your printer will b elieve these are Epson cartridges.
No warning message, no error message and none of those "bluish print problems"
Page 5

Additional observation.
We have found that the typical refill is still about 14cc on the aftermarket cartridges. This is not due to the efficiency of the refill or the origin al cartridge, but the chip itself. The chip is designed to stop functioning at a certain
point and this appears to be it.
 Loading...