

Page 1

Basic Operation Guide
- for use without a computer -
Page 2

About This Guide
Follow these guidelines as you read your instructions:
w c
Warning:
Warnings must be followed
carefully to avoid bodily injury.
Caution:
Cautions must be observed
to avoid damage to your
equipment.
Must be observed to avoid
bodily injury and damage to
your equipment.
Q R &
Note:
Notes contain important
information and hints for using
the printer.
Indicates a page number where
additional information can be
found.
2
Page 3

Copyright Notice
No part of this publication may be reproduced, stored in a retrieval system, or transmitted in any form or by any means, electronic, mechanical, photocopying, recording, or otherwise, without the prior
written permission of Seiko Epson Corporation. The information contained herein is designed only for use with this product. Epson is not responsible for any use of this information as applied to other
printers.
Neither Seiko Epson Corporation nor its aliates shall be liable to the purchaser of this product or third parties for damages, losses, costs, or expenses incurred by the purchaser or third parties as a result of
accident, misuse, or abuse of this product or unauthorized modications, repairs, or alterations to this product, or (excluding the U.S.) failure to strictly comply with Seiko Epson Corporation’s operating and
maintenance instructions.
Seiko Epson Corporation shall not be liable for any damages or problems arising from the use of any options or any consumable products other than those designated as Original Epson Products or Epson
Approved Products by Seiko Epson Corporation.
Seiko Epson Corporation shall not be held liable for any damage resulting from electromagnetic interference that occurs from the use of any interface cables other than those designated as Epson Approved
Products by Seiko Epson Corporation.
EPSON and EPSON STYLUS® are registered trademarks, and Exceed Your Vision and EPSON ME are trademarks of Seiko Epson Corporation.
SDHC™ is a trademark.
Memory Stick, Memory Stick Duo, Memory Stick PRO, Memory Stick PRO Duo, Memory Stick PRO-HG Duo, Memory Stick M icro, MagicGate Memory Stick, and MagicGate Memory Stick Duo are trademarks
of Sony Corporation.
xD-Picture Card™ is a trademark of Fuji Photo Film Co., Ltd.
General Notice: Other product names used herein are for identication purposes only and may be trademarks of their respective owners. Epson disclaims any and all rights in those marks.
3
Page 4

Contents
Important Safety Instructions ............................................................................................................................. 5
Guide to Control Panel .......................................................................................................................................... 6
Using the LCD Screen.............................................................................................................................................7
Power Saving Function .......................................................................................................................................... 7
Handling Media
Selecting Paper .................................................................................................................................................. 10
Loading Paper ....................................................................................................................................................11
Inserting a Memory Card ...............................................................................................................................12
Placing Originals ...............................................................................................................................................14
Copying/Printing/Scanning
Copying Photos or Documents ...................................................................................................................16
Printing Photos ..................................................................................................................................................18
Printing Photos from an Index Sheet ........................................................................................................20
Scanning to a Computer ................................................................................................................................23
Maintenance
Checking/Cleaning the Print Head ............................................................................................................. 26
Aligning the Print Head ..................................................................................................................................28
Changing Language & Resetting ................................................................................................................30
Solving Problems
Error/Warning Messages ...............................................................................................................................32
Replacing Ink Cartridges ................................................................................................................................33
Paper Jam ............................................................................................................................................................36
Print Quality/Layout Problems .....................................................................................................................38
Contacting Customer Support.....................................................................................................................39
4
Page 5
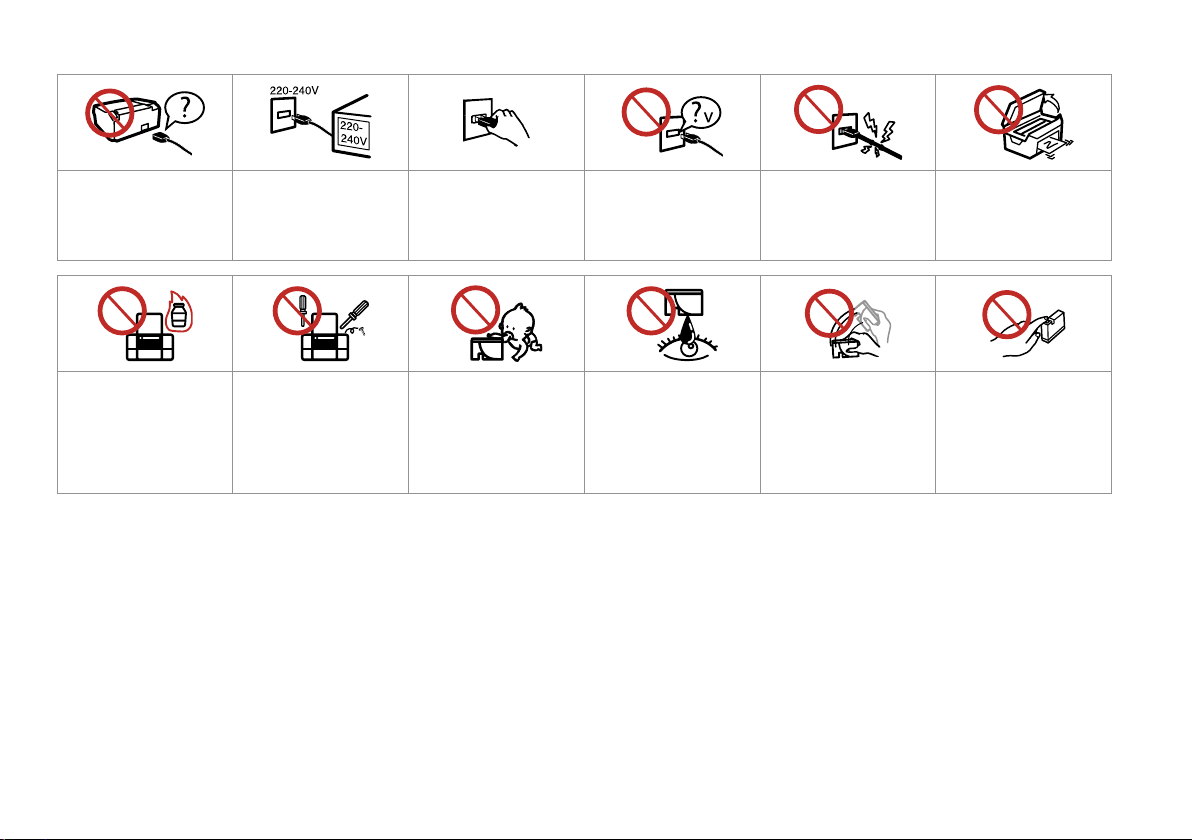
Important Safety Instructions
Use only the power cord that
comes with the printer. Use of
another cord may cause re or
shock. Do not use the cord with
any other equipment.
Do not use aerosol products
that contain ammable gases
inside or around the printer.
Doing so may cause re.
Make sure the power cord
meets all relevant local safety
standards.
Except as specically explained
in your documentation, do not
attempt to service the printer
yourself.
Place the printer near a wall
outlet where the power cord
can be easily unplugged.
Keep ink cartridges out of the
reach of children and do not
drink the ink.
Use only the type of power
source indicated on the label.
If ink gets on your skin, wash
it o with soap and water. If it
gets in your eyes, ush them
immediately with water. If
you still have discomfort or
vision problems, see a doctor
immediately.
Do not let the power cord
become damaged or frayed.
Do not shake ink cartridges
after opening their packages;
this can cause leakage.
Do not open the scanner unit
while copying, printing, or
scanning.
If you remove an ink cartridge
for later use, protect the ink
supply area from dirt and
dust and store it in the same
environment as the printer. Do
not touch the ink supply port
or surrounding area.
5
Page 6
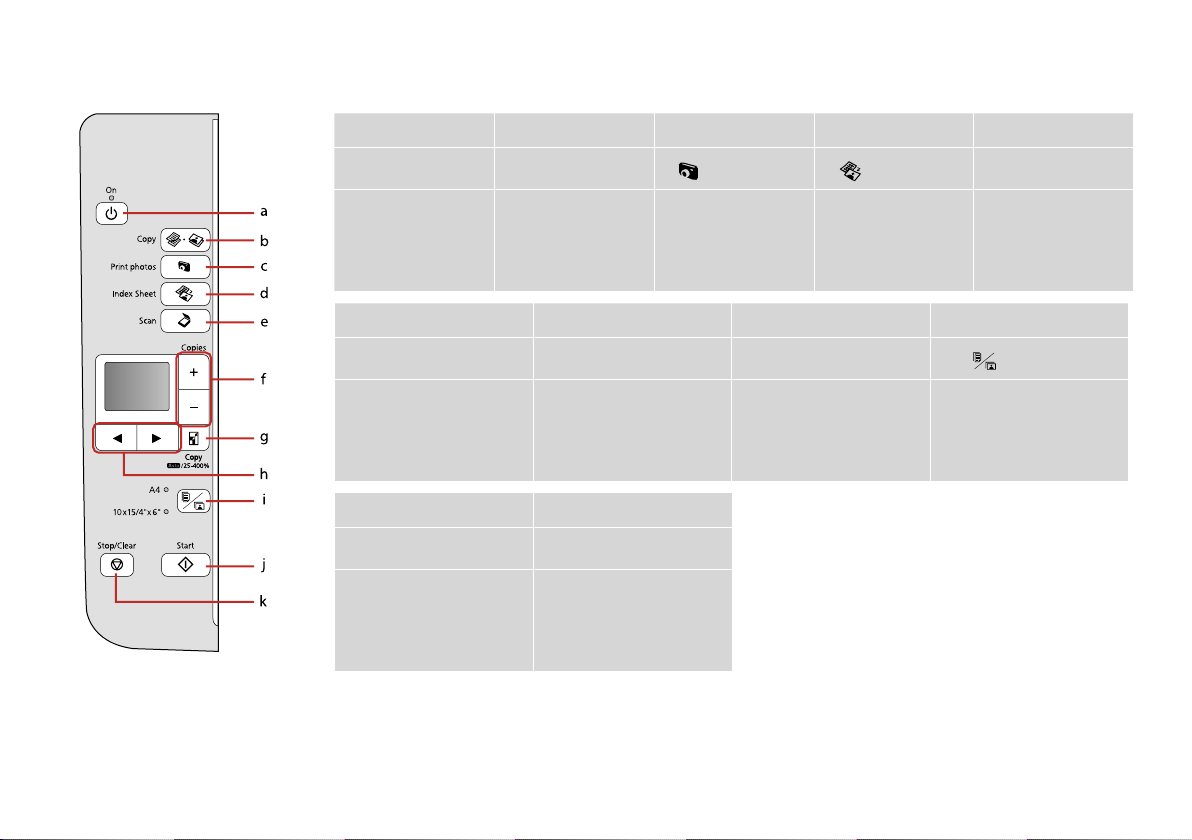
Guide to Control Panel
Control panel design varies by area.
a b c d e
P On
Turns on/o printer. Selects to copy photo/
f g h i
+, -
Sets the number of copies. Changes the zoom settings for
j k
r • J Copy
documents.
o Copy
copying.
Print photos
Selects to view and print
photos.
x Start y Stop/Clear
Starts copying/printing. Stops copying/printing or
resets settings.
Index Sheet
Selects to print photos
using index sheet.
l, r
Selects photos and menus. Selects between A4 plain
paper and 10×15/4”×6” photo
paper for the paper loaded in
the sheet feeder.
u Scan
Selects to scan and save
documents.
Paper select
6
Page 7

Using the LCD Screen
Power Saving Function
a b
Use Copies + or - to set the
number of copies.
Press l or r to select the
setting item, or change the
photo displayed on the LCD
screen.
After 13 minutes of inactivity, the screen turns black to save
energy. Press any button (except P On) to return the screen
to its previous state.
7
Page 8

8
Page 9

Handling Media
9
Page 10

Selecting Paper
The availability of special paper
varies by area.
If you want to print
on this paper...
a Plain paper A4
b Epson Bright White
Ink Jet Paper
c Epson Premium Ink
Jet Plain Paper
d Epson Premium
Glossy Photo Paper
e Epson Premium
Semigloss Photo
Paper
f Epson Ultra Glossy
Photo Paper
g Epson Glossy
Photo Paper
h Epson Photo Paper 10×15/4”×6”
*1 Paper with a weight of 64 to 90 g/m².
*2 30 sheets for paper that already has printing on one side.
Choose this on
the control panel
Plain Paper
A4
Plain Paper
A4
Plain Paper
10×15/4”×6”
Photo Paper
10×15/4”×6”
Photo Paper
10×15/4”×6”
Photo Paper
10×15/4”×6”
Photo Paper
Photo Paper
Loading capacity
(sheets)
[12 mm] *¹ *²
80 *²
80 *²
20
20
20
20
20
10
Page 11

Loading Paper
A B
Open and slide out. Flip forward.
Q
See the online User’s Guide when
using Legal size paper.
Align the edges of the paper
before loading.
C D
Load printable side up. Fit.
Q
Do not load paper above the H
arrow mark inside the edge guide.
Q
Do not use paper with binder
holes.
11
Page 12

Inserting a Memory
Card
A B
Insert one card at a time. Check the light stays on.
c
Do not try to force the card all the
way into the slot. It should not be
fully inserted.
Removing a Memory
Card
12
A B
Check the light stays on.
Remove.
Q
On Flashing
Page 13

xD-Picture Card
xD-Picture Card Type M
xD-Picture Card Type M+
xD-Picture Card Type H
SD
SDHC
MultiMediaCard
MMCplus
MMCmobile *
MMCmicro *
miniSD *
miniSDHC *
microSD *
microSDHC *
Memory Stick
Memory Stick PRO
MagicGate Memory Stick
Memory Stick Duo *
Memory Stick PRO Duo *
Memory Stick PRO-HG Duo *
MagicGate Memory Stick Duo *
Memory Stick Micro *
*Adapter required
c
If the memory card needs an adapter then attach it before
inserting the card into the slot, otherwise the card may get stuck.
13
Page 14

Placing Originals
A B
Q
You can reprint photos from
30 × 40 mm to 127 × 178 mm.
14
Place face-down horizontally.
Slide to the corner.
Page 15

Copying/Printing/Scanning
15
Page 16

Copying Photos or
Documents
A R & 11 B R & 14 C
Load paper printable side up. Place original horizontally. Select Copy.
D E
16
Set the number of copies.
Q
To clear the number of copies,
press the r·J Copy button.
F
Select paper type/size.Select a color mode.
Page 17

Q
After step F, if you want to
change the copy zoom, press the
o Copy button as shown in (1),
and then use + or - to change the
zoom manually as shown in (2). Or,
press the l button to select AUTO
to t to your paper size.
G
Start copying.
Q
You can speed up plain paper
copying, however print quality
declines. In step G, hold down
x button until the P light starts
ashing.
17
Page 18

Printing Photos
A R & 11 B R & 12 C
Load photo paper. Insert a memory card. Select Print photos.
18
D
Select a photo.
E
Set the number of copies.
Q
To clear the number of copies,
press the button.
Q
To select more photos, repeat
steps D and E.
Page 19

F
G
Select 10×15/4”×6”.
Start printing.
19
Page 20

Printing Photos from
an Index Sheet
You can print photos using an A4
index sheet. First print an index sheet,
mark the photos that you want to
print, and then scan the index sheet
to print your photos.
Q
All of the photos on the card are
printed in groups of 30 thumbnails
per index sheet. You may need
several sheets of A4 plain paper.
A R & 11
20
B R & 12
Insert a memory card.
C
Select Index Sheet.Load A4-size plain paper.
D
Print the index sheet.
Page 21

E F
G
Check u aligns with the corner on the sheet.
H
Select to print with a date stamp.
I K R & 11
Select the number of copies.
Select a paper size.
J
Place the index sheet face-down.
Select border or borderless.
Load the photo paper.
21
Page 22

L
Print photos from the index sheet.
Q
You can print photos on Ultra
Glossy Photo Paper, Premium
Glossy Photo Paper, or Premium
Semigloss Photo Paper.
Q
If you have more than one index
sheet, wait until printing is
complete for the rst sheet, and
then repeat steps J to L to scan
and print from each additional
sheet.
22
Page 23

Scanning to a
Computer
Q
Make sure you have installed
software for this printer on
your computer and connected
following the instructions on the
Start Here poster.
A
B
C
Select an item.
Q
After step C, your computer’s
scanning software automatically
starts scanning. For details, see the
online User’s Guide.
Place face down horizontally.
Select Scan.
23
Page 24

24
Page 25

Maintenance
25
Page 26

Checking/Cleaning
the Print Head
A R & 11 B
C
D
26
Check the pattern.
Load A4-size plain paper.
Press both buttons at the same time.
E
Start head cleaning.
Select Nozzle Check.
F
Finish head cleaning.
Page 27

Q
Print head cleaning uses ink from
all cartridges, so clean the print
head only if quality declines.
Q
If it does not improve after
cleaning four times, turn o the
printer for at least six hours. Then
try cleaning the print head again.
If quality still does not improve,
contact Epson Support.
27
Page 28

Aligning the Print
Head
A R & 11 B
C
D
Select the most solid pattern.
28
Load A4-size plain paper.
E
Select the pattern number.
Press both buttons at the same time.
F
Enter the number.
Select Head Alignment.
G
Repeat E and F for all patterns.
Page 29

H
Finish aligning the print head.
29
Page 30

Changing Language
& Resetting
Restoring Default
Settings
A B
Press both buttons at the same time. Select Restore Default Settings.
30
Changing the
Language
A B C
Press both buttons at the same time. Select Language. Select a language.
Page 31

Solving Problems
31
Page 32

Error/Warning
Messages
Code Solution
E-01 Turn the printer o and then back on. Make sure that no paper is still in the printer. If the error still appears, contact
E-02 Turn the printer o and then back on. If the error message still appears, contact Epson support.
E-10 Turn o the printer. Contact Epson support to replace ink pads.
I-01
I-10 No photos on the memory card. Check the memory card and try again.
I-11
W-01
W-02
W-03
W-04
W-05
W-10
W-11
W-13
W-20 There is no index sheet or it is not placed correctly on the document table. Check it and try again.
W-21 Photos are not selected or the ovals are marked incorrectly on the index sheet. Correct the sheet and try again.
W-22 The paper type is not selected or ovals are marked incorrectly on the index sheet. Correct the sheet and try again.
W-23 The contents of the memory card have changed. Print a new index sheet and try again.
W-30 Make sure that the memory card is inserted correctly. If it is, check that there are no problems with the card and try
W-40 The settings you have made will be cleared. Select Yes or No.
W-41
Epson support.
Paper out. Load paper and press x. R & 11
Memory card is not inserted. Insert a memory card. R & 12
Press x to return to the previous screen. Contact Epson support to replace ink pads before the end of their service life.
When the ink pads are saturated, the printer stops and Epson support is required to continue printing.
Paper jam. Turn o the printer, remove the jammed paper, and then turn it back on. R & 37
Paper jam. Open the scanner unit, remove the jammed paper, and then press x. R & 36
The ink cartridge cover is open. Open the scanner unit and close the ink cartridge cover. Press x to continue. R & 33
Remove and reload the paper, then press x. R & 11
The ink cartridge(s) shown on the LCD panel have not been installed. Install them. R & 33
Cannot recognize the ink cartridge(s) shown on the LCD panel. Install them correctly. R & 33
You need to replace the ink cartridge(s) shown on the LCD panel. R & 33
again.
Replace the cartridge(s) shown on the LCD panel before cleaning the print head. R & 33
32
Page 33

Replacing Ink
Cartridges
Ink Cartridge Handling Precautions
c
Never move the print head by hand.
O
Some ink is consumed from all cartridges during
O
the following operations: print head cleaning and
ink charging when an ink cartridge is installed.
For maximum ink eciency, only remove an ink
O
cartridge when you are ready to replace it. Ink
cartridges with low ink status may not be used
when reinserted.
Epson recommends the use of genuine Epson ink
O
cartridges. Epson cannot guarantee the quality
or reliability of non-genuine ink. The use of
non-genuine ink may cause damage that is not
covered by Epson’s warranties, and under certain
circumstances, may cause erratic printer behavior.
Information about non-genuine ink levels may
not be displayed, and use of non-genuine ink is
recorded for possible use in service support.
Make sure you have a new ink cartridge before
O
you begin replacement. Once you start replacing
a cartridge, you must complete all the steps in one
session.
Leave the expended cartridge installed until you
O
have obtained a replacement. Otherwise the ink
remaining in the print head nozzles may dry out.
Do not open the ink cartridge package until you
O
are ready to install it in the printer. The cartridge is
vacuum packed to maintain its reliability.
Other products not manufactured by Epson may
O
cause damage that is not covered by Epson’s
warranties, and under certain circumstances, may
cause erratic printer behavior.
Do not turn o the printer during ink charging as
O
this will waste ink.
When an ink cartridge is expended, you cannot
O
continue printing even if the other cartridges still
contain ink.
33
Page 34

Q
To replace an ink cartridge before
it is expended, press the Index
Sheet and u Scan buttons at
the same time to enter Setup
mode. Then, use the l or r
buttons to select Ink Cartridge
Replacement, and then press the
x Start button. Next, go to step B
in the following instructions.
A B
Check the color to replace. Open.
c
Never open the cartridge cover
while the print head is moving.
34
C D E
Open. Remove. Shake new cartridge.
Page 35

c
Be careful not to break the hooks
on the side of the ink cartridge.
F G H
Remove the yellow tape. Insert and push. Close.
c
If you nd it dicult to close
the cover, press down on each
cartridge until it clicks into place.
I
Close.
J
Start charging ink.
Q
If you had to replace an ink
cartridge during copying, to
ensure copy quality after ink
charging is nished, cancel the
job that is copying and start again
from placing the originals.
35
Page 36

Paper Jam
Paper Jam - jammed
inside 1
A
B
36
C
Close.
Q
If paper still remains near the rear
feeder, gently pull it out.
Open.
Remove.
D
Press to resume printing.
Page 37

Paper Jam - jammed
inside 2
A B C
Turn o . Open. Remove.
Q
If paper still remains near the rear
feeder, gently pull it out.
D
Turn on.
37
Page 38

Print Quality/Layout
Problems
Try the following solutions in order from the Top. For further information, see your online User’s Guide.
Problems Solution No.
You see banding (light lines) in your printouts or copies.
Your printout is blurry or smeared.
Your printout is faint or has gaps.
Your printout is grainy.
You see incorrect or missing colors.
The image size or position is incorrect.
Solutions
Make sure you selected the correct paper setting for the loaded paper. R & 10
A
Make sure the printable side (the whiter or glossier side) of the paper is facing in the right direction. R & 11
B
Clean the print head. R & 26
C
Align the print head. R & 28
D
If quality is not improved, try aligning using the printer driver utility. See your online User’s Guide to align the print head.
To clean the inside of the printer, make a copy without placing a document on the document table. For further information,
E
see your online User’s Guide.
Use up ink cartridge within six months of opening vacuum package. R & 33
F
Try to use genuine Epson ink cartridges and paper recommended by Epson.
G
If a moiré (cross-hatch) pattern appears on your copy, change the zoom setting or shift the position of your original.
H
R & 14, 17
Make sure you loaded paper and placed the original correctly. R & 11, 14
I
If the edges of the copy or photo are cropped o, move the original slightly away from the corner. R & 14
J
Clean the document table. See your online User’s Guide.
K
ABCDFH
ABCDEG
ABCF
D
CF
AIJK
38
Page 39

Contacting
Customer Support
If you cannot solve the problem using the troubleshooting information, contact customer support services for assistance. You can
get the contact information for customer support for your area in your online User’s Guide or warranty card. If it is not listed there,
contact the dealer where you purchased your product.
39
Page 40

Epson
Stylus
SX210
Series *¹
Available ink cartridge sizes vary by area.
Black Cyan Magenta Yellow
T0891 T0892 T0893 T0894
T0711 T0712 T0713 T0714
T0711H - - -
*1 For the SX210 Series, Epson recommends the T071 ink cartridges for
normal print usage.
*2 For the TX210 Series, the ink cartridge numbers between the
parenthesis may be displayed depending on the area.
Epson Stylus TX210
Series *²
73N (T0731N)/
73HN (T0731HN)
73N
(T0732N)
73N
(T0733N)
73N
(T0734N)
Epson ME Oce 510 109 109 109 109
Getting more information.
Copyright © 2009 Seiko Epson
Corporation. All rights reserved.
Printed in XXXXXX
 Loading...