

Page 1

Epson® SureColor
T7000
T5000
T3000
User’s Guide
®
Page 2

Copyrights and Trademarks
All rights reserved. No part of this publication may be reproduced, stored in a retrieval system, or transmitted in any
form or by any means, electronic, mechanical, photocopying, recording, or otherwise, without the prior written
permission of Seiko Epson Corporation. The information contained herein is designed only for use with this
EPSON printer. Epson is not responsible for any use of this information as applied to other printers.
Neither Seiko Epson Corporation nor its affiliates shall be liable to the purchaser of this product or third parties for
damages, losses, costs, or expenses incurred by the purchaser or third parties as a result of accident, misuse, or
abuse of this product or unauthorized modifications, repairs, or alterations to this product, or (excluding the U.S.)
failure to strictly comply with Seiko Epson Corporation’s operating and maintenance instructions.
Seiko Epson Corporation shall not be liable for any damages or problems arising from the use of any options or
any consumable products other than those designated as Original Epson Products or Epson Approved Products
by Seiko Epson Corporation.
Seiko Epson Corporation shall not be held liable for any damage resulting from electromagnetic interference that
occurs from the use of any interface cables other than those designated as Epson Approved Products by Seiko
Epson Corporation.
EPSON, Epson UltraChrome, and SureColor are registered trademarks and EPSON Exceed Your Vision is a
registered logomark of Seiko Epson Corporation.
General Notice: Other product names used herein are for identification purposes only and may be trademarks of
their respective owners. Epson disclaims any and all rights in those marks.
This information is subject to change without notice.
© 2013 Epson America, Inc. 8/13
CPD-38239R2
Copyrights and Trademarks 2
Page 3

Contents
Copyrights and Trademarks
Chapter 1 Introduction
Important Safety Instructions. . . . . . . . . . . . . . . . . . . . . . . . . . . . . . . . . . . . . . . . . . . . . . . . . . . . . . . . . .8
When choosing a place for this product. . . . . . . . . . . . . . . . . . . . . . . . . . . . . . . . . . . . . . . . . . . . . .8
When setting up this product . . . . . . . . . . . . . . . . . . . . . . . . . . . . . . . . . . . . . . . . . . . . . . . . . . . . . .8
When using this product . . . . . . . . . . . . . . . . . . . . . . . . . . . . . . . . . . . . . . . . . . . . . . . . . . . . . . . . .9
When handling the ink cartridges. . . . . . . . . . . . . . . . . . . . . . . . . . . . . . . . . . . . . . . . . . . . . . . . . . .9
Warnings, Cautions, Important and Notes . . . . . . . . . . . . . . . . . . . . . . . . . . . . . . . . . . . . . . . . . . .10
Illustrations. . . . . . . . . . . . . . . . . . . . . . . . . . . . . . . . . . . . . . . . . . . . . . . . . . . . . . . . . . . . . . . . . . .10
Printer Parts. . . . . . . . . . . . . . . . . . . . . . . . . . . . . . . . . . . . . . . . . . . . . . . . . . . . . . . . . . . . . . . . . . . . . .11
Front section . . . . . . . . . . . . . . . . . . . . . . . . . . . . . . . . . . . . . . . . . . . . . . . . . . . . . . . . . . . . . . . . .11
Roll paper adapter . . . . . . . . . . . . . . . . . . . . . . . . . . . . . . . . . . . . . . . . . . . . . . . . . . . . . . . . . . . . .13
Control panel . . . . . . . . . . . . . . . . . . . . . . . . . . . . . . . . . . . . . . . . . . . . . . . . . . . . . . . . . . . . . . . . .15
Screen View. . . . . . . . . . . . . . . . . . . . . . . . . . . . . . . . . . . . . . . . . . . . . . . . . . . . . . . . . . . . . . . . . .17
Features. . . . . . . . . . . . . . . . . . . . . . . . . . . . . . . . . . . . . . . . . . . . . . . . . . . . . . . . . . . . . . . . . . . . . . . . .20
High Productivity . . . . . . . . . . . . . . . . . . . . . . . . . . . . . . . . . . . . . . . . . . . . . . . . . . . . . . . . . . . . . .20
High Resolution . . . . . . . . . . . . . . . . . . . . . . . . . . . . . . . . . . . . . . . . . . . . . . . . . . . . . . . . . . . . . . .21
Ease-of-Use . . . . . . . . . . . . . . . . . . . . . . . . . . . . . . . . . . . . . . . . . . . . . . . . . . . . . . . . . . . . . . . . . .21
Notes on Usage and Storage . . . . . . . . . . . . . . . . . . . . . . . . . . . . . . . . . . . . . . . . . . . . . . . . . . . . . . . .23
Installation space . . . . . . . . . . . . . . . . . . . . . . . . . . . . . . . . . . . . . . . . . . . . . . . . . . . . . . . . . . . . . .23
Notes when using the printer . . . . . . . . . . . . . . . . . . . . . . . . . . . . . . . . . . . . . . . . . . . . . . . . . . . . .24
Notes when not using the printer . . . . . . . . . . . . . . . . . . . . . . . . . . . . . . . . . . . . . . . . . . . . . . . . . .24
Notes on handling ink cartridges . . . . . . . . . . . . . . . . . . . . . . . . . . . . . . . . . . . . . . . . . . . . . . . . . .25
Notes on handling paper . . . . . . . . . . . . . . . . . . . . . . . . . . . . . . . . . . . . . . . . . . . . . . . . . . . . . . . .26
Using the Supplied Software . . . . . . . . . . . . . . . . . . . . . . . . . . . . . . . . . . . . . . . . . . . . . . . . . . . . . . . . .28
Contents of the Software CD . . . . . . . . . . . . . . . . . . . . . . . . . . . . . . . . . . . . . . . . . . . . . . . . . . . . .28
Summary of the Printer Driver . . . . . . . . . . . . . . . . . . . . . . . . . . . . . . . . . . . . . . . . . . . . . . . . . . . .29
Chapter 2 Basic Operations
Loading and Removing the Roll Paper . . . . . . . . . . . . . . . . . . . . . . . . . . . . . . . . . . . . . . . . . . . . . . . . .32
Loading Roll Paper . . . . . . . . . . . . . . . . . . . . . . . . . . . . . . . . . . . . . . . . . . . . . . . . . . . . . . . . . . . .32
Cutting the roll paper . . . . . . . . . . . . . . . . . . . . . . . . . . . . . . . . . . . . . . . . . . . . . . . . . . . . . . . . . . .38
Removing the roll paper. . . . . . . . . . . . . . . . . . . . . . . . . . . . . . . . . . . . . . . . . . . . . . . . . . . . . . . . .41
Loading and Removing Cut Sheets. . . . . . . . . . . . . . . . . . . . . . . . . . . . . . . . . . . . . . . . . . . . . . . . . . . .43
Loading Cut Sheets . . . . . . . . . . . . . . . . . . . . . . . . . . . . . . . . . . . . . . . . . . . . . . . . . . . . . . . . . . . .44
Contents 3
Page 4

Removing Cut Sheets . . . . . . . . . . . . . . . . . . . . . . . . . . . . . . . . . . . . . . . . . . . . . . . . . . . . . . . . . .46
Loading and Removing Poster Board . . . . . . . . . . . . . . . . . . . . . . . . . . . . . . . . . . . . . . . . . . . . . . . . . .47
Loading Poster Board . . . . . . . . . . . . . . . . . . . . . . . . . . . . . . . . . . . . . . . . . . . . . . . . . . . . . . . . . .47
Removing Poster Board. . . . . . . . . . . . . . . . . . . . . . . . . . . . . . . . . . . . . . . . . . . . . . . . . . . . . . . . .52
Viewing and Changing Media Settings . . . . . . . . . . . . . . . . . . . . . . . . . . . . . . . . . . . . . . . . . . . . . . . . .53
Checking Media Settings . . . . . . . . . . . . . . . . . . . . . . . . . . . . . . . . . . . . . . . . . . . . . . . . . . . . . . . .54
Adjusting Settings . . . . . . . . . . . . . . . . . . . . . . . . . . . . . . . . . . . . . . . . . . . . . . . . . . . . . . . . . . . . .55
Replacing Paper . . . . . . . . . . . . . . . . . . . . . . . . . . . . . . . . . . . . . . . . . . . . . . . . . . . . . . . . . . . . . . . . . .56
Using the Paper Basket. . . . . . . . . . . . . . . . . . . . . . . . . . . . . . . . . . . . . . . . . . . . . . . . . . . . . . . . . . . . .58
Using the Auto Take-up Reel Unit (SureColor T7000 Only) . . . . . . . . . . . . . . . . . . . . . . . . . . . . . . . . .61
Using the Control Panel . . . . . . . . . . . . . . . . . . . . . . . . . . . . . . . . . . . . . . . . . . . . . . . . . . . . . . . . .62
Attaching the Paper . . . . . . . . . . . . . . . . . . . . . . . . . . . . . . . . . . . . . . . . . . . . . . . . . . . . . . . . . . . .63
Removing Paper from the Auto Take-up Reel Unit . . . . . . . . . . . . . . . . . . . . . . . . . . . . . . . . . . . .69
Basic Printing Methods (Windows) . . . . . . . . . . . . . . . . . . . . . . . . . . . . . . . . . . . . . . . . . . . . . . . . . . . .71
Basic Printing Methods (Mac OS X) . . . . . . . . . . . . . . . . . . . . . . . . . . . . . . . . . . . . . . . . . . . . . . . . . . .76
Printable Area . . . . . . . . . . . . . . . . . . . . . . . . . . . . . . . . . . . . . . . . . . . . . . . . . . . . . . . . . . . . . . . . . . . .81
Roll Paper Printable Area . . . . . . . . . . . . . . . . . . . . . . . . . . . . . . . . . . . . . . . . . . . . . . . . . . . . . . .81
Cut Sheets Printable Area . . . . . . . . . . . . . . . . . . . . . . . . . . . . . . . . . . . . . . . . . . . . . . . . . . . . . . .83
Turning Off the Power Using Power Off Timer . . . . . . . . . . . . . . . . . . . . . . . . . . . . . . . . . . . . . . . . . . .83
Canceling Printing . . . . . . . . . . . . . . . . . . . . . . . . . . . . . . . . . . . . . . . . . . . . . . . . . . . . . . . . . . . . . . . . .84
Canceling from the computer (Windows). . . . . . . . . . . . . . . . . . . . . . . . . . . . . . . . . . . . . . . . . . . .84
Canceling from the computer (Mac OS X) . . . . . . . . . . . . . . . . . . . . . . . . . . . . . . . . . . . . . . . . . . .85
Canceling on the printer. . . . . . . . . . . . . . . . . . . . . . . . . . . . . . . . . . . . . . . . . . . . . . . . . . . . . . . . .86
Chapter 3 Using the Optional Hard Disk Unit
The Purpose of the Hard Disk Unit . . . . . . . . . . . . . . . . . . . . . . . . . . . . . . . . . . . . . . . . . . . . . . . . . . . .87
Saving Print Jobs to the Hard Disk Unit. . . . . . . . . . . . . . . . . . . . . . . . . . . . . . . . . . . . . . . . . . . . . . . . .89
Viewing and Printing Saved Print Jobs . . . . . . . . . . . . . . . . . . . . . . . . . . . . . . . . . . . . . . . . . . . . . . . . .91
Chapter 4 More Ways to Print
Enlargements and Horizontal and Vertical Banners . . . . . . . . . . . . . . . . . . . . . . . . . . . . . . . . . . . . . . .92
Fitting Documents to the Width of the Roll Paper . . . . . . . . . . . . . . . . . . . . . . . . . . . . . . . . . . . . .93
Choosing a Print Size . . . . . . . . . . . . . . . . . . . . . . . . . . . . . . . . . . . . . . . . . . . . . . . . . . . . . . . . . .96
Fitting Documents to the Output Size . . . . . . . . . . . . . . . . . . . . . . . . . . . . . . . . . . . . . . . . . . . . . .98
Printing at Non-Standard Sizes . . . . . . . . . . . . . . . . . . . . . . . . . . . . . . . . . . . . . . . . . . . . . . . . . . . . . .100
Printing CAD Drawings . . . . . . . . . . . . . . . . . . . . . . . . . . . . . . . . . . . . . . . . . . . . . . . . . . . . . . . . . . . .104
Borderless Printing . . . . . . . . . . . . . . . . . . . . . . . . . . . . . . . . . . . . . . . . . . . . . . . . . . . . . . . . . . . . . . .106
Types of Borderless Printing Methods . . . . . . . . . . . . . . . . . . . . . . . . . . . . . . . . . . . . . . . . . . . . .106
Supported Media Sizes for Borderless Printing . . . . . . . . . . . . . . . . . . . . . . . . . . . . . . . . . . . . . .107
About Roll Paper Cutting . . . . . . . . . . . . . . . . . . . . . . . . . . . . . . . . . . . . . . . . . . . . . . . . . . . . . . .108
Setting Procedures for Printing . . . . . . . . . . . . . . . . . . . . . . . . . . . . . . . . . . . . . . . . . . . . . . . . . .109
Contents 4
Page 5

Correct Color and Print . . . . . . . . . . . . . . . . . . . . . . . . . . . . . . . . . . . . . . . . . . . . . . . . . . . . . . . . . . . .113
Windows . . . . . . . . . . . . . . . . . . . . . . . . . . . . . . . . . . . . . . . . . . . . . . . . . . . . . . . . . . . . . . . . . . .114
Mac OS X. . . . . . . . . . . . . . . . . . . . . . . . . . . . . . . . . . . . . . . . . . . . . . . . . . . . . . . . . . . . . . . . . . .116
Multi-Page/Poster Printing . . . . . . . . . . . . . . . . . . . . . . . . . . . . . . . . . . . . . . . . . . . . . . . . . . . . . . . . . .119
Folded Double-Side (Windows only) . . . . . . . . . . . . . . . . . . . . . . . . . . . . . . . . . . . . . . . . . . . . . .120
N-up . . . . . . . . . . . . . . . . . . . . . . . . . . . . . . . . . . . . . . . . . . . . . . . . . . . . . . . . . . . . . . . . . . . . . . .121
Poster (Windows only) . . . . . . . . . . . . . . . . . . . . . . . . . . . . . . . . . . . . . . . . . . . . . . . . . . . . . . . . .122
Printing Multiple Documents (the Layout Manager)
(Windows Only) . . . . . . . . . . . . . . . . . . . . . . . . . . . . . . . . . . . . . . . . . . . . . . . . . . . . . . . . . . . . . . . .131
Setting Procedures for Printing . . . . . . . . . . . . . . . . . . . . . . . . . . . . . . . . . . . . . . . . . . . . . . . . . .132
Saving and Recalling Settings . . . . . . . . . . . . . . . . . . . . . . . . . . . . . . . . . . . . . . . . . . . . . . . . . . .134
Chapter 5 Color Management Printing
About Color Management . . . . . . . . . . . . . . . . . . . . . . . . . . . . . . . . . . . . . . . . . . . . . . . . . . . . . . . . . .135
Color Management Print Settings . . . . . . . . . . . . . . . . . . . . . . . . . . . . . . . . . . . . . . . . . . . . . . . . . . . .136
Setting color management with the applications . . . . . . . . . . . . . . . . . . . . . . . . . . . . . . . . . . . . .136
Setting color management with the printer driver . . . . . . . . . . . . . . . . . . . . . . . . . . . . . . . . . . . .136
Setting profiles . . . . . . . . . . . . . . . . . . . . . . . . . . . . . . . . . . . . . . . . . . . . . . . . . . . . . . . . . . . . . . .137
Setting Color Management with the Applications . . . . . . . . . . . . . . . . . . . . . . . . . . . . . . . . . . . . . . . .138
Setting Color Management with the Printer Driver . . . . . . . . . . . . . . . . . . . . . . . . . . . . . . . . . . . . . . .140
Color management printing by Host ICM (Windows). . . . . . . . . . . . . . . . . . . . . . . . . . . . . . . . . .140
Color management printing by ColorSync (Mac OS X) . . . . . . . . . . . . . . . . . . . . . . . . . . . . . . . .142
Color management printing by Driver ICM (Windows only). . . . . . . . . . . . . . . . . . . . . . . . . . . . .143
Chapter 6 Tips for Using the Printer Driver (Windows)
Displaying the Settings Screen . . . . . . . . . . . . . . . . . . . . . . . . . . . . . . . . . . . . . . . . . . . . . . . . . . . . . .146
From the Printer icon . . . . . . . . . . . . . . . . . . . . . . . . . . . . . . . . . . . . . . . . . . . . . . . . . . . . . . . . . .146
Displaying Help . . . . . . . . . . . . . . . . . . . . . . . . . . . . . . . . . . . . . . . . . . . . . . . . . . . . . . . . . . . . . . . . . .148
Click the Help Button to Display. . . . . . . . . . . . . . . . . . . . . . . . . . . . . . . . . . . . . . . . . . . . . . . . . .148
Right-click on the item you want to check and display. . . . . . . . . . . . . . . . . . . . . . . . . . . . . . . . .149
Customizing the Printer Driver. . . . . . . . . . . . . . . . . . . . . . . . . . . . . . . . . . . . . . . . . . . . . . . . . . . . . . .150
Saving various settings as your Select Settings . . . . . . . . . . . . . . . . . . . . . . . . . . . . . . . . . . . . .150
Adding Media Types . . . . . . . . . . . . . . . . . . . . . . . . . . . . . . . . . . . . . . . . . . . . . . . . . . . . . . . . . .151
Rearranging display items . . . . . . . . . . . . . . . . . . . . . . . . . . . . . . . . . . . . . . . . . . . . . . . . . . . . . .153
Overview of the Utility Tab. . . . . . . . . . . . . . . . . . . . . . . . . . . . . . . . . . . . . . . . . . . . . . . . . . . . . . . . . .155
Uninstalling the Printer Driver . . . . . . . . . . . . . . . . . . . . . . . . . . . . . . . . . . . . . . . . . . . . . . . . . . . . . . .158
Contents 5
Page 6

Chapter 7 Tips for Using the Printer Driver (Mac OS X)
Displaying the Settings Screen . . . . . . . . . . . . . . . . . . . . . . . . . . . . . . . . . . . . . . . . . . . . . . . . . . . . . .160
Displaying Help . . . . . . . . . . . . . . . . . . . . . . . . . . . . . . . . . . . . . . . . . . . . . . . . . . . . . . . . . . . . . . . . . .160
Using Epson Printer Utility 4 . . . . . . . . . . . . . . . . . . . . . . . . . . . . . . . . . . . . . . . . . . . . . . . . . . . . . . . .161
Starting Epson Printer Utility 4 . . . . . . . . . . . . . . . . . . . . . . . . . . . . . . . . . . . . . . . . . . . . . . . . . . .161
Epson Printer Utility 4 Functions . . . . . . . . . . . . . . . . . . . . . . . . . . . . . . . . . . . . . . . . . . . . . . . . .161
Uninstalling the Printer Driver . . . . . . . . . . . . . . . . . . . . . . . . . . . . . . . . . . . . . . . . . . . . . . . . . . . . . . .163
Removing EPSON LFP Remote Panel 2. . . . . . . . . . . . . . . . . . . . . . . . . . . . . . . . . . . . . . . . . . .163
Chapter 8 Using the Control Panel Menu
Menu Operations . . . . . . . . . . . . . . . . . . . . . . . . . . . . . . . . . . . . . . . . . . . . . . . . . . . . . . . . . . . . . . . . .164
Menu List . . . . . . . . . . . . . . . . . . . . . . . . . . . . . . . . . . . . . . . . . . . . . . . . . . . . . . . . . . . . . . . . . . . . . . .165
Menu Descriptions. . . . . . . . . . . . . . . . . . . . . . . . . . . . . . . . . . . . . . . . . . . . . . . . . . . . . . . . . . . . . . . .170
Print Queues menu . . . . . . . . . . . . . . . . . . . . . . . . . . . . . . . . . . . . . . . . . . . . . . . . . . . . . . . . . . .170
Paper menu . . . . . . . . . . . . . . . . . . . . . . . . . . . . . . . . . . . . . . . . . . . . . . . . . . . . . . . . . . . . . . . . .171
Maintenance menu . . . . . . . . . . . . . . . . . . . . . . . . . . . . . . . . . . . . . . . . . . . . . . . . . . . . . . . . . . .174
Setup menu . . . . . . . . . . . . . . . . . . . . . . . . . . . . . . . . . . . . . . . . . . . . . . . . . . . . . . . . . . . . . . . . .175
Enlarged Copy menu . . . . . . . . . . . . . . . . . . . . . . . . . . . . . . . . . . . . . . . . . . . . . . . . . . . . . . . . . .183
Chapter 9 Maintenance
Adjusting the Print Head . . . . . . . . . . . . . . . . . . . . . . . . . . . . . . . . . . . . . . . . . . . . . . . . . . . . . . . . . . .184
Checking for clogged nozzles . . . . . . . . . . . . . . . . . . . . . . . . . . . . . . . . . . . . . . . . . . . . . . . . . . .184
Cleaning the print head . . . . . . . . . . . . . . . . . . . . . . . . . . . . . . . . . . . . . . . . . . . . . . . . . . . . . . . .187
Minimizing Print Misalignments (Head Alignment). . . . . . . . . . . . . . . . . . . . . . . . . . . . . . . . . . . .189
Replacing Consumables . . . . . . . . . . . . . . . . . . . . . . . . . . . . . . . . . . . . . . . . . . . . . . . . . . . . . . . . . . .193
Replacing Ink Cartridges . . . . . . . . . . . . . . . . . . . . . . . . . . . . . . . . . . . . . . . . . . . . . . . . . . . . . . .193
Replacing Maintenance Boxes . . . . . . . . . . . . . . . . . . . . . . . . . . . . . . . . . . . . . . . . . . . . . . . . . .195
Replacing the Cutter . . . . . . . . . . . . . . . . . . . . . . . . . . . . . . . . . . . . . . . . . . . . . . . . . . . . . . . . . .197
Cleaning the Printer . . . . . . . . . . . . . . . . . . . . . . . . . . . . . . . . . . . . . . . . . . . . . . . . . . . . . . . . . . . . . . .201
Cleaning the outside . . . . . . . . . . . . . . . . . . . . . . . . . . . . . . . . . . . . . . . . . . . . . . . . . . . . . . . . . .201
Cleaning the inside . . . . . . . . . . . . . . . . . . . . . . . . . . . . . . . . . . . . . . . . . . . . . . . . . . . . . . . . . . .201
Chapter 10 Problem Solver
What to Do When a Message Is Displayed . . . . . . . . . . . . . . . . . . . . . . . . . . . . . . . . . . . . . . . . . . . . .204
When a Maintenance Call/Service Call Occurs. . . . . . . . . . . . . . . . . . . . . . . . . . . . . . . . . . . . . . . . . .207
Troubleshooting. . . . . . . . . . . . . . . . . . . . . . . . . . . . . . . . . . . . . . . . . . . . . . . . . . . . . . . . . . . . . . . . . .208
You cannot print (because the printer does not work) . . . . . . . . . . . . . . . . . . . . . . . . . . . . . . . . .208
The printer sounds like it is printing, but nothing prints . . . . . . . . . . . . . . . . . . . . . . . . . . . . . . . .211
Contents 6
Page 7

The prints are not what you expected . . . . . . . . . . . . . . . . . . . . . . . . . . . . . . . . . . . . . . . . . . . . .211
Feeding or ejecting problems. . . . . . . . . . . . . . . . . . . . . . . . . . . . . . . . . . . . . . . . . . . . . . . . . . . .217
Others . . . . . . . . . . . . . . . . . . . . . . . . . . . . . . . . . . . . . . . . . . . . . . . . . . . . . . . . . . . . . . . . . . . . .220
Appendix A Options and Information
Options and Consumable Products. . . . . . . . . . . . . . . . . . . . . . . . . . . . . . . . . . . . . . . . . . . . . . . . . . .222
Supported Media . . . . . . . . . . . . . . . . . . . . . . . . . . . . . . . . . . . . . . . . . . . . . . . . . . . . . . . . . . . . . . . . .223
Epson Special Media Table . . . . . . . . . . . . . . . . . . . . . . . . . . . . . . . . . . . . . . . . . . . . . . . . . . . . .224
Usable Commercially Available Paper Size. . . . . . . . . . . . . . . . . . . . . . . . . . . . . . . . . . . . . . . . .229
Before printing on non-Epson media . . . . . . . . . . . . . . . . . . . . . . . . . . . . . . . . . . . . . . . . . . . . . .230
Notes When Moving or Transporting the Printer . . . . . . . . . . . . . . . . . . . . . . . . . . . . . . . . . . . . . . . . .232
Before Moving or Transporting . . . . . . . . . . . . . . . . . . . . . . . . . . . . . . . . . . . . . . . . . . . . . . . . . .232
Notes on Transporting . . . . . . . . . . . . . . . . . . . . . . . . . . . . . . . . . . . . . . . . . . . . . . . . . . . . . . . . .233
After Moving or Transporting . . . . . . . . . . . . . . . . . . . . . . . . . . . . . . . . . . . . . . . . . . . . . . . . . . . .233
System Requirements . . . . . . . . . . . . . . . . . . . . . . . . . . . . . . . . . . . . . . . . . . . . . . . . . . . . . . . . . . . . .233
Specifications Table. . . . . . . . . . . . . . . . . . . . . . . . . . . . . . . . . . . . . . . . . . . . . . . . . . . . . . . . . . . . . . .235
Standards and Approvals. . . . . . . . . . . . . . . . . . . . . . . . . . . . . . . . . . . . . . . . . . . . . . . . . . . . . . .238
FCC Compliance Statement . . . . . . . . . . . . . . . . . . . . . . . . . . . . . . . . . . . . . . . . . . . . . . . . . . . . . . . .238
For United States Users. . . . . . . . . . . . . . . . . . . . . . . . . . . . . . . . . . . . . . . . . . . . . . . . . . . . . . . .238
For Canadian Users. . . . . . . . . . . . . . . . . . . . . . . . . . . . . . . . . . . . . . . . . . . . . . . . . . . . . . . . . . .239
Appendix B Where To Get Help
Contacting Epson Support. . . . . . . . . . . . . . . . . . . . . . . . . . . . . . . . . . . . . . . . . . . . . . . . . . . . . . . . . .240
Appendix C Software License Terms
Open Source Software Licenses . . . . . . . . . . . . . . . . . . . . . . . . . . . . . . . . . . . . . . . . . . . . . . . . . . . . .241
Bonjour. . . . . . . . . . . . . . . . . . . . . . . . . . . . . . . . . . . . . . . . . . . . . . . . . . . . . . . . . . . . . . . . . . . . .243
Other Software Licenses . . . . . . . . . . . . . . . . . . . . . . . . . . . . . . . . . . . . . . . . . . . . . . . . . . . . . . . . . . .250
Info-ZIP copyright and license . . . . . . . . . . . . . . . . . . . . . . . . . . . . . . . . . . . . . . . . . . . . . . . . . . .250
Contents 7
Page 8

Chapter 1
Introduction
Important Safety Instructions
Read all of these instructions before using the printer. Also be sure to follow all warnings
and instructions marked on the printer.
When choosing a place for this product
O Place this product on a flat, stable surface that is larger than this product. This product
will not operate properly if it is tilted or at an angle.
O Avoid places subject to rapid changes in temperature and humidity. Also keep it away
from direct sunlight, strong light, or heat sources.
O Avoid places subject to shocks and vibrations.
O Keep this product away from dusty areas.
O Place this product near a wall outlet where the plug can be easily unplugged.
When setting up this product
O Do not block or cover the openings in this product’s cabinet.
O Do not insert objects through the slots. Take care not to spill liquid on this product.
O This product’s power cord is for use with this product only. Use with other equipment
may result in fire or electric shock.
O Connect all equipment to properly grounded power outlets. Avoid using outlets on the
same circuit as copiers or air control systems that regularly switch on and off.
O Avoid electrical outlets controlled by wall switches or automatic timers.
O Keep the entire computer system away from potential sources of electromagnetic
interference, such as loudspeakers or the base units of cordless telephones.
O Use only the type of power source indicated on the product’s label.
Introduction 8
Page 9

O Use only the power cord that comes with this product. Use of another cord may result
in fire or electric shock.
O Do not use a damaged or frayed power cord.
O If you use an extension cord with this product, make sure the total ampere rating of the
devices plugged into the extension cord does not exceed the cord’s ampere rating.
Also, make sure the total ampere rating of all devices plugged into the wall outlet does
not exceed the wall outlet’s ampere rating.
O Do not attempt to service this product yourself.
O Unplug this product and refer servicing to qualified service personnel under the
following conditions: The power cord or plug is damaged; liquid has entered the
product; the product has been dropped or the cabinet damaged; the product does not
operate normally or exhibits a distinct change in performance.
O If damage occurs to the plug, replace the cord set or consult a qualified electrician. If
there are fuses in the plug, make sure you replace them with fuses of the correct size
and rating.
When using this product
O Do not put your hand inside this product or touch the ink cartridges while printing.
O Do not move the print heads by hand; otherwise you may damage this product.
O Always turn the product off using the Power button on the control panel. When this
button is pressed, the Power light flashes briefly then goes off. Do not unplug the power
cord or turn off the product until the Power light stops flashing.
When handling the ink cartridges
O Keep ink cartridges out of the reach of children and do not drink the ink.
O If ink gets on your skin, wash it off with soap and water. If it gets in your eyes, flush them
immediately with water.
O Before installing the new ink cartridge in the printer, shake it gently for about five
seconds.
O Use the ink cartridge before the date printed on its package.
O Use up the ink cartridge within a year of installation for best results.
Introduction 9
Page 10

O Do not dismantle the ink cartridges or try to refill them. This could damage the print
head.
O Do not touch the IC chip on the side of the cartridge. This may affect normal operation
and printing.
O The IC chip on this ink cartridge retains a variety of cartridge-related information, such
as the ink cartridge status, so that the cartridge may be removed and reinserted freely.
However, each time the cartridge is inserted, some ink is consumed because the printer
automatically performs a reliability check.
O If you remove an ink cartridge for later use, protect the ink supply area from dirt and
dust, and store it in the same environment as this product. Note that there is a valve in
the ink supply port, making covers or plugs unnecessary, but care is needed to prevent
the ink from staining items that the cartridge touches. Do not touch the ink supply port
or surrounding area.
The lithium batteries in this product contain Perchlorate Material - special handling may
apply. See www.dtsc.ca.gov/hazardouswaste/perchlorate.
Warnings, Cautions, Important and Notes
Warning:
Warnings must be followed to avoid serious bodily injury.
w
Caution:
c
Important:
Note:
Illustrations
Unless otherwise noted, the illustrations in this documentation show the SureColor T7000.
Cautions must be followed to avoid damage to this
product or bodily injury.
Important must be followed to avoid damage to this
product.
Notes contain useful or additional information on the
operation of this product.
Introduction 10
Page 11

Printer Parts
Front section
1Printer cover
Open this cover when cleaning the printer or clearing jams.
2 Poster board support
Raise this support so that you can place the media on it when printing on poster board. The
support ensures that poster board feeds smoothly.
See “Loading and Removing Poster Board” on page 47.
Introduction 11
Page 12

3 Maintenance box covers
Open these covers when replacing the Maintenance Box.
Some models have only the right cover.
See “Replacing Maintenance Boxes” on page 195.
4 Paper basket
Output from the printer collects in this basket, keeping the media clean and free of creases.
It can hold up to 20 sheets of plain paper printed in line drawing mode.
The stand (24”) for the SureColor T3000 comes with a paper basket.
See “Using the Paper Basket” on page 58.
5Casters
There are two casters on each leg. The casters are normally kept locked once the printer is
in place.
6 Stack guides
Select a guide according to the size of the media output to the paper basket.
See “Using the Paper Basket” on page 58.
7 Stack guide switch lever
Use to choose a stack guide.
8 Cartridge cover
Open when replacing ink cartridges.
See “Replacing Ink Cartridges” on page 193.
9 Ink cartridges
Install all ink cartridges into each slot.
10 AC inlet
Connect the supplied power cable here.
11 Option port
Use when connecting the optional auto take-up reel unit.
See “Using the Auto Take-up Reel Unit (SureColor T7000 Only)” on page 61.
12 LAN port
Connects the LAN cable.
13 Data light
The network connection status and data reception are indicated by a lit or flashing light.
On : Connected.
Flashing : Receiving data.
14 Status light
The color indicates the network transmission speed.
Off : 10Base-T
Introduction 12
Page 13

Red : 100Base-T
Green : 1000Base-T
15 USB port
Connect the USB cable here.
16 Control panel
See “Using the Control Panel” on page 62.
17 Alert lamp
This lamp lights or flashes when an error occurs.
Lights or
flashes
Off : No error.
18 Roll rest
When loading roll paper, place it on this rest and attach the roll paper adapters.
See “Loading Roll Paper” on page 32.
19 Adapter guides
Guides for attaching roll paper. Move the roll along these guides to attach it to the adapter
holder.
See “Loading Roll Paper” on page 32.
20 Roll lock lever
A lever that locks roll paper in place after the roll is attached to the adapter holder.
21 Adapter holder
The roll paper adapter is placed in this holder after the roll paper is attached.
22 Paper slot
The slot through which roll paper and single sheets are fed during printing.
Feed single sheets one at a time.
: An error has occurred. How the lamp lights or flashes varies with the type of error.
The control panel displays a description of the error.
23 Print head
Fires ink via high density nozzles while moving left and right to print.
24 Roll paper cover
Cover to protect the roll paper. Except when loading or removing roll paper, it should be
closed when using the printer.
25 Paper eject guide
Guides paper output from the printer smoothly into the paper basket.
Roll paper adapter
Use the supplied roll paper adapter when loading roll paper onto the printer.
Introduction 13
Page 14

See “Loading Roll Paper” on page 32.
1 Adapter lock lever
Lift to unlock, lower to lock. Unlock when attaching roll paper to the adapter, lock once the
roll is attached.
2 Size lever
Position according to the size of the roll core.
Introduction 14
Page 15

Control panel
1 P button (Power button)
Turns the power on and off.
2 P light (Power light)
The printer’s operational status is indicated by a lit or flashing light.
On : The power is on.
Flashing : The printer is receiving data or cleaning the print head or performing other
operations in the course of being shut down.
Off : The power is off.
3 ( button (Load/Remove Paper button)
Pressing this button displays the Load/Remove Paper menu. Instructions for loading or
removing the paper can be displayed by highlighting either Remove Paper or the type of
paper currently loaded and then pressing the OK button. Follow the on-screen instructions
to load or remove the paper.
4 Screen
Displays the printer’s status, menus, error messages, and so on.
See “Screen View” on page 17.
Introduction 15
Page 16

5 Menu button
Displays the menu for the tab currently selected in the display.
See “Using the Control Panel Menu” on page 164.
6 y button (Back button)
If menus are displayed, pressing this button takes you up one level in the menu hierarchy.
See “Menu Operations” on page 164.
7 l/r buttons (Left/Right buttons)
O Use these buttons to select tabs. The selected tab is highlighted and the content of the
info display area updated for the selected tab.
See “Screen View” on page 17.
O If menus are displayed, these buttons can be used to position the cursor or to delete
characters when entering text for items such as Setting Name or IP Address.
8 u/d buttons (Up/Down buttons)
When menus are displayed, these buttons can be used to highlight items or options.
See “Menu Operations” on page 164.
9 Z button
O Displays the menu for the tab currently selected in the display. (This button cannot be
used to display menus when the + is selected.)
See “Using the Control Panel Menu” on page 164.
O When menus are displayed and an item is highlighted, pressing this button displays the
sub-menu for the highlighted item.
O If pressed while a parameter is selected from the Menu, the parameter is set or
executed.
10 button (Help button)
Except when printing is in progress, pressing this button displays the Help menu. Highlight an
item and press the OK button to view help for the highlighted item.
11 " button (Maintenance button)
Displays the Maintenance menu, which is used for nozzle checks and head cleaning.
See “Adjusting the Print Head” on page 184.
12
W button (Pause/Cancel button)
O The printer enters pause status if this is pressed while printing. To release the pause status,
press the W button again, or select Pause Cancel on the screen and then press the OK
button. To cancel print jobs being processed, select Job Cancel on the screen and then
press the OK button.
O Pressing this button while a menu or help is displayed closes the menu or help and returns
the printer to ready status.
Introduction 16
Page 17

13 ) button (Feed/Cut Media button)
O This button is used with roll paper only. If the printer is loaded with cut sheets or poster
board, pressing this button will have no effect.
O It is used to manually cut roll paper using the built-in cutter.
See “Manual cut method” on page 39.
O If printing is not currently in progress and the printer is loaded with roll paper, you can
feed paper ahead by pressing first this button and then the d button. Press the u button
to rewind. Keep the d button pressed to feed the paper up to 9.8 feet (3 m). Keep the
u button pressed to rewind the paper up to 7.9 inches (20 cm).
When the u button is used to rewind roll paper, the paper will pause when the end of
the roll reaches the starting print position. Release the button and then press it again to
resume.
Screen View
1Message
Displays the printer’s status, operation, and error messages.
See “What to Do When a Message Is Displayed” on page 204.
Introduction 17
Page 18

2 Tabs/Info Display Area
The tab/info display area contains the six tabs listed below.
Use the l r buttons to select a tab.
Information on the selected tab appears in the info display area.
, The Print Queues Tab
This tab displays print job status and can be used to access the Print Queues menu.
The Info Display Area
The print queues tab info display area shows the name of the current print job.
If an optional hard disk unit is installed, it also shows the number of held jobs, if any.
Pressing the OK or Menu button when this tab is selected displays the Print Queues
menu.
Important:
A flashing , icon indicates that the optional hard disk unit is exchanging data with another
device. Do not disconnect the power cord or turn the printer off while the icon is flashing. Failure
to observe this precaution could corrupt the data on the hard disk.
. The Paper Tab
This tab shows the type of paper in the printer and can be used to access the Paper
menu.
The Info Display Area
The paper tab info display area shows the Source and Media Type. When roll paper is
used, it also shows the roll width. In addition, when On is selected for Roll Paper
Remaining, it shows the amount of roll paper remaining. When the length remaining
drops below the value selected for Remaining Alert, a icon appears above the tab
icon and an alert like that shown below is displayed to warn that the printer is nearing
the end of the roll.
Pressing the OK or Menu button when this tab is selected displays the Paper menu.
See “Paper menu” on page 171.
The Ink Tab
The ink tab displays ink status.
The Info Display Area
The ink tab info display area contains icons showing ink status and the approximate
level of ink remaining. The icons change as follows when the ink is low or an error occurs.
Normal Warning or Error
1
2
1 Status indicators
The ink cartridge status is indicated as follows.
No error. The height of the indicator varies with the amount of ink
remaining in the cartridge.
Introduction 18
Page 19
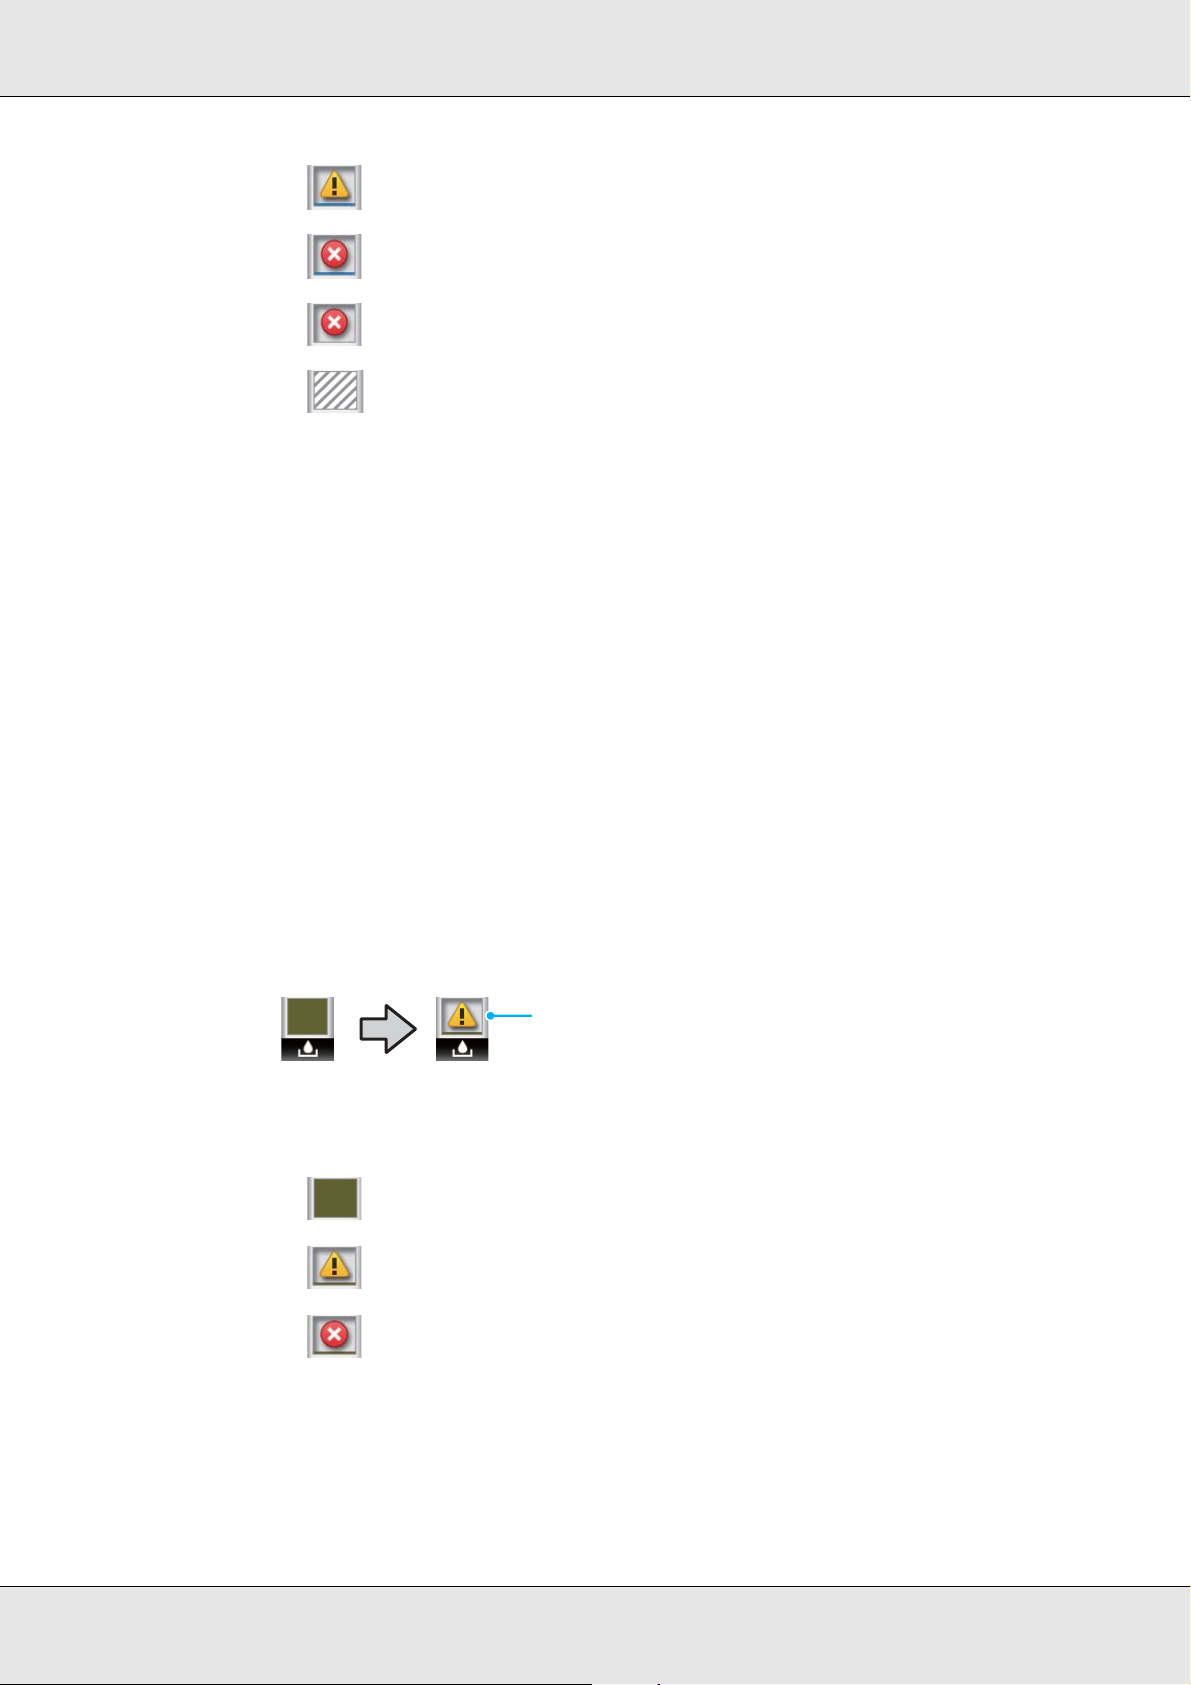
Ink is low. You need to prepare a new ink cartridge.
Ink cartridge is expended; replace with a new ink cartridge.
An error occurred. Check the message on the screen, and clear the error.
Non-genuine cartridge.
Epson recommends the use of genuine Epson ink cartridges. Epson
cannot guarantee the quality or reliability of non-genuine ink.
2 Ink color codes
CCyan
YYellow
MMagenta
MK Matte Black
PK Photo Black
The Maintenance Tab
-
The maintenance tab shows the status of the Maintenance Box and is used to display
the Maintenance menu.
The Info Display Area
The maintenance tab info display area shows Maintenance Box status and the
approximate amount of space remaining in the Maintenance Box. The icons change
as follows to show errors or to warn when the Maintenance Box is nearing the end of its
service life.
Normal Warning or Error
1
1 Status indicators
Maintenance Box status is indicated as follows.
No error. The height of the indicator corresponds to the amount of space
remaining.
The Maintenance Box is nearing the end of its service life. You need to
prepare a new Maintenance Box.
Maintenance Box is at the end of its service life. Replace the
Maintenance Box with a new one.
Pressing the OK or Menu button when this tab is selected displays the Maintenance
menu.
See “Maintenance menu” on page 174.
Introduction 19
Page 20

The Setup Tab
/
The setup tab displays the IP address and menus for various settings.
The Info Display Area
The setup tab info display area shows the IP address currently assigned, if any.
Pressing the OK or Menu button when this tab is selected displays the Setup menu.
See “Setup menu” on page 175.
The Enlarged Copy Tab
+
The enlarged copy tab is displayed only when a scanner is connected.
Pressing the OK button when this tab is selected displays the Enlarged Copy screen.
See “Enlarged Copy menu” on page 183.
Features
The main features of this printer are described below.
High Productivity
High-speed printing
The speed of the print head and paper feed have been increased for faster printing.
The printer is equipped with a high-speed rotary cutter for quick cutting, significantly
increasing productivity.
Paper basket holds consecutive sheets
The paper basket accommodates up to 20 sheets of A1/D- or A0/E-size plain paper,
promoting automation for improved productivity.
The stand (24”) for the SureColor T3000 comes with a paper basket.
See “Using the Paper Basket” on page 58.
Improved operability with an easy to see and use color screen
Designed for intuitive operation, the large, brightly-lit, color LCD display is easy to
understand and easy to use.
The large display offers detailed, easy-to-understand error messages and illustrated
guides to loading paper.
See “Screen View” on page 17.
Introduction 20
Page 21

Checking current operating status even from afar thanks to an alert lamp
Errors are immediately obvious even at a distance, thanks to the large, highly visible alert
lamp. This helps prevent any wasted time when printing has stopped due to running out of
ink or paper.
High Resolution
Thanks to newly developed Epson UltraChrome® XD Ink technology, the printer can be
used for high-quality posters and CAD drawings.
CAD drawings: clear, legible, and with unsurpassed water resistance
Newly-developed, high-density Matte Black ink enables the printer to produce extremely
detailed drawings.
Pigmented inks are used for all colors for unsurpassed water resistance, allowing print
results to be safely carried out-of-doors.
The printer driver offers a line drawing mode, making it easier to optimize printing for line
drawing and, through unsurpassed reproduction of line drawing and fine lines in the form
of connected lines, diagonals, and curves, ensuring the best possible results when the
printer is used for drawings.
Vivid, highly lightfast posters and displays
Our new magenta ink makes red colors more vibrant and even more noticeable on posters.
The printer driver offers a poster mode that simplifies the printing of vivid posters. Posters
with vivid hues can be printed simply by selecting poster mode.
Thanks to the pigmented inks used for all colors, the results are highly water-resistant and
can be used for short-term outdoor display. They are also extremely lightfast and
fade-resistant and can be safely displayed in direct sunlight.
Ease-of-Use
Spindle-free roll paper adapter makes loading roll paper a snap
The lack of a spindle makes it possible to load and remove roll paper even in environments
where space is at a premium.
To load roll paper, simply place it on the roll rest and attach roll paper adapters to both
ends. The roll rest is low, making it easy to load paper.
See “Loading Roll Paper” on page 32.
Introduction 21
Page 22

Easy maintenance
Roll paper and all replacements, including ink cartridges, Maintenance Boxes, and cutters,
are installed from the front, allowing the printer to be placed against a wall. The printer does
not have to be moved to allow rear access.
Choose from three sizes of cartridge according to the task
Choose from 110, 350, and 700 ml cartridges according to the frequency with which the
printer is used. Use cost-effective 700 ml cartridges for high-volume poster printing or mix
different size cartridges to best fit your printing needs.
New printer driver offers improved ease-of-use
Print settings can be optimized simply by choosing the desired use or target. This spares
you the trouble of adjusting print settings individually.
On startup, the printer driver automatically checks the status of the paper loaded in the
printer and displays it in the Media Settings dialog, preventing errors caused by failure to
check paper status before printing.
The printer driver displays printer settings graphically, reducing errors caused by
inappropriate choices of settings.
Introduction 22
Page 23
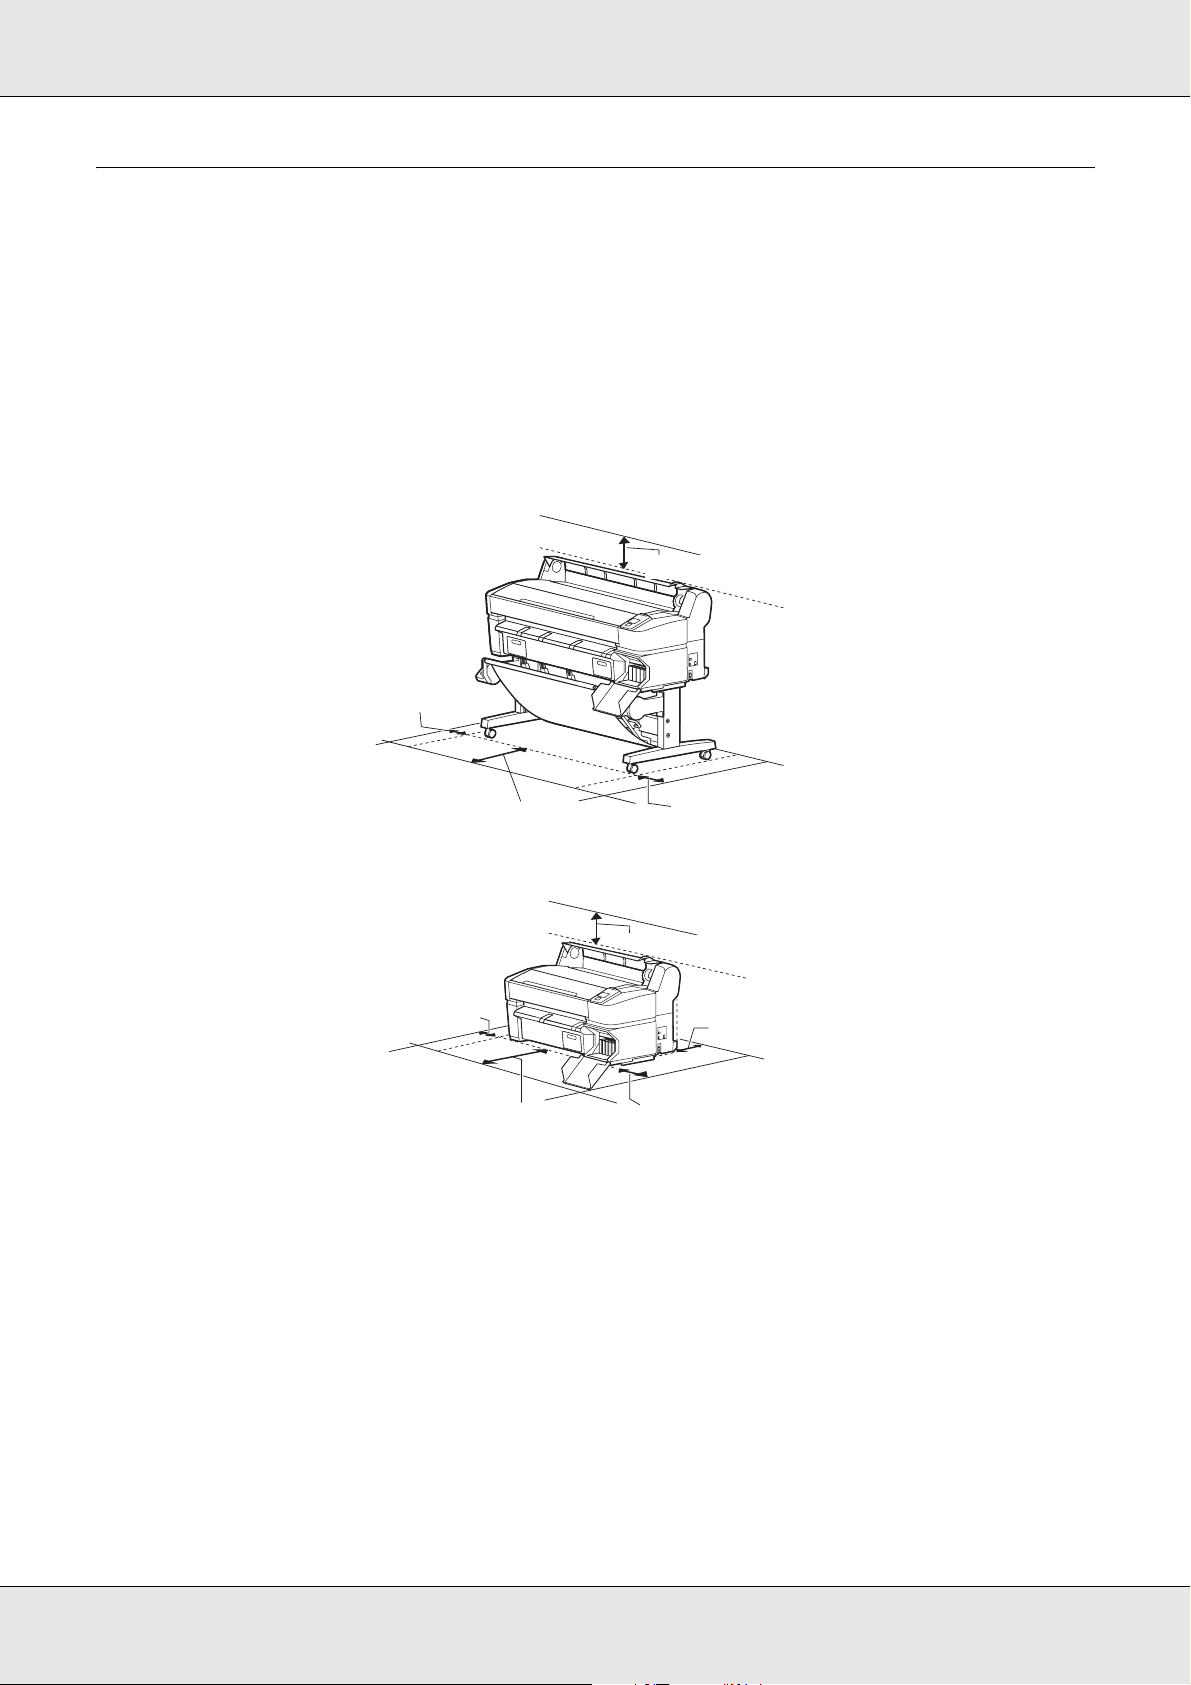
Notes on Usage and Storage
Installation space
Make sure that you secure the following space, clear of any other objects, so that paper
ejection and consumable replacement are not obstructed.
See “Specifications Table” on page 235 for the external dimensions of the printer.
SureColor T7000/T5000
5.9 inches (150 mm)
0.4 inches (10 mm)
23.6 inches (600 mm)
SureColor T3000
0.4 inches (10 mm)
11.8 inches (300 mm)
* When printing on poster board, make sure that there is sufficient sp ace bot h in front
of and behind the printer.
See “Loading and Removing Poster Board” on page 47.
5.9 inches (150 mm)
5.9 inches (150 mm)
1.6 inches (40 mm)
5.9 inches (150 mm)
Introduction 23
Page 24

Notes when using the printer
Note the following points when using this printer to avoid breakdowns, malfunctions, and
print quality decline.
O When using the printer, observe the operating temperature and humidity range
described in the "Specifications Table". See “Specifications Table” on page 235.
Even when the conditions above are met, you may not be able to print properly if the
environmental conditions are not suitable for the paper. Be sure to use the printer in an
environment where the paper’s requirements are met. For more details, see the
documentation supplied with the paper.
Also, when operating in dry areas, air conditioned environment, or under direct sunlight,
maintain the appropriate humidity.
O Do not install the printer next to heat sources or directly in the path of air from a
ventilator or air conditioner. Failure to observe this precaution could result in the print
head nozzles drying and clogging.
O The print head may not be capped (i.e., may not move to the right side) if an error
occurs and the printer is turned off without first resolving the error. Capping is a function
for automatically covering the print head with a cap (lid) to prevent the print head from
drying out. In this case, turn on the power and wait a while until capping is performed
automatically.
O When the power is on, do not remove the power plug or cut the power at the breaker.
The print head may not be capped properly. In this case, turn on the power and wait a
while until capping is performed automatically.
O Even when the printer is not in use, some ink will be consumed by head cleaning and
other maintenance operations needed to keep the print head in good condition.
Notes when not using the printer
If you are not using it, note the following points when storing the printer. If it is not stored
correctly, you may not be able to print properly the next time it is used.
O If you do not print for a long time, the print head nozzles may become clogged. We
recommend that you print once a week to prevent the print head from clogging.
O The roller may leave an impression on paper that is left in the printer. This can also
cause wavy or curled paper resulting in paper feeding problems or the print head could
be scratched. Remove any paper when the printer is not in use.
Introduction 24
Page 25

O Store the printer after confirming that the print head has been capped (the print head is
positioned at the far right). If the print head is left uncapped for a long time, the print
quality may decline.
Note:
If the print head is not capped, turn the printer on, and then turn it off.
O To prevent the accumulation of dust and other foreign matter in the printer, close all
covers before placing it in storage.
If the printer will be not be used for an extended period, protect it with an anti-static cloth
or other cover.
The print head nozzles are very small, and they can become clogged easily if fine dust
gets on the print head, and you may not be able to print properly.
O When turned on after an extended period of disuse, the printer may automatically
perform head cleaning to ensure print quality.
Head cleaning will end after about 10 to 15 minutes.
Notes on handling ink cartridges
Note the following points when handling ink cartridges to maintain good print quality.
O The supplied ink cartridges and Maintenance Box are for use during the initial charging.
The supplied ink cartridges and Maintenance Box will be require replacement relatively
quickly.
O Store the ink cartridges at room temperature out of direct sunlight and used before the
expiration date printed on the packaging.
O To ensure good results, use all the ink in the cartridge within a year of installation.
O Ink cartridges that have been stored at low temperatures for an extended period should
be allowed to return to room temperature over a period of four hours.
O Do not touch the IC chips on the sides of ink cartridges. You may not be able to print
properly.
O Install all ink cartridges into each slot. You cannot print if any of the slots are empty.
O Do not leave the printer without ink cartridges installed. The ink in the printer may dry,
preventing it from printing as expected. Leave ink cartridges in all slots even while you
do not use the printer.
Introduction 25
Page 26

O The ink level and other data are stored in the IC chip, allowing cartridges to be used
after being removed and replaced.
O To avoid getting dirt on the ink supply port, store the removed ink cartridge properly.
The ink supply port has a valve in it so it does not need to be capped.
O Removed ink cartridges may have ink around the ink supply port, so be careful not to
get any ink on the surrounding area when removing the cartridges.
O To maintain the quality of the print head, this printer stops printing before ink cartridges
are completely expended.
O Although the ink cartridges may contain recycled materials, this does not affect printer
function or performance.
O Do not dismantle or remodel ink cartridges. You may not be able to print properly.
O Do not drop or knock it against hard objects; otherwise, the ink may leak.
Notes on handling paper
Note the following points when handling and storing the paper. If the paper is not in good
condition, print quality may decline.
Check the documentation supplied with each paper.
Notes on Handling
O Use Epson special media under normal room conditions (temperature: 59 to 77°F [15
to 25°C]; humidity: 40 to 60%).
O Do not fold the paper or scratch the surface of the paper.
O Avoid touching the printable surface of the paper with your bare hands. Moisture and
oils from your hands can affect print quality.
O Handle paper by the edges. We recommend wearing cotton gloves.
O Changes in temperature and humidity may cause paper to become wavy or curled. Be
careful not to scratch or soil the paper, and flatten it before loading it in the printer.
O Do not wet the paper.
O Do not throw away the paper packaging as you can use it for storing the paper.
O Avoid locations that are subject to direct sunlight, excessive heat, or humidity.
Introduction 26
Page 27

O Keep cut sheets in their original package after opening, and keep them in a flat place.
O Remove roll paper that is not in use from the printer. Rewind it correctly and then store
it in the original packaging that came with the roll paper. If you leave the roll paper in the
printer for a long time, its quality may decline.
Notes on handling printed paper
To maintain long lasting, high quality print results, note the following points.
O Do not rub or scratch the printed surface. If they are rubbed or scratched, the ink may
peel off.
O Do not touch the printed surface; failure to observe this precaution may cause ink to rub
off.
O Make sure the printouts are completely dry before folding of stacking; otherwise, the
color may change where they touch (leaves a mark). These marks will disappear if they
are separated immediately and dried; however, they will remain if not separated.
O If you put the printouts in an album before they are completely dry, they may be blurred.
O Do not use a dryer to dry the printouts.
O Avoid direct sunlight.
O Prevent color distortion while displaying or storing the printouts by following the
instructions in the paper’s documentation.
Note:
Typically, printouts and photos fade over time (color distortion) due to the effects of light and
various constituents in the air. This also applies to Epson special media. However, with the
correct storage method, the degree of color distortion can be minimized.
O See the documentation supplied with Epson special media for detailed information on
handling the paper after printing.
O The colors of photos, posters, and other printed materials appear different under different
lighting conditions (light sources
different under different light sources.
* Light sources include sunlight, fluorescent light, incandescent light, and other types.
*
). The colors of printouts from this printer may also appear
Introduction 27
Page 28

Using the Supplied Software
Contents of the Software CD
The following applications are available on the supplied software CD. Install as required.
For information about these applications, see the on-line help for the application in
question.
For Windows
Software Name
Epson Driver and Utilities The following software is installed:
Printer Driver
The printer driver is required when using the printer.
It can be installed by selecting Install during setup.
See “Summary of the Printer Driver” on page 29.
EPSON LFP Remote Panel 2
This application is used for custom paper settings and to update printer
firmware.
Epson Network Utilities Select this option during installation if the printer and computer are
connected via a network. Installing this utility allows a wizard to be used
to simplify the process of setting the addresses needed for network
connections.
EpsonNet Print is also installed. With this software, you can perform
direct TCP/IP printing when the computer and the printer are
connected via a network.
EpsonNet Config With this software, you can configure various network settings for the
printer from your computer. This is useful as it allows you to enter
addresses and names using the keyboard.
The documentation is installed with the application.
LFP Print Plug-In for Office This is a plug-in for Microsoft Office applications (Word, Excel, and
PowerPoint). Installing this plug-in displays a ribbon in Office
applications that gives quick access to horizontal and vertical banner
printing and enlarged printing.
Before installing the plug-in, check the following:
O Office 2003, Office 2007, or Office 2010 is installed.
O None of these applications (Office 2003, Office 2007, or Office 2010)
is running.
This plug-in is not included in some regions.
Introduction 28
Page 29

For Mac OS X
Software Name
Epson Driver and Utilities The following software is installed:
Printer Driver
The printer driver is required when using the printer.
It can be installed by selecting Install during setup.
See “Summary of the Printer Driver” on page 29.
EPSON LFP Remote Panel 2
This application is used for custom paper settings and to update printer
firmware.
Epson Network Utilities Select this option during installation if the printer and computer are
connected via a network. Installing this utility allows a wizard to be used
to simplify the process of setting the addresses needed for network
connections.
EpsonNet Config With this software, you can configure various network settings for the
printer from your computer. This is useful as it allows you to enter
addresses and names using the keyboard.
The documentation is installed with the application.
Summary of the Printer Driver
The main functions of the printer driver are described below.
O Converts print data received from applications into printable data and sends it to the
printer.
O Settings such as document size and print quality can be adjusted from the settings
dialogs.
Windows
Introduction 29
Page 30

You can save these settings and easily import or export these saved settings.
See “Customizing the Printer Driver” on page 150.
Mac OS X
Allows the user to execute printer maintenance functions to maintain print quality, and
O
check the printer’s status and so on.
Windows
You can easily import or export printer driver settings.
Introduction 30
Page 31

See “Overview of the Utility Tab” on page 155.
Mac OS X
Introduction 31
Page 32

Chapter 2
Basic Operations
Loading and Removing the Roll Paper
Loading Roll Paper
Load roll paper after attaching the supplied roll paper adapters.
Important:
Insert the paper just before printing. The roller may leave an impression on paper that is left in
the printer.
Note:
The paper that can be used in the printer is detailed in the following section. (See “Supported
Media” on page 223.)
1. Turn on the printer by pressing the P button.
Note:
Closing the paper basket makes the work easier. See
page 58.
Leaving the poster board supports raised can cause jams; lower all the supports
before proceeding. To lower the supports, grasp them, pull them diagonally
downward, and then release.
“Using the Paper Basket” on
Basic Operations 32
Page 33

2. Open the roll paper cover.
3. Confirm that the adapter holder lock lever is raised.
4. Place roll paper on the roll rest on top of the printer.
Basic Operations 33
Page 34

5. Size the two supplied roll paper adapters to the roll core.
3-inch core
2-inch core
6. Raise the adapter lock lever to release the lock on each of the two roll paper adapters.
7. Attach an adapter to each end of the roll.
Basic Operations 34
Page 35

Press the adapters in until they are fully inserted in the roll, with no gaps.
8. Lower the lock levers to lock the adapters in place.
9. Slide the roll paper right until it contacts the adapter guides.
Following the adapter guide, slide the roll slowly to the opposite side.
Basic Operations 35
Page 36

10.Press the ( button on the control panel. Confirm that Roll Paper is highlighted in the
display and press the OK button.
11.Insert the end of the roll paper in the paper slot and pull it through. Make sure that the
paper is free of slack and that the end is not folded.
Pull the paper straight through until the lead edge of the paper reaches the front of the
printer as shown.
Basic Operations 36
Page 37

Note:
Do not touch the paper where it will be printed. After loading the roll paper, rotate the
roll paper adapters as shown to feed the paper through.
12.Lower the roll lock lever.
13.Following the on-screen instructions, press the OK button.
The paper will be fed into the printer.
Basic Operations 37
Page 38

14.Close the roll paper cover.
15.Check the media type.
If a barcode giving information on the paper is printed on the roll
The printer will automatically read the barcode as the paper is fed; no message is
displayed. The printer is ready to print when Ready is displayed.
If a barcode giving information on the paper is not printed on the roll
The printer will display the Paper Type and Roll Paper Remaining settings for the paper
currently selected with the printer. To print at current settings, press the d/u buttons to
highlight Keep Settings Above and press the OK button. To change settings, highlight
Change Settings and press the OK button. See “Viewing and Changing Media
Settings” on page 53.
Cutting the roll paper
Either of the following two methods can be used to cut roll paper after printing.
O Auto Cut:
Cut the roll paper after printing each page automatically using the built-in cutter.
O Manual cut:
Press the ) button to cut the paper using the built-in cutter. A cutline is printed for
manual cutting and can be used as a guide when cutting paper using the built-in cutter.
You can specify the method either from the control panel or the printer driver. Note,
however, that the setting selected with the printer driver takes priority when the printer
driver is used.
Basic Operations 38
Page 39

Note:
O Disable printer driver Auto Cut and printer Auto Cut options when using the optional auto
take-up reel unit.
O It may take a while to cut the roll paper.
O Some of the roll paper may not be cut using the built-in cutter. Use a cutter sold at a store to
cut the paper. Follow the steps below when using a third-party cutter.
Press the ) button. Keep the d button pressed to feed the paper so that the cut location
is below the paper eject guide. Cut the paper using scissors or a third-party cutter.
Setting methods
Setting on the computer
Set Auto Cut from the Advanced tab - Roll Paper Option in the printer driver’s
Properties (or Printing preferences) screen.
Setting from the printer
Use the l/r buttons in the control panel to select the / tab and press the OK or Menu
button. The Setup menu will be displayed; select Printer Setup > Roll Paper Setup> Auto
Cut > On and press the OK button. For manual cutting, select Off. The default setting is
On. See “Setup menu” on page 175 for more information.
Manual cut method
When Off is selected in the printer driver or Off is selected for Auto Cut in the control
panel, the paper can be cut in any location after printing as described below.
Buttons that are used in the following settings:
Basic Operations 39
Page 40

Cutting paper manually using the built-in cutter
1. Press the ) button. Viewing the interior of the printer without opening the printer
cover, press the d button to align the cut location with the mark on the right side of
the printer’s interior.
Note:
The minimum length of paper that can be cut with the built-in cutter is fixed at 2.4 to
5 inches (60 to 127 mm) and cannot be changed. If the cutting position is shorter than
the shortest length above, the paper has to be automatically fed to that length thus a
margin will have to be left. Cut off the margin with a cutter sold at a store.
Basic Operations 40
Page 41

2. Press the OK button.
The paper is cut by the built-in cutter.
Removing the roll paper
This section describes how to remove and store roll paper after printing. The pressure
rollers may leave impressions on paper that is left in the printer.
Buttons that are used in the following settings:
1. Confirm that the printer is ready and press the ( button.
The Load/Remove Paper menu will be displayed.
2. Press the d/u buttons to highlight Remove Paper and press the OK button.
If On is selected for Roll Paper Remaining, the printer will automatically print a
barcode.
3. The paper will automatically be rewound.
Once the paper is rewound, the printer will display Press and load paper.
Note:
When the display shows Turn roll paper adapter to wind up roll paper, open the
roll paper cover and rewind the paper by hand.
Basic Operations 41
Page 42

4. Open the roll paper cover.
Note:
When removing the roll paper, you can use the optional roll paper belt to prevent the
roll paper from unwinding.
5. Raise the roll lock lever.
6. Holding the paper by the roll adapters, move the roll to the roll rest.
Basic Operations 42
Page 43

7. Lift the adapter lock levers to release the roll paper adapters.
8. Remove the roll paper adapters.
After rewinding the roll paper carefully, store it in the original package.
9. Close the roll paper cover.
Loading and Removing Cut Sheets
The procedure for loading and positioning cut sheets varies with the thickness of the paper.
See “Loading Cut Sheets” on page 44 (0.08 to 0.8 mm) or “Loading Poster Board” on page
47 (0.9 to 2.1 mm) for more information.
Important:
If the paper is wavy or curled, flatten the paper before loading it in the printer, or use new paper.
If wavy or curled paper is loaded, this printer may not be able to recognize the paper size, feed
the paper, or print correctly.
We recommend that you return the paper to its original package and store it flat, and take it out
of the package just before you use it.
Basic Operations 43
Page 44

Loading Cut Sheets
Important:
Insert the paper just before printing. The pressure rollers may leave impressions on paper that is
left in the printer.
Note:
The paper that can be used in the printer is detailed in the following section. See “Supported
Media” on page 223.
1. Turn on the printer by pressing the P button.
Note:
Closing the paper basket makes the work easier. See “Using the Paper Basket” on
page 58.
Leaving the poster board supports raised can cause jams; lower all the supports
before proceeding. To lower the supports, grasp them, pull them diagonally
downward, and then release.
Basic Operations 44
Page 45

2. Press the ( button on the control panel. Press the d/u button to highlight Cut Sheet
and press the OK button.
3. Feed the paper into the paper slot with the printable surface toward you.
Insert the paper into the paper slot, keeping its right edge aligned with the loading mark
on the roll paper cover. Slide the paper in until it stops.
Important:
Insert all paper in portrait orientation. Inserting paper in landscape orientation may
cause a decline in print quality.
4. Confirm that Press OK is displayed and press the OK button.
Basic Operations 45
Page 46

The paper will be fed into the printer.
5. Check the media type.
The display shows the type of paper currently selected with the printer. To print at
current settings, press the d/u buttons to highlight Keep Settings Above and press
the OK button. To change settings, highlight Change Settings and press the OK
button. See “Viewing and Changing Media Settings” on page 53.
Removing Cut Sheets
This section describes how to remove cut sheets when printing is complete.
Note:
To remove paper that was loaded but not used, press the
Buttons that are used in the following settings:
1. Confirm that Paper Eject is displayed in the control panel. Then, keeping a hand on the
cut sheets to prevent them falling from the printer, press the OK button.
( button and select Remove Paper.
2. The paper will be fully ejected from the printer and can then be removed by hand.
Basic Operations 46
Page 47

Loading and Removing Poster Board
This section describes how to load and remove poster board from 0.9 to 2.1 mm thick.
The printer can be used with board of the following sizes.
A2/A1/B2/B1*/B1 landscape*/24 × 30 inch/30 × 40 inch
*
* Not supported by the SureColor T3000.
Loading Poster Board
Poster board requires space both behind and in front of the printer. The approximate
amount of space required is shown below. If the printer is set up near a wall, make sure
there is enough space at the rear.
Paper Size Front (a) Back (b)
A2 17.5 inches (444 mm) 5.3 inches (135 mm)
A1 27.2 inches (691 mm) 15 inches (382 mm)
B2 22.7 inches (578 mm) 10.6 inches (269 mm)
B1 34.6 inches (880 mm) 22.5 inches (571 mm)
24 × 30 inch 24.1 inches (612 mm) 11.9 inches (303 mm)
30 × 40 inch 34.1 inches (866 mm) 21.9 inches (557 mm)
Important:
Insert the paper just before printing. The roller may leave an impression on paper that is left in
the printer.
Note:
The paper that can be used in the printer is detailed in the following section. See “Supported
Media” on page 223.
Basic Operations 47
Page 48

1. Turn on the printer by pressing the P button.
Note:
Closing the paper basket makes the work easier. See “Using the Paper Basket” on
page 58.
2. Press the ( button in the control panel. Press the d/u button to highlight Poster
Board and press the OK button.
3. Raise all the poster board supports.
Basic Operations 48
Page 49

Press the supports diagonally downwards and then lift them straight up.
4. Place the printable side face up with its edge in front of the projecting supports as
shown.
Basic Operations 49
Page 50

5. Insert the poster board, using the edge to keep the supports pressed down.
6. Open the printer cover.
Basic Operations 50
Page 51

7. Insert the poster board, checking to be sure that it passes under the rollers.
8. Close the printer cover.
9. Position the trailing and right edges of the poster board as shown by the loading
indicators.
Center the right edge over the groove to the right of the paper eject guide and align the
trailing edge with the ends of poster board supports, as shown.
10.After positioning the media, press the OK button.
Basic Operations 51
Page 52

The paper will be fed into the printer.
11.Check the media type.
The display shows the type of paper currently selected with the printer. To print at
current settings, press the d/u buttons to highlight Keep Settings Above and press
the OK button. To change settings, highlight Change Settings and press the OK
button. See “Viewing and Changing Media Settings” on page 53.
Removing Poster Board
This section describes how to remove poster board when printing is complete.
Note:
To remove paper that was loaded but not used, press the
Buttons that are used in the following settings:
1. Confirm that Paper Eject is displayed in the control panel. Then, keeping a hand on the
poster board to prevent it falling from the printer, press the OK button.
( button and select Remove Paper.
2. Pull the poster board forward as shown in the on-screen instructions. After removing
the poster board, press the OK button.
Basic Operations 52
Page 53

Important:
If poster board will not be used in the next print job, lower all the poster board
supports. Leaving the supports raised may cause paper to jam.
To lower the supports, grasp them as shown, pull them diagonally downward, and
then release.
Viewing and Changing Media Settings
The following is displayed in the control panel after paper is loaded.
Note:
If On is selected for Roll Paper Remaining and a barcode with roll data is printed on the current
roll, the printer will read the barcode and adjust settings automatically, and the above dialog will
not be displayed.
Basic Operations 53
Page 54

Checking Media Settings
The dialog displays the following options for the paper currently loaded in the printer.
Selected Paper Type: The current paper type.
Remaining Setup: Displayed only with roll paper.
This item shows the option currently selected for Roll Paper Remaining.
When On is selected for Roll Paper Remaining, the printer tracks the following roll paper
data.
O Time until replacement
The following settings are recorded in a barcode printed on the roll: the amount of paper
remaining, the value selected for remaining alert, and the paper type.
The barcode is automatically printed at the end of the roll when the roll is rewound. The
barcode is automatically read and settings adjusted the next time the paper is used,
improving efficiency when multiple rolls of paper are used.
O The amount of paper remaining in the . tab info display area
The info display area shows the amount of paper remaining in the current roll. Once the
amount of paper remaining falls below the limit, the amount is replaced by a warning
indicator showing that paper is running low. See “Screen View” on page 17.
O Printing availability
The printer predicts whether the current job can be printed on the amount of paper
remaining and displays the results, preventing waste caused by the paper running out
part way through a print job. This allows you to choose whether to print on the existing
roll or replace the paper, preventing waste.
Basic Operations 54
Page 55

Adjusting Settings
Follow the steps below to change the settings displayed.
Buttons that are used in the following settings:
1. Select an option.
To print at current settings
Press the d/u buttons to highlight Keep Settings Above and press the OK button.
Then proceed to step 6.
To change settings
Press the d/u buttons to highlight Change Settings and press the OK button.
2. Highlight a setting you wish to change and press the OK button.
3. Highlight an option and press the OK button.
4. Press the y button to return to the dialog shown in step 2.
5. When settings are complete, highlight Exit and press the OK button.
6. If On is selected for Remaining Setup, you will be prompted to enter the length of the
roll. Press the d/u buttons to choose a value between 16 and 326 feet (5.0 and 99.5 m)
and press the OK button. Paper length is set in increments of 1 foot (0.5 m).
After a short pause the printer will show Ready, indicating that it is ready to print. Transmit
the data to be printed from a computer.
Basic Operations 55
Page 56

Replacing Paper
This section describes how to replace paper. The process for removing the current paper
differs with the type of paper loaded; follow the instructions displayed in the control panel.
Buttons that are used in the following settings:
1. Confirm that the printer is ready and press the ( button.
The Load/Remove Paper menu will be displayed.
2. Press the d/u buttons to select the type of paper used to replace the current paper, and
then press the OK button.
3. The printer will eject the current paper. The process for ejecting the paper varies with
the type of paper loaded, as described below.
If On is selected for Roll Paper Remaining, barcode printing will begin; when printing
is complete, the roll will rewind automatically.
If Off is selected for Roll Paper Remaining, the roll rewinds automatically.
Note:
When the display shows Turn roll paper adapter to wind up roll paper, open the
roll paper cover and rewind the paper by hand.
Basic Operations 56
Page 57

Cut Sheets
Cut sheets are automatically ejected to the rear, where they can be removed by hand.
Poster Board
Poster board is partially ejected to the front. Supporting the board with one hand to
prevent it from falling, press the OK button and pull out the board.
If the next job will not use poster board, lower all the poster board supports. Leaving the
supports raised may cause paper to jam.
To lower the supports, grasp them as shown, pull them diagonally downward, and then
release.
4. Follow the on-screen instructions to load the paper for the next job.
Basic Operations 57
Page 58

Using the Paper Basket
The paper basket collects paper from the printer, preventing it from falling to the floor and
becoming creased or dirty.
The stand (24”) for the SureColor T3000 comes with a paper basket.
It can hold up to 20 sheets of the following types of paper printed in line drawing mode.
Paper Size Media types
A1 (594 × 841 mm) Plain Paper Roll
US D (22 × 34 in)
A0 (841 × 1189 mm)
US E (34 × 44 in)
* Not supported by the SureColor T3000.
Paper not of the above types must be removed from the printer one at a time before the
next sheet is printed.
*
*
Important:
Collecting consecutive sheets of other types in the paper basket may result in stains, folds, or
other damage to the printed sheets.
The paper basket can hold sheets up to 47 inches (1189 mm) long.
Note:
Close the paper basket before printing banners or other documents that exceed the maximum
length. Before the paper ejected from the printer touches the floor, we suggest that you take it in
both hands close to the paper eject guides and continue to lightly support it until printing is
complete.
Basic Operations 58
Page 59

Closing the Paper Basket
Before loading paper or moving the printer, close the paper basket by pressing it to the
opposite side as shown.
Opening the Paper Basket
If the paper basket is closed, open it by gently pulling it down as shown.
Basic Operations 59
Page 60

Important:
The paper basket will not function correctly when opened to the position shown below at right.
Stop when the paper basket is in the position shown below at left.
Using the Paper Basket
Adjust the stack guide to match the size of the paper.
Note:
The paper basket may with some documents or in some environments fail to hold the paper
correctly, resulting in the paper wrinkling or folding.
Basic Operations 60
Page 61

Using the Auto Take-up Reel Unit (SureColor T7000 Only)
The optional auto take-up reel unit automatically takes up paper as it is printed. It improves
efficiency for banners or large jobs involving continuous printing on roll paper.
The auto take-up reel unit for this printer can take up paper in either of the directions shown
below. Some types of paper may not support one or the other of these directions or may
place restrictions on the take-up direction.
See the following section for information on take-up support and take-up direction. See
“Epson Special Media Table” on page 224.
BackwardForward
Forward takes up the roll with the printable side out. Backward takes up the roll with the
printable side in.
Caution:
c
Important:
Confirm that the end of the roll is cut straight across. The unit will not function as expected if the
end of the roll is wavy or curved. See “Manual cut method” on page 39.
Note:
For information on installing the auto take-up reel unit, see the documentation supplied with the
auto take-up reel unit attachment.
O Fix the roll core for the auto take-up reel unit in place as described in the
documentation.
O Dropping the roll core could cause injury.
O Be careful that your hands, hair, or other objects do not get caught in the moving
parts of the auto take-up reel unit.
O Failure to observe this precaution could result in injury.
Basic Operations 61
Page 62

Using the Control Panel
This section describes how to use the control panel for the auto take-up reel unit.
1Power lamp
Displays the status of the auto take-up reel unit.
On : The auto take-up reel unit is ready for use.
Flickering : The auto take-up reel unit is in use.
Blinking : The auto take-up reel unit is in power-saving mode.
Intermittent blinking : An error has occurred.
Off : The power is off.
2Auto switch
Selects the auto take-up direction.
Backward : The roll is taken up with the printable side in.
Forward : The roll is taken up with the printable side out.
Off : The auto take-up reel unit does not take up paper.
3 Manual switch
Selects the manual take-up direction.
The setting selected with the Manual switch takes effect when the Auto switch is in the Off
position.
Backward : The roll is taken up with the printable side in.
The speed will increase after the button is pressed for
more than three seconds.
Forward : The roll is taken up with the printable side out.
The speed will increase after the button is pressed for
more than three seconds.
Basic Operations 62
Page 63

Attaching the Paper
This section describes how to attach roll paper to the auto take-up reel unit roll core. The
procedure varies with the take-up direction.
Important:
Before proceeding, select Off for Auto Cut. Using the auto take-up reel unit when On is selected
will cause errors. See “Cutting the roll paper” on page 38.
Taking Up the Paper Printable Side Out
For information on installing the roll core, see the Setup Guide for the optional auto take-up
reel unit.
Buttons that are used in the following settings:
Basic Operations 63
Page 64

1. Set the auto take-up reel unit Auto switch to Off. Plug the power cord into an outlet and
confirm that the power lamp lights.
2. Turn on the printer by pressing the P button.
3. Check that the roll paper is correctly loaded in the printer.
4. Press the ) button in the control panel. Keep the d button pressed until the end of
the roll reaches the roll core.
5. Tape the end to the roll core. Place tape at the center and then at the left and right ends.
6. Keep the d button in the control panel pressed until you have fed enough paper for
about three wraps around the roll core.
Basic Operations 64
Page 65

7. Keep the Manual switch pressed to Forward to wrap the paper three times around the
core.
After wrapping the paper around the core, ensure that paper around the core is
sufficiently loose.
Note:
The tensioner supplied with the auto take-up reel unit is used with some types of
paper. Slacken the paper and insert the tensioner near the center of the paper as
shown. See the following section for information on paper that requires the
tensioner. See “Epson Special Media Table” on page 224.
Basic Operations 65
Page 66

8. Set the Auto switch to Forward.
Taking Up the Paper Printable Side In
For information on installing the roll core, see the Setup Guide for the optional auto take-up
reel unit.
Buttons that are used in the following settings:
Basic Operations 66
Page 67

1. Set the auto take-up reel unit Auto switch to Off. Plug the power cord into an outlet and
confirm that the power lamp lights.
2. Turn on the printer by pressing the P button.
3. Check that the roll paper is correctly loaded in the printer.
4. Press the ) button in the control panel. Keep the d button pressed until the end of
the roll reaches the roll core.
5. Tape the end to the roll core. Place tape at the center and then at the left and right ends.
6. Keep the d button in the control panel pressed until you have fed enough paper for
about three wraps around the roll core.
Basic Operations 67
Page 68

7. Keep the Manual switch pressed to Backward to wrap the paper three times around the
core.
After wrapping the paper around the core, ensure that paper around the core is
sufficiently loose.
8. Set the Auto switch to Backward.
Basic Operations 68
Page 69

Removing Paper from the Auto Take-up Reel Unit
This section describes how to remove paper from the auto take-up reel unit.
Caution:
c
Buttons that are used in the following settings:
Removing paper from the auto take-up reel unit requires two workers, one on each end
of the roll. A single worker working alone could drop the roll, resulting in injury.
1. Set the Auto switch to Off.
2. Cut the paper and take it up until it is all on the auto take-up reel unit roll core. See
“Manual cut method” on page 39.
Basic Operations 69
Page 70

After cutting the paper, support the end to prevent the printed surface touching the floor;
continue to support the paper until it is all taken up. Keep the Manual switch pressed in
the take-up direction (either Forward or Backward).
3. Unlock the movable unit and remove it from the roll core. When removing the movable
unit, support the roll core with one hand to prevent it from falling to the floor.
4. Remove the roll core from the auto take-up reel unit.
Basic Operations 70
Page 71

Basic Printing Methods (Windows)
Printing is performed from the application used to create the document you wish to print.
The basic procedure is described below.
1. Turn on the printer, and load the paper.
See “Loading Roll Paper” on page 32, “Loading Cut Sheets” on page 44, or “Loading
Poster Board” on page 47 for more information.
2. When you have created the data, click Print in the File menu.
3. After confirming that the printer is selected, click Printer properties or Properties to
display the Printer Settings tab.
Basic Operations 71
Page 72

4. Check the options selected for Media Settings.
On startup, the printer driver automatically downloads information on the media in the
printer and displays it in the Media Settings area.
To print at current settings, proceed to the next step.
If the desired settings are not displayed, replace the media in the printer with the
desired paper type and click the Acquire Info button. The driver will reacquire data
from the printer and update the information displayed in the Media Settings area.
Basic Operations 72
Page 73

5. In the Size Settings area, choose the desired Paper Size.
Choose the Paper Size selected when the document was created in the application.
If the desired size is not available in the menu, click Custom Paper Size to add a
custom paper size. See “Printing at Non-Standard Sizes” on page 100.
6. Select “fit to” and borderless printing options.
To resize the document to fit it to the width of the roll when using roll paper, simply
select Fit to Roll Paper Width.
To print without borders (margins), select Borderless.
For borderless printing on paper larger than the original document size, select both the
“fit to” and borderless options.
Basic Operations 73
Page 74

Advanced fit and borderless settings are available in the Layout tab.
See “Enlargements and Horizontal and Vertical Banners” on page 92 and “Borderless
Printing” on page 106.
7. In the Print Quality area, choose an option for Select Target.
Choose an option according to the type of document and how it will be used.
To choose a color correction method or adjust colors, select Advanced Settings. See
“Correct Color and Print” on page 113.
8. Check settings.
The selected settings are reflected in the area on the right; check that settings are
correct.
Basic Operations 74
Page 75

9. Click the OK button.
10.When settings are complete, click Print.
The progress bar is displayed, and printing starts.
Screen while printing
The following screen is displayed when you start printing, and the progress bar (the
computer’s processing status) is displayed. On this screen you can check the remaining
ink level, product numbers for the ink cartridges, and so on.
Basic Operations 75
Page 76

An error message is displayed if an error occurs or an ink cartridge needs replacing while
printing.
Basic Printing Methods (Mac OS X)
1. Turn on the printer, and load the paper.
See “Loading Roll Paper” on page 32, “Loading Cut Sheets” on page 44, or “Loading
Poster Board” on page 47.
2. When you have created the data, from the File menu of the application, click Print and
so on.
Basic Operations 76
Page 77

3. The print screen is displayed.
For Mac OS X 10.7 or higher, click Show Details at the bottom of the dialog.
For Mac OS X 10.6 and 10.5, click the arrow ( ) to make settings on the Page Setup
screen.
Basic Operations 77
Page 78

Note:
If page settings are not displayed in the print dialog, click the “page settings” option
(e.g., Page Setup) in the File menu.
4. Check that this printer is selected, and then set the paper size.
Select one of the following options for Paper Size. XXXX is the actual paper size, such
as A4.
XXXX: Print with margins on roll paper. Print using the Roll Paper Margin selected on
the printer. See “Print Queues menu” on page 170.
XXXX (cut sheet): Print with margins on cut sheets. Print with top, right, and left margins
of 0.1 inches (3 mm) and a bottom margin of 0.5 inches (14 mm).
When performing borderless or banner printing; see “Borderless Printing” on page 106,
and “Enlargements and Horizontal and Vertical Banners” on page 92.
5. To view basic print settings, select Printer Settings from the list.
In Mac OS X versions 10.8, 10.7 and 10.6, the printer driver automatically acquires
information on the paper loaded in the printer at startup and displays it in the Page
Setup and Media Type areas. To print at current settings, proceed to the next step.
Basic Operations 78
Page 79

In Mac OS X version 10.5, choose Page Setup and the Media Type according to the
type of paper loaded in the printer.
If the desired settings are not displayed, replace the media in the printer with the
desired paper type and click the Acquire Info button. The driver will reacquire data
from the printer and update the information displayed.
6. Choose how the printed document will be used. Then choose an option according to the
type of document and how it will be used.
To choose a color correction method or adjust colors, select Advanced Settings for
Mode. See “Correct Color and Print” on page 113.
Basic Operations 79
Page 80

7. Check settings.
The selected settings are reflected in the area on the right; check that settings are
correct.
8. When settings are complete, click Print.
The printer icon is displayed in the Dock while printing. Click the printer icon to display
the status. You can check the progress of the current print job and the printer status
information. You can also cancel a print job.
Also, if an error occurs while printing, a notificati on m es s age is displayed.
Basic Operations 80
Page 81

Printable Area
This section describes the printable areas for the printer.
If the margin set in an application is larger than the following setting values, sections
beyond the specified margins are not printed. For example, if 1.5 cm (15 mm) is selected
for the left and right margins in the printer menus and the document fills the page, the
1.5 cm (15 mm) at the left and right sides of the page will not be printed.
Roll Paper Printable Area
The gray area in the illustration below shows the printable area.
When printing borderless on the left and right, the left and right margins are 0 mm. When
printing borderless on all edges, all margins are 0 mm.
The arrow in the illustration indicates the direction of the ejected paper.
10 ~ 44 inches (254 ~ 1118 mm)
10 ~ 36 inches (254 ~ 914 mm)
10 ~ 24 inches (254 ~ 620 mm)
C
B
5 ~ 0.6 inches (127 ~ 15 mm)
A
4
4
*1
*2
*3
0.1 ~ 0.6 inches (3 ~ 15 mm)0.1 ~ 0.6 inches (3 ~ 15 mm)
0.1 ~ 0.6 inches (3 ~ 15 mm)
D
0.1 ~ 0.8 inches (3 ~ 45 mm)
*1 SureColor T7000
*2 SureColor T5000
*3 SureColor T3000
*4 If Banner is selected for Roll Paper Option in the
printer driver Advanced tab, the top and bottom margins
are 0 mm.
Margins for roll paper depend on the option selected for Roll Paper Margin in the menus,
as shown in the following table. For Roll Paper Margin Settings, see “Setup menu” on
page 175.
The default setting is Normal.
Basic Operations 81
Page 82

Roll Paper Margin Parameter Margin Values
Normal 1, 3 = 15 mm
2, 4 = 3 mm
Top15 mm/Bottom 15 mm 1, 3 = 15 mm
2, 4 = 3 mm
Top 35 mm/Bottom 15 mm 1 = 35 mm
3 = 15 mm
2, 4 = 3 mm
Top 45 mm/Bottom 15 mm 1 = 45 mm
3 = 15 mm
2, 4 = 3 mm
3 mm 1, 2, 3, 4, = 3 mm
15 mm 1, 2, 3, 4, = 15 mm
* When Normal is selected, the value for 1 is 20 mm for the following paper types: Premium Glossy Photo
Paper (250)/Premium Semigloss Photo Paper (250)/Premium Luster Photo Paper (260)/Premium Semimatte
Photo Paper (260)
*
When the following media type is used in CAD / Line Drawing mode, the value for 1 and 3 is 3 mm:
Singleweight Matte Paper.
Important:
Printing is distorted when the trailing edge of the roll paper comes off the core. Make sure the
trailing edge does not come inside the printing area.
The print size does not change even when the margins are changed.
Basic Operations 82
Page 83

Cut Sheets Printable Area
When printing borderless on the left and right, the left and right margins are 0 mm.
(Borderless printing is not available with poster board.)
The arrow in the illustration indicates the direction of the ejected paper.
0.1 inches (3 mm)
11 ~ 62.2 inches
(279 ~ 1580 mm)
8.3 ~ 17 inches
(210 ~ 432 mm)
0.1 inches (3 mm)
0.5 inches (14 mm)
0.1 inches (3 mm)
Turning Off the Power Using Power Off Timer
The printer offers the following two power management options:
O Sleep mode
The printer enters sleep mode when there are no errors, no print jobs being received,
and no control panel or other operations performed. When the printer enters sleep
mode, the control panel’s screen turns off and the internal motors and other parts
switch off to consume less power.
Press any button in the control panel to reactivate the display. However, under these
conditions, the screen display turns off again after 30 seconds if no operations are
performed. The printer only exits sleep mode and is completely restored to normal
operation when a print job is received or the cover is opened or another hardware
operation is performed. The delay before the printer enters sleep mode can be selected
from values between 5 and 180 minutes. At default settings, the printer enters sleep
mode if no operations are performed for 15 minutes. The delay can be changed from
the Setup menu (see “Setup menu” on page 175).
Note:
When the printer enters sleep mode, the control panel’s screen goes blank as if the power
has been turned off, but the P light remains lit.
Basic Operations 83
Page 84

O Power Off Timer
The printer is equipped with a Power Off Timer option that automatically turns the
printer off if no errors occur, no print jobs are received, and no control panel or other
operations are performed for a set period of time. The delay before the printer turns off
automatically can be selected from values between 1 and 24 hours in increments of 1
hour.
At default settings, the printer turns off automatically if no errors occur, no print jobs are
received, and no control panel or other operations are performed for eight hours. Power
Off Timer settings can be adjusted from the Setup menu (see “Setup menu” on page
175).
About Power Management
You can adjust the time before Power Management is applied. Any increase will affect the
printer’s energy efficiency. Please consider the environment before making any change.
Canceling Printing
There are a few ways to stop printing operations depending on the situation.
When the computer has finished sending data to the printer, you cannot cancel the print job
from the computer. Cancel on the printer.
Canceling from the computer (Windows)
When the Progress Bar is displayed
Click Cancel.
Basic Operations 84
Page 85

When the Progress Bar is not displayed
1. Click the printer icon in the task bar while printing is in progress.
Whether or not an icon is displayed depends on the settings selected for Windows.
2. Right click the name of the job you want to cancel and select Cancel from the document
menu.
To cancel all jobs, click Cancel All Documents in the Printer menu.
If the job has been sent to the printer, print data is not displayed on the above screen.
Canceling from the computer (Mac OS X)
1. Click the printer icon in the Dock.
2. Select the job you want to cancel, and then click Delete.
If the job has been sent to the printer, print data is not displayed on the above screen.
Basic Operations 85
Page 86

Canceling on the printer
Press the W button, select Job Cancel on the screen, and then press the OK button.
The print job is canceled even in the middle of printing. It may take a while before the
printer returns to ready status after canceling a job.
Note:
You cannot delete print jobs which are in the print queue on the computer using the above
operation. See "Canceling from the computer" to delete print jobs in the print queue.
Basic Operations 86
Page 87

Chapter 3
Using the Optional Hard Disk Unit
The Purpose of the Hard Disk Unit
When an optional hard disk unit is connected, print jobs can be viewed and managed as
described below.
Print Job Management
O From the Print Queues menu
For more information, see “Viewing and Printing Saved Print Jobs” on page 91.
O From Remote Manager
The Remote Manager utility is included in the standard installation of the printer
network interface and, in addition to managing the print jobs stored on the hard disk
unit, can be used for viewing printer status and adjusting network settings. It is
launched by entering the printer’s IP address in a computer web browser.
For more information, see the online help for Remote Manager. For information on
launching Remote Manager see the Network Guide (pdf).
O From LFP HDD Utility (Windows only)
The LFP HDD Utility can be used to manage print jobs stored on a hard disk unit
connected to the printer. It is used when the printer is connected to the computer via
USB and can be downloaded from the Epson website (http://www.epson.com/support).
Using the Optional Hard Disk Unit 87
Page 88

Hard Disk Unit Functions
When an optional hard disk unit is installed, print jobs can be viewed and managed as
described below.
O Viewing Print Jobs
When there are multiple print jobs with some in the queue, the following information can
be displayed.
O Print start time
O Estimated print time
O Other information, including whether the job can be printed without replacing
consumables
Print jobs can be selected and cancelled in Remote Manager or the LFP HDD Utility.
O Viewing and Resuming Held Print Jobs
If the source selected with the printer differs from the source specified in the print job,
an error will occur and printing will be suspended.
When an error occurs, printing cannot be restarted until the printer has been readied by,
for example, replacing the paper.
When an optional hard disk unit is installed, the following types of print job can be held
temporarily.
O Print jobs that specify sources that differ from that selected with the printer
O Print jobs that specify paper types that differ from that selected with the printer
O Print jobs that specify output paper sizes (widths) that differ from that selected with
the printer
After printing all the jobs that can be printed with the current paper, you can replace the
paper with the media specified in the held print jobs and resume printing, making your
work more efficient.
Individual jobs can be selected and resumed or cancelled in Remote Manager or the
LFP HDD Utility.
Note:
Held print jobs can be saved if On is selected for Store Held Job in the control panel
Setup menu. The factory default setting is Off.
See “Setup menu” on page 175.
Using the Optional Hard Disk Unit 88
Page 89

O Viewing and Printing Stored Jobs
Print jobs can be stored on the hard disk unit and printed at a later date.
Print jobs selected for printing at a later date can be printed directly from the hard disk
unit without increasing the load on your computer.
Print jobs are saved using the printer driver. See “Saving Print Jobs to the Hard Disk
Unit” on page 89.
Note:
Enlarged copy print jobs created with a scanner attached to the printer cannot be
saved to the hard disk unit.
Jobs printed from the following applications are always saved to the hard disk unit.
O LFP Print Plug-In for Office
O EPSON CopyFactory5
For information on other applications, see the software documentation or online
help.
Saving Print Jobs to the Hard Disk Unit
This section describes the print driver settings used to save print jobs.
1. When you have created the data, click Print in the File menu.
Using the Optional Hard Disk Unit 89
Page 90

2. After confirming that the printer is selected, click Printer properties or Properties to
display printer settings.
3. In the Advanced tab, click the Settings button in the Hard Disk Unit area and select
Print and Save or Save only.
4. Next, print the document normally.
If Save only is selected, the print job will be saved to the optional hard disk unit but not
printed.
Using the Optional Hard Disk Unit 90
Page 91

Viewing and Printing Saved Print Jobs
This section describes how to view and print saved jobs from the control panel.
Buttons that are used in the following settings:
1. Confirm that the printer is ready to print. Press the l/r buttons to highlight , and press
the OK button.
The Print Queues menu will be displayed.
2. Press the d/u buttons to highlight Saved Job Queue and press the OK button.
The print job tab info display area shows the names of stored print jobs.
3. Press the d/u buttons to highlight the desired job and press the OK button.
Information on the selected job will be displayed.
To exit without printing the job, press the W button after viewing job data.
To print the job, proceed to step 4.
4. Press the OK button.
You will be prompted to enter the number of copies.
5. Press the d/u buttons to choose the number of copies and press the OK button.
Using the Optional Hard Disk Unit 91
Page 92

Chapter 4
More Ways to Print
Enlargements and Horizontal and Vertical Banners
The printer driver can enlarge or reduce documents for different paper sizes. There are
three setting methods.
Before printing at non-standard sizes, including vertical or horizontal banners and
documents with equal sides, enter the desired paper size in the printer driver.
See “Printing at Non-Standard Sizes” on page 100.
O Fit to Roll Paper Width
Automatically enlarges or reduces the image size to fit the roll paper width.
O Specify Size
You can specify the enlargement or reduction ratio. Use this method for a non-standard
paper size.
A4
1000mm
More Ways to Print 92
Page 93

O Fit to Output Size
Automatically enlarges or reduces the image size to fit the paper size.
Note:
O When printing from applications designed expressly for horizontal or vertical banners, adjust
printer driver settings as described in the application documentation.
O When using Windows applications designed for horizontal or vertical banners, select Banner
in the Advanced tab as required.
Fitting Documents to the Width of the Roll Paper
Windows
1. Display the printer driver’s Printer Settings tab and select a Paper Size that matches
the document page size.
More Ways to Print 93
Page 94

See “Basic Printing Methods (Windows)” on page 71.
2. In the Layout tab, select Reduce/Enlarge and click Fit to Roll Paper Width.
3. Choose whether to fit the short or long edge of the document to the roll paper width.
More Ways to Print 94
Page 95

Note:
Output can also be fitted to the roll width by selecting Fit to Roll Paper Width in the
Printer Settings tab.
4. Check other settings, and then start printing.
Mac OS X
1. Choose Page Layout Settings from the list in the print dialog and select
Reduce/Enlarge.
See “Basic Printing Methods (Mac OS X)” on page 76.
2. Select Fit to Roll Paper Width and choose whether to fit the short or long edge of the
document to the roll paper width.
3. Check other settings, and then start printing.
More Ways to Print 95
Page 96

Choosing a Print Size
Windows
1. Display the printer driver’s Printer Settings tab and select a Paper Size that matches
the document page size.
See “Basic Printing Methods (Windows)” on page 71.
2. In the Layout tab, select Reduce/Enlarge and click Specify Size.
3. Choose an input method and select a size.
More Ways to Print 96
Page 97

Enter a value directly or click the arrows to the right of the scale box to set the value.
4. Check other settings, and then start printing.
Mac OS X
1. Choose Page Layout Settings from the list in the print dialog and select
Reduce/Enlarge.
See “Basic Printing Methods (Mac OS X)” on page 76.
2. Select Specify Size, choose a method for specifying the size, and select a size.
Enter a value directly or click the arrows to the right of the scale box to set the value.
3. Check other settings, and then start printing.
More Ways to Print 97
Page 98

Fitting Documents to the Output Size
Windows
1. Display the printer driver’s Printer Settings tab and select a Paper Size that matches
the document page size.
See “Basic Printing Methods (Windows)” on page 71.
2. In the Layout tab, select Reduce/Enlarge and click Fit to Output Size.
3. Select the size of the paper used for printing.
To print the document, margins excluded, at precisely the selected output size, select
Oversize.
Note:
When printing using Oversize, load paper that is as large as the selected Output
Size plus the margins needed by the printer. Printer margins see “Printable Area” on
page 81.
More Ways to Print 98
Page 99

4. Check other settings, and then start printing.
Mac OS X
1. Choose Page Layout Settings from the list in the print dialog and select
Reduce/Enlarge.
See “Basic Printing Methods (Mac OS X)” on page 76.
2. Select Fit to Output Size and choose a paper size that matches the paper in the
printer.
3. Check other settings, and then start printing.
Note:
Output can also be fitted to the paper size by selecting Scale to fit paper size in the print dialog
Paper Handling pane.
More Ways to Print 99
Page 100

Printing at Non-Standard Sizes
Before printing at non-standard sizes, including vertical or horizontal banners and
documents with equal sides, save the desired paper size in the printer driver. Once they
have save in the printer driver, custom sizes can be selected in the application Page Setup
and other print dialogs.
The following sizes can be used.
Width SureColor T7000 3.5 to 44 inches (89 to 1,118 mm)
SureColor T5000 3.5 to 36 inches (89 to 914 mm)
*1
Length
SureColor T3000 3.5 to 24 inches (89 to 620 mm)
*2
Windows: 5 to 590 inches (127 to 15000 mm)
Mac OS X: 5 to 600 inches (127 to 15240 mm)
*1
The maximum printable width is 24 inches (610 mm).
*2
The paper length can be longer if using applications that support banner printing. However, the actual print
size depends on the application, the paper size loaded in the printer, and the computer environment.
Important:
The smallest size supported by the printer is 10 inches (254 mm) wide × 5 inches (127 mm) long.
If a smaller size is entered in the printer driver as a Custom Paper Size, the document will print
with wider-than-expected margins, which must be trimmed.
For Mac OS X Custom Paper Sizes, although you can specify a large paper size which cannot
be loaded on this printer, it will not be printed properly.
The available output size is limited depending on the application.
More Ways to Print 100
 Loading...