

Page 1
User’s Guide
Printed on recycled paper with at least 10% post-consumer content
Page 2

All rights reserved. No part of this publication may be reproduced, stored in a retrieval system, or transmitted in
any form or by any means, electronic, mechanical, photocopying, recording, or otherwise, without the prior
written permission of
with this
Neither
EPSON printer. EPSON is not responsible for any use of this information as applied to other printers.
SEIKO EPSON CORPORATION nor its affiliates shall be liable to the purchaser of this product or third
SEIKO EPSON CORPORATION. The information contained herein is designed only for use
parties for damages, losses, costs, or expenses incurred by purchaser or third parties as a result of: accident, misuse,
or abuse of this product or unauthorized modifications, repairs, or alterations to this product, or (excluding the
U.S.) failure to strictly comply with
SEIKO EPSON CORPORATION shall not be liable for any damages or problems arising from the use of any options
or any consumable products other than those designated as Original
Products by
EPSON and EPSON ESC/P are registered trademarks and EPSON ESC/P 2 and EPSON Stylus are trademarks of
SEIKO EPSON CORPORATION.
SEIKO EPSON CORPORATION.
SEIKO EPSON CORPORATION’s operating and maintenance instructions.
EPSON Products or EPSON Approved
General Notice: Other product names used herein are for identification purposes only and may be trademarks of
their respective owners.
NERGY STAR emblem does not represent EPA endorsement of any product or service.
The E
EPSON disclaims any and all rights in those marks.
Copyright © 1996 by Epson America, Inc. 4006678
11/96
ii
Page 3

FCC Compliance Statement
For United States Users
This equipment has been tested and found to comply with the limits for a Class B digital device, pursuant to Part
15 of the FCC Rules. These limits are designed to provide reasonable protection against harmful interference in a
residential installation. This equipment generates, uses, and can radiate radio frequency energy and, if not installed
and used in accordance with the instructions, may cause harmful interference to radio or television reception.
However, there is no guarantee that interference will not occur in a particular installation. If this equipment does
cause interference to radio and television reception, which can be determined by turning the equipment off and
on, the user is encouraged to try to correct the interference by one or more of the following measures.
◗ Reorient or relocate the receiving antenna.
◗ Increase the separation between the equipment and receiver.
◗ Connect the equipment into an outlet on a circuit different from that to which the receiver is connected.
◗ Consult the dealer or an experienced radio/TV technician for help.
WARNING
The connection of a non-shielded equipment interface cable to this equipment will invalidate the FCC
Certification of this device and may cause interference levels which exceed the limits established by the FCC for
this equipment. It is the responsibility of the user to obtain and use a shielded equipment interface cable with this
device. If this equipment has more than one interface connector, do not leave cables connected to unused
interfaces. Changes or modifications not expressly approved by the manufacturer could void the user’s authority to
operate the equipment.
For Canadian Users
This Class B digital apparatus meets all requirements of the Canadian Interference-Causing Equipment
Regulations.
Cet appareil numérique de la classe B respecte toutes les exigences du Règlement sur le materiel brouilleur du
Canada.
iii
Page 4

iv
Page 5

Introduction
Windows System Requirements 2
Macintosh System Requirements 2
How To Use Your Manuals 3
Warnings, Cautions, and Notes 4
Where To Get Help 4
Electronic Support Services 5
NERGY STAR Compliance 6
E
Energy-saving Tips 7
Important Safety Instructions 7
1 Basic Printing
Printing from Windows 1-1
Setting Printer Options from Windows Applications 1-2
Setting Default Printer Options 1-4
Checking Printer Status 1-5
Printing from a Macintosh 1-6
What To Do When the Printer Lights Flash 1-8
Contents
v
Page 6

Contents
2 Printing on Special Media
Using Special Paper and Media 2-1
Letterhead, Preprinted Forms, and Legal-size Paper 2-3
EPSON 360 dpi High Quality and Photo Quality
Ink Jet Paper 2-3
EPSON Photo Quality Glossy Paper, Film, and
Transparencies 2-3
Envelopes 2-4
EPSON Photo Quality Ink Jet Cards 2-5
EPSON Photo Quality Self Adhesive Sheets 2-5
EPSON Iron-On Transfer Paper 2-6
Printing Banners and Other Custom Size Projects 2-6
Printing a Banner from Windows 2-7
Printing a Banner from a Macintosh 2-8
3 Custom Printing
Using Predefined Advanced Settings 3-1
Customizing Print Quality and Special Effects 3-4
Customizing Color Settings 3-7
Using ColorSync on the Macintosh 3-9
Saving Custom Settings 3-11
4 Managing Print Jobs and
Network Printing
Managing Print Jobs in Windows 4-1
Using the Spool Manager 4-2
Using the Status Monitor 4-4
Managing Print Jobs on a Macintosh 4-6
Using Monitor2 4-6
Using the Macintosh Status Monitor 4-8
vi
Page 7

Network Printing on a PC 4-9
Setting Up the Host System 4-10
Setting Up Remote Systems 4-10
Setting Up Your Network Path in Windows 95 4-11
Network Printing on a Macintosh 4-12
Assigning a Name to the Printer 4-12
Using the AppleTalk Connection 4-13
5 Maintenance and
Transportation
Replacing an Ink Cartridge 5-1
Removing an Empty Ink Cartridge 5-2
Installing the New Cartridge 5-4
Replacing an Outdated Ink Cartridge 5-5
Cleaning the Print Heads 5-6
Using the Head Cleaning Utility 5-6
Using the Control Panel To Clean the Print Heads 5-7
Examining the Nozzle Check Pattern 5-8
Aligning the Print Heads 5-8
Using the Print Head Alignment Utility 5-9
Using the Control Panel To Align the Print Heads 5-9
Cleaning the Printer 5-10
Transporting the Printer 5-11
Contents
6 Troubleshooting
Diagnosing Problems 6-1
Reading the Control Panel Lights 6-2
Running a Self Test 6-3
Using Hex Dump Mode 6-3
Improving Print Quality 6-4
Printed image has horizontal banding 6-5
vii
Page 8

Contents
Vertical lines are misaligned or vertical banding
appears 6-5
The printed image has incorrect or missing colors 6-5
The printed image is faint or has gaps 6-6
The printed image is blurry or smeared 6-7
Photographic images look grainy or rough 6-7
Solving Printing Problems 6-8
All lights are off 6-8
Only the Ppower light is on, but nothing prints 6-8
The S paper out light is flashing or on 6-9
A B black or A color ink out light is flashing or on 6-9
The S and Plights are flashing 6-9
All the lights are flashing 6-10
The printer has finished charging the ink cartridge,
but the Ppower light is still flashing 6-10
The printer software doesn’t work correctly after you
upgrade to Windows 95 6-10
After you install your printing software, you see the
Windows 95 New Hardware found window 6-10
You see a spooling error message (Windows) 6-11
You see a memory error message (Macintosh) 6-11
In Windows 95, the Status Monitor box does not
appear with the Despooler 6-11
A portion of your image doesn’t print (Macintosh) 6-11
Printing is too slow 6-12
Your printer switches to the modem port or won’t
confirm on the printer port (Macintosh) 6-12
Your printer icon doesn’t appear in the Chooser
(Macintosh) 6-12
Fixing Paper Problems 6-13
Paper doesn’t feed 6-13
Multiple pages feed at the same time 6-13
Paper jams inside the printer 6-14
Paper doesn't eject fully or is wrinkled 6-14
viii
Page 9

Solving Miscellaneous Printout Problems 6-15
Characters are incorrect or garbled. 6-15
The margins are incorrect. 6-15
The image is inverted as if viewed in a mirror. 6-15
The printer prints blank pages. 6-16
A Using Optional Interfaces
Selecting an Interface Board A-1
Using Macintosh Interface Boards A-2
Using the PC Serial Interface Board A-2
Installing Optional Interfaces A-3
B Technical Specifications
Printing B-1
Paper B-3
Ink Cartridges B-5
Mechanical B-5
Electrical B-6
Environmental B-6
Safety Approvals B-6
DOS Support B-6
Control Panel Settings B-7
Control Codes B-8
Character Tables B-9
Contents
Glossary
Index
ix
Page 10

Introduction
EPSON® Stylus™ COLOR 800 printer is the ideal output
Your
device for business graphics, single-page layout proofs, digital
photography—or any project you create on your computer.
With resolutions up to 1440 by 720 dpi, you get amazingly
realistic photographic images and vivid graphics in color, or
razor-sharp black printing at speeds up to eight pages per
minute.
The printer software for Windows
advanced color management, with adjustable levels of
brightness, contrast, saturation, and ink colors. Support for
ColorSync
match the colors on your monitor.
With standard parallel and serial ports and simple network
connectivity, setting up your printer is fast and easy.
specially formulated ink cartridges and wide variety of ink jet
papers offer the most flexibility for getting the results you want.
™
2.01 and Windows ICM ensures printouts that
®
and Macintosh® provides
EPSON’s
1
Page 11

Introduction
Windows System Requirements
To use your printer and its software with a PC, your system
should have:
®
◗ An IBM
faster processor
◗ Microsoft
or Windows 95
◗ At least 8MB of RAM (more for Windows 95)
◗ At least 20MB of free hard disk space for storing images
(40MB or more is recommended)
◗ VGA, Super VGA, or better display adapter and monitor
◗ A shielded, twisted-pair parallel cable (6 to 10 feet long) to
connect your computer to the printer; the cable must have
a D-SUB, 25-pin, male connector for your computer and a
36-pin, Centronics
compatible PC with at least a 386/25 MHz or
®
Windows 3.1, Windows for Workgroups
®
compatible connector for the printer.
™
3.1,
Macintosh System Requirements
To use your printer and its software with a Macintosh, your
system should have:
◗ Any Macintosh or Power Macintosh model except the
Macintosh +, Macintosh 512, Macintosh Classic,
Macintosh SE, or PowerBook
◗ System 7.1 or later
◗ At least 8MB of RAM (16MB or more is recommended)
◗ At least 20MB of free hard disk space for storing images
(40MB or more is recommended)
◗ VGA (8 bit, 640
◗ Standard Apple
× 480) or better display and monitor
®
System Peripheral-8 cable or equivalent
(RS-422, 8-pin mini DIN male/male, Belkin F2V024
recommended)
2
™
100
Page 12

Introduction
How To Use Your Manuals
To set up your printer, see the Quick Setup card. For color
printing tips, see the Print It in EPSON Color booklet. This
User’s Guide contains the following information:
Chapter 1 covers the basics of printing with Windows or
Macintosh.
Chapter 2 gives guidelines for selecting the right paper or other
media for your print job and instructions for loading it in your
printer.
Chapter 3 tells you how to print special projects with custom
settings for print quality and color management.
Chapter 4 explains how to manage print jobs, check printer
status, and set up your system for network printing.
Chapter 5 gives instructions for replacing ink cartridges,
cleaning and aligning the print heads, and cleaning and
transporting the printer.
Chapter 6 provides solutions for any problems you may have.
Appendix A tells you how to install optional interface cards in
your printer.
Appendix B provides the technical details on your printer, ink
cartridges, and
A Glossary and Index
EPSON media.
are included at the end of the book.
3
Page 13
Introduction
Warnings, Cautions, and Notes
You’ll find this information throughout your manual:
Warnings must be followed carefully to avoid bodily injury.
Cautions must be observed to avoid damage to your
equipment.
Notes contain important information about your printer.
Tips contain additional hints for great printing.
Where To Get Help
EPSON provides customer support and service through a
network of authorized EPSON Customer Care Centers. Dial
(800) 922-8 911 for the nearest location or the following
services
◗ Fax-on-Demand access to EPSON’s technical information
◗ Literature on current and new products
◗ The location of your nearest Authorized
◗ Technical information on the installation, configuration,
◗ Customer relations
:
library
Customer Care Center
and operation of
EPSON products
4
EPSON Reseller or
Page 14

Introduction
For answers to commonly asked questions about
products 24 hours a day, seven days a week, call EPSON Sound
Advice at (800) 442-2110.
You can purchase ink cartridges, paper, manuals, accessories,
and parts from
sales only). In Canada, please call (800) 873-7 766 for dealer
referral.
If you need help using software with an EPSON product, see the
documentation for that program for technical support
information.
EPSON Accessories at (800) 873 -7 766 (U.S.
EPSON
Electronic Support Services
You can access helpful tips, specifications, DIP switch or
jumper settings, drivers, FAQs, sample files, application notes,
and
EPSON product bulletins 24 hours a day, seven days a
week, using a modem and one of the online services below.
World Wide Web
From the Internet, you can reach EPSON’s Home Page at
http://www.epson.com.
EPSON Internet FTP Site
If you have Internet FTP capability, use your Web browser (or
other software for FTP downloading) to log onto
ftp.epson.com with the user name anonymous and your
e-mail address as the password.
EPSON Download Service
You can call the EPSON Download Service at (800) 442-2007.
Set your communications software to 8 data bits, 1 stop bit, no
parity. Modem speed can be up to 28.8 Kbps.
5
Page 15

Introduction
EPSON Fax-on-Demand service
You can access EPSON’s technical information library by calling
(800) 442-2 110 or (800 ) 922-8911 and selecting the
appropriate phone option. You must provide a return fax
number to use Fax-on-Demand.
EPSON Forum on CompuServe
Members of CompuServe® can type GO EPSON at the menu
prompt to reach CompuServe’s Epson America Forum. As an
owner of an
introductory CompuServe membership, which entitles you to
an introductory credit and your own user ID and password.
To take advantage of this offer in the U.S. or Canada, call
(800) 848-8 199 and ask for representative #529.
EPSON product, you are eligible for a free
ENERGY STAR Compliance
As an ENERGY STAR Partner, EPSON has determined that this
product meets the ENERGY STAR guidelines for energy
efficiency. The EPA ENERGY STAR Office Equipment
program is a voluntary partnership with the computer and
office equipment industry to promote the introduction of
energy-efficient personal computers, monitors, printers, fax
machines, and copiers in an effort to reduce air pollution caused
by power generation.
6
Page 16
Caution:
Always turn the printer
off using the
button. If you’re using a
power strip, do not
switch it off or unplug the
printer until the
light is off.
P power
P power
Introduction
Energy-saving Tips
Here are a few tips you can use to be even more energy-wise:
◗ If your monitor isn’t Energy Star compliant, turn it off
when you’re not using it.
◗ Turn off your computer, printer, and monitor each day
when you are done using them.
◗ Use the print preview option in your software so you can
catch errors before you print something.
◗ Send e-mail rather than distributing memos. Not only is
this faster, but you’ll save paper and storage space too.
Important Safety Instructions
Before using your printer, read the following safety instructions
to make sure you use the printer safely and effectively:
◗ Turn off and unplug the printer before cleaning. Clean
with a damp cloth only. Do not spill liquid on the printer.
◗ Do not place the printer on an unstable surface or near a
radiator or heating vent.
◗ Do not block or cover the openings in the printer’s cabinet
or insert objects through the slots.
◗ Use only the type of power source indicated on the printer’s
label.
◗ Connect all equipment to properly grounded power
outlets. Avoid using outlets on the same circuit as
photocopiers or air control systems that regularly switch
on and off.
◗ Place the printer near a wall outlet where the plug can be
easily unplugged.
Placez l’imprimante près d’une prise de contacte où la fiche
peut être débranchée facilement.
7
Page 17

Introduction
◗ Do not let the power cord become damaged or frayed.
◗ If you use an extension cord with the printer, make sure
the total ampere rating of the devices plugged into the
extension cord does not exceed the cord’s ampere rating.
Also, make sure the total of all devices plugged into the wall
outlet does not exceed 15 amperes.
◗ Except as specifically explained in this User’s Guide, do not
attempt to service the printer yourself.
◗ Unplug the printer and refer servicing to qualified service
personnel under the following conditions:
If the power cord or plug is damaged; if liquid has entered
the printer; if the printer has been dropped or the cabinet
damaged; if the printer does not operate normally or
exhibits a distinct change in performance. Adjust only those
controls that are covered by the operating instructions.
8
Page 18
Basic Printing
1
It’s easy to print all your color and black and white documents
with your new EPSON Stylus COLOR 800. First you have to set
up your printer and install the software, following the
instructions on the Quick Setup card. Then read this chapter to
find out about the following:
◗ Printing from Windows
◗ Printing from a Macintosh
◗ What to do when the printer lights flash
Printing from Windows
Note:
If you’re using
Windows NT, you’ll need
special software for your
printer. Contact
described in the
Introduction if you need
printer driver software for
Windows NT.
EPSON as
When you want to print from your Windows application, you
click the print icon or choose Print from the File menu. You
can then choose which pages to print, the number of copies,
and other options. The settings that describe your print job—
whether you want to use color or black ink, for example—are
part of your printer driver software.
The following sections tell you how to set printer options from
Windows applications, how to change the default printer
settings, and how to check your printer’s status.
1-1
Page 19
Basic Printing
Setting Printer Options from Windows Applications
This section describes the settings you’ll need to check for all
your everyday printouts. See Chapter 3 for information about
advanced settings for special print jobs.
Follow these steps to check printer settings from your word
processor or other Windows software:
For more information
about printer settings,
click the
Windows 95, you can
right-click any item on the
screen and then click
What’s This?
Help button. In
1. Click the
Print icon or choose Print or Print Setup from
the File menu. You see a printing dialog box.
2. Make sure your
EPSON Stylus COLOR 800 printer is
selected, and then click the Printer, Setup, Properties, or
Options button. (You may have to click a combination of
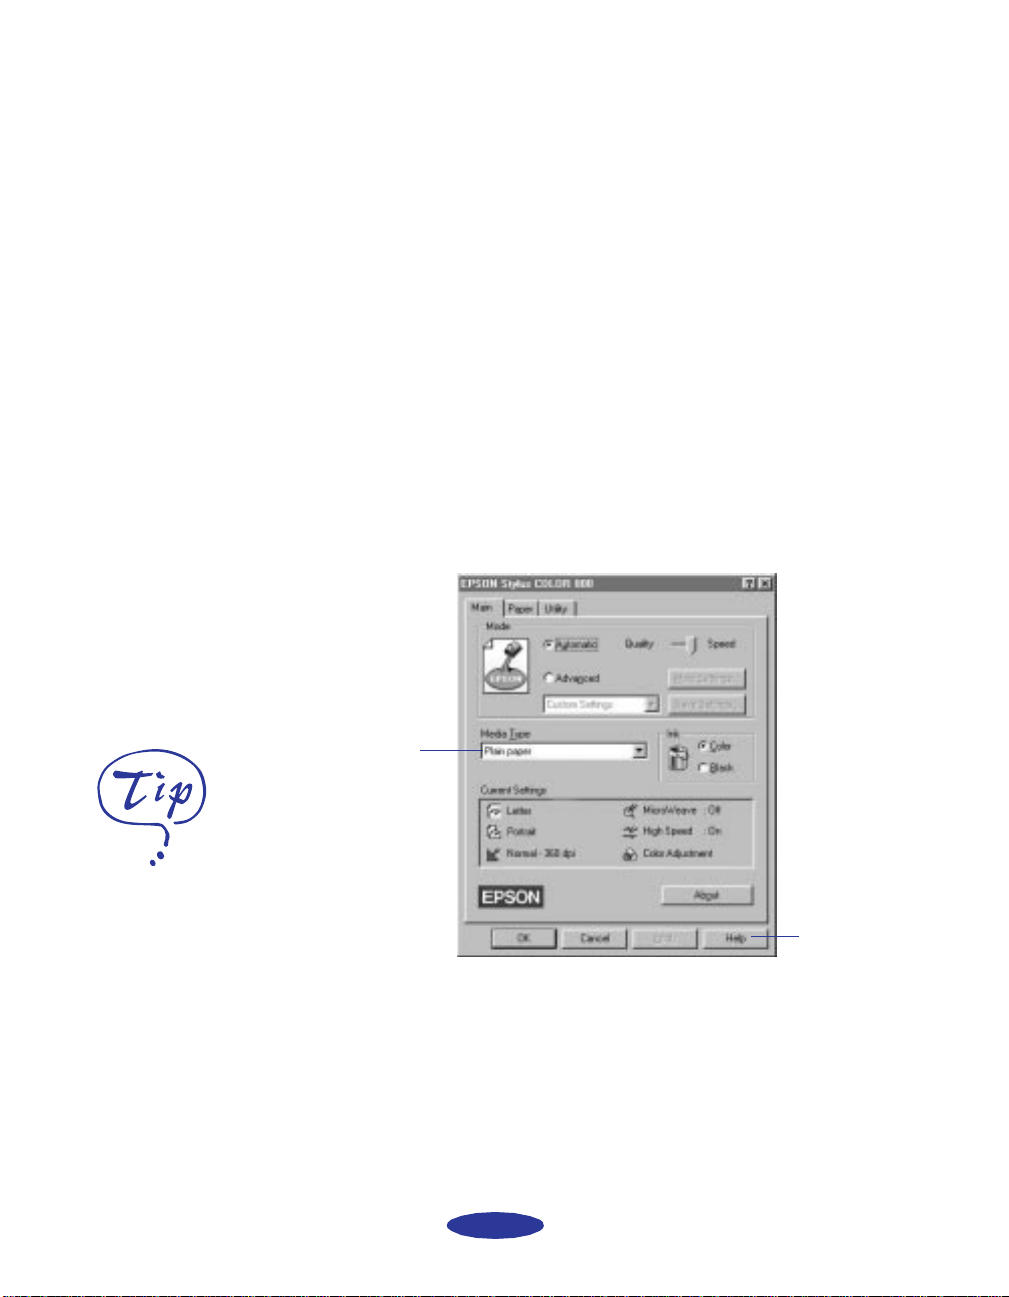
these buttons.) You see a dialog box like the following:
Click to see
list of me dia
types.
3. Click the
Main tab if necessary and make sure the Mode
option is set to Automatic. This is the easiest way to get
good printing results for all kinds of documents, on all
types of paper.
Click for
more
informat ion.
1-2
Page 20

Basic Printing
For printing at the highest
resolution (SuperFine
quality at 1440 dpi), you
need to use one of the
photo quality media. For
the best printing at any
resolution, always use
EPSON media.
4. Choose the
Media Type you want to print on from the
following list:
◗ Plain paper
◗ 360 dpi Ink Jet Paper
◗ Photo Quality Ink Jet Paper
◗ Photo Quality Glossy Paper
◗ Photo Quality Glossy Film
◗ Ink Jet Transparencies
The type of paper or other media you choose determines
the print quality or resolution you can use.
See Chapter 2 for guidelines on choosing paper and
handling special media.
5. Choose
6. Set the slider to
Color or Black ink.
Quality or Speed. This lets you choose
between the fastest printing or the highest resolution for the
media you’re using. (The slider is not available for certain
media types.)
7. If necessary, click the
Paper tab and choose your paper size,
number of copies, and orientation. If your software
application lets you control these settings, you don’t need
to use the
8. Click
Paper tab.
OK when you’re finished checking your settings. The
dialog box closes.
If you’re using Windows 95, you can click
Apply and keep
the dialog box open.
9. In the printing dialog box, click
Close, OK, or Print. You
may need to click a combination of these buttons.
While your document is printing, the
EPSON Despooler
dialog box appears, showing the printing progress and the
status of your printer. If you’re using Windows 95, this box
also displays the Status Monitor. (See “Checking Printer
Status,” on page 1-5 for more information.)
1-3
Page 21

Basic Printing
Setting Default Printer Options
When you change printer settings through your software
application, the settings apply only to the application you’re
using. If you want to adjust the default settings for all your
Windows applications, you can access the dialog box through
the Windows 95 Settings option or the Windows 3.1 Control
Panel.
Make sure all your software applications are closed before you
start. If not, you’ll have to close and then reopen them to have
the new default settings take effect.
Setting Default Options in Windows 95
Follow these steps:
1. Click
2. Right-click the
3. Select
Start, point to Settings, and then point to Printers.
EPSON Stylus COLOR 800 icon.
Properties. Then click the Main tab.
You see the Main printer settings dialog box, as shown on
page 1-2. Any changes you make will become the default
settings for all your applications and documents.
Setting Default Options in Windows 3.1
Follow these steps:
1. Double-click the
2. Double-click the
3. Select
EPSON Stylus COLOR 800 from the list of printers
and click Setup.
You see the Main printer settings dialog box, as shown on
page 1-2. Any changes you make will become the default
settings for all your applications and documents.
Control Panel icon in the Main group.
Printers icon.
1-4
Page 22
Basic Printing
Checking Printer Status
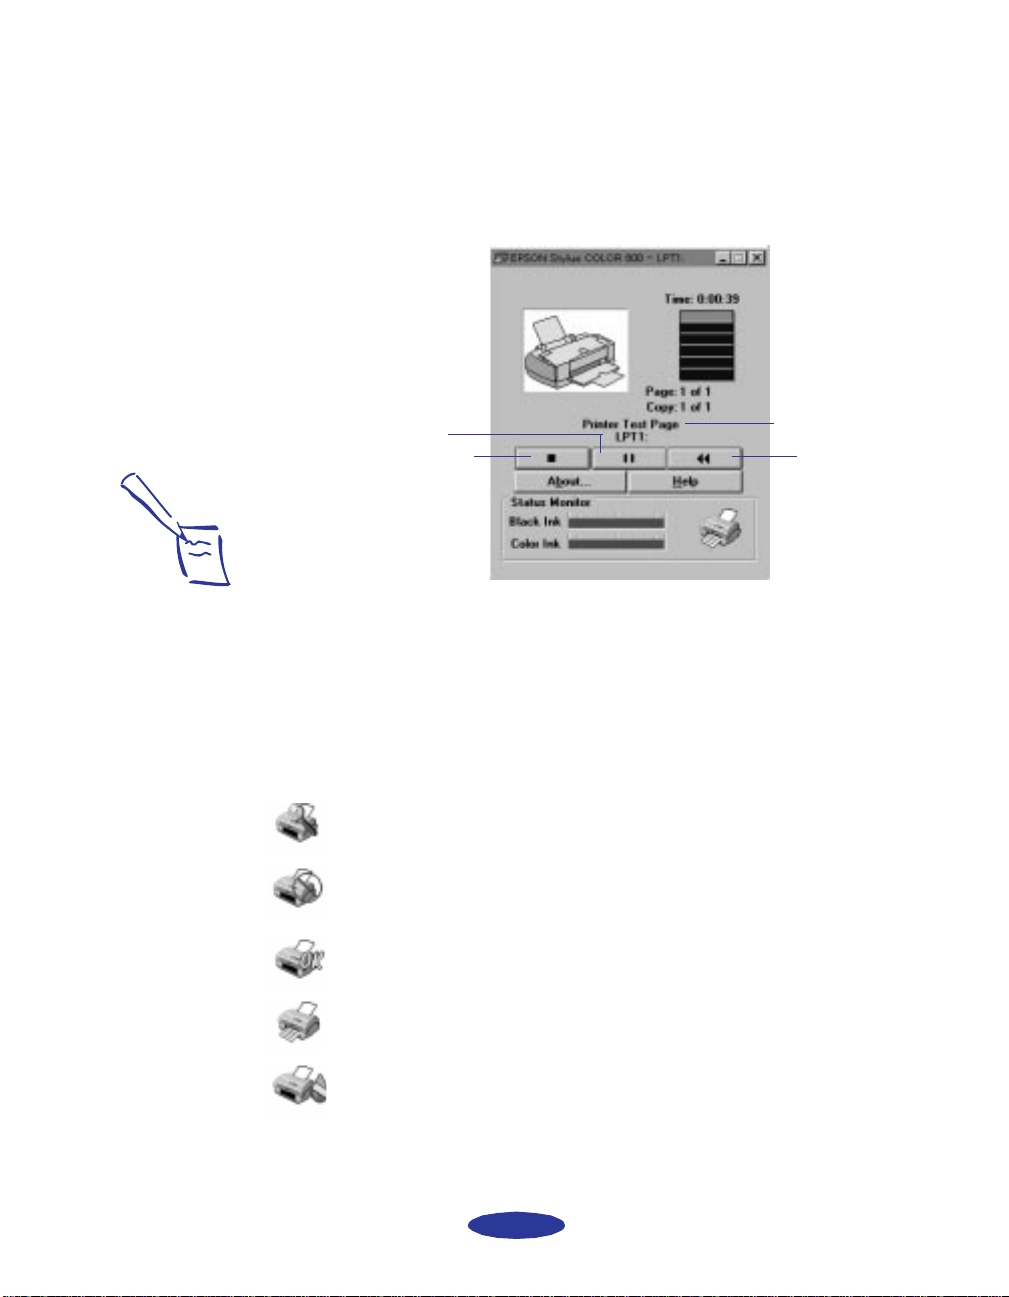
While your document is printing, the EPSON Despooler dialog
box appears in the lower right corner of your screen:
The name of the
Click to pause
printing.
lick to
ancel printin g.
file you’re printing
appears here.
Click to restart
printing.
Note:
The Status Monitor
appears only if you’re
using Windows 95 and
you’re not printing over a
network.
This dialog box shows the progress of your print job and the
status of your printer. If you run out of paper while printing, for
example, the Despooler warns you. You can use the buttons to
cancel, pause, or restart your print job.
The Status Monitor at the bottom of the dialog box shows how
much ink is left in your printer, along with these status icons:
The Status Monitor is checking printer status.
An error has occured. Check your printer or see Chapter 6.
Your printer is ready to print.
Your printer is printing.
The ink level is low or empty. Check the B or A light on the
control panel and replace the cartridge if necessary.
1-5
Page 23
Basic Printing
Printing from a Macintosh
When you set up a new printer for your Macintosh, you need to
check the page setup for documents in each application you use.
You can then click the print icon or choose
menu. You see a dialog box that lets you choose which pages to
print, the number of copies, and other options. The settings
that describe your print job—whether you want to use color or
black ink, for example—are part of your printer driver software.
This section describes the settings you’ll need to check for all
your everyday printouts. See Chapter 3 for information about
advanced settings for special print jobs.
Follow these steps to check printer settings from your word
processor or other Macintosh software:
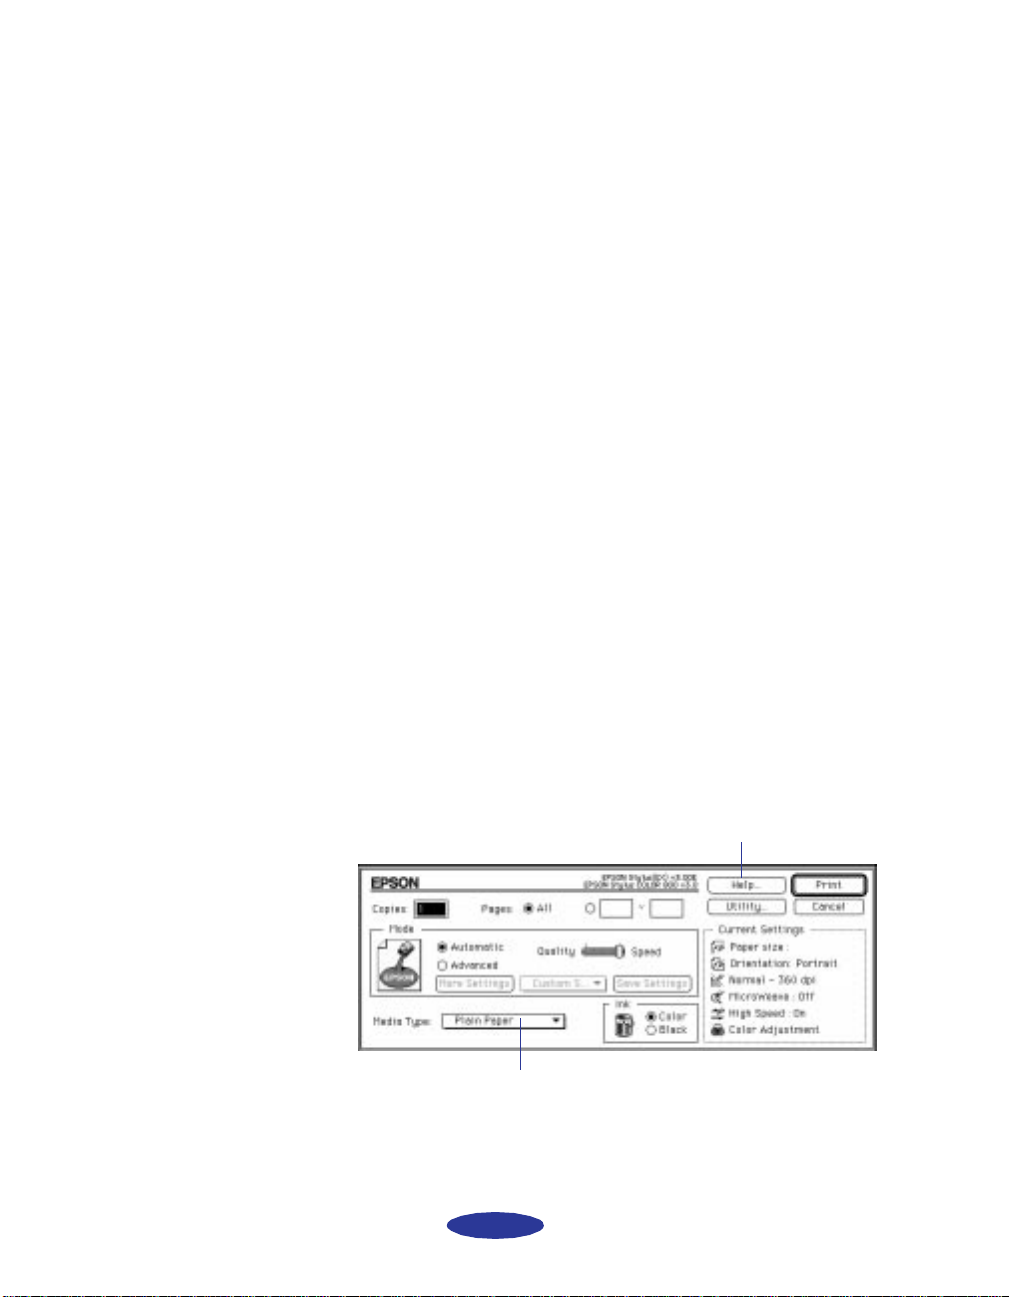
Print from the File
1. Choose
Page Setup from the File menu. You see the Page
Setup dialog box.
2. Choose your paper size and other page setup options and
click
OK. For more information about special paper
settings, see page 2-9.
3. Choose
Print from the File menu or click the Print icon in
your application. You see a dialog box like the following:
Click for more information
about pri nter settings.
Click to see list
of media types.
1-6
Page 24
Basic Printing
4. Choose the number of copies and indicate which pages you
want to print.
5. Make sure the Mode option is set to Automatic. This is
the easiest way to get good printing results for all kinds of
documents, on all types of paper.
For printing at the highest
resolution (SuperFine
quality at 1440 dpi), you
need to use one of the
photo quality media. For
the best printing at any
resolution, always use
EPSON media.
Note:
On the Macintosh, printer
settings are saved with
your document, but you
can’t save them from one
application to another.
You’ll have to check your
settings each time you
open a new application. If
you want to reuse
settings, you can create
document templates for
your favorite applications.
6. Choose the
Media Type you want to print on from the
following list:
◗ Plain paper
◗ 360 dpi Ink Jet Paper
◗ Photo Quality Ink Jet Paper
◗ Photo Quality Glossy Paper
◗ Photo Quality Glossy Film
◗ Ink Jet Transparencies
The type of paper or other media you choose determines
the print quality or resolution you can use.
See Chapter 2 for guidelines on choosing paper and
instructions on handling special media.
7. Choose
8. Set the slider to
Color or Black ink.
Quality or Speed. This lets you choose
between the fastest printing or the highest resolution for the
media you’re using.
9. Click
Print when you’re finished checking your settings.
If you chose background printing when you set up your
printer, you can continue working while your document is
printing.
1-7
Page 25
Basic Printing
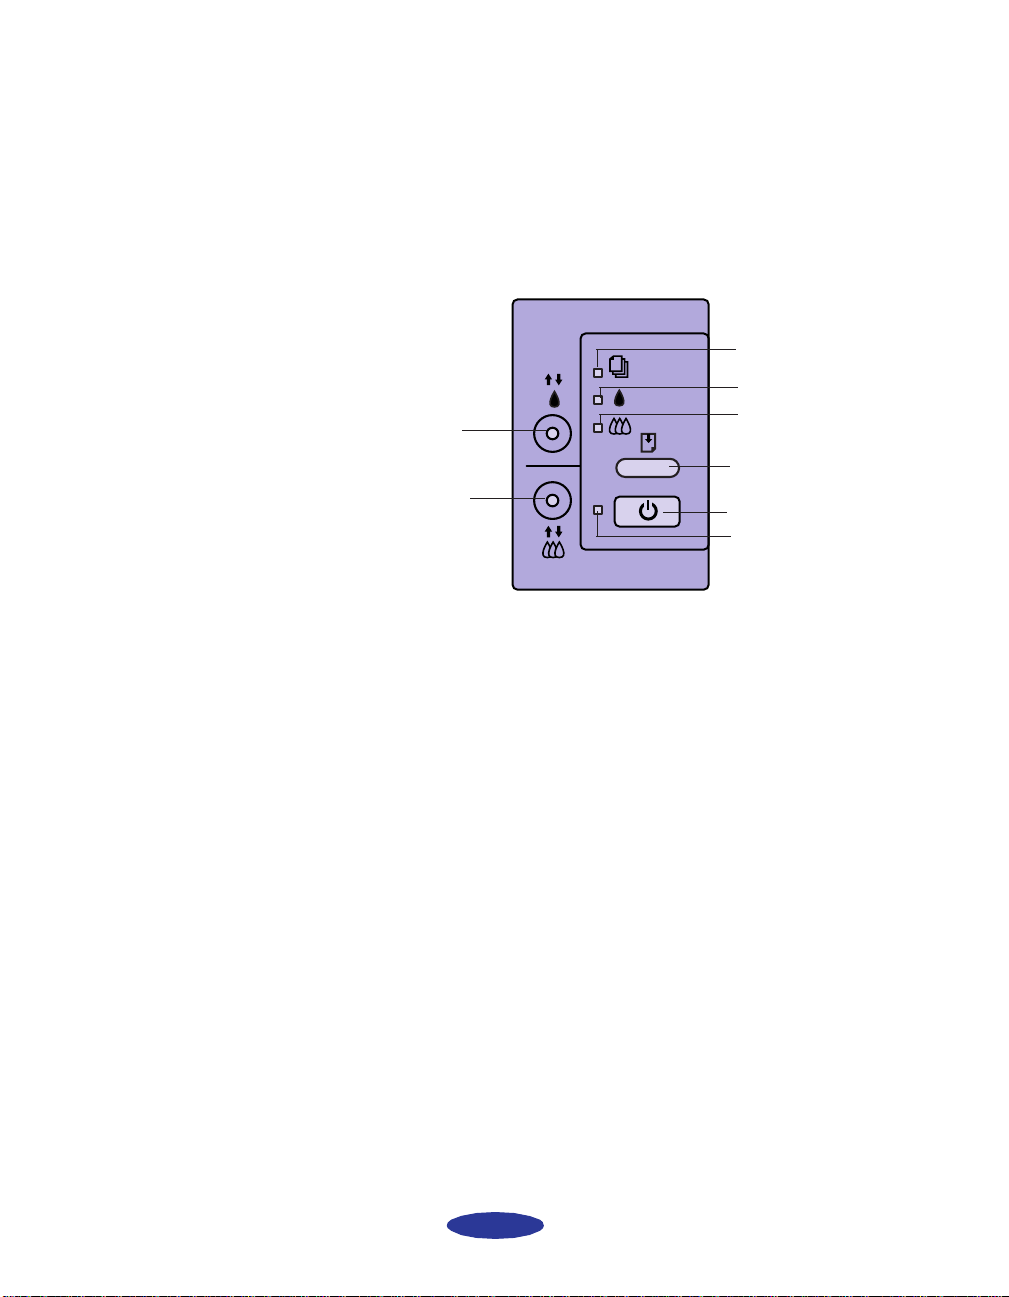
What To Do When the Printer Lights Flash
paper out light
black ink out ligh t
black cleaning
button
color cleaning
button
The four lights on your printer’s control panel show the
printer’s status and alert you to problems like paper jams.
color ink out light
load/eject button
power button
power light
S
S
B A
B A
P
P S B A
When the paper light flashes, paper is jammed in the printer.
Turn off the printer and gently pull out all jammed paper.
Then press the E load/eject button. See page 6-14 for more
information.
When the paper light comes on, your paper ran out or is
incorrectly loaded. Load paper in the feeder and then press
the E load/eject button.
When an ink light flashes, your ink supply is low. Make sure
you have a replacement cartridge.
When an ink light comes on, you need to replace the ink
cartridge. See Chapter 5 for instructions.
When the power light flashes, the printer is receiving a print
job or performing a maintenance operation.
When two or more lights flash, your printer may have a
problem. See page 6-9 and page 6-10 for more information.
1-8
Page 26

Printing on
2
Special Media
Your EPSON Stylus COLOR 800 lets you print on just about
any kind of paper you want to use. You can get great results
printing on various sizes of plain paper, letterhead, and
envelopes. You’ll get even better results with specially coated
ink jet paper. For the best output, use
media: paper, glossy paper, and glossy film.
For special projects, you can use a variety of
designed for ink jet printers, ranging from transparencies to
iron-on transfer paper. You can even set up your printer to use
custom paper sizes to print large posters and banners. This
chapter covers the following:
◗ Using special paper and media
◗ Creating banners and other custom-size projects
EPSON’s photo-quality
EPSON media
Using Special Paper and Media
When you print on special media, you need to be careful about
choosing the correct Media Type and Paper Size settings in
your printer software. The table on the following page lists the
available
for each one.
EPSON media and the Media Type setting to choose
2-1
Page 27
Printing on Special Media
EPSON ink jet media and their settings
Media name Size Part number Media Type setting
EPSON 360 dpi Ink Jet Paper A4
Letter
EPSON Special Coated Paper
for 360 dpi Printing
EPSON High Quality Ink Jet
Paper
EPSON Photo Quality Ink Jet
Paper
EPSON Photo Quality Glossy
Paper
EPSON Photo Quality Glossy
Film
EPSON High Quality Glossy
Paper
EPSON Iron-On Transfer Paper Letter S041001, S041002
EPSON Ink Jet Transparencies A4
EPSON Photo Quality Ink Jet
Cards
EPSON 720 dpi Index Card 4.1
EPSON Photo Quality Self
Adhesive Sheets
Letter S041060
Letter S041111 Photo Quality
A4
Letter
Legal
A4
Letter
A4
Letter
Letter S041072
Letter
4.1
× 5.8 (A6)
5
× 8
8
× 10
× 5.8 (A6) S041054
A4 S041106
S041059
S041060
S041061
S041062
S041067
S041126
S041124
S041071
S041072
S041063
S041064
S041054
S041121
S041122
360 dpi Ink Jet Paper
Ink Jet Paper
Photo Quality Glossy
Paper
Photo Quality Glossy
Film
Ink Jet Transparencies
Photo Quality Ink Jet
Paper
To order
or call
EPSON papers and other media, contact your dealer
EPSON Accessories at (800) 873-7766 (U.S. sales only).
In Canada, call (800) 873-7766 for dealer referral.
The type of paper or other media you use is one of the most
important factors in determining the quality of your printed
output. For example, you can achieve the highest resolution
(SuperFine quality at 1440 dpi) only when you use EPSON
Photo Quality media. The following tips will help you get the
best results on any type of paper or other media.
2-2
Page 28
Note:
When you load paper,
make sure the printable
side is facing up. Some
special media have a cut
corner that you need to
position correctly; follow
any instructions in the
package. Always handle
sheets by the edges, and
don’t touch the printable
surface.
Printing on Special Media
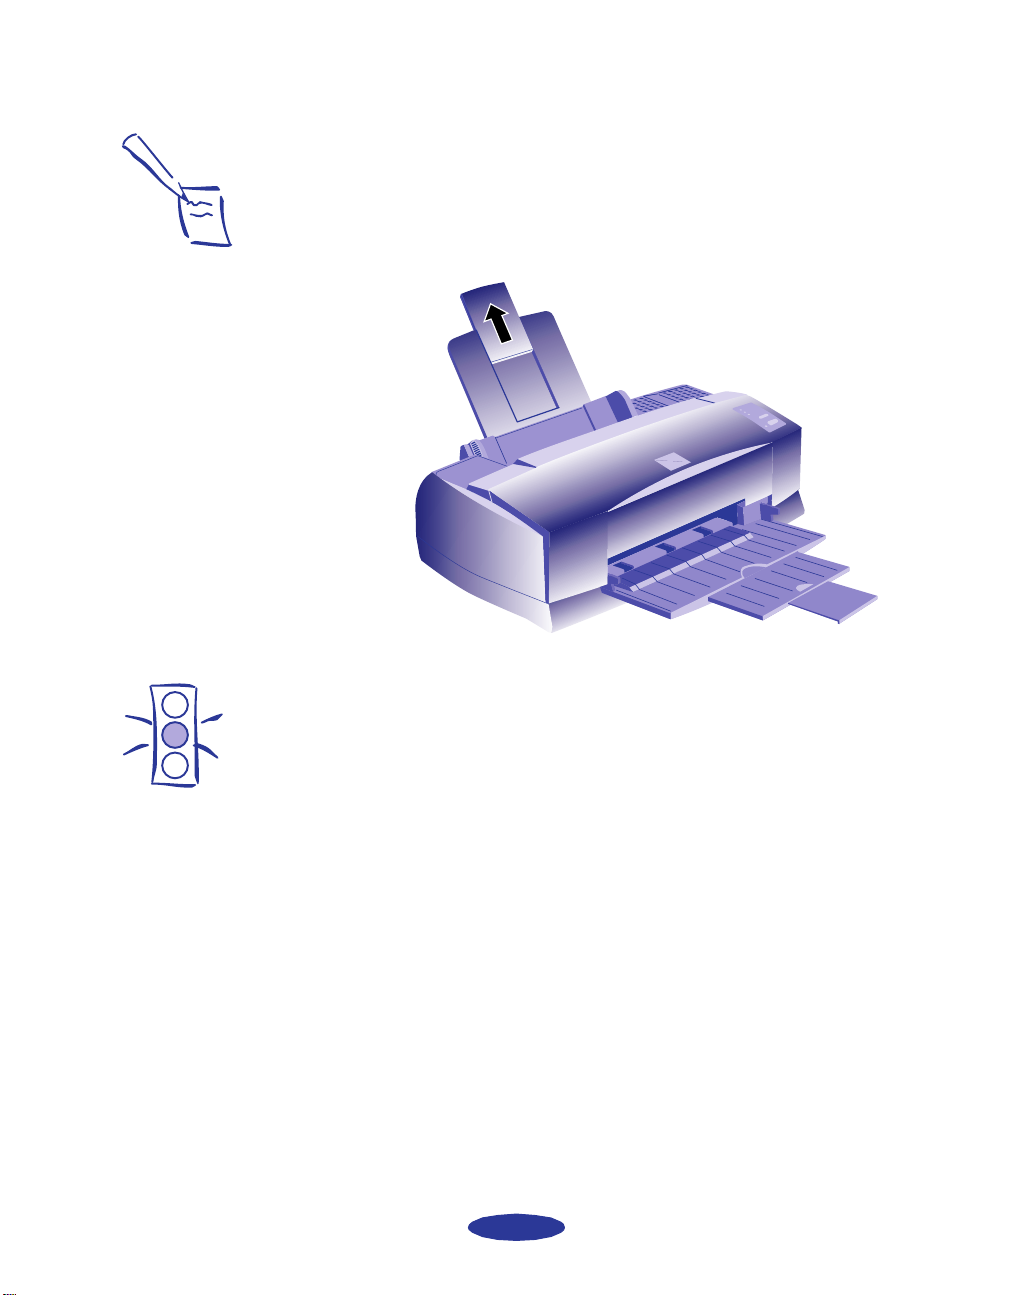
Letterhead, Preprinted Forms, and Legal-size Paper
Load the top edge first. When you load legal-size paper, pull up
the paper support extension as shown below:
Caution:
Don’t use the cleaning
sheets that may be
included with your special
media; they may damage
the printer.
EPSON 360 dpi High Quality and Photo
Quality Ink Jet Paper
You can load paper up to the arrow mark on the left edge guide.
If you use legal-size ink jet paper, don’t load it more than half
way to the arrow mark.
EPSON Photo Quality Glossy Paper, Film,
and Transparencies
Before you load glossy media or transparencies, put a support
sheet (packed with the media) or a plain paper sheet beneath the
stack. You can load up to 20 sheets of glossy paper, and up to
30 sheets of glossy film or transparencies.
2-3
Page 29
Printing on Special Media
However, you may get better results by loading one sheet at a
time. With multiple sheets loaded, the minimum top margin
you can use is 1.2 inches (30 mm). If you want to use a smaller
top margin, load and print one sheet at a time.
Note:
Use ink jet papers within
one year of purchase.
Use glossy media and
transparencies within six
months. Return unused
sheets and envelopes to
their original package as
soon as possible. See
Appendix B for more
storage information.
Remove each sheet from the output tray immediately after it’s
printed. Make sure each sheet is dry before stacking.
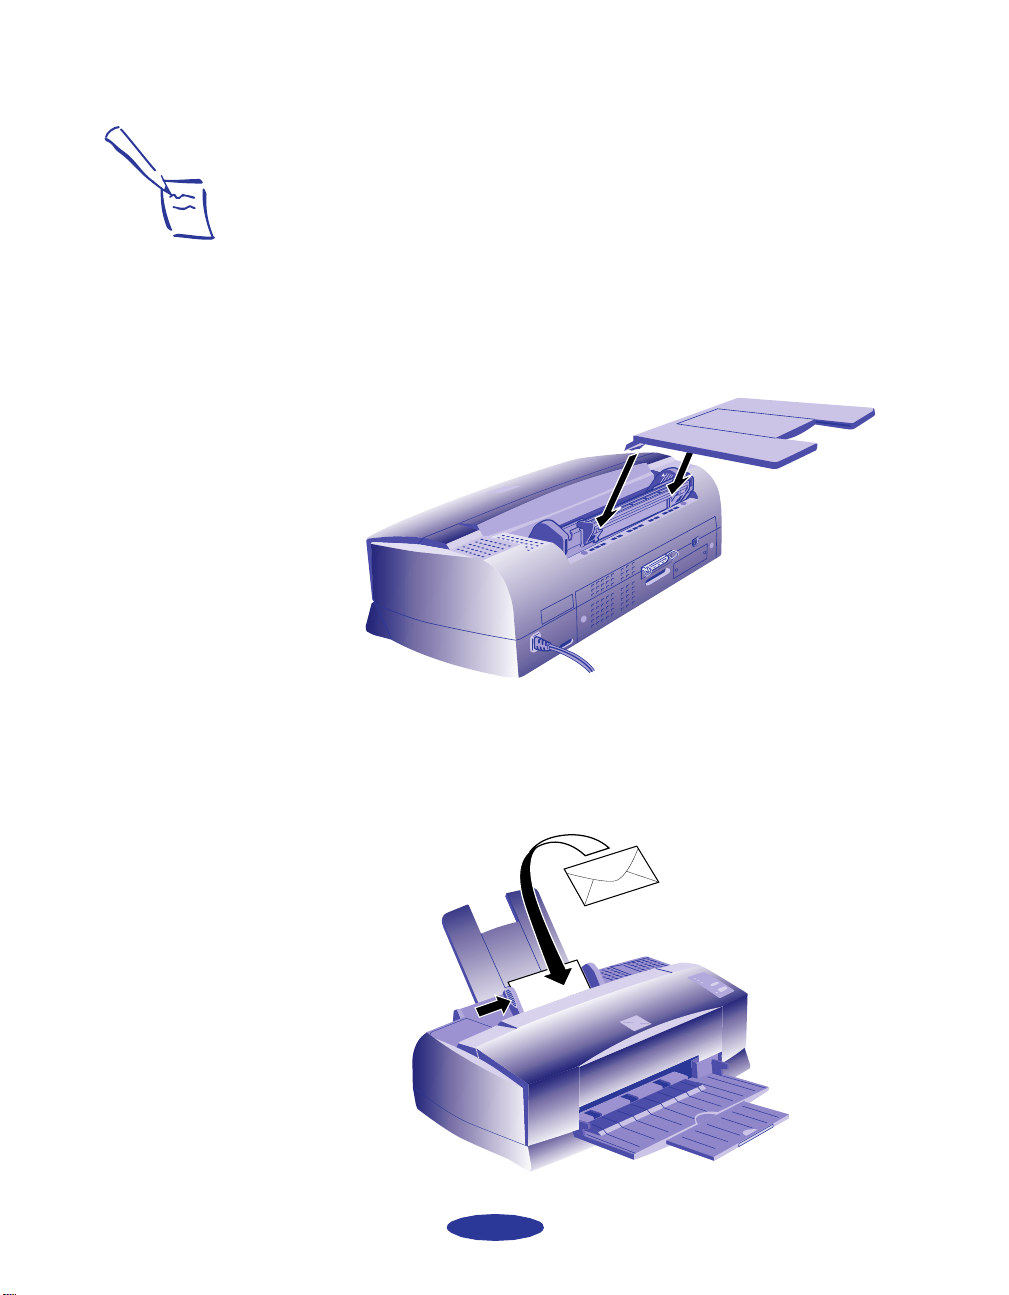
To print on transparencies, remove the paper support and
reposition it in the slots at the back of the printer as shown:
Envelopes
You can load up to 10 envelopes as shown below:
2-4
Page 30
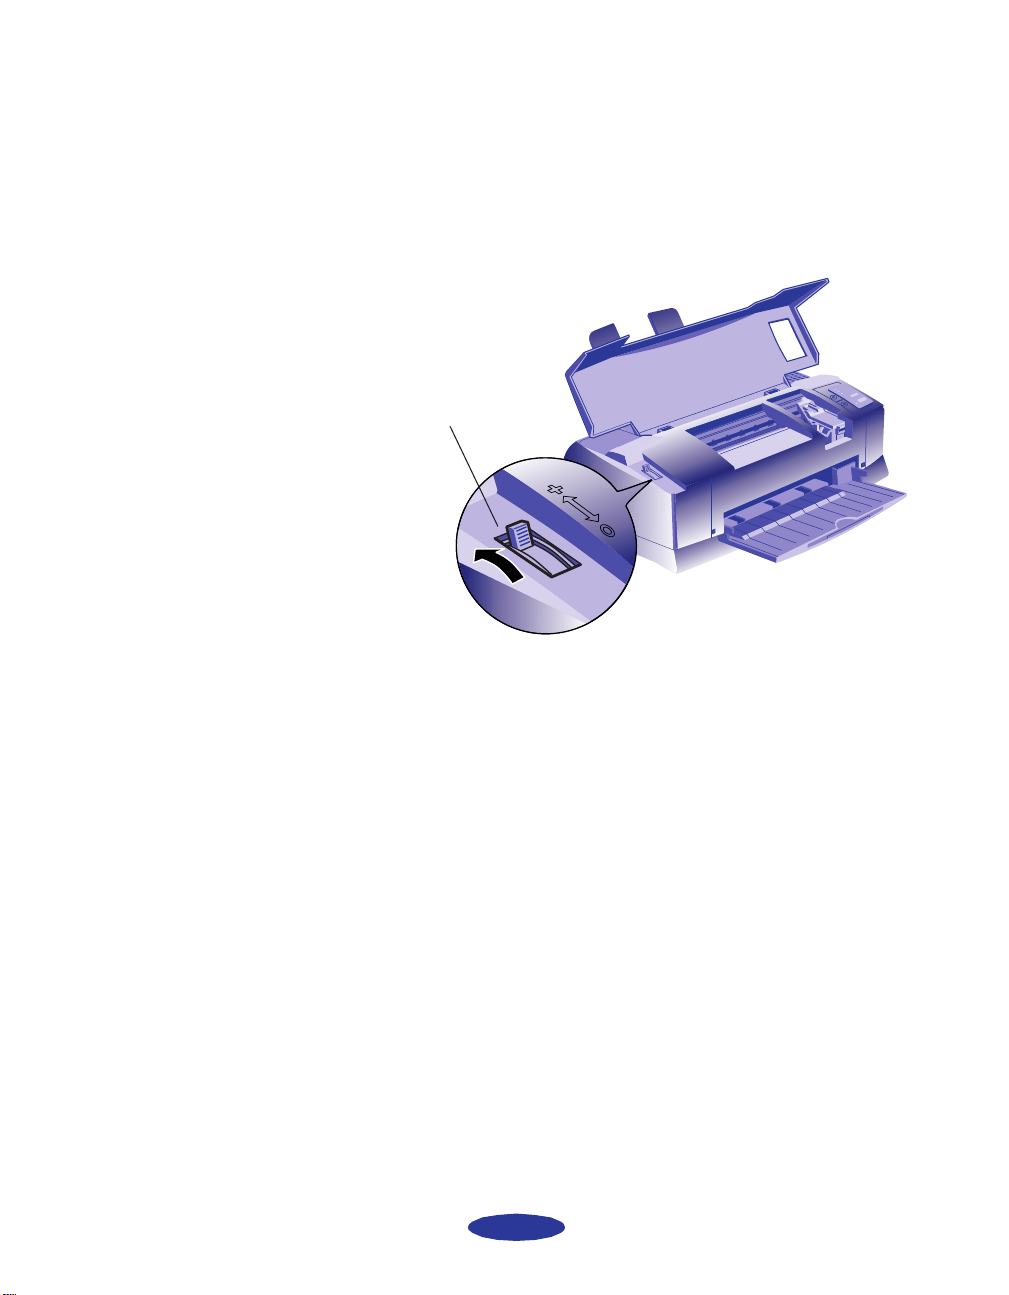
Printing on Special Media
If ink smears when you print on envelopes or other thick media,
set the paper thickness lever to the + position. Open the printer
cover and position the lever as shown below. Then close the
cover and print. (Make sure you return the lever to the 0
position before you print on other media.)
Set the thickness lever
to + if ink smears when
you print on envelopes
or cards.
EPSON Photo Quality Ink Jet Cards
You can use these cards to print photographs that look almost as
good as the ones you get from film processing. Make sure you
set the paper thickness lever to the + position as shown above.
You can load up to 30 cards at a time. Always place the
included support sheet under the cards. When you’re ready to
print, use your software to set the
Paper Size option for the
size card you’re using.
EPSON Photo Quality Self Adhesive Sheets
Use these sheets to print labels or stickers. You can load one
sheet at a time.
2-5
Page 31

Printing on Special Media
For iron-on transfers,
make sure you reverse
your image before you
print it, especially if it
includes text. Then the
text will read correctly
when it’s transferred. You
can use the Flip
Horizontal option in your
printer software. See
page 3-6 for more
information.
EPSON Iron-On Transfer Paper
You can print photos, company logos, or anything else you
want on this paper, and then transfer your images to T-shirts or
other cloth items. Load one sheet of transfer paper at a time.
After you print, follow the instructions that came with the
paper to iron the image onto the shirt or other item.
Printing Banners and Other Custom Size Projects
You can use banner paper or ordinary (continuous-form)
computer paper to print a banner up to 44 inches long. You can
also print on any size paper that fits into the printer (at least
3.94 inches in width and height), by using the custom page size
feature of your printer software on either a Windows computer
or a Macintosh.
1. To make a 44-inch banner, first tear off four sheets of
banner paper or continuous-form computer paper. If you’re
using computer paper, tear off the perforations at the edges.
2. Insert the paper in the printer as shown:
2-6
Page 32

Printing on Special Media
3. Follow the instructions below to print your banner on
either a Windows computer or a Macintosh.
Printing a Banner from Windows
Follow these steps to print a banner or other custom size
document on a Windows computer:
1. Create the document in your word processor or other
application software. You can create a banner in either
portrait or landscape orientation.
2. Click the
Print icon or choose Print or Print Setup from
the File menu. You see a printing dialog box.
3. Make sure your printer is selected, and then click the
Printer, Setup, Properties, or Options button. (You may
have to click a combination of these buttons.) You see the
Main printer settings dialog box, as shown on page 1-2.
4. Click the
Paper tab. You see a dialog box like the
following:
Click to
display list of
paper sizes.
2-7
Page 33

Printing on Special Media
5. Choose the paper you want to use from the
Paper Size list.
If you want to print a banner or other custom-size
document, choose
If you choose
User Defined.
User Defined, the following dialog box
appears:
For banner printing, type
any size up to 44 inches.
6. To print a banner, type
8.5 inches for the Paper Width
and 44 inches for the Paper Height. (This works for both
“landscape” and “portrait” style banners.) Click OK.
7. Choose
Portrait or Landscape if you haven’t already
specified the orientation in your application software. Set
the printable area if necessary.
8. Click
OK again to return to the Main printer settings dialog
box. Make sure you choose Plain Paper and the other
settings you want to use, and then click
OK,
or Print to print your banner. You may need to click a
OK. Click Close,
combination of these buttons.
Printing a Banner from a Macintosh
Follow these steps to print a banner or other custom size
document on a Macintosh:
1. Create the document in your word processor or other
application software. You can create a banner in either
portrait or landscape orientation.
2. Choose
Page Setup from the File menu.
2-8
Page 34

Printing on Special Media
You see a dialog box like the following:
Click to display list of paper sizes.
Letter
Click to define your
own paper size.
3. Choose Portrait or Landscape, depending on the
orientation of the banner or document you created. Set the
printable area if necessary.
4. Choose the paper you want to use from the
Paper Size list.
If you want to print a banner or other custom-size project,
click the Customize button. The following dialog box
appears:
Click to create a
new paper size
5. Click the
New button. The dialog box changes:
Type a name for
your size here.
2-9
Page 35

Printing on Special Media
You can create up to eight
custom paper sizes. If you
give each one a unique
name, you’ll be able to
reuse them by selecting
them from the Page Size
list in the Page Setup
dialog box.
6. Type a name for your custom size in the
New Paper Size
box.
7. To print a banner, type
inches for the
Height. (This works for both “landscape”
8.5 inches for the Width and 44
and “portrait” style banners.) Click OK, then OK again.
8. Choose
Print from the File menu or click the Print icon in
your application. You see a printer settings dialog box like
the one shown on page 1-6. Make sure you choose Plain
Paper
and the other settings you want to use, and then
click Print to print your banner.
2-10
Page 36

Custom Printing
3
When you want to print presentation graphics, photographs, or
other special projects, you can use the custom settings in your
EPSON Stylus COLOR 800 software. You can choose
predefined settings or adjust individual options like brightness,
contrast, saturation, and halftoning. For professional-quality
color accuracy, you can use Image Color Matching (ICM)
under Windows 95 or ColorSync on the Macintosh.
This chapter includes the following information:
◗ Using predefined advanced settings
◗ Customizing print quality and special effects
◗ Customizing color settings
◗ Using ColorSync on the Macintosh
◗ Saving custom settings
Using Predefined Advanced Settings
Predefined settings provide an easy way to fine-tune your
printer’s operation for special purposes. Follow these steps to
print with predefined settings:
1. Create your document, image, or project in your
application software.
3-1
Page 37

Custom Printing
Note
When you use advanced
settings, the
Quality/Speed slider
disappears.
2. Access the Main printer settings dialog box as described on
page 1-2 (Windows) or page 1-6 (Macintosh).
You see one of the following dialog boxes:
Click Advanced, then click here
to see a list of project types.
Windows
Macintosh
3. Choose
Click Advanced, then click here
to see a list of project types.
Color or Black ink.
3-2
Page 38

Custom Printing
4. Click
Advanced, and then Custom Settings. You see the
list of project types.
5. Follow these guidelines to choose the right setting for your
project:
◗
Photo
For printing scanned photographs. Increases contrast
in the image.
Text/Graph
◗
For printing graphics-intensive documents like
presentation pages with charts and graphs. Intensifies
colors and lightens the midtones and highlights.
◗
Video/Digital Camera
For images captured from a digital camera or video.
Increases color brightness and makes the image sharper.
◗
Economy
For rough drafts of text only, on plain paper. Saves ink.
ICM (Windows 95 only)
◗
Automatically adjusts printout colors to match the
colors on your screen.
Note:
See Chapter 2 for
information about using
special media.
◗
ColorSync (Macintosh only)
Automatically adjusts printout colors to match the
colors on your screen. For more information, see
page 3-9.
6. Choose the
Media Type you want to print on. The
available media are limited by the project you choose. For
example, you can’t use plain paper or transparencies with
the ICM or ColorSync settings.
7. Click
Print (Macintosh) or OK (Windows). If you’re using
Windows, click any other buttons that your application
uses for printing.
3-3
Page 39

Custom Printing
After you customize your
print settings for a special
project, you can save
them as a group. Then
you can reuse them
whenever you print a
similar project. See
page 3-11 for instructions.
Customizing Print Quality and Special Effects
If you need the maximum control over your project, or you
want to experiment with special effects, you can adjust
individual settings in your printer software. Follow these steps:
1. Create your document, image, or project in your
application software.
2. Access the Main printer settings dialog box as described on
page 1-2 (Windows) or page 1-6 (Macintosh).
3. Click
Advanced, and then click More Settings. You see
the More Settings dialog box:
Windows
Some of these options are
automatically set or disabled by other
settings you choose.
3-4
Page 40

Macintosh
Custom Printing
Some of these options are
automatically set or disabled by other
settings you choose.
Note:
The Print Quality option
you choose limits your
choice of Media Types.
4. Choose one of the following
Print Quality options:
◗ Economy
For low-resolution rough drafts on plain paper. Saves
ink.
Normal - 360 dpi
◗
For most documents on plain paper, transparencies, or
360 dpi Ink Jet paper.
◗
Fine - 720 dpi
For high-resolution output. Works best on Photo
Quality media.
◗
SuperFine - 1440 dpi
For the highest-resolution output on Photo Quality
media only.
5. Choose the
Media Type and Ink settings you want to use,
following the guidelines in Chapters 1 and 2.
3-5
Page 41

Custom Printing
6. Choose one of the following
No Halftoning
◗
Halftoning options:
For printing black text only.
◗
Error Diffusion
For printing photographic or video/digital camera
images. Blends each dot of color with the surrounding
dots.
◗
Dithering
For printing charts, graphs, and other images that
require precise, solid areas of bright colors. Arranges
dots in orderly patterns. Use Coarse for images with
more shading and less detail. Use
Fine for images with
more detail and less shading.
7. Choose any of the following options. Some of these settings
are automatically selected or disabled by the
Print Quality
(resolution) you choose.
◗
MicroWeave
For improved print quality. Prints graphic data in finer
increments to eliminate unwanted banding effects
(light horizontal lines). Always use for color printing.
If vertical lines in your
printout are misaligned
when you use the High
Speed setting, you may
need to align the print
heads. See Chapter 5 for
instructions.
◗
High Speed
For fast, bidirectional printing at lower quality.
Flip Horizontal
◗
Prints a mirror image of your document. Use for
printing with iron-on transfer paper. When you iron
the printout onto a T-shirt or other item, it will read
correctly.
Finest Detail
◗
For printing text, graphics, and line art with very sharp
edges. Slows print speed and increases your system
memory requirements.
8. Click
OK if you’re ready to print, or see the next section if
you want to adjust your printer’s color settings.
3-6
Page 42

Custom Printing
Customizing Color Settings
You can choose from several color adjustment modes or
manually adjust brightness, contrast, and saturation. For
professional color correction, you can set individual CMY color
values. To achieve the maximum color accuracy, you can use
Image Color Matching (ICM) under Windows 95 or
ColorSync on the Macintosh.
Follow these steps to customize your color settings:
1. Access the More Settings dialog box as described on
page 3-4.
The color settings appear on the right side of the dialog
box, as shown:
Click to set Color Adjustment Mode.
Windows
Click to set Color Adjustment Mode.
Drag
sliders to
set
values
between
-25% and
+25%.
Macintosh
3-7
Page 43

Custom Printing
2. Choose one of the following
Automatic
◗
Color Adjustment Modes:
Analyzes the color information in your project and
optimizes color correction accordingly.
◗
Photo-realistic
For printing color photographs.
Vivid
◗
For printing graphics-intensive documents like
presentation pages with charts and graphs. Intensifies
colors and lightens the midtones and highlights.
No Color Adjustment (Macintosh only)
◗
Choose this mode only if you’re using ColorSync.
3. If you want to specify individual color correction values,
use the sliders to increase (drag right) or decrease (drag left)
the settings listed below. (If you want to use the options
described in step 4, you won’t be able to specify individual
color correction values.)
Brightness
◗
Makes your image lighter or darker.
◗
Contrast
Increases or decreases the difference between the bright
or dark parts of an image.
◗
Saturation
Makes colors more vivid or less vivid.
◗
Cyan, Magenta, Yellow
Increases or decreases the amount of the three ink
colors that combine to make a full-color picture. Use
these sliders to fine-tune the color balance in your
printout.
3-8
Page 44

Custom Printing
Note:
When you choose
Video/Digital Camera,
ICM, or ColorSync, all the
other color options are
preset.
4. Choose
ColorSync (Macintosh):
◗
Video/Digital Camera, ICM (Windows 95) or
Video/Digital Camera
Use for printing images captured from a digital camera
or video. Increases color brightness and makes the
image sharper.
ICM (Windows 95 only)
◗
Automatically adjusts printout colors to match colors
on the screen.
◗
ColorSync (Macintosh only)
Automatically adjusts printout colors to match colors
on the screen. See “Using ColorSync on the
Macintosh” for more information.
5. Click
6. Click
OK to return to the Main printer settings dialog box.
Save Settings if you want to save your custom
settings as a group that you can reuse for special projects.
See page 3-11 for more information about saving settings.
7. Click
Print (Macintosh) or OK (Windows). If you’re using
Windows, click any other buttons that your application
uses for printing.
For more information
about color matching
and working with
color, see
EPSON Color
booklet that came
with your printer.
Print It in
, the
Using ColorSync on the Macintosh
Every device you use for producing or viewing colors—your
monitor, scanner, and printer—uses a different color
technology. That’s why it’s difficult to get printed colors to
match the colors displayed on your monitor or other device.
The Macintosh ColorSync system helps you control all your
devices so their colors match your printer’s as closely as possible.
ColorSync uses profile information from each device—
including your
accurate color matching. First you have to make sure your
monitor’s profile is set. Then you can use your printer software
to specify the exact method of color matching you want to use.
EPSON Stylus COLOR 800 printer—to achieve
3-9
Page 45

Custom Printing
Follow these steps to set your monitor’s ColorSync profile and
use your printer software’s ColorSync features:
1. Open the ColorSync System Profile under
ControlPanels on the Apple menu.
Note:
The EPSON Standard
profile is customdesigned for your printer.
If you use a scanner or
other color imaging
equipment, you may have
other profiles on your
Macintosh.
2. Click the
3. Select your monitor from the list, and then click
Set Profile button.
Select.
4. Access the More Settings dialog box as described on
page 3-4.
5. Click
ColorSync.
6. For Profile, choose EPSON Standard.
7. Choose one of the following options for
◗
Perceptual
Rendering Intent:
For printing scanned photographs.
Saturation
◗
For printing graphics-intensive documents like
presentation pages with charts and graphs.
◗
Colorimetric
For matching colors on your screen as exactly as
possible, within the limits of desktop technology.
Reproduces colors the way your eye distinguishes them.
8. Click
OK, and then click Print.
3-10
Page 46

Custom Printing
Saving Custom Settings
After you’ve fine-tuned your printer settings for a special
project, you can save the settings as a group. Then you can
quickly reuse them the next time you print a similar project.
Follow these steps:
1. Customize your printer settings as described in this chapter.
2. Click the
Save Settings button on the Main printer
settings dialog box.
You see one of the following:
Macintosh
Windows
3. Type a unique name for your settings and click the Save
button.
The name you choose will now be available on the Main
printer settings dialog box when you click
Advanced, and
then Custom Settings.
3-11
Page 47

Managing
4c
Print Jobs and
Network Printing
Your printer software includes several utilities for managing
print jobs. You can use them to schedule large jobs for
convenient times, monitor your printer’s status, and handle
network printing. If you’re using your printer on a network,
you need to follow special setup procedures.
This chapter provides instructions for the following:
◗ Managing Print Jobs in Windows
◗ Managing Print Jobs on a Macintosh
◗ Network Printing on a PC
◗ Newwork Printing on a Macintosh
Managing Print Jobs in Windows
Your Windows printer software includes two management
utilities: the Spool Manager and Status Monitor.
◗ The Spool Manager starts automatically when you send a
job to the printer. It allows you to print in the background
while you continue to work on your computer and to
queue jobs to print at a later time. If you’re using your
printer on a network, it also handles multiple print jobs
that come in at the same time.
4-1
Page 48

Managing Print Jobs and Networ k Printing
◗ The Status Monitor, which is available only if you’re using
Windows 95, also starts automatically when you send a job
to the printer. It displays in the lower right corner of your
screen to alert you about printer and ink status, as described
on page 1-5.
Note:
The Status Monitor
doesn’t work if you’re
printing over a network.
Using the Spool Manager
The Spool Manager works like the Windows Print Manager.
◗ To open it while you’re printing, click the Spool Manager
icon that appears on the Taskbar (Windows 95) or at the
bottom of your desktop (Windows 3.1).
◗ To open the Spool Manager at any time, double-click the
Spool Mana g er4 icon in the EPSON program group or
folder.
You see the Spool Manager window:
menus
queue
journal file
When you send a job to your printer, your printer software
creates a temporary journal file, stores it in the C:\TEMP or
C:\WINDOWS\TEMP folder or directory, and assigns it to a
print queue. The software then sends the file to your printer at
the right time.
4-2
Page 49

For information about any
of these procedures and
more, use the Spool
Manager Help menu.
Managing Print Jobs and Network Printing
The Spool Manager window displays the status of your print
queues and journal files and lets you control them. Here are
some of the things you can do:
◗ Hold or release a queue
◗ Send journal files to your printer over a network
◗ Hold, re-queue, or delete a journal file
◗ Select the information you want to see in the Spool
Manager window
◗ Prevent the Despooler popup window from appearing on
your screen whenever you print
◗ Change your default spool directory
Deleting a Stalled Print Job
If you’re having trouble printing, it may be because of a stalled
print job. Follow these steps to delete it so you can continue
printing:
1. Open the Spool Manager as described on page 4-2.
2. Click on any print jobs marked
Held, then open the
Document menu and click Delete.
3. Exit Spool Manager and try printing again.
Changing the Default Spool Directory
If you get an error message when you try to print, or printing is
very slow, you can try changing your default spool directory.
Follow these steps:
1. Make a directory on your hard drive where you want Spool
Manager to store journal files, for example, C:\SPLTEMP.
2. Open the Spool Manager as described on page 4-2.
4-3
Page 50

Managing Print Jobs and Networ k Printing
3. Make sure
choose Setup from the Queue menu. The Queue Setup
dialog box appears.
4. Change the spool directory to the one you created in step 1.
Also make sure
checked. (If you don’t see the Status Monitor when you
print, make sure it’s unchecked.) Then click OK.
5. Choose Default Spool Directory from the Options menu.
6. In the dialog box, change the spool directory to the one you
created in step 1. Then click
7. Close Spool Manager.
EPSON Stylus COLOR 800 is selected, and then
Use Print Manager for thi s port is
OK.
Using the Status Monitor
The Status Monitor, available only if you’re using Windows 95,
displays automatically when you send a job to the printer.
However, you can use it at any time to see how much ink you
have left. Follow these steps:
1. Access the Main printer settings dialog box as described on
page 1-2 or 1-4.
2. Click the
Utility tab.
4-4
Page 51

Managing Print Jobs and Network Printing
You see the Utility menu:
For inform ation
about these
three utilities,
see Chapter 5.
3. Click the
Status Monitor icon. You see the Despooler
window with the Status Monitor at the bottom:
4. Check the amount of ink you have left. For more
information about the Despooler window, see page 1-5.
4-5
Page 52

Managing Print Jobs and Networ k Printing
Enabling the Status Monitor
If the Status Monitor doesn’t appear on the Despooler window,
you may need to check your bidirectional spool settings. Follow
these steps:
1. Click
2. Right-click the
3. Select
4. Click
5. Make sure
Start, point to Settings, and then point to Printers.
EPSON Stylus COLOR 800 icon.
Properties. Then click the Details tab.
Spool Settings.
Enable bi-directional support for this printer
is turned on. Then click OK.
Managing Print Jobs on a Macintosh
Your Macintosh printer software includes two management
utilities: Monitor2 and Status Monitor.
◗ If you’re using background printing, Monitor2 starts
automatically when you send a job to the printer. It handles
background printing while you continue to work on your
Macintosh and lets you track documents that are waiting to
be printed.
◗ The Status Monitor alerts you to any problems that occur
during printing. You can also use it at any time to see how
much ink you have left.
Using Monitor2
The Monitor2 utility lets you continue to work on your
Macintosh while your document is printing. However,
background printing is slower and may also slow down your
system.
4-6
Page 53

Managing Print Jobs and Network Printing
If you want to use this utility, you need to turn on background
printing in the Chooser and increase the memory allocation for
Monitor2. Follow these steps to turn on background printing
and use the Monitor2 utility:
1. Open the Chooser from the Apple menu and make sure
your
EPSON Stylus COLOR 800 printer is selected.
2. Under
Background Printing, click On and close the
Chooser.
3. Select
4. Choose
EPSON Monitor2 in your System folder.
Get Info from the File menu.
5. Set the Memory Requirements to 2000 or 3000, depending
on your system’s available RAM.
6. While you’re printing, click the
EPSON Monitor2 icon on
the Application menu at the right end of the menu bar. You
see a dialog box like the following:
job currently
printing
job s queued
for printing
7. You can select a job and cancel it or just use this window to
track the printer’s progress.
4-7
Page 54

Managing Print Jobs and Networ k Printing
Using the Macintosh Status Monitor
You can use the Status Monitor to check the level of ink in your
printer and to control the way your software warns you about
printer problems. Follow these steps:
1. Choose
Print from the File menu or click the Prin t button
in your application. You see the printer settings dialog box.
2. Click the
For
informatio n
about these
three
utilities, see
Chapter 5.
3. Click the
Utility button. You see the Utility menu:
StatusMonitor icon. The software checks the
amount of ink remaining in the printer and displays the
StatusMonitor window:
Click to control messages
and warnings.
4-8
Click to recheck ink level.
Page 55

Managing Print Jobs and Network Printing
4. If you want to change printer messages and warnings, click
Configurati on button. You see the following dialog
the
box:
Printing stops
when these
messages
appear.
Printing
continues when
these messages
appear.
Note:
If you need to install a
network interface board
in your printer, see
Appendix A for
instructions.
5. Choose the options you want and click
OK.
Network Printing on a PC
You can use your printer on a network under Windows 95 or
other network operating systems. First you need to set up your
printer, using either your printer software’s built-in network
support or the network’s LPT port redirection functions.
When you use your printer’s built-in support, the Spool
Manager sends journal files from your computer to a shared
directory on a network server. These files can then be printed
from another computer attached to the printer.
First you need to run Spool Manager and identify the shared
directory to use for journal files. After you set this up on the
computer connected to the printer (the host system), you need
to perform a similar procedure on each remote system on the
network.
Under Windows 95, you also need to specify the port and
network path to the printer.
4-9
Page 56

Managing Print Jobs and Networ k Printing
Setting Up the Host System
Follow these steps to set up the computer connected to the
printer:
1. Create an icon for the
(EPSPLMGR.EXE in the \WINDOWS\SYSTEM folder
or directory).
2. Place this icon in the Startup folder.
3. Open the Spool Manager window as described on page 4-2.
4. In the Spool Manager window, double-click the queue you
want to use for network printing. The Queue Setup dialog
box appears.
5. Click the
Printing from remote queues option.
6. Click the
directory that will receive journal files.
7. Click
Remote Despool tab and then click the
Browse button and select the remote server
OK and minimize the Spool Manager.
EPSON Spool Manager
Setting Up Remote Systems
Follow these steps to set up computers on the network:
1. Create an icon for the
(EPSPLMGR.EXE in the \WINDOWS\SYSTEM folder
or directory).
2. Open the Spool Manager window as described on page 4-2.
3. In the Spool Manager window, double-click the queue you
want to use for network printing. The Queue Setup dialog
box appears.
4. Click the
Spool to remote printer button.
4-10
EPSON Spool Manager
Page 57

Managing Print Jobs and Network Printing
5. Click the
using for journal files on the host system.
6. Click
Browse button and select the directory you’re
OK and minimize the Spool Manager.
Setting Up Your Netw ork Path in Windows 95
If you want to use your printer on a network running
Windows 95, you need to set up the port and network path
on the computer connected to the printer. Follow these steps:
1. Double-click
2. Double-click the
3. Right-click the
choose Properties.
4. Click the
appears:
My Computer.
Printers folder.
EPSON Stylus COLOR 800 icon and
Details tab. A dialog box like the following
4-11
Page 58

Managing Print Jobs and Networ k Printing
5. Click the
to the printer and click OK.
6. Open the Spool Manager window as described on page 4-2.
7. In the Spool Manager window, double-click your printer’s
queue. The Queue Setup dialog box appears.
8. Make sure the
checked. Then click OK.
Add Port button, then specify the network path
Use Print Manager fo r this port option is
Network Printing on a Macintosh
If you want to use your printer on an AppleTalk™ network, you
need to install one of the optional interface boards: either the
LocalTalk™ board or the Ethernet™ board. See Appendix A for
more information about optional interfaces.
Then you can use the
printer in the Chooser. The
your hard drive along with the other printer software.
EPSON Namer utility and set up your
EPSON Namer was installed on
Assigning a Name to the Printer
Follow these steps to use the EPSON Namer utility:
1. Double-click the
2. Click the
window.
3. Select the zone where your printer is located.
4. Under
distinguish it from other printers on the network.
5. Click
EPSON Stylus(AT) icon in the Device Types
New Name, type a name from your printer to
Rename and then click Don e.
EPSON Namer icon on your hard drive.
4-12
Page 59

Managing Print Jobs and Network Printing
Using the AppleTalk Connection
Make sure your printer is turned on and then follow these steps
to set up your printer on an AppleTalk network:
1. Open the Chooser from the Apple menu. You see a dialog
box like the following:
2. Click the
3. Select the AppleTalk zone you want to use. A list of all
printers connected to the selected zone appears on the right.
4. Click the name you assigned to your
COLOR 800. You see a prompt asking you to confirm your
choice.
5. Click
If your printer name doesn’t appear, make sure the printer
is turned on and correctly connected, then click RETRY.
6. To ensure compatibility, leave Background Printing
turned off.
7. Close the Chooser when you’re finished.
EPSON Stylus(AT) icon.
EPSON Stylus
OK.
4-13
Page 60

Maintenance and
5
Transportation
It’s easy to keep your EPSON Stylus COLOR 800 printer
working at its best. All you have to do is follow the simple
instructions in this chapter for replacing ink cartridges, moving
the printer, and performing routine maintenance. You can use
your printer software utilities to clean and align the print heads
whenever necessary.
This chapter covers the following procedures:
◗ Replacing an ink cartridge
◗ Cleaning the print heads
◗ Aligning the print heads
◗ Cleaning the printer
◗ Transporting the printer
Caution:
To ensure good results,
use genuine
cartridges and do not
refill them. Other
products may cause
damage to your printer
not covered by
warranty.
EPSON
EPSON’s
Replacing an Ink Cartridge
When a B black or A color ink out light flashes, the indicated
cartridge is low on ink. This is a good time to make sure you
have a new cartridge. When the light stays on, the cartridge is
empty and you need to replace it.
When you need new ink cartridges, contact your dealer or call
EPSON Accessories at (800) 873-7766 (U.S. only). In Canada,
please call (800) 873-7766 for dealer referral.
5-1
Page 61

Maintenance and Transportation
Caution:
To avoid damaging the
printer, never move the
print heads by hand.
Use these
EPSON ink cartridges within six months of installing
them and before the expiration date on the package:
◗ Black ink cartridge S020108
◗ Color ink cartridge S020089
When the A color ink out light comes on, you can continue to
print with black ink. Simply turn the printer off and then back
on again. When you print, make sure you choose
Black as the
Ink setting in your printer software.
Removing an Empty Ink Cartridge
You can replace a cartridge when the B black or A color ink
out light is either flashing or on. Make sure the printer is turned
on and not printing before you start. Then follow these steps:
1. Determine which cartridge needs to be replaced.
2. Lower the output tray and raise the printer cover. Then
locate the Y black and X color cleaning buttons next to the
control panel under the printer’s cover.
Caution:
If you press the cleaning
button when no ink out
light is flashing or on, the
printer cleans the print
heads, as described on
page 5-6. If you need to
replace an ink cartridge
before the lights flash
(because the ink is too
old, for example) follow
the instructions on
page 5-5.
black cleaning
button
color cleaning
button
3. Press the Y black or X color cleaning button and hold it for
three seconds.
5-2
Page 62

Caution:
Don’t open the clamp or
remove a cartridge
except to replace it with
a new one. Once you
remove a cartridge, you
can’t reuse it, even if it
contains ink.
Maintenance and Transportation
The print heads move slightly left and the Ppower light
begins flashing. (The print heads return to their home
position if you don’t proceed to step 4 within 60 seconds.)
4. Pull up the ink cartridge clamp. (Although the illustration
shows the black ink cartridge, the procedure is the same for
replacing the color ink cartridge.)
Warning:
If ink gets on your hands,
wash them thoroughly
with soap and water. If ink
gets into your eyes, flush
them immediately with
water.
The cartridge rises up from its holder.
5. Lift the cartridge out of the printer and dispose of it
carefully.
6. Follow the steps in the next section to install the new ink
cartridge.
5-3
Page 63

Maintenance and Transportation
Installing the New Cartridge
Once you have removed the empty cartridge, you’re ready to
install the new one. Follow these steps:
1. Remove the new ink cartridge from its packaging.
2. Remove the yellow tape seal as shown:
Caution:
You must remove the
yellow tape seal from the
top of the cartridge;
leaving the tape on will
permanently damage it.
Do not remove the clear
seal from the bottom of
the cartridge; ink will leak
out.
3. Lower the ink cartridge into its holder with the label facing
black cartridge color cartridge
up and the arrow pointing to the back of the printer.
4. Press down the ink cartridge clamp until it locks in place.
5-4
Page 64

Caution:
Never turn off the printer
while the
is flashing.
P power light
Maintenance and Transportation
5. If you need to replace the other ink cartridge, follow the
steps under “Removing an Empty Ink Cartridge,” and then
steps 1 through 4 under “Installing the New Cartridge.”
6. Press the E load/eject button and close the printer cover.
The printer moves the print heads and begins charging the
ink delivery system. (Even if you don’t press the button, ink
charging begins 60 seconds after you close the clamp.)
The Ppower light flashes, and the printer makes various
sounds. Charging takes about two minutes. When it’s
finished, you can print again.
Replacing an Outdated Ink Cartridge
If an ink cartridge is more than six months old, you may need
to replace it. How can you tell? You may notice that your
printouts don’t look as good as they used to. If print quality
doesn’t improve after cleaning and aligning the print heads, you
can replace one or both cartridges.
Caution:
To avoid damaging the
printer, never move the
print heads by hand.
Follow these steps to replace an ink cartridge before the B black
or A color ink out light is flashing or on:
1. Make sure the printer is turned on and not printing.
2. Lower the output tray and raise the printer cover. Then
locate the Y black and X color cleaning buttons next to the
control panel under the printer’s cover.
3. Press both the Y black and X color cleaning buttons and
hold them down for a few seconds until the print heads
move to the left.
◗ To replace the black ink cartridge, follow the
instructions beginning with step 4 on page 5-3.
◗ To replace the color ink cartridge, press the X color
cleaning button and hold it down for a few seconds.
After the color ink cartridge moves to the left, follow
the instructions beginning with step 4 on page 5-3.
5-5
Page 65

Maintenance and Transportation
Cleaning the Print Heads
If your printed image is unexpectedly light or faint, or dots are
missing from the image, you may need to clean the print heads.
This unclogs the nozzles so they can deliver ink properly.
Cleaning the print heads uses ink, so clean them only if print
quality declines. You can clean the print heads in either of the
following two ways:
◗ With the Head Cleaning utility in your printer software
◗ Using the printer’s control panel buttons
Using the Head Cleaning Utility
Follow these steps to run the utility from a Windows computer
or a Macintosh:
(when the printer is on a local port rather than a network)
Caution:
Never turn off the printer
while the P power light is
flashing.
1. Make sure the printer is turned on but not printing, and
the B black and A color ink out lights are off.
2. Access the main printer settings dialog box as described in
Chapter 1.
3. Click the
(Macintosh). You see the Utility menu.
4. Click the
5. Follow the instructions on the screen to clean one or
both print heads. Cleaning each head takes about two
minutes, during which the printer makes some noise and
the Ppower light flashes.
When the power light stops flashing, you need to run a
nozzle check.
Utility tab (Windows) or the Utility button
Head Cleaning icon.
5-6
Page 66

Maintenance and Transportation
6. Make sure paper is loaded in the printer and click
nozzle check pattern
(Macintosh). See page 5-8 for instructions on examining
the nozzle check pattern.
If your print quality has not improved, repeat the steps above. If
you don’t notice any improvement after doing this four or five
times, check the print quality solutions in Chapter 6.
(Windows) or Confirmation
Print
Using the Control Panel To Clean the Print Heads
Follow these steps to clean the print heads using the control
panel buttons:
1. Make sure the printer is turned on and not printing, and
that the B black and A color ink out lights are off.
2. Open the printer cover.
3. Press the Y black or X color cleaning button and hold it for
three seconds. Cleaning takes about two minutes, during
which the printer makes some noise and the Ppower light
flashes.
4. When the Ppower light stops flashing, repeat step 2 for the
other print head if necessary.
After you’re finished cleaning and the Ppower light stops
flashing, you need to run a nozzle check.
5. Access the main printer settings dialog box as described in
Chapter 1.
6. Click the
(Macintosh). You see the Utility menu.
7. Click the
instructions on examining the nozzle check pattern.
Utility tab (Windows) or the Utility button
Nozzle Check icon. See the next section for
5-7
Page 67

Maintenance and Transportation
If your print quality has not improved, repeat the steps above. If
you don’t notice any improvement after doing this four or five
times, check the print quality solutions in Chapter 6.
Examining the Nozzle Check Pattern
Examine the nozzle check pattern you print after cleaning the
print heads. It should look something like this, with the lower
pattern colored cyan, magenta, and yellow:
Each staggered horizontal and straight vertical line should be
complete, with no gaps in the dot pattern. If your printout
looks okay, you’re done. If any dots are missing, clean the print
heads again, as explained in the previous sections.
Aligning the Print Heads
If your printouts contain misaligned vertical lines, you may
need to align the print heads. You can align the print heads in
either of the following two ways:
◗ With the Print Head Alignment utility in your printer
software (when the printer is on a local port rather than a
network)
◗ Using the printer’s control panel buttons
5-8
Page 68

Maintenance and Transportation
Using the Print Head Alignment Utility
Follow these steps to run the utility from a Windows computer
or a Macintosh:
Caution:
Load paper that’s at least
8.27 inches (210 mm)
wide. This prevents ink
from spraying inside the
printer and smudging
your printouts.
1. Make sure the printer is turned on and paper is loaded.
2. Access the main printer settings dialog box as described in
Chapter 1.
3. Click the
Utility tab (Windows) or the Utility button
(Macintosh). You see the Utility menu.
4. Click the
Print Head Alignment icon.
5. Follow the instructions on the screen to print a test page
and select the correct alignment.
Using the Control Panel To Align the Print Heads
Follow these steps to align the print heads using the control
panel buttons:
1. Make sure the printer is turned off and paper is loaded.
2. Open the printer cover.
3. Hold down the E load/eject button and the Y black
cleaning button and turn on the printer. Then release the
buttons.
The printer prints an instruction sheet that tells you how to
align the print heads.
4. Follow the instructions on the printed sheet.
5. When you’re finished, turn off the printer to exit the
alignment mode.
5-9
Page 69

Maintenance and Transportation
Cleaning the Printer
To keep your printer working at its best, you should clean it
several times a year, following these steps:
Caution:
◗ Don’t touch the gears
inside the printer.
◗ Never use alcohol or
thinner for cleaning; they
can damage the printer
components and case.
◗ Don’t use a hard or
abrasive brush.
◗ Don’t get water on the
printer components.
◗ Don’t spray lubricants or
oils inside the printer.
1. Turn off the printer, unplug the power cord, and
2. Remove all the paper from the sheet feeder.
3. Carefully clean away dust and dirt with a soft brush.
4. Clean the exterior of the printer with a soft, damp cloth.
5. Clean ink out of the printer’s interior with a soft, damp
disconnect the printer cable.
Keep the printer cover closed so water doesn’t get inside.
cloth.
5-10
Page 70

Caution:
To avoid damage,
always leave the ink
cartridges installed
when transporting the
printer.
Maintenance and Transportation
Transporting the Printer
If you want to move your printer some distance, you need to
prepare it for transportation and repack it in the original box.
Follow these steps:
1. Turn on the printer and wait until the print heads lock in
the far right position. Then turn off the printer.
2. Unplug the power cord from the electrical outlet. Then
disconnect the interface cable from the printer.
3. Remove any paper from the sheet feeder and remove the
paper support.
4. Push in the output tray extensions and close the tray.
5. Repack the printer and attachments in the original box
using the protective materials that came with it. See the
Notice Sheet that was packed with the printer.
Be sure to keep the printer flat as you transport it. If you notice
a decline in print quality after transporting the printer, clean the
print heads; if output is misaligned, align the print heads. See
the instructions in this chapter.
5-11
Page 71

Troubleshooting
6
As you use your printer, you may occasionally experience a
paper jam or other problem. The first thing you should do is try
to diagnose the problem, following the guidelines in this
chapter. Then try the most likely solutions until the problem is
fixed.
This chapter tells you everything you need to know about the
following:
◗ Diagnosing problems ◗ Improving print quality ◗ Solving printing problems ◗ Fixing paper jams and other paper problems ◗ Solving miscellaneous printout problems
Your printer provides a number of ways to help you diagnose
problems:
◗ To identify the most common problems, read the lights on
the printer’s control panel. See the following section for
more information.
◗ You can also use the Status Monitor utility to identify
common problems. For instructions, see page 1-5
(Windows 95) or page 4-8 (Macintosh).
◗ To determine whether the problem is caused by the printer
itself, run a self test. See page 6-3 for instructions.
6-1
Page 72

Troubleshooting
◗ You can use the printer’s hex dump mode to pinpoint
communication problems. Then you can fax the printout
to a technical support representative or interpret it yourself.
See page 6-3 for instructions.
S
S
B A
◗ For the latest information, check the
COLOR
EPSON program group or folder.
◗ If none of the suggested solutions in this chapter solve your
problem, contact
Help” in the Introduction.
800 Help program and the ReadMe file in the
EPSON as described under “Where to Get
EPSON Stylus
Reading the Control Panel Lights
Follow these guidelines when the control panel lights come on
or flash:
.
When the paper light flashes, paper is jammed in the printer.
Turn off the printer and gently pull out all paper. Then press
the E load/eject button. See page 6-14 for more information.
When the paper light comes on, your paper ran out or is
incorrectly loaded. Load paper in the feeder and then press
the E load/eject button.
When an ink light flashes, your ink supply is low. Make sure
you have a replacement cartridge.
B A
P S B A
P S B A
When an ink light comes on, you need to replace the ink
cartridge. See Chapter 5 for instructions.
When the power light and paper light flash and all the other
lights are on, your printer has a carriage error. See page 6-9
for more information.
When all the lights flash, your printer may have an internal
error. See page 6-10 for more information.
6-2
Page 73

Troubleshooting
Running a Self Test
You can run a self test to determine whether the problem comes
from the printer itself or the computer.
◗ If the results are satisfactory, the problem lies in software
settings, the interface cable, or your computer.
◗ If the self test does not print correctly, you have a problem
with your printer. See the suggestions in this chapter for
possible solutions.
Follow these steps to run the test:
1. Make sure both the printer and computer are turned off.
2. Disconnect the interface cable from the printer.
3. Make sure paper is loaded in the feeder.
4. Press the
press the Ppower button. Continue to hold the buttons
until the Ppower light starts to flash.
The printer prints a nozzle check pattern (shown on
page 5-8) and samples of fonts and colors.
5. To end the test, turn off the printer.
E load/eject button and hold it down while you
Using Hex Dump Mode
You can use the printer’s hex dump mode to identify problems
if you know how to interpret hex code. Or, you can fax the hex
printout to a technical support representative. Follow these
steps to use hex dump mode:
1. Make sure the printer is turned off and has paper in the
feeder.
2. Open the cover.
6-3
Page 74

Troubleshooting
3. Hold down the E load/eject button and the X color
cleaning button and press the Ppower button. The printer
prints Hex Dump Mode at the top of a page and then
stops.
4. Print one or more pages from an application as usual. The
printer prints the exact code it receives in hexadecimal
format.
Improving Print Quality
If you find that your print quality has been declining, you can
often improve it by doing one of the following:
◗ Clean the print heads following the instructions in
Chapter 5.
◗ Use higher quality paper appropriate for your print job.
(See Chapter 2 for a list of
EPSON papers).
◗ Match the Media Type in the main printer settings dialog
box to the type of paper or media you loaded in the printer.
(See Chapter 1 for details).
◗ Turn off High Speed mode in the advanced printer settings
dialog box, as described in Chapter 3.
◗ Replace the ink cartridges as described in Chapter 5.
(Check the status of the B black and A color ink out lights
first.)
On the following pages are some detailed solutions to specific
print quality problems.
6-4
Page 75

Printed image has horizontal banding.
Possible cause Solution
The
Media Type setting
doesn’t match the loaded
paper.
Make sure the Media Type setting matches the paper or media
you’re using. Then the printer software can automatically select
other settings for the best quality. See Chapter 1 for instructions.
Troubleshooting
The printable side of the
paper is face down.
The print head nozzles are
clogged.
The ink cartridges are low on
ink.
The
MicroWeave option is
not set.
Remove the paper and reload it with the printable side face up.
See Chapter 2 for instructions.
Clean the print heads. See Chapter 5 for instructions.
Check the B black and A color ink out lights to see which
cartridge you may need to replace. See Chapter 5.
Turn on MicroWeave in the advanced printer settings dialog
box. See Chapter 3 for more information.
Vertical lines are misaligned or vertical banding appears.
Possible cause Solution
The print head nozzles are
clogged.
The
High Speed setting is
turned on.
The print heads are
misaligned.
Clean the print heads. See Chapter 5 for instructions.
Turn off the High Speed setting if vertical lines are misaligned.
See Chapter 3 for information.
Run the Print Head Alignment utility. See Chapter 5 for
instructions.
The printed image has incorrect or missing colors.
Possible cause Solution
The
Ink option is set to
Change the
Black.
The
Media Type setting
doesn’t match the loaded
paper.
The printable side of the
paper is face down.
Make sure the Media Type setting matches the paper or media
you’re using. Then the printer software can automatically select
other settings for the best quality. See Chapter 1 for instructions.
Remove the paper and reload it with the printable side face up.
See Chapter 2 for instructions.
Ink setting to Color. See Chapter 1 for instructions.
6-5
Page 76

Troubleshooting
Possible cause Solution
The Halftoning and Color
Adjustment Mode
options are set incorrectly
for your document type.
The print head nozzles are
clogged.
The
ColorSync settings
are incorrect for your
document (Macintosh).
The ink cartridges are low
on ink or one or more ink
colors are empty.
The colors displayed on
your monitor don’t match
the printed colors.
The color settings in your
application software need
adjustment.
Use the correct settings for the project you’re printing, following
the instructions in Chapter 3.
Clean the print heads. See Chapter 5 for instructions.
Use the Automatic mode setting or choose a different
Rendering Intent setting. See Chapter 3 for more information.
Check the B black and A color ink out lights to see which cartridge
you may need to replace. See Chapter 5 for instructions.
Because your monitor and printer use different technologies
to represent colors, your printed colors can’t exactly match the
colors you see on your monitor screen. Use the
(Windows 95) or
for more information.
You may be able to adjust various color settings in your application
software. See your software documentation for more information.
ColorSync (Macintosh) settings. See Chapter 3
The printed image is faint or has gaps.
ICM
Possible cause Solution
The print head nozzles are
clogged.
The
Media Type setting
doesn’t match the loaded
paper.
The loaded paper is
damaged, old, or dirty.
The ink cartridges are low
on ink.
Clean the print heads. See Chapter 5 for instructions.
Make sure the Media Type setting matches the paper or media
you’re using. Then the printer software can automatically select
other settings for the best quality. See Chapter 1 for instructions.
Remove the paper and reload a new stack with the printable side
face up. See Chapter 2 for instructions.
Check the B black and A color ink out lights to see which cartridge
you may need to replace. See Chapter 5 for instructions.
6-6
Page 77

The printed image is blurry or smeared.
Possible cause Solution
Troubleshooting
The printer’s adjust lever is
in the 0 position.
The paper is damp or the
printable side is face down.
You loaded special media
without a support sheet.
You tried to print on
cardboard or other
non-recommended media.
The
Media Type setting
doesn’t match the loaded
paper.
Multiple sheets entering the
output tray are smearing
the ink on ejected pages.
Ink has leaked inside the
printer.
The color ink cartridge is
empty.
You’re using the
Speed
settings with a misaligned
print head.
and MicroWeave
High
Set the adjust lever to the + position and try printing again. See
Chapter 2 for instructions.
Remove the paper and reload a new stack with the printable side
face up. See Chapter 2 for instructions.
Follow the special media loading instructions in Chapter 2 and on
the paper packaging for media that require support sheets. Also
try loading your media one sheet at a time.
Make sure your paper or media meets the specifications listed in
Appendix B. If your printouts are still blurry after you change
paper, clean the print heads as described in Chapter 5.
Make sure the Media Type setting matches the paper or media
you’re using. Then the printer software can automatically select
other settings for the best quality. See Chapter 1 for instructions.
Remove each sheet from the output tray as soon as it is printed to
prevent smearing, especially if you use transparencies.
Clean carefully inside the printer to remove spilled ink. See
Chapter 5 for instructions.
Replace the color ink cartridge following the instructions in
Chapter 5 or choose
Turn off
the Print Head Alignment utility following the instructions in
Chapter 5.
High Speed following the instructions in Chapter 3. Run
Black ink in your printer software.
Photographic images look grainy or rough.
Possible cause Solution
The print heads are
misaligned.
The resolution of your
image is too low.
Run the Print Head Alignment utility following the instructions in
Chapter 5.
Increase the image resolution using your image-editing software,
or decrease the size of the image.
6-7
Page 78

Troubleshooting
Solving Printing Problems
If the printer won’t print, first check that:
◗ The printer is turned on and the Ppower light is on.
◗ Paper is loaded in the printer.
◗ The printer is plugged into a working electrical outlet that’s
not controlled by a switch or timer.
◗ The interface cable is securely connected to the printer and
computer and both are turned on.
If you still can’t print, check the following solutions.
All lights are off.
Possible cause Solution
The printer is not receiving
power.
Try these solutions:
• Make sure the printer is turned on.
• Turn off the power and plug in the power cord securely.
• Make sure the outlet is not controlled by a switch or timer and
is operable.
Only the Ppower light is on, but nothing prints.
Possible cause Solution
The interface cable is not
connected securely.
The printer has an internal
problem.
The printer or application
software is installed
incorrectly.
Your computer doesn’t
have enough memory to
handle the file you’re
printing.
Turn off your printer and computer. Then make sure the cable is
connected securely and meets the printer’s specifications. Try
printing again.
Turn off the printer and computer, disconnect the interface cable,
and run a self test as described on page 6-3.
If the self test works, check your printer and application software
for correct installation. If you’re printing on a network, you may
need to set up your printer for network printing, as described in
Chapter 4.
Try one of the following:
• Reduce the resolution of your image.
• Select fewer colors or a lower resolution for your display or
monitor.
• Add more memory to your computer.
6-8
Page 79

Possible cause Solution
Troubleshooting
Printing is stalled in Spool
Manager (Windows).
Printing is stalled in
Monitor2 (Macintosh).
The print heads are clogged
or the ink cartridges are too
old.
Delete the stalled print jobs in Spool Manager and resume
printing; see Chapter 4 for instructions.
Open the Extensions folder, EPSON folder, and Spool folder.
Then delete any queued files.
If the printer sounds like it’s trying to print but doesn’t feed paper,
clean the print heads; see Chapter 5 for instructions. If cleaning
doesn’t help, replace the cartridges. For information on cartridge
life and replacement instructions, see Chapter 5.
The S paper out light is flashing or on.
Possible cause Solution
If flashing, paper is jammed. Remove the paper and follow the guidelines for preventing jams
as described on page 6-14.
If on, paper is used up or is
loaded incorrectly.
Load paper or remove the stack and reload it as described in
Chapter 2. Then press the E load/eject button to turn off the light
and resume printing.
A B black or A color ink out light is flashing or on.
Possible cause Solution
If flashing, the ink supply is
getting low.
You need to replace the indicated ink cartridge soon; see
Chapter 5 for instructions and make sure you have a new
cartridge.
If on, the ink cartridge is
empty.
You must replace the indicated ink cartridge now to be able to
print; see Chapter 5 for instructions.
The S and Plights are flashing.
Possible cause Solution
A carriage error has
occurred.
Remove any paper in the printer. Press the
about 30 seconds. Then press it again. Turn the printer off, wait a
few seconds, and then turn it on and try printing again. If the error
is not cleared, contact EPSON as described in the Introduction.
E load/eject button for
6-9
Page 80

Troubleshooting
All the lights are flashing.
Possible cause Solution
You haven’t removed all the
packing material from the
printer.
An internal error has
occurred.
Remove the packing material, following the instructions on the
notice sheet in the box. If the printer still doesn’t print, contact
EPSON as described in the Introduction.
Turn off your printer, wait a few seconds, and turn it on again. If
the lights still flash or stay on, contact EPSON as described in the
Introduction.
The printer has finished charging the ink cartridge, but the P power
light is still flashing.
Possible cause Solution
The ink cartridge clamp
isn’t locked down.
Packing material remains in
the carriage.
The printer needs to
initialize.
Press down on the clamp to lock it.
Remove all packing material, following the instructions on the
notice sheet.
If the printer is not moving or making noise, but the light is still
flashing for more than 5 minutes, turn the printer off. If the light is
still flashing when you turn it back on, contact EPSON as described
in the Introduction.
The printer software installed with Windows 3.1 doesn’t work correctly after you upgrade to Windows 95.
Possible cause Solution
Your printer software is not
set up correctly for
Windows 95.
Reinstall the printer software after installing Windows 95.
After you install your printing software, you see the Windows 95 New Hardware found window.
Possible cause Solution
An operating system error
has occurred.
Click
Do not install a driver, and then click OK.
6-10
Page 81

You see a spooling error message (Windows).
Possible cause Solution
Troubleshooting
If you see error messages
or printing is very slow, the
problem may be caused by
temporary files.
Your hard drive is too full. Delete unnecessary files to make room on the drive.
Your computer doesn’t
have enough memory for
the file you’re printing.
Change the Spool Manager default directory, following the
instructions in Chapter 4.
Try one of the following:
• Reduce the resolution of your image.
• Select fewer colors or a lower resolution for your display or
monitor.
• Add more memory to your computer.
You see a memory error message (Macintosh).
Possible cause Solution
You need to increase the
memory allocation for your
application,
Monitor2, or both.
EPSON
Choose
highlighted and increase the Memory Requirements. See Chapter 4
for more information. Also, turn off background printing if it’s on.
Get Info from the File menu when EPSON Monitor2 is
In Windows 95, the Status Monitor box does not appear with the Despooler.
Possible cause Solution
The Windows Print
Manager is interfering with
the Status Monitor.
Make sure
the Spool Manager Queue setup. Then check your bidirectional
spool settings. See Chapter 4 for instructions.
Use Print Manager for this port is not checked in
A portion of your image doesn’t print (Macintosh).
Possible cause Solution
Your system doesn’t have
enough available memory.
You need to increase the
memory allocation for your
application, EPSON
Monitor2, or both.
Close any other applications you are running and turn off
background printing.
Choose
active and increase the Memory Requirements. See Chapter 4 for
more information.
Get Info from the File menu when the application is
6-11
Page 82

Troubleshooting
Printing is too slow.
Possible cause Solution
Your printer software
options are set incorrectly.
Your system doesn’t have
enough resources.
You’re using background
printing on a Macintosh.
Your port settings are
incorrect in Windows 95.
For faster printing, try the following:
• Set
Print Quality to Economy.
• Turn
MicroWeave off.
• Turn
High Speed on.
• Choose
• Choose
See Chapters 1 and 3 for more information.
• Clear space on your hard disk drive or run a defragmentation
utility.
• Don’t run too many applications at the same time.
• Turn off virtual memory.
• Increase your system’s memory (RAM)
Choose
Requirements for EPSON Monitor2 or turn off background
printing.
Change your default spool directory and disable port settings as
described in Chapter 4.
No Halftoning.
Black ink.
Get Info from the File menu and increase the Memory
Your printer switches to the modem port or won’t confirm on the printer port (Macintosh).
Possible cause Solution
Your Macintosh has
extension confilcts.
Make sure AppleTalk is inactive. In the Extensions Manager,
disable the AppleShare, FileShare, and PrinterShare extensions.
Set your printer and any unused Apple printers to the printer port.
Then restart your system.
You’re using an AppleTalk
cable.
Make sure you’re using a standard Apple System Peripheral-8
cable. See the Introduction for more information.
Your printer icon doesn’t appear in the Chooser (Macintosh).
Possible cause Solution
Your Macintosh has
extension confilcts.
Disable Quick Draw GX in the Extensions Manager. Make sure
EPSON Monitor2 and EPSON Stylus Color are enabled, and then
restart your Macintosh.
6-12
Page 83

Fixing Paper Problems
You can avoid most paper handling problems by doing the
following:
◗ Use smooth, high-quality media designed for ink jet
printers that meets the media specifications in the
Appendix.
◗ Follow all loading and handling instructions included with
the media.
◗ Load the media as described in Chapter 2 with the
printable side face up.
If you have problems with paper feeding, paper jams, or ejected
paper, check here for solutions.
Paper doesn’t feed.
Try this Then do this
Troubleshooting
Remove the stack of paper
from the sheet feeder.
Check that the paper:
• Isn’t curled or creased.
• Isn’t too old. (See Chapter 2 or your paper packaging for more
information.)
• Isn’t loaded above the arrow on the left edge guide.
• Isn’t jammed inside the printer. (If the S paper out light is
flashing, paper is jammed.)
Then reload the paper as described in Chapter 2, making sure the
left edge guide is adjusted to fit the paper’s width.
Multiple pages feed at the same time.
Try this Then do this
Remove the stack of paper. • Make sure the paper isn’t too thin (see the paper specifications
in Appendix B).
• Fan the edges of the stack of paper to separate the sheets.
• Reload the paper as described in Chapter 2.
• If too many copies of a page or document are printing, check the
Copies settings in both the printer settings dialog box and your
application program. See Chapter 1 for more information.
6-13
Page 84

Troubleshooting
Paper jams inside the printer.
Try this Then do this
Turn off your printer, open
the cover, and remove all
the paper that’s inside,
including any little pieces
that may have torn off.
Load more paper in the printer, following the instructions in
Chapter 2 and on the
make sure you:
• Use smooth, high-quality paper, loaded printable side up.
• Fan the stack and then even the edges before loading it.
• Load paper beneath the arrow mark on the left edge guide.
• Adjust the left edge guide to fit the width of your paper.
Paper doesn't eject fully or is wrinkled.
Possible cause Solution
If the paper doesn’t eject
fully, you may have set the
wrong paper size.
If it’s wrinkled when it
comes out, the paper may
be damp or too thin.
Press the E load/eject button to eject the paper. Then make sure
you select the correct paper size in your application or printer
software.
See the paper specifications in Appendix B for ranges of paper
thicknesses you can print with, as well as environmental
requirements for storage.
Quick Setup
. If your paper jams frequently,
6-14
Page 85

Solving Miscellaneous Printout Problems
If your printout results are not what you expected, try these
solutions.
Characters are incorrect or garbled.
Possible cause Solution
Troubleshooting
Your printer is not the
Windows default printer.
Printing is stalled in Spool
Manager.
If you’re using background
printing on a Macintosh,
spooled data may be
corrupted.
The interface cable is not
securely connected.
Select your printer as the default Windows printer. See your
Windows documentation or online help for instructions.
Delete the stalled print jobs in Spool Manager following the
instructions in Chapter 4. Then try printing again.
Open the Extensions folder, EPSON folder, and Spool folder.
Then delete any queued files. Increase the Memory
Requirements for EPSON Monitor2.
Turn off your printer and computer. Then make sure the cable is
connected securely and meets the printer’s specifications.
.
The margins are incorrect.
Possible cause Solution
Margins are set incorrectly in
your application software.
Paper settings in the printer
software are incorrect for
your paper size.
Check your software documentation for instructions on selecting
the correct margins for your paper size.
Check the settings in the paper dialog box to make sure they’re
correct for your paper size. See Chapter 2 for more information.
The image is inverted as if viewed in a mirror.
Possible cause Solution
You used a
Horizontal
application software or the
printer software.
Flip
option in your
Turn off the
software or the printer software. See Chapter 3 for instructions.
Flip Horizontal or Mirror setting in your application
6-15
Page 86

Troubleshooting
The printer prints blank pages.
Possible cause Solution
Your printer is not the
Windows default printer.
Paper settings in the printer
software are incorrect for
your paper size.
The print head nozzles are
clogged.
Select your printer as the default Windows printer. See your
Windows documentation or online help for instructions.
Check the settings in the paper dialog box to make sure they’re
correct for your paper size. See Chapter 2 for more information.
Clean the print heads following the instructions in Chapter 5.
6-16
Page 87

Using Optional
A
Interfaces
Your EPSON Stylus COLOR 800 includes both parallel and
serial interfaces. You can connect it to a PC or Macintosh, or
both at the same time. If you want to connect to another system
or to a network, you can install an optional interface board.
This chapter tells you how to install and use EPSON interface
boards in the following sections:
◗ Selecting an interface board
◗ Using Macintosh interface boards
◗ Using the PC serial interface board
◗ Installing optional interfaces
Selecting an Interface Board
You can install the following interface boards in your printer:
Type of interface board Model number Compatibility
Serial C823051 PC
32KB serial C832071 PC
32KB parallel C823101 PC
LocalTalk C823121 Macintosh
Twinax C823151 PC
Coax C823141 PC
Ethernet C823461 Macintosh/PC
A-1
Page 88

Using Optional Interfaces
To order an interface board, contact your dealer or call
Accessories at (800) 873-7766 (U.S. sales only). In Canada, call
(800) 873-7766 for dealer referral.
EPSON
Using Macintosh Interface Boards
If you are planning to install the LocalTalk board, you will also
need two LocalTalk Locking Connector Kits (DIN-8 version).
Attach one connector box to the AppleTalk interface on the
printer and the other to the printer port on the Macintosh.
Then attach the LocalTalk cable between the two connector
boxes. For more information, see the instructions that came
with the connector kits.
If you install the Ethernet board connected to a thin coaxial
(10BASE2) cable, and the printer is the last device on the
network, you need to obtain a 50-ohm terminator. The
Ethernet transceiver is included on the
so you do not need an adapter box for the printer.
EPSON Ethernet board,
Using the PC Serial Interface Board
Before you install the serial interface board in your printer,
follow the instructions that come with the board for setting
baud rate and parity. Refer to your computer documentation
for information about matching the board’s settings to your
computer system. You may also need to set the board’s
handshake timing, error handling, and other data transfer
conventions.
A-2
Page 89

Using Optional Interfaces
Installing Optional Interfaces
Before you install an optional interface board in your printer,
make sure the printer is turned off and all the printer’s lights are
off. Then follow these steps:
Caution:
To avoid damaging your
printer or computer, do
not install the interface
board when the printer is
connected to an electrical
outlet.
1. Unplug the power cord from the electrical outlet (and from
the back of the printer, if your printer’s power cord is
removable).
2. Turn the printer around so that its back faces you, and
disconnect any interface cables.
3. Use a cross-head screwdriver to remove the two screws
securing the shield plate to the interface slot; then lift off
the plate. Be sure to keep both screws; you may need to use
them again when you reinstall the shield plate.
4. Be sure to set any switches and jumpers on the board. See
the interface board’s manual for details. If your board has a
jumper labeled JG, make sure that you set it to on, or the
board will not work properly.
A-3
Page 90

Using Optional Interfaces
5. Slide the interface board along the slots on both sides of the
compartment. Push it in firmly to fully insert the board’s
connector into the printer’s internal socket.
6. Secure the interface board in the slot with the two screws
included with the interface board.
7. Connect the proper interface cable to the interface board
and to your computer. If the cable has a grounding wire,
connect it to one of the screws securing the parallel
interface.
Also, if you are using more than one computer, reconnect
the other interface cable.
8. Make sure the printer is turned off. Then plug in the power
cord.
In most cases, the printer automatically detects the interface
you’re using. However, if you have trouble printing through an
installed interface board, you may need to change the printer’s
I/F (interface) mode setting. See page B-7 for instructions.
To remove the interface board, follow the above steps in reverse
order.
A-4
Page 91

Technical
B
Printing
Printing method On-demand ink jet
Nozzle configuration 128 black nozzles (32
Printable columns and
printing speed
64 color nozzles × 3 (cyan, magenta, yellow)
Up to 8 pages per minute in black, 7 pages per minute in color
Character mode
Character pitch
(characters per inch)
10 80 533 400
12 96 640 480
15 120 800 600
17 (10 condensed) 137 912 684
20 (12 condensed) 160 1067 800
Specifications
× 4, staggered)
Printable
columns
Printing speed
(characters per second)
Draft Normal
Raster graphics mode (printable area is 8.27 inches)
CR speed (inches per
Print quality Available dots
× 180 dpi 1488 26.7
180 dpi
× 360 dpi 2976 20
360 dpi
× 720 dpi 5952 20
720 dpi
1440 dpi
× 720 dpi 5952 10
B-1
second)
Page 92

Technical Specifications
Resolution Maximum 1440 × 720 dpi
Input buffer 32KB
Print direction Bidirectional with logic seeking for text and graphics
Control code ESC/P 2
IBM X24E emulation code
Character tables 1 italic and 10 graphics character tables
Character sets 14 international character sets and 1 legal character set
Bitmap fonts • EPSON Roman (proportional)
• EPSON Sans Serif (proportional)
• EPSON Courier
• EPSON Prestige
• EPSON Script
All bitmap fonts are available in 10, 12, and 15 cpi. You can select
other font/pitch combinations using ESC/P commands.
Scalable fonts • EPSON Roman
• EPSON Sans Serif
• EPSON Roman T
• EPSON Sans Serif H
All scalable fonts are available in sizes from 8 to 32 points, in 2 point
increments, and four styles: normal, bold, italic, and bold italic.
The printer always uses the fonts you select with your software
application. You need to use the printer’s internal fonts only if your
application doesn’t allow you to select fonts.
™
and expanded raster graphics code
B-2
Page 93

Technical Specifications
Paper
Paper Type Size Paper Types Thickness Weight
Single Sheets Letter (8.5 × 11 inches)
Transparencies
and glossy
media
Self adhesive
sheets
Envelopes No. 10 (9.5 × 4.1 inches,
Cards A6 (105 × 148 mm)
A4 (210 × 297 mm)
A5 (148 × 210 mm)
B5 (182 × 257 mm)
Legal (8.5 × 14 inches)
Half letter (5.5 × 8.5 inches)
Executive (7.5 × 10 inches)
Letter (8.5 × 11 inches)
A4 (210 × 297 mm)
A6 (105 × 148 mm, glossy
film only)
A4 (210 × 297 mm) Self adhesive
240 × 104 mm)
DL (8.7 × 4.3 inches,
220 × 110 mm)
C6 (4.4 × 6.4 inches,
114 × 162 mm)
5 × 8 inches (127 × 203 mm)
8 × 10 inches (203 × 254 mm)
Plain paper and
special ink jet
papers
distributed by
EPSON
Transparencies,
glossy paper, and
glossy film
distributed by
EPSON
sheets
distributed by
EPSON
Plain, bond, or
air mail paper
Ink jet cards
distributed by
EPSON
0.003 to 0.004 inch
(0.08 to 0.11 mm)
Glossy film and
transparencies:
0.0051 to 0.0059
inch (0.13 to
0.15 mm)
glossy paper:
0.0067 to 0.0071
inch (0.17 to
0.18 mm)
0.006 to 0.017 inch
(0.16 to 0.43 mm)
0.0091 inch
(0.23 mm)
17 to 24 lb
(64 to 90 g/m
use 24 lb (90 g/m
paper under normal
temperature and
humidity conditions
12 to 20 lb
(45 to 75 g/m
50.7 l b (188 g/m
2
);
2
)
2
)
2
)
Notes:
Since the quality of any particular brand or type of paper may be changed by the manufacturer at
any time, EPSON cannot guarantee the use of any particular brand or type of paper. Always test
samples of paper stock before purchasing large quantities or printing large jobs.
Poor quality paper may reduce print quality and cause paper jams and other problems. If you
encounter problems, switch to a higher grade of paper.
Do not load curl ed or folded paper, envelopes, or transparencies.
Print on ink jet papers and envelopes only under these conditions:
Temperature: 59 to 77°F (15 to 25°C)
Humidity: 40 to 60% RH
Store glossy media and self adhesive sheets under these conditions:
Temperature: 59 to 86°F (15 to 30°C)
Humidity: 20 to 60% RH
B-3
Page 94

Technical Specifications
Printable area
A
B-L
B-R
C
B-L
A
B-R
C
EnvelopeSingle sheet
A The minimum top margin is 0.12 inch (3.0 mm).
When printing multiple sheets of glossy media, the minimum
top margin is 1.2 inches (30 mm).
BL The minimum left margin is 0.12 inch (3.0 mm).
BR The minimum right margin is:
0.35 inch (9.0 mm) for Letter and Legal
0.12 inch (3.0 mm) for all other paper sizes
1.10 inches (28 mm) for #10 envelopes
0.28 inch (7 mm) for DL envelopes
0.12 inch (3 mm) for C6 envelopes
C The minimum bottom margin is 0.55 inch (14.0 mm).
Note:
Always load paper into the sheet feeder short edge first except envelopes. Load envelopes long
edge first.
B-4
Page 95

Technical Specifications
Ink Cartridges
Specification Black ink cartridge (S020108) Color ink cartridge (S020089)
Color(s) Black Cyan, magenta, and yellow
Print Capacity* 900 pages (A4 paper;
text at Normal - 360 dpi; 5%)
(ISO/IEC 10561 Letter Pattern)
Cartridge life 2 years from production date and up to within 6 months after opening package at 77 °C
Storage
Temperature
Transit
Temperature
Freezing
Temperature**
Dimensions 1.09 (W) × 2.1 (D) × 1.5 (H) inche s
* The print capacity may vary depending on how often you use the print head cleaning function. Also, if you
print large graphics and dense text with little white space, you use ink faster.
** The ink thaws and is usable after approximately 3 hours at 77 °F (25 °C).
(25 °F)
–4 to 104 °F (–20 to 40 °C)
1 month at 104 °F (4 0 °C)
–22 to 140 °C (–30 to 60 °F)
1 month at 104 °F (4 0 °C)
120 hours at 140 °F (60 °C)
–3.2 °F (–16 °C) –0.4 °F (–18 °C)
27.8 (W) × 52.7 (D) × 38.5 (H ) mm
300 pages (A4 paper;
Normal - 360 dpi, 5% each color)
1.7 (W) × 2.1(D) × 1.5 (H) inches
42.9 (W ) × 52 .7 (D) × 38.5 (H) mm
Caution:
To ensure good results, use genuine EPSON cartridges and do not refill them. Other
products may cause damage to your printer not covered by EPSON’s warranty.
Do not use an ink cartridge after the expiration date on the package.
Mechanical
Paper feed method Friction with auto sheet feeder, rear entry
Sheet feeder capacity Maximum 100 sheets of 17 lb (64 g/m
Dimensions Storage
Width: 18.7 inches (475 mm)
Depth: 10.7 inches (274 mm)
Height: 7.4 inches (177 mm)
Printing
Width: 18.7 inches (475 mm)
Depth: 24.0 inches (610 mm)
27.2 inches (692 mm, when loading transparencies)
Height: 12.4 inches (315 mm)
7.95 inches (202 mm, when loading transparencies)
Weight 14.3 lb (6.5 kg) without the ink cartridges
B-5
2
) paper
Page 96

Technical Specifications
Electrical
Environmental
Specification 120 V model 240 V model
Input voltage range 103.5 to 132 V 198 to 264 V
Rated frequency range 50 to 60 Hz
Input frequency range 49.5 to 60.5 Hz
Rated current 0.4A 0.2A
Power consumption Approx. 18 W (ISO/IEC 10561 Letter Pattern)
Temperature Operation 50 to 95 °F (10 to 35 °C)
Humidity Operation 20 to 80% RH
Storage* –4 to 140 °F (–20 to 60 °C)
1 month at 104 °F (40 °C)
120 hours at 140 °F (60 °C)
Storage* 5 to 85% RH
(without condensation)
* Stored in shipping container
Safety Approvals
Safety standards UL 1950 with D3, CSA 22.2 950 with D3
EMC FCC part 15 subpart B class B
CSA C108.8 class B
DOS Support
If driver support for the EPSON Stylus COLOR 800 is not available
from your software manufacturer, you can use one of the other
EPSON ESC/P 2 printer drivers. Choose the first printer available
from the following two lists:
Black printing only • LQ-870/1170
Color and black
printing
• LQ-570(+)/1070(+)
• SQ-870/1070
• LQ-850
• LQ-500
• EPSON Stylus PRO
• EPSON Stylus COLOR 500
• EPSON Stylus COLOR II
• LQ-860
• LQ-2550
B-6
Page 97

Control Panel Settings
Technical Specifications
You can change the following “default” settings from the printer’s
control panel:
Setting Options
Print direction Auto, Bi-D, Uni-D
Font Courier, Roman, Sans Serif, Prestige,
Script, Roman T, Sans Serif H, Draft
Pitch 10 cpi, 12 cpi, 15 cpi, 17.1 cpi, 20 cpi,
Proportional
I/F mode Auto, Parallel, Serial, Option
Auto I/F wait time 10 seconds, 30 seconds
Software ESC/P 2, IBM X24E
Auto CR (IBM mode only) Off, On
AGM (IBM mode only) Off, On
Character table PC437, PC850, PC860, PC861, PC863,
PC865, Abicomp, BRASCII, Roman 8, ISO
Latin 1, Italic U.S.A., Italic France, Italic
Germany, Italic U.K., Italic Denmark 1,
Italic Sweden, Italic Italy, Italic Spain 1
Auto line feed Off, On
Network I/F mode Off, On
Loading position 8.5 mm, 3 mm, Others
Economy Off, On
Parallel I/F transfer rate Fast, Normal
Changing control
panel settings
Follow these steps to change the settings listed above:
1. Make sure the printer is turned off and has paper loaded.
2. Hold down the
X color cleaning button and press the power
button. The printer prints a summary of instructions for
changing settings and choosing the language to use for additional
instructions.
3. Press the
X color cleaning button to print a list of current settings
and additional instructions.
4. After you make the changes you want, turn the printer off to save
the settings. The settings remain in effect until you change them
again.
B-7
Page 98

Technical Specifications
Control Codes
ESC/P 2 control codes See the ESC/P® Reference Manual for more information about these
commands.
General operation:
ESC@, ESC U, ESC EM
Paper feeding:
CR, FF, LF, ESC 0, ESC 2, ESC 3, ESC +
Page format:
ESC ( C, ESC C, ESC C 0, ESC Q, ESC l, ESC ( c, ESC N, ESC O
Print position motion:
ESC $, ESC \, ESC ( V, ESC ( v, ESC D, HT, ESC B, ESC J, VT
Font selection:
ESC k, ESC x, ESC X, ESC P, ESC M, ESC g, ESC p, ESC 4, ESC 5,
ESC E, ESC F, ESC !
Font enhancement:
ESC W, DC 4, SO, DC2, SI, ESC w, ESC G, ESC H, ESC T,
ESC S, ESC -, ESC ( -, ESC q
Spacing:
ESC Space, ESC c, ESC ( U
Character handling:
ESC t, ESC ( t, ESC R, ESC %, ESC &, ESC :, ESC 6, ESC 7,
ESC ( ^
Bit image:
ESC *
Graphics:
ESC ( G, ESC ., ESC ( i, ESC ( e, ESC ( \, ESC ( s
Color:
ESC r, ESC ( r
Printing mode:
ESC ( K
IBM X24E emulation
control codes
This printer emulates the IBM Proprinter with the following
commands. For detailed information, see IBM’s X24E reference
manual.
General operation:
NUL, DC3, ESC j, BEL, CAN, DC1, ESC Q, ESC [ K, ESC U
Paper feeding:
FF, LF, ESC 5, ESC A, ESC A (AGM*), ESC 0, ESC 1, ESC 2,
ESC 3, ESC 3 (AGM*), CR
Page format:
ESC C, ESC X, ESC N, ESC O, ESC 4
B-8
Page 99

Character Tables
Internat ional character
sets
Technical Specifications
Print position motion:
ESC d, ESC R, ESC D, HT, ESC B, VT, ESC J, ESC J (AGM*)
Font selection:
DC2, ESC P, ESC :, ESC E, ESC F, ESC I
Font enhancement:
DC4, SO, ESC SO, ESC W, ESC [ @, SI, ESC SI, ESC G, ESC H,
ESC T, ESC S, ESC -, ESC _
Spacing:
BS, SP, ESC [ \
Character handling:
ESC 6, ESC 7, ESC [ T, ESC ^, ESC \
Bit image:
ESC K, ESC L, ESC Y, ESC Z, ESC [ g, ESC * (AGM*)
* Alternate Graphics Mode
All character tables except Italic are the same as the PC437 table for
hex codes 00 through 7F. Additional characters are available for hex
codes 80 through FF. You can select the following character tables
through the control panel or software commands:
• PC 437 (U.S./Standard Europe)
• PC850 (Multilingual)
• PC860 (Portuguese)
• PC861 (Icelandic)
• PC863 (Canadian-French)
• PC865 (Nordic)
• Abicomp
• BRASCII
• Roman 8
• ISO Latin 1
• Italic (no characters available for hex code 15)
You can select a number of international character sets with the
control panel or the ESC R command. Other sets can only be selected
with the ESC R command. You can select additional characters with
the ESC ( ^ command.
B-9
Page 100

Glossary
banding The horizontal lines that sometimes appear in a printed image.
See also MicroWeave.
buffer The portion of the printer’s memory used to store data before
printing it.
character table A collection of letters, numbers, and symbols that provides you
with the characters used in a particular language.
characters per inch (cpi) A measure of the size of text characters, sometimes referred to as
pitch.
CMYK Cyan (blue-green), magenta, yellow, and black. These colored
inks are used to create printed colors.
ColorSync Macintosh software that is designed to help you get WYSIWIG
(what you see is what you get) output. This software prints
colors as you see them on your screen.
default A value or setting that takes effect when the equipment is
turned on, reset, or initialized.
dithering A halftoning method in which dots are arranged in an orderly
pattern. Dithering works best for printing images with solid
colors, such as charts and graphs. See also halftoning.
dpi Dots per inch. The dpi measures the resolution (print quality).
See also resolution.
driver A software program that sends instructions to a computer
peripheral to tell it what to do. For example, your printer driver
accepts print data from your word processing application and
sends instructions to the printer on how to print this data.
G-1
 Loading...