

Page 1
for Mac
User’s Guide
M00050803
Page 2
All rights reserved. No part of this publication may be reproduced, stored in a retrieval system, or transmitted in any
form or by any means, electronic, mechanical, photocopying, recording, or otherwise, without the prior written
permission of Seiko Epson Corporation. No patent liability is assumed with respect to the use of the information
contained herein. While every precaution has been taken in the preparation of this manual, Seiko Epson Corporation
assumes no responsibility for errors or omissions. Neither is any liability assumed for damages resulting from the use
of the information contained herein.
Neither Seiko Epson Corporation nor its affiliates shall be liable to the purchaser of this product or third parties for
damages, losses, costs, or expenses incurred by purchaser or third parties as a result of: accident, misuse, or abuse
of this product or unauthorized modifications, repairs, or alterations to this product, or (excluding the U.S.) failure to
strictly comply with Seiko Epson Corporation’s operating and maintenance instructions.
Seiko Epson Corporation shall not be liable against any damages or problems arising from the use of any options or
any consumable products other than those designated as Original Epson Products or Epson Approved Products by
Seiko Epson Corporation.
NOTICE: The contents of this manual are subject to change without notice.
© 2012 Seiko Epson Corporation. All rights reserved.
Trademarks
• Apple, Mac, and Mac OS are registered trademarks of Apple Inc. in the United States and/or other countries.
• Intel is a registered trademark of Intel Corporation.
• Adobe is a trademark of Adobe Systems Incorporated.
• EPSON is a registered trademark of Seiko Epson Corporation.
• Exceed Your Vision is a registered trademark or trademark of Seiko Epson Corporation.
All other trademarks are the property of their respective owners and used for identification purpose only.
Marks Used in this Guide
The following marks are used in this guide to indicate important information.
Screens Appearing in this Guide
Unless otherwise indicated, the screens appearing in this guide are Mac OS X v10.7 screens with the PP-100.
Indicates information with which you must comply when using this product. Ignoring this
information and mishandling the product may cause it to fail or malfunction.
Indicates an additional explanation or information we want you to know.
Notes
Page 3
3
Organization of this Manual
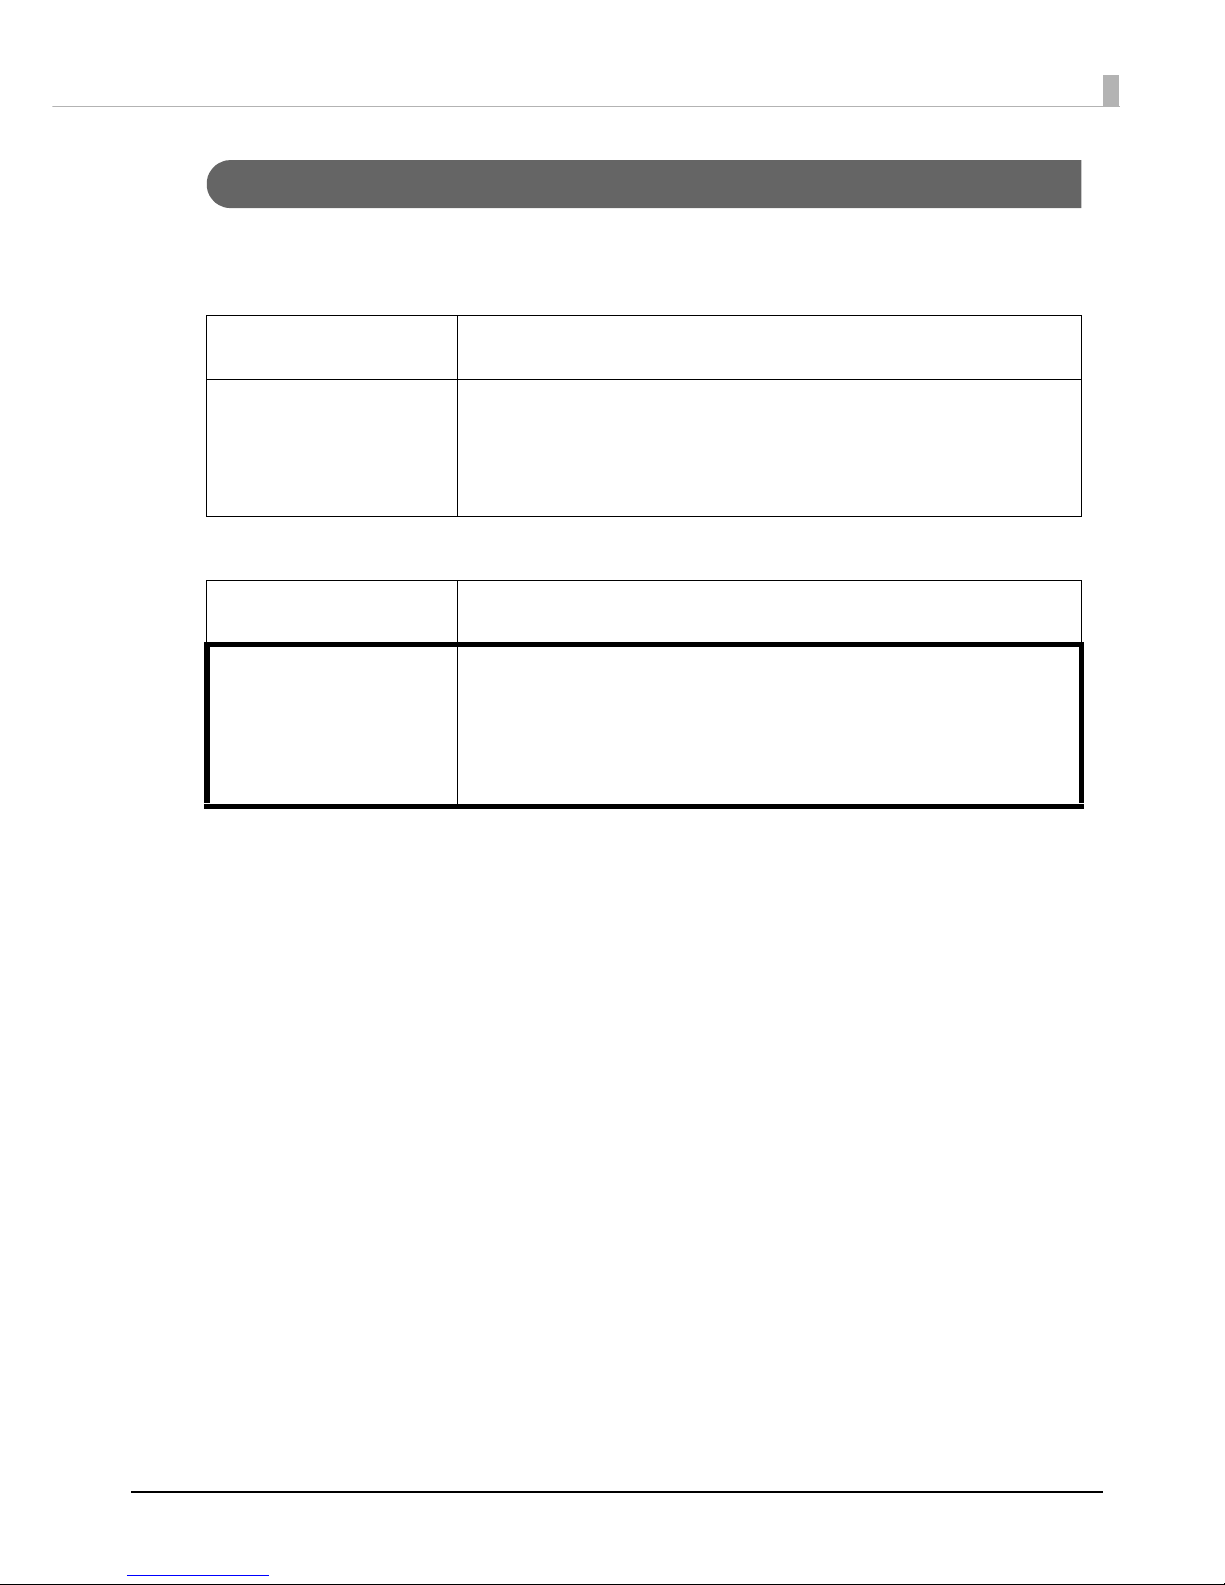
The following instruction guides are included with this product.
For Windows OS
For Mac OS
Setup Guide Briefly describes how to set up this product with illustrations. See User’s
Guide for more information.
User’s Guide (PDF) Presents detailed information users need to know such as the product/
software functions and operations, how to troubleshoot various problems,
as well as maintenance information.
It is included on the Discproducer Utility & Documents Disc. You can also
display it from the start menu after installing the software.
Setup Guide for Mac Briefly describes how to set up this product with illustrations. See User’s
Guide for Mac for more information.
User’s Guide for Mac
(This manual)
Presents detailed information users need to know such as the product/
software functions and operations, how to troubleshoot various problems,
as well as maintenance information.
It is included on the Discproducer Utility & Documents Disc For Apple Mac
OS. You can access it by clicking Launchpad, EPSON Software, and then
EPSON Total Disc Maker after installing the software.
Page 4

4
Table of Contents
Trademarks...................................................................2
Marks Used in this Guide .......................................... 2
Screens Appearing in this Guide ..............................2
Organization of this Manual......................................3
Before Using this Product.......... 6
■ For Safe Use.........................................................6
Cautions for the Power Source..................................8
Cautions for Using...................................................... 9
WARNING ................................................................. 10
FCC Compliance Statement for American Users . 10
For Canadian Users................................................... 11
DECLARATION of CONFORMITY (For PP-100/
PP-100AP)................................................................... 11
■ Cautions for CD/DVD discs...........................12
■ Uses of this Product..........................................12
■ Incidental Loss Arising from the Use of this
Product...............................................................12
■ Restriction of Use..............................................12
■ Indication of the Manufacturer and the
Importer in Accordance with Requirements of
Directive 2011/65/EU (RoHS)........................12
Basic Operations .................... 13
■ Parts Names.......................................................13
■ Lights for the Status of the Product ...............18
■ Turning Power On/Off....................................20
Turning On the Power ..............................................20
Turning Off the Power.............................................. 20
■ Opening/Closing the Disc Cover ..................21
Opening the Disc Cover...........................................21
Closing the Disc Cover.............................................22
■ Handling Stackers ............................................23
Stacker 1/Stacker 2 ...................................................23
Stacker 3......................................................................24
Stacker 4 (Only for PP-100II/PP-100/PP-100AP). 25
Software Settings..................... 26
■ Installing Software............................................26
System Requirements................................................27
■ Properties Setting .............................................28
■ Common Settings for Publishing ................... 30
Setting a Working Folder..........................................30
Notification Settings (Only for PP-100AP) ............31
Write Settings (Only for PP-100II/PP-100/PP-50)32
■ Uninstalling the Software ...............................33
Using Software......................... 35
■ EPSON Total Disc Maker ................................35
What is EPSON Total Disc Maker? .........................35
Starting EPSON Total Disc Maker...........................35
EPSON Total Disc Maker Help................................35
Screen Configuration of EPSON Total Disc Maker...
......................................................................................36
■ EPSON Total Disc Utility ................................39
What is EPSON Total Disc Utility? .........................39
Starting EPSON Total Disc Utility...........................39
EPSON Total Disc Utility Help................................39
Screen Configuration of EPSON Total Disc Utility...
......................................................................................40
■ Printer Driver.................................................... 45
What is Printer Driver?.............................................45
Displaying Printer Driver Screen ............................45
Screen Configuration of Printer Driver..................46
Publishing Discs ...................... 49
■ Compatible Disc Types....................................49
Printable Disc Types..................................................49
Writable Disc Types...................................................50
■ Handling Discs .................................................51
Notes on Usage ..........................................................51
Notes on storage ........................................................52
■ Printable Area ...................................................53
Setting the Print Area................................................54
■ Flow for Publishing Discs ...............................55
Selecting Publish Mode ............................................57
Loading Discs.............................................................61
Registering Write Data (Only for PP-100II/PP-100/
PP-50)...........................................................................63
Creating Labels ..........................................................65
Publishing Discs.........................................................66
Page 5

5
Setting Printer Driver and Publishing Discs.........68
Taking out discs.........................................................71
■ Job Operations .................................................. 73
Pausing/Cancelling Jobs.......................................... 73
Priority Publishing....................................................74
Convenient Features .............. 75
■ Printing on User Defined Label Size Discs... 75
■ Creating Disc Copies (Only for PP-100II/
PP-100/PP-50) .................................................. 76
Creating Copies Directly from Discs......................76
Creating Copies from Disc Image Files.................. 78
■ Adjusting Print Colors .................................... 79
Maintenance........................... 81
■ Replacing the Ink Cartridge ........................... 81
Checking the Ink Levels...........................................81
How to Replace the Ink Cartridges ........................82
■ Checking the Print Head Nozzles ................. 85
How to Perform a Nozzle Check ............................85
■ Cleaning the Print Head ................................. 87
How to Clean the Print Head.................................. 88
■ Aligning the Print Head.................................. 90
■ Correcting the Printing Position .................... 93
■ Cleaning Your Product.................................... 96
Cleaning the Exterior................................................96
Cleaning the Interior................................................. 96
Cleaning the Air Vents (Only for PP-100II/PP-100/
PP-50) ..........................................................................97
■ Checking Maintenance Information............ 100
■ Replacing the Ink Pad (Only for PP-100/PP-50)
.......................................................................... 102
How to Check When it is Time to Replace the Ink Pad
....................................................................................102
How to Replace the Ink Pad ..................................102
■ Replacing the Maintenance Box (Only for
PP-100II/PP-100AP) ...................................... 103
How to Check When it is Time to Replace the
Maintenance Box..................................................... 103
How to Replace the Maintenance Box .................103
■ Replacing the Drive (Only for PP-100II)..... 105
How to Check When it is Time to Replace the Drive
....................................................................................105
How to Replace the Drive ......................................105
■ Precautions for Transporting Your Product......
...........................................................................106
Troubleshooting..................... 108
■ Problems and their Remedies.......................108
Power/Control Panel Problems............................108
Disc Transferring (Input/Output) Problems.......109
Disc Writing Problems (Only for PP-100II/PP-100/
PP-50).........................................................................110
Label Printing Problems ......................................... 111
Other Problems........................................................113
■ Checking Lights for Errors............................114
Error Associated with Covers................................114
Error Associated with Disc Transfer.....................115
Error Associated with Stacker ...............................117
Error Associated with Ink ......................................118
Error Associated with Printer................................119
Error Associated with Drives (Only for PP-100II/
PP-100/PP-50)..........................................................120
Other Error ...............................................................121
■ Checking with EPSON Total Disc Utility....122
■ When Discs Cannot be Published ................123
■ Disc Does not Come Out ...............................127
Drive Tray Does not Come Out (Only for PP-100II/
PP-100/PP-50)..........................................................127
Printer Tray Does not Come Out...........................128
■ Disc Recording Surface is Stained with Ink......
...........................................................................135
Appendix............................... 142
■ Where to Get Help..........................................142
Before Contacting Epson........................................142
Help for Users in the United States and Canada......
....................................................................................142
Help for Users in Europe (EMEA) ........................142
Help for Users in Australia ....................................143
Help for Users in Southeast Asia ..........................143
■ Product Specifications....................................145
Basic Specifications..................................................145
■ Consumables and Options ............................151
Ink cartridges and Maintenance Box....................151
Discs...........................................................................151
Drive (Only for PP-100II)........................................151
Page 6
6
Before Using this Product
For Safe Use
• To use this product safely, be sure to read this guide as well as the other instruction guides included with this
product before using it.
• Keep this guide at hand so that you can resolve any questions you have about this product.
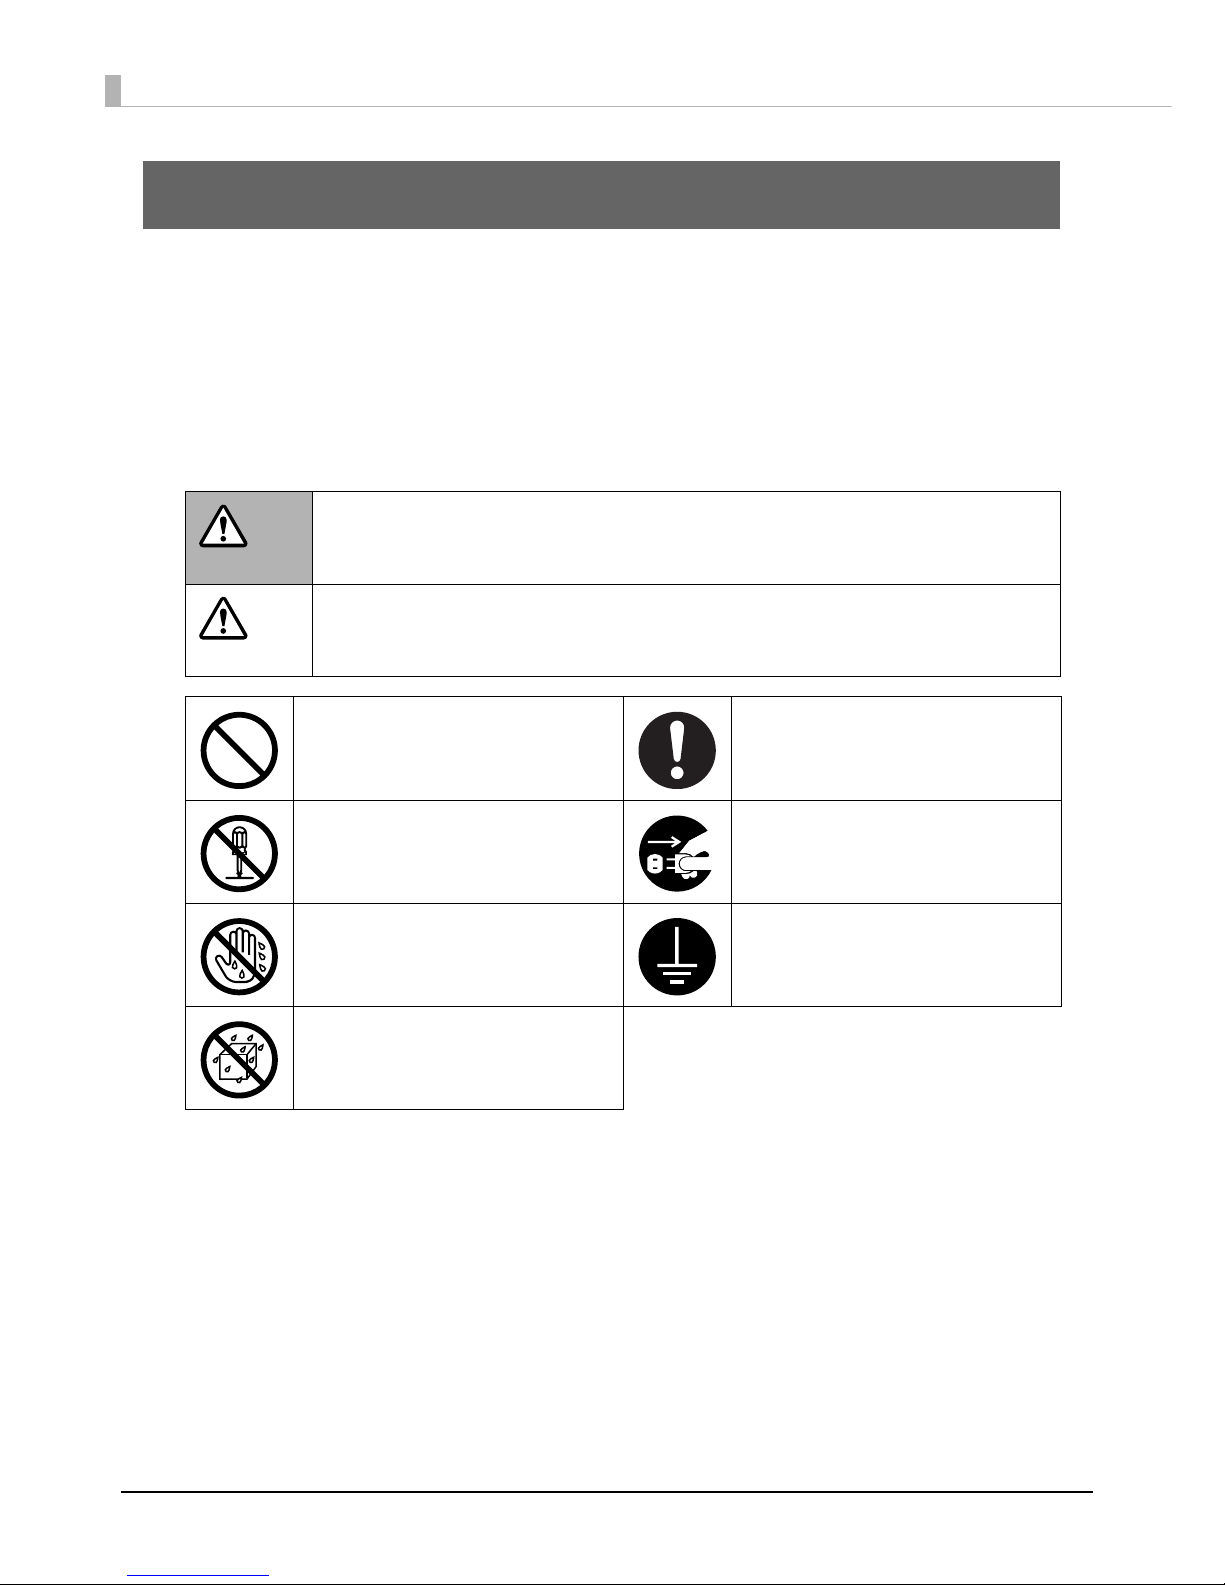
To prevent harm to customers and other people or damage to property, this guide contains the following symbols and
warning displays for operations and use that may be dangerous. Please thoroughly understand this information
before you read this guide.
WARNING
If this display is ignored and the product is mishandled, it may result in death or serious
injury.
CAUTION
If this display is ignored and the product is mishandled, it may result in bodily harm or
physical damage.
Indicates action that should not
be performed (prohibited).
Indicates items (instruction,
action) that must be performed.
Indicates that disassembly is
prohibited.
Indicates that the plug should be
disconnected from the outlet.
Indicates that touching the
product with wet hands is
prohibited.
Indicates that the product must
be used with the power cord
grounded.
Indicates that the product must
not come in contact with water.
Page 7
7
Before Using this Product
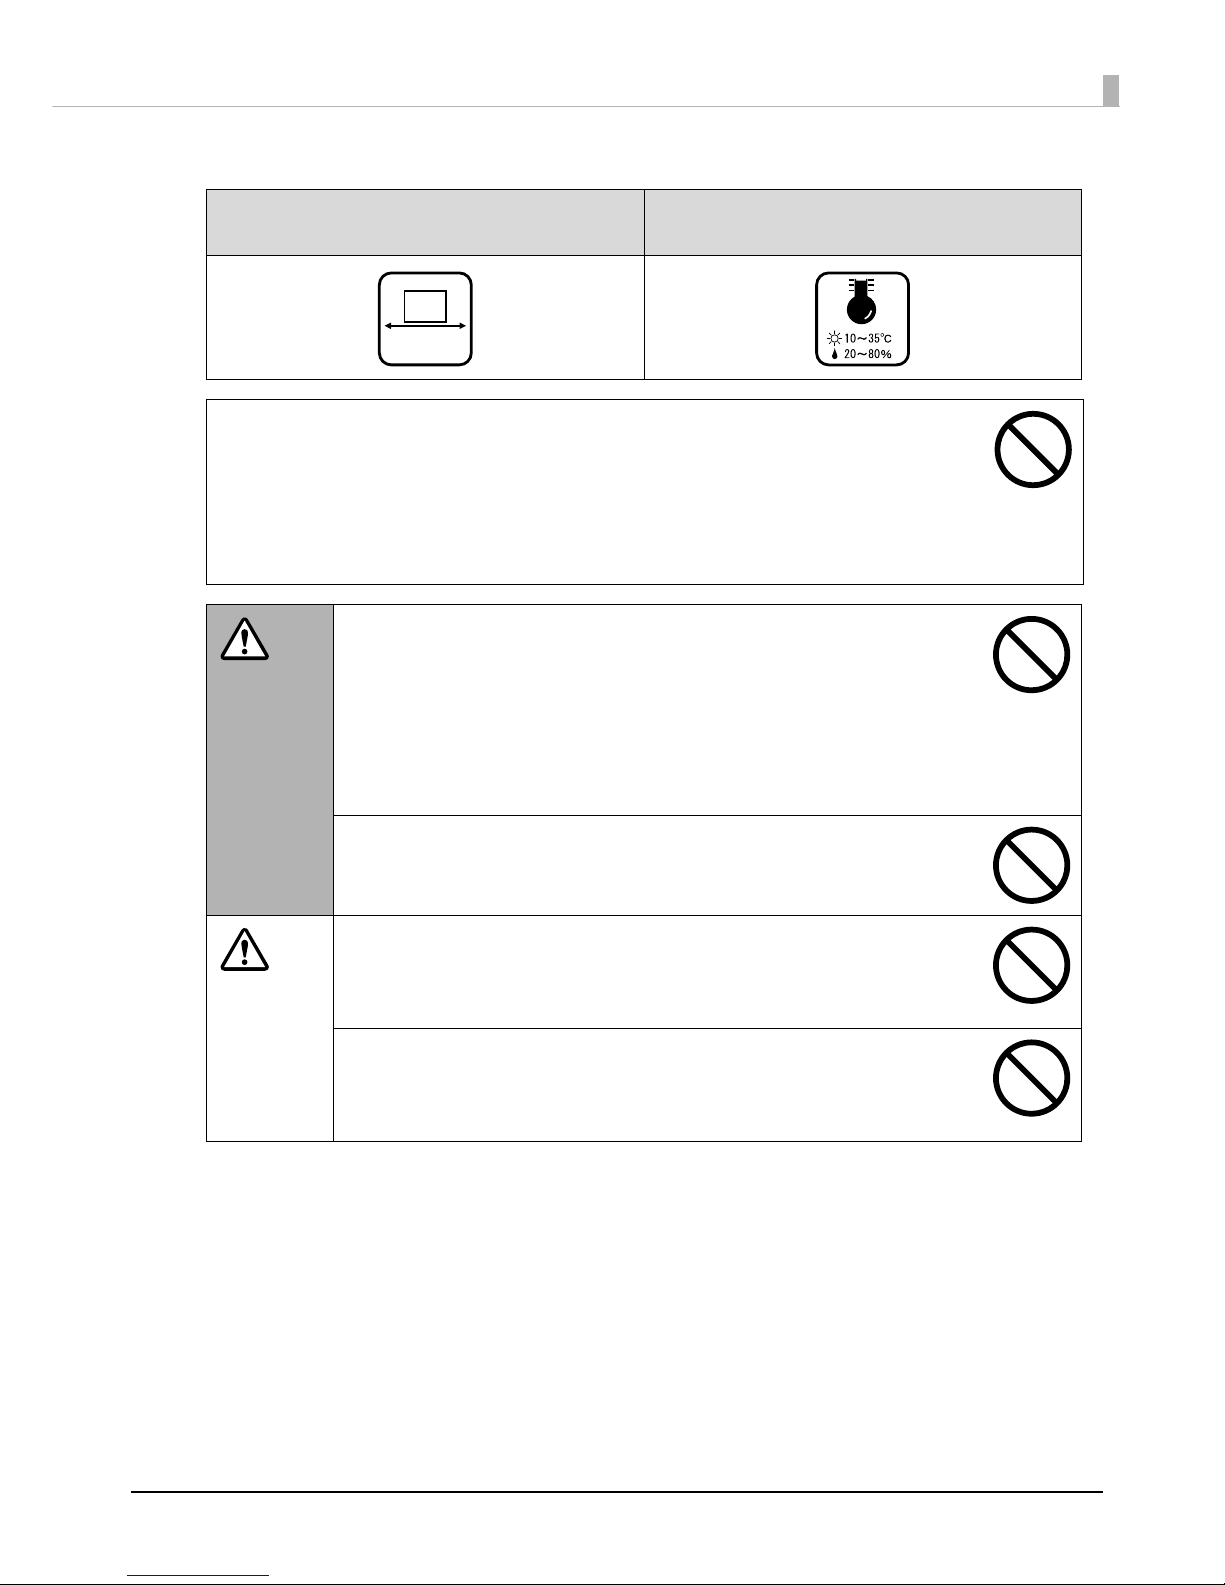
Install this product in the following type of place.
Place that is flat and stable
Place with the following temperature and
humidity range
• When using this product in a place where static electricity is easily generated, use an
antistatic mat or other product to prevent static electricity.
• Do not install on a surface that is smaller than the base of the product.
If the rubber feet on the bottom of the product extend beyond the surface the product is
installed on, it places stress on the internal mechanisms, which negatively affects disc
writing, printing and transporting. Be sure to install on a flat surface that is wider than the
product so that all of the feet on the base of the product rest firmly on it.
WARNING
Do not block the air vents on this product.
Blocking the air vents may result in internal heat build-up and fire.
Do not install in the following types of places.
• Tight spaces where ventilation is poor, such as in a closet or on a bookshelf
• On a rug or bed
If you place the product by a wall, leave more than 10 cm between the back
of the product and the wall. It is also necessary to leave enough space in front
of the product to open and close the disc cover.
Do not install in a place where volatile substances, such as alcohol or paint
thinner, are present or in a place where there is fire.
This may result in electric shock or fire.
CAUTION
Do not install or store in an unstable place (such as on a wobbly or tilted
surface), in reach of children, or in a place subject to vibration from other
machines.
There is a risk that it could drop or fall over, resulting in injury.
Do not install in places where there is excessive moisture or dust, risk of getting
wet, direct sunlight, severe changes in temperature and humidity, or close to
heating and cooling devices.
There is a risk of electric shock, fire, and malfunction or failure of this product.
Flat
Page 8
8
Cautions for the Power Source
WARNING
Do not connect or disconnect the power plug with wet hands.
This may result in electric shock.
Use only the type of power source indicated on the product’s label.
Use of the wrong type of power source may result in electric shock or fire.
Do not plug the power cord into an outlet with many other cords connected to
it.
This may result in heat build-up and fire.
Do not use a damaged power cord.
This may result in electric shock or fire.
If the power cord is damaged, consult your dealer for repairs.
Observe the following when handling the power cord.
• Do not modify the power cord
• Do not place heavy objects on the power cord
• Do not bend, twist or pull the power cord by force
• Do not wire the cord near heating appliances
Be careful when handling the power plug.
Mishandling may result in fire.
• Do not leave plugged into a power source with foreign matter such as dust
on it
• Firmly insert the prongs of the power plug all the way
When you disconnect the power plug from the outlet, be sure to turn off the
power and hold the plug as you pull.
If you stretch the power cord, it may become damaged, which could result in
electric shock or fire.
Use only the power cord supplied with the product. Also, do not use the power
cord supplied with this product with any other devices.
This may result in electric shock or fire.
For safety reasons, be sure to ground the power cord.
The power cord supplied with the product has a 3-pin cable with a power
system grounding (PE) terminal, so connect it to an outlet that is grounded
securely.
Regularly disconnect the power plug from the outlet and clean the base of the
prongs and between the prongs.
If you leave the power plug connected to an outlet for a long time, the base
of the power plug prongs may become dusty, which may result in short circuit
and fire.
CAUTION
For safety, be sure to disconnect the power plug from the outlet when you will
not be using the product for a long time.
Page 9
9
Before Using this Product
Cautions for Using
WARNING
Do not continue to use under abnormal conditions such as smoke, unusual
odors or sounds.
This may result in electric shock or fire.
Immediately turn off the power, disconnect the power plug from the outlet,
and contact your dealer or the Epson Repair Center about repairs. Servicing
the product yourself is dangerous, so never attempt it.
If a foreign object, water or other liquid enters the product, do not continue to
use it.
This may result in electric shock or fire.
Immediately turn off the power, disconnect the power plug from the outlet,
and contact your dealer or the Epson Repair Center about repairs.
Do not attempt to service the product yourself
This may result in injury, electric shock, fire or malfunction.
Do not use flammable gas sprays inside or around this product.
There is a risk that gas will build up and a spark may cause a fire.
Do not connect the cables (cords) to the product in a way other than that
specified in the instruction guide.
This may result in fire. Also, the connected devices may be damaged.
Do not insert or drop metal or flammable objects into the air vents or other
openings.
This may result in electric shock or fire.
CAUTION
Do not step or place heavy objects on top of the product.
Be especially careful in households with small children. There is a risk that it
could fall over or break, resulting in injury.
When connecting this product to a computer (or other devices) using a cable,
be careful to orient the connector the right way.
The connectors on the cables have a specific orientation. If you connect
incorrectly oriented connectors to both this product and the computer (or
other devices), this may result in the malfunction of both connected devices.
When storing or transporting this product, do not tilt it, stand it on end, or turn it
upside down.
When transporting the product, be sure to package it in the original box to
protect it from any impact.
For safety reasons, if you move this product, first check that the power is off, the
power plug is disconnected from the outlet, and all of the wires are
disconnected.
Page 10
10
WARNING
The connection of a non-shielded interface cable to this product will invalidate the EMC standards of this device. You
are cautioned that changes or modifications not expressly approved by Seiko Epson Corporation could void your
authority to operate the equipment.
For PP-100/PP-100AP in Europe, PP-100II and PP-50
This is a Class A product. In a domestic environment this product may cause radio interference in which case the user
may be required to take adequate measures.
FCC Compliance Statement for American Users
For PP-100/PP-100AP
This equipment has been tested and found to comply with the limits for a Class B digital device, pursuant to Part 15 of
the FCC Rules. These limits are designed to provide reasonable protection against harmful interference in a
residential installation.This equipment generates, uses, and can radiate radio frequency energy and, if not installed
and used in accordance with the instruction manual, may cause harmful interference to radio communications.
However, there is no guarantee that interference will not occur in a particular installation. If this equipment does
cause harmful interference to radio or television reception, which can be determined by turning the equipment off
and on, the user is encouraged to try to correct the interference by one or more of the following measures:
-Reorient or relocate the receiving antenna.
-Increase the separation between the equipment and receiver.
-Connect the equipment into an outlet on a circuit different from that to which the receiver is connected.
-Consult the dealer or an experienced radio/TV technician for help.
CAUTION
When replacing the ink cartridges, be careful that the ink does not contact
your eyes or skin.
If ink gets into your eyes, immediately flush them with water, and if it gets onto
your skin, immediately wash the area with soap and water. Otherwise you may
have bloodshot eyes or a mild inflammation. In the rare event that there is a
problem, immediately consult a physician.
Do not disassemble the ink cartridges to replenish or refill the ink.
Do not shake the ink cartridge too hard.
The ink cartridge may leak if you shake it too much.
Store ink cartridges out of the reach of children. Also, do not ingest the ink.
Page 11

11
Before Using this Product
For PP-100II/PP-50
This equipment has been tested and found to comply with the limits for a Class A digital device, pursuant to Part 15
of the FCC Rules. These limits are designed to provide reasonable protection against harmful interference when the
equipment is operated in a commercial environment.
This equipment generates, uses, and can radiate radio frequency energy and, if not installed and used in accordance
with the instruction manual, may cause harmful interference to radio communications.
Operation of this equipment in a residential area is likely to cause harmful interference, in which case the user will be
required to correct the interference at his own expense.
For Canadian Users
For PP-100/PP-100AP
This Class B digital apparatus complies with Canadian ICES-003.
For PP-100II/PP-50
This Class A digital apparatus complies with Canadian ICES-003.
DECLARATION of CONFORMITY (For PP-100/PP-100AP)
According to 47CFR, Part 2 and 15 for Class B Personal Computers and Peripherals; and/or CPU Boards and Power
Supplies used with Class B Personal Computers:
We: EPSON AMERICA, INC.
Located at: MS 3-13
3840 Kilroy Airport Way
Long Beach, CA 90806
Telephone: (562) 290-5254
Declare under sole responsibility that the product identified herein, complies with 47CFR Part 2 and 15 of the FCC
rules as a Class B digital device. Each product marketed, is identical to the representative unit tested and found to be
compliant with the standards. Records maintained continue to reflect the equipment being produced can be expected
to be within the variation accepted, due to quantity production and testing on a statistical basis as required by 47CFR
§2.909 Operation is subject to the following two conditions: (1) this device may not cause harmful interference, and (2)
this device must accept any interference received, including interference that may cause undesired operation.
Trade Name : EPSON
Type of Product: DVD Publisher / DVD Printer
Model: N131A / N151A
Page 12

12
Cautions for CD/DVD discs
Before using this product, run an operation check to make sure it is functioning normally. Also, back up the data on
CD/DVD discs onto separate media as necessary. Data may be damaged or lost at the following times:
• When there is static electricity or electrical noise
• During improper use
• During a malfunction or repair
• When there is damage due to a natural disaster
Even if the product is still under warranty, Epson accepts no responsibility for data that is lost or damaged due to
causes not limited to those listed above.
Uses of this Product
This product is for business use and not for household use.
Incidental Loss Arising from the Use of this Product
Should you not obtain the results you expect from this product, including the bundled software, we cannot provide
compensation for incidental loss arising from that fact, such as expenses required for the use of this product and lost
earnings that would have been gained through the use of this product.
Restriction of Use
When this product is used for applications requiring high reliability / safety, such as transportation devices related to
aviation, rail, marine, automotive, etc.; disaster prevention devices; various safety devices, etc.; or functional /
precision devices, etc., you should use this product only after giving consideration to including fail-safes and
redundancies into your design to maintain safety and total system reliability. Because this product was not intended
for use in applications requiring extremely high reliability / safety, such as aerospace equipment, main
communication equipment, nuclear power control equipment, or medical equipment related to direct medical care,
etc., please make your own judgment on this product’s suitability after a full evaluation.
Indication of the Manufacturer and the Importer in
Accordance with Requirements of Directive 2011/65/EU
(RoHS)
Manufacturer: SEIKO EPSON CORPORATION
Address: 3-5, Owa 3-chome, Suwa-shi,
Nagano-ken 392-8502 Japan
Telephone: 81-266-52-3131
Fax: 81-266-52-8409
Importer: EPSON EUROPE B.V.
Address: Azië building, Atlas ArenA, Hoogoorddreef 5,
1101 BA Amsterdam Zuidoost
The Netherlands
Telephone: 31-20-314-5000
Page 13
13
Basic Operations
Basic Operations
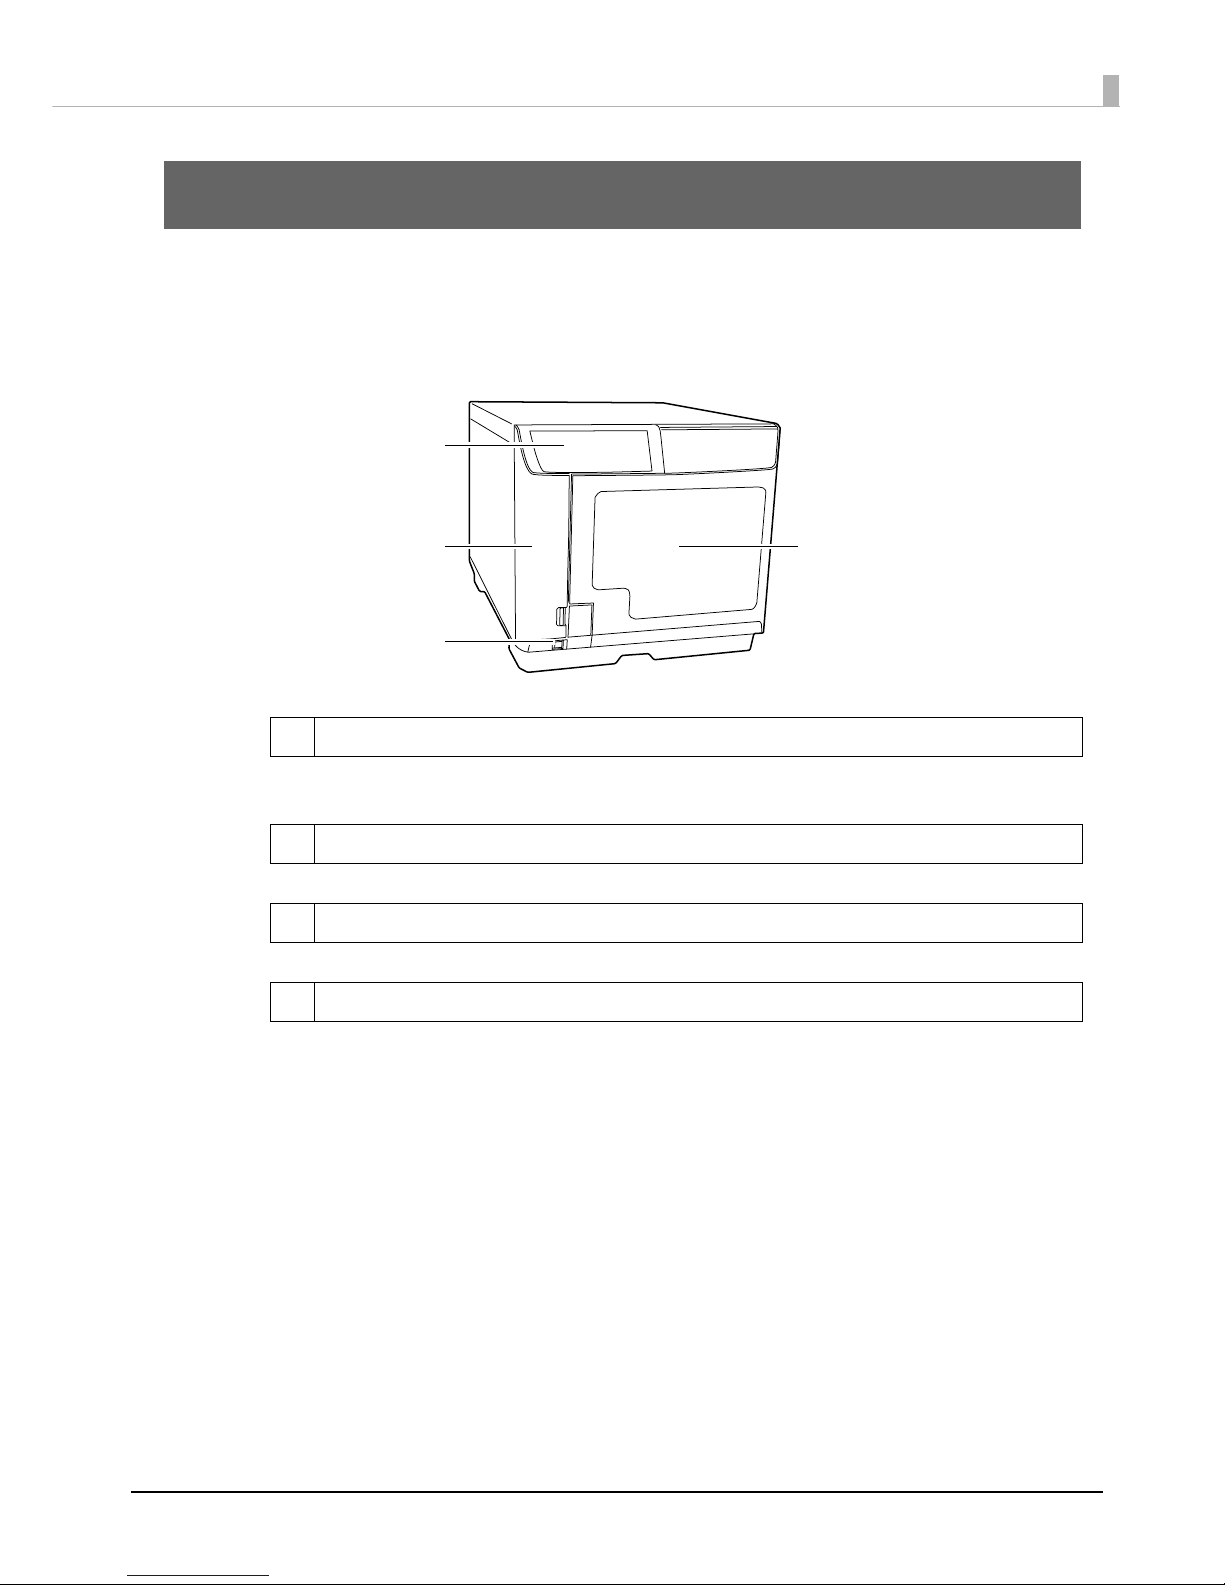
Parts Names
Front
1 Control panel
Use to control the product. It also shows the status of the product.
See “Control panel” on page 17 for details.
2 Ink cartridge cover
Open to insert and replace ink cartridges.
3Power button
Use to turn the product on and off.
4 Disc cover
Open to load and take out discs.
4
1
2
3
Page 14
14
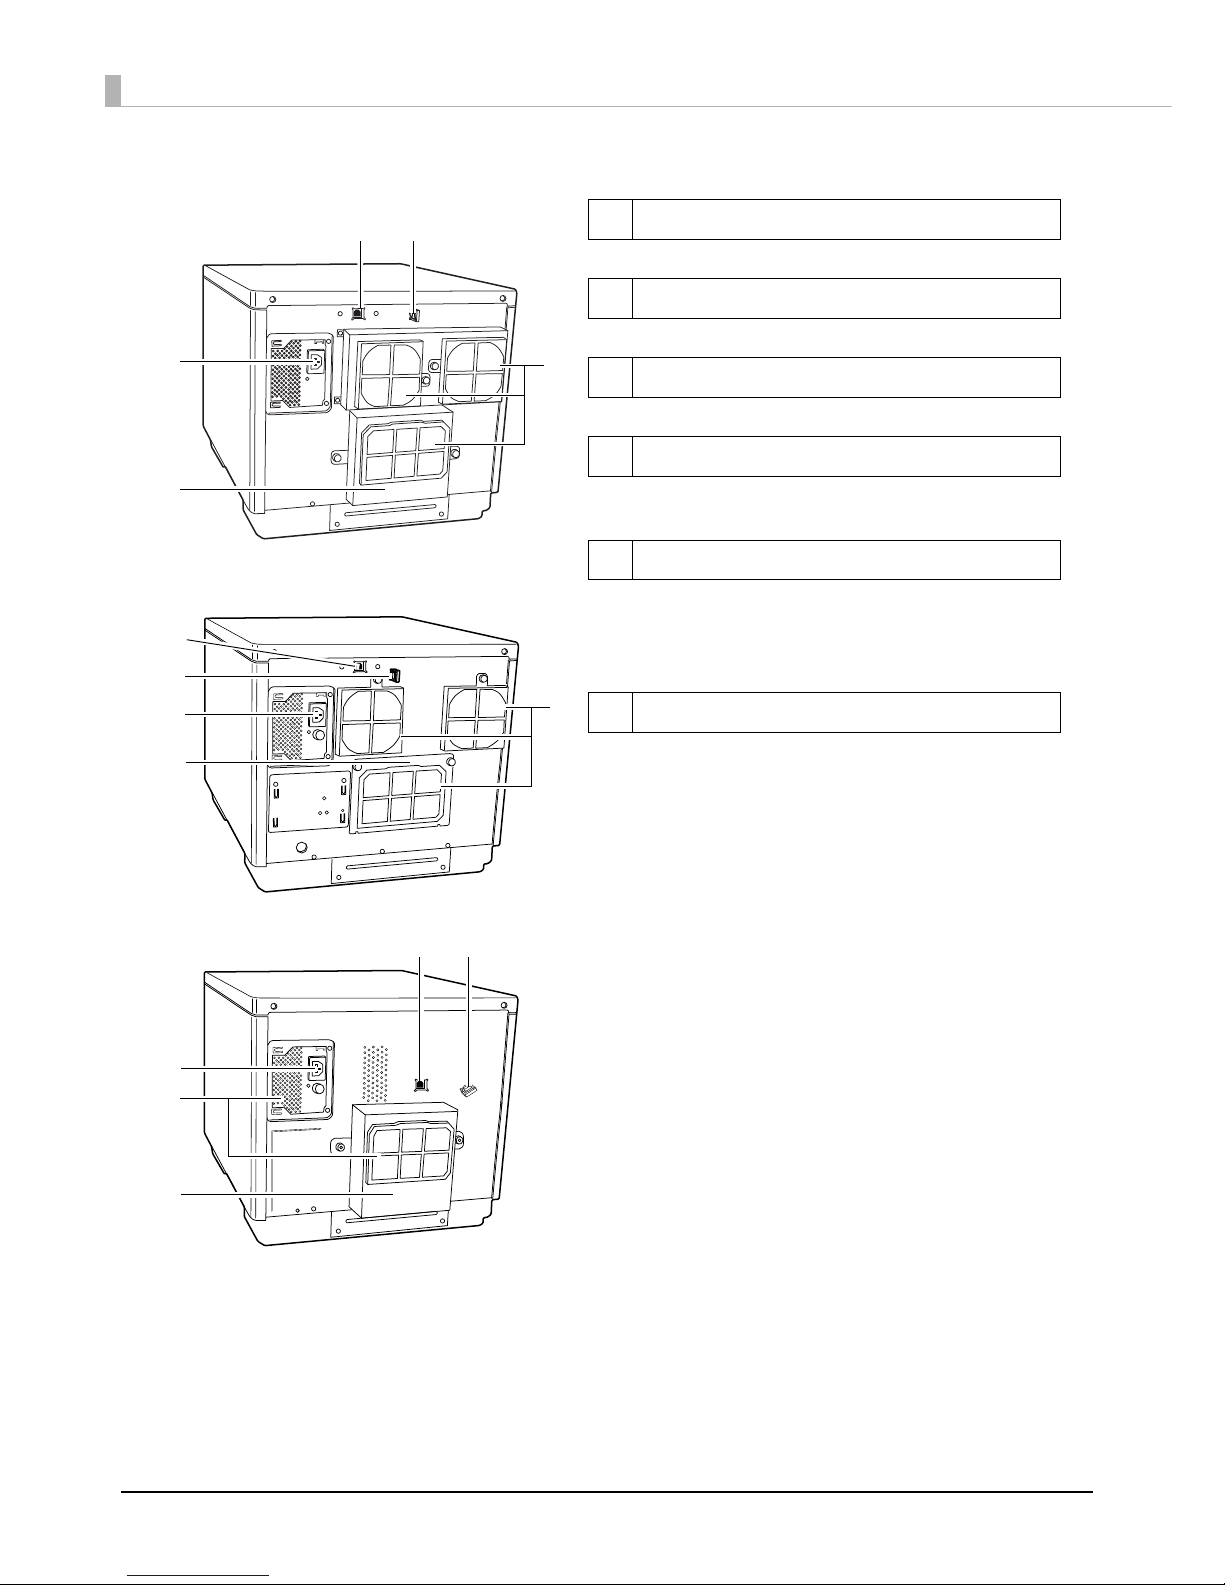
Back
1 USB interface connector
Plug the USB cable into this connector.
2 Interface cable holder
Use to fix the USB cable.
3 AC inlet
Plug the power cord into this connector.
4 Rear printer cover
Open this cover only when a disc is stuck in the
printer tray.
5 Air vents
Expel heat generated inside this product to
prevent the temperature from rising. Leave at
least 10 cm between the back of the product
and the wall for ventilation.
6 Maintenance box cover
Open this cover to replace a maintenance box or
remove a disc stuck in the printer tray.
1
2
3
5
1
2
3
6
5
PP-100AP
PP-100/PP-50
PP-100II
1 2
3
5
6
4
Page 15
15
Basic Operations
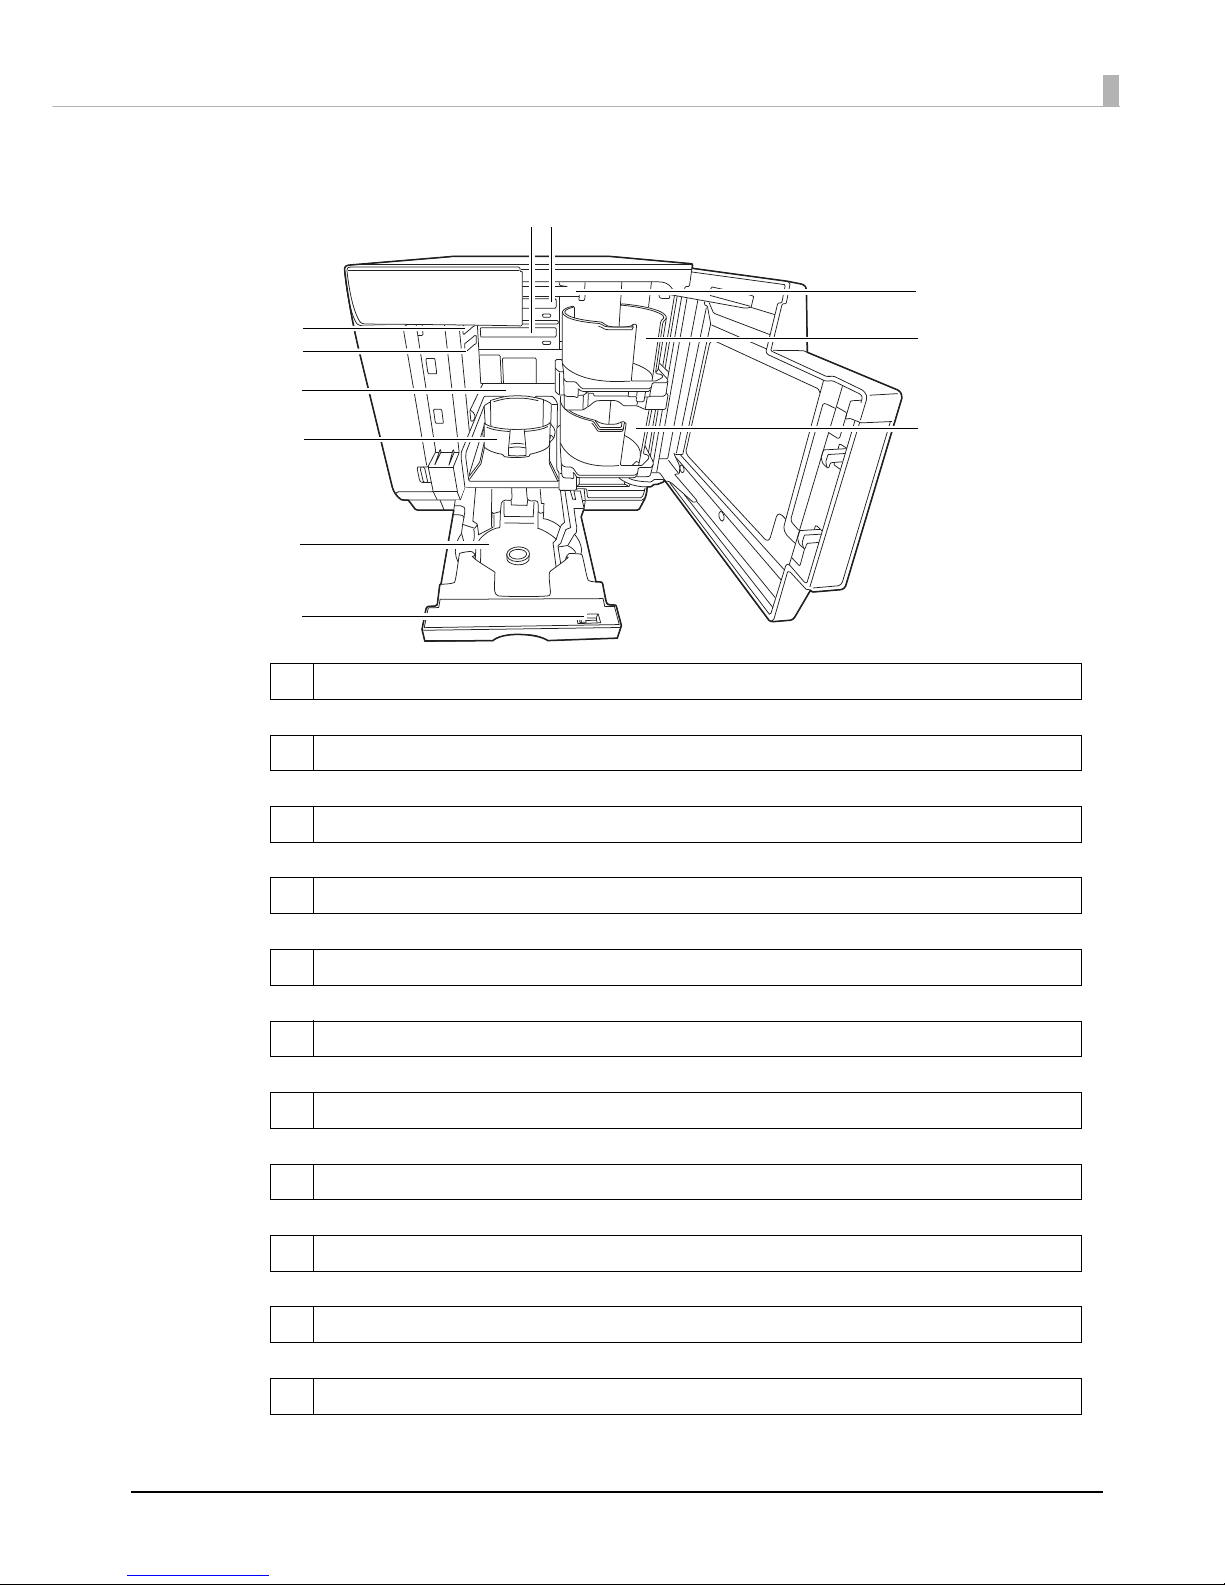
Inside
1 Drive 1 (Only for PP-100II/PP-100)
Writes data on the recording surface of the discs.
2 Drive 2 (Only for PP-100II/PP-100)
Writes data on the recording surface of the discs.
3 Drive release lever 1 (Only for PP-100II)
Releases Drive 1 when you replace it.
4 Drive release lever 2 (Only for PP-100II)
Releases Drive 2 when you replace it.
5Printer
Prints on the label surface of the discs.
6Stacker 3
Use as the disc output stacker. Holds up to about 50 discs.
7Stacker 4
Use as a disc output stacker. Holds up to about 5 discs.
8Lock lever
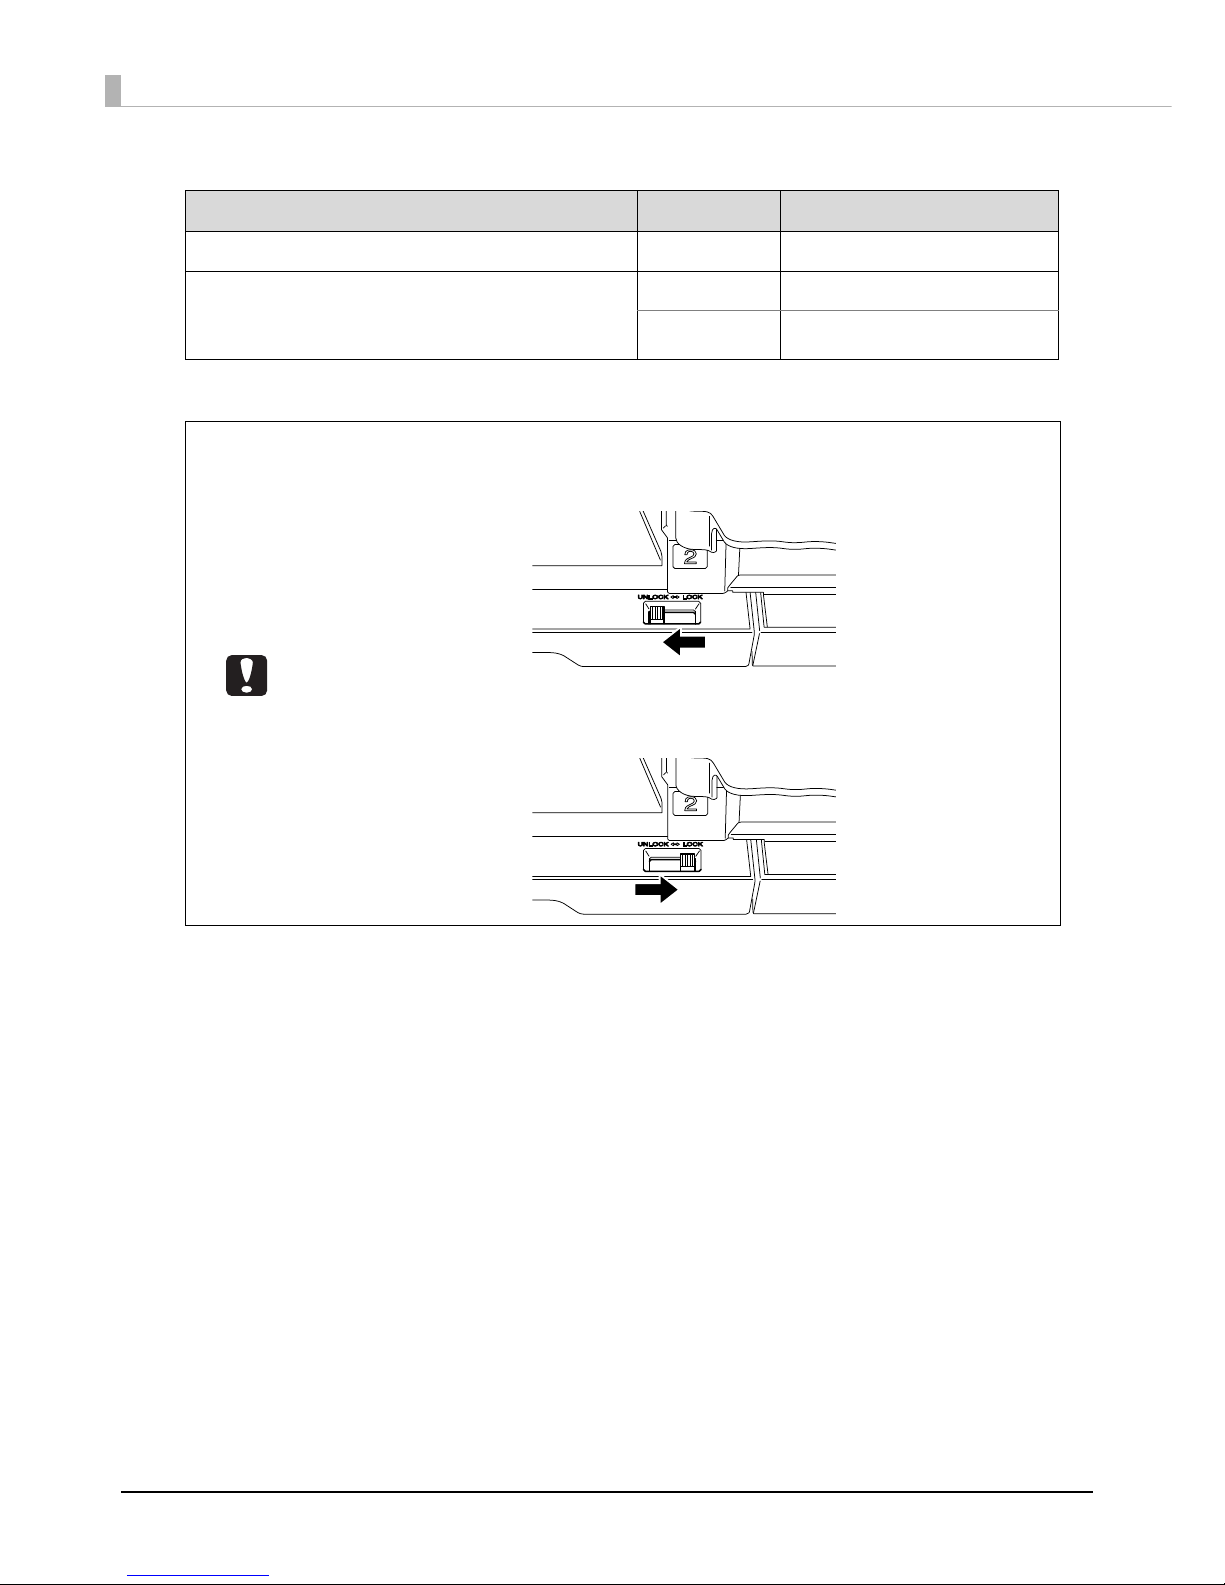
Locks and unlocks Stacker 4. Be sure to lock when using Stacker 3.
9Arm
Transports discs.
10 Stacker 1
Use Stacker 1 as a disc input stacker. Holds up to about 50 discs.
11 Stacker 2
Use Stacker 2 as a disc input or output stacker. Holds up to about 50 discs.
10
9
11
1
5
8
2
6
4
3
7
PP-100II/PP-100/PP-100AP
Page 16
16
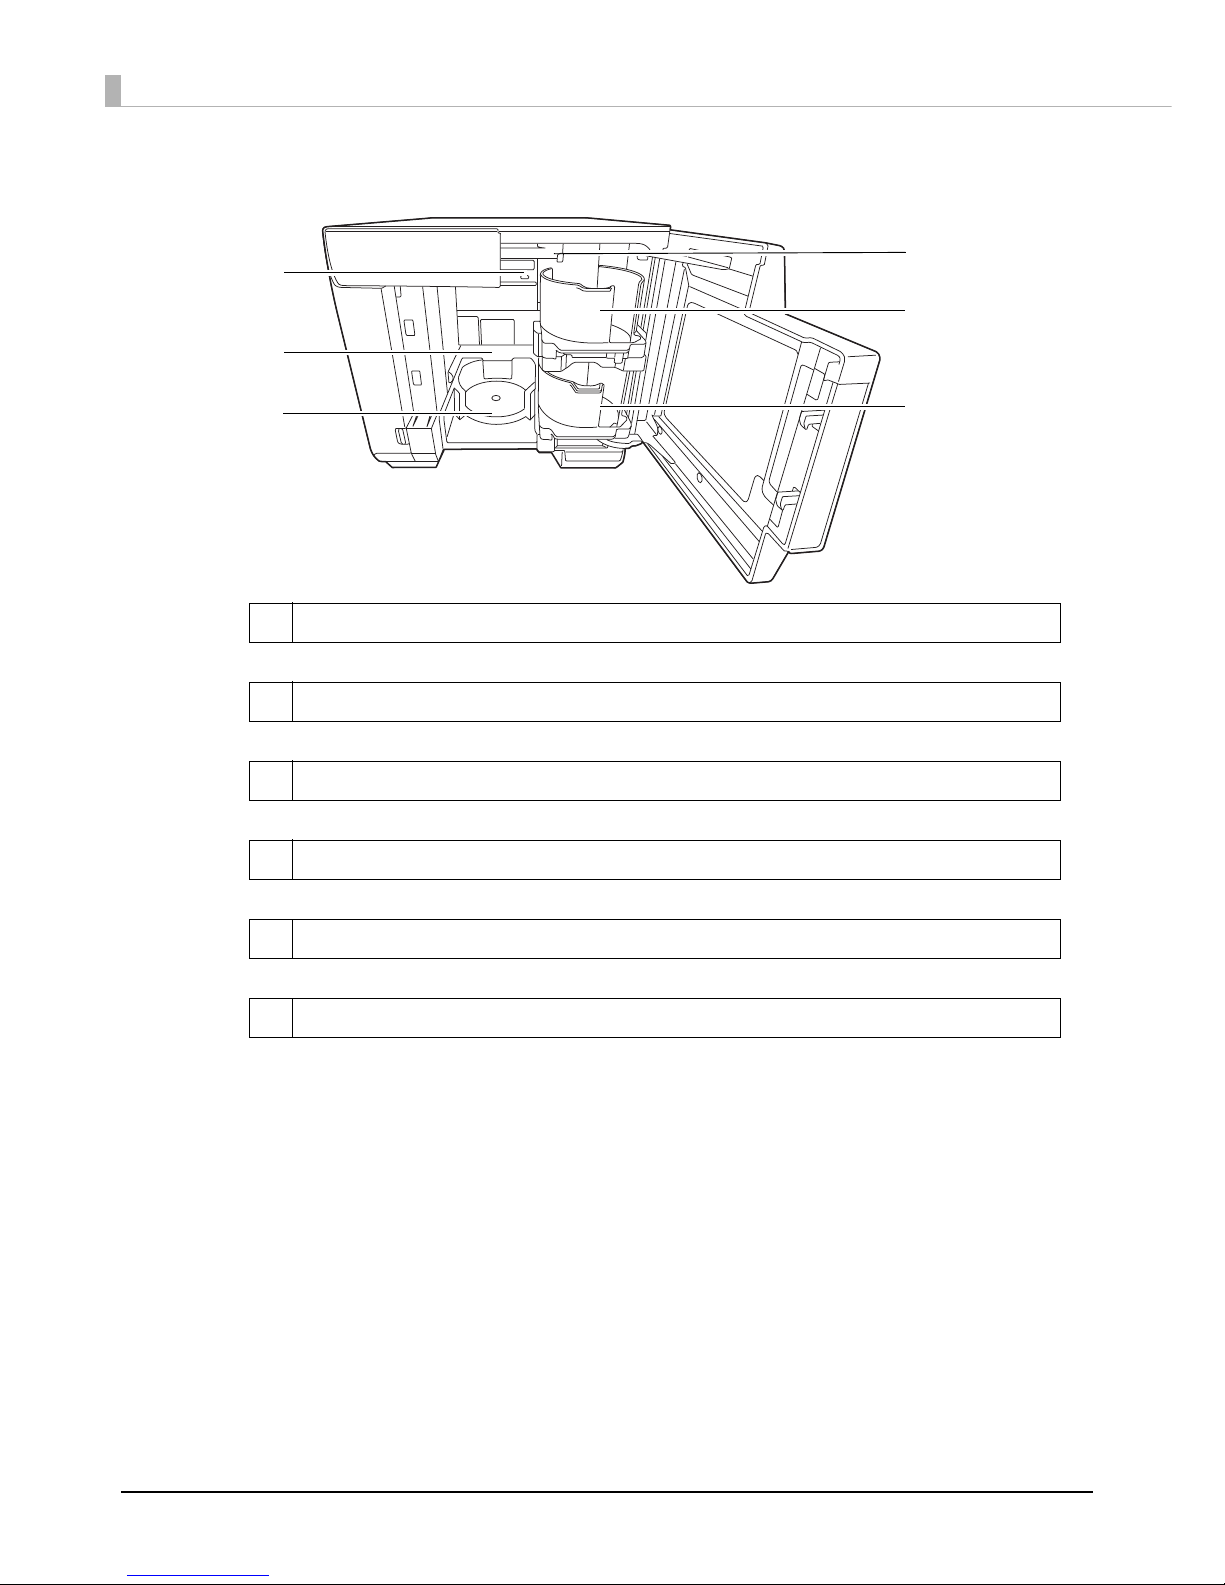
1Drive
Writes data on the recording surface of the discs.
2 Printer
Prints on the label surface of the discs.
3Stacker 3
Use as the disc output stacker. Holds up to about 20 discs.
4Arm
Transports discs.
5Stacker 1
Use Stacker 1 as a disc input stacker. Holds up to about 50 discs.
6Stacker 2
Use Stacker 2 as a disc input or output stacker. Holds up to about 50 discs.
5
4
6
2
1
3
PP-50
Page 17
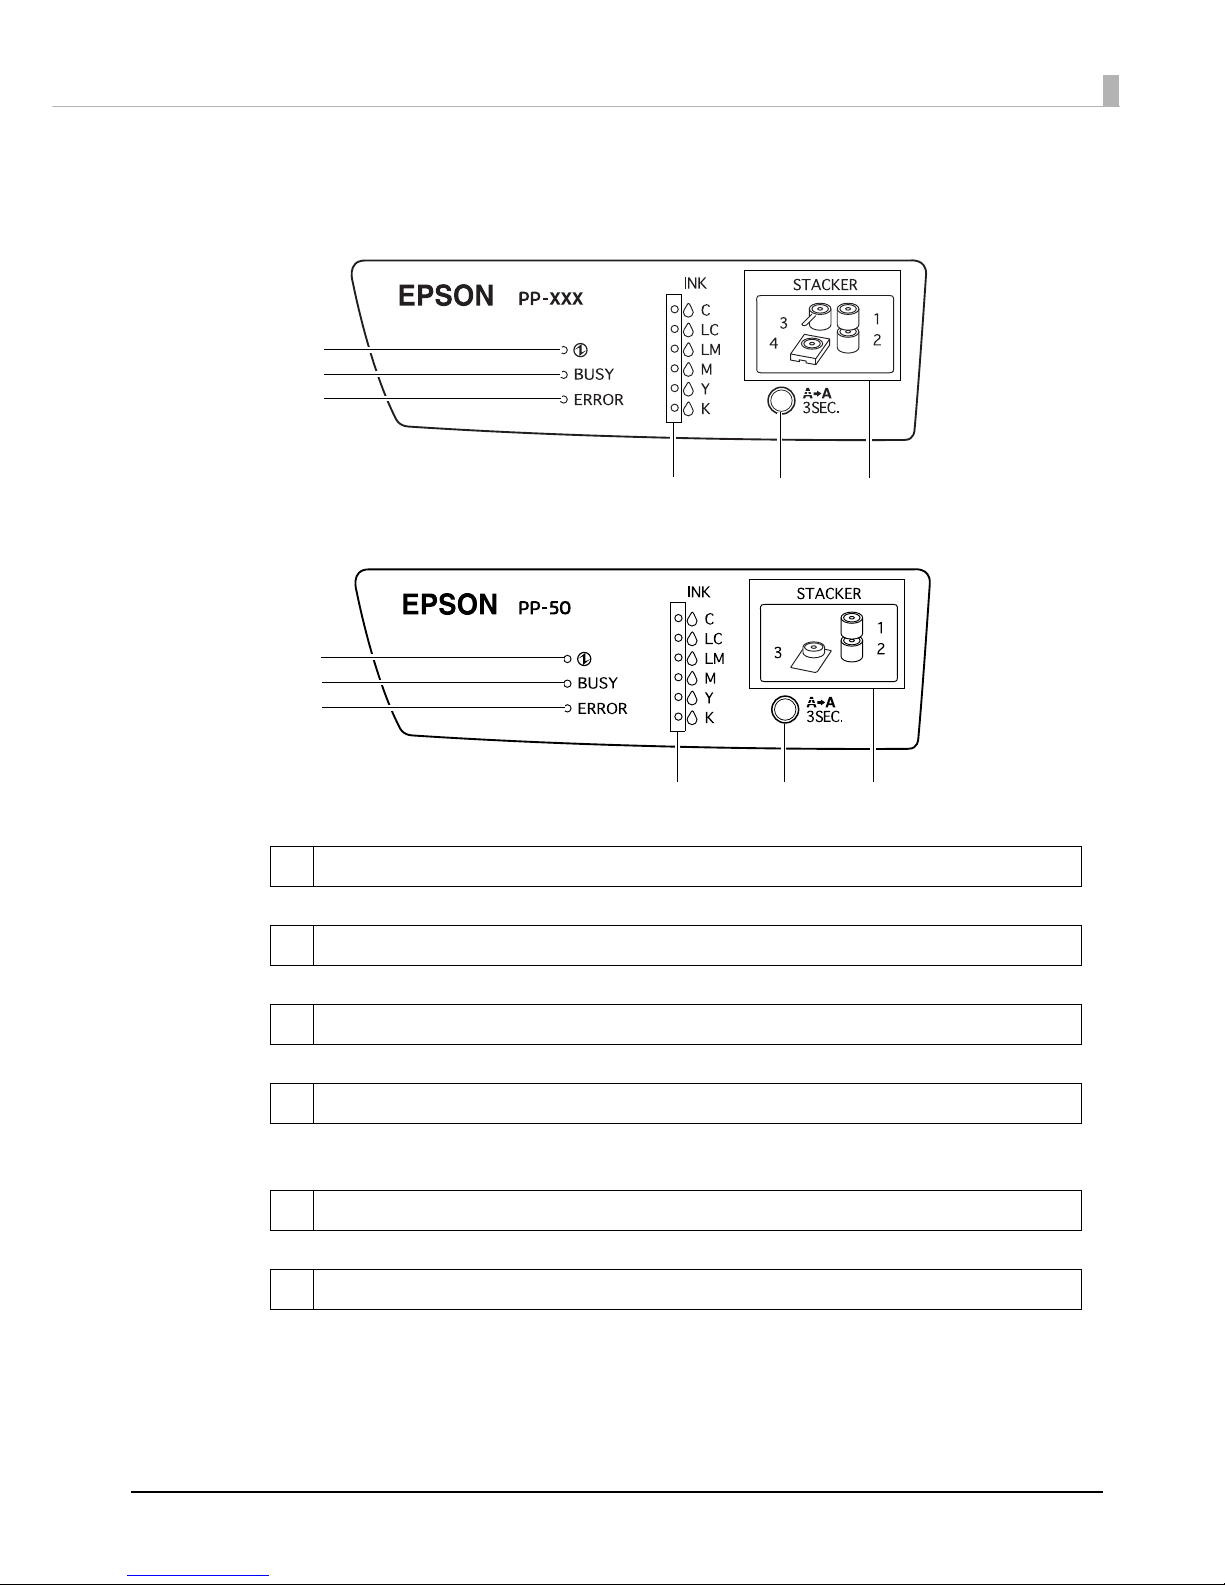
17
Basic Operations
Control panel
*
Job: Processing performed by this product, such as writing and printing data
1 Power light
Flashes or turns on when the power is turned on.
2 BUSY light
Flashes when a job
*
is being processed.
3 ERROR light
Flashes or turns on when an error occurs.
4 INK light
PP-100II/PP-100AP: Flashes or turns on depending on the ink/maintenance box status.
PP-100/PP-50: Flashes or turns on depending on the ink status.
5 Cleaning button
Cleans the print head.
6 STACKER light
Flashes or turns on depending on the stacker status.
PP-100II/PP-100/PP-100AP
PP-50
2
3
1
2
3
1
4 5 6
654
Page 18
18
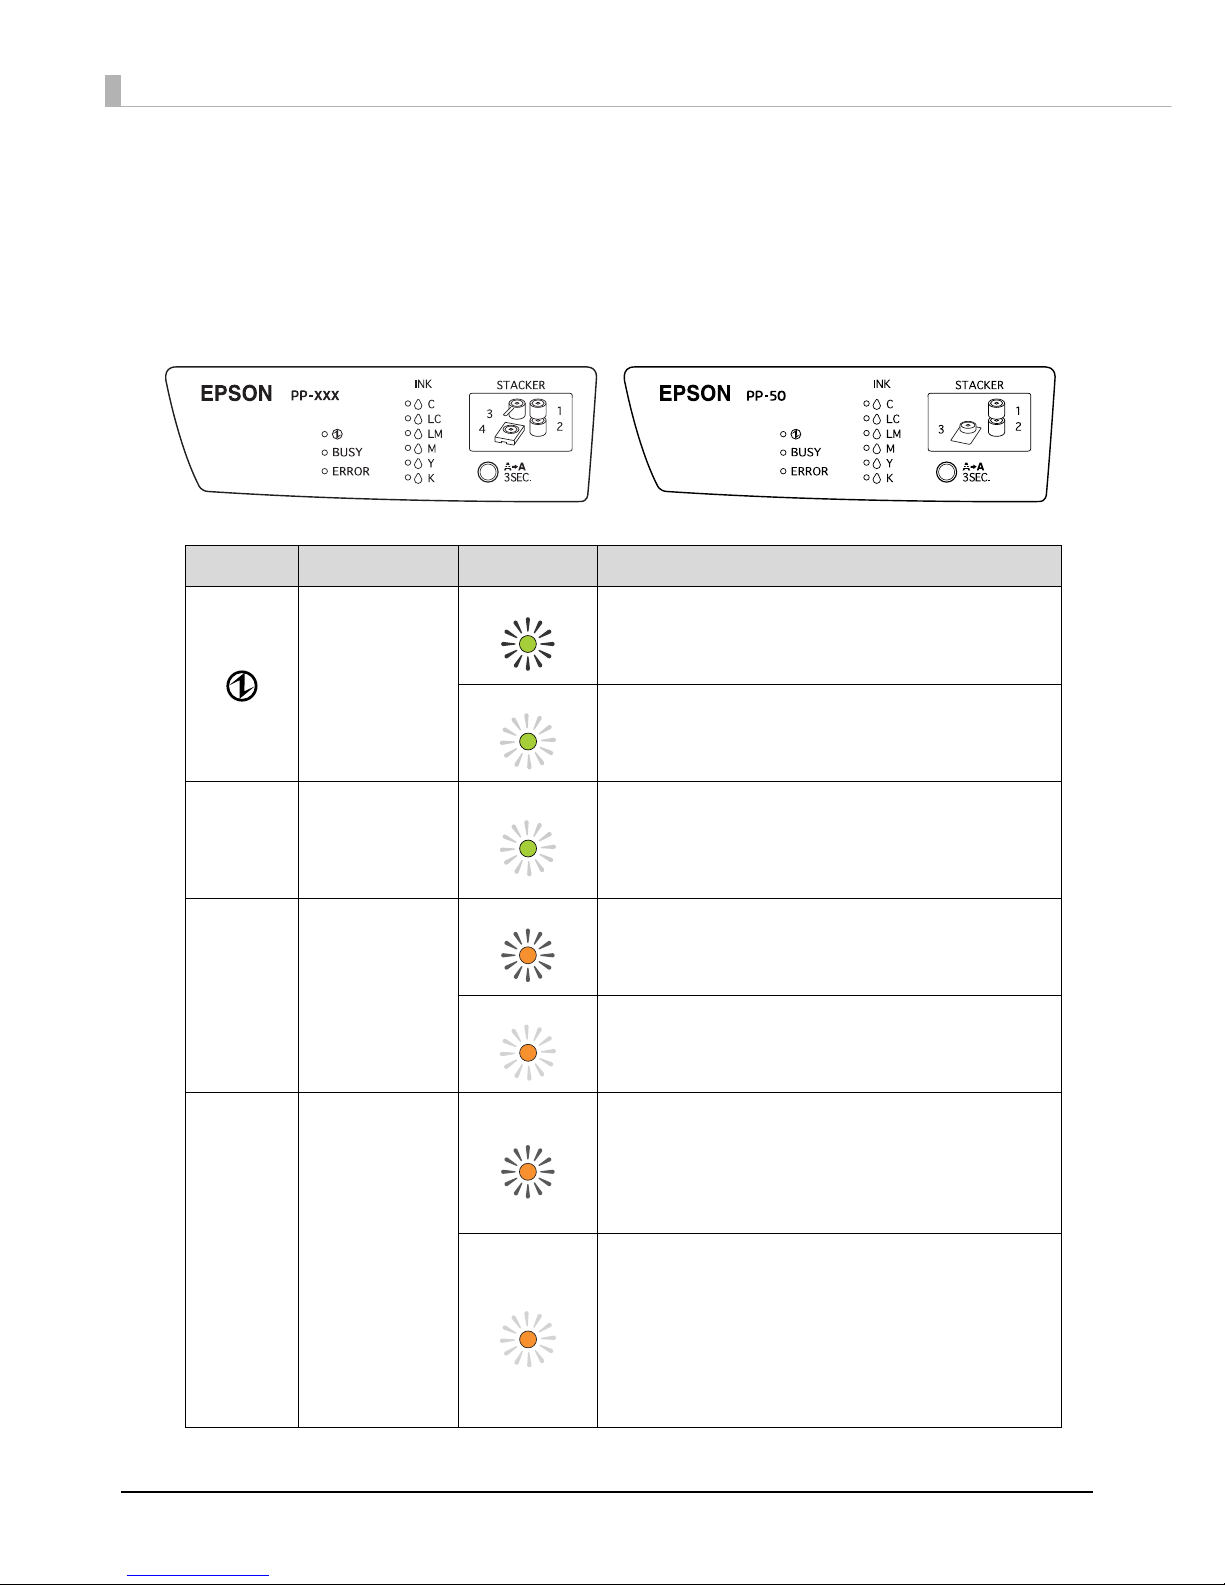
Lights for the Status of the Product
This section describes the status of the product using the lights displayed on the control panel.
The status of the product is also indicated by the combination of lights flashing/turning on. See “Checking Lights for
Errors” on page 114 for details.
Indicator light Flashing/On Status
Power light
On The power is on.
When only the Power light is on, the product is on
standby for data.
Flashing Product is being initialized.
When it flashes rapidly, it is shutting down
BUSY BUSY light
Flashing
Product is processing a job.
For the PP-100II, PP-100, or PP-100AP, when the BUSY
light is flashing rapidly, a disc is being ejected, so do
not pull out Stacker 4. Discs may be damaged.
ERROR ERROR light
On The cover, disc transport system, stacker, drive, or
printer is experiencing an error.
Flashing The unit is experiencing a problem.
INK INK light
On
The ink cartridge has reached its replacement time,
the ink cartridge is not correctly installed, or incorrect
ink cartridge is installed.
For information on replacing ink cartridges, see
“Replacing the Ink Cartridge” on page 81.
Flashing
The ink is low. Obtain a replacement ink cartridge.
For the PP-100II or PP-100, when all INK lights flash
rapidly, the maintenance box has reached its
replacement time or is not correctly inserted.
For information on replacing maintenance box, see
“Replacing the Maintenance Box (Only for PP-100II/
PP-100AP)” on page 103.
PP-100II/PP-100/PP-100AP PP-50
Page 19

19
Basic Operations
* PP-50 does not have the STACKER 4 light.
STACKER
1/2/3/4*
STACKER light
On The stacker is overloaded or full.
Flashing The stacker is empty or not correctly inserted.
The STACKER light flashes when the input stacker is empty; however. the beginning of the
light flashing may not match the exact time that the stacker becomes empty.
Indicator light Flashing/On Status
Notes
Page 20
20
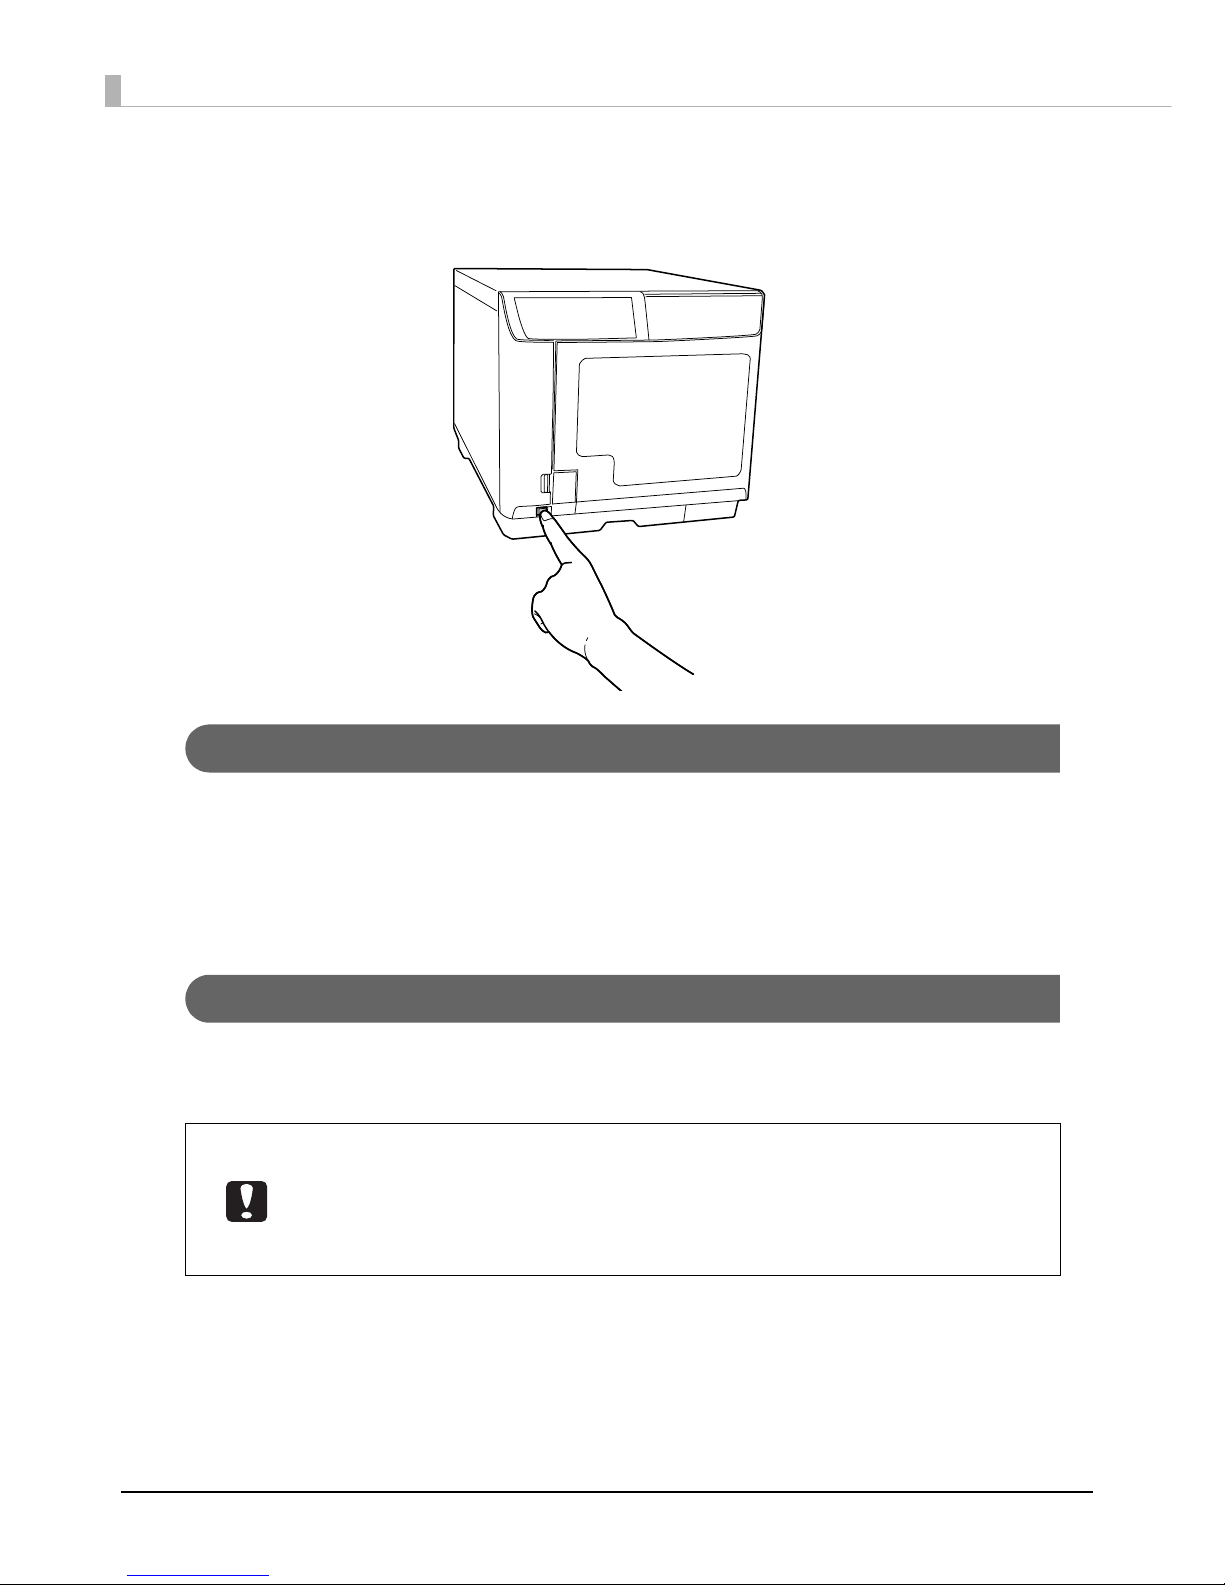
Turning Power On/Off
This section describes how to turn the power on and off.
Turning On the Power
1
Connect the power cord.
2
Press the power button.
The Power light flashes green, then stays on.
Turning Off the Power
Press the power button until the Power light flashes.
The Power light flashes in green then goes off; then the power is turned off.
• The fan may continue to operate after the power is turned off, but it will automatically
stop after 15 minutes.
• The product may not be recognized by the PC when the power is turned back on while
fan is operating. In this case, disconnect the USB cable and connect it again.
• If the product is operating, wait for 10 seconds after operation is stopped; then turn off
the power.
Page 21
21
Basic Operations
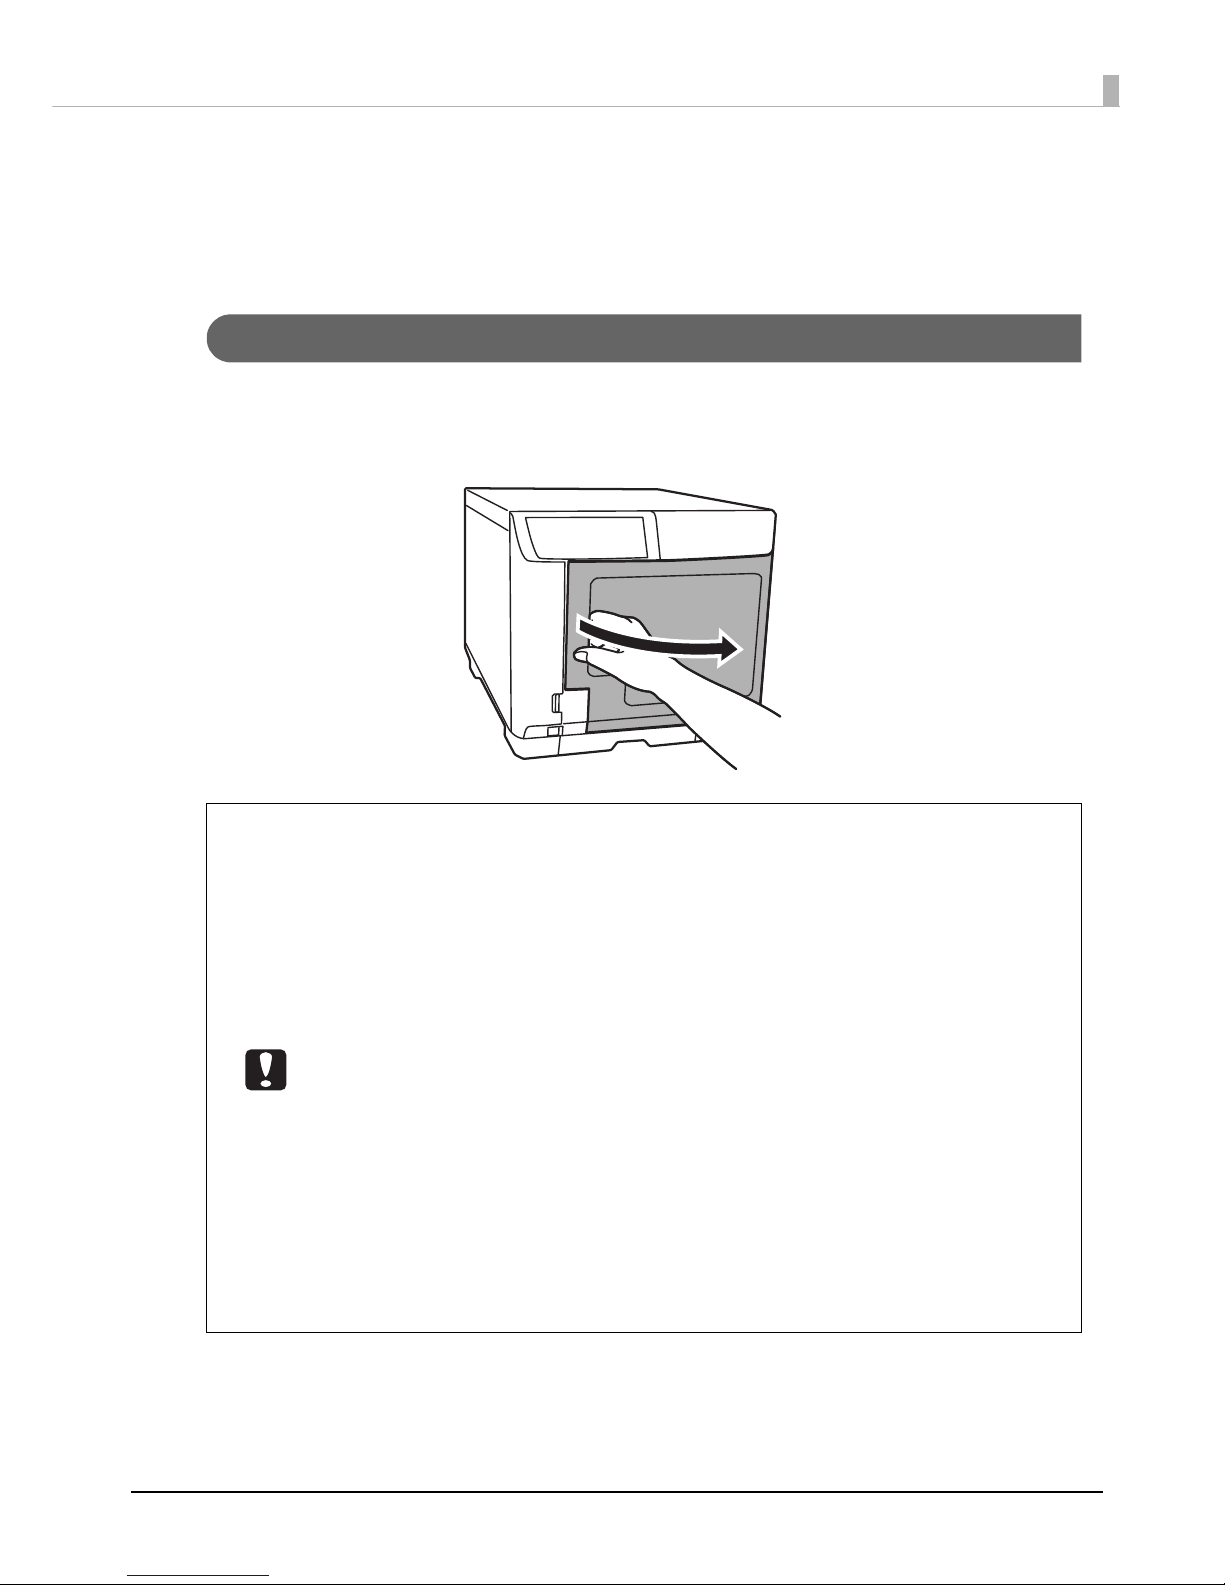
Opening/Closing the Disc Cover
When you load discs into the input stackers or take out discs from the output stackers, open and close the disc cover
as described below.
Opening the Disc Cover
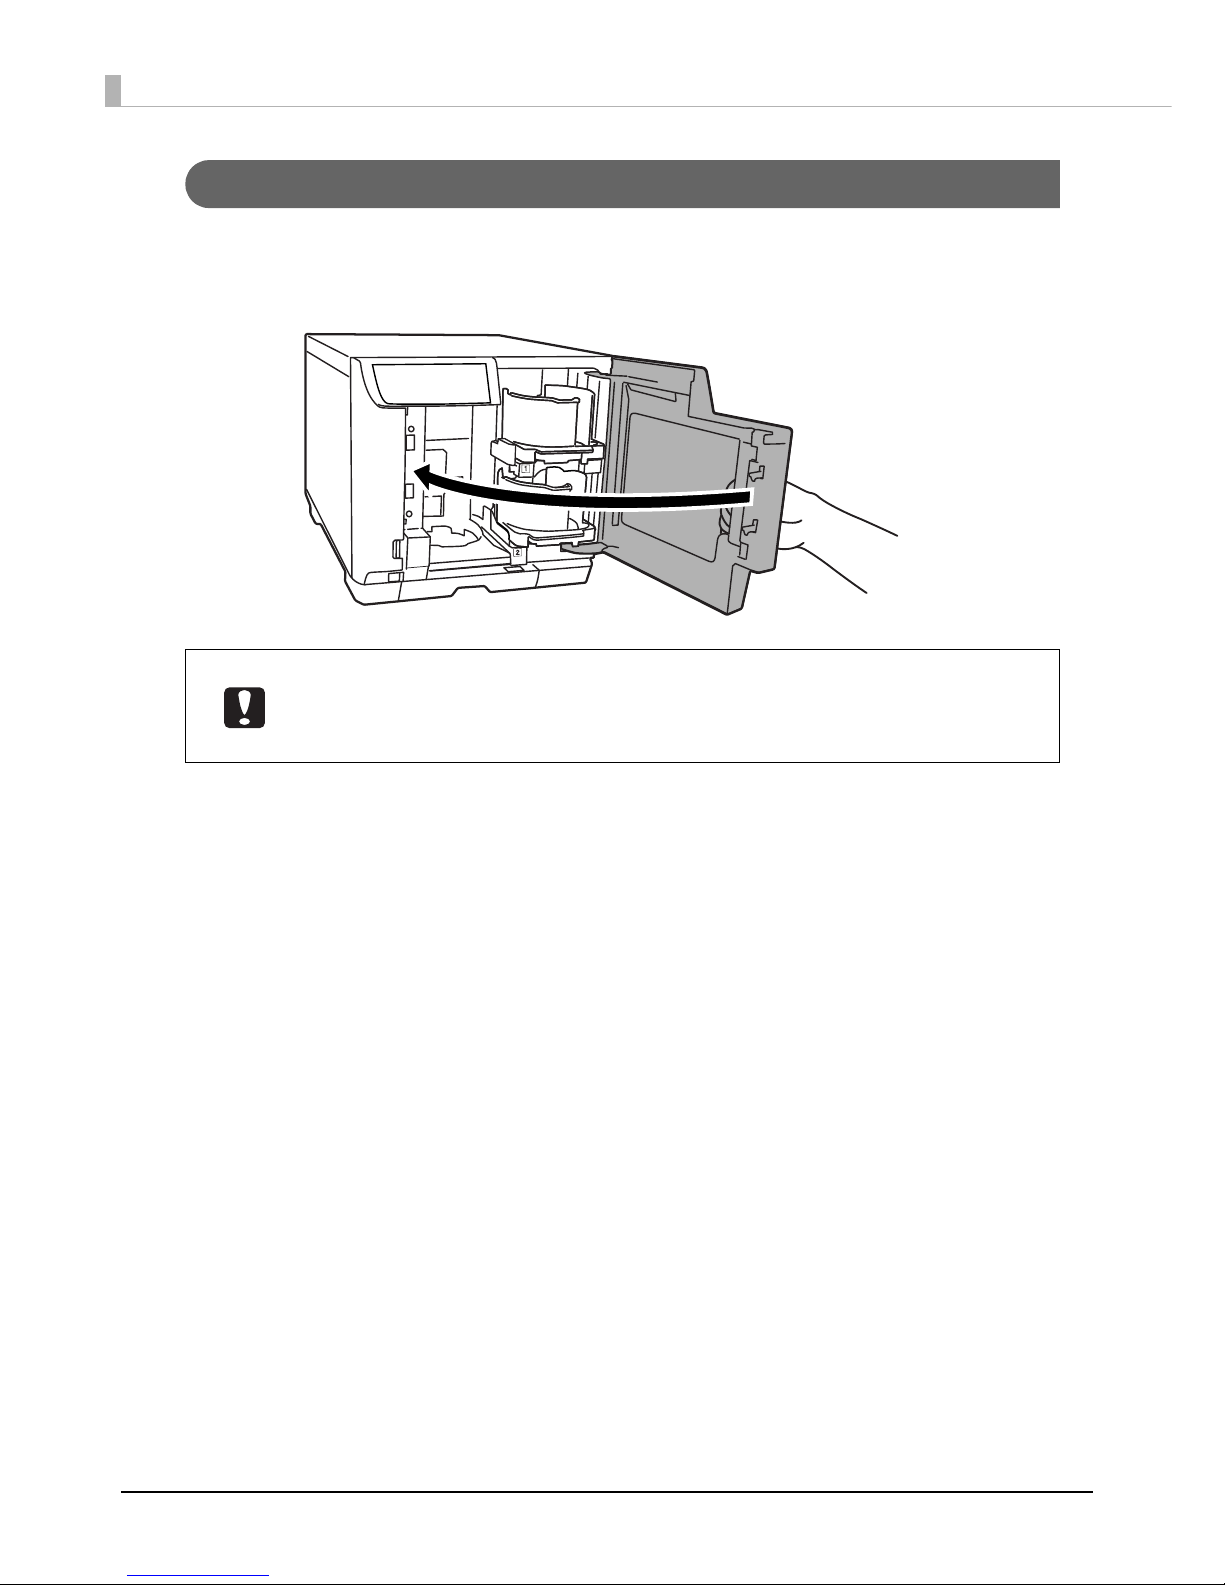
Hold the handle, and open the disc cover in the direction indicated by the arrow in the
illustration below.
For PP-100II/PP-100
• Do not open the disc cover while a job is being processed (while the BUSY light is
flashing). This could adversely affect the writing or printing quality.
• If a job is being processed (while the BUSY light is flashing) and you need to open the
disc cover to load or take out discs, first pause the job and then open the disc cover.
See “Pausing/Cancelling Jobs” on page 73 for the procedure to pause a job.
• If you open the disc cover while a job is being processed (while the BUSY light is
flashing), an alarm beep sounds and the current job enters the standby status. Closing
the disc cover automatically resumes the job.
• While an alarm beep is sounding, the arm is moving. To ensure safety, do not put your
hands inside the product. Also, do not operate any stackers while an alarm beep is
sounding. This could damage the arm.
For PP-100AP/PP-50
• If you open the disc cover while a job is being processed (while the BUSY light is
flashing), make sure the internal light has turned off and that the arm has stopped
moving before performing any operation, such as loading or taking out discs. Do not
put your hands inside the product or operate any stackers while the arm is moving. Also,
open and close the disc cover gently.
• If you open the disc cover while a job is being processed (while the BUSY light is
flashing), the current job enters the standby status. Closing the disc cover automatically
resumes the job.
Page 22
22
Closing the Disc Cover
Hold the handle, and close the disc cover in the direction indicated by the arrow in the
illustration below.
For PP-50
Before closing the disc cover, make sure that there are no discs left near Stacker 3 and
that discs in Stacker 3 are not slanted. Otherwise, an error may occur when you close the
disc cover.
Page 23
23
Basic Operations
Handling Stackers
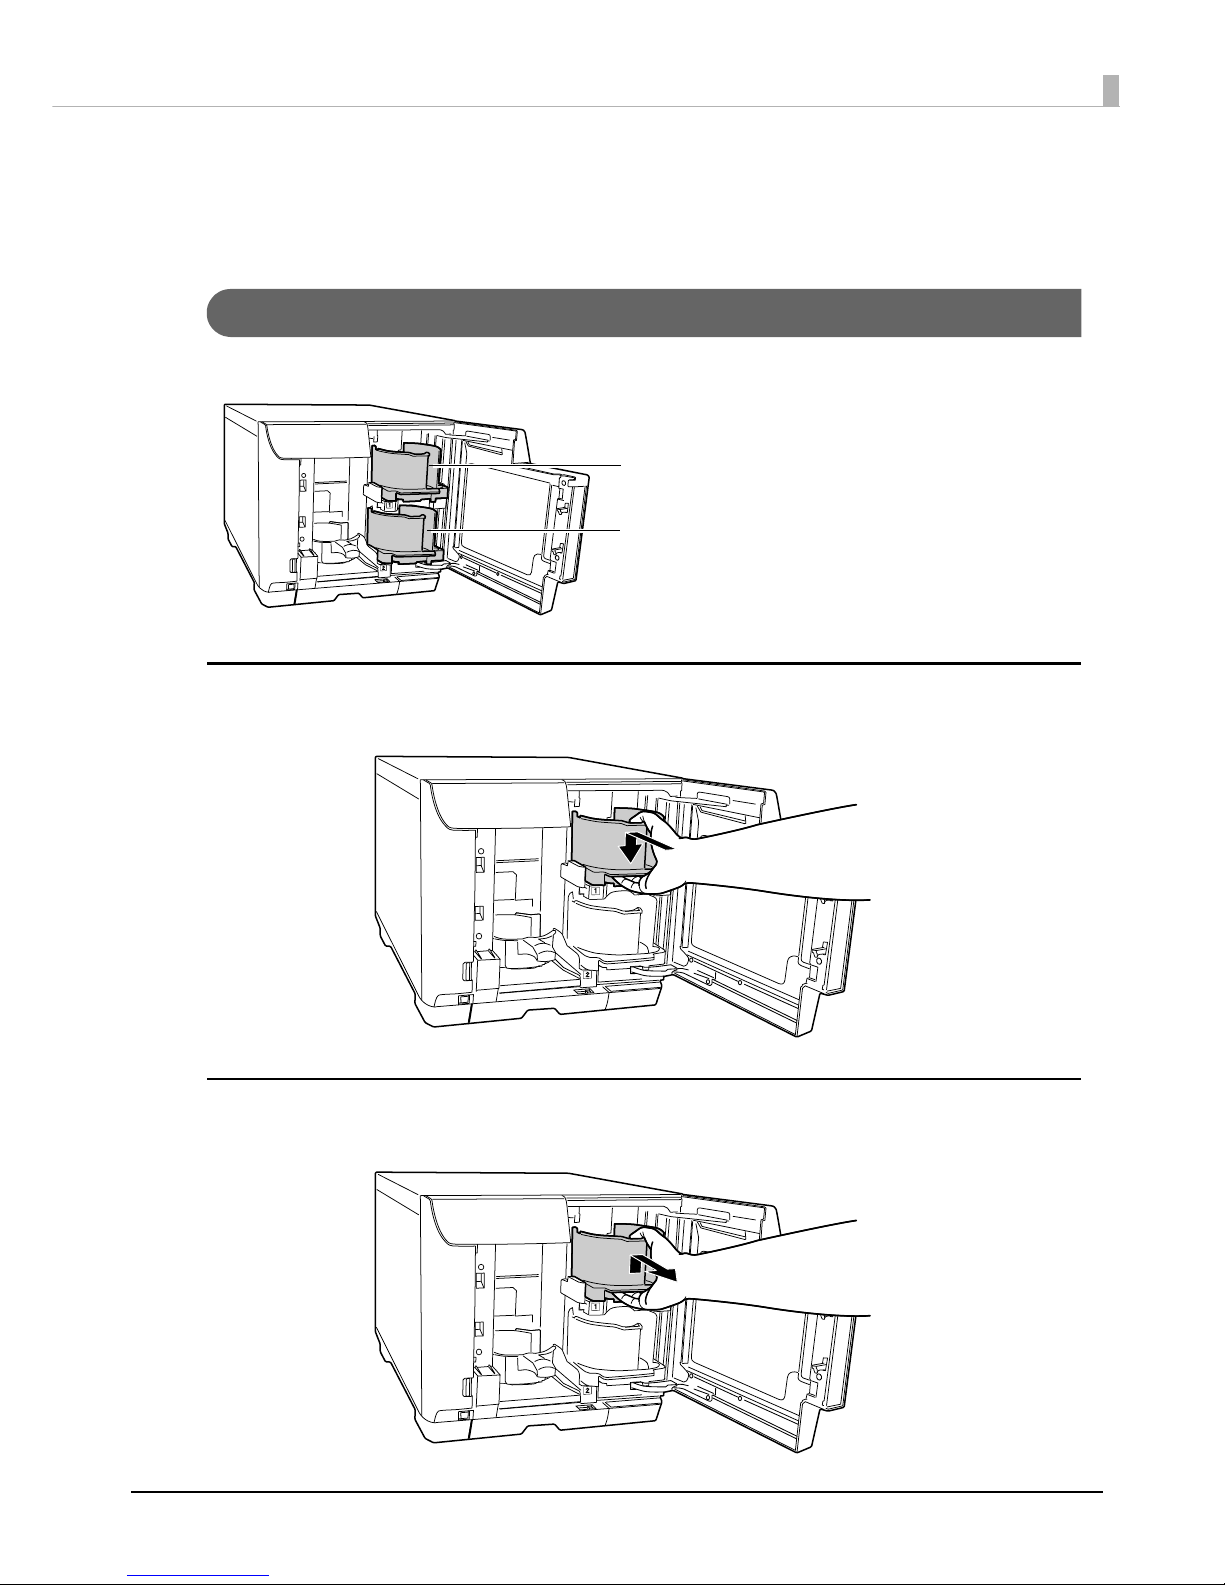
Handle the stackers as shown below.
Stacker 1/Stacker 2
Stacker 1 and Stacker 2 are the same. Handle them in the same way.
Attach
Line up the indentations and attach.
Remove
Gently lift and pull towards you to take out.
Stacker 1
Stacker 2
Page 24
24
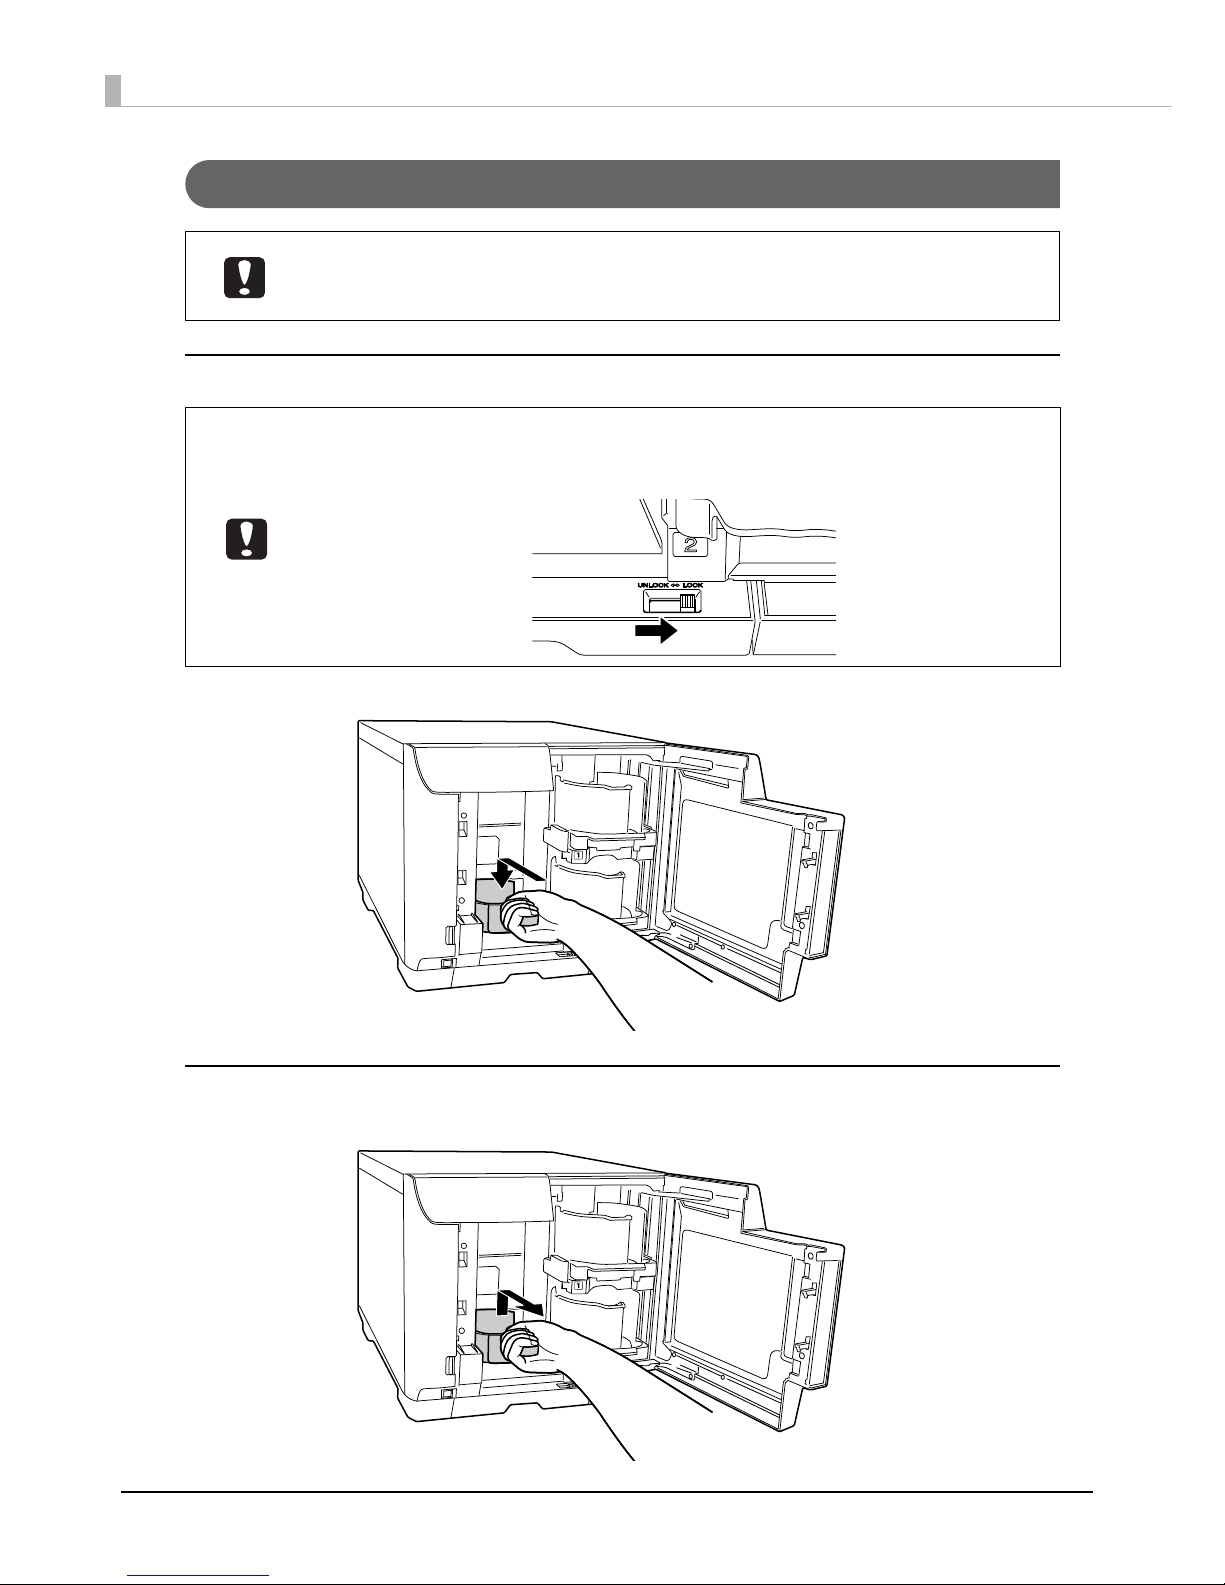
Stacker 3
Attach (Only for PP-100II/PP-100/PP-100AP)
Hold the handle, line up the indentations, and attach.
Remove (Only for PP-100II/PP-100/PP-100AP)
Hold the handle, lift it up, and then pull towards you to take out.
For PP-50
Stacker 3 is fixed. Its shape differs from that of stacker 3 for the PP-100II, PP-100 and
PP-100AP.
• When you insert Stacker 3, first check that there are no discs in Stacker 4, and then
attach it.
• When you use Stacker 3, set the lock lever to LOCK, and do not pull out Stacker 4.
Page 25
25
Basic Operations
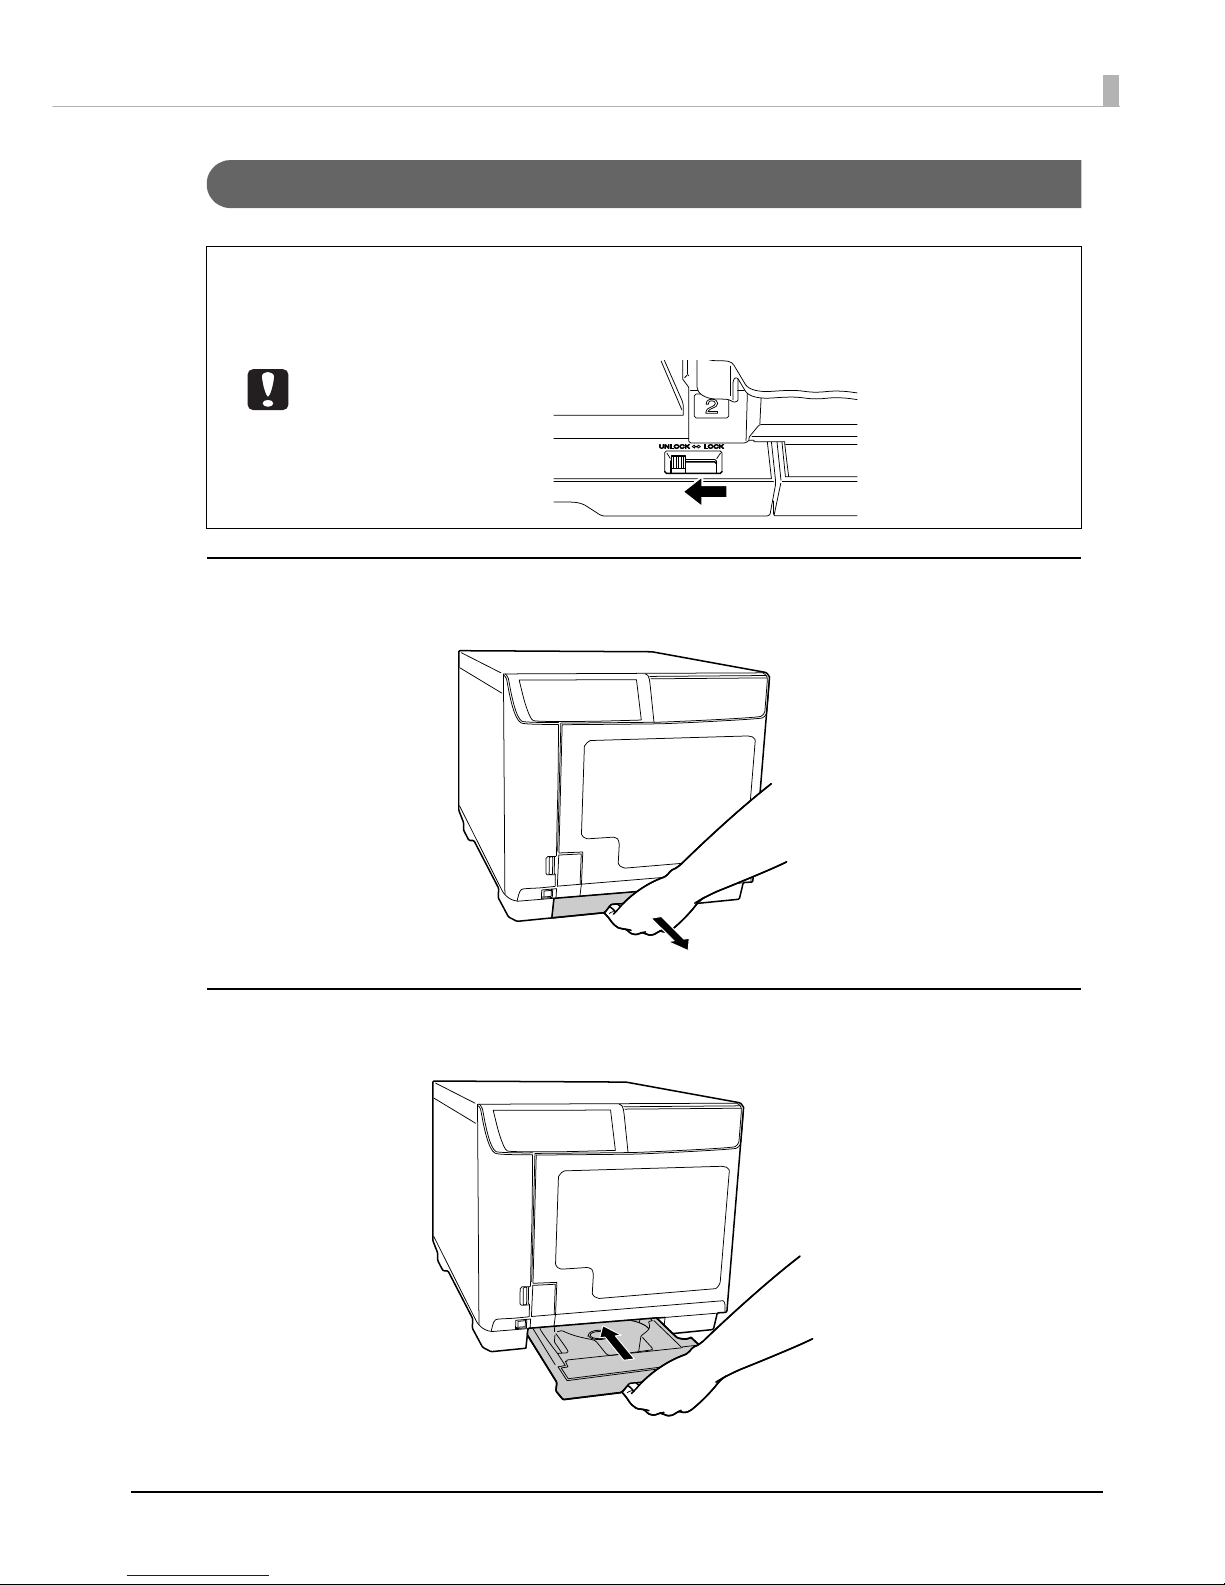
Stacker 4 (Only for PP-100II/PP-100/PP-100AP)
Pull out
Hold the Stacker 4 grip and pull out the stacker.
Push in
Hold the Stacker 4 grip and push the stacker in.
• Do not apply strong force to Stacker 4 when handling it.
• When the BUSY light and the STACKER 4 light are flashing rapidly, a disc is being
ejected, so do not pull out Stacker 4. Discs may be damaged.
• When you use Stacker 4, set the lock lever to UNLOCK.
Page 26

26
Software Settings
This section describes the basic settings of the software required for using the product (PP-100II/PP-100/PP-100AP/
PP-50) after the setup. (For the setup procedure, see Setup Guide for Mac.)
Installing Software
The installation procedure installs the following software on your PC. (For the installation procedure, see Setup Guide
for Mac.)
• EPSON Total Disc Utility
This software is used to set up the product and check the product status from your PC.
• EPSON Total Disc Maker
This software is used to edit the write data* and the print data for the label surface and to publish using this
product.
• Printer driver
* Editing write data is not available with the PP-100AP.
• Important Note
You may use the software to operate the EPSON products. You may use the EPSON
products to copy materials onto media, including but not limited to CDs and DVDs.
You agree to respect the rights of copyright owners. EPSON shall have no liability for,
and you shall hold EPSON harmless from, any copyright infringement by you or your
employees, representatives or agents.
• Be sure to install the software by following the procedure in Setup Guide for Mac.
• The product cannot be used as a shared printer using the Mac sharing setting.
• The product cannot be used by more than one user using the Mac fast user switching.
• The operation of the product using Apple Remote Desktop is not guaranteed.
Page 27
27
Software Settings
System Requirements
The minimum hardware and system requirements for using the supplied software are shown below.
OS (Operating system)
• Mac OS X v10.10 Yosemite
• Mac OS X v10.9 Mavericks
• Mac OS X v10.8 Mountain Lion
• Mac OS X v10.7 Lion
• Mac OS X v10.6 Snow Leopard
CPU
Mac OS X v10.10
Mac OS X v10.9
Mac OS X v10.8
Mac OS X v10.7
Intel 64 bit CPU
Mac OS X v10.6 Intel Core Duo 1.83 GHz or faster processor
Memory
Mac OS X v10.10
Mac OS X v10.9
Mac OS X v10.8
Mac OS X v10.7
2 GB or more
Mac OS X v10.6 1 GB or more
HDD available space
25 GB or more
HDD rotation speed
7200 rpm or faster
Display
XGA (1024 x 768 pixels) or higher
65,536 colors or more
Interface
Mac OS X v10.10
Mac OS X v10.9
• For the PP-100II: USB 3.0 or USB 2.0
∗ Compatible with USB 3.0 or USB 2.0 standard
∗ Ensure Super Speed USB or Hi-Speed USB performance
• For the PP-100/PP-100AP/PP-50: USB 2.0
∗ Compatible with USB 2.0 standard
∗ Ensure Hi-Speed USB performance
Mac OS X v10.8
Mac OS X v10.7
Mac OS X v10.6
USB 2.0
• Compatible with USB 2.0 standard
• Ensure Hi-Speed USB performance
• The product may not function properly where third-party writing software is installed,
anti-virus software is installed, or another USB device is connected.
• The source drive should use commands and operations that are compliant with MMC4
or higher, and be capable of reading sub-channels. (Only for PP-100II/PP-100/PP-50)
• If you use a USB 3.0 Mac computer with Mac OS X v10.8 for the PP-100II, be sure to use
a USB 2.0 cable.
Page 28
28
Properties Setting
After installing the software and adding the printer (For these procedures, see Setup Guide for Mac.), follow the steps
below to set Stacker Settings, Drive Settings, and Printer Settings with EPSON Total Disc Utility.
1
Make sure that the product is connected to the PC via the USB cable and that the product
is turned on.
2
Start up EPSON Total Disc Utility.
See “Starting EPSON Total Disc Utility” on page 39.
3
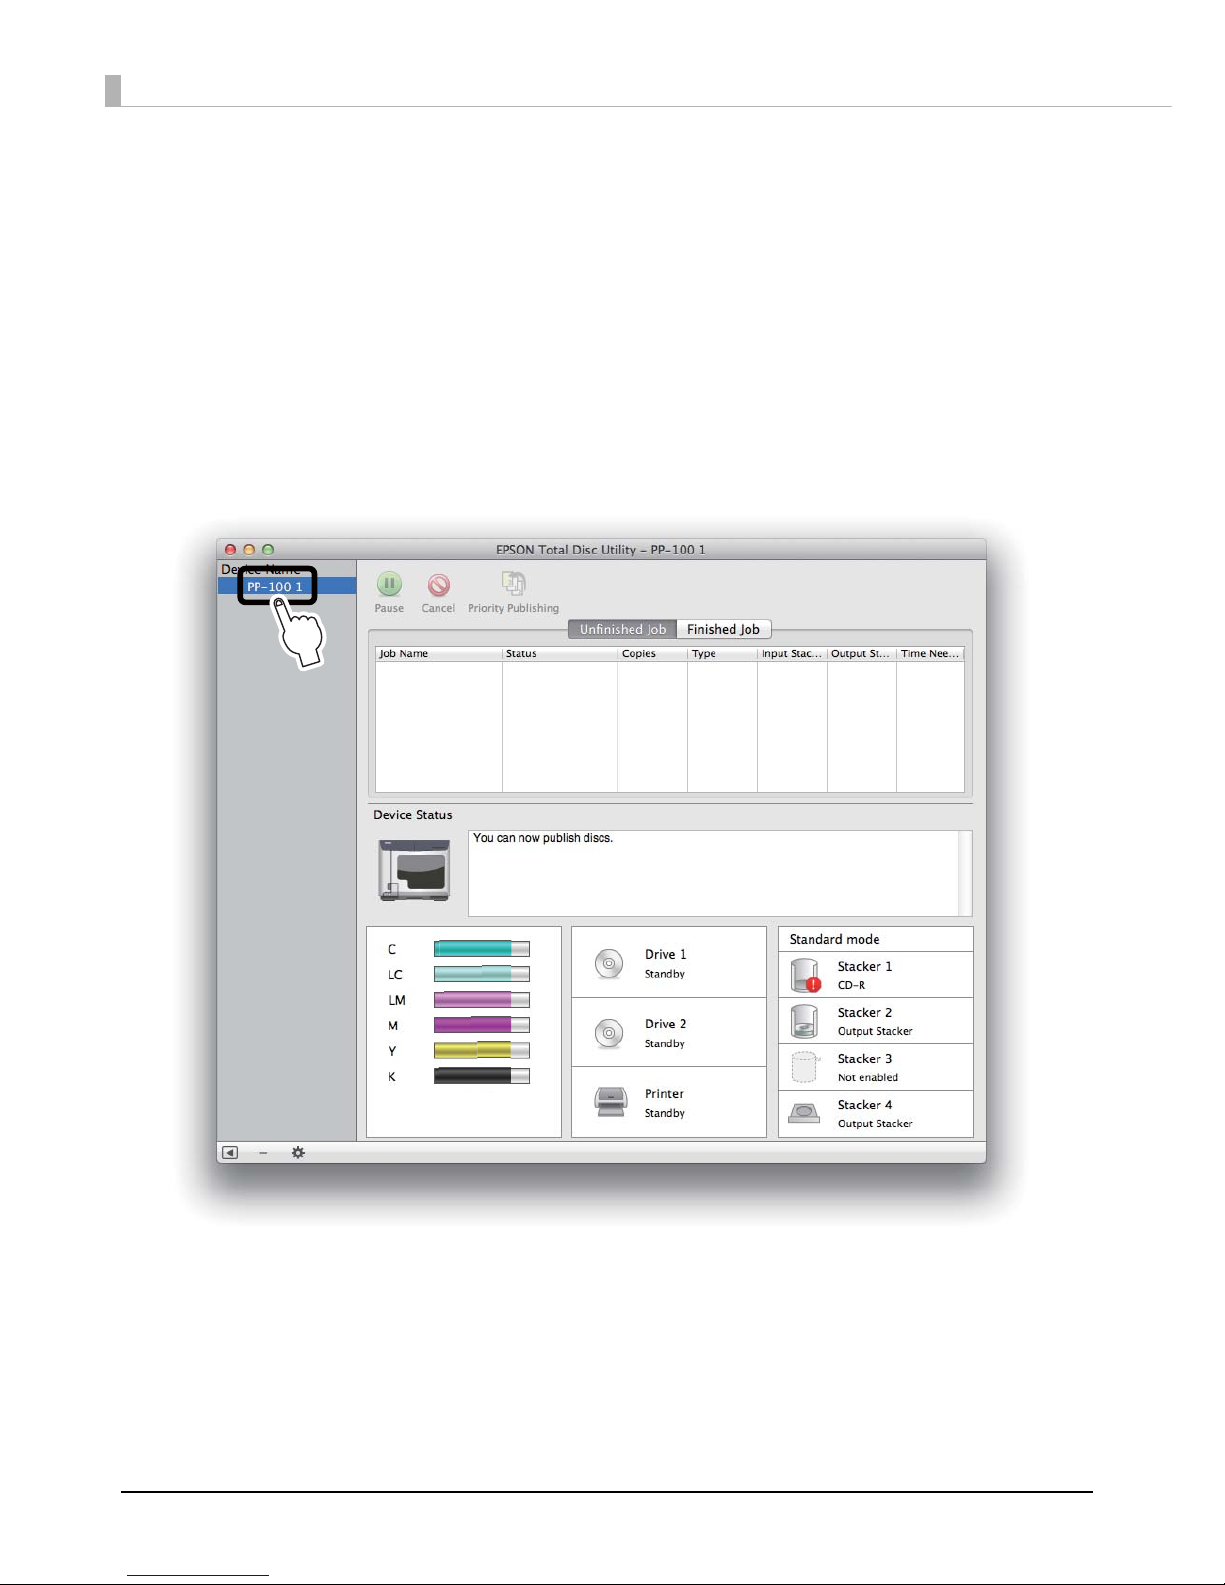
Double-click the product name.
Page 29
29
Software Settings
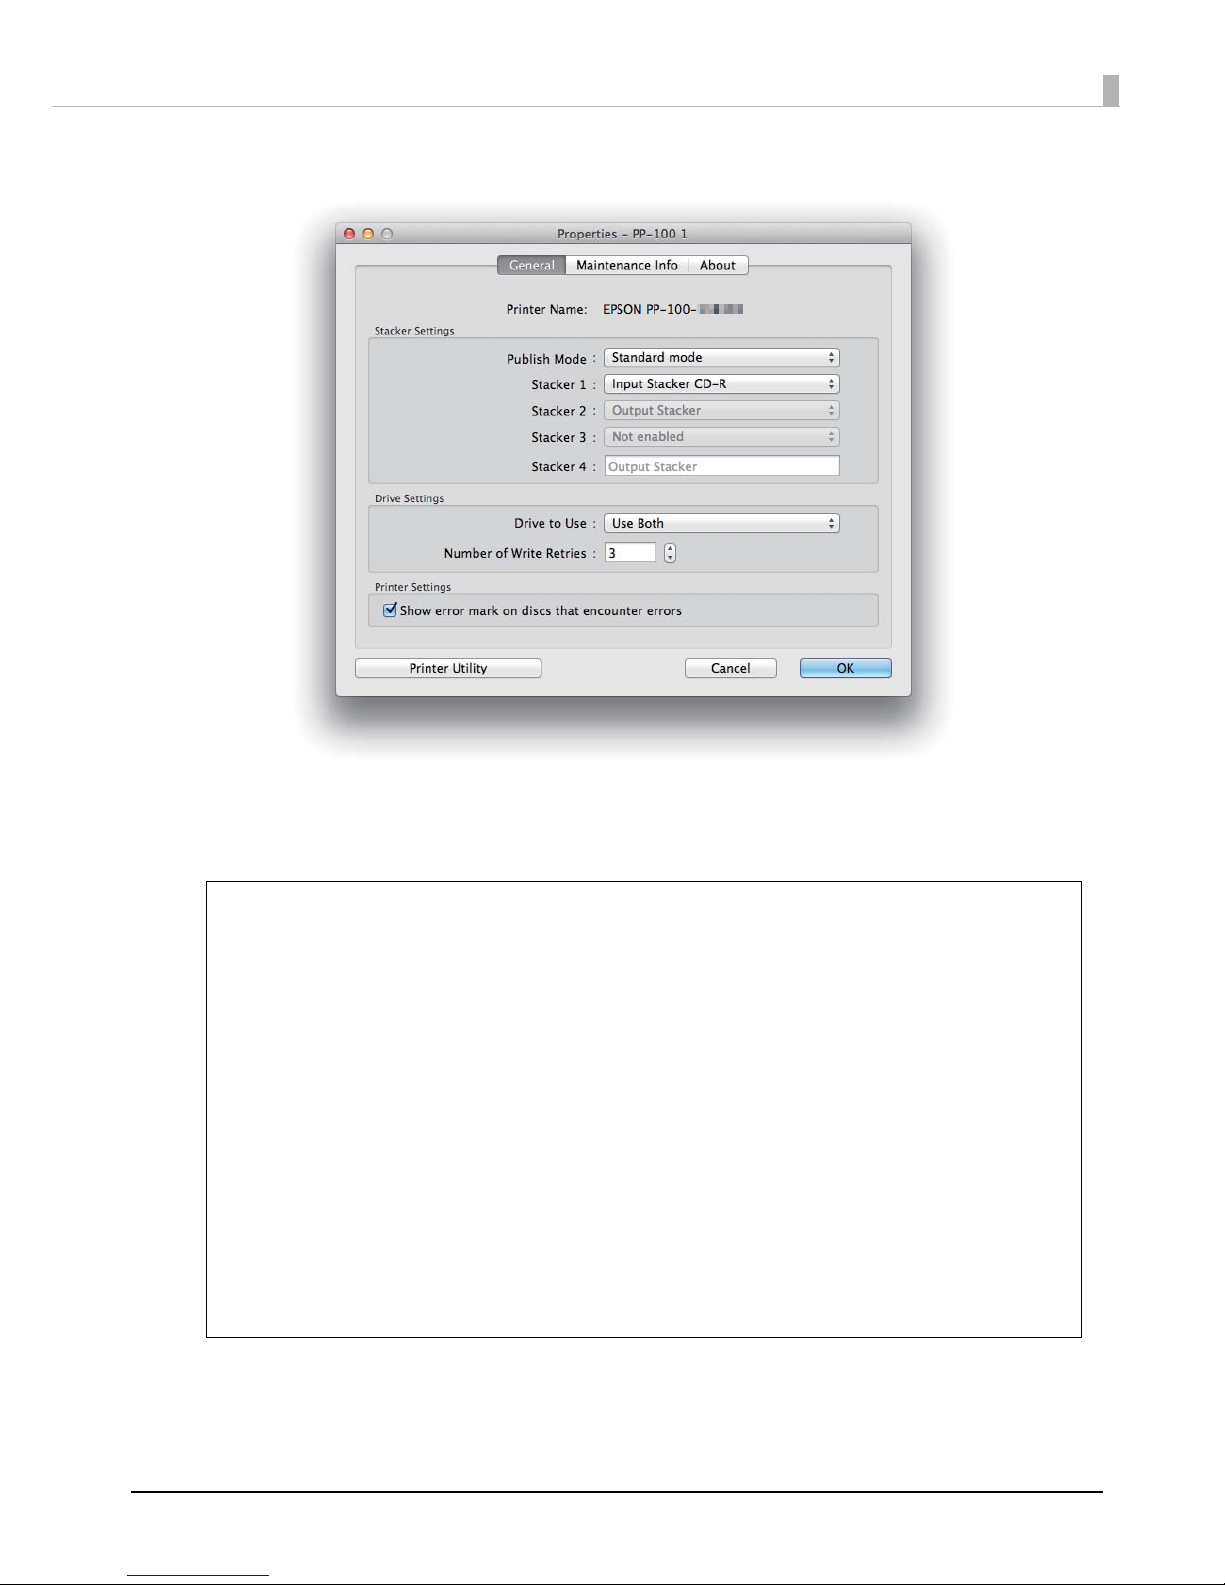
The Properties screen appears.
4
Set Stacker Settings, Drive Settings (only for PP-100II/PP-100/PP-50), and Printer
Settings (only for PP-100II/PP-100/PP-50).
See EPSON Total Disc Utility Help for details.
5
Click OK.
• Setting the most suitable publish mode for the usage or number of discs to be
published enables efficient disc publishing. (See “Selecting Publish Mode” on page 57.)
• Setting the Number of Write Retries enables a job to be executed again without job
processing pausing even if an error occurs during writing. The error disc is output to the
output stacker.
• The error mark will not be printed in the following cases.
∗ The job was cancelled
∗ An incorrect disc type was found in the input stacker
∗ Not enough ink was left to print the error mark
∗ Fatal error
• For PP-100II/PP-100
Error discs are ejected to:
∗ Stacker 4 in Standard mode
∗ Stacker 3 or Stacker 4 in External Output mode
∗ Stacker 2 or Stacker 3 in Batch mode
• For PP-50
Error discs are ejected to Stacker 3.
• For EPSON Total Disc Utility Help, see “EPSON Total Disc Utility Help” on page 39.
Notes
Page 30
30
Common Settings for Publishing
Follow the steps below to set Working Folder, Notification Settings, and Write Settings.
Setting a Working Folder
Follow the steps below to create a Working Folder on the hard disk for the disc publishing operation.
1
Start up EPSON Total Disc Utility.
See “Starting EPSON Total Disc Utility” on page 39.
2
Select Common Settings for Publishing from the Too l s menu.
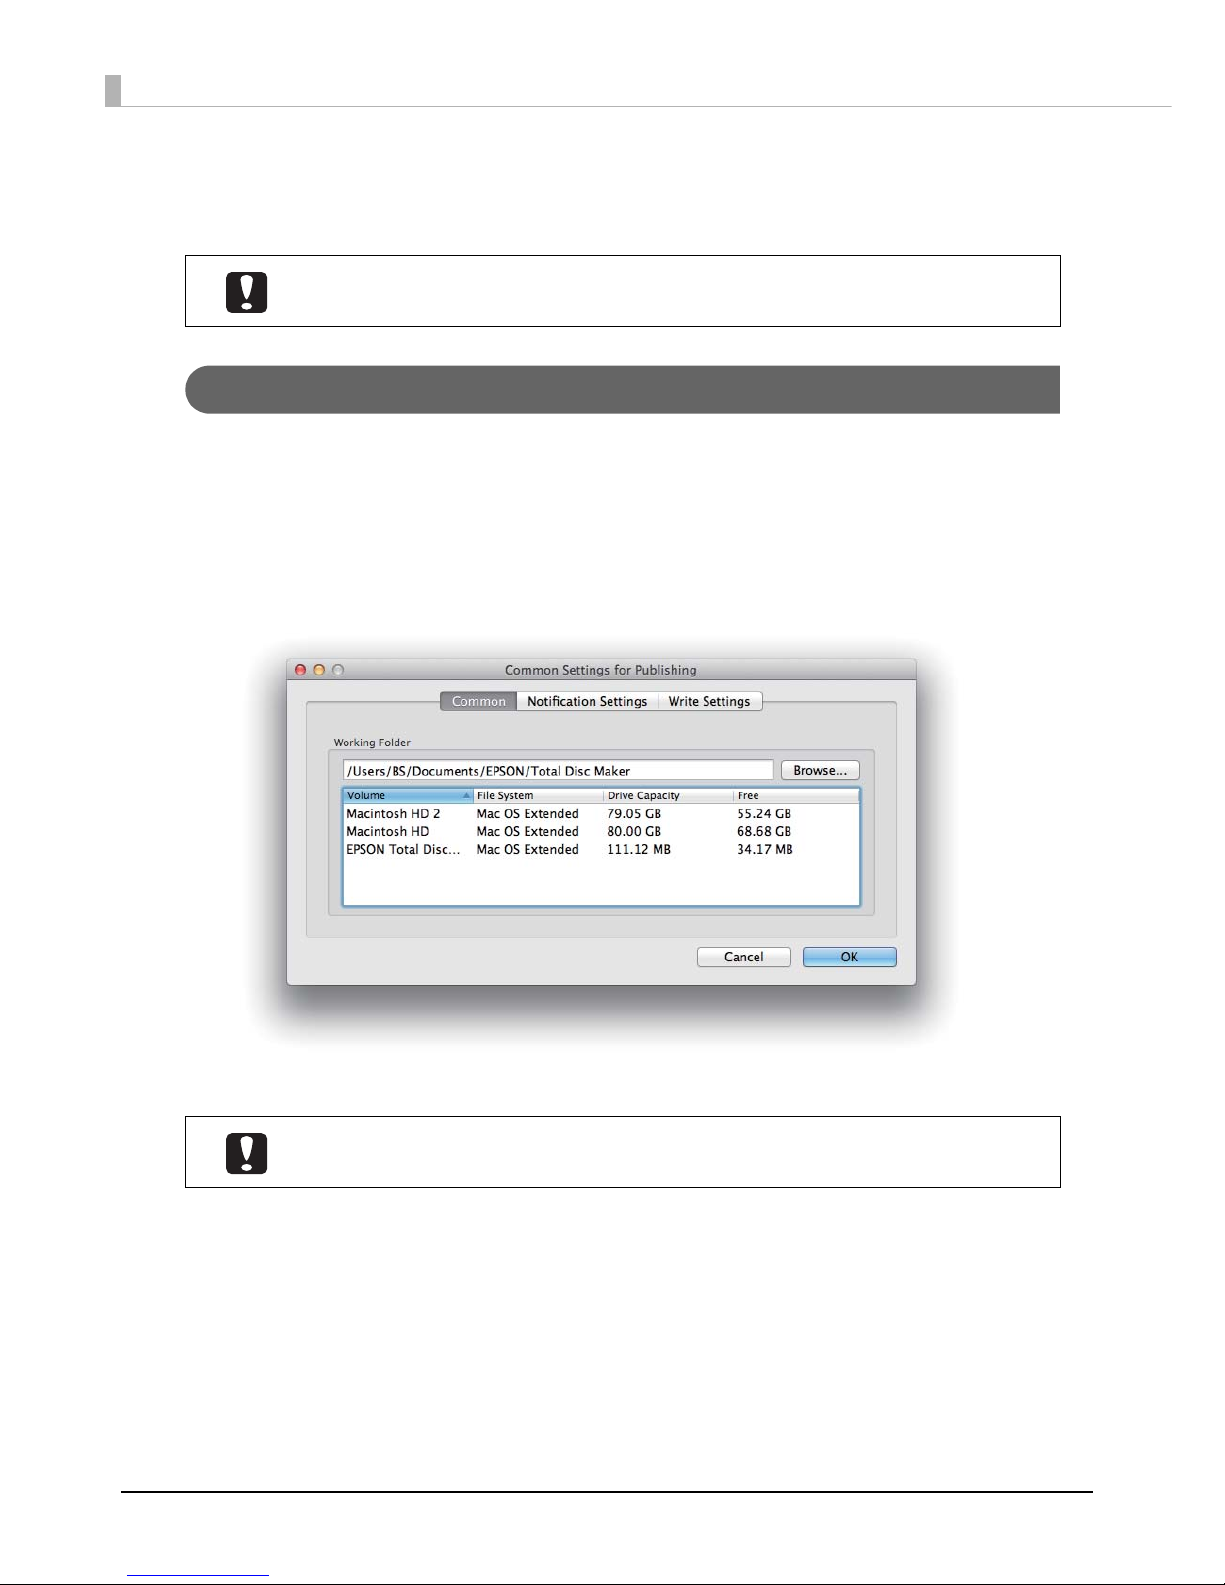
The Common screen appears.
3
Click Browse... to select a folder to create a Working Folder.
4
Click OK.
These settings are reflected for all the publishers (PP-100II/PP-100/PP-100AP/PP-50)
registered.
Select a drive with sufficient free space (25 GB or more).
Page 31
31
Software Settings
Notification Settings (Only for PP-100AP)
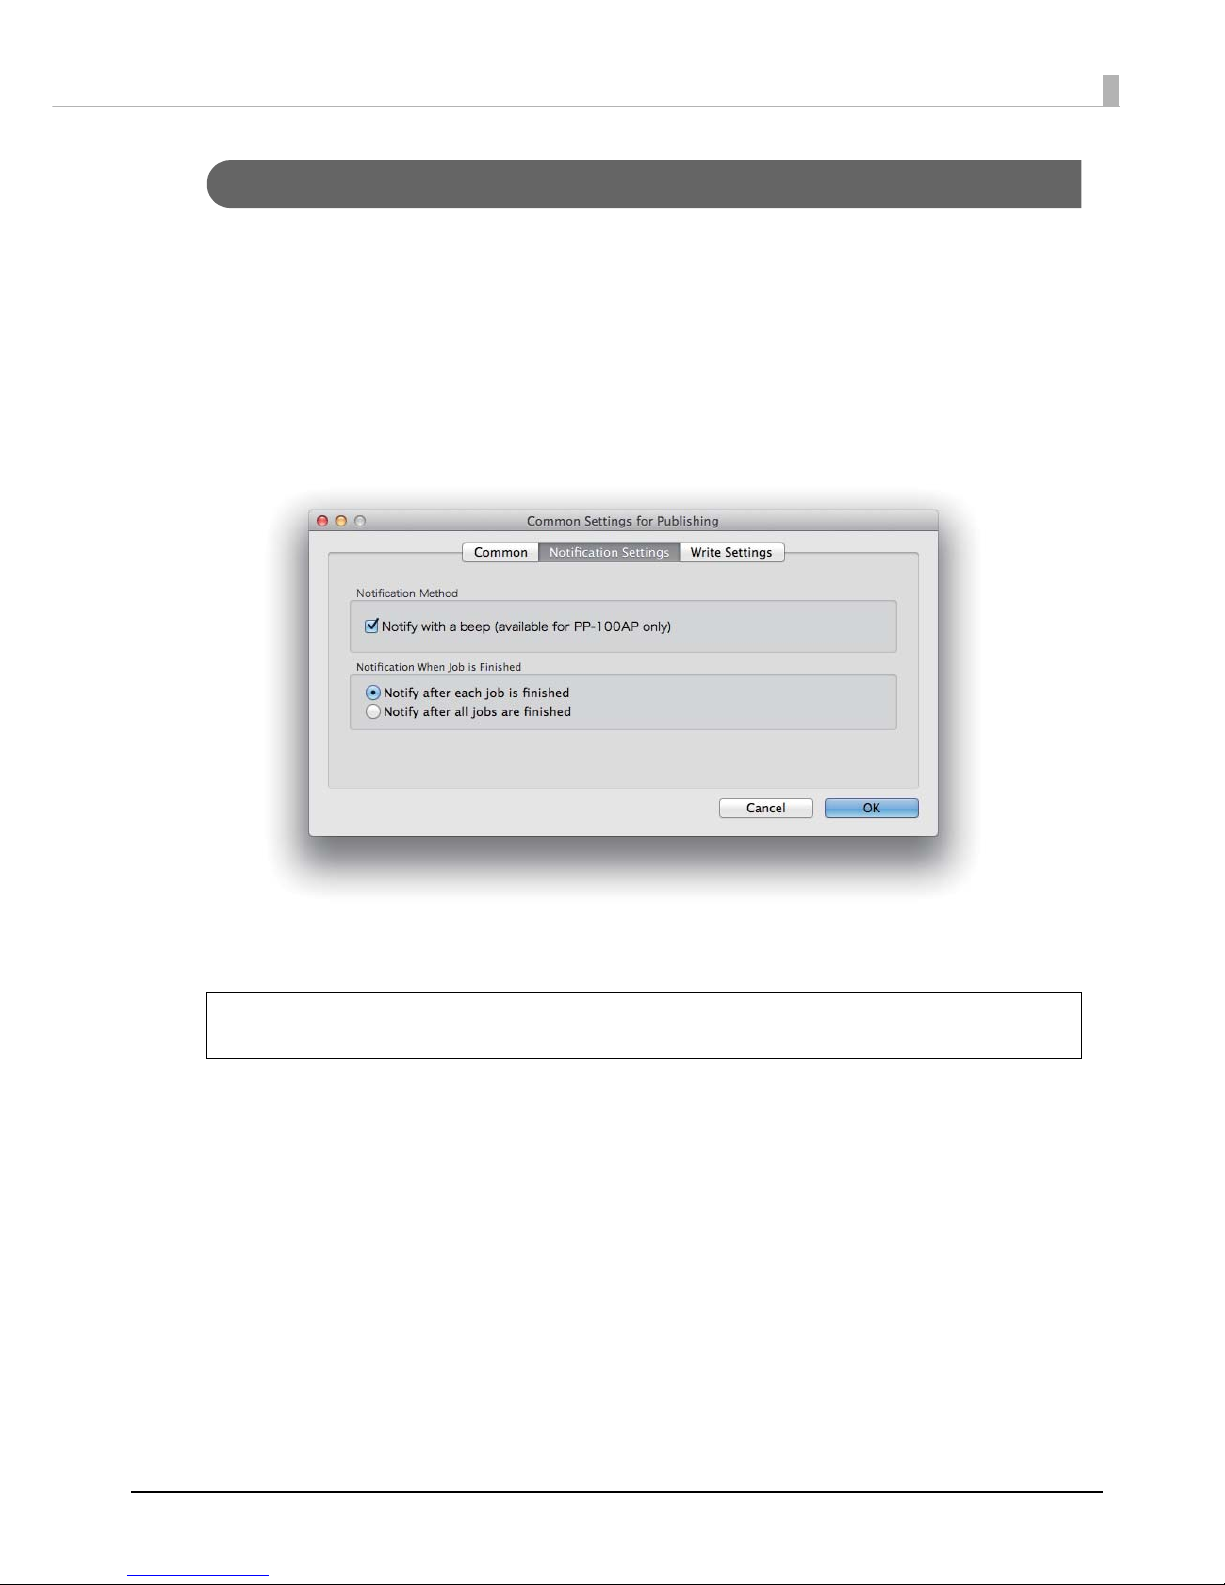
Follow the steps below to set the buzzer function that lets you know when jobs end with the PP-100AP.
1
Start up EPSON Total Disc Utility.
See “Starting EPSON Total Disc Utility” on page 39.
2
Select Common Settings for Publishing from the Tools menu.
3
Click Notification Settings.
The Notification Settings screen appears.
4
Set Notification Method and Notification When Job is Finished.
See EPSON Total Disc Utility Help for details.
5
Click OK.
For EPSON Total Disc Utility Help, see “EPSON Total Disc Utility Help” on page 39.
Notes
Page 32
32
Write Settings (Only for PP-100II/PP-100/PP-50)
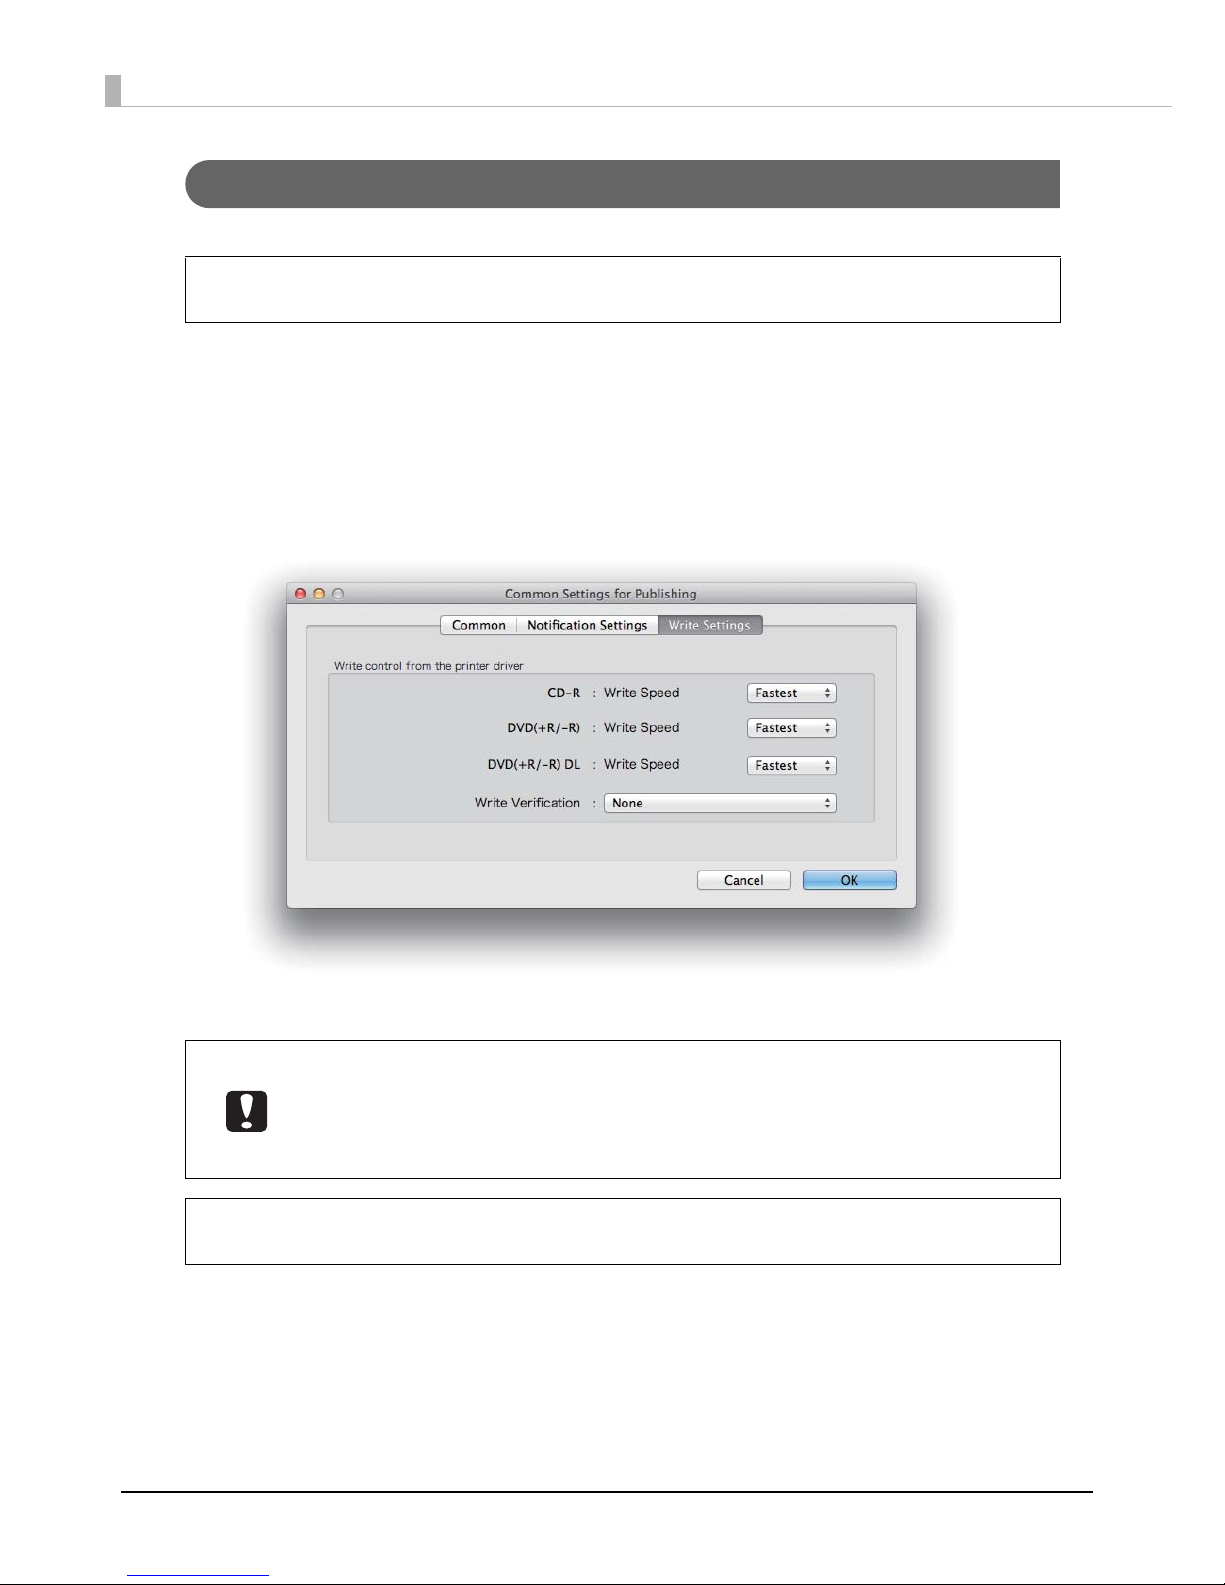
Follow the steps below to set Write Speed and Write Verification with the PP-100II/PP-100/PP-50.
1
Start up EPSON Total Disc Utility.
See “Starting EPSON Total Disc Utility” on page 39.
2
Select Common Settings for Publishing from the Too l s menu.
3
Click Write Settings.
The Write Settings screen appears.
4
Set Write Speed and Write Verification.
5
Click OK.
If you publish with EPSON Total Disc Maker, changing the settings is possible also in Publish
view.
• Depending on the discs and PC used, the writing speed may become slower than the
set speed.
• Depending on the discs used, writing may not be able to be performed properly at the
speed recommended for the disc. If this happens, write at a slower speed. In particular,
we recommend writing to DVD±R DL at a slow speed.
If Write Verification is set to Compare, you can confirm whether data was written to discs
properly.
Notes
Notes
Page 33
33
Software Settings
Uninstalling the Software
If the software could not be installed properly, uninstall (delete) the software, and then reinstall it.
1
Turn off the product.
See “Turning Off the Power” on page 20.
2
Exit all applications that are running.
3
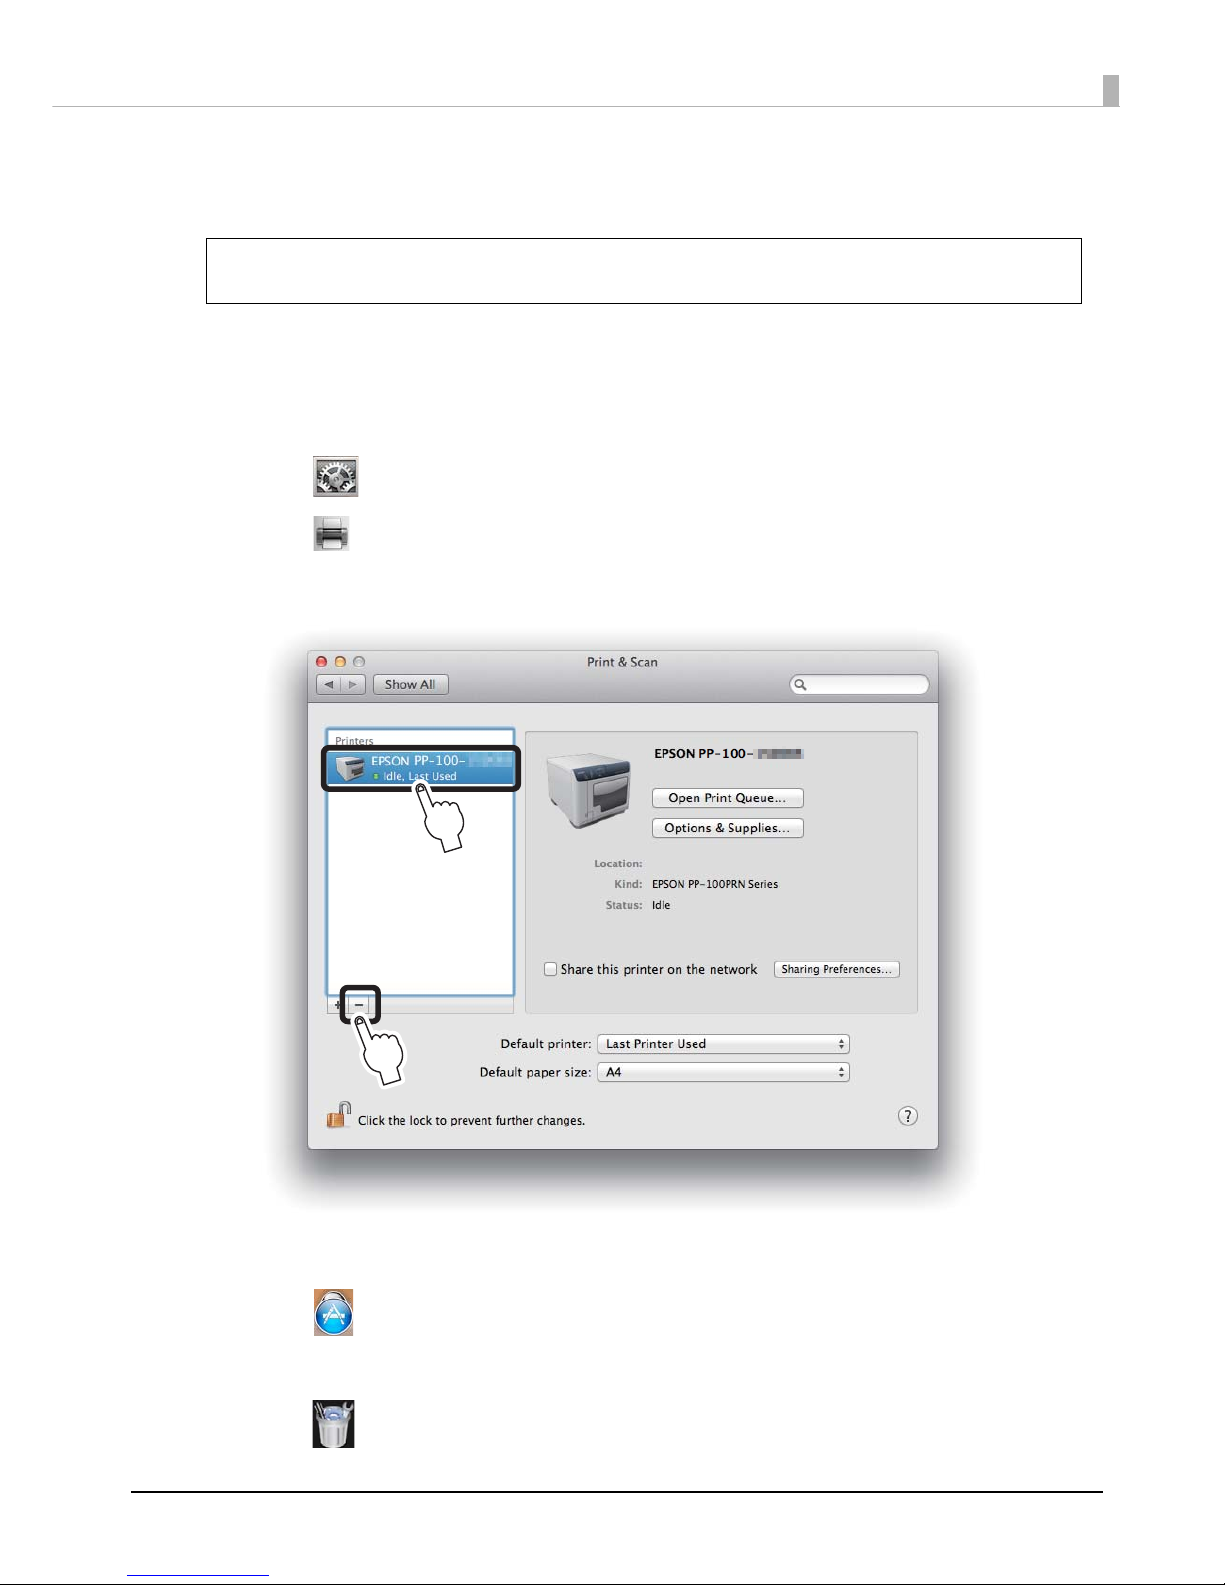
Click [System Preferences] in the Dock.
4
Click [Print & Scan] ([Print & Fax] in Mac OS X v10.6) in Hardware.
5
Select the printer to be deleted, and click [-].
6
When the confirmation message appears, click Delete Printer.
7
Click [Applications].
8
Click EPSON Software.
9
Click [Uninstaller].
You may be asked for an administrator password when uninstalling the software. When
asked for a password, enter the password to proceed with the operation.
Notes
1
2
Page 34
34
10
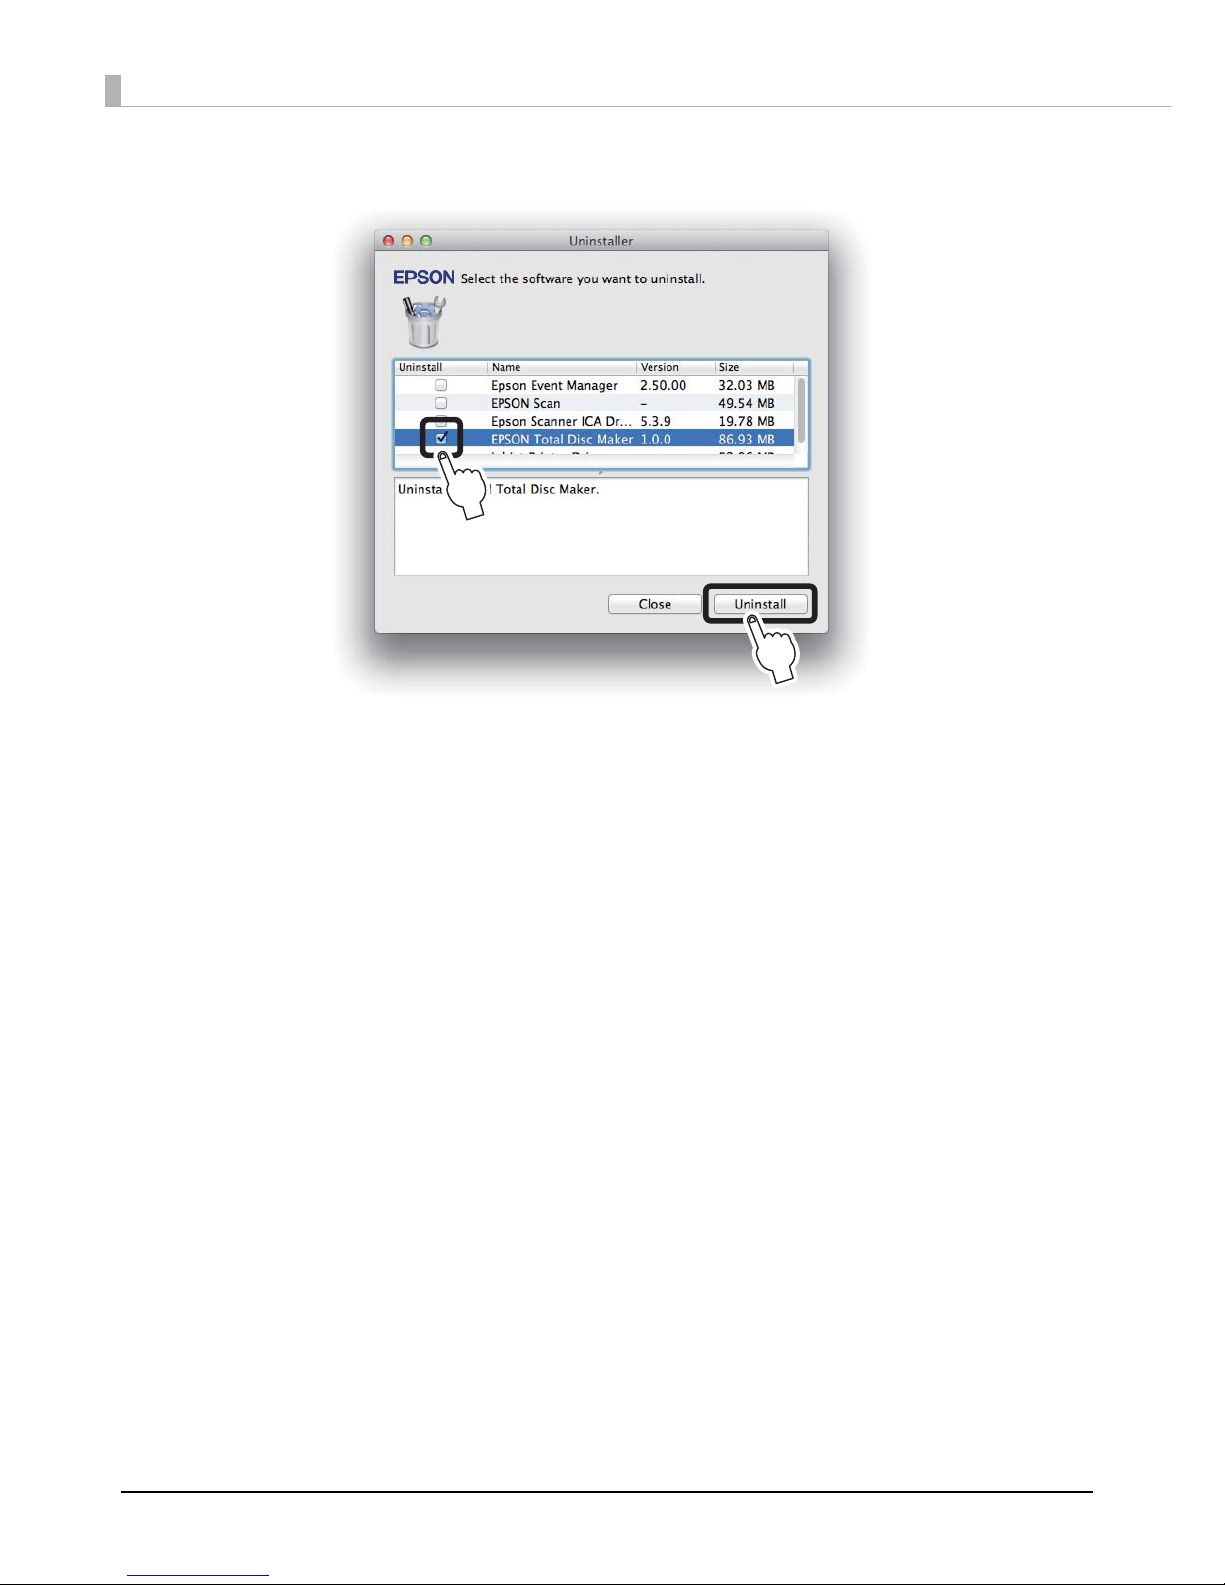
Select EPSON Total Disc Maker, and click Uninstall.
11
When the uninstall complete screen appears, click Quit.
1
2
Page 35
35
Using Software
Using Software
EPSON Total Disc Maker
What is EPSON Total Disc Maker?
EPSON Total Disc Maker is software for registering the write data* and the print data for the label surface, and
publishing to this product (PP-100II/PP-100/PP-100AP/PP-50).
In EPSON Total Disc Maker, the execution of writing data* and printing labels is referred to as “publishing.”
Publishing enables this product to write data to a CD or DVD and print the label to create a finished disc.
*: Writing data is not available with the PP-100AP.
Starting EPSON Total Disc Maker
1
Click [Launchpad] in the Dock.
2
Click EPSON Software.
3
Click [EPSON Total Disc Maker].
The EPSON Total Disc Maker starts.
EPSON Total Disc Maker Help
EPSON Total Disc Maker Help contains the procedures for using and specifications of EPSON Total Disc Maker.
Follow the steps below to display EPSON Total Disc Maker Help.
1
Start up EPSON Total Disc Maker.
2
Select EPSON Total Disc Maker Help from the Help menu.
EPSON Total Disc Maker Help appears.
If you drag and drop the [EPSON Total Disc Maker] icon to the Dock, the [EPSON Total Disc
Maker] icon will be added in the Dock. After that, clicking the icon starts up the EPSON
Tot al D isc Mak er.
Notes
Page 36
36
Screen Configuration of EPSON Total Disc Maker
This section describes the screen configuration of EPSON Total Disc Maker.
See EPSON Total Disc Maker Help for details on use.
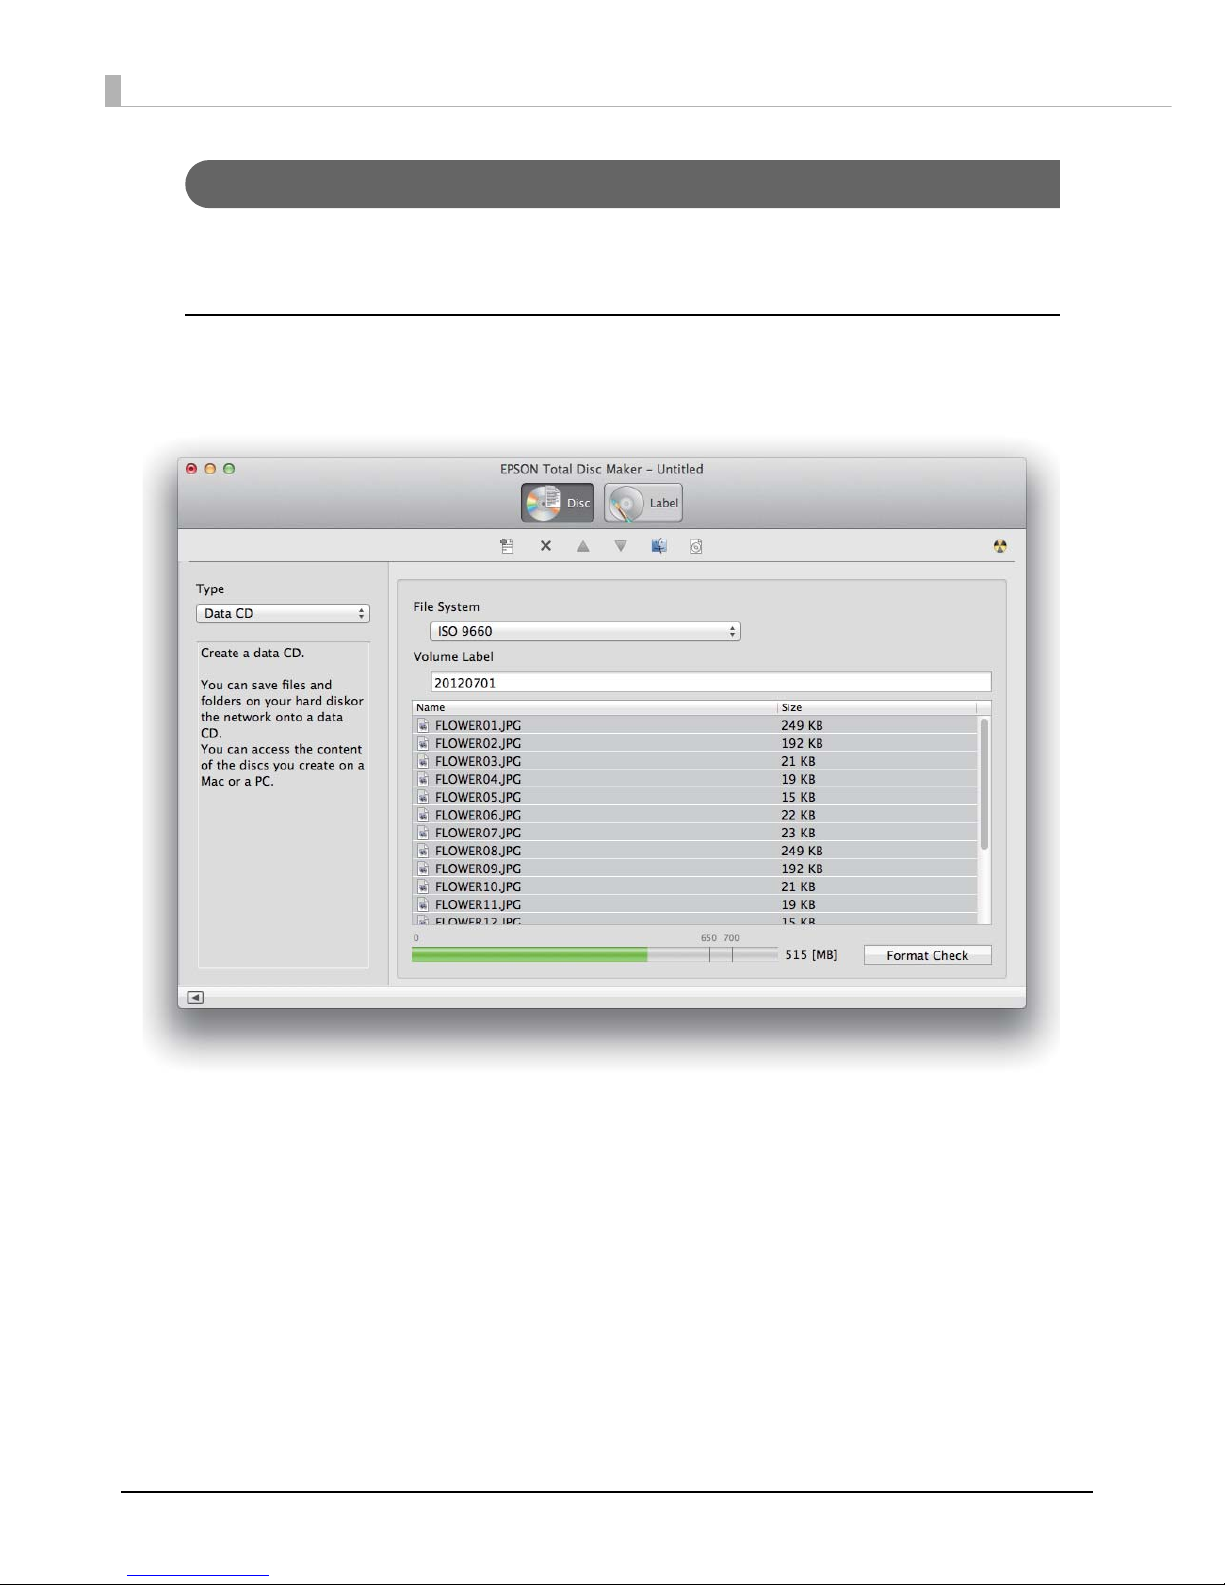
Disc view
Starting EPSON Total Disc Maker or clicking Disc in Label view displays Disc view.
In Disc view, you can register the data to write to the disc. Disc view is not used with the PP-100AP.
Page 37
37
Using Software
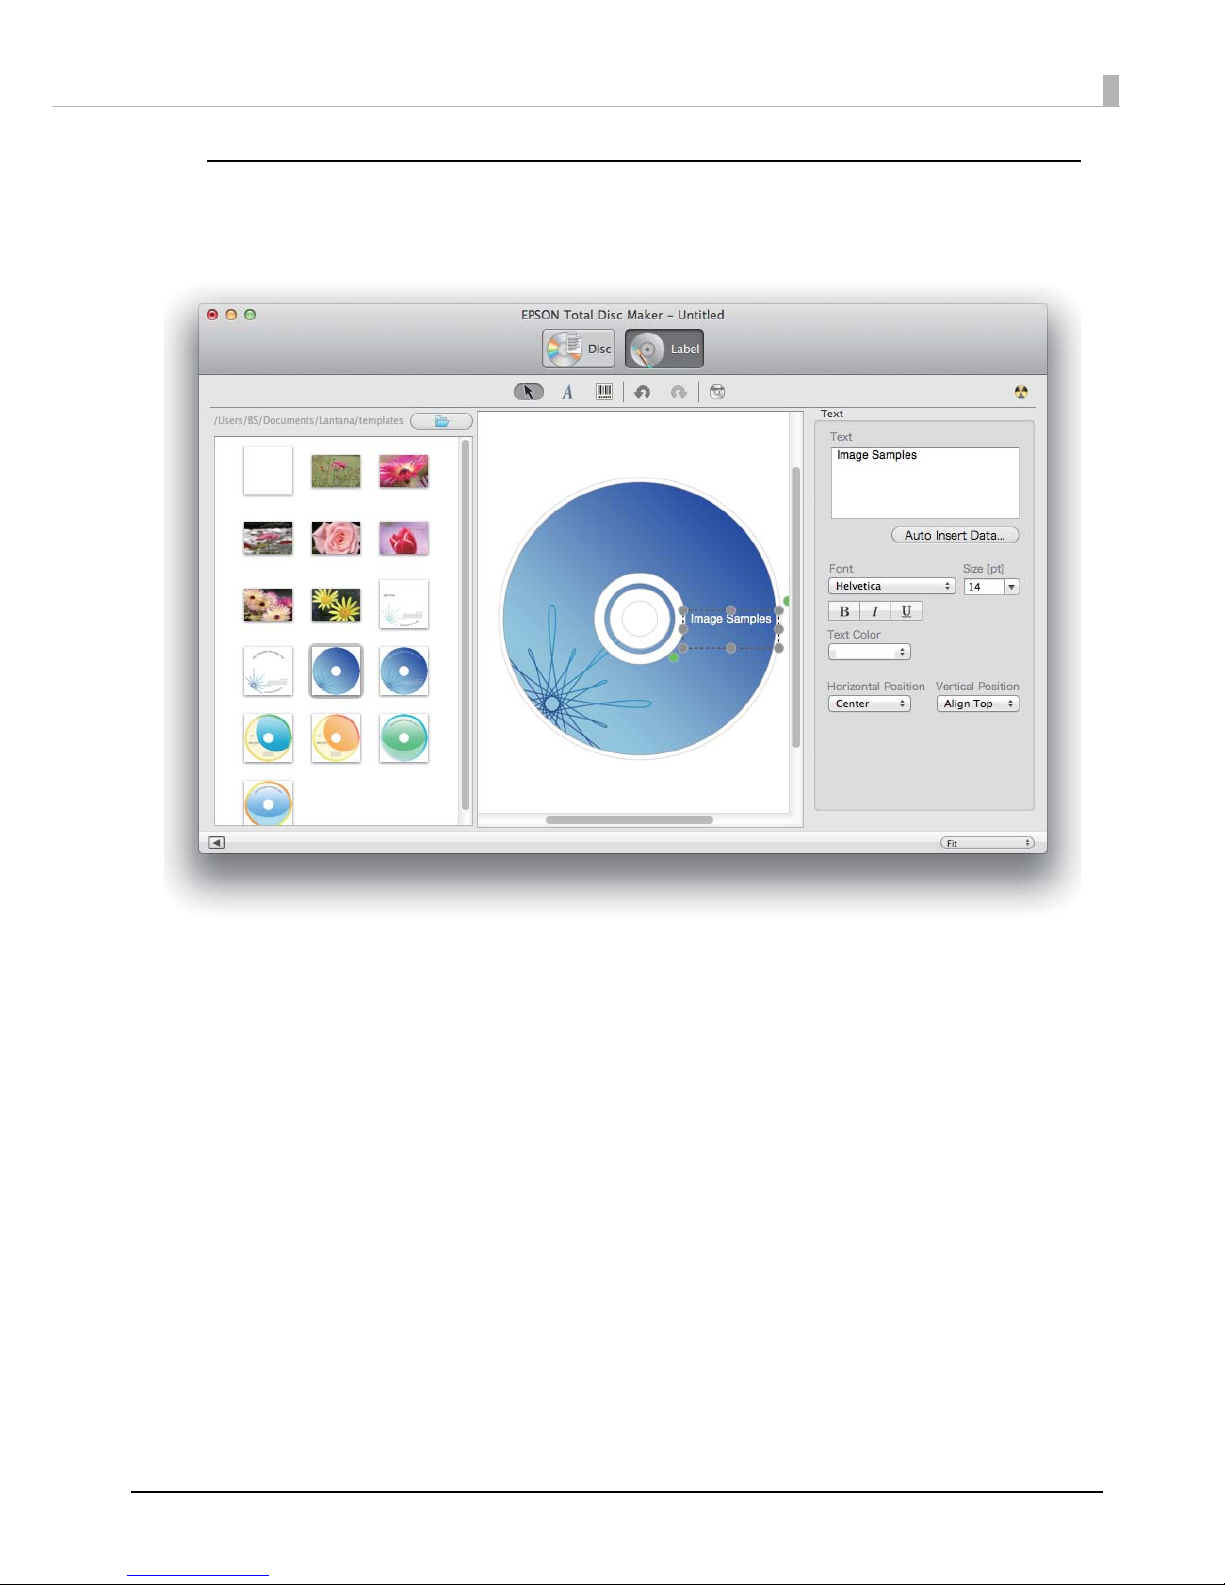
Label view
Clicking Label in Disc view displays Label view.
In Label view, you can edit the data for printing on the label surface of the disc.
Page 38
38
Publish view
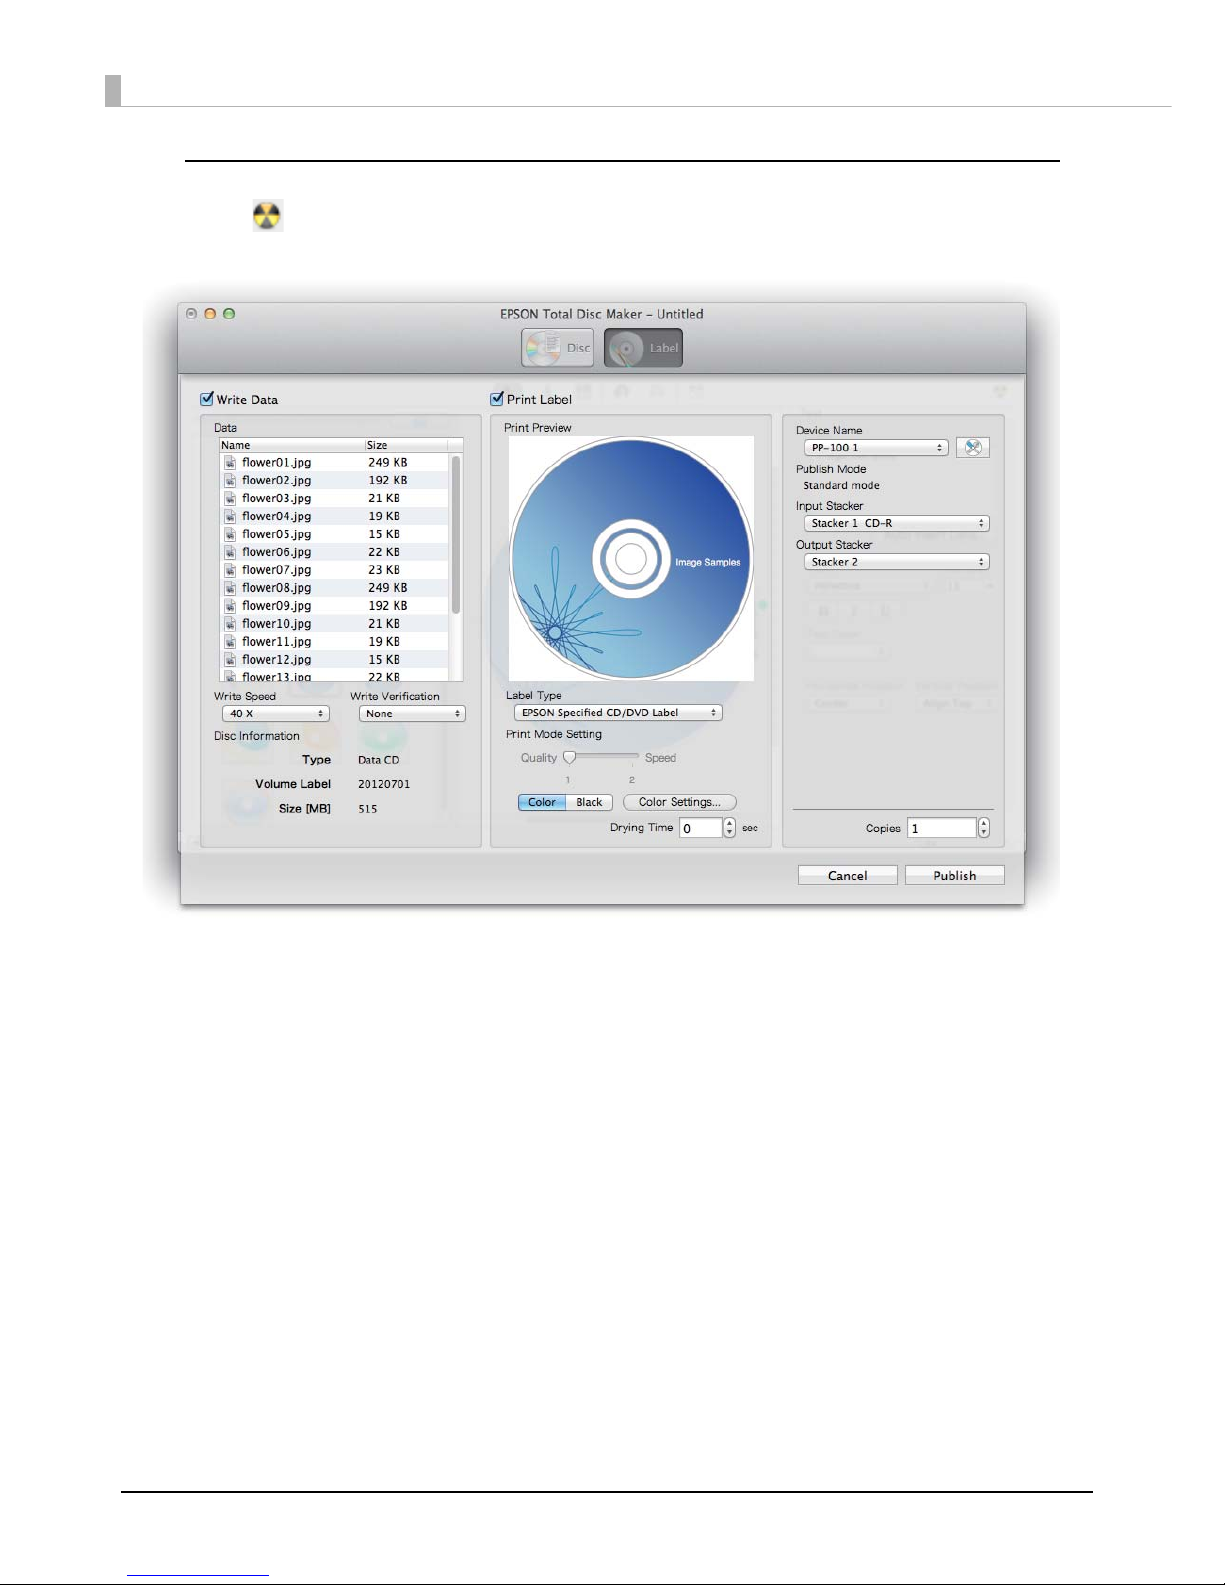
Clicking [Publish] in Disc view or Label view displays Publish view.
In Publish view, you can publish the writing data and label to this product.
Page 39
39
Using Software
EPSON Total Disc Utility
What is EPSON Total Disc Utility?
EPSON Total Disc Utility is software for displaying the product’s current status, remaining ink, job information, and
other information, as well as for the basic settings for publishing discs with the product, such as settings for publish
mode, stackers, and drives. You can also pause/cancel jobs and perform maintenance, such as running nozzle checks
and cleaning the print head.
Starting EPSON Total Disc Utility
1
Click [Launchpad] in the Dock.
2
Click EPSON Software.
3
Click [EPSON Total Disc Utility].
The EPSON Total Disc Utility starts.
EPSON Total Disc Utility Help
EPSON Total Disc Utility Help contains the procedures for using and specifications of EPSON Total Disc Utility.
Follow the steps below to display EPSON Total Disc Utility Help
1
Start up EPSON Total Disc Utility.
2
Select EPSON Total Disc Utility Help from the Help menu.
EPSON Total Disc Utility Help appears.
• If you drag and drop the EPSON Total Disc Utility icon to the Dock, the EPSON Total Disc
Utility icon will be added in the Dock. After that, clicking the icon starts up EPSON Total
Disc Utility.
• You can also start EPSON Total Disc Utility by clicking Publish in EPSON Total Disc Maker.
Notes
Page 40
40
Screen Configuration of EPSON Total Disc Utility
This section describes the screen configuration of EPSON Total Disc Utility.
See EPSON Total Disc Utility Help for details on use.
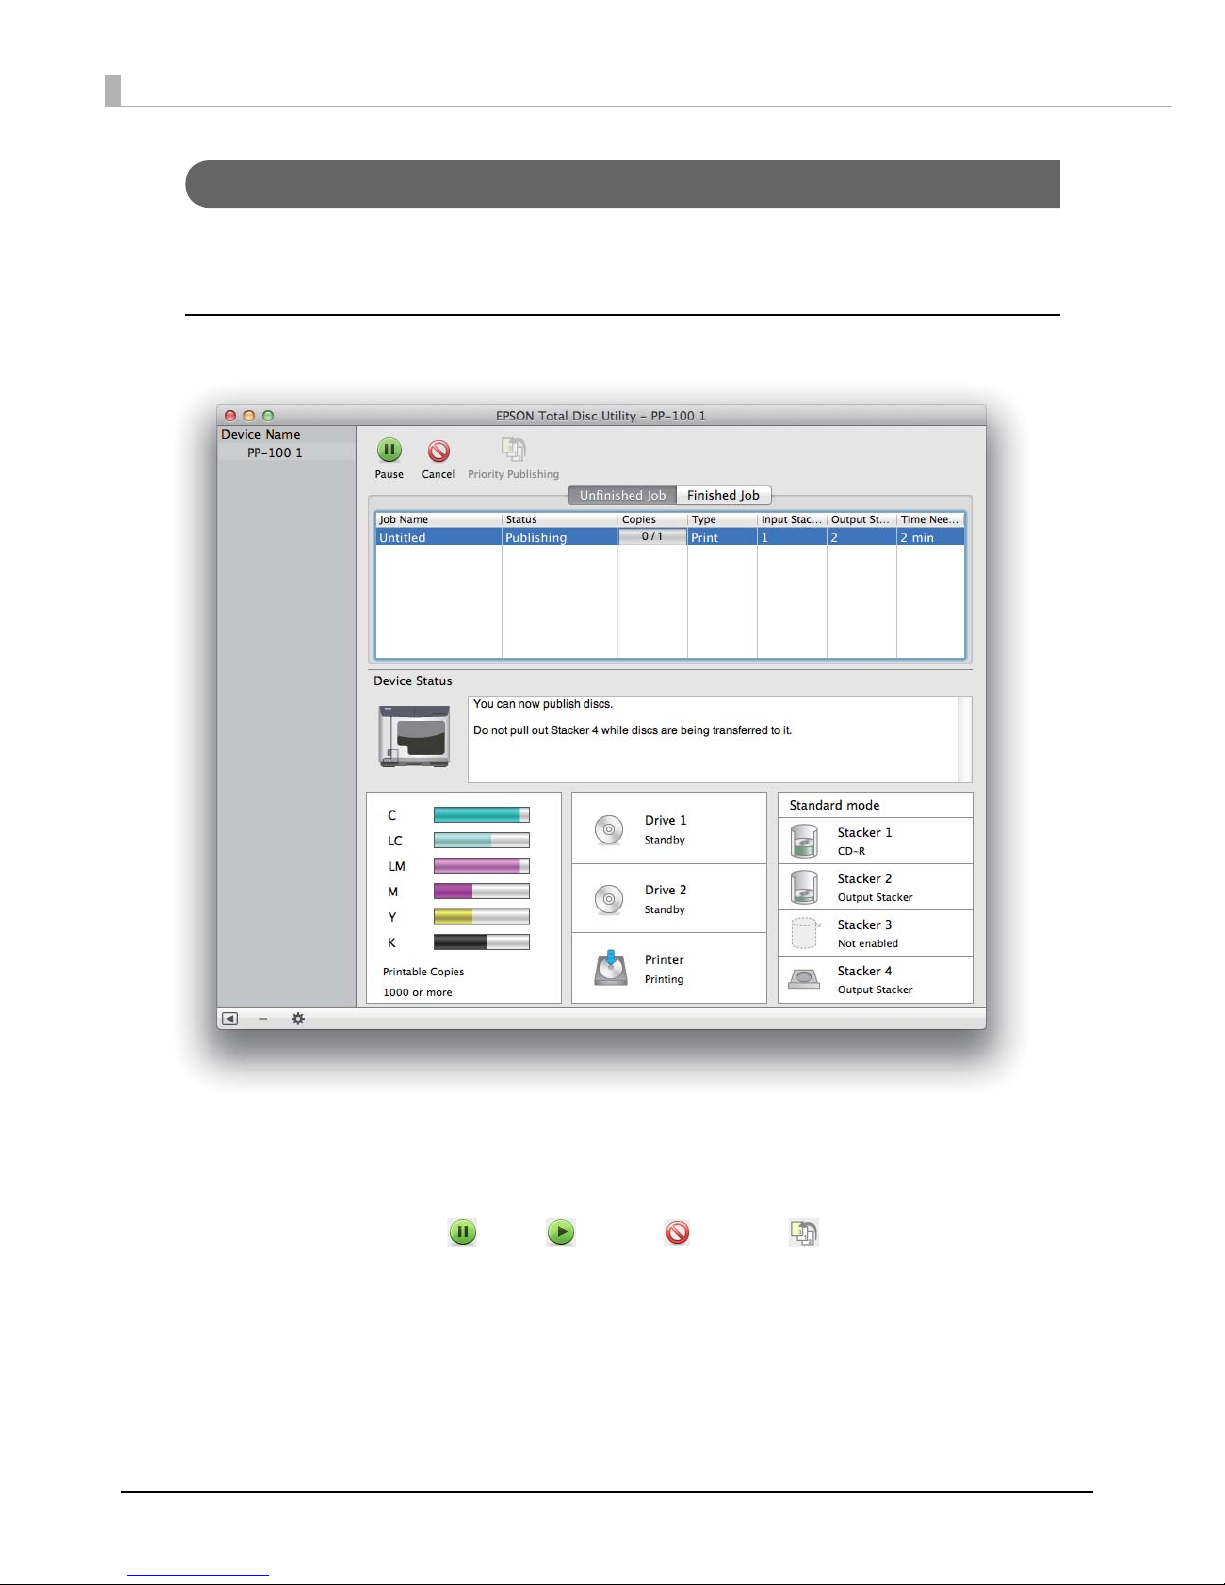
Main screen
Click the Unfinished Job tab and Finished Job tab to display each screen.
Unfinished Job screen
The Unfinished Job screen displays information on job status.
Selecting a job enables you to click [Pause], [Resume], [Cancel], or [Priority Publishing].
Finished Job screen
The Finished Job screen displays information on jobs for which publishing is finished.
Double-clicking a job displays detailed job information.
Page 41
41
Using Software
Properties screen (General screen)
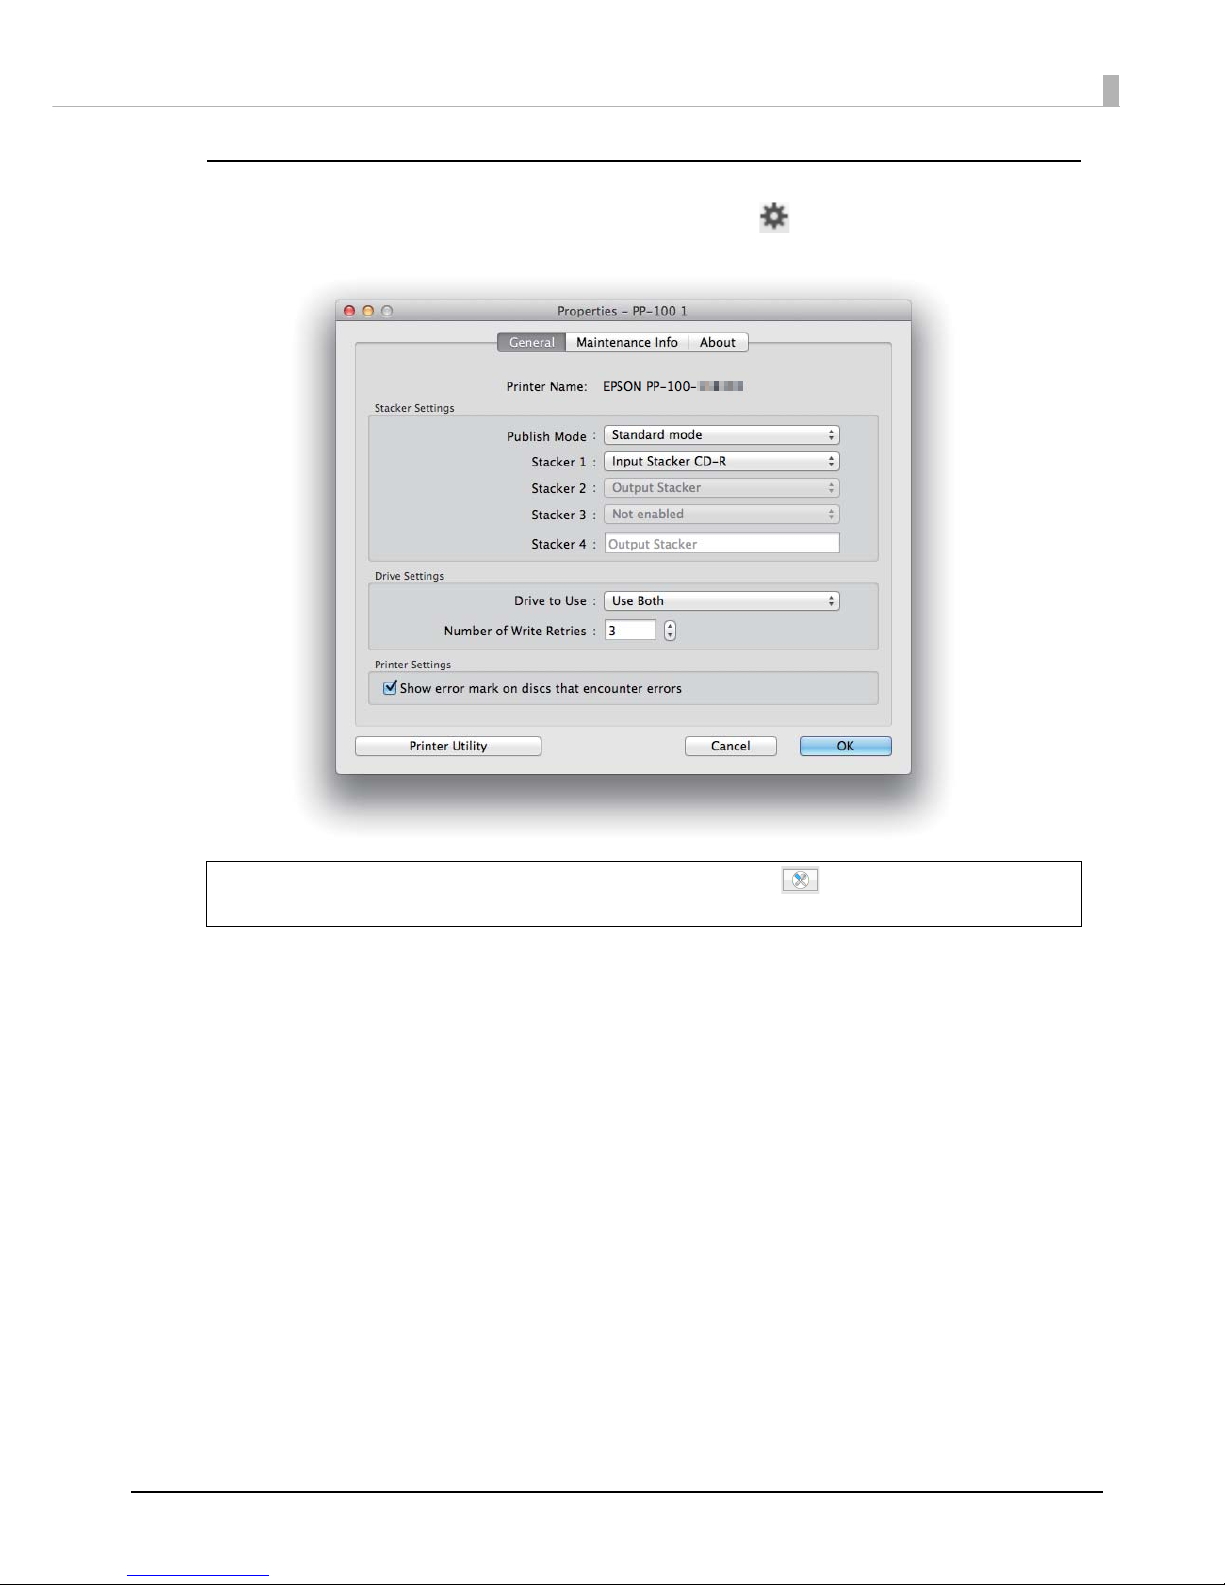
On the Main screen, double-click a model name for Device Name or click [Properties] to display the device’s
Properties screen.
Click the General tab, Maintenance Info tab, and About tab to display each screen.
Click Printer Utility in each screen to display the Printer Utility screen.
You c a n also d i s p lay th e Properties screen by clicking in Publish view of EPSON Total
Disc Maker.
Notes
Page 42
42
Maintenance Info screen
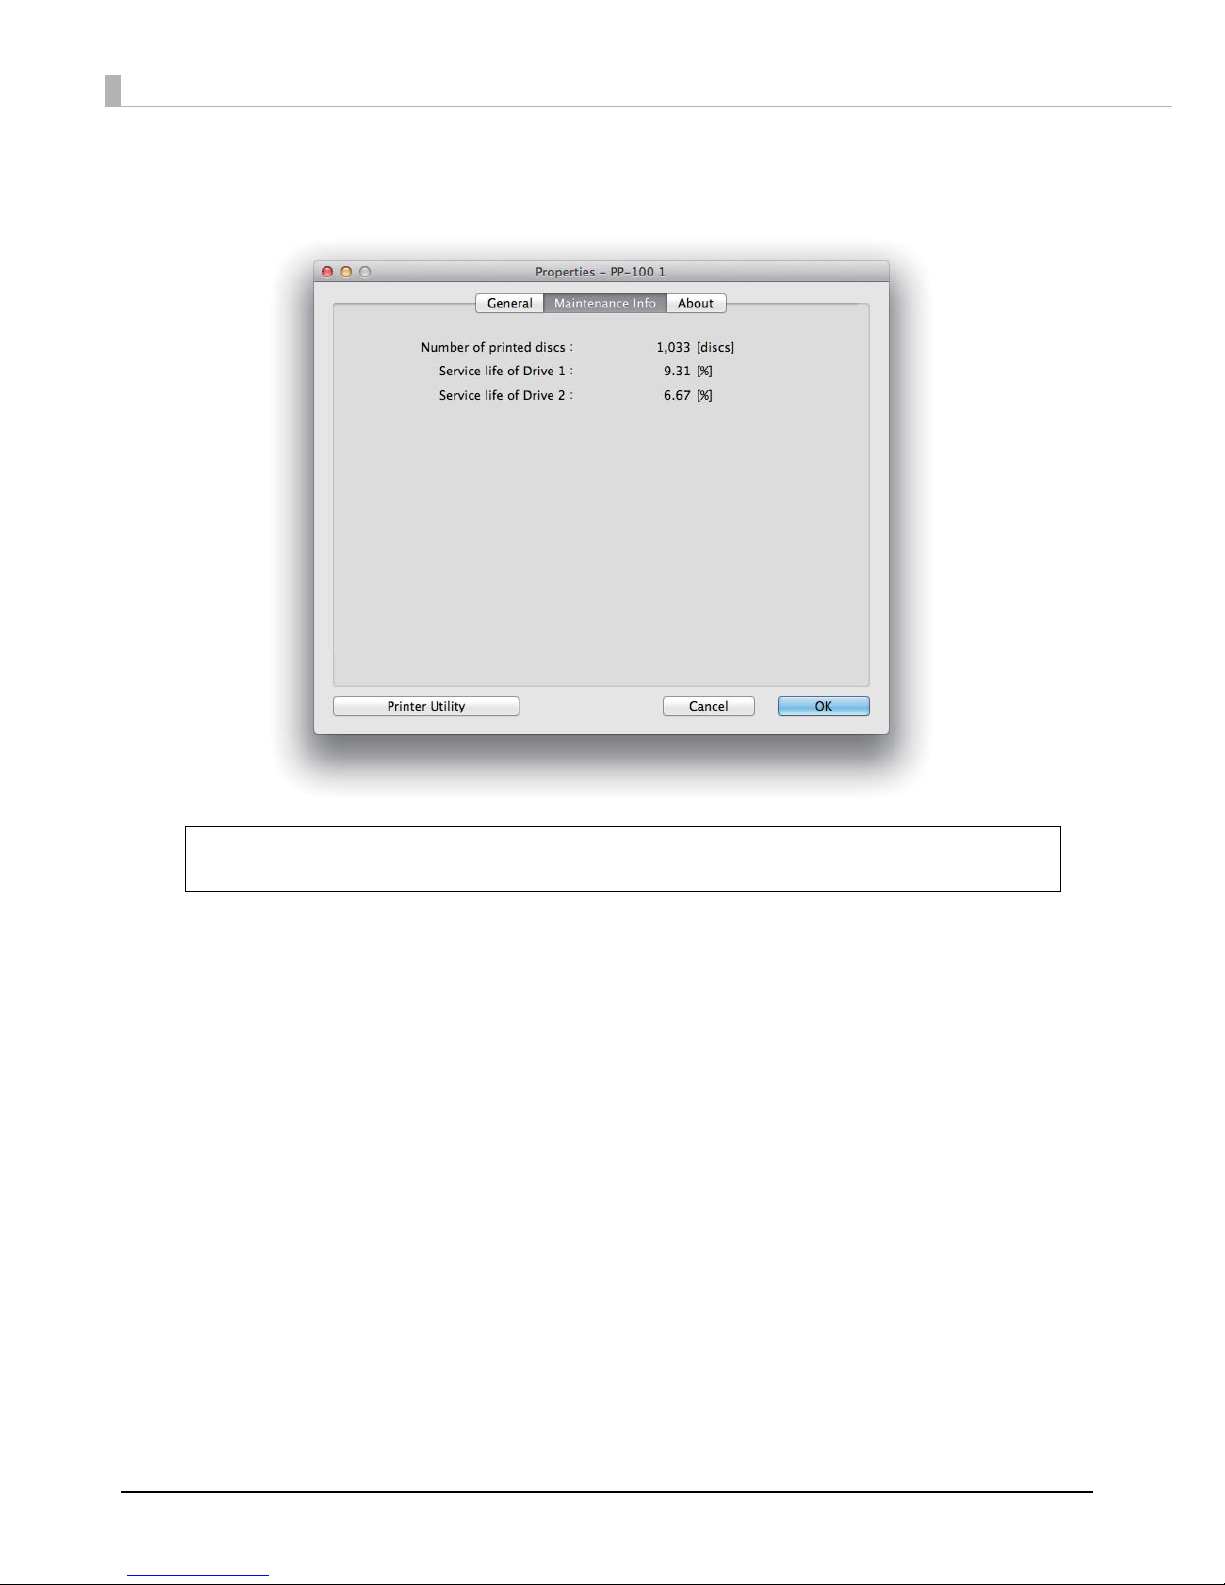
In the Maintenance Info screen, you can check maintenance information for your product.
See “Checking Maintenance Information” on page 100 for details.
Notes
Page 43
43
Using Software
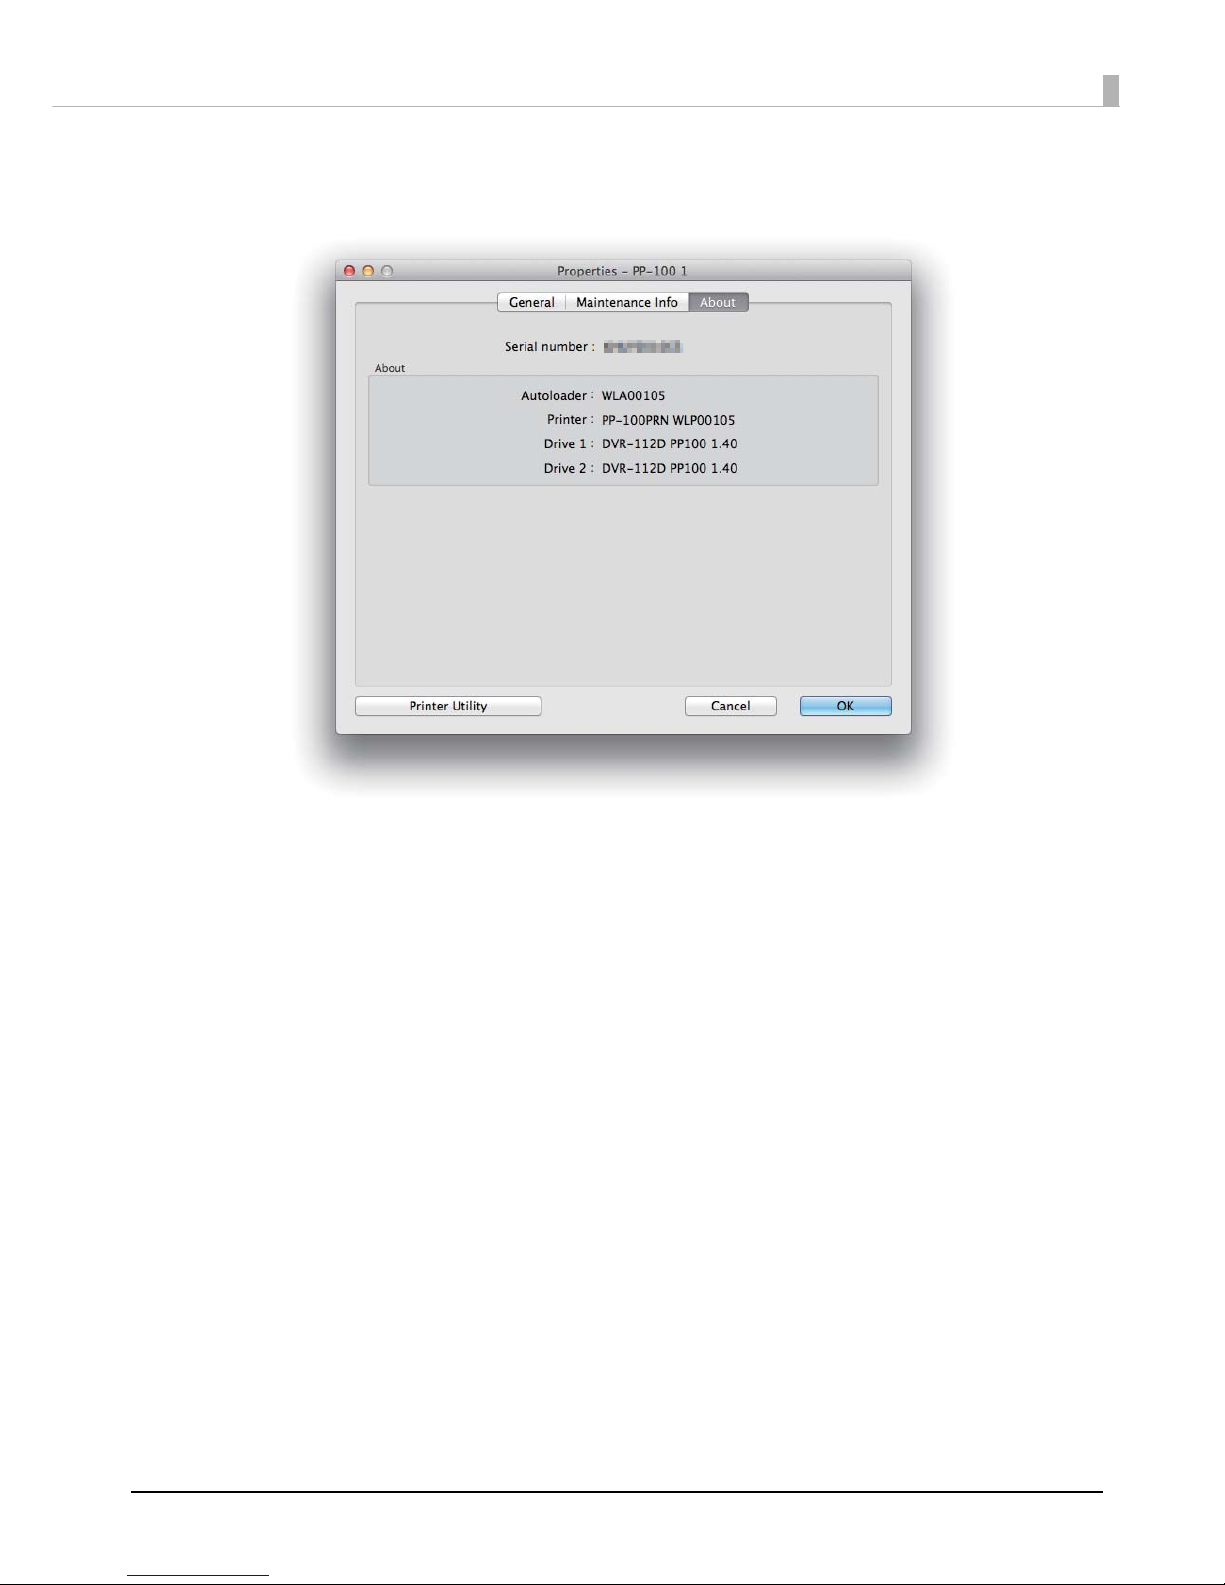
About screen
In the About screen, you can check the serial number and versions for your product.
Page 44
44
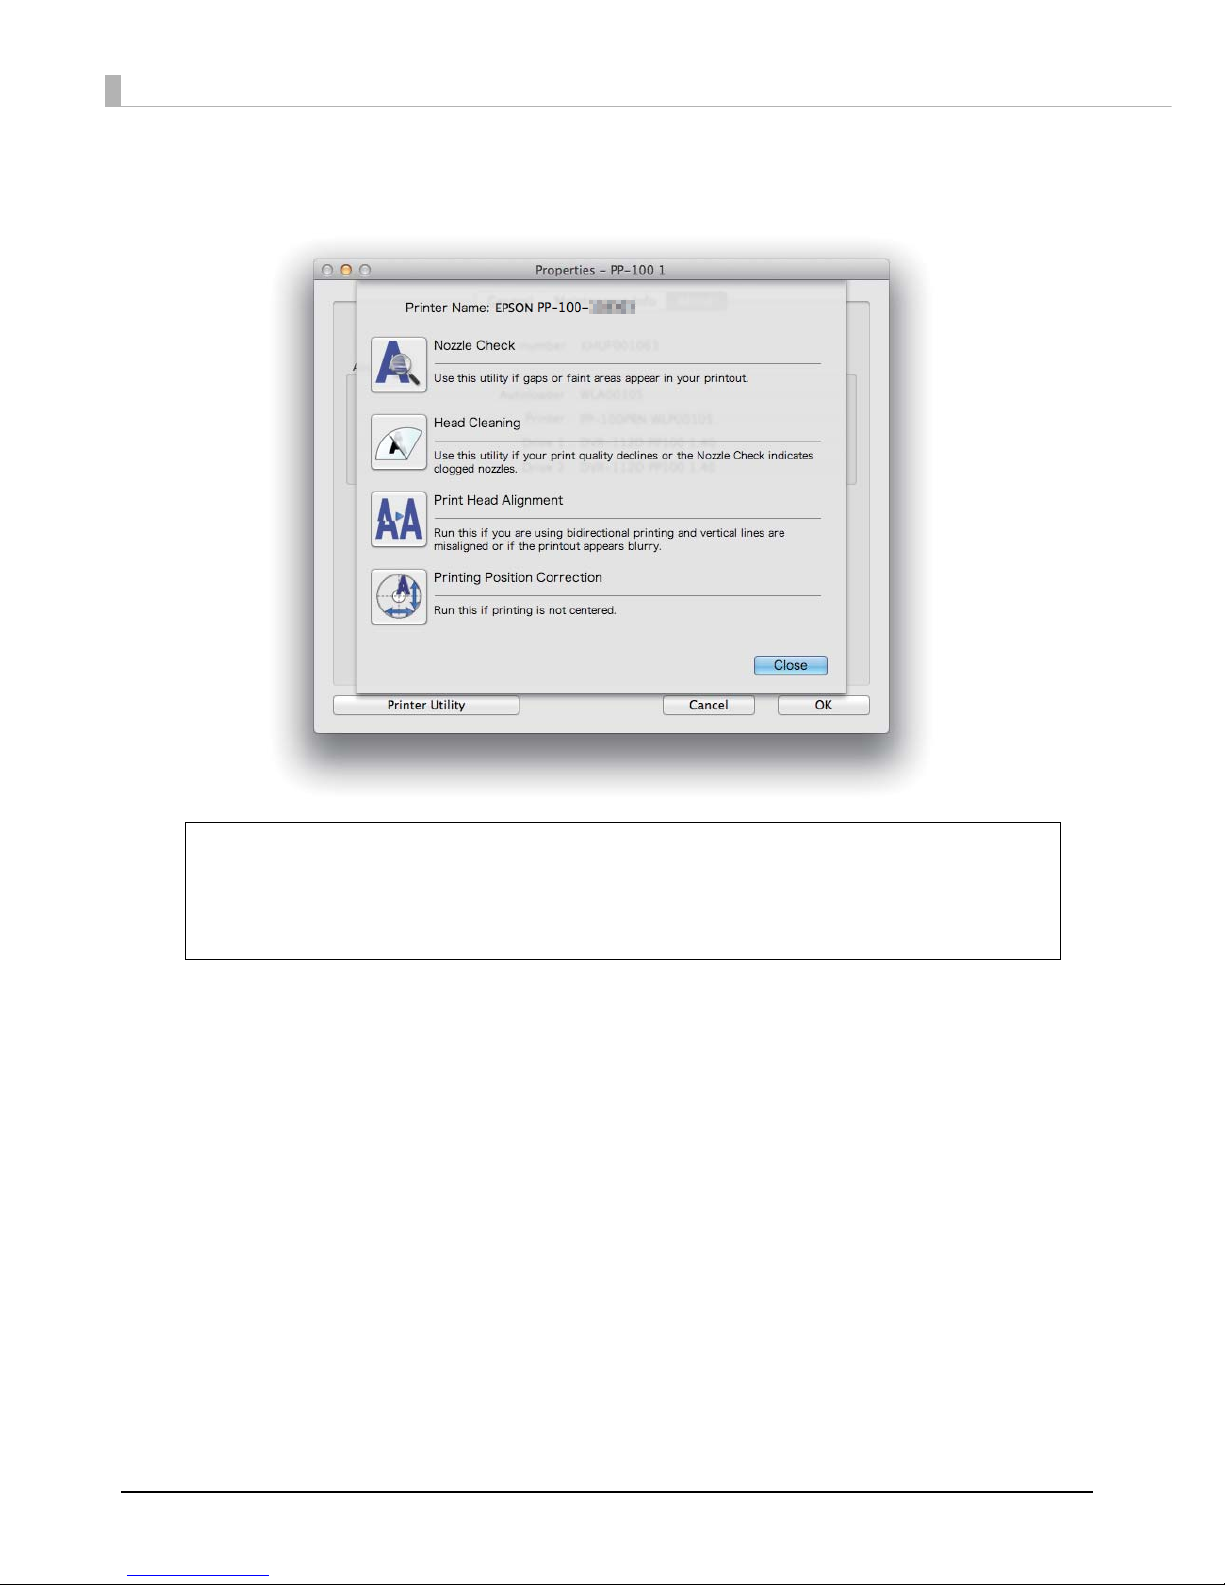
Printer Utility screen
In the Utility screen, you can run various maintenance functions to maintain the print quality.
• For details on Nozzle Check, see “Checking the Print Head Nozzles” on page 85.
• For details on Head Cleaning, see “Cleaning the Print Head” on page 87.
• For details on Print Head Alignment, see “Aligning the Print Head” on page 90.
• For details on Printing Position Correction, see “Correcting the Printing Position” on
page 93.
Notes
Page 45
45
Using Software
Printer Driver
What is Printer Driver?
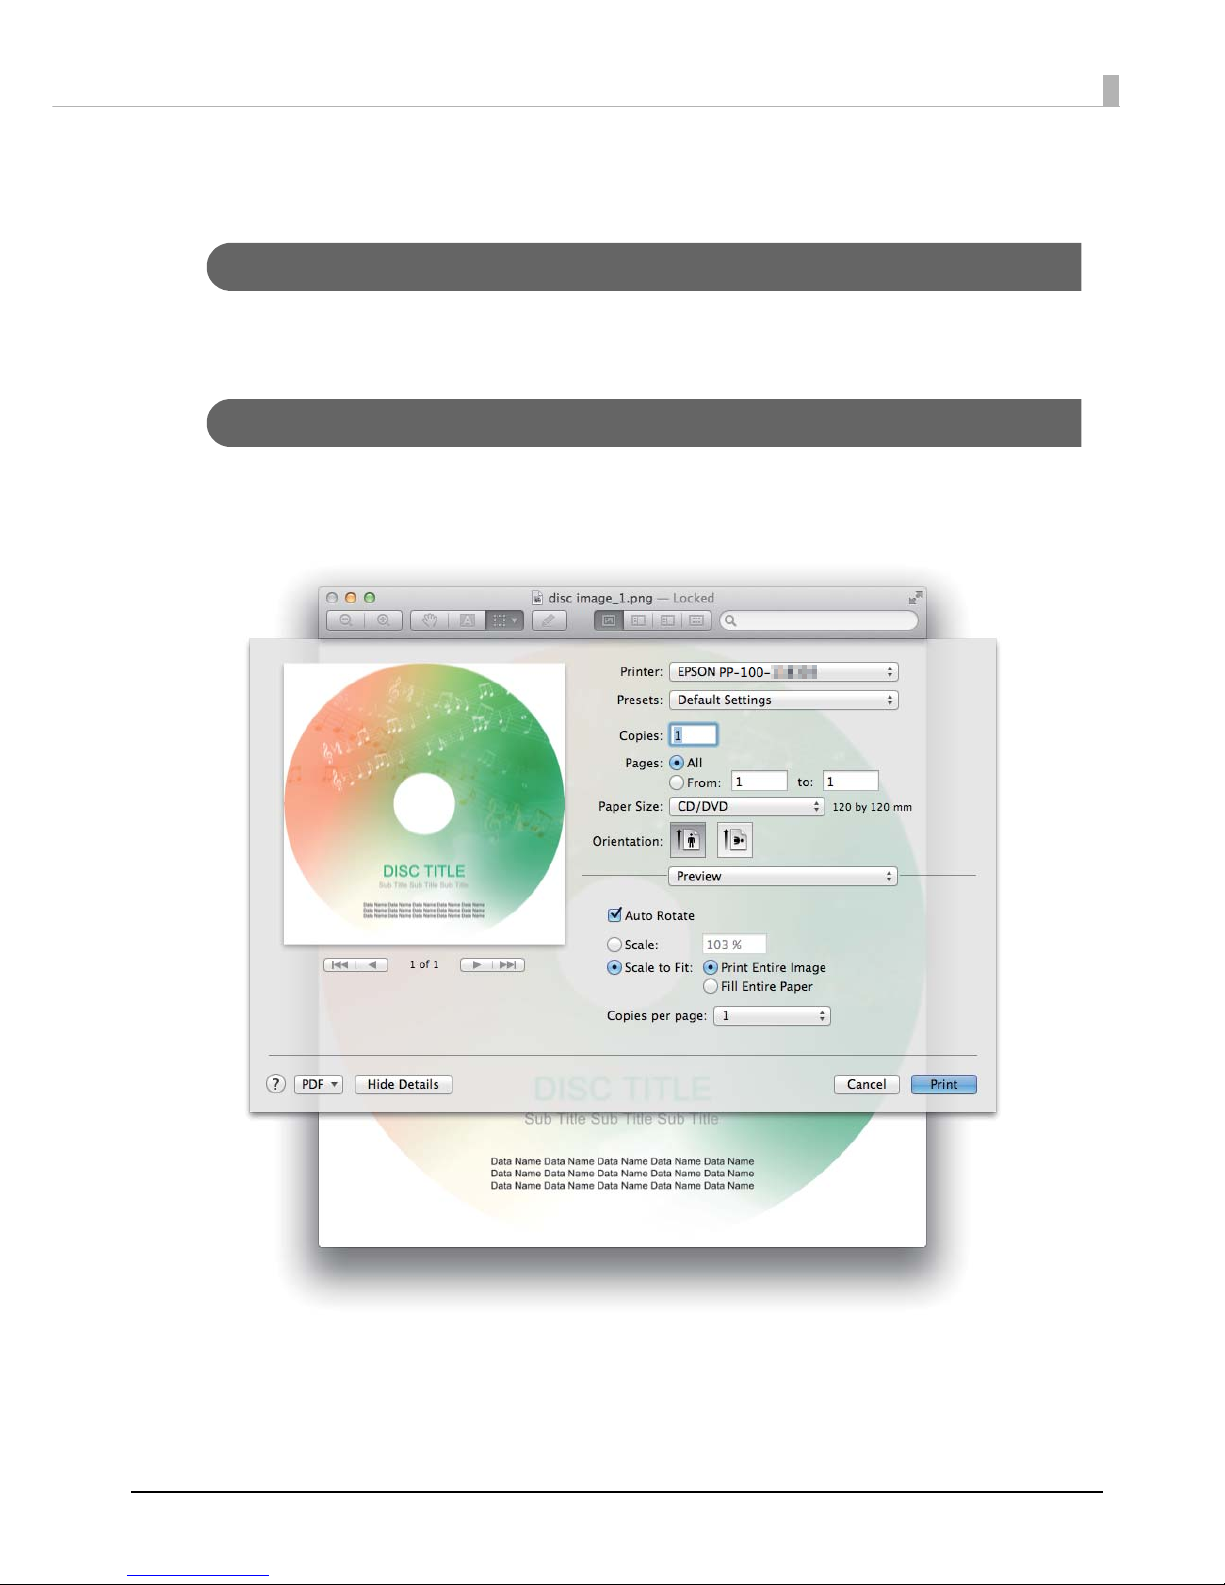
The printer driver is software for the necessary settings to publish discs from commercially available applications
other than EPSON Total Disc Maker.
Displaying Printer Driver Screen
Select Print... from the File menu of your application to display the setting screen of the
printer driver.
Page 46
46
Screen Configuration of Printer Driver
This section describes the screen configuration of the printer driver.
Print Settings area
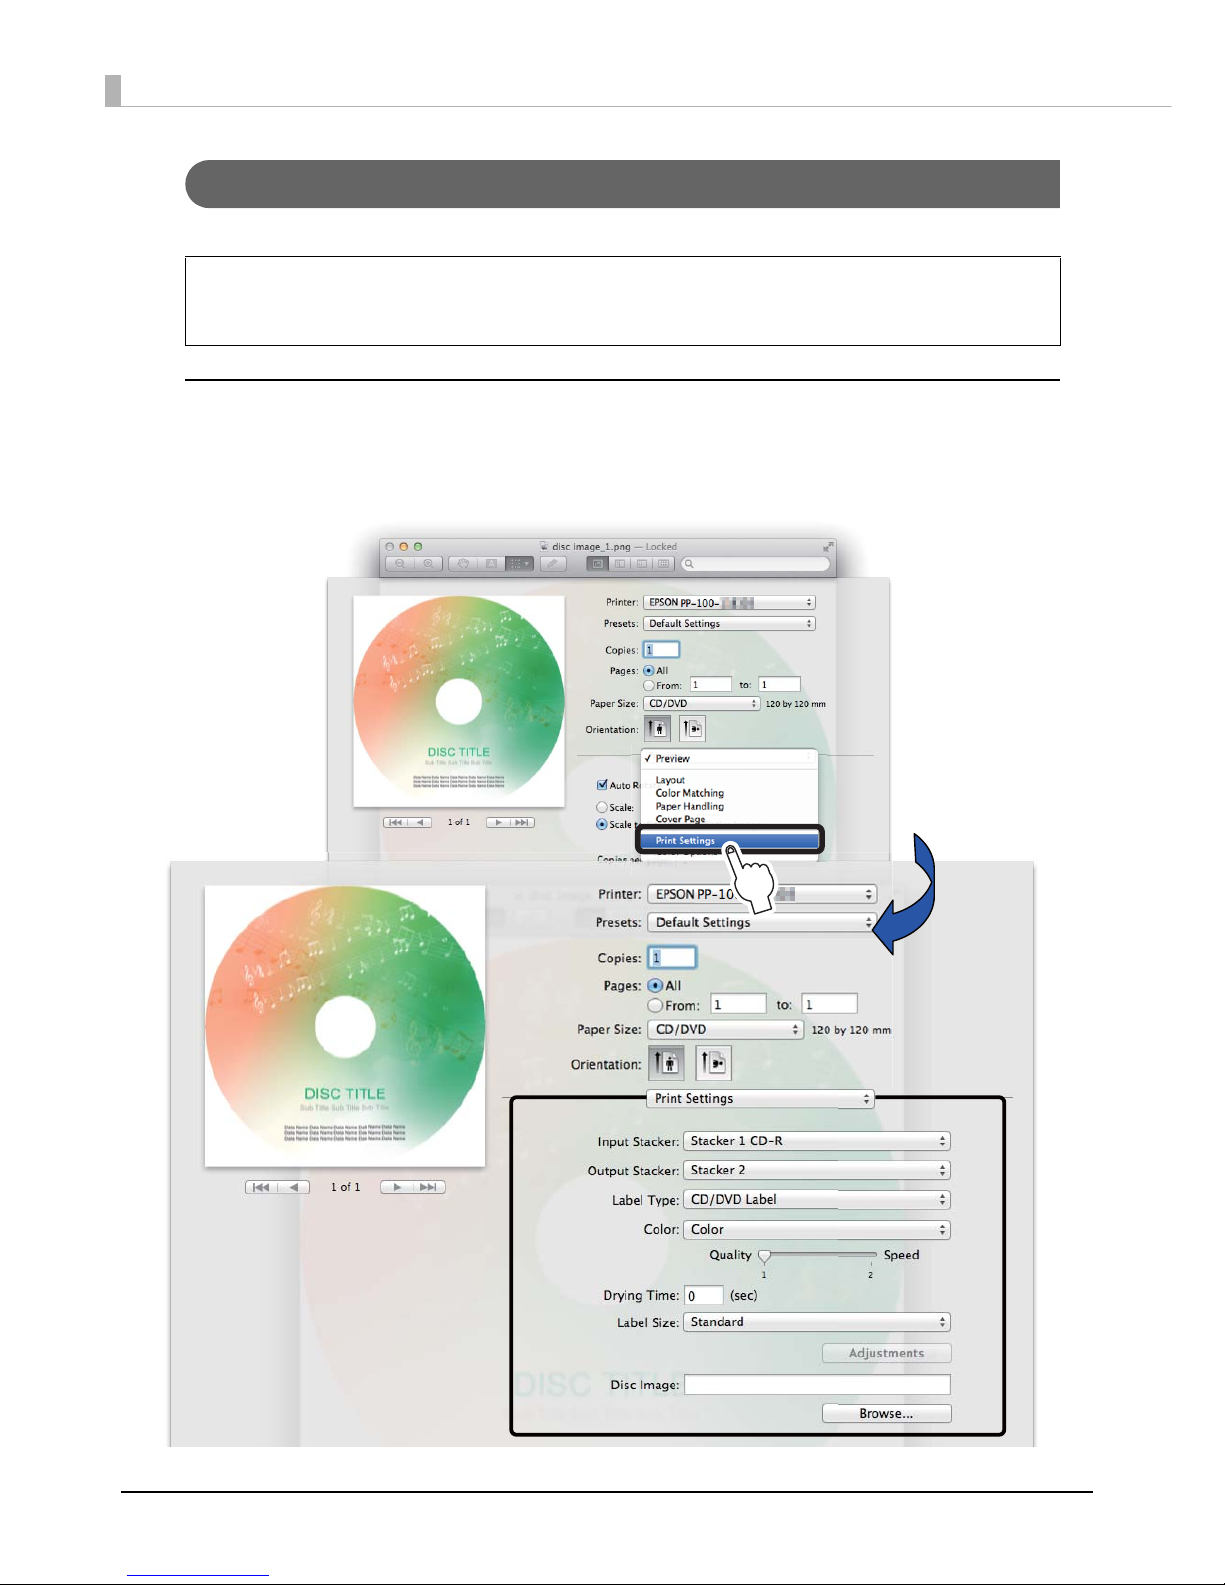
In the Print Settings area, you can configure basic settings for label printing and disc image file setting to write data
onto discs.
Display the printer driver screen, and select Print Settings to display the Print Settings area.
After setting, you can store the current setting as a preset. However, some items of the
preset setting may not be reflected if the current publish mode is different from the publish
mode when the preset was stored.
Notes
Page 47
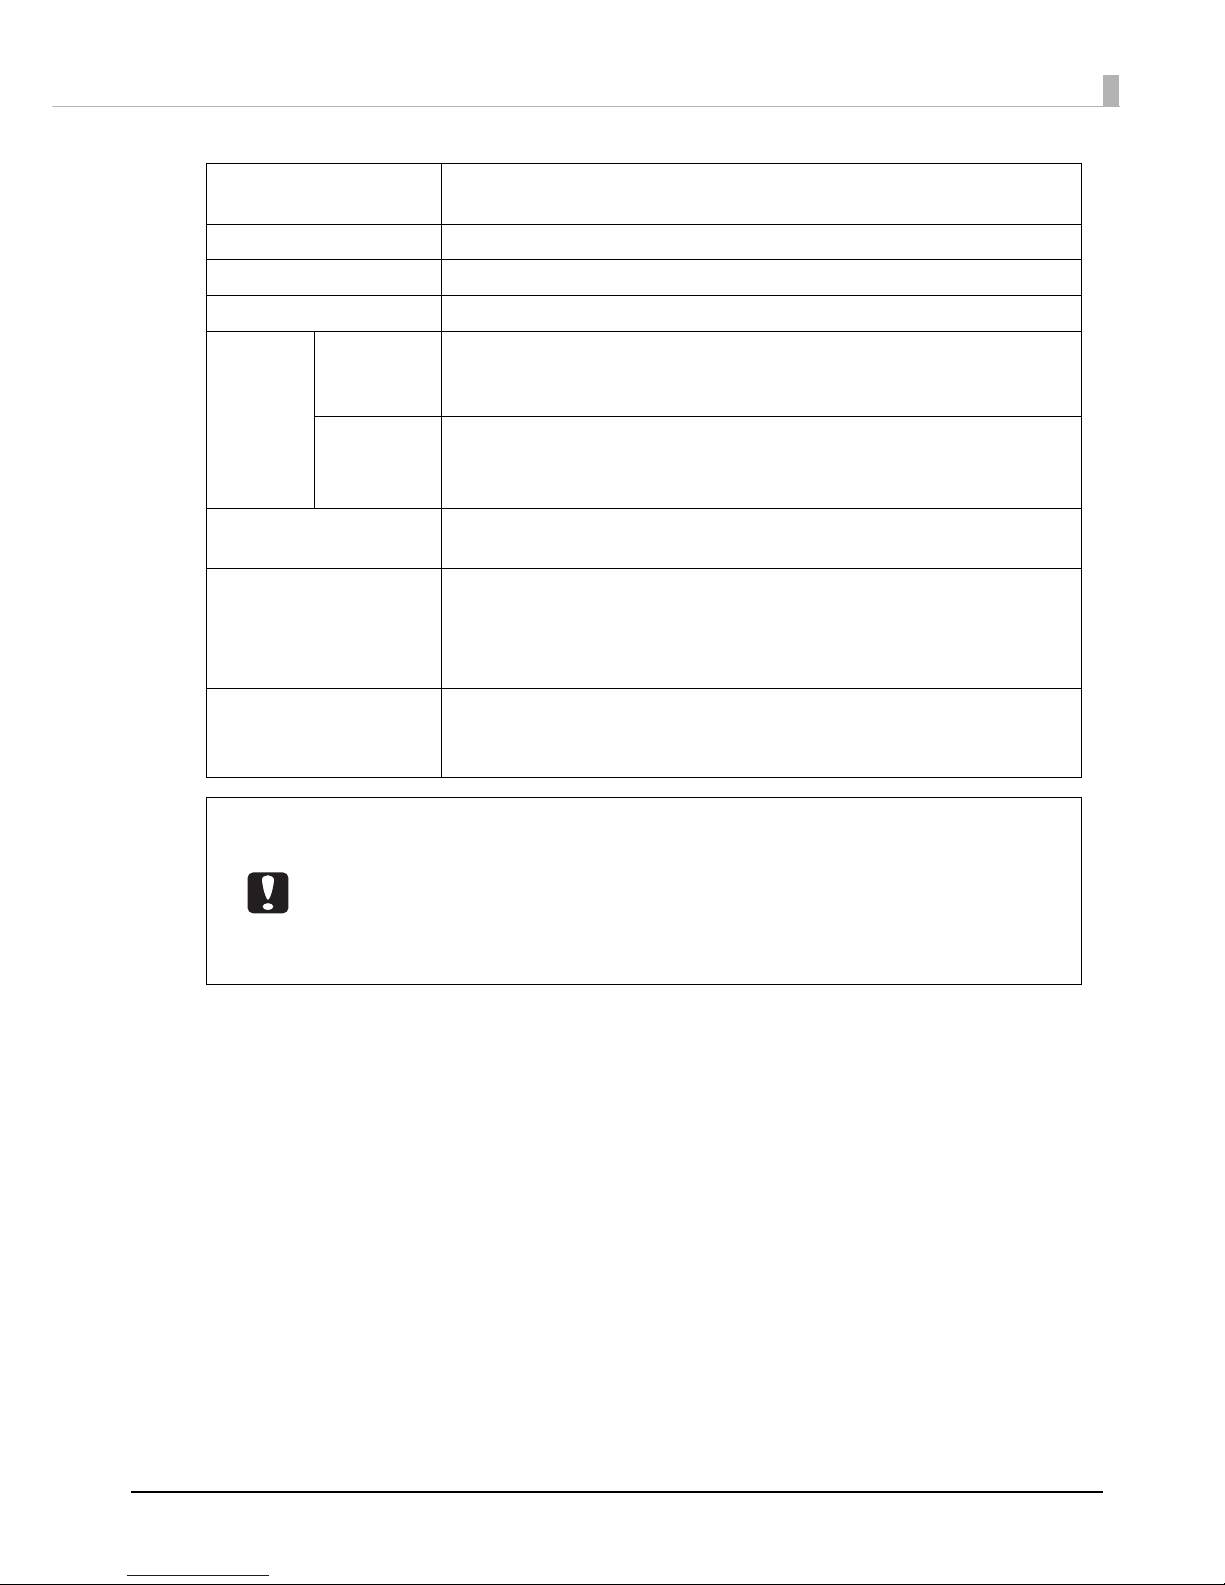
47
Using Software
Input Stacker
Allows you to select the stacker where the discs to be written/printed are
set.
Output Stacker Allows you to select the stacker to which to output published discs.
Label Type Allows you to select the type of disc label to be printed.
Color Select Color to print in color, and select Black for monochrome printing.
Quality/
Speed
PP-100II
PP-100
PP-50
1: Prints labels with an emphasis on printing quality.
2: Prints labels with an emphasis on printing speed.
PP-100AP
1: Prints labels with an emphasis on printing quality.
2: Prints labels with an emphasis on printing speed.
3: Prints labels with even more emphasis on speed than when this is set to 2.
Drying Time
Allows you to set the time taken to dry the ink on the discs in the printer tray
after label printing is finished.
Label Size
Allows you to select from among the following label sizes.
• Standard: Outside Diameter 116.0 mm, Inside Diameter 45.0 mm
• Wide: Outside Diameter 116.0 mm, Inside Diameter 25.5 mm
• User Defined: Allows you to set a custom size
Disc Image
(only for PP-100II/PP-100/
PP-50)
Allows you to specify a disc image file if you write data onto a disc at the
same time as label printing.
• If you print on the matte label type of EPSON specified CDs, set Label Type to CD/DVD
Label.
• If you print on the matte label type of EPSON specified DVDs, set Label Type to CD/DVD
Premium Label.
• If Label Type is set to EPSON Specified CD/DVD Label, Quality/Speed is set to 1.
• For setting the user defined label size, see “Printing on User Defined Label Size Discs” on
page 75.
Page 48
48
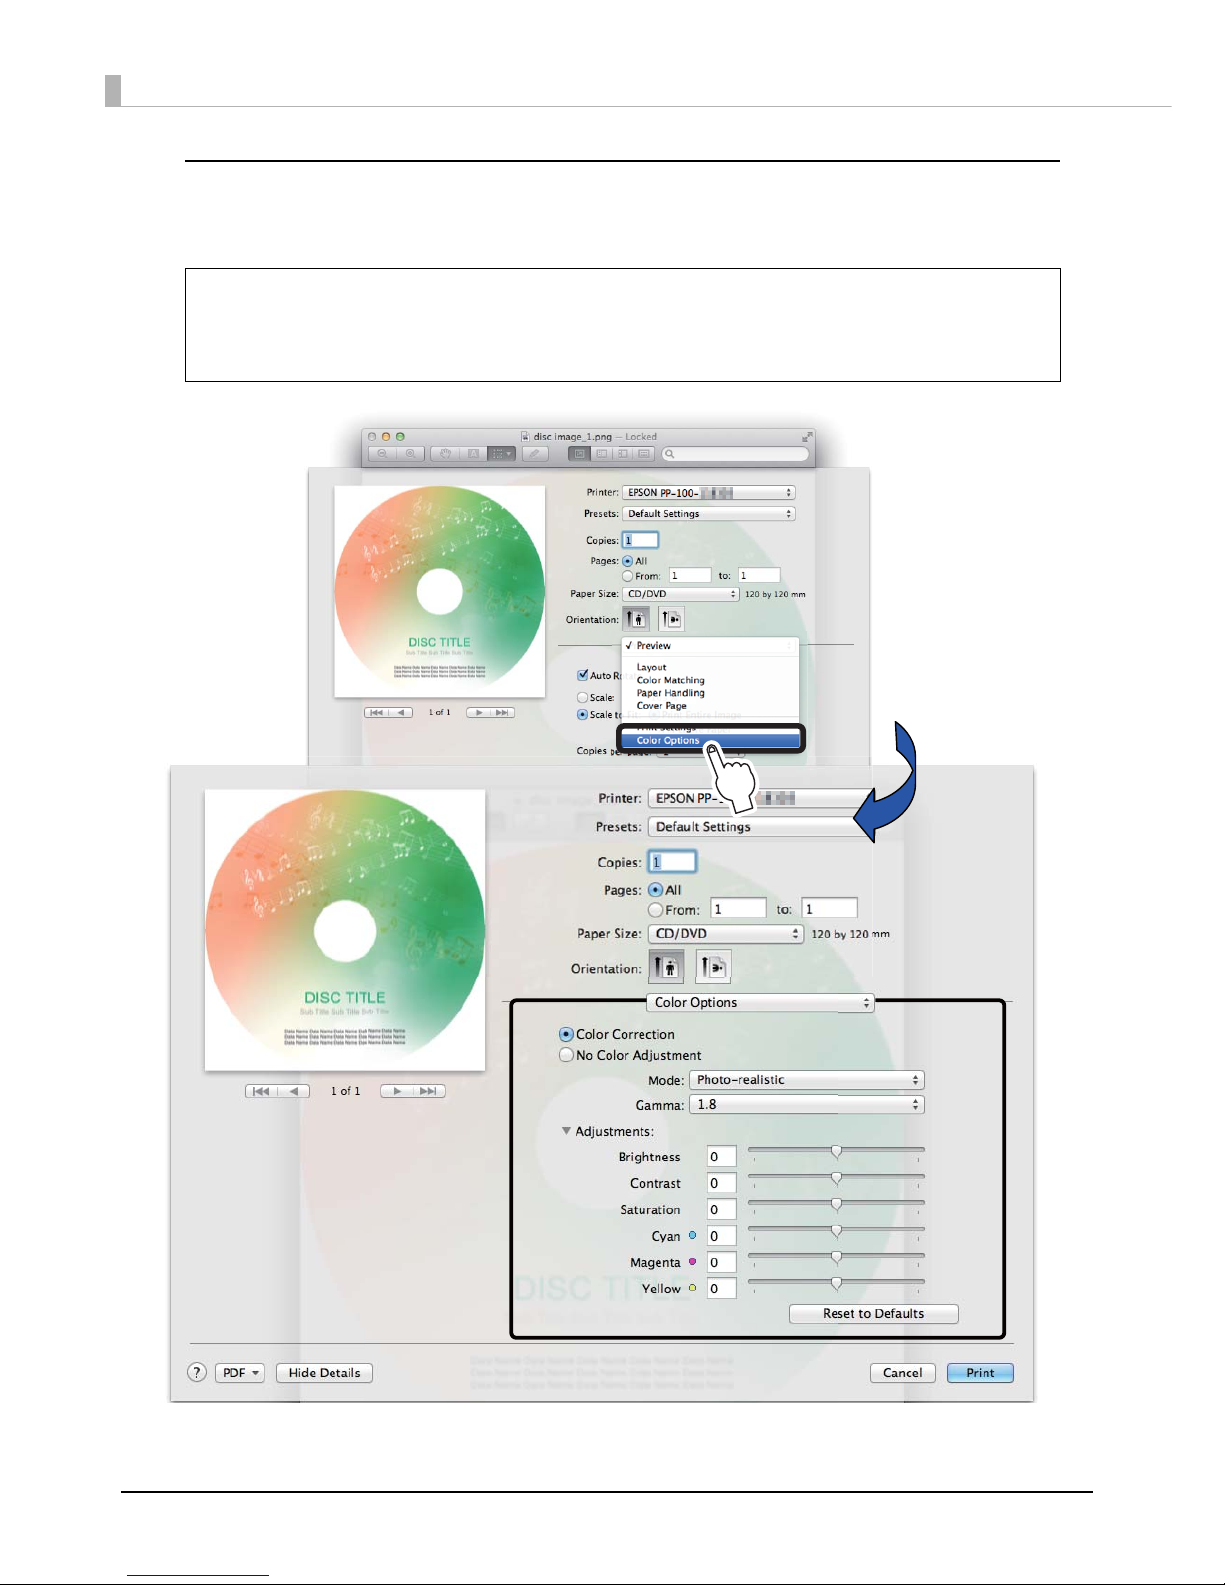
Color Options area
In Color Options area, you can adjust print colors.
Display the printer driver screen, and select Color Options to display the Color Options area.
• If you wish, you can make color adjustments at the time of printing without making
color adjustments to the actual data.
• If Color is set to Black in the Print Settings area, color adjustments cannot be made.
• For adjusting print colors, see “Adjusting Print Colors” on page 79.
Notes
Page 49

49
Publishing Discs
Publishing Discs
Compatible Disc Types
Printable disc and writable disc types differ. When using this product for both printing and writing*, use discs that are
compatible with both.
* Writing data is not available with the PP-100AP.
Printable Disc Types
The product can print on 12-cm CD/DVD discs that support using an inkjet color printer to print on the label surface*.
*
Discs for which “printable label surface,” “inkjet printer compatible,” or the like is specified in the instructions for
the discs.
• The product supports discs for inkjet printers. It does not support discs for thermal
transfer printers.
• Glossy discs other than EPSON specified CDs/DVDs are not supported.
• 80-mm discs are not supported.
• Do not use discs that have lens cleaner, labels or stickers, or condensation on them.
Doing so may result in an malfunction or failure.
• Do not use a cracked, warped, or deformed disc. The disc may break into pieces inside
the product, resulting in a malfunction, or an injury when the disc is taken out.
• With some discs, ink may get on the recording surface if the discs are stacked
immediately after printing. We recommend using a disc you do not need to do a test
print to check the print quality. Wait at least 24 hours before checking the color.
• With some discs, the printing position may be shifted. Perform the print head alignment
and the printing position correction. (See “Aligning the Print Head” on page 90 and
“Correcting the Printing Position” on page 93.)
• If you use discs with a small stack ring (concentric circular projection), the discs may
stick to each other before or after printing.
• Even if the same data is printed on identical discs, the same print results may not be
able to be achieved because of the individual differences (variations) of each disc.
Disc quality may affect print quality. We recommend using EPSON specified CDs/DVDs.
Epson offers specified CD-R and DVD-R discs for all your printing needs.
Notes
Page 50
50
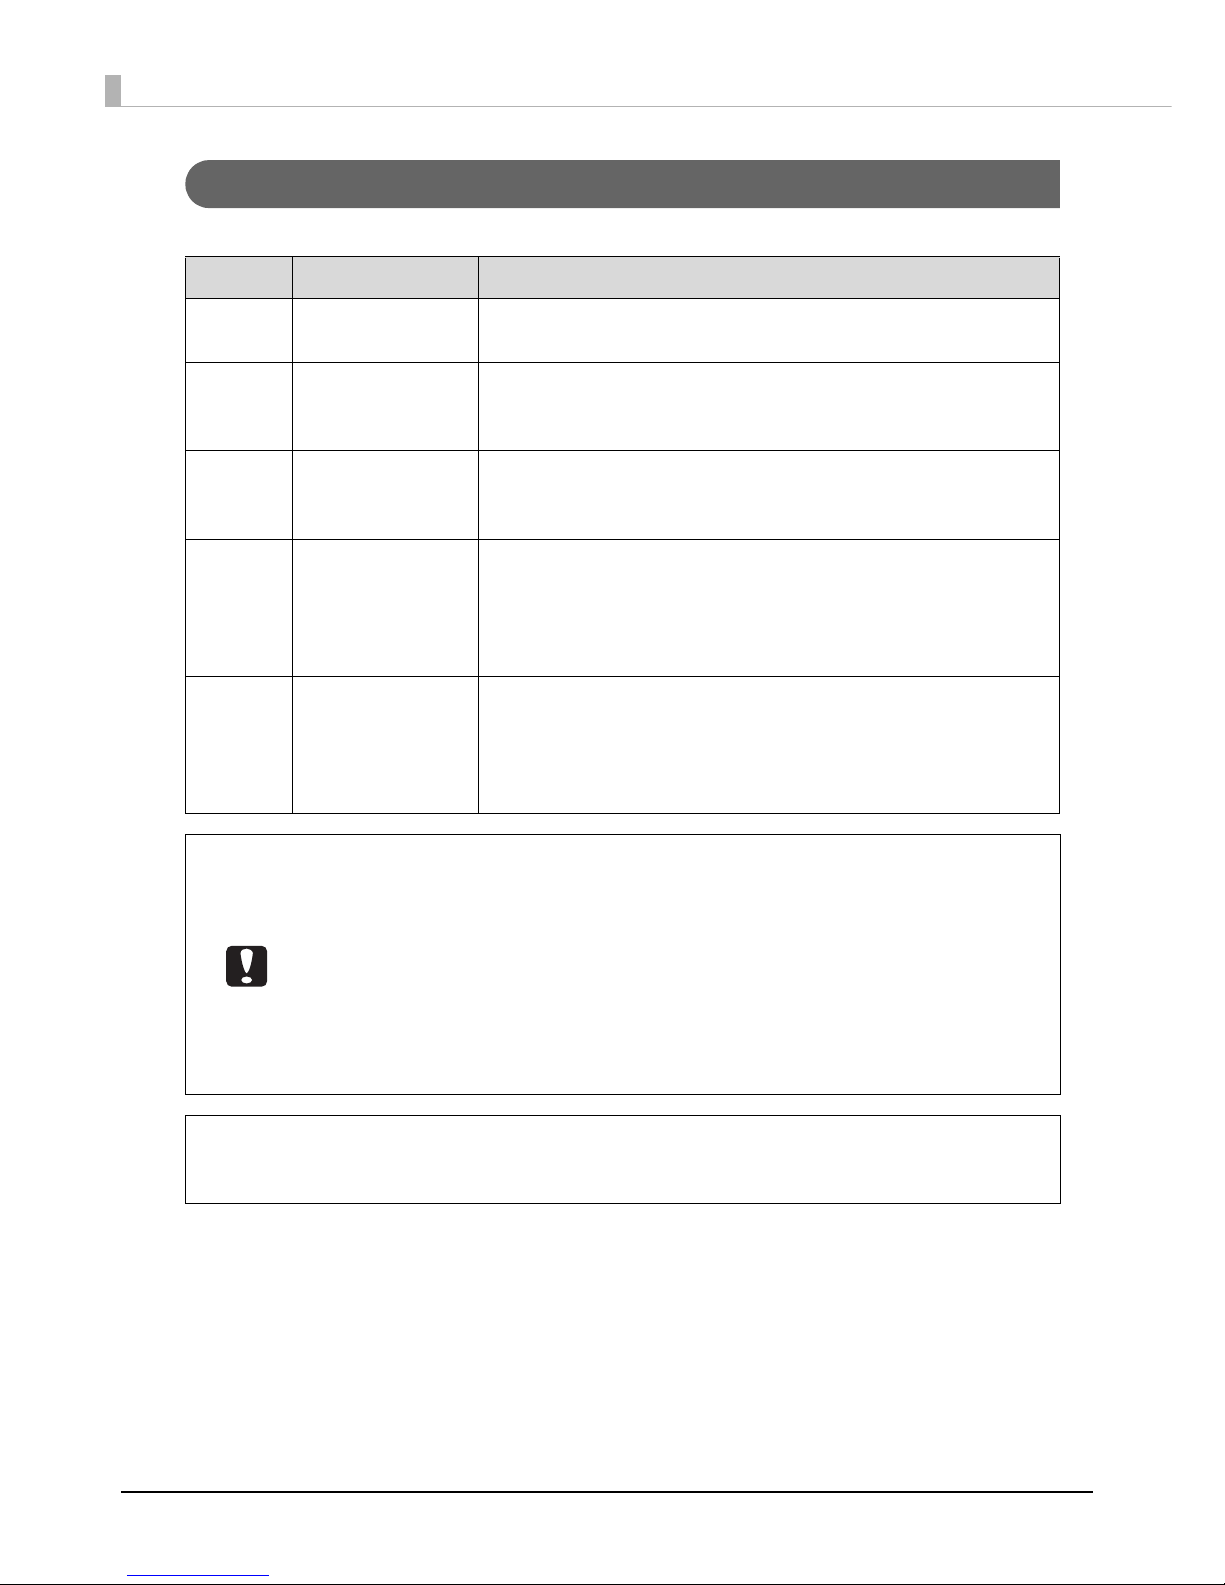
Writable Disc Types
The PP-100II, PP-100, and PP-50 can write to the following types of disc.
Type Capacity Characteristics
CD-R 650/700 MB
The rewriting and deleting of data is not possible once data has
been written.
DVD-R
4.7 GB (single sided,
single layer)
The rewriting and deleting of data is not possible once data has
been written.
This is a standard DVD defined by the DVD Forum.
DVD+R
4.7 GB (single sided,
single layer)
The rewriting and deleting of data is not possible once data has
been written.
This is a standard DVD defined by the DVD+RW Alliance.
DVD-R DL
8.5 GB (single sided,
double layer)
The rewriting and deleting of data is not possible once data has
been written. This disc allows double-layer recording on a single side.
This increases the capacity, thus enabling recording for a long time
or recording of high-quality video.
This is a standard DVD defined by the DVD Forum.
DVD+R DL
8.5 GB (single sided,
double layer)
The rewriting and deleting of data is not possible once data has
been written. This disc allows double-layer recording on a single side.
This increases the capacity, thus enabling recording for a long time
or recording of high-quality video.
This is a standard DVD defined by the DVD+RW Alliance.
• 80-mm discs are not supported.
• Do not use discs that have lens cleaner, labels or stickers, or condensation on them.
Doing so may result in an malfunction or failure.
• Do not use a cracked, warped, or deformed disc. The disc may break into pieces inside
the product, resulting in a malfunction, or an injury when the disc is taken out.
• Writing (reading) may not be performed properly if a disc has a slight scratch or is dirty.
Be sufficiently careful when handling discs.
• Depending on the discs used, writing may not be able to be performed properly at the
speed recommended for the disc. If this happens, write at a slower speed. In particular,
we recommend writing to DVD±R DL at a slow speed.
• Disc quality may affect write quality. We recommend using EPSON specified CDs/DVDs.
Epson offers the specified CD-R and DVD-R discs for all your printing needs.
• See EPSON Total Disc Maker Help for details on writable disc types.
Notes
Page 51

51
Publishing Discs
Handling Discs
Notes on Usage
• Do not touch the recording surface when holding a disc.
• Handle discs carefully to ensure fingerprints, dirt, dust, moisture, scratches, etc., do not
get on the label surface and recording surface. Gently wipe off any dust, dirt, and the
like with a soft dry cloth or a commercially available CD cleaner. Do not use benzene,
thinner, or antistatic agents.
• Do not drop a disc, or subject it to an impact.
• Do not apply excessive force by, for example, pinching with a clip or bending.
• Do not attach an adhesive sticker to a disc. Doing so may result in writing, printing, or
playing no longer being possible.
• Do not use discs in a place where lots of dirt and dust are present.
• If writing and printing are performed separately, we recommended performing writing
before printing.
• Leaving discs stacked may result in them sticking to each other.
• Directly touching or getting moisture on the printing surface immediately after printing
may result in blurring.
• Let discs dry sufficiently after printing. However, let them dry naturally. Do not use a
dryer or other means.
• Text can be written only on the printing surface. When writing, use a felt tipped pen or
other writing instrument with a soft tip. Do not use a ballpoint pen, pencil, or other
writing instrument with a hard tip. Also, do not attempt to erase text once it has been
written.
• Do not use a disc printed with this product in an auto loading mechanism, a drive with
a holding mechanism that has diameter of 33 mm or more, or an in-car drive. Also, do
not leave a disc in equipment for a long period of time.
• A published disc may not be able to be recognized if it is incompatible with the drive or
player.
Page 52
52
Notes on storage
• Do not place discs in a location where they will be subject to high temperature and
humidity such as locations under direct sunlight, near heating equipment.
• Do not place discs in locations where temperatures vary greatly. Doing so may result in
condensation.
• Do not place an object on a disc.
• When storing discs, keep them in their disc cases and take care that film, card, or other
material does not touch the printing surface. Such materials may scratch the printing
surface.
• Do not store discs in soft cases or bags that may touch the printing surface directly.
Doing so may result in discs sticking, uneven color, or discoloration.
• Do not store discs with part of the printing surface covered. Doing so may cause
uneven color or discoloration.
• Back up (copy) important data just in case. When storing data for a long period of
time, we recommend backing it up periodically.
See the instruction manual of the discs for other handling procedures and precautions for
discs.
Notes
Page 53
53
Publishing Discs
Printable Area
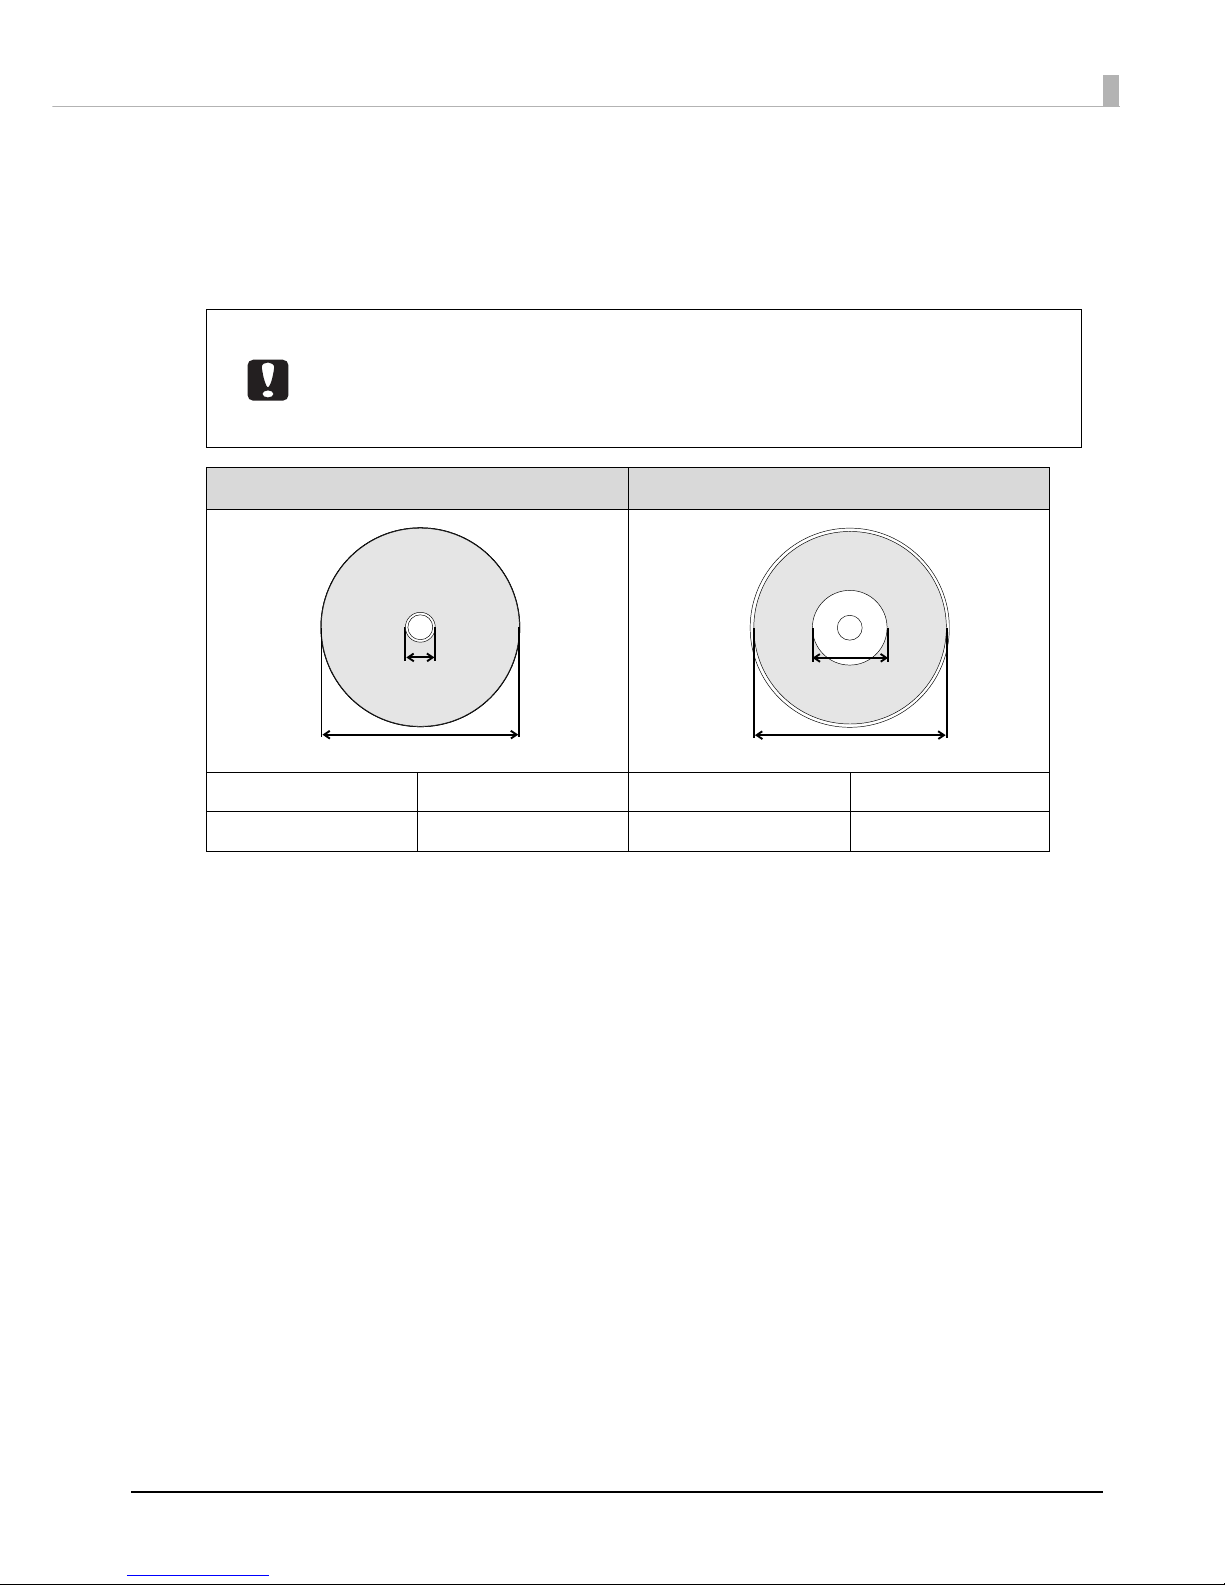
The printable area is the area of the label surface on which printing is possible.
The printable area and recommended print area are shown in the table below. Printing will be done in the gray area in
the figure below.
• Printing outside of the recommended print area may result in the discs or tray
becoming dirty, peeling off or blurring of the print, or discs sticking together.
• If you print outside of the printing range (ink absorbing layer) of the discs you are using,
the ink printed outside the printing area will not fix. Check the label print range of the
discs you are using before configuring the setting.
Printable area Recommended print area
Inside Diameter Outside Diameter Inside Diameter Outside Diameter
18.0 mm 119.4 mm 45.0 mm 116.0 mm
Inside Diameter
Outside Diameter
Inside Diameter
Outside Diameter
Page 54
54
Setting the Print Area
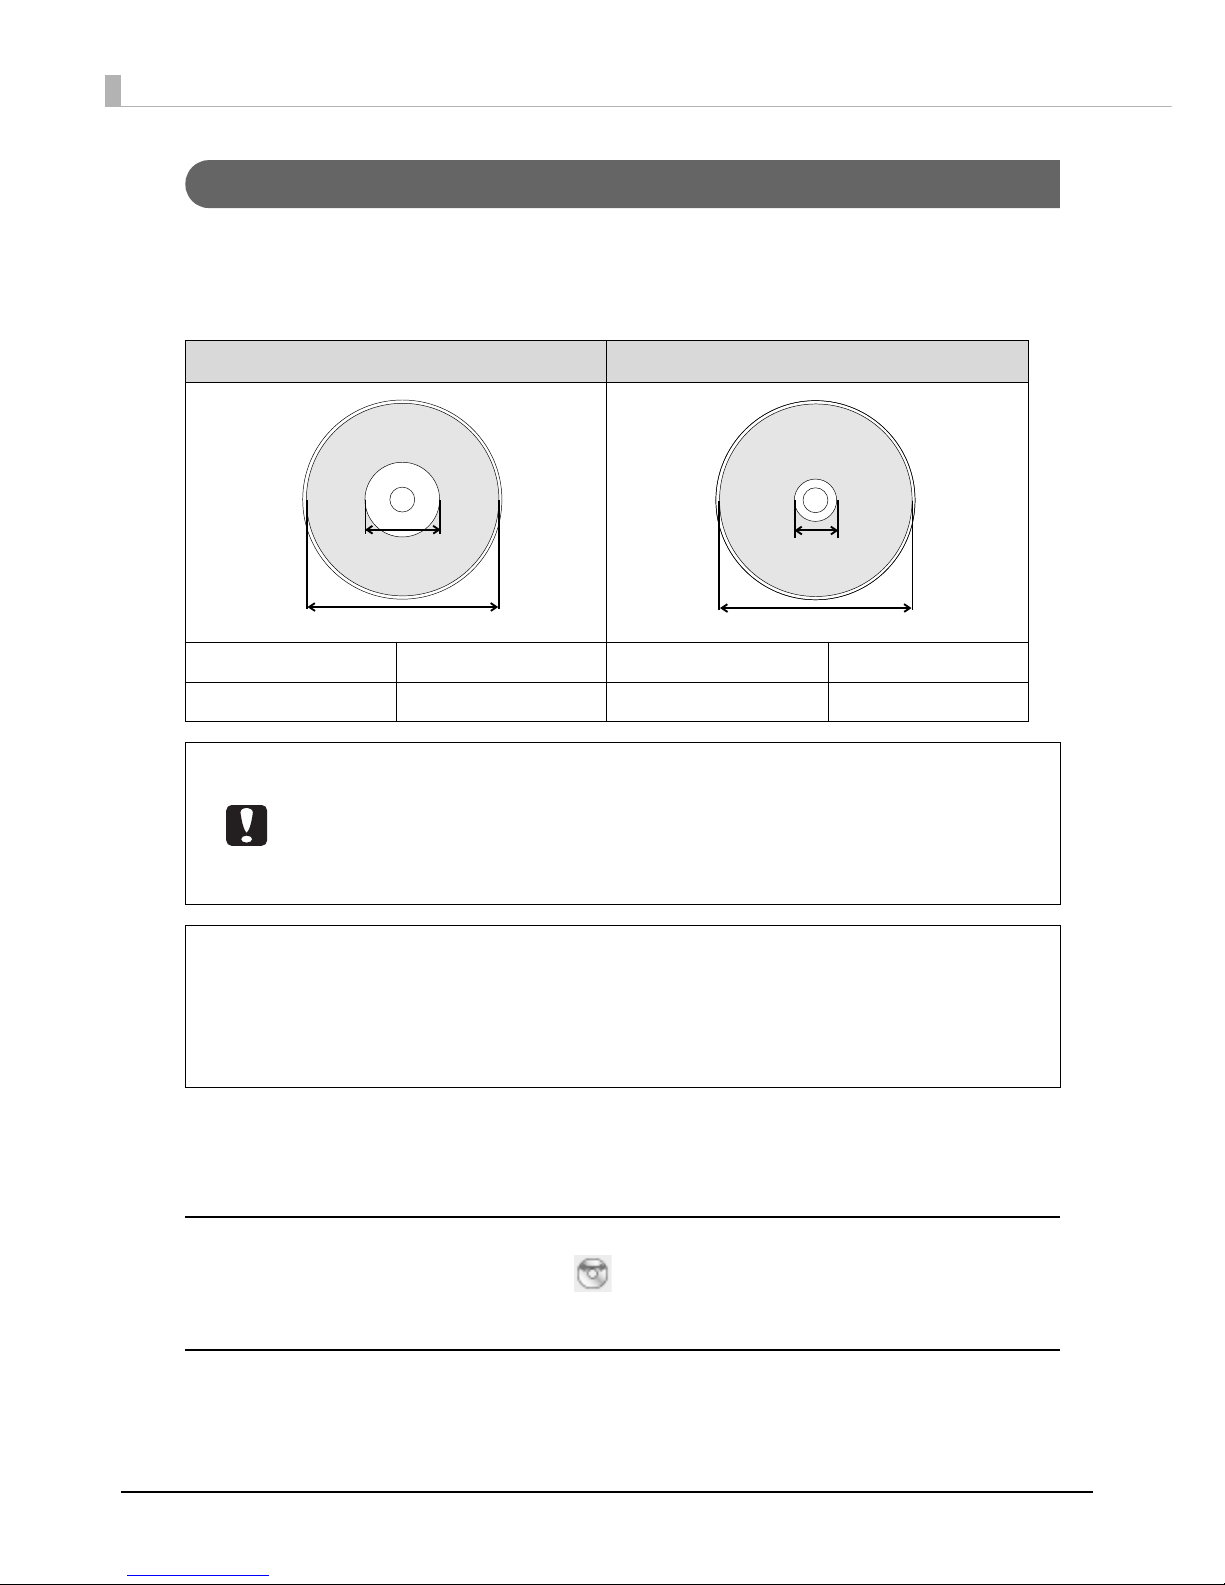
Select from Standard and Wide, or set an arbitrary size (User Defined label size).
The print areas of Standard and Wide are shown in the table below. Printing will be done in the gray area in the figure
below.
The setting procedure of the print area differs, depending on whether you publish with EPSON Total Disc Maker or
with the other applications.
When publishing with EPSON Total Disc Maker
Set in the dialogue that is displayed when you click [Set Inner/Outer Diameter] in Label view of EPSON Total
Disc Maker.
When publishing with the other applications
Set in Label size in the Print Settings area of the printer driver.
Standard Wide
Inside Diameter Outside Diameter Inside Diameter Outside Diameter
45.0 mm 116.0 mm 25.5 mm 116.0 mm
• Before printing, check that the set print area does not exceed the print area of the
discs you are using.
• Printing on the stack ring (concentric circular projection) portion may result in uneven
coloring.
• Printing on the stack ring (concentric circular projection) portion may result in ink
getting on the discs, peeling off, or discs sticking together after printing.
• See “Printing on User Defined Label Size Discs” on page 75 for the setting procedure of
the user defined label size.
• When printing with applications other than EPSON Total Disc Maker, use the following
settings to create print data.
∗ Paper size: 124 x 124 mm
∗ Margins on all sides: 2 mm
Inside Diameter
Outside Diameter
Inside Diameter
Outside Diameter
Notes
Page 55
55
Publishing Discs
Flow for Publishing Discs
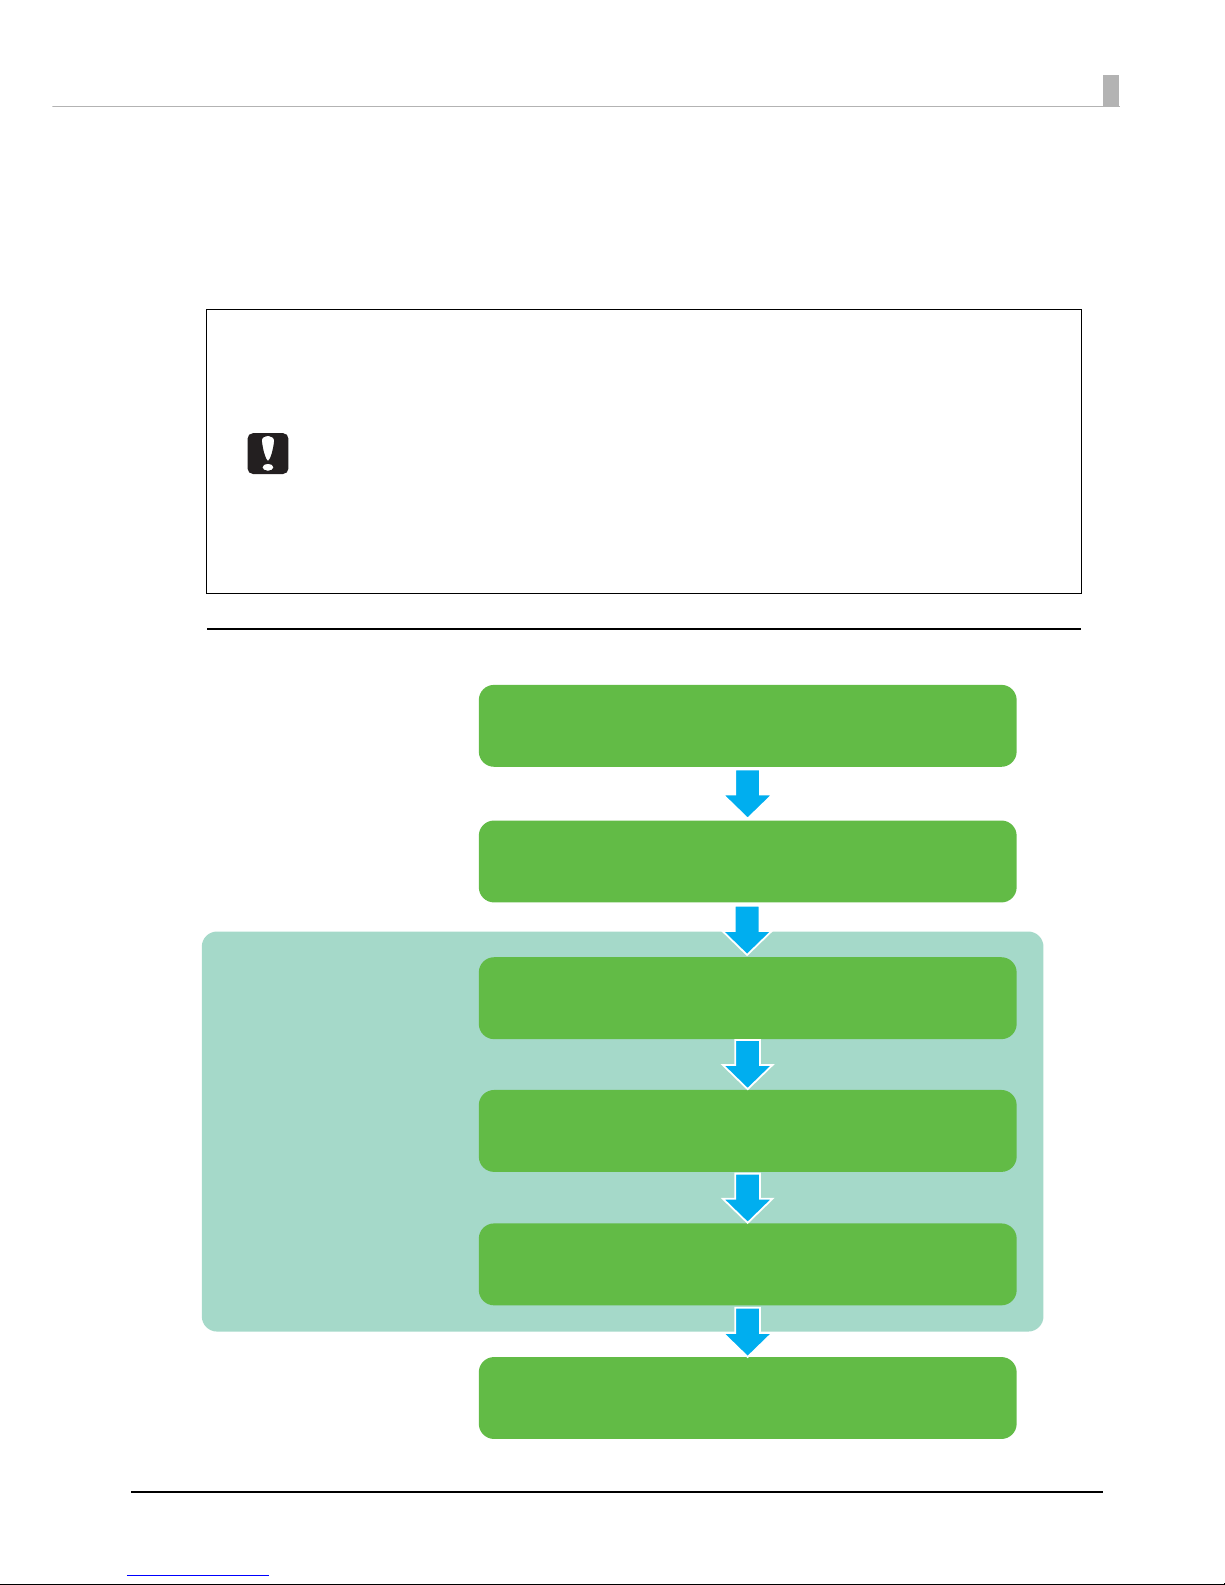
This section describes how to publish discs using the product.
The publishing procedure differs, depending on whether you publish with EPSON Total Disc Maker or with other
applications.
When publishing with EPSON Total Disc Maker
• If you publish a large number of discs, first publish one disc and check the write result
and print result.
• When the product is used for the first time, after it has been stored for a long time, or
after an error occurs, missing dots or ink stains may appear and print quality may be
reduced on rare occasions. When publishing multiple discs, publish one disc in
advance and check that there are no missing dots. If any dots are missing, perform
head cleaning. (See “Cleaning the Print Head” on page 87.)
• If writing and printing are performed separately, performing writing before printing is
recommended. If writing is performed after printing, ink may cause discs to stick to
each other and result in a disc transport error, or dirt, stains, or scratches on discs may
result in a write error.
Selecting Publish Mode
Select publish mode. (See page 57.)
Loading Discs
Load discs into the product. (See page 61.)
EPSON Total Disc Maker
Registering Write Data
(only for PP-100II/PP-100/PP-50)
Creating Label
Create a label design. (See page 65.)
Publishing Discs
Publish a job to the product. (See page 66.)
Taking out Discs
Take out published discs. (See page 71.)
Register data to be written onto discs. (See page 63.)
Page 56

56
When publishing with the other applications
* Registering write data is not available with the PP-100AP.
With the PP-100II, PP-100 or PP-50, if you specify an image file in the print settings, writing
data onto a disc is possible at the same time as label printing. See “Print Settings area” on
page 46 for specifying an image file.
Selecting Publish Mode
Select publish mode. (See page 57.)
Loading Discs
Load discs into the product. (See page 61.)
Creating Label
Create a label design.
Application
Printer driver
(See page 68.)
Print Settings and Registering Write Data*
Configure print settings and register an image file of write data.
Publishing Discs
Publish a job to the product.
Taking out Discs
Take out published discs. (See page 71.)
Notes
Page 57
57
Publishing Discs
Selecting Publish Mode
Setting the most suitable publish mode for the usage or number of discs to be published enables efficient disc
publishing.
Select the publish mode, referring to the following descriptions, and change the setting in the properties setting if
necessary. For properties setting procedure, see “Properties Setting” on page 28.
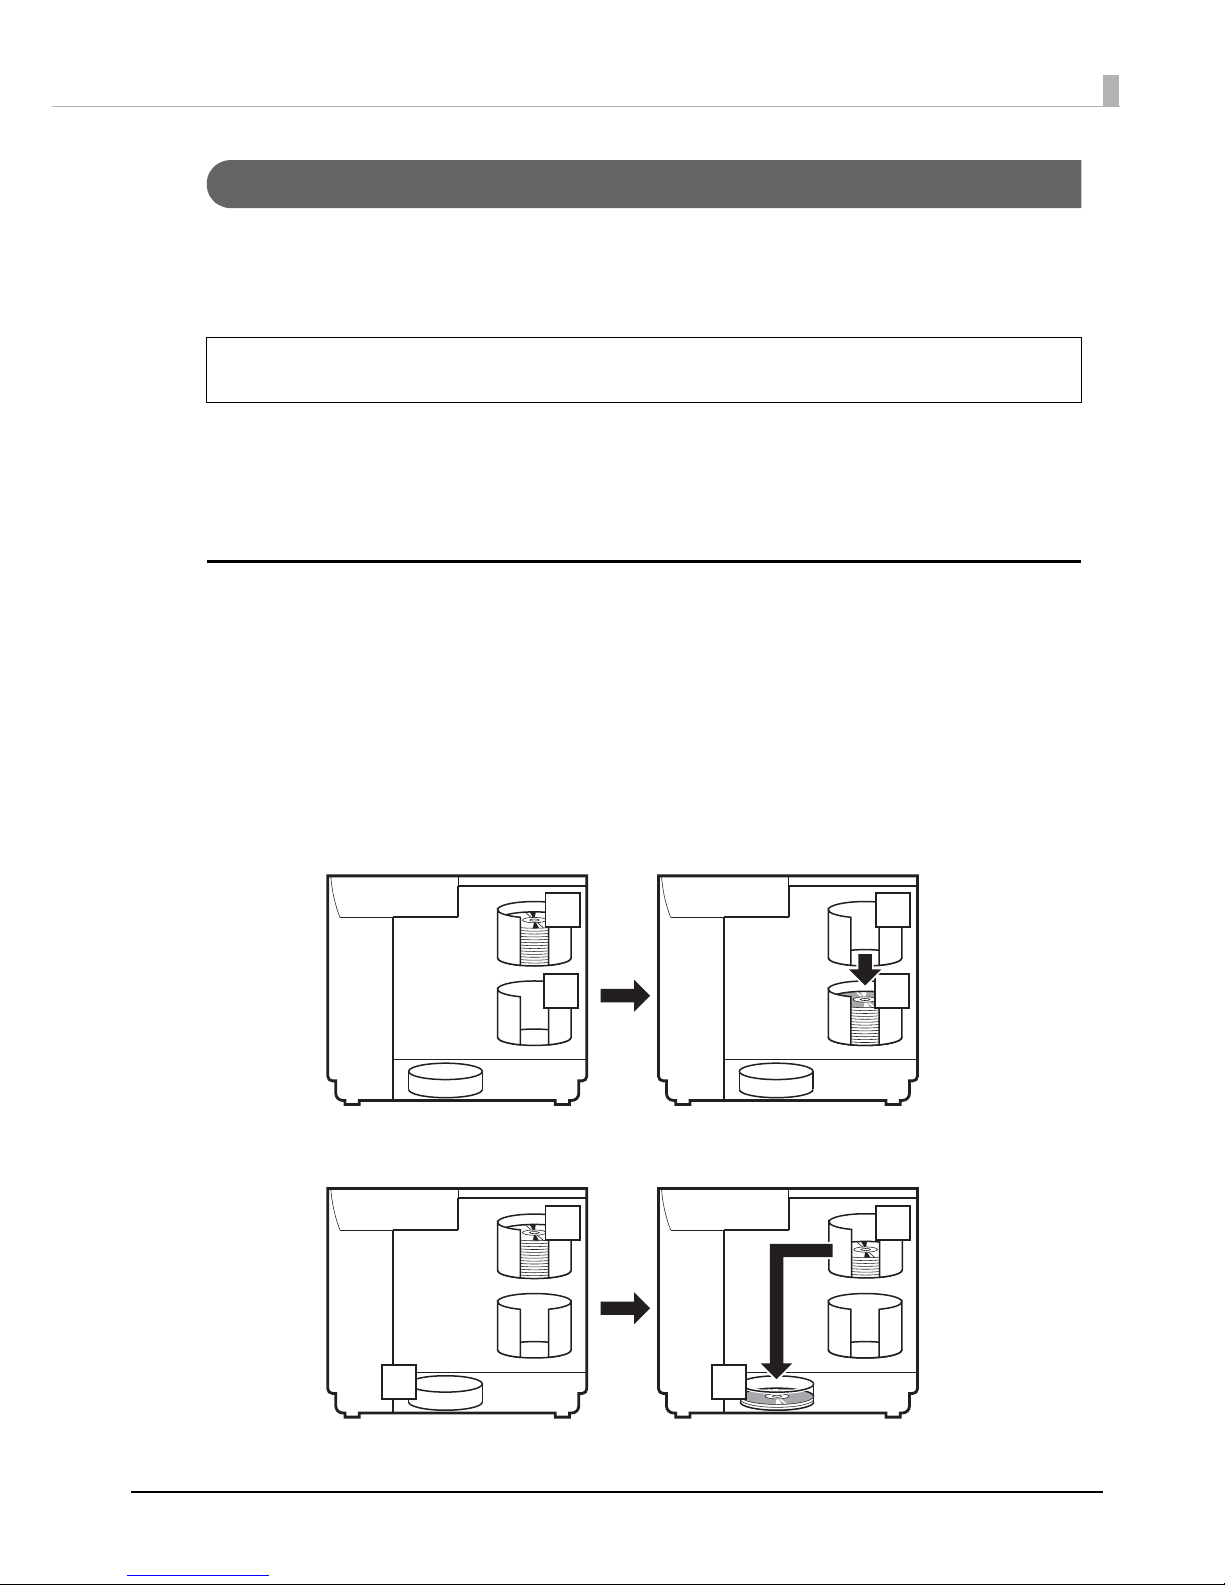
The PP-100II, PP-100, and PP-100AP have three publish modes, Standard mode, External Output mode, and Batch
mode.
The PP-50 has two publish modes, Low-volume mode and Standard mode.
For PP-100II/PP-100/PP-100AP
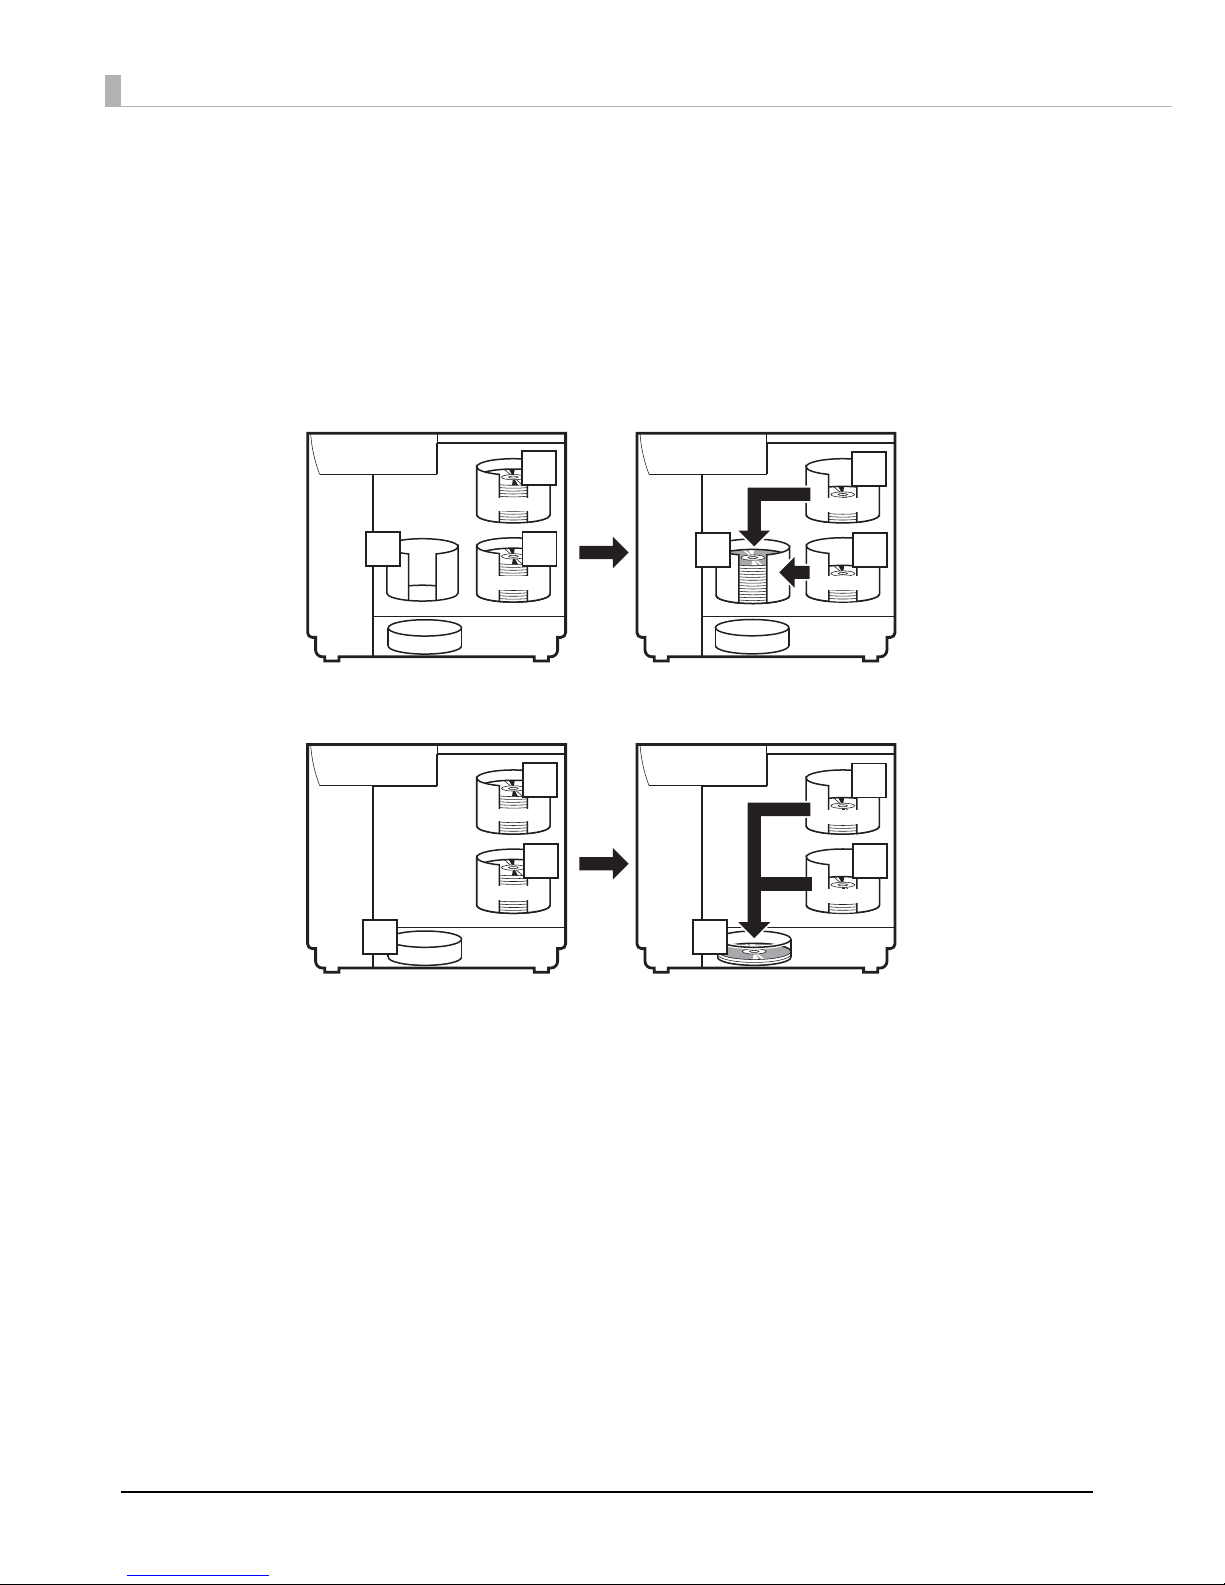
Standard mode: When you want to publish up to 50 identical discs at once
This mode uses Stacker 1 as the input stacker for discs. You can select Stacker 2 or Stacker 4 as the output stacker.
If you select Stacker 2 as the output stacker, you can publish up to 50 discs without having to replenish the discs or
take out published discs.
If you select Stacker 4 as the output stacker, you can easily take out published discs without even having to pause a
job during publishing up to 50 discs.
Repeatedly replenishing and taking out discs allows for the continuous publishing of up to 1,000 discs.
• When you select Stacker 2 as the output stacker
• When you select stacker 4 as the output stacker
If you publish with EPSON Total Disc Maker, you can change the publish mode setting in
Publish view.
Notes
1
2
1
2
1 1
44
Page 58
58
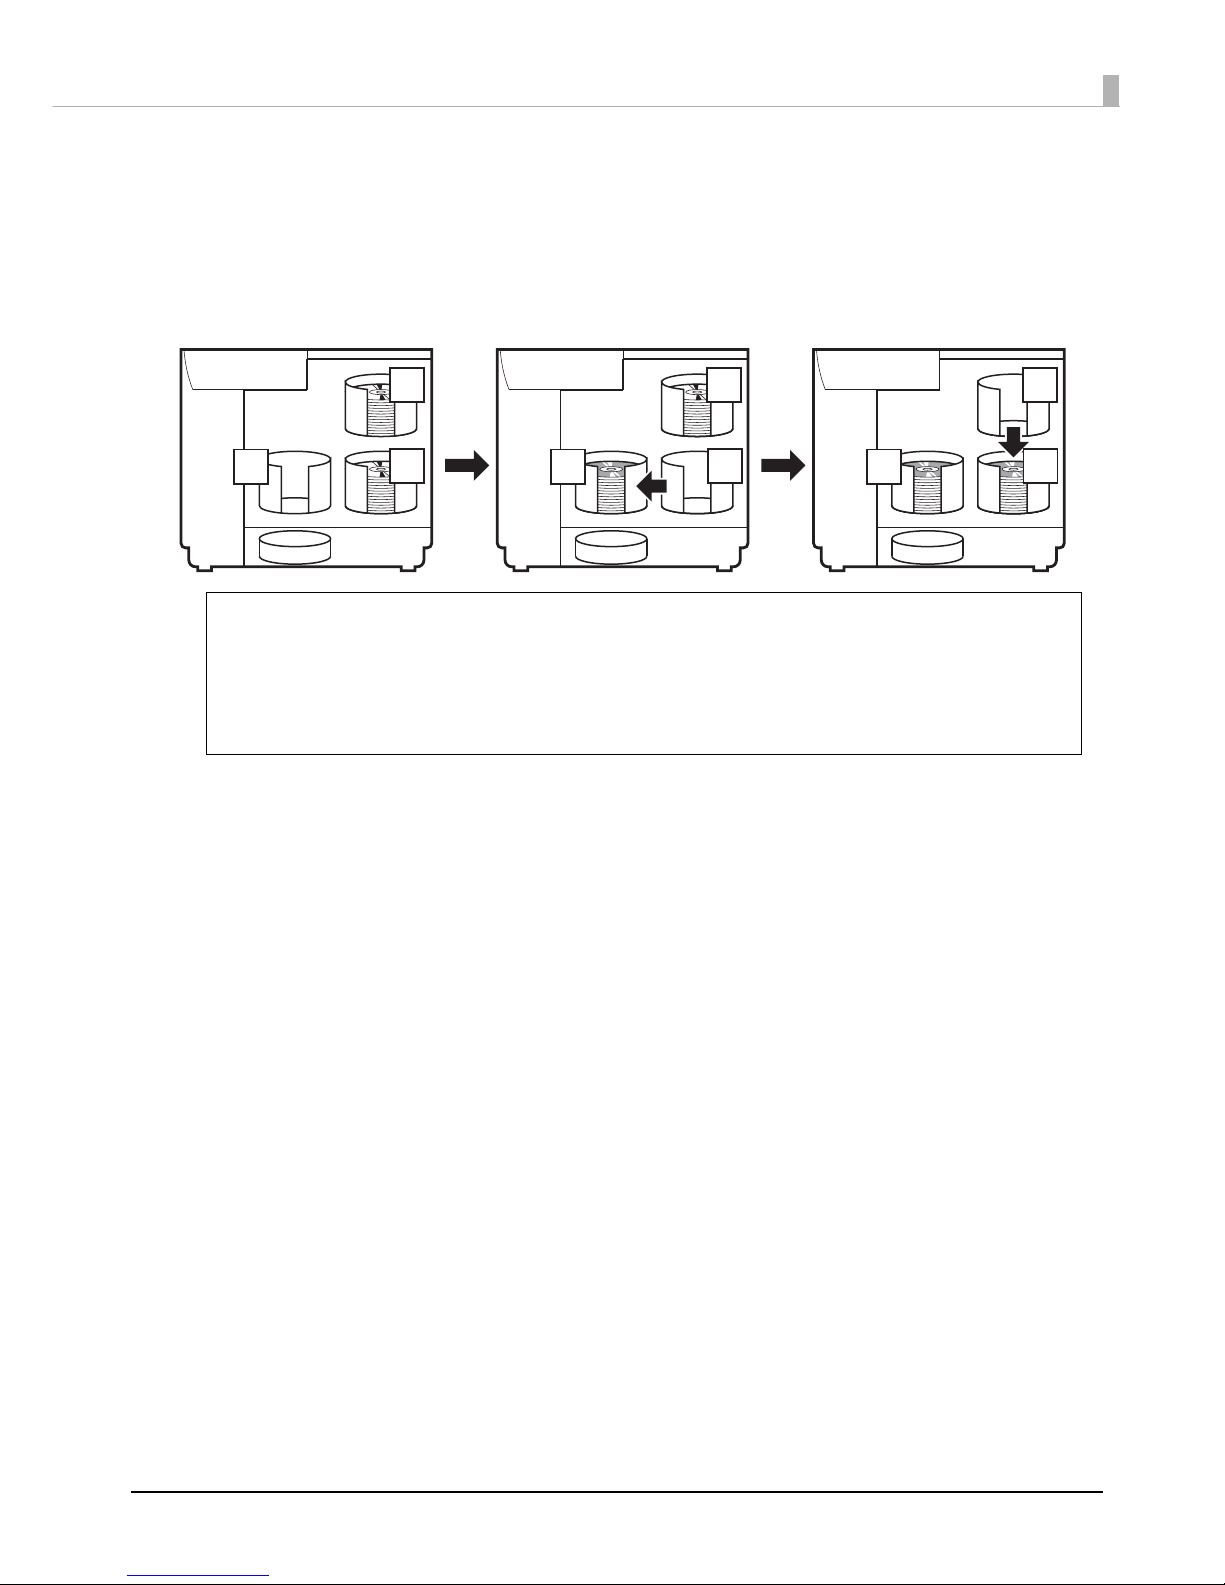
External Output mode:
When you want to publish two type of discs without having to change discs
This mode uses Stacker 1 and Stacker 2 as the input stackers for discs. You can select Stacker 3 or Stacker 4 as the
output stacker.
If, for example, CD-Rs are loaded in Stacker 1 and DVD-Rs are loaded in Stacker 2, you can just select a stacker as
necessary to publish the required discs without having to change the discs.
If you select Stacker 4 as the output stacker, you can easily take out published discs without even having to pause a
job during publishing.
• When you select Stacker 3 as the output stacker
• When you select Stacker 4 as the output stacker
1
2
3
1
2
3
CD
DVD
CD
DVD
1
2
4
1
2
4
CD
DVD
CD
DVD
Page 59
59
Publishing Discs
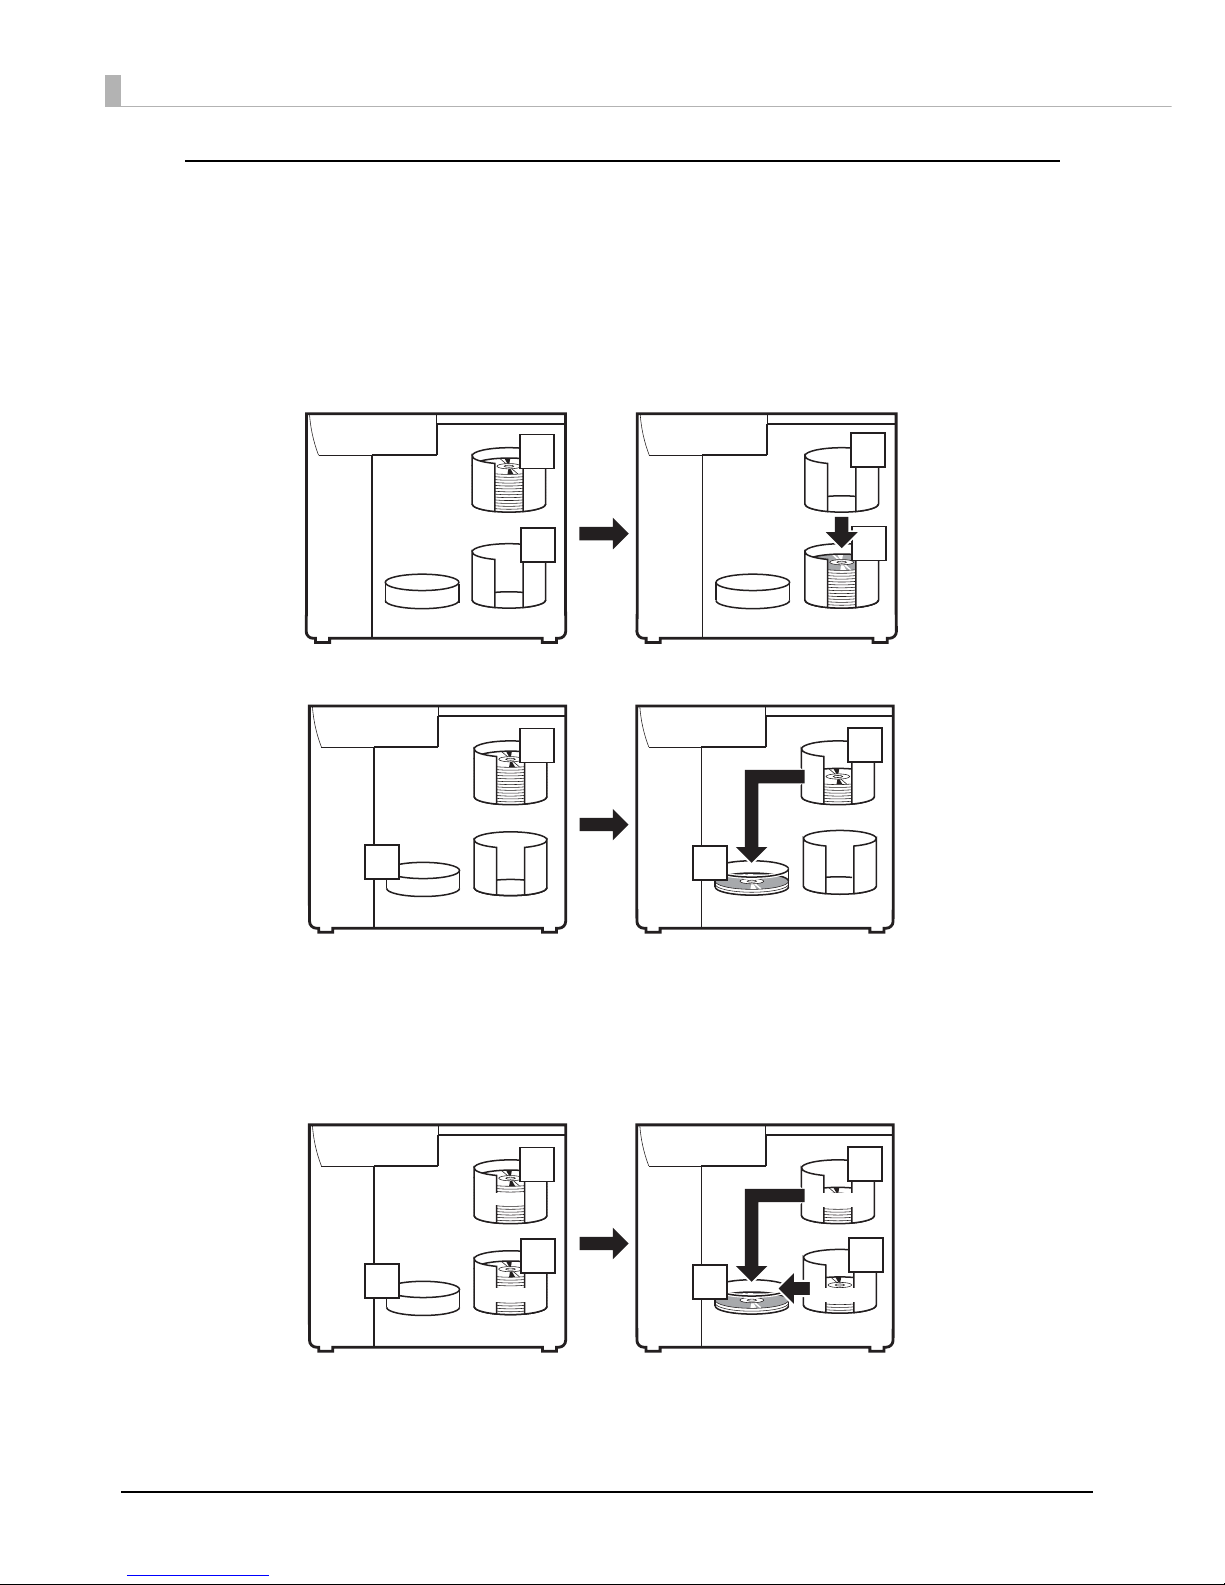
Batch mode: When you want to publish a large number of discs with least labor
This mode uses Stacker 1 and Stacker 2 as the input stackers for discs, and Stacker 2 and Stacker 3 as the output
stackers.
Loading 50 discs into each of Stacker 1 and Stacker 2 allows for the continuous publishing of 100 copies of the same
disc without having to replenish the discs or take out published discs.
Repeatedly replenishing and taking out discs allows for the continuous publishing of up to 1,000 discs.
When discs are published in Batch Mode, the number of discs loaded into Stacker 2 and
the number of discs output to Stacker 3 do not always match. Also, 50 discs may not be
output. The same applies for the discs output to Stacker 2.
In Batch Mode, once the height of the stack of discs output to Stacker 3 reaches the
maximum value, the output stacker is switched to Stacker 2. Therefore, the number of
discs output to a stacker differs depending on the thickness of the discs used.
1
2
3
1
2
3
1
2
3
Notes
Page 60
60
For PP-50
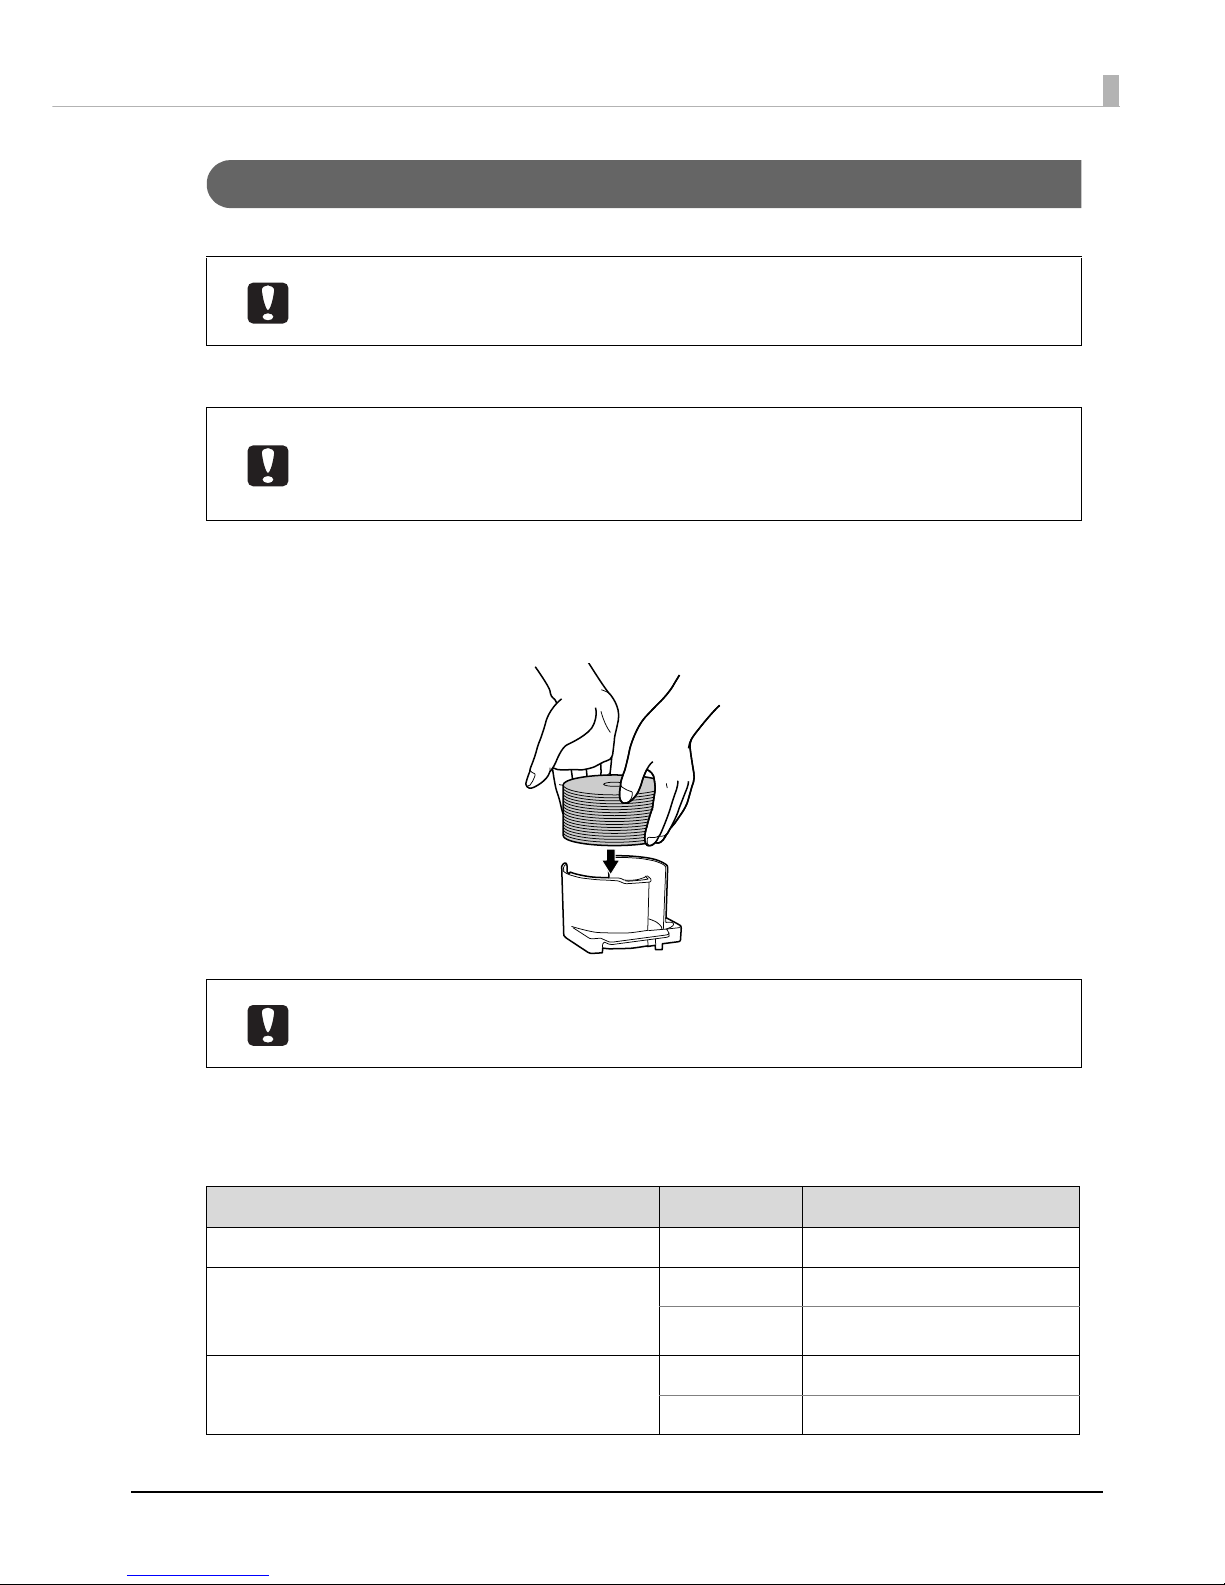
Standard mode: When you want to publish up to 50 identical discs at once
This mode uses Stacker 1 as the input stacker for discs. You can select Stacker 2 or Stacker 3 as the output stacker.
If you select Stacker 2 as the output stacker, you can publish up to 50 discs without having to replenish the discs or
take out published discs.
Repeatedly replenishing and taking out discs allows for the continuous publishing of up to 1,000 discs.
• When you select Stacker 2 as the output stacker
• When you select stacker 3 as the output stacker
Low-volume mode:
When you want to publish two type of discs without having to change discs
This mode uses Stacker 1 and Stacker 2 as the input stackers for discs. Published discs are output to Stacker 3.
If, for example, CD-Rs are loaded in Stacker 1 and DVD-Rs are loaded in Stacker 2, you can just select a stacker as
necessary to publish the required discs without having to change the discs.
1
2
1
2
1
3
1
3
1
2
3
1
2
3
CD
DVD
CD
DVD
Page 61
61
Publishing Discs
Loading Discs
This section describes how to load discs into the input stacker, and insert it.
1
Fully separate the discs to prevent them from sticking together.
2
Open the disc cover.
For precautions when you open the disc cover, see “Opening the Disc Cover” on page 21.
3
Take out the input stacker and load the discs into it.
The stacker to use as the input stacker differs depending on the product model and the set publish mode.
Confirm the input stacker in the following table.
For PP-100II/PP-100/PP-100AP
Load the discs into a stacker. Do not load discs in the drives or printer. Furthermore, with
the PP-100II or PP-100, do not load discs between Drive 1 and Drive 2. They may become
unable to be removed.
• Be sufficiently careful not to scratch a disc.
• If a long time elapses after discs are loaded in the stacker, the separated discs may
stick together again. Fan the discs again if a long time has elapsed since they were
loaded.
• Do not load discs above the red line on the stacker. The product may malfunction, or
the discs may be damaged.
• Make sure that the bottom of the stacker is not dirty before loading the discs.
Publish Mode Input Stacker Number of Discs
Standard Mode Stacker 1 Up to approximately 50 discs
External Output Mode
(Different types of discs can be loaded into Stacker 1
and Stacker 2.)
Stacker 1 Up to approximately 50 discs
Stacker 2 Up to approximately 50 discs
Batch Mode Stacker 1 Up to approximately 50 discs
Stacker 2 Up to approximately 50 discs
Place the label surface facing upwards.
Page 62
62
For PP-50
4
Insert the stacker, and close the disc cover.
Publish Mode Input Stacker Number of Discs
Standard Mode Stacker 1 Up to approximately 50 discs
Low-volume Mode
(Different types of discs can be loaded into Stacker 1
and Stacker 2.)
Stacker 1 Up to approximately 50 discs
Stacker 2 Up to approximately 50 discs
For PP-100II/PP-100/PP-100AP
• When Stacker 4 is set as the output stacker in Standard mode and External Output
mode, remove Stacker 3 and set the lock lever to UNLOCK.
• In Batch Mode and when Stacker 3 is set as the output stacker in External Output
Mode, make sure that no discs are loaded in Stacker 3 and Stacker 4. Also, set the lock
lever to LOCK, and do not pull out Stacker 4.
Page 63
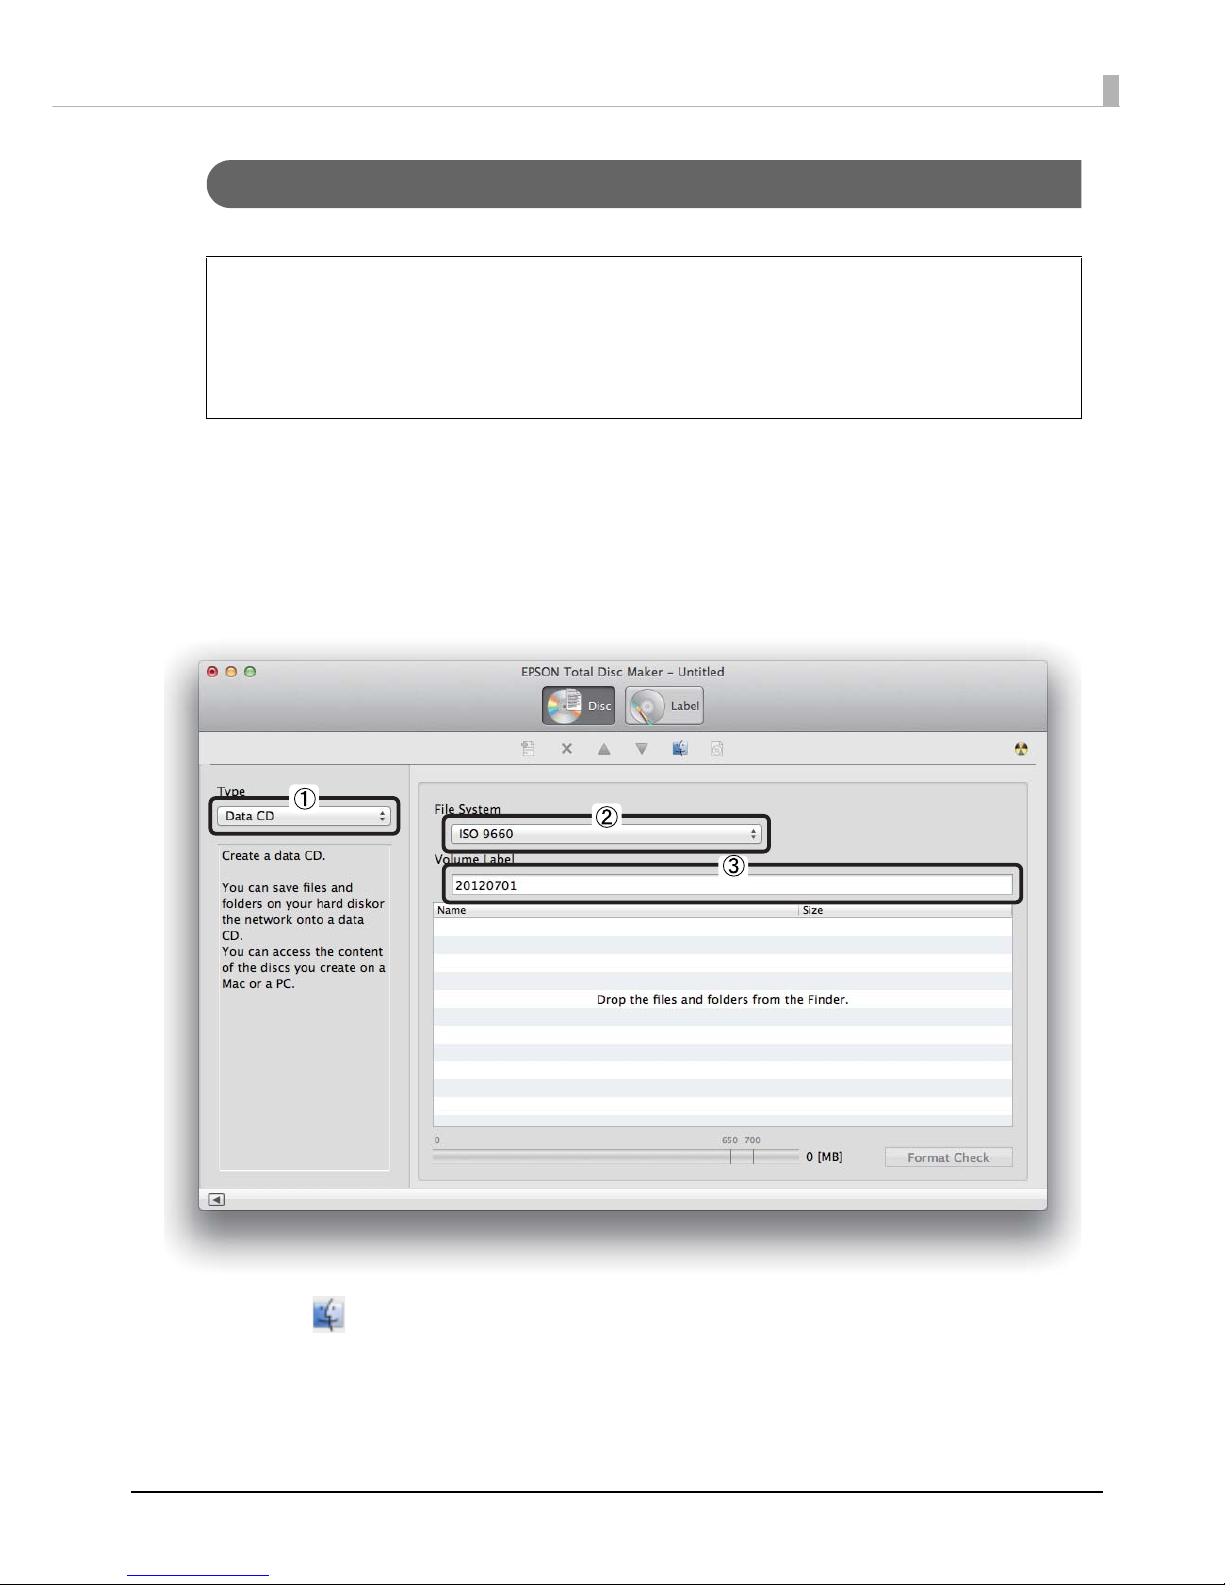
63
Publishing Discs
Registering Write Data (Only for PP-100II/PP-100/PP-50)
This section describes how to register data to be written in Disc view of EPSON Total Disc Maker.
In this example, we explain the procedure to publish photo data CDs.
1
Display Disc view of EPSON Total Disc Maker.
See “Disc view” on page 36.
2
Configure each setting.
See EPSON Total Disc Maker Help for details.
3
Click [Open Finder].
• There is no need to register write data if you only want to print disc labels.
• If you directly publish CD/DVD copies from a CD/DVD disc inserted in the drive of your
PC, see “Creating Copies Directly from Discs” on page 76 for registering write data.
• If you publish CD/DVD copies using a disc image file, see “Creating Copies from Disc
Image Files” on page 78 for registering write data.
• For details on EPSON Total Disc Maker, see EPSON Total Disc Maker Help.
Notes
Page 64
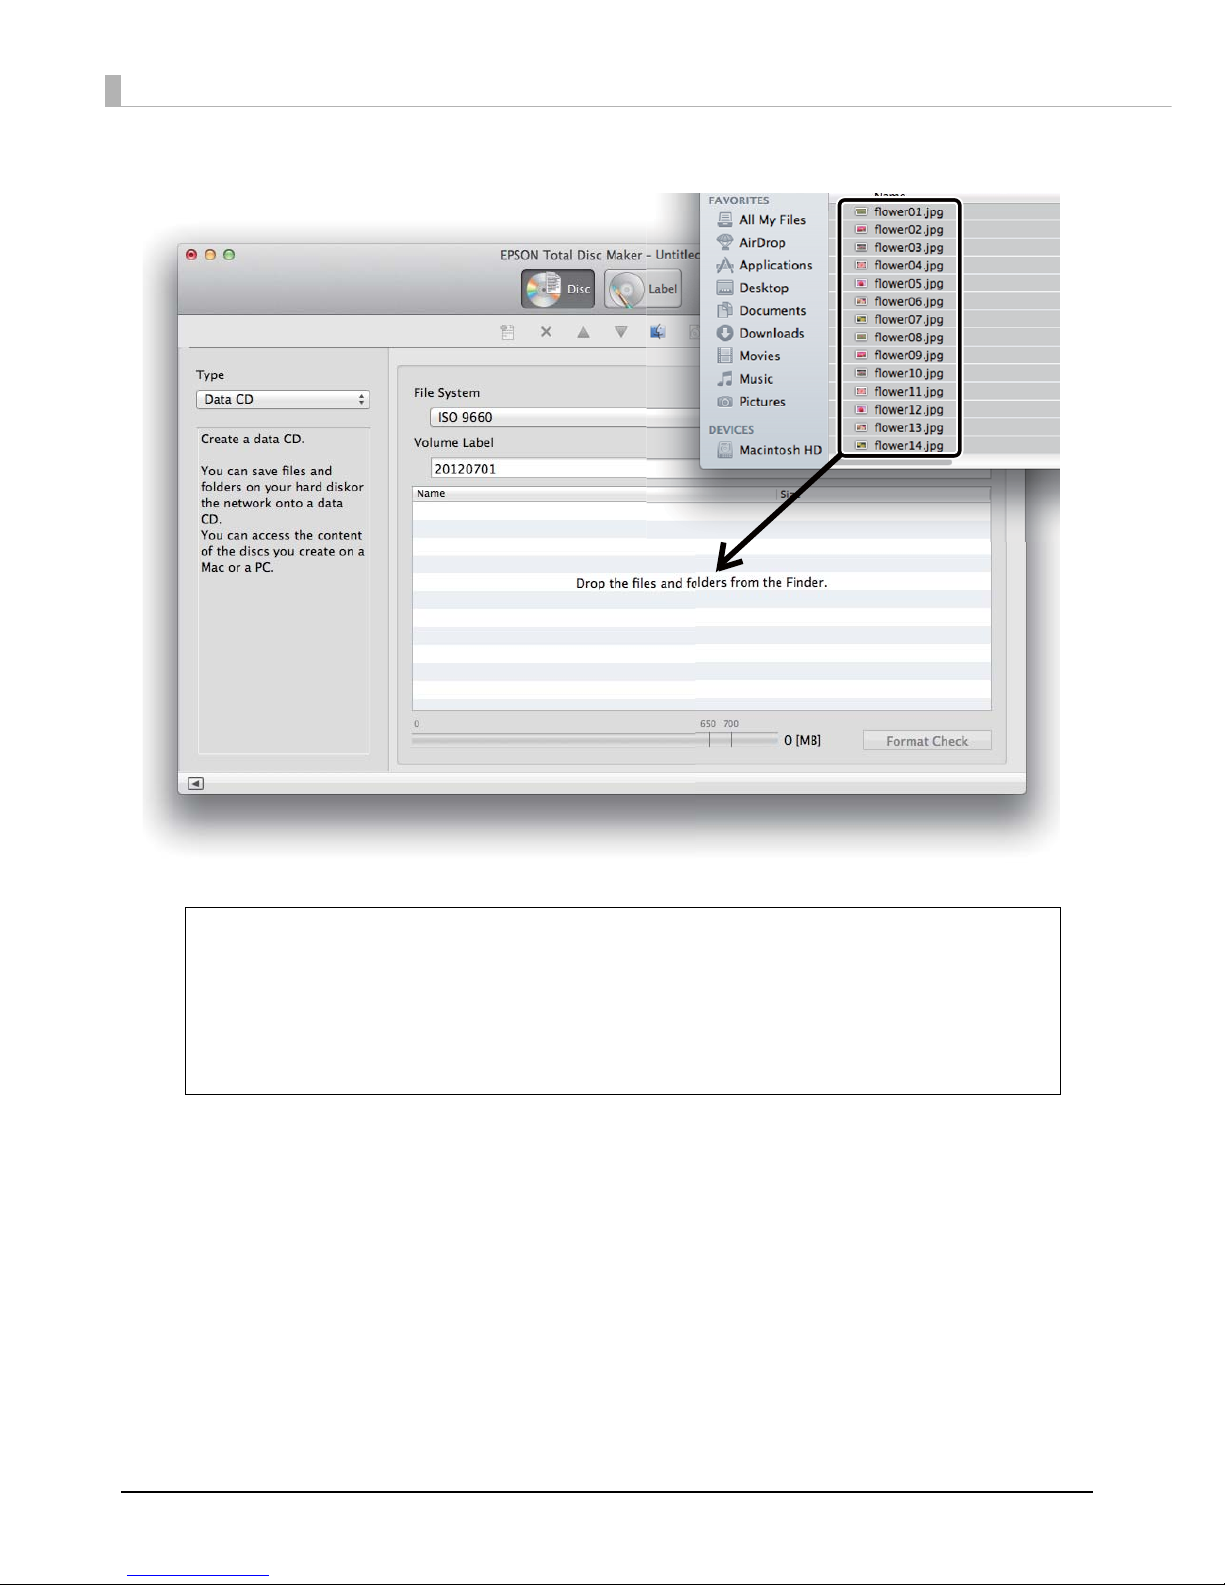
64
4
Drag and drop any image data to write to the CD from Finder.
The data that you drag and drop appears in the data list.
The registration of write data is now finished.
• When the registered data does not comply with the restrictions of the selected file
system, the file system restriction dialog box appears. See EPSON Total Disc Maker Help
for details on file system restrictions.
• If you select Create Disc Image... from the File menu after registering the write data,
the registered data is saved as a disc image file. A disc image file is used when creating
CD/DVD copies of the registered data. See “Creating Copies from Disc Image Files” on
page 78 for details.
Notes
Page 65
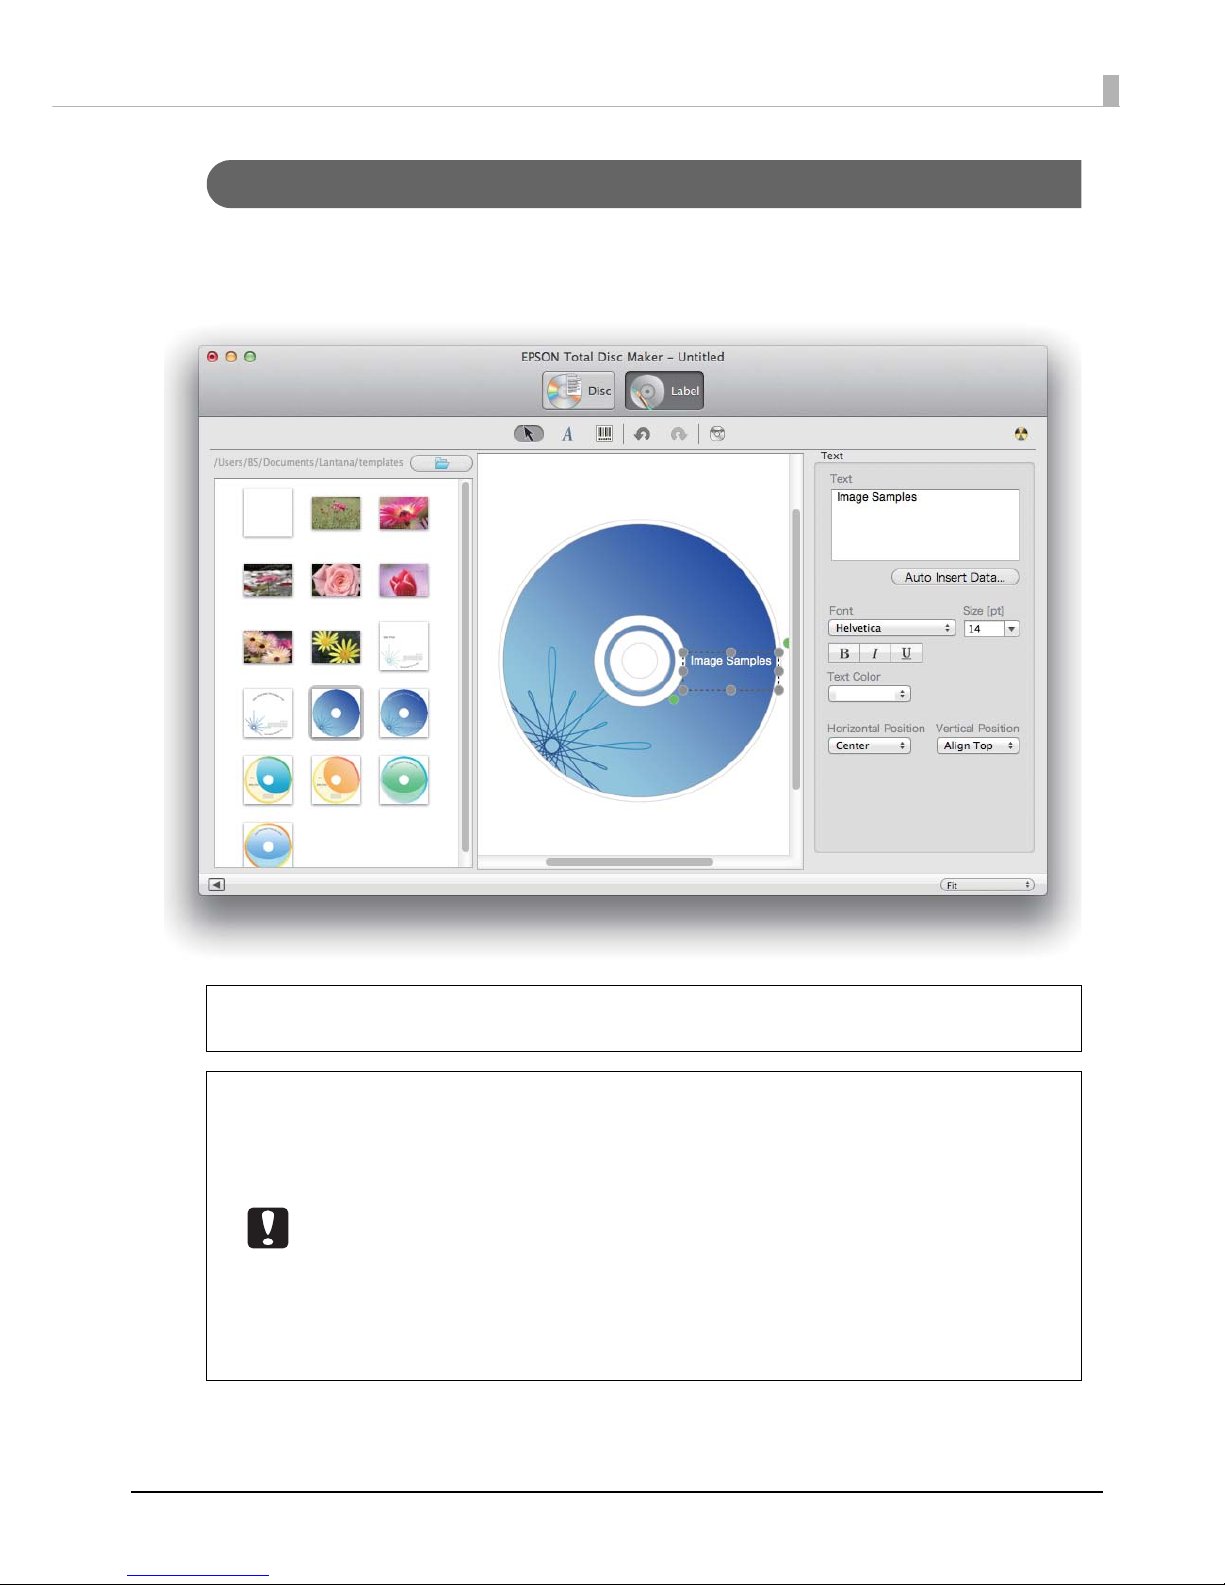
65
Publishing Discs
Creating Labels
Create a label design in Label view (See “Label view” on page 37.) of EPSON Total Disc Maker.
In the label view, an image of the print results of the label appears. You can edit the label while checking the image of
the print results.
• There is no need to create a label if you only want to write data to discs.
• For details on EPSON Total Disc Maker, see EPSON Total Disc Maker Help.
• When printing barcodes and 2D codes, be sure to use Epson brand ink cartridges.
• When printing barcodes and 2D codes on discs that are not EPSON specified CD/DVDs,
check whether the printed barcodes or 2D codes can be read correctly by a scanner.
• Do not place barcodes and 2D codes where they overlap with other print data, or
where they extend out of the print area.
• Barcodes and 2D codes use the ratio of black to white to indicate information. If ink
penetration results in a deterioration in the ratio of black to white, barcodes and 2D
codes may not be able to be read correctly. Check whether the printed barcodes and
2D codes can be read correctly by a scanner.
• If a barcode printed with bidirectional printing cannot be read correctly, align the print
head (See “Aligning the Print Head” on page 90.) and then print the barcode, or print
the barcode with unidirectional printing.
Notes
Page 66
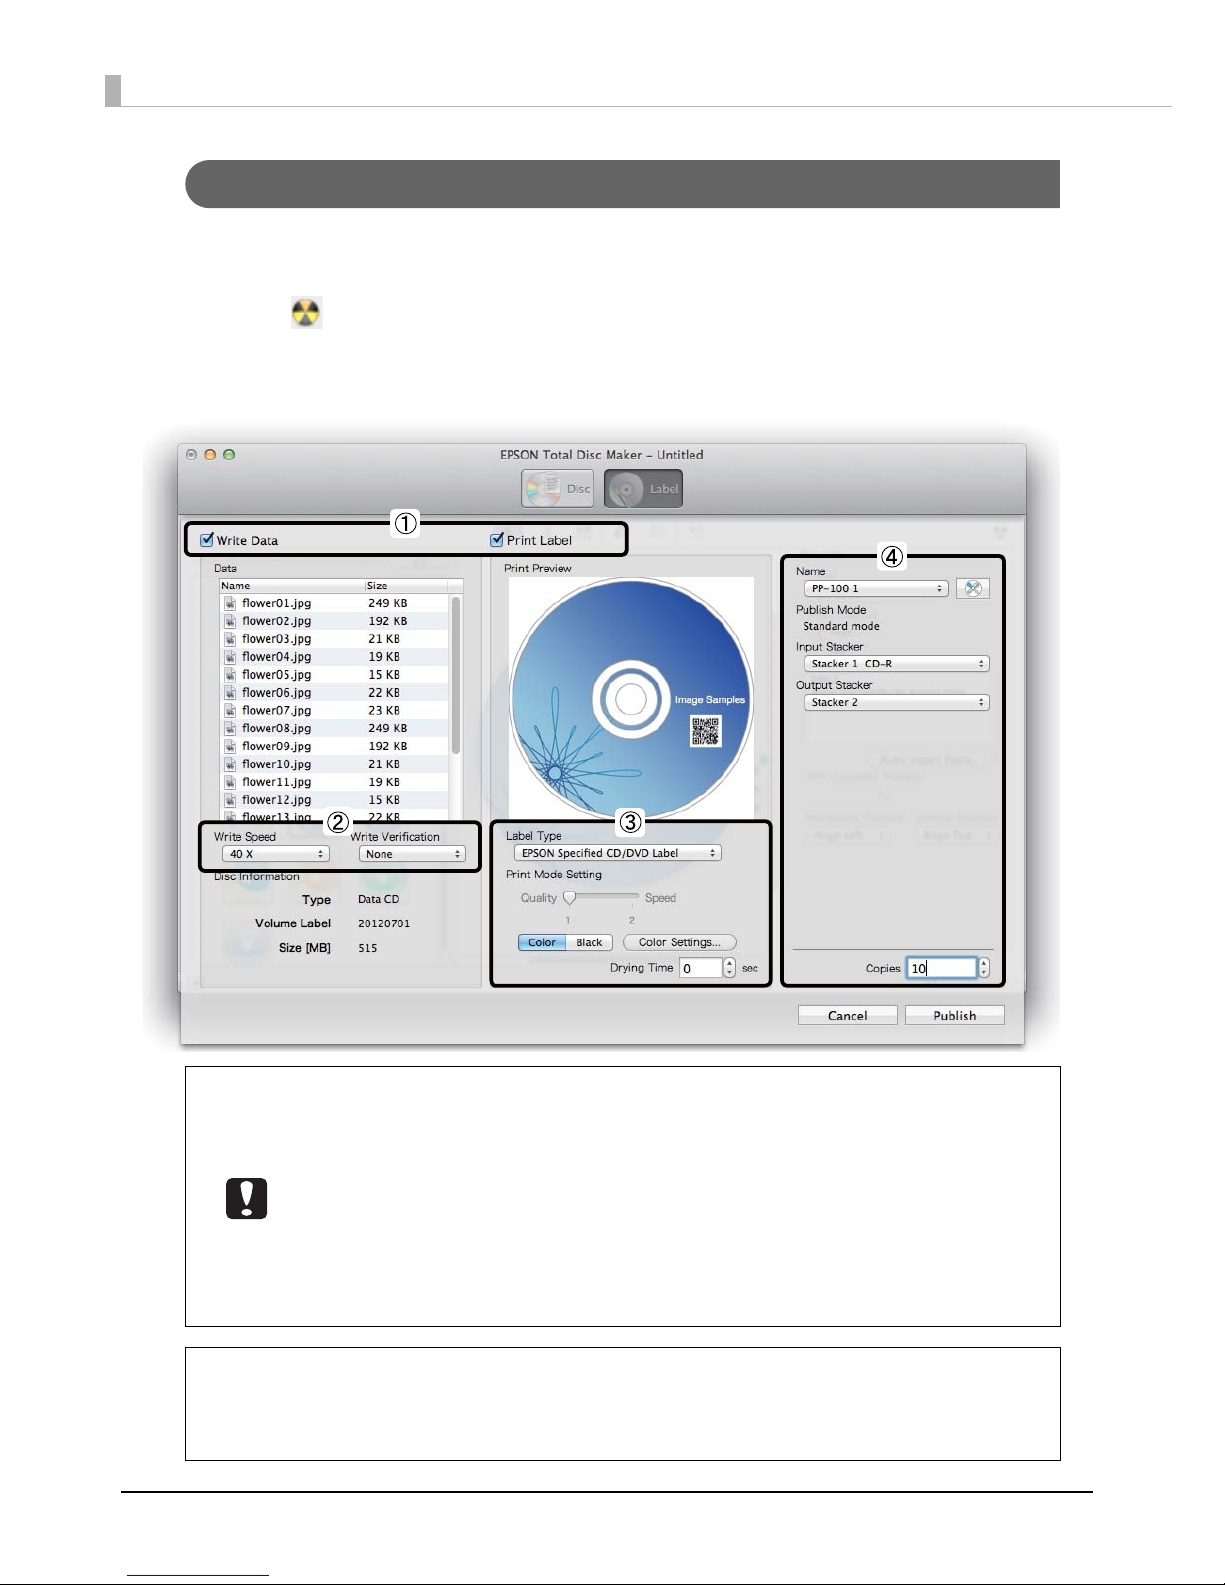
66
Publishing Discs
This section describes how to publish a job for publishing discs to the product in Publish view of EPSON Total Disc
Maker.
1
Click [Publish] in Disc view or Label view to display Publish view.
2
Configure each setting.
See EPSON Total Disc Maker Help for details.
• Depending on the discs and PC used, the writing speed may become slower than the
set speed.
• Depending on the discs used, writing may not be able to be performed properly at the
speed recommended for the disc. If this happens, write at a slower speed. In particular,
we recommend writing to DVD±R DL at a slow speed.
• If you print on the matte label type of EPSON specified CDs, set Label Type to CD/DVD
Label.
• If you print on the matte label type of EPSON specified DVDs, set Label Type to CD/DVD
Premium Label.
• If Label Type is set to EPSON Specified CD/DVD Label, Quality/Speed is set to 1.
• If Write Verification is set to Compare, you can confirm whether data was written to
discs properly.
• Clicking Color Settings... allows you to make color adjustments. (See “Adjustin g P r i n t
Colors” on page 79.)
Notes
Page 67

67
Publishing Discs
3
Make sure that discs are loaded in the input stacker correctly.
See “Loading Discs” on page 61.
4
Click Publish.
EPSON Total Disc Utility starts, and the disc publishing process begins.
• With the PP-100II, PP-100, or PP-100AP, you can take out the published discs output to
Stacker 4 without pausing the job. However, when the BUSY light is flashing rapidly, do
not pull out Stacker 4 because discs are being output to Stacker 4. Doing so may
damage the discs.
• Once the output stacker becomes full, the job is paused. The job is resumed
automatically if you take out the published discs and close the disc cover/stacker 4.
• If the Mac shuts down while processing a job, all the jobs are cancelled.
• For PP-100II/PP-100
∗ Do not open the disc cover while a job is being processed (while the BUSY light is
flashing). This could adversely affect the writing or printing quality.
∗ If a job is being processed (while the BUSY light is flashing) and you need to open the
disc cover to load or take out discs, first pause the job and then open the disc cover.
See “Pausing/Cancelling Jobs” on page 73 for the procedure to pause a job.
∗ If you open the disc cover while a job is being processed (while the BUSY light is
flashing), an alarm beep sounds and the current job enters the standby status.
Closing the disc cover automatically resumes the job.
∗ While an alarm beep is sounding, the arm is moving. To ensure safety, do not put your
hands inside the product. Also, do not operate any stackers while an alarm beep is
sounding. This could damage the arm.
• For PP-100AP
∗ If you open the disc cover while a job is being processed (while the BUSY light is
flashing), make sure the internal light has turned off and that the arm has stopped
moving before performing any operation, such as loading or taking out discs. Do not
put your hands inside the product or operate any stackers while the arm is moving.
Also, open and close the disc cover gently.
∗ If you open the disc cover while a job is being processed (while the BUSY light is
flashing), the current job enters the standby status. Closing the disc cover
automatically resumes the job.
• For PP-50
∗ If you open the disc cover while a job is being processed (while the BUSY light is
flashing), make sure the internal light has turned off and that the arm has stopped
moving before performing any operation, such as loading or taking out discs. Do not
put your hands inside the product or operate any stackers while the arm is moving.
Also, open and close the disc cover gently.
∗ If you open the disc cover while a job is being processed (while the BUSY light is
flashing), the current job enters the standby status. Closing the disc cover
automatically resumes the job.
Page 68
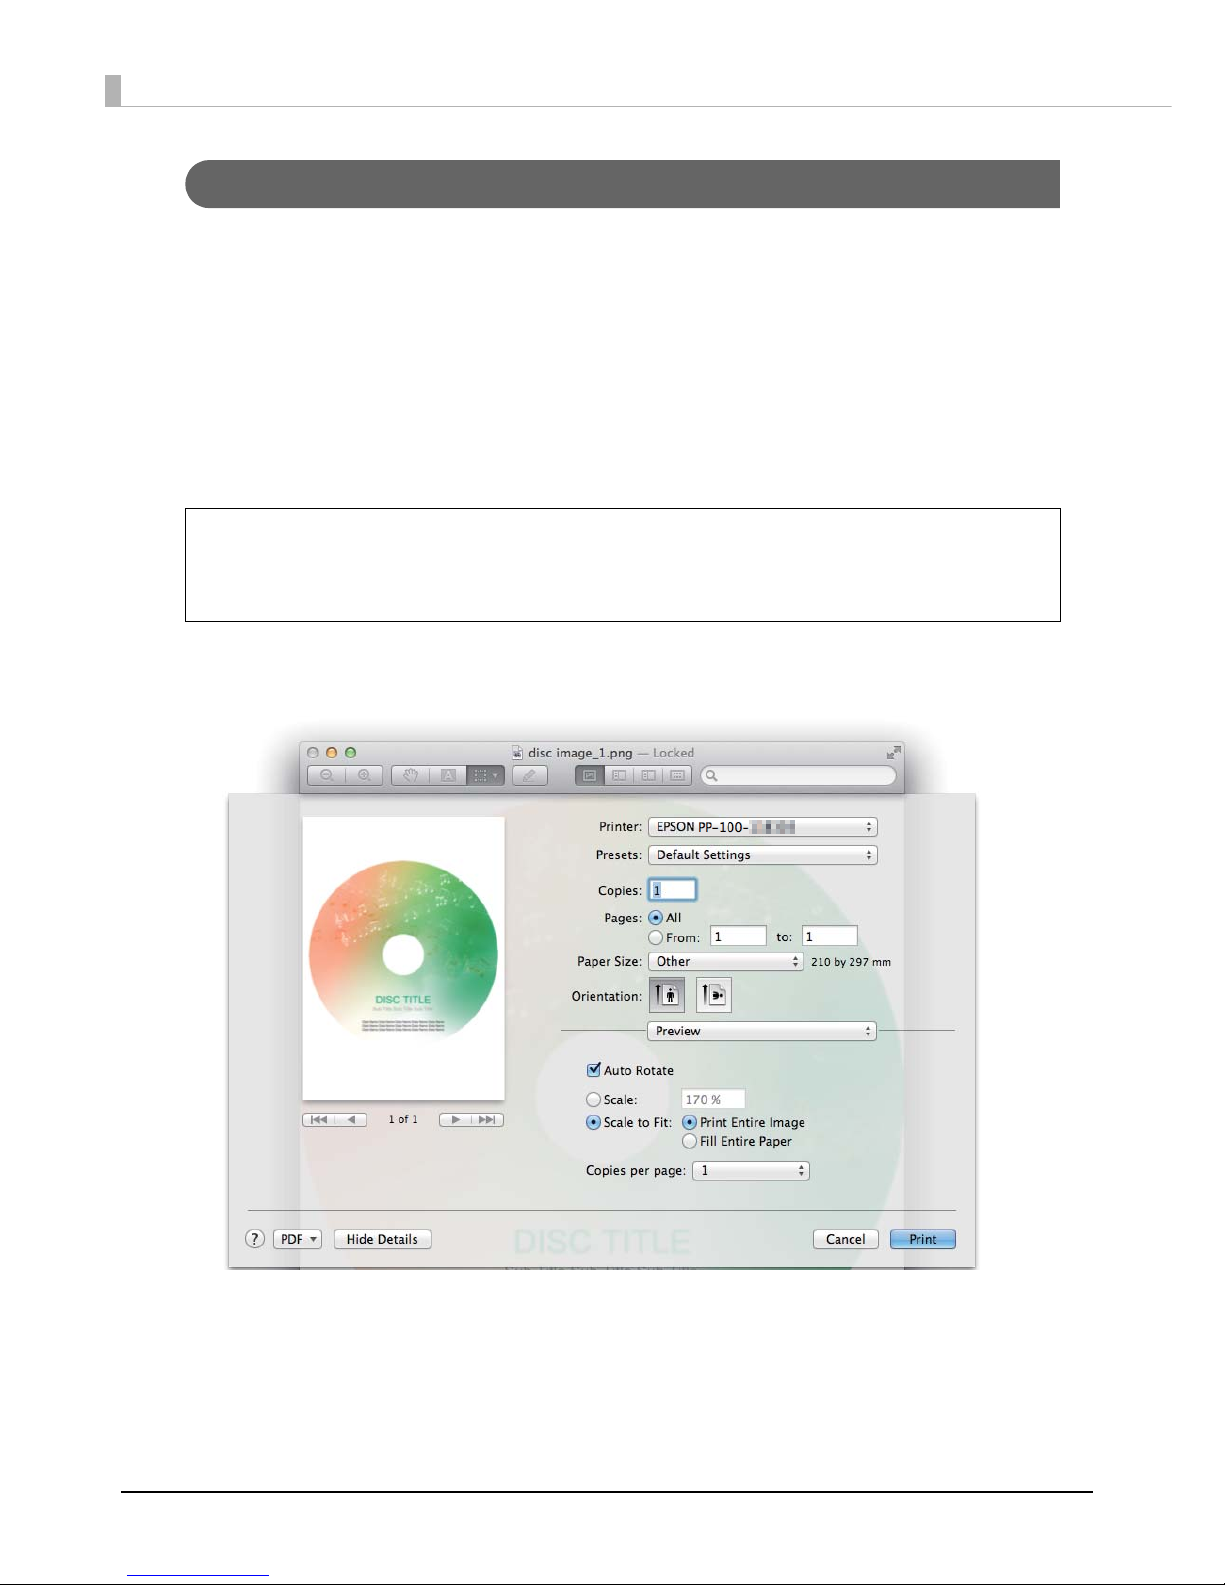
68
Setting Printer Driver and Publishing Discs
This section describes how to set the printer driver (setting for label print and registering a disc image file of write
data*) and publish a job for publishing discs to the product when you publish discs with applications other than
EPSON Total Disc Maker.
* Registering write data is not available with the PP-100AP.
In this example, we explain the procedure using Mac Preview.
1
Start up Preview.
2
Open the data to be printed on the disc label.
3
Select Print... from the File menu.
The setting screen of the printer driver appears.
4
Set Printer to EPSON PP-xxx-xxxxxx.
5
Set Paper Size to CD/DVD.
When you print using application other than EPSON Total Disc Maker, create the print
data using the following settings.
• Paper size: 124×124 mm
• Top, bottom, left, and right margins: 2 mm.
Notes
Page 69
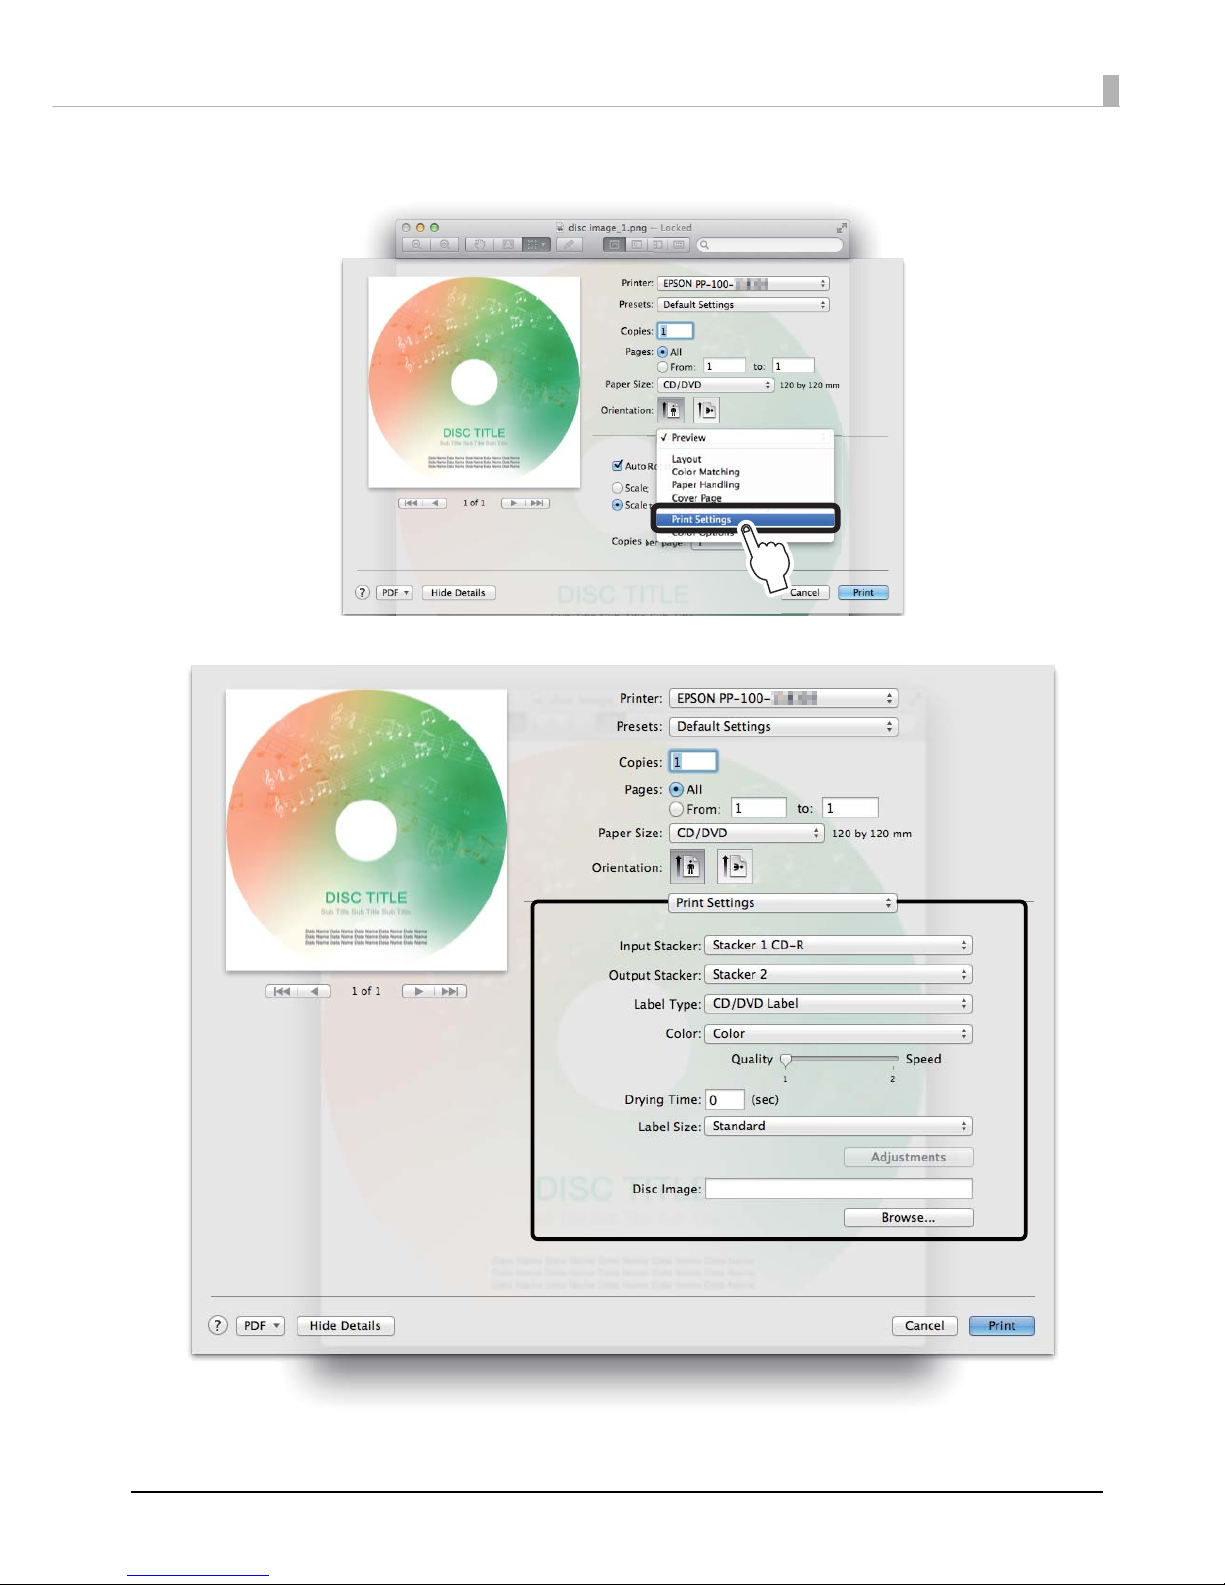
69
Publishing Discs
6
Select Print Settings.
The Print Setting area appears.
Page 70

70
7
Configure each setting.
See “Print Settings area” on page 46 for details.
8
Click Print.
EPSON Total Disc Utility starts, and the disc publishing process begins.
• With the PP-100II, PP-100, or PP-100AP, you can take out the published discs output to
Stacker 4 without pausing the job. However, when the BUSY light is flashing rapidly, do
not pull out Stacker 4 because discs are being output to Stacker 4. Doing so may
damage the discs.
• Once the output stacker becomes full, the job is paused. The job is resumed
automatically if you take out the published discs and close the disc cover/stacker 4.
• If the Mac shuts down while processing a job, all the jobs are cancelled.
• For PP-100II/PP-100
∗ Do not open the disc cover while a job is being processed (while the BUSY light is
flashing). This could adversely affect the writing or printing quality.
∗ If a job is being processed (while the BUSY light is flashing) and you need to open the
disc cover to load or take out discs, first pause the job and then open the disc cover.
See “Pausing/Cancelling Jobs” on page 73 for the procedure to pause a job.
∗ If you open the disc cover while a job is being processed (while the BUSY light is
flashing), an alarm beep sounds and the current job enters the standby status.
Closing the disc cover automatically resumes the job.
∗ While an alarm beep is sounding, the arm is moving. To ensure safety, do not put your
hands inside the product. Also, do not operate any stackers while an alarm beep is
sounding. This could damage the arm.
• For PP-100AP
∗ If you open the disc cover while a job is being processed (while the BUSY light is
flashing), make sure the internal light has turned off and that the arm has stopped
moving before performing any operation, such as loading or taking out discs. Do not
put your hands inside the product or operate any stackers while the arm is moving.
Also, open and close the disc cover gently.
∗ If you open the disc cover while a job is being processed (while the BUSY light is
flashing), the current job enters the standby status. Closing the disc cover
automatically resumes the job.
• For PP-50
∗ If you open the disc cover while a job is being processed (while the BUSY light is
flashing), make sure the internal light has turned off and that the arm has stopped
moving before performing any operation, such as loading or taking out discs. Do not
put your hands inside the product or operate any stackers while the arm is moving.
Also, open and close the disc cover gently.
∗ If you open the disc cover while a job is being processed (while the BUSY light is
flashing), the current job enters the standby status. Closing the disc cover
automatically resumes the job.
Page 71
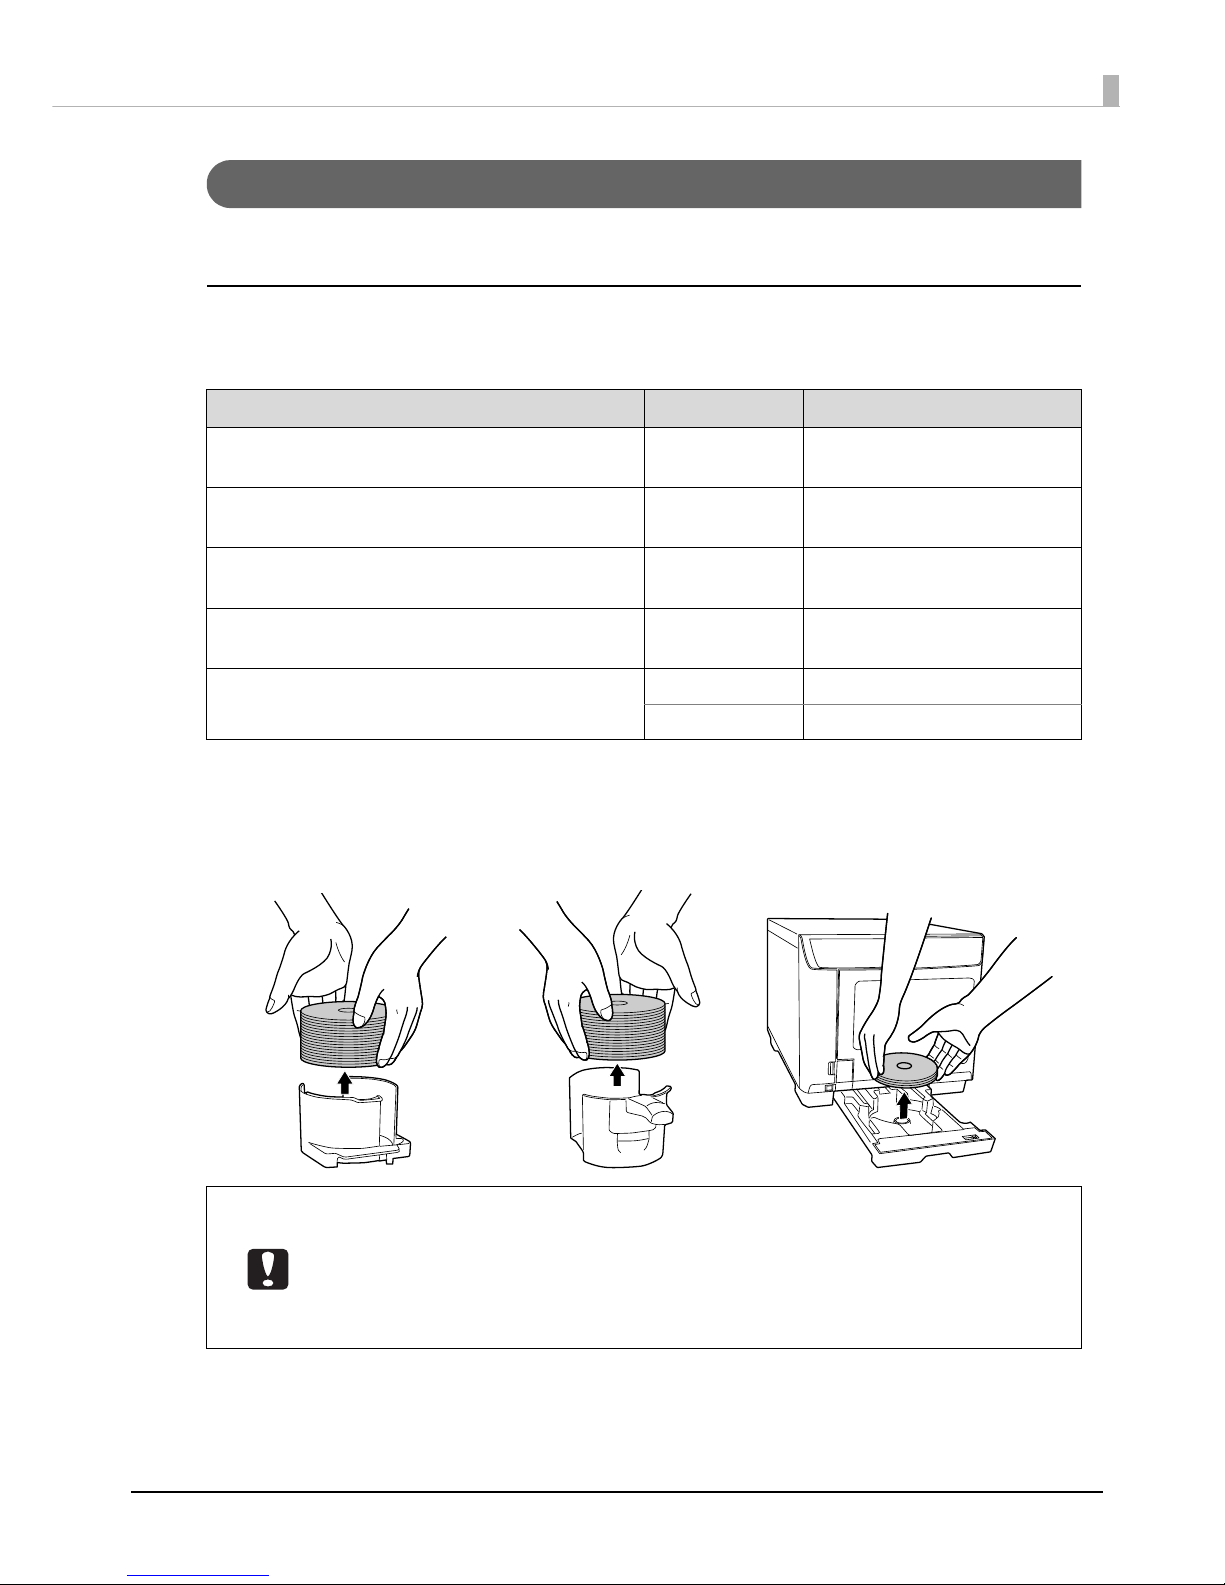
71
Publishing Discs
Takin g out discs
When the publishing process finishes, follow the steps below to take out published discs.
For PP-100II/PP-100/PP-100AP
The stacker used as the output stacker differs depending on the publish mode. Confirm the output stacker in the
following table.
1
Only when the output stacker is Stacker 2 or Stacker 3, open the disc cover and take it out.
For precautions when you open the disc cover, see “Opening the Disc Cover” on page 21.
2
Take out the published discs from the stacker.
Publish Mode Output Stacker Number of Discs
Standard mode
(when the output stacker is set to Stacker 2)
Stacker 2 Up to approximately 50 discs
Standard mode
(when the output stacker is set to Stacker 4)
Stacker 4 Up to approximately 5 discs
External Output mode
(when the output stacker is set to Stacker 3)
Stacker 3 Up to approximately 50 discs
External Output mode
(when the output stacker is set to Stacker 4)
Stacker 4 Up to approximately 5 discs
Batch mode Stacker 2 Up to approximately 50 discs
Stacker 3 Up to approximately 50 discs
• After printing on the label surface, allow EPSON specified CDs/DVDs to dry for at least
one hour, and other types of discs for at least 24 hours. Do not insert discs into a drive or
other device until they are completely dry.
• Avoid drying under direct sunlight.
• Directly touching or moisture getting on the label surface before or after printing may
result in blurring or discs sticking together.
<Stacker 2> <Stacker 4><Stacker 3>
Page 72
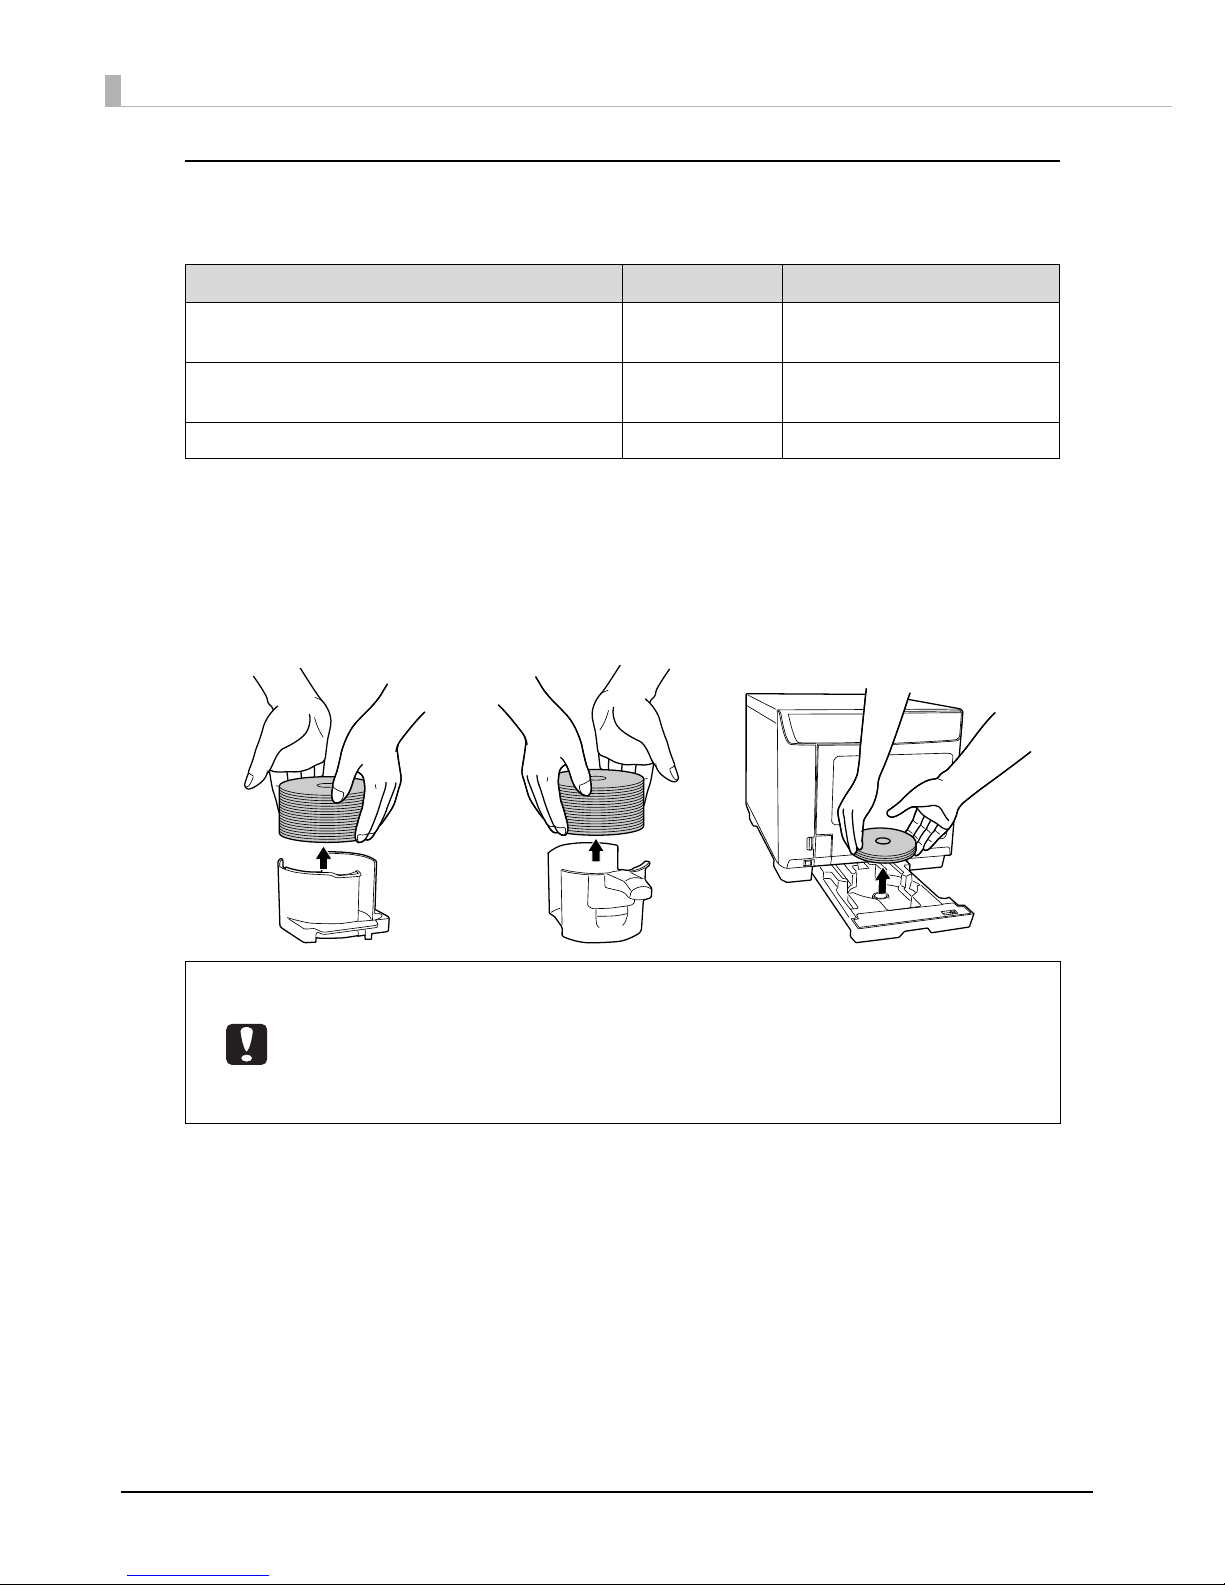
72
For PP-50
The stacker used as the output stacker differs depending on the publish mode. Confirm the output stacker in the
following table.
1
Open the disc cover.
For precautions when you open the disc cover, see “Opening the Disc Cover” on page 21.
2
Only when the output stacker is Stacker 2, take it out.
3
Take out the published discs from the output stacker.
Publish Mode Output Stacker Number of Discs
Standard mode
(when the output stacker is set to Stacker 2)
Stacker 2 Up to approximately 50 discs
Standard mode
(when the output stacker is set to Stacker 3)
Stacker 3 Up to approximately 20 discs
Low-volume mode Stacker 3 Up to approximately 20 discs
• After printing on the label surface, allow EPSON specified CDs/DVDs to dry for at least
one hour, and other types of discs for at least 24 hours. Do not insert discs into a drive or
other device until they are completely dry.
• Avoid drying under direct sunlight.
• Directly touching or moisture getting on the label surface before or after printing may
result in blurring or discs sticking together.
<Stacker 2> <Stacker 4><Stacker 3>
Page 73
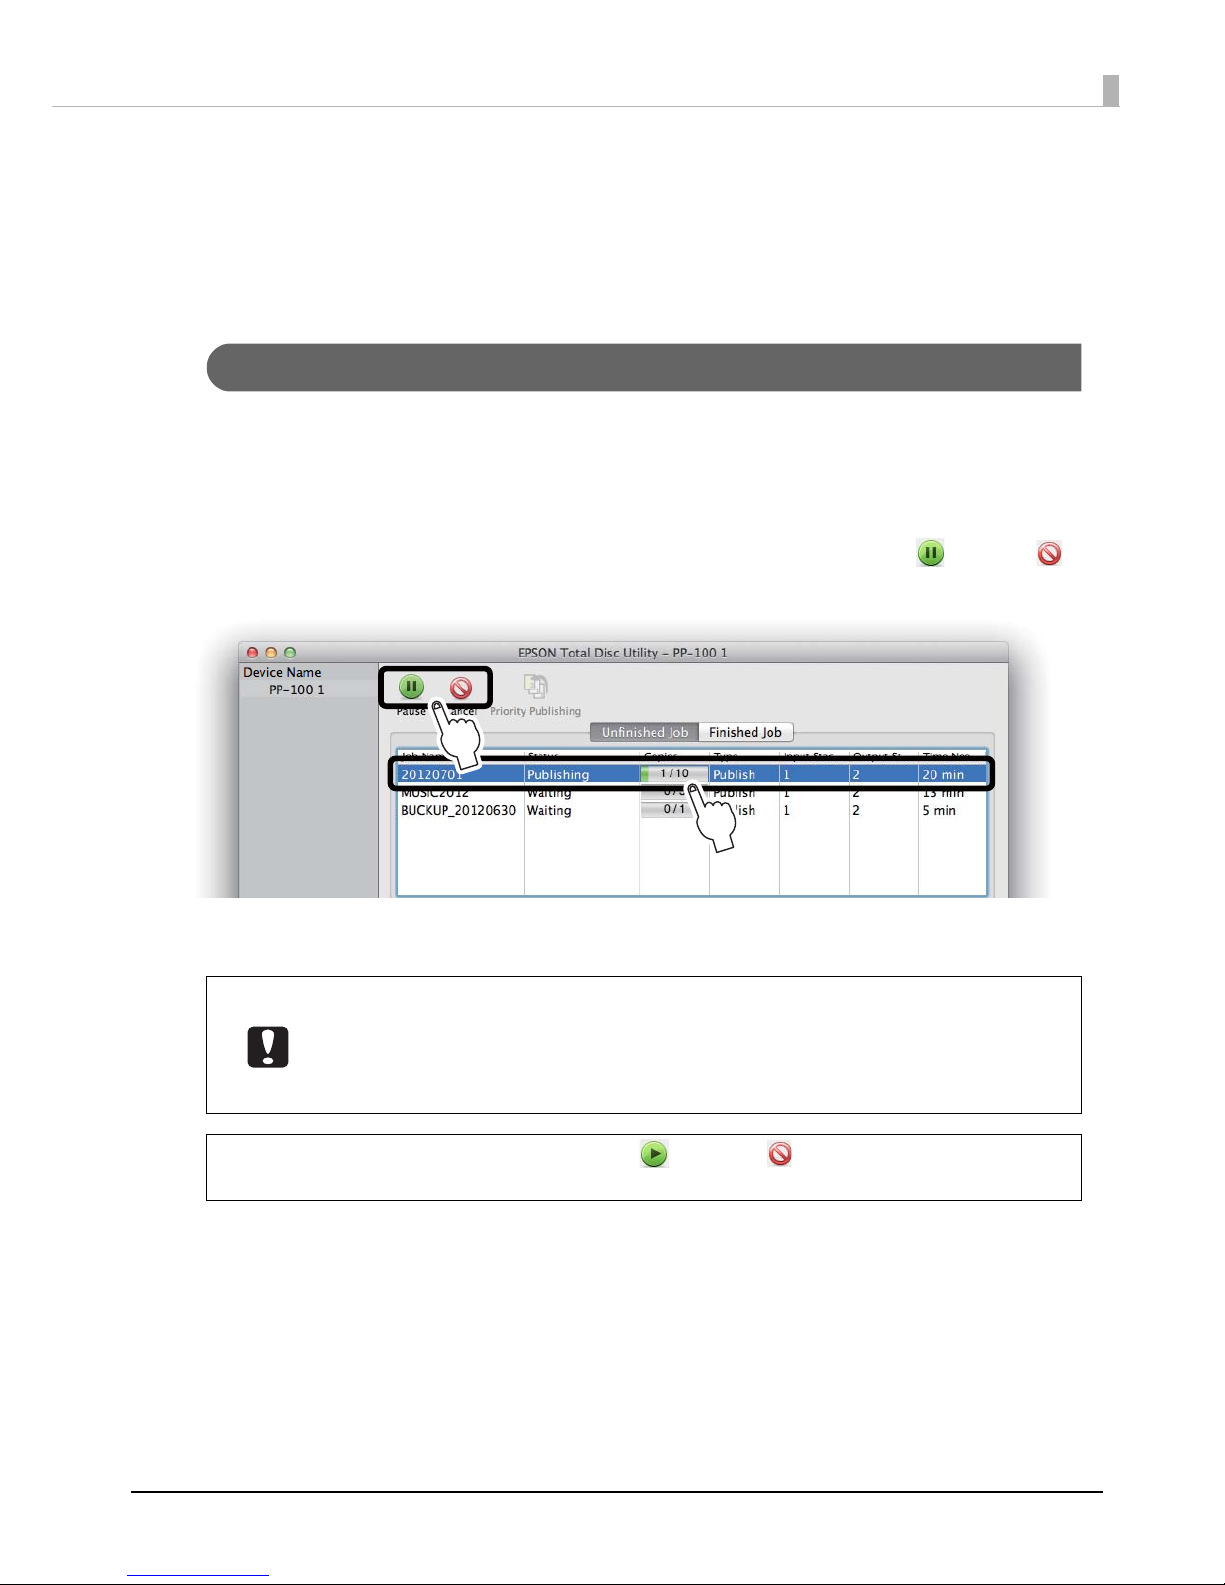
73
Publishing Discs
Job Operations
Processing performed by this product, such as writing and printing data, is called a “job.”
After publishing a job with EPSON Total Disc Maker or the printer driver, you can pause/cancel it or change the
processing order of jobs.
Pausing/Cancelling Jobs
Follow the steps below to pause or cancel a job.
1
Start up EPSON Total Disc Utility.
See “Starting EPSON Total Disc Utility” on page 39.
2
Select the job for which you want to pause/cancel processing, and click [Pause]/
[Cancel].
When the job is paused, the job status display changes to Paused.
When the job is cancelled, the job display disappears from the Unfinished Job screen.
• If a job is paused when there is a disc being published, the job is paused after the
processing is finished.
• The processing of any subsequent job also does not start while the job is paused.
• If a job is cancelled when the disc is being published, that processing is stopped, and
the disc is output to the output stacker.
Selecting a paused job and clicking [Resume] / [Cancel] allows you to resume or
cancel the job.
1
2
Notes
Page 74
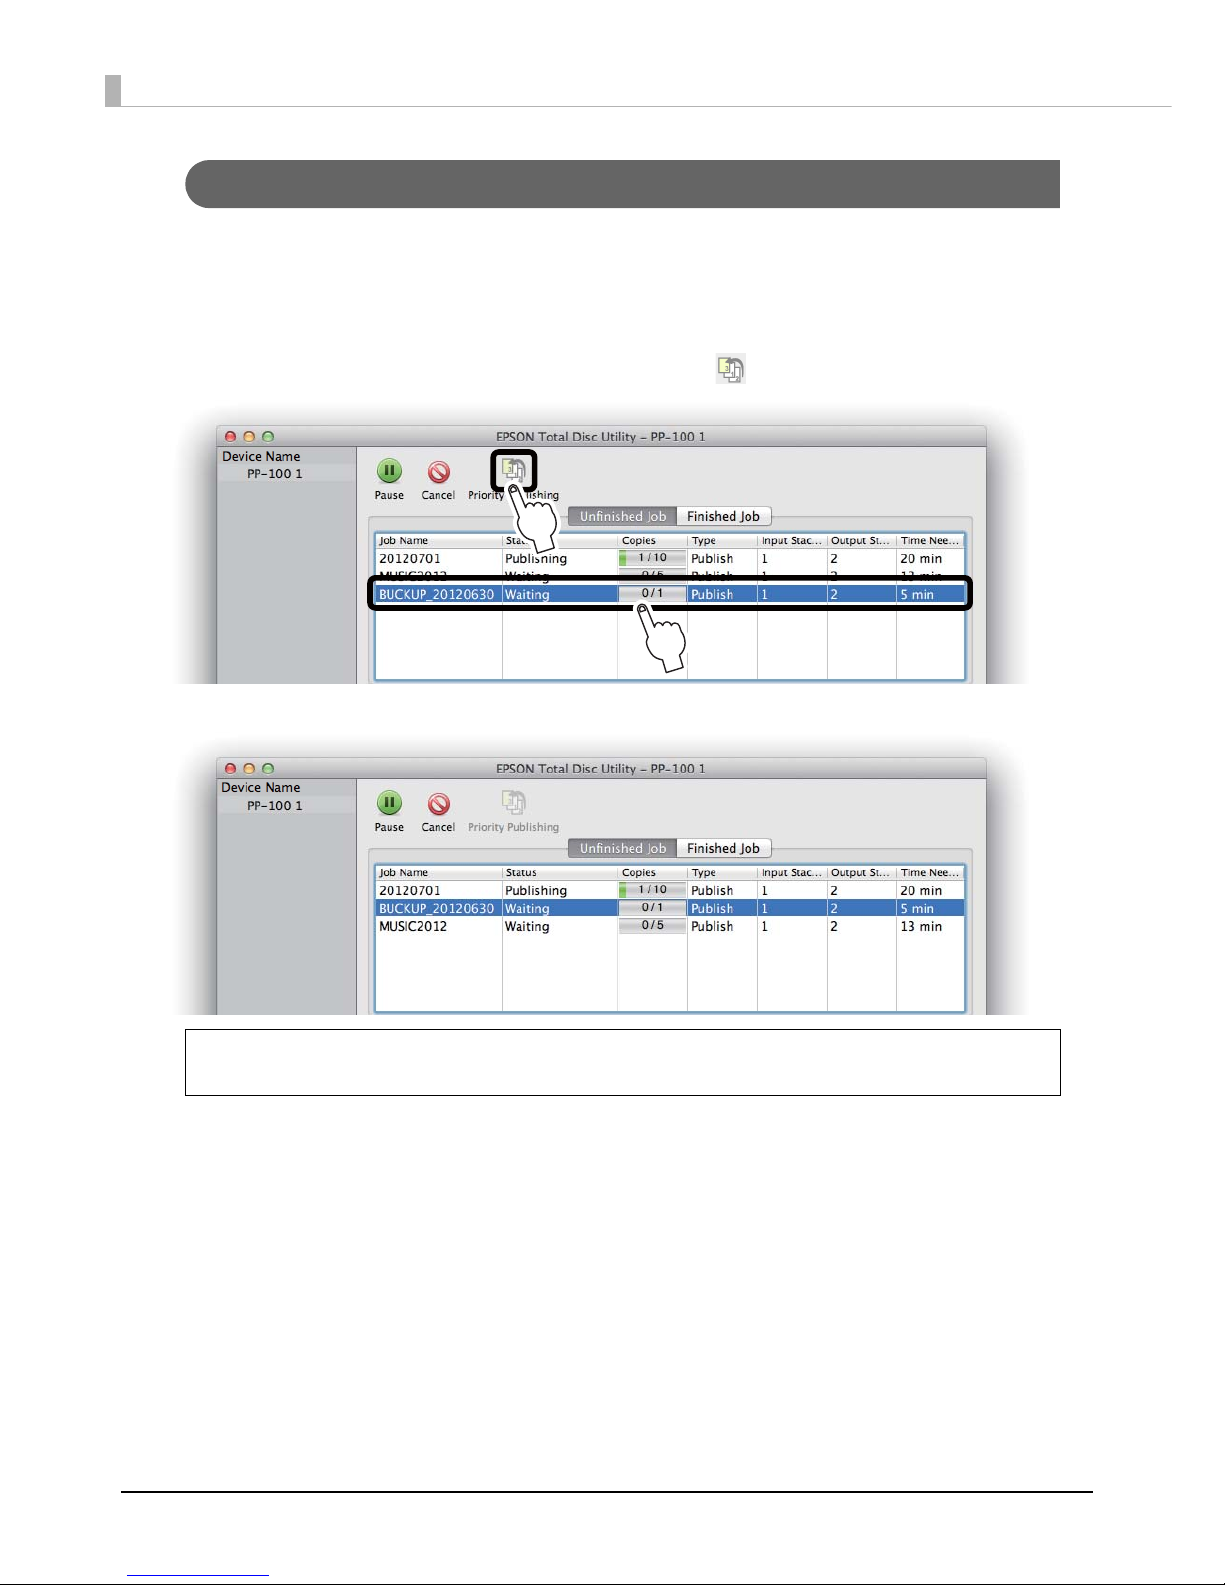
74
Priority Publishing
If you need to process a job before the others when more than one job is being published, follow the steps below.
1
Start up EPSON Total Disc Utility.
See “Starting EPSON Total Disc Utility” on page 39.
2
Select the job you want to give priority to, and click [Priority Publishing].
The selected job will be processed after the job in progress.
No job can be given priority before such operations as nozzle checking, aligning print
head, and correcting printing position.
1
2
Notes
Page 75
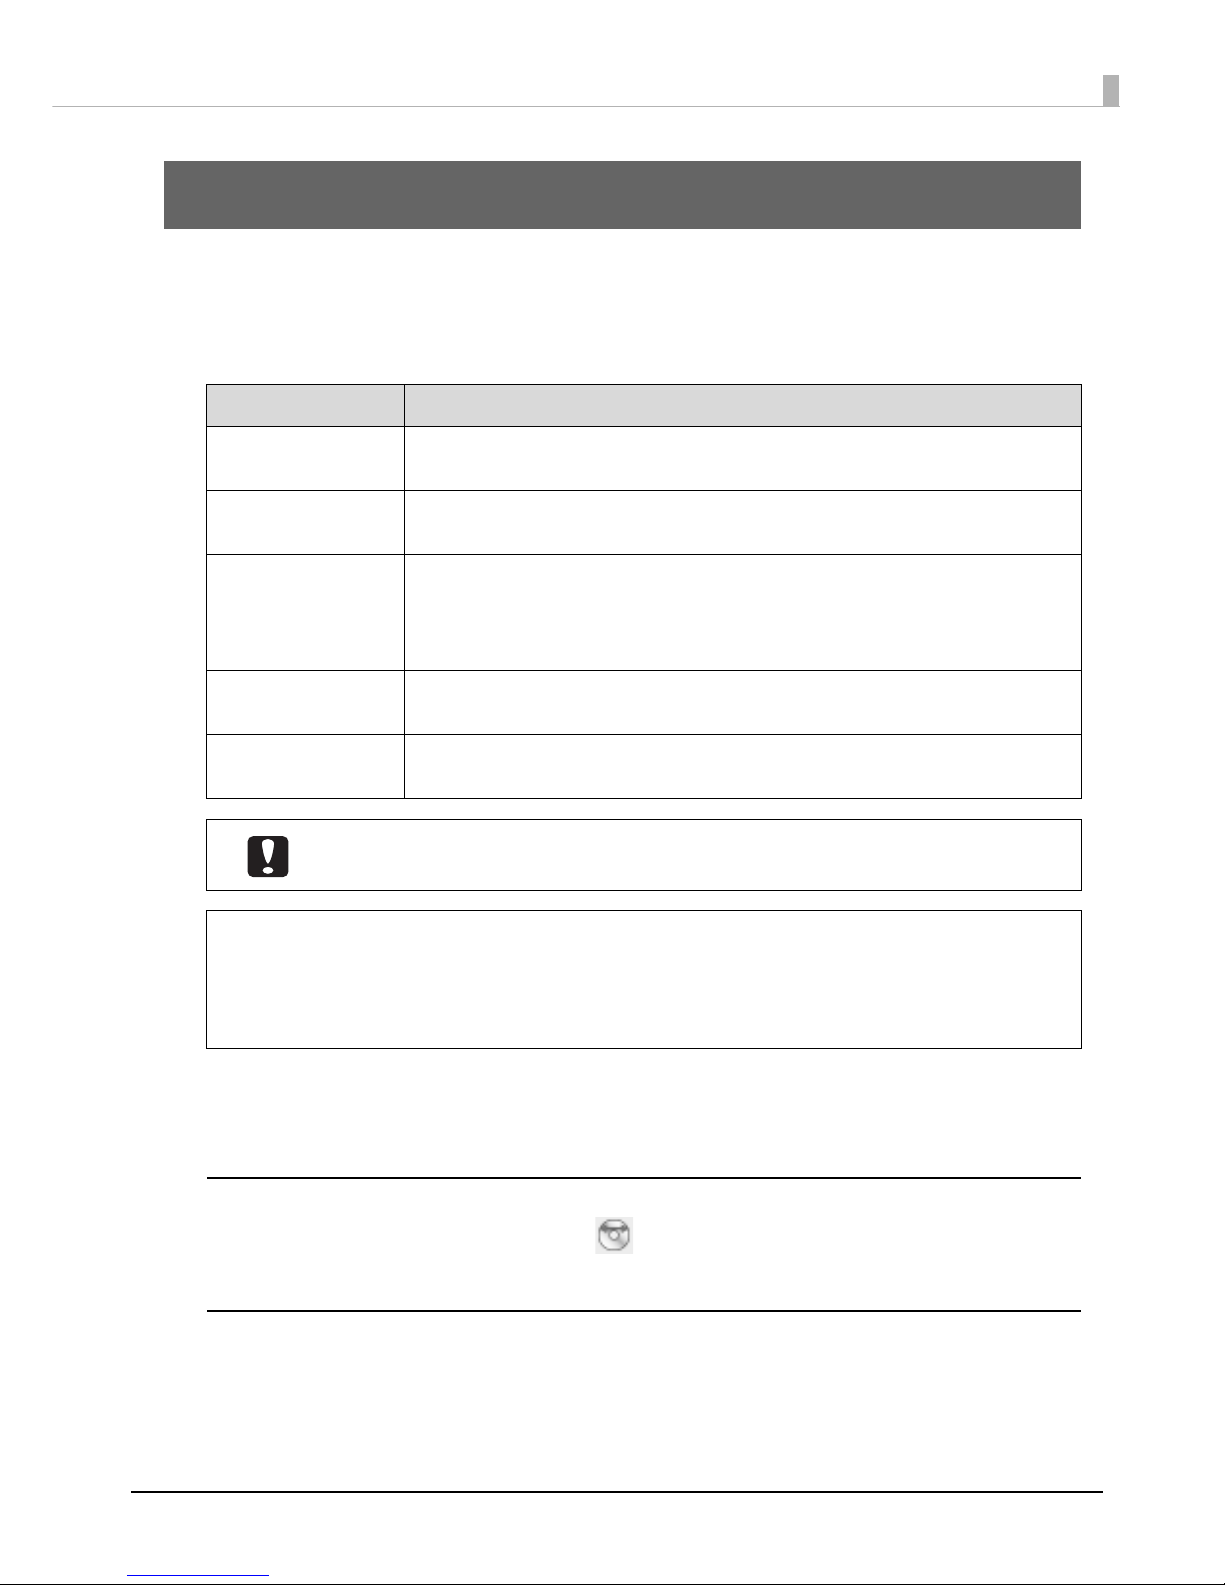
75
Convenient Features
Convenient Features
Printing on User Defined Label Size Discs
Set an arbitrary size if you print on discs whose label size is other than Standard and Wide.
The setting procedure of the user defined label size differs, depending on whether you publish with EPSON Total
Disc Maker or with the other applications.
When publishing with EPSON Total Disc Maker
Set in the dialogue that is displayed when you click [Set Inner/Outer Diameter] in Label view of EPSON Total
Disc Maker.
When publishing with the other applications
Set in the dialogue that is displayed when you set Label Size to User Defined, and then click Adjustments in the
Print Settings area of the printer driver.
Setting item Description
Inside Diameter
Set the inside diameter of the label. You can set a value within the range of 1.80
to 5.00 cm (180 to 500).
Outside Diameter
Set the outside diameter of the label. You can set a value within the range of
7.00 to 11.94 cm (700 to 1194).
Mask Rib Area
Check this to mask the rib area.
Rib refers to the protruding section of the disc inside circumference.
Masking the rib area enables you to prevent ink running onto the rib when a
printed disc and rib touch in the output stacker.
Rib Inside Diameter
Set the inside diameter of the rib area. You can set a value within the range of
2.70 to 5.00 cm (270 to 500).
Rib Width
Set the width of the rib area. You can set a value within the range of 0.01 to 1.15
cm (1 to 115).
Printing inside the rib area may result in ink getting on discs, discs sticking together, or
discoloration.
Setting the range outside of the recommended print area (inside diameter of 45.0 mm or
more and outside diameter within 116.0 mm) and printing may result in the discs or tray
becoming dirty, peeling off or blurring of the print, or discs sticking together. Check the
label print range of the discs you are using before configuring the setting. See “Printable
Area” on page 53 for details on the recommended print area.
Notes
Page 76
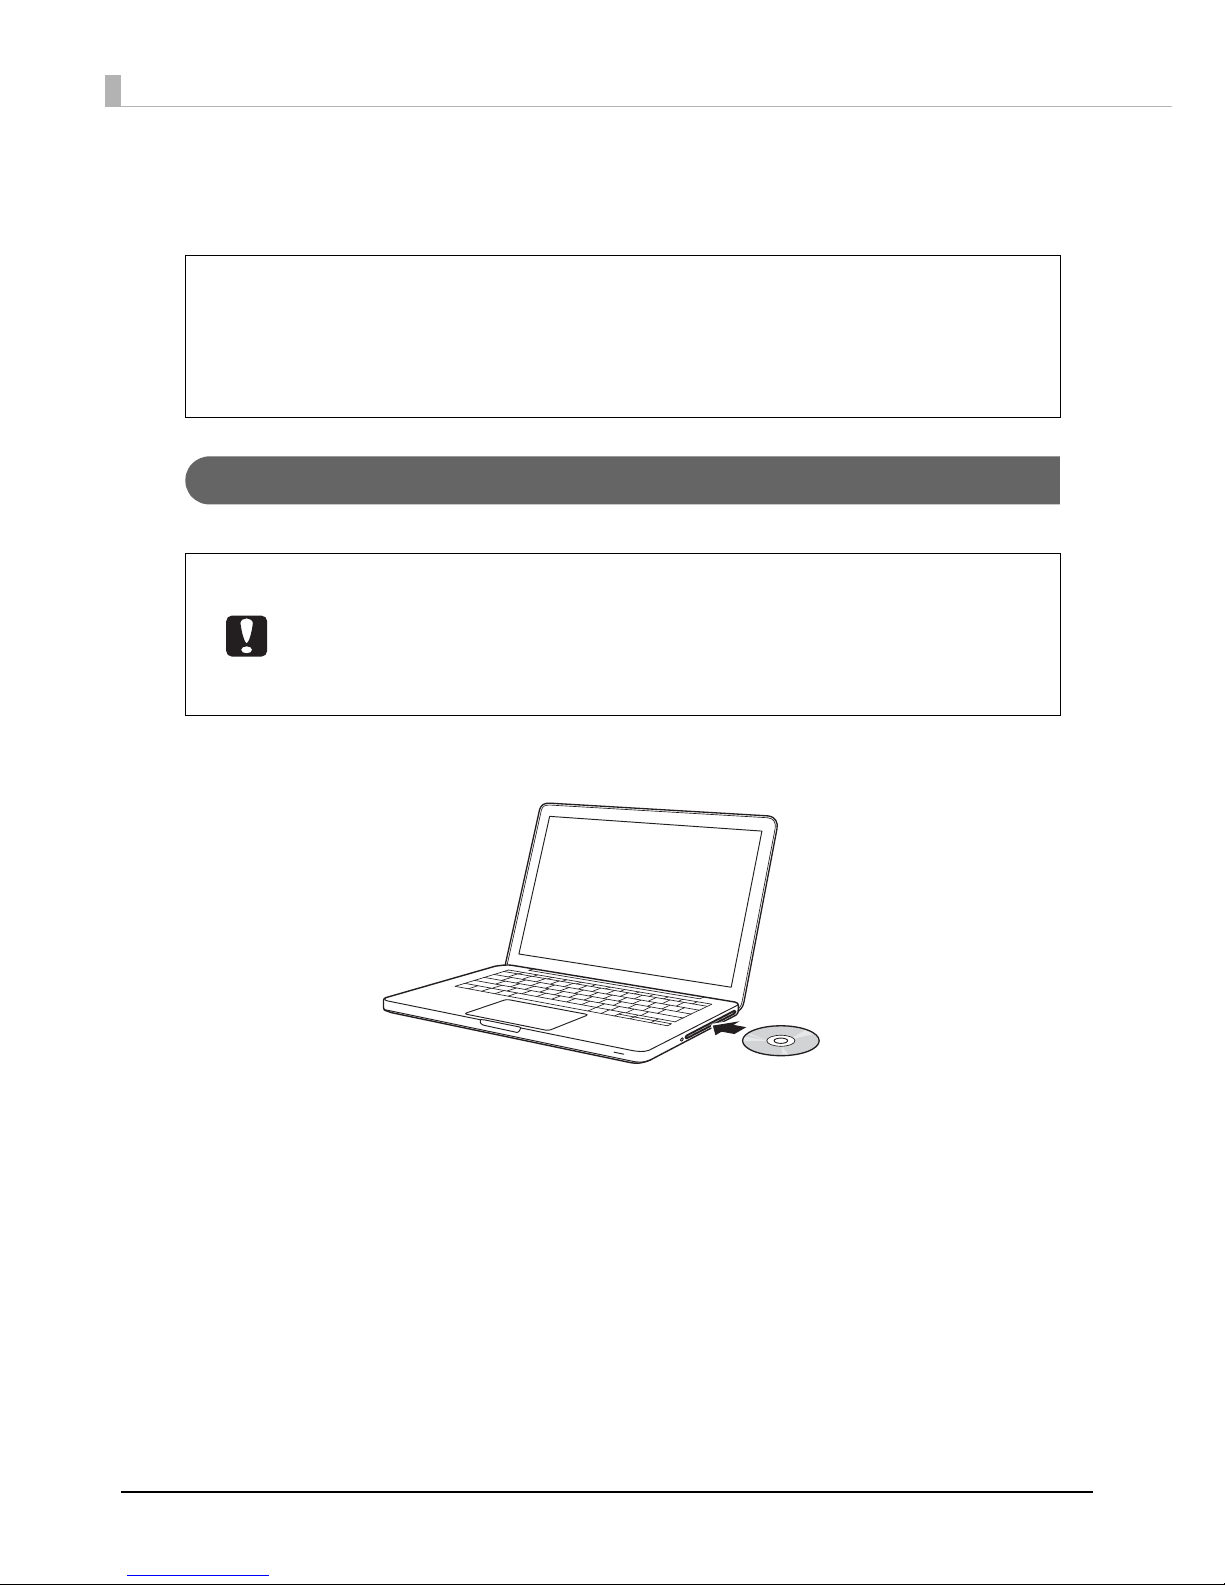
76
Creating Disc Copies
(Only for PP-100II/PP-100/PP-50)
With EPSON Total Disc Maker, you can create CD/DVD copies using an original disc or a disc image file.
Creating Copies Directly from Discs
This section describes how to create CD/DVD copies directly from a CD/DVD disc inserted in the drive of your PC.
1
Insert the disc you want to create a copy of in the drive of the PC.
2
Start up EPSON Total Disc Maker.
See “Starting EPSON Total Disc Maker” on page 35.
• This section describes only the procedure to register write data to create disc copies.
For the procedures other than registering write data, follow the usual flow. (See “Flow
for Publishing Discs” on page 55.)
• If you publish with applications other than EPSON Total Disc Maker, specifying an image
file in the print setting of the printer driver allows you to create disc copies. (See “Print
Settings area” on page 46.)
• As the copy source, use a CD/DVD drive with support for commands compliant with
MMC4, and capable of operations compliant with MMC4.
• CD/DVD copies may not be able to be created depending on the model of CD/DVD
drive used as the source. In such a case, try changing the source CD/DVD drive.
• Copying is not possible if the source disc is a multi-session CD/DVD.
• Copying is not possible If the source disc is a packet-written CD.
Notes
Page 77
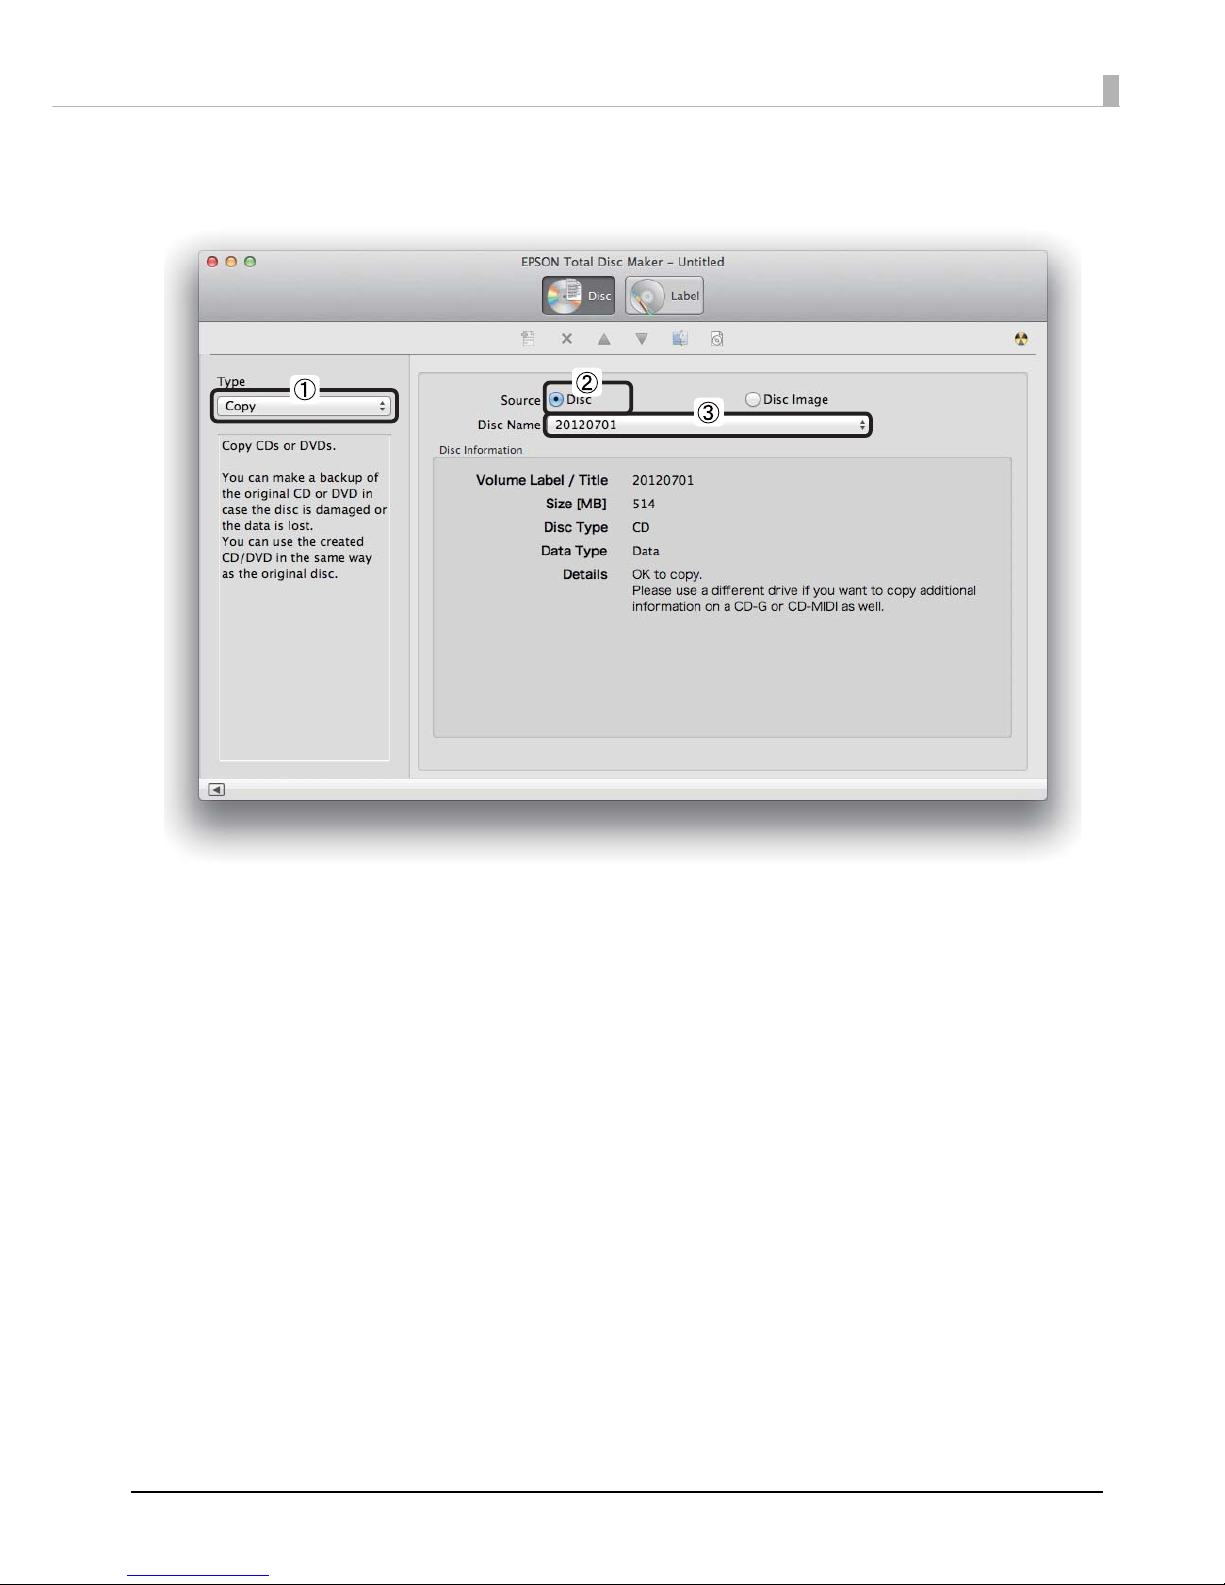
77
Convenient Features
3
Configure each setting.
See EPSON Total Disc Maker Help for details.
The registration of write data is now finished.
Page 78
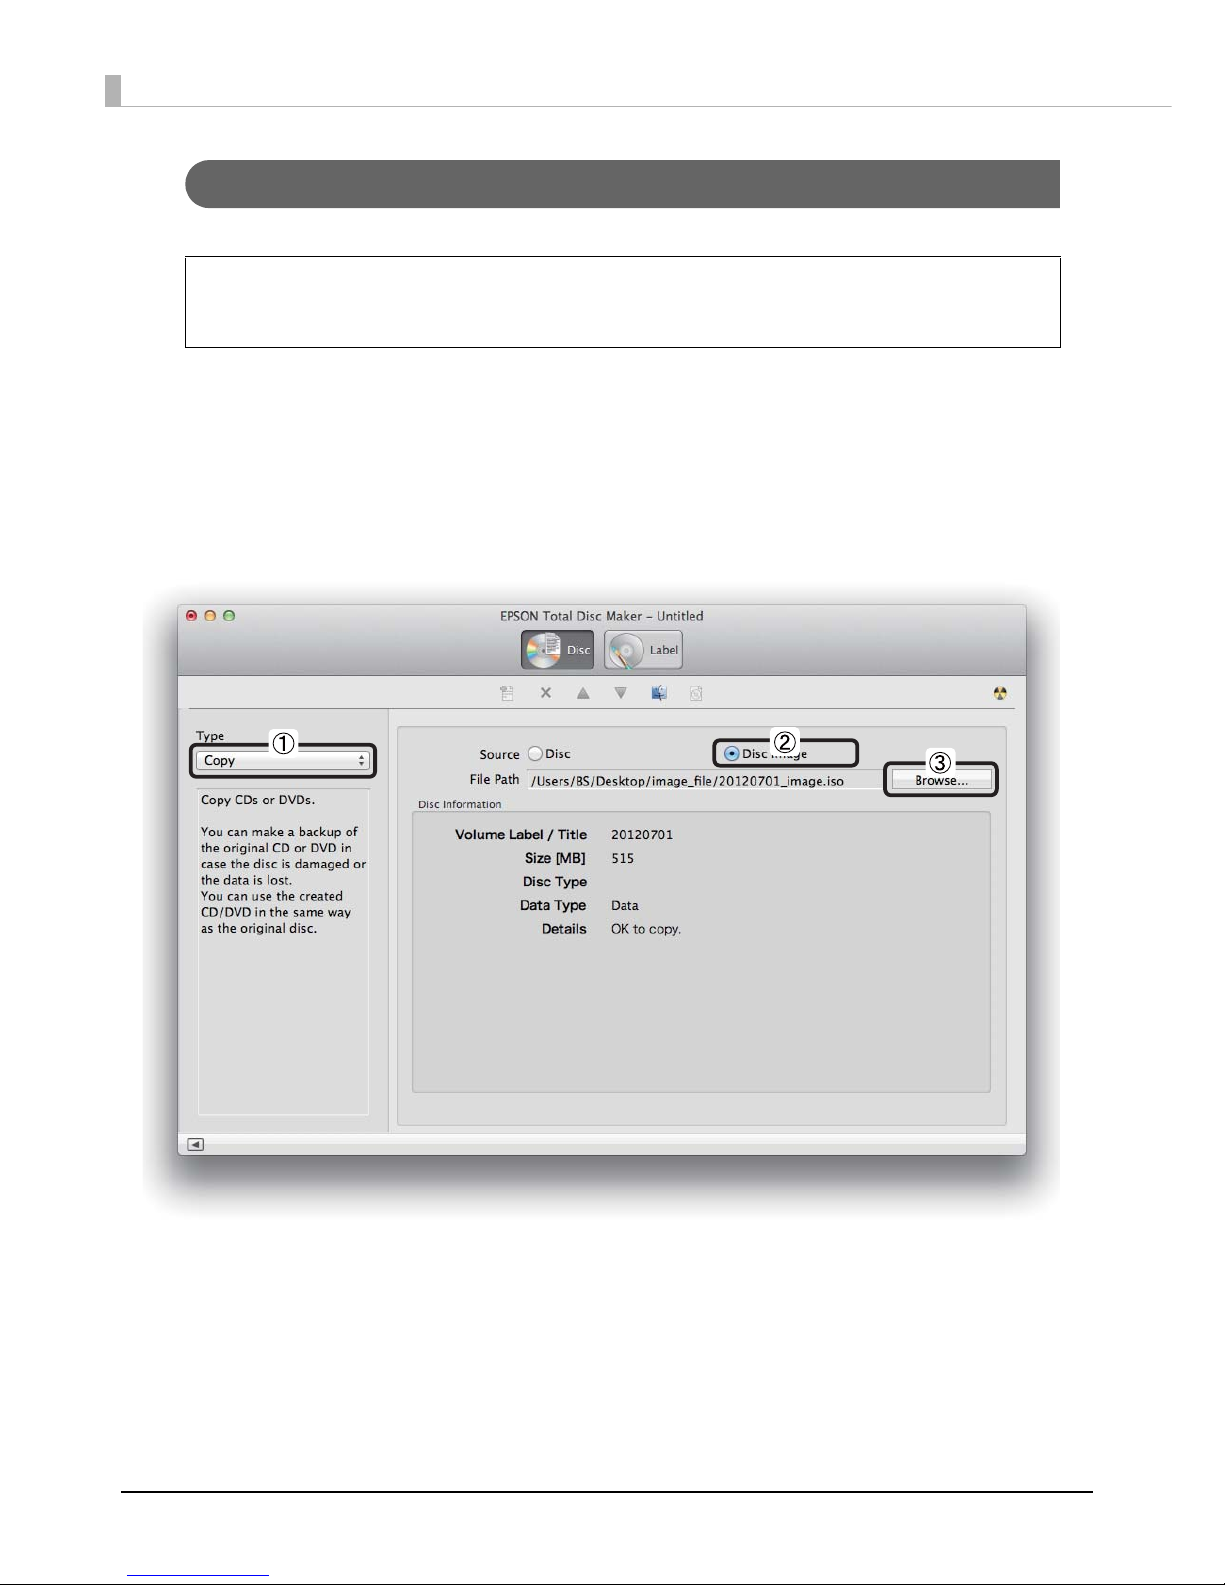
78
Creating Copies from Disc Image Files
This section describes how to create CD/DVD copies using a disc image file.
1
Start EPSON Total Disc Maker.
See “Starting EPSON Total Disc Maker” on page 35.
2
Set Type to Copy.
3
Configure each setting.
See EPSON Total Disc Maker Help for details.
The registration of write data is now finished.
If you click Create Disc Image... on the File menu after registering write data (see page
63.), you can create a disc image file.
Notes
Page 79

79
Convenient Features
Adjusting Print Colors
This section describes how to adjust the colors of print data.
If you wish, you can make color adjustments at the time of printing without making color
adjustments to the actual data.
Mode
Photo-realistic Uses the standard color correction of the printer driver for printing.
Vivid
Performs color processing to increase color saturation to
strengthen the intensity of colors.
EPSON Standard Performs color processing to obtain the standard colors of Epson.
Adobe RGB
Performs color processing with Adobe RGB for wider color space.
Select this option when, for example, printing print data that
includes Adobe RGB color space information.
Gamma
1.5
Produces a softer image than one printed using a gamma value of
1.8.
1.8
Produces a print with more depth and crispness than one printed
using a gamma value of 1.5. Use this value for normal printing.
2.2
Use this value when printing to match color with a device that uses
sRGB.
Adjustments
Brightness
Allows you to use a slider to adjust the overall brightness of an
image. With 0 as the standard, you can adjust the brightness from 25% to + 25%. Moving the slider in the negative direction (-) makes
the image darker, and moving the slider in the positive direction (+)
makes the image brighter. This is useful for images that are too dark
or too light overall.
Contrast
Allows you to use a slider to adjust the contrast between light and
dark in an image. With 0 as the standard, you can adjust the
contrast from - 25% to + 25%. When you increase the contrast, the
bright areas become brighter and the dark areas become darker.
Conversely, if you decrease the contrast, the difference between
light and dark in the image decreases.
Saturation
Allows you to use a slider to adjust the saturation (vividness of the
colors) of an image. With 0 as the standard, you can adjust the
brightness from - 25% to + 25%. When you increase the saturation,
the colors become stronger. When you decrease the saturation,
colors are lost and the image becomes colorless and close to gray.
Cyan
- setting: Strengthens red.
+ setting: Strengthens cyan.
Magenta
- setting: Strengthens green.
+ setting: Strengthens magenta.
Yellow
- setting: Strengthens blue.
+ setting: Strengthens yellow.
Notes
Page 80

80
The adjusting procedure differs, depending on whether you publish with EPSON Total Disc Maker or with other
applications.
When publishing with EPSON Total Disc Maker
Set in the dialogue that is displayed when you click Color Settings... in Publish view of EPSON Total Disc Maker.
Click Color Correction to configure each setting.
When publishing with other applications
Select Color Correction in the Color Options area of the printer driver to set Mode and Gamma. Click Adjustments
to set the rest of the items.
• If you set Print Mode Setting to Black in Publish view of EPSON Total Disc Maker, you can
adjust only Gamma, Brightness, and Contrast.
• Select ColorSync when adjusting colors between devices. If you select ColorSync,
color adjustment is not possible.
If you set Color to Black in the Print Settings area, you can adjust only Gamma, Brightness,
and Contrast.
Notes
Notes
Page 81
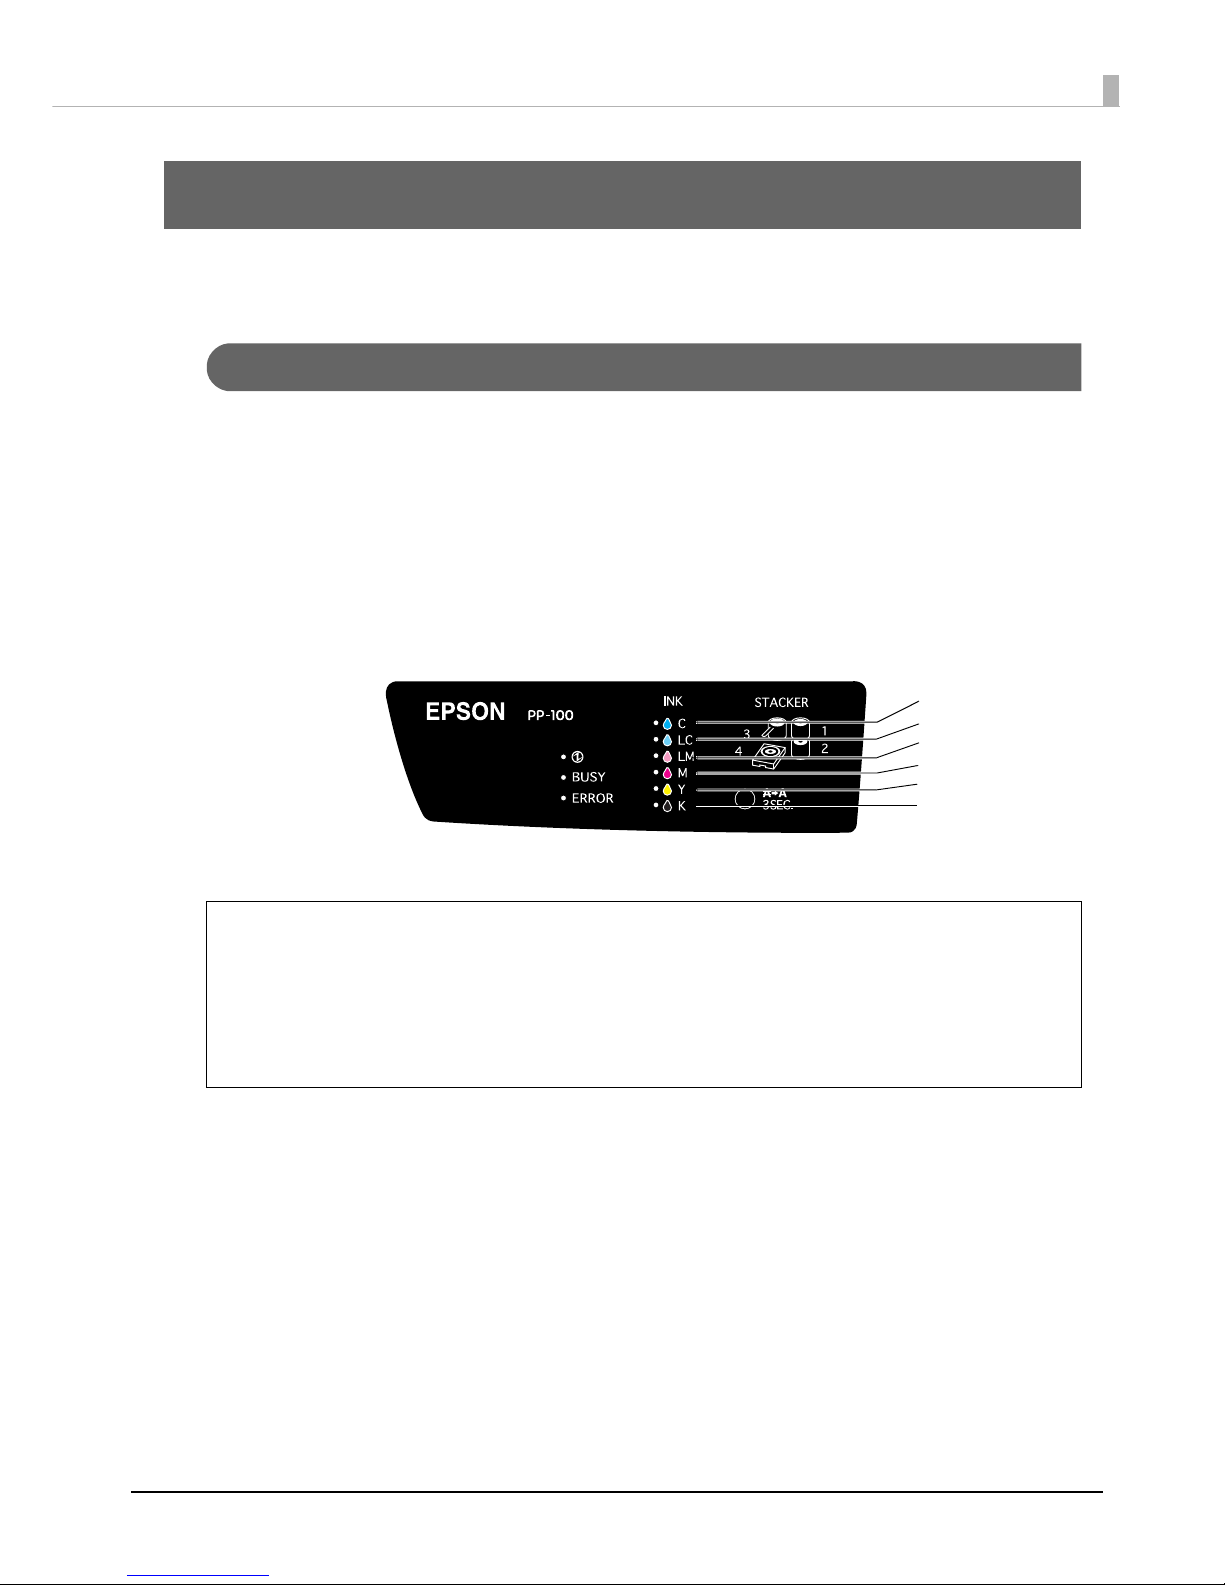
81
Maintenance
Maintenance
Replacing the Ink Cartridge
Checking the Ink Levels
When it becomes time to replace even one of the six ink cartridges, printing is no longer possible.
The INK light on the control panel notifies you the ink levels as follows.
• When the INK light flashes, the remaining ink of that color is low.
Prepare a new ink cartridge.
• When the INK light turns on, it is time to replace the ink cartridge of that color.
Replace it with a new ink cartridge.
You can check the ink levels in EPSON Total Disc Utility. See EPSON Total Utility Help for details.
• When the ink cartridges are installed for the first time (during setup), ink is consumed for
filling, and so the time to replace the cartridges is earlier than normal.
• Even when Print Mode Setting is set to Black in Publish view of EPSON Total Disc Maker or
when Color is set to Black in the Print Settings area of the printer driver, all the ink colors
are used in an operation designed to maintain the printing and print head quality.
• The product stops running before the ink is completely empty to maintain print head
quality. Therefore, some ink remains in the ink cartridge.
Magenta
Cyan
Yellow
Black
INK lights on the Control panel
Light Cyan
Light Magenta
Notes
Page 82
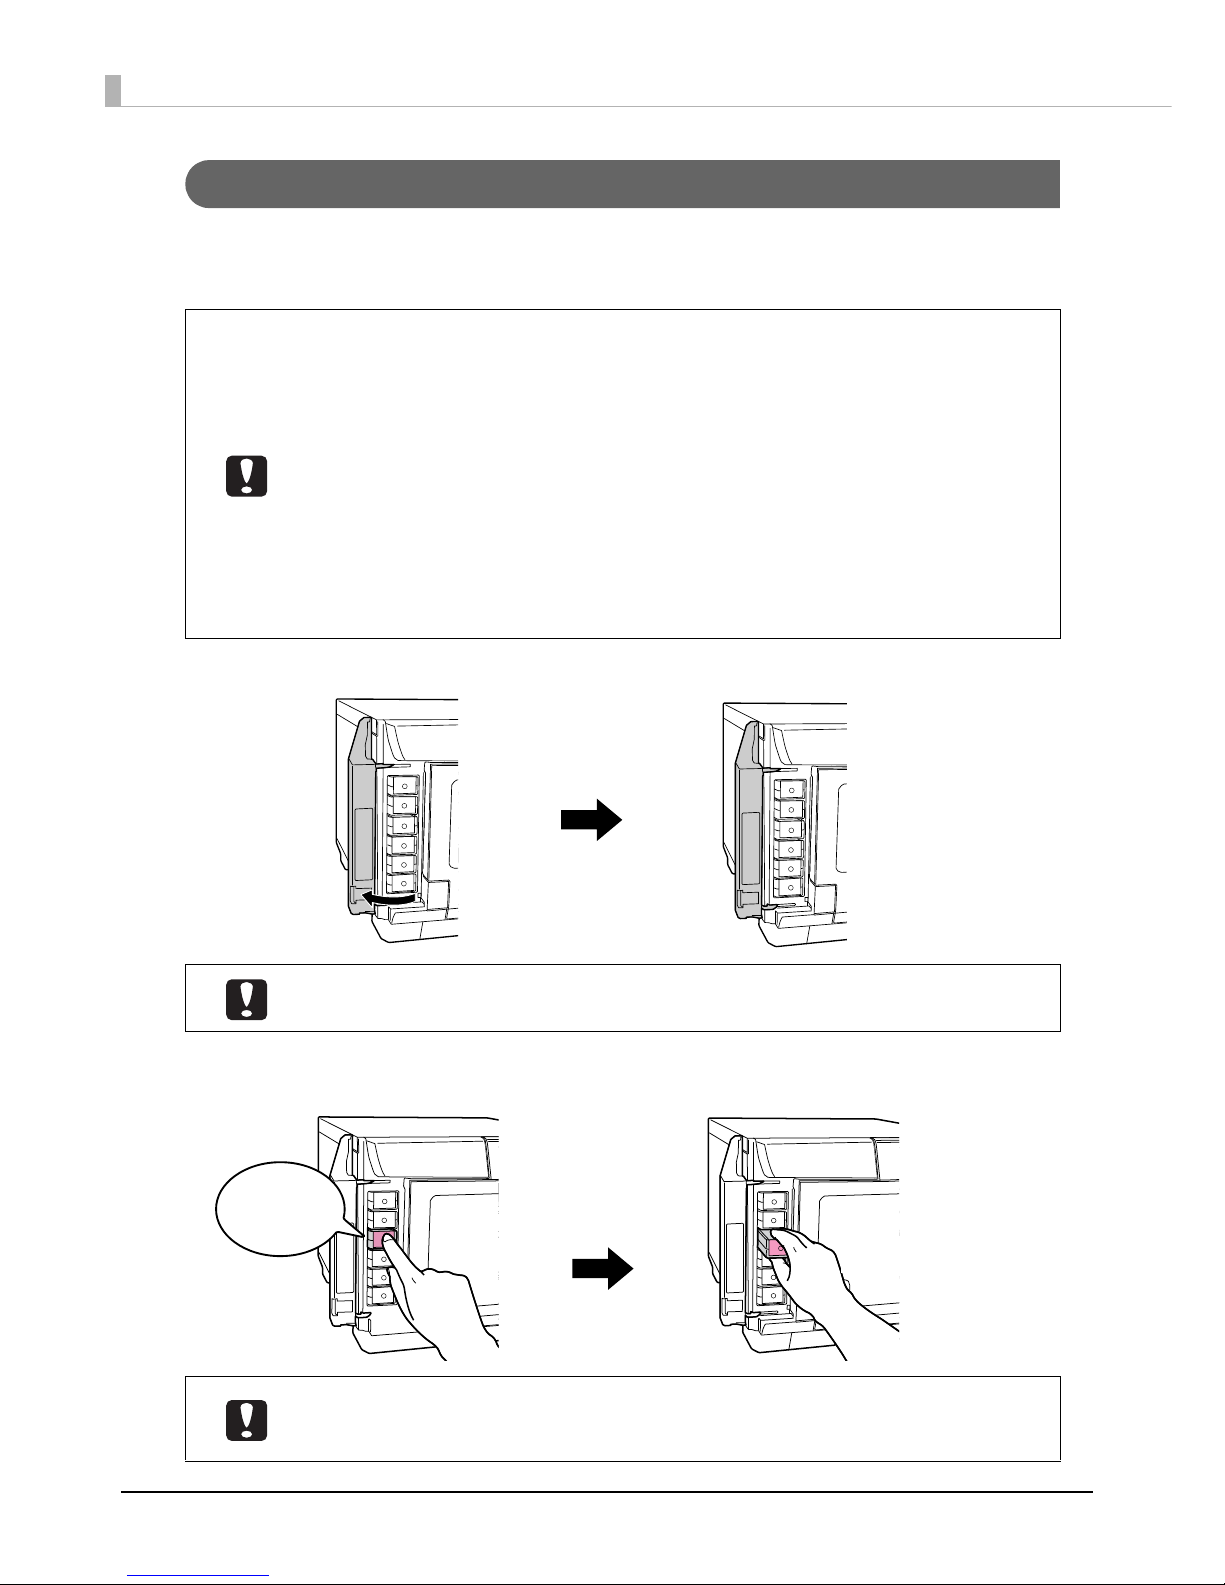
82
How to Replace the Ink Cartridges
This section describes how to replace the ink cartridges, using light magenta as an example. The replacement
positions differ for the other colors, but the procedure is the same.
See “Ink cartridges and Maintenance Box” on page 151 for the ink cartridge model numbers.
1
Open the ink cartridge cover, and wait at least 4 seconds until internal operations stop.
2
Gently push in the ink cartridge until you hear a click, unlock the lock, and then slowly
pull it straight out.
• Use of Epson brand ink cartridges is recommended. Use of non-Epson brand ink
cartridges can result in problems that will not be covered by the warranty.
• Epson cannot guarantee the quality and reliability of non-Epson brand products.
Repairs for any damage or breakdown of this product due to the use of non-Epson
brand products will not be free of charge even if the warranty period is still valid.
• This product performs color adjustment based on use of Epson brand ink cartridges. Use
of non-Epson brand ink products can adversely affect the printing quality and prevent
the product from realizing its maximum performance.
• Do not place an ink cartridge with the ink supply holes facing downward. This could
cause stains on a desk or other surface. In addition, dirt stuck on this product may
prevent it from functioning properly.
• Do not store ink cartridges in environments exposed to high temperatures, freezing or
direct sunlight.
If you take out the ink in less than 4 seconds, there is a risk that the ink may spurt out.
• Ink may leak from the ink supply port on the ink cartridge you pulled out.
• Once an ink cartridge is used, there may be some ink around the ink supply port, so do
not touch it.
Wait at least 4 seconds.
Push in.
Pull straight out.
Click
Page 83
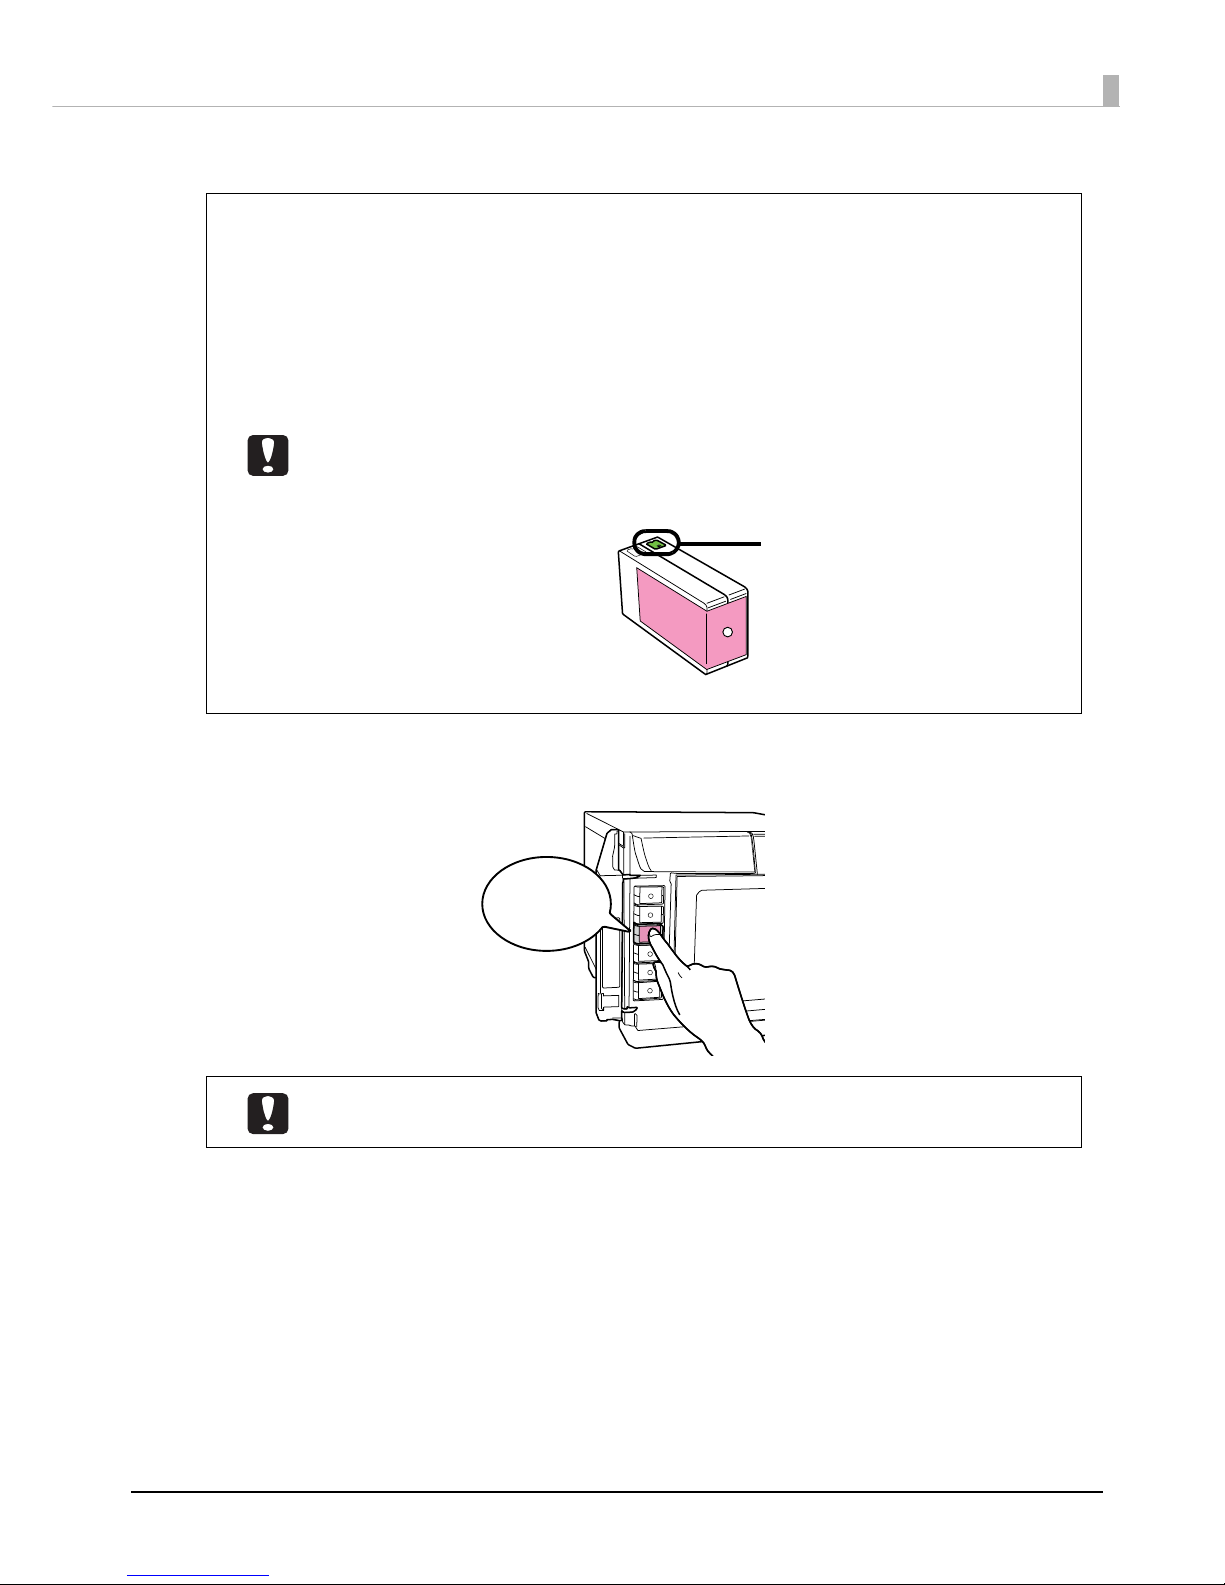
83
Maintenance
3
Take the ink cartridge out of its package.
4
Use the label color to check where to set the ink cartridge, and gently push the new ink
cartridge into the ink cartridge holder on this product until you hear a click.
• For optimum printing quality, open the clear plastic package only immediately before
installing. After opening the cartridge, try to use it up within six months. If you use an ink
cartridge that has been left open for a long time, the print quality may decline.
• When you open the plastic package, be careful not to drop the ink cartridge. The ink
may leak out.
• Do not leave the ink supply port on an ink cartridge facing downward. This could stain
the desk or other surface. In addition, dirt stuck on this product may prevent it from
functioning properly.
• Do not shake the ink cartridge too hard. The ink cartridge may leak if you shake it too
much.
• Do not touch the green IC chip attached to the ink cartridge. Also, never peel off the
labels and film attached to the ink cartridge. This could prevent you from properly
setting, operating, or printing with the ink cartridge, or ink could leak out.
• Use up the ink cartridge before the expiration date printed on the box.
Do not repeatedly take out and put in an ink cartridge which has been set. Ink could stain
the ink cartridge or the product.
Do not touch the IC chip.
Click
Page 84
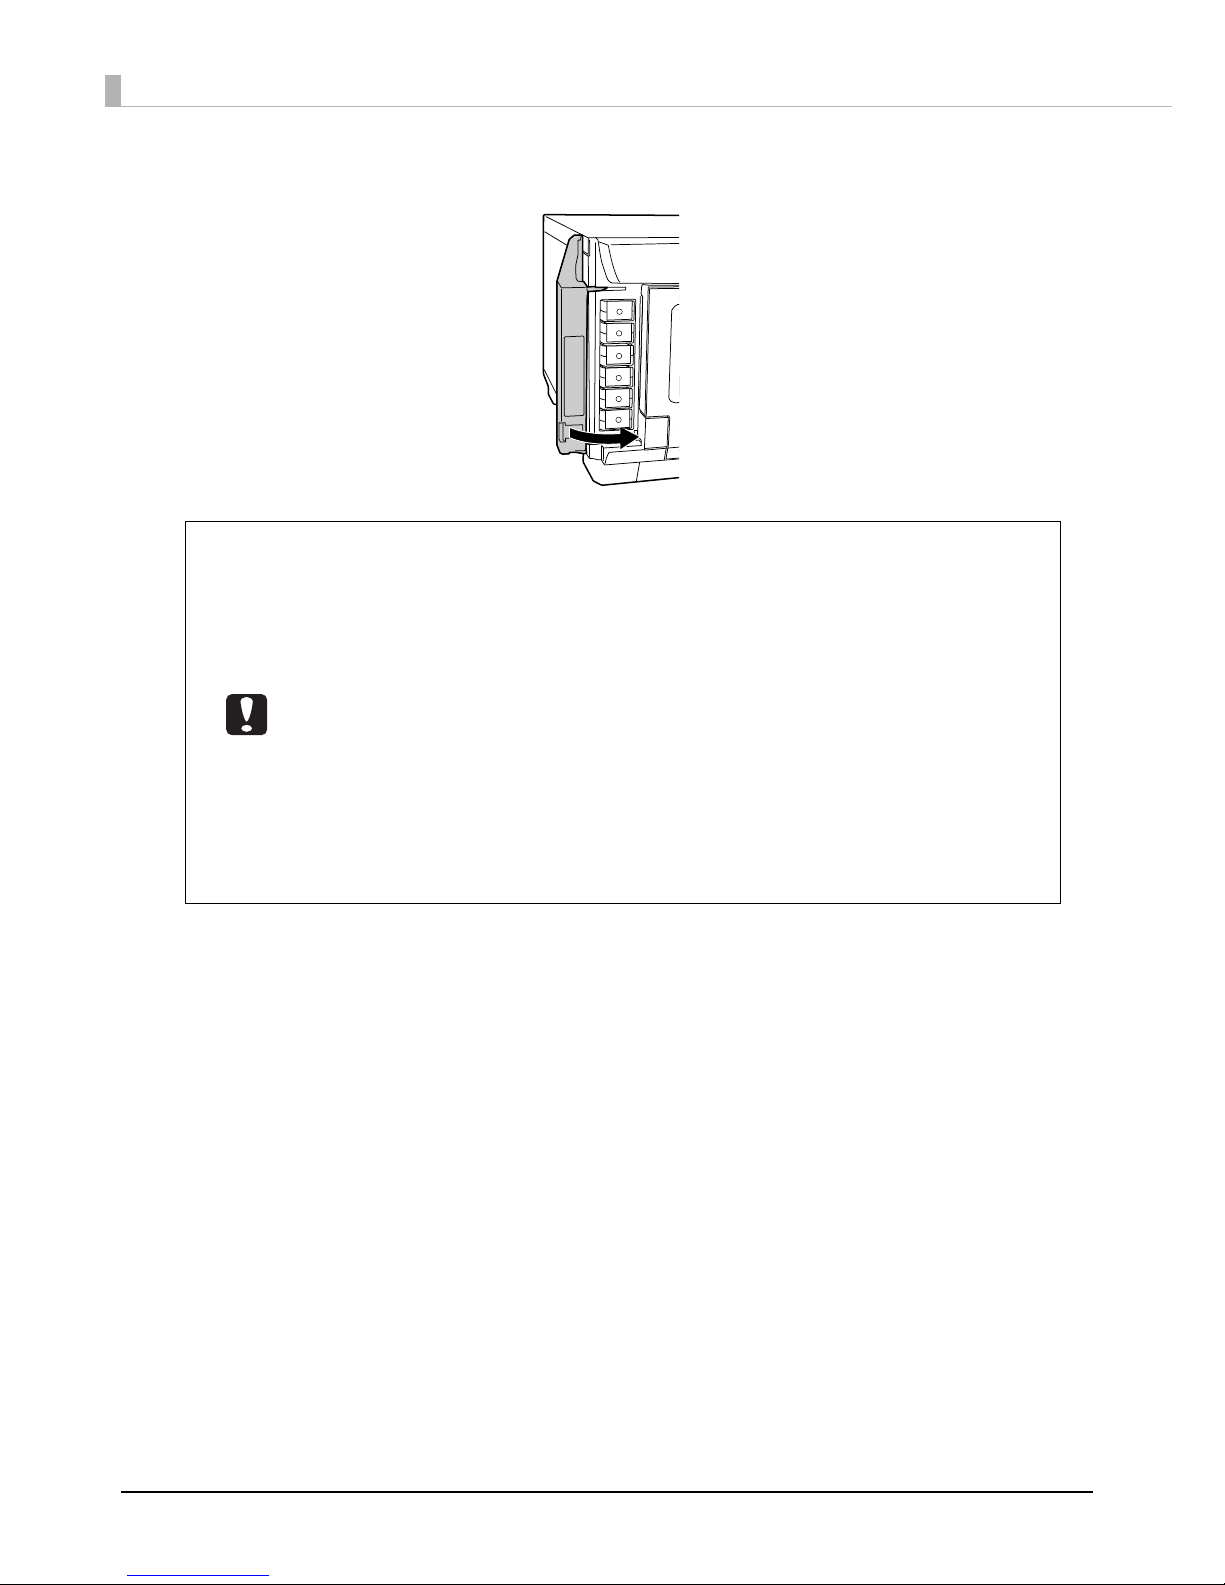
84
5
Close the ink cartridge cover.
• Do not turn off the power or open the ink cartridge cover during ink charging. These
actions cause the ink to be charged again, which results in a noticeable consumption
of ink. In addition, there is a risk that you will not be able to print properly.
• If the ink cartridges are not recognized even though they are set properly, dirt may be
stuck on the green IC chip surface. Wipe it off with a soft cloth, and then set it again.
• If you cannot print even though the ink cartridges are set properly, run print head
cleaning. (See “Cleaning the Print Head” on page 87.)
• If you turn the power off using the power button on the unit, the print head is
automatically capped, which prevents the ink from drying. After installing the ink
cartridges, be sure to turn the power off using the power button on the unit when you
are not using the product. Do not pull out the power plug or trip the breaker while the
power is on.
• If you move or transport this product after you have installed the ink cartridges, leave
the ink cartridges as they are when you move or transport it.
• Do not take out the ink cartridges unless you are replacing them.
Page 85
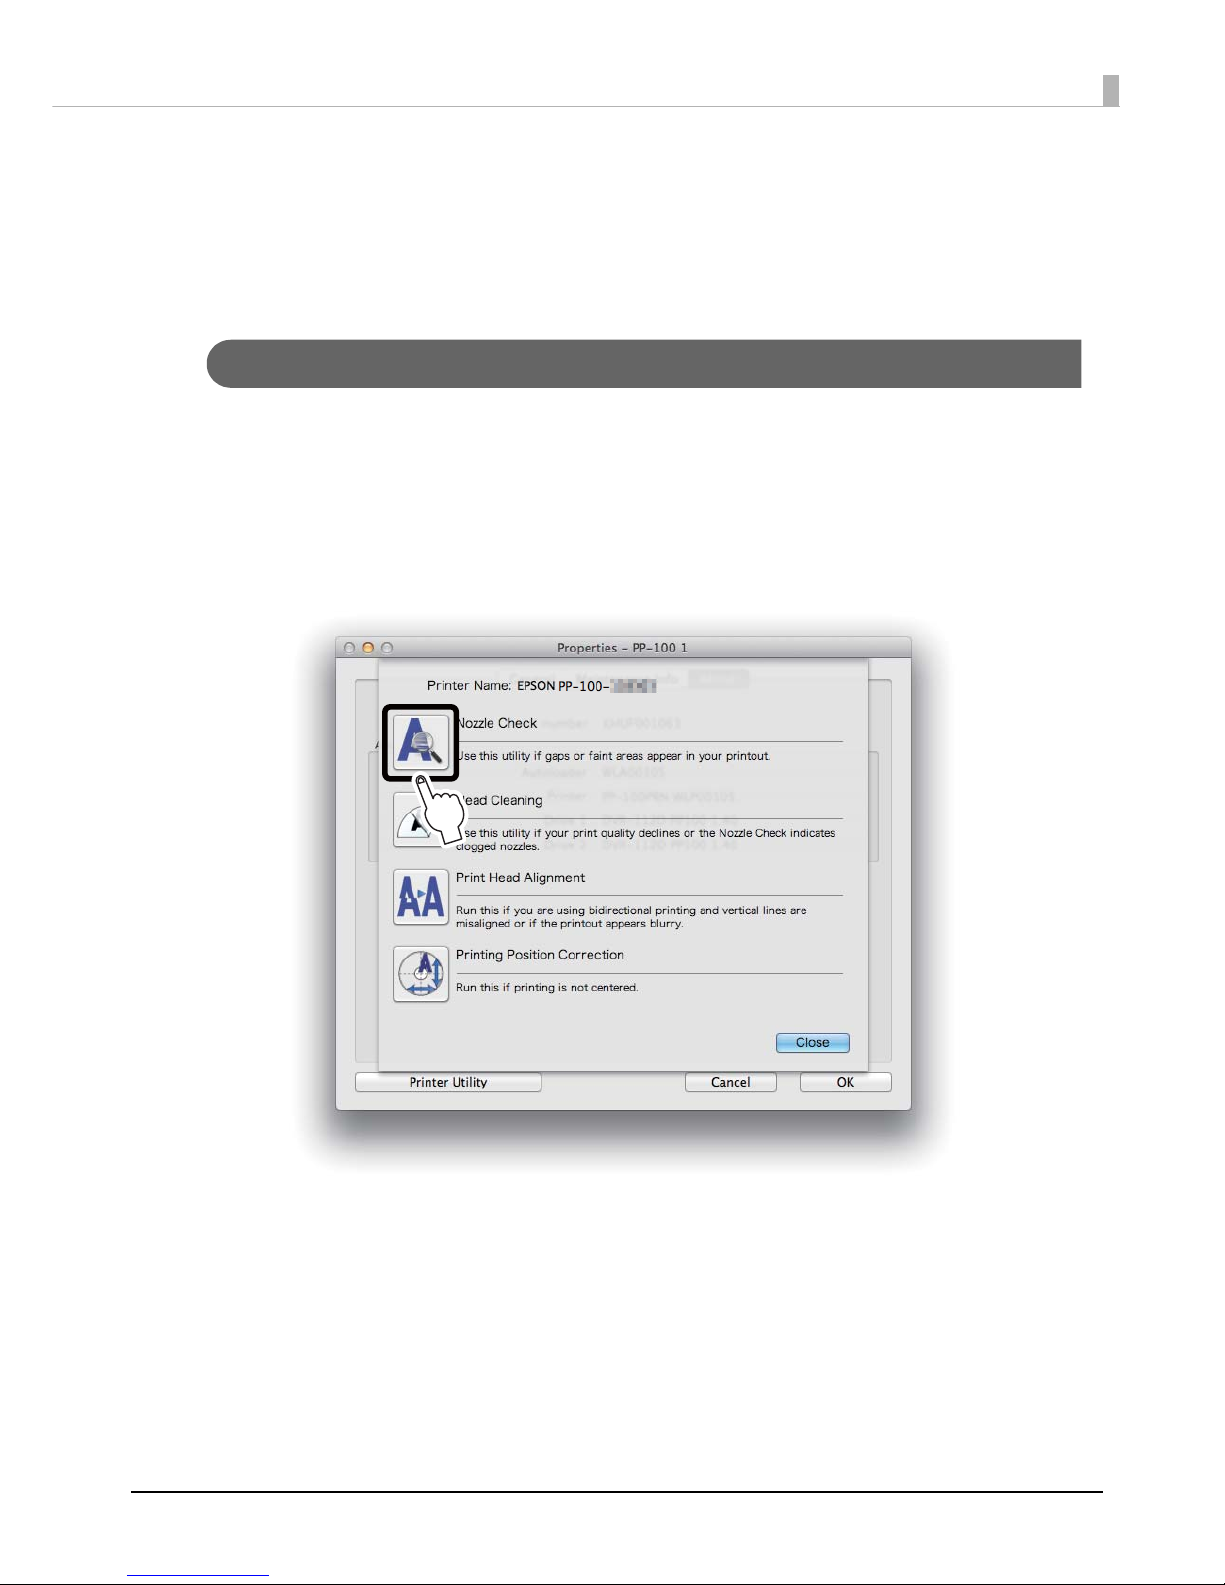
85
Maintenance
Checking the Print Head Nozzles
If the print head nozzles are clogged, the printing may be faint even though there is ink, or unusual colors may be
printed. The nozzle check prints a pattern for checking the status of the nozzles, and you can check if the nozzles are
clogged by looking at this pattern.
How to Perform a Nozzle Check
1
Set one unprinted disc into Stacker 1.
2
Display the Printer Utility screen of the EPSON Total Disc Utility.
See “Properties screen (General screen)” on page 41 for display procedure.
3
Click Nozzle Check.
Page 86
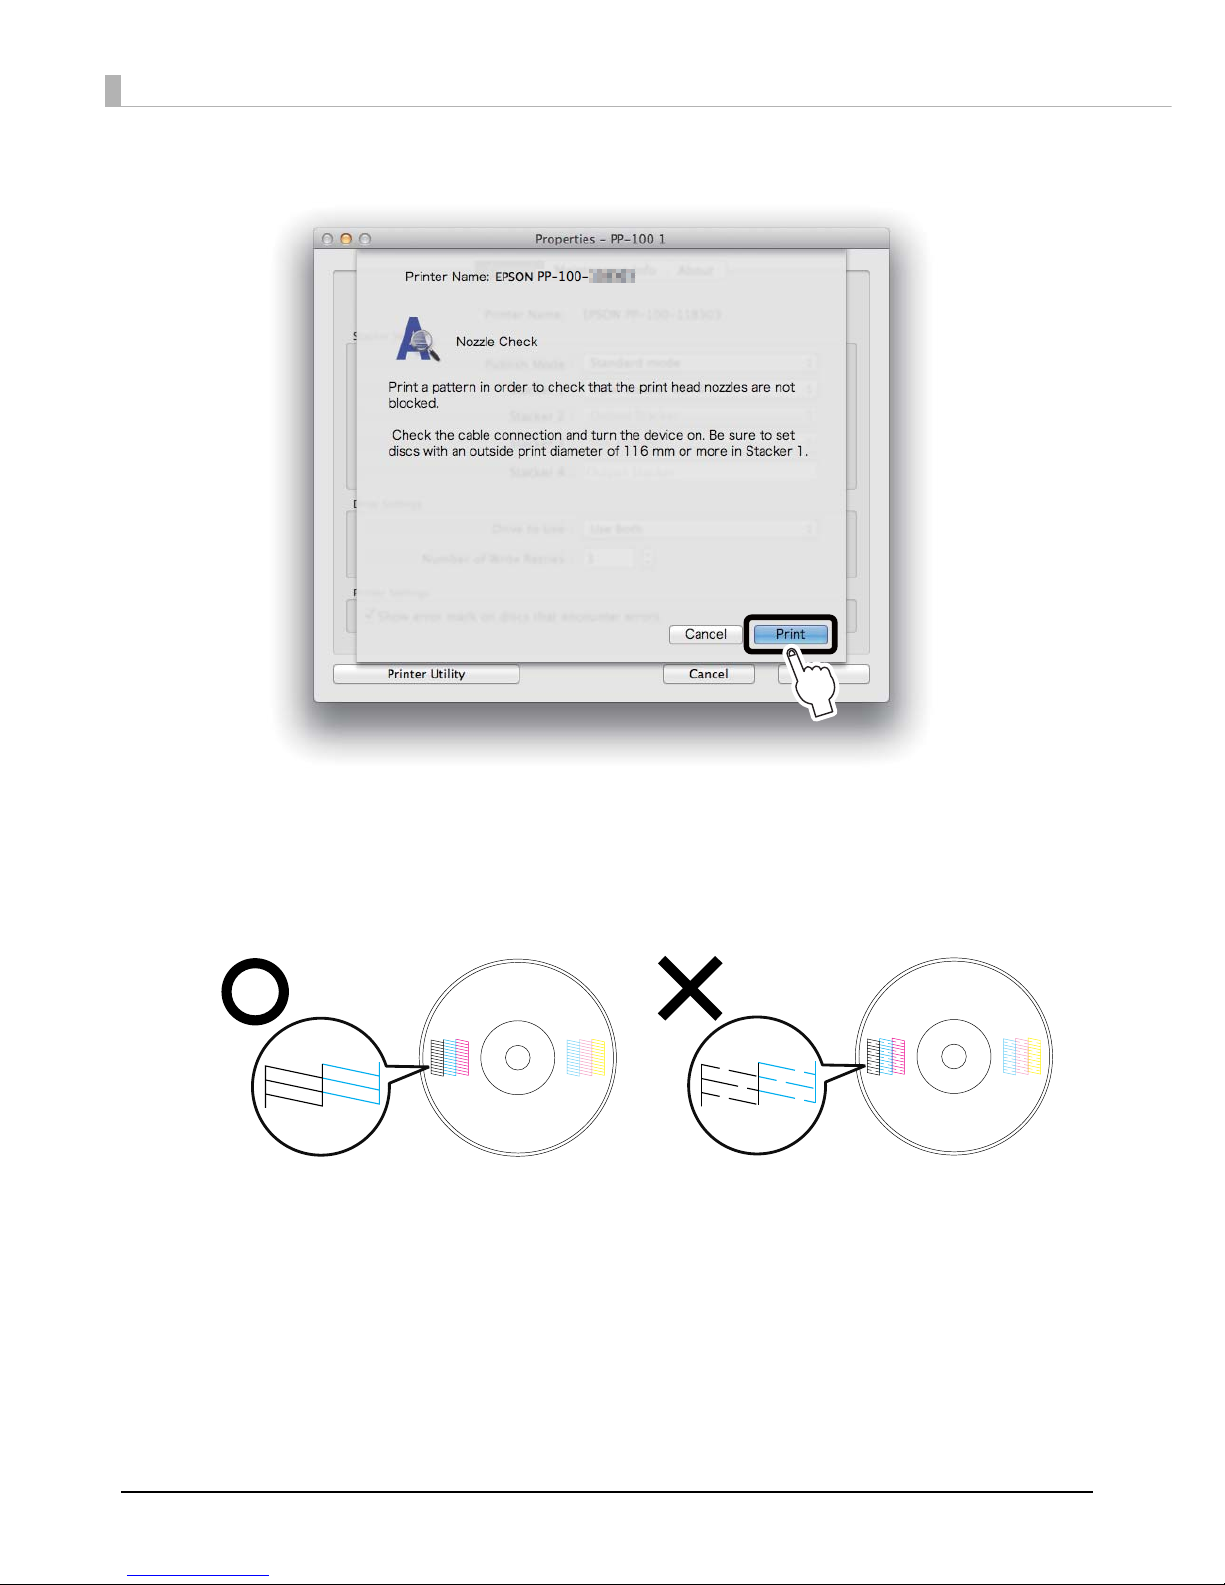
86
4
Click Print.
The disc on which the nozzle check pattern was printed is output to Stacker 3 or Stacker 4.
5
Check the printed nozzle check pattern.
If it is normal, all of the lines are printed as shown in the illustration on the left below.
If there are lines that were not printed, as shown in the illustration on the right below, the nozzles are clogged.
Run print head cleaning. (See “How to Clean the Print Head” on page 88.)
Normal Clogged
Page 87
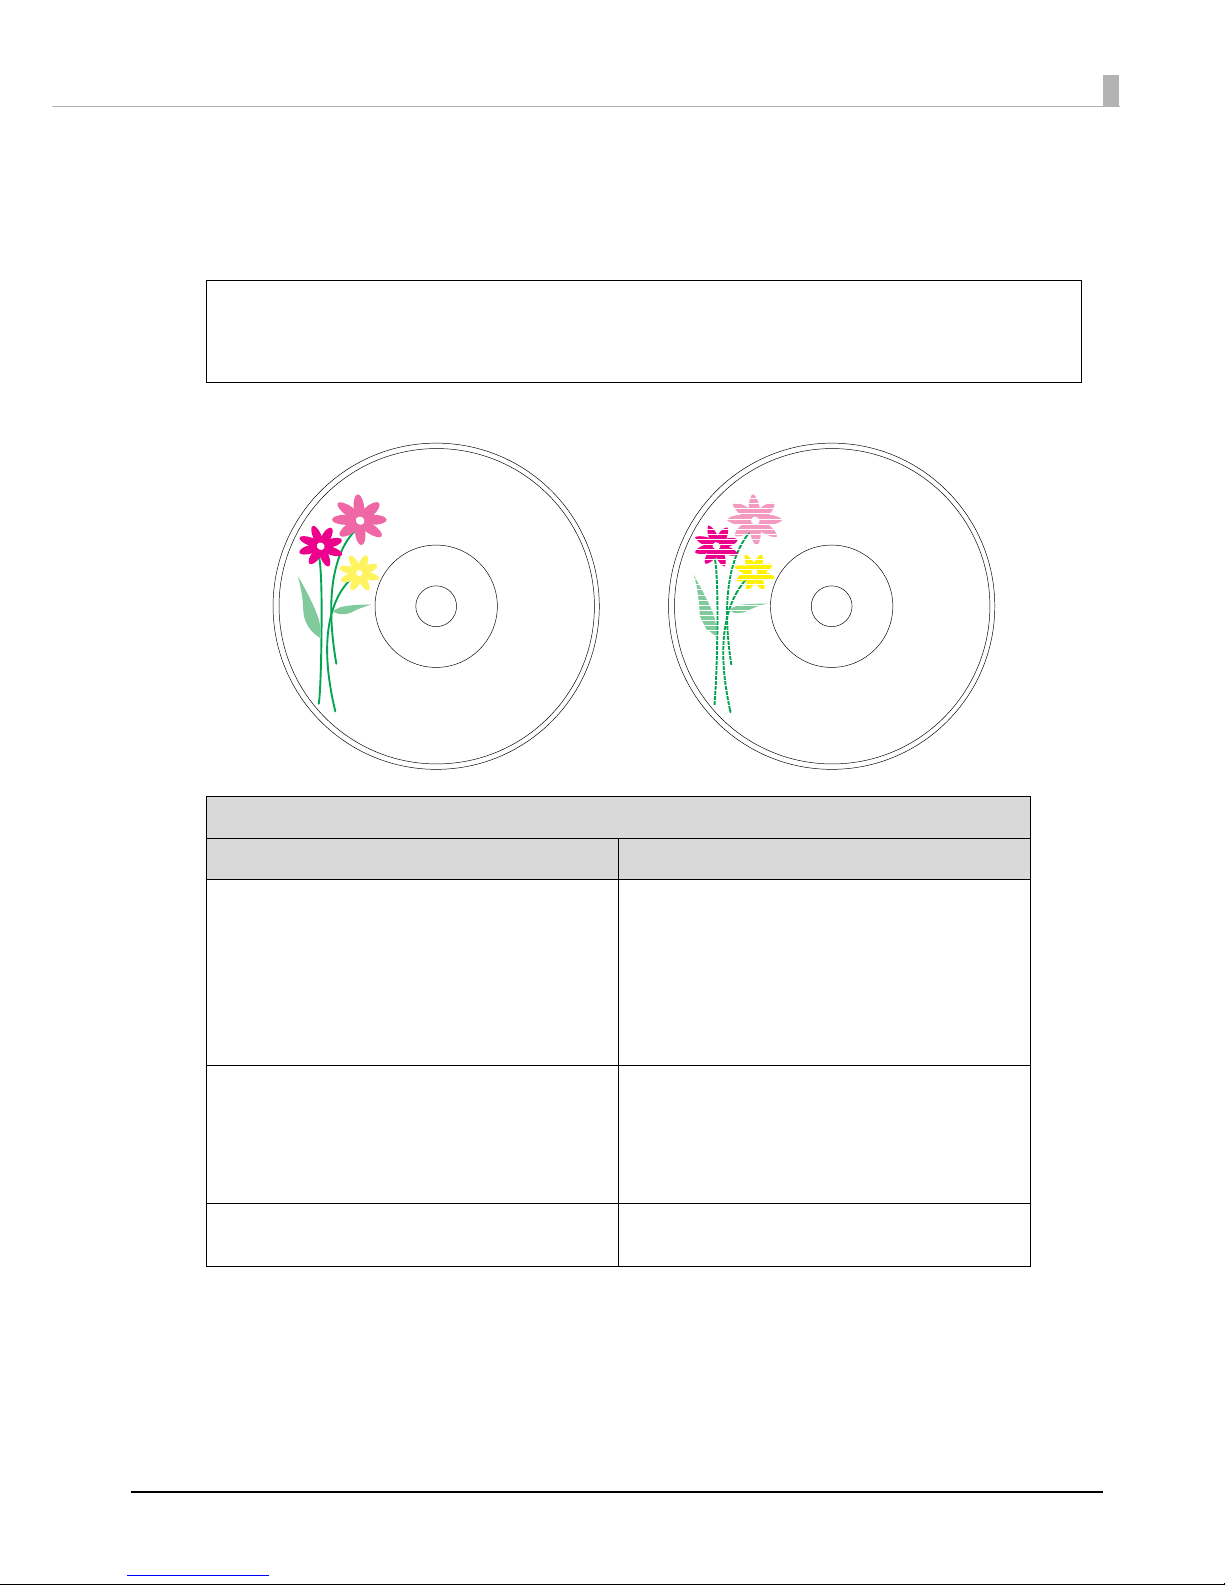
87
Maintenance
Cleaning the Print Head
Head cleaning is a function for cleaning the surface of the print head to maintain the print quality. Run head cleaning
if the printing becomes faint or gaps appear in the printing.
Print head cleaning consumes ink. Before running print head cleaning, you can run a
nozzle check to check whether or not the nozzles are clogged. This makes it possible to
prevent consuming extra ink during print head cleaning. (See “Checking the Print Head
Nozzles” on page 85.)
Causes and Solutions for Print Head Drying
Cause Prevention
This product has a print head cap to prevent it
from drying, the same way there are caps for
fountain pens or ballpoint pens. Normally, the
print head is automatically capped after
printing finishes, but if the power suddenly goes
off while the product is running, it is not capped
properly and it dries out.
• Plug the power plug into an outlet directly
attached to the wall. Do not connect it to a
power strip with a switch.
• Be sure to turn th e power on and off using the
power button.
If you do not use this product for a long time,
the print head may dry out and become
clogged, the same way a fountain pen dries up
and no longer writes if it has been left open for
a long time.
We recommend that you print regularly. You
can maintain the print head in optimal
condition by printing regularly.
If you take the ink cartridges out and leave
them out, the print head dries out.
Do not take out the ink cartridges and leave
them out.
Notes
Normal
Clogged
Page 88
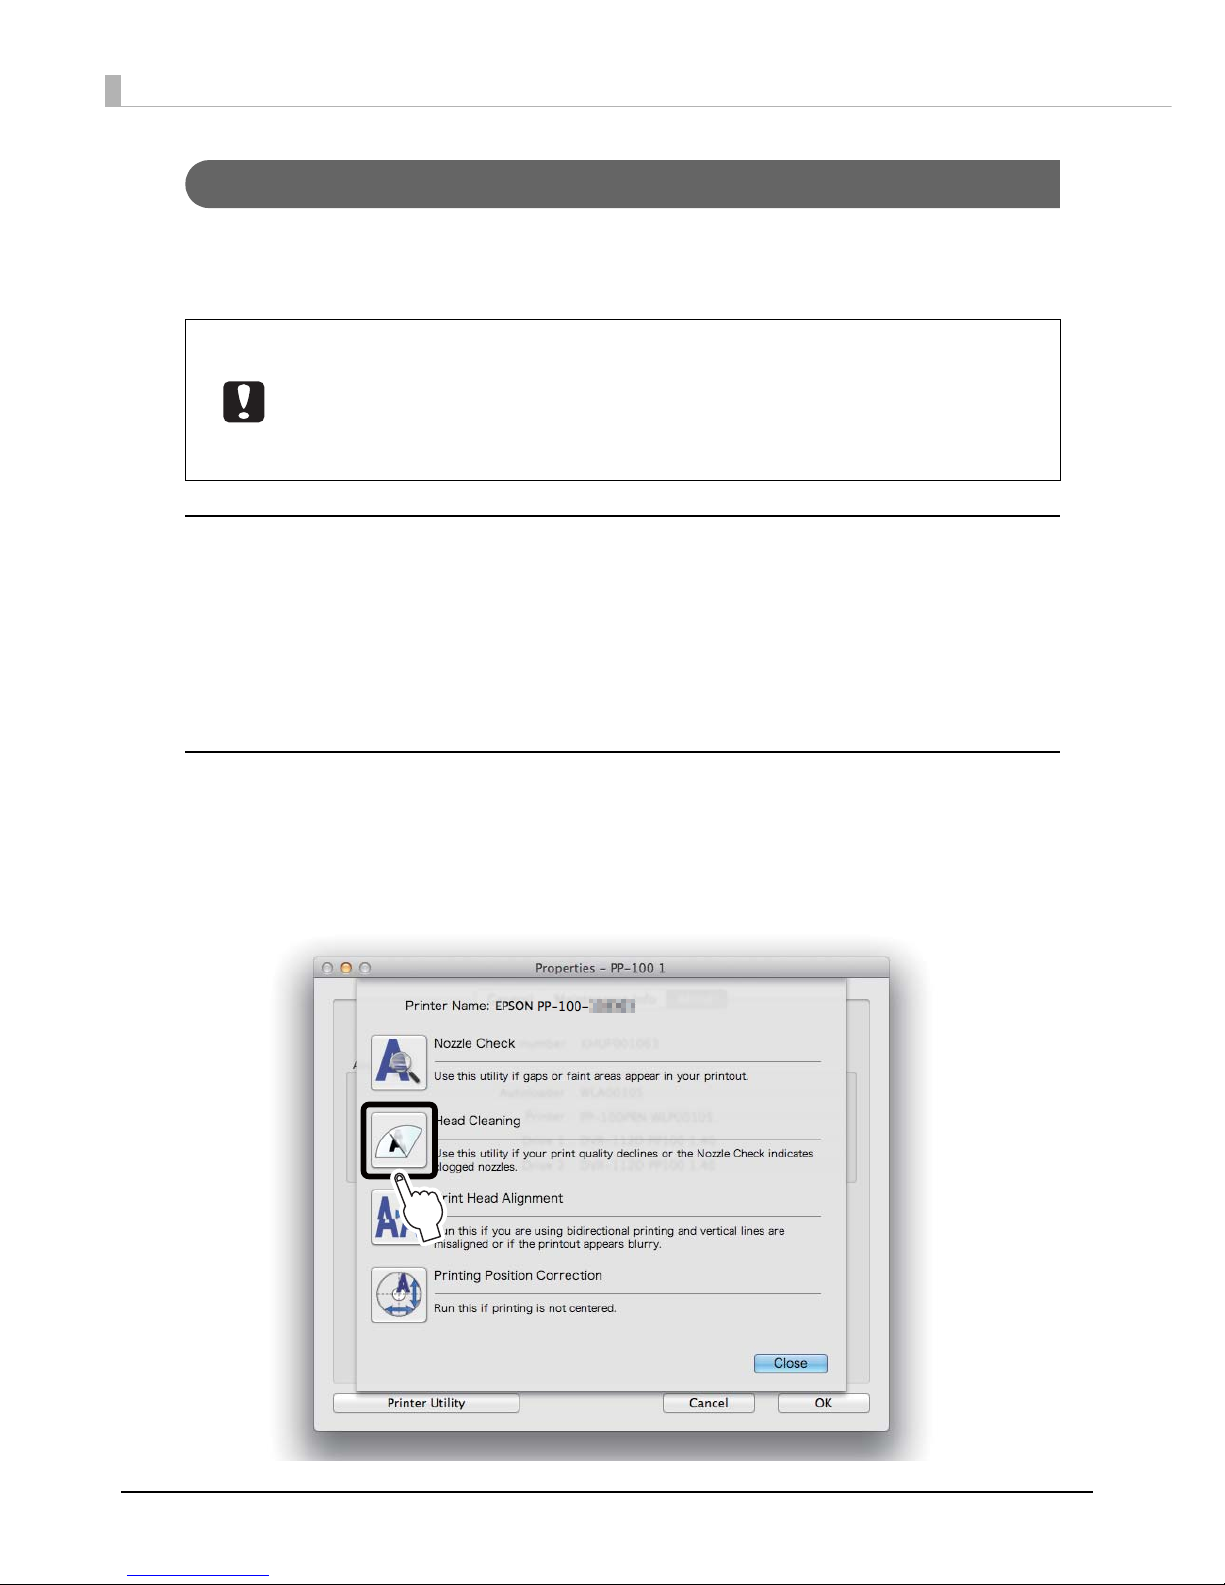
88
How to Clean the Print Head
There are the following two ways to run head cleaning.
• Running it using the control panel on the product
• Running it from a PC
Running it using the control panel on the product
1
Turn the product on.
2
Press the Cleaning button for 3 seconds.
The BUSY light flashes, and head cleaning starts.
When head cleaning is finished, the BUSY light goes off.
Running it from a PC
1
Display the Printer Utility screen of the EPSON Total Disc Utility.
See “Properties screen (General screen)” on page 41 for display procedure.
2
Click Head Cleaning.
• Print head cleaning consumes ink. Note that if you run head cleaning more than
necessary, the lifetime of the ink cartridges is reduced.
• Do not open the ink cartridge cover while cleaning the print head. Print head cleaning
stops if the cover is opened.
• If there is a job being published, head cleaning starts after processing of the job is
finished.
Page 89
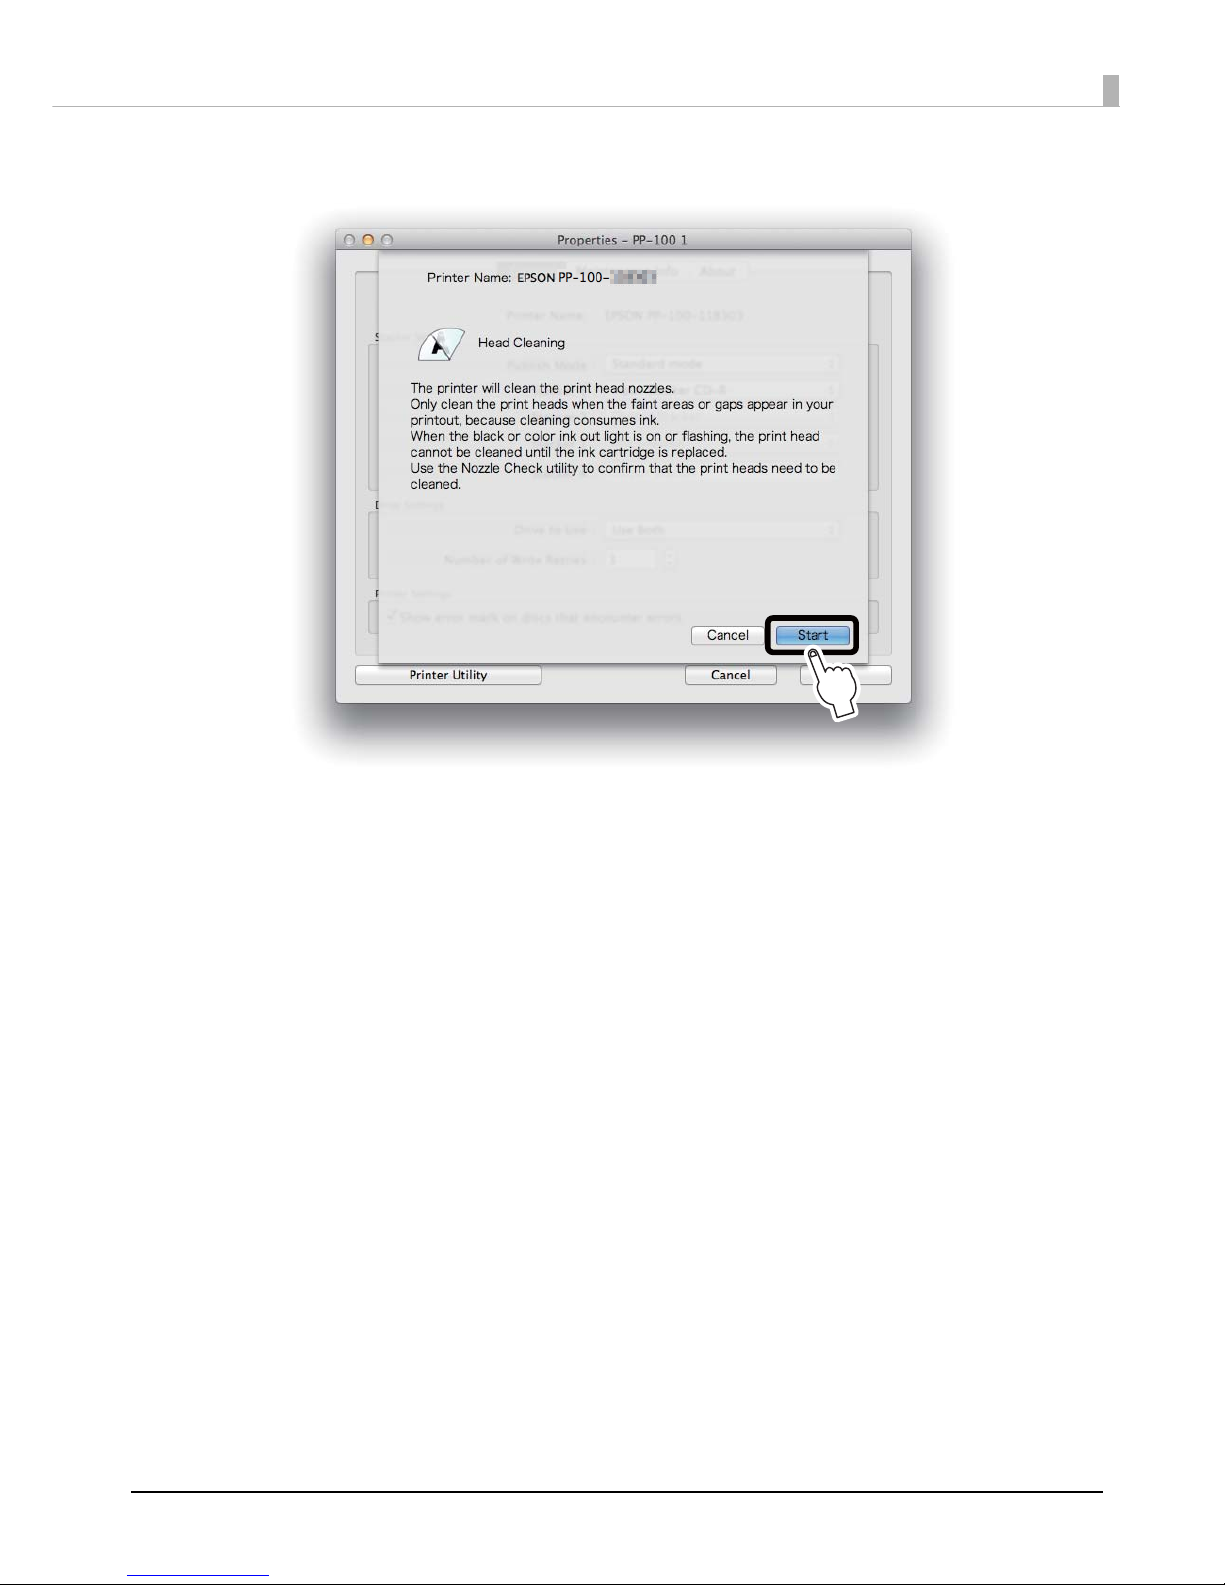
89
Maintenance
3
Click Start.
The BUSY light flashes, and head cleaning starts.
When head cleaning is finished, the BUSY light goes off.
Page 90
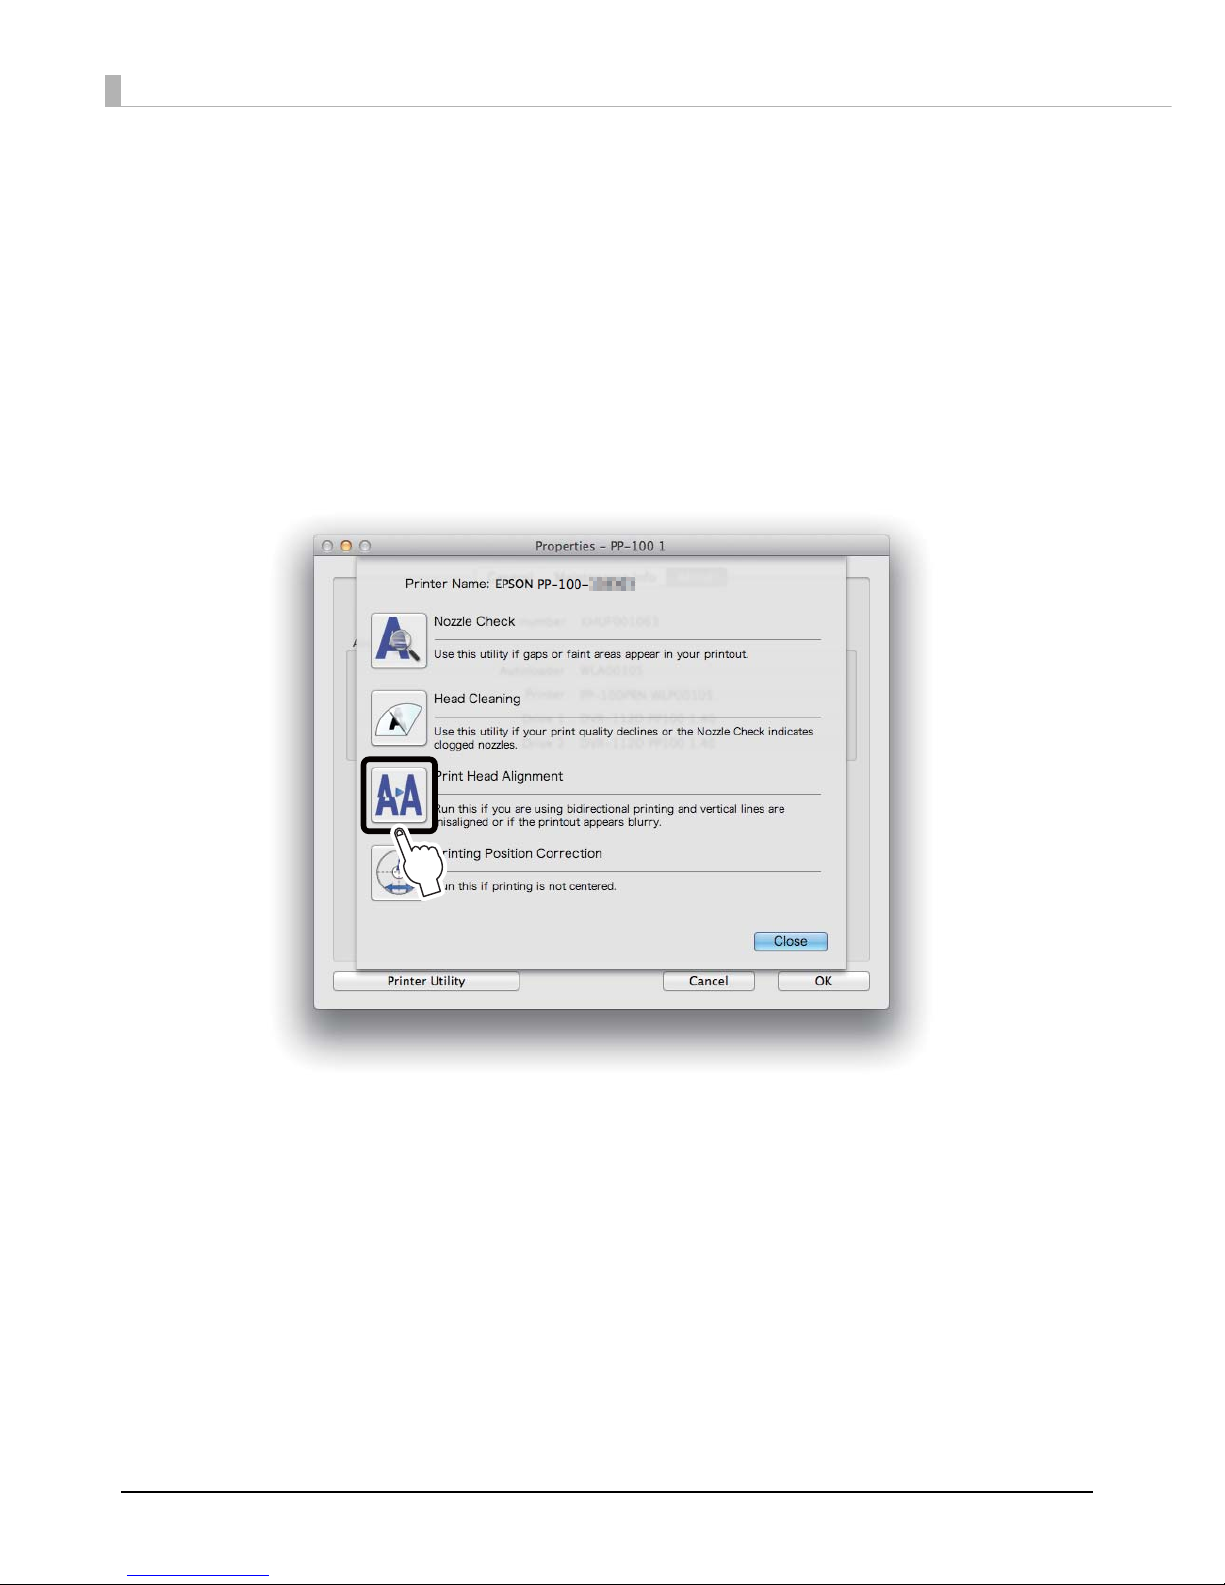
90
Aligning the Print Head
If the print position when the print head moves from right to left is not aligned with the print position when the print
head moves from left to right, gaps may appear in vertical lines, and the print results may become blurry. If this
happens, run print head alignment.
1
Set one unprinted disc into Stacker 1.
2
Display the Printer Utility screen of the EPSON Total Disc Utility.
See “Properties screen (General screen)” on page 41 for display procedure.
3
Click Print Head Alignment.
Page 91
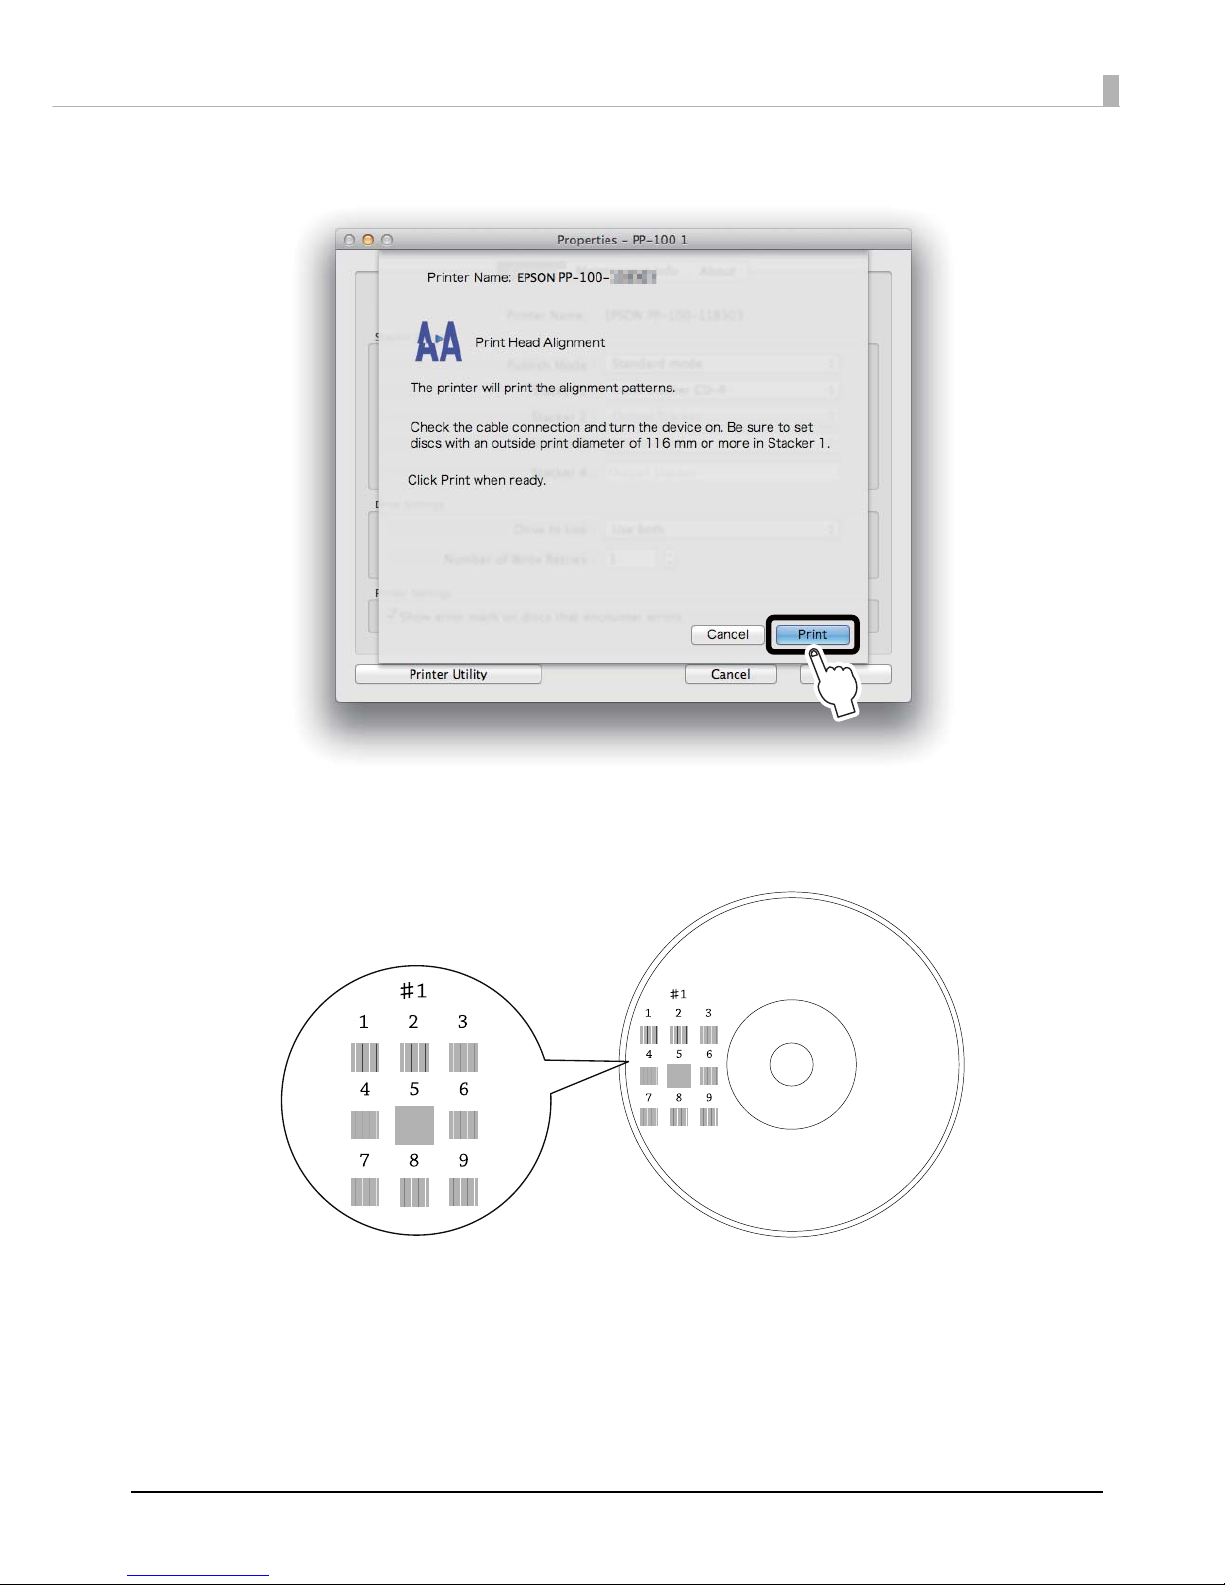
91
Maintenance
4
Click Print.
The disc on which the print head alignment pattern was printed is output to Stacker 3 or Stacker 4.
5
Check the printed print head alignment pattern.
Print head alignment pattern
Page 92
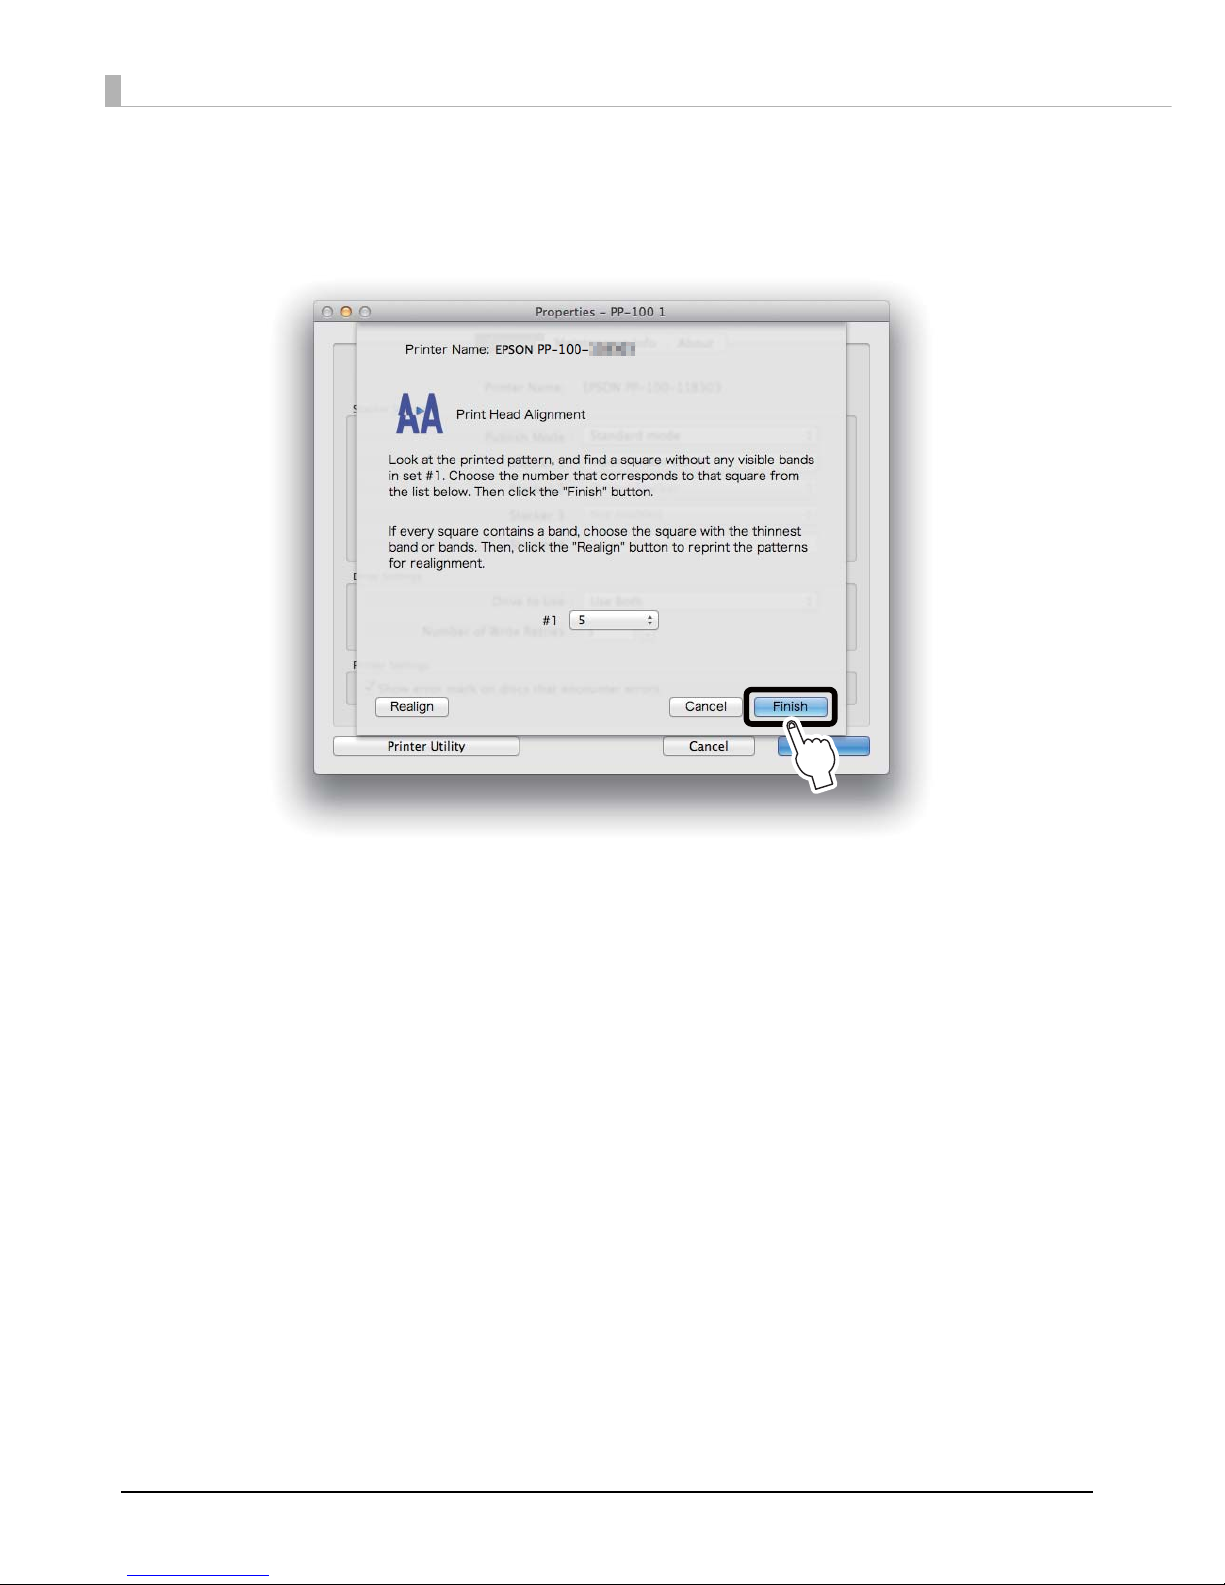
92
6
Select the number of the pattern with the fewest vertical lines.
In the illustration above, the pattern with the fewest vertical lines is “5”, so select “5.”
If you want to print the print head alignment pattern again, to check it, set a disc in Stacker 1, and click
Realign.
7
Click Finish.
Page 93
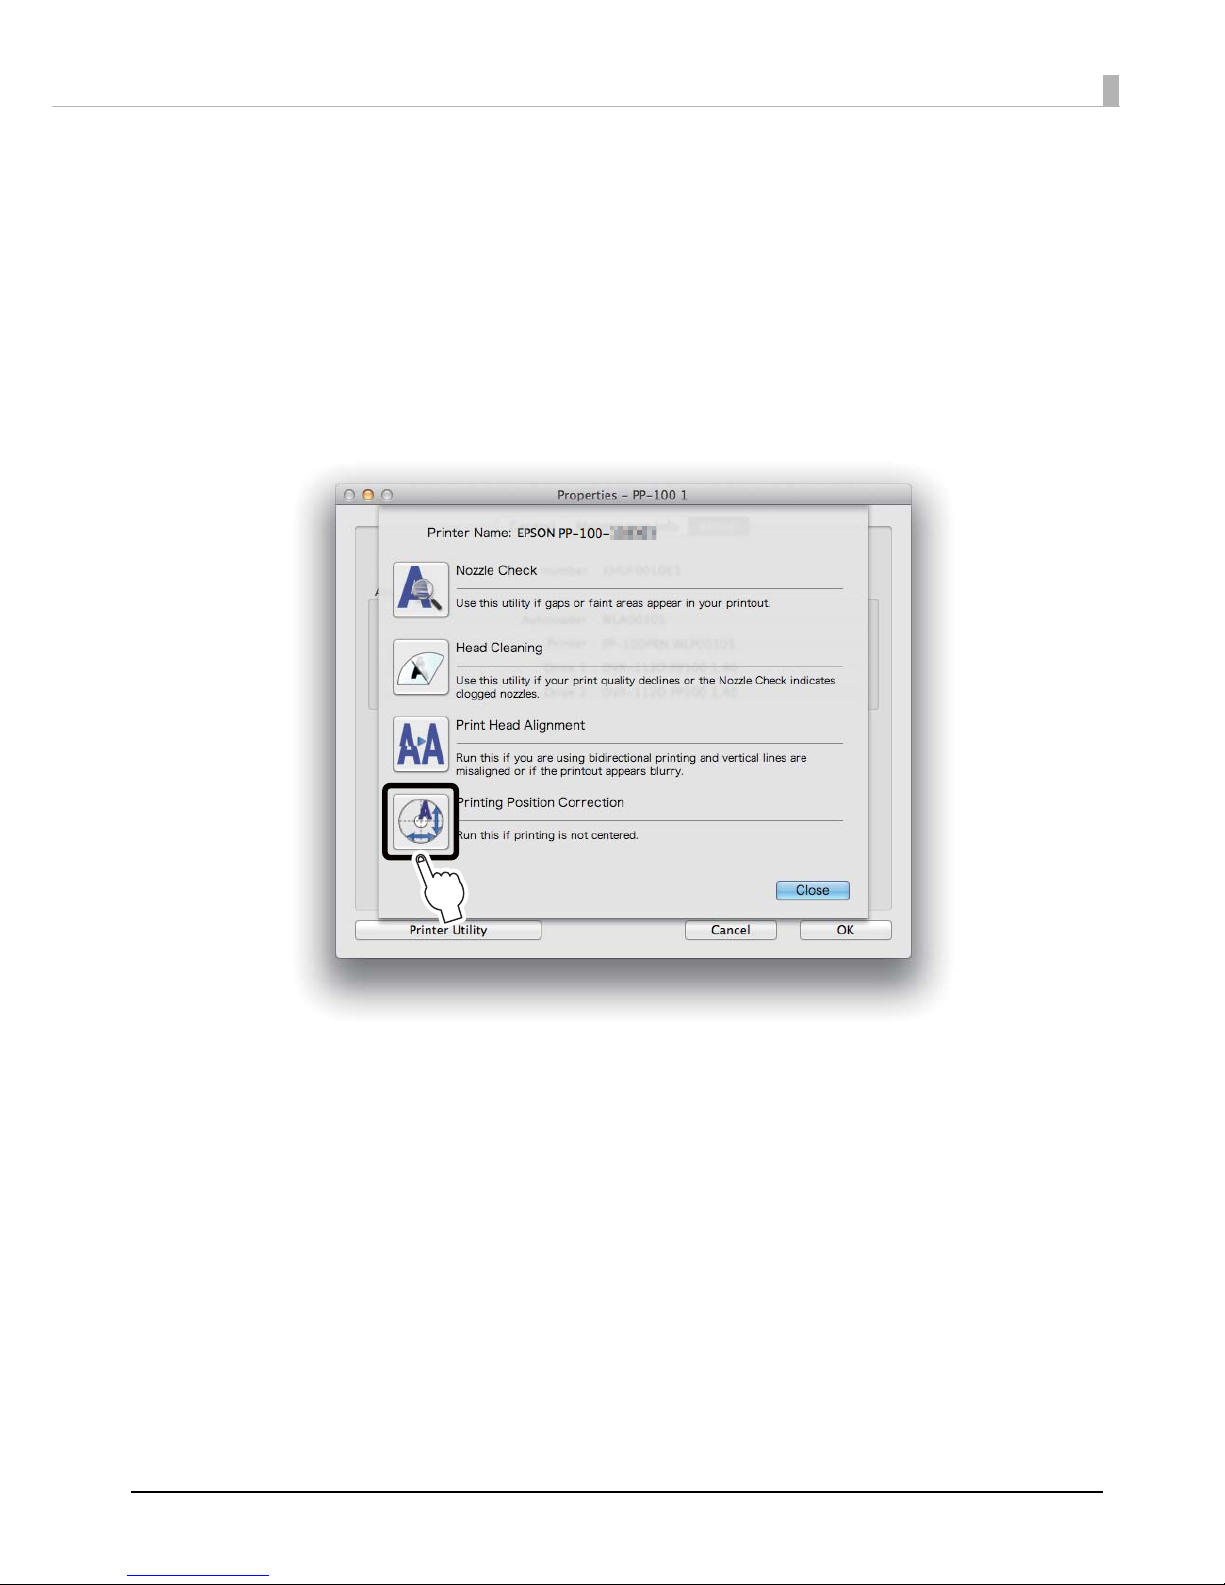
93
Maintenance
Correcting the Printing Position
Adjust the printing position if it has shifted towards the top, bottom, left, or right.
1
Set one unprinted disc into Stacker 1.
2
Display the Printer Utility screen of the EPSON Total Disc Utility.
See “Properties screen (General screen)” on page 41 for display procedure.
3
Click Printing Position Correction.
Page 94
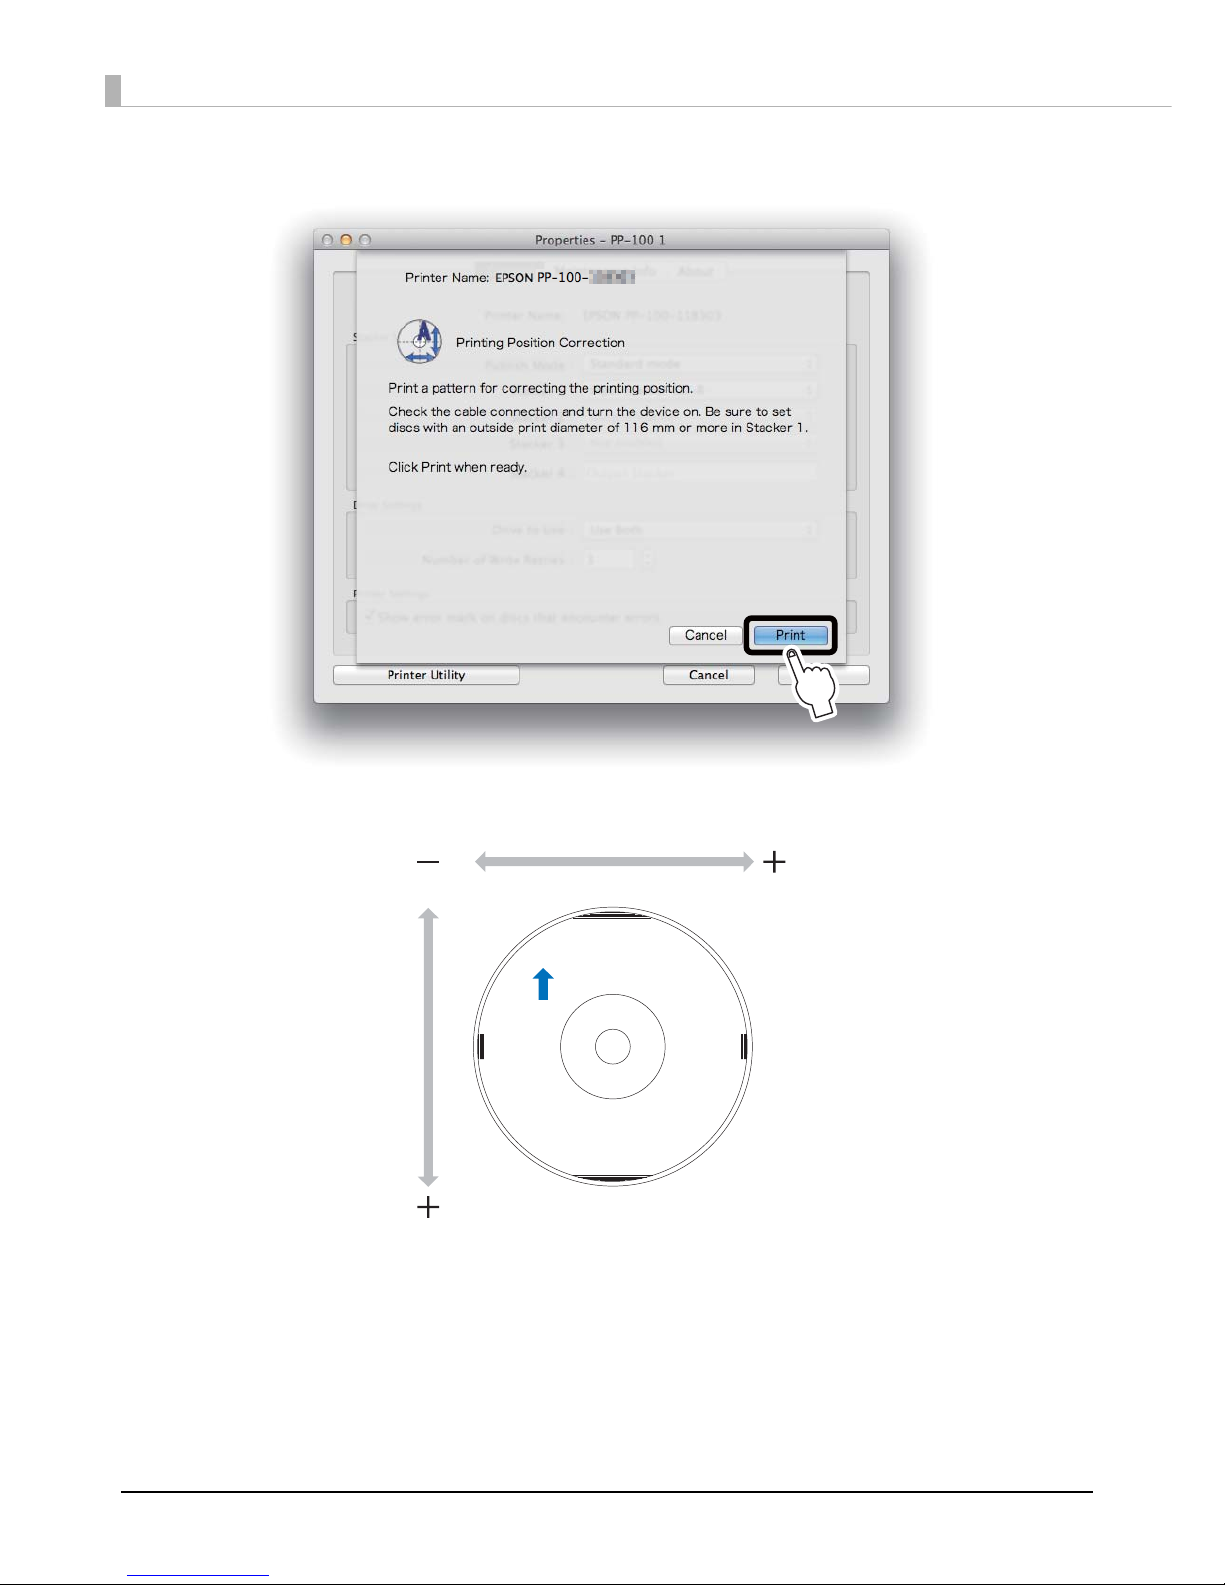
94
4
Click Print.
The disc on which there are five lines printed on the top, bottom, left and right respectively as well as one blue
upward-pointing arrow is output to Stacker 3 or Stacker 4.
Page 95
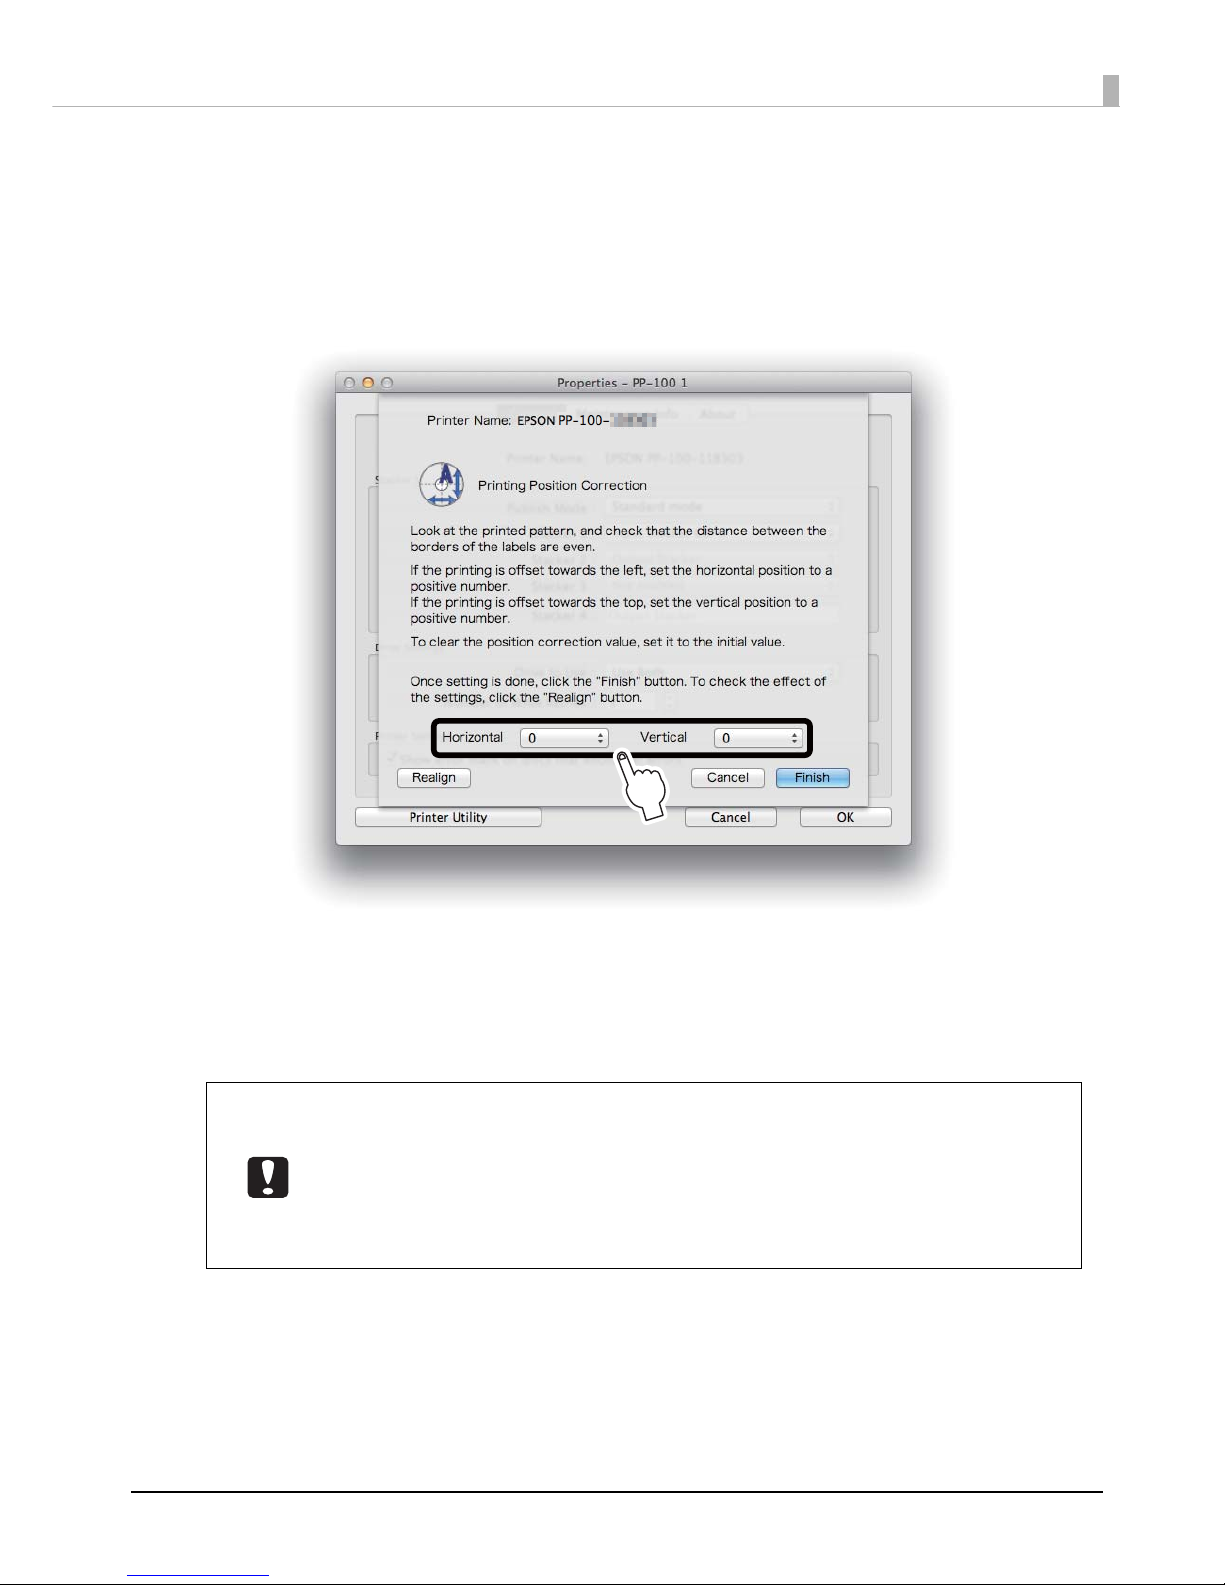
95
Maintenance
5
Click Finish if the lines on the top, bottom, left and right are evenly printed on the label
surface. If they are not printed evenly, adjust the alignment in one of the following ways.
• If the printing has shifted to the left: Select a positive correction value in Horizontal.
• If the printing has shifted to the right: Select a negative correction value in Horizontal.
• If the printing has shifted to the top: Select a positive correction value in Vertical.
• If the printing has shifted to the bottom: Select a negative correction value in Vertical.
6
Set one unprinted disc into Stacker 1, and click Realign.
After this, repeat Steps 4 through 6 until the lines are printed evenly on the disc on the top, bottom, left, and
right.
7
Click Finish.
• If you reenter a correction value after the first adjustment, the printing position is
corrected using a correction value combined with the adjusted value from the first
time. If you want to clear the printing position correction value, select Reset, and then
click Finish.
• If the label application is not centered on the disc, even after you adjust the printing
position using the steps above, the printing appears to have shifted with respect to the
label application.
Page 96
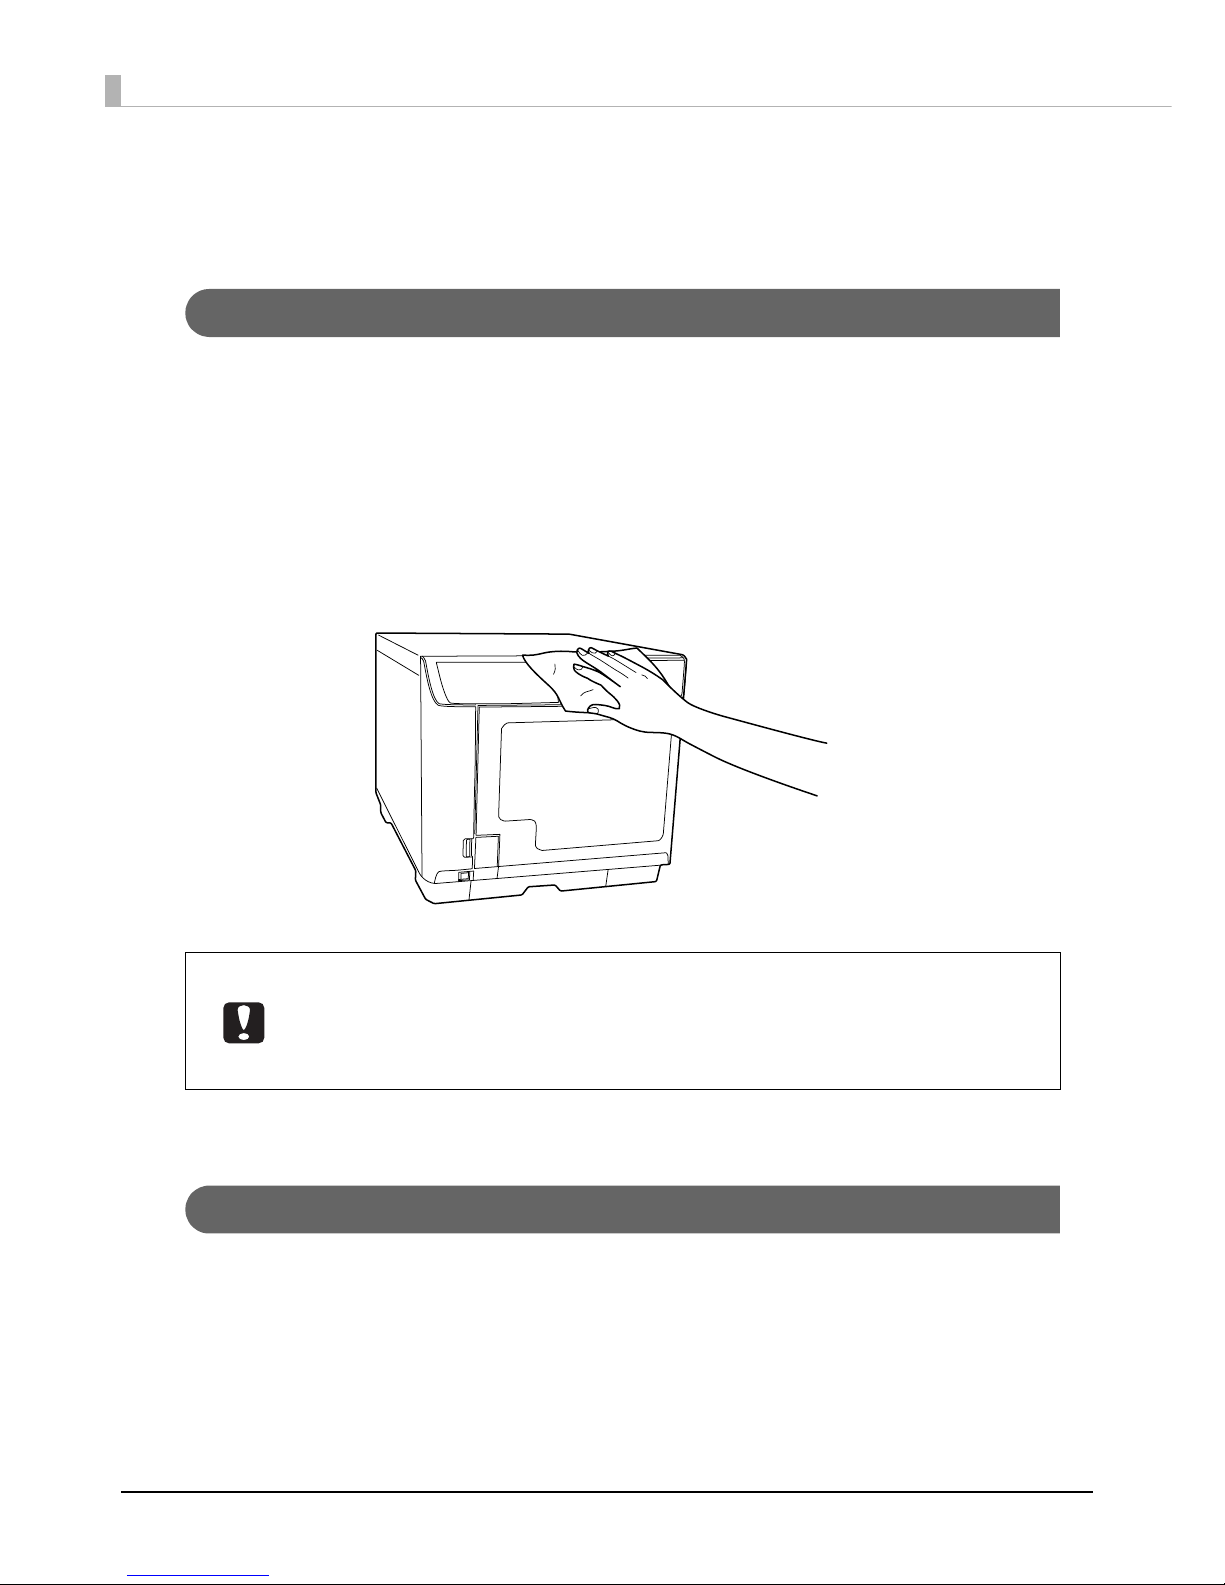
96
Cleaning Your Product
To keep your product operating at its best, clean it by using the following procedure.
Cleaning the Exterior
1
Turn the product off.
See “Turning Off the Power” on page 20.
2
After the Power light goes off, unplug the power plug from the outlet.
3
Use a soft cloth to wipe off the dust and dirt.
When the exterior is very dirty, soak a soft cloth in water with a small amount of mild detergent, wring it out,
and then wipe off the dirt. Finally, wipe off the moisture using a soft, dry cloth.
4
Plug the power plug into the outlet, and turn the power on.
Cleaning the Interior
If dirt or dust collects in the inside of this product or the stackers, or if dirt adheres to it, use a soft cloth to wipe off the
dirt.
Ink may sometimes stain stackers. Remove the stains by soaking a soft cloth in water or mild detergent, wringing it
out, and then wiping them off.
• Wipe with the cover closed so that moisture does not enter the inside of the product. If
the inside becomes wet, there is a risk that the electrical circuits will short out.
• Do not use benzine, paint thinner, alcohol, or other volatile chemicals. There is a risk that
the inside or outside of the product may change properties or shape.
• Do not use a stiff brush. There is a risk of scratching the exterior of the product.
Page 97
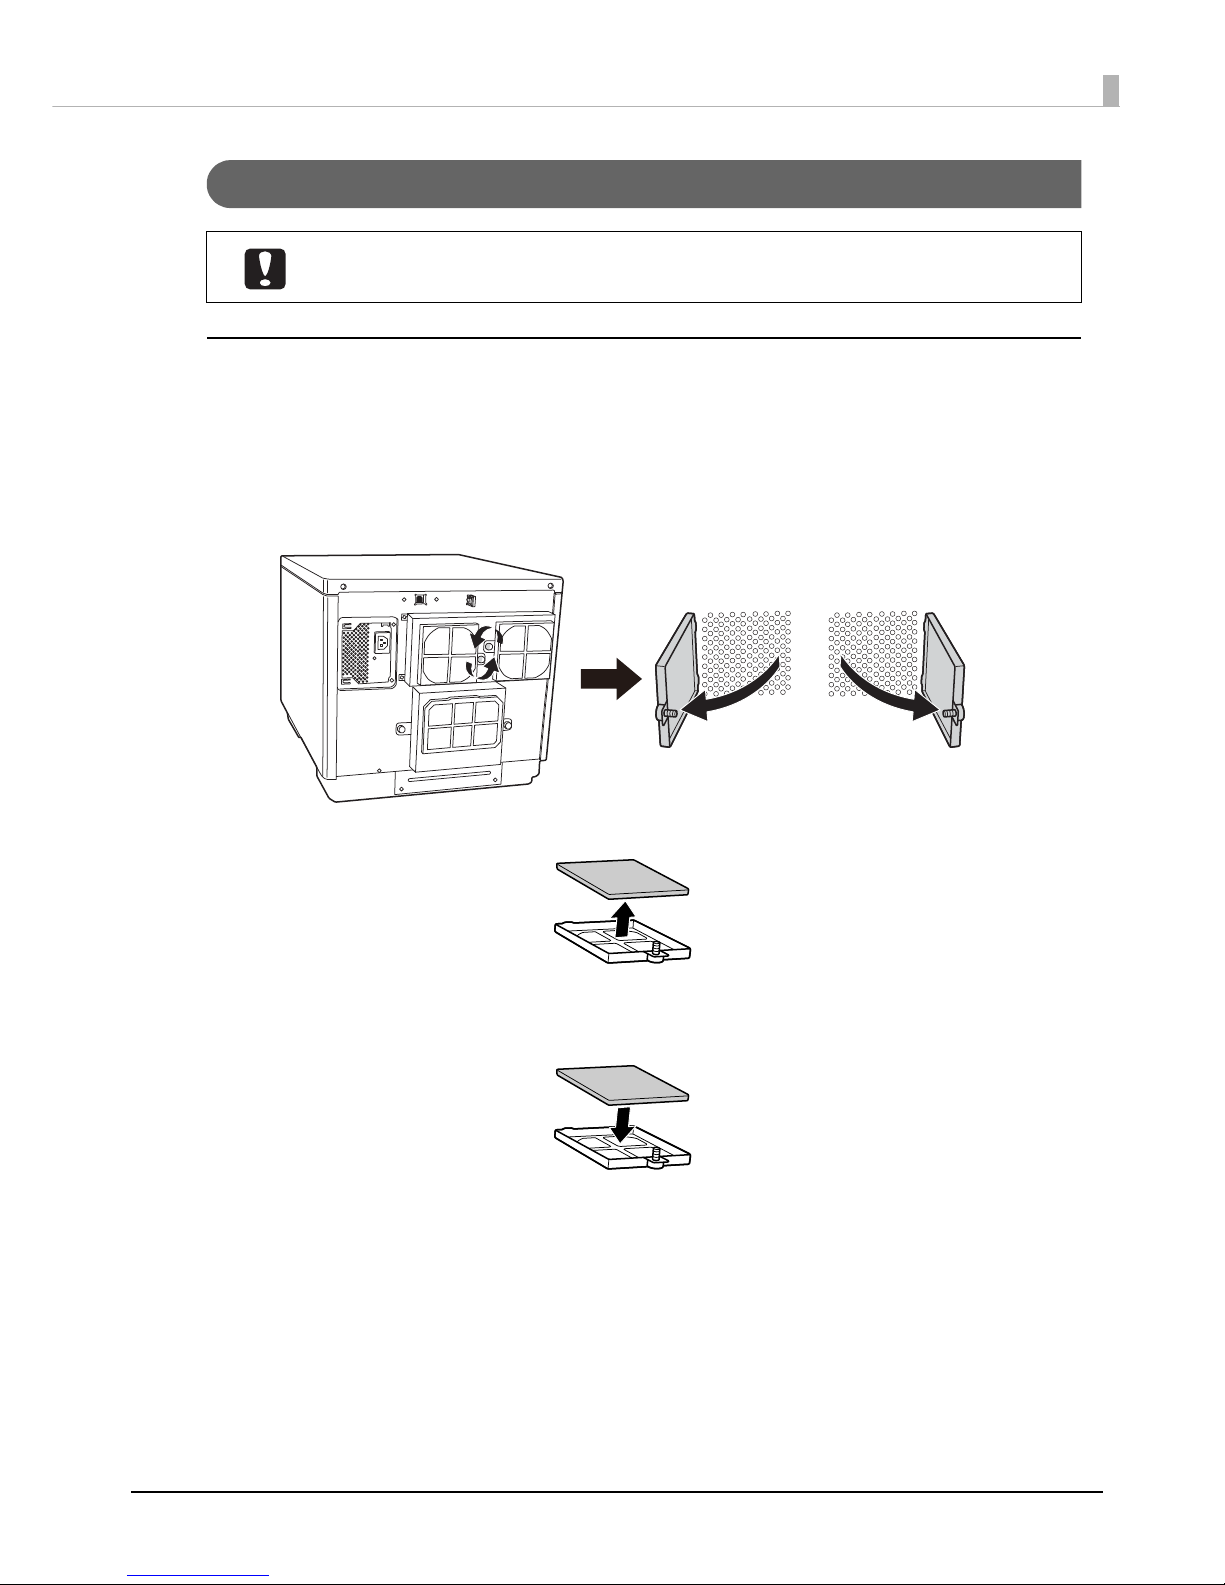
97
Maintenance
Cleaning the Air Vents (Only for PP-100II/PP-100/PP-50)
PP-100II
1
Turn the product off.
See “Turning Off the Power” on page 20.
2
After the Power light goes off, unplug the power plug from the outlet.
3
Loosen the screws on the filter covers to open them.
4
Take the filters off the filter covers.
5
Use a vacuum cleaner to clean the dust off the filters.
6
Put the filters back on the filter covers.
Clean the air vents regularly (once every six months).
Page 98
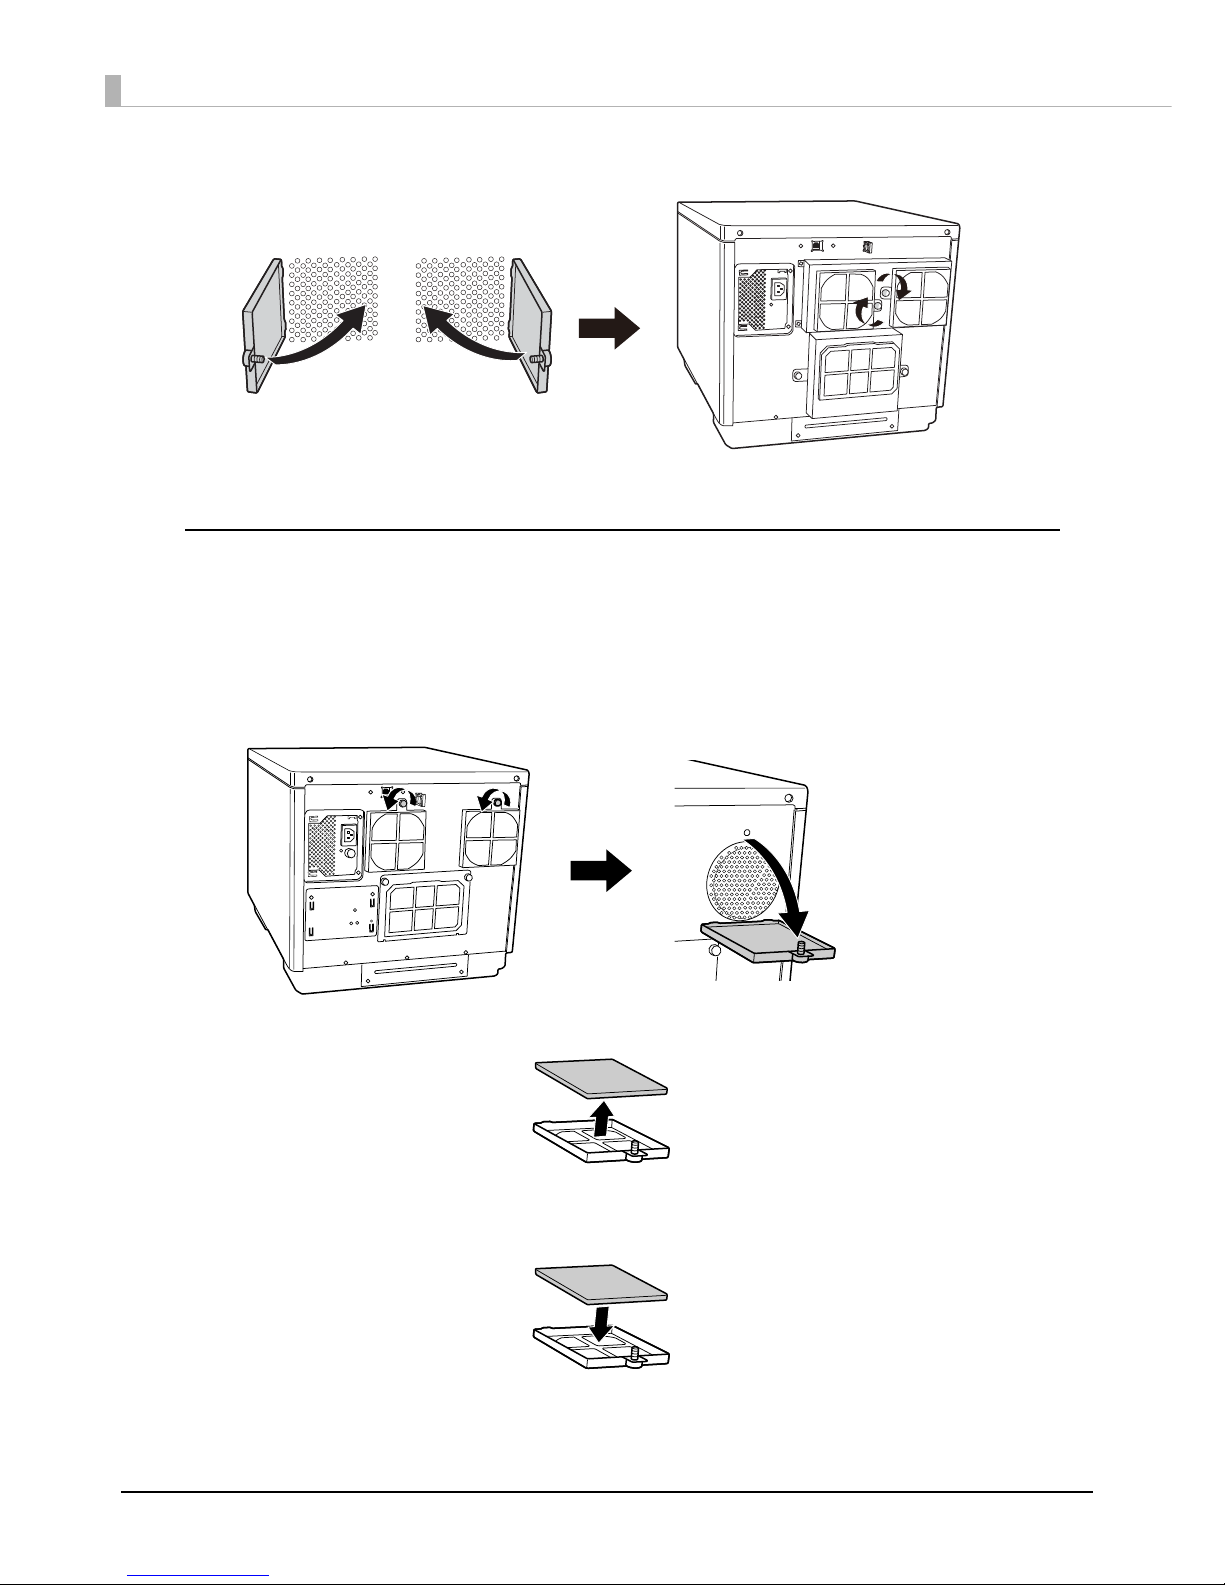
98
7
Tighten the screws to close the filter covers.
8
Plug the power plug into the outlet, and turn the power on.
For PP-100/PP-50
1
Turn the product off.
See “Turning Off the Power” on page 20.
2
After the Power light goes off, unplug the power plug from the outlet.
3
Loosen the screws on the filter covers to open them.
4
Take the filters off the filter covers.
5
Use a vacuum cleaner to clean the dust off the filters.
6
Put the filters back on the filter covers.
Page 99
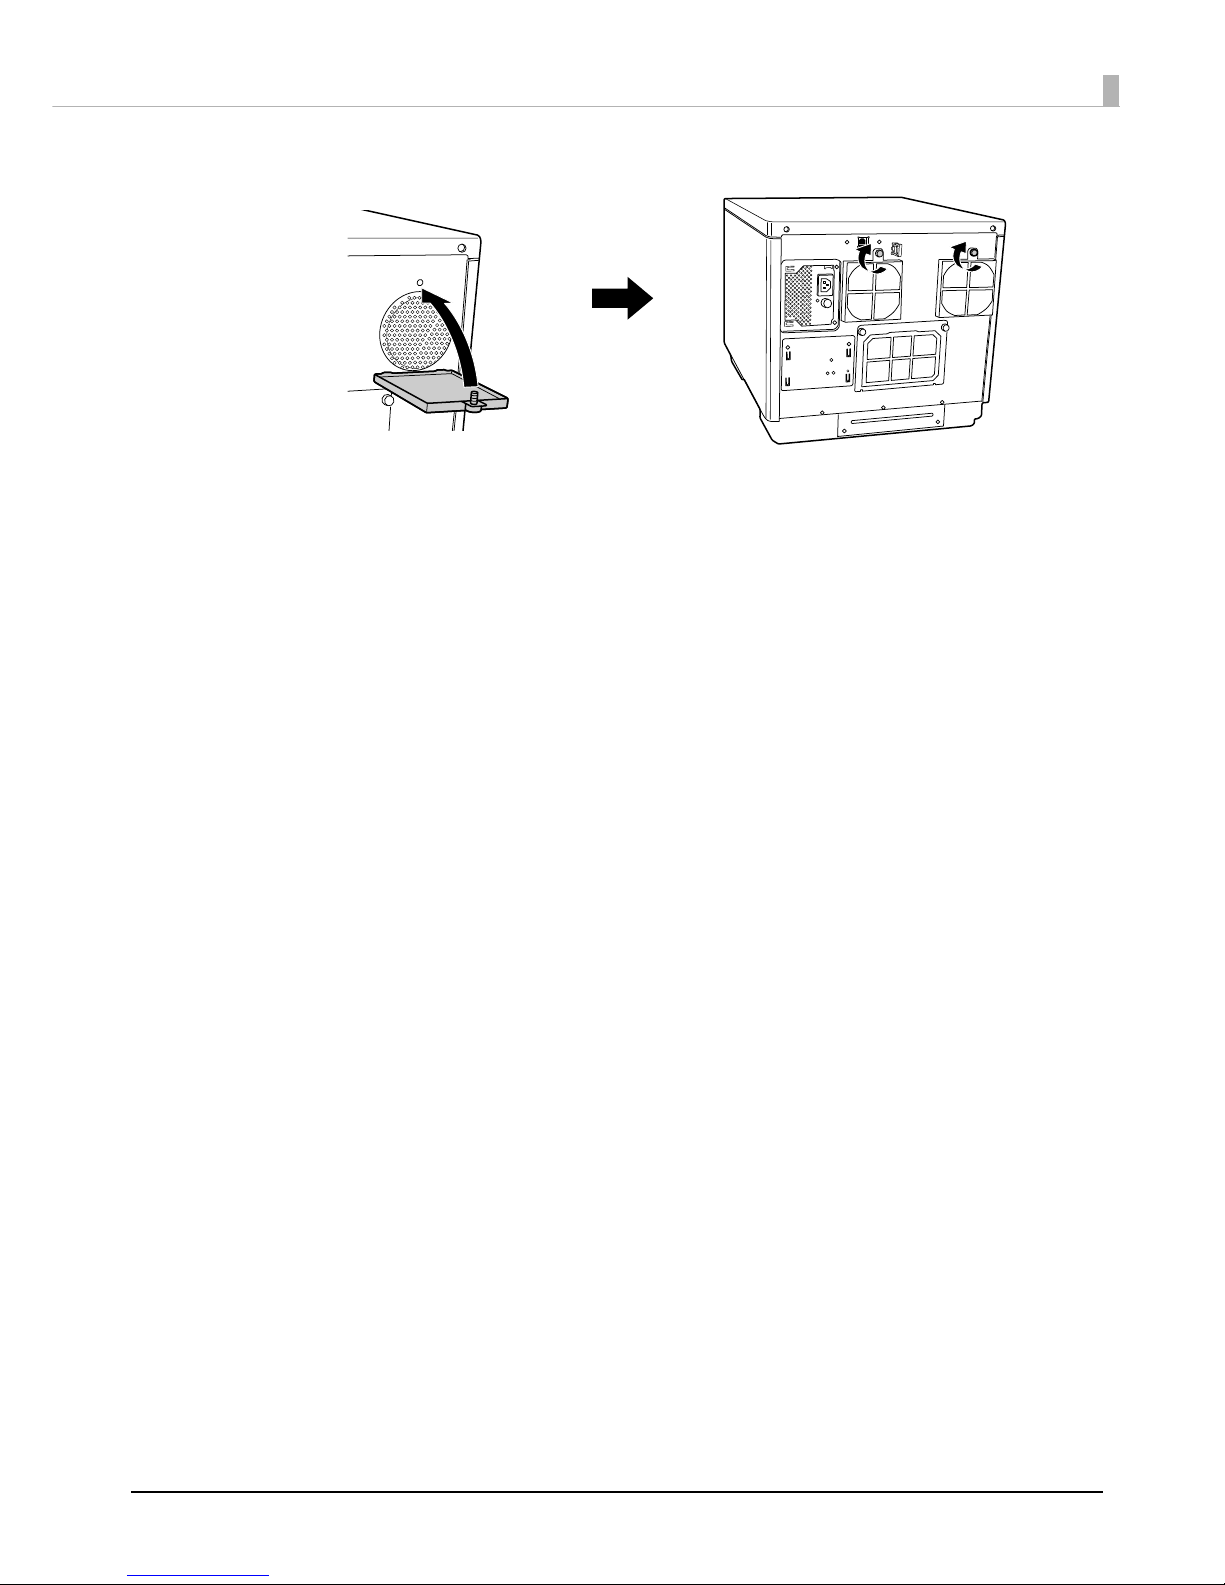
99
Maintenance
7
Tighten the screws to close the filter covers.
8
Plug the power plug into the outlet, and turn the power on.
Page 100
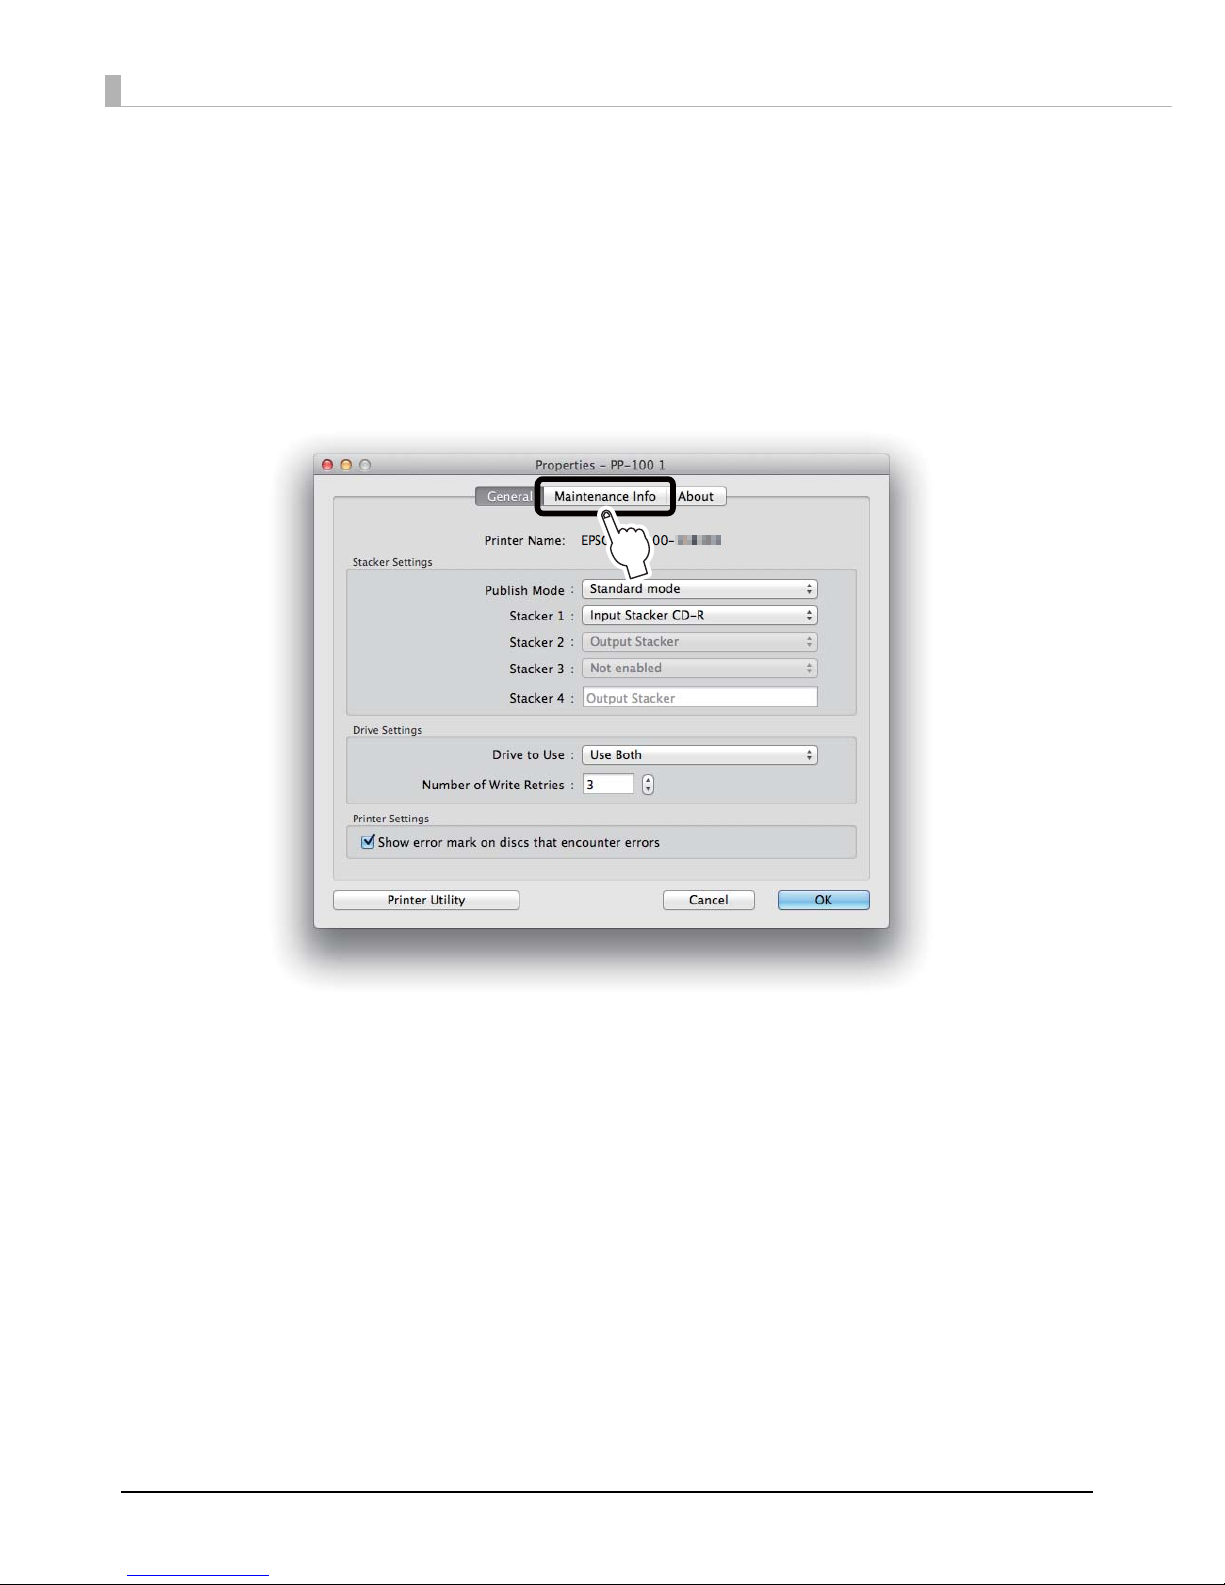
100
Checking Maintenance Information
This section describes how to check information that is useful when carrying out maintenance and providing support
for your product, such as usage status of the internal drives and the number of published discs.
1
Display the Printer Utility screen of the EPSON Total Disc Utility.
See “Properties screen (General screen)” on page 41 for display procedure.
2
Click the Maintenance Info tab.
 Loading...