

Epson®PowerLite®Home 10
Home Theater Projector •Projecteur cinéma maison
User’s Guide
Guide de l’utilisateur
CPD-17904R2
+

Copyright Notice
All rights reserved. No part of this publication may be reproduced, stored in a retrieval system, or transmitted in
any form or by any means, electronic, mechanical, photocopying, recording, or otherwise, without the prior
written permission of Seiko Epson Corporation. The information contained herein is designed only for use with
this Epson product. Epson is not responsible for any use of this information as applied to other products.
Neither Seiko Epson Corporation nor its affiliates shall be liable to the purchaser of this product or third parties for
damages, losses, costs, or expenses incurred by purchaser or third parties as a result of: accident, misuse, or abuse of
this product or unauthorized modifications, repairs, or alterations to this product, or (excluding the U.S.) failure to
strictly comply with Seiko Epson Corporation’s operating and maintenance instructions.
Seiko Epson Corporation shall not be liable for any damages or problems arising from the use of any options or
any consumable products other than those designated as Original Epson Products or Epson Approved Products by
Seiko Epson Corporation.
Epson is a registered trademark and the 3LCD logo is a trademark of Seiko Epson Corporation.
Epson Extra Care, Epson Connection and Epson Store are service marks, and PrivateLine and PowerLite are
registered trademarks of Epson America, Inc.
Pixelworks, DNX, and the DNX logo are trademarks of Pixelworks, Inc.
General Notice: Other product names used herein are for identification purposes only and may be trademarks of
their respective owners. Epson disclaims any and all rights in those marks.
2
© 2005 Epson America, Inc. 4/05
CPD-17904R2

Contents
Important Safety Information 5
Remote Control Information 6
Presenting the Epson PowerLite Home 10+ 7
Registration and Warranty 7
Projector Parts 8
Projection Controls 9
Using This Manual 10
Getting More Information 10
Supported Devices 11
Cable Requirements 11
Optional Accessories 12
Using the Projector 13
English
Choosing a Location 13
Adjusting the Picture 14
Adjusting the Volume 16
Turning Off the Picture and Sound 16
Freezing the Action 16
Using the Projector’s Menu System 17
Changing Menu Settings 17
Adjusting the Appearance of the Picture 18
Customizing Projector Operation 20
Repositioning the Picture 22
Viewing Lamp Usage and Other Information 23
Restoring the Default Settings 24
3

Caring for the Projector 25
Cleaning the Lens 25
Cleaning the Projector Case 26
Changing the Remote Control’s Battery 26
Cleaning and Replacing the Air Filter 27
Replacing the Lamp 28
Resetting the Lamp Timer 30
Storing the Projector 30
Transporting the Projector 30
Problem Solving 31
What To Do When the Lights Flash 31
Solving Picture Problems 32
Solving Remote Control Problems 36
Where To Get Help 36
Specifications and Notices 37
4
General 37
Projection Lamp 37
Remote Control 37
Dimensions 38
Electrical 38
Environmental 38
Safety 38
Compatible Video Formats 39
FCC Compliance Statement 40
Declaration of Conformity 41
Epson America, Inc. Limited Warranty 41
Index 43

Important Safety Information
Follow these safety instructions when setting up and using the projector:
■ Never look into the projector lens when the lamp is turned on; the bright light can
damage your eyes. Never let children look into the lens when it is on.
■ Never open any cover on the projector, except the lamp and filter covers. Dangerous
electrical voltages inside the projector can severely injure you.
■ Except as specifically explained in this User’s Guide, do not attempt to service this product
yourself. Refer all servicing to qualified service personnel.
■ The projector and its accessories come packaged in plastic bags. Keep plastic bags away
from small children to avoid any risk of suffocation.
■ Don’t place the projector on an unstable cart, stand, or table. Also, don’t use the projector
near water or sources of heat.
■ Use the type of power source indicated on the projector. If you’re not sure of the power
available, consult your dealer or power company.
■ Place the projector near a wall outlet where the plug can be easily unplugged.
■ Don’t insert the plug into an outlet with dust present, and insert the plug firmly into the
outlet. Failure to do so could result in sparks or fire.
■ Don’t overload wall outlets, extension cords, or integral convenience receptacles. This can
cause fire or electric shock.
■ Don’t block the slots and openings in the projector case. They provide ventilation and
prevent the projector from overheating. Don’t operate the projector on a sofa, rug, or
other soft surface, or in a closed-in cabinet unless proper ventilation is provided.
■ Never push objects through the cabinet slots or spill liquid into the projector.
■ Unplug the projector from the wall outlet and refer servicing to qualified service
personnel under the following conditions: when the power cord or plug is damaged or
frayed; if liquid has been spilled into the projector, or if it has been exposed to rain or
water; if it doesn’t operate normally when you follow the operating instructions, or if it
exhibits a distinct change in performance, indicating a need for service; if it has been
dropped or the housing has been damaged.
■ Don’t place the projector where the cord can be walked on. This may result in fraying or
damage to the plug.
5

■ Unplug the projector from the wall outlet before cleaning. Use a damp cloth for cleaning.
Do not use liquid or aerosol cleaners.
■ This product includes a lamp component that contains mercury (Hg). Please consult
your state and local regulations regarding proper disposal or recycling, and do not place in
the trash.
■ Unplug the projector during lightning storms or when not in use for extended periods.
■ Don’t place the projector or remote control on top of heat-producing equipment.
■ If you use the projector in a country other than where you purchased it, use the correct
power cord for that country.
■ Don’t stand on the projector or place heavy objects on it.
■ Don’t use the projector outside of the required temperature range of 41 to 95 °F (5 to
35 °C). Doing so may cause an unstable display and could lead to projector damage.
■ Don’t store the projector outside of the required temperature range of 14 to 140 °F
(-10 to 60 °C) or in direct sunlight for long periods of time. Doing so may cause damage
to the case.
Remote Control Information
6
You can operate the projector by remote control via a line-of-sight infrared (IR) receiver at the
front and rear of the projector. The projector may not respond to remote control commands
under the following conditions:
■ There is an object between the remote control and the IR receiver on the projector.
■ Ambient light is too bright.
■ Certain types of fluorescent lighting are used.
■ Other equipment that emits infrared energy, such as a radiant room heater, is in the
room.
If you experience problems, try the following:
■ The remote control’s battery may be low on power; replace it.
■ Dim the ambient lighting and/or turn off any fluorescent lights.
■ Close any window coverings and/or move the projector out of direct sunlight.
■ Turn off other equipment that emits infrared energy.

Presenting the Epson PowerLite Home 10+
The Epson® PowerLite® Home 10+ Theater Projector lets you enjoy high-quality projection
in the relaxing environment of your own home. It offers these powerful features:
■ Adjustable color modes with built-in cinema filter for great viewing
■ 16:9 LCD panel for wide format projection
■ Five setup configurations, including front or rear projection and ceiling mounted
installation
■ Short lens focus; you can project an 80-inch diagonal image with the projector just
6.6 feet away
■ 800:1 contrast ratio
■ Extra parental control through the projector’s child lock option
■ Lock port for optional Kensington
■ Toll-free two-year priority technical support
®
MicroSaver® anti-theft device
Registration and Warranty
The Epson PowerLite Home 10+ projector comes with a basic two-year carry-in warranty.
For details, see page 41.
In addition, for customers who register their projector, Epson offers free Extra Care
Service. In the unlikely event of an equipment failure, you won’t have to wait for your unit to
be repaired. Instead, Epson will ship you a replacement unit anywhere in the United States or
Canada, usually via overnight delivery. See your Extra Care Home Service brochure for details.
To register, simply fill out the registration card that came with your projector and mail it to
Epson. Or you can register online at http://www.epson.com/webreg. Registering also lets you
receive special updates on new accessories, products, and service.
SM
Home
7
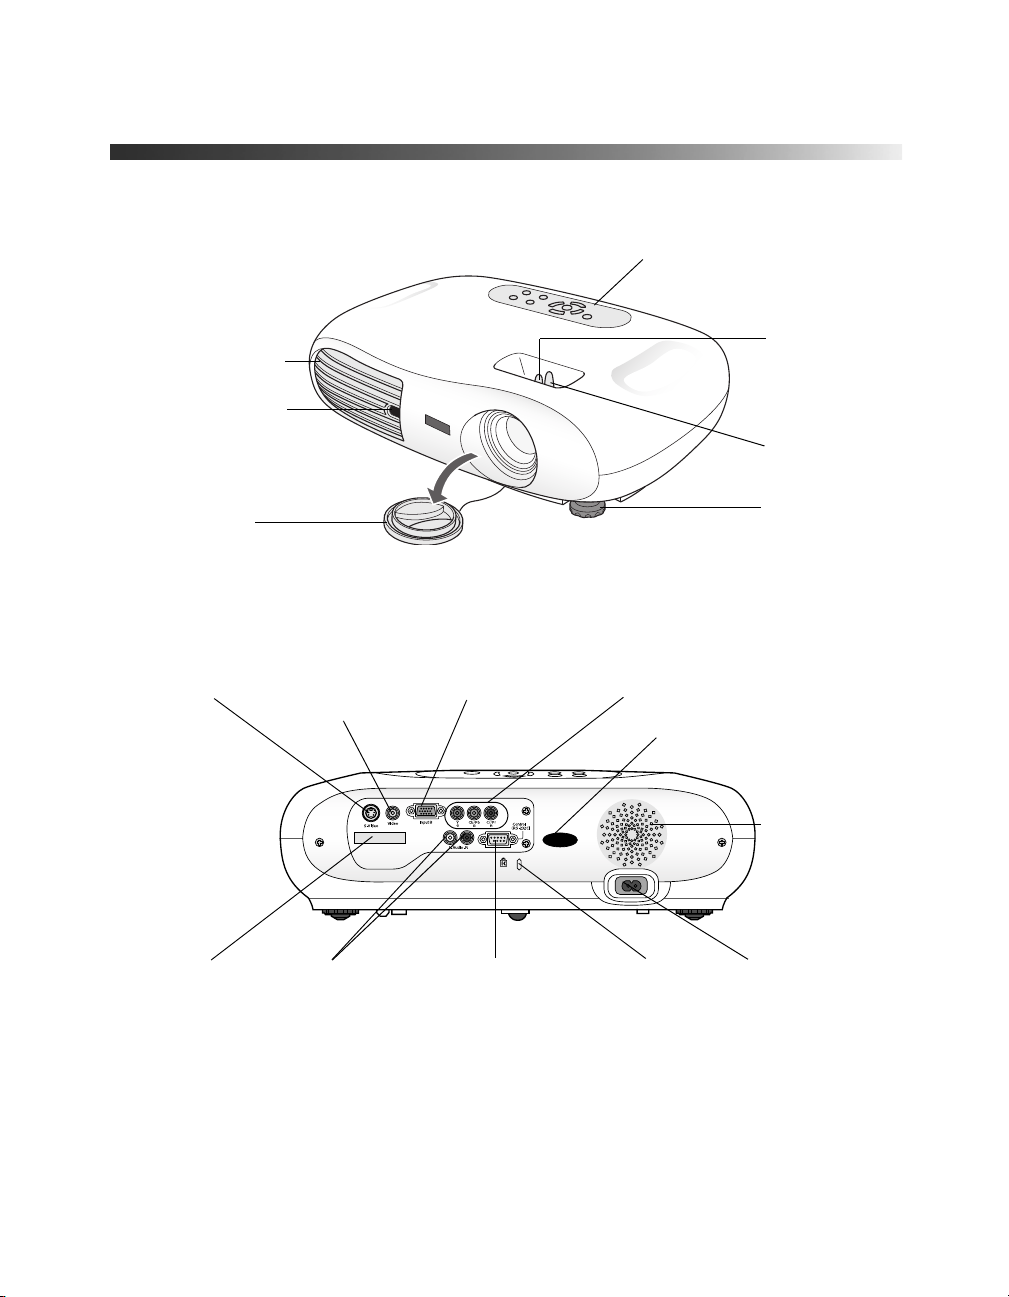
Projector Parts
Control panel
Ventilation slots
Infrared receiver
Lens cover
S-video port Video port
(composite video)
Focus lever
Zoom lever
Adjustable
foot
Input B (computer) Input A (component video)
Infrared receiver
Speaker
8
Remote control
holder
Audio ports Kensington
Control port for
service use only
security lock
AC power inlet
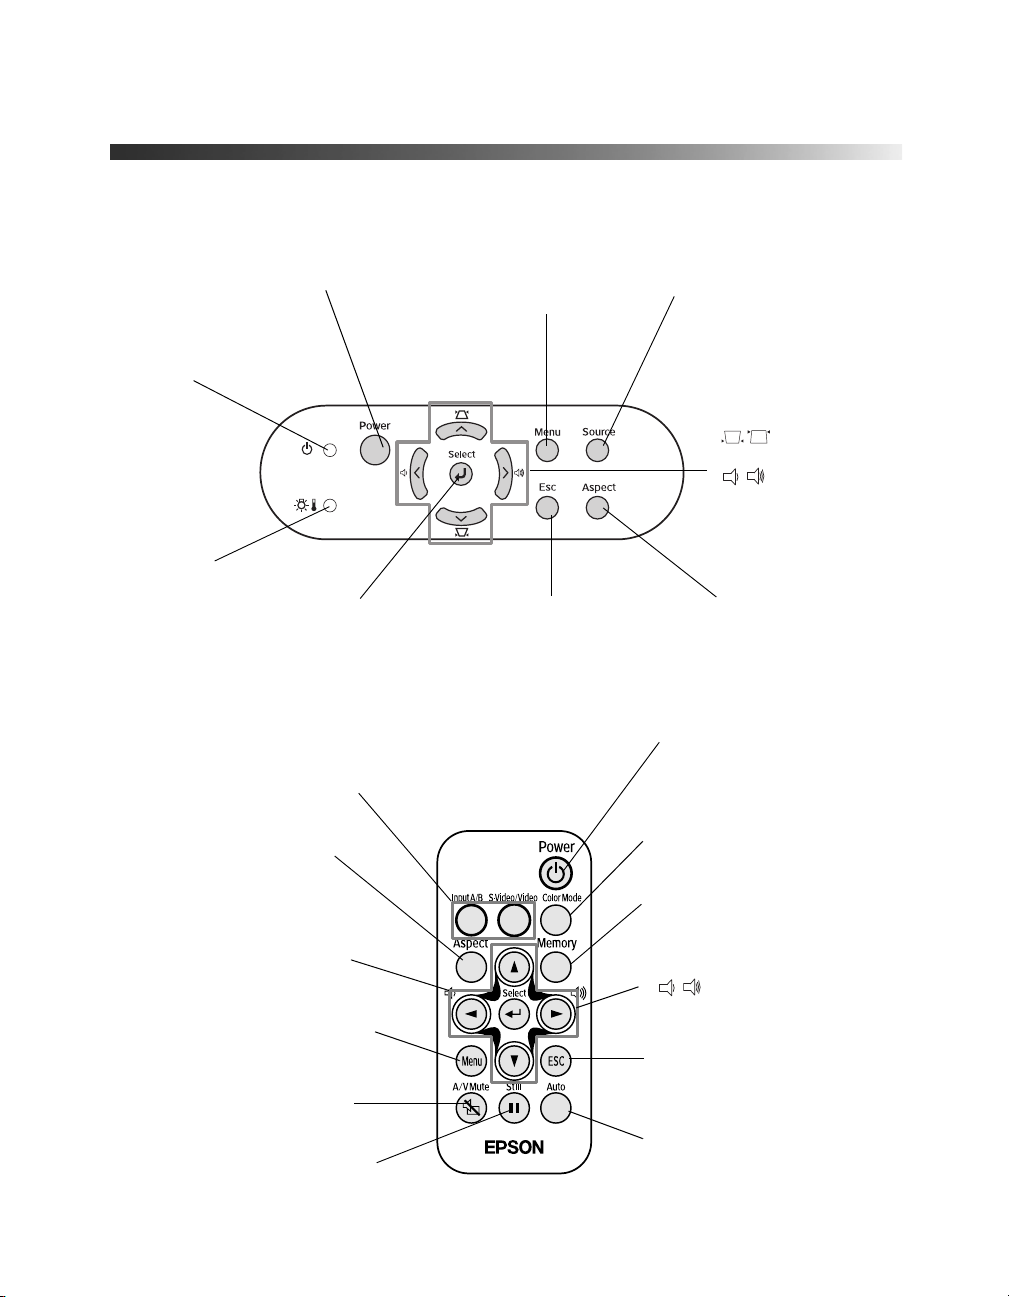
Projection Controls
Power button
Turns the projector on and off
Power light
Indicates operating
status
Warning light
Alerts you to
problems
Source buttons
Switch between equipment
connected to the projector
Aspect button
Changes the picture’s
aspect ratio
Arrow and Select buttons
Navigate menus and select
menu items
Menu button
Displays or hides projector’s
menus
A/V Mute button
Turns off audio and video
Select button
Selects a menu item or
advances to the next menu
Menu button
Displays or hides
projector’s menus
Esc button
Exits the current
function or menu
Source button
Switches the video input source
Keystone
correction and
volume
buttons
Also used to
navigate the
projector’s menus
Aspect button
Changes the
picture’s aspect
ratio
Power button
Turns the projector
on and off
Color Mode button
Selects the Color Mode
Memory button
Recalls settings made in
the projector’s menus
Volume buttons
Adjust volume
ESC button
Exits the current function
or menu
Still button
Freezes the picture and sound
Auto button
Optimizes images
from a computer
9

Using This Manual
See the Quick Setup sheet to connect the projector to your video or computer equipment.
This book contains all the information you need to use the projector, in addition to
maintenance instructions, troubleshooting tips, important safety instructions, specifications,
and warranty information.
Please follow these guidelines as you read through the manual:
Warnings: Must be followed carefully to avoid bodily injury.
Cautions: Must be observed to avoid damage to your equipment.
Notes: Contain important information about your projector.
Tips: Contain helpful projection tips.
Getting More Information
Need additional help? Take advantage of Epson’s automated support services 24 hours a day
at http://support.epson.com. Use this site to download FAQs or product information and
e-mail your questions to Epson support.
If you need more help, you can use the Epson PrivateLine
(800) 637-7661 and enter the PIN on the PrivateLine support card that came with your
projector.
®
Support service. Call
10

Supported Devices
You can connect the projector to any of the following video sources: VCR, DVD player,
DTV decoder, HDTV tuner, videodisc player, cable/satellite box, TV, video game console,
audio/video receiver, camcorder, personal video recorder, digital camera, or laser disc player.
You can also connect to a desktop or laptop PC or Apple
The projector supports composite video, S-video, and component video, and it automatically
senses the video format (HDTV, NTSC, PAL, or SECAM).
The Quick Setup sheet explains how to connect your projector to your other equipment. For
cable requirements, see the next section.
Cable Requirements
The projector does not come with any cables. However, you may already have the ones you
need, or you can purchase them from Epson, as described in the next section.
■ To receive a composite video signal, you need an RCA video cable. (One is usually
provided with your video equipment.)
■ To receive an S-video signal, you need an S-video cable. (One is usually provided with
your video equipment.)
■ To receive a component video signal from a DVD player, HDTV tuner, or other video
device, you need a component video cable.
®
Macintosh® system.
■ To connect a computer to the projector, you need a VGA computer cable.
■ Some older PowerBooks
®
and Macintosh desktop models may need a Macintosh adapter
set. (You can purchase this from Epson; see the next section for details.) Older iMac
systems may need a special adapter to provide a VGA output port; see your computer
dealer.
®
11

Optional Accessories
Epson provides the following optional accessories for the projector:
Product Part number
Replacement lamp V13H010L29
Air filter replacement V13H134A04
Remote control V12H007T12
Customized carrying cases:
Samsonite
Samsonite soft shoulder bag
Ceiling mount
Suspension adapter
False ceiling plate
Kensington security lock ELPSL01
Projection screens:
50-inch portable screen
60-inch portable pop-up screen
80-inch portable pop-up screen
Macintosh adapter set (includes monitor adapter
and desktop adapter)
S-video cable ELPSV01
®
wheeled soft case
ELPKS35
ELPKS43
ELPMB42
ELPMBAPL
ELPMBFCP
ELPSC06
ELPSC07
ELPSC08
ELPAP01
12
You can purchase many of these accessories from your dealer, by calling Epson
SM
at (800) 873-7766, or by visiting the Epson Store
at www.epsonstore.com
(U.S. sales only). In Canada, please call (800) 463-7766 for dealer referral.
Using the Projector
Follow the instructions in this section to choose a location for the projector, adjust the image
and volume, turn off picture and sound, freeze the action, or use the projector menus.
Choosing a Location
The distance from the projector to the screen or wall determines the size of the picture. The
picture will be larger when you place the projector further from the screen. See the Quick
Setup sheet for details about the relationship between distance and picture size.
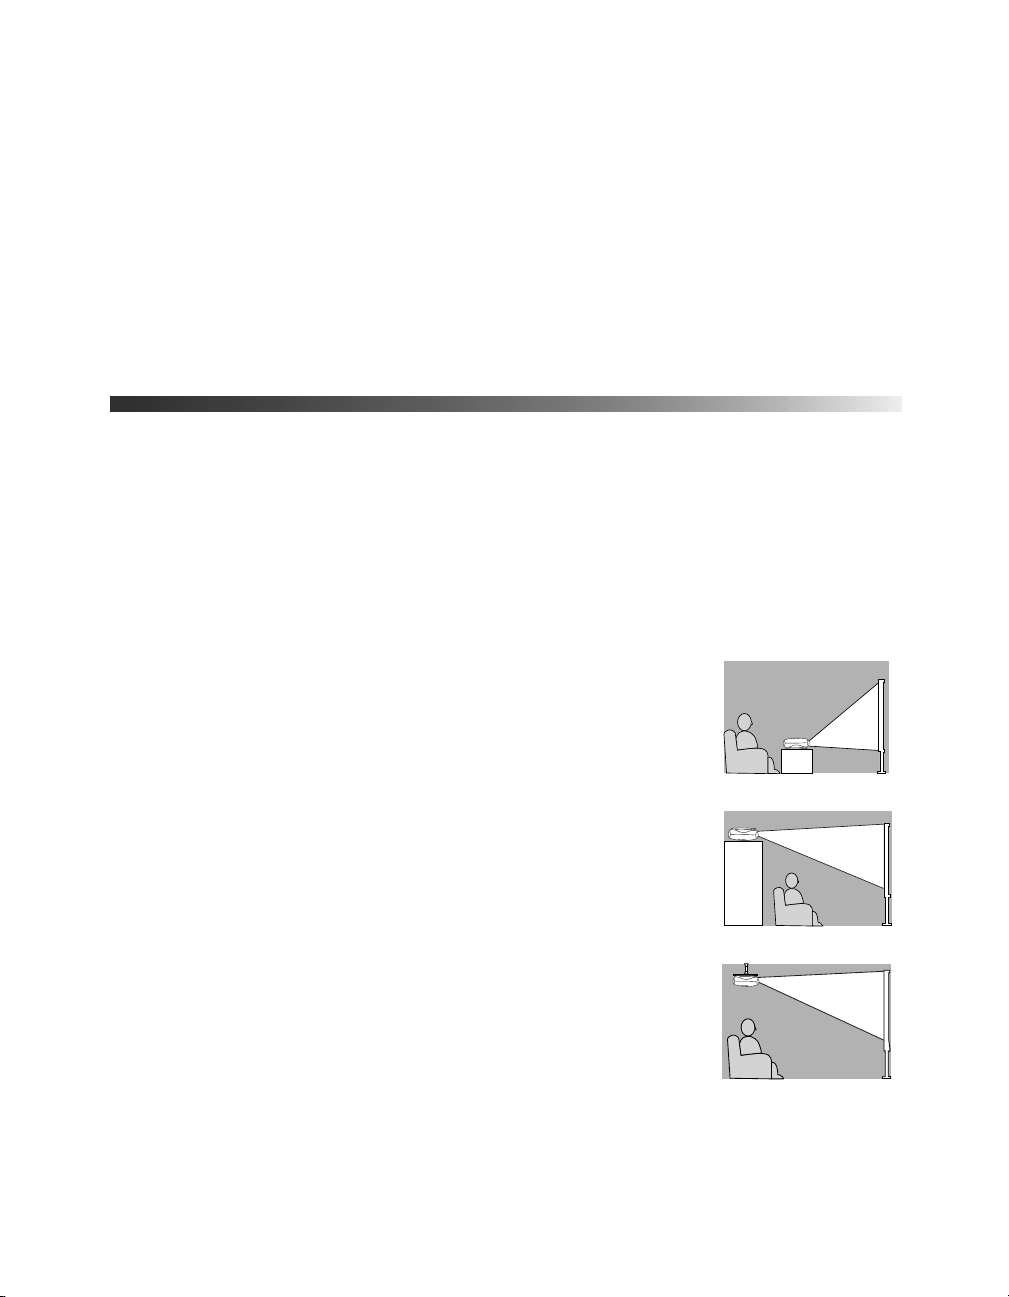
You can also choose from five different viewing setups. If you install the projector in a rear or
overhead position, you’ll need to choose the correct Projection option (identified below) from
the projector’s Setting menu.
■ Table: For temporary front projection, place the projector on a
low table in front of the screen. If possible, place the projector
directly in front of the screen, facing the screen squarely. The
base of the lens should be about level with the bottom of the
screen.
■ Shelf: You can also place the projector on a high shelf behind
you. Attach the three rubber feet that came with the projector
to the top of the projector, then place the projector
upside-down. After you turn on the projector, choose
Front/Ceiling for the Projection option in the Setting menu.
■ Ceiling: You can purchase special equipment from Epson to
attach the projector to your ceiling (see page 12 for ordering
information). If you choose this setup, professional installation
is recommended. Choose
option.
Front/Ceiling for the Projection
Table
Shelf
Ceiling
13
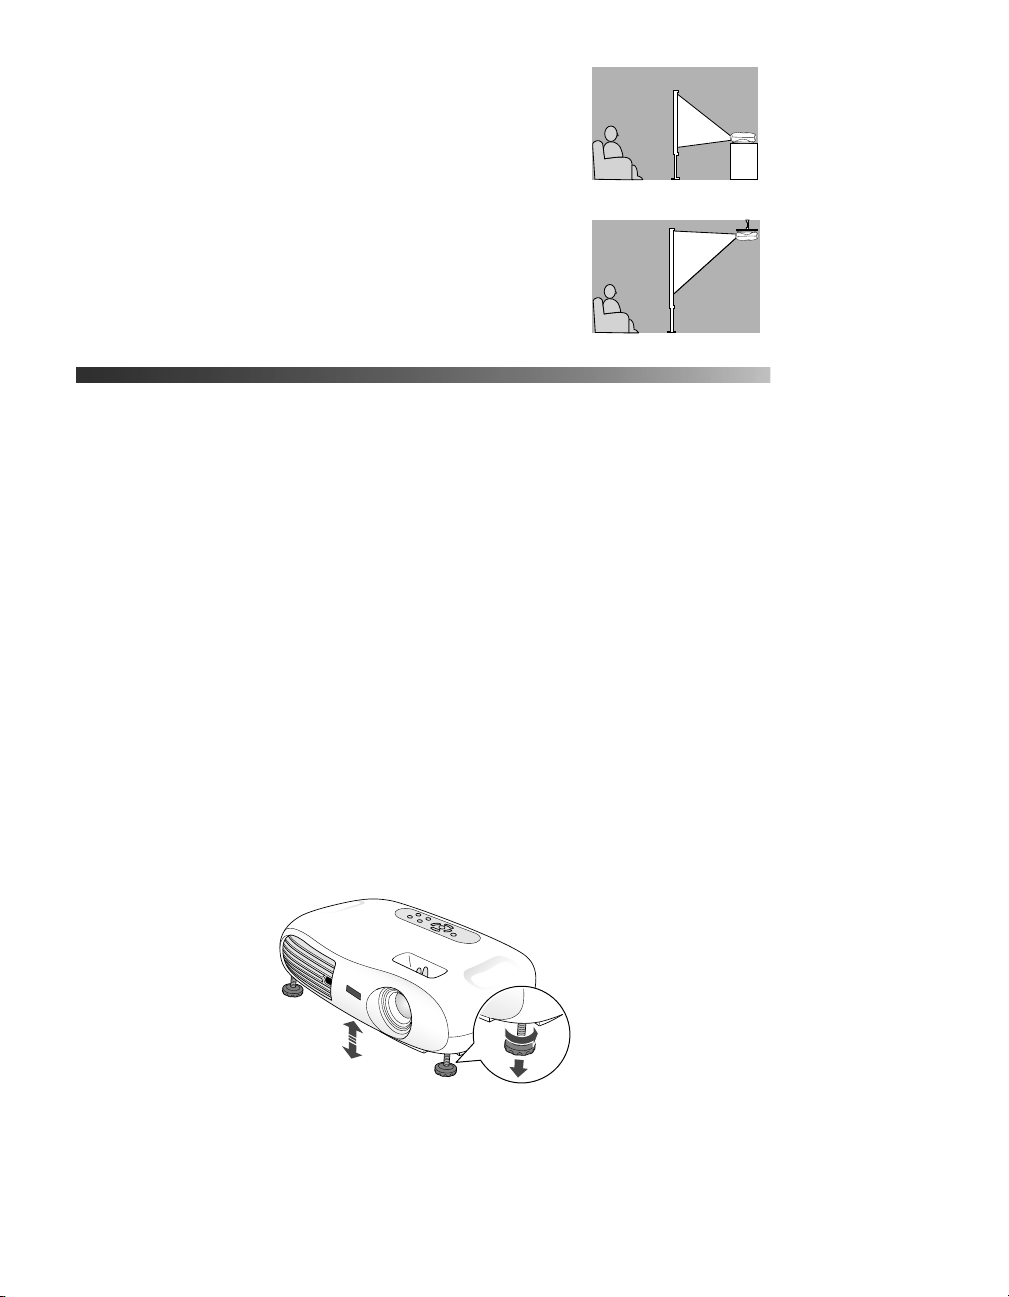
■ Rear: You can also set up your projector behind a
translucent screen. Choose
Rear for the Projection
option.
■ Rear/Ceiling: Professional installation is
recommended if you choose to attach the
Rear
projector to the ceiling behind a translucent
screen. (See page 12 for information about
ordering ceiling mounting equipment.) Choose
Rear/Ceiling for the Projection option.
Rear/Ceiling
Adjusting the Picture
Follow the steps on the Quick Setup sheet to connect the projector to your
equipment and turn it on. Be sure to follow these guidelines when turning the
projector on or off:
■ Turn your video equipment on or off before you turn your projector on or
off. (If you’re attaching the projector to a computer, turn the projector on or
off first.)
■ Press the P Power button on the remote control to turn the projector on
or off.
■ Never unplug the projector when the P power light on the projector’s control
panel is green or flashing orange.
Once you see your picture, you may need to make certain adjustments.
Note: If you don’t see a picture, you may need to change the image source. See
page 33 for details.
1. To raise the picture, turn the projector’s front feet.
14
 Loading...