

Page 1
300"
30"
40"
60"
80"
100"
200"
EPSON PowerLite
Quick Setup
®
Home 10
1
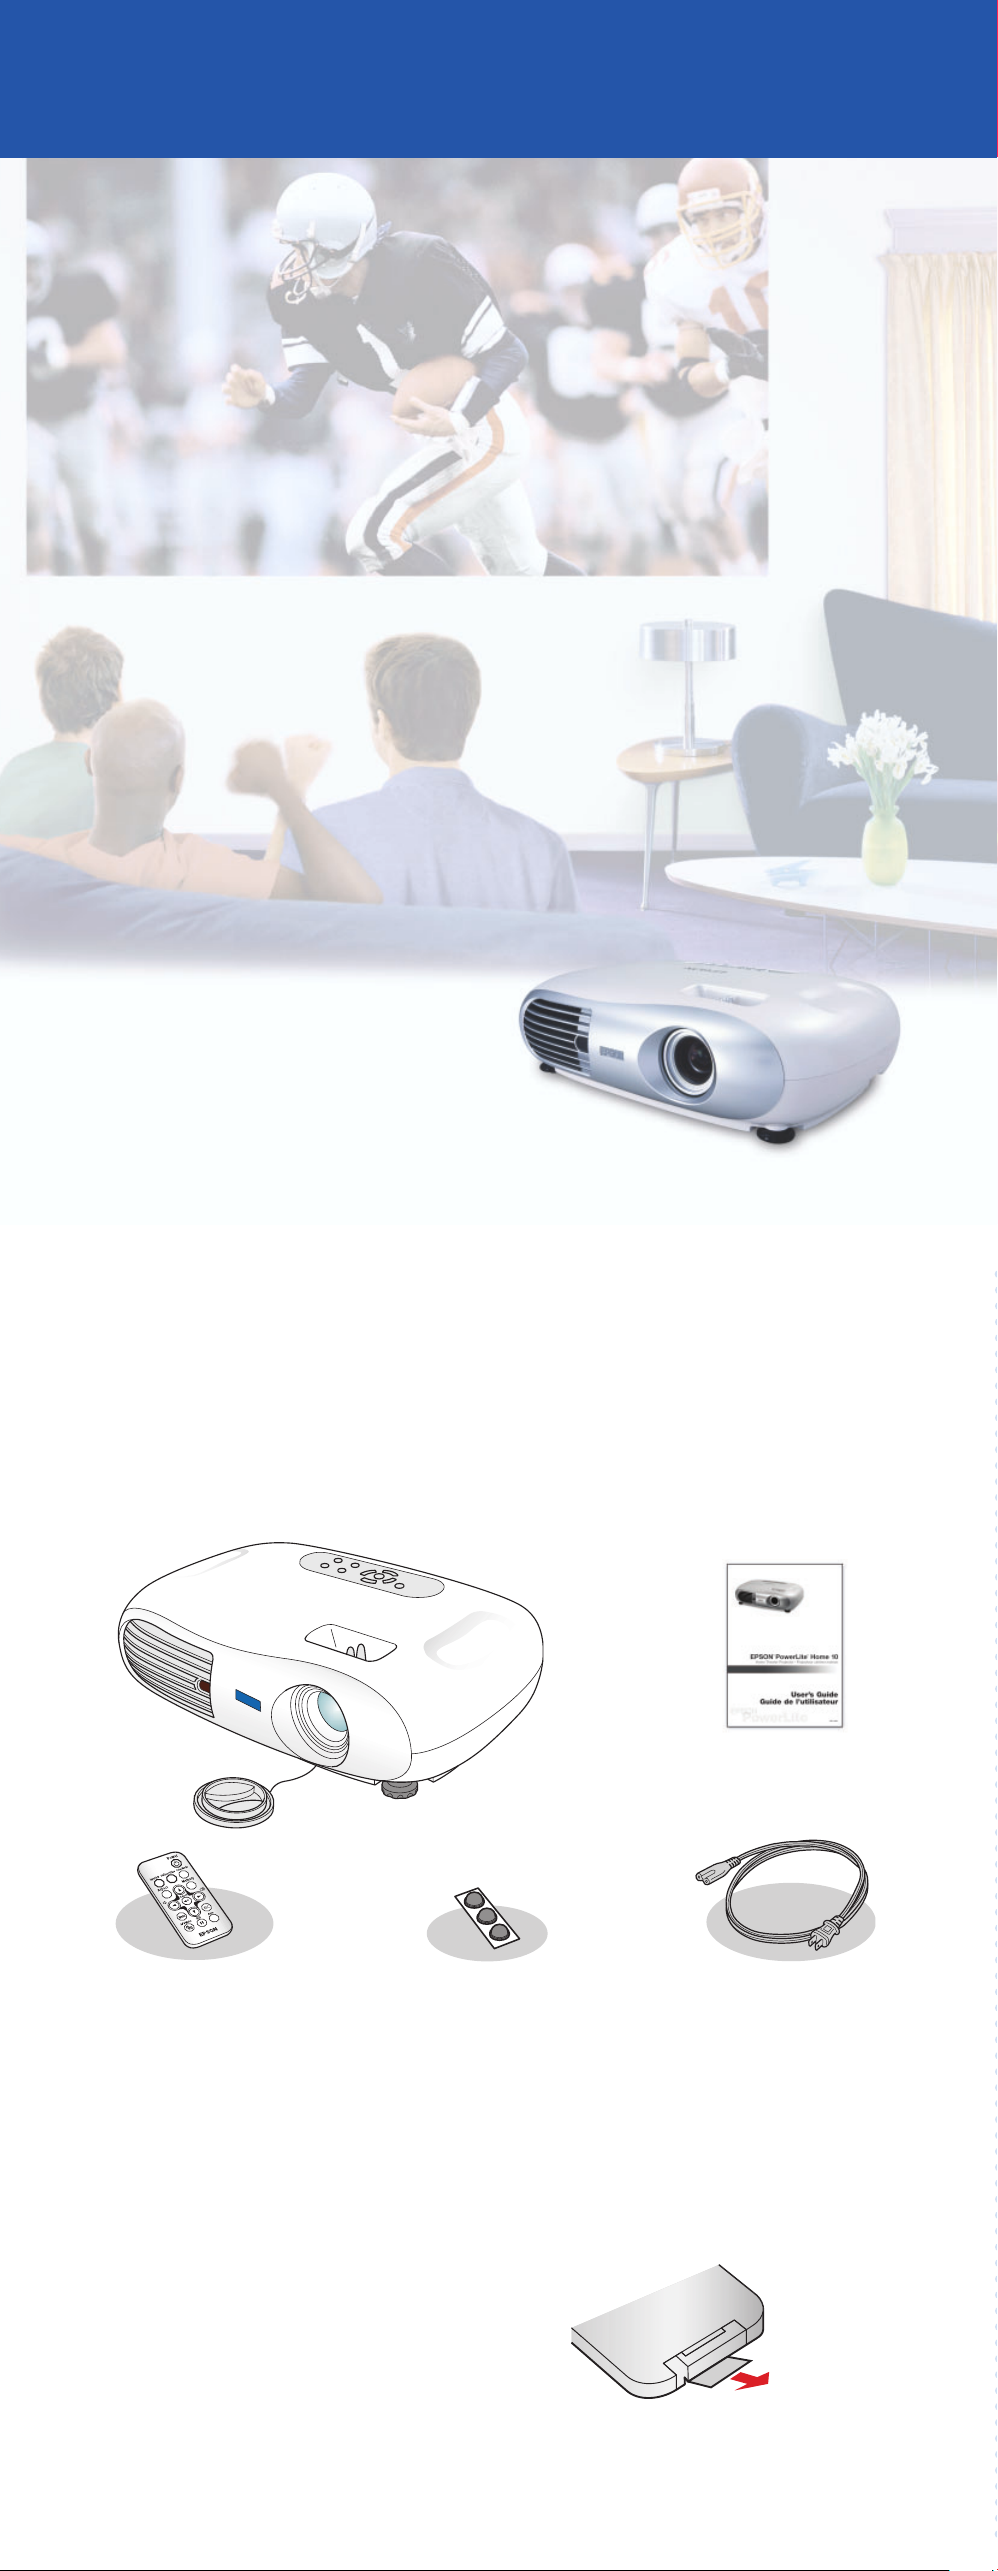
Your projector comes with the following items:
Unpack the projector
Projector User’s Guide
Remote control
2
Pull out the insulating tape to remove it
from the battery holder.
The remote control is ready for use.
Set up the remote control
Rubber feet
Power cord
Page 2
3
300"
30"
40"
60"
80"
100"
200"
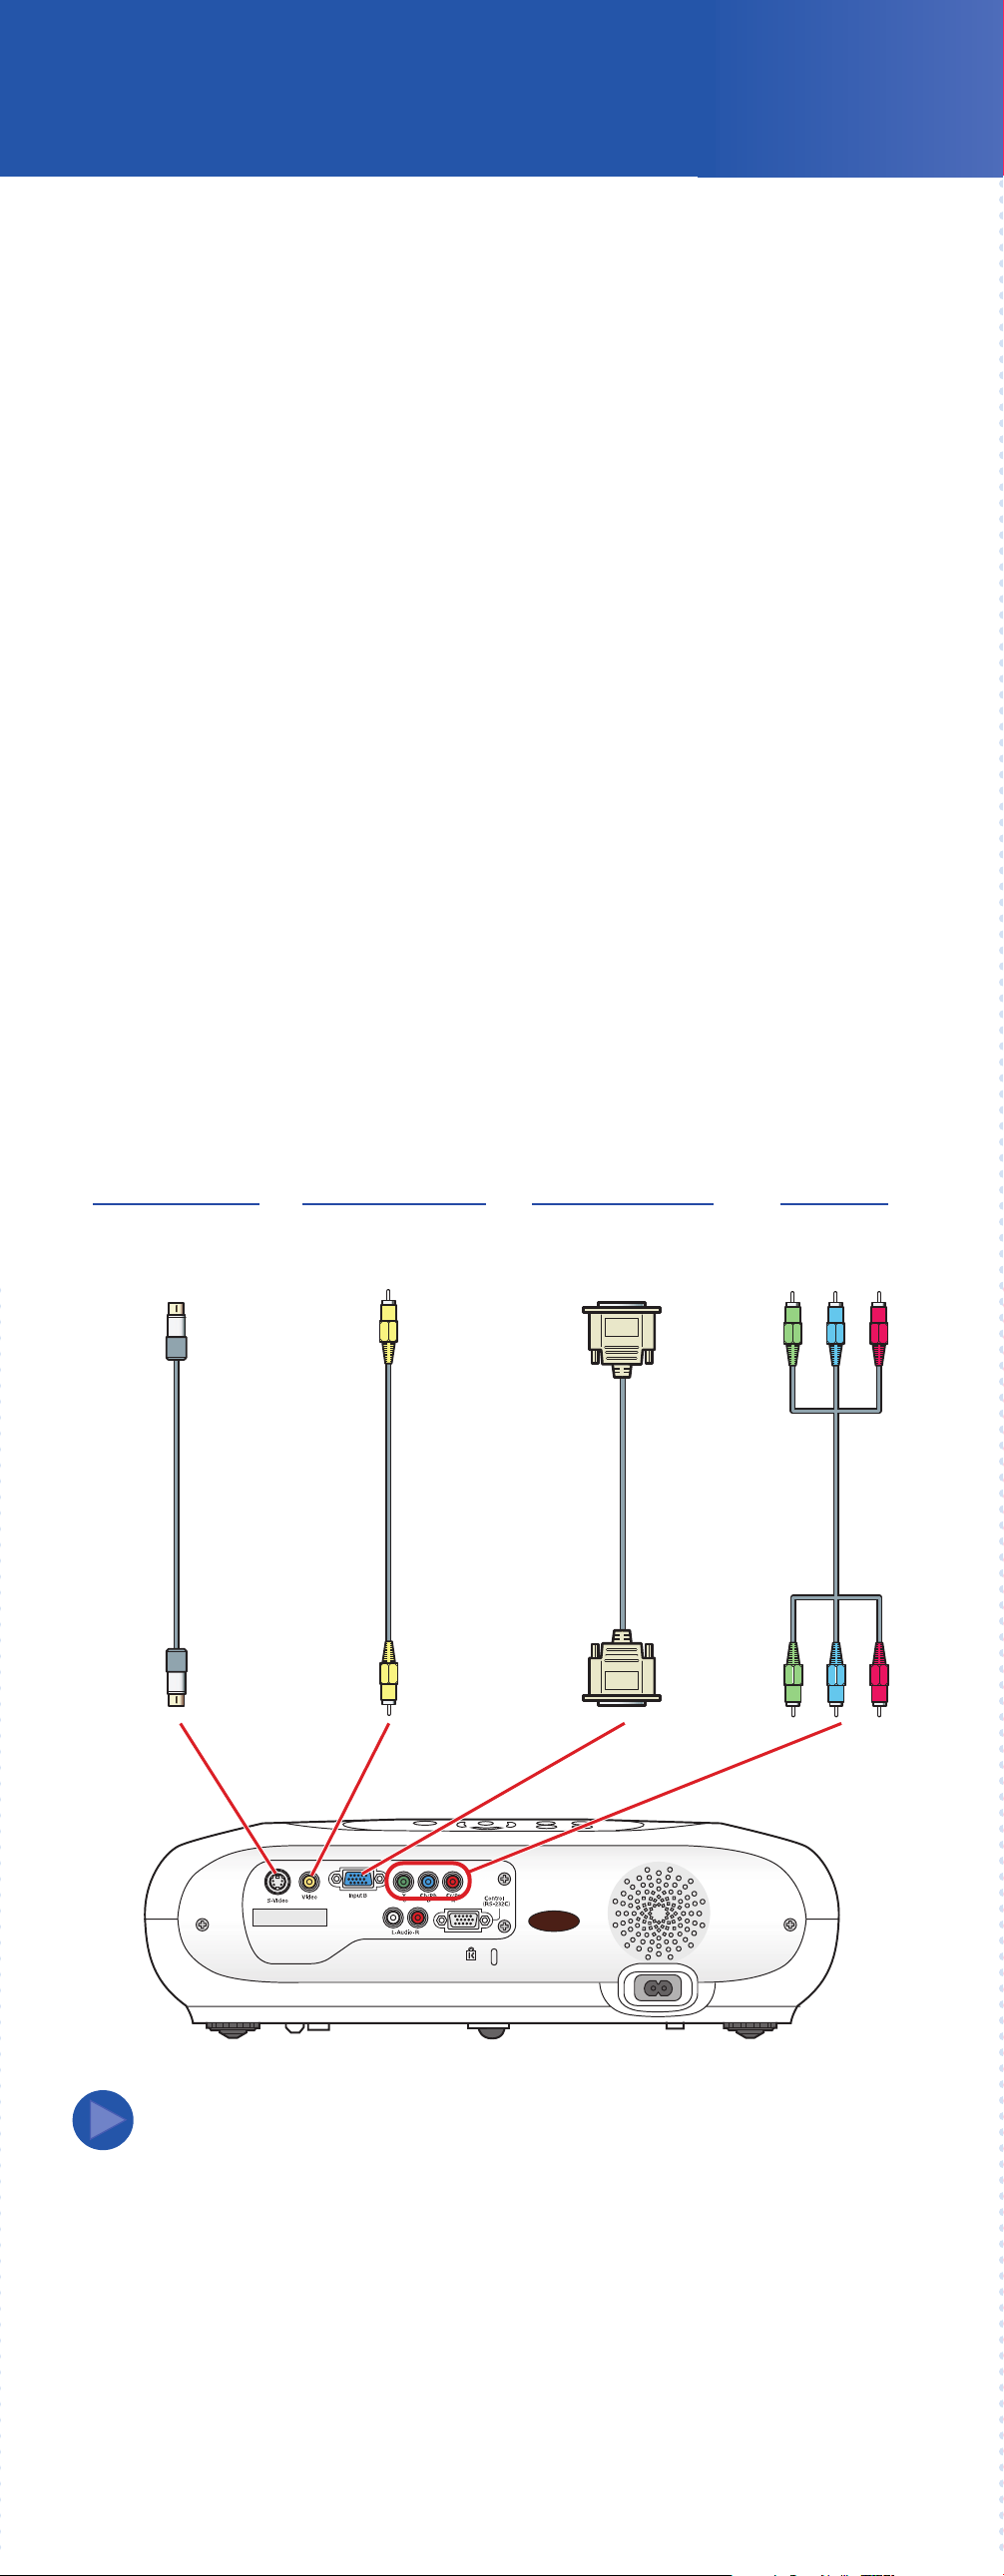
Connect your equipment
The projector has 4 types of connections, as shown below. Each one
is color-coded and requires a different type of cable (not included).
You can connect up to 4 video sources and use the remote control
to switch from one to the other.
Check the connectors on your video equipment. If more than one
connection is available, choose the one that provides the best quality.
For example, component video produces higher quality images than
S-video or composite video.
Make sure you have the right cable for the connection you want
to use, and the cable is long enough for your setup. If you need
a cable longer than the standard 6 to 10 feet, you may need a
distribution amplifier.
Before you connect your equipment, make sure everything is
turned off.
Connect your video equipment to the projector using any of the
available connections shown below.
TV
VCR
DVD player
Camcorder
Cable/satellite box
S-video cable
Video game console
RCA video cable
(composite video)
TV
VCR
Camcorder
Computer
VGA computer cable
DVD player
HDTV tuner
Component
video cable
NOTE
To play back audio through the projector, you can connect an audio
cable from your video device to the audio-in ports on the projector.
Page 3

Choosing a location
300"
30"
40"
60"
80"
100"
200"
The easiest way to set up your projector is to place it on a table
in front of your screen or wall, or on a high shelf behind you.
See the User’s Guide for other ways of setting up the projector.
Table
Convenient for temporary front projection. Ideally, place the projector
directly in front of the screen, facing the screen squarely. The base
of the lens should be level with the bottom of the screen.
Shelf
For temporary or permanent installation
on a high shelf. Attach the rubber feet
and place the projector upside-down.
After you turn on the projector, choose
Front/Ceiling for the Projection option
in the Setting menu. See the User’s
Guide for details.
Attach the 3 rubber feet
The distance between the projector and the screen determines the
size of the image. The diagram below shows approximately how big
your image will be, based on where you set up the projector.
25-38'
16.5-25.5'
8-13'
6.5-10'
3-5'
5-7.5'
30"
30"
40"
40"
60"
60"
80"
80"
100"
100"
200"
200"
300"
300"
Wall
Distance from projector to screen
7.9 inches
2.5-4'
Screen size (diagonal)
Turn over
Page 4

4
Plug in and turn on
1 Remove the lens cover.
2 Connect one end of the power cord to the projector and
plug the other end into an electrical outlet.
The power light turns orange.
Power light
3 Turn on your equipment. (If you are connecting to a computer,
don’t turn it on yet. Wait until you’ve turned on the projector.)
4 Press the Power button on the projector or remote control.
You hear a beep, the power light flashes green, and the
projector lamp comes on in about 45 seconds.
Power button
The projector automatically detects your video source and
begins projecting.
Turning off the projector
1 When you’re finished using the projector, turn off your
video equipment.
2 Press the Power button on the projector or remote control.
3 When you see the confirmation message, press the Power
button again. The power light flashes orange as the projector
cools down.
4 When the power light is a steady orange, unplug the projector.
5 Store the remote control in
its holder on the back of the
projector. (Part of the remote
control will stick out when
it’s fully inserted.)
Caution:
Never unplug the projector when the power light is
green or flashing orange.
Page 5

5
Adjust the image
1 To raise the image, turn the projector’s front feet.
2 Rotate the focus ring to sharpen the image. Rotate the zoom ring
to reduce or enlarge the image.
Zoom lever
Focus lever
3 If your image looks like or , first make sure the projector is
facing the screen squarely. If necessary, press the and
buttons on the projector’s control panel until the image is corrected.
4 To select the best color mode, press the
Color Mode button on the remote control
repeatedly to move through the options.
See your User’s Guide for more information
about image adjustments.
Color Mode
button
Where to get help
Telephone Support Services
To use the EPSON®PrivateLine®Support service, call (800) 637-7661 and
enter the PIN on the included EPSON PrivateLine Support card. This service
is available 6
duration of your warranty period. You may also speak with a projector
support specialist by dialing one of these numbers:
U.S.: (562) 276-4394, 6
Canada: (905) 709-3839, 6
Toll or long distance charges may apply.
Electronic Support Services
AM to 6 PM Pacific Time, Monday through Friday, for the
AM to 6 PM, Pacific Time,
Monday through Friday
AM to 6 PM, Pacific Time,
Monday through Friday
EPSON provides technical assistance through electronic support
services 24 hours a day at http://support.epson.com.
Accessories
You can purchase video cables, screens, carrying cases or other
accessories from EPSON at (800) 873-7766 or by visiting the
EPSON Store
In Canada, call (800) 463-7766 for dealer referral.
SM
at www.epsonstore.com (U.S. sales only).
Page 6

Troubleshooting
If you don’t find the answer to your problem here, see the User’s Guide
for more troubleshooting tips.
The image doesn’t fill the screen.
Try adjusting the zoom ring.
If possible, place the projector farther
away from the screen.
Press the Aspect button to move through
the projector’s aspect ratio settings: Normal, Squeeze, and Zoom.
Experiment to see which setting looks best on your screen.
The colors on your screen don’t look right.
Press the Color Mode button on the remote control to move
through the different color mode settings.
Check your cable connection. If your cable is not securely
connected at both ends, some colors may not appear.
Make sure the projector has detected
the correct video source. Press one of
these buttons on the remote control:
Input A/B Toggles between component
video and computer signals.
S-Video/Video Toggles between S-video and
composite video signals.
Adjust the settings under the Picture Quality
option in the projector’s Image menu.
See the User’s Guide for details.
Only part of the image is displayed, or the image is distorted.
Try selecting a different aspect ratio by
pressing the Aspect button.
If the image is distorted or contains
interference, make sure the cable is
securely connected.
Source
buttons
If your image looks like or , press the or buttons
on the projector’s control panel to correct the problem.
Nothing is displayed, or you see
a “No signal” message.
Press the Source button on the projector or
the Input A/B or S-Video/Video button on
the remote control until you see your picture.
Check the cable connection.
Make sure your video equipment is on. If it isn’t, turn your
projector off. Then turn it on again after you’ve turned on
your video equipment.
No signal
The remote control doesn’t work.
Make sure you’ve removed the battery
insulating tape. See section 2 on the
front of this sheet.
Make sure you’re not farther than 20 feet
from the projector. Also, point the remote
control at one of the projector’s two
infrared receivers.
Infrared
receiver
Move the projector and remote control
away from strong sunlight and turn off
any fluorescent lighting.
Remove the clear film covering the
infrared receivers.
EPSON is a registered trademark of SEIKO EPSON CORPORATION. PowerLite and PrivateLine are registered
trademarks and EPSON Store is a service mark of Epson America, Inc.
General Notice: Other product names used herein are for identification purposes only and may be trademarks
of their respective owners. EPSON disclaims any and all rights in those marks.
Copyright © 2003 by Epson America, Inc. 7/03
Printed in XXX
Infrared
receiver
CPD-16678
 Loading...