

Page 1
®
EPSON
English
Deutsch
FranGais
EspaAol
Italian
Page 2

All rights reserved. No part of this publication may be reproduced, stored
in a retrieval system, or transmitted in any form or by any means,
mechanical, photocopying, recording, or otherwise, without the prior
written permission of Seiko Epson Corporation. No patent liability is
assumed with respect to the use of the information contained herein.
While every precaution has been taken in the preparation of this manual,
Seiko Epson Corporation assumes no responsibility for errors or omissions.
Neither is any liability assumed for damages resulting from the use of the
information contained herein.
Neither Seiko Epson Corporation nor its affiliates shall be liable to the
purchase of this products or third parties for damages, losses, costs, or
expenses incurred by purchaser or third parties as a result of accident,
misuse, or abuse of this product or unauthorized modifications, repairs, or
alterations to this product, or (excluding the US) failure to strictly comply
with Seiko Epson Corporation’s operating and maintenance instructions.
Seiko Epson Corporation shall not be held liable against any damage or
problems arising from the use of any options other than those designated
as Original Epson Products or Epson Approved Products by Seiko Epson
Corporation.
Epson is a registered trademark of Seiko Epson Corporation.
Copyright 0 1992 by Seiko Epson Corporation, Nagano, Japan
Page 3

Transparency Unit
for use with EPSON Scanners
B813021/B813022
Page 4
This transparency unit is a high-quality device developed to enable
Epson Scanner owners to scan transparencies and slides. By
installing this unit on your Epson scanner, you can scan
transparencies and slides beautifully, in full color. Also, it is not
necessary to remove this unit if you wish to return to scanning
normal reflective (paper) documents.
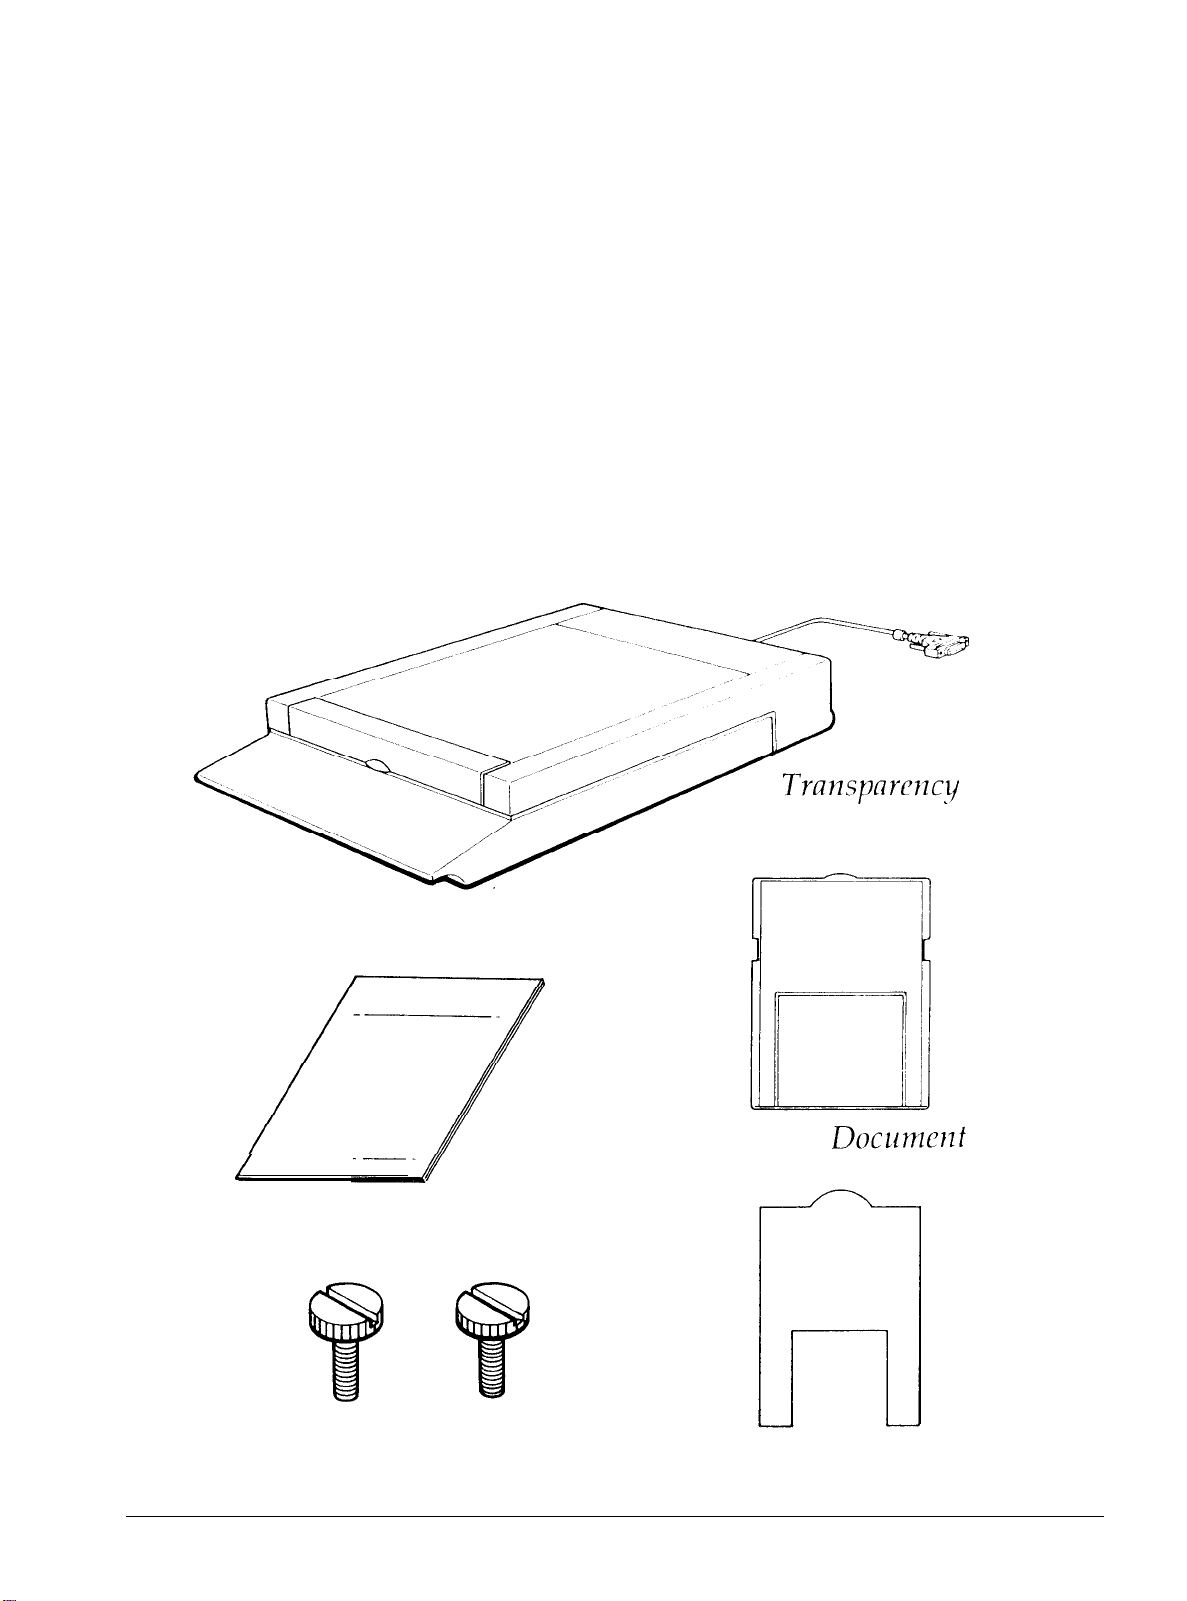
Unpacking the Unit
When you first open the package, make sure that all the following
items are included and that none has been damaged during
shipping. Contact your Epson dealer if any item is missing or
damaged.
Unit
Reflective
/
User’s Guide
Doclrmclzt
Mat
Screws (2)
2
Transparency Document Guide
Page 5

Removing the Shipping Screw
To prevent damage during shipping a shipping screw is attached to
the transparency unit. Make sure this screw
to the following steps before you attempt
1. Turn the unit so the glass side faces up.
2. Remove the screw from the position shown below.
is removed according
to use this unit.
3. Insert the screw you just removed into the storage-hole in the
position shown.
3
Page 6

Note: l
Keep the shipping screw in a safe place; you will need it if
you should need to transport the scanner. When
transporting the scanner, you should remove the
transparency unit and reattach the shipping screw.
l If the unit’s lamp assembly is not in its initial position, you
cannot attach the shipping screw. If this happens,
reattach the unit to the scanner, close the unit, and turn
the scanner on; the unit’s lamp assembly then returns to
its initial position. Then turn off the scanner and remove
the transparency unit.
Installing the Transparency
Unit on the Scanner
Follow the steps below to install the transparency unit on the
scanner.
1. Make sure the scanner’s power switch is turned off and remove
the power cable from the scanner.
2. Remove the document cover from the scanner.
3. The scanner comes with two mounting screws attached; slide the
mounting slots on the transparency unit forward underneath
these two screws.
4
Page 7

4. Use a coin to tighten the two screws and secure the transparency
unit.
5. Close the transparency unit.
6. Connect the transparency unit’s connector to the option
connector on the scanner.
5
Page 8

Transparency Document Guide and Reflective
Document Mat
A transparency document guide and reflective document mat are
included with this unit. Use as necessary.
Positioning Transparencies
You can scan the transparency types shown below:
Document type
Scanning size
Note: l Wipe the glass of the transparency unit, the scanner’s
document table, and the narrow window near the
mounting bracket before scanning transparencies.
l
Your scanner software automatically handles the
operation of the transparency unit.
Transparency documents (including slide film) in
color or monochrome
Up to 5 x 5 inches (127 x 127 mm)
6
Page 9

Position transparency documents according to the steps below.
1. Open the transparency unit.
2. Place the transparency document guide on the scanner’s
document table.
3. Using the transparency document guide, place the transparency
document face down on the scanners glass document table.
Align the transparency document with the upper right-hand
corner of the transparency document guide.
4. Close the unit. If the reflective document mat is in place, remove
it from the transparency unit.
Note: Make sure the unit is completely closed. If it is not closed, an
option error results and you cannot scan the document.
Page 10

Scanning Normal (Reflective) Documents
When you return to scanning normal reflective documents, you
should always insert the reflective document mat included with this
unit. Also, make sure you remove the transparency document
guide from the scanners document table.
Insert the reflective document mat as described below.
1. Open the transparency unit.
2.
Insert the reflective document mat.
3.
Position the reflective document and close
To remove the reflective document mat, lift up on the mat and pull
it out of the transparency unit.
the unit.
8
Page 11

EPSON OVERSEAS MARKETING LOCATIONS
EPSON AMERICA, INC.
20770 Madrona Ave.
P.O. Box 2842
Torrance,
Phone: (800) 922-89
Fax: (310) 782-5220
EPSON
Ztilpicher StraRe
4000 Dusseldorf 11 F.R.
Phone: (02
Telex: 8584786
EPSON
Untt 3,
Frenchs Forest, NSW 2086, Australia
Phone:
Fax:
EPSON
25/F, Harbour Centre.
25 Harbour Road, Wanchar,
Hong Kong
Phone:
Telex:
CA
90509-2842
1 1
DEUTSCHLAND
6,
Germany
11)
56030
AUSTRALIA PTY. LTD.
17
(2)
(2)
975-1409
HONG
5854600
65542
Rodborough
452-0666
KONG LTD.
Road,
GmbH
EPSON UK LTD.
Campus
Hemel Hempstead,
HP2 7E2,
Phone: 442-6 1144
Telex: 5 182467
EPSON FRANCE
68 bis, rue Marjolin
92300, Levallois-Perret,
Phone: (1) 4087-3737
Telex: 6 10657
EPSON
No. 1 Raffles
OUB Centre, Singapore 0104
Phone: 5330477
Fax: 5338 1
100,
Maylands Avenue.
Herts,
U.K.
S.A.
France
SINGAPORE PTE.
Place
19
#26-00
EPSON ELECTRONICS
(TAIWAN BRANCH)
1OF.
No.
287 Nanking
Taipei, Taiwan,
Phone: (02) 7 17-7360
Fax: (02) 7 12-9 164
R.O.C.
E. Road,
LTD.
TRADING LTD.
Sec. 3,
EPSON
V.le F.lli Casiraghi 427
20099 Sesto S.Giovannr
Ml, Italy
Phone: 2-26233 1
Fax:
SEIKO
ITALIA S.p.A.
2-2440750
EPSON CORPORATION
(Hirooka Office)
80 Harashinden, Hirooka
Shiojiri-shr, Nagano-ken
399-07 Japan
Phone: (0263) 52-2552
EPSON IBERICA
Av. de Roma, 18-26
08290 Cerdanyola
Barcelona,
Phone: 582.15.00
Fax:
Spain
582.15.55
S.A.
del
Valles
1992 July
 Loading...