

Page 1

Color Image Scanner
®
All rights reserved. No part of this publication may be reproduced , stored in a retrieval
system, or transmitted in any form or by any means, electronic, mechanical, photocopying,
recording, or otherwise, without the p rior written permiss ion of SEIKO EPSON
CORPORATION. No patent liability is assumed with respect to the use of the information
contained herein. Neither is any liability assumed for damages resulting from the use of the
information contain e d herein.
Neither SEIKO EPSON CO RPORATION nor its affiliates sh all be liable to the purchaser of
this product or third parties for damages, losses, costs, or expenses incurred by the purchaser
or third parti e s as a result of: ac cident, misuse, or abuse of this product or unau t horized
modifications, repairs, or alterations to this product.
SEIKO EPSON CORPOR AT I ON and its affiliates shall not be li ab le for any damages or
problems arising from the use of any options or any consumable products other than those
designated as Original EPSON Products or EPSON Approved Products by SEIKO EPSON
CORPORATION.
EPSON is a registered trademark of SEIKO EPSON CORPORATION.
IBM and PS/2 are regi stered trademarks of Internat ional Business Machines Corporation.
Apple, Macintosh, Mac, iMac, and Power Macintosh are registered trademarks of Apple
Computer, Inc.
Microsoft and Win dows are registered tradem arks of Microsoft Corporat ion in the United
States of America and other count ri es.
ISIS is a registered trademark of Pixel Translation s, a Division of ActionPoint, Inc.
General Notice: Other product names used herein are for identification purposes only and may be
trademarks of their respective companies.
Copyright © 2000 by SEIKO EPSON CORPORATION, Nagano, Japan.
Reference Guide
Page 2

Contents
Introduction
Features. . . . . . . . . . . . . . . . . . . . . . . . . . . . . . . . . . . . . . . . . . . . . . . .1
About This Guide . . . . . . . . . . . . . . . . . . . . . . . . . . . . . . . . . . . . . . .2
Chapter 1 Scanning Basics
Main Window and Preview Window. . . . . . . . . . . . . . . . . . . . . . .1-1
Main window . . . . . . . . . . . . . . . . . . . . . . . . . . . . . . . . . . . . . .1-2
Preview window. . . . . . . . . . . . . . . . . . . . . . . . . . . . . . . . . . . .1-3
Optimizing Image Scanning . . . . . . . . . . . . . . . . . . . . . . . . . . . . . .1-4
Manually optimizing images . . . . . . . . . . . . . . . . . . . . . . . . .1-5
Displaying a preview image. . . . . . . . . . . . . . . . . . . . . . . . . .1-6
Adjusting the Highlight Setting . . . . . . . . . . . . . . . . . . . . . . . . . . .1-7
Adjusting the Shadow Setting. . . . . . . . . . . . . . . . . . . . . . . . . . . . .1-8
Adjusting the Gamma Setting . . . . . . . . . . . . . . . . . . . . . . . . . . . . .1-9
Applying a Preset Tone Curve . . . . . . . . . . . . . . . . . . . . . . . . . . . .1-10
Adjusting the Gray Balance Intensity Setting . . . . . . . . . . . . . . . .1-14
Adjusting the Saturation Setting. . . . . . . . . . . . . . . . . . . . . . . . . . .1-15
Using the Tone Curve. . . . . . . . . . . . . . . . . . . . . . . . . . . . . . . . . . . .1-16
Saving your own tone curve. . . . . . . . . . . . . . . . . . . . . . . . . .1-19
Deleting a customized tone curve . . . . . . . . . . . . . . . . . . . . .1-19
Closing the Tone Correction dialog box . . . . . . . . . . . . . . . .1-19
Optimizing OCR Scanning. . . . . . . . . . . . . . . . . . . . . . . . . . . . . . . .1-20
Scanning text. . . . . . . . . . . . . . . . . . . . . . . . . . . . . . . . . . . . . . .1-20
Improving character recognition . . . . . . . . . . . . . . . . . . . . . .1-20
If you still have problems.... . . . . . . . . . . . . . . . . . . . . . . . . . .1-21
Potential text recognition problems. . . . . . . . . . . . . . . . . . . .1-22
Contents 1
Page 3

Chapter 2 Understanding EPSON TWAIN HS Features
Overview . . . . . . . . . . . . . . . . . . . . . . . . . . . . . . . . . . . . . . . . . . . . . . 2-1
EPSON TWAIN HS Main Window. . . . . . . . . . . . . . . . . . . . . . . . 2-2
Document Sources . . . . . . . . . . . . . . . . . . . . . . . . . . . . . . . . . . . . . . 2-3
Image Types . . . . . . . . . . . . . . . . . . . . . . . . . . . . . . . . . . . . . . . . . . . 2-4
Changing Resolution . . . . . . . . . . . . . . . . . . . . . . . . . . . . . . . . . . . . 2-6
Unsharp Mask. . . . . . . . . . . . . . . . . . . . . . . . . . . . . . . . . . . . . . . . . . 2-6
Size . . . . . . . . . . . . . . . . . . . . . . . . . . . . . . . . . . . . . . . . . . . . . . . . . . . 2-6
Preview Window . . . . . . . . . . . . . . . . . . . . . . . . . . . . . . . . . . . . . . . 2-8
Preview Buttons . . . . . . . . . . . . . . . . . . . . . . . . . . . . . . . . . . . . . . . . 2-10
Zoom Preview button. . . . . . . . . . . . . . . . . . . . . . . . . . . . . . . 2-10
Return to Full Preview button. . . . . . . . . . . . . . . . . . . . . . . . 2-10
Return to Zoom Preview button. . . . . . . . . . . . . . . . . . . . . . 2-11
Marquee and Marquee Buttons . . . . . . . . . . . . . . . . . . . . . . . . . . . 2-11
Making and modifying marquees . . . . . . . . . . . . . . . . . . . . 2-12
Delete Marquee button. . . . . . . . . . . . . . . . . . . . . . . . . . . . . . 2-14
Duplicate Marquee button. . . . . . . . . . . . . . . . . . . . . . . . . . . 2-14
Auto Locate button . . . . . . . . . . . . . . . . . . . . . . . . . . . . . . . . . 2-15
Marquee number indicator . . . . . . . . . . . . . . . . . . . . . . . . . . 2-16
Adjust Buttons . . . . . . . . . . . . . . . . . . . . . . . . . . . . . . . . . . . . . . . . . 2-16
Auto Exposure. . . . . . . . . . . . . . . . . . . . . . . . . . . . . . . . . . . . . 2-17
Image Controls. . . . . . . . . . . . . . . . . . . . . . . . . . . . . . . . . . . . . 2-18
Tone Correction. . . . . . . . . . . . . . . . . . . . . . . . . . . . . . . . . . . . 2-20
Color Adjustment . . . . . . . . . . . . . . . . . . . . . . . . . . . . . . . . . . 2-22
Reset button . . . . . . . . . . . . . . . . . . . . . . . . . . . . . . . . . . . . . . . 2-23
Configuration Button. . . . . . . . . . . . . . . . . . . . . . . . . . . . . . . . . . . . 2-24
Scan Button . . . . . . . . . . . . . . . . . . . . . . . . . . . . . . . . . . . . . . . . . . . . 2-25
Chapter 3 Calibrating Your System
Overview . . . . . . . . . . . . . . . . . . . . . . . . . . . . . . . . . . . . . . . . . . . . . . 3-1
Calibrating Your Screen . . . . . . . . . . . . . . . . . . . . . . . . . . . . . . . . . 3-1
For Windows 98, 2000, and Millennium Edition users . . . 3-1
For Windows 95 and NT 4.0 users . . . . . . . . . . . . . . . . . . . . 3-4
Using ICM, ICM/sRGB (For Windows 95, 98, 2000,
and Millennium Edition Users). . . . . . . . . . . . . . . . . . . . . . . . . 3-6
2 Contents
Page 4

Chapter 4 Maintenance and Troubleshooting
Maintenance. . . . . . . . . . . . . . . . . . . . . . . . . . . . . . . . . . . . . . . . . . . .4-1
Cleaning the scanner . . . . . . . . . . . . . . . . . . . . . . . . . . . . . . . .4-1
Replacing the fluorescent lamp . . . . . . . . . . . . . . . . . . . . . . .4-2
Transporting the Scanner. . . . . . . . . . . . . . . . . . . . . . . . . . . . . . . . .4-2
Problems and Solutions . . . . . . . . . . . . . . . . . . . . . . . . . . . . . . . . . .4-4
Error Indicator . . . . . . . . . . . . . . . . . . . . . . . . . . . . . . . . . . . . . . . . . .4-5
Operating Problems . . . . . . . . . . . . . . . . . . . . . . . . . . . . . . . . . . . . .4-6
The OPERATE light does not come on. . . . . . . . . . . . . . . . .4-7
The scanner does not scan. . . . . . . . . . . . . . . . . . . . . . . . . . . .4-7
The scanner software does not work properly. . . . . . . . . . .4-7
Quality Problems. . . . . . . . . . . . . . . . . . . . . . . . . . . . . . . . . . . . . . . .4-8
The entire image is distorted or blurred. . . . . . . . . . . . . . . .4-8
Part of the image is distorted or blurred. . . . . . . . . . . . . . . .4-8
Edges of the document are not scanned.. . . . . . . . . . . . . . . .4-9
Colors are patchy or distorted at the edges of the
image.. . . . . . . . . . . . . . . . . . . . . . . . . . . . . . . . . . . . . . . . . . .4-9
The image is faint or out of focus. . . . . . . . . . . . . . . . . . . . . .4-9
The image is too dark. . . . . . . . . . . . . . . . . . . . . . . . . . . . . . . .4-10
Straight lines in the image come out jagged. . . . . . . . . . . . .4-10
The image does not look the same as the original. . . . . . . .4-10
A line of dots is always missing from the scanned
image.. . . . . . . . . . . . . . . . . . . . . . . . . . . . . . . . . . . . . . . . . . .4-10
Colors on your monitor are different from those in the
original image. . . . . . . . . . . . . . . . . . . . . . . . . . . . . . . . . . . .4-11
Printed co lors are different from those in the original
image.. . . . . . . . . . . . . . . . . . . . . . . . . . . . . . . . . . . . . . . . . . .4-11
The printed image is larger o r smaller than the
original. . . . . . . . . . . . . . . . . . . . . . . . . . . . . . . . . . . . . . . . . .4-11
Scanned images cannot be printed or come out
garbled when printed.. . . . . . . . . . . . . . . . . . . . . . . . . . . . .4-12
Software Setup Problems . . . . . . . . . . . . . . . . . . . . . . . . . . . . . . . . .4-12
You cannot install EPSON TWAIN HS. . . . . . . . . . . . . . . . .4-12
Contents 3
Page 5

The scanner does not appear in the Port list of the
EPSON TWAIN HS dialog box in Control Panel when
you connect the SCSI model to your PC running
Windows 95 and NT 4.0. . . . . . . . . . . . . . . . . . . . . . . . . . . 4-12
The Scanner Status does not indicate “Device Ready”
after you click Test in the EPSON TWAIN HS
dialog box (Windows 95 and NT4.0) or in the
Scanner’s Properties dialog box (Windows 98, 2000,
and Millennium Edition) in Control Panel. . . . . . . . . . . 4-13
Software Operation Problems . . . . . . . . . . . . . . . . . . . . . . . . . . . . 4-14
You cannot start EPSON TWAIN HS. . . . . . . . . . . . . . . . . . 4-14
You cannot select Automatic Document Feeder. . . . . . . . . 4-15
Scanning Problems. . . . . . . . . . . . . . . . . . . . . . . . . . . . . . . . . . . . . . 4-15
Image is dark, with little or no detail. . . . . . . . . . . . . . . . . . 4-15
You cannot scan an image or you only get a few dots
for the scanned image. . . . . . . . . . . . . . . . . . . . . . . . . . . . . 4-15
Moiré (cross hatch) patterns appear in the scanned
image during halftone scanning. . . . . . . . . . . . . . . . . . . . 4-15
Colors differ from the original or look strange. . . . . . . . . . 4-16
Scanned image is too large. . . . . . . . . . . . . . . . . . . . . . . . . . . 4-16
Poor character recognition during OCR scanning. . . . . . . 4-16
You cannot scan from the Automatic Document Feeder. . 4-16
Scanning does not start by pressing the Start button. . . . . 4-17
Scanned image by using the Start button is missing.. . . . . 4-17
Paper Jams. . . . . . . . . . . . . . . . . . . . . . . . . . . . . . . . . . . . . . . . . . . . . 4-17
Network Problems . . . . . . . . . . . . . . . . . . . . . . . . . . . . . . . . . . . . . . 4-18
You cannot install EPSON TWAIN HS Network
and/or EPSON Scan Server. . . . . . . . . . . . . . . . . . . . . . . . 4-18
The scanner does not appear in the Scanner Selection
box in the EPSON Scan Server setup dialog box.
(For Windows 95 and NT 4.0 users). . . . . . . . . . . . . . . . . 4-18
Status: unavailable appears under the General tab of
the EPSON GT-30000 Properties dialog box.
(For Windows 98, 2000, and Millennium Edition
users). . . . . . . . . . . . . . . . . . . . . . . . . . . . . . . . . . . . . . . . . . . 4-19
You cannot start up EPSON Scan Server. . . . . . . . . . . . . . . 4-19
EPSON TWAIN HS Network dialog box does not
appear on the client PC when you try to start
EPSON TWAIN HS Network from a
4 Contents
Page 6

TWAIN-compliant application.. . . . . . . . . . . . . . . . . . . . .4-20
Network connection is terminated before the scanned
image is transferred to the client PC. . . . . . . . . . . . . . . . .4-21
Changing the SCSI ID number or SCSI board. . . . . . . . . . . . . . . .4-21
Upgrading the System . . . . . . . . . . . . . . . . . . . . . . . . . . . . . . . . . . .4-23
Upgrading from Windows 98 or 95 to
Windows Millennium Edition . . . . . . . . . . . . . . . . . . . . . .4-23
Upgrading from Windows 98, 95, or NT 4.0 to
Windows 2000 . . . . . . . . . . . . . . . . . . . . . . . . . . . . . . . . . . .4-24
Upgrading from Windows 95 to Windows 98. . . . . . . . . . .4-25
Recovering from Scanner Software Installation Problems on
Windows 98, 2000, and Millennium Edition. . . . . . . . . . . . . . .4-26
Sizing up Your System . . . . . . . . . . . . . . . . . . . . . . . . . . . . . . . . . . .4-31
RAM and hard disk size . . . . . . . . . . . . . . . . . . . . . . . . . . . . .4-31
Video cards . . . . . . . . . . . . . . . . . . . . . . . . . . . . . . . . . . . . . . . .4-31
Monitors. . . . . . . . . . . . . . . . . . . . . . . . . . . . . . . . . . . . . . . . . . .4-31
File compression software. . . . . . . . . . . . . . . . . . . . . . . . . . . .4-32
Contacting Customer Support. . . . . . . . . . . . . . . . . . . . . . . . . . . . .4-32
Appendix A Setting up the Scanner Server PC
Setting up the Scanner Server PC . . . . . . . . . . . . . . . . . . . . . . . . . .A-1
Installing the TCP/IP Protocol . . . . . . . . . . . . . . . . . . . . . . . . . . . .A-1
Installing the TCP/IP protocol
(Windows Millennium Edition, 98, and 95) . . . . . . . . . . . A-1
Installing the TCP/IP protocol (Windows 2000) . . . . . . . . . A-5
Installing the TCP/IP protocol (Windows NT 4.0) . . . . . . .A-8
Setting the Scanner Server PC’s IP Address . . . . . . . . . . . . . . . . .A-10
Assigning an IP address to a scanner server PC on
Windows Millennium Edition/98/95. . . . . . . . . . . . . . . .A-11
Assigning an IP address to a scanner server PC on
Windows 2000 . . . . . . . . . . . . . . . . . . . . . . . . . . . . . . . . . . .A-12
Assigning an IP address to a scanner server PC on
Windows NT 4.0. . . . . . . . . . . . . . . . . . . . . . . . . . . . . . . . . .A-15
Connecting the Scanner to the Scanner Server PC . . . . . . . . . . . .A-16
Contents 5
Page 7

Appendix B Technical Specifications
Scanning. . . . . . . . . . . . . . . . . . . . . . . . . . . . . . . . . . . . . . . . . . . . . . . B-1
Electrical. . . . . . . . . . . . . . . . . . . . . . . . . . . . . . . . . . . . . . . . . . . . . . . B-3
Environmental . . . . . . . . . . . . . . . . . . . . . . . . . . . . . . . . . . . . . . . . . B-3
Standards and Approvals . . . . . . . . . . . . . . . . . . . . . . . . . . . . . . . . B-4
SCSI Interface . . . . . . . . . . . . . . . . . . . . . . . . . . . . . . . . . . . . . . . . . . B-4
Interface Connector . . . . . . . . . . . . . . . . . . . . . . . . . . . . . . . . . . . . . B-5
Initialization Methods . . . . . . . . . . . . . . . . . . . . . . . . . . . . . . . . . . . B-6
Automatic Document Feeder . . . . . . . . . . . . . . . . . . . . . . . . . . . . . B-6
IEEE 1394 Interface Board. . . . . . . . . . . . . . . . . . . . . . . . . . . . . . . . B-7
Glossary
Index
6 Contents
Page 8

Introduction
Features
The CD-ROM that comes with your scanner contai ns the EPSON
scanner software suite, including EPSON TWAIN HS and EPSON
TWAIN HS Network (The network version of EPSON TWAIN
HS). The software suite is the perfect companion for your EPSON
scanner. Using your scanner and the software from the CD-ROM,
you can scan images in color, grayscale, or black and white, and
save them as files or print them out. EPSON Scan Server allows
your scanner to be used over a network.
❏ The software supports the following EPSON scanner:
EPSON GT-30000
❏ EPSON TWAIN HS and EPSON TWAIN HS Network
directly control all of the features of your EPSON scanner.
This program is the standard cross-platform interface for
other applications.
The CD-ROM also contains other applications that let you use
your scanner in exciting new ways. For detailed information , refer
to the supporting documentation.
❏ EPSON Screen Calibration utili ty allows you to calibrate your
scanner and monitor to reproduce images identical to the
originals.
❏ ISIS (Image and Scanner Interface Specification) driver is an
industry standard interface for high performance document
scanning.
Introduction 1
Page 9

About This Guide
The information in this guide is divi ded into si x chapters, wi th a
glossary and index provided for your reference.
❏ Chapter 1 describes the basic steps of scanning.
❏ Chapter 2 provides a comp lete description of EPSON TWAIN
HS and EPSON TWAIN HS Network features. Refer to this
chapter when modifying scanning settings.
❏ Chapter 3 covers how to calibrate your monit or to match your
EPSON scanner. If you notice t hat colors on you r screen or in
your printout do not match the original image, see this
chapter.
❏ Chapter 4 contains maintenance and troubleshooting
information.It also conta ins customer support information. If
your application does not opera te properly or scanned images
are not what you expect, see this chapter.
❏ Appendix A describes the procedure for initially setting up a
PC to be a scanner server PC.
❏ Appendix B contains technical specifications information.
Notes contain important information and useful tips about your
scanner and software.
To set up and use the scanner, see your scanner’s online Setup
Guide. EPSON TWAIN HS and EPSON TWAIN HS Network
online help can also prov ide you with i nformation on modifying
EPSON TWAIN HS or EPSON TWAIN HS Network settings.
2 Introduction
Page 10

Chapter 1
Scanning Basics
Main Window and Preview Windo w
EPSON TWAIN HS and EPSON TWAIN HS Net work have two
main windows. The EPSON TWAIN HS window or the EPSON
TWAIN HS Network window (main window) and the Preview
window.
Note:
All settings and functions available from the two main windows are the
same for both EPSON TWAIN HS and EPSON TWAIN HS Network.
Although most of the illustrations and explanations in this gu ide are for
the EPSON TWAIN HS, they also apply to EPSON TWAIN HS
Network.
Scanning Basics 1-1
Page 11
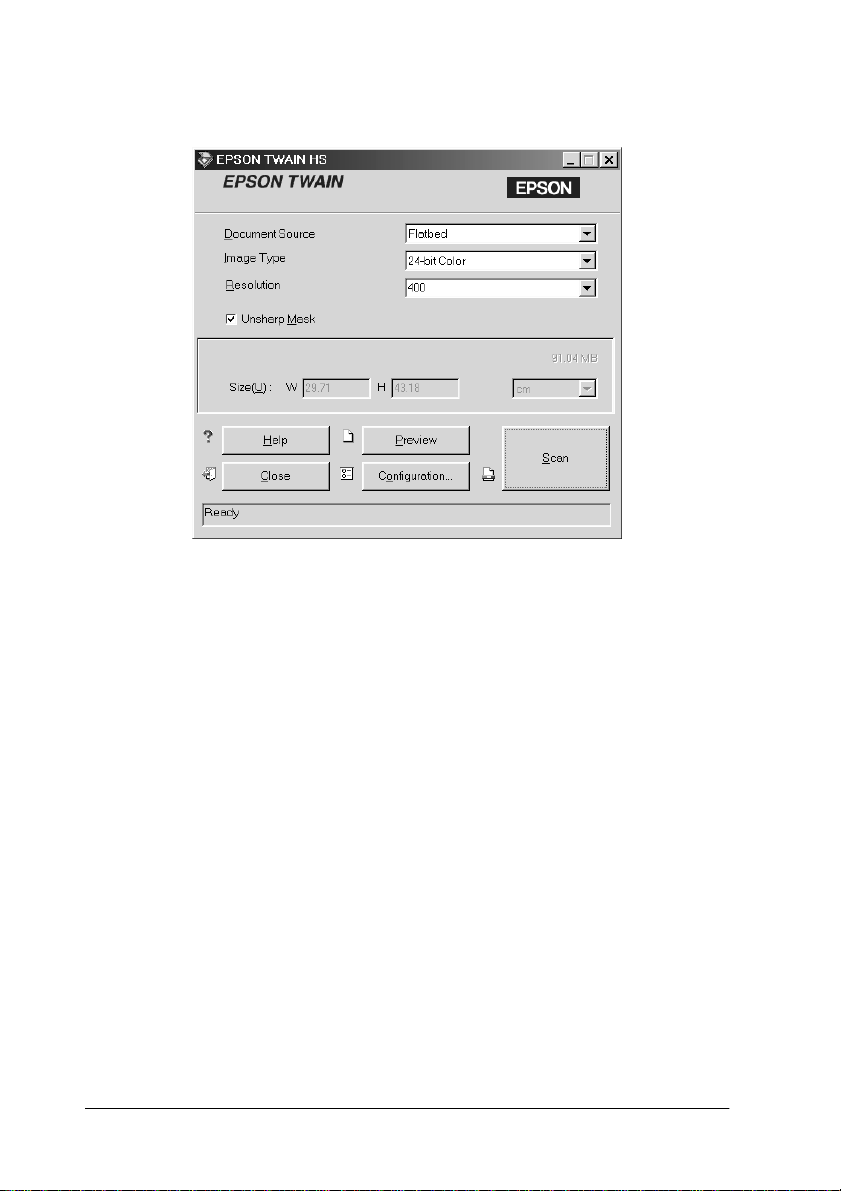
Main window
The main window gives yo u access to the control s where you can
make basic settings, such as Document Source, the type of
material to scan, scanning resolution, scanned image size, and so
on. If you want to specify the areas of the images to scan or you
want to see the effects of your settings before scanning, click
Preview to open the Preview window to display the preview
images.
1-2 Scanning Basics
Page 12
Preview window
In the Preview window, there are more options ava ilable to give
you greater control over your scanning i mage. Powerful tool s are
available to help you adjust tones, colors, and other elements to
optimize your images.
Scanning Basics 1-3
Page 13
Optimizing Image Scanning
EPSON TWAIN HS can automatically adjust and optimize the
exposures and colors of scanned images during scanning. You can
also make adjustments manually with the image quality
adjustment tools in the Preview window. This section provides
general information on optimizing images with these tools.
1-4 Scanning Basics
Preview window
Page 14

Manually optimizing images
To optimize images manua lly, adjust the following EPSON
TWAIN HS settings in the order specified below:
Adjust the brightness and contrast
1. Adjust the Highlight and Shadow settings in the Image
Controls dialog box. See “Adjusting the Hi ghlight Setting” on
page 1-7 and “Adjusting the Shadow Setting” on page 1-8.
2. Adjust the Gamma setting in the Image Controls dialog box.
See “Adjusting the Gamma Setting” on page 1-9.
3. Adjust the tone curve with a predefined tone correction
setting in the Tone Correction dialog box. See “Applying a
Preset Tone Curve” on page 1-10.
Make color adjustme n ts
4. Adjust the Gray Balance Intensity setting in the Color
Adjustment dialog box. See “Adjusting the Gray Balance
Intensity Setting” on page 1-14.
5. Adjust the Saturation setting in the Color Adjustment dialog
box. See “Adjusting the Saturation Setting” on page 1-15.
6. Manually adjust the tone curve for individual colors in the
Tone Correction dialog box. See “Using the Tone Curve” on
page 1-16.
To make the following adjustments in EPSON TWAIN HS, you
need to display a preview image in the Pr eview window. See the
following section for details.
Scanning Basics 1-5
Page 15

Displaying a preview image
The Preview window shows you how your adjustments will
affect the image as you make them. Th e Previ e w window i s al so
the starting point for accessing the Image Controls, Color
Adjustment, and Tone Correction dialog boxes that con tain tools
for optimizing your image.
Note:
See “Preview Window” on page 2-8 for Preview window options, and
“Configuration Button” on page 2-24 for information about how to
control preview image quality.
1. After selecting the Document Source, Image Type, and
Resolution in the main window, click Preview to start
prescanning. If the Preview window is not open, it opens and
begins prescanning. A preview image of the document
appears on your screen.
2. Click one of the buttons below to open the d ialog box with the
image optimization tools you need.
Image Controls button
1-6 Scanning Basics
Tone Correction button
Color Adjustment button
Page 16

Adjusting the Highlight Setting
Highlights are the brightest areas of an image.
1. In the Image Controls dialo g box, click the eyedropper button
under Highlight.
The pointer changes to an eyedropper, with movement
restricted to within the Preview window.
2. Move the eyedropper t o the location you want to select as the
highlight point and clic k it.
The brightness of the pixel at the point you click is set as the
highlight level, and the other p arts of the i mage are ad justed
accordingly.
3. To change the highlight level (brightness) of the point you
selected, move the Highlight slider left or right, or enter a
value in the text box. You can enter a value between 61 and
490 for the highlight.
Scanning Basics 1-7
Page 17
Note:
See “Image Controls” on page 2-18 for further information on adjusting
the highlight level.
Adjusting the Shadow Setting
Shadows, the darkest areas of an image, are the opposite of
highlights.
1. In the Image Controls dial og box, click the eyedropper butt on
under Shadow.
The pointer changes to an eyedropper, with movement
restricted to within the Preview window.
2. Move the eyedropper to the l ocation you want to sel ect as the
shadow point and click it.
1-8 Scanning Basics
Page 18

The brightness of the pixel at the point you click is set as the
shadow level, and the other parts of the image are adjusted
accordingly.
3. To change the shadow level (darkness) of the point you
selected, move the Shadow slider left or right, or enter a value
in the text box. You c an enter a value betwe en 0 and 60 for the
shadow.
Note:
See “Image Controls” on page 2-18 for further information on adjusting
the shadow level.
Adjusting the Gamma Setting
Gamma is the difference in contrast between the light tones and
dark tones of an image. Any change you make i n the gamma level
only affects the mid-tones of the image.
Scanning Basics 1-9
Page 19
To change the gamma level of the image, move the Gam ma slider
left or right, or enter a value in the text box.
You can enter a value between 50 and 500 for the gamma.
Note:
See “Image Controls” on page 2-18 for further information on adjusting
the gamma level.
Applying a Preset Tone Curve
You can finely adjust the contrast within an image by applying
one of the preset tone curves. This allows more control over the
image when used in conjunction wit h the Auto Exposure settings
in the Preview window. The Tone Curve Name list in the Tone
Correction dialog box provides the six most common tone
correction curves, described below.
Linear
A linear tone curve has no tone cor rection. Use this sett ing if you
are satisfied with the tone of the preview image.
1-10 Scanning Basics
Page 20
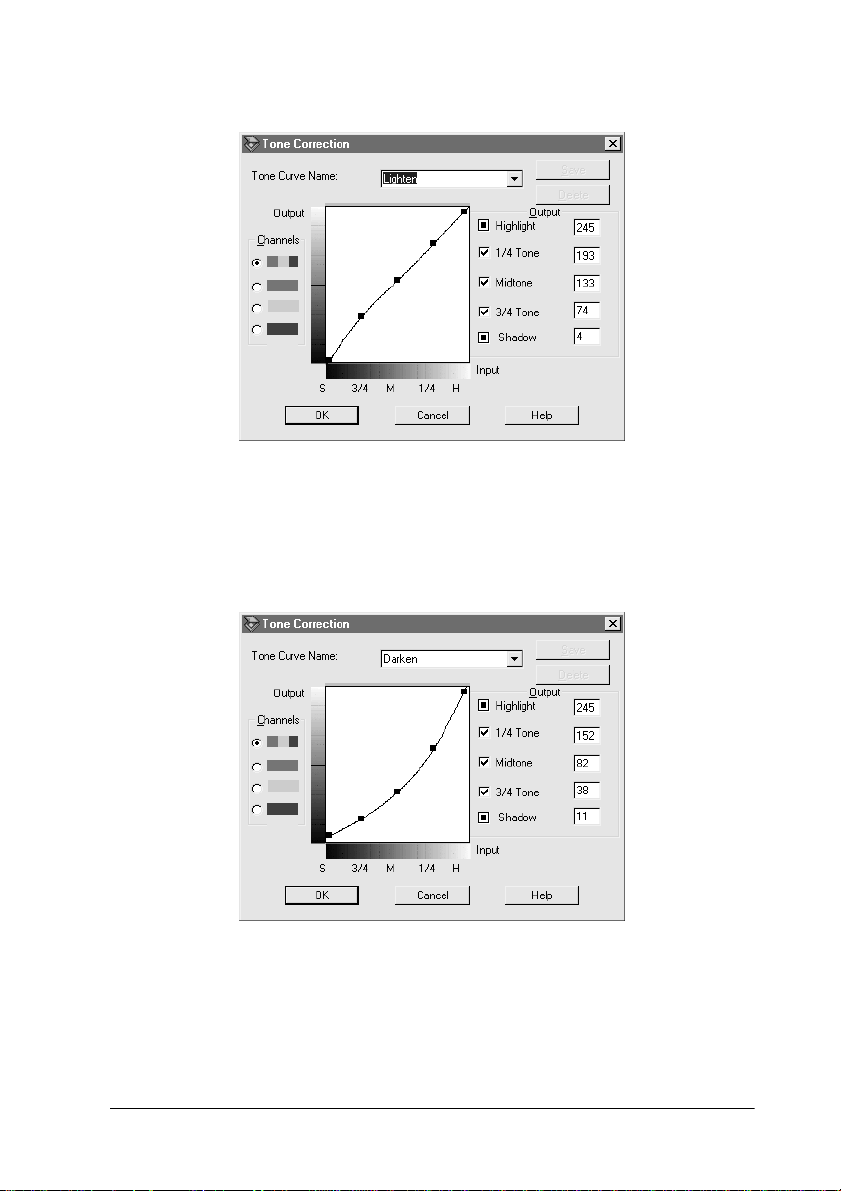
Lighten
Adjusts dark er images (like underexposed film) to make them
slightly brighter.
Darken
Adjusts brighter images (like overexposed film) to make them
slightly darker.
Scanning Basics 1-11
Page 21
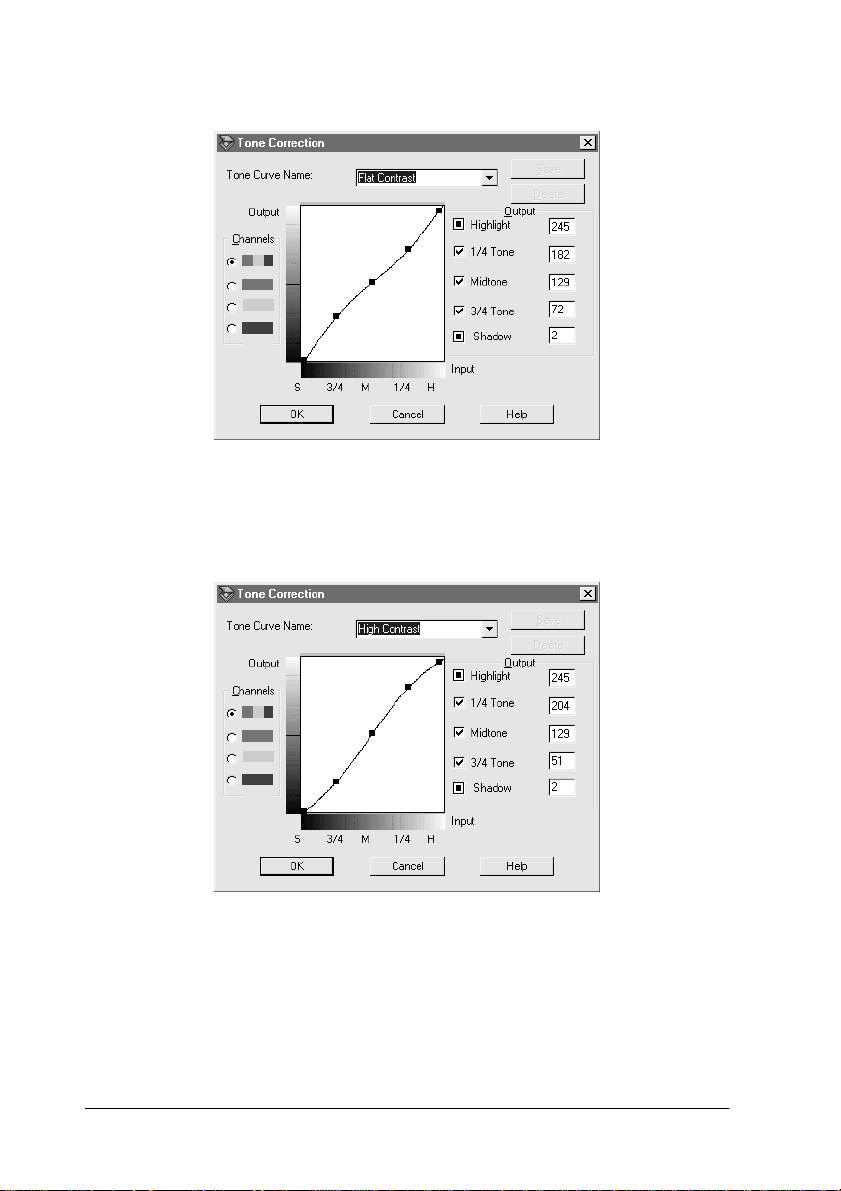
Flat Contrast
Flattens high contrast images to make them look more natural.
High Contrast
Increases the contrast of dull images.
1-12 Scanning Basics
Page 22
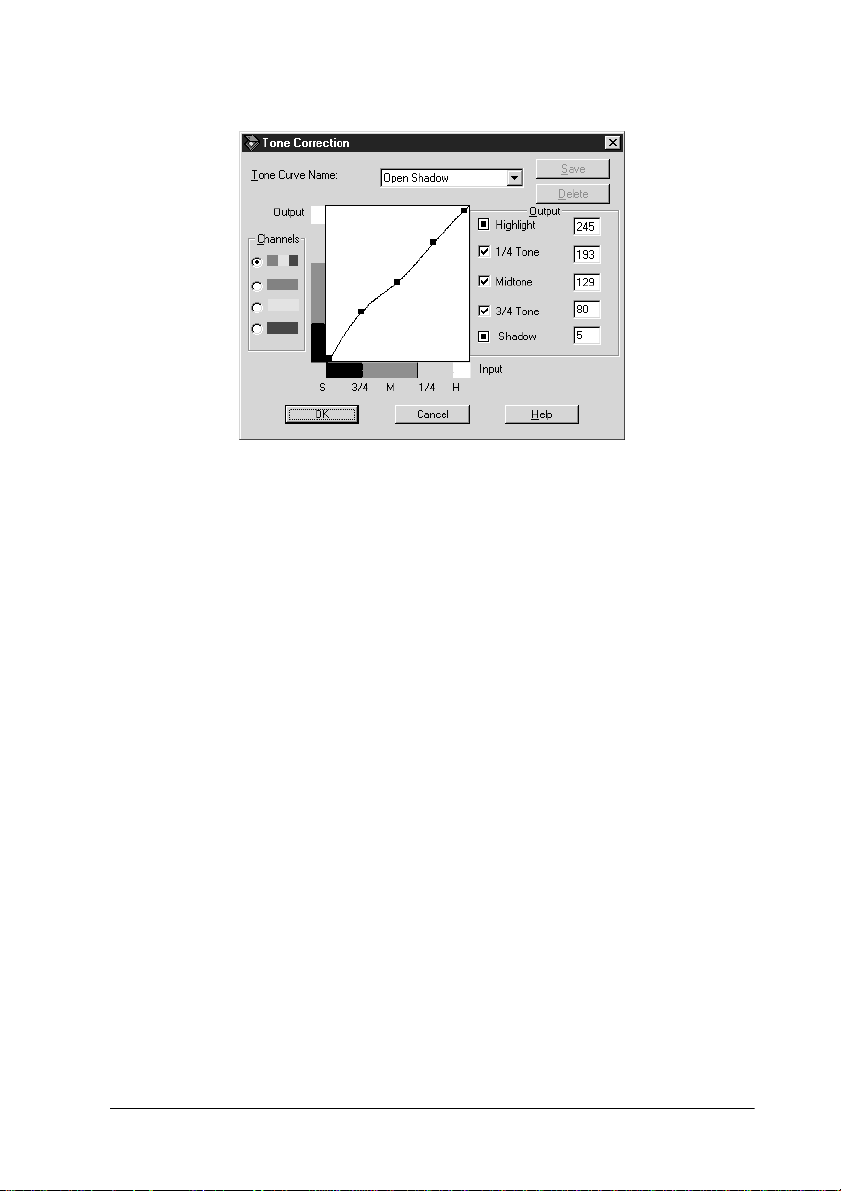
Open Shadow
Improves details in the dark areas of images.
Note:
See “Using the Tone Curve” on page 1-16 and “Tone Correction” on
page 2-20 for more information on tone correction.
Scanning Basics 1-13
Page 23
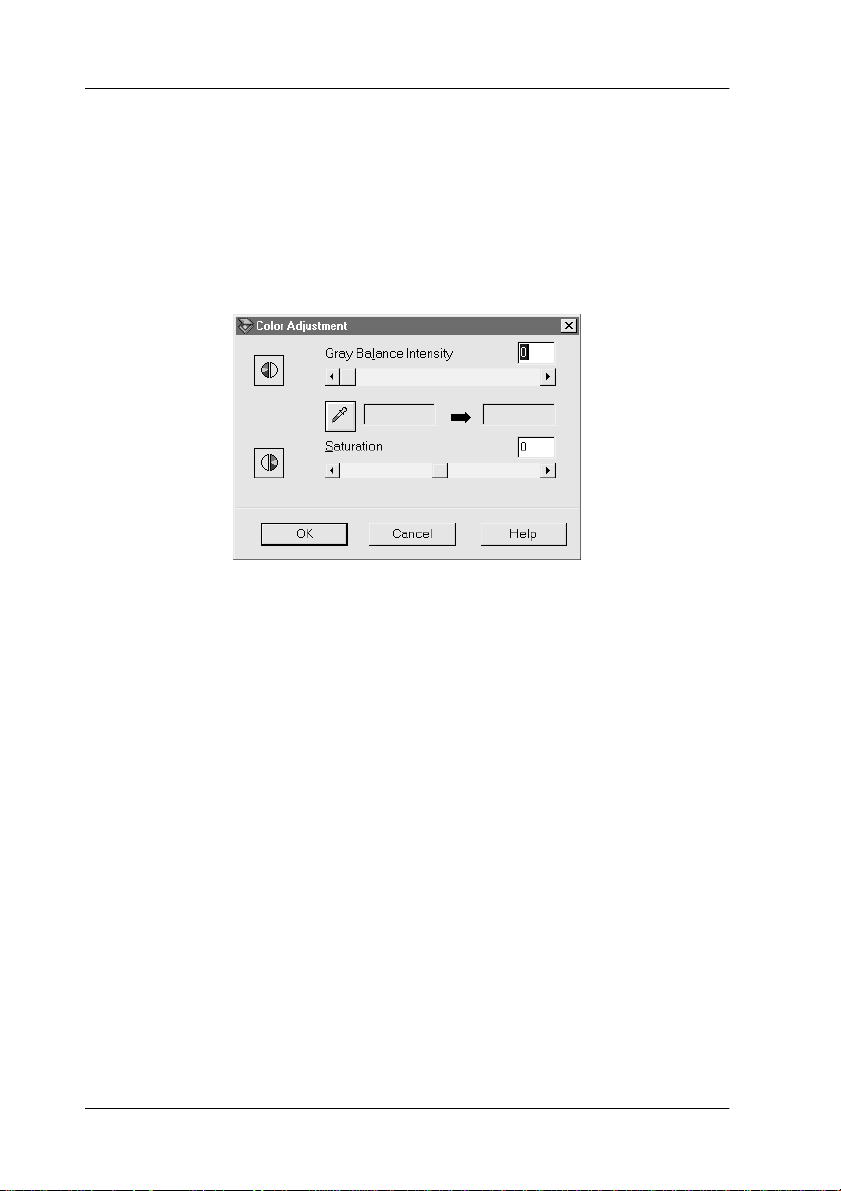
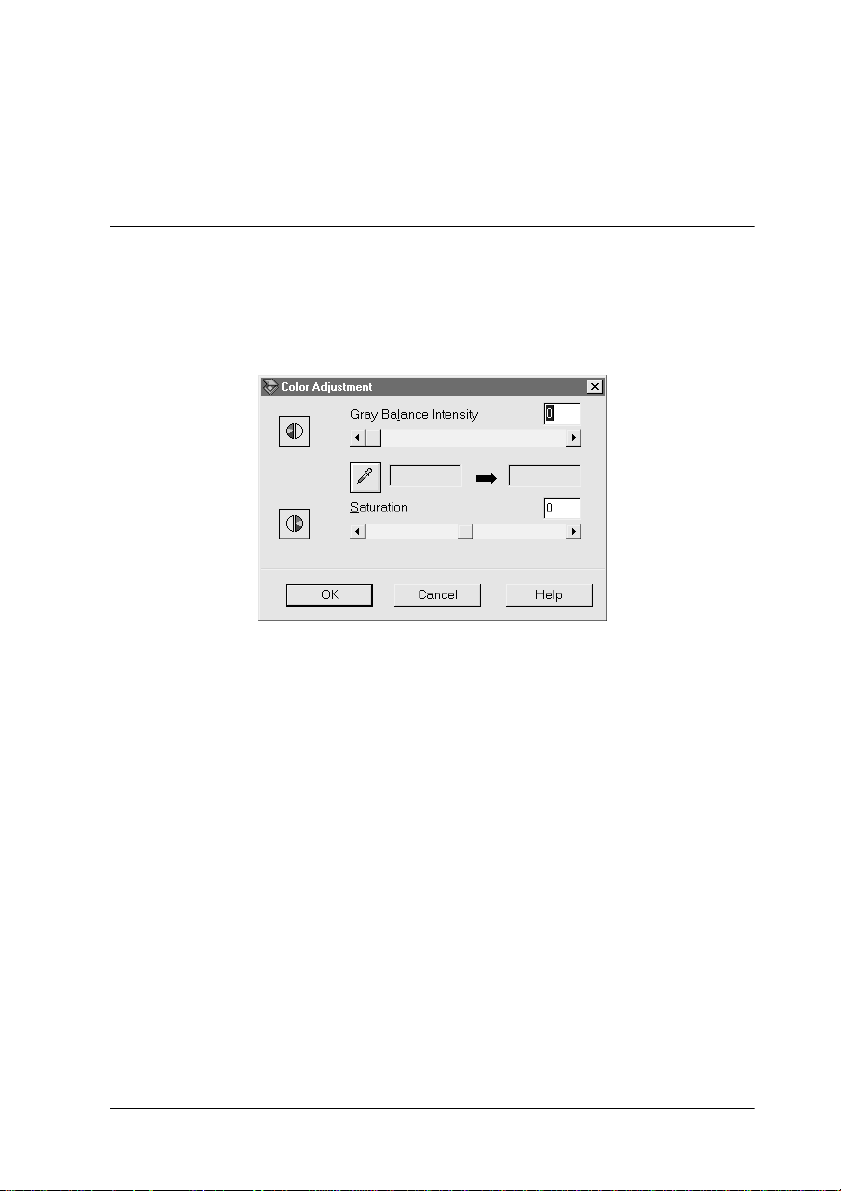
Adjusting the Gray Balance Intensity Setting
Gray balance makes it possible to remove a cast (tint) from a
specific color.
1. In the Color Adjustment dialog box, click the eyedropper
button under Gray Balance Intensity.
The pointer changes to an eyedropper, with movement
restricted to within the Preview window.
2. Move the eyedropper to t he location where you want to adjust
its gray balance intensity, and then click the color.
The color you selected appears in the two boxes below the
Gray Balance Inten si ty slider.
3. To change the gray balance intensi ty level of the colo r, move
the slider left or right, or enter a value in the text box.
You can enter a value between 0 and 100. Chang ing the value
causes the color in the r ight hand box t o change accord ingly.
The changes are also reflected in the image in the Preview
window.
1-14 Scanning Basics
Page 24
Note:
See “Color Adjustment” on page 2-22 for more information on adjusting
the gray balance intensity level.
Adjusting the Saturation Setting
Saturation is the density of a color. Higher saturation makes the
color appear richer, whil e lower saturation makes it appear pa ler.
To change the saturation lev el of the image, move the Saturation
slider left or right, or input a value in the text box.
You can enter a value between -100 (lowest color density) and 100
(highest color density).
Note:
See “Color Adjustment” on page 2-22 for more information on adjusting
the saturation level.
Scanning Basics 1-15
Page 25
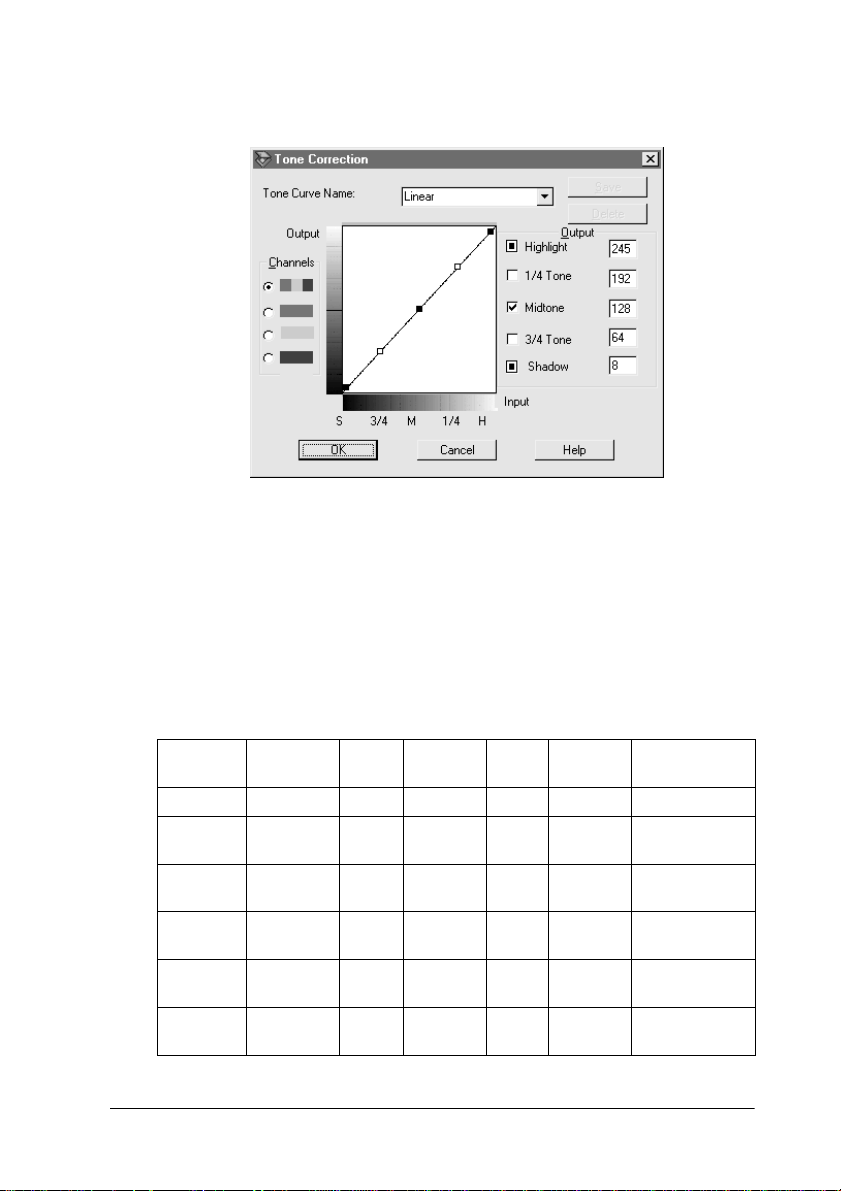
Using the Tone Curve
The tone curve provides you with a versatile means for adjusting
the intensity of colors of t he image being scanned. You can adjust
the shadow, mid-tone, and highlight values, which helps to
ensure well-balanced coloring of the image.
Note:
❏ Use of the tone curve is recommended for fine adjustments after you
have previewed the image and adjusted the highlights and the
shadows using the Auto Exposure and the Image Controls dialog
box. Use of the tone curve to make initial settings is not
recommended.
❏ The Tone Correction button becomes unavailable if Black & White
is selected from the Image Type dialog box list.
The tone curve is loca ted in the Tone Correction d ialog box, which
appears when you click the Tone Correction button in the
Preview window. The following section descr ibes how to use each
of the controls in the Tone Correction dialog box.
Tone Correction button
1-16 Scanning Basics
Page 26
Tone Correction dialog box
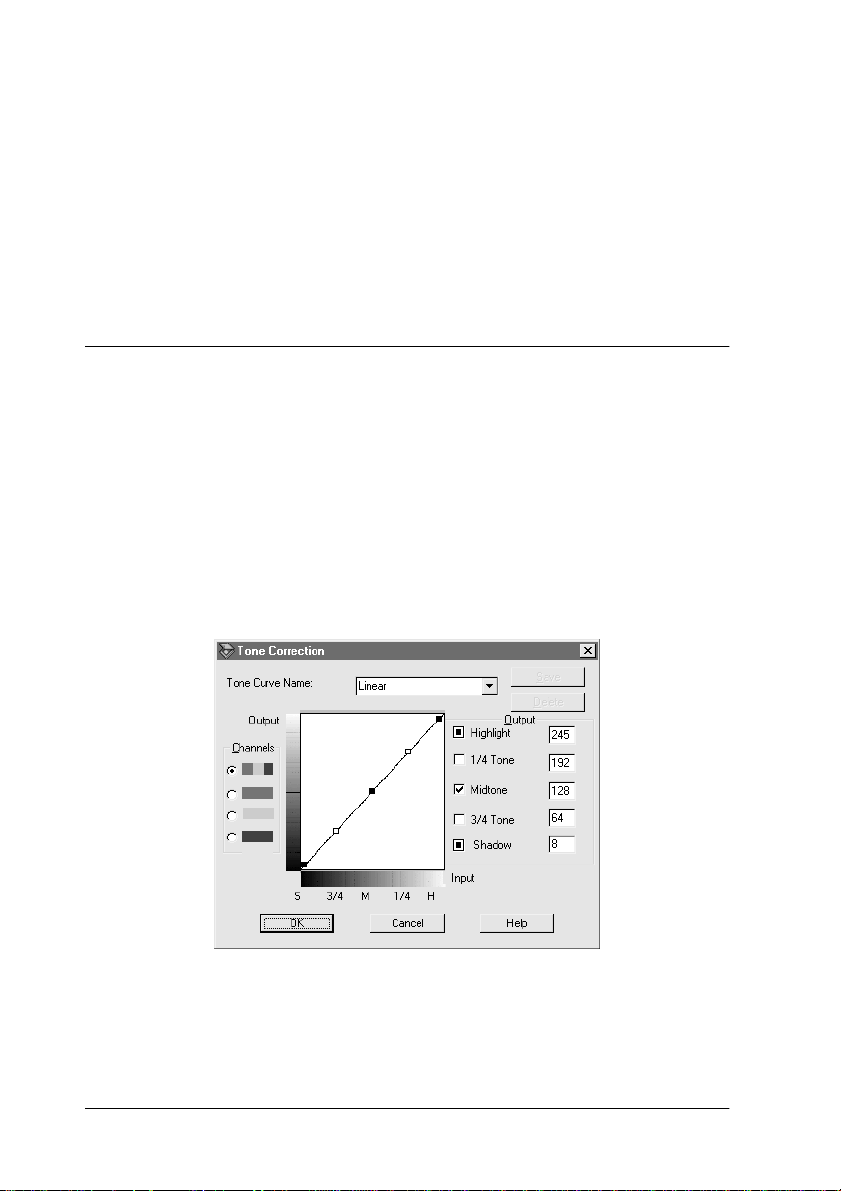
Tone Curve Name list
Use this list box to select a preset tone curve. The following six
preset tone curves are available, and you can add your own curves
to the list using the procedure described in the next section,
“Saving your own tone curve” on page 1-19.
Curve
Name
Linear 245 192 128 64 8 Default curve
Lighten 245 193 133 74 4 Lightens dark
Darken 245 152 82 38 11 Darkens bright
Flat
Contrast
High
Contrast
Open
Shadow
Highlight 1/4
Tone
245 182 129 72 2 Reduces
245 204 129 51 2 Increases
245 193 129 80 5 Lightens dark
Midtone 3/4
Tone
Shadow Description
image
image
contrast
contrast
shadows
Scanning Basics 1-17
Page 27

When you select a curve from the Tone Curve Name list, the
settings in the Tone Correction dialog box change accordingly.
Channels
Click an option button under Channel s to select the color whose
tone curve you want to adjust. When the master channel at the
top is selected, your adjustments affect all three colors. Select ing
one of the other channels allows you to adj ust red, green, or blue
only.
Tone curve editor
Moving the pointer into the tone curve editor causes it to cha nge
to a finger. Use this pointer to drag any of the five points on the
curve and change its shape. The x-axis of the curve is the
brightness of the original (input values) while the y-axis is the
brightness of the scanned image (output values).
To change the tone curve back to its default, select Linear from
the Tone Curve Name list.
Output valu es
These are the current values for output data according to the
current locations of the points inside the tone curve edit or. These
values change when you drag points in the t one cur ve edit or , or
you can enter values here to change the shape of the tone curve.
Each value can be adjusted within the range of 0 to 255.
Note:
❏ Each output value name has a check box to the left of it. Highlight
and Shadow are always selected, but you can select or clear 1/4 Tone,
Midtone, and 3/4 Tone by clicking their check boxes.
❏ When a value’s check box is clear, its point on the tone curve editor
automatically shifts to smooth out the tone curve when one of the
other points is moved.
❏ When a value’s check box is selected, it means that its point is fixed
and it will not shift when other points are moved.
1-18 Scanning Basics
Page 28

Saving your own tone curve
Use the following procedur e to assign a name t o a tone curve you
have customized and want to save for later use.
1. Modify the tone curve settings as desired. The name shown
in the Tone Curve Name list changes to User Defined.
2. After customizing the tone curve, enter a name for the new
curve (up to 32 characters) in the list box.
3. Click Save to save your new tone curve settings.
Deleting a customized tone curve
Use the following procedure to delete a custom tone curve. You
cannot, however, delete the six preset tone patterns.
1. Select a custom tone curve from the Tone Curve Name list.
2. Click Delete.
3. When a dialog box appears, click Yes to delete the curve.
Closing the Tone Correction dialog box
You can close the Tone Correction dialog box by clicking either
OK or Cancel.
❏ Clicking OK applies the current Tone Correction dialog box
settings and closes the dialog box. Clicking the close button
has the same effect as clicking OK.
❏ Clicking Cancel closes the dialog box without applying the
current dialog box settings.
Scanning Basics 1-19
Page 29

Optimizing OCR Scanning
This section gives you suggestions a nd recommended settings in
order to improve OCR (Optical Character Recognition) sca nning
results.
Scanning text
Make sure you select Black & White for Image Type in the main
window.
If the recognition rate is not satisfactory with the def ault settings,
use the following steps to change the settings.
Improving character recognition
1. In the main window, make sure Black & White is selected in
the Image Type list box.
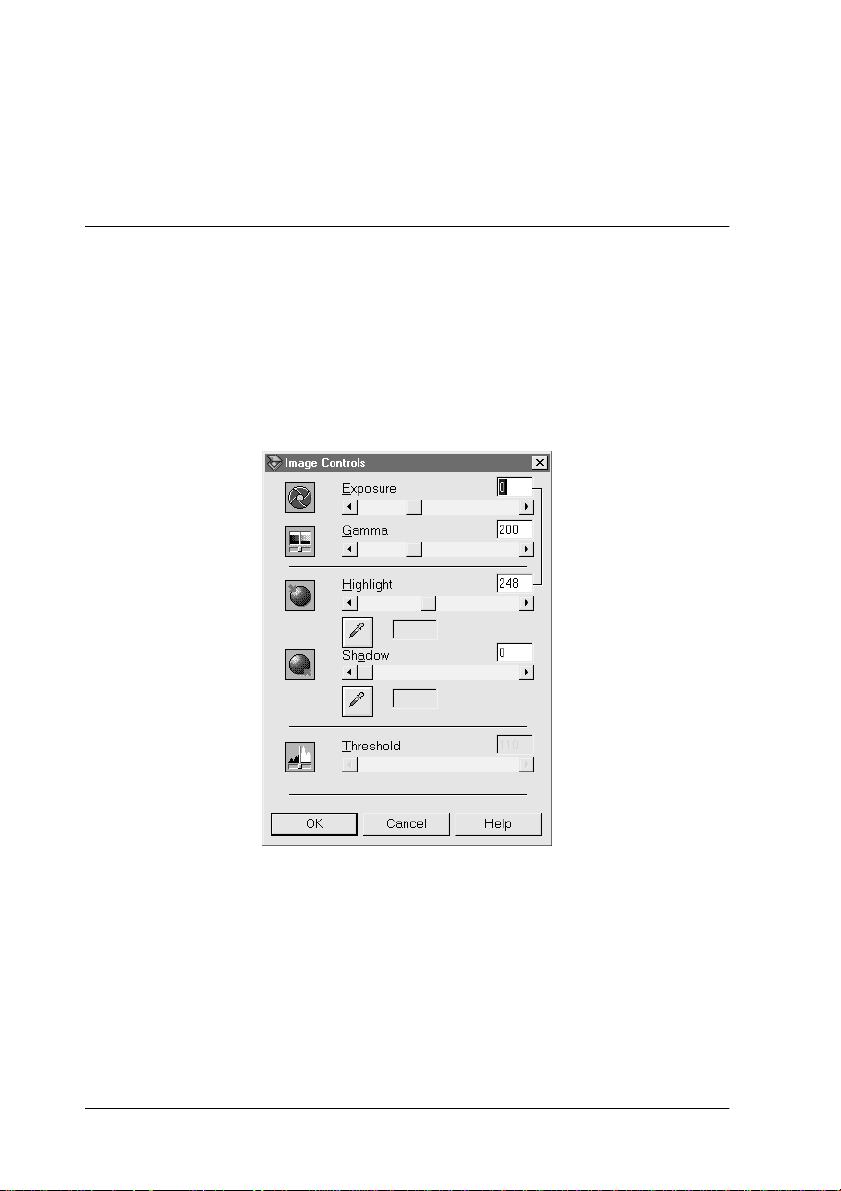
2. Click Preview. Then click the Image Controls button in the
Preview window to display the Image Controls dialog box.
1-20 Scanning Basics
Image Controls button
Page 30
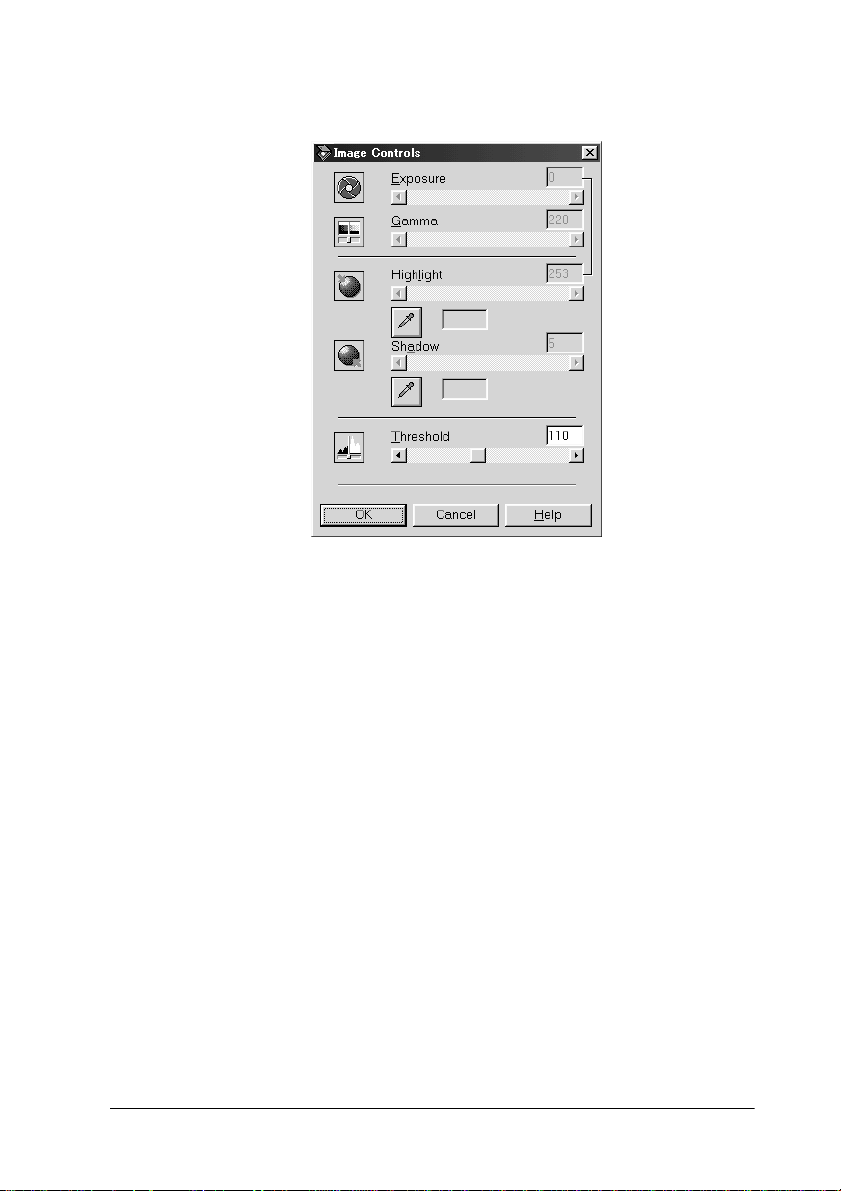
Image Controls dialog box
3. Use the Threshold slider to change the threshold value,
monitoring the results of your changes in the Preview
window. Adjusting the thre shold value can make it easier for
OCR to recognize characters.
If you still have problems...
1. In the main window, increase the Resolution value to 400.
Remember that scanning at a higher resolution takes more
time and may not greatly increase the recognition rate.
2. If you still have problems, try us ing the enhancement tools in
your OCR software to make adjustments.
Scanning Basics 1-21
Page 31

Potential text recognition problems
The quality of the text in your original document greatly affects
OCR results.
The following types of origin als can make reco gnition difficult
and should be av oided if possible:
❏ Items that have been copied from other copies
❏ Faxes
❏ Text with tightly-spaced characters or line pitch
❏ Text that is in tables or underlined
❏ Cursive or italic fonts, and font sizes less than 8 points
Remember that OCR software cannot recognize handwritten
characters.
1-22 Scanning Basics
Page 32

Chapter 2
Understanding EPSON TWAIN HS Features
Overview
When you start EPSON TWAIN HS or EPSON TWAIN HS
Network through a TWAIN-compliant applicat ion, the following
window appears on the screen:
Note for EPSON TWAIN HS Network users:
Although most illustrations and explana tions of settings and functions
in this guide are for EPSON TWAIN HS, they also apply to EPSON
TWAIN HS Network.
Understanding EPSON TWAIN HS Features 2-1
Page 33

The following sections describe the features of EPSON TWAIN
HS and EPSON TWAIN HS Network.
Note:
Some settings may appear dimmed depending on yo ur choice of settings
and the features supported by your scanner.
EPSON TWAIN HS Main Window
Main window
The main window is the starting point to make detailed settings.
You can select parameters for a setting or select special func tions
provided with EPSON TWAIN HS to attain the highest quality
scanned images.
2-2 Understanding EPSON TWAIN HS Features
Page 34

Note:
❏ Online help also provides you with information on settings. Click
Help to access the online help.
❏ You cannot scan an image which exceeds the available memory or
disk space. If you try to scan a very large image, an alert appears on
the screen.
❏ Before scanning, be sure to calibrate your screen. For details, see
“Calibrating Your Screen” on page 3-1.
❏ After an image is scanned, be sure to save or export it.
Document Source s
When scanning a reflective document placed on the document
table of the scanner, leave the Document Source set to Flatbed.
Other selections depend on what is installed.
Flatbed:
Choose this setting to use the document table of the scanner.
ADF-Single-sided:
Select this setting to scan single-sided documents on the
Automatic Document Feeder.
ADF-Double-sided:
Select this setting to scan double-sided documents on the
Automatic Document Feeder.
Understanding EPSON TWAIN HS Features 2-3
Page 35

Image Types
The Image Type list provides the following predefined settings.
They can be combined with the optional pixel depth, scanning
mode, de-screening, and auto exposure settings.
Note:
The Auto Exposure feature is disabled when scanning without
previewing.
24-bit Color:
An Image Type setting which produces 24-bit images with over
16 millions of colors. This setting reproduces highlight and
shadow details. Use this setting to scan color photos, and display
or print the images in full color.
24-bit Color De-screening:
An Image Type setting which produces 24-bit images with over
16 millions of colors. You can get rel ative ly high cont rast images
with the moiré pattern removed . Use t his set ti ng to sc an p ri nted
materials and display the images in full color.
2-4 Understanding EPSON TWAIN HS Features
Page 36

Note:
❏ A moiré is a cross-hatch pattern that appears on scanned images
when scanning printed material. It is a result of interference that
occurs due to the difference between the pitches of the scanning and
the halftone screens.
❏ If de-screening is selected and Resolution is set to more than 800
dpi, when you click Scan, an alert appears on the screen. Decrease
resolution or scale.
8-bit Gray:
An Image Type setting which produces 8-bit grayscale images
with 256 levels of gray. This setting reproduces highlight and
shadow deta ils. Use this settin g to scan photos and display or
print the images in grayscale.
8-bit Gray De-screening:
An Image Type setting which produces 8-bit grayscale images
with 256 levels of gray. You can get images with the light part
lighter and the dark part darker, with the moir é pattern removed.
Use this setting to sc an printe d materials and display o r print the
images in grayscale.
Black & White:
An Image Type setting which produces black and white images
without halftoning. Use this setting to scan drawings or line art
illustrations.
Black & White Halftone:
An Image Type setting which produces black and white images
with 4 × 4 dither halftoning patterns. Use this setting to scan
drawings or line art.
Understanding EPSON TWAIN HS Features 2-5
Page 37

Changing Resolution
You can change the resolution for the current sca nning operation
by selecting or typing a new value. The value has a rang e of 50 to
4800 dpi in increments of 1 dpi.
Unsharp Mask
You can select or deselect the Unsharp Mask setting. Selecting the
check box improves image sharpness.
Note:
If the Document Source setting is Black & White or Black & White
Halftone, this check box appears dimmed and is not available.
Size
The Size fields indicate the size of the image that is displayed or
selected in the Preview window.
2-6 Understanding EPSON TWAIN HS Features
Page 38

Note:
❏ The image size setting is closely related to the resolution. If you
change either setting arbitrarily, the resulting image may not be
what you expect.
❏ The image size setting is not available before previewing the image.
Width and Height menu :
The width and height of an image are indicated in the selected
unit of measure. You can type new values di rectly in the indicator
fields, or you can change the image area in the Preview window
by creating a marquee or frame. Do this by dragging the mouse
over the desired area. See “Marquee and Marquee Buttons” on
page 2-11 for more information on marquees.
Units menu:
Select a unit of measurement. You c an select either pixels, inches,
or cm.
Storage size indicator:
The storage size of an image is indicated in KB or MB. As you
change the image area in the Preview window, this value also
changes.
Understanding EPSON TWAIN HS Features 2-7
Page 39

Preview Window
Before you scan and save an image, you can preview it in the
Preview window. The Preview feature displays you r image in the
Preview window and allows you to see the effects of your settings
before scanning. You can also use the Preview feature to
determine the width and height of the scanning imag e and the file
size of the image to be saved. See “Size” on page 2-6.
Note:
You cannot preview an image which exceeds the available memory or
disk space. If you try to scan a very large image, an alert ap pears on the
screen.
To preview an image, click Preview in the main window.
The following window appears.
Preview window
2-8 Understanding EPSON TWAIN HS Features
Page 40

You can see the effects of the following settings in the preview
image.
❏ Image Type in the main window
❏ Unsharp Mask in the main window
❏ Exposure, Gamma, Highlig ht, Shadow, and Thr eshold in th e
Image Controls dialog box
❏ Tone Correction in the Tone Correction dialog box
❏ Gray Balance Intensity and Saturation in the Color
Adjustment dialog box
❏ Auto Exposure
Note:
Although the image in the Preview window changes as you make
settings, the settings do not affect the real image until you scan or rescan
the image.
For more information on image settings , see “Image Controls ” on
page 2-18, “Tone Correction” on page 2-20, “Color Adjustment”
on page 2-22, and “Configuration Button” on page 2-24.
Understanding EPSON TWAIN HS Features 2-9
Page 41

Preview Button s
Zoom Preview button
To preview a part of the image that is already in the Preview
window, drag the mouse to create a marquee over the area you
want to see in detail, then click the Zoom Preview button. See
“Marquee and Marquee Buttons” on page 2-11 for information
about marquees.
Note:
If the Document Source setting is ADF-Single-sided or ADFDouble-sided, the Zoom Preview button appears dimmed and is not
available.
Return to Full Preview button
Clicking the Return to Ful l Preview button restor es the image to
a full preview. This button is av ailable only when the ma rquee is
zoomed as described above.
2-10 Understanding EPSON TWAIN HS Features
Page 42

Return to Zoom Preview button
Clicking the Return to Zoom Preview button restores the image
to the previous zoom. This button is available only when a
marquee has been previously zoomed. This restores the zoom
preview from memory, which is quicker than re scanning the same
zoomed area by clicking the Zoom Preview button again.
Marquee and Marquee Buttons
A marquee is a frame around an entire image, or just a part of a
certain image. Marquees are often used in scanning and imageediting software to select only the most important part of an
image.
There are buttons available on the Preview window to help you
manage the marquees.
Understanding EPSON TWAIN HS Features 2-11
Page 43

Making and modifying marquees
Move the pointer over the image in the Prev iew window, and the
pointer becomes a cross-hairs. Drag (move the mouse while
holding down the mouse button) the cross-hairs over any area of
the image, and a dotted frame appears. The point where you first
clicked is anchored, but the rest of the frame is sizable and
movable. After you finish creating a mar quee, you can resize and
move it as described below.
Multiple marquees
You can make multiple marquees in one image to scan the most
important parts while ignoring the rest. It is also useful to set
several items on the document table and scan all of them in just
one scan. Marquees can be different sizes, and they can overlap.
Extra marquees can be made anywhere except on the frame of
another marquee. You can make settings on each marquee.
You can begin a marquee anywhere the pointer appears as crosshairs. To distinguish the active marquee from other marquees,
look at the marquee frames. The active marquee is indicated by a
moving dotted line as shown below. To make an inactive marquee
active, just point the cursor at the edge of the ma rquee and clic k.
The marqu e e becomes ac tive.
2-12 Understanding EPSON TWAIN HS Features
Page 44

Resizing marquees
When the pointer is placed on the edge of the marquee, it changes
to a double-headed arrow. You can resize the marquee by
dragging the arrow. The double-headed arrows appear only on
the active marquee.
If you drag an arrow while pressing the Shift key, the marquee is
resized proportionally.
Moving marquees
When the pointer is placed within the active marquee, it changes
to a hand icon. You can drag the marquee anywhere in the
Preview window to move it.
If you drag a hand icon while pressing the Shift key, the marqu ee
is limited to vertical or horizontal movement.
Note:
If you want to create a marquee inside the active marquee, first make a
marquee outside the active marquee. The newly created marquee becomes
the active marquee and you can move it inside the other marquee.
Understanding EPSON TWAIN HS Features 2-13
Page 45

Delete Marquee button
Clicking the Delete Marquee button removes the active marquee.
Note:
You can also delete the active marquee by pressing the Delete key on
your keyboard.
Duplicate Marquee button
Clicking the Duplicate Marquee button creates another marquee
with the same size as the active marquee. Use this button to make
multiple marquees.
Clicking the Duplicate Marquee button while holding down the
keys noted in the table below causes the active marquee to be
duplicated in a specific direction next to the original marquee.
Horizontal Vertical
Ctrl key Alt key
2-14 Understanding EPSON TWAIN HS Features
Page 46

Auto Locate button
Click the Auto Locate button to cause the scanner to
automatically locate and select the target image. The image
appears without white borders in the Preview window.
entire preview area located image
If a document contains more th an one image, select a target image
by dragging the pointer over the image and clicking the Auto
Locate button
. The selected image is located automatically.
target image and other image located and
Understanding EPSON TWAIN HS Features 2-15
non-located images
Page 47

Note:
Create a marquee only on the target image. If the marquee covers other
images, the Auto Locate feature does not work as expected.
Marquee number indicator
This shows the number of marquees in the Preview window. To
create more marquees, see “Duplicate Marquee button” on p age
2-14.
Adjust Buttons
Before you scan an image, you can make adjustments manually
with the powerful image quali ty adjustment tools on the Previe w
window. The following adjust buttons are available.
2-16 Understanding EPSON TWAIN HS Features
Page 48

Note:
All adjust buttons appear dimmed and are not available when Image
Type setting is 24-bit Color or 24-bit Color De-screening and ICM
or ICM/sRGB is selected in the Configuration dialog box.
auto exposure button
image controls button
tone correction button
color adjustment button
Auto Exposure
Click the Auto Exposure button on the Preview window to
automatically optimize the exposure for an image. The Gamma,
Highlight, and Shadow settings in the Image Controls dialog box
are automatically set.
Note:
The Auto Exposure button appears dimmed and is not available when
the Image Type setting is Black & White
Understanding EPSON TWAIN HS Features 2-17
.
Page 49

Image Controls
Click the Image Controls button on the Preview window to view
the following dialog box.
Note:
❏ If the Image Type setting is Black & White, all the settings except
Threshold appear dimmed and cannot be selected.
❏ You can see the effects of the Image Controls settings in the Preview
window.
Exposure:
The Exposure setting lightens o r darkens an image. You can select
from -10 (darkest) to 20 (brigh test) by moving the slider.
The Exposure and Highlight controls are related. When the
Exposure setting is changed, the Highl ight value is automaticall y
set.
2-18 Understanding EPSON TWAIN HS Features
Page 50

Gamma:
The Gamma control allows you to adjust the mid-tones in an
image. You can select from 50 (darkest) to 500 (brightest) by
moving the slider.
Highlight:
The Highlight control allows you to adjust the brightness level of
the brightest parts of an image. You can select from 61 to 490 by
moving the slider.
Click the eyedropper button beneath the slider, and the pointer
changes to an eyedropper. M ove the eyedropper over the preview
image, and click a bright area. The eyedropper “picks up” the
color from that area, and uses it as the highlight for the entire
image. This effect appears immediately in the preview image.
Click Cancel to restore the original image.
If you want to stop adjusting the setting using the eyedropper,
press the Esc key on your keyboard.
Shadow:
The Shadow control allows you to adjust the darkness level of the
darkest parts of an image. You c an select fro m 0 to 6 0 by moving
the slider.
Click the eyedropper button beneath the slider, and the pointer
changes to an eyedropper. M ove the eyedropper over the preview
image, and click a dark area. The eyedropper “picks up” the color
from that area, and uses it as the shadow for the entire image. This
effect appears immediately in the preview image. Click Cancel
to restore the original image.
If you want to stop adjusting the setting using the eyedropper,
press the Esc key on your keyboard.
Understanding EPSON TWAIN HS Features 2-19
Page 51

Threshold:
Available only when the Image Type setting is Black & White.
The scanner scans gray shades as eithe r black or white usi ng this
setting.
You can select from 0 (lightest) to 255 (darkest) by moving the
slider.
Tone Correction
Click the Tone Correction button in the Previ ew window to view
the following dialog box.
Note:
❏ The default Tone Correction setting is Linear.
❏ The Tone Correction button appears dimmed and is not available
when the Image Type setting is Black & White.
2-20 Understanding EPSON TWAIN HS Features
Page 52

❏ You can see the effects of the Tone Correction settings in the Preview
window .
The tone value represents the contrast in the tonal relationship
between an original image and its reproduction on a monitor or
printer.
Tone Curve Name list:
Select a tone correction set ting from thi s list. The custom setting s
you have saved appear in this list.
Tone Curve editor:
The editor allows you to customize tone correction. Drag points
on the tone curve to adjust the tone value. You can edit up to fiv e
tonal elements.
Output options:
If you select the check box for a specific point, such as 1/4 Tone
or Midtone, you can move that point and it remains where you
leave it; it is not affected by the movement of other points on the
curve. If the check box is cleared, the point becomes affected by
the movement of other points.
Channels options:
You can select the combined red, green, and blu e (RGB) cha nnel
to modify all colors, or select these colors separately.
Note:
If the Image Type setting is 8-bit Gray, 8-bit Gray De-screening,
or Black & White Halftone, you can select only the combined RGB
channel option.
Save/Delete/OK/Cancel/Help buttons:
After you correct tone, type a name for your custom settings in
the Tone Curve Name list, and then click Save.
Understanding EPSON TWAIN HS Features 2-21
Page 53

To delete a setting, select the name of the setting you want from
the Tone Curve Name list, and then click Delete.
To accept the defining Tone Correction or close the dialog box,
click OK.
To cancel the operation, click Cancel.
To access the online help, click Help.
Color Adjustment
Click the Color Adjustment button in the Preview window to
view the following dialog box.
Note:
❏ If the Image Type setting is 8-bit Gray, 8-bit Gray De-
screening, Black & White, or Black & White Halftone, the
Color Adjustment button appears dimmed and these settings cannot
be selecte d .
❏ You can see the effects of the Color Adjustment settings in the
Preview window.
2-22 Understanding EPSON TWAIN HS Features
Page 54

Gray Balance Intensity:
Gray Balance Intensity removes unwanted color casts and tints
by balancing color saturation.
Click the eyedropper button beneath the slider. The pointer
changes to an eyedropper. Then click the color you want to
represent gray. The eyedropper “picks up” the color and displ ays
it in the box beside the eyedropper button. You can then correct
the cast level for that color from 0 to 100 by moving the slider. The
corrected color appears in the box on the right, and the effect
shows up immediately in the preview image. Click Cancel to
restore the original image.
If you want to stop adjusting the setting using the eyedropper,
press the Esc key on your keyboard.
Saturation:
Saturation is the property that defines color depth. Select a
saturation level from -100 (less color) to 100 (more color) by
moving the slider.
Reset button
Click the Reset button to return any image control settings you
made back to their default settings. If you did not alter any image
control settings, this button app ears dimmed and is not available.
Understanding EPSON TWAIN HS Features 2-23
Page 55

Configuration Button
You can adjust the Preview window by changing the
configuration. Click the Configuration button to displa y the
following dialog box and make changes.
Save Preview Image and Settings:
Select this check box t o automatically save the p review image and
its image settings when you exit EPSON TWAIN HS (and quit
scanning). The image and its settings are available the next time
you restart EPSON TWAIN HS.
Auto Exposure on Pre view:
Select this check box to display the previewed image with
automatically optimized exposure settings. This produces the
same result as if clicking the Auto Exposure button.
Note:
If ICM or ICM/sRGB is selected in the Configuration dialog box, this
check box is grayed out.
2-24 Understanding EPSON TWAIN HS Features
Page 56

ICM, ICM/sRGB (for Windows 95, 98, 2000, and Millennium
Edition users):
Depending on your Windows version, this se tting may not be
available. Select ICM (for Windows 95) or ICM/sRGB (for
Windows 98, 2000, and Millennium Edition) to reproduce the
colors in your image using the Windows ICM color management
system.
Note:
❏ If your printer and monitor do not support ICM, be sure this check
box is cleared.
❏ If the Image Type setting is not 24-bit Color or 24-bit Color De -
screening, this check b o x is available, but the function does not
work.
❏ See “Using ICM, ICM/sRGB (For Windows 95, 98, 2000, and
Millennium Edition Users)” on page 3-6 for more details.
Scan Button
Clicking the Scan button scans the image or all of the marquees
in the Preview window (one at a time). The scanned image is
transferred to the application softwa re you used to open EPSO N
TWAIN HS so that you can work with the image from within that
application.
While scanning, a progress indicator appears. If necessary, click
Cancel to cancel the operation.
Note:
❏ You cannot scan an image which exceeds the available memory or
disk space. If you try to scan a very large image, an alert appears on
the screen.
❏ Before scanning, be sure to calibrate your display screen. For details,
see “Calibrating Your Screen” on page 3-1.
Understanding EPSON TWAIN HS Features 2-25
Page 57

❏ After an image is scanned, be sure to save it.
❏ The Auto Locate feature is automatically activated when sc ann in g
without previewing.
2-26 Understanding EPSON TWAIN HS Features
Page 58

Chapter 3
Calibrating Your System
Overview
When you install EPSON TWAIN HS, the EPSON Screen
Calibration utility is automatically installed.
EPSON Screen Calibration calibrates your monitor to ensur e the
tone and contrast on your screen match the original image. Be sure
to calibrate your screen before using your scanner.
Calibrating Your Screen
You need to calibrate your screen when you first install the
scanner software, and anytime you switch to a different moni tor.
For Windows 98, 2000, and Millennium Edition users
1. Double-click the Scanners and Cameras icon in Control
Panel. The Scanners and Cameras Properties dialog box
similar to the one shown below appears.
Calibrating Your System 3-1
Page 59

2. Select a scanner you want to use, and then click Properties.
3-2 Calibrating Your System
Page 60

3. Click the Utility tab, then click the Screen Calibration Utility
icon. The Screen Calibration dialog box appears.
Calibrating Your System 3-3
Page 61

4. Look at the screen and move the sli der to the right or left unt il
the two shades of the gray horizontal stripes match.
Note:
View the screen from a short distance. While the gray stripes do not
blend perfectly well, try to adjust until the different tones match as
closely as possible.
5. Click OK to finish calibrating your scanner and monitor.
For Windows 95 and NT 4.0 users
1. Double-click the EPSON TWAIN HS icon in Control Panel.
The EPSON TWAIN HS setup dialog box appears.
2. Click the Screen Calibration Utility icon in the dialog box.
3-4 Calibrating Your System
Page 62

The followi ng screen appea rs:
3. Look at the screen and move the sli der to the right or left until
the two shades of the gray horizontal stripes match.
Note:
View the screen from a short distance. While the gray stripes do not
blend perfectly well, try to adjust until the different tones match as
closely as possible.
4. Click OK to finish calibrating your scanner and monitor.
Calibrating Your System 3-5
Page 63

Using ICM, ICM/sRGB (For Windows 95 , 98, 2000, and Millennium Edition Users)
If you use Windows 95, 98, 2000 , or Millennium Edi tion and your
output devices (printer and monitor) support the ICM color
management system, you can use the ICM calibration method.
Follow the steps below:
Note:
❏ If your output devices do not support ICM, clear the check box.
❏ If the Image Type setting is not 24-bit Color or 24-bit Color De-
screening, this check box is available, but the function does not
work.
1. Run a TWAIN-compliant application and start EPSON
TWAIN HS.
2. Click Configuration. Select ICM (for Windows 95) or
ICM/sRGB (for Windows 98, 2000, and Millennium Edition)
in the Configuration dialog box, and click OK.
3. Make any other settings you want.
4. Click Scan.
The scanner scans an image using the ICM profile.
3-6 Calibrating Your System
Page 64

Chapter 4
Maintenance and Troubleshooting
Maintenance
Cleaning the scanner
To keep your scanner operating at its best, you should clean it
periodically, as described below.
1. Turn the scanner off and unplug the power cord.
2. Clean the outer case with a cloth dampened with mild
detergent and water.
3. If the glass of the document table gets dirty, clean it with a
soft dry cloth. If the glass is stained with grease or some other
hard-to-remove material, use a small amou nt of glass cleaner
and a soft cloth to remove it. Wipe off all remaining liquid.
Be sure that there is no dust on the glass of the document table.
Dust can cause spots in your scanned image.
Maintenance and Troubleshooting 4-1
Page 65

Caution:
c
❏ Be careful not to scratch or damage the glass of the document
table, and do not use a hard or abrasive brush to clean it. A
damaged glass surface can decrease the scanning quality.
❏ Never use alcohol, thinner, or corrosive solvent to c lea n th e
scanner. These chemicals can damage the scanner
components as well as the case.
❏ Be careful not to spill liquid into the scanner mechanism or
electronic components. This could permanently damage the
mechanism and circuitry.
❏ Never open the scanner case.
Replacing the fluorescent lamp
The luminosity of the fluorescent lamp declines over t ime. If the
lamp breaks or becomes too dim to operate nor mally, the scanner
stops working a nd both the READY and ERROR
flash. When this happens, the lamp assembly must be replaced. For
details, contact your dealer.
lights rapidly
Caution:
c
Never open the case of the scanner. If you think repairs or
adjustments are necessary, consult your dealer.
Transporting the Scanner
Before transporting the sca nner ove r a lo ng distance or st oring it
for an extended period, you need to uninstall the Automatic
Document Feeder and lock the scanner’s carriage to prevent
damage. Follow the steps below.
1. Turn on the scanner and wait unt il th e carriage mov es left t o
the home position. Then turn off the scanner.
4-2 Maintenance and Troubleshooting
Page 66

2. Uninstall the Automatic Document Feeder in the reverse
order as explained in your online Setup Guide.
3. Secure the carriage by tur ning the transporta tion lock butt on
clockwise wh ile pushing it, using a coin or similar disc.
Make sure the transportation lock button is de pressed.
Maintenance and Troubleshooting 4-3
Page 67

Problems and Solutions
Most of the problems you will encounter while operating your
scanner and software have simple solutions. This section divides
scanner problems into eight categories:
"Error Indicator" on page 4-5
"Operating Problems" on page 4-6
"Quality Problems" on page 4-8
"Software Setup Problems" on page 4-12
"Software Operation Problems" on page 4-14
"Scanning Problems" on page 4-15
"Paper Jams" on page 4-17
"Network Problems" on page 4-18
See the table in “Error Indicator” o n page 4-5 first. If this does not
help you solve your problem, go to the c ategory for the type of
problem you have, then look for the problem description.
Note:
If some settings appear dimmed in EPSON TWAIN HS and EPSON
TWAIN HS Network, they cannot be selected because of the capability
of your scanner or your choice of other settings.
If you cannot solve a problem after rea ding and following the
information in this section, contact your dealer or a qualified
customer support person for assistance.
4-4 Maintenance and Troubleshooting
Page 68

Error Indicator
If an error occurs, the scanner stops and the ERROR and READY
lights show the type of error.
ERROR Light READY Light Error Type
On On “Command error” on
Flashing Off “Interface error” on
Flashing Flashing “Fatal error” on page
Off On “Option error” on
page 4-5
page 4-5
4-5
page 4-6
Command error
The scanner has received incorrect commands from your
scanning software.
When this error occurs, try to rescan the document. The scanner
returns to normal when it receives correct commands. Normally
you do not need to reset the scanner when this type of error
occurs.
Interface error
The interface setup is wrong or the scanner is not properly
connected to the PC.
When this error occurs, check the interface connection and then
turn the scanner off and then back on again to reset it.
Fatal error
This type of error indicates one of the following problems:
❏ The fluorescent lamp needs to be replaced.
Maintenance and Troubleshooting 4-5
Page 69

❏ The transportation lock lever is not released.
❏ The scanner is malfunctioning.
Check that the transportation lock lever is rel eased and check any
installed options for problems. Next, turn the scann er off and then
back on again. If this does not correct the problem, consult your
dealer.
Option error
This indicates a problem with an installed unit, such as a paper
jam, an empty document feeder, or an open cover.
Check the option and correct the cause of the problem.
Operating Probl ems
Problems you may have while using the scanner often involve the
operation of your soft war e and PC. Op erat io n pr oblems usually
occur because of:
❏ Incorrect setup of the interface (see your online Setup Guide).
❏ Inappropriate selection of the scanner functions (see your
software documentation).
❏ Incorrect setup of your PC or software (see your on li neSetup
Guide).
❏ Incorrect operation of your software (see your software
documentation).
Also see the documentation that came with you r PC and software
for possible solutions.
4-6 Maintenance and Troubleshooting
Page 70

The OPERATE light does not come on.
❏ Press the OPERATE button to turn on the scanner.
❏ Make sure the power cord is connected to the scanner and
plugged into a wall outlet.
The scanner does not scan.
❏ Wait until the READY light comes on (ready for scanning).
❏ Make sure the interface port and software settings ar e correct.
Also make sure that your comp uter’s interface board is
installed properly.
❏ For SCSI interface users:
Make sure the scanner’s SCSI ID and the terminator are set
correctly. See your online Setup Guide.
If you have other expansion boards in your PC, make sure
that their interrupt settings are not interfering with your SCSI
board. See your PC’s documentation for details.
The scanner software does not work properly.
❏ Make sure your software is installed correctly.
❏ For Windows 98, 2000, and Millennium Edition users:
Check if your scanner is listed mor e than once in the Scanners
and Cameras Properties dialog box. To view the dialog box,
double-click the Scanners and Cameras icon in Control
Panel. Remove your scanner everywhere it appears in the
dialog box, then reinstall EPSON TWAIN HS following the
instructions in your online Setup Guide.
Maintenance and Troubleshooting 4-7
Page 71

Note:
When reinstalling the scanner software, if you see a message box
and then a dialog box requesting the EPSON Scanners Driver Disk,
insert the scanner software CD-ROM in the CD-ROM drive. Be
sure to specify the correct drive letter, the EPSON folder, the folder
of your preferred language, and the Win98, Win 2000, or WINME
folder as the location.
❏ Make sure your PC meets the memory and other system
requirements specified for the software you are using.
❏ Make sure the PC has enough memory for your software. If
the PC does not have enough memory available, see your
software and PC documenta tion for details.
Quality Problems
The entire image is distorted or blurred.
❏ Make sure the document is flat against the document table.
❏ Make sure you do not accidentally move the document
during scanning.
❏ Make sure the scanner is on a flat, stable surface.
Part of the image is distorted or blurred.
Make sure the document is uniformly flat against the document
table. A document that is wrinkled or warped may not scan well.
Caution:
c
4-8 Maintenance and Troubleshooting
Do not place heavy objects on the document table.
Page 72

Edges of the document are not scanned.
Position the document so the area y ou want t o scan is wi thin th e
edge guide limits of the document table.
Note that an area 0.5 mm in from both horizontal and vertical
rulers will not be scanned.
Colors a re patchy or distort ed at the e dges of th e image.
❏ A document that is very thick or warped at the edges can
cause discoloration. Cover the edges of the document with
paper to block outside light.
❏ Make sure the document is flat against the document table.
The image is faint or out of focus.
❏ Make sure the document is flat against the document table.
❏ Adjust your software’s Exposure setting. See “Image
Controls” on page 2-18.
❏ Adjust your software’s Gamma setting. See “Adjusting the
Gamma Setting” on page 1-9.
Maintenance and Troubleshooting 4-9
Page 73

The image is too dark.
❏ Check your software’s brightness setting. See “Adjusting the
Highlight Setting” on page 1-7.
❏ Check the brightness and contrast settings of you r compute r
display.
Straight lines in the image come out jagged.
Make sure the document orientation is perfectly straight on the
document table. Align vertical and horizontal lines with the scales
at the top and side of the document table.
The image does not look the same as the original.
❏ Try different image setting combinations on your scanner
software.
❏ Your software may not have sufficient color matching and
color management features, or these components may not be
installed correctly. See the documentation that comes with
your software and computer.
❏ If you are importing an image file, make sure the file format
is one your software can read. Also, make sure the image
settings of your soft ware are appropriate for t he type of image
you want to scan.
A line of dots is always missing from t he scanned image.
❏ Print head malfunction is i ndicated when a line is missing on
printouts only. See your printer manual.
4-10 Maintenance and Troubleshooting
Page 74

❏ Scanner sensor malfunction is indicated when a line is
missing on both screen images and printouts. Contact your
dealer.
Colors on your monitor are different from those in the original image.
❏ Check the image settings of yo ur scanner software, especial ly
data format (bits, pixel, color), gamma correction, and color
correction. Try different combinations of these settings.
❏ Check the color matching a nd color management cap abilities
of your computer, display adapter, and software. Some
computers can change the color palet te to adjust the colors on
your screen. See your software and hardware manuals for
details.
❏ Exact color matching is very difficult. Check your software
and monitor documentation for information on color
matching and calibration.
Printed colors are different from those in the original image.
Exact color matching is very difficult. Check your software or
contact your printer company for informati on on color matching
and calibration.
The printed image is larger or smaller than the original.
The image size settings of your software determine the size of the
printed image. Do not use the size of the monitor image to judge
the printed size.
Maintenance and Troubleshooting 4-11
Page 75

Scanned images cannot be printed or come out garbled when printed.
❏ Make sure your printer is properly connected to the
computer, correctly set up, and maintained. See your pr inter
manual for details.
❏ Check that your software is properl y instal led an d set up for
your printer. See your software manual.
Software Setup Problems
You cannot install EPSON TWAIN HS.
❏ Check if your PC and operating system meet the system
requirements.
❏ Make sure your PC has enough memory to run the
application.
The scanner does not appear in the Port list of the
EPSON TWAIN HS dialog box in Control Panel
when you connect the SCSI model to your PC
running Windows 95 and NT 4.0.
❏ Turn off the PC and the scanner, and check the connection
between your hardware. Unplug the SCSI cable and then plug
it back in.
❏ Change the SCSI ID number to one that is not being used by
any other SCSI devices. See your online Setup Guide.
❏ Check the connection sequence and make sure the terminat or
switch of the end device of daisy chain is set correctly. See
your online Setup Guide.
4-12 Maintenance and Troubleshooting
Page 76

The Scanner Status does not indicate “Device
Ready” after you click Test in the EPSO N TWAIN
HS dialog box (Windows 95 and NT4.0) or in the
Scanner’s Properties dialog box (Windows 98,
2000, and Millennium Edition) in Control Panel.
❏ Make sure the interface cable meets the requ irements of yo ur
interface board. See the manual th at comes with the int erface
board.
❏ Turn off the PC and the scanner, and check the connection
between them. Unplug the SCSI cable and plug it back in.
❏ Make sure the SCSI interface board is installed correctly.
❏ Turn off the scanner and the PC. Turn on the scanner and then
turn on the PC.
❏ Make sure the SCSI driver is installed correctly.
❏ Change the scanner’s SCSI ID nu mber to one that is not being
used by any other SCSI device. See “Changing the SCSI ID
number or SCSI board” on page 4-21 in this guide or your
online Setup Guide.
❏ Check the connection seque nce and make sure the terminator
switch of the end device of daisy chain is set correctly. See
your online Setup Guide.
Maintenance and Troubleshooting 4-13
Page 77

Software Operation Problems
You cannot start EPSON TWAIN HS.
❏ Turn on the scanner and then turn on the PC.
❏ Make sure the interface cable meet s the requirements of your
interface board. See the manual that comes with the inter face
board.
❏ Turn off the scanner and the PC and the n check the connection
between them.
❏ Make sure the interface board is installed correctly.
❏ Make sure that EPSON TWAIN HS is selected properly in
your application software. See your online Setup Guide.
❏ Make sure your software is inst alled correct ly.
For Windows 98, 2000, and Millennium Edition users:
In the Device Manager menu, make sure your scanner’s na me
appears under Imaging Device hardware type without a
question (?) mark or an exclamation (!) mark. If the scanner
appears with a question (?) mark or an excla mation ( !) mark,
or as an Unknown devices hardware type, remove it while the
scanner is still connected and turned on. Then reinstall
EPSON TWAIN HS. See “Recovering from Scanner Software
Installation Problems on Wind ows 98, 2000, and Mill ennium
Edition” on page 4-26 for deta ils.
Note:
If the EPSON Scanners Driver Disk is requested during the
EPSON TWAIN HS reinstallation, insert the scanner software
CD-ROM in the CD-ROM drive. Be sure to specify the correct drive
letter, the EPSON folder, the folder of your preferred language, and
the Win98, Win2000, or WINME folder as the location.
4-14 Maintenance and Troubleshooting
Page 78

You cannot select Automatic Document Feeder.
Make sure the Automatic Document Feeder is installed corre ctly.
See your online Setup Guide.
Scanning Problems
Image is dark, with little or no detail.
Calibrate the screen as described in “Calibrating Your Screen” on
page 3-1.
You cannot scan an image or you only get a few dots for the scanned image.
❏ Make sure you have placed a document on the document
table of the scanner.
❏ Change the Threshold setting in the Image Controls dialog
box. See “Image Controls” on page 2-18.
Moiré (cross hatch) patterns appear in the scanned image during halftone scanning.
❏ Select the 24-bit Color De-screening or 8-bit Gray De-
screening from the Image Type list box.
❏ Place a transparent sheet such as an overhead projector sheet
between the document and document table to defocus the
image.
❏ Reposition the document slightly.
❏ Make the image size slightly smaller.
Maintenance and Troubleshooting 4-15
Page 79

Colors differ from the original or look strange.
❏ Calibrate the screen. See “Calibrating Your Screen” on page
3-1.
❏ Change the Image Type setting. See “Image Types” on page
2-4 to make sure your setting is c orrect.
❏ Printed colors do not exactly match the colors on your
monitor, since printers and monitors use different color
systems: monitors use RGB (red, green, and blue), while
printers typically use CMYK (cyan, magenta, yellow, and
black).
Scanned image is too large.
Change the image size setting in main window. See “Size” on
page 2-6.
Poor character recognition during OCR scanning.
❏ Select Black & White as describe d in “Image Types” on pag e
2-4.
❏ Try adjusting the Threshold setting in the Image Controls
dialog box.
❏ See “Optimizing OCR Scanning” on page 1-20 for more
information.
You cannot scan from the Automatic Document Feeder.
❏ Make sure the Document Source setting is selected to ADF-
Single-sided or ADF-Double-sided.
4-16 Maintenance and Troubleshooting
Page 80

❏ Close the Automatic Document Feeder and try again. If the
Automatic Document Feeder is opened while scanning,
remove any jammed paper, and reload any d ocument which
has not yet been scanned and restart EPSON TWAIN HS.
❏ Take the jammed paper out and reload the document, then
restart EPSON TWAIN HS.
Scanning does not start by pressing the Start button.
❏ Check that the power cord is connected and press the
OPERATE button to turn on the scanner.
❏ For Windows 98, 2000, and Millennium Edition users:
Click the Events tab in your scanner’s Prop erties dial og box
and make sure the Disable device events check box is clear.
Also, make sure the Start button is selected as the Scanner
events, and at least one scanner event recognizable
application in the Send to this application box is selected.
See your online Setup Guide for details.
Scanned image by using the Start button is missing.
Make sure the desired application is assigned to the Start button.
Paper Jams
Paper gets jammed in the Automatic Document Feeder. Remove
the jammed paper. See your online Setup Guide.
Maintenance and Troubleshooting 4-17
Page 81

Network Problems
You cannot install EPSON TWAIN HS Network and/or EPSON Scan Server.
❏ Check that both your PC and operating system match the
system requirements.
❏ Make sure your PC has enough memory (RAM) to run the
application.
The scanner does not appear in the Scanner
Selection box in the EPSON Scan Server setup
dialog box. (For Windows 95 and NT 4.0 users)
❏ Turn off the scanner and PC, and check that they are
connected properly.
❏ Make sure that a scanner supported by EPSON Scan Server
and EPSON TWAIN HS Networ k is connected to the scanner
server PC.
❏ Change the scanner’s SCSI ID number t o one that is not being
used by any other SCSI device. See your online Setup Guide.
❏ Check the connection sequence and make sure the terminat or
switch of the end device of daisy chain is set correctly. See
your online Setup Guide.
4-18 Maintenance and Troubleshooting
Page 82

Status: unavailable appears under the General
tab of the EPSON GT-30000 Properties dialog
box. (For Windows 98, 2000, and Millennium
Edition users)
❏ Turn off the scanner and PC, and check that they are
connected properly.
❏ Make sure that a scanner supported by EPSON Scan Server
and EPSON TWAIN HS Network is c onnected to the scanner
server PC.
❏ Change the scanner’s SCSI ID nu mber to one that is not being
used by any other SCSI device. See “Changing the SCSI ID
number or SCSI board” on page 4-21 for details.
❏ Check the connection seque nce and make sure the terminator
switch of the end device of the daisy chain is set correctly . See
your online Setup Guide.
❏ Install EPSON TWAIN HS (Version 1.0✽ or later) on the
scanner server PC (the PC which is connected to the EPSON
scanner).
You cannot start up EPSON Scan Server.
❏ Turn on the scanner and then your PC.
❏ Turn off the scanner and PC, and check that they are
connected properly.
❏ Make sure the interface cable meets the requ irements of yo ur
interface board. See the documentation that came with the
interface board.
❏ Make sure the interface board is installed correctly.
Maintenance and Troubleshooting 4-19
Page 83

❏ Make sure that a scanner supported by EPSON Scan Server
and EPSON TWAIN HS Networ k is connected to the scanner
server PC.
❏ For Windows 98, 2000, and Millennium Edition users:
Install EPSON TWAIN HS (Version 1.0✽ or later) on the
scanner server PC (the PC which is connected to the EPSON
scanner).
EPSON TWAIN HS Network dialog box does not
appear on the client PC when you try to start
EPSON TWAIN HS Network from a TWAINcompliant application.
❏ Turn on the scanner then the scanner server PC.
❏ Make sure that TCP/IP is selected as the networking protocol.
See “Installing the TCP/IP Protocol” on page A-1.
❏ Make sure that the cables which connect the E PSON scanner,
the scanner server PC and the client PC meet system
requirements and are properly connected.
❏ Make sure the interface card is installed correctly.
❏ Enter the correct IP address in the EPSON TWAIN HS
Network setup dialog box.
❏ Make sure that one of the naming services such as DNS,
WINS, or LMHOSTS is used i n your netw ork. Otherwise u se
the IP address to specify the scanner server PC in t he TWAIN
HS Network setup dialog box.
4-20 Maintenance and Troubleshooting
Page 84

Network connection is terminated before the scanned image is transferred to the client PC.
Check the time out setting and increase the value, if necessary.
See your online Setup Guide.
Changing the SCSI ID number or SCSI board
If you are using your scanner with Windows 98, 2000, or
Millennium Edition and you want to change the scanner’s SCSI
ID number or replace the SCSI boa rd wit h a new one, follow the
steps below.
Note:
If you do not follow these steps, your scanner or PC may not operate
correctly.
1. Double-click the Scanners and Cameras icon in Control
Panel.
Maintenance and Troubleshooting 4-21
Page 85

2. Select your scanner from the installed devices list, and then
click Remove.
3. Click OK.
4. Shut down Windows 98, 2000, or Millennium Edition and
turn off your PC and the scanner.
5. Change the SCSI ID number (see your on line Setup Guide), or
replace the SCSI board.
6. Turn on your scanner and then your PC.
7. Follow the instructions on the screen.
Note:
If the EPSON Scanners Driver Disk is requested, insert the Scanner
Software CD-ROM in the CD-ROM drive and make sure to specify the
correct drive letter, the EPSON folder, the folder of your preferred
language, and the Win98, Win2000, or WINME folder as the location.
4-22 Maintenance and Troubleshooting
Page 86

Upgrading the System
Upgrading from Windows 98 or 95 to Windows Millennium Edition
If you are using your EPSON scanner with your PC running
Windows 98 or 95 and are planning to upgrade your system to
Windows Millennium Edition, you need to uninstall EPSON
TWAIN HS before upgrading your operating system, as
described below.
1. Uninstall EPSON TWAIN HS. See “Uninstalling EPSON
TWAIN HS” on page 4-23.
2. Turn off your PC and scanner, and then disconnect your
scanner from your PC.
3. Turn on your PC and then install Windows Millennium
Edition.
4. Make sure that Windows Millennium Edition is installed
correctly, and then shut down your PC.
5. Connect your scanner and th en start your PC to install EPSON
TWAIN HS following the instructions in your online Setup
Guide.
Uninstalling EPSON TWAIN HS
For Windows 95 or NT 4.0 users:
1. Click the Start button on the Win dows task bar and point to
Programs, select EPSON Scanner, and then click EPSON
TWAIN HS U n install.
2. Click Yes to uninstall.
3. Click OK to finish.
Maintenance and Troubleshooting 4-23
Page 87

For Windows 98 users:
1. Connect your scanner to your PC. Turn on you r scanner then
your PC.
2. Click the Start button on the Wi ndo ws tas k ba r and point to
Settings, and then select Control Panel.
3. Double-click the Scanners and Cameras icon.
4. Select your scanner from the installed devices list, and then
click Remove.
5. Click OK to close the dialog box.
Upgrading from Windows 98, 95, or NT 4.0 to
Windows 2000
If you are using your EPSON scanner with your PC running
Windows 98, 95, or NT 4.0 and are planning to upgrade your
system to Windows 2000, you need to uninst al l EPSON T WAI N
HS before upgrading your operating syst em, as described b elow.
1. Uninstall EPSON TWAIN HS. See “Uninstalling EPSON
TWAIN HS” on page 4-23.
2. Turn off your PC and scanner, and then disconnect the
scanner from your PC.
3. Turn on your PC and then install Windows 2000.
4. Make sure that Windows 2000 i s installed c orrectly, and th en
shut down your PC.
5. Connect your scanner and t hen start your PC to install EPSON
TWAIN HS following the instructions in your online Setup
Guide.
4-24 Maintenance and Troubleshooting
Page 88

During Windows 2000 installation
While you are installi ng Window s 2000, if a dialo g box similar to
the one shown below appears and asks for the updated files for
your scanner, click Next and continue the instal lation. Do not click
Provide Files .. ..
Note:
If you insert the Scanner Software CD-ROM and click Provide
Files..., an error message may appear. Replace the scanner software CD-
ROM with the Windows 2000 CD-ROM and continue installing
Windows 2000. After finishing the Windows 2000 installation, you need
to uninstall your scanner from the Device Manager and reinstall
EPSON TWAIN HS. Follow the instructions described in “Recovering
from Scanner Software Installation Problems on Windows 98, 2000, and
Millennium Edition” on page 4-26 to uninstall EPSON TWAIN HS.
Upgrading from Windows 95 to Windows 98
If you are using your EPSON scanner with your PC running
Windows 95 and are planning to upgrade your system to
Windows 98, you need to uninstall EPSON TWAIN HS before
upgrading your operating system, as described below.
Maintenance and Troubleshooting 4-25
Page 89

1. Uninstall EPSON TWAIN HS. See “Uninstalling EPSON
TWAIN HS” on page 4-23.
2. Turn off your PC and scanner, and then disconnect the
scanner from your PC.
3. Turn on your PC and then install Windows 98.
4. Make sure that Windows 98 is installed correctly, and then
shut down your PC.
5. Connect your scanner and t hen start your PC to install EPSON
TWAIN HS following the instructions in your online Setup
Guide.
Recovering from Scanner Software Installation Problems on Windows 98, 2000, and Millennium Edition
If you cancelled the plug and play driver installation before the
procedure was completed, or if you do not follow the installati on
instructions for EPSON TWAIN HS for Windows 2000 and
Millennium Edition, EPSON TWAIN HS will not be properly
installed o n your PC. To correct this pr oblem, first remove the
scanner from your system in Device Manager following the
instructions below, and then reinstall EPSON TWAIN HS
following the instructions in your online Setup Guide.
Follow the steps below to check the installation.
Note for Windows 2000 and Millennium Edition users:
The screen shots shown in this section are for Windows 98, so they may
vary in appearance from the actual dialog boxes that appear on your
screen. The instructions are the same, however, except as noted.
1. Plug the interface cable into your scanner and the PC.
4-26 Maintenance and Troubleshooting
Page 90

2. Turn on your scanner and then your PC.
3. Right-click the My Computer ico n on your desktop, then click
Properties.
For Windows 98 and Mille nnium Edition users:
Click the Device Manager tab.
For Windows 2000 users:
In the System Properties dialog box, select the Hardware tab
then click Device Manager.
4. If your EPSON TWAIN HS is correctly instal led, EPSON GT-
30000 should appear under Imaging Devi ce when you clic k
the plus (+) sign next to Imaging Device.
If EPSON GT-30000 appears under Other devices with a
question (?) mark or under Imaging Device with an
exclamation (!) mark, the EPSON TWAIN HS file is not
installed correctly.
EPSON GT-30000 appearing under Other devices
with a question (?) mark
Maintenance and Troubleshooting 4-27
Page 91

EPSON GT-30000 appearing under Imaging Device
with an exclamation (!) mark
If EPSON GT-30 000 appears under Other devices with a
question (?) mark, see “If EPSON GT-30000 app ears under Other
devices with a question (?) mark” on page 4-28. If EPSON GT-
30000 appears under Imaging Device with an exclamation
(!) mark, see “If EPSON GT-30000 appear s under Imaging Device
with an exc lamation (!) mark” on page 4-29.
If EPSON GT-30000 appears under Other devices with a
question (?) mark
Note:
Make sure your scanner is turned on and connected to your PC. If your
scanner is off or not connected to your PC, you cannot reinstall the driver
properly.
4-28 Maintenance and Troubleshooting
Page 92

1. For Windows 98 and Millennium Edition users, click
? EPSON GT-30000, then click Remove and OK.
For Windows 2000 users, right-click ? EPSON GT-30000,
then select Uninstall and click OK.
2. Click OK to close the System Properties window.
3. Shut down your PC and turn off your scanner. Then turn on
your scanner and your PC.
4. When the message prompting you to install the driver
appears, install the driver agai n. See your onli ne Setup Guide.
If EPSON GT-30000 appears under Imaging Device with an
exclamation (!) mark
Note:
Make sure your scanner is turned on and connected to your PC. If your
scanner is off or not connected to your PC, you cannot reinstall the d river
properly.
Maintenance and Troubleshooting 4-29
Page 93

1. For Windows 98 and Millennium Edition users, click
! EPSON GT-30000, then click Remove and OK.
For Windows 2000 users, right-click ! EPSON GT-30000,
then select Uninstall and click OK.
2. Click OK to close the System Properties window.
3. Shut down your PC and turn off yo ur scanner . Then turn on
your scanner and your PC.
4. When a message appears to prompt you t o insert the scanner
software CD-ROM, insert the CD-ROM in the CD-ROM drive,
and then click OK.
If the following dialog appears, click
select, or type in t he CD-ROM drive letter, the EPSON folder,
the folder of your preferred language, and the Win98,
Win2000, or WINME folder as the location as shown below.
Finally, click OK.
4-30 Maintenance and Troubleshooting
d
, then browse and
Page 94

5. The Screen Calibration window appears. Follow the
instructions described in your online Setup Guide.
Sizing up Your System
Your scanner is sufficient for most scanni ng needs, but if you are
not satisfied with the quality of the images on your monitor or
with the speed of image processing, read this section. While it
does not contain specific recommendations, it describes various
possibilities for improving your scanning system. For further
information, seek advice from your dealer or an experienced
scanner user.
RAM and hard disk size
Scanned images use much more memory than text files, so you
may need more RAM (Random Access Memory) in your PC and
a larger hard disk than you have used previously.
Video cards
A video card that is sufficient for text may not be good enough
for displaying graphic images, especially in color. If all your
scanned images look coarse on your monitor, you may want to
upgrade your video card. You will need 24-bit color, also called
true color or millions of colors, to make the highest quality image
reproductions.
Monitors
The resolution of your monitor affects the quality of the image
you see. Consider a high resolution monitor if you do precise color
work, but also be sure you have a high quality video card.
Maintenance and Troubleshooting 4-31
Page 95

File compression software
Many different programs are available to make image files
smaller for storage or transmission. For example, some
compression software can store a 3MB image file on a 1.44MB
floppy disk, and compress images a nd resto re them wit h no loss
of data or quality; others compr ess images more, but the rest ored
file is not exactly the same as the original. The difference between
the original and restored files is, however, almost unnoticeable.
Contacting Custom er Support
If your EPSON product is not operatin g properly and y ou cannot
solve the problem using the troubleshoo ting information i n your
product documentation, contact customer support services for
assistance or contact the dealer where you purchased your
product.
Customer support will be able to help you much more qu ickly if
you give them the following informatio n.
❏ Product serial number
(The serial number label i s usually on the back o f the product.)
❏ Product model
❏ Product software version
(Click About, Version Info, or similar button in the product
software.)
❏ Brand and model of your computer
❏ Your computer operating system name and version
❏ Names and versions of the software applications you
normally use with your product
4-32 Maintenance and Troubleshooting
Page 96

Appendix A
Setting up the Scanner Server PC
Setting up the Scanner Server PC
To allow networking, the scanner ser ver PC and the client PCs i n
the network require a Network Interface Card and a Net work
Interface C ard (NIC) driver. Install the Network Interface Card
and Network Interface Card (NIC) driver in the scanner server
PC and the client PCs. For installation procedures, refer to the
corresponding manuals included with the card.
Installing the TCP/IP Protocol
Installing the TCP/IP protocol (Windows Millennium Edition, 98, and 95)
To install the TCP/IP protocol on the scanner server PC and client
PCs on the network, follow the instructions below.
1. Click the Start button on the Win dows task bar and point to
Settings, then select Control Panel.
The Control Panel window appears.
Setting up the Scanner Se rver PC A-1
Page 97

2. Double-click the Network icon in Control Panel.
The Network dialog box appears.
3. Click the Configuration tab.
A-2 Setting up the Scanner Server PC
Page 98

4. Check that TCP/IP protocol is included in the The followi ng
network components are installed list box.
If the TCP/IP protocol appears in the li st box, proceed to th e
following section “Setting the Scanner Server PC's IP
Address” on page A-10. Otherwise, proceed to step 5.
5. Click Add.
The Select Network Component Type dialog box appears.
6. Select Protocol from the list and click Add.
Setting up the Scanner Se rver PC A-3
Page 99

7. Select Microsoft from Manufacturers list box and TCP/IP
from Network Protocols, and click OK.
8. Follow the instructions displayed on the screen. After you
finish this step, proceed to the section “Setting the Scanner
Server PC's IP Address” on page A-10.
A-4 Setting up the Scanner Server PC
Page 100

Installing the TCP/IP protocol (Windows 2000)
To install the TCP/IP protocol on the scanner server PC and client
PCs on the network, follow the instructions below.
1. Right-cl ick the My Network Places icon and select
Properties.
2. Double-click Local Area Connection.
Setting up the Scanner Se rver PC A-5
 Loading...