

Page 1

Color Scanner
User’s Guide
Page 2

Copyright Notice
All rights reserved. No part of this publication may be reproduced, stored in a retrieval system, or transmitted in
any form or by any means, electronic, mechanical, photocopying, recording, or otherwise, without the prior
written permission of SEIKO EPSON CORPORATION. The information contained herein is designed only for
use with this EPSON scanner. EPSON is not responsible for any use of this information as applied to other
scanners.
Neither SEIKO EPSON CORPORATION nor its affiliates shall be liable to the purchaser of this product or third
parties for damages, losses, costs, or expenses incurred by purchaser or third parties as a result of: accident, misuse,
or abuse of this product or unauthorized modifications, repairs, or alterations to this product, or (excluding the
U.S.) failure to strictly comply with SEIKO EPSON CORPORATION’s operating and maintenance instructions.
SEIKO EPSON CORPORATION shall not be liable for any damages or problems arising from the use of any
options or any consumable products other than those designated as Original EPSON Products or EPSON
Approved Products by SEIKO EPSON CORPORATION.
A Note Concerning Responsible Use of Copyrighted Materials
Digital cameras and scanners, like photocopiers and conventional cameras, can be misused by improper copying of
copyrighted material. While some countries’ laws permit limited copying of copyrighted material in certain
circumstances, those circumstances may not be as broad as some people assume. EPSON encourages each user to
be responsible and respectful of the copyright laws when using digital cameras and scanners.
Trademarks
EPSON and EPSON Stylus are registered trademarks of SEIKO EPSON CORPORATION.
EPSON Store and Micro Step Drive are trademarks, and ColorTrue is a registered trademark of Epson America,
Inc.
General Notice: Other product names used herein are for identification purposes only and may be trademarks of
their respective owners. EPSON disclaims any and all rights in those marks.
ii
Copyright © 2001 by Epson America, Inc. CPD-11739
2/01
Printed on recycled paper
Page 3

Contents
Welcome!
About Your Scanner 1
About Your Software 2
Getting More Information 3
Warnings, Cautions, and Notes 4
Reading the Online Reference Guide 4
Reading Your Other Electronic Manuals 6
Registering 8
Chapter 1 Setting Up Your Scanner
Unpacking Your Scanner 10
Choosing a Good Place for Your Scanner 11
Identifying Scanner Parts 12
Unlocking the Scanner 13
Installing the Automatic Document Feeder 14
Testing Your Scanner’s Operation 16
1
9
Connecting the Scanner to Your Computer 17
Connecting to a SCSI Interface 17
Connecting to an IEEE 1394 Scanner Interface 21
Chapter 2 Installing the Software
Installing the Scanner Software 23
Installing the Software for Windows Me 24
Installing the Software for Windows 2000 30
Installing the Software for Windows 98 36
Installing the Software for Windows 95 41
Installing the Software for Windows NT 4.0 46
23
iii
Page 4

Installing Additional Software 49
Installing the ISIS Driver 49
Installing PixTools QuickScan 50
Installing Presto! PageManager 52
Chapter 3 How to Scan
Overview 53
Selecting Your Scanner Source 53
Selecting Resolution 54
Scanning Color Images 55
Scaling (Resizing) Images 55
Batch Scanning 55
Step-by-Step Scanning Instructions 56
Loading the Automatic Document Feeder 56
Placing a Single Original Document 57
Scanning with EPSON TWAIN HS 58
Using the
a Start Button 60
Setting Up the
a
Start Button 60
Chapter 4 Network Scanning
Setting Up the Scanner Server 65
53
63
iv
Installing the Scanner Server Software for Windows Me 66
Installing the Scanner Server Software for Windows 2000 71
Installing the Scanner Server Software for Windows 98 76
Installing the Scanner Server Software for Windows 95 82
Installing the Scanner Server Software for Windows NT 4.0 87
Changing the Scanner Server Start Up Mode 90
Setting Up Client Computers 91
Installing EPSON TWAIN HS Network 91
Contents
Page 5

Using a Network Scanner 95
Starting EPSON Scan Server 96
Starting EPSON TWAIN HS Network 97
Starting a Scan 98
Stopping a Scan in Progress 99
Chapter 5 Maintaining and
Transporting Your Scanner
Cleaning the Scanner 101
Replacing the Fluorescent Lamp 102
Transporting the Scanner 102
101
Chapter 6 Solving Problems
Scanner Lights 103
Problems and Solutions 105
Setup Problems 105
Scanner Problems 106
Software Problems 108
Scanning Problems 110
Uninstalling the Scanner Software 114
Uninstalling EPSON TWAIN HS 114
Uninstalling EPSON TWAIN HS Network 115
Uninstalling EPSON Scan Server 115
Solving Problems with the Automatic Document Feeder 116
Fixing Paper Jams 116
Changing the Document Feed Speed 117
Where To Get Help 118
EPSON Technical Support 118
103
Software Technical Support 119
Contents
v
Page 6

Appendix A Installing the TCP/IP Protocol
121
Installing the TCP/IP Protocol on Windows Me and Windows 2000
Installing the TCP/IP Protocol on Windows 98 and Windows 95
Assigning an IP Address for Windows 95 and Windows 98 (First Release)
Installing the TCP/IP Protocol on Windows NT 4.0
Assigning an IP Address on Windows NT 4.0
Appendix B Specifications
Appendix C Notices
System Requirements
Important Safety Instructions
Declaration of Conformity
FCC Compliance Statement
ENERGY STAR Compliance
Warranty
122
123
124
126
127
129
133
133
134
135
136
137
137
vi
Index
Contents
139
Page 7

Welcome!
The EPSON® GT-30000 is a 36-bit, large-format professional scanner that delivers
superior results and versatility for both departments and busy workgroups. Using
EPSON’s ColorTrue® Imaging System, the scanner captures text and images with
amazing detail and accurate colors. Its 600 × 1200 dpi optical resolution and
11.7 × 17-inch scan bed let you quickly capture incredibly sharp images from
practically any size source document.
About Your Scanner
Your EPSON GT-30000 scanner includes these features:
■
36-bit color depth and 600 × 1200 optical resolution lets you capture crisp, clean
text and high-quality images with millions of colors and thousands of shades
of gray.
■
Speeds through documents with accuracy and detail: letter-sized monochrome up
to 30 ppm, color up to 15 ppm (landscape at 300 dpi, draft mode).
■
Large scan bed and auto document feeder let you quickly scan anything from a
two-page book spread to a double-sided, 100-page document.
■
Automatic document size recognition with EPSON TWAIN eliminates the need
to preset document settings prior to each scan.
■
EPSON scanner software lets stand-alone users or network clients control
scanning directly from their workstation.
1
Page 8
About Your Software
The EPSON GT-30000 comes with these applications:
EPSON TWAIN HS
General-purpose driver for scanning photographs, artwork, or
text for Optical Character Recognition (OCR). Includes
automatic document size recognition.
EPSON TWAIN HS Network and EPSON Scan Server
Ideal general-purpose drivers for network scanning from
hundreds of applications.
ISIS Driver
The Image and Scanner Interface Specification (ISIS) is a
flexible, modular standard for acquiring, viewing, converting,
printing, and storing document images.
PixTools® QuickScan
A high-performance utility that provides an integrated image
acquisition environment allowing you to scan, view, print,
annotate, store, and perform image processing on documents.
NewSoft™ Presto!™ PageManager for EPSON
After you’ve scanned your paper documents, use this leading
document management software to organize, file, edit, copy,
fax, and e-mail them from one convenient screen.
Adobe® Acrobat® Reader
Lets you read the on-screen manuals for your applications and
any other files you may have in Portable Document Format
(PDF).
™
2
Page 9

Getting More Information
There are several ways to learn more about your EPSON GT-30000. Here’s where to
look for help:
■
EPSON GT-30000 Reference Guide
Provides detailed information about EPSON TWAIN HS, including additional
troubleshooting tips. You must have a web browser (Netscape Navigator® or
Microsoft® Internet Explorer, versions 3.0 or later) on your computer to read this
guide. See page 4 for instructions on viewing your Reference Guide.
■
On-Screen Help
Most of the applications that come with your scanner include on-screen help. For
EPSON TWAIN HS, just click the button or select
■
Electronic Documents
from the menu.
Help
Several of the applications that came with your scanner include electronic manuals
in the Adobe Acrobat PDF format. You’ll find electronic user’s guides in the
Manuals
folder on the EPSON GT-30000 Scanning Tools CD-ROM, as well as
in the product folders. See page 6 for instructions on locating and viewing your
Acrobat manuals.
If none of these sources answers your questions, please see “Where To Get Help” on
page 118.
3
Page 10

Warnings, Cautions, and Notes
Please follow these guidelines as you read your documentation:
Warnings must be followed carefully to avoid bodily injury.
Cautions must be observed to avoid damage to your equipment.
Notes contain important information about your scanner.
Tips offer hints for great scanning.
Reading the Online Reference Guide
The electronic EPSON GT-30000 Reference Guide is on your EPSON GT-30000
Scanner Software CD-ROM. You can view it from the CD-ROM or copy it to your
hard drive and view it from there. You must have a web browser (for example,
Netscape Navigator or Internet Explorer, versions 3.0 or later).
4
If you copy the manual to your hard drive, you can read it anytime. After
you copy the manual, just click Start, point to Programs, then EPSON, and
select EPSON GT-30000 Reference Guide.
Follow these steps to view the manual:
1. Insert your scanner software CD-ROM. If the Select Language screen doesn’t
appear, double-click the
the
Epson
2. Make sure
CD-ROM icon.
English
My Computer
is selected and click OK.
3. When you see the EPSON Software Setup screen, click the
icon on your desktop. Then double-click
Browse this CD
button.
Page 11
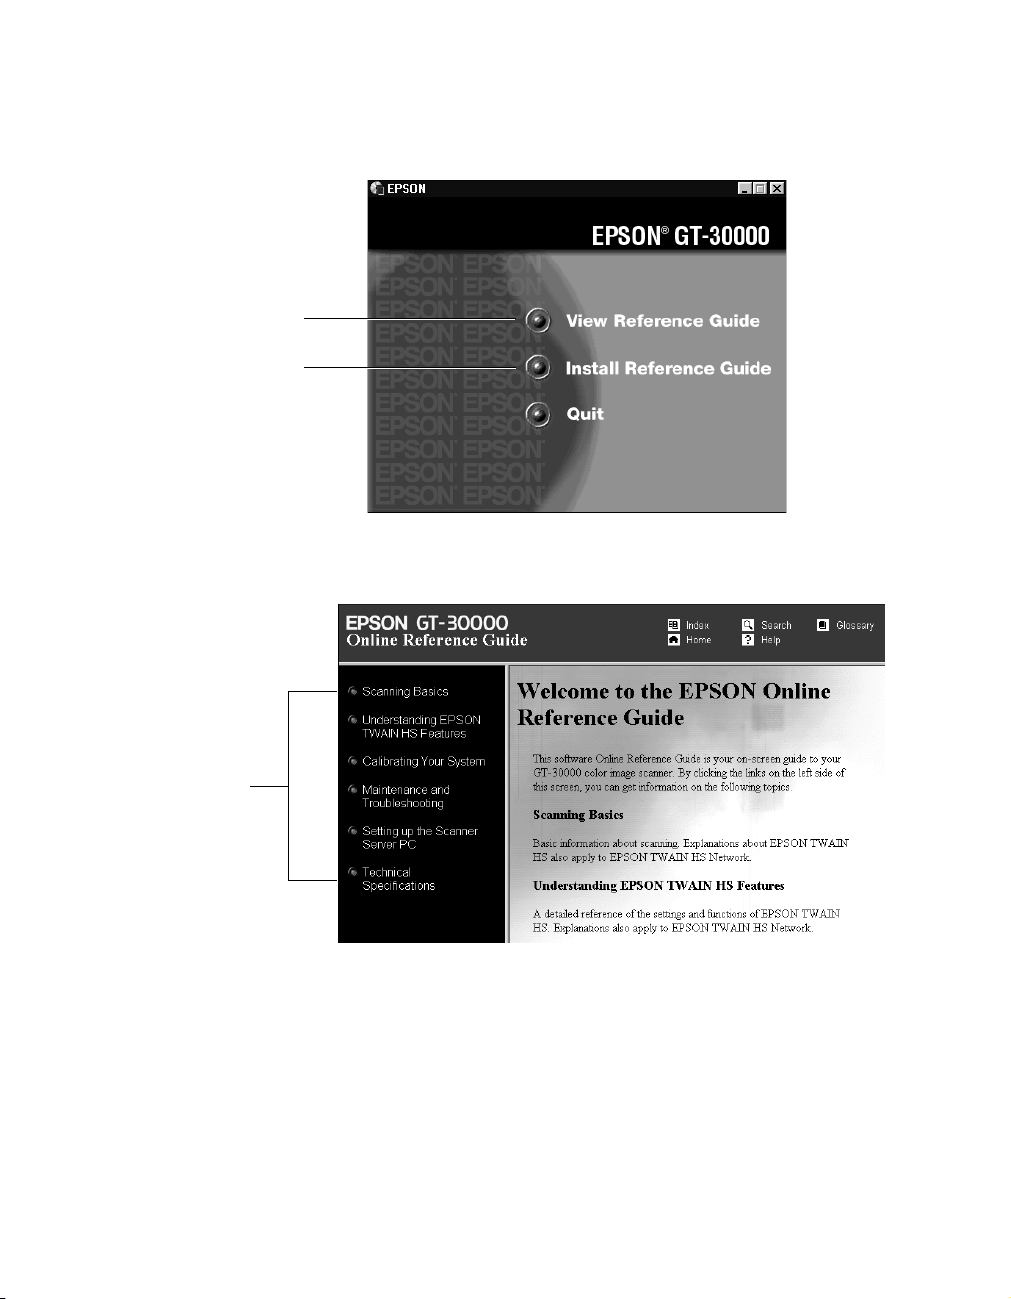
4. Open the
Manuals
folder, then double-click the
Reference Guide window opens:
Click to view the
Reference Guide.
Click to install the
Reference Guide
on your hard drive.
GT30000.exe
icon. The
5. Click
Click a topic
to expand
its contents.
View Reference Guide
. Your browser opens and you see this window:
5
Page 12
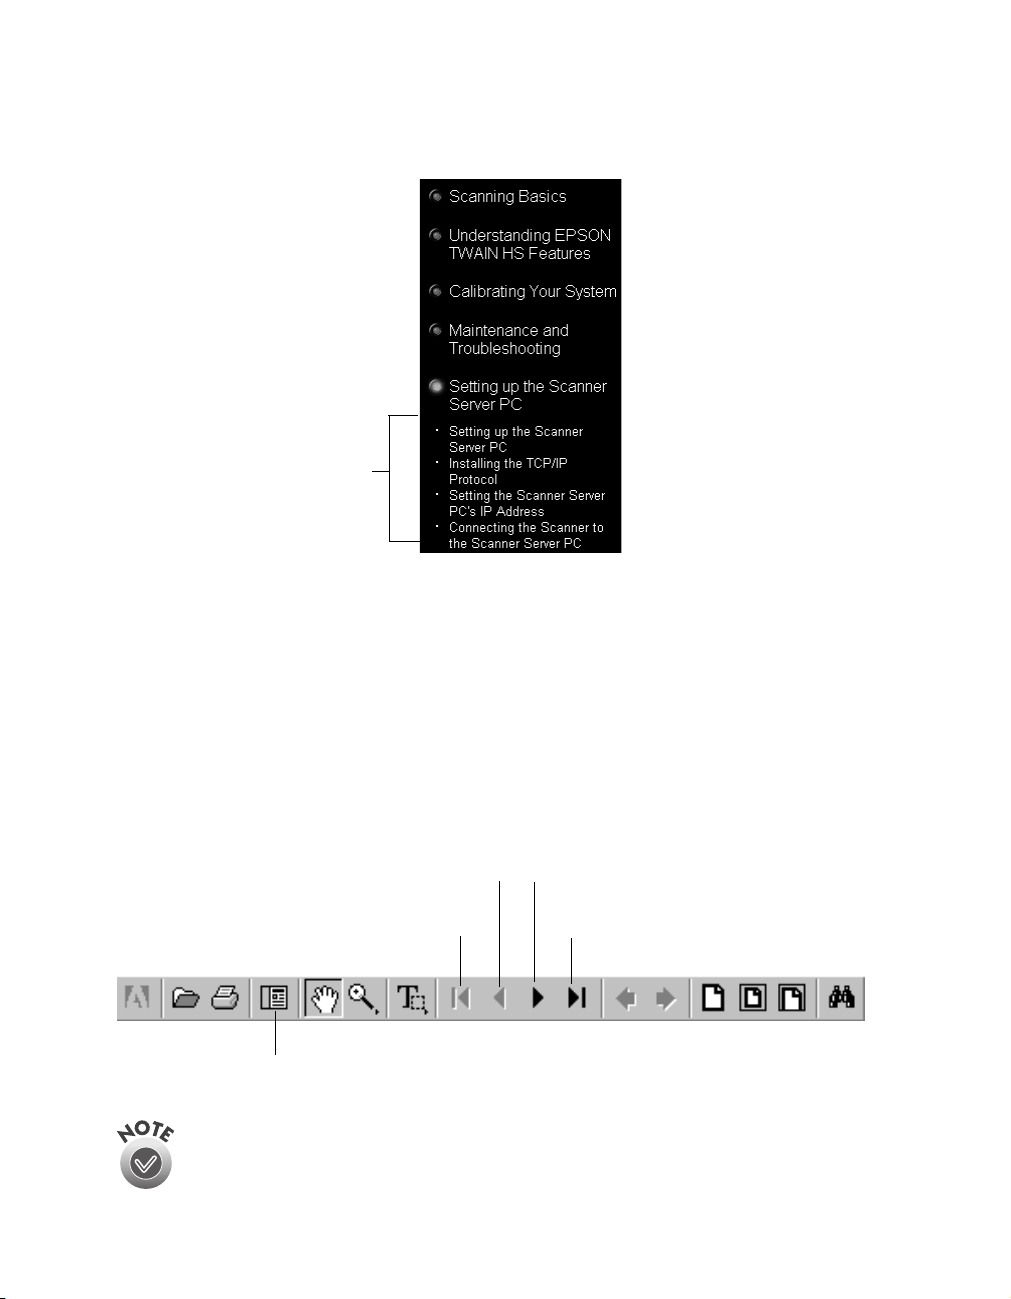
6. Click one of the topics on the left to expand its contents. Then click the subtopic
you want to view.
expanded
contents list
Reading Your Other Electronic Manuals
To read other PDF manuals on your CD-ROM, you’ll use Acrobat Reader. If
Acrobat Reader is not already installed on your computer, you can install it with the
other scanner software. See the software installation instructions for your system in
Chapter 1, “Setting Up Your Scanner.”
6
When you open an electronic manual, you’ll see this toolbar:
previous page next page
last pagefirst page
show bookmarks and page
This is the toolbar for Acrobat Reader 4.05. The toolbar for Acrobat Reader
3.0 looks slightly different.
Page 13

With Acrobat Reader, you have several ways to navigate through text:
■
Click on hot topics, which are usually underlined or displayed in a different color.
To find out if a topic is hot, move your cursor over it. If the cursor turns into a
pointing hand, the topic is linked—you can jump to it by clicking once.
■
Use the bookmark section of the left side of the screen to move quickly to the
topic of your choice. Click the
Show/Hide Navigation Pane
icon on the toolbar
to see the bookmark section, if the manual has bookmarks. Some manuals only
have a table of contents, but you can also use this to navigate the manual if the
topics are linked.
■
Use the arrow buttons in the toolbar or the vertical scroll bar on the right side of
the document to move through the manual. (The box to the left of the scroll bar
displays the current page number.)
For more information, see your Acrobat Reader online guide.
Locate your PDF manuals as follows:
■
ISIS User’s Guide—Insert your scanner software CD-ROM. When the EPSON
Software Setup screen appears, click
the
English
■
Presto! PageManager—Click
EPSON
folder, then double-click
, and select
PageManager User’s Manual
Browse this CD
GT30000.pdf
Start, Programs, Presto! PageManager for
. Open the
.
.
folder, then
ISIS
■
Acrobat Reader—Select
You can download and view a PDF version of the GT-30000 User’s Guide
from the EPSON support web site at http://support.epson.com.
PixTools QuickScan includes on-screen help. To access it, click Start,
Programs, PixTools Products, Documentation, and select QuickScan Help.
Reader Guide
from the Acrobat Reader Help menu.
7
Page 14

Registering
Please take a minute to complete the electronic registration form which appears at the
end of the software installation process (see “Chapter 2, Installing the Software”).
Registering enables you to receive special information on options, new products, and
software upgrades. You’ll get immediate attention if you have a problem with your
scanner.
8
Page 15

Chapter 1
Setting Up Your Scanner
Setting up your scanner is easy—just follow the steps in this chapter in the order
listed below.
1. Unpack and choose a good place for the scanner.
2. Unlock the scanner.
3. Install the automatic document feeder.
4. Test the scanner.
5. Set the SCSI ID number and terminator switch (SCSI connections only).
6. Connect the scanner to your computer.
9
Page 16
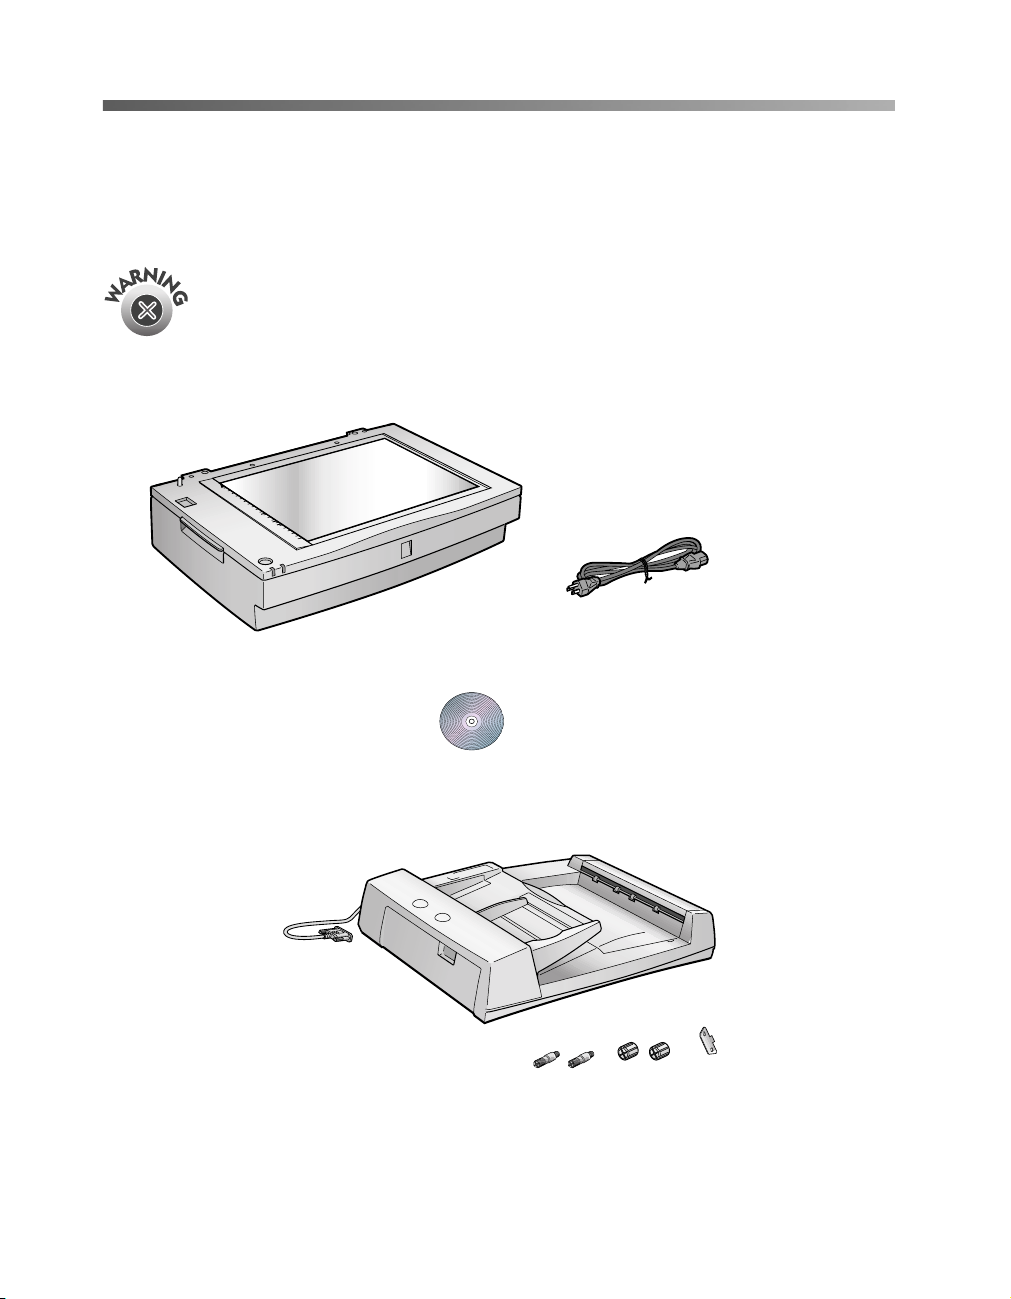
Unpacking Your Scanner
Remove the automatic document feeder and scanner from the box, then remove the
packing material from your scanner. Save the packaging in case you need it later.
The scanner and automatic document feeder are large and heavy, so you
may need to have someone help you unpack and lift them.
Along with this guide, your EPSON GT-30000 comes with these items:
power cable
EPSON GT-30000
automatic document feeder
Setting Up Your Scanner
10
EPSON GT-30000 Scanner
Software CD-ROM
installation screws
knobs
screwdriver
Page 17
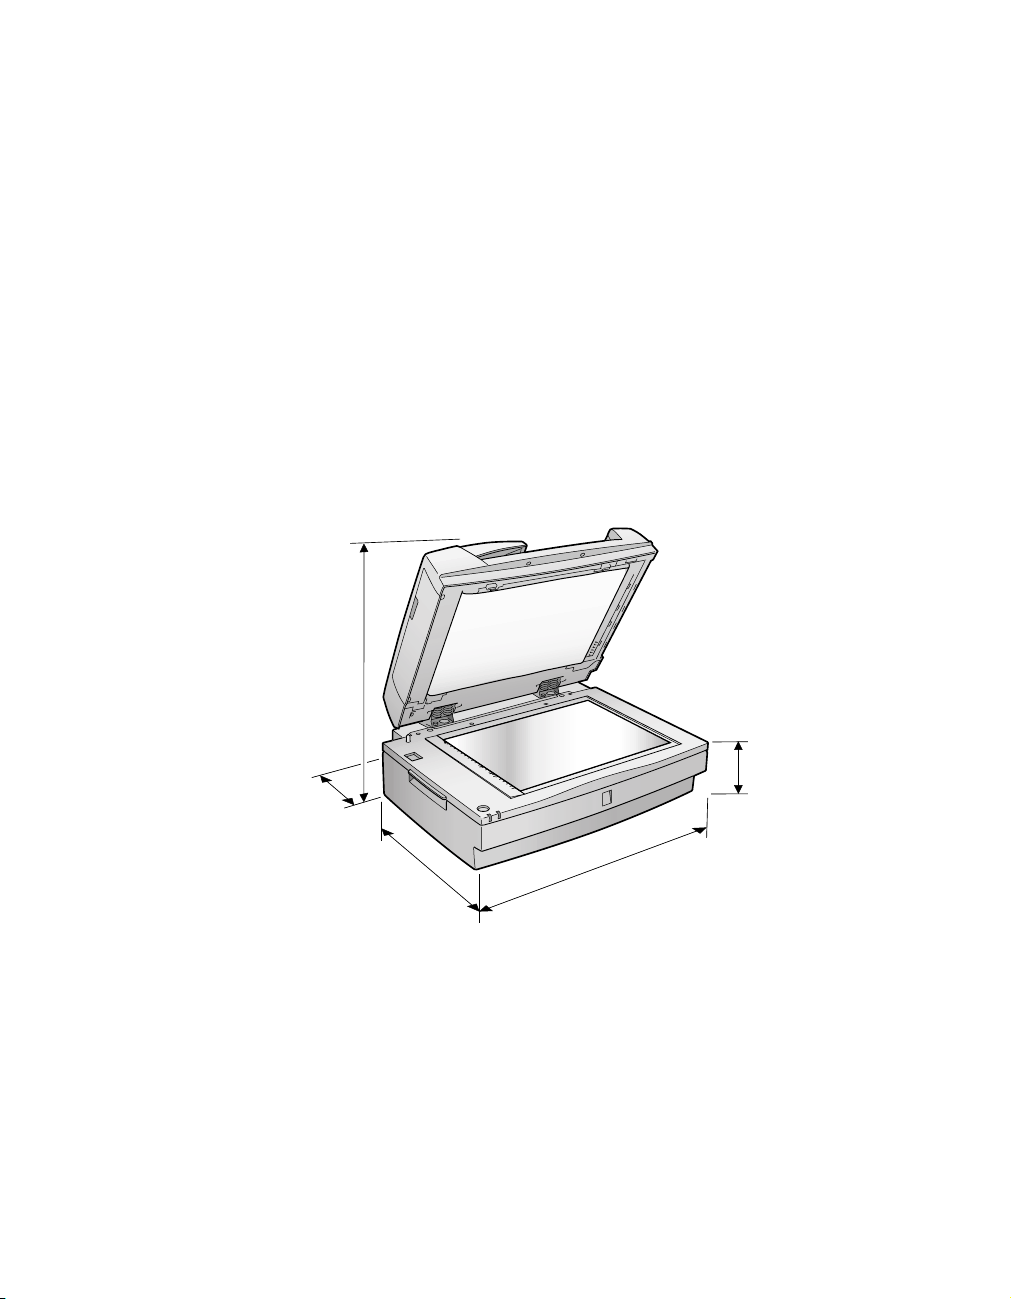
Choosing a Good Place for Your Scanner
When deciding where to place the scanner, follow these guidelines:
■
Place the scanner on a flat, stable surface. If the scanner is tilted, it can’t operate
properly.
■
Make sure to place the scanner where you can easily unplug the power cord, near
a grounded wall outlet, and where your cable can reach your computer.
■
Keep the scanner away from direct sunlight and strong light sources.
■
Avoid places subject to shocks and vibrations, or high or rapidly changing
temperatures and humidity.
■
Make sure there’s enough room behind the scanner for the cables, and above the
scanner so you can fully raise the document cover.
23.4 inches
(596 mm)
3.9 inches or more
(100 mm)
* When automatic document feeder is closed.
19.2 inches
(488 mm)
25.9 inches
(658 mm)
10 inches*
(254 mm)
Setting Up Your Scanner
11
Page 18
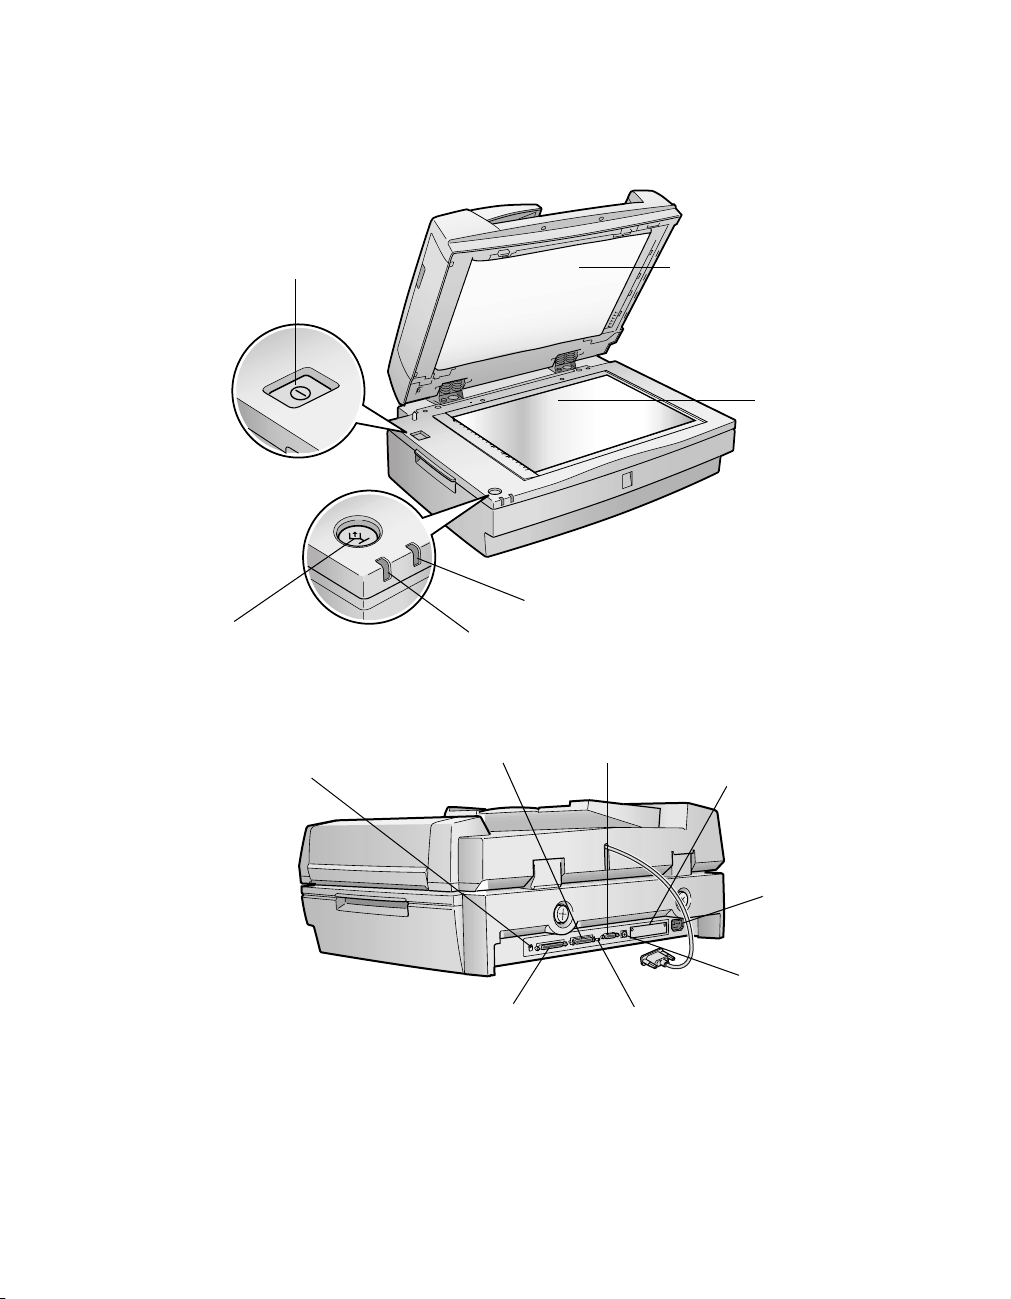
Identifying Scanner Parts
Operate button
a Start button
SCSI terminator switch
READY light
SCSI interface (50-pin)
automatic document feeder
document table
ERROR light
ADF connector
optional interface slot
Setting Up Your Scanner
12
SCSI interface (68-pin)
AC socket
SCSI ID dial
SCSI select
switch N/W
Page 19
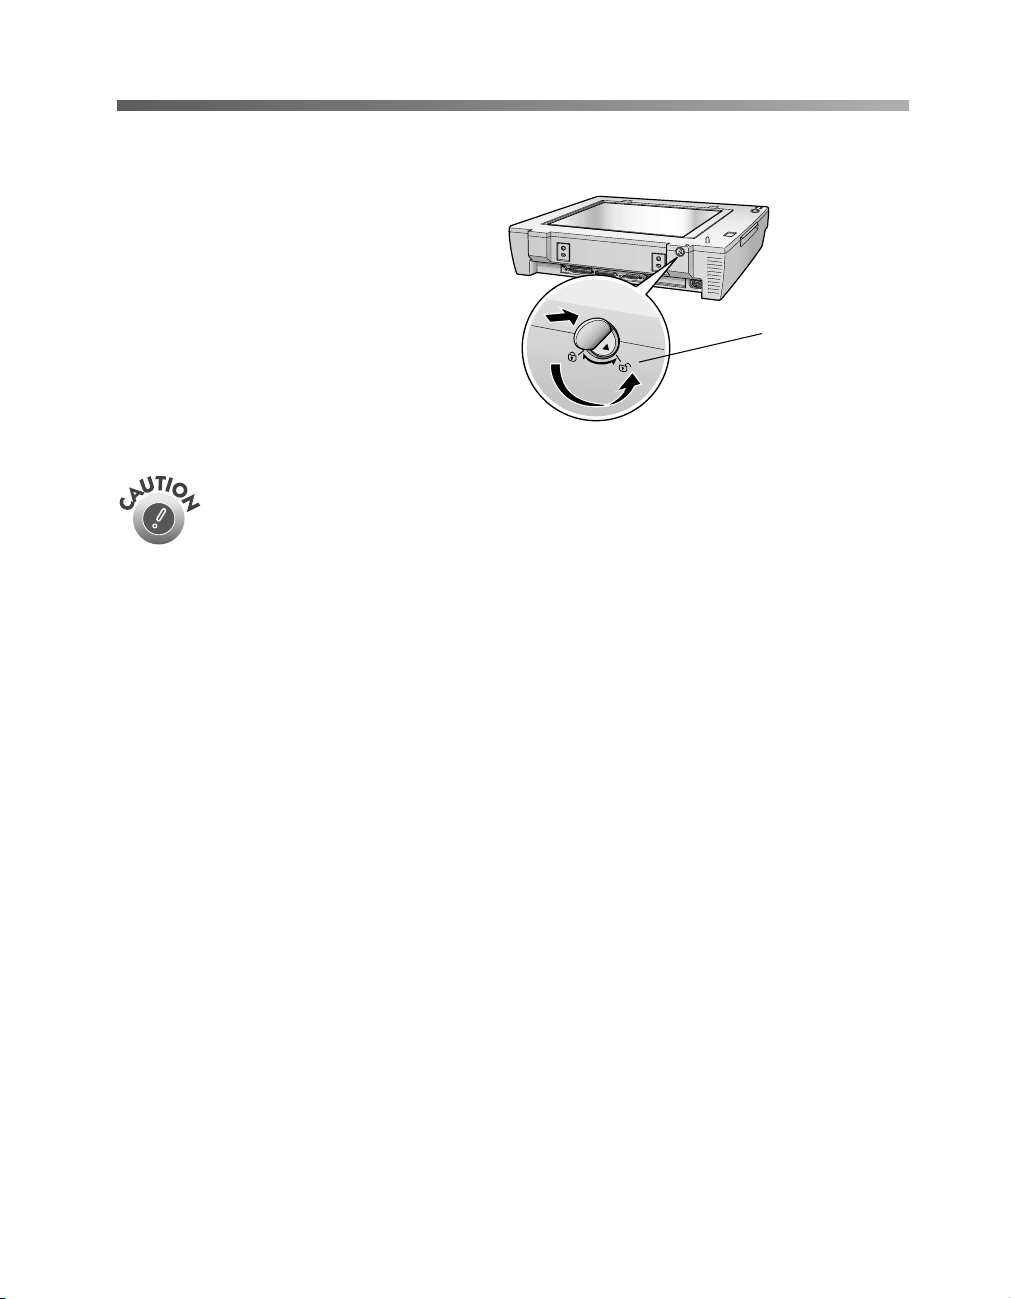
Unlocking the Scanner
Before installing the automatic
document feeder and connecting the
scanner to a power source, you must
release the transportation lock on the
back of the scanner.
Use a coin or large flat-head screwdriver
to turn the transportation lock button
counterclockwise to the unlocked
position, as shown.
Always lock the transportation lock before moving the scanner. Whenever
the transportation lock is locked, the scanner lamp must be in the home
position (on the left side of the scanner). See “Transporting the Scanner”
on page 102 for more information.
unlocked position
Setting Up Your Scanner
13
Page 20
Installing the Automatic Document Feeder
The automatic document feeder (ADF) automatically loads multi-page documents
into your scanner.
The ADF is large and heavy. Clear a wide space around the scanner before
installing the ADF. You may need to have someone help you unpack and
lift it.
Make sure you have released the transportation lock before installing the
ADF. For details, refer to page 13.
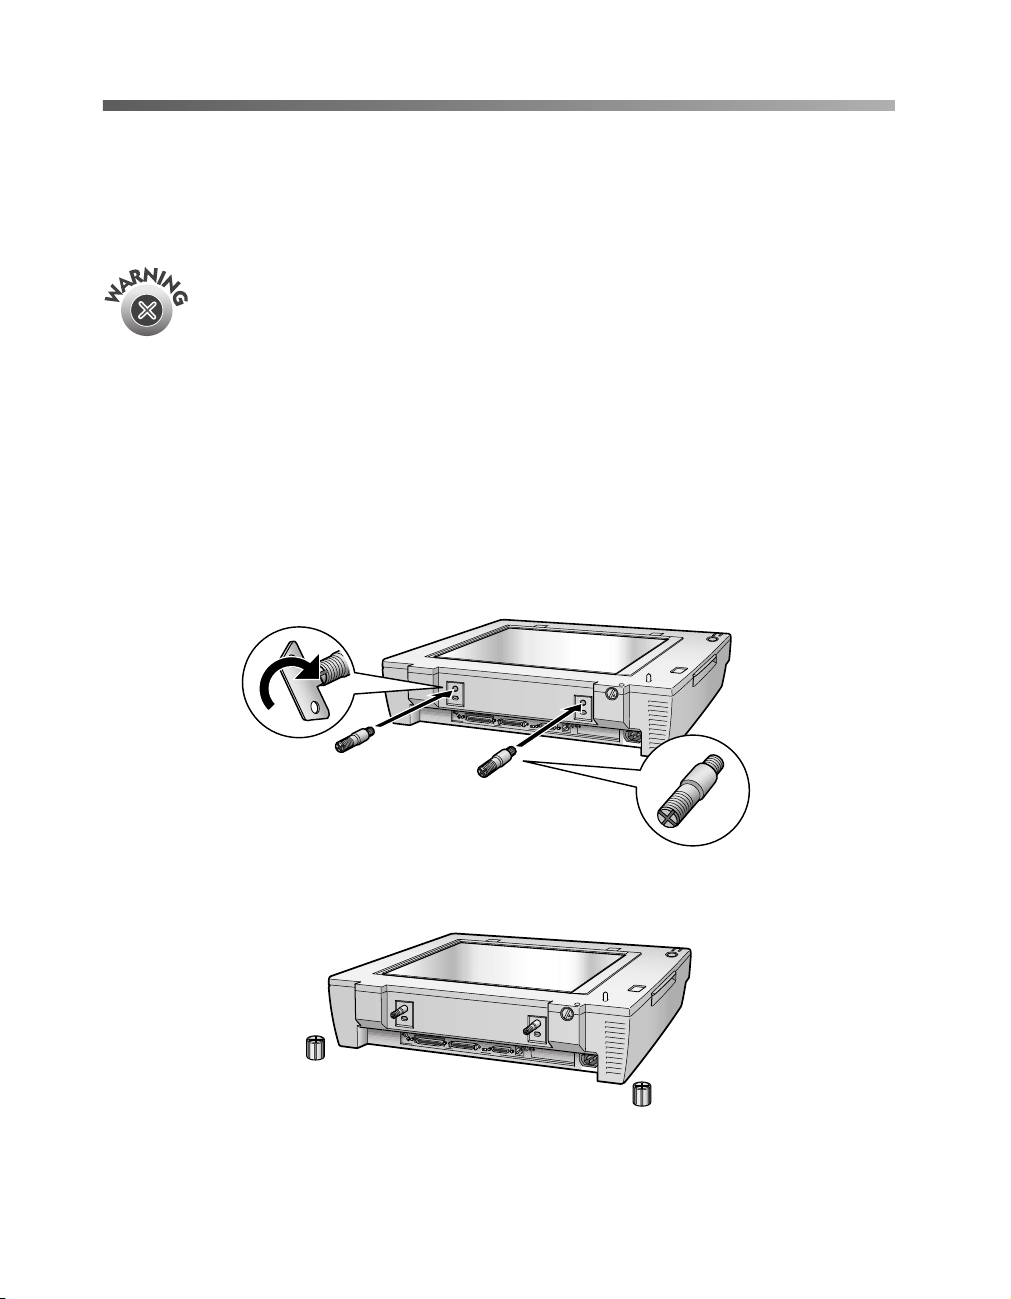
To install the ADF:
1. Make sure your scanner is turned off, then unplug the scanner’s power and
interface cables, if necessary.
2. Insert the installation screws that came with the ADF into the holes in the back of
the scanner and secure them with the enclosed screwdriver tool, as shown below.
3. Place the two knobs included with the ADF beside the scanner.
Setting Up Your Scanner
14
Page 21
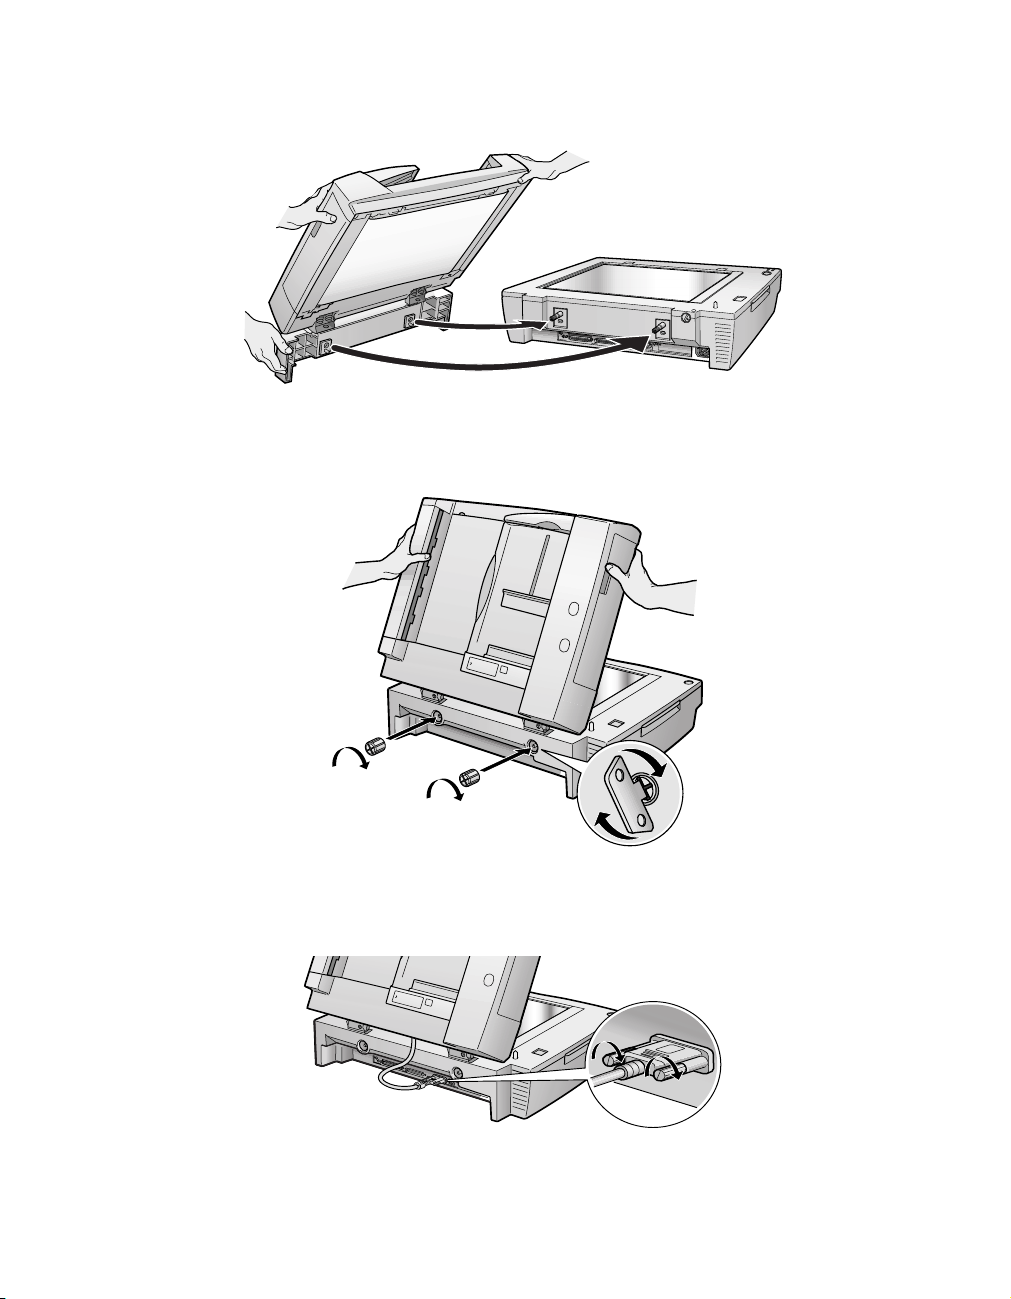
4. Slide the ADF onto the scanner, lining up the screws with the holes as shown.
5. Twist the knobs onto the ends of the screws and tighten them using the
screwdriver tool.
6. Attach the ADF’s connector to the scanner’s option interface. Then tighten the
connector screws.
7. Close the ADF.
Setting Up Your Scanner
15
Page 22
Testing Your Scanner’s Operation
To make sure your scanner is working properly, it’s a good idea to turn it on before
you connect it to your computer.
The scanner’s voltage cannot be changed. If the label on the back of the
scanner does not display the correct voltage for your area, contact your
dealer. Do not plug in the power cord.
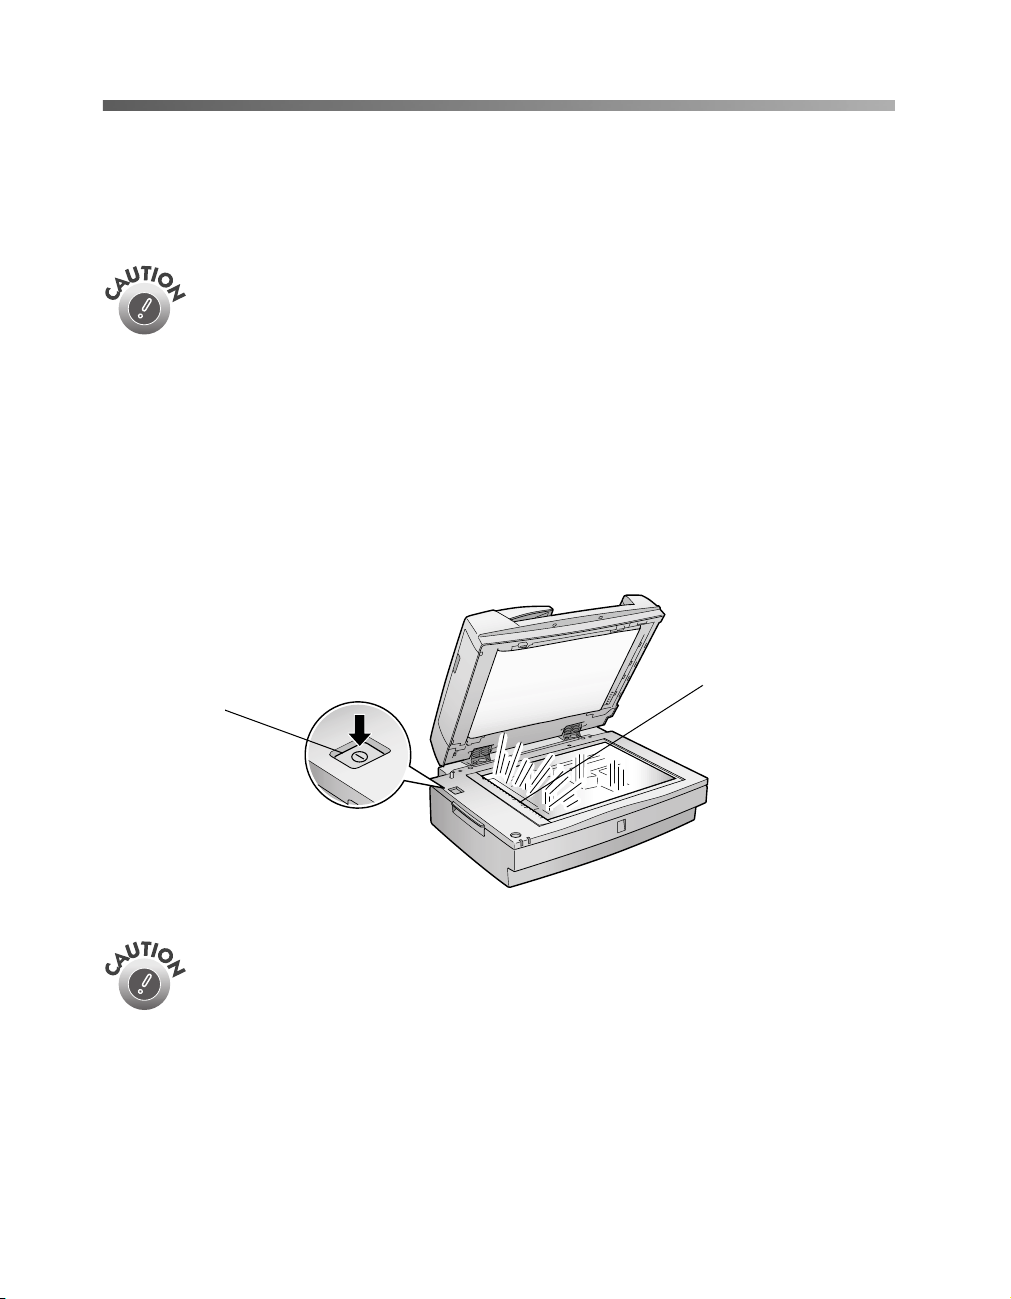
1. Plug the scanner’s power cord into a grounded electrical outlet. Then open the
ADF so you can see the operation of the carriage.
2. Press the
The
Operate
READY
button to turn on the scanner.
light on the scanner’s front panel flashes, and the scanner’s carriage
moves forward, then back. The
to scan.
Operate button
If you turn off the scanner, wait at least 10 seconds before turning it back
on. Rapidly turning the scanner on and off can damage the scanner.
READY
light stays on when the scanner is ready
carriage home position
Setting Up Your Scanner
16
Page 23
Connecting the Scanner to Your Computer
You can connect the scanner to your computer in one of the following ways:
■
SCSI
If you have a compatible PCI SCSI/SCSI 2 adapter board, or your computer has
an ASPI-compliant SCSI 2 board (Adaptec® boards are recommended), you can
connect the scanner with a SCSI 2 cable (micro DB 50-pin connector) not more
than 9.8 feet (3 meters) long. If you want to use the 68-pin connector, you will
need a SCSI 3 cable and SCSI ultra-wide 68-pin host adapter board.
■
IEEE 1394
If you have purchased the optional IEEE 1394 scanner interface card, you can
connect the scanner to your PC with the IEEE 1394 cable. Your PC must have an
OHCI compliant port or card, and must be running a pre-installed version of
Windows Me or Windows 2000. For installation instructions, see page 21.
Connecting to a SCSI Interface
Before you connect the scanner, you must have an ASPI-compliant SCSI 2 interface
board installed in your computer. Some computers come with a SCSI 2 board
preinstalled; check your computer documentation.
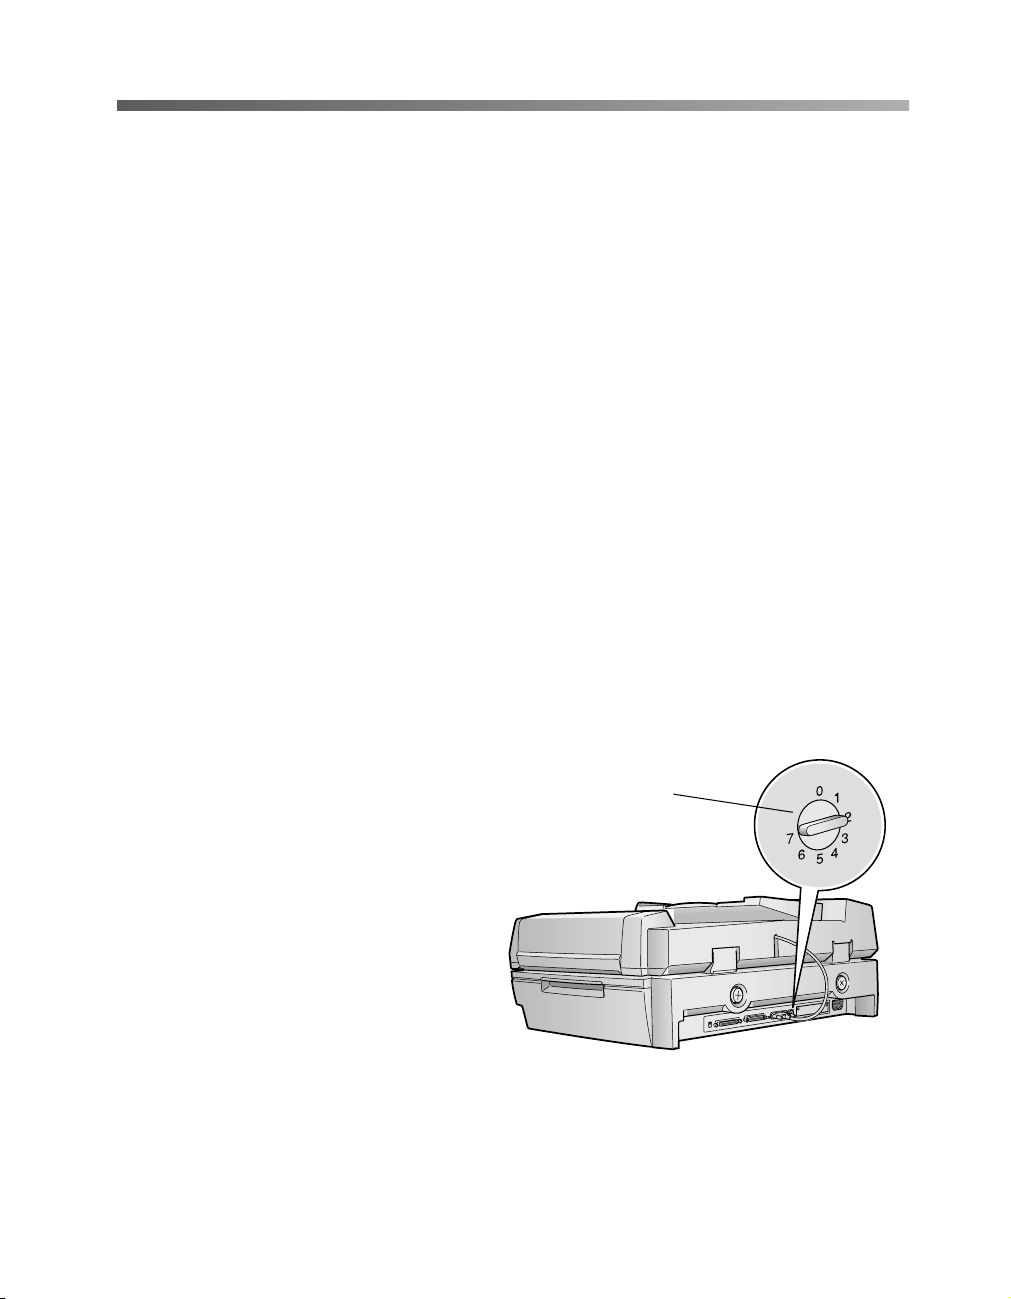
You may need to change the scanner’s
SCSI ID setting before you connect it
to your computer. The scanner’s SCSI
ID number default setting is 2. If you
need to change this number, turn the
SCSI ID dial on the back panel. Be
sure to choose a unique number that
doesn’t conflict with the ID number of
other SCSI devices.
Don’t use SCSI ID 7, which is usually
reserved for the SCSI interface in the
computer. SCSI ID 0 and 1 are also
not recommended, as these may be
used for the hard disk.
SCSI ID dial
Setting Up Your Scanner
17
Page 24
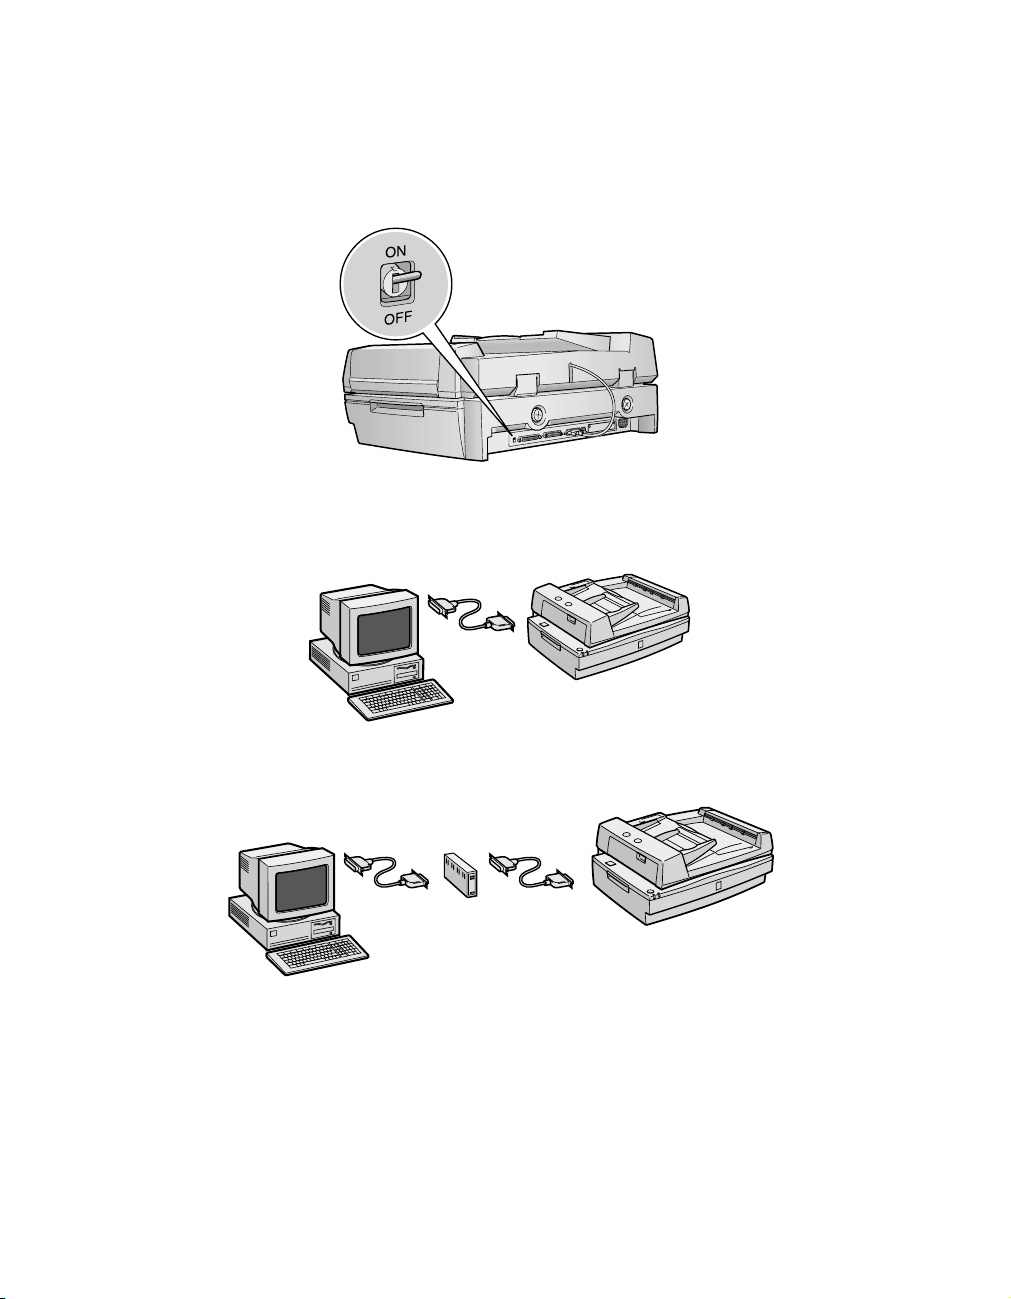
Setting the SCSI Terminator
The scanner’s SCSI terminator is built-in, with a switch to turn it on or off on the
scanner’s back panel.
If the scanner is your only SCSI device, leave the terminator turned ON (the default
setting).
If the scanner is the last device in the chain, leave the terminator turned ON.
Setting Up Your Scanner
18
Page 25
If the scanner is in the middle of a chain, turn the switch
OFF
.
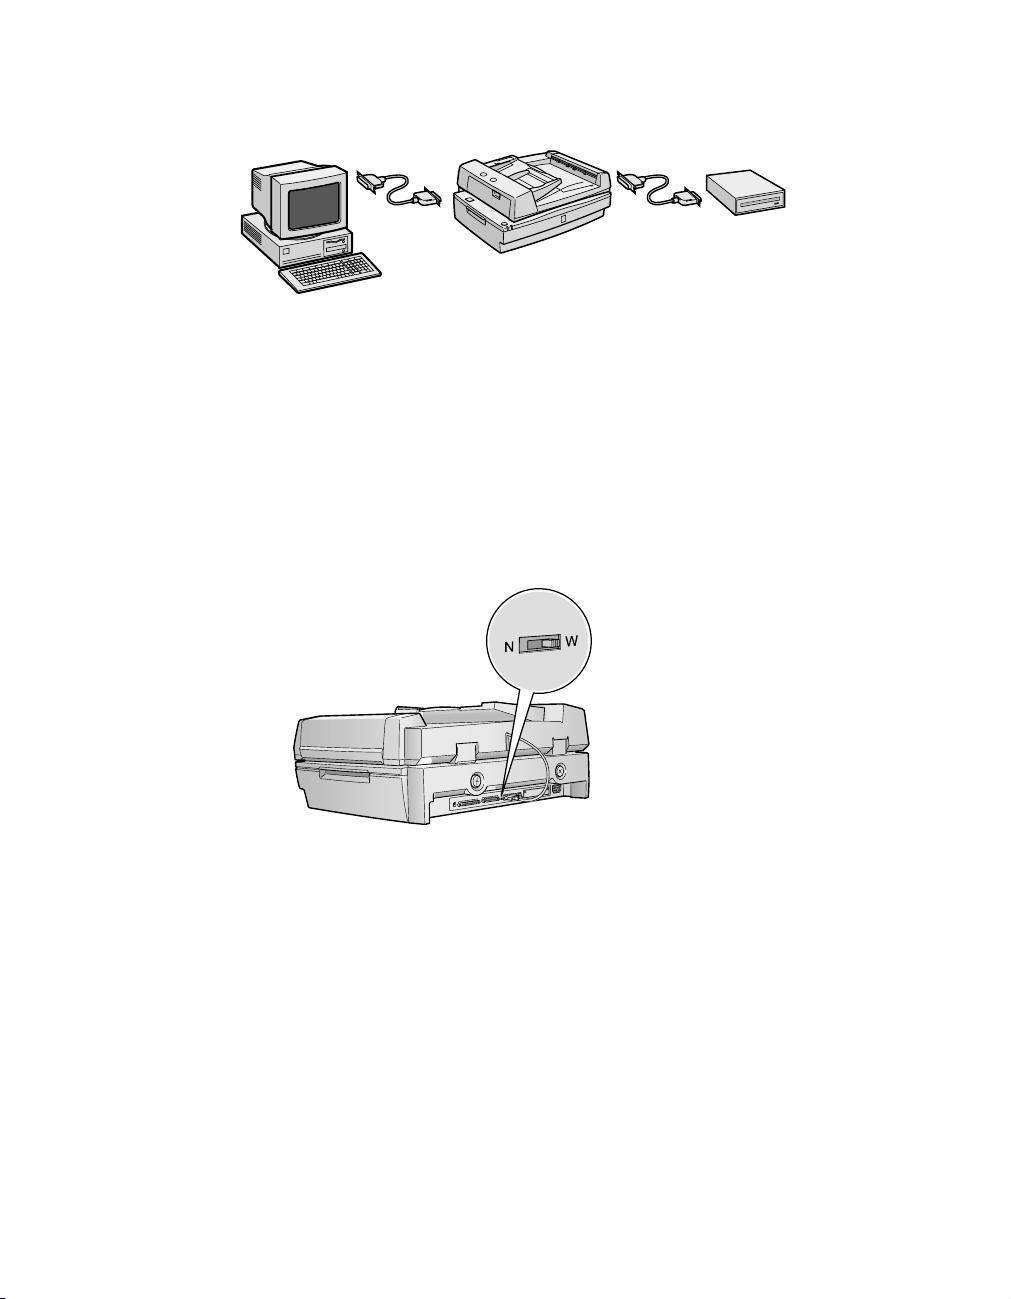
Setting the Select Switch
The scanner has two SCSI connectors: one for a 68-pin SCSI cable and the other for a
50-pin SCSI cable. You may need to change the select switch setting depending on
the SCSI card and cable you are using in your computer.
If you are using a 50-pin host adapter and SCSI cable connection anywhere on the
bus between the host adapter and the scanner, use the N setting. Use the W setting for
68-pin SCSI ultra-wide host adapter and cable connections.
Setting Up Your Scanner
19
Page 26
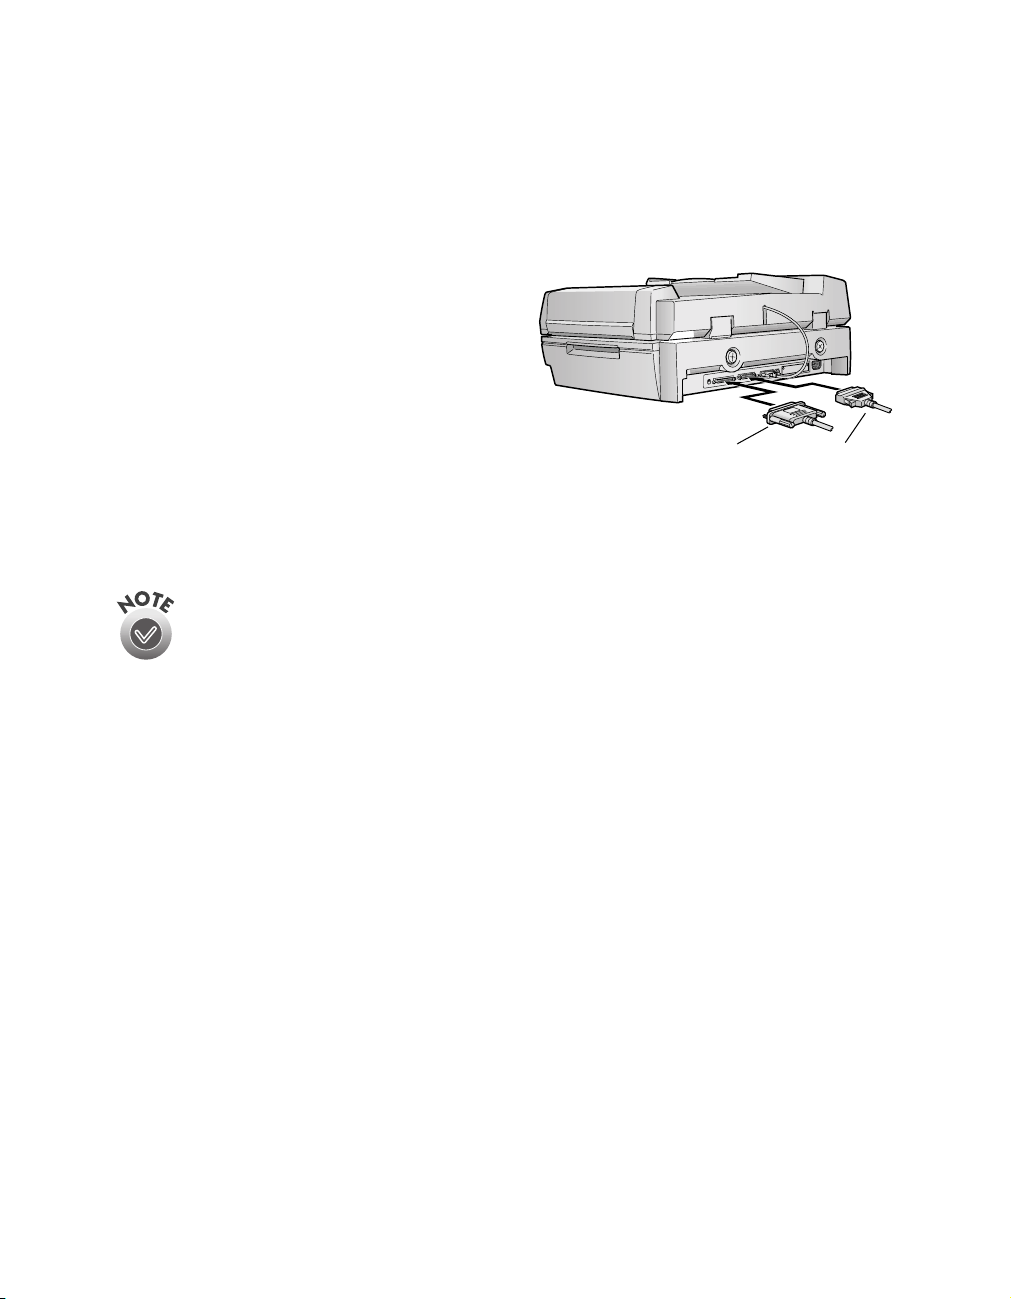
Connecting the SCSI Cable to Your Computer
To connect the SCSI cable to your computer, follow these steps:
1. Make sure your scanner, computer, and any SCSI devices connected to your
computer are turned off.
2. Connect the scanner to your computer
using a suitable SCSI cable.
Squeeze the lock releases on the lock
connector end of the SCSI cable and plug
the cable into the appropriate SCSI
connector on the back of the scanner. The
cable is secure when both connector locks
snap in.
68-pin SCSI
interface
3. Connect the pin end of the SCSI cable to the SCSI port on your computer or
another SCSI device in the chain and tighten the screws to secure the cable.
Whether you’re connecting the scanner directly to your computer or
connecting multiple SCSI devices, the total length of the SCSI bus (cables)
must not exceed 9.8 feet (3 meters); otherwise the system may not work
properly.
50-pin SCSI
interface
Don’t use an external terminator.
4. Plug in the power cables for your computer, scanner, and other external
SCSI devices.
Always turn on your scanner first. Otherwise, the computer may not recognize your
EPSON scanner when you install your software.
Setting Up Your Scanner
20
Page 27
Connecting to an IEEE 1394 Scanner Interface
If you purchased the optional IEEE 1394 scanner interface card (B808342), follow
the instructions in this section to install the interface card in your scanner and connect
the scanner to your computer.
You can purchase genuine EPSON supplies and accessories from the
EPSON Store
sales only). In Canada, please call (800) 873-7766 for dealer referral.
™
at (800) 873-7766, or visit www.epsonstore.com (U.S.
To use the IEEE 1394 scanner interface card, your PC must have an OHCI
compliant port or card, and must be running a pre-installed version of Windows Me
or Windows 2000.
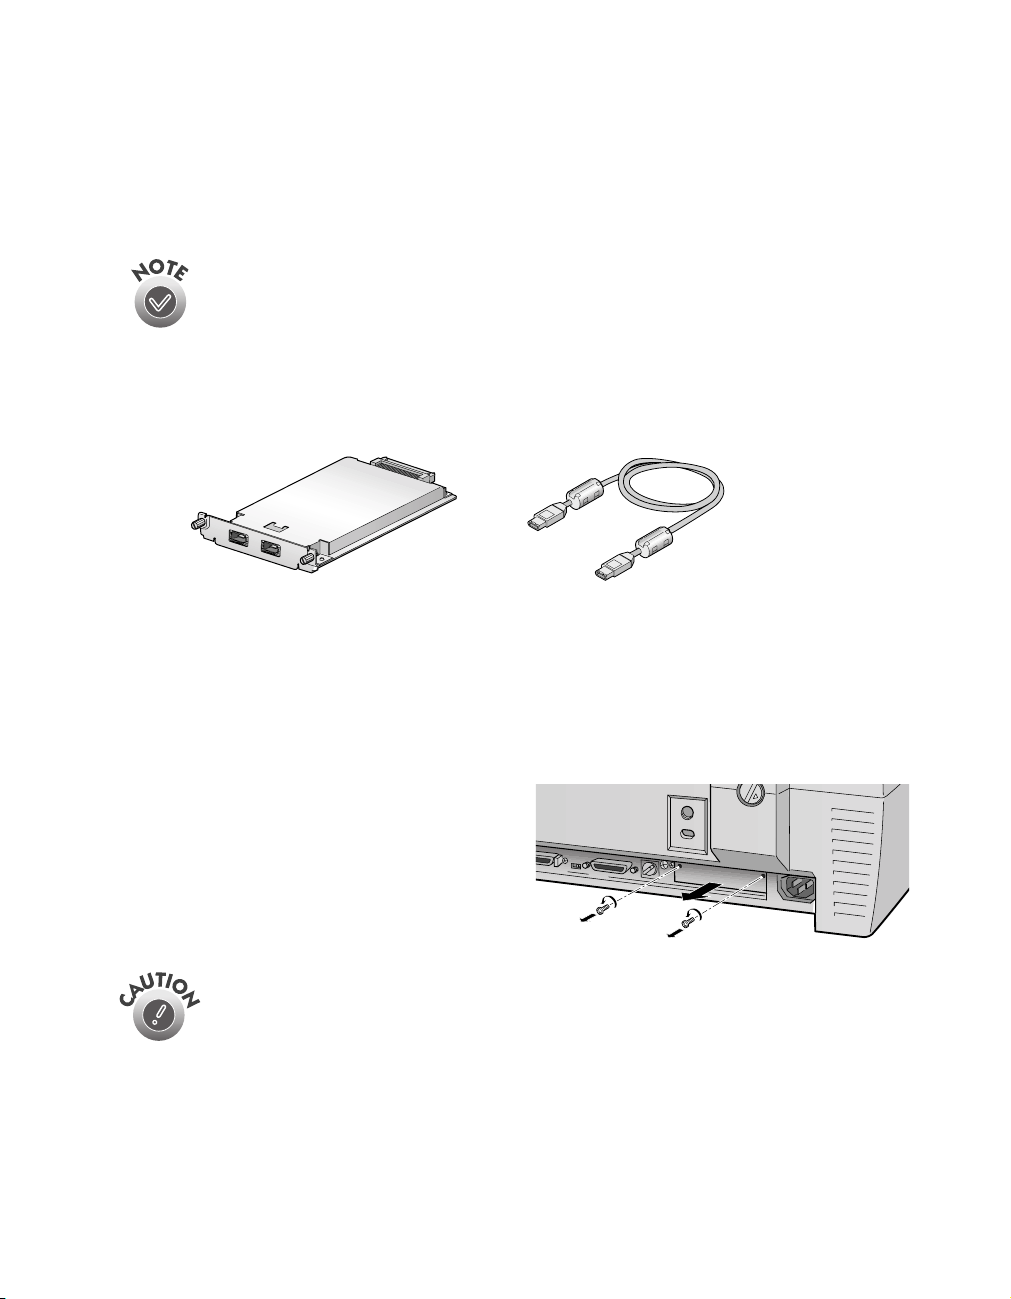
IEEE 1394 Scanner Interface Card IEEE 1394 Scanner Interface
Card Cable
Installing the IEEE 1394 Card in Your Scanner
Before you begin, turn off the scanner and disconnect the power cord and any cables.
1. Remove the two screws securing the
shield plate to the scanner’s optional
interface slot, and then remove the
plate. Put the screws in a safe place in
case you want to reinstall the shield
plate later.
Static electricity can damage electronic components like the IEEE 1394
scanner interface card. To discharge static electricity, touch the scanner’s
metal frame before handling the card.
Setting Up Your Scanner
21
Page 28
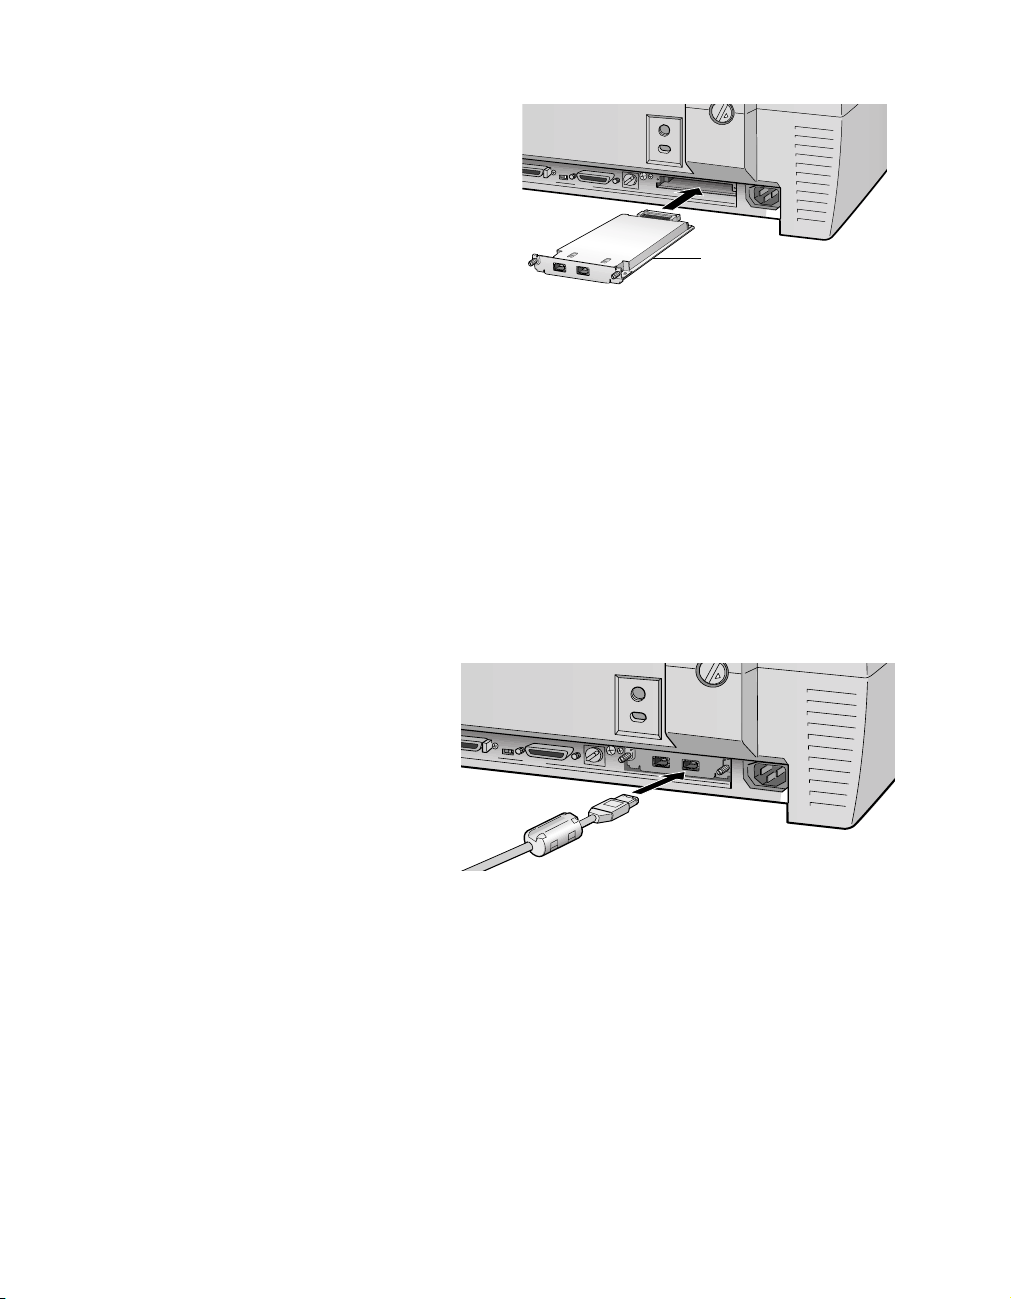
2. Turn the card over so that the circuit
board side is facing down, and insert it
in the optional interface slot. Push
gently until the card is firmly seated in
the expansion slot inside the optional
interface slot.
circuit board, face down
3. Tighten the retaining screws and
reconnect the scanner’s cables.
Connecting the IEEE 1394 Cable to Your Computer
The IEEE 1394 scanner interface card has two cable connectors. You can use either
one to connect the scanner directly to your computer. At the same time, you can use
the second connector to connect other IEEE 1394 devices in a daisy chain or tree
configuration. You can also connect the scanner to another IEEE 1394 device so that
it’s the last IEEE 1394 device in a chain connected to your computer.
Neither your scanner nor your computer has to be off when you connect the cable.
However, be careful not to connect or disconnect the cable when the scanner is in use.
Follow these steps to connect the
scanner:
1. Connect one end of the cable to
the IEEE 1394 port on the card.
2. Connect the other end of the
cable to the IEEE 1394 port on
your computer or on another
IEEE 1394 device.
Setting Up Your Scanner
22
Page 29

Chapter 2
Installing the Software
This chapter explains how to install the scanner software on your computer so it
works properly with your scanner. It also includes instructions for installing the ISIS
driver, PixTools QuickScan and Presto! PageManager. See “Installing Additional
Software” on page 49.
For instructions on installing software for a network scanner, go to
Chapter 4, “Network Scanning.”
Installing the Scanner Software
Before you begin installing software, make sure you recalibrate your monitor to
factory specifications (see your monitor documentation for instructions). Then follow
the instructions for your operating system:
■
If you’re running Windows Me, continue with the next section.
■
If you’re running Windows 2000, go to page 30.
■
If you’re running Windows 98, go to page 36.
■
If you’re running Windows 95, go to page 41.
■
If you’re running Windows NT 4.0, go to page 46.
23
Page 30
Installing the Software for Windows Me
Before you begin, make sure the GT-30000 is connected to your computer. Also,
make sure you’ve recalibrated your monitor to factory specifications (see your monitor
documentation for instructions).
This procedure automatically installs your EPSON TWAIN HS driver. You’ll be
asked to install your SCSI or IEEE 1394 driver at the beginning of installation.
Follow the instructions on the screen to install your SCSI or IEEE 1394 driver, or see
the documentation that came with your card.
You may be asked to insert your Windows CD-ROM during this procedure.
Make sure you have your Windows CD-ROM available, or know where to find the
Windows source files on your hard drive. If you need help locating your source files,
contact your computer manufacturer.
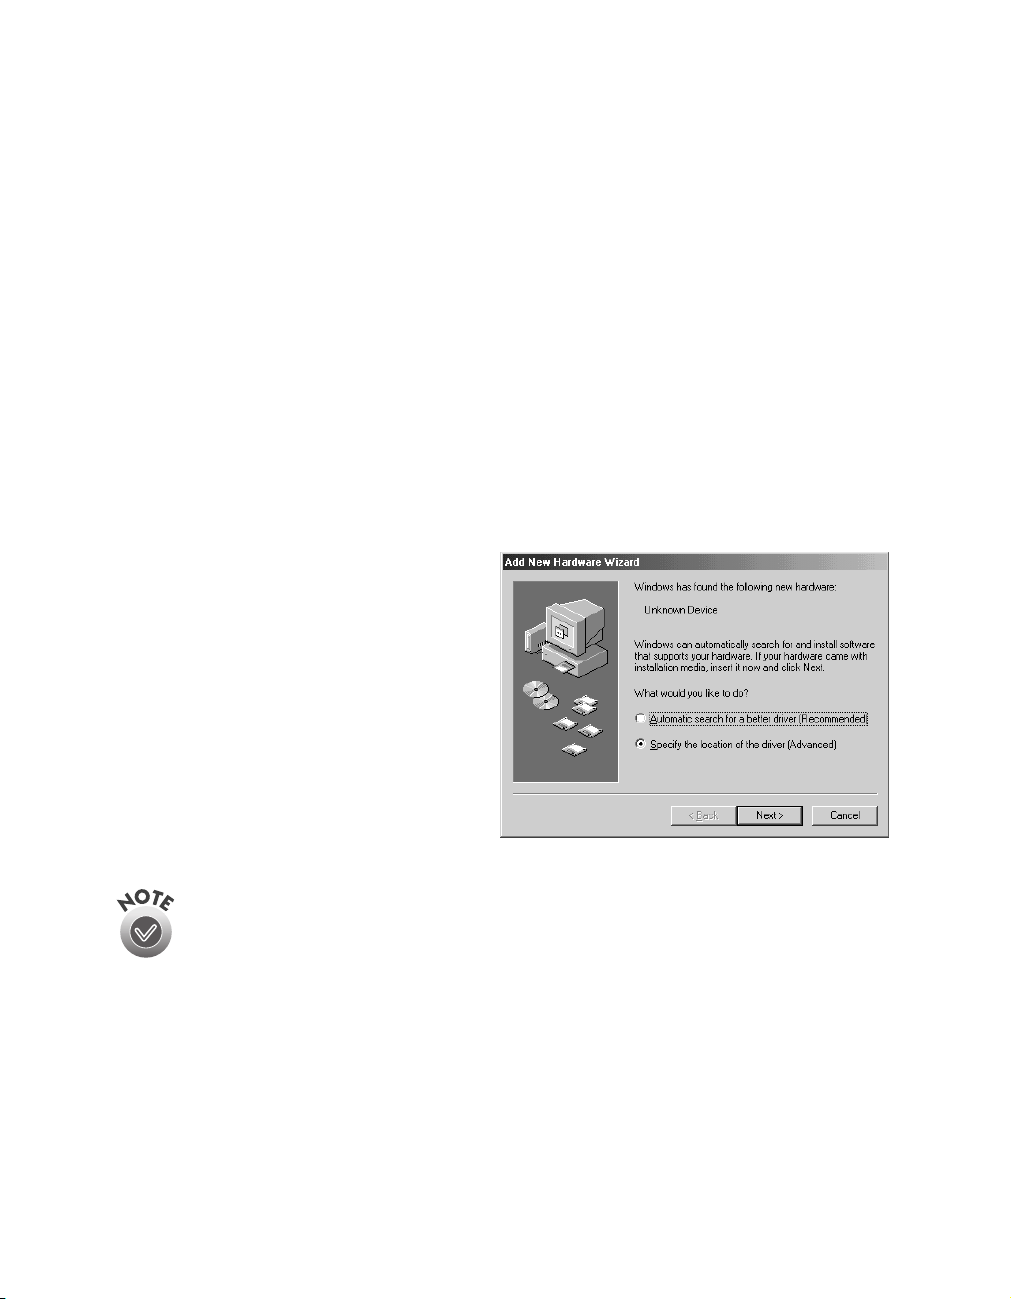
1. Turn on your scanner first, then turn on your computer.
2. When you see the window on the
right, select
the driver
3. Insert the EPSON GT-30000
Scanning Tools CD-ROM in your
drive.
Specify the location of
, and then click
Next
.
Installing the Software
24
The Add New Hardware Wizard screen above illustrates a SCSI
connection and may look slightly different for IEEE 1394 connections.
Page 31

4. Make sure the
driver for your device
a location
options are selected.
Search for the best
Specify
and
Uncheck the
necessary, before clicking the
unchecked, the wrong driver may be installed.
5. Browse to
EPSON\ English\WINME
Removable Media (Floppy, CD-ROM...)
Specify a location
option. If not
on your CD-ROM drive. (The example to
option, as
the right uses “E” as the CD-ROM drive letter. Your CD-ROM drive letter may
be different.) Click OK to close the Browse window, and then click
Next
6. Follow the instructions on the screen.
If you see a message asking for your Windows Me CD-ROM, insert it and click
OK
(or click
Browse
and locate the Windows Me source files on your hard drive;
then click OK).
7. When you see the Screen Calibration window,
move the slider right or left until the stripes
match as closely as possible. (The stripes will
not match perfectly and the recommended
setting is 1.8.) Then click OK.
The EPSON Screen Calibration Utility
calibrates the preview image you see in your
EPSON TWAIN HS driver to match your
monitor settings.
.
Installing the Software
25
Page 32

You won’t need to change the screen calibration as long as you continue
to use the same display. If you need to recalibrate your screen at a later
time, double-click the Scanners and Cameras icon in your Windows
Control Panel to open the Scanners and Cameras Properties window.
Select EPSON GT-30000 on the Devices tab, if necessary, and click the
Properties button to display the EPSON GT-30000 Properties window.
Click the Utility tab, and then click the Screen Calibration Utility button.
8. When installation is complete, click
Finish
.
Installing Acrobat Reader and Registering Online
Follow these steps to install Adobe Acrobat Reader (if it is not already installed on
your computer) and complete the GT-30000 electronic registration form:
1. Double-click the
double-click the
2. When the Select Language
window appears, make sure
English
is selected and
click OK. The Software
Setup window appears.
3. Click the
Add Software
button to display the
Software Selection window.
My Computer
Epson
CD-ROM icon.
icon on your Windows desktop, then
Installing the Software
26
Page 33

4. Make sure a check mark
appears beside Acrobat
Reader (if you need to
install it) and EPSON
GT-30000 Registration,
then click OK.
Don’t select either of the two network applications, EPSON TWAIN HS
Network or EPSON Scan Server. The EPSON TWAIN HS driver, which is
already installed on your computer, lets you scan to a GT-30000 connected
to your computer. If you want to install software for a network scanner, go
to Chapter 4, “Network Scanning”
5. Follow the instructions on the screen.
If you’re done installing software, remove the EPSON GT-30000 Scanning Tools
CD-ROM and restart your computer. Then follow the instructions in the next
section to make sure your scanner is operating properly.
If you want to install the ISIS driver, PixTools QuickScan, or Presto! PageManager
continue with the instructions under “Installing Additional Software” on page 49.
Installing the Software
27
Page 34

Testing the Scanner’s Operation (Windows Me)
Follow these steps to test scanner operation:
1. Open the Windows Control Panel and
double-click the
Cameras
icon to open the Scanners and
Cameras Properties window.
Scanners and
2. Double-click the
EPSON GT-30000
icon to display the Properties window.
3. Click the
Test Scanner or Camera
General
tab, then click the
button. If
the scanner is operating properly, a Test
Successful message displays. Click OK to
close the message.
appears next to
Device Ready
Status
on the Properties
window.
4. Click OK to close the Properties
window.
Installing the Software
28
Page 35

Selecting the GT-30000 as Your Default Scanner
(Windows Me)
If you have more than one scanner connected to your computer, you can set up the
GT-30000 as the default scanner.
1. Open the Windows Control Panel and
double-click the
Cameras
icon.
Scanners and
2. Double-click the
EPSON GT-30000
icon. You see the EPSON GT-30000
Properties window.
3. Click the
as default scanner for EPSON
TWAIN HS
Utility
tab. Make sure
is checked, click
Apply,
then OK.
Select
and
Installing the Software
29
Page 36

Installing the Software for Windows 2000
Before you begin, make sure the GT-30000 is connected to your computer. Also,
make sure you’ve recalibrated your monitor to factory specifications (see your monitor
documentation for instructions).
This procedure automatically installs your EPSON TWAIN HS driver. You’ll be
asked to install your SCSI or IEEE 1394 driver at the beginning of installation.
Follow the instructions on the screen to install your SCSI or IEEE 1394 driver, or see
the documentation that came with your card.
You may be asked to insert your Windows CD-ROM during this procedure.
Make sure you have your Windows CD-ROM available, or know where to find the
Windows source files on your hard drive. If you need help locating your source files,
contact your computer manufacturer.
1. Turn on your scanner first, then turn on your computer.
2. When you see the window on the
right, insert the EPSON GT-30000
Scanning Tools CD-ROM in your
drive and click
Next
.
3. Select
for my device
Installing the Software
30
Search for a suitable driver
and click
Next
.
Page 37

4. Select
a location
CD-ROM drives
, then click
and
Next
Specify
.
5. Browse to
Win2000
EPSON\English\
on your CD-ROM drive.
(The example to the right uses “F” as
the CD-ROM drive letter. Your
CD-ROM drive letter may be
different.) Click OK to close the
Browse window, and then click OK.
6. Follow the instructions on the screen.
If you see a message asking for your Windows 2000 CD-ROM, insert it and click
OK
(or click
Browse
and locate the Windows 2000 source files on your hard
drive; then click OK).
7. When you see the Digital Signature
Not Found screen, click
Yes.
If prompted for the EPSON
Scanners Driver Disk 1, reinsert
your EPSON GT-30000 Scanning
Tools CD-ROM.
Installing the Software
31
Page 38

8. When you see the Screen Calibration window,
move the slider right or left until the stripes
match as closely as possible. (The stripes will
not match perfectly and the recommended
setting is 1.8.) Then click OK.
The EPSON Screen Calibration Utility
calibrates the preview image you see in your
EPSON TWAIN HS driver to match your
monitor settings.
You won’t need to change the screen calibration as long as you continue
to use the same display. If you need to recalibrate your screen at a later
time, double-click the Scanners and Cameras icon in your Windows
Control Panel to open the Scanners and Cameras Properties window.
Select EPSON GT-30000 on the Devices tab, if necessary, and click the
Properties button to display the EPSON GT-30000 Properties window.
Click the Utility tab, and then click the Screen Calibration Utility button.
9. Click
with the instructions in the next section.
Installing the Software
32
Finish
when you see a message that installation is complete, then continue
Page 39

Installing Acrobat Reader and Registering Online
Follow these steps to install Adobe Acrobat Reader (if it is not already installed on
your computer) and complete the GT-30000 electronic registration form:
1. Double-click the
double-click the
2. Make sure
English
My Computer
Epson
selected and click OK. The
Software Setup window
appears.
3. Click the
Add Software
button to display the
software selection window.
icon on your Windows desktop, then
CD-ROM icon.
is
4. Make sure a check mark
appears beside Acrobat
Reader (if you need to
install it) and EPSON
GT-30000 Registration,
then click OK.
Don’t select either of the two network applications, EPSON TWAIN HS
Network or EPSON Scan Server. The EPSON TWAIN HS driver, which is
already installed on your computer, lets you scan to a GT-30000 connected
to your computer. If you want to install software for a network scanner, go
to Chapter 4, “Network Scanning.”
5. Follow the instructions on the screen.
Installing the Software
33
Page 40

If you’re done installing software, remove the EPSON GT-30000 Scanning Tools
CD-ROM and restart your computer. Then follow the instructions in the next
section to make sure your scanner is operating properly.
If you want to install the ISIS driver, PixTools QuickScan, or Presto! PageManager
continue with the instructions under “Installing Additional Software” on page 49.
Testing the Scanner’s Operation (Windows 2000)
Follow these steps to test scanner operation:
1. Open the Windows Control Panel and
double-click the
Cameras
icon to open the Scanners
and Cameras Properties window.
Scanners and
2. Make sure
selected, and then click the
EPSON GT-30000
Properties
is
button.
3. Click the
Test Scanner or Camera
button. If the scanner is operating
properly, a Test Successful message
displays. Click OK to close the message.
Device Ready
Status
to
appears next
.
4. Click OK to close the Properties
window.
Installing the Software
34
Page 41

Selecting the GT-30000 as Your Default Scanner
(Windows 2000)
If you have more than one scanner connected to your computer, you can set up the
GT-30000 as the default scanner.
1. Open the Windows Control Panel and
double-click the
Cameras
icon to open the Scanners
and Cameras Properties window.
Scanners and
2. Make sure
selected, and click the
EPSON GT-30000
Properties
button. You see the EPSON GT-30000
Properties window.
3. Click the
as default scanner for EPSON
TWAIN HS
Utility
tab. Make sure
is checked, and then
click OK.
4. Click OK to close the Properties
window.
is
Select
Installing the Software
35
Page 42

Installing the Software for Windows 98
Before you begin, make sure the GT-30000 is connected to your computer. Also,
make sure you’ve recalibrated your monitor to factory specifications (see your monitor
documentation for instructions).
This procedure automatically installs your EPSON TWAIN HS driver. If you
connected the scanner with a SCSI cable, you’ll be asked to install your SCSI driver at
the beginning of installation. Follow the instructions on the screen to install your
SCSI driver, or see the documentation that came with your SCSI card.
You may be asked to insert your Windows CD-ROM during this procedure.
Make sure you have your Windows CD-ROM available, or know where to find the
Windows source files on your hard drive. If you need help locating your source files,
contact your computer manufacturer.
If you want to use your scanner on a network, go to Chapter 4, “Network
Scanning,” instead.
1. Turn on the scanner first, then
turn on your computer. When you see
the window on the right, click
(The Wizard may also say it has found
an unknown device.)
Next
.
2. Select
for your device
3. Insert the EPSON GT-30000
Scanner Software CD-ROM in
your drive.
Installing the Software
36
Search for the best driver
, and click
Next
.
Page 43

4. Select
Specify a location
, if
necessary. Browse to
EPSON\English\WIN98
CD-ROM drive. Then click
on your
Next
.
(The example on the right shows “E”
as the CD-ROM drive. Your
CD-ROM drive letter may be
different.)
5. Follow the instructions on the screen.
If you see a message asking for your Windows 98 CD-ROM, insert it and click
OK
(or select
Specify a location
, click
Browse
, and locate the Windows 98
source files on your hard drive. Then click OK.) When prompted, reinsert your
scanner software CD-ROM.
6. When you see the Screen Calibration window,
move the slider right or left until the stripes
match as closely as possible. (The stripes will
not match perfectly. The recommended setting
is 1.8.) Then click OK.
The EPSON Screen Calibration Utility
calibrates the preview image you see in your
EPSON TWAIN HS driver to match your
monitor settings.
You won’t need to change the screen calibration as long as you continue
to use the same display. If you need to recalibrate your screen at a later
time, double-click the Scanners and Cameras icon in your Windows
Control Panel to open the Scanners and Cameras Properties window.
Select EPSON GT-30000 on the Devices tab, if necessary, and click the
Properties button to display the EPSON GT-30000 Properties window.
Click the Utility tab, and then click the Screen Calibration Utility button.
7. When installation is complete, click
Finish
.
Continue with the instructions in the next section to install Acrobat Reader, if
necessary, and register your scanner online.
Installing the Software
37
Page 44

Installing Acrobat Reader and Registering Online
Follow these steps to install Adobe Acrobat Reader (if it is not already installed on
your computer) and complete the GT-30000 electronic registration form:
1. Double-click the
double-click the
2. Make sure
My Computer
Epson
English
selected and click OK. The
Software Setup window
appears.
3. Click the
Add Software
button to display the
software selection window.
icon on your Windows desktop, then
CD-ROM icon.
is
4. Make sure a check mark
appears beside Acrobat
Reader (if you need to
install it) and EPSON
GT-30000 Registration,
then click OK.
5. Follow the instructions on the screen.
Installing the Software
38
Don’t select either of the two network applications, EPSON TWAIN HS
Network or EPSON Scan Server. The EPSON TWAIN HS driver, which is
already installed on your computer, lets you scan to a GT-30000 connected
to your computer. If you want to install software for a network scanner, go
to Chapter 4, “Network Scanning.”
Page 45

If you’re done installing software, remove the EPSON GT-30000 Scanning Tools
CD-ROM and restart your computer. Then follow the instructions in the next
section to make sure your scanner is operating properly.
If you want to install the ISIS driver, PixTools QuickScan, or Presto! PageManager
continue with the instructions under “Installing Additional Software” on page 49.
Testing Your Scanner Connection (Windows 98)
You need to verify that your scanner was properly connected and the software was
installed correctly. Follow these steps to test scanner operation:
1. Open the Windows Control Panel and
double-click the
Cameras
icon to open the Scanners and
Cameras Properties window.
Scanners and
2. Make sure
then click the
3. If necessary, click the
Test Scanner or Camera
the
the scanner is operating properly,
Ready
EPSON GT-30000
Properties
button.
General
appears next to Status.
is selected,
tab. Click
button. If
Device
4. Click OK to close the Properties window.
Installing the Software
39
Page 46

Selecting the GT-30000 as Your Default Scanner
(Windows 98)
If you have more than one scanner connected to your computer and you’re running
Windows 98, you can set up the EPSON GT-30000 as your default scanner.
1. Open the Windows Control Panel and
double-click the
Cameras
icon to open the Scanners and
Cameras Properties window.
Scanners and
2. Select
and click the
3. Click the
as default scanner for EPSON TWAIN
HS
EPSON GT-30000
Properties
Utility
tab. Make sure
, if necessary,
button.
is checked, and then clickOK.
Select
4. Click OK to close the Scanners and
Cameras Properties window.
The default scanner remains in effect until
you use this procedure to change it again.
Installing the Software
40
Page 47

Installing the Software for Windows 95
Follow the instructions in this section to install your EPSON GT-30000 scanner
driver and other software on your scanner software CD-ROM for stand-alone
scanning. Before you begin installing software, make sure you recalibrate your
monitor to factory specifications. (See your monitor documentation for instructions.)
If you want to use your scanner on a network, go to Chapter 4, “Network Scanning,”
instead.
You may be asked to insert your Windows CD-ROM during this procedure.
Make sure you have your Windows CD-ROM available, or know where to find the
Windows source files on your hard drive. If you need help locating your source files,
contact your computer manufacturer.
1. Turn on your scanner first, then turn
on your computer. When you see the
window on the right, click
Next
.
2. Click
Other Locations
.
Installing the Software
41
Page 48

3. Make sure your scanner software
CD-ROM is in the drive.
Browse to the following location
on your CD-ROM drive:
EPSON\English\WIN95
. Then
click OK.
(The example on the right shows
“G” as the CD-ROM drive.
Your CD-ROM drive letter may
be different.)
4. When you see the window on the
right, click
Finish
. Then restart
your computer.
Continue with the instructions in the
next section to install EPSON
TWAIN HS and Acrobat Reader (if
necessary).
Installing the Software
42
Page 49

Installing Other Software on Your CD-ROM
Follow these steps to install EPSON TWAIN HS, Adobe Acrobat Reader (if it is not
already installed on your computer) and complete the GT-30000 electronic
registration form.
1. Double-click the
Epson
2. Make sure
CD-ROM icon.
English
My Computer
selected and click OK. The
Software Setup window
appears.
3. Click the
Add Software
button to display the
software selection window.
icon on your desktop, then double-click the
is
4. You must install EPSON
TWAIN HS to use your
scanner. Make sure a check
mark appears beside it.
Also select Acrobat Reader
(if you need to install it) and
EPSON GT-30000 Registration, then click OK.
Don’t select either of the two network applications, EPSON TWAIN HS
Network or EPSON Scan Server. The EPSON TWAIN HS driver lets you
scan when your scanner is connected directly to your computer. If you
want to use the scanner on a network, go to Chapter 4, “Network
Scanning,” instead.
Installing the Software
43
Page 50

5. Follow the instructions on the screen to
install EPSON TWAIN HS. When
installation is complete, you see the
window on the right. Make sure
selected and
GT-30000
appears in the
SCSI
is
Scanner Selection list.
6. Click
Test
to check the connection. If the
scanner software is installed correctly, you
Status: Device Ready
see
under Scanner
Information. Click OK to close the
window.
You can test your scanner connection at
any time. (Double-click the
TWAIN HS
icon in your Windows
EPSON
Control Panel to open the EPSON
TWAIN HS window. Then click the
button.)
Test
Installing the Software
44
Page 51

7. When you see the Screen Calibration window,
move the slider right or left until the stripes
match as closely as possible. (The stripes will
not match perfectly. The recommended setting
is 1.8.) Then clickOK.
The EPSON Screen Calibration Utility
calibrates the preview image you see in your
EPSON TWAIN HS driver to match your
monitor settings.
You won’t need to change the screen calibration as long as you continue
to use the same display. If you need to recalibrate your screen at a later
time, double-click the EPSON TWAIN HS icon in your Windows Control
Panel to open the EPSON TWAIN HS window. Then click the Screen
Calibration Utility button at the bottom of the window.
8. Follow the instructions on the screen to install Acrobat Reader (if necessary).
To make sure your scanner driver is installed correctly, verify that the scanner is listed
in the Windows Device Manager. (Click
double-click the
EPSON Scanners. GT-30000
System
icon. Select the Device Manager tab and double-click
should appear in the list.)
Start, Settings, Control Panel
, then
If you’re done installing software, restart your computer. If you want to install the
ISIS driver, PixTools QuickScan, or Presto! PageManager, see page 49.
Installing the Software
45
Page 52

Installing the Software for Windows NT 4.0
Follow the instructions in this section to install the EPSON GT-30000 scanner driver
and other software on your scanner software CD-ROM. Before you begin installing
software, make sure you recalibrate your monitor to factory specifications. (See your
monitor documentation for instructions.)
You may be asked to insert your Windows CD-ROM during this procedure.
Make sure you have your Windows CD-ROM available, or know where to find the
Windows source files on your hard drive. If you need help locating your source files,
contact your computer manufacturer.
If you want to use your scanner on a network, go to Chapter 4, “Network Scanning,”
instead.
1. Turn on your scanner first, then turn on your computer.
2. Log onto Windows NT and insert your EPSON GT-30000 Scanner Software
CD-ROM in your drive.
3. If you don’t see the Select Language screen, double-click the
on your desktop, then double-click the
4. Make sure
English
is
Epson
CD-ROM icon.
selected and click OK. The
Software Setup window
appears.
5. Click the
Add Software
button to display the
software selection window.
My Computer
icon
Installing the Software
46
Page 53

6. You must install EPSON
TWAIN HS to use your
scanner. Make sure a check
mark appears beside it.
Also select Acrobat Reader
(if you need to install it)
and EPSON GT-30000 Registration, then click OK.
Don’t select either of the two network applications, EPSON TWAIN HS
Network or EPSON Scan Server. The EPSON TWAIN HS driver lets you
scan when your scanner is connected directly to your computer. If you
want to use the scanner on a network, go to Chapter 4, “Network
Scanning,” instead.
7. Follow the instructions on the screen to
install EPSON TWAIN HS. When
installation is complete, you see the
window on the right. Make sure
selected and
GT-30000
appears in the
SCSI
is
Scanner Selection list.
Installing the Software
47
Page 54

8. Click
Test
to check the connection.
If the scanner software is installed
correctly, you see
Status: Device Ready
under Scanner Information. Click OK to
close the window.
You can test your scanner connection at
any time. (Double-click the
TWAIN HS
icon in the Windows Control
EPSON
Panel to open the EPSON TWAIN HS
window. Then click the
Test
button.)
9. When you see the Screen Calibration
window, move the slider right or left until
the stripes match as closely as possible.
(The stripes will not match perfectly. The
recommended setting is 1.8.) Then
clickOK.
The EPSON Screen Calibration Utility
calibrates the preview image you see in your
EPSON TWAIN HS driver to match your
monitor settings.
10. Follow the instructions on the screen to
install Acrobat Reader (if necessary).
If you’re done installing software, restart your computer. If you want to install the
ISIS driver, PixTools QuickScan, or Presto! PageManager, go to the next section.
Installing the Software
48
You won’t need to change the screen calibration as long as you continue
to use the same display. If you need to recalibrate your screen at a later
time, open the EPSON TWAIN HS window by double-clicking the EPSON
TWAIN HS icon in the Windows Control Panel. Then click the
Screen Calibration button at the bottom of the window to start the utility.
Page 55

Installing Additional Software
Follow the instructions in this section to install the ISIS driver, PixTools QuickScan,
and Presto! PageManager.
Installing the ISIS Driver
Follow these steps to install the ISIS driver:
You should install your ISIS-compatible application before you install the ISIS
driver.
1. If necessary, insert your scanner software CD-ROM in the drive. If you don’t see
the Select Language screen, double-click
double-click the
Epson
CD-ROM icon.
My Computer
on your desktop, then
2. Make sure
selected and click OK. The
Software Setup window
appears.
3. Click
4. To install the ISIS driver,
double-click the ISIS folder,
then double-click the
Setup.exe
follow the instructions on
the screen.
5. When installation is
complete, click OK, then
restart your computer.
English
Browse This CD
icon. Then
is
.
Installing the Software
49
Page 56

Installing PixTools QuickScan
Follow these steps to install PixTools QuickScan:
1. If necessary, insert your scanner software CD-ROM in the drive. If you don’t see
the Select Language screen, double-click
double-click the
Epson
CD-ROM icon.
2. Make sure English is
selected and click OK. The
Software Setup window
appears.
My Computer
on your desktop, then
3. Click
Browse This CD
4. To install QuickScan,
double-click the
Quickscn
folder, then double-click
Setup.exe
the
icon. Then
follow the instructions on
the screen.
5. When installation is
complete, click OK, then
restart your computer.
.
Installing the Software
50
Page 57

Accessing the ISIS Driver from QuickScan
Before you can scan, you must select the GT-30000 as your scanner. To select the
scanner:
1. Choose
Select Scanner
Selection dialog appears.
2. Make sure EPSON
GT-30000 is selected and
click OK.
from the
File
menu. In a few moments, the Scanner
Installing the Software
51
Page 58

Installing Presto! PageManager
Follow these steps to install Presto! PageManager:
1. If necessary, insert your scanner software CD-ROM in the drive. If you don’t see
the Select Language screen, double-click
double-click the
Epson
CD-ROM icon.
My Computer
on your desktop, then
2. Make sure
English
is
selected and click OK. The
Software Setup window
appears.
3. Click
Browse This CD
.
4. To install Presto!
PageManager, double-click
pagemgr
the
double-click the
folder, then
English
folder.
5. Double-click the
Setup.exe
icon, then
follow the instructions on
the screen.
6. When installation is
complete, click OK, then restart your computer.
Installing the Software
52
Page 59

Chapter 3
How to Scan
This chapter gives you an overview of the scanning process and then provides
step-by-step scanning instructions.
Overview
Getting the best scan possible depends on several factors, including the quality of your
original and the resolution you select. The better your original is, the better your scan
will be. While you can make some color corrections in your scanning software, you’ll
need to do any major color photo retouching in a program such as Adobe
Photoshop®. To get the best possible scan, keep the document table clean, and make
sure the document is flat against the glass surface.
Selecting Your Scanner Source
Your EPSON GT-30000 scanner comes with two all-purpose drivers, EPSON
TWAIN HS and EPSON TWAIN HS Network, as well as the ISIS driver. The
scanner driver is what you select as the source in your application. This is the software
that allows your computer to communicate with your scanner. It also allows you to
select certain settings to optimize the scanned image.
If you installed EPSON TWAIN HS on the scanner server so that you could
make a direct connection to the scanner, remember that you must exit
EPSON Scan Server to use EPSON TWAIN HS. EPSON Scan Server
disables EPSON TWAIN HS.
If you’re accessing a GT-30000 scanner connected to another computer,
always use EPSON TWAIN HS Network as your source. If you’re
accessing the GT-30000 scanner connected to your computer, always use
EPSON TWAIN HS. Do not use EPSON TWAIN HS Network.
53
Page 60

For details on using EPSON TWAIN HS or EPSON TWAIN HS Network, see
page 58 and your electronic EPSON GT-30000 Reference Guide. You can also install
the ISIS driver and use it as your source. (See the ISIS User’s Guide on your
GT-30000 Scanning Tools CD-ROM for details.)
Selecting Resolution
Resolution refers to how many dots per inch (dpi) or dots per centimeter (dpcm) your
image contains. The best resolution for a scanned image depends on the type of image
you’re scanning and your final output device.
As a rule of thumb for most images except line art, use a scanning resolution that is
approximately one third of your output resolution. For example, use a scanning
resolution up to 100 dpi with a 300 dpi laser printer, and up to 200 dpi with a
600 dpi laser printer. For 1440 dpi ink jet printers, such as the EPSON Stylus
series, use a scanning resolution of up to 300 dpi. Try a scanning resolution of 240
dpi for 720 dpi printing.
Keep the following in mind when you choose a resolution:
■
The higher the resolution you select, the larger the resulting image file will be. For
example, an 8.5
×
11-inch original scanned at 300 dpi can produce a 24MB file.
The same original scanned at 72 dpi creates a 1.3MB file. Large files take longer to
process and print, so consider the practical limitations of your computer system
and hard disk drive when selecting a resolution. To keep your file size
manageable, select the lowest possible resolution that gives acceptable quality. (If
your final output is for on-screen viewing, you can scan at 72 dpi and reduce your
file size.)
®
Color
54
■
If you need to scan at a higher resolution, you can reduce the size of the resulting
image file by scanning only part of the image. For information about selecting
part of an image, see “Making and Modifying Marquees” in your electronic
EPSON GT-30000 Reference Guide.
How to Scan
Page 61

Scanning Color Images
If the colors in your scanned image don’t match those in your original document, try
experimenting with the Unsharp Mask setting. Click the
EPSON TWAIN HS or EPSON TWAIN HS Network main window to display the
Destination window, and then select or deselect
Unsharp Mask
Destination
.
button on the
Scaling (Resizing) Images
If you plan to enlarge your image, it’s better to enlarge it by scanning at a higher
resolution rather than adjusting resolution in your application. Each time you modify
an image, you lose some image quality.
Keep in mind when you enlarge a small photo, you’ll need to scan at a high enough
resolution to retain your image quality, but not so high that your file size is too large
to be efficient.
Batch Scanning
You can use batch scanning to save time. Batch scanning allows you to scan several
images at once, or the same image with several different settings.
For more information, see “Making and Modifying Marquees” in your electronic
EPSON GT-30000 Reference Guide.
How to Scan
55
Page 62

Step-by-Step Scanning Instructions
This section contains step-by-step instructions for scanning an image. Before you
scan, make sure you’ve set up your scanner and installed the software as described in
Chapter 1, “Setting Up Your Scanner.”
If you are scanning a document with multiple pages, see “Loading the Automatic
Document Feeder” below. If you are scanning a single page, see “Placing a Single
Original Document” on page 57.
Loading the Automatic Document Feeder
You can load up to 100 sheets in the automatic document feeder (ADF). First, make
sure the document:
■
Has no wet ink on it.
■
Has no holes.
■
Is not ripped or wrinkled.
■
Has no staples or other objects attached that may damage the feeder.
■
Has no folds.
56
■
Is not a multipart form.
■
Is not bound.
■
Has no carbon coating.
■
Has no cut-out areas.
When scanning high-quality color or halftone documents, it’s best to open
the ADF and scan documents manually.
Don’t open the ADF while scanning. You’ll get an option error and possibly
a paper feeding error. Always close the ADF before scanning or using the
feeder.
How to Scan
Page 63

To load documents into the ADF, follow these steps:
1. Slide the edge guide all the way out.
2. Insert the document stack face up into the ADF until it meets resistance. Then
move the right edge guide so it is flush with the right edge of your document.
3. Continue with the scanning procedure on page 58.
Placing a Single Original Document
Follow these steps to position a single page:
1. Raise the ADF and place your
document face down on the
document table.
2. Position the document so the
horizontal and vertical edges are
carefully aligned with the scales on
the top and left side of the
document table.
3. Close the ADF slowly. Be careful
not to move the document.
top corner of
document
How to Scan
57
Page 64

Scanning with EPSON TWAIN HS
Follow the steps below to scan a document using EPSON TWAIN HS or EPSON
TWAIN HS Network:
1. Start your host application (for example, Presto! PageManager or any other
application that supports EPSON TWAIN HS).
2. Select your scanner source. (Unless you change your source, you need to do this
step only once.)
For example, if you’re using Presto! PageManager as your host application, click
File
HS
. Then click
If you’re accessing a network scanner connected to another computer, select
EPSON TWAIN HS Network
Select Source
, then
Select
. In the Select Source dialog box, select
.
EPSON TWAIN
as your input source and click OK.
You can’t select EPSON TWAIN HS as your scanner source if you’re using
a network scanner and EPSON Scan Server is running. EPSON Scan
Server disables EPSON TWAIN HS.
For example, choose
Acquire
The EPSON TWAIN HS main
window appears.
3. Choose the
Image Type
and
Document Source
.
For example, if you’re scanning a
photograph, select
Document Source
Color (Std)
as your
Flatbed
and
Image Type
When using the ADF, choose
ADF-Single-sided
ADF-Double-sided
Document Source
or
as your
.
from Presto! PageManager’s File menu.
as your
24-bit
.
click to display
a preview of
the image
click to start
scanning
58
How to Scan
Page 65

4. Click the
Preview
button. You see a
preview of your scan in
the window that opens.
If you are scanning
multiple pages using
the ADF, you do not
need to Preview the
document unless you
want to scan only a
portion of a document.
5. Choose your scan
settings.
Preview button
Marquee button
Auto Locate button
Auto Exposure button
Click the
Locate
Auto
button to
automatically define the scan area around the edges of your image. You can also
adjust the scan area by positioning the mouse pointer over the dotted line around
the marquee’s edge and dragging the box to resize the marquee.
Click the
Auto Exposure
button to automatically set the highlight and
shadow exposure.
Generally it’s a good idea to use the Auto Exposure button to obtain the
best settings for your scan. See your electronic EPSON GT-30000
Reference Guide for more information about choosing settings.
If you need to remove color cast from your image, use the Gray Balance
Intensity feature.
6. When you’ve finished making adjustments, click the
READY
The
light on the front of the scanner flickers while it’s scanning. In a few
Scan
button.
moments, a scanned image is imported into your host application’s window.
(If the
READY
light continues to blink, it may indicate an error condition. See
Chapter 6, “Solving Problems,” for more information.)
7. Click
Close
to close the EPSON TWAIN HS or EPSON TWAIN HS Network
window and return to your application.
How to Scan
59
Page 66

Using the
a Start Button
You can load a document in the scanner, press the
a Start button, and watch while
the assigned application starts and then scans your document.
This section shows you how to set up the a Start button to launch an application
which supports this feature.
The
Start button features described in this chapter are only available
a
when you use EPSON TWAIN HS to access a scanner connected to
your computer and you are running Windows Me, Windows 2000, or
Windows 98. If you are running Windows 95 or Windows NT, the
a
Start button is disabled.
To use the
must start both the host application and EPSON TWAIN HS Network.
Pressing the
computer currently connected to the scanner server, but does not
automatically launch any applications.
Setting Up the
Start button with a network scanner, the client computer
a
Start button sends the scanned image to the client
a
a
Start Button
If you’re running Windows Me,
Windows 2000, or Windows 98,
whenever you press the
a Start button
you’ll see a window asking you to choose
which application to launch. To avoid
this window, make sure that only one
application is assigned to the
a Start
button.
60
How to Scan
Page 67

Follow these steps to assign an application to the
1. Open the Windows Control Panel
and double-click the
and Cameras
Scanners
icon.
a Start button:
2. Select
EPSON GT-30000
necessary, and click
Properties
you are running Windows Me,
double-click the
GT-30000
3. Click the
4. Make sure
Events
EPSON
icon.
tab.
Start Button
appears
in the Scanner events box, then
deselect any applications you
don’t want to use in the Send to
this application list. When you
finish, a check mark should appear
only beside the application that
you want to assign to the
button.
, if
. If
a Start
5. Click OK to close the EPSON
GT-30000 Properties window,
then click OK again to close the
Scanners and Cameras Properties window.
Press the scanner’s
a Start button to have EPSON TWAIN HS started and the
document scanned into the assigned application.
You can disable the
checkbox on the Events tab.
a Start button by clicking the Disable device events
How to Scan
61
Page 68

62
How to Scan
Page 69

Chapter 4
Network Scanning
You can use EPSON Scan Server and EPSON TWAIN HS Network, two
applications on your EPSON GT-30000 Scanner Software CD-ROM, to share your
scanner with other users in a small workgroup.
Your network must have a scanner server (the Windows computer connected to the
scanner) and one or more client computers. Only one client computer at a time can
connect to the scanner server and access the scanner. However, you can have more
than one scanner and scanner server on a network, so clients can choose which
scanner to use.
Here are some other requirements for sharing a scanner:
■
The scanner server must be an IBM® Pentium® compatible PC running Windows
Me, Windows 2000, Windows 98, Windows 95, or Windows NT 4.0 with
Service Pack 3 or higher.
■
Client computers can be running Windows Me, Windows 2000, Windows 98,
Windows 95, or Windows NT 4.0.
■
Both the client computers and the scanner server must have a network interface
card installed, and must be running the TCP/IP protocol (see Appendix A for
instructions on installing the TCP/IP protocol).
■
EPSON Scan Server must be installed on the scanner server, and EPSON
TWAIN HS Network must be installed on client computers.
■
It is recommended the scan server have a static IP address.
63
Page 70

This chapter includes the following:
■
How to install, set up, and start EPSON Scan Server on the scanner server
■
How to install and start EPSON TWAIN HS Network on client computers
■
How to begin a scan from the client computer, the scanner server, or the scanner’s
a Start button
■
How to stop a scan in progress.
The illustration below shows a sample network configuration in which network
scanning is available. The software you install depends on which computer you’re
setting up—a scanner server or client computer.
Scanner Server
EPSON Scan Server
EPSON TWAIN HS*
TWAIN-compliant software
EPSON GT-30000
Network
Network Scanning
64
Client Computers
EPSON TWAIN HS Network
TWAIN-compliant software
* If you installed EPSON TWAIN HS on the scanner server so that you could make a direct
connection to the scanner, remember that you must exit EPSON Scan Server to use EPSON
TWAIN HS.
Page 71

Setting Up the Scanner Server
You can set up any Windows Me, Windows 2000, Windows 98, Windows 95, or
Windows NT 4.0 computer as a scanner server, as long as it has a network interface
card installed and is running the TCP/IP protocol.
Before you begin, make sure the scanner is unlocked and connected to the scanner
server (see Chapter 1, “Setting Up Your Scanner” for details). If you don’t have the
TCP/IP protocol installed on the scanner server, see Appendix A, “Installing the
TCP/IP Protocol.”
Follow the instructions for your operating system:
■
If you’re running Windows Me, continue with the next section.
■
If you’re running Windows 2000, go to page 71.
■
If you’re running Windows 98, go to page 76.
■
If you’re running Windows 95, go to page 83.
■
If you’re running Windows NT, go to page 88.
Network Scanning
65
Page 72

Installing the Scanner Server Software for Windows Me
Before you begin, make sure the GT-30000 is connected to your computer. Also,
make sure you’ve recalibrated your monitor to factory specifications. (See your
monitor documentation for instructions.)
Depending on how your computer system was originally set up, you may be asked to
insert your Windows Me CD-ROM during driver installation. Make sure you have it
available, or know where to find the Windows source files on your hard disk (for
example, in the Windows folder). If you need help, contact your computer
manufacturer.
If you’ve just installed a SCSI interface card, you may be asked to install a
SCSI driver at the beginning of installation. Follow the instructions on the
screen to install the best driver, then continue with the scanner server
installation.
1. Turn on your scanner first, then turn on your computer.
2. When you see the window on the
right, select
the driver
Specify the location of
, and then click
Next
.
3. Insert the EPSON GT-30000
Scanning Tools CD-ROM in your
drive and click
Network Scanning
66
Next
.
Page 73

4. Make sure the
driver for your device
Specify a location
selected.
Uncheck the Removable Media (Floppy, CD-ROM...) option, as
necessary, before clicking the Specify a location option. If not
unchecked, the wrong driver may be installed.
Search for the best
and
options are
5. Browse to
EPSON\ English\WINME
on your CD-ROM drive. (The example to
the right uses “E” as the CD-ROM drive letter. Your CD-ROM drive letter may
be different.) Click OK to close the Browse window, and then click
Next
6. Follow the instructions on the screen.
If you see a message asking for your Windows Me CD-ROM, insert it and click
OK
(or click
Browse
and locate the Windows Me source files on your hard drive;
then click OK).
7. Click
Finish
when you see a message that installation is complete.
8. Continue with the instructions in the next section.
.
Network Scanning
67
Page 74

Finishing the Scanner Server Installation on Windows Me
Before your computer can share its scanner, you must install EPSON Scan Server. At
the same time, you can install other software that came with your scanner. Your
scanner comes with a multi-user license (6) for Presto! PageManager, an unlimited
license for EPSON TWAIN HS Network and TWAIN HS, and a single-user license
for PixTools QuickScan and the ISIS driver. If you want to install them on additional
computers, please contact the software manufacturer to purchase additional licenses.
The ISIS driver and PixTools QuickScan cannot be run over a network.
1. If the Select Language window doesn’t appear, double-click the
icon on your Windows desktop, then double-click the
Epson
CD-ROM icon.
2. When the Select Language
window displays, make sure
English
is selected and
click OK.
3. Click the
Add Software
button to display the
Software Selection window.
My Computer
Network Scanning
68
Page 75

4. A check mark appears
beside applications selected
for installation. If you want
to deselect Acrobat Reader
or the GT-30000
Registration (as shown),
click the application to clear the check mark. Then click OK.
Do not install EPSON TWAIN HS Network to use the scanner connected
to your computer—use EPSON TWAIN HS instead. EPSON TWAIN HS is
automatically installed when you install the scanner server software. Only
install EPSON TWAIN HS Network if you want to use a GT-30000
connected to another computer.
5. Follow the instructions on the screen to install EPSON Scan Server and any other
software you selected in the software selection window.
6. Follow the instructions in “Installing Additional Software” on page 49 if you want
to install the ISIS driver, PixTools QuickScan, or Presto! PageManager.
7. When you’re done installing software, restart your computer.
If you don’t want to close Scan Server each time you need to scan locally,
you can install TWAIN HS Network and type LOCALHOST in the Network
Scanner Address field. Choose TWAIN HS Network as the scanner source
in your application.
Network Scanning
69
Page 76

Setting Up the Default Scanner on Windows Me
If you have more than one scanner connected to your computer, you can set up the
GT-30000 as the default scanner.
1. Open the Windows Control Panel and
double-click the
Cameras
icon.
Scanners and
2. Double-click the
EPSON GT-30000
icon. You see the EPSON GT-30000
Properties window.
3. Click the
as default scanner for EPSON Scan
Server
Utility
tab. Make sure
is checked, and then
click OK.
Select
Network Scanning
70
Page 77

Installing the Scanner Server Software for Windows 2000
Before you begin, make sure the GT-30000 is connected to your computer. Also,
make sure you’ve recalibrated your monitor to factory specifications. (See your
monitor documentation for instructions.)
Depending on how your computer system was originally set up, you may be asked to
insert your Windows 2000 CD-ROM during driver installation. Make sure you have
it available, or know where to find the Windows source files on your hard disk (for
example, in the Windows folder). If you need help, contact your computer
manufacturer.
If you’ve just installed a SCSI interface card, you may be asked to install a
SCSI driver at the beginning of installation. Follow the instructions on the
screen to install the best driver, then continue with the scanner server
installation.
1. Turn on your scanner first, then turn on your computer.
2. When you see the window on the
right, insert the EPSON GT-30000
Scanning Tools CD-ROM in your
drive and click
Next
.
Network Scanning
71
Page 78

3. Select
for my device
Search for a suitable driver
, and then click
Next
.
4. Select
CD-ROM drives
a location
Next
.
5. Browse to
English\WIN2000
, if necessary, and click
EPSON\
on your
and
Specify
CD-ROM drive. (The example to
the right uses “F” as the CD-ROM
drive letter. Your CD-ROM drive
letter may be different.) Click OK to
close the Browse window, and then
Next
click
.
6. Follow the instructions on the screen to complete the driver installation.
If you see a message asking for your Windows 2000 CD-ROM, insert it and click
OK
drive; then click OK).
Network Scanning
72
(or click
Browse
and locate the Windows 2000 source files on your hard
Page 79

7. When you see the window to the
right, click
Yes.
If prompted for the EPSON
Scanners Driver Disk 1, reinsert
your EPSON GT-30000 Scanning
Tools CD-ROM.
8. Click
Finish
when you see a message
that installation is complete.
Continue with the instructions in the
next section.
Finishing the Scanner Server Installation on Windows 2000
Before your computer can share its scanner, you must install EPSON Scan Server. At
the same time, you can install other software that came with your scanner. Your
scanner comes with a multi-user license (6) for Presto! PageManager, an unlimited
license for EPSON TWAIN HS Network and TWAIN HS, and a single-user license
for PixTools QuickScan and the ISIS driver. If you want to install them on additional
computers, please contact the software manufacturer to purchase additional licenses.
The ISIS driver and PixTools QuickScan cannot be run over a network.
1. If the Select Language window doesn’t appear, double-click the
icon on your Windows desktop, then double-click the
2. Make sure
English
is
Epson
selected and click OK. The
Software Setup window
appears.
My Computer
CD-ROM icon.
Network Scanning
73
Page 80

3. Click the
Add Software
button to display the
software selection window.
4. Select
Server
EPSON Scan
. A check mark
appears beside applications
selected for installation.
If you want to deselect
Acrobat Reader or the
GT-30000 Registration (as shown), click the application to clear the check mark.
Then click OK.
You don’t need to install EPSON TWAIN HS Network to use the scanner
connected to your computer. EPSON TWAIN HS is automatically installed
when you install the scanner server software. Only install EPSON TWAIN
HS Network if you want to use a GT-30000 attached to another computer.
5. Follow the instructions on the screen to install EPSON Scan Server and any other
software you selected in the software selection window.
6. Follow the instructions in “Installing Additional Software” on page 49 if you want
to install the ISIS driver, PixTools QuickScan, or Presto! PageManager.
7. When you’re done installing software, restart your computer.
Network Scanning
74
Page 81

Setting Up the Default Scanner on Windows 2000
If you have more than one scanner connected to your computer, you can set up the
GT-30000 as the default scanner.
1. Open the Windows Control Panel and
double-click the
Cameras
icon to open the Scanners
and Cameras Properties window.
Scanners and
2. Make sure
selected, and click the
EPSON GT-30000
Properties
is
button. You see the EPSON GT-30000
Properties window.
3. Click the
as default scanner for EPSON Scan
Server
Utility
tab. Make sure
is checked, and then click OK.
Select
Network Scanning
75
Page 82

Installing the Scanner Server Software for Windows 98
Follow the instructions in this section to install your EPSON GT-30000 scanner
driver and other software on your scanner software CD-ROM. Before you begin,
make sure you recalibrate your monitor to factory specifications. (See your monitor
documentation for instructions.)
You may be asked to insert your Windows CD-ROM during this procedure.
Make sure you have it available, or know where to find the Windows source files on
your hard drive. If you need help locating your source files, contact your computer
manufacturer.
1. Turn on the scanner first, then
turn on your computer. When you see
the window on the right, click
(The Wizard may also say it has found
an unknown device.)
Next
.
2. Select
for your device
3. Insert the EPSON GT-30000
Scanner Software CD-ROM in
your drive.
Network Scanning
76
Search for the best driver
, and click
Next
.
Page 83

4. Select
Specify a location
Then browse to
WIN98
click
on your CD-ROM drive. Then
Next
.
, if necessary.
EPSON\English\
(The example on the right shows “E” as
the CD-ROM drive. Your CD-ROM
drive letter may be different.)
5. Follow the instructions on the screen.
If you see a message asking for your Windows 98 CD-ROM, insert it and click
OK.
(Or, select
Specify a location
, click
Browse
, and locate the Windows 98
source files on your hard drive. Then click OK.) When prompted, reinsert your
scanner software CD-ROM.
6. When you see the Screen Calibration window,
move the slider right or left until the stripes
match as closely as possible. (The stripes will
not match perfectly. The recommended setting
is 1.8.) Then click OK.
The EPSON Screen Calibration Utility
calibrates the preview image you see in your
EPSON TWAIN HS driver to match your
monitor settings
.
You won’t need to change the screen calibration as long as you continue
to use the same display. If you need to recalibrate your screen at a later
time, double-click the Scanners and Cameras icon in your Windows
Control Panel to open the Scanners and Cameras Properties window. In
the Devices tab, make sure EPSON GT-30000 is selected, and then click
the Properties button to display the EPSON GT-30000 Properties window.
Click the Utility tab, and then click the Screen Calibration Utility button.
7. When installation is complete, click
Finish
to return to the Windows desktop.
Network Scanning
77
Page 84

Continue with the instructions in the next section to install EPSON Scan Server and
Acrobat Reader (if necessary).
Network Scanning
78
Page 85

Finishing the Scanner Server Installation on Windows 98
Before your computer can share its scanner, you must install EPSON Scan Server. At
the same time, you can install other software that came with your scanner. Your
scanner comes with a multi-user license (6) for Presto! PageManager, an unlimited
license for EPSON TWAIN HS Network and TWAIN HS, and a single-user license
for PixTools QuickScan and the ISIS driver. If you want to install them on additional
computers, please contact the software manufacturer to purchase additional licenses.
The ISIS driver and PixTools QuickScan cannot be run over a network.
1. Double-click the
double-click the
2. Make sure
English
My Computer
Epson
selected and click OK. The
Software Setup window
appears.
3. Click the
Add Software
button to display the
software selection window.
icon on your Windows desktop, then
CD-ROM icon.
is
Network Scanning
79
Page 86

4. Select
Server
EPSON Scan
. A check mark
appears beside applications
selected for installation.
If you want to deselect
Acrobat Reader or the
GT-30000 Registration (as shown), click the application to clear the check mark.
Then click OK.
Do not install EPSON TWAIN HS Network to use the scanner connected
to your computer—use EPSON TWAIN HS instead. EPSON TWAIN HS is
automatically installed when you install the scanner server software. Only
install EPSON TWAIN HS Network if you want to use a GT-30000
connected to another computer.
5. Follow the instructions on the screen.
If you’re installing EPSON TWAIN HS Network in order to use a GT-30000
scanner attached to another computer, you’ll see a window that asks for
the Network Scanner Address (the scanner server’s IP address). Enter the
IP address for the computer you want to connect to. (See page 94 for
instructions.)
6. If you want to install the ISIS driver, PixTools QuickScan, or Presto!
PageManager, see page 49 for instructions.
7. When you’re done installing software, restart your computer. Then follow the
instructions in “Testing Your Scanner Connection (Windows 98)” on page 39 to
make sure the scanner is operating properly.
Network Scanning
80
Page 87

Setting Up the Default Scanner on Windows 98
If you have more than one scanner connected to your computer and you’re running
Windows 98, you can set up the EPSON GT-30000 as your default scanner.
1. Open the Windows Control Panel and
double-click the
Cameras
icon. You see the Scanners and
Cameras Properties window.
Scanners and
2. Select
EPSON GT-30000
and click the
Properties
, if necessary,
button. You
see the EPSON GT-30000 Properties
window.
Network Scanning
81
Page 88

3. Click the
as default scanner for EPSON Scan
Server
Utility
tab. Make sure
is checked, and then clickOK.
Select
4. Click OK to close the EPSON GT-30000
Properties window.
The EPSON GT-30000 remains the default
scanner until a different default scanner is
selected.
Network Scanning
82
Page 89

Installing the Scanner Server Software for Windows 95
Follow the instructions in this section to install your EPSON GT-30000 scanner
driver and other software on your scanner software CD-ROM. Before you begin,
make sure you recalibrate your monitor to factory specifications. (See your monitor
documentation for instructions.)
To install your software on the client computers, see “Setting Up Client Computers”
on page 92 instead.
You may be asked to insert your Windows CD-ROM during this procedure.
Make sure you have it available, or know where to find the Windows source files on
your hard drive. If you need help locating your source files, contact your computer
manufacturer.
1. Turn on your scanner first, then turn
on your computer. When you see the
window on the right, click
Next
.
2. Click
Other Locations
.
Network Scanning
83
Page 90

3. Make sure your scanner software
CD-ROM is in the drive.
Browse to the following location
on your CD-ROM drive:
EPSON\English\WIN95
. Then
click OK.
(The example on the right shows
“G”as the CD-ROM drive.
Your CD-ROM drive letter may
be different.)
4. When you see the window on the
right, click
Finish
. Then restart
your computer.
Continue with the instructions in the
next section to install EPSON Scan
Server and Acrobat Reader (if
necessary).
Network Scanning
84
Page 91

Finishing the Scanner Server Installation on Windows 95
Before your computer can share its scanner, you must install EPSON Scan Server. At
the same time, you can install other software that came with your scanner. Your
scanner comes with a multi-user license (6) for Presto! PageManager, an unlimited
license for EPSON TWAIN HS Network and TWAIN HS, and a single-user license
for PixTools QuickScan and the ISIS driver. If you want to install them on additional
computers, please contact the software manufacturer to purchase additional licenses.
The ISIS driver and PixTools QuickScan cannot be run over a network.
1. Insert your scanner software CD-ROM if it’s not already in your CD-ROM
drive.
2. Double-click the
double-click the
3. Make sure
English
My Computer
Epson
selected and click OK. The
Software Setup window
appears.
4. Click the
Add Software
button to display the
software selection window.
icon on your Windows desktop, then
CD-ROM icon.
is
Network Scanning
85
Page 92

5. Select
Server
EPSON Scan
. A check mark
appears beside applications
selected for installation.
If you want to deselect
Acrobat Reader or the GT-30000 Registration (as shown), click the application to
clear the check mark. Then click OK.
Use EPSON TWAIN HS to scan from the EPSON GT-30000 connected to
your computer. Only install EPSON TWAIN HS Network if you want to
access a GT-30000 scanner connected to another computer.
6. If you’re installing EPSON TWAIN HS,
follow the instructions on the screen.
When you see the window on the right,
make sure
SCSI
and
GT-30000
are
selected under Scanner Selection.
7. Click
computer, you see
to close the window.
Network Scanning
86
If you’re installing EPSON TWAIN HS Network in order to use a GT-30000
scanner attached to another computer, you’ll see a window that asks for
the Network Scanner Address (the scanner server’s IP address). Enter the
IP address for the scanner server you want to connect to. See page 94 for
instructions.
Test
to check scanner operation. If the scanner is communicating with your
Status: Device Reader
under Scanner Information. Click OK
Page 93

8. When you see the Screen Calibration
window, move the slider right or left until
the stripes match as closely as possible. (The
stripes will not match perfectly and the
recommended setting is 1.8.) Then click OK.
The EPSON Screen Calibration Utility
calibrates the preview image you see in your
EPSON TWAIN HS driver to match your
monitor settings.
9. Follow the instructions on the screen to
install EPSON Scan Server. When you see
the window on the right, make sure
GT-30000
is selected under Scanner
Selection.
Select either
Icon
Dialogbox
or
as the
scanner server start up mode. (See “Changing
the Scanner Server Start Up Mode” on
page 91 for details about the start up mode.)
10. Click
Test
to test scanner operation.
OK. Scanner available
appears under
Status if the scanner is communicating with
the scanner server. Then click OK.
If you want to share a different network
scanner with the client computers, you can access the EPSON Scan
Server window at any time by double-clicking the EPSON Scan Server icon
in the Windows Control Panel. Then select the scanner you want in the
Scanner Selection list.
11. Follow the instructions on the screen to complete installation of additional
software you selected in the software selection window.
12. If you want to install the ISIS driver, PixTools QuickScan, or Presto!
PageManager, see page 49 for instructions. When you’re done installing software,
restart your computer.
Network Scanning
87
Page 94

Installing the Scanner Server Software for Windows NT 4.0
Before your computer can share its scanner, you must install EPSON Scan Server. At
the same time, you can install other software that came with your scanner. Your
scanner comes with a multi-user license (6) for Presto! PageManager, an unlimited
license for EPSON TWAIN HS Network and TWAIN HS, and a single-user license
for PixTools QuickScan and the ISIS driver. If you want to install them on additional
computers, please contact the software manufacturer to purchase additional licenses.
The ISIS driver and PixTools QuickScan cannot be run over a network.
1. Insert your scanner software CD-ROM if it’s not already in your CD-ROM
drive.
2. Double-click the
double-click the
3. Make sure
selected and click OK. The
Software Setup window
appears.
4. Click the
button to display the
software selection window.
Add Software
My Computer
Epson
English
icon on your Windows desktop, then
CD-ROM icon.
is
Network Scanning
88
Page 95

5. Select
EPSON Scan
Server
. A check mark
appears beside applications
selected for installation.
If you want to deselect
Acrobat Reader or the
GT-30000 Registration (as
shown), click the application to clear the check mark. Then click OK.
Select EPSON TWAIN HS if you want to scan from the EPSON GT-30000
connected to your computer. Only install EPSON TWAIN HS Network if
you want to access a network scanner connected to another computer.
6. If you’re installing EPSON TWAIN HS,
follow the instructions on the screen.
When you see the window on the right,
make sure
SCSI
and
GT-30000
are
selected under Scanner Selection.
If you’re installing EPSON TWAIN HS Network in order to use a GT-30000
scanner attached to another computer, you’ll see a window that asks for
the Network Scanner Address (the scanner server’s IP address). Enter the
IP address for the scanner server you want to connect to. See page 94 for
instructions.
7. Click
Test
to check scanner operation. If the scanner is communicating with your
computer, you see
to close the window.
Status: Device Reader
under Scanner Information. Click OK
Network Scanning
89
Page 96

8. When you see the Screen Calibration
window, move the slider right or left until
the stripes match as closely as possible.
(The stripes will not match perfectly and
the recommended setting is 1.8.) Then
click OK.
The EPSON Screen Calibration Utility
calibrates the preview image you see in
your EPSON TWAIN HS driver to match
your monitor settings.
9. Follow the instructions on the screen to
install EPSON Scan Server. When you see
the window on the right, make sure
GT-30000
is selected under Scanner
Selection.
Select either
Icon
Dialogbox
or
as the
scanner server start up mode. (See
“Changing the Scanner Server Start Up
Mode” on page 91 for details about the
start up mode.)
10. Click
Test
to test scanner operation.
OK. Scanner available
appears under
Status if the scanner is communicating
with the scanner server. Click OK to close
the window.
If you want to share a different network scanner with the client
computers, you can access the EPSON Scan Server window at any time
by double-clicking the EPSON Scan Server icon in the Windows Control
Panel. Then select the scanner you want in the Scanner Selection list.
11. Follow the instructions on the screen to complete installation of any other
software you’ve selected in the EPSON Software Setup window. If you’re done
installing software, restart your computer. Refer to “Installing Additional
Software” on page 49 if you want to install the ISIS driver, PixTools QuickScan,
or Presto! PageManager.
Network Scanning
90
Page 97

Changing the Scanner Server Start Up Mode
When you installed the software, you set up the Scan Server to start in either Dialog
Box or Icon mode.
In Dialog Box mode, the following dialog box appears whenever you start EPSON
Scan Server. (The message
the scanner is waiting for a connection to a client computer.)
Click here and select
Taskbar Icon to switch
to Icon mode.
In Icon mode, the EPSON Scan Server icon appears on the Windows taskbar
when you start EPSON Scan Server.
Waiting for connection
in the status area indicates that
■
To change from Dialog Box mode to Icon mode, click the scanner icon in the
upper left corner of the dialog box and select
■
To change from Icon mode to Dialog Box mode, right-click the EPSON
Scan Server icon on the taskbar and click
Taskbar Icon
Taskbar Icon
from the list.
to deselect it.
Your setting takes effect when you exit and restart EPSON Scan Server. See page 97
for instructions on starting EPSON Scan Server.
Make sure no client computer is accessing the scanner server when you
exit EPSON Scan Server.
Network Scanning
91
Page 98

Setting Up Client Computers
To set up a client computer, you’ll need to know the IP address or host name of the
scanner server. Also, make sure the TCP/IP protocol is installed. (See Appendix A,
“Installing the TCP/IP Protocol,” for instructions.)
Installing EPSON TWAIN HS Network
You must install EPSON TWAIN HS Network on the client computer before the
client can use the network scanner. At the same time, you can install other software
that came with your scanner. Your scanner comes with a multi-user license (6) for
Presto! PageManager, an unlimited license for EPSON TWAIN HS Network and
TWAIN HS, and a single-user license for PixTools QuickScan and the ISIS driver. If
you want to install them on additional computers, please contact the software
manufacturer to purchase additional licenses.
The ISIS driver and PixTools QuickScan cannot be run over a network.
1. Insert the EPSON GT-30000 Scanner Software CD-ROM in the CD-ROM
drive. If the Select Language window doesn’t appear, double-click the
Computer
icon.
icon on your desktop, and then double-click the
Epson
My
CD-ROM
2. Make sure
and click OK. The Software
Setup window appears.
Network Scanning
92
English
is selected
Page 99

3. Click the
Add Software
button to display the
software selection
window.
4. Select
EPSON TWAIN
HS Network
. A check
mark appears beside
applications selected for
installation.
If you want to deselect
Acrobat Reader or the GT-30000 Registration (as shown), click the application to
clear the check mark. Then click
If you’re installing the scanner software on Windows 95 or Windows NT,
click EPSON TWAIN HS to deselect it. EPSON TWAIN HS only works if
the scanner is connected to your computer.
OK.
Network Scanning
93
Page 100

5. Follow the instructions on the screen to
continue the installation. When you see the
window to the right, enter the IP address of
the scanner server in the Network Scanner
Address box.
6. Click
Test
to test the connection. If your
computer is communicating with the scanner
server and the scanner is on, you see a message
that the scanner is available. Then click
OK
to
save your settings.
If you need to connect to a different GT-30000 scanner or change the
timeout setting, you can open the EPSON TWAIN HS Network window
any time by double-clicking the EPSON TWAIN HS Network icon in the
Control Panel. You can enter up to five IP addresses or host names in the
Network Scanner Address box. You can remove a network scanner
address by selecting it in the list and clicking the Delete button.
7. Follow the instructions on the screen. When
you see the Screen Calibration window, move
the slider right or left until the stripes match as
closely as possible. (The stripes will not match
perfectly. The recommended setting is 1.8.)
Then click OK.
The EPSON Screen Calibration Utility
calibrates the preview image you see in your
EPSON TWAIN HS driver to match your
monitor settings
Network Scanning
94
.
 Loading...