

Page 1
Color Image Scanner
Setup Guide
4013305-00
XXX
Page 2

Where to Find Information
Setup Guide (this document)
Describes how to set up and use the scanner. Basic scanning
operations are covered. It also explains how to install and
configure the EPSON scanner software and the Automatic
Document Feeder, and includes information on how to calibrate
your system. The guide describes how to make basic software
settings, use the Start Button function, and scan images in a
networked environment.
Online Reference Guide
Provides basic information about scanning, detailed reference on
settings and functions of EPSON TWAIN HS and other EPSON
scanner utility software, troubleshooting tips, and customer
support information. Explanations about EPSON TWAIN HS also
apply to EPSON TWAIN HS Network. It also explains how to set
up the scanner server PC. To access the Online Reference Guide,
see “Getting Information from Online Reference Guide” on page
4-31 in this guide.
Information on EPSON TWAIN HS and EPSON TWAIN HS Network (online help)
Provides you with detailed information on EPSON TWAIN HS
and EPSON TWAIN HS Network. To display the online help,
click the Help button in the dialog box of EPSON TWAIN HS or
EPSON TWAIN HS Network.
Information on ISIS driver
Refer to the respective documentation provided on the EPSON
Scanner Software CD-ROM.
Page 3

®
Color Image Scanner
All rights reserved. No part of this publication may be reproduced, stored in a retrieval
system, or transmitted in any form or by any means, electronic, mechanical, photocopying,
recording, or otherwise, without the prior written permission of SEIKO EPSON
CORPORATION. No patent liability is assumed with respect to the use of the information
contained herein. Neither is any liability assumed for damages resulting from the use of the
information contained herein.
Neither SEIKO EPSON CORPORATION nor its affiliates shall be liable to the purchaser of
this product or third parties for damages, losses, costs, or expenses incurred by purchaser or
third parties as a result of: accident, misuse, or abuse of this product or unauthorized
modifications, repairs, or alterations to this product.
SEIKO EPSON CORPORATION and its affiliates shall not be liable against any damages or
problems arising from the use of any options or any consumable products other than those
designated as Original EPSON Products or EPSON Approved Products by SEIKO EPSON
CORPORATION.
EPSON is a registered trademark of SEIKO EPSON CORPORATION.
IBM and PS/2 are registered trademarks of International Business Machines Corporation.
Apple, Macintosh, Mac, iMac, and Power Macintosh are registered trademarks of Apple
Computer, Inc.
Microsoft and Windows are registered trademarks of Microsoft Corporation in the United
States of America and other countries.
Adobe and Acrobat Reader are registered trademarks of Adobe Systems Incorporated.
ISIS is a registered trademark of Pixel Traslations, a Division of ActionPoint, Inc.
General Notice: Other product names used herein are for identification purposes only and may be
trademarks of their respective companies.
Copyright © 2000 by SEIKO EPSON CORPORATION, Nagano, Japan.
Setup Guide
Page 4

ii
Page 5

Contents
Safety Instructions
Important Safety Instructions . . . . . . . . . . . . . . . . . . . . . . . . . . . . .1
Warnings, Cautions, and Notes. . . . . . . . . . . . . . . . . . . . . . . . . . . . 2
ENERGY STAR Compliance . . . . . . . . . . . . . . . . . . . . . . . . . . . . . .3
For United Kingdom Users . . . . . . . . . . . . . . . . . . . . . . . . . . . . . . .3
Safety information . . . . . . . . . . . . . . . . . . . . . . . . . . . . . . . . . .3
Chapter 1 Getting to Know Your Scanner
Features. . . . . . . . . . . . . . . . . . . . . . . . . . . . . . . . . . . . . . . . . . . . . . . . 1-2
EPSON Scan Server and EPSON TWAIN HS Network . . .1-3
Unpacking the Scanner. . . . . . . . . . . . . . . . . . . . . . . . . . . . . . . . . . . 1-5
Scanner Parts . . . . . . . . . . . . . . . . . . . . . . . . . . . . . . . . . . . . . . . . . . . 1-6
Lights and Buttons . . . . . . . . . . . . . . . . . . . . . . . . . . . . . . . . . . . . . .1-7
Options . . . . . . . . . . . . . . . . . . . . . . . . . . . . . . . . . . . . . . . . . . . . . . . .1-8
Chapter 2 Setting up the Scanner
Choosing a Place for the Scanner . . . . . . . . . . . . . . . . . . . . . . . . . . 2-2
Releasing the Transportation Lock . . . . . . . . . . . . . . . . . . . . . . . . . 2-4
Installing the Automatic Document Feeder . . . . . . . . . . . . . . . . .2-5
Plugging in the Scanner . . . . . . . . . . . . . . . . . . . . . . . . . . . . . . . . . .2-9
Initializing the Scanner. . . . . . . . . . . . . . . . . . . . . . . . . . . . . . . . . . .2-10
Connecting the Scanner to Your PC using the SCSI
Interface . . . . . . . . . . . . . . . . . . . . . . . . . . . . . . . . . . . . . . . . . . . . . 2-11
Understanding SCSI connections. . . . . . . . . . . . . . . . . . . . . . 2-11
Setting the SCSI ID number . . . . . . . . . . . . . . . . . . . . . . . . . . 2-13
Setting the terminator switch . . . . . . . . . . . . . . . . . . . . . . . . . 2-14
Setting the select switch. . . . . . . . . . . . . . . . . . . . . . . . . . . . . .2-15
Connecting the scanner . . . . . . . . . . . . . . . . . . . . . . . . . . . . . .2-16
Power-on sequence. . . . . . . . . . . . . . . . . . . . . . . . . . . . . . . . . . 2-17
Power-off sequence . . . . . . . . . . . . . . . . . . . . . . . . . . . . . . . . . 2-19
iii
Page 6

Chapter 3 Installing the Software
System Requirements . . . . . . . . . . . . . . . . . . . . . . . . . . . . . . . . . . . 3-2
For Windows and SCSI users . . . . . . . . . . . . . . . . . . . . . . . . 3-2
For Windows and IEEE 1394 users. . . . . . . . . . . . . . . . . . . . 3-3
For scanning over a network. . . . . . . . . . . . . . . . . . . . . . . . . 3-3
Installing EPSON TWAIN HS . . . . . . . . . . . . . . . . . . . . . . . . . . . . 3-5
For Windows Millennium Edition users . . . . . . . . . . . . . . . 3-5
For Windows 2000 users . . . . . . . . . . . . . . . . . . . . . . . . . . . . 3-8
For Windows 98 users . . . . . . . . . . . . . . . . . . . . . . . . . . . . . . 3-12
For Windows 95 and NT 4.0 users . . . . . . . . . . . . . . . . . . . . 3-16
Software for Scanning over a Network. . . . . . . . . . . . . . . . . . . . . 3-22
Installing EPSON Scan Server. . . . . . . . . . . . . . . . . . . . . . . . 3-22
Installing EPSON TWAIN HS Network . . . . . . . . . . . . . . . 3-31
Installing Another Application Software . . . . . . . . . . . . . . . . . . . 3-38
Calibrating Your Screen . . . . . . . . . . . . . . . . . . . . . . . . . . . . . . . . . 3-39
Selecting Scanners . . . . . . . . . . . . . . . . . . . . . . . . . . . . . . . . . . . . . . 3-41
For Windows 98, 2000, and Millennium Edition users . . . 3-42
For Windows 95 and NT 4.0 users . . . . . . . . . . . . . . . . . . . . 3-44
Chapter 4 Using Your Scanner
Scanning Procedure . . . . . . . . . . . . . . . . . . . . . . . . . . . . . . . . . . . . . 4-2
Loading documents into your Automatic Document
Feeder . . . . . . . . . . . . . . . . . . . . . . . . . . . . . . . . . . . . . . . . . . . . . . 4-2
Placing a Document on the Scanner . . . . . . . . . . . . . . . . . . . . . . . 4-4
Starting EPSON TWAIN HS. . . . . . . . . . . . . . . . . . . . . . . . . . . . . . 4-7
Scanning from the Automatic Document Feeder . . . . . . . . . . . . 4-8
Changing the Document Feed Speed. . . . . . . . . . . . . . . . . . 4-10
Fixing paper jams in the Automatic Document Feeder. . . 4-11
Document specifications . . . . . . . . . . . . . . . . . . . . . . . . . . . . 4-13
Scanning an Image . . . . . . . . . . . . . . . . . . . . . . . . . . . . . . . . . . . . . . 4-15
Saving the Scanned Image . . . . . . . . . . . . . . . . . . . . . . . . . . . . . . . 4-26
Network Scanning Procedure. . . . . . . . . . . . . . . . . . . . . . . . . . . . . 4-26
Starting EPSON Scan Server . . . . . . . . . . . . . . . . . . . . . . . . . 4-26
Starting EPSON TWAIN HS Network. . . . . . . . . . . . . . . . . 4-27
Network Scanning. . . . . . . . . . . . . . . . . . . . . . . . . . . . . . . . . . 4-28
iv
Page 7

Getting Information from Online Reference Guide . . . . . . . . . . .4-31
Opening the Online Reference Guide . . . . . . . . . . . . . . . . . . 4-32
Installing the Online Reference Guide . . . . . . . . . . . . . . . . .4-32
Chapter 5 Using the Start Button
The Start Button Feature. . . . . . . . . . . . . . . . . . . . . . . . . . . . . . . . . . 5-2
Setting up the Start Button Feature. . . . . . . . . . . . . . . . . . . . . . . . . 5-2
Assigning an application to the Start button . . . . . . . . . . . . 5-3
Disabling the Start button . . . . . . . . . . . . . . . . . . . . . . . . . . . . 5-5
Scanning by Pressing the Start Button . . . . . . . . . . . . . . . . . . . . . . 5-6
Chapter 6 Option
Using the IEEE 1394 Interface Board . . . . . . . . . . . . . . . . . . . . . . .6-2
Installing the IEEE 1394 interface board to your
scanner. . . . . . . . . . . . . . . . . . . . . . . . . . . . . . . . . . . . . . . . . . 6-2
Understanding IEEE 1394 connections . . . . . . . . . . . . . . . . .6-4
Connecting to your PC . . . . . . . . . . . . . . . . . . . . . . . . . . . . . .6-5
Installing the scanner software. . . . . . . . . . . . . . . . . . . . . . . .6-6
Glossary
Index
v
Page 8

vi
Page 9

Safety Instructions
Important Safety Instructions
Read all these instructions and save them for later reference.
Follow all warnings and instructions marked on the scanner.
❏ Unplug the scanner before cleaning. Clean with a damp cloth
only. Do not spill liquid on the scanner.
❏ Do not place the scanner on an unstable surface, or near a
radiator or heat source.
❏ Use only the type of power source indicated on the scanner's
label.
❏ Connect all equipment to properly grounded wall outlets.
Avoid using outlets on the same circuit as photocopiers or air
control systems that regularly switch on and off.
❏ Do not let the power cord become damaged or frayed.
❏ If you use an extension cord with the scanner, make sure the
total ampere rating of the devices plugged into the extension
cord does not exceed the cord's ampere rating. Also, make
sure the total ampere rating of all devices plugged into the
wall outlet does not exceed the wall outlet's ampere rating.
❏ Except as specifically explained in this Setup Guide and the
Online Reference Guide, do not attempt to service the scanner
yourself.
Safety Instructions
1
Page 10

❏ Unplug the scanner and refer servicing to qualified service
personnel under the following conditions:
❏ If the power cord or plug is damaged.
❏ If liquid has entered the scanner.
❏ If the scanner has been dropped or the case damaged.
❏ If the scanner does not operate normally or exhibits a
distinct change in performance. (Do not adjust controls
that are not covered by the operating instructions.)
❏ If you plan to use the scanner in Germany, observe the
following:
To provide adequate short-circuit protection and overcurrent protection for this scanner, the building installation
must be protected by a 10 or 16 amp circuit breaker.
Note for German-speaking users:
Bei Anschluss des Scanner an die Stromversorgung muss
sichergestellt werden, dass die Gebäudeinstallation mit einer 10 Aoder 16 A-Sicherung abgesichert ist.
Warnings, Cautions, and Notes
Warnings
must be followed carefully to avoid bodily injury.
w
Cautions
must be observed to avoid damage to your equipment.
c
Notes contain important information and useful tips on the operation
of your scanner.
2
Safety Instructions
Page 11

ENERGY STAR Compliance
As an ENERGY STAR Partner, EPSON has determined that this
product meets the ENERGY STAR guidelines for energy
efficiency.
The International ENERGY STAR Office
Equipment Program is a voluntary partnership
with the computer and office equipment
industry to promote the introduction of energy-efficient personal
computers, monitors, printers, fax machines, copiers, and
scanners, in an effort to reduce air pollution caused by power
generation.
For United Kingdom Users
Safety information
Warning:
w
This appliance must be earthed. Refer to the rating plate for
voltage and check that the appliance voltage corresponds to the
supply voltage.
Important:
The wires in the mains lead fitted to this appliance are colored in
accordance with the following code:
Green and yellow — Earth
Blue — Neutral
Brown — Live
Safety Instructions
3
Page 12

As the colors of the wires in the mains lead of this appliance may
not correspond with the colored markings identifying the
terminals in your plug, proceed as follows:
The green and yellow wire must be connected to the terminal in
the plug which is marked with the letter E or with the earth
symbol (
).
G
The blue wire must be connected to the terminal in the plug
marked with the letter N.
The brown wire must be connected to the terminal in the plug
marked with the letter L.
If damage occurs to the plug, replace the cord set or consult a
qualified electrician.
Replace fuses only with a fuse of the correct size and rating.
4
Safety Instructions
Page 13

Chapter 1
Getting to Know Your Scanner
Features. . . . . . . . . . . . . . . . . . . . . . . . . . . . . . . . . . . . . . . . . . . . . . . . 1-2
EPSON Scan Server and EPSON TWAIN HS Network . . .1-3
Unpacking the Scanner. . . . . . . . . . . . . . . . . . . . . . . . . . . . . . . . . . . 1-5
Scanner Parts . . . . . . . . . . . . . . . . . . . . . . . . . . . . . . . . . . . . . . . . . . . 1-6
Lights and Buttons . . . . . . . . . . . . . . . . . . . . . . . . . . . . . . . . . . . . . .1-7
Options . . . . . . . . . . . . . . . . . . . . . . . . . . . . . . . . . . . . . . . . . . . . . . . .1-8
1
Getting to Know Your Scanner
1-1
Page 14

Features
The EPSON GT-30000 scanner offers the following features:
❏ Maximum optical resolution of 600 dots per inch (dpi) for
main scanning, and 1200 dpi for sub scanning
❏ A3/US B (Ledger) size scanning area
❏ Start Button control for shortcut local and networked
scanning operation
In a stand-alone configuration of Windows Millennium
Edition, 98, and 2000, pressing the
scanner can automatically start a scanning sequence by
invoking EPSON TWAIN HS, scanning documents,
launching a graphical application and importing scanned
images to the application.
a Start button on the
In a networked configuration, pressing the
the scanner starts the same operation as clicking the Scan
button in the EPSON TWAIN HS Network dialog box.
❏ Full color or grayscale scanning (36-bit input, 24-bit output)
❏ EPSON TWAIN HS lets you take full advantage of your
scanner's advanced features.
❏ EPSON TWAIN HS Network and EPSON Scan Server
software work together to directly control all of the features
of your scanner in a networked environment.
❏ Unsharp Mask option of EPSON TWAIN HS and EPSON
TWAIN HS Network automatically sharpens images to
provide crisp detail.
❏ The De-screening option of EPSON TWAIN HS and EPSON
TWAIN HS Network automatically removes unwanted moiré
patterns from scanned images for higher quality output.
1-2
Getting to Know Your Scanner
a Start button on
Page 15

❏ The Automatic Document Feeder (B81321✽) is available for
continuous sheet scanning. Pages loaded in the Automatic
Document Feeder are fed from the top and ejected face down.
❏ The optional IEEE 1394 Interface Board (B80834✽) enables
you to vastly enhance your scanner’s connectivity.
❏ The optional EPSON Network Image Express (B80836✽)
enables a scanner to become shareable on a network without
the need to have it connected to a scanner server PC.
EPSON Scan Server and EPSON TWAIN HS Network
EPSON Scan Server and EPSON TWAIN HS Network software
work together to directly control all of the features of your EPSON
scanner in a networked environment. Through the use of these
software packages, you can share one or more scanners among
the users in a network and allow scanned images to be imported
into any TWAIN-compliant application.
EPSON Scan Server software is installed on a PC which is
connected to an EPSON scanner (hereafter, the PC is called the
scanner server PC), and makes the EPSON scanner shareable in
the network. The scanner can be accessed from all client PCs
which have EPSON TWAIN HS Network software installed.
1
EPSON TWAIN HS Network software controls the functions of
your scanner just like EPSON TWAIN HS software and can be
used in a networked environment. On the other hand, EPSON
TWAIN HS software is designed to be used only in a stand-alone
configuration in which only one PC is connected to an EPSON
scanner.
Getting to Know Your Scanner
1-3
Page 16
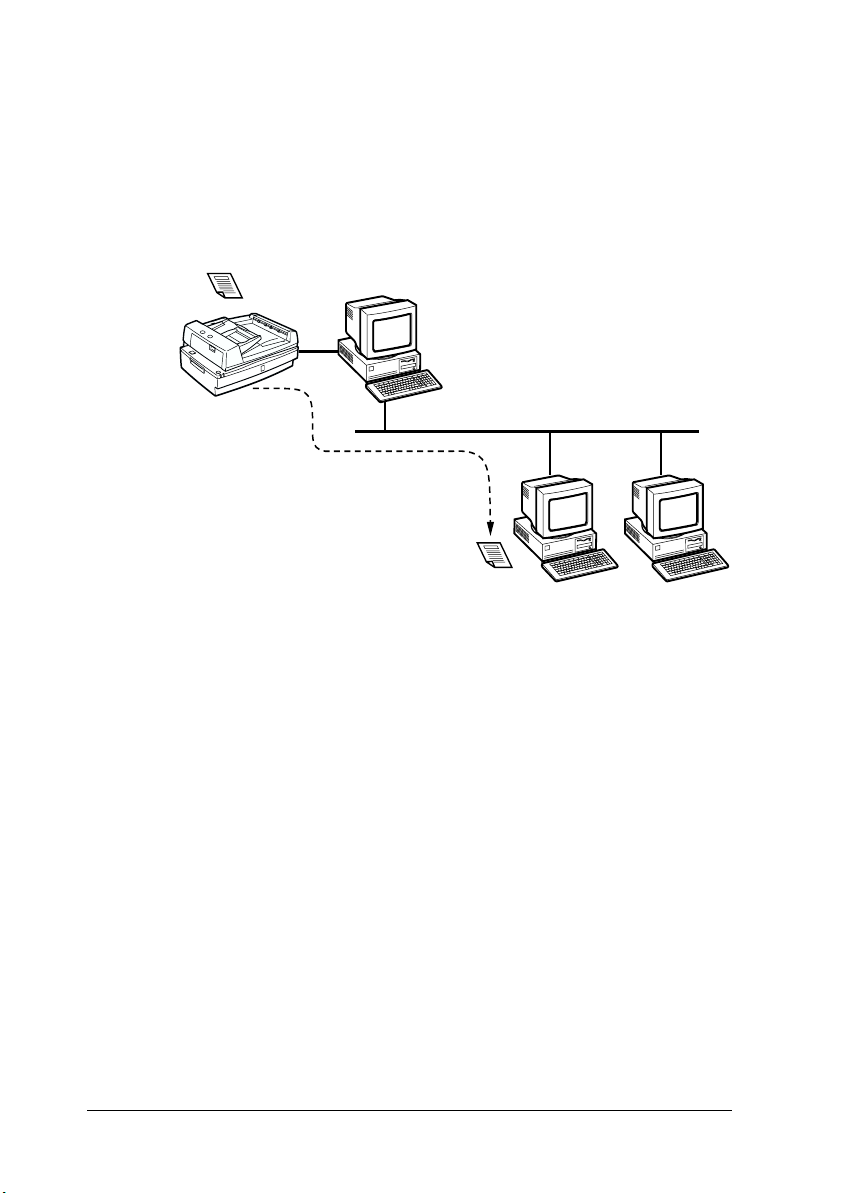
The illustration below shows a sample network configuration in
which networked scanning is available. One of the clients can be
connected to the scanner server PC and import a scanned image
from the scanner. After disconnecting, another client can access
the scanner server PC.
Document to be scanned
Scanner
Scanner Server PC
EPSON Scan Server
Network
Scanned Image
EPSON TWAIN
HS Network
Client PCClient PC
If there are multiple EPSON scanners and scanner server PCs in
the network, you can select which scanner to be used in the
EPSON TWAIN HS Network setup dialog box on the client PC.
To share an EPSON scanner by clients in the network, only one
EPSON scanner can be connected to one scanner server PC.
1-4
Getting to Know Your Scanner
Page 17
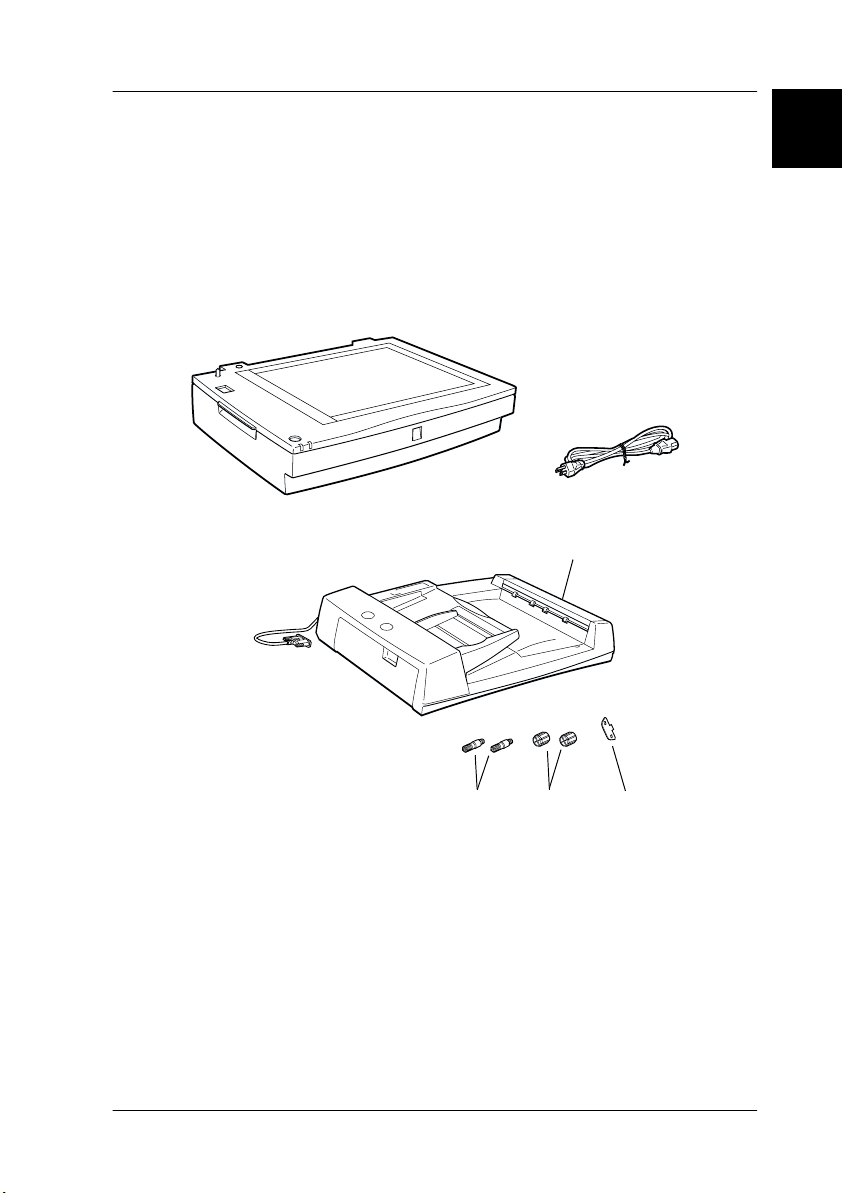
Unpacking the Scanner
When you unpack your scanner, make sure the following parts
are included and not damaged. If you find any missing or
damaged items, contact your EPSON dealer immediately. (Your
scanner also comes shipped with CD-ROMs (and/or floppy
disks) which contain the driver software to run your scanner,
along with other items necessary to use the scanner.)
1
scanner
Automatic Document Feeder
installation screws (2)
Depending on the country of purchase, the power cord may come
attached to the scanner. The shape of the AC plug also varies, so
make sure the plug included is the correct shape for the electrical
outlet in your country.
If your computer is already equipped with SCSI board, you can
use it for allowing the computer to communicate with the scanner.
Otherwise, install the SCSI board. For setup of the SCSI board,
refer to the manual which comes with it.
knob (2)
power cord
screwdriver
Getting to Know Your Scanner
1-5
Page 18
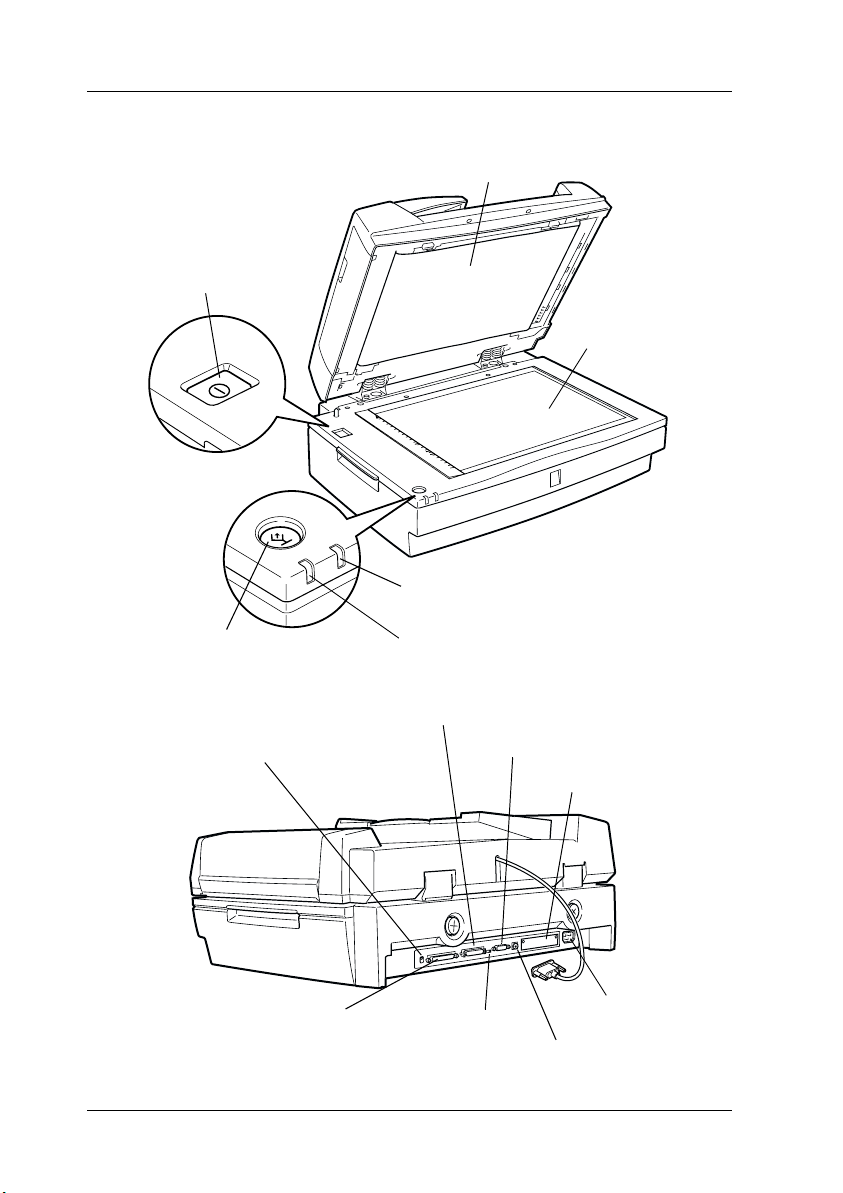
Scanner Parts
OPERATE button
Automatic Document Feeder
document table
ERROR light
Start button
SCSI interface 50-pin connector
SCSI terminator switch
SCSI interface 68-pin connector
1-6
Getting to Know Your Scanner
READY light
option interface connector
SCSI select switch
option interface slot
AC socket
SCSI ID rotary switch
Page 19
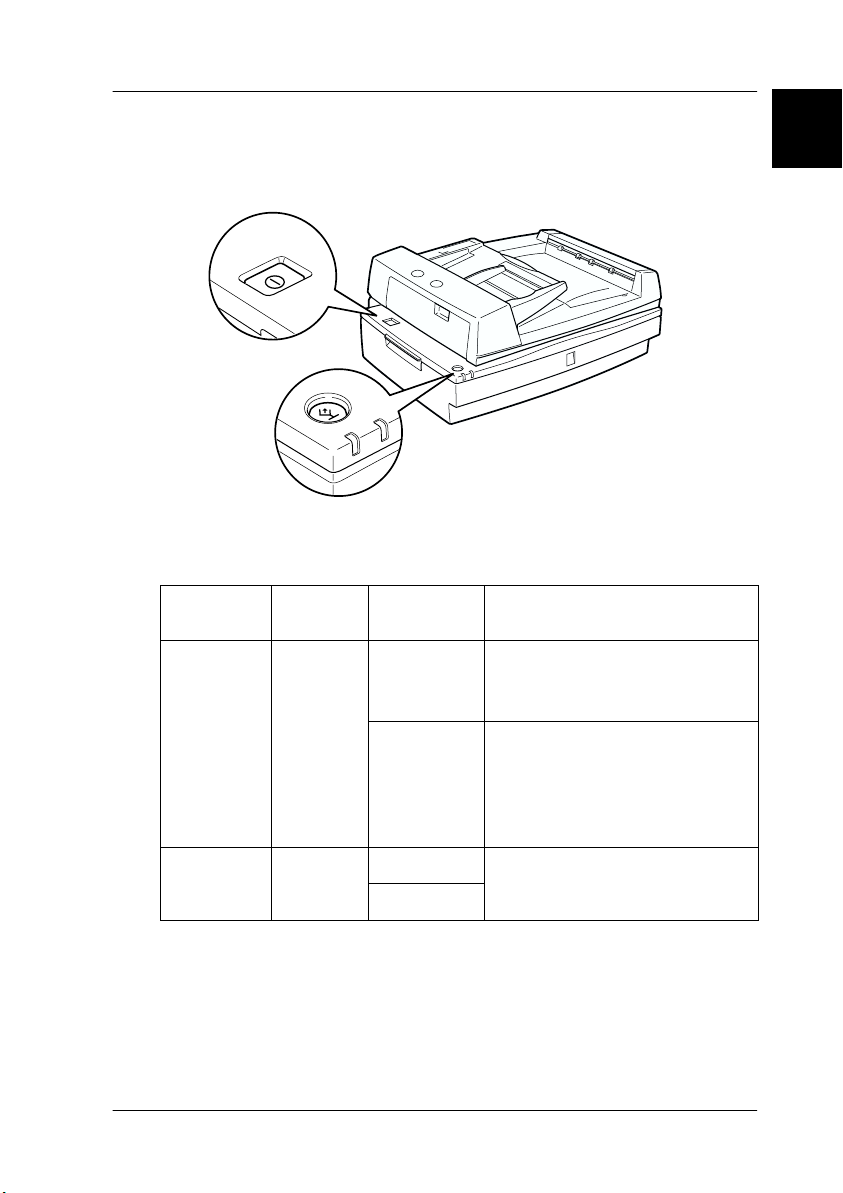
Lights and Buttons
The scanner has two indicator lights and two buttons.
Lights
1
Light Color Indicator
READY
ERROR
Green
Red
Status
On
Flashing
On This indicator also lights when
Flashing
Meaning
Scanner is ready to scan.
Error. See your Online
Reference Guide.
Scanning operation is in
progress.
Scanner is being initialized.
Error. See your Online
Reference Guide.
an error occurs. See your
Online Reference Guide.
Getting to Know Your Scanner
1-7
Page 20

Buttons
Button Function
OPERATE
a
Start
Turns the scanner on and off.
The hardware switch to execute scanning and
transfer scanned images to an assigned
application in a stand-alone configuration of
Windows Millennium Edition, 98, and 2000. To use
this feature, see Chapter 5, “Using the Start
Button,” for more details.
In a networked environment it works in the same
way as the Scan button in EPSON TWAIN HS
Network.
Options
The following options expand the capability of your scanner. For
detailed information on their use, see Chapter 6 in this guide or
the documentation which comes with the option.
IEEE 1394 Interface Board (B80834✽)
Allows you to connect your computer or scanner to other devices
which support the IEEE 1394 standard.
EPSON Network Image Express (B80836✽✽✽✽)
Enables an EPSON scanner supporting EPSON TWAIN HS
Network to become shareable on a network without the need for
a scanner server PC, which allows you to use various scanning
methods in a networked environment with less power and space.
Note:
The asterisk is a substitute for the last digit of the product number, which
varies by country.
1-8
Getting to Know Your Scanner
Page 21

Chapter 2
Setting up the Scanner
Choosing a Place for the Scanner . . . . . . . . . . . . . . . . . . . . . . . . . . 2-2
Releasing the Transportation Lock . . . . . . . . . . . . . . . . . . . . . . . . . 2-4
Installing the Automatic Document Feeder . . . . . . . . . . . . . . . . .2-5
Plugging in the Scanner . . . . . . . . . . . . . . . . . . . . . . . . . . . . . . . . . .2-9
Initializing the Scanner. . . . . . . . . . . . . . . . . . . . . . . . . . . . . . . . . . .2-10
Connecting the Scanner to Your PC using the SCSI
Interface . . . . . . . . . . . . . . . . . . . . . . . . . . . . . . . . . . . . . . . . . . . . . 2-11
Understanding SCSI connections. . . . . . . . . . . . . . . . . . . . . . 2-11
Setting the SCSI ID number . . . . . . . . . . . . . . . . . . . . . . . . . . 2-13
Setting the terminator switch . . . . . . . . . . . . . . . . . . . . . . . . . 2-14
Setting the select switch. . . . . . . . . . . . . . . . . . . . . . . . . . . . . .2-15
Connecting the scanner . . . . . . . . . . . . . . . . . . . . . . . . . . . . . .2-16
Power-on sequence. . . . . . . . . . . . . . . . . . . . . . . . . . . . . . . . . . 2-17
Power-off sequence . . . . . . . . . . . . . . . . . . . . . . . . . . . . . . . . . 2-19
2
Setting up the Scanner
2-1
Page 22

Choosing a Place for the Scanner
Follow the guidelines below when selecting a location for your
scanner:
❏ Place the scanner on a flat, stable surface. The scanner will not
operate properly if it is tilted at an angle.
❏ Place the scanner close enough to the computer for the
interface cable to reach it easily.
❏ Place the scanner near a wall outlet where the power cord can
be easily unplugged.
Note for French-speaking users:
Placez le scanner près d’une prise de courant où la fiche peut-être
débranchée facilement.
2-2
Setting up the Scanner
Page 23
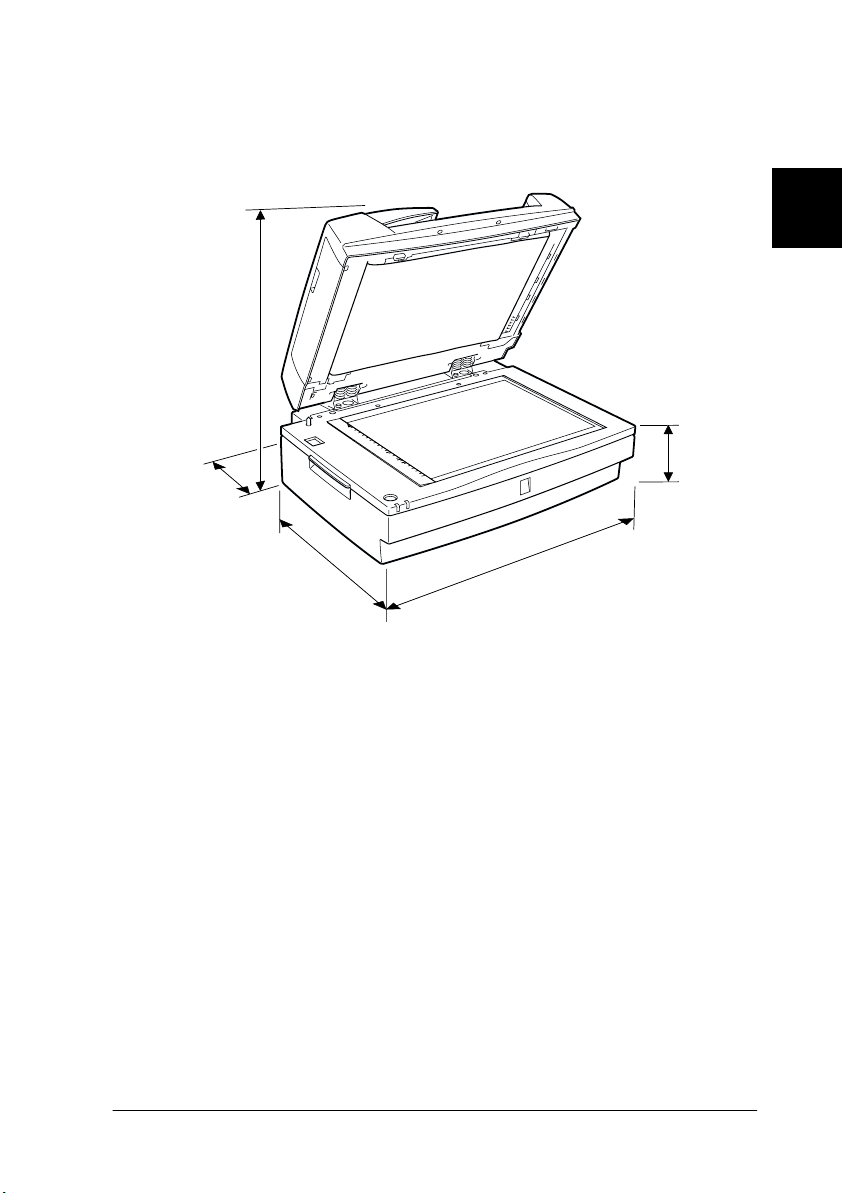
❏ Allow space behind the scanner for the cables, and space
above the scanner so that you can raise the Automatic
Document Feeder fully.
596 mm
254 mm*
100 mm
or more
2
488 mm
* When Automatic Document Feeder is closed.
658 mm
❏ Keep the scanner away from high temperatures, humidity
and excessive dirt or dust. Also avoid using or storing the
scanner in places subject to rapid changes of temperature and
humidity.
❏ Keep the scanner away from direct sunlight and strong light
sources.
❏ Avoid places subject to shocks and vibrations.
Setting up the Scanner
2-3
Page 24
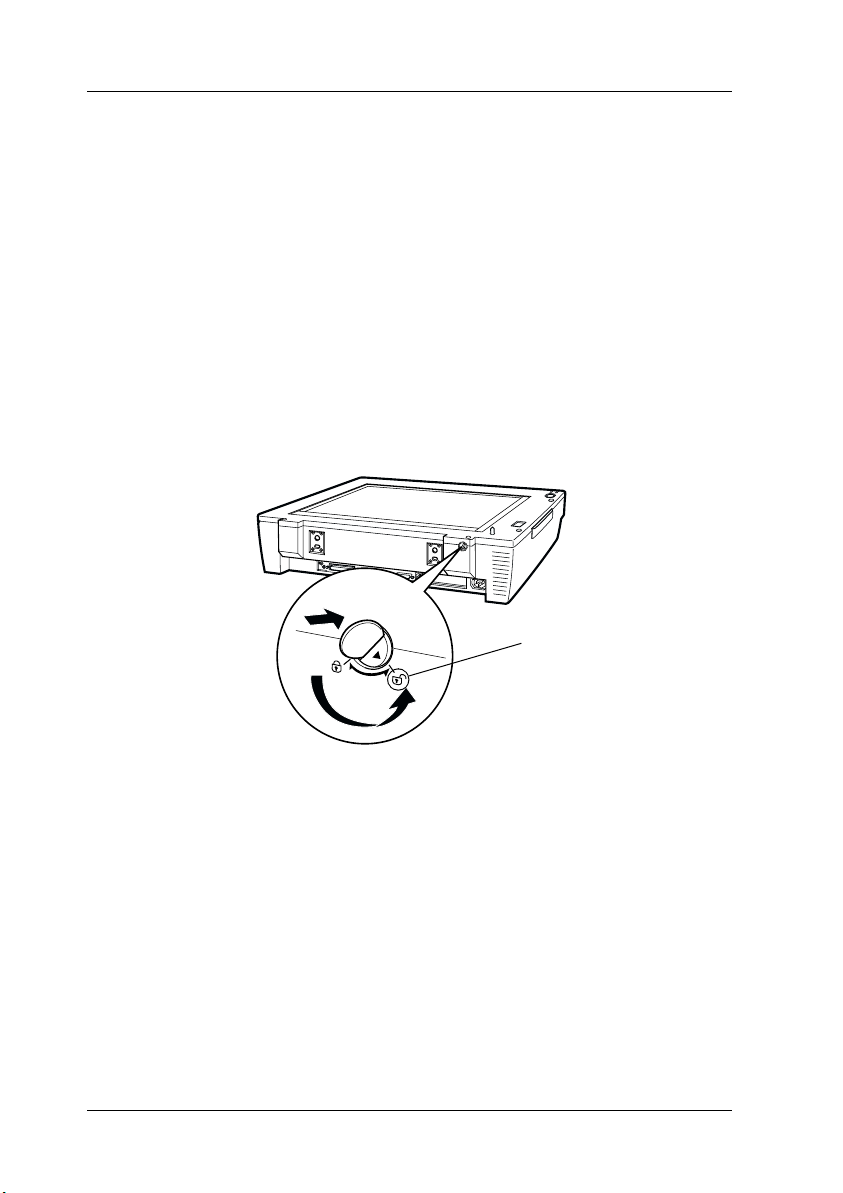
Releasing the Transportation Lock
Before installing the Automatic Document Feeder and connecting
the scanner to a power source, you must release the transportation
lock.
1. Place the scanner on a flat, stable surface with its back side
facing you.
2. While pushing the transportation lock button, turn it
counterclockwise to the unlocked position, using a coin or
similar disc as shown below.
The button is level to the surface of the scanner.
unlocked position
Note:
Before you transport the scanner or store it for an extended period of
time, secure the carriage by turning the transportation lock button
clockwise while pushing it. When the transportation lock button is
locked, the button goes down.
2-4
Setting up the Scanner
Page 25
Installing the Automatic Document Feeder
The Automatic Document Feeder (B81321✽) allows you to
automatically load multiple-page documents into your scanner.
The document feeder is particularly useful for creating an image
database.
Before installing the Automatic Document Feeder, be aware that:
❏ The Automatic Document Feeder is heavy, so you may need
to have someone help you lift it.
❏ The Automatic Document Feeder is large, so you should clear
sufficient space around the scanner.
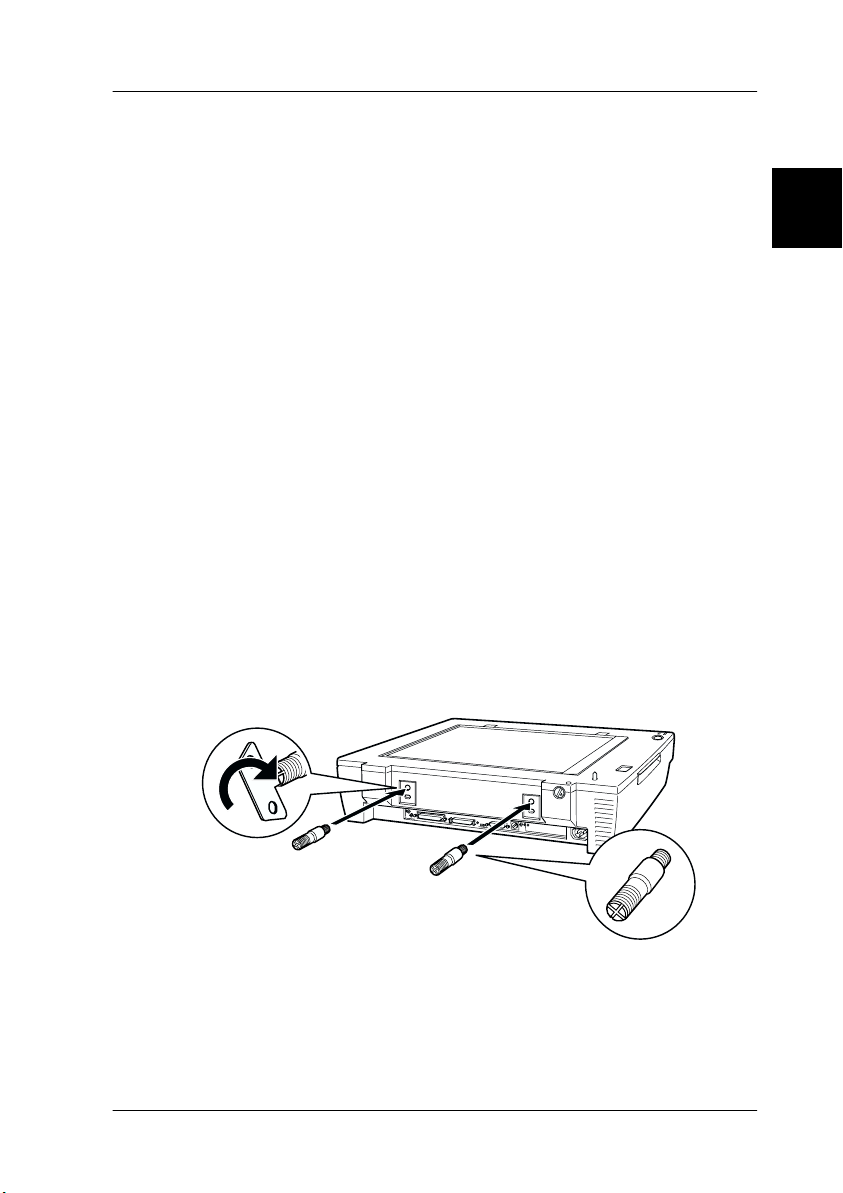
Follow the steps below to install the Automatic Document Feeder
on your scanner.
1. Make sure the transportation lock is released, your scanner is
turned off, and power cord unplugged.
2. Insert the installation screws comes with the Automatic
Document Feeder into the holes in the back of the scanner and
secure them using the included screwdriver as shown below.
2
Setting up the Scanner
2-5
Page 26
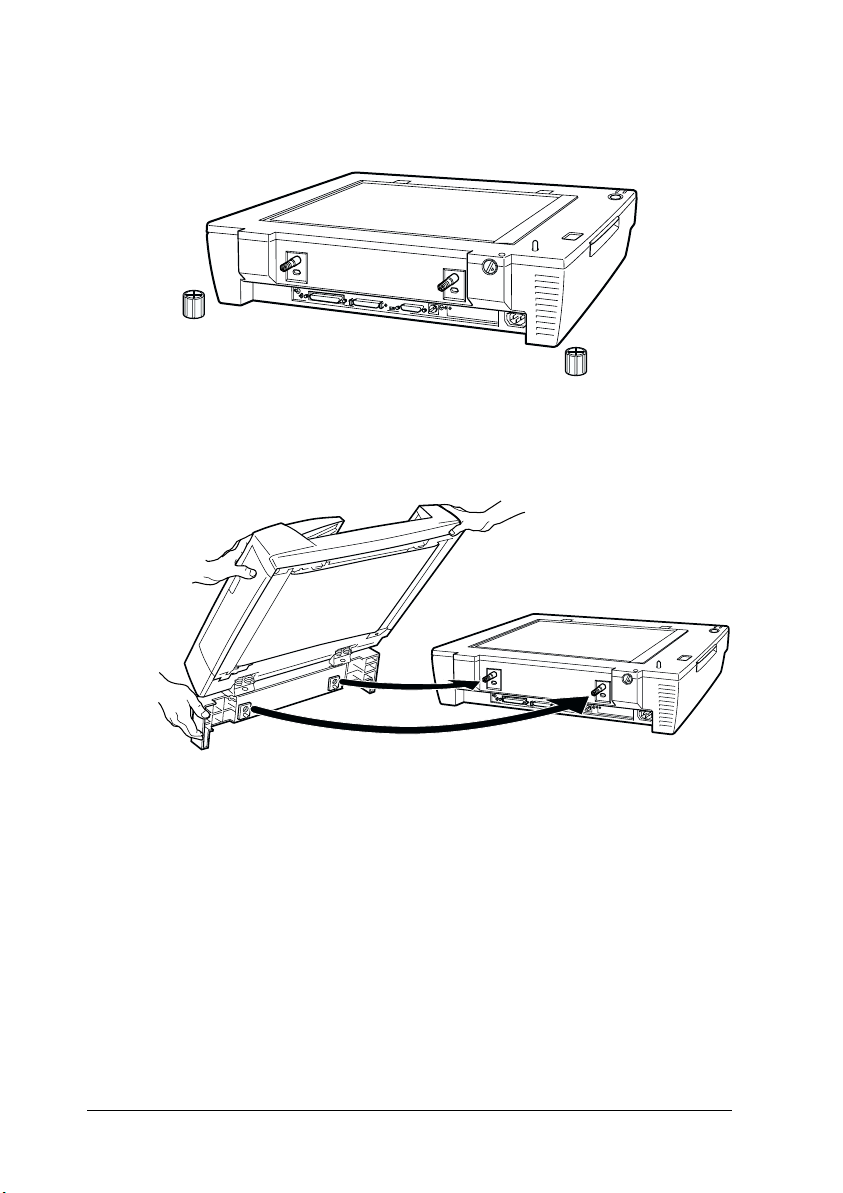
3. Place the two knobs comes with the Automatic Document
Feeder beside the scanner.
4. Align the installation screws with the holes of the Automatic
Document Feeder. Slide the holes over the installation screws.
2-6
Warning:
w
Setting up the Scanner
The Automatic Document Feeder is heavy. Ask for assistance
when lifting it.
Page 27
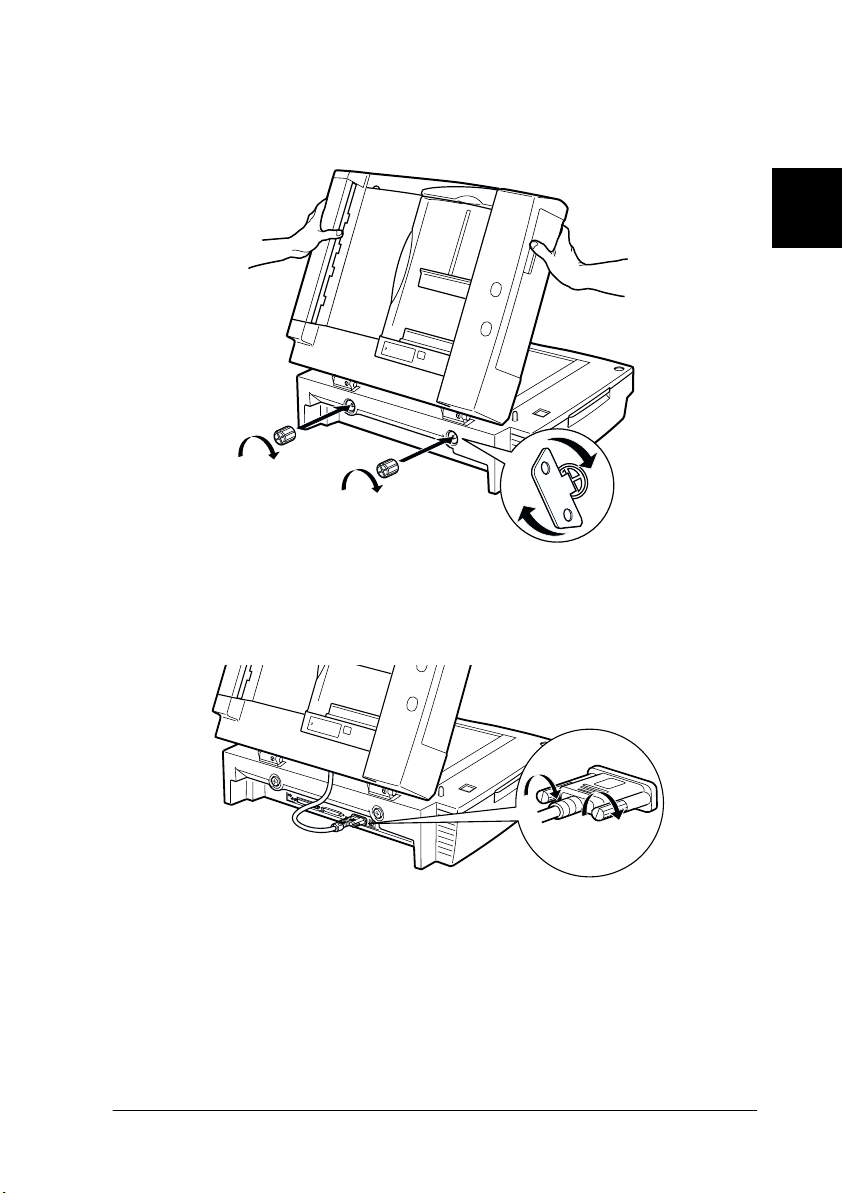
5. Secure the knobs to the ends of the installation screws using
the screwdriver.
6. Attach the Automatic Document Feeder’s connector to the
scanner’s option interface.
2
Setting up the Scanner
2-7
Page 28
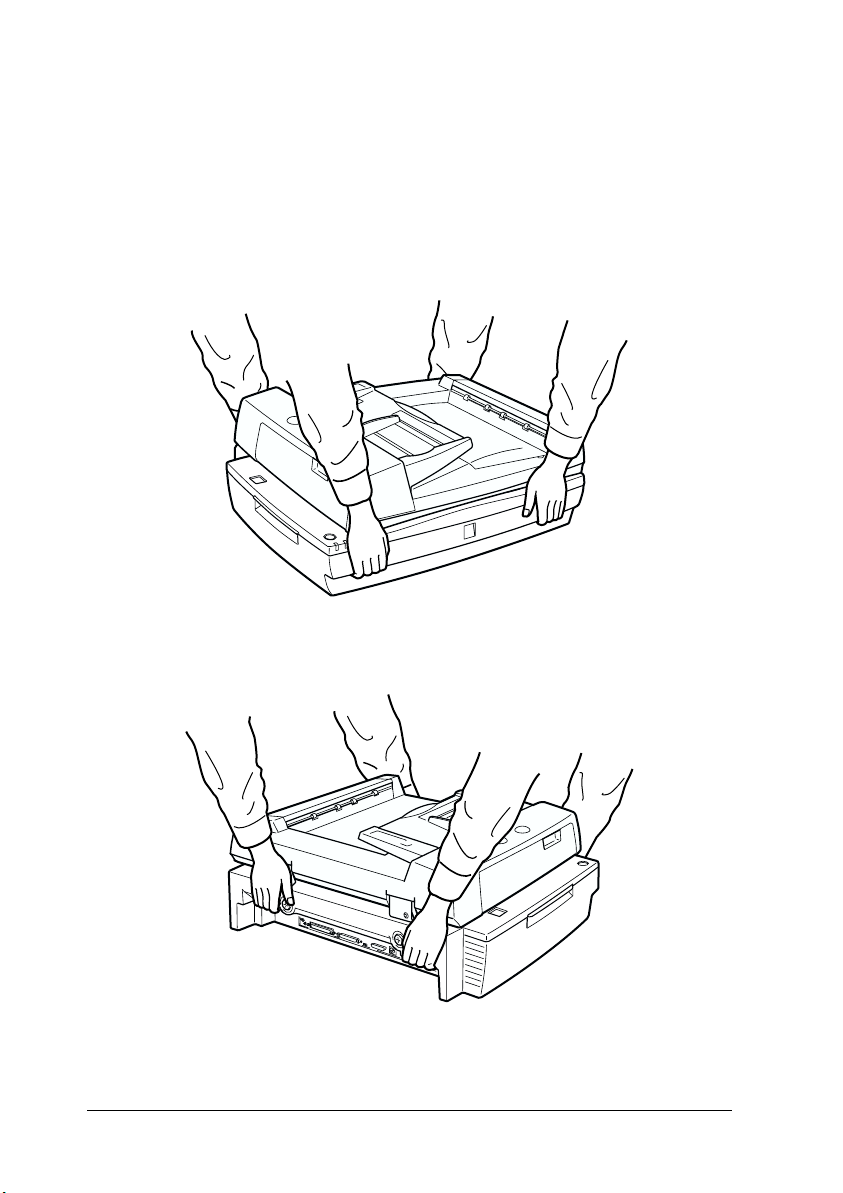
7. Close the Automatic Document Feeder.
Note:
After installing the ADF, be sure to carry the scanner as shown in
the illustration below.
Front view
Rear view
2-8
Setting up the Scanner
Page 29
Plugging in the Scanner
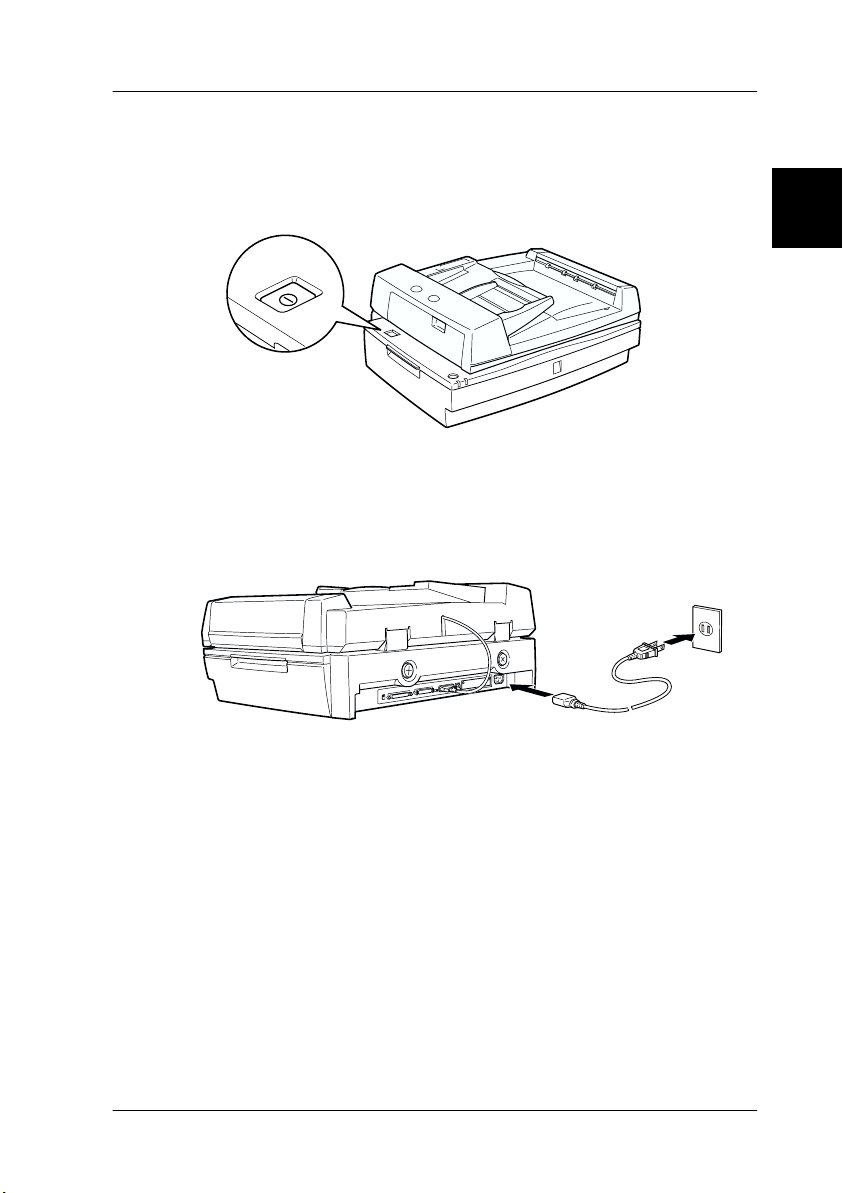
1. Make sure that the scanner is turned off. The scanner is off
when the OPERATE
2. If the power cord is not attached to the scanner, connect it to
the AC socket on the back of the scanner, and plug the other
end into a properly grounded wall outlet.
button is raised (not depressed).
2
c
Caution:
It is not possible to change the scanner's voltage. If the label on the
back of the scanner does not show the correct voltage for your
country, contact your dealer. Do not plug in the power cord.
Setting up the Scanner
2-9
Page 30
Initializing the Scanner
Before connecting the scanner to your PC, follow the steps below to
make sure that the scanner is operating properly.
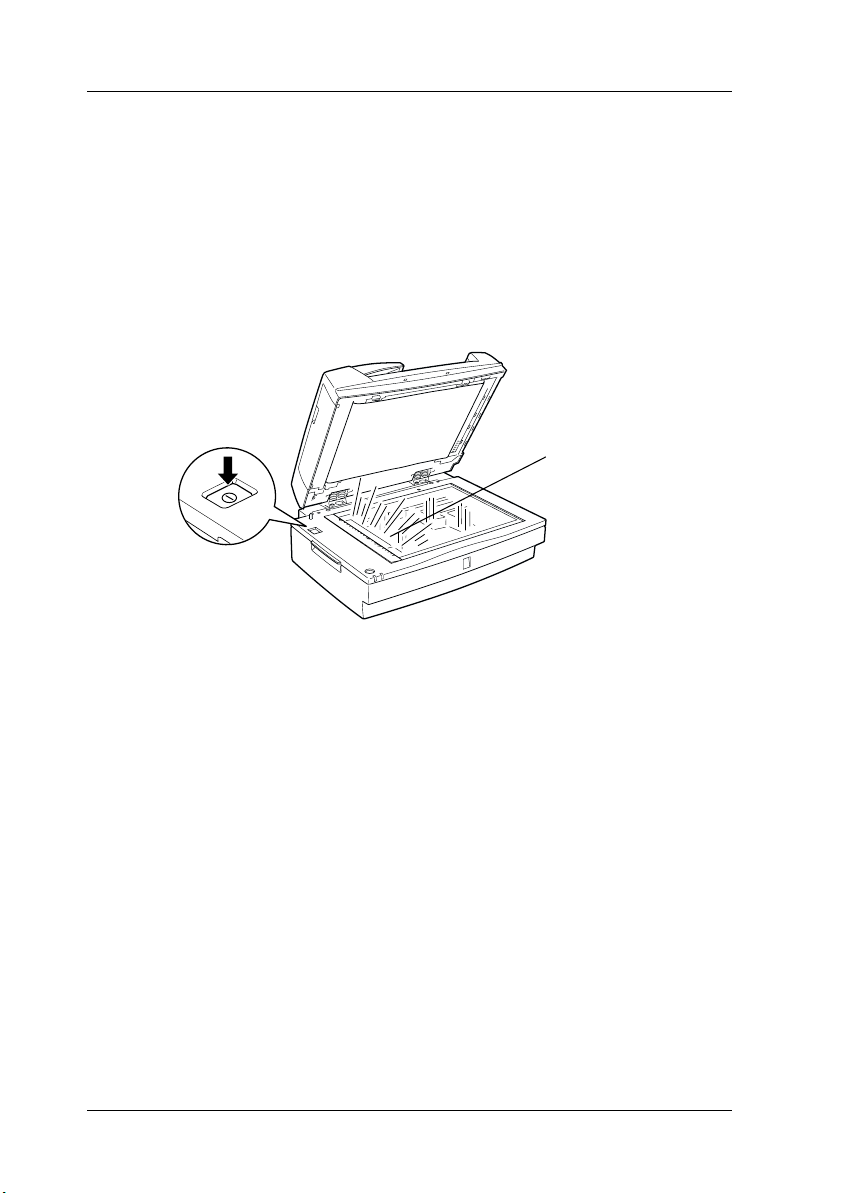
1. Open the Automatic Document Feeder so you can see the
operation of the scanner during initialization.
OPERATE
2. Turn on the scanner by pressing the
3. Make sure the carriage moves slightly to the right and then
back to its original position, and the fluorescent lamp on the
carriage flashes.
light comes on, meaning the scanner has
The READY
completed initialization.
4. Turn off the scanner.
If the scanner does not work as described, turn it off. Make sure
the power cord is firmly plugged in and that you have released
the transportation lock, then try again.
button.
carriage
(in the home position)
c
2-10
Caution:
Whenever you turn off the scanner, wait at least 10 seconds before
turning it back on. Rapidly turning the scanner on and off can
damage the scanner.
Setting up the Scanner
Page 31

Connecting the Scanner to Your PC using the SCSI Interface
For instructions on connecting the scanner to your PC using the
SCSI interface, read this section.
Unless your PC already has a SCSI board installed, you need to
install one, along with SCSI driver software. Install the SCSI board
according to the directions included with it.
If your PC has a SCSI board up and running, connect the scanner
as described in the next section.
Note:
❏ You will need to install the SCSI driver that is normally included
with Windows 95, 98, Millennium Edition, NT (see your system
documentation for instructions), or 2000, or the driver described in
the SCSI board installation documentation.
❏ If you are having errors or poor performance, an updated driver may
help. The latest driver may be available for download from the Web
site of the SCSI board manufacturer.
2
Understanding SCSI connections
Read the following sections to determine how to set up your SCSI
devices and whether you need any optional SCSI cables.
Setting up the Scanner
2-11
Page 32

Daisy Chain
The SCSI interface allows you to connect up to seven devices (such
as a scanner, hard drive, CD-ROM, and so on) to the computer, in
w ha t i s ca l le d a “ d a is y ch ai n ” a r ra ng em e nt . O nl y th e f i rs t SC S I d e v ic e
in a daisy chain is connected to the computer; each of the other
devices is connected to another SCSI device.
Note:
To work with a scanner in wide SCSI, the scanner must be connected to
the wide SCSI Host Adapter via a 68-pin SCSI cable. If narrow SCSI
devices exist between the SCSI host adapter and the scanner, the scanner
works only in the narrow SCSI mode. In this case, you need to set the
select switch to N (narrow).
SCSI Cables
You may need to purchase SCSI cables before setting up your SCSI
daisy chain. The scanner has two SCSI connectors: one is for a
wide 68-pin SCSI cable and the other for a narrow 50-pin SCSI
cable. Be sure the SCSI cable connectors are suitable for your
hardware, according to the maker of your SCSI device and SCSI
interface board.
SCSI ID and terminator
Each device has a SCSI ID number: the computer is usually set to
number 7, and each of the other devices must have a different
number between 0 and 6. Also, the first device and the last device
in the chain (not including the computer) must have a terminator.
No other device can have a terminator, or if a terminator does
exist, it must be turned off or removed.
2-12
Setting up the Scanner
Page 33

Setting the SCSI ID number
The scanner's default SCSI ID number is 2.
The SCSI ID rotary switch
is located at the rear of
the scanner.
If you add the scanner to a system in which one of your SCSI
devices already has a SCSI ID of 2, change the ID number to an
unused number using the rotary switch. See the table below as a
guide.
ID Availability Description
0 Not recommended Usually used for hard disk
1 Not recommended Usually used for hard disk
2 Factory setting of the scanner
3
4
5
6
7 May not be available Usually used for the SCSI board
2
c
Caution:
Do not set the SCSI ID to an ID number that is already assigned
to another device; otherwise the PC, scanner, and other devices
will not operate properly.
Setting up the Scanner
2-13
Page 34

Setting the terminator switch
The scanner has a built-in terminator, which allows SCSI devices
to communicate properly with each other. You may need to
change the terminator switch setting according to your computer
system.
Note:
Do not use an external terminator.
The terminator switch is located
at the rear of the scanner.
Only the scanner is connected
The scanner is the last device in the daisy chain
(other SCSI device)
2-14
Setting up the Scanner
terminator on
terminator on
Page 35

The scanner is in the middle of the daisy chain
(other SCSI device)
terminator off
Setting the select switch
The scanner has two SCSI connectors: one is for a wide 68-pin SCSI
cable and the other for a narrow 50-pin SCSI cable. You may need
to change the select switch setting according to the SCSI cable you
are using.
2
You may need to change the select switch setting according to the
SCSI device connection.
Select switch SCSI cable
N
W (default) Except above connection.
Host adapter is wide SCSI, and there are 50pin SCSI cables between host adapter and
scanner.
Setting up the Scanner
2-15
Page 36

Connecting the scanner
Use the following steps to connect the scanner to your PC or to
another SCSI device.
Note:
The combination of connectors on the SCSI interface cable you need
varies depending on the maker of your SCSI device and SCSI interface
board.
1. Make sure the scanner, your PC, and all other SCSI devices
are turned off and unplugged from the power source.
Caution:
c
2. Connect one end of the interface cable to a suitable scanner
SCSI connector until the locks on both sides snap in.
Do not connect the scanner to your PC or other devices while
they are turned on, otherwise damage may occur.
2-16
Note:
❏ To connect the scanner to a PC or any other SCSI device, the total
length of cable in the daisy chain must not exceed 3 meters;
otherwise the system may not work properly.
❏ Make sure no other interface is used.
❏ Before connecting the scanner to a PC, you need to set the select
switch. See “Setting the select switch” on page 2-15 for details.
Setting up the Scanner
Page 37

3. Connect the other end of the cable to the SCSI port of your PC
or another SCSI device.
4. Plug in the power cords of your PC, the scanner, and other
external SCSI devices.
Note:
Before turning on your system, be sure to read “Power-on sequence”
on page 2-17.
Power-on sequence
Keep the following in mind every time you turn on your PC and
SCSI devices, including the scanner.
❏ Be sure to turn on the SCSI devices first and your PC last. If
you turn on a SCSI device after your PC, SCSI or your PC may
not work properly.
❏ For Windows 95, 98, 2000, or Millennium Edition users:
The first time you turn on your PC after the scanner, one of
the following dialog boxes or similar may appear.
2
Windows 95
Setting up the Scanner
2-17
Page 38

Windows 98 Windows 2000
Windows Millennium Edition
If you see one of these, follow the installation instructions in
Chapter 3, then see “Power-off sequence” following.
2-18
Setting up the Scanner
Page 39

Power-off sequence
Keep the following in mind every time you turn off your PC and
SCSI devices.
❏ When you are finished using your system, turn off your PC
first, then the scanner and other SCSI devices.
❏ While using your PC, do not turn off any SCSI device which
has a terminator that is active (on).
❏ Do not turn the scanner off and back on while using your PC,
otherwise the scanner may not work properly.
When the connection is complete, you need to install the scanner
software. See Chapter 3 of this guide.
2
Setting up the Scanner
2-19
Page 40

2-20
Setting up the Scanner
Page 41

Chapter 3
Installing the Software
System Requirements . . . . . . . . . . . . . . . . . . . . . . . . . . . . . . . . . . . . 3-2
For Windows and SCSI users . . . . . . . . . . . . . . . . . . . . . . . . .3-2
For Windows and IEEE 1394 users . . . . . . . . . . . . . . . . . . . . 3-3
For scanning over a network . . . . . . . . . . . . . . . . . . . . . . . . .3-3
Installing EPSON TWAIN HS . . . . . . . . . . . . . . . . . . . . . . . . . . . . . 3-5
For Windows Millennium Edition users. . . . . . . . . . . . . . . . 3-5
For Windows 2000 users . . . . . . . . . . . . . . . . . . . . . . . . . . . . . 3-8
For Windows 98 users . . . . . . . . . . . . . . . . . . . . . . . . . . . . . . . 3-12
For Windows 95 and NT 4.0 users. . . . . . . . . . . . . . . . . . . . . 3-16
Software for Scanning over a Network . . . . . . . . . . . . . . . . . . . . . 3-22
Installing EPSON Scan Server . . . . . . . . . . . . . . . . . . . . . . . . 3-22
Installing EPSON TWAIN HS Network . . . . . . . . . . . . . . . .3-31
Installing Another Application Software. . . . . . . . . . . . . . . . . . . .3-38
Calibrating Your Screen . . . . . . . . . . . . . . . . . . . . . . . . . . . . . . . . . . 3-39
Selecting Scanners . . . . . . . . . . . . . . . . . . . . . . . . . . . . . . . . . . . . . . . 3-41
For Windows 98, 2000, and Millennium Edition users. . . . 3-42
For Windows 95 and NT 4.0 users. . . . . . . . . . . . . . . . . . . . . 3-44
3
Installing the Software
3-1
Page 42

System Requirements
Before installing the scanner software, make sure that your
system meets the following requirements.
For Windows and SCSI users
Scanner: EPSON GT-30000
®
System: Microsoft
Windows Millennium Edition, Windows 2000
Professional, or Windows NT
Windows® 95, Windows 98,
®
4.0 Workstation
Interface:
Display: VGA or higher resolution monitor 640 × 480 pixel
Adaptec® SCSI adapter
resolution (800 × 600 or higher recommended),
with High Color (16bit) or True Color (32bit)
setting
Note:
Color and tone reproduction are subject to the display
capability of your computer system, including the
video card, display monitor, and software. See the
product documentation for details.
3-2
Installing the Software
Page 43

For Windows and IEEE 1394 users
Scanner: EPSON GT-30000
System: Microsoft Windows Millennium Edition, or
Windows 2000 Professional pre-installed
Interface:
Display: VGA or higher resolution monitor 640 × 480 pixel
IEEE 1394 adapter
resolution (800 × 600 or higher recommended),
with High Color (16bit) or True Color (32bit)
setting
Note:
Color and tone reproduction are subject to the display
capability of your computer system, including the
video card, display monitor, and software. See the
product documentation for details.
For scanning over a network
Computer: For EPSON Scan Server
IBM PC/AT compatible computer
(Intel Pentium or faster processor is
recommended)
For EPSON TWAIN HS Network
IBM PC/AT compatible computer
(Intel Pentium or faster processor is
recommended)
3
Installing the Software
3-3
Page 44

Operating
System:
System Configuration: Minimum two computers on the
Scanner: EPSON GT-30000
For EPSON Scan Server
Microsoft Windows 95, Windows 98,
Windows Millennium Edition,
Windows 2000 Professional/Server,
or Windows NT 4.0
Workstation/Server
For EPSON TWAIN HS Network
Microsoft Windows 95, Windows 98,
Windows Millennium Edition,
Windows 2000 Professional, or
Windows NT 4.0 Workstation
network
Hardware Interface for
Scanner:
Hardware Interface for
Networking:
Ethernet Communication
Protocol:
SCSI, IEEE 1394
(IEEE 1394 is available on Windows
Millennium Edition and Windows
2000 preinstalled only)
10BASE-T/100BASE-TX, 10BASE-5,
10BASE-2
TCP/IP
3-4
Installing the Software
Page 45

Installing EPSON TWAIN HS
After connecting the scanner to your PC, install the scanner
software (EPSON TWAIN HS) from the CD-ROM. The
installation steps differ depending on the version of Windows.
For Windows Millennium Edition users, see the instructions on
this page.
For Windows 2000 users, see “For Windows 2000 users” on page
3-8.
For Windows 98 users, see “For Windows 98 users” on page 3-12.
For Windows 95 and NT 4.0 users, see “For Windows 95 and NT
4.0 users” on page 3-16.
Note:
❏ If the scanner software is already installed and you are upgrading
your system to Windows 98, 2000, or Millennium Edition, be sure
to uninstall it before the upgrade, and then re-install it using the
same steps described in this section. For more information, see
“Maintenance and Troubleshooting” in your Online Reference
Guide.
❏ To install the scanner software in Windows 2000 or NT 4.0, you
need to log on to Windows as an Administrator.
3
For Windows Millennium Edition users
Note:
If you use the Scanner and Camera Wizard to select a scanner driver,
EPSON recommends selecting the EPSON TWAIN driver to scan
images, not the “WIA” driver provided with Windows Millennium
Edition. See Windows online help for details on the Scanner and Camera
Wizard.
1. Connect your scanner to your PC.
Installing the Software
3-5
Page 46

2. Turn on the scanner, then your PC.
Note:
It is important to follow this power-on sequence if you are using a
SCSI interface. Otherwise the Plug and Play feature will not work.
3. When the dialog box shown below appears, select the Specify
the location of the driver option, then click Next.
4. Insert your scanner software CD in the CD-ROM drive.
5. Make sure the Search for the best driver for your device
option and the Specify a location check box are selected.
Next, browse the CD-ROM for EPSON\(your preferred
language)\WINME, then click Next.
3-6
Installing the Software
Page 47

6. When the dialog box shown below appears, click Next.
7. The EPSON Screen Calibration utility automatically starts.
Follow the instructions on the screen. For details, see
“Calibrating Your Screen” on page 3-39.
Note:
If the EPSON Screen Calibration utility does not start
automatically, see your Online Reference Guide to calibrate your
screen after installing the scanner software.
8. When the dialog box shown below appears, click Finish.
3
Installing the Software
3-7
Page 48

9. This completes the EPSON TWAIN HS installation. Restart
your PC.
Note:
It is important to restart your PC before using the scanner.
You can now continue and install the other utility and
applications from the scanner software CD. To install EPSON
Scan Server and EPSON TWAIN HS Network, see “Software for
Scanning over a Network” on page 3-22. To install the ISIS
driver, see “Installing Another Application Software” on page
3-38.
For Windows 2000 users
1. Connect your scanner to your PC.
2. Turn on the scanner, then your PC.
Note:
It is important to follow this power-on sequence if you are using a
SCSI interface. Otherwise the Plug and Play feature will not work.
®
3. When the dialog box shown below appears, insert the scanner
software CD in the CD-ROM drive, then click Next.
3-8
Installing the Software
Page 49

4. Select the Search for a suitable driver for my device option,
then click Next.
5. Make sure only the Specify a location check box is selected,
and click Next.
3
Installing the Software
3-9
Page 50

6. Browse and select, or type in the CD-ROM drive letter, the
EPSON folder, the folder of your preferred language, and the
Win2000 folder as the location, as shown below. Finally, click
OK.
7. Follow the instructions on the screen. When the dialog box
shown below appears, click Yes to continue.
3-10
Note:
If you click No and stop installation, your scanner will appear under
Other Devices with a question (?) mark in the Device Manager
menu. You must reinstall EPSON TWAIN HS. Follow the
instructions on “Maintenance and Troubleshooting” in your
Online Reference Guide.
Installing the Software
Page 51

8. The EPSON Screen Calibration utility automatically starts.
Follow the instructions on the screen. For details, see
“Calibrating Your Screen” on page 3-39.
Note:
If the EPSON Screen Calibration utility does not start
automatically, see your Online Reference Guide to calibrate your
screen after installing the scanner software.
9. When the dialog box shown below appears, click Finish.
3
10. If the dialog box shown below appears, click Yes to restart
your PC.
This completes the EPSON TWAIN HS installation. You can now
continue and install the other utility and applications from the
scanner software CD. To install EPSON Scan Server and EPSON
TWAIN HS Network, see “Software for Scanning over a
Network” on page 3-22. To install the ISIS driver, see “Installing
Another Application Software” on page 3-38.
Installing the Software
3-11
Page 52

For Windows 98 users
1. Connect your scanner to your PC.
2. Turn on the scanner, then your PC.
Note:
It is important to follow this power-on sequence if you are using a
SCSI interface. Otherwise the Plug and Play feature will not work.
3. When a dialog box similar to the one shown below appears,
insert the scanner software CD in the CD-ROM drive, then click
Next
.
3-12
Installing the Software
Page 53

4. Select the Search for the best driver for your device option,
then click Next.
5. Make sure only the Specify a location check box is selected,
then browse and select, or type in the CD-ROM drive letter,
the EPSON folder, the folder of your preferred language, and
the Win98 folder as the location, as shown below. Finally, click
Next.
3
Installing the Software
3-13
Page 54

6. Follow the instructions on the screen. Depending on your
system, you may be asked to insert the Windows 98 CD-ROM.
Replace the scanner software CD with the Windows 98 CDROM. Make sure that the correct CD-ROM drive letter and
the Win98 folder are specified in the Copy files from: box as
shown below.
After installing the appropriate files, replace the Windows 98
CD-ROM with the scanner software CD.
7. The EPSON Screen Calibration utility automatically starts.
Follow the instructions on the screen. For details, see
“Calibrating Your Screen” on page 3-39.
Note:
If the EPSON Screen Calibration utility does not start
automatically, see your Online Reference Guide to calibrate your
screen after installing the scanner software.
3-14
Installing the Software
Page 55

8. When the following dialog box shown below appears, click
Finish.
This completes the EPSON TWAIN HS installation. You can now
continue and install the other utility and applications from the
scanner software CD. To install EPSON Scan Server and EPSON
TWAIN HS Network, see “Software for Scanning over a
Network” on page 3-22. To install the ISIS driver, see “Installing
Another Application Software” on page 3-38.
3
Installing the Software
3-15
Page 56

Note:
❏ If you see README files in the application folders on the CD-ROM,
be sure to read them as they contain up-to-date information on the
applications.
❏ The Scanners and Cameras icon appears in Control Panel as
shown below, after EPSON TWAIN HS is installed.
For Windows 95 and NT 4.0 users
1. Make sure that the scanner is turned on.
2. Turn on the PC, and start Windows.
If you are using Windows NT 4.0, insert the scanner software
CD in the CD-ROM drive, then go to step 3.
For Windows 95, either of the following dialog boxes appears.
3-16
Installing the Software
Page 57

❏ If the following dialog box appears, insert the scanner
software CD in the CD-ROM drive, then click Next
When prompted for the drive and folder, select the CD-ROM
drive, the EPSON folder, the folder of your preferred
language, and the Win95 folder. An example is shown below.
.
3
Installing the Software
3-17
Page 58

When a dialog box similar to the one shown below appears,
click Finish and go to step 3
.
❏ If the following dialog box appears, insert the scanner
software CD in the CD-ROM drive.
3-18
Select Driver from disk provided by hardware
manufacturer
Installing the Software
Click OK then Browse.
.
Page 59

Select the CD-ROM drive, the EPSON folder, the folder of
your preferred language, and the Win95 folder. Finally click
OK and go to step 3.
3. Double-click the My Computer icon.
4. Double-click the CD-ROM drive icon. A dialog box asking for
your preferred language appears. If no dialog box appears,
double-click the Cdsetup.exe icon.
5. Select your preferred language and click OK.
3
6. When the following dialog box appears, click Add Software.
Installing the Software
3-19
Page 60

7. From the list of applications, select those you want to install.
Make sure EPSON TWAIN HS is selected for installation.
8. Click OK. Then follow the instructions on the screen.
The setup program installs EPSON TWAIN HS.
9. After EPSON TWAIN HS is installed, the EPSON TWAIN HS
dialog box appears.
10. Make sure that SCSI is selected and your EPSON scanner
appears in the Scanner Selection list. If not, see “Maintenance
and Troubleshooting” in your Online Reference Guide.
3-20
Installing the Software
Page 61

11. Click Test to check the connection. If everything is properly
installed and connected, Status: Device Ready appears under
Scanner Information in the dialog box
If the “Device Ready” message does not appear, see
“Maintenance and Troubleshooting” in your Online Reference
Guide.
.
3
to close the EPSON TWAIN HS dialog box.
12. Click OK
The EPSON Screen Calibration utility automatically starts. Go
to “Calibrating Your Screen” on page 3-39.
This completes the EPSON TWAIN HS installation. You can now
continue and install the other utility and applications from the
scanner software CD. To install EPSON Scan Server and EPSON
TWAIN HS Network, see “Software for Scanning over a
Network” on page 3-22. To install the ISIS driver, see “Installing
Another Application Software” on page 3-38.
Installing the Software
3-21
Page 62

Software for Scanning over a Network
To use EPSON scanners in a networked environment and send
scanned images to client PCs, you need to install the following
software:
❏ EPSON Scan Server on the PC connected to the EPSON
scanner you want to use
❏ EPSON TWAIN HS Network on network clients
Note:
To install the scanner software in Windows 2000 or NT 4.0, you need
to log on to Windows as an Administrator.
Installing EPSON Scan Server
Before installing EPSON Scan Server on the scanner server PC,
you need to do the following:
1. Connect your scanner to the scanner server PC.
2. Turn on the scanner, then the scanner server PC.
3. Insert the scanner software CD in the CD-ROM drive.
If you are using Windows NT 4.0, go to step 5.
4. Windows automatically detects the connected scanner and
starts the New Hardware Found Wizard. The New Hardware
Found Wizard automatically finds the location of the .inf file
(information file) in the CD and installs it. In this case, go to
step 6.
If it doe s n ot f in d t he lo ca ti on of th e . in f f il e, b ro ws e a nd se le ct ,
or type in the CD-ROM drive letter, the EPSON folder, the folder
of your preferred language, and the WINME, Win2000,
Win98, or Win95 folder as the location.
3-22
Installing the Software
Page 63

Note:
If using Windows 95, the .inf file is installed. On Windows 98,
Windows 2000, and Windows Millennium Edition, EPSON
TWAIN HS is installed.
5. Start the Windows Explorer and double-click Cdsetup.exe in
the CD-ROM drive.
6. Select the language that you want to use in the Select
Language dialog box and click OK.
The EPSON Software Setup dialog box appears.
7. Click Add Software in the EPSON Software Setup dialog box.
3
Installing the Software
3-23
Page 64

8. Select EPSON Scan Server by checking to the left of the name in
the EPSON S oftware Setup dialog box. Make sure to remove the
check mark from application which is already installed on the
scanner server PC.
9. Click OK to start the installation of selected applications.
The Welcome dialog box appears.
10. Click Next to continue.
3-24
The File Copy Progress bar appears. After files are copied, the
Question dialog box appears.
Installing the Software
Page 65

11. Click Yes or No.
12. Find your version of Windows below and follow the
instructions.
For Windows 98, 2000, and Millennium Edition users:
The information dialog box appears. Click OK, then go to step
17 to finish the setup procedure.
3
Note:
After you finish the setup procedure, be sure to double-click the
Scanners and Cameras icon in Control Panel and select
EPSON GT-30000 in the Scanners and Cameras Properties list.
See “Selecting Scanners” on page 3-41 for details.
Installing the Software
3-25
Page 66

For Windows 95 and NT 4.0 users:
The EPSON Scan Server dialog box appears.
3-26
Installing the Software
Page 67

Click Next, the EPSON Scan Server setup dialog box appears.
3
13. Select the scanner to be used from the Scanner Selection list box.
Note:
If the EPSON TWAIN HS software or device information file is not
already installed on the scanner server PC using Windows 95, no
available scanners will appear on the list at this point. In this case,
skip selection of the scanner name and continue the installation.
Then proceed with the installation of the EPSON TWAIN HS
software. After the installation, select EPSON Scan Server from
the Control Panel. Now the scanner name is on the list and can be
selected.
Installing the Software
3-27
Page 68
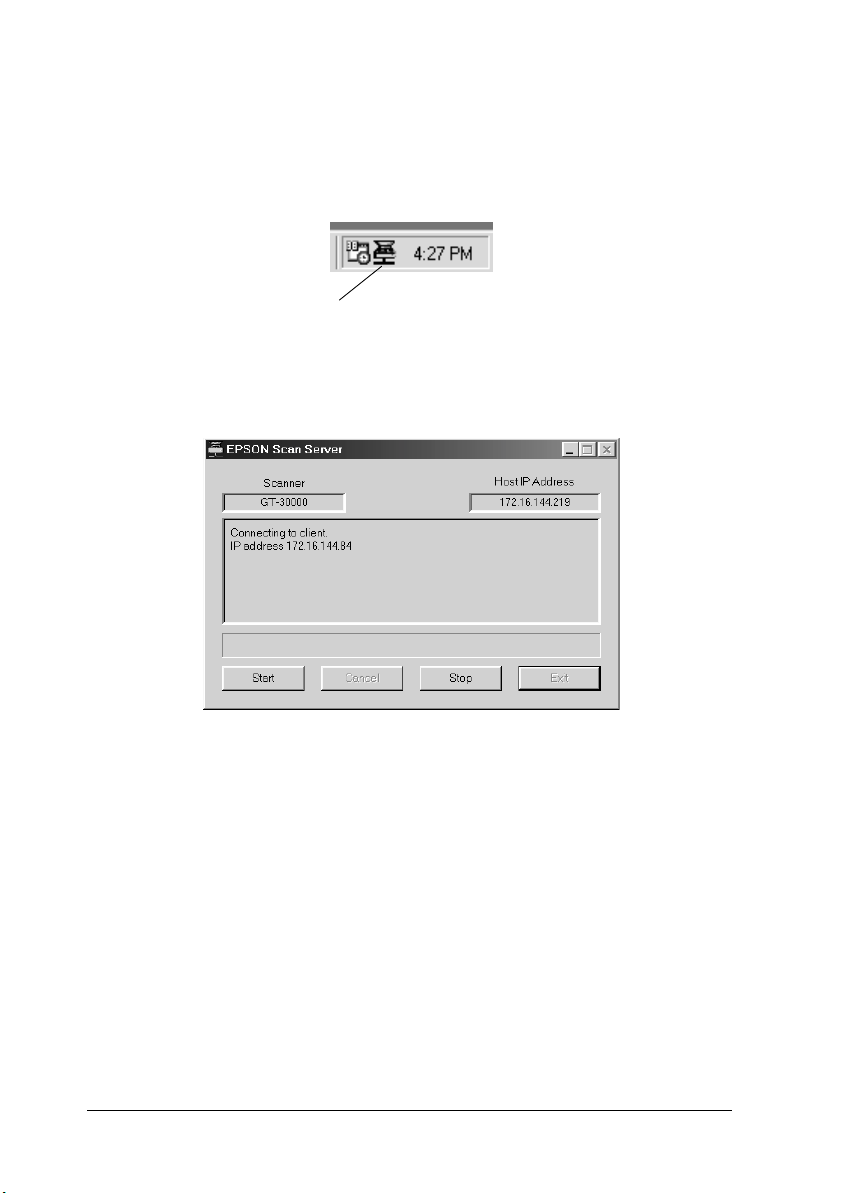
14. Select the desired start up mode between Icon or Dialogbox.
In the Taskbar icon start up mode, the EPSON Scan Server
icon appears in the Taskbar tray when Scan Server starts as
shown below.
icon
In the dialog box start up mode, the following dialog box
appears when Scan Server starts.
3-28
Installing the Software
Page 69

15. To test the status of the scanner, click Test.
After the test is completed, information about the scanner
status is displayed below the [Status] heading.
3
16. After setting this dialog box, click OK.
The Setup Complete dialog box appears.
17. Click OK.
Installing the Software
3-29
Page 70

18. Click Yes or No.
Installation of EPSON Scan Server is complete.
Windows 98, 2000, and Millennium Edition users can select the
default scanner they want to use from Scanners and Cameras in
Control Panel once they have installed EPSON Scan Server. See
“Selecting Scanners” on page 3-41.
Changing the start up mode
Dialog box to Taskbar icon:
To change from the dialog box start up mode to the Taskbar icon
start up mode, click the scanner icon in the upper left corner of
the EPSON Scan Server dialog box and select Taskbar Icon from
the drop down menu. A check mark will appear next to Taskbar
Icon.
Taskbar icon to dialog box:
To change from the Taskbar icon start up mode to the dialog box
start up mode, right-click the EPSON Scan Server icon in the
Taskbar tray and click Taskbar Icon to remove the check mark.
Your settings will take effect the next time you start EPSON Scan
Server.
3-30
Installing the Software
Page 71

Installing EPSON TWAIN HS Network
Install and use EPSON TWAIN HS Network on a client PC that
is connected to your network. Make sure you know the IP address
or host name of the host PC on which you installed EPSON Scan
Server as you will need it while installing EPSON TWAIN HS
Network.
1. Insert the scanner software CD in the CD-ROM drive.
The installer automatically starts and the Select language
dialog box appears. If the dialog box does not appear, start
Windows Explorer and double-click Cdsetup.exe in the CDROM drive.
2. Select your preferred language and click OK.
3
Installing the Software
3-31
Page 72

3. When the following dialog box appears, click Add Software.
4. Click to select EPSON TWAIN HS Network. A check mark
appears to indicate EPSON TWAIN HS Network is selected.
3-32
You can also select additional applications to install.
However, be sure to remove the check marks for applications
already installed on your PC.
Installing the Software
Page 73

5. Click OK, and then Next.
6. Click Next.
3
Installing the Software
3-33
Page 74

The following dialog box appears.
3-34
Note:
After the installation, you can still change the settings in the
EPSON TWAIN HS Network dialog box. Click the Start button on
the Windows taskbar and point to Settings, then select Control
Panel. Finally, double-click the EPSON TWAIN HS Network
icon.
Installing the Software
Page 75

7. In the Network Scanner Address box, enter the IP address or
Host name of the scanner server PC.
Note:
❏ If you enter the IP address or Host name of the scanner server
PC which connects a scanner other than GT-30000, the Scanner
Status box displays a message indicating that this scanner is
not supported. If this happens, you need to select the GT-30000
scanner as the default scanner on the scanner server PC.
For Windows 98, 2000, and Millennium Edition users, select
EPSON GT-30000 in the Scanners and Cameras Properties
list. See “Selecting Scanners” on page 3-41.
For Windows 95 and NT 4.0 users, select EPSON GT-30000
in the EPSON Scan Server setup dialog box.
❏ Host name can be used on networks that employ the DNS,
WINS or LMHOSTS naming service.
❏ To delete the IP address or Host name, select it and then click
Delete.
8. Specify the Timeout Setting. Normally you do not need to
change this value. Valid values range from 30 to 300 seconds.
3
For screen calibration, refer to “Calibrating Your Screen” on
page 3-39.
Installing the Software
3-35
Page 76
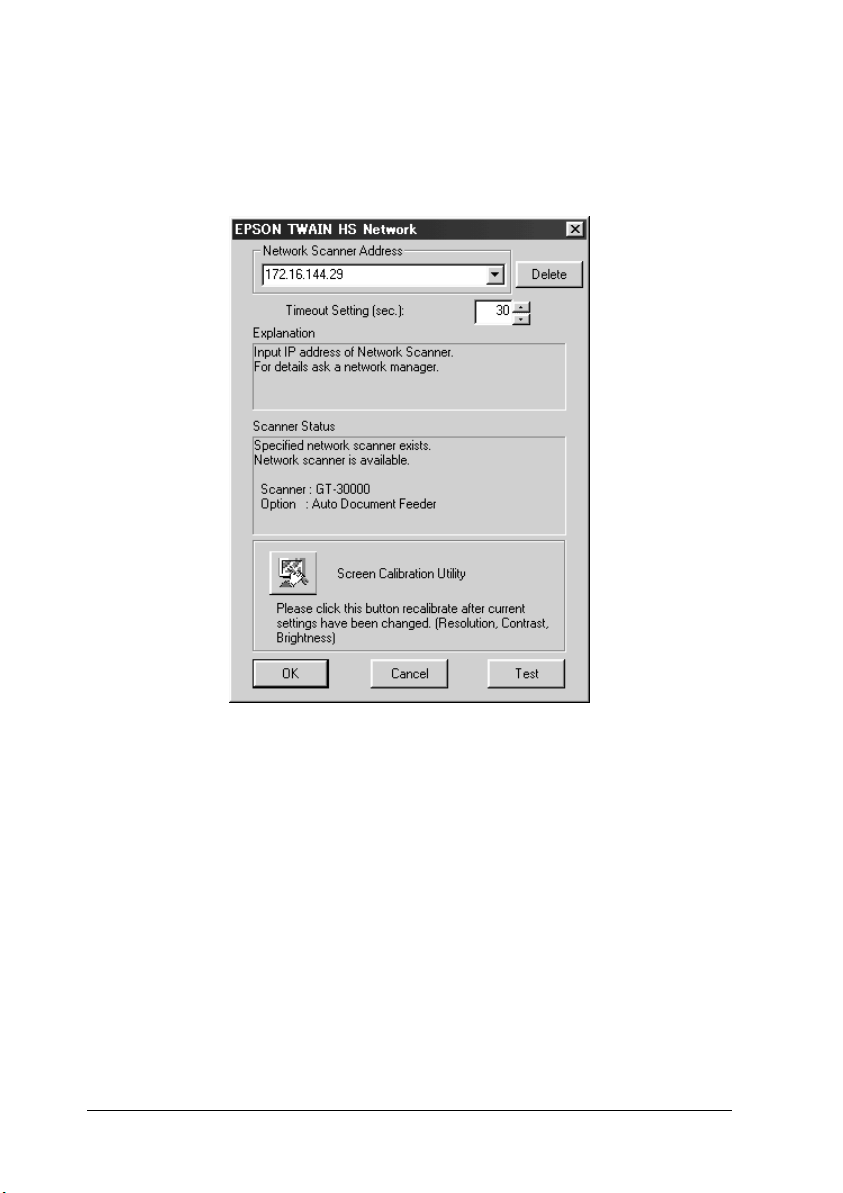
9. To test the status of the scanner, click Test.
After the test is complete, check the scanner's status in the
Scanner Status box.
10. After setting this dialog box, click OK.
Screen calibration begins.
3-36
Installing the Software
Page 77

11. Click Next.
12. The EPSON Screen Calibration utility automatically starts.
Follow the instructions on the screen. For details, see
“Calibrating Your Screen” on page 3-39.
13. Click OK.
3
Installation of EPSON TWAIN HS Network is complete. You can
now continue and install the ISIS driver from the scanner software
CD. See the next section.
Installing the Software
3-37
Page 78

Installing Another Application Software
The ISIS (Image and Scanner Interface Specification) driver is an
industry standard interface for high performance document
scanning.
This section explains how to install the driver from the EPSON
Scanner Software CD, as follows:
1. Insert the scanner software CD in the CD-ROM drive.
2. Click the Start button on the Windows task bar, and select
Run.
3. In the Run dialog box, browse and select, or type in the CDROM drive letter, the ISIS folder, and Setup.exe as the
location.
4. Click OK and follow the instructions in the ISIS driver
documentation.
Note:
❏ The ISIS driver documentation is located in each of language
folder in the ISIS driver folder.
❏ To read the ISIS driver documentation, you need to install
®
Adobe
following section.
Acrobat Reader® on your PC, as described in the
Installing Acrobat Reader
1. Insert the scanner software CD in the CD-ROM drive.
The installer automatically starts and the Select language
dialog box appears. If the dialog box does not appear, start
Windows Explorer and double-click Cdsetup.exe in the CDROM drive.
2. Select your preferred language and click OK.
3-38
Installing the Software
Page 79

3. When the EPSON Software Setup dialog box appears, click
Add Software.
4. Click to select Adobe Acrobat Reader. A check mark appears
to indicate Adobe Acrobat Reader is selected.
Note:
Some of the applications in the application list are selected by default.
If you want to read the PDF files but do not want to install some of
the applications, clear the check marks next to the applications you
do not want to install.
5. Click OK.
Calibrating Your Screen
You must calibrate your screen and the scanner to reproduce
images identical to the originals.
Note for Windows 98, 2000, and Millennium Edition users:
There is no introductory Screen Calibration dialog for Windows 98,
2000, and Millennium Edition. Start from step 2 to calibrate your
screen.
3
Installing the Software
3-39
Page 80

During the EPSON scanner software installation, the following
dialog box appears.
1. Click Next
2. In a dialog box similar to the one shown below, move the
slider to the right or left until the two shades of the gray
horizontal stripes match.
.
r
3-40
Installing the Software
Page 81

Note:
View the screen from a short distance. While the gray stripes do not
blend perfectly well, try to adjust until the different tones match as
closely as possible.
3. Click OK to register the calibration setting.
4. When the message Setup is complete appears, click OK
Screen calibration is not required any more until you change to a
different monitor.
Selecting Scanners
If several EPSON TWAIN HS-compliant scanners are connected
to your PC, or you are to use the scanner in a networked
configuration, follow the instructions below to select the default
scanner you want to use.
Note:
If you use different interface connections, you can only connect and use
scanners that are of the same model.
.
3
Installing the Software
3-41
Page 82

For Windows 98, 2000, and Millennium Edition users
1. Double-click the Scanners and Cameras icon in Control
Panel.
2. Select a scanner you want to use, and then click Properties.
3. Click the Utility tab.
3-42
Installing the Software
Page 83

4. Select the Select as default scanner for EPSON TWAIN HS
option or the Select as default scanner for EPSON Scan
Server option, and then click OK.
Note:
If you set up your scanner as a network scanner, select the Select
as default scanner for EPSON Scan Server check box.
3
5. Click OK.
Installing the Software
3-43
Page 84

For Windows 95 and NT 4.0 users
1. Double-click the EPSON TWAIN HS icon in Control Panel.
The EPSON TWAIN HS dialog box appears.
2. Use the Scanner Selection list box to select a scanner you want
to use. Then click OK.
3-44
Installing the Software
Page 85

Chapter 4
Using Your Scanner
Scanning Procedure. . . . . . . . . . . . . . . . . . . . . . . . . . . . . . . . . . . . . . 4-2
Loading documents into your Automatic Document
Feeder . . . . . . . . . . . . . . . . . . . . . . . . . . . . . . . . . . . . . . . . . . . . . . .4-2
Placing a Document on the Scanner . . . . . . . . . . . . . . . . . . . . . . . . 4-4
Starting EPSON TWAIN HS . . . . . . . . . . . . . . . . . . . . . . . . . . . . . .4-7
Scanning from the Automatic Document Feeder . . . . . . . . . . . . .4-8
Changing the Document Feed Speed . . . . . . . . . . . . . . . . . . 4-10
Fixing paper jams in the Automatic Document
Feeder . . . . . . . . . . . . . . . . . . . . . . . . . . . . . . . . . . . . . . . . . .4-11
Document specifications . . . . . . . . . . . . . . . . . . . . . . . . . . . . . 4-13
Scanning an Image . . . . . . . . . . . . . . . . . . . . . . . . . . . . . . . . . . . . . .4-15
Saving the Scanned Image . . . . . . . . . . . . . . . . . . . . . . . . . . . . . . . . 4-26
Network Scanning Procedure . . . . . . . . . . . . . . . . . . . . . . . . . . . . .4-26
Starting EPSON Scan Server. . . . . . . . . . . . . . . . . . . . . . . . . .4-26
Starting EPSON TWAIN HS Network . . . . . . . . . . . . . . . . . 4-27
Network Scanning . . . . . . . . . . . . . . . . . . . . . . . . . . . . . . . . . . 4-28
Getting Information from Online Reference Guide . . . . . . . . . . .4-31
Opening the Online Reference Guide . . . . . . . . . . . . . . . . . . 4-32
Installing the Online Reference Guide . . . . . . . . . . . . . . . . .4-32
4
Using Your Scanner
4-1
Page 86

Scanning Procedure
This chapter shows you how the scanner operates. The basic
procedure for scanning is as follows:
1. Turn on the scanner and PC. (Keep in mind the “Power-on
sequence” on page 2-17.) Make sure that the scanner’s READY
light is on.
2. Place a stack of documents in the Automatic Document
Feeder (See “Loading documents into your Automatic
Document Feeder” on page 4-2.), or a document on the
document table. (See “Placing a Document on the Scanner”
on page 4-4.)
3. Run the scanner software and scan. (See “Starting EPSON
TWAIN HS” on page 4-7 for details on scanning.)
Loading documents into your Automatic Document Feeder
Note:
Make sure EPSON TWAIN HS is installed.
Before scanning a document, remember to respect the rights of
copyright owners. Do not scan published text or images without
first checking the copyright status.
The Automatic Document Feeder can automatically load up to
100 sheets. See “Document specifications” on page 4-13 for further
information.
Follow the steps below to load documents into the Automatic
Document Feeder.
4-2
Using Your Scanner
Page 87

1. Slide the right edge guide all the way to the right.
2. Insert the document stack face up into the Automatic
Document Feeder until it meets resistance. Then move the
right edge guide so it is flush with the right edge of your
document.
Note:
Make sure that there is no document on the document table. If you
scan using the Automatic Document Feeder while there is still
document on the document table, paper jam may occur.
4
3. Start your scanner software, and follow scanning instructions
described later in this chapter or your Online Reference Guide.
Note:
❏ Be sure to insert documents face up.
❏ If you load multiple pages in the Automatic Document Feeder, the
pages will be fed from the top and be ejected face down.
❏ To automatically scan both sides of a document, choose the Double-
side setting in EPSON TWAIN HS.
Using Your Scanner
4-3
Page 88

Placing a Document on the Scanner
Before scanning a document, remember to respect the rights of
copyright owners. Do not scan published text or images without
first checking the copyright status.
1. Open the Automatic Document Feeder.
2. Place the document on the document table, with the side to
be scanned facing down. Make sure that the document is
carefully aligned with the document guides.
Corner of the document
4-4
Using Your Scanner
Page 89
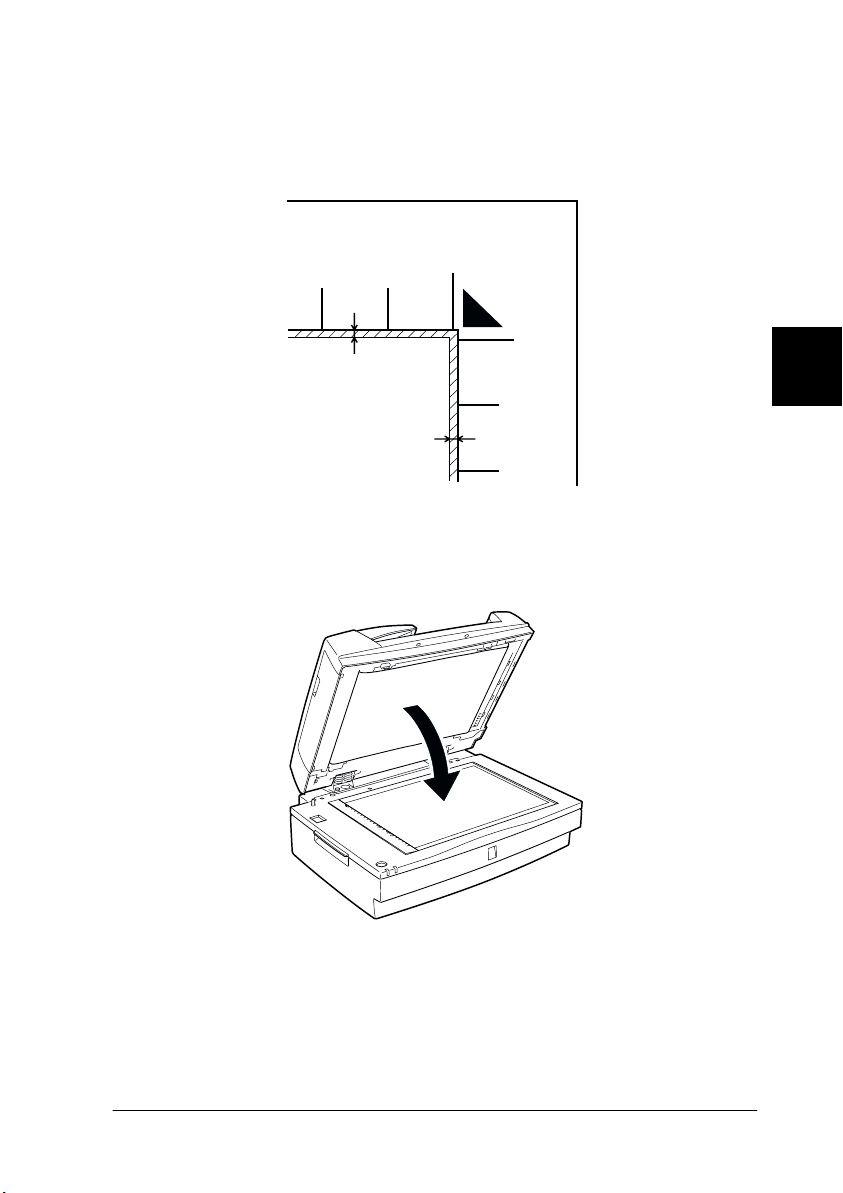
Note:
The area with a width of 0.5 mm from both horizontal and vertical
rulers is not scanned.
0.5mm
0.5mm
3. Close the Automatic Document Feeder gently so that the
document does not move.
4
Using Your Scanner
4-5
Page 90

4. Start your scanner software, and follow scanning instructions
described later in this chapter or your Online Reference Guide.
Note:
❏ Make sure the document is flat against the glass surface, otherwise the
image will appear fuzzy and out of focus. Also be sure to close the
Automatic Document Feeder to prevent interference from external
light.
❏ Opening the Automatic Document Feeder while scanning is in
progress will result in an option error and may result in a paper feeding
error.
❏ Always close the Automatic Document Feeder and the middle cover
before scanning or using the feeder.
❏ Always keep the document table clean. See “Maintenance and
Troubleshooting” in your Online Reference Guide.
❏ Do not leave photographs on the document table for an extended period
of time as they may stick to the glass.
❏ Do not place heavy objects on top of the scanner.
4-6
Using Your Scanner
Page 91

Starting EPSON TWAIN HS
There are two ways to scan; with an application that supports
TWAIN, or with the
If you ..
❏ use an application that supports EPSON TWAIN HS to scan,
open your application (see “Starting EPSON TWAIN HS
through your application software” below).
a Start button.
❏ want to scan an image directly to your application without
opening EPSON TWAIN HS or the TWAIN-compliant
application every time, setup the
application to work with (see Chapter 5, “Using the Start
Button.”). Then simply press the
Note:
❏ In a stand-alone configuration, the Start Button feature is
available only on the Windows Millennium Edition, 98, and
2000.
❏ Even if your application supports TWAIN, some features of
EPSON TWAIN HS may not be available depending on the
application software.
a Start button and the
a Start button.
Starting EPSON TWAIN HS through your application software
Application programs that support the scanning interface
standard TWAIN, allow you to scan images while an application
is running. To verify whether your application is compatible with
TWAIN, see your application documentation.
How you should open EPSON TWAIN HS and scan varies
depending on the application. Read the following to find out how
to access EPSON TWAIN HS.
4
Using Your Scanner
4-7
Page 92

1. Start the TWAIN-compliant application you want to use, such
as Microsoft Imaging for Windows.
2. From the TWAIN-compliant application’s menu, select
EPSON TWAIN HS as the TWAIN data source
Note:
You usually need to perform this step only the first time you use the
scanner with your application.
Note for Windows Millennium Edition users:
Do not select WIA-(scanner name) as the TWAIN data source.
3. Open EPSON TWAIN HS using a command such as Acquire.
To scan, see “Scanning from the Automatic Document Feeder” on
page 4-8 and “Scanning an Image” on page 4-15.
.
Scanning from the Automatic Document Feeder
The scanning instructions are divided into two sections; read
“Scanning a complete document” on page 4-8 to scan an entire
document or image, or read “Scanning part of a document” on
page 4-9 to scan only a certain part of an image or document.
Scanning a complete document
You do not need to use the preview feature when scanning a full
document or image. The scanner automatically finds and scans
the whole image. To scan an image or document, follow the steps
below.
1. Load the document into the Automatic Document Feeder.
2. Start EPSON TWAIN HS from the TWAIN-compliant
application.
4-8
Using Your Scanner
Page 93

3. In the dialog box of EPSON TWAIN HS, make sure that ADFSingle-sided or ADF-Double-sided is selected in the
Document Source list. Also choose the appropriate settings
for scanning. See “Scanning an Image” on page 4-15 in this
guide or your Online Reference Guide for details on choosing
EPSON TWAIN HS settings.
4. Click Scan.
Scanning part of a document
To scan only a part of an image, follow the steps below.
1. Load the document into the Automatic Document Feeder.
2. Start EPSON TWAIN HS from the TWAIN-compliant
application.
3. In the dialog box of EPSON TWAIN HS, make sure that ADF-
Single-sided or ADF-Double-sided is selected in the
Document Source list.
4. Click Preview. The document is ejected after previewing.
Note:
The second page is fed immediately after the first page is scanned
and ejected without actually being scanned.
5. Draw a marquee to define the part of the image you want to
scan.
6. Set document(s) to be scanned in the Automatic Document
Feeder, including the ejected document.
7. Choose your settings in EPSON TWAIN HS. See “Scanning
an Image” on page 4-15 in this guide or your Online Reference
Guide for details on choosing EPSON TWAIN HS settings.
4
8. Click Scan.
Using Your Scanner
4-9
Page 94
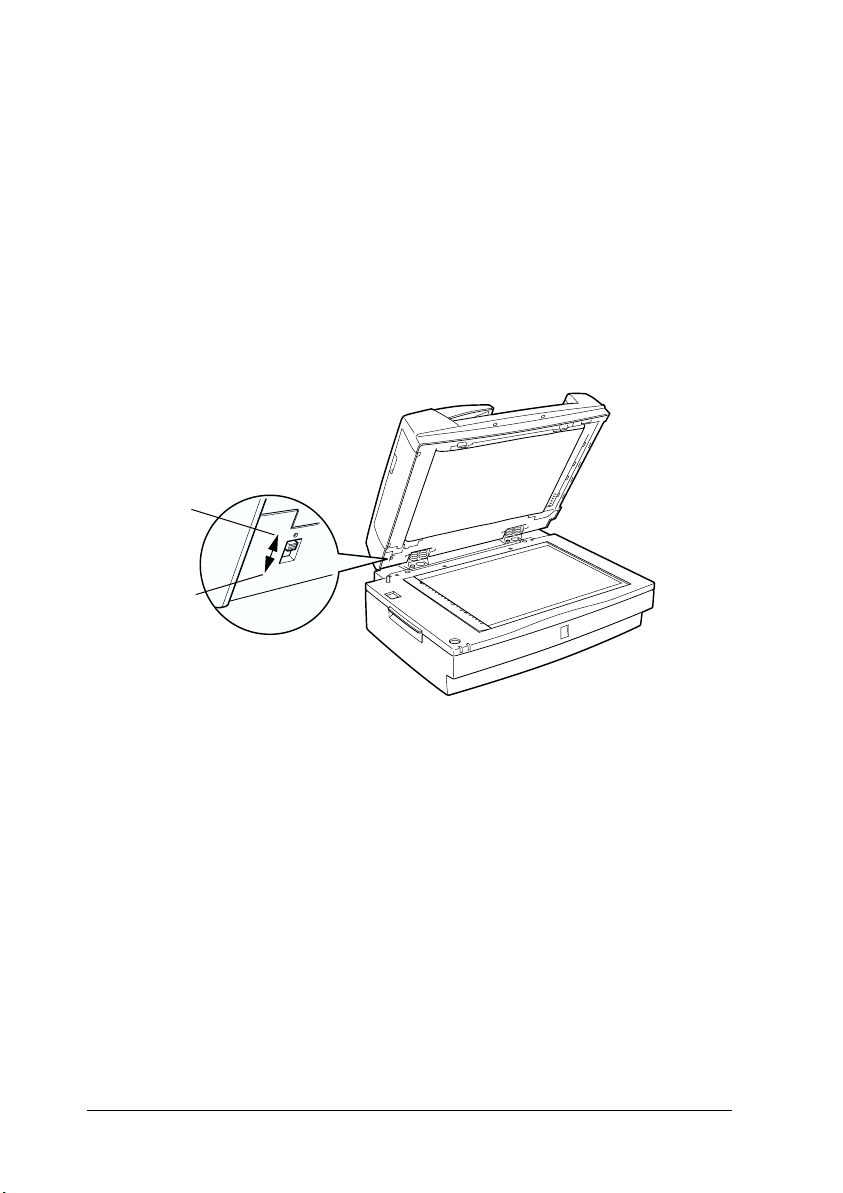
Changing the Document Feed Speed
When you scan using the Automatic Document Feeder, you can
select the document feed speed between low and fast. Normally,
you use the high speed mode. If you want to scan thick documents
or reduce noise of an image, use the low speed mode.
To change the document feed speed, lift the Automatic Document
Feeder and locate a switch as shown below. Slide the switch to
the circular mark position to use low speed, or to the other end to
use high speed.
LOW
HIGH
4-10
Using Your Scanner
Page 95

Fixing paper jams in the Automatic Document Feeder
To remove jammed paper, follow the steps below.
1. Open the Automatic Document Feeder, then clear the paper
on the document table and determine where the paper jam
occurred.
4
2. Remove the jammed paper.
If paper jams at the feeder position:
Open the left cover and carefully pull the jammed paper out of
the feeder mechanism.
Note:
Be careful not to pull too hard; otherwise the paper may tear, making it
more difficult to remove.
Using Your Scanner
4-11
Page 96

Left Cover
If paper jams at the paper eject position:
Open the right cover and carefully pull the jammed paper out of
the feeder mechanism.
Right Cover
4-12
Using Your Scanner
Page 97

Note:
Be careful not to pull too hard. If the paper tears, open the middle cover
and remove the paper as shown below.
Middle Cover
3. After removing the jammed paper, close the Automatic
Document Feeder.
4
Document specifications
Document size Orientation
A3, Ledger, B4, Legal, A4, Letter, B5 or Executive, A5 Portrait
A4, Letter, B5 or Executive, A5, A6 Landscape
Weight: 50 to 127 g/m
Paper quality: High-quality, medium quality, ink-jet, or bond
paper
Document type: Documents printed with impact printers, laser
printers, or facsimile machines
²
Using Your Scanner
4-13
Page 98

Document conditions
Be sure to check the following before feeding a document:
❏ Ink on the document is dry.
❏ The document has no holes, is not ripped or curled, and has
no articles attached to it.
❏ The document has no staples or other objects attached that
might damage the feeder mechanism.
❏ The document has no folds closer than 5 mm to its edge.
❏ The document is not a multipart form or a bound document.
❏ The document has no rear carbon coating.
❏ The document has no cut out areas.
Other precautions
Do not feed photographic sheets or particularly valuable original
artwork into the Automatic Document Feeder; misfeeding a
document may result in accidental wrinkling or damage.
When you are scanning high-quality color or halftone documents,
it is recommended you open the Automatic Document Feeder and
scan documents individually.
4-14
Using Your Scanner
Page 99

Scanning an Image
When you start EPSON TWAIN HS or EPSON TWAIN HS Network
through a TWAIN-compliant application, the following window or
similar appears on the screen:
The following gives an overview of EPSON TWAIN HS and
EPSON TWAIN HS Network.
4
Note:
❏ Some settings may appear dimmed and cannot be selected because
of your choice of settings.
❏ You cannot scan an image which exceeds the available memory or
disk space. If you try to scan a very large image, an alert appears on
the screen.
❏ Before scanning, be sure to calibrate your screen. For details, see
your Online Reference Guide.
❏ After an image is scanned, be sure to save it.
Using Your Scanner
4-15
Page 100

Document Source
When using the document table of the scanner, leave the
Document Source set to Flatbed
depending on what is installed.
Select any of the following settings from the Document Source list:
Flatbed:
Select this setting when you use the scanner document table.
ADF - Single-sided:
Select this setting to scan single-sided documents on the
Automatic Document Feeder.
ADF - Double-sided:
Other selections are available
.
4-16
Select this setting to scan double-sided documents on the
Automatic Document Feeder.
Using Your Scanner
 Loading...