

Page 1

Vision Guide CV2-H/-S
4 Connect the high-flex GigE camera cable to the camera and
to the CH1 port on the CV2 unit.
3
Test the system
6 Expand Vision in the menu tree, click General, and click
Add.
Setup Guide
IMPORTANT: Before using this product, make sure you read these
instructions, and the safety instructions and guidelines in the online Epson®
Vision Guide Hardware Manual.
The illustrations show the CV2-S but the steps are the same for the CV2-H,
unless otherwise specified.
1
Unpack
5 Connect the Ethernet cable to the LAN1 port on the CV2
unit and to the LAN port on your robot controller.
Note: If CV2 unit is connected to PC via Ethernet cable, see
online Epson Vision Guide Hardware Manual for details on how
to configure using a hub.
6 Connect your power source to the DC IN port on the CV2
unit. The CV2 unit powers on. If the CV2 unit does not turn
on, press the power button.
Before testing the Vision Guide system, make sure the Epson
RC+ 7.0 software is installed on your computer.
Note: See “Installing the software” on the next page for instructions.
1 On your computer, double-click the EPSON RC+ 7.0 icon
on your Windows® desktop to start the Epson RC+ 7.0
software.
2 In the Connection list, select USB.
The robot controller’s PROGRAM light starts flashing.
3 Open the Project menu and select New to create a test
project.
7 Select Manually configure a camera and click OK.
8 Select Compact Vision from the Type drop-down list.
High-flex GigE
camera cable
Note: Your setup may vary and not all items may be shown above. A
24V power source (not pictured) and any lenses (not pictured) for the
camera(s) in your system are sold separately and required to set up your
Vision Guide system.
2
Connect the hardware
Ethernet cable
1 Turn on your robot controller, if necessary.
2 Make sure your computer is connected to your robot
controller.
Note: See the Epson RC+ 7.0 User’s Guide for details on
connecting your computer to the CV2 unit.
3 Install your camera lens (not included) on the camera.
Note: If you are installing your own 24V power source (not
included), wire it to the 24V power connector included with the
CV2 unit. Be sure to use AWG14–AWG24 wires. For wiring details,
see the online Epson Vision Guide Hardware Manual.
7 Check the lights for proper function. The power and
PoE 1 lights should be on and the STATUS light should be
flashing.
ERROR
STATUS
TRIGGER
CH1
4
3
DC IN
CH2
19V-24V
CH3
CH4
CON 1
2
1
9 Enter 192.168.0.3 in the IP Address field.
4 Enter a test project name and click OK.
10 Make sure GigE 1 is selected as the Channel setting.
11 Check the camera’s label for the model number and select it
from the Model drop-down list.
5 Open the Setup menu and select System Configuration.
Page 2
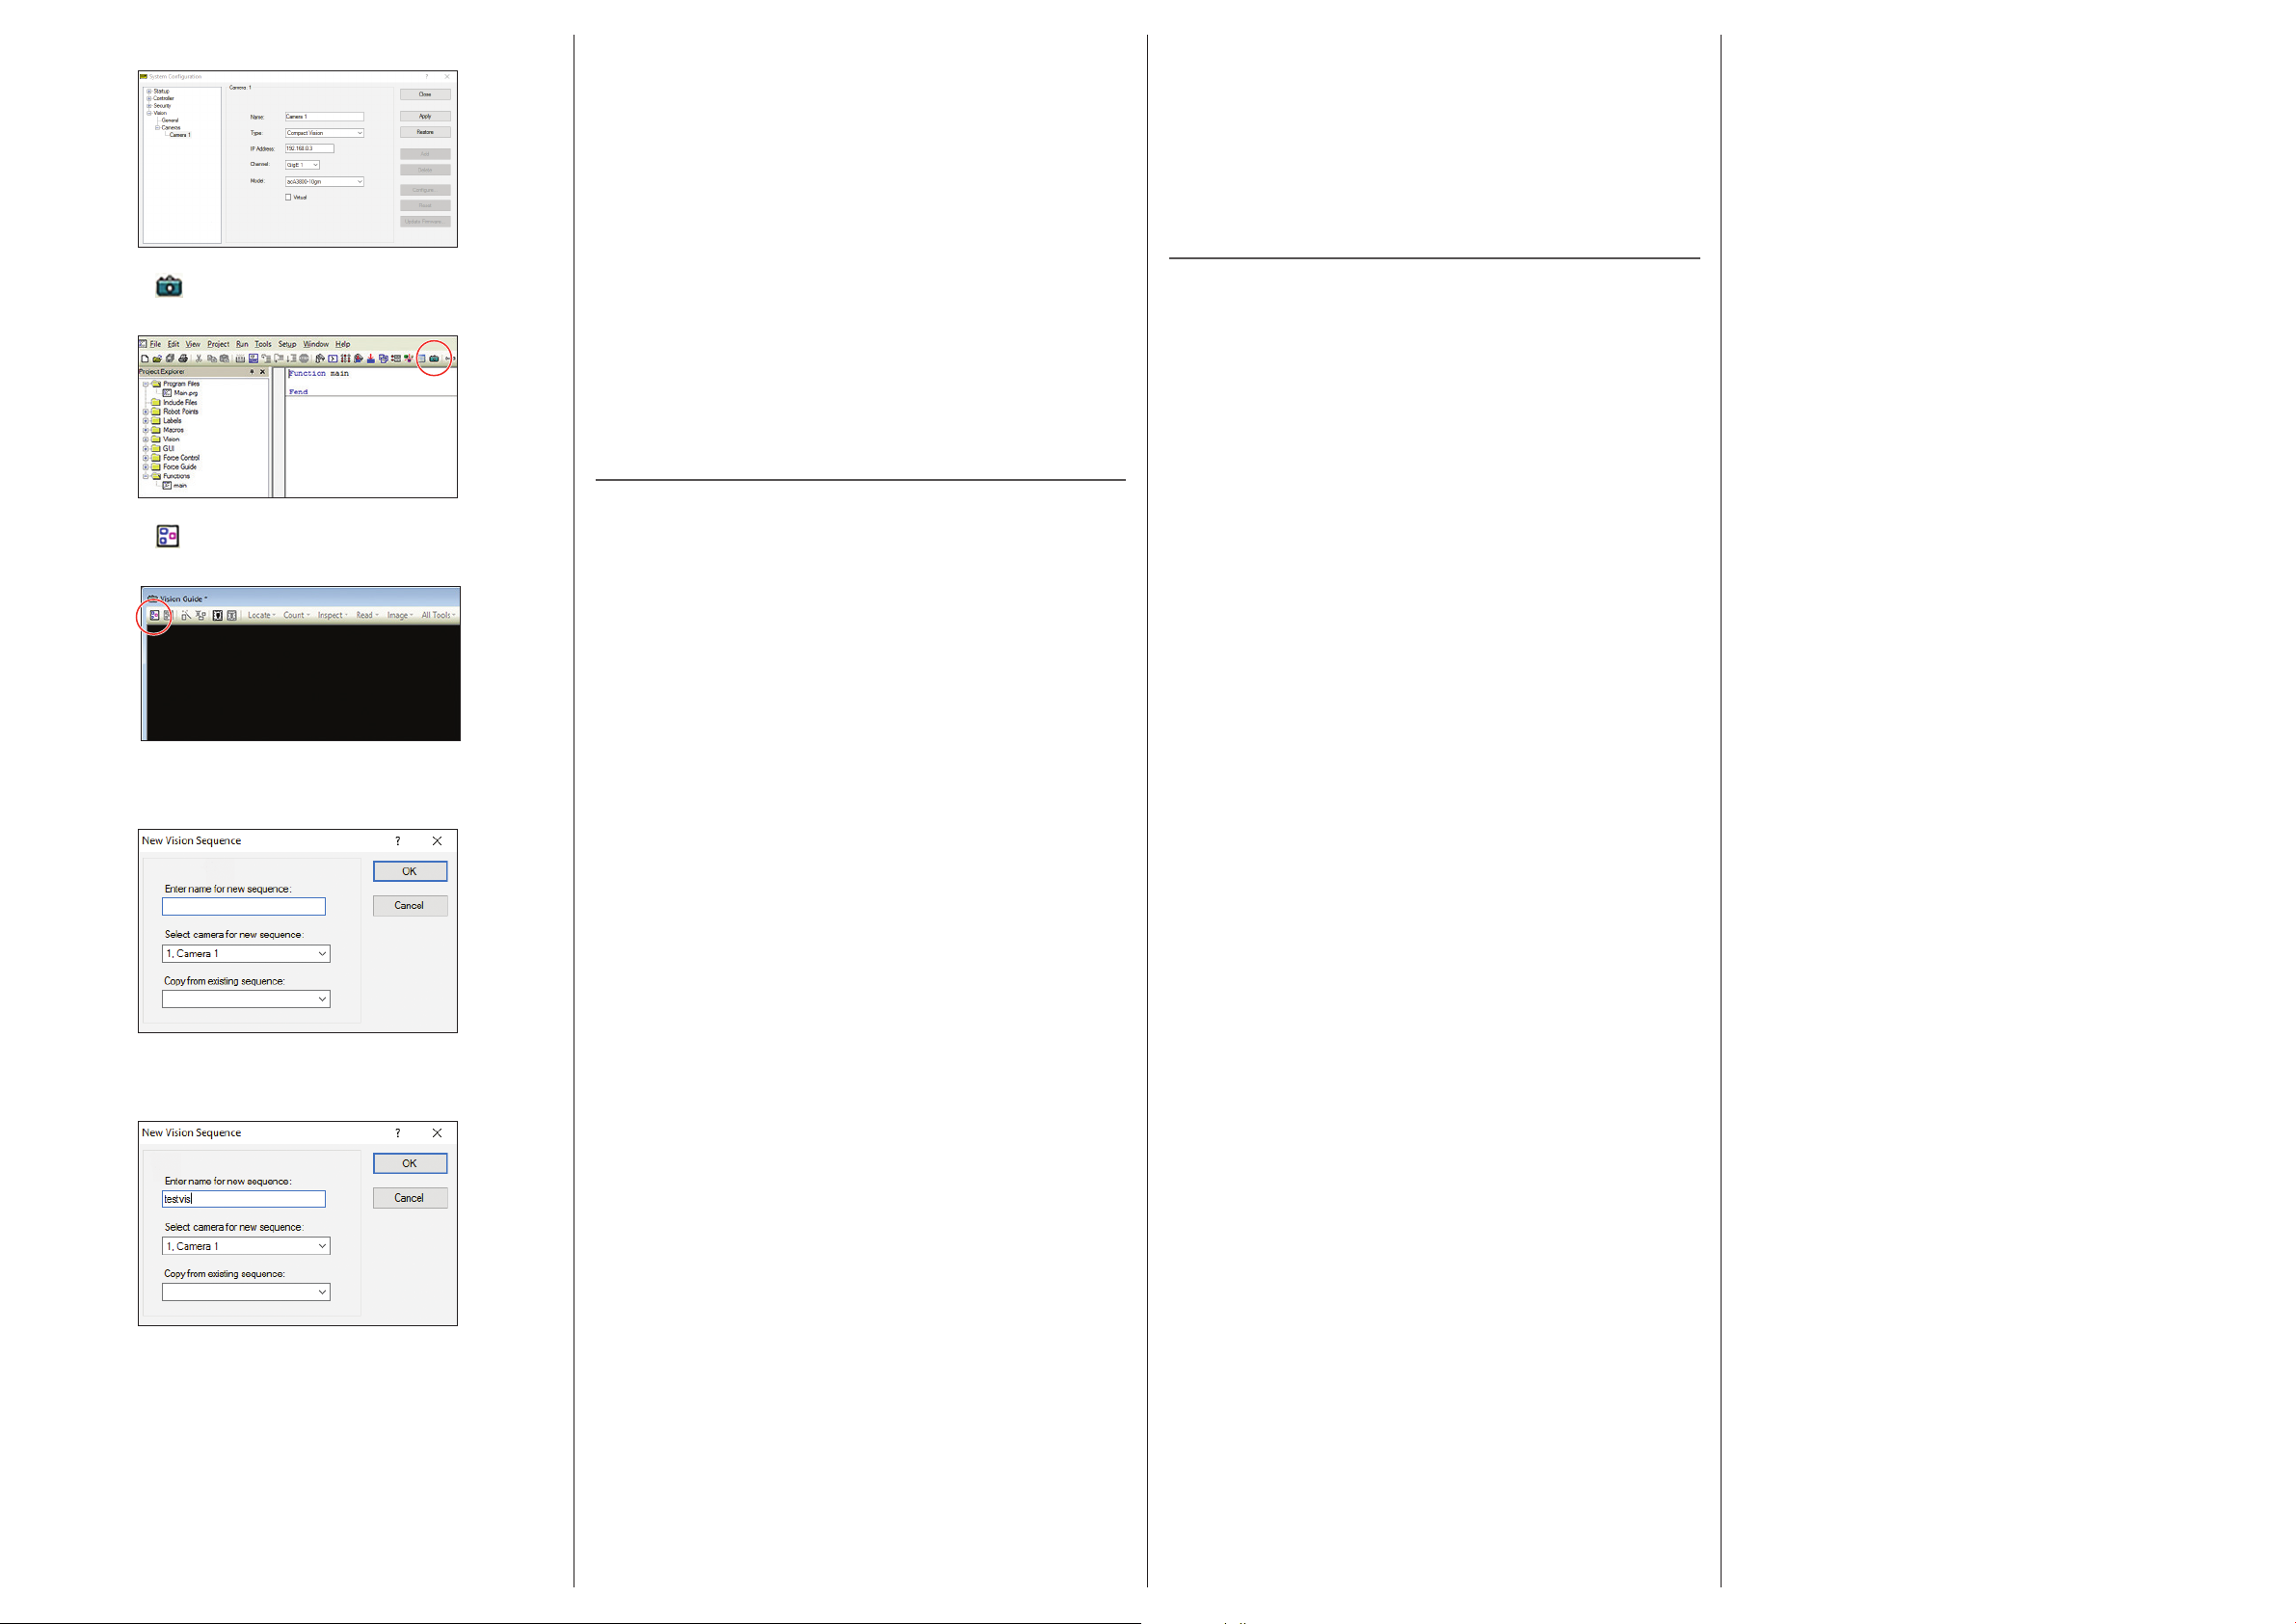
12 Click Apply then click Close.
Installing the software
Where to get help
13 Click the vision icon in the toolbar to launch the Vision
Guide environment.
14 Click the new sequence icon at the top of the Vision
Guide screen.
(Windows only)
1 Insert the Epson RC+ 7.0 DVD into a DVD drive on the
computer you will use to program the robot.
Note: You can download manuals for your product from the
Epson website. Visit www.epsonrobots.com/product-manuals
and search for your product. If you need to download the
Epson RC+ 7.0 software, send an email request to
applications@robots.epson.com to receive a download link.
2 Follow the on-screen instructions to install the software.
3 Double-click the EPSON RC+ 7.0 icon on your desktop to
start the Epson RC+ 7.0 software.
See the online Epson RC+ 7.0 User’s Guide for details on
installing and using the Epson RC+ 7.0 software.
Any problems?
When testing the Vision Guide environment, there is no
live feed showing from the camera (screen is dark).
• Make sure the lens cap is removed from the lens.
For technical support, do one of the following:
• Visit www.epsonrobots.com/customer-service anytime.
• Call 1-866-ROBOTS1 (U.S. only, toll-free) or 1-562-290-5900
(U.S. and elsewhere, toll or long distance charges may apply),
6 am to 4:30 pm, Pacific Time, Monday through Friday.
Training
To help you get the most from your Epson product, Epson offers
programming, maintenance, and robotics vision guide classes.
Visit www.epsonrobots.com/training for more information.
15 Enter a name for the new sequence in the first field and
make sure Camera 1 is selected.
16 Click OK. A live feed from the camera is shown on the
screen.
• Try adjusting the iris on the lens.
• Make sure the Virtual setting has not been selected in the
camera settings. In the Epson RC+ 7.0 software, open the
Setup menu and click System Configuration. Expand Vision
in the menu tree then expand Cameras. Click on Camera 1. If
the Virtual setting is selected, deselect the box, then continue
from step 12 of “Test the system.”
• Remove the lens and point the camera at a light source. If the
screen shows a bright image, there may be an issue with the
lens. If the screen remains dark after removing the lens, contact
Epson.
• Reset the system from the software. In the Epson RC+ 7.0
software, open the Setup menu and click System
Configuration. Expand Vision in the menu tree and click
Cameras. Click Reset, then click Yes. If the screen remains
dark, contact Epson.
I get a connection or communication error message.
• Make sure your cable connections are correct and secure.
• Check the camera configuration settings in the software.
• Reset the system from the software. In the Epson RC+ 7.0
software, open the Setup menu and click System
Configuration. Expand Vision in the menu tree and click
Cameras. Click Reset, then click Yes. If the error messages
persist, contact Epson.
The Vision Guide system is now ready to program and use. See
the online Epson Vision Guide 7.0 Software Manual to get started
with vision development.
EPSON is a registered trademark and EPSON Exceed Your Vision is a registered logomark of
Seiko Epson Corporation.
Windows is a registered trademark of Microsoft Corporation in the United States and/or other
countries.
General Notice: Other product names used herein are for identification purposes only and may
be trademarks of their respective owners. Epson disclaims any and all rights in those marks.
This information is subject to change without notice.
© 2019 Epson America, Inc., 3/19
Printed in U.S.A. CPD-57173
 Loading...