

Page 1

Color Laser Printer
Copyrights
No part of this publication may be reproduced, stored in a retrieval system, or transmitted
in any form or by any means, mechanical, photocopying, recording, or otherwise, without
the prior written permission of Seiko Ep son Corporation. No patent liability is assumed with
respect to the use of the information contained herein. Neither is any liability assumed for
damages resulting from the use of the information contained herein.
Neither Seiko Epson Corporation nor its affiliates shall be liable to the purchaser of this
product or third partie s for damages, losses, costs, or expenses incur red by purchaser or third
parties as a result of: accide nt, misuse, or abuse of this product or unauthorize d modifications,
repairs, or alterations to this product, or (excluding the U.S.) failure to strictly comply with
Seiko Epson Corporation’s operating and maintenance instructions.
Seiko Epson Corp oration and its affiliates sha ll not be liable against any d amages or problems
arising from the use of any options or any consumable products other than those designated
as Original Epson Products or Epson Approved Products by Seiko Epson Corporation.
Features Zoran Corporation Integrated Print System XL (IPS/XL) for PCLXL print language
emulation.
NEST Office Kit Copyright © 1996, Novell, Inc. All rights reserved.
Trademarks
IBM and PS/2 are registered trademarks of International Business Machines Corporation.
Microsoft
States of America and other countries. Apple
®
and Windows® are registered trademarks of Microsoft Corporation in the United
®
and Macintosh® are registered trademarks of
Apple Computer, Inc.
EPSON and EPSON ESC/P are registered trademarks and EPSON AcuLaser and EPSON
ESC/P 2 are trademarks of Seiko Epson Corporation.
Coronet is a trademark of Ludlow Industries (UK) Ltd.
Marigold is a trademark of Arthur Baker and may be registered in some jurisdictions.
1
Page 2

CG Times and CG Omega are trademarks of Agfa Monotype Corporation and may be
registered in certain jurisdictions.
Arial, Times New Roman and Albertus are trademarks of The Monotype Corporation and
may be registered in certain jurisdictions.
ITC Avant Garde Gothic, ITC Bookman, ITC Zapf Chancery and ITC Zapf Dingbats are
trademarks of International Typeface Corporation and may be registered in some
jurisdictions.
Antique Olive is a trademark of Fonderie Olive.
Helvetica, Palatino, Times, Univers, Clarendon, New Century Schoolbook, Miriam and
David are trademarks of Heidelberger Druckmaschinen AG which may be registered in
certain jurisdictions.
Wingdings is a trademark of Microsoft Corporation and may be registered in some
jurisdictions.
HP and HP LaserJet are registered trademarks of the Hewlett-Packard Company.
Adobe, the Adobe logo and PostScript3 are trademarks of Adobe Systems Incorporated,
which may be registered in certain jurisdictions.
General Notice: Other product names used herein are for identification purposes only and may be
trademarks of their respective owners. Epson disclaims any and all rights in those marks.
Copyright © 2005 Seiko Epson Corporation. All rights reserved.
2
Page 3

Safety Instructions
Safety
Warnings, Cautions, and Notes
Warnings
must be followed carefully to avoid bodily injury.
w
Cautions
must be observed to avoid damage to your equipment.
c
Notes
contain important information and useful tips on the operation of your
printer.
Safety precautions
Be sure to follow the precautions carefully to ensure safe, efficient
operation:
Safety Instructions 3
Page 4

❏ Because the printer weighs approximately 37 kg (81.5 lb) with
consumable products installed, one person should not lift or
carry it. Two people should carry the printer, lifting it by the
correct positions as shown below.
*
* Do not lift the printer by these areas.
4 Safety Instructions
Page 5
❏ Be careful not to touch the fuser, which is marked CAUTION
HIGH TEMPERATURE, or the surrounding areas. If the printer
has been in use, the fuser and the surrounding areas may be
very hot. If you must touch one of these areas, wait 30 minutes
to allow the heat to subside before doing so.
1
2
1. Do not insert your hand deep into the fuser unit.
2. CAUTION HIGH TEMPERATURE
❏ Do not insert your hand deep into the fuser unit as some
components are sharp and may cause injury.
❏ Avoid touching the components inside the printer unless
instructed to do so in this guide.
❏ Never force the printer’s components into place. Although the
printer is designed to be sturdy, rough handling can damage
it.
❏ When handling a toner cartridge, always place it on a clean,
smooth surface.
Safety Instructions 5
Page 6

❏ Do not attempt to modify a toner cartridge or take it apart.
They cannot be refilled.
❏ Do not touch the toner. Keep the toner away from your eyes.
❏ Do not dispose of used toner cartridge, photoconductor units,
fuser units, or waste toner collector in fire, as they can explode
and cause injury. Dispose of them according to local
regulations.
❏ If toner is spilled, use a broom and dustpan or a damp cloth
with soap and water to clean it up. Because the fine particles
can cause a fire or explosion if they come into contact with a
spark, do not use a vacuum cleaner.
❏ Wait at least one hour before using a toner cartridge after
moving it from a cool to a warm environment to prevent
damage from condensation.
❏ When removing the photoconductor unit, avoid exposing it
to room light for more than five minutes. The unit contains a
green-colored light-sensitive drum. Exposure to light can
damage the drum, causing dark or light areas to appear on
the printed page and reducing the service life of the drum. If
you need to keep the unit out of the printer for long periods,
cover it with an opaque cloth.
❏ Be careful not to scratch the surface of the drum. When you
remove the photoconductor unit from the printer, always
place the unit on a clean, smooth surface. Avoid touching the
drum, since oil from your skin can permanently damage its
surface and affect print quality.
❏ To get the best print quality, do not store the photoconductor
unit in an area subject to direct sunlight, dust, salty air, or
corrosive gases (such as ammonia). Avoid locations subject to
extreme or rapid changes in temperature or humidity.
6 Safety Instructions
Page 7

❏ Be sure to keep consumable components out of the reach of
children.
❏ Do not leave jammed paper inside the printer. This can cause
the printer to overheat.
❏ Avoid sharing outlets with other appliances.
❏ Use only an outlet that meets the power requirements of this
printer.
Important Safety Instructions
Read all of the following instructions before operating your
printer:
When choosing a place and power source for the printer
❏ Place the printer near an electrical outlet where you can easily
plug in and unplug the power cord.
❏ Do not place the printer on an unstable surface.
❏ Do not put your printer where the cord will be stepped on.
❏ Slots and openings in the cabinet and the back or bottom are
provided for ventilation. Do not block or cover them. Do not
put the printer on a bed, sofa, rug, or other similar surface or
in a built-in installation unless proper ventilation is provided.
❏ All interface connectors for this printer are Non-LPS
(non-limited power source).
Safety Instructions 7
Page 8

❏ Connect your printer to an electrical outlet that meets the
power requirements of this printer. Your printer’s power
requirements are indicated on a label attached to the printer.
If you are not sure of the power supply specifications in your
area, contact your local power company or consult your
dealer.
❏ If you are unable to insert the AC plug into the electrical
outlet, contact an electrician.
❏ Avoid using outlets that other appliances are plugged into.
❏ Use the type of power source indicated on the label. If you are
not sure of the type of power available, consult your dealer or
local power company.
❏ If you are unable to insert the plug into the outlet, contact a
qualified electrician.
❏ When connecting this product to a computer or other device
with a cable, ensure the correct orientation of the connectors.
Each connector has only one correct orientation. Inserting a
connector in the wrong orientation may damage both devices
connected by the cable.
❏ If you use an extension cord, make sure that the total of the
ampere ratings on the products plugged into the extension
cord does not exceed the extension cord ampere rating.
❏ Unplug this printer from the wall outlet and refer servicing
to a qualified service representative under the following
conditions:
A. When the power cord or plug is damaged or frayed.
B. If liquid has been spilled into it.
C. If it has been exposed to rain or water.
8 Safety Instructions
Page 9

D. If it does not operate normally when the operating
instructions are followed. Adjust only those controls
that are covered by the operating instructions since
improper adjustment of other controls may result in
damage and will often require extensive work by a
qualified technician to restore the product to normal
operation.
E. If it has been dropped or the cabinet has been
damaged.
F. If it exhibits a distinct change in performance,
indicating a need for service.
When using the printer
❏ Follow all warnings and instructions marked on the printer.
❏ Unplug this printer from the wall outlet before cleaning.
❏ Use a well-wrung cloth for cleaning and do not use liquid or
aerosol cleaners.
❏ Avoid touching the components inside the printer unless
instructed to do so in the printer’s documentation.
❏ Never force printer components into place. Although the
printer is designed to be sturdy, rough handling can damage
it.
❏ Be sure to keep consumables out of the reach of children.
❏ Do not use printer in a damp environment.
❏ Do not leave jammed paper inside of the printer. This can
cause the printer to overheat.
Safety Instructions 9
Page 10

❏ Never push objects of any kind through cabinet slots as they
may touch dangerous voltage points or short out parts that
could result in a risk of fire or electric shock.
❏ Never spill liquid of any kind on the printer.
❏ Except as specifically explained in the printer’s
documentation, do not attempt to service this product
yourself. Opening or removing those covers that are marked
Do Not Remove may expose you to dangerous voltage points
or other risks. Refer all servicing in those compartments to a
qualified service representative.
❏ Adjust only those controls that are covered by the operating
instructions. Improper adjustment of other controls may
result in damage and may require repair by a qualified service
representative.
ENERGY STAR® compliance
As an ENERGY STAR® Partner, Epson has
determined that this product meets the ENERGY
®
STAR
guidelines for energy efficiency.
®
The International ENERGY STAR
Office Equipment Program is
a voluntary partnership with the computer and office equipment
industry to promote the introduction of energy-efficient personal
computers, monitors, printers, fax machines, copiers, scanners,
and multifunction devices, and in an effort to reduce air pollution
caused by power generation. Their standards and logos are
uniform among participating nations.
10 Safety Instructions
Page 11

Safety Information
Power cord
Caution:
Be sure the AC power cord meets the relevant local safety
c
standards.
Use only the power cord that comes with this product. Use of the
another cord may result in fire or electric shock.
This product’s power cord is for use with this product only. Use
with other equipment may result in fire or electric shock.
Laser safety labels
Warning:
The performance of procedures and adjustments other than those
w
specified in the printer’s documentation may result in hazardous
radiation exposure.
Your printer is a Class 1 laser product as defined in the IEC60825
specifications. The label shown is attached to the back of the
printer in countries where required.
Safety Instructions 11
Page 12

Internal laser radiation
Max. Average Radiation Power: 15 mW at laser aperture
Wavelength: 770 to 800 nm
This is a Class III b Laser Diode Assembly that has an invisible
laser beam. The printer head unit is NOT A SERVICE ITEM,
therefore, the printer head unit should not be opened under any
circumstances. An additional laser warning label is affixed to the
inside of the printer.
CDRH regulations
For information about the Center for Devices and Radiological
Health of the U.S. Food and Drug Administration, see "Standard
and approvals" on page 418.
Ozone safety
Ozone emission
Ozone gas is generated by laser printers as a by-product of the
printing process. Ozone is produced only when the printer is
printing.
Ozone exposure limit
The recommended exposure limit for ozone is 0.1 parts per
million (ppm) expressed as an average time-weighted
concentration over an eight (8) hour period.
The Epson laser printer generates less than 0.1 ppm for eight (8)
hours of continuous printing.
12 Safety Instructions
Page 13

Minimize the risk
To minimize the risk of exposure to ozone, you should avoid the
following conditions:
❏ Use of multiple laser printers in a confined area
❏ Operation in conditions of extremely low humidity
❏ Poor room ventilation
❏ Long, continuous printing together with any of the above
Printer location
The printer should be located so that the exhaust gases and heat
generated are:
❏ Not blown directly into the user’s face
❏ Vented directly out of the building whenever possible
Power On/Off Cautions
Do not turn off the printer:
❏ After turning on the printer, wait until Ready appears on the
LCD panel.
❏ While the Ready light is flashing.
❏ While the Data light is on or flashing.
❏ While printing.
Safety Instructions 13
Page 14

Contents
Safety Instructions
Safety . . . . . . . . . . . . . . . . . . . . . . . . . . . . . . . . . . . . . . . . . . . . . . . . . . . . 3
Warnings, Cautions, and Notes . . . . . . . . . . . . . . . . . . . . . . . . . 3
Safety precautions . . . . . . . . . . . . . . . . . . . . . . . . . . . . . . . . . . . . . 3
Important Safety Instructions . . . . . . . . . . . . . . . . . . . . . . . . . . . 7
Safety Information. . . . . . . . . . . . . . . . . . . . . . . . . . . . . . . . . . . . 11
Power On/Off Cautions. . . . . . . . . . . . . . . . . . . . . . . . . . . . . . . 13
Chapter 1 Getting to Know Your Printer
Where to Find Information . . . . . . . . . . . . . . . . . . . . . . . . . . . . . . . . . 25
Printer Parts. . . . . . . . . . . . . . . . . . . . . . . . . . . . . . . . . . . . . . . . . . . . . . 26
Front view. . . . . . . . . . . . . . . . . . . . . . . . . . . . . . . . . . . . . . . . . . . 26
Rear view . . . . . . . . . . . . . . . . . . . . . . . . . . . . . . . . . . . . . . . . . . . 27
Inside the printer . . . . . . . . . . . . . . . . . . . . . . . . . . . . . . . . . . . . . 28
Control panel . . . . . . . . . . . . . . . . . . . . . . . . . . . . . . . . . . . . . . . . 29
Options and Consumable Products. . . . . . . . . . . . . . . . . . . . . . . . . . 31
Options . . . . . . . . . . . . . . . . . . . . . . . . . . . . . . . . . . . . . . . . . . . . . 31
Consumable products. . . . . . . . . . . . . . . . . . . . . . . . . . . . . . . . . 32
Chapter 2 Printer Features and Various Printing Options
Printer Features. . . . . . . . . . . . . . . . . . . . . . . . . . . . . . . . . . . . . . . . . . . 33
High-quality printing . . . . . . . . . . . . . . . . . . . . . . . . . . . . . . . . . 33
Pre-defined color settings in the printer driver . . . . . . . . . . . 33
Color printing mode and monochrome printing mode . . . . 34
Toner save mode . . . . . . . . . . . . . . . . . . . . . . . . . . . . . . . . . . . . . 34
Resolution Improvement Technology and
Enhanced MicroGray technology. . . . . . . . . . . . . . . . . . . . . 34
Wide variety of fonts. . . . . . . . . . . . . . . . . . . . . . . . . . . . . . . . . . 34
Adobe PostScript 3 Mode. . . . . . . . . . . . . . . . . . . . . . . . . . . . . . 35
P5C Emulation Mode . . . . . . . . . . . . . . . . . . . . . . . . . . . . . . . . . 35
Various Printing Options . . . . . . . . . . . . . . . . . . . . . . . . . . . . . . . . . . 36
14
Page 15

Double-sided printing . . . . . . . . . . . . . . . . . . . . . . . . . . . . . . . . .36
Fit to page printing. . . . . . . . . . . . . . . . . . . . . . . . . . . . . . . . . . . .37
Pages per sheet printing . . . . . . . . . . . . . . . . . . . . . . . . . . . . . . .37
Watermark printing . . . . . . . . . . . . . . . . . . . . . . . . . . . . . . . . . . .38
Overlay printing . . . . . . . . . . . . . . . . . . . . . . . . . . . . . . . . . . . . . .39
Using the Reserve Job function . . . . . . . . . . . . . . . . . . . . . . . . .40
Using the HDD form overlay function . . . . . . . . . . . . . . . . . . .40
Chapter 3 Paper Handling
Paper Sources. . . . . . . . . . . . . . . . . . . . . . . . . . . . . . . . . . . . . . . . . . . . .41
MP tray. . . . . . . . . . . . . . . . . . . . . . . . . . . . . . . . . . . . . . . . . . . . . .41
Standard lower paper cassette . . . . . . . . . . . . . . . . . . . . . . . . . .42
Optional paper cassette unit . . . . . . . . . . . . . . . . . . . . . . . . . . . .42
Selecting a paper source . . . . . . . . . . . . . . . . . . . . . . . . . . . . . . .43
Loading Paper . . . . . . . . . . . . . . . . . . . . . . . . . . . . . . . . . . . . . . . . . . . .46
MP tray. . . . . . . . . . . . . . . . . . . . . . . . . . . . . . . . . . . . . . . . . . . . . .46
Standard lower paper cassette and optional paper cassette
unit . . . . . . . . . . . . . . . . . . . . . . . . . . . . . . . . . . . . . . . . . . . . . . .50
Output tray . . . . . . . . . . . . . . . . . . . . . . . . . . . . . . . . . . . . . . . . . .55
Printing on Special Media . . . . . . . . . . . . . . . . . . . . . . . . . . . . . . . . . .56
EPSON Color Laser Paper. . . . . . . . . . . . . . . . . . . . . . . . . . . . . .56
EPSON Color Laser Transparencies . . . . . . . . . . . . . . . . . . . . .57
Envelopes. . . . . . . . . . . . . . . . . . . . . . . . . . . . . . . . . . . . . . . . . . . .59
Labels . . . . . . . . . . . . . . . . . . . . . . . . . . . . . . . . . . . . . . . . . . . . . . .62
Thick paper . . . . . . . . . . . . . . . . . . . . . . . . . . . . . . . . . . . . . . . . . .63
Loading a custom paper size . . . . . . . . . . . . . . . . . . . . . . . . . . .64
Chapter 4 Using the Printer Software with Windows
About the Printer Software . . . . . . . . . . . . . . . . . . . . . . . . . . . . . . . . .65
Accessing the printer driver . . . . . . . . . . . . . . . . . . . . . . . . . . . .65
Making Changes to Printer Settings. . . . . . . . . . . . . . . . . . . . . . . . . .67
Making the print quality settings. . . . . . . . . . . . . . . . . . . . . . . .67
Resizing printouts . . . . . . . . . . . . . . . . . . . . . . . . . . . . . . . . . . . .74
Modifying the print layout . . . . . . . . . . . . . . . . . . . . . . . . . . . . .77
Using a watermark. . . . . . . . . . . . . . . . . . . . . . . . . . . . . . . . . . . .79
15
Page 16

Using an overlay . . . . . . . . . . . . . . . . . . . . . . . . . . . . . . . . . . . . . 82
Using HDD form overlay. . . . . . . . . . . . . . . . . . . . . . . . . . . . . . 87
Duplex printing . . . . . . . . . . . . . . . . . . . . . . . . . . . . . . . . . . . . . . 93
Making Extended Settings . . . . . . . . . . . . . . . . . . . . . . . . . . . . . 95
Making Optional Settings . . . . . . . . . . . . . . . . . . . . . . . . . . . . . 97
Printing a status sheet. . . . . . . . . . . . . . . . . . . . . . . . . . . . . . . . . 97
Ordering Consumables. . . . . . . . . . . . . . . . . . . . . . . . . . . . . . . . 98
Using the Reserve Job Function . . . . . . . . . . . . . . . . . . . . . . . . . . . . 100
Re-Print Job . . . . . . . . . . . . . . . . . . . . . . . . . . . . . . . . . . . . . . . . 101
Verify Job . . . . . . . . . . . . . . . . . . . . . . . . . . . . . . . . . . . . . . . . . . 103
Stored Job . . . . . . . . . . . . . . . . . . . . . . . . . . . . . . . . . . . . . . . . . . 104
Confidential Job. . . . . . . . . . . . . . . . . . . . . . . . . . . . . . . . . . . . . 106
Monitoring Your Printer Using EPSON Status Monitor 3 . . . . . . 108
Installing EPSON Status Monitor 3 . . . . . . . . . . . . . . . . . . . . 109
Accessing EPSON Status Monitor 3 . . . . . . . . . . . . . . . . . . . . 113
Getting printer status details. . . . . . . . . . . . . . . . . . . . . . . . . . 114
Order Online . . . . . . . . . . . . . . . . . . . . . . . . . . . . . . . . . . . . . . . 116
Setting Monitoring Preferences. . . . . . . . . . . . . . . . . . . . . . . . 118
Status Alert window . . . . . . . . . . . . . . . . . . . . . . . . . . . . . . . . . 120
Job Management function . . . . . . . . . . . . . . . . . . . . . . . . . . . . 121
Stopping monitoring. . . . . . . . . . . . . . . . . . . . . . . . . . . . . . . . . 126
Monitored Printers settings . . . . . . . . . . . . . . . . . . . . . . . . . . . 127
Setting Up the USB Connection . . . . . . . . . . . . . . . . . . . . . . . . . . . . 128
Canceling Printing . . . . . . . . . . . . . . . . . . . . . . . . . . . . . . . . . . . . . . . 130
Uninstalling the Printer Software . . . . . . . . . . . . . . . . . . . . . . . . . . 131
Uninstalling the printer driver . . . . . . . . . . . . . . . . . . . . . . . . 131
Uninstall the USB device driver . . . . . . . . . . . . . . . . . . . . . . . 134
Sharing the Printer on a Network . . . . . . . . . . . . . . . . . . . . . . . . . . 136
Sharing the printer . . . . . . . . . . . . . . . . . . . . . . . . . . . . . . . . . . 136
Setting up your printer as a shared printer . . . . . . . . . . . . . . 137
Using an additional driver. . . . . . . . . . . . . . . . . . . . . . . . . . . . 139
Setting up clients . . . . . . . . . . . . . . . . . . . . . . . . . . . . . . . . . . . . 146
Installing the printer driver from the CD-ROM . . . . . . . . . . 154
Chapter 5 Using the Printer Software with Macintosh
About the Printer Software. . . . . . . . . . . . . . . . . . . . . . . . . . . . . . . . 156
Accessing the printer driver . . . . . . . . . . . . . . . . . . . . . . . . . . 156
16
Page 17

Making Changes to Printer Settings. . . . . . . . . . . . . . . . . . . . . . . . .158
Making the print quality settings. . . . . . . . . . . . . . . . . . . . . . .158
Resizing printouts . . . . . . . . . . . . . . . . . . . . . . . . . . . . . . . . . . .165
Modifying the print layout . . . . . . . . . . . . . . . . . . . . . . . . . . . .166
Using a watermark. . . . . . . . . . . . . . . . . . . . . . . . . . . . . . . . . . .168
Duplex printing . . . . . . . . . . . . . . . . . . . . . . . . . . . . . . . . . . . . .174
Making Extended Settings . . . . . . . . . . . . . . . . . . . . . . . . . . . .176
Printing a status sheet . . . . . . . . . . . . . . . . . . . . . . . . . . . . . . . .177
Using the Reserve Job Function. . . . . . . . . . . . . . . . . . . . . . . . . . . . .178
Re-Print Job . . . . . . . . . . . . . . . . . . . . . . . . . . . . . . . . . . . . . . . . .179
Verify Job . . . . . . . . . . . . . . . . . . . . . . . . . . . . . . . . . . . . . . . . . . .181
Stored Job. . . . . . . . . . . . . . . . . . . . . . . . . . . . . . . . . . . . . . . . . . .183
Confidential Job . . . . . . . . . . . . . . . . . . . . . . . . . . . . . . . . . . . . .185
Monitoring Your Printer using EPSON Status Monitor 3 . . . . . . .187
Accessing EPSON Status Monitor 3. . . . . . . . . . . . . . . . . . . . .187
Getting printer status details . . . . . . . . . . . . . . . . . . . . . . . . . .189
Setting Monitoring Preferences . . . . . . . . . . . . . . . . . . . . . . . .191
Status Alert window . . . . . . . . . . . . . . . . . . . . . . . . . . . . . . . . .193
Using the Job Management function. . . . . . . . . . . . . . . . . . . .194
Setting Up the USB Connection. . . . . . . . . . . . . . . . . . . . . . . . . . . . .196
For Mac OS X users . . . . . . . . . . . . . . . . . . . . . . . . . . . . . . . . . .196
For Mac OS 9 users. . . . . . . . . . . . . . . . . . . . . . . . . . . . . . . . . . .197
Canceling Printing. . . . . . . . . . . . . . . . . . . . . . . . . . . . . . . . . . . . . . . .198
For Mac OS X users . . . . . . . . . . . . . . . . . . . . . . . . . . . . . . . . . .198
For Mac OS 9 users. . . . . . . . . . . . . . . . . . . . . . . . . . . . . . . . . . .198
Uninstalling the Printer Software . . . . . . . . . . . . . . . . . . . . . . . . . . .199
For Mac OS X users . . . . . . . . . . . . . . . . . . . . . . . . . . . . . . . . . .199
For Mac OS 9 users. . . . . . . . . . . . . . . . . . . . . . . . . . . . . . . . . . .200
Sharing the Printer on a Network. . . . . . . . . . . . . . . . . . . . . . . . . . .201
Sharing the printer . . . . . . . . . . . . . . . . . . . . . . . . . . . . . . . . . . .201
For Mac OS X users . . . . . . . . . . . . . . . . . . . . . . . . . . . . . . . . . .201
For Mac OS 9 users. . . . . . . . . . . . . . . . . . . . . . . . . . . . . . . . . . .201
Chapter 6 Using the PostScript Printer Driver
About the PostScript 3 Features . . . . . . . . . . . . . . . . . . . . . . . . . . . .205
Features . . . . . . . . . . . . . . . . . . . . . . . . . . . . . . . . . . . . . . . . . . . .205
Hardware requirements . . . . . . . . . . . . . . . . . . . . . . . . . . . . . .206
17
Page 18

System requirements. . . . . . . . . . . . . . . . . . . . . . . . . . . . . . . . . 206
Using the PostScript Printer Driver with Windows . . . . . . . . . . . 209
Installing the PostScript printer driver for the parallel
interface . . . . . . . . . . . . . . . . . . . . . . . . . . . . . . . . . . . . . . . . . 209
Installing the PostScript printer driver for the USB
interface . . . . . . . . . . . . . . . . . . . . . . . . . . . . . . . . . . . . . . . . . 211
Installing the PostScript printer driver for the network
interface . . . . . . . . . . . . . . . . . . . . . . . . . . . . . . . . . . . . . . . . . 213
Accessing the PostScript printer driver . . . . . . . . . . . . . . . . . 216
Making changes to PostScript printer settings . . . . . . . . . . . 217
Using the Reserve Job function . . . . . . . . . . . . . . . . . . . . . . . . 218
Using AppleTalk under Windows 2000 or NT 4.0. . . . . . . . 219
Using the PostScript Printer Driver with Macintosh . . . . . . . . . . 220
Installing the PostScript printer driver . . . . . . . . . . . . . . . . . 220
Selecting the printer . . . . . . . . . . . . . . . . . . . . . . . . . . . . . . . . . 221
Accessing the PostScript printer driver . . . . . . . . . . . . . . . . . 226
Making changes to PostScript printer settings . . . . . . . . . . . 226
Chapter 7 Using the Control Panel
Using the Control Panel Menus . . . . . . . . . . . . . . . . . . . . . . . . . . . . 228
When to make control panel settings. . . . . . . . . . . . . . . . . . . 228
How to access the control panel menus. . . . . . . . . . . . . . . . . 229
Control Panel Menus . . . . . . . . . . . . . . . . . . . . . . . . . . . . . . . . . . . . . 230
Information Menu . . . . . . . . . . . . . . . . . . . . . . . . . . . . . . . . . . . 230
Tray Menu . . . . . . . . . . . . . . . . . . . . . . . . . . . . . . . . . . . . . . . . . 234
Emulation Menu . . . . . . . . . . . . . . . . . . . . . . . . . . . . . . . . . . . . 235
Printing Menu . . . . . . . . . . . . . . . . . . . . . . . . . . . . . . . . . . . . . . 236
Setup Menu . . . . . . . . . . . . . . . . . . . . . . . . . . . . . . . . . . . . . . . . 239
Mode Config. Menu . . . . . . . . . . . . . . . . . . . . . . . . . . . . . . . . . 243
Reset Menu. . . . . . . . . . . . . . . . . . . . . . . . . . . . . . . . . . . . . . . . . 245
Quick Print Job Menu . . . . . . . . . . . . . . . . . . . . . . . . . . . . . . . . 246
Confidential Job Menu . . . . . . . . . . . . . . . . . . . . . . . . . . . . . . . 246
Parallel Menu. . . . . . . . . . . . . . . . . . . . . . . . . . . . . . . . . . . . . . . 246
USB Menu. . . . . . . . . . . . . . . . . . . . . . . . . . . . . . . . . . . . . . . . . . 248
Network Menu. . . . . . . . . . . . . . . . . . . . . . . . . . . . . . . . . . . . . . 249
AUX Menu . . . . . . . . . . . . . . . . . . . . . . . . . . . . . . . . . . . . . . . . . 249
LJ4 Menu. . . . . . . . . . . . . . . . . . . . . . . . . . . . . . . . . . . . . . . . . . . 250
18
Page 19

GL2 Menu . . . . . . . . . . . . . . . . . . . . . . . . . . . . . . . . . . . . . . . . . .253
PS3 Menu . . . . . . . . . . . . . . . . . . . . . . . . . . . . . . . . . . . . . . . . . . .255
ESCP2 Menu . . . . . . . . . . . . . . . . . . . . . . . . . . . . . . . . . . . . . . . .256
FX Menu. . . . . . . . . . . . . . . . . . . . . . . . . . . . . . . . . . . . . . . . . . . .259
I239X Menu . . . . . . . . . . . . . . . . . . . . . . . . . . . . . . . . . . . . . . . . .262
Support Menu . . . . . . . . . . . . . . . . . . . . . . . . . . . . . . . . . . . . . . .264
Printer Adjust Menu . . . . . . . . . . . . . . . . . . . . . . . . . . . . . . . . .265
Status and Error Messages . . . . . . . . . . . . . . . . . . . . . . . . . . . . . . . . .268
Printing and Deleting Reserve Job Data. . . . . . . . . . . . . . . . . . . . . .285
Using the Quick Print Job Menu . . . . . . . . . . . . . . . . . . . . . . .285
Using the Confidential Job Menu. . . . . . . . . . . . . . . . . . . . . . .286
Printing a Status Sheet . . . . . . . . . . . . . . . . . . . . . . . . . . . . . . . . . . . .288
Canceling Printing. . . . . . . . . . . . . . . . . . . . . . . . . . . . . . . . . . . . . . . .289
Using the Cancel Job button . . . . . . . . . . . . . . . . . . . . . . . . . . .289
Using the Reset menu . . . . . . . . . . . . . . . . . . . . . . . . . . . . . . . .289
Switching the Printing Mode. . . . . . . . . . . . . . . . . . . . . . . . . . . . . . .290
Color mode to B/W mode. . . . . . . . . . . . . . . . . . . . . . . . . . . . .290
Color mode to 4 x B/W mode . . . . . . . . . . . . . . . . . . . . . . . . .291
B/W mode to color mode . . . . . . . . . . . . . . . . . . . . . . . . . . . . .292
B/W mode to 4 x B/W mode . . . . . . . . . . . . . . . . . . . . . . . . . .293
4 x B/W mode to B/W mode . . . . . . . . . . . . . . . . . . . . . . . . . .294
4 x B/W mode to color mode . . . . . . . . . . . . . . . . . . . . . . . . . .295
Chapter 8 Installing Options
Optional Paper Cassette Unit . . . . . . . . . . . . . . . . . . . . . . . . . . . . . .296
Handling precautions . . . . . . . . . . . . . . . . . . . . . . . . . . . . . . . .296
Installing the optional paper cassette unit . . . . . . . . . . . . . . .297
Removing the optional paper cassette unit . . . . . . . . . . . . . .299
Duplex Unit . . . . . . . . . . . . . . . . . . . . . . . . . . . . . . . . . . . . . . . . . . . . .300
Installing the Duplex Unit. . . . . . . . . . . . . . . . . . . . . . . . . . . . .300
Removing the Duplex Unit . . . . . . . . . . . . . . . . . . . . . . . . . . . .304
Hard Disk Drive. . . . . . . . . . . . . . . . . . . . . . . . . . . . . . . . . . . . . . . . . .304
Installing the Hard Disk Drive. . . . . . . . . . . . . . . . . . . . . . . . .304
Removing the Hard Disk Drive . . . . . . . . . . . . . . . . . . . . . . . .309
Memory Module . . . . . . . . . . . . . . . . . . . . . . . . . . . . . . . . . . . . . . . . .309
Installing a memory module. . . . . . . . . . . . . . . . . . . . . . . . . . .309
Removing a memory module . . . . . . . . . . . . . . . . . . . . . . . . . .313
19
Page 20

Interface Card . . . . . . . . . . . . . . . . . . . . . . . . . . . . . . . . . . . . . . . . . . . 313
Installing an interface card. . . . . . . . . . . . . . . . . . . . . . . . . . . . 313
Removing an interface card . . . . . . . . . . . . . . . . . . . . . . . . . . . 315
P5C Emulation Kit . . . . . . . . . . . . . . . . . . . . . . . . . . . . . . . . . . . . . . . 315
Installing the P5C ROM module. . . . . . . . . . . . . . . . . . . . . . . 315
Removing the P5C ROM module . . . . . . . . . . . . . . . . . . . . . . 318
Chapter 9 Replacing Consumable Products
Replacement Messages . . . . . . . . . . . . . . . . . . . . . . . . . . . . . . . . . . . 319
Toner Cartridge . . . . . . . . . . . . . . . . . . . . . . . . . . . . . . . . . . . . . . . . . 321
Handling precautions . . . . . . . . . . . . . . . . . . . . . . . . . . . . . . . . 321
Replacing a toner cartridge . . . . . . . . . . . . . . . . . . . . . . . . . . . 322
Photoconductor Unit . . . . . . . . . . . . . . . . . . . . . . . . . . . . . . . . . . . . . 325
Handling precautions . . . . . . . . . . . . . . . . . . . . . . . . . . . . . . . . 325
Replacing the photoconductor unit . . . . . . . . . . . . . . . . . . . . 326
Fuser Unit . . . . . . . . . . . . . . . . . . . . . . . . . . . . . . . . . . . . . . . . . . . . . . 332
Handling precautions . . . . . . . . . . . . . . . . . . . . . . . . . . . . . . . . 332
Replacing the fuser unit . . . . . . . . . . . . . . . . . . . . . . . . . . . . . . 333
Waste Toner Collector . . . . . . . . . . . . . . . . . . . . . . . . . . . . . . . . . . . . 337
Handling precautions . . . . . . . . . . . . . . . . . . . . . . . . . . . . . . . . 337
Replacing the waste toner collector . . . . . . . . . . . . . . . . . . . . 337
Chapter 10 Cleaning and Transporting the Printer
Cleaning the Printer. . . . . . . . . . . . . . . . . . . . . . . . . . . . . . . . . . . . . . 341
Cleaning the output tray . . . . . . . . . . . . . . . . . . . . . . . . . . . . . 342
Cleaning the pickup roller . . . . . . . . . . . . . . . . . . . . . . . . . . . . 343
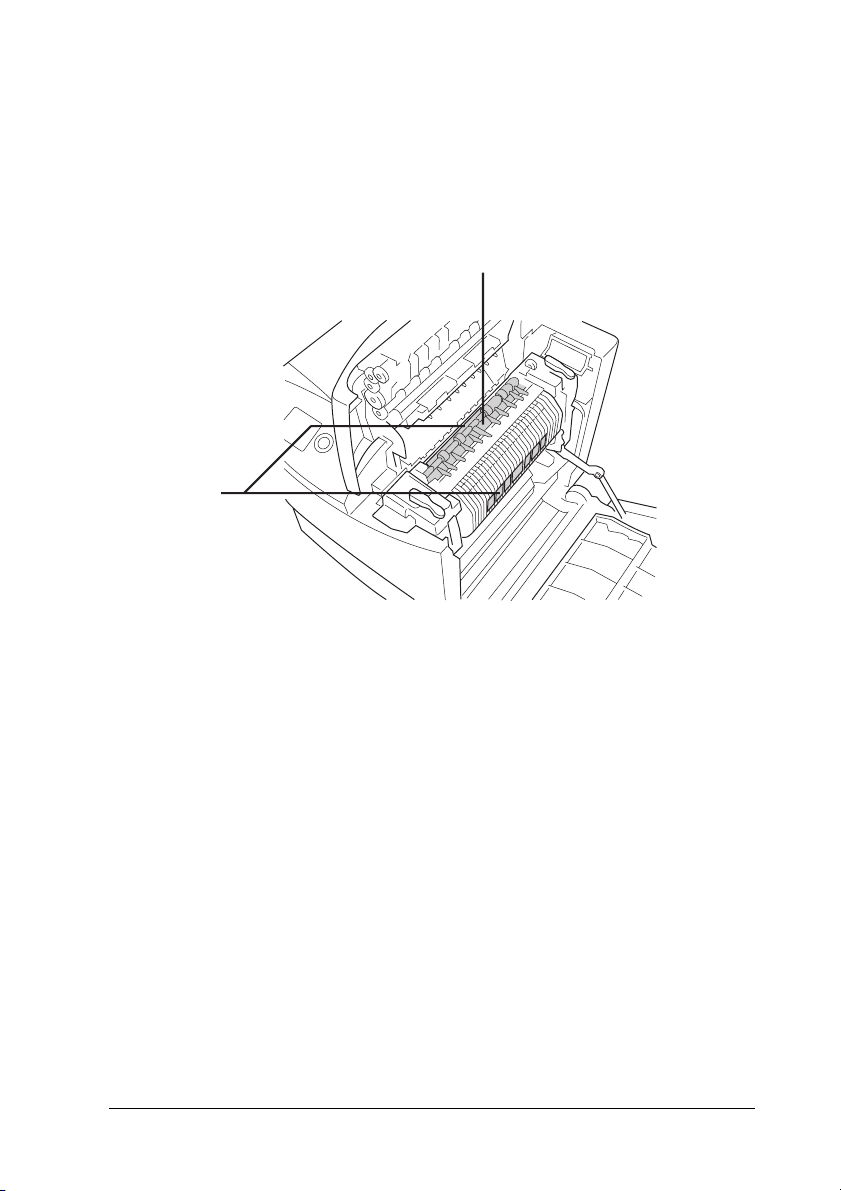
Cleaning the photoconductor wire (knob [a]). . . . . . . . . . . . 345
Cleaning the exposure window (knob [b]) . . . . . . . . . . . . . . 346
Transporting the Printer . . . . . . . . . . . . . . . . . . . . . . . . . . . . . . . . . . 347
For long distances . . . . . . . . . . . . . . . . . . . . . . . . . . . . . . . . . . . 347
For short distances . . . . . . . . . . . . . . . . . . . . . . . . . . . . . . . . . . 348
Finding a place for the printer. . . . . . . . . . . . . . . . . . . . . . . . . 350
20
Page 21

Chapter 11 Troubleshooting
Clearing Jammed Paper . . . . . . . . . . . . . . . . . . . . . . . . . . . . . . . . . . .352
Precautions for clearing jammed paper . . . . . . . . . . . . . . . . .352
Jam A (cover A). . . . . . . . . . . . . . . . . . . . . . . . . . . . . . . . . . . . . .353
Jam A, B (cover A and B). . . . . . . . . . . . . . . . . . . . . . . . . . . . . .356
Jam MP, A (MP tray and cover A) . . . . . . . . . . . . . . . . . . . . . .363
Jam A, C1 (cover A and standard lower paper cassette) . . .367
Jam A, E, C2 (cover A, E, and optional paper cassette) . . . .371
Printing a Status Sheet . . . . . . . . . . . . . . . . . . . . . . . . . . . . . . . . . . . .377
Operational Problems . . . . . . . . . . . . . . . . . . . . . . . . . . . . . . . . . . . . .377
The Ready light does not turn on. . . . . . . . . . . . . . . . . . . . . . .377
The printer does not print (Ready light off) . . . . . . . . . . . . . .378
The Ready light is on but nothing prints . . . . . . . . . . . . . . . .378
The optional product is not available . . . . . . . . . . . . . . . . . . .379
The Properties dialog box does not appear or it takes too
much time to open it. (For Windows users only) . . . . . . .379
Printout Problems . . . . . . . . . . . . . . . . . . . . . . . . . . . . . . . . . . . . . . . .380
The font cannot be printed . . . . . . . . . . . . . . . . . . . . . . . . . . . .380
Printout is garbled . . . . . . . . . . . . . . . . . . . . . . . . . . . . . . . . . . .380
The printout position is not correct . . . . . . . . . . . . . . . . . . . . .381
Graphics do not print correctly . . . . . . . . . . . . . . . . . . . . . . . .381
Toner is no fixed to the paper. . . . . . . . . . . . . . . . . . . . . . . . . .381
Color Printing Problems. . . . . . . . . . . . . . . . . . . . . . . . . . . . . . . . . . .382
Cannot print in color . . . . . . . . . . . . . . . . . . . . . . . . . . . . . . . . .382
The printout color differs when printed from different
printers. . . . . . . . . . . . . . . . . . . . . . . . . . . . . . . . . . . . . . . . . . .382
The color looks different from what you see on the
computer screen . . . . . . . . . . . . . . . . . . . . . . . . . . . . . . . . . . .383
Print Quality Problems. . . . . . . . . . . . . . . . . . . . . . . . . . . . . . . . . . . .384
The background is dark or dirty . . . . . . . . . . . . . . . . . . . . . . .384
White dots appear in the printout . . . . . . . . . . . . . . . . . . . . . .384
Print quality or tone is uneven . . . . . . . . . . . . . . . . . . . . . . . . .385
Half-tone images print unevenly . . . . . . . . . . . . . . . . . . . . . . .385
Toner smudges . . . . . . . . . . . . . . . . . . . . . . . . . . . . . . . . . . . . . .386
Areas are missing in the printed image . . . . . . . . . . . . . . . . .386
Completely blank pages are output. . . . . . . . . . . . . . . . . . . . .387
The printed image is light or faint . . . . . . . . . . . . . . . . . . . . . .388
The non-printed side of the page is dirty . . . . . . . . . . . . . . . .388
21
Page 22

Memory Problems . . . . . . . . . . . . . . . . . . . . . . . . . . . . . . . . . . . . . . . 389
Print quality decreased. . . . . . . . . . . . . . . . . . . . . . . . . . . . . . . 389
Insufficient memory for current task . . . . . . . . . . . . . . . . . . . 389
Insufficient memory to print all copies . . . . . . . . . . . . . . . . . 389
Paper Handling Problems. . . . . . . . . . . . . . . . . . . . . . . . . . . . . . . . . 390
Paper does not feed properly . . . . . . . . . . . . . . . . . . . . . . . . . 390
Problems Using Options . . . . . . . . . . . . . . . . . . . . . . . . . . . . . . . . . . 391
The message Invalid AUX /IF Card appears on the LCD
panel . . . . . . . . . . . . . . . . . . . . . . . . . . . . . . . . . . . . . . . . . . . . 391
Paper does not feed from the optional paper cassette . . . . . 391
Feed jam when using the optional paper cassette . . . . . . . . 392
An installed option cannot be used . . . . . . . . . . . . . . . . . . . . 392
Correcting USB Problems . . . . . . . . . . . . . . . . . . . . . . . . . . . . . . . . . 393
USB connections . . . . . . . . . . . . . . . . . . . . . . . . . . . . . . . . . . . . 393
Windows operating system . . . . . . . . . . . . . . . . . . . . . . . . . . . 393
Printer software installation . . . . . . . . . . . . . . . . . . . . . . . . . . 394
Status and Error Messages . . . . . . . . . . . . . . . . . . . . . . . . . . . . . . . . 400
Canceling Printing . . . . . . . . . . . . . . . . . . . . . . . . . . . . . . . . . . . . . . . 400
Printing in the PostScript 3 Mode Problems . . . . . . . . . . . . . . . . . 401
The printer does not print correctly in the PostScript
mode . . . . . . . . . . . . . . . . . . . . . . . . . . . . . . . . . . . . . . . . . . . . 401
The printer does not print . . . . . . . . . . . . . . . . . . . . . . . . . . . . 402
Printouts are black and white even though the Resolution
setting is set to Color in the printer driver.
(For Mac OS X users only) (only when printing with an
AL-2600 model that is set to the Color mode) . . . . . . . . . 403
The printer driver or printer that you need to use does not
appear in the Printer Setup Utility (for Mac OS X 10.3),
Print Center (for Mac OS X 10.2), or Chooser
(for Mac OS 9) . . . . . . . . . . . . . . . . . . . . . . . . . . . . . . . . . . . . 403
The font on the printout is different from that on the
screen . . . . . . . . . . . . . . . . . . . . . . . . . . . . . . . . . . . . . . . . . . . 404
The printer fonts cannot be installed . . . . . . . . . . . . . . . . . . . 404
The edges of texts and/or images are not smooth . . . . . . . . 405
The printer does not print normally via the parallel
interface (Windows 98 only) . . . . . . . . . . . . . . . . . . . . . . . . 405
The printer does not print normally via the USB interface. 406
The printer does not print normally via the network
interface . . . . . . . . . . . . . . . . . . . . . . . . . . . . . . . . . . . . . . . . . 406
22
Page 23

An undefined error occurs (Macintosh only). . . . . . . . . . . . .407
Insufficient memory to print data (Macintosh only). . . . . . .408
Appendix A Customer Support
Contacting Customer Support. . . . . . . . . . . . . . . . . . . . . . . . . . . . . .409
Technical Support Web Site . . . . . . . . . . . . . . . . . . . . . . . . . . . . . . . .410
Appendix B Technical Specifications
Paper . . . . . . . . . . . . . . . . . . . . . . . . . . . . . . . . . . . . . . . . . . . . . . . . . . .411
Available paper types . . . . . . . . . . . . . . . . . . . . . . . . . . . . . . . .411
Paper that should not be used . . . . . . . . . . . . . . . . . . . . . . . . .412
Printable area . . . . . . . . . . . . . . . . . . . . . . . . . . . . . . . . . . . . . . .413
Printer . . . . . . . . . . . . . . . . . . . . . . . . . . . . . . . . . . . . . . . . . . . . . . . . . .414
General . . . . . . . . . . . . . . . . . . . . . . . . . . . . . . . . . . . . . . . . . . . . .414
Environmental . . . . . . . . . . . . . . . . . . . . . . . . . . . . . . . . . . . . . .415
Mechanical. . . . . . . . . . . . . . . . . . . . . . . . . . . . . . . . . . . . . . . . . .416
Electrical. . . . . . . . . . . . . . . . . . . . . . . . . . . . . . . . . . . . . . . . . . . .417
Standard and approvals . . . . . . . . . . . . . . . . . . . . . . . . . . . . . .418
Interfaces. . . . . . . . . . . . . . . . . . . . . . . . . . . . . . . . . . . . . . . . . . . . . . . .420
Parallel interface . . . . . . . . . . . . . . . . . . . . . . . . . . . . . . . . . . . . .420
USB interface. . . . . . . . . . . . . . . . . . . . . . . . . . . . . . . . . . . . . . . .420
Ethernet interface . . . . . . . . . . . . . . . . . . . . . . . . . . . . . . . . . . . .420
Options and Consumable Products . . . . . . . . . . . . . . . . . . . . . . . . .421
Optional paper cassette unit . . . . . . . . . . . . . . . . . . . . . . . . . . .421
Duplex Unit . . . . . . . . . . . . . . . . . . . . . . . . . . . . . . . . . . . . . . . . .422
Memory modules . . . . . . . . . . . . . . . . . . . . . . . . . . . . . . . . . . . .422
Hard Disk Drive . . . . . . . . . . . . . . . . . . . . . . . . . . . . . . . . . . . . .423
Toner cartridge . . . . . . . . . . . . . . . . . . . . . . . . . . . . . . . . . . . . . .423
Photoconductor unit . . . . . . . . . . . . . . . . . . . . . . . . . . . . . . . . .424
Fuser unit 120/220 . . . . . . . . . . . . . . . . . . . . . . . . . . . . . . . . . . .424
Waste toner collector . . . . . . . . . . . . . . . . . . . . . . . . . . . . . . . . .424
23
Page 24

Appendix C Information about Fonts
Working with Fonts . . . . . . . . . . . . . . . . . . . . . . . . . . . . . . . . . . . . . . 425
EPSON BarCode Fonts (Windows Only). . . . . . . . . . . . . . . . 425
Available fonts. . . . . . . . . . . . . . . . . . . . . . . . . . . . . . . . . . . . . . 444
Adding more fonts . . . . . . . . . . . . . . . . . . . . . . . . . . . . . . . . . . 451
Selecting fonts . . . . . . . . . . . . . . . . . . . . . . . . . . . . . . . . . . . . . . 452
Downloading fonts . . . . . . . . . . . . . . . . . . . . . . . . . . . . . . . . . . 452
EPSON Font Manager (Windows Only) . . . . . . . . . . . . . . . . 453
Symbol Sets . . . . . . . . . . . . . . . . . . . . . . . . . . . . . . . . . . . . . . . . . . . . . 456
Introduction to symbol sets . . . . . . . . . . . . . . . . . . . . . . . . . . . 456
In the LJ4 Emulation Mode . . . . . . . . . . . . . . . . . . . . . . . . . . . 457
In the ESC/P 2 or FX Modes . . . . . . . . . . . . . . . . . . . . . . . . . . 460
In the I239X Emulation Mode . . . . . . . . . . . . . . . . . . . . . . . . . 463
In the EPSON GL/ 2 Mode . . . . . . . . . . . . . . . . . . . . . . . . . . . 463
In the P5C Mode . . . . . . . . . . . . . . . . . . . . . . . . . . . . . . . . . . . . 464
Glossary
Index
24
Page 25

Chapter 1
Getting to Know Your Printer
Where to Find Information
Setup Guide
Provides you with information on assembling the printer and
installing the printer software.
User’s Guide (this manual)
Provides you with detailed information on the printer’s functions,
optional products, maintenance, troubleshooting, and technical
specifications.
Network Guide
Provides network administrators with information on both the
printer driver and network settings.You need to install this guide
from the Network CD-ROM to your computer’s hard disk before
referring it.
1
1
1
1
1
1
1
1
Paper Jam Guide
Provides you with solutions for paper jam problems about your
printer you may need to refer to on a regular basis. We
recommend printing this guide and keeping it near the printer.
Online Help for printer software
Click Help for detailed information and instructions on the
printer software that controls your printer. Online help is
automatically installed when you install the printer software.
Getting to Know Your Printer 25
1
1
1
1
Page 26
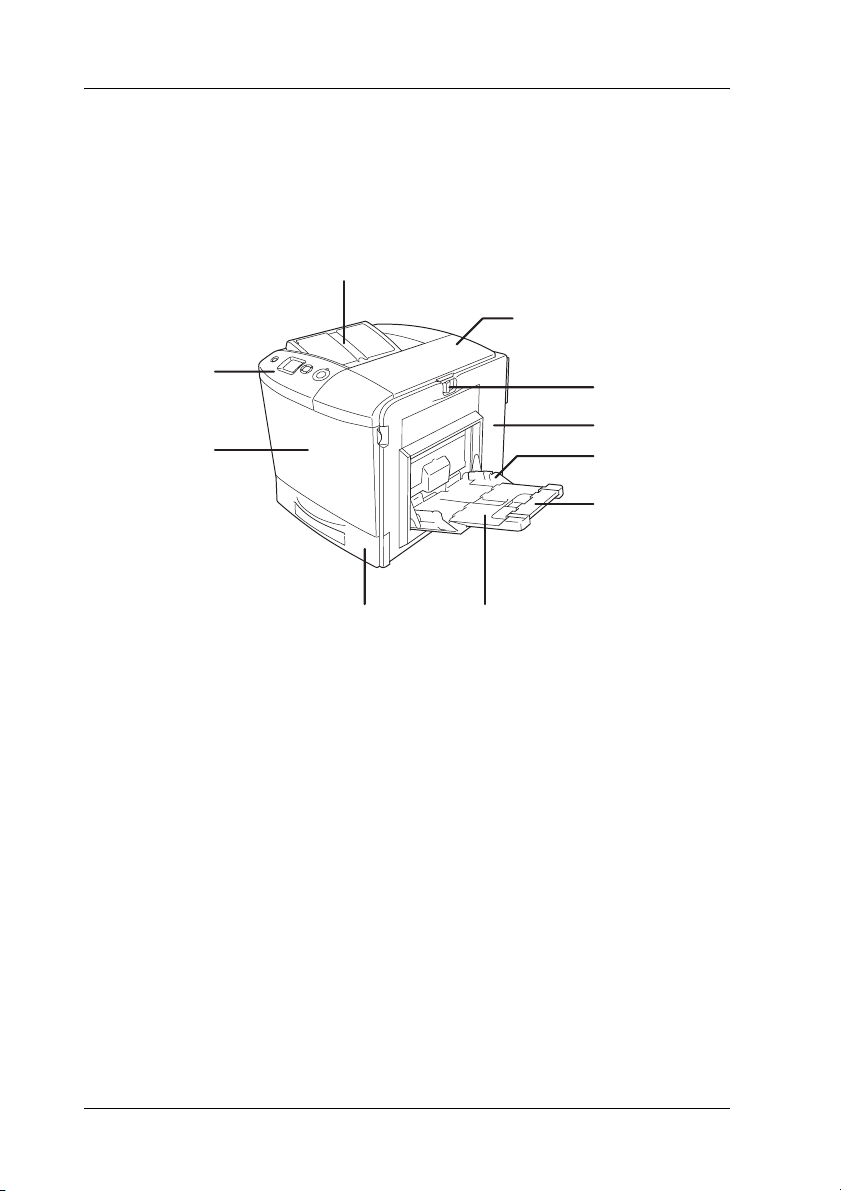
Printer Parts
j
Front view
i
a
b
c
d
e
f
h
a. output tray
b. cover B
c. latch on cover A
d. cover A
e. MP tray (Multi-Purpose tray)
f. expansion tray 2
g. expansion tray 1
h. standard lower paper cassette
i. cover D
j. control panel
g
26 Getting to Know Your Printer
Page 27

Rear view
1
a
1
d
a. Ethernet interface connector
b. parallel interface connector
c. USB interface connector
d. interface card slot
e. power switch
f. AC inlet
b
c
1
e
1
f
1
1
1
1
1
Getting to Know Your Printer 27
1
1
1
Page 28
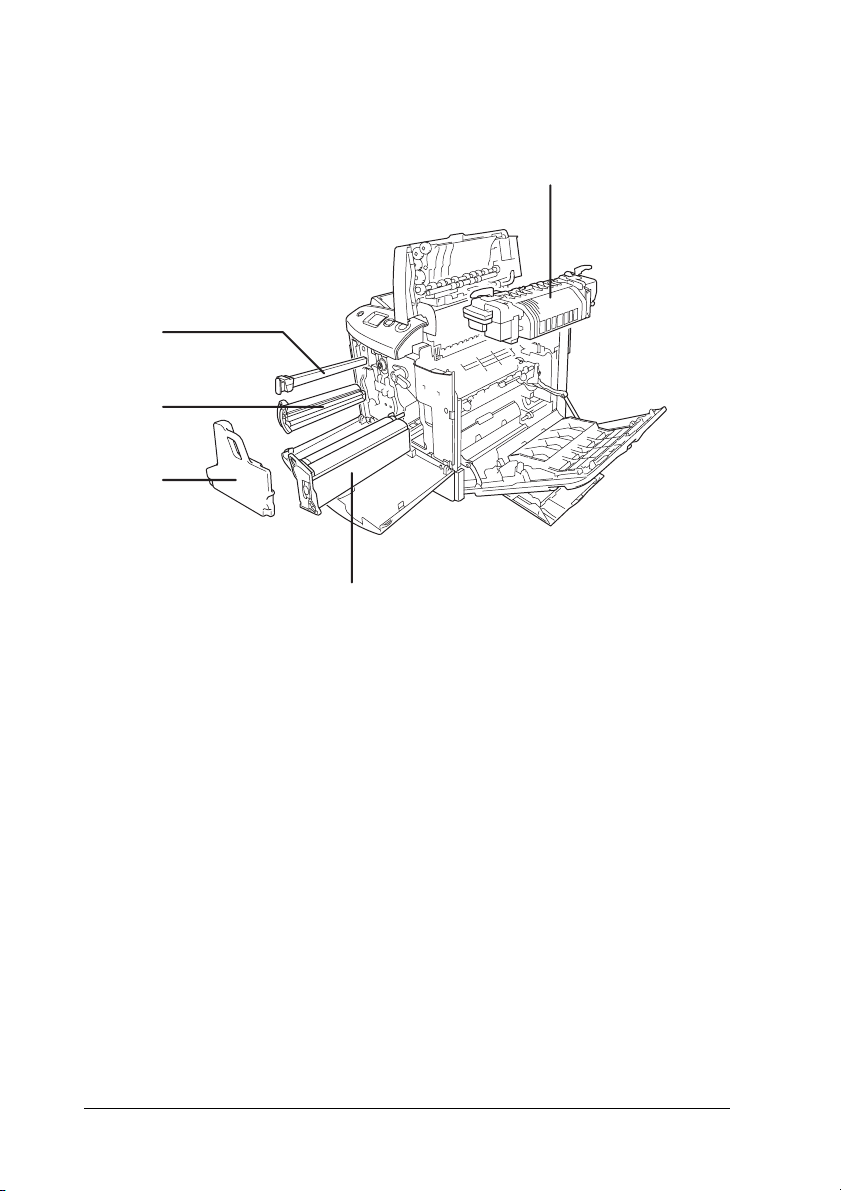
Inside the printer
e
d
c
a. fuser unit
b. photoconductor unit
c. waste toner collector
d. toner cartridge
e. filter
a
b
28 Getting to Know Your Printer
Page 29

Control panel
1
c eb
da
1
f
g
1
1
ijh
a. LCD panel Displays printer status messages and
control panel menu settings.
b.
Back button
c.
Up button
d.
Enter button
e.
Down button
f. Ready light
(Green)
g. Error light
(Red)
Use these buttons to access the control
panel menus, where you can make
printer settings and check the status of
consumable products. For instructions
on how to use these buttons, see "Using
the Control Panel Menus" on page 228.
On when the printer is ready, indicating
that the printer is ready to receive and
print data.
Off when the printer is not ready.
On or flashes when an error has
occurred.
1
1
1
1
1
1
1
1
Getting to Know Your Printer 29
Page 30

h. Start/Stop button When the printer is printing, pressing
this button stops the printing.
When the error light is flashing, pressing
this button clears the error and switches
the printer to ready status.
i. Data light
(Yellow)
j. Cancel Job button Press once to cancel the current print job.
On when print da ta is stored in the print
buffer (the section of printer memory
reserved for receiving data) but not yet
printed.
Flashes when the printer is processing
data.
Off when no data remains in the print
buffer.
Press and hold for more than two
seconds to delete all jobs fro m the printer
memory.
30 Getting to Know Your Printer
Page 31

Options and Consumable Products
1
Options
You can add to your printer’s capabilities by installing any of the
following options.
❏ Optional Paper Cassette Unit (C12C802211)
This unit increases paper feeding capacity up to 500 sheets of
paper.
❏ Duplex Unit (C12C802221)
This Duplex Unit allows for automatic printing on both sides
of the paper.
❏ Hard Disk Drive (C12C824172)
This option expands the printer’s capacity by allowing you to
print complex and large print jobs at high speed. This option
also enables you to use the Reserve Job function. By using the
Reserve Job function, you can store print jobs in the printer’s
hard disk and print them later directly from the printer’s
control panel.
❏ P5C Emulation Kit (C12C832641)
The P5C emulation kit provides you with the ability to print
documents in the PCL5c printing language with this printer.
This optional kit includes the ROM module and printer
driver.
❏ Memory Module
This option expands the printer’s memory by allowing you to
print complex and graphics-intensive documents. The
memory can be installed up to 512 MB for your printer.
1
1
1
1
1
1
1
1
1
1
Getting to Know Your Printer 31
1
Page 32

Note:
Make sure that the DIMM you purchase is compatible with EPSON
products. For details, contact the store where you purchased this
printer or an EPSON qualified service representative.
Consumable products
The life of the following consumable products is monitored by the
printer. The printer lets you know when replacements are needed.
Product name Product code
5K: high capacity toner cartridge (Yellow) 0226
5K: high capacity toner cartridge (Magenta) 0227
5K: high capacity toner cartridge (Cyan) 0228
5K: high capacity toner cartridge (Black) 0229
2K: standard capacity toner cartridge (Yellow) 0230
2K: standard capacity toner cartridge (Magenta) 0231
2K: standard capacity toner cartridge (Cyan) 0232
Photoconductor unit 1107
Fuser unit 120 (110 - 120V) 3019
Fuser unit 220 (220 - 240V) 3018
Waste toner collector 0223
32 Getting to Know Your Printer
Page 33

Chapter 2
Printer Features and Various Printing Options
Printer Features
The printer comes with a full set of features that contributes to
ease of use and consistent, high-quality output. The main features
are described below.
High-quality printing
When using the driver provided, your printer does 2400RIT*
printing at a speed of up to 30 pages per minute when printing
on A4 paper in monochrome mode. You’ll appreciate the
professional print quality produced by your printer and its quick
processing speed.
* Epson AcuLaser Resolution Improvement Technology.
2
2
2
2
2
2
2
2
Pre-defined color settings in the printer driver
The printer driver offers many pre-defined settings for printing,
allowing you to optimize print quality for various types of color
documents.
For Windows, see "Making the print quality settings" on page 67
for more information.
For Macintosh, see "Making the print quality settings" on page
158 for more information.
Printer Features and Various Printing Options 33
2
2
2
2
Page 34

Color printing mode and monochrome printing mode
The printer can be used both for color and monochrome printing.
The printer has three color modes: color printing mode,
monochrome printing mode with one black toner cartridge, and
monochrome printing mode with four black toner cartridges.
Toner save mode
To reduce the amount of toner used in printing documents, you
can print rough drafts using the Toner Save mode.
Resolution Improvement Technology and Enhanced MicroGray technology
Resolution Improvement Technology (RITech) is an original
Epson printer technology that works by smoothing out the jagged
edges of diagonal and curved lines in both text and graphics.
Enhanced MicroGray improves the halftone quality of graphics.
With the driver provided, the printer’s resolution (dots per inch)
is enhanced by RITech and Enhanced MicroGray technology.
Wide variety of fonts
The printer comes with a selection of 93 Laser-Jet-compatible
scalable fonts, and 7 bitmap fonts in LJ4 emulation mode to
provide you with the fonts you need to create
professional-looking documents.
34 Printer Features and Various Printing Options
Page 35

Adobe PostScript 3 Mode
The printer’s Adobe PostScript 3 Mode provides you with the
ability to print documents formatted for PostScript printers.
Seventeen scalable fonts are included. IES (Intelligent Emulation
Switch) and SPL (Shared Printer Language) support allow the
printer to switch between the PostScript mode and other
emulations as print data is received at the printer.
P5C Emulation Mode
The P5C Emulation mode provides you with the ability to print
documents in the PCL5c printing language with this printer.
Installing this optional memory modules into your printer, this
printer driver allows your computer to control the P5C printer.
2
2
2
2
2
2
2
2
Printer Features and Various Printing Options 35
2
2
2
2
Page 36

Various Printing Options
This printer provides you with a variety of different printing
options. You can print in various formats, or can print using many
different types of paper.
The following explains the procedure for each type of printing.
Choose the appropriate one for your printing.
Double-sided printing
"Duplex Unit" on page 300
"Duplex printing" on page 93 (Windows)
"Duplex printing" on page 174 (Macintosh)
Lets you print on both sides of the paper.
Note:
You need an optional Duplex Unit installed on your printer in order to
automatically print on both sides of the paper.
36 Printer Features and Various Printing Options
Page 37

Fit to page printing
"Resizing printouts" on page 74 (Windows)
"Resizing printouts" on page 165 (Macintosh)
Note:
This function is not available with Mac OS X.
Lets you automatically enlarge or reduce the size of your
document to fit the paper size you selected.
Pages per sheet printing
2
2
2
2
2
2
2
2
"Modifying the print layout" on page 77 (Windows)
"Modifying the print layout" on page 166 (Macintosh)
Lets you print two or four pages on a single sheet.
Printer Features and Various Printing Options 37
2
2
2
2
Page 38

Watermark printing
"Using a watermark" on page 79 (Windows)
"Using a watermark" on page 168 (Macintosh)
Note:
This function is not available with Mac OS X.
Lets you print text or an image as a watermark on your printout.
For example, you can put “Confidential” on an important
document.
38 Printer Features and Various Printing Options
Page 39

Overlay printing
"Using an overlay" on page 82 (Windows)
Lets you prepare standard forms or template on your printout
that you can use as overlays when printing other documents.
Note:
The Overlay printing function is not available in the PostScript 3 mode.
2
2
2
2
2
2
2
2
Printer Features and Various Printing Options 39
2
2
2
2
Page 40

Using the Reserve Job function
"Hard Disk Drive" on page 304
"Using the Reserve Job Function" on page 100 (Windows)
"Using the Reserve Job Function" on page 178 (Macintosh)
Lets you print jobs that you stored in the printer’s Hard Disk Dri ve
later directly from the printer’s control panel.
Note:
You need an optional hard disk drive installed on your printer in order
to use the Reserve Job function.
Using the HDD form overlay function
"Hard Disk Drive" on page 304
"Using HDD form overlay" on page 87 (Windows)
40 Printer Features and Various Printing Options
Page 41

Chapter 3
Paper Handling
Paper Sources
This section describes the combinations of paper sources and
paper types that you can use.
MP tray
Paper Type* Paper Size* Capacity
Plain paper
Weight: 64 to
90 g/m²
Envelopes
Weight: 75 to
105 g/m²
A4, A5, B5, Letter (LT),
Half-Letter (HLT),
Executive (EXE),
Government Letter (GLT)
Custom-size paper:
98 × 148 mm minimum
216 × 297 mm maximum
C5, C6, C10, DL,
Monarch (MON), ISO-B5
Up to 150 sheets
(Total thick stack:
up to 16.5 mm)
Up to 15 sheets
(Total thick stack:
up to 16.5 mm)
3
3
3
3
3
3
3
3
Labels A4, Letter (LT) Up to 50 sheets
Thick paper
Weight: 91 to
163 g/m²
A4, A5, B5, Letter (LT),
Half-Letter (HLT),
Executive (EXE),
Government Letter (GLT)
Custom-size paper:
98 × 148 mm minimum
216 × 297 mm maximum
Up to 75 sheets
Paper Handling 41
3
3
3
3
Page 42

EPSON Color
Laser Paper
A4 Up to 150 sheets
(Total thick stack: up
to 16.5 mm)
EPSON Color
Laser
Transparencies
* You can print on the back side of paper that has been printed on previously
by this printer, if the paper is listed above.
A4, Letter (LT) Up to 60 sheets
Standard lower paper cassette
Paper Type Paper Size Capacity
Plain paper
Weight: 64 to
90 g/m²
EPSON Color
Laser Paper
A4, Letter (LT) Up to 500 sheets
(Total thick stack: less
than 55 mm)
A4 Up to 500 sheets
(Total thick stack: less
than 55 mm)
Optional paper cassette unit
Paper Type Paper Size Capacity
Plain paper
Weight: 64 to
90 g/m²
EPSON Color
Laser Paper
42 Paper Handling
A4, Letter (LT) Up to 500 sheets
(Total thick stack: less
than 55 mm)
A4 Up to 500 sheets
(Total thick stack: less
than 55 mm)
Page 43

Selecting a paper source
You can specify a paper source manually, or set the printer to
select the paper source automatically.
Manual selection
You can use the printer driver or the printer’s control panel to
select a paper source manually.
To access the printer driver, for Windows, see "Accessing the
printer driver" on page 65, or for Macintosh, see "Accessing the
printer driver" on page 156.
And to use the printer’s control panel, see "Using the Control
Panel Menus" on page 228.
Using the printer driver:
❏ For Windows:
Access the printer driver, click the Basic Settings tab, and
select the paper source that you want to use from the Paper
Source list. Then click OK.
❏ For Macintosh:
Access the printer driver, select Printer Settings from the
drop-down list and click the Basic Settings tab (for Mac OS
X), or open the Basic Settings dialog box (for Mac OS 9). Then,
select the paper source that you want to use from the Paper
Source list and click OK.
3
3
3
3
3
3
3
3
3
Using the printer’s control panel:
Access the control panel’s Setup Menu, then select Paper Source
and specify the paper source you want to use.
Paper Handling 43
3
3
3
Page 44

Auto selection
You can use the printer driver or the printer’s control panel to
select a paper source containing the appropriate size of paper
automatically.
To access the printer driver, for Windows, see "Accessing the
printer driver" on page 65, or for Macintosh, see "Accessing the
printer driver" on page 156.
And to use the printer’s control panel, see "Using the Control
Panel Menus" on page 228.
Using the printer driver:
❏ For Windows:
Access the printer driver, click the Basic Settings tab, and
select Auto Selection as the paper source. Then click OK.
❏ For Macintosh:
Access the printer driver, select Printer Settings from the
drop-down list and click the Basic Settings tab (for Mac OS
X), or open the Basic Settings dialog box (for Mac OS 9). Then,
select Auto Selection as the paper source and click OK.
The printer will search for a paper source containing the specified
paper size in the following order.
Standard configuration:
MP tray
Lower Cassette 1
With optional paper cassette unit installed:
MP tray
Lower Cassette 1
Lower Cassette 2
44 Paper Handling
Page 45

Note:
❏ If you make paper size settings or paper source settings in your
application, these settings may override the printer driver settings.
❏ If you select an envelope for the Paper Size setting, it can be fed
only from the MP tray regardless of the Paper Source setting.
❏ You can change the priority of the MP tray by using the MP Mode
setting in the control panel’s Setup Menu. For details, see "Setup
Menu" on page 239.
3
3
3
Using the printer’s control panel:
Access the control panel’s Setup Menu, and select Paper Source,
then select Auto.
3
3
3
3
3
3
3
3
Paper Handling 45
3
Page 46

Loading Paper
This section describes how to load paper. If you use special media
such as transparencies or envelopes, see also "Printing on Special
Media" on page 56.
MP tray
Follow the steps below to load paper.
1. Turn the printer on. Press the latch on the MP tray and open
the tray.
46 Paper Handling
Page 47
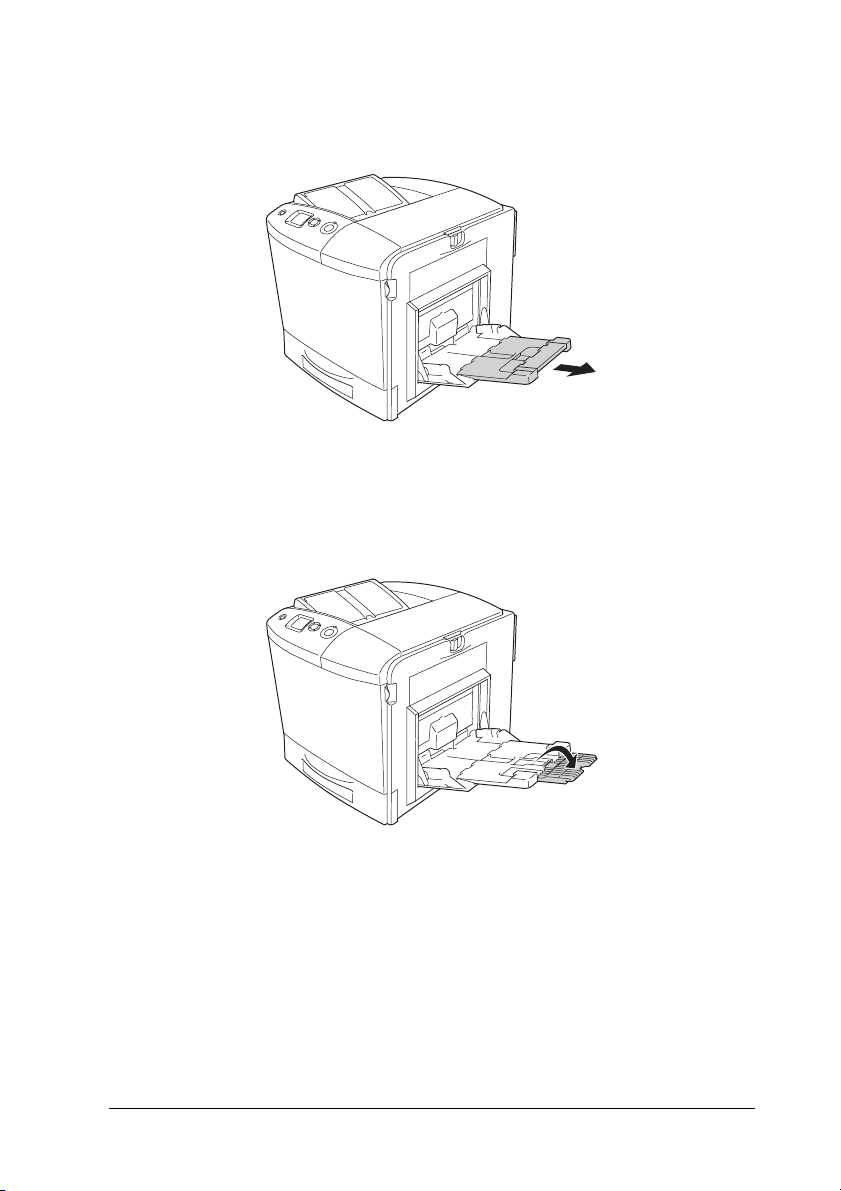
2. Pull out the expansion tray on the MP tray to accommodate
the size of the paper you want to load.
3
3
3
3
Note:
When you use A4, Letter or larger sizes of paper, unfold the
expansion tray 2 by lifting it up.
3
3
3
3
3
3
3
3
Paper Handling 47
Page 48

3. Pinch the knob and the paper guide together, then slide the
right paper guide outward.
4. Load a stack of the desired paper on the center of the tray.
Make sure to load it with the printable surface down.
Note:
❏ When loading paper, insert the short edge first.
❏ Do not load paper that exceeds the maximum stack height.
❏ When you use paper that has been printed on previously,
straighten any curled parts before loading it.
48 Paper Handling
Page 49

5. Pitch the knob and the paper guide together, then slide the
side paper guide until it is against the right side of the stack
to get a snug fit.
Note:
After loading paper, set the MP Tray Size setting to match the
loaded paper size on the control panel.
3
3
3
3
3
3
3
Paper Handling 49
3
3
3
3
3
Page 50

Standard lower paper cassette and optional paper cassette unit
Loading Paper
Follow the steps below to load paper. The illustrations show the
standard lower paper cassette.
1. Turn the printer on and pull out the paper cassette.
50 Paper Handling
Page 51

2. Push the tray in the paper cassette down.
3
3
3
3
3. Load a stack of paper into the paper cassette. Make sure to
load it with the printable surface up.
Note:
❏ Load paper after aligning the edges of the paper carefully.
❏ Do not load paper that exceeds the maximum stack height.
❏ To change the paper size loaded in the paper cassette, see
"Changing the paper size" on page 52 for instructions.
3
3
3
3
3
3
3
3
Paper Handling 51
Page 52

4. Reinsert the paper cassette.
Note:
After loading paper, set the LC Size setting to match the loaded
paper size on the control panel.
Changing the paper size
Follow the steps below to change the paper size loaded in the
paper cassette.
1. Pull out the paper cassette. If paper is loaded in the paper
cassette, remove it.
52 Paper Handling
Page 53

2. Push the tray in the paper cassette down.
3
3
3
3
3. Remove the three screws securing the tray in the paper
cassette.
3
3
3
3
3
3
3
3
Paper Handling 53
Page 54

4. Slide the three paper guides to fit the paper size that you want
to use.
5. Secure the three paper guides with the three screws.
54 Paper Handling
Page 55

6. Load the paper and reinsert the paper cassette.
3
3
3
3
Note:
After loading paper, set the LC Size setting to match the loaded
paper size on the control panel.
Output tray
The output tray is located on the top of the printer. Since printouts
are output face-down, this tray is also referred to as the face-down
tray. This tray can hold up to 250 sheets.
If the printouts do not stack well, open the extension on the output
tray.
3
3
3
3
3
3
3
3
Paper Handling 55
Page 56

Printing on Special Media
You can print on special media which include Epson paper such
as the following.
Note:
Since the quality of any particular brand or type of media may be changed
by the manufacturer at any time, Epson cannot guarantee the quality of
any type of media. Always test samples of media stock before purchasing
large quantities or printing large jobs.
EPSON Color Laser Paper
When loading EPSON Color Laser Paper, you should make paper
settings as shown below:
❏ Make settings on the Basic Settings in the printer driver.
Paper Size: A4
Paper Source: MP Tray (up to 150 sheets or up to
16.5 mm thick stack),
Lower Cassette (up to 500 sheets
or up to 55 mm thick stack)
Paper Type: Plain
❏ You can also make these settings on the Tray Menu in the
control panel. See "Tray Menu" on page 234.
56 Paper Handling
Page 57

EPSON Color Laser Transparencies
Epson recommends the use of EPSON Color Laser
Transparencies.
Note:
Duplex printing is not available for transparencies.
Transparencies can be loaded into the MP tray only. When using
transparencies, you should make paper settings as shown below:
❏ Make settings on the Basic Settings in the printer driver.
Paper Size: A4 or LT
Paper Source: MP Tray (up to 60 sheets)
Paper Type: Transparency
❏ You can also make these settings on the Tray Menu in the
control panel. See "Tray Menu" on page 234.
Please note the following when handling this media:
❏ Hold each sheet by its edges, as oil from your fingers may
transfer to the surface and damage the printable surface of the
sheet. The Epson logo appears on the printable side.
3
3
3
3
3
3
3
3
3
Paper Handling 57
3
3
3
Page 58

❏ When loading transparencies in the MP tray, insert the short
edge first as shown below.
❏ When using transparencies, load them in the MP tray and set
the Paper Type setting to Transparency in the printer driver.
❏ When the Paper Type setting in the printer driver is set to
Transparency, do not load any other type of paper except
transparencies.
❏ When printing transparencies, the printing speed is extremely
slow.
Caution:
Sheets that have just been printed on may be hot.
c
58 Paper Handling
Page 59

Envelopes
The print quality of envelopes may be irregular because different
parts of an envelope have different thicknesses. Print one or two
envelopes to check the print quality.
Caution:
Do not use window envelopes. The plastic on most window
c
envelopes will melt when it comes into contact with the fuser.
Note:
❏ Depending on the quality of envelopes, the printing environment,
or the printing procedure, envelopes might be wrinkled. Make a trial
print run before you print on a lot of envelopes.
❏ Duplex printing is not available for envelopes.
When loading envelopes, you should make paper settings as
shown below:
❏ Make settings on the Basic Settings in the printer driver.
Paper Size: IB5, C6, MON, C10, DL, or C5
Paper Source: MP Tray (up to 15 sheets, or a
stack up to 16.5 mm thick)
3
3
3
3
3
3
3
3
Paper Type: Normal
❏ You can also make these settings on the Tray Menu in the
control panel. See "Tray Menu" on page 234.
Please note the following when handling this media.
Paper Handling 59
3
3
3
3
Page 60

❏ When printing on envelopes, be sure to set the lever on the
fuser unit to the envelope position before loading the
envelopes. After printing envelopes, be sure to reset the lever
to the original position. Printing on media other than
envelopes when the lever is set to the envelope position may
cause poor print quality because the printer fails to fix toner
to the media. It also may cause paper jam and dirty printouts
because of the toner that adheres to the rollers inside the
printer. When this happens, reset the lever to the original
position and print blank pages until the printouts are clean.
Caution:
Be careful not to touch the fuser, which is marked CAUTION
c
HIGH TEMPERATURE, or the surrounding areas. If the
printer has been in use, the fuser and the surrounding areas
may be very hot. If you must touch one of these areas, open
cover A and B, then wait 30 minutes to allow the heat to
subside before doing so.
60 Paper Handling
Page 61

❏ Load envelopes with the short edge first as shown below.
3
3
3
3
❏ Do not use an envelope that has glue or tape on it.
Caution:
Make sure that the minimum size of envelopes meets the
c
following size requirements:
Height: 162 mm
Width: 98.43 mm
2
1
1. 98.43 mm
2. 162 mm
❏ When printing envelopes, the printing speed is extremely
slow.
1
2
3
3
3
3
3
3
3
3
Paper Handling 61
Page 62

Labels
You can load up to 16.5 mm thick stack of labels into the MP tray
at a time. However, you may need to feed some labels one sheet
at a time, or load them manually.
Note:
❏ Duplex printing is not available for labels.
❏ Depending on the quality of labels, the printing environment, or the
printing procedure, labels might be wrinkled. Make a trial print run
before you print on a lot of labels.
When loading labels, you should make paper settings as shown
below:
❏ Make settings on the Basic Settings in the printer driver.
Paper Size: A4 or LT
Paper Source: MP Tray (up to 50 sheets)
Paper Type: Labels
❏ You can also make these settings on the Tray Menu in the
control panel. See "Tray Menu" on page 234.
Note:
❏ You should only use labels designed for laser printers or plain-paper
copiers.
❏ To prevent the label adhesive from coming into contact with printer
parts, always use labels that completely cover the backing sheet, with
no gaps between the individual labels.
❏ Press a sheet of paper on top of each sheet of labels. If the paper sticks,
do not use those labels in your printer.
62 Paper Handling
Page 63

❏ You may have to make the setting Thick for Paper Type in the
Setup Menu.
❏ When printing labels, the printing speed is extremely slow.
Thick paper
3
3
You can load thick paper (91 to 163 g/m²).
When loading thick you should make paper settings as shown
below:
❏ Make settings on the Basic Settings in the printer driver.
Paper Size: A4, A5, B5, LT, HLT, EXE, GLT
Paper Source: MP Tray (up to 75 sheets)
Paper Type: Thick
Note:
When using thick paper, you cannot do duplex printing
automatically. When you want to do duplex printing with thick
paper, set the Paper Type setting on printer driver to Thick (Back),
then do duplex printing manually. When you use thick paper that
has been printed on previously, straighten any curled parts before
loading it.
❏ You can also make these settings on the Tray Menu in the
control panel. See "Tray Menu" on page 234.
3
3
3
3
3
3
3
3
❏ When you use EPSON Color Laser Coated Paper, make the
settings as thick paper.
❏ When printing thick paper, the printing speed is extremely
slow.
Paper Handling 63
3
3
Page 64

Loading a custom paper size
You can load non-standard size paper (98 × 148 mm to 216 × 297
mm) into the MP tray as long as it meets the following size
requirements:
When loading a custom paper size, you should make paper
settings as shown below:
❏ Make settings on the Basic Settings in the printer driver.
Paper Size: User Defined Size
Paper Source: MP Tray (up to 16.5 mm thick
stack)
Paper Type: Plain or Thick
Note:
❏ For Windows, access the printer driver, then select
User-Defined Size from the Paper Size list on the Basic
Settings tab. In the User Defined Paper Size dialog box, adjust
the Paper Width, Paper Length, and Unit settings to match
your custom paper. Then click OK and your custom paper size
will be saved.
❏ For Macintosh, access the printer driver, click Custom Size in
the Paper Setting dialog box. Then click New, adjust the Paper
Width, Paper Length, and Margin settings to match your
custom paper. Then enter the setting’s name, and click OK to
save your custom paper size.
❏ You can also make these settings on the Tray Menu in the
control panel. See "Tray Menu" on page 234.
❏ If you cannot use the printer driver as explained above, make
this setting at the printer by accessing the control panel’s
Printing Menu and selecting CTM (custom) as the Page Size
setting.
64 Paper Handling
Page 65

Chapter 4
Using the Printer Software with Windows
About the Printer Software
The printer driver lets you choose from a wide variety of settings
to get the best results from your printer. The printer driver also
includes EPSON Status Monitor 3, which is accessed through the
Optional Settings menu. EPSON Status Monitor 3 lets you check
the status of your printer.
See "Monitoring Your Printer Using EPSON Status Monitor 3" on
page 108 for more information.
Accessing the printer driver
You can access the printer driver directly from any application
programs, from your Windows operating system.
The printer settings made from many Windows applications
override the setting made when the printer driver is accessed
from the operating system, so you should access the printer driver
from your application to make sure that you get the result you
want.
4
4
4
4
4
4
4
4
4
From the application
To access the printer driver, click the Print or Page Setup from
the File menu. You also need to click Setup, Options, Properties,
or a combination of these buttons.
Using the Printer Software with Windows 65
4
4
4
Page 66

Windows XP or Server 2003 users
To access the printer driver, click Start, click Printers and Faxes,
then click Printers. Right-click your printer’s icon, then click
Printing Preferences.
Windows Me or 98 users
To access the printer driver, click Start, point to Settings, then
click Printers. Right-click your printer’s icon, then click
Properties.
Windows 2000 users
To access the printer driver, click Start, point to Settings, then
click Printers. Right-click your printer’s icon, then click Printing
Preferences.
Windows NT4.0 users
To access the printer driver, click Start, point to Settings, then
click Printers. Right-click your printer’s icon, then click
Document Defaults.
Note:
The printer driver’s online help provides details on printer driver
settings.
66 Using the Printer Software with Windows
Page 67

Making Changes to Printer Settings
4
Making the print quality settings
You can change the print quality of printouts through settings in
the printer driver. With the printer driver, you can make the print
settings by choosing from a list of predefined settings, or
customizing the settings.
Choosing the print quality by using the Automatic setting
You can change the print quality of printouts to favor speed or
detail. There are five quality modes for the color printing mode
and three for the monochrome printing mode.
When Automatic is selected in the Basic Settings menu, the
printer driver takes care of all detailed settings according to the
color setting you select. Print quality and color are the only
settings you have to make. You can change other settings such as
paper size or orientation in most applications.
Note:
The printer driver’s online help provides details on printer driver
settings.
1. Click the Basic Settings tab.
4
4
4
4
4
4
4
4
Using the Printer Software with Windows 67
4
4
4
Page 68

2. Click Automatic, then choose desired printing quality.
3. Click OK to apply the settings.
The printer driver provides the following quality modes.
Color
Draft, Text, Text&Image, Web, Photo
Monochrome
Draft, Text&Image, Photo
Note:
If printing is unsuccessful or a memory-related error message appears,
selecting a different print quality may allow printing to proceed.
68 Using the Printer Software with Windows
Page 69

Using the predefined settings
The predefined settings are provided to help you optimize print
settings for a particular kind of printout, such as presentation
documents or images taken by a video or digital camera.
Follow the steps below to use the predefined settings.
1. Click the Basic Settings tab.
2. Select Advanced. You will find the predefined settings in
the list below of Automatic.
4
4
4
4
4
4
4
4
Note:
This screen may vary depending on your operating system version.
3. Select the most appropriate setting from the list according to
the type of document or image you want to print.
Using the Printer Software with Windows 69
4
4
4
4
Page 70

When you choose a predefined setting, other settings such as
Printing Mode, Resolution, Screen, and Color Management are
set automatically. Changes are shown in the current settings list
on the Setting Information dialog box that appears by pressing
the Setting Info. button on the Optional Settings menu.
This printer driver provides the following predefined settings:
Draft
Suitable for printing inexpensive drafts.
Text
Suitable for printing documents that include mainly text.
Text & Image
Suitable for printing documents that include text and images.
Photo
Suitable for printing photos.
Web
Suitable for printing web screens that include many icons,
symbols, and colored text. This setting is effective for screens that
include full color 24 or 36 bit images. It is not effective for screens
that include only illustrations, graphs, and text, and do not
include any images.
Text/Graph
Suitable for printing documents that include text and graphs,
such as presentation documents.
70 Using the Printer Software with Windows
Page 71

Graphic/CAD
Suitable for printing graphics and charts.
PhotoEnhance
Suitable for printing video captures, images taken with a digital
camera, or scanned images. EPSON PhotoEnhance4
automatically adjusts the contrast, saturation, and brightness of
the original image data to produce sharper, more vivid color
printouts. This setting does not affect your original image data.
ICM (Except for Windows NT 4.0)
ICM stands for Image Color Matching. This feature automatically
adjusts printout colors to match colors on your screen.
sRGB
When using equipment which supports sRGB, the printer
performs Image Color Matching with these pieces of equipment
before printing. To confirm that your equipment supports sRGB,
contact your equipment dealer.
Advanced Text/Graph
4
4
4
4
4
4
4
4
Suitable for printing high-quality presentation documents that
include text and graphs.
Advanced Graphic/CAD
Suitable for printing high-quality graphs, charts, and photos.
Advanced Photo
Suitable for printing high-quality scanned photos and
digitally-captured images.
Using the Printer Software with Windows 71
4
4
4
4
Page 72

Customizing print settings
If you need to change detailed settings, make the settings
manually.
Follow the steps below to customize your print settings.
1. Click the Basic Settings tab.
2. Click Advanced, then click More Settings.
3. Choose Color or Black as the Color setting, then choose
desired printing resolution with the Resolution slider bar.
Note:
❏ This screen may vary depending on your operating system
version.
❏ When making the other settings, see online help for details on
each setting.
72 Using the Printer Software with Windows
Page 73

❏ The Web Smoothing check box is not available when
PhotoEnhance is selected. Note this setting is effective for
screens that include full color 24 or 36 bit images. It is not
effective for screens that include only illustrations, graphs, and
text, and do not include any images.
4. Click OK to apply the settings and return to the Basic Settings
menu.
Saving your settings
4
4
4
To save your custom settings, click Advanced, then click Save
Settings on the Basic Settings menu. The Custom Settings dialog
box appears.
Type a name f or your custom settings in t he Name box, then click
Save. Your settings will appear in the list to the right of
Automatic in the Basic Settings menu.
Note:
❏ You cannot use a predefined setting name for your custom settings.
4
4
4
4
4
4
4
4
❏ To delete a custom setting, click Advanced, click Save Settings
in the Basic Settings menu, select the setting in the Custom Settings
dialog box, then click Delete.
Using the Printer Software with Windows 73
4
Page 74

❏ You cannot delete predefined settings.
If you change any setting in the More Settings dialog box when
one of your custom settings is selected in the Advanced Settings
list on the Basic Settings menu, the setting selected in the list
changes to Custom Settings. The custom setting that was
previously selected is not affected by this change. To return to
your custom setting, simply reselect it from the current settings
list.
Resizing printouts
You can have your document enlarged or reduced during
printing.
To automatically resize pages to fit the output paper
1. Click the Advanced Layout tab.
74 Using the Printer Software with Windows
Page 75

2. Select the Zoom Options check box, then select the desired
paper size from the Output Paper drop-down list. The page
will be printed to fit on the paper you have selected.
4
4
4
4
4
4
4
3. Select Upper Left (to print reduced page image at upper left
corner of the paper) or Center (to print reduced page image
with centering) for Location setting.
4. Click OK to apply the settings.
Using the Printer Software with Windows 75
4
4
4
4
4
Page 76

Resizing pages by a specified percentage
1. Click the Advanced Layout tab.
2. Select the Zoom Options check box.
3. Select the Zoom To check box, then specify the magnification
percentage in the box.
Note:
The percentage can be set between 50% and 200% in 1%
increments.
4. Click OK to apply the settings.
If necessary, select the paper size to be printed from the Output
Paper drop-down list.
76 Using the Printer Software with Windows
Page 77

Modifying the print layout
Your printer can print either two or four pages onto a single page
and specifies the printing order, automatically resizing each page
to fit the specified paper size. You can also choose to print
documents surrounded by a frame.
1. Click the Advanced Layout tab.
2. Select the Print Layout check box and the number of pages
you want to print on one sheet of paper. Then click More
Settings. The Print Layout Settings dialog box appears.
4
4
4
4
4
4
4
4
Using the Printer Software with Windows 77
4
4
4
4
Page 78

3. Select the Page Order in which the pages are printed on each
sheet.
4. Select the Print the Frame check box when you want to print
the pages surrounded by a frame.
Note:
The Page Order choices depend on the number of pages selected
above, and the paper orientation (Portrait or Landscape) selected on
the Basic Settings menu.
5. Click OK to apply the settings and return to the Layout menu.
78 Using the Printer Software with Windows
Page 79

Using a watermark
Follow the steps below to use a watermark on your document. In
the Advanced Layout tab or Watermark dialog box, you can
select from a list of predefined watermarks, or you can make an
original watermark with text or a bitmap. The Watermark dialog
box also allows you to make a variety of detailed watermark
settings. For example, you can select the size, intensity, and
position of your watermark.
1. Click the Advanced Layout tab.
2. Select a watermark that you want to use from the Watermark
drop-down list. If you want to make detailed settings, click
Watermark Settings. The Watermark dialog box appears.
4
4
4
4
4
4
4
4
Using the Printer Software with Windows 79
4
4
4
4
Page 80

3. Select the color from the Color drop-down list, then adjust the
image intensity of the watermark with the Intensity slider bar.
4. Select Front (to print the watermark in the foreground of the
document) or Back (to print the watermark in the
background of the document) for the Position setting.
5. Select the location on the page where you want to print the
watermark from the Location drop-down list.
6. Adjust the X (horizontal) or Y (vertical) Offset position.
7. Adjust the size of the watermark with the Size slider bar.
8. Click OK to apply the settings and return to the Special menu.
80 Using the Printer Software with Windows
Page 81

Making a new watermark
You can make a new watermark as follows:
1. Click the Advanced Layout tab.
2. Click New/Delete. The User Defined Watermarks dialog box
appears.
Note:
The User Defined Watermarks dialog box also appears by clicking
New/Delete in the Watermark dialog box.
3. Select Text or BMP and type a name for the new watermark
in the Name box.
4
4
4
4
4
4
4
4
Note:
This screen appears when you select Text.
4. If you select Text, type the watermark text in the Text box. If
you select BMP, click Browse, select the BMP file you want to
use, then click OK.
Using the Printer Software with Windows 81
4
4
4
4
Page 82

5. Click Save. Your watermark will appear in the List box.
6. Click OK to apply the new watermark settings.
Note:
You can register up to 10 watermarks.
Using an overlay
The Overlay Settings dialog box allows you to prepare standard
forms, or templates, that you can use as overlays when printing
other documents. This feature can be useful for creating corporate
letterheads or invoices.
Note:
The overlay function is available only when High Quality (Printer) is
selected for the Printing Mode in the Extended Settings dialog box from
the Optional Settings menu.
Creating an overlay
Follow the steps below to create and save a form overlay file.
1. Open your application and create the file that you want to use
as an overlay.
2. When the file is ready to be saved as an overlay, choose Print
or Print Setup from the File menu of your application, then
click Printer, Setup, Options, Properties, or a combination of
these buttons, depending on your application.
3. Click the Advanced Layout tab.
82 Using the Printer Software with Windows
Page 83

4. Select the Form Overlay check box, then click Overlay
Settings. The Overlay Settings dialog box appears.
4
4
4
4
4
4
4
Using the Printer Software with Windows 83
4
4
4
4
4
Page 84

5. Select Create Overlay Data, then click Settings. The Form
Settings dialog box appears.
6. Select the Use Form Name check box, then click Add Form
Name. The Add Form dialog box appears.
84 Using the Printer Software with Windows
Page 85

Note:
If the Assign to Paper Source check box is selected, the form
name is displayed in the Paper Source drop-down list on the Basic
Settings tab.
4
7. Type the form name in the Form Name box and its description
in the Description box.
8. Select To Front or To Back to specify whether the overlay will
be printed as background or foreground of the document.
9. Click Register to apply the settings and return to Form
settings dialog box.
10. Click OK in the Form Settings dialog box.
4
4
4
4
4
4
4
4
4
11. Click OK in the Overlay Settings dialog box.
12. Print the file saved as overlay data. It is possible to save any
kind of file as an overlay. The overlay data is created.
Using the Printer Software with Windows 85
4
4
Page 86

Printing with an overlay
Follow the steps below to print a document with overlay data.
1. Open the file to print with overlay data.
2. From the application, access the printer driver. Open the File
menu, choose Print or Print Setup, then click Printer, Setup,
Options, Properties, or a combination of these buttons,
depending on your application.
3. Click the Advanced Layout tab.
4. Select the Form Overlay check box, and click Overlay
Settings to open the Overlay Settings dialog box.
5. Choose the form from the Form drop-down list, then click OK
to return the Advanced Layout menu.
86 Using the Printer Software with Windows
Page 87

Note:
If the Assign to Paper Source check box is selected, the form
name is displayed in the Paper Source drop-down list on the Basic
Settings tab. You can also select the form without accessing the
dialog box above.
6. Click OK to print the data.
4
4
Different printer settings overlay data
The overlay data is made with the current printer settings (such
as Orientation:Portrait). If you want to make the same overlay
with different printer settings (such as Landscape), follow the
instructions below.
1. Re-access the printer driver as described in step 2 in "Creating
an overlay" on page 82.
2. Make the printer settings and exit the printer driver.
3. Send the same data that you made by application to the
printer like step 12 in "Creating an overlay" on page 82.
This setting is available only for Form Name data.
Using HDD form overlay
This function enables faster printing with form overlay data.
Windows users can use the form data registered on the optional
Hard Disk Drive installed in the printer though only an
administrator can register or delete the form data on the Hard
Disk Drive. You can access this function from the Form Selection
dialog box in the printer driver.
4
4
4
4
4
4
4
4
4
Note:
❏ This function is not available if the optional Hard Disk Drive is not
installed.
Using the Printer Software with Windows 87
4
Page 88

❏ When the document’s resolution, paper size or paper orientation
settings are different from the form overlay data that you use, you
cannot print the document with the form overlay data.
❏ This function is available in the High Quality (Printer) mode.
Register the form overlay data on the Hard Disk Drive
Only a network administrator using Windows XP, 2000, NT 4.0,
or Server 2003 is allowed to register the form overlay data on the
optional Hard Disk Drive, using the following steps.
Note:
❏ The form name must use only the characters shown below. A - Z, a
- z, 0 - 9, and ! ’ ) ( - _ %
❏ If you are using the color printer driver, monochrome form overlay
data created in the black mode is not displayed.
1. Prepare the form overlay data to register on the local PC Hard
Disk Drive.
2. Log in to Windows XP, 2000, NT 4.0, or Server 2003 as an
administrator.
3. For Windows 2000 or NT 4.0, click Start, point to Settings,
and then click Printers.
For Windows XP or Server 2003, click Start, point to Control
Panel, and then double-click the Printers and Faxes icon.
4. Right-click the EPSON AL-C2600 Advanced or EPSON
AL-2600 Advanced icon and then click Properties.
5. Click the Optional Settings tab.
6. Click Register. The Register to HDD dialog box appears.
88 Using the Printer Software with Windows
Page 89

7. Select the form name from the Form Names list, and then click
Register.
Note:
Only form names that can be registered appear on the Form Name
list.
4
4
4
4
4
4
8. If you plan to distribute the form list to the clients, click Print
List to print the list.
9. Click Back to close the Register to HDD dialog box.
10. Click OK to close the window.
Using the Printer Software with Windows 89
4
4
4
4
4
4
Page 90

Printing with HDD form overlay
All Windows users can use the registered form data on the
optional Hard Disk Drive. Follow the steps below to print with
HDD form data.
1. Click the Advanced Layout tab.
2. Select the Form Overlay check box, and click Overlay
Settings. The Overlay Settings dialog box appears.
3. Select No Form name in the Form drop-down list, and click
Details. The Form Selection dialog box appears.
Note:
Make sure that No Form name is selected. If any form name is
selected, another dialog box will appear.
4. Click Printer’s HDD. Type the form name in the text box, or
click Browse and select the registered form name if the printer
is connected through a network.
90 Using the Printer Software with Windows
Page 91

Note:
❏ If you need the list of the registered form data, click Print List to
print it and confirm the form name.
Also, if you need a sample print-out of the form data, enter the
form name, then click Print Sample.
❏ You can view thumbnails of the forms using a Web browser by
clicking the Thumbnail button if the printer is connected
through a network and the Java Runtime Environment has been
installed.
4
4
4
5. Select To Front or To Back to print the form data as
background or foreground of the document, then click OK to
return to the Advanced Layout tab.
6. Click OK to print data.
Delete the form overlay data on the Hard Disk Drive
Only a network administrator using Windows XP, 2000, NT 4.0,
or Server 2003 is allowed to delete or edit the form overlay data
on the optional Hard Disk Drive, using the following steps.
1. Log in to Windows XP, 2000, NT 4.0, or Server 2003 as an
administrator.
2. For Windows 2000 or NT 4.0, click Start, point to Settings,
and then click Printers.
For Windows XP or Server 2003, click Start, point to Control
Panel, and then double-click the Printers and Faxes icon.
3. Right-click the EPSON AL-C2600 Advanced or EPSON
AL-2600 Advanced icon and then click Properties.
4. Click the Optional Settings tab.
4
4
4
4
4
4
4
4
5. Click Delete. The Delete from HDD dialog box appears.
Using the Printer Software with Windows 91
4
Page 92

6. If you delete all form data, click the All button, then click
Delete. If you want to delete some specific data, click the
Selected button, enter the form name in the Form Name edit
box, then click Delete.
Note:
❏ If you need the list of the registered form data, click Print List to
print it and confirm the form name. Also, if you need a sample
print-out of the form data, enter the form name and click the
Print Sample button.
❏ You can use the Browse button if the printer is connected
through a network. Form names registered to the HDD are
displayed by clicking the Browse button.
7. Click Back.
8. Click OK to close the dialog box.
92 Using the Printer Software with Windows
Page 93

Duplex printing
Duplex printing prints on both sides of the paper. When printing
for binding, the binding edge can be specified as required to
produce the desired page order.
As an ENERGY STAR
the double-sided printing function. Refer to ENERGY STAR
Compliance for more information on the ENERGY STAR
program.
Printing with the Duplex Unit
Follow the steps below to print with the Duplex Unit.
1. Click the Basic Settings tab.
2. Select the Duplex check box, then select Left, Top, or Right as
the Binding position.
®
partner, Epson recommends the use of
4
4
®
®
4
4
4
4
4
4
Using the Printer Software with Windows 93
4
4
4
4
Page 94

3. Click Duplex Settings to open the Duplex Settings dialog box.
4. Specify the Binding Margin for the front and back sides of the
paper, then select whether the front or back side of the paper
is to be printed as the Start Page.
5. When printing for binding as a booklet, select the Binding
Method check box and make appropriate settings. For details
about each setting, see online help.
6. Click OK to apply the settings and return to the Basic Settings
tab.
94 Using the Printer Software with Windows
Page 95

Making Extended Settings
You can make various settings in the Extended Settings dialog
box. To open the dialog box, click Extended Settings on the
Optional Settings menu.
Printing mode: High Quality (PC):
Print True Type fonts as
bitmap check box:
Print True Type fonts with
substitution check box:
Select this mode if you use a computer
with higher specs to reduce the printer
load.
In this mode, functions such as “Form
Overlay,” and “Print true type with fonts
with substitution” cannot be used.
High Quality (Printer):
Select this mode if you use a computer
with lower specs to reduce the PC load.
CRT:
Select this mode if your printing results
are not as good as you wish with “High
Quality (PC)” or “High Quality (Printer).”
In this mode, functions such as
“PhotoEnhance4,” “Print Layout,”
“Binding Met hod,” “Watermark,” “Fo rm
Overlay” and “Print true type with fonts
with substitution” cannot be used.
Select this check box to print, as
bitmap, the True Type fonts that are
not substituted with device fonts in the
document.
Select this check box to print the True
Type fonts in the document as device
fonts. This function is not available
when the Graphic Mode setting is set
to High Quality (PC).
4
4
4
4
4
4
4
4
4
4
Setting button: Click this button to open the Font
Uses the settings specified
on the printer check box:
Using the Printer Software with Windows 95
Substitution dialog box. This button is
available when Print True Type fonts
with substitution is selected.
Select this check box to use the Offset,
the Skip blank page, and Ignore the
selected paper size settings on the
control panel.
4
4
Page 96

Uses the settings specified
on the driver check box:
Offset Makes fine adjustments to the printing
Select this check box to use the Offset,
the Skip blank page, and Ignore the
selected paper size settings in the
printer driver.
position on the front and the back of
data on a page in 0.5 mm i ncrements.
Skip Blank Page check box: When you select this check box, the
Ignore the selected paper
size check box:
Automatically change to
monochrome mode check
box:
High Speed Graphics
Output check box:
Uses the collate settings
specified in the application
check box:
Uses the spooling method
provided by the operating
system check box:
Default button: Click this button to return the driver
printer skips blank pages.
When you select this check box, the
printer prints on loaded paper,
regardless of size.
Select this check box to have the
printer driver analyze the printing data,
and automatically switch to
monochrome mode if the printing
data is black and white.
Select this check box to optimize the
printing speed of graphics composed
of line drawings such as overlaid
circles and squares.
Clear this check box if graphics do not
print correctly.
Select this check box to enable the
collate settings that are specified on
the application.
Select this check box to enable the
Spool function for Windows XP, 2000,
Server 2003, or NT 4.0.
settings to the initial settings.
Help button: Click this button to open online help.
Cancel button: Click this button to exit the dialog box
OK button: Click this button to save the settings
or printer driver without saving the
settings.
and to exit the dialog box or printer
driver.
96 Using the Printer Software with Windows
Page 97

Making Optional Settings
You can update the installed option information manually if you
have installed options to your printer.
1. Click the Optional Settings tab, then select Update the
Printer Option Info Manually.
2. Click Settings. The Optional Settings dialog box appears.
3. Make settings for each installed option, then click OK.
Printing a status sheet
To confirm the current status of the printer, print a status sheet
from the printer driver. The status sheet contains information
about the printer, the current settings.
Follow the steps below to print a status sheet.
1. Access the printer driver.
2. Click the Optional Settings tab and then click Status Sheet.
The printer starts printing a status sheet.
4
4
4
4
4
4
4
4
Using the Printer Software with Windows 97
4
4
4
4
Page 98

Ordering Consumables
To order consumables online, click the Order Online button on
the Basic Settings tab. See "Order Online" on page 116 for details.
98 Using the Printer Software with Windows
Page 99

Note:
The amount of toners remaining and the expected service life of the
photoconductor are displayed on the Basic Settings tab when EPSON
Status Monitor 3 is installed. You can set the interval of the remaining
consumables on the Consumables Info Settings dialog box that appears
by clicking the Consumables Info Settings button on the Optional
Settings tab.
4
4
4
4
4
4
4
Using the Printer Software with Windows 99
4
4
4
4
4
Page 100

Using the Reserve Job Function
The Reserve Job function allows you to store print jobs on the
printer’s Hard Disk Drive and to print them later directly from
the printer’s control panel. Follow the instructions in this section
to use the Reserve Job function.
Note:
You need an optional Hard Disk Drive installed in your printer in order
to use the Reserve Job function. Make sure that the drive is correctly
recognized by the printer driver before you start using the Reserve Job
function.
The table below gives an overview of the Reserve Job options.
Each option is described in detail later in this section.
Reserve Job Option Description
Re-Print Job Lets you print the job now and store it for later
Verify Job Lets you print one copy now to verify the content
Stored Job Lets you save the print job without printing it now.
Confidential Job Lets you apply a password to the print job and
reprinting.
before printing multiple copies.
save it for later printing.
Jobs stored on the Hard Disk Drive are handled differently
depending on the Reserve Job option. Refer to the tables below
for details.
100 Using the Printer Software with Windows
 Loading...