

Page 1

EPSON
RODUCT SUPPORT BULLETIN
P
Date:
PSB #:
Reference:
Product(s):
Subject:
This bulletin was created to inform you of a firmware update required for the EpsonNet 802.11b
Wireless Print Server.
Reasons:
If any existing OS X system is updated to version 10.2.3, the Epson Stylus Photo 2200 printer
cannot be found in the Apple Print Center.
Recommendations:
Verify the current version of the firmware on the Print Server. If the version is 3.96 or lower,
update the firmware to 3.99 using the instructions listed below.
How to verify the firmware version:
Print a status sheet from the print server. On the third line of the status sheet the firmware
version will be listed as follows:
04/23/2003
PSB.2003.05.007
N/A
Epson Stylus Photo 2200 printer and 802.11b Wireless Print Server
Stylus Photo 2200 printer not available in OS X Print Center
Originator:
Authorization:
Total Pages:
JAM
2
FW Ver. WLES-
File location:
The firmware update file, epson10651.sea.hqx, and this bulletin are posted on the
Epson website; http://www.epson.com.
3.96
(2002.06.05)
Page 1 of 2
Page 2

Updating the firmware:
1.) Configure the Mac and the print server for TCP/IP.
2.) Download/copy the “
WLEP399.bin”
firmware file from the epson10651.sea.hqx to
the Apple Desktop.
3.) Navigate to
Macintosh HD>Applications>Utilities>Terminal
4.) At the terminal screen do the following:
1. Type
2. Type tftp <
3. At the tftp> prompt, type
4. At the tftp> prompt, type
*Where
cd desktop
ipaddress*
ipaddress
then press the RETURN key
of the print server> then press the RETURN key
binary
put <WLEP399.bin**
then press the RETURN key
> then press the RETURN key
is the IP address of the Wireless print server. Examples
135.79.2.468 or 10.0.1.3
**Where
5. You will get a messa ge on the screen, at the
WLEP399.bin
is the filename of the 3.99 firmware update.
TFTP>
prompt, that a number of bytes
were sent. This means the update is complete.
5.) Next, go to the print server and perform a reset, then launch WP-Admin again to setup the
print server. At WP-Admin in the search screen, click on
CLEAR,
then click on
START
for
the print server to reappear. Finish the print server configuration, then Quit WP-ADMIN.
Search for the printer:
Once the update is complete, open the Print Center.
Select ADD Printer and choose Epson AppleTalk. This will allow you to select the Stylus
Photo 2200 printer.
Page 2 of 2
Page 3

EPSON
RODUCT SUPPORT BULLETIN
P
Date:
PSB #:
Reference:
Product(s):
Subject:
This bulletin was created to inform you of a firmware update required for the EpsonNet 802.11b
Wireless Print Server.
Reasons:
If any existing OS X system is updated to version 10.2.3, the Epson Stylus Photo 2200 printer
cannot be found in the Apple Print Center.
Recommendations:
Verify the current version of the firmware on the Print Server. If the version is 3.96 or lower,
update the firmware to 3.99 using the instructions listed below.
How to verify the firmware version:
Print a status sheet from the print server. On the third line of the status sheet the firmware
version will be listed as follows:
04/23/2003
PSB.2003.05.007
N/A
Epson Stylus Photo 2200 printer and 802.11b Wireless Print Server
Stylus Photo 2200 printer not available in OS X Print Center
Originator:
Authorization:
Total Pages:
JAM
2
FW Ver. WLES-
File location:
The firmware update file, epson10651.sea.hqx, and this bulletin are posted on the
Epson website; http://www.epson.com.
3.96
(2002.06.05)
Page 1 of 2
Page 4

Updating the firmware:
1.) Configure the Mac and the print server for TCP/IP.
2.) Download/copy the “
WLEP399.bin”
firmware file from the epson10651.sea.hqx to
the Apple Desktop.
3.) Navigate to
Macintosh HD>Applications>Utilities>Terminal
4.) At the terminal screen do the following:
1. Type
2. Type tftp <
3. At the tftp> prompt, type
4. At the tftp> prompt, type
*Where
cd desktop
ipaddress*
ipaddress
then press the RETURN key
of the print server> then press the RETURN key
binary
put <WLEP399.bin**
then press the RETURN key
> then press the RETURN key
is the IP address of the Wireless print server. Examples
135.79.2.468 or 10.0.1.3
**Where
5. You will get a messa ge on the screen, at the
WLEP399.bin
is the filename of the 3.99 firmware update.
TFTP>
prompt, that a number of bytes
were sent. This means the update is complete.
5.) Next, go to the print server and perform a reset, then launch WP-Admin again to setup the
print server. At WP-Admin in the search screen, click on
CLEAR,
then click on
START
for
the print server to reappear. Finish the print server configuration, then Quit WP-ADMIN.
Search for the printer:
Once the update is complete, open the Print Center.
Select ADD Printer and choose Epson AppleTalk. This will allow you to select the Stylus
Photo 2200 printer.
Page 2 of 2
Page 5

EPSON
RODUCT SUPPORT BULLETIN
P
Date:
PSB #:
Reference:
Product(s):
Subject:
This bulletin was created to inform you of the procedural steps used to update the EpsonNet
802.11b Wireless Print Server firmware using the OS X Terminal Utility.
Procedure:
1.) Configure the Macintosh and the EpsonNet 802.11b Wireless Print Server for TCP/IP.
2.) Download/copy the “WLEP399.bin” firmware file to the Desktop.
3.) Navigate to Macintosh HD>Applications>Utilities>Terminal, and launch the T e rminal
Utility program.
4.) At the Terminal program screen do the following:
Type cd desktop, press RETURN
4/30/2003
PSB.2003.05.005
N/A
EpsonNet 802.11b Wireless Print Server
OS X Procedure for Updating the Firmware
Originator:
Authorization:
Total Pages:
DS
6
Page 1 of 6
Page 6
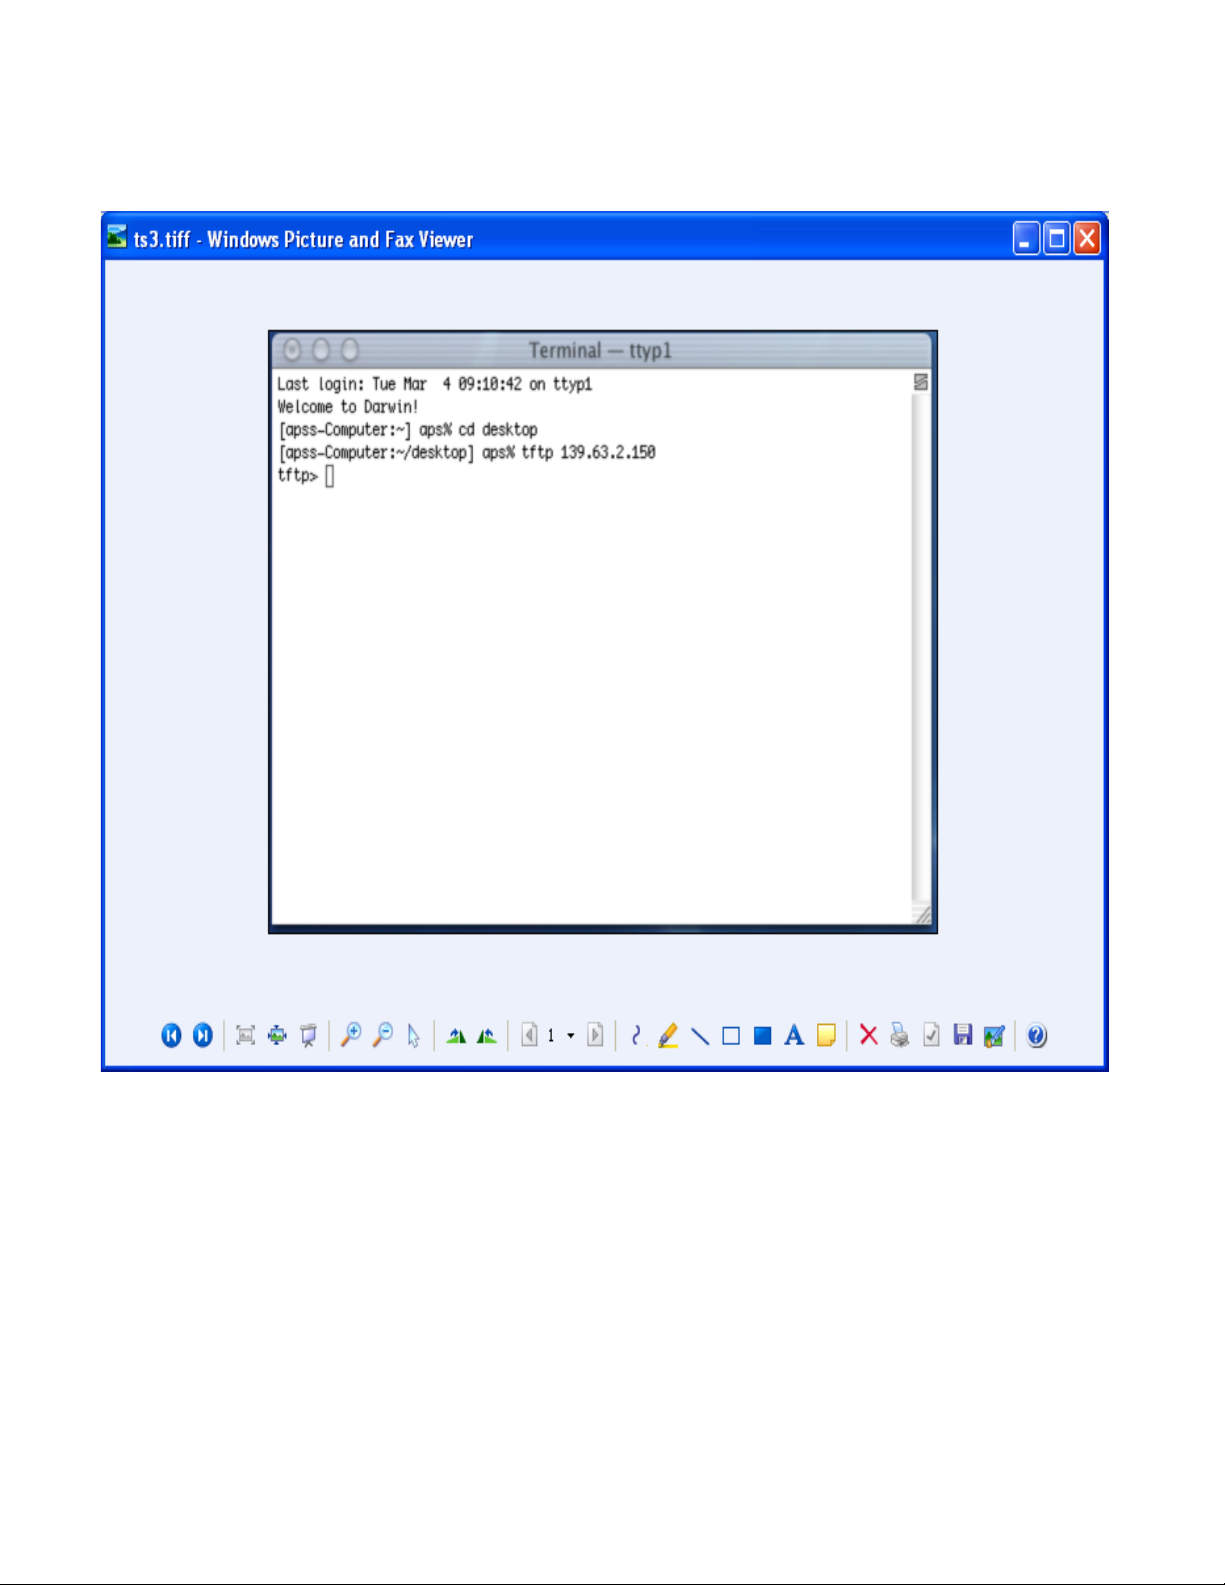
TYPE: tftp <enter the IP address of the print server> then press RETURN
Example: tftp 139.63.2.150, then press the RETURN key.
Page 2 of 6
Page 7

At the tftp> prompt type the word binary, then press RETURN
Example: tftp> binary, then press the RETURN key.
Page 3 of 6
Page 8

At the tftp> prompt type put <WLEP399.bin file name> then press RETURN
Example: tftp> put WLEP399.bin, then press the RET URN key.
Page 4 of 6
Page 9

During the update process, you will see a message on the screen at the TFTP prompt that a
number of bytes were sent. This means the update is complete.
Note: If a timeout error occurs do the following:
Check your TCP/IP settings
Cycle the power of the print server
Run WP-Admin, click CLEAR then click START
Check the TCP/IP settings in the Configuration page of the print server, save the settings then
Quit.
Rerun step 4.
5. Next, go to the print server and perform a reset, then launch WP-Admin again to setup the
print server.
6. At WP-Admin in the search screen, click on CLEAR first, then click on START for the print
server to reappear.
Page 5 of 6
Page 10

7. Open the configuration page and confirm the settings are correct, change if necessary.
8. Print the Configuration page. Click on the WP-Admin drop down menu at the top of the page
and select TEST PAGE or PRINT.
9. Save, then Quit WP-Admin.
Page 6 of 6
 Loading...