

Page 1
Operator’s Guide
This guide contains selected information on how to use the
printer and frequently used features of the printer.
See the User’s Guide (online manual) for detailed instructions
on using the printer.
Home Screen Operations ....................................... 2
Getting Ready to Print ............................................. 4
Printing CAD Drawings ...........................................6
Printing Banners ........................................................ 8
Printing at Non-Standard Sizes ............................10
Printing Outside the Oce .................................... 12
Page 2
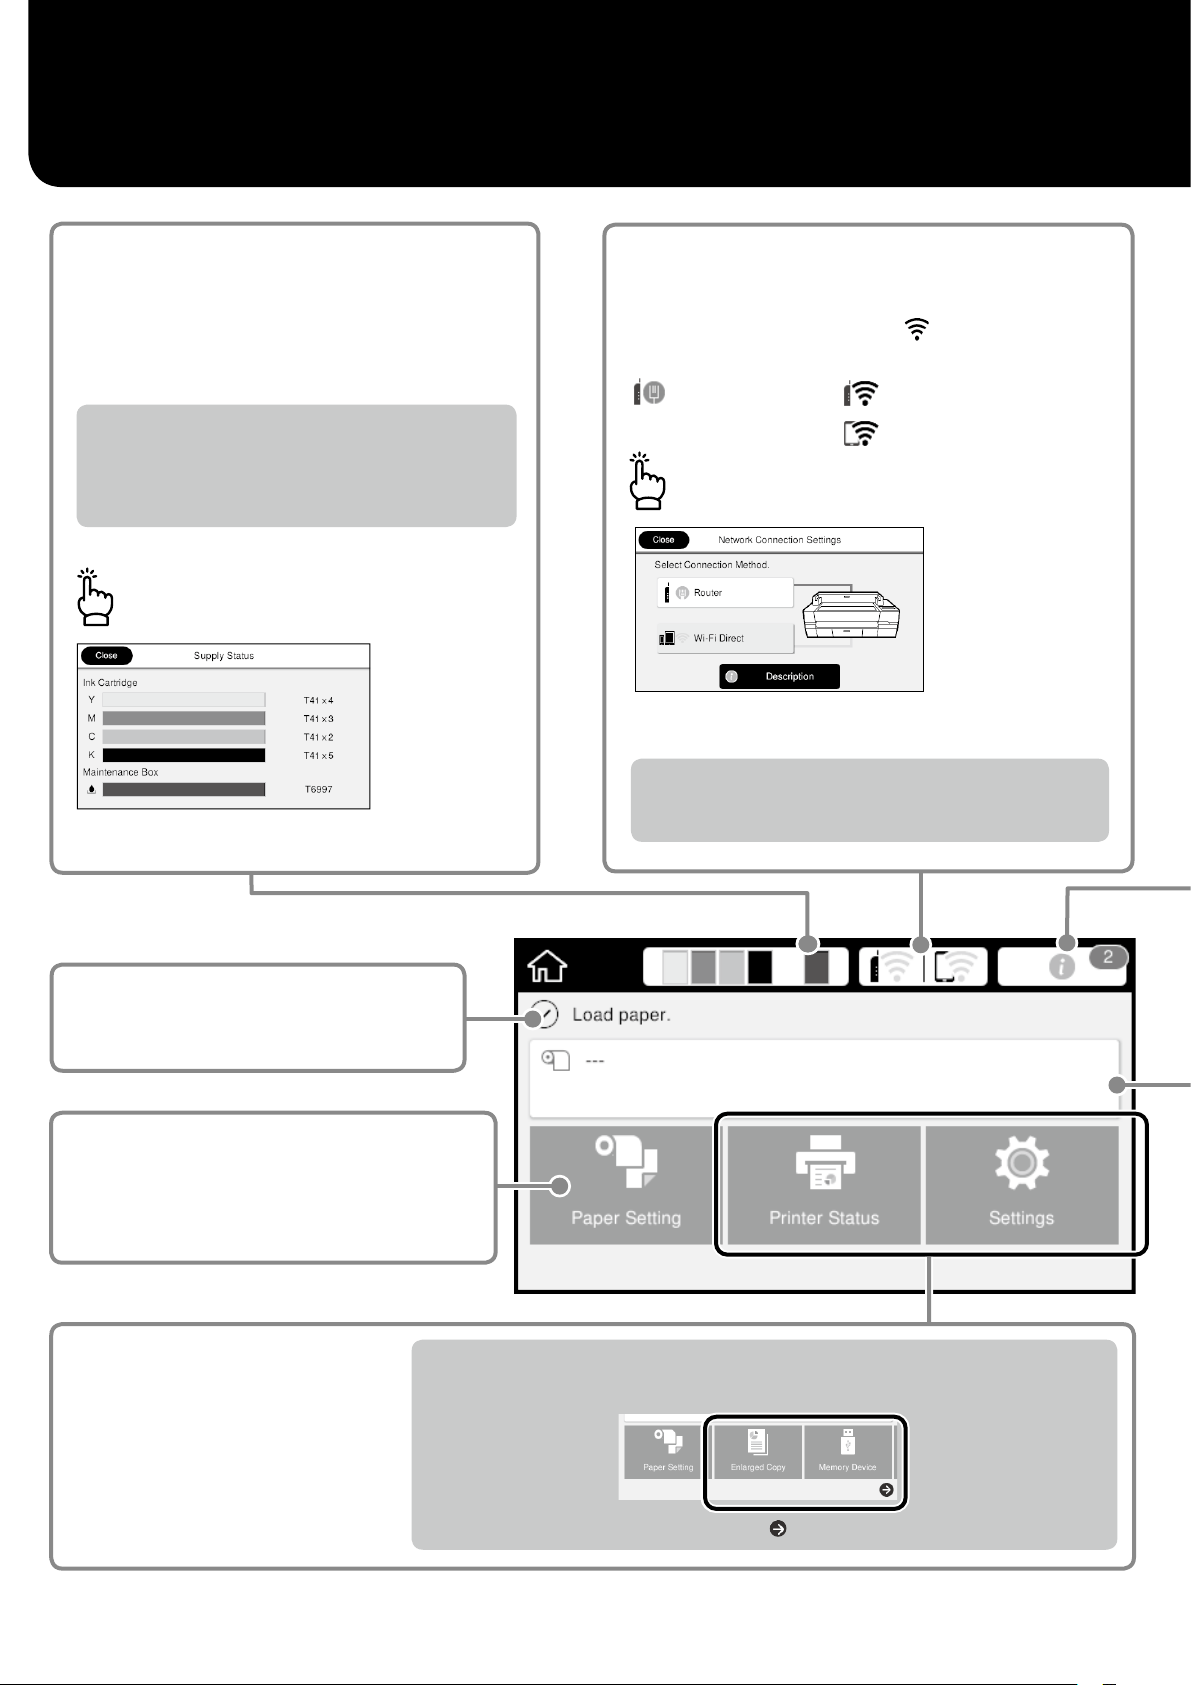
Home Screen Operations
Approx. remaining levels of
consumables
As the ink is consumed or the maintenance box
becomes full, the corresponding bar becomes
shorter.
When a is displayed on bars, prepare a new ink
cartridge or a maintenance box. You can continue
printing until replacement is required.
Touch this icon…
You can see the consumable product numbers.
The network connection status
The icon changes according to the connection method.
While the printer is connected,
the signal strength.
Wired (Ethernet)
is blue and indicates
Wi-Fi (Wireless)
Wi-Fi Direct
Touch this icon…
You can change the connection method.
For information on Wi-Fi Direct, see below.
U
“Printing Outside the Oce” on page 12
The current printer status
Touch to load or remove paper.
U
“Getting Ready to Print” on page 4
Touch to check the
printer status or change
When you connect a compatible Epson scanner to the printer, the Enlarged Copy button
appears. When you install a USB ash memory on the printer, the Memory Device button
appears.
the printer settings.
The Settings button appears when you touch .
2
Page 3
The home screen is displayed when the printer is turned on.
These pages show the available operations on the home screen.
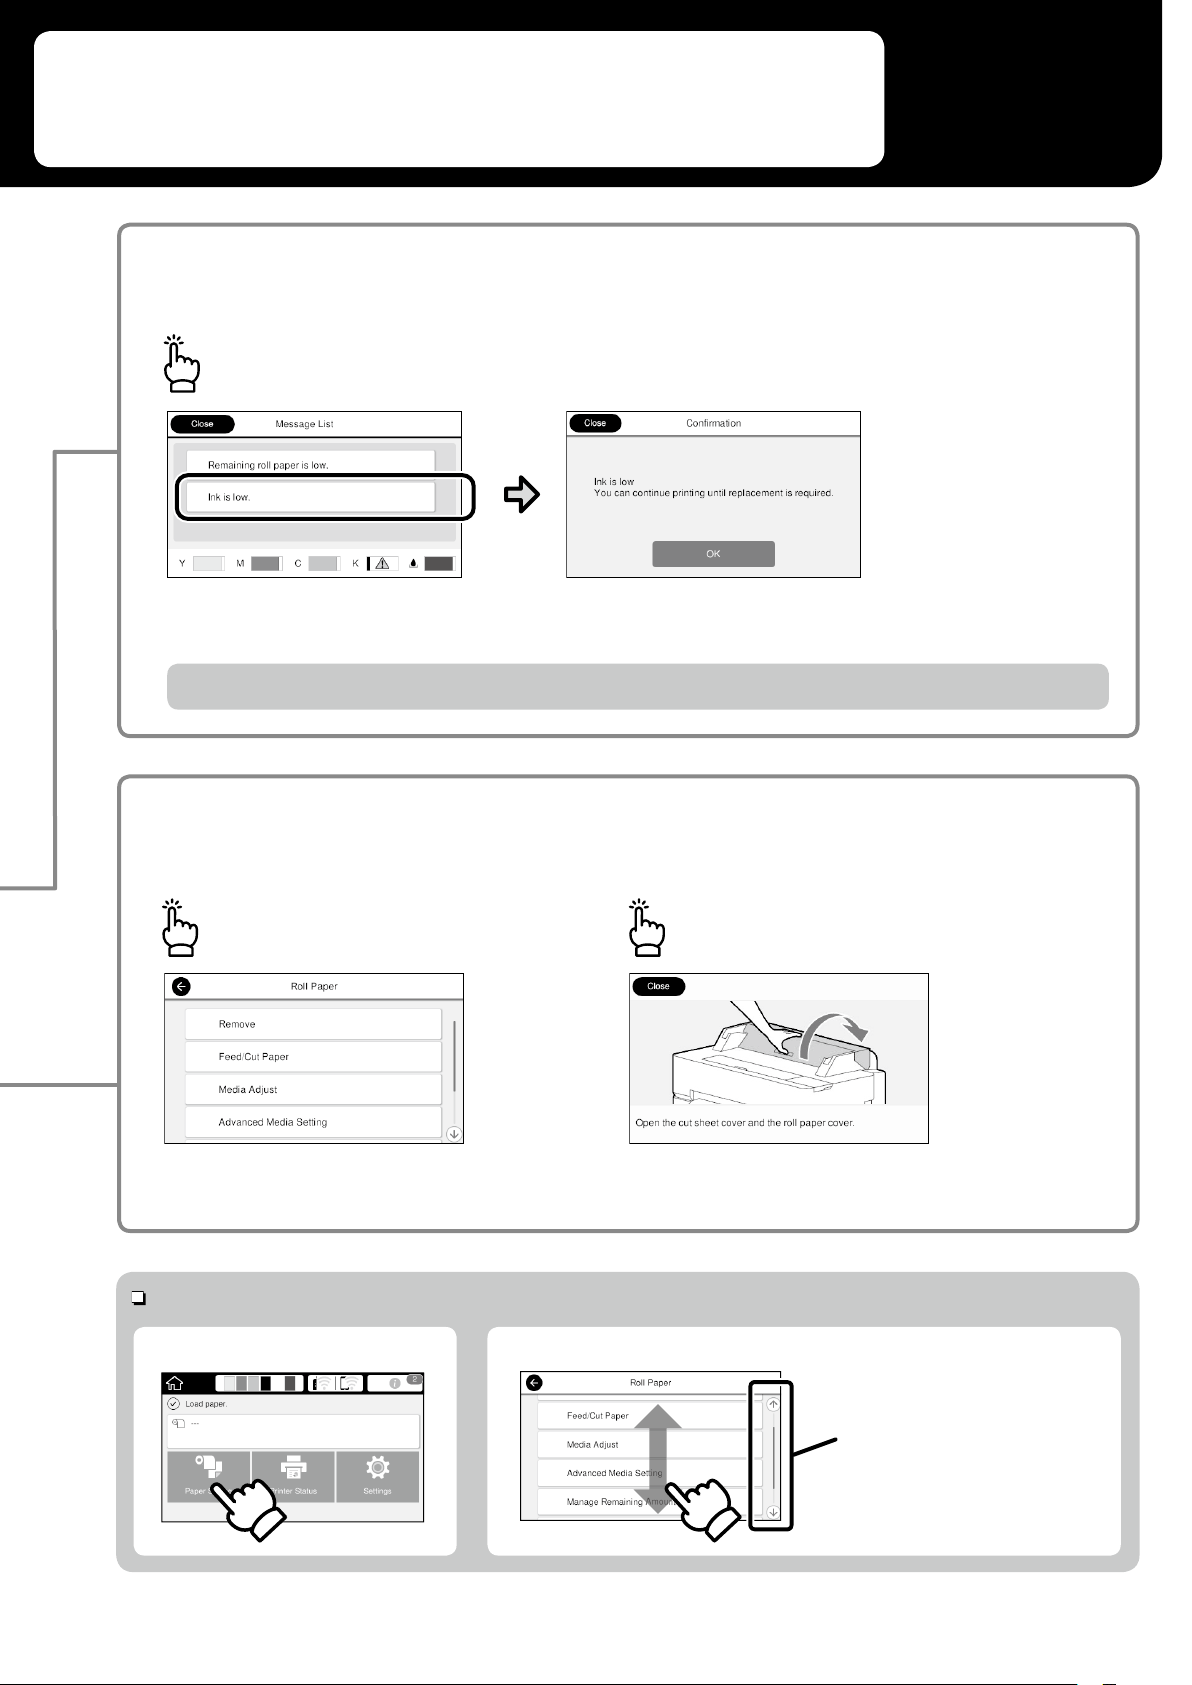
The number of notices
The number of notices, such as ink low warnings, is displayed on the icon.
Touch this icon…
A list of the notices that require your action is displayed. You can see instructions on what to do when you
touch each notice.
When you complete the actions for all the notices, the number disappears from the icon.
Roll paper information
The paper type and roll paper width that have been set are displayed.
Touch after loading roll
paper...
You can perform actions such as replacing
roll paper.
Touch before loading roll
paper...
Instructions on how to load roll paper are displayed.
Touch Panel Operations
Touch (tap)
Slide
The scroll bar is displayed
when you can scroll up and
down.
3
Page 4
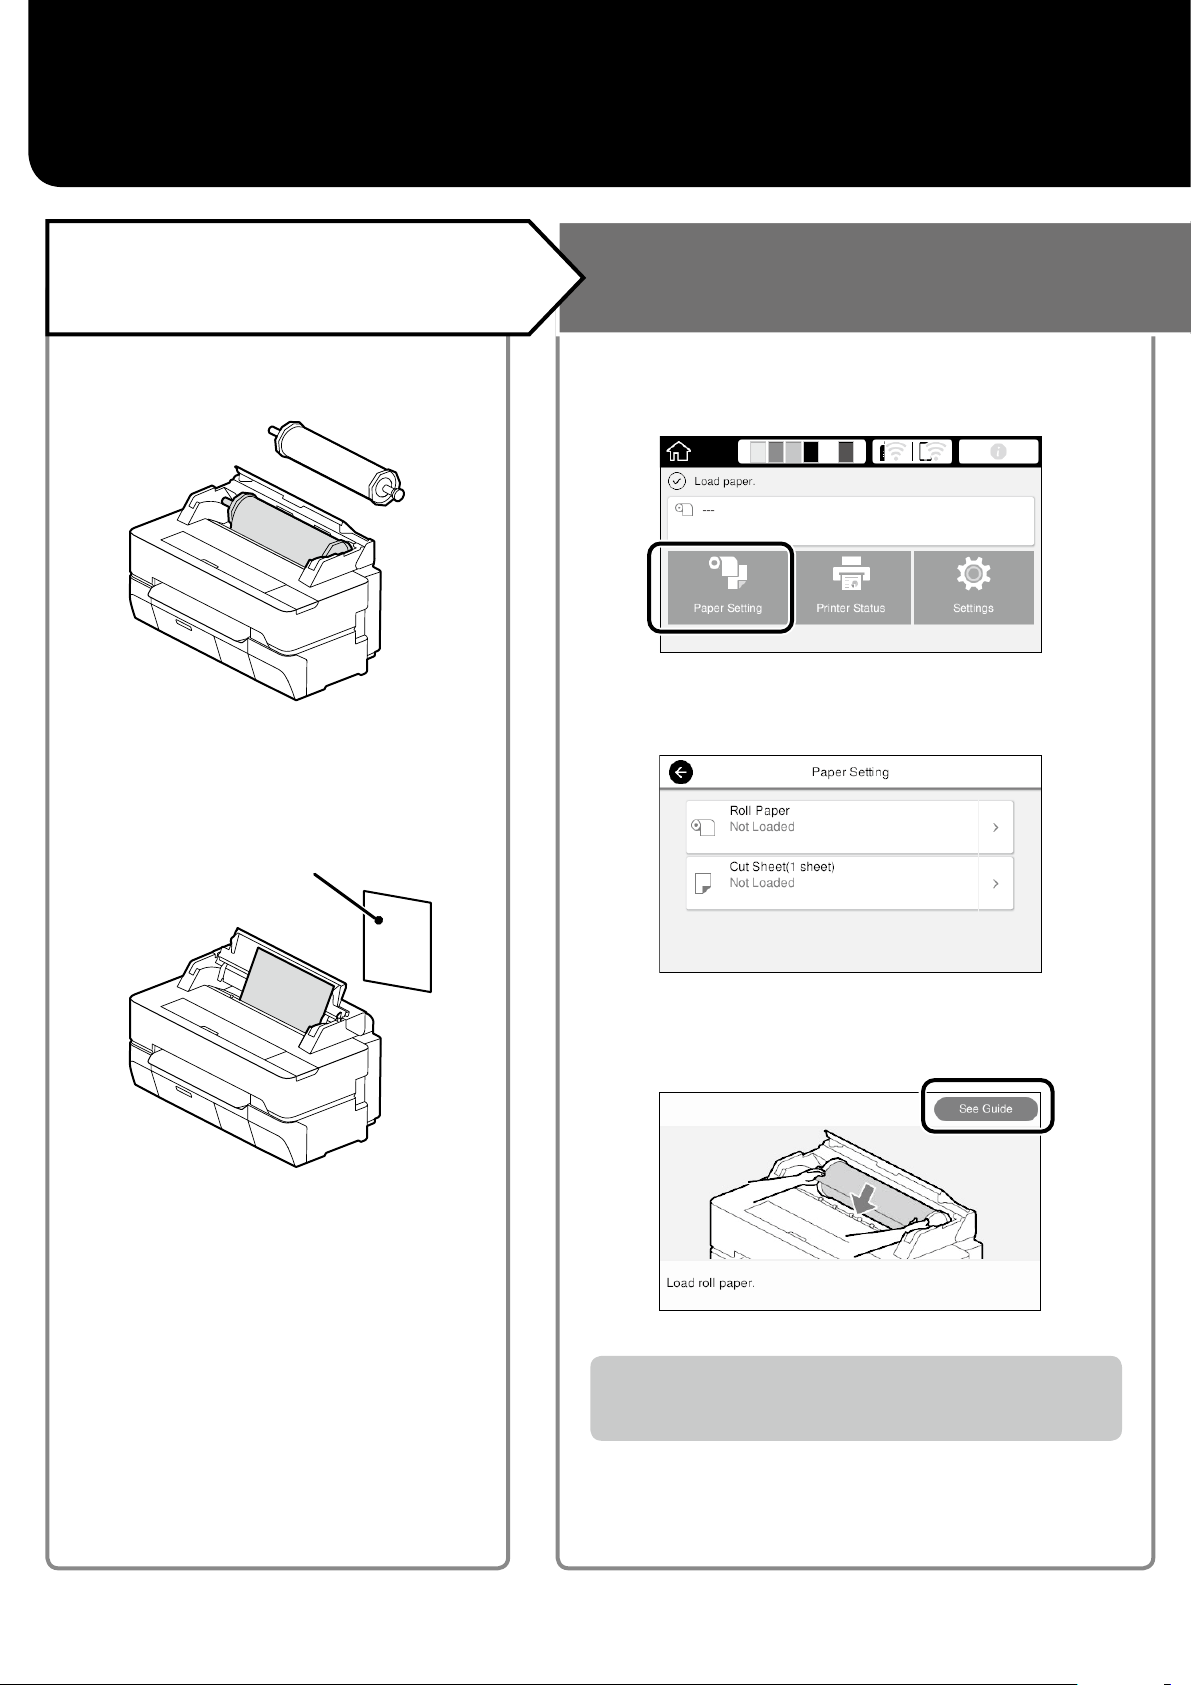
Getting Ready to Print
Check the Paper Loading
Positions
Roll Paper
Cut Sheet (1 sheet)
A4 to the maximum print width
One sheet at a time
Load the Paper Following the
On-Screen Instructions
Touch Paper Setting.
A
Select one of the paper sources.
B
Touch See Guide to see the detailed on-screen
C
instructions.
When Load paper is displayed on the home screen, you can open
the cut sheet cover and load a cut sheet into the printer.
4
Page 5
These pages explain how to get the printer ready for printing.
Carefully follow these steps to get optimum print quality.
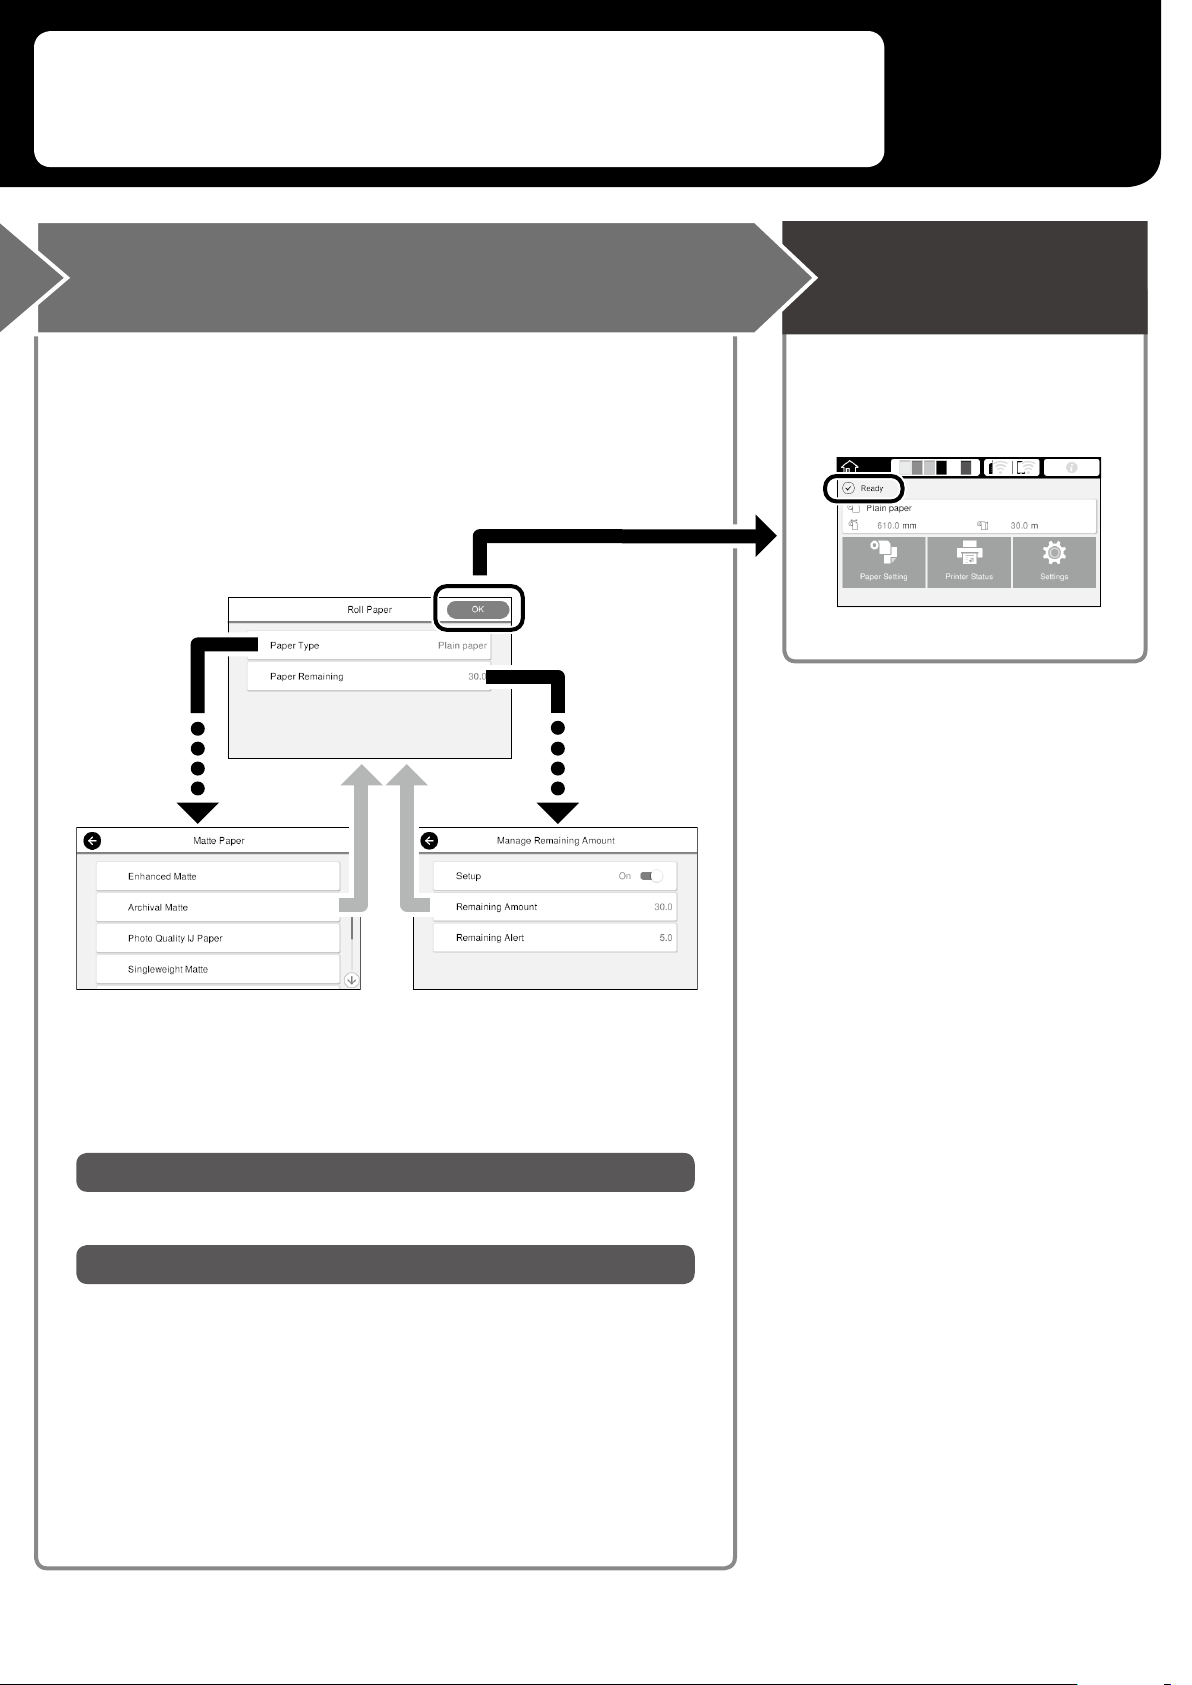
Set the Paper Type and Paper Size Print
The setting items vary according to the paper.
If you select a paper type or size that does not match the loaded paper,
the printout will have creases, ink smudges, or banding.
Press OK after you complete
the settings
Paper Type Paper
Remaining
Amount or
Paper Size
When Ready is displayed, you can
start printing.
Promptly select the settings because the paper will start being fed if
the screen is not used for 90 seconds.
Epson Special Paper
Select the paper name printed on the paper package.
Non-Epson Paper
Select one of the following.
- Plain Paper
- Coated Paper <Generic>
- Photo Paper <Generic>
- Tracing Paper
- Tracing Paper <LowDuty>
- Matte Film
5
Page 6
Printing CAD Drawings
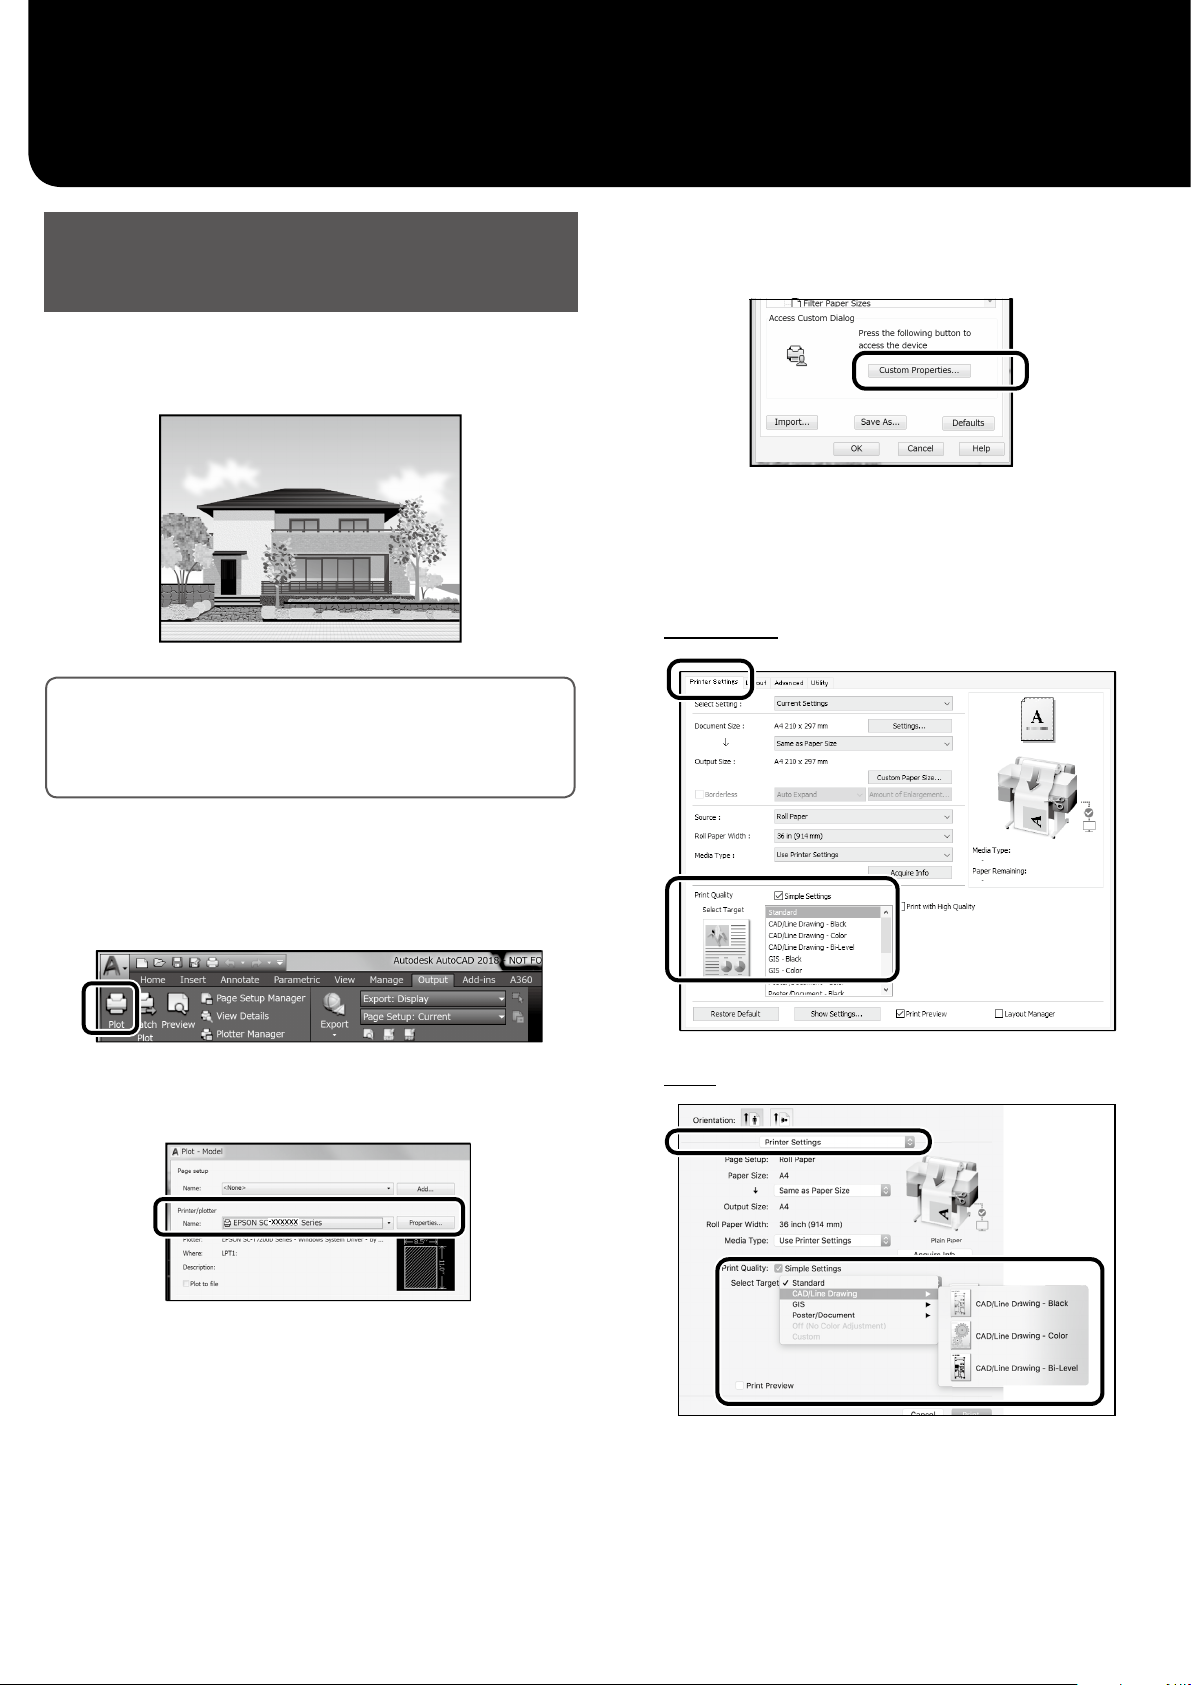
Using the Printer Driver
This method is best suited to printing CAD drawings, such as
appearance view of buildings, at high quality.
C
D
Click Custom Properties.
The printer driver screen is displayed.
Select CAD/Line Drawing at Printer Settings
tab.
Windows
Important
c
If lines or parts on your drawing are not printed properly,
use the HP-GL/2 or HP RTL mode.
The procedure below is for AutoCAD 2018.
Click Plot.
A
Select the printer in Printer/plotter, and then
B
click Properties....
Mac
6
Page 7
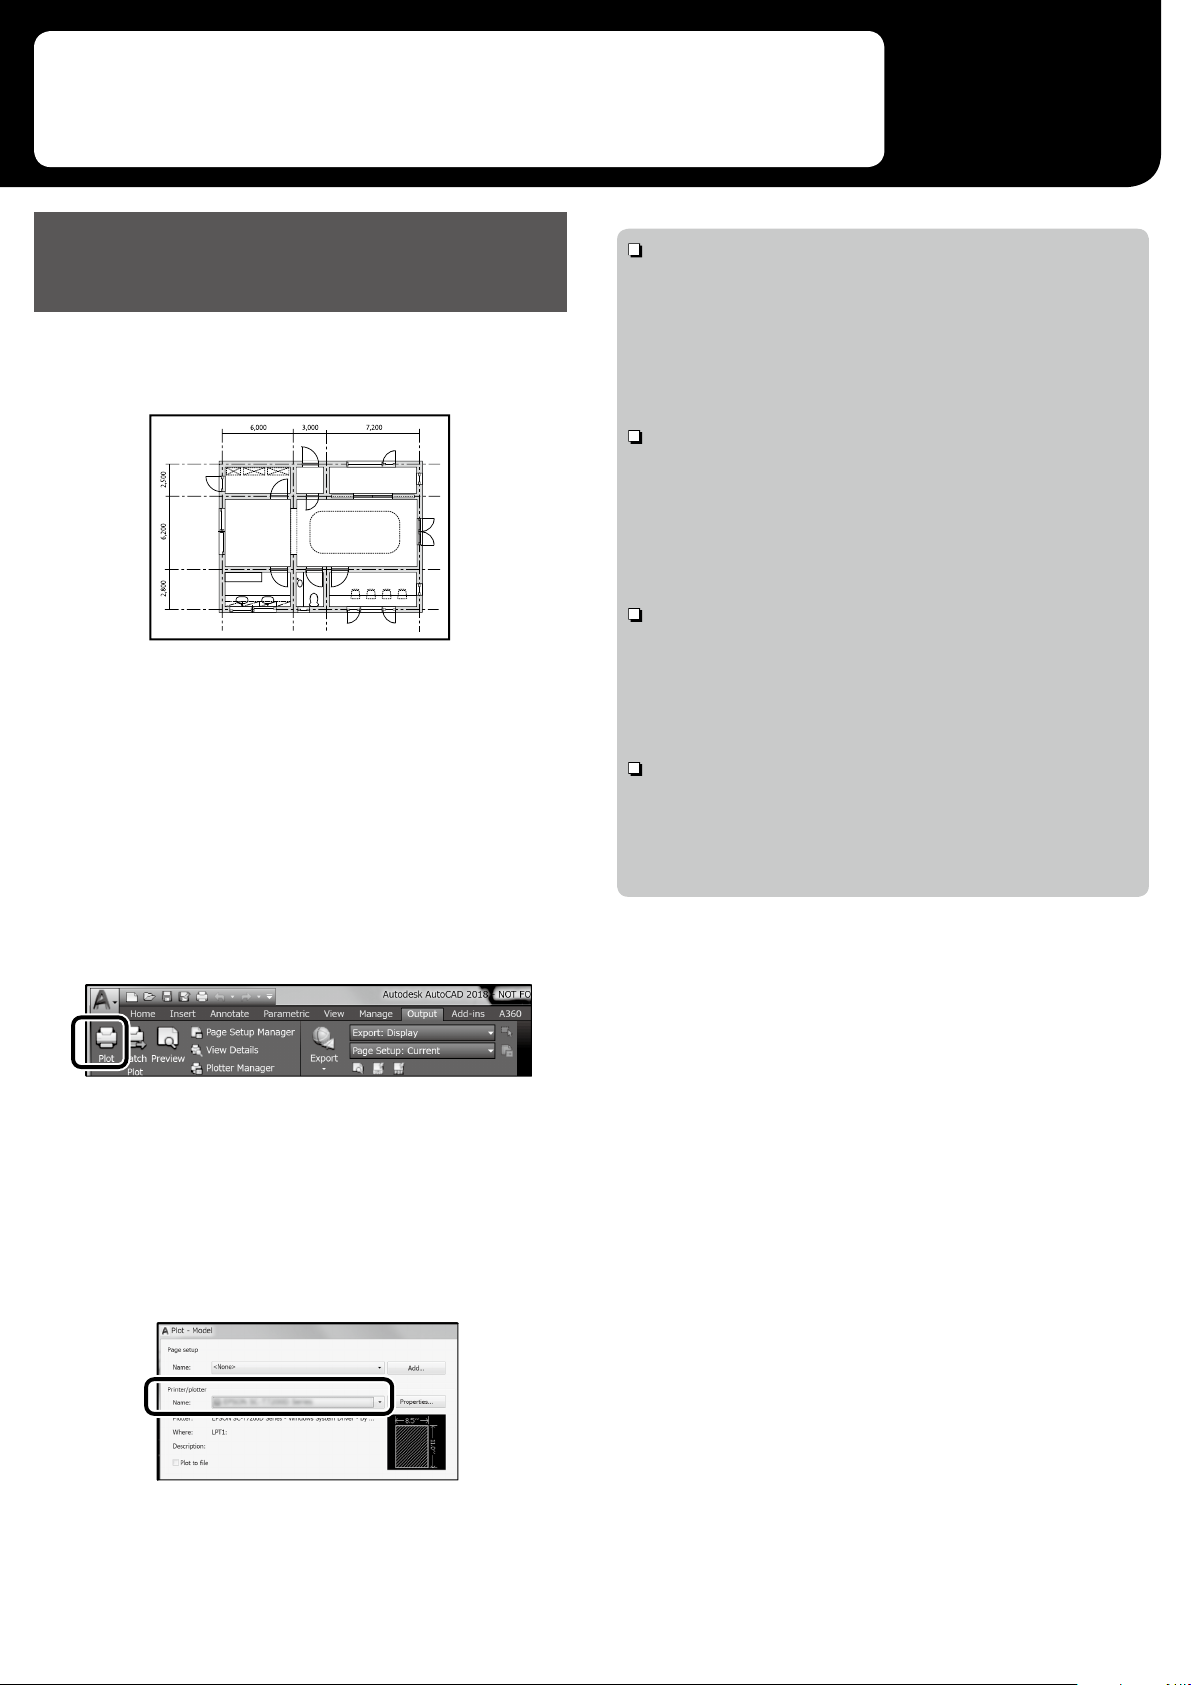
Print CAD and GIS drawings using either of the following two
methods depending on the intended use of the drawing.
Using HP-GL/2 or HP RTL Mode
This method is best suited to printing CAD and GIS drawings,
such as maps and blueprints.
You can print from an application that supports HP-GL/2
(compatible with HP DesignJet 750C) and HP RTL.
The default paper source is Roll Paper and the default
print quality is Standard. If you want to change the
settings, change them from the printer setting menu before
performing the procedure below.
The procedure below is for AutoCAD 2018.
When nothing is printed or text is garbled
Change the printer setting as follows.
Settings - General Settings - Printer Settings - Printing
Language - USB (or Network) - HP-GL/2
When you print using the printer driver, change the setting back
to Auto from HP-GL/2.
When you want to print on a cut sheet or change the
print quality setting
Select your target setting item from the printer setting menu
shown below.
Settings - General Settings - Printer Settings - Universal Print
Settings
When you want to change the pen width or pen color
Select your target setting item from the printer setting menu
shown below.
Settings - General Settings - Printer Settings - HP-GL/2
Unique Settings
When you want to print on oversized paper
Load the printer with paper larger than the original size, and
then change the printer setting as follows.
Settings - General Settings - Printer Settings - Universal Print
Settings - Page Margins option - Oversize
Click Plot.
A
Select plotter in Printer/plotter.
B
Select the plotter name as shown below according to
your model.
SC-T5400 Series: HP DesignJet 750C C3196A
SC-T3400 Series: HP DesignJet 750C C3195A
SC-T3400N Series: HP DesignJet 750C C3195A
7
Page 8

Printing Banners
Steps to print a banner
Create the original in the application
Select the enlargement method
in the printer driver
Print
Fitting the Original to the Roll
Paper Width
*
Fitting the short side of
Original
Select Output Size - Fit to Roll Paper Width, and then select
whether to t the short side or long side of the original to the
roll paper width.
Windows
the original to the roll
paper width.
Fitting the long side of
the original to the roll
paper width.
* For creating a non-standard size original, see below.
U
“Printing at Non-Standard Sizes” on page 10
Mac
8
Page 9

These pages explain how to enlarge and print an original created at
a standard size for a banner.
Fitting the Original to the Output
Size
Output size
Original
Select Output Size - Fit to Output Size, and then select the
output size.
Windows
Specifying the Size
Output size
Original
Select Output Size - Specify Size, and then select the output
size or enter magnication.
Windows
Mac
Mac
9
Page 10

Printing at Non-Standard Sizes
Steps to print a non-standard size
Register and Select the Paper Size
Register and select the paper size
in the application
Windows
Start the application, click the File menu, and
A
then click Print.
On the Printer Settings tab, click Custom
B
Paper Size...
Create the original
Enlarge and print the original
These pages explain how to create an original that is about
one-third of the output size and then enlarge and print that
original to create a banner that ts the width of 24-inch (610
mm) roll paper.
Paper size (original)*
Output size
Enter the following information on the User-
C
Dened Paper Size window.
Click Save, and then click OK to nish registering the
paper size.
Select the registered paper size.
D
Example: Microsoft Word 2016
* You can congure the paper size as shown below.
Paper Width: 89 mm to maximum printing width
Paper Height: 127 mm to 18,000 mm (Windows)
Height: 127 mm to 15,240 mm (Mac)
10
Orientation: Landscape
Size: Banner
If the registered paper size is not displayed, check the paper
sizes supported in the application.
Page 11
These pages explain how to create and print an original with a nonstandard size, such as a banner or square shape.
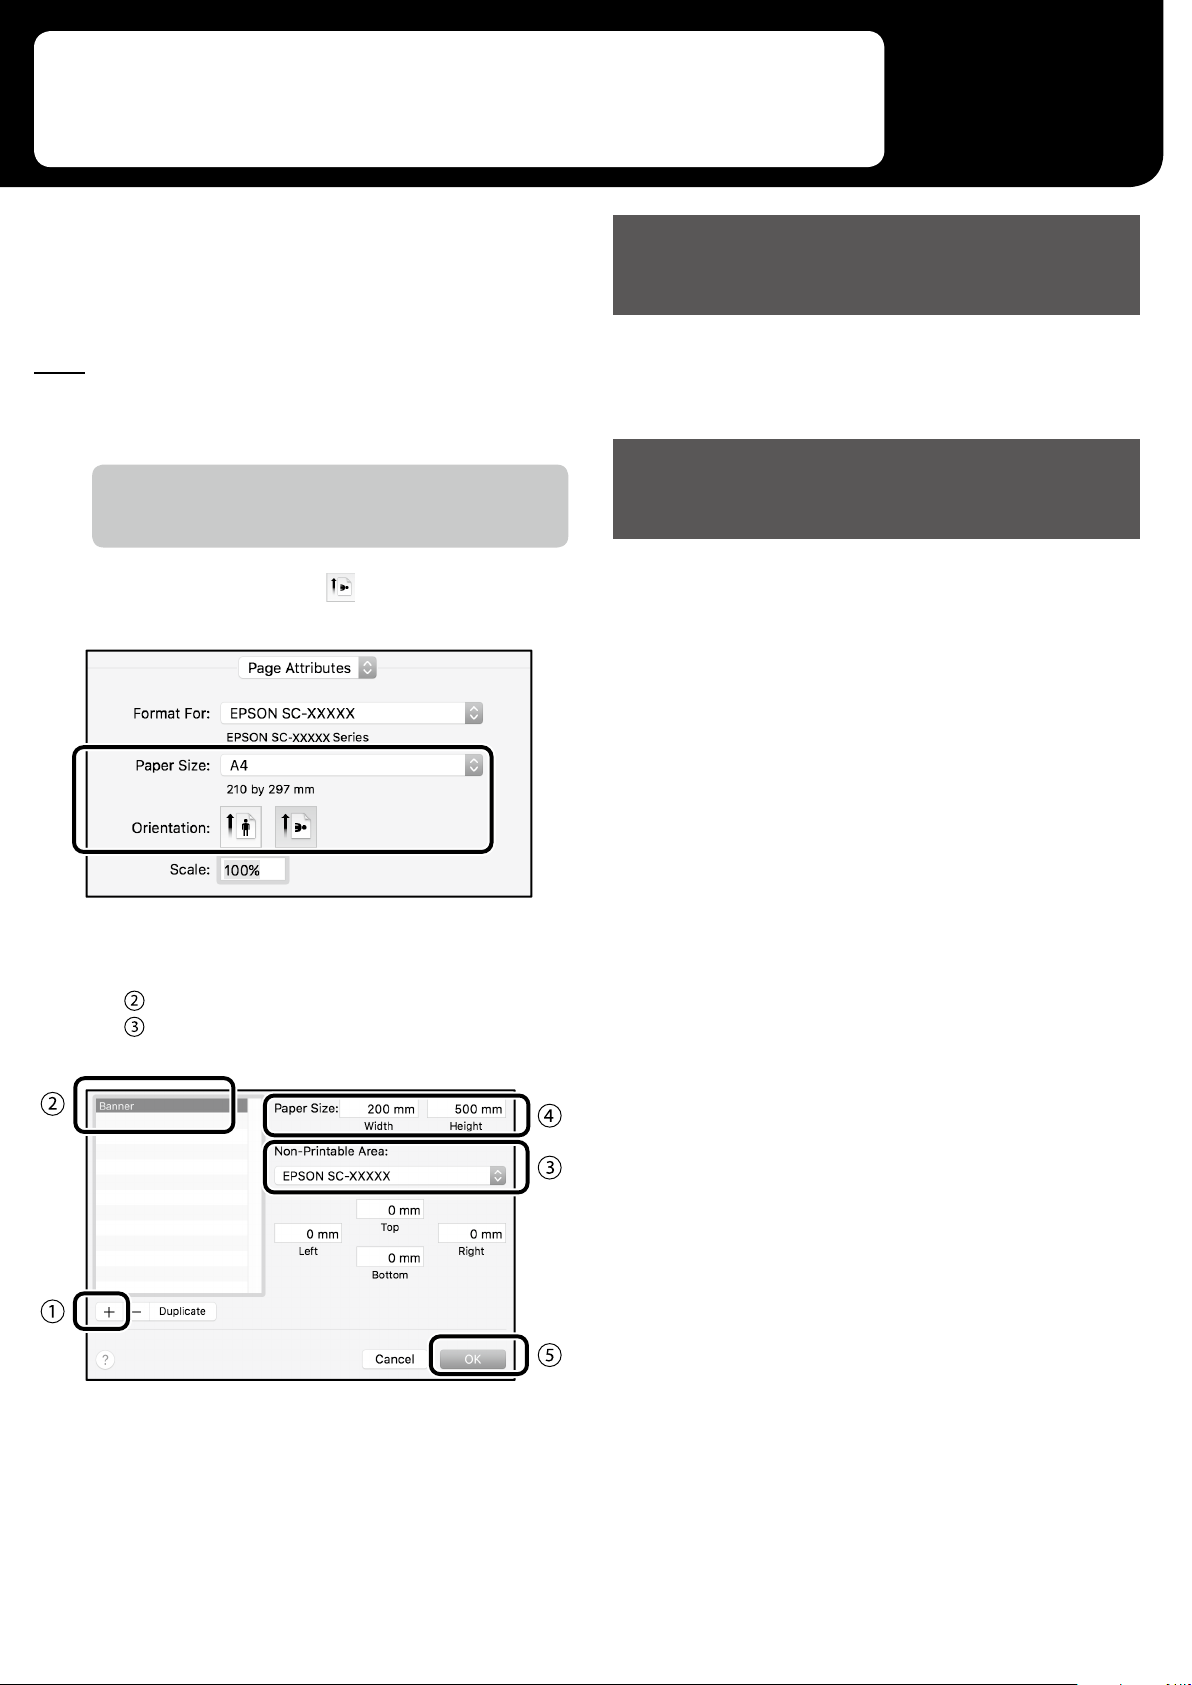
Create the Original
Mac
Start the application, and then click Page
A
Setup.
If Page Setup is not displayed due to the application, select
Print.
For Orientation, select , and for Paper Size,
B
select Manage Custom Sizes.
Create the original using the application.
Enlarge and Print the Original
Load 24-inch roll paper, and then enlarge and print the
original by tting it to the roll paper width.
For enlarging and printing the original, see below.
U
“Printing Banners” on page 8
Register the paper size in the following order.
C
For , enter “Banner” as the name of the paper size.
For
, select the printer name.
Click OK to nish registering the paper size.
11
Page 12

Printing Outside the Oce
Printing by connecting with Wi-Fi
Direct
Use Wi-Fi Direct to connect your device to the printer when
you are outside the oce and cannot connect to the printer
over a wired or wireless connection.
Connection method
Touch on the home screen.
A
Touch Wi-Fi Direct.
B
Print
After connecting to the printer with Wi-Fi Direct, print using
the printer driver.
Even if the printer driver has not been installed, you can still
print with a Mac computer or iOS smart device using AirPrint.
Windows computer Printer driver
Mac computer Printer driver or AirPrint
iOS smart device AirPrint
The following operations are not allowed when using AirPrint.
- Printing by automatically tting the original to the roll paper
width
- Printing by automatically enlarging or shrinking the original
to t the output paper size
- Setting a print quality suitable for the intended purpose of
use
Use the printer driver for these operations.
See the Apple website for more information on using AirPrint.
Follow the on-screen instructions to complete the
connection setting.
12
Page 13

If the printer is outside the oce, you can perform printing with the
following two methods.
Printing by Installing a USB Flash
Memory
You can install the USB ash memory in which the JPEG le
or TIFF le is saved onto the printer when you are outside the
oce, and then print the le.
Install the USB ash memory in which the data
A
to be printed is saved onto the printer.
Select B&W or Color.
D
If you have selected a JPEG le, you can check the image to
print with the Preview button.
Touch the Print button.
E
From the home screen, touch Memory Device.
B
Select the le to print.
C
Select only one le.
13
Page 14

MEMO
14
Page 15
Copyrights and Trademarks
No Part of this publication may be reproduced, stored in a retrieval system, or transmitted in any form or by any means, electronic, mechanical, photocopying,
recording, or otherwise, without the prior written permission of Seiko Epson Corporation. The information contained herein is designed only for use with this
Epson printer. Epson is not responsible for any use of this information as applied to other printers.
Neither Seiko Epson Corporation nor its aliates shall be liable to the purchaser of this product or third parties for damages, losses, costs, or expenses incurred
by the purchaser or third parties as a result of accident, misuse, or abuse of this product or unauthorized modications, repairs, or alterations to this product, or
(excluding the U.S.) failure to strictly comply with Seiko Epson Corporation‘s operating and maintenance instructions.
Seiko Epson Corporation shall not be liable for any damages or problems arising from the use of any options or any consumable products other than those
designated as Original Epson Products or Epson Approved Products by Seiko Epson Corporation.
Seiko Epson Corporation shall not be held liable for any damage resulting from electromagnetic interference that occurs from the use of any interface cables
other than those designated as Epson Approved Products by Seiko Epson Corporation.
EPSON, EPSON EXCEED YOUR VISION, EXCEED YOUR VISION, and their logos are registered trademarks or trademarks of Seiko Epson Corporation.
Microsoft®, Windows®, and Windows Vista® are registered trademarks of Microsoft Corporation.
Mac, macOS, OS X, Bonjour, Safari, and AirPrint are trademarks of Apple Inc., registered in the U.S. and other countries.
HP-GL/2® and HP RTL® are registered trademarks of Hewlett-Packard Corporation.
AutoCAD is registered trademarks or trademarks of Autodesk, Inc., and/or its subsidiaries and/or aliates in the USA and/or other countries.
General Notice: Other product names used herein are for identication purposes only and may be trademarks of their respective owners. Epson disclaims any and all
rights in those marks.
© 2018 Seiko Epson Corporation. All rights reserved.
Meaning of Symbols
Important
c
U
Important must be followed to avoid damage to this product.
Indicates related reference content.
Product Model Descriptions
Some models described in this manual may not be sold in your country or region.
15
Page 16
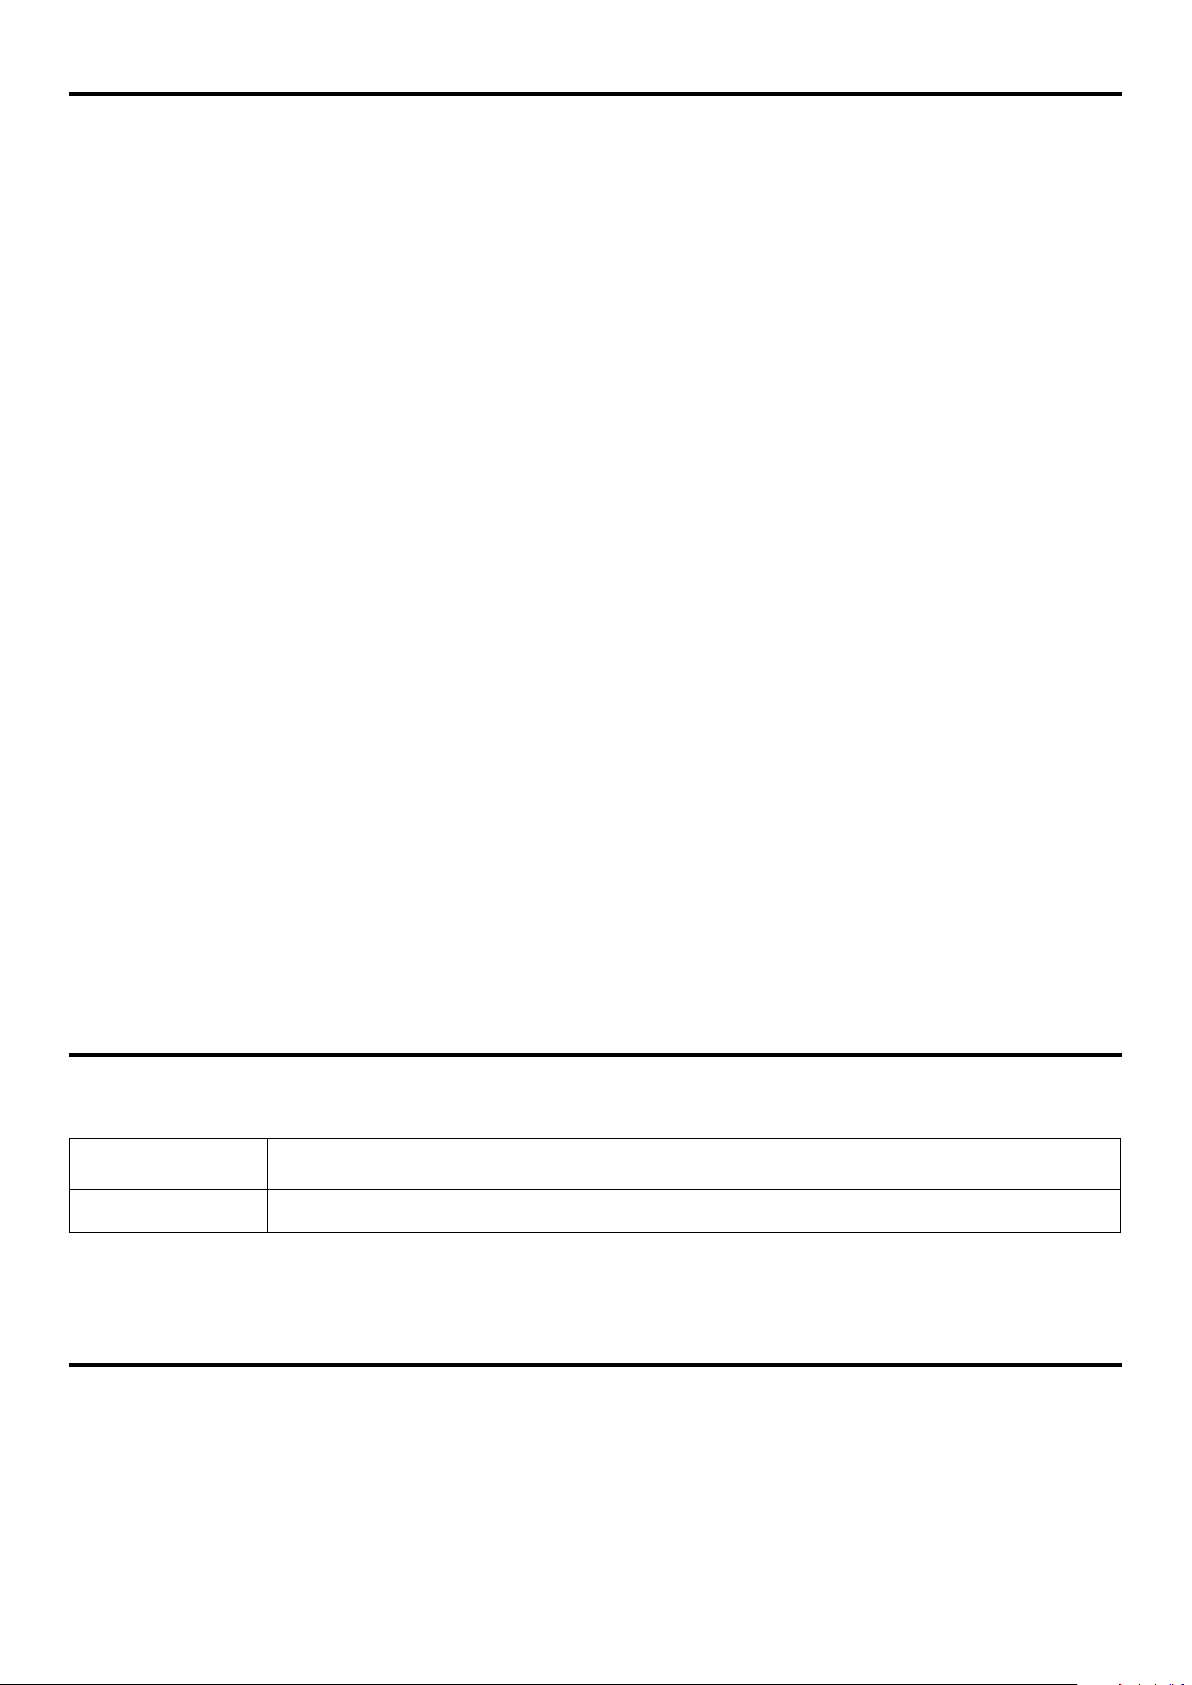
Troubleshooting Print Quality
Problems
Solutions
Perform the solutions in the following order until the printed results have improved.
Start by reloading the target paper.
Horizontal or Vertical Lines
Check the Paper Type Setting
Touch Paper Setting on the home screen and make sure the set paper and paper type
are matching. If the paper type setting is incorrect, touch the target paper source and
change to the correct paper type.
For how to set the paper type, see below.
U
“Getting Ready to Print”-“Set the Paper Type and Paper Size” on page 5
If the printed results did not improve
Double Ruled Lines or
Warped Characters
Perform Easy Adjustment
From the home screen, touch Paper Setting - target paper source - Media Adjust - Easy
Adjustment. Follow the on-screen instructions to complete the adjustment.
Operator’s Guide
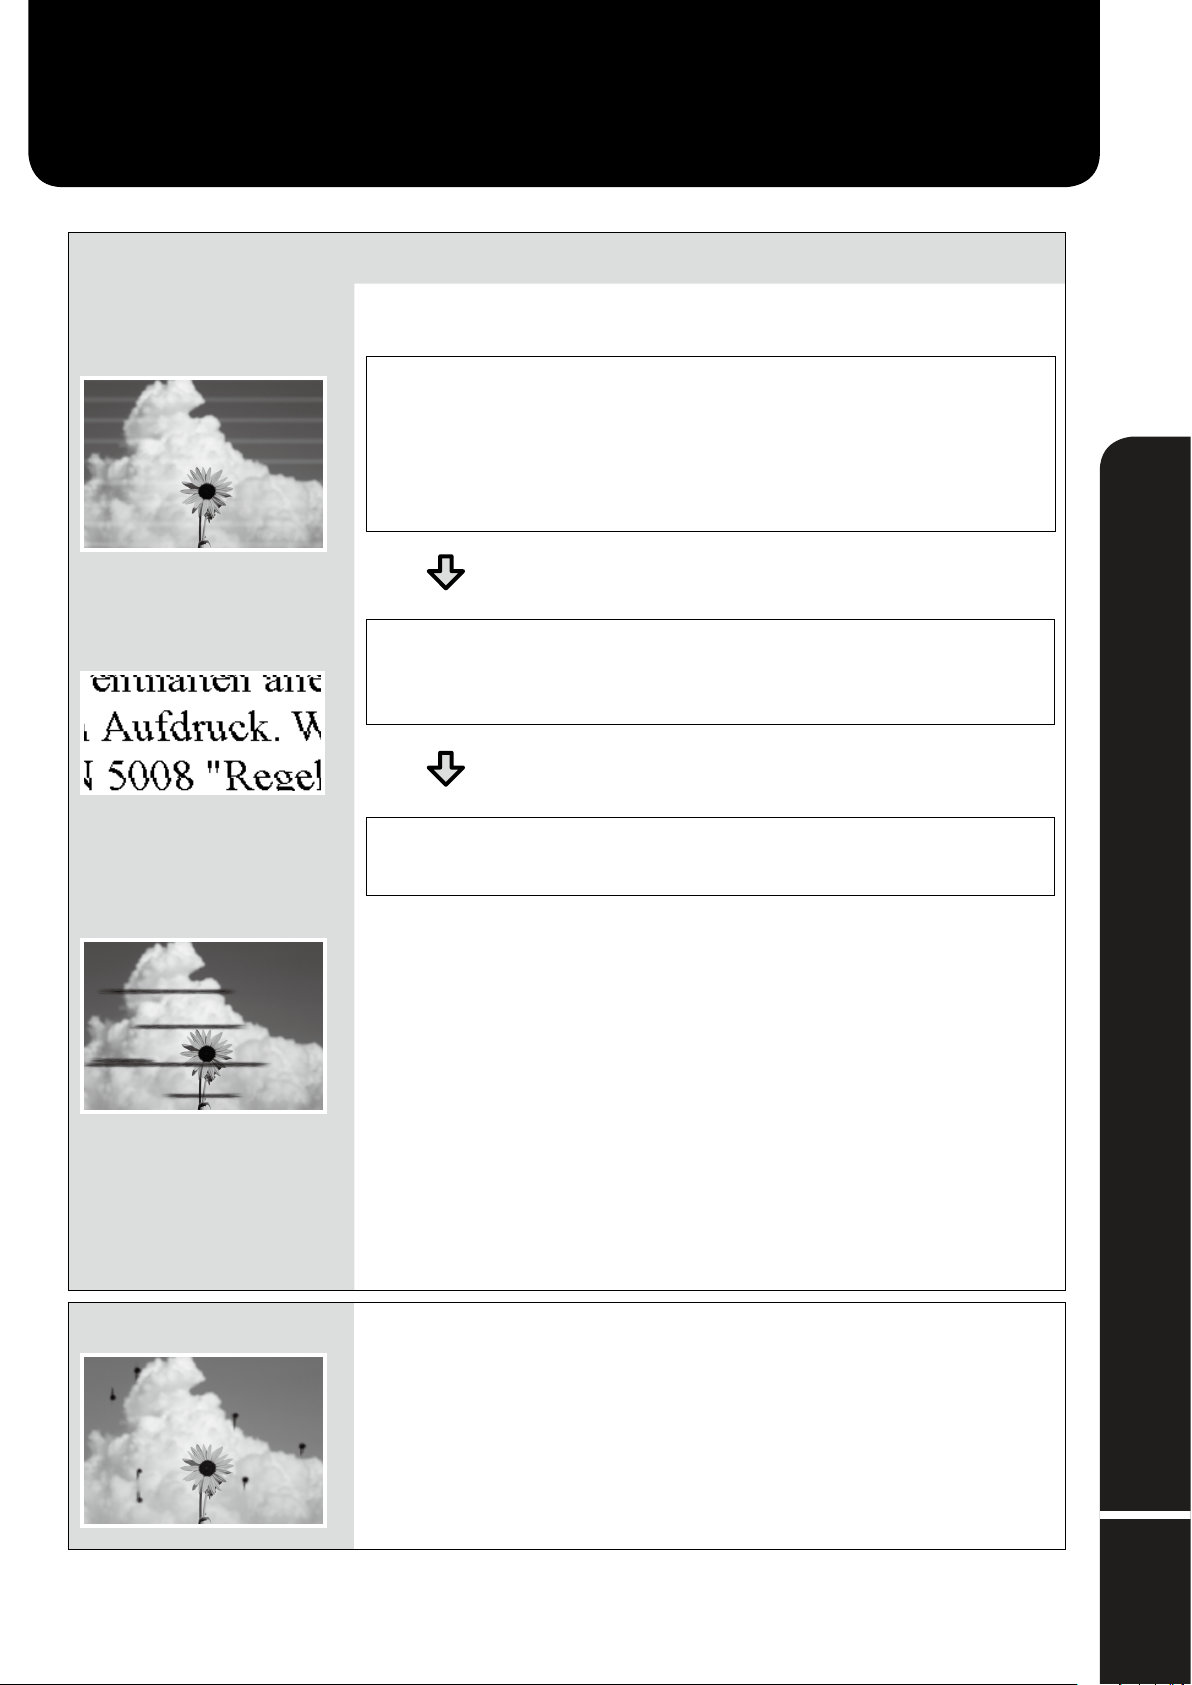
Creases, Scu marks, or
Uneven colors
Ink Drops
- When an Error message is Displayed
- If the adjustment results are not satisfactory
Perform Paper Feed Adjustment or Print Head Alignment
For details, see the User’s Guide (online manual).
Perform head cleaning.
From the home screen, touch Settings - Maintenance - Print Head Cleaning.
CMP0158-00 EN
©2018 Seiko Epson Corporation. All rights reserved.
 Loading...