

Page 1

User’s Guide
NPD5799-02 EN
Page 2

LQ-590II/LQ-590IIN/LQ-2090II/LQ-2090IIN User’s Guide
Copyrights and Trademarks
No part of this publication may be reproduced, stored in a retrieval system, or transmitted in any form or by any means,
electronic, mechanical, photocopying, recording, or otherwise, without the prior written permission of Seiko Epson
Corporation. The information contained herein is designed only for use with this Epson printer. Epson is not responsible for any
use of this information as applied to other printers.
Neither Seiko Epson Corporation nor its affiliates shall be liable to the purchaser of this product or third parties for damages,
losses, costs, or expenses incurred by the purchaser or third parties as a result of accident, misuse, or abuse of this product or
unauthorized modifications, repairs, or alterations to this product, or (excluding the U.S.) failure to strictly comply with Seiko
Epson Corporation’s operating and maintenance instructions.
Seiko Epson Corporation shall not be liable for any damages or problems arising from the use of any options or any consumable
products other than those designated as Original Epson Products or Epson Approved Products by Seiko Epson Corporation.
EPSON
trademarks of Seiko Epson Corporation.
Microsoft
IBM is a registered trademark of International Business Machines Corporation.
General Notice: Other product names used herein are for identification purposes only and may be trademarks of their respective
owners. Epson disclaims any and all rights in those marks.
The contents of this manual and the specifications of this product are subject to change without notice.
© 2017 Seiko Epson Corporation
and ESC/P® are registered trademarks, EPSON EXCEED YOUR VISION, EXCEED YOUR VISION and ESC/P2 are
®
, Windows®, Windows Server®, and Windows Vista® are registered trademarks of Microsoft Corporation.
®
Copyrights and Trademarks 2
Page 3

LQ-590II/LQ-590IIN/LQ-2090II/LQ-2090IIN User’s Guide
Contents
About This Manual
Where to Find Information ............................................................... 8
Descriptions Used in this Manual.......................................................... 8
Operating System Versions............................................................... 8
Safety Instructions
Safety Instructions...................................................................... 10
Warnings, Cautions, and Notes....................................................... 10
Hot Parts Caution Symbol........................................................... 10
Important Safety Instructions........................................................ 10
For users in Russia, Belarus, and Kazakhstan............................................ 13
For United Kingdom users. . . . . ...................................................... 14
For Singapore users................................................................ 15
For German users.................................................................. 15
For Turkish users.................................................................. 15
Chapter 1 Paper Handling
Selecting a Paper Source................................................................. 16
Printing on continuous paper........................................................ 16
Printing on single sheets (cut-sheet)................................................... 18
Setting the Paper Release Lever........................................................... 19
Adjusting the Paper Thickness Lever...................................................... 19
Loading Continuous Paper. . . . . .......................................................... 21
Positioning your continuous paper supply.............................................. 21
Loading continuous paper with the tractor............................................. 21
Using the tear-off function........................................................... 42
Loading Single Sheets................................................................... 44
Available paper types. . . . . . ......................................................... 44
Using the sheet guide............................................................... 45
Loading Special Paper................................................................... 49
Multipart forms.................................................................... 49
Labels............................................................................ 50
Contents 3
Page 4

LQ-590II/LQ-590IIN/LQ-2090II/LQ-2090IIN User’s Guide
Envelopes......................................................................... 52
Cards............................................................................ 52
Switching Between Continuous Paper and Single Sheets...................................... 53
Switching to single sheets............................................................ 53
Switching to continuous paper....................................................... 54
Using the Micro Adjust Function......................................................... 55
Adjusting the tear-off position....................................................... 55
Adjusting the top-of-form position. . . . . . . . ............................................ 56
Chapter 2 Printer Software
About Your Printer Software............................................................. 59
Using the Printer Driver................................................................. 59
Accessing the printer driver from Windows applications.................................. 60
Accessing the printer driver from the Start menu........................................ 62
Changing the printer driver settings................................................... 64
Printer Driver Settings Overview.......................................................... 65
Printer settings.................................................................... 66
Monitoring settings................................................................ 68
Setting Utility..................................................................... 68
Using EPSON Status Monitor 3........................................................... 68
Setting up EPSON Status Monitor 3................................................... 69
Accessing EPSON Status Monitor 3................................................... 71
Installing EPSON Status Monitor 3................................................... 72
Using Bi-D Adjustment................................................................. 72
Making adjustment with Bi-D Adjustment............................................. 72
Using Printer Setting. . . . . . . . . . .......................................................... 74
Changing printer setting............................................................ 74
Setting Up Your Printer on a Network..................................................... 75
Sharing the printer................................................................. 75
Setting up your printer as a shared printer.............................................. 76
Setting for the clients............................................................... 80
Cancelling Printing..................................................................... 85
Uninstalling the Printer Software......................................................... 85
Uninstalling the printer driver and EPSON Status Monitor 3.............................. 86
Contents 4
Page 5

LQ-590II/LQ-590IIN/LQ-2090II/LQ-2090IIN User’s Guide
Chapter 3 Control Panel
Buttons and Lights..................................................................... 88
Selecting a Font and Pitch............................................................... 90
About Your Printer’s Default Settings...................................................... 92
Default Setting mode............................................................... 92
Changing default settings............................................................ 98
Lock-Out Mode....................................................................... 100
Changing the lock-out mode setting.................................................. 100
Chapter 4 Troubleshooting
Using the Error Indicators. . . . .......................................................... 103
Problems and Solutions................................................................ 104
Power supply problems............................................................ 105
Printing......................................................................... 105
Paper Handling................................................................... 110
Network problems................................................................ 112
Correcting USB Problems.............................................................. 112
Clearing a Paper Jam................................................................... 112
Aligning Vertical Lines in Your Printout.................................................. 113
Cancelling Printing.................................................................... 114
Using the printer driver. . .......................................................... 115
Using the printer’s control panel..................................................... 115
Printing a Self Test.................................................................... 115
Printing Hex Dump................................................................... 116
Chapter 5 Where To Get Help
Technical Support Web Site............................................................. 118
Contacting Customer Support........................................................... 118
Before Contacting Epson. . . . . ...................................................... 118
Help for Users in Europe. . . . ....................................................... 119
Help for Users in Indonesia......................................................... 119
Help for Users in Singapore. ........................................................ 119
Help for Users in Vietnam.......................................................... 119
Help for Users in Hong Kong....................................................... 120
Help for Users in Malaysia.......................................................... 120
Help for Users in the Philippines.................................................... 121
Contents 5
Page 6

LQ-590II/LQ-590IIN/LQ-2090II/LQ-2090IIN User’s Guide
Chapter 6 Options and Consumables
Replacing the Ribbon Cartridge.......................................................... 122
Genuine Epson ribbon cartridge..................................................... 122
Replacing the ribbon cartridge...................................................... 122
Cut-Sheet Feeder...................................................................... 126
Installing the cut-sheet feeder....................................................... 127
Loading paper in the single-bin cut-sheet feeder........................................ 129
Loading paper in the high-capacity cut-sheet feeder..................................... 132
Assembling the double-bin cut-sheet feeder........................................... 135
Selecting the paper path (bin 1 or bin 2)............................................... 136
Roll Paper Holder..................................................................... 137
Assembling the roll paper holder.................................................... 137
Installing the roll paper holder...................................................... 138
Loading roll paper. . . . . . . .......................................................... 138
Removing roll paper............................................................... 141
Additional Tractor Unit................................................................ 141
Additional Sheet Guide................................................................. 141
Chapter 7 Product Information
Printer Parts.......................................................................... 142
Printer Specifications.................................................................. 144
Mechanical...................................................................... 144
Electronic........................................................................ 147
Electrical........................................................................ 148
Environmental................................................................... 149
System Requirements.............................................................. 149
Paper........................................................................... 150
Recommended printable area....................................................... 154
Command Lists....................................................................... 156
Epson ESC/P control codes......................................................... 156
IBM PPDS emulation control codes.................................................. 157
Standards and Approvals. .............................................................. 158
Safety approvals................................................................... 159
Cleaning the Printer................................................................... 159
Transporting the Printer................................................................ 160
Contents 6
Page 7

Glossary
Index
LQ-590II/LQ-590IIN/LQ-2090II/LQ-2090IIN User’s Guide
Contents 7
Page 8

LQ-590II/LQ-590IIN/LQ-2090II/LQ-2090IIN User’s Guide
About This Manual
Where to Find Information
The following manuals are supplied with your Epson printer.
Start Here (paper manual)
Provides information on setting up the printer and installing the software.
User's Guide (this manual)
Provides overall information and instructions on using the printer.
Network Guide ( LQ-590IIN/ LQ-2090IIN only)
Provides network information on management and printer settings.
Descriptions Used in this Manual
❏ Screenshots of the printer software screens are from Windows 10 unless otherwise specified. The
content displayed on the screens varies depending on the model and situation.
❏ Illustrations of the printer used in this manual are examples only. Although there may be slight
differences depending on the model, the method of operation is the same.
Operating System Versions
In this manual, terms such as "Windows 10", "Windows 8.1", "Windows 8", "Windows 7", "Windows
Vista", "Windows XP", "Windows Server 2016", "Windows Server 2012 R2", "Windows Server 2012",
"Windows Server 2008 R2", "Windows Server 2008", "Windows Server 2003 R2", and "Windows
Server 2003" refer to the following operating system. Additionally, "Windows" is used to refer to all
versions.
❏ Microsoft
❏ Microsoft
❏ Microsoft
❏ Microsoft
Windows® 10 operating system
®
Windows® 8.1 operating system
®
Windows® 8 operating system
®
Windows® 7 operating system
®
About This Manual 8
Page 9

LQ-590II/LQ-590IIN/LQ-2090II/LQ-2090IIN User’s Guide
❏ Microsoft® Windows Vista® operating system
❏ Microsoft
❏ Microsoft
❏ Microsoft
❏ Microsoft
❏ Microsoft
❏ Microsoft
❏ Microsoft
❏ Microsoft
❏ Microsoft
Windows® XP operating system
®
Windows® XP Professional x64 Edition operating system
®
Windows Server® 2016 operating system
®
Windows Server® 2012 R2 operating system
®
Windows Server® 2012 operating system
®
Windows Server® 2008 R2 operating system
®
Windows Server® 2008 operating system
®
Windows Server® 2003 R2 operating system
®
Windows Server® 2003 operating system
®
About This Manual 9
Page 10

LQ-590II/LQ-590IIN/LQ-2090II/LQ-2090IIN User’s Guide
Safety Instructions
Safety Instructions
Warnings, Cautions, and Notes
Warnings
!
must be followed carefully to avoid bodily injury.
Cautions
!
must be observed to avoid damage to your equipment.
Notes
contain important information and useful tips on the operation of your printer.
Hot Parts Caution Symbol
This symbol is placed on the print head and other parts to indicate that they may be hot.
Never touch those parts just after the printer has been used. Let them cool for a few
minutes before touching them.
Important Safety Instructions
Read all of these safety instructions before using the printer. In addition, follow all warnings and
instructions marked on the printer itself.
Some of the symbols used on your printer are to ensure safety and proper use of the printer. Visit the
following Web site to learn the meaning of the symbols.
http://support.epson.net/symbols
When setting up the printer
❏ Do not place the printer on an unstable surface or near a radiator or heat source.
❏ Place the printer on a flat, stable surface. The printer will not operate properly if it is tilted or placed
at an angle.
Safety Instructions 10
Page 11

LQ-590II/LQ-590IIN/LQ-2090II/LQ-2090IIN User’s Guide
❏ Do not place this product on a soft, unstable surface like a bed or a sofa, or a small, enclosed area, as
this restricts ventilation.
❏ Do not block or cover the slots and openings in the printer’s cabinet, and do not insert objects
through the slots.
❏ Leave adequate room around the printer for easy operation and maintenance.
❏ Place the printer where you can easily connect it to a network interface cable, if necessary
(LQ-590IIN/LQ-2090IIN only).
❏ Use only the type of power source indicated on the printer’s label. If you are not sure of the power
supply specifications in your area, contact your local power company or consult your dealer.
❏ Connect all equipment to properly grounded electrical outlets. Avoid using outlets on the same
circuit as photocopiers or air control systems that regularly switch on and off.
❏ Do not use a damaged or frayed power cord.
❏ The power cord should be placed to avoid abrasions, cuts, fraying, crimping, kinking, and other
damage.
❏ If you use an extension cord with the printer, make sure the total ampere rating of all devices
plugged into the extension cord does not exceed the cord’s ampere rating. Also, make sure the total
ampere of all devices plugged into the electrical outlet does not exceed the electrical outlet’s
ampere rating.
❏ Use only the power cord that comes with this product. Use of another cord may result in fire or
electric shock.
❏ This product’s power cord is for use with this product only. Use with other equipment may result
in fire or electric shock.
❏ Be sure the AC power cord meets the relevant local safety standards.
❏ Avoid using or storing the printer in places subject to rapid changes in temperature and humidity.
Also keep it away from direct sunlight, strong light, heat sources, or excessive moisture or dust.
❏ Avoid places subject to shocks and vibrations.
❏ Place the printer near a wall outlet where you can easily unplug the power cord.
❏ Keep the entire computer system away from potential sources of electromagnetic interference,
such as loudspeakers or the base units of cordless telephones.
Safety Instructions 11
Page 12

LQ-590II/LQ-590IIN/LQ-2090II/LQ-2090IIN User’s Guide
❏ Avoid electrical outlets controlled by wall switches or automatic timers. An interruption in power
can erase information in the memory of your printer or computer. Also avoid outlets on the same
circuit as large motors or other appliances that can cause voltage fluctuations.
❏ Use a grounded power outlet; do not use an adapter plug.
❏ If you plan to use a printer stand, follow these guidelines:
- Use a stand that can support at least twice the weight of the printer.
- Never use a stand that tilts the printer. The printer should always be kept level.
- Position your printer’s power cord and interface cable so they do not interfere with paper
feeding. If possible, secure the cables to a leg of the printer stand.
When maintaining the printer
❏ Unplug the printer before cleaning it, and always clean it with a piece of damp cloth only.
❏ Do not spill liquid onto the printer.
❏ Do not attempt to service the printer yourself except as specifically explained in this guide.
❏ Unplug the printer and refer servicing to qualified service personnel under the following
conditions:
i. If the power cord or plug is damaged.
ii. If liquid has entered the printer.
iii. If the printer has been dropped or the cabinet damaged.
iv. If the printer does not operate normally or exhibits a distinct change in performance.
❏ Do not use aerosol blowers which contain flammable gas inside or around this product. Doing so
may cause fire.
❏ Adjust only those controls that are covered by the operating instructions.
❏ If you plan to use the printer in Germany, observe the following:
To provide adequate short-circuit protection and over-current protection for this printer, the
building installation must be protected by a 10- or 16-amp circuit breaker.
Bei Anschluss des Druckers an die Stromversorgung muss sichergestellt werden, dass die
Gebaudeinstallation mit einer 10A- oder 16 A-Sicherung abgesichert ist.
When Handling the paper
❏ Do not leave labels loaded in the printer between jobs; they may curl around the platen and jam
when you resume printing.
❏ Do not load paper that is curled or has been folded.
Safety Instructions 12
Page 13

LQ-590II/LQ-590IIN/LQ-2090II/LQ-2090IIN User’s Guide
When operating the printer
❏ Adjust only those controls that are covered in the user documentation. Improper adjustment of
other controls may result in damage requiring extensive repair by a qualified technician.
❏ Whenever you turn off the printer, wait at least five seconds before turning it back on; otherwise,
you may damage the printer.
❏ Do not turn off the printer while it is printing the self test. Always press the Pause button to stop
printing and then turn off the printer.
❏ Do not reconnect the power cord to an electrical outlet that has the wrong voltage for your printer.
❏ Never replace the print head yourself; you may damage the printer. Also, other parts of the printer
must be checked when the print head is replaced.
❏ You need to move the print head by hand to replace the ribbon cartridge. If you have just used the
printer, the print head may be hot; let it cool for a few minutes before touching it.
Restriction of use
When this product is used for applications requiring high reliability/safety such as transportation
devices related to aviation, rail, marine, automotive etc.; disaster prevention devices; various safety
devices etc.; or functional/precision devices etc., you should use this product only after giving
consideration to including fail-safes and redundancies into your design to maintain safety and total
system reliability. Because this product was not intended for use in applications requiring extremely
high reliability/safety such as aerospace equipment, main communication equipment, nuclear power
control equipment, or medical equipment related to direct medical care etc., please make your own
judgment on this product's suitability after a full evaluation.
For users in Russia, Belarus, and Kazakhstan
Customer information
The model complies with the Technical regulation of Customs Union "About the safety of low voltage
equipment" (TP TC 004/2011); with the Technical regulation of Customs Union "On Electromagnetic
Compatibility of Technical Devices" (TP TC 020/2011)
Manufacturer: SEIKO EPSON CORPORATION
Address: 3-5, Owa 3-chome, Suwa-shi, Nagano-ken 392-8502 Japan Telephone: 81-266-52-3131
Safety Instructions 13
Page 14

LQ-590II/LQ-590IIN/LQ-2090II/LQ-2090IIN User’s Guide
Official representative in CIS countries:
LLC "EPSON CIS"
Address: Moscow, 129110, ul. Schepkina, 42, Bldg. 2a, Fl. 3 Business Center Chaika Plaza
Telephone: +7 (495) 777-0355/56
web: http://www.epson.ru/
email: info_CIS@epson.ru
EPSON EUROPE B.V. MOSCOW REPRESENTATIVE OFFICE
Address: Moscow, 129110, ul. Schepkina, 42, Bldg. 2a, Fl. 3 Business Center Chaika Plaza
Telephone: +7 (495) 777-0355/56
web: http://www.epson.ru/
Production month and year: Labeled on the product with 8 numbers: YYYY.MM.DD
Country of production: Labeled on the product
For United Kingdom users
Use of options
Epson (UK) Limited shall not be liable against any damages or problems arising from the use of any
options or consumable products other than those designated as Original Epson Products or Epson
Approved Products by Epson (UK) Limited.
Safety information
Warning:
!
This appliance must be earthed. Refer to the rating plate for voltage and check that the appliance
voltage corresponds to the supply voltage.
Important:
The wires in the mains lead fitted to this appliance are coloured in accordance to the following code:
Green and yellow — Earth
Blue — Neutral
Brown — Live
Safety Instructions 14
Page 15

LQ-590II/LQ-590IIN/LQ-2090II/LQ-2090IIN User’s Guide
If you have to fit a plug:
As the colours of the mains lead of this appliance may not match coloured markings used to identify
the terminals in a plug, please proceed as follows:
The green and yellow wire must be connected to the terminal in the plug which is marked with the
letter E or the Earth symbol (G).
The blue wire must be connected to the terminal in the plug marked with the letter N.
The brown wire must be connected to the terminal in the plug marked with the letter L.
If damage occurs to the plug, replace the cord set or consult a qualified electrician.
Replace fuses only with a fuse of the correct size and rating.
For Singapore users
Replace fuses only with fuses of the correct size and rating.
For German users
Maschinenlärminformations-Verordnung 3. GPSGV: Der höchste Schalldruckpegel beträgt 70
dB(A) oder weniger gemäss EN ISO 7779.
Das Gerät ist nicht für die Benutzung am Bildschirmarbeitsplatz gemäß BildscharbV vorgesehen.
Importeur
EPSON EUROPE. B.V.
AMSTERDAM. THE NETHERLANDS
For Turkish users
Safety Instructions 15
Page 16

LQ-590II/LQ-590IIN/LQ-2090II/LQ-2090IIN User’s Guide
Chapter 1
Paper Handling
Selecting a Paper Source
Your printer provides a variety of paper sources for printing on single sheets and continuous paper.
Paper can be fed into the printer from the front, bottom, or rear. Select the paper source that best suits
your current printing needs.
Caution:
!
Do not use paper that is folded, creased, curled, torn, stained, or stamped. Always use new, clean
paper that meets the paper specifications. See “Paper” on page 150 for more details.
Printing on continuous paper
You can choose from three tractor positions (front push, rear push, and pull) and three paper entry
slots (front, rear, and bottom) for continuous paper printing. This section helps you determine which
paper paths and tractor positions are best for your continuous paper printing needs. See “Loading
continuous paper with the tractor” on page 21 for tractor installation and paper loading
instructions.
Using the push tractor positions
If you often need to tear off sheets of continuous paper (for example, if you are printing purchase
orders or sales slips), it is best to use the tractor in the front or rear push position. This allows you to use
the printer’s tear-off edge to easily tear off sheets of continuous paper at the perforation. Also, when
continuous paper is loaded on a rear push tractor, you can print on single sheets of paper from the
sheet guide without removing the continuous paper from the tractor.
There are two push tractor positions: front and rear. See the table below for details about the push
positions and the corresponding paper paths.
Paper Handling 16
Page 17

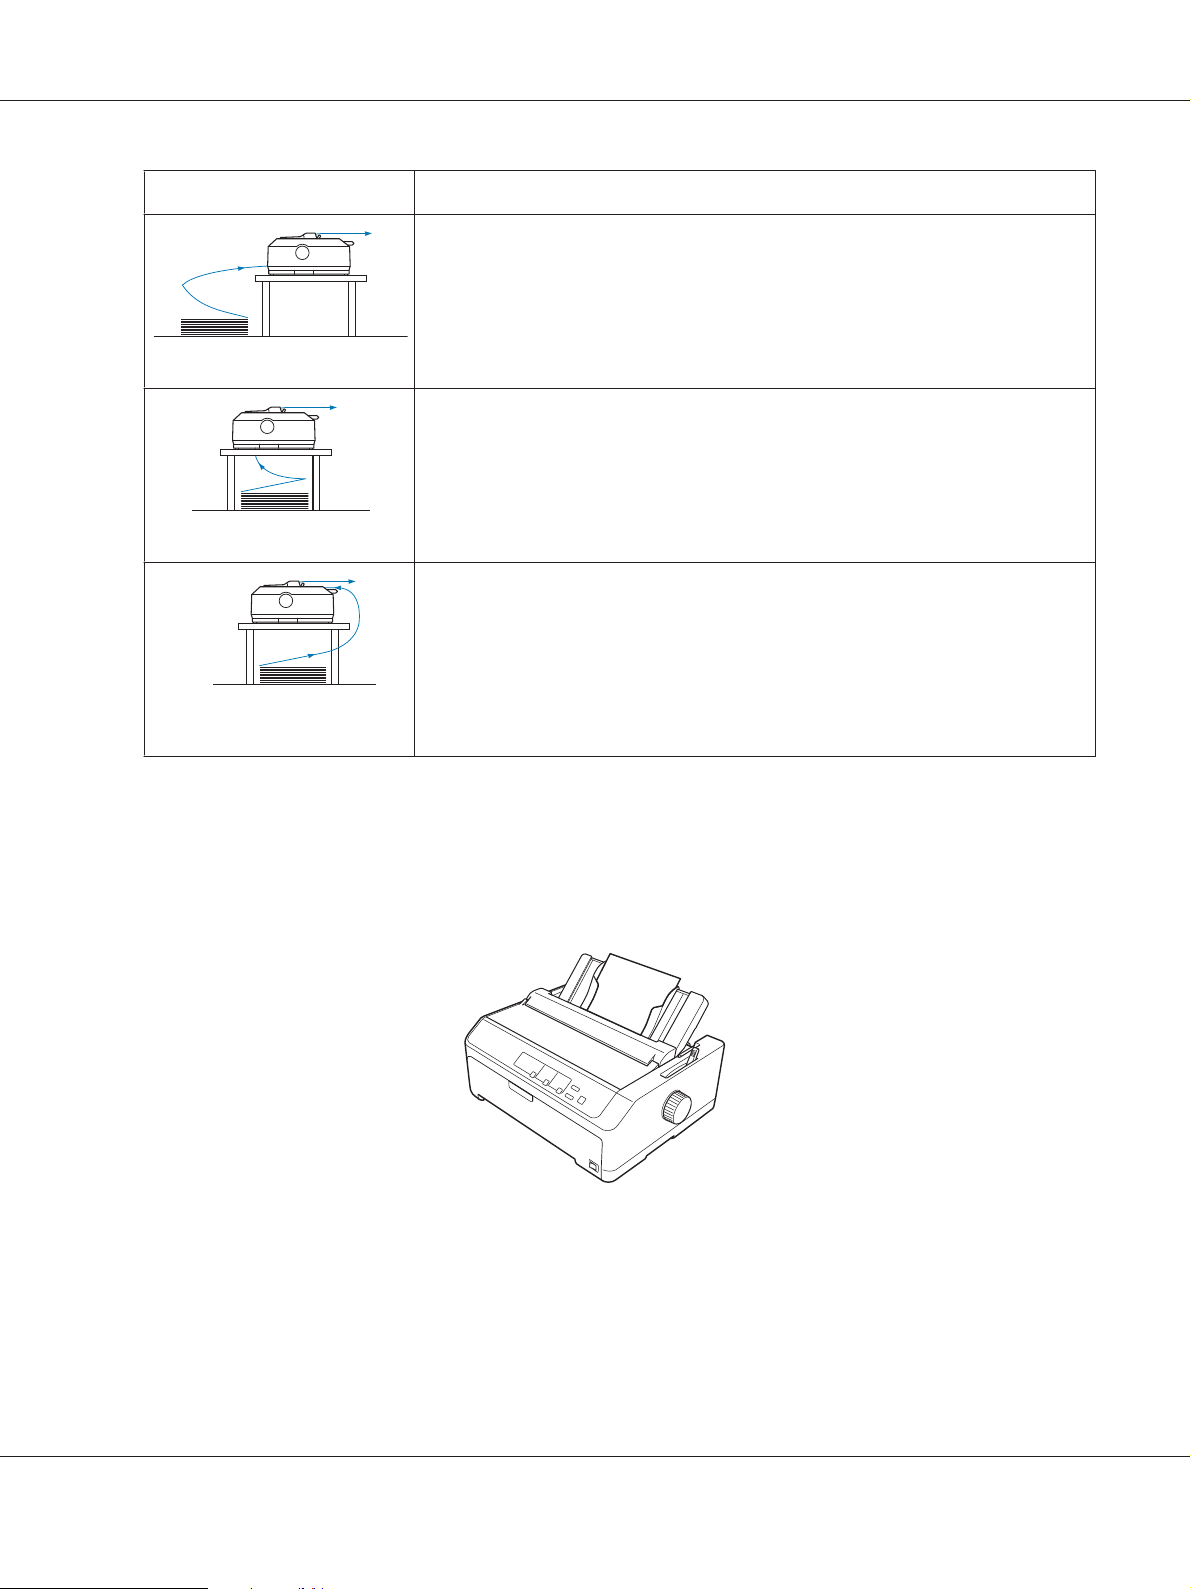
Tractor position Description
Load paper from the front slot.
If you print on thick paper such as multipart forms, use the front paper slot because
this paper path is almost straight. This reduces the chances of paper jams.
front push
Load paper from the rear slot.
Caution:
Do not load continuous paper with labels from the rear slot. Labels require a straight
paper path; otherwise the labels may come off their backing sheets inside the printer
and cause a paper jam.
rear push
Note:
The rear slot is also not recommended when your multipart forms have 5 or 6 parts (1
original plus 4 or 5 copies), because paper might jam.
LQ-590II/LQ-590IIN/LQ-2090II/LQ-2090IIN User’s Guide
Using the pull tractor position
If you often print on thick or heavy continuous paper, such as multipart forms or continuous paper
with labels, use the tractor in the pull position. The pull tractor provides you with the best paper jam
prevention, and allows you to load continuous paper from the front, rear, or bottom of the printer.
However, you cannot use the tear-off feature when the tractor is in the pull position.
Note:
To use the tractor in the pull position, you can remove the tractor from the rear push position and
reinstall it in the pull position, or you can purchase the optional pull tractor unit.
LQ-590II/LQ-590IIN: C933761
LQ-2090II/LQ-2090IIN: C933791
If you use a push tractor with the optional tractor in the pull position, you can create a push/pull
tractor combination. This improves the performance of continuous paper, and is recommended for
printing on continuous pre-printed forms. See “Using two tractors in a push/pull combination” on
page 40 for more information.
You can use the front, bottom, or rear paper slot with the pull tractor.
Paper Handling 17
Page 18
Paper slot Description
If you print on thick paper such as multipart forms or continuous paper with labels,
use the front paper slot because this paper path is nearly straight. This reduces the
chances of paper jams.
front
The bottom paper slot has the straightest paper path, so it is the best slot to use when
printing on thick paper, such as multipart forms or continuous paper with labels.
Note:
When loading paper from the bottom slot, be sure to use a printer stand with an
opening large enough for the paper to feed through it without obstruction.
bottom
If the front or bottom paper slot is unavailable, you can also load ordinary continuous
paper from the rear slot. Please note that loading paper from the rear slot results in a
curved paper path, which may affect loading performance, so use the front or bottom
slot whenever possible.
LQ-590II/LQ-590IIN/LQ-2090II/LQ-2090IIN User’s Guide
Caution:
rear
Do not lo ad con tinuo us pap er wit h labe ls fro m the r ear sl ot. The la bels m ay com e off
the backing sheets inside the printer and cause a paper jam.
Printing on single sheets (cut-sheet)
You can load ordinary single sheets and envelopes one at a time from the rear paper entry slot of the
printer, using the sheet guide.
You can also load a stack of single-sheet paper using the optional cut-sheet feeder. See “Loading Single
Sheets” on page 44 for more information. See “Cut-Sheet Feeder” on page 126 for information on
the optional cut-sheet feeder.
Paper Handling 18
Page 19

LQ-590II/LQ-590IIN/LQ-2090II/LQ-2090IIN User’s Guide
Setting the Paper Release Lever
When you load continuous paper in the printer, you need to set the paper release lever to indicate the
paper source you want to use, as described in the table below.
The table below describes each paper release lever position.
Paper release
lever position
Description
Single-sheet (cut-sheet) position
For loading single-sheet paper from the rear or front slot. See “Loading Single Sheets” on page 44
for instructions.
Rear push tractor position
For loading continuous paper using the tractor installed in the rear push position. Also set the lever
to this position when using the rear push and pull tractors in combination.
Front push tractor position
For loading continuous paper using the tractor installed in the front push position. Also set the lever
to this position when using the front push and pull tractors in combination.
Pull tractor position
For loading continuous paper from the tractor installed on top of the printer in the pull position.
When the tractor is in the pull position, you can load paper in the front, rear, or bottom slot.
Adjusting the Paper Thickness Lever
You can get the best printing quality by adjusting the paper-thickness lever according to the thickness
of the paper you are using.
Paper Handling 19
Page 20

LQ-590II/LQ-590IIN/LQ-2090II/LQ-2090IIN User’s Guide
1. Turn off the printer and open the printer cover. The paper-thickness lever is located on the left side
of the printer. The numbers next to the lever indicate the thickness setting.
2. Use the table below to select the appropriate paper thickness.
Paper type*
1
Paper-thickness lever
position
Ordinary paper Single sheets 0 or 1
Continuous paper 0
Thin paper 0
Multipart forms*
2
2 parts (original + 1 copy) 1
(carbonless, 40 g/m)
3 parts (original + 2 copies) 2
4 parts (original + 3 copies) 3
5 parts (original + 4 copies) 4
6 parts (original + 5 copies) 5 or 6
7 parts (original + 6 copies)*
3
6 or 7
Labels 1
Cards 2
Envelopes*
2
20 lb 4
24 lb 6
*1 See the paper specifications in “Paper” on page 150 for more details.
2
Change the lever position to one level down if the printed results are too light. Change the lever position to one level
*
up if the printed results are dirty or smeared.
3
*
Available when using a bottom pull position or front pull position.
Paper Handling 20
Page 21

LQ-590II/LQ-590IIN/LQ-2090II/LQ-2090IIN User’s Guide
Loading Continuous Paper
Follow the instructions in this section to load continuous paper in the printer.
Positioning your continuous paper supply
Wh en you lo ad co nt in uo us pa pe r, ma ke su re yo u a li gn your paper supply with the tractor so the paper
feeds smoothly into the printer, as shown below.
Loading continuous paper with the tractor
The paper loading procedure depends on where you position the tractor which feeds paper to the
printer. Follow the instructions below for your tractor position.
This section provides instructions of following:
- “Using the tractor in the rear push position” on page 21
- “Using the tractor in the front push position” on page 26
- “Using the tractor in the pull position” on page 31
- “Using two tractors in a push/pull combination” on page 40
Using the tractor in the rear push position
If your tractor is in the rear push position, skip to “Loading paper with the rear push tractor” on
page 22 for instructions on loading paper.
This section provides instructions for following:
- “Installing the tractor in the rear push position” on page 22
- “Loading paper with the rear push tractor” on page 22
- “Removing the tractor from the rear push position” on page 25
Note:
Thick paper, such as continuous paper with labels or multipart forms with five or six parts, requires a
relatively straight paper path to avoid paper jams. When printing on thick continuous paper, use the
tractor in the front push position or the pull position.
Paper Handling 21
Page 22

LQ-590II/LQ-590IIN/LQ-2090II/LQ-2090IIN User’s Guide
Installing the tractor in the rear push position
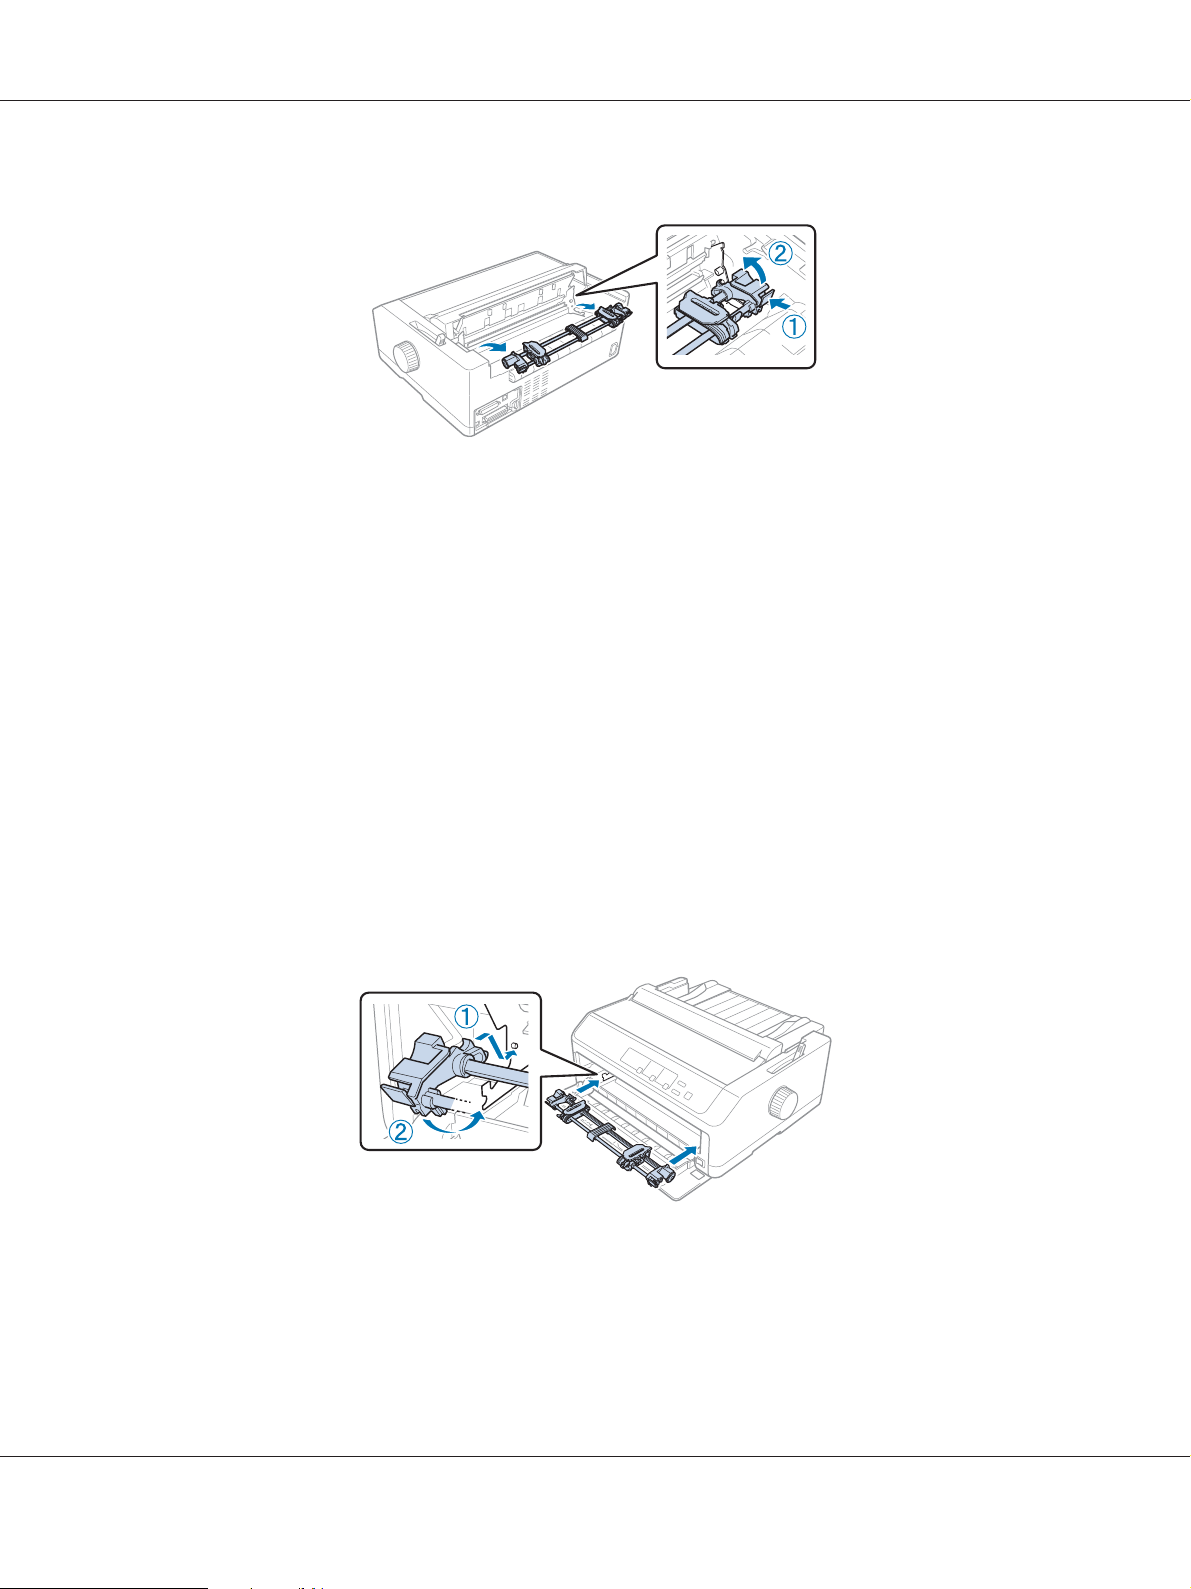
Before installing the tractor in the r ea r pu sh po si ti on , r em ov e i t f ro m its current position. If the tractor
is in the front push position, remove it by pressing the tractor’s lock tabs while lifting it out. If the
tractor is in the pull position, remove it as described in “Removing the tractor from the rear push
position” on page 25.
1. Make sure the printer is turned off. Then open the paper guide cover by pulling its back edge
forward.
2. Slide the sheet guide along the path and lift it at an angle to remove it.
3. Lower the tractor into the printer’s mounting slots and press down both ends of the tractor to
make sure that it is firmly seated.
See “Loading paper with the rear push tractor” on page 22 for instructions on loading continuous
paper using the rear push tractor.
Loading paper with the rear push tractor
Follow these steps to load paper using the rear push tractor:
1. Make sure the printer is turned off.
Paper Handling 22
Page 23

LQ-590II/LQ-590IIN/LQ-2090II/LQ-2090IIN User’s Guide
2. Make sure the tractor is installed in the rear push position and the sheet guide is removed from the
printer.
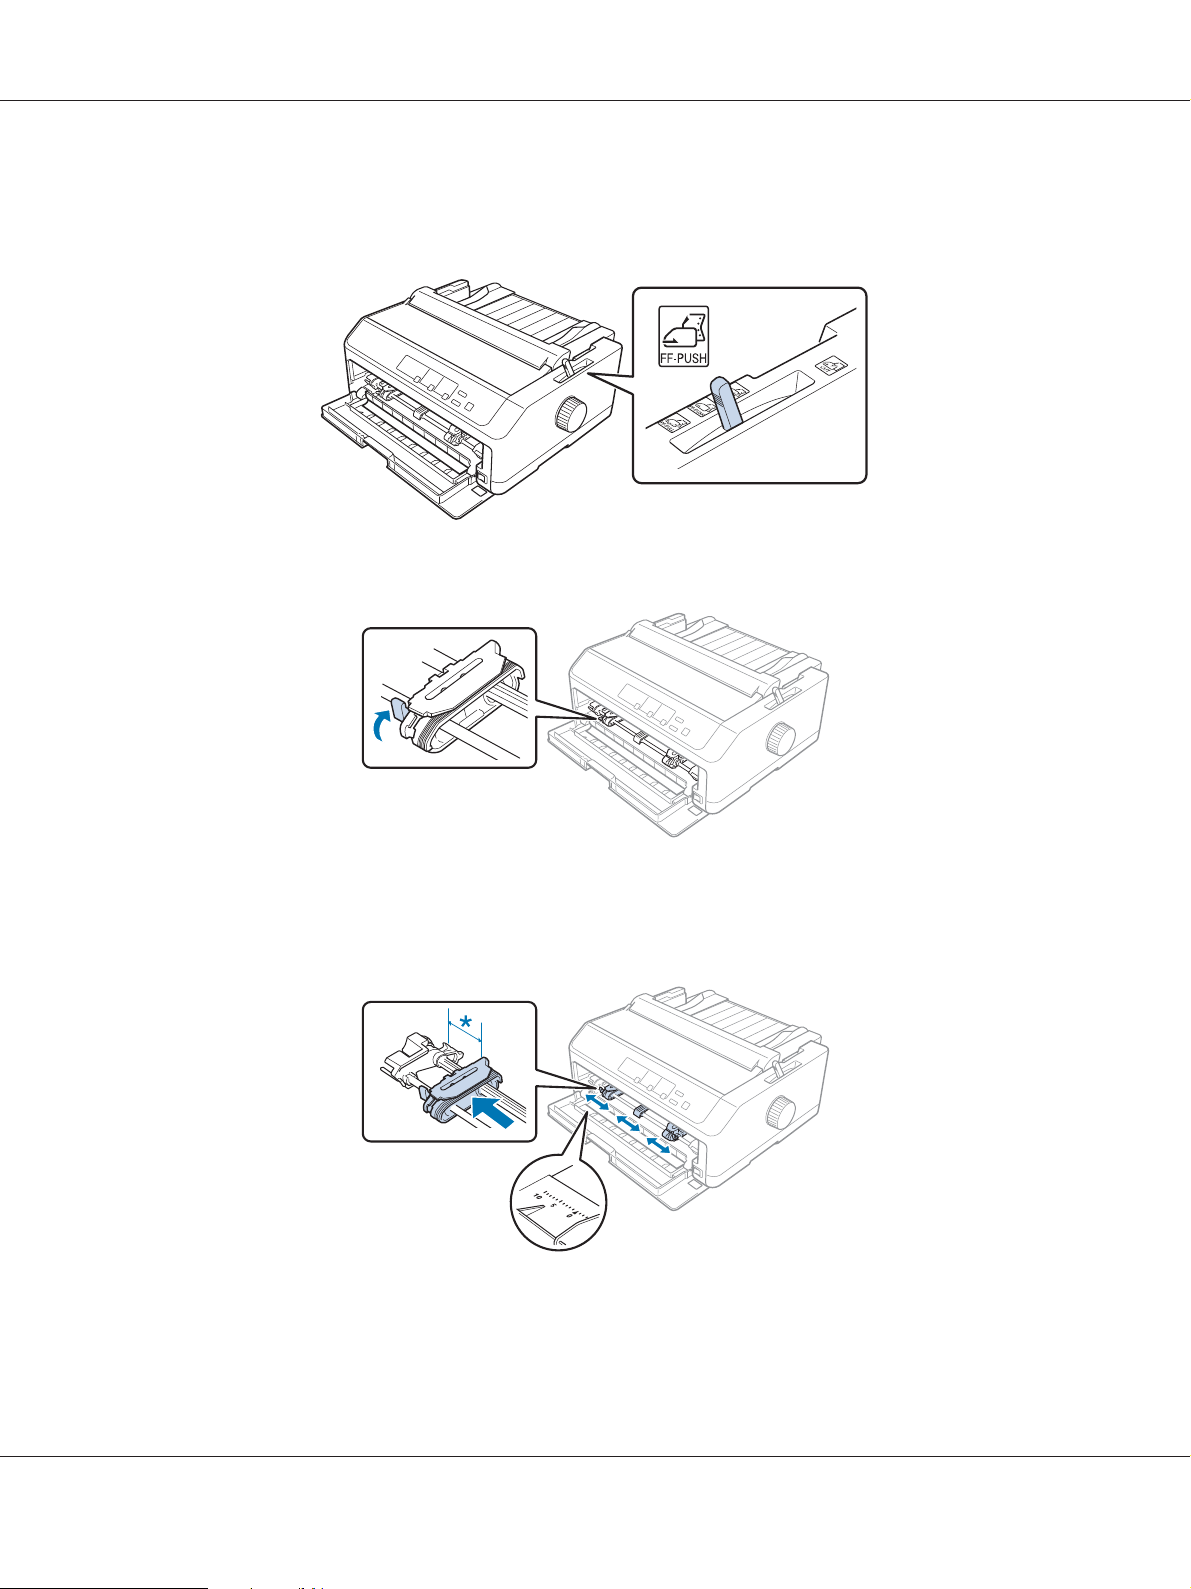
3. Set the paper release lever to the rear push tractor position.
4. Release the left and right sprockets by pulling the blue sprocket lock levers forward.
Paper Handling 23
Page 24
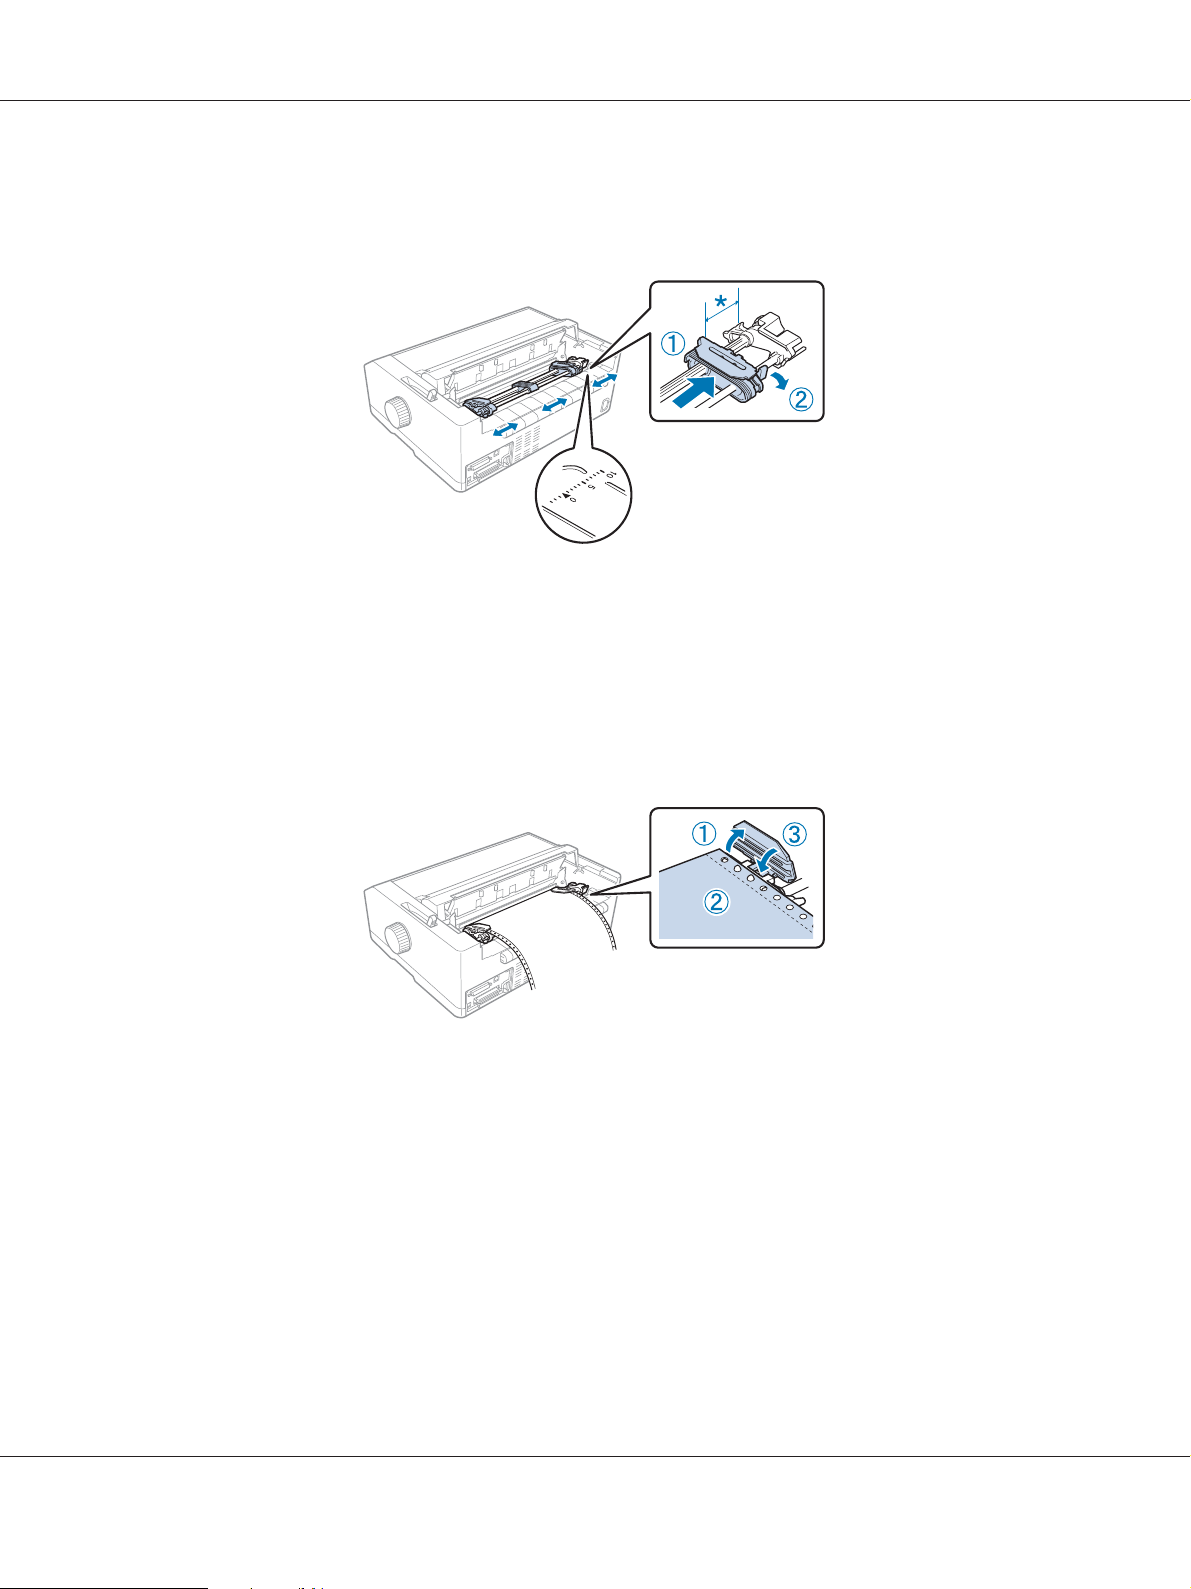
LQ-590II/LQ-590IIN/LQ-2090II/LQ-2090IIN User’s Guide
5. Slide the right sprocket (illustration shown below) approximately 12 mm (0.5 inch) from the far
position and push the blue lever back to lo ck in p la ce . Then slide the another sprocket to match the
width of your paper, but do not lock it.
* approx. 12 mm (0.5 inch)
The triangle mark on top of the printer indicates the point furthest to the left where printing can
begin.
6. Make sure your paper has a clean, straight edge. Then open both sprocket covers and fit the first
four holes of the paper, with the printable side down, over the tractor pins.
7. Close the sprocket covers.
8. Slide the right sprocket to remove any slack in the paper; then lock it in place by pushing the blue
sprocket lock down.
Paper Handling 24
Page 25
LQ-590II/LQ-590IIN/LQ-2090II/LQ-2090IIN User’s Guide
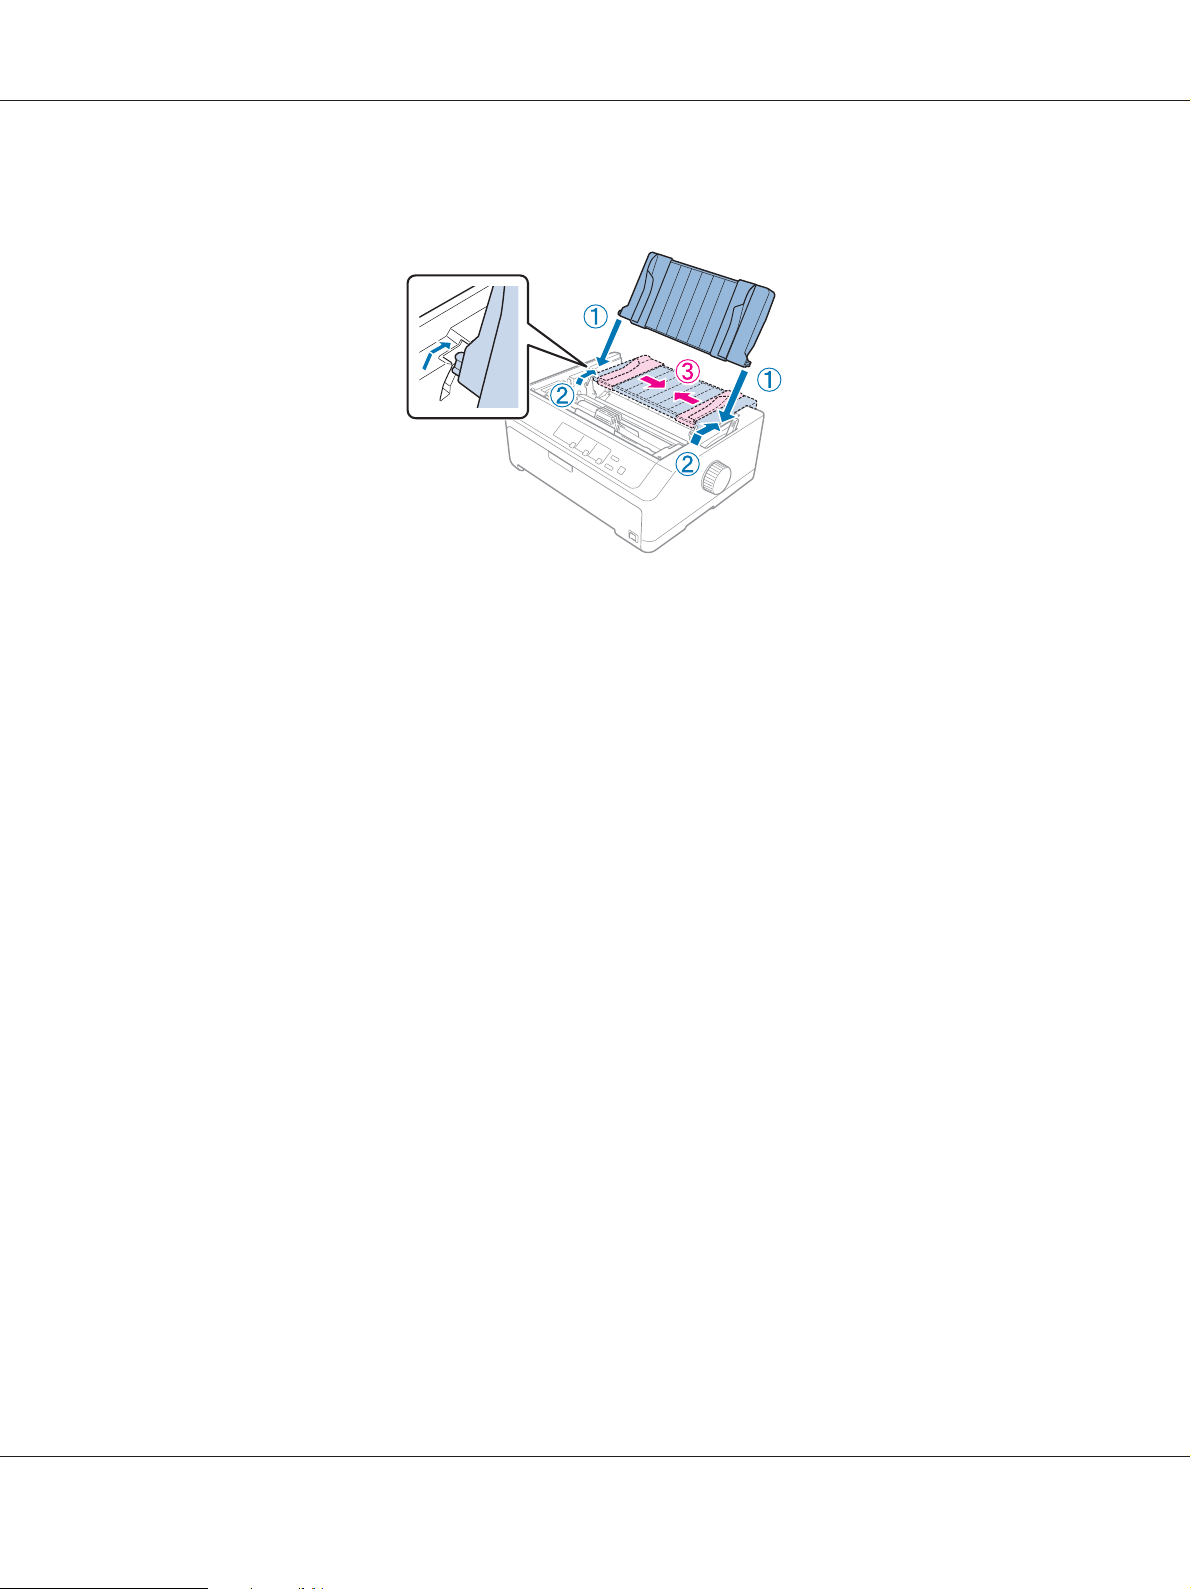
9. Attach the sheet guide and lay it flat on the printer and slide the edge guides to the middle of the
sheet guide.
Note:
For your safety, Epson recommends operating the printer with the printer cover closed. The printer
will function with the printer cover opened or removed, but maximum safety and print speed are
achieved when the cover is closed.
10. Turn on the printer. When the printer receives data, it automatically loads the paper and starts
printing.
11. After you finish printing, follow the steps in “Removing continuous paper” on page 42 to remove
your printed document.
If the first line on your page appears too high or low, you can change its position using the Micro
Adjust function as described in “Adjusting the top-of-form position” on page 56.
Caution:
!
Never use the knob to adjust the top-of-form position; this may damage the printer or cause it to
lose the top-of-form position.
Removing the tractor from the rear push position
Follow these steps to remove the tractor from the rear push position:
1. Make sure the printer is turned off.
2. Remove any paper from the tractor as described in “Removing continuous paper” on page 42.
Paper Handling 25
Page 26
LQ-590II/LQ-590IIN/LQ-2090II/LQ-2090IIN User’s Guide
3. Press the tractor’s lock tabs, tilt the tractor up, and lift it out of the printer.
Using the tractor in the front push position
Installing the tractor in the front push position
Before installing the tractor in the front push position, remove it from its current position. If the
tractor is in the rear push position, remove the sheet guide and then press the tractor’s lock tabs while
lifting it out. If the tractor is in the pull position, remove it following the instructions in “Removing the
tractor from the pull position” on page 38.
1. Make sure the printer is turned off. If necessary, install the sheet guide on your printer as described
in the supplied setup sheet.
2. If the sheet guide is installed in the front, remove it by grasping the fins on both sides and pulling
the guide slightly up and away from the printer.
3. Insert the tractor into the printer’s mounting slots and press down both ends of the tractor to make
sure that it is firmly seated.
See “Loading paper with the front push tractor” on page 27 for instructions on loading continuous
paper with the front push tractor.
Paper Handling 26
Page 27

LQ-590II/LQ-590IIN/LQ-2090II/LQ-2090IIN User’s Guide
Loading paper with the front push tractor
When using the push tractor, it is a good idea to set the Auto tear-off function in the Default Setting
mode to On. See “About Your Printer’s Default Settings” on page 92 for more information.
Follow these steps to load paper using the front push tractor:
1. Make sure the printer is turned off.
2. Open the front cover. Make sure the tractor is installed in the front push position.
3. Remove the sub cover to insert the paper.
Paper Handling 27
Page 28
LQ-590II/LQ-590IIN/LQ-2090II/LQ-2090IIN User’s Guide
4. Set the paper release lever to the front push tractor position. Also set the paper-thickness lever
(located under the printer cover) to the proper position for your paper’s thickness. See “Adjusting
the Paper Thickness Lever” on page 19 for instructions.
5. Release the left and right sprockets by pushing the blue sprocket lock levers backward.
6. Slide the left sprocket approximately 12 mm (0.5 inch) from the far left position and pull the blue
lever forward to lock it in place. Then slide the right sprocket to match the width of your paper, but
do not lock it.
* approx. 12 mm (0.5 inch)
Paper Handling 28
Page 29

LQ-590II/LQ-590IIN/LQ-2090II/LQ-2090IIN User’s Guide
7. Insert the paper into the bottom slot as shown in the illustration below.
8. Make sure your paper has a clean, straight edge. Then open both sprocket covers and fit the first
four holes of the paper, with printable side up, over the tractor pins. Then close the sprocket
covers.
9. Slide the right sprocket to remove any slack in the paper; then lock it in place by pushing the
sprocket lock down.
10. Close the front cover with the continuous paper positioned as shown below.
11. Make sure the sheet guide is lying flat on the printer and slide the edge guides to the middle of the
sheet guide.
Paper Handling 29
Page 30
LQ-590II/LQ-590IIN/LQ-2090II/LQ-2090IIN User’s Guide
Note:
For your safety, Epson recommends operating the printer with the printer cover closed. The printer
will function with the printer cover opened or removed, but maximum safety and print speed are
achieved when the cover is closed.
12. Turn on the printer. When the printer receives data, it automatically loads the paper and starts
printing.
13. After you finish printing, follow the steps in “Removing continuous paper” on page 42 to remove
your printed document.
If the first line on your page appears too high or low, you can change its position by using the Micro
Adjust function as described in “Adjusting the top-of-form position” on page 56.
Caution:
!
Never use the knob to adjust the top-of-form position; this may damage the printer or cause it to
lose the top-of-form position.
Removing the tractor from the front push position
Follow these steps to remove the tractor from the front push position:
1. Make sure the printer is turned off.
2. Remove any paper from the tractor as described in “Removing continuous paper” on page 42.
3. Press the tractor’s lock tabs, tilt the tractor up, and lift it out of the printer.
Paper Handling 30
Page 31

LQ-590II/LQ-590IIN/LQ-2090II/LQ-2090IIN User’s Guide
4. Close the front cover.
Using the tractor in the pull position
Using the tractor in the pull position is ideal for printing on thick and heavy continuous paper, such as
multipart forms or continuous paper with labels. However, you cannot use the tear-off function with
the pull tractor.
Because thick paper requires a straight paper path to avoid paper jams, you should load paper in the
front or bottom slot when using the pull tractor. To further reduce the chances of paper jams and
improve the performance of continuous paper, you can use two tractors in combination. See “Using
two tractors in a push/pull combination” on page 40 for more information.
This section provides instructions of following:
- “Installing the tractor in the pull position” on page 31
- “Loading paper with the pull tractor” on page 33
- “Removing the tractor from the pull position” on page 38
Installing the tractor in the pull position
Before installing the tractor in the pull position, remove it from its current position. If the tractor is in
the front push position, remove it by pressing the tractor’s lock tabs while lifting it out. If the tractor is
in the rear push position, remove the sheet guide and then press the tractor’s lock tabs while lifting it
out.
Note:
If you plan to load paper from the rear, you need to insert the paper into the paper path before installing
the sheet guide and tractor. See “Loading paper with the pull tractor” on page 33 for instructions.
Paper Handling 31
Page 32

LQ-590II/LQ-590IIN/LQ-2090II/LQ-2090IIN User’s Guide
1. Make sure the printer is turned off. Then open the paper guide cover by pulling its back edge
forward.
2. Lift the printer cover and pull it straight up.
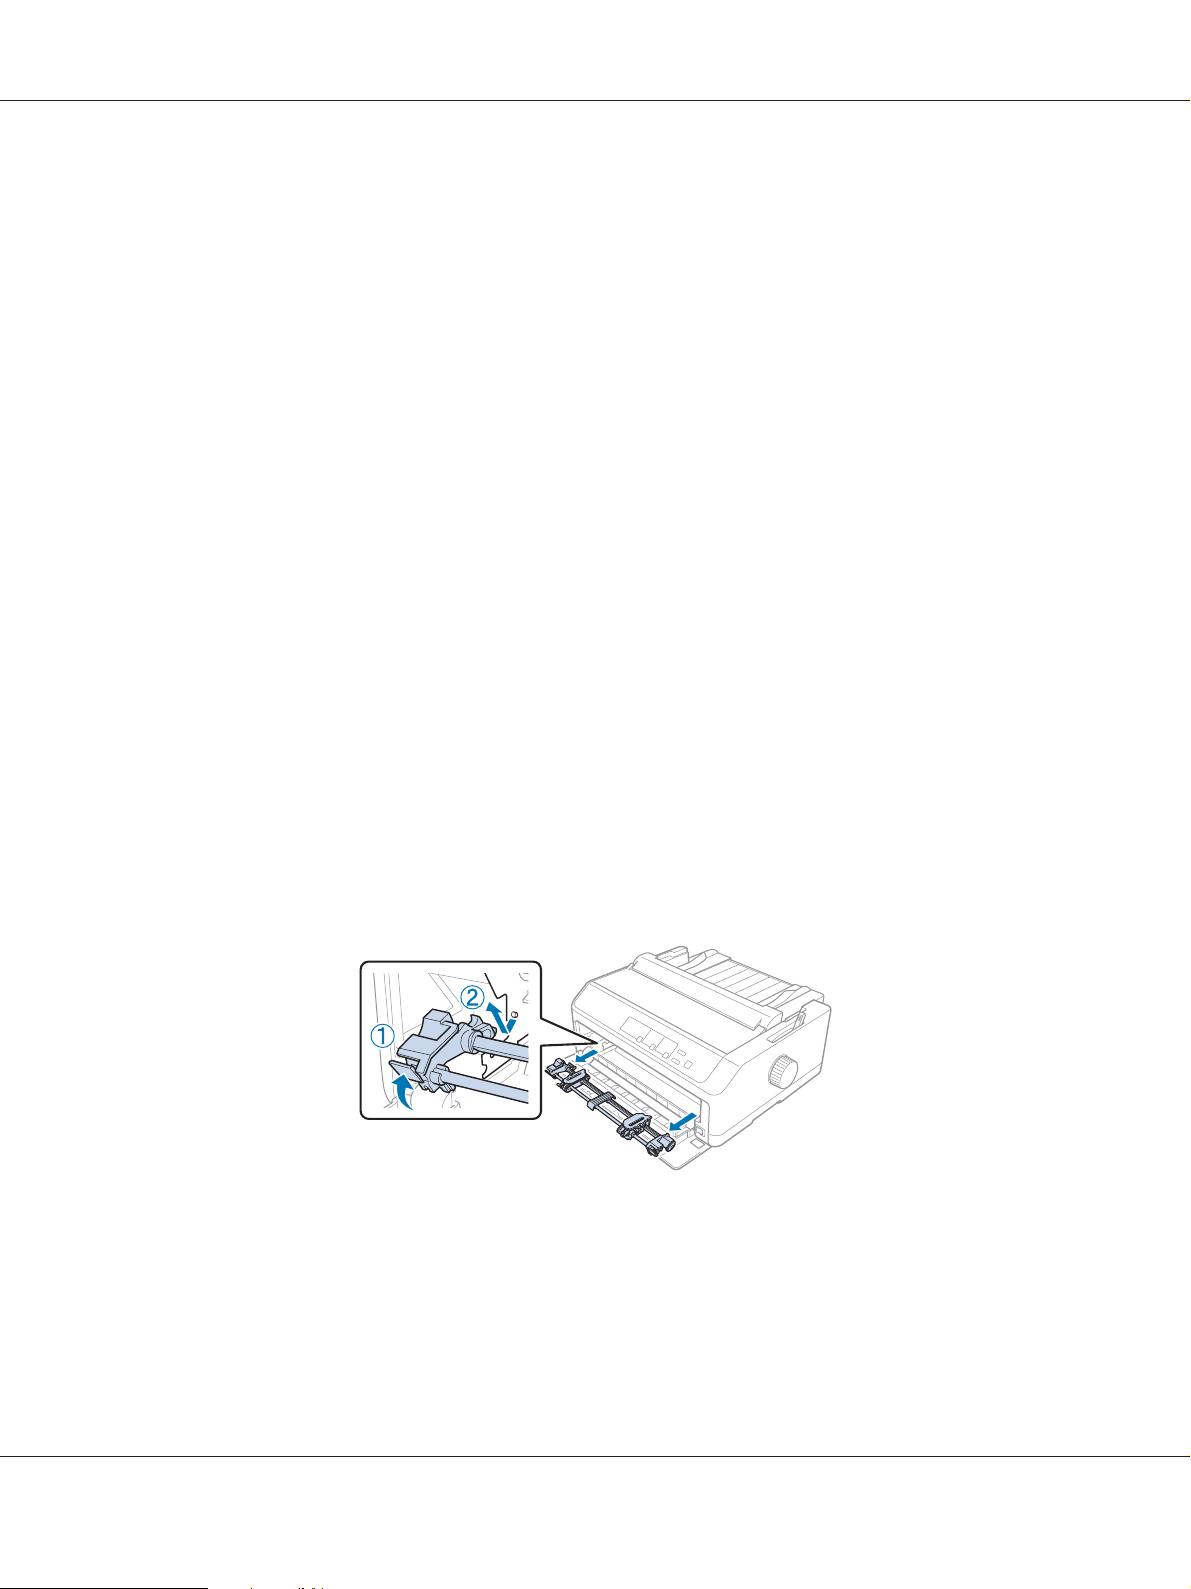
3. Press the tabs on each side of the paper tension unit upward and pull it towards you. Store the
paper tension unit in a safe place.
Paper Handling 32
Page 33

LQ-590II/LQ-590IIN/LQ-2090II/LQ-2090IIN User’s Guide
4. Attach the sheet guide if necessary then lay it flat on the printer. Then slide the edge guides to the
middle of the sheet guide.
5. While pinching the tractor's lock tabs with your fingers, lower the tractor into the printer's
mounting slots, and then press down both ends of the tractor to make sure it is firmly seated.
Loading paper with the pull tractor
Follow these steps to load paper using the pull tractor:
Paper Handling 33
Page 34

LQ-590II/LQ-590IIN/LQ-2090II/LQ-2090IIN User’s Guide
1. Before loading a paper, make sure the following:
- the printer is turned off
- the printer cover is removed
- the tractor is installed in the pull position
- the sheet guide is lying flat on the printer
2. Set the paper release lever to the pull tractor position.
3. Release the sprockets by pulling the sprocket lock levers forward.
Paper Handling 34
Page 35

LQ-590II/LQ-590IIN/LQ-2090II/LQ-2090IIN User’s Guide
4. Slide the left sprocket approximately 12 mm (0.5 inch) from the far left position and push the lever
back to lock it in place. Then slide the right sprocket to match the width of your paper, but do not
lock it.
* approx. 12 mm (0.5 inch)
5. Make sure your paper has a clean, straight edge. Then open the sprocket covers.
Note:
Make sure the printer is off before you insert the paper in the paper slot. If you insert the paper while it
is on, a paper jam may occur.
6. Insert the paper into the rear, front, or bottom paper slot as shown in the illustration below until it
emerges between the platen and the ribbon guide. Then pull up the paper until the perforation
between the first and second pages is even with the top of the printer’s ribbon.
Rear slot:
Load paper in the rear slot with the printable side facing up.
Paper Handling 35
Page 36

LQ-590II/LQ-590IIN/LQ-2090II/LQ-2090IIN User’s Guide
Front slot:
Load paper with the printable side facing up.
Bottom slot:
Load paper in the bottom slot with the printable side facing up.
7. Fit four holes of the paper over the tractor pins on both sprockets. Then close the sprocket covers.
8. Slide the right sprocket to remove any slack in the paper, then lock it in place.
Paper Handling 36
Page 37

LQ-590II/LQ-590IIN/LQ-2090II/LQ-2090IIN User’s Guide
9. Slide the edge guides on the sheet guide to the center.
10. Close the front cover as shown below.
Note:
When using the bottom slot, you do not need to open the front cover.
11. Turn on the printer.
12. Remove any slack in the paper by pressing the LF/FF button.
Caution:
!
Always remove any slack from the paper; otherwise print quality may deteriorate.
13. If necessary, follow the steps in “Adjusting the top-of-form position” on page 56 to adjust the
current position of the paper.
Caution:
!
Never use the knob to adjust the top-of-form position; this may damage the printer or cause it
to lose the top-of-form position.
14. Attach the printer cover by inserting the front tabs into the slots on the printer, then lowering the
cover into place. Then close the paper guide cover.
Paper Handling 37
Page 38

LQ-590II/LQ-590IIN/LQ-2090II/LQ-2090IIN User’s Guide
Note:
For your safety, Epson recommends operating the printer with the printer cover closed. The printer
will function with the printer cover opened or removed, but maximum safety and print speed are
achieved when the cover is closed.
15. The printer starts printing from the top-of-form position. After you finish printing, open the
paper guide cover.
Removing paper from the pull tractor
Follow these steps to remove continuous paper from the pull tractor:
1. After you finish printing, tear off the paper supply at the perforation nearest the paper entry slot.
2. To feed paper forward and eject it, hold down the LF/FF button.
Caution:
!
Never press the Load/Eject or Tear Off/Bin button when you are using the pull tractor; the
paper could come off the pull tractor and jam the printer.
Removing the tractor from the pull position
Follow these steps to remove the tractor from the pull position:
Paper Handling 38
Page 39

LQ-590II/LQ-590IIN/LQ-2090II/LQ-2090IIN User’s Guide
1. Remove any paper loaded on the pull tractor as described in “Removing paper from the pull
tractor” on page 38.
2. Make sure the printer is turned off. Then open the paper guide cover by pulling its back edge
toward you.
3. Lift the printer cover and pull it straight up and off the printer.
4. Press the tractor’s lock tabs, tilt the tractor toward you, and lift it off the printer.
5. Store the tractor in a safe place, or install it in the front or rear push position as described in “Using
the tractor in the front push position” on page 26 or “Using the tractor in the rear push position” on
page 21.
6. Reinstall the paper tension unit by lower it onto the printer’s mounting pegs. Then press down on
both ends of the unit until it clicks into place.
7. Replace the printer cover.
Paper Handling 39
Page 40

LQ-590II/LQ-590IIN/LQ-2090II/LQ-2090IIN User’s Guide
Using two tractors in a push/pull combination
Using two tractors at the same time is recommended for printing on continuous pre-printed forms,
multipart forms, and labels, and for printing high quality graphics. To reduce paper jams and improve
continuous paper feeding, you can install the optional pull tractor unit.
LQ-590II/LQ-590IIN: C933761
LQ-2090II/LQ-2090IIN: C933791
Follow these steps to use two tractors at the same time:
1. Install one tractor in the front or rear push position as described in “Installing the tractor in the
front push position” on page 26 or “Installing the tractor in the rear push position” on page 22.
2. Load continuous paper using the front or rear push tractor as described in “Loading paper with the
front push tractor” on page 27 or “Loading paper with the rear push tractor” on page 22.
3. Set the paper release lever to the front or rear push position, depending on the position of your
push tractor.
4. Turn on the printer and press the Load/Eject button to advance the paper to the top-of-form
position. Then press the LF/FF button until the perforation between the first and second pages is
even with the top of the printer’s ribbon.
Caution:
!
Never use the knob to move the paper; this may damage the printer or cause it to lose the
top-of-form position.
5. Install the other tractor in the pull position as described in “Installing the tractor in the pull
position” on page 31.
6. Fit the holes of the paper over the pins on both sprockets of the pull tractor.
Caution:
!
Do not pull up the paper by hand to fit it on the pull tractor; this may damage the printer. Press
the LF/FF button to move the paper.
7. Set the paper release lever to the pull tractor position. Then use the Micro Adjust function
(described in “Using the Micro Adjust Function” on page 55) to remove any slack in the paper
between the push and pull tractors.
8. Move the paper release lever back to the position you set in step 3.
Paper Handling 40
Page 41

LQ-590II/LQ-590IIN/LQ-2090II/LQ-2090IIN User’s Guide
9. When the printer receives data, it will start printing at the current position without advancing the
paper. If necessary, follow the steps in “Adjusting the top-of-form position” on page 56 to adjust
the current position of the paper.
10. Attach the printer cover. Make sure the sheet guide is installed and lying flat on the printer.
Note:
For your safety, Epson recommends operating the printer with the printer cover closed. The printer
will function with the printer cover opened or removed, but maximum safety and print speed are
achieved when the cover is closed.
11. The printing starts from the current position without advancing the paper. After you finish
printing, tear off the printed document at the perforation nearest the paper exit slot.
The table below summarizes the various methods of feeding continuous paper with two tractors and
shows which paper release lever setting to use for each method.
Tractor positions Paper release lever
position
Pull + front push Front push tractor
Pull + rear push Rear push tractor
Front push + rear
push
Front push tractor
Rear push tractor
Paper path
Paper Handling 41
Page 42

LQ-590II/LQ-590IIN/LQ-2090II/LQ-2090IIN User’s Guide
Using the tear-off function
If the push tractor is installed, you can use the tear-off function to advance your continuous paper to
the printer’s tear-off edge when you finish printing. You can then easily tear off the printed document.
When you resume printing, the printer automatically feeds the paper back to the top-of-form position
so that you can save the paper normally lost between documents.
Removing continuous paper
You can remove continuous paper using the tear-off function in two ways:
❏ Manually: Press the Tear Off/Bin button
❏ Automatically: Turn on auto tear-off mode
The Tear Off/Bin light flashes when the paper is in the tear-off position.
If the perforation between pages is not aligned with the tear-off edge, you can adjust the position of the
perforation using the Micro Adjust function. See “Adjusting the tear-off position” on page 55 for
more information.
Caution:
!
❏ Never use the tear-off function with the pull tractor; the paper may come off the pull tractor
and jam the printer. After you finish printing, tear off the printed document at the perforation
nearest the paper exit slot.
❏ Never use the tear-off function to feed continuous paper with labels backward; they may come
off their backing sheet and jam the printer.
Using the Tear Off/Bin button
Follow these steps to remove continuous paper using the Tear Off/Bin button:
1. After you finish printing, make sure that the Tear Off/Bin light is not flashing.
Note:
If the Tear Off/Bin light is flashing, the paper is in the tear-off position. If you press the Tear Off/Bin
button again, the printer feeds your paper to the next top-of-form position.
2. Press the Tear Off/Bin button. The printer advances the paper to the tear-off edge.
Paper Handling 42
Page 43

LQ-590II/LQ-590IIN/LQ-2090II/LQ-2090IIN User’s Guide
Caution:
!
Never use the knob to adjust the tear-off position; this may damage the printer or cause it to
lose the top-of-form position.
Note:
If your paper’s perforation is not properly aligned with the tear-off edge, you can adjust the tear-off
position using the Micro Adjust function as described in “Adjusting the tear-off position” on
page 55.
3. Tear off the printed document using the tear-off edge of the printer cover.
4. To feed the continuous paper backward out of the printer and into the standby position, press the
Load/Eject button.
To remove the remaining paper from the printer, press the Load/Eject button to feed the paper
backward to the standby position. Then open the sprocket covers of the tractor and remove the paper.
Caution:
!
Always tear off the printed document before you press the Load/Eject button. Reverse feeding
several pages at a time may cause a paper jam.
Advancing paper to the tear-off position automatically
To automatically advance the printed documents to the tear-off position, turn on the auto tear-off
mode and select the appropriate page length for continuous paper in the Default Setting mode. See
“Changing default settings” on page 98 for instructions on how to change the default settings.
When auto tear-off is on, the printer automatically advances the paper to the tear-off position
whenever it receives a full page of data or a form feed command followed by no more data.
Paper Handling 43
Page 44

LQ-590II/LQ-590IIN/LQ-2090II/LQ-2090IIN User’s Guide
Loading Single Sheets
You can load ordinary single sheets and envelopes one at a time from the rear and front bypass tray of
the printer, using the sheet guide.
You can also load single-sheet paper using an optional cut-sheet feeder and sheet guide. See “Front
sheet guide” on page 45 for more information.
Available paper types
The table below shows the types of paper you can load and the paper slots you can use with each paper
type. See “Adjusting the Paper Thickness Lever” on page 19 for instructions on how to adjust the
paper-thickness lever.
Paper type Available paper slot(s)
Ordinary paper front and rear
Multipart forms
(carbonless)
Envelopes rear
Note:
Do not load paper that is curled or has been folded.
2 parts (original and one copy) front and rear
3 parts (original and two copies)
4 parts (original and three copies)
5 parts (original and four copies)
6 parts (original and five copies)
Paper Handling 44
Page 45

LQ-590II/LQ-590IIN/LQ-2090II/LQ-2090IIN User’s Guide
Using the sheet guide
You can use the supplied sheet guide to load one single sheet, multipart forms, or envelopes at a time
from the rear of the printer. Your single-sheet paper can be up to 257 mm (10.1 inches) wide on the
LQ-590II/LQ-590IIN and 420 mm (16.5 inches) wide on the LQ-2090II/LQ-2090IIN. See “Printer
Specifications” on page 144 for more details.
Caution:
!
Do not load carbon paper or labels in the sheet guide.
Front sheet guide
Installing the front sheet guide
Follow these steps to install the sheet guide in the front position:
1. Open the front cover, and then remove the tractor unit if it is installed in the front push position.
To remove it, press the tractor’s lock tabs, then tilt the tractor up and pull it out of the printer.
2. Fit the plastic tabs on the sheet guide over the mounting notches on the printer as shown below.
You are now ready to load paper in the front using the sheet guide. See “Loading paper in the rear sheet
guide” on page 47 for instructions.
Paper Handling 45
Page 46

LQ-590II/LQ-590IIN/LQ-2090II/LQ-2090IIN User’s Guide
Loading paper in the front sheet guide
You can load single sheets or multipart forms one at a time in the front sheet guide. Follow these
steps:
Caution:
!
Do not load labels or envelopes in the front sheet guide.
1. Make sure the sheet guide is in the upright position and the edge guides are open all the way to the
left and right. Set the paper release lever to the single-sheet position.
2. If you are using ordinary single-sheet paper, set the paper-thickness lever (located under the
printer cover) to 0 as shown below.
If you are loading a single-sheet multipart form, set the paper-thickness lever to the proper
position, as shown in the table below.
Multipart form type Paper-thickness lever position
2 parts (original + 1 copy) 1
3 parts (original + 2 copies) 2
4 parts (original + 3 copies) 3
5 parts (original + 4 copies) 4
6 parts (original + 5 copies) 5 or 6
3. Turn on the printer, if necessary.
4. Slide the left edge guide to the triangle mark on the sheet guide. Then adjust the right edge guide to
match the width of your paper.
Paper Handling 46
Page 47

LQ-590II/LQ-590IIN/LQ-2090II/LQ-2090IIN User’s Guide
Note:
You can slide the left edge guide to the left in 1/10-inch increments to increase the left margin on your
printout.
5. Slide the paper printable side up between the edge guides until it meets resistance. The printer
loads the paper automatically.
Note:
When feeding paper, place your hand flat on the paper and push it to completely into the feed slot.
If the first line on your page appears too high or low, you can adjust its position using the Micro Adjust
function. See “Adjusting the top-of-form position” on page 56.
Loading paper in the rear sheet guide
Follow these steps to load paper in the rear sheet guide:
Note:
Make sure the sheet guide is in the upright position.
Paper Handling 47
Page 48

LQ-590II/LQ-590IIN/LQ-2090II/LQ-2090IIN User’s Guide
1. Set the paper-thickness lever (located under the printer cover) to 0 if you are using ordinary
single-sheet paper. Also move the paper release lever to the single-sheet position.
2. Turn on the printer, if necessary.
3. Slide the left edge guide until it locks in place next to the triangle mark on the sheet guide. Then,
adjust the right edge guide to match the width of your paper.
Paper Handling 48
Page 49

LQ-590II/LQ-590IIN/LQ-2090II/LQ-2090IIN User’s Guide
4. Insert a sheet of paper with the printable side down between the edge guides until it meets
resistance. The printer feeds the paper automatically and is ready to print.
Note:
For your safety, Epson recommends operating the printer with the printer cover closed. The printer
will function with the printer cover opened or removed, but maximum safety and print speed are
achieved when the cover is closed.
If the first printed line on your page appears too high or low, you can use the Micro Adjust function
to adjust the top-of-form position. See “Adjusting the top-of-form position” on page 56 for more
information.
Loading Special Paper
Multipart forms
Your printer can print on both single-sheet and continuous multipart forms. It can use multipart
forms with up to six parts including the original.
Caution:
!
❏ Use only carbonless multipart forms.
❏ When using multipart forms with a line of glue at the top of the form, load the forms with the
glued side first.
Before printing, set the paper-thickness lever to the appropriate position for your multipart forms
referring to the table in “Adjusting the Paper Thickness Lever” on page 19.
Paper Handling 49
Page 50

LQ-590II/LQ-590IIN/LQ-2090II/LQ-2090IIN User’s Guide
Continuous multipart forms
Except for setting the paper-thickness lever, you load continuous multipart forms the same way as
ordinary continuous paper. See “Loading Continuous Paper” on page 21 for more information.
Note:
❏ Be sure your multipart forms do not exceed 0.49 mm (0.019 inch) in thickness.
❏ Do not load paper that is curled or has been folded.
❏ Thick paper, such as multipart forms with six or seven parts, requires a straight paper path to avoid
paper jams. Load thick paper in the front or bottom slots.
Single-sheet multipart forms
You can load single-sheet multipart forms from the front and rear position by using the sheet guide.
Note:
❏ Be sure your multipart forms do not exceed 0.46 mm (0.018 inch) in thickness.
❏ Do not load paper that is curled or has been folded.
Labels
When printing on labels, use only the type of labels that are mounted on continuous backing sheets
with sprocket holes for use with a tractor feeder. Do not try to print on single sheets with labels because
the printer may not feed labels on a shiny backing sheet properly.
Thick paper, such as continuous paper with labels, requires a straight or almost straight paper path.
Load labels only in the front (push tractor or pull tractor) or bottom (pull tractor) paper slot; however,
for best results, use the tractor in the pull position, and load paper in the front or bottom paper slot.
The loading procedure for continuous paper with labels is the same as that for ordinary continuous
paper, except that you must set the paper-thickness lever to 2 before printing. See “Loading paper with
the pull tractor” on page 33 for more information.
Paper Handling 50
Page 51

Caution:
!
❏ Never feed labels backward using the Load/Eject or Tear Off/Bin button. When fed
backward, labels can easily peel off the backing sheet and cause a paper jam.
❏ Use them only under normal operating conditions described below:
Temperature: 15 to 25 ˚C (59 to 77 ˚F)
Humidity: 30 to 60% RH
❏ Do not leave labels loaded in the printer between jobs; they may curl around the platen and
jam when you resume printing.
❏ Do not load continuous paper with labels from the rear paper slot. Because the paper path from
the rear slot is curved, labels may come off their backing sheets inside the printer and cause a
paper jam.
❏ Do not load paper that is curled or has been folded.
Tear off and eject labels
LQ-590II/LQ-590IIN/LQ-2090II/LQ-2090IIN User’s Guide
When using continuous forms, always tear off and eject labels as described below.
1. Tear off the last label form that has entered the printer.
* perforation nearest the paper entry slot
2. Press the LF/FF button to eject the remaining labels from the printer.
Caution:
!
Never feed labels backward using the Load/Eject or Tear Off/Bin button. When fed backward,
labels can easily come off the backing sheet and cause a paper jam.
Paper Handling 51
Page 52

LQ-590II/LQ-590IIN/LQ-2090II/LQ-2090IIN User’s Guide
Envelopes
You can feed envelopes one at a time using the sheet guide, or you can load multiple envelopes using
the optional high-capacity cut-sheet feeder (bin 1 of the double-bin cut-sheet feeder).
Note:
Envelopes can be loaded only in the rear paper slot.
Before loading envelopes, set the paper-thickness lever to a position 5 (for thin envelopes) or 6 (for
thick envelopes).
T o l oa d a s i n gl e e nv e l op e , fo l l ow t h e i n s tr u c ti o n s i n “ Lo a d in g p ap e r i n t he r e ar s h ee t g ui d e ” o n p ag e 4 7.
To load multiple envelopes, see “Loading paper in the high-capacity cut-sheet feeder” on page 132.
Load envelopes with the printable side down and push them completely into the feed slot.
Note:
❏ Be sure to place the envelope printable side down and insert the top edge of the envelope into the
printer first.
❏ The print head must not print past the left or right edge of the envelope or other thick paper. Make
sure your application program prints entirely within the recommended printable area of your
envelope. See “Recommended printable area” on page 154 for more information.
❏ If you are using No. 6 envelopes, make sure the left edge guide is aligned with the arrow on the sheet
guide.
Cards
You can feed cards one at a time using the sheet guide, or you can load multiple cards using the
optional high-capacity cut-sheet feeder (bin 1 of the double-bin cut-sheet feeder).
Paper Handling 52
Page 53

LQ-590II/LQ-590IIN/LQ-2090II/LQ-2090IIN User’s Guide
Note:
The cards can be loaded only in the front or rear paper slot.
Before loading cards, set the paper-thickness lever to position 2 and set the paper release lever to the
single-sheet position.
To load a single card, follow the instructions in “Loading paper in the rear sheet guide” on page 47.
Note:
❏ When you are loading postcards long edge first, always load them in the rear slot.
❏ Before printing, turn on the card mode by pressing the Tear Off/Bin button several times until the left
Tear Off/Bin light is on.
❏ Use postcards under the following temperature and humidity conditions:
Temperature: 15 to 25 ˚C (59 to 77 ˚F)
Humidity: 30 to 60% RH
❏ When loading A6 size cards, always load them long edge first.
Switching Between Continuous Paper and Single Sheets
You can easily switch between continuous paper with a rear push tractor and single sheets without
removing the continuous paper from the tractor.
Switching to single sheets
Follow these steps to switch from continuous paper from a push tractor to single sheets:
Paper Handling 53
Page 54

LQ-590II/LQ-590IIN/LQ-2090II/LQ-2090IIN User’s Guide
Note:
❏ If continuous labels are loaded in the printer, remove them before switching to single-sheet printing.
See “Tear off and eject labels” on page 51 for more information.
❏ If the tractor is in the pull position, remove any continuous paper from it before switching to
single-sheet printing. See “Removing paper from the pull tractor” on page 38 for more information.
1. If any printed pages remain in the printer, press the Tear Off/Bin button to advance the paper to
the tear-off position. Then tear off the printed pages.
Caution:
!
Make sure you tear off your printed document before you press the Load/Eject button in the
next step. Reverse feeding several pages at a time may cause a paper jam.
2. Press the Load/Eject button to feed the continuous paper backward to the standby position. The
paper is still attached to the push tractor but is no longer in the paper path.
3. Move the sheet guide to the upright position.
4. Set the paper release lever to the single-sheet position.
5. Load single sheets as described in “Loading Single Sheets” on page 44.
Switching to continuous paper
Follow these steps to switch from single sheets to continuous paper with a push tractor:
1. If a single sheet remains in the printer, press the Load/Eject button to eject it.
Caution:
!
Never use the knob to eject paper; this may damage the printer or cause it to lose the
top-of-form position.
Paper Handling 54
Page 55

LQ-590II/LQ-590IIN/LQ-2090II/LQ-2090IIN User’s Guide
2. Make sure that the tractor is installed in the front or rear push position and that continuous paper
is loaded on it as described in “Loading continuous paper with the tractor” on page 21.
3. Set the paper release lever to the front or rear push position, depending on the tractor position you
are using.
The printer loads the continuous paper automatically when you begin printing.
Using the Micro Adjust Function
The Micro Adjust function allows you to move the paper forward or backward in 0.118 mm
(1/216-inch) increments so that you can make precise adjustments to the top-of-form and tear-off
positions.
Adjusting the tear-off position
If your paper perforation is not aligned with the tear-off edge, you can use the Micro Adjust function to
move the perforation to the tear-off position.
Caution:
!
Never use the knob to adjust the tear-off position; this may damage the printer or cause it to lose the
tear-off position.
Note:
The tear-off position setting remains in effect until you change it, even if you turn off the printer.
Follow these steps to adjust the tear-off position:
1. Make sure the Tear Off/Bin light is flashing (the paper is at the current tear-off position). You may
need to press the Tear Off/Bin button to advance the paper to the tear-off position.
Paper Handling 55
Page 56

LQ-590II/LQ-590IIN/LQ-2090II/LQ-2090IIN User’s Guide
2. Hold down the Pause button for about three seconds. The Pause light begins flashing and the
printer enters the Micro Adjust mode.
3. Open the paper guide cover, then press the LF/FF button to feed paper forward, or press the
Load/Eject button to feed paper backward, until the paper perforation is aligned with the tear-off
edge of the paper tension unit.
1. tear-off edge of the paper tension unit
2. paper perforation
Note:
The printer has a minimum and a maximum tear-off position. If you try to adjust the tear-off
position beyond these limits, the printer beeps and stops moving the paper.
4. Tear off the printed pages.
5. Press the Pause button to save the adjusted setting.
When you resume printing, the printer automatically feeds the paper back to the top-of-form position
and begins printing.
Adjusting the top-of-form position
The top-of-form position is the position on the page where the printer starts printing. If the printing
appears too high or low on the page, you can use the Micro Adjust function to adjust the top-of-form
position.
Paper Handling 56
Page 57

LQ-590II/LQ-590IIN/LQ-2090II/LQ-2090IIN User’s Guide
Caution:
!
Never use the knob to adjust the top-of-form position; this may damage the printer or cause it to
lose the top-of-form position.
Note:
❏ This mode can be used even when the printer cover is opened.
❏ The top-of-form position setting remains in effect until you change it, even if you turn off the printer.
❏ The top margin setting made in some application software overrides the top-of-form position setting
you make with the Micro Adjust function. If necessary, adjust the top-of-form position in your
software.
Follow these steps to adjust the top-of-form position:
1. Make sure the printer is turned on.
2. Load paper then lift up the printer cover.
Note:
If the tractor is in a push position, press the Load/Eject button to advance continuous paper to the
current top-of-form position.
3. Hold down the Pause button for about three seconds. The Pause light starts flashing and the
printer enters the Micro Adjust mode.
4. Press the LF/FF button to move the top-of-form position down on the page, or press the Load/
Eject button to move the top-of-form position up on the page.
Note:
❏ The printer has a minimum and a maximum top-of-form position. If you try to adjust it beyond
these limits, the printer beeps and stops moving the paper.
Paper Handling 57
Page 58

LQ-590II/LQ-590IIN/LQ-2090II/LQ-2090IIN User’s Guide
❏ When the paper reaches the default top-of-form position, the printer also beeps and stops moving
the paper briefly. You can use the default setting as a reference point when adjusting the
top-of-form position.
5. After you set the top-of-form position, press the Pause button to save the adjusted setting.
Note:
For your safety, Epson recommends operating the printer with the printer cover closed. The printer will
function with the printer cover opened or removed, but maximum safety and print speed are achieved
when the cover is closed.
Paper Handling 58
Page 59

LQ-590II/LQ-590IIN/LQ-2090II/LQ-2090IIN User’s Guide
Chapter 2
Printer Software
About Your Printer Software
The Epson software includes the printer driver software and EPSON Status Monitor 3.
The printer driver is software that allows your computer to control the printer. You need to install the
printer driver so your Windows software applications can take full advantage of the printer’s
capabilities.
EPSON Status Monitor 3 program allows you to monitor the status of your printer, alerts you when
errors occur, and provides you with troubleshooting tips. If you want to install EPSON Status Monitor
3 later, see “Installing EPSON Status Monitor 3” on page 72 for instructions.
Note:
❏ Before proceeding, make sure you have installed the printer driver on your computer described in the
supplied setup sheet.
❏ On-screen displays on the following pages may differ depending on the version of the printer driver.
❏ When you wish to reinstall or upgrade the printer driver, uninstall the printer driver that has been
installed already.
Using the Printer Driver
You can access the printer driver from your Windows applications or from the Start menu.
Screens and procedures that appear in this manual are mostly from Windows 10 unless otherwise
specified.
❏ When you access the printer driver from a Windows application, any settings you make apply only
to the application you are using. See “Accessing the printer driver from Windows applications” on
page 60 for more information.
❏ When you access the printer driver from the Start menu, the printer driver settings you make apply
to all your applications. See “Accessing the printer driver from the Start menu” on page 62 for
more information.
Printer Software 59
Page 60

LQ-590II/LQ-590IIN/LQ-2090II/LQ-2090IIN User’s Guide
See “Changing the printer driver settings” on page 64 to check and change printer driver settings.
Note:
❏ The examples in the following section are from the LQ-590II. If you have the LQ-590IIN, LQ-2090II,
and LQ-2090IIN, substitute the model that has been used. The instructions are the same all models.
❏ While many Windows applications override the settings made with the printer driver, some do not,
so you must verify that the printer driver settings match your requirements.
Accessing the printer driver from Windows applications
Follow these steps to access the printer driver from a Windows application:
Note:
The screen shots used in this procedure are from the Windows 10 operating system. The content on the
screen may vary depending on your computer's environment.
1. Select Print from the File menu of your application software. Make sure that your printer is
selected in the Select Printer of Print dialog box.
Printer Software 60
Page 61
LQ-590II/LQ-590IIN/LQ-2090II/LQ-2090IIN User’s Guide
2. Click Preferences. The Printing Preferences window appears, and you see the Layout, Paper/
Quality, User Defined Paper, and Extension Settings menus. These menus contain the printer
driver settings.
Printer Software 61
Page 62

LQ-590II/LQ-590IIN/LQ-2090II/LQ-2090IIN User’s Guide
3. To view a menu, click the corresponding tab at the top of the window. See “Changing the printer
driver settings” on page 64 to change the settings.
Accessing the printer driver from the Start menu
Follow these steps to access the printer driver from the Start menu:
Note:
The screen shots used in this procedure are from the Windows 10 operating system. The content on the
screen may vary depending on your computer's environment.
1. For Windows 10/Windows Server 2016:
Right-click the Start menu, click Control Panel, and then click View devices and printers from
the Hardware and Sound category.
Printer Software 62
Page 63

LQ-590II/LQ-590IIN/LQ-2090II/LQ-2090IIN User’s Guide
For Windows 8.1/Windows 8/Windows Server 2012 R2/Windows Server 2012:
Click Desktop on the Start screen, move the cursor to the top-right corner of the screen, click
Settings, and then click Control Panel. Next, click View devices and printers from the
Hardware and Sound category.
For Windows 7/Windows Server 2008 R2:
Click Start, and click Devices and Printers.
For Windows Vista/Windows Server 2008:
Click Start, click Control Panel, click Hardware and Sound, and then click Printers.
For Windows XP/Windows Server 2003 R2/Windows Server 2003:
Click Start, and click Printers and Faxes.
2. Right-click your printer icon, and click Printing Preferences. The screen displays the Layout,
Paper/Quality, User Defined Paper and Extension Settings menus. These menus display the
printer driver settings.
Printer Software 63
Page 64

LQ-590II/LQ-590IIN/LQ-2090II/LQ-2090IIN User’s Guide
When you click Printer properties in the menu displayed by right-clicking the printer icon, the
Properties window appears, which includes menus used to make the printer driver settings.
3. To view a menu, click the corresponding tab at the top of the window. See “Printer Driver Settings
Overview” on page 65 for more information.
Changing the printer driver settings
Your printer driver has two menus from which you can change the printer driver settings; Layout,
Paper/Quality. You can also change settings on the Utility menu in the printer software. For an
overview of the available settings, see “Printer Driver Settings Overview” on page 65.
Note:
For Windows XP/Windows Server 2003 R2/Windows Server 2003, you can also view online help by
right-clicking items in the driver and selecting What’s this?.
Printer Software 64
Page 65

LQ-590II/LQ-590IIN/LQ-2090II/LQ-2090IIN User’s Guide
Click the Help button on the Printer Driver screen.
When you finish making your printer driver settings, click OK to apply the settings, or click Cancel to
cancel your changes.
Once you have checked your printer driver settings and changed them if necessary, you are ready to
print.
Printer Driver Settings Overview
The following tables show the Windows printer driver settings. Note that not every setting is available
in all versions of Windows. For more details, see Help for the printer driver.
Printer Software 65
Page 66

Printer settings
Settings Explanations
Paper Size Select the size of the paper you want to use. If you do not see your paper size, use the
LQ-590II/LQ-590IIN/LQ-2090II/LQ-2090IIN User’s Guide
scroll bar to scroll through the list.
Orientation
Page Order Select whether to print from front to back or back to front.
Pages per Sheet Select the number of pages that you want to print onto a single page.
Paper Source Select the paper source you want to use.
Graphics Select the printing resolution you want. The higher the resolution you select, the more
Paper/Output
Halftone Click this button to set the brightness and contrast, input the RGB gamma, or make
Printer Font Setting Select a character table group to use. You can select one of three character table
Select Portrait or Landscape.
detailed your printout will be; however, increasing the resolution slows printing.
Check the Paper Size, Orientation, and Paper Source se tti ngs you mad e on the P age
Setup menu and change them if necessary. Select the setting and then choose an
option from the Change Setting list box.
other settings. The Halftone Color Adjustment dialog box appears. For details, click
Help in this dialog box.
groups, Standard, Expanded, and None (Bit Image printing).
When Standard or Expanded is selected, the printer uses the device fonts. Expanded
includes more fonts than Standard.
When None is selected, the printer uses bit map images instead of the device fonts.
For details on the fonts which are included in each table, see “Electronic” on
page 147.
Printable Area If Standard is selected, the size of the top margin is 4.2 mm. If Maximum is selected, it is 0
mm.
Top Margin Priority Select which setting for the print-start position is to be used; driver setting or printer
setting. For more details, see Help for the printer driver.
Packet mode Ordinarily, there is no need to change this setting. If you change the printer’s Packet
mode settings, change this setting to match. If the printer and printer driver settings are
different, you may not be able to print correctly. For more details, see Help for the
printer driver.
User Defined Paper If your paper is not included in the Paper Size drop-down list, you can add the size to the
list. For more details, see Help for the printer driver.
Offset This setting allows you to offset the image on the page. That is, you can adjust the
position of the printed image. If the offset you specify moves a portion of the image out
of the printer’s printable area, that portion will not be printed.
Printer Software 66
Page 67

Settings Explanations
LQ-590II/LQ-590IIN/LQ-2090II/LQ-2090IIN User’s Guide
Print Speed
Print Direction
This setting allows you to select print speed. Select Printer Setting when you want to
print using the settings stored in the printer. When Standard is selected, prints in
standard printing mode. When High Speed is selected, prints in high-speed printing
mode.
This setting allows you to select bidirectional printing. Selecting the Printer Setting
will use the setting stored in the printer. Selecting Bidirectional will print in
bidirectional printing mode. Selecting Unidirectional will print in unidirectional
printing mode.
Make sure that Bi-d is selected as the Print direction setting stored in the printer.
Otherwise this setting is ignored by the printer.
Definition of Custom Paper Size
If your paper is not included in the Paper Size drop-down list, you can add the size to the list.
1. For Windows 10/Windows Server 2016:
Right-click the Start menu, click Control Panel, and then click View devices and printers from
the Hardware and Sound category.
For Windows 8.1/Windows 8/Windows Server 2012 R2/Windows Server 2012:
Click Desktop on the Start screen, move the cursor to the top-right corner of the screen, click
Settings, and then click Control Panel. Next, click View devices and printers from the
Hardware and Sound category.
For Windows 7/Windows Server 2008 R2:
Click Start, and click Devices and Printers.
For Windows Vista/Windows Server 2008:
Click Start, click Control Panel, click Hardware and Sound, and then click Printers.
For Windows XP/Windows Server 2003 R2/Windows Server 2003:
Click Start, and click Printers and Faxes.
2. Right click your printer icon, and click Printing Preferences.
3. Select the User Defined Paper menu.
4. Enter the paper size in the Paper Size fields.
5. Click Apply and then click OK.
Printer Software 67
Page 68

Note:
For more details, see Help for the printer driver.
Monitoring settings
Settings Explanations
EPSON Status Monitor 3 You can access EPSON Status Monitor 3 when you click this button. To
Monitoring Preferences Click this button to open the Monitoring Preferences dialog box where you
Setting Utility
LQ-590II/LQ-590IIN/LQ-2090II/LQ-2090IIN User’s Guide
monitor the printer, make sure the Monitor the printing status check box is
selected.
can make settings for EPSON Status Monitor 3. See “Setting up EPSON Status
Monitor 3” on page 69 for more information.
Settings Explanations
Bi-D Adjustment Click this button to open the Bi-D Adjustment dialog box where you can
adjust misalignment in vertical lines.
Printer Setting Click this button to open the Printer Settings utility dialog box where you can
change the printer settings.
Using EPSON Status Monitor 3
EPSON Status Monitor 3 allows you to monitor your printer’s status, alerts you when printer errors
occur, and provides troubleshooting instructions when needed.
EPSON Status Monitor 3 is available when:
❏ The printer is connected directly to the host computer via the parallel port [LPT1] or the USB port
or connected to an Ethernet network.
❏ Your system is configured to support bidirectional communication.
Printer Software 68
Page 69

LQ-590II/LQ-590IIN/LQ-2090II/LQ-2090IIN User’s Guide
You can install EPSON Status Monitor 3 by selecting it when you set up the printer. If you need to
install it, see “Installing EPSON Status Monitor 3” on page 72. When sharing the printer, be sure to
set EPSON Status Monitor 3 so that the shared printer can be monitored on the printer server and
clients. See “Setting up EPSON Status Monitor 3” on page 69 and “Setting Up Your Printer on a
Network” on page 75.
Note:
❏ If you are using a computer running with different OS by multiple users are logged on, a
communication error message may be displayed when monitoring printers at the same time.
❏ Although you can print to the printer directly connected to the computer in a remote location by
using Remote Desktop function, communication error may occur.
❏ If EPSON Status Monitor 3 is installed with the Windows Firewall feature turned on
(recommended), the shared printer may not be able to be monitored. This problem can be resolved by
adding ENAGENT.EXE to Exceptions of the firewall function.
Setting up EPSON Status Monitor 3
Follow these steps to set up EPSON Status Monitor 3:
1. For Windows 10/Windows Server 2016:
Right-click the Start menu, click Control Panel, and then click View devices and printers from
the Hardware and Sound category.
For Windows 8.1/Windows 8/Windows Server 2012 R2/Windows Server 2012:
Click Desktop on the Start screen, move the cursor to the top-right corner of the screen, click
Settings, and then click Control Panel. Next, click View devices and printers from the
Hardware and Sound category.
For Windows 7/Windows Server 2008 R2:
Click Start, and click Devices and Printers.
For Windows Vista/Windows Server 2008:
Click Start, click Control Panel, click Hardware and Sound, and then click Printers.
For Windows XP/Windows Server 2003 R2/Windows Server 2003:
Click Start, and click Printers and Faxes.
2. For Windows 10/Windows 8.1/Windows 8/Windows 7/Windows Server 2016/Windows Server
2012 R2/Windows Server 2012/Windows Server 2008 R2:
Right-click your printer icon, then click Printer properties, and then click the Utility tab.
Printer Software 69
Page 70

LQ-590II/LQ-590IIN/LQ-2090II/LQ-2090IIN User’s Guide
For Windows Vista/Windows XP/Windows Server 2008/Windows Server 2003 R2/Windows
Server 2003:
Click Properties, then click the Utility tab.
3. Click the Monitoring Preferences button. The Monitoring Preferences dialog box appears.
4. The following settings are available:
Select Notification
Select Shortcut Icon
Displays the error item check box On/Off status.
Turn on this check box to display the selected error notification.
The selected icon is displayed on the taskbar. The setting’s example is shown on
the right window. By clicking the shortcut icon, you can access the Monitoring
Preferences dialog box easily.
Printer Software 70
Page 71

LQ-590II/LQ-590IIN/LQ-2090II/LQ-2090IIN User’s Guide
Allow monitoring of shared
printers
When this check box is selected, a shared printer can be monitored by other
PCs.
Note:
If the server’s OS is Windows Vista, select Run as Administrator when opening
the printer properties before checking.
Note:
Click the Default button to revert all items to the default settings.
Accessing EPSON Status Monitor 3
Do one of the following to access EPSON Status Monitor 3;
❏ Double-click the printer-shaped shortcut icon on the taskbar. To add a shortcut icon to the
taskbar, go to the Utility menu and follow the instructions.
❏ Open the Utility menu, then click the EPSON Status Monitor 3 icon. To find out how to open the
Utility menu, See “Using the Printer Driver” on page 59.
When you access EPSON Status Monitor 3 as described above, the following printer status window
appears.
You can view printer status information in this window.
Note:
It might not be possible to retrieve the printer status during printing. In this situation, click the EPSON
Status Monitor 3 button in the Utility tab, and use the printer with the status window left open.
Printer Software 71
Page 72

LQ-590II/LQ-590IIN/LQ-2090II/LQ-2090IIN User’s Guide
Installing EPSON Status Monitor 3
Follow the steps below to install EPSON Status Monitor 3.
1. Make sure that the printer is off and that Windows is running on your computer.
2. Insert the Software Disc in the CD-ROM drive.
Note:
Before proceeding, make sure you have installed the printer driver on your computer.
3. Follow the on-screen instructions to install the software.
You can also run the executable file that locates in the following.
Client’s OS Folder Name
Windows XP/Vista/7/8/8.1/10 (x64) \Apps\StatusMonitor\STM3x64
Windows XP/Vista/7/8/8.1/10 (x86) \Apps\StatusMonitor\STM3
Using Bi-D Adjustment
This utility tool allows you to make adjustment when you find a misalignment in vertical line.
Making adjustment with Bi-D Adjustment
To make Bi-D Adjustment, follow the steps below.
Caution:
!
❏ Do not turn off the printer while the printer is printing adjustment pattern. Doing so may
cause the printer to store incorrect settings. If you turned off the printer during the adjustment
process, restart Bi-D Adjustment again.
❏ Serial connection is not supported.
❏ Make sure that the printer’s status is ready before making Bi-D Adjustment.
❏ If Bi-D Adjustment is not printed properly, set the printer’s font setting to default and try
again.
Printer Software 72
Page 73

LQ-590II/LQ-590IIN/LQ-2090II/LQ-2090IIN User’s Guide
1. Open the Utility menu, then click the Bi-D Adjustment icon. To find out how to open the Utility
menu, see “Using the Printer Driver” on page 59. The Bi-D Adjustment window appears.
2. Click Next.
3. Click Print. The printer prints three sets of adjustment pattern. To see the adjustment pattern, you
need to prepare the necessary number of sheets.
LQ-590II/ LQ-590IIN: A4 or 8 inches continuous paper
LQ-2090II/ LQ-2090IIN: A3 Rotated or 13.6 inches continuous paper
Note:
The image on the right above is an example of good and bad patterns in the print results.
4. Look at the adjustment patterns and find the vertical line that is aligned the best. Then, select the
corresponding line number in the Bi-D Adjustment window.
Printer Software 73
Page 74

LQ-590II/LQ-590IIN/LQ-2090II/LQ-2090IIN User’s Guide
5. Click Set. The adjustment value will be stored in the printer.
Using Printer Setting
This utility tool allows you to display current settings stored in the printer, change settings of the
printer, and read settings stored in the file or save settings to the file.
You can also change some of the printer's default settings stored in the printer from this utility. For
details on the setting items, see “Default Setting mode” on page 92.
Caution:
!
❏ Serial connection is not supported.
❏ Make sure that the printer status is ready before getting setting from the printer or updating the
printer settings.
Note:
❏ You do not need to change the default printer settings stored in the printer if you only print from
Windows. Changing these settings may cause undesirable effects in your printouts when printing
from Windows.
❏ Some settings are not supported on the Utility menu.
Changing printer setting
To change printer settings, follow the steps below.
Printer Software 74
Page 75

LQ-590II/LQ-590IIN/LQ-2090II/LQ-2090IIN User’s Guide
1. Open the Utility menu, then click the Printer Setting icon. To find out how to open the Utility
menu, see “Using the Printer Driver” on page 59. The Printer Setting windows appears.
2. Change the necessary printer settings. For details on how to use this tool, refer to the printer driver
Help.
Note:
To display additional printer default settings, select Setting from the menu at the top of the Printer
Setting window, and then select Show Expansion Setting....
Setting Up Your Printer on a Network
Sharing the printer
This section describes how to share the printer on a standard Windows network.
Printer Software 75
Page 76

LQ-590II/LQ-590IIN/LQ-2090II/LQ-2090IIN User’s Guide
The computers on a network can share a printer that is directly connected to one of them. The
computer that is directly connected to the printer is the printer server, and the other computers are the
clients which need permission to share the printer with the printer server. The clients share the printer
via the printer server.
According to the versions of Windows OS and your access rights on the network, perform the
appropriate settings of the printer server and clients.
❏ See “Setting up your printer as a shared printer” on page 76.
❏ See “Setting for the clients” on page 80.
Note:
❏ When sharing the printer, be sure to set EPSON Status Monitor 3 so that the shared printer can be
monitored on the printer server and clients. See “Setting up EPSON Status Monitor 3” on page 69.
❏ When connecting to a shared printer beyond a router, error and warning notification for shared
printers during printing is not available in some cases because of the router’s settings.
❏ The printer server and clients should be set on the same network system, and they should be under the
same network management beforehand.
Setting up your printer as a shared printer
Follow these steps to set the printer server.
Note:
You must access as the Administrators of the local machine.
1. For Windows 10/Windows Server 2016:
Right-click the Start menu, click Control Panel, and then click View devices and printers from
the Hardware and Sound category.
For Windows 8.1/Windows 8/Windows Server 2012 R2/Windows Server 2012:
Click Desktop on the Start screen, move the cursor to the top-right corner of the screen. Click
Settings, and then click Control Panel. Next, click View devices and printers from the
Hardware and Sound category.
For Windows 7/Windows Server 2008 R2:
Click Start, and then click View devices and printers.
Printer Software 76
Page 77

LQ-590II/LQ-590IIN/LQ-2090II/LQ-2090IIN User’s Guide
For Windows Vista/Windows Server 2008:
Click Start, click Control Panel, click Hardware and Sound, and then click Printers.
For Windows XP/Windows Server 2003 R2/Windows Server 2003:
Click Start, and click Printers and Faxes.
2. For Windows 10/Windows 8.1/Windows 8/Windows 7/Windows Server 2016/Windows Server
2012 R2/Windows Server 2012/Windows Server 2008 R2:
Right-click your printer icon, click Printer properties, and then click the Sharing tab in the
appearing screen.
For Windows Vista/Windows XP/Windows Server 2008/Windows Server 2003 R2/Windows
Server 2003:
Right-click your printer icon, and click Sharing in the menu that appears.
For Windows XP/Windows Server 2003 R2/Windows Server 2003, if the following menu appears,
click either Network Setup Wizard or If you understand the security risks but want to share
printers without running the wizard, click here.
In either case, follow the on-screen instructions.
Printer Software 77
Page 78

LQ-590II/LQ-590IIN/LQ-2090II/LQ-2090IIN User’s Guide
Select Share this printer, then type the name in the Share name box and click OK.
Note:
❏ Do not use spaces or hyphens for the share name, or an error may occur.
❏ In Windows 8.1/Windows 8/Windows 7/Windows Vista/Windows Server 2012 R2/Windows
Server 2012/Windows Server 2008 R2/Windows Server 2008, you cannot select Share this
printer until you click the Change sharing options button.
You need to set the client computers so that they can use the printer on a network. See the following
pages for details:
❏ See “Setting for the clients” on page 80.
Sharing the printer when the firewall is on
Note:
To share files and printers when Windows Firewall is on, perform the following procedure.
Windows 10/Windows Server 2016
1. Right-click the Start menu, click Control Panel, click System and Security, and then click
Windows Firewall.
2. Click Turn Windows Firewall on or off in the window on the left. Make sure that Block all
incoming connections, including those in the list of allowed apps is not selected, and then
click OK.
3. Click Allow an app or feature through Windows Firewall in the window on the left.
Printer Software 78
Page 79

LQ-590II/LQ-590IIN/LQ-2090II/LQ-2090IIN User’s Guide
4. Select File and Printer Sharing, and then click OK.
Windows 8.1/Windows 8/Windows Server 2012 R2/Windows Server 2012
1. Click Desktop on the Start screen, move the cursor to the top-right corner of the screen, click
Settings, and then click Control Panel. Next, click System and Security, and then click
Windows Firewall.
2. Click Turn Windows Firewall on or off in the window on the left. Make sure that Block all
incoming connections, including those in the list of allowed apps is not selected, and then
click OK.
3. Click Allow an app or feature through Windows Firewall in the window on the left.
4. Select File and Printer Sharing, and then click OK.
Windows 7/Windows Server 2008 R2
1. Click Start, click Control Panel, click System and Security, and then click Windows
Firewall.
2. Click Turn Windows Firewall on or off in the window on the left. Make sure that Block all
incoming connections, including those in the list of allowed programs is not selected, and
then click OK.
3. Click Allow a program or feature through Windows Firewall in the window on the left.
4. Select Share file and printer, and then click OK.
Windows Vista/Windows Server 2008
1. Click Start, and then click Control Panel.
2. Click Security, and then click Windows Firewall to open the Windows Firewall window.
3. Click Turn Windows Firewall on or off in the window on the left. When the User Account
Control screen is displayed, click Continue.
4. Make sure that Block all incoming connections is not selected from the General tab.
5. Open the Exceptions tab, select File and Printer Sharing, and then click OK.
Printer Software 79
Page 80

LQ-590II/LQ-590IIN/LQ-2090II/LQ-2090IIN User’s Guide
Windows XP/Windows Server 2003 R2/Windows Server 2003
1. Click Start, and then click Control Panel.
2. Click Security Center.
3. Click Windows Firewall to open the Windows Firewall window.
4. Make sure that Don’t allow exceptions is not selected from the General tab.
5. Open the Exceptions tab, select File and Printer Sharing, and then click OK.
Setting for the clients
This section describes how to install the printer driver by accessing the shared printer on a network.
Note:
❏ To share the printer on a Windows network, you need to set the printer server. For details, see
“Setting up your printer as a shared printer” on page 76.
❏ This section describes how to access the shared printer on a standard network system using the server
(Microsoft workgroup). If you cannot access the shared printer due to the network system, ask the
administrator of the network for assistance.
❏ This section describes how to install the printer driver by accessing the shared printer from the
Printers folder. You can also access the shared printer from Network Neighborhood or My Network
on the Windows desktop.
❏ When you want to use the EPSON Status Monitor 3 at clients, you have to install both of the printer
driver and the EPSON Status Monitor 3 in each client.
❏ If the printer drivers are not already installed on the client, please install them before performing
these settings.
1. Right-click the Start menu, click Control Panel, then click View devices and printers.
Printer Software 80
Page 81

LQ-590II/LQ-590IIN/LQ-2090II/LQ-2090IIN User’s Guide
2. Right-click the icon for the printer you wish to change the settings for, and then click Printer
properties.
Printer Software 81
Page 82

3. Click the Ports tab and then click Add Port.
LQ-590II/LQ-590IIN/LQ-2090II/LQ-2090IIN User’s Guide
4. When the Printer Ports window appears, select Local Port, and then click New Port.
Printer Software 82
Page 83

LQ-590II/LQ-590IIN/LQ-2090II/LQ-2090IIN User’s Guide
5. Enter the following information for the port name and then click OK.
\\Name of computer connected to the target printer\name of shared printer
6. After returning to the Printer Ports window, click Cancel.
7. Check that the name you entered for the port has been added and selected, and then click
Close.
Installing the printer driver from the CD-ROM
This section describes how to install the printer driver in the clients when the computers of the server
and clients use different OS.
The on-screen displays on the following pages may differ depending on the version of Windows OS.
Note:
❏ When installing the printer driver in the clients, you must access with the Administrator.
❏ If the computers of the server and clients have the same OS and the same architecture, you do not
have to install the printer drivers from the CD-ROM.
1. Access the shared printer and a prompt may appear. Click OK, and then follow the on-screen
instructions to install the printer driver from the CD-ROM.
Printer Software 83
Page 84

LQ-590II/LQ-590IIN/LQ-2090II/LQ-2090IIN User’s Guide
2. Insert the CD-ROM, then the Install Navi dialog box appears. Cancel the dialog box by clicking
Cancel, then type the appropriate drive and folder names in which the printer driver for clients is
located, then click OK.
When installing drivers in Windows Vista, XP, “Digital Signature is not found.” may appear. Click
Continue Anyway (for Windows XP) or Install this driver software anyway (for Windows
Vista) and continue installing.
The folder name differs depending on the OS being used.
Client’s OS Folder Name
Windows XP/Vista/7/8/8.1/10 (x64) \Driver\Printer\Driver\WINX64
Windows XP/Vista/7/8/8.1/10 (x86) \Driver\Printer\Driver\WINX86
3. Select the name of the printer, then click OK. Then follow the on-screen instructions.
Note:
❏ If you also want to install EPSON Status Monitor 3, see “Installing EPSON Status Monitor 3” on
page 72 for instructions.
❏ If you want to use EPSON Status Monitor 3 for the shared printer, reinstall the printer driver as
instructed in “Setting for the clients” on page 80 after installing the printer driver and EPSON Status
Monitor 3 from the CD-ROM. Before printing, be sure to select the printer driver installed in “Setting
for the clients” on page 80.
❏ If EPSON Status Monitor 3 is installed with the Windows Firewall feature turned on
(recommended), the shared printer may not be able to be monitored. This problem can be resolved by
adding ENAGENT.EXE to Exceptions of the firewall function.
Printer Software 84
Page 85

LQ-590II/LQ-590IIN/LQ-2090II/LQ-2090IIN User’s Guide
Cancelling Printing
If the printouts are not what you expected and display incorrect or garbled characters or images, you
may need to cancel printing. When the printer icon is displayed on the taskbar, follow the instructions
below to cancel printing.
1. Double-click the printer icon on the task bar.
2. When cancelling all printing documents, select Cancel All Documents on the Printer menu.
When cancelling a specified document, select a document you want to cancel and select Cancel on
the Document menu.
The printing job is canceled.
Uninstalling the Printer Software
When you wish to reinstall or upgrade the printer driver, uninstall the printer driver that has been
installed already.
Printer Software 85
Page 86

LQ-590II/LQ-590IIN/LQ-2090II/LQ-2090IIN User’s Guide
Note:
When uninstalling EPSON Status Monitor 3 from a multi-user Windows XP/Windows Server 2003
R2/Windows Server 2003 environment, remove the shortcut icon from all clients before uninstalling.
You can remove the icon by clearing the Shortcut Icon check box in the Monitoring Preferences dialog
box.
Uninstalling the printer driver and EPSON Status Monitor 3
1. Turn off the printer.
2. Quit all running applications.
3. Open Control Panel:
❏ Windows 10/Windows Server 2016
Right-click the start button or press and hold it, and then select Control Panel.
❏ Windows 8.1/Windows 8/Windows Server 2012 R2/Windows Server 2012
Select Desktop > Settings > Control Panel.
❏ Windows 7/Windows Vista/Windows XP/Windows Server 2008 R2/Windows Server 2008/
Windows Server 2003 R2/Windows Server 2003
Click the start button and select Control Panel.
4. Open Uninstall a program (or Add or Remove Programs):
❏ Windows 10/Windows 8.1/Windows 8/Windows 7/Windows Vista/Windows Server 2012
R2/Windows Server 2012/Windows Server 2008 R2/Windows Server 2008
Select Uninstall a program in Programs.
❏ Windows XP/Windows Server 2003 R2/Windows Server 2003
Click Add or Remove Programs.
5. Select the software you want to uninstall.
6. Uninstall the software:
Printer Software 86
Page 87

LQ-590II/LQ-590IIN/LQ-2090II/LQ-2090IIN User’s Guide
❏ Windows 10/Windows 8.1/Windows 8/Windows 7/Windows Vista/Windows Server 2012
R2/Windows Server 2012/Windows Server 2008 R2/Windows Server 2008
Click Uninstall/Change or Uninstall.
❏ Windows XP/Windows Server 2003 R2/Windows Server 2003
Click Change/Remove or Remove.
Note:
If the User Account Control window is displayed, click Continue.
7. Click the Printer Model tab, select the icon of the printer you want to uninstall, then click OK.
Note:
Make sure that nothing is selected in the Printer Model tab. Open Utility tab and select EPSON
Status Monitor 3 (for EPSON XXXXXX ESC/P) and click OK. You can uninstall only the EPSON
Status Monitor 3.
8. Follow the on-screen instructions.
Printer Software 87
Page 88

Chapter 3
Control Panel
Buttons and Lights
LQ-590II/LQ-590IIN/LQ-2090II/LQ-2090IIN User’s Guide
1. Font ( ItemD ) button
❏ Selects one of the fonts. To select a font, see “Selecting a Font and Pitch” on page 90.
❏ When the printer enters the Default Setting mode, the button works as an ItemD button. You can
press the ItemD button to select the next menu. See “Changing default settings” on page 98.
2. Reset
When you press both the Font and Pitch buttons simultaneously, the printer clears buffer and returns
to its default settings.
3. Pitch ( ItemU ) button
❏ Selects one of the pitch settings. To select a pitch, see “Selecting a Font and Pitch” on page 90.
❏ When the printer enters the Default Setting mode, the button works as an ItemU button. You can
press the ItemU button to select the previous menu.
4. Menu
❏ When you press the Pitch and Tear Off/Bin buttons at the same time, the printer enters or exits
the Default Setting mode and you can set the various printer settings. See “About Your Printer’s
Default Settings” on page 92.
Control Panel 88
Page 89

LQ-590II/LQ-590IIN/LQ-2090II/LQ-2090IIN User’s Guide
❏ When the printer is in the Default Setting mode, the Menu lights (both the Tear Off/Bin lights)
stay on.
5. Tear Off/Bin ( Set) button
❏ Feeds continuous paper forward to the tear-off position.
❏ Feeds continuous paper backward from the tear-off position to the top-of-form position.
❏ Selects a cut-sheet feeder bin when the cut-sheet feeder is installed.
❏ When the printer enters the Default Setting mode, the button works as the Set button. You can
press the Set button to select the next value of a setting menu.
6. Load/Eject button
❏ Loads a single sheet of paper.
❏ Ejects a single sheet of paper if a sheet is loaded.
❏ Loads continuous paper from the standby position.
❏ Feeds continuous paper backward to the standby position if a sheet is loaded.
7. Micro Adjust
When you hold down the Pause button for three seconds, the printer enters the Micro Adjust mode.
In this mode, you can press the LF/FF and Load/Eject buttons to adjust the top of form or tear off
position. See “Using the Micro Adjust Function” on page 55.
8. LF/FF button
❏ Feeds paper line by line when pressing shortly.
❏ Ejects a single sheet or advances continuous paper to the next top-of-form position when held
down.
9. Pause light
❏ On when the printer is paused.
❏ Flashes when the printer is in the Micro Adjust mode.
❏ Flashes when the print head has overheated.
❏ Only this light is on in sleep mode. All other lights are off.
Control Panel 89
Page 90

LQ-590II/LQ-590IIN/LQ-2090II/LQ-2090IIN User’s Guide
10. Pause button
❏ Stops printing temporarily, and resumes printing when pressed again.
❏ Press and hold for three seconds to enter Micro Adjust mode. Press the button again to exit.
11. Paper Out light
❏ On when no paper is loaded in the selected paper source or paper is not loaded correctly.
❏ Flashes when paper has not been fully ejected or a paper jam has occurred.
12. Tear Off/Bin lights
❏ Both of the two lights flash when continuous paper is in the tear-off position, and both of the lights
are off when continuous paper is not in the tear-off position.
❏ The left light is on when Card mode is selected.
❏ Both the lights are off when bin 1 of the optional cut-sheet feeder is selected.
❏ The right light is on when bin 2 of the optional cut-sheet feeder is selected.
13. Pitch lights
Indicate which pitch is selected.
14. Font lights
Indicate which font is selected.
Selecting a Font and Pitch
You can select one of the printer’s fonts and pitch by using the buttons on the printer’s control panel, as
described below.
Note:
❏ You can select other fonts than the eight fonts on the control panel by selecting Others. Other fonts
can be set in the Default Setting mode. See “Changing default settings” on page 98.
❏ Settings you make in application programs usually override settings you make from the printer’s
control panel. For best results, use your application to select a font and make other settings.
❏ Bar code fonts cannot be selected via the control panel.
Control Panel 90
Page 91

LQ-590II/LQ-590IIN/LQ-2090II/LQ-2090IIN User’s Guide
❏ The available pitch depends on the font you select. See the table below for more information.
Font Pitch
USD 10
HSD 10, 12
Draft 10, 12, 15, 17, 20
Roman 10, 12, 15, 17, 20, PS
Sans Serif 10, 12, 15, 17, 20, PS
Courier 10, 12, 15, 17, 20, PS
Prestige 10, 12, 17, 20, PS
Script 10, 12, 17, 20, PS
Others*
*1 The available pitch depends on the font you select.
1
10, 12, 17, 20, PS
1. Make sure that the printer is not printing. If it is, press the Pause button to stop printing.
2. Press the Font button until the three Font lights indicate the desired font as shown below.
OON
ONO
ONN
NOO
NON
N = on, O = off, F = flashing
USD
HSD
Draft
Roman
Sans Serif
NNO
NNN
OOF
OFO
Courier
Prestige
Script
Others
3. Press the Pitch button until the three Pitch lights indicate the desired pitch as shown below.
OON
ONO
10 cpi
12 cpi
Control Panel 91
Page 92

LQ-590II/LQ-590IIN/LQ-2090II/LQ-2090IIN User’s Guide
ONN
NOO
NON
NNN
N = on, O = off
15 cpi
17 cpi
20 cpi
PS
4. Make sure that the desired font and pitch are selected.
About Your Printer’s Default Settings
The default settings control many printer functions. While you can often set these functions through
your software or printer driver, you may sometimes need to change a default setting from the printer’s
control panel using the Default Setting mode. You can also change some of the settings using the
Printer Setting utility in the printer driver. See “Using Printer Setting” on page 74.
Default Setting mode
The following table is the default settings and the options you can select in the Default Setting mode.
The settings are explained in detail after the table. For instructions on changing the default settings, see
“Changing default settings” on page 98.
Item
Page length for front tractor*
Page length for rear tractor*
Skip over perforation*
Auto tear off
Auto tear-off wait time
Auto line feed*
Print direction*
Software
3
3
3
Setting / value*
2
2
Length in inches: 3, 3.5, 4, 5.5, 6, 7, 8, 8.5, 11, 70/6, 12, 14, 17
Length in inches: 3, 3.5, 4, 5.5, 6, 7, 8, 8.5, 11, 70/6, 12, 14, 17
Off, On
Off, On
0.5 seconds, 3 seconds
Off, On
Bi-D, Uni-D, Auto
ESC/P2, IBM PPDS
1
Control Panel 92
Page 93

LQ-590II/LQ-590IIN/LQ-2090II/LQ-2090IIN User’s Guide
Item
0 slash*
I/F (interface) mode*
2
3
Auto I/F (interface) wait time
Parallel I/F bidirectional mode
Packet mode*
Character table*
3
2
International character set for italic table*
2*4
Font*
Setting / value*
1
0, (the zero character with a slash)
Auto, Parallel, Serial*3, USB, Network*
3
10 seconds, 30 seconds
Off, On
Auto, Off
Standard model: italic, PC 437, PC 850, PC 860, PC 863, PC 865, PC 861,
BRASCII, Abicomp, Roman 8, ISO Latin 1, PC858, ISO8859-15
All other models: Italic, PC 437, PC 850, PC 437 Greek, PC 853, PC855,
PC 852, PC 857, PC864, PC 866, PC 869, MOZOWIA, Code MJK, ISO
8859-7, ISO Latin 1T, Bulgaria, PC 774, Estonia, ISO 8859-2, P C 866 LAT.,
PC 866 UKR, PC APTEC, PC708, PC720, PC AR864, PC 860, PC 865, PC
861, PC 863, BRASCII, Abicomp, Roman 8, ISO Latin 1, PC858,
ISO8859-15, PC771, PC437 Slovenia, PC MC, PC1250, PC1251, KZ1048
2
Italic U.S.A., Italic France, Italic Germany, Italic U.K., Italic Denmark 1,
Italic Sweden, Italic Italy, Italic Spain 1
OCR-B, Orator, Orator-S, Script C, Roman T, Sans Serif H
IPsec/IP Filtering*
5
Link Speed & Duplex*
Baud rate*
Parity*
Data length*
5*6
5*6
5*6
Auto CR (IBM PPDS)*
A.G.M (IBM PPDS)*
7
Manual feed wait time
Buzzer
Roll paper
Off, On
5
Auto, 10BASE-T Half Duplex, 10BASE-T Full Duplex, 100BASE-T Half
Duplex, 100BASE-T Full Duplex
19200 BPS, 9600 BPS, 4800 BPS, 2400 BPS, 1200 BPS, 600 BPS
None, Odd, Even, Ignore
8 bit, 7 bit
7
Off, On
Off, On
1 second, 1.5 seconds, 2 seconds, 3 seconds
Off, On
Off, On
Control Panel 93
Page 94

LQ-590II/LQ-590IIN/LQ-2090II/LQ-2090IIN User’s Guide
Item
Low-noise mode
*1 Settings with bold weight mean the standard factory settings.
2
*
This does not affect printing from Windows even if the settings are changed.
3
Changing from the standard factory settings may cause undesirable effects when printing from Windows.
*
4
*
You can use the font selected in this setting by selecting Others in the control panel.
5
This setting is available only on Network compatible models.
*
6
*
Printing is available only when the port setting and printer settings are configured correctly.
7
*
This setting is available only in IBM PPDS emulation mode.
Setting / value*
Off, On
1
Page length for front tractor
This setting allows you to set the page length (in inches) for the continuous paper loaded on the front
push tractor.
Page length for rear tractor
This setting allows you to set the page length (in inches) for the continuous paper loaded on the rear
push tractor.
Skip over perforation
This feature is available only when continuous paper is selected as the paper source. When you turn on
this feature, the printer provides a one-inch (25.4 mm) margin between the last line printed on one
page and the first line printed on the next page. Because most application program margin settings
override margin settings from the control panel, you should use this setting only if you cannot set your
top and bottom margins using your application.
Auto tear off
When auto tear off is on and you are using continuous paper with the front or rear push tractor, the
printer automatically advances the paper perforation to the tear-off position, where you can easily tear
off the printed pages. When the printer receives the next print job, it automatically moves the unused
paper back to the top-of-form position and starts printing, so you can use all of the next page.
When auto tear off is off and you are using continuous paper with the front or rear push tractor, you
need to move the perforation to the tear-off position manually by pressing the Tear Off/Bin button.
See “Using the tear-off function” on page 42 for more information.
Control Panel 94
Page 95

LQ-590II/LQ-590IIN/LQ-2090II/LQ-2090IIN User’s Guide
Auto tear-off wait time
You can select the time from the point printing finished until the paper moves to the tear-off position
for continuous printing. This setting is available when the auto tear-off function is set to on.
Auto line feed
When auto line feed is on, the printer accompanies each carriage return (CR) code received with a line
feed code. Set this to On if printing might continue without line feeding depending on the OS or the
applications used.
Note:
Set to Off when printing from Windows, otherwise a blank line is inserted between the lines.
Print direction
You can select auto print direction (Auto), bidirectional printing (Bi-D), or unidirectional printing
(Uni-D). Printing is normally bidirectional for faster printing; however, unidirectional printing
allows for precise vertical printing alignment.
When print direction is set to Auto, the printer analyzes the data, and then switches automatically
whether to use Bi-D or Uni-D.
Note:
Set to Bi-D when printing from Windows to enable the printer driver's print direction setting. When
Uni-D or Auto is selected, the printer ignores the command from the Windows driver.
Software
When you select ESC/P2 the printer operates in the Epson ESC/P mode. When you select IBMPPDS,
the printer emulates an IBM
printer.
®
0 slash
The zero character has a slash ( ) when this feature is turned on. It has no slash (0) when this feature is
turned off. The slash allows you to easily distinguish between the uppercase letter O and a zero.
Control Panel 95
Page 96

LQ-590II/LQ-590IIN/LQ-2090II/LQ-2090IIN User’s Guide
I/F (interface) mode
The printer provides built-in slots for four interfaces; Parallel, Serial, USB, and Network. You can
choose Auto (automatic), Parallel, USB, Serial or Network for the interface mode. When you select
Auto, the printer automatically selects the interface that is receiving data, and uses that interface until
the end of the print job. The Auto setting allows you to share the printer among multiple computers
without changing the interface mode.
If only one computer is connected to the printer, you can select Parallel, Serial, USB, and Network,
depending on which interface your computer uses.
Note:
Serial and Network are available only on Network compatible models.
Auto I/F (interface) wait time
This setting is effective only when I/F mode is set to Auto. This setting specifies how long the printer
waits when no longer the printer receives data. You can specify 10 seconds or 30 seconds for the
auto interface wait time.
Parallel I/F (interface) bidirectional mode
The Parallel Interface bidirectional transfer mode is used when this feature is on. If bidirectional
transfer mode is unnecessary, turn this off.
Note:
To use EPSON Status Monitor 3 or the Printer Setting utility, always turn this feature on.
Packet mode
Make sure to select Auto to print from Windows applications using the printer driver included in the
software disc that comes with the printer. Turn off this mode if you encounter connection problems
when you are printing from applications based on other operating systems such as DOS.
Note:
Make sure that the printer and the printer driver settings are the same, otherwise, you cannot print or
printing may be corrupted.
Character table
You can select among various character table. Make sure that you select same character table as the
printer driver if necessary.
Control Panel 96
Page 97

LQ-590II/LQ-590IIN/LQ-2090II/LQ-2090IIN User’s Guide
When using the printer driver, change the settings on the printer driver. For details, see “Printer
Driver Settings Overview” on page 65.
International character set for Italic table
You can select among several international character sets for the Italic character table. Each character
set contains eight characters that vary depending on the country or language, so you can customize the
Italic table to suit your printing needs.
Font
This setting allows you to set a font that is used when Others is selected from the fonts on the control
panel.
IPsec/IP Filtering
You can filter traffic based on IP addresses, services, and port. By combining of the filtering, you can
configure the printer to accept or block specified clients and specified data. Additionally, you can
improve security level by using an IPsec.
See the Network Guide for details.
Link Speed & Duplex
You can select an appropriate Ethernet speed and duplex setting. If you select a setting other than
Auto, make sure the setting corresponds to the settings on the hub you are using.
Baud rate
Use this option to set the data transfer rate (baud) for the serial interface. The baud rate is measured in
bits per second (bps). See your computer manual and software documentation for the proper setting.
Parity
When this option is set to None, parity checking is disabled. The parity bit, if used, provides a basic
form of error detection. See your computer manual and software documentation for the proper
setting.
Data length
Set the data length of the serial interface to 7 bit or 8 bit. See your computer manual and software
documentation for the proper setting.
Control Panel 97
Page 98

LQ-590II/LQ-590IIN/LQ-2090II/LQ-2090IIN User’s Guide
Auto CR (carriage return)
This setting automatically adds a line feed (LF) code to the carriage return (CR) code.
The default setting for this feature is Off. Change this to On for systems that do not have CR code
control.
Note:
This feature is available only in IBM PPDS emulation mode.
A.G.M
Turn on the alternate graphic mode (A.G.M.) to make the ESC 3, ESC A, ESC J, ESC K, ESC L, ESC Y,
ESC Z, and ESC commands in IBM PPDS emulation mode work the same way as in ESC/P2 mode.
Note:
This feature is available only in IBM PPDS emulation mode.
Manual feed wait time
The length of wait time between the time paper is inserted into the sheet guide and when it is fed. If the
paper feeds before adjusting its position, you can increase the wait time.
Buzzer (beeper)
The printer beeps when an error occurs. (See “Using the Error Indicators” on page 103 for more
information on printer errors.) If you do not want the printer to beep when an error occurs, turn this
setting off.
Roll Paper
When you turn on this mode, the printer recognizes that single sheets are not loaded in the printer.
When you press the LF/FF button, the printer does not eject the paper and continues to the next page.
Low-noise mode
When this mode is set to On, the printing speed is lowered to reduce the noise during printing.
Changing default settings
The following table shows the basic function of each button in the Default Setting mode.
Control Panel 98
Page 99

LQ-590II/LQ-590IIN/LQ-2090II/LQ-2090IIN User’s Guide
Button Basic function
Menu (Pitch and Tear Off/Bin) buttons
ItemD button
ItemU button
Set button
Enters or exits the Default Setting mode.
Selects the next menu parameter.
Selects the previous menu parameter.
Changes the value in the selected menu.
Follow these steps to enter the Default Setting mode and change the printer’s default settings:
Note:
❏ Before entering the Default Setting mode, you need to load A4 or letter size single-sheet paper or
continuous paper that is at least 210 mm (8.3 inches) wide. See “Loading Continuous Paper” on
page 21 and “Loading Single Sheets” on page 44 for instructions on loading continuous paper and
single sheets.
❏ If you use single sheets, you need to load a new sheet of paper each time the printer ejects a printed
sheet from the sheet guide.
❏ For your safety, Epson recommends operating the printer with the printer cover closed. The printer
will function with the printer cover opened or removed, but maximum safety and print speed are
achieved when the cover is closed.
❏ If you turn off the printer prior to exiting Default Setting mode, any changes you may have made are
canceled and not saved.
1. Make sure paper is loaded.
2. Press the Menu ( Pitch and Tear Off/Bin) buttons until the printer beep once and the Menu lights
(both the Tear Off/Bin lights) turn on.
The printer enters the Default Setting mode and prints a message prompting you to select the
language for the Default Setting menu. The language which is underlined indicates the current
setting.
3. If the language you want is not selected, press the ItemD ( Font) button until the printout indicates
the language you want.
Note:
You cannot change the language by the ItemU (Pitch) button.
4. Press the Set (Tear Off/Bin) button to select the desired language.
Control Panel 99
Page 100

LQ-590II/LQ-590IIN/LQ-2090II/LQ-2090IIN User’s Guide
The printer prints a message asking if you wish to print all of the current settings.
Note:
The language you select is also effective when you are entering the lock-out setting mode or
bidirectional adjustment mode.
5. If you want to print the current settings, press the Set button. If you want to bypass printing of the
current settings, press the ItemD button or the ItemU button.
The printer prints the first menu and the current value of the menu.
6. Press the ItemD button or the ItemU button to select the menu parameters which you wish to
change. Press the Set button to scroll through the values within the selected parameter until you
find the desired setting. After setting the selected parameter to the desired setting, you may either
continue to make changes to other parameters by pressing the ItemD button or the ItemU button,
or exit the Default Setting mode by pressing the Menu (Pitch and Tear Off/Bin) buttons.
Note:
You cannot change the setting value to the previous item. You have to press the Set button until the
value you want is selected.
7. After you finish settings, press the Menu (Pitch and Tear Off/Bin) buttons.
The Menu lights (both of the Tear Off/Bin lights) turn off and the printer exits the Default Setting
mode.
The settings you made is saved as new default value.
Note:
If you turn off the printer prior to exiting Default Setting mode, any changes you may have made are
canceled and not saved.
Lock-Out Mode
You can restrict the use of buttons on the control panel by using the lock-out mode.
Changing the lock-out mode setting
You can turn lock-out mode on, off, or change locked functions from lock-out setting mode.
Control Panel 100
 Loading...