

Page 1

Network Guide
NPD5659-00 EN
Page 2

Epson Network Guide
Copyright and Trademarks
No part of this publication may be reproduced, stored in a retrieval system, or transmitted in any form or by any means,
mechanical, photocopying, recording, or otherwise, without the prior written permission of Seiko Epson Corporation. No
patent liability is assumed with respect to the use of the information contained herein. Neither is any liability assumed for
damages resulting from the use of the information contained herein.
Neither Seiko Epson Corporation nor its affiliates shall be liable to the purchaser of this product or third parties for damages,
losses, costs, or expenses incurred by purchaser or third parties as a result of: accident, misuse, or abuse of this product or
unauthorized modifications, repairs, or alterations to this product, or (excluding the U.S.) failure to strictly comply with Seiko
Epson Corporation’s operating and maintenance instructions.
Seiko Epson Corporation and its affiliates shall not be liable against any damages or problems arising from the use of any options
or any consumable products other than those designated as Original Epson Products or Epson Approved Products by Seiko
Epson Corporation.
EPSON
Corporation.
Microsoft
Apple
Adobe
and/or other countries.
RSA and BSAFE are registered trademarks or trademarks of EMC Corporation in the United States and other countries.
General Notice: Other product names used herein are for identification purposes only and may be trademarks of their respective
owners. Epson disclaims any and all rights in those marks.
Copyright © 2017 Seiko Epson Corporation.
, EPSON EXCEED YOUR VISION, EXCEED YOUR VISION and their logos are registered trademarks of Seiko Epson
®
, Windows®, Windows Server®, and Windows Vista® are registered trademarks of Microsoft Corporation.
®
, Mac®, Mac OS®, OS X®, and Bonjour® are registered trademarks of Apple, Inc.
®
, the Adobe logo, Acrobat®, and Reader® are registered trademarks of Adobe Systems Incorporated in the United States
®
Copyright and Trademarks 2
Page 3

Epson Network Guide
Contents
Safety Instructions
Warning, Caution, Important, and Note.................................................... 6
Chapter 1 Introduction
About Your Printer...................................................................... 7
About This Guide....................................................................... 7
Operating Environment.................................................................. 8
Features of the Network Interface.......................................................... 8
Network Interface Operation.............................................................. 9
Status light......................................................................... 9
Network connector................................................................. 10
About the Software..................................................................... 10
Chapter 2 How To
Overview............................................................................. 11
Selecting a Printing Method.............................................................. 12
Printing from Windows............................................................. 12
Printing from Mac OS.............................................................. 12
Features of the Printing Methods..................................................... 12
Installing Components on Your Computer................................................. 13
About Installing Components on Your Computer....................................... 13
Windows 10/8/7/Vista/Server 2016/Server 2012/Server 2008. . . . . . ........................ 14
Windows XP...................................................................... 15
Windows Server 2003. .............................................................. 17
Mac OS........................................................................... 18
Setting Up the Network Interface......................................................... 18
Connecting the Network Interface to the Network....................................... 18
Configuring the Network Interface.................................................... 19
Installing the Printer Driver.............................................................. 20
About Installing the Printer Driver.................................................... 20
Windows 10/8/7/Vista/Server 2016/Server 2012/Server 2008. . . . . . ........................ 20
Windows XP...................................................................... 24
Contents 3
Page 4

Epson Network Guide
Windows Server 2003. .............................................................. 28
Mac OS........................................................................... 32
Chapter 3 Network Software
EpsonNet Config....................................................................... 34
System Requirements............................................................... 34
Installing EpsonNet Config.......................................................... 34
Accessing the EpsonNet Config User’s Guide........................................... 35
EpsonNet Config with Web Browser...................................................... 36
About EpsonNet Config............................................................. 36
Configuring the Network Interface Using EpsonNet Config with Web Browser............... 36
Opening Screen.................................................................... 39
EpsonNet Print (For Windows Users)..................................................... 39
About EpsonNet Print.............................................................. 39
System Requirements............................................................... 40
Installing EpsonNet Print............................................................ 40
Adding a Port for a Printer.......................................................... 41
Configuring the Printer Port......................................................... 47
Chapter 4 Troubleshooting
General Problems...................................................................... 49
Cannot configure the network interface or cannot print from the network................... 49
Cannot print even if you have assigned the IP address to the computer and the printer......... 49
Unable to start EpsonNet Config...................................................... 49
The message “EpsonNet Config cannot be used because no network is installed.” appears when
you start EpsonNet Config......................................................... 50
The message “Could not complete communicating configuration data” appears when you send
settings to the network interface.................................................... 50
Unable to start EpsonNet Config with Web Browser...................................... 50
The Model Name and IP Address do not appear in the EpsonNet Config dialog box........... 51
Printing a Network Status Sheet.......................................................... 51
Chapter 5 Tips for Administrator
Setting an IP Address on the Printer’s Control Panel......................................... 52
Network Menu.................................................................... 53
Contents 4
Page 5

Epson Network Guide
Secure Communication Using IPsec, Access Control, SSL, and IEEE 802.1X. . . . . . . . . . . . . . . . . . . . . . 54
IPsec protocol..................................................................... 55
Access Control.................................................................... 55
SSL.............................................................................. 55
SNMPv3.......................................................................... 56
IEEE 802.1X....................................................................... 56
Secure Communications (IPsec/Access Control)............................................. 57
Overview and Sample Settings........................................................ 57
Configuration Workflow............................................................ 58
Product Security Policies............................................................ 59
Supported Security Methods. . . . . . . . . . . . . ............................................ 62
Index
Contents 5
Page 6

Safety Instructions
Warning, Caution, Important, and Note
Warning
!
must be followed carefully to avoid serious bodily injury.
Caution
!
must be followed carefully to avoid bodily injury.
Important
c
must be observed to avoid damage to your equipment.
Note
contains important information and useful tips on the operation of your printer.
Epson Network Guide
Safety Instructions 6
Page 7

Epson Network Guide
Chapter 1
Introduction
About Your Printer
Your printer has a built-in Ethernet interface and can connect anywhere on your network using
10Base-Te, 100Base-TX, and 1000Base-T Ethernet. The built-in Ethernet interface, which is called the
network interface in this manual, automatically selects the correct standard when it connects to a
network. In addition, it automatically selects appropriate network protocols.
Because the network interface supports multiple protocols and automatically detects protocols on
your network, you can print from Microsoft
Use the Software Disc or the Epson website (http://epson.sn), to easily configure the network interface
for use on the TCP/IP network and install the printer driver. You can use the printer on the TCP/IP
network at once.
Windows® and Apple® Mac OS® applications.
®
If you want to configure the network interface for protocols such as TCP/IP, WSD, LLTD, IPP/IPPS,
UPnP, Bonjour, MS Network, and SNMP, use EpsonNet Config, the configuration utility provided
with your product, to quickly and easily configure the network interface to use those protocols.
Note:
The EpsonNet Config utility configures the network interface to work only with protocols that exist on
your network. This does not imply that you can use all of the above-mentioned protocols on your network
or operating system. The protocols that the network interface can use may vary depending on the
operating system and the network configuration.
About This Guide
This Network Guide contains information about using the network interface on a network. It includes
how to set up the network interface, install the configuration software, and modify network settings of
your printer and computers.
For information about your printer, see your User’s Guide.
Note:
❏ To read the online guide, you must have Adobe Reader or Adobe Acrobat Reader installed on your
computer.
Introduction 7
Page 8

Epson Network Guide
❏ This guide is written for network administrators, and many of the steps included here require
detailed network knowledge and administrator rights.
❏ The term “network administrator” refers to the person responsible for maintaining the network.
“Administrator” is synonymous with “Supervisor” in this guide.
❏ The term “network interface” refers to the built-in Ethernet interface of the printer in this guide.
❏ Some screen shots in this guide may list a printer name other than your printer. This difference does
not alter the instructions.
❏ The supported operating systems are different depending on the printer. See your printer’s User’s
Guide for the supported operating systems.
Operating Environment
The network interface supports the following environments. Check what is available.
OS Protocol IPv4 IPv6
Windows 10
Windows 8 (includes 8.1 or later)
Windows 7
Windows Vista
Windows Server 2016
Windows Server 2012 (includes R2)
Windows Server 2008 (includes R2)
Windows XP (Home, Professional)
Windows Server 2003 (includes R2)
Mac OS X 10.6 or later Bonjour
TCP/IP (Standard TCP/IP port) ✓✓
TCP/IP (EpsonNet Print port) ✓ -
TCP/IP (Standard TCP/IP port) ✓ -
TCP/IP (EpsonNet Print port)
✓
✓✓
Features of the Network Interface
❏ Connects your Epson printer using a built-in Ethernet interface, which is called the network
interface in this manual, to the network.
-
Introduction 8
Page 9
Epson Network Guide
❏ Supports multiple protocols, such as TCP/IP, WSD, LLTD, IPP/IPPS, UPnP, Bonjour, MS
Network, and SNMP.
❏ Supports 10Base-Te, 100Base-TX, and 1000Base-T Ethernet.
❏ Supports Bonjour on Mac OS X 10.6 or later.
❏ Supports access control to your printer by filtering client computer’s IP addressees.
❏ Supports SSL (Secure Sockets Layer) for IPPS and HTTPS protocols.
❏ Supports IPsec.
❏ Supports IEEE 802.1X.
❏ Supports EpsonNet Config with a Web browser, which allows you to configure and monitor your
printer using a Web browser.
Network Interface Operation
Status light
The indicator lights provide you with important information on the operations of the network
interface.
Laser printers
Data light Status light Network Status
Green Green Ready (1000 M link)
Green (Flashing) Green Receiving packets (1000 M link)
Green Orange Ready (100 M link)
Green (Flashing) Orange Receiving packets (100 M link)
Green Off Ready (10 M link)
Green (Flashing) Off Receiving packets (10 M link)
Off Green Deep sleep mode (1000 M link)
Off Off Deep sleep mode (100 M / 10 M link)
Power off mode
Introduction 9
Page 10

Epson Network Guide
Network connector
RJ-45 connector: This connector is used to connect an Ethernet cable to a network. You can use this
cable for 10Base-Te, 100Base-TX, and 1000Base-T Ethernet.
Important:
c
You must use the following shielded twisted-pair cable to connect the network interface to a
network.
❏ Category-5 or higher for the 10Base-Te or 100Base-TX connection
❏ Category-6 or higher for the 1000Base-T connection
About the Software
The software provided with your printer includes the following network software.
Note:
The software provided varies depending on your printer model.
❏ EpsonNet Config is a configuration utility for administrators that allows you to configure the
network interface for various protocols such as TCP/IP, MS Network, IPP, and SNMP. See
“EpsonNet Config” on page 34.
❏ EpsonNet Config with Web Browser is a Web-based configuration utility that allows you to
configure the network interface for TCP/IP, MS Network, IPP, and SNMP. See “EpsonNet Config
with Web Browser” on page 36.
❏ EpsonNet Print is a utility program that provides peer to peer printing to Epson printers on the
TCP/IP network. See “EpsonNet Print (For Windows Users)” on page 39.
Introduction 10
Page 11

Epson Network Guide
Chapter 2
How To
Overview
This section describes the general procedure on how to set up the network interface for use on a
network.
1. Check the network interface operation.
Check the functions and operations of the network interface, such as status lights and RJ-45
connector. See “Network Interface Operation” on page 9 for details.
2. Select a printing method.
Select a printing method appropriate for your network environment and operating system. If you
are not sure, see “Printing from Windows” on page 12 or “Printing from Mac OS” on page 12
for details.
3. Install the necessary components on your computer.
Make sure the necessary components (such as TCP/IP) are installed on the computer, and
network settings (such as IP address, subnet mask, etc.) of the computer is set. See “About
Installing Components on Your Computer” on page 13 for details.
4. Connect the network interface to the network.
Connect the network interface to the network. See “Connecting the Network Interface to the
Network” on page 18 for details.
5. Configure the network interface and install the printer driver.
See “Configuring the Network Interface” on page 19 for details.
6. If necessary, configure the network settings of the network interface using EpsonNet Config.
Configure the network interface using EpsonNet Config. See “About EpsonNet Config” on
page 36 for details.
How To 11
Page 12

Epson Network Guide
Selecting a Printing Method
Printing from Windows
Check if there is a Windows 10/8/7/Vista/XP/Server 2016/Server 2012/Server 2008/Server 2003 print
server on your network, and then use the suggestions below.
Note:
Only the recommended printing methods are introduced here. See “Features of the Printing Methods” on
page 12 for information on additional methods.
If no Windows print server exists
We recommend TCP/IP printing. See “Windows 10/8/7/Vista/Server 2016/Server 2012/Server 2008”
on page 20, “Windows XP” on page 24, or “Windows Server 2003” on page 28.
If a Windows print server exists
On the server, set the printer to connect and turn it into a shared printer. Your clients can then print to
this shared printer.
Printing from Mac OS
Mac OS X 10.6 or later
❏ Bonjour
Features of the Printing Methods
This section describes features of the printing methods available for you to choose.
TCP/IP printing
Advantages
❏ No computer as a network interface is required.
❏ No special utility for Windows 10/8/7/Vista/XP/Server 2016/Server 2012/Server 2008/Server
2003 is required.
How To 12
Page 13

❏ You can see the printer status using EPSON Status Monitor.
❏ You can print via a router.
Disadvantages
❏ You need to set up TCP/IP.
Internet printing
Advantages
❏ You can print to the printer over the Internet.
Disadvantages
❏ EPSON Status Monitor cannot be used.
Epson Network Guide
❏ TCP/IP and DNS settings are required.
❏ For Windows 10/8/7/Vista/XP/Server 2016/Server 2012/Server 2008/Server 2003, you cannot
share the Internet printer.
Installing Components on Your Computer
About Installing Components on Your Computer
Before configuring the network interface and printing from the computer, you need to install the
necessary components (such as TCP/IP) and assign an IP address and subnet mask for your computer,
depending on the printing method you want to use. See the section in this chapter appropriate for your
operating system.
Note:
❏ The Windows operating system disk may be required during the installation.
❏ When using TCP/IP for printing, you need to set the IP address, the subnet mask, and the default
gateway of the computer.
How To 13
Page 14
Epson Network Guide
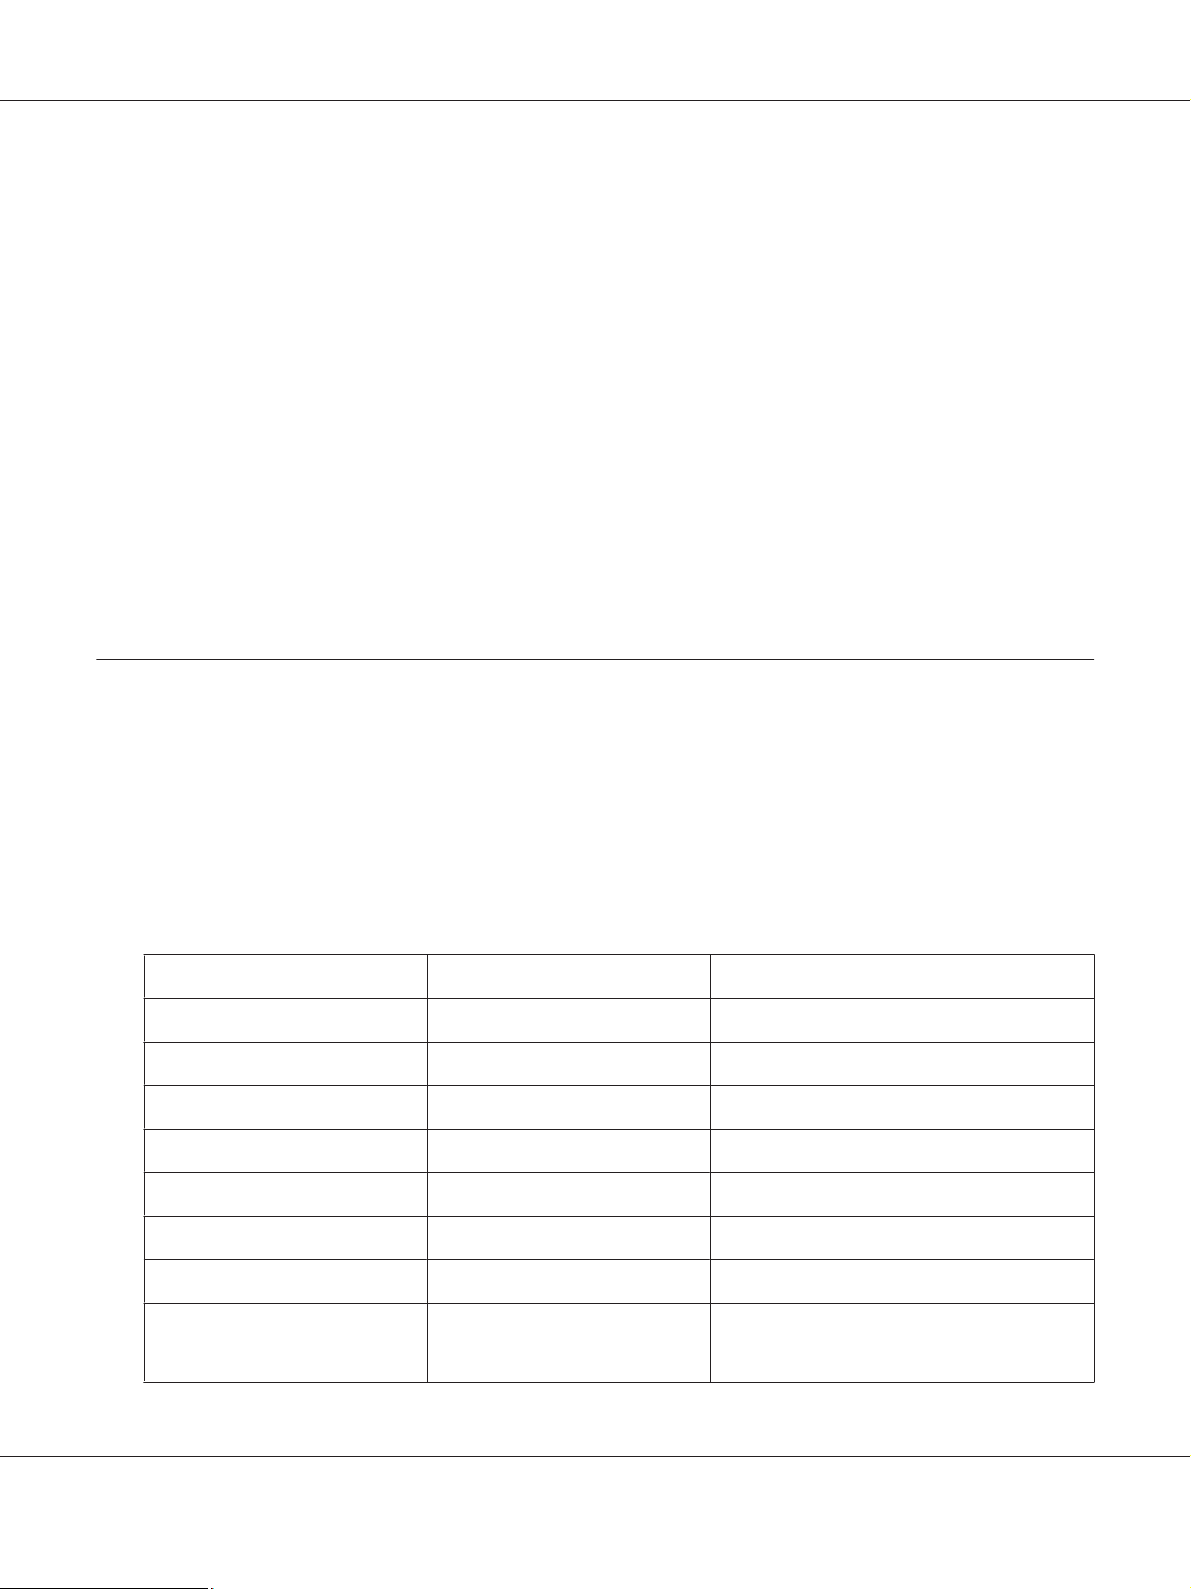
Windows 10/8/7/Vista/Server 2016/Server 2012/Server 2008
Use the following procedure to install the necessary components.
1. Open the Control Panel, and then click View network status and tasks or double-click
Network and Sharing Center.
2. Click Ethernet (Windows 10/8/Server 2016/Server 2012), Local Area Connection (Windows
7), or View Status (Windows Vista/Server 2008), and then click the Properties button.
Note:
If the User Account Control screen appears, click the Yes or Continue button.
3. Check if the following necessary components are in the list.
The following table lists the components required for configuring the network interface with
EpsonNet Config.
EpsonNet Config’s setting screens Necessary components
TCP/IP, WSD, IPP/IPPS, UPnP, Bonjour, MS
Network
Internet Protocol (TCP/IP IPv4) or Internet Protocol (TCP/IP
IPv6)
The following table lists the components required for network printing.
How To 14
Page 15

Epson Network Guide
Printing method Necessary components
TCP/IP printing Internet Protocol (TCP/IP IPv4) or Internet Protocol (TCP/IP
IPv6)
4. Double-click Internet Protocol Version 4 (TCP/IPv4) or Internet Protocol Version 6 (TCP/
IPv6) on the Local Area Connection Properties dialog box to open the properties dialog box. Set
the IP address, the subnet mask, etc. and then click OK.
5. Restart the computer.
The necessary components are now installed. Go to the section “Setting Up the Network Interface” on
page 18.
Windows XP
For Windows XP, use the following procedure to install the necessary components.
1. Click Start, highlight Control Panel, and then click Network and Internet Connections.
Select Network Connections.
2. Under LAN or High-Speed Internet, click the Local Area Connection icon.
3. Under Network Tasks, click Change settings of this connection.
How To 15
Page 16

4. Check if the following necessary components are in the list.
Epson Network Guide
The following table lists the components required for configuring the network interface with
EpsonNet Config.
EpsonNet Config’s setting screens Necessary components
TCP/IP, WSD, IPP/IPPS, UPnP, Bonjour, MS
Network
Internet Protocol (TCP/IP)
The following table lists the components required for network printing.
Printing method Necessary components
TCP/IP printing Internet Protocol (TCP/IP)
5. Double-click Internet Protocol (TCP/IP) on the Local Area Connection Properties dialog box to
open the Internet Protocols (TCP/IP) Properties dialog box. Set the IP address, the subnet mask,
etc. and then click OK.
6. Restart the computer.
The necessary components are now installed. Go to the section “Setting Up the Network Interface” on
page 18.
How To 16
Page 17
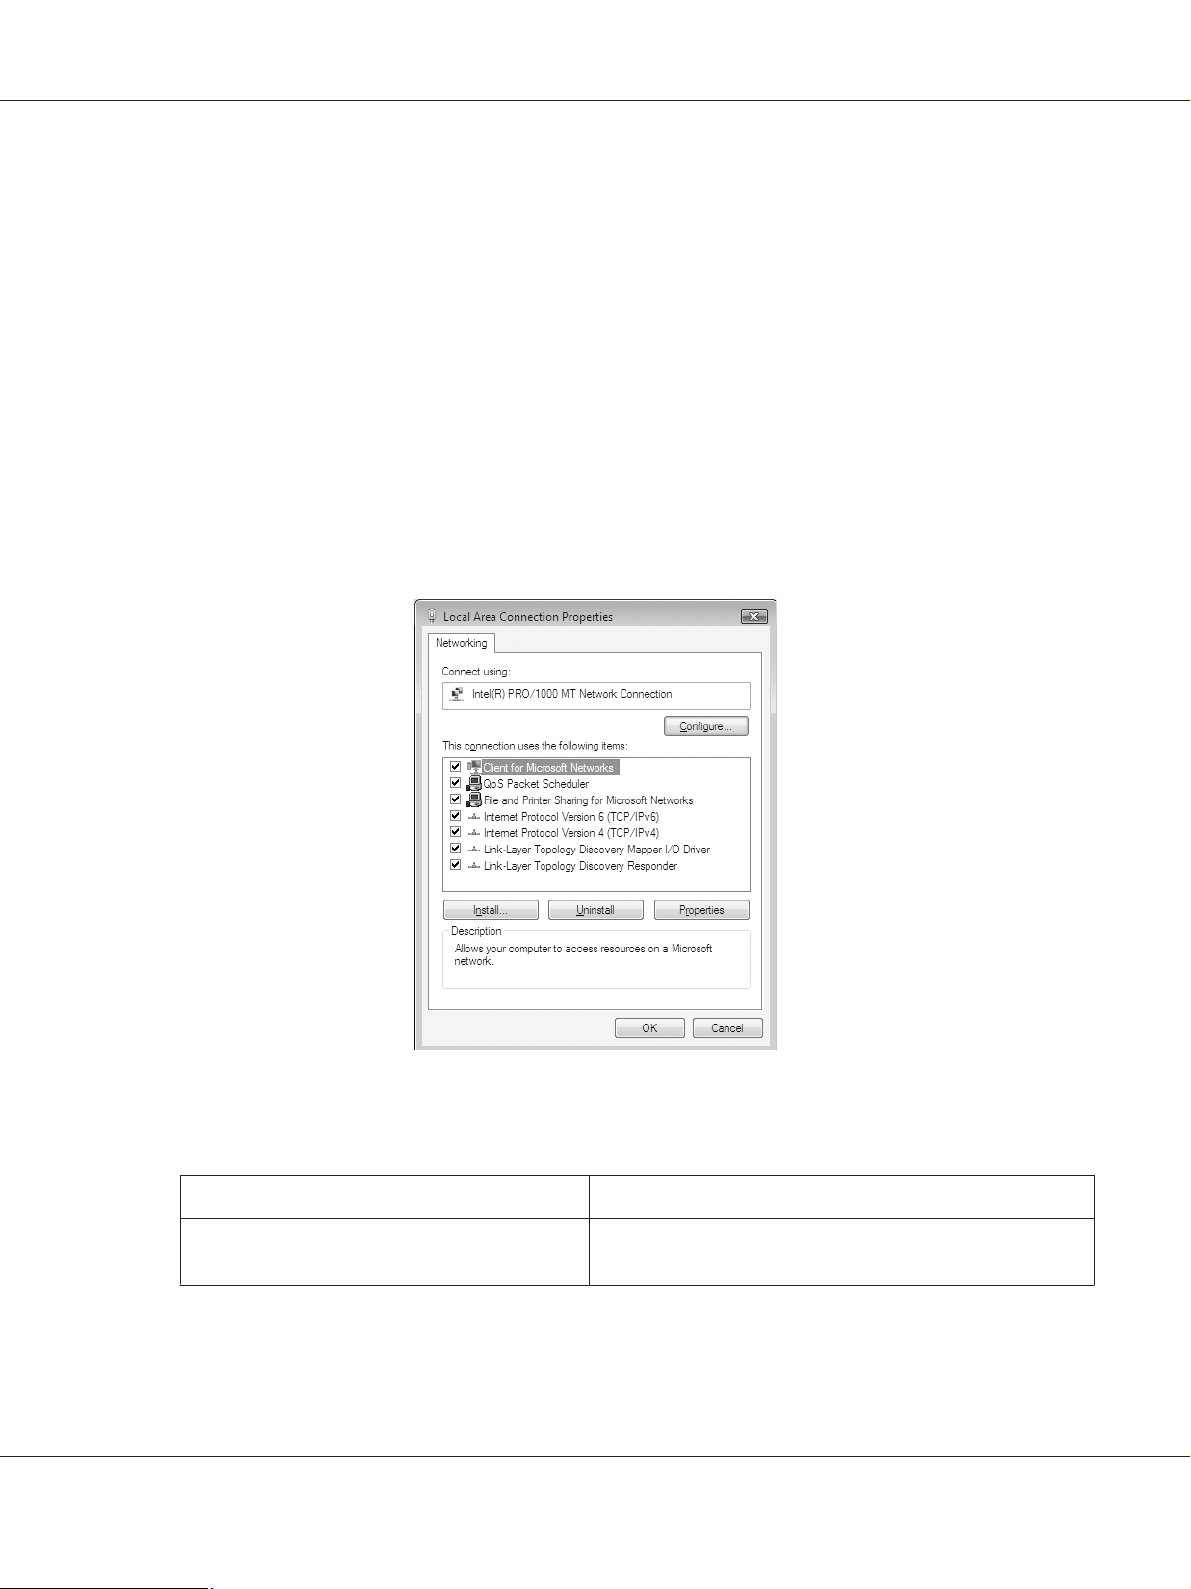
Epson Network Guide
Windows Server 2003
For Windows Server 2003, use the following procedure to install the necessary components.
1. Click Start, point to Control Panel, and then select Network Connections. Click Local Area
Connections.
2. Click the Properties button.
3. Check if the following necessary components are in the list.
The following table lists the components required for configuring the network interface with
EpsonNet Config.
EpsonNet Config’s setting screens Necessary components
TCP/IP, WSD, IPP/IPPS, UPnP, Bonjour, MS
Network
Internet Protocol (TCP/IP)
The following table lists the components required for network printing.
Printing method Necessary components
TCP/IP printing Internet Protocol (TCP/IP)
How To 17
Page 18

Epson Network Guide
4. Double-click Internet Protocol (TCP/IP) on the Local Area Connection Properties dialog box to
open the Internet Protocols (TCP/IP) Properties dialog box. Set the IP address, the subnet mask,
etc. and then click OK.
5. Restart the computer.
The necessary components are now installed. Go to the section “Setting Up the Network Interface” on
page 18.
Mac OS
To assign an IP address, subnet mask, etc. to your Mac, follow the steps below.
1. From the Apple menu, select System Preferences.
2. Open the Network control panel. Click the TCP/IP tab.
Note:
For Mac OS X 10.6 or later, select Ethernet as the connecting method on the Network control panel,
select the method to assign the IP address from the Configure menu, and then assign the IP address.
3. Select Built-in Ethernet from the Show pull-down menu.
4. Assign an IP address and other settings if necessary.
5. Click the Apply Now button to save any changes.
Go to the section “Setting Up the Network Interface” on page 18.
Setting Up the Network Interface
Connecting the Network Interface to the Network
Follow the instructions below to connect the network interface to the network.
1. Make sure that your printer is turned off.
How To 18
Page 19

Epson Network Guide
2. Connect one end of the network cable to the RJ-45 connector on the network interface, and the
other end to the network.
Important:
c
❏ You must use the following shielded twisted-pair cable to connect the network interface to
a network.
-- Category-5 or higher for the 10Base-Te or 100Base-TX connection
-- Category-6 or higher for the 1000Base-T connection
❏ Do not connect the network interface and the computer directly. Be sure to use a HUB to
connect the network interface to the network.
Note:
You can use 10Base-Te, 100Base-TX, and 1000Base-T Ethernet. When you print a lot of data, we
recommend you use a higher-speed with light network traffic.
3. Turn on your printer. After the status lights go off, print a network status sheet.
Important:
c
After turning off the printer, wait until the status lights go off before turning it back on;
otherwise the network interface may not work correctly.
Note for Mac OS X 10.6 or later:
Since the printer supports Bonjour and is on by default, you can use the printer on a network just by
connecting it to the network. If you want to disable the Bonjour setting, use the printer’s control
panel. See “Setting an IP Address on the Printer’s Control Panel” on page 52 for details.
Now, you can configure the network interface to use on the TCP/IP network and also install the
printer driver using the Software Disc shipped with your printer. See “Configuring the Network
Interface” on page 19 for details.
Configuring the Network Interface
Configure the network interface for use on the TCP/IP network by installing the EpsonNet Print (For
Windows Users), and install the printer driver on your computer.
For detals about EpsonNet Print, see “EpsonNet Print (For Windows Users)” on page 39.
For installation of the printer driver, see “Installing the Printer Driver” on page 20.
How To 19
Page 20

Epson Network Guide
Installing the Printer Driver
About Installing the Printer Driver
To print to the network printer, you need to install the printer driver on the computer. The following
section explains how to install the printer driver manually. See the section in this chapter appropriate
for your operating system.
Note:
❏ Go to the Epson website (http://epson.sn), enter the product name, and then start the setup.
❏ Download the driver from the Epson website, and then install it.
http://www.epson.eu/support/ (Europe)
http://support.epson.net/ (outside Europe)
❏ For Windows users, you can get the printer driver from the Software Disc shipped with your printer.
Windows 10/8/7/Vista/Server 2016/Server 2012/Server 2008
The printer driver installation procedure differs depending on the printing method you prefer.
TCP/IP printing
Note:
If you are using EpsonNet Print, the setup procedure is different. See “About EpsonNet Print” on
page 39 for details. Note that EpsonNet Print does not support IPv6 environment.
1. Open the Control Panel, and then View devices and printers (Windows 10/8/7/Server 2016/
Server 2012) or Printers (Windows Vista/Server 2008).
2. Click Add a printer to start the Add Printer wizard.
How To 20
Page 21

Epson Network Guide
3. Click Add a local printer.
4. Select the Create a new port radio button, and then select Standard TCP/IP Port from the list.
Then click Next.
How To 21
Page 22

Epson Network Guide
5. Enter the IP address of the network interface and then click Next.
6. If an error occurs, the following dialog box appears. Select the Standard radio button and then
select EPSON Network Printer. Click Next.
7. Click Finish.
8. See “Installing a printer driver” on page 23 to install the printer driver.
Internet printing (IPP/IPPS)
1. Open the Control Panel, and then View devices and printers (Windows 8/7/Server 2012) or
Printers (Windows Vista/Server 2008).
2. Click Add a printer to start the Add Printer wizard.
How To 22
Page 23

Epson Network Guide
3. Click Add a network, wireless or Bluetooth printer.
4. Click The printer that I want isn’t listed.
5. Select the Add a printer using a TCP/IP address or hostname radio button and then click
Next.
6. Enter the URL of the target device to the Hostname or IP address box using the format below.
The URL should be the same as the URL you set on EpsonNet Config’s IPP/IPPS Information
page.
http://IP address of network interface:631/Printer name
Example: http://192.168.100.201:631/EPSON_IPP_Printer
Note:
To check the IP address of the network interface, use EpsonNet Config. See “About EpsonNet Config”
on page 36 for details.
7. Follow the on-screen instructions to set up the device. See “Installing a printer driver” on page 23
if necessary.
8 . I f y ou wa n t t o p ri nt wit h I PP S (Secure IPP printing), you have to import a digital certificate to your
printer using EpsonNet Config with Web browser. See “EpsonNet Config with Web Browser” on
page 36 for details.
Installing a printer driver
1. Insert the Software Disc shipped with the device.
How To 23
Page 24

Epson Network Guide
Note:
If your computer does not have a disc drive, download the printer driver from the Epson website, and
then install it.
http://www.epson.eu/support/ (Europe)
http://support.epson.net/ (outside Europe)
2. Close the Epson Install Navi screen if it appears.
3. On the Add Printer screen, click the Have Disk button. The Install From Disk dialog box appears.
4. Click Browse.
5. Select the disc drive for Drives, and double-click the WINX64 folder or the WINX86 folder
depending on your operating system. Click Open.
6. Click OK in the Install From Disk dialog box.
7. Select the model name of the device, and then click Next.
Note:
If the Add Printer wizard prompts you to select either Keep existing driver or Replace existing
driver, be sure to select the Replace existing driver radio button.
8. Click Finish and follow the on-screen instructions to complete the setup.
Windows XP
The printer driver installation procedure differs depending on the printing method you prefer.
TCP/IP printing
Note:
If you are using EpsonNet Print, the setup procedure is different. See “About EpsonNet Print” on
page 39 for details.
1. Click Start, click Control Panel, click Printers and Other Hardware, and then click Printers
and Faxes.
2. Under Printer Tasks, click Add a printer to start the Add Printer wizard, and then click Next.
How To 24
Page 25

Epson Network Guide
3. Click Local printer attached to this computer, clear the Automatically detect and install
my Plug and Play printer check box, and then click Next.
Note:
You must clear the Automatically detect and install my Plug and Play printer check box because
the printer is attached directly to the network, not to a Windows XP computer.
4. Select the Create a new port radio button, and then select Standard TCP/IP Port from the list.
Then click Next.
How To 25
Page 26

Epson Network Guide
5. Enter the IP address of the network interface and then click Next.
6. If an error occurs, the following dialog box appears. Select the Standard radio button and then
select EPSON Network Printer. Click Next.
7. Click Finish.
8. See “Installing a printer driver” on page 27 to install the printer driver.
Internet printing (IPP/IPPS)
1. Click Start, click Control Panel, click Printers and Other Hardware, and then click Printers
and Faxes.
How To 26
Page 27

Epson Network Guide
2. Under Printer Tasks, click Add a printer to start the Add Printer wizard, and then click Next.
3. Click A network printer, or a printer attached to another computer, and then click Next.
4. Select the Connect to a printer on the Internet or on a home or office network radio button.
5. Enter the URL of the target printer using the format below. The URL should be the same as the
URL you set on EpsonNet Config’s IPP/IPPS Information page.
http://IP address of printer:631/Printer name
Example: http://192.168.100.201:631/EPSON_IPP_Printer
Note:
To check the IP address of the network interface, use EpsonNet Config. See “About EpsonNet Config”
on page 36 for details.
6. Follow the on-screen instructions to set up the printer. See “Installing a printer driver” on
page 27 if necessary.
7 . I f y ou wa n t t o p ri nt wit h I PP S (Secure IPP printing), you have to import a digital certificate to your
printer using EpsonNet Config with Web browser. See “EpsonNet Config with Web Browser” on
page 36 for details.
Installing a printer driver
1. Insert the Software Disc shipped with the printer.
How To 27
Page 28

Epson Network Guide
Note:
If your computer does not have a disc drive, download the printer driver from the Epson website, and
then install it.
http://www.epson.eu/support/ (Europe)
http://support.epson.net/ (outside Europe)
2. Close the Epson Install Navi screen if it appears.
3. On the Add Printer screen, click the Have Disk button. The Install From Disk dialog box appears.
4. Click Browse.
5. Select the disc drive for Drives, and double-click the WINX64 or WINX86 folder. Click Open.
6. Click OK in the Install From Disk dialog box.
7. Select the model name of the printer, and then click Next.
Note:
If the Add Printer wizard prompts you to select either Keep existing driver or Replace existing
driver, be sure to select the Replace existing driver radio button.
8. Click Finish and follow the on-screen instructions to complete the setup.
Windows Server 2003
The printer driver installation procedure differs depending on the printing method you prefer.
TCP/IP printing
Note:
If you are using EpsonNet Print, the setup procedure is different. See “About EpsonNet Print” on
page 39 for details.
1. Click Start, and then select Printers and Faxes.
2. Double-click the Add Printer icon to start the Add Printer wizard, and then click Next.
3. Click Local printer attached to this computer, clear the Automatically detect and install
my Plug and Play printer check box, and then click Next.
How To 28
Page 29

Epson Network Guide
Note:
You must clear the Automatically detect and install my Plug and Play printer check box because
the printer is attached directly to the network, not to a computer.
4. Select the Create a new port radio button, and then select Standard TCP/IP Port from the list.
Click Next.
5. When Add Standard TCP/IP Printer Port Wizard dialog box appears, click Next.
How To 29
Page 30

Epson Network Guide
6. Enter the IP address of the network interface and then click Next.
7. If an error occurs, the following dialog box appears. Select the Standard radio button and then
select EPSON Network Printer. Click Next.
8. Click Finish.
9. See “Installing a printer driver” on page 31 to install the printer driver.
Internet printing (IPP/IPPS)
1. Click Start, and then select Printers and Faxes.
How To 30
Page 31

Epson Network Guide
2. Double-click the Add Printer icon to start the Add Printer wizard, and then click Next.
3. Select A network printer, or a printer attached to another computer, and then click Next.
4. Select the Connect to a printer on the Internet or on a home or office network radio button.
5. Enter the URL of the target printer using the format below. The URL must be the same URL you set
on EpsonNet Config’s IPP/IPPS Information page.
http://IP address of printer:631/Printer name
Example: http://192.168.100.201:631/EPSON_IPP_Printer
Note:
To check the IP address of the network interface, use EpsonNet Config. See “About EpsonNet Config”
on page 36 for details.
6. Follow the on-screen instructions to set up the printer. See “Installing a printer driver” on
page 31 if necessary.
7 . I f y ou wa n t t o p ri nt wit h I PP S (Secure IPP printing), you have to import a digital certificate to your
printer using EpsonNet Config with Web browser. See “EpsonNet Config with Web Browser” on
page 36 for details.
Installing a printer driver
1. Insert the Software Disc shipped with the printer.
How To 31
Page 32

Epson Network Guide
Note:
If your computer does not have a disc drive, download the printer driver from the Epson website, and
then install it.
http://www.epson.eu/support/ (Europe)
http://support.epson.net/ (outside Europe)
2. Close the Epson Install Navi screen if it appears.
3. On the Add Printer screen, click the Have Disk button. The Install From Disk dialog box appears.
4. Click Browse.
5. Select the disc drive for Drives, and double-click the WINX64 or WINX86 folder. Click Open.
6. Click OK in the Install From Disk dialog box.
7. Select the model name of the printer, and then click Next.
Note:
If the Add Printer wizard prompts you to select either Keep existing driver or Replace existing
driver, be sure to select the Replace existing driver radio button.
8. Click Finish and then follow the on-screen instructions to complete the setup.
Mac OS
Installing a printer driver
❏ Go to the Epson website (http://epson.sn), enter the product name, and then start the setup.
❏ Go to the following Epson website to download and install the driver.
http://www.epson.eu/support/ (Europe)
http://support.epson.net/ (outside Europe)
Mac OS X 10.6 or later
Follow the steps below to set a printer.
How To 32
Page 33

Bonjour printing
1. Open System Preferences.
2. Open Print & Fax.
3. Click the + button to add a new printer.
4. Select the desired printer model that is connected with Bonjour.
5. Click Add.
TCP/IP printing
1. Open System Preferences.
2. Open Print & Fax.
Epson Network Guide
3. Click the + button to add a new printer.
4. Click IP.
5. Select the desired printing protocol from the pull-down list.
6. Enter the host name or IP address of the printer.
7. Select the desired printer model.
8. Click Add.
How To 33
Page 34

Epson Network Guide
Chapter 3
Network Software
This chapter explains how to use the network software provided with your printer.
Note:
The software provided varies depending on your printer model.
EpsonNet Config
EpsonNet Config is a configuration software for administrators to configure the network interface for
TCP/IP.
Note:
Be sure to use EpsonNet Config for your printer.
System Requirements
Windows
Operating systems Same as the printer’s operating environment
Hard disk drive space 30 MB
Mac OS
Operating systems Same as the printer’s operating environment
Hard disk drive space 30 MB
Installing EpsonNet Config
You can install EpsonNet Config on your computer from the Software Disc shipped with your printer
(for Windows users), or from the following Epson website (for both Windows and Mac OS users).
Network Software 34
Page 35

Epson Network Guide
Installing from the Software Disc (For Windows users)
Note:
Log on to the operating system with an administrator account to install EpsonNet Config.
1. Insert the Software Disc shipped with the device.
2. If your disc drive is D:, double-click setup.exe in the D:\Network\EpsonNetConfig\.
Note:
Change the drive letter as needed for your system.
Note:
❏ If you add or delete protocols or services from your operating system after installing EpsonNet Config,
EpsonNet Config may not work correctly. If this happens, uninstall EpsonNet Config and then install
it again.
❏ If the Windows Security Alert window appears after you start EpsonNet Config, click the Allow
access or Unblock button; otherwise the devices are not listed on the screen of EpsonNet Config.
Installing from the Epson website (For both Windows users and Mac OS users)
Go to the following Epson website to download and install EpsonNet Config.
http://www.epson.eu/support/ (Europe)
http://support.epson.net/ (outside Europe)
Accessing the EpsonNet Config User’s Guide
The EpsonNet Config User’s Guide contains detailed information on EpsonNet Config. Follow the
steps below to access the EpsonNet Config User’s Guide.
Windows
1. Click Start, point to All Programs, select EpsonNet, and then select EpsonNet Config SE.
2. Click EpsonNet Config User’s Guide.
The EpsonNet Config User’s Guide appears. By clicking the links on the front page or contents
page, you can get information on using EpsonNet Config.
Network Software 35
Page 36

Epson Network Guide
Mac OS
1. Start the Finder.
2. In the Applications folder, double-click the EpsonNet folder, and then double-click the
EpsonNet Config SE folder. Finally, double-click the EpsonNet Config icon.
EpsonNet Config starts.
3. From the Help menu, select EpsonNet Config Help.
The EpsonNet Config User’s Guide appears. By clicking the links on the front page or contents
page, you can get information on using EpsonNet Config.
EpsonNet Config with Web Browser
About EpsonNet Config
EpsonNet Config with Web Browser is a Web-based utility designed to configure the printer for use
on a network.
By typing the IP address of the network interface for the URL in your browser, you can start EpsonNet
Config to allow you to configure the network interface for TCP/IP, NetWare, MS Network, IPP, and
SNMP.
Note:
Please use the web browser associated with the OS that the printer supports.
Configuring the Network Interface Using EpsonNet Config with Web Browser
After you have assigned an IP address to the network interface using EpsonNet Setup, EpsonNet
Config for Windows or Mac OS, or the arp/ping command, you can configure the network interface
using EpsonNet Config with Web Browser.
Note:
❏ A Web browser must be installed on your computer.
❏ TCP/IP must be correctly set for the computer and the network interface.
Network Software 36
Page 37

Epson Network Guide
❏ Do not run both EpsonNet Config for Windows or Mac OS and EpsonNet Config with Web Browser
at the same time.
❏ Your browser may restrict some characters you can use. For details, see your browser or operating
system documentation.
The following procedure shows an example of configuring the network interface on a TCP/IP IPv4
network.
1. Turn on your printer.
2. Run EpsonNet Config using one of the following ways.
❏ Run EpsonNet Config for Windows or Mac OS. Select the printer you want to configure from
the list and then click Configuration.
❏ Open your browser, and then type in the IP address of the network interface directly. Do not
run EpsonNet Config for Windows or Mac OS.
https://IP address of network interface/
Example: https://192.168.100.201/
Note:
❏ To check the IP address of the network interface, use EpsonNet Config. See “About EpsonNet
Config” on page 36 for details.
❏ If Windows security alert screen appears, click Continue to start EpsonNet Config with Web
Browser.
3. Click TCP/IP under Network on the Configuration menu, then click IPv4 Address to display the
TCP/IP IPv4 settings screen.
Note:
If you want to configure a protocol other than TCP/IP, configure the desired settings on
Configuration - Network screen.
4. Select a method for acquiring the IP address. When you select Auto, DHCP becomes available and
assigns an IP address automatically. If you want to set the IP address manually, select Manual.
Note:
❏ The network administrator must check any changes made to the IP address settings.
Network Software 37
Page 38

Epson Network Guide
❏ When Auto is selected, DHCP becomes available. To use the DHCP server, make sure it is
installed on your computer and correctly configured. See your operating system’s online help for
detailed instructions.
❏ If Set Using Automatic Private IP Addressing (APIPA) is enabled, a private IP address is
automatically assigned to the network interface even when there are no DHCP servers on your
system or your network.
❏ If the DNS function is not supported, we recommend that you select Manual and then enter an IP
address. This is because if you select Auto, the IP address of the network interface changes every
time you turn on the printer so that you need to change the printer port setting accordingly.
5. To assign an IP address manually, enter the IP address, the subnet mask, and the default gateway.
Be sure the IP address does not conflict with any other devices on the network.
Note:
If there is a server or a router functioning as a gateway, enter the IP address of the server or the router
for the gateway address. If there is no gateway, leave the default values there.
6. If you want to get a private address between 169.254.1.1 and 169.254.254.254 automatically when
an IP address cannot be obtained by the DHCP server, leave it at Enable for Set Using Automatic
Private IP Addressing (APIPA); otherwise, select Disable.
7. When setting an IP address using the ping command, select Enable for Set Using PING. Select
Disable when setting an IP address with EpsonNet Config; this prevents any unexpected change
of the IP address.
8. Select Enable for Acquire DNS Server Address Automatically if you want to acquire the DNS
server address using the DHCP server.
If you want to enter the DNS server address manually, select Disable and then enter the IP address
of the DNS server.
9. Select Enable for Acquire Host Name and Domain Name Automatically if you want to
acquire the host name and the domain name using the DHCP server.
If you want to specify manually, enter the host name and the domain name in the text boxes.
10. Select Enable for Register Network Interface Address to DNS Server if you want to register
the host name and domain name to the DNS server through the DHCP server that supports
Dynamic DNS.
Network Software 38
Page 39

Epson Network Guide
If you want to register the host name and the domain name directly to the DNS server, select
Enable for Register Network Interface Address Directly to DNS Server.
11. Mac OS X only:
Select Enable or Disable for Use Bonjour. If you select Enable, enter the Bonjour Name and the
Bonjour Printer Name.
12. Do not exit the Web browser and do not send a job to the printer until this message appears. Follow
the on-screen instructions to reset the printer.
Note:
❏ Since the new IP address becomes available after the printer is reset, you need to restart EpsonNet
Config by entering the new IP address.
❏ Only changes on the page where you press the Transmit button take effect.
Opening Screen
Any user can access the opening screen by typing the IP address of the network interface into the
address bar of your browser.
Note:
❏ The item appears only if your printer supports the function, and the name of the item may vary
depending on the model.
❏ See the EpsonNet Config with Web Browser help for details about each item.
EpsonNet Print (For Windows Users)
About EpsonNet Print
EpsonNet Print is a utility program that provides peer to peer printing to Epson printers on the TCP/
IP network.
By using EpsonNet Print, you can find a printer located in the same segment or beyond a router. You
can select LPR standard printing, LPR enhanced printing, or High-speed printing.
Note:
EpsonNet Print does not support IPv6 environment.
Network Software 39
Page 40

System Requirements
The following table lists the system requirements of EpsonNet Print.
Operating systems Windows 10
Windows 8 (includes 8.1 or later)
Windows 7
*1
*1
(includes R2)
*1
(includes R2)
*1
With Service Pack 2 or higher
Windows Vista
Windows XP (Home, Professional)
Windows Server 2016
Windows Server 2012 (includes R2)
Windows Server 2008
Windows Server 2003
Epson Network Guide
*2
*1
*2
With Service Pack 3 or higher
Installing EpsonNet Print
Note:
Log on to the operating system with an administrator account to install EpsonNet Print.
Installing from the Software Disc
1. Insert the Software Disc shipped with the device.
2. If your disc drive is D:, double-click ENPE.exe in the D:\Network\EpsonNetPrint\.
Note:
Change the drive letter as needed for your system.
Installing from the Epson website
❏ Go to the Epson website (http://epson.sn), enter the product name, and then start the setup.
❏ Go to the following Epson website to download and install EpsonNet Print.
http://www.epson.eu/support/ (Europe)
http://support.epson.net/ (outside Europe)
Network Software 40
Page 41

Epson Network Guide
Adding a Port for a Printer
Follow the steps below to add a port using the Add Printer Wizard.
❏ If you want to add a port for a printer with its IP address assigned automatically by the DHCP
server or router, see “Adding a port for a printer assigned with a dynamic IP address” on
page 41.
❏ If you want to add a port for a printer with its IP address assigned manually, see “Adding a port for
a printer assigned with a static IP address” on page 44.
Note:
❏ Be sure that the computer is connected to the network and TCP/IP is correctly set.
❏ A valid IP address must be assigned to the printer.
Adding a port for a printer assigned with a dynamic IP address
1. Open the Control Panel, and then View devices and printers (Windows 10/8/7/Server 2016/
Server 2012), or Printers (Windows Vista/Server 2008). Click Add a printer to start the Add
Printer Wizard.
For Windows XP: Click Start and then Printers and Faxes. Under Printer Tasks, click Add a
printer to start the Add Printer Wizard. Click Next.
For Windows Server 2003: Click Start and then Printers and Faxes. Double-click Add Printer
in the Printers folder to start the Add Printer Wizard. Click Next.
2. Click Add a local printer. Select the Create a new port radio button, and then select EpsonNet
Print Port from the list. Click Next.
Note:
If the Windows Security Alert screen appears, click the Allow access or Unblock button, and then
click the Search Again button to search the printers.
For Windows XP/Server 2003: Click Local printer attached to this computer, clear the
Automatically detect and install my Plug and Play printer check box, and then click Next.
Select the Create a new port radio button, and then select EpsonNet Print Port from the list.
Click Next.
Network Software 41
Page 42

Epson Network Guide
Note:
If the Windows Security Alert screen appears, click the Unblock button, and then click the Search
Again button to search the printers.
3. Select the target printer, and then click Next.
Note:
❏ If the target printer is not in the list, click the Search Again button to search the printers using
new parameters.
❏ Each column can be sorted in ascending or descending order by clicking the column header.
However, Manual Setting is always displayed on the top of the list regardless of sorting.
Network Software 42
Page 43

Epson Network Guide
❏ If you want to search printers in other segments, click the N/W Settings button. Select the
Specific Network Segments check box, and then enter the network address and subnet mask of
the network segment for the search. Then click the Add button. You can also specify the time
before declaring communication error.
4. Confirm the information about the printer’s port you want to configure, and then click Finish.
Network Software 43
Page 44

Epson Network Guide
Items Explanations
Port Type The following items are listed in the pull-down menu, and you can select the port
type you need.
IP Address (Auto): Configure the port automatically. If the IP address of the
printer is acquired automatically and the computer and the printer are in the same
segment, you can select this port type.
IP Address (Manual): Use the printer’s IP Address for the port name.
HostName (DNS): Use the printer’s host name registered in the DNS server for the
port name.
MS Network: Use the NetBIOS name registered in the printer for the port name.
The port Information The following items are displayed:
- Port Name (If the port type is changed, the port name and the host name or IP
address are also changed.)
- Printer Model
- Host Name or IP Address
- Protocol
Finish button Register the port information to the system and close the Add EpsonNet Print Port
Wizard.
Back button Go back to the printer list window.
Cancel button Close the Add EpsonNet Print Port Wizard.
The new printer port is created in your computer. To install the printer driver, see “Installing the
Printer Driver” on page 47.
Adding a port for a printer assigned with a static IP address
1. Open the Control Panel, and then View devices and printers (Windows 8/7/Server 2012), or
Printers (Windows Vista/Server 2008). Click Add a printer to start the Add Printer Wizard.
For Windows XP: Click Start and then Printers and Faxes. Under Printer Tasks, click Add a
printer to start the Add Printer Wizard. Click Next.
For Windows Server 2003: Click Start and then Printers and Faxes. Double-click Add Printer
in the Printers folder to start the Add Printer Wizard. Click Next.
2. Click Add a local printer. Select the Create a new port radio button, and then select EpsonNet
Print Port from the list. Click Next.
Network Software 44
Page 45

Epson Network Guide
Note:
If the Windows Security Alert screen appears, click the Allow access or Unblock button, and then
click the Search Again button to search the printers.
For Windows XP/Server 2003: Click Local printer attached to this computer, clear the
Automatically detect and install my Plug and Play printer check box, and then click Next.
Select the Create a new port radio button, and then select EpsonNet Print Port from the list.
Click Next.
Note:
If the Windows Security Alert screen appears, click the Unblock button, and then click the Search
Again button to search the printers.
3. Select Manual Setting from the list, and then click Next.
Network Software 45
Page 46

Epson Network Guide
4. Enter the printer’s name and the port name is automatically entered to the Port Name edit box.
Then click Next.
5. Confirm the information about the printer’s port you want to configure, and then click Finish.
Items Explanations
The port Information The following items are displayed:
- Port Name
- Host Name or IP Address
- Protocol
Finish button Register the port information to the system and close the Add EpsonNet Print Port
Wizard.
Back button Go back to the printer list window.
Network Software 46
Page 47

Epson Network Guide
Items Explanations
Cancel button Close the Add EpsonNet Print Port Wizard.
The new printer port is created in your computer. To install the printer driver, see “Installing the
Printer Driver” on page 47.
Installing the Printer Driver
Install the printer driver. See the section appropriate for your operating system.
❏ For Windows 10/8/7/Vista/Server 2016/Server 2012/Server 2008, see “Installing a printer driver”
on page 23.
❏ For Windows Server 2003, see “Installing a printer driver” on page 31.
❏ For Windows XP, see “Installing a printer driver” on page 27.
Then the printer is ready for peer-to-peer printing.
To configure the printer port, see “Configuring the Printer Port” on page 47.
Configuring the Printer Port
Follow the steps below to configure the printer port. The printing speed differs depending on your
selection.
1. Open the Control Panel, and then View devices and printers (Windows 10/8/7/Server 2016/
Server 2012) or Printers (Windows Vista/Server 2008).
For Windows XP/Server 2003:
Click Start and then Printers and Faxes.
2. Right-click the target printer, and then click Properties.
3. Click the Ports tab, and then click the Configure Port button.
Network Software 47
Page 48

4. Make the appropriate settings for the desired port.
Epson Network Guide
LPR enhanced printing:
Select the LPR Printing radio button, and then specify the queue name (up to 32 characters). LPR
enhanced printing sends a print job to the target network printer without spooling all of the print
data. LPR enhanced printing is faster than LPR standard printing.
LPR standard printing:
Select the Confirm file size check box, and then specify the queue name (up to 32 characters).
Print data is spooled by the computer before being sent to the target network printer.
Note:
When the print data size is 20 MB or more, we recommend that you use LPR enhanced printing.
High-speed printing:
Select the High-Speed Printing (RAW) radio button. The Epson high-speed printing port sends a
print job to the target network printer without spooling all of the print data. High-Speed printing
is faster than the other two printing methods.
5. Click OK.
If you select the High-Speed Printing (RAW) radio button and if the printer does not support
High-Speed printing, or if you fail to connect to the printer, an error message appears. Follow the
message to remedy the problem.
Network Software 48
Page 49

Epson Network Guide
Chapter 4
Troubleshooting
General Problems
Cannot configure the network interface or cannot print from the network.
Cause What to do
The printer settings or network settings may
be wrong.
First, check to see if you can print a status sheet, as described in “Printing
a Network Status Sheet” on page 51. If you can print a status sheet,
check the network settings; otherwise, set the interface mode of the
printer’s control panel to Auto or other options.
Cannot print even if you have assigned the IP address to the computer and the printer.
Cause What to do
You have assigned an IP address to the
computer manually, but you assigned the IP
address to the printer by Automatic Private IP
Addressing (APIPA).
Assign the printer’s IP address so that it belongs to the same segment of
the computer. Use EpsonNet Config and the printer’s control panel.
Unable to start EpsonNet Config.
Cause What to do
You have added or deleted protocols after
installing EpsonNet Config.
Uninstall EpsonNet Config and then reinstall it. See “Installing
EpsonNet Config” on page 34.
Troubleshooting 49
Page 50

Epson Network Guide
The message “EpsonNet Config cannot be used because no network is
installed.” appears when you start EpsonNet Config.
Cause What to do
Both TCP/IP and IPX/SPX are not installed on
the computer.
TCP/IP is installed on the computer, but its IP
address is not set correctly.
Install the TCP/IP or IPX/SPX protocol.
Set a correct IP address for the computer.
The message “Could not complete communicating configuration data”
appears when you send settings to the network interface.
Cause What to do
This may happen when using a dial-up
router.
Run Command Prompt from the computer on which EpsonNet Config
is installed, and then enter the following command:
Format: >ROUTE_ADD_the IP address of the network interface_ the IP
address of the computer (the under bar represents one space)
Example: >ROUTE ADD 192.168.192.168 22.33.44.55.
Unable to start EpsonNet Config with Web Browser.
Cause What to do
You have not set the IP address for the
network interface.
Set the IP address for the network interface using EpsonNet Config for
Windows or Mac OS, the printer’s control panel. You can check the IP
address on a status sheet. See the EpsonNet Config User’s Guide.
Troubleshooting 50
Page 51

Epson Network Guide
The Model Name and IP Address do not appear in the EpsonNet Config dialog box.
Cause What to do
If the valid IP address is not set, the items
indicated in the dialog box mentioned above
may not appear.
Set a valid IP address.
Refresh the status by selecting Refresh from the View menu.
In cre ase the len gth o f ti me b efo re a tim eout . To do t his , se lec t Options
from the Tool menu, and then select Timeout. Note that doing so can
cause EpsonNet Config to run more slowly.
Printing a Network Status Sheet
Before you start configuring the network interface, be sure to print a network status sheet that contains
important information such as the current configuration and the MAC address of the network
interface.
For information on printing network status sheets, see the printer User’s Guide.
Troubleshooting 51
Page 52

Epson Network Guide
Chapter 5
Tips for Administrator
Setting an IP Address on the Printer’s Control Panel
After connecting the printer to the network, you need to set the IP address for the network interface.
To set the IP address, subnet mask, and default gateway from the control panel, follow the steps below.
Note:
If you are using a printer model that does not have an LCD panel, you cannot use the steps below. Use
EpsonNet Config for Windows or Mac OS instead. See “EpsonNet Config” on page 34.
1. Turn on your printer.
2. Press the Right button on the printer’s control panel once to enter the SelecType mode.
3. Press the Up or Down button until Network Menu appears. Then press the Right button.
4. Press the Down button until Common Settings menu appears. Then press the Right button.
5. Check that Network I/F = On appears.
If Network I/F = Off appears instead, press the Right button and then the Up or Down button
to change to Network I/F = On. Press the Right button, the Left button twice, and then the Up
or Down button to select Yes (Unprinted data is deleted). Then press the Right button to
reboot your printer.
6. Press the Up or Down button until Get IP Address = Auto appears. Press the Right button
and then the Up or Down button to change to Get IP Address = Panel. Then press the Right
button. You can use the following methods to get an IP address.
❏ Choose Panel when setting the IP address, subnet mask, and default gateway using the
printer’s control panel.
❏ Choose Auto when getting the IP address from a DHCP server. The IP address is automatically
obtained from the DHCP server whenever the printer is reset or turned on.
Tips for Administrator 52
Page 53

Epson Network Guide
❏ Choose PING when setting the IP address using the arp/ping command. The network interface
uses the IP address set by the arp/ping command. The settings become available when the
printer is reset or turned off and then back on.
Note:
❏ To use Auto, a DHCP server must be correctly configured on the network. See the online help of
your operating system for detailed instructions.
❏ Choose PING only when setting the IP address using the arp/ping command.
7. Press the Up or Down button to select IP = xxx.xxx.xxx.xxx. Press the Right button.
8. Press the Up or Down button until the desired value appears. Then press the Right button to set
the value.
Note:
Repeat steps 6 and 7 to set the IP address, subnet mask, and default gateway.
9. Press the Left button three times to exit the control panel menus. The Do you want to reboot
to apply the settings? screen appears.
10. Press the Up or Down button to select Yes (Unprinted data is deleted). Then press the
Right button to reboot your printer. Be sure to wait until Ready is displayed on the LCD panel.
Print a network status sheet to confirm the new IP address.
Note:
❏ You must first set the IP address before using EpsonNet Config with Web Browser.
❏ See the User’s Guide for more information about settings on the printer’s control panel.
Network Menu
These items are used to make network settings on the printer’s control panel.
Note:
For users with a printer that does not have an LCD panel, start EpsonNet Config with Web Browser, and
access Network Administrator to do the corresponding settings.
Item Settings
Network I/F On, Off
Tips for Administrator 53
Page 54

Item Settings
Get IPAddress Panel, Auto, PING
IP 0.0.0.1 to 255.255.255.254
SM 0.0.0.0 to 255.255.255.255
GW 0.0.0.0 to 255.255.255.255
MS Network On, Off
WSD On, Off
LLTD On, Off
Bonjour On, Off
IPv6 On, Off
IPsec On, Off
Epson Network Guide
Pre-Shared Key Enter the pre-shared key (up to 20 characters).
Redirect(HTTP->HTTPS) Enable, Disable
IEEE802.1X On, Off
Link Speed Auto, 100 Full, 100 Half, 10 Full, 10 Half
Buffer Size Normal, Maximum, Minimum
Note:
❏ To activate the Network Menu settings, you must turn off the printer for more than five seconds and
then turn it back on. Or, you can perform a Reset All operation, as explained in “Reset Menu” in the
User’s Guide.
❏ Resetting the printer erases all print jobs. Make sure the Ready light is not flashing when you reset the
printer.
Secure Communication Using IPsec, Access Control, SSL, and IEEE 802.1X
The following table lists the system requirements of secure data communication using the IPsec
protocol and the access control function.
Tips for Administrator 54
Page 55

IPsec Access Control
Data format Encrypted data Unencrypted data
Epson Network Guide
Supported operating
systems
Windows 10
Windows 8 (includes 8.1 or later)
Windows 7
Windows Vista
All operating systems supported by
this product
IPsec protocol
IPsec is a protocol that is suitable for securing IP communication by encrypting the data or by
authenticating client users in a network. To use this function, make the necessary settings on your
printer using EpsonNet Config with Web Browser. Security settings on the client computers on the
network are also required. For details on the settings, r ef er t o th e Ep so nNe t Co nfi g w ith Web Bro ws er
help.
Access Control
Access control function allows you to restrict network access to the printer.
❏ Restrict access to the printer from specified client users only
❏ Restrict data communication to the printer to specified purposes only (such as accessing
administrative information by the administrators)
To use this function, make the necessary settings on your printer using EpsonNet Config with Web
Browser. For details on the settings, refer to the EpsonNet Config with Web Browser help.
SSL
SSL prevents unauthorized external access or other malicious acts such as data being read while the
product is connected to a network. Enabling SSL allows product settings to be managed securely via a
web browser. For details on the settings, refer to the EpsonNet Config with Web Browser help.
Tips for Administrator 55
Page 56

Epson Network Guide
SNMPv3
SNMPv3 is a UDP protocol that authenticates users, encrypts data, prevents the interception of
communications and tampering of data.
To use this function, enable the SNMPv3 and appropriate settings using EpsonNet Config with Web
Brower. For details on the settings, refer to EpsonNet Config with Web Browser help.
IEEE 802.1X
IEEE 802.1X is the standard protocol for allowing client users to be authenticated to the network
before obtaining a connection. It provides effective access control to both wired and wireless
networks.
IEEE 802.1X network consists of an authentication server (RADIUS server) and authenticator
(switching hub with authentication function). Supplicants (devices such as printers) can join the IEEE
802.1X network by being authenticated by the authentication server and authenticator.
To print via an IEEE 802.1X network, you have to make the necessary network settings using a
computer that is not connected to the IEEE 802.1X network before connecting the printer to the IEEE
802.1X network.
1. Connect the printer and computer, which is not connected to the network, using an Ethernet
cable.
2. Assign an IP address to the printer and print the network status sheet to confirm the IP address.
3. Start EpsonNet Config with Web Browser on the computer and import the digital certificate, then
make the IEEE 802.1X settings and other necessary settings.
4. Turn off the printer and disconnect the printer and computer.
5. Connect the printer to the destination IEEE 802.1X network and turn it on, then print the network
status sheet to confirm the settings.
For details on the settings, refer to the EpsonNet Config with Web Browser help.
Tips for Administrator 56
Page 57

Epson Network Guide
Secure Communications (IPsec/Access Control)
This feature prevents unauthorized external access, spoofing, or other malicious acts such as data theft
or falsification while the product is connected to a network.
Enabling IPsec/Access Control allows the following tasks to be performed securely:
❏ Network printing
❏ Managing settings via a web browser
Some printers may not support secure communications using IPsec/Access Control. For information
on whether your printer supports these features, see the printer manual. This document provides
sample IPsec/Access Control configurations and information on setup and troubleshooting.
Overview and Sample Settings
IPsec and Access Control are configured differently and use different connection types. Review the
sample settings and choose a configuration suited to your objectives.
IPsec Access Control
Data format Secure (encrypted) Not secure (unecrypted)
Supported
operating systems
Configuration Configure both product and client. Configure product only.
Sample settings Sample 1: Accept IPsec only Sample 2: Accept print data only
Windows 10, Windows 8(Include 8.1),
Windows 7, Windows Server 2016, Windows
Server 2012, Windows Server 2008
All operating systems supported by the
printer
Sample 3: Accept specified data types only
Sample 1
The product accepts from the client only data secured using IPsec. Normal data (i.e. data not secured
using IPsec) are not accepted.
Sample 2
The product accepts print data from specific clients only. Data from other clients and non-print data
from the specified clients are not accepted.
Tips for Administrator 57
Page 58

Epson Network Guide
Sample 3
The product accepts only specific types of da ta fr om sp ec if i c c li en ts . I n th is ex am pl e, se cu ri ty l ev el s a re
set separately for each client type so that the product accepts all data from administrator clients
(including product management and print data) but only print data from print clients and no data at
all from other clients.
Product Security Policies: An Overview
❏ You can create one Default Policy and Group Policy 1-10.
❏ If there is more than one policy, the product will check the policies in order from the top of the
display (“Group Policy 1”) and initiate a network connection when it finds a matching policy.
❏ Because the product checks the policies in order from the top, more restrictive policies should
precede the more general policies on which they are based.
Configuration Workflow
IPsec requires a client with secure access to the product and configured according to your purposes.
Access Control requires that the product be configured according to your purposes.
The configuration workflow is shown below.
Note:
If your network is already secure, we recommend that you connect the product to a computer on a
different network before adjusting settings. There is potential for data theft if the product is connected to
a secure network when settings are adjusted. If no other network is available, refer to the “Encrypting
communications”, below.
1. Connect the product and the computer that will be used to configure the product to the network.
2. Adjust the settings using EpsonNet Config with Web Browser.
See the following page information on the settings using EpsonNet Config with Web Browser.
3. Transmit the settings to the printer.
*
4. Adjust client computer security settings (not required for Access Control).
5. Connect the printer to a secure network.
Tips for Administrator 58
Page 59

Epson Network Guide
* Encrypting communications: There is potential for data theft if product settings are adjusted
over a secure network. If no other network is available, follow the steps below to encrypt the data
for transmission.
(1) In the product control panel, select Common Settings > Network Menu > IPSec > On and
enter the pre-shared key.
(2) Set up IPsec on the computer that will be used to configure the product.
(3) Connect the product and the computer that will be used to configure the product to the
network.
Important:
c
The network connection will close if Common Settings > Network Menu > IPSec is enabled in
the product control panel and a blank key is entered for Pre-Shared Key (i.e. no pre-shared key
is entered). Be sure to enter a key for Pre-Shared Key after enabling Common Settings >
Network Menu > IPSec in the product control panel.
Product Security Policies
Start EpsonNet Config with Web Browser by typing the printer’s IP address in the address bar of your
browser, and adjust the Network Administrator > Security > IPsec/Access Control settings for
security policies that match how the product will be used.
Note:
We recommend that the product be assigned a static IP address for secure access using IPsec or Access
Control. Settings will be invalidated if the IP address changes.
Sample 1
Access the EpsonNet Config with Web Browser and configure Security > IPsec/Access Control >
Default Policy settings as follows:
Option Setting
IPsec/Access Control Enable
Default Policy > Access Control
Pre-Shared Key Enter a key (maximum 127 alphanumeric
Use IPsec
characters)
Tips for Administrator 59
Page 60

Epson Network Guide
Sample 2
Access the EpsonNet Config with Web Browser and configure Security > IPsec/Access Control >
Group Policy settings for each client.
Refusing Access from Unauthorized Clients
Access the EpsonNet Config with Web Browser and configure Security > IPsec/Access Control >
Default Policy settings as follows:
Option Setting
IPsec/Access Control Enable
Default Policy > Access Control
Access Refuse
Print Client Settings
Create group policy options separately in Security > IPsec/Access Control > Group Policy. Group
policies are applied in order from Group Policy 1.
The settings shown below are examples of when RAW (9100) is set for use in Windows standard
TCP/IP printing.
Setting
Option
Group Policy n (n = 1–10) Enable
Access Control Access Permission
Remote Address (Host)
Method of Choose Port Service Name
RAW (Port 9100) SNMP
*
Enter the print client IP address (prefix length can be used to specify range if desired).
Example (IPv4): 192.168.0.0/24
Service Name RAW (Port 9100) SNMP
* A static IP address is recommended. If DHCP or “obtain automatically” (IPv6) is selected, the connection may terminate
when the lease or address expires.
Note:
Select TCP or UDP for Protocol when Local Port is selected for Method of Choose Port > Port
Number.
Tips for Administrator 60
Page 61

Epson Network Guide
Sample 3
Access the EpsonNet Config with Web Browser and configure Security > IPsec/Access Control >
Group Policy settings for each client.
Refusing Access from Unauthorized Clients
Access the EpsonNet Config with Web Browser and configure Security > IPsec/Access Control >
Default Policy settings as follows:
Option Setting
IPsec/Access Control Enable
Default Policy > Access Control
Access Refuse
Administrator Client Settings
Separate settings must be created for each Group Policy in IPsec/Access Control. Group policies are
applied in order from Group Policy 1.
Option Setting
Group Policy n (n = 1–10) Enable
Access Control Access Permission
Remote Address (Host)
* A static IP address is recommended. If DHCP or “obtain automatically” (IPv6) is selected, the connection may terminate
when the lease or address expires.
*
Enter the administrator client IP address
Tips for Administrator 61
Page 62

Epson Network Guide
Client Settings for Specific Communications
Create group policy options separately in Security > IPsec/Access Control > Group Policy for
group policy options whose settings are different from those used for the administrator client. Group
p ol ic ie s ar e a pp l ie d i n or d er f ro m Gr o up P ol i cy 1 ; w h en s e tt i ng u p p o li ci e s f o r bo t h a d mi n is t ra t o rs a nd
clients, order the list so that the group policies for administrators precede those for print clients.
Note that EpsonNet Config (Windows/Mac OS) will be unable to detect the printer if separate group
policies are not created for the Service Name > ENPC, SNMP options.
The settings shown below are examples of when a client uses EpsonNet Config (configuration
software) for Windows or Mac.
Setting
Option
Group Policy n (n = 1–10) Enable
Access Control Access Permission
Remote Address (Host)
Method of Choose Port Service Name
Service Name ENPC SNMP
*1
An Epson protocol used by Epson printer and scanner drivers and such applications as EpsonNet Config to find the
printer.
*2
A static IP address is recommended. If DHCP or “obtain automatically” (IPv6) is selected, the connection may terminate
when the lease or address expires.
*2
*1
ENPC
Enter the client IP address (prefix length can be used to specify range if desired).
Example (IPv4): 192.168.0.0/24
SNMP
Note:
Select TCP or UDP for Protocol when Local Port is selected for Method of Choose Port > Port
Number.
Supported Security Methods
The product supports the security methods listed below; choose one of these combinations when
selecting the computer security method. In most cases computers can use default IPsec settings.
Tips for Administrator 62
Page 63

Security method Option
Authentication algorithm SHA-256
AES-XCBC
MD5
SHA-1
Encryption algorithm AES-CBC 256
AES-CBC 192
AES-CBC 128
3DES
DES
Key exchange algorithm Elliptic Curve Diffie-Hellman P-384
Elliptic Curve Diffie-Hellman P-256
Diffie-Hellman Group 17
Epson Network Guide
Diffie-Hellman Group 16
Diffie-Hellman Group 15
Diffie-Hellman Group 14
Diffie-Hellman Group 5
Diffie-Hellman Group 2
Diffie-Hellman Group 1
Tips for Administrator 63
Page 64

Index
Epson Network Guide
A
Access Control........................................................54, 55 , 57
E
EpsonNet Config (Mac OS)...............................................34
EpsonNet Config (Web Browser).....................................36
EpsonNet Config (Windows)............................................34
EpsonNet Print....................................................................39
I
IEEE 802.1X...................................................................54, 56
Installation
EpsonNet Config (Mac OS)............................................34
EpsonNet Config (Windows).........................................34
EpsonNet Print.................................................................40
IP address.............................................................................52
IPsec.........................................................................54, 55 , 57
N
SSL...................................................................................54, 55
U
Using the printer with
Mac OS..............................................................................32
Windows 7........................................................................20
Windows 8........................................................................20
Windows Server 2003......................................................28
Windows Server 2008......................................................20
Windows Server 2012......................................................20
Windows Vista.................................................................20
Windows XP.....................................................................24
Network status sheet...........................................................51
O
Operating environment........................................................8
P
Protocols.................................................................................8
R
RJ-45 connector...................................................................10
S
Setting the IP address....................................................36, 52
SNMPv3................................................................................56
Index 64
 Loading...