

Page 1

User’s Guide
CMP0025-01 EN
Page 2

SC-P600 Series User’s Guide
Copyrights and Trademarks
Copyrights and Trademarks
No part of this publication may be reproduced, stored in a retrieval system, or transmitted in any form or by any means, electronic, mechanical,
photocopying, recording, or otherwise, without the prior written permission of Seiko Epson Corporation. The information contained herein is designed
only for use with this Epson printer. Epson is not responsible for any use of this information as applied to other printers.
Neither Seiko Epson Corporation nor its affiliates shall be liable to the purchaser of this product or third parties for damages, losses, costs, or expenses
incurred by the purchaser or third parties as a result of accident, misuse, or abuse of this product or unauthorized modifications, repairs, or alterations to
this product, or (excluding the U.S.) failure to strictly comply with Seiko Epson Corporation’s operating and maintenance instructions.
Seiko Epson Corporation shall not be liable for any damages or problems arising from the use of any options or any consumable products other than those
designated as Original Epson Products or Epson Approved Products by Seiko Epson Corporation.
Seiko Epson Corporation shall not be held liable for any damage resulting from electromagnetic interference that occurs from the use of any interface cables
other than those designated as Epson Approved Products by Seiko Epson Corporation.
EPSON, EPSON EXCEED YOUR VISION, EXCEED YOUR VISION, UltraChrome, and their logos are registered trademarks or trademarks of Seiko
Epson.
Microsoft
Apple
other countries.
AirPrint and the AirPrint logo are trademarks of Apple Inc.
Android
Wi-Fi
Intel
PowerPC
Adobe
General Notice:Other product names used herein are for identification purposes only and may be trademarks of their respective owners. Epson disclaims any
and all rights in those marks.
Copyright © 2014 Seiko Epson Corporation. All rights reserved.
, Windows®, and Windows Vista® are registered trademarks of Microsoft Corporation.
®
, Macintosh®, Mac OS®, OS X®, iPad®, iPhone®, iPod touch®, iTunes®, and ColorSync® are trademarks of Apple Inc., registered in the U.S. and
®
and Google Cloud Print™ are trademarks of Google Inc.
™
and Wi-Fi Alliance® are registered trademarks of the Wi-Fi Alliance. Wi-Fi Direct™ and WPA2™ are trademarks of the Wi-Fi Alliance.
®
is a registered trademark of Intel Corporation.
®
is a registered trademark of International Business Machines Corporation.
®
, Photoshop®, Lightroom®, and Adobe® RGB are registered trademarks of Adobe Systems Incorporated.
®
2
Page 3

SC-P600 Series User’s Guide
Contents
Contents
Copyrights and Trademarks
Introduction
Important Safety Instructions................. 6
When choosing a place for this product. . . . . . . . 6
When setting up this product............... 6
When using this product................... 7
Using the printer with a wireless connection. . . . 7
When handling the ink cartridges............ 7
Using the LCD screen (Touch panel).......... 7
Meaning of Symbols...................... 8
Printer Parts.............................. 9
Front section........................... 9
Inside................................ 10
Back................................. 10
Control panel.......................... 11
Home Screen View...................... 12
Printer Features.......................... 14
Realizing High Resolution................. 14
Realizing High Productivity................ 15
Superior Ease of Use..................... 15
Notes on Usage and Storage.................. 17
Installation space....................... 17
Notes when using the printer............... 17
Notes when not using the printer............ 17
Notes on handling ink cartridges............ 18
Notes on handling paper.................. 19
Introducing the Supplied Software............. 20
Contents of the Software Disc.............. 20
Summary of the Printer Driver............. 21
Basic Operations
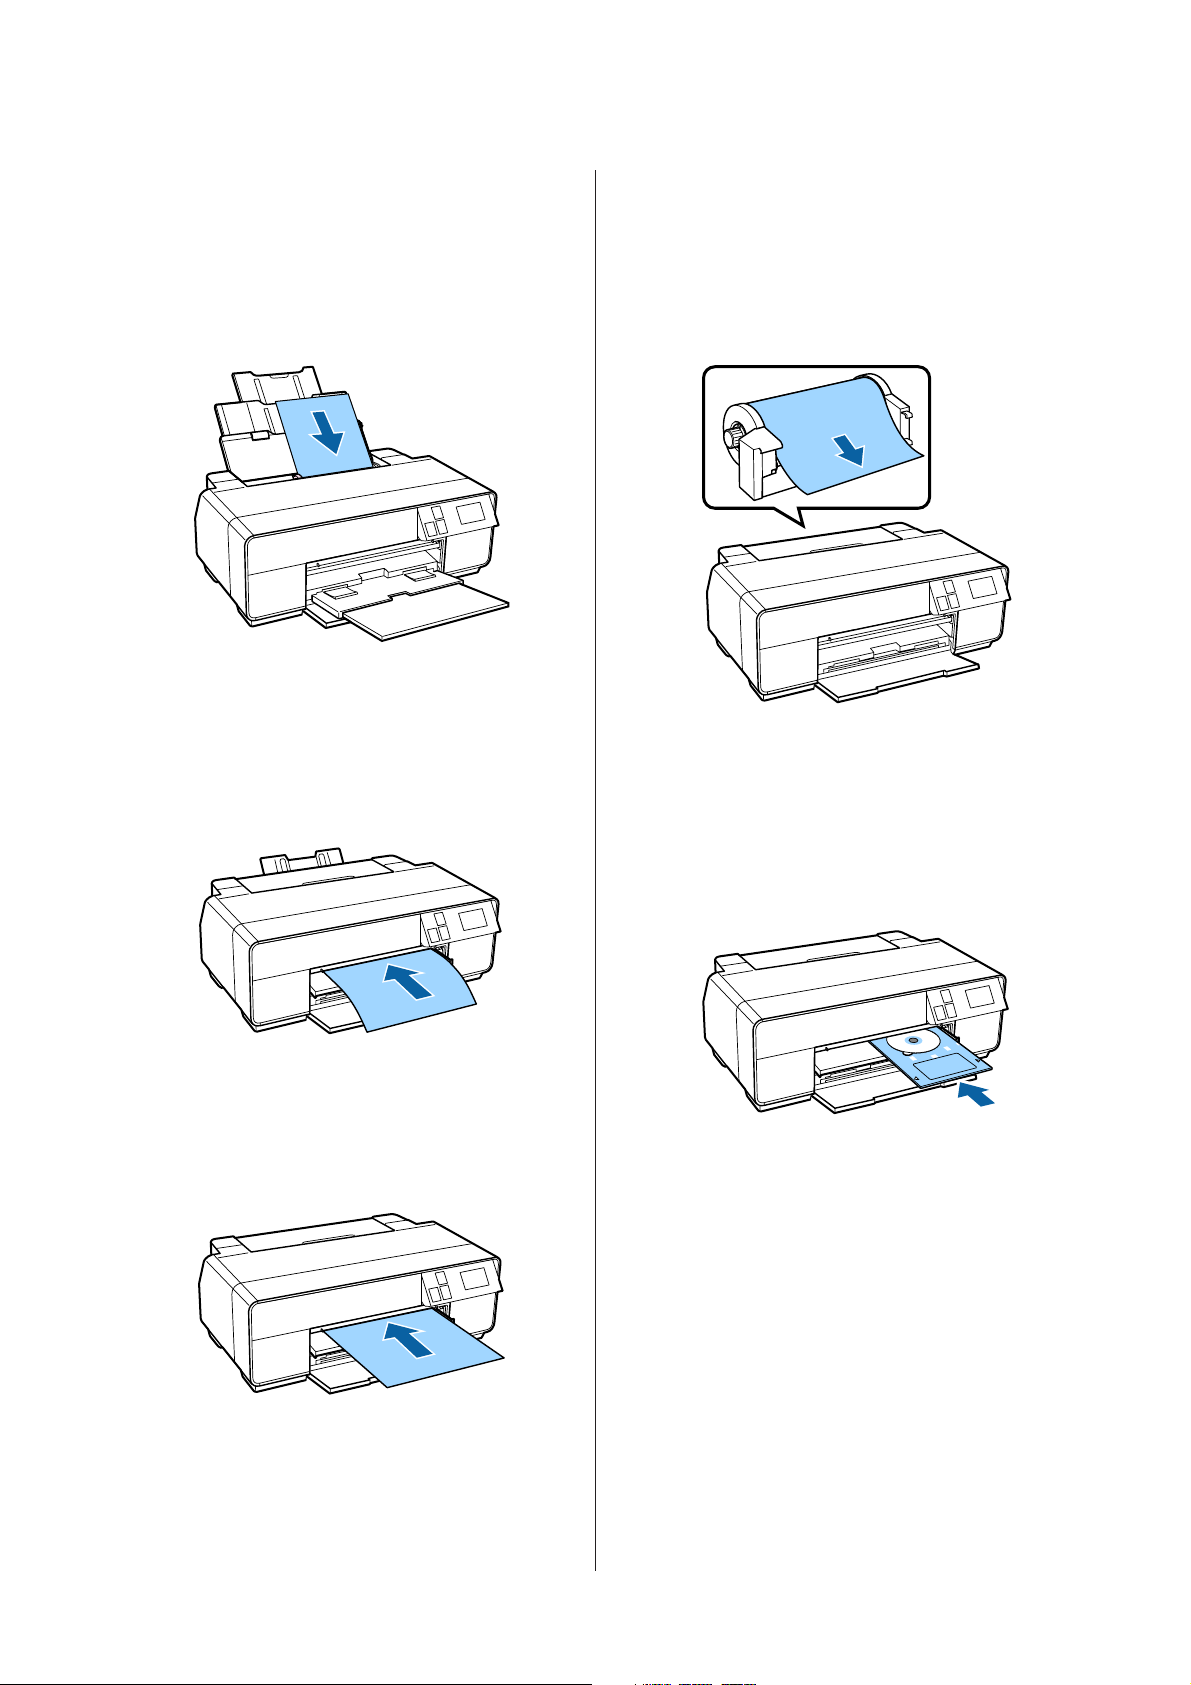
Loading Cut Sheets........................ 22
Loading Paper into the Auto Sheet Feeder. . . . . 22
Loading Fine Art Media.................. 23
Loading Poster Board.................... 25
Loading and Removing Roll Paper............. 27
Loading Roll Paper...................... 27
Cutting Roll Paper...................... 28
Removing Roll Paper..................... 28
Loading and Removing CDs and DVDs. . . . . . . . . 29
Loading CDs and DVDs.................. 29
Removing the CDs and DVDs.............. 30
Basic Printing Methods(Windows)............ 31
Basic Printing Methods(Mac OS X)............ 33
Printable area............................ 34
The Printed Area for Cut Sheets............. 34
The Printed Area for Roll Paper............. 34
The Printed Area for CDs and DVDs......... 35
Changing the Type of Black Ink............... 35
Switching Automatically.................. 35
Switching Manually...................... 36
Energy Saving Settings..................... 37
Canceling Printing........................ 38
Using the Printer Driver(Windows)
Displaying the Settings Screen................ 40
From the Start button.................... 40
Displaying Help.......................... 41
Click the Help Button to Display............ 41
Right-click on the item you want to check..... 41
Customizing the Printer Driver............... 42
Saving various settings as your Select Settings
.................................... 42
Saving media settings.................... 42
Rearranging display items................. 43
Summary of the Utility Tab.................. 44
Uninstalling the printer driver................ 46
Using the Printer Driver(Mac OS X)
Displaying the Settings Screen................ 47
Displaying Help.......................... 47
Using Epson Printer Utility 4................. 47
Starting Epson Printer Utility 4............. 47
Epson Printer Utility 4 Functions............ 47
Uninstalling the printer driver................ 49
Printing Varieties
Auto Correct Color and Print Photos
(PhotoEnhance).......................... 50
Correct color and print..................... 52
Printing Black and White Photos.............. 55
Borderless printing........................ 58
Types of Borderless Printing Methods. . . . . . . . 58
Supported Media Sizes for Borderless Printing
.................................... 59
Setting Procedures for Printing............. 60
3
Page 4

SC-P600 Series User’s Guide
Contents
Enlarged/Reduced Printing.................. 63
Fit to Page/Scale to fit paper size............ 63
Fit to Roll Paper Width(Windows only)....... 64
Custom Scale Setting..................... 65
Multi-Page Printing....................... 66
Manual Double-Sided Printing(Windows only)
...................................... 68
Cautions when Performing Double-Sided
Printing.............................. 68
Setting Procedures for Printing............. 68
Poster Printing (Enlarge to cover several sheets
and print - Windows only).................. 69
Setting Procedures for Printing............. 69
Joining the output paper together........... 71
User-defined Paper Sizes/Custom Paper Sizes. . . . . 73
Banner printing (on roll paper)............... 75
Layout Manager(Windows only).............. 77
Setting Procedures for Printing............. 78
Saving and Calling Layout Manager Settings. . . . 79
Printing from a Smart Device................ 80
Using Epson iPrint...................... 80
Using AirPrint......................... 81
Color Management Printing
About Color Management................... 82
Color Management Print Settings............. 82
Setting profiles......................... 83
Setting color management with the applications
...................................... 83
Setting color management with the printer driver
...................................... 84
Color management printing by Host ICM
(Windows)............................ 84
Color management printing by ColorSync
(Mac OS X)............................ 85
Color management printing by Driver
ICM(Windows only)..................... 86
Checking for clogged nozzles............... 94
Head Cleaning......................... 95
Correcting Print Misalignment (Print Head
Alignment)............................ 95
Replacing Ink Cartridges.................... 97
Ink Cartridge Product Numbers............ 97
How to replace......................... 97
Cleaning Inside the Printer.................. 99
Problem Solver
Messages............................... 100
Troubleshooting......................... 101
You cannot print (because the printer does not
work)............................... 101
The printer sounds like it is printing, but
nothing prints......................... 102
Print Quality/Print Results................ 103
Unable to feed or eject paper............... 105
Paper from the Auto Sheet Feeder Jams During
Printing............................. 106
Jammed Fine Art Media................. 107
Jammed Poster Board................... 108
Roll paper jam......................... 109
The CD/DVD Tray is jammed............. 110
Others.............................. 110
Appendix
Supported Media......................... 111
Item descriptions...................... 111
Epson Special Media Table............... 111
Usable Commercially Papers.............. 113
Transporting the Printer................... 115
Preparing the Printer for Transport......... 115
After Transport........................ 116
Specifications Table....................... 117
Standards and Approvals................. 118
Using the Control Panel
Menus................................. 88
Using the Menu........................ 88
Setting Items for the Network Summary
Display............................... 89
Setting Items for the Setup Menu............ 89
Maintenance
Adjusting the Print Head.................... 94
Where To Get Help
Technical Support Web Site................. 120
Contacting Epson Support.................. 120
Before Contacting Epson................. 120
Help for Users in North America........... 121
Help for Users in Europe................. 121
Help for Users in Taiwan................. 121
Help for Users in Australia............... 122
Help for Users in Singapore............... 122
Help for Users in Thailand................ 123
Help for Users in Vietnam................ 123
4
Page 5

SC-P600 Series User’s Guide
Help for Users in Indonesia............... 123
Help for Users in Hong Kong.............. 124
Help for Users in Malaysia................ 124
Help for Users in India.................. 124
Help for Users in the Philippines........... 125
Contents
5
Page 6

SC-P600 Series User’s Guide
Introduction
Introduction
Important Safety Instructions
Read all of these instructions before using the printer.
Also be sure to follow all warnings and instructions
marked on the printer.
❏ Avoid electrical outlets controlled by wall switches
or automatic timers.
❏ Keep the entire computer system away from
potential sources of electromagnetic interference,
such as loudspeakers or the base units of cordless
telephones.
❏ Use only the type of power source indicated on the
product’s label.
❏ Use only the power cord that comes with this
product. Use of another cord may result in fire or
electric shock.
When choosing a place for this product
❏ Place this product on a flat, stable surface that is
larger than this product. This product will not
operate properly if it is tilted or at an angle.
❏ Avoid places subject to rapid changes in
temperature and humidity. Also keep it away from
direct sunlight, strong light, or heat sources.
❏ Avoid places subject to shocks and vibrations.
❏ Keep this product away from dusty areas.
❏ Place this product near a wall outlet where the plug
can be easily unplugged.
❏ When storing or transporting the printer, do not tilt
it, stand it on its side, or turn it upside down.
Otherwise, ink may leak from the cartridges.
❏ Do not use a damaged or frayed power cord.
❏ If you use an extension cord with this product,
make sure the total ampere rating of the devices
plugged into the extension cord does not exceed the
cord’s ampere rating. Also, make sure the total
ampere rating of all devices plugged into the wall
outlet does not exceed the wall outlet’s ampere
rating.
❏ Do not attempt to service this product yourself.
❏ Unplug this product and refer servicing to qualified
service personnel under the following conditions:
The power cord or plug is damaged; liquid has
entered the product; the product has been dropped
or the cabinet damaged; the product does not
operate normally or exhibits a distinct change in
performance.
❏ If you plan to use the printer in Germany, observe
the following:
When setting up this product
❏ Do not block or cover the openings in this product’s
cabinet.
❏ Do not insert objects through the slots. Take care
not to spill liquid on this product.
❏ This product’s power cord is for use with this
product only. Use with other equipment may result
in fire or electric shock.
❏ Connect all equipment to properly grounded
power outlets. Avoid using outlets on the same
circuit as copiers or air control systems that
regularly switch on and off.
To provide adequate short-circuit protection and
over-current protection for this printer, the
building installation must be protected by a 10 or 16
amp circuit breaker.
❏ If damage occurs to the plug, replace the cord set or
consult a qualified electrician. If there are fuses in
the plug, make sure you replace them with fuses of
the correct size and rating.
❏ When connecting the printer to a computer or
other device with a cable, ensure the correct
orientation of the connectors. Each connector has
only one correct orientation. Inserting a connector
in the wrong orientation may damage both devices
connected by the cable.
6
Page 7

SC-P600 Series User’s Guide
Introduction
When using this product
❏ Do not put your hand inside this product or touch
the ink cartridges during printing.
❏ Do not move the print heads by hand; otherwise
you may damage this product.
❏ Always turn the product off using the Power button
on the control panel. When this button is pressed,
the Power light flashes briefly then goes off. Do not
unplug the power cord or turn off the product until
the Power light stops flashing.
Using the printer with a wireless connection
❏ Do not use this product inside medical facilities or
near medical equipment. Radio waves from this
product may adversely affect the operation of
electrical medical equipment.
❏ Keep this product at least 22 cm away from cardiac
pacemakers. Radio waves from this product may
adversely affect the operation of cardiac
pacemakers.
❏ Use the ink cartridge before the date printed on its
package.
❏ Use up the ink cartridge within six months of
opening the package for best results.
❏ Do not dismantle the ink cartridges or try to refill
them. This could damage the print head.
❏ Do not touch the IC chip on the side of the cartridge.
This may affect normal operation and printing.
❏ The IC chip on this ink cartridge retains a variety of
cartridge-related information, such as the ink
cartridge status, so that the cartridge may be
removed and reinserted freely. However, each time
the cartridge is inserted, some ink is consumed
because the printer automatically performs a
reliability check.
❏ If you remove an ink cartridge for later use, protect
the ink supply area from dirt and dust, and store it in
the same environment as this product. Note that
there is a valve in the ink supply port, making covers
or plugs unnecessary, but care is needed to prevent
the ink from staining items that the cartridge
touches. Do not touch the ink supply port or
surrounding area.
❏ Do not use this product near automatically
controlled devices such as automatic doors or fire
alarms. Radio waves from this product may
adversely affect these devices, and could lead to
accidents due to malfunction.
When handling the ink cartridges
❏ Keep ink cartridges out of the reach of children and
do not drink.
❏ If ink gets on your skin, wash it off with soap and
water. If it gets in your eyes, flush them immediately
with water. If discomfort or vision problems remain
after a thorough flushing, see a doctor immediately.
❏ Shake new ink cartridges four or five times before
opening their packages.
❏ Do not shake ink cartridges after opening their
packages; this can cause leakage.
❏ Do not remove or tear the label on the cartridge; this
can cause leakage.
❏ Install the ink cartridge immediately after you
remove it from its package. If you leave a cartridge
unpacked for a long time before using it, normal
printing may not be possible.
❏ Store ink cartridges with their labels facing upward.
Do not store cartridges upside down.
Using the LCD screen (Touch panel)
❏ The LCD screen may contain a few small bright or
dark spots, and because of its features it may have an
uneven brightness. These are normal and do not
indicate that it is damaged in any way.
❏ Only use a dry, soft cloth to clean the LCD screen.
Do not use liquid or chemical cleansers.
7
Page 8

SC-P600 Series User’s Guide
Introduction
❏ If the liquid crystal solution gets on your hands,
wash them thoroughly with soap and water. If the
liquid crystal solution gets into your eyes, flush
them immediately with water. If discomfort or
vision problems remain after a thorough flushing,
see a doctor immediately.
❏ The exterior cover of the LCD screen could break if
it receives a heavy impact. Contact your dealer if the
panel surface chips or cracks, and do not touch or
attempt to remove the broken pieces.
❏ Press the LCD screen gently with your finger. Do
not press force or operate with your nails.
❏ Do not operate by a sharp edge thing such as a ball
point pen, sharp pencil, stylus pen and so on.
❏ Condensation inside the LCD screen due to abrupt
changes in temperature or humidity may cause
performance to deteriorate.
Meaning of Symbols
!
!
c
War
ning
Cauti
on
Imp
orta
nt
Warnings must be followed to avoid
serious bodily injury.
Cautions must be followed to avoid
bodily injury.
Important must be followed to avoid
damage to this product.
Note
Notes contain useful or additional
information on the operation of this
product.
8
Page 9
SC-P600 Series User’s Guide
Introduction
Printer Parts
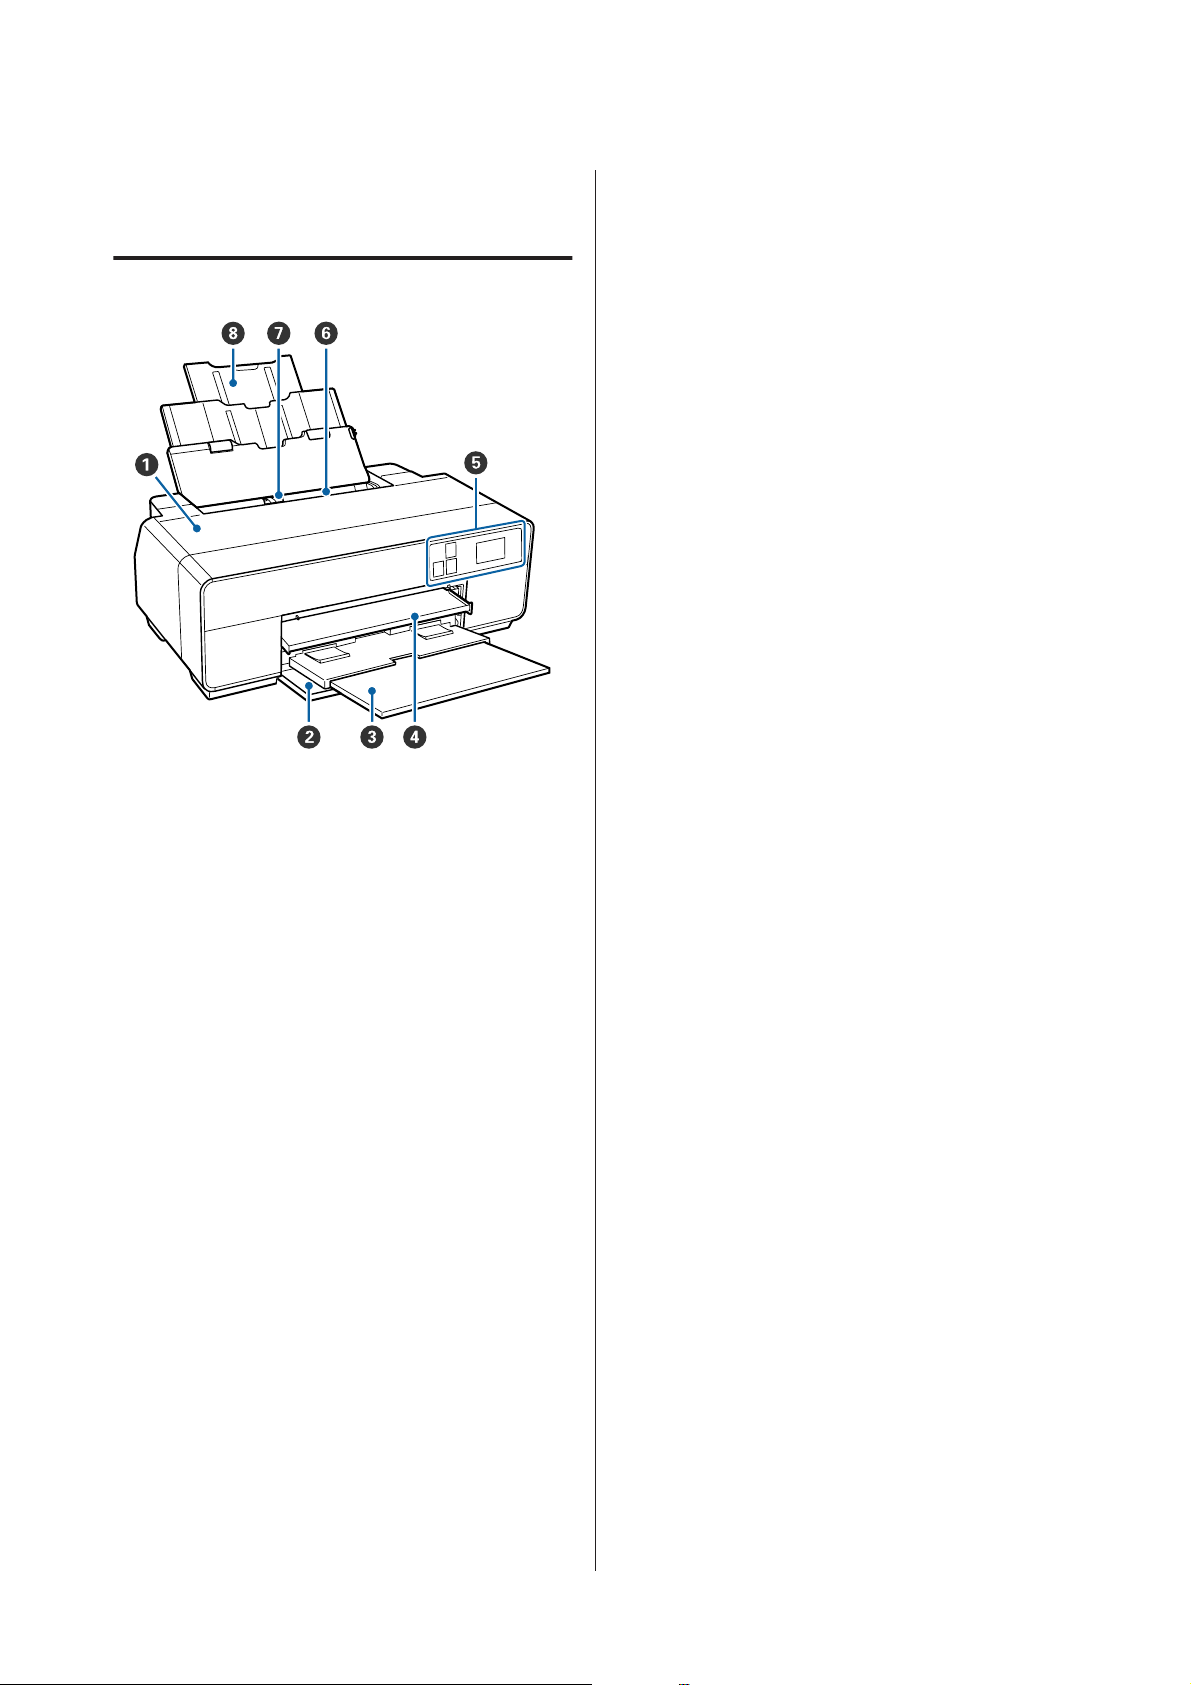
Front section
H Paper support
Supports paper to prevent it from falling forward or
backward.
A Printer cover
Open when replacing ink cartridge, cleaning the
inside of the printer, or removing jammed paper.
The cover is normally closed when the printer is in
use.
B Front cover
Open before pulling out the front manual feed tray
or output trays.
C Output tray
Ejected paper is collected here. Extend the tray when
using the printer.
D Front manual feed tray
Press the center of the tray and pull it out to load fine
art media, poster board, or the CD/DVD tray.
E Control panel
U “Control panel” on page 11
F Auto sheet feeder
Automatically feeds paper.
G Edge guide
Move left and right depending on the size of the
paper that you want to load. This prevents paper
being fed at a slant.
9
Page 10
SC-P600 Series User’s Guide
Introduction
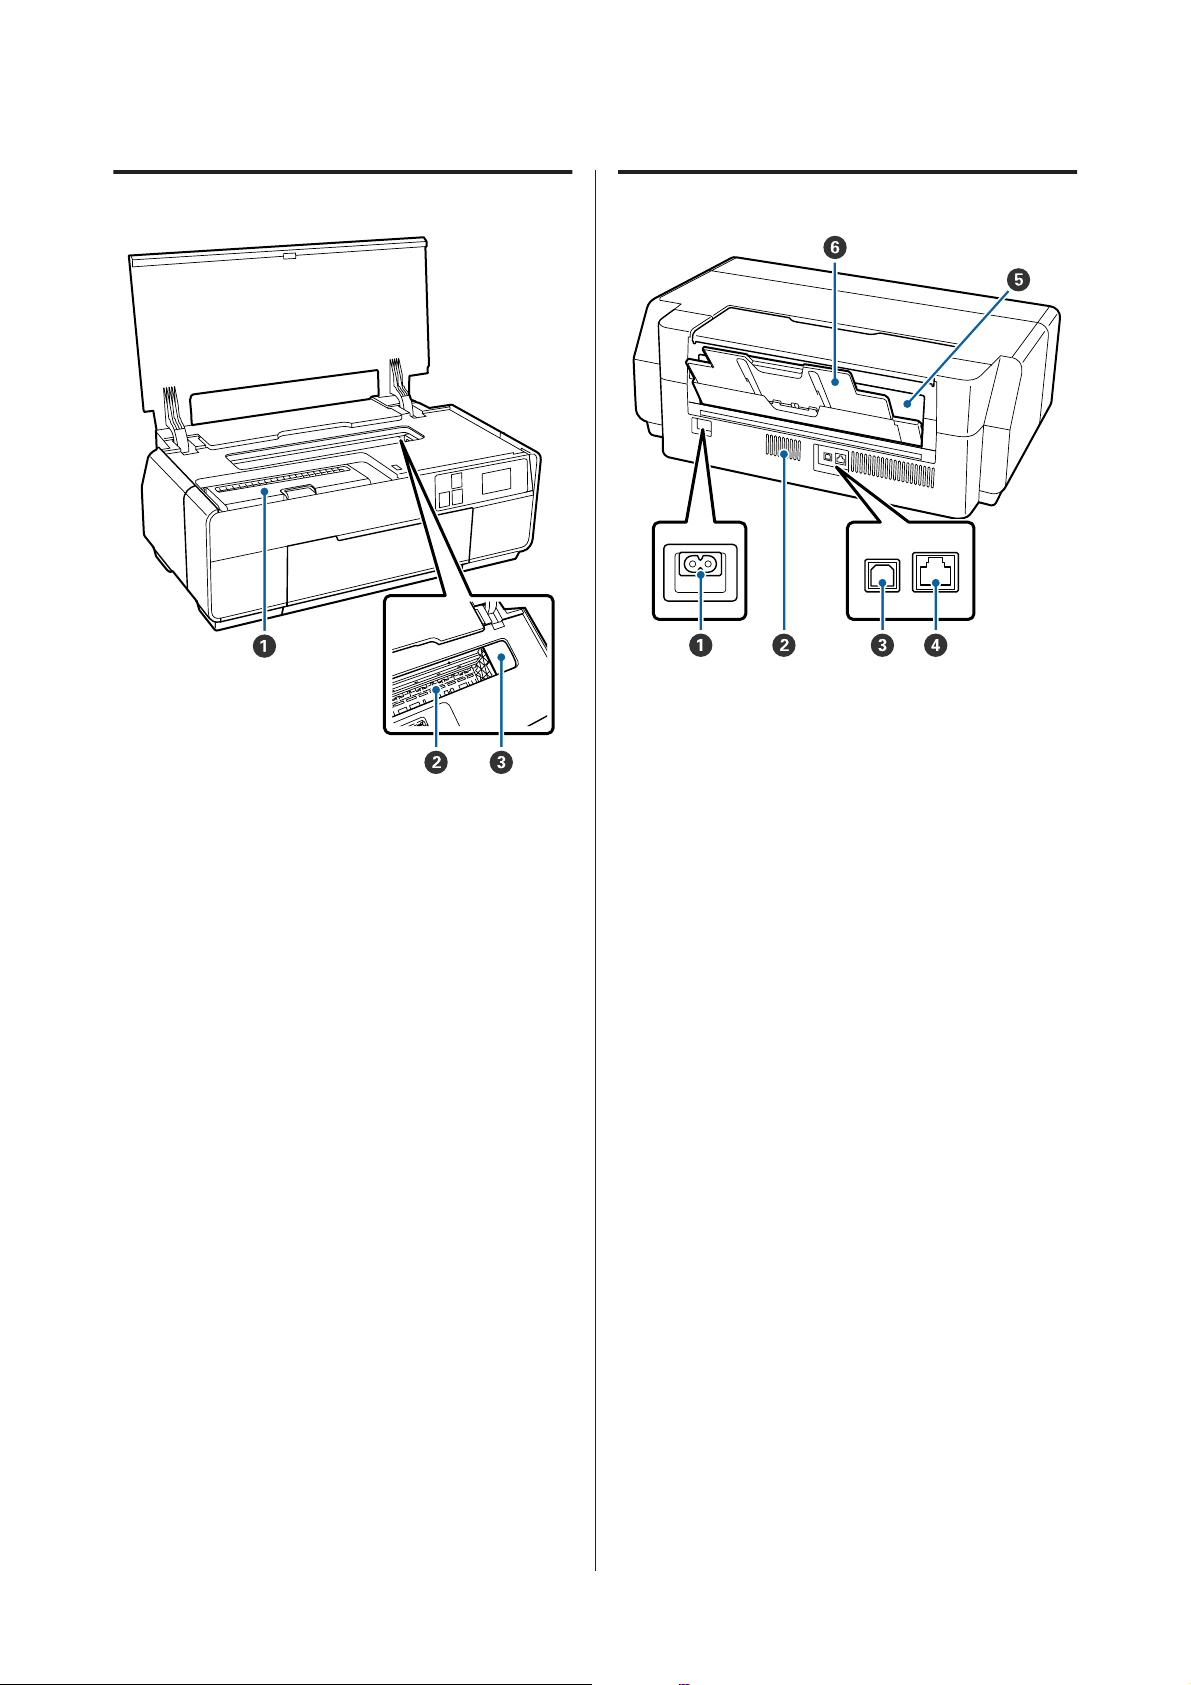
Inside
A Cartridge cover
Open when replacing ink cartridges.
U “Replacing Ink Cartridges” on page 97
B Ink absorber
Absorbs ink that bleeds past the edge of the paper
during borderless printing.
C Print head
Fires ink via high density nozzles while moving left
and right to print. Do not move the print head by
hand.
Back
A AC inlet
Connects the supplied power cable.
B Airflow vents
Exhausts internal air. Do not cover the vents.
C USB port
Connects the USB cable.
D LAN port
Connects the LAN cable.
E Roll paper feeder
Paper feed slot for roll paper printing.
U “Loading Roll Paper” on page 27
F Rear support
Open to use when loading fine art media or roll
paper.
10
U “Loading Fine Art Media” on page 23
U “Loading Roll Paper” on page 27
Page 11
SC-P600 Series User’s Guide
Introduction
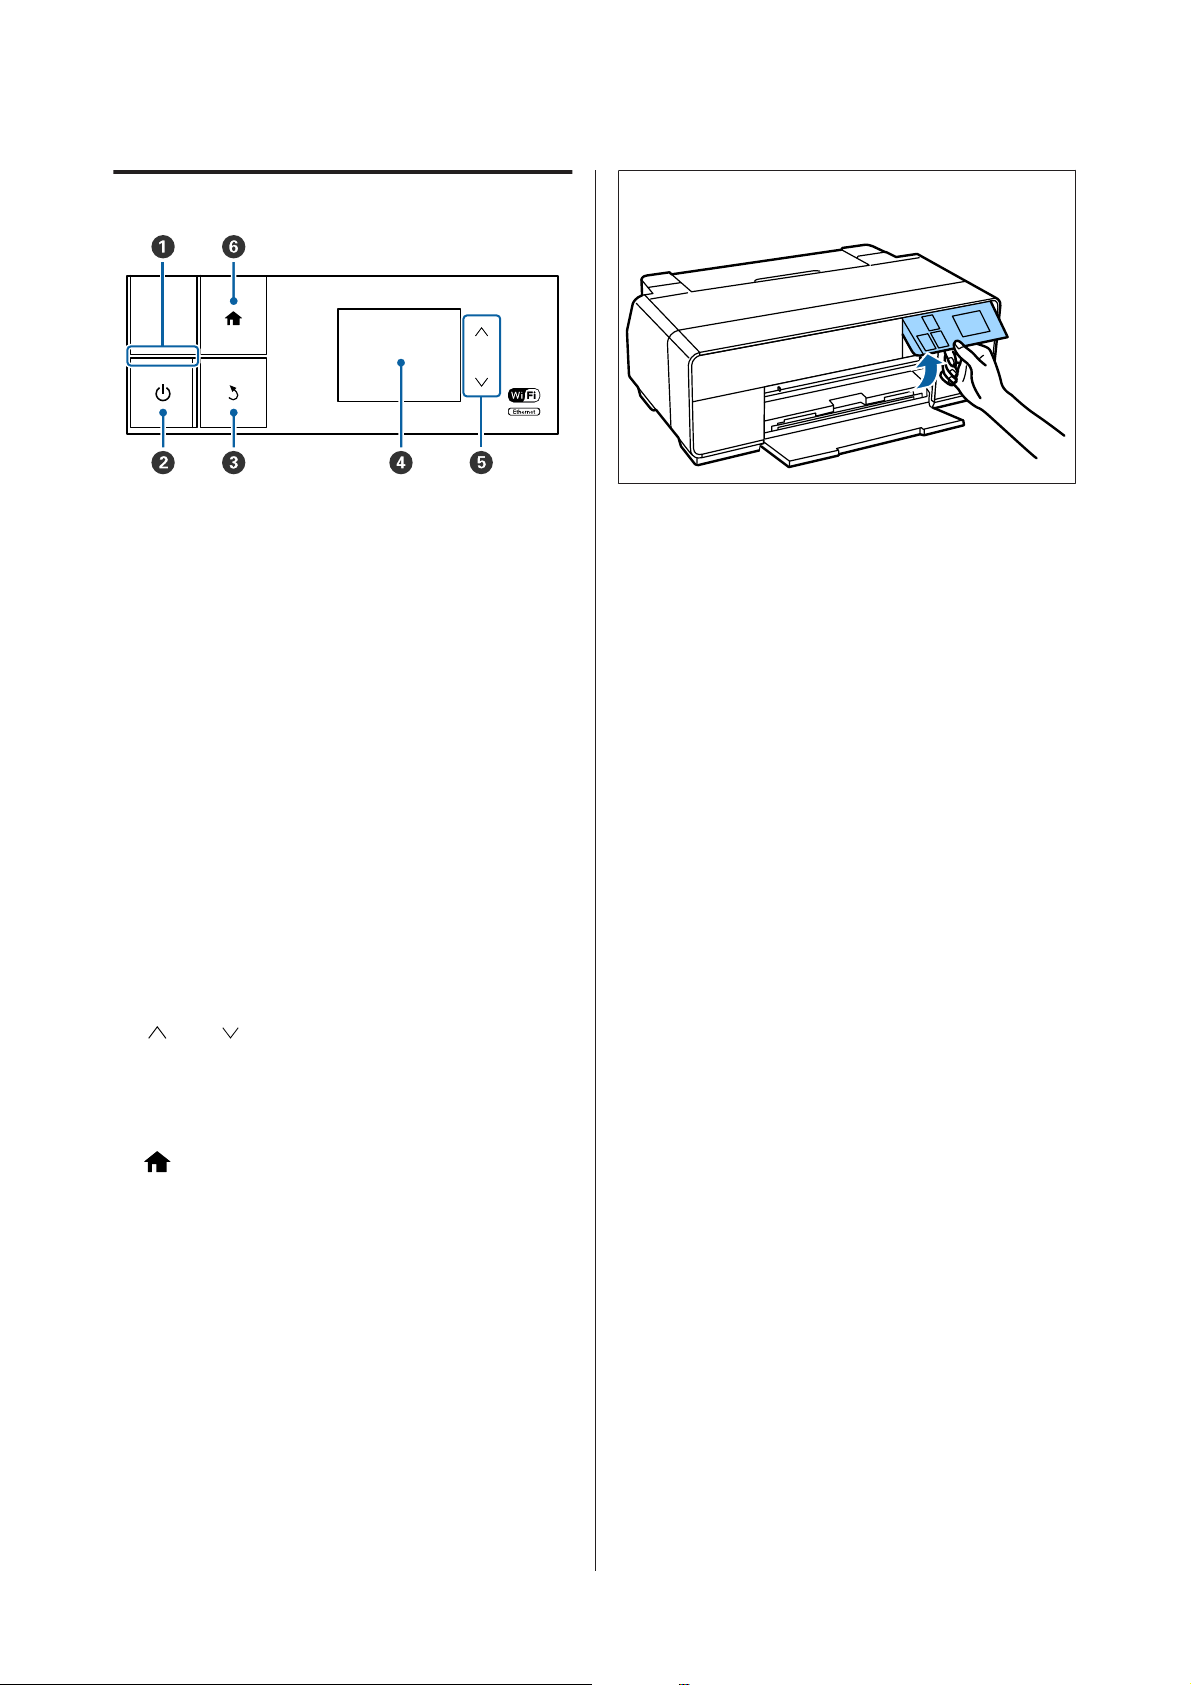
Control panel
A
P light (power light)
On : The power is on.
Off : The power is off.
B
P button (power button)
Turns the power on and off.
C y button (back button)
Press to return to the previous screen while the
Menu is displayed.
Note:
You can change the angle of the control panel.
D Screen
Displays the printer's status, menus, error messages,
and so on. U “Home Screen View” on page 12
E and buttons
Press to select menu items and setting values when a
menu is displayed.
F button
Display the home screen.
U “Home Screen View” on page 12
11
Page 12

SC-P600 Series User’s Guide
Introduction
Home Screen View
A The icons indicate the status.
Check the meaning of icons in the following table.
Photo Black ink is selected.
Connection is established in Wi-Fi Direct
mode.
Connection is established in AP mode.
Auto Sheet Feeder is selected in Load
Guide.
Fine Art Media is selected in Load Guide.
Poster Board is selected in Load Guide.
CD/DVD is selected in Load Guide.
Or
Matte Black ink is selected.
The amount of remaining ink is nearing the
limit.
Displays the status of the wired LAN. This is
on when connected.
Indicates that a wireless LAN or wired LAN
connection has been established.
Displays the connection and radio wave
status for the wireless LAN. The more lines
that are lit, the stronger the signal status.
When all of the lines are off, the wireless LAN
is disconnected. When only N is on, wireless
LAN is searching or cannot be used.
Connection is established in ad hoc mode.
Roll Paper is selected in Load Guide.
Turns on when Thick Paper is set to On.
Press the B to G icons to display menus such as
Settings and Checking
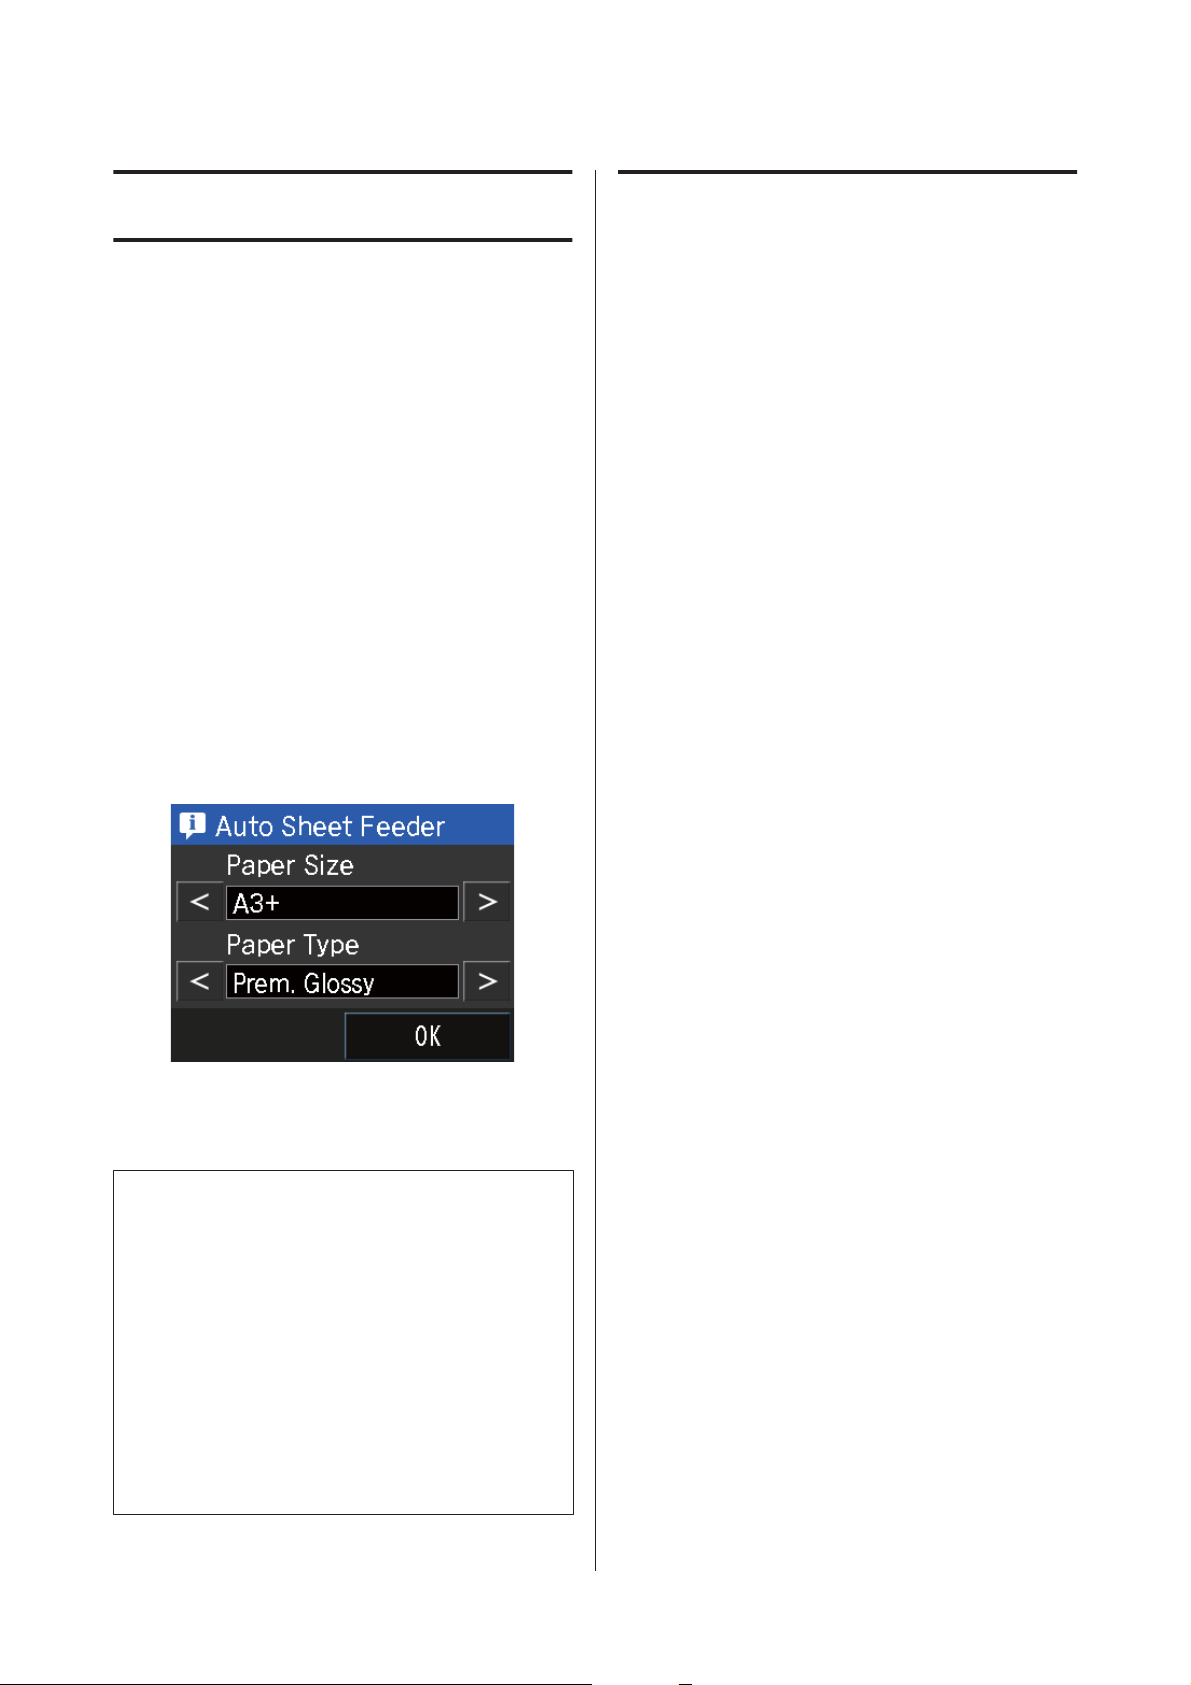
B Load Guide/Media Setup button
Load Guide is displayed when paper is not loaded.
You can continue by checking the selected Load
Guide procedure on the screen.
Media Setup is displayed when paper is loaded. You
can set the Media Size and Media Type.
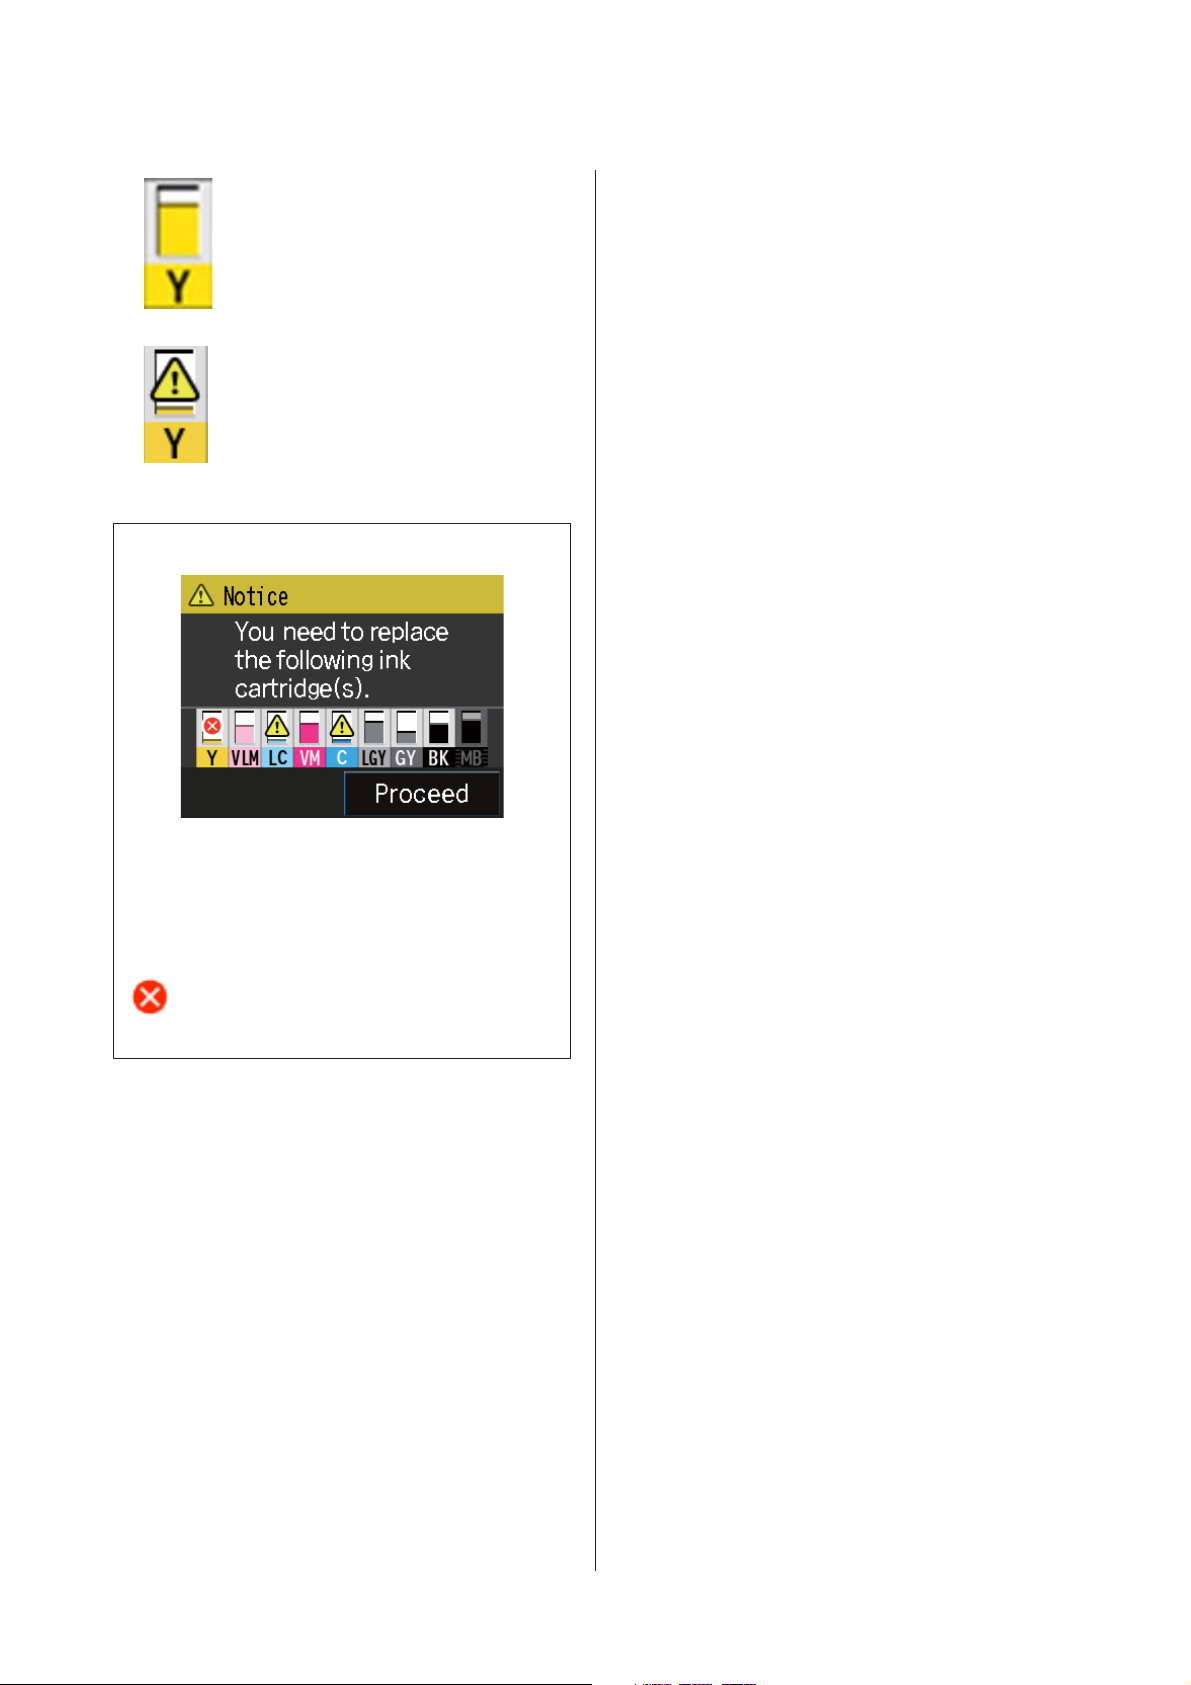
C Ink remaining display button
Displays the approximate level of remaining ink and
the current status.
The icon for the ink cartridges changes as shown
below.
12
Page 13
SC-P600 Series User’s Guide
Introduction
Note:
: No error. The level of the indicator
changes depending on the amount of
ink remaining in the cartridge.
: Ink is low. You need to prepare a new
ink cartridge. We recommend replacing
the ink cartridge as soon as possible
because the ink may be expended while
printing.
Y
:
Yellow
VLM
:
Vivid Light Magenta
LC
:
Light Cyan
VM
:
Vivid Magenta
C
:
Cyan
LLK
:
Light Light Black
LK
:
Light Black
PK
:
Photo Black
MK
:
Matte Black
D BK Ink Change button
You can change from one type of black ink to
another.
U “Changing the Type of Black Ink” on
page 35
During printing, ink replacement, or when an ink
cartridge error has occurred, the level and status of the
ink remaining is displayed.
As well as the above, the following icons are displayed.
: The amount of ink remaining is below the limit
or an error has occurred. Check the message on
the screen, and clear the error.
Ink color codes
U “Supported Media” on page 111
E Network Summary Display button
Displays the status of the printer's connection to the
computer. You can also display Wi-Fi/Network
Settings and so on directly from the Menu.
U “Setting Items for the Network Summary
Display” on page 89
F F (setup) button
You can perform printer maintenance and adjust
printer settings.
U “Menus” on page 88
G Cut/Eject button
13
Page 14

SC-P600 Series User’s Guide
Introduction
You can eject paper that has been loaded.
The following can be performed when roll paper is
loaded.
❏ Move roll paper to the cutting position
❏ Eject paper after moving the roll paper to the cutting
position
❏ Eject roll paper
Printer Features
This ink jet color printer supports A3+ paper.
The main features of this printer are described below.
Realizing High Resolution
The newly developed Epson UltraChrome HD ink
technology provides high definition for professional
needs.
Maximum black density
The new ink technology realizes maximum black
density (Dmax) which is higher than previous products.
Printing Black and White Photos
Three different densities of black ink bring out delicate
tone differences in black-and-white photographs.
The printer driver can be used to create richly shaded
black-and-white prints directly from color image data
without the use of imaging software.
U “Printing Black and White Photos” on page 55
Providing two types of black ink to match the paper
type
You can choose from Photo Black or Matte Black ink
depending on the paper type. Photo Black ink provides a
smooth finish to glossy photo papers. Matte Black ink
increases black optical density for matte type papers.
This printer allows you to set both photo black ink and
matte black ink and switch between them depending on
the paper type.
U “Changing the Type of Black Ink” on page 35
Balanced Color Reproduction Using the Epson LUT
Technology
Epson LUT Technology realizes the following
conditions while ensuring an excellent balance among
all these parameters. This makes possible an overall
increase in image quality and consistent color
reproduction.
1. Reduces color inconsistencies due to differences in
lighting
2. Reproduces fine gradations
3. Reduces graininess
14
Page 15

SC-P600 Series User’s Guide
Introduction
4. Increases the gamut for rich color reproduction
5760 × 1440 dpi Maximum Resolution, 2 pl Minimum
Ink Dot Size for a precise output
Print beautiful photographs with little graininess.
Long life prints
Pigment inks maintain more beautiful and more vibrant
prints over a long period of time since their high water
and ozone resistance and high light fastness prevent the
inks from being broken down by light and ozone in the
air.
Realizing High Productivity
Excellent color stability leads to efficient printing
The color stabilizes in a short time so it can safely be used
for pre-press workflow and color editing, increasing
work efficiency.
Superior Ease of Use
Adopted a touch panel interface that offers
improved operability with an easy-to-see-and-use
color screen
The large, bright LCD display provides an intuitive, easy
to operate screen design.
The highly legible color screen makes error messages
and other information easier to understand. It also
provides instructions on loading media such as fine art
media.
Printing from a smart device
By using AirPrint or Google cloud print, you can print
from iOS or Android smart devices.
Borderless printing function
You can print with no margins for all directions with
both auto expand or retain size print settings.U
“Borderless printing” on page 58
Also included is a poster printing function that allows
you to join the output paper together when performing
borderless printing in order to create large posters and
calendars.U “Poster Printing (Enlarge to cover several
sheets and print - Windows only)” on page 69
Freely placing print data made by various
applications using Layout Manager
This function allows you to place multiple print data
made by different applications freely on one sheet to
create posters and display articles.
U “Layout Manager(Windows only)” on page 77
Saving energy using Sleep Mode and Power Off
Timer
When no print jobs are being handled, or when no
operation has been performed for some time, the printer
enters sleep mode to reduce power consumption.
Furthermore, if the Power Off Timer function is
enabled, the printer can automatically switch off to
avoid wasting electricity. This function works if no print
jobs are received and no operations are carried out on
the control panel while the printer is not in an error
status for a specified duration of time.
U “Home Screen View” on page 12
Equipped for Wireless LANs
The wireless LAN feature that comes standard with the
printer allows wireless printing from computers and
compatible Wi-Fi devices.
By using a Wi-FI Direct connection, you can wirelessly
connect the printer directly to a computer or a smart
device without using an access point.
Note:
You may find print speeds to be insufficient on some
wireless networks or when printing at A3 or other
extremely large sizes. A physical connection is
recommended when consistent print speeds are required.
U “Energy Saving Settings” on page 37
Support for a Wide Variety of Paper Types
EPSON offers a wide variety of special media for
high-quality printing. The printer can also print on
poster board, roll paper, and inkjet-compatible CDs and
DVDs.
Loading paper automatically displays the setup screen
for media type and media size. You can set this display to
On/Off from Paper Setup Display in the Setup menu.
U “Setting Items for the Setup Menu” on page 89
These paper types can be loaded as described below.
15
Page 16
SC-P600 Series User’s Guide
Introduction
❏ Cut sheet
Cut sheets are fed into the printer from the auto
sheet feeder.
U “Loading Paper into the Auto Sheet Feeder” on
page 22
❏ Fine art media
Extend the rear support and load paper from the
front manual feed tray.
❏ Roll paper
Install the roll paper holder on the back of the
printer.
U “Loading and Removing Roll Paper” on
page 27
❏ CD/DVD
U “Loading Fine Art Media” on page 23
❏ Poster board
Load from the front manual feed tray.
U “Loading Poster Board” on page 25
Use the CD/DVD tray to load CDs and DVDs from
the front manual feed tray.
U “Loading and Removing CDs and DVDs” on
page 29
16
Page 17
SC-P600 Series User’s Guide
Introduction
Notes on Usage and Storage
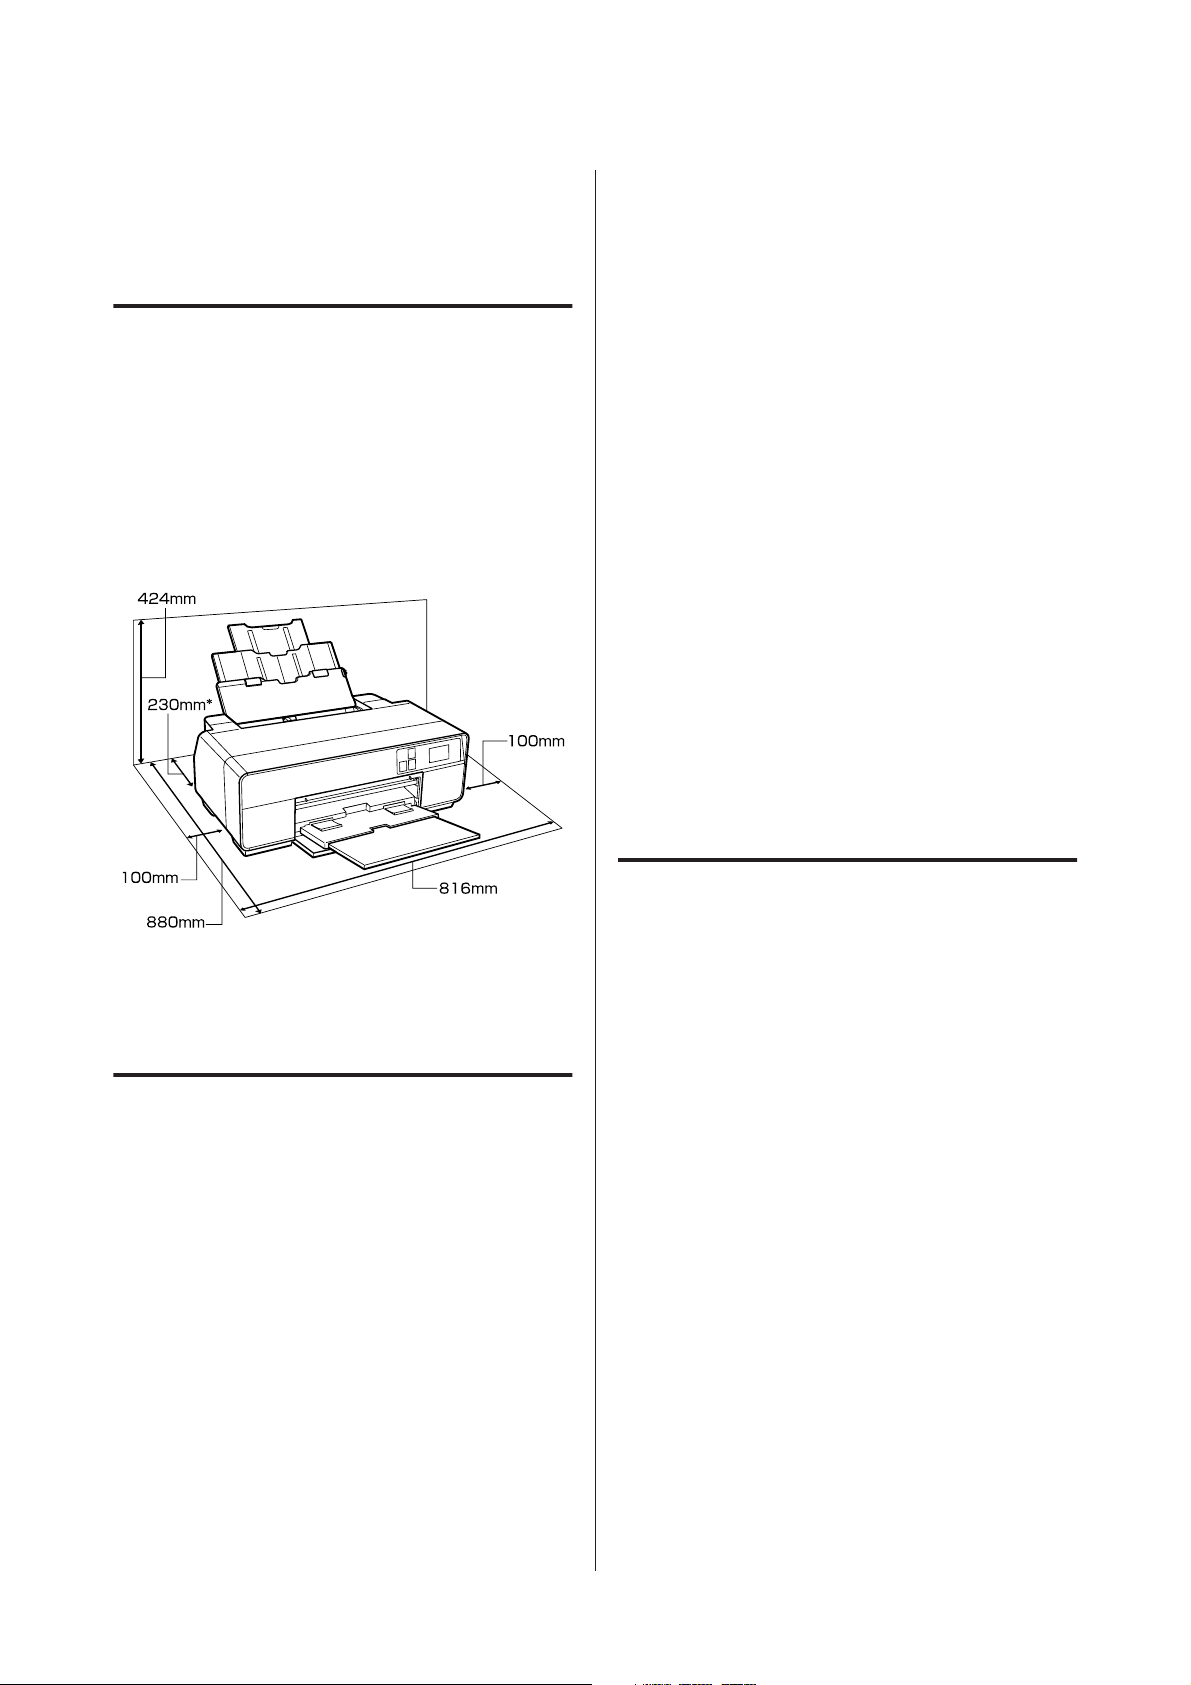
Installation space
Make sure that you secure the following space, clear of
any other objects, so that paper ejection and
consumable replacement are not obstructed.
See the “Specifications Table” for the external
dimensions of the printer.
U “Specifications Table” on page 117
requirements are met. For more details, see the
manual supplied with the paper.
Also, when operating in dry areas, air conditioned
environment, or under direct sunlight, maintain
the appropriate humidity.
❏ Avoid locations in direct contact with air from air
conditioners and locations with heat sources. This
could dry the nozzles in the print head and cause
clogging.
❏ Capping may not occur (the print head is not
positioned on the right-hand side) if the printer is
turned off during a paper jam or when an error
occurs. Capping is a function for automatically
covering the print head with a cap (lid) to prevent
the print head from drying out. In this case, turn on
the power and wait a while until capping is
performed automatically.
❏ When the power is on, do not remove the power
plug or cut the power at the breaker. The print head
may not be capped properly. In this case, turn on the
power and wait a while until capping is performed
automatically.
* When printing on poster board, leave a space of at
least 320 mm in behind the printer.
Notes when using the printer
Note the following points when using this printer to
avoid breakdowns, malfunctions, and print quality
decline.
❏ When using the printer, observe the operating
temperature and humidity range described in the
“Specifications Table”.
Even when the conditions above are met, you may
not be able to print properly if the environmental
conditions are not suitable for the paper. Be sure to
use the printer in an environment where the paper's
Notes when not using the printer
If you are not using it, note the following points when
storing the printer. If it is not stored correctly, you may
not be able to print properly the next time it is used.
❏ When storing the printer leave the ink cartridges
installed and keep the printer level. Do not tilt or
invert the printer or stand it on end.
❏ If you do not print for a long time, the print head
nozzles may become clogged. We recommend that
you use the printer periodically to prevent the print
head from clogging.
❏ If the paper is left in the printer, the roller of the
paper presser may leave a mark on the surface of the
paper. This can also cause wavy or curled paper
resulting in paper feeding problems or the print
head could be scratched. Remove any paper when
storing.
17
Page 18

SC-P600 Series User’s Guide
Introduction
❏ Store the printer after confirming that the print
head has been capped (the print head is positioned
at the far right). If the print head is left uncapped for
a long time, the print quality may decline.
Note:
If the print head is not capped, turn the printer on, and
then turn it off.
❏ Make sure covers are kept closed to avoid dust
getting in. If you are not using the printer for a long
time, put an anti-static cloth or cover on the printer
to prevent dust. The print head nozzles are very
small, and they can become clogged easily if fine
dust gets on the print head, and you may not be able
to print properly.
❏ If you have not used the printer for a long time,
check the print head for clogging before you start
printing. Perform head cleaning if the print head is
clogged.
U “Checking for clogged nozzles” on page 94
Notes on handling ink cartridges
Note the following points when handling ink cartridges
to maintain good print quality.
❏ Make sure you remove the yellow tape before
installing. If you install without removing the tape,
you may not be able to print properly. Do not
remove any other film or labels. Otherwise, ink
could leak.
❏ Do not touch the IC chip in the ink cartridge. You
may not be able to print properly.
U “Replacing Ink Cartridges” on page 97
❏ When loading ink cartridges, be sure all colors are
installed. The printer can only be used when all
colors are installed.
❏ Do not move the print head by hand; otherwise, the
printer may be damaged.
❏ Do not leave the printer without ink cartridges
installed. If the print head (nozzles) dries, you may
not be able to print.
❏ Because the green IC chip contains the cartridge’s
own information such as the remaining ink level,
you can still reinstall and use the ink cartridge after
removing it from the printer. Note, however, that
you may not be able to reuse ink cartridges that
contained very little ink when they were removed
from the printer. Some ink may also be used to
ensure reliable operation when the cartridges are
reinserted.
❏ As part of the initial ink charging process
performed after purchase, some ink is used to fill
the print head nozzles to the tips and ready them for
printing. As a result, the first ink cartridges installed
after purchase will print fewer pages than
subsequent cartridges.
❏ We recommend storing ink cartridges in a cool,
dark place, and using them before the expiry date on
the package. Use cartridges within six months of
opening.
❏ Do not open the bag containing the ink cartridge
until you are ready to install it in the printer. Ink
cartridges are vacuum packed to maintain quality.
❏ If you move ink cartridges from a cold place to a
warm place, leave it at room temperature for more
than three hours before using the ink cartridge.
❏ Cartridges that still contain ink should be stored
under the same conditions as the printer, with the
nozzles down or to the side to prevent them
becoming clogged with dust. Note that the ink
supply port has a valve in it so it does not need to be
capped.
❏ Removed ink cartridges may have ink around the
ink supply port, so be careful not to get any ink on
the surrounding area.
❏ To maintain the quality of the print head, this
printer stops printing before ink cartridges are
completely expended.
❏ Although the ink cartridges may contain recycled
materials, this does not effect printer function or
performance.
❏ Do not dismantle or remodel ink cartridges. You
may not be able to print properly.
18
Page 19

SC-P600 Series User’s Guide
Introduction
❏ All colors of ink are used during head cleaning and
other non-printing maintenance operations to
ensure that the print heads remain in good
condition.
❏ Depending on the paper type and print quality
settings, colored inks may also be used for
high-density blacks in monochrome or grayscale
printing.
❏ You cannot use the cartridges that came with the
printer for replacement.
Notes on handling paper
Note the following points when handling and storing
the paper. If the paper is not in good condition, print
quality may decline.
Check the manuals supplied with each paper.
Notes on Handling
❏ Use Epson special media under normal room
conditions (temperature: 15 to 25°C; humidity: 40
to 60%).
Notes on handling printed paper
To maintain long lasting, high quality print results, note
the following points.
❏ Do not rub or scratch the printed surface. If they are
rubbed or scratched, the ink may peel off.
❏ Do not touch the printed surface; otherwise, the ink
may peel off.
❏ Make sure the print outs are completely dry before
folding of stacking; otherwise, the color may change
where they touch (leaves a mark). These marks will
disappear if they are separated immediately and
dried; however, they will remain if not separated.
❏ If you put the print outs in an album before they are
completely dry, they may be blurred.
❏ Do not use a dryer to dry the print outs.
❏ Avoid direct sunlight.
❏ Prevent color distortion while displaying or storing
the print outs by following the instructions in the
paper’s manual.
❏ Do not fold the paper or scratch the surface of the
paper.
❏ Avoid touching the printable surface of the paper
with your bare hands. Moisture and oils from your
hands can affect print quality.
❏ Paper may be wavy or slack if the temperature and
humidity change. Be careful not to scratch or soil
the paper, and flatten it before loading it in the
printer.
❏ Do not wet the paper.
❏ Do not throw away the paper packaging as you can
use it for storing the paper.
❏ Avoid locations that are subject to direct sunlight,
excessive heat, or humidity.
❏ Keep paper in their original package after opening,
and keep them in a flat place.
❏ To keep your printouts from discoloring, store
them in a dark place, away from high temperatures,
high humidity, and direct sunlight.
Note:
Typically, print outs and photos fade over time (color
distortion) due to the effects of light and various
constituents in the air. This also applies to Epson special
media. However, with the correct storage method, the
degree of color distortion can be minimized.
❏ See the manuals supplied with Epson special media
for detailed information on handling the paper after
printing.
❏ The colors of photos, posters, and other printed
materials appear different under different lighting
*
conditions (light sources
from this printer may also appear different under
different light sources.
* Light sources include sunlight, fluorescent light,
incandescent light, and other types.
). The colors of print outs
19
Page 20
SC-P600 Series User’s Guide
Introduction
Introducing the Supplied Software
Contents of the Software Disc
The following Windows only software can be found on the supplied software disc.
See http://epson.sn for Mac OS X or if you do not have a disk drive.
You need to install the printer driver to use this printer.
For details on each software see Network Guide (PDF) or the online help.
Software Name Summary
Printer Driver U “Summary of the Printer Driver” on page 21
Easy Photo Print Print selected photos quickly and easily. See the application’s on-line help for more
information.
Epson Print CD With this software, you can design labels for music, photo, or movie CDs and DVDs and print
them directly on the discs. You can also design and print CD and DVD jackets.
See the application’s on-line help for more information.
EpsonNet Setup With this software, you can configure various network settings for the printer from your
computer.
EpsonNet Print With this software, you can perform direct TCP/IP printing when the computer and the printer
are connected via a network.
EpsonNet Config With this software, you can configure various network settings for the printer from your
computer. This is useful as it allows you to enter the address and name using the keyboard.
EPSON Software Updater This software connects to the Internet and checks if there are any updates available and installs
them.
Adobe ICC profiles Use as input profiles when required for color management.
20
Page 21
SC-P600 Series User’s Guide
Introduction
Summary of the Printer Driver
The main functions of the printer driver are described
below.
❏ Converts print data received from applications into
printable data and sends it to the printer.
❏ Allows the user to specify print settings such as the
media type and paper size.
Windows
❏ Allows the user to execute printer maintenance
functions to maintain print quality, and check the
printer's status and so on.
Windows
You can easily import or export printer driver
settings.
You can save these settings and easily import or
export these saved settings.
U “Customizing the Printer Driver” on
page 42
Mac OS X
U “Summary of the Utility Tab” on page 44
Mac OS X
21
Page 22
SC-P600 Series User’s Guide
Basic Operations
Basic Operations
Loading Cut Sheets
The method for feeding varies depending on the
thickness of the paper as shown below.
In addition, available paper sizes vary depending on the
feed method and the media type. For paper sizes, see U
“Supported Media” on page 111.
Auto sheet feeder: 0.08 to 0.3 mm
Front manual feed (fine art media): 0.3 to 0.7 mm
Front manual feed (poster board): 0.7 to 1.3 mm
When Paper Setup Display is set to On and media is
loaded, the setup screen for media type and media size is
automatically displayed.
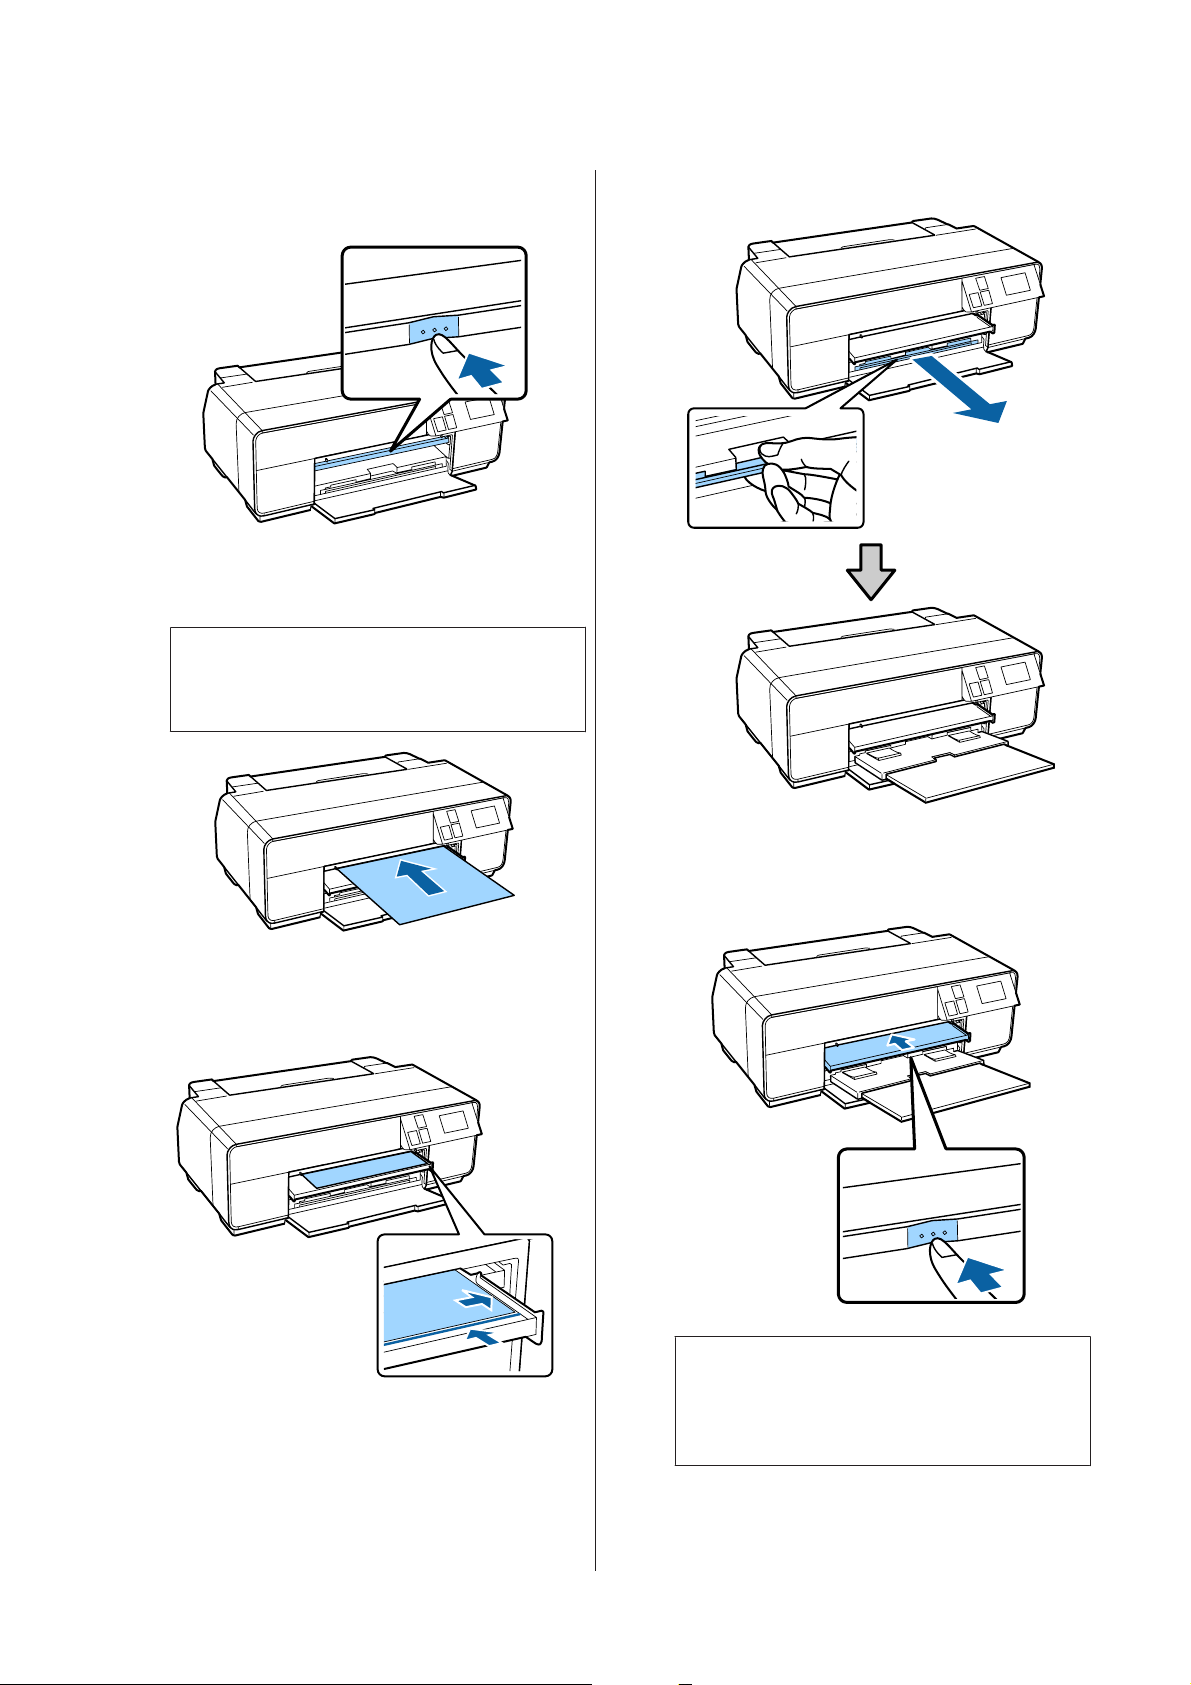
Loading Paper into the Auto Sheet Feeder
Turn on the printer.
A
See U “Menus” on page 88 for the "Paper Setup
Display" settings.
c
❏ If the paper is wavy or curled, flatten the paper
before loading it in the printer, or use new
paper. If wavy or curled paper is loaded, this
printer may not be able to recognize the paper
size, feed the paper, or print correctly.
We recommend that you return the paper to its
original package and store it flat, and take it
out of the package just before you use it.
❏ To avoid paper jams, make sure you open the
front cover and extend the output tray before
printing.
22
Page 23
SC-P600 Series User’s Guide
Basic Operations
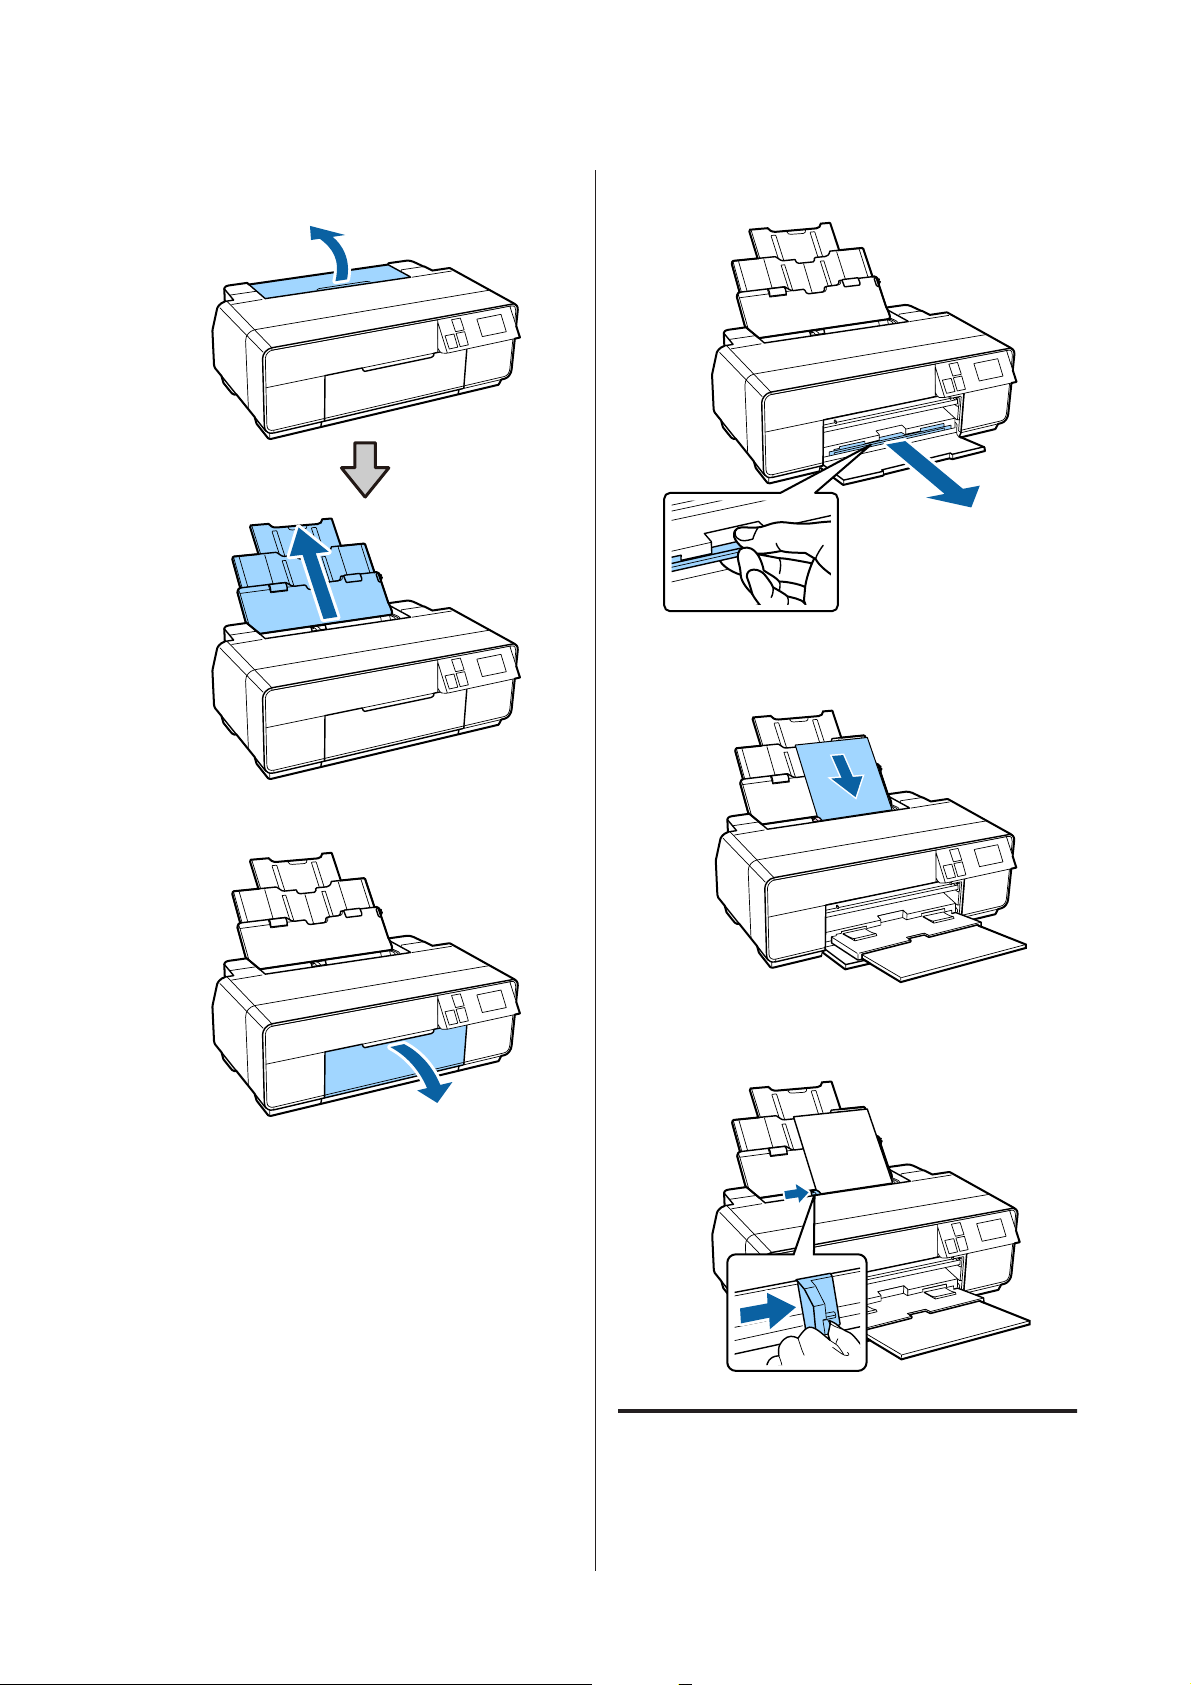
Open and fully extend the paper support.
B
Fully extend the output tray.
D
Load the paper vertically with the printable side
E
face up.
Open the front cover.
C
Grasp and slide the edge guide to fit it to the width
F
of the paper.
Loading Fine Art Media
Use the front manual feed tray and the rear support to
load fine art media.
23
Page 24
SC-P600 Series User’s Guide
Basic Operations
You can load fine art media with a thickness of 0.3 to 0.7
mm.
Turn on the printer.
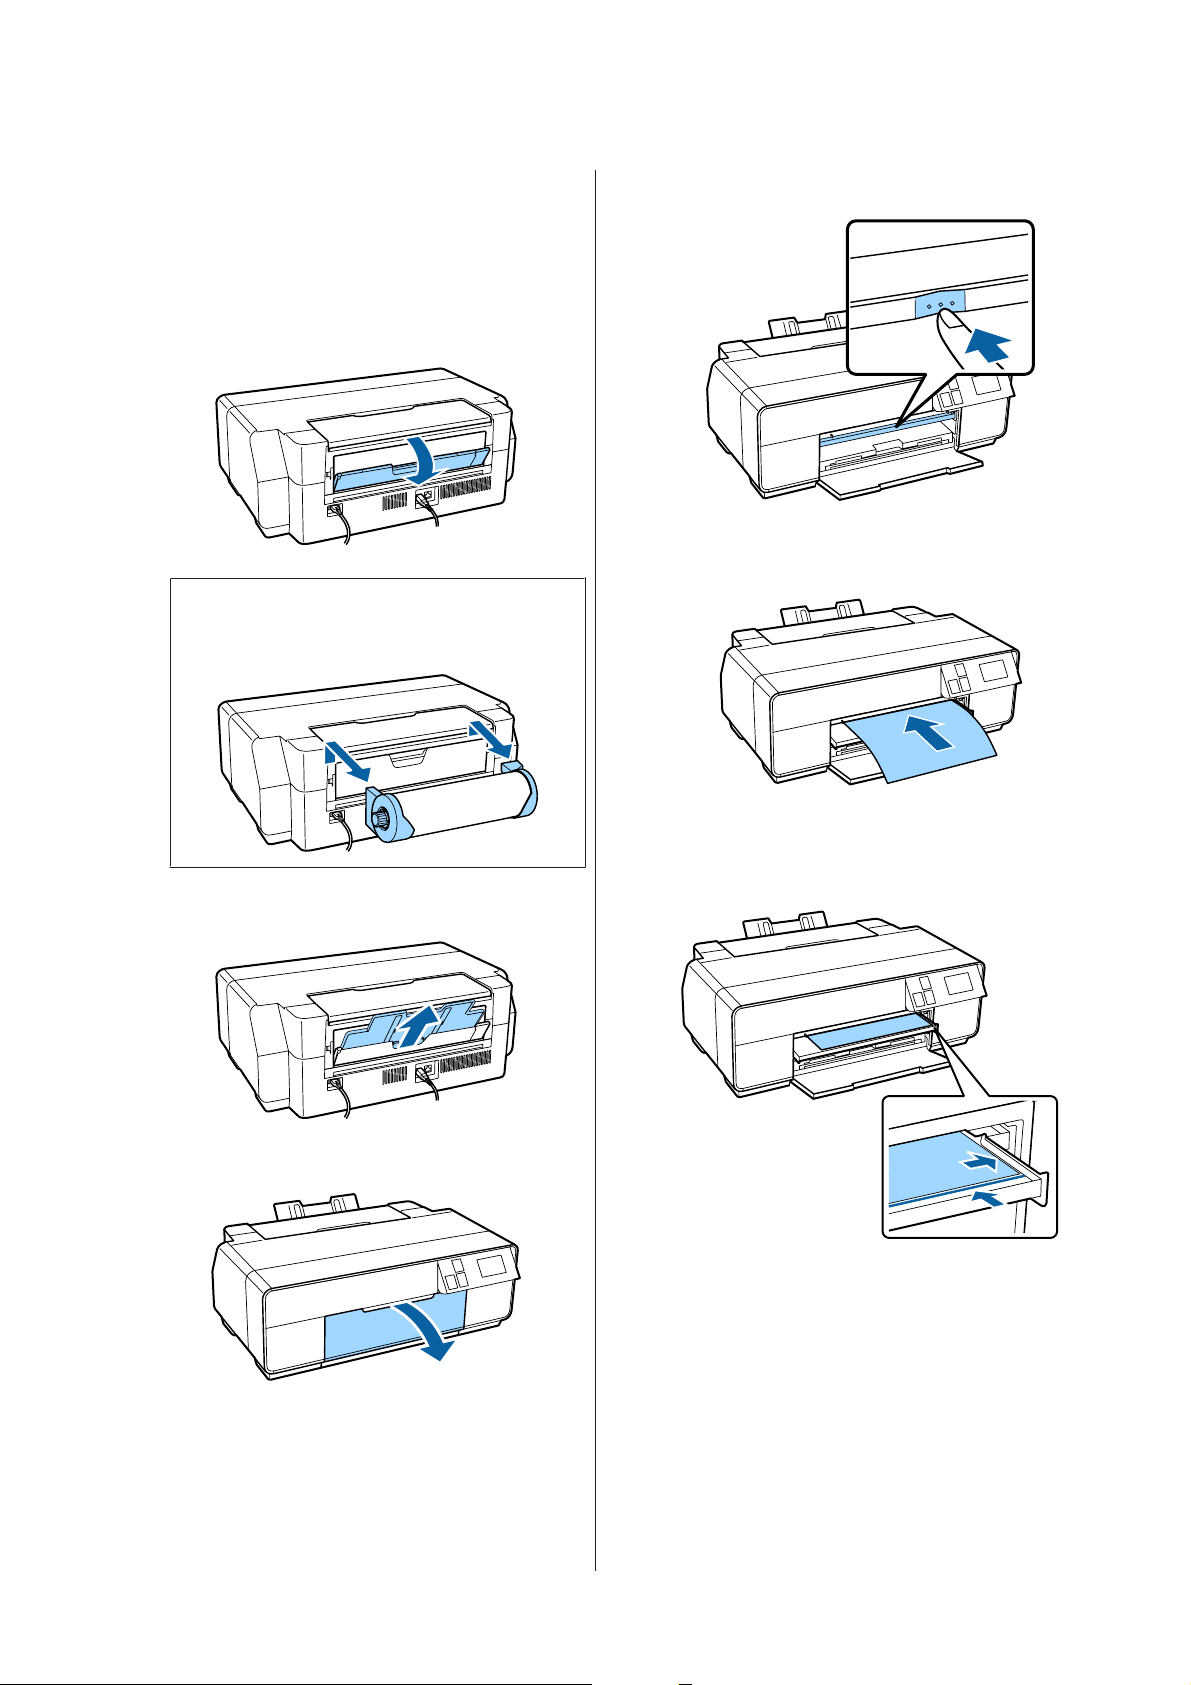
A
Open the rear support.
B
Note:
If the roll paper holder is currently in place at the
rear of the printer, remove it before proceeding.
Push the center of the front manual feed tray.
E
Load the paper vertically with the printable side
F
face up.
Fully extend the rear support.
C
Open the front cover.
D
Align the right edge of the paper with the right
G
edge of the tray and the trailing edge with the line
on the tray.
Press Load on the control panel screen.
H
The paper will be fed into the printer.
24
Page 25
SC-P600 Series User’s Guide
Basic Operations
Fully extend the output tray.
I
Loading Poster Board
Use the front manual feed tray to load poster board.
You can load poster board with a thickness of 0.7 to 1.3
mm.
Poster board sticks out from the rear of the printer when
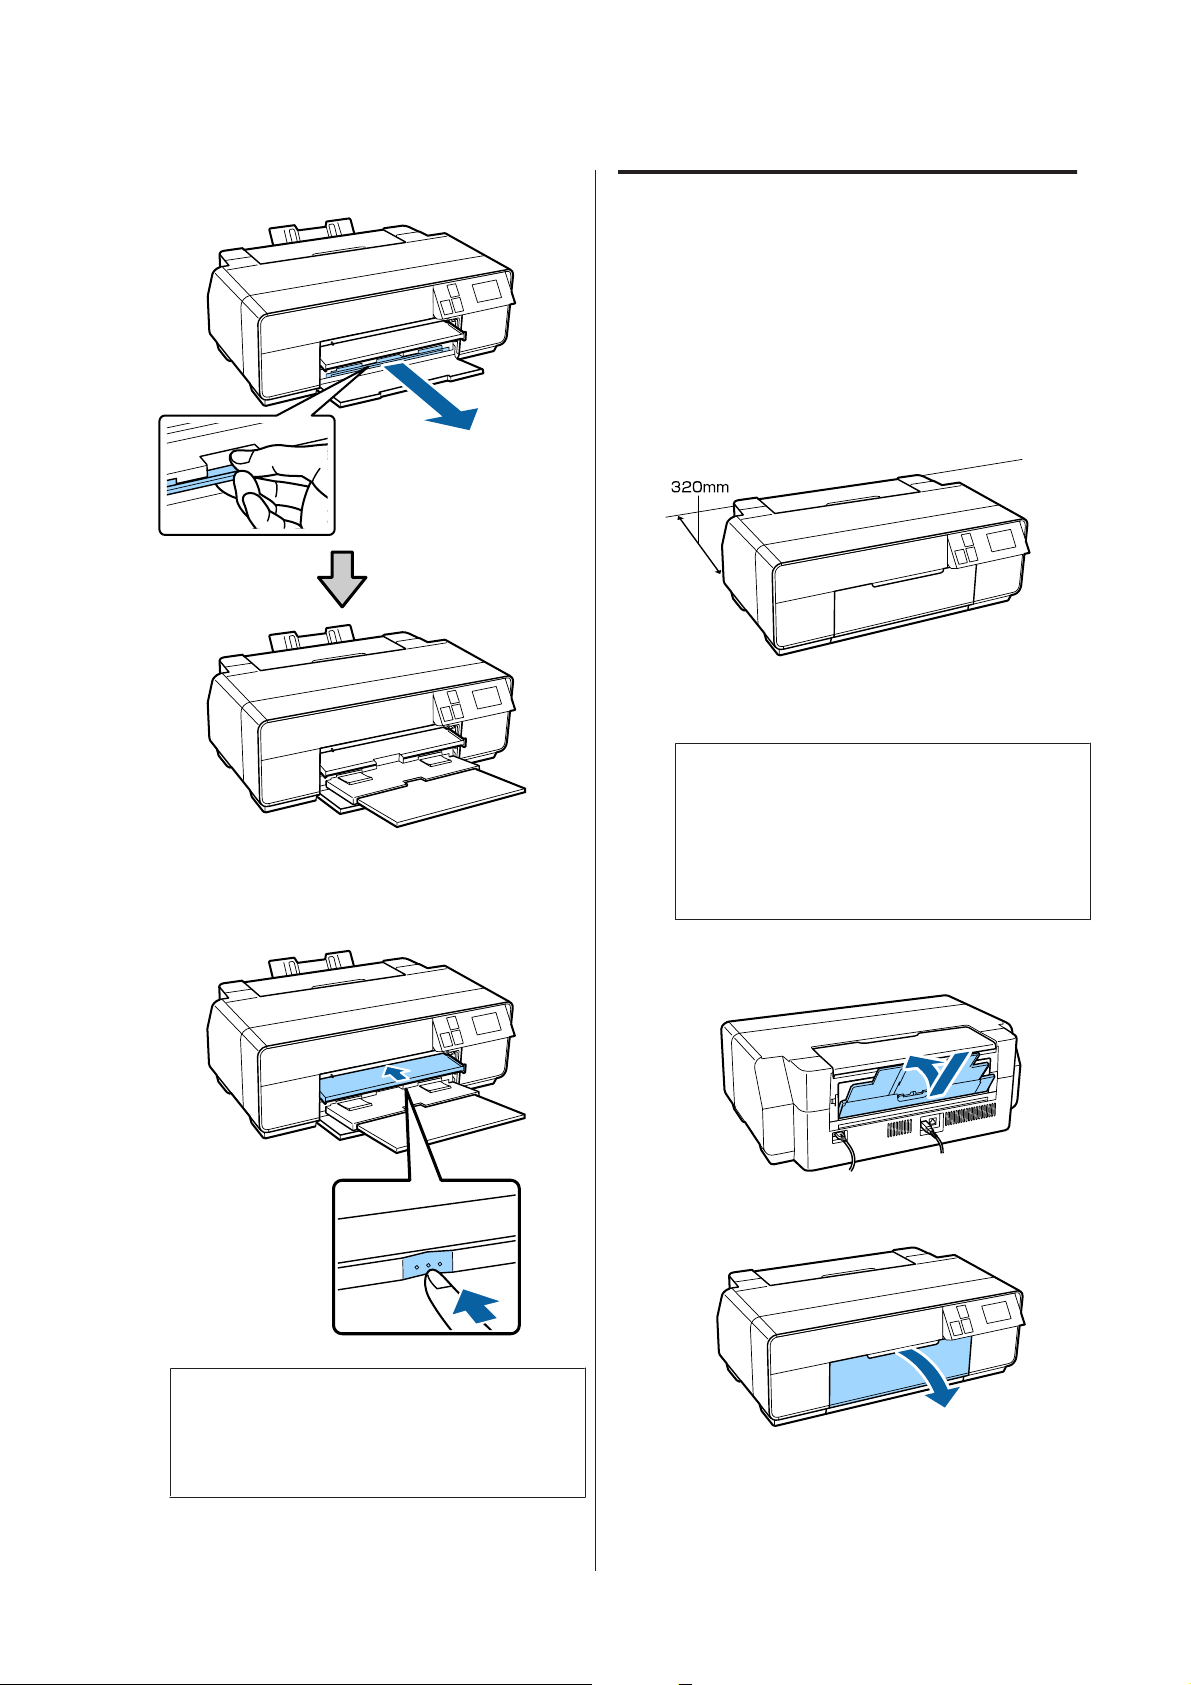
it is loaded. Leave a space of at least 320 mm between the
rear of the printer and the nearest wall.
Turn on the printer.
A
With the paper loaded and the printer idle, push
J
the center of the front manual feed tray to close
the tray.
Important:
c
An error may occur if you perform the
following operations during printing.
❏ Extend the front manual feed tray.
❏ Load poster board.
If the rear support is open, close it.
B
Open the front cover.
C
Note:
To eject the paper, press Eject on the control panel's
Home screen, and then follow the on-screen
instructions.
25
Page 26
SC-P600 Series User’s Guide
Basic Operations
Push the center of the front manual feed tray to
D
pop it out.
Load the paper vertically with the printable side
E
face up.
Important:
c
Inserting paper from the rear may cause a
malfunction or error.
Fully extend the output tray.
H
Align the right edge of the paper with the right
F
edge of the tray and the trailing edge with the line
on the tray.
Press Poster Board - Load on the control panel's
G
screen.
Once the paper is loaded, make sure that the
I
printer is idle, and then push the center of the
front manual feed tray to close it.
Note:
To eject the paper, press Eject on the control panel's
Home screen, and then follow the on-screen
instructions.
The paper will be fed into the printer.
26
Page 27
SC-P600 Series User’s Guide
Basic Operations
Loading and Removing Roll Paper
Loading Roll Paper
Use the roll paper holder supplied to load roll paper into
the rear of the printer. See the following for information
on supported roll paper types.
U “Supported Media” on page 111
Turn on the printer.
A
Open the front cover.
B
Fully extend the output tray.
C
Note:
If the front manual feed tray is open, push the
center of the tray to close it.
After confirming that the end of the roll paper is
D
cut straight across, insert the roll paper holder
into the ends of the roll.
If the end of the roll paper is not cut straight
across, trim it straight before proceeding.
Open the rear support.
E
Only open the support; there is no need to extend
it.
27
Page 28
SC-P600 Series User’s Guide
Basic Operations
Attach the roll paper holder to the rear of the
F
printer.
Feed the roll paper into the roll paper feeder on
G
the rear of the printer until it stops.
After you have held the paper in place for about
three seconds, it will be loaded the printer
automatically.
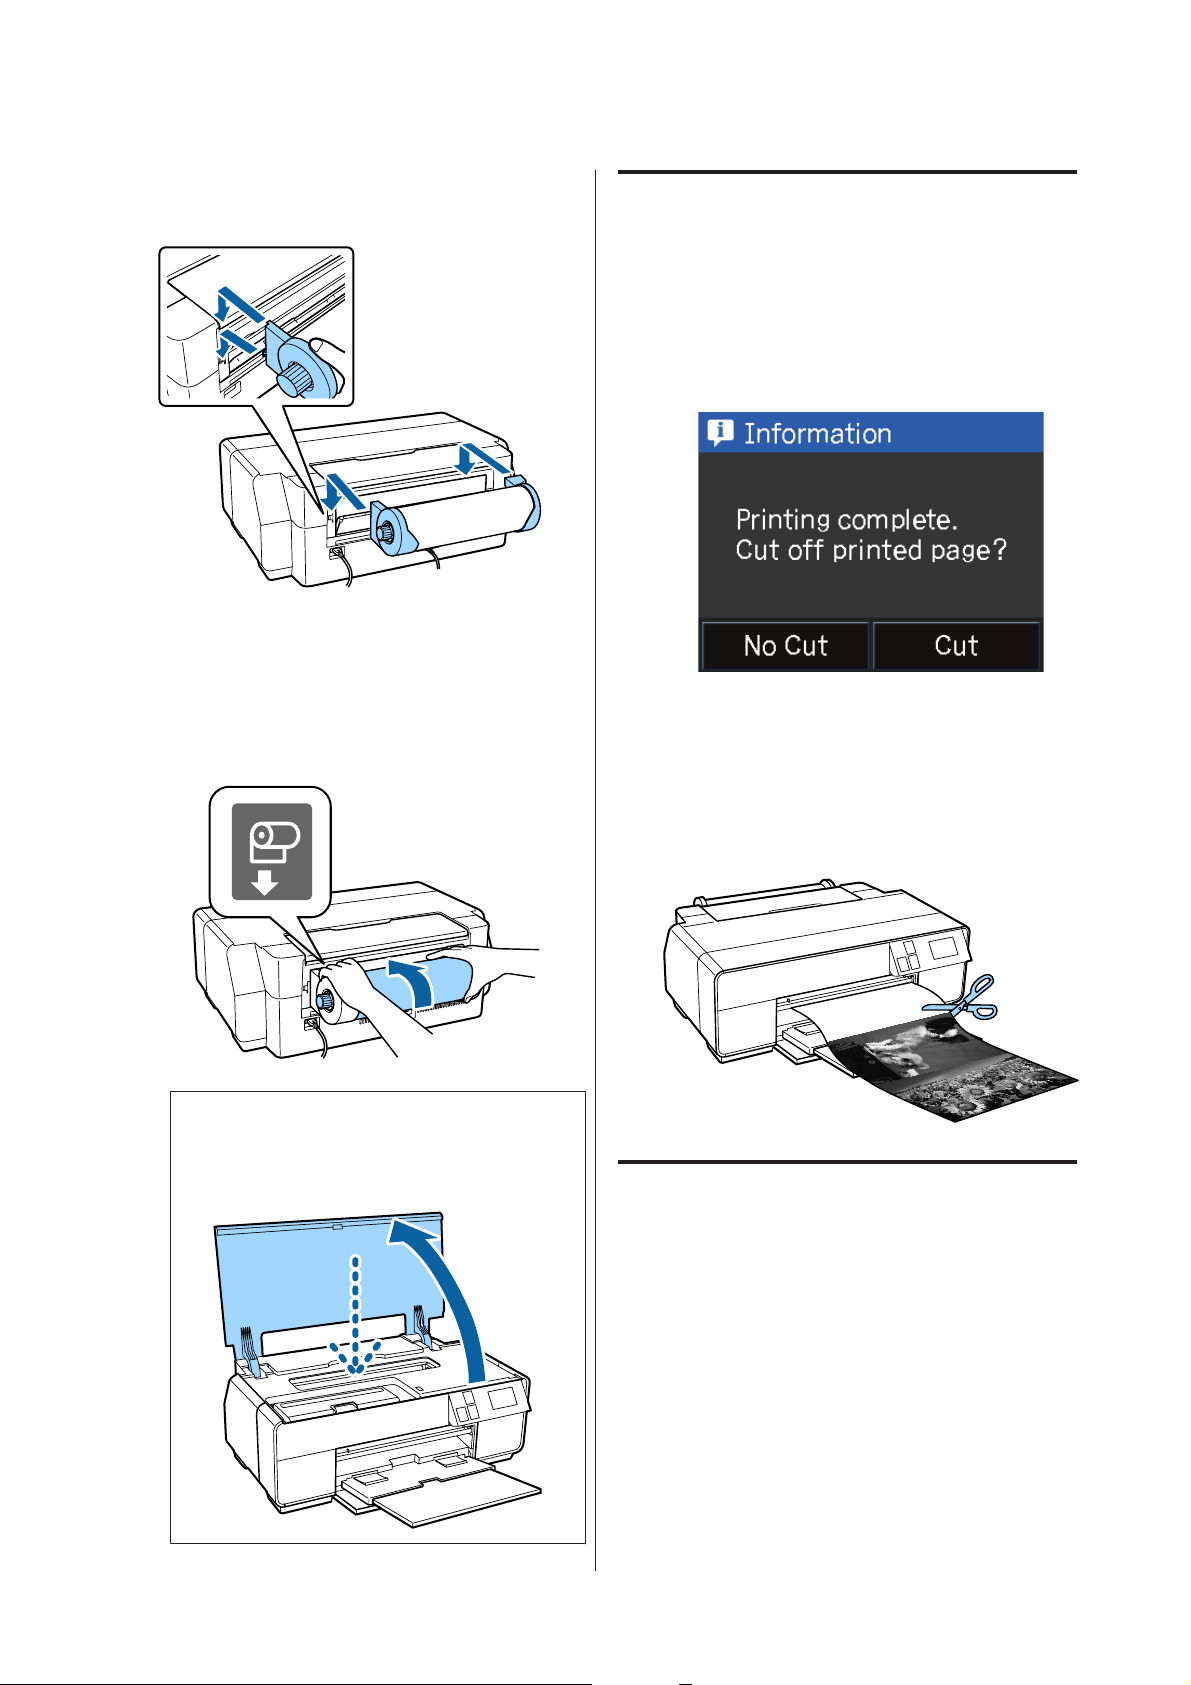
Cutting Roll Paper
Follow the steps below and use scissors and so on to cut
the print results from the roll paper when printing is
complete.
Select one of the options on the following screen
A
displayed when printing is complete.
Cut: Feeds roll paper to the cutting position.
No Cut: Press to print without cutting.
Note:
Open the printer cover and look down into the
printer to check that the paper is not being fed at a
slant.
When you press Cut, follow the instructions on
B
the control panel's screen.
Removing Roll Paper
Press Cut/Eject on the control panel's Home
A
screen.
Press Eject.
B
The paper will be fed back through the printer.
28
Page 29
SC-P600 Series User’s Guide
Basic Operations
Turn the knobs on the roll paper holder to take
C
up the excess paper.
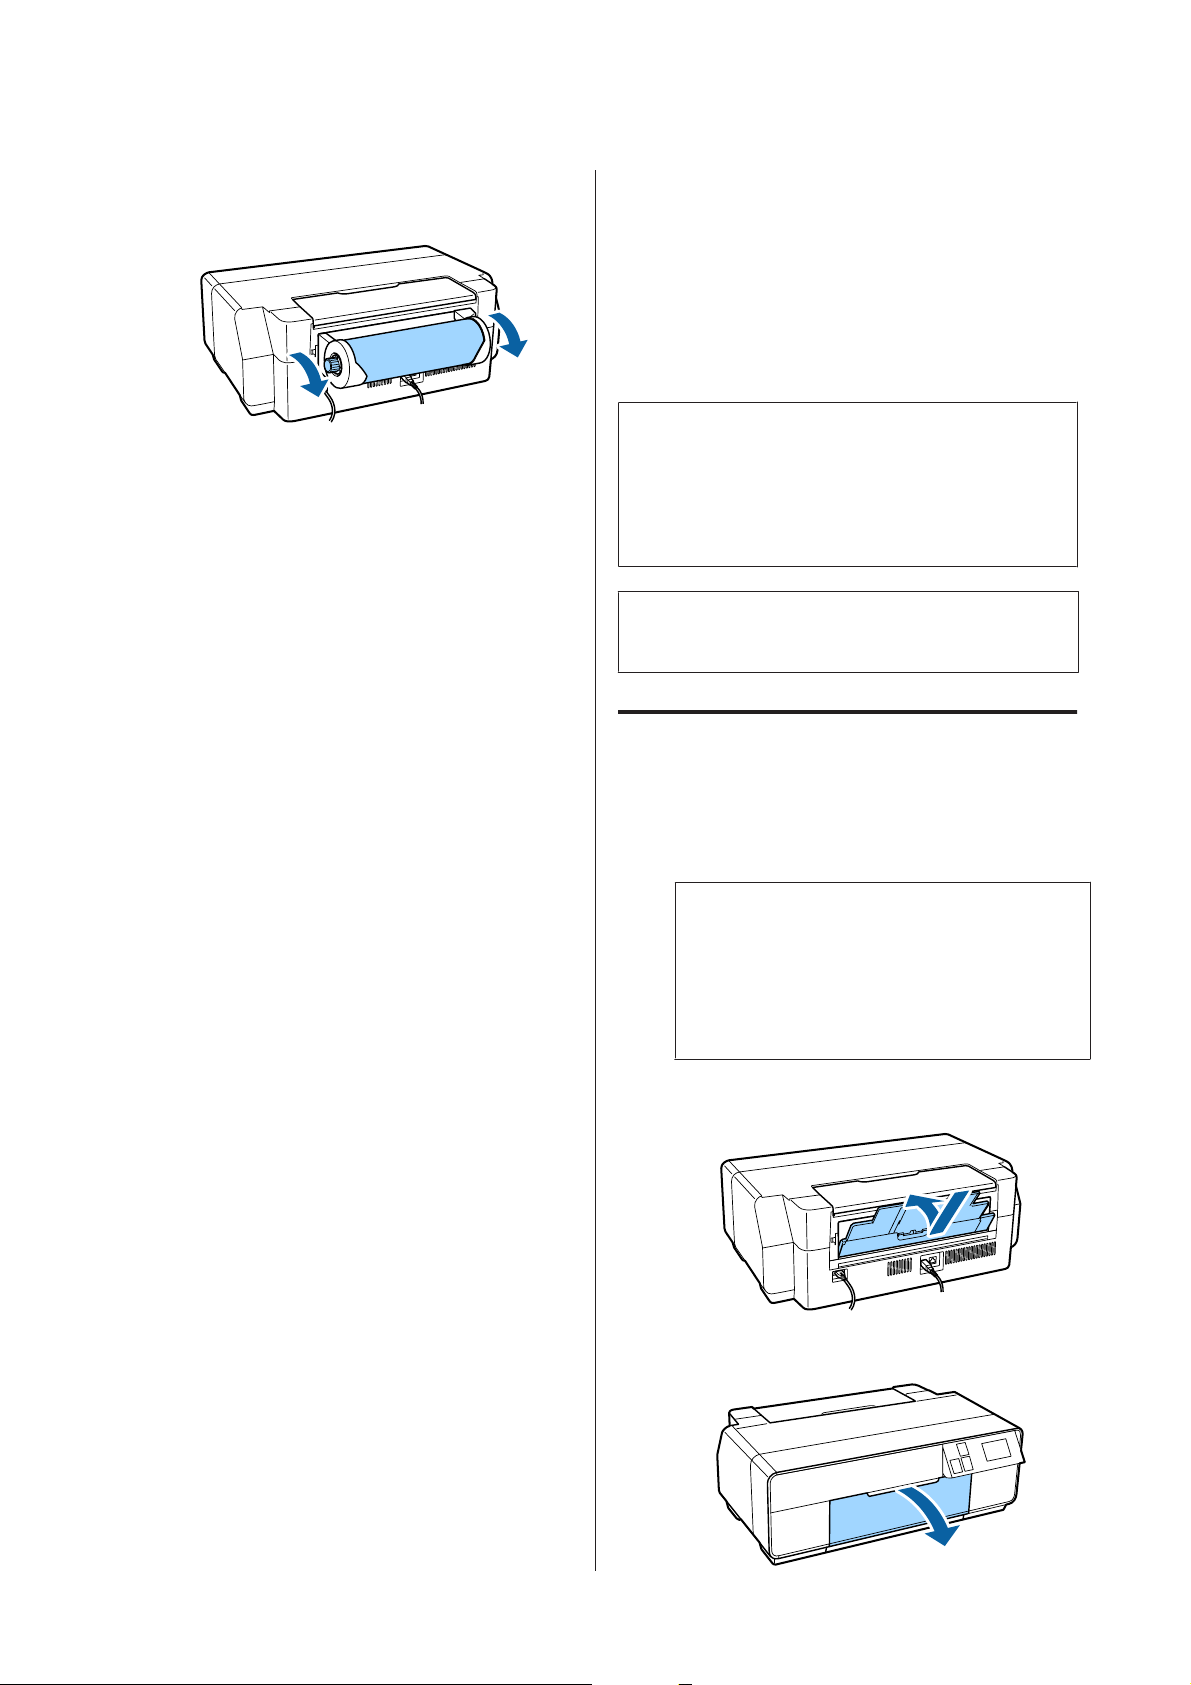
Loading and Removing CDs and DVDs
You can print on 12 cm CDs and DVDs with packaging
indicating that the label surface supports printing with
inkjet printers.
c
❏ Do not turn the printer on or off while the tray
is inserted. This could cause a malfunction.
❏ Store the tray flat. Malfunction could result if
the tray is curled or deformed.
A special application is required to print CDs and DVDs.
Use the supplied Epson Print CD application.
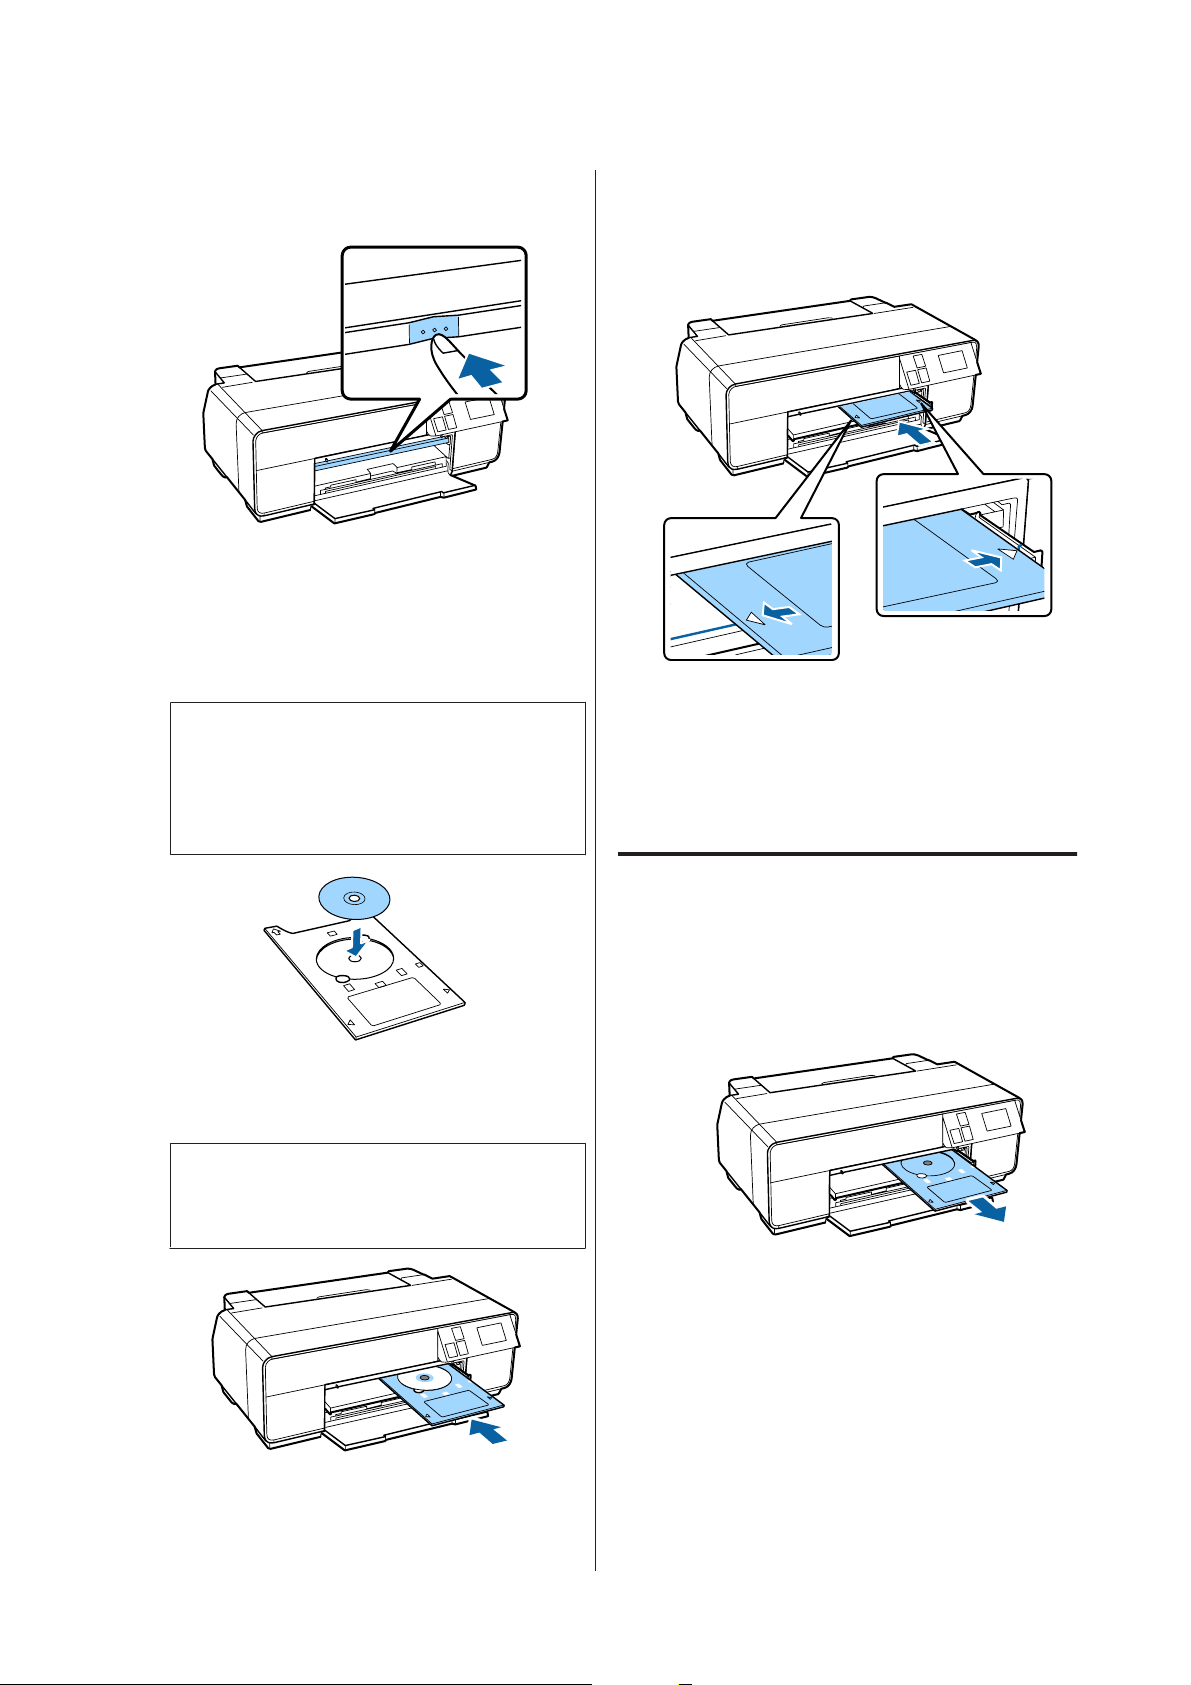
Loading CDs and DVDs
Use the front manual feed tray and the CD/DVD tray.
Turn on the printer.
A
Important:
c
An error may occur if you perform the
following operations during printing.
❏ Extend the front manual feed tray.
❏ Load poster board.
If the rear support is open, close it.
B
Open the front cover.
C
29
Page 30
SC-P600 Series User’s Guide
Basic Operations
Push the center of the front manual feed tray to
D
pop it out.
Place a disc on the supplied CD/DVD tray with
E
the printable side up.
Press the disc down in the center to secure it in
place.
Important:
c
Use the CD/DVD tray supplied with the
printer. Using a different tray could damage
the printer, tray, or disc or cause printer
malfunction.
Align the right edge of the CD/DVD tray with the
G
right edge of the front manual feed tray, and then
align the arrows on the CD/DVD tray with the
lines on the front manual feed tray.
Press CD/DVD - Load on the control panel's
H
screen.
The printer will load the CD/DVD tray and
prepare to print.
Insert the CD/DVD tray into the front manual
F
feed tray.
Important:
c
Inserting the CD/DVD tray from the rear may
cause a malfunction or error.
Removing the CDs and DVDs
Removing after printing is complete
When the CD/DVD tray is ejected after printing,
A
hold the end of the tray and pull it straight out.
30
Page 31

SC-P600 Series User’s Guide
Basic Operations
Close the front manual feed tray.
B
Removing before printing
Follow the steps below to remove the CD/DVD tray
without printing.
Basic Printing Methods (Windows)
You can make print settings such as paper size and paper
feed from the connected computer and then print.
Turn on the printer, and load the paper.
A
U “Loading Cut Sheets” on page 22
U “Loading Roll Paper” on page 27
U “Loading CDs and DVDs” on page 29
When you have created the data, click Print from
B
the File menu.
Press Eject on the control panel's Home screen.
A
Follow the on-screen instructions.
B
Make sure your printer is selected, and then click
C
Preferences or Properties to display the settings
screen.
31
Page 32

SC-P600 Series User’s Guide
Basic Operations
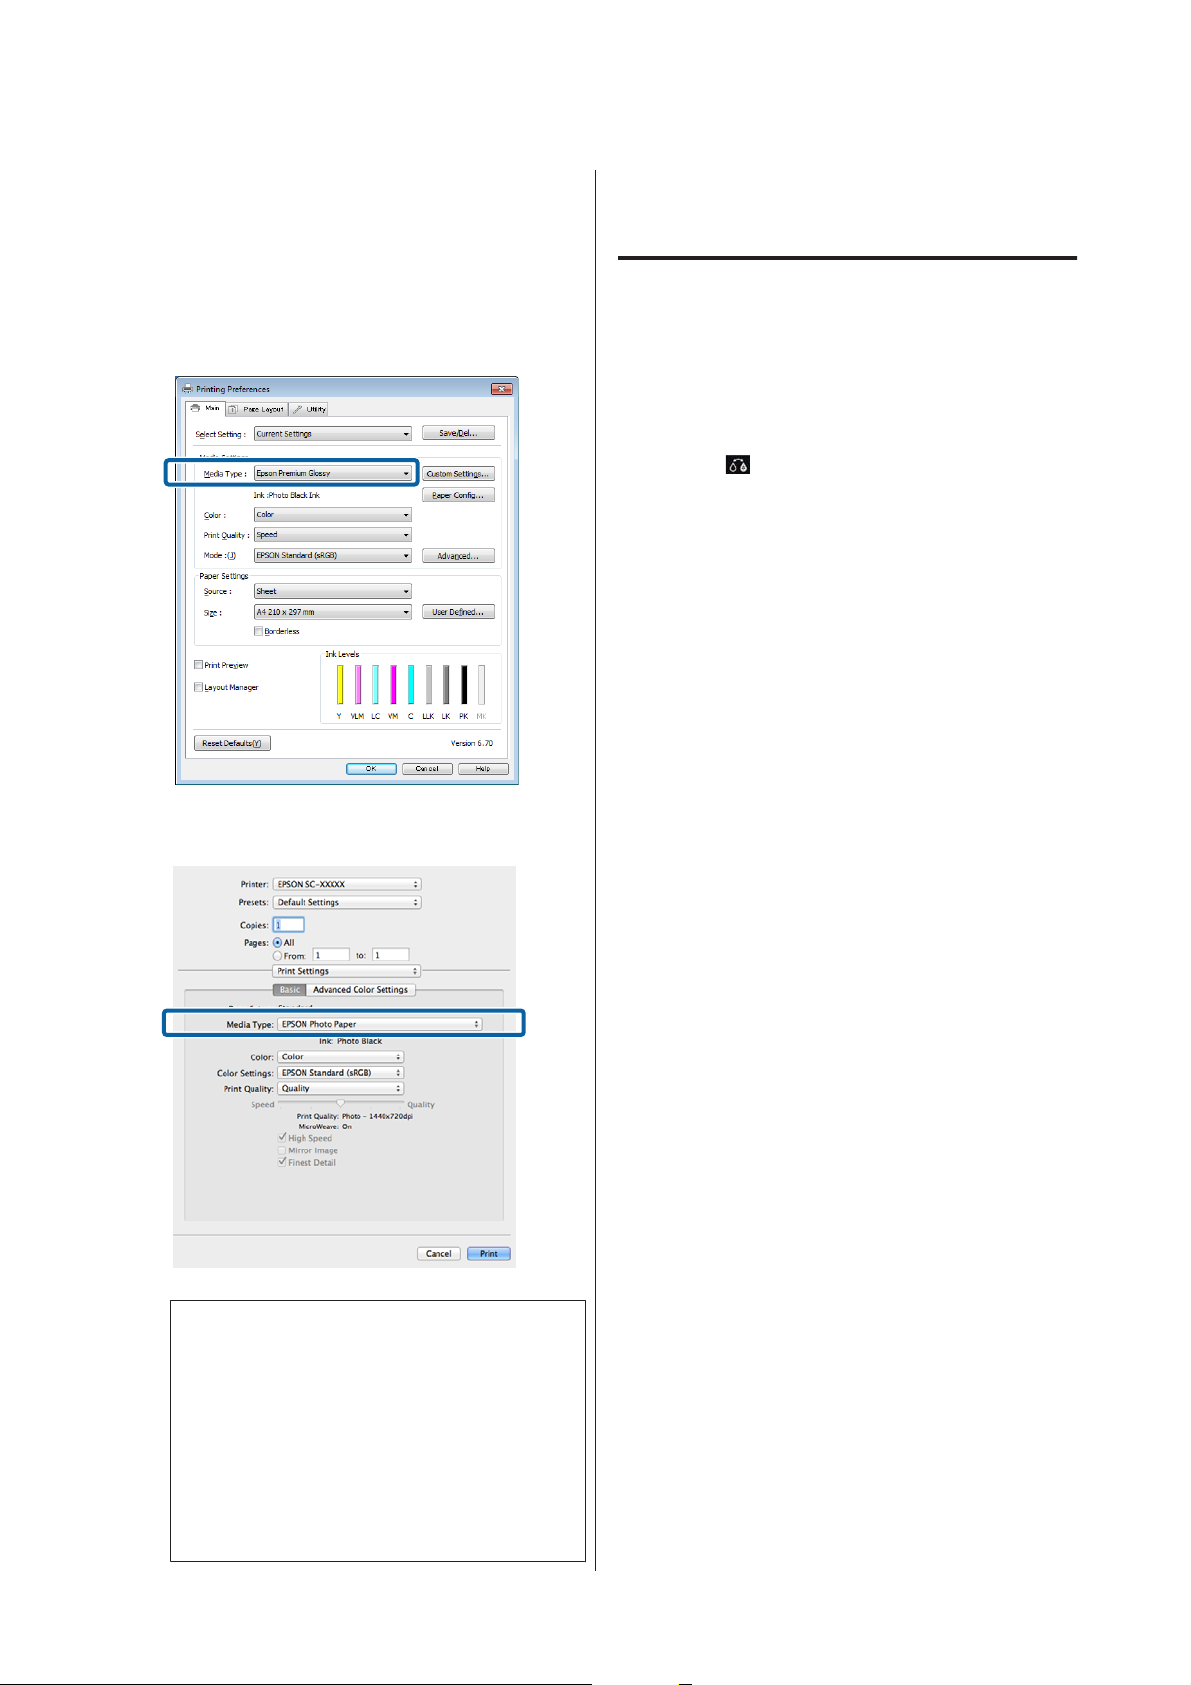
Select the Media Type, Color, Print Quality,
D
Mode, and Source according to the paper loaded
in the printer.
Make sure you select the same Size as you set in
E
the application.
When settings are complete, click Print.
F
The Progress Bar is dis played, and printing starts.
Screen while printing
The following screen is displayed when you start
printing, and the Progress Bar (the computer's
processing status) is displayed. On this screen you can
check the remaining ink level, product numbers for the
ink cartridges, and so on.
After making the settings, click OK.
An error message is displayed if an error occurs or an ink
cartridge needs replacing while printing.
Click How to, to find out how to solve the problem.
32
Page 33

SC-P600 Series User’s Guide
Basic Operations
Basic Printing Methods (Mac OS X)
You can make print settings such as paper size and paper
feed from the connected computer and then print.
Turn on the printer, and load the paper.
A
U “Loading Cut Sheets” on page 22
U “Loading Roll Paper” on page 27
U “Loading CDs and DVDs” on page 29
When you have created the data, from the File
B
menu of the application, click Print and so on.
Note:
If the page setting items are not displayed on the
print screen, click File menu - Page Setup and so on
in your application.
Check that this printer is selected, and then set
D
the paper size.
Select the paper size, borderless printing options,
and paper source in the Paper Size menu.
Click Show Details at the bottom of the screen.
C
For Mac OS X v10.6.8, click the arrow on the right
of the printer name (
Page Setup screen.
) to make settings on the
Select Print Settings from the list, and then set
E
each item.
33
Page 34

SC-P600 Series User’s Guide
Basic Operations
Set the Media Type, Color, Print Quality, and
other settings according to the type of paper
loaded in the printer. Normally, you can print
correctly just by setting items in the Print
Settings screen.
When settings are complete, click Print.
F
The printer icon is displayed in the Dock while printing.
Click the printer icon to display the status. You can
check the progress of the current print job and the
printer status information. You can also cancel a print
job.
Also, if an error occurs while printing, a notification
message is displayed.
Printable area
The printable area is shown in gray in the illustration
below. Note, however, that owing to the design of the
printer, print quality will drop in the areas with
hatching. The arrow in the illustration indicates the
direction of the ejected paper.
Important:
c
The width of the margins may vary somewhat
depending on how the paper is loaded and its
elasticity.
The Printed Area for Cut Sheets
Normal printing
Borderless printing
1
1 Borderless printing is not supported with poster board.
2 Poster board under A3+ in size is printed with 20 mm margins.
The Printed Area for Roll Paper
Normal printing Borderless printing
* 0 mm for continuous print jobs.
34
Page 35

SC-P600 Series User’s Guide
Basic Operations
The Printed Area for CDs and DVDs
Note:
The supplied EPSON Print CD application supports a
minimum internal diameter of 18 mm and a maximum
external diameter of 120 mm. When printing on CDs and
DVDs, check the dimensions of the discs’ printable area
before selecting the internal and external diameter.
Changing the Type of Black Ink
This printer allows you to set both photo black ink and
matte black ink and switch between them depending on
the paper type.
Photo Black ink reduces the grainy feeling of photo
papers giving them a smooth, professional finish. Matte
Black ink significantly increases black optical density
when printing on matte type papers.
See the following section to select a suitable black ink for
the media type.
U “Epson Special Media Table” on page 111
The time needed to switch from one type of black ink to
another (from ink replacement until charging is
complete) is given below. Note that this process
consumes some of the new type of ink.
Do not switch the black ink unless necessary.
Photo Black to Matte Black: Approx. 1.5 mins.
Matte Black to Photo Black: Approx. 3.5 mins.
Note:
If there is not enough ink remaining for the switch, you
will need to replace the cartridge. It may be possible to
print with ink cartridges that could not be used for a black
ink switch.
Switching Automatically
You can switch black inks and print from the printer
driver.
Press F on the control panel's Home screen, and then set
System Administration - Printer Settings - BK Ink
Auto Change to On.
35
Display the printer driver's Main screen.
A
U “Basic Printing Methods(Windows)” on
page 31
U “Basic Printing Methods(Mac OS X)” on
page 33
Page 36
SC-P600 Series User’s Guide
Basic Operations
Select the paper type from the Media Type menu.
B
Depending on the media type you select, black
ink is switched automatically during printing.
<Windows>
Check other settings, and then start printing.
C
Switching Manually
Change from the control panel.
Press the P button to turn on the printer.
A
Press (switch black ink) on the Home screen.
B
Follow the on-screen instructions.
<Mac OS X>
❏ The black ink type that can be used for printing
varies depending on the media type.
❏ You can select the type of black ink from Ink
when the media type selected supports both
photo black and matte black.
U “Supported Media” on page 111
❏ If the printer status cannot be acquired, the
black ink type may change automatically.
36
Page 37

SC-P600 Series User’s Guide
Basic Operations
Energy Saving Settings
This printer comes equipped with the following two
types of power saving settings. You can save power by
transitioning into sleep mode or use the Power Off
Timer function to automatically turn off the power
when the printer has not been used for a certain period
of time.
Sleep mode
The printer enters sleep mode when there are no errors,
no print jobs being received, and no control panel or
other operations performed.
When the printer enters sleep mode, the control panel's
screen turns off and the internal motors and other parts
switch off to consume less power.
Sleep mode ends and normal operation is restored when
a print job is received or any button (excluding the P
button) is pressed in the control panel.
You can make Power Off Timer settings from the
computer using the Utility.
Windows U “Summary of the Utility Tab” on
page 44
Mac OS X U “Epson Printer Utility 4 Functions” on
page 47
About Power Management using Power Off Timer
You can adjust the time before Power Management is
applied.
Any increase will affect the printer's energy efficiency.
Please consider the environment before making any
change.
You can set the time to switch to sleep mode (Sleep
Timer) from 1 to 240 minutes. As the manufacturer's
setting, the printer will enter sleep mode if no operations
are performed for 3 minutes.
Set the time before switching to sleep mode in the Setup
menu.
U “Menus” on page 88
Note:
When the printer enters sleep mode, the control
panel’s screen goes blank as if the power has been
turned off, but the P light remains lit.
Power Off Timer
The printer includes an Power Off Timer function that
allows the printer to be turned off automatically if there
are no errors, no print jobs being received, and no
control panel or other operations being performed for
more than the specified amount of time. You can choose
the elapsed time before the printer is automatically
turned off from 30minutes, 1h, 2h, 4h, 8h, and 12h.
You can make Power Off Timer settings from the
printer using the Setup menu. U “Menus” on
page 88
The manufacturer's setting varies depending on the area
of use.
37
Page 38

SC-P600 Series User’s Guide
Basic Operations
Canceling Printing
There are a few ways to stop printing operations
depending on the situation.
When the computer has finished sending data to the
printer, you cannot cancel the print job from the
computer. Cancel on the printer.
Canceling from the computer (Windows)
When the Progress Bar is displayed
Click Cancel.
Select the job you want to cancel, and then select
B
Cancel from the Document menu.
When you want to cancel all jobs, select Cancel
All Documents from the Printer menu.
When the Progress Bar is not displayed
Click the printer icon on the Taskbar.
A
If the job has been sent to the printer, print data is
not displayed on the above screen.
Canceling from the computer (Mac OS X)
Click the printer icon in the Dock.
A
Select the job you want to cancel, and then click
B
Delete.
38
If the job has been sent to the printer, print data is
not displayed on the above screen.
Page 39

SC-P600 Series User’s Guide
Basic Operations
Canceling on the printer
Press Cancel on the control panel screen, and then
follow the on-screen instructions.
The print job is canceled even in the middle of printing.
It may take a while before the printer returns to ready
status after canceling a job.
Note:
You cannot delete print jobs which are in the print queue
on the computer using the above operation. See
“Canceling from the Computer” for information on
deleting print jobs from the print queue.
39
Page 40

SC-P600 Series User’s Guide
Using the Printer Driver(Windows)
Using the Printer
Driver
(Windows)
Displaying the Settings Screen
Right-click your printer icon, and click Printing
B
preferences.
You can access the printer driver in the following ways:
❏ From Windows applications
U “Basic Printing Methods(Windows)” on
page 31
❏ From the Start button
From the Start button
Follow the steps below when specifying common
settings among applications or performing printer
maintenance, such as Nozzle Check or Head Cleaning.
Open the Printers or Printers and Faxes folder.
A
For Windows 7/Windows 8.1/Windows 8
Click Start (or Settings), Control Panel, and
then View devices and printers (or Devices and
printers) from Hardware and Sound (or
Hardware).
The printer driver setting screen is displayed.
Make the necessary settings. These settings become the
default settings of the printer driver.
For Windows Vista
Click
and then Printer.
, Control Panel, Hardware and Sound,
40
Page 41

SC-P600 Series User’s Guide
Using the Printer Driver(Windows)
Displaying Help
You can access the printer driver help in the following
ways:
❏ Click Help
❏ Right-click on the item you want to check
Click the Help Button to Display
By displaying help, you can use the contents page or
keyword search to read the help.
Right-click on the item you want to check
Right-click the item, and then click Help.
41
Page 42

SC-P600 Series User’s Guide
Using the Printer Driver(Windows)
Customizing the Printer Driver
You can save the settings or change the display items as
you prefer.
Saving various settings as your Select Settings
You can save all printer driver settings as a Select Setting.
Additionally, in Select Setting the recommended
settings for a variety of uses are already available.
This allows you to easily load settings that have been
stored in Select Settings, and repeatedly print using
exactly the same settings.
Set each item for the Main screen and the Page
A
Layout screen that you want to save as your Select
Settings.
Enter any name in the Name box, and then click
C
Save.
You can save up to 100 settings. You can choose a setting
you have registered from the Select Setting list box.
Note:
You can save the settings as a file by clicking Export. You
can share the settings by clicking Import to import the
saved file on another computer.
Click Save/Del in the Main or Page Layout tab.
B
Saving media settings
You can save the items of the Media Settings on the
Main screen.
Change the Media Settings items on the Main
A
screen.
42
Page 43

SC-P600 Series User’s Guide
Using the Printer Driver(Windows)
Click Custom Settings.
B
Enter any name in the Name box, and then click
C
Save.
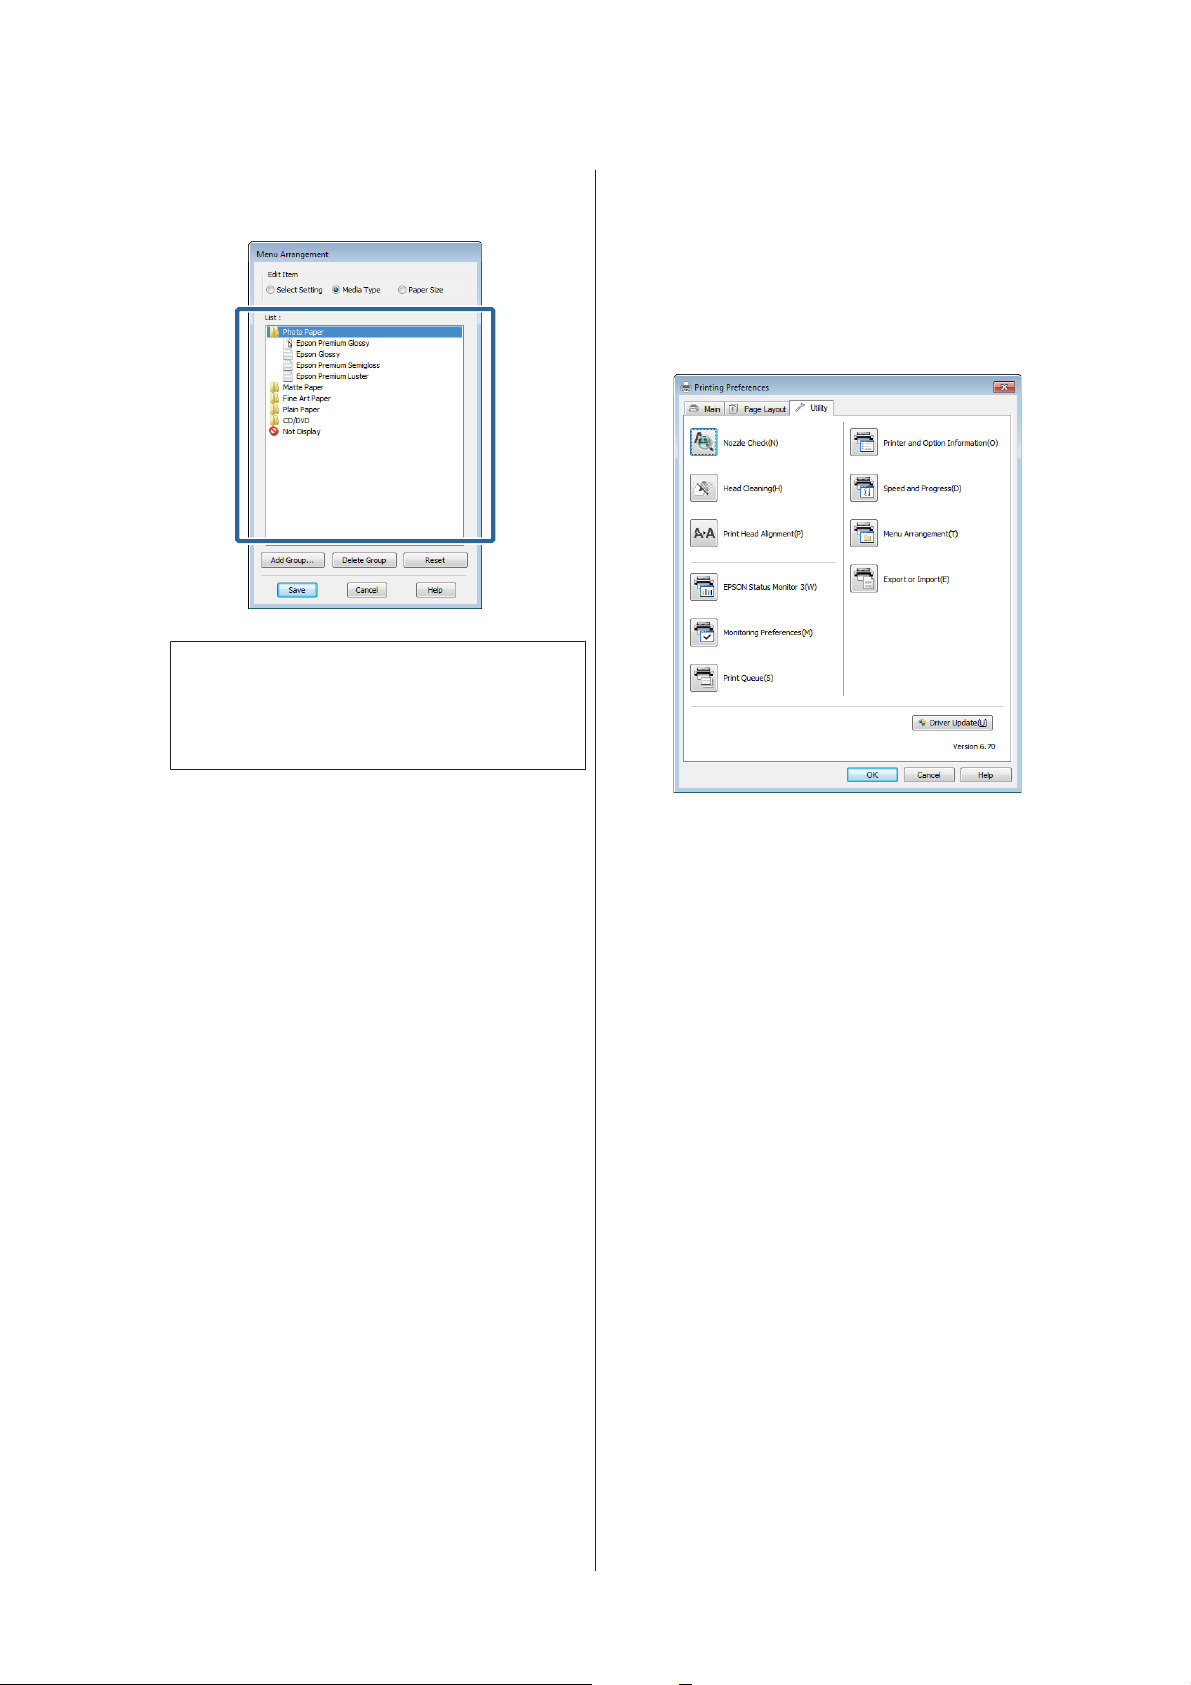
❏ Arrange in groups (folders).
Go to the Utility tab and click Menu
A
Arrangement.
Select Edit Item.
B
You can save up to 100 settings. You can choose a setting
you have registered from the Media Type list box.
Note:
You can save the settings as a file by clicking Export. You
can share the settings by clicking Import to import the
saved file on another computer.
Rearranging display items
To display frequently used items right away, you can
arrange Select Setting, Media Type, and Paper Size as
follows.
❏ Hide unnecessary items.
❏ Rearrange in an order of most frequent use.
Order or group items in the List box.
C
❏ You can move and order items by dragging
and dropping.
❏ To add a new group (folder), click Add
Group.
❏ To delete a group (folder), click Delete
Group.
43
Page 44
SC-P600 Series User’s Guide
Using the Printer Driver(Windows)
❏ Drag and drop unnecessary items to Not
Display.
Note:
When Delete Group is performed, the group
(folder) is deleted, however the items in the deleted
group (folder) remain.
Summary of the Utility Tab
You can perform the following maintenance functions
from the printer driver's Utility tab.
D
Click Save.
Nozzle Check
This function prints a nozzle check pattern to check
whether the print head nozzles are clogged.
If the pattern is blurred or there are gaps, preform head
cleaning to clear the clogging.
U “Checking for clogged nozzles” on page 94
Head Cleaning
Perform head cleaning if you notice banding or gaps in
the print results. Cleans the surface of the print head to
improve the print quality.
U “Head Cleaning” on page 95
Print Head Alignment
If the print results appear grainy or out of focus, perform
Print Head Alignment. The Print Head Alignment
function corrects print head gaps.
U “Correcting Print Misalignment (Print Head
Alignment)” on page 95
44
Page 45

SC-P600 Series User’s Guide
Using the Printer Driver(Windows)
EPSON Status Monitor 3
You can check the printer's status, such as the remaining
ink level and error messages, from the computer's
screen.
Monitoring Preferences
You can select the error notifications displayed on the
EPSON Status Monitor 3 screen, or register a shortcut
for the Utility icon to the Taskbar.
Note:
If you select the Shortcut Icon on the Monitoring
Preferences screen, the Utility shortcut icon is displayed
on the Windows Taskbar.
By right-clicking the icon, you can display the following
menu and perform maintenance functions.
EPSON Status Monitor 3 starts when the printer name is
clicked from the displayed menu.
Printer and Option Information
You can set the time to automatically turn off the printer
from Power Off Timer Settings.
Speed and Progress
You can set various functions for printer driver basic
operations.
Menu Arrangement
You can arrange items by, for example, listing Select
Setting, Media Type, and Paper Size options by
frequency of use.
Export or Import
You can save the printer driver settings to a file or
import them from the file. This function is useful when
you want to make the same printer driver settings on
multiple computers.
Driver Update
Visit the Epson website to check whether there is a
driver newer than the currently installed version. If a
new version is found, the printer driver will be updated
automatically.
Print Queue
You can display the list of all waiting jobs.
On the Print Queue screen, you can view information
on the data waiting to be printed, delete and reprint
these jobs.
45
Page 46

SC-P600 Series User’s Guide
Using the Printer Driver(Windows)
Uninstalling the printer driver
Follow the instructions below to uninstall the printer
driver.
Important:
c
❏ You must log in with an Administrator
account.
❏ In Windows 7/Windows Vista, if an
Administrator password or confirmation is
requested, enter the password and then
continue with the operation.
Turn off the printer, and unplug the interface
A
cable.
Go to the Control Panel and click Uninstall a
B
program from the Programs category.
Note:
You can also remove the Epson Network Utility by
clicking the Utility tab and selecting the Epson
Network Utility.
Note, however, that the drivers for any other Epson
printers you may be using may also access the
Epson Network Utility. Do not remove the Epson
Network Utility if you are using other Epson
printers.
Follow the on-screen instructions to continue.
E
When the delete confirmation message appears,
click Yes.
Restart the computer if you are reinstalling the printer
driver.
Select a program to uninstall, and then click
C
Uninstall/Change (or Change/Remove/Add or
remove).
Select the target printer icon, and then click OK.
D
46
Page 47

SC-P600 Series User’s Guide
Using the Printer Driver(Mac OS X)
Using the Printer
Driver
(Mac OS X)
Displaying the Settings Screen
The display method of the printer driver setting screen
may differ depending on the application or the OS
version.
U “Basic Printing Methods(Mac OS X)” on page 33
Displaying Help
Click in the printer driver setting screen to display
Help.
Using Epson Printer Utility 4
You can perform maintenance tasks such as Nozzle
Check or Head Cleaning by using Epson Printer Utility
4. This utility is installed automatically when you install
the printer driver.
Starting Epson Printer Utility 4
Click the Apple menu - System Preferences -
A
Print & Scan (or Print & Fax).
Select the printer, and then click Options &
B
Supplies - Utility - Open Printer Utility.
Epson Printer Utility 4 Functions
You can perform the following maintenance functions
from Epson Printer Utility 4.
47
Page 48

SC-P600 Series User’s Guide
Using the Printer Driver(Mac OS X)
EPSON Status Monitor
You can check the printer's status, such as the remaining
ink level and error messages, from the computer's
screen.
Nozzle Check
This function prints a nozzle check pattern to check
whether the print head nozzles are clogged.
You can set the time to automatically turn off the printer
from Power Off Timer Settings.
If the pattern is blurred or there are gaps, preform head
cleaning to clear the clogging.
U “Checking for clogged nozzles” on page 94
Head Cleaning
Perform head cleaning if you notice banding or gaps in
the print results. Cleans the surface of the print head to
improve the print quality.
U “Head Cleaning” on page 95
Print Head Alignment
Perform print head alignment if the print results appear
grainy or blurred. The Print Head Alignment function
corrects print head gaps.
U “Correcting Print Misalignment (Print Head
Alignment)” on page 95
Printer Settings
You can make settings for printer operations.
48
Page 49

SC-P600 Series User’s Guide
Using the Printer Driver(Mac OS X)
Uninstalling the printer driver
When reinstalling the printer driver or upgrading,
remove the target software first.
Use the "Uninstaller" to remove the printer driver.
Acquiring the Uninstaller
You can download the "Uninstaller" from the Epson
homepage.
http://www.epson.com/
Using the Uninstaller
Follow the steps provided when you acquire the
"Uninstaller".
49
Page 50

SC-P600 Series User’s Guide
Printing Varieties
Printing Varieties
Auto Correct Color and Print Photos (PhotoEnhance)
The printer driver for this printer comes with the Epson
proprietary function PhotoEnhance that makes the
most efficient use of the color reproduction area,
corrects image data to improve colors before printing.
By using PhotoEnhance, you can correct photo colors to
match the subject types such as people, scenery, or night
view. You can print color data in sepia or black and
white. Colors are automatically corrected simply by
selecting the print mode.
Note:
It is recommended that you use images with a color space
of sRGB.
Note:
For information on the operating systems
supported by each application, visit the
distributor’s website.
Setting example for Adobe Photoshop CS5
Open the Print screen.
Select Color Management and then Document.
Select Printer Manages Colors as the Color
Handling setting, and then click Print.
Adjusting Settings in Windows
When using applications featuring a color
A
management function, specify how to adjust
colors from these applications.
When using applications without a color
management function, start from step 2.
Depending on the type of the application, make
the settings following the table below.
Application Color Management
Settings
Adobe Photoshop
CS3 or later
Adobe Photoshop
Lightroom 1 or
later
Adobe Photoshop
Elements 6 or later
Other applications No Color Management
Printer Manages Colors
Display the Main tab in the printer driver, select
B
PhotoEnhance for Mode, and click Advanced.
U “Basic Printing Methods(Windows)” on
page 31
50
Page 51

SC-P600 Series User’s Guide
Printing Varieties
On the PhotoEnhance screen, you can set effects
C
to apply to the print data.
See the printer driver help for more details on
each item.
Check other settings, and then start printing.
D
Making Settings for Mac OS X
When using applications featuring a color
A
management function, specify how to adjust
colors from these applications.
Depending on the type of the application, make
the settings following the table below.
Application Color Management
Settings
Select Color Management and then Document.
Select Printer Manages Colors as the Color
Handling setting, and then click Print.
Display the Print dialog, select Color Matching,
B
and click EPSON Color Controls.
U “Basic Printing Methods(Mac OS X)” on
page 33
Adobe Photoshop
CS3 or later
Adobe Photoshop
Lightroom 1 or
later
Adobe Photoshop
Elements 6 or later
Other applications No Color Management
Setting example for Adobe Photoshop CS5
Open the Print screen.
Printer Manages Colors
Note:
EPSON Color Controls is unavailable in Adobe
Photoshop CS3 or later, Adobe Photoshop
Lightroom 1 or later, and Adobe Photoshop
Elements 6 or later unless the setting in step 1 is
made.
51
Page 52

SC-P600 Series User’s Guide
Printing Varieties
Select Print Settings from the list, select
C
PhotoEnhance for Color Settings, and click
Advanced Color Settings.
Choose the effects that will be applied to the print
D
data in the Advanced Color Settings screen.
Correct color and print
The printer driver automatically and internally corrects
colors to match the color space. You can select from the
following color correction modes.
❏ EPSON Standard (sRGB)
Optimizes the sRGB space and corrects the color.
❏ Adobe RGB
Adobe RGB Optimizes the sRGB space and corrects
the color.
Note that if you click Advanced when one of the above
color processing options is selected, you can fine-tune
Gamma, Brightness, Contrast, Saturation, and color
balance for the selected option.
Use this option when the application in use does not
have a color correction function.
See the printer driver help for more details on
each item.
Check other settings, and then start printing.
E
Adjusting Settings in Windows
When using applications featuring a color
A
management function, specify how to adjust
colors from these applications.
When using applications without a color
management function, start from step 2.
Depending on the type of the application, make
the settings following the table below.
Application Color Management
Settings
Adobe Photoshop
CS3 or later
Adobe Photoshop
Lightroom 1 or
later
Adobe Photoshop
Elements 6 or later
Other applications No Color Management
Printer Manages Colors
52
Note:
For information on the operating systems
supported by each application, visit the
distributor’s website.
Setting example for Adobe Photoshop CS5
Page 53

SC-P600 Series User’s Guide
Printing Varieties
Open the Print screen.
Select Color Management and then Document.
Select Printer Manages Colors as the Color
Handling setting, and then click Print.
When the printer driver's Main screen is
B
displayed, select the color correction mode.
U “Basic Printing Methods(Windows)” on
page 31
If you opted to display the Color Controls screen
C
in Step 2, adjust settings as desired.
See the printer driver help for more details on
each item.
Note:
You can adjust the correction value by checking the
sample image on the left side of the screen. You can
also use the color circle to fine-tune the color
balance.
To adjust settings manually, click Advanced to
display Color Controls.
Check other settings, and then start printing.
D
Making Settings for Mac OS X
When using applications featuring a color
A
management function, specify how to adjust
colors from these applications.
When using applications without a color
management function, start from step 2.
Set color management to Printer Manages
Colors in the following applications.
Adobe Photoshop CS3 or later
Adobe Photoshop Elements 6 or later
Adobe Photoshop Lightroom 1 or later
In other applications, set No Color
Management.
Note:
For information on the operating systems
supported by each application, visit the
distributor’s website.
53
Page 54

SC-P600 Series User’s Guide
Printing Varieties
Setting example for Adobe Photoshop CS5
Open the Print screen.
Select Color Management and then Document.
Select Printer Manages Colors as the Color
Handling setting, and then click Print.
Note:
EPSON Color Controls is unavailable unless the
setting in step 1 is made for the following
applications.
❏ Adobe Photoshop CS3 or later
❏ Adobe Photoshop Lightroom 1 or later
❏ Adobe Photoshop Elements 6 or later
Select Print Settings from the list, and then select
D
EPSON Standard (sRGB) or AdobeRGB under
Color Settings. When adjusting the parameters
manually, click Advanced Color Settings.
Display the Print screen.
B
U “Basic Printing Methods(Mac OS X)” on
page 33
Select Color Matching from the list, and then
C
click EPSON Color Controls.
54
Page 55

SC-P600 Series User’s Guide
Printing Varieties
Make the necessary settings.
E
See the printer driver help for more details on
each item.
Check other settings, and then start printing.
F
Printing Black and White Photos
You can print black and white photos with rich
gradation by adjusting the image data color by the
printer driver.
The original data is not affected.
You can correct image data when printing without
processing the data from applications.
Note:
It is recommended that you use images with a color space
of sRGB.
Adjusting Settings in Windows
When using applications featuring a color
A
management function, specify how to adjust
colors from these applications.
When using applications without a color
management function, start from step 2.
Depending on the type of the application, make
the settings following the table below.
Application Color Management
Settings
Adobe Photoshop
CS3 or later
Adobe Photoshop
Lightroom 1 or
later
Adobe Photoshop
Elements 6 or later
Other applications No Color Management
Note:
For information on the operating systems
supported by each application, visit the
distributor’s website.
Setting example for Adobe Photoshop CS5
Printer Manages Colors
55
Open the Print screen.
Page 56

SC-P600 Series User’s Guide
Printing Varieties
Select Color Management and then Document.
Select Printer Manages Colors or No Color
Management as the Color Handling setting, and
then click Print.
Display the printer driver Main tab and select
B
Advanced B&W Photo as the Color.
Click Advanced for Mode.
C
Make the necessary settings.
D
See the printer driver help for more details on
each item.
U “Basic Printing Methods(Windows)” on
page 31
Check other settings, and then start printing.
E
Making Settings for Mac OS X
When using applications featuring a color
A
management function, specify how to adjust
colors from these applications.
56
Set color management to Printer Manages
Colors in the following applications.
Adobe Photoshop CS3 or later
Adobe Photoshop Elements 6 or later
Adobe Photoshop Lightroom 1 or later
Page 57
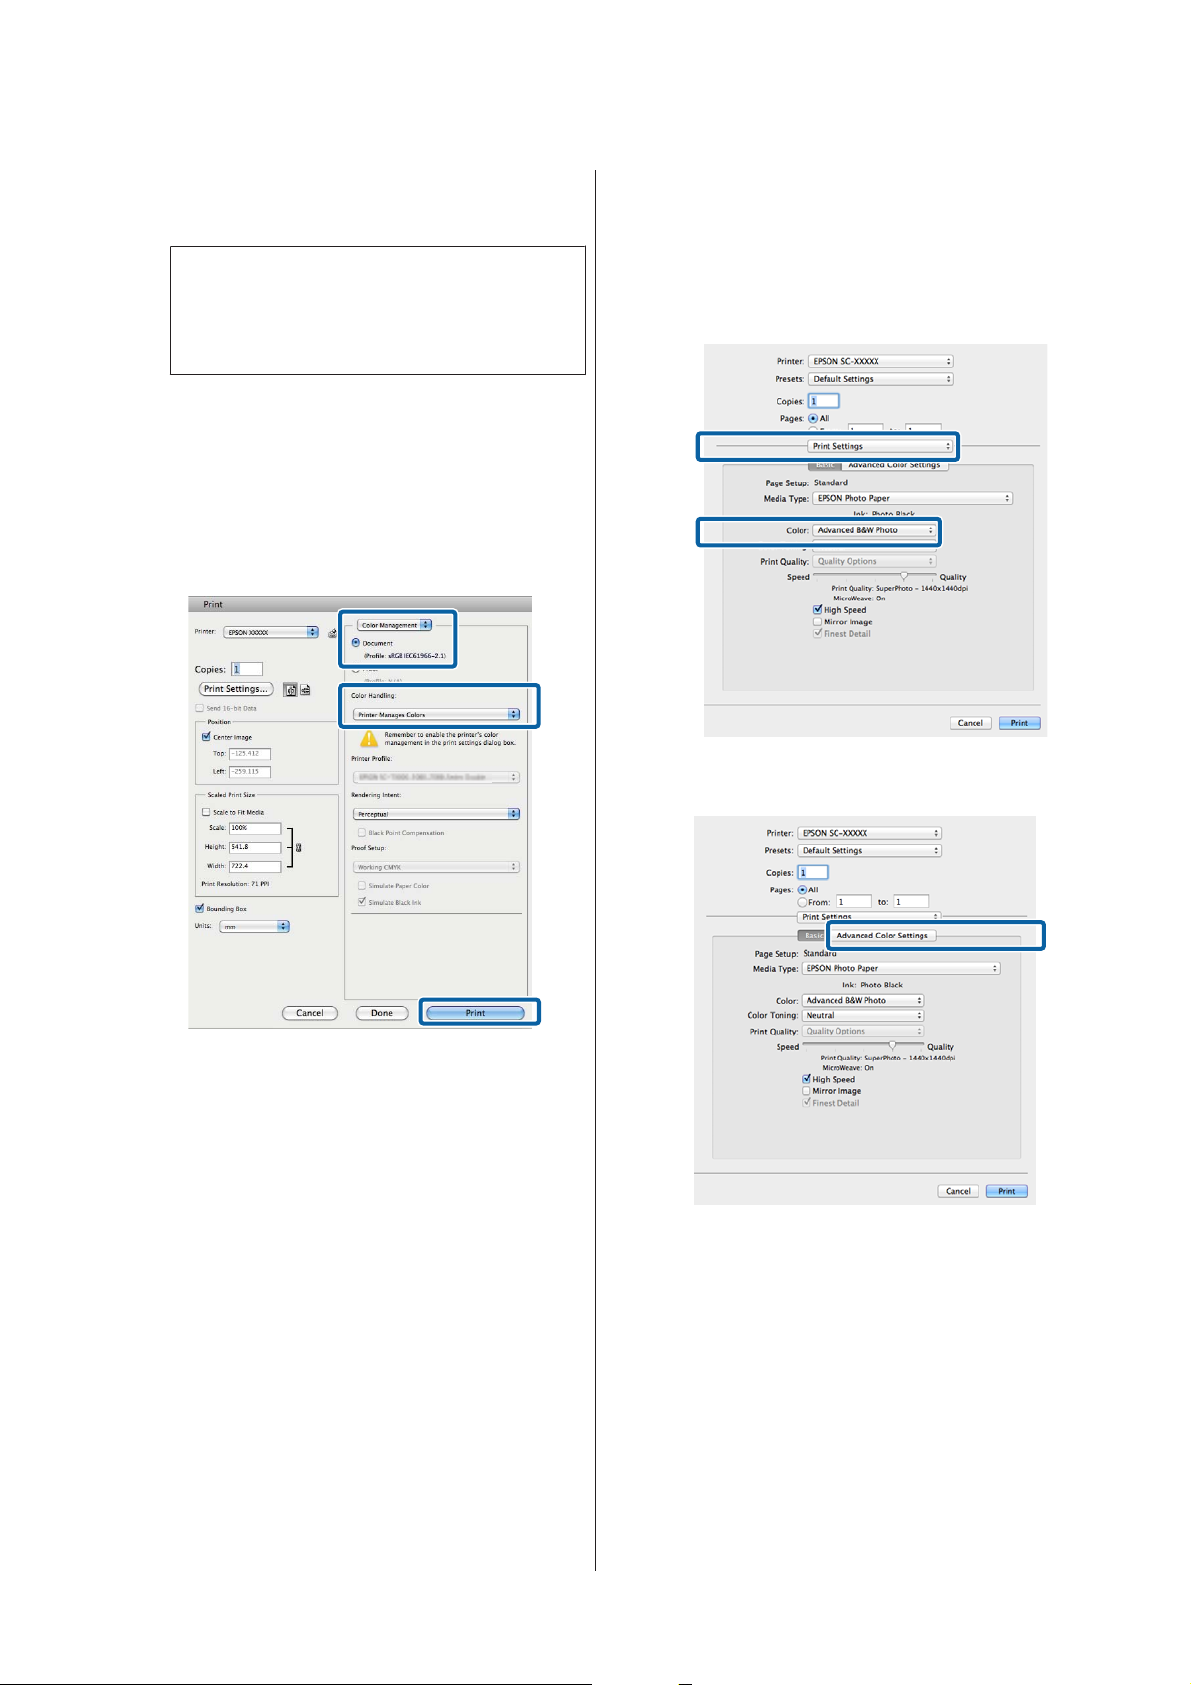
SC-P600 Series User’s Guide
Printing Varieties
In other applications, set No Color
Management.
Note:
For information on the operating systems
supported by each application, visit the
distributor’s website.
Setting example for Adobe Photoshop CS5
Open the Print screen.
Select Color Management and then Document.
Select Printer Manages Colors as the Color
Handling setting, and then click Print.
Display the Print screen, select Print Settings
B
from the list, and then select Advanced B&W
Photo as the Color.
U “Basic Printing Methods(Mac OS X)” on
page 33
Click Advanced Color Settings.
C
57
Page 58

SC-P600 Series User’s Guide
Printing Varieties
Make the necessary settings.
D
See the printer driver help for more details on
each item.
Check other settings, and then start printing.
E
Borderless printing
You can print your data without margins on the paper.
The types of borderless printing you can choose vary as
shown below depending on the media type.
Cut sheets: No margins for all edges
Roll paper: No margins for the left and right
When performing left and right borderless printing,
margins appear on the top and bottom of the paper.
Values for top and bottom margins U “Printable area”
on page 34
Borderless printing is not available with poster board or
CDs and DVDs.
Types of Borderless Printing Methods
Two options are available for borderless printing: Auto
Expand and Retain Size.
Choose either option when printing on cut sheets.
Settings for roll paper are automatically adjusted as
follows.
❏ Roll paper: Auto Expand
❏ Roll paper (banner): Retain Size (Windows only)
Auto Expand
The printer driver enlarges the print data to a size
slightly larger than the paper size and prints the enlarged
image. The sections which are beyond the paper edges
are not printed; therefore, resulting in borderless
printing.
Use settings such as Page Layout in the applications to
set the size of the image data as follows.
- Match the paper size and page setting for the print
data.
- If the application has margin settings, set the
margins to 0 mm.
58
Page 59

SC-P600 Series User’s Guide
Printing Varieties
- Make the image data as large as the paper size.
Retain Size
Create the print data larger than the paper size in the
applications to produce borderless output. The printer
driver does not enlarge the image data. Use settings such
as Page Layout in the applications to set the size of the
image data as follows.
- Print data is created so that 5 mm (a total of 10 mm)
extends in all directions beyond the actual paper
size.
- If the application has margin settings, set the
margins to 0 mm.
- Make the image data as large as the paper size.
- There is no need to increase the top and bottom sizes
for roll paper.
Select this setting if you want to avoid image
enlargement by the printer driver.
Supported Media Sizes for Borderless Printing
The following media sizes are supported for borderless
printing.
Supported paper sizes
A4 (210 × 297 mm)
A3 (297 × 420 mm)
A3+ (329 × 483 mm)
Letter (8½ × 11 in.)
100 × 148 mm
9 × 13 cm (3.5 × 5 in.)
10 × 15 cm (4 × 6 in.)
13 × 18 cm (5 × 7 in.)
59
Page 60

SC-P600 Series User’s Guide
Printing Varieties
Supported paper sizes
13 × 20 cm (5 × 8 in.)
16:9 wide (102 × 181 mm)
20 × 25 cm (8 × 10 in.)
254 × 305 mm (10 × 12 in.)
279 × 356 mm (11 × 14 in.)
US B 11 × 17 in.
30 × 30 cm (12 × 12 in.)
A3+ roll paper (329 mm wide)
Depending on the media type, the print quality may
decline or borderless printing cannot be selected.
U “Epson Special Media Table” on page 111
Setting Procedures for Printing
Adjusting Settings in Windows
When the printer driver's Main screen is
A
displayed, you can configure various settings
required for printing such as Media Type,
Source, Size.
U “Basic Printing Methods(Windows)” on
page 31
Select Borderless, and then click Expansion.
B
You can not choose the expansion amount when
Roll Paper or Roll Paper (Banner) is selected for
Source.
60
Page 61

SC-P600 Series User’s Guide
Printing Varieties
Select Auto Expand or Retain Size as the
C
Method of Enlargement. If you select Auto
Expand, set how much of the image goes beyond
the edge of the paper as shown below.
Max Sizes larger than A4:
Approximately 3 mm past the top,
4.5 mm past the bottom, and 3.5 mm
past the left and right edges
A4 or smaller (excluding 100 × 148
mm, 9 × 13 cm/3.5 × 5 in., 10 × 15
cm/4 × 6 in.):
Approximately 3 mm past the top, 4
mm past the bottom, and 2.5 mm
past the left and right edges
100 × 148 mm, 9 × 13 cm/3.5 × 5 in.,
10 × 15 cm/4 × 6 in.:
Approximately 1.3 mm past the top,
2.5 mm past the bottom, and 2.5 mm
past the left and right edges
Mid ½ of Max
The selections for borderless printing methods
are displayed as shown below.
XXXX (Sheet Feeder - Borderless (Auto
Expand))
XXXX (Sheet Feeder - Borderless (Retain Size))
XXXX (Fr.-FineArt(Borderless, Auto Expand))
XXXX (Fr.-FineArt(Borderless, Retain Size))
A3+ (Roll Paper - Borderless)
Where XXXX is the actual paper size, such as A4.
If items on the Page Setup screen are not
displayed on the Print screen due to the
application being used, display the Page Setup
screen and make settings.
Min ½ of Max
Note:
Choosing Mid or Min decreases the image
enlargement ratio. Therefore, some margins may
appear at the edges of the paper depending on the
paper and printing environment.
Check other settings, and then start printing.
D
Making Settings for Mac OS X
Open the Print screen and select the paper size
A
from the Paper Size option, and then select a
borderless printing method.
U “Basic Printing Methods(Mac OS X)” on
page 33
If Auto Expand is selected for Paper Size, set how
B
much of the image goes beyond the edge of the
paper in the Expansion screen.
Select Page Layout Settings from the list. The
following shows how much the image will be
larger than the paper edges.
Max Sizes larger than A4:
Approximately 3 mm past the top,
4.5 mm past the bottom, and 3.5 mm
past the left and right edges
A4 or smaller (excluding 100 × 148
mm, 9 × 13 cm/3.5 × 5 in., 10 × 15
cm/4 × 6 in.):
Approximately 3 mm past the top, 4
mm past the bottom, and 2.5 mm
past the left and right edges
100 × 148 mm, 9 × 13 cm/3.5 × 5 in.,
10 × 15 cm/4 × 6 in.:
Approximately 1.3 mm past the top,
2.5 mm past the bottom, and 2.5 mm
past the left and right edges
61
Page 62

SC-P600 Series User’s Guide
Printing Varieties
Mid ½ of Max
Min ½ of Max
You cannot choose the expansion amount when
A3+ (Roll Paper - Borderless) is selected as the
Paper Size.
Check other settings, and then start printing.
D
Note:
Choosing Mid or Min decreases the image
enlargement ratio. Therefore, some margins may
appear at the edges of the paper depending on the
paper and printing environment.
Select Print Settings from the list, and then set
C
the Media Type.
62
Page 63

SC-P600 Series User’s Guide
Printing Varieties
Enlarged/Reduced Printing
You can enlarge or reduce the size of your data. There
are three setting methods.
❏ Fit to Page printing
Automatically enlarges or reduces the image to fit
the paper.
Fit to Page/Scale to fit paper size
Adjusting Settings in Windows
When the printer driver's Page Layout screen is
A
displayed, set the same paper size as the data's
paper size in Page Size or Paper Size.
U “Basic Printing Methods(Windows)” on
page 31
❏ Fit to Roll Paper Width (Windows only)
Automatically enlarges or reduces the image to fit
the width of the roll paper.
❏ Custom
You can specify the enlargement or reduction ratio.
Use this method for a non-standard paper size.
Select the size of the paper loaded in the printer
B
from the Output Paper list.
Fit to Page is selected as Reduce/Enlarge.
63
Check other settings, and then start printing.
C
Page 64
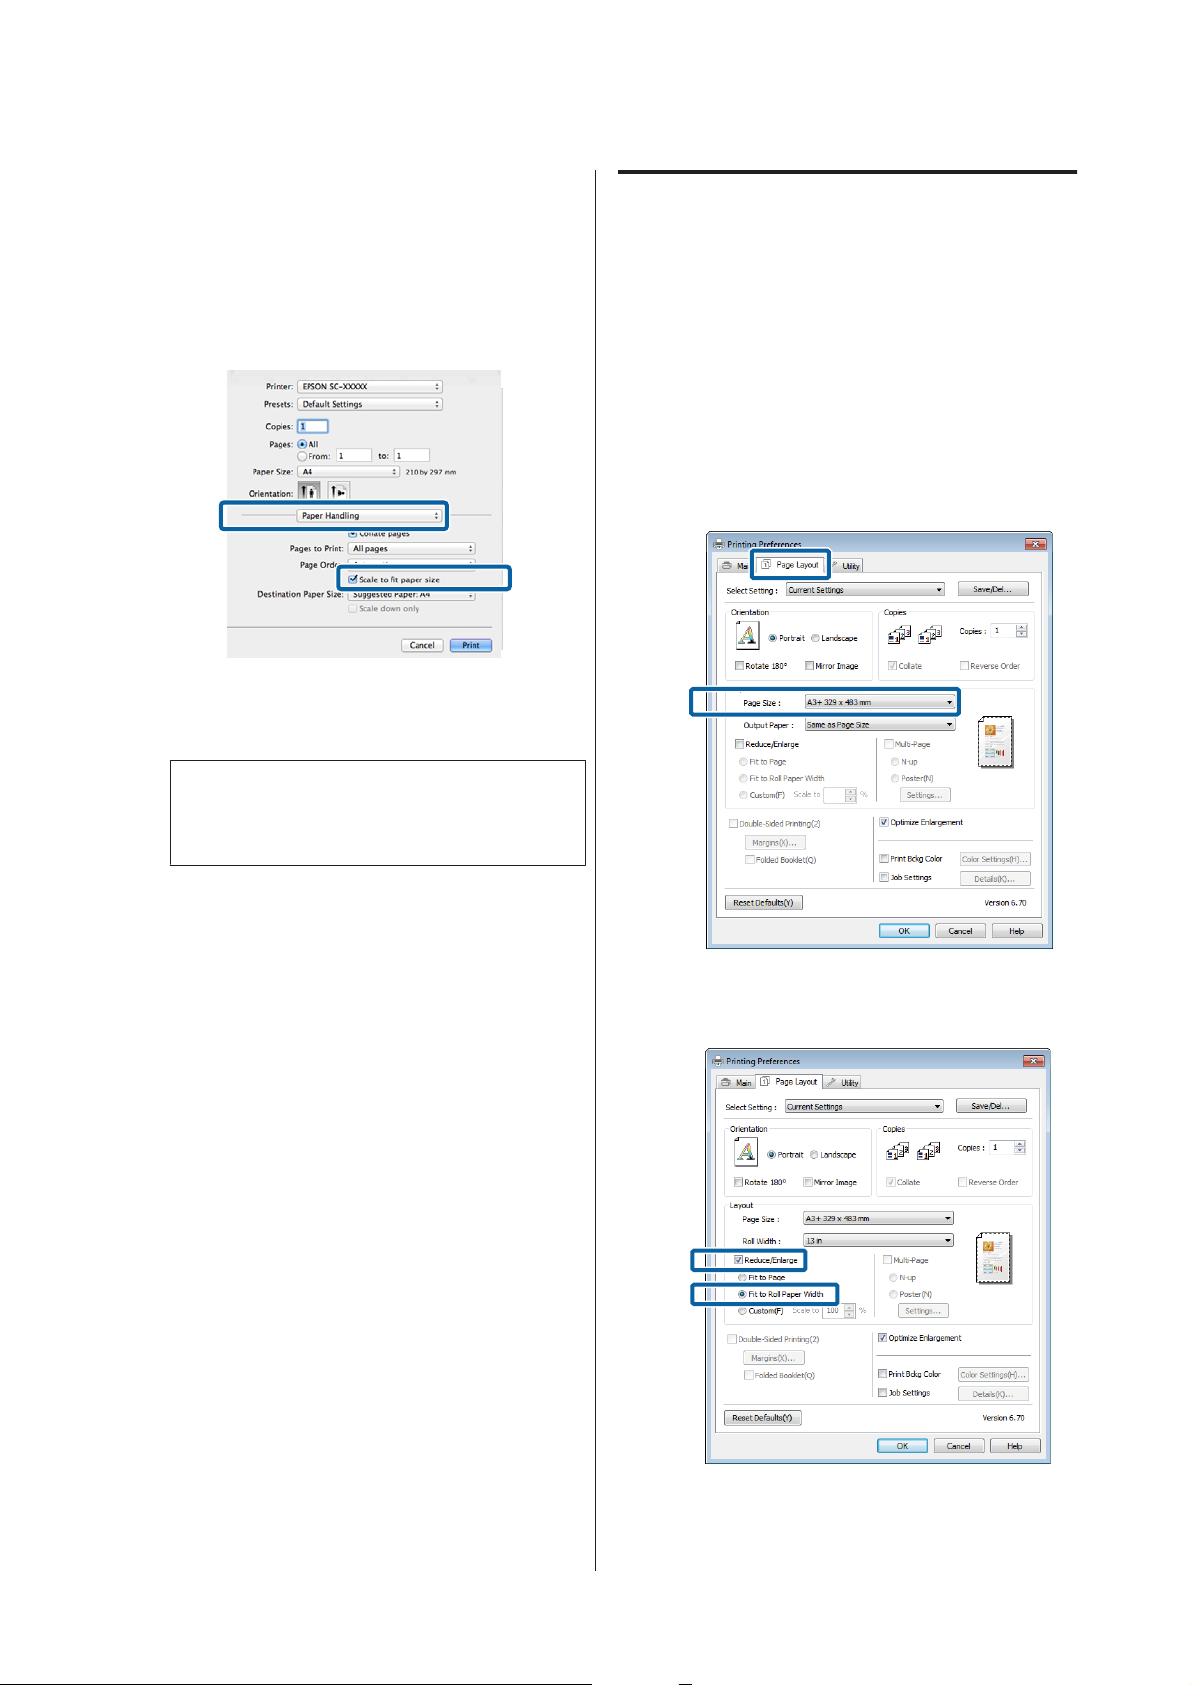
SC-P600 Series User’s Guide
Printing Varieties
Making Settings for Mac OS X
Open the Print screen, select Paper Handling
A
from the list, and then check Scale to fit paper
size.
U “Basic Printing Methods(Mac OS X)” on
page 33
Select the size of the paper loaded in the printer as
B
the Destination Paper Size.
Fit to Roll Paper Width (Windows only)
Display the printer driver Main tab and select
A
Roll Paper for Source.
U “Basic Printing Methods(Windows)” on
page 31
Display the Page Layout tab and choose a Paper
B
Size that matches the page size used in the
document size.
Note:
When performing enlarged printing, clear the
Scale down only check box.
Check other settings, and then start printing.
C
Select Reduce/Enlarge and click Fit to Roll
C
Paper Width.
64
Page 65

SC-P600 Series User’s Guide
Printing Varieties
Select the width of the roll paper loaded in the
D
printer from the Roll Width list.
Check other settings, and then start printing.
E
Select the scale within a range of 10 to 650 %.
Check other settings, and then start printing.
D
Custom Scale Setting
Adjusting Settings in Windows
When the printer driver's Page Layout screen is
A
displayed, set the same paper size as the data's
paper size in Page Size or Paper Size.
U “Basic Printing Methods(Windows)” on
page 31
Select the Output Paper option that matches the
B
size of paper loaded in the printer.
Select Reduce/Enlarge, click Custom, and then
C
set the Scale to value.
Enter a value directly or click the arrows to the
right of the scale box to set the value.
Making Settings for Mac OS X
When the Print screen is displayed, select the size
A
of the paper loaded in the printer from the Paper
Size list.
If items on the Page Setup screen are not
displayed on the Print screen due to the
application being used, display the Page Setup
screen and make settings.
U “Basic Printing Methods(Mac OS X)” on
page 33
65
Page 66

SC-P600 Series User’s Guide
Printing Varieties
B
Enter the scale.
Multi-Page Printing
You can print multiple pages of your document on one
sheet of paper.
If you print continuous data prepared at A4 size, it is
printed as shown below.
Note:
❏ In Windows, you cannot use the Multi-Page
printing function when performing borderless
printing.
❏ In Windows, you can use the reduce/enlarge
function (Fit to Page) to print the data on different
sizes of paper.
U “Enlarged/Reduced Printing” on page 63
66
Page 67

SC-P600 Series User’s Guide
Printing Varieties
Adjusting Settings in Windows
When the printer driver's Page Layout screen is
A
displayed, select the Multi-Page check box, select
N-up, and then click Settings.
U “Basic Printing Methods(Windows)” on
page 31
Making Settings for Mac OS X
When the Print screen is displayed, select Layout
A
from the list, and then specify the number of
pages per sheet and so on.
U “Basic Printing Methods(Mac OS X)” on
page 33
Note:
You can print frames around arranged pages using
the Border function.
In the Print Layout screen, specify the number of
B
pages per sheet and the page order.
If the Print page frames check box is selected,
page frames are printed on each page.
Check other settings, and then start printing.
C
Check other settings, and then start printing.
B
67
Page 68

SC-P600 Series User’s Guide
Printing Varieties
Manual Double-Sided Printing (Windows only)
You can easily print on both sides of the paper by
printing out all even numbered pages and then flipping
those pages over and reloading them manually to print
the odd numbered pages.
Cautions when Performing Double-Sided Printing
When performing double-sided printing, note the
following points.
❏ Use paper that supports double-sided printing.
❏ Depending on the paper type and the print data, ink
may seep through to the back side of the paper.
❏ Double-sided printing is supported with the auto
sheet feeder only.
U “Basic Printing Methods(Windows)” on
page 31
Note:
❏ You can set the Binding Edge and Binding
Margin b y cl i ck i n g o n Margins. Depending on
the application, the specified binding margin
and the actual print result may differ.
❏ Performing successive double-sided print jobs can
soil the inside of the printer with ink. If the printed
paper is soiled by ink on the roller, clean the printer.
Note:
You can save even more paper by combining this printing
method with printing multiple pages on a single page.
U “Multi-Page Printing” on page 66
Setting Procedures for Printing
Load paper in the auto sheet feeder.
A
U “Loading Paper into the Auto Sheet Feeder”
on page 22
When the printer driver's Page Layout screen is
B
displayed, select Double-Sided Printing.
When Roll Paper is selected as the Source
setting, you cannot select Double-Sided
Printing. In this case, set the Source first from
the Main screen.
❏ Select Folded Booklet to print out as a booklet.
In the example figure shown below, the pages
that appear on the inside when the page is
folded in two (pages 2, 3, 6, 7, 10, 11) are
printed first.
Check other settings, and then start printing.
C
When the odd pages have finished printing and
D
the on-screen guide appears, reload the paper as
instructed, and then click Resume.
68
Page 69

SC-P600 Series User’s Guide
Printing Varieties
Poster Printing (Enlarge to cover several sheets and print - Windows only)
The poster printing function automatically enlarges and
divides the print data. You can join the printed sheets to
create a large poster or calendar. Poster printing is
available up to 16-fold (four sheets by four sheets) of
normal printing size. There are two ways to print
posters.
❏ Borderless poster printing
This automatically enlarges and divides the print
data and prints without margins. You can make a
poster just by joining the output paper together. To
perform borderless printing, the data is expanded
so that it extends slightly over the paper size.
Enlarged areas that exceed the paper are not
printed. Therefore, the image may misalign at the
joins. To join the pages precisely, perform the
following poster printing with margins.
Setting Procedures for Printing
Prepare the print data using applications.
A
The printer driver automatically enlarges the
image data when printing.
When the printer driver's Page Layout screen is
B
displayed, select the Multi-Page check box, select
Poster, and then click Settings.
U “Basic Printing Methods(Windows)” on
page 31
❏ Poster printing with margins
This automatically enlarges and divides the print
data and prints with margins. You need to cut the
margins and then join the output paper together to
make a poster. Although the final size is slightly
smaller since you have to cut off the margins, the
image joins fit precisely.
In the Poster Settings screen, select the number
C
of pages you want in the poster.
69
Page 70

SC-P600 Series User’s Guide
Printing Varieties
Select borderless poster printing or poster
D
printing with margins, and then select any pages
that you do not want to print.
When borderless is selected:
Select Borderless Poster Print.
Note:
If Borderless Poster Print is grayed out, the
selected paper or the size does not support
borderless printing.
Note:
Regarding the size after joining together:
When Borderless Poster Print is cleared and
printing with margins is selected, the Print Cutting
Guides items are displayed.
The finished size is the same whether or not Trim
Lines is selected. However, if Overlapping
Alignment Marks is selected, the finished size is
smaller with an overlap.
Check other settings, and then start printing.
E
U “Supported Media Sizes for Borderless
Printing” on page 59
U “Epson Special Media Table” on page 111
When with margins is selected:
Clear Borderless Poster Print.
70
Page 71

SC-P600 Series User’s Guide
Printing Varieties
Joining the output paper together
The steps for joining the output paper together differ
between borderless poster printing and poster printing
with margins.
Borderless poster printing
This section describes how to join four printed pages
together. Check and match the printed pages, and join
them in the order indicated below using an adhesive
tape on the back of the sheets.
The following describes how to join four printed pages
together.
Poster printing with margins
When you select Overlapping Alignment Marks, the
following marks are printed on the paper. See the
procedures below to join the four printed pages together
using the alignment marks.
Cut the upper left sheet along the alignment
A
mark (vertical blue line).
Lay the upper left sheet on top of upper right
B
sheet. Lineup the X marks as shown in the
illustration below, and temporarily fasten them
using an adhesive tape on the back.
While two pages are overlapping, cut them along
C
the alignment mark (vertical red line).
Note:
The alignment marks are black for black-and-white
printing.
71
Page 72

SC-P600 Series User’s Guide
Printing Varieties
Join the left and right sheets together.
D
Use an adhesive tape to stick the backs of the
sheets together.
Repeat steps 1 to 4 for the lower sheets.
E
Cut the bottom of the upper sheets along the
F
alignment marks (horizontal blue line).
While two pages are overlapping, cut them along
H
the alignment marks (horizontal red line).
Join the upper and lower sheets together.
I
Use an adhesive tape to stick the backs of the
sheets together.
Lay the upper sheet on top of the lower sheet.
G
Lineup the X marks as shown in the illustration
below, and temporarily fasten them using an
adhesive tape on the back.
After joining all of the sheets together, cut the
J
margins along the outer guide lines.
72
Page 73

SC-P600 Series User’s Guide
Printing Varieties
User-defined Paper Sizes/ Custom Paper Sizes
You can also print on paper sizes that are not already
available in the printer driver. User-defined paper sizes
that have created and saved as described below can be
selected using the application page setup option. If your
application supports creating user defined sizes, follow
the steps below to select the same size that was created in
the application, and then print.
See the following for information on the paper sizes
supported by this printer.
Length
1 The maximum length in Mac OS X is 1117.6 mm.
2 The length can be longer than the maximum length specified
if the application supports banner printing. However, the
actual print size depends on the application, the paper size
loaded in the printer, and the computer environment.
Adjusting Settings in Windows
When the printer driver's Main screen is
A
displayed, click User Defined.
U “Basic Printing Methods(Windows)” on
page 31
279.4 to 3276.7
*1
mm
U “Usable Commercially Papers” on page 113
In addition, the following paper sizes can be selected for
User Defined Paper Size (Windows) or Custom Paper
Sizes (Mac OS X) in the printer driver.
Important:
c
❏ Although you can specify a large paper size
which cannot be loaded on this printer, it will
not be printed properly.
❏ The available output size is limited depending
on the application.
Auto sheet feeder
Width 89.0 to 329.0 mm
Length
Roll paper
Width 329.0 mm
89.0 to 3276.7
*2
*1
mm
In the User Defined Paper Size screen, set the
B
paper size you want to use, and then click Save.
❏ You can enter up to 24 single-byte characters
for the Paper Size Name.
❏ The length and width values for a
pre-defined size close to the desired custom
size can be displayed by selecting the
appropriate option in the Base Paper Size
menu.
Length
Front manual feed (poster board)/front manual feed
(fine art media)
Width 210.0 to 329.0 mm
55.0 to 3276.7
*1
mm
73
Page 74

SC-P600 Series User’s Guide
Printing Varieties
❏ If the length and width ratio is the same as a
defined paper size, select the defined paper
size from Fix Aspect Ratio and select either
Landscape or Portrait for the Base. In this
case, you can only adjust either the paper
width or paper height.
Note:
❏ To change the paper size you saved, select the
paper size name from the list on the left.
❏ To delete the user-defined size you saved, select
the paper size name from the list on the left,
and then click Delete.
U “Basic Printing Methods(Mac OS X)” on
page 33
Click +, and then enter the paper size name.
B
❏ You can save up to 100 paper sizes.
Click OK.
C
You can now select the new paper size from the
Size menu in the Main tab.
You can now print as normal.
Making Settings for Mac OS X
When the Print screen is displayed, select
A
Manage Custom Sizes from the Paper Size list.
If items on the Page Setup screen are not
displayed on the Print screen due to the
application being used, display the Page Setup
screen and make settings.
Enter the Width, Height for the Paper Size, and
C
enter the margins, and then click OK.
You can set the page size and printer margins
depending on the printing method.
74
Page 75

SC-P600 Series User’s Guide
Printing Varieties
Note:
❏ To change the contents that you saved, select
the paper size name from the list on the left of
the Custom Paper Sizes screen.
❏ To duplicate the user-defined size you saved,
select the paper size name from the list on the
left of the Custom Paper Sizes screen, and then
click Duplicate.
❏ To delete the user-defined size you saved, select
the paper size name from the list on the left of
the Custom Paper Sizes screen, and then click
-.
❏ The custom paper size setting differs
depending on the operating system version.
See your operating system's documentation for
details.
Click OK.
D
You can select the paper size you saved from the
Paper Size pop-up menu.
Banner printing (on roll paper)
You can print banners and panoramic pictures if you
create and set print data for banner printing in your
application.
There are two ways to print a banner.
Printer Driver Source Supported Applications
Open the Paper Size menu and select the paper
E
size saved using the Custom Paper Size dialog.
Select Print Settings and choose a paper source
in the Page Layout menu.
The paper sources available depend on the page
size.
You can now print as normal.
Roll paper Document preparation
software, image editing
software, and so on
Roll paper (Banner)
*1 Create print data at a size supported by the given application
while maintaining the printing length and width ratio.
*2 Windows only
The following printing sizes are available.
Available Media Sizes
Width 329.0 mm
*
Length
* The paper length can be longer if using applications that
support banner printing. However, the actual print size
depends on the application, the paper size loaded in the
printer, and the computer environment.
*2
Windows: Max. 3,276.7 mm
Mac OS X: Max. 1,117.6 mm
Applications that support
banner printing
*1
75
Page 76

SC-P600 Series User’s Guide
Printing Varieties
Adjusting Settings in Windows
In the printer driver's Main screen, select Media
A
Type.
U “Basic Printing Methods(Windows)” on
page 31
Click User Defined and match the paper size to
C
the size of the data if necessary.
Note:
If you are using applications that support banner
printing, you do not need to set User Defined Paper
Size if you select Roll Paper (Banner) as the
Source.
Make sure the Optimize Enlargement check box
D
is selected.
Select Roll Paper or Roll Paper (Banner) from
B
the Source list.
Note:
❏ You can only use Roll Paper (Banner) for
applications that support banner printing.
Check other settings, and then start printing.
E
Making Settings for Mac OS X
When the Print screen is displayed, select the size
A
of the data created with the application in Paper
Size.
If items on the Page Setup screen are not
displayed on the Print screen due to the
application being used, display the Page Setup
screen and make settings.
❏ Selecting Roll Paper (Banner) sets the top and
bottom margins of the paper to 0 mm.
76
Page 77

SC-P600 Series User’s Guide
Printing Varieties
U “Basic Printing Methods(Mac OS X)” on
page 33
Check other settings, and then start printing.
B
Layout Manager (Windows only)
The Layout Manager function allows you to place
multiple pieces of print data created in different
applications on the paper freely and print them at once.
You can create a poster or display material by placing
multiple pieces of print data where you like. Also,
Layout Manager allows you to use paper effectively.
The following is a layout example.
Placing multiple data items
77
Page 78

SC-P600 Series User’s Guide
Printing Varieties
Placing the same data
Placing data freely
Open the file you want to print in your
B
application.
Select Layout Manager in the Main tab of the
C
printer driver and choose an option for Size that
matches the size of the document created in the
application.
U “Basic Printing Methods(Windows)” on
page 31
Placing data on roll paper
Setting Procedures for Printing
Check that the printer is connected and ready to
A
print.
Note:
The option selected for Size is the size used in the
Layout Manager. The actual printing paper size is
set in the screen in step 7.
Click OK. When printing with an application,
D
the Layout Manager screen opens.
The print data is not printed, but one page is
placed on the paper of the Layout Manager
screen as one object.
Leave the Layout Manager screen open and
E
repeat steps 2 to 4 to arrange the next pieces of
data.
The objects are added to the Layout Manager
screen.
78
Page 79

SC-P600 Series User’s Guide
Printing Varieties
Arrange the objects on the Layout Manager
F
screen.
You can drag objects to move and resize them,
use tool buttons and the Object menu to align
and rotate objects on the Layout Manager
screen.
You can resize and replace whole objects in the
Preference or Arrangement Settings screens.
See the Layout Manager screen help for more
details on each function.
Saving and Calling Layout Manager Settings
You can save the Layout Manager screen arrangement
and setting contents to a file. If you need to close your
application in the middle of a job, you can save it to a file
and then open it later to continue your work.
Saving
On the Layout Manager screen, click File menu
A
and then Save as.
Enter the file name, select the location, and then
B
click Save.
Close the Layout Manager screen.
C
Opening saved files
Click File - Properties, and make print settings
G
on the printer driver screen.
Right-click the utility icon ( ) in the Windows
A
taskbar and select Layout Manager from the
menu that is displayed.
The Layout Manager screen is displayed.
If the utility icon does not appear in the Windows
taskbar U “Summary of the Utility Tab” on
page 44
On the Layout Manager screen, click File menu
B
and then Open.
Select the location and open the required file.
C
Set Media Type, Source, Size, and so on.
Click the File menu on the Layout Manager
H
screen, and then click Print.
Printing starts.
79
Page 80

SC-P600 Series User’s Guide
Printing Varieties
Printing from a Smart Device
Using Epson iPrint
Epson iPrint is an application that allows you to print
photos, Web pages, documents, and so on from smart
devices such as smart phones and tablets.
You can install Epson iPrint on your smart device using
the following URL or QR code.
Using Epson iPrint
Launch Epson iPrint on your smart device, and then
select the item you want to use from the following Home
screen.
The following screen may change without notice.
http://ipr.to/d
Home screen displayed at startup.
A
Displays information pages such as making printer
B
settings and the FAQ.
Displays the screen that allows you to select and
C
setup the printer. Once selected, the printer is
available the next time the application is launched,
without having to select it again.
80
Select the data you want to print such as a photo, a
D
document, or a Web page.
The screen where you can make print settings such
E
as the paper size and paper type is displayed.
Page 81

SC-P600 Series User’s Guide
Printing Varieties
The selected photos or documents are displayed.
F
Printing starts.
G
Note:
When printing from the document menu in iPhone,
iPad, or iPod touch, send the document you want to print
using the iTunes file sharing function, and then launch
Epson iPrint.
Using AirPrint
For iOS devices using the latest iOS, or computers later
than Mac OS X v10.7.x, you can print wirelessly using
this printer.
Note:
❏ AirPrint is not available when the control panel's
setup menu - System Administration - Paper Setup
Display is set to Off.
❏ For more detailed information on AirPrint, see the
AirPrint page on Apple's homepage.
Connect the device you want to use to the same
A
wireless LAN as the printer.
Load paper in the printer.
B
Print from the device to the printer.
C
U “Loading Cut Sheets” on page 22
81
Page 82

SC-P600 Series User’s Guide
Color Management Printing
Color Management
Printing
About Color Management
Even when using the same image data, the original
image and the displayed image may look different, and
the printed results may look different to the image you
see on the display. This occurs due to the difference in
characteristics when input devices such as scanners and
digital cameras capture colors as electronic data, and
when output devices such as display screens and
printers reproduce colors from the color data. The color
management system is a means to adjust differences in
color conversion characteristics among input and
output devices. As well as applications for image
processing, each operating system is equipped with a
color management system, such as ICM for Windows
and ColorSync for Mac OS X.
In a color management system, a color definition file
called a "Profile" is used to perform color matching
between devices. (This file is also called an ICC profile.)
The profile of an input device is called an input profile
(or source profile), and of an output device, such as a
printer, is called a printer profile (or output profile). A
profile is prepared for each media type in this printer's
driver.
The color conversion areas by the input device and the
color reproduction area by the output device differ. As a
result, there are color areas that do not match even when
performing color matching using a profile. In addition
to specifying profiles, the color management system
also specifies conversion conditions for areas where
color matching failed as "intent". The name and type of
intent vary depending on the color management system
you are using.
Color Management Print Settings
You can perform color management printing using this
printer's printer driver in the following two ways.
Choose the best method according to the application
you are using, the operating system environment, the
aim of the print out and so on.
Setting color management with the applications
This method is for printing from applications that
support color management. All color management
processes are carried out by the application's color
management system. This method is useful when you
want to obtain the same color management print results
using a common application among different operating
system environments.
U “Setting color management with the applications”
on page 83
Setting color management with the printer driver
The printer driver uses the operating system's color
management system and carries out all color
management processes. You can make color
management settings in the printer driver using the
following two methods.
❏ Host ICM (Windows)/ColorSync (Mac OS X)
Set when printing from applications that support
color management. This is effective in producing
similar print results from different applications
under the same operating systems.
U “Color management printing by Host ICM
(Windows)” on page 84
U “Color management printing by ColorSync
(Mac OS X)” on page 85
❏ Driver ICM (Windows only)
You cannot match the colors on the printed results and
display by color management between the input device
and the printer. To match both colors, you need to
perform color management between the input device
and the display as well.
This allows you to perform color management
printing from applications that do not support
color management.
U “Color management printing by Driver
ICM(Windows only)” on page 86
82
Page 83

SC-P600 Series User’s Guide
Color Management Printing
Setting profiles
Settings for the input profile, printer profile, and intent
(matching method) vary between three types of color
management printing since their color management
engines are used differently. This is because color
management usage differs between the engines. Make
settings in the printer driver or application as described
in the following table.
Input
profile
settings
Driver ICM
(Windows)
Host ICM
(Windows)
ColorSync
(Mac OS X)
Application ApplicationApplicationApplicatio
Printer
Driver
ApplicationPrinter
ApplicationPrinter
Printer
profile
settings
Printer
Driver
Driver
Driver
Intent
settings
Printer
Driver
Printer
Driver
Applicatio
n
n
Setting color management with the applications
Print using applications with a color management
function. Make the color management settings in the
application and disable the printer driver's color
adjustment function.
Make color management settings in the
A
applications.
Setting example for Adobe Photoshop CS5
Open the Print screen.
Select Color Management and then Document.
Select Photoshop Manages Colors as the Color
Handling setting, select the Printer Profile and
the Rendering Intent, and then click Print.
Printer profiles for each paper type that is needed when
performing color management are installed with the
printer's printer driver. You can select the profile from
the printer driver's settings screen.
See the following for detailed information.
U “Color management printing by Driver
ICM(Windows only)” on page 86
U “Color management printing by Host ICM
(Windows)” on page 84
U “Color management printing by ColorSync (Mac
OS X)” on page 85
U “Setting color management with the applications”
on page 83
Display the printer driver's settings screen
B
(Windows) or Print screen (Mac OS X).
Make printer driver settings.
For Windows
U “Basic Printing Methods(Windows)” on
page 31
83
For Mac OS X
U “Basic Printing Methods(Mac OS X)” on
page 33
Page 84

SC-P600 Series User’s Guide
Color Management Printing
Set color management to off.
C
For Windows
In the Main screen, select Custom as the Mode
setting, and select Off (No Color Adjustment).
Setting color management with the printer driver
Color management printing by Host ICM (Windows)
Use image data in which an input profile has been
embedded. Also, the application must support ICM.
Make the settings for color adjustment using the
A
application.
Depending on the type of the application, make
the settings following the table below.
Application Color Management
Settings
Note:
For Windows 7 and Windows Vista, Off (No Color
Adjustment) is selected automatically.
For Mac OS X
Select Print Settings from the list, and then select
Off (No Color Adjustment) as the Color
Settings setting.
Adobe Photoshop
CS3 or later
Adobe Photoshop
Lightroom 1 or
later
Adobe Photoshop
Elements 6 or later
Other applications No Color Management
Note:
For information on the operating systems
supported by each application, visit the
distributor’s website.
Printer Manages Colors
Check other settings, and then start printing.
D
84
Page 85

SC-P600 Series User’s Guide
Color Management Printing
Setting example for Adobe Photoshop CS5
Open the Print screen.
Select Color Management and then Document.
Select Printer Manages Colors as the Color
Handling setting, and then click Print.
Select Host ICM.
C
When Epson special media is selected from
Media Type in the Main screen, the printer
profile corresponding to the media type is
automatically selected and displayed in the
Printer Profile Description box.
To change the profile, select Show all profiles at
the bottom.
When using applications without a color
management function, start from step 2.
In the printer driver's Main screen, select
B
Custom as the Mode, select ICM, and then click
Advanced.
U “Basic Printing Methods(Windows)” on
page 31
Check other settings, and then start printing.
D
Color management printing by ColorSync (Mac OS X)
Use image data in which an input profile has been
embedded. Also, the application must support
ColorSync.
Note:
Depending on the application, color management
printing by ColorSync may not be supported.
Disable the color management functions in the
A
application.
Display the Print screen.
B
U “Basic Printing Methods(Mac OS X)” on
page 33
85
Page 86
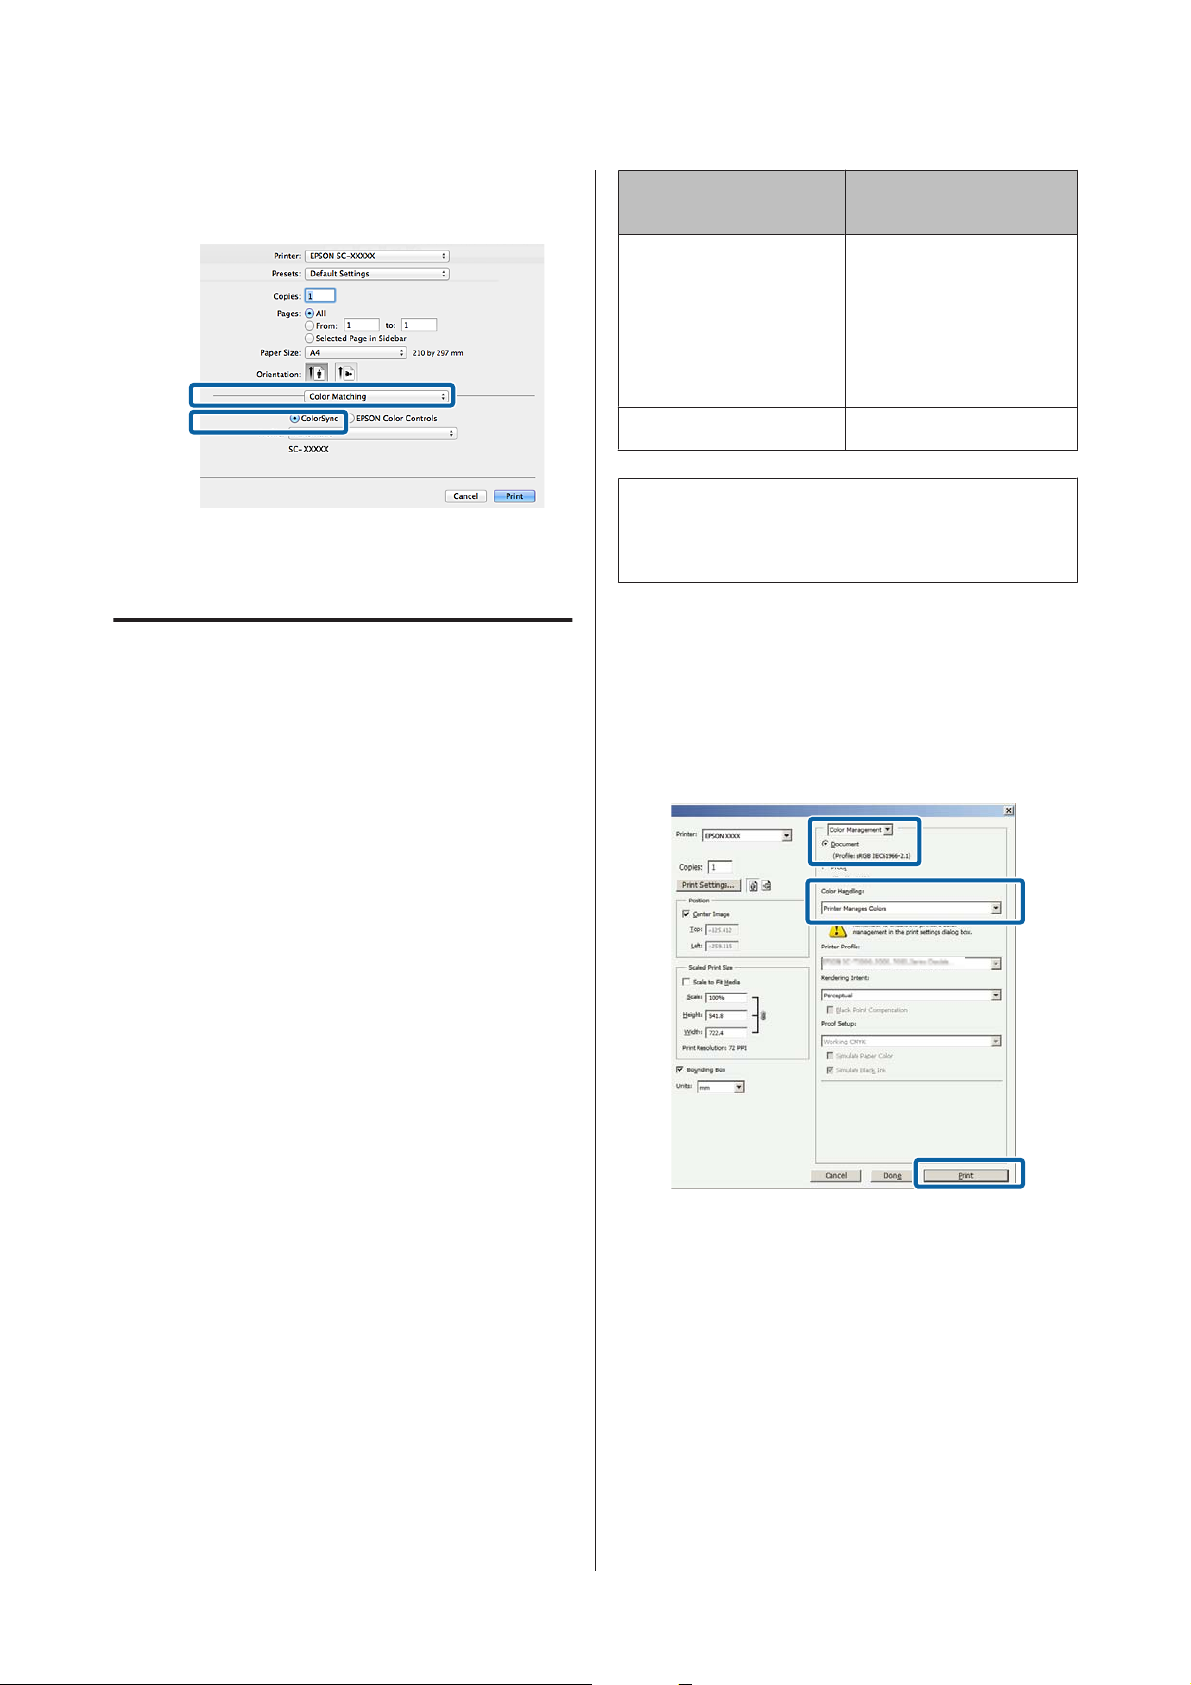
SC-P600 Series User’s Guide
Color Management Printing
Select Color Matching from the list, and then
C
click ColorSync.
Check other settings, and then start printing.
D
Color management printing by Driver ICM (Windows only)
The printer driver uses its own printer profiles to
perform color management. You can use the following
two color correction methods.
Application Color Management
Settings
Adobe Photoshop CS3 or
later
Adobe Photoshop
Lightroom 1 or later
Adobe Photoshop
Elements 6 or later
Other applications No Color Management
Note:
For information on the operating systems supported by
each application, visit the distributor’s website.
Setting example for Adobe Photoshop CS5
Open the Print screen.
Select Color Management and then Document. Select
Printer Manages Colors as the Color Handling setting,
and then click Print.
Printer Manages Colors
❏ Driver ICM (Basic)
Specify one type of profile and intent for processing
the entire image data.
❏ Driver ICM (Advanced)
The printer driver distinguishes the image data into
the Image, Graphics, and Text areas. Specify three
types of profiles and intents for processing each
area.
When using applications featuring a color
management function
Make the settings for color processing using the
application before making printer driver settings.
Depending on the type of the application, make the
settings following the table below.
86
Page 87

SC-P600 Series User’s Guide
Color Management Printing
In the printer driver's Main screen, select
A
Custom as the Mode, select ICM, and then click
Advanced.
U “Basic Printing Methods(Windows)” on
page 31
Intent Explanation
Absolute
Colorimetric
Assigns absolute color gamut
coordinates to the original and
print data and converts the
data. Therefore, color tone
adjustment is not performed on
any white point (or color
temperature) for the original or
print data. This feature is used
for special purposes such as
logo color printing.
From ICM Mode in the ICM screen, select
B
Driver ICM (Basic) or Driver ICM
(Advanced).
If you select Driver ICM (Advanced), you can
specify the profiles and intent for each image
such as photos, graphics, and text data.
Intent Explanation
Saturation Keeps the current saturation
unchanged and converts the
data.
Perceptual Converts the data so that a
more visually natural image is
produced. This feature is used
when a wider gamut of color is
used for image data.
Relative
Colorimetric
Converts the data so that a set
of color gamut and white point
(or color temperature)
coordinates in the original data
match their corresponding
print coordinates. This feature is
used for many types of color
matching.
Check other settings, and then start printing.
C
87
Page 88

SC-P600 Series User’s Guide
Using the Control Panel
Using the Control Panel
Press an item to select it.
C
Note:
Depending on the item, press
screens.
or to change
Press the icons to display menus such as Settings and
Checking.
U “Home Screen View” on page 12
Menus
Using the Menu
Explanations in this section use the Setup menu as an
example.
Press the button.
A
Press F.
B
88
Page 89

SC-P600 Series User’s Guide
Using the Control Panel
Setting Items for the Network Summary Display
The following items can be set from the network summary display.
Item Content
Menu Wi-Fi/Network Settings See the Network Guide (PDF).
Wi-Fi Setup
Wi-Fi Direct Setup
Wi-Fi Setup See the Network Guide (PDF).
Setting Items for the Setup Menu
The Setup menu contains the following items and parameters.
* indicates the default setting.
89
Page 90

SC-P600 Series User’s Guide
Using the Control Panel
Item Content
Maintenance Print Head Nozzle Check Check whether the print head nozzles are clogged. Visually
confirm the printed check pattern, and perform head cleaning
if there are any blurred or missing sections.
U “Checking for clogged nozzles” on page 94
Print Head Cleaning Perform head cleaning if you notice banding or gaps in the
print results. Cleans the surface of the print head to improve
the print quality.
Paper Guide Cleaning Select this option to pass (feed and eject) a cleaning sheet or
plain paper through the printer and clean its inside.
U “Cleaning Inside the Printer” on page 99
Thick Paper On This option is only available when printing from a smart
device.
Off*
Set this if print results are scuffed or smeared. When this is set
to On, print speed may slow down. Only use this if scuffing
occurs. When the printer is turned off, this setting returns to
Off.
Print Head Alignment If print results appear grainy or out of focus, perform Print
Head Alignment to correct the print misalignment.
U “Correcting Print Misalignment (Print Head Alignment)”
on page 95
System Administration See the next section.
Network Status Wi-Fi/Network Status Check network information.
Wi-Fi Direct Status
Google Cloud Print Status
Print Status Sheet Configuration Status She et Prints an information sheet for the current status and settings.
Supply Status Sheet
Usage History Sheet
90
Page 91

SC-P600 Series User’s Guide
Using the Control Panel
System Administration
* indicates the default setting.
Item Parameter Content
Printer Settings Paper Source
Settings
BK Ink Change
Setting
Printer Settings Paper Skew Check On* This option only takes effect with fine art
Paper Setup
Display
Error Notice On Set whether or not to display an error if the
Normal*
Save Ink
Off
On* Automatically displays the media setup
screen when paper is loaded.
Off
Off*
When this is Off, AirPrint is unavailable. Also,
Error Notice from Paper Source Settings
becomes Off.
paper size or type differ from the printer
settings.
Select Save Ink to reduce the amount of ink
consumed when switching from one black
ink to another. Note, however, that this may
result in uneven gloss in areas printed with
black ink after the switching.
Select Normal to ensure adequate print
quality after switching black inks.
media and poster board.
Select On to display an error in the control
panel’s screen when the paper is fed in at a
slant.
On is recommended, as feeding the paper at
a slant can cause the paper to jam.
Print Page Line On*
Off
Paper Size Check On* Select whether or not (On/Off) to detect the
Off
BK Ink Auto
Change
On*
Off
When this is set to On, a dotted line is printed
on the roll paper.
paper width. When this is set to Off, printing
may be performed beyond the edges of the
paper. If printing is performed beyond the
edges of the paper, the inside of the printer
will be soiled with ink. We recommend
setting this to On.
When this is set to On, the black ink is
changed automatically using the Media
Type selected in the printer driver.
U “Changing the Type of Black Ink” on
page 35
U “Supported Media” on page 111
91
Page 92

SC-P600 Series User’s Guide
Using the Control Panel
Item Parameter Content
Common Settings LCD Brightness 1-9 (9*) You can adjust the brightness of the screen in
nine stages.
Sound Button Press High* Set whether or not to play a sound and the
volume for operation sounds, error sounds,
Medium
Low
Off
Error Notice High*
Medium
Low
Off
and done sounds.
Completion
Notice
Common Settings Sleep Timer 1 to 240 mins.
(3*)
Power Off Timer Off, 30minutes, 1h, 2h, 4h, 8h,
12h
Date/Time
Settings
Date/Time Set the date and time.
Time Difference Set the time difference from Coordinated
High*
Medium
Low
Off
Set the time to switch to sleep mode (energy
saving mode) when the printer is not
operated for a continuous period.
Set whether or not to turn off the printer
automatically, as well as setting the time
until the printer automatically turns off when
no printer operations are performed for a
continuous period.
The default setting varies depending on the
area of use.
Universal Time (UTC). Default: Since this is set
to ±0:00, it does not normally need to be
changed.
Language English, French, Italian, Ger-
man, Spanish, Portuguese,
Dutch, Russian, Simplified Chinese, Traditional Chinese, Korean
Operation Time
Out
On* You are returned to the Home screen if no
Off
92
Select the language for the screen display.
The default setting varies depending on the
area of use.
operations are performed for three minutes
on each menu.
Page 93

SC-P600 Series User’s Guide
Using the Control Panel
Item Parameter Content
Wi-Fi/Network
Settings
Google Cloud Print
Services
Wi-Fi/Network
Status
Wi-Fi Setup Manual
Connection Check - See the Network Guide (PDF).
Advanced Setup Printer Name See the Network Guide (PDF).
How to -
Settings -
- Print a network status sheet. View network
settings and connection status.
See the Network Guide (PDF).
Push Button Setup (WPS)
PIN Code Setup (WPS)
Wi-Fi Auto Connect
Disable Wi-Fi
Wi-Fi Direct Setup
TCP/IP Address
DNS Server
Proxy Server
Wi-Fi Direct
Select How to to display an explanation of
the function.
Visit the portal for more information on
registering and usage.
You can stop/restart service usage and
restore content to the default settings from
Settings.
Restore Default
Settings
Network Settings - Restore network settings to the default
settings.
All except Network
Settings
All Settings - Restore all settings to the default settings.
- Restore all control panel settings except
network settings to the default settings.
93
Page 94

SC-P600 Series User’s Guide
Maintenance
Maintenance
Adjusting the Print Head
U “Epson Printer Utility 4 Functions” on page 47
Place A4 plain paper in the auto sheet feeder.
A
U “Loading Paper into the Auto Sheet Feeder”
on page 22
You need to adjust the print head if white lines appear in
your print outs or if you notice the print quality has
declined. You can perform the following printer
maintenance functions for maintaining the print head
in good condition to ensure the best print quality.
Carry out appropriate maintenance depending on the
print results and situation.
Checking for clogged nozzles
Check whether the print head nozzles are clogged. If the
nozzles are clogged, print results may include banding
or unusual colors. Perform print head cleaning if the
nozzles are clogged.
U “Checking for clogged nozzles” on page 94
Head Cleaning
Perform head cleaning if you notice banding or gaps in
the print results. Cleans the surface of the print head to
improve the print quality.
U “Head Cleaning” on page 95
Click Nozzle Check from the Utility tab in the
B
printer driver's Properties (or Print Settings)
screen.
Follow the on-screen instructions.
Adjusting the print head position (Print head
alignment)
If the print results appear grainy or out of focus, perform
Print Head Alignment. The Print Head Alignment
function corrects print misalignments.
U “Correcting Print Misalignment (Print Head
Alignment)” on page 95
Checking for clogged nozzles
Print a pattern to check if the print head nozzle is
clogged. When checking the printed pattern, if you see
banding or any gaps in the print out you should perform
head cleaning.
From the computer
Explanations in this section use the Windows printer
driver as an example.
Use Epson Printer Utility 4 for Mac OS X.
From the printer
Press the button to display the Menu.
A
Press F - Maintenance - Print Head Nozzle
B
Check.
Place A4 plain paper in the auto sheet feeder and
C
press Print.
U “Loading Paper into the Auto Sheet Feeder”
on page 22
Check the results.
D
Review the printed nozzle check pattern while
referring to the following section.
Example of clean nozzles
94
Page 95

SC-P600 Series User’s Guide
Maintenance
There are no gaps in the nozzle check pattern.
Example of clogged nozzles
If any segments are missing in the nozzle check
pattern, perform head cleaning.
Head Cleaning
Notes on head cleaning
Note the following points when performing head
cleaning.
❏ Clean the print head only if print quality declines;
for example, if the printout is blurry or the color is
incorrect or missing.
❏ Head cleaning uses ink from all ink cartridges. Even
if you are using only black inks for black and white
printing, color inks are also consumed.
❏ If the nozzles are still clogged after you have
performed around four cycles of nozzle checks and
head cleaning, turn the printer off, wait for at least
six hours, and perform a nozzle check and head
cleaning again. Leaving the cartridges undisturbed
for a period of time may allow the ink that is causing
the clog to dissolve.
Click Head Cleaning from the Utility tab in the
A
printer driver's Properties (or Print Settings)
screen.
Follow the on-screen instructions. Head
B
cleaning may take as long as about five and a half
minutes.
From the printer
Press the button to display the Menu.
A
U “Menus” on page 88
Press F - Maintenance - Print Head Cleaning.
B
Further instructions are displayed in the control
panel’s screen.
If the nozzles are still clogged, contact your dealer or
Epson Support.
Performing Head Cleaning
From the computer
Explanations in this section use the Windows printer
driver as an example.
Use Epson Printer Utility 4 for Mac OS X.
U “Using Epson Printer Utility 4” on page 47
Correcting Print Misalignment (Print Head Alignment)
Because there is a small distance between the print head
and paper, misalignment may occur due to humidity or
temperature, the inertial force of the print head's
movements, or by moving the print head
bidirectionally. As a result, print results may appear
grainy or out of focus. When this happens, perform
Print Head Alignment to correct the print
misalignment.
From the computer
Explanations in this section use the Windows printer
driver as an example.
Use Epson Printer Utility 4 for Mac OS X.
95
Page 96

SC-P600 Series User’s Guide
Maintenance
U “Epson Printer Utility 4 Functions” on page 47
Place several sheets of A4 Photo Quality Inkjet
A
Paper in the auto sheet feeder.
U “Loading Paper into the Auto Sheet Feeder”
on page 22
Click Print Head Alignment from the Utility
B
tab in the printer driver’s Properties (or Print
Settings) screen.
Follow the on-screen instructions.
Look at #1 and check for the pattern with the least
E
vertical lines.
In this example, you would choose "4".
Check that #1 is displayed on the control panel
F
screen, press the
number you chose in step 4, and then press
Proceed.
Select the pattern with the least number of
G
vertical lines for #2 to #9.
Follow the on-screen instructions to continue.
/ buttons to select the
H
From the printer
Place several sheets of A4 Photo Quality Inkjet
A
Paper in the auto sheet feeder.
U “Loading Paper into the Auto Sheet Feeder”
on page 22
Press the button to display the Home screen.
B
Press F - Maintenance - Print Head
C
Alignment.
U “Menus” on page 88
Press Print to print an adjustment pattern.
D
96
Page 97

SC-P600 Series User’s Guide
Maintenance
Replacing Ink Cartridges
Ink Cartridge Product Numbers
The following ink cartridges can be used with this
printer. (Current as of June, 2014)
For the latest information, see the Epson Web site.
SC-P600
Ink color Product number
Photo Black T7601
Cyan T7602
Vivid Magenta T7603
Yellow T7604
Light Cyan T7605
Vivid Light Magenta T7606
Light Black T7607
Matte Black T7608
Light Light Black T7609
Ink color Product number
Photo Black T7611
Cyan T7612
Vivid Magenta T7613
Yellow T7614
Light Cyan T7615
Vivid Light Magenta T7616
Light Black T7617
Matte Black T7618
Light Light Black T7619
Important:
c
Epson recommends the use of genuine Epson ink
cartridges. Epson cannot guarantee the quality or
reliability of non-genuine ink. The use of
non-genuine ink may cause damage that is not
covered by Epson’s warranties, and under certain
circumstances may cause erratic printer behavior.
Information about non-genuine ink levels may not
be displayed, and use of non-genuine ink is recorded
for possible use in service support.
SC-P607
Ink color Product number
Photo Black T7631
Cyan T7632
Vivid Magenta T7633
Yellow T7634
Light Cyan T7635
Vivid Light Magenta T7636
Light Black T7637
Matte Black T7638
Light Light Black T7639
SC-P608
How to replace
If one of the installed ink cartridges is expended,
printing cannot be performed. If an ink low warning is
displayed, we recommend replacing the ink cartridge(s)
as soon as possible.
If an ink cartridge runs out while printing, you can
continue printing after replacing the ink cartridge.
However, when replacing ink during a print job, you
may see a difference in color depending on the drying
conditions.
Supported ink cartridges U “Ink Cartridge Product
Numbers” on page 97
The following procedure uses Yellow ink as an example.
You can use the same procedure to replace all ink
cartridges.
Make sure the printer is on.
A
97
Page 98

SC-P600 Series User’s Guide
Maintenance
Holding the new cartridge as shown, shake it four
B
or five times and then remove it from the package
and peel off the yellow tape only.
You may hear a rattling sound from inside the
cartridge when it is shaken.
Important:
c
❏ Do not touch the area shown in the
illustration. You may not be able to print
properly.
Open the cartridge cover.
D
Remove the ink cartridge that will be replaced.
E
Hold the cartridge by the hooks and lift it straight
up.
❏ Do not shake the ink cartridge once it has
Open the printer cover.
C
been removed from the package.
Otherwise, ink could leak.
If the cartridge does not come out easily, pull
harder.
Important:
c
Removed ink cartridges may have ink around
the ink supply port, so be careful not to get any
ink on the surrounding area.
98
Page 99

SC-P600 Series User’s Guide
Maintenance
Insert the new ink cartridge.
F
Push the cartridge in until it clicks into place.
Repeat steps 4 to 6 to replace other ink cartridges.
Important:
c
Install all ink cartridges. You cannot print if
one or more colors of ink cartridge are not
inserted.
Cleaning Inside the Printer
Clean the rollers by passing (feeding and ejecting) one of
the following types of paper through the printer.
Plain Paper
If the print results are scratched or smudged, there may
be dirt on the rollers. Pass (feed and eject) plain paper
through the printer to remove dirt from the rollers.
Cleaning sheet
If a cleaning sheet is provided with the Epson special
media, you can pass (feed and eject) it through the
printer to clean the rollers when plain paper fails to
produce the desired results.
See the manual supplied with the paper for more
information.
Turn on the printer.
A
Close the cartridge cover.
G
Close the printer cover.
H
Insert A3 or A3+ plain paper or a cleaning sheet
B
into the auto sheet feeder.
Plain paper: If the paper is smaller than A3 or
A3+, only the area corresponding to the size of
the paper will be cleaned.
Cleaning sheet: Remove the protective covering
from the cleaning sheet and place the sheet in the
auto sheet feeder. Adhesive tape is located
beneath the protective covering. Do not touch
the adhesive tape or attach it to other objects.
Press F - Maintenance - Paper Guide Cleaning
C
on the control panel's menu.
U “Menus” on page 88
Plain paper: Continue feeding and ejecting paper
until no ink smudges are detected.
Cleaning sheet: Feed and eject the same cleaning
sheet three times.
99
Page 100

SC-P600 Series User’s Guide
Problem Solver
Problem Solver
Messages
If one of the following messages is displayed in the control panel’s screen, refer to the solutions listed here and perform
the necessary steps to fix the problem.
Message What to do
Printer error. Turn power off and then on again. For details, see
your documentation.
Combination of IP address and subnet mask is invalid. See your
documentation.
Close the printer cover. See your documentation for details. Refer to the appropriate section below.
Some function may not be available. For details, see your
documentation.
Turn off the printer, and then turn it back on.
If the problem persists, turn off the printer, open the printer
cover, and check that there are no paper jams or foreign
objects in the printer.
Remove any foreign objects you discover and turn on the
printer.
See the Network Guide (PDF).
U “Paper from the Auto Sheet Feeder Jams During Printing”
on page 106
U “Jammed Fine Art Media” on page 107
U “Jammed Poster Board” on page 108
U “Roll paper jam” on page 109
U “The CD/DVD Tray is jammed” on page 110
When Paper Setup Display is set to Off, AirPrint is not
available. Error Notice from Paper Source Settings becomes
Off. To use this function, set Paper Setup Display to On.
U “Menus” on page 88
A printer's ink pad is at the end of its service life. Please contact
Epson support.
A printer's ink pad is nearing the end of its service life. Please
contact Epson support.
Contact your dealer or Epson Support any time that “Please
contact Epson support” is displayed.
100
 Loading...