

Page 1

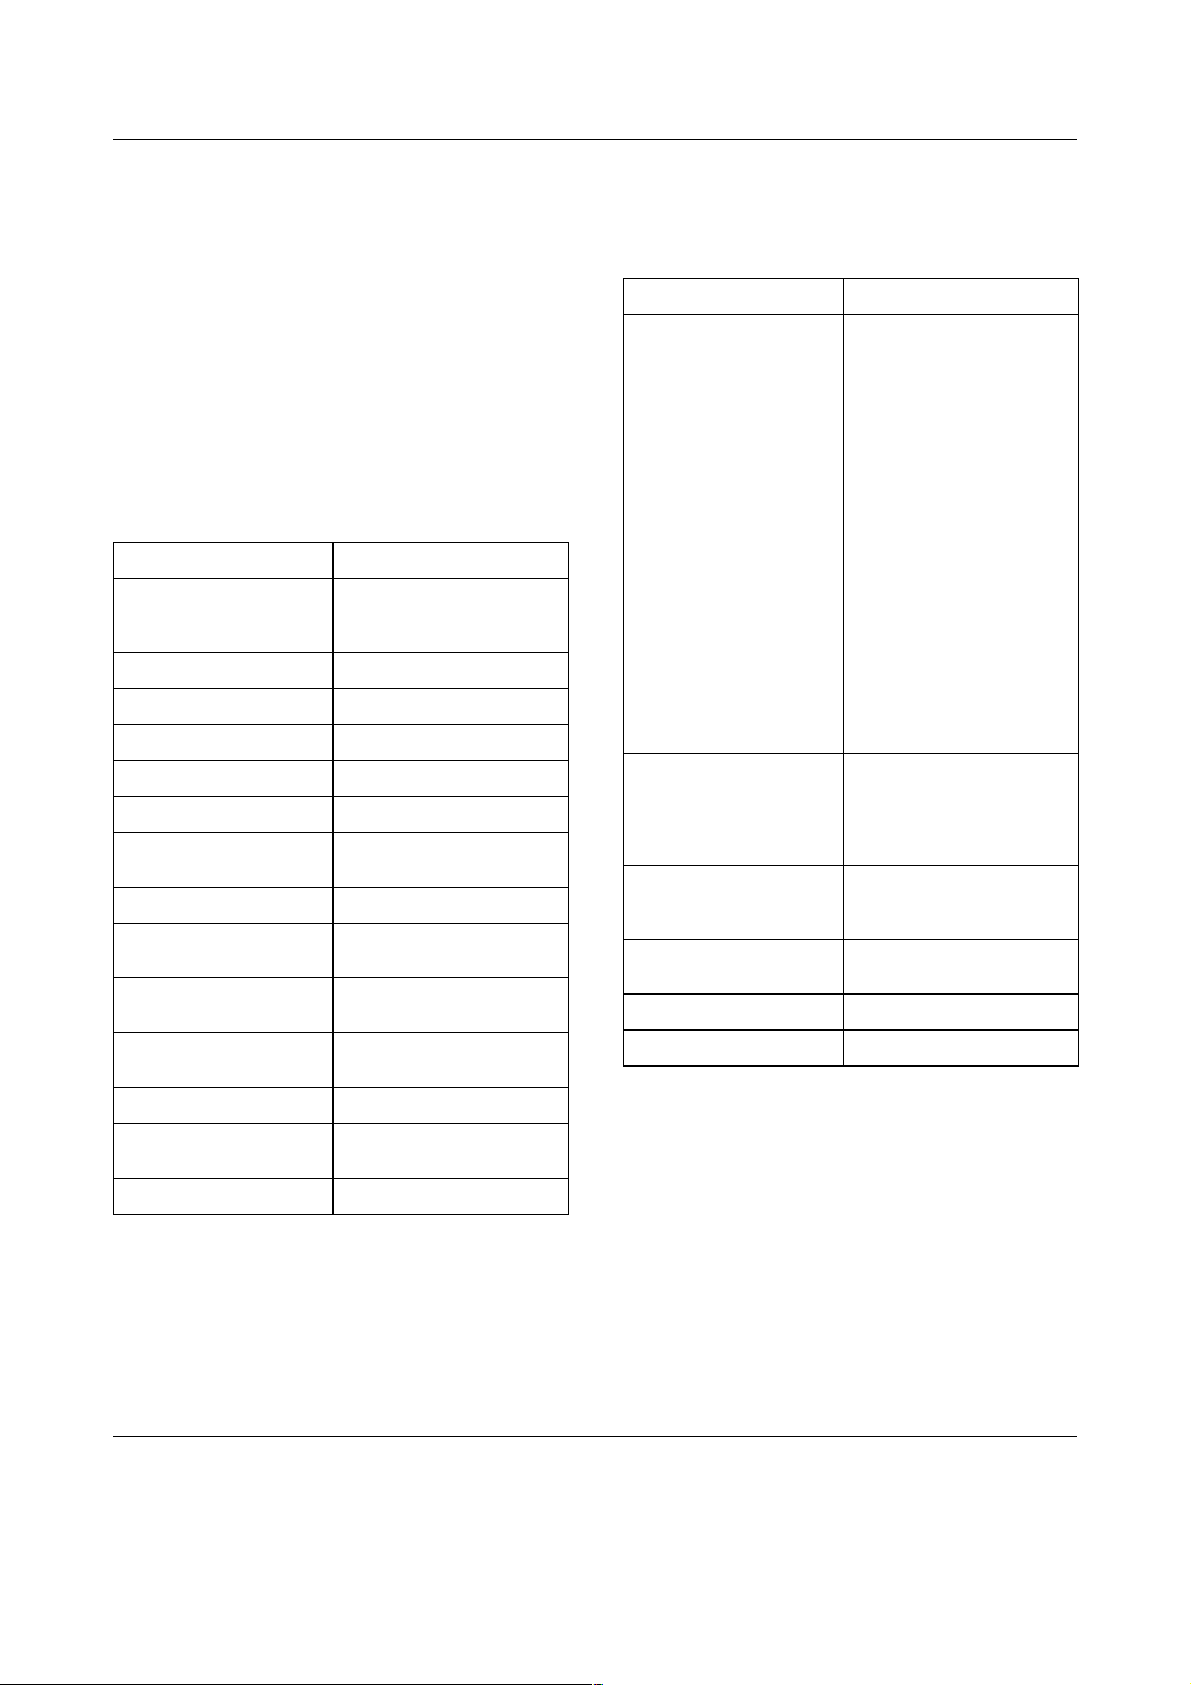
Buttons and Lights
EPSON DLQ-3500 Quick Guide
1 Font button
Selects one of the available fonts.
Font lights
Indicate which font is selected.
2 Reset
When you press both the Font and
Pitch buttons simultaneously, the
printer clears buffer and returns to its
default settings.
Font Pitch Paper Source Pause
10 cpi
12 cpi
15 cpi
17 cpi
20 cpi
PS
Tear Off
/
Special Paper
Tear Off
Envelope
Card
Tractor
Manual/CSF
3sec
LF/FFReset Load/Eject
4 Tear Off/Special Paper button
❏ Feeds continuous paper forward
❏ Feeds continuous paper
❏ Selects special paper (envelope
Tear Off/Special Paper lights
Paper Out
Micro Adjust
to the tear-off position.
backward from the tear-off
position to the top-of-form
position.
or card) as the paper type.
3 Pitch button
Selects one of the pitch settings.
Pitch lights
Indicate which pitch is selected.
❏ Flash when continuous paper is
in the tear-off position.
❏ Only the right one is on when
envelope is selected as the paper
type.
❏ Only the left one is on when card
is selected as the paper type.
Buttons and Lights (1/2)
Page 2

EPSON DLQ-3500 Quick Guide
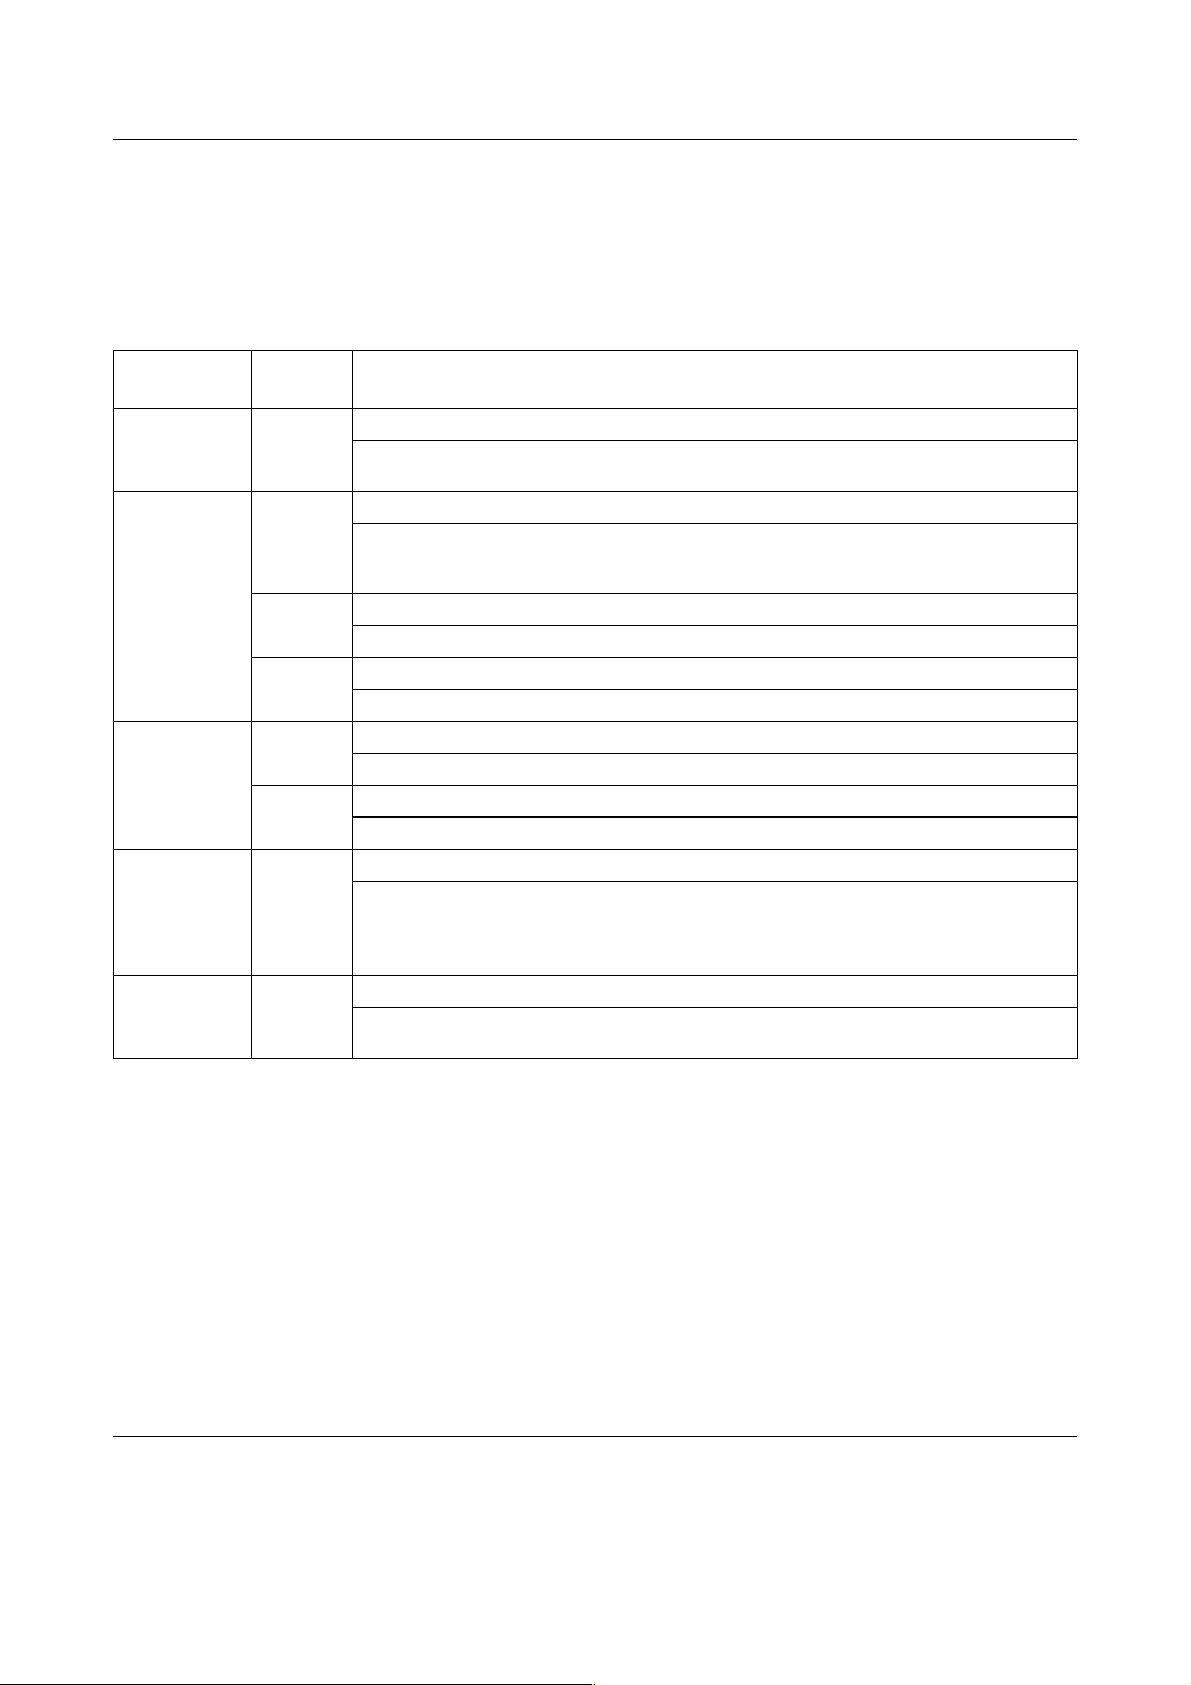
5 Paper Source button
Selects a paper source.
Tractor light
On when continuous paper is
selected.
Manual/CSF light
On when single-sheet is selected.
6 LF/FF button
❏ Feeds paper line by line when
pressed shortly.
❏ Ejects a single sheet or advances
continuous paper to the next
top-of-form position when held
down for a few seconds.
7 Load/Eject button
9 Paper out light
❏ On when no paper is loaded in
the selected paper source or
paper is not loaded correctly.
❏ F la sh es w he n p ap er ha s n o t b ee n
fully ejected or a paper jam has
occurred.
10 Pause button
❏ Stops printing temporarily, and
resumes printing when pressed
again.
❏ When held down for three
seconds, enters the Micro Adjust
mode. When pressed again, exits
the Micro Adjust mode.
Pause light
❏ On when the printer is paused.
❏ Loads a single sheet of paper.
❏ Ejects a single sheet of paper if a
sheet is loaded.
❏ Loads continuous paper from
the standby position.
❏ Feeds continuous paper
backward to the standby
position if a sheet is loaded.
8 Micro Adjust
When you hold down the Pause
button for three seconds, the printer
enters the Micro Adjust mode. In this
mode, you can adjust the top-of-form
a n d t e ar - of f po s i t i on s b y p re s s i n g t h e
D and Load/Eject U buttons.
LF/FF
See “Micro Adjust Function.”
❏ Fl as he s wh en th e pr in te r i s in th e
Micro Adjust mode.
Buttons and Lights (2/2)
Page 3
Default Settings
EPSON DLQ-3500 Quick Guide
Understanding default settings
This section describes the settings and
options available in the default-setting
mode. These settings are shown in the
following table and explained in detail after
the table.
Default-setting mode
Setting Options
Page length for tractor Length in inches: 3, 3.5, 4,
Skip over perforation Off, On
Auto tear-off Off, On
Auto line feed Off, On
Print direction Bi-D, Uni-D, Auto
Software ESC/P2, IBM PPDS
0 slash 0, (the zero character
High speed draft Off, On
I/F (interface) mode Auto, Parallel, USB,
Auto I/F (interface)
wait time
Parallel I/F bidirectional
mode
Packet mode Auto, Off
Auto CR (carriage
return)*
5.5, 6, 7, 8, 8.5, 11, 70/6,
12, 14, 17
/
0
with a slash)
Option
10 seconds, 30 seconds
Off, On
Off, On
Setting Options
Character table Standard model: italic,
International
character set for italic
table**
Font OCR-B, Orator, Orator-S,
M an ua l fe ed w ai t ti m e 0 .5 se co nd, 1 s ec on d, 1. 5
Buzzer Off, On
Overlapping Forms Off, On
* This setting is available only in IBM PPDS emulation
mode.
** The options available for this setting vary
depending on the country.
PC437, PC850, PC860,
PC863, PC865, PC861,
BRASCII, Abicomp,
Roman8, ISO Latin 1,
PC858, ISO 8859-15
All other models: Italic,
PC437, PC850,
PC437 Greek, PC853,
PC855, PC852, PC857,
PC864, PC866, PC869,
MAZOWIA, Code MJK,
ISO 8859-7, ISO Latin 1T,
Bulgaria, PC 774, Estonia,
ISO 8859-2, PC 866 LAT.,
PC 866UKR, PC APTEC,
PC708, PC720, PCAR 864,
PC860, PC865, PC861,
PC863, BRASCII,
Abicomp, Roman8,
ISO Latin 1, PC858,
ISO8859-15, PC 771
Italic U.S.A., Italic France,
Italic Germany, Italic U.K.,
Italic Denmark 1, Italic
Sweden, Italic Italy, Italic
Spain 1
Script C, Roman T, Sans
Serif H
seconds, 2 seconds
A.G.M* Off, On
Default Settings (1/4)
Page 4

EPSON DLQ-3500 Quick Guide
Page length for tractor
T hi s s et ti ng a ll ow s y o u t o s et th e p ag e l en gt h
(in inches) for the continuous paper loaded
on the tractor.
Skip over perforation
This feature is available only when
continuous paper is selected as the paper
source. When you turn on this feature, the
printer provides a one-inch (25.4 mm)
margin between the last line printed on one
page and the first line printed on the next
page. Because most application program
margin settings override margin settings
from the control panel, you should use this
setting only if you cannot set your top and
bottom margins using your application.
Auto tear-off
When auto tear-off is on and you are using
continuous paper with the tractor, the
printer automatically advances the paper
perforation to the tear-off position, where
you can easily tear off the printed page(s).
When the printer receives data again, it
automatically moves the paper back to the
top-of-form position and starts printing, so
you can use all of the next page.
When auto tear-off is off and you are using
continuous paper with the tractor, you need
to move the perforation to the tear-off
position manually by pressing the Tear
Off/Special Paper button. See “Using the
tear-off function” for more information.
Auto line feed
When auto line feed is on, the printer
accompanies each carriage return (CR) code
received with a line feed (LF) code.
Print direction
You can select auto print direction,
bidirectional printing (Bi-D), or
unidirectional printing (Uni-D). Printing is
normally bidirectional; however,
unidirectional printing allows for precise
vertical printing alignment.
Software
When you select ESC/P2, the printer
operates in the EPSON ESC/P2 mode. When
you select IBM PPDS, the printer emulates an
IBM printer.
0 slash
Select the zero character with a slash
(this feature is on) or without a slash (0) (this
feature is off). The slash allows you to easily
distinguish between the uppercase letter
“O” and a zero.
High speed draft
When high speed draft is on, the printer
prints up to 550 cps (characters per second)
at 10 cpi (characters per inch). When it is off,
the printer prints 495 cps at 10 cpi.
I/F (interface) mode
The printer provides a slot for an optional
interface in addition to its built-in parallel
interface and USB interface. You can choose
Auto (automatic), Parallel, USB or Option
for the interface mode. When you select
Auto, the printer automatically selects the
interface that is receiving data, and uses that
interface until the end of the print job. The
Auto setting allows you to share the printer
among multiple computers without
changing the interface mode.
()
/
0
If only one computer is connected to the
printer, you can select Parallel, USB or
Option, depending on which interface your
computer uses.
Default Settings (2/4)
Page 5

EPSON DLQ-3500 Quick Guide
Auto I/F (interface) wait time
When the printer is in the auto interface
mode and it receives no data from the
currently selected interface for the amount
of time specified with this setting, it
determines which interface is receiving data
and switches to that interface. You can
specify either 10 seconds o r 30 seconds f or
the auto interface wait time.
Parallel I/F bidirectional mode
The Parallel Interface bidirectional transfer
mode is used when this feature is on. If
bidirectional transfer mode is unnecessary,
turn this off.
Packet mode
Be sure to select Auto when printing from
Windows applications using the printer
driver included in the CD-ROM that comes
with the printer. In case you encounter any
communication troubles when printing
from applications based on other operating
systems such as DOS, turn off this mode.
The A.G.M. feature is available only in IBM
PPDS emulation mode.
Character table
You can select from among 13 to 36 standard
character tables, depending on the country
of purchase. See “Default-setting mode” for
more information.
International character set for italic table
You can select among several international
character sets for the italic character table.
Each character set contains eight characters
that vary depending on the country or
language, so you can customize the italic
table to suit your printing needs.
Font
One of these fonts selected in the default
setting is corresponding to Others on the
control panel. You can select the following
fonts directly on the control panel: Draft,
Roman, Sans Serif, Courier, Prestige and
Script.
Auto CR (carriage return)
This setting is available only in IBM PPDS
emulation mode. When auto carriage return
is on, each line feed (LF) code or ESC J code
is accompanied by a carriage return (CR)
code so the printer moves the next printing
position to the left margin. When this setting
is off, you must send a CR cod e after the line
feed code to move the printing position to
the left margin.
A.G.M. (IBM)
Turn on the alternate graphic mode (A.G.M.)
to m a ke t h e E S C 3, ES C A, ESC J, ESC K, ESC
L, ESC Y, ESC Z, and ESC * commands in
IBM PPDS emulation mode work the same
way as in ESC/P 2 mode.
Manual feed wait time
This setting allows you to set the amount of
wait time between when paper is inserted
in to th e p ap er gu id e and it is fed . I f t he pa pe r
feeds before you can adjust its position
properly, you should increase the wait time.
Buzzer (beeper)
The printer beeps when an error occurs. See
“Error Indicators” for more information on
printer errors. If you do not want the printer
to beep when an error occurs, turn off this
setting.
Default Settings (3/4)
Page 6

EPSON DLQ-3500 Quick Guide
Overlapping forms
This setting takes effect only when the
skip-over-perforation setting is on. When
overlapping-forms setting is on, the printer
lifts up the print head each time it makes a
one-inch margin with the
skip-over-perforation feature. You need to
turn on both the overlapping-forms and the
skip-over-perforation settings when you use
overlapping forms.
Changing default settings
Note:
❏ To print the language selection and
default-setting mode instructions, you need
three sheets of A4 or letter size single-sheet
paper or three pages of continuous paper that
is at least 279 mm (11 inches) long and 210
mm (8.3 inches) wide. See “Continuous
Paper” and “Single Sheets with the Paper
Guide” for instructions on loading
continuous paper and single sheets.
❏ If you use single sheets, you need to load a
new sheet of paper each time the printer ejects
a printed sheet from the paper guide.
1. Make sure paper is loaded and the
printer is turned off.
3.Press the Font button until the Font and
Pitch lights indicate the language you
want, as described in the language
selection instructions.
4. Press the Tear Off/Special Paper
button to print the default-setting mode
instructions (two pages) in the language
you selected.
The printed instructions list the settings
you can change, describe how to change
them, and show you how the control
panel lights help you make settings. Use
these instructions to change the printer’s
default settings from the control panel.
Note:
The arrows in the instructions indicate the
printer’s current settings.
5. When you finish making settings, turn
off the printer and exit the
default-setting mode.
Note:
You may exit the default-setting mode by
turning off the printer at any time. Any
settings you have made remain in effect until
you change them again.
Caution:
c
2. Turn on the printer while holding down
the Font button.
The printer enters the default-setting
mode and prints the language selection
instructions (one page).
Whenever you turn off the printer,
wait at least five seconds before
turning it back on; otherwise, you
may damage the printer.
Default Settings (4/4)
Page 7
ff
EPSON DLQ-3500 Quick Guide
Error Indicators
You can identify many common printer problems using the lights on the control panel. If your printer
stops working and one or more control panel lights are on or flashing or the printer beeps, use the
following table to diagnose and fix the problem.
State of
panel lights
n Paper Out
n Pause
f Paper Out
n Pause
o Paper Out
n Pause
f Paper Out
f Pause
ff Tear Off/
Special Paper
fff Font
f Pitch
o Paper Out
f Pause
Beep
pattern
••• No paper is loaded in the selected paper source.
••• Paper is not loaded correctly.
••• Paper is jammed in the printer.
••• Paper is not fully ejected.
••• The paper source is not selected correctly on the control panel.
••• The printer cover is open.
••••• An unknown printer error has occurred.
– The print head is overheated.
Problem
Solution
Load paper in the selected paper source; the Paper Out and Pause lights go off and the
printer resumes printing.
Remove and reload your paper correctly, then press the Pause button.
See “Continuous Paper,” “Single Sheets with the Paper Guide” or “Special Papers” for
paper-loading instructions.
To clear the paper jam, see “Clearing a Paper Jam” in the Reference Guide.
Press the Load/Eject button to eject the sheet.
Select the proper paper source Then press the Pause button.
Close the printer cover and press the Pause button.
Turn off the printer and leave it off for several minutes; then turn it on again.
If the error recurs, contact your dealer.
Wait for a few minutes; the printer resumes printing automatically once the print head
cools.
n = on,
••• = short series of beeps (three beeps), ••••• = long series of beeps (five beeps)
o = off, f = flashing
Note:
The printer beeps once if you press a control panel button when the corresponding function is not available.
Error Indicators (1/1)
Page 8
-1
1
0
2
3
4
5
6
7
8
9
AU
T
UTO
EPSON DLQ-3500 Quick Guide
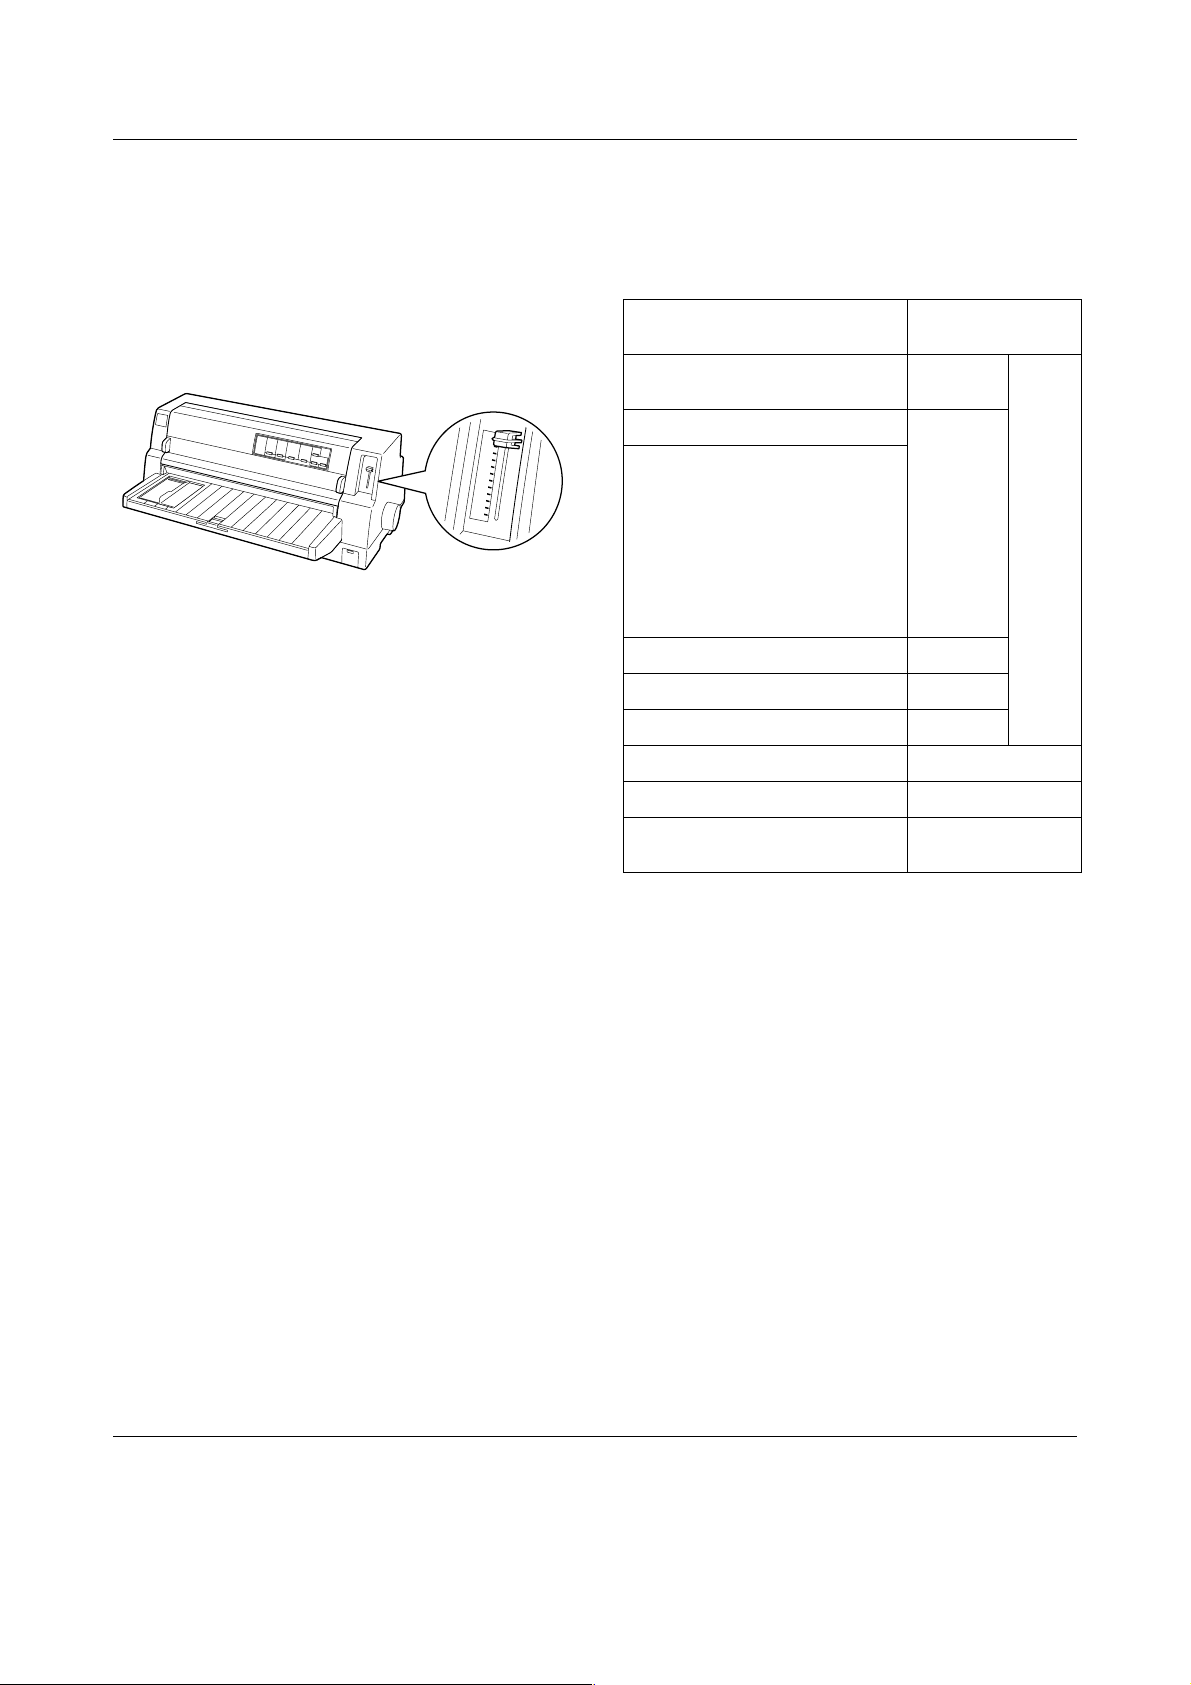
Paper-Thickness Settings
Usually, set the paper-thickness lever to the
AUTO p os it io n a s s ho wn be lo w; yo ur pr i n te r
automatically adjusts itself to the thickness
of the paper loaded in the printer.
Paper type Paper-thickness
Ordinary paper (single sheets or
continuous paper)
Multipart forms (carbonless)
lever position
-1 to 1
If you are not content with the printing
quality, especially when using special paper
such as multipart forms, you can manually
set the paper-thickness lever to the
appropriate position.
The higher the number you set the
paper-thickness lever to, the wider the space
between the platen and print head. If your
printout appears faint or characters seem
skipped or missing, this setting may be too
high. On the other hand, if the setting is too
low, your printout may appear smudged,
the paper may not feed correctly, or the
ribbon may become damaged.
The following table provides guidelines for
selecting the appropriate lever position for
the type of paper you are using.
2 parts (original + 1 copy)
3 parts (original + 2 copies)
4 parts (original + 3 copies)
5 parts (original + 4 copies)
6 parts (original + 5 copies)
7 parts (original + 6 copies)
8 parts (original + 7 copies)
Labels 2 or 3
Envelopes 2 to 7
Postcards 2
Continuous forms with labels Auto
Overlapping multipart forms Auto
Overlapping multipart forms with
labels
0 or 1
1 or 2
2 to 4
3 to 5
4 to 6
5 to 8
6 to 9
Auto
Caution:
c
Do not set the paper-thickness lever to
AUTO when using labels whose backing
sheet is exposed. Set it to the appropriate
position according to the table above.
Note:
❏ When Overlapping Forms is turned on in
the default-setting mode, the printer
automatically operates on AUTO function
even though the paper-thickness lever may be
set to another position.
Auto
Paper-Thickness Settings (1/2)
Page 9

❏ It is recommended to set the paper-thickness
lever to AUTO when printing on multipart
forms, because the total thickness of
multipart forms may vary depending on the
kind of paper even if the number of parts is
the same. However, if your printout appears
faint, set the paper-thickness lever to a lower
position within the range specified in the
table above. Similarly, if your printout
appears smudged, set the lever to a higher
position.
❏ If your printout appears faint or characters
seem skipped or missing, this setting may be
too high. On the other hand, if the setting is
too low, your printout may appear smudged
EPSON DLQ-3500 Quick Guide
Paper-Thickness Settings (2/2)
Page 10

Continuous Paper
Paper Source Paus
3se
M
LF/F
ff
f
e
Manual/CSF
Tractor
EPSON DLQ-3500 Quick Guide
Positioning the continuous paper supply
W h en y ou l oa d co n ti n uo u s pa p e r , m a ke s u re
to line up the paper supply with the tractor
so the paper feeds smoothly into the printer
as shown below.
Loading continuous paper
1. Make sure that Tractor is selected as the
paper source on the control panel. If not,
select it by pressing the Paper Source
button.
2. Slide the edge guide all the way to the
left.
3. Facing the back of the printer, release the
sprocket lock levers by pushing them up.
* sprocket lock lever
Continuous Paper (1/4)
Page 11

EPSON DLQ-3500 Quick Guide
4. Position the left sprocket so that the
sprocket pins are to the left of the arrow
mark on the back of the printer. Then
push down the lock lever to lock the
sprocket in place.
Note:
Printing starts at the arrow mark on the back
of the printer.The unprintable area is to the
left of the arrow mark.
5. Slide the right sprocket to roughly match
the width of your paper, but do not lock
it.
7. Open the sprocket covers.
* sprocket cover
8. Fit the first three holes of the continuous
paper over the sprocket pins on both
sides. Be sure to position your paper
supply so that the printable side faces
up.
6. Slide the center paper support to the
middle of the two sprockets.
Caution:
c
9. Close the sprocket covers.
Make sure the first sheet of your
continuous paper has a clean,
straight edge so that it can feed
smoothly into the printer.
Continuous Paper (2/4)
Page 12

EPSON DLQ-3500 Quick Guide
10. Slide the right sprocket to remove any
slack in the paper. Then push down the
sprocket lock lever to lock the sprocket
in place.
11. Turn on the printer if it is turned off. The
printer is ready to start printing.
When using continuous paper, you can use
the tear-off function to tear off printed pages
and save the blank pages that are usually
wasted between print jobs. For more
information, see “Using the tear-off
function.”
Note:
Always make sure there is at least one more sheet
than required; continuous paper may not feed
properly if it is not fed through the sprockets.
Using the tear-off function
You can use the tear-off function to advance
your continuous paper to the printer’s
tear-off edge when you finish printing. You
can then easily tear off the printed sheets.
When you resume printing, the printer
automatically feeds the paper back to the
top-of-form position so that you can save the
paper normally lost between documents.
Using the Tear Off/Special Paper button
Follow these steps to advance continuous
paper to the tear-off position using the Tear
Off/Special Paper button:
1. After the printer finishes printing your
document, check that the Tear
Off/Special Paper lights are not
flashing.
Note:
If the Tear Off/Special Paper lights are
flashing, the paper is in the tear-off position.
If you press the Tear Off/Special Paper
button again, the printer feeds your paper to
the next top-of-form position.
Caution:
c
Note:
If the first line on your page appears too high or
low, you can change its position by using the
Micro Adjust function as described in
“Adjusting the top-of-form position.”
❏ Use the knob on the right side of the
printer only to clear paper jams when
the printer is off. Otherwise, you may
damage the printer or cause it to lose
the top-of-form position.
❏ Do not open the printer cover while
paper is being fed; otherwise you
cannot load the paper correctly.
2. Press the Tear Off/Special Paper
button. The printer advances the paper
to the tear-off edge.
Note:
If your paper’s perforation is not properly
aligned with the tear-off edge, you can adjust
the tear-off position using the Micro Adjust
function as described in “Adjusting the
tear-off position.”
Caution:
c
Never use the knob to adjust the
tear-off position; this may damage the
printer or cause it to lose the
top-of-form position.
Continuous Paper (3/4)
Page 13

EPSON DLQ-3500 Quick Guide
3. Tear off all printed pages using the
tear-off edge of the printer cover.
* tear-off edge
When you resume printing, the printer
feeds the paper back to the top-of-form
position and begins printing. (You can
also manually feed the paper back to the
top-of-form position by pressing the
Tear Off/Special Paper button.)
Advancing paper to the tear-off position
automatically
To automatically advance your printed
documents to the tear-off position, turn on
the auto tear-off mode and select the
appropriate page length for continuous
paper in the default-setting mode. See
“Changing default settings” for instructions
on how to change the default settings.
The steps below describe how to use auto
tear-off.
2. Tear off all printed pages using the
tear-off edge of the printer cover.
Note:
If your paper’s perforation is not properly
aligned with the tear-off edge, you can adjust
the tear-off position using the Micro Adjust
function as described in “Adjusting the
tear-off position.”
3. When you resume printing, the printer
feeds the paper back to the top-of-form
position and begins printing. (You can
also manually feed the paper back to the
top-of-form position by pressing the
Tear Off/Special Paper button.)
Removing continuous paper
Follow these steps to remove continuous
paper from the printer:
1. Press the Tear Off/Special Paper
button after the printer finishes printing
your document. The printer advances
the paper to the tear-off position.
Note:
When the auto tear-off function is on, the
printer advances the paper perforation to the
tear-off position automatically. You can turn
on the auto tear-off function by changing the
default settings. See “Changing default
settings” for instructions.
1. When printing is finished, the printer
advances the perforation of the final
printed page to the tear-off position.
2. Tear off the printed pages.
3.Press the Load/Eject button to feed the
continuous paper backward out of the
printer and into the standby position.
4 . T o co m p l e te l y r e mo v e c o nt i n u o us p ap e r
from the printer, open the sprocket
covers. Remove the paper from the
tractor unit, and then close the sprocket
covers.
Continuous Paper (4/4)
Page 14

Paper Source Pau
3s
LF/F
al Paper
ff
pe
Manual/CSF
Tractor
EPSON DLQ-3500 Quick Guide
Single Sheets with the Paper Guide
Follow these steps to load single sheets from
the paper guide.
1. Make sure the paper guide is attached as
described in the Setup Guide. Then close
the tractor unit sprocket covers located
on the back of your printer and push
down the sprocket lock levers to lock the
sprockets in place.
2. Turn on the printer.
3. Make sure that Manual/CSF is selected
as the paper source on the control pa nel.
If not, select it by pressing the Paper
Source button.
5. While aligning the left side of a sheet of
paper with the edge guide, insert it into
the printer until it meets resistance. Be
sure to load paper printable side up.
After a few seconds, the printer
automatically advances the paper to the
loading position. The printer is ready to start
printing.
Caution:
c
❏ Use the knob on the right side of the
printer only to clear paper jams when
the printer is off. Otherwise, you may
damage the printer or cause it to lose
the top-of-form position.
4. Slide the edge guide until it rests against
the guide mark.
* guide mark
❏ Do not open the printer cover while
paper is being fed; otherwise the
printer cannot load the paper
correctly.
Note:
❏ If the platen rotates but the printer does not
load the paper, completely remove the paper
and then insert it all the way into the printer
again.
❏ If the paper feeds before you can adjust its
position properly, increase the Manual
feed wait time in the default-setting
mode. See “Changing default settings” for
more information.
Single Sheets with the Paper Guide (1/2)
Page 15

❏ If you need to adjust the position of the paper
after it is loaded, see “Adjusting the
top-of-form position” and follow the
instructions.
After printing a sheet, the printer ejects it
o nt o t he p ap er gu id e a nd th e Paper Out a n d
Pause lights come on. If you are printing a
multiple-page document, remove the
printed sheet and insert a new sheet into the
paper guide. The printer automatically
advances the paper and resumes printing.
Note:
If the printer does not eject the printed sheet,
press the Load/Eject button.
EPSON DLQ-3500 Quick Guide
Single Sheets with the Paper Guide (2/2)
Page 16

EPSON DLQ-3500 Quick Guide
Single Sheets with the Cut-Sheet Feeder
Loading paper to the cut-sheet feeder
For single-sheet multipart forms, use only
the type of forms that are glued at the top.
To avoid paper jams, do not allow too many
printed sheets to be stacked on the paper
guide at one time. Remove the stack when it
is half as thick as the paper loading limit
marked on the cut-sheet feeder.
Follow these steps to load paper to the
cut-sheet feeder:
1. Pu ll th e pa pe r s et l ev er for wa rd un ti l t he
paper guides retract to allow paper
loading.
3. Slide the right paper guide so that its
edge is even with the guide mark on the
cut-sheet feeder and push back the lever
to lock the paper guide in place. Next,
slide the left paper guide to roughly
match the width of the paper.
4. Slide the center support midway
between the paper guides.
2. Release the paper guide lock levers by
pulling them forward.
5. Fan a stack of paper, and tap the sides
and bottom of the stack on a flat surface
to even it up.
Caution:
c
Single Sheets with the Cut-Sheet Feeder (1/3)
Do not load labels to the cut-sheet
feeder.
Page 17

EPSON DLQ-3500 Quick Guide
6. Insert the paper along the right paper
guide and adjust the position of the left
paper guide so that it matches your
pape r’s wid th. Mak e su re the p os itio n o f
the guide allows the paper to move up
and down freely. Then lock the left guide
in place.
Note:
Load paper with the printable side up. If you
are using pre-printed forms, load the forms
top-down.
7. Push back the paper set levers to clamp
the paper against the guide rollers.
The cut-sheet feeder feeds paper when
you send data to the printer. You can also
feed paper by pressing the Load/Eject
button.
Note:
❏ If the platen turns without loading the paper,
completely remove the paper and then insert
it all the way into the printer again.
❏ If you need to adjust the position of the paper
after it is loaded, see “Adjusting the
top-of-form position” and follow the
instructions.
Loading paper manually using the front paper guide
The cut-sheet feeder’s single-sheet loading
feature allows you to switch to a different
type or size of paper without replacing the
paper already loaded in the cut-sheet feeder
or removing the feeder.
8. Before printing, make sure that
Manual/CSF is selected as the paper
source on the control panel. If not, select
it by pressin g the Paper Source button.
Also set the paper-thickness lever to the
appropriate position for the paper
loaded in the cut-sheet feeder as
described in “Paper-Thickness
Settings.” In your printer driver
software, select your paper size from the
Paper Size list.
Follow these steps to load paper manually
using the paper guide:
1. Make sure that Manual/CSF is selected
as the paper source on the control panel.
If not, select it by pressing the Paper
Source button.
2. Push the paper guide and the paper
guide extension all the way in.
3. Adjust the edge guide so that it is aligned
with the guide mark on the paper guide.
4 . W h il e a li gn in g th e l ef t s id e of pa pe r w it h
the edge guide, insert it until it meets
resistance. Be sure to load paper
printable side up. After a few seconds,
the printer automatically advances the
paper to the loading position. The
printer is re ady to accept data from yo ur
computer and print.
Single Sheets with the Cut-Sheet Feeder (2/3)
Page 18

After printing a page of your document, the
printer ejects it onto the paper guide and the
Paper Out a nd Pause li gh ts co me on . I f y o u
are printing a multiple-page document,
remove the printed sheet and insert a new
sheet into the paper guide. The printer
automatically advances the paper and
resumes printing.
EPSON DLQ-3500 Quick Guide
Single Sheets with the Cut-Sheet Feeder (3/3)
Page 19

EPSON DLQ-3500 Quick Guide
Single Sheets with the Automatic Sheet Alignment Unit
Follow these steps to load paper using the
automatic sheet alignment unit:
1. Make sure that Manual/CSF is selected
as the paper source on the control pa nel.
If not, select it by pressing the Paper
Source button.
2. Set the paper-thickness lever to the
appropriate position for the type of
single sheet you are using referring to
the table in “Paper-Thickness Settings.”
Normally set it to AUTO.
AUTO
9
8
7
6
5
4
3
2
1
0
-1
Note:
Make sure to insert paper between the two
arrow marks on the unit.
Caution:
c
Use the knob on the right side of the
printer only to clear paper jams when
the printer is off.
4. The printer starts printing when it
receives data. The printing position (the
position of the first letter of the first line)
is set to 3 mm (0.12 inch) from the left
edge of the paper by default. See
“Adjusting the printing position” in the
Reference Guide for more information
on the printing position.
A
* paper-thickness lever
3. Insert paper into the automatic sheet
alignment unit so that the tip of the
paper goes behind the rollers of the unit.
The printer automatically aligns the
paper, recognizes the right and left
edges (the widt h) of the pa per and star ts
feeding.
1. inserted position
2. aligned position
3. arrow marks
A. 3 mm
* the printing position
5. The printer automatically ejects paper
when it finishes printing. If the printed
sheet remains in the printer, press the
Load/Eject button to eject it.
Single Sheets with the Automatic Sheet Alignment Unit (1/1)
Page 20

EPSON DLQ-3500 Quick Guide
Special Papers
Multipart forms
Your printer can print on both single-sheet
and continuous multipart forms. It can use
multipart forms with up to eight parts
including the original.
Caution:
c
B e f o r e p r i n t in g , s e t t h e p a p e r - t h i c k ne s s l e v e r
to the appropriate position for your
multipart forms referring to the table in
“Paper-Thickness Settings.”
You can load single-sheet multipart forms
from the paper guide, or with the optional
cut-sheet feeder or optional automatic sheet
alignment unit. For instructions, see “Single
Sheets with the Paper Guide,” “Loading
paper to the cut-sheet feeder” or “Single
Sheets with the Automatic Sheet Alignment
Unit.” You can load continuous multipart
forms in the same way as you load ordinary
continuous paper. For instructions, see
“Continuous Paper.”
c
Use only carbonless multipart forms.
Caution:
❏ When printing on multipart forms,
make sure that your software settings
keep the printing entirely within the
printable area of the forms. Printing
on the edge of a multipart form can
damage the print head. For
information about the printable area,
see “Printable area” in the Reference
Guide.
❏ Single-sheet multipart forms that are
glued at the side of the form should be
loaded only from the paper guide, not
from the optional cut-sheet feeder.
Overlapping multipart forms
Overlapping multipart forms are a type of
continuous paper with multipart forms. The
page length of the multipart forms is longer
than that of the backing continuous paper.
So when extended, one page’s multipart
forms overlap the next page’s multipart
forms as shown below. This overlapping
area is thicker than the printable area.
Follow these steps to load overlapping
multipart forms:
Caution:
c
1. Make sure of the following:
Use overlapping multipart forms only
under normal operating conditions.
❏ Your software settings keep the
printing entirely within the
printable area. See “Printable area”
in the Reference Guide for more
information.
❏ Tractor is selected as the paper
source on the control panel.
❏ The setting of the page length for
tractor in the default settings
matches the page length of the form
you use. See “Changing default
settings” for more information.
Special Papers (1/6)
Page 21

EPSON DLQ-3500 Quick Guide
2. Turn on Overlapping Forms and Skip
over perforation settings in the
default-setting mode.
Note:
When Overlapping Forms is turned on in
the default-setting mode, the printer
automatically activates the auto paper
thickness function even though the
paper-thickness lever may be set to another
position.
Caution:
c
3. Follow the instructions in “Loading
continuous paper.”
❏ Printing on the edge of
overlapping multipart forms can
damage the print head.
❏ Be sure to turn on
Overlapping Forms and Skip
over perforation settings in
the default-setting mode when
using this type of paper;
otherwise your printer may be
damaged.
To tear off and eject overlapping multipart
forms
Labels
When selecting labels for printing, always
choose labels mounted on continuous
backing sheets with sprocket holes for use
with a tractor. Do not use labels on shiny
single-sheet backing, because the backing
sheet tends to slip and may not feed
properly.
Follow these steps to load labels:
Caution:
c
1. Make sure of the following:
Use labels only under normal operating
conditions because labels are especially
sensitive to temperature and humidity.
❏ Your software settings keep the
printing entirely within the
printable area. For information
about the printable area, see
“Printable area” in the Reference
Guide.
Caution:
c
Printing on the edge of a label can
damage the print head.
Always tear off and eject overlapping
multipart forms following the instructions
described below.
Note:
When Overlapping Forms is turned on in the
default-setting mode, the Tear Off/Special
Paper button is disabled and the Load/Eject
button only feeds forms forward.
1. At the back of your printer, tear off the
last overlappin g multipart f orm that has
entered the printer.
2. Press the LF/FF button to eject the last
overlapping multipart forms forward.
❏ The auto tear-off function is turned
off in the default-setting mode.
❏ If you use labels whose backing
sheet is exposed, make sure the
paper-thickness lever is not set to
AUTO. Set it to the appropriate
position. See “Paper-Thickness
Settings” for more information.
2. Load labels as described in “Continuous
Paper.”
Special Papers (2/6)
Page 22

EPSON DLQ-3500 Quick Guide
To tear off and eject labels
Always tear off and eject labels as described
below.
Caution:
c
1. At the back of your printer, tear off the
Never feed labels backward using the
Load/Eject button, Tear Off/Special
Paper button, or knob on the right side
of the printer. Labels can easily peel off
their backing and jam the printer.
last label form that has entered the
printer, but do not press the Tear
Off/Special Paper button. See the
illustration below.
Continuous forms with labels
The continuous forms with labels is a type of
continuous paper with one label on each
page. This is different from label paper,
which consists entirely of labels. When
printing on this type of paper, the printer
must adjust the height of the print head for
the extra thickness of the labels.
Follow these steps to load continuous forms
with labels:
Caution:
c
Use continuous forms with labels only
under normal operating conditions.
2. Press the LF/FF button to eject the last
label form forward.
Caution:
c
Do not leave labels loaded in the printer
between print jobs; they tend to curl and
may come off their backing sheet and jam
the printer when you resume printing.
1. Make sure of the following:
❏ Your software settings keep the
printing entirely within the
printable area. See “Printable area”
in the Reference Guide for more
information.
❏ Tractor is selected as the paper
source on the control panel.
2. Turn on Overlapping Forms and Skip
over perforation settings in the
default-setting mode.
Note:
When Overlapping Forms is turned on in
the default-setting mode, the printer
automatically activates the auto paper
thickness function even though the
paper-thickness lever may be set to another
position.
Special Papers (3/6)
Page 23

EPSON DLQ-3500 Quick Guide
3. Follow the instructions in “Loading
continuous paper.”
Caution:
c
To tear off and eject continuous forms with
labels
Always tear off and eject continuous forms
with labels by following the procedure
below.
Note:
When Overlapping Forms is turned on in the
default-setting mode, the Tear Off/Special
Paper button is disabled and the Load/Eject
button only feeds forms forward.
❏ Printing on the edge of continuous
forms with labels can damage the
print head.
❏ When loading continuous forms with
labels, make sure the left edge of the
form is no further than 3 cm to the left
of the arrow mark (when facing the
back of the printer).
3. To print on another type of paper, turn
off Overlapping Forms and Skip over
perforation settings in the
default-setting mode.
Caution:
c
Do not leave continuous forms with labels
loaded in the printer between print jobs;
they tend to curl and may come off their
backing sheet and jam the printer when
you resume printing.
Overlapping multipart forms with labels
This kind of continuous paper is a
combination of the two types of forms;
overlapping multipart forms and
continuous forms with labels. Be sure to
follow any special instructions intended for
either type of forms.
1. At the back of your printer, tear off the
last continuous form with labels that has
entered the printer.
2. Press the LF/FF button to eject the last
form forward.
Caution:
c
Follow these steps to load overlapping
multipart forms with labels:
1. Make sure of the following:
Use overlapping multipart forms with
labels only under normal operating
conditions because labels are especially
sensitive to temperature and humidity.
❏ Your software settings keep the
printing entirely within the
printable area. See “Printable area”
in the Reference Guide for more
information.
Special Papers (4/6)
Page 24

EPSON DLQ-3500 Quick Guide
❏ Tractor is selected as the paper
source on the control panel.
❏ The setting of the page length for
tractor in the default settings
matches the page length of the form
you use. See “Changing default
settings” for more information.
2. Turn on Overlapping Forms and Skip
over perforation settings in the
default-setting mode.
Note:
When Overlapping Forms is turned on in
the default-setting mode, the printer
automatically activates the auto paper
thickness function even though the
paper-thickness lever may be set to another
position.
3. Follow the instructions in “Loading
continuous paper.”
Caution:
c
❏ Printing on the edge of overlapping
multipart forms with labels can
damage the print head.
❏ When loading overlapping multipart
forms with labels, make sure the left
edge of the form is no further than 3
cm to the left of the arrow mark (when
facing the back of the printer).
1. At the back of your printer, tear off the
last overlapping multipart form with
labels that has entered the printer.
2. Press the LF/FF button to eject the last
form forward.
3. To print on another type of paper, turn
off Overlapping Forms and Skip over
perforation settings in the
default-setting mode.
Caution:
c
Do no t l eav e o ve rl app in g m ul tip ar t f or ms
with labels loaded in the printer between
print jobs; they tend to curl and may come
off their backing sheet and jam the printer
when you resume printing.
Envelopes
You can print on a variety of envelopes by
loading them the same way you load single
sheets—from the paper guide or with the
optional cut-sheet feeder or optional
automatic sheet alignment unit.
Follow these steps to load envelopes:
Caution:
c
Use envelopes only under normal
operating conditions.
To tear off and eject overlapping multipart
forms with labels
Always tear off and eject overlapping
multipart forms with labels by following the
procedure below.
Note:
When Overlapping Forms is turned on in the
default-setting mode, the Tear Off/Special
Paper button is disabled and the Load/Eject
button only feeds forms forward.
1. Make sure that your software settings
keep the printing entirely within the
printable area. See “Printable area” in
the Reference Guide for more
information.
Caution:
c
Printing on the edge of an envelope
can damage the print head.
Special Papers (5/6)
Page 25

EPSON DLQ-3500 Quick Guide
2. Make sure that Manual/CSF is selected
as the paper source on the control pa nel.
If not, select it by pressing the Paper
Source button.
3. Select Envelope on the control panel by
pressing the Tear Off/Special Paper
button.
4. Load envelopes following the
instructions in “Single Sheets with the
Paper Guide,” “Single Sheets with the
Cut-Sheet Feeder” or “Single Sheets
with the Automatic Sheet Alignment
Unit.” Be sure to fold the flap and be
careful of the flap’s orientation.
from the paper guide
1. Make sure that your software settings
keep the printing entirely within the
printable area. See “Printable area” in
the Reference Guide for more
information.
Caution:
c
2. Make sure that Manual/CSF is selected
as the paper source on the control panel.
If not, select it by pressing the Paper
Source button.
3.Select Card on the control panel by
pressing the Tear Off/Special Paper
button.
4. Load cards following the instructions in
“Single Sheets with the Paper Guide,”
“Single Sheets with the Cut-Sheet
Feeder” or “Single Sheets with the
Automatic Sheet Alignment Unit.”
Printing on the edge of a postcard can
damage the print head.
* top edge first and flap side down
Postcards
You can print on a variety of postcards by
loading them the same way you load single
sheets from the paper guide or with the
optional cut-sheet feeder or optional
automatic sheet alignment unit.
Follow these steps to load postcards.
Caution:
c
Use postcards only under normal
operating conditions.
from the paper guide
* guide mark
Special Papers (6/6)
Page 26

Paper Source Pau
3s
LF/F
al Paper
ff
pe
Manual/CSF
Tractor
EPSON DLQ-3500 Quick Guide
Paper-Type Switching
When using the tractor, you can easily
switch between continuous paper and single
sheets (including envelopes or postcards)
without removing the continuous paper
from the tractor.
Switching to single sheets
Follow these steps to switch from
continuous paper to single sheets:
1. When you have finished printing on
continuous paper, press the Tear
Off/Special Paper button to advance
the paper to the tear-off position.
Note:
If the auto tear-off mode is turned on, the
printer advances the paper perforation to the
tear-off position automatically.
2. Tear off the printed pages.
4. Select Manual/CSF as the paper source
on the control panel by pressing the
Paper Source button.
Now you can load single sheets from the
paper guide. See “Single Sheets with the
Paper Guide” for more information.
Switching to continuous paper
Follow these steps to switch from single
sheets to continuous paper:
Caution:
c
❏ Always tear off paper before
feeding it backwards; feeding too
many sheets backwards can
cause a paper jam.
❏ Never feed labels backward using
the Load/Eject button, Tear
Off/Special Paper button, or
knob on the right side of the
printer. Labels can easily peel off
their backing and jam the
printer. For information on
removing labels from the paper
path, see “Special Papers.”
3.Press the Load/Eject button to feed the
continuous paper back to the standby
position. The paper is still attached to the
tractor, but is no longer in the paper
path.
1. If necessary, press the Load/Eject
button to eject the last printed single
sheet.
2 . M a ke su re c on ti nu ou s p a pe r i s l o ad ed in
the printer as described in “Loading
continuous paper.”
Paper-Type Switching (1/2)
Page 27

3. Select Tractor as the paper source on the
Paper Source Pau
3s
LF/F
al Paper
ff
pe
Manual/CSF
Tractor
control panel by pressing the Paper
Source button.
The printer automatically advances the
continuous paper from the standby position
to the loading p osition whe n it receives d ata.
EPSON DLQ-3500 Quick Guide
Paper-Type Switching (2/2)
Page 28

Paper Out
Pause
3sec
Micro Adjust
LF/FF Load/Eject
EPSON DLQ-3500 Quick Guide
Micro Adjust Function
The M icr o Ad jus t fu nct ion all ows you to
move the paper forward or backward in
0.141 mm (1/180-inch) increments so
that you can make precise adjustments
to the top-of-form and tear-off positions.
Adjusting the tear-off position
If your paper perforation is not aligned with
the tear-off edge, you can use the Micro
Adjust function to move the perforation to
the tear-off position.
Follow these steps to adjust the tear-off
position:
Caution:
c
Note:
Your tear-off position setting remains in effect
until you change it, even if you turn off the
printer.
1. Press the Pause button if the printer is
Never use the knob to adjust the tear-off
position; this may damage the printer or
cause it to lose the tear-off position.
printing.
4. Press the LF/FF
backward, or press the Load/Eject
button to feed paper forward, until the
paper perforation is aligned with the
tear-off edge of the printer cover.
Note:
The printer has a minimum and a maximum
tear-off position. If you try to adjust the
tear-off position beyond these limits, the
printer beeps and stops moving the paper.
5. Tear off the printed pages.
6. Press the Pause button to exit the Micro
Adjust mode.
When you resume printing, the printer
automatically feeds the paper back to the
top-of-form position and begins printing.
button to feed paper
D
U
2. Make sure the Tear Off/Special Paper
lights are flashing (the paper is at the
current tear-off position). You may need
to press the Tear Off/Special Paper
button to advance the paper to the
tear-off position.
3. Hold down the Pause button for about
three seconds. The Pause light begins
flashing and the printer enters the Micro
Adjust mode.
Micro Adjust Function (3/4)
Page 29

EPSON DLQ-3500 Quick Guide
Adjusting the top-of-form position
The top-of-form position is the position on
the page where the printer starts printing. If
your printing appears too high or low on the
page, you can use the Micro Adjust function
to adjust the top-of-form position.
Follow these steps to adjust the top-of-form
position:
Caution:
c
Note:
❏ Your top-of-form position setting remains in
❏ The top margin setting made in some
Never use the knob to adjust the
top-of-form position; this may damage the
printer or cause it to lose the top-of-form
position.
effect until you change it, even if you turn off
the printer.
application software overrides the
top-of-form position setting you make with
the Micro Adjust function. If necessary,
adjust the top-of-form position in your
software.
5. Press the LF/FF
top-of-form position down on the page,
or press the Load/Eject
move the top-of-form position up on the
page.
Note:
❏ The printer has a minimum and a
maximum top-of-form position. If you
try to adjust it beyond these limits, the
printer beeps and stops moving the
paper.
❏ When the paper reaches the default
top-of-form position, the printer also
beeps and stops moving the paper
briefly. You can use the default setting
as a reference point when adjusting the
top-of-form position.
6. After you set the top-of-form position,
press the Pause button to exit the Micro
Adjust mode.
button to move the
D
button to
U
1. Make sure the printer is turned on.
2. Press the Pause button to stop printing.
The Pause light comes on.
3. Load paper. Press the Load/Eject
button to advance continuous paper to
the current top-of-form position. If
n e ce s sa r y, l if t u p t he p r i n te r c o v er s o y ou
can see the paper position.
4. Hold down the Pause button for about
three seconds. The Pause light starts
flashing and the printer enters the Micro
Adjust mode.
Micro Adjust Function (4/4)
Page 30

EPSON DLQ-3500 Quick Guide
Ribbon Cartridge
Genuine EPSON ribbon cartridge
When printing becomes faint, you need to
replace the ribbon cartridge. Genuine
EPSON ribbon cartridges are designed and
manufactured to work properly with your
EPSON printer. They ensure proper
operation and long life of the print head and
other printer parts. Other products not
manufactured by EPSON may cause
d a ma g e t o yo u r p r in t e r, w h i ch i s n o t co v e r ed
by EPSON’s warranties.
Your printer uses the following ribbon
cartridges:
EPSON black ribbon cartridge:
S015139 (long-life cartridge)
S015066 (normal cartridge)
EPSON color ribbon cartridge:
S015067
Warning:
w
3. The print head should be in the
replacement position shown in the
illustration below.
If you have just used the printer, the
print head may be hot; let it cool for a
few minutes before replacing the
ribbon cartridge.
Replacing the ribbon cartridge
Follow these steps to replace a used ribbon
cartridge:
1. Make sure the printer is turned off.
2. Open the printer cover by holding the
finger grips on both ends of the cover
and lifting it up. Then open the paper
bail.
If it is not, close the printer cover and
turn the printer on to move the print
head to the replacement position. Wait a
few seconds, then turn the printer off
again and open the printer cover.
Caution:
c
Following the steps below while the
printer is turned on can damage the
printer.
Ribbon Cartridge (1/2)
Page 31

EPSON DLQ-3500 Quick Guide
4. Press the tab at the upper right of the
cartridge holder and pull the cartridge
out of the printer.
5. Remove the new ribbon cartridge from
its package and turn the
ribbon-tightening knob in the direction
of the arrow to remove any slack in the
ribbon.
6. Hold the ribbon cartridge with the part
where the ribbon is exposed facing
down and the ribbon-tightening knob
facing to the front of the printer. Then
guide the ribbon under the print head,
and snap the cartridge into place so that
the tabs on both sides of the cartridge fit
into the notches in the cartridge holder.
7. Turn the ribbon-tightening knob again
to remove any slack in the ribbon so that
the ribbon moves freely.
8. Close the paper bail and the printer
cover.
Ribbon Cartridge (2/2)
 Loading...