

Page 1
Setup Guide
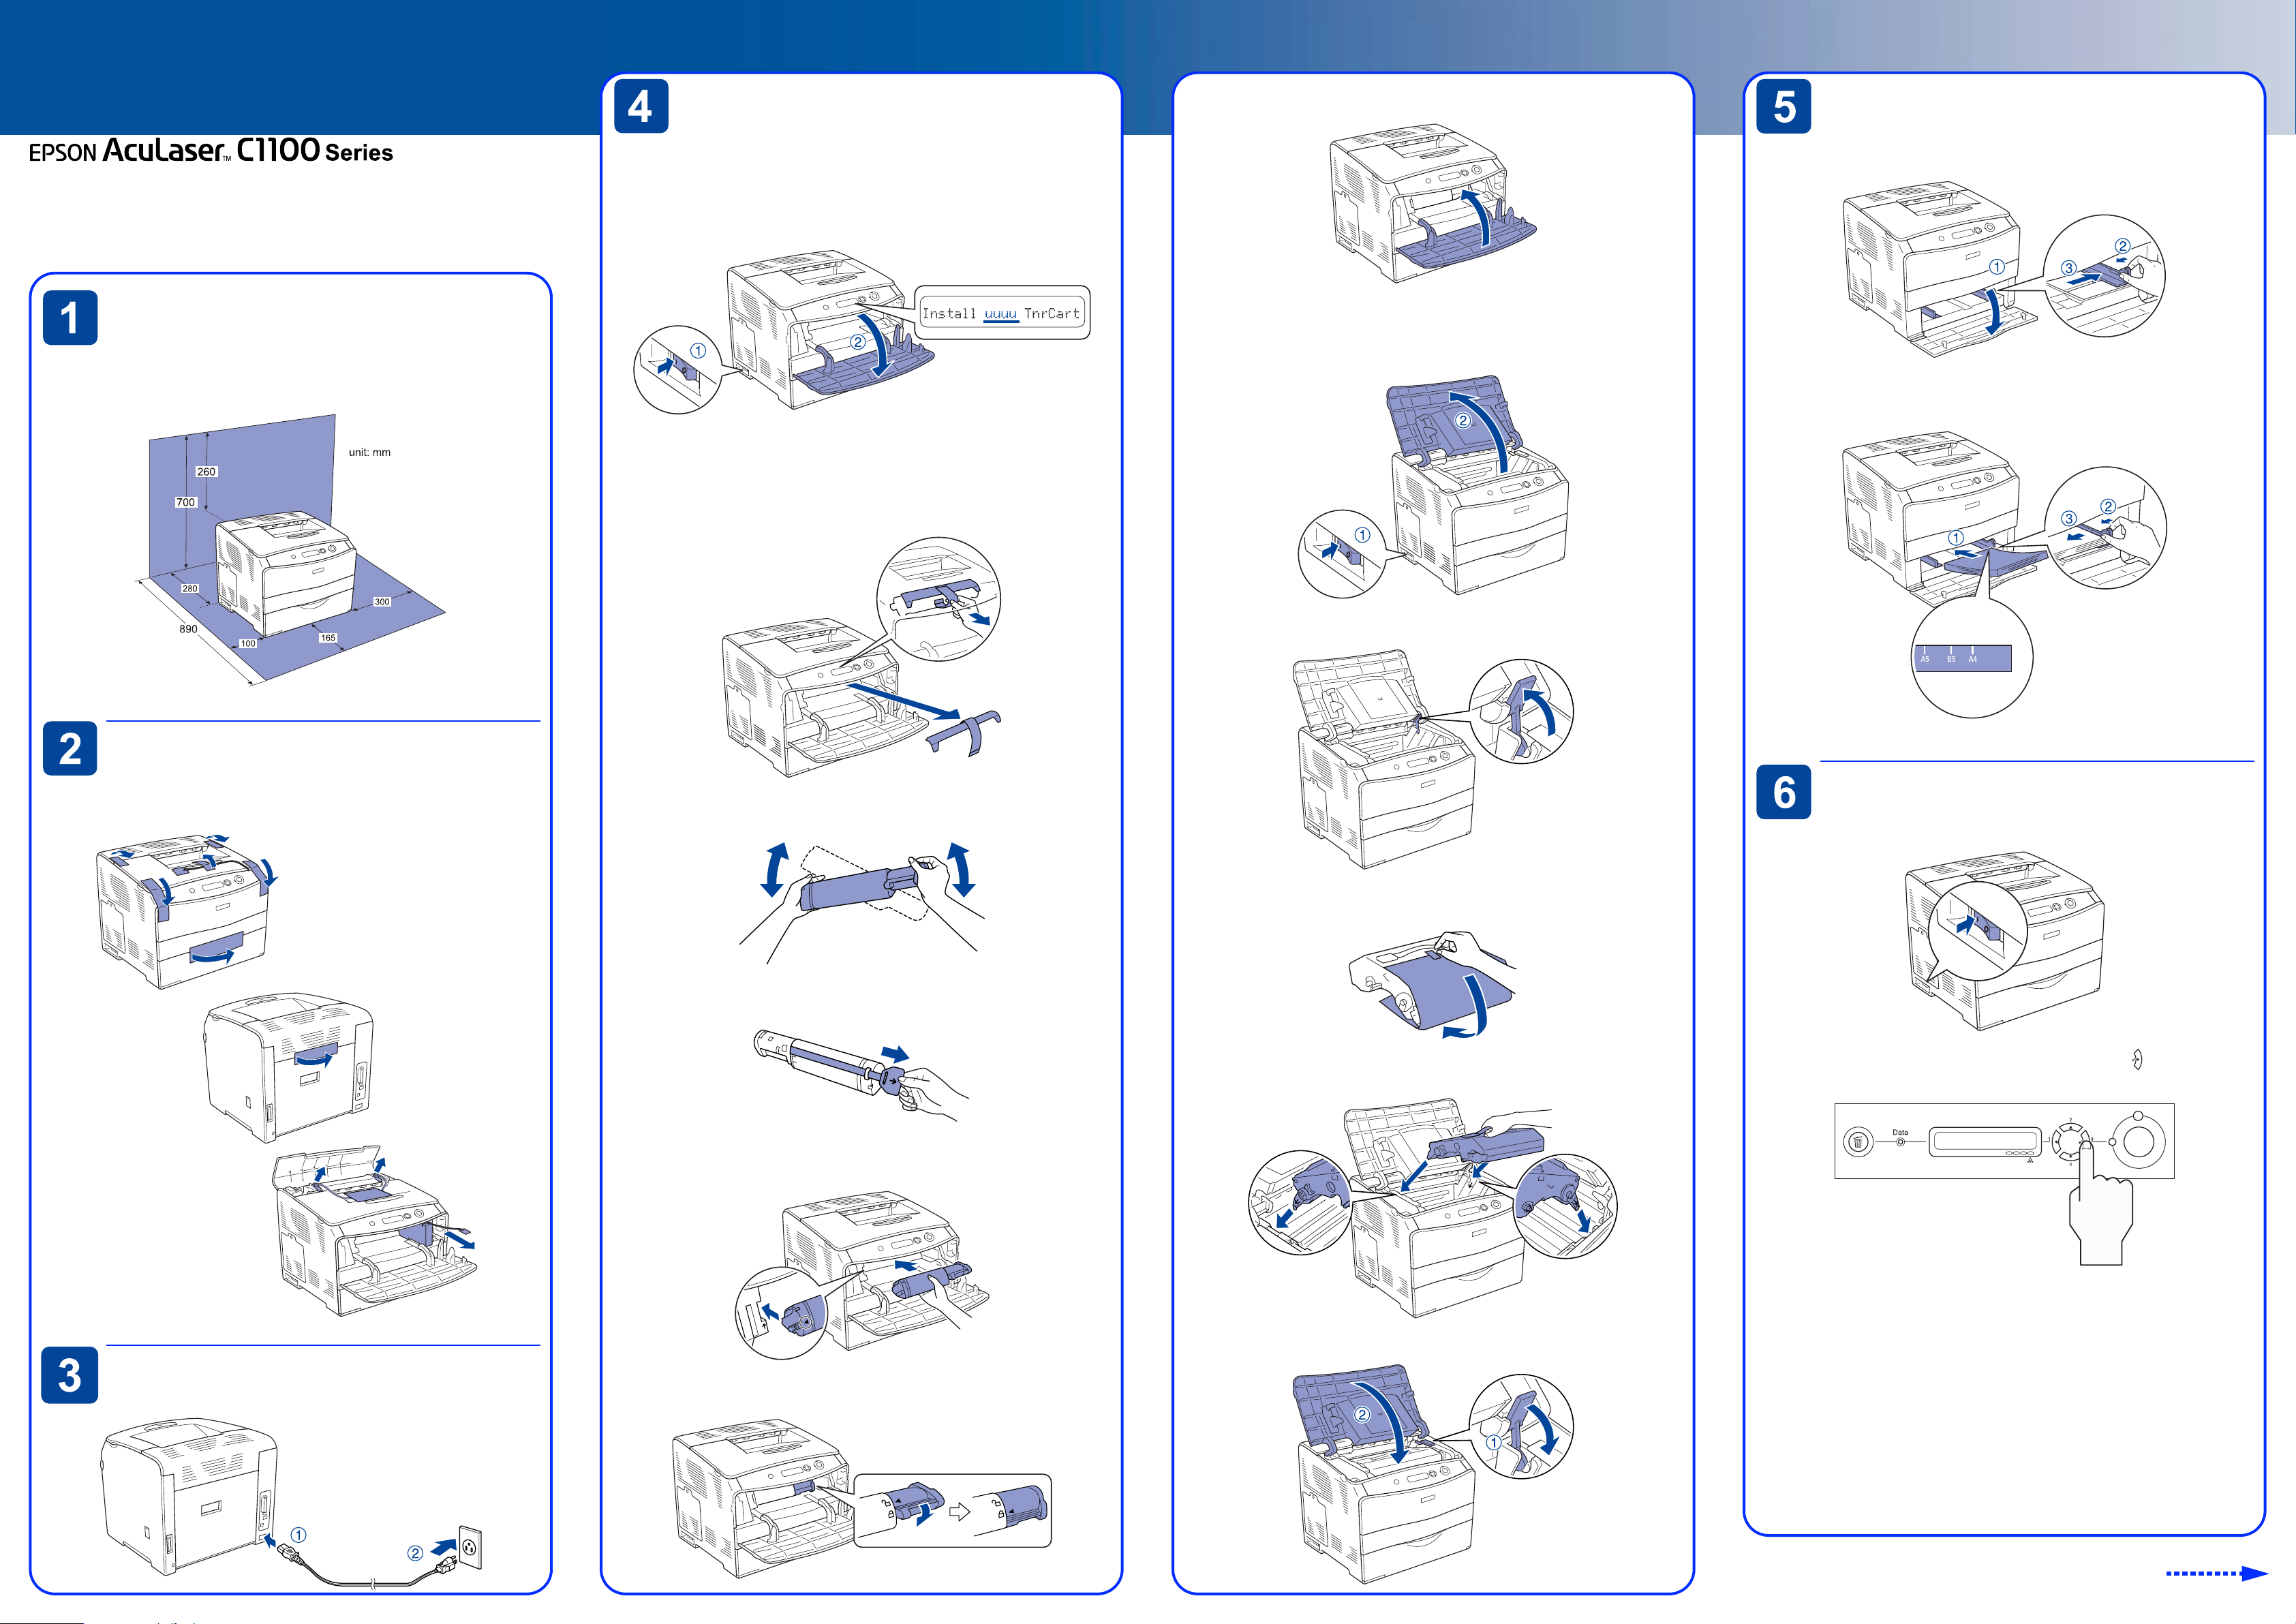
Installing Consumables
7. Close the cover A.
Loading Paper
4049771-02
XXX
Notes contain important information and useful tips on the operation of your
printer.
Finding a Place
The illustration shows the recommended amount of space. For
information and cautions, see the Safety Instructions sheet.
For specifications and handling precautions, see the Reference Guide.
Toner Cartridges and Photoconductor Unit
1. Make sure the printer is turned on, then open cover A.
Note:
The letters C, M, Y, or K appear in place of uuuu and indicate the colors Cyan,
Magenta, Yellow, and Black respectively.
2. Remove the cover from inside of the printer.
1. Open the MP tray cover, then slide the right paper guide outward.
8. Repeat 1 to 7 steps to install other toner cartridges.
9. Make sure the printer is turned on, then open the cover B.
2. Set A4 or Letter size paper into the tray with the printable side facing
up, then close the MP tray cover.
Removing the Protective
Materials
3. Shake the toner cartridge enough.
4. Hold the tag and gently pull the toner seal upward.
10.Raise the yellow lever up.
Testing the Printer
1. Make sure the printer is turned on.
11.Take the photoconductor unit out of its package, then remove the
protective sheet.
Plugging in the Printer
5. Insert the toner cartridge firmly with aligning the arrow mark.
6. Lock the toner cartridge.
12.Insert the photoconductor unit firmly with aligning the arrow marks
on the printer.
13.Push the yellow lever down, then close the cover B.
2. Make sure the LCD panel shows Ready. Press the
three times. The printer starts printing a status sheet.
Note:
If you are unable to get the printer to print a normal status sheet or you have
a problem with print quality, see “Problem Solver” in the Reference Guide.
Enter button
Turn over
Page 2

Connecting the Printer to
a Computer
Make sure that both the printer and the computer are turned off.
2. Insert the printer software CD-ROM in the CD-ROM drive.
3. Click Continue.
6. In the dialog box that appears, click Install Software.
Getting More Information
Online guides
The CD-ROM shipped with your printer includes the following online
guides as well as the printer driver.
Safety Instructions Sheet
Provides you with important safety information about this printer.
Read this sheet before assembling the printer.
Reference Guide
USB or Parallel Interface
Attach the USB or parallel interface cable to the printer. Plug the other
end of the cable into the computer’s parallel or USB interface
connector.
<USB>
<Parallel>
4. When the software license agreement screen appears, read the
statement and then click Agree.
5. In the dialog box that appears, click Local or Network.
6. Follow the on-screen instructions.
For Macintosh users
1. Make sure the printer is turned off.
7. Click Install and follow the on-screen instructions.
For Mac OS 10.1.2 or later
1. After installing the software and restarting the computer, turn the
printer on.
2. Open the Applications folder on your hard drive, then open the
Utilities folder and double-click the Print Center (Mac OS 10.2.x) or
Printer Setup Utility (Mac OS 10.3) icon. Click Add Printer in the
Printer List dialog box.
3. Select EPSON USB from the pop-up menu. Select AL-C1100 in the
Product list, then click Add.
For Mac OS 9.1 or later
1. After installing the software and restarting the computer, turn the
printer on.
Provides you with detailed information on the printer’s functions,
optional products, maintenance, troubleshooting, and technical
specifications. A Reference Guide icon is created on the desktop
when the printer software is installed.
Paper Jam Guide (PDF guide)
Provides you with solutions for paper jam problems that you may
need to refer to on a regular basis. We recommend printing this
guide and keeping it near the printer.
Online Help for printer software
Click Help for detailed information and instructions on the printer
software that controls your printer. Online help is automatically
installed when you install the printer software.
Network Guide
Provides network administrators with information on both the
printer driver and network settings.
Note:
Refer to this guide if your printer is a network model.
Installing the Network Guide
1. Insert the printer software CD-ROM in the CD-ROM drive.
For Mac OS 9 users, double-click the Mac OS 9 icon.
For Mac OS X users, double-click the EPSON icon, then double-click
the Mac OS X icon.
2. Click Continue.
Network Interface
Attach the network interface cable to the printer. Plug the other end
of the cable into the network hub.
Note:
This interface is available for the network model.
Installing the Printer
Software
For Windows users
1. Make sure the printer is turned off.
2. Insert the printer software CD-ROM in the CD-ROM drive.
3. For Mac OS 9 users, double-click the Mac OS 9 icon. For Mac OS X
users, double-click the EPSON icon, then double-click the Mac OS
X icon.
4. Click Continue.
2. Open Chooser from the Apple menu. Select AL-C1100 and your
USB port, then close Chooser.
Options
The printer provides you with a variety of options. For specifications,
handling precautions, or installing, see the Reference Guide or the
instructions that come with the packages.
3. When the software license agreement screen appears, read the
statement and then click Agree.
4. In the dialog box that appears, click Install Network Utility.
5. Select Network Guide. Then follow the on-screen instructions.
No part of this publication may be reproduced, stored in a retrieval system, or transmitted in
any form or by any means, mechanical, photocopying, recording, or otherwise, without the
prior written permission of Seiko Epson Corporation.
No patent liability is assumed with respect to the use of the information contained herein. Neither
is any liability assumed for damages resulting from the use of the information contained herein.
Neither Seiko Epson Corporation nor its affiliates shall be liable to the purchaser of this product
or third parties for damages, losses, costs, or expenses incurred by purchaser or third parties as
a result of: accident, misuse, or abuse of this product or unauthorized modifications, repairs, or
alterations to this product, or (excluding the U.S.) failure to strictly comply with Seiko Epson
Corporation’s operating and maintenance instructions.
Seiko Epson Corporation and its affiliates shall not be liable against any damag es or prob lems
arising from the use of any options or any consumable products other than those designated
as Original Epson Products or Epson Approved Products by Seiko Epson Corporation.
EPSON is registered a trademark and EPSON AcuLaser is a trademark of Seiko Epson Corporation.
5. When the software license agreement screen appears, read the
statement and then click Agree.
Microsoft and Windows are registered trademarks of Microsoft Corporation in the United States
and/or other countries.
Apple and Macintosh are registered trademarks of Apple Computer, Inc.
Adobe and PostScript are trademarks of Adobe Systems Incorporated, which may be registered
in certain jurisdictions.
General Notice: Other product names used herein are for identification purposes only and may
be trademarks of their respective owners. Epson disclaims any and all rights in those marks.
Copyright© 2005 Seiko Epson Corporation. All rights reserved.
Printed in XXX XX-XX.XX
 Loading...