

Page 1
®
彩色雷射印表機
使用手冊
Page 2

All rights reserved. No part of this publication may be reproduced, stored in a retrieval
system, or transmitted in any form or by any means, mechanical, photocopying, recording,
or otherwise, without the prior written permission of Seiko Epson Corporation. No patent
liability is assumed with respect to the use of the information contained herein. Neither is
any liability assumed for damages resulting from the use of the information contained herein.
Neither Seiko Epson Corporation nor its affiliates shall be liable to the purchaser of this
product or third parties for damages, losses, costs, or expenses incurred by purchaser or third
parties as a result of: accident, misuse, or abuse of this product or unauthorized modifications,
repairs, or alterations to this product, or (excluding the U.S.) failure to strictly comply with
Seiko Epson Corporation’s operating and maintenance instructions.
Seiko Epson Corporation and its affiliates shall not be liable against any damages or problems
arising from the use of any options or any consumable products other than those designated
as Original Epson Products or Epson Approved Products by Seiko Epson Corporation.
IBM and PS/2 are registered trademarks of International Business Machines Corporation.
Microsoft and Windows are registered trademarks of Microsoft Corporation in the United
States of America and other countries.
Apple and Macintosh are registered trademarks of Apple Computer, Inc.
EPSON is registered a trademark and EPSON AcuLaser is a trademark of Seiko Epson
Corporation.
General Notice: Other product names used herein are for identification purposes only and
may be trademarks of their respective owners. Epson disclaims any and all rights in those
marks.
Copyright © 2004 by Seiko Epson Corporation, Nagano, Japan.
本手冊的內容如有任何變更,恕不另行通知。
2
Page 3

目錄
第 1 章 更換耗材
更換訊息 . . . . . . . . . . . . . . . . . . . . . . . . . . . . . . . . . . . . . . . . . . . . . . . . 5
碳粉匣 . . . . . . . . . . . . . . . . . . . . . . . . . . . . . . . . . . . . . . . . . . . . . . . . . . 6
注意事項 . . . . . . . . . . . . . . . . . . . . . . . . . . . . . . . . . . . . . . . . . . . . 6
更換碳粉匣 . . . . . . . . . . . . . . . . . . . . . . . . . . . . . . . . . . . . . . . . . . 7
感光滾筒單元 . . . . . . . . . . . . . . . . . . . . . . . . . . . . . . . . . . . . . . . . . . . 11
注意事項 . . . . . . . . . . . . . . . . . . . . . . . . . . . . . . . . . . . . . . . . . . . 11
更換感光滾筒單元 . . . . . . . . . . . . . . . . . . . . . . . . . . . . . . . . . . . 12
第 2 章 安裝選購品
選購下方進紙器 . . . . . . . . . . . . . . . . . . . . . . . . . . . . . . . . . . . . . . . . . 15
注意事項 . . . . . . . . . . . . . . . . . . . . . . . . . . . . . . . . . . . . . . . . . . . 15
安裝選購下方進紙器 . . . . . . . . . . . . . . . . . . . . . . . . . . . . . . . . . 16
移除選購下方進紙器 . . . . . . . . . . . . . . . . . . . . . . . . . . . . . . . . . 18
雙面列印單元 . . . . . . . . . . . . . . . . . . . . . . . . . . . . . . . . . . . . . . . . . . . 18
安裝雙面列印單元 . . . . . . . . . . . . . . . . . . . . . . . . . . . . . . . . . . . 18
移除雙面列印單元 . . . . . . . . . . . . . . . . . . . . . . . . . . . . . . . . . . . 22
記憶體模組 . . . . . . . . . . . . . . . . . . . . . . . . . . . . . . . . . . . . . . . . . . . . . 22
安裝記憶體模組 . . . . . . . . . . . . . . . . . . . . . . . . . . . . . . . . . . . . . 23
移除記憶體模組 . . . . . . . . . . . . . . . . . . . . . . . . . . . . . . . . . . . . . 25
第 3 章 清除夾紙
清除夾紙的注意事項 . . . . . . . . . . . . . . . . . . . . . . . . . . . . . . . . . 27
夾紙 - 護蓋 C (Jam C ). . . . . . . . . . . . . . . . . . . . . . . . . . . . . . . . 28
夾紙 - 護蓋 D (Jam D) . . . . . . . . . . . . . . . . . . . . . . . . . . . . . . . . 30
夾紙 - 護蓋 E (Jam E) . . . . . . . . . . . . . . . . . . . . . . . . . . . . . . . . 33
夾紙 - 護蓋 F (Jam F). . . . . . . . . . . . . . . . . . . . . . . . . . . . . . . . . 34
夾紙 - 護蓋 DM (Jam DM) . . . . . . . . . . . . . . . . . . . . . . . . . . . . . 37
夾紙 - 萬用進紙匣 (Jam MP). . . . . . . . . . . . . . . . . . . . . . . . . . . 38
3
Page 4

夾紙 - 下方進紙匣 (Jam LC) . . . . . . . . . . . . . . . . . . . . . . . . . . .39
夾紙 - 護蓋 G (Jam G) . . . . . . . . . . . . . . . . . . . . . . . . . . . . . . . .40
當投影片夾在萬用進紙匣時. . . . . . . . . . . . . . . . . . . . . . . . . . . .41
4
Page 5
第 1 章
更換耗材
更換訊息
當您看見印表機的液晶顯示幕及 EPSON 印表機監控程式 3 的視窗
出現下列訊息時,請您更換合適的耗材。 在訊息出現後,您可再
繼續列印一段時間,但是 EPSON 建議您及早更換,以便維持其
列印品質並延長印表機的壽命。
1
1
1
1
液晶顯示幕的訊息 說明
Worn Photoconductor 感光滾筒單元的使用壽命即將用盡。
Worn Fuser 加熱器單元的使用壽命即將用盡。請聯絡您的
Worn uuuu Dev Unit Developer 單元的使用壽命即將用盡。請聯絡您
附註:
請從控制面板選擇 〝Reset Menu〞中的 〝
清除訊息。
若您在耗材之使用壽命將盡時繼續使用而不更換,則印表機將會
停止列印,且液晶顯示幕或 EPSON 印表機監控程式 3 視窗將會
出現以下訊息,直到您更換耗材之後,印表機才會重新列印。
液晶顯示幕訊息 說明
Replace Toner uuuu* 所指示的碳粉匣已用盡。
Replace Photocondctr 列印停止,以避免損害印表機的引擎。
* 字母 C、M、Y 和 K 會出現在這個位置,代表需要更換的碳粉匣顏色。例如,Y
Toner Low 訊息,代表黃色碳粉匣的碳粉存量低。
經銷商。
的經銷商。
Clear All Warning
〞
1
1
1
1
1
1
1
1
更換耗材
5
Page 6

附註:
印表機一次只會顯示一個耗材的訊息,因此更換完一項耗材後,
請檢查印表機液晶顯示幕是否出現其他訊息。
當液晶顯示幕上顯示 Replace Photocondctr 訊息並且閃爍紅色
錯誤燈號時,您可以按下控制面板上的 『 N 開始 / 停止』鍵,繼
續再列印一段時間 。此時液晶顯示幕上的訊息將會由 Replace
Photocondctr 變成 Worn Photoconductor。
附註:
❏
當您繼續以使用壽命即將用盡的耗材列印時,我們將無法保
證其列印品質。若無法達到您所期望的品質時,請更換新的
耗材。
❏
當印表機停止列印時請更換新的耗材,否則如果繼續以使用
壽命即將用盡的耗材列印,可能會損害印表機。
碳粉匣
注意事項
更換耗材時,請務必遵守下列的注意事項:
❏ 建議您使用 EPSON 原廠碳粉匣。若您使用非原廠碳粉匣將會
影響列印品質。Epson 對於使用非原廠碳粉匣所造成的任何損
壞和問題,將不予負責。
❏ 更換碳粉匣的過程中,請將碳粉匣放置在乾淨的平台上。
❏ 當您將碳粉匣從低溫的地方移到溫暖的地方時,請至少過一
個小時後,再將碳粉匣安裝到印表機中,避免因為耗材的凝
結而損害印表機。
6
更換耗材
Page 7

w
警告:
❏
請不要觸碰碳粉,且避免讓碳粉接觸到您的眼睛。若
您的皮膚或衣服不小心碰觸到碳粉,請立即用肥皂或
清水洗淨。
1
❏
請將碳粉匣放置在兒童拿不到的地方。
❏
請不要將使用過的碳粉匣丟棄在火源中,因為它可能
會爆炸而導致受傷。請依照當地廢棄物的相關規定來
處理碳粉匣。
❏
若碳粉外漏時,請使用掃把和簸箕或沾有肥皂水的布
清理。請勿使用吸塵器清理,因為細微的碳粉顆粒如
果接觸到火星即會起火或發生爆炸。
更換碳粉匣
請依照下列步驟,更換碳粉匣。
1. 開啟印表機的電源。
1
1
1
1
1
1
1
1
更換耗材
1
1
1
7
Page 8
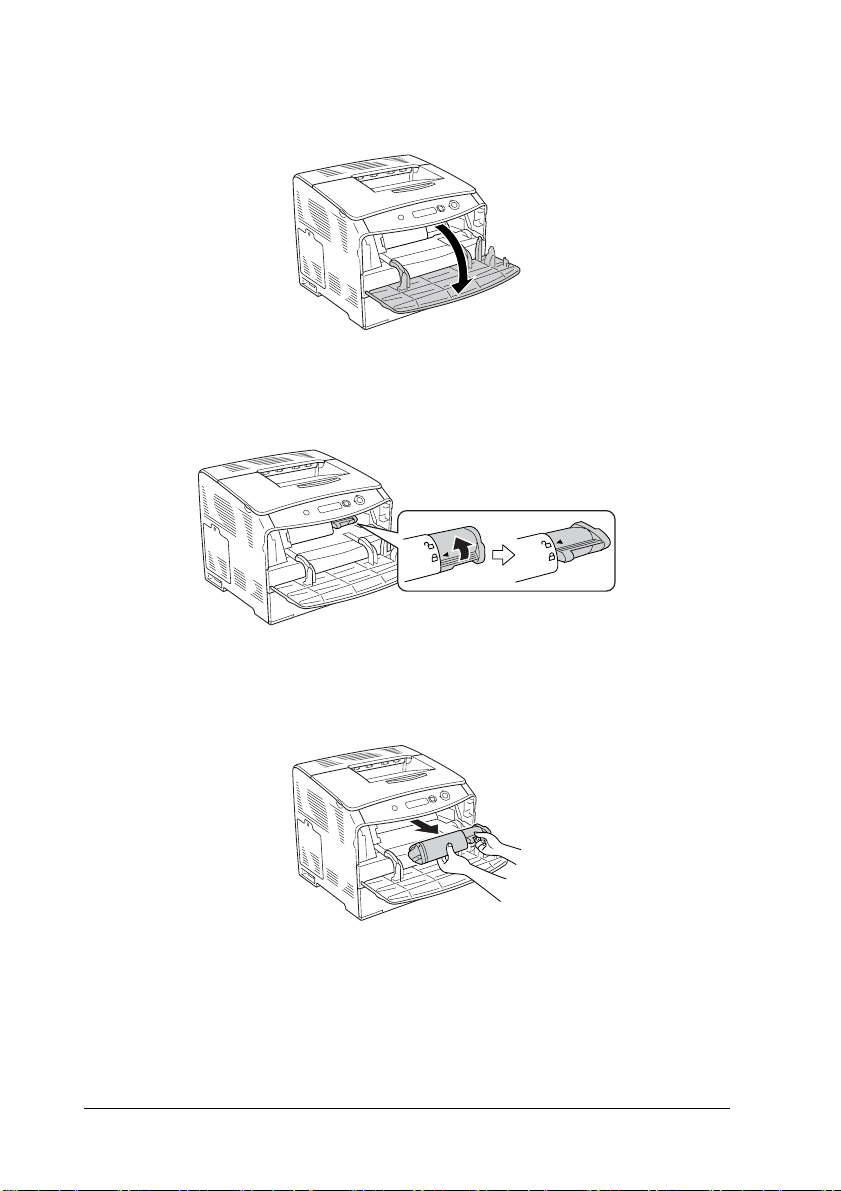
2. 打開護蓋 A。
3. 請依下圖所示,鬆開碳粉匣。
4. 取出印表機中的碳粉匣。
8
更換耗材
Page 9

5. 從包裝袋中取出新的碳粉匣,再依下圖所示輕輕地搖晃碳粉
匣。
1
1
1
6. 握住標籤,然後輕輕地將碳粉封條往上拉出。
7. 對齊箭頭符號,將碳粉匣插入印表機。
1
1
1
1
1
1
1
1
更換耗材
1
9
Page 10
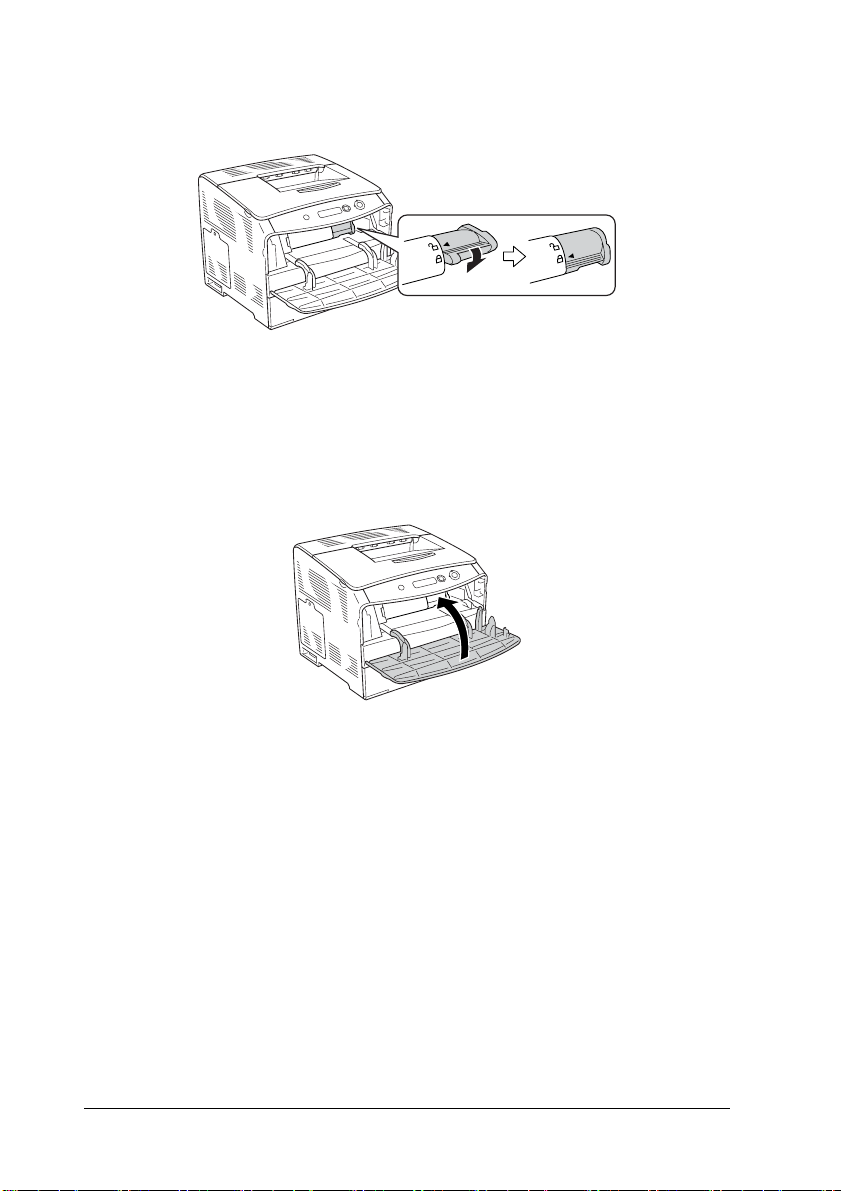
8. 請依下圖所示,將碳粉匣鎖上。
附註:
您必須將碳粉匣鎖到底,才能將其固定在印表機上。
9. 闔上護蓋 A。
10. 請確認液晶顯示幕上的錯誤訊息。當有其他碳粉匣需要更換
時,將會顯示錯誤訊息。請依照 3 至 8 的步驟,更換碳粉匣。
10
更換耗材
Page 11

感光滾筒單元
1
注意事項
更換感光滾筒單元時,請務必遵守下列的注意事項:
❏ 感光滾筒單元重量約 3.0 kg (6.6 lb),請牢牢握住以避免掉落。
❏ 更換感光滾筒單元時,請儘可能避免長時間讓感光滾筒單元
直接暴露於室內光線。
❏ 請勿刮到感光鼓和皮帶的表面。除此之外,也要避免直接觸
摸到感光鼓,因為您的皮膚所滲出的油脂會造成感光滾筒表
面永久性的傷害,並且會影響列印的品質。
❏ 為了得到最佳的列印品質,請不要將感光滾筒單元存放在陽
光直射、灰塵、含有鹽分的空氣或是具有腐蝕性的瓦斯 ( 像
是阿摩尼亞氣體 ) 的場所中。亦避免將感光滾筒單元儲存在
溫差極大或是濕度變化很大的環境中。
❏ 請勿傾斜感光滾筒單元。
警告 :
❏
w
請不要將使用過的感光滾筒單元丟棄在火源中,因為
它可能會爆炸而導致受傷。請依照當地廢棄物的相關
規定來處理感光滾筒單元。
1
1
1
1
1
1
1
1
❏ 請將感光滾筒單元放置在兒童拿不到的地方。
更換耗材
1
1
1
11
Page 12
更換感光滾筒單元
請依照下列步驟,更換感光滾筒單元。
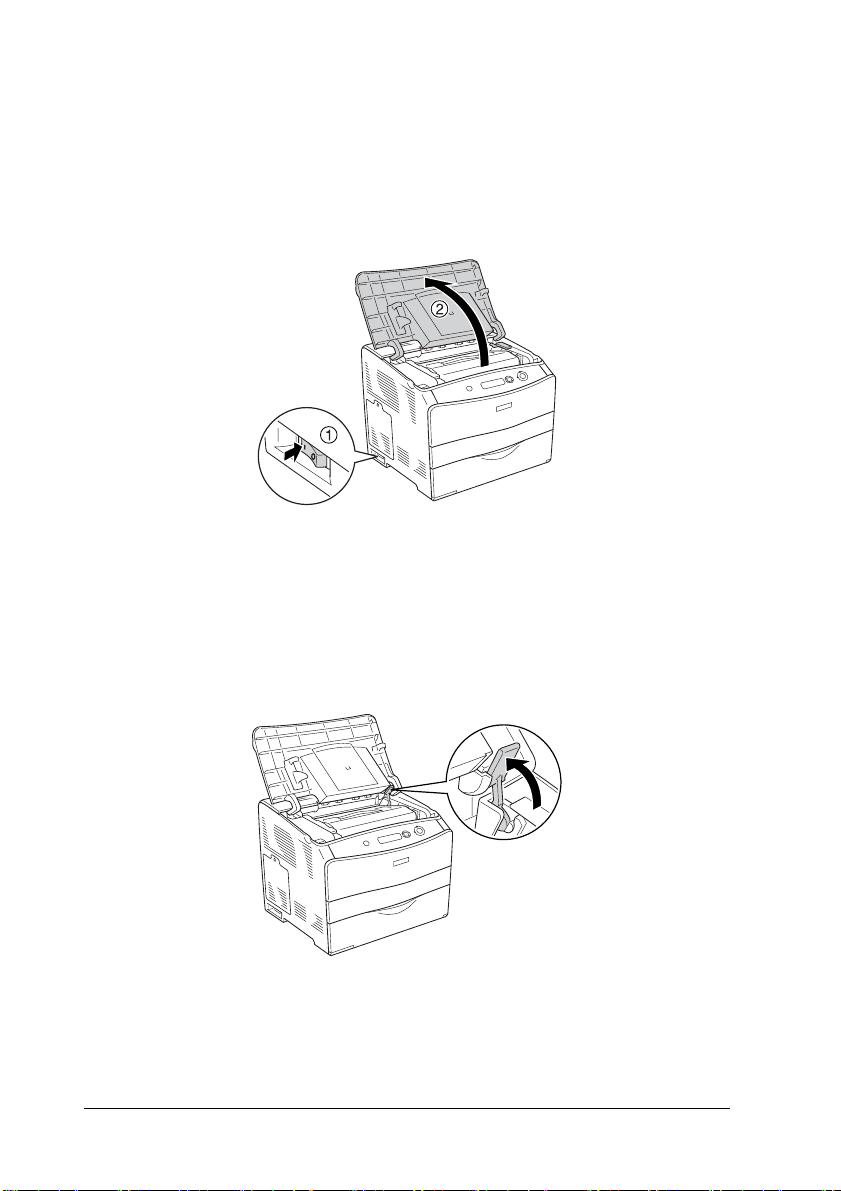
1. 開啟印表機的電源,然後打開護蓋 B。
附註:
若已安裝選購雙面列印單元,請先打開護蓋 D,再打開護蓋
B。
2. 將護蓋 B 內的黃色卡榫往上扳起。
12
更換耗材
Page 13
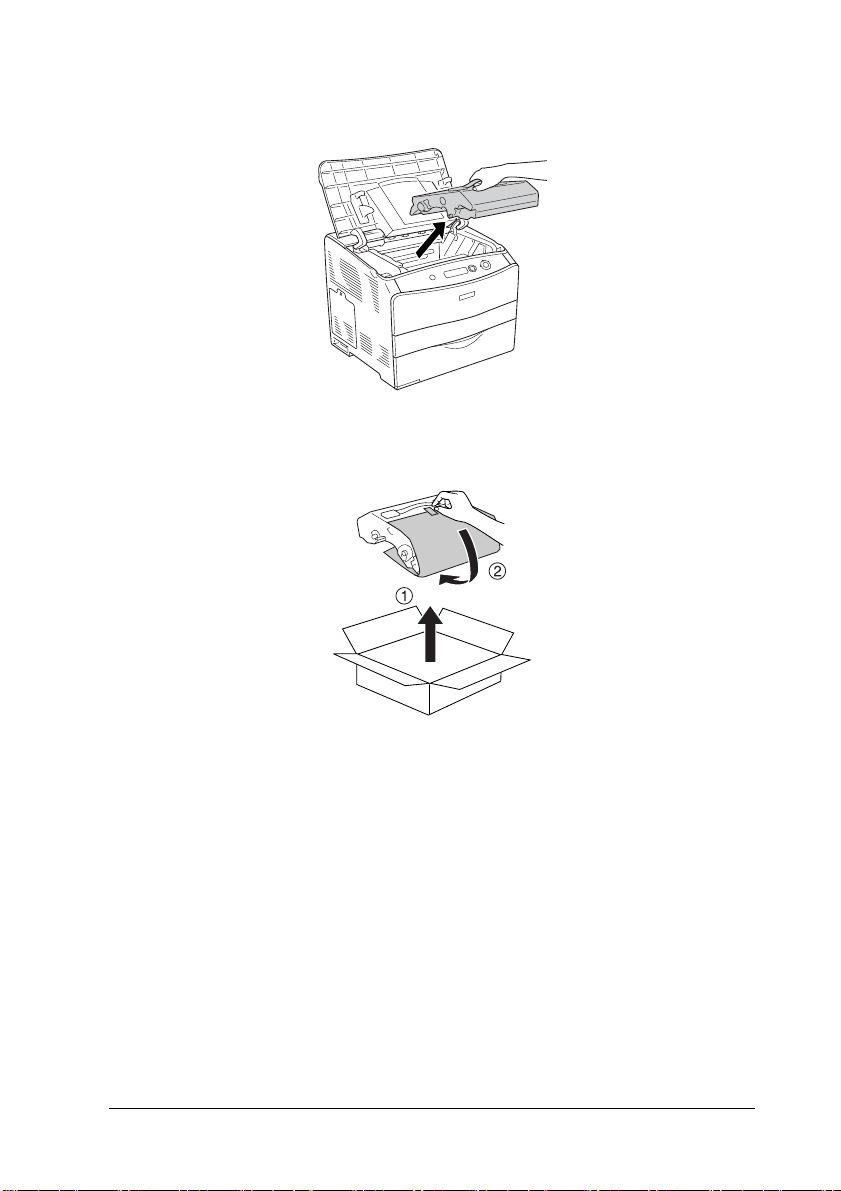
3. 從印表機中取出感光滾筒單元。
1
1
1
1
4. 從包裝中取出新的感光滾筒單元,然後移除保護紙膜。
注意:
請勿觸碰感光滾筒單元上方的皮帶和藍色的感光區域。
c
否則可能降低列印的品質。
1
1
1
1
1
1
1
1
更換耗材
13
Page 14
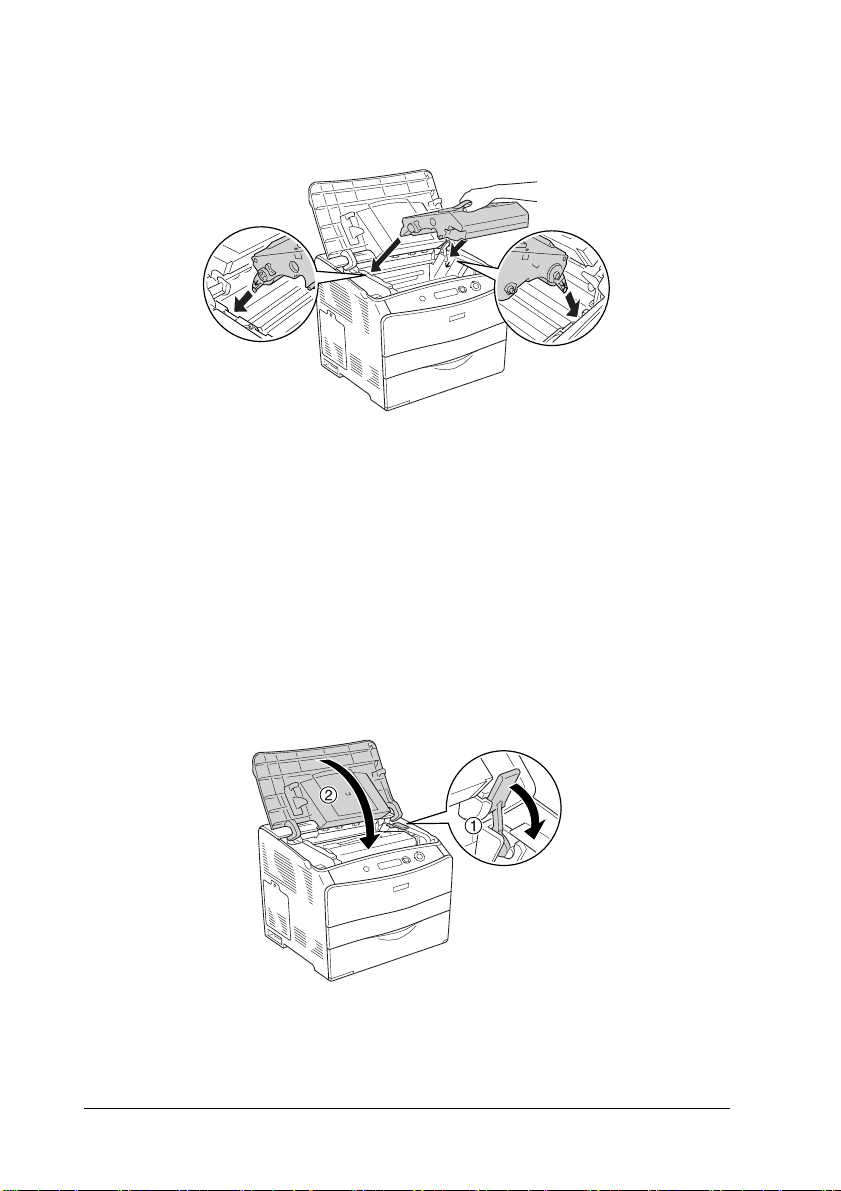
5. 請握住感光滾筒單元的把手,對齊印表機上的箭頭符號,然
後插入印表機內直到發出卡嗒聲。
警告:
請勿觸碰印表機內部標示著 〝
w
TEMPERATURE
加熱器。若您剛剛使用過印表機列印資料,則加熱器
的溫度可能非常高。
注意:
請勿觸碰印表機內部的零件。
c
/ 注意!表面高溫避免觸碰〞字樣的
CAUTION HIGH
6. 將黃色卡榫往下壓,闔上護蓋 B。
附註:
若已安裝選購雙面列印單元,請闔上護蓋 D。
14
更換耗材
Page 15

第 2 章
安裝選購品
選購下方進紙器
有關選購下方進紙器所適用的紙張種類以及詳細的規格說明,請
〝進階使用說明
參考
附註:
放入紙張時,請將列印面朝上。
注意事項
這台印表機重量約 28 kg (62 lb)。因此,請勿試圖一個人獨立搬運
印表機。必須由 2 個人並依照下圖的方式搬運印表機。
〞。
2
2
2
2
2
2
2
警告:
若您搬運方式不正確,印表機可能會掉落而導致損壞。
w
安裝選購品
2
2
2
2
2
15
Page 16

安裝選購下方進紙器
請依照下列步驟,安裝選購下方進紙器。
1. 關閉印表機的電源,拔除電源線和界面連接線。
2. 請從包裝箱中取出選購下方進紙器,然後移除進紙器的保護
裝置。
3. 將選購下方進紙器放置在想要設置印表機的地方。然後將印
表機抬至選購下方進紙器的上方,對齊進紙器和印表機的四
個角落,再將印表機輕輕地往下放在進紙器上。
16
附註:
由於印表機和選購下方進紙器的重量都不輕,所以必須分開
搬運。
安裝選購品
Page 17

4. 移除選購下方進紙器的紙匣。
5. 將選購下方進紙器內的固定裝置往上推,然後順時針方向旋
轉,以將進紙器和印表機固定在一起。
2
2
2
2
2
2
2
6. 重新裝回選購下方進紙器的進紙匣。
7. 重新連接界面連接線和電源線,然後開啟印表機的電源。
8. 請列印狀態表,以確認選購下方進紙器是否安裝正確。詳細
說明,請參考 〝
進階使用說明
〞。
安裝選購品
2
2
2
2
2
17
Page 18

Windows 使用者的注意事項:
若沒有安裝 EPSON 印表機監控程式 3,您必須手動更改印表機驅
動程式的設定。詳細說明,請參考 〝進階使用說明〞。
Macintosh 使用者的注意事項:
當您安裝或移除印表機的選購品時,您必須使用 〝
Utility / 印表機設定工具程式
列印中心
(Mac OS 9),刪除印表機,然後重新安裝印表機。
〞(Mac OS X 10.2 或以下 ),或 〝
〞(Mac OS X 10.3),〝
Chooser / 選擇週邊
Print Setup
Print Center /
移除選購下方進紙器
請依照與安裝相反的步驟執行。
雙面列印單元
有關雙面列印單元的規格,以及適用的紙張種類和紙張大小,請
參考 〝
進階使用說明
〞。
〞
安裝雙面列印單元
請依照下列步驟,安裝選購雙面列印單元。
1. 關閉印表機的電源,並拔除電源線和界面連接線。然後移除
雙面列印器連接埠護蓋。
18
安裝選購品
Page 19

2. 打開護蓋 E。
2
2
2
3. 先稍微打開護蓋 C,然後依下圖所示移除護蓋。
4. 壓下護蓋兩側的凹槽,然後往上拉以移除護蓋 E( 外護蓋 )。
然後闔上護蓋 E( 內護蓋 )。
2
2
2
2
2
2
2
2
安裝選購品
2
19
Page 20

5. 將雙面列印單元底部的兩個鉤子嵌入印表機上的凹槽。
附註:
請確定鉤子已牢固地嵌入印表機的凹槽。否則將無法闔上護
蓋。
6. 將雙面列印單元兩側的固定皮帶用螺絲鎖在印表機上。
7. 將連接線插入印表機的連接埠。
20
安裝選購品
Page 21

8. 請依下圖所示裝上雙面列印單元所附的連接埠護蓋,並將連
接線穿過連接埠護蓋。
9. 闔上護蓋 D,然後用螺絲鎖緊雙面列印單元的兩側。
2
2
2
2
2
2
2
10. 請列印狀態表,以確認雙面列印單元是否安裝正確。詳細說
明,請參考 〝
Windows 使用者的注意事項:
若沒有安裝 EPSON 印表機監控程式 3,您必須手動更改印表機驅
動程式的設定。
Macintosh 使用者的注意事項:
當您安裝或移除印表機的選購品時,您必須使用 〝
Utility / 印表機設定工具程式
列印中心
(Mac OS 9),刪除印表機,然後重新安裝印表機。
〞(Mac OS X 10.2 或以下 ),或 〝
進階使用說明
詳細說明,
〞。
請參考〝進階使用說明〞。
Print Setup
〞(Mac OS X 10.3),〝
Chooser / 選擇週邊
Print Center /
安裝選購品
〞
21
2
2
2
2
2
Page 22

移除雙面列印單元
請依照下列步驟,移除選購雙面列印單元。
1. 關閉印表機電源,拔除電源線和界面連接線。
2. 移除雙面列印單元兩側的螺絲,然後打開護蓋 D。
3. 移除連接埠護蓋。
4. 拔除印表機上的連接線。
5. 鬆開螺絲並將雙面列印單元兩側的帶子從印表機上移除。
6. 將雙面列印單元向前拉出。
7. 重新裝上護蓋 E。
8. 重新裝上護蓋 C。
9. 闔上護蓋 E。
10. 重新連接界面連接線和電源線,然後開啟印表機的電源。
記憶體模組
安裝選購 DIMM 規格記憶體模組,最大可以擴充至 256 MB。若
有列印複雜文件和圖片的困難時,您可能需要額外增加印表機的
記憶體。
這台印表機只有一個記憶體插槽。
附註:
❏
記憶體最大可以擴充至 256 MB。
❏
這台印表機內建 32MB 記憶體,您雖可再額外增加256MB 記憶
體,但實際可用記憶體為 256ME 記憶體。
22
安裝選購品
Page 23

安裝記憶體模組
請依下列步驟,安裝記憶體模組。
警告:
處理印表機內部的零件時,請小心,因為有些零件的邊緣
w
非常的銳利,您可能會被割傷。
注意:
安裝記憶體模組之前,請先觸摸已經接地的金屬片以釋放
c
出身上的靜電。否則,您可能會損壞某些對靜電特別敏感
的電子零件。
1. 關閉印表機的電源,並拔下印表機的電源線和界面連接線。
2. 請依下圖所示,鬆開螺絲以移除印表機左邊的護蓋。
2
2
2
2
2
2
2
2
3. 請確認 RAM 插槽的位置。
*
安裝選購品
2
2
2
2
23
Page 24

* RAM 插槽 ( 灰色 )
4. 將記憶體模組插入插槽中,直到卡榫夾住記憶體模組。請確
認上方的插槽 ( 白色 ) 中一直都有安裝記憶體模組。
注意:
❏
c
5. 請依下圖所示,裝回印表機左邊的護蓋。
將記憶體模組插入插槽時,請勿太過用力。
❏
請確認記憶體模組所插入方向是正確的。
❏
您不應該從電路板上移除記憶體之外的其他模組,
否則印表機將無法正常運作。
6. 重新連接界面連接線和電源線,然後開啟印表機的電源。
7. 請列印狀態表,以確認記憶體模組是否安裝正確。詳細說
24
明,請參考 〝
安裝選購品
進階使用說明
〞。
Page 25

Windows 使用者的注意事項:
若沒有安裝 EPSON 印表機監控程式 3,您必須手動更改印表機驅
〝
動程式的設定。詳細說明,請參考
進階使用說明〞。
2
Macintosh 使用者的注意事項:
當您安裝或移除印表機的選購品時,您必須使用 〝
Utility / 印表機設定工具程式
列印中心
(Mac OS 9),刪除印表機,然後重新安裝印表機。
移除記憶體模組
c
w
請依照安裝的相反步驟執行。
當要移除記憶體模組時,請依下圖所示,將插槽的卡榫往下壓,
然後拉出記憶體模組。
〞(Mac OS X 10.2 或以下 ),或 〝
注意:
安裝記憶體模組之前,請先觸摸已經接地的金屬片以釋放
出身上的靜電。否則,您可能會損壞某些對靜電特別敏感
的電子零件。
警告:
處理印表機內部的零件時,請小心,因為有些零件的邊緣
非常的銳利,您可能會被割傷。
〞(Mac OS X 10.3),〝
Chooser / 選擇週邊
Print Setup
Print Center /
2
〞
2
2
2
2
2
2
2
安裝選購品
2
2
2
25
Page 26

26
安裝選購品
Page 27

第 3 章
清除夾紙
3
當印表機發生夾紙時,印表機的液晶顯示幕及 EPSON 印表機監
控程式 3 會顯示警示訊息。
請依照控制面板或 EPSON 印表機監控程式 3 上所顯示的護蓋名稱
順序,清除夾紙。
清除夾紙的注意事項
清除夾紙時,請確實遵守下列的注意事項。
❏ 清除夾紙時請勿太用力,因為扯破的紙張可能更難清除並造
成其他夾紙問題,因此請您小心地將夾紙取出以免扯破紙
張。
❏ 請務必用雙手取出夾紙,以免扯破紙張。
❏ 若夾紙碎片依然殘留在印表機的內部,或是手冊中並無提及
該部位的夾紙問題時,請直接洽詢 EPSON 授權維修中心。
❏ 請確認你所放入的紙張種類和在印表機驅動程式中的設定一
致。
3
3
3
3
3
3
3
3
w
警告:
❏
請勿觸碰印表機內部標示著
TEMPERATURE
加熱器單元或是其周圍的部份。若您剛剛使用過印表
機列印資料,則此加熱器單元和其周圍的溫度可能非
常高。
❏
請勿將您的手深入加熱器單元,否則可能會碰到內部
鋒利的零件而受傷。
/ 注意!表面高溫避免觸碰〞字樣的
CAUTION HIGH
清除夾紙
3
3
3
27
Page 28

夾紙 - 護蓋 C (Jam C )
請依照下列步驟,清除護蓋 C 處的夾紙。
1. 打開護蓋 C。
2. 將加熱器單元兩側的綠色卡榫往上扳起。
28
清除夾紙
Page 29

3. 請依下圖所示,用手扳起綠色凸桿以托住加熱器護蓋,然後
小心地取出夾紙。請小心不要將夾紙撕破。
警告:
❏
w
4. 將加熱器單元兩側的綠色卡榫向下壓。
請勿觸碰印表機內部標示著
TEMPERATURE
加熱器單元或是其周圍的部份。若您剛剛使用過印表
機列印資料,則此加熱器單元和其周圍的溫度可能非
常高。
/ 注意!表面高溫避免觸碰〞字樣的
CAUTION HIGH
3
3
3
3
3
3
3
清除夾紙
3
3
3
3
3
29
Page 30

5. 闔上護蓋 C。
夾紙 - 護蓋 D (Jam D)
請依照下列步驟,清除護蓋 D 處的夾紙。
1. 將卡榫往上推,打開護蓋 D。
30
清除夾紙
Page 31

2. 小心地將印表機內的夾紙取出。
附註:
若未發現夾紙,請進行下一個步驟。
3. 將加熱器單元兩側的綠色卡榫往上扳起。
3
3
3
3
3
3
3
清除夾紙
3
3
3
3
3
31
Page 32

4. 請依下圖所示,用手扳起綠色凸桿以托住加熱器護蓋,然後
小心地取出夾紙。請小心不要將夾紙撕破。
警告:
❏
w
5. 將加熱器單元兩側的綠色卡榫往下壓。
請勿觸碰印表機內部標示著
TEMPERATURE
加熱器單元或是其周圍的部份。若您剛剛使用過印表
機列印資料,則此加熱器單元和其周圍的溫度可能非
常高。
/ 注意!表面高溫避免觸碰〞字樣的
CAUTION HIGH
32
清除夾紙
Page 33

6. 闔上護蓋 D。
3
3
3
3
夾紙 - 護蓋 E (Jam E)
請依照下列步驟,清除護蓋 E 處的夾紙。
1. 打開護蓋 E。
附註:
若已安裝選購雙面列印單元,請先打開護蓋 D。
3
3
3
3
3
3
3
3
清除夾紙
33
Page 34

2. 請用雙手小心地取出夾紙。請小心不要將夾紙撕破。然後闔
上護蓋 E。
夾紙 - 護蓋 F (Jam F)
請依照下列步驟,清除護蓋 F 處的夾紙。
1. 打開護蓋 E。
34
附註:
若已安裝選購雙面列印單元,請先打開護蓋 D。
清除夾紙
Page 35

2. 打開護蓋 F。
3
3
3
3. 打開護蓋 C,然後將加熱器單元兩側的綠色卡榫往上扳起。
4. 請用雙手小心地取出夾紙。請小心不要將夾紙撕破。
3
3
3
3
3
3
3
3
附註:
若夾紙不易看到,表示紙張被夾在印表機的內部。此時,請
小心地將紙張拉至上圖所示的位置,然後緩緩地拉出紙張。
清除夾紙
35
3
Page 36

5. 將加熱器單元兩側的綠色卡榫往下壓,然後闔上護蓋 C。
6. 闔上護蓋 F,然後再闔上護蓋 E。
36
附註:
若已安裝選購雙面列印單元,請在最後將護蓋 D 闔上。
清除夾紙
Page 37

夾紙 - 護蓋 DM (Jam DM)
請依照下列步驟,清除護蓋 DM 處的夾紙
1. 打開護蓋 DM。
2. 小心地將印表機內的夾紙取出。
3
3
3
3
3
3
3
3
3. 闔上護蓋 DM。
清除夾紙
3
3
3
3
37
Page 38

夾紙 - 萬用進紙匣 (Jam MP)
請依照下列步驟,清除萬用進紙匣中的夾紙。
1. 打開萬用進紙匣護蓋,取出紙匣內的所有紙張。
2. 小心地將印表機內的夾紙取出。
3. 重新放入紙張,然後闔上萬用進紙匣護蓋。
38
清除夾紙
Page 39

夾紙 - 下方進紙匣 (Jam LC)
請依照下列的步驟,清除選購下方進紙器中的夾紙。當已安裝選
購下方進紙器時,才會顯示這個訊息。
1. 請拉出選購下方進紙器的紙匣。
2. 小心地將印表機內的夾紙取出。
3
3
3
3
3
3
3
3
清除夾紙
3
3
3
3
39
Page 40

3. 將紙匣推回印表機內。
夾紙 - 護蓋 G (Jam G)
請依照下列步驟,清除護蓋 G 處的夾紙。當已安裝選購下方進紙
器時,才會顯示這個訊息。
1. 打開護蓋 G。
40
清除夾紙
Page 41

2. 請用雙手小心地取出夾紙。請小心不要將夾紙撕破。
3. 闔上護蓋 G。
3
3
3
3
3
3
3
當投影片夾在萬用進紙匣時
當投影片夾在萬用進紙匣時,請依照下列步驟清除夾紙。
清除夾紙
3
3
3
3
3
41
Page 42

1. 打開萬用進紙匣護蓋,然後取出紙匣內的所有紙張。
2. 打開護蓋 E,然後用雙手小心地將紙張取出。請小心不要將
夾紙撕破。
3. 重新將投影片放入萬用進紙匣中。
4. 闔上護蓋 E。
42
清除夾紙
 Loading...