

Page 1
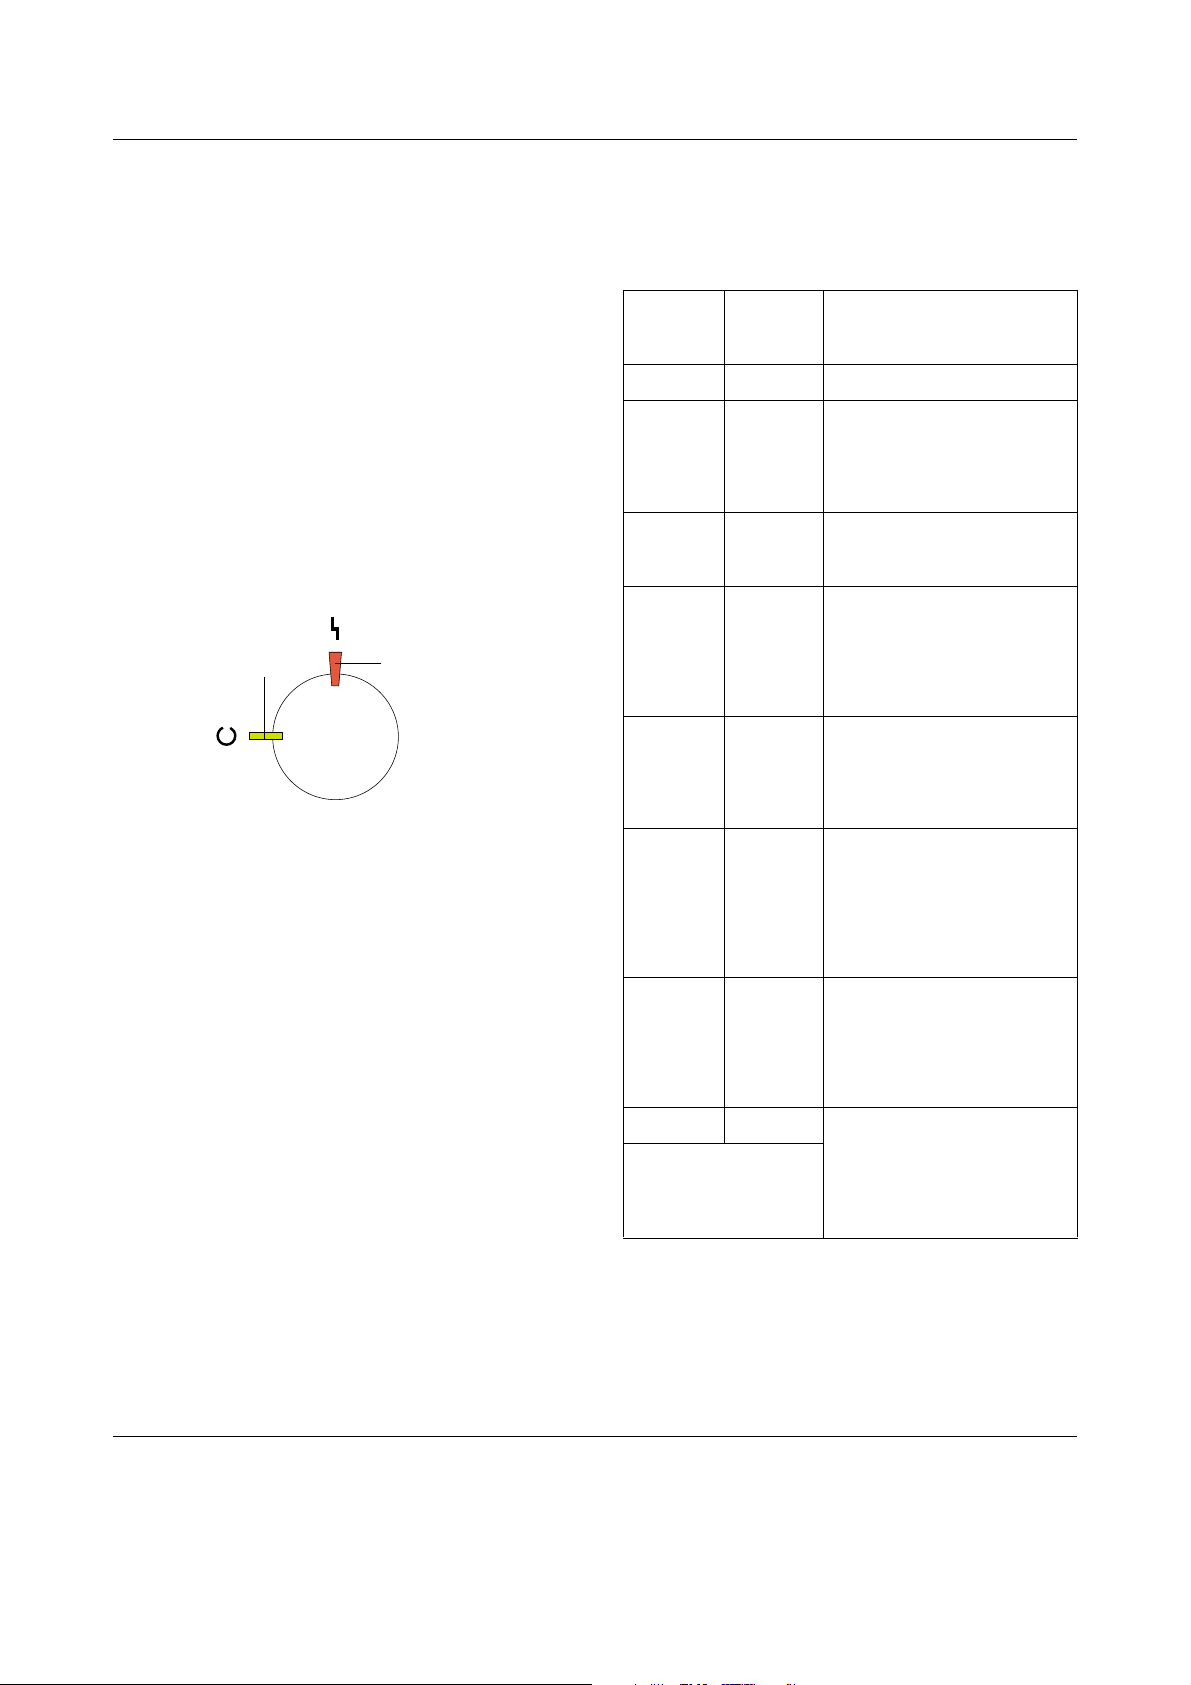
Ready and Error Lights
The ready (green) and error (red) lights on
the top of the printer may be the first
indication of trouble. The status of the lights,
on, off or flashing, indicates your printer
status as described below.
The Status Alert window in the EPSON
Status Monitor 3 utility indicates what type
of error has occurred and offers you a
possible solution. Look through this section
to find the kind of problem you have, then
try the recommended solutions in the order
they are presented until your problem is
solved.
ready light
error light
EPSON AcuLaser C1000 Quick Reference
Ready
Light
(green)
Off Off Printer’s power is turned off.
On Off Printer is ready for printing or
Flashing Off Printer is warming up,
Slow
flashing
Error
Light
(red)
Off A consumable product is
Printer Status
printing a job. To get current
information about the printer,
check the EPSON Status
Monitor 3 utility.
receiving data, or adjusting
for printing.
almost used up. Check the
alert message of EPSON
Status Monitor 3 utility and
replace the consumable with
a new one.
On Flashing There is an error that can be
On On The cover of the printer is
Flashing On Protocol error has occurred.
Off On An error has occurred. Try
Flashing alternately.
easily remedied. Check the
alert message of EPSON
Status Monitor 3 utility for the
solutions.
open, the printer is out of
paper, or paper is jammed in
the printer. When printing with
the duplex unit, make sure
that the paper size setting is
correct.
Try turning off the pr inter and
then turning it back on. If this
does not clear the error,
contact your dealer or a
qualified service person.
turning off the printer and
then turning it back on. If this
does not clear the error,
contact your dealer or a
qualified service person.
Note:
If the problem remains after trying the
suggestions in this section, contact your dealer
for assistance.
Ready and Error Lights (1/1)
Page 2
Clearing Jammed Paper
EPSON AcuLaser C1000 Quick Reference
When paper is jammed in the printer, the
ready and error lights turns on.
EPSON Status Monitor 3 utility also provide
alert messages.
Precautions for clearing jammed paper
Be sure to observe the following points when
you clear jammed paper:
❏ Do not remove jammed paper by force.
Torn paper can be difficult to remove
and might cause other paper jams. Pull
it gently in order to avoid tearing.
❏ Always try to remove jammed paper
with both hands to avoid tearing it.
❏ If jammed paper is torn and remains in
the printer, or if paper is jammed in a
place not mentioned in this chapter,
contact your dealer.
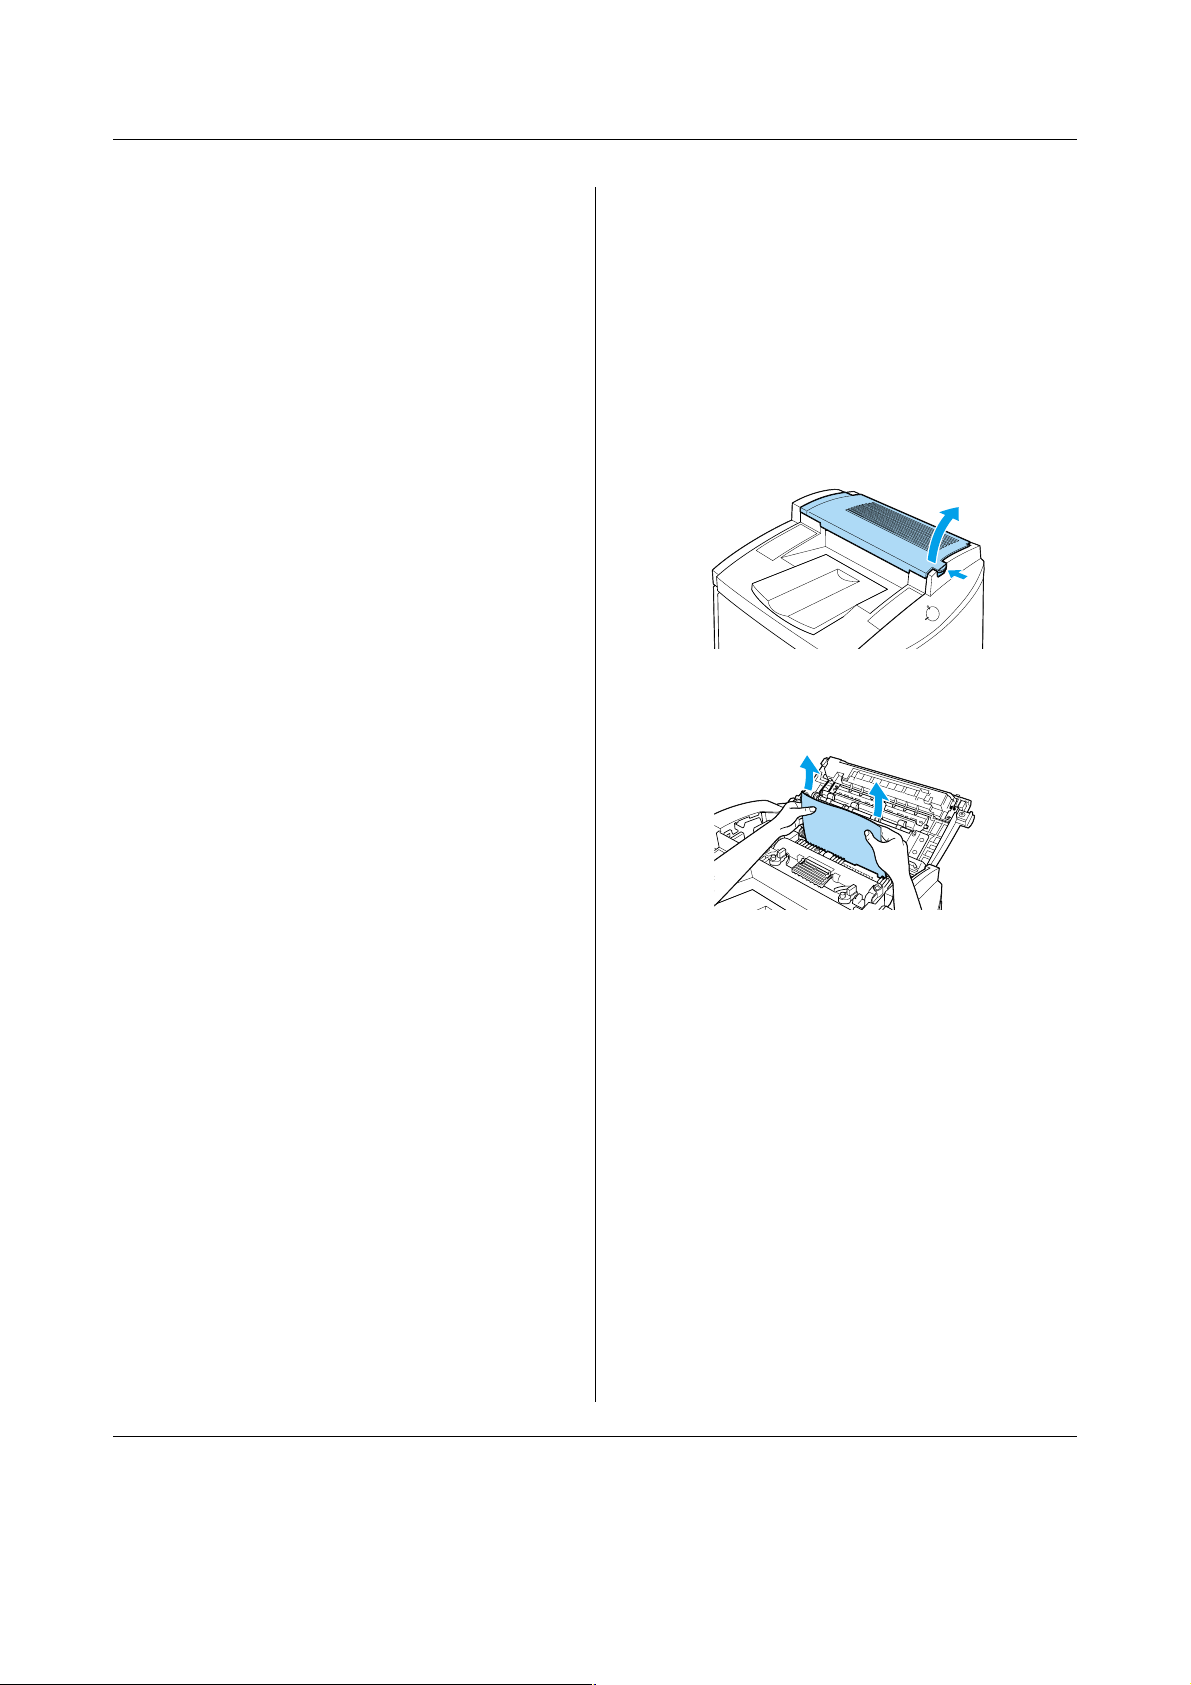
Clearing the fuser unit
There is paper jam at the fuser unit.
Follow these steps to clear paper jams in the
fuser unit:
1. Push the lever and lift the printer’s top
cover.
2. Gently remove any jammed paper with
both hands.
Warning:
w
Be careful not to touch the fuser, which is
marked CAUTION Hot Surface Avoid
Contact, or the surrounding areas. If
the printer has been in use, the fuser and
the surrounding areas may be very hot.
Paper Jam — output
When there is a paper jam at the fuser unit
or the top cover, the
indicates the error message and the solution.
If you don’t find jammed paper in the fuser
unit, always check the top cover and
vice-versa.
Status Alert window
c
Caution:
Be careful not to touch the fuser,
which is marked CAUTION Hot
Surface Avoid Contact, or the
surrounding areas. If the printer has
been in use, the fuser and the
surrounding areas may be very hot.
Clearing Jammed Paper (1/7)
Page 3
EPSON AcuLaser C1000 Quick Reference
Note:
The jammed paper may be in the position
illustrated below. Gently pull the jammed
paper out with both hands.
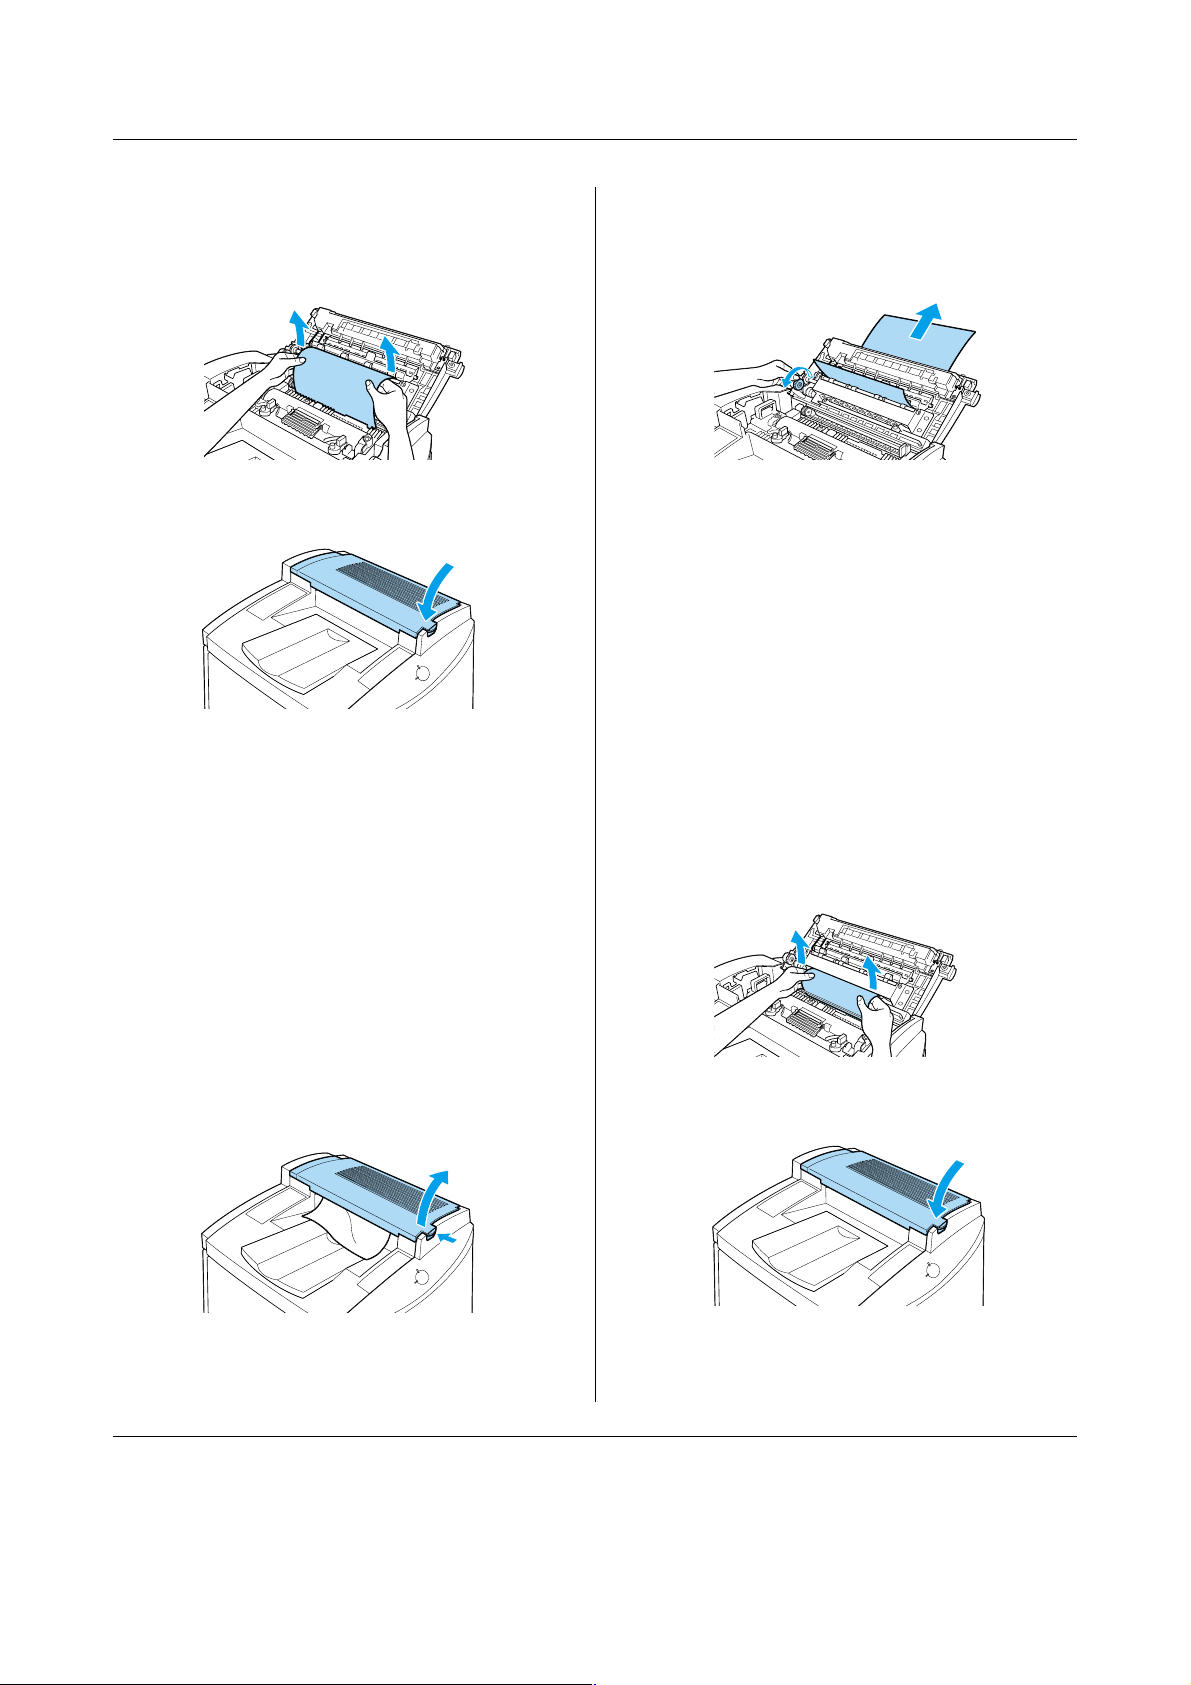
3. Close the top cover until it clicks.
Clearing the top cover
There is a paper jam at the top cover.
Caution:
c
Even if you see part of the jammed paper
in the output tray, do not pull it out from
the output tray. Follow the procedures in
this section to clear the jammed paper.
2. Rotate the gear in the counterclockwise
direction until the jammed paper is
totally removed from the paper path in
the top cover.
Caution:
c
Note:
If paper is jammed at the top cover while
using the optional Duplex Unit, the jammed
paper may be in the position illustrated
below. Gently pull out the jammed paper
with both hands, making sure not to tear the
paper.
Be careful not to touch the fuser,
which is marked CAUTION Hot
Surface Avoid Contact, or the
surrounding areas. If the printer has
been in use, the fuser and the
surrounding areas may be very hot.
Follow these steps to clear paper jams in the
printer’s top cover:
1. Push the lever and lift the printer’s top
cover.
3. Close the top cover until it clicks.
Clearing Jammed Paper (2/7)
Page 4

EPSON AcuLaser C1000 Quick Reference
Paper Jam — MP tray
There is paper jam at the MP tray.
Follow these steps to clear paper jams at the
MP tray:
1. Pull the jammed paper out gently.
Note:
If the jammed paper feels tight, do not pull it
out by force. Proceed to the next step.
2. Open the right side cover. Be careful not
to tear the jammed paper.
Warning:
w
4. Close the right side cover.
When the paper jam is cleared completely
and the printer cover closed, the jammed
page’s print data is automatically reprinted.
Be careful not to touch the transfer
belt unit as it gets hot during use.
3. Lift the inner panel by its handle and
remove any jammed paper inside. Then
close the panel.
Note:
If paper is torn, be sure to remove all torn
pieces.
Paper Jam — standard paper cassette
There is a paper jam at the standard lower
cassette.
Follow these steps to clear paper jams in the
standard lower cassette:
1. Open the standard lower cassette’s right
cover.
Clearing Jammed Paper (3/7)
Page 5

EPSON AcuLaser C1000 Quick Reference
2. Gently pull out any jammed paper with
both hands, then close the standard
lower cassette’s right cover.
Note:
If the jammed paper has fed part way into the
main paper path and is difficult to remove,
proceed to the next step.
3. Open the printer’s right cover.
Warning:
w
5. Remove the paper cassette from the
printer and discard any crumpled paper.
Be careful not to touch the transfer
belt unit as it gets hot during use.
4. Lift the inner panel by its handle and
remove any jammed paper inside. Then
close the panel.
6. Gently remove any paper that has fed
part way into the printer.
Note:
If paper is torn, be sure to remove all pieces.
Clearing Jammed Paper (4/7)
Page 6

EPSON AcuLaser C1000 Quick Reference
7. Remove the stack of paper from the
cassette, tap it on a flat surface to even
out the edges, then reinsert it into the
paper cassette. Be sure the paper is
evenly aligned and the top of the stack is
below the metal retaining clip and the
maximum paper mark.
8. Reinsert the paper cassette back into the
printer.
1. Open the 500-Sheet Paper Cassette
Unit’s right cover.
2. Gently pull out any jammed paper with
both hands, then close the 500-Sheet
Paper Cassette Unit’s right cover.
When the paper jam is cleared completely,
the jammed page’s print data is
automatically reprinted.
Paper Jam — optional paper cassette
When there is a paper jam at the optional
500-Sheet Paper Cassette Unit. Clearing
paper jams at this unit is similar to clearing
paper jams in the standard lower cassette.
Follow these steps to clear paper jams in the
optional 500-Sheet Paper Cassette Unit:
Note:
If the jammed paper has fed part way into the
standard lower cassette, refer to steps 1 to 4
of the procedure for clearing paper jams in
the standard lower cassette before proceeding
to the next step. For instructions, see “Paper
Jam — standard paper cassette” .
3. Remove the paper cassette from the unit
and discard any crumpled paper.
Clearing Jammed Paper (5/7)
Page 7

EPSON AcuLaser C1000 Quick Reference
4. Gently remove any paper that has fed
part way into the printer.
Note:
If paper is torn, be sure to remove all pieces.
5. Remove the stack of paper from the
cassette, tap it on a flat surface to even
out the edges, then reinsert it into the
paper cassette. Be sure the paper is
evenly aligned and the top of the stack is
below the metal retaining clip and the
maximum paper mark.
Paper Jam — duplex unit
There is a paper jam in the Duplex Unit.
Follow these steps to clear paper jams in the
Duplex Unit:
1. Open the cover of the Duplex Unit.
2. Gently remove any jammed or crumpled
paper.
6. Reinsert the paper cassette back into the
unit.
When the paper jam is cleared completely,
the jammed page’s print data is
automatically reprinted.
Note:
❏ If the paper is torn, be sure to remove all
pieces.
❏ Open the printer’s right side cover if you
are unable to remove the jammed paper
from within the Duplex Unit. See
“Clearing the main paper path” for
more information.
3. Close the cover of the Duplex Unit.
Clearing Jammed Paper (6/7)
Page 8

EPSON AcuLaser C1000 Quick Reference
When the paper jam is cleared completely,
the jammed page’s print data is
automatically reprinted.
Clearing the main paper path
When paper is jammed at the main paper
path, the
error message and the solution.
This message also indicates a paper jam at
the MP tray. It is always good to check the
main paper path for paper jams even if the
jam seems to be located at the MP tray, the
standard lower cassette, the fuser unit, or the
optional Duplex Unit because these
components are all connected to and share
the same main paper path.
Follow these steps to clear paper jams in the
main paper path:
1. Remove any paper that is loaded in the
Status Alert window
MP tray.
indicates the
Warning:
w
Note:
Paper may be jammed in the location shown
below. Gently remove any jammed paper
with both hands.
Be careful not to touch the transfer
belt unit as it gets hot during use.
2. Open the printer’s right cover.
3. Lift the inner panel by its handle and
remove any jammed paper inside. Then
close the panel.
4. Close the printer’s right cover.
Clearing Jammed Paper (7/7)
 Loading...