

Page 1

®
EPSON Stylus
Pro 7600/9600
How to use Custom RGB ICC Proles with the
Standard Epson Photographic Printer Driver
A Photographic Workow with Adobe Photoshop 7
EPSON America, Inc. © 2002, Version 1.0E
Page 2

Forward
This document is to help assist novice level photographers who are trying to produce the best
quality color and black and white photographic prints on the EPSON Stylus Pro 7600 or 9600
printers using UltraChrome Inks. However, the workow described in this document can be
applied to any printer.
Although, you can simply use the built-in color management system within the standard Epson
printer driver, using the power of the ICC prole format, this document will teach you a different
way of printing your RGB photography.
If your a photographer of any type, you need to try this ICC workow out. I’m sure you’ll agree,
it represents a big step forward in producing sellable quality prints. Enjoy...
Mark Radogna
Senior Manager, Professional Graphics
EPSON America, Inc.
Page 3
How to use an ICC prole with the Epson driver
STEP 1: Installing Your RGB ICC Prole & Conguring Adobe Photoshop 7
To use any RGB ICC prole with the EPSON Stylus Pro 7600 or 9600 driver, you must rst place
them in the standard place for proles. Regardless if your using a Macintosh or Windows
computer, you will get great results. Here is where you must copy the .icc les:
Operating System ICC File Location
Mac OS 9.2.2 System Folder / ColorSync Proles
Mac OS X System / Library / ColorSync / Proles
Windows 98 & Me Windows / System / Color
Windows NT, 2000, & XP Winnt / System32 / Spool / Drivers / Color
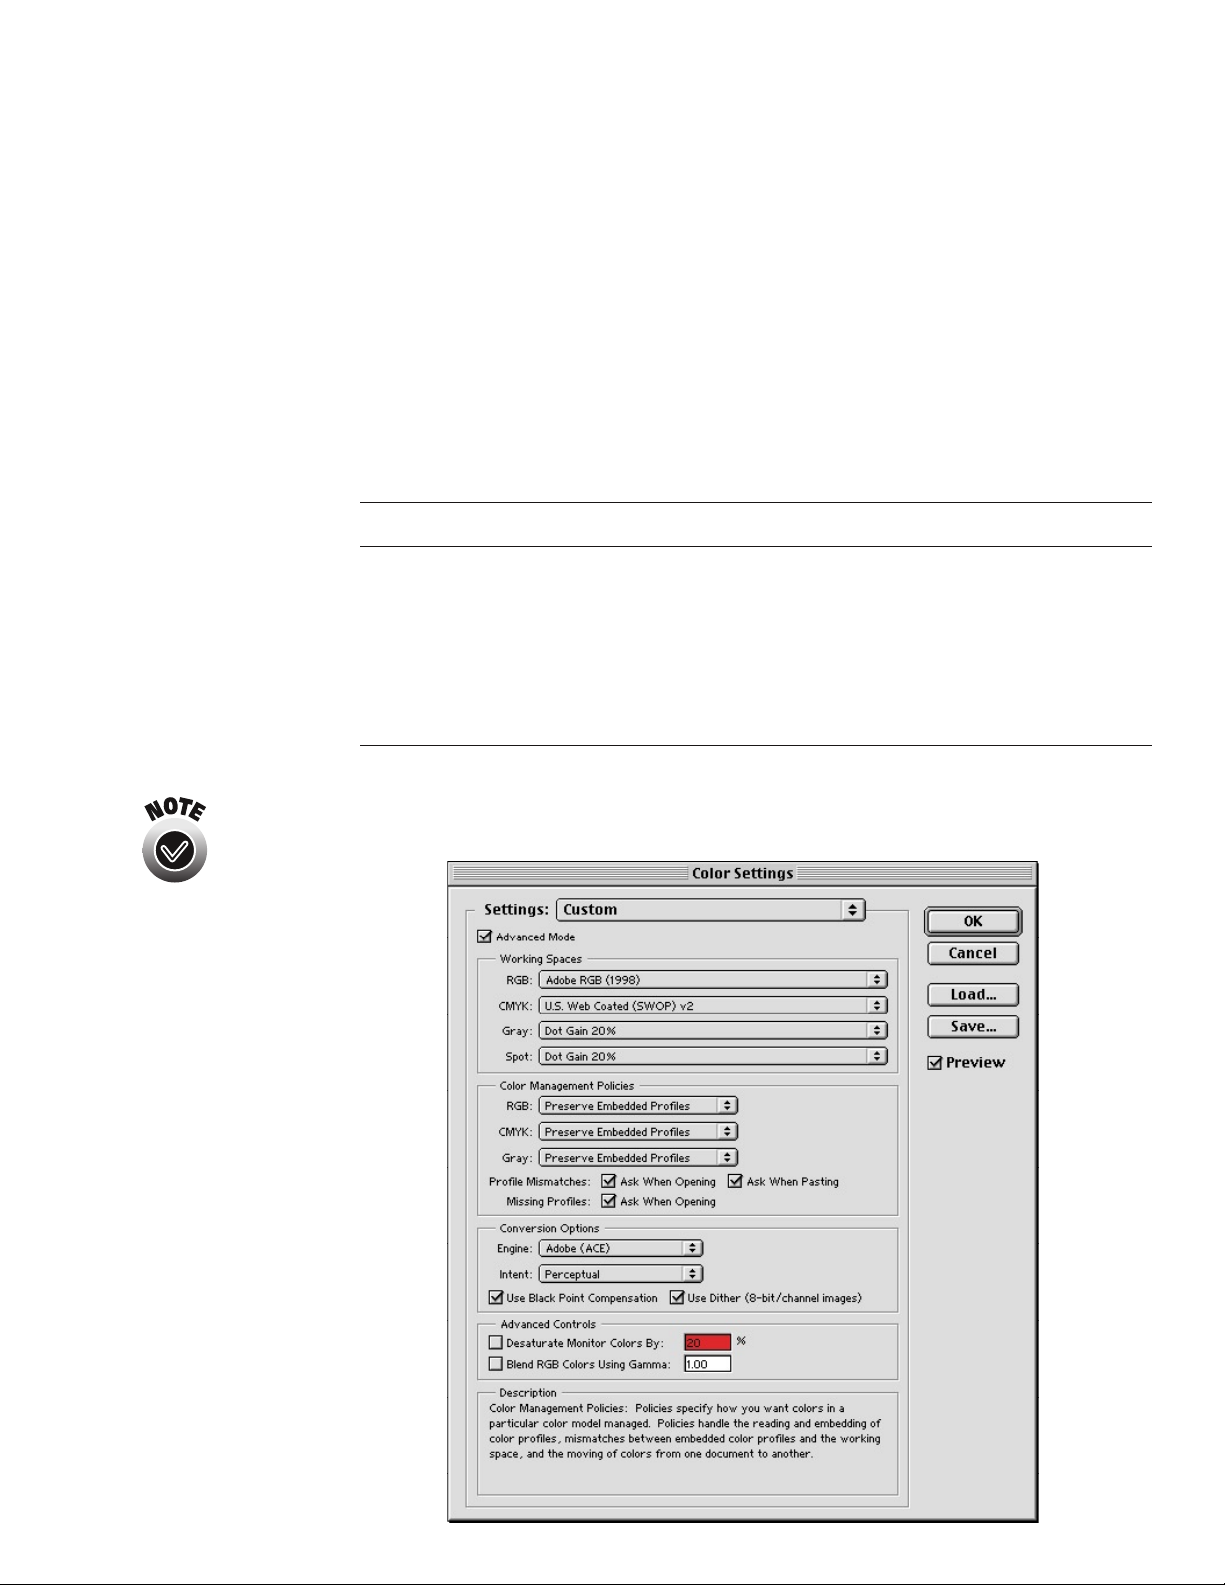
Next, open Adobe Photoshop 7 and choose “Color Settings...” under the “Edit” menu. (This may
This is a very controversial dialog box.
Depending upon who you talk to, they
might give you different recommendations.
I like Adobe RGB (1998) for better color
saturation. However, ColorMatch RGB also
works well here, especially for esh tones.
For grayscale images, I chose a Dot Gain of
20% instead of Gray Gamma 1.8 because
I feel it looks more ‘neutral’ versus the
warmer look of Gray Gamma 1.8.
Always use the Adobe (ACE) Conversion
Engine. Its the best. And only available
from within Adobe software.
I like using the Perceptual Rendering Intent
for everything. I sometimes use Relative
Colorimetric for Black & White photos.
Try your prints both ways to nd the best
setting for your work.
be different under Mac OS X). Set-up the dialog box to look like this and hit “OK”.
Always turn ‘on’ Black Point Compensation.
This is because the Perceptual Rendering
Intent does not care, but the Relative
Colorimetric does. So its easier to always
turn this ‘on’ and forget about it.
3
Page 4

What color space should I calibrate my
monitor to?
The answer to this question will vary, but
I prefer to calibrate all my Macintosh and
Windows monitors to 2.2 gamma and at
6500 degrees Kelvin.
For Macintosh users, a gamma of 1.8 at
5000 degrees Kelvin also works well,
but the monitor’s color takes some time
getting used to.
Since most monitors are in a 2.2 gamma
naturally, then calibrating to this setting is
usually the best.
By making sure your operating system
and application software understands how
your monitor is displaying color, you will
make better color decisions using your
montor before commiting them to paper.
STEP 2 : Opening Your Image File
Next, open your image le and choose the proper conversion option. If your image le already
contains a prole that matches the Color Settings you’ve selected in Step 1 or if your image le is
in LAB space, then the image will come right up. If not, then Photoshop will display this dialog:
Adobe Photoshop 7 Opening Conversion Dialog
In order to open your image le properly, you should NOT convert your data le. Instead, select
“Leave as is (don’t color manage)”. The less color conversions you perform on your data le
before printing the better.
Whenever you ask Photoshop to convert color using this dialog box, you will be modifying your
image le forever. Depending upon how you created your image le, you may be limiting the
quality of the actual image!
However, if you know what you’re doing, then select “Assign working RGB: Adobe RGB (1998)”
or assign a different prole using the “Assign prole:” radio button.
Photoshop will then perform any color conversions and open your le into a window.
4
Page 5

After verifying what image size your le
is, create a Custom Page Size within the
Epson driver Page Set-up dialog box and
dene it about 1-inch bigger than your
image le.
To center the print, make sure to dene
the top and bottom margins the same.
STEP 3: Setting Your Page Setup & Getting Ready to Print
Next, choose “Print with Preview...” from the le menu. Notice the document dimensions, then
click the “Page Setup...” button and set the proper page size and options and click “OK”.
Back in the “Print with Preview” dialog, you can visually conrm that your image will t on the
printed page, then check the “Show More Options” check box, and choose “Color Management”.
Your dialog box should now look something like this:
Photoshop 7’s Print with Preview dialog
box, is a great way to visually see how
your image will fall on the page size
you’ve dened.
For images within the gamut of the printer,
Relative Colorimetric with Black Point
Compensation ‘on’ usually works well.
If you are not sure if your printer’s color
gamut is larger than the color gamut of
the image le you’re trying to print, then
use the Perceptual rendering intent.
If you notice blocky or unsmooth
color transitions when using the Relative
Colorimetric rendering intent, then use
Perceptual.
Print with Preview Dialog within Photoshop 7
Under “Source Space:” the Document radio button should be selected. You may see a different
RGB prole tagged for your image le versus the example “Lab Color” above. It may say “Adobe
RGB (1998)” or even “ColorMatch RGB”. If it says “Untagged RGB”, then Photoshop will apply
the default RGB Working Space prole that you dened in Step 1, which was “Adobe RGB (1998)”.
Under “Print Space:” the “Prole:” selection should be set to an RGB ICC printer prole designed
for your combination of printer model, paper, ink, and driver setup.
5
Page 6

Under “Print Space:” the “Intent:” selection should be set to either Perceptual or Relative
Colorimetric depending upon your image le.
As discussed, Black Point Compensation ‘on’ or ‘off’ makes no difference when printing using the
Perceptual rendering intent, but it is needed for Relative Colorimetric. So turn it ‘on’ and forget
about it.
Are your ICC proles showing up in the prole pull down menu?
Make sure you double check the prole name when searching for your ICC prole. Sometimes
The EPSON Stylus Pro 7600 and 9600
printers are identical in every way. The
only difference in the width and price.
Proles created using the SP7600 should
work ne for the SP9600 and vice versa
as long as your are printing with the same
ink and media type.
the lename of the prole differs from the actual internal ICC prole name that’s used within the
software application. In any case, just make sure you didn’t overlook the prole. That Adobe
Photoshop prole pull down menu can get crowded.
If your sure you do not see the ICC prole your expecting, then repeat step one and restart your
computer. Also, try restarting Adobe Photoshop 7.
Where can I get good quality RGB ICC proles for my printer?
For any EPSON Stylus Pro branded printer, you should check our web site at:
http://prographics.epson.com
OR
Use the ICC proles that came with your Epson printer driver.
OR
Create your own RGB ICC proles using standard ICC prole software and hardware.
Now on to our nal step of printing your image le!
6
Page 7

STEP 4 : Setting Up Your Printer Driver Settings and Printing Your Image!
Take note of the Print Space Prole selection within the “Print with Preview” dialog box then click
the “Print” button. The following dialog box will appear:
Epson Print Dialog
When the Epson print dialog appears, click on the “Custom” radio button then the “Advanced...”
button and carefully create and save a new driver setup for that particular RGB ICC prole.
You must make sure the printer driver
settings match exactly the way the RGB
ICC Prole is expecting them to be set.
All ICC proles were created with certain
printer driver settings.
You must nd out how your particular
ICC prole was created and set your
printer driver settings to match them
exactly.
Also, make sure you are using the correct
printer model, ink type, and media for
that particular ICC prole!
On SP7600 and SP9600 UltraChrome
models, make sure you know which
Black Ink Mode you’re in - Photo Black or
Matte Black?
Here is an example Advanced Settings Dialog screen setup for an ICC prole that was created for
“Premium Glossy Photo Paper”, Printing in “Color/B&W”, at 2880 dpi, with High Speed ‘off’ and
the “No Color Adjustment” radio selected.
Epson Printer Driver Advanced Settings Dialog
After you have chosen the correct printer driver setup for this prole, then click the “O.K.” and
“Print” buttons to actually start printing. That’s it!
7
Page 8

This document comes with no technical support of any kind and can be
distributed freely among Epson customers for their use.
Specications and terms are subject to change without notice. EPSON,
EPSON Stylus and Micro Piezo are registered trademarks of Seiko Epson
Corporation. UltraChrome, EPSON Archival, EPSON Photographic Dye,
ColorLife, and DX3 are trademarks, and EPSON Preferred Protection Plan
is a service mark of Epson America, Inc. All other product brand names are
trademarks and/or registered trademarks of their respective companies.
EPSON disclaims any and all rights in these trademarks. © Epson America,
Inc. 2002.
8
 Loading...