

Epson 915 Service Manual
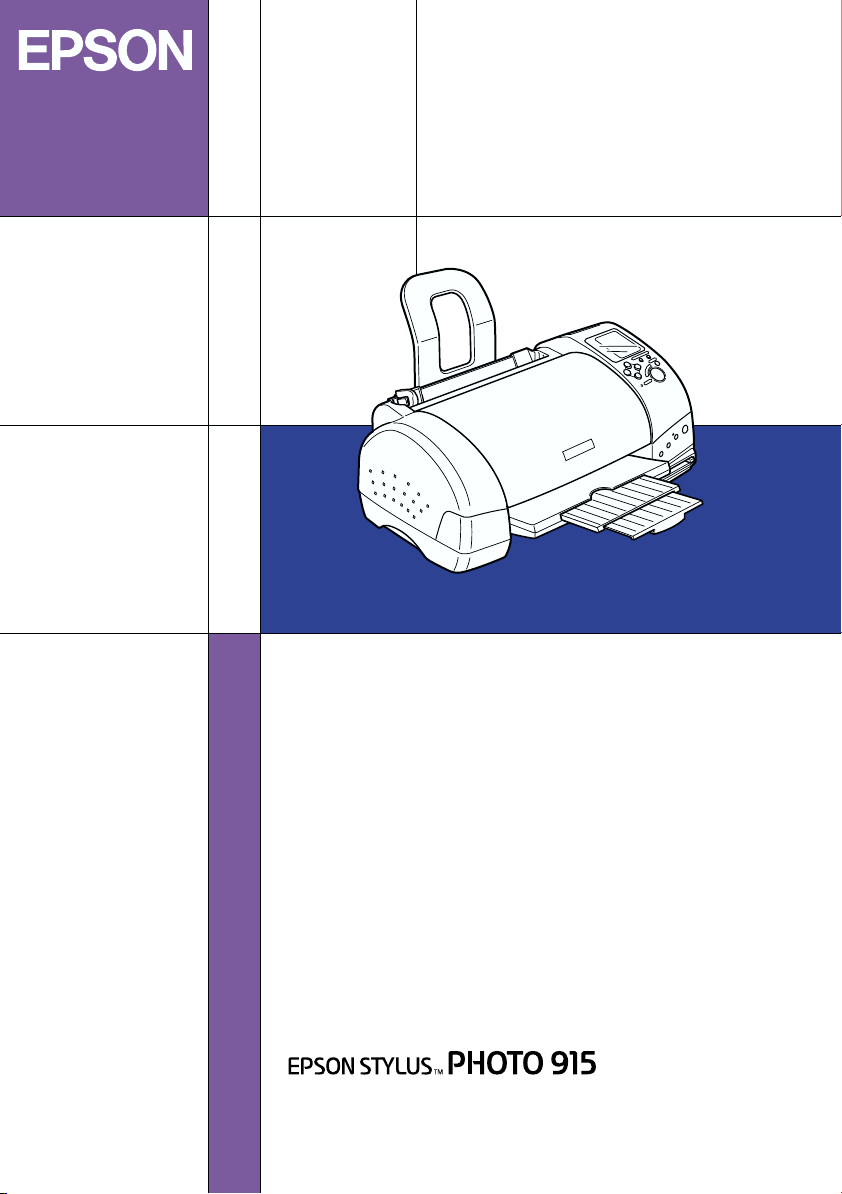
Color Ink Jet Printer
Daily Use
4032203-00
EUL

Where to Find Information
Setup Guide
This guide will help you set up and begin using your printer. It
includes information on setting up your printer and installing the
printer software.
Photo Print Software Setup included on the CD-ROM
This guide provides information on installing EPSON
PhotoQuicker, EPSON PhotoStarter and EPSON CardMonitor. It
also contains uninstalling and system requirements.
Daily Use guide
This guide provides information mainly for direct printing. It also
contains troubleshooting tips and customer support information.
For printing with a computer, please refer to the Online Reference
Guide.
EPSON PhotoQuicker User’s Guide
Included on the printer software CD-ROM, this guide provides
basic information on using the EPSON PhotoQuicker utility to
print your photo data. It also contains troubleshooting tips.
Reference Guide included on the CD-ROM
The Reference Guide contained on the CD-ROM included with
your printer provides detailed information about printer software
settings, printing on special paper, maintenance, and problem
solving.
To access the Reference Guide, refer to the Setup Guide.

All rights reserved. No part of this publication may be reproduced, stored in a retrieval
system, or transmitted in any form or by any means, electronic, mechanical, photocopying,
recording, or otherwise, without the prior written permission of SEIKO EPSON
CORPORATIO N. The information contained h erein is designed only for use with th is EPSON
printer. EPSON is not responsible for any use of this information as applied to other printers.
Neither SEIKO EPSON CORPORATION nor its affiliates shall be liable to the purchaser of
this product or third parties for damages, losses, costs, or expenses incurred by the purchaser
or third parties as a result of accident, misuse, or abuse of this product or unauthorized
modifications, repairs, or alterations to this product, or (excluding the U.S.) failure to strictly
comply with SEIKO EPSON CORPORATION's operating and maintenance instructions.
SEIKO EPSON C ORPORATION shall not be liable fo r any damages or problems arising from
the use of any options or any consumable products other than those designated as Original
EPSON Products or EPSON Approved Products by SEIKO EPSON CORPORATION.
SEIKO EPSON CORPORATION shall not be held liable for any damage resulting from
electromagnetic interference that occurs from the use of any interface cables other than those
designated as EPSON Approved Products by SEIKO EPSON CORPORATION.
EPSON is a registered trademark and EPSON Stylus is a trademark of SEIKO EPSON
CORPORATION.
Copyright 2001 SEIK O EPSON CORPORATION. All rights reserve d. PRINT Image Matching
is a trademark of SEIKO EPSON CORPORATION. The PRINT Image Matching logo is a
trademark of SEIKO EPSON CORPORATION.
Microsoft and Windows are registered trademarks of Microsoft Corporation.
Apple and Macintosh are registered trademarks of Apple Computer, Inc.
DPOF is a trademark of CANON INC., Eastman Kodak Company, Fuji Photo Film Co., Ltd.
and Matsushita Electric Industrial Co., Ltd.
SanDisk Host Developer’s Tool Kit © 1999 SANDISK CORPORATION
General Notice: Other product names used herein are for identification purposes only and
may be trademarks of their respective owners. EPSON disclaims any and all rights in those
marks.
Copyright © 2002 by SEIKO EPSON CORPORATION, Nagano, Japan.
ii

Contents
Safety Instructions . . . . . . . . . . . . . . . . . . . . . . . . . . . . . 1
Important Safety Instructions . . . . . . . . . . . . . . . . . . . . . . . . . . . . . . . 1
Warnings, Cautions, and Notes . . . . . . . . . . . . . . . . . . . . . . . . . . . . . 6
Printer Parts and Control Panel Functions . . . . . . . . . . 7
Printer Parts . . . . . . . . . . . . . . . . . . . . . . . . . . . . . . . . . . . . . . . . . . . . . . 7
Buttons . . . . . . . . . . . . . . . . . . . . . . . . . . . . . . . . . . . . . . . . . . . . . . . . . . 8
Lights . . . . . . . . . . . . . . . . . . . . . . . . . . . . . . . . . . . . . . . . . . . . . . . . . . . 10
Using Roll Paper . . . . . . . . . . . . . . . . . . . . . . . . . . . . . . 11
Using the Roll Paper Holder . . . . . . . . . . . . . . . . . . . . . . . . . . . . . . . 11
Removing Roll Paper from the Printer . . . . . . . . . . . . . . . . . . . . . . . 17
Storing EPSON Roll Paper . . . . . . . . . . . . . . . . . . . . . . . . . . . . . . . . . 18
Printing Photos Directly from PC Cards . . . . . . . . . . .19
Available Media Types . . . . . . . . . . . . . . . . . . . . . . . . . . . . . . . . . . . . 19
Loading Paper . . . . . . . . . . . . . . . . . . . . . . . . . . . . . . . . . . . . . . . . . . . 22
Loading PC Cards . . . . . . . . . . . . . . . . . . . . . . . . . . . . . . . . . . . . . . . . 25
Printing from the Control Panel . . . . . . . . . . . . . . . . . . . . . . . . . . . . 30
Display . . . . . . . . . . . . . . . . . . . . . . . . . . . . . . . . . . . . . . . . . . . . . . . . . 33
Printing All Photographs on a PC Card . . . . . . . . . . . . . . . . . . . . . . 37
Printing an Index Print . . . . . . . . . . . . . . . . . . . . . . . . . . . . . . . . . . . . 39
Printing a Selected Photo . . . . . . . . . . . . . . . . . . . . . . . . . . . . . . . . . . 41
Printing Multiple Selected Photos . . . . . . . . . . . . . . . . . . . . . . . . . . 43
Printing with the DPOF setting . . . . . . . . . . . . . . . . . . . . . . . . . . . . . 45
Expanded Layout Options . . . . . . . . . . . . . . . . . . . . . . . . . . . . . . . . . 46
Using Filters . . . . . . . . . . . . . . . . . . . . . . . . . . . . . . . . . . . . . . . . . . . . . 52
Brightness Adjustment . . . . . . . . . . . . . . . . . . . . . . . . . . . . . . . . . . . . 54
Changing Default Settings . . . . . . . . . . . . . . . . . . . . . . . . . . . . . . . . . 55
Replacing Ink Cartridges . . . . . . . . . . . . . . . . . . . . . . 57
Checking the Ink Supply . . . . . . . . . . . . . . . . . . . . . . . . . . . . . . . . . . 57
iii

Replacing an Ink Cartridge . . . . . . . . . . . . . . . . . . . . . . . . . . . . . . . . .58
Maintenance . . . . . . . . . . . . . . . . . . . . . . . . . . . . . . . .64
Checking the Print Head Nozzles . . . . . . . . . . . . . . . . . . . . . . . . . . .64
Cleaning the Print Head . . . . . . . . . . . . . . . . . . . . . . . . . . . . . . . . . . .65
Cleaning the Printer . . . . . . . . . . . . . . . . . . . . . . . . . . . . . . . . . . . . . . .67
Transporting the Printer . . . . . . . . . . . . . . . . . . . . . . . . . . . . . . . . . . .69
Troubleshooting . . . . . . . . . . . . . . . . . . . . . . . . . . . . . .71
Error Indicators and Display . . . . . . . . . . . . . . . . . . . . . . . . . . . . . . .71
Print Quality Problems . . . . . . . . . . . . . . . . . . . . . . . . . . . . . . . . . . . .74
Printout Problems Not Related to Print Quality . . . . . . . . . . . . . . .77
Paper Does Not Feed Correctly . . . . . . . . . . . . . . . . . . . . . . . . . . . . .78
Printer Does Not Print . . . . . . . . . . . . . . . . . . . . . . . . . . . . . . . . . . . . .81
Cancelling Printing . . . . . . . . . . . . . . . . . . . . . . . . . . . . . . . . . . . . . . . .84
Exif Print . . . . . . . . . . . . . . . . . . . . . . . . . . . . . . . . . . . . . . . . . . . . . . . .85
Printing with PRINT Image Matching . . . . . . . . . . . . . . . . . . . . . . .86
Customer Support . . . . . . . . . . . . . . . . . . . . . . . . . . . .88
Technical Support Web Site . . . . . . . . . . . . . . . . . . . . . . . . . . . . . . . .88
Contacting Customer Support . . . . . . . . . . . . . . . . . . . . . . . . . . . . . .88
Options and Consumable Products . . . . . . . . . . . . . .91
Options . . . . . . . . . . . . . . . . . . . . . . . . . . . . . . . . . . . . . . . . . . . . . . . . . .91
Consumable products . . . . . . . . . . . . . . . . . . . . . . . . . . . . . . . . . . . . .93
Printer Specifications . . . . . . . . . . . . . . . . . . . . . . . . . .95
Printing . . . . . . . . . . . . . . . . . . . . . . . . . . . . . . . . . . . . . . . . . . . . . . . . . .95
Paper . . . . . . . . . . . . . . . . . . . . . . . . . . . . . . . . . . . . . . . . . . . . . . . . . . . .95
Ink Cartridges . . . . . . . . . . . . . . . . . . . . . . . . . . . . . . . . . . . . . . . . . . . .99
Mechanical . . . . . . . . . . . . . . . . . . . . . . . . . . . . . . . . . . . . . . . . . . . . . .101
Electrical . . . . . . . . . . . . . . . . . . . . . . . . . . . . . . . . . . . . . . . . . . . . . . . .101
Operating Environment . . . . . . . . . . . . . . . . . . . . . . . . . . . . . . . . . . .102
Standards and Approvals . . . . . . . . . . . . . . . . . . . . . . . . . . . . . . . . .102
iv

v

Safety Instructions
Important Safety Instructions
Read all of the instructions in this section before using your
printer. Also, be sure to follow all warnings and instructions
marked on the printer.
When setting up your printer
Observe the following when setting up the printer:
❏ Do not block or cover the openings in the printer’s cabinet.
❏ Use only the type of power source indicated on the printer’s
label.
❏ Be sure your AC power cord meets the relevant local safety
standard.
❏ Connect all equipment to properly grounded power outlets.
Avoid using outlets on the same circuit as photocopiers or air
control systems that regularly switch on and off.
❏ Avoid electrical outlets controlled by wall switches or
automatic timers.
❏ Keep the entire computer system away from potential sources
of electromagnetic interference, such as loudspeakers or the
base units of cordless telephones.
❏ Do not use a damaged or frayed power cord.
1

❏ If you use an extension cord with the printer, make sure that
the total ampere rating of the devices plugged into the
extension cord does not exceed the cord’s ampere rating. Also,
make sure that the total ampere rating of all devices plugged
into the wall outlet does not exceed the wall outlet’s ampere
rating.
❏ Do not attempt to service the printer yourself.
❏ Unplug the printer and refer servicing to qualified service
personnel under the following conditions:
The power cord or plug is damaged; liquid has entered the
printer; the printer has been dropped or the cabinet damaged;
the printer does not operate normally or exhibits a distinct
change in performance.
❏ If you plan to use the printer in Germany, the building
installation must be protected by a 10 or 16 amp circuit
breaker to provide adequate short-circuit protection and
over-current protection for this printer.
When choosing a place for the printer
Observe the following when choosing a place for the printer:
❏ Place the printer on a flat, stable surface that extends beyond
the printer base in all directions. The printer will not operate
properly if it is tilted or at an angle.
❏ Leave enough space in front of the printer for the paper to be
fully ejected.
❏ Avoid places subject to rapid changes in temperature and
humidity. Also, keep the printer away from direct sunlight,
strong light, or heat sources.
❏ Avoid places subject to dust, shocks, and vibrations.
2

❏ Leave enough room around the printer to allow for sufficient
ventilation.
❏ Place the printer near a wall outlet where the plug can be
easily unplugged.
When using the printer
Observe the following when using the printer:
❏ Do not insert objects through the slots in the printer’s cabinet.
❏ Take care not to spill liquid on the printer.
❏ Do not put your hand inside the printer or touch the ink
cartridges during printing.
❏ Do not move the print head by hand; otherwise, you may
damage the printer.
❏ Always turn the printer off using the P power button. When
this button is pressed, the Processing light flashes briefly and
then goes out. Do not unplug the printer or turn off the power
to the outlet until the Processing light stops flashing.
❏ Before transporting the printer, make sure that the print head
is in the home (far right) position and the ink cartridges are
in place.
When using a memory card
❏ Do not remove the memory card or turn off the printer power
while the computer and the memory card are communicating
(when the Processing light is flashing). Doing so can corrupt
memory card data.
3

❏ The handling method varies depending on the storage media.
Be sure to refer to the documentation packaged with your
memory card and PC card adapter for details.
❏ You can only use memory cards and PC card adapters that
are based on PCMCIA ATA standards (Memory Card ATA
standards) with this printer. For details about PCMCIA ATA
standards, please see the manual packaged with your
memory card or PC card adapter, or contact the manufacturer.
When using the display or the optional Preview Monitor
❏ Your LCD panel may contain a few small bright or dark spots.
These are normal and do not mean that your LCD monitor is
broken.
❏ Only use a dry, soft cloth to clean the display or the optional
Preview Monitor. Do not use liquid or chemical cleansers.
❏ If the display on the printer or the Preview Monitor’s LCD
panel is damaged, contact your dealer. If the liquid crystal
solution gets on your hands, wash them thoroughly with soap
and water. If the liquid crystal solution gets into your eyes,
flush them immediately with water. If discomfort or vision
problems remain after a thorough flushing, see a physician
immediately.
❏ Always attach the cover on the Preview Monitor slot, unless
using the optional Preview Monitor.
When handling the ink cartridges
Observe the following when handling the ink cartridges:
4

❏ Keep ink cartridges out of the reach of children. Do not allow
children to drink from or otherwise handle the cartridges.
❏ Be careful when you handle used ink cartridges, as there may
be some ink remaining around the ink supply port. If ink gets
on your skin, wash the area thoroughly with soap and water.
If discomfort or vision problems remain after a thorough
flushing, see a doctor immediately.
❏ Do not shake an ink cartridge; this can cause leakage.
❏ Install the ink cartridge immediately after you remove it from
its package. Leaving the cartridge unpacked for a long time
before use may result in reduced print quality.
❏ Do not use an ink cartridge beyond the date printed on the
cartridge carton. For best results, use up the ink cartridges
within six months of installing them.
❏ Do not dismantle the ink cartridges or try to refill them. This
could damage the print head.
❏ After bringing an ink cartridge inside from a cold storage site,
allow it to warm up at room temperature for at least three
hours before using it.
❏ Store ink cartridges in a cool, dark place.
❏ Do not touch the green IC chip on the side of the cartridge.
This may affect normal operation and printing.
❏ The IC chip on this ink cartridge retains a variety of cartridge
related-information, such as the amount of ink remaining, so
that a cartridge may be removed and reinserted freely.
However, each time the cartridge is inserted, some ink is
consumed because the printer automatically performs a
reliability check.
5

❏ If you remove an ink cartridge for later use, protect the ink
supply area from dirt and dust and store it in the same
environment as the printer. A valve in the ink supply port
makes covers or plugs unnecessary, but the ink may stain
items that come in contact with this area of the cartridge. Do
not touch the ink supply port or surrounding area.
ENERGY STAR
The International
a voluntary partnership with the computer and office equipment
industry to promote the introduction of energy-efficient personal
computers, monitors, printers, fax machines, copiers, and
scanners in an effort to reduce air pollution caused by power
generation.
®
Compliance
As an ENERGY STAR® Partner, EPSON has
determined that this product meets the
®
STAR
guidelines for energy efficiency.
ENERGY STAR
®
Office Equipment Program is
Warnings, Cautions, and Notes
Warnings must be followed carefully to avoid bodily injury.
w
Cautions must be observed to avoid damage to your equipment.
c
Notes contain important information and useful tips on the operation
of your printer.
ENERGY
6
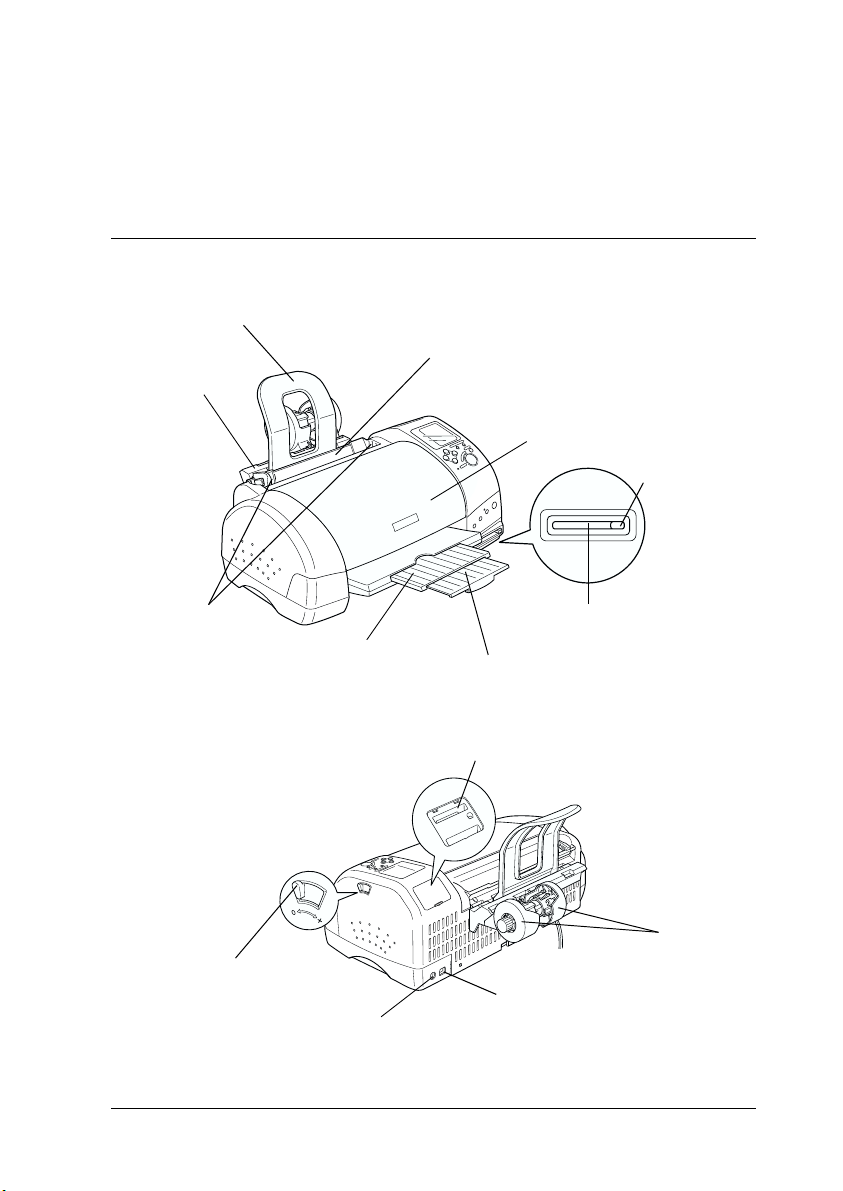
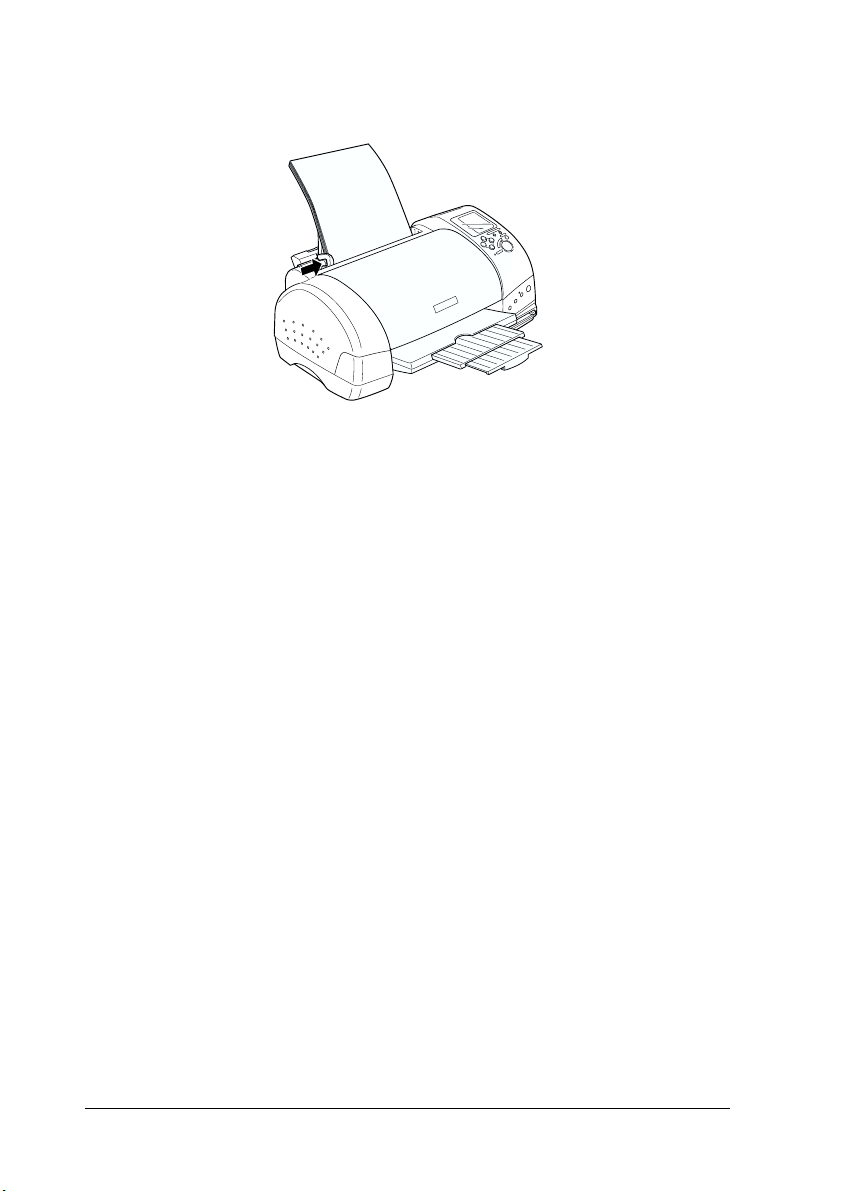
Printer Parts and Control Panel Functions
Printer Parts
paper support
roll paper holder
adapter
edge guides
Adjust lever
output tray
sheet feeder
printer cover
card eject lever
PC card slot
output tray
extension
Preview Monitor slot
roll paper
holder
Preview Monitor cable
connector
USB interface cable
connector
7
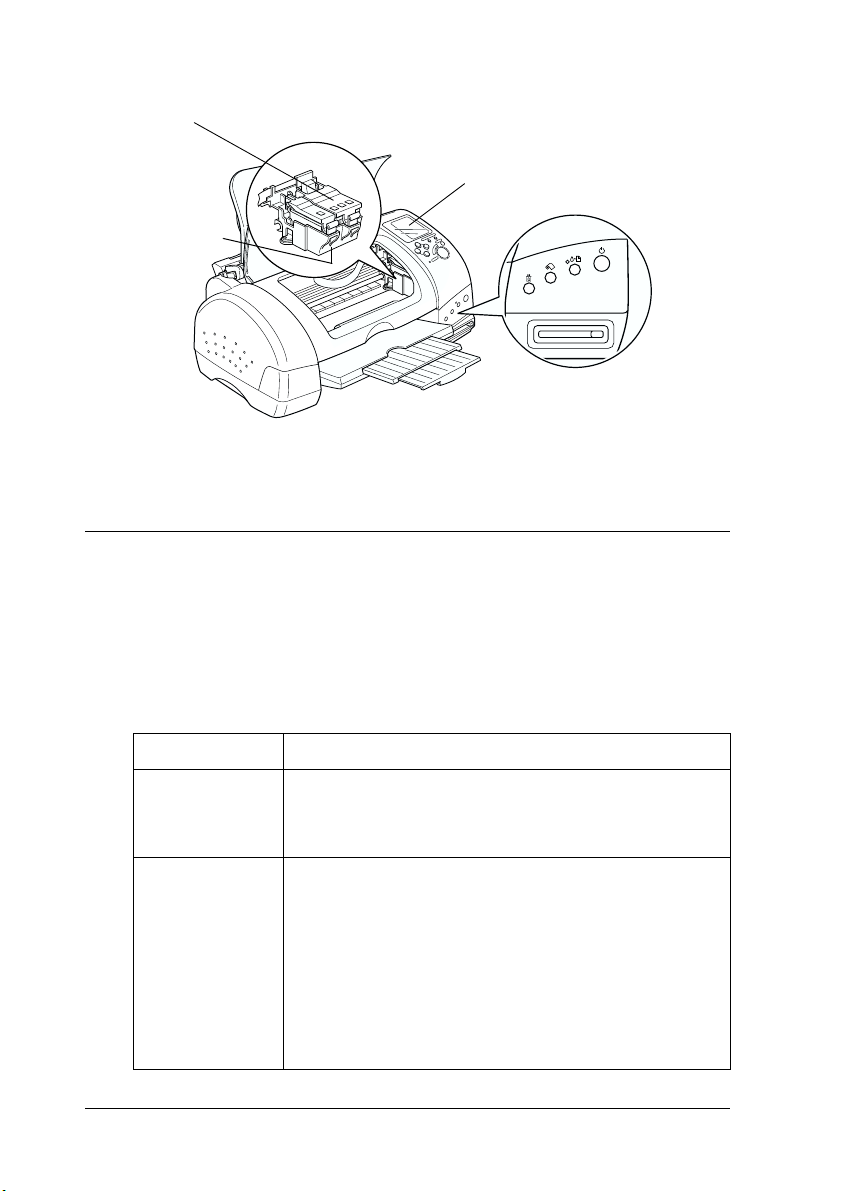
ink cartridge clamps
print head
Buttons
Control panel, front
control panel, top
control panel, front
Button Function
P
power
b
maintenance
Turns the printer on and off.
Clears the printer's memory if pressed twice while the
power is on.
Loads or ejects paper if pressed and released within
two seconds.
Resumes printing if pressed and released after a paper
out error.
Performs print head cleaning if pressed for 3 seconds
while the
Moves the print head to the ink cartridge replacement
position and charges ink to the printer when ink is out.
b error light is off.
8
z
roll paper
Loads and ejects roll paper.
Feeds roll paper in reverse to a position where it can be
easily removed from the sheet feeder, if pressed for
more than 3 seconds.
Clears the
paper.
b error light if pressed after removing roll
e
ink cartridge
replacement
Moves the print head to the ink cartridge replacement
position and charges ink to the printer when ink is out.
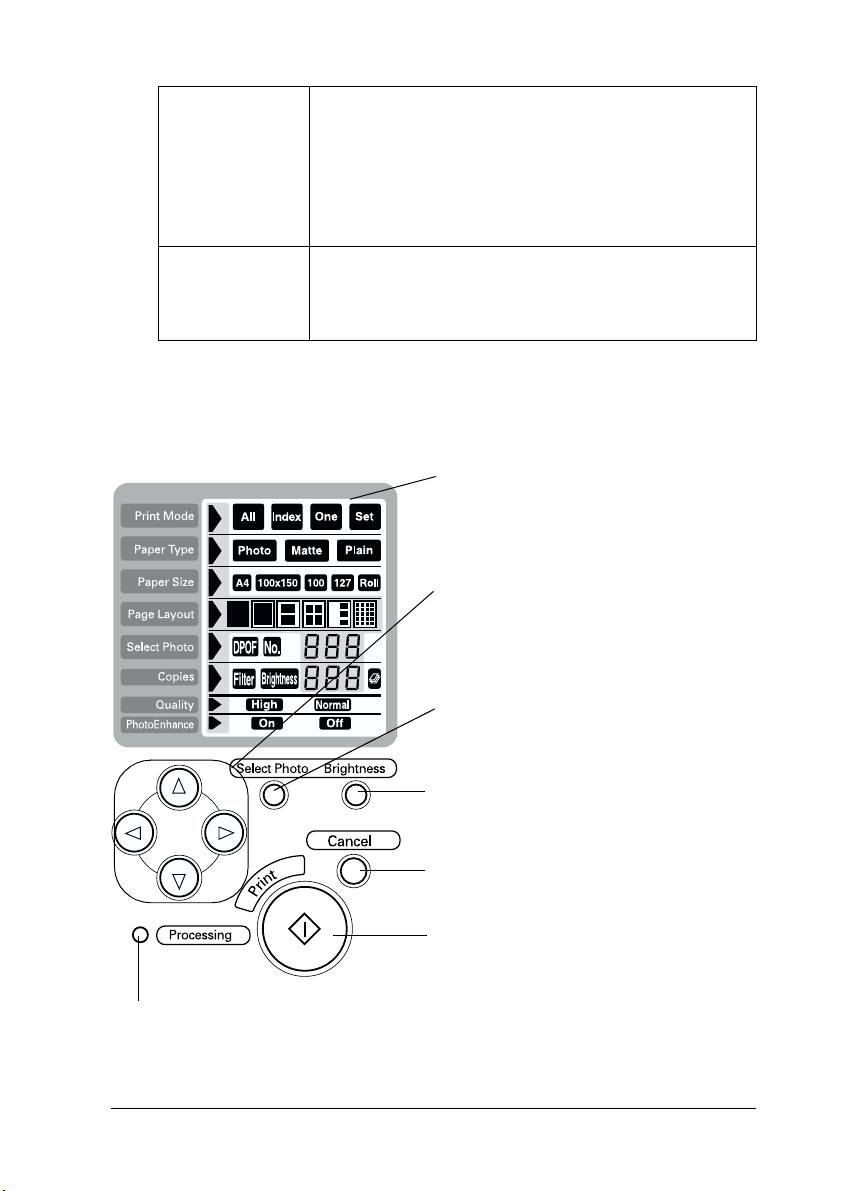
Control panel, top
Processing light:
On when ready to print.
Flashes while processing the data.
Display:
Shows the items and settings you change
with the buttons on the control panel.
Arrow buttons (up, down, left, right):
Use arrow buttons, up or down to select
setting menus. Use arrow button, left or
right to decide the settings.
Select Photo button: Sets the number of
copies for the photo selected on the
Select Photo menu.
Brightness b utton: Press to change into the
brightness setting mode. Press three
seconds to change into the filter setting
mode.
Cancel button:
Cancels print operation, or settings on the
display.
Start Print button:
Starts printing with the settings selected
via the buttons on the control panel.
9
Note:
The buttons on the top control panel only affect direct printing from a
PC card.
Lights
Light Description
Processing On when the printer is on.
Flashes when the printer is receiving data, reading data
from a PC card, sending PC card data to the computer,
printing, charging ink, cleaning the print head, or when
an ink cartridge is being replaced.
b
error
On when the printer is out of paper. Load paper into the
sheet feeder, then press the
resume printing.
On when the paper is jammed. Take all of the paper out
of the feeder, then reload it. If the light continues to flash,
turn off the printer and gently pull all of the paper out of
the printer.
Flashes when the black or color ink cartridge is nearly
empty.
On when the black or color ink cartridge is empty.
Replace the empty black ink cartridge or color ink
cartridge.
Black:
T007 Standard Capacity
T010 Light Capacity
Color:
T008
Flashes when the print head has moved to the ink
cartridge replacement position.
b maintenance button to
10

Using Roll Paper
Using the Roll Paper Holder
With the roll paper holder mounted on the printer, you can print
in roll paper format, which is convenient for banner printing.
When you are printing using the roll paper holder, keep the
following in mind:
❏ Load the paper printable side up.
❏ Use flat, undamaged paper. If the paper is curled, flatten it
before loading to avoid paper feeding problems.
❏ Always handle the paper by the edges.
❏ Provide ample space in front of the printer for the paper to
eject fully.
❏ Make sure that the output tray is down and the output tray
extension is closed.
❏ Check that the end of the paper is cut cleanly, perpendicular
to the long axis of the paper. If it is cut on a diagonal or not
cleanly, the paper may not feed smoothly or the print may
extend off the edge of the paper.
❏ EPSON recommends using media distributed by EPSON to
ensure high-quality results.
Loading the roll paper
Follow the directions below to mount the roll paper holder and
load the following types of roll paper.
11
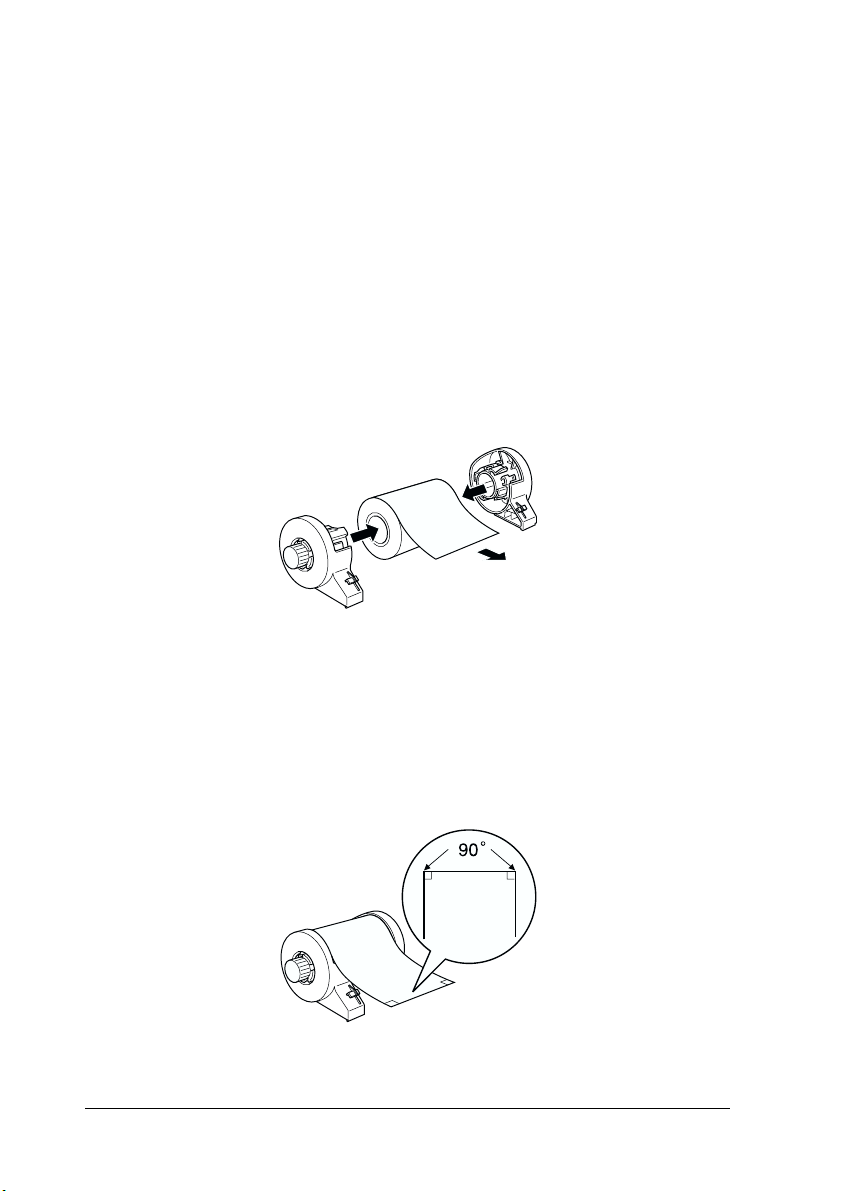
Photo Paper (100 mm × 8m)
Photo Paper (210 mm × 10 m)
Premium Glossy Photo Paper (100 mm × 8m)
Premium Glossy Photo Paper (127 mm × 8m)
Premium Glossy Photo Paper (210 mm × 10 m)
1. Load roll paper in the roll paper holder.
Note:
Remove the transparent sheet after setting the roll paper into the
holders.
2. Check that the end of the roll is cut perpendicularly to the
edges as shown, using a triangle.
12
Caution:
Always use a triangle or other tool to ensure that the end of
c
the roll is cut perpendicularly. A diagonal cut may cause
paper feed problems.
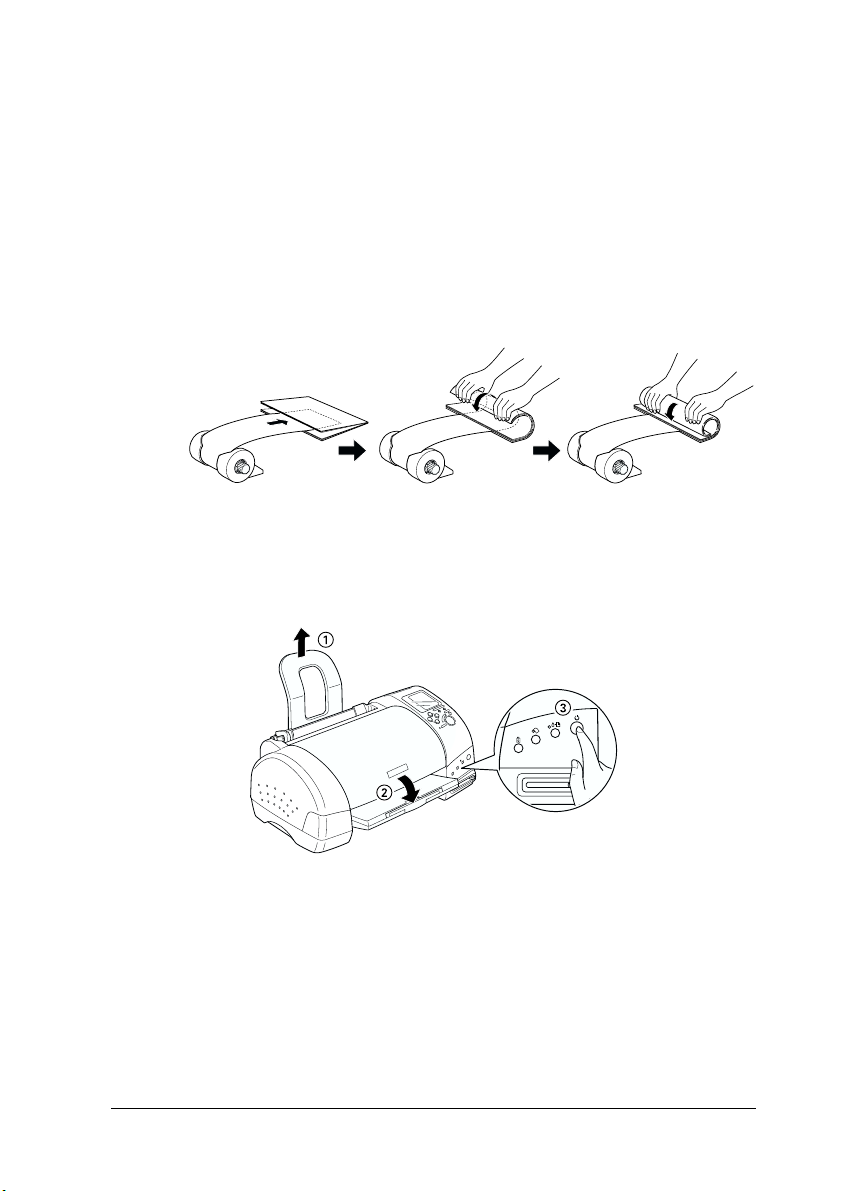
3. To flatten the roll paper, place it printable-side up between
the pages of the instruction booklet packaged with the roll
paper to protect it. Then, roll the booklet in the direction
opposite of the paper’s curl.
4. Remove the paper support and lower the output tray. Then
turn on the printer.
13
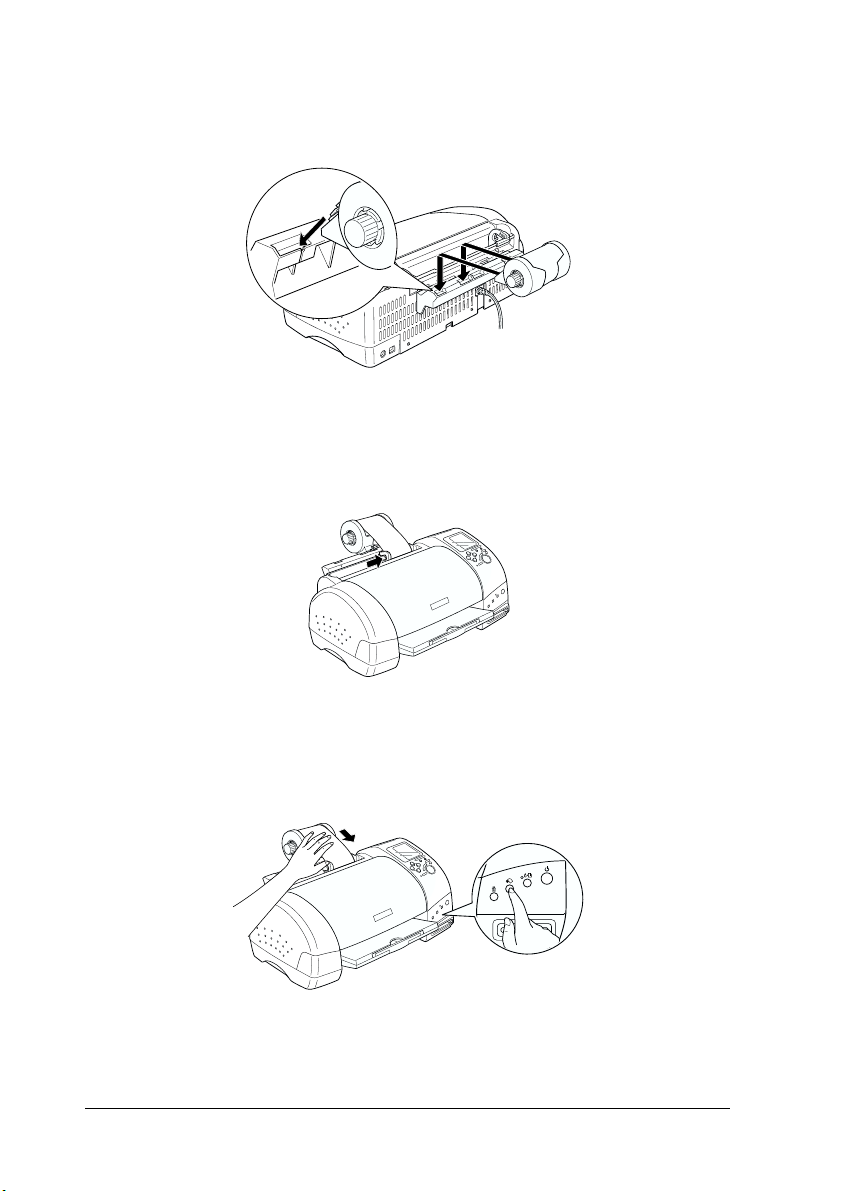
5. Insert the roll paper holder adapter into the slot at the rear of
the printer, then attach the roll paper holder to the adapter.
6. Gently insert the end of the paper into the printers as far as it
will go, flush with the right edge guide. Slide the left edge
guide against the left edge of the printer.
7. To load the paper correctly, you must hold the paper in place
with your hand while you press the
paper will feed into the printer.
z roll paper button. The
14
8. Open the printer cover and make sure that the paper is
feeding correctly. If it is not straight, press the
button for at least three seconds to eject the paper. The error
light comes on. Press the
then feed the paper again.
The roll paper is now loaded.
Note:
❏ Always check the ink levels before printing on roll paper as replacing
ink cartridges while the roll paper is loaded can smear the paper.
❏ We recommend replacing the roll paper with a new roll when there
is 20 cm remaining. Otherwise, print quality may be compromised
on the remaining portion.
z roll paper bu tton to clear the error,
z roll paper
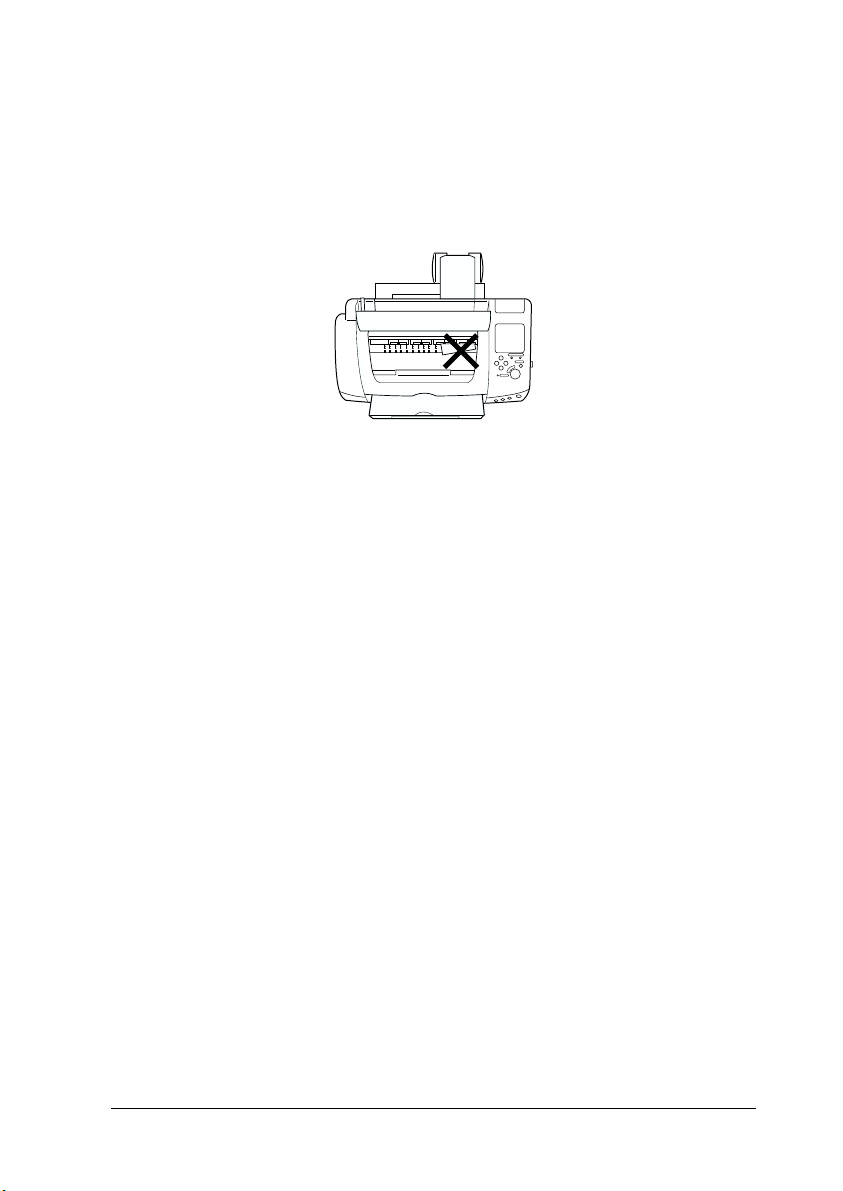
❏ Do not select A4 or 100
setting when roll paper is loaded in the sheet feeder. Doing so causes
unnecessary paper to be fed after each print job. If you have already
started printing, press the Cancel button. Wait until the printer
stops printing and feeding paper. Cut off the paper at the back of the
printer, then turn off the printer. The remaining paper is ejected.
×
150 mm sheet paper for the Paper Size
Printing area and margins
Follow the steps below to change the margins between pages of
printed data.
1. Select Roll Paper as the Paper Size on the control panel, top.
15
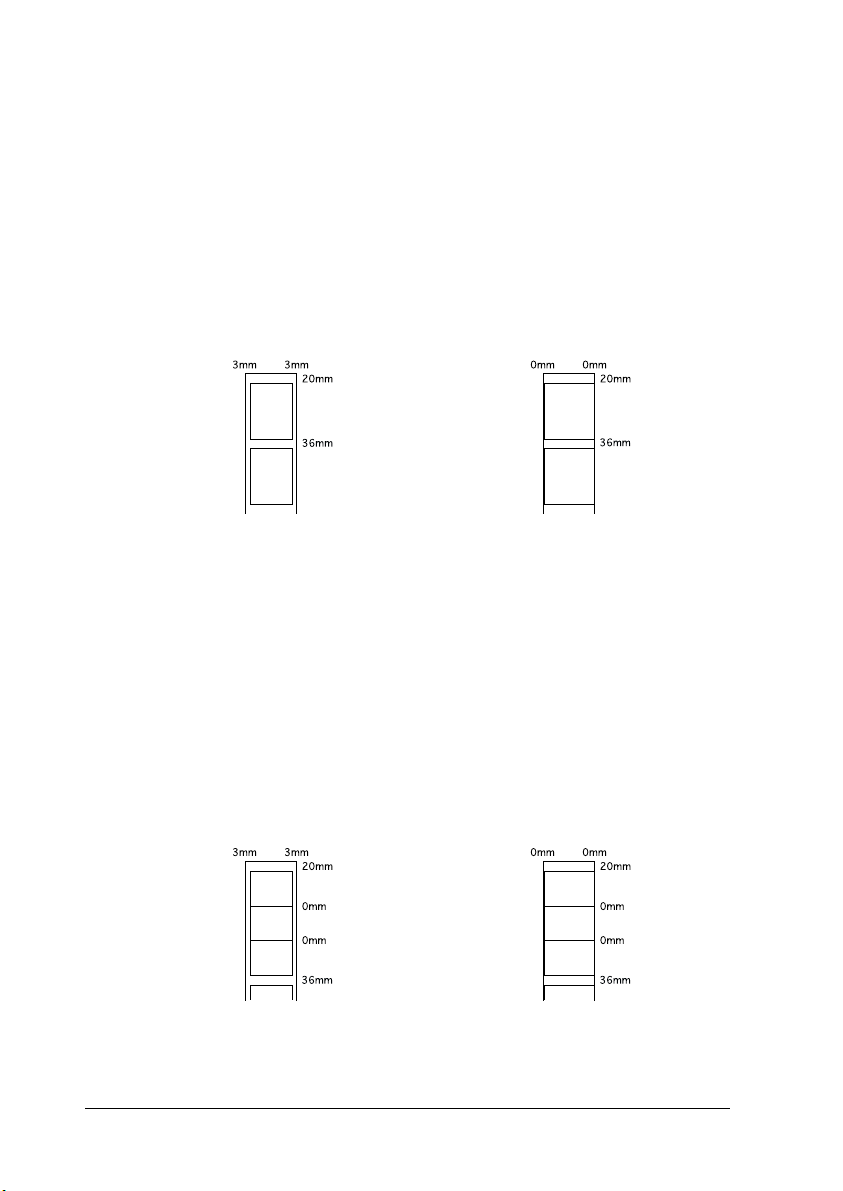
2. When printing is finished, press the z roll paper button once
to print a cutting guideline about 12 mm from the bottom of
the print data.
3. To print the next print job, press the
z roll paper button to
feed the paper back to the printing position. Then start the
next print job. The space between pages is automatically set
to 36 mm, as shown below.
Standard margins No margins
Note:
You must press the z roll paper button, or the printer will not
operate even if you send a new print job. Do not press the z roll
paper button more than necessary. Doing so can damage the prinout.
To print data with no margins between separate files, as
shown below, do not press the
z roll paper button between
print jobs.
16
Standard margins No margins
Note:
The top margin is automatically set to 20 mm, regardless of the margin
setting.
Removing Roll Paper from the Printer
Follow the directions below to remove the paper from the printer.
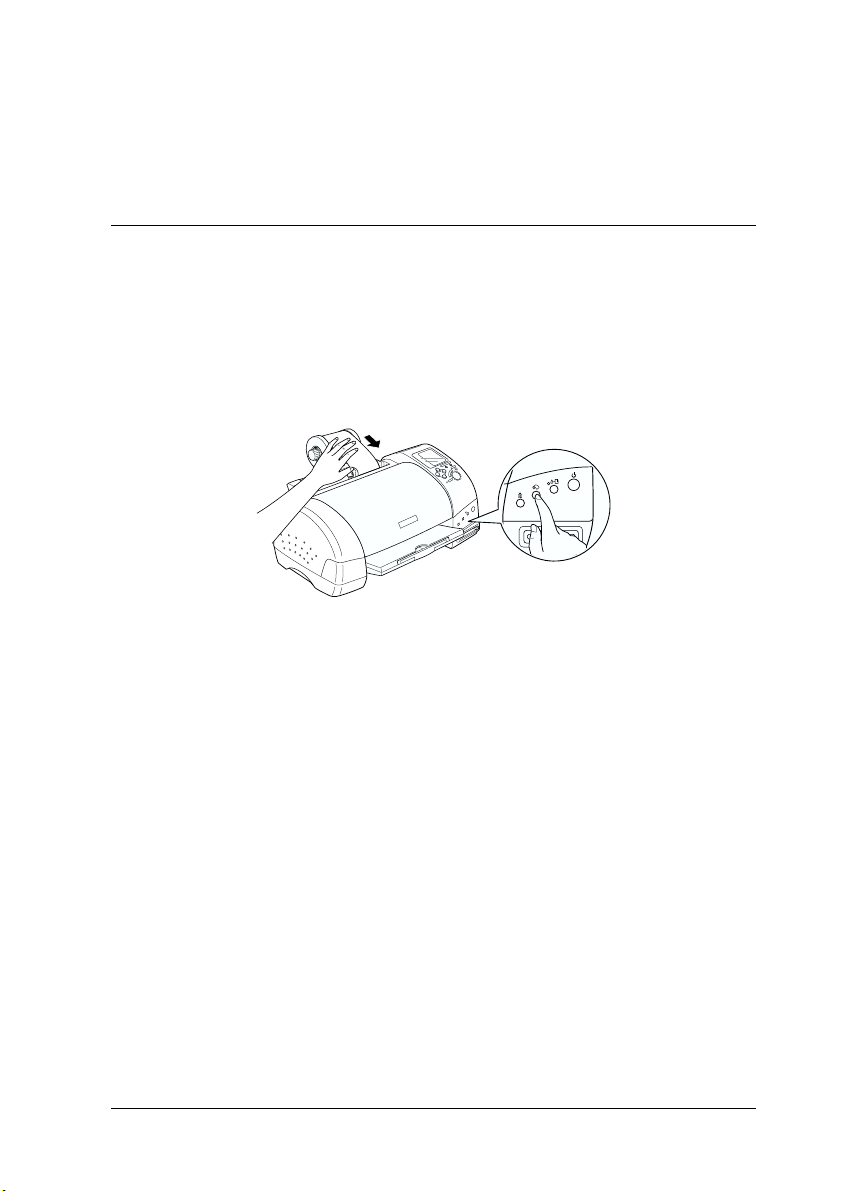
1. Press the
guide line is printed on the roll paper.
Note:
To cancel the paper removal sequence and print more data, press the
z roll paper button to feed the paper. A cutting
z roll paper button and send the next print job. The paper will
return to the printing start position before starting the next print
job. Do not press the
Doing so can damage the printout.
2. Cut the paper along the printed line. Never pull the paper as
you cut it. Doing so may damage the printout. When cutting
the paper, do not cut inside the line (closer to the printer) as
this may cause paper feed problems.
z roll paper button more than necessary.
Note:
EPSON recommends that you use a triangle or other tool to ensure
that the end of the roll is cut perpendicularly. A diagonal cut may
cause paper feed problems.
17
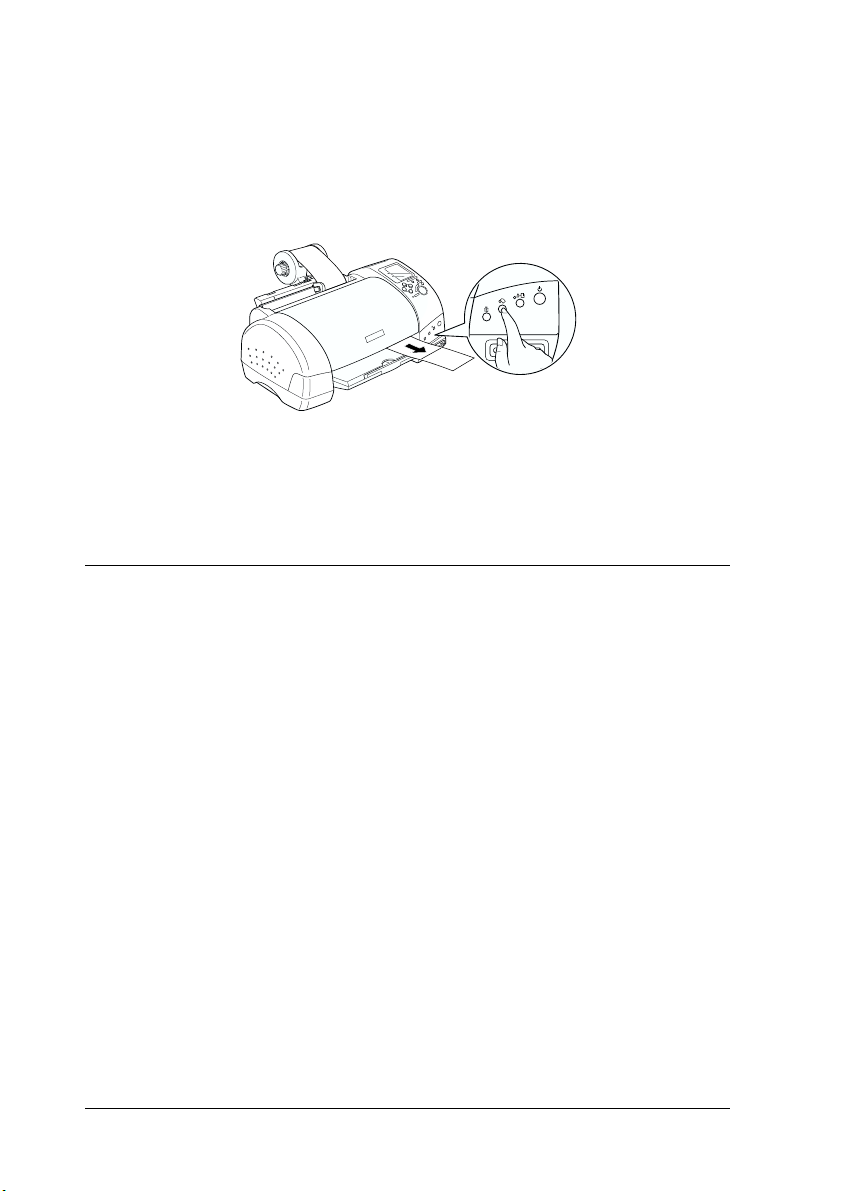
3. Once you have cut the paper, hold down the z roll paper
button for about 3 seconds. The paper feeds in reverse to a
position where it can be easily removed from the sheet feeder
at the back of the printer. If it does not feed to this position,
repeat this step.
4. Gently remove the paper, then press the
to clear error light.
z roll paper button
Storing EPSON Roll Paper
Return unused paper to the original package as soon as you finish
printing. EPSON recommends storing your printouts in a
resealable plastic bag. Keep them away from high temperature,
humidity, and direct sunlight.
18

Printing Photos Directly from PC Cards
Available Media Types
The type and quality of media determines the finish of your prints.
Be sure to read the following information and select the correct
paper for your needs.
Note:
❏ You should always print at normal room temperature and humidity:
15 to 25°C (59 to 77°F) and 40 to 60% RH.
❏ Do not touch the printable surface of the media. Fingerprints may
degrade in print quality.
Plain paper (A4, 100 x 150 mm)
When using plain paper, please observe the following:
❏ Use paper of 64 to 90 g/m² weight and 0.08 to 0.11 inches thick.
❏ Load paper up to the arrow mark on the edge guides.
EPSON special media
EPSON provides special print media that is formulated for the ink
used on EPSON ink jet printers. EPSON recommends you use
media distributed by EPSON to ensure high-quality results.
Before loading any media distributed by EPSON, read the
instruction sheet packed with it and keep the following in mind:
19
Note:
❏ More media types and sizes are available when you print images
from a computer with the EPSON Stylus Photo 915 printer
software.
❏ The availability of special media varies by country. For the latest
information on available media, visit our regional customer service
web site.
Caution:
Use EPSON special media in a normal room environment
c
(temperature and humidity) to obtain best results.
The following table lists available media types and sizes when
printing directly from PC cards. Select the one best suited to your
printing needs.
Media name Size available Product
code
Premium Ink
Jet Plain Paper
Bright White Ink
Jet Paper
Photo Paper A4 S041140 This media gives
A4 S041214 EPSON plain paper
A4 S041442 Outstanding results
100 × 150 mm S041255
100 mm × 8 m S041279
210 mm × 10 m S041280
Characteristics
for your everyday
printings needs.
for all your
everyday printing
needs.
you the highest
quality printouts at
moderate printing
cost. The glossy
surface provides
you with a
photo-like finish.
20
Media name Size available Product
code
Characteristics
Matte
Paper-Heavyw
eight
Premium
Glossy Photo
Paper
A4 S041256
S041258
S041259
A4 S041285
S041287
S041297
100 mm × 8 m S041302
S041303
127 mm × 8 m S041474
210 mm × 10 m S041376
S041377
Bright white, ultra
smooth coated
paper. For photo
quality color with a
matte finish.
Perfect for
photographs, signs,
crafts projects and
much more.
Borderless prints for
glass frames and
photo albums.
Looks and feels like
a real photograph.
About cleaning sheets
The cleaning sheet packaged with some special types of media
cannot be used with the paper feeding mechanism in this printer.
Forcing it into the printer could damage the paper feeding
mechanism.
Precautions on paper storage
❏ Store paper flat where it is not exposed to high temperature,
high humidity, or direct sunlight.
❏ Do not let the paper get wet.
❏ Keep unused paper in its original packaging and store it in a
cool, dry place to preserve quality.
21
Loading Paper
Loading sheet paper
This section applies to the following paper types:
Plain Paper
Premium Ink Jet Plain Paper
Bright White Ink Jet Paper
Photo Paper
Matte Paper-Heavyweight
Premium Glossy Photo Paper
Note:
Read all instruction sheets packed with your EPSON special media
before loading it in the printer.
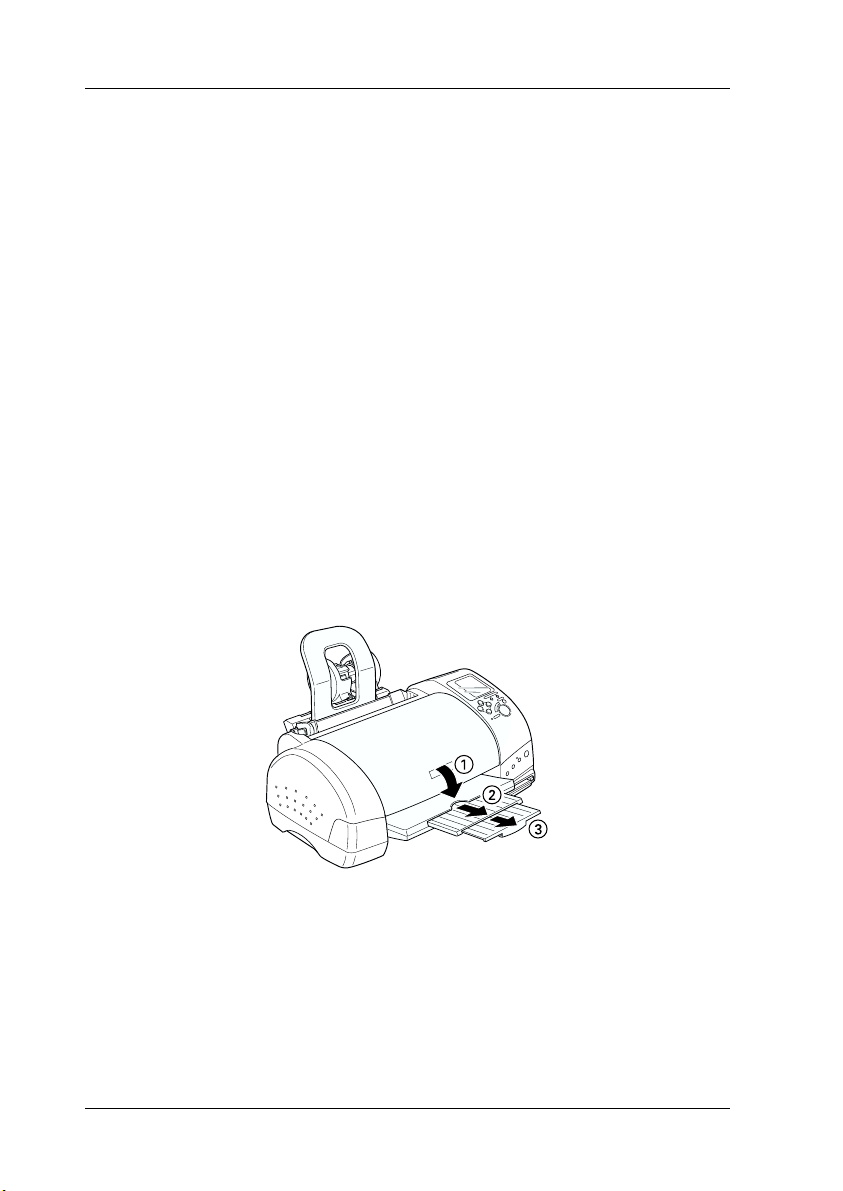
1. Lower the output tray and slide out the extension.
22
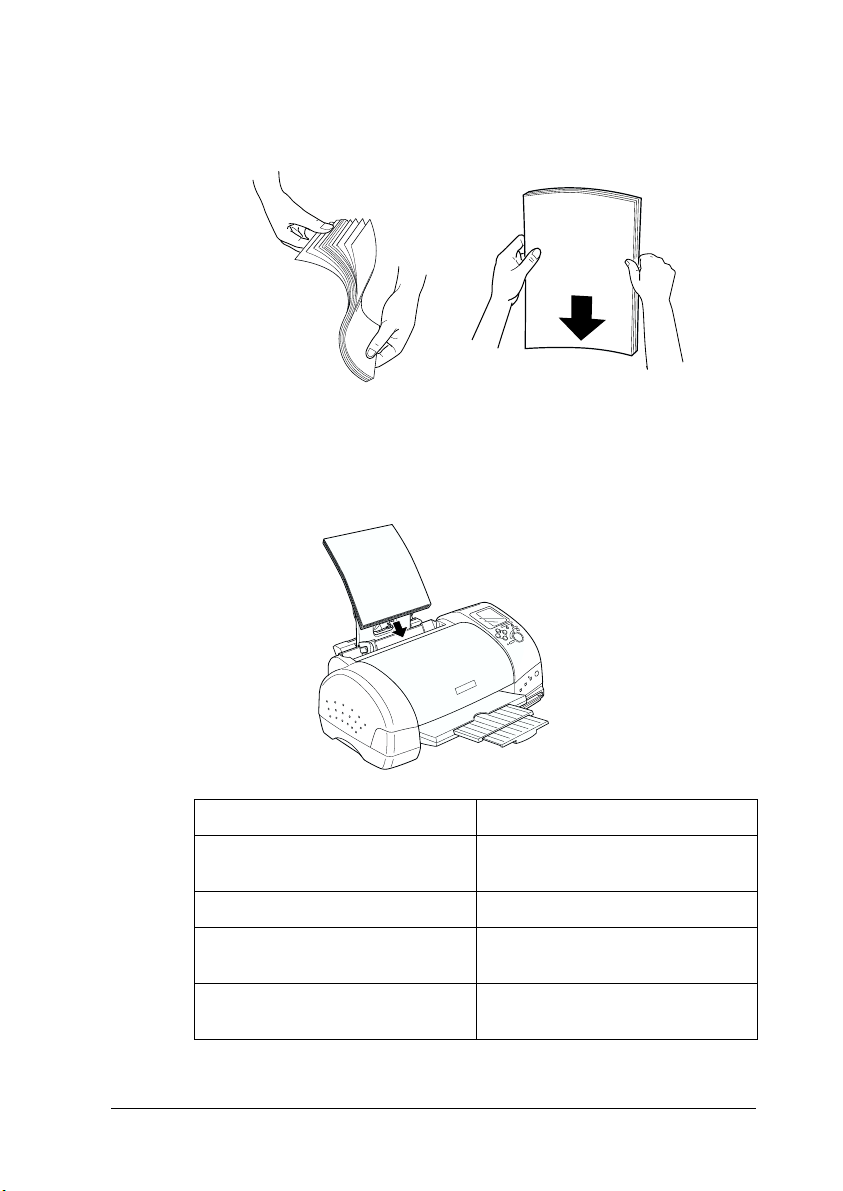
2. Fan a stack of paper; then tap it on a flat surface to even the
edges.
3. With the printable side up, load the paper so it is against the
right edge guide, and slide it into the sheet feeder.
Paper Loading Capacity
Plain paper Up to arrow mark on the left edge
guide
EPSON Photo Paper Up to 20 Sheets
EPSON Matte
Paper-Heavyweight
EPSON Premium Glossy Photo
Paper
Up to 20 Sheets
One sheet at a time
23
4. Slide the left edge guide against the paper.
Note:
Be sure to make the left edge guide flush against the paper or the
paper will not feed properly into the printer.
Loading EPSON Photo Stickers 16
To load EPSON Photo Stickers 16, follow the steps below.
Note:
Be sure to read the instruction sheet packed with the media before
loading.
1. With the printable side up, set the media against the right
edge guide and slide it into the sheet feeder.
24
 Loading...