

Page 1
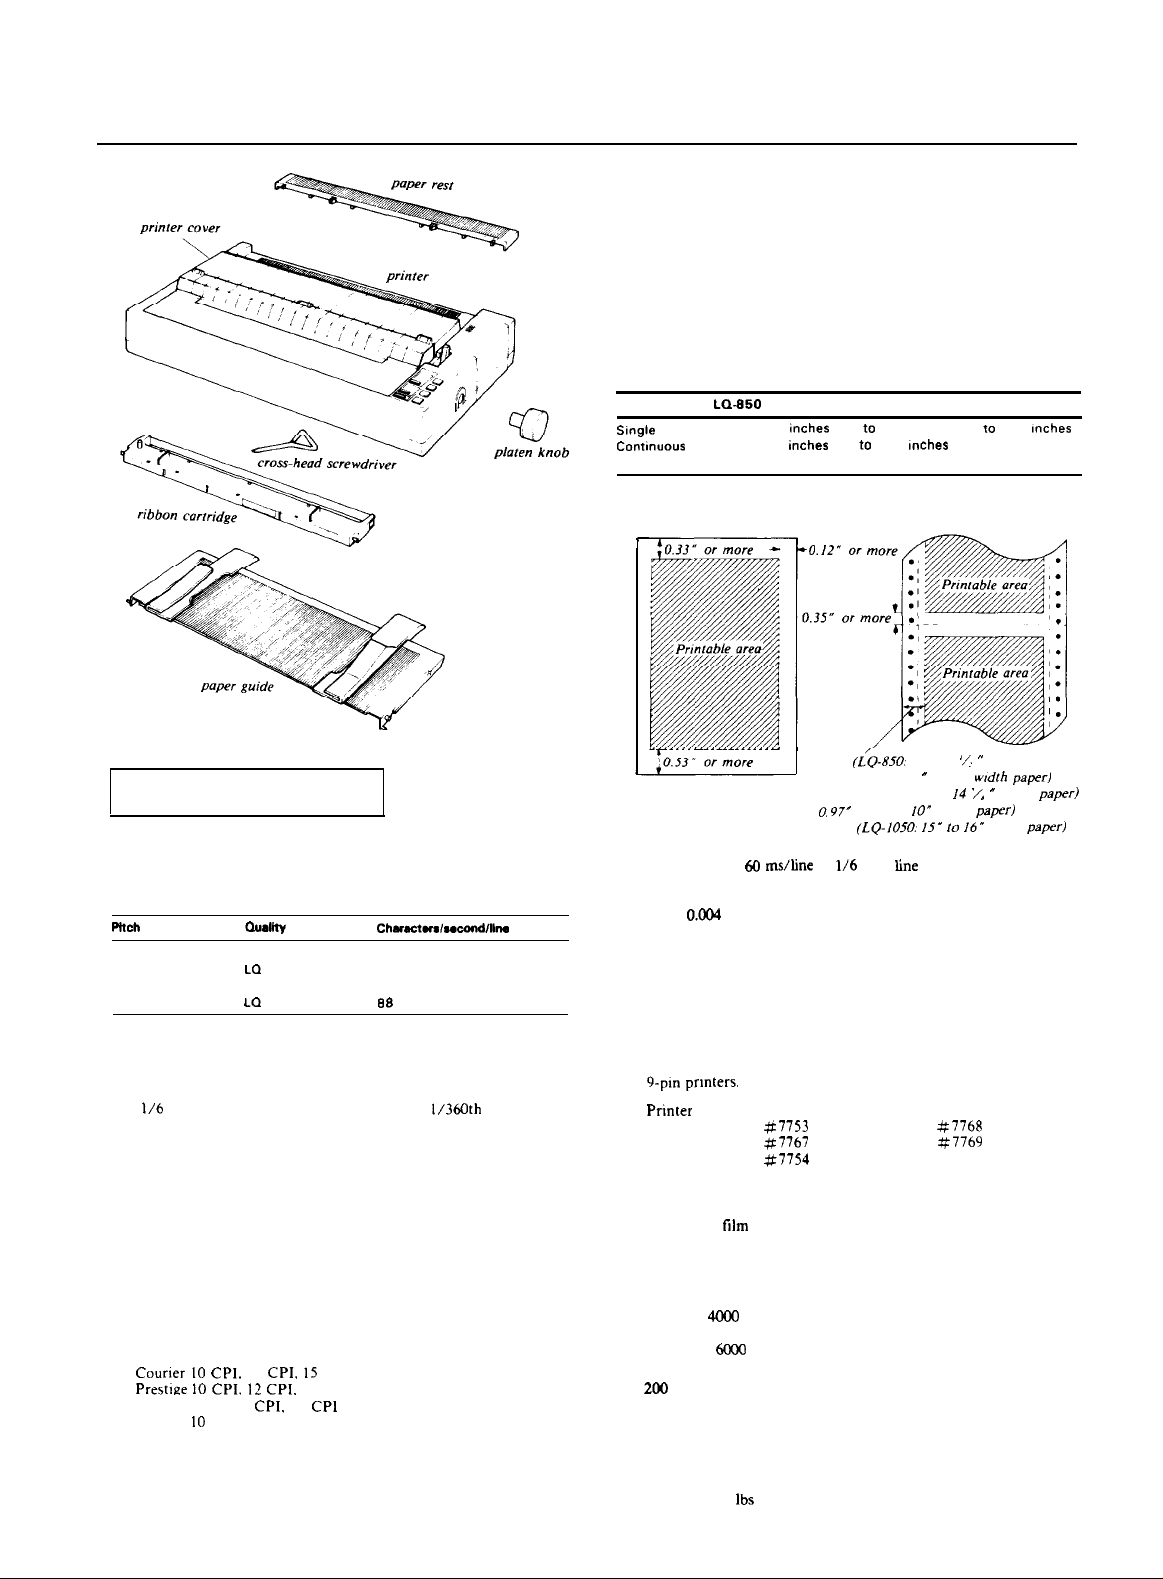
LQ - 850/950/1050 DOT - MATRIX PRINTER
Character tables
96 standard ASCII characters
13 international character sets
Epson Extended Graphics set
Paper
Paper feed methods
Friction
Built-in push feed tractor with paper tension unit
Single-bin or dual-bin cut sheet feeder (optional)
Pull tractor (optional)
Paper width
Type of paper
Envelopes
LQ-950
7.2 to 10.1 mches 7 2 to 13.0 inches 7.2 to 14.4 Inches
4.0 to 10.0 mches 4.0 to 12.0 Inches 4.0 to 16.0 inches
No. 6, No. 10
No. 6. No. 10 No 6. No. 10
LQ-1050
Printer Specifications
Printing
Printing method
24-pin impact dot matrix
Printing speed
10
10
12
12
Printing direction
Bi-directional with logic-seeking. User can select unidirectional
printing (left to right).
Line
spacing
inch, or programmable in increments of
Buffer
6 Kbytes or 0 Kbytes (DIP switch selectable)
Fonts
Epson New Draft
Epson Roman 10 CPI
Epson Roman 12 CPI
Epson Roman 15 CPI
Epson Roman proportional
Epson Sans Serif 10 CPI
Epson Sans Serif 12 CPI
Epson Sans Serif 15 CPI
Epson Sans Serif proportional
Optional fonts
Script-10 CPI, I2
OCR-A
OCR-B 10 CPI
Orator 10 CPI
Orator-S 10 CPI
24 - Pin Printers
draft
draft
CPI. I2 CPI.
CPI.
CPI
CPI
15 CPI
15 CPl
220
73
264
of an inch
12/12/88
Printable area
Single sheet Continuous paper
0.47”
I
4” to 9 wrdth paper)
(LQ-950: 4
(LQ-1050: 4” to
(LQ-850: IO” wrdth paper)
to 12”
7,
to 16” wrdth paper)
Paper feed speed
Approximately
Paper thickness
Up to
ms/line at
inch
spacing
inches for single sheets; up to 0.0126 inches for
continuous paper
Number of copies
With continuous, multi-part, no-carbon paper only; one original
plus up to three copies, maximum thickness: 0.0126 inches
Mechanical
Ribbon
Cartridge ribbon, available in black only Do not use ribbons for
prmters.
Standard ribbon
Film ribbon
LQ-850
LQ-950
LQ-1050
$7770
Life expectancy (in Letter Quality characters, at 48
dots/character): 2 million for standard ribbon and 0.2
million for
MCBF
For all components excluding print head: 5 million lines.
MTBF
LQ-850:
ribbon
power on hours (at 25% duty)
LQ-950: 5000 power on hours (at 25% duty)
LQ-1050:
power on hours (at 25% duty)
Print head life
million strokes per wire
Dimensions and weight
LQ-850
Height: 5.6 in.
Width: 17.0 in.
Depth: 14.2 in.
Weight: 19.8
LQ-950
Height: 5.6 in.
Width: 20.5 in.
Depth: 14.2 in.
Weight: 22.0 lbs
LQ-1050
Height: 5.6 in.
Width: 23.8 in.
Depth: 14.2 in.
Weight: 26.4 Ibs
LQ - 850/950/1050 - 1
paper)
width
Page 2
LQ - 850/950/1050 DOT - MATRIX PRINTER
Electrical
Voltage
120 VAC, + 10% (USA)
220 VAC,
10% (Europe)
Non-switchable
Power consumption
120 Watts maximum
Frequency
49.5 to 60.5 Hz
Insulation resistance
between AC power line and chassis
Dielectric strength
120 V model can withstand 1.25
line and chassis for 1 minute, or 1.5
Environment
Temperature
Operation: 41” F to 95” F
Storage:
22” F to
C to 35” C)
F
30” C to 65” C)
Humidity
Operation: 10% to 80% without condensation
Storage: 5% to 85% without condensation
Shock
Operation: Up to
G within 1ms
Storage: Up to 2 G within 1ms
Vibration
Operation: Up to 0.25 G at up to
Storage: Up to 0.5
at up to
Hz
rms applied between AC
rms for
second
Hz
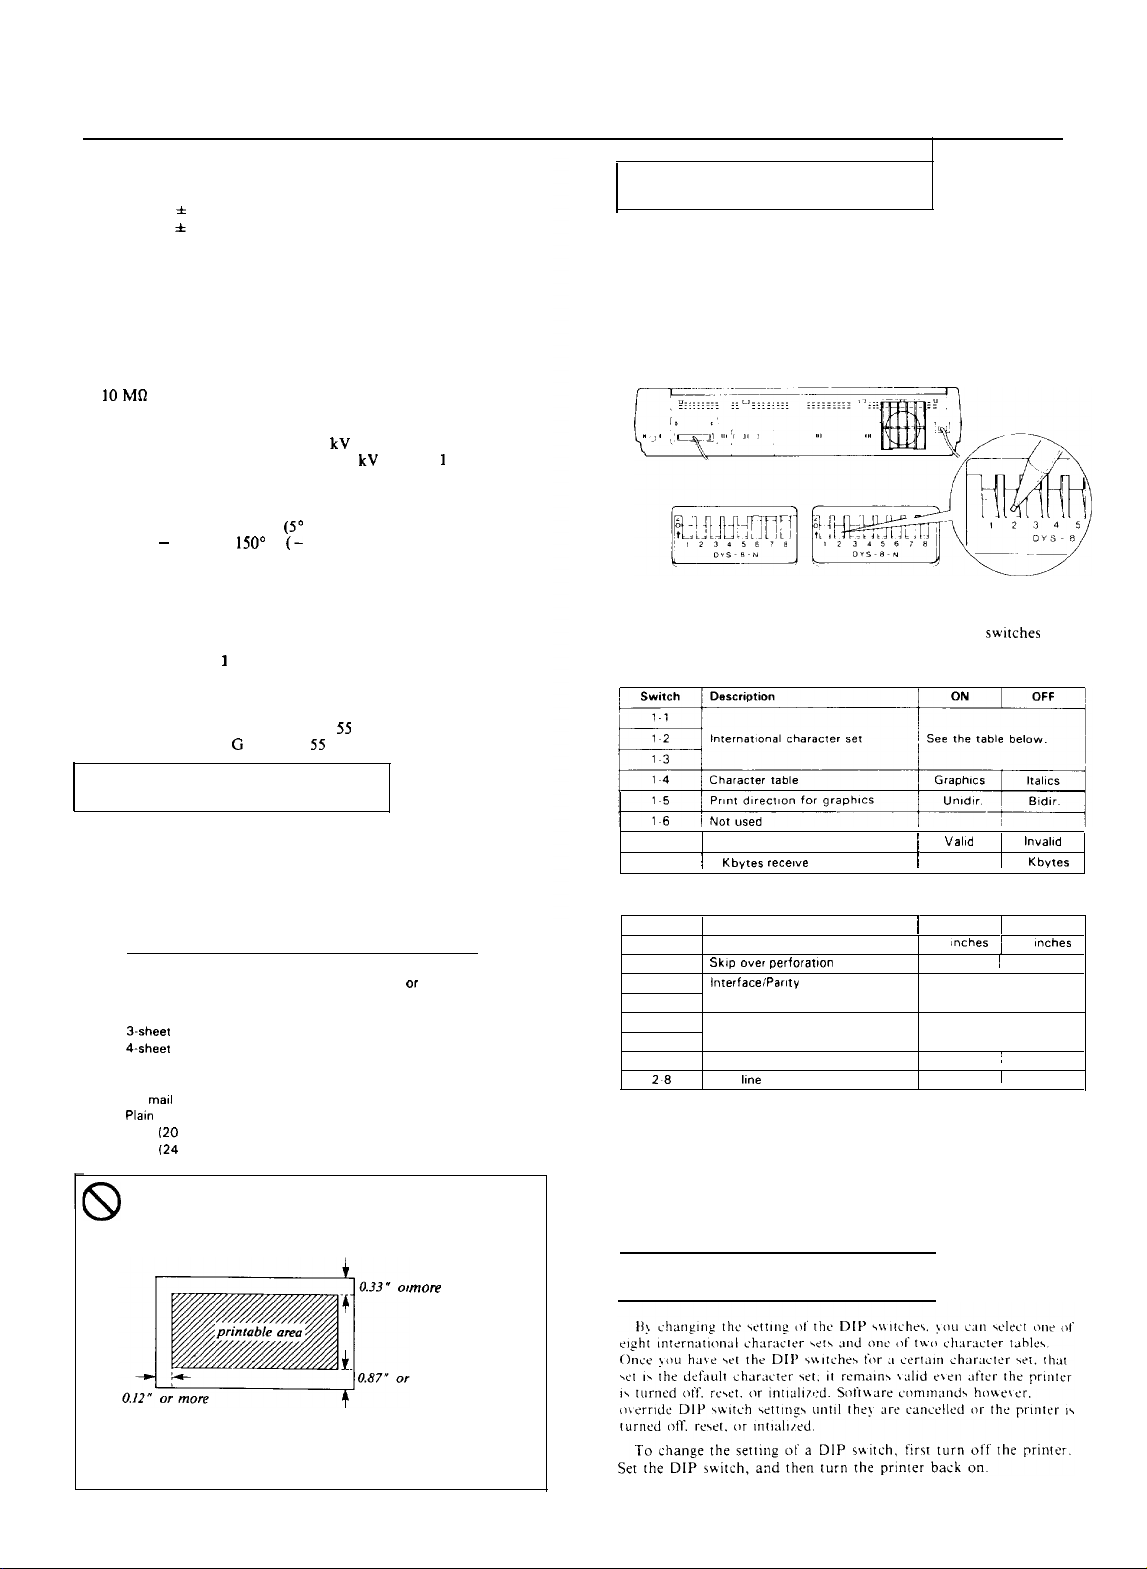
Setting the DIP Switches
By adjusting the settings of the two groups of DIP switches (SW1
and SW2) in the back of the printer, you can control various
features such as character set and page length.
To change the setting of a DIP switch, first turn off the printer.
Using a pencil, pen, or other pointed instrument, change the setting
as shown below. Then, turn the printer back on.
SW 1
The tables below describe the functions of the DIP switches
DIP Switch 1
SW 2
Printing on Special Paper
For printing on special types of paper, see the table below. When
the paper thickness lever is set to position 4 or higher, the MULTI-
PART light comes on and the printing speed is reduced.
The following table gives you general guidelines for selecting the
right paper thickness lever position to match your paper:
Paper Type
Paper (single sheets or continuous)
Thin paper
Multi-part paper
P-sheet
Labels
Envelopes
Air mall
Bond
lb.1
Bond
lb.1
When printing on envelopes, be sure that your application
program settings keep the printing entirely within the
printable area of the envelopes as shown below.
Lever Position
2
2
1
3
4
5
4
4
4 or 5
6
6
7
17 Cut sheet feeder mode
1.8
DIP Switch
Switch
21
22
23
2-4
25
26
27
6
2
Description
Page length
Baud rate
Short tear-off mode
Auto
buffer
feed
Valid
0 bytes 1 6 Kbytes
ON 1
I
12
ON
See the table below
See the table below
OFF
ON
ON
OFF
11
OFF
OFF
represents the DIP switch settings that have been preset at
the factory.
The factory settings for International character sets (DIP switches
1-1 to 1-3), the Character table (DIP switch 1-4). and Page length
(DIP switch 2-1) vary depending on the country, and are not
shown in the tables above.
Selecting Character Sets
more
To make sure that the printing fits within this area, always
perform a sample printing test using a normal single sheet
of paper before printing on envelopes.
LQ - 850/950/1050 - 2
12/12/88
24 - Pin Printers
Page 3
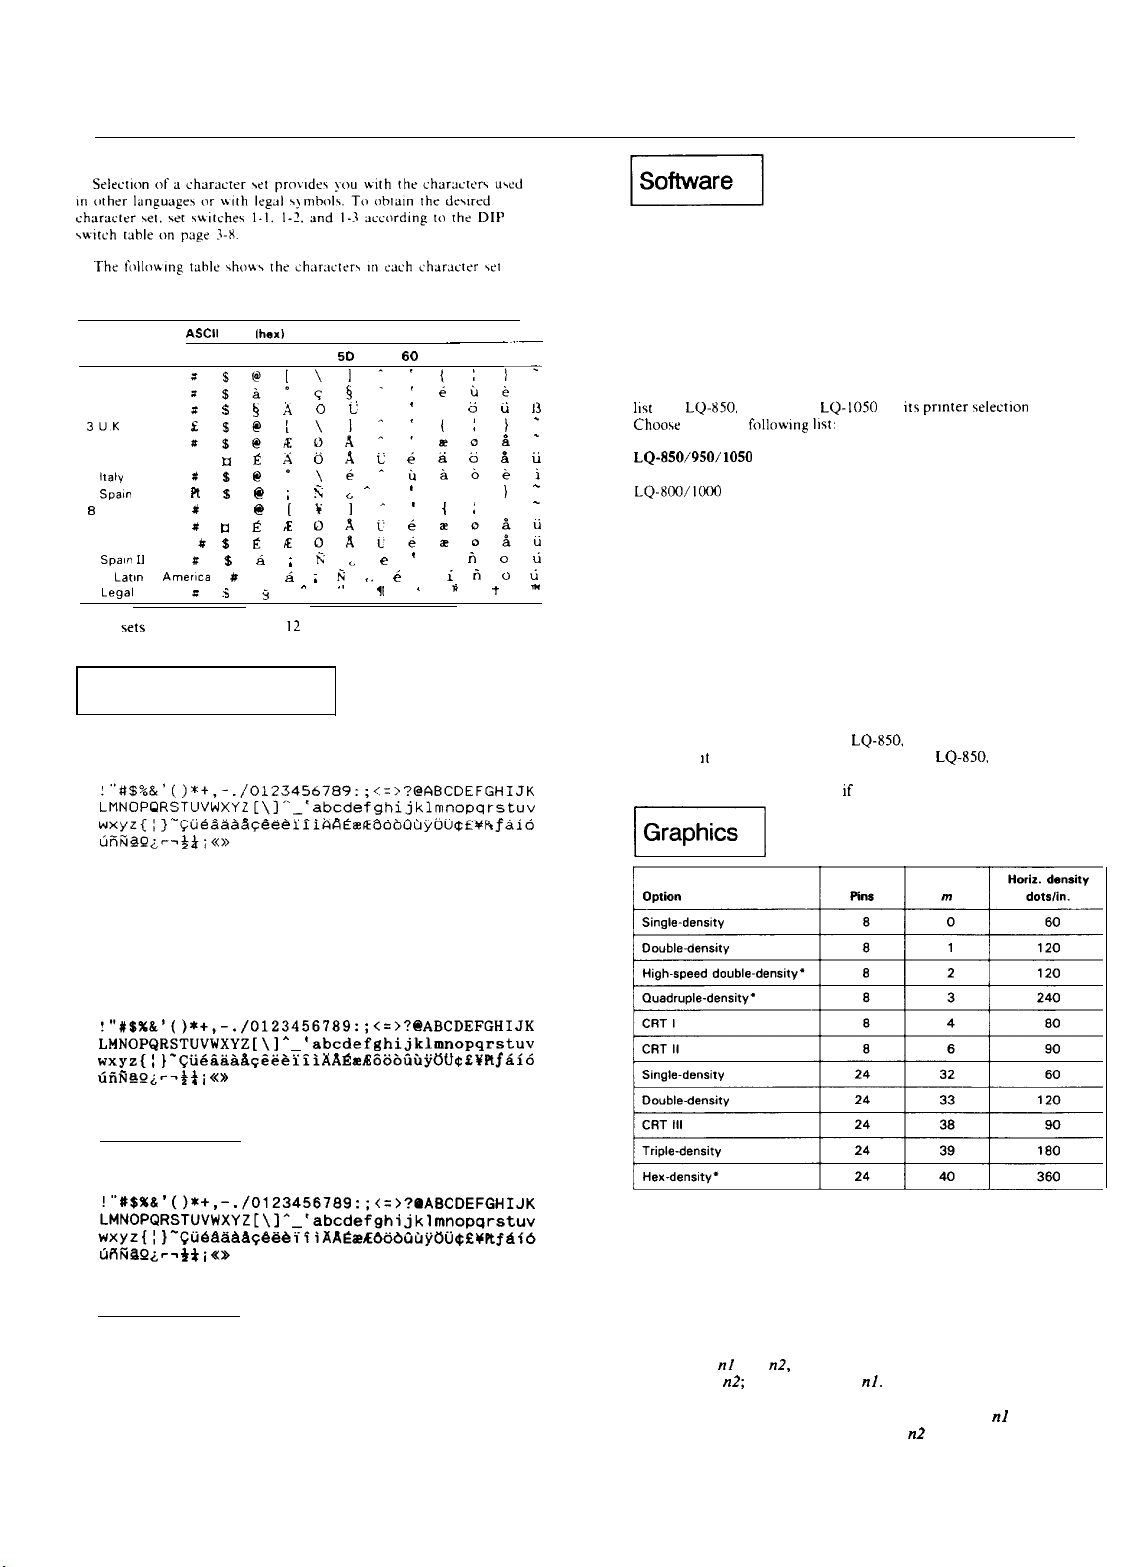
Choosing a character set
Character sets
Country
23 24 40 50 5C
OUSA
1 France
2 Germany
4 Denmark I
5 Sweden A A
6
7
I
Japan
3 Norway
10 Denmark II
11
12 Latm
64 Legal
The
numbered 8 through
$
$
g &
$
5E
.
t
70 7C 70 7E
a d ti
i
ii
&
Ii
and 64 are available only through
a software command. See page 9-3 I.
Selecting Typestyles
Draft mode uses fewer dots per character for high-speed printing.
DRAFT
LQ - 850/950/1050 DOT - MATRIX PRINTER
Now that you have set up and tested the LQ, you should make
sure that it works with the application programs you want to use.
Most application programs let you specify the type of printer you
are using so that the program can take full advantage of the
printer’s features. Many of these programs provide an installation
or setup section that presents a list of printers from which to
choose.
Choosing from a menu
Because the family of Epson printers shares a great many
commands, you can use an application program even if it does not
the
LQ-2500
LQ-1500
If none of these printers is listed, select the first one available on
the following list.
EX
FX
LX
RX
MX
Epson printer
Standard printer
Draft printer
To use all the features of the
however,
LQ-1050 on its menu. If your program does not list these printers.
contact the manufacturer to see
LQ-950. or
from the
is best to use a program with the
an update is available.
on
prmter
LQ-950, and LQ-1050.
menu.
LQ-950, or
We’ve just seen your excellent ad for
miniature zebras in a recent back issue of
Trader’s Times. What is the price schedule
for quantities over one gross?
The Roman and Sans Serif Letter Quality (LQ) fonts use a larger
number of dots for higher print quality at a lower speed.
ROMAN
.
We’ve just seen your excellent ad for
miniature zebras in a recent back issue of
Trader’s Times.
for quantities over one gross?
SANS
SERIF
We’ve just seen your excellent ad for
miniature zebras in a recent back issue of
Trader’s Times.
for quantities over one gross?
What is the price schedule
What is the price schedule
. . .
. . .
‘Adjacent dots cannot be printed in this mode.
Column reservation numbers
The graphics command requires more than one number to specify
how many columns to reserve because one line can use thousands of
columns, but the LQ does not use numbers larger than 255
(decimal). Therefore, the graphics mode command uses two
numbers for reserving columns.
To figure
The result is
and n2, divide the total number of columns by 256.
the remainder is
Since the command is set up
for two numbers, you must supply two even if you need only one.
When you need fewer than 256 columns, just make
the number
of columns you are reserving and make n2 a zero.
24 - Pin Printers
12/12/88
LQ - 850/950/1050 - 3
Page 4

LQ - 850/950/1050 DOT- MATRIX PRINTER
The Cut Sheet Feeder
The following
proper operation of your cut sheet feeder. Not all software is
the
you
a
you may find that a
best equivalent settings to use.
example of a software setup reqmred for
of experimentation
up
required
After checking to see that you have all of the parts shown in the
figure above, remove the foam packaging from between the paper
rests and rollers. Keep the packing materials in the original box in
case you need to store or transport the cut sheet feeder.
In
To
Change Page
Length from
Change Top
Margin from
Change
Bottom
Margin from
Many word processors and other software
change these \ettmgs’
l
l You can change the program’s default settings so that every time
If your program has additional features, such as headers and
footers, you have to compensate accordingly.
Control panel operation
All of the functions from the control panel are
feeder mode.
off. the loading
the
per page. You may need
The optional cut sheet feeders
handling of
paper can be fed automatically into the printer without reloading.
These
Printer
LQ-850
LQ-950
LQ-
The dlustratlons
LQ-1050. but the others work in the same way. For the dual bin
feeders, see the manual that comes with them for assembly
instructions. You can select the second bin with a software command
(ESC EM) or the control panel.
54 prmted
form \ettmgs
You can change the settings in each individual file you print or;
you use the program, these new settings are in effect.
after loading a sheet using the LOAD/EJECT button and
the ON LINE button.
for as long as the power remams on. If the power IS turned
for thts new page length.
sheet paper Up to 150 sheets of standard bond
can also automatically feed envelopes.
Single bin
per page:
Cut sheet
feeder settmgs
61
4
6
adjustment of the
returned to the factory
with micro adjustment affects the number of lines
change your software margin settings
this chapter show the
to
you
you easier and more efficient
paper support
sets a new sheet loading
Dual bin
bin feeder for the
3
ways to
cut sheet
Changing
paper feeder rests
I I
The optlonal pull tractor (A731
LQ-950. or q7312 for the LQ-1050) provides optimum contmuous
paper handling. The pull tractor IS especially
multi-part forms and labels. For best results, use the pull tractor
along with the budt-in push tractor. as described in this section.
After making sure that you have both parts of the
option as shown below, remove the packing material and save it in
case you need to ship the unit later.
The short tear-off function cannot be used with the pull
tractor. Before you start printing with the pull tractor,
!
make sure that DIP switch 2-7 is set to off. (See the
section on setting DIP switches in Chapter 3.)
The Multi
The optional Multi-Font Module (#7631) gives you seven
additional fonts for your LQ printer. Once you install it in either slot
A or slot B, the following fonts are available: Courier, Prestige,
Script, OCR-A, OCR-B, Orator, and Orator-S.
The Multi-Font Module is installed in one of the slots (A or B)
the printer. See the manual that comes with the module for full
information on using the font module.
Using the Multi-Font Module
To install a font module, follow these steps:
1. Make sure the printer is turned off.
2. Open the font compartment cover. Inside the compartment are
two connectors labelled A and
Font Module
for the LQ-850, #7313 for the
continuous
tractor
pull tractor cover
LQ - 850/950/1050 - 4
front stacker suporis
12/12/88
24 - Pin Printers
Page 5

LQ - 850/950/1050 DOT-MATRIX PRINTER
3.
Insert the font module securely into SLOT A or
so that the
arrow symbols on the font module and the slot are facing each
other. If you install only one font module, be sure to insert it
into SLOT A.
Commands in Numerical Order
The following list shows control codes and ESC sequences (with
their decimal and hexadecimal values), and the page number where
the complete command can be found.
ASCII Dec.
BEL
BS
HT
LF
VT
CR
so
DC1
DC2
DC3
DC4
CAN
DEL
127
ESC SO
ESC
ESC EM
ESC
ESC !
ESC
ESC
ESC
ESC
ESC IESC
ESC +
ESC
ESC I
ESC 0
ESC 2
ESC 3
ESC 4
ESC 5
ESC 6
ESC 7
ESC :
ESC
ESC =
ESC
ESC
ESC
ESC A
ESC B
ESC C
ESC C 0
ESC D
ESC E
ESC F
ESC G
ESC H
ESC J
ESC K
ESC L
64
65
66
67
67
68
69
70
71
72
74
75
76
10
11
12
13
14
15
17
18
19
20
24
14
15
25
32
33
35
36
37
38
40
42
43
45
47
48
50
51
52
53
54
55
58
60
61
62
63
9
Description
Hex
07
Beeper
Backspace
08
09
Tab Horizontally
OA
Line Feed
OB
Tab Vertically
OC
Form Feed
OD
Carriage Return
OE
Select Double-wide Mode (one line)
OF
Select Condensed Mode
11
Select Printer
12
Cancel Condensed Mode
13
Deselect Printer
14
Cancel Double-wide Mode (one
18 9-13
Cancel Line
7F
Delete Character
OE
Select Double-wide Mode (one
OF
Select Condensed Mode
19 9-11
Turn Cut Sheet Feeder Mode
20 9-31
Set Intercharacter Space
21
Master Select
23 9-12
Cancel MSB Control
24
Set Absolute Print Position
25
Select User-defined Set
26
Define User-defined Characters
28 9-29
Select /Cancel Score
2A
Select Graphics Mode
2B
Select n/360-inch Line Spacing
2D
2F
30
32
33
34
35
36
37
3A
3c
3D
3E
3F
40
41
42
43
43
44
45
46
47
48
4A
4B
4c
Underlining On/Off
Select Vertical Tab Channel
Select l/&inch Line Spacing
Select
Line Spacing
Select n/l8@inch Line Spacing
Select Italic Mode
Cancel Italic Mode
Enable Printable Characters
Enable Upper Control Codes
Copy ROM into RAM
Select Unidirectional Mode (one line)
Set MSB to 0
Set MSB to 1
Reassign Graphics Mode
Initialize Printer
Select
Line Spacing
Set Vertical Tabs
Select Page Length in Lines
Select Page Length in Inches
Set Horizontal Tabs
Select
Mode
Cancel Emphasized Mode
Select Double-strike Mode
Cancel Double-strike Mode
Perform n/l8@inch Line Feed
Select Single-density Graphics Mode
Select Double-density Graphics Mode
Page
9-12
9-21
9-15
9-17
9-13
9-25
9-24
9-a
9-25
9-9
9-26
9-9
9-25
9-25
9-23
9-20
9-34
9-33
9-36
9-16
9-28
9-15
B-16
9-16
9-32
9-32
9-34
9-10
9-11
9-12
9-37
9-a
b-16
9-17
9-14
9-14
9-21
9-26
9-27
9-27
9-27
9-35
9-35
Commands
ASCII
ESC M 77
ESC N 78
ESC 0
ESC
ESC Q
ESC R 82
ESC SO 83
ESC
ESC T
ESC
ESC W 87
ESC
ESC 2 90
ESC
ESC a 97
ESC b 98
ESC g
ESC k
ESC
ESC
ESCq113
ESCt116
ESC
ESC x
in
1
83
85
89
92
103
107
108
p 112
119
120
Order
Select 12 Pitch
4D
Set Skip Over Perforation 9-14
4E
Cancel Skip Over Perforation 9-15
4F
Select 10 Pitch
50
Set Right Margin
51
52
53
53
54
5.5
57
59
5A
61
62
67
a Character Set
Select Superscript Mode 9-27
Select Subscript Mode 9-28
Cancel Superscript/Subscript 9-28
Turn Unidirectional Mode On/Off 9-10
Turn Double-wide Mode On/Off 9-26
Select
Select Quadruple-density Graphics
Set Relative Position
Select Justification
Set Vertical Tabs in Channels 9-18
Select 15 Pitch
Select Typestyle Family 9-22
Set Left
70 Turn
71
74
77
78
Proportional Mode On/Off 9-24
Select Character Style 9-30
Select Character Table
Select Double High
Select Letter Quality or Draft 9-22
9-23
9-19
9-33
Graphics 9-35
9-31
9-24
9-18
9-25
Page
9-23
9-36
Interface Boards
Compatible interfaces
The following is a list of Epson interfaces that are compatible
your LQ prmter.
interface number
$8148
All Epson Interfaces have the EPSON name printed on them. If
the board has an Identification code prmted on it. be a four
digit number
8, and should correspond
numbers listed in the table above.
one of the
24 - Pin
Printers
12/12/88
LQ - 850/950/1050 - 5
Page 6

LQ - 850/950/1050 DOT - MATRIX PRINTER
Installation/Support Tips
Short Tear Off
To activate the short tear-off feature on the printer, first turn
DIP switch 2-7 to the on position. To control it through the
software, send a form feed command at the end of each
page. After sending a form feed, do not send it any more
data for a 3-second interval. To activate the tear -off
feature manually, take the printer off line and press the FF
button. When it is put back on line, the print position will
go right back to the top of the page, ready for the next
print job.
Single - Sheet Loading
When loading single sheets, make sure that the paper lever
is set to single sheets, not tractor paper. The paper can be
loaded manually or via the auto load button. Before
attempting to load in the paper, wait for the platen to lock in
place after changing the paper lever.
Setting up the Page Length
The page length has to be adjusted for using single sheets
and for using tractor paper. When your software you asks
you to set up the number of lines/page, single sheets
require a shorter page length than does tractor paper. Set
the page length to 61 lines for single sheets (also when
using the cut -sheet feeder) and 66 lines for tractor paper.
Software
The type of printer installed on your system must be
identified for each software package. This is usually done
through a setup menu.
in the software package, any Epson 24-pin driver will be
compatible. (Preferably, choose the LQ-800/1000.)
If the LQ-850/950/1050 is not listed
DIP Switch Settings
The default settings will usually work for most applications,
but they should be checked before using the printer. This
will avoid unexpected results.
LQ - 850/950/1050 - 6
12/12/88
24 - Pin Printers
Page 7

LQ - 850/950/1050 DOT - MATRIX PRINTER
Information Reference List
Engineering Change Notices
LQ - 850 - 007/
LQ-1050-007
LQ - 850 - 006/
LQ-1050-006
LQ - 850 - 003
LQ - 850 - 002
7340-001
LQ-850-004
LQ - 850 - 005
8/12/88
7/28/88
2/2/88
6/29/88
1/14/88
2/1/88
Version M82982 to Version M80483
LQ-850 PROM upgrade: to increase graphics accuracy in 24-pin
bidirectional mode.
Version M8307A to Version M82982
PROM upgrade: to correct and improve paper handling and and print
quality.
Version M81777 to Version M82778
PROM upgrade: to correct and improve print quality.
Version M81179 to Version M8217A
PROM upgrade: CSF eject/15-cpi print in unidirectional mode.
Improved paper-holding spring
Base plate and lower case modification
Change of printer cover B
Product Support Bulletins
P - 0020
5/6/88 Paper thickness lever
Related Documentation
M-TM-LQ8/9/10
Y45499114000
Technical Information Bulletins
LQ - 850 - 001
LQ-1050-001
5/6/88 MONMA carriage width selection
24 - Pin Printers
LQ -850/950/1050 Technical Manual
LQ -850/950/1050 User’s Manual
12/12/88
LQ - 850/950/1050 - 7
 Loading...