

Page 1
®
COLOR
TM
COLOR INK JET PRINTER
All rights reserved. No part of this publication may be reproduced, stored in a retrieval
system, or transmitted in any form or by any means, electronic, mechanical, photocopying,
recording, or otherwise, without the prior written permission of Seiko Epson Corporation.
No patent liability is assumed with respect to the use of the information contained herein.
Neither is any liability assumed for damages resulting from the use of the information
contained herein.
Neither Seiko Epson Corporation nor its affiliates shall be liable to the purchaser of this
product or third parties for damages, losses, costs, or expenses incurred by purchaser or
third parties as a result of: accident, misuse, or abuse of this product or unauthorized
modifications, repairs, or alterations to this product, or (excluding the U.S.) failure to
strictly comply with Seiko Epson Corporation’s operating and maintenance instructions.
Seiko Epson Corporation shall not be liable against any damages or problems arising from
the use of any options or any consumable products other than those designated as
Original Epson Products or Epson Approved Products by Seiko Epson Corporation.
EPSON and EPSON ESC/P are registered trademarks and EPSON ESC/P 2 and EPSON
Stylus are trademarks of Seiko Epson Corporation.
Helvetica and Times are trademarks of Linotype AG and/or its subsidiaries.
General Notice: Other product names used herein are for identification purposes only and may be
trademarks of their respective owners. EPSON disclaims any and all rights in those marks.
Copyright © 1994 by Epson America, Inc.
Printed on recycled paper
User’s Guide
Page 2

FCC Compliance Statement
For United States Users
This equipment has been tested and found to comply with the limits for a Class B digital
device, pursuant to Part 15 of the FCC Rules. These limits are designed to provide
reasonable protection against harmful interference in a residential installation. This
equipment generates, uses, and can radiate radio frequency energy and, if not installed
and used in accordance with the instructions, may cause harmful interference to radio or
television reception. However, there is no guarantee that interference will not occur in a
particular installation. If this equipment does cause interference to radio and television
reception, which can be determined by turning the equipment off and on, the user is
encouraged to try to correct the interference by one or more of the following measures.
❑ Reorient or relocate the receiving antenna.
❑ Increase the separation between the equipment and receiver.
❑ Connect the equipment into an outlet on a circuit different from that to which the
receiver is connected.
❑ Consult the dealer or an experienced radio/TV technician for help.
WARNING
The connection of a non-shielded equipment interface cable to this equipment will
invalidate the FCC Certification of this device and may cause interference levels which
exceed the limits established by the FCC for this equipment. It is the responsibility of the
user to obtain and use a shielded equipment interface cable with this device. If this
equipment has more than one interface connector, do not leave cables connected to unused
interfaces. Changes or modifications not expressly approved by the manufacturer could
void the user’s authority to operate the equipment.
For Canadian Users
This digital apparatus does not exceed the Class B limits for radio noise emissions from
digital apparatus as set out in the radio interference regulations of the Canadian
Department of Communications.
Le présent appareil numérique n’émet pas de bruits radioélectriques dépassant les limites
applicables aux appareils numériques de Classe B prescrites dans le règlement sur le
brouillage radioélectrique édicté par le Ministère des Communications du Canada.
ii
Page 3

Contents
Getting Started
System Requirements . . . . . . . . . . . . . . . . . . . . . . . . 0-2
Energy Star Compliant . . . . . . . . . . . . . . . . . . . . . . . 0-2
Energy-saving tips . . . . . . . . . . . . . . . . . . . . . . . 0-3
Where to Get Help for U.S. and Canadian Users . . . . . . . . 0-3
CompuServe on-line support . . . . . . . . . . . . . . . . . 0-4
Important Safety Instructions . . . . . . . . . . . . . . . . . . . 0-5
Chapter 1
Using Your Ink Jet Printer Safely and Efficiently . . . . . . . . 1-2
Unpacking the Printer . . . . . . . . . . . . . . . . . . . . . . . 1-3
Attaching the paper support and the paper separators . . 1-4
Your Work Area . . . . . . . . . . . . . . . . . . . . . . . . . . . 1-5
Plugging in and Turning on the Printer . . . . . . . . . . . . . 1-6
Installing the Ink Cartridges . . . . . . . . . . . . . . . . . . . . 1-7
More about ink cartridges . . . . . . . . . . . . . . . . . . . 1-11
Loading Plain Paper . . . . . . . . . . . . . . . . . . . . . . . . . 1-12
Testing the Printer . . . . . . . . . . . . . . . . . . . . . . . . . . 1-14
Connecting the Printer to Your Computer . . . . . . . . . . . . 1-15
Calibrating the Printer . . . . . . . . . . . . . . . . . . . . . . . 1-16
Recalibrating the printer . . . . . . . . . . . . . . . . . . . . 1-16
Installing the EPSON Windows Printer Driver . . . . . . . . . 1-17
Setting Up
iii
Page 4

Chapter 2
Choosing Paper . . . . . . . . . . . . . . . . . . . . . . . . . . . . 2-2
Special papers . . . . . . . . . . . . . . . . . . . . . . . . . . . 2-2
Thick paper . . . . . . . . . . . . . . . . . . . . . . . . . . . . 2-3
Loading Paper . . . . . . . . . . . . . . . . . . . . . . . . . . . . . 2-3
Loading plain paper . . . . . . . . . . . . . . . . . . . . . . . 2-3
Loading special coated and glossy paper . . . . . . . . . . . 2-4
Loading transparencies . . . . . . . . . . . . . . . . . . . . . 2-5
Loading envelopes . . . . . . . . . . . . . . . . . . . . . . . . 2-6
Choosing and Loading Paper
Chapter 3
About the Printer Driver . . . . . . . . . . . . . . . . . . . . . . . 3-2
Using the Printer Driver . . . . . . . . . . . . . . . . . . . . . . . 3-3
Displaying the dialog boxes . . . . . . . . . . . . . . . . . . . 3-5
Choosing settings . . . . . . . . . . . . . . . . . . . . . . . . . 3-6
Using the command buttons . . . . . . . . . . . . . . . . . . 3-7
Saving settings . . . . . . . . . . . . . . . . . . . . . . . . . . 3-8
Restoring prior settings . . . . . . . . . . . . . . . . . . . . . 3-8
Getting help . . . . . . . . . . . . . . . . . . . . . . . . . . . . 3-8
Exiting the driver . . . . . . . . . . . . . . . . . . . . . . . . . 3-8
Before Printing for the First Time . . . . . . . . . . . . . . . . . . 3-9
About printing with color . . . . . . . . . . . . . . . . . . . . 3-9
Choosing required settings . . . . . . . . . . . . . . . . . . . 3-9
Driver Settings and Options . . . . . . . . . . . . . . . . . . . . . 3-12
Choosing the Best Settings for your Document . . . . . . . . . . 3-25
Printing black text quickly . . . . . . . . . . . . . . . . . . . . 3-25
Printing with Windows
Printing Color with Selected Windows Software . . . . . . . . . 3-27
Making color selections in your software . . . . . . . . . . . 3-27
Printing your color Windows documents . . . . . . . . . . . 3-29
Printing Color with Selected DOS Software . . . . . . . . . . . . 3-29
Making color selection in your software . . . . . . . . . . . . 3-29
The EPSON Spool Manager . . . . . . . . . . . . . . . . . . . . . 3-32
The EPSON Despooler . . . . . . . . . . . . . . . . . . . . . . . . 3-33
iv
Page 5

Chapter 4
Using the Control Panel . . . . . . . . . . . . . . . . . . . . . . 4-2
Lights . . . . . . . . . . . . . . . . . . . . . . . . . . . . . . . 4-2
Buttons . . . . . . . . . . . . . . . . . . . . . . . . . . . . . . 4-4
Using Special Power-On Functions . . . . . . . . . . . . . . . . 4-6
Selecting Fonts . . . . . . . . . . . . . . . . . . . . . . . . . . . . 4-7
Scalable fonts . . . . . . . . . . . . . . . . . . . . . . . . . . . 4-8
Selecting Condensed Printing . . . . . . . . . . . . . . . . . . . 4-9
Using the Default-Setting Mode . . . . . . . . . . . . . . . . . . 4-10
About the default settings . . . . . . . . . . . . . . . . . . . 4-11
Changing the default settings . . . . . . . . . . . . . . . . . 4-13
The Control Panel
Chapter 5
Replacing an Ink Cartridge . . . . . . . . . . . . . . . . . . . . . 5-2
Cleaning the Print Heads . . . . . . . . . . . . . . . . . . . . . . 5-6
Cleaning the Printer . . . . . . . . . . . . . . . . . . . . . . . . . 5-7
Transporting the Printer . . . . . . . . . . . . . . . . . . . . . . 5-8
Chapter 6
Problems With Printing . . . . . . . . . . . . . . . . . . . . . . . 6-2
Print Quality Problems . . . . . . . . . . . . . . . . . . . . . . . 6-2
Problems with Printing . . . . . . . . . . . . . . . . . . . . . . . 6-5
Paper Handling Problems . . . . . . . . . . . . . . . . . . . . . 6-8
Clearing and preventing paper jams . . . . . . . . . . . . . 6-8
Paper feeding problems . . . . . . . . . . . . . . . . . . . . 6-9
Maintenance
Troubleshooting
Chapter 7
Optional Interfaces . . . . . . . . . . . . . . . . . . . . . . . . . 7-2
Installing optional interfaces . . . . . . . . . . . . . . . . . 7-2
Using Optional Interfaces
v
Page 6

Appendix A
General Specifications . . . . . . . . . . . . . . . . . . . . . . . . A-2
Printing . . . . . . . . . . . . . . . . . . . . . . . . . . . . . . A-2
Paper . . . . . . . . . . . . . . . . . . . . . . . . . . . . . . . . A-4
Ink cartridges . . . . . . . . . . . . . . . . . . . . . . . . . . . A-7
Mechanical . . . . . . . . . . . . . . . . . . . . . . . . . . . . . A-8
Electrical . . . . . . . . . . . . . . . . . . . . . . . . . . . . . . A-8
Environmental . . . . . . . . . . . . . . . . . . . . . . . . . . A-9
Safety approvals . . . . . . . . . . . . . . . . . . . . . . . . . A-9
Interface Specifications . . . . . . . . . . . . . . . . . . . . . . . . A-9
Parallel interface . . . . . . . . . . . . . . . . . . . . . . . . . A-9
Serial interface . . . . . . . . . . . . . . . . . . . . . . . . . . . A-12
Optional interfaces . . . . . . . . . . . . . . . . . . . . . . . . A-13
Initialization . . . . . . . . . . . . . . . . . . . . . . . . . . . . . . A-13
Default Settings . . . . . . . . . . . . . . . . . . . . . . . . . . . . A-14
Specifications
Appendix B
Command List . . . . . . . . . . . . . . . . . . . . . . . . . . . . B-2
Character Tables . . . . . . . . . . . . . . . . . . . . . . . . . . . B-3
International character sets . . . . . . . . . . . . . . . . . . . B-7
Characters available with ESC (^ command: . . . . . . . . . B-8
Commands and Character Tables
Glossary
Index
vi
Page 7
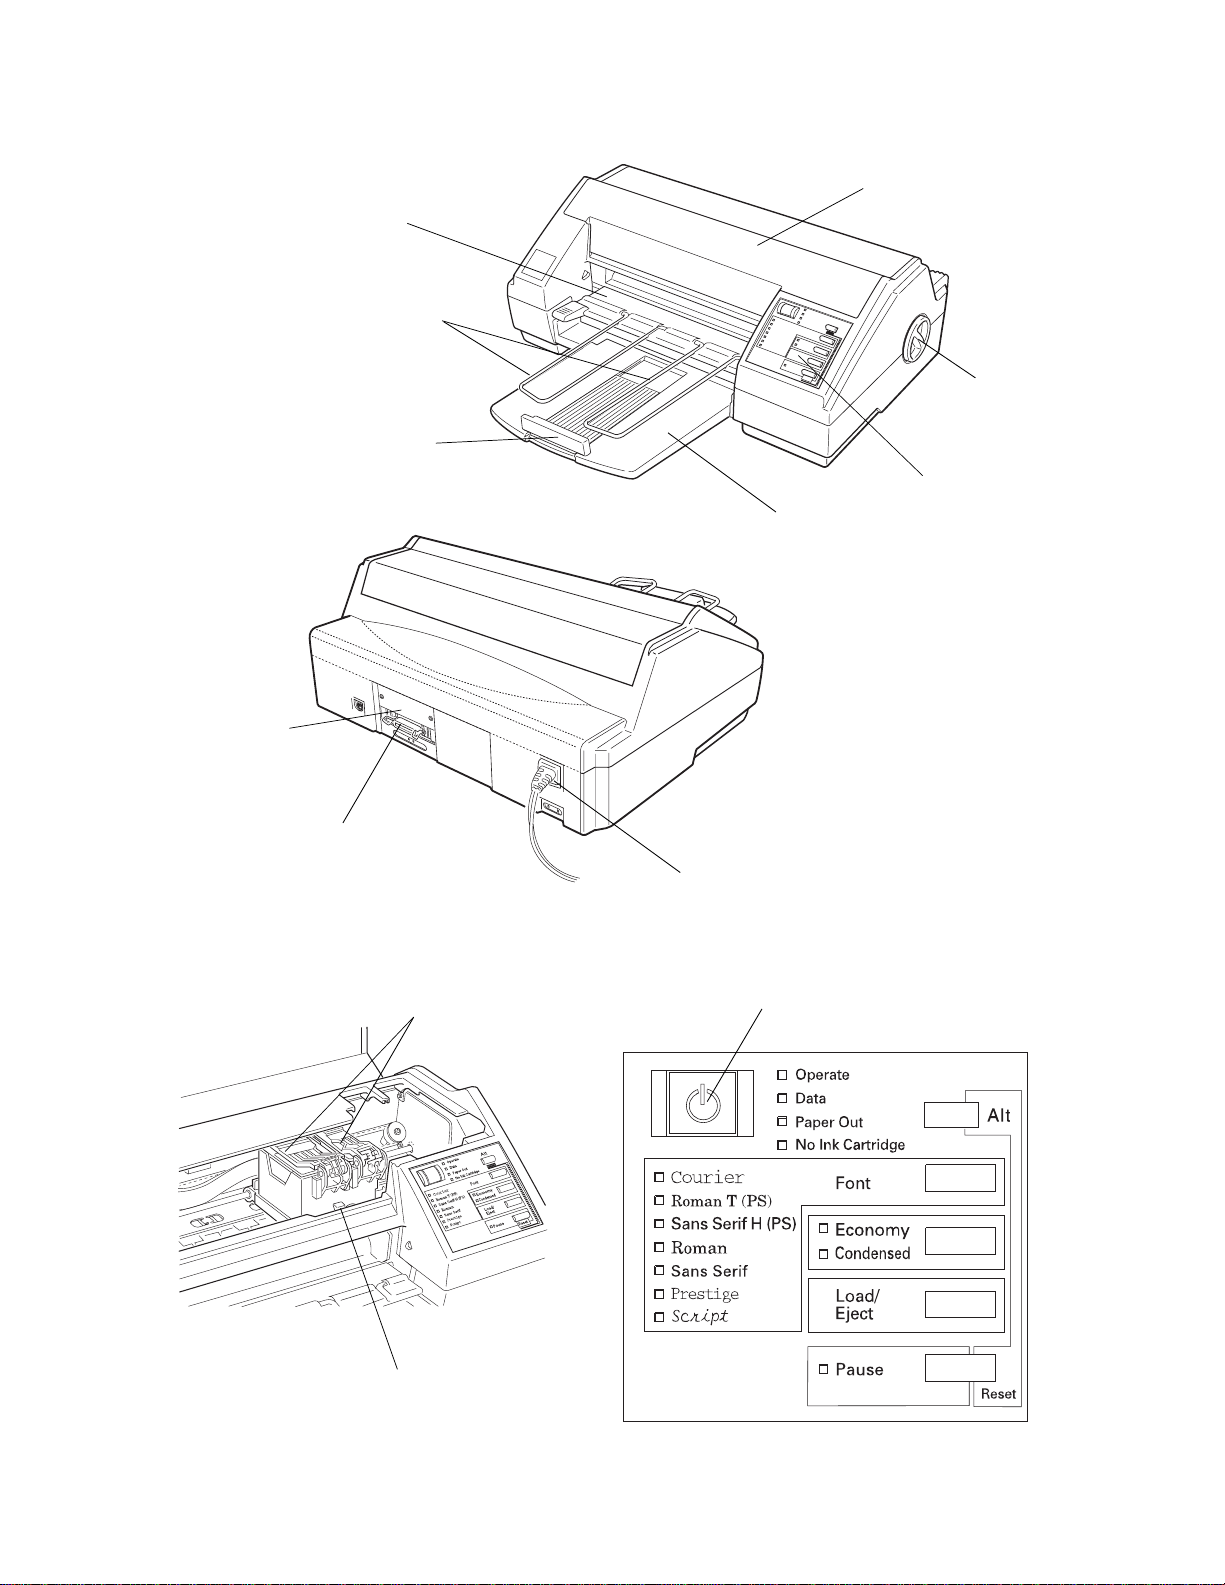
Printer Parts
sheet
feeder
cover
separators
rear edge
paper
guide
paper
support
printer
cover
knob
control
panel
interface
card
cover
parallel
interface
ink
cartridge
clamps
(AC inlet)
Control Panel
Operate button
paper
thickness
lever
Page 8

Getting Started
The EPSON® Stylus COLOR printer gives you presentationquality color and monochrome printing with quiet operation.
To get started with your EPSON Stylus COLOR printer, please:
❑ Make sure you have the equipment you need to use this
printer as described below in “System Requirements.”
❑ Read about using energy wisely and the important safety
instructions in this introduction.
❑ Read Chapter 1, “Setting Up,” to test and install the
Windows
❑ Refer to the rest of this User’s Guide for help with selecting
printer driver software.
paper, choosing printer driver settings, maintenance,
troubleshooting, optional interfaces, and printer
specifications.
❑ See the Color Printing Tips booklet to learn to produce
high-quality color documents.
If you need additional assistance, see “Where to Get Help for
U.S. and Canadian Users” on page 3.
Getting Started
1
Page 9
System Requirements
To use your EPSON Stylus COLOR printer, you need
Microsoft
3.1 or higher, a shielded, twisted-pair parallel cable, and:
Minimum system Recommended system
80386/16 MHz processor 80386/25 MHz or faster processor
4MB RAM 8MB RAM
10MB More than 10MB free hard disk space
VGA monitor VGA or better monitor
Your computer dealer can help you update your system if it
does not meet these requirements.
®
Windows 3.1 or higher or Windows for Workgroups
Energy Star Compliant
Your EPSON Stylus COLOR printer complies with the U.S.
Environmental Protection Agency’s Energy Star Program,
which promotes the manufacture of energy-efficient printers,
computers, and monitors.
The EPA estimates that if all desktop computers, printers, and
other peripheral devices met Energy Star standards, energy
cost savings would exceed $1 billion annually and carbon
dioxide emissions would be reduced by 20 million tons.
All of EPSON’s ink jet printers conform to Energy Star
standards.
The Energy Star emblem does not represent EPA endorsement of any
2
product or service.
Getting Started
Page 10

Energy-saving tips
Here are a few additional tips you can use to be even more
energy-wise:
❑ If your monitor isn’t Energy Star compliant, turn it off
when you’re not using it.
❑ Use the print preview option on your software before you
print something. You’ll be able to catch formatting errors
before you commit them to paper.
❑ If you have an electronic mail system available to you, send
E-mail rather than memos. Not only is this faster, but you’ll
save paper and storage space too.
Where to Get Help for U.S. and Canadian Users
Epson America provides local customer support and service
through a nationwide network of authorized EPSON dealers
and Service Centers.
EPSON also provides the support services listed below through
EPSON Connection.
Canadian users can call (800) GO-EPSON.
❑ Assistance in locating your nearest Authorized EPSON
Reseller or Service Center
❑ Technical assistance with the installation, configuration,
and operation of EPSON products
❑ EPSON technical information library fax service
SM
U.S. users can call (800) 922-8911;
❑ Product literature with technical specifications on EPSON’s
current and new products
❑ Customer Relations
Getting Started
3
Page 11

You can purchase supplies, parts, documentation, and
accessories by calling EPSON Accessories at (800) 873-7766
(U.S. sales only). In Canada, call (800) GO-EPSON for sales
locations.
When you call for technical assistance, be ready to identify
your system and its configuration, and provide any error
messages to the support staff.
If you need help with any software application program you
are using, see the documentation that came with that program
for technical support information.
CompuServe ® on-line support
The fastest way to access helpful tips, specifications, drivers,
application notes, and bulletins is through the Epson America
Forum on CompuServe.
If you are not currently a member of CompuServe, you are
eligible for a free introductory membership as an owner of an
EPSON product. This membership entitles you to:
❑ An introductory $15 credit on CompuServe
❑ Your own user ID and password
❑ A complimentary subscription to CompuServe Magazine,
CompuServe’s monthly publication.
To take advantage of this offer, call 1-800-848-8199 in the
United States and Canada and ask for representative #529. In
other countries, call (614) 529-1611 or your local CompuServe
4
access number.
If you are already a CompuServe member, simply type
GO EPSON at the menu prompt to reach the Epson America
Forum.
Getting Started
Page 12

Important Safety Instructions
Read all of these instructions and save them for later reference.
Follow all warnings and instructions marked on the printer.
❑ Unplug the printer before cleaning. Clean with a damp
cloth only. Do not spill liquid on the printer.
❑ Do not place the printer on an unstable surface or near a
radiator or heat register.
❑ Do not block or cover the openings in the printer’s cabinet.
Do not insert objects through the slots.
❑ Use only the type of power source indicated on the
printer’s label.
❑ Connect all equipment to properly grounded power
outlets. Avoid using outlets on the same circuit as
photocopiers or air control systems that regularly switch on
and off.
❑ Do not let the power cord become damaged or frayed.
❑ If you use an extension cord with the printer, make sure the
total ampere rating of the devices plugged into the
extension cord does not exceed the cord’s ampere rating.
Also, make sure the total of all devices plugged into the
wall outlet does not exceed 15 amperes.
❑ Except as specifically explained in this User’s Guide, do not
attempt to service the printer yourself.
❑ Unplug the printer and refer servicing to qualified service
personnel under the following conditions:
If the power cord or plug is damaged; if liquid has entered
the printer, if the printer has been dropped or the cabinet
damaged; if the printer does not operate normally or
exhibits a distinct change in performance. Adjust only those
controls that are covered by the operating instructions.
Getting Started
5
Page 13

Chapter 1
Setting Up
Using Your Ink Jet Printer Safely and Efficiently . . . . . . . . 1-2
Unpacking the Printer . . . . . . . . . . . . . . . . . . . . . . . 1-3
Attaching the paper support and the paper separators . . 1-4
Your Work Area . . . . . . . . . . . . . . . . . . . . . . . . . . . 1-5
Plugging in and Turning on the Printer . . . . . . . . . . . . . 1-6
Installing the Ink Cartridges . . . . . . . . . . . . . . . . . . . . 1-7
More about ink cartridges . . . . . . . . . . . . . . . . . . . 1-11
Loading Plain Paper . . . . . . . . . . . . . . . . . . . . . . . . 1-12
1
Testing the Printer . . . . . . . . . . . . . . . . . . . . . . . . . . 1-14
Connecting the Printer to Your Computer . . . . . . . . . . . . 1-15
Calibrating the Printer . . . . . . . . . . . . . . . . . . . . . . . 1-16
Recalibrating the printer . . . . . . . . . . . . . . . . . . . . 1-16
Installing the EPSON Windows Printer Driver . . . . . . . . . 1-17
Setting Up
1-1
Page 14

Using Your Ink Jet Printer Safely and Efficiently
The EPSON Stylus COLOR uses two ink cartridges, one black
and one color. Inside the print head, tiny spray units shoot ink
from the cartridges onto the page to form characters or graphics.
The printer will be damaged if you use ink or cartridges
not manufactured by EPSON or which do not meet EPSON’s
specifications. Do not attempt to refill ink cartridges manually.
If you use substandard products with your EPSON printer,
you will damage the print heads and void your warranty.
❑
Under normal circumstances, ink will not come out of the
cartridge. If it does get on your skin, wash it off with soap
and water. If it gets in your eyes, flush them immediately
with water.
❑
Keep ink cartridges out of the reach of children.
❑
Once you install an ink cartridge, do not open the clamp or
remove the cartridge except to replace it with a new one.
The cartridge may become unusable otherwise.
❑
Install an ink cartridge immediately after you remove it
from its package. Leaving a cartridge unpacked for a long
time before use may result in poor print quality.
❑
Do not use an ink cartridge beyond the date printed on the
cartridge carton. Use up the ink cartridges within six
months of installing them.
❑
Do not shake an ink cartridge; this can cause leakage.
❑
Do not put your hand inside the printer or touch the
❑
1-2
cartridge during printing.
Before you turn off the printer, make sure that the print
head is capped (in the far right position). The print head is
capped when no data is received for several seconds; you
can also cap the print head by pressing the
Setting Up
Pause
button.
Page 15
❑
Before you unplug the printer, be sure to turn it off by
pressing the
Operate
light stops flashing before unplugging the power cord or
turning off the power to the electrical outlet.
❑
Do not remove the ink cartridges before transporting the
printer.
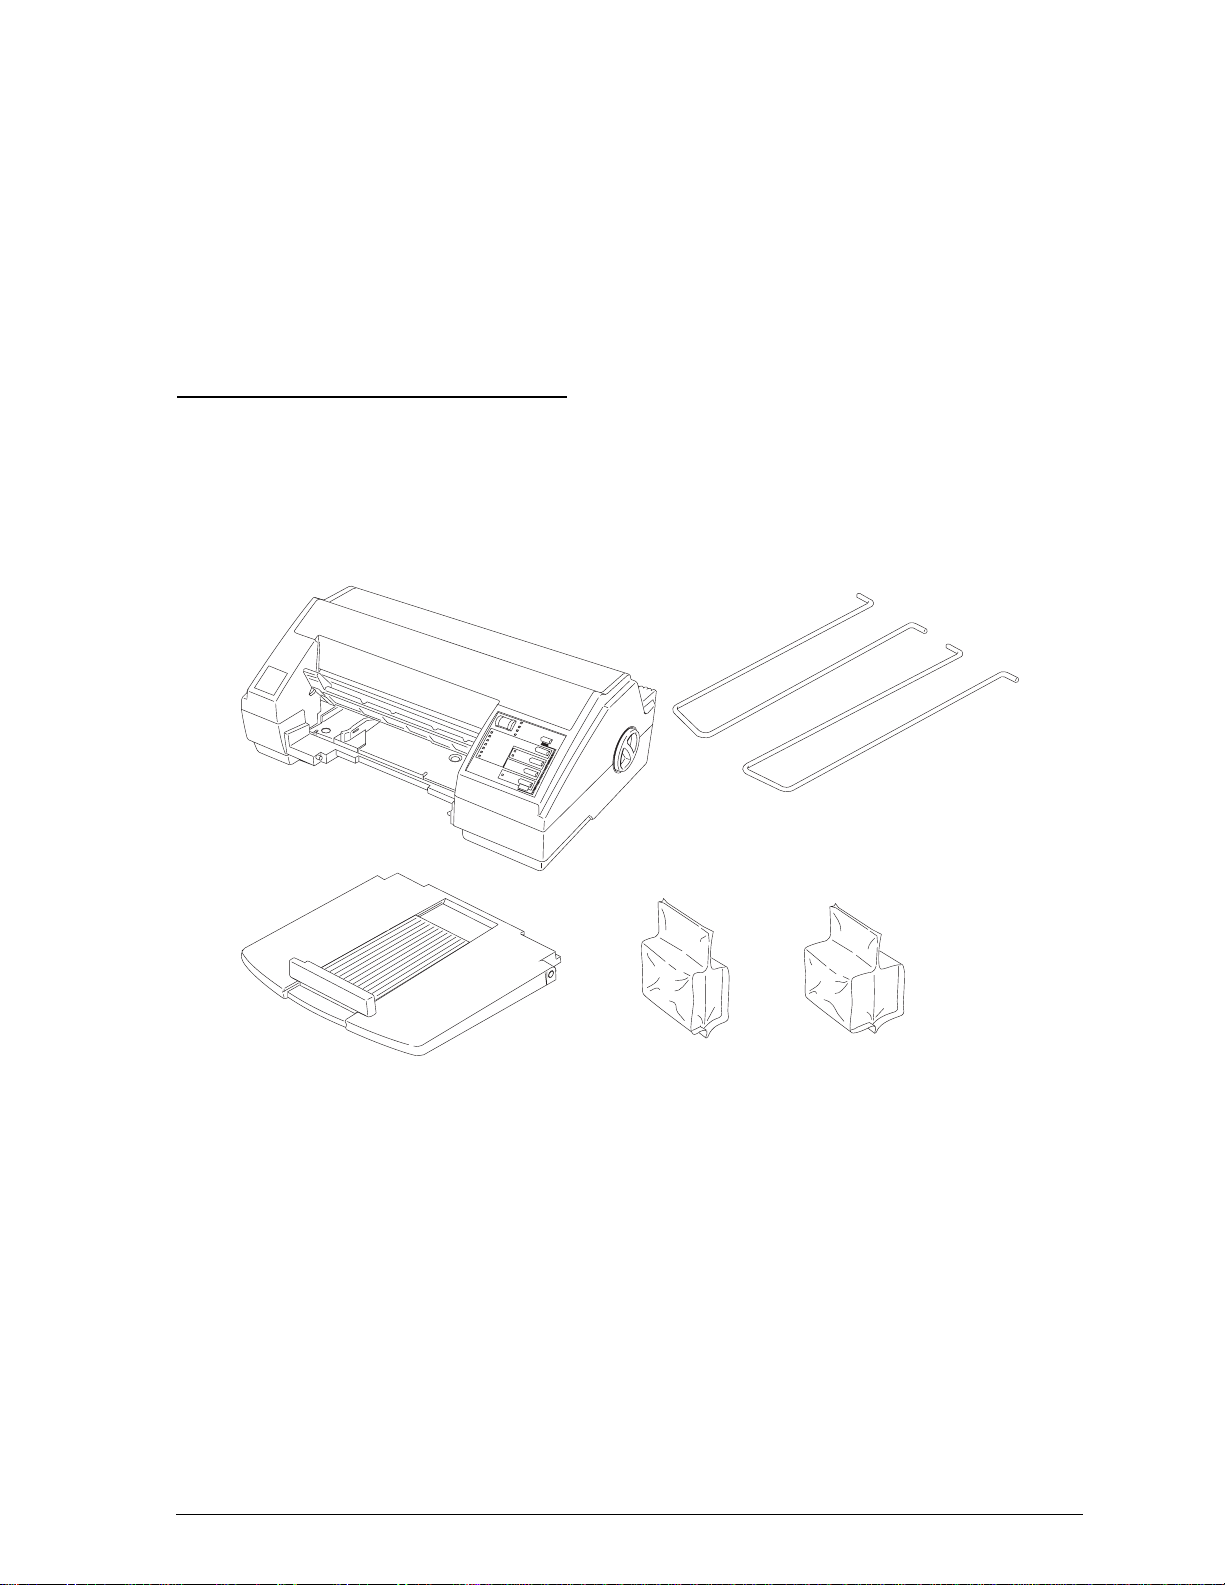
Unpacking the Printer
Your printer box should include an EPSON printer driver disk
and these items:
button. Then wait until the
Operate
paper
separators
printer
black ink
cartridge
paper
support
color ink
cartridge
Remove all protective materials packed with your printer
before you set it up and turn on the power. Follow the
directions on the Notice Sheet (inserted with the printer) to
remove these materials. Save all of the packaging and the
protective materials in case you need to transport the printer
in the future.
Setting Up
1-3
Page 16
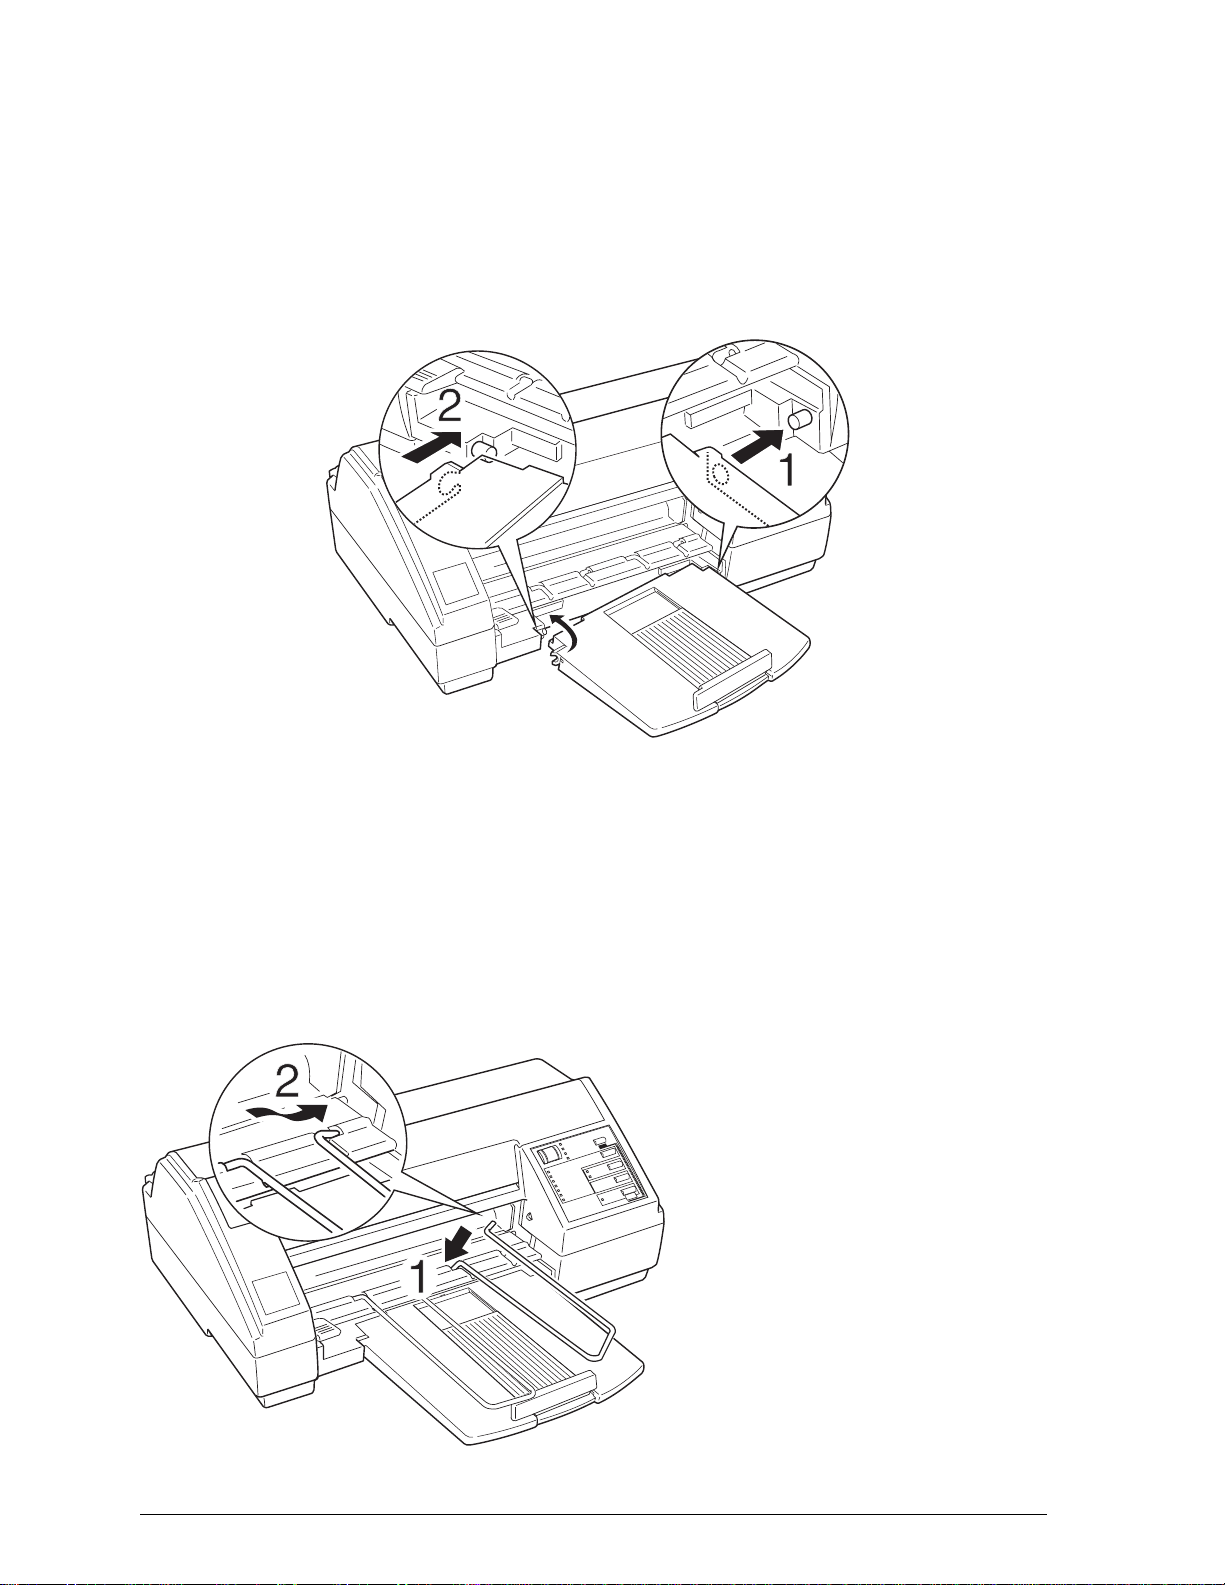
Attaching the paper support and the paper separators
1. Place the paper support’s right side hole over the mounting
post as shown in bubble 1 below. Then push the support’s
left side notch onto the mounting post until it snaps in
place as shown in bubble 2.
2. Hold the wire paper separator, marked with an R near its
shortest tip, and insert the longer tip into the third notch
from the left, as shown by arrow 1 below. Next, twist the
other tip and fit it in the fourth printer notch as shown by
arrow 2 below. Repeat this procedure for the paper
separator marked with an L.
1-4
Setting Up
Page 17

Your Work Area
When choosing a location for your printer, follow these
guidelines:
❑
Place the printer on a flat, horizontal, stable surface. If the
printer is tilted, it cannot operate properly.
❑
Always leave approximately 2 inches of clear area next to
the knob on the printer’s right side. The printer will not
print if anything is pressing against the knob.
❑
Avoid places subject to rapid changes in temperature and
humidity. Also keep the printer away from direct sunlight,
strong light, or heat sources.
❑
Place the printer near a wall outlet where the plug can be
easily unplugged.
Note for French-speaking users:
Placez l’imprimante près d’une prise de contacte où la fiche
peut être débranchée facilement.
❑
Use a grounded power outlet; do not use an adapter plug.
If you plan to use a printer stand, follow these guidelines:
❑
Use a stand that supports at least 32 lb (14.8 kg).
❑
Never use a stand that tilts the printer. It should always be
kept level.
Setting Up
1-5
Page 18
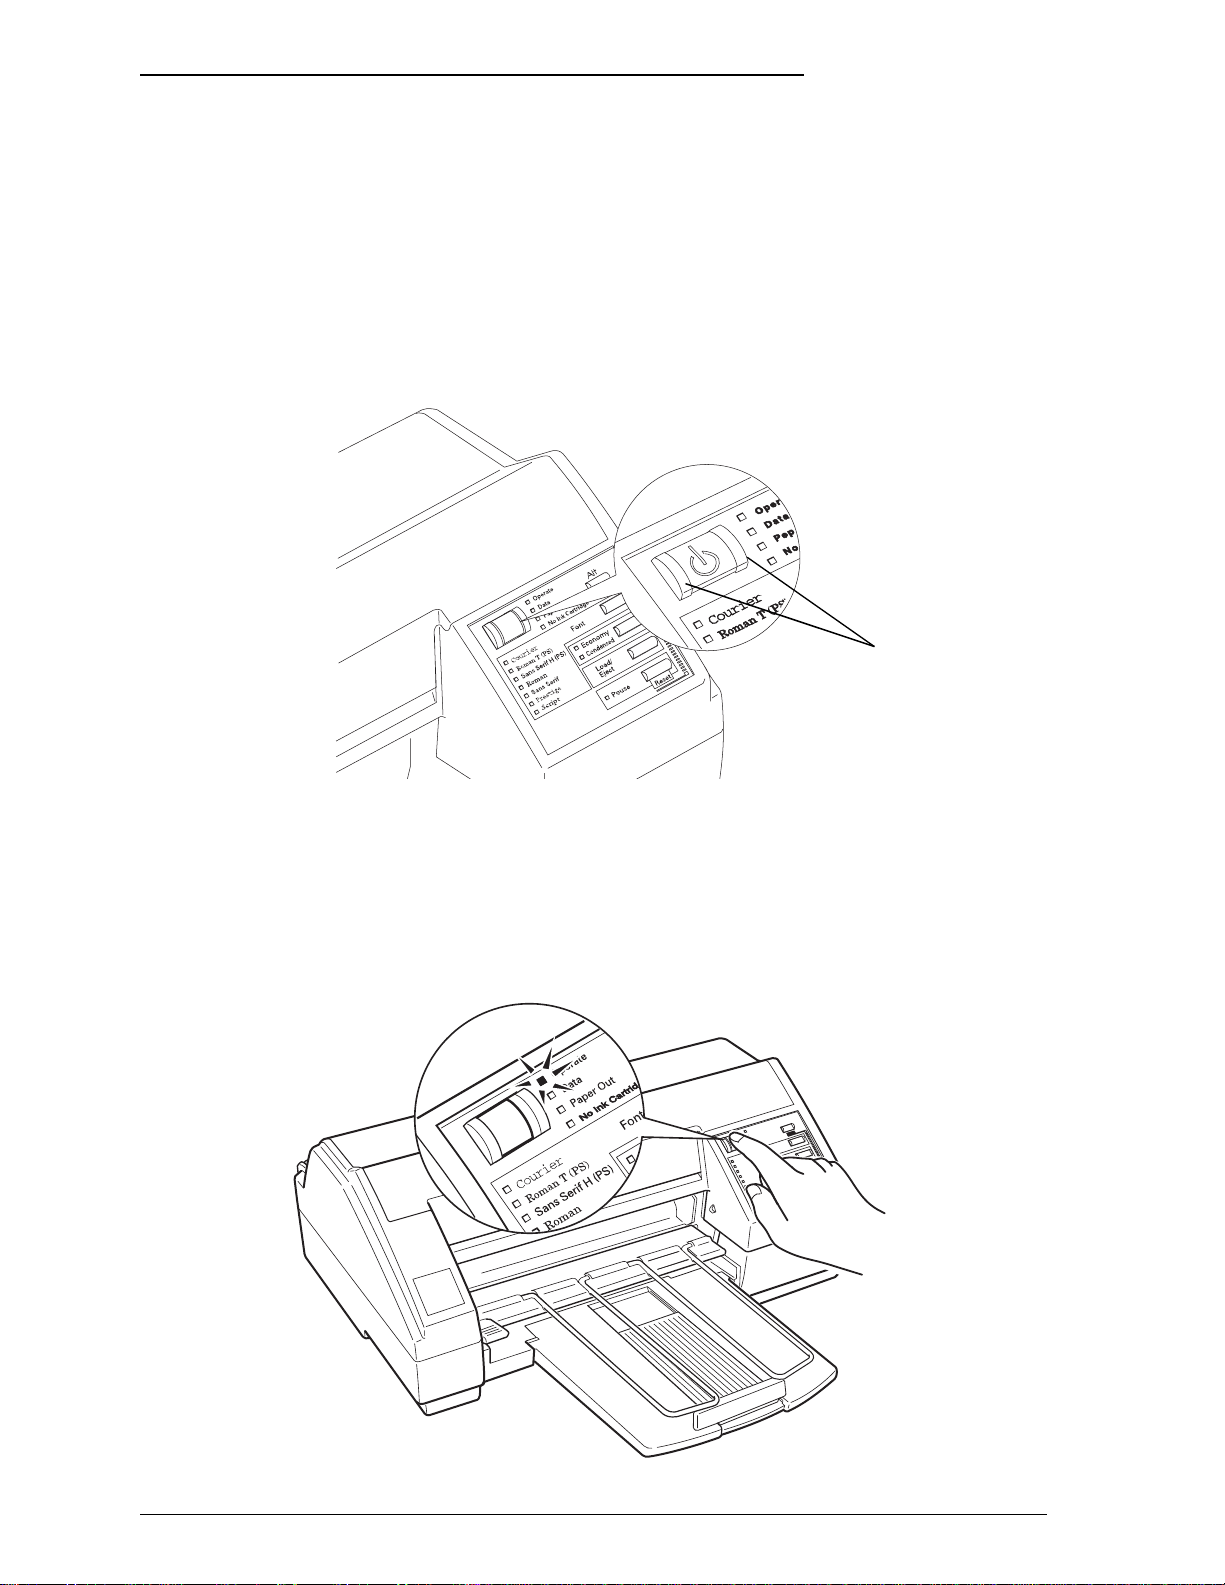
Plugging in and Turning on the Printer
1. Make sure you have removed all protective packing
materials as described in the Notice Sheet.
2. Make sure that the
Operate
button is turned off. It is off
when its surface is even with the button protectors on the
left and right.
button
protectors
3. Plug the power cord into a properly grounded electrical outlet.
4. Turn on the printer by pressing the
shown below.
Operate
button as
1-6
Setting Up
Page 19
Installing the Ink Cartridges
Caution:
c
Note:
❑
❑
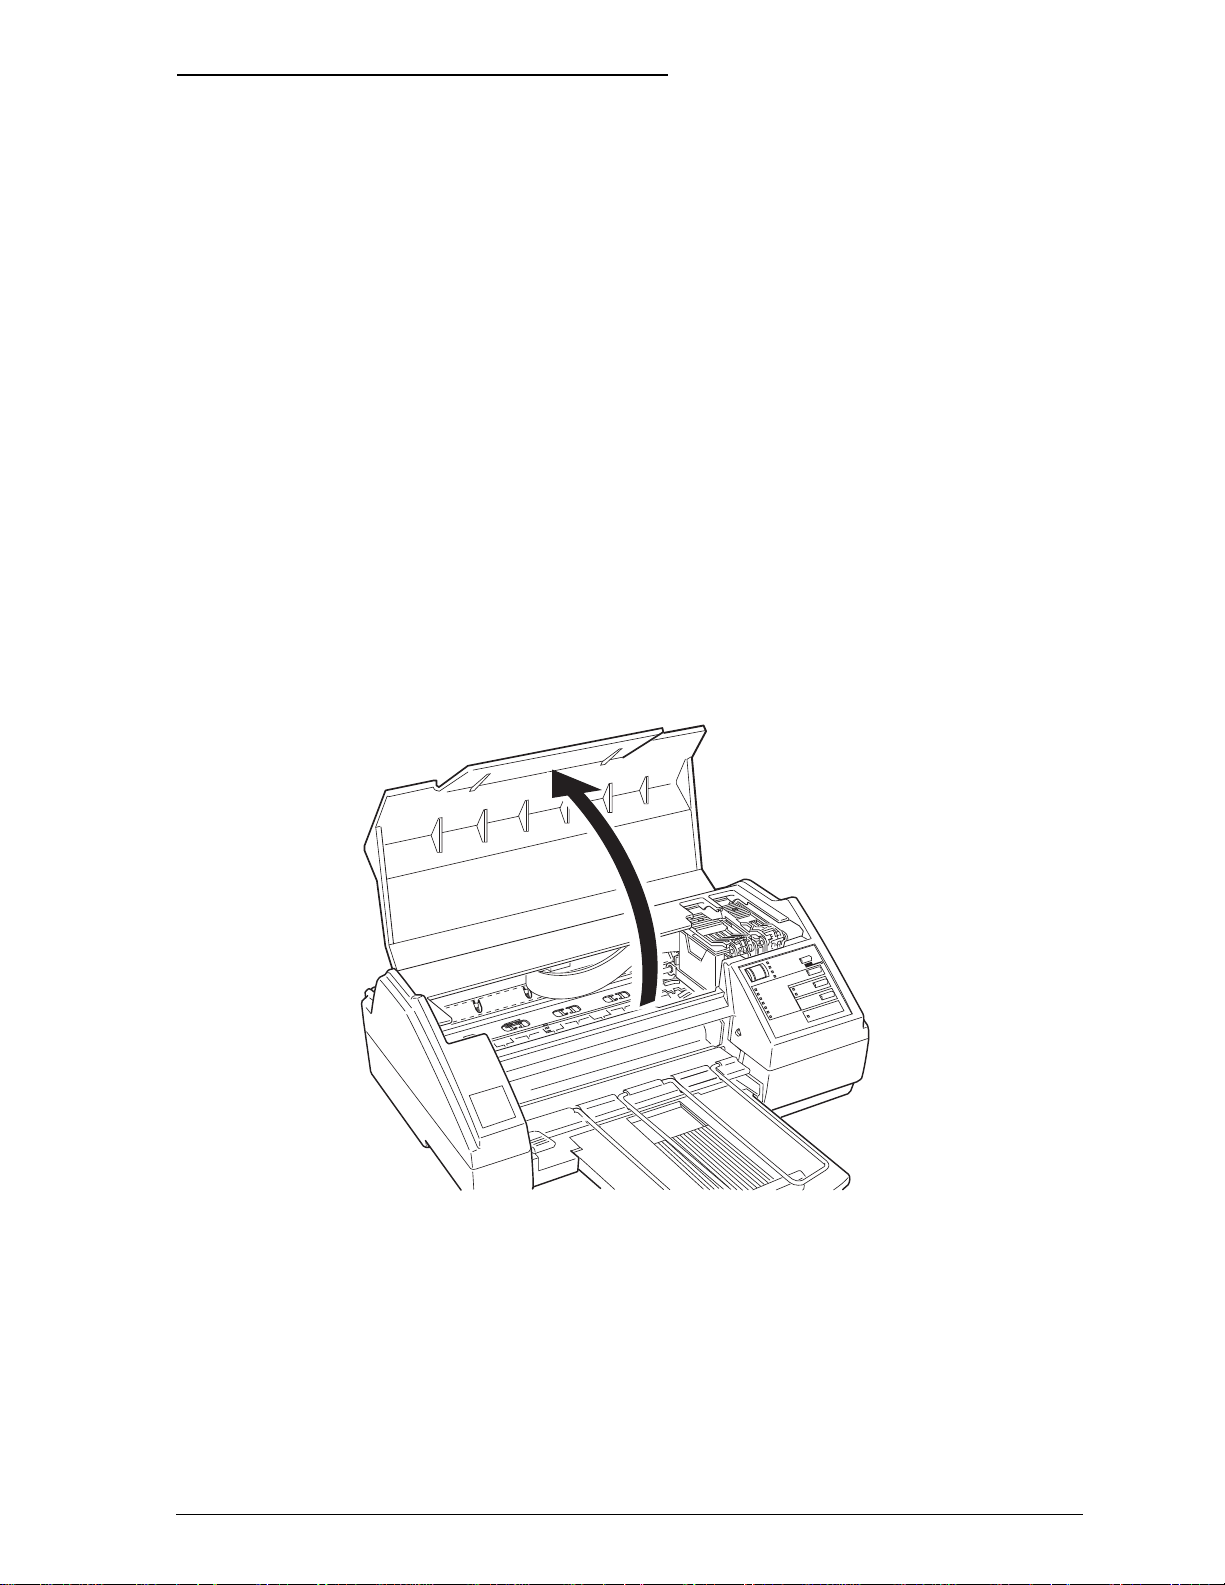
1. Make sure the printer is turned on, and then open the
The ink cartridges are self-contained units. Under ordinary
use, ink will not leak from a cartridge. If ink does get on your
hands, wash them thoroughly with soap and water. If ink gets
into your eyes, flush them immediately with water.
Do not open an ink cartridge package until just before you install
the cartridge or the ink may become unusable.
Install both ink cartridges. If either of the cartridges is not
installed, the printer will not work.
printer cover. Press the
Pause
button.
Setting Up
1-7
Page 20
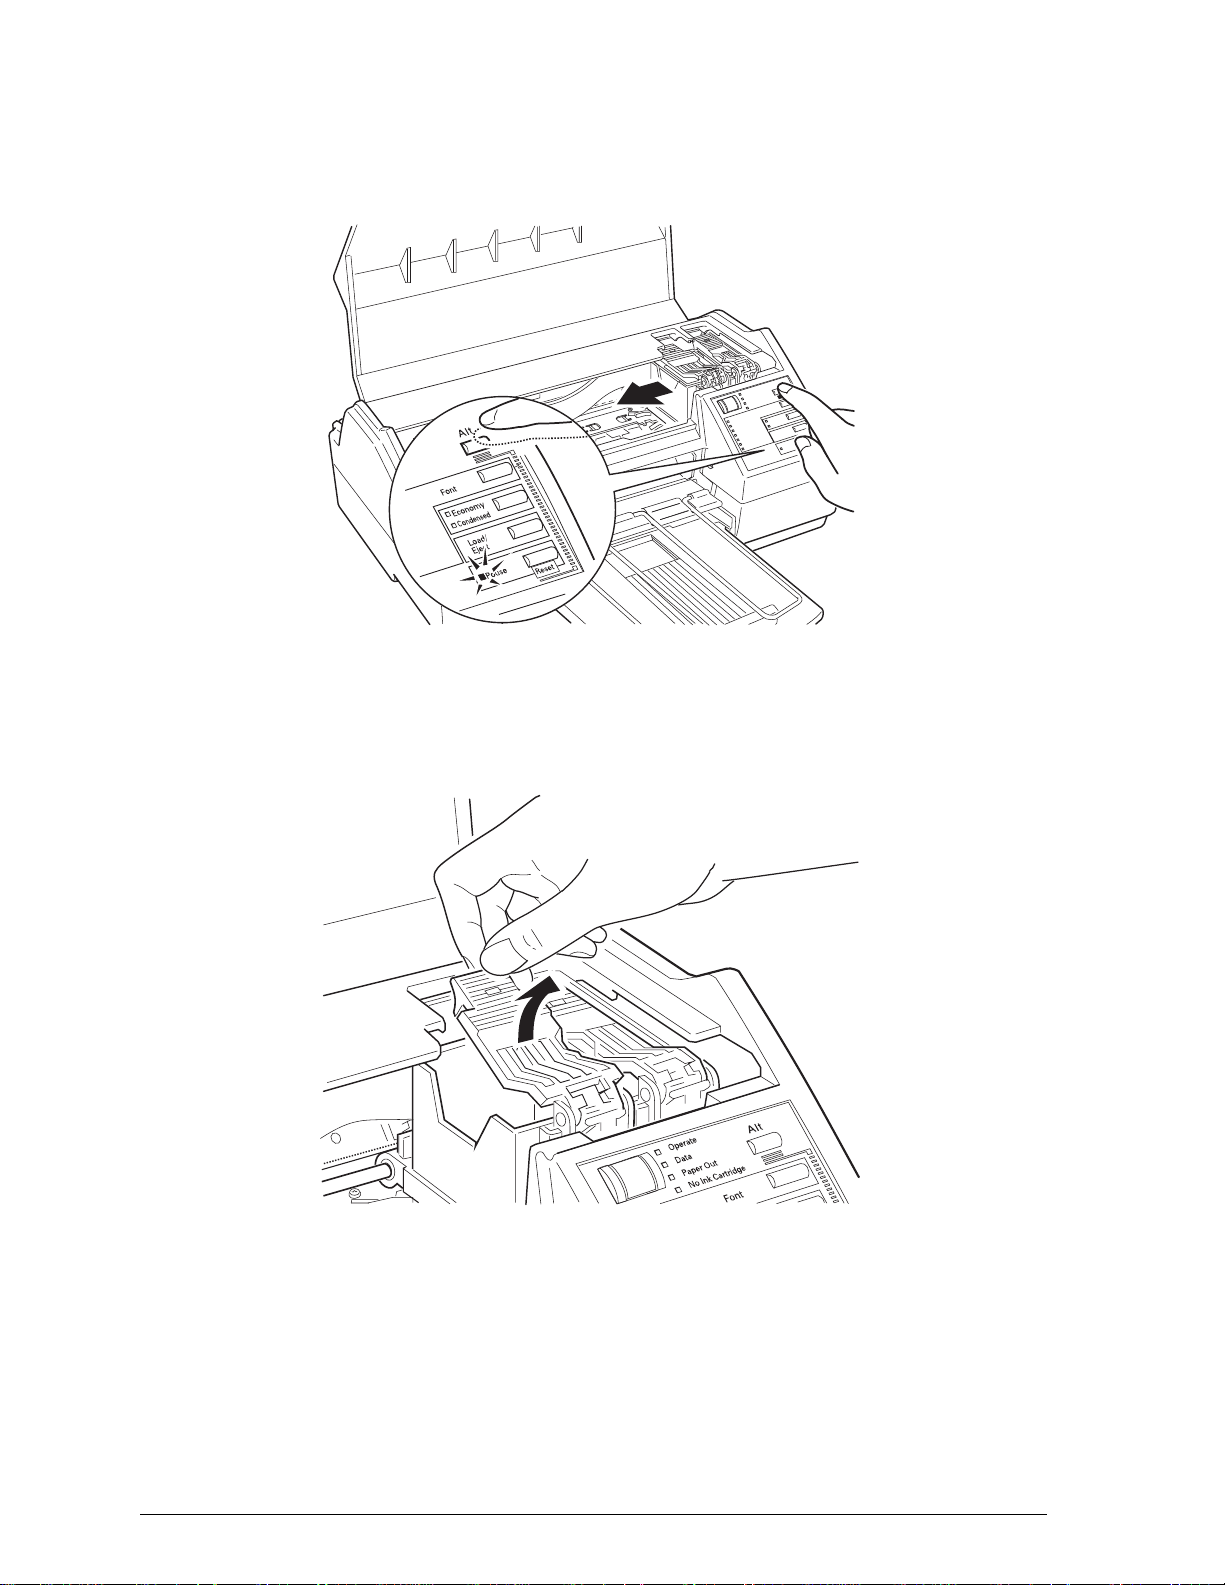
2. Hold down the
Alt
button for about 5 seconds until the print
head moves very slightly to the left, which is the ink
cartridge install position.
3. Pull each of the ink cartridge clamps toward you to open
them.
1-8
Setting Up
Page 21
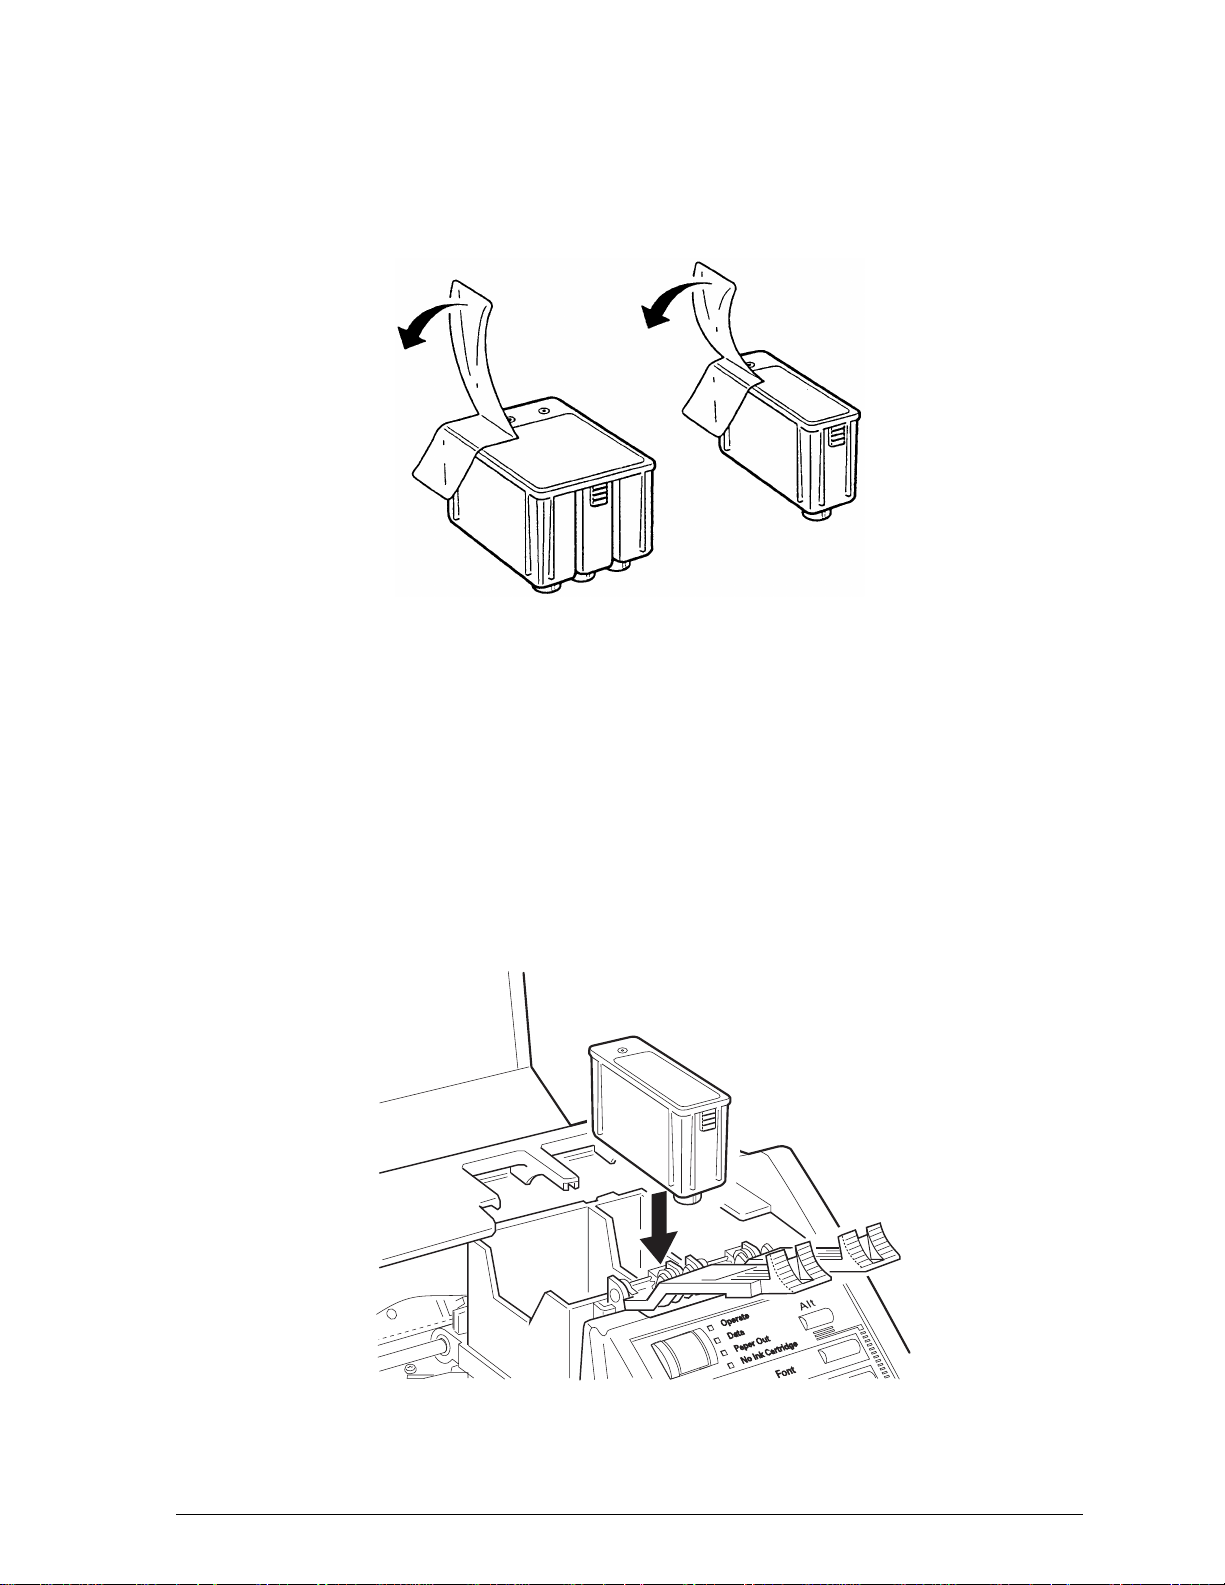
4. Open the foil ink cartridge packages and remove the
cartridges from their protective cardboard. Remove the
tape seal from each ink cartridge. (Your packaging may
differ slightly from that shown below.)
Caution:
c
5. Lower the cartridges into their holders with the labels face
up and the arrow on the top of the cartridge pointing
toward the rear of the printer. The color cartridge, which is
larger, goes on the left, the black ink cartridge on the right.
You must remove the tape seal from the cartridges.
Leaving the tape on will permanently damage them.
Setting Up
1-9
Page 22
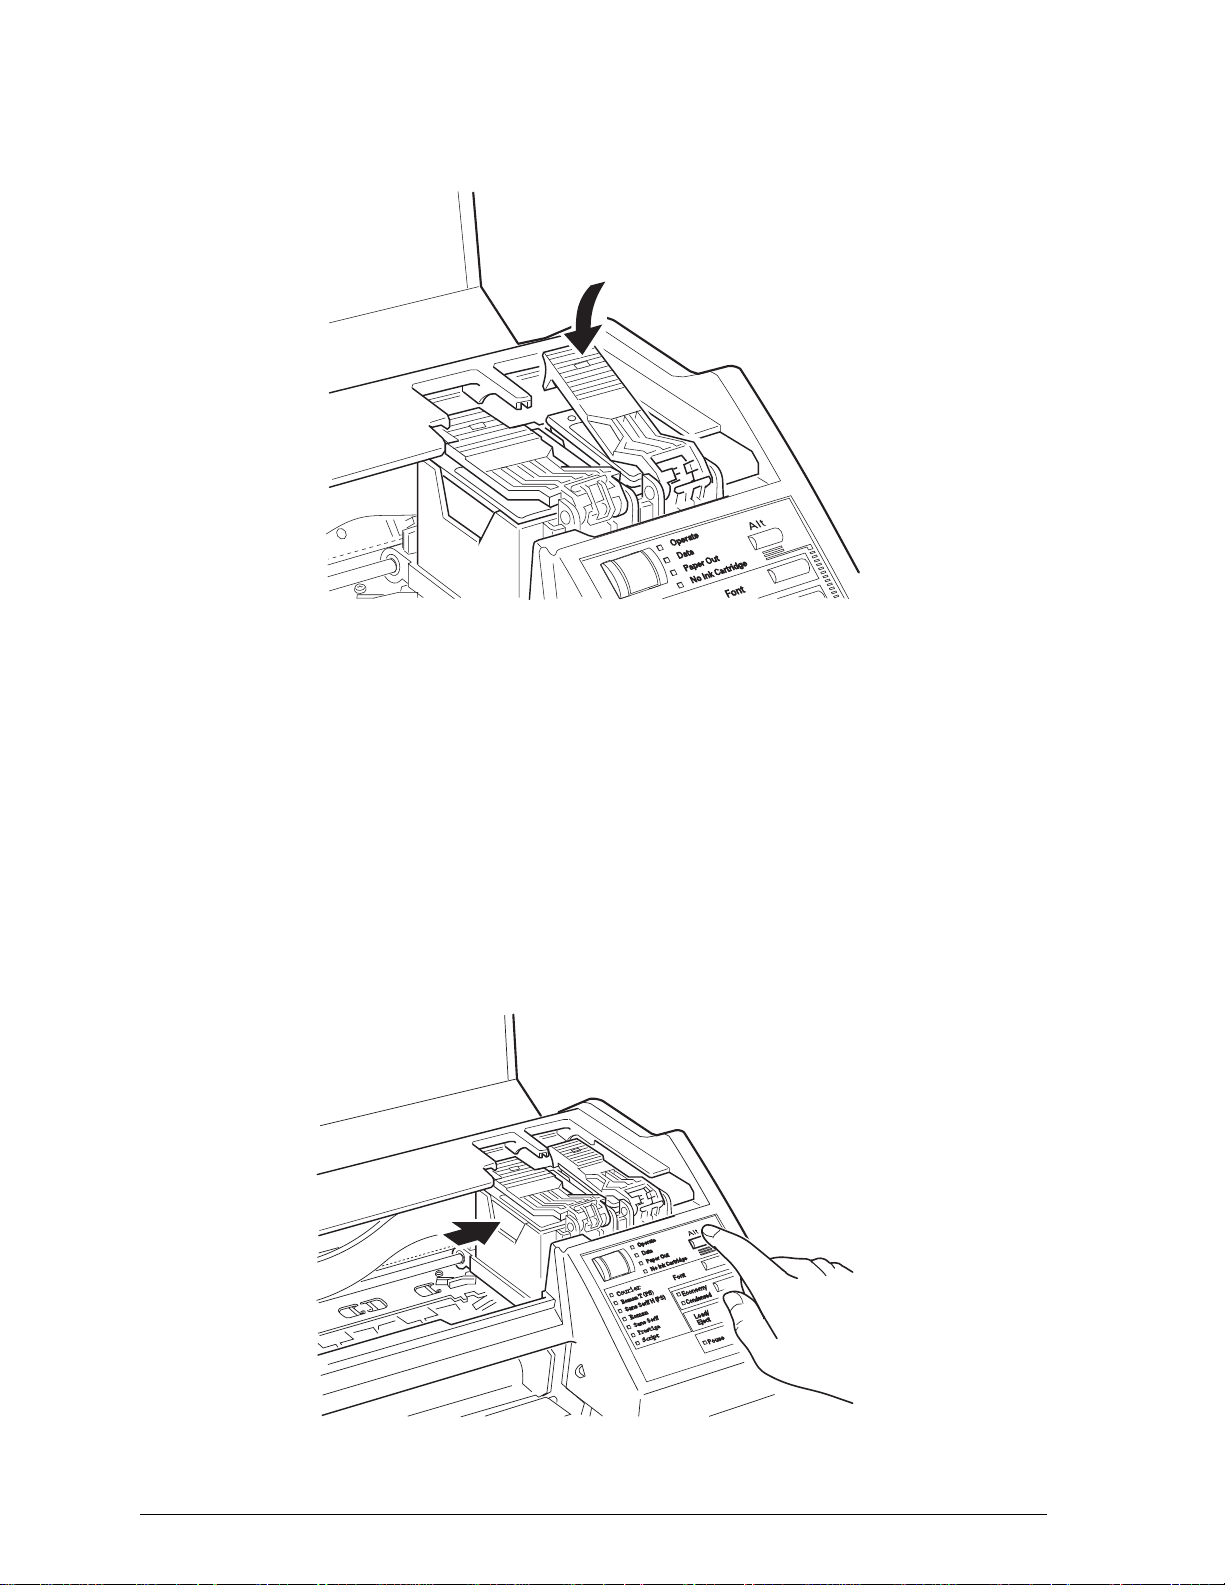
6. Push the ink cartridge clamps toward the back of the printer
until they lock in place.
Caution:
c
7. Press the
home position. (Even if you do not press
moves the print head back to its home position about
60 seconds after you install the cartridges.)
Once you install the ink cartridges, do not open the clamps
or remove them except to replace them with new ones.
Otherwise, cartridges may become unusable.
Alt
button again to return the print head to its
Alt
, the printer
1-10
Setting Up
Page 23

8. Close the printer cover.
The first time you install ink cartridges, the printer
automatically charges the ink delivery system. This takes
about one minute. The printer mechanism moves while the
system is charging.
Caution:
c
9. Press the
10. While holding down the
The carriage moves to the left.
11. Look at the small blue lever in front of the ink cartridges.
Make sure that the left side of this lever is pressed down.
12. Press the
13. Press the
During the ink charging process, the
Never turn off the printer while the
flashing.
Pause
Alt
Pause
button.
button.
button.
Alt
button, press the
Pause
Pause
light flashes.
light is
Font
button.
More about ink cartridges
In order to maintain optimum print quality, the printer
periodically performs a cleaning operation. You might notice
the cleaning cycle being performed when the printer has been
on for a while without being used or when you turn the printer
on after it has been off for a while.
The number of pages a black ink cartridge can print
depends on the amount of text and graphics you use. The
number of pages a color cartridge can print depends on the
amount of color you print. You can replace black and color ink
cartridges independently. See Appendix A for ink cartridge
capacities.
Setting Up
1-11
Page 24
Loading Plain Paper
The following procedure describes how to load plain paper
(copier-quality or paper specifically designed for ink jet
printers), which works well for most color printing. To load
coated papers for higher-quality output or to load
transparencies and other special papers, see Chapter 2.
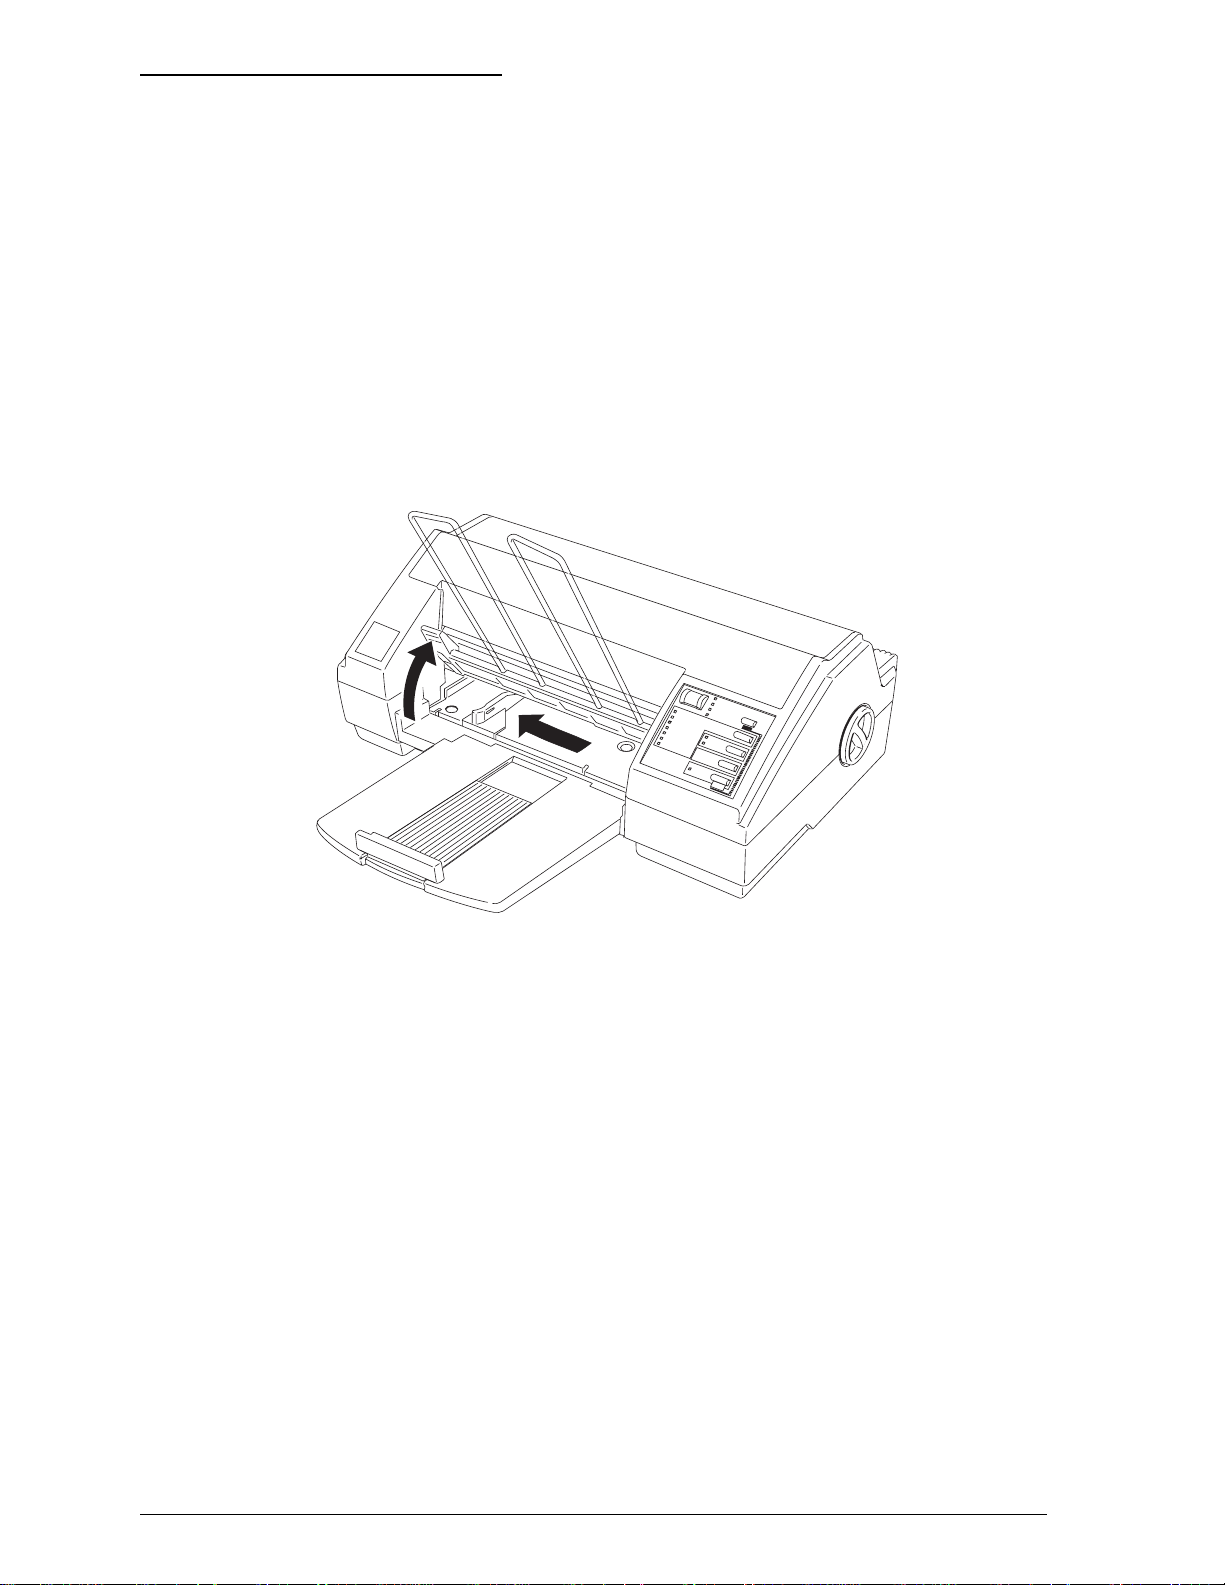
1. Open the sheet feeder cover by lifting the lever on the left
until it clicks into place. Then slide the left edge guide as far
to the left as it will go.
2. Fan a stack of paper; then tap it on a flat surface to even the
1-12
edges.
Note:
The sheet feeder holds up to 100 sheets of 17-lb or 64-gm
Do not load paper above the mark on the edge guide.
Setting Up
2
paper.
Page 25
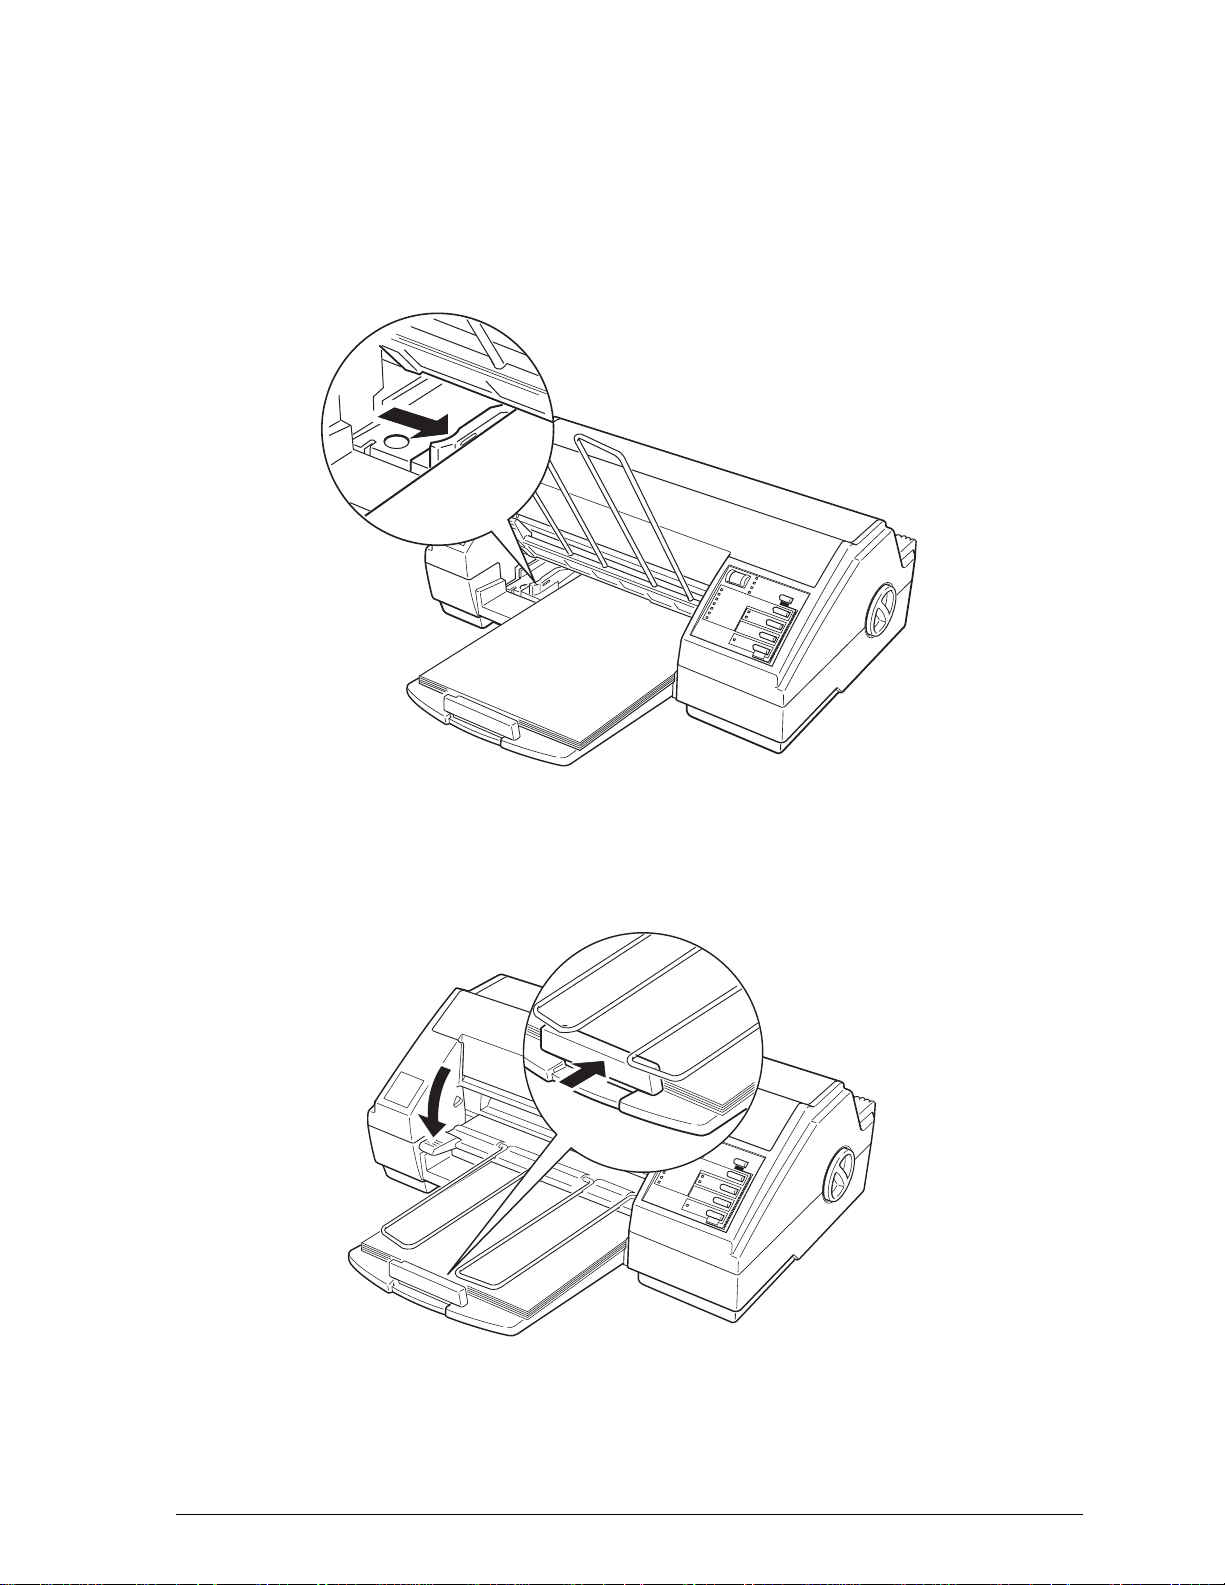
3. While aligning the paper’s edge with the right edge guide,
insert it with the printable surface (the printable surface is
marked with an arrow on most plain paper packaging) face
down into the sheet feeder until it meets resistance. Then
adjust the left edge guide as shown.
4. Adjust the rear edge guide to match the length of your
paper as shown below. Then close the sheet feeder cover.
Setting Up
1-13
Page 26

Testing the Printer
Use paper at least 8.27 inches (210 mm) wide; otherwise the
print head sprays ink directly on the platen, which could
smudge your next document.
1. Make sure the printer is turned off.
2. While holding down the
Operate
The self test begins by printing on the first and last lines of
the first sheet of paper to measure the page length. Then the
printer prints character samples on the next sheet of paper in
the available fonts and colors.
3. To pause the test, press the
continue to print for a few seconds.) Otherwise, the test
continues until the paper in the sheet feeder runs out. To
resume the test, press the
4. To end the self test, press the
printer by pressing the
Note:
( ) button.
Load/Eject
Pause
Pause
Operate
button again.
Pause
button, press the
button. (The test may
button and turn off the
button.
Do not turn off the printer before pressing the
Otherwise, a cleaning cycle occurs when you turn it on again and ink
is wasted.
If the quality of the test output is not good, clean the print
heads as described in Chapter 5. Note that it might take as
many as three cleaning cycles to solve the problem. If cleaning
the print heads does not improve the print quality, see
Chapter 6, “Troubleshooting.”
1-14
Setting Up
Pause
button.
Page 27
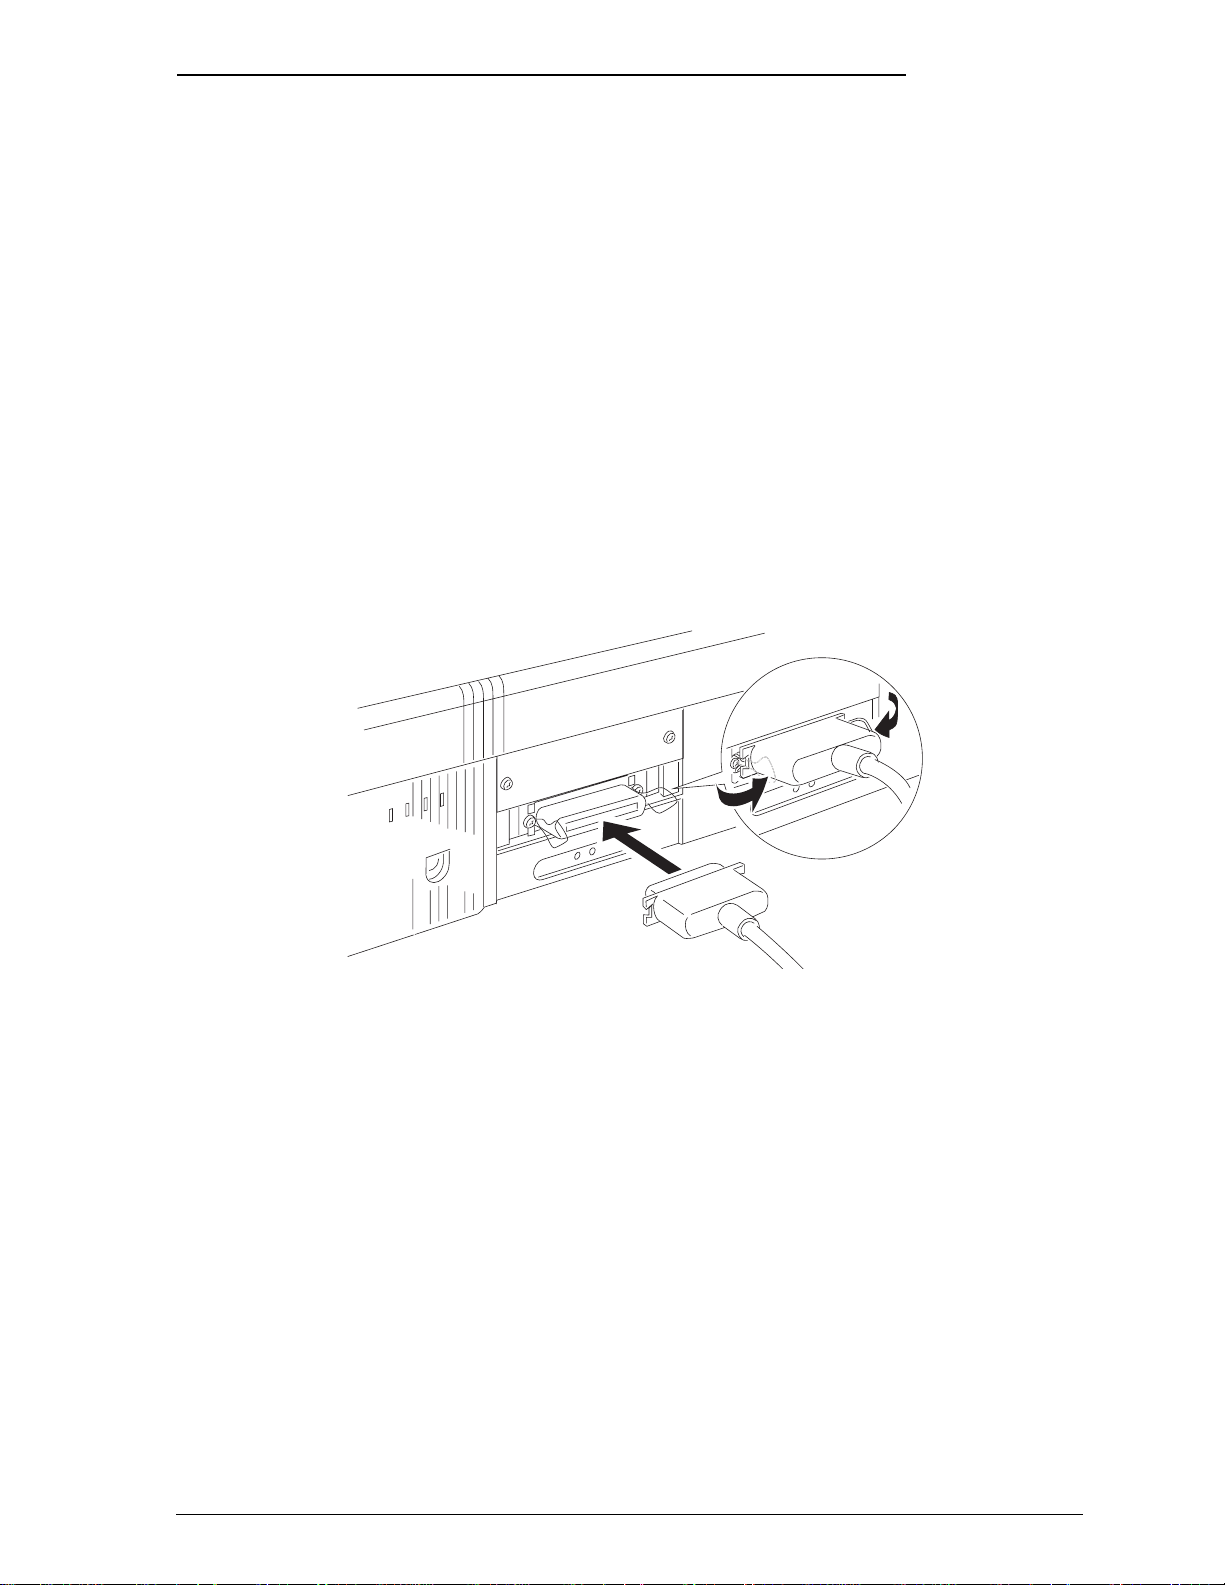
Connecting the Printer to Your Computer
You need a shielded, twisted-pair parallel cable to connect your
computer to the printer’s built-in parallel interface.
Note:
The printer also has an RS-422 serial port, which is standard for the
Apple
1. Make sure both the printer and computer are turned off.
2. Plug the cable connector securely into the printer’s interface
®
Macintosh® but is not often used for PCs.
connector. Then squeeze the wire clips together until they
lock in place on both sides.
3. Plug the other end of the cable into the computer’s parallel
interface.
Setting Up
1-15
Page 28

Calibrating the Printer
Before calibrating the printer, make a backup copy of the
EPSON printer driver disk. Then put away the original and use
the backup for calibration and printer driver installation.
Use the print calibration utility to adjust your printer so that
the vertical lines in text and graphics are correctly aligned. This
ensures the highest possible quality printing.
You can calibrate your printer in either DOS or Windows. Just
follow the appropriate steps below:
DOS
1. Insert the EPSON printer driver disk into drive A (or B).
2. At the DOS prompt, type A:CALIBRAT (or B:CALIBRAT).
3. Follow the instructions on the screen.
Windows
1. Open Program Manager in Windows.
2. Insert the EPSON printer driver disk into drive A (or B).
3. Pull down the File menu and choose
4. When the Run dialog box appears, type A:CALIBRAT (or
B:CALIBRAT) and press Enter.
5. Follow the instructions on the screen.
Recalibrating the printer
In most cases, you will only need to calibrate your printer once.
Run
.
If, however, your text or graphics print quality declines, repeat
the calibration procedure.
1-16
Setting Up
Page 29

Installing the EPSON Windows Printer Driver
Now that you have calibrated your printer, you can install the
EPSON Windows printer driver. It allows your computer to
communicate with the printer.
Always use this printer driver when you print from Windows;
it is specifically designed to provide fast, sharp printing while
optimizing all of the printer’s features.
Note:
If you are not using Windows, choose the LQ-2550 printer driver in
your software. This lets you print in color but does not give you some
EPSON Stylus COLOR features, such as 720-dpi printing and
MicroWeave.
1. Make sure Windows is running and that the Main window
is open.
2. In the Main window, double-click the
3. Double-click the
appears.
4. Click the
of the box. Click
to highlight it and then click Install. The Install Driver box
appears.
5. Insert the EPSON printer driver disk into your computer.
Make sure the correct drive letter (A or B) is displayed in
the Install Driver box and then choose
6. The
Add Unlisted or Updated Printer
Add
Printers
button. A list of printers appears at the bottom
Install Unlisted
icon. The Printers dialog box
or
Control Panel
Updated Printer
OK
.
box appears. Select
icon.
once
EPSON Stylus COLOR
.
Setting Up
1-17
Page 30

7. Click
driver to your hard disk and adds it to the list of installed
printers.
OK
. Windows automatically copies the new printer
8. Choose the
printer is selected whenever you begin using your
Windows software. Click
If you want to use the driver’s original factory settings, simply
choose
To customize the printer settings and learn more about printing
in color with your Windows software, see Chapter 3, “Printing
with Windows.”
c
Print
Caution:
Color printing of large photographs may require a large
amount of free hard disk space.
To let you get back to work more quickly, the Stylus COLOR
sends print data to your hard disk for temporary storage before
Set As Default Printer
Close
in your Windows software and then choose
button so that your
.
OK
.
it is printed. The amount of hard disk space required depends
on the size and complexity of the image and on the application
you are using. Ordinary text and graphics use very little hard
disk space, but photographic images in color can use more.
Although your Windows driver compresses data, a full-page
color photographic image at 360 dpi may require 10MB to
20MB of hard disk space (or in some cases as much as 30MB).
A full-page color photographic image at 720 dpi may require
40MB to 60MB, or in some cases up to 125MB.
If you plan to print large photographic images, be sure to have
enough hard disk space available or do one of the following:
Reduce the size of your image.
Reduce the resolution of your image.
1-18
Setting Up
Page 31

Chapter 2
Choosing and Loading Paper
Choosing Paper . . . . . . . . . . . . . . . . . . . . . . . . . . . 2-2
Special papers . . . . . . . . . . . . . . . . . . . . . . . . . . 2-2
Thick paper . . . . . . . . . . . . . . . . . . . . . . . . . . . 2-3
Loading Paper . . . . . . . . . . . . . . . . . . . . . . . . . . . . 2-3
Loading plain paper . . . . . . . . . . . . . . . . . . . . . . 2-3
Loading special coated and glossy paper . . . . . . . . . . 2-4
Loading transparencies . . . . . . . . . . . . . . . . . . . . . 2-5
Loading envelopes . . . . . . . . . . . . . . . . . . . . . . . 2-6
2
Choosing and Loading Paper
2-1
Page 32

Choosing Paper
While most correspondence-quality plain paper works well in
your printer, you should be sure the paper is suitable for ink jet
printers. For detailed paper specifications, see Appendix A.
Special papers
For the highest quality print output and overhead
presentations, EPSON offers the following special papers:
❑
EPSON Special coated paper for 360 dpi (dots per inch)
(S041028 for letter, S041025 for A4)
Use this paper for high-quality 360 dpi output.
❑
EPSON Special coated paper for 720 dpi
(S041029 for letter, S041026 for A4)
This paper can be used only when printing at 720 dpi.
❑
EPSON High Quality Glossy paper (S041033)
When you use this paper, choose Special coated paper 360
or Special coated paper 720 in the Media/Options section
of the printer driver.
Note:
When printing at 720 dpi, use only EPSON Special coated paper
for 720 dpi or High Quality Glossy paper.
❑
EPSON Transparency film
(S041030 for letter, S041027 for A4)
2-2
Use this film with 360 dpi printing to produce high-quality
overhead transparency presentations. Do not use 720 dpi
printing on transparencies.
Choosing and Loading Paper
Page 33

Make sure to select the appropriate media type from the
printer setup dialog box of your driver. See Chapter 3,
“Printing with Windows,” for information about changing
printer driver settings.
Thick paper
You can also print on some kinds of thick paper and envelopes.
Note:
If your printing becomes faint when you print on thick paper, you
need to adjust the paper-thickness lever as shown in steps 1 through 5
in “Loading envelopes,” later in this chapter.
Make sure to select the appropriate paper type in your printer
driver setup. See Chapter 3, “Printing with Windows,” for
information about changing printer driver settings.
Loading Paper
You can select from several paper types for your printer’s
built-in sheet feeder: plain paper, special ink jet paper, coated
ink jet paper, transparency film, and envelopes.
Loading plain paper
To load plain paper, see “Loading Plain Paper” in Chapter 1.
Make sure to select “Plain Paper” as the paper type in your
printer driver setup. See Chapter 3, “Printing with Windows,”
for information about changing printer driver settings.
Choosing and Loading Paper
2-3
Page 34

Loading special coated and glossy paper
To load EPSON Special coated paper for 360 and 720 dpi and
the EPSON High Quality Glossy paper:
1. Make sure the printable surface of the paper is face down.
For coated paper, the printable side is whiter than the other
side. For glossy paper, the printable side is face down when
the cut corner is toward you on the right as you insert
paper in the sheet feeder.
Caution:
c
2. Insert the paper into the sheet feeder until it meets
resistance. You can insert up to 70 sheets of coated paper
and up to 50 sheets of glossy paper.
3. Select Special coated paper in the printer driver setup and
either 360 or 720 dpi resolution.
c
Do not touch the printable surface; hold the sheets by their
edges.
Caution:
Do not print on 720 dpi paper with 360 dpi resolution;
likewise, do not print on 360 dpi paper with 720 dpi
resolution.
Return unused sheets to the original packaging. Unfavorable
storage conditions, especially high temperature, humidity,
4. Adjust the left and rear edge guides so the paper feeds
If you have paper feed or paper jam problems, see Chapter 6,
“Troubleshooting.”
When you need more special paper, see your dealer or call
EPSON Accessories at (800) 873-7766.
2-4
and direct sunlight, can damage the paper.
straight into the paper path.
Choosing and Loading Paper
Page 35

Loading transparencies
When printing on transparencies, use only EPSON
Transparency film S041030 (Letter). For best results, use
transparencies within six months of opening the package.
1. Make sure the printable surface of the transparencies is
face down. The printable side is face down when the cut
corner is on the bottom right as you hold the transparencies
in front of you.
Caution:
c
2. Insert up to 50 transparencies into the sheet feeder until
they meet resistance.
Do not touch the printable surface; hold the sheets by their
edges.
3. Adjust the left and rear edge guides so that the
transparencies feed straight into the paper path.
4. Select Transparency and 360 dpi resolution in the printer
driver setup as shown in Chapter 3.
Choosing and Loading Paper
2-5
Page 36

Caution:
c
If you have paper feed or paper jam problems, see Chapter 6,
“Troubleshooting.”
When you need more transparencies, see your dealer or call
EPSON Accessories at (800) 873-7766.
Do not print on transparencies using 720 dpi resolution.
Return unused sheets to the original packaging.
Unfavorable storage conditions, especially high
temperature, humidity, and direct sunlight, can damage
transparencies.
Loading envelopes
You can print up to 10 envelopes at a time. First you need to
adjust the paper-thickness lever.
1. Make sure the printer is turned on. Then press the Pause
button and open the cover.
Note:
When adjusting the paper-thickness lever, make sure no paper is
in the paper path. Paper loaded in the printer is ejected when you
adjust this lever.
2-6
Choosing and Loading Paper
Page 37

2. While holding down the Alt button, press the Font button.
The carriage moves to the lever-adjusting position.
3. Turn the lever clockwise as far as it will go.
4. Press the Alt button.
5. Press the Pause button.
Choosing and Loading Paper
2-7
Page 38

6. Remove the rear edge guide from the printer and re-install
it as shown.
7. Insert up to 10 envelopes into the printer as shown.
8. Adjust the rear and left edge guides carefully so that the
9. Choose the envelope size (called paper type in your printer
2-8
envelopes feed straight into the paper path.
driver) from the printer driver setup as shown in Chapter 3.
Choosing and Loading Paper
Page 39

Note:
❑
Do not use envelopes that are too thin; they may curl during
printing.
❑
Return unused envelopes to the original packaging.
Unfavorable storage conditions, especially high temperature,
humidity, and direct sunlight, can damage envelopes.
❑
Do not choose 720 dpi resolution for envelope printing.
10. Re-adjust the paper-thickness lever to its original position
after you finish printing on envelopes or thick paper.
Otherwise, the print on plain paper may be faint.
Choosing and Loading Paper
2-9
Page 40

Chapter 3
Printing with Windo
About the Printer Driver
Using the Printer Driver
Displaying the dialog boxes
Choosing settings
Saving settings
Restoring prior settings
Getting help
Exiting the driver
Before Printing for the First Time
About printing with color
Choosing required settings.
Setting Descriptions
Driver setup tabs and command buttons.
Choosing the Best Settings for your Document
Printing Color with Selected Windows Software
Making color selection in your software
Printing your color Windows documents
........................
..........................
...........................
........................
.........................
ws
......................
......................
..................
.....................
.................
...................
..................
..........
...........
..........
.........
........
3-2
3-3
3-5
3-5
3-6
3-6
3-6
3-7
3-7
3-7
3-8
3-10
3-10
3-25
3-27
3-27
3-29
Printing Color with Selected DOS Software
Making color selection in your software
The EPSON Spool Manager
The EPSON Despooler
....................
.......................
Printing with Windows
...........
...........
3-29
3-29
3-32
3-33
3-1
Page 41

About the Printer Driver
This chapter describes how to use the EPSON Windows
higher) printer driver. You’ll also find on-line help throughout
the driver.
(3.1
or
Note:
If
you are not using Windows, choose the LQ-2550 printer driver in
your software. This lets you print in color but does not give you some
EPSON Stylus COLOR features, such as 720-dpi printing and
MicroWeave.
A printer driver is a custom-designed program that works with
the software on your computer to send codes that run (or
“drive”) your printer. These software codes select the page size,
orientation, resolution, and other features of the document you
are printing.
because color printing is more complex than black-and-white
(monochrome) printing, results and print speed vary
depending on printer driver and software settings. Therefore,
it’s important that you use the EPSON driver that comes with
your EPSON Stylus COLOR and that you install it correctly
by using the Printers icon in the Windows Control Panel.
Installing the driver is described in Chapter
1,
“Setting Up.”
Note:
Be
sure you see
the section in this chapter
called “Before
Printing
the First Time.” If you do not choose the right settings, your printed
output may be unsatisfactory.
3-2
Printing with Windows
for
Page 42

Using the Printer Driver
Your printer driver settings are divided into six categories
which display as tabs. This table shows you the printer driver
settings, dialog boxes, and options. It also lists factory settings.
Driver settings
Setting Dialog box
c
Paper
Media/
Options
Paper size
Orientation
Paper source
Copies
Paper type
Print options
Options
Letter (8
Legal (8 1/2x 14 in)
A4
A5(148x210mm)
B5 (182 x 257
Statement (5
Executive (7
Envelope # 10 (4
Envelope DL
Envelope C5
6
Portrait
Landscape
Auto Sheet Feeder
Number (l-99)
Collate
Reverse order print (@ = on, 0 = off)
Plain paper
Special coated paper 360
Special
Transparency film
High Speed (I3 = on, 0 = off
MicroWeave (II =
l/2 x 11
(210 x 297
3/4”
Envelope (3
(a =
coated paper
in)
mm)
mm)
l/2 x
8
l/2
l/2 x 10
in)
l/8 x
9
(110 x 220
(162 x
229 mm)
5/8 x
on, 0 = off)
on, 0 =
in)
l/2
in)
mm)
6
l/2
720 dpi
in)
dpi
off)
Options in bold type indicate the driver’s factory default settings.
An asterisk indicates settings not available when Monochrome is selected
Printing with Windows
3-3
Page 43

Driver
settings
Setting
Image
Settings
(continued)
1
Dialog box
Red Strength*
1
Green strength*
1
Blue strength*
4
About [Printer driver
informotion]
Options
-5G% -
0% -
50%
-5046 - 0% - 50%
H =
on
0 =
Off
-5c% - 0% - 50%
-50% -
0% -
50%
-50% - 0% - 50%
-50% 0% - 50%
El =
on
cl =
off
Monochrome
Color
(CMYK)
Super -
720 x 720 dpi
Best - 360 x
Draft No halftoning
Line art pattern
Fine dither pattern
Coarse dither pattern
Diffused (Pencil art)
Diffused (High speed)
Diffused (Images)
Diffused
(Complex Diagrams)
N/A
360 dpi
180 x 180 dpi
Options in bold type indicate the driver’s factory default settings.
An
3-4
asterisk indicates
Printing with Windows
settings not
available
when Monochrome is selected
Page 44

Displaying
You can display the driver setup screen in two ways:
Q
0
When you display the driver setup screen, the Paper dialog box
appears. The top of the screen looks like this:
the
dialog boxes
Double-click the Printers icon in the Control Panel dialog
box. Then click Epson Stylus COLOR in the Installed
Printers list box to highlight it and click the Setup button.
Choose Print Setup or a similar name from the File menu
of your software. Highlight Epson Stylus Color in the
Installed Printers list box and then click the Setup button.
Choosing settings
You can select settings in any of the following ways:
0
Click the option button or name
0
Click the check box
u
Click the scroll box on the scroll bar and drag it
0
Click the drop-down list box, then click the item
c)
Click the text box, then enter the number
o
Hold down the
type the underlined character representing the setting.
Alt
key on your computer keyboard and
Printing
with
Windows
3-5
Page 45

Saving settings
When you have selected the settings you want and you’re
ready to print, choose the OK button. This exits you from the
driver setup and saves your selections. Your settings stay in
effect until you make additional changes and choose the OK
button again.
Restoring prior settings
If you decide you want to use the driver’s original factory
settings, click the Defaults button,
Getting
help
Whenever you want more information about the driver
settings, choose the Help button. Once you are in Help, you
also use the Search menu to look up specific topics.
When you are in a Help dialog box, click once on underlined
words and phrases to view related information.
If you want more information about using Help, see your
Microsoft Windows User’s Guide.
can
3-6
Printing with Windows
Page 46

Exiting the driver
There are two ways to exit the setup screen:
0
Click the OK button to save all settings you made and exit
the printer driver.
0
Click the Cancel button to ignore all changes you made
during your current printer driver setup session and exit
the printer driver.
Before Printing for the First Time
Before you start printing, there are a few things you should
know about printing with color in order to get the results you
expect.
About printing with color
We recommend you read the color guide that came with your
printer before you begin printing. Keep in mind these
guidelines for improving printed output:
a
You can often improve quality by using the right paper.
0
For highest quality printing, always turn on
and turn off High Speed in the Media/Options section of
the printer driver.
cl
You can make adjustments in the software you use to
create your documents.
cl
With scanned documents, you can adjust scanner settings.
cl
You can make adjustments through your printer driver.
MicroWeave
Printing with Windows
3-7
Page 47

Choosing required settings
Choose the following driver settings to match your document
requirements:
Paper size
Orientation
Resolution
Ink
Note:
The following procedure assumes you are using
The size of the paper loaded in the printer.
The direction of printing on the document.
The number of dots per inch printed.
Monochrome (black) or color
360 dpi
(CMYK)
resolution
and plain paper for your document.
1.
Click the Setup button in the Print Setup dialog box. You
the following:
ink.
see
3-8
Printing with
Windows
Page 48

2.
Select the paper size you have loaded in the printer from the
Paper Size drop-down list box. The diagram on the screen
changes the printable area according to the paper size you
select.
3.
Select Portrait or Landscape orientation. Portrait is up and
down orientation, landscape is lengthwise. If you would
like to print your document lengthwise, select Landscape.
The diagram on the screen changes according to the
orientation you select.
4.
Click the Ink/Resolution tab at the top of the dialog box.
You see the following:
5.
Select the Ink option. Select Color
document includes color.
6.
Select the Resolution.
(CMYK)
only when your
Printing with Windows
3-9
Page 49

7.
Click the OK button at the bottom of the dialog box.
Note:
0
To print with
transparencies,
720 dpi resolution
or
you need to change
use special
coated
other settings.
paper or
See “Setting
Descriptions “ below.
0
The
360 x 360 dpi - Best option
documents.
7’he 180 x 280 dpi - Draft option
is
suitable
for most types of
is
useful
forfaster
prin fing.
Now print your document. A window with information about
the print job appears on the screen. This is the
screen, which is explained at the end of this chapter.
Despooler
Setting Descriptions
This section describes your printer driver settings. Settings in
bold print are the original factory settings.
Driver setup tubs and command buttons
This printer driver has six categories which display as tabs.
3-10
Printing with
Windows
Page 50

Click a tab to make your selection. The dialog box appears.
These four command buttons appear at the bottom of the
screen:
OK
Saves your settings and exits the driver setup. Any changes
you made go into effect when you exit using this button.
Cancel
Cancels all setting changes you made during your current
printer driver setup session and exits the driver setup.
Defaults
Cancels all settings you made in your current printer driver
setup session and returns to the driver’s factory default settings.
Help
Displays help dialog boxes for the printer driver. To exit Help,
click Exit in the File menu within Help or click anywhere
outside a help dialog box.
Printing
with
Windows
3-11
Page 51

Paper
Select the paper size, orientation, paper source, and number of
copies.
Paper size
This drop-down list box displays the available paper sizes.
Select the paper size you loaded in the printer. The diagram
changes according to the paper size you select and displays the
printable area dimensions. Your choices are:
3-12
Letter
Legal
A4
A5
B5
Statement
Executive
Envelope
Envelope DL
Envelope
6
3/4
Envelope
Printing
#lO
C5
with
8
l/Z x 11
81/2xl4in
210 x 297
148 x 210
182 x 257
51/2x81/2in
7
l/2 x 10
41/8x91/2
110 x 220
162 x 229
3 518 x 6
Windows
in
mm
mm
mm
in
mm
mm
l/2
in
Page 52

Orientation
You can select the direction of the print on a document. To
change the orientation, click the appropriate option button.
Portrait prints up and down, Landscape prints lengthwise.
Portrait
Landscape
Paper Source
Your printer has a built-in sheet feeder, so you do not need to
change this setting.
Auto sheet feeder
Copies
Note:
In most cases you should choose multiple copies with your application
software, not with
copies in
You can print multiple copies using these settings. To select
multiple copies of your document, click the copies text box and
then enter the number from your keyboard.
both the application and the driver.
the
driver. Be sure
that
you do not choose
multiple
1
to
99
Printing
with Windows
3-13
Page 53

Collate
Reverse Page Order
The Collate and Reverse Page Order options are factory-set to
Off.
Note:
Because these settings often require
hard disk space and may
them turned
o
To print multiple-page documents in sets, set Collate to on
by clicking the check box so that an El appears.
o
To print more than one document set
the correct order after printing, click both the Collate and
Reverse Page Order check boxes so that an
each one.
0
To print one multiple-page document so that its pages are
in the correct order after printing, click Reverse Page Order
so that an
off.
Use
El appears.
conflict with
them
only
additional
your software
for
special
system memory and
settings,
circumstances.
so that each set is in
El appears in
keep
3-14
Printing with
Windows
Page 54

Media/Options
Use the Media /Options tab to select paper type and printing
options.
For highest quality printing, always turn off High Speed in the
Media/Options section of the printer driver.
Media type
Your Stylus COLOR can print on most types of paper.
However, to get the best printing results, it is important to
match the driver settings to your paper type. The available
paper types are:
Plain Paper
Special coated paper
Special coated paper
Transparency film
360 dpi
720 dpi
Printing with Windows
3-15
Page 55

Plain paper
Select this option for most types of documents. You can use
either standard office copier paper or paper suitable for ink jet
printers. Select this option if your paper is not a special coated
paper or transparency film.
Note:
For highest quality printing with the media types below, always turn
off
High Speed in the Media/Options section of the printer driver.
Special coated paper 360
To obtain good print quality, use special coated paper for ink
jet printers. To print at 360 dpi, use EPSON SO41028 (Letter)
Special coated paper for
paper is designed to work best with the ink used in your
printer. Also choose this option if you use other special coated
paper for ink jet printers.
Special coated paper
To get the highest print quality, use EPSON SO41029 (Letter)
Special coated paper for
You must use this EPSON paper for
use this paper if you are not printing in
Transparent y film
To print transparencies, use EPSON SO41030 (Letter)
Transparencyfilm
resolution when printing transparencies, and use only EPSON
transparency film.
360 dpi
720 dpi
and select this option. Use only
dpi
printing with this option. EPSON
720 dpi
printing and select this option.
720
dpi printing. Do not
720 dpi
resolution.
360 dpi
3-16
Printing with Windows
Page 56

Print Options
These options allow you to select high speed printing or
MicroWeave,
which gives you higher quality output.
High speed
MicroWeave (IXl =
High Speed
When you select this option, the printer prints in both
directions. Bi-directional printing is fast, but for highest quality
printing, always turn
Note:
If
the vertical lines in printing
(IXI =
on, Cl = off)
on, 0 = off)
off
High Speed.
appear
misaligned when you print
with High Speed, you may need to calibrate the printer as described in
Chapter
Micro Weave
When
output because sections are printed in finer increments. This
reduces the possibility of banding-light horizontal lines in
graphics. EPSON recommends you use special coated paper or
transparency film when you use
Note:
MicroWeave
MicroWeave
1,
“Setting Up.
MicroWeave
II
is selected, your printer generates superior
MicroWeave.
is recommended for printing in color. You can select
for Monochrome printing to reduce banding, but the
printing time is significantly longer.
Printing with
Windows
3-17
Page 57

Image
Settings
You can modify a document’s color (or gray scale) settings
using this setting.
Note:
lf
you simply want to print high-quality color or black-and-white, do
not change the original factory settings. To make adjustments in
brightness, color, and other settings affecting printed output, use your
computer software. However,
if
your software does not allow you to
make adjustments and you want to modify your images, experiment
with the Image Settings dialog box until you achieve satisfactory
results.
When you select Image Settings, the following appears:
3-18
Printing with Windows
Page 58

Note:
0
An image will appear in the dialog box
of
how your setting changes will
0
You can replace the image by double-clicking the current image
giving
affect
printed images.
you an impression
and using the dialog box to insert your own bitmap image.
There are two
and Color.
Image
The Image settings include Brightness, Contrast, and Enable
Ink Density Correction.
Brigh
tness
The Brightness option changes the lightness or darkness of
your image.
-50% - 0% - 50%
Contrast
The Contrast option changes the ratio between the brightest
and the darkest parts of your image.
-50% - 0% - 50%
Enable Ink Density Correction
setting
categories within Image Settings: Image
This setting takes into account the characteristics of the
Stylus COLOR printer when it determines the amount of ink
used to print the text or image. Printing with this option turned
off usually produces dark images.
q
=on
Cl =
off
Printing with
Windows
3-19
Page 59

Color
The color settings allow you to modify the five color options:
Saturation, Red Strength, Green Strength, Blue Strength, and
Enable Ink Color Correction. (These settings cannot be changed
when Monochrome is selected in the Ink/Resolution setting.)
Saturation
You can adjust the saturation (vividness of a color) using the
scroll bar. Negative saturation produces colors that are duller
than those produced with positive saturation.
-50% - 0% - 50%
Red/Green/Blue Strength
You can adjust the strength of each primary color (Red, Green,
and Blue) using the scroll bar. Experiment with these settings if
your printed colors do not appear as you expect and you
cannot change the colors with your software.
-50% - 0% - 50%
Note:
Try using your
make
color adjustments.
software
settings before you change printer settings to
Enable Ink
This setting takes into account the characteristics of the
Stylus COLOR printer when it determines the colors of ink
used to print the text or image. Printing with this option turned
off usually produces dull colors.
El =
cl =
3-20
Printing with Windows
on
off
Color
Correction
Page 60

Ink/Resolution
When you select Ink/Resolution, the following appears:
Use this tab to select the ink and resolution.
Ink
This setting lets you select either monochrome or color.
Monochrome
Color
(CMYK)
Printing with
Windows
3-21
Page 61

Resolution
Three resolutions are available, but
suitable for the majority of your documents. Keep in mind that the
higher the resolution,the longer the printing time.
Super Best Draft -
Note:
You’ll want to use
0
720 x 720 dpi
360 x 360 dpi
180 x 180 dpi
720 dpi
resolution and
360 x 360 dpi -
MicroWeave
Best is
for your
highest-quality color photographic images.
When you choose this resolution, you must use only EPSON
0
Special coated
For highest quality printing, always turn
0
Media/Options section
A half-page color photographic image at 360
0
10MB of
paper
for
720 dpi
printing.
off
of
the printer driver.
hard disk space (or over 20MB at
High Speed in the
dpi
requires over
720 dpi). If
you plan
to print large photographic images, be sure to have enough hard
disk space available
or
reduce the size or resolution
of
your image.
3-22 Printing with
Windows
Page 62

Halftoning
When you select Halftoning, the following appears:
Halftone
The printer driver has seven halftoning settings-which you
select according to the type of image you are printing-and
a No halftoning selection. The halftoning image you select
displays on the screen. You may need to experiment with
different settings until your printed output is satisfactory.
Printing with Windows
3-23
Page 63

Use this chart to select the appropriate halftoning method for
your image:
Halftone method
No halftoning
Diffused (Pencil art)
Diffused (High speed)
Diffused (Images)
Diffused (Complex
diagrams)
Note:
0
All
four
diffused methods give an air-brushed look to images and
shaded areas.
0
When printing at
720 dpi,
selectable.
Use for...
Black text and no graphics. This is the
fastest
setting.
Do not use with color.
Simple line art and computer graphics.
Graphic images with significant detail but
Graphic images with limited detail and
Art with fine gradations, such as pencil
drawings.
This is a faster holftoning setting.
Photographic images or equivalent
drawings.
Detailed diagrams or drawings, such as
those produced with
only the four
CorelDRAW!?
diffused
methods are
I
I
I
I
Caution:
Use the halftoning methods in the driver before you use the
dithering options in your software.
About
This tab gives you general information about your printer
driver.
3-24
Printing with Windows
Page 64

Choosing
the
Best
Settings
for your
Document
Use the Settings guide table below to help you get the best
results with your Stylus COLOR.
Note:
When printing speed is important, remember that the following
settings take more time than standard black-and-white text printing:
c;1
MicroWeave
o
Color
~3
Diffused halftone methods
0
Higher resolution
Settings guide table
Printing
type
Text and
simple
graphics
set to on with Monochrome
(CMYK)
for
complex printing
Minimum
Desired results media setting Suggested settings
Sharp black text
Sharp black or Plain paper 360
color text and
basic, non-
gradated
graphics
Low-detail
pencil drawings
Plain paper
Plain paper
360
dpi
resolution
Monochrome
No halftoning
dpi
resolution
Color (CMY
tine art pattern
360
dpi
resolution
Monochrome
Halftone Diffused
(Pencil art)
K)
Printing with Windows
3-25
Page 65

Settinas
auide table (continued)
Y ”
.
Printing
We
Grayscale
Desired results media setting
Clear, low-detail Plain poper Monochrome
I
Minimum
graphics images
High-quality,
Plain
paper
detailed
diagrams or
drawings
High-quality
photographic
Images or
equivalent
c
’ drawings
Special
coated
paper
360
dpi
Complex Sharp. color Special
Color graphics or coated 360
Images
scanned images
poper Holftone 360 dpi
Highest-quolity,
color
graphics
or scanned
photographic
Special
coated
paper -
dpi
720
images
Suggested settings
Halftone Diffused
(High speed)
360
dpi
resolution
Monochrome
Halftone Diffused
(Complex
360
dpi
resolution
Diagroms)
Monochrome
Halftone Diffused
(Images)
360
dpi
resolution
Color
(CMYK)
dpi resolution
Diffused
(Images)
MicroWeave
Color
720 dpi
set to on
(CMYK)
resolution
Halftone Diffused
(Images)
MicroWeove
set to on
3-26
Printing with Windows
Page 66

Printing Color with
Selected Windows
Software
You’re ready to use your Windows software to make color
selections for your documents.
Note:
If
you have not installed the EPSON Windows Printer
Chapter
1,
“Setting Up.”
Driver,
Making color selection in your software
The following table shows you how to locate color settings in
some popular Windows applications.
The table may not include all the steps for using color in the
application. For complete details, see your software
documentation.
Quick co/or selection locator for Windows
-
Software
Name Desired
Microsoft Color
Word for
Windows 2.0
WordPerfectB
for Windows color Choose Color from Font menu
5.1
Microsoft
Excel’4.0
Action
text
Draw color
graphics
Select text Select text thot you wont to color
Draw color
graphics
Select text Select cells that you wont to color
color
Select cell
bockground
color
Action(s) or Selections(s) Required
Select text thot you wont to color
Choose Character from
Choose color from Color drop-down
Click
drow
icon in formatting ribbon
Draw graphic
Choose colors beside Line
Choose colors from Select Text Color
Color
graphics
color
connot
Choose Font from Format menu
Choose Color from color drop-down
Select cells that you wont to color
Choose Patterns from Format menu
Try the 3 cell shading options
with
con be imported, but
be changed or
Formot
Tools
and
see
menu
Fill
odded
Printing with Windows
3-27
Page 67

Quick color
Software Action
Name Desired Action(s) or Selections(s) Required
Aldus
PageMaker@
4.0
CorelDRAW
2.01
*
CorelDRAW! 2.01
your
selection
1
software documentation for details.
locator for Windows (con
Customize
color palette menu
Select text
and
graphics
color
Select fill
color for
objects
Select color
for text or
object
outlines
offers additional dialog boxes for choosing colors, See
Choose Define Colors from Element
Use New
command buttons
Choose Color Palette from Window
menu
Choose text tool in Tools menu
Select what you want to color
Choose the color in Colors window
Select pointer tool from toolbox
Select object you want to color
Click color from Color Palette with Fill
tool icon
Choose Uniform fill icon from
menu
Select color from UNIFORM
Select pointer tool from toolbox
Select text or object outline to color
Use Outline tool icon from toolbox
Use Custom Outline Color tool icon
Select color from one of six dialog
boxes
.,,,
tinued)
Edit
,,,,
Copy . . . . or Remove
flyout
FILL*
3-28
Printing with Windows
Page 68

Printing your
After you locate and make your color selections, you can:
0
Cl
Remember that printing in color takes longer than printing in
monochrome.
color
Choose Print from your software to print the document
using the current EPSON printer driver settings, or
Choose Print and then Setup to access the EPSON printer
driver settings. Once you make your setting selections,
choose OK three times to print.
Windows documents
Printing Color with Selected DOS Software
Because the EPSON printer driver requires Windows, you
cannot use it when working with non-Windows software.
Instead, choose the LQ-2550 printer driver in your software.
This lets you print in color but does not give you some
EPSON Stylus COLOR features, such as
MicroWeave.
720dpi
printing and
Making color selection in your software
The following table shows you how to locate color settings in
some popular DOS applications.
The table may not include all the steps for using color in the
application. For complete details, see your
documentation.
Printing with Windows
software
3-29
Page 69

Quick color selection locator for DOS
Software Action
Name Desired
Microsoft
Word
5.5
WordPerfect
5.1
Select text
color
Select
paragraph
shading
Select new
text color
Select text
color
Action(s) or Selections(s) Required
Select text that you want to color
Choose Format Character
Select font name in Font box
/
Select point size in Point Size box
Select color in Color box
Place cursor in paragraph
Choose Format Borders
Select shading percentage
Ctrl F8
Press
Select Print Color
Select a color
Press
F7
Type text you want in color.
Move cursor right before text to color
Press
Ctrl F8
Select Print Color
Select a color
Press
F7
To end color text, move cursor just
after color text
Press
Ctrl F8
Select Print Color
Select a color
Press
F7
(5)
(5)
(5)
3-30
Printing with Windows
Page 70

Quick co/or selection locator for DOS (continued)
Sofhvare
Name
otus@ l-2-3@
L
R
‘el. 2.3
F
reelonce
i
I
(
sraphics
r
tel. 4.0
iarvard
Graphics 3.0
Action
Desired
Add color to
text
Add color to
graph
Add color to
objects
Add color to Choose Chart
charts
Add color to Select Edit Chart
text on
spreadsheets
Add color to
objects
Action(s) or Selections(s) Required
: >
Press Shift
Select Format
Select Color
Select Text
Select color
Highlight range to color
Press Enter
Press Shift
Select Graph
Select Edit
Select cell in graph
Press Enter
Select object to color
Select color
Select Inside, Lines, Text, or Background
Select color from palette
Select quit
Choose Edit
Choose Color
Choose Edge or
Choose color
Choose Edit-data for Style menu
Choose chart component to color
Press space bar
Choose color
Press
Press
Select Text Attributes or other option
Select color from color column
Select
Select color
Select
Select Edit Chart
Press
Select object
Select color icon
Select fill, line/text, or shadow color
Select color
Select
for
: >
for
FlO to draw chart
F8
F3
F2
F4
F4
WYSIWYG
WYSIWYG
Inside
menu
menu
Printing
with
Windows
3-31
Page 71

Remember that printing in color takes longer than printing in
monochrome.
The EPSON Spool Manager
When you print your document, the driver uses a print spool
manager to send the data to your hard disk and then to the
printer. Then it uses a
The EPSON Spool Manager icon appears when you send data
to the printer. If you double-click the spool manager icon, a
window appears that includes:
0
A queue menu that allows you to place queues (lists of
print jobs) on hold, release them to be printed, and identify
if a queue is local or remote (network printing).
Q
A document menu that allows you to hold files from
printing,
re-order
the queue, or save them for reprinting.
0
A view menu that allows you to limit the amount of
information that the spool manager displays and keep the
despooler
from appearing.
despooler
to print the data.
them for later printing, delete them from
0
An options menu that allows you to send files to a default
directory, adjust timers, and adjust the default font for the
spool manager window.
To view the EPSON Spool Manager Window:
1.
Select Print from the File menu of your application software
and choose to print a document.
2.
Once the EPSON Spool Manager icon appears on your
screen, double-click it. The EPSON Spool Manager Window
appears.
3-32
Printing
with
Windows
Page 72

3.
The spool manager window shows you the list of printers
supported by the EPSON Stylus series printing system and
a list of files currently printing or waiting to print. If you
wish to make changes affecting print timing or location (if
you are sending a file over a network for remote printing),
choose the Help menu in the EPSON Spool Manager
window to learn about using the spool manager.
Note:
0
Files are called journals or journal files throughout Help.
QIf you print a large complex color document file, the spool
manager may break it down into smaller files to save hard disk
space. This will
not affect printing.
The EPSON Despooler
After you send a file to the printer, a status box for the EPSON
Despooler appears on the screen. The
file in sections thereby producing documents more quickly.
Once a section is finished, the
message and begins processing another section.
despooler
despooler
updates the status
processes your
The status box includes the following information:
0
The time it takes the document to be sent and printed.
0
A series of bands representing the number of units into
which the document is divided.
0
A message telling you which page is printing.
0
A message telling you which copy out of a total number of
copies is printing.
0
An About button that gives general information about the
EPSON
Despooler.
Printing with Windows
3-33
Page 73

Q
A Help button to help you understand the EPSON Spool
Manager.
0
Three icons: Cancel - to cancel print, Pause - to pause print,
and Restart - to restart from the current page, reprint the
whole document, or delay printing.
If you want to keep the EPSON Despooler status box from
appearing, use the View menu of the EPSON Spool Manager
window.
3-34
Printing with Windows
Page 74

Chapter 4
The Control Panel
Using the Control Panel . . . . . . . . . . . . . . . . . . . . . . 4-2
Lights . . . . . . . . . . . . . . . . . . . . . . . . . . . . . . . 4-2
Buttons . . . . . . . . . . . . . . . . . . . . . . . . . . . . . . 4-4
Using Special Power-On Functions . . . . . . . . . . . . . . . . 4-6
Selecting Fonts . . . . . . . . . . . . . . . . . . . . . . . . . . . . 4-7
Scalable fonts . . . . . . . . . . . . . . . . . . . . . . . . . . . 4-8
Selecting Condensed Printing . . . . . . . . . . . . . . . . . . . 4-9
Using the Default-Setting Mode . . . . . . . . . . . . . . . . . . 4-10
About the default settings . . . . . . . . . . . . . . . . . . . 4-11
Changing the default settings . . . . . . . . . . . . . . . . . 4-13
The Control Panel
4
4-1
Page 75

Using the Control Panel
The lights and buttons on the control panel give you easy
control over most common printer operations.
Note:
Software usually overrides control panel selections. Use your software
to select print functions whenever possible.
Lights
Operate
On when the printer is on. Flashes when the printer is turned
on or off.
Data
Flashes when data is being received by the printer. On when
data remains in the printer’s memory.
4-2
The Control Panel
Page 76

Paper Out
On when the printer runs out of paper. Rapid flashing
indicates a paper jam.
No Ink Cartridge
On when either ink cartridge is not installed. The printer will
not work unless both cartridges are installed.
Font
Indicates the current font setting. For instructions on selecting
fonts, see page 4-7.
Economy
On when the economy printing mode is selected. In economy
mode the printer uses less ink by printing fewer dots per
character. Use this mode for rough drafts of text only.
Condensed
On when the condensed-printing mode is selected. In this
mode, the printer prints selected fonts so that more characters
fit on a page. See page 4-9 for more information.
Pause
On when printing is paused. This light flashes when you clean
the print heads or replace ink cartridges.
Note:
Data
The
and
Pause
lights flash when an error occurs.
The Control Panel
4-3
Page 77

Buttons
Operate
Turns the printer on and off.
Caution:
c
Font
Press this button to cycle through the font choices on the
control panel font menu. The Font lights indicate the current
selection.
Load/Eject
Press this button to load or eject a sheet of paper.
Pause
Press this button to stop printing temporarily. Press it again to
Always turn off the printer by pressing the
Then be sure to wait until the
before unplugging the printer.
Operate
light stops flashing
Operate
button.
resume printing.
Economy/Condensed
Press this button to select economy or condensed mode. The
indicator light goes on or off next to the mode you select.
Alt
Hold down this button about five seconds to move the carriage
to the ink cartridge replace position when the Pause light is on.
See “Replacing an Ink Cartridge” on page 5-2 for details.
4-4
The Control Panel
Page 78

The Alt button alters the functions of the other buttons. Hold
down the Alt button and press another button to change the
functions as follows:
Reset (Alt + Pause)
Clears the printer’s buffer and initializes the printer settings to
their factory settings. See “Initialization” in Appendix A.
Black print head cleaning (Alt + Load/Eject)
Starts the black print head cleaning cycle. See “Cleaning the
Print Heads” on page 5-6 for details.
Color print head cleaning (Alt + Economy/Condensed)
Starts the color print head cleaning cycle. See “Cleaning the
Print Heads” on page 5-6 for details.
Note:
❑
Cleaning the print head uses ink. Don’t do it unless print quality
declines.
❑
When you clean a print head, the printer ejects the page you are
currently printing.
Paper-thickness adjust (Alt + Font)
For special papers, such as envelopes and transparencies, you
should change the paper-thickness setting using this function.
See “Loading Envelopes” on page 2-6 for details.
The Control Panel
4-5
Page 79

Using Special Power-On Functions
These functions are available when you hold down the
following buttons when turning on the printer:
Self test (Operate + Load/Eject)
Checks the paper length and performs self-test printing. See
Chapter 1, “Testing the Printer.”
Hex dump (Operate + Font + Load/Eject)
Prints the print data in hexadecimal code. See page 6-5.
Demonstration ( Operate + Alt)
Prints a demonstration page.
Default setting (Operate + Economy/Condensed)
Enters the default-setting mode. See “Using the Default-Setting
Mode” on page 4-10 for details.
Note:
To exit the hex dump, demonstration, or default-setting modes, press
Pause
the
printer.
button and then the
Operate
button to turn off the
4-6
The Control Panel
Page 80

Selecting Fonts
Your printer has seven built-in character fonts including two
new EPSON fonts: EPSON Roman T and EPSON Sans Serif H.
(Roman T is similar to the Times
to Helvetica
Note:
Font selections you make with your software override your printer’s
control panel selections. For best results, use your software to select
fonts.
Press the Font button to select from the seven fonts listed on
the control panel. The indicator light comes on to indicate the
active font.
.)
font; Sans Serif H is similar
The table below shows the available fonts.
Fonts Sample
EPSON Courier
EPSON Roman T
EPSON Sans Serif H
EPSON Roman
EPSON Sans Serif
EPSON Prestige
EPSON Script
The Control Panel
4-7
Page 81

Note:
❑
Roman T and Sans Serif H fonts are available in proportional
spacing only.
❑
Some of the character tables might not be able to print with
EPSON Roman T and EPSON Sans Serif H fonts. In these cases,
selected character tables are printed with EPSON Roman.
Scalable fonts
The size of the Roman, Sans Serif, Roman T, and Sans Serif H
fonts can be selected from 8 to 32 points in 2-point increments
through your software or by sending an ESC/P 2
See the documentation that came with your software for
information on selecting the size of scalable fonts.
command.
EPSON
Roman
EPSON
Roman T
EPSON
Sans Serif
EPSON
Sans Serif H
scalable sample
4-8
The Control Panel
Page 82

Selecting Condensed Printing
Condensed printing reduces the size of characters to
approximately 60 percent of their normal width, allowing more
characters to fit on a line. This is useful for spreadsheets and
other applications where you need to print the maximum
amount of information on a page.
You can condense the current font by pressing the
Economy/Condensed button. (EPSON Roman T and EPSON
Sans Serif H cannot be condensed.) You can condense printing
that is 10 characters per inch (cpi), 12 cpi, and proportionally
spaced. You cannot condense 15-cpi printing.
Note:
If your software controls fonts and can select the condensed mode,
you should select fonts and condensed mode through the software
rather than with the control panel. Program or command settings
override control panel settings.
The Control Panel
4-9
Page 83

Using the Default-Setting Mode
You can change several printer settings that control a variety of
functions such as print direction and loading position. Because
these settings take effect each time you turn on the printer, they
are called default settings.
The factory default settings are designed to meet the needs of
most users, so you may not need to change them. The table
below lists the features you can select in the default-setting
mode.
Setting Options
Print direction Auto*, Bi-D, Uni-D
Network interface mode On, Off*
Auto line feed On, Off*
Loading position 3 mm, 8.5 mm*
Interface mode Auto I/F mode*, Parallel I/F, Serial I/F,
Option I/F
Auto interface wait mode 10 seconds*, 30 seconds
Character table Italic U.S.A.*, Italic France, Italic Germany,
Italic U.K., Italic Denmark, Italic Sweden,
Italic Italy, Italic Spain I, PC437, PC850,
PC860, PC863, PC865, PC861, BRASCII, or
Abicomp
* Default setting
For details, see “About the default settings” below. To change a
setting, see “Changing the default settings” on page 4-13.
Note:
Most software controls the character table and auto line feed. If your
software controls these features, you may never need to set them with
the control panel.
4-10
The Control Panel
Page 84

About the default settings
Print direction
Your printer has three direction settings: Uni-d, Bi-d, and Auto.
Note:
Most software controls this setting. If your software does, you may
never need to set it with the control panel.
Uni-d causes the print head to print in one direction only. This
provides maximum alignment for both graphics and character
printing.
Bi-d causes the print head to print in both directions. This
provides the fastest printing. If vertical lines are not aligned,
calibrate your printer as shown in Chapter 1.
When Auto is selected, the printer switches automatically
between bidirectional (for text data) and unidirectional (for
graphics data).
Network interface mode
If your printer is connected to a single computer, leave this
feature off. If you want to use the printer in a network and
share it among multiple computers, set this feature to on.
When this feature is set to on, data may be present in the
printer’s buffer even though the printer is not printing. Always
make sure the Data light is off before turning off the printer.
Auto line feed
When the auto line feed feature is on, each carriage return (CR)
code is accompanied by a line feed (LF) code. If your printed
text is unexpectedly double-spaced, set this feature to off. If
text lines print on top of each other, set it to on.
The Control Panel
4-11
Page 85

Loading position
When you want to print more lines on a page, set this feature to
3 mm. If you set the top margin with your software, that setting
is added to the default-setting value.
Interface mode
The interface mode specifies which interface port can receive
print data.
The EPSON Stylus COLOR has a parallel interface port and
an RS-422 serial port. You can also install an optional interface
card, including an RS-232C serial interface card or an
additional parallel interface. See Chapter 7 for more
information about optional interface cards.
Note:
The RS-422 serial port is standard for the Apple Macintosh but is not
often used for PCs.
By default, interface mode is selected for automatic selection so
the printer can automatically select the interface that is
receiving data. This allows you to connect the printer to more
than one computer without having to specify the interface port.
If you wish, you can set the interface mode for a specific
interface. However, the printer will not detect print data that is
received over a different interface.
Auto interface wait mode
When you select Auto I/F mode in the Interface mode option,
you can set the interface timeout to 10 seconds or 30 seconds.
The printer does not accept data from another interface unless
it receives no data from the current interface for the period set
in I/F timeout.
4-12
The Control Panel
Page 86

Character table
Character tables contain the characters and symbols used by
different languages. The printer prints text based on the
selected character table. For the available character tables, see
Appendix B. To change the character table, see the next section,
“Changing the default settings.”
Changing the default settings
To change the printer’s default settings, you use the control
panel buttons; the control panel lights show your selections.
1. Make sure the printer is turned off and paper is loaded in
the sheet feeder.
2. Hold down the Economy/Condensed button and turn on
the printer to enter the default-setting mode.
The printer loads a sheet of paper and prints a brief
summary and instructions. It instructs you to select the
language that you want messages printed in (English,
French, German, Italian, or Spanish).
3. Press the Font button until the Font lights indicate the
language of your choice; then press the Alt button to make
your selection.
Language Font
English Courier
French Roman T (PS)
German Sans Serif H (PS)
Italian Roman
Spanish Sans Serif
The Control Panel
4-13
Page 87

After you press the Alt button, the printer prints the current
default settings and the next instruction in the language
you selected.
4. To move to the feature you want to change, press the Font
button until the Courier, Roman T (PS), and Sans Serif H
(PS) lights indicate the appropriate selection.
Default-setting menu
Print direction NO O
Network interface mode ON O
Auto line feed NN O
Loading position OO N
Interface mode O ON
Auto interface ON N
Character table N OO
On N Off O
Courier
light
Roman T
(PS) light
For example, if you want to change the loading position
setting, press the Font button until the Courier and
Sans Serif H
(PS) light
4-14
Roman T (PS) lights are off and the Sans Serif H (PS) light
is on.
The Control Panel
Page 88

5. Then after the font lights indicate your selection, press the
Alt button until the Operate, Data, and Paper Out lights
match your desired setting as shown in the tables below
and on the next page.
Default-setting
menu Settings
Print direction Auto NO O
Bi-d ON O
Uni-d NN O
Network
interface mode
Auto line feed Off OO O
Loading position 3 mm OO O
Interface mode Auto
Off OO O
On NO O
On NO O
8.5 mm NO O
interface
mode
Operate
light
NO O
Data
light
Paper out
light
Auto interface
wait mode
On N Off O
Parallel
interface
Serial
interface
Option
interface
10 seconds OO O
30 seconds NO O
ON O
NN O
OO N
The Control Panel
4-15
Page 89

Character table setting table
Operate
Character table
Italic U.S.A OOO
Italic France NOO
Italic Germany FOO
Italic U.K. ONO
Italic Denmark NNO
Italic Sweden FNO
Italic Italy OFO
Italic Spain 1 NFO
PC 437 FFO
PC 850 OON
light
Data
light
Paper out
light
PC 860 NON
PC 863 FON
PC 865 ONN
PC 861 NNN
BRASCII FNN
Abicomp OFN
On N Off O Flashing F
6. Repeat steps 4 and 5 to change as many default settings as
desired.
7. Exit the default-setting mode by turning off the printer.
Note:
You may exit the default-setting mode any time by turning off the
printer. Any changes you have made remain in effect until you
change them again.
4-16
The Control Panel
Page 90

Chapter 5
Maintenance
Replacing an Ink Cartridge . . . . . . . . . . . . . . . . . . . . 5-2
Cleaning the Print Heads . . . . . . . . . . . . . . . . . . . . . . 5-6
Cleaning the Printer . . . . . . . . . . . . . . . . . . . . . . . . . 5-7
Transporting the Printer . . . . . . . . . . . . . . . . . . . . . . 5-8
5
Maintenance
5-1
Page 91

Replacing an Ink Cartridge
When the printed image is faint, has many gaps, or nothing
prints, either wait until the document finishes printing or press
the Pause button and then the Load/Eject button to eject the
page. Then clean one or both of the print heads. If three
cleanings do not improve print quality, replace one or both ink
cartridges.
If the colors you print are very different from what you expect,
print a self test as described in Chapter 1. If one or more of the
colors do not appear in the self test, replace one or both ink
cartridges.
Use these EPSON ink cartridges or cartridges manufactured to
EPSON’s specifications only:
Black ink cartridge S020034
Color ink cartridge S020036
When you need new ink cartridges, contact your dealer or call
EPSON Accessories at (800) 873-7766.
1. Make sure the printer is on.
2. Open the printer cover.
3. Press the Pause button to turn the Pause light on.
4. Hold down the Alt button for about five seconds until the
print head moves slightly left to the ink cartridge install
position. The Pause light begins blinking.
5. Lift the cartridge lever up as far as it will go. The cartridge
rises partly out of the carriage.
5-2
Maintenance
Page 92

6. Lift the cartridge out of the printer and dispose of it properly.
Do not take the used cartridge apart or try to refill it.
Caution:
c
If ink gets on your hands, wash them thoroughly with
soap and water. If ink gets into your eyes, flush them
immediately with water.
Leave the old cartridge installed in the printer until you
are ready to replace it with a new one. Attempting to print
without a cartridge installed can damage the printer.
Never use a refilled or reassembled cartridge. If you use
substandard products with your EPSON printer, you will
damage the print heads and void your warranty.
Note:
When replacing the ink cartridge, make sure no paper is in
the paper path. Paper loaded in the printer is ejected
automatically when you replace the cartridge.
The carriage returns to the home position after 60 seconds
if the ink cartridges are not removed.
Maintenance
5-3
Page 93

7. Open the package containing the ink cartridge and remove
the cartridges from their protective cardboard. Remove the
tape seal from the cartridge. (Your packaging may differ
slightly from that shown below.)
Caution:
c
8. Lower the ink cartridge into the cartridge holder with
the label on the cartridge face up and the arrow on the
cartridge pointing to the rear of the printer. The larger
(color) cartridge goes on the left, the black ink cartridge on
the right.
You must remove the tape seal from the cartridge. Leaving
the tape on when you install the cartridge will
permanently damage it.
5-4
Maintenance
Page 94

9. Push the ink cartridge clamp toward the back of the printer
until it locks in place. The Pause light begins flashing.
10. Press the Alt button again. The printer mechanism moves
while the Pause light continues to flash.
Caution:
c
11. When the Pause light quits flashing and stays on, press the
Pause button and close the printer cover.
Note:
If you have print quality problems after you replace the cartridge, try
cleaning the print heads as described in Chapter 5.
Never turn off the printer while the
flashing.
Pause
light is
Maintenance
5-5
Page 95

Cleaning the Print Heads
If print quality diminishes, use the printer’s built-in print head
cleaning cycle to enable the nozzles to deliver ink properly.
You can clean the color and black print heads separately.
To avoid wasting ink, clean the print head only if print quality
declines.
1. Make sure the printer is turned on and press the Pause
button.
Note:
When cleaning a print head, make sure no paper is in the paper
path. Paper loaded in the printer is ejected automatically when
you clean a print head.
2. Hold down the Alt button and press Economy/Condensed
to clean the color print head.
Hold down the Alt button and press Load/Eject to clean the
black print head.
Note:
The cleaning cycle takes about one minute. The
light flashes throughout the cycle and then stays on when
the cleaning cycle is finished.
You cannot perform both color and black print head
cleaning operations at the same time.
3. Press the Pause button to resume printing.
Note:
If the print quality does not improve after you perform cleaning
Pause
5-6
three times, replace the ink cartridge following the steps shown
earlier in this chapter.
Maintenance
Page 96

Cleaning the Printer
To keep your printer operating at its best, you should clean it
thoroughly several times a year.
1. Make sure the printer is turned off. Then unplug the power
cord.
2. Remove any paper from the sheet feeder.
3. Use a soft brush to carefully brush away all dust and dirt.
4. If the outer case or the inside of the sheet feeder is dirty,
clean it with a soft, clean cloth dampened with mild
detergent. Keep the printer cover closed to prevent water
from getting inside.
5. If the inside of the printer accidentally gets soiled with ink,
wipe it off with a damp cloth.
Caution:
c
Never use alcohols or thinners to clean the printer; these
chemicals can damage the components as well as the case.
Be careful not to get water on the printer mechanism or
electronic components.
Do not use a hard or abrasive brush.
Do not spray the inside of the printer with lubricants;
unsuitable oils can damage the mechanism. Contact your
dealer or a qualified service person if lubrication is needed.
Maintenance
5-7
Page 97

Transporting the Printer
If you need to transport your printer some distance, carefully
repack it using the original box and packing materials as
follows:
1. Open the printer cover and make sure that the print head is
capped in the far right position. If the print head is not
capped, turn on the printer to cap it. Then turn off the
printer.
Caution:
c
2. Unplug the power cord from the electrical outlet; then
disconnect the interface cable from the printer.
3. Remove the paper from the sheet feeder.
4. Attach the protective material to the printer. See the Notice
Sheet that came in the box.
5. Repack the printer in the original box.
6. Keep the printer flat in the box during transport.
If the printed image is faint, has gaps, or nothing prints when
you first use the printer after transport, clean the print heads.
Transporting the printer without the cartridges installed
can damage the printer.
See “Cleaning the Print Heads” earlier in this chapter. If the
printed image is misaligned, calibrate the printer as described
in Chapter 1, “Setting Up.”
5-8
Maintenance
Page 98

Chapter 6
Troubleshooting
Problems With Printing . . . . . . . . . . . . . . . . . . . . . . 6-2
Print Quality Problems . . . . . . . . . . . . . . . . . . . . . . . 6-2
Problems with Printing . . . . . . . . . . . . . . . . . . . . . . . 6-5
Paper Handling Problems . . . . . . . . . . . . . . . . . . . . . 6-8
Clearing and preventing paper jams . . . . . . . . . . . . . 6-8
Paper feeding problems . . . . . . . . . . . . . . . . . . . . 6-9
6
Troubleshooting
6-1
Page 99

Problems With Printing
This chapter describes what you can do if you are having
problems printing. It is divided into the following sections:
❑ Print quality problems. See this section if the print quality
is not good or not what you expect.
❑ Problems with printing. See this section if your printer is
not printing.
❑ Paper handling problems. See this section if you have
paper jams or other problems with paper feeding
incorrectly.
If you have a printing problem, check the appropriate section
and follow all suggestions that apply to your problem. If
none of the suggested solutions solve your problem, call the
EPSON Connection at (800) 922-8911. (Canadian users can call
(800) GO-EPSON.)
Print Quality Problems
Print quality problems can often be solved by cleaning the print
heads as described in Chapter 5. Note that it may take as many
as three cleaning cycles to solve a print quality problem. If
cleaning the print heads does not improve the print quality, try
the following:
❑ Check whether the ink cartridges are empty. Print a self test
as described in Chapter 1. After the first page prints, the
printer prints an entire page of text lines in various colors,
including black, magenta, cyan, and yellow. If the black
lines don’t print, replace the black ink cartridge; if the
6-2
magenta, cyan, or yellow lines don’t print, change the color
ink cartridge.
Troubleshooting
Page 100

❑ For color or complex grayscale images, turn on
MicroWeave and turn off High Speed.
❑ Use a higher-quality paper.
❑ For monochrome printing, check that Monochrome is
selected.
❑ Make sure the Media Type setting matches the type of
paper loaded in the printer.
Other problems may be caused by an incorrect driver setting. If
you’re printing a scanned image, check the scanner software
settings.
If print quality does not improve, see the following specific
items.
Printed output is not what you expect or is faint or blurred.
Clean one or both print heads as described in Chapter 5.
Replace one or both ink cartridges.
Make sure MicroWeave is on and High Speed is off.
Use a higher quality paper. Also, check that the Media Type
setting in the driver is selected for the type of paper loaded. If
you are using 720-dpi resolution, be sure to load special coated
720-dpi paper or High Quality Glossy paper. Always use this
special paper when printing at 720 dpi.
Check that the paper thickness lever is set correctly for the type
of paper. (See “Loading envelopes” in Chapter 2 for more
information.) Faint printouts can result if you print on plain
paper when the paper thickness lever is set for thick paper.
Check whether your paper is moist or damp. Ink jet printers
are sensitive to moisture absorbed by paper. Do not store paper
in damp or humid places.
Troubleshooting
6-3
 Loading...