

Page 1
User’s Guide
=--TM
z=::=
= ---A
Esr
==
EPSON=-
Stylus
™
1000
®
EPSON
Page 2
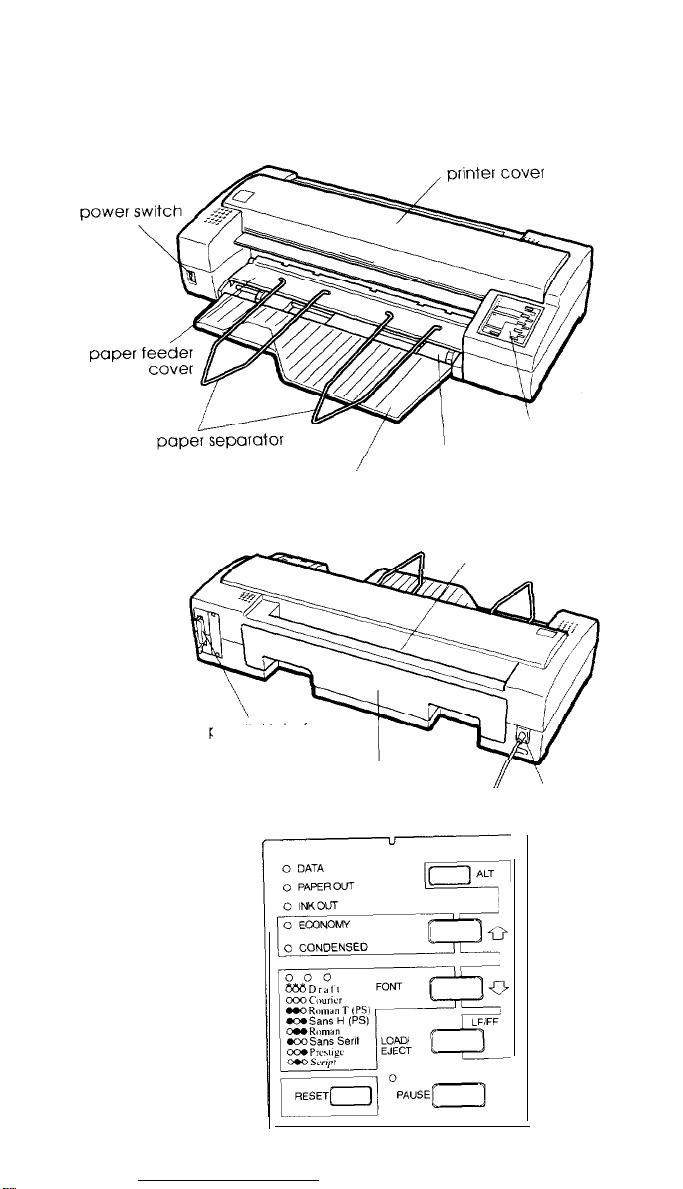
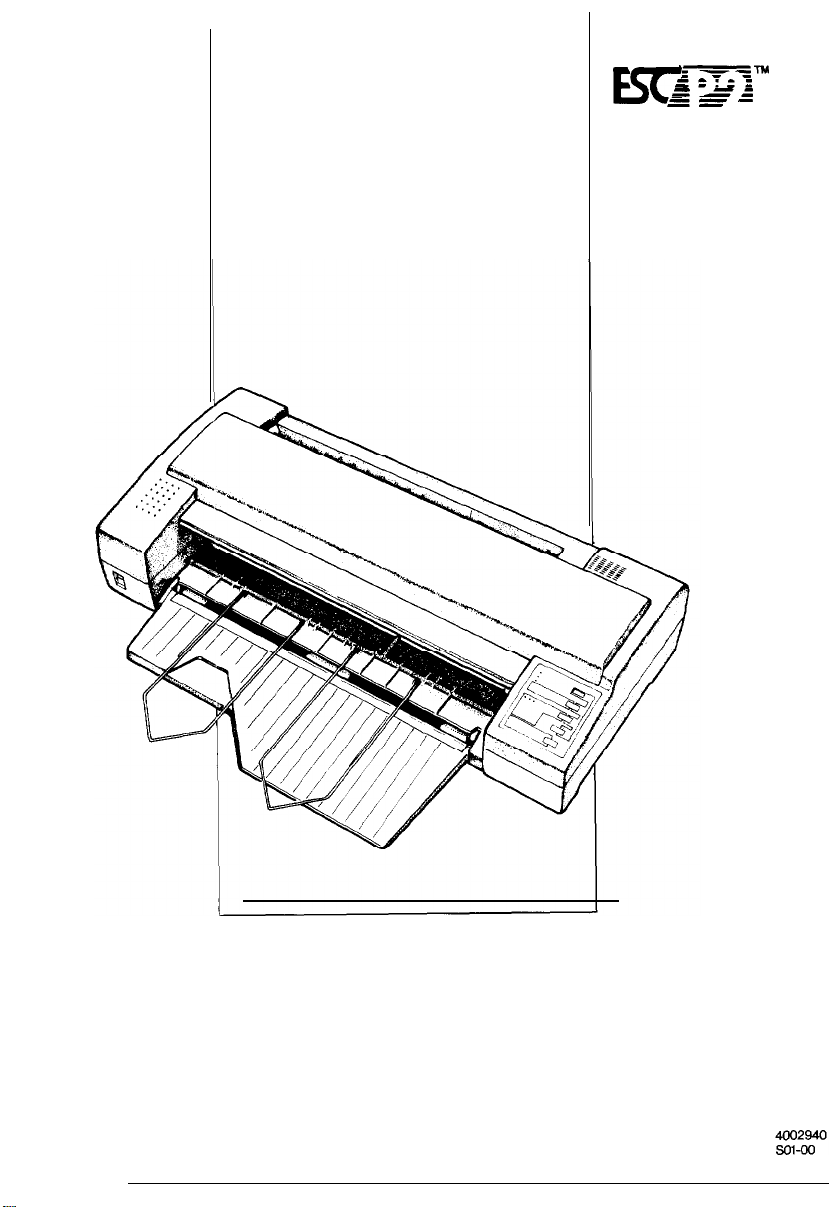
Printer
Parts
control panel
paper feeder
paper support
manual feed slot
parallel interface
access panel
-J.L
AC inlet
Page 3

EPSON
48-NOZZLE
INK JET PRINTER
Stylus 1000
All rights reserved, No part of this publication may be reproduced, stored in a retrieval
system, or transmitted in any form or by any means, mechanical, photocopying,
recording, or otherwise, without the prior written permission of Seiko Epson Corporation.
No patent liability is assumed with respect to the use of the information contained herein.
Neither is any liability assumed for damages resulting from the use of the information
contained herein.
Neither Seiko Epson Corporation nor its affiliates shall be liable to the purchaser of this
product or third parties for damages, losses, costs, or expenses incurred by purchaser or
third parties as a result of: accident, misuse, or abuse of this product or unauthorized
modifications, repairs, or alterations to this product, or (excluding the US) failure to
strictly comply with Seiko Epson Corporation’s operating and maintenance instructions.
Seiko Epson Corporation shall not be liable against any damages or problems arising from
the use of any options or any consumable products other than those designated as
Original Epson Products or Epson Approved Products by Seiko Epson Corporation.
Epson and Epson
Seiko Epson Corporation.
Helvetica and Times are trademarks of Linotype
LocalTalk is a trademark of Apple Computer, Inc.
Copyright 0
Nagano,
Japan
ESC/P
are registered trademarks and Epson
1993
by Seiko Epson Corporation
ESC/P
2 is a trademark of
AG and/or its subsidiaries.
User’s Guide
Page 4

Important Safety Instructions
1.
Read all of these instructions before you set up your printer.
Follow all warnings and instructions marked on the printer.
2.
Unplug the printer from the wall outlet before you clean it,
3.
and use a damp cloth for cleaning, not liquid or aerosol
cleaners.
4.
Do not use your printer near water or spill any liquid on it.
5.
Do not place the printer on an unstable cart, stand, table, or
other surface that may allow the printer to fall.
Do not block any slots or openings in the cabinet. These are
6.
provided for the ventilation necessary to ensure reliable
operation and protection from overheating. Placing the
printer on a bed, sofa, rug, or other similar surface may
block the openings. Also, do not place the printer in a
built-in installation unless proper ventilation is provided.
7.
Never place the printer near or over a radiator or heat
register.
8.
Use the type of power source indicated on the label. If you
are not sure of the type of power available, consult your
dealer or local power company.
9.
This printer may be equipped with a plug having a third
(grounding) pin, which fits only into a grounding-type
outlet. This is a safety feature. If you are unable to insert
the plug into the outlet, have an electrician replace your
obsolete outlet. Do not defeat the purpose of the
grounding-type plug.
10.
Do not put your printer where the cord will be walked on.
. . .
iii
Page 5

11.
If you use an extension cord, make sure that the total of the
ampere ratings on the products plugged into the extension
cord does not exceed the extension cord’s ampere rating.
Also, make sure that the total of all products plugged into
the wall outlet does not exceed
12.
Never push objects of any kind into your printer because
they may touch dangerous voltage points or short out parts
that could result in a risk of fire or electric shock.
13.
Except as specifically explained in the user’s manual, do not
attempt to repair the printer yourself. This could expose
you to dangerous voltage points or other risks. Refer all
servicing in those compartments to service personnel.
14.
Unplug the printer from the wall outlet and have it repaired
by a qualified service person under the following
conditions:
A.
When the power cord or plug is damaged or frayed
B.
If liquid has been spilled into it
C.
If it has been exposed to rain or water
15
amperes.
iv
D.
If it does not operate normally when the operating
instructions are followed. Adjust only those controls
that are covered by the operating instructions since
improper adjustment of other controls may result in
damage and will often require extensive work by a
qualified technician to restore the printer to normal
operation.
E.
If it has been dropped or the cabinet has been damaged
F.
If it exhibits a distinct change in performance, indicating
a need for service.
Page 6

FCC Compliance Statement
For United States Users
This equipment has been tested and found to comply with the limits for a Class B digital
device, pursuant to Part
reasonable protection against harmful interference in a residential installation. This
equipment generates, uses, and can radiate radio frequency energy and, if not installed
and used in accordance with the instructions, may cause harmful interference to radio or
television reception. However, there is no guarantee that interference will not occur in a
particular installation. If this equipment does cause interference to radio and television
reception, which can be determined by turning the equipment off and on, the user is
encouraged to try to correct the interference by one or more of the following measures.
P
Reorient or relocate the receiving antenna.
0
Increase the separation between the equipment and receiver.
Cl
Connect the equipment into an outlet on a circuit different from that to which the
receiver is connected.
QConsult the dealer or an experienced radio/TV technician for help.
The connection of a non-shielded equipment interface cable to this equipment will
invalidate the FCC Certification of this device and may cause interference levels which
exceed the limits established by the FCC for this equipment. It is the responsibility of the
user to obtain and use a shielded equipment interface cable with this device. If this
equipment has more than one interface connector, do not leave cables connected to
unused interfaces. Changes or modifications not expressly approved by the manufacturer
could void the user’s authority to operate the equipment.
15
of the FCC Rules. These limits are designed to provide
WARNING
For Canadian Users
This digital apparatus does not exceed the Class B limits for radio noise emissions from
digital apparatus as set out in the radio interference regulations of the Canadian
Department of Communications.
Le
present
applicables aux appareils numeriques
brouillage radioelectrique
appareil numerique n’emet
edict6 par le
pas de bruits
de
Classe
B
Ministere des
radioelectriques depassant les limites
prescrites dans le reglement sur le
Communications du Canada.
Page 7
Tips for Printing on Single Sheets
When you print on single sheets, you may notice that your
printer prints the first page of your file correctly but then
prints too low on the next page, or that it prints the last few
lines from one page onto the next.
These differences in print position are easy to adjust; you can
simply change some of the settings in your application
program as described below to get the right results.
1.
When you install an application program, it normally asks
you what printer you are using. Make sure you choose the
correct printer. See Chapter 1 for, the right printer to
choose.
2.
Many programs include an option to set the maximum lines
per page. If your program has a lines-per-page setting and
8.5
x
you are using
61;
for
A4,
try
Note:
Tofind the right lines-per-page settingfor paper that is not
create
a test document using your application
and bottom margins to 0 and then create a file
1 to
66.
When you print yourfile, notice the last number printed on
the first page. This is your maximum lines-per-page setting.
ll-inch
65.
paper, set the lines per page to
8.5
x
12,
program. Set
of
numbered lines from
your top
3.
If your program doesn’t have a lines-per-page setting, try
decreasing the top margin or increasing the bottom
margin, or both, until you get the results you want.
4.
You can also try adjusting the form length setting. For a
standard
10
inches
5.
Some programs also let you indicate whether you are using
single sheets or continuous paper. Make sure you choose
single sheets.
8.5
x
ll-inch
(10.5
inches for
page, try setting the form length at
A4).
-
V
Page 8

Contents
Introduction
Features
Options
HowtoUseThisManual
Warnings, Cautions, and Notes
Chapter 1 Setting Up the Printer
About Your Ink Jet Printer
A few precautions
Choosing the right paper
Unpacking the Printer
Attaching the paper support and the paper separators
Choosing a Place for the Printer
Plugging in the Printer
Installing the Ink Cartridge
Loading Paper in the Paper Feeder
Testing the Printer
Connecting the Printer to Your Computer
Setting Up Your Software Programs
Chapter 2 Paper Handling
.............................
.............................
..................
...............
......................
.......................
..................
........................
..................
........................
.....................
.................
..........................
.............
................
.
.2
.2
.3
l-2
l-2
.1-4
1-5
. . l-6
l-7
l-8
l-9
l-13
l-15
l-17
l-18
Printing on Single Sheets . . . . . . . . . . . . . . . . . . . . . . ,
Tips on using the paper feeder . . . . . . . . . . . . . . .
Adjusting the loading position-Adjusting the
print position
Loading paper manually . . . . . . . . . . . . . . . . . . .
vi
2-2
.2-2
.2-5
Page 9

Using Continuous Paper with Optional Push Tractor
Installing the push tractor
Loading continuous paper
Tips on using continuous paper
Using the tear-off feature
Removing the push tractor
Switching Between Continuous Paper and Single Sheets
Switching to single sheets
Switching to continuous paper
Printing on Special Paper
Envelopes
Labels
...........................
Printing on envelopes
..............................
..................
..................
...............
...................
..................
..................
...............
.....................
.....
...
2-7
2-7
2-8
2-11
2-12
2-13
2-14
2-14
2-15
2-16
2-16
2-18
Chapter 3
Operating the Control Panel
Indicator lights
Buttons
Selecting Character Fonts
Scalable fonts
Condensed printing
Using the Default-Settings Mode
Default settings descriptions
Changing the default settings
Optional Interface Cards
Installing an interface card
The
Using the Printer
....................
.........................
.............................
.....................
.........................
......................
Character table -Auto print direction Continuous-paper page length Skip-over-perforation -Network interface mode
-Mixed text/graphics mode -Auto line feed Auto interface selection - Auto interface wait
time -Tear off
......................
C82305*/C82306*
Selecting a baud rate -Handshake timing Error handling
serialinterface card
.................
................
................
..................
........
3-2
3-2
3-3
3-5
3-6
3-7
3-7
3-9
3-11
3-15
3-16
3-17
vii
Page 10

Maintenance and Transportation
Replacing the ink cartridge
Cleaning the print head
Cleaning the printer
Transporting the printer
Troubleshooting
...........................
Error indicators
Power supply
Printing
.............................
Paper handling
........................
.........................
.........................
...................
......................3-20
....................3-21
.................
.................
.3-18
.3-18
.3-20
.3-22
.3-22
.3-24
.3-25
3-29
Clearing a paper jam-Preventing paper feeding
and paper jam problems
Appendix
Technical Specifications . . , . . . . . . . . . . . . . . . . . . . . A-2
Printer specifications . . . . . . . . . . . . . . . . . . . . . . A-2
Printing-Paper-Mechanical-ElectricalEnvironmental-Safety approvals
Interface specifications . . . . . . . . . . . . . . . . . . . . . A-7
Specifications and pin assignments-Interface
timing
Initialization . . . . . . . . . . . . . . . . . . . . . . . . . . . A-10
Default settings
Command Summary . . . . . . . . . . . . . . . . . . . . . . . . . A-11
Sending printer commands . . . . . . . . . . . . . . . . . . A-11
Using the command summary. . . . . . . . . . . . . . . . A-12
General operation-Paper feeding--Page
format-Print position motion-Font
selection-
Font enhancement-Spacing-Character
handling-Graphics-Bit image
Character Tables . . . . . . . . . . . . . . . . . . . . . . . . . . . A-20
Glossary
Index
. . .
V111
Page 11
Your new Epson printer is a
quiet, high-speed printing.
48-nozzle
Features
Your printer offers the following features:
High print quality. Epson’s new ink jet technology delivers
*
crisp
360
x
360
dot-per-inch
Flexible paper handling. Use the built-in paper feeder to
*
100
load up to
envelopes or single pages manually without removing the
paper supply.
sheets automatically. You can also insert
(dpi)
ink jet printer, ideal for
text and graphics.
Wide range of paper size with
*
can print on paper up to A3 size:
inches x
manually insert paper up to
x
16.5
Quiet printing. Ink jet technology helps maintain a quiet
*
working environment.
Epson
*
adds scalable fonts and improved graphics capability.
Compatibility. Supports the Epson
*
widely used in software written for other Epson printers.
Convenience. Drop-in ink cartridge prints up to
*
(at
16.5
inches) using the paper feeder. You can
inches).
ESC /
P
2?’
This enhanced printer control language
1000
characters per page, using the Roman font)
136
printable columns. You
297
mm x
420
mm x
ESCI I@ commands
420
mm
420
mm
Introduction
(16.5
700
(11.7
inches
pages.
2
Page 12

Options
The following options enable you to make full use of your
printer.
0
Push-Tractor Unit
With this option you can print on continuous paper as well
as single sheets. See Chapter 2 for details.
0
Interface Cards
Optional interface cards, including one for
available to supplement the printer’s built-in parallel
interface. See Chapter 3 for details.
(C80029*)
LocalTall<:
How to Use This Manual
Here’s what you’ll find in this book:
Chapter 1 describes how to unpack and set up the printer.
a
It also describes printing a self test and configuring your
software for the printer. These instructions include basic
directions regarding the ink, paper, and placement of the
printer; be sure to read and follow these instructions
carefully.
are
Chapter 2 explains paper handling. It contains instructions
cl
on using the optional push tractor and printing on special
paper.
Chapter 3 covers operating the control panel, changing
a
printer settings, the use of options, and maintenance and
troubleshooting.
The Appendix includes printer specifications, commands,
a
and character tables.
A glossary of printer terms and an index are included at
a
the end.
2 Introduction
Page 13
Warnings, Cautions, and Notes
Warnings
Cautions
Notes
contain important information and
of your printer.
must be followed carefully to avoid bodily injury.
must be observed to avoid damage to your equipment.
usefu?
tips on the operation
Where to Get Help for United States Users
Epson America provides local customer support and service
through a nationwide network of authorized Epson dealers
and Service Centers.
Epson also provides the following support services through
the Epson
Assistance in locating your nearest Authorized Epson
a
Reseller or Service Center
Technical assistance with the installation, configuration,
a
and operation of Epson products
ConnectionSM
at
(800) 922-8911:
Information on
a
Sales of the
a
comprehensive information on
Epson technical information library fax service
a
Product literature with technical specifications on our
a
current and new products
Sales of ribbons, supplies, parts, documentation, and
a
accessories for your Epson product
Customer Relations
a
ESC/
P 2 drivers for your software
ESC
/ P reference manual, which contains
ESC
/ P 2
Introduction 3
Page 14

Chapter
1
Setting Up
About Your Ink Jet Printer
A few precautions
Choosing the right paper
Unpacking the Printer . . . . . . . . . . . . . . . . . . . . . . . l-5
Attaching the paper support and the paper separators . . .
Choosing a Place for the Printer . . . . . . . . . , . . . . . . . , l-7
Plugging in the Printer . . . . . . . . . . . . . . .
Installing the Ink Cartridge
Loading Paper in the Paper Feeder . . . . . . . _ . . . . . . . l-13
Testing the Printer . . . . . . . . . . . . . . . . . . . . . . . . . . l-15
Connecting the Printer to Your Computer . . . . . . . . . . . . l-17
the
Printer
.....................
........................
.................... l-4
. . . . . .. . l-8
. . . . . . . . . . . . . . . . . . . .
l-2
l-2
l-6
Setting Up Your Software Programs . . . . . . . . . . . . . . . l-18
Setting Up the Printer 1-1
Page 15

About Your Ink Jet Printer
If you’re new to ink jet printers, you may wonder how they
differ from dot matrix or laser printers. Two noticeable benefits
of this technology are high print quality and quiet printing.
An ink jet printer produces cost-effective, high-quality print
results. When you use the right paper, you get the crisp, sharp
printouts usually associated with laser printers. And the ink
cartridge inside your printer is easier to replace and more
affordable than the toner cartridges used by lasers.
Inside the ink jet print head, tiny spray units, or jets, draw ink
from the cartridge and then propel it onto the page in the form
of characters or graphics. Because the print head doesn’t strike
the page as it prints, an ink jet printer is much quieter than an
impact dot-matrix printer.
A few precautions
Even if you are familiar with other types of printers, be sure to
read through the following list of precautions to operate your
ink jet printer safely and efficiently.
0
Cl
LI
Cl
1-2
The ink cartridge contains ethyl alcohol. Under normal
circumstances, it will not come out of the cartridge. If
leakage occurs, however, make sure ink does not come in
contact with your skin or eyes. If it does get on your skin,
wash it off with soap and water. If it gets in your eyes,
flush them with plenty of water and contact a physician.
Keep ink cartridges out of the reach of children.
Do not dismantle the ink cartridges or try to refill them.
Once you install the ink cartridge, do not open the clamp
or remove the ink cartridge except to replace it with a new
one. The cartridge may become unusable otherwise.
_______-
Setting Up the Printer
Page 16
Ll
Install the ink cartridge immediately after you remove it
from its package. Leaving the cartridge unpacked for a
long time before use may result in poor print quality.
Do not use an ink cartridge beyond its rated life
expectancy. Ink cartridges are good up to the date printed
on the cartridge carton.
Do not shake an ink cartridge. Shaking or swinging an ink
cartridge may cause leakage of ink.
Ll
Do not put your hand inside the printer or touch the
cartridge during printing.
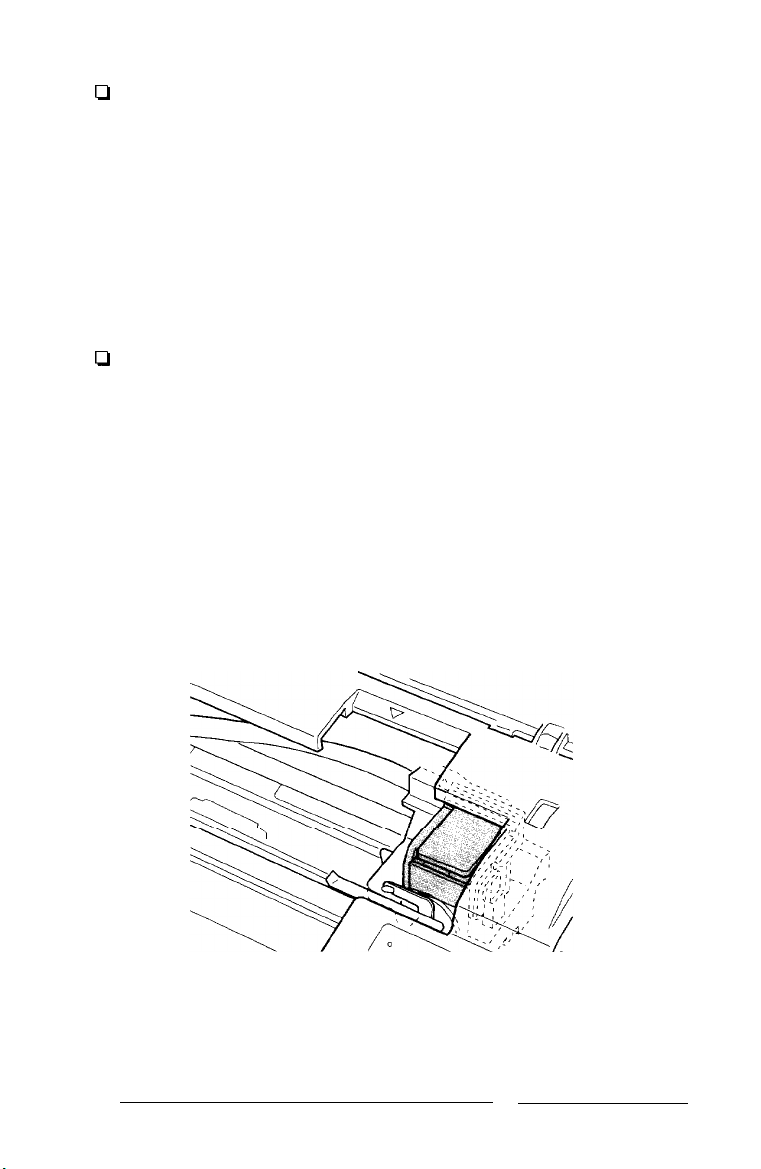
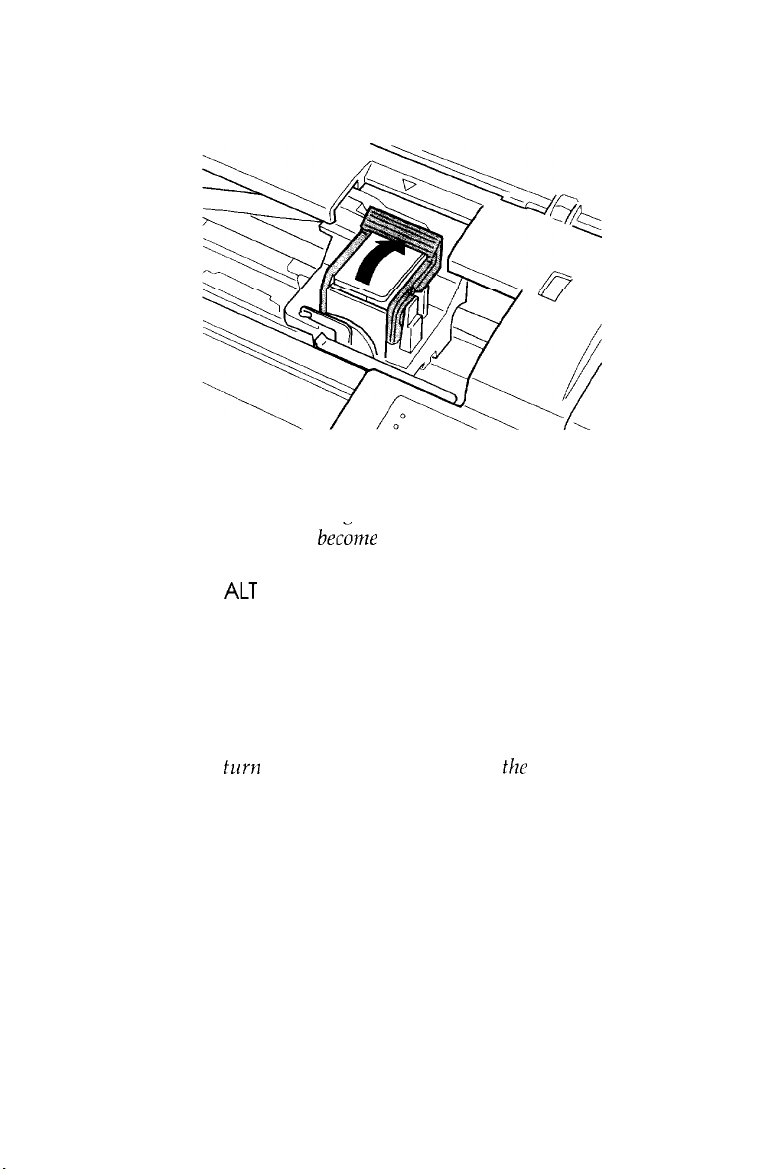
Before transporting the printer, make sure the print head is
capped, and do not remove the ink cartridge.
Before you turn off the printer, make sure that the print head is
capped. (It is capped when it is in the far right position as
shown below.) The printer caps the print head when no data is
received for several seconds; you can also cap the print head
by pressing the
PAUSE
button.
Setting Up the Printer
1-3
Page 17

Choosing the right paper
One of the keys to getting great results with your ink jet printer
is selecting the right paper. With paper that is too absorbent,
the ink can bleed slightly, causing characters to blur. With
paper that is
to dry and may smear easily.
The finish and thickness of the paper are also important. Avoid
paper that has a rough finish or a slick, coated finish. Also,
avoid paper that is too thick or too thin. See the paper
specifications in the Appendix for more information.
Most correspondence-quality paper works in your printer
without problems. However, it is a good practice to test any
paper or envelopes in your printer before buying large
quantities.
To test a supply of paper, perform the self test using a single
sheet from the package and check
the paper to determine which gives you the best quality
printing. If the ink does not bleed or smear, the paper should
be suitable for use with your printer.
not
absorbent enough, the ink may take too long
the
results. Test both sides of
Because the drying speed for the ink depends on the pattern
being printed, the type of paper used, and the temperature and
humidity, some smudging or streaking may occur under
certain conditions. If the ink does not dry quickly enough, try
removing
Note:
d
Ll
____-
1-4
Ink jet printers
paper. Keep unused paper in its original packaging material and
store it in a cool, d y place.
conditions only. Poor quality paper may reduce print quality, as
well as cause paper jams and other problems.
problems, switch to a higher grade qf paper.
Setting Up the Printer
sheets
one at a time as they finish printing.
are
particularly sensitive to the condition of your
Use recycled paper under normal temperature and humidity
If
you encounter
--
-
Page 18
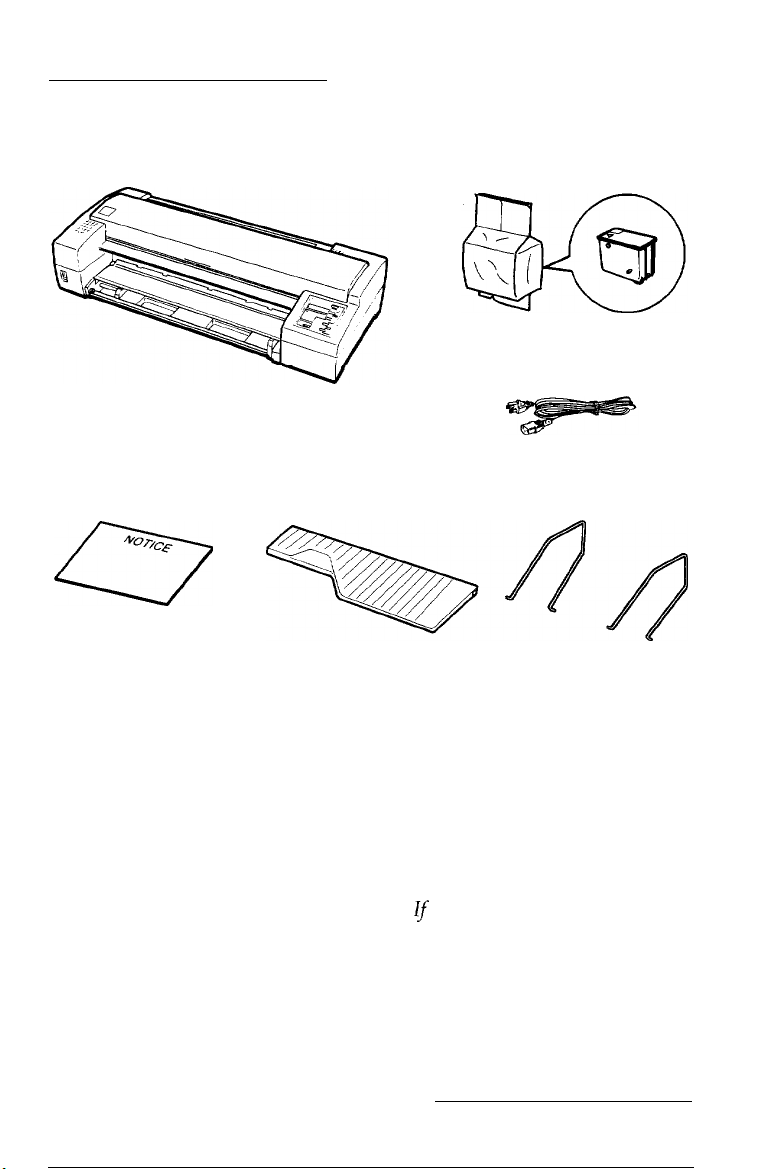
Unpacking the Printer
Your printer box should include these items:
Printer
Ink cartridge
Power cord
0
Notice sheet
In some locations, the power cord comes attached to the
printer. The shape of the AC plug varies by country; be sure
the plug included is the right shape for your location.
q
You must remove all packing and protective materials packed
with your printer before you can set it up and turn on the
power. Follow the directions on the Notice Sheet (inserted in
your printer) to remove these materials.
%/1//
Paper support
Caution:
It is not possible to change the printer’s voltage. Check the label
on the back of the printer to make sure the printer’s voltage
matches your
electrical
outlet. lf not, con&t your dealer.
Setting
Paper separator
Up
the Printer
1-5
Page 19
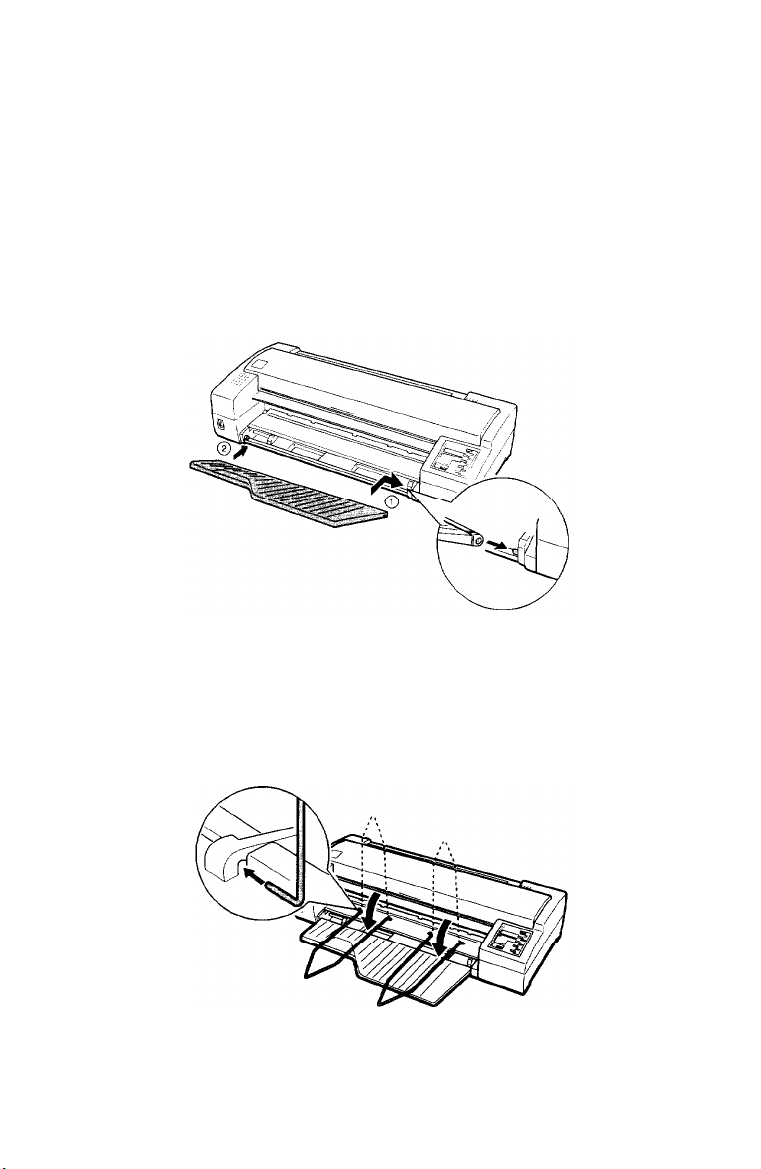
Attaching the paper support and the paper separators
You should install the paper support and the paper separators
before you begin using the printer. To install, follow the steps
below.
1.
Attach the paper support. Grasp the paper support and
place the right end notch over the mounting post of the
printer. Then, push the left notch onto the left mounting
post.
2.
Attach the paper separators. Hold the first paper separator
upright and push the tips into the notches. Then lower the
paper separator. Repeat for the second paper separator.
1-6
Setting Up the Printer
Page 20
Choosing a Place for the Printer
When selecting a location for your printer, follow these
guidelines:
Place the printer on a flat, horizontal, stable surface. If the
printer is tilted or at an angle, it cannot operate properly.
Place the printer close enough to the computer for the
interface cable to reach it easily.
Leave adequate room for easy operation and maintenance.
Avoid using or storing the printer in places subject to rapid
changes in temperature and humidity. Also keep it away
from direct sunlight, strong light sources, or heat
generating devices.
Avoid places subject to shocks and vibrations.
Place the printer where you can easily unplug the power
cord.
Avoid electrical outlets controlled by wall switches or
automatic timers. Also, avoid outlets on the same circuit as
large motors or other appliances that can cause
fluctuations in line voltage.
Keep the entire computer system away from potential
sources of electromagnetic interference, such as
loudspeakers or the base units of cordless telephones.
Use a grounded power outlet; do not use an adapter plug.
When you use continuous paper, make sure the paper path
is not obstructed. See Chapter 2 for details.
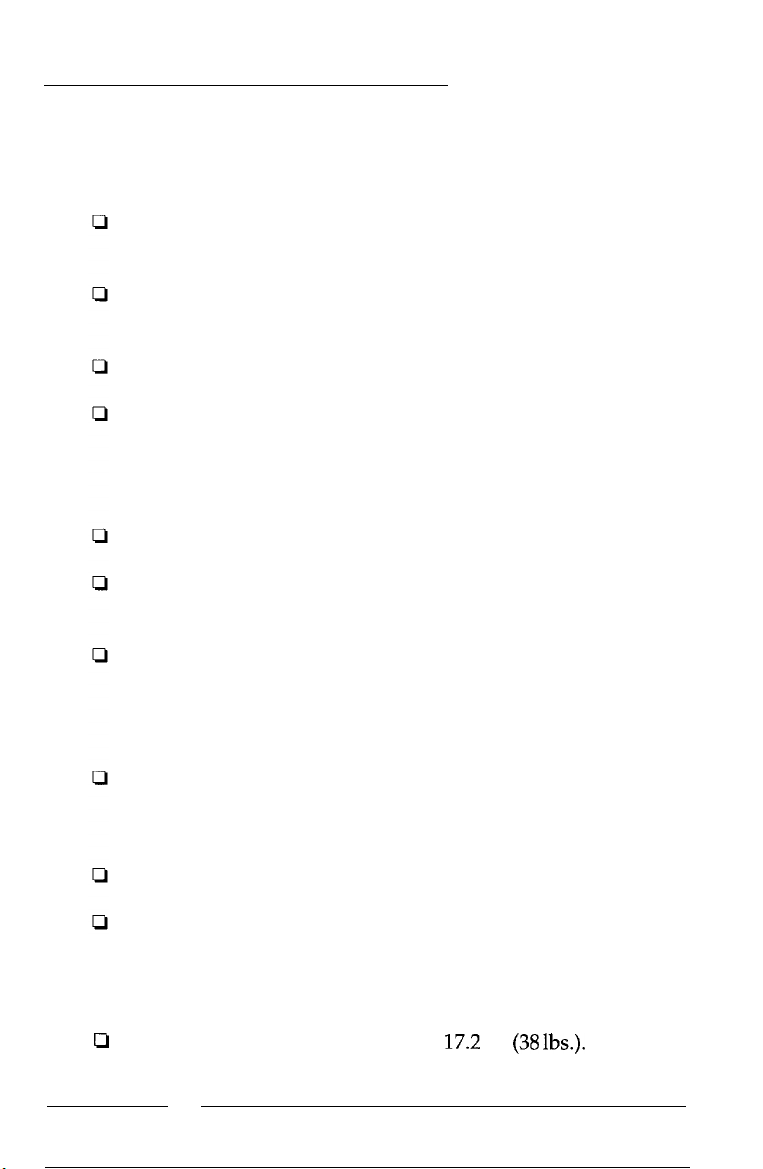
If you plan to use a printer stand, follow these guidelines:
Q
Use a stand that supports at least
17.2
kg
(38 lbs.).
Setting Up the Printer
1-7
Page 21
Cl
Never use a stand that tilts the printer. It should always be
kept level.
Cl
Place cables so they do not interfere with paper feeding;
secure them to a leg of the stand if possible.
Plugging in the Printer
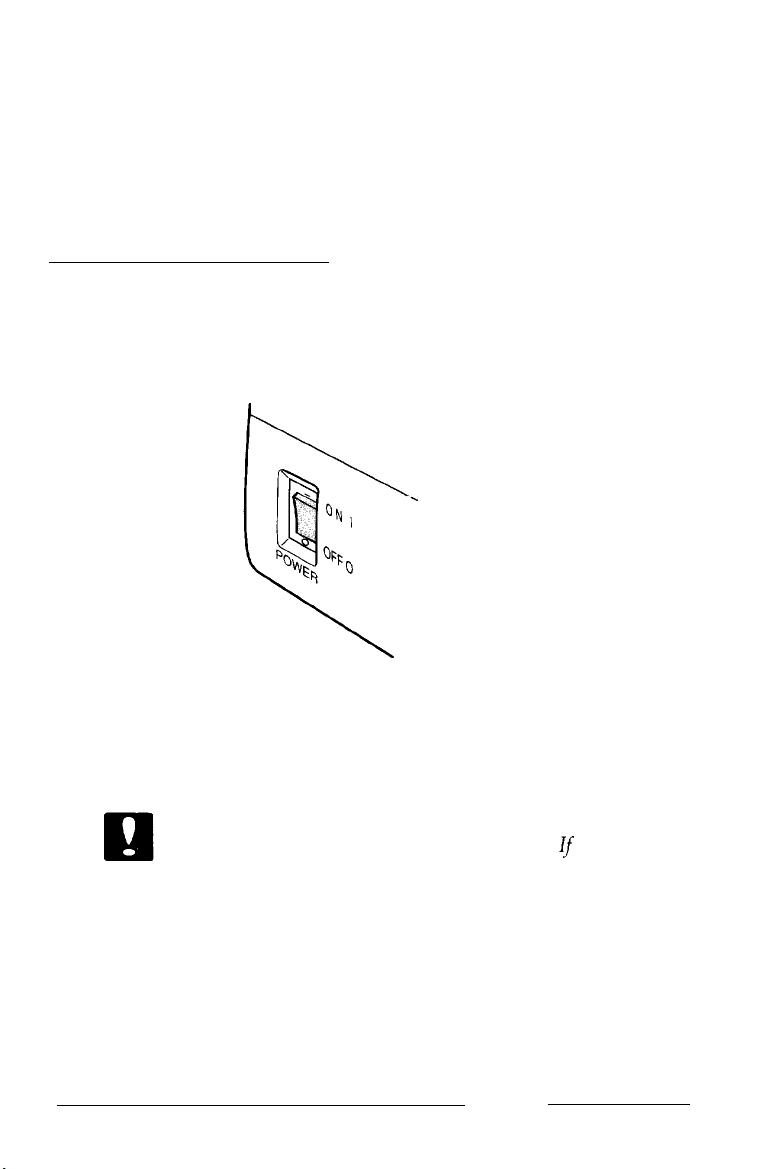
1.
Make sure that the power switch is turned off. It is off when
the “G” side of the switch is pressed down.
1-8
2.
Check the label on the back of the printer to make sure the
voltage required by the printer matches that of your
electrical outlet. Also, make sure that you have the correct
power cable for your power source.
Caution:
It is not possible to change the printer‘s voltage. If the rated
voltage and
dealerfor assistance. Do not plug in the power cord.
3.
If the power cord is not attached to the printer, connect it to
the AC inlet on the back of the printer.
4.
Plug the power cord into a properly grounded electrical
outlet.
Setting Up the Printer
your
outlet voltage do not match, contact your
Page 22

Installing
the Ink Cartridge
Each ink cartridge contains enough ink to print about
pages. The exact number of pages a single cartridge can print
varies according to the amount of text and graphics on each
page.
Warning:
0
The first time you use your new printer, you need to charge the
The ink cartridge is a self-contained unit. Under ordinary use,
ink will not leakfrom the cartridge.
contact with skin and eyes. lf ink gets into
them immediately with plenty
physician. Wash all traces of inkfrom
water. lf irritation occurs, contact a physician.
ink delivery system with ink. You need to perform this
operation only once.
Install the ink cartridge as follows:
Note:
Do not open the ink cartridge package until just before you install the
cartridge, OY the ink may dry up.
If
ink does come out, avoid
your
of
water and contact a
your
skin with soap and
700
eyes,fIush
1.
Make sure the printer is turned off.
2.
Hold down both the
on the printer. Release the buttons after the printer starts
initializing; the print head then moves to the ink cartridge
replace position.
ALT
and
PAUSE
buttons while you turn
Setting Up the Printer
1-9
Page 23
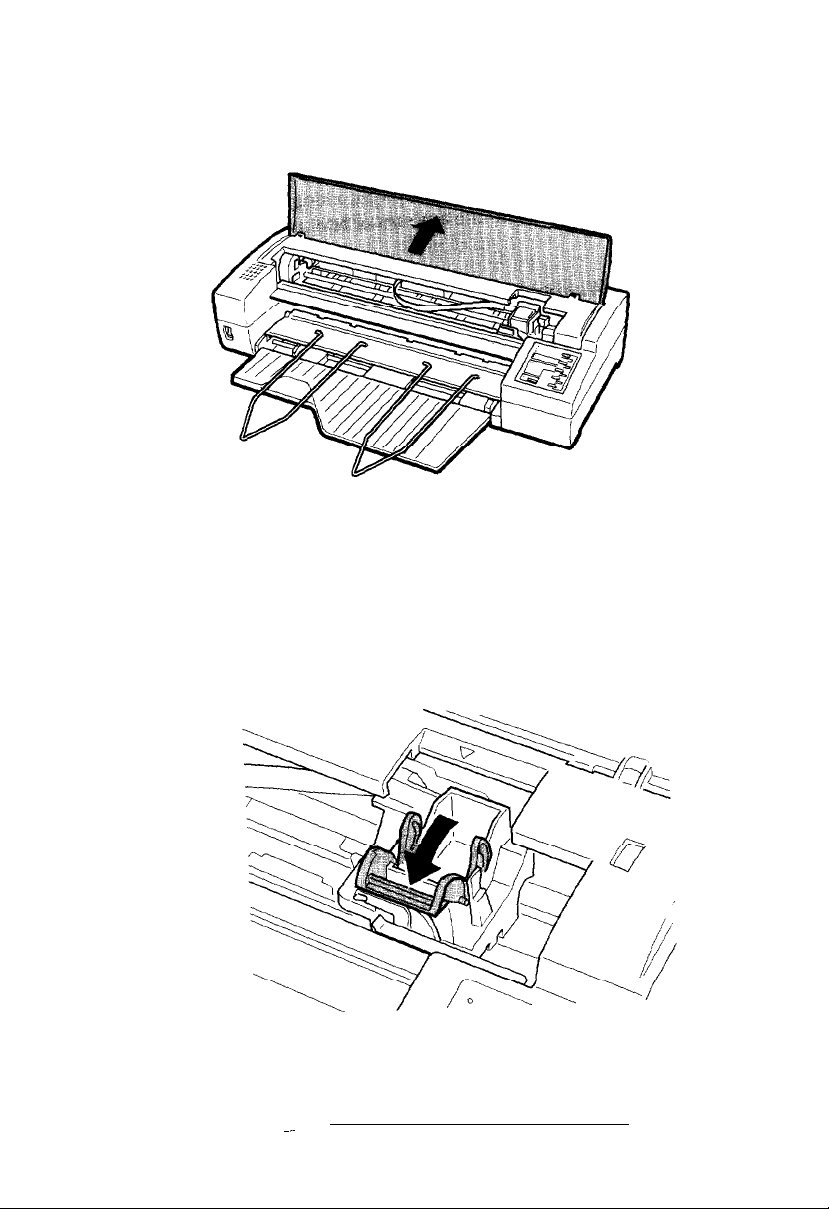
Open the printer cover.
3.
Pull the top of the ink cartridge clamp towards you to open
4.
it.
1-10
Setting
Up
~~
the
-
Printer
--
Page 24
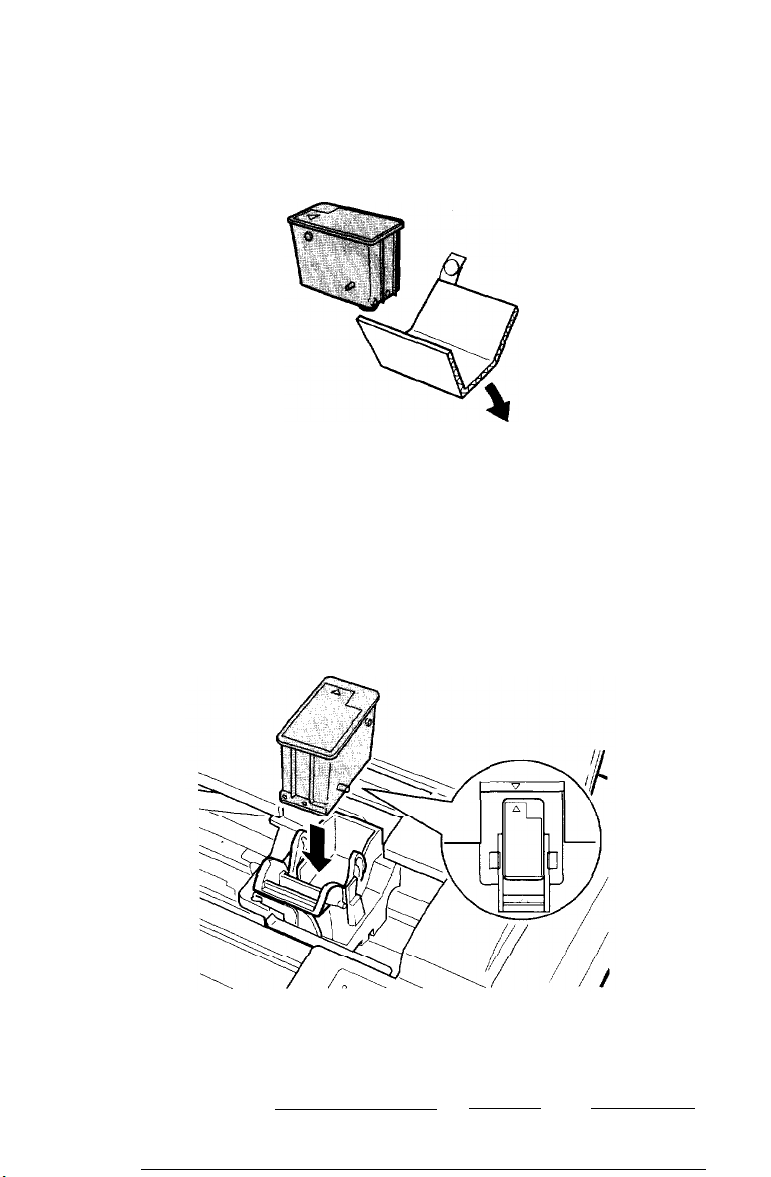
5.
Open the foil package containing the ink cartridge and
remove it from the protective cardboard. Make sure to
remove the tape seal from the ink cartridge.
6.
Lower the cartridge into the holder with the label face up
and the arrow mark on the cartridge towards the arrow
mark on the printer case.
Setting Up the Printer
1-11
Page 25
7.
Push the ink cartridge clamp towards the back of the printer
to secure the cartridge.
Caution:
Once you install the ink cartridge, do not open the clamp or
R
remove the ink cartridge except to replace it with a new
The cartridge may
8.
Press the
It takes about one minute.
ALT
button again to charge the ink delivery system.
bec&e
unusable otherwise.
one.
R
9.
1-12
The PAUSE
when the ink charging has finished.
Caution:
Do not
is complete.
Close the printer cover.
Setting Up the Printer
light flashes throughout the cycle and turns off
turn
offor reset the printer until
the
ink-charging cycle
Page 26
After you charge the ink delivery system, you can use the
built-in self test to make sure the printer is working properly.
You can run the self test with paper from the built-in paper
feeder or by feeding a sheet manually. This section describes
loading paper in the paper feeder.
1.
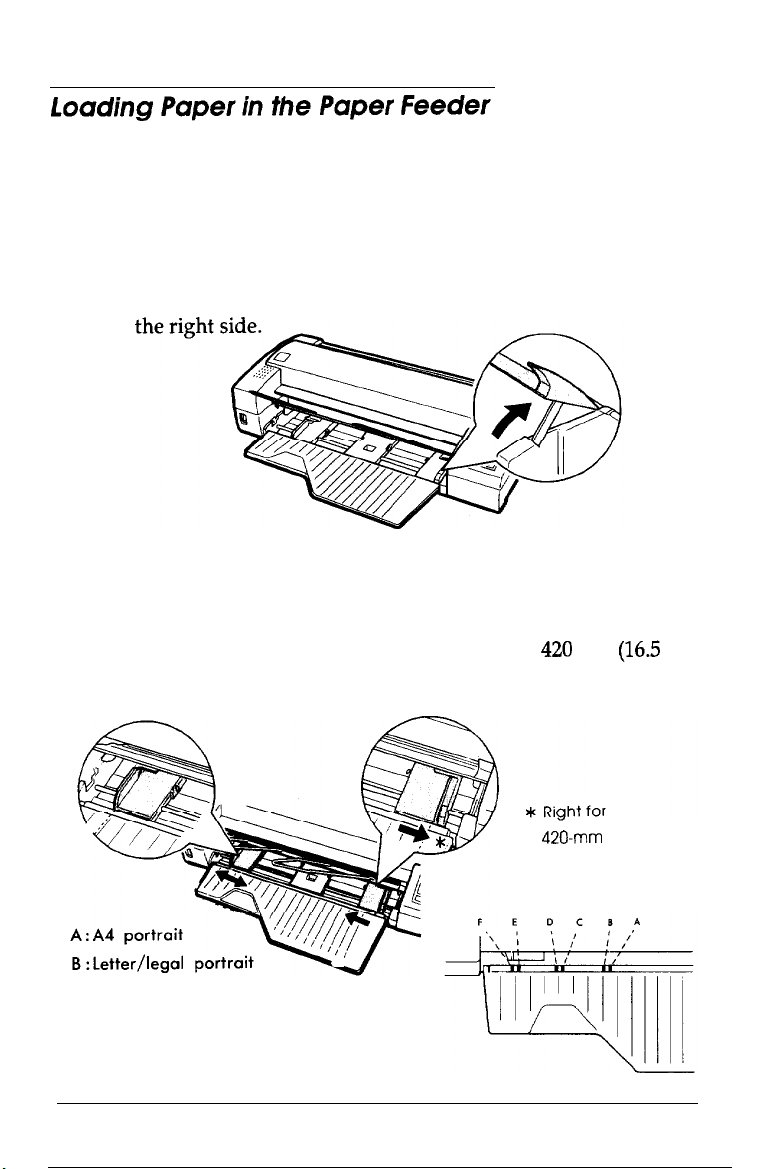
Open the paper feeder cover while holding up the lever on
2.
Slowly slide the right edge guide as far to the left as it will
go, and align it to the guide mark. Then adjust the left edge
guide to match the width of your paper. You may also use
the guide mark for A4 size paper (or letter /legal size paper
for the U.S. version). When you load paper
420
mm
(16.5
inches) wide, move the right edge guide as far to the right
as it will go.
C : Letter landscape
D :A4 landscape
E : Legal landscape
B4
landscape
F :
420.mm wide paper
Setting Up the Printer
1-13
Page 27
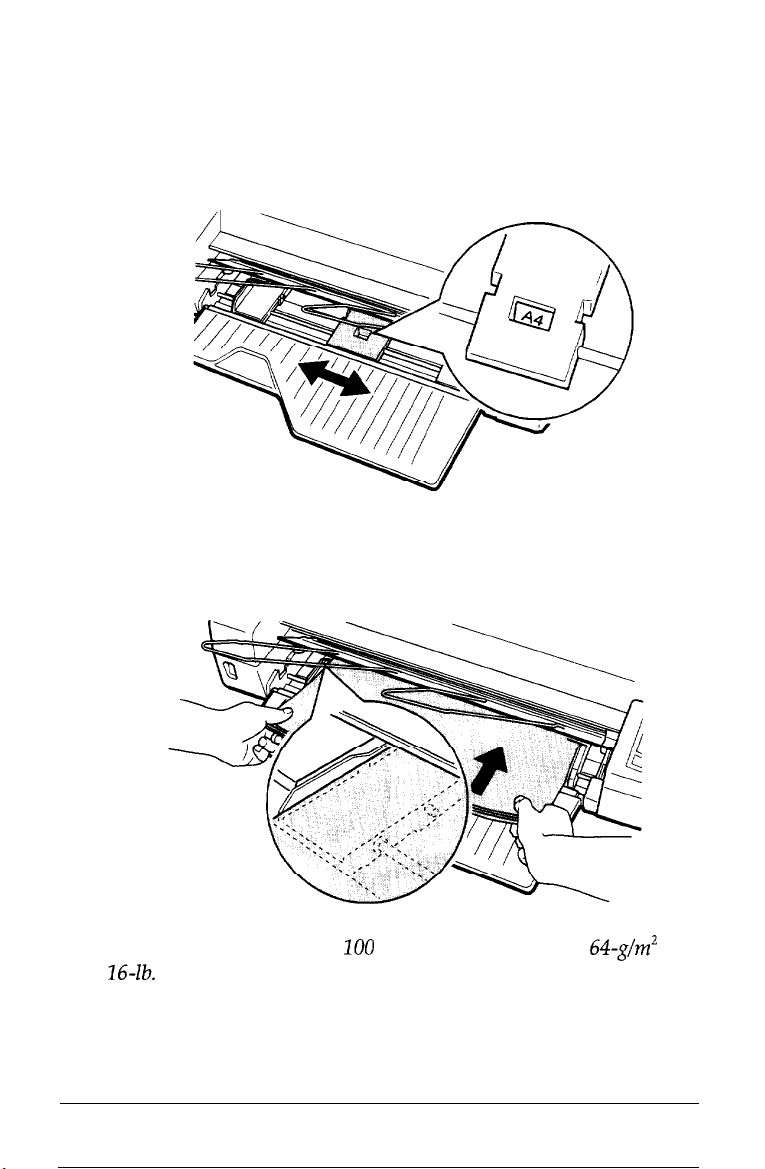
Move the center support to the center of both edge guides.
3.
When you load paper in the landscape direction, adjust the
center support until you can see the paper size you are
using through the cutout in the center support.
Fan a stack of paper; then tap it on a flat surface to even the
4.
edges. While aligning the paper’s edges with the edge
guides, insert it with the printable surface face down all the
way into the paper feeder until it meets resistance.
Note:
The paperfeeder holds up to
I6-lb. paper). Do not load paper higher than the mark on the edge
guide.
1-14
Setting Up the Printer
100
sheets (the maximum for 64-g/m’ or
Page 28
5.
Close the paper feeder cover.
When you send data to the printer or when you run the self
test,
the
printer advances the paper to the loading position and
starts printing.
Now you are ready to run the self test. For more about printing
with the paper feeder, be sure to read “Tips for Using the
Paper Feeder” in Chapter
2.
Testing
the
Printer
When using the paper feeder, the self test begins by printing
on the first and last lines of page
1;
this allows the printer to
measure the page length. Then the printer prints character
samples on page
2.
Note:
Use paper at least 360 mm
prints directly on the platen and shortens your printer life. The paper
feeder holds up to
paper).
200
(14
inches) wide; otherwise, the print head
sheets (the maximum for 64-g/m’ or
Follow these steps to run the self test:
1.
Make sure the printer is turned off.
2.
While holding down the
LOAD/EJECT
button (draft mode), turn on the printer.
FONT
button
(LQ
mode) or the
The printer loads a sheet of paper from the paper feeder and
begins the self test. It prints on the first and last lines of
page 1 to measure the page length. Then the printer prints
character samples on page
2.
16-lb.
Setting Up the Printer
1-15
Page 29

In LQ mode, the printer prints characters in each font, in the
order the fonts appear on the control panel. Here is part of
a typical self test:
Courier
!"#$%&'()*+,-./0123456789:;<=>?@ABCDEFGHIJKLMNOPQR
'"#$%&'()*+,-./0123456789:;(=>?@ABCDEFGHIJKLMNOPQRS
"#$%&'()*+,-./0123456789:;<=>?@ABCDEFGHIJKLMNOPQRST~
#$%&'()*+,-./0123456789:;<=>?@ABCDEFGHIJKLMNOPQRSTU'
$%I&'()*+,-./0123456789
%&'()*+,-./0123456789:;<=>?@ABCDEFGHIJKLMNOPQRSTU~
&R?2;)n*;,-./O123456789.,
'()*+,-./0123456789:;<=>?@ABCDEFGHIJKLMNOPQRSTUVWXYZ~]"_‘abcdefghi~
()*+,-./0123456789:;<=>?@ABCDEFGHIJKLMNOPQRSTUVWXYZ[U*'_'abcdefghij
)*+,-./0123456789:;<=>?@ABCDEFGHIJKLMNO~RSTUVWXYZN*~abcdefghij~
The test continues until the paper in the paper feeder runs
3.
out or you press the
the
PAUSE
button. To resume the test, press the
PAUSE
:;<=>?@ABCDEFGHIJKLMNOPQRSTUVl
.*<=>?@ABCDEFGHIJKLMNOPQRSTUVWX
button. To stop the test, press
PAUSE
button again.
4.
5.
1-16
To end the self test, press the
and then press the
LOAD/EJECT
Turn off the printer.
Setting Up the Printer
PAUSE
button to stop printing
button to eject the paper.
Page 30
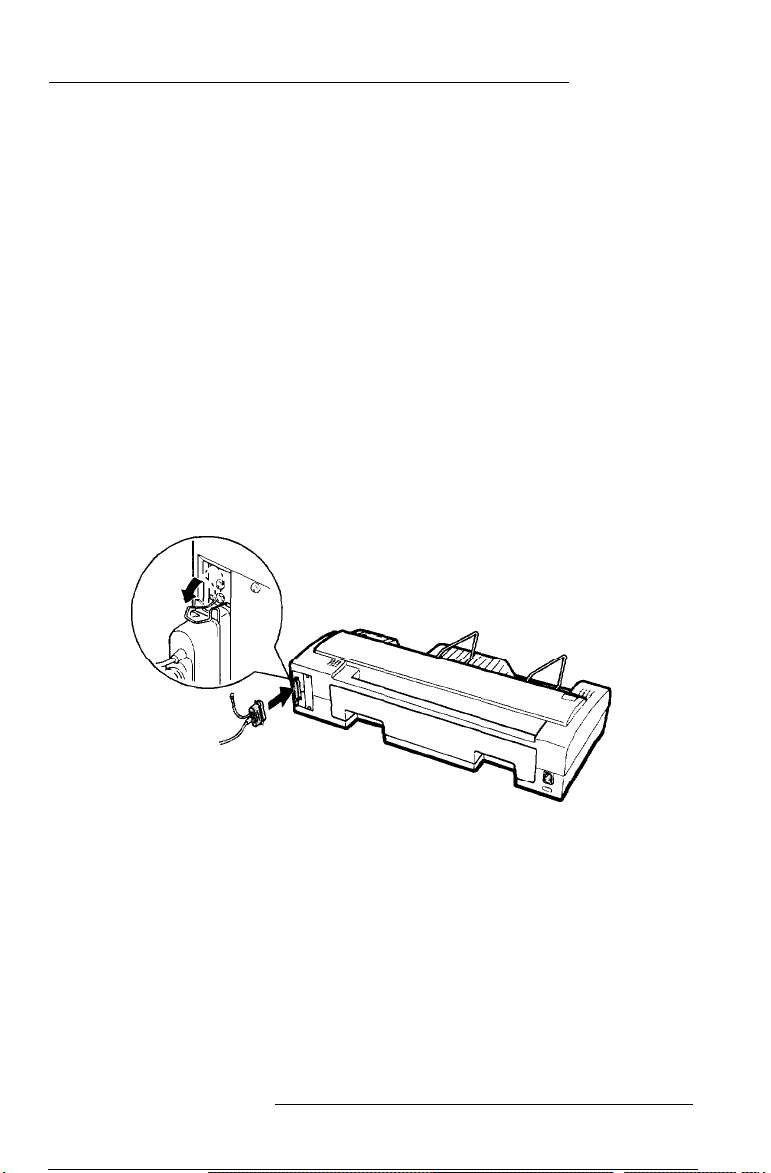
Connecting the Printer to Your Computer
If the self test prints correctly, you are ready to connect your
printer to the computer. You need a shielded, twisted-pair
parallel cable to connect your computer to the printer’s built-in
parallel interface.
Follow these steps:
1.
Make sure both the printer and computer are turned off.
2.
Plug the cable connector securely into the printer’s interface
connector.
3.
Squeeze the wire clips together until they lock in place on
both sides. If your cable has a ground wire, connect it to the
ground connector above the interface connector.
4.
Plug the other end of the cable into the computer’s parallel
interface. If there is a ground wire at the computer end of
the cable, connect it to the ground connector at the back of
the computer.
Setting Up the
Printer 1-17
Page 31

Setting
Up Your Software Programs
Most software programs let you specify the type of printer you
use so that the software can take full advantage of the printer’s
features. Many provide an installation or setup menu that
presents a list of printers.
To take full advantage of your printer’s features, including
ESC/P 2,
If none of these is listed, contact your software manufacturer
for an update that includes one of these. Until you receive an
update, choose another printer as close to the top of the list as
possible.
choose one of the
ESC/P
2 printers on the list below.
Stylus
Stylus
SQ-870/1170
LQ-870/1170
LQ-570/1070
If none of these printers is listed among your software’s
options, select the first one available from the following:
EX, FX,
printer.
After you select the most appropriate printer as described
above, you may want to create and print a sample file with the
fonts and formats that you use most often. Printing the sample
file shows you how the printer works with your software.
If the printing results are not what you expect, see
“Troubleshooting” in Chapter 3 or consult your computer or
software manual.
1000
800
LX, RX,
ESC/P
MX,
2
Epson printer, Standard printer, and Draft
SQ-850/2550
SQ-850+/ 1050+
LQ-550/1010
LQ-2550
LQ-8OO/lOOO
LQ-1500
ESC/P
LQ,
1-18
Setting
Up the &inter
Page 32

Chapter 2
Paper Handling
Printing on Single Sheets
Tips on using the paper feeder
Loading paper manually
Using Continuous Paper with Optional Push Tractor
Installing the push tractor
Loading continuous paper
Tips on using continuous paper
Using the tear-off feature
Removing the push tractor
Switching Between Continuous Paper and Single Sheets
Switching to single sheets . . . . . . . . . . . , . . . . . . . .
Switching to continuous paper . . . . . . . . . . . . . . . . .
Printing on Special Paper
Envelopes
Labels.
.............................
...............................
......................
.................
....................
.....
....................
....................
................
....................
...................
......................
. . .
2-2
2-2
2-5
2-7
2-7
2-8
2-11
2-12
2-13
2-14
2-14
2-15
2-16
2-16
2-18
Paper Handling
2-1
Page 33

Printing on Single Sheets
You can load single sheets up to
using the built-in paper feeder or the manual insertion slot.
420
mm
(16.5
inches) wide
Tips on using the paper feeder
For the steps on using the paper feeder, see “Loading paper in
the paper feeder” in Chapter
give you the best performance when loading paper with the
paper feeder.
Load paper into the paper feeder before you turn on the
Ll
printer or send data. When the printer receives data from
the computer, it loads a single sheet and begins to print.
If the printer runs out of paper during a print job, reload
Cl
the paper feeder and then press the
continue printing.
Press the
tl
of loaded paper.
You can switch to either manual loading or to the optional
Cl
push tractor without removing the paper supply from the
paper feeder. For details, see “Loading paper manually” or
“Switching to continuous paper” later in this chapter.
LOAD/EJECT
1.
Following the tips below will
LOAD/EJECT
button if you need to eject a sheet
button to
If the ink does not dry fast enough, try removing sheets
U
one at a time as they finish printing.
The default page length for paper loaded from the paper
Q
feeder is 61 lines (letter-size paper) or 65 lines
paper). You can change it using your software or printer
commands, if necessary. See the Appendix for more about
printer commands.
2-2
Paper Handling
(A4-size
Page 34

Q
Because most software takes care of the top and bottom
margins, you should usually adjust the margins by using
your software, taking the printer’s default loading position
into account.
c3
You can use the printer’s micro-feed feature to adjust the
paper loading position or to adjust the current print
position during a print job. See below.
Adjusting the loading position
The loading position is the position of the paper when the
printer loads it. If printing is too high or low on the page,
change the loading position with the micro-feed feature.
1.
Make sure the printer is turned on.
2.
Load a sheet of paper from the paper feeder by pressing the
LOAD/EJECT
3.
Open the printer cover and the paper feeder cover.
4.
As soon as the paper is loaded, hold down the
and press the
the loading position up l/180 inch, or the
move the loading position down l/180 inch. Continue
pressing the appropriate button until you reach the
position you want.
button.
ECONOMY/CONDENSED
button to move
FONT
ALT
button
button to
5.
Close the printer cover and the paper feeder cover.
6.
Send data from the computer to start printing.
Ll
The printer has a minimum and maximum loading
position. If you try to move the loading position beyond
these limits, the printer beeps and the paper stops moving.
Ll
When the paper reaches the factory-set loading position,
the printer beeps. Use the factory setting as a reference
point when adjusting the loading position.
Paper Handling
2-3
Page 35

The pointer on the print head indicates the base line of
printed characters. (You may have to experiment a few
times to get the results you want.)
__---------
When you adjust the loading position for single-sheet
3a.xw 3a.xw
paper, the printer remembers the new position only until
you turn off the power. The loading position returns to the
factory setting when the power is turned on again.
Adjusting the print position
The print position is the position on the page where the print
head is currently printing. If you want to change the current
vertical print position, you can use the micro-feed feature as
follows:
1.
Press the
comes on.
2.
Hold down the
ECONOMY/CONDENSED
adjust the print position on the page.
PAUSE
button to stop printing; the
ALT
button and press the
(up) or
FONT
(down) button to
PAUSE
light
3.
Press the
have to experiment a few times to get the results you
want.)
2-4
Paper Handling
PAUSE
button again to resume printing. (You may
Page 36

Note:
(0.31
The printer has a limit-S.0 mm
can move the vertical print position backwards using micro feed.
Feeding stops when you reach this limit.
inches)-to the
amount
Loading paper manually
You can load single sheets of paper or envelopes from the
manual feed slot without removing the paper supply from the
paper feeder.
You can use the manual feed slot to load single sheets of paper
from
182
mm
(7.2
inches) to
long.
When you load paper manually, you can use the printer’s
micro-feed feature, just as when you load paper from the paper
feeder.
Follow these steps to load a single sheet in the manual feed
slot:
Turn on the printer. Lower both sides of the page eject guide.
1.
420
mm
(16.5
inches) wide and
you
Note:
Ifa
sheet of paper is in the slot before you turn on the printer, the
paper is ejected with nothing printed.
Paper Handling
2-5
Page 37

2.
Insert a single sheet of paper into the slot until it meets
resistance, aligning the right edge of the paper with the
arrow mark on the printer. When you use paper
(16.5
inches) wide, align the right edge of the paper with
the right end.
3.
The printer loads the sheet.
Note:
lf
the sheet does
eject it. Then try loading if again.
not
load straight, press the
LOAD/EJEClbutton
420
mm
to
4.
Send data from the computer to start printing.
When the printer finishes printing, it ejects the sheet. If the
sheet does not come all the way out, press the
LOAD/EJECT
button.
Press the
LOAD/EJECT
button or send data to the printer
without inserting a sheet into the manual slot to switch back to
the paper feeder. The page eject guides raise automatically.
The printer then loads a sheet of paper from the paper feeder.
Note:
lf
the ink does not dry fast enough, fry removing sheets one af a time
as theyfinish printing.
Paper Handling
Page 38

Using Continuous Paper with Optional Push Tractor
You can use the optional push tractor to print on continuous
paper from
102
mm (4 inches) to
406
mm
(16
inches) wide.
Installing the push
Warning:
Be careful not to touch the part of the access panel or push
0
1.
tractor that fits inside the printer.
Make sure the printer is turned off. Then insert your fingers
into the cutouts on both sides of the access panel; pull
straight back on the top of the cutouts to remove the access
panel from the printer.
2.
Push the release lever of the tractor down to the single-sheet
position.
tractor
Paper
Handling
2-7
Page 39

3.
Grasp both ends of the tractor and push it into the printer, as
shown below, until it locks in place.
Loading continuous paper
1.
Place the supply of continuous paper behind the printer so
that the printer feeds the paper smoothly. Make sure the
paper path is not obstructed, and allow the printed pages
to be stacked in front of the printer. See below for an
illustration of proper paper placement.
2-8
Paper Handling
Page 40

2. Release the sprocket units by raising the sprocket-lock levers.
Align one sprocket unit with the mark as shown below.
Slide the other sprocket unit to match the width of your
paper, but do not lock it.
3. Position the center support midway between the two
sprocket units.
4.
Open both sprocket covers.
Paper Handling
2-9
Page 41

5.
Fit the first four holes of the paper over the sprocket pins,
and then close the sprocket covers.
6.
Slide the left sprocket unit to remove any slack in the paper.
Then lower the sprocket-lock levers until they lock into
place.
2-10
Paper Handling
Page 42

7.
Raise the release lever to the continuous-paper position.
8.
Raise the paper separators and remove them.
9.
Lower both sides of the page eject guide as shown on page
2-5.
Turn on the printer. When it receives data, it advances
the paper to the loading position and starts printing.
Tips on using continuous paper
Follow the tips below for the best performance when printing
on continuous paper.
If the printer runs out of paper during a print job, attach
additional paper to the push tractor and press the
LOAD/EJECT
button to continue printing.
Paper Handling
2-11
Page 43

D
You can switch to single sheets without removing the
paper supply from the push tractor. For instructions, see
“Switching to single sheets” later in this chapter.
Q
You can use the printer’s micro-feed feature to adjust the
position, just as when you load single sheets. The printer
remembers this new position even after you turn it off. See
page
2-3.
When you turn on the printer with paper loaded, it
reverses the paper to the paper-park position and then
advances it to the next page. To keep the loading position
accurate, remove any printed sheets before you turn off
printer .
Using the tear-off feature
After you have finished printing, you can use the tear-off
feature to advance paper to the tear-off edge of the printer. You
can then easily tear off printed sheets. When you resume
printing, the printer feeds paper back to the loading position.
This feature lets you save paper that would normally be lost
between documents.
the
To use the tear-off feature, turn the tear-off mode on using the
default-settings mode as described in Chapter
3.
The printer advances paper to the tear-off position only when
the printer receives a full page of data or a form-feed command
and no more data is received for three seconds.
I
Caution:
1
Never use the tear-offfeature with labels. When fed
backward, labels may come off the backing and jam the
printer.
U
2-12
Paper Handling
When you use labels,
using the
defrzult-settings
alzuays
turn the tear-off mode off
mode.
Page 44

If the perforation is not aligned with the tear-off edge, adjust
the tear-off position as follows:
1.
Make sure the paper is in the tear-off position.
2.
While holding down the
ECONOMY/CONDENSED
ALT
button, press the
(up) or
FONT
(down) button to
adjust the position. The printer remembers the new
position even after you turn it off.
3.
Tear off any printed pages.
Note:
Q
The printer has a minimum and maximum tear-offposition.
you try to move the
printer beeps and the paper stops moving.
tear-ofiposition
beyond these limits, the
If
U When the paper reaches the
printer beeps. Use the factory setting as a reference point when
adjusting the
tear-oflposition.
factory-set
Removing the push tractor
1.
Tear off any printed pages. Press the
feed the paper backward out of the printer and into the
paper-park position. Remove the paper from the push
tractor.
Caution:
U
R
2.
Never feed labels
printer, see “Labels“ later in this chapter.
U
Make sure you tear offyour printed document before
feeding paper
time may cause a paper jam.
Turn off the printer. Attach the paper separators as shown on
page l-6.
3.
Lower the release lever to the single-sheet position.
backzuard.
backzuard.
tear-off position, the
LOAD/EJECT
To remove labels from the
Reverse feeding several pages at a
button to
Paper Handling
2-13
Page 45

4.
Pull up on both levers on the sides of the bottom of the
tractor and pull the tractor out of the printer.
5.
Replace the access panel.
Switching Between Continuous Paper and Single
Sheets
When using the push tractor, you can easily switch to
single-sheet printing without removing the continuous paper.
Switching
To switch from continuous paper to single sheets, follow the
steps below.
2-14
Paper Handling
to
single sheets
Page 46

1.
If any printed sheets remain in the printer, tear off the
printed pages.
2.
Press the
continuous paper backward to the paper-park position.
Caution:
U
R
0
3.
Move the release lever to the single-sheet position.
Note:
If
the
prilz ter
button to
thcrz
lower the lever again.
4.
Attach the paper separators as shown on page l-6.
5.
The printer is ready to print. When it receives data, it loads a
single sheet from the paper feeder or manual feed slot.
LOAD/EJECT
Always tear offpaper before back-feeding; back-feeding too
many sheets can cause a paper jam.
Nezler
back-feed labels. Labels call easily come qf their
backing and jam the printer.
beeps, raise the release lever and press the LOA D/EJECT
feed
the paper
button. The printer feeds the
backwnrds
to the paper-park position. You can
Switching
2.
to continuous paper
To switch from single sheets back to continuous paper, follow
the steps below.
1.
If a single sheet is in the paper path, press the
button to eject it.
Raise the release lever to the continuous-paper position.
Note:
lf
the
pri/l
ter
beeps, lower the release leuer and press the
LOAD/EJECT button to eject the paper. Then raise the lever again.
Paper Handling
LOAD/EJECT
2-15
Page 47

3.
Remove the paper separators as shown on page
4.
The printer is ready to print. When it receives data, it loads
continuous paper from the push tractor and begins to
print.
2-11.
Printing on Special Paper
In addition to printing on single sheets and continuous paper,
your printer can print on a wide variety of other paper types,
such as envelopes and labels.
Envelopes
You can load the following envelope sizes from the manual
feed slot.
No. 6 envelope,
No. 10 envelope,
166
240
mm
mm
(6.5
inches) x 92 mm
(9.5
inches) x
104
(3.6
mm
Printing on envelopes
You can use the manual feed slot to print on individual
envelopes.
1.
Turn on the printer and open the printer cover.
2.
Turn the paper-thickness lever clockwise as far as it will go
3.
Close the printer cover.
2-16
Paper Handling
inches)
(4.1
inches)
Page 48

4.
Lower both sides of the page eject guide.
5.
Insert an envelope with the wide end entering the printer
first, printable side face-up, until it meets resistance. The
printer then loads the envelope to the print position.
6.
Send data from your computer. The printer ejects the
envelope when it finishes printing.
Note:
Make sure
printable area of the envelope. See the Appendix for details.
your software keeps the printing entirely within the
Use envelopes only under normal operating conditions.
lf
the ink is not dryingfast enough,
a time as they finish printing.
To
switch back to the paper feeder, turn the paper-thickness
try removing envelopes
one at
lever counterclockwise as far as it will go. Then press the
LOAD/EJECT
button to load from the paper feeder.
Paper Handling
2-17
Page 49

Labels
Only use labels mounted on a continuous backing sheet with
tractor sprocket holes. Do not try to print labels on single
sheets; labels on a shiny backing sheet may not feed properly.
You load labels the same way as continuous paper, except you
turn the paper-thickness lever clockwise as far as it will go.
Caution:
Ll
El
To remove labels from the printer, follow the steps below.
Neverfeed labels
button. They
printer.
I-1
Make sure the tear-off mode is set to
settings mode
Ll
Use labels under normal operating conditions only because
they are sensitive to extreme temperature and humidity.
Do not leave labels loaded in the printer between jobs; they
c-l
nmy
jam zclhen
backzoard
call
easily peel off the backing and jam the
when
you resume printing.
by pressing the LOAD/EJECT
offin
the default
using labels.
1.
Tear off the labels at the rear of the printer.
2.
Press the
button to advance the remaining labels out of the printer.
2-18
Paper Handling
LOAD/EJECT
button while holding down the
ALT
Page 50

Operating the Control Panel
Indicator lights
Buttons
..............................
..........................
....................
3-2
3-2
3-3
Selecting Character Fonts
Scalable fonts
...........................
Condensed printing
.....................
.......................
Using the Default-Settings Mode
Default settings descriptions
Changing the default settings
Optional Interface Cards
Installing an interface card
The
C82305*/C82306*
serial interface card
......................
..................
..................
...................
Maintenance and Transportation
Replacing the ink cartridge
Cleaning the print head
Cleaning the printer
Transporting the printer
Troubleshooting
Error indicators
Power supply
Printing
Paper handling
...........................
..........................
...........................
..............................
..........................
...................
.....................
.......................
.....................
.................
..........
.................
3-5
3-6
3-7
3-7
3-9
3-11
3-15
3-16
3-17
3-18
3-18
3-20
3-20
3-21
3-22
3-22
3-24
3-25
3-29
Using the Printer
3-1
Page 51

Operating the
Control
Panel
The printer control panel gives you easy control over most
common printer operations. It consists of indicator lights and
buttons.
You can also change the default settings with this panel. See
“Changing the default settings” on page
0 DATA
0
PAPERour
3-11.
Indicator
lights
The indicator lights tell you the current status of the printer
and give information about error conditions. See
“Troubleshooting” for details on errors.
PAUSE
On when printing is paused
FONT
Indicates the current font setting. These three lights go on and
off when you press the
FONT
button. The font menu on the
control panel tells you which font is selected. For instructions
on selecting fonts, see page
3-2
Using the Printer
3-5.
Page 52

CONDENSED
On when the condensed printing mode is selected. When this
mode is selected, the printer prints a condensed version of
selected fonts. See page
3-7
for more information.
ECONOMY
On when the economy printing mode is selected. When this
mode is selected, the printer uses less ink. This mode is ideal
for rough drafts and editing work.
INK OUT
On when the ink cartridge runs out of ink. It flashes when the
ink is low. For instructions on replacing the ink cartridge, see
page
3-18.
PAPER OUT
On when the printer runs out of paper. Rapid flashing
indicates a paper jam.
DATA
On when data remains in the printer’s memory.
Note:
When the network interface mode is set to on in the default settings
mode, data may be present in the printer’s buffer even though the
printer is not continuously printing. Always make sure the
light is off before turning
ojf
the printer.
DATA
Buttons
RESET
Clears the printer’s buffer and initializes the printer settings to
their factory settings. See page A-10 for details.
PAUSE
Press this button to stop printing temporarily. Press it again to
resume printing.
Using the Printer
3-3
Page 53

LOAD/EJECT
Press this button to load paper. However, the printer normally
loads paper automatically. When single-sheet paper is in the
loading position, the printer ejects the sheet when you press
this button. When continuous paper is in the loading position
or tear-off position, the printer feeds the paper backward to the
paper-park position.
If you have been printing from the manual feed slot, pressing
this button switches paper loading back to the paper feeder.
FONT
Press this button to cycle through the font choices on the font
menu. The
FONT
lights indicate
the
current selection.
ECONOMY/CONDENSED
Press this button to select economy or condensed printing. The
indicator lights indicate which mode is on.
ALT
Hold down this button for several seconds to move the print
head to the ink cartridge replace position when the printer is
paused.
The
ALT
button also alters the functions of the other buttons.
Hold down the
ALT
button and press another button to
perform the following functions:
PRINT HEAD CLEANING (ALT + PAUSE)
Starts the print head cleaning cycle. See “Cleaning the Print
on
page
3-20
Head”
LF/FF
(ALT + LOAD/EJECT)
for details.
Press this button briefly to feed the paper forward one line.
Hold this button down to eject a single sheet or to advance
continuous paper to the top of
button to feed continuous paper from the paper-park position
to the loading position.
3-4
Using the Printer
next
page. You can also use this
Page 54

MICRO FEED:
(ALT
+ FONT)
Feeds paper forward in I/180-inch increments.
(ALT +ECONOMY/CONDENSED)
Feeds paper backward in l/180-inch increments.
See page
2-3
for details.
Selecting Character Fonts
Your printer has eight built-in character fonts including two
new Epson fonts: Epson Roman T and Epson
Roman T is similar to the Times’” font;
Helvetica?” )
The draft font of your printer has an excellent appearance
compared with draft fonts in other printers. It uses fewer dots
per character than the other fonts to increase printing speed.
This allows you to print good quality documents for rough
drafts and editing work.
Sans
Serif H. (The
Sans
Serif H is similar to
Press the
the control panel. The three
(o), or flash
FONT
button to select from the eight fonts listed on
FONT
lights come on
(5)
to indicate the active font.
(O),
Note:
q
Roman T and Sans Serif
spacing only.
0
Font selections you make in your software usually override these
control panel selections. For best results, use your software to
select fun
ts.
Hfon ts
are available in proportional
Using the Printer
or go off
3-5
Page 55

The table below lists the available fonts and shows how the
FONT
lights appear for each selection.
FONT
bdifj
i 000
0.0
1 0 0 0 1 Epson
/ 0 0 0 1 Epson Roman
000
000
0.0
0 on 0 off 6 flashing
Fonts
Draft
Epson Courier
Epson Roman T
Sans
Serif H
Samples
ABCDEFGhi
~
ABCDEFGhijklm0123456789
ABCDEFGhijklm0123456789
1 ABCDEFGhijklmOl23456769
1 ABCDEFGhijklm0123456789
Epson Sans Serif
Epson Prestige
Epson Script
ABCDEFGhi
ABCDEFGhijklmOl23456789
A8CDEFGhijklm0123456789
j
klmOl23456789
j
klmO123456789
Scalable fonts
The size of the Roman,
fonts can be selected from 8 to
by using your software or by sending an
See the documentation that came with your software for
information on selecting the size of scalable fonts. See the
Appendix for a list of
Sans
Serif, Roman T, and
32
points in
ESC/P
2 commands.
2-point
ESC/P
2 command.
Sans
Serif H
increments
3-6
Roman
Epson
Epson Epson Epson
Roman T
Epson Epson
Sans
Serif
Epson
Sans
Serif H
Epson Epson Epson Epson
Using the Printer
Epson Epson Epson
Epson
Epson
Page 56

Condensed printing
Condensed printing reduces the size of characters to
approximately
more characters to fit on a line. This is useful for spreadsheets
and other software that needs to print the maximum amount of
information on a page.
You can condense most fonts by pressing the
ECONOMY/CONDENSED
Epson
Sans
60
percent of their normal width, allowing
button. (Epson Roman
Serif H, and
15-cpi
printing cannot be condensed.)
T,
The printout below shows condensed
This is 10
This is condensed 10
Note:
Ifyour
software controls characterfonts
mode, you should select condensed mode through the software rather
than with the control panel. Software or command settings usually
override panel settings.
Using the
Your printer comes with a series of internal settings that
control a variety of printer functions, such as print direction
and
you turn on the printer, they are called default settings.
The factory default settings are designed to meet most user’s
needs, so you may not need to change them. The table below
lists the features you can set in the default-settings mode.
For a detailed description of each setting, see “Default settings
descriptions.” To change a setting, see “Changing the default
settings” on page
Default-Settings
auto
line feed. Because these settings take effect each time
3-11.
cpi
printing.
cpi
printing.
Mode
lo-cpi printing.
nnd
cm select the condensed
Using the Printer
3-7
Page 57

Settings
Options
Character table
Auto print direction
Continuous-paper page
length
Skip-over-perforation
Network interface mode
Mixed text/graphics mode
Auto line feed
Auto interface selection
Auto interface wait time
Tear off
l
Available only in the European version
**
Available only in the North/South American version
Italic U.S.A., Italic France,
Italic Germany, Italic U.K.,
Italic Denmark. Italic Sweden,
Italic Italy, Italic Spain
PC437, PC850. PC860. PC863,
PC865, PC853’. PC857”.
PC437 Greek’.
PC866’. PC852*, BRASCII’“,
Abicomp”
,On,
Off
1 1 inches,
7016
On, Off
On, Off
On, Off
On, Off
On. Off
10
seconds, 30 seconds
On, Off
inches
12
inches,
1,
PC851*, PC855*,
8.5
inches,
Note:
Most software controls the character table and auto line.feed. lf your
software controls thesefeatures, you may never need to set them with
the control panel.
3-8
Using the Printer
Page 58

Default settings descriptions
Character
fable
Character tables contain the characters and symbols used by
different languages. The printer prints text with the selected
character table. When you select this feature, the font light on
the control panel goes on or off to indicate the current
selection.
Auto print direction
The printer ordinarily prints text
prints graphics characters unidirectionally for precise vertical
alignment.
When auto print direction is set to on, the printer switches
between bidirectional (for text data) and unidirectional motion
(for graphics data). When this feature is set to off, the print
head motion is controlled by your software.
bidirectionally
for speed and
Continuous-paper page length
When you are printing on continuous paper, this feature lets
you select from the four page lengths described in the table on
page
3-15.
Skip-over-perforation
When this feature is on and you are using continuous paper,
the printer leaves a l-inch
printable line on one page and the first printable line on the
next page. This causes the printer to skip over the perforation
between continuous sheets.
Most software takes care of the top and bottom margins. Do
not turn on skip-over-perforation unless your software does
not provide these margins.
(25.4-mm)
margin between the last
Using the Printer
3-9
Page 59

Adjust your top-of-form position with the micro-feed feature
to get half of the margin at the bottom of one page and half at
the top of the next page.
Network interface mode
If your printer is connected to a single computer, leave this
feature off. If you want to use the printer in a network
environment and share it among multiple computers, set this
feature to on.
Note:
When this feature is set to on, data may be present in the printer‘s
buffer even though the printer is not continuously printing. Always
make sure the DATA light is off before turning off the printer.
Mixed text/graphics mode
This feature is for software that has problems printing scalable
font text combined with graphics. Leave the mixed
text/graphics mode set to off if you don’t notice any problems
in your printout.
Auto line feed
When the auto line feed feature is on, each carriage return (CR)
code is accompanied by a line feed
text is unexpectedly double-spaced, set this feature to off. If
text lines print on top of each other, set it to on.
(LF)
code. If your printed
Auto interface selection
This feature is necessary when an optional interface card is
installed and interface cables are connected to both the parallel
interface and the optional interface card.
3-10
Using the Printer
Page 60

When this feature is on, the printer determines which interface
receives data and then switches to that interface until the end
of the print job (when no data is received from the selected
interface for the amount of time specified by the Auto interface
wait time). Usually, you should set this feature to on.
When this feature is set to off, the printer receives data only
from the interface specified by the DIP switch on the optional
interface card.
A
uto
interface wait time
This feature is necessary when the auto interface selection is set
to on. If the data from the computer is not sent within the
specified period, the printer
new data. Otherwise, the printer receives data only from the
currently selected interface and ignores data from the other
interface. You can set the time to either
seconds.
Tear
of7
You can set this feature on to select tear-off mode. See “Using
the tear-off feature” in Chapter 2 for information on tear-off
mode. Use the tear-off feature only with continuous paper.
re-determines
10
the source of any
seconds or
30
Do not use the tear-off feature with labels.
Changing the default settings
You change the printer’s default settings using the control
panel buttons; the control panel lights show your selections.
Follow the steps below to make your changes:
1.
Make sure the printer is turned off and
paper is loaded in the paper feeder.
A4,
letter, or larger
Using the Printer
3-11
Page 61

2.
Hold down the
ECONOMY/CONDENSED
button and turn
on the printer to enter the default-settings mode.
The printer loads a sheet of paper and prints a brief summary
and instructions. It instructs you to select the language that
you want messages printed in (English, French, German,
Italian, or Spanish).
Press the
3.
language of your choice; then press the
FONT
button until the
FONT
lights indicate the
ALT
button to make
your selection.
Languages
English
French
German
Oon
l
off
After you press the
FONT
0e0
000
0.0
ALT
button, the printer prints the current
default settings and the next instruction in the language
you selected. Wait until printing is finished; then go to the
next step.
4.
To move to the feature you want to change, press the
button until the
DATA, PAPER OUT,
and
INK OUT
ALT
lights
indicate the appropriate selection.
For example, if you want to change the character table setting,
press the
are off and the
ALT
button until the
INK OUT
DATA
light is on.
and
PAPER OUT
lights
3-12
Using the Printer
Page 62

Next, press the
5.
FONT
button to change the setting.
As you move from setting to setting, the
(0),
off
(o),
and flash
in the tables on page
Oon
l Off
6
flashing
(ie)
to show your selection, as indicated
3-14
and
3-15.
FONT
lights turn on
Repeat steps 4 and 5 to make all of your changes.
6.
To exit the default-settings mode, turn the printer off.
7.
Note:
You may exit default-setting mode any time by turning off the
Cl
printer. Any changes you have made remain in effect until you
change them again.
lf you
ulant
Cl
settings mode again and print the current settings. Turn the
printer
to check the new default settings, enter the default-
qff
to exit without making
chatzges.
Using
the Printer
3-13
Page 63

Default-settings menu
Settings
FONT
Character table
I
I
Italic U.S.A
r
Italic France
c
Italic Germany
t
Italic U.K.
Italic Denmark 1
Italic Sweden
Italic Italy
Italic Spain 1
PC437 (USA, Standard Europe)
PC850 (Multilingual)
PC860 (Portuguese)
PC863 (Canadian-French)
PC865 (Norwegian)
PC853 (Turkish)’
BRASCII
L
L
L
L
(Brazilian Portuguese)”
PC857 (Turkish)*
Abicomp (Brazilian Portuguese)**
PC437 Greek (Greek)’
PC851 (Greek)’
PC855
(Cyrillic)’
moo
0.0
0.0
000
000
000
060
<I,
000
.I, \I,
000
0.0
0.0
0@6
000
000
006
06*
.1,
000
066
.1,
.I,
l
l
*
3-14
PC866 (Russian)*
PC852 (East Europe)’
+
Auto print direction
on
Off
Available only in the European version
Available only in the North/South American version
Using the Printer
5.0
.I,
0.0
a.0
0.0
Page 64

Default-settings menu
Continuous-paper
page length
Settings
11
inches
12
inches
8.5
inches
FONT
orno
0.0
0.0
\I,
7016
inches
Skip-over-perforation off
L
Network interface
mode
c
Mixed text/graphics
mode
Auto line feed
Auto interface
selection
on
Off
on
Off
on
Off
on
on
Off
Auto interface wait 30 seconds
time
Tear off
10
seconds
Off
on
000
orno
0.0
0.0
0.0
0.0
l @O
0.0
0.0
0.0
0.0
l
orno
:
0.0
0.0
1
.e
Optional
You
Interface Cards
can
use optional interface cards to supplement your
printer’s built-in parallel interface.
The Epson interface cards below are compatible with your
printer. (Not all interfaces are available in all countries.)
Using the Printer
3-15
Page 65

If you are unsure whether you need an optional interface or
would like to know more about interfaces, contact your dealer.
Model Numbers
C82305*/C82306*
C82307*/C82308*
C82310*
C823
13*
C82312*
l The last digit varies by country
Names
Serial interface card
32 KB
Serial interface card
32 KB
Parallel interface card
32 KB
IEEE-488 interface card
LocalTalk interface card
Installing an Interface Card
Follow the steps below to install an optional interface card.
Removal of the interface card is the reverse of these steps.
1.
Make sure the printer is turned off. Unplug the printer’s
power cord and disconnect the interface cable.
2.
Remove the screws from the interface cover. Remove the
interface cover.
3.
Be sure to set any switches and jumpers on the card. See the
interface card’s manual for details.
Note:
8
You can set the Auto
in default-settings mode. See pages
information.
3-16
Using
the Printer
interface
selection and Auto interface wait time
3-10
and 3-Z 1 for mow
Page 66

Slide the interface card along the slots
4.
interface compartment. Push in firmly to make sure you
fully insert the connector at the rear of the interface card
into the printer’s internal socket.
5.
Re-insert
the optional interface.
the screws and tighten to complete installation of
on
both sides of the
The C82305 */C82306 * serial interface
To use the
below on selecting a baud rate, handshake timing, and error
handling. For all other data transfer conventions, see the
C82305*/C82306*
C82305*/C82306*
interface card manual.
interface card, see the sections
card
Using the Printer
3-17
Page 67

Selecting a
You can select from the following baud rates: 300, 600, 1,200,
2,400, 4,800, 9,600 and
set the baud rate, see the bit-rate selection table in the
C82305*/C82306*
baud
rate
19,200
bps (bits per second). When you
interface card manual.
When the vacant area for data in the input buffer drops to
bytes, the printer outputs an X-OFF code or sets the
to 1 (MARK) to indicate that it cannot receive data. When the
vacant area for data in the buffer increases to
printer outputs an X-ON code or sets the
(SPACE) to indicate that it is ready to receive data.
512
DTR
DTR
bytes, the
flag to 0
Error handling
When the printer detects an error, it prints an asterisk
Maintenance
Replacing the ink
When the
the ink cartridge is low. The printer continues printing until
the cartridge is completely empty. When it is out of ink, the
printer stops and the
resume until you insert a new cartridge.
It’s a good idea to keep a spare ink cartridge on hand. Use
Epson ink cartridge SO20025 to ensure proper operation and
preserve the life of the print head. Other brands of ink may
clog the print head or damage it.
and
cartridge
INK OUT
Transportation
light on the control panel flashes, the ink in
INK OUT
light stays on. Printing does not
256
flag
(*).
Follow these steps to remove the empty cartridge:
3-18
Using the Printer
Page 68

1.
Make sure the printer stops printing and both the
and
PAUSE
2.
Hold down the
lights stay on. Then open the printer cover.
ALT
button for several seconds and release
INK OUT
the button when the print head moves to the ink cartridge
replace position.
3.
Pull the ink cartridge clamp toward you to release the
cartridge. (The clamp pushes the ink cartridge up so it is
easy to grasp.)
4.
Lift the cartridge out of the printer and dispose of it properly.
Do not take the used cartridge apart or try to refill it.
Warning:
The ink cartridge is self-contained to prevent leaks. However, if
ink gets on
water. Avoid touching your eyes.
physician.
your hands, wash them thoroughly with soapy
lf
irritation occurs, contact a
5.
Turn to page l-11 and follow the instructions from step 5 on
to install the new cartridge. After installing, make sure that
you
press the
PAUSE
button and that the
PAUSE
light is
turned off.
Note:
When you replace the cartridge, the printer does not recharge the ink,
delivery system again. However, the print head may start moving
the
printer performs normal maintenance procedures. This can take up
to 40 seconds to complete.
Using the Printer
07s
3-19
Page 69

Cleaning the print head
If print quality diminishes, use the printer’s built-in print-head
cleaning cycle to ensure the nozzles are delivering ink
properly. To avoid wasting ink, clean the print head only if
print quality declines.
Follow these steps:
1.
Make sure the printer is turned on and the
If the
PAUSE
pause the printer.
2.
Hold down the
two seconds.
light is not on, press the
ALT
button and press the
PAUSE
PAUSE
PAUSE
light is on.
button to
button for
The cleaning cycle takes about 40 seconds. The
flashes throughout the cycle and then stays on when
cleaning cycle is finished.
3.
Press the
Cleaning
the printer
To keep your printer operating at its best, you should clean it
thoroughly several times a year.
Before you clean the printer, make sure the printer is turned off
and remove any paper.
Use a soft brush to carefully brush away all dust and dirt.
To clean the outer case, use a soft, clean cloth dampened with
mild detergent. Keep the printer cover closed to prevent water
from getting inside the printer.
If the inside of the printer accidentally gets soiled with ink,
wipe it off with a damp cloth.
PAUSE
button to resume printing.
PAUSE
light
the
3-20
Using the Printer
Page 70

Caution:
U
q
Never use alcohols or
chemicals cm damage the components as well as the case.
ELI
Be careful roof to get wafer on the prinfcr mechanism or
clectrotzic
‘J
Do not
NJ
Do not spray the inside
umuitable dils cau
dealer or a qual$ied service person if lubrication is needed.
components.
use
a hard or abrasive brush.
fhimers
(If
the printer with lubricants;
damage the
to clean the prinfer; these
mchanism.
Contact your
Transporting the printer
If you need to transport your printer some distance, carefully
repack it using a box and enough packing materials to prevent
damage to your printer, as described below:
1.
Open the printer cover and make sure that the print head is
capped in the far right position. If it is not capped, turn on
the printer to cap it. Then, turn off the printer.
2.
Remove the paper separators from the printer. Then, remove
the paper support.
3.
Unplug the power cord from the electrical outlet; then
disconnect the interface cable from the printer.
4.
Remove the paper from the paper feeder and attach the
protective material to the printer. Repack it in a box.
Caution:
3 Do mf
q
If the print quality is poor after transport, clean the print head.
See “Cleaning the Print Head.”
printer.
‘-I
renmue
the ink cartridge when you tramport your
Keep the printerflat in the box during transport.
Using the Printer
3-21
Page 71

Troubleshooting
Most problems you may encounter while operating your
printer have simple solutions. Find your problem in this section
and follow the recommended steps. If you cannot solve your
problem using these instructions, contact your dealer or a
qualified service person for assistance.
Error indicators
You can get information on problems you encounter by looking
at the control panel. Check the lights on your printer and
compare them to the list below. Follow the recommended steps
to fix the error.
l off Oon
3-22
6
flashing
Using the Printer
- unchanged
Page 72

Paper end
No paper is loaded in the printer. Load paper again.
Paper jam
The paper is jammed inside the printer. Follow the steps on
3-33.
page
Ink is low
The ink cartridge is almost out of ink. Get ready to replace the
ink cartridge.
Ink is gone/No ink cartridge
The ink cartridge is empty or not installed. Replace the ink
cartridge with a new one.
Fatal ink system error
Contact your dealer.
Cleaning/Charging
The printer is in the charging cycle or the cleaning cycle. This is
not an error.
Release lever error
The release lever is in the wrong position. Move the release
lever to the correct position.
Back feed/Eject error
The paper is too long. When using continuous paper, tear off
any printed page before ejecting. Use paper that is within the
specified size. See “Technical Specifications” in the Appendix.
Carriage error
A carriage error occurred. Turn off the printer. After a few
seconds turn it back on again.
Using the Printer
3-23
Page 73

Power supply
The printer does not work or control panel lights are off.
Check that the power cord is properly plugged into the
electrical outlet.
Check that the n I “side of the power switch is pressed down to
turn on the printer.
If the electrical outlet is controlled by an outside switch or
automatic timer, use a different outlet.
Plug another electrical device into the outlet to determine
whether it is working.
The lights come on briefly but then go off and stay off.
Check that the printer’s voltage rating matches the voltage of
your electrical outlet. If the voltages do not match, unplug the
printer and contact your dealer immediately. Do not reconnect
the power cord to an electrical outlet.
3-24
Using the Printer
Page 74

Printing
Printing stops and the
Printing is temporarily suspended. Press the
PAUSE
light is on.
PAUSE
button to
continue.
The
PAUSE
light is off but nothing prints.
Check both ends of the cable between the printer and the
computer. Make sure the interface cable is plugged in securely.
Make sure your interface cable meets both the printer and
computer specifications.
The printer sounds like it is printing, but nothing prints.
____
The print head nozzles may be clogged. Hold down the
button and press the
PAUSE
button for two seconds to clean
the print head. See “Cleaning the Print Head” earlier in this
chapter.
ALT
Using the Printer
3-25
Page 75

Dots are missing in printed characters or graphics.
The print head nozzles may be clogged. Hold down the
button and press the
PAUSE
button for two seconds to clean
the print head. See “Cleaning the Print Head” earlier in this
chapter.
Set the Mixed text/graphics mode to on in the default-settings
mode. See “Using the Default-Settings Mode” earlier in this
chapter.
Set the Network interface mode to on in the default-settings
mode. See “Using the Default-Settings Mode” earlier in this
chapter.
The printed image is light or faint.
The print head nozzles may be clogged. Hold down the
button and press the
PAUSE
button for two seconds to clean
the print head. See “Cleaning the Print Head” earlier in this
chapter.
The paper-thickness lever may not be set correctly. The raised
position is for envelopes and may cause faint printouts if used
for plain paper. For details on the paper-thickness lever, see
“Printing on Special Paper” in Chapter
2.
ALT
ALT
Your paper may be moist or damp. Ink jet printers are sensitive
to moisture absorbed by the paper. Do not store your paper in
a damp or humid environment.
You may have selected the economy printing mode. To exit
this mode, press the
the
ECONOMY
3-26
Using the Printer
ECONOMY/CONDENSED
light goes off.
button until
Page 76

The printed image is blurred.
You may not be using the correct type of paper. See Chapter 1
for tips on choosing the right paper.
You may not be printing on the correct side of the paper. Test
both sides to determine which side gives you the best print
quality.
Your paper may be moist or damp. Do not store your paper in
a damp or humid environment.
The typestyles or characters set with your software do not print.
Check that the software is correctly configured for your printer.
The font selected on the control panel does not print.
Your software settings may be overriding the control panel
setting. Check the font settings in your software.
The wrong characters are printed.
The wrong character table is selected. Change the character
table as described in “Using the Default-Settings Mode” earlier
in this chapter.
Printing starts too high or too low on the page.
Adjust the top margin using your software or use the printer’s
micro-feed feature to make minor adjustments to the loading
position. See “Tips on using the paper feeder” in Chapter
Using the Printer
2.
3-27
Page 77

All the text prints on the same line.
Set
Auto
line
feed to on in the default-settings mode so that the
printer adds a line-feed to each carriage return. See “Using the
Default-Settings Mode” earlier in this chapter.
The text prints an extra blank line between each text line.
Set Auto line feed to off in the default-settings mode so that
two line-feed signals are not sent. See “Using the
Default-Settings Mode” earlier in this chapter.
Line spacing is incorrect. Adjust the line-space setting with
your software.
The printed page length is not what you expected.
The page length setting may not match the length of the paper
loaded in the printer. Change the page length setting with your
software to match the paper you are using. When using
continuous paper, you can change the length in the default
settings mode.
When using an optional interface card, the printer does not print
or the printout is not what you expected.
The other interface may be selected by the Auto interface
selection feature. Set Auto interface selection to off in the
default settings mode; the DIP-switch setting on the optional
interface board then selects the interface.
You may be trying to use an interface card or cable with the
wrong specifications. Check the specifications to make sure
you can use the interface card or cable with this printer.
3-28
Using the Printer
Page 78

The computer and printer interface settings may not match.
Make sure the settings on the computer and printer match.
The interface may have been disabled. Make sure that the
switch near the interface connector is turned on.
Single sheets do not feed properly from the paper feeder.
Too many sheets are loaded in the paper feeder. Remove the
paper from the paper feeder and reload the paper no higher
than the mark on the edge guide.
The paper is too thick or too thin to be fed. Make sure the
paper is within the specifications. Some paper types require
manual feeding. See “Technical Specifications” in the
Appendix.
Check that the release lever is in the single-sheet position when
using the push tractor.
The paper-feeder cover may be opened. Close the paper-feeder
cover.
Paper may be jammed near the print head.
The printer loads more than one sheet at a time.
The paper is too thin. Make sure the paper is within the
specifications. See “Technical Specifications” in the Appendix.
Using the Printer
3-29
Page 79

The ejected paper is wrinkled.
The paper is too thin or is damp. Make sure the paper is within
the specifications. See “Technical Specifications” in the
Appendix. Do not store your paper in a damp or humid
environment.
Single-sheet paper does not fully eject.
Use the
LOAD/EJECT
button to eject the page.
The paper may be too long. Use paper that is within the
specified size. See “Technical Specifications” in the Appendix.
Paper from the paper feeder is crooked.
The paper may be old or creased. Use only new, clean sheets of
paper.
There may be too much paper on the paper support.
Make sure that your paper is the proper size and quality. See
the Appendix.
When installing the push tractor, it does not lock in place.
The release lever is in the continuous paper position. Move the
release lever to the single-sheet position.
3-30
Using the Printer
Page 80

The lever inside the printer is in the wrong position as shown
below.
Remove the printer cover and the push tractor. Raise the lever
as shown below and do not move the lever afterwards.
After installing the push tractor, the release lever is locked.
When installing the push tractor, the release lever is in the
wrong position. Remove the push tractor and lower the release
lever to the single-sheet position. Then
re-install
the push
tractor.
Using
the Printer
3-31
Page 81

The push tractor does not feed the paper.
The release lever is in the wrong position. Move the release
lever to the continuous-paper position.
The paper has come off the push tractor. Reattach the paper to
the push tractor.
The lever inside the printer is in the wrong position. Remove
the printer cover and the push tractor. Raise the lever as shown
in illustrations above and do not move the lever afterwards.
Paper feeding of continuous paper is crooked or the paper jams.
Check that the release lever is in the correct position.
Make sure the paper supply is not obstructed by a cable or
some other object.
Make sure that your paper supply is positioned within 1 meter
(3.28
feet) of the printer.
Check that the holes on the sides of the paper are aligned with
each other. Also, make sure the sprocket units are locked and
their covers are closed.
Check that the paper-thickness lever is set correctly for the
paper you are using. See page
2-16.
Check that the paper size and thickness is within the specified
range. See the Appendix.
There may be slack in the paper. Adjust the position of the
sprocket units.
3-32
Using the Printer
Page 82

The continuous paper does not eject properly.
The page is too long. Tear off the paper and remove it from the
printer. Use paper that is within the specified length range. See
the Appendix.
The paper is jammed inside the printer.
Clearing u paper
To clear a paper jam follow the steps below:
Warning:
0
Be
tractor thatfits inside the printer.
1.
Open the printer cover and the paper feeder cover.
2.
Pull the access panel straight out of the rear of the printer, as
shown below. When loading continuous paper, remove the
push tractor.
jam
carefill not to touch the
part of
the access panel or push
Using the Printer
3-33
Page 83

3.
Pull the paper out gently. If the paper tears, make sure you
remove any remaining pieces.
4.
If the paper is caught in the paper ejection area, gently pull it
out of the printer.
5.
Push the access panel back into the rear of the printer. When
loading continuous paper, replace the push tractor. Close
the printer cover and the paper feeder cover.
Preventing
paper feeding and paper jam problems
If you have frequent paper feeding or paper jam problems,
refer to this checklist of corrective measures:
Cl
Use a higher-quality paper, one that is not too thin or
rough. Some types of paper require manual feeding. See
Chapter
Ll
Fan the stack of paper and then tap it on its edge to align it
2.
before you load it.
0
Be sure that you do not load paper higher than the mark on
the edge guide.
LI
Try turning the stack of paper over in the paper feeder.
Most packages of paper indicate the best side with an
arrow on the end of the package. Make sure the best side is
loaded face down.
~________
3-34
Using the Printer
Page 84

Appendix
Technical Specifications
Printer specifications
Interface specifications
Initialization
Command Summary
Sending printer commands
Using the command summary
Character Tables , . . . . . . . . . . . . . . . . . . . . . . . . . . A-20
............................
.......................
.......................
......................
........................
...................
.................
A-2
A-2
A-7
A-10
A-11
A-l 1
A-12
Appendix A-l
Page 85

Technical Specifications
Printer specifications
Printing
Printing method: Drop on demand 48-nozzle ink jet matrix
Printable columns and printing speed:
cpi:
characters per inch
cps:
characters per second
Maximum Resolution:
Printing direction:
Line spacing:
Paper feed speed: 82
Input buffer:
A-2 Appendix
360
x
360 dpi
text and graphics
Bidirectional with logic-seeking for
text and graphics. (The auto print
direction can be set in the
default-setting mode.)
l/6 inch, l/8 inch, or programmable
in l/360-inch increments
milliseconds per l/6-inch line
2.2
inches/set. for continuous paper
64 KB
when Mixed text/graphics
option in default-settings mode is set
to ON
128 KB
when Mixed text/graphics
option in default-settings mode is set
to OFF
Page 86

Character tables:
North/South America:
Europe:
Other countries:
Character sets:
1 italic and 7 graphics character tables
1 italic and
12
graphics character tables
1 italic and 5 graphics character tables
14
international character sets and
1.
legal character set
Bitmap fonts:
Select other font/pitch combinations using ESC/P 2 commands. See the
command summary later in this chapter for a list of commands.
Scalable fonts:
Font
Epson
Roman 8
Epson
Sans
Serif
Epson Roman T
Epson
Sans
Serif Ii
Paper
Single sheets (Paper feeder):
Min.
pnt.
8
18
18
Width
Length
Thickness
Weight
Max.
pnt.
32
32
132
132
182
to
420
mm
182
to
297
mm
0.065
to
0.11
64
to 90 g/m2 (18 to 24 lb)
(7.1
(7.1
mm
2
2
12Pt
bpt
to
to
(0.0026
Increments
Pf
Pf
16.5
11.7
Quality Bond paper, plain paper
1
I
inches)
inches)
to
0.0043
inches)
Appendix A-3
Page 87

Single sheets (Manual insertion):
Width
Length
182
182
Thickness 0.065
52
Weight
to 90 g/m2 (14
Quality Bond Paper, plain paper
Cl
Use
90g/m2 (24
lb.) paper under normal temperature and
humidity conditions only.
Cl
Use recycled paper under normal temperature and humidity
conditions only. Poor quality paper may reduce print quality, as
well as cause paper jams and other problems. If you encounter
problems, switch to a higher grade of paper.
Continuous paper:
Width
102
Thickness 0.065
52
Weight
to 82
Quality Plain paper
Labels:
Size
102
width for backing sheet
63.5
for label
Thickness 0.2
Quality
Plain paper
to
420
mm
to
420
mm
to
0.11
mm
to
406
mm (4 to 16 inches)
to
0.1
mm
g/m2 (14
to
406
mm (4 to 16 inches)
x
23.8
mm
mm
(0.0078
(7.1
to
16.5
inches)
(7.1
to
16.5
inches)
(0.0026
to
0.0043
inches)
to 24 lb)
(0.0026
to
0.0039
inches)
to 22 lb)
(2.5
x
0.94
inches) minimum
inches) maximum total
D Use labels only under normal temperature and humidity
conditions.
Cl
Use continuous type labels only with the optional push tractor.
Envelopes:
LI
Use envelopes only under normal temperature and humidity
conditions.
Cl
Insert envelopes long side first; use the manual feed slot only.
0
Make sure the difference in thickness within the printable area is
less than
A-4 Appendix
166
x
92
mm
(6.5
x
(9.5
to
3.6 inches)
X
0.0197
4.1
inches)
Size No. 6
No. 10240
Thickness 0.16
Weight 45
to 90 g/m2 (12
to
0.52
X
mm
104
mm
(0.0063
to 24 lb)
Quality Bond paper, plain paper, air mail
0.25
mm
(0.01
inches).
inches)
Page 88

Printable area:
Single sheets
(paper feeder and manual insertion)
Envelopes
A The minimum top margin is
B The minimum left and right margins are
(0.12
is
345
C The minimum bottom margin is
Continuous paper
A The minimum top and bottom
margins (above and below the
perforation) are
inches).
B The minimum left and right
margins are
inches). However, the
maximum printable width is
345
Mechanical
Paper-feed method:
Ink cartridge
3.0
mm
(0.12
inches).
3.0
mm
inches). However, the maximum printable width
mm
(13.6
inches).
13.0
mm
(0.51
inches).
9.0
mm
(0.35
3.0
mm
(0.12
mm
(13.6
inches).
Friction
(S020025):
Color:
Print capacity:
Cartridge life:
Black
Approximately
characters in letter quality mode
2 years from production date
(The cartridge life may vary,
depending on how often you use the
print head cleaning function.)
IA
0.7
million
Appendix A-5
Page 89

Ink cartridge
MTBF:
Lifetime print capacity:
Print head life:
Dimensions and weight:
Electrical
120
V model:
220-240
V model:
(S020025):
Temperature:
Storage:
Transit:
Freezing:
Height
Width
Depth
Weight
Rated voltage:
Input voltage range:
Rated frequency range:
Input frequency range:
Rated current:
Power consumption:
Rated voltage:
Input voltage range:
Rated frequency range:
Input frequency range:
Rated current:
Power consumption:
-30”
to
40°C (-22”
-30”
to
60°C (-22”
1 month at
120
hours at
-3°C (26.6”F)
2 hours at
6,000
75,000
1,000
164
mm
666
mm
2&4
mm
feeder
466
mm
feeder
8.6
kg
40°C (104°F)
60°C (140°F)
thaws in
25°C (77°F)
power-on hours
pages (A4 or letter)
million dots per nozzle
(6.45
inches)
(26.25
inches)
(11.2
inches) without paper
(18.3
inches) with paper
(19.0
lb.)
AC
120
V
AC
103.5
50
to 60 Hz
49.5
to
60.5
0.5
A
Approx. 13
printing in LQ mode at 10
AC
220
to
AC
198
to
50
to 60 Hz
49.5
to
60.5
0.3
A
Approx. 13
printing in LQ mode at 10
to
104°F)
to
140°F)
approx.
to
132
V
Hz
W (during self- test
240
V
264
V
Hz
W (during self-test
cpi)
cpi)
A-6 Appendix
Page 90

Environmental
Temperature:
Operation:
Storage:
Humidity (without condensation):
Operation:
Storage:
10”
to
-20’ to
20
to
5 to
35°C (50”
50°C
80%
RI-I
85% RH
to 95’F)
(4” to
122°F)
Print assured
Safety approvals
Safety standards:
US model:
European model:
R.F.I.:
US model:
European model:
Interface
Your printer is equipped with an g-bit parallel interface.
Specifications
The built-in parallel interface has the following characteristics:
Data format:
Synchronization:
Handshake timing:
Signal level: TTL
Connector: 36-pin 57-30360
The table below provides the connector pm assignments and describes
their respective interface signals.
Specifications
and pin assignments
&bit parallel
STROBE pulse
BUSY and
(50°F) (80°F) (95°F)
ACKNLG
compatible
UL1950
with
D3, CSA22.2 #220
EN
60950 (TijV) IEC 950 (SEMKO,
DEMKO, NEMKO,
FCC Part 15 Subpart B class B
Vfg. 243 (VDE 0878
EN
55022
(CISPR Pub
signals
Amphenol connector or equivalent
ar.3a
SETI)
part 3, part
22)
class B
30)
Appendix A-7
Page 91

Signal
Pin
Return Signal
Pin
Direction Description
1
2 20 DATA 1
3
4 22
5 23
6 24
7
8
9
10
11
19
21
25 DATA 6
26 DATA 7
27
28 ACKNLG
29 BUSY
STROBE
DATA 2
DATA 3
DATA 4
DATA 5
DATA 8
IN
IN
IN
IN
IN
IN
IN
IN
IN
OUT About an
OUT A HIGH signal indicates the
STROBE pulse to read data.
Pulse width must be more than
0.5 ps
at the receiving terminal.
These signals represent
information in bits 1 to 8 of
parallel data respectively. Each
signal is at HIGH level when
data is logical 1 and LOW when
it is logical
LOW indicates that data has
been received and that the
printer is ready to accept more
data.
printer cannot receive data.
The signal goes HIGH in the
following cases:
1)
During data entry (for each
character)
2)
During printing
3)
When the PAUSE button is
pressed
4)
During an error state
0.
approx. lo-l.ts
pulse.
12
13
- SLCT
14
, -
15
-
16
17
.-_
30
-
-
’
CHASSIS -
~
A-8 Appendix
PE
AUTO
FEED
i?
NC
GND
-
GND
OUT A HIGH signal indicates the
OUT
IN
printer is out of paper.
Pulled up to 5 V through 1 .O
resistance
When this signal is LOW, the
paper is automatically fed one
line after printing.
Not used
Logic ground level
Printer’s chassis ground, which is
isolated from the logic ground
kR
Page 92

Signal
Pin Pin
Return
Signal Direction
Description
18
-
19-30
31
32
-
33
-1
34
35
-
36
16
NC
GND
-
-
INIT
ERROR
GND
-
NC Not used
NC
IN
OUT This level becomes LOW when:
Not used
Twisted-pair return signal ground
level
When this level becomes LOW,
the printer controller is reset to
its state when the power is first
turned on and the print buffer is
cleared. This level is normally
HIGH; its pulse width must be
more than 50 us at the receiving
terminal.
1)
The paper-is out
2)
The PAUSE button is
pressed
3)
An error occurs
Same
as for pins
Pulled up to 5 V through 1 .O
resistance
Not used
19-30
Note:
The column heading “Direction” refers to the direction of signal flow as
viewed from the printer.
“Return” denotes the twisted-pair return, connected at signal ground level.
For the interface wiring, be sure to use a twisted-pair cable for each
signal and to complete the connection on the return side.
All interface conditions are based on the
times of each signal must be less than
Data transfer must be carried out by observing the
TTL
level. Both the rise and fall
0.2
microseconds.
ACKNLG
or BUSY
signal. Data transfer to this printer can be carried out only after receipt of
the
ACKNLG
signal or when the BUSY signal is LOW.
kR
Appendix A-9
Page 93

Interface
timing
The figure below shows the timing for the parallel interface.
BUSY
ACKNLG
DATA
STROBE
d
I
x\ x;
,+&F
,;
lop -l
Initialization
The printer can be initialized (returned to a fixed set of conditions) in
three ways:
Ll
Hardware
initialization
Software
initialization
r
Control
panel
initialization
The power is turned on.
D
The printer receives an INIT signal from the parallel
interface (pin 31 goes LOW).
The following condition then results:
1)
The printer mechanism is initialized.
2)
The input data buffer is cleared.
3)
The download character set is cleared.
4)
The print buffer is cleared.
5)
The default values are set. (Panel settings are reset.)
CI
Software sends the
command.
The following condition then results:
1)
The print buffer is cleared.
2)
The default values are set.
kept.)
D
Hold down the RESET button.
0
The printer switches to an interface using the Auto
interface selection feature.
The following results:
1)
The input data buffer is cleared.
2)
The print buffer is cleared.
3)
The default values are set. (The last panel settings are
kept.)
ESC @
(initialize the printer)
Crhe
last panel settings are
A-10 Appendix
Page 94

Default settings
The table below shows the default settings that take effect when the
printer is initialized. In addition, hardware and control panel
initialization clears the data buffer.
Item
Top-of-form position
Page length
Left and right margins
Line spacing
Character size
Vertical tab position
Horizontal tab positions
Font selection
Special printing effects
Download character set
Command Summary
Default setting
Current paper position
Single sheets:
65 lines for A4-size paper
61
lines for letter-size paper
22
inches for manual insertion
Canceled
1
/binch
line spacing
10.5
point
Cleared
Every eight characters
Last font selected on control panel
Canceled (except condensed printing)
Hardware initialization: cleared
Software/control panel
initialization: deselected only
Sending printer commands
Most actions your printer performs are handled by your software.
Software commands instruct the printer to print in a particular typeface,
feed the paper a certain amount after printing each line, start printing a
particular place on the page, and so on.
Some software programs let you send these commands yourself. This
allows you to enhance your printing in ways that may not normally be
available through the software. For example, some word processing
programs may not offer shadow fonts, but by inserting a command in
your document, you can use shadow fonts anywhere you like. The
commands your printer recognizes are listed in this command summary.
Appendix A-11
Page 95

How you format commands depends on the software you are using.
Some software programs accept only the decimal format, while others let
you type in ASCII characters. (Some programs don’t let you insert printer
commands at all.) In addition, your software probably specifies certain
punctuation you must use to enter the command. If your software allows
you to send commands to the printer, the software manual should
explain exactly what format and punctuation are required.
Using the command summary
The following section lists and describes all the commands by topic. If a
command has no parameters, it is merely listed. If it has parameters, they
are explained. The parameters are indicated by lowercase italicized
letters, usually n. The examples below show how the parameters are
indicated.
ESC 8
is a command with no parameters.
ESC
U 1 /O is a command that uses 1 to turn the feature on and 0 to turn it
off.
ESC
$ nl n2 is a command with two parameters.
ESC
D nn is a command with a variable number of parameters.
General operation
ASCII
ESC 8
-
Dec.
64
Hex.
40 Initialize Printer
Description
ESCUl/O
ESC EM n
Paper feeding
ASCII
CR
FF
LF
ESC
0
ESC2
A-12 Appendix
-
85 55
25
Dec.
13
12
10
48
50 32
19
Hex.
OD
oc
OA
30
Turn Unidirectional Mode On/Off
Control Paper Loading/Ejecting
n =
“R”
: Eject a sheet
Description
Carriage Return
Form Feed
Line Feed
Selectl/g-inch
Selectl/6-inch
Line
Spacing
LineSpacing
Page 96

ASCII
ESC3n
ESC+n
Dec.
51
43
Hex.
33
2B
Description
Set n / 180-inch Line Spacing
Set n/360-inch Line Spacing
Page
format
ASCII
ESC(cnn
ESC(Cnn
ESCCn
ESCCOn
ESCNn
ESC
0
ESCln
Dec.
40 99
40 67
67
67
78
79
108
Hex.
28 63
28 43
43
43
4E
4F
6C
Description
Set Page Format
ESC(c4Omlm2nln2
m=ml+m2x256
m:
Top margin in defined units
n = nl +
n:
Set Page Length in Defined Unit
ESC(C20nln2
n = nl + n2 x
n:
Set Page Length in Lines
n2
x
256
Bottom margin in defined units
256
Number of defined units
n = Number of lines
Set Page Length in Inches
n = Number of inches
Set Bottom Margin
for Continuous Paper
n = Number of lines
Cancel Top/Bottom Margin
for Continuous Paper
Set Left Margin
n = Left margin column
ESCQn
81
51
Set Right Margin
n = Right margin column
Appendix A-13
Page 97

Print position motion
ASCII
ESC
$
nl
n2
Dec.
36
Hex.
24
Description
Set Absolute Horizontal Print Position
n = nl + n2 x
n:
Specifies print position from
left margin in defined units
* Before you define the unit, the
default unit is l/60 inch for this
command.
256
ESC
\ nl
ESC(Vnn
ESC(vnn
ESC
D
HT
ESC
B
VT
nn
nn
n2
92
40 86
40118 2876
68
9 09
66
11
5c
28 56
44
42
08
Set Relative Horizontal Print Position
n = nl +
n:
* Before you define the unit, the
Set Absolute Vertical Print Position
ESC(V20nln2
n = nl + n2 x
n:
Set Relative Vertical Print Position
n2
x
256
Moves current print position in
defined units
default unit is l/120 inch in draft
and l/180 inch in LQ for this
command.
256
Specifies print position from top
margin in defined units
ESC(v20nln2
n = nl + n2 x
n:
Moves current print position in
defined units
Set Horizontal Tabs
Up to 32 tabs entered in ascending
order
Terminated by 0
Tab Horizontally
Set Vertical Tabs
Up to 16 tabs; last n should be 0
Tab Vertically
256
ESCJn
A-14 Appendix
74 4A
Advance paper n /
180
inch
Page 98

Font selection
ASCII
ESCkn
ESCXnn
ESC ! n
Dec.
107
88
33
Hex.
6B
58
21
Description
Select Typeface
n= 0:Roman
1: Sans
Serif
2:
Courier
3:
Prestige
Select Font by Pitch and Point
ESCXmnln2
m:
Set pitch to 360/m
M =
0:
No change in pitch
m = 1: Select proportional
rn
= 0,
1,18,21,24,30,36,42,48,60,
or
72
n = nl +
n:
Total points = (nl +
n =
n =
n =
*
ESC P, M, g, p, !,
Master Select
To find the value of II, add together
n = 0:
n2
x
Set point size in
0:
No change in point
0,16,21,24,28,32,36,
40,44,48,52,56,60,
(for Roman,
Roman T, and
0,21,42
(for other typefaces)
the numbers of the font attributes
and enhancements you want to
combine from the list below:
1Ocpi
1: 12 cpi
2:
Proportional
4:
Condensed
8:
Bold
4 : Script
10:
11: Sans
cpi
256
0.5
points
n2
Sans
Sans
or @ cancel
16:
32:
64:
128:
Roman T
Serif H
x
256)
x
0.5
or
64
Serif
Serif
H.)
ESC X.
Double-strike
Double-width
Italic
Underline
ESC
I’
ESC
M
ESC
ESC
l/O
ESCxn
80
77
g
p
103
112
120
50
4D
67
70
78
Select
10.5
point, 10
Select
10.5
point, 12
Select
10.5
point, 15
Turn Proportional Mode On/Off
Select LQ or Draft
n =
0:
Draft
cpi
cpi
cpi
1: LQ
Appendix A-15
Page 99

ASCII
ESC4 52
ESC
5
ESC
E
ESC
F 70 46
font enhancement
ASCII
SI
DC2
so
Dec.
53 35
69 45
Dec.
15
18
14
Hex.
34
Hex.
OF
12
OE
Description
Select Italic Font
Cancel Italic Font
Select Bold Font
Cancel Bold Font
Description
Select Condensed Printing
Cancel Condensed Printing
Select Double-Width Printing
(one line)
ESC
W l/O
DC4
ESC w l/O
ESCSO
ESCSl
ESC
T
ESC(-nn
ESCqn
87
20
119
83
83
84
40 45
113
57
14
77
53
53
54
28 2D
71
Turn Double-Width Printing On/Off
Cancel Double-Width Printing
(one line)
Turn Double-Height Printing On/Off
Select Superscript Printing
Select Subscript Printing
Cancel Superscript/Subscript Printing
Select Line/Score
ESC(-301nln2
nl= 1: Underline
2:
Strikethrough
3:
Overscore
n2= 0:
Cancel score line selected by nl
1:
Single continuous line
2:
Double continuous line
5:
Single broken line
6:
Double broken line
Select Character Style
n =
0:
Normal style
1:
Outline
2:
Shadow
3:
Outline with shadow
ESC
G
A-16 Appendix
71
47
Select Double-Strike Printing
Page 100

ASCII
ESC
H
ESC
- l/O
Spacing
ASCII
ESC SP
Dec.
72
45
Dec.
n
32
Hex.
48
2D
Hex.
20
Description
Cancel Double-Strike Printing
Turn Underline On/Off
Description
Set Intercharacter Space
n = Number of units of space added
to the space between characters
Units is l/120 inch (draft) or
l/180 inch
(LQ
and proportional)
ESC(Unn
ESC
c nl
n2
4085 2855
99 63
Character handling
ASCII
ESC
6
ESC7
ESCRn
Dec. Hex.
54 36
55
82
37
52
Define Unit
ESC(UlOn
Define positioning unit as n/3600
inch
n = 10,20,30,40,50, or60
n =
10:
default
Set Horizontal Motion Index
Select Pitch in n/360-inch units
Total units =
Description
Enable Printing of
Upper Control Codes
This command enables the printing
of codes
table has characters in those
locations).
Enable Upper Control Codes
Cancels
Select an International Character Set
n= 0:
USA 7: Spain I
1:
France 8: Japan
2:
Germany 9: Norway
3:
UK
4:
Denmark I
5:
Sweden
6:
Italy
nl + n2 x
128
ESC
6
10:
Denmark
12:
13:
to
159
11:
Spain II
Latin America
Korea
(HMI)
256
(if current
64:
Legal
Appendix A-17
 Loading...