

Page 1

EME
Self-Monitoring Blood Glucose System
Quick Reference Guide
Note:
Single -User meter only and Single -use lancets only.
A new, sterile lancet should be used each time you perform a test. The Meter, Lancing device and
Lancets are NOT to be shared between users. Sharing meter and lancing device and lancets may
transmit bloodborne pathogens, such as viral hepatitis.
Page 2
2
Intended Use:
The EME Blood Glucose Monitoring System is intended to be used by a single person
and should not be shared
.
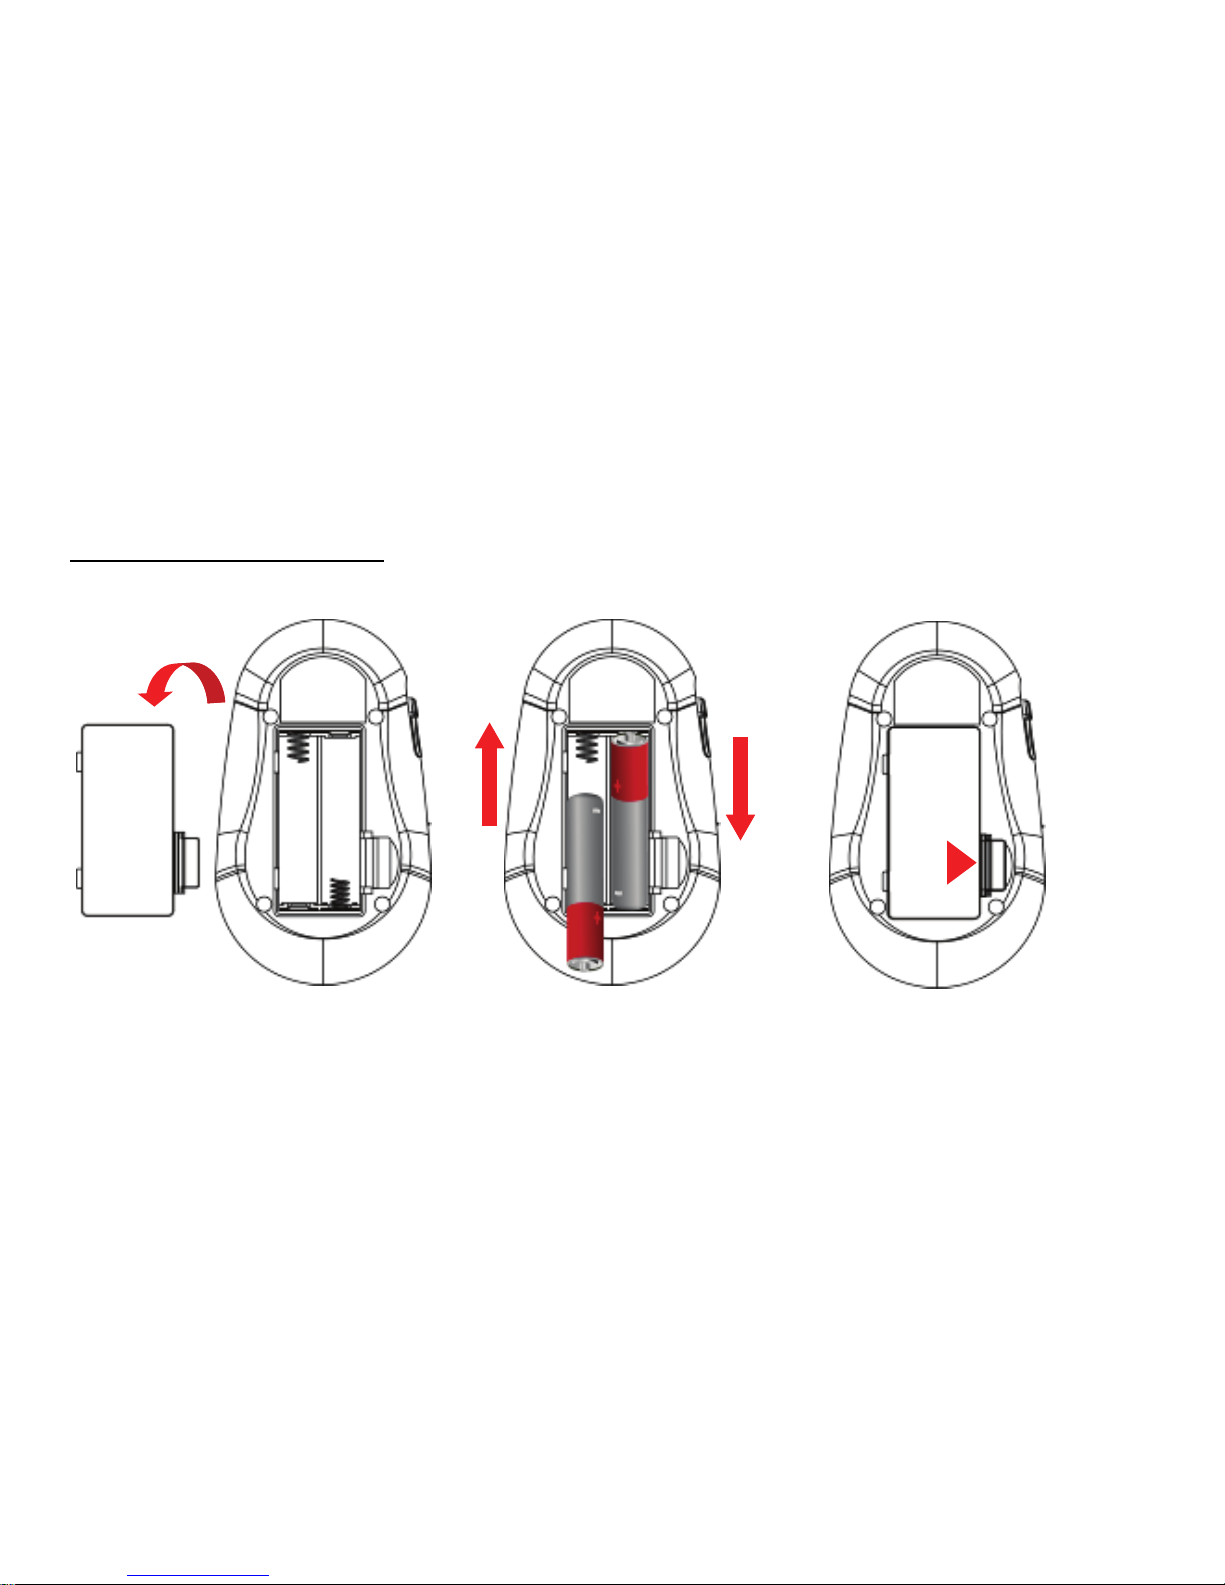
Installing Batteries
1. Open the battery door on the
back of the meter by pushing
the tab in the direction of the
arrow and pulling the door up.
3. Put the battery door back in
place and snap it closed.
The meter turns on
automatically.
2. Insert two batteries and the
meter beeps.
Page 3
3
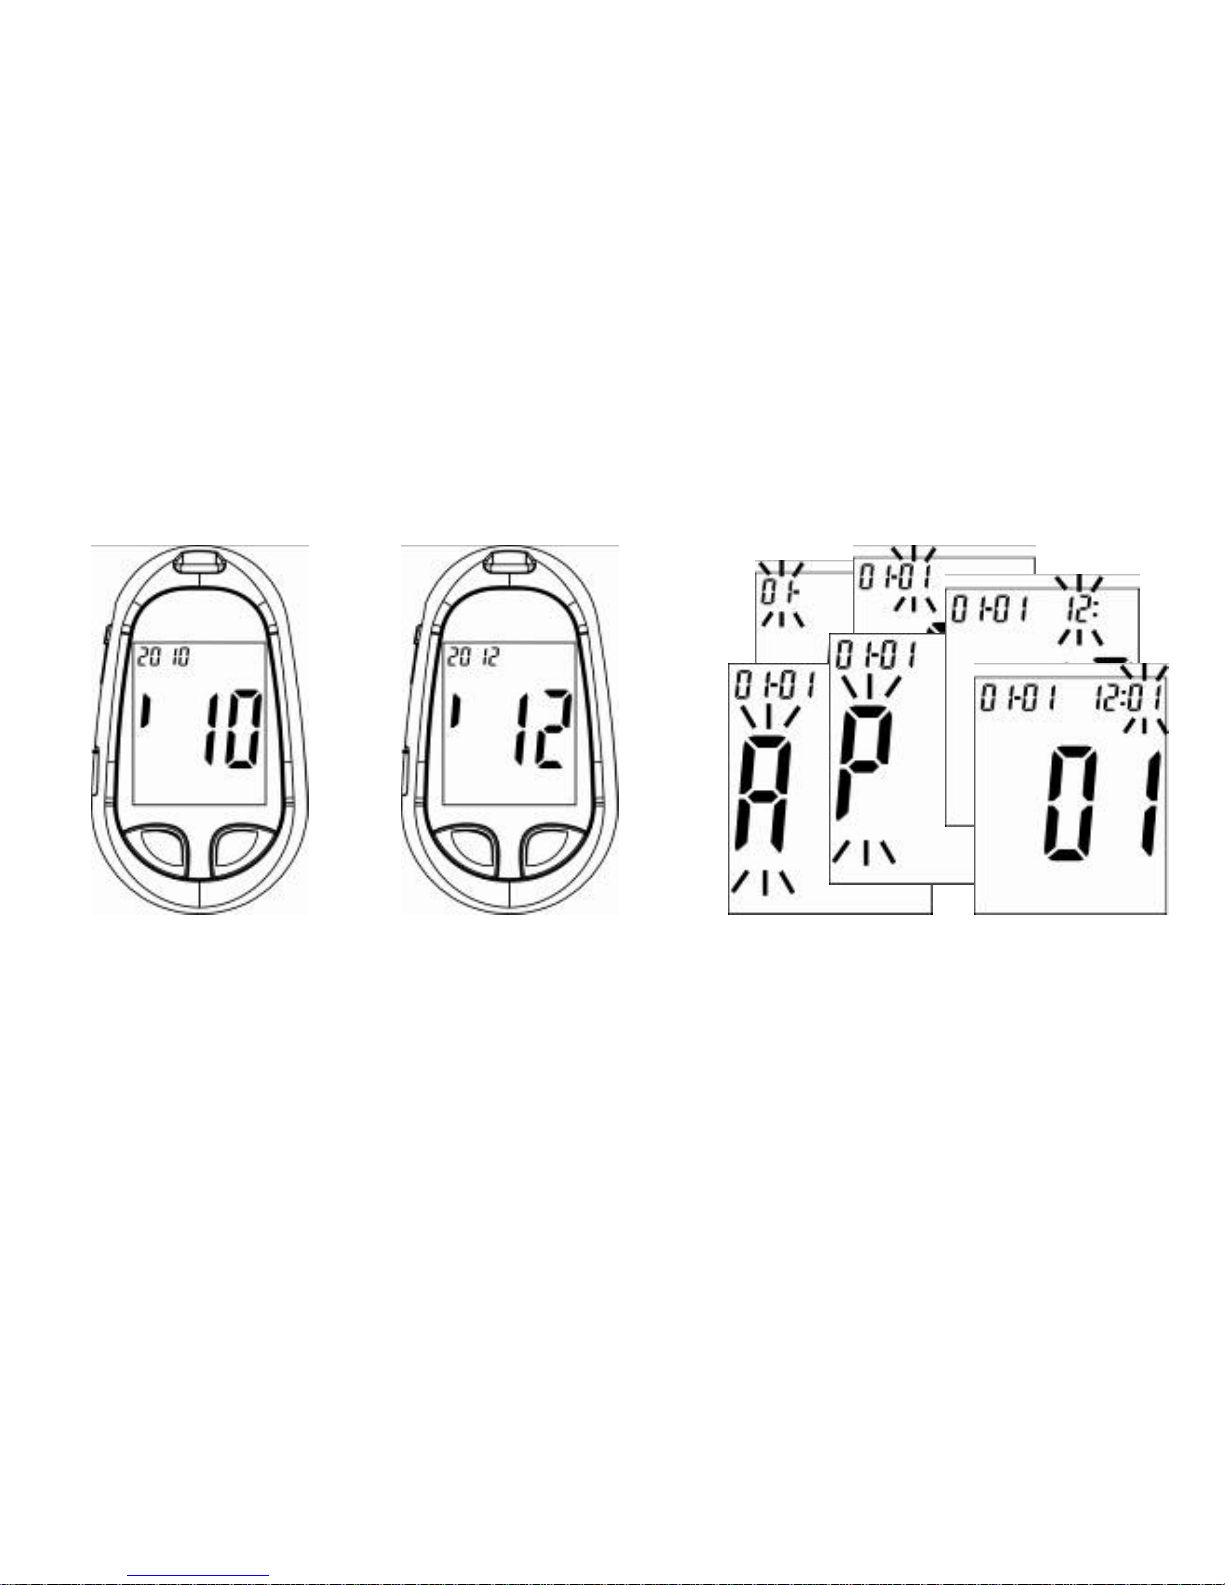
Setting the Time and Date - First Time Use
Setting the current time and date in your meter is important if you use the meter memory.
3. Repeat step 2 to set the date and
time. The flashing field is the one
you are currently setting. (A= AM,
P= PM)
1. Press (right button) to
turn the meter on.
2. The display shows the last
2-digit of the year that flashes at
the right top of display as well.
Press (left button) to adjust
the year and press (right
button) to confirm the setting.
Page 4
4
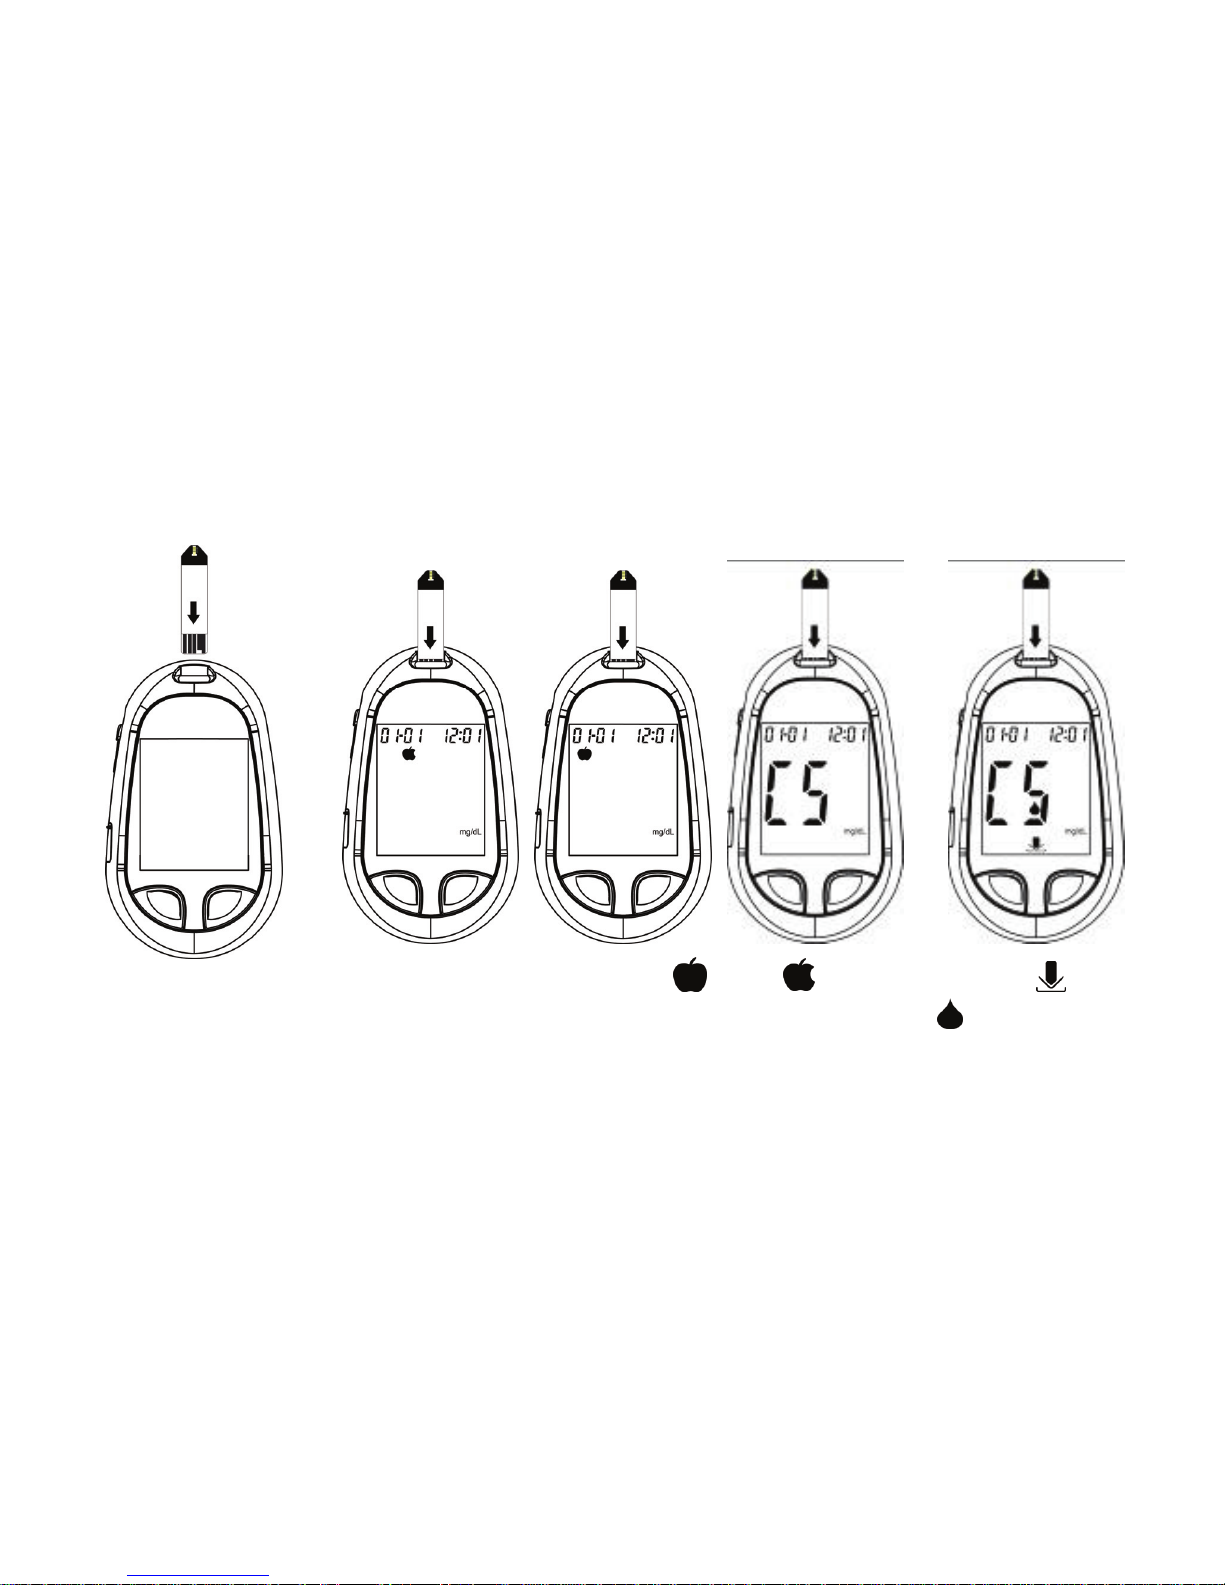
Running a Control Solution Test
You need the meter, a test strip, and control solution.
1. Put a test trip into the
meter as the direction
of the arrow on the test
strip. The meter turns
on.
3. The icons and
show themselves.
2. Press (left button) to set (AC), (PC)
or CS Mode, then press (right button) to
confirm the setting.
Page 5
5
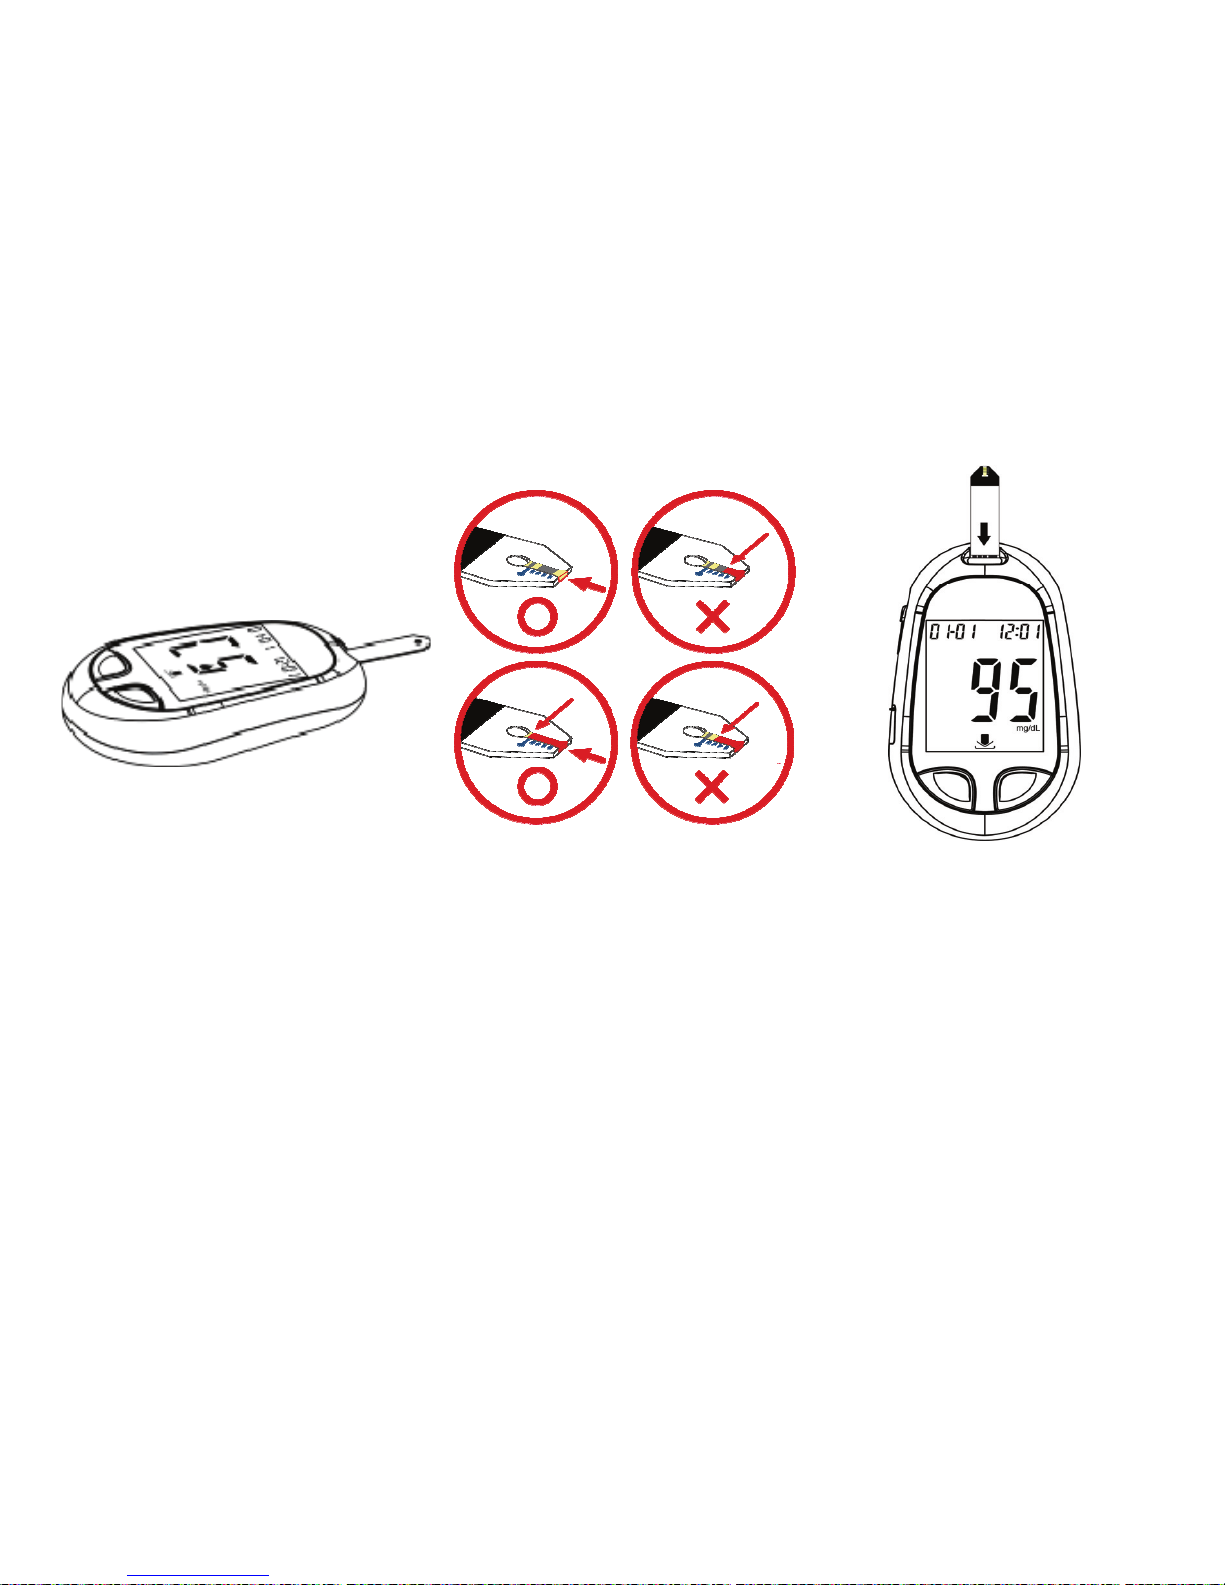
4. Place the meter on a flat
surface, like a table.
5. Remove the control solution
bottle cap and wipe the tip
of the bottle with a tissue.
6. Squeeze the bottle until a
tiny drop forms at the tip of
the bottle.
7. Touch the drop at the tip of the
test strip.
8. The meter starts to count down
from 5 seconds and then
shows the test result.
9. Do not remove the test strip
yet. Check if the reading
falls within the range printed
on the test strip bottle.
Page 6
6
10. Push the Strip Ejector to
remove the test strip.
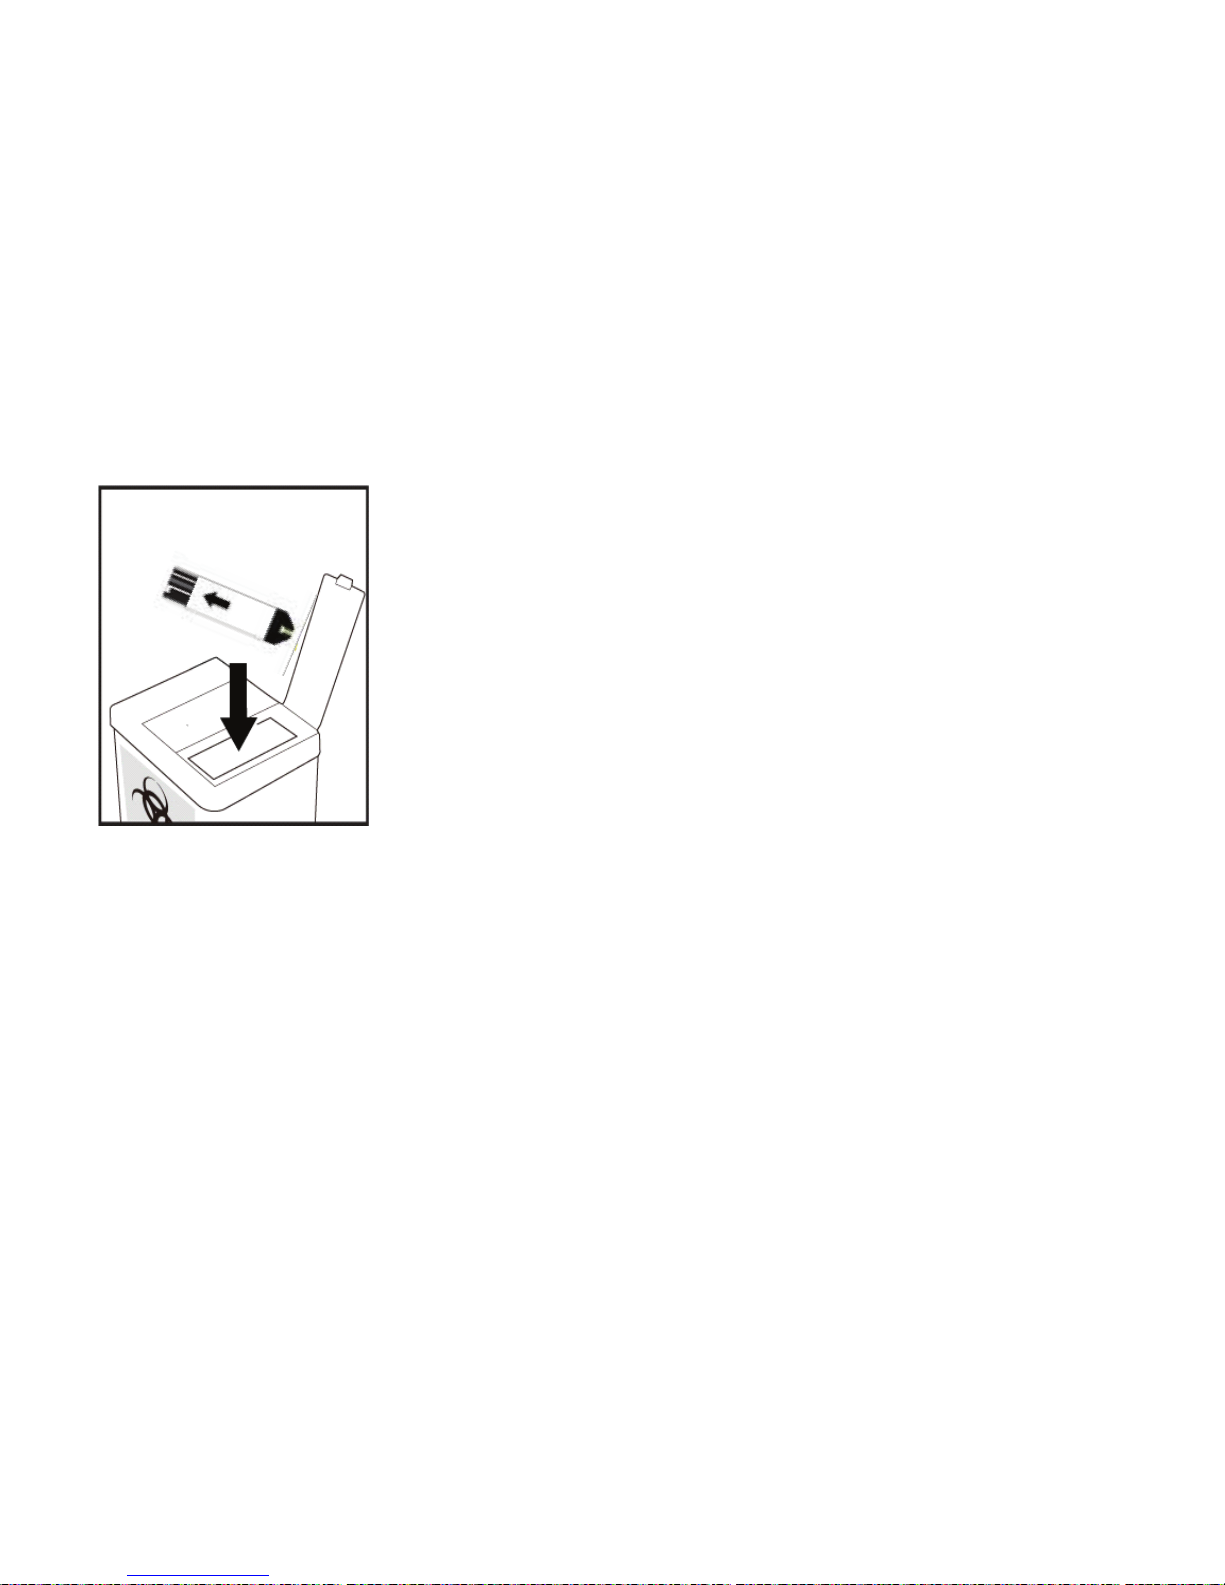
11. Throw the test strip away
after you have compared
the reading to the range
printed on the test strip
bottle.
Page 7
7
Inserting a Lancet into the Lancing Device
You must first load the lancet into the lancing device to get it ready for use.
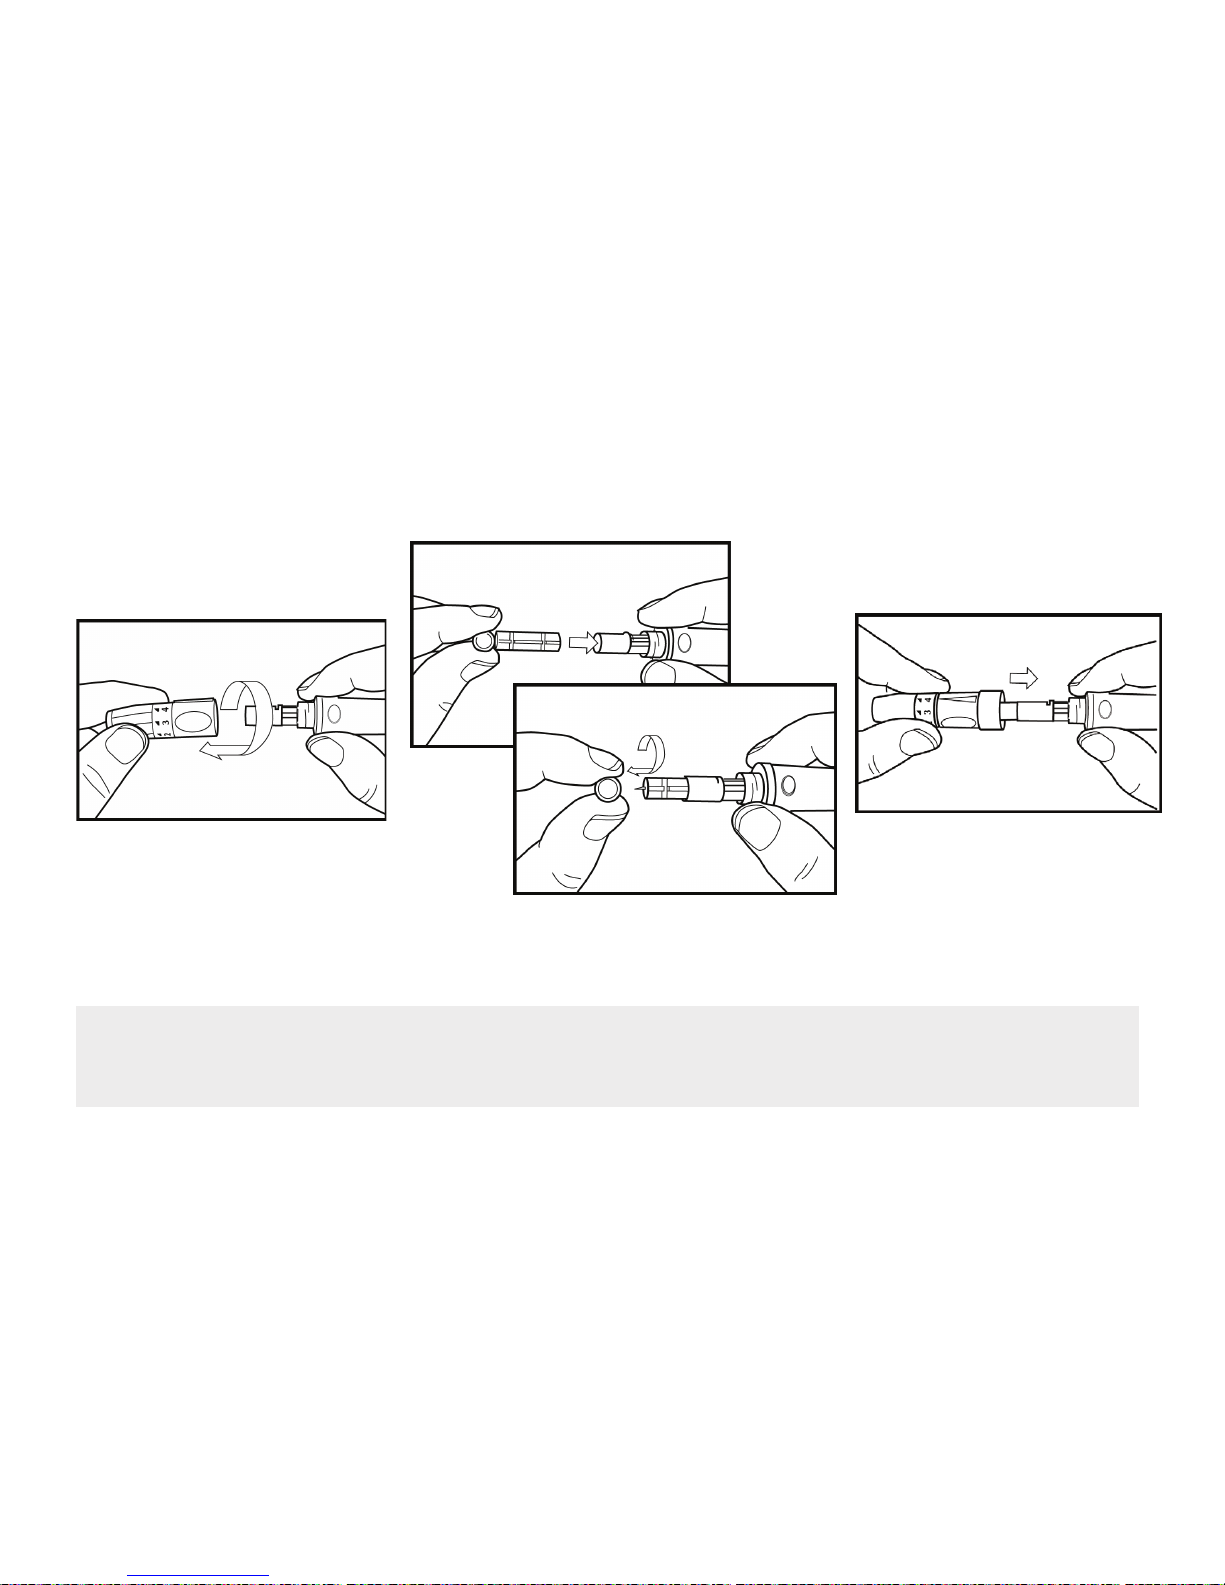
1. Unscrew the Cap.
2. Insert the lancet into the lancing
device firmly then twist off the
protective cover.
3. Recap the front cap.
Note:
Lancets are for single use only and a new, sterile lancet should be used each time you perform a
test
.
Page 8
8
Note: 1. Select 1-2 for soft or thin skin, 3 for average, and 4-5 for thick or calloused skin.
2. Lancing device and lancets are not to be shared between users. Sharing lancing devices
and lancets may transmit blood borne pathogens, such as viral hepatitis.
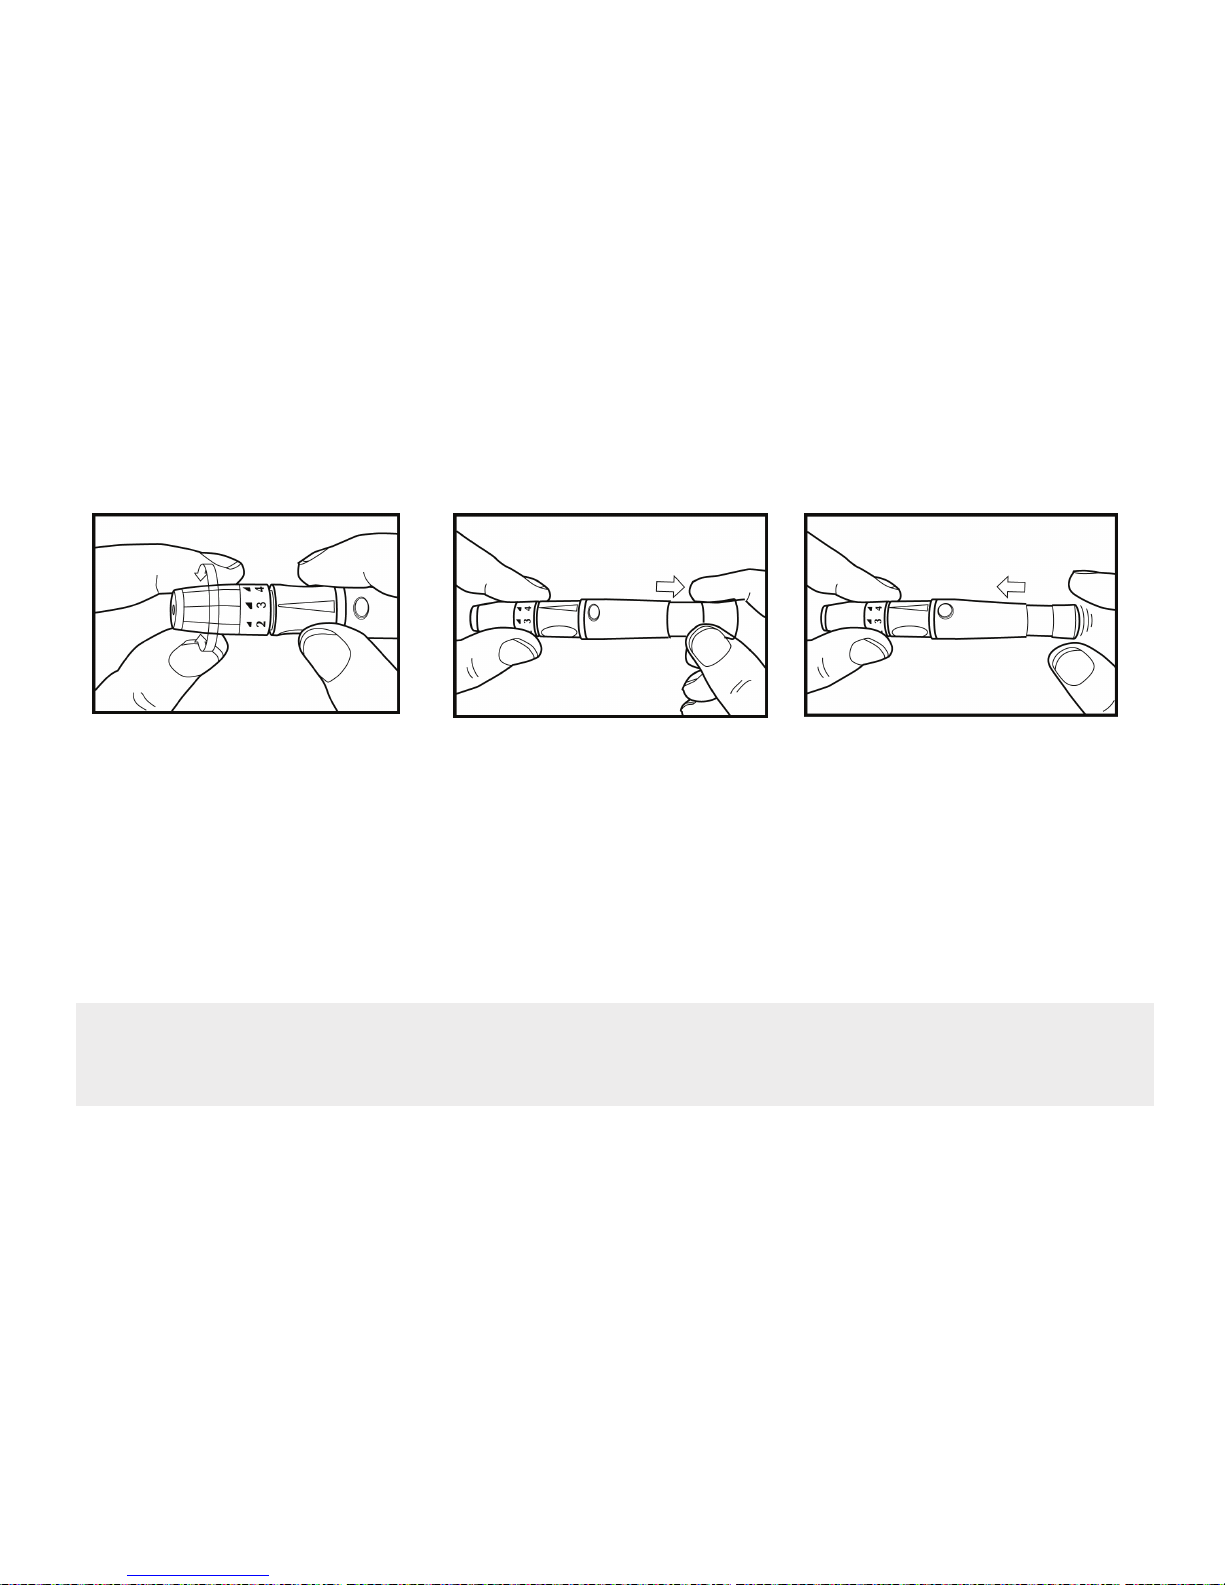
6. Set the lancing device aside
until later in the test.
5. Pull on the sliding barrel of the
lancing device until it clicks and
then release.
Now the lancing device is ready.
Do not prick your finger until your
meter and strip are prepared.
4. Select the desired penetration
depth.
Page 9
9
Running a Blood Glucose Test with Blood from Your Fingertip
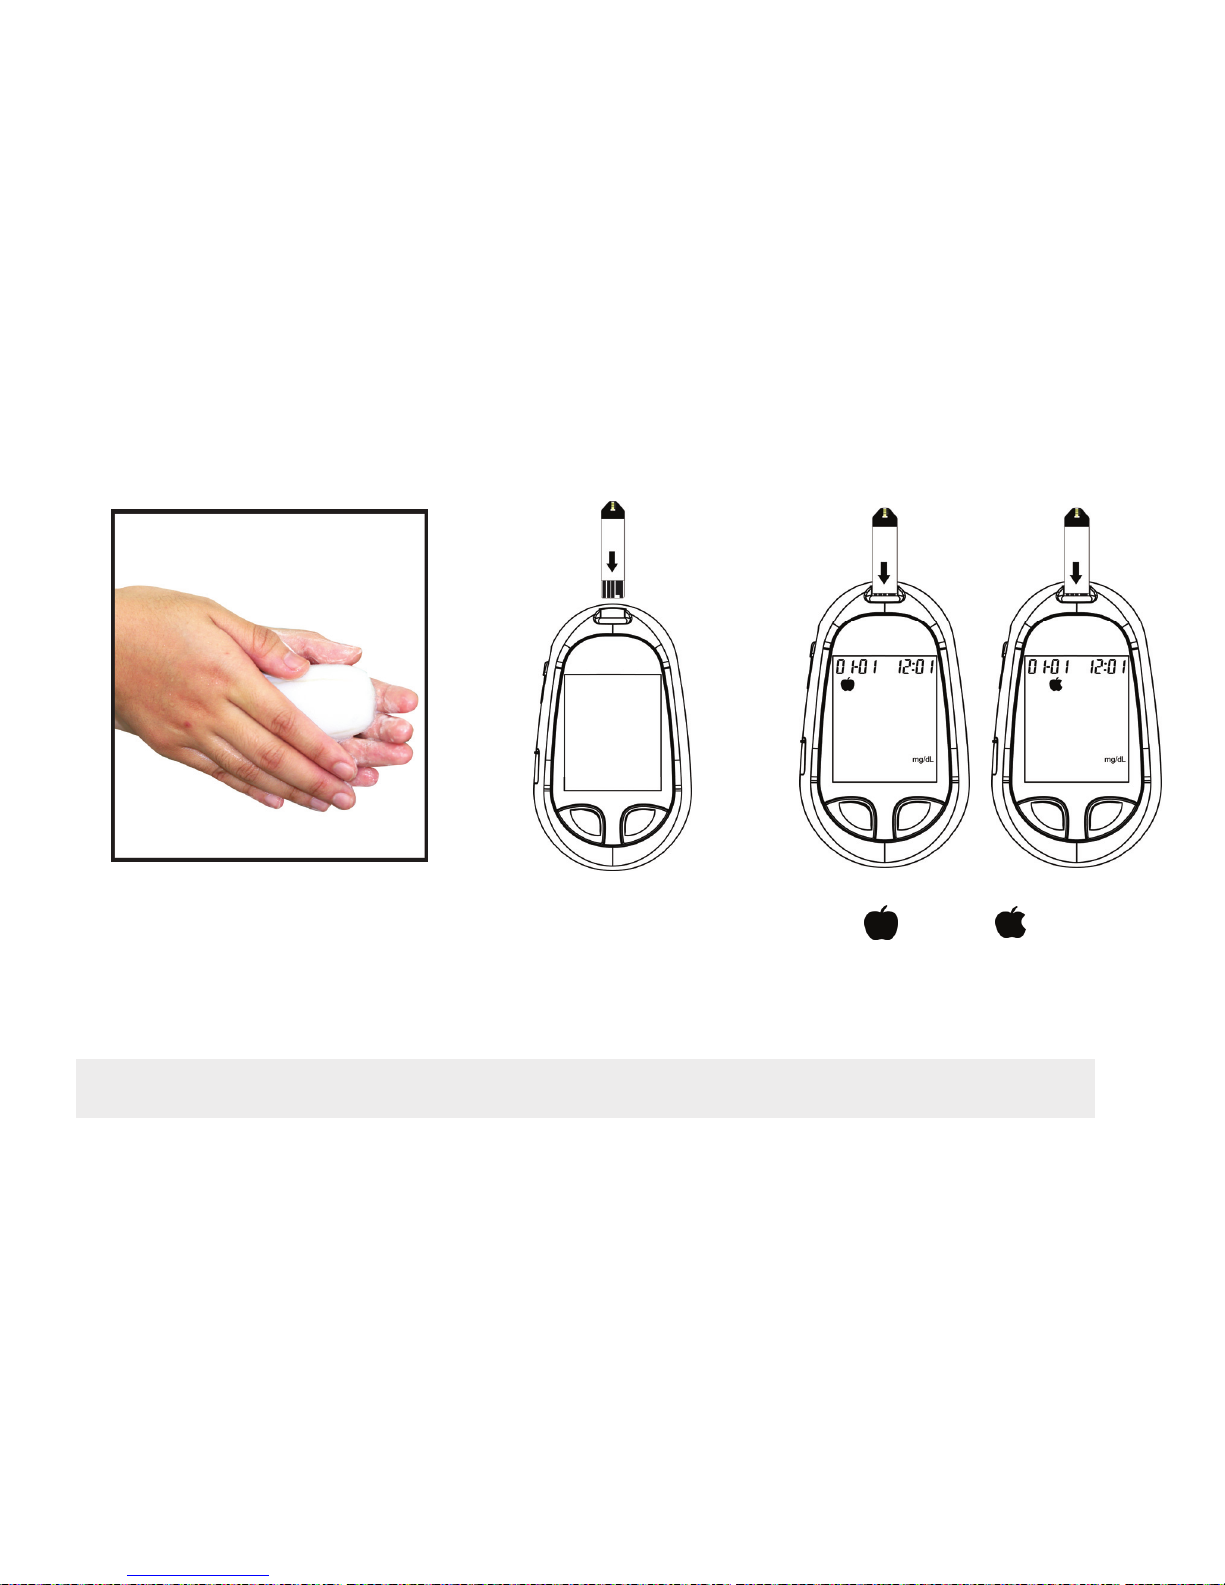
1. Wash your hands with soap
and warm water.
Rinse and dr
y
thoroughly.
Note: You can also turn on the meter by inserting a test strip.
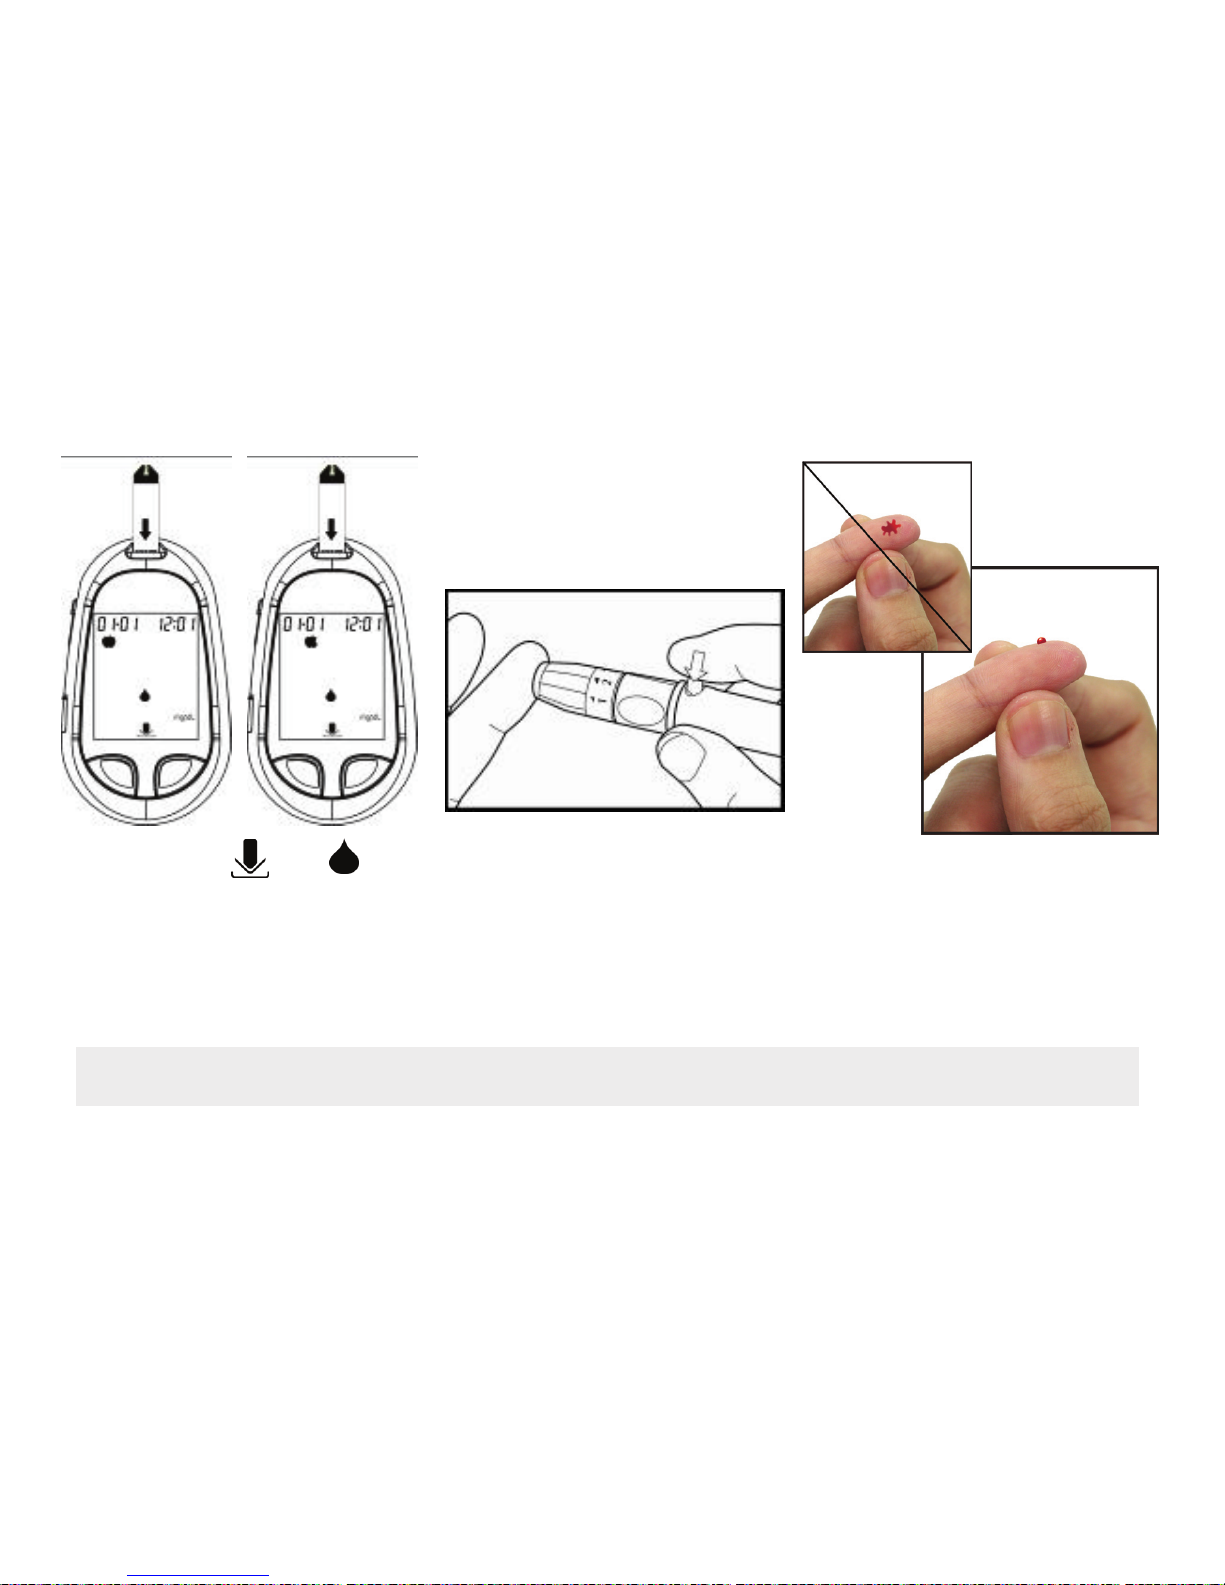
2. Put a test strip into the meter in
the direction of the arrow. The
meter turns on automatically.
3. Press (left button) to set
(AC) or (PC)
Mode, then press (right
button) to confirm the setting.
Page 10
10
5. Hold the lancing device firmly
against the side of your finger.
Press the trigger button. Then
remove the lancing device
from your finger.
6. Gently squeeze and/or massage
your fingertip until a round drop
of blood on your fingertip.
7. Wipe away the first drop with a
tissue and use the second drop.
Note: 1. please make sure to apply blood when the blood drop appears on the display.
4. The icons and
show themselves.
When the blood drop flashes
on the display, then use the
lancing device.
Page 11
11
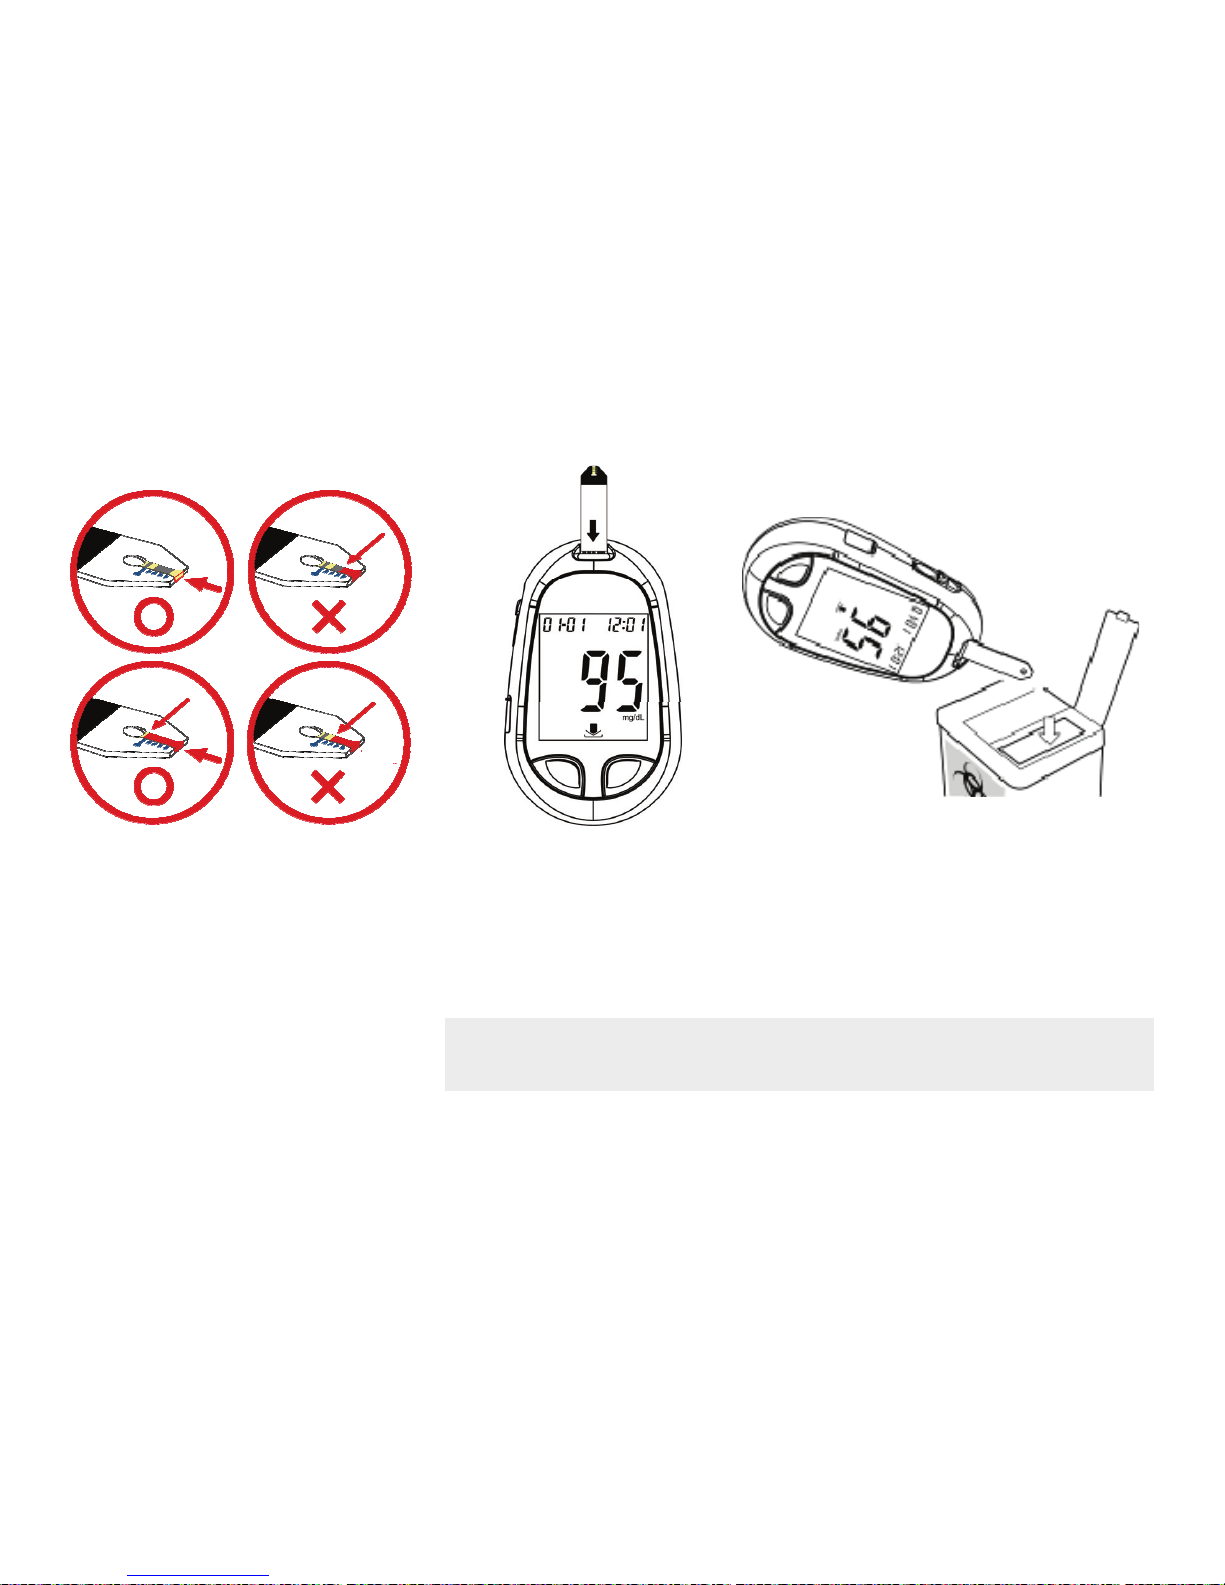
8. Touch the drop to the tip of the
transparent window of the test
strip.
Do not put blood on top of
the strip.
Be sure to get enough blood in
the strip’s confirmation window.
9. The meter starts to count
down from 5 seconds and
then shows the test result.
10. Push the Strip Ejector to remove
the test strip.
11. Throw it away after you have
compared the reading to the range
printed on the test strip bottle.
Note: For the most accurate readings, please use the second
dro
p
of blood.
Page 12
12
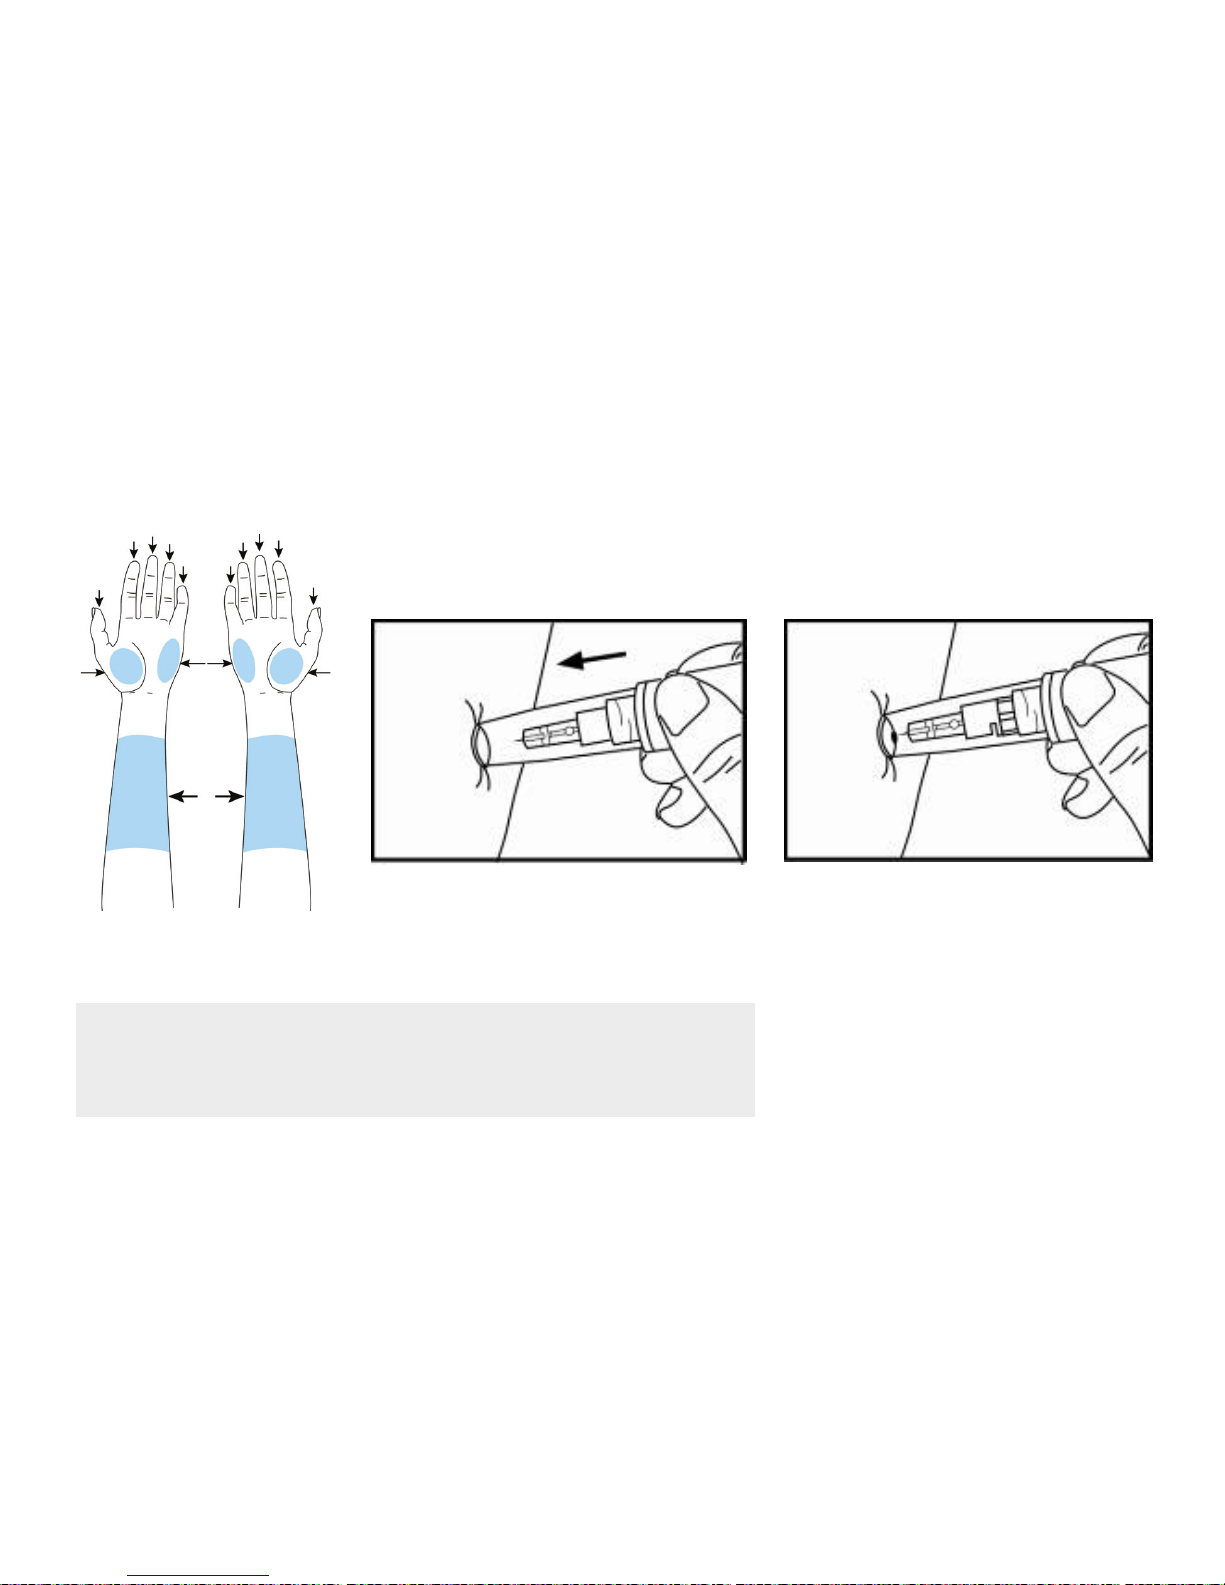
2. Press and hold the device with
clear adjustable tip against the
forearm.
3. Press the trigger button to activate
the lancing device. Hold the device
against forearm and increase
pressure until the blood sample
size is sufficient.
4. Wipe away the first drop with a
tissue and use the second drop.
1. Massage the puncture
area of forearm for a
few seconds.
Running a Blood Glucose Test with Blood from Your Palm or Forearm
Please use the clear cap with the lancing device for AST testing
Note: 1. Check with your healthcare professional before
test other sites than fingertip.
2. Please do NOT use the first drop of blood sample.
Page 13
13
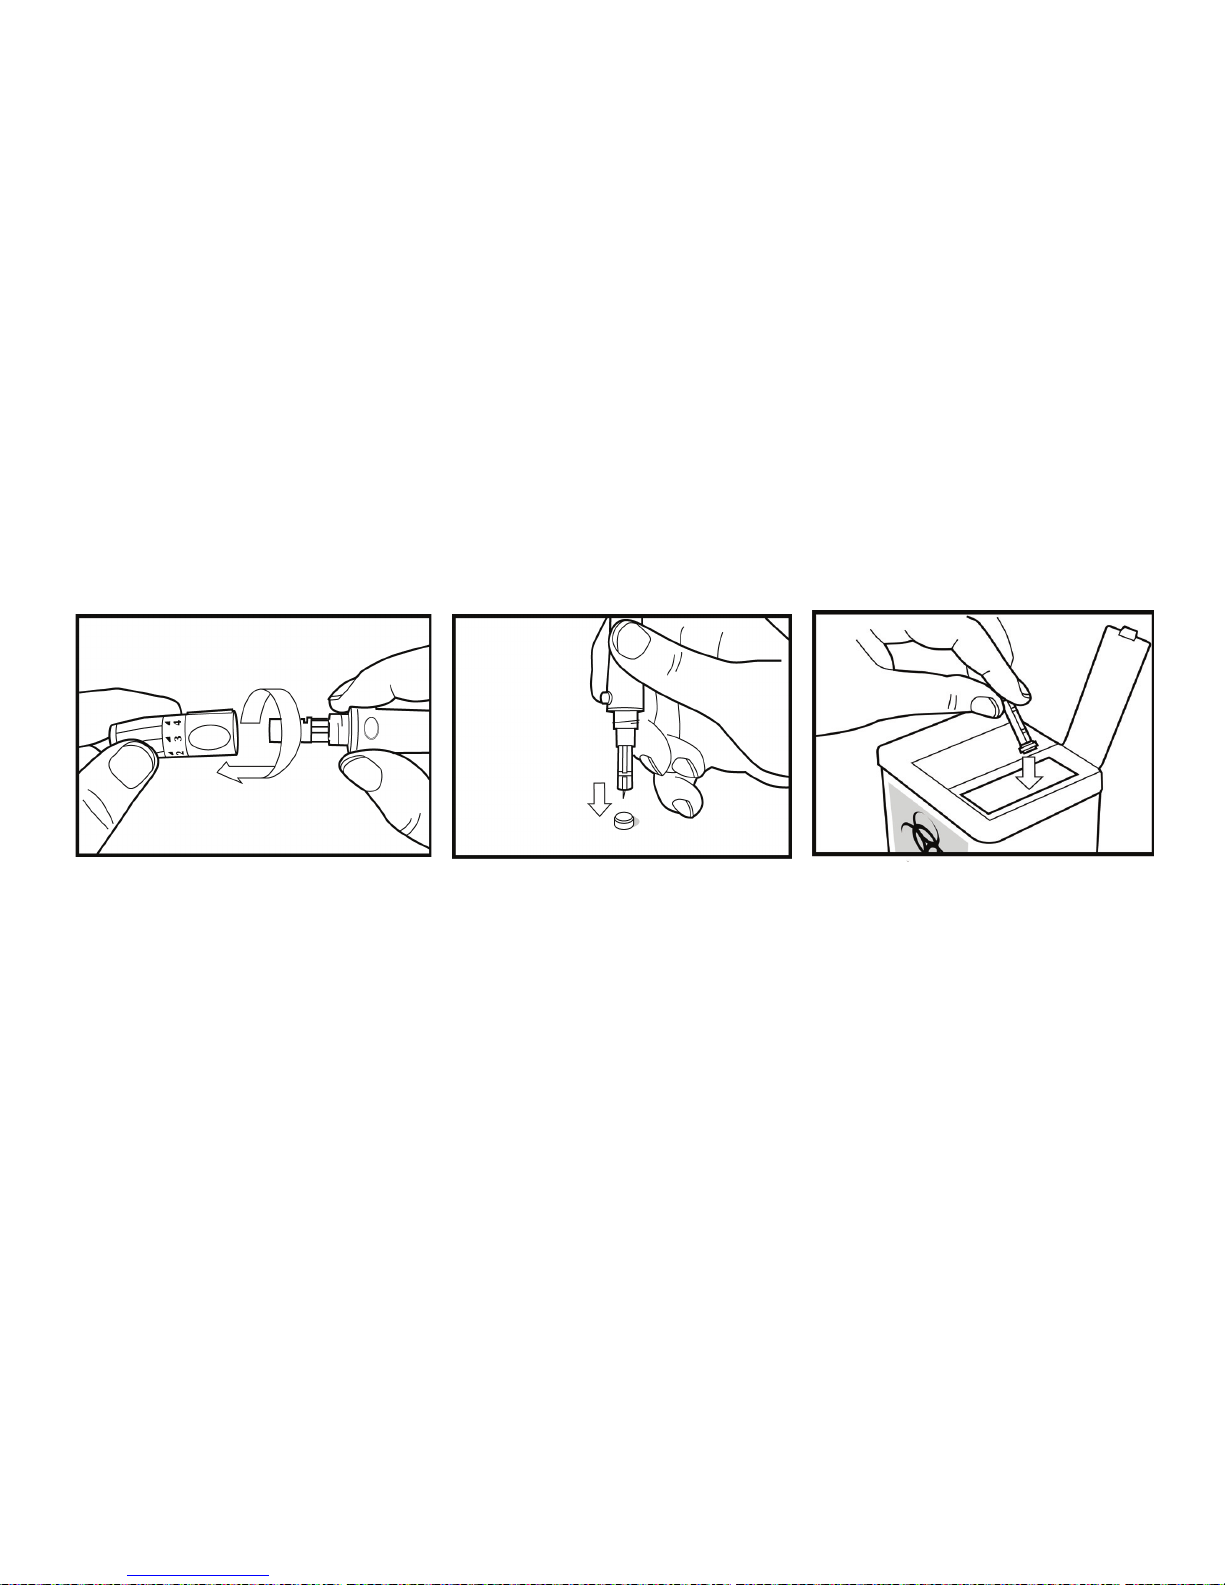
Discarding Used Lancets
1. Unscrew and remove the
adjustable cap.
2. Without touching the used
lancet, stick the lancet tip into
its protective cover.
3. Discard used disposable
lancets into an appropriate
sharps or biohazard container.
Page 14
14
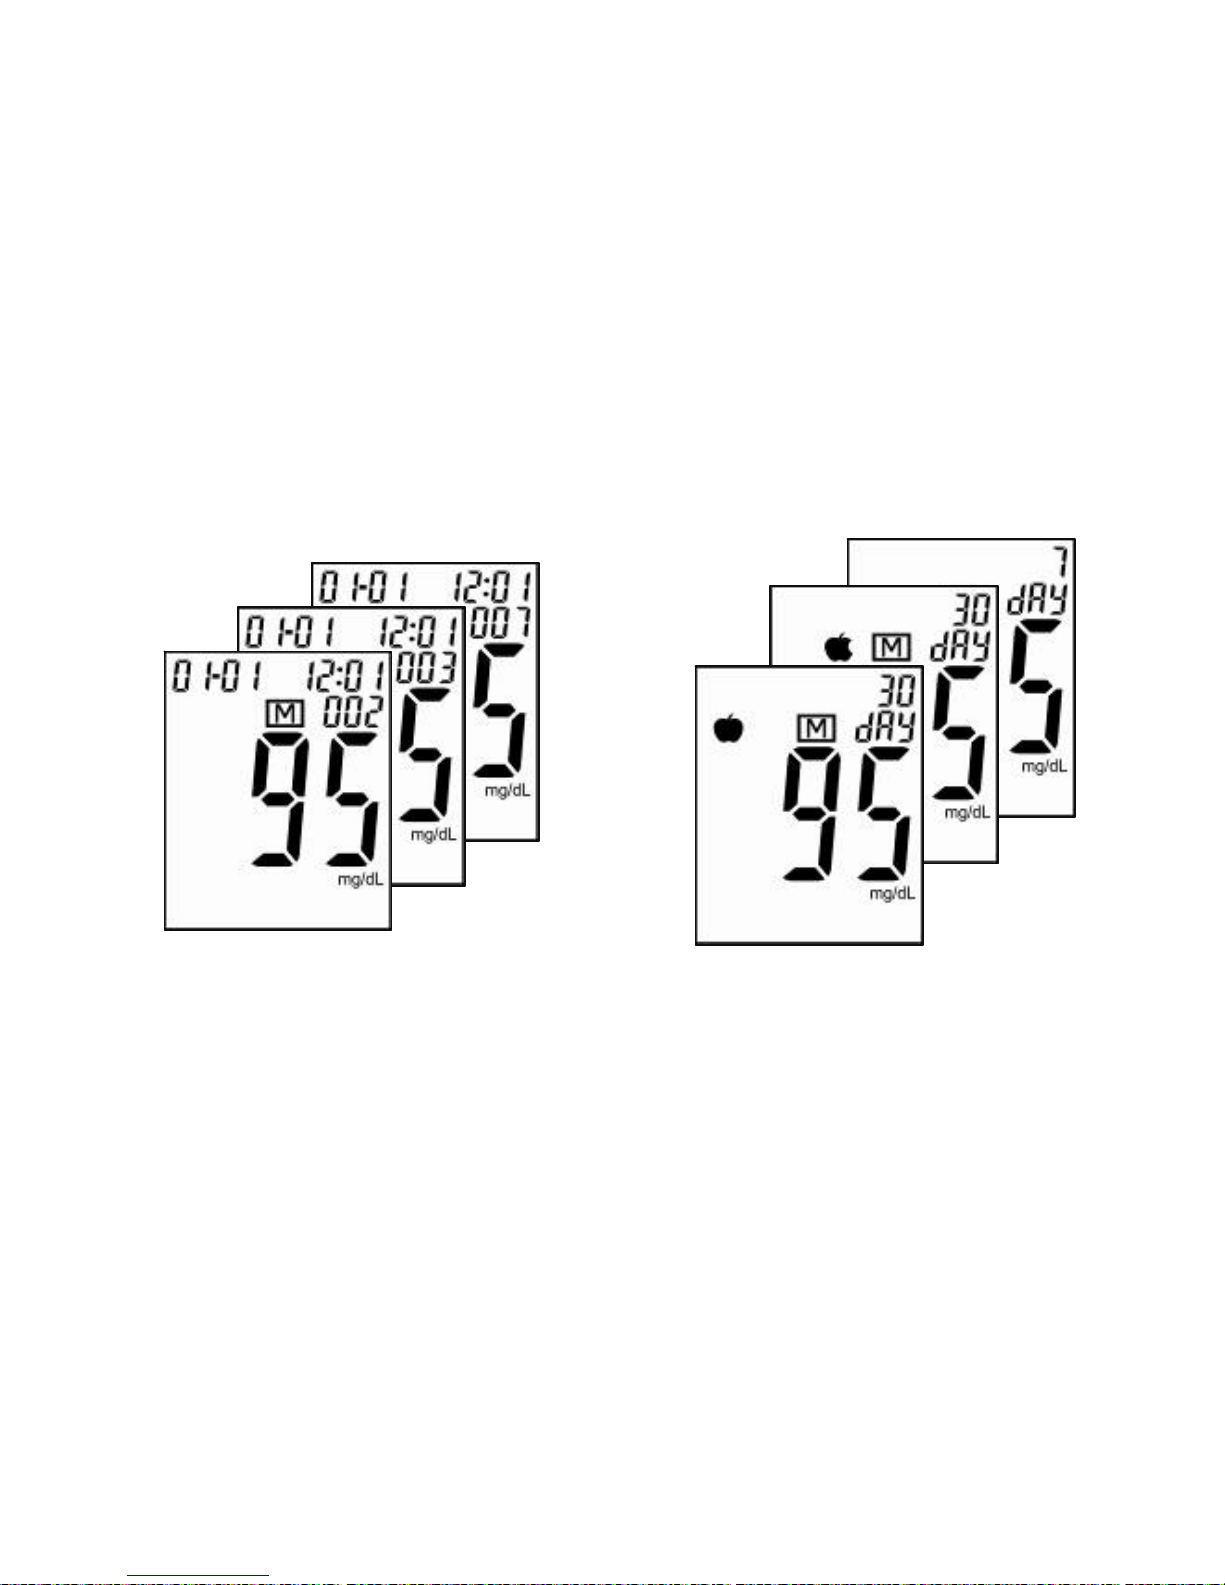
Viewing Test Results
The meter provides 7, 14, 30 and 90 days averaging to help track your blood glucose trend soundlessly.
1. Press until turning the meter on.
2. Press to view the latest test result.
3. All results are shown in turn from
records of M480 to M001.
4. Press to view averages of 30day-
AC/PC and 7/ 14/ 30/ 90 days.
Page 15

15
Cleaning and Disinfecting Your Meter and Lancing Device
Choosing the disinfectant
The recommended EPA-registered disinfected product is as follow:
PDI® Super SANI-CLOTH® Germicidal disposable wipe (EPA Reg. No.:9480-4)
Super Sani-Cloth germicidal wipe contains active ingredients: n-Alkyl (60% C14, 30%C16, 5%C12, 5%C18)
dimethyl benzyl ammonium chlorides and n-Alkyl (68%C
12, 32%C14) dimethyl ethylbenzyl ammonium
chlorides and they have been shown to be safe for use with the EME meter, but any other disinfectant product
with the EPA registration number may be used on this device.
Please find the Super Sani-Cloth germicidal wipe in any pharmaceutical store or purchase on the PDI website:
http://www.pdipdi.com/healthcare/surface_disinfect.aspx
Cleaning and Disinfection Instruction
Please keep the meter and lancing device free of dirt, dust, bloodstain, and water stains. EME blood glucose
meter and lancing device should be used only on one patient and not shared. Follow these guidelines carefully
to clean your meter
After every use (for up to 9 times a day), follow the cleaning instruction to prevent the growth of any
microorganism and also to help improving the effectiveness of disinfection. Then follow disinfection
instruction once per week which could effectively kill blood borne pathogens, such as viral hepatitis and
prevent cross-contamination. Therefore, if the meter and lancing device are being operated by a second
person who is providing testing assistance to the user, the meter and lancing device should be disinfected
prior to use by the second person.
Page 16

16
Cleaning Instruction: All blood and other body fluids must be thoroughly cleaned from surfaces and
objects before disinfection by the germicidal wipe. Open, unfold and use first germicidal wipe to remove heavy
soil after every use.
Disinfection Instruction
: Unfold a clean wipe and thoroughly wet all the surface of the meter, including the
strip port and other connection port. Unfold a clean wipe and thoroughly wet all the surface of the lancing
device, including cap or AST cap if used. Treated area must remain visibly wet for a full 2 minutes. Let the
devices air dry for 0.5 minute. Do disinfection once per week.
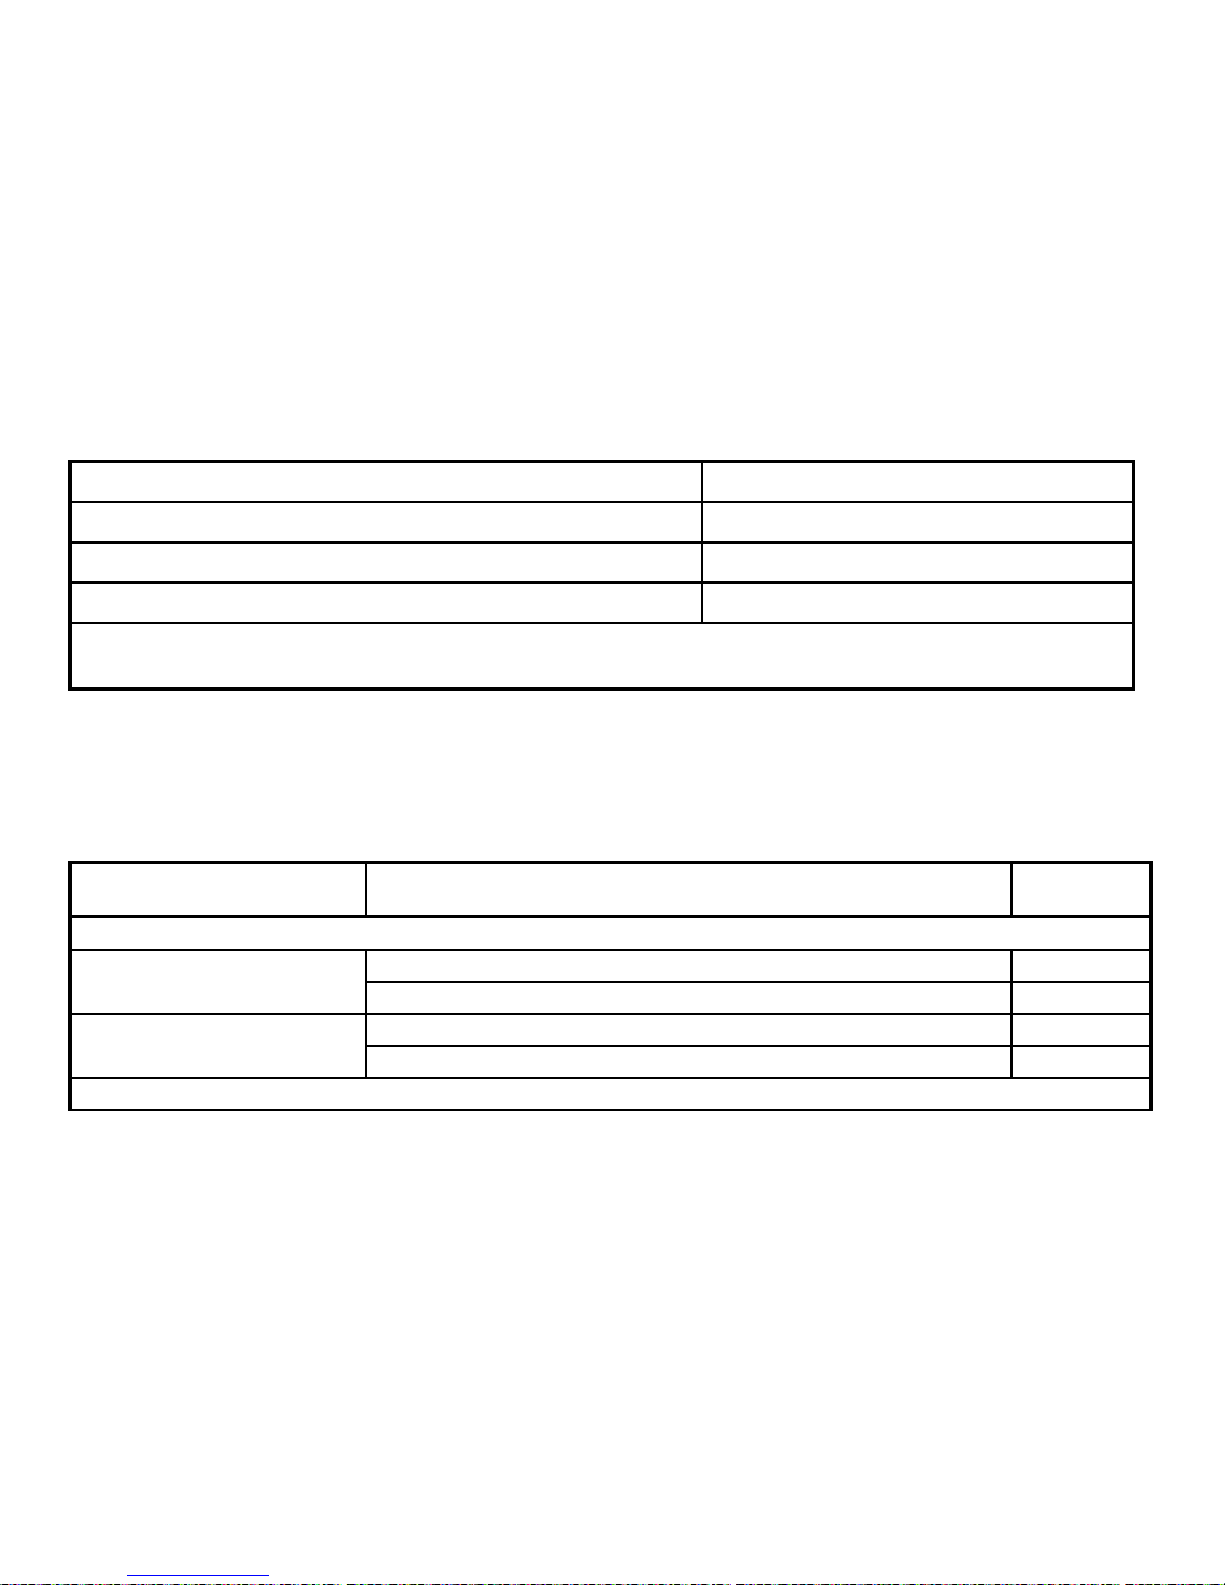
Physical Appearance check of the meter after each cleaning or disinfection
Do Not:
Get any moisture in the test strip slot.
Spray any cleaning solution directly onto
the meter.
Put the meter under water or liquid.
Pour liquid into the meter.
Do:
Make sure the meter is turned off during cleaning and
disinfection.
Keep the test strip vials tightly closed when performing the
cleaning and disinfection procedures because the fumes
from the disinfectant may affect the performance of the strip
After cleaning or disinfection, please perform the physical
appearance and performance check of devices. Please
follow the instruction on the page 17 to 19.
Page 17
17
Check item Accept Result
Is it clear to see through the transparency part, like display? Yes
Is there NO erosion happened on the strip slot or other parts? Yes
Is the labeling on the meter legible? Yes
Action: If any of the results is “No” the user should call the Customer Care Service toll-free at
866-994-3345(Eastern Time, Mon - Fri 9:00AM ~ 5:00PM) for assistance.
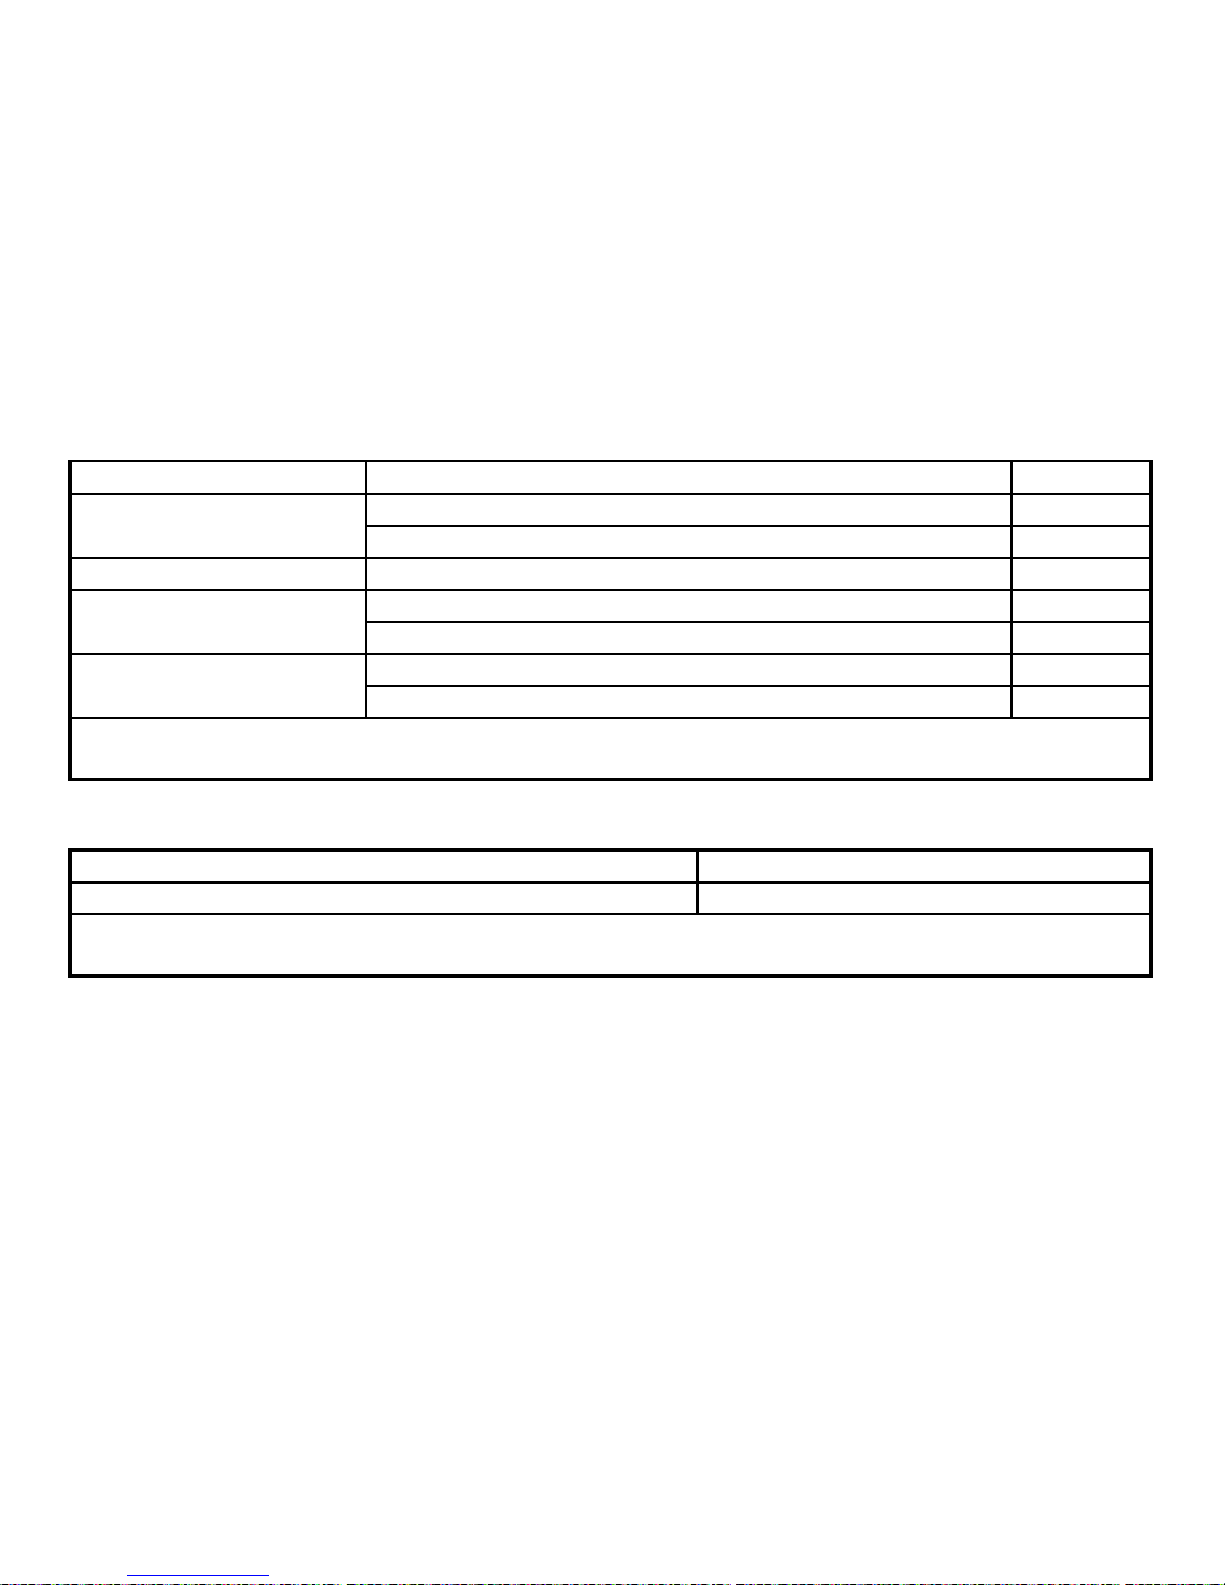
Performance check of the meter
Steps Check item
Accept
Result
After each cleaning
Is the meter powered on? Yes 1. Press and hold left
button for 3 sec.
Did the meter beep? Yes
Is the testing result correctly stored in the memory? Yes 2. Press and release right
button.
Can the result be clearly read? Yes
After each disinfection
Page 18
18
1. Insert test strip Is the meter powered on? Yes
Any reading? Yes 2. Apply Level 2 control
solution
Is the reading within control range? Yes
3. Remove test strip Is the meter powered off? Yes
Is the meter powered on? Yes 4. Press and hold left
button for 3 sec.
Did the meter beep? Yes
Is the testing result correctly stored in the memory? Yes 5. Press and release right
button.
Can the result be clearly read? Yes
Action: If any of the results is “No”, stop using the device. Please call the Customer Care Service toll-free
at 866-994-3345 (Eastern Time, Mon - Fri 9:00AM ~ 5:00PM) for replacement with a new meter.
Physical Appearance check of the lancing device after each cleaning or disinfection
Check item Accept Result
Is there NO erosion happened on any parts? Yes
Action: If any of the results is “No” the user should call the Customer Care Service toll-free at
866-994-3345 (Eastern Time, Mon - Fri 9:00AM ~ 5:00PM) for assistance.
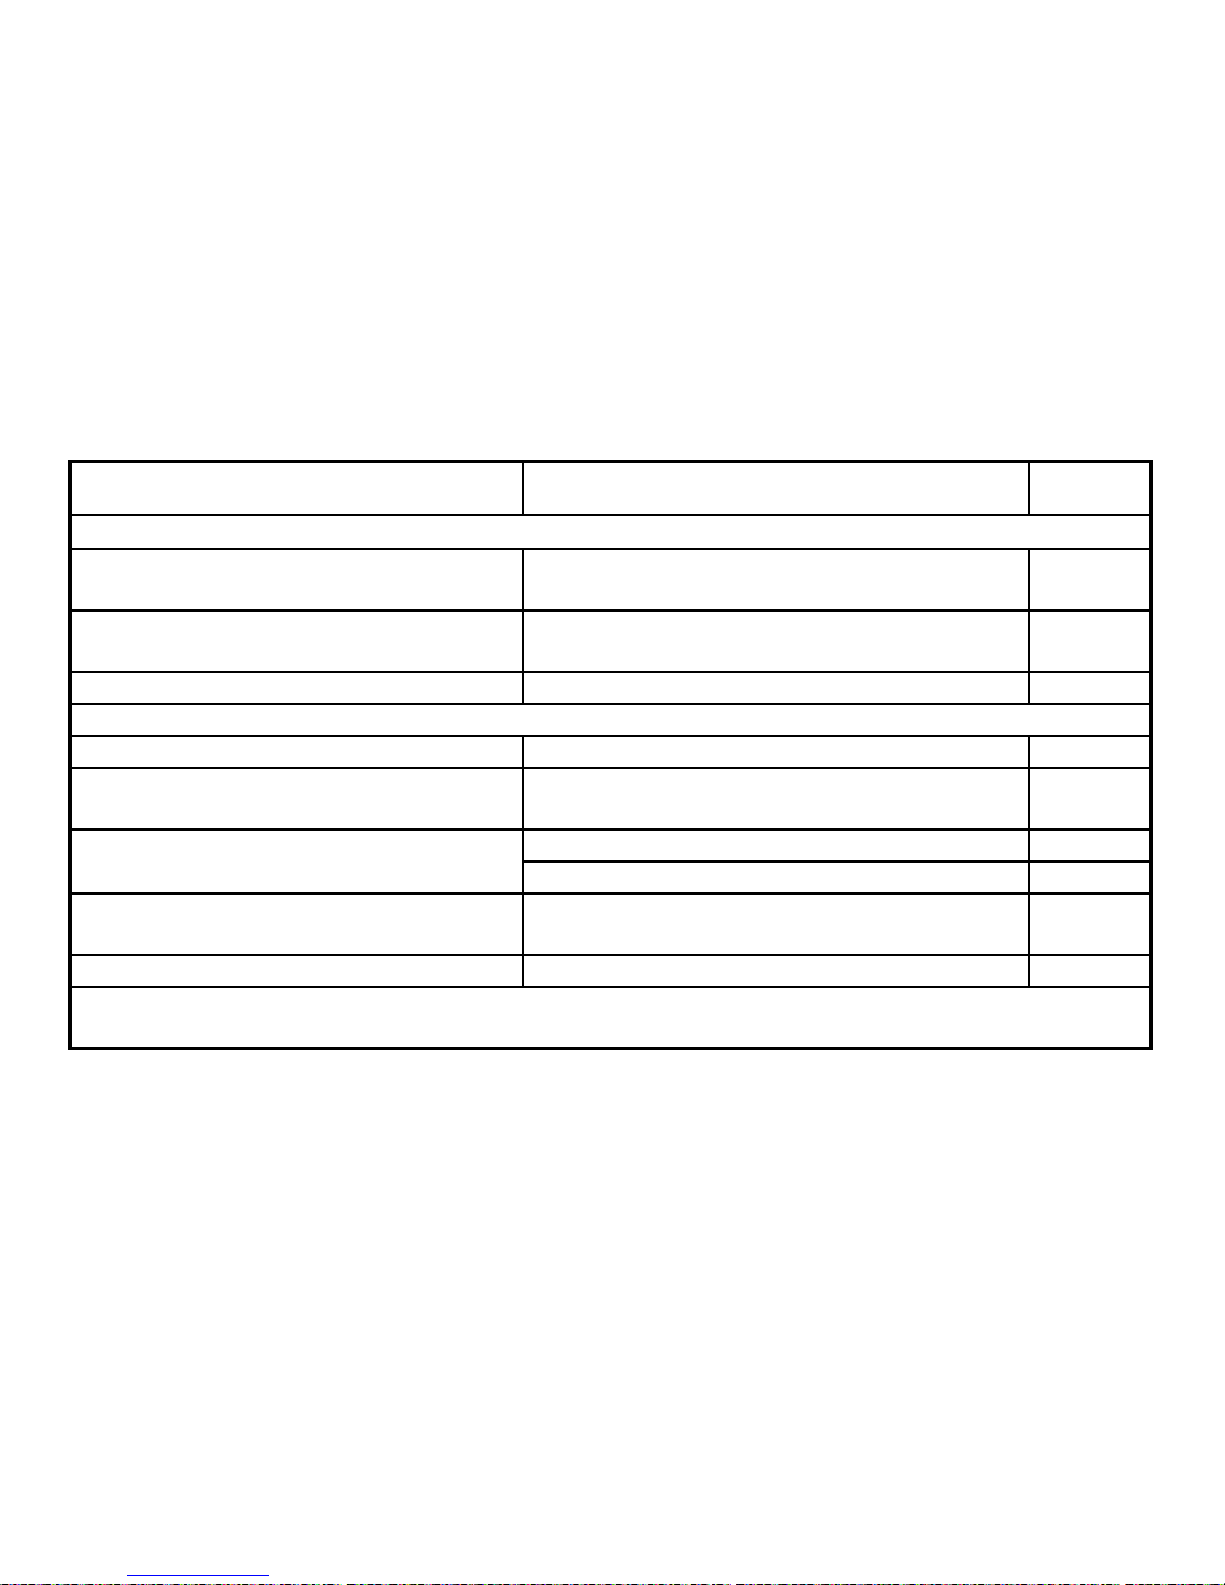
Performance check of the Lancing device
Page 19
19
Step Check item
Accept
Result
After each cleaning
1. Cap the normal cap to the lancing
device.
Can the cap be screwed on the lancing device?
Yes
2. Pull on the sliding barrel and then
release.
Can the lancing device click? Yes
3. Press trigger button. Can the lancet be fired? Yes
After each disinfection
1. Install the lancet on the lancet holder. Can the lancet be fixed on the lancet holder? Yes
2. Cap the AST cap to the lancing device. Can the AST cap be screwed on the lancing
device?
Yes
Can the cap be screwed on the lancing device? Yes 3. Remove the AST cap. Recap the normal
cap to the lancing device.
Can the penetration depth ring be adjusted? Yes
4. Pull on the sliding barrel and then
release.
Can the lancing device click? Yes
5. Press trigger button. Can the lancet be fired? Yes
Action: If any of the results is “No”, please call the Customer Care Service toll-free at
866-994-3345(Eastern Time, Mon - Fri 9:00AM ~ 5:00PM) for replacement with a new device.
Page 20
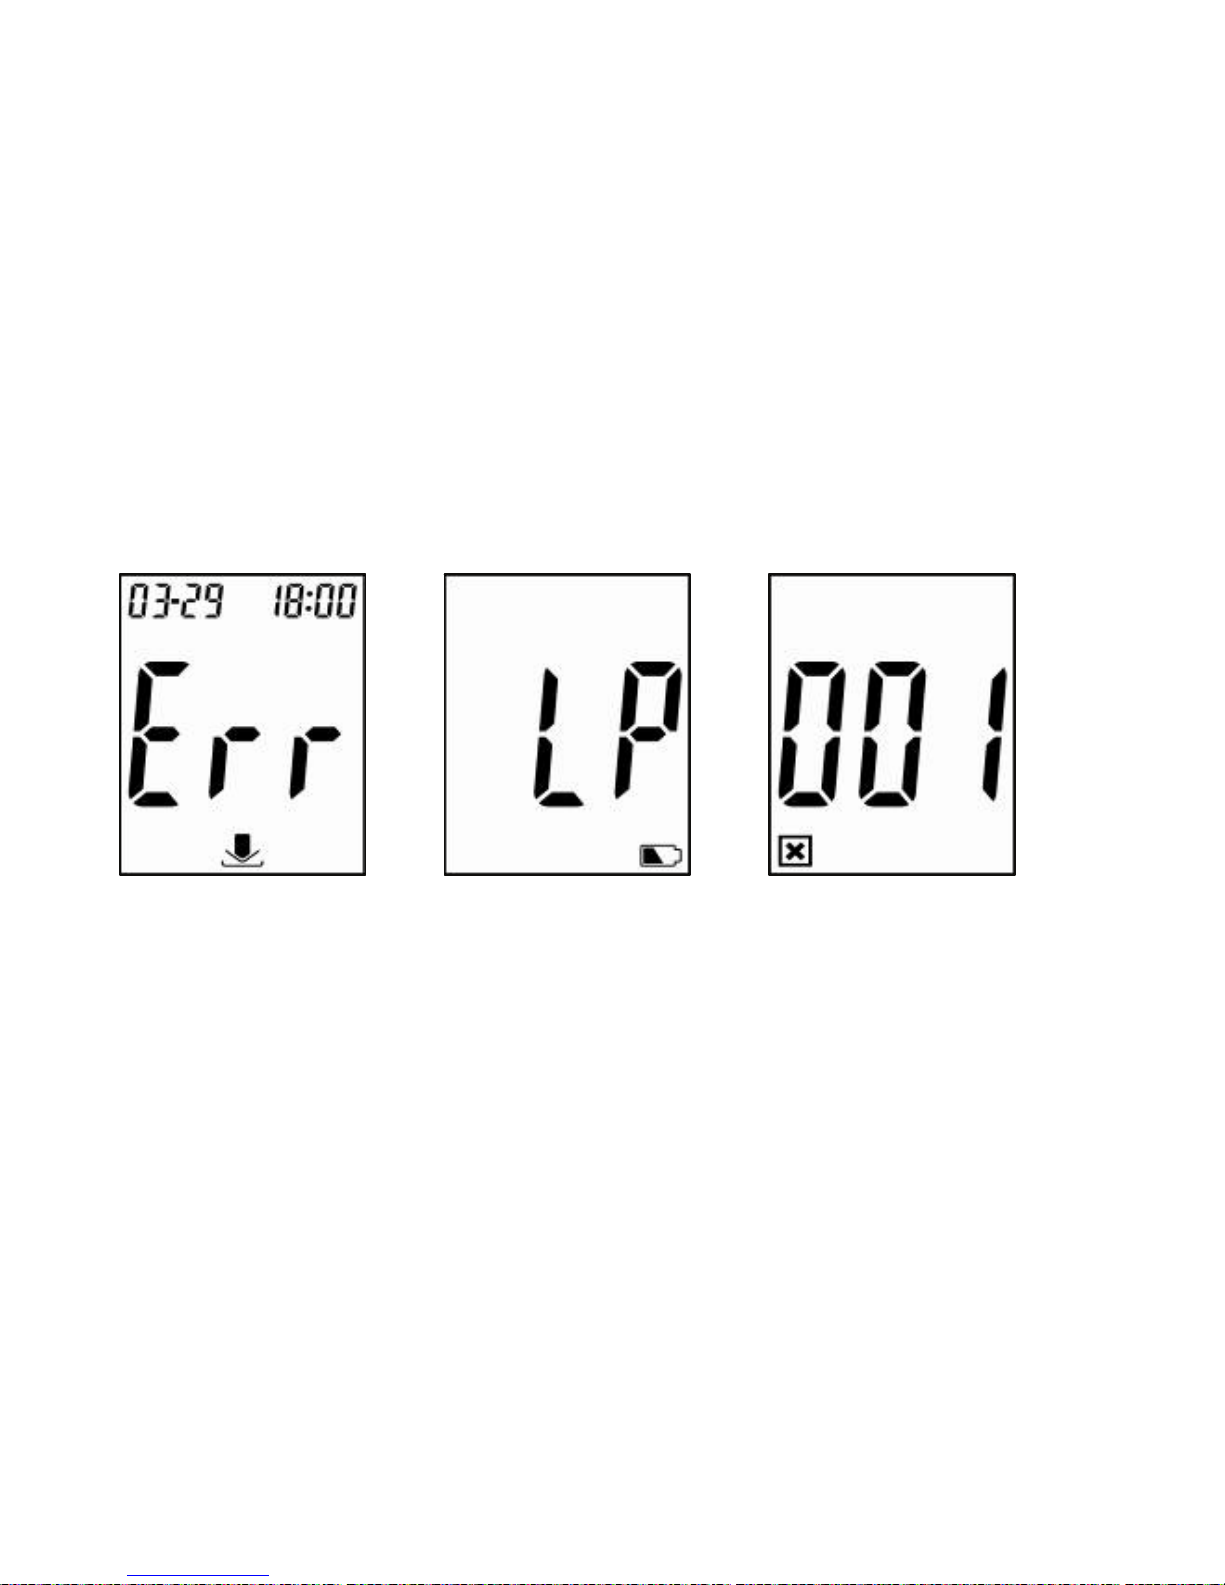
20
Screen Messages and Troubleshooting
Never make treatment decisions based on an error message. If you have any concerns, please call the
Customer Care Service toll-free at 866-994-3345 (Eastern Time, Mon - Fri 9:00AM ~ 5:00PM).
Low power
Action: Replace with new
batteries.
System fault
Action: Replace the batteries first. If
ERROR 001 appears again, please
call the Customer Care Service
toll-free at 866-994-3345 (Eastern
Time, Mon - Fri 9:00AM ~ 5:00PM).
During non-service hours, please
contact your local dealer.
Humidified/Used strips
Action: Replace with a
new strip.
Page 21
21
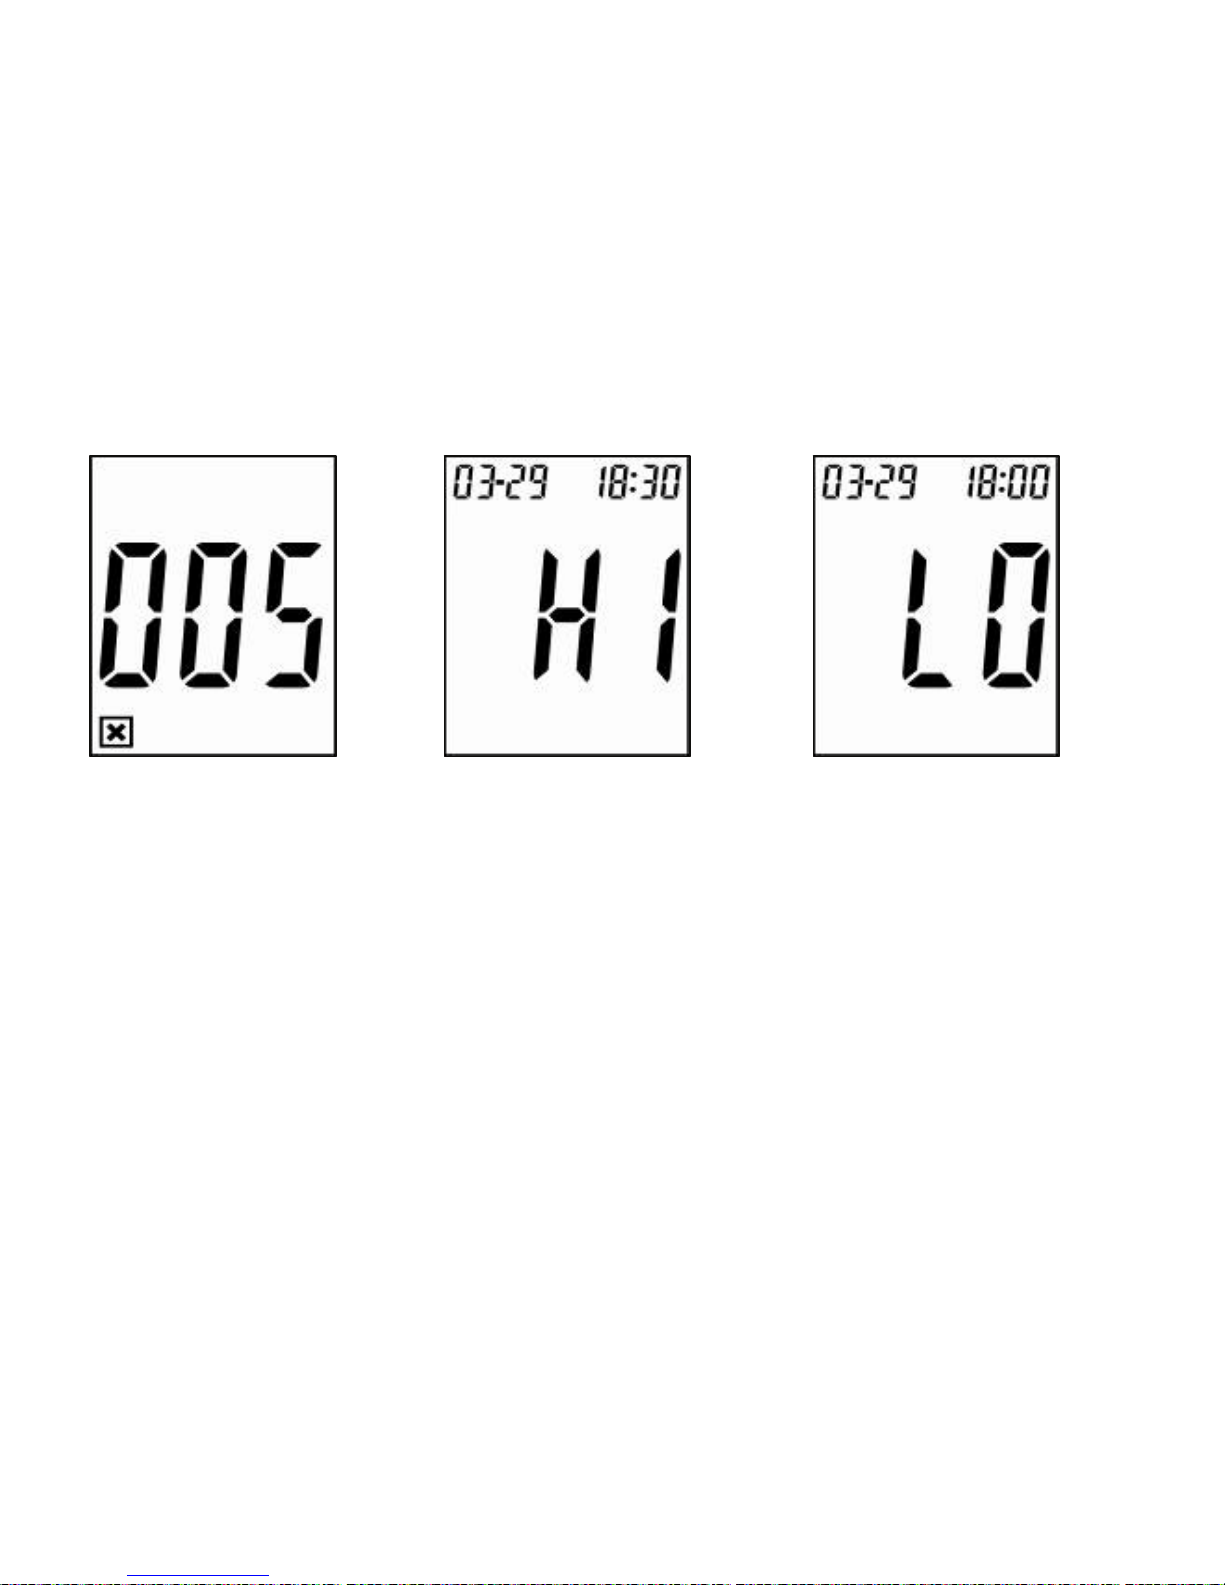
Test result is higher than 600
mg/dL.
Action: Test again. If the result is
still the same, try a control
solution test and if the control
solution test falls within the
correct range, please call your
health care provider.
System fault
Action: Replace the
batteries first. If Err
appears again, please call
the Customer Care
Service toll-free at
866-994-3345 (Eastern
Time, Mon - Fri 9:00AM ~
5:00PM). During
non-service hours, please
contact your local dealer.
The test result is lower than 20
mg/dL.
Action: Test again. If the result is
still the same, try a control solution
test and if the control solution test
falls within the correct range,
please call your health care
provider.
Page 22
22
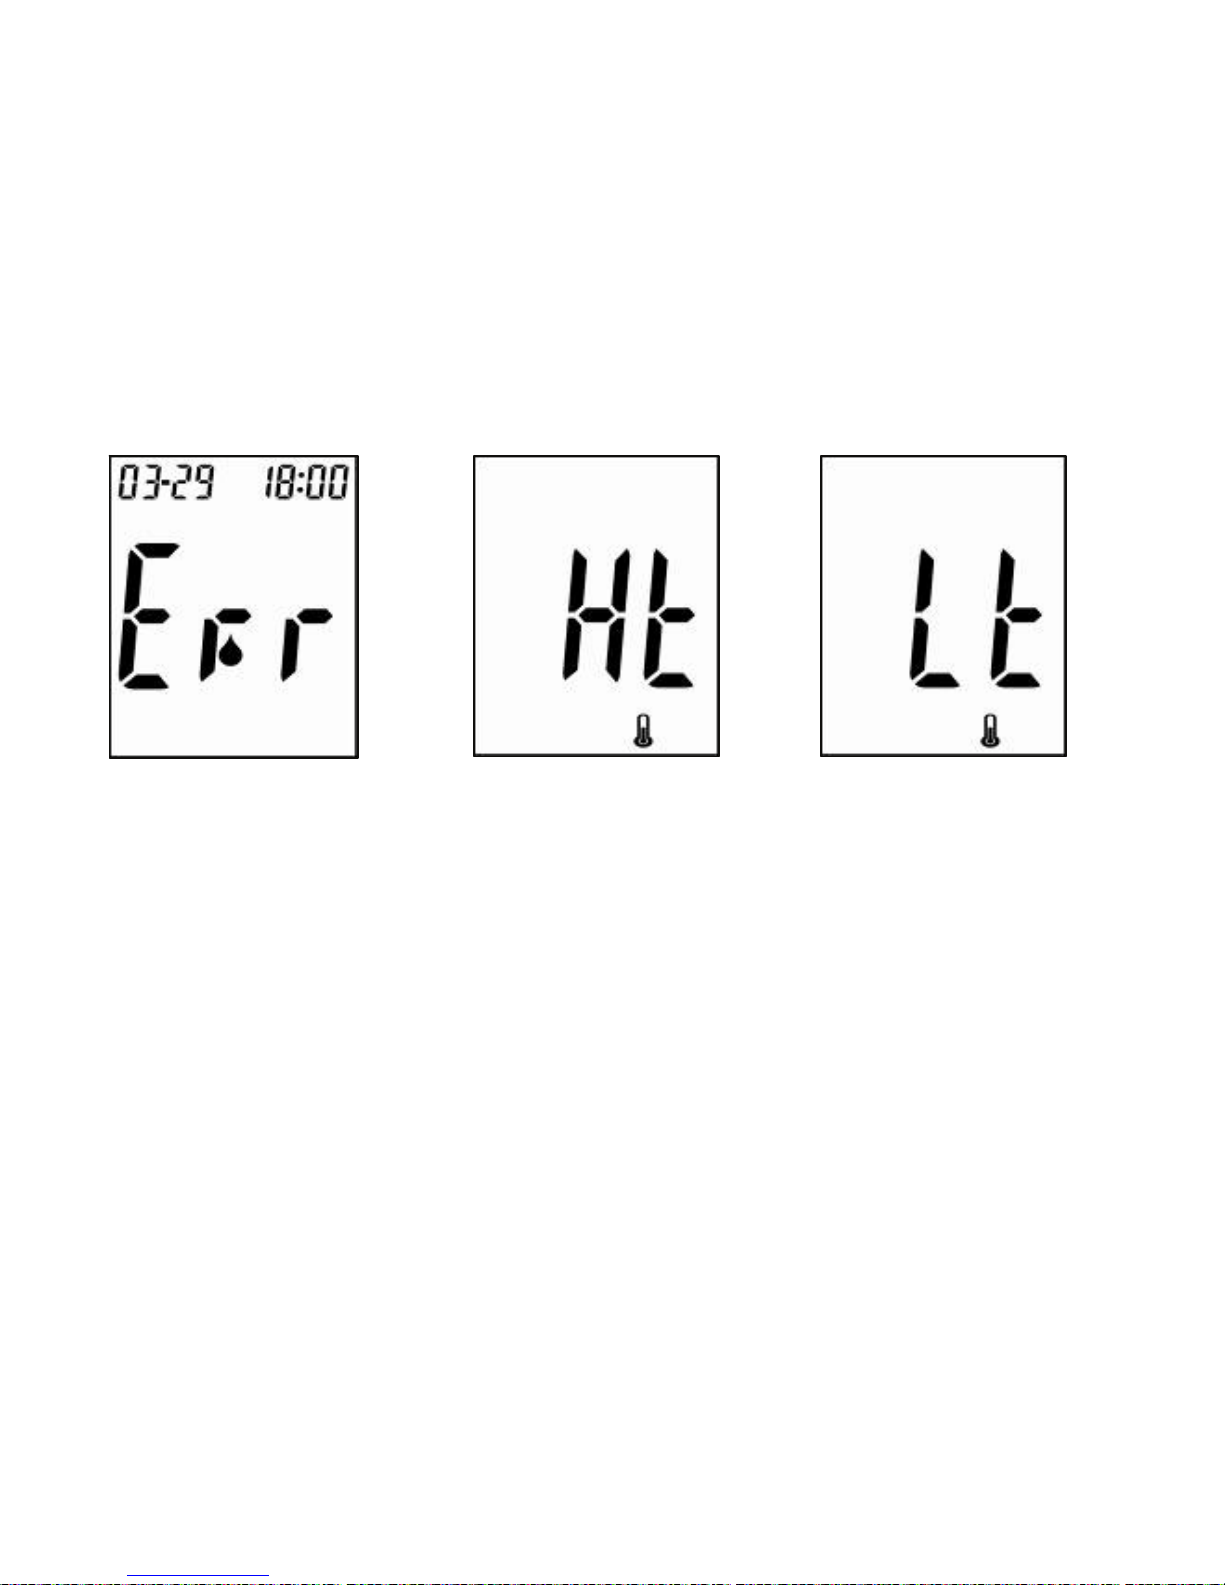
The “Ht” and thermometer
icon appears. Temperature is
too high, outside the required
range of 10°C - 40°C (50°F 104°F).
Action: Relocate the meter to a
location with temperature
between
10°C - 40°C (50°F -
104°F).
The “Lt” and thermometer icon
appears. Temperature is too
low, outside the required range
of 10°C - 40°C (50°F - 104°F).
Action: Relocate the meter to a
location with temperature
between
10°C - 40°C (50°F -
104°F).
“Err” message. Not
enough sample was drawn
into the test strip for
measurement.
Action: Discard the test strip
and repeat the test.
Page 23

23
Manufacturer:
EPS BIO TECHNOLOGY CORP.
No.8, R&D RD. III, Hsinchu Science Park, Hsinchu, Taiwan 30077
TEL:+886-3-6686868 FAX:+886-3-6686866
E-mail:[email protected]
Website:http://www.epsbio.com.tw
Warranty
EPS warrants the original purchaser for a period of 3 years from the date of purchase. This means during the
warranty period if the Self-Monitoring Blood Glucose System does not work for any reason (other than obvious
abuse), EPS will replace it with a new system or an equivalent product free of charge.
Please read EME User’s Manual before operation. If you have any questions and/or need assistance, please
contact us as follows:
Within the USA, call toll-free: 866-994-3345 (Eastern Time, Mon - Fri 9:00AM ~ 5:00PM). During non-service
hours, please contact your healthcare provider.
Outside the USA, call your authorized representative or write to:
Customer Service E-mail: [email protected]
P/N: 71800280A Rev.X01
 Loading...