

Page 1

EasyPlus mini 2IN1
Self-Monitoring Blood Glucose System
Quick Reference Guide
Page 2
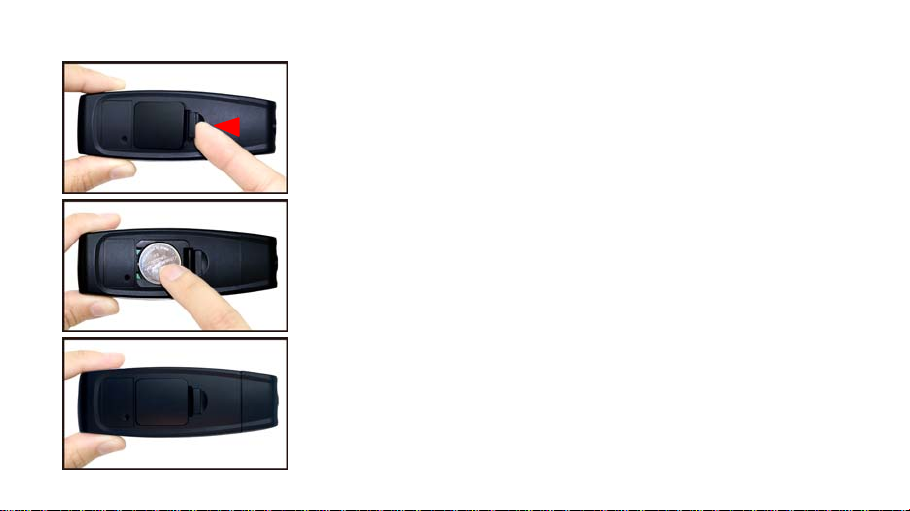
Installing Batteries
1. Flip open the battery door by pushing the tab in the direction of
the arrow and pulling the door up.
2. Insert a battery.
3. Put the battery door back in place and snap it closed. The meter
beeps and turns on automatically.
2
Page 3
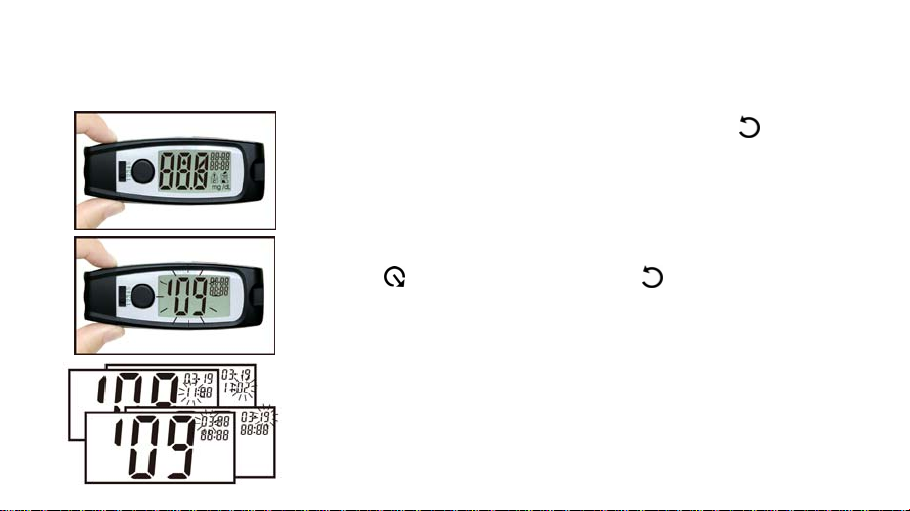
Setting The Time and Date—First Time Use
g
Setting the current time and date in your meter is important if you intend to use the meter memory or
if you want to download your results to a computer.
1. If your meter does not turn on automatically, press for 3
seconds to turn on the meter.
2. The last 2-digits of the year flash at the center of the display.
Press to adjust the year and press to confirm the
settin
.
3. Repeat step 2 to set the date and time. The flashing field is
the one you are currently setting. When finishing the setting,
the meter beeps.
3
Page 4
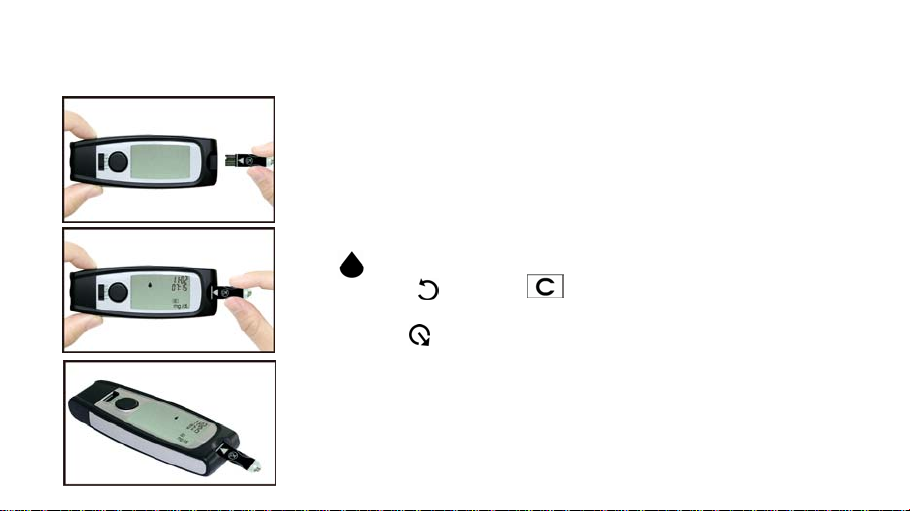
Running A Control Solution Test
You need the meter, a test strip, and control solution.
1. Put a test strip into the meter in the direction of the arrow.
2. The meter beeps and turns on automatically. The icon
shows itself.
3. Press the , the icon shows and the meter is ready to
run a Control Solution Test.
Or press to cancel the Control Solution Test Mode.
4. Place the meter on a flat surface, like a table.
5. Remove the control solution bottle cap and wipe the tip of the
bottle with a tissue.
4
Page 5
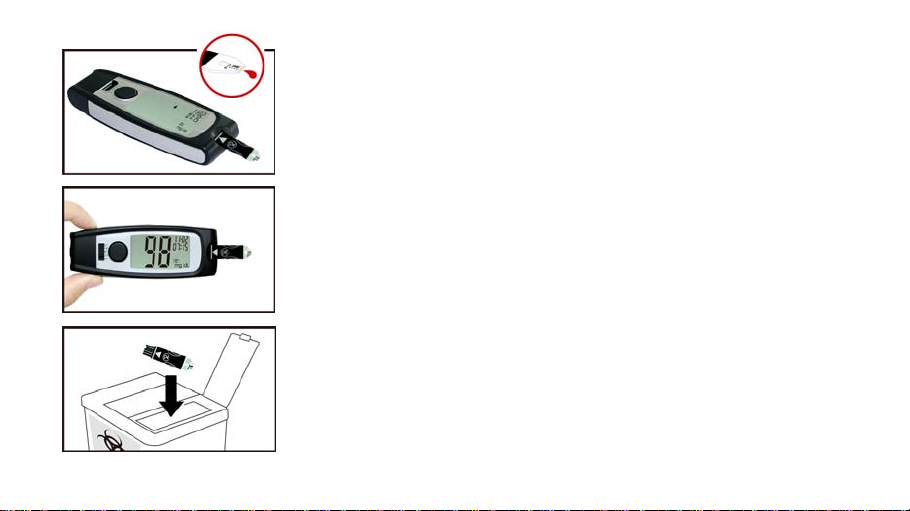
6. Squeeze the bottle until a tiny drop forms at the tip of the
ge p
bottle.
7. Touch the drop to the blood collection area at the tip of the test
strip. When you hear beeps, you have enough control solution
in the test strip.
8. The meter starts to count down from 5 seconds, the display
shows “Ok”, and then shows the test result.
9. Do not remove the test strip yet. Check if the reading falls within
the ran
rinted on the test strip bottle.
10. Remove the test strip and throw it away after you have
compared the reading to the range printed on the test strip bottle.
5
Page 6
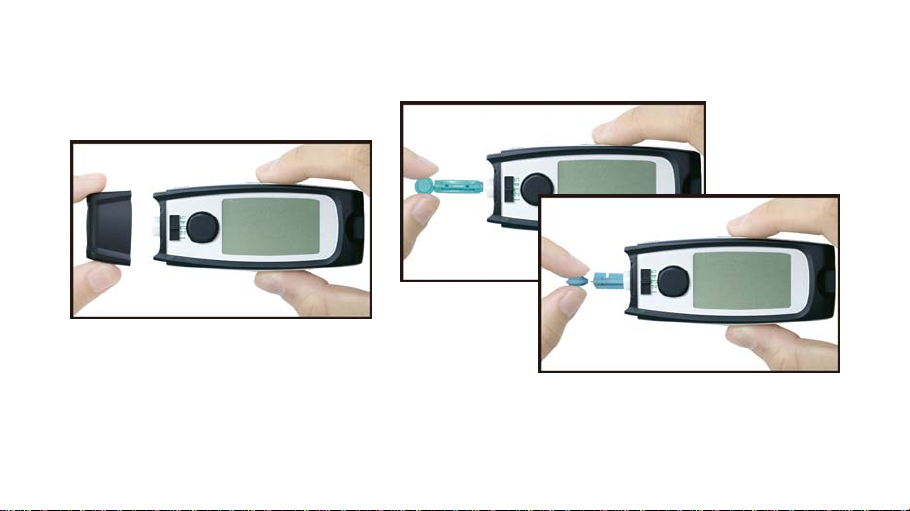
Inserting A Lancet Into The Built-in Lancing Device
You must first load the lancet into the lancing device to get it ready for use.
1. Unscrew the Cap. 2. Insert a new disposable lancet firmly into the
carrier and then twist off the protective cover.
6
Page 7
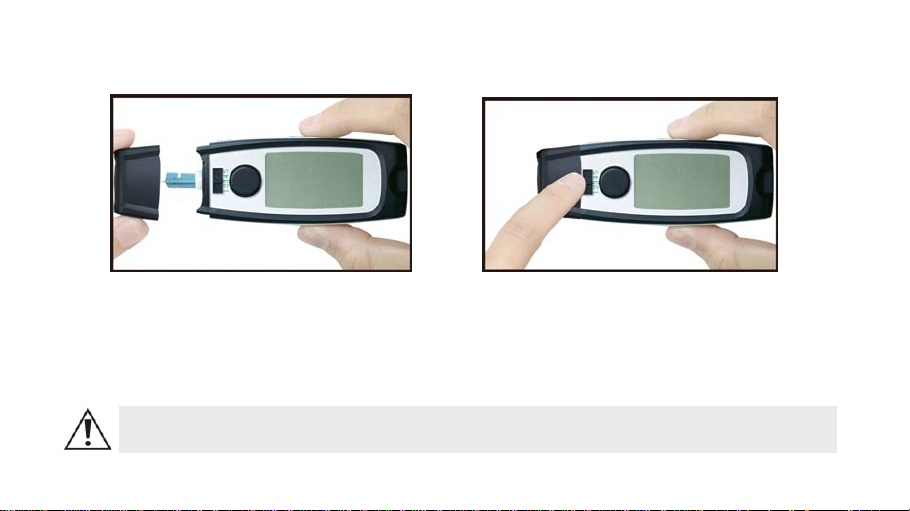
3. Recap the front cap. 4. Select the desired penetration
depth.
Select 1-2 for thick or calloused skin. 3 for average. 4-5 for soft or thin skin.
7
Page 8
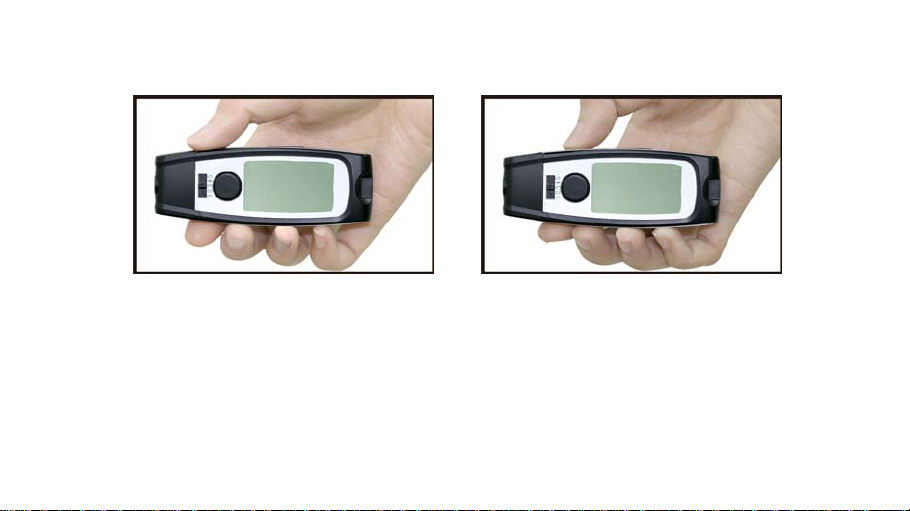
5. Pull on the cocking button of the lancing device until it clicks and then release.
Now the lancing device is ready.
Do not prick your finger until your meter and strip are prepared.
6. Set the lancing device aside until later in the test.
8
Page 9
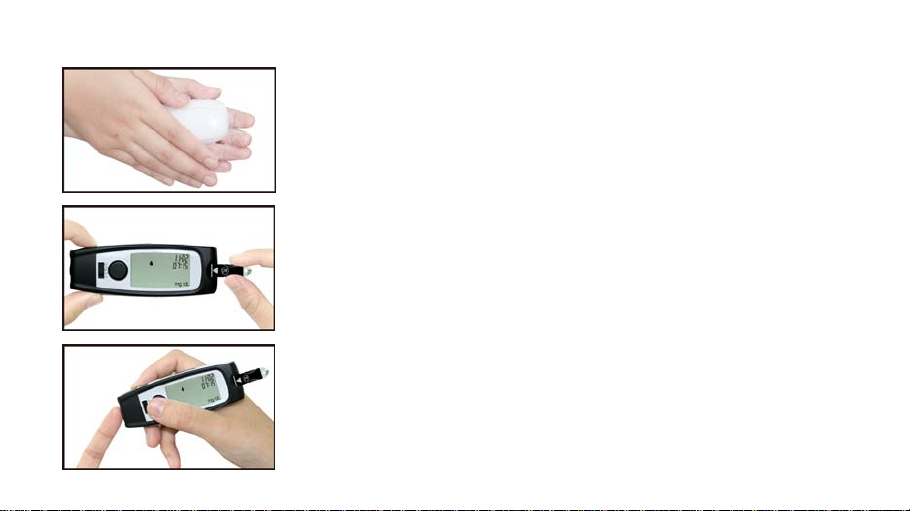
Running A Blood Glucose Test With Blood From Your Fingertip
1. Wash your hands with soap and warm water.
Rinse and dry thoroughly.
2. Put a test strip into the meter in the directi on of the arrow.
The meter beeps and turns on automatically.
3. When the blood drop flashes on the display, using the lancing
device.
4. Hold the lancing device firmly against the side of your
finger. Press the release button. Then remove the lancing
device from your finger.
9
Page 10
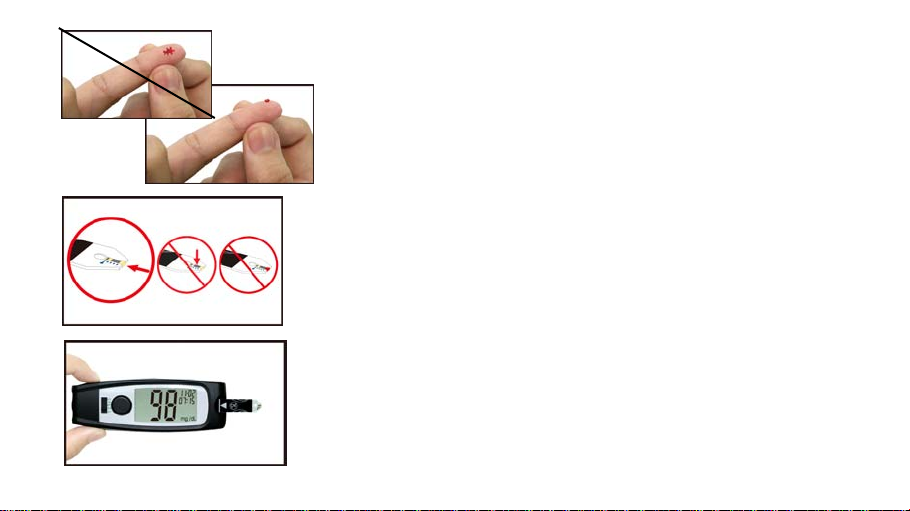
5. Gently squeeze and/or massage your fingertip until a round
drop of blood on your fingertip.
6. Touch the blood drop at the tip of the transparent window
of the test strip. Do not put blood on top of the strip. When
you hear beeps, you have enough blood in the test strip.
Be sure to get enough blood in the test strip. Otherwise, an
inaccurate reading may result.
7. The meter starts to count down from 5 seconds, the display
shows “Ok”, and then shows the test result.
8. Remove the test strip and the meter turns off automatically.
10
Page 11
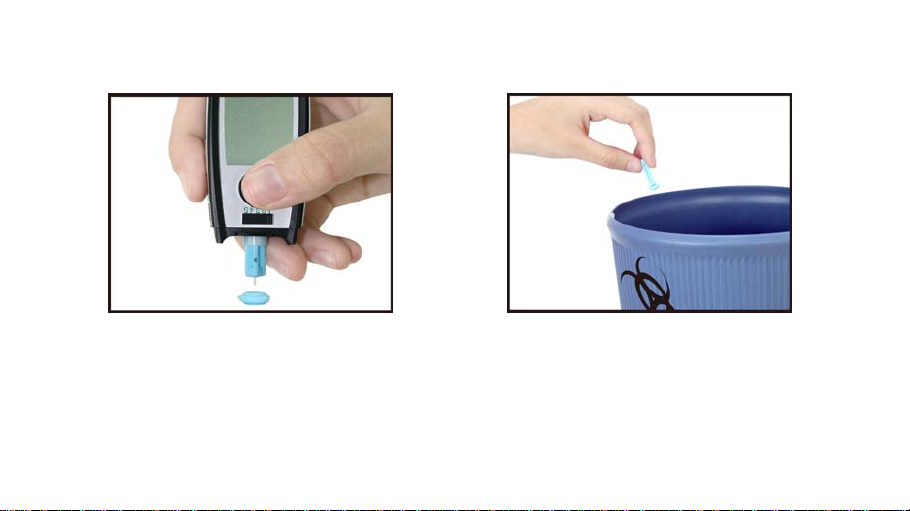
Discarding Used Lancets
1. Unscrew and remove the cap. Without
touching the used lancet, stick the
lancet tip into its protective cover. Grip
the lancet carrier firmly and pull the
lancet safely out.
11
2. Discard the used disposable lancet
into an appropriate sharps or
biohazard container.
Page 12
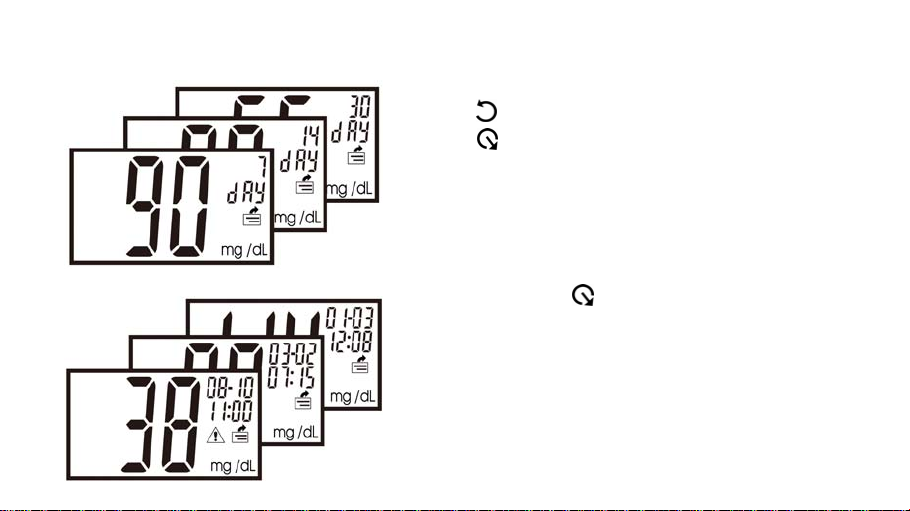
Viewing & Deleting Test Results
1. Press to turn the meter on.
2. Press to view averages for 7/14/30 days.
3. Continue to press to view the test result from
latest to oldest.
12
Page 13
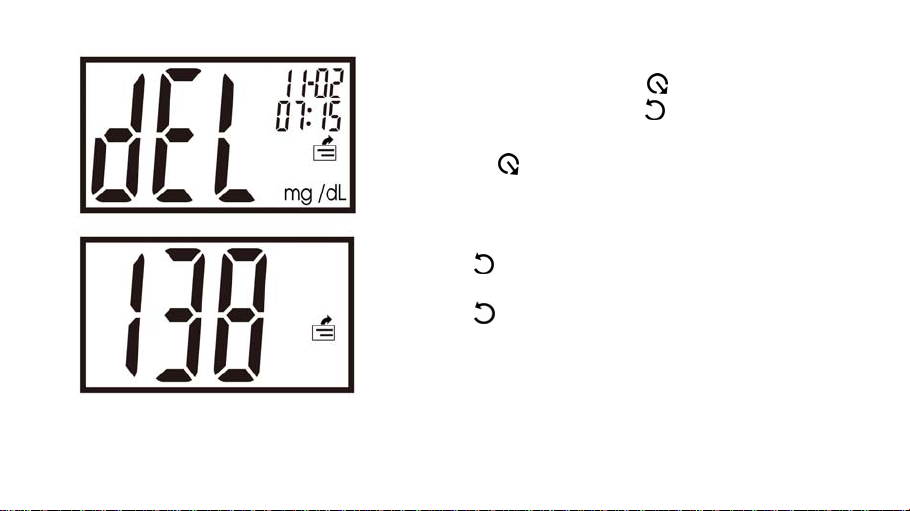
4. To delete a test result, press for 3 seconds. When
display shows "dEL", press to confirm the
deletion.
Or press to cancel the deletion and go back to the
total number of the stored results.
5. Press for 1 second to go back to the total
number of the stored results.
6. Press for 3 seconds to turn off the meter, or the
meter turns off automatically in 120 seconds.
13
Page 14
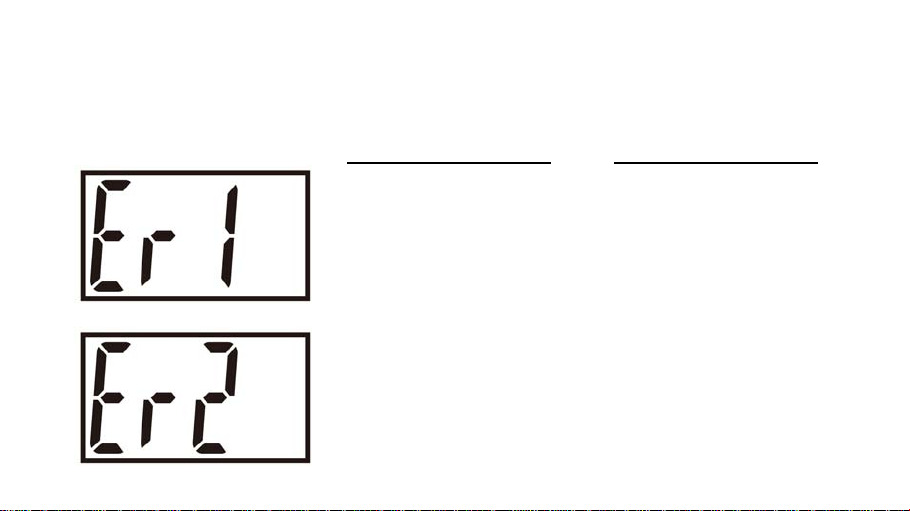
Screen Messages And Troubleshooting
Never make treatment decisions based on an error message. If you have any concerns, please
contact your healthcare professional.
What it means ?
System err.
Humidified or used strip.
14
What to do ?
Please replace the batteries
first. If Err appears again,
please contact your
healthcare professional
immediately.
Please replace with a new
strip.
Page 15
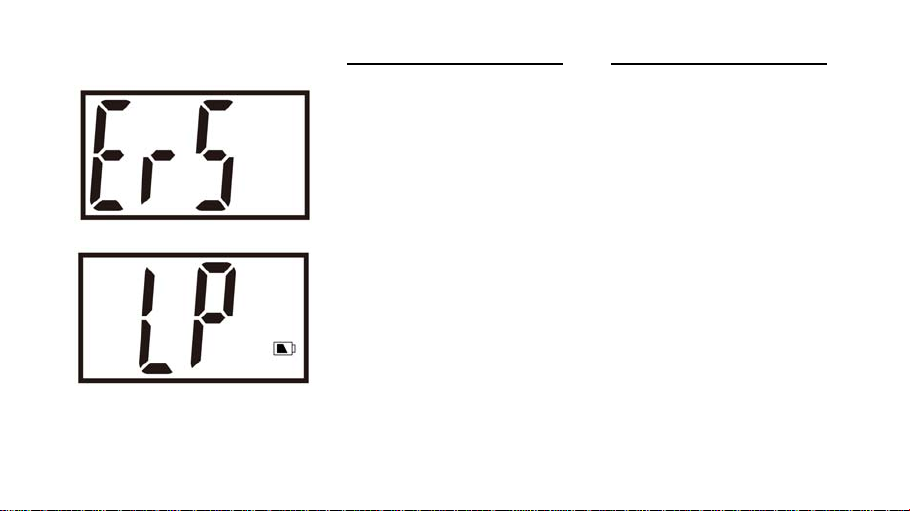
What it means ?
Memory err.
Low power.
15
What to do ?
Please replace the batteries
first. If Err appears again,
please contact your
healthcare professional
immediately.
Please replace with a new
battery.
Page 16
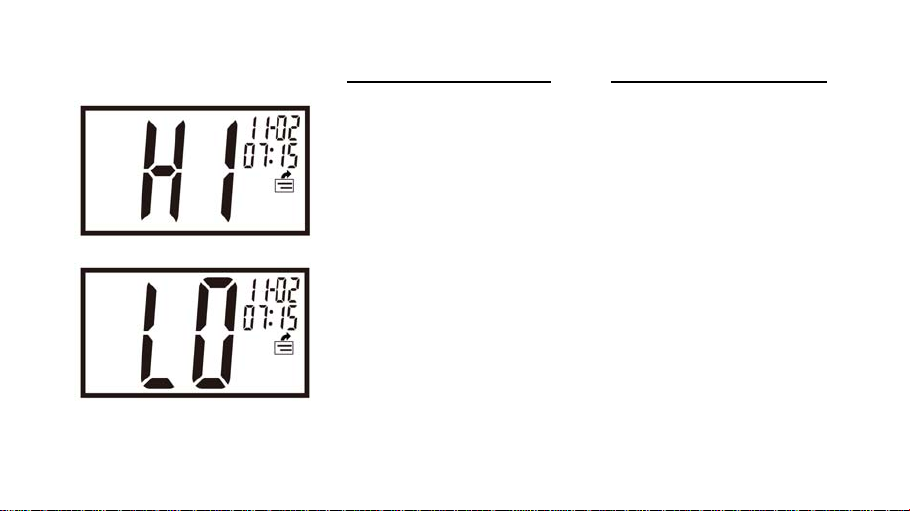
What it means ?
You may have a very high
blood glucose level(severe
hypoglycemia), over 630
mg/dL.
You may have a very low
blood glucose level(severe
hypoglycemia), lower than
20 mg/dL.
16
What to do ?
Please test again and if you
get the same result, please
contact your healthcare
professional immediately.
Please test again and if you
get the same result, please
contact your healthcare
professional immediately.
Page 17

What it means ?
Temperature is too high,
outside the required range of
10°C - 40°C (50°F - 104°F).
This alerts users that an
incorrect result may occur if
the test continues.
Temperature is too low,
outside the required range of
10°C - 40°C (50°F - 104°F).
This alerts users that an
incorrect result may occur if
the test continues.
17
What to do ?
Relocate the meter to a
location with temperature
between 10°C - 40°C
(50°F - 104°F).
Relocate the meter to a
location with temperature
between 10°C - 40°C
(50°F - 104°F).
Page 18
Manufacturer:
EPS Bio Technology Corp.
No.8, R&D RD III, Hsinchu Science Park, Hsinchu, Taiwan 30077
Tel: +886-3-6686868 Fax: +886-3-6686866
E-mail: [email protected]
Website: http://www.epsbio.com.tw
Obelis s.a.
Boulevard Général Wahis 53, 1030 Brussels, BELGIUM
TEL:(32) 2.732.59 54 FAX:(32) 2.732.60 03
E-mail: [email protected]
P/N. 718038900_0372_02
18
 Loading...