

Page 1

EasyPlus
Self-Monitoring Blood Glucose System
User’s Manual
Please read this User Manual thoroughly before using your
blood glucose monitor.
Page 2

Dear EasyPlus SMBG System Owner,
Thank you for using the EasyPlus Self-Monitoring Blood Glucose (SMBG)
System. We design this system for medical care on diabetes. The test results can
help you determine the effects of food, exercise and diabetes medications. We
design this system to be dependable, easy-to-use, compact, and lightweight and
portable to help you monitor your blood glucose on a re gular basis.
This manual will help you get the most from your EasyPlus SMBG System.
To start testing quickly, you can also refer to the Quick Reference Guide.
If you have questions, please call the EasyPlus Customer Care Service toll-free at
1-888-216-5888 to get our help. We offer assistance from Monday to Friday, 9:00AM
to 5:00PM. You can also visit www.epsbio.com.tw for diabetes management tools
and product demonstrations.
Thanks again for choosing the EasyPlus blood glucose meter.
Page 3

EasyPlus SMBG System
Your new EasyPlus Blood Glucose meter and accessories work together to
measure the amount of glucose in your blood. The system includes:
• Wallet
• User Manual
• Self-Test Log Book
• Warranty Card
• EasyPlus Blood Glucose Meter
• Test Strip Instructions
• Control Solution Instructions
• Lancing device
• EasyPlus Blood Glucose Test
Strips (10 pcs)
• EasyPlus Normal Control Solution
• Check Strip
• Code Card
• Quick Installation Guide
• 2 Alkaline Batteries 1.5V (AAA)
• Lancets (10 pcs
)
Page 4

Why is it so important to test blood glucose regularly?
Testing your blood glucose regular ly can make a big difference in how you manage
your diabetes every day. We’ve made this SMBG system as simple as possible and
help you to use the meter regularly.
Do you need Help?
If you have questions, please call the Customer Care Service Center
toll-free:1-888-216-5888. You can also visit www.epsbio.com.tw for diabetes
management tools and product demonstrations.
Note:
Although the EasyPlus SMBG System is easy to use, you may need to consult your
healthcare professional (this may be your doctor, pharmacist or diabetes nurse
educator) for instructions on how to use the system. Only the correct use of the system
will ensure accurate results.
Page 5

Important Information About Your New Meter
EasyPlus blood glucose meter is designed and approved for testing fresh
capillary whole blood samples from fingerstick. The meter is for outside the
body (in vitro) use. It should not be used to diagnose diabetes.
EasyPlus blood glucose meter only use with EasyPlus Blood Glucose Test
Strips. Other test strips will give inaccurate results.
Testing is not valid for neonatal blood specimen.
Do not disassemble the meter as this may cause damage to the components
resulting in incorrect reading. Disassembling the meter will also void the
warranty.
Protect the meter from direct sunlight to ensure a longer lifes pan.
You should not store the meter and test strips in a car, a bathroom or a
refrigerator.
Keep the meter, test strips and lancing device away from children and pets.
You should not test critically ill patients with home-use blood glucose meters.
Elevated levels of acetaminophen, uric acid, gentisic a acid, levodop a, dopamine
and methyldopa may affect results.
Page 6

Health-Related Information
If you are very dehydrated or urinating frequently, you may get a test result that
is lower than what your blood glucose really is. If you think you are dehydra ted,
call your doctor right away.
If you have followed the steps in the user’s manual, but still have symptoms that
don’t seem to match your test results, or if you have questions, please talk to
your doctor.
Please read your test strip instruction carefully for additional health-related
information.
Warning for potential biohazard:
Healthcare professionals using this system on multiple patients should handle all
products or objects in contact with human blood carefully to avoid transmitting viral
disease, even after cleaning.
Page 7

Content
Chapter 1: Understanding Your Meter .....................................................................9
The EasyPlus Blood Glucose Meter ...............................................................9
Checking Your System ....................................................................................11
Coding Your Meter ........................................................................................12
Setting The Time And Date............................................................................13
Using EasyPlus Blood Glucose Test Strips...................................................15
Chapter2: Control Solution Test.............................................................................16
Why Run A Control Solution Tests..................................................................16
About The Control Solutions............................................................................17
Running A Control Solution Test.....................................................................18
Understanding Control Test Results...............................................................21
Chapter 3: Testing Your Blood Glucose.................................................................23
Inserting A Lancet into the Lancing Device........................................................23
Running A Blood Glucose Test With Blood From Your Fingertip....................27
Discarding Used Lancets................................................................................30
Understanding Your Test Results...................................................................31
Unusual Test Results................................................................................32
Chapter 4: Meter Memory, Setup..........................................................................33
Memory, Storing Test Result.........................................................................33
Page 8

Viewing &Deleting Test Results.....................................................................34
Meter Setup...................................................................................................35
Setting Thermometer.....................................................................................36
Setting The Alarm.........................................................................................37
Setting The Beeper For The Alarm...............................................................38
Setting The Clock..........................................................................................39
Chapter 5: Maintenance And Troubleshooting.................. ................. ...... ............40
Installing Batteries.........................................................................................40
Cleaning Your Meter ....................................................................................42
Cleaning Your Lancing Device......................................................................42
Screen Messages And Troubleshooting.......................................................43
Chapter 6: Technical Information.........................................................................47
Specifications...................................... ......... .............. ................. ............ ......47
Comparing Your Meter Result To A Lab Result..................................................48
Device Information........................................................................................ 49
Additional Supplies........................................................................................50
Warranty..............................................................................................................50
Page 9
9
Chapter 1: Understanding Your Meter
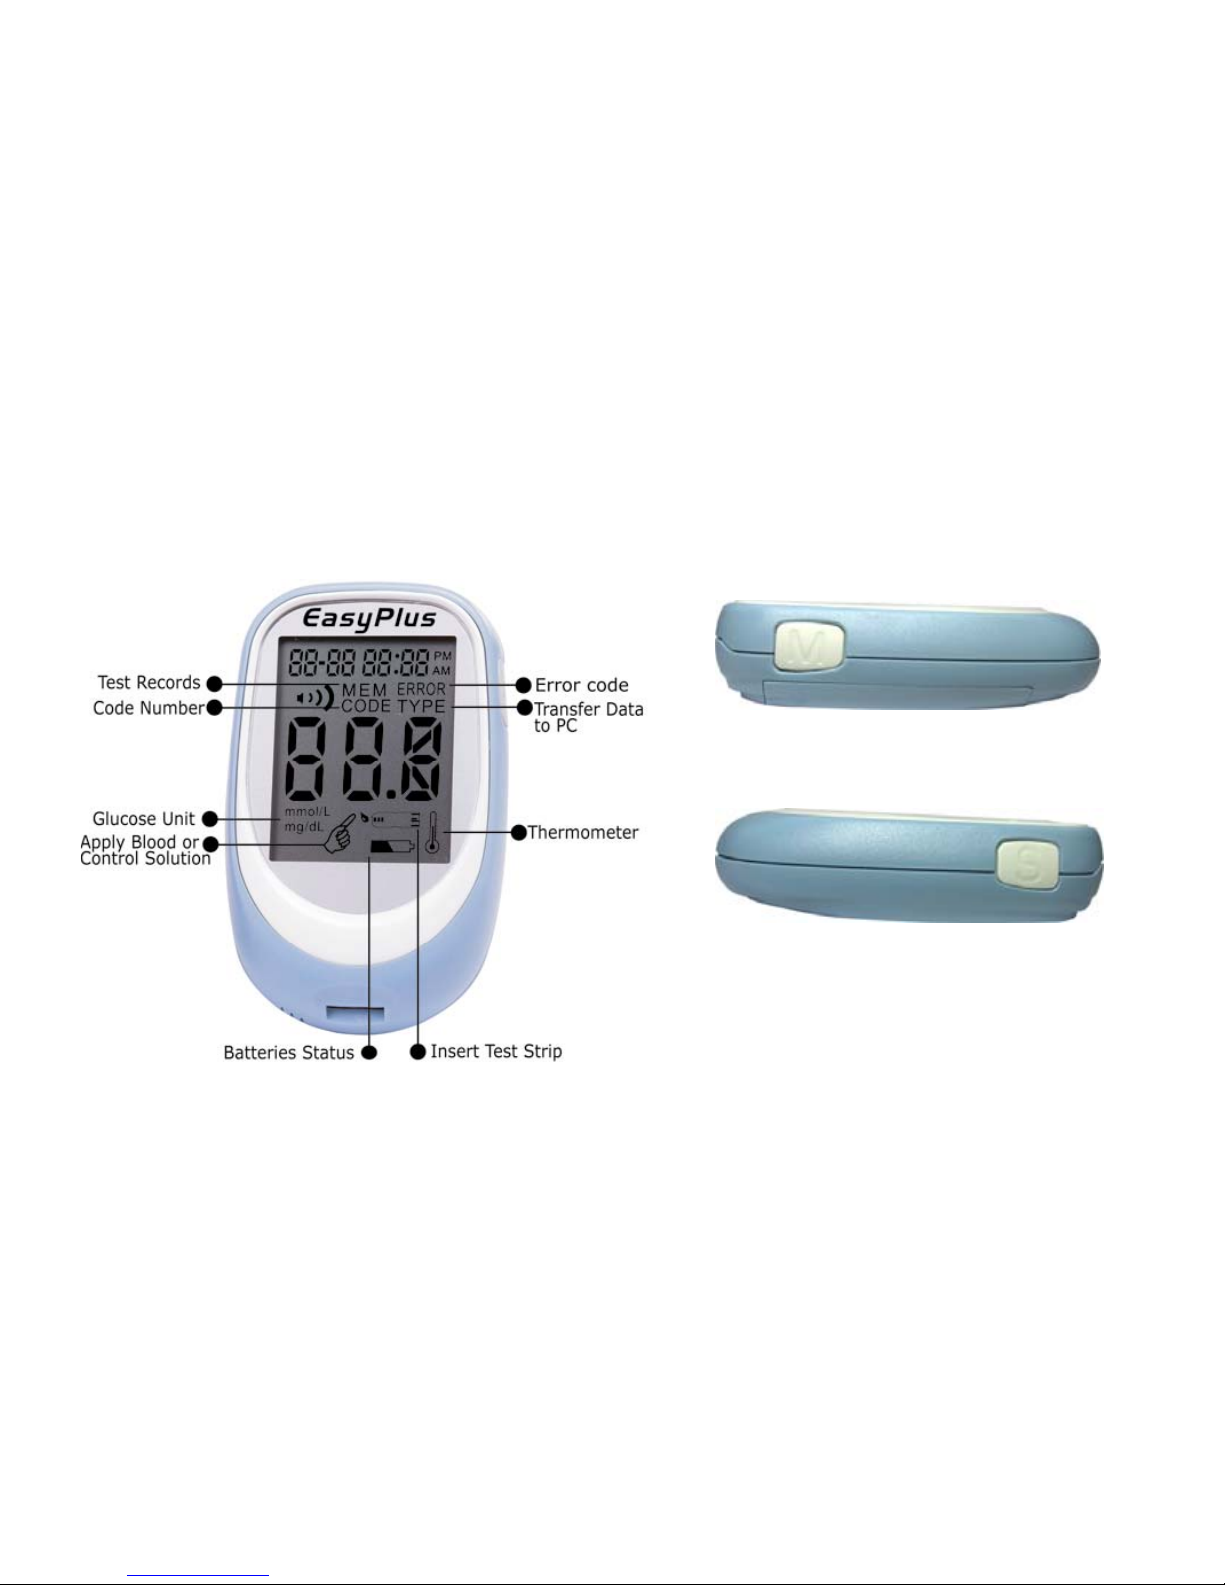
The EasyPlus Blood Glucose Meter
M Button
To turn on the meter or read records.
S Button
To turn on the meter or go into
Setting Mode.
Page 10
10
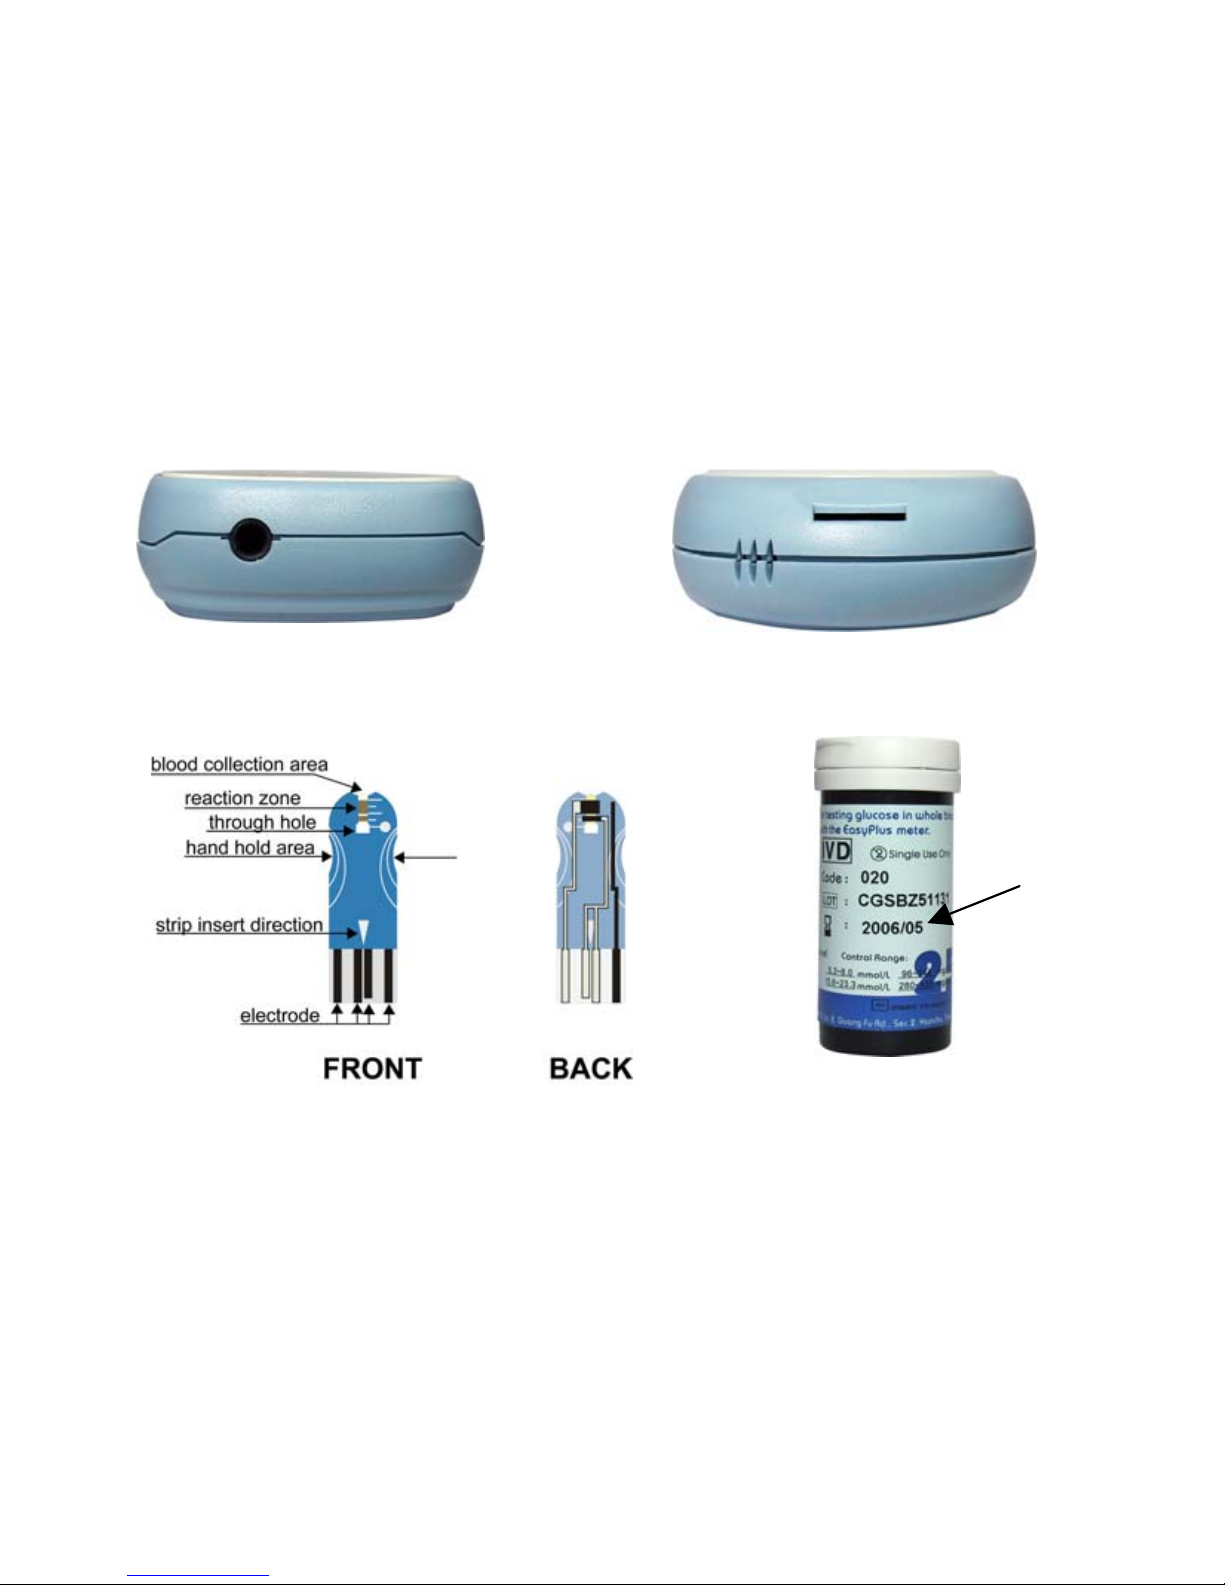
USB Port
To transfer data to a Computer.
Strip Slot
To insert test strip, check strip or
code card.
Test Strip Vial
Use by
Page 11
11
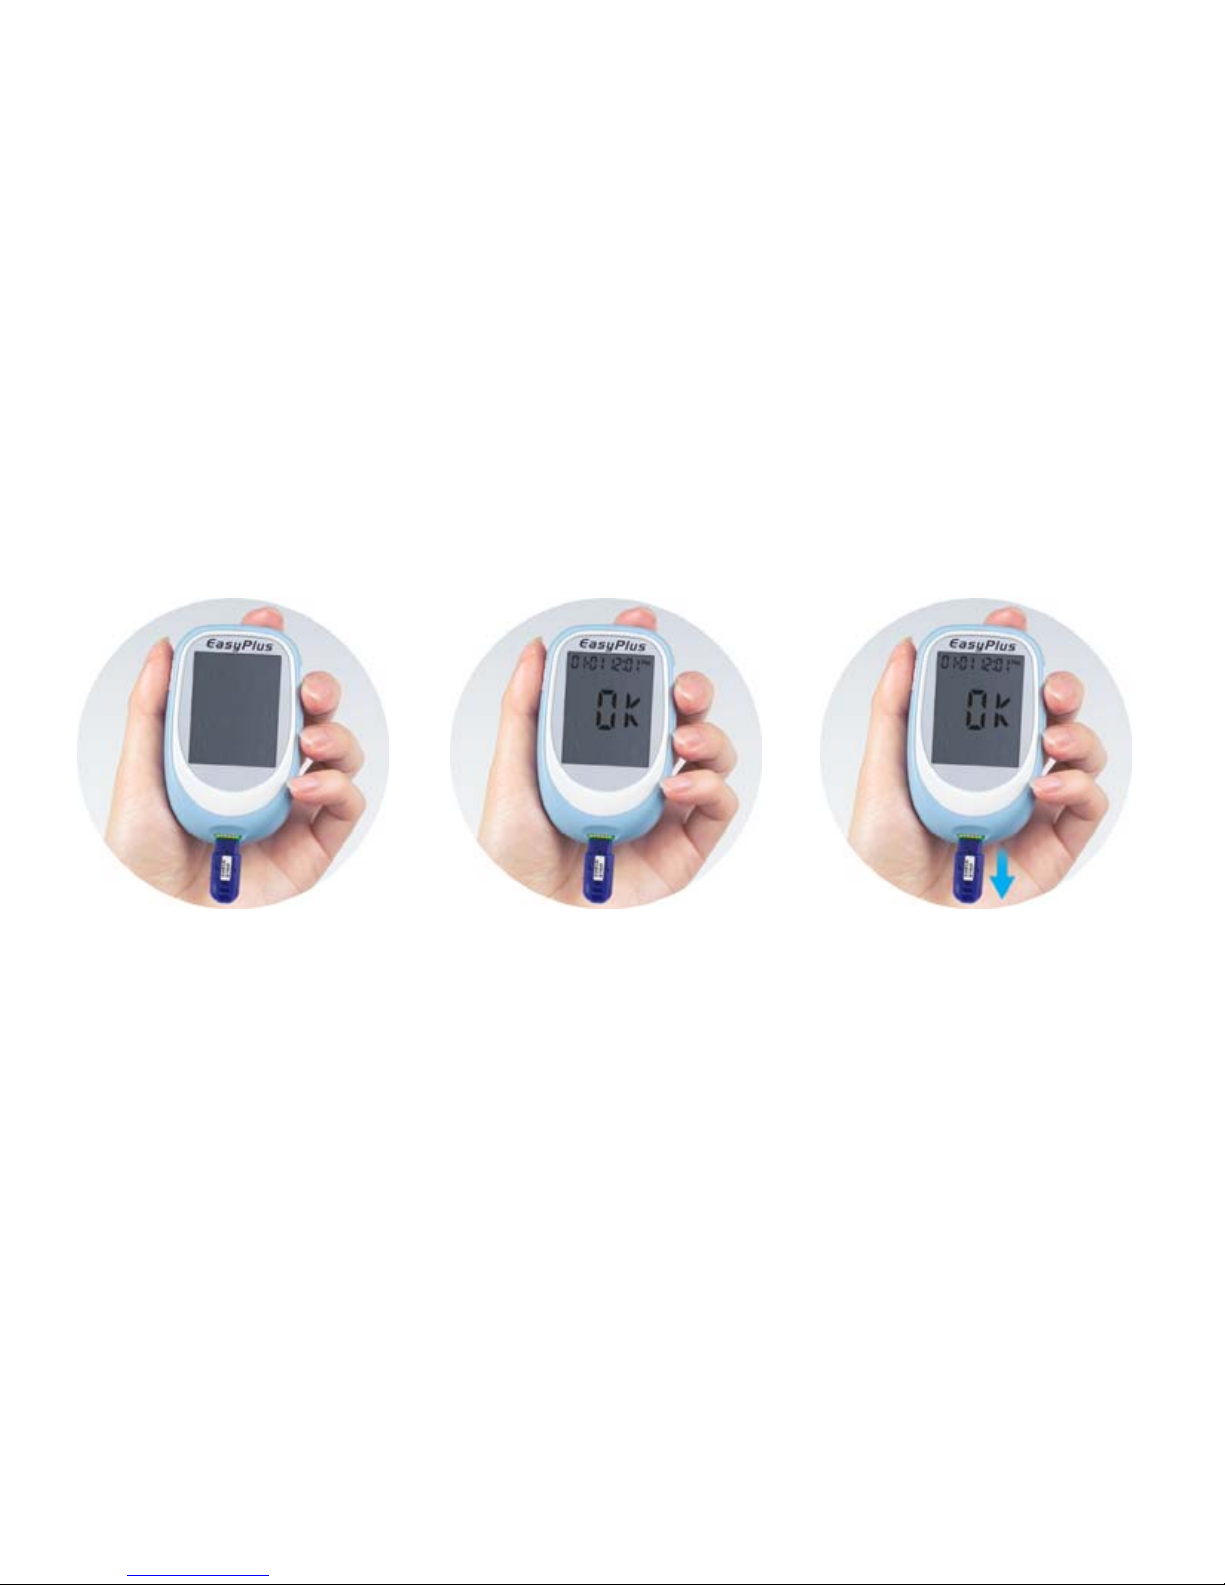
Checking Your System
A new check strip is included with your meter.
1. Make sure your check
strip is inserted. The
meter will turn on
automatically.
2. The screen displays
“OK”.
3. Remove the check strip
and the meter will turn
off automatically. Store
the check strip in a safe
place.
Page 12
12
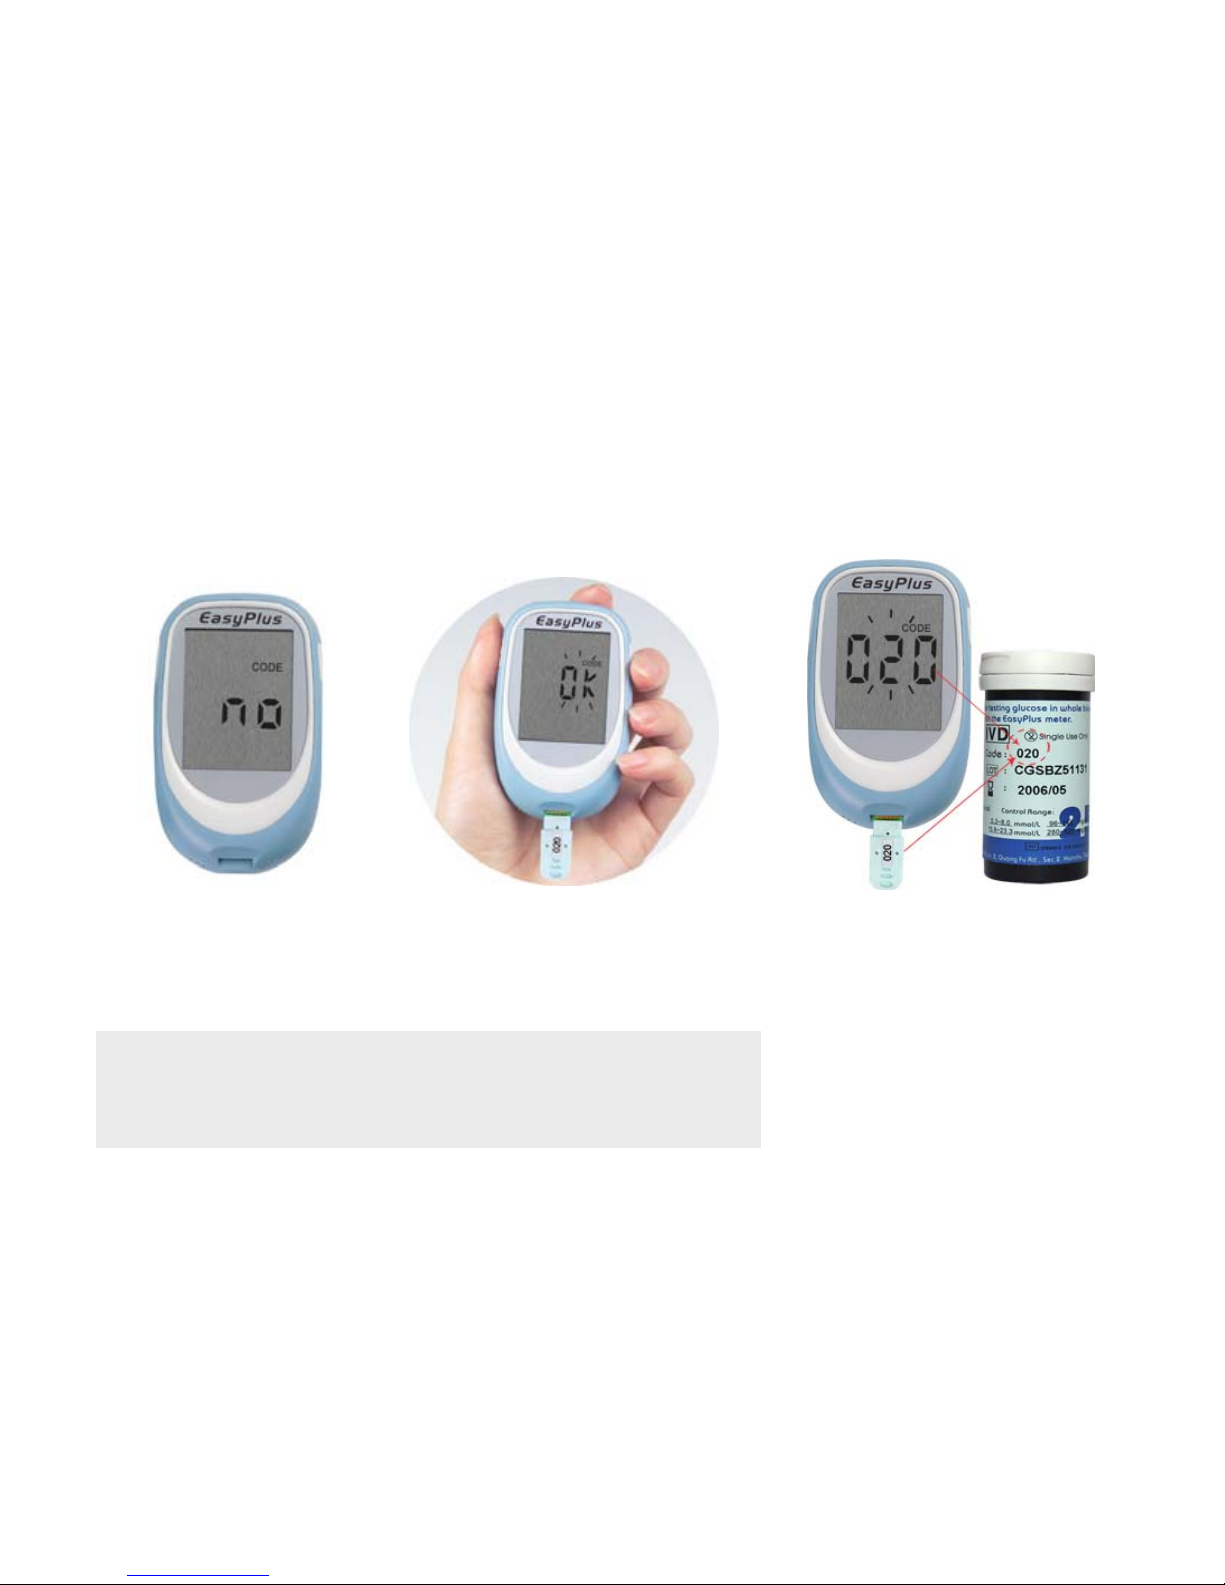
Coding Your Meter
A new Code Card is inside each ne w box of test strips. Code your meter every time
you open a new box of test strips.
1. The LCD display will
show “no CODE” the
first time batteries
are installed.
2. Insert the code card
into the slot. The
screen displays “OK”.
3. The code number will be
shown on the LCD. Make
sure the code number on
the LCD matches the code
number on the test strip vial.
Note:
Do not discard the code card until you use all test
strips in the same vial.
Page 13
13
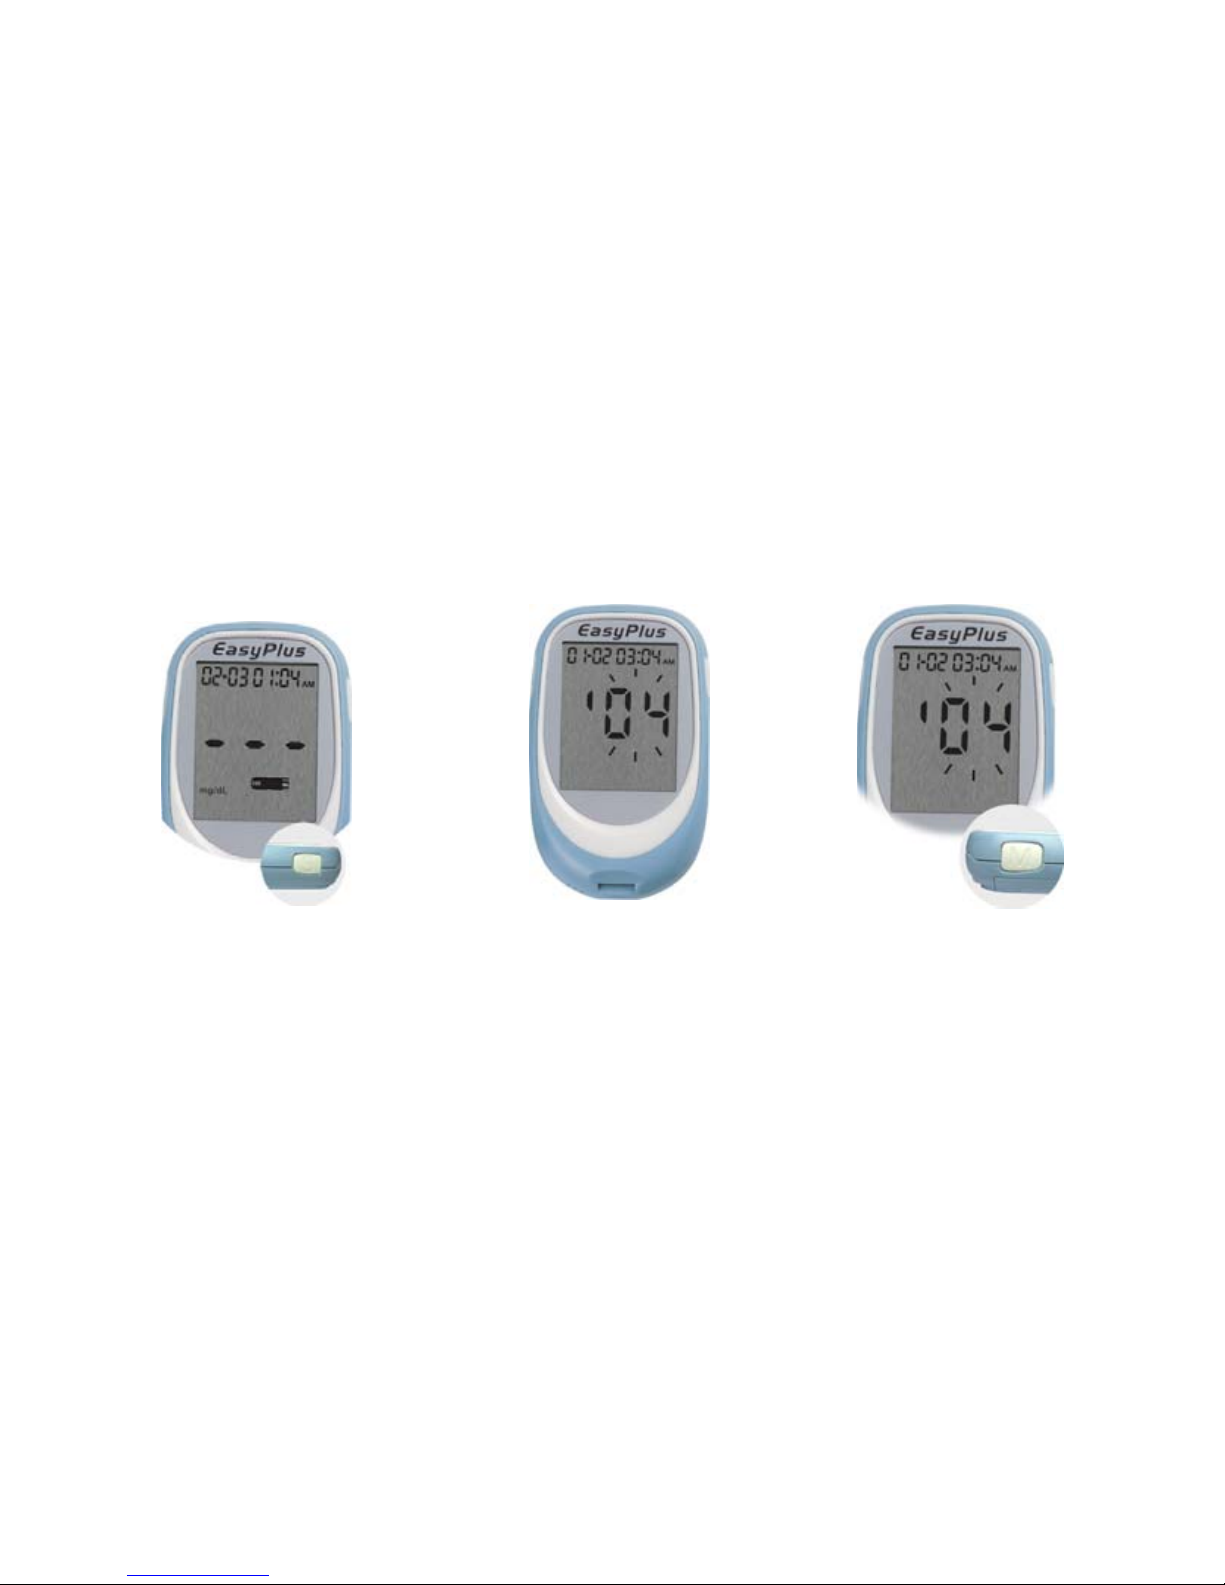
Setting The Time and Date—First Time Use
Setting the current time and date in your meter is important if you use the meter
memory or if you want to download your results to a computer.
1. Press and hold the “S”
button until turning the
meter on. Press ”S” button
and release to enter
setting mode.
2. The time and date
appear on the display.
The year flashes at
the center of the LCD
display.
3. Press ”M” button to
adjust the year.
Press and hold “M”
button to scroll
faster.
Page 14
14
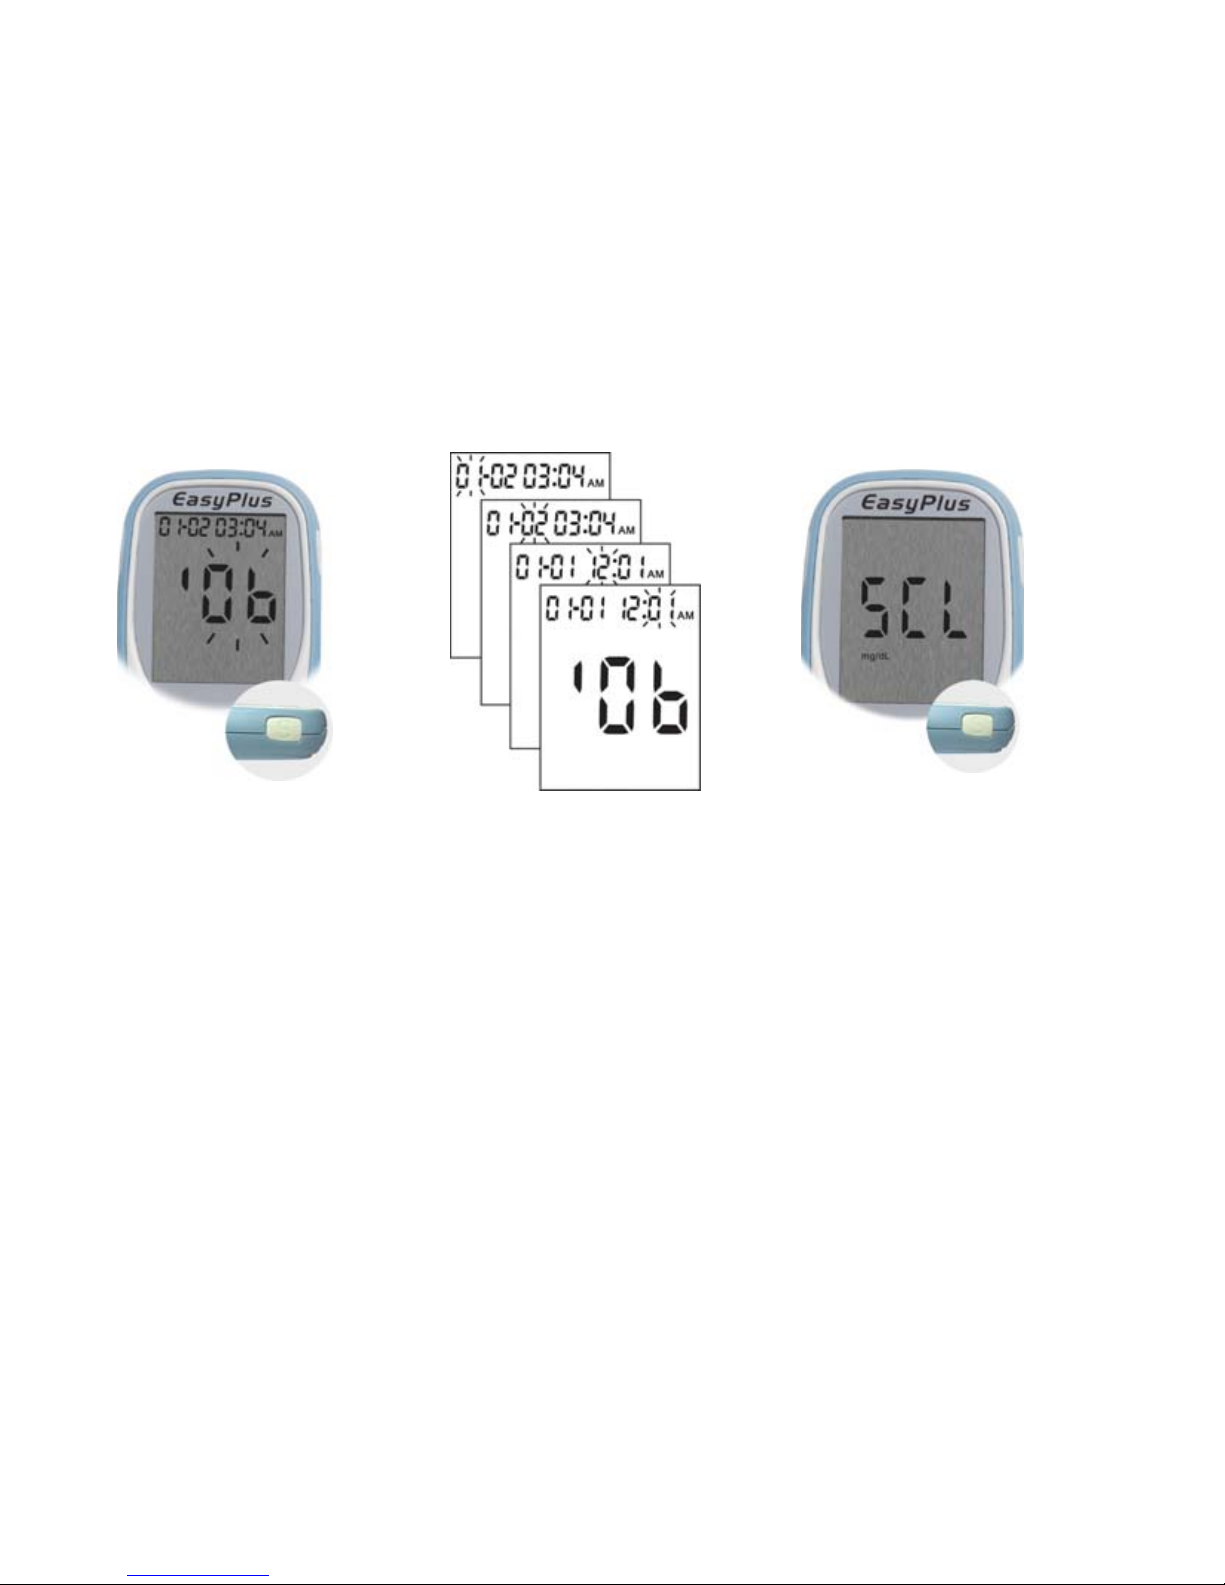
4. Press and release ”S”
button to set the year.
The month will then
flash.
5. Repeat step 3 and 4
to set the date, hour,
and minute. The
flashing field is the
one you are setting.
6. Press the “S” button to
confirm the setting. The
display will show “SCL” and
the unit of measurement.
Press the “S” button again, to
go to screen shown in Step 1.
Press and hold “S” for more
than 3 seconds, and the
meter will turn off.
Page 15

15
Using EasyPlus Blood Glucose Test Strip
Use only with EasyPlus Blood Glucose Meter.
Code your meter and run a control test every time you open a new box of test
strips (See Chapter 2 “Control Solution Testing.”)
Keep the test strips in their original vial.
Close the vial tightly right after you take a test strip out. This helps keeps the
test strip dry.
Use the test strip within three minutes after you take it out of the vial.
The strip is for single use only. Do not reuse it.
Record the date you open the test strip vial. Be sure to check the “Use by” date
on the test strip vial. The test strip is good for three months from the date the
vial is opened or until the “Use by” date on the vial, whichever comes first.
Store the test strip vial and your meter in a cool dry place.
Store the test strips below 86°F(30°C). Do not freeze.
Do not apply blood or control solution to the test strip before you insert it into the
meter.
Do not touch the test strip with wet hands. Do not bend, cut, or twist the test
strips.
Page 16

16
Chapter 2: Control Solution Testing
Why Run A Control Solution Test
Running a control test lets you know that your meter and test strips are working
properly to give reliable results. You should run a control test when:
You use the EasyPlus Blood Glucose Meter for the first time.
You open a new vial of test strips.
You think the meter or test strips may be working incorrectly.
You drop the meter.
You have repeated a test and the test results are still lower or higher than
expected.
You are practicing the test procedure.
Note:
Professional users are instructed to follow federal, state, and local guidelines
concerning QC practices.
Page 17

17
About The Control Solution
Use only with EasyPlus test strips.
Write the date you opened the bottle on the bottle label. T he control solution is
good for three months from the date the vial is opened or until the “Use b y” date
on the bottle, whichever comes first.
Do not uses control solution that is past the “Use by” date.
Close the bottle tightly after every use.
Left over control solution should not be added back into the control bottle.
Store the bottle of control solution at room temperature, below 86°F (30°C). Do
not freeze.
Page 18
18
Running A Control Solution Test
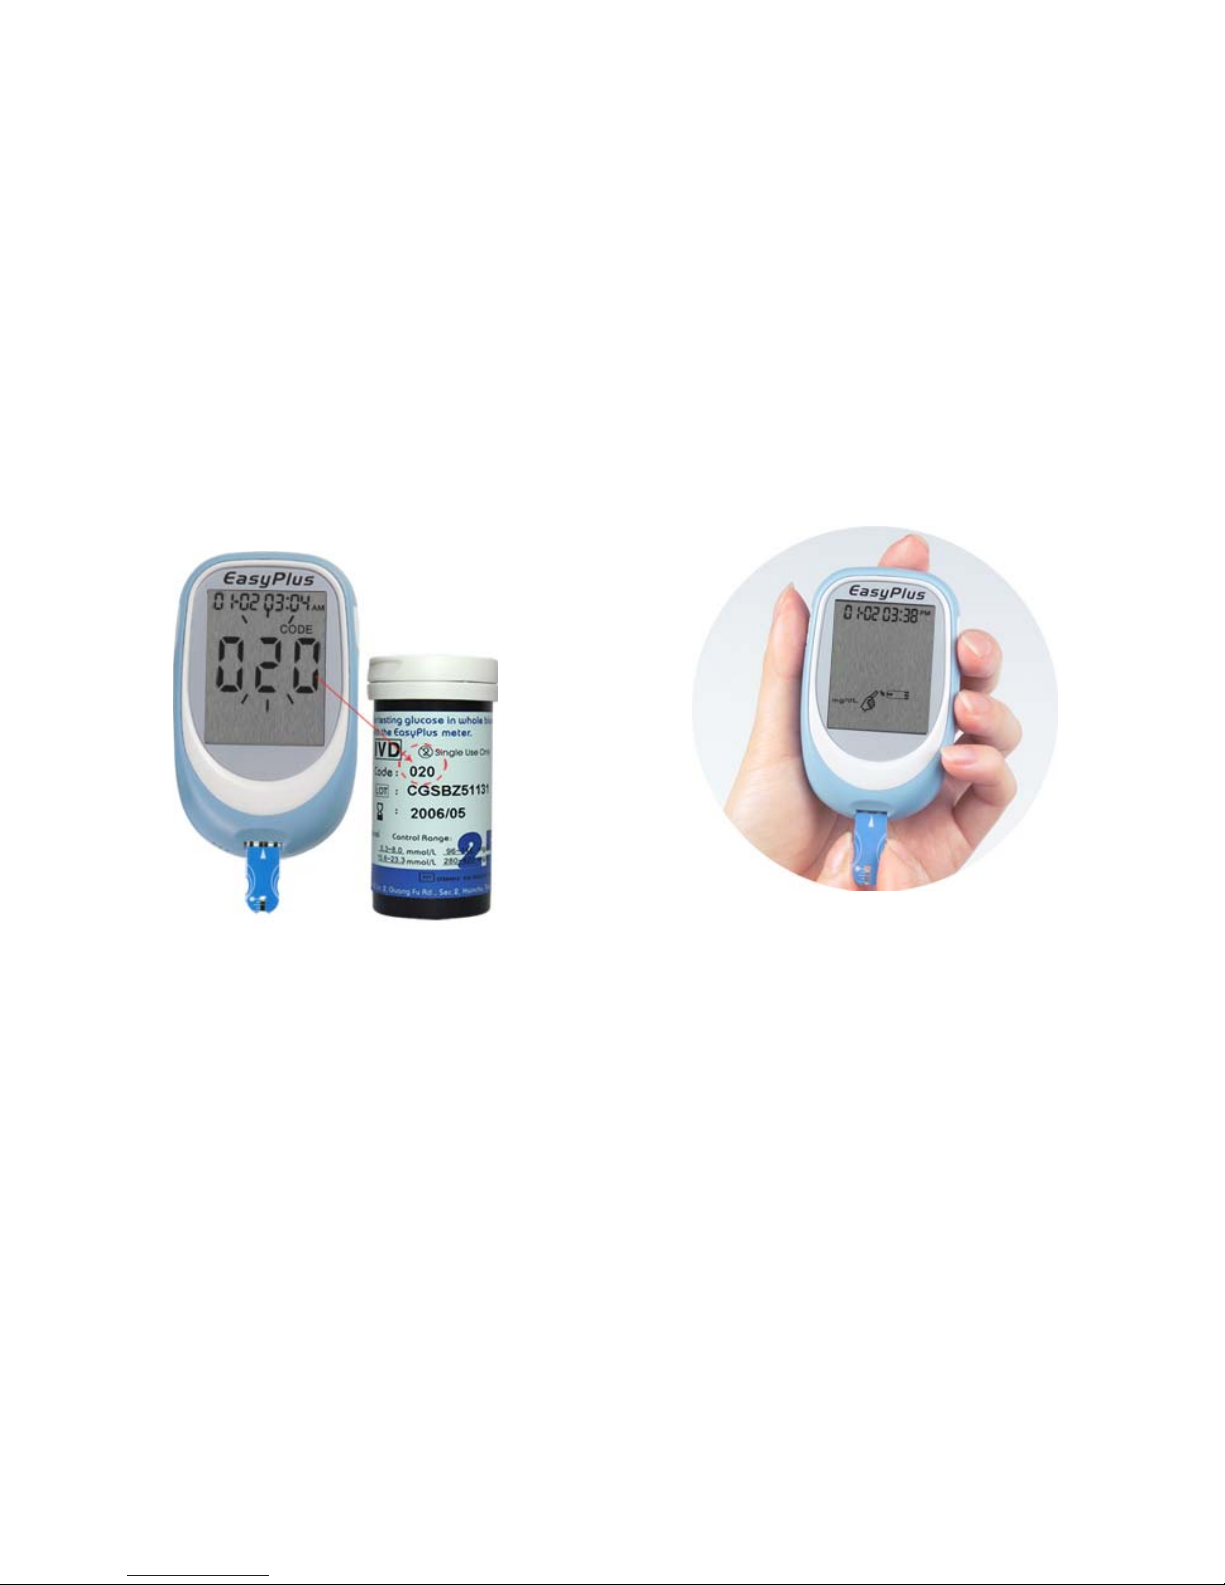
You need the meter, a test strip, and control solution
2. If you miss seeing the code
number, take the test strip out
and reinsert it into the meter.
After LCD shows the code
number, you will see the
screen shown above.
1. Put a test strip into the meter in
the direction of the arrow. The
meter turns on. Make sure the
code number on the display
matches the code number on the
test strip vial.
Page 19
19
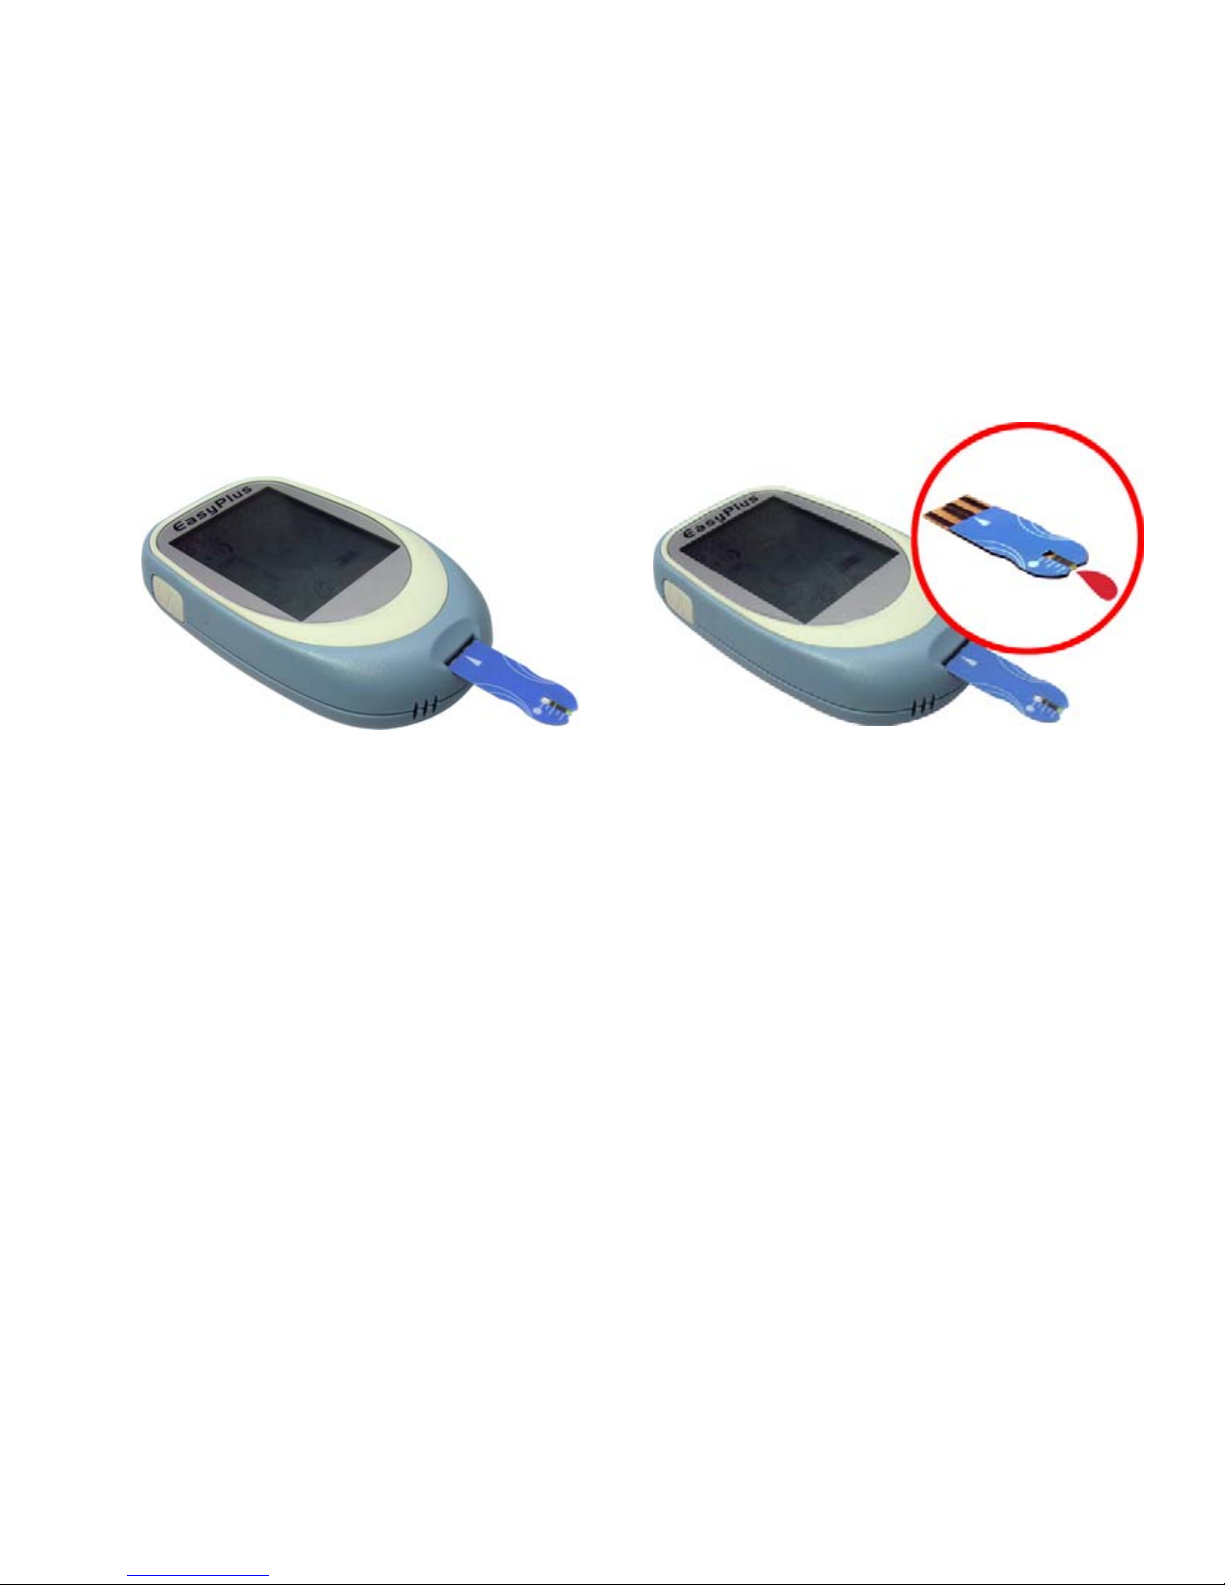
3. Place the meter on a flat
surface, like a table.
4. Remove the control solution
bottle cap and wipe the tip
of the bottle with a tissue.
5. Squeeze the bottle until a tiny drop
forms at the tip of the bottle. Touch
the drop to the Blood collection area
at the end of the test strip. Do not
put control solution on top of the
test strip. When you hear the
beeper, you have enough control
solution in the test strip. The meter
starts to count down from 5 seconds
and will show the results.
Page 20
20
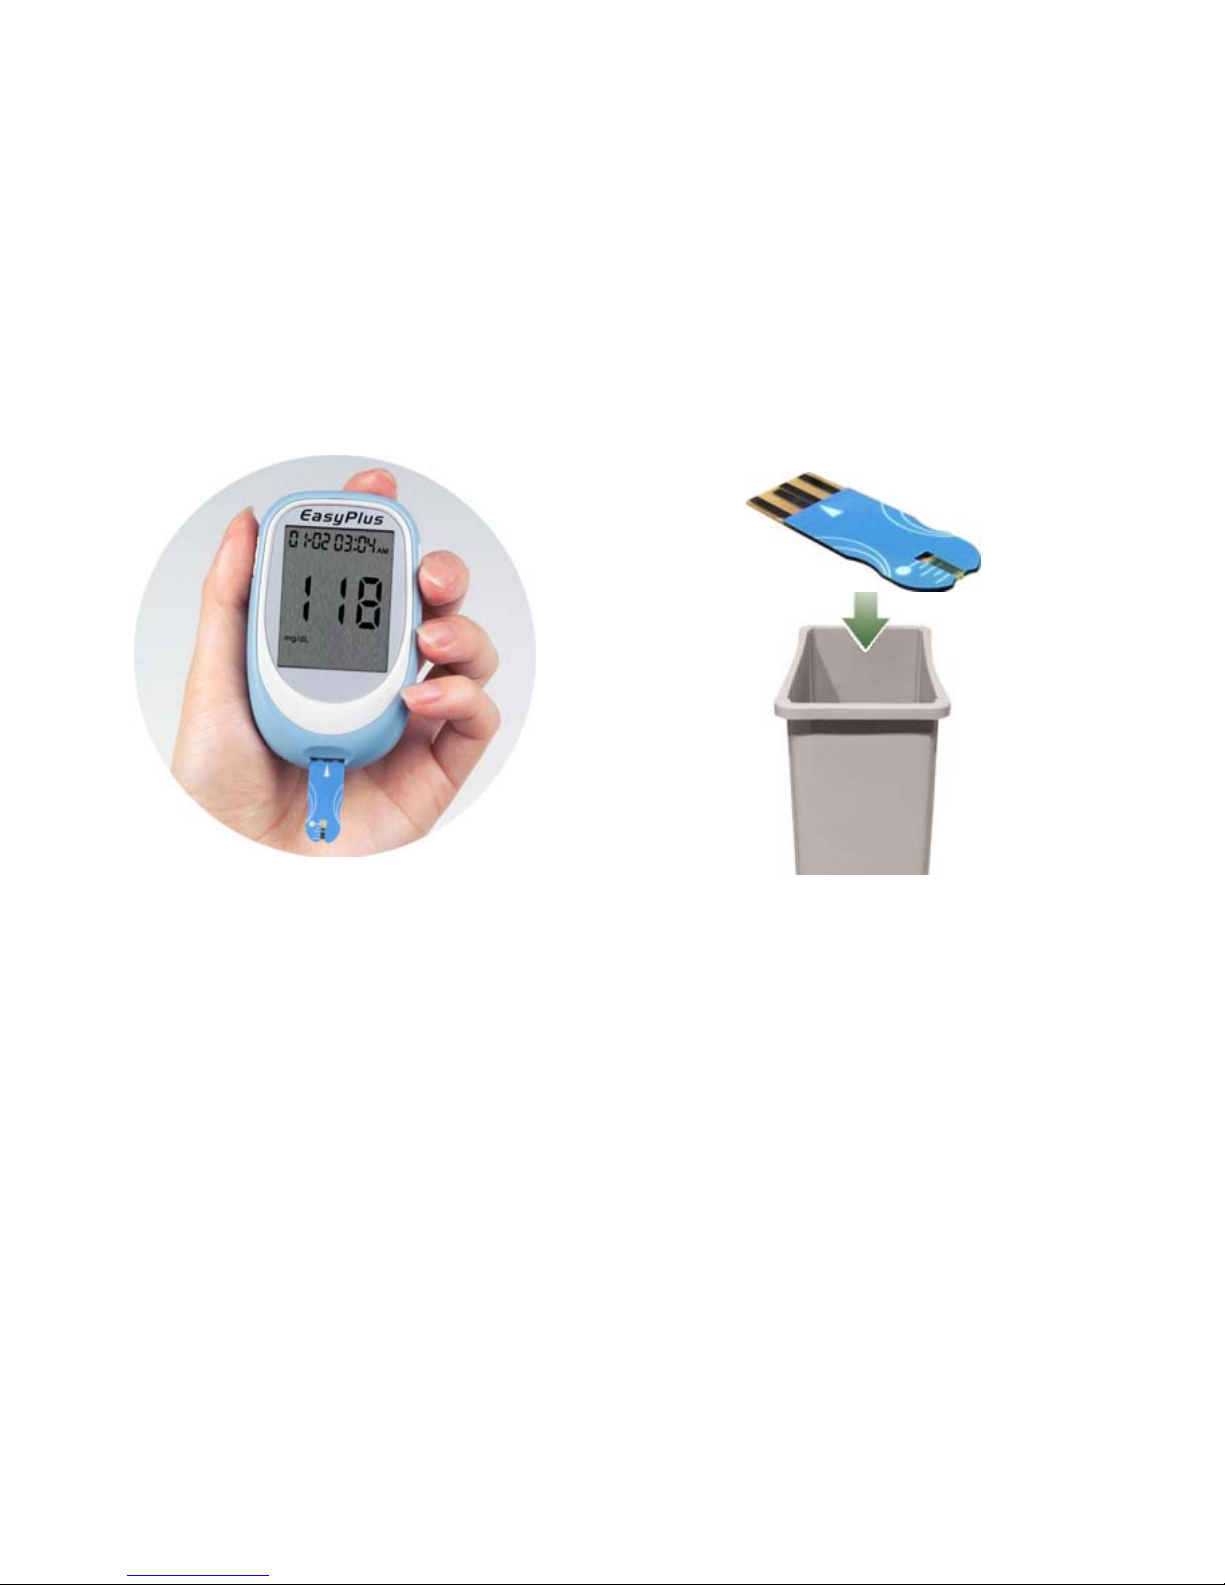
6. A result appears on the display.
Don’t remove the test strip yet.
Check if the reading falls within the
ran
ge p
rinted on the test strip vial.
7. Remove the test strip and thro
w
it away after you have compared
the reading to the range printed
on the test strip vial.
Page 21

21
Understanding Control Test Results
The label on your test strip vial shows the acceptable ranges for the Control Solutions .
The result you get should be inside this range. Make sure you compare the result to
the correct level of control.
Acceptable Control Ranges
Normal Control 96- 144 mg/dL
High Control 280-420 mg/dL
When the control result is inside the range on the test strip vial, your test strips and
your meter is working properly.
If your control result is not inside the acceptable range (print ed on yo ur test strip vial),
here are some things you can do to solve the problem:
Page 22

22
Troubleshooting Checks Action
Was the test strip exposi ng to open air
for a long period of time?
Repeat the control test with properly
stored strips.
Was the test strip vial capped tightly? This will humidify strips inside. Replace
the test strips.
Did the code number on the meter
display match the code number on the
test strip?
If they do not match, insert the correct
code card in the meter and try again.
Was the meter functioning well?
Is the control solution expired or
contaminated?
You can use the check strip to verify the
meter’s functions.
Replace with new control solution to
check the performance of SMBG
system.
Were test strips and control solutions
stored in cool, dry places?
Repeat the control test with properly
stored strips or control solutions.
Did you follow the testing steps
properly?
Read Chapter 2 “Control Solution
Testing” again and retest again. If you
still have problems, call the our
Customer Service Toll Free:
1-888-216-5888
Page 23
23
Chapter 3: Testing Your Blood Glucose
Inserting A Lancet Into The Lancing Device
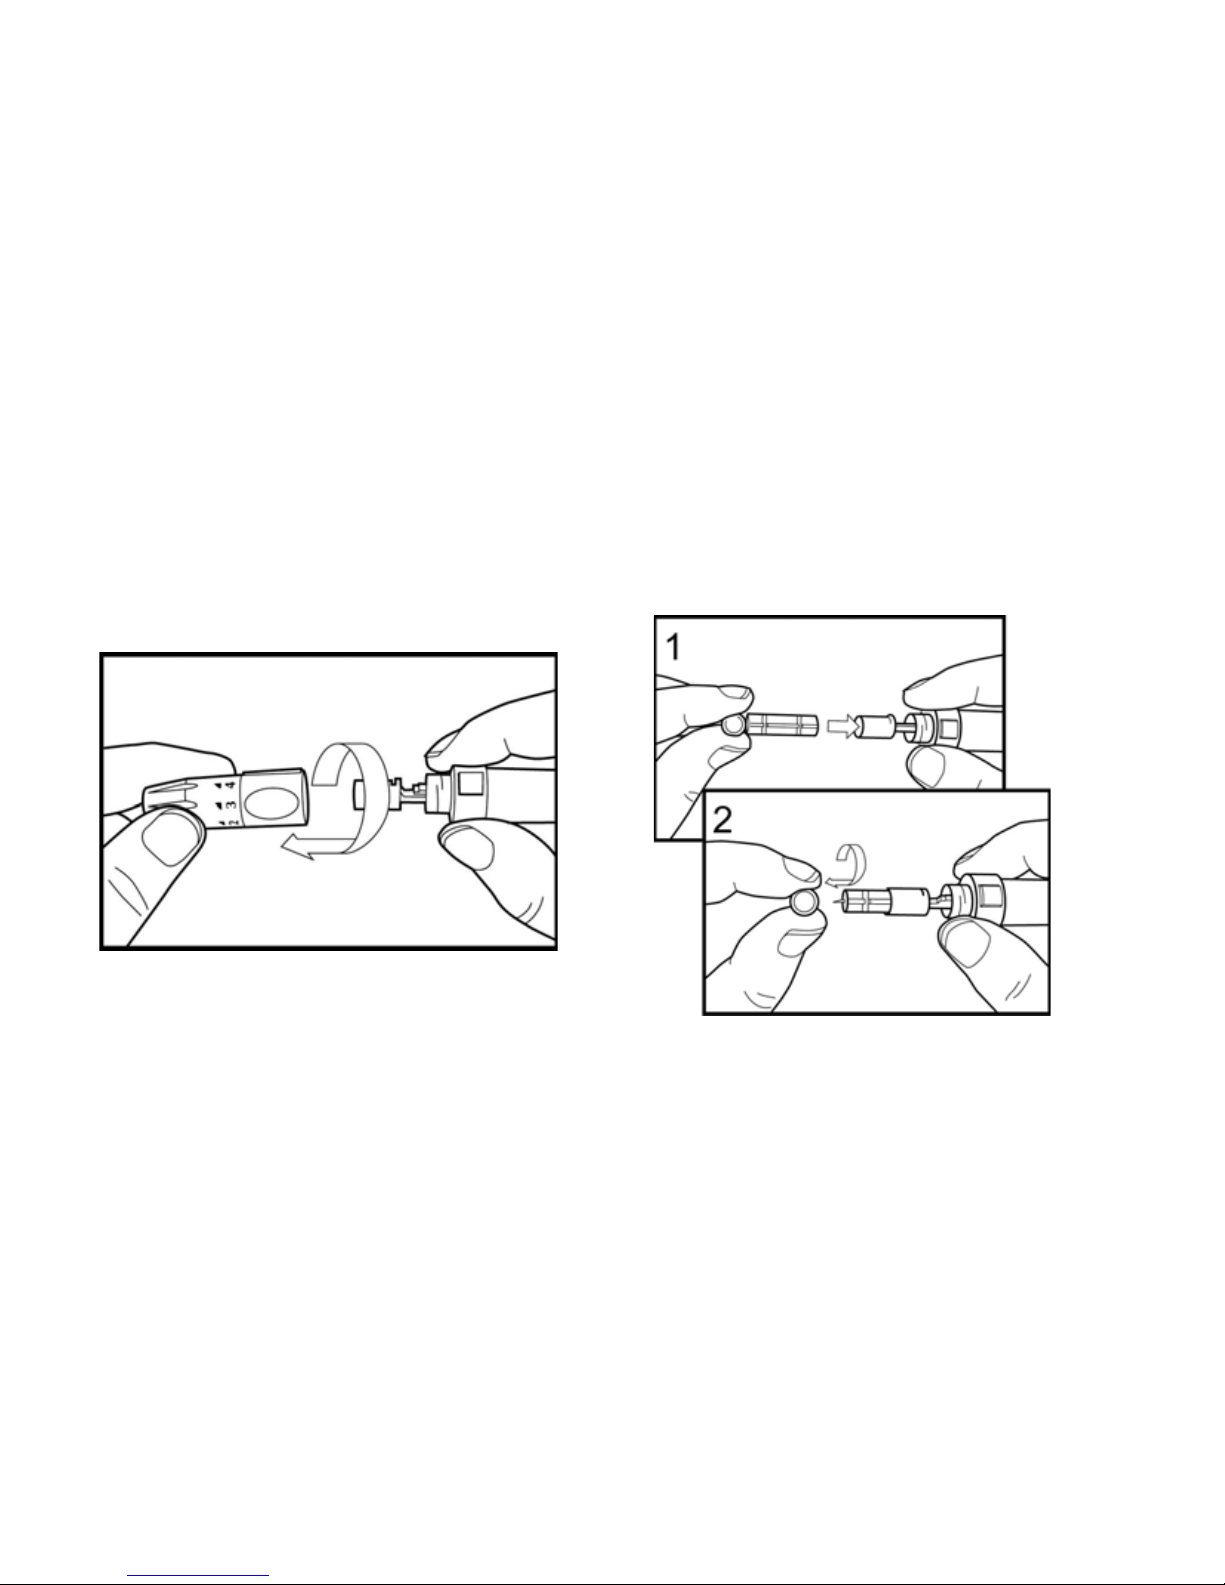
You must first load the lancet into the lancing device to get it ready for use.
1. Unscrew the Cap.
2. Insert the lancet into the lancing
device firmly then twist off the
protective cover.
Page 24
24
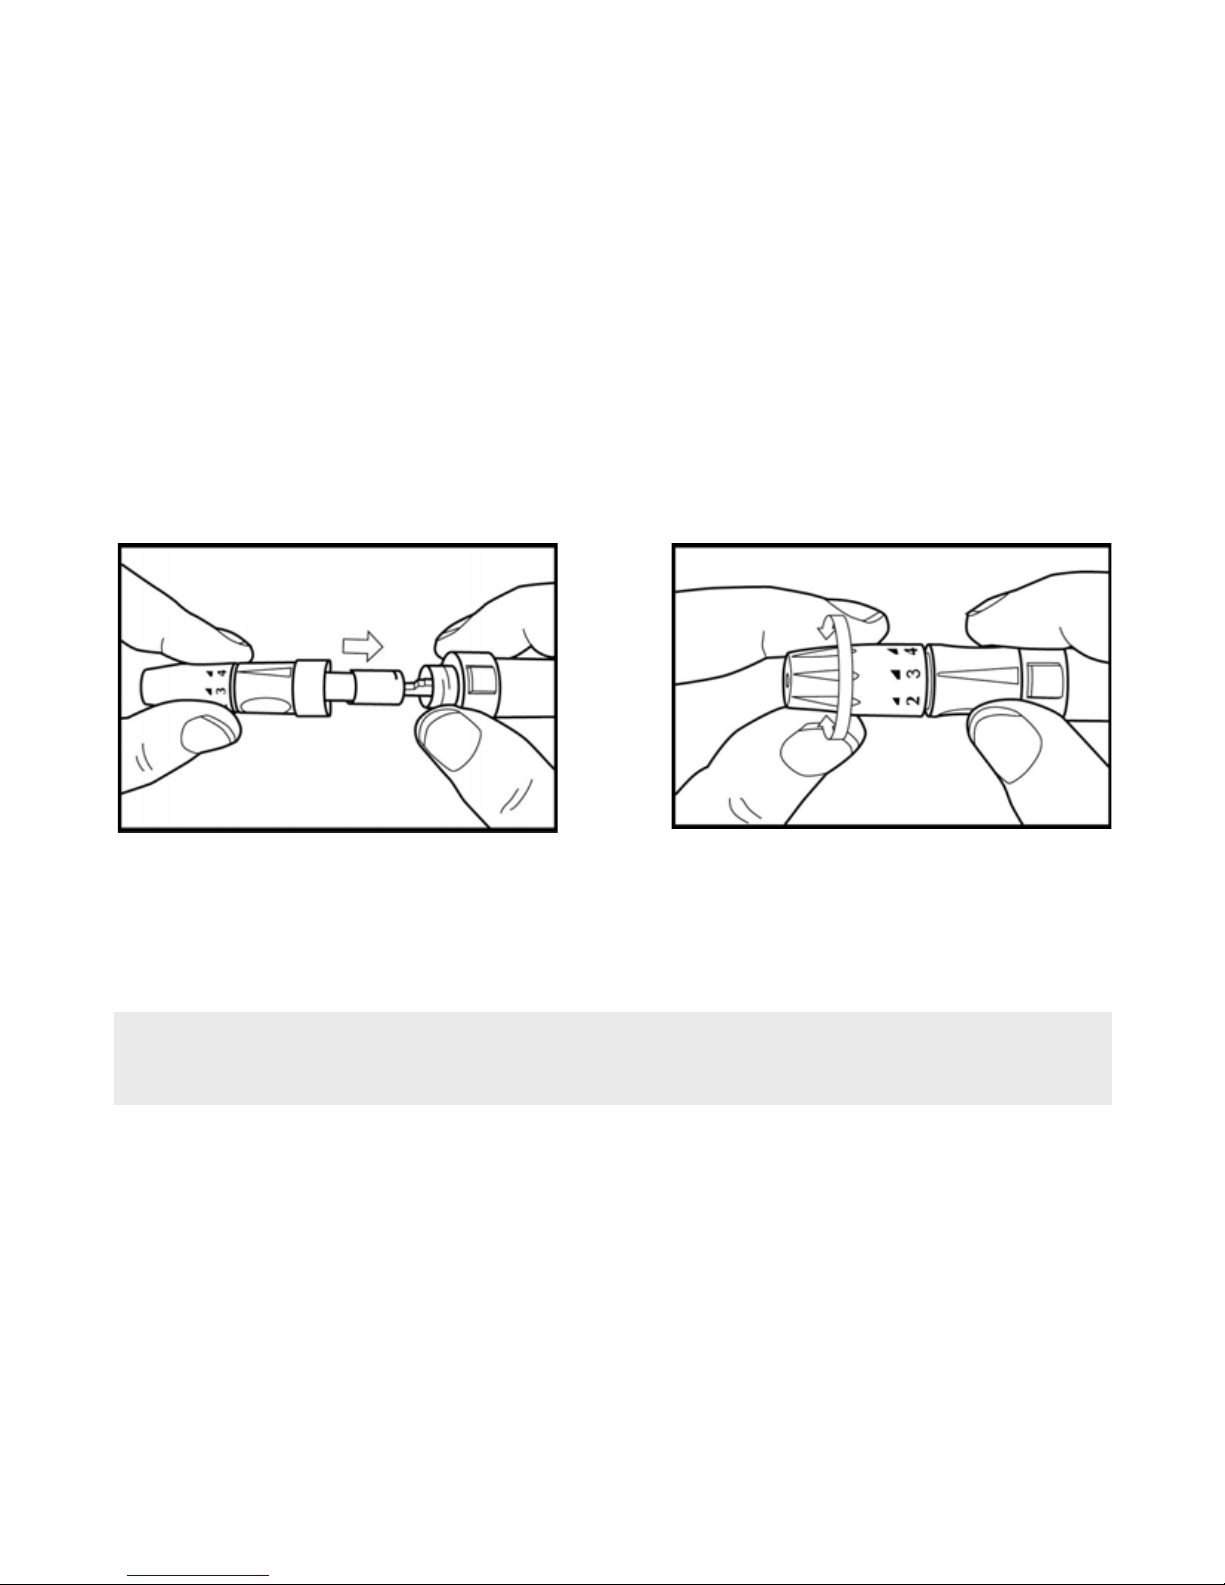
3. Recap the front cap.
4. Select the desired penetration
depth.
Note:
Select 1-2 for soft or thin skin. 3 for average. 4-5 for thick or calloused skin.
Page 25
25
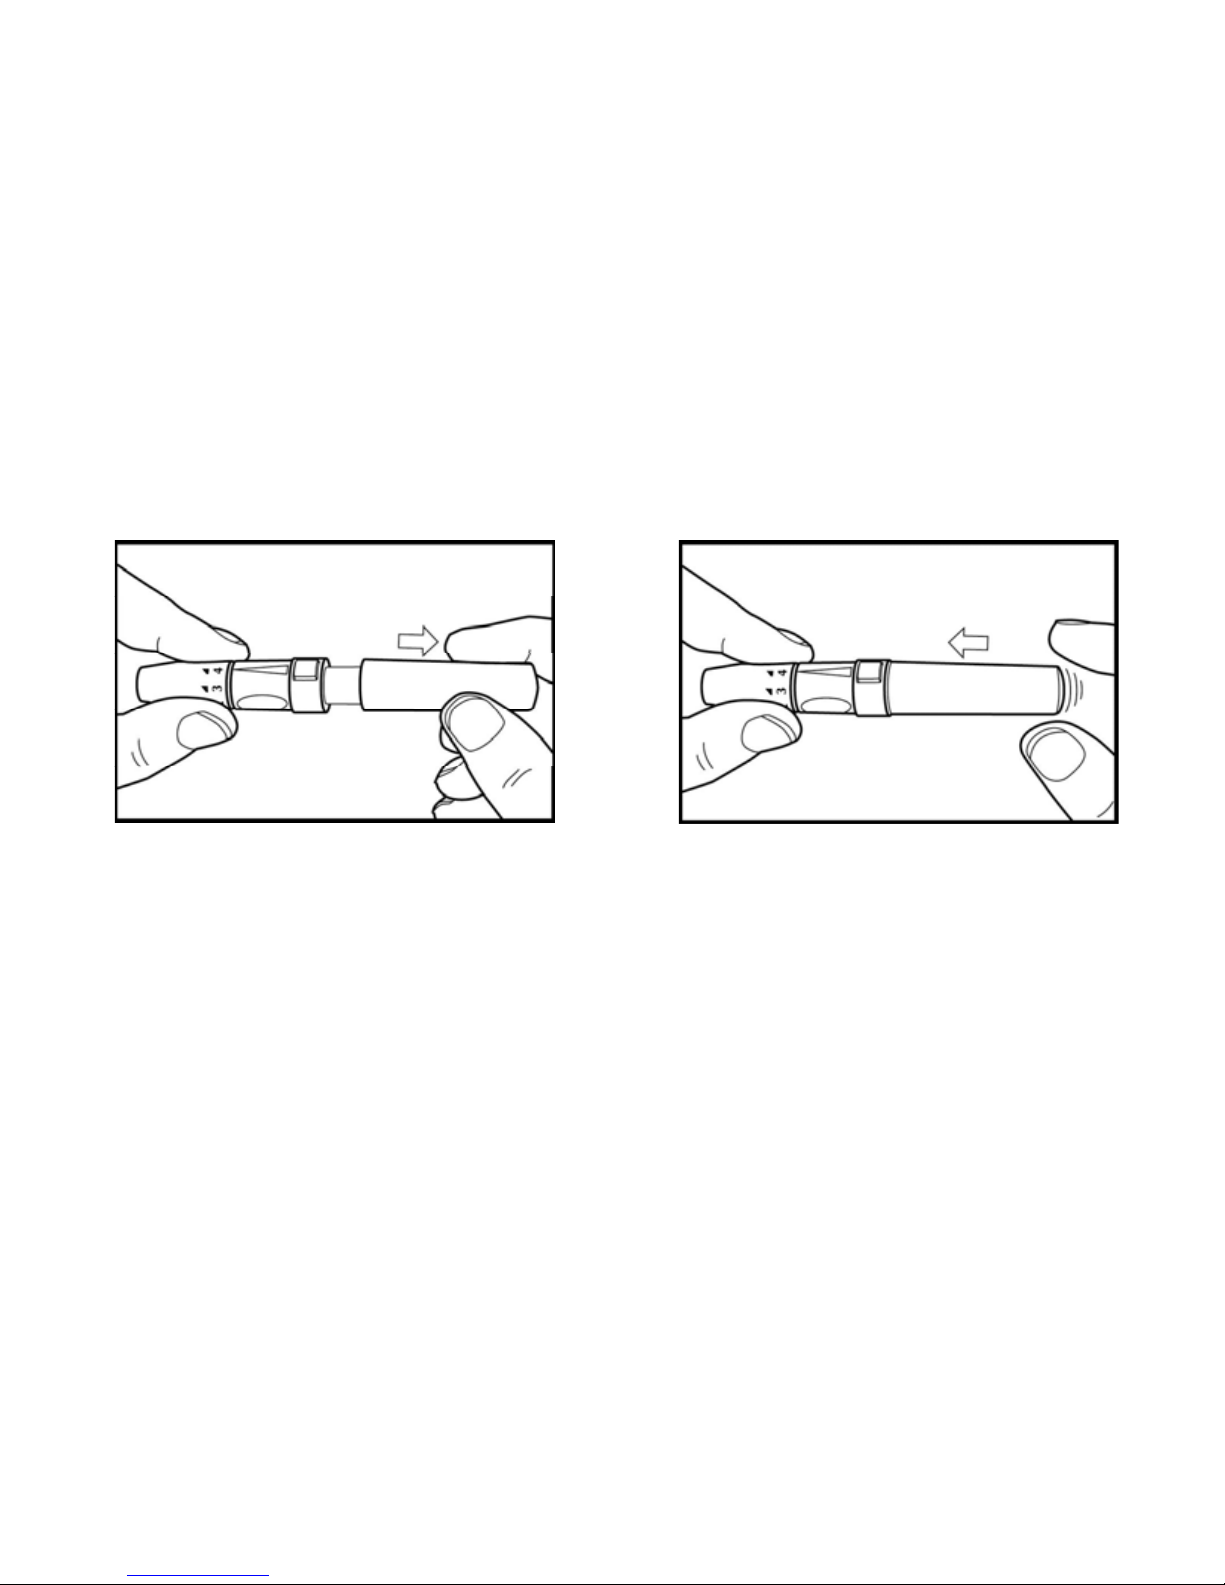
5. Pull on the sliding barrel of the lancing device until it clicks and then
release. Now the lancing device is ready. Do not prick your finger until
your meter and strip are prepared.
6. Set the lancing device aside until later in the test.
Page 26

26
Notes
The best depth setting is the lowest number that draws enough blood for a test.
Try diff erent settings to find the one that’s right for you.
Please do not share your lancing device with anyone. And always use a new,
sterile lancet. Lancets are for one time use only.
Used Test strips and Lancets are considered bio-hazardous waste in
accordance with U.S. local regulations and should be handled as if capable of
transmitting infection. The users may discuss methods for disposing of used
test strips and lancets with their doctor.
Page 27
27
Running A Blood Glucose Test With Blood From Your Fingertip
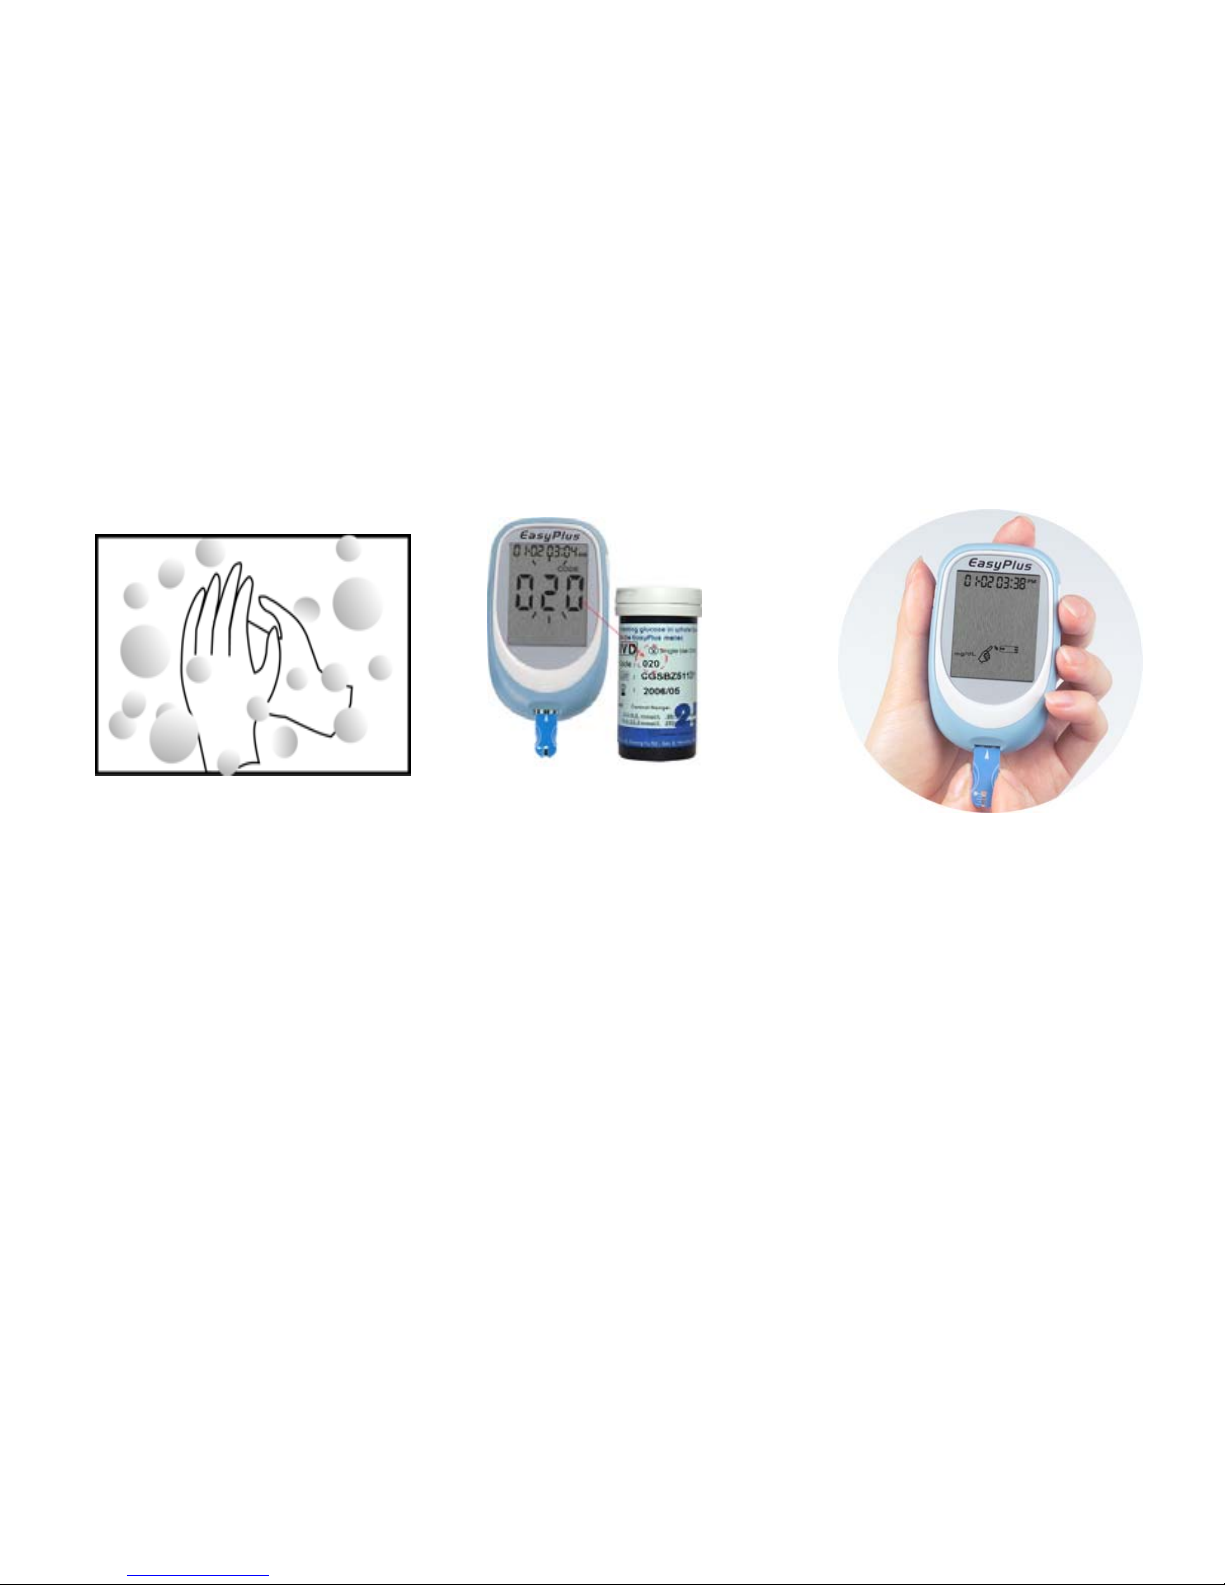
1. Wash your hands with
soap and warm water.
Rinse and dry
thorou
ghly
.
2. Put a test strip into the
meter in the direction
of the arrow. The meter
turns on. Make sure
the code number on
the display matches
the code number on
the test strip vial.
3. If you miss seeing the
code number, take the
test strip out and reinsert
it into the meter.
After
LCD shows the code
number, you will see the
screen shown above.
Page 28
28
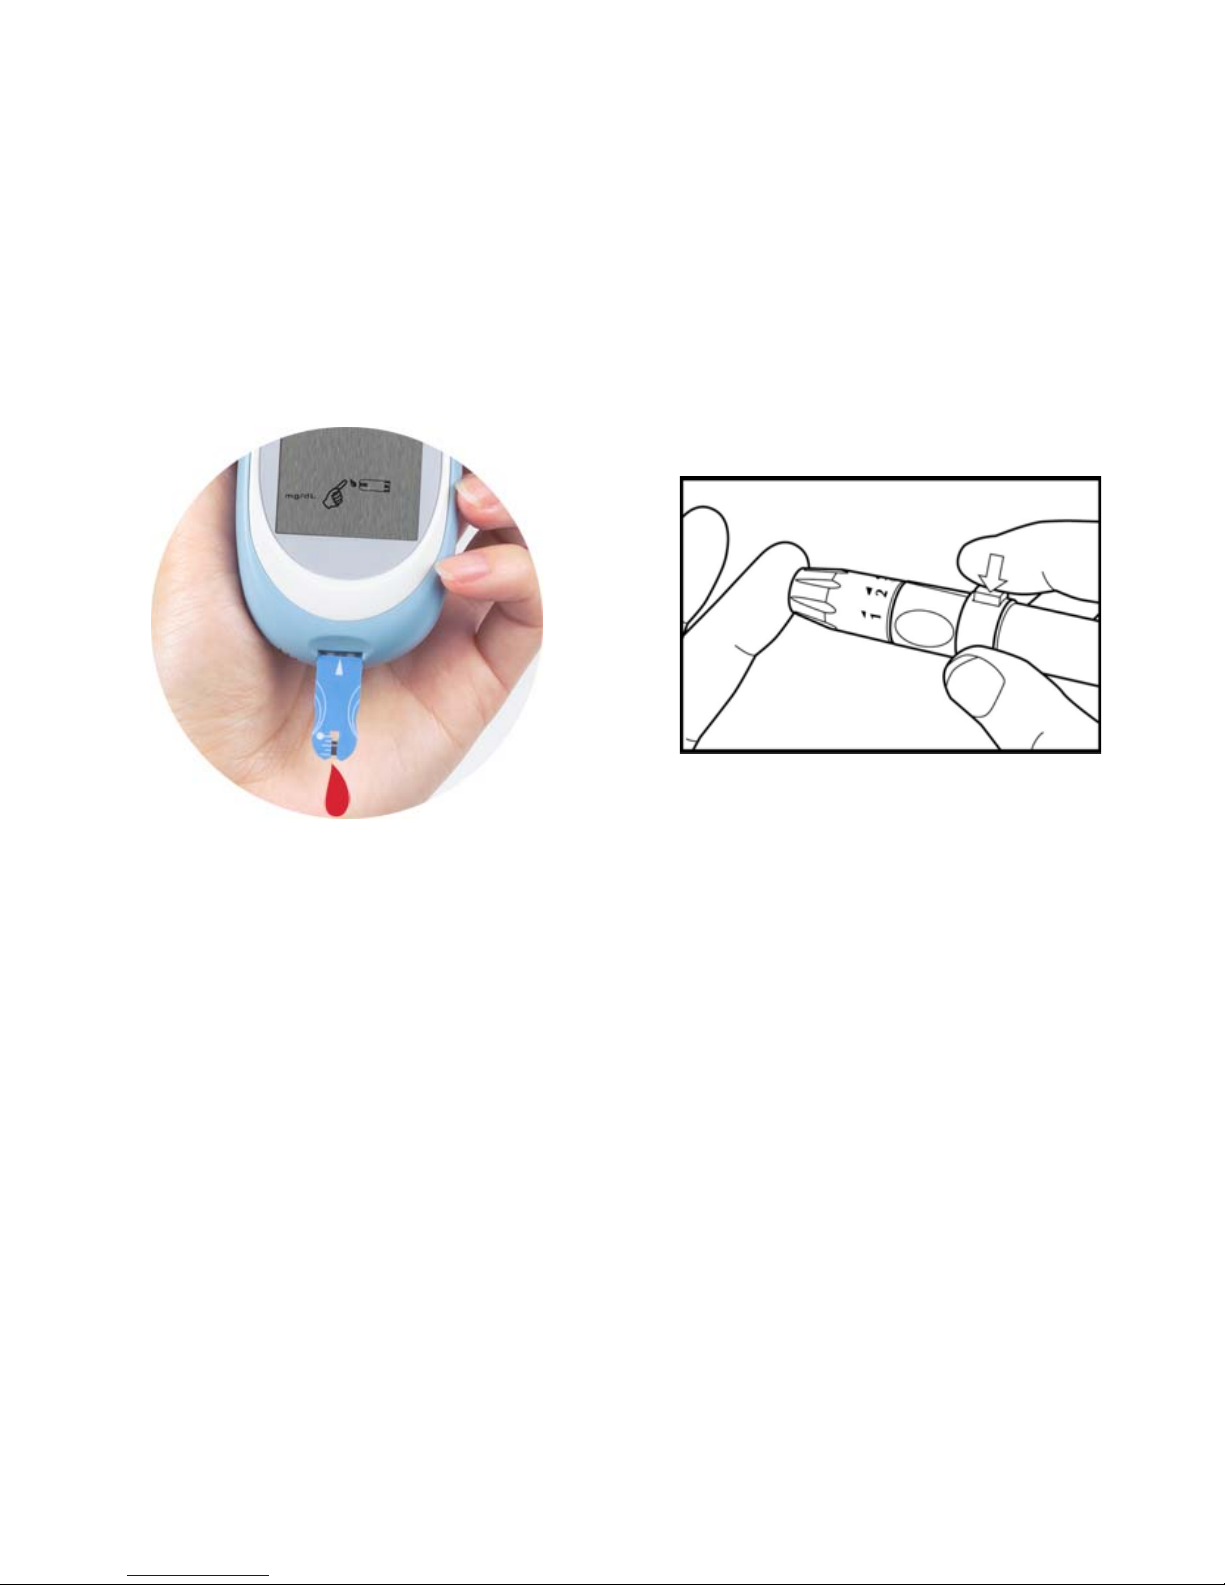
4. When the blood drop flashes on the
display, obtain a drop of blood from you
r
fingertip.
5. Swab the blood collection area on your
finger with an alcohol swab. Please wait
at least 5 seconds until the intended area
is dry and clean before sampling the
blood.
6. Place the lancing device against
the pad of your finger. Press the
trigger button to activate the
lancing device.
Page 29
29
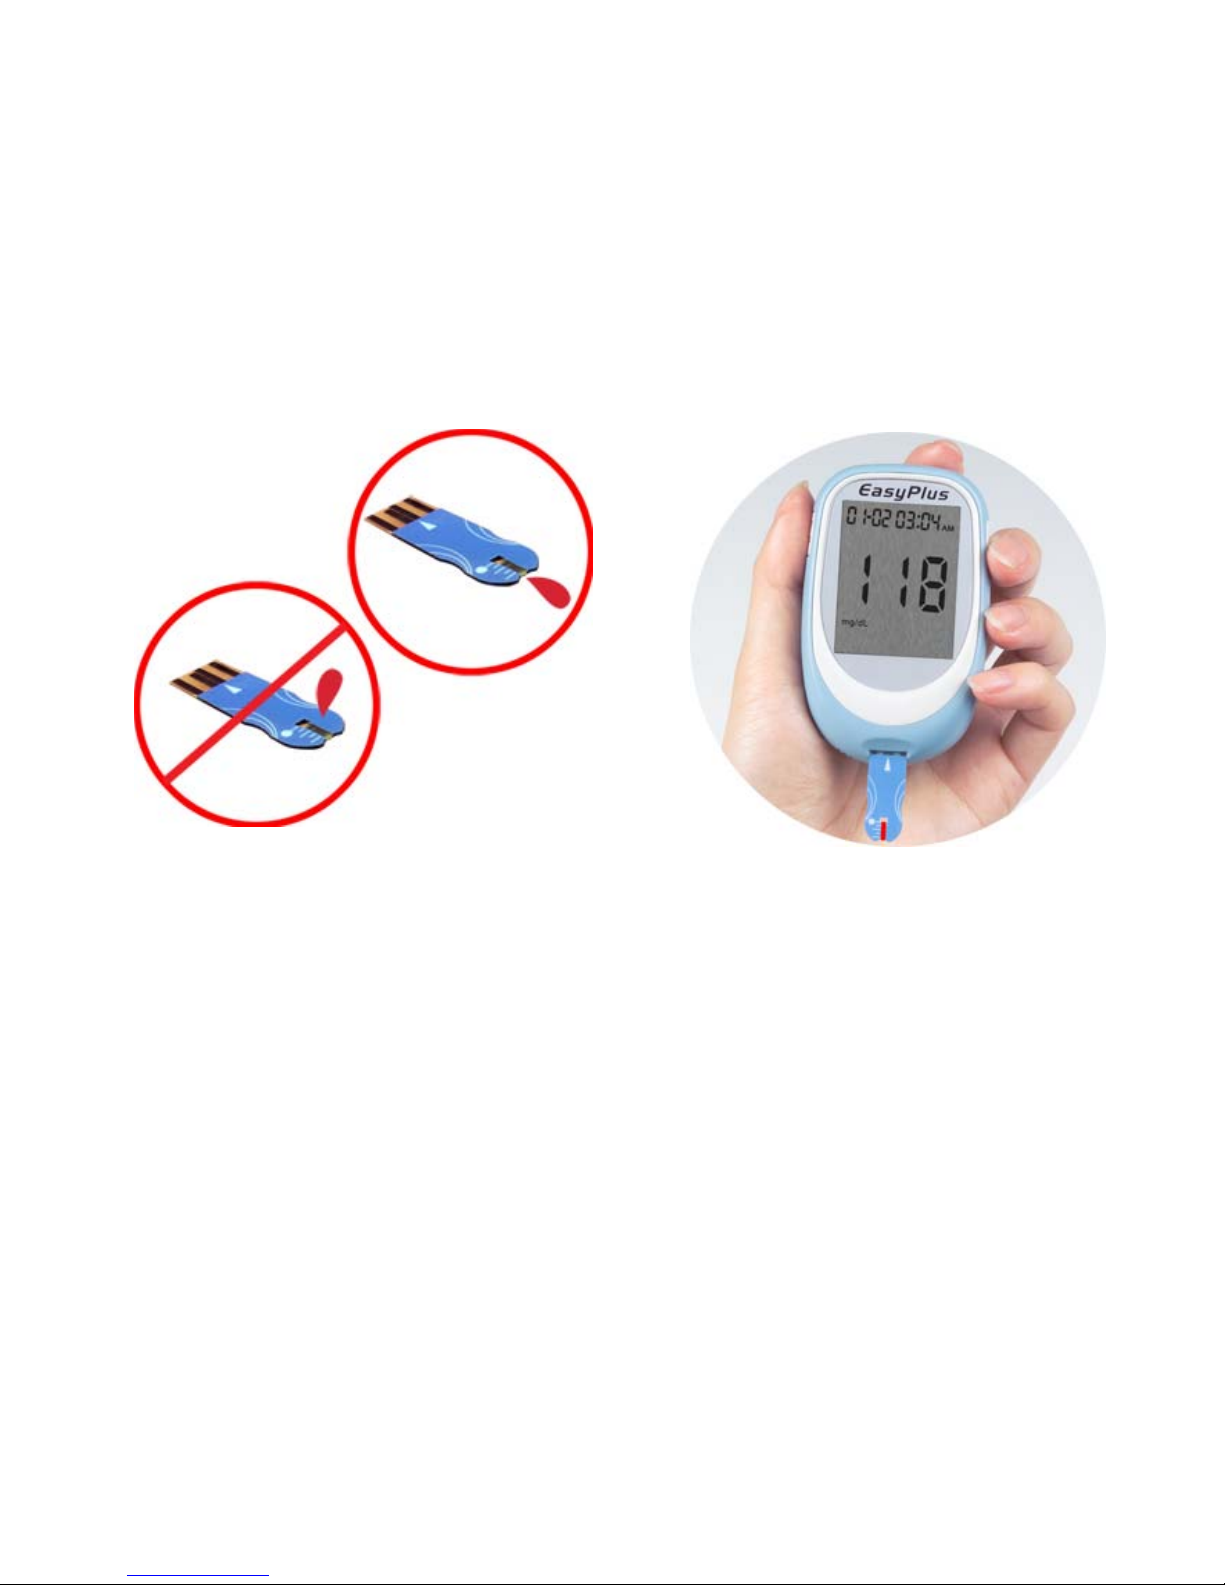
7. Gently squeeze your finger to assist
the flow of blood. This helps you get
a blood drop. Touch the drop to the
tip of the transparent window of the
test strip. Do not put blood on top
of the strip. Be sure to get enough
blood on the strip’s reaction zone.
Otherwise, an inaccurate reading
m
ay result
.
8. The meter will beep when enough
blood has entered the strip’s
reaction zone. The result will
appear on the display after 5
seconds.
Page 30
30
Discarding Used Lancets
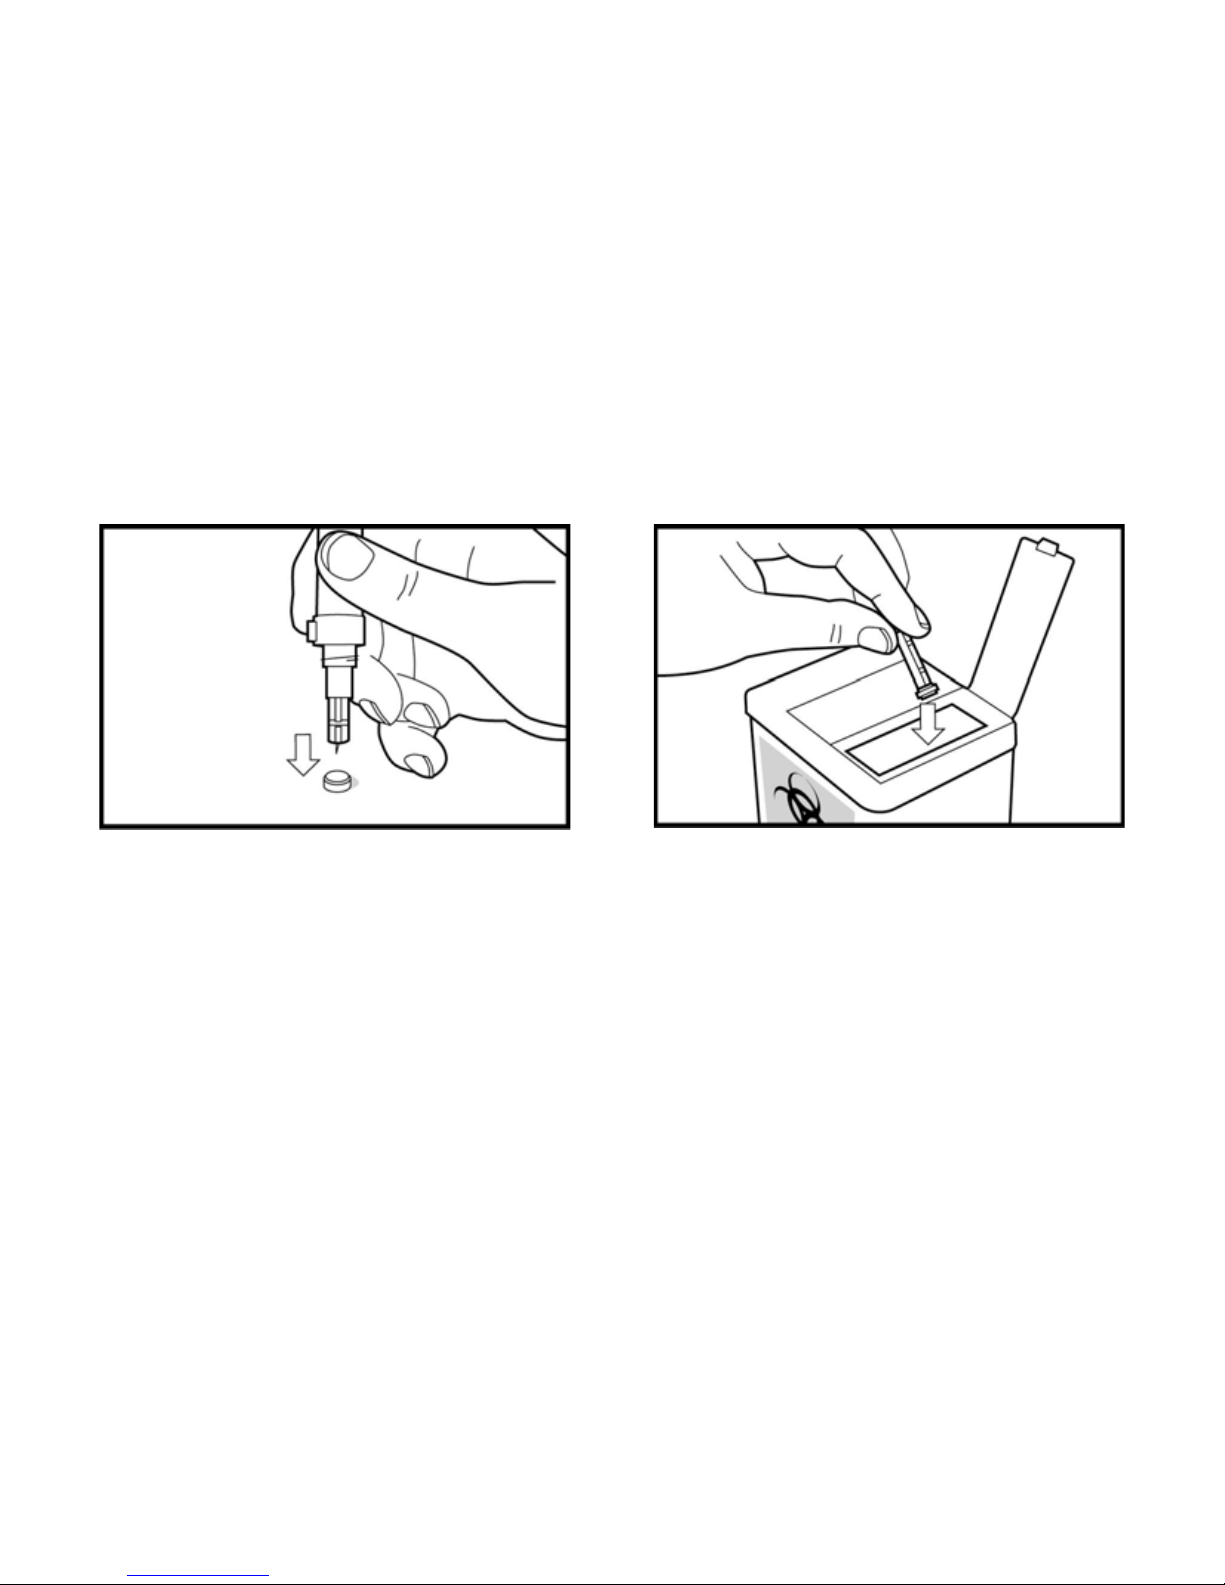
1. Unscrew and remove the
adjustable cap. Without touching
the used lancet, stick the lancet tip
into its protective cover. Grip the
lancet carrier firmly and pull the
lancet safely out.
2. Discard the used disposable lancet
into an appropriate sharps or
biohazard container.
Page 31

31
Understanding Your Test Results
The EasyPlus Blood Glucose test strips are whole-blood referenced and calibrated
for easier comparison to lab results. The normal fasting blood glucose range for an
adult without diabetes is 70 – 110 mg/dL. Two hours after meals, the blood glucose
range for an adult without diabetes is less than 140 mg/dL.
For people with diabetes:
please consult your doctor for the blood glucos e range appropriate for you.
Page 32

32
Unusual Test Results
If your blood glucose result doesn’t match the way you feel, please follow these
steps:
1. Run a control test, Chapter 2 “Control Solution Testing.”
2. Repeat a blood glucose test, Chapter 3 “Testing Your Blood glucose.”
3. If your blood glucose results still don’t reflect the way you feel, call your doctor
immediately.
Notes:
1. Extremely high humidity may affect the test results. A relative humidity
greater than 90% may cause inaccurate results.
2. A red blood cell count (Hematocrit) that is either very high (above 55%) or
very low (below 30%) may not provide accurate results.
3. Some studies have shown that electromagnetic fields may affect results. Do
not test near an operating microwave oven.
Page 33

33
Chapter 4: Meter Memory, Setup
Memory, Storing Test Results
Your meter stores a maximum of 100 test results with the time and date of the test.
You can review them at any time. When the memory is full, the oldest result is
dropped as the newest is added, so it is very important to have the correct time and
date set in the meter.
Notes:
1. Do not change your therapy based on one individual result in memory.
2. The memory is not lost when you replace the battery. You do need to check that
the time and date are still correct. See Section “Setting the time and date” in
Chapter 1.
3. Once 100 results are in memory, adding a new result causes the oldest one to be
deleted.
Page 34
34
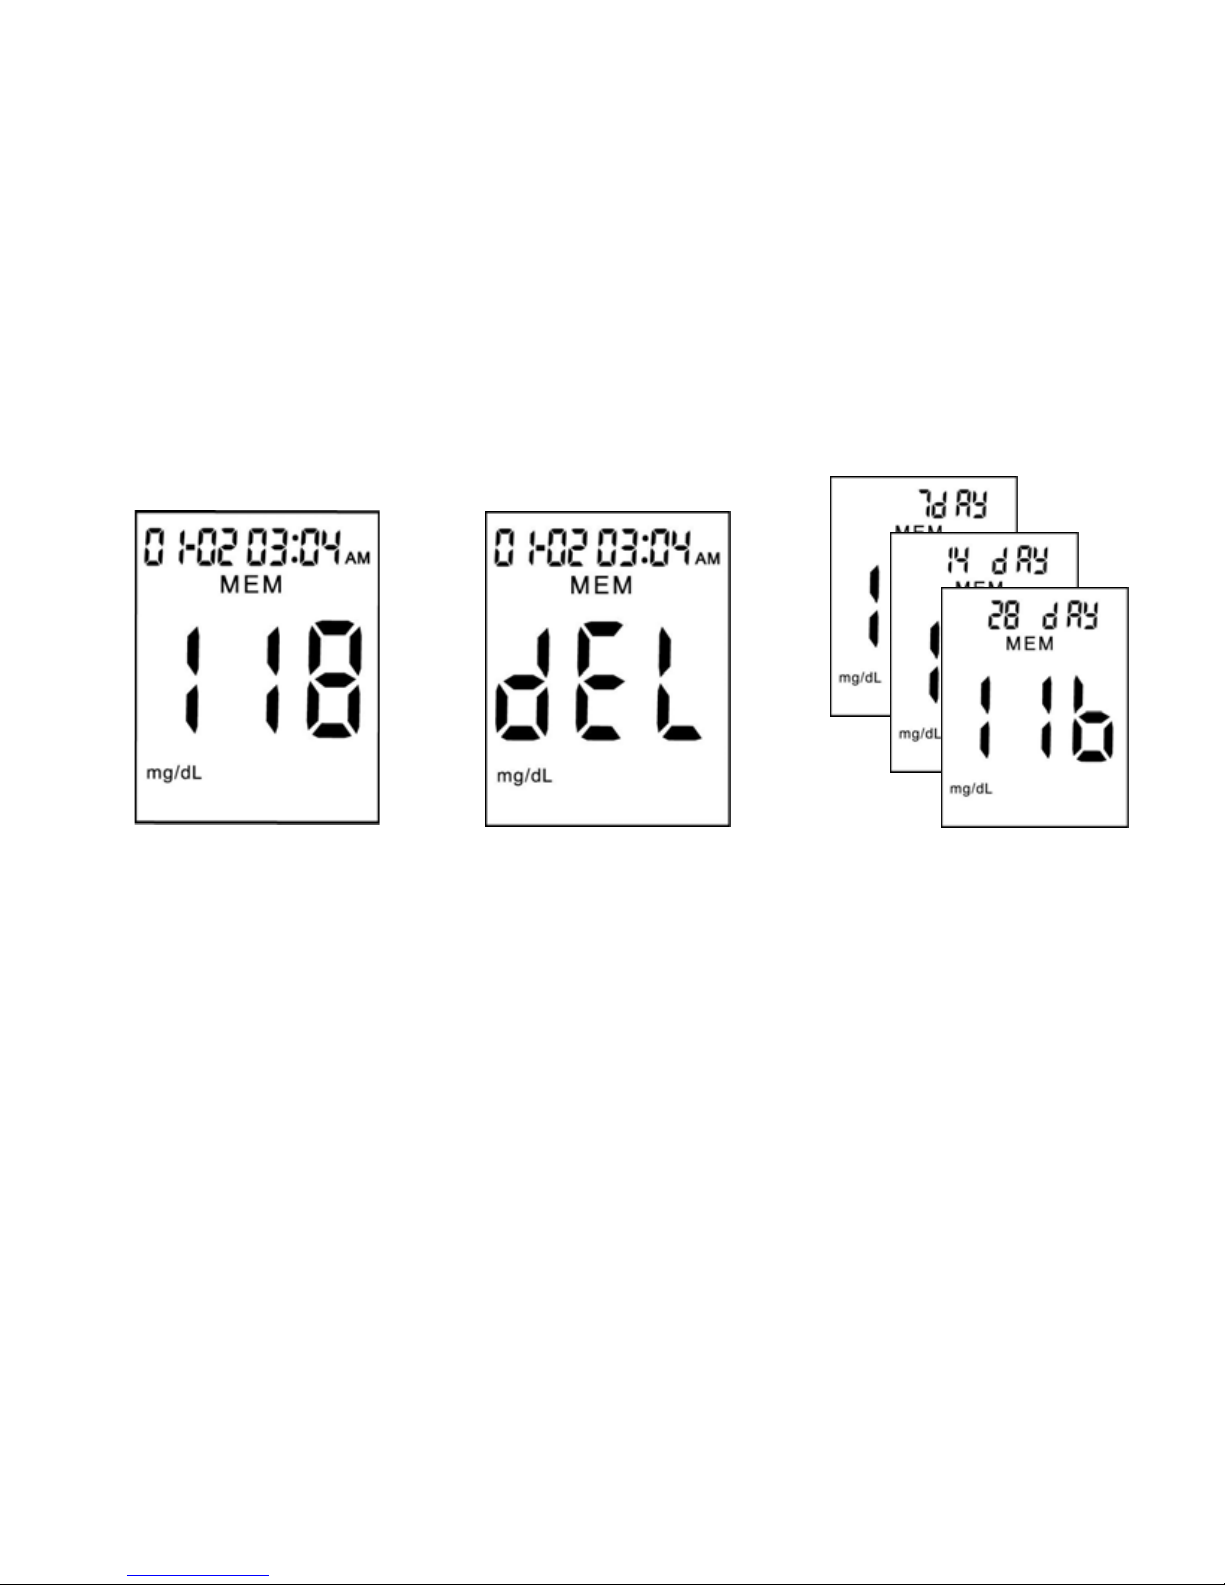
Viewing & Deleting Test Results
1. Press and hold the “S”
button until turning the
meter on.
2. Press the “M” button to
view the last test result.
3. Press “S” to view the
previous results in
order from the most
recent to the oldest.
4. To delete a test result,
Press and hold “M” for
more than 3 seconds. The
LCD will show “del”.
5. Continue pressing “M”
without releasing, the
currently viewed result will
be erased.
6. Press “M” and release to
review the average results
for the last seven days
7. Press “S” to view
averages for 14 or 28
days.
8. Press “M” to close the
memory mode.
Page 35

35
Meter Setup
Using The Set Mode
By using the set mode, you can personalize your meter to suit your needs. Here are
the features you can customize —
Time and Date — to set the time and date(see Chapter 1).
Thermometer — to show the current temperature.
Alarm — as a test reminder to test.
Beeper — to indicate a button has been pushed.
Clock — to indicate the time.
Page 36
36
Setting The Thermometer
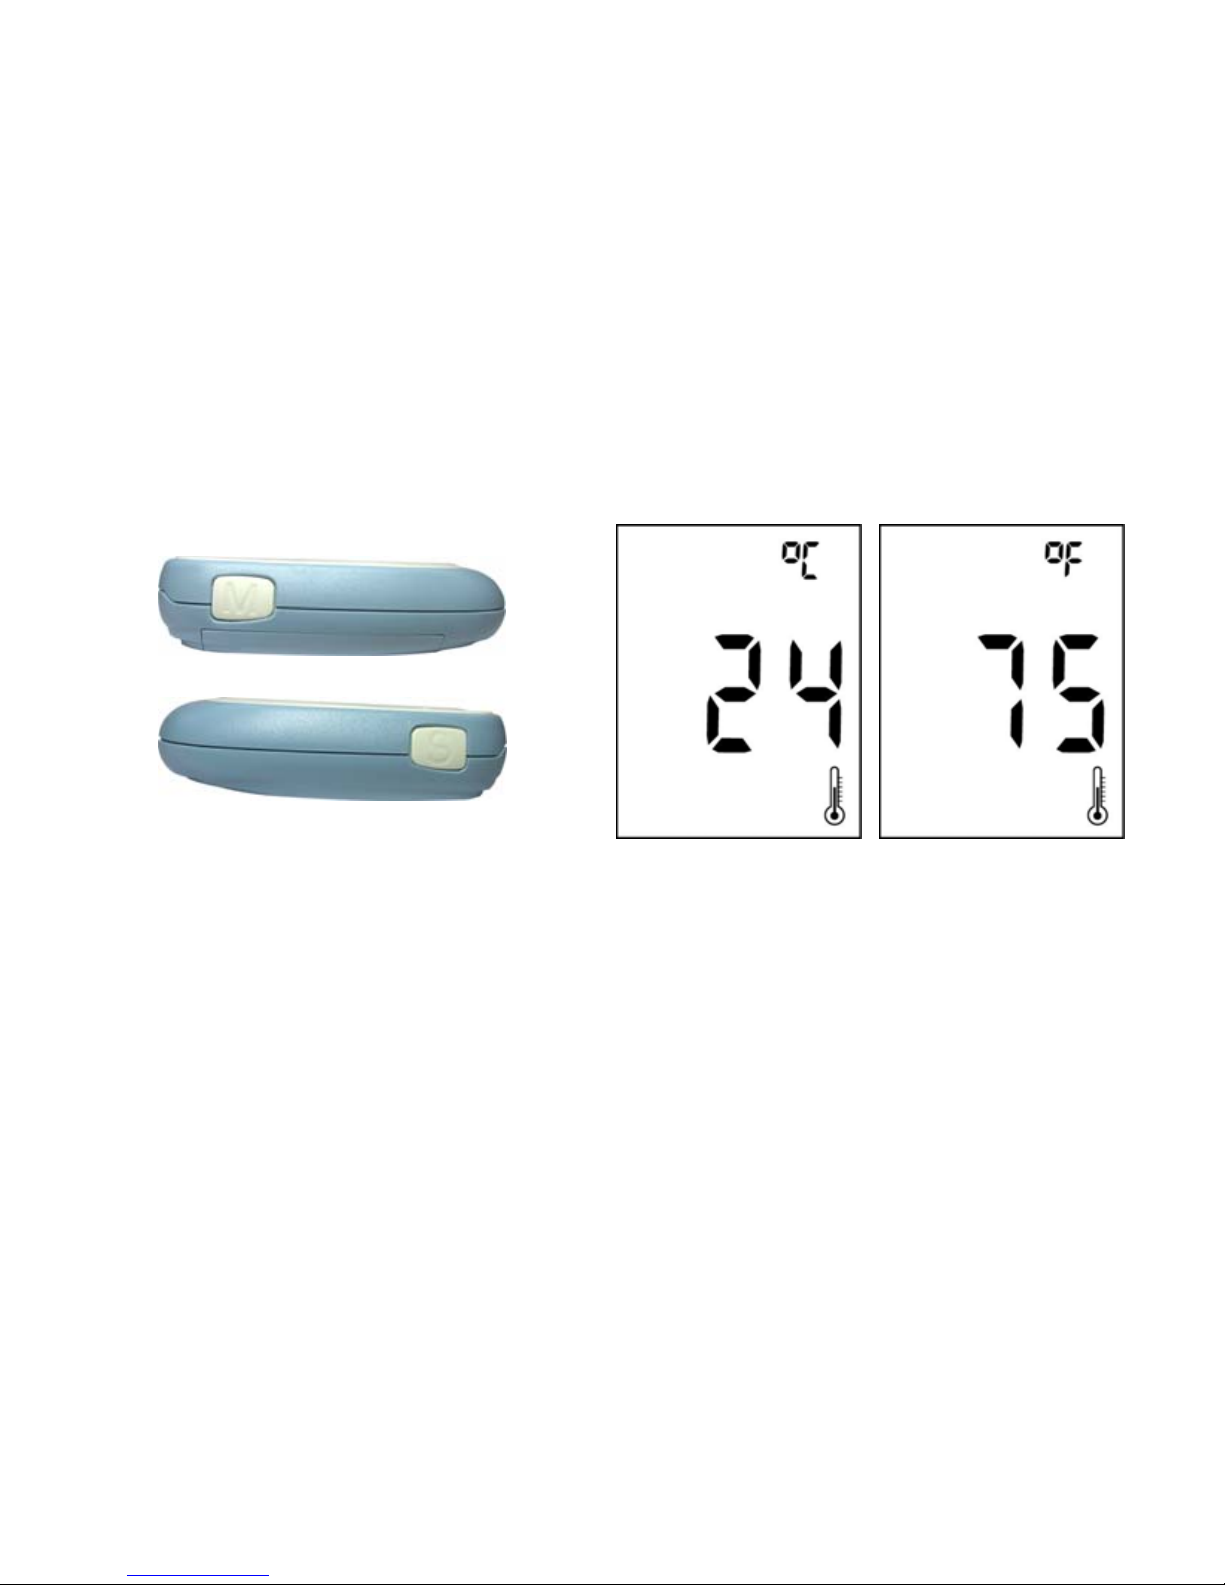
1. Press the ”S“ to turn the meter on.
2. Press the ”M“ and ”S“ buttons at
the same time and hold for more
than 3 seconds. The meter will go
into Centigrade Thermometer
Mode.
3. Press the ”S“ and the meter
will change the temperature
reading to Fahrenheit.
4. Press the ”S“ again and the
meter will change to the
Alarm Setting Mode.
Page 37
37
Setting The Alarm
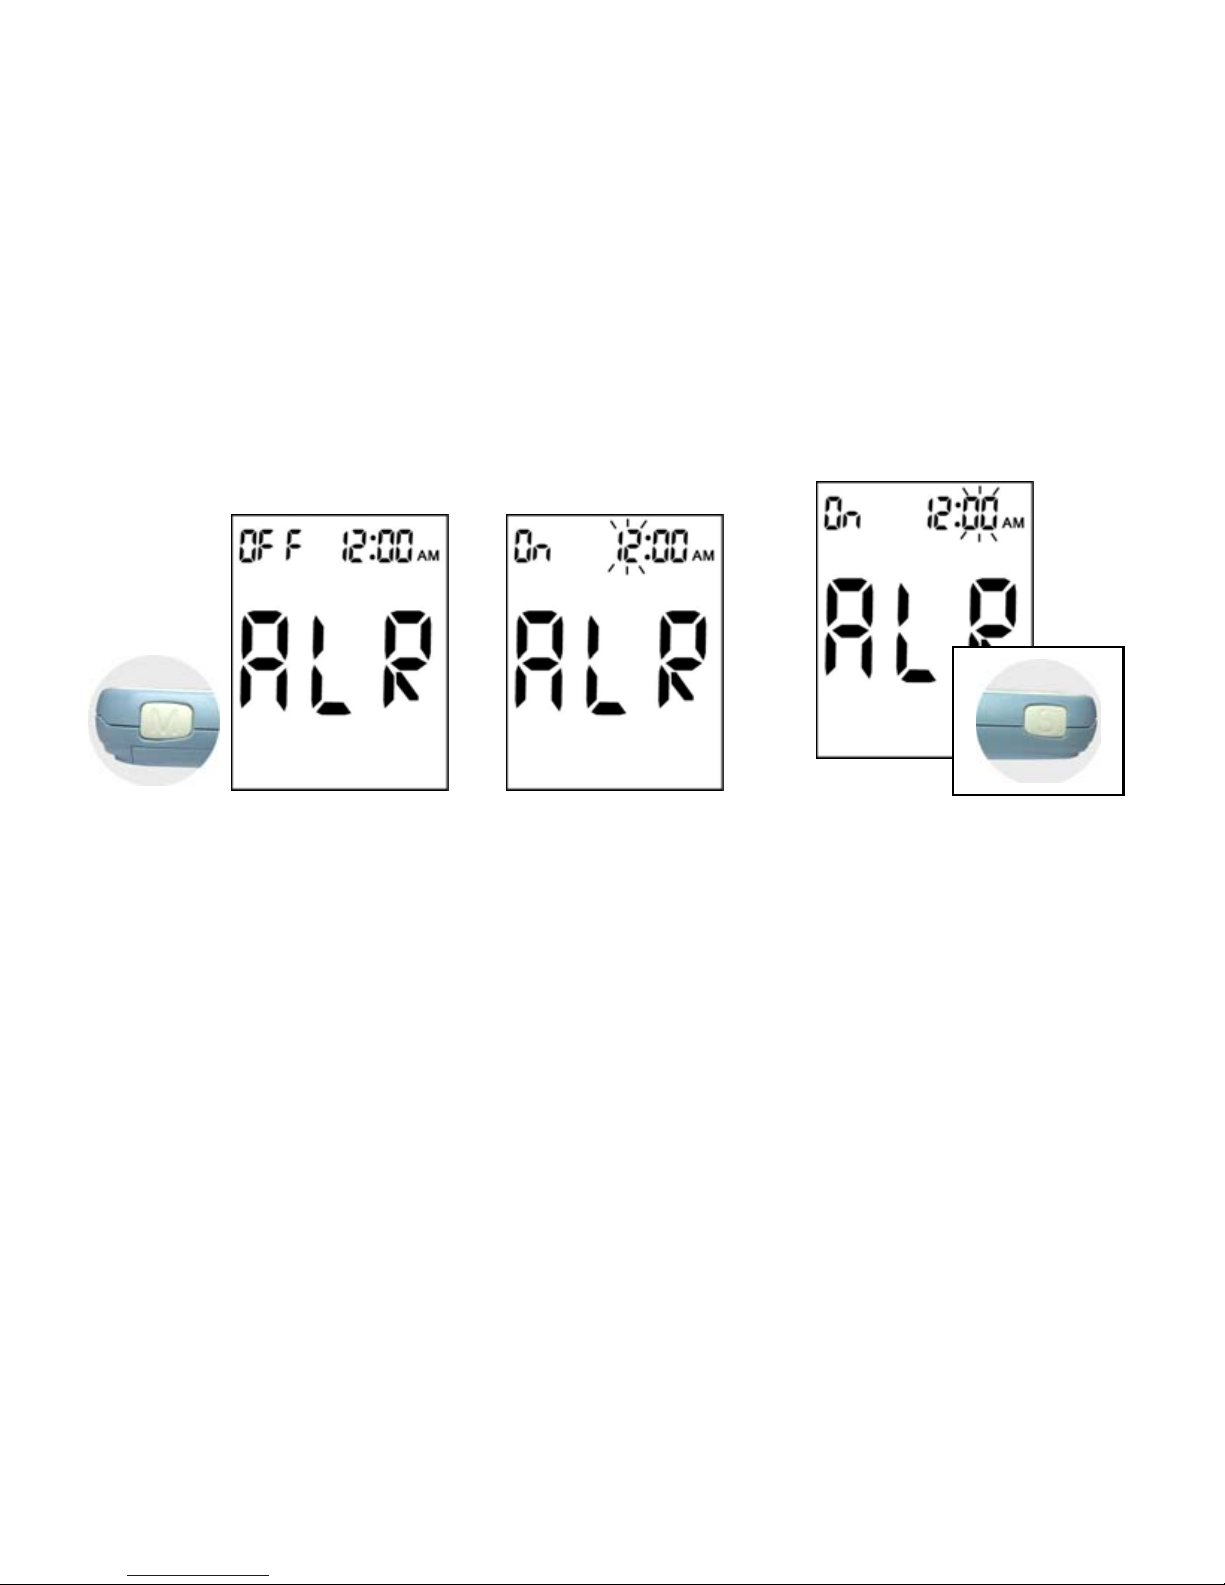
1. Press the “M“ to turn the
alarm On or
OFF. "On”
or
"OFF" indicators
appear at the upper left
corner of the LCD display
screen.
2. Press the “S“ when the
LCD displays "OFF” to
change the meter alarm
mode to Beep Setting
Mode.
3. Press the “S“ when LCD
displays "On", the first
2-digits of time (hour
field) will flash. Press the
“M” to adjust the hours.
4. If the time shows 12:00
AM, you must press the
“M” 12 times to set at
"PM". Press "S" to
confirm.
5. The minute flashes.
Press ”M” to adjust the
minutes, and press “S” to
confirm the setting.
Page 38
38
Setting The Beeper For The Alarm
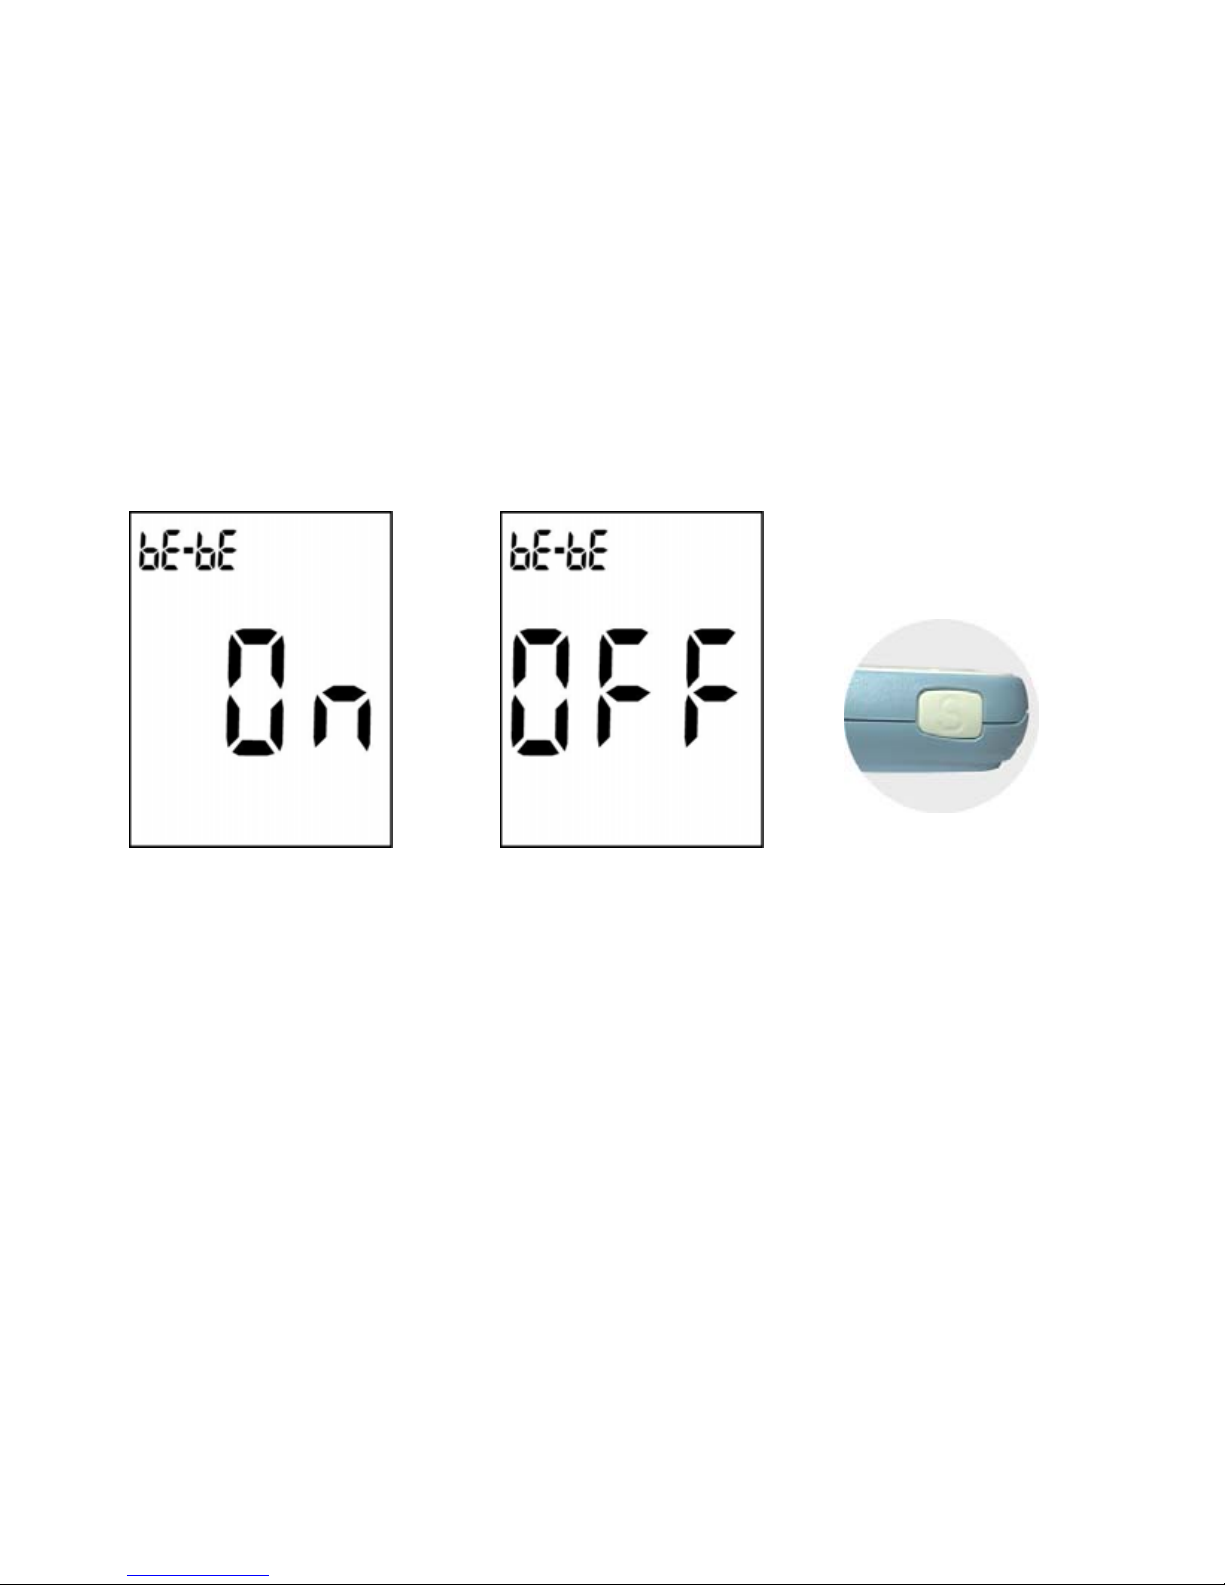
1. You will see the Beep Setting Mode
after the Alarm Setting was confirmed.
Press the “M “to switch the "On"
"OFF"
at the center of LCD.
2. Press the “S“ to confirm.
Page 39
39
Setting The Clock
After confirming the beep setting, the meter will go to the Clock Mode.
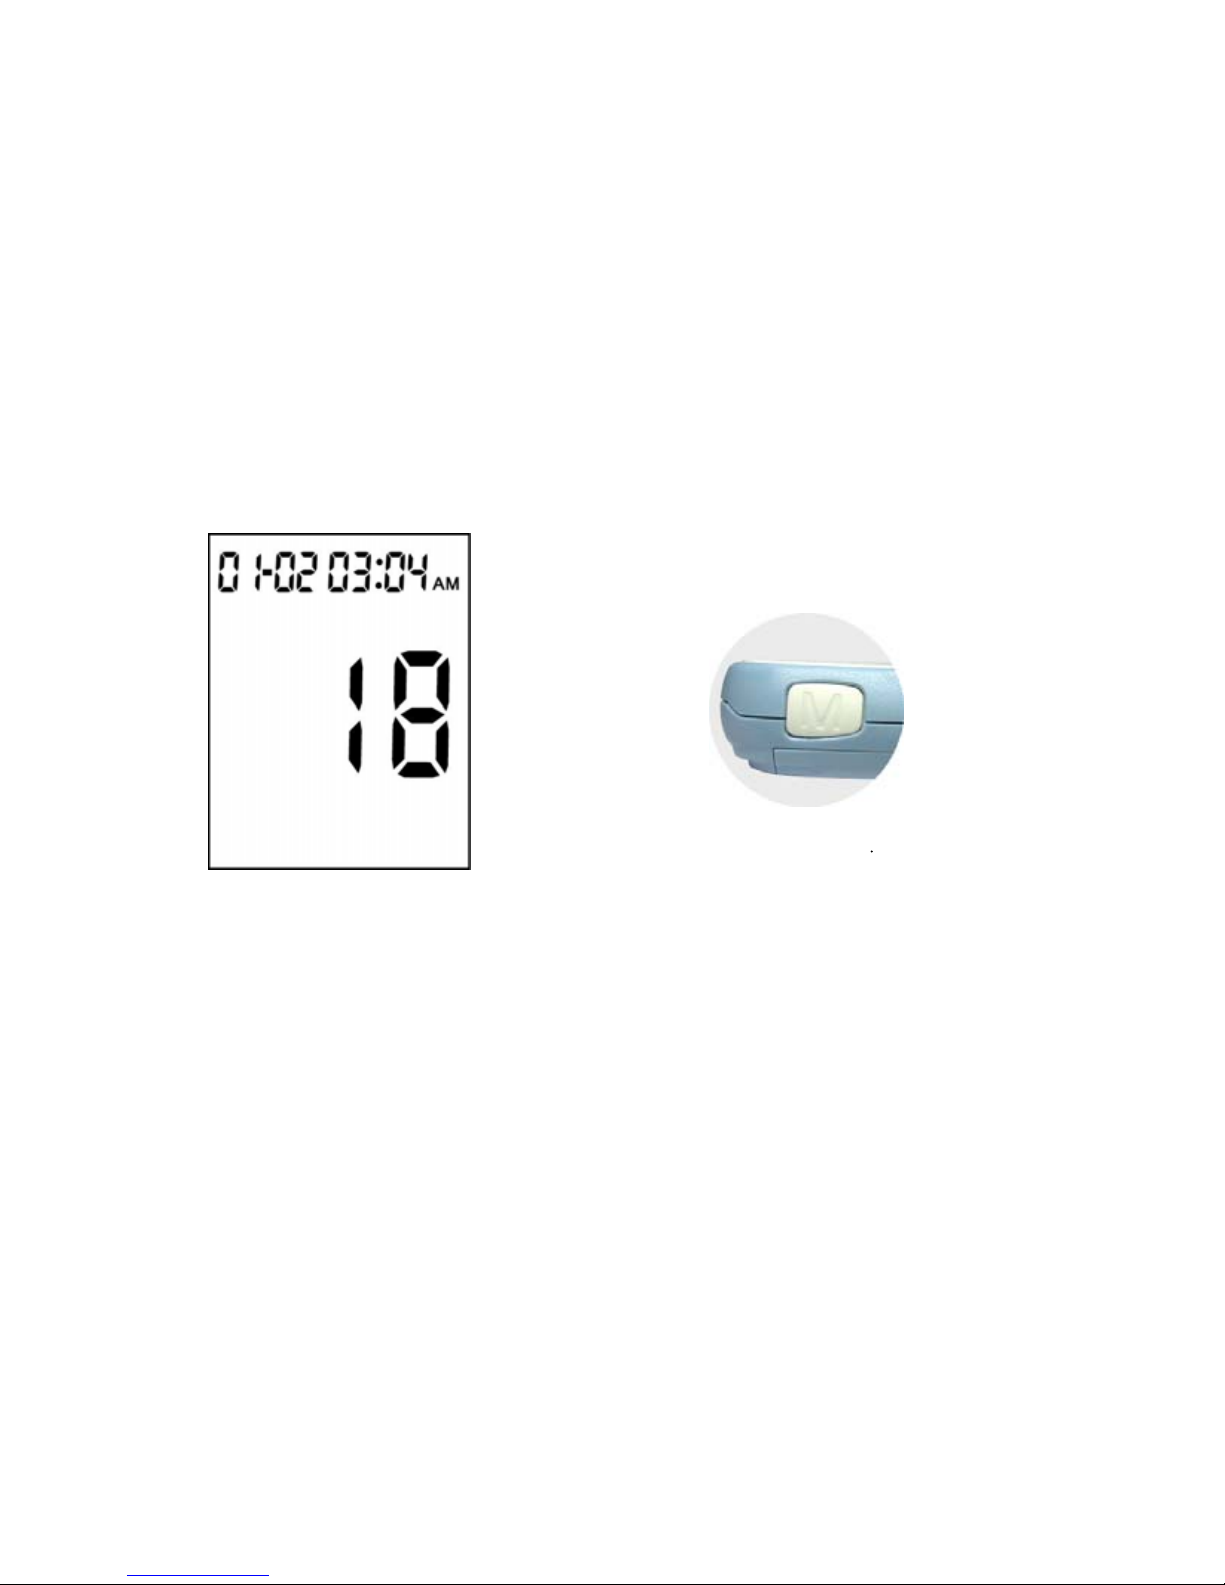
1. You will see seconds being
counted in the center of the
display, 2-digits (month field)
and 2-digits (day field) at the top
left corner, 2-digits (hour field)
and 2-digits (minute field) at the
top right corner.
2. The meter alarm will sound when clock
time matches the time set in the alarm
mode. You can stop the alarm by
pressing the “M“ or it will stop
automatically after 10 seconds.
3. Press the “S“ to exit the “meter se
t
mode”.
Page 40
40
Chapter 5: Maintenance and Troubleshooting
Installing Batteries
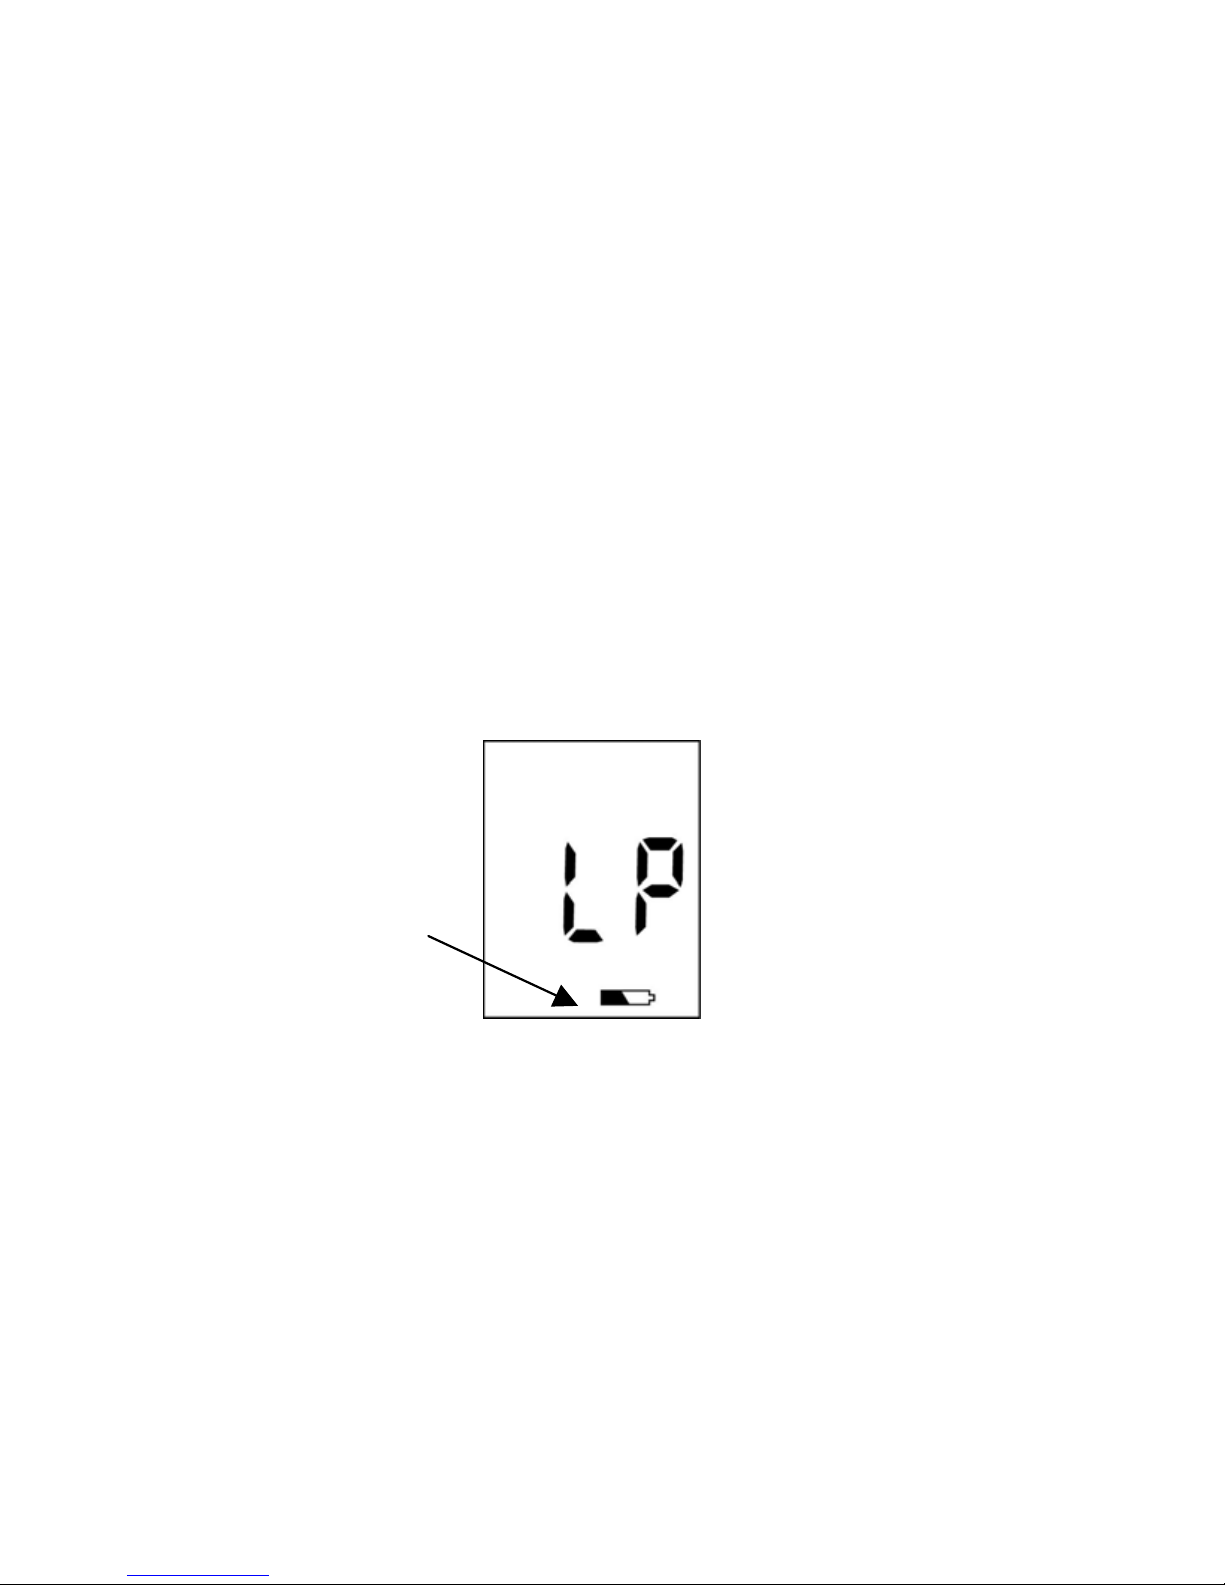
The meter uses two alkaline 1.5V (AAA) batteries. Batteries will normally last for
over 1000 tests. Other types of 1.5V (AAA) batteries are also acceptable, yet the
capacity of test times may differ. Install the batteries when you first use the meter
or replace with new batteries when the “LP” messag e and the low battery symbol
appear on the LCD display.
Low battery symbol
Page 41

41
The LCD display will show “no CODE” the first time batteries are installed. Please
code your meter correctly.
Notes:
1. The meter won’t delete earlier records after you replace batteries.
2. You should reset the time and date again after you replace the batteries.
3. 5V (AAA) x 2 batteries is available in shops. You may take the old batteries
with you for replacement.
4. Remove batteries when you will not be using the meter for one month or
more.
Page 42

42
Cleaning Your Meter
Caring for your EasyPlus SMBG system does not require special cle aning.
Please keep the meter free of dirt, dust, bloodstain, and water stains.
To clean your meter, wipe the surface with a soft cloth dampened with water
and mild detergent. Do not use alcohol or another solvent to clean your
meters.
Do not get any moistures, blood or control solution inside the meters through
the strip connector.
Do not spray cleaning solution on the meter or immerse it in any liquid.
Cleaning Your Lancing Device
To clean the lancing device, wipe them with a soft cloth da mpened with water
and mild detergent. DO NOT place the entire device under water
To disinfect the cap after cleaning by placing it in 70% rubbing alcohol for 10
minutes. Allow the cap to air-dry after disinfecting.
Page 43
43
Screen Messages And Troubleshooting
Never make treatment decisions based on an error message. If you have any
concerns, call our Customer Service Toll-Free: 1-888-216-5888
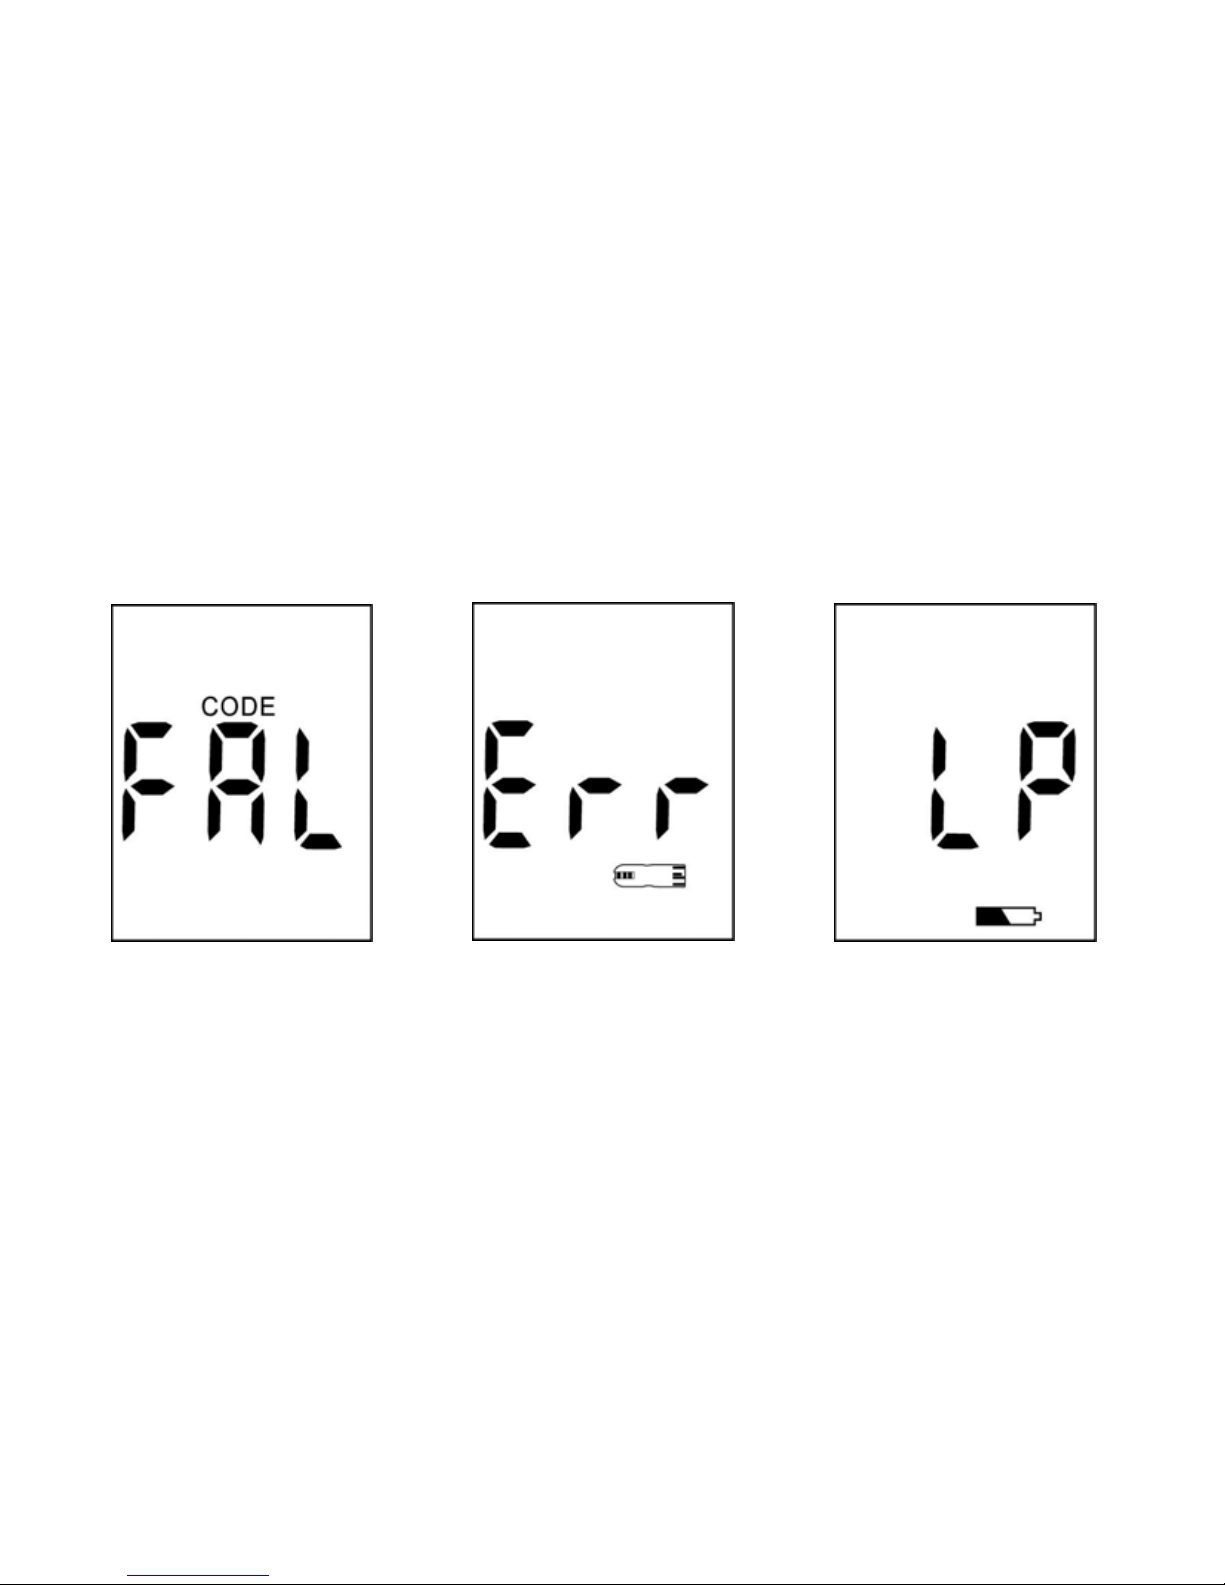
Code transmission failure
A
ction: Re-insert the code
card. If “FAL” appears
consistently, contact local
dealer for repair.
Humidified strips
A
ction: Replace with a new
strip.
Low powe
r
A
ction: Replace
with new batteries.
Page 44
44
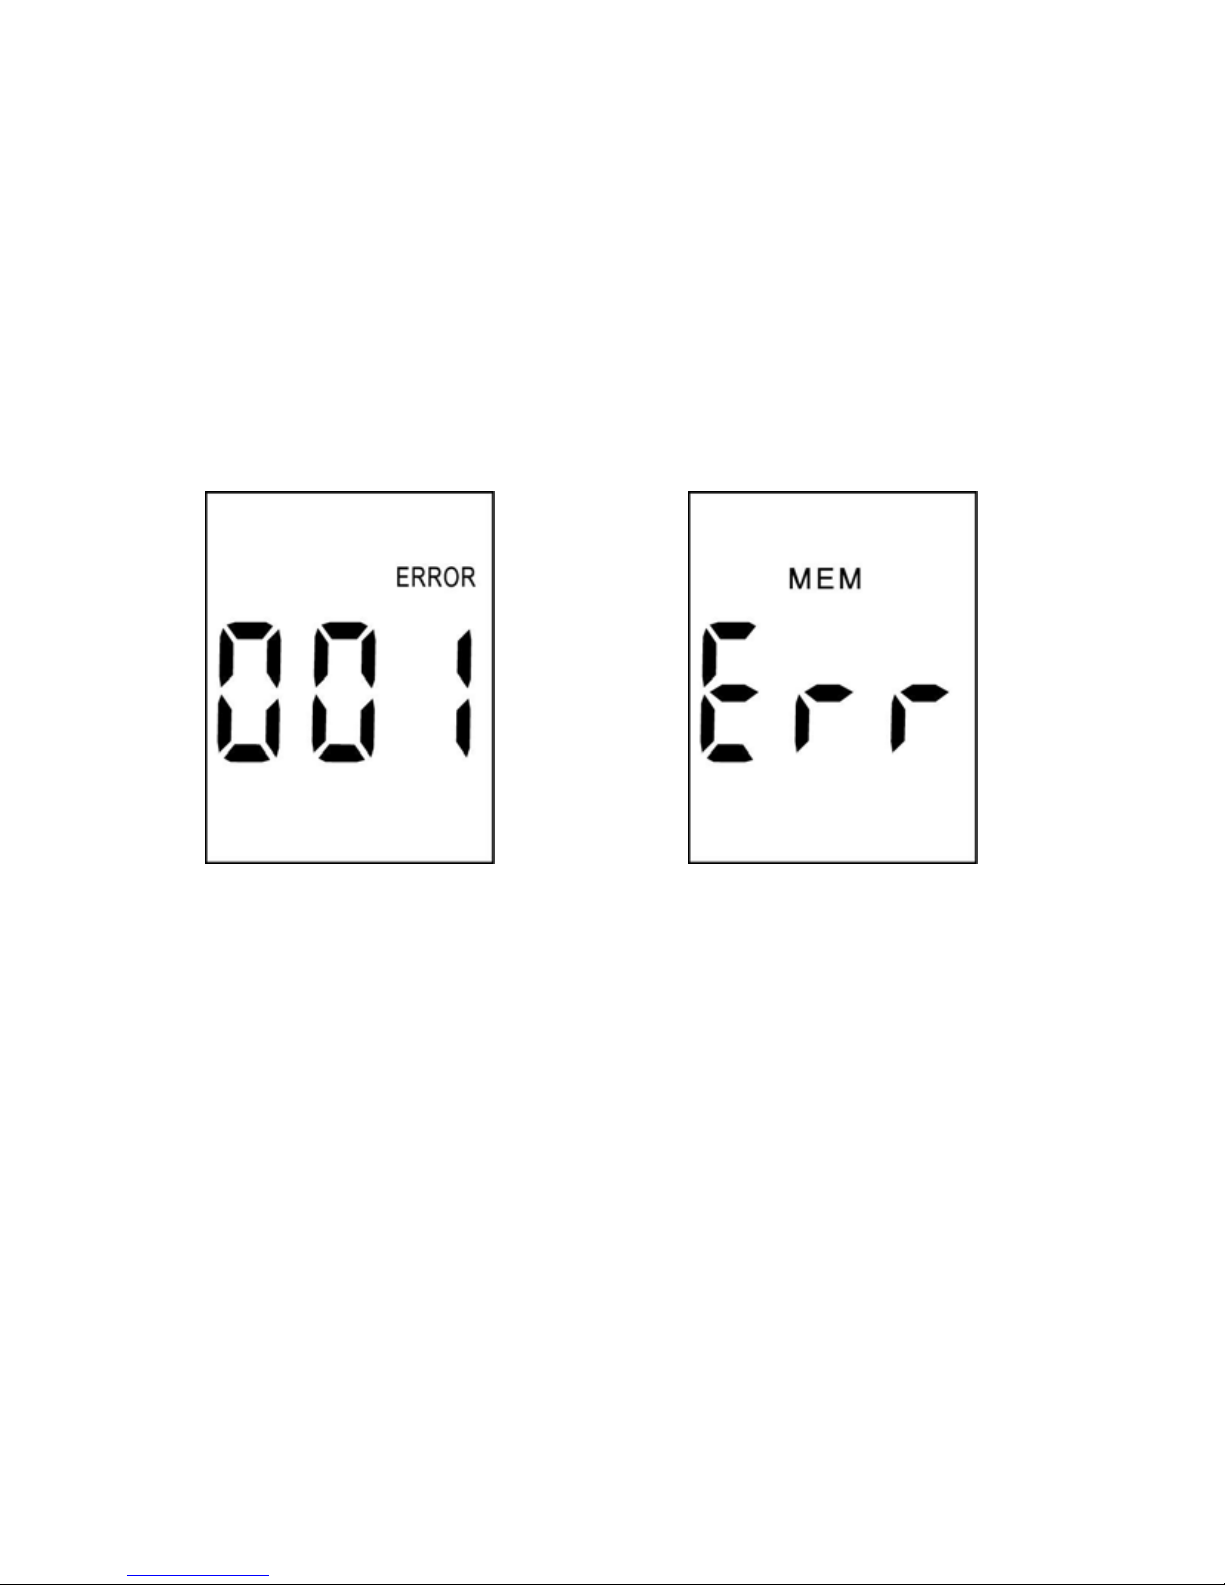
System fault
A
ction: Replace the batteries first. If
001 ERROR appears again, contact
your local dealer for repair.
System fault
A
ction: Replace the batteries first. If
Err appears again, contact your local
dealer for repair.
Page 45
45
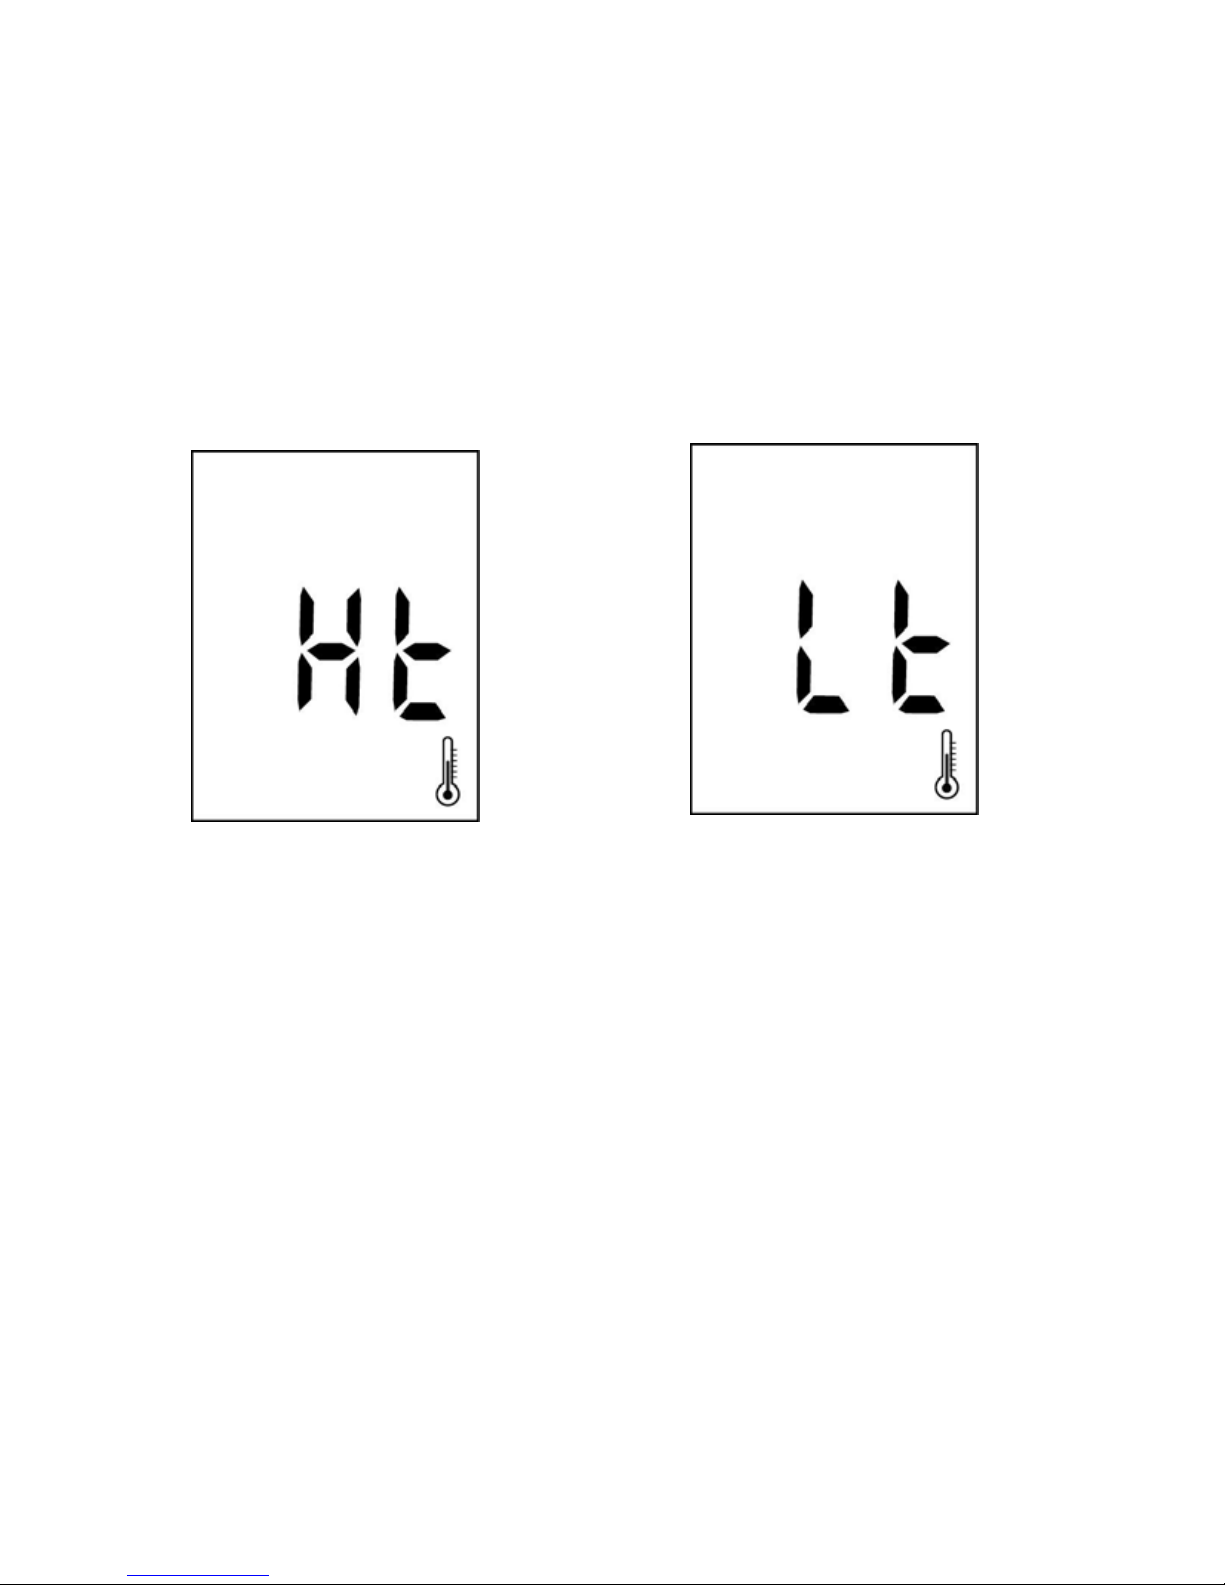
The “Ht” and thermometer icon
appears. Temperature is to o high,
outside the required range of 50°F
~104°F (10°C ~40°C). This alerts
users that an incorrect result may
occur if the test continues.
A
ction: Relocate the meter to a location
with temperature between 50°F ~104°F
(10°C ~40°C).
The “Lt” and thermometer icon
appears. Temperature is too low,
outside the required range of 50°F
~104°F (10°C ~40°C). This alerts
users that an incorrect result may
occur if the test continues.
A
ction: Relocate the meter to a
temperature between 50°F ~104°F
(10°C ~40°C).
Page 46
46
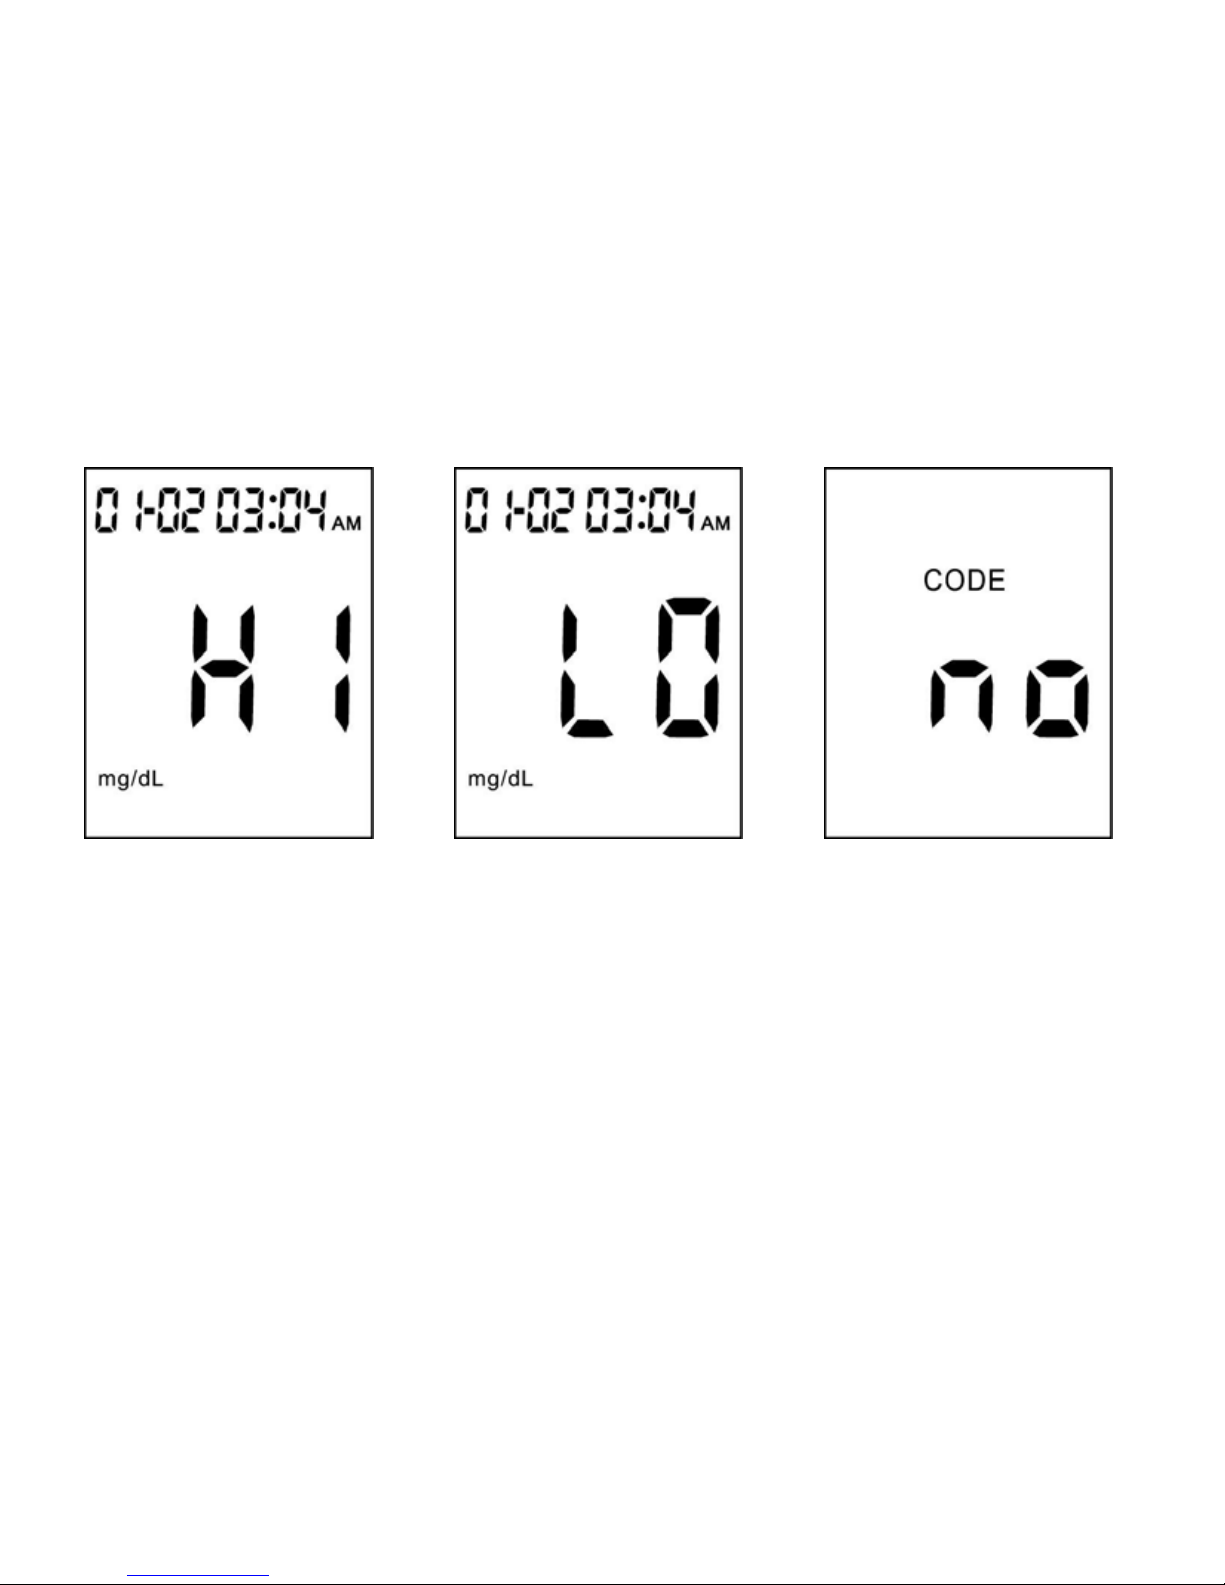
Test result is higher
than 550 mg/dL.
A
ction: Test again. If the
result is still the same,
please contact your
healthcare professional.
The test result is lowe
r
than 30 mg/dL.
A
ction: Test again. If the
result is still the same,
please contact your
healthcare professional.
First time installation o
f
batteries and the meter
has not yet been coded.
A
ction: Code your meter.
Page 47

47
Chapter 6: Technical Information
Specifications
Brand name EasyPlus Blood Glucose Meter
Range 30~550 mg/dL
Response time 5 seconds
Memory sets 100 test results
Temp. 50°F ~104°F (10°C ~40°C) Operating
condition
Relative Humidity R.H. ≦ 90%
≧2.0 μL
Blood sample
Fresh fingertip blood
Hematocrit (Hct) 30~55%
Power 2 Alkaline 1.5V (AAA)
Battery life Over 1000 tests
Display dimension LCD (40×32 mm)
Device dimension H×W×D (mm) 82.5×51×19(mm)
Weight 45.5 grams w/o batteries
Principles Electrochemical biosensor technology
Page 48

48
Comparing Your Meter Result To A Lab Result
If you want to compare your meter result to the lab result, you must be fasting. Bring
your meter to the doctor’s office, and test yo urself by fingertip within five minutes of
having blood drawn from your arm by a healthcare professional. Keep in mind that
the lab could use different technology than Eas yPlus blood glucose meter, and that
blood glucose meters for self testing generally read some what lower or higher than
the lab result.
For accuracy and precision data and for important information on limitations, see the
instructions that come with your test strips.
Page 49

49
Device Information
EasyPlus SMBG System,
EasyPlus Blood Glucose Test Strips,
EasyPlus Blood Glucose Meter.
GlucoManager Software Set
Manufacturer:
EPS BIO TECHNOLOGY CORP.
2F, No.49-2, Lane 2, Guang-Fu Rd., Sec. 2, Hsinchu City, Taiwan 300
TEL:+886-3-5752522 FAX:+886-3-5752552
E-mail:[email protected] http://www.epsbio.com.tw
Lancing Device
Meets the requirements of MDD 93/42/EEC
Manufacturer:
PALCO LAB. INC.
8030 Soquel Avenue Suite 104 Santa Cruz, CA 950 62-2032 USA
TEL: 831-476-3151, 800-346-4488 FAX: 831-476-1114
E-mail: [email protected]
Page 50

50
Lancet
Meets the requirements of MDD 93/42/EEC
Manufacturer:
SAE HAN MEDICAL CORP.
# 700-113 PUB GOT-DONG, IL SAN-GU, GOYANG-CITY, KYUNGGI-DO, KOREA
TEL: 82-31-923-4330 FAX: 82-31-923-4331
E-mail: [email protected]
Additional Supplies
EasyPlus Glucose Normal Control Solution
GlucoManager Software Set
Warranty
EPS warrants the original purchaser for a period of 5 years from the date of purchase.
This means during the warranty period if your Self-Monitoring Blood Glucose System
does not work for any reason (other than obvious abuse), EPS will replace it with a
new system or an equivalent product free of charge.
Part No.718009000 Rev.A01-082206 Reference No.EPS04014
 Loading...