

Page 1

Next Generation (NG) Self-Monitoring Blood Glucose System
User’s Manual
Please read this User’s Manual thoroughly
before using your blood glucose meter.
Page 2

Introduction
Welcome to the EasyMax Next Generation (NG) Self-Monitoring Blood Glucose (SMBG) System. This system
is dependable & easy-to-use, utilizing a compact, lightweight and portable meter that will aide you in monitoring
you or your patients’ blood glucose levels.
Please read this manual thoroughly before you begin testing. It provides you and your diabetes care team
important information and step-by-step directions for use of the EasyMax NG Self-Monitoring Blood Glucose
System.
Intended Use
The EasyMax NG Self Monitoring Blood Glucose Test System is intended for the quantitative measurement
of glucose in fresh capillary whole blood samples drawn from the fingertip, palm or forearm. Testing is done
outside the body (In Vitro diagnostic use). The EasyMax NG Blood Glucose System can be used by a single
patient or for multiple-patient use in professional healthcare settings, as an aid to monitor the effectiveness of
diabetes control. When used in Long Term Care Settings, this system must be used with safety lancets. The
system is not to be used on neonates, nor for the diagnosis of, or screening for, diabetes mellitus.
Page 3

Important Safety Instructions
All parts of the kit are considered biohazardous and may transmit infection, even if you have performed
cleaning and disinfection. Wash hands thoroughly with soap and water after handling the meter. Follow
Standard Precautions when using the meter and obtaining a sample. A new pair of gloves should be worn by
the user before testing each patient.
The meter should be disinfected after each use. The EasyMax NG Self Monitoring Blood Glucose Test
System may be used for testing multiple patients when Standard Precautions and the disinfection procedures
included in this manual are followed.
EasyMax NG Blood Glucose Meter Accessories:
• EasyMax 15 Blood Glucose Test Strips
• EasyMax 15 Level 1 (Low) Control Solution
• EasyMax 15 Level 2 (Normal) Control Solution
• User’s Manual
• Logbook
• 2 AAA batteries
• Carrying case
Page 4

For further information, please see:
"Biosafety in Microbiological and Biomedical Laboatories (BMBL)"
http://www.cdc.gov/biosafety/publications/bmbl5/
"Protection of Laboratory Workers From Occupationally Acquired Infections; Approved Guideline--Third Edition
" Clinical and Laboratory Standards Institute (CLSI) M29-A3.
“Guideline for Isolation Precautions: Preventing Transmission of Infectious Agents in Healthcare Settings 2007”,
http://www.cdc.gov/hicpac/2007ip/2007isolationprecautions.html.
“FDA Public Health Notification: Use of Fingerstick Devices on More than One Person Poses Risk for
Transmitting Bloodborne Pathogens: Initial Communication” (2010)
http://www.fda.gov/MedicalDevices/Safety/AlertsandNotices/ucm224025.htm
“CDC Clinical Reminder: Use of Fingerstick Devices on More than One Person Poses Risk for Transmitting
Bloodborne Pathogens” (2010) http://www.cdc.gov/injectionsafety/Fingerstick-DevicesBGM.html
Page 5

Why is it so important to test blood glucose regularly?
Testing blood glucose regularly can make a big difference in how you manage you or your patients’ day to day
diabetes care. We’ve made EasyMax NG Self-Monitoring Blood Glucose System as simple as possible to help
you use it regularly.
Do you need help?
If you have questions or need assistance, please call the Customer Care Service toll-free at 866-994-3345
(Eastern Standard Time, Mon-Fri 8:00AM-6:00PM).
Page 6

Important Information about your new EasyMax NG Meter
The EasyMax NG Blood Glucose Meter is designed and approved for testing fresh capillary whole blood
samples from the fingertip, palm and forearm. The meter is for in vitro use ONLY (for testing outside the
body). It should not be used to diagnose diabetes.
Remove batteries if the meter will not be used for one month or more.
The EasyMax NG Blood Glucose Meter can only be used with EasyMax 15 Blood Glucose Test Strips.
Other test strips will give inaccurate results. EasyMax 15 Blood Glucose Test Strips feature a unique and
accurate glucose dehydrogenase chemistry system.
Testing is not valid for neonatal blood specimens.
Do not disassemble the meter as this may cause damage to the components resulting in incorrect
readings. Disassembling the meter will also void the warranty.
Always keep the meter clean and store it in a safe place. Protect the meter from direct sunlight to ensure a
longer lifespan.
You should not store the meter and test strips in a car, a bathroom or a refrigerator.
Keep the meter, test strips and lancets away from children and pets.
You should not test critically ill patients with home-use blood glucose meters.
Critically ill patients should not be tested with blood glucose meters. See page 9 for more information.
Page 7

Warning for potential biohazard: Healthcare professionals using this system on multiple patients should be
aware that all products or objects that come in contact with human blood, even after cleaning, should be
handled as if capable of transmitting viral disease.
Note:
Do not touch the strips with wet hands.
Do not use expired strips (the expiration date is shown on the vial.)
Do not bend, cut or twist the strips.
Altitude up to 10,000 feet above sea level has no effect on readings.
Page 8

Health-Related Information
If the patient is experiencing dehydration, frequent urination, low blood pressure, shock or hyperosmolar
hyperglycemic nonketotic coma (HHNKC), you may get a test result that is lower than the actual blood
glucose level. We recommend confirming the result on such patients via a clinical laboratory.
If you have followed the steps in the user’s manual, but still have symptoms that don’t seem to match your
test results, or if you have questions, please call the Customer Care Service toll-free at 866-994-3345
(Eastern Standard Time, Mon-Fri 8:00AM-6:00PM).
Healthcare personnel should wash hands & change gloves between patients, even if patient-dedicated
testing devices and single-use lancing devices are used.
Note: Warning for potential biohazard:
Healthcare professionals using this system on multiple patients should handle all products or
objects in contact with human blood carefully to avoid transmitting viral disease, even after
cleaning.
Page 9
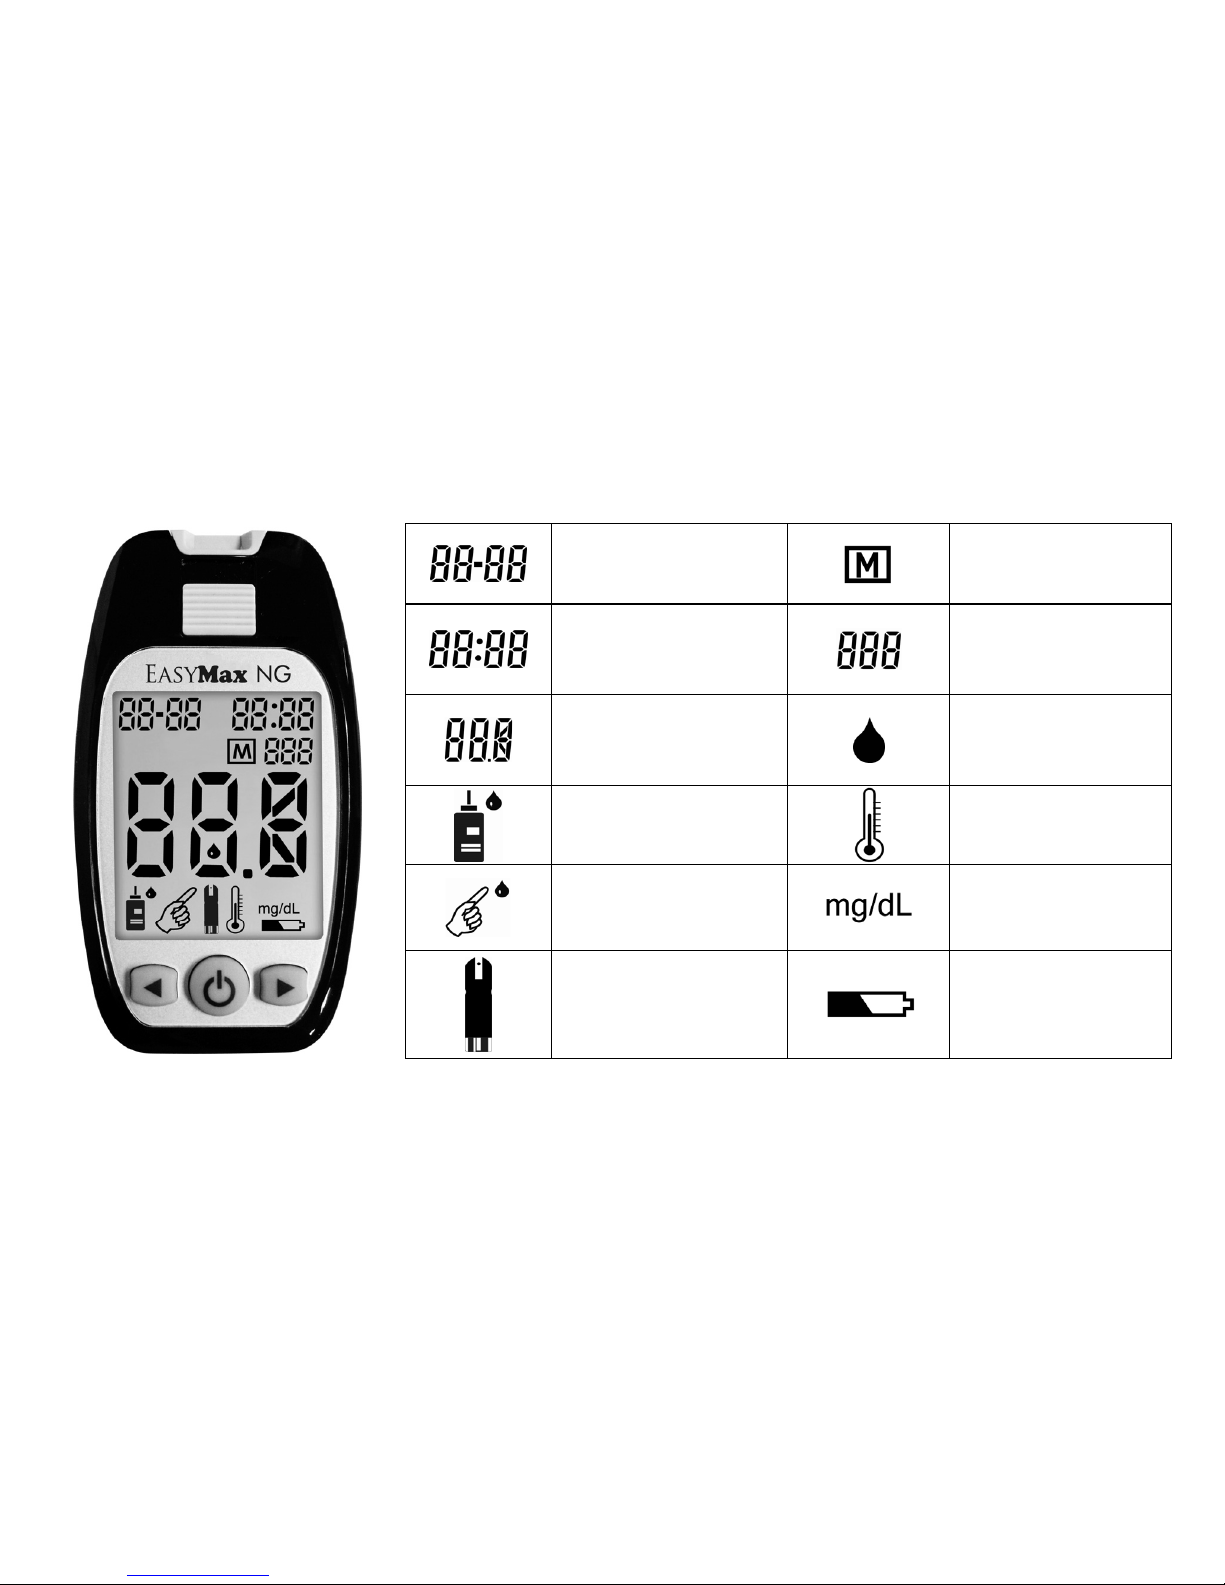
Explanation of Meter Symbols
Date
(on the left side)
Memory
Time
(on the right side)
Record/Average
display
Result
Apply Blood
Apply Control
Solution
Temperature
Application of
blood or control
solution
Unit
Insert a strip
Battery
Page 10

Table of Contents
Chapter 1: Understanding Your Meter …........................................................................................................12
EasyMax NG Blood Glucose Meter …........................................................................................................12
The EasyMax NG
Accessories....................................................................................................................13
Inserting Batteries........................................................................................................................................14
Setting the Time and Date...........................................................................................................................15
Using EasyMax 15 Blood Glucose Test Strips …...…………………...........................................................16
Chapter 2: Control Solution Test ....................................................................................................................17
When to Run a Control Solution Test ..........................................................................................................17
About Control Solution ................................................................................................................................18
Running a Control Solution Test .................................................................................................................19
Understanding Control Solution Test Results ….........................................................................................21
Chapter 3: Testing Your Blood Glucose ........................................................................................................23
Instructions for Using Single-use lancets with a Lancing Device……………………....................................23
Inserting a Lancet Into The Lancing Device.................................................................................................23
Running a Blood Glucose Test with Blood from Your Fingertip ..................................................................25
Understanding Your Test Results …...........................................................................................................28
Unusual Test Results …..............................................................................................................................28
Page 11

Chapter 4: Meter Memory, Setup …................................................................................................................29
Memory, Storing Test Result …...................................................................................................................29
Viewing and Deleting Test Results…...........................................................................................................30
Using With Your Computer…......................................................................................................................31
Chapter 5: Maintenance and Troubleshooting …..........................................................................................32
Battery Information......................................................................................................................................32
Cleaning and Disinfecting the EasyMax NG Meter in LTC Settings............................................................33
Cleaning And Disinfection Frequency..........................................................................................................37
Maintenance and Testing ...........................................................................................................................38
Screen Messages and Troubleshooting …..................................................................................................39
Chapter 6: Technical Information …...............................................................................................................43
Specifications …..........................................................................................................................................44
Limitations.................................................................................................................................................44
Device Information …..................................................................................................................................46
Warranty......................................................................................................................................................46
Page 12
12
Chapter 1: Understanding Your Meter
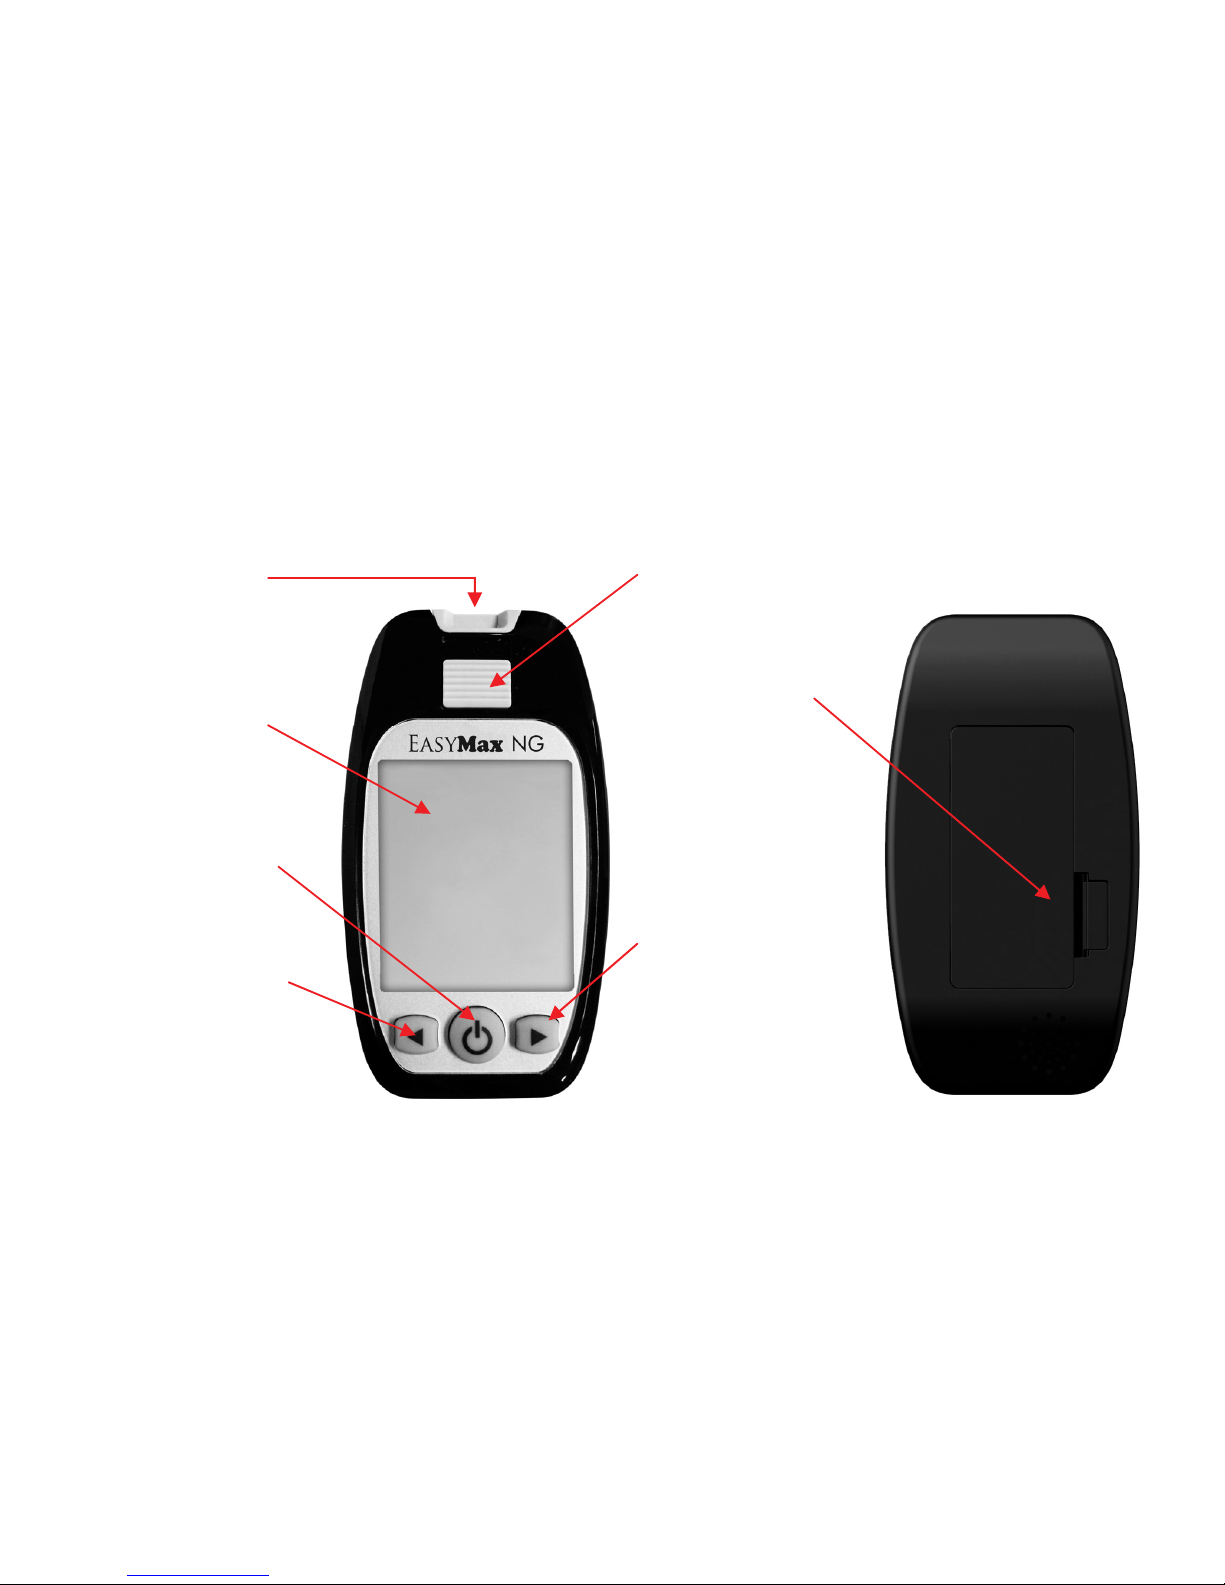
EasyMax NG Blood Glucose Meter
Display-
Shows results,
messages, and results
stored in memor
y
.
Left () Button-
Press to enter memory,
adjust setting, and
scroll through results.
Test Strip Slot-
Insert test strip here.
Battery Door-
Flip open the
battery door by
pushing the tab in
the direction of the
arrow and pulling
the door up.
Right () Button-
Press to enter
memories, adjust
setting, and scroll
through results.
Power Button-
Press to confirm the
setting.
Strip Ejector-
Push the Strip Ejector to remove
the strip.
Page 13
13
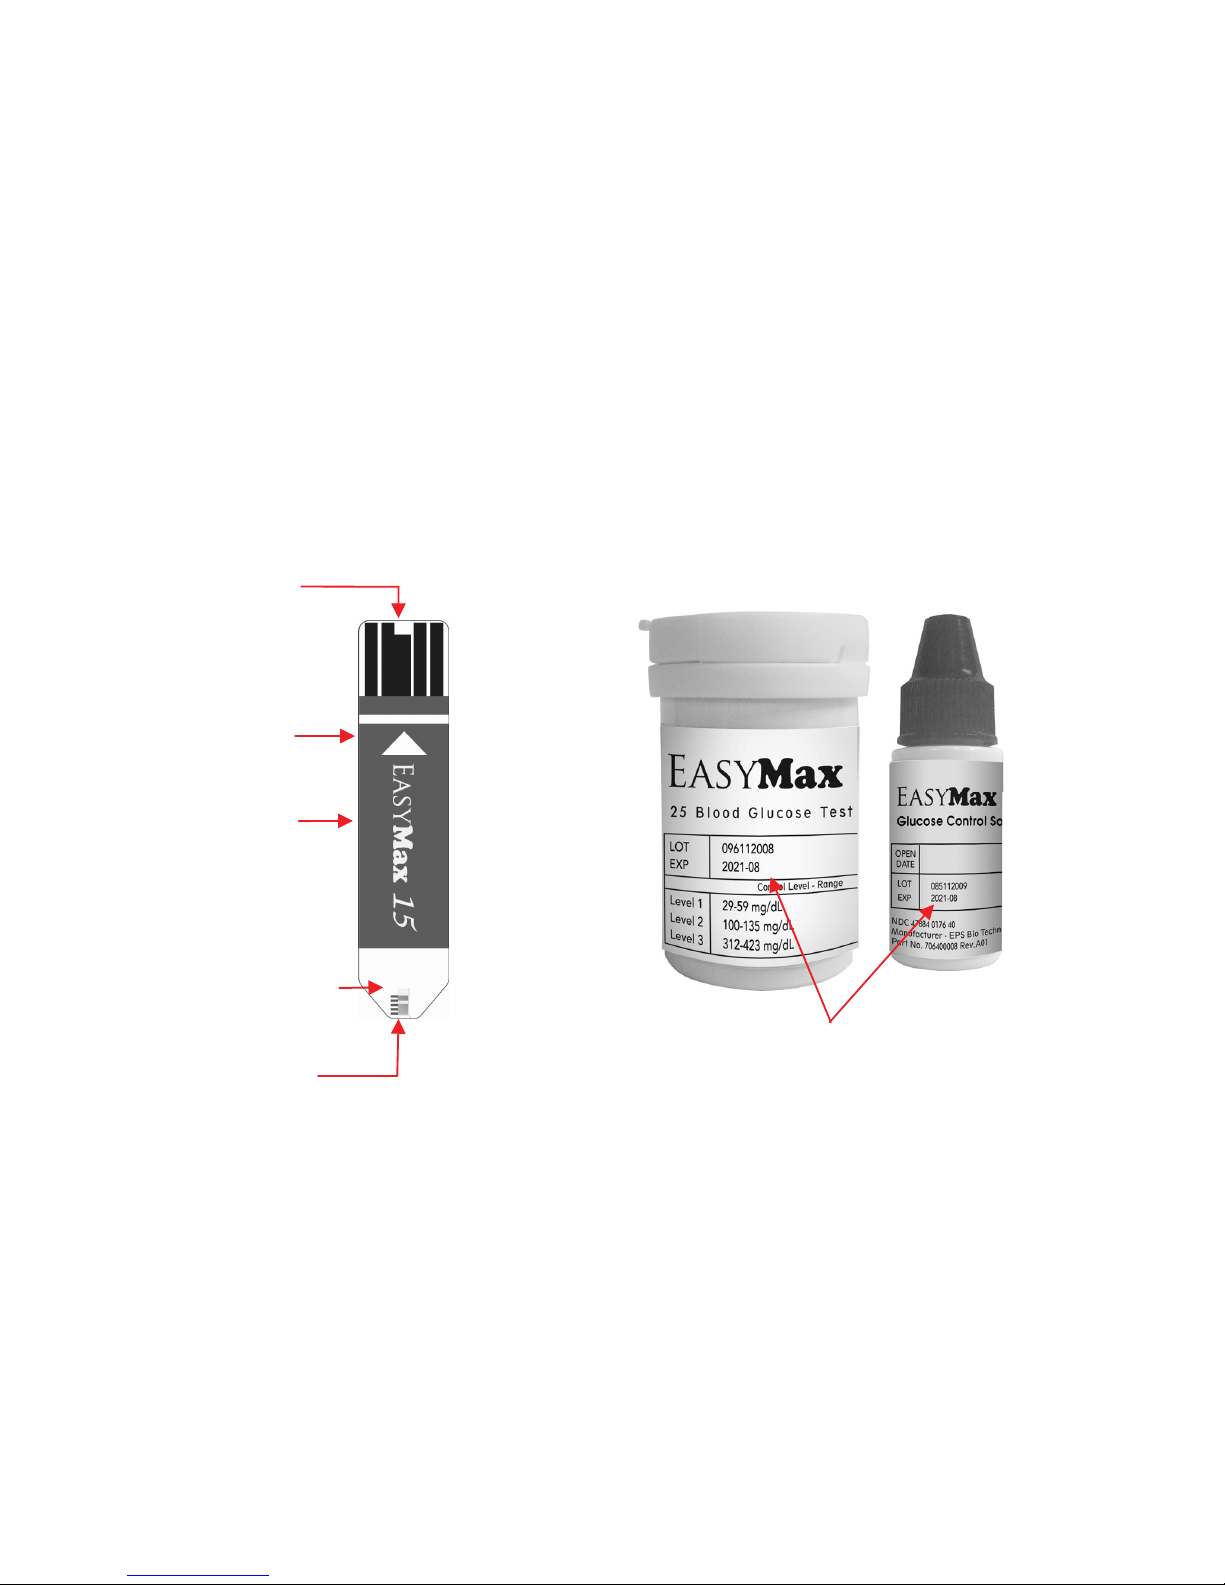
The EasyMax NG Accessories
EasyMax 15 Blood Glucose Test Strip
Test Strip Bottle &
Control Solution Bottle
Expiration Date
Strip Insert
Direction
Reaction area
Hand Hold
Area
Blood collection
area
Electrode
Page 14
14
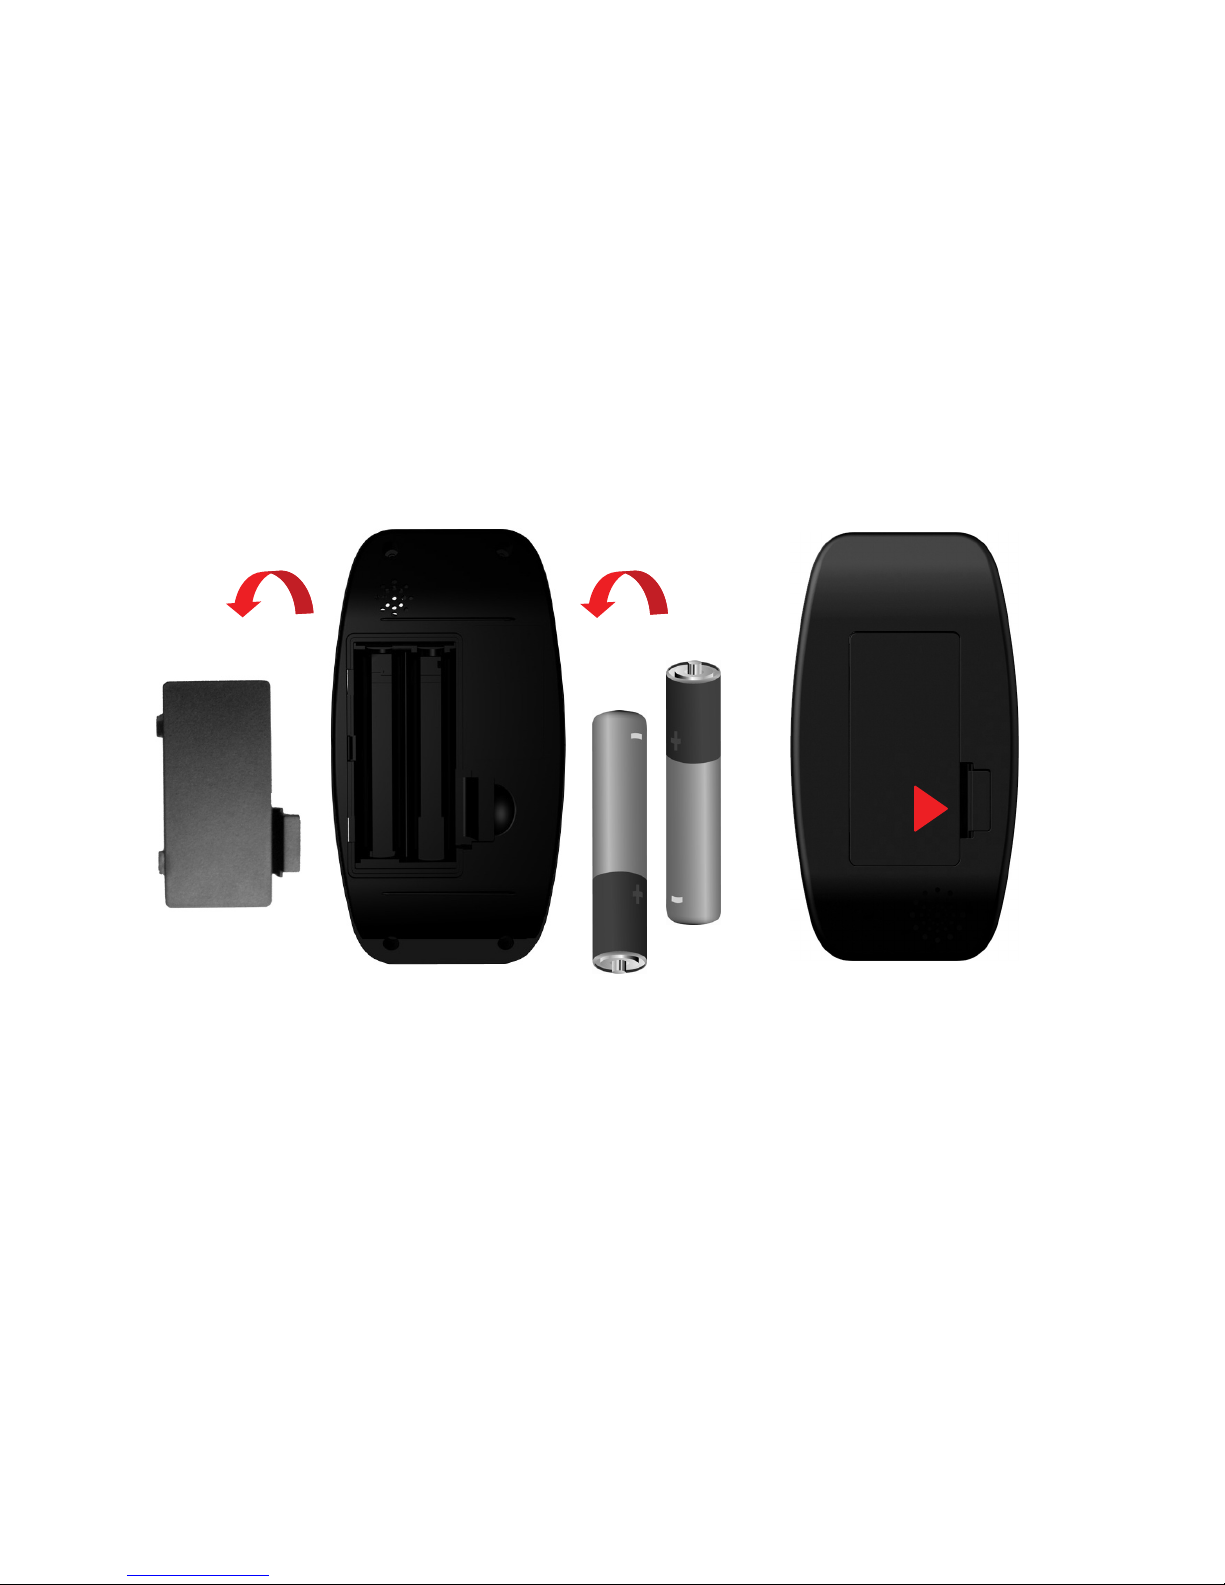
Inserting Batteries
1. Open the battery door on the back of the meter by pushing the tab in the direction of the arrow and
pulling the door up.
2. Insert two AAA batteries. The meter will beep to confirm the batteries are inserted correctly.
3. Put the battery door back in place and snap it closed.
Page 15
15
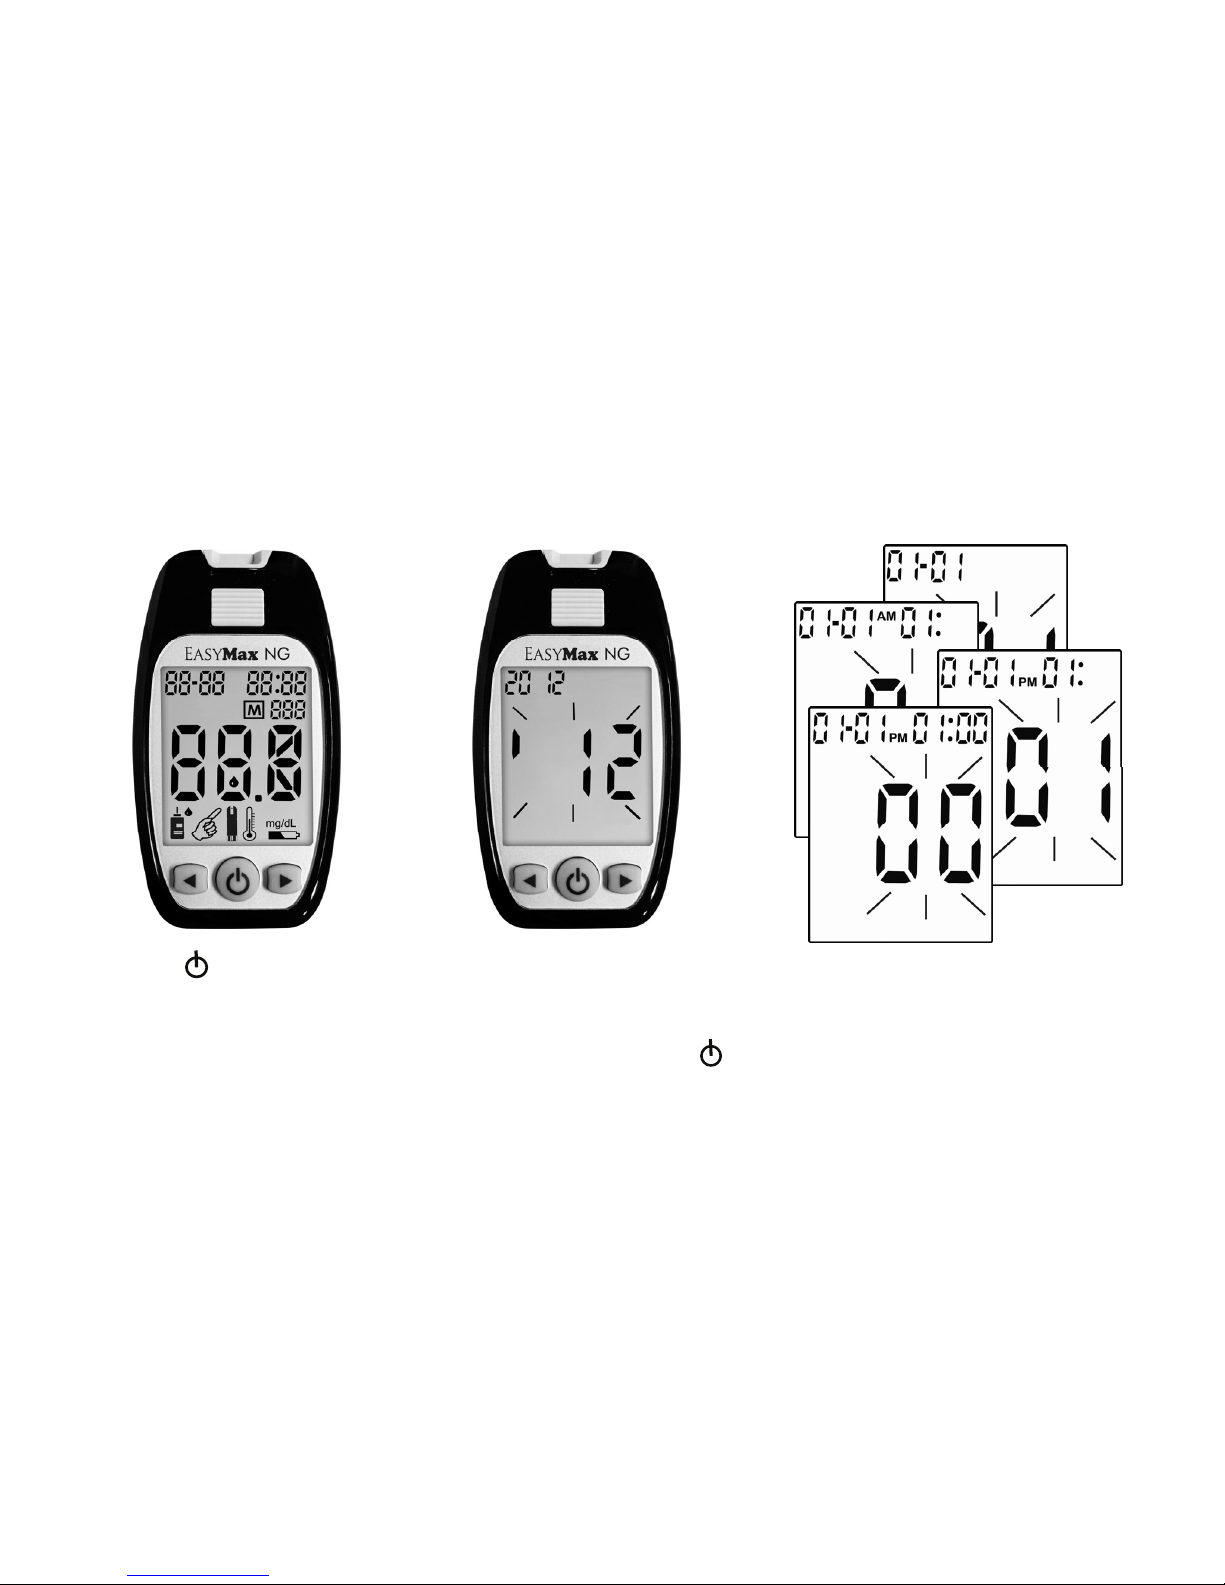
Setting the Time and Date
Setting the current time and date on your meter is important if you use the meter memory.
4. Repeat step 3 to set the date
and time. The flashing field is
the one you are currently
setting.
3. The last 2-digits of the year flashes
at the top of the display. Press
(Left button) or (Right button) to
adjust the year and press
(Power Button) to confirm the
setting.
1. Press (Power Button)
and hold the button until
the meter turns on.
2. Press (Right button) for
2 seconds to get into
setting mode.
Page 16

16
Using EasyMax 15 Blood Glucose Test Strips
Use only with EasyMax NG or EasyMax LTC Blood Glucose Meters.
EasyMax NG Self-Monitoring Blood Glucose System is a no code system and does not require test strip
calibration.
EasyMax NG Self-Monitoring Blood Glucose System utilizes glucose dehydrogenase chemistry to avoid
incorrect readings on patients receiving Oxygen therapy.
Run a control solution test every time you open a new box of strips (See Chapter 2 “Control Solution
Testing.”)
After you take a test strip out of the vial, tightly close the vial immediately to keep the test strips dry.
Use the test strip within three minutes after taking it out of the vial.
The strip is for single use only. Do not reuse it.
When you open a new test strip vial, check the expiration date. The test strips are good for six months
from the initial date the vial is opened or until the expiration date, whichever comes first. Record the date
you first open the test strip vial in the designated spot on the vial.
Store the test strip vial and your meter in a cool, dry place, between 36°F - 86°F (2°C- 30°C). Do not
freeze.
Insert the test strip into the meter before applying blood or control solution.
Do not touch the test strip with wet hands. Do not bend, cut, or twist the test strips.
Page 17

17
Chapter 2: Control Solution Testing
When to Run a Control Solution Test
Running a EasyMax 15 Control Solution Test will let you know that your meter and test strips are working
properly. You should run control solution tests:
If you are using a new EasyMax NG Blood Glucose Meter.
When you open a new vial of EasyMax 15 test strips.
If you think the meter or test strips may be working incorrectly.
If the meter has been dropped.
If the results are lower or higher than expected, and you have repeated the test with similar results.
When you practice the test procedure.
Page 18

18
About Control Solution
Use only with EasyMax 15 test strips and EasyMax NG or EasyMax LTC meters.
Write the date you first open the Control Solution bottle on the label. The control solution is good for three
months from the date the bottle is opened or until the expiration date on the bottle, whichever comes first.
Do not use a control solution that is past the expiration date.
The control solution can stain clothing. If you spill it, wash your clothes with soap and water.
Close the bottle tightly after every use.
Left over control solution should not be returned to the control solution bottle.
Store the bottle of control solution at room temperature, between 36°F - 86°F (2°C- 30°C). Do not freeze.
Page 19
19
Running a Control Solution Test
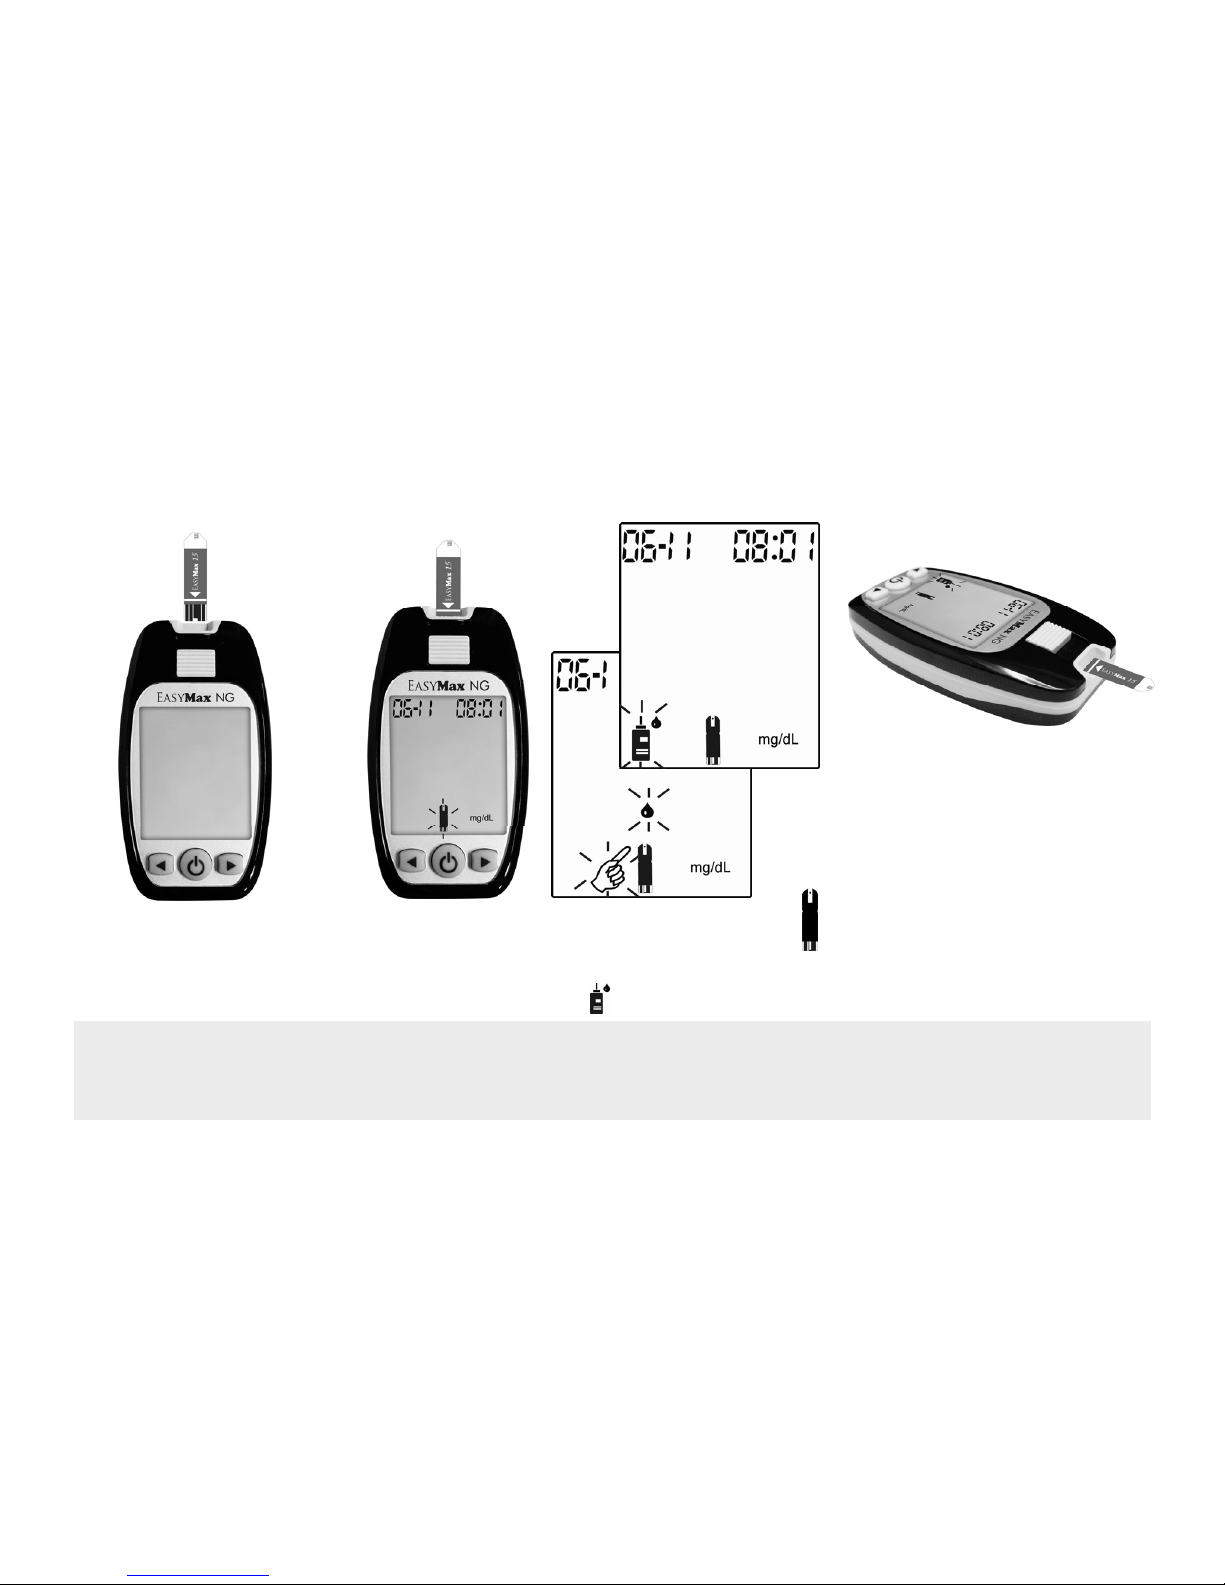
You need the meter, a test strip, and control solution.
Note:
Setting the meter in control solution mode will prevent the control solution reading from being
added to your memory and averages.
1. Put a test strip into
the meter in the
direction of the
arrow.
3. Place the meter on a flat
surface, like a table.
4. Remove the control solution
bottle cap and wipe the tip of
the bottle with a tissue.
5. Squeeze the bottle until a
tiny drop forms at the tip of
the bottle and place the
solution on top of bottle cap.
2. The meter turns on automatically and the strip
icon appears.
Press (Left button) to change the testing mode to
Control Solution and the icon will flash.
Page 20
20
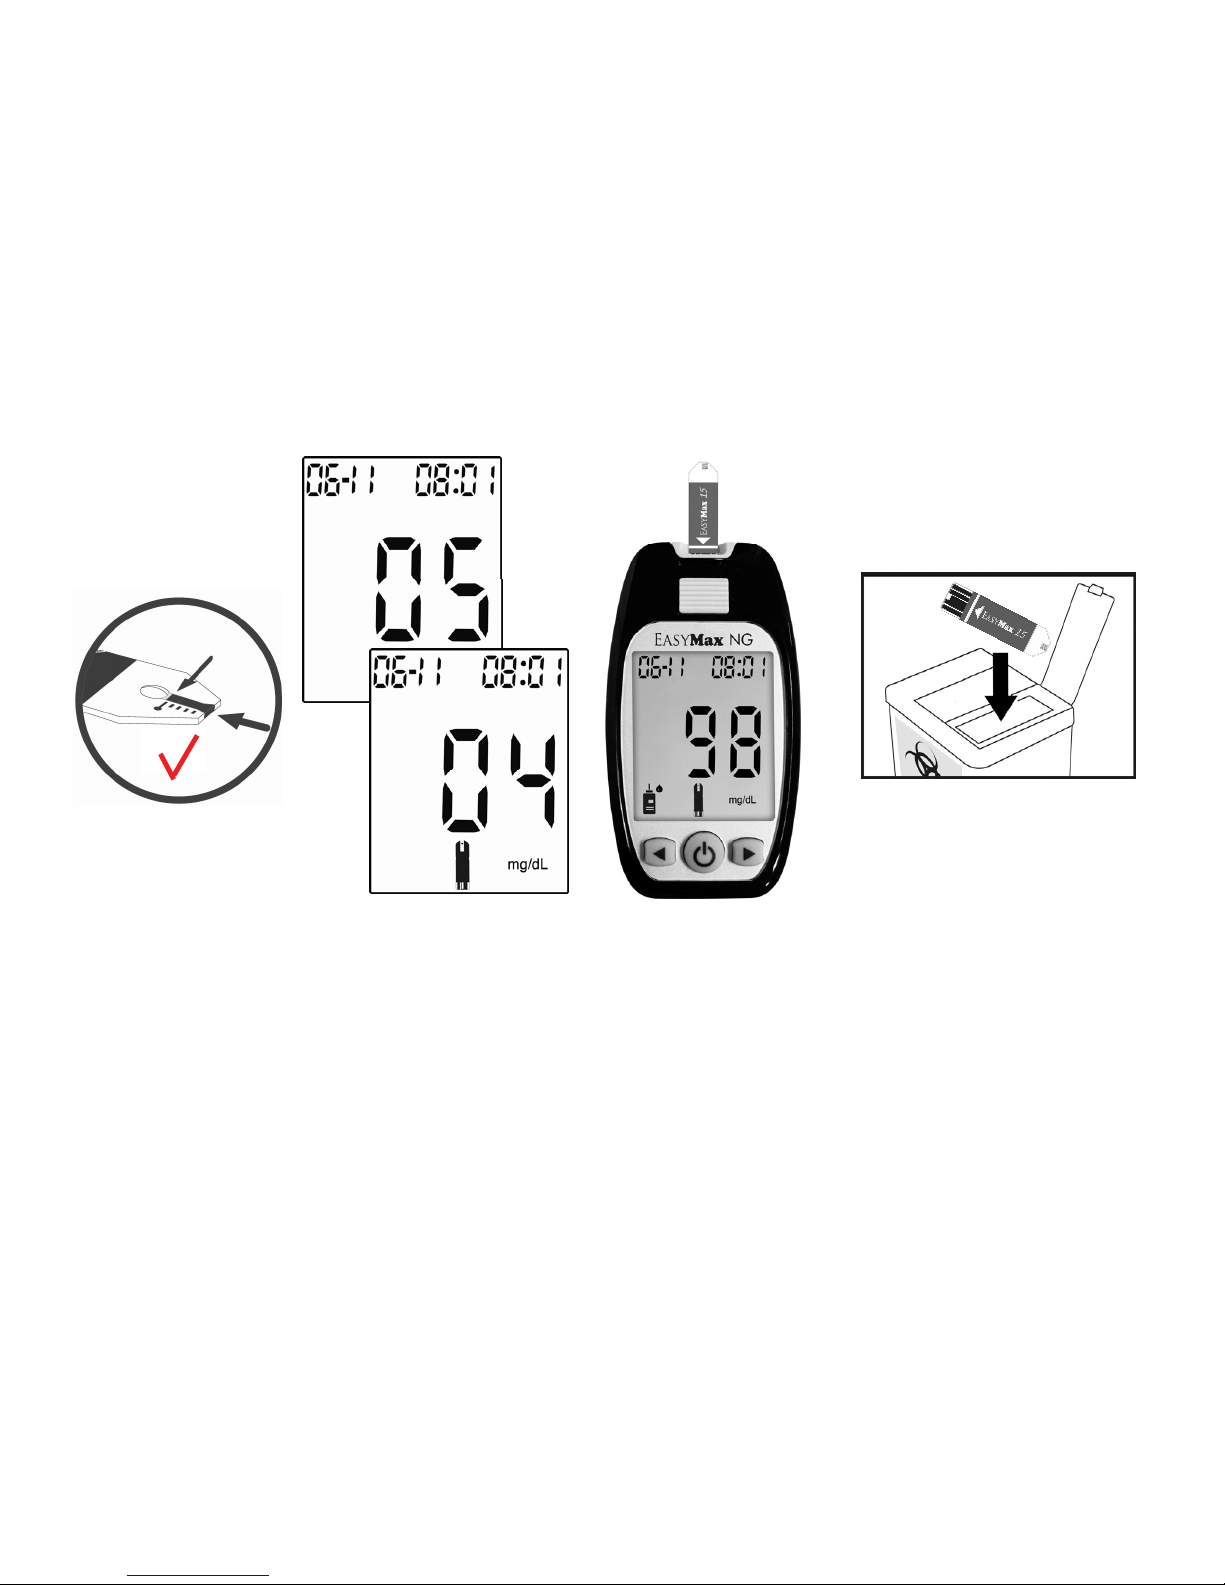
6. Touch the drop to the blood
collection area at the tip of the
test strip. Do not put control
solution on the top of test
strip. The meter starts to count
down from 5 seconds and will
show the result.
7. Do not remove the test strip until you
confirm that the reading falls within
the range printed on the test strip vial.
Be sure to match the correct control
solution range to your test result.
8. Push the strip ejector to
eject the test strip into a
proper trash receptacle.
Page 21

21
Understanding Control Solution Results
The label on your test strip vial shows the acceptable ranges for the different control solution levels. The result
you get should be inside the acceptable range for the appropriate control solution level. Make sure you
compare the result to the correct level of control.
When the control result is inside the range on the test strip vial, your test strips and your meter are working
properly.
If your control solution result is not within the acceptable range printed on your test strip vial, look at the
troubleshooting checks on next page.
Note:
In the Control Solution mode, control Solution values will NOT be included in the average memory.
Page 22
22
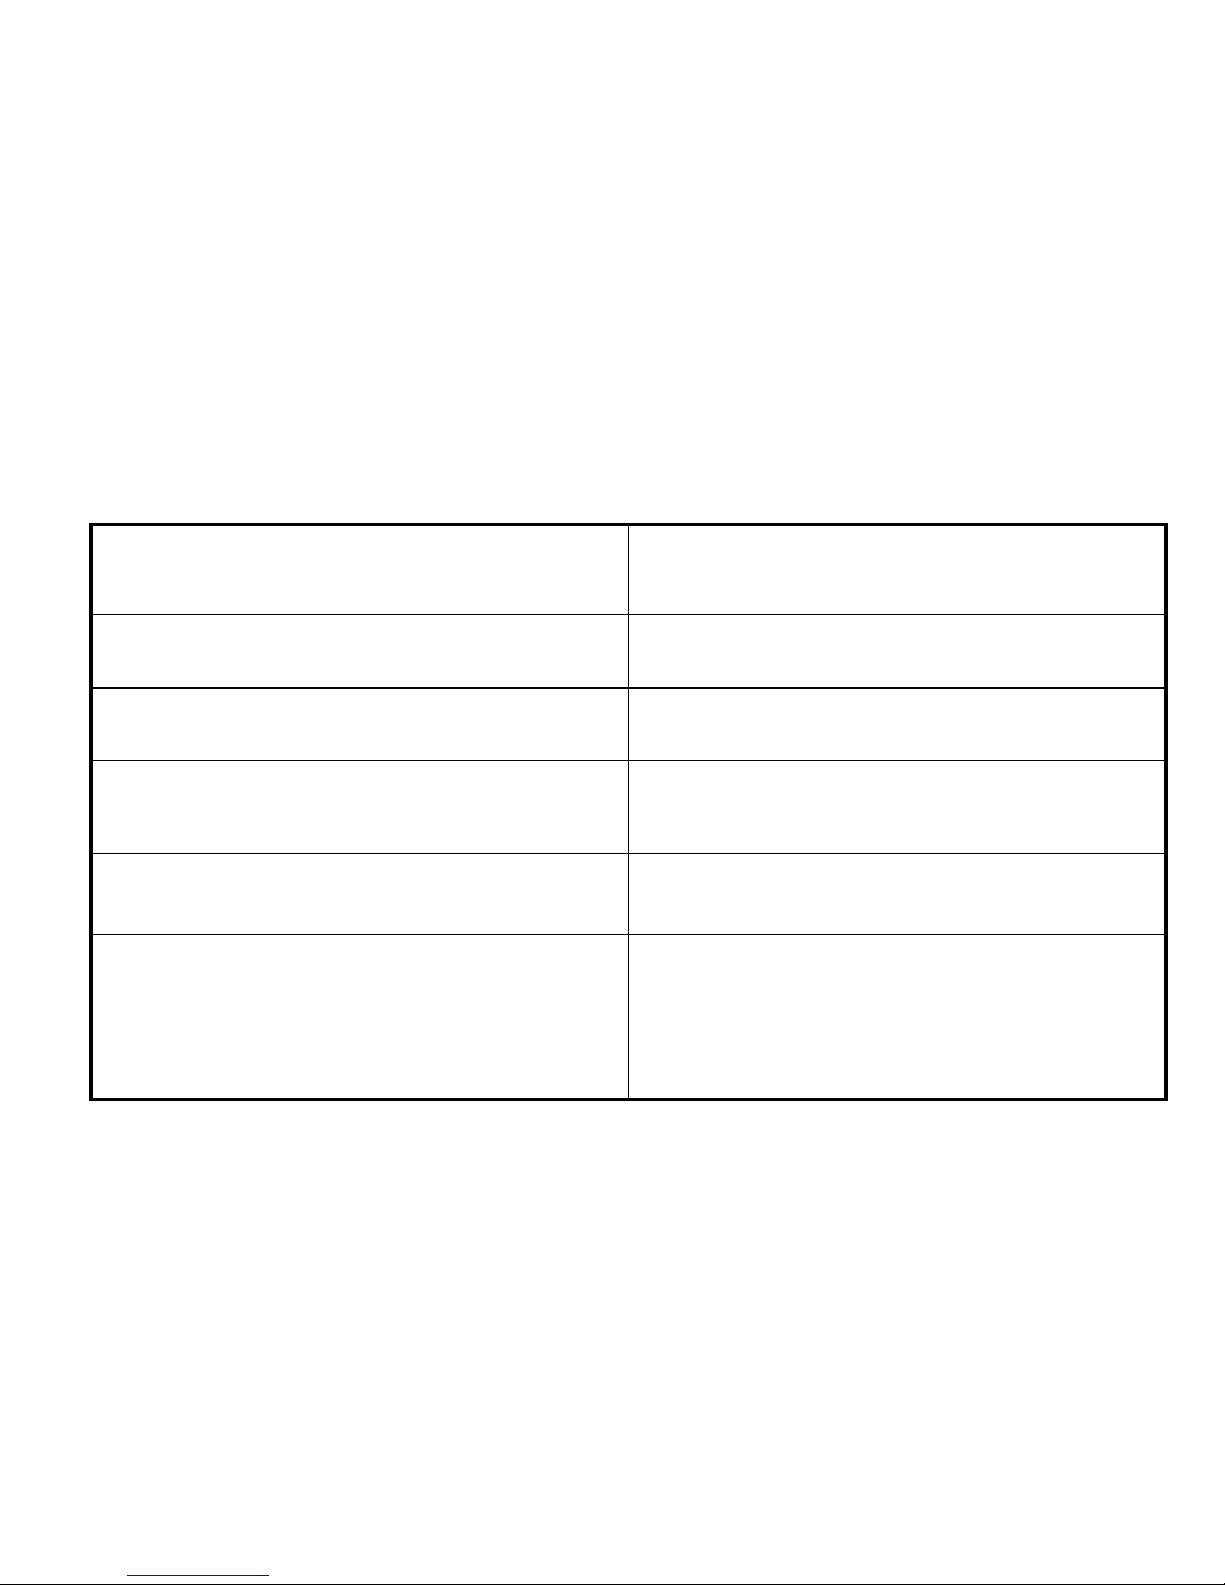
Troubleshooting Checks Action
9 Was the test strip exposed to open air for a long
period of time?
Repeat the control test with properly stored strips.
9 Was the test strip vial capped tightly?
If it wasn’t, the strips could be humidified. Replace
the test strips.
9 Is the meter functioning well?
You can use control solution to verify the meter’s
functions. (Chapter 2)
9 Is the control solution expired or contaminated?
Replace with new EasyMax 15 control solution to
check the performance of your EasyMax NG meter.
9 Were test strips and control solutions stored in
cool, dry places?
Repeat the control test with properly stored strips
and/or control solutions.
9 Did you follow the testing steps properly?
Read Chapter 2 "Control Solution Testing" and test
again. Stop using the meter if you continue to obtain
inaccurate results. Please contact the EasyMax
Customer Care Service line at 866-994-3345 for
further troubleshooting.
Page 23
23
Chapter 3: Testing Your Blood Glucose
Instructions for using single-use lancets with a Lancing Device
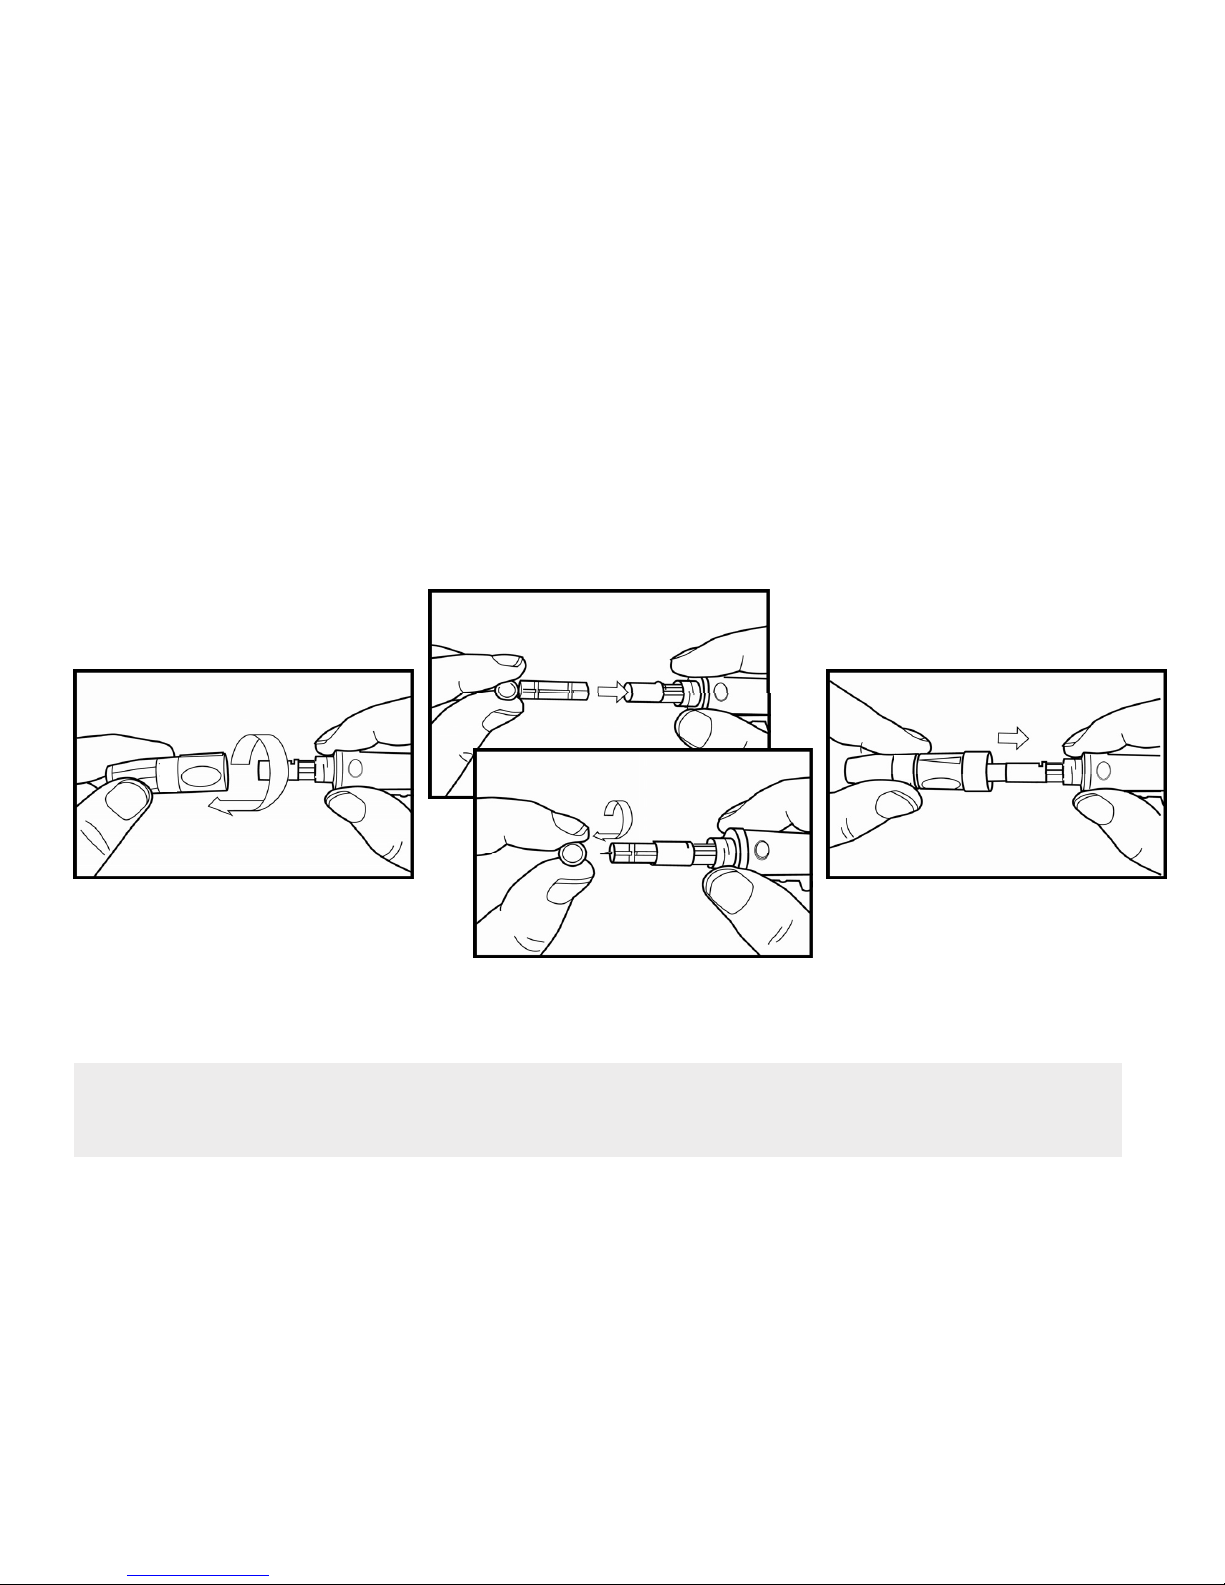
You must first load the lancet into the lancing device to get it ready for use.
1. Unscrew the Cap.
2. Insert the lancet into the lancing
device firmly then twist off the
protective cover.
3. Put the front cap back on
and turn clockwise to
secure.
Note:
Lancets are for single use only and a new, sterile lancet should be used each time you perform a
test.
Page 24
24
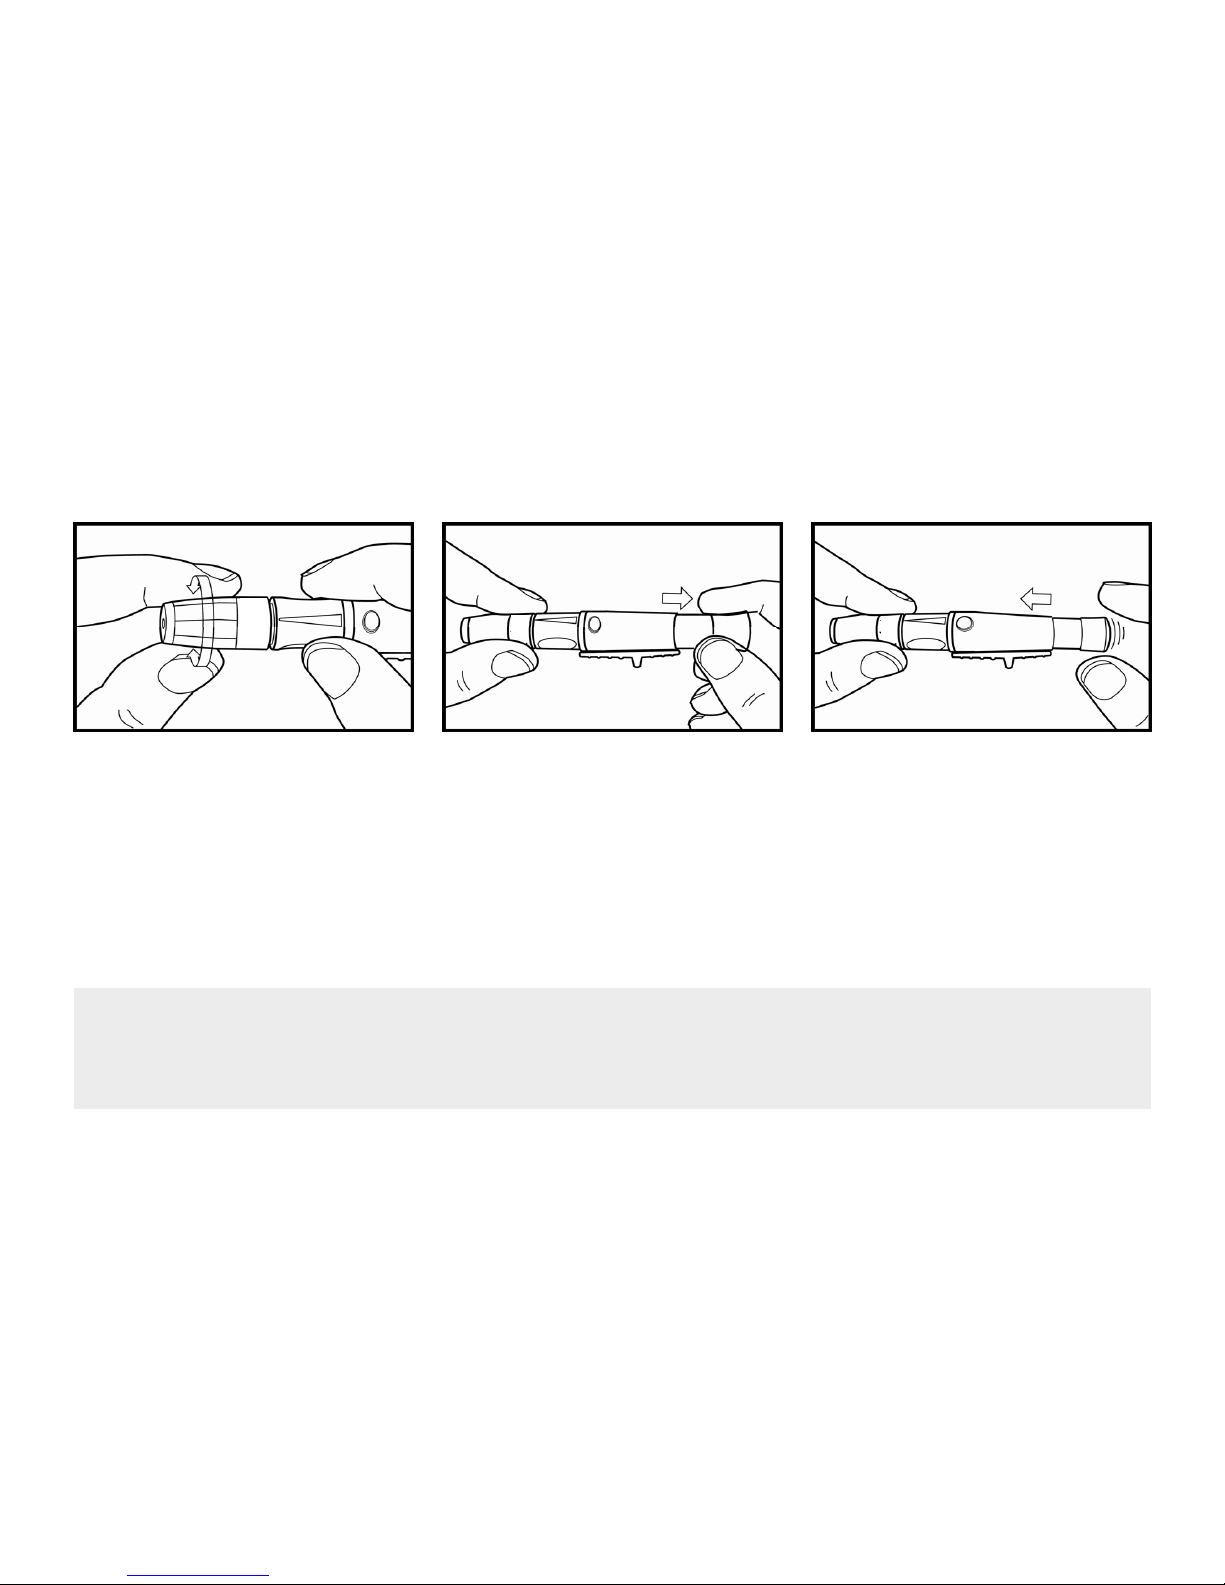
4. Select the desired penetration
depth.
Note:
1. Select 1-2 for soft or thin skin, 3-4 for average, and 5-6 for thick or calloused skin.
2. Lancing device and lancets are not to be shared between users. Sharing lancing devices and
lancets may transmit bloodborne pathogens, such as viral hepatitis.
6. Set the lancing device
aside until later in the test.
5. Pull on the sliding barrel of the
lancing device until it clicks and
then release.
Now the lancing device is ready.
Do not prick your finger until your
meter and strip are prepared.
Page 25
25
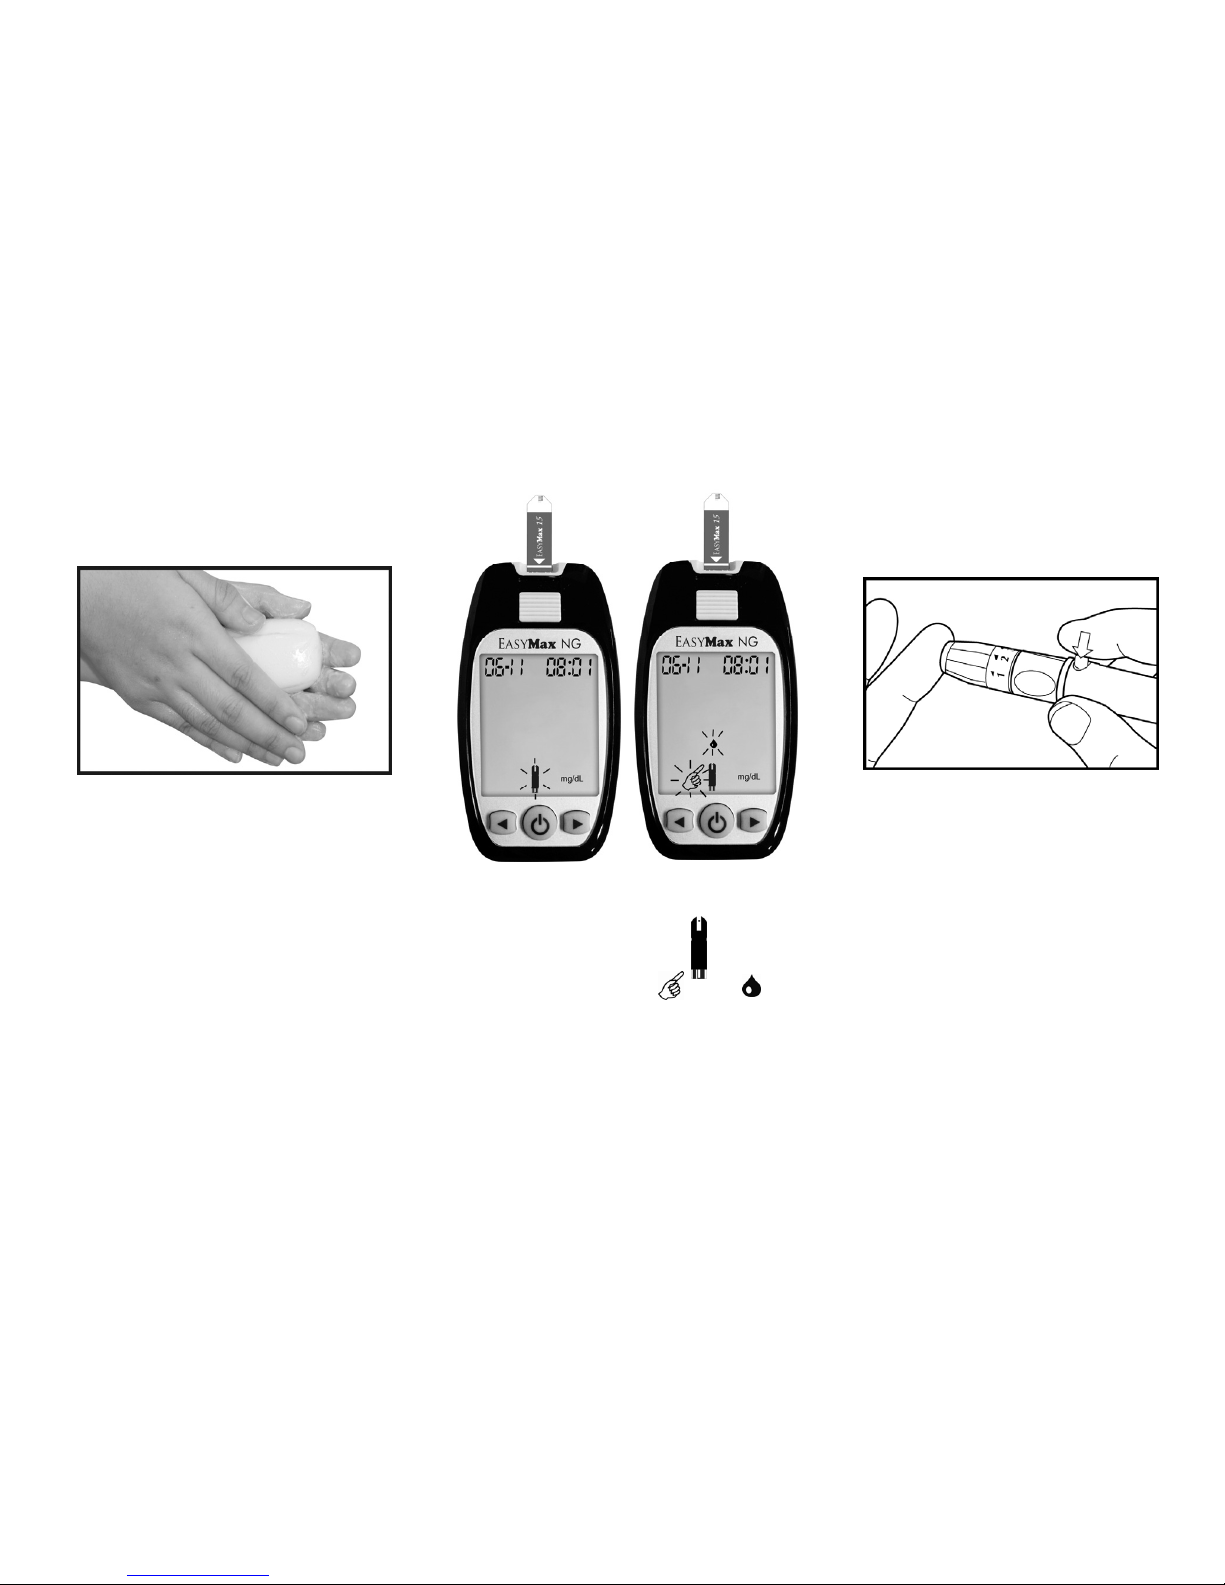
2. Put a test strip into the meter in the
direction of the arrow. The meter
turns on and the icon shows
automatically.
3. When the icons of and
flashes on the display, the testing
mode of blood drop is starting.
Running a Blood Glucose Test with Blood from Your Fingertip
1. Wash your hands with soap and
warm water. Rinse and dry
thoroughly. You can also use an
alcohol prep pad to clean the site.
If you are testing others, a new
pair of clean gloves should be
worn before testing each patient.
4. Please wait at least 5 seconds
until the intended area is dry
and clean before using the
lancing device.
5. Position the lancing device
and press it firmly against the
puncture site.
Page 26
26
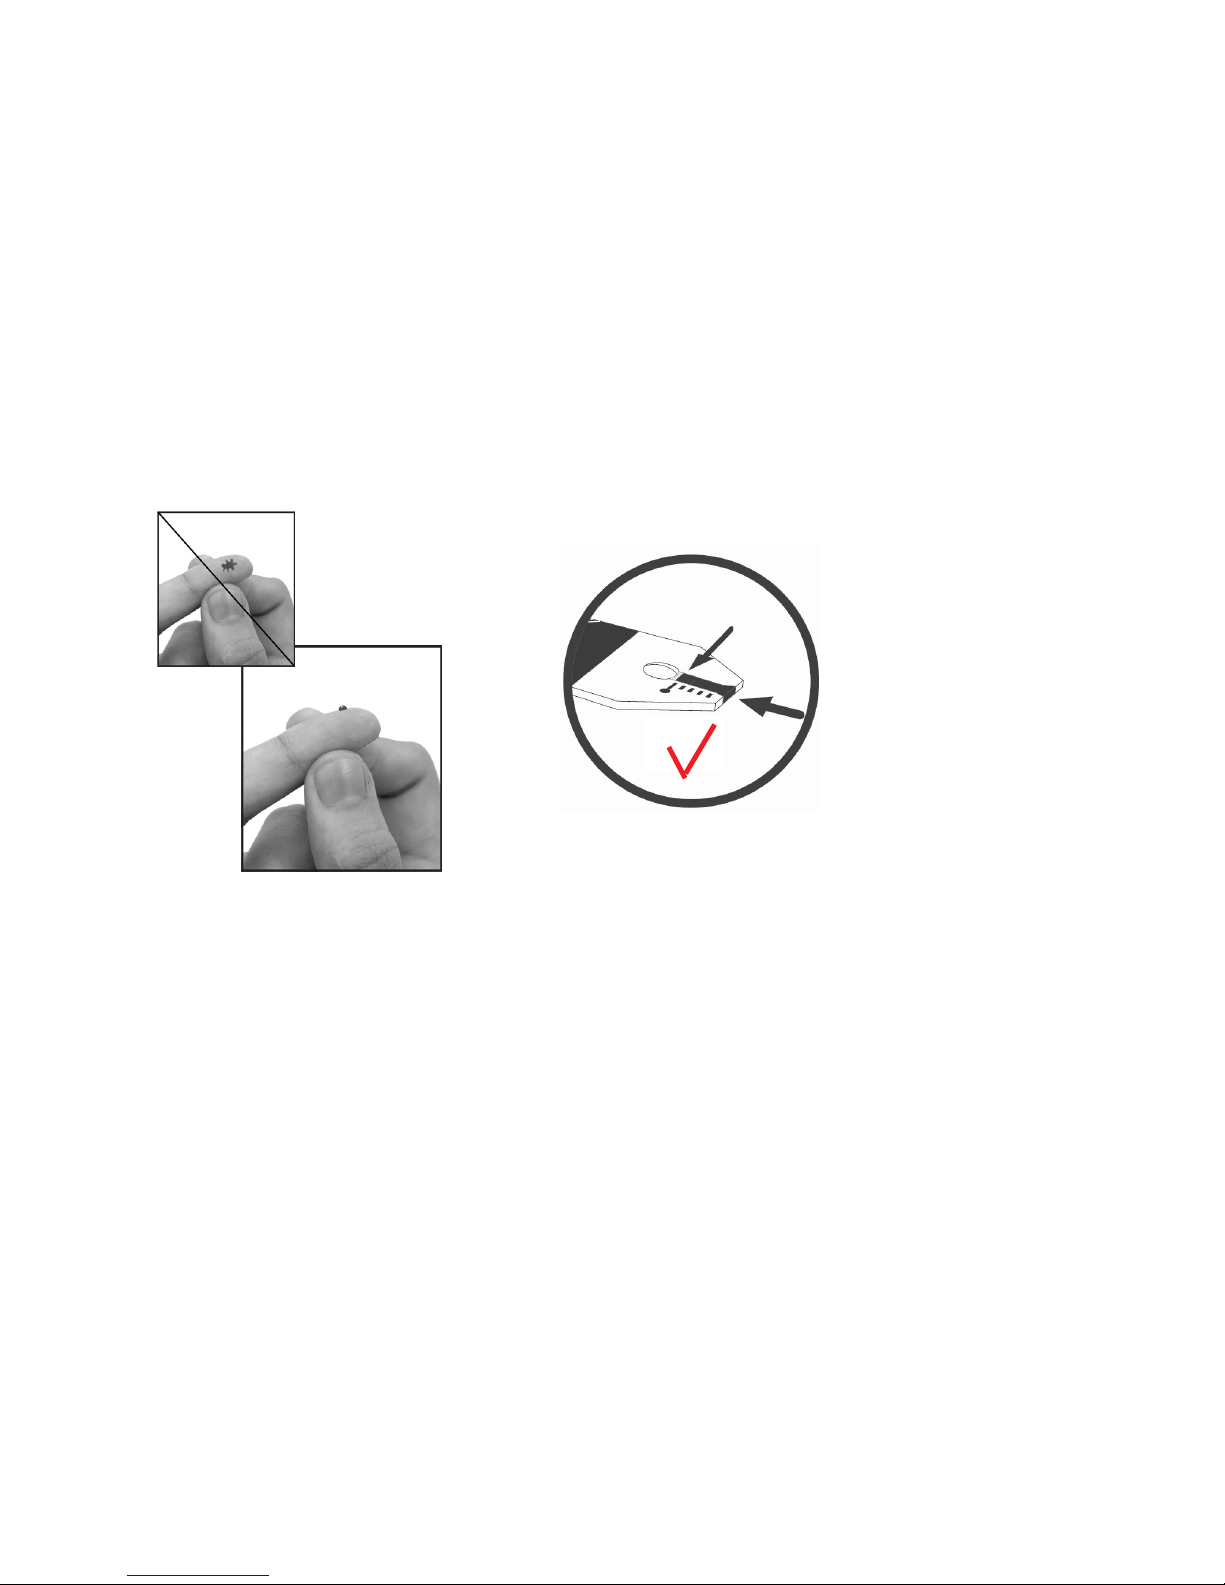
6. Gently squeeze and/or massage
your fingertip until a round drop of
blood forms on your fingertip.
7. Touch the blood drop at the tip of the
transparent window of the test strip. Do not
put blood on top of the strip. Be sure to get
enough blood on the strip’s reaction zone.
Otherwise, an error code will appear.
n Apply blood to the edge
of the test strip.
o Do not apply blood on
top of the test strip.
p Be sure to get enough
blood on strip to make it
to the confirmation
window.
n
p
Page 27
27
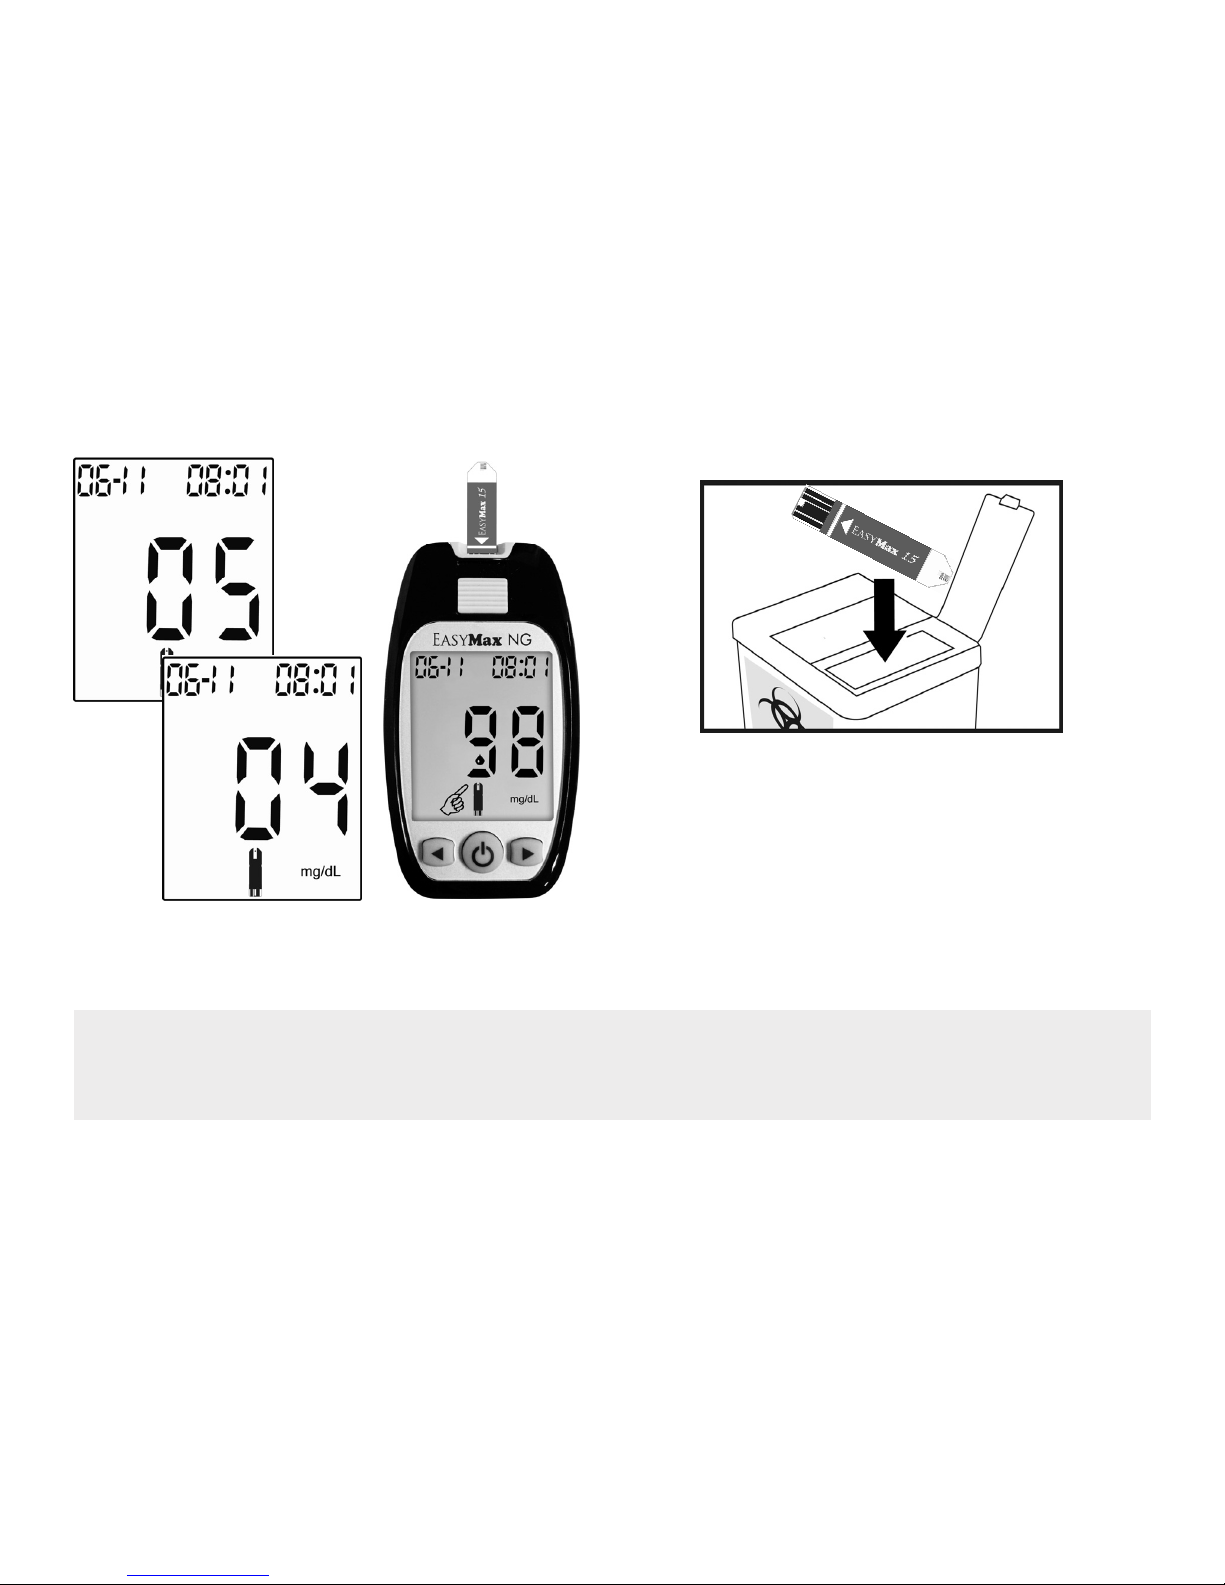
8. The meter starts to count down from 5
seconds and then displays the test result.
9. Push the Strip Ejector to eject the test strip.
Dispose of both strip and lancet properly.
10. After discarding, wash hands thoroughly with
soap and water. Rinse and dry thoroughly.
11. Clean and disinfect the meter following the
instruction in Chapter 5.
Note: Used test strips and lancets are considered bio-hazardous waste in accordance with U.S. &
local regulations and should be handled as if capable of transmitting infection. Users may
discuss proper methods for disposing of used test strips and lancets with their doctor.
Page 28

28
Understanding Your Test Results
Expected Values*
The EasyMax 15 Blood Glucose test strips are plasma referenced and calibrated for easier comparison to lab
results. The American Diabetes Association recommends a post-meal glucose level of less than 140 mg/dL and
a pre-meal glucose of less than 100 mg/dL*.
*American Diabetes Association: Diagnosis and Classification of Diabetes Mellitus (Position Statement). Diabetes Care 34
(Supp. 1) S66, 2011.
Unusual Test Results
If the results are inconsistent with you or your patient’s symptoms, please follow these steps:
1. Run a control solution test, Chapter 2 "Control Solution Testing."
2. Repeat a blood glucose test, Chapter 3 "Testing Your Blood Glucose."
3. After running the quality control and retesting your blood glucose, if there are still concerns about the
performance of the meter, call EasyMax Customer Care at 866-994-3345 for further troubleshooting or if it is
an emergency, contact your healthcare professional.
4. For accuracy and precision data and for important information on limitations, see the instructions that come
with your test strips.
Note: 1. Extremely high humidity may affect the test results. A relative humidity above 90% may
cause inaccurate results.
2. Hematocrit below 20% may cause higher results. Hematocrit above 60% may cause lower
results.
Page 29

29
Chapter 4: Meter Memory, Setup
Memory, Storing Test Results
Your meter stores a maximum of 480 test results with the time and date of the test. You can review them at any
time. When the memory is full, the oldest result is dropped as the newest is added, so it is very important to
have the correct time and date set in the meter.
The memory function is necessary in order to transmit data to a central location (separate software &
instructions are available).
Note:
1. Do not change your therapy based on one individual result in memory.
2. The memory is not lost when you replace the battery. You do need to check that the time and
date are still correct. See Section "Setting the Time and Date" in Chapter 1.
3. Once 480 results are in memory, adding a new result causes the oldest one to be deleted.
4. In the Control Solution mode, control solution values will NOT be included in the average
memory.
Page 30
30
Viewing and Deleting Test Results
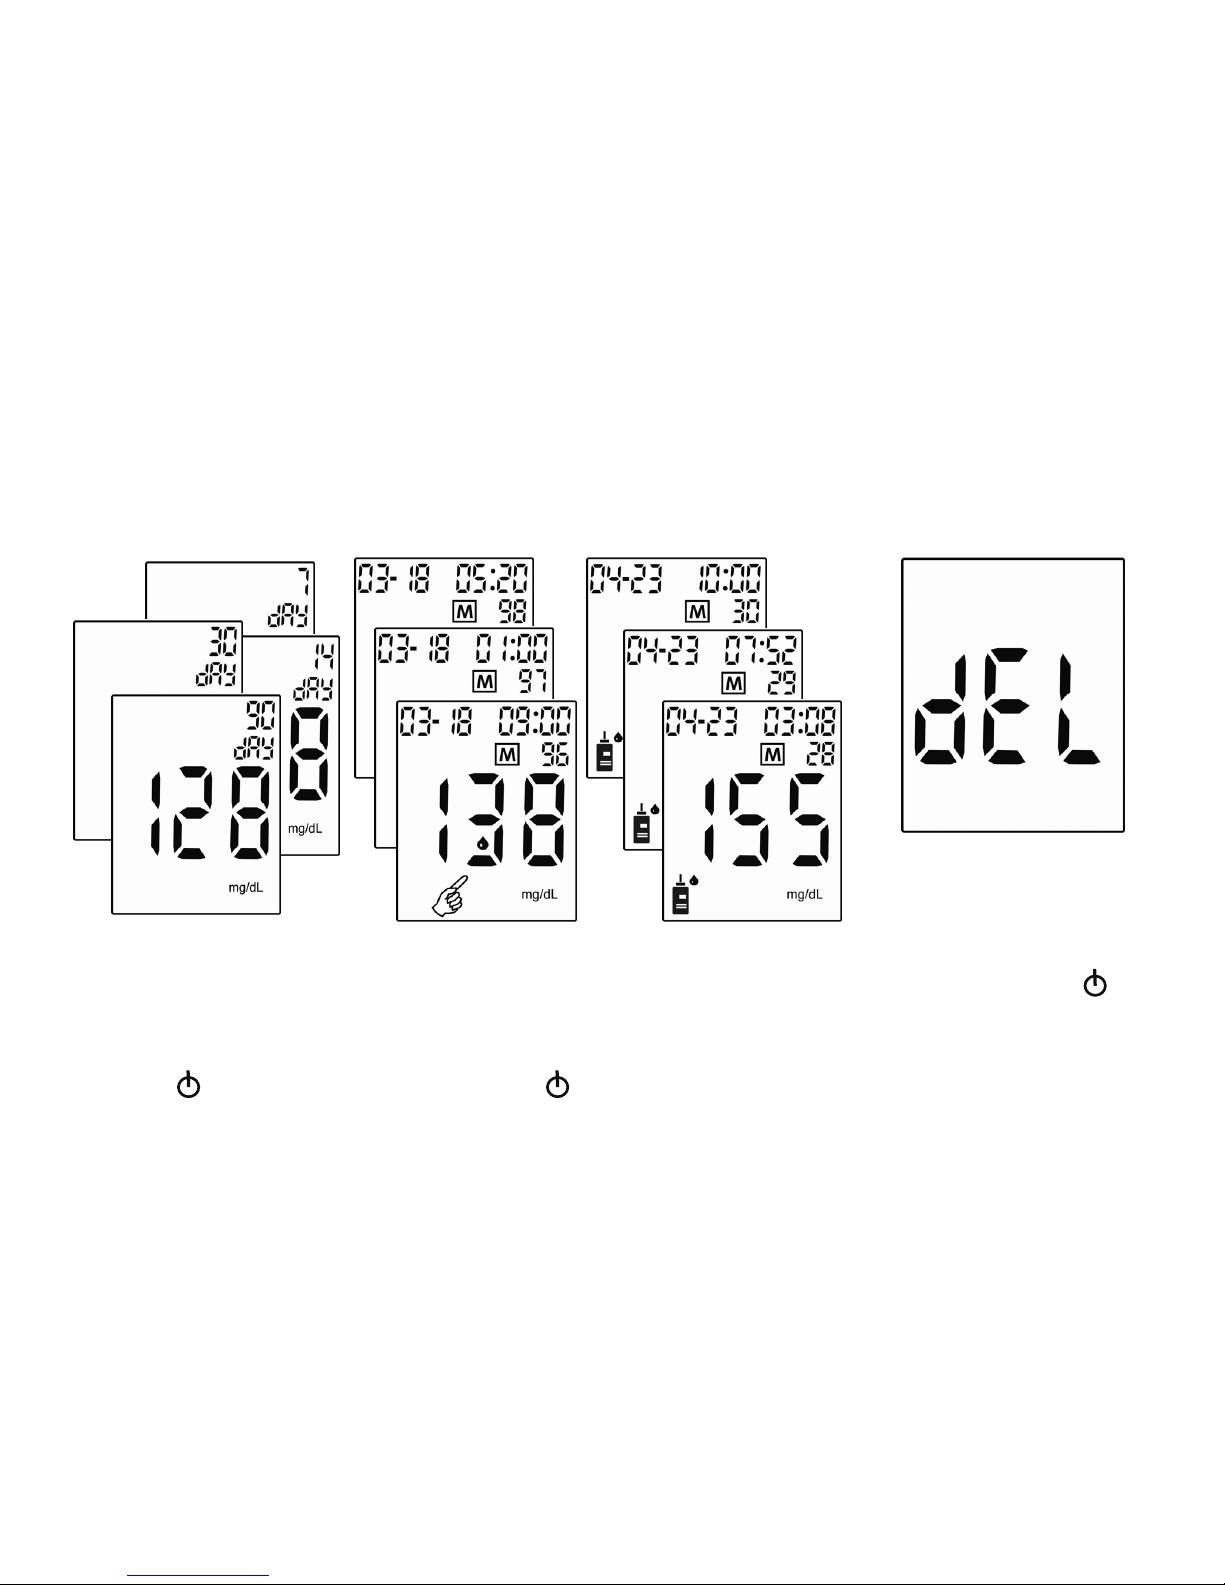
Each review requires the user to go back to the main screen (testing mode) by pressing the power button.
3. To delete a test result, press
(Left button) for more than
2 seconds and display
shows “dEL”, press to
confirm deletion.
4. Press (Left button) or
(Right button) to keep
reviewing the results.
2. From the main screen, press
(Left button) for more than 2
seconds to view the control solution
records in order from 30 to 1.
Press back to the testing mode.
1. Press the (Left button) or
(Right button) to view averages
of 7/14/30/90 day test results first
and then all results.
Press back to the testing
mode.
Page 31
31
Using With Your Computer
To Transfer data, the meter can be turned on or turned off. The USB mini port can be found on the bottom of
your meter below the power, left and right buttons.
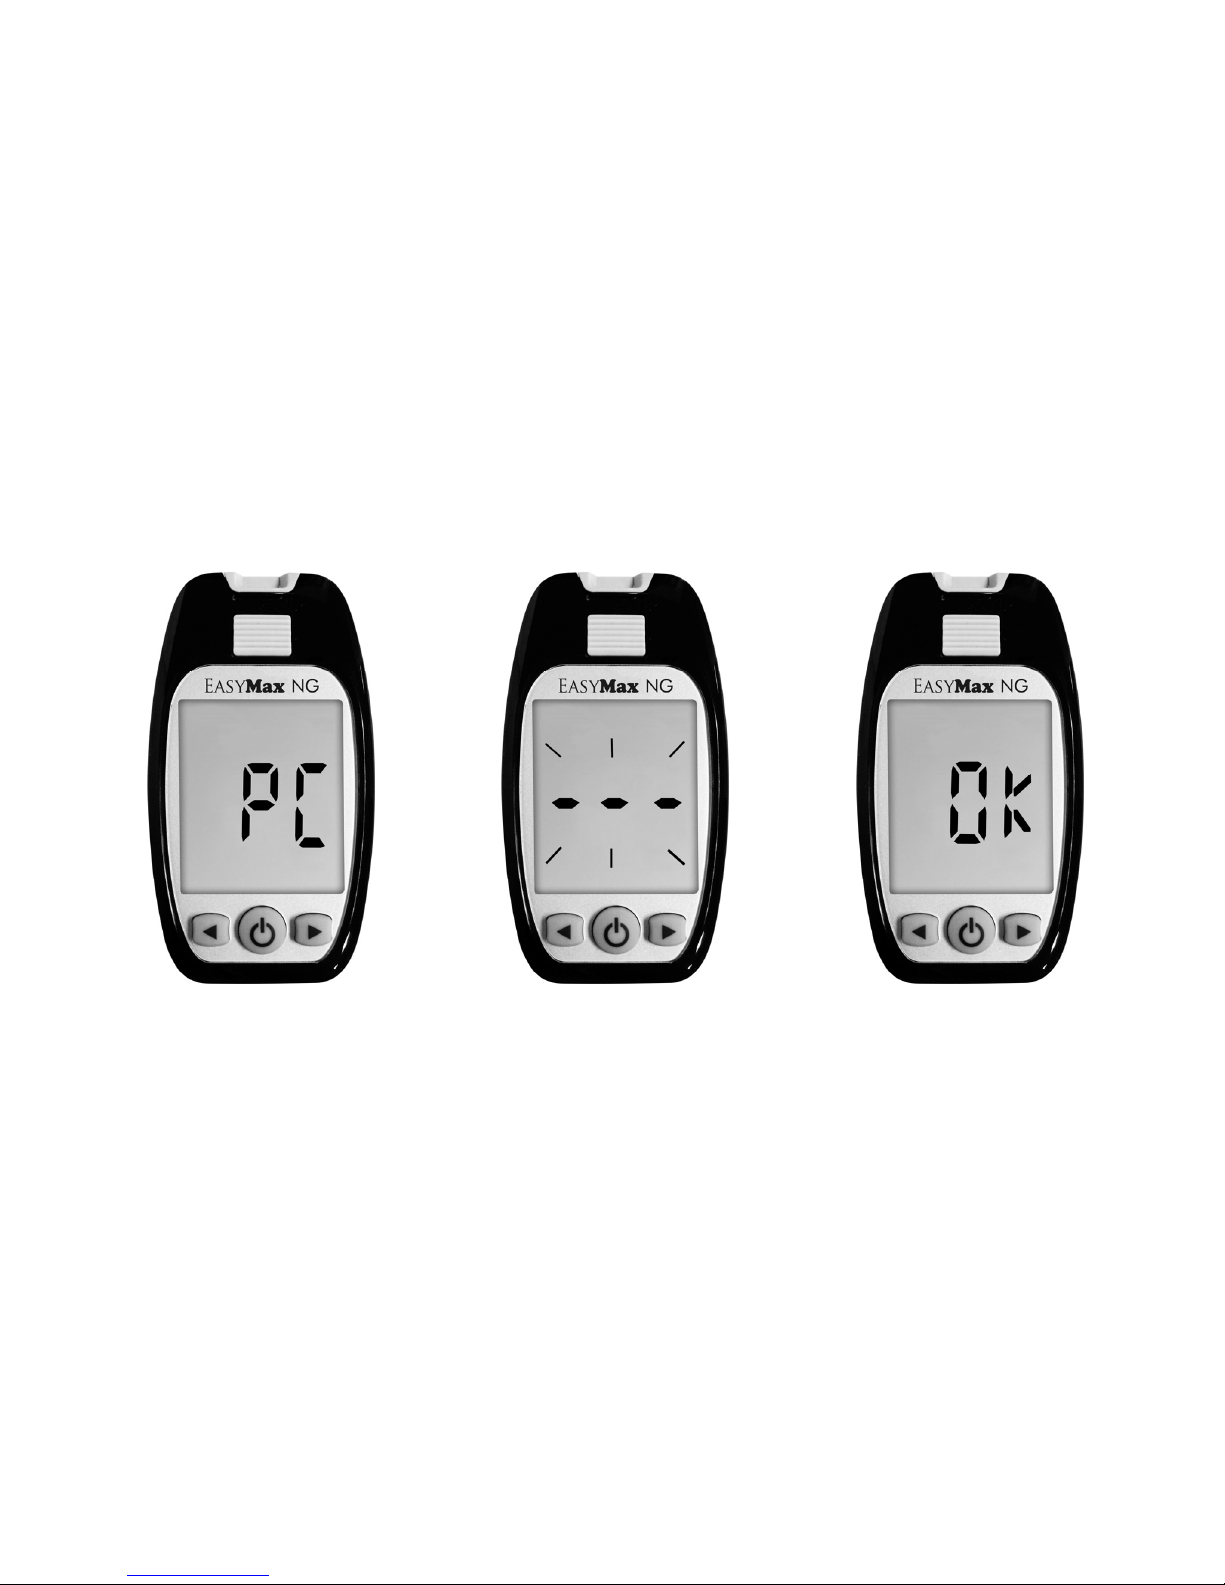
1. Use the USB cable to connect
your meter and computer. The
display shows ”PC”.
2. The meter starts to transfer
data to the GlucoManager
TM
software.
3. When all data is uploaded from
the meter to the PC, the meter
shows “OK” and beeps. In the
software, select Individual
Management.
Page 32
32
Chapter 5: Maintenance and Troubleshooting
Battery Information
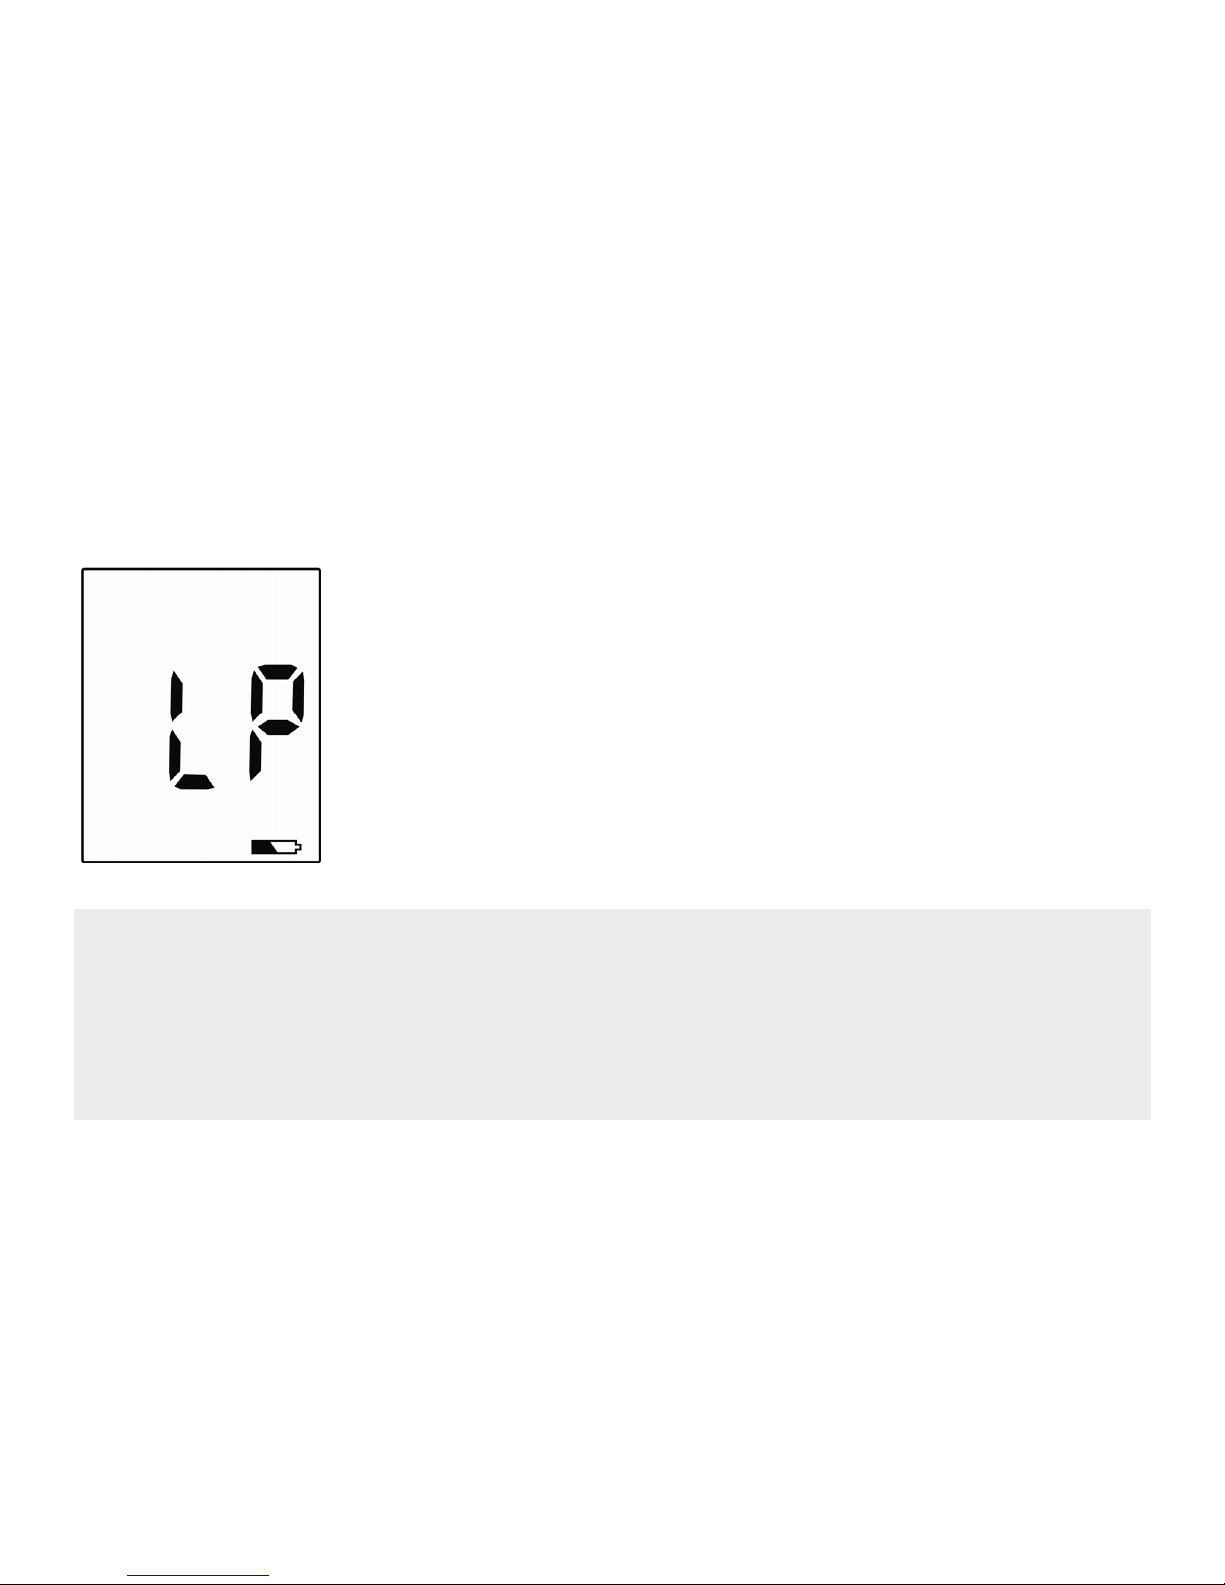
The meter uses two alkaline 1.5V (AAA) batteries. Batteries will normally last for
more than 2000 tests. Other types of 1.5V (AAA) batteries are also acceptable, but
the capacity of test times may differ. Install the batteries when you first use the
meter or replace with new batteries when the "LP" (low power) message and the
low battery symbol appear on the display.
Note:
1. The meter won’t delete earlier records after you replace the battery.
2. You should reset the time and date again after you replace the battery.
3. 1.5V (AAA) x 2 batteries are available at most stores. You may take the old battery with you for
replacement.
4. Remove the battery when you will not be using the meter for one month or more.
Page 33
33
Cleaning and Disinfecting the EasyMax NG Meter in LTC Settings
Choosing a disinfectant
According to Guideline for Disinfection and Sterilization in Healthcare Facilities in 2008, you should clean your
glucose meter after every use to prevent any possibility of cross infection. Wipes used should be
EPA-registered as a disinfectant. Many EPA-registered disinfectant wipes have "2-minute" claims. If your wipes
have higher or lower kill times, you should adjust your technique accordingly.
Cleaning and Disinfection Instructions
Please keep the meter free of dirt, dust, bloodstain, and water stains. After every use, follow both the cleaning
and disinfection instructions below, using the EPA-registered wipes.
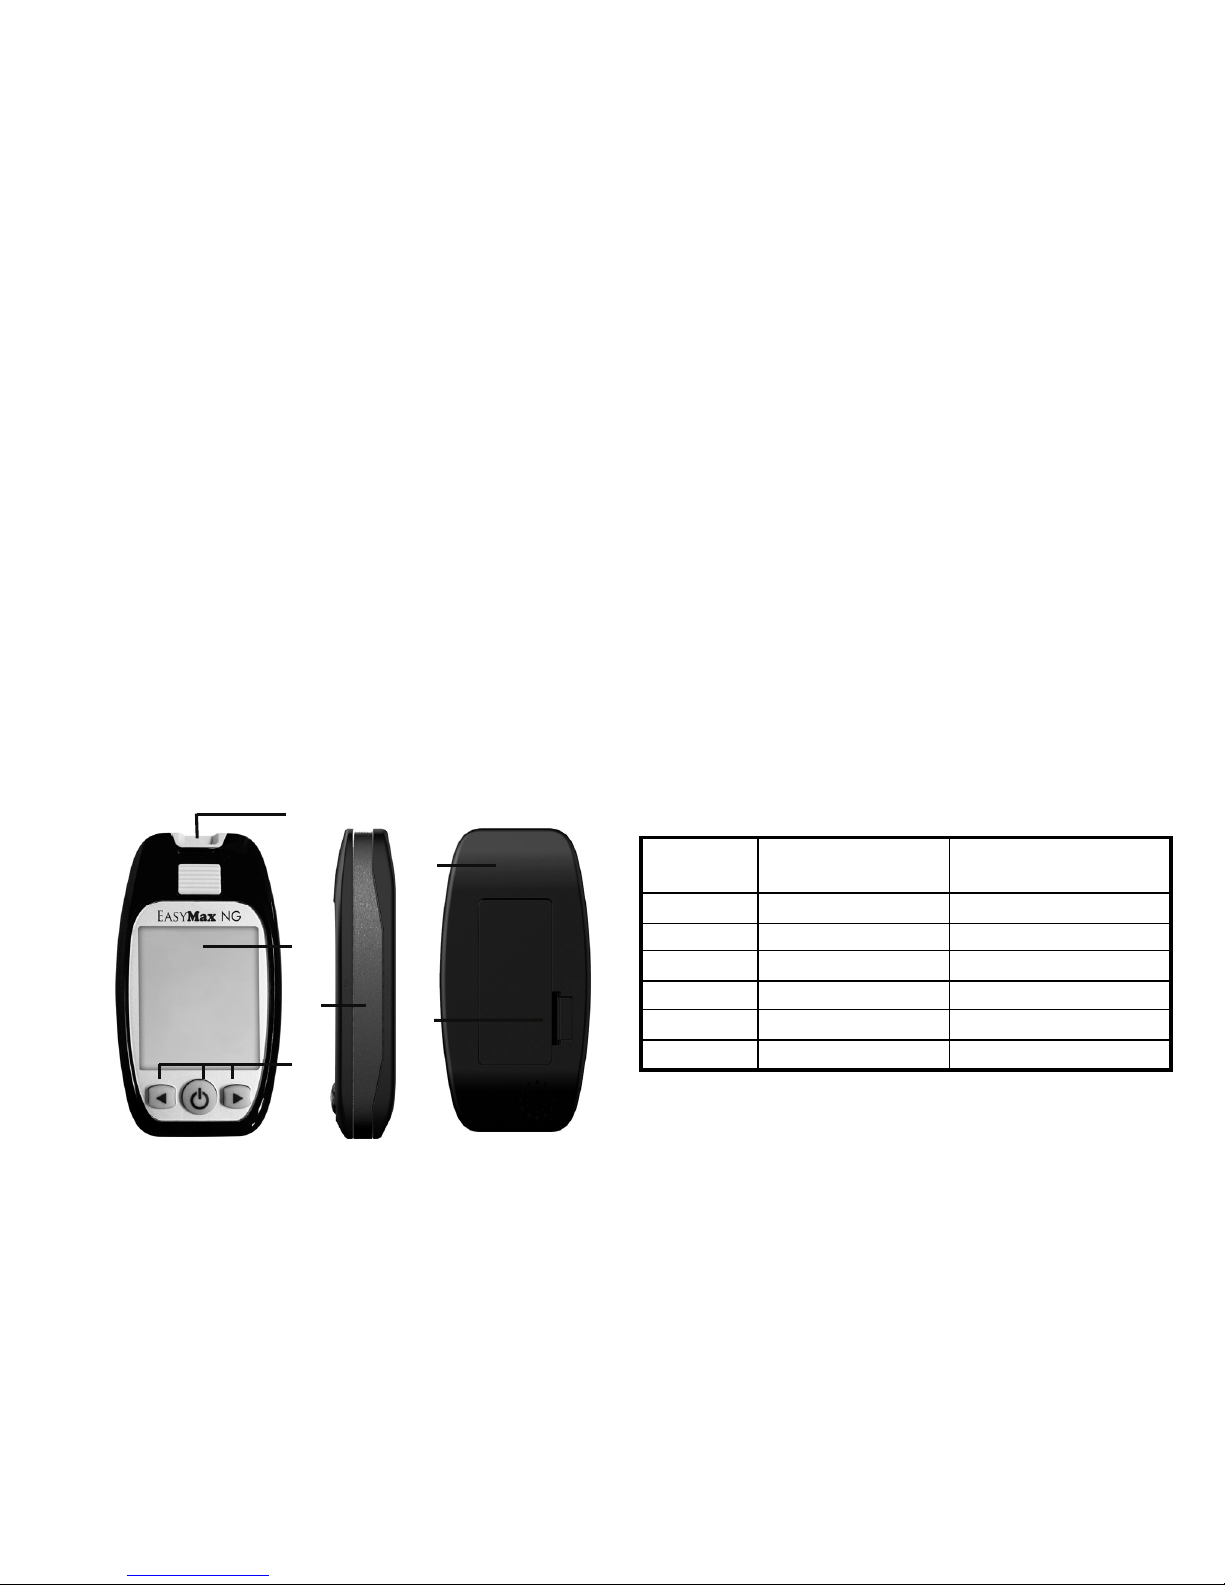
Meter cleaning area
Code Name
Possibility of
contact with blood
A
Strip Slot High
B
Front Case Medium
C
Side Case High
D
Front Buttons High
E
Back Case Low
F
Battery Cover Medium
A
B
C
D
E
F
Page 34

34
Step 1: Cleaning Instruction: Clean first to remove any heavy soil left on the surface of the meter. All blood
and bodily fluids must be thoroughly cleaned from surfaces and objects before disinfection with a germicidal
wipe. Open, unfold and use the first germicidal wipe to remove heavy soil.
Step 2: Disinfection Instruction: After cleaning, and before using the meter again, unfold a new wipe and
thoroughly wet all meter surfaces, including the strip port and the connection port. Treated area must remain
visibly wet for a full 2 minutes. Use additional wipe(s) if needed to ensure a continuous 2 minute wet contact
time. Let the device air dry for 30 seconds.
Note:
After disinfection, users’ gloves should be removed and hands should be thoroughly washed with
soap and water before proceeding to the next patient.
Do Not:
Get any moisture into the test strip slot.
Spray any cleaning solution directly onto
the meter.
Put the meter under water or liquid.
Pour liquid onto the meter.
Do:
Make sure the meter is turned off during cleaning and
disinfection.
Keep test strip vial(s) tightly closed when performing
cleaning and disinfection procedures; the fumes from
the disinfectant may affect the performance of the
strips.
After cleaning and disinfection, please perform a
physical appearance and performance check of
devices.
Always wear gloves when cleaning and testing.
Page 35
35
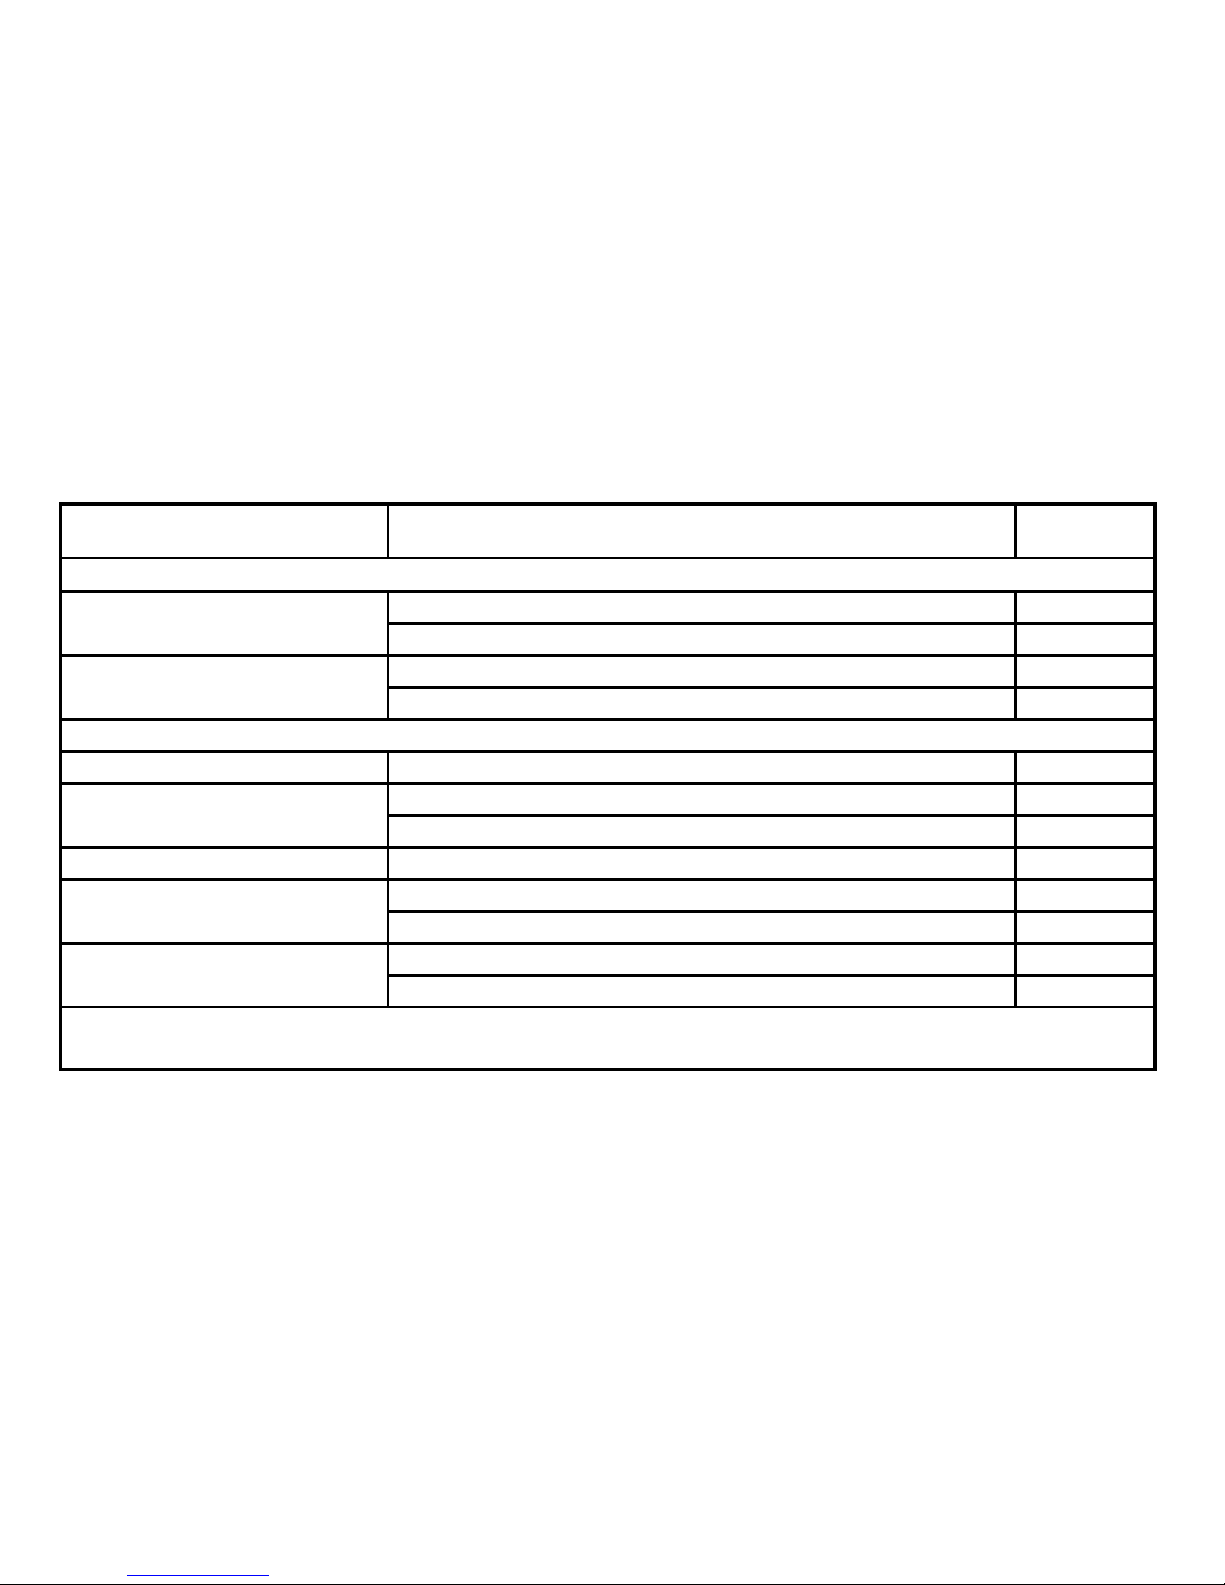
Performance check of the meter
Steps Check item
Accept
Result
After each cleaning
Does the meter turn on? Yes 1. Press and hold power
button for 3 sec.
Does the meter beep? Yes
Does the meter have stored results? Yes 2. Press and release left or
right button.
Is the display clear? Can you read the result? Yes
After each disinfection
1. Insert test strip Does the meter turn on? Yes
Any reading? Yes 2. Run control solution test
Is the reading within control range? Yes
3. Eject test strip Does the meter turn off? Yes
Does the meter turn on? Yes 4. Press and hold power
button for 3 sec.
Does the meter beep? Yes
Does the meter have stored results? Yes 5. Press and release left or
right button.
Is the display clear? Can you read the result? Yes
Action: If any of the results are “No” the user should call the Customer Care Service toll-free at 866-994-3345
(Eastern Standard Time, Mon-Fri 8:00AM-6:00PM) for assistance.
Page 36

36
Physical Appearance check of the meter after each cleaning or disinfection
Check item Accept Result
Is the display clear to read? Is the screen clear? Yes
Is the strip slot and other parts free of corrosion? Yes
Action: If any of the results are “No” the user should call the Customer Care Service toll-free at
866-994-3345 (Eastern Standard Time, Mon-Fri 8:00AM-6:00PM) for assistance.
Meter Life when Cleaned and Disinfected
The meter has been tested through 20,000 validated cycles (10,000 cycles of cleaning and 10,000 cycles of
disinfection). If the meter is used for 9 cycles of cleaning and 9 cycles of disinfection per day, it will last in
professional use for 3 years.
Page 37

37
Cleaning And Disinfection Frequency
At least 9 cycles of cleaning per day and 1 cycle of disinfection per week will allow the user to use the device for
4 years. The meter can sustain 20,000 cycles of cleaning and disinfection and the lancing device can sustain
14,600 cycles of cleaning and disinfection.
Cleaning Frequency: 9 cycles/day X 365 days/year X 4 year product life = 13,140 cycles of cleaning
Disinfection Frequency: 1 cycle/week X 52 weeks/year X 4 year product life = 208 cycles of disinfections
< 20,000 validated cycles of cleaning and disinfection for the meter
< 14,600 validated cycles of cleaning and disinfection for the lancing device
4 year product life is for properly cleaning and disinfection. After 4 years, the meter must be replaced
with a new meter.
Page 38
38
Maintenance and Testing
Your meter needs little or no maintenance with normal use. It automatically tests its
own systems every time you turn it on and lets you know if something is wrong. (See
"Screen Messages" and what to do about them.)
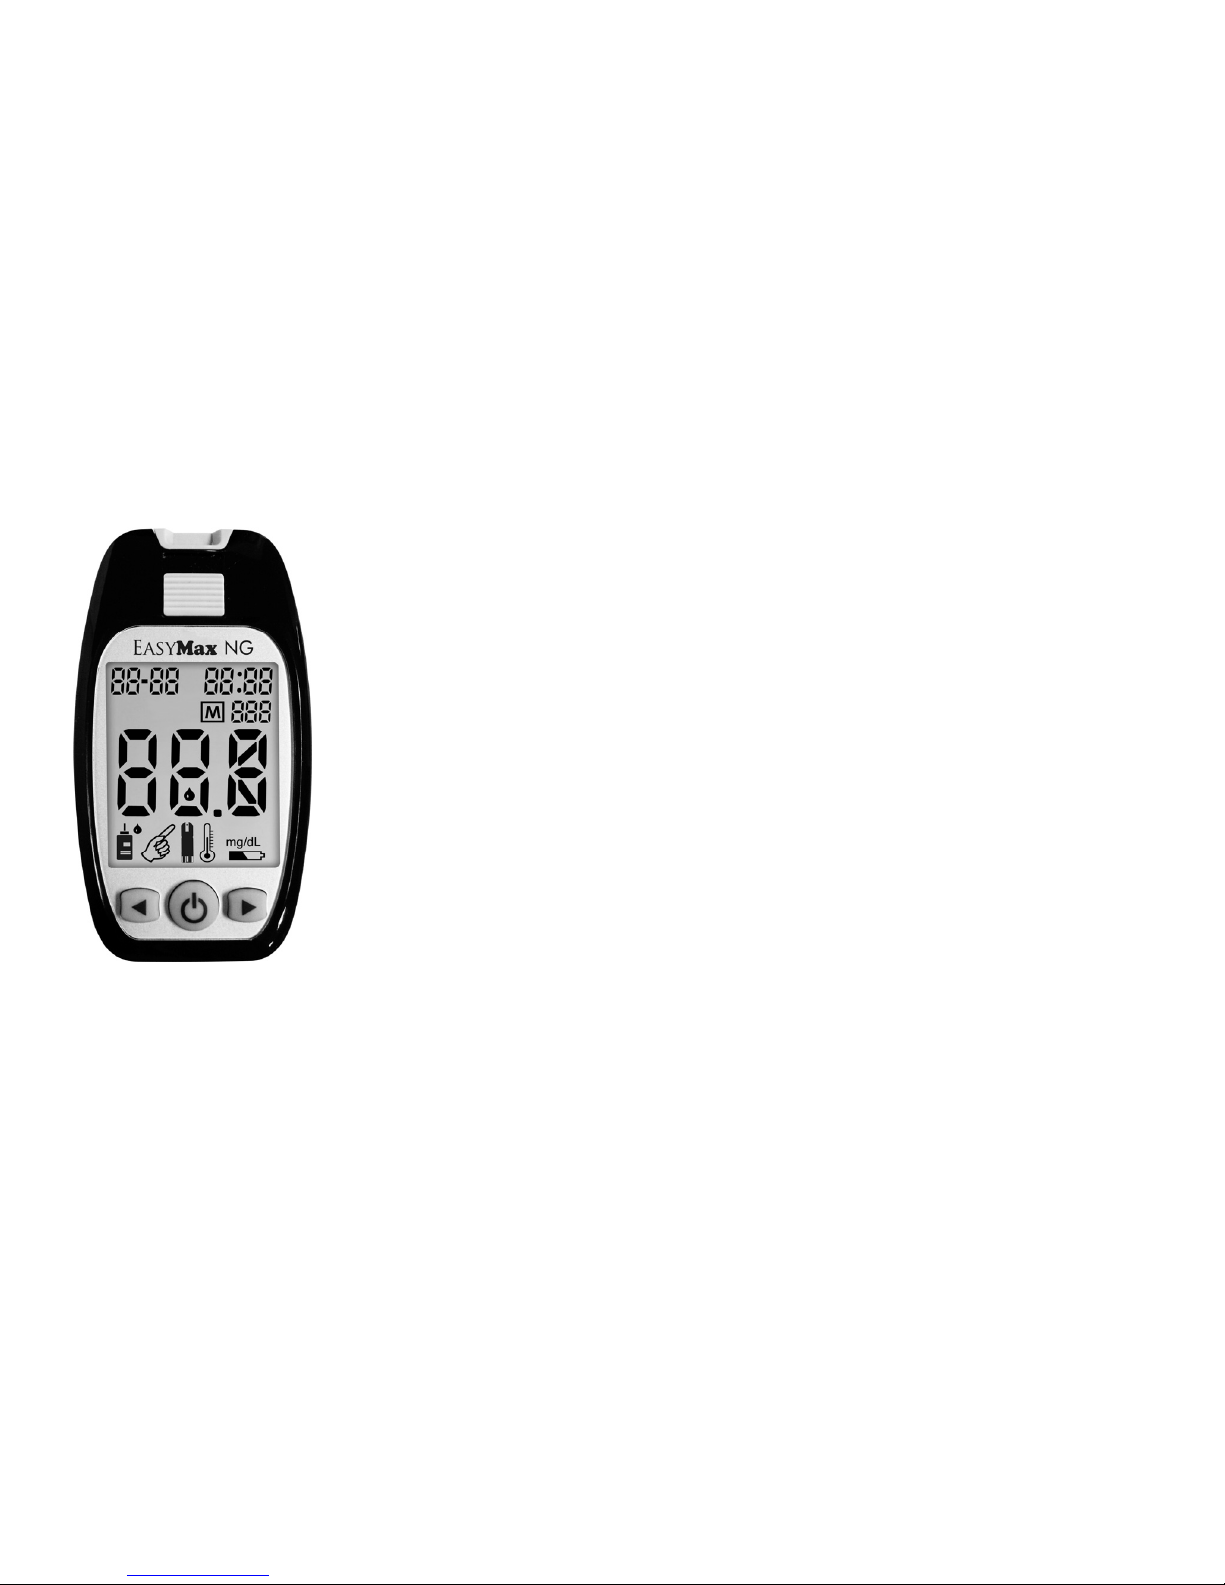
To make sure the display is working properly, turn off the meter. Press and hold
power button to see the complete display. All the indicators should be clear and look
exactly like the picture to the left. If not, please contact Customer Service at
866-994-3345.
Page 39
39
Screen Messages And Troubleshooting
Never make treatment decisions based on an error message. If you have any concerns, call the Customer
Care Service toll-free at 866-994-3345 (Eastern Standard Time, Mon-Fri 8:00AM-6:00PM).
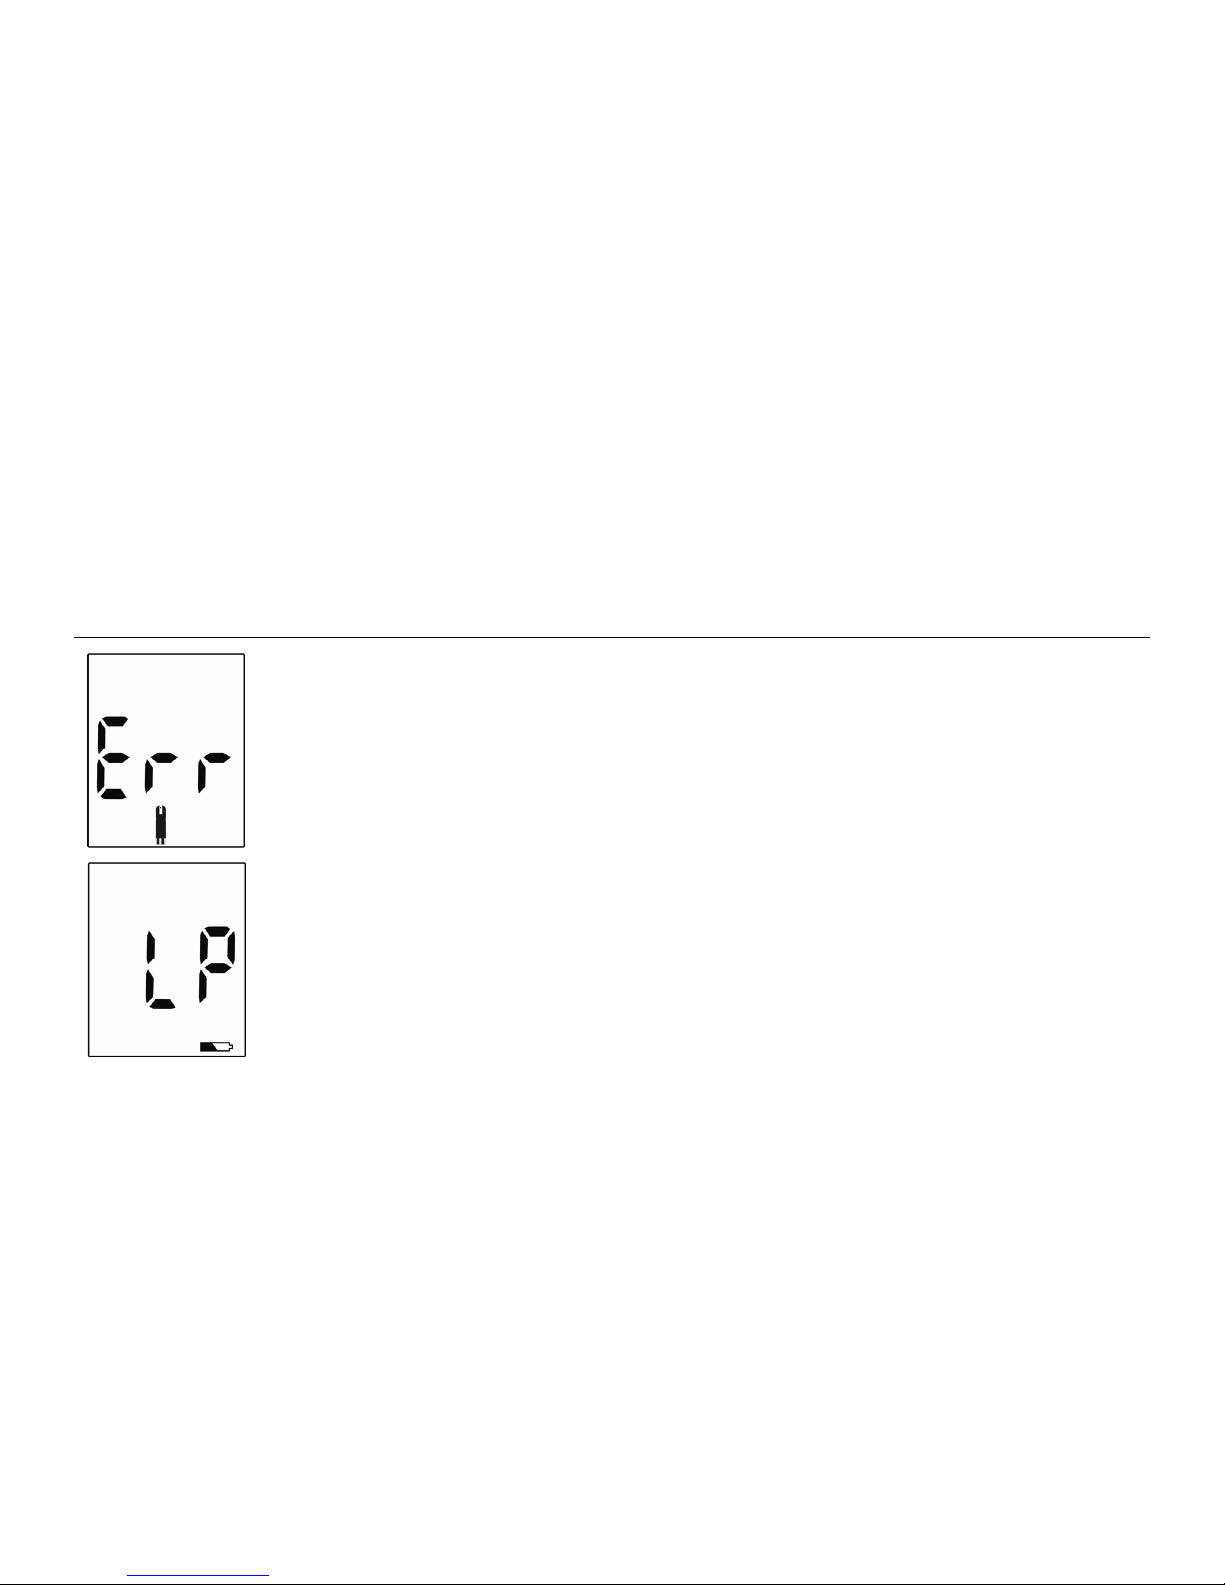
Message What it means? What to do?
Humidified / Used strips
The meter has detected a problem with
the test strip.
Repeat the test with a new strip and
puncture site.
Refer to pages 25-27 for information on
sample application.
Low power
The meter batteries do not have enough
power to perform a test.
Replace with new batteries.
Page 40
40
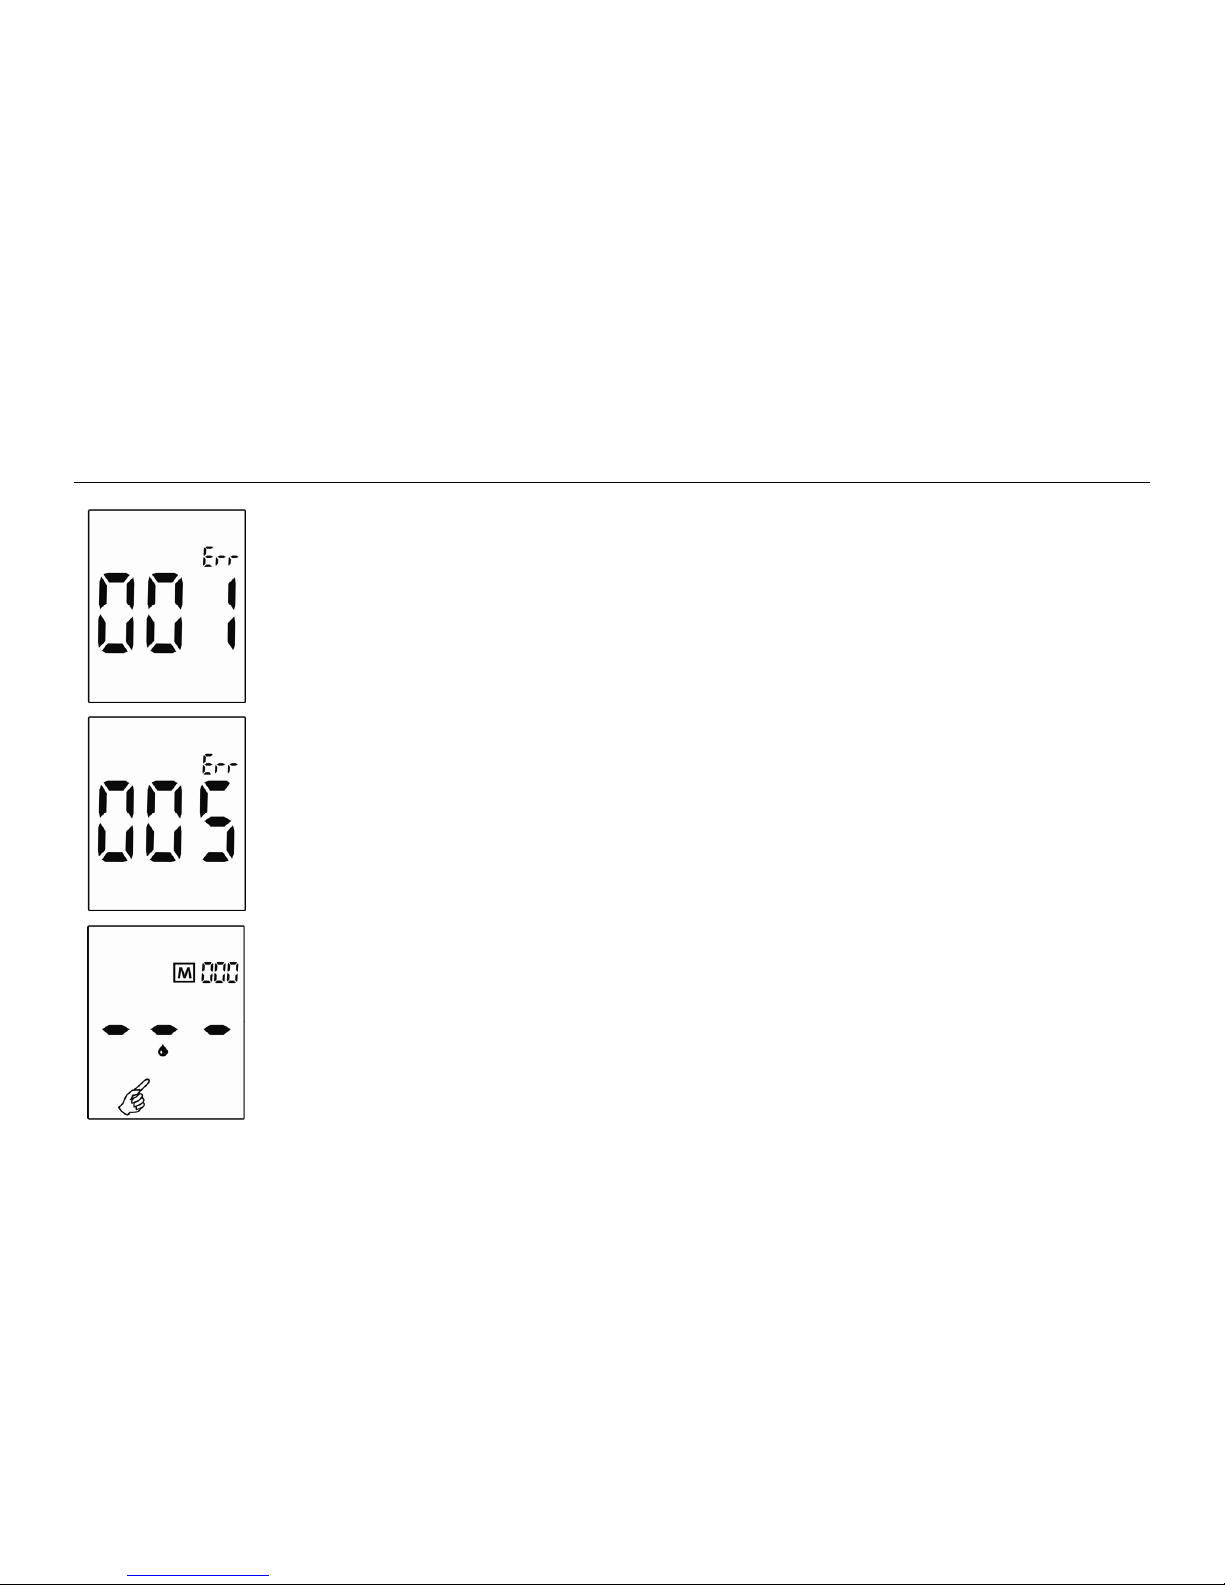
Message
What it means? What to do?
System error
There may be a problem with the meter.
Replace the batteries first.
Refer to pages 14 and 32. If this error
message appears again, please contact
Customer Service.
Memory Error
Replace the batteries first. If ERROR
005 appears again, please contact
Customer Service.
No result in memory.
The test proceeds incompletely. The
meter was unable to recall this result.
You can still perform a blood glucose
test and get an accurate test result.
Page 41
41
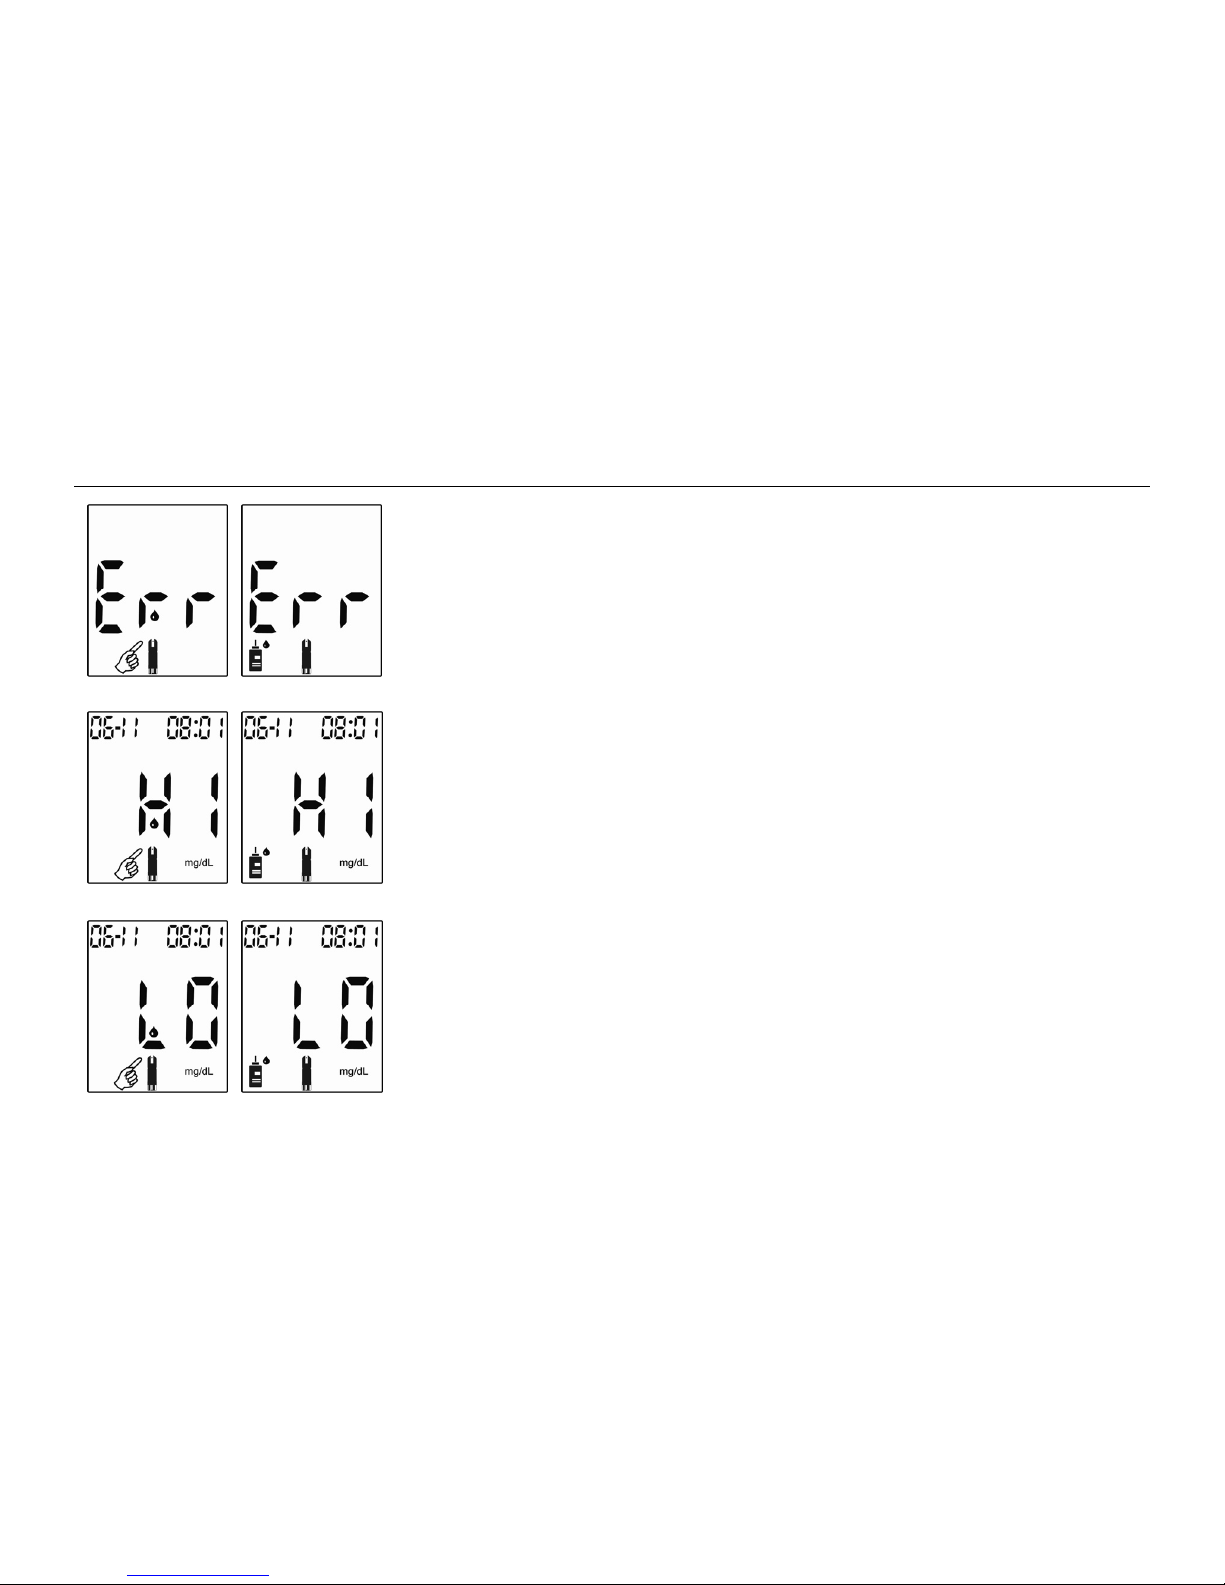
Message
What it means? What to do?
Insufficient Volume error
The volume of blood or
control solution is NOT
enough.
Repeat the test with a new strip,
puncture site, and enough
blood/control solution.
Refer to pages 25-27 for information on
sample application.
Test result is higher than
600 mg/dL.
Re-check your glucose level.
If the glucose result is HI again, obtain
and follow instructions from your
healthcare professional without delay.
The test result is lower
than 20 mg/dL.
This may require immediate treatment
according to your healthcare
professional’s recommendations.
Although this message could be due to a
test error, it is safer to treat first and then
do another test.
Page 42
42
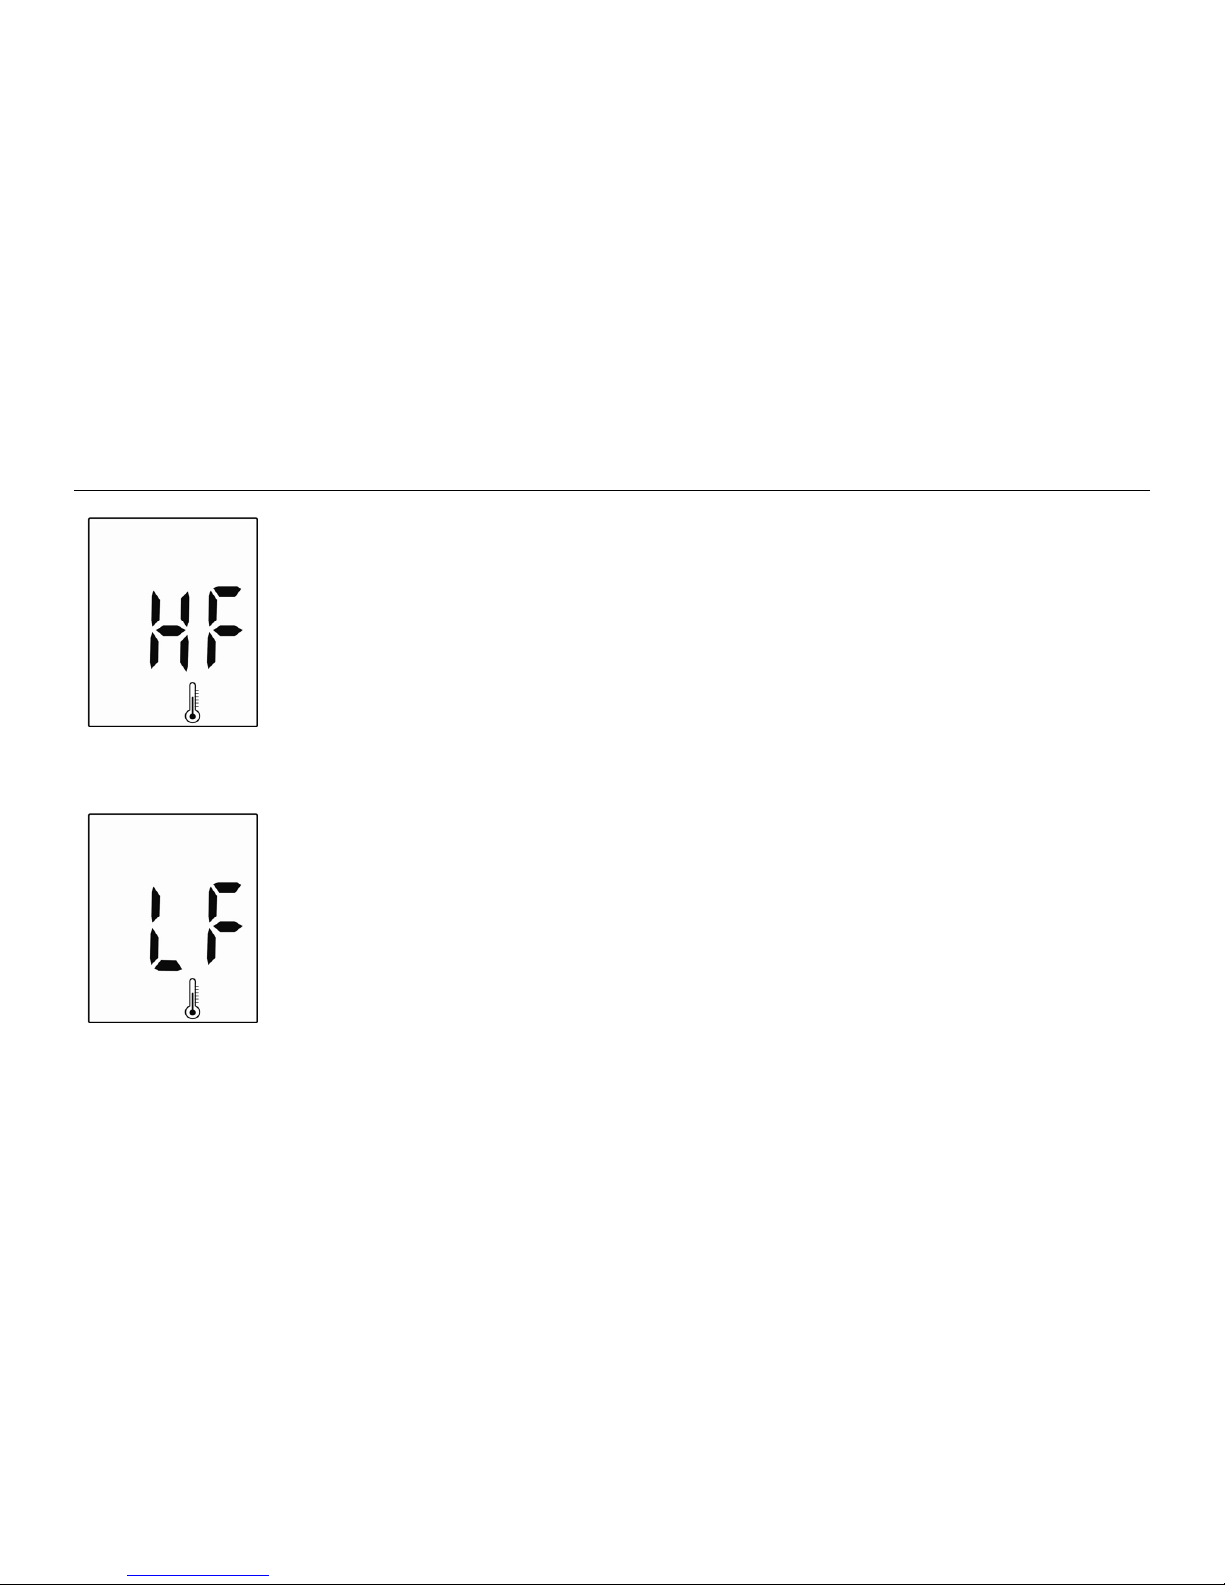
Message
What it means? What to do?
The “HF” and thermometer icon
appears. Temperature is too high,
outside the required range of 50°F 104°F (10°C - 40°C). This alerts users
that an incorrect result may occur if
the test continues.
Relocate the meter to a location with
temperature between 50°F - 104°F (10°C
- 40°C).
The “LF” and thermometer icon
appears. Temperature is too low,
outside the required range of 50°F 104°F (10°C - 40°C). This alerts users
that an incorrect result may occur if
the test continues.
Relocate the meter to a location with
temperature between 50°F - 104°F (10°C
- 40°C).
Page 43

43
Chapter 6: Technical Information
Specifications
Brand name EasyMax NG Blood Glucose Meter
Range 20-600 mg/dL
Response time 5 seconds
Memory sets 480 test results
Temp. 50°F ~ 104°F (10°C ~40°C)
Operating condition
Relative Humidity R.H. ≦ 90%
Temp. -4F - 122°F (-20°C - 50°C)
Storage and transportation
condition
Relative Humidity R.H. ≦ 90%
0.6 μL
Blood sample
Fresh blood from fingertip
Hematocrit (Hct) 20~60%
Power Alkaline Battery (2 ct.)
Battery life Over 2000 tests
Display dimension 1.4 x 1.7 inches (35.0 x 43.0 mm)
Device dimension H × W × D 3.7 x 2.0 x 0.8 inches (94 x 50 x 19.5 mm)
Weight
1.68 oz. without batteries (47.7±1 gram)
Principles Electrochemical biosensor technology
Software via USB GlucoManagerTM
Page 44

44
Limitations
The test strips are used for fresh capillary whole blood samples.
1. DO NOT use neonate blood sample.
2. Extreme humidity may affect the results. A relative humidity greater than 90% may cause incorrect results.
3. The system should be used at temperatures between 50°F and 104°F (10°C and 40°C). Outside this range,
the system may get incorrect results.
4. DO NOT reuse test strips. The test strips are for single use only.
5. Hematocrit: The hematocrit between 20% and 60% will not affect the results. Hematocrit below 20% may
cause higher results. Hematocrit above 60% may cause lower results.
6. Altitude up to 10,000 feet above sea level has no effect on readings.
Healthcare Professionals – Please note these additional Limitations
1. If the patient has the following conditions, the result may fail:
♦ Severe dehydration
♦ Severe hypotension (low blood pressure)
♦ Shock
♦ A state of hyperglycemic-hyperosmolar state (with or without ketosis)
2. Lipemic samples: Cholesterol level up to 500 mg/dL and triglycerides up to 3,000 mg/dL do not affect the
results. Grossly lipemic patient samples have not been tested and are not recommended for testing with the
EasyMax NG Blood Glucose Meter.
3. Critically ill patients should not be tested with home-use blood glucose meters.
4. DO NOT use during xylose absorption testing. Xylose in the blood will interfere with the Self-Monitoring
Blood Glucose System.
5. Interfering Substances depend on the concentration. EPS (EasyMax NG mfg) has tested above the
therapeutic levels and at or above the suggested testing levels of the EPA for many common substances.
Page 45

45
Based on this chart, many of these substances do not have an effect on EasyMax NG blood glucose results.
Blood Concentration, mg/dL
Exogenous Interferent Therapeutic Conc.
Suggestion tested
conc. by EPA
Result
(+/-)
EPS
tested conc.
Acetaminophen 1~2 0.5-3 - 7
Ascorbic Acid 0.8~1.2 4 - 4
Dopamine NA 0.09 - 2.6
Gentisic Acid 1.8 1.8 - 6
Glipizide 0.2 0.2 - 8
Ibuprofen 0.5~4.2 50 - 50
L-Dopa 0.5~8.0 ---- - 2
Methyldopa 0.1~0.5 0.5 - 2
Sodium Salicylate 15~30 - - 50
Tetracycline 0.4 1.5 - 1.5
Tolbutamide 5.3~10 64 - 100
Bilirubin-unconjugated 1.2 1-4 - 25
Cholesterol 300 ---- - 500
Creatinine 1.5 1.5-5.0 - 30
Triglycerides 190 150-250 - 1000
Uric Acid 7~14 3-9 - 11.9
Fructose - - - 30
Galactose 10 10 - 20
Sucrose - - - 50
Maltose 5 5 - 20
Mannose - - - 10
Xylose 10 10 - 6
Page 46

46
Device Information
EasyMax NG SMBG System
EasyMax NG Blood Glucose Meter
EasyMax 15 Blood Glucose Test Strip
Manufacturer:
EPS BIO TECHNOLOGY CORP.
No.8, R&D RD. III, Hsinchu Science Park, Hsinchu, Taiwan 30077
Oak Tree Health warranty
During the warranty period, if your EasyMax NG Self-Monitoring Blood Glucose System does not work for any
reason (other than obvious abuse), Oak Tree Health will replace it with a new system or an equivalent product
free of charge. Please call the Customer Care Service toll-free at 866-994-3345 (Eastern Standard Time,
Mon-Fri 8:00AM-6:00PM).
P/N: 718063742 Rev.A01
EasyMax 15 Level 1 (Low) Control Solution
EasyMax 15 Level 2 (Normal) Control Solution
 Loading...