

Page 1

BEP_6.1_241111
1
Dear user!
Before operating the interactive whiteboard for education and presentations ePresenter
(hereinafter - the interactive whiteboard, IWB), please read carefully this User Manual.
In case of passing interactive whiteboard to another person, User Manual and Installation
Disk should be also transferred.
User Manual is a property of LLC "Institute of the Newest Technologies in Education" (LLC
"INTE") and can be reproduced no fully neither partially, replicated in any way, or distributed
without owner permission (“INTE”).
The content of this document may be changed without previous notification.
Permitted to use in educational institutions of Ukraine
(Certificate № 591 dated September 15, 2010)
LLC "Institute of the Newest Technologies in Education"
Ukraine, 04136 Kyiv, ul.Severo-Syretska 1-3, Business Centre Syretska Grove, office.328
Phone +380 44 2060821, fax +380 44 2060822
e-mail: [email protected]
www.epresenter.com.ua
www.into-edu.com.ua
Page 2

BEP_6.1_241111
2
Interactive Whiteboard ePresenter
User Manual
Table of contents
Interactive Whiteboard ePresenter ........................................................................................ 2
User Manual .......................................................................................................................... 2
Table of contents ............................................................................................................... 2
1. Description and Operating ............................................................................................. 3
1.1. About Interactive Whiteboard ePresenter ................................................................ 3
1.2. Modifications of Interactive Whiteboard ePresenter ................................................ 3
1.3. The interactive system ePresenter content ............................................................. 3
1.4. Principle of Operation .............................................................................................. 3
1.5. Specifications .......................................................................................................... 4
1.6. Construction and operating ..................................................................................... 5
1.7. Packaging ................................................................................................................ 8
1.8. Package contents .................................................................................................... 8
2. Using Interactive Whiteboard ePresenter ....................................................................... 9
2.1. Terms of use ........................................................................................................... 9
2.2. Precautions for operation ........................................................................................ 9
2.3. Transportation and Storage ..................................................................................... 9
2.4. Product Maintenance ............................................................................................. 10
3. User Guide ................................................................................................................... 10
3.1. Mounting IWB ........................................................................................................ 10
3.2. Software Installation .............................................................................................. 12
3.3. Interactive Whiteboard Connection........................................................................ 18
3.4. ePresenter Software Customization ...................................................................... 25
3.5. Language Setting .................................................................................................. 26
3.6. Sensitivity Settings ................................................................................................ 26
3.7. Smoothing Setings ................................................................................................ 27
3.8. How to Use eDraw Program .................................................................................. 27
3.6. KlassmatePresenter Software Guide ..................................................................... 34
4. Troubleshooting: Questions and Answers .................................................................... 34
Page 3
BEP_6.1_241111
3
1. Description and Operating
1.1. About Interactive Whiteboard ePresenter
Interactive whiteboard ePresenter transforms any surface like whiteboard, flipchart,
projection screen, even a wall into into multifunctional interactive system.
An IWB is packed with a big amount of features which let you make your lesson, lecture of
presentation more powerful and attractive.
You can make a presentation and can do some additional operations at the same time like:
· to highlight screen objects with an optical stylus;
· to make drawings;
· to launch any application as using PC;
· to play videos;
· to import any image or other object to your presentation;
· to import information from different electronic sources including external source
libraries;
· to export changes made while presentation run and to save all of them.
1.2. Modifications of Interactive Whiteboard ePresenter
ePresenter product family is available in two different modifications: ePresenter EP03 (wired
model) and ePresenter EP03M (wireless model). The difference between these two models
is a way to connect interactive block to managing PC. EPresenter EP03 is connected to
computer’s USB port directly via USB cable. ePresenter EP03M uses Bluetooth wireless
adapter.
1.3. The interactive system ePresenter content
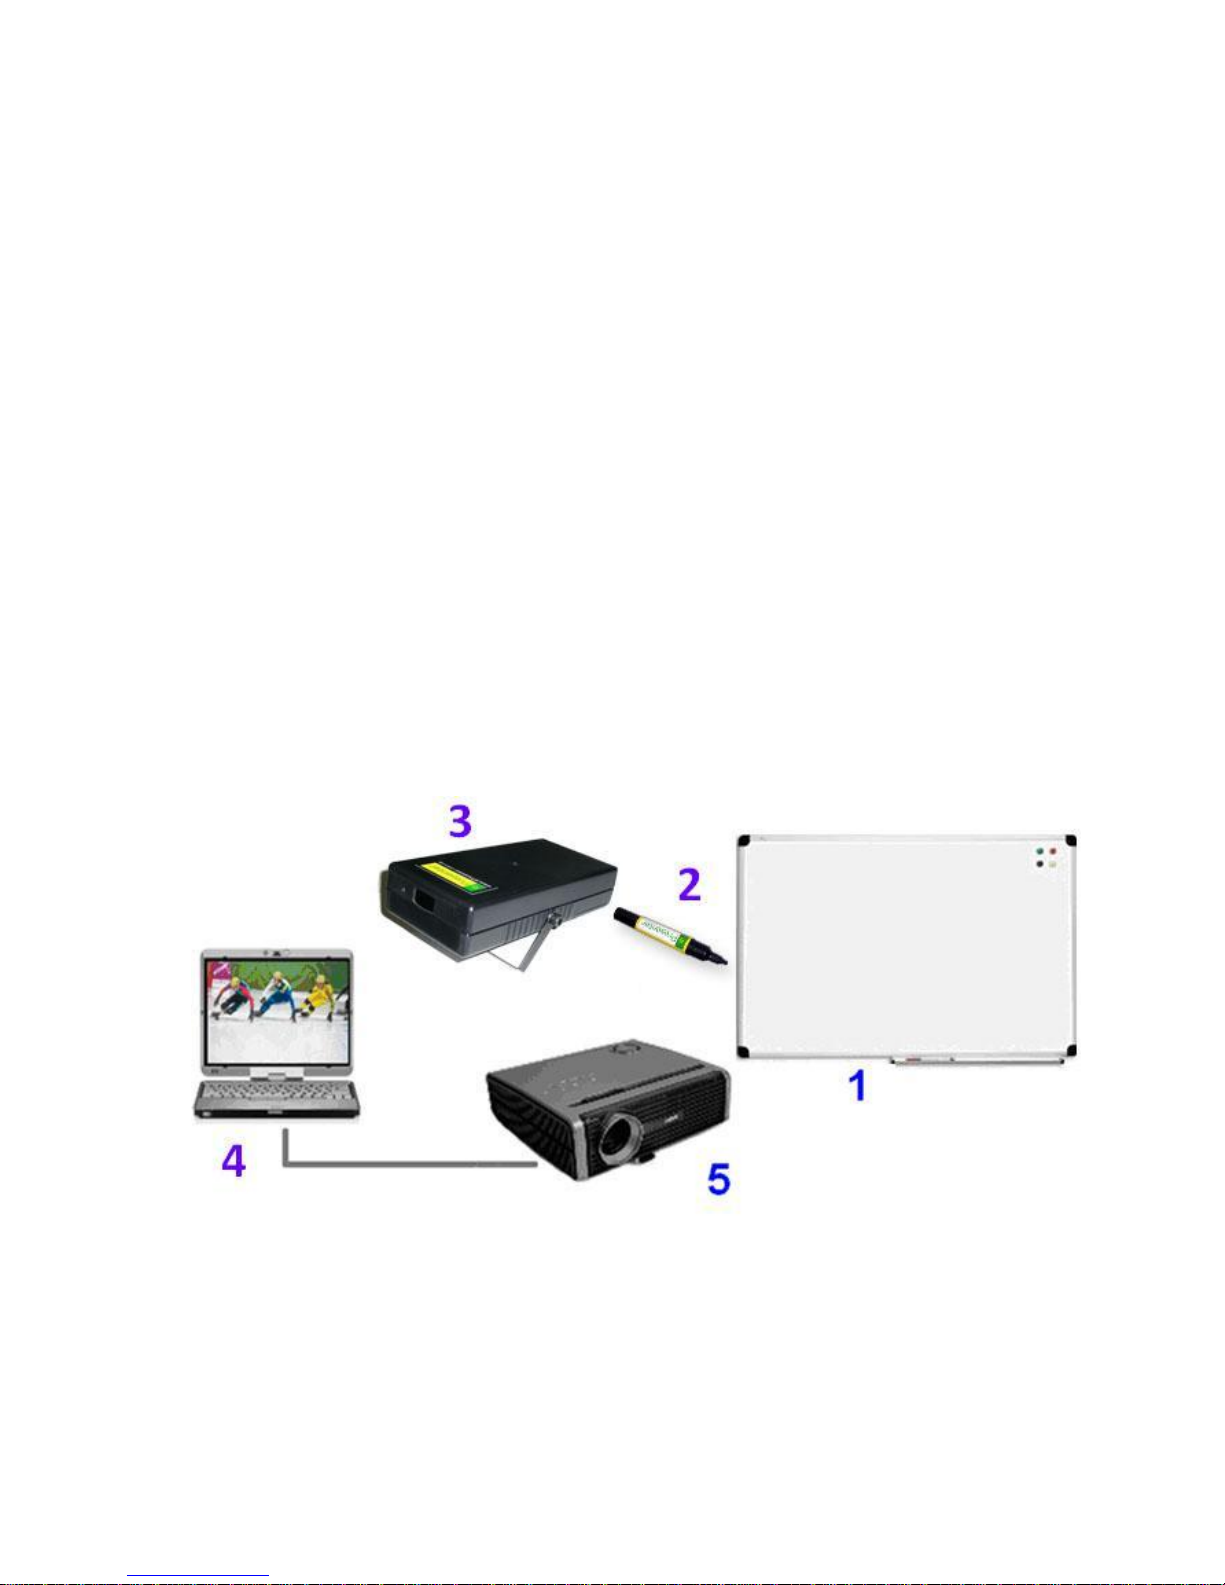
Interactive system with interactive whiteboard ePresenter (Fig. 1.1) includes the following
components: marker-projection board or projection screen (1), infra-red stylus (2),
interactive block ePresenter (3) Control Computer (4), the multimedia projector (5).
Fig.1.1
Interactive whiteboard ePresenter comes with a USB cable or Bluetooth Wireless Adaprter
depending of modification and connectivity type.
1.4. Principle of Operation
Infrared stylus generates infrared marks on a projection surface. Optical sensors of
interactive block ePresenter capture these marks and transmit their coordinates to control
PC. Computer receives coordinates and converts them into control signals for projector.
Projector generates a proper image on a projection surface.
Page 4
BEP_6.1_241111
4
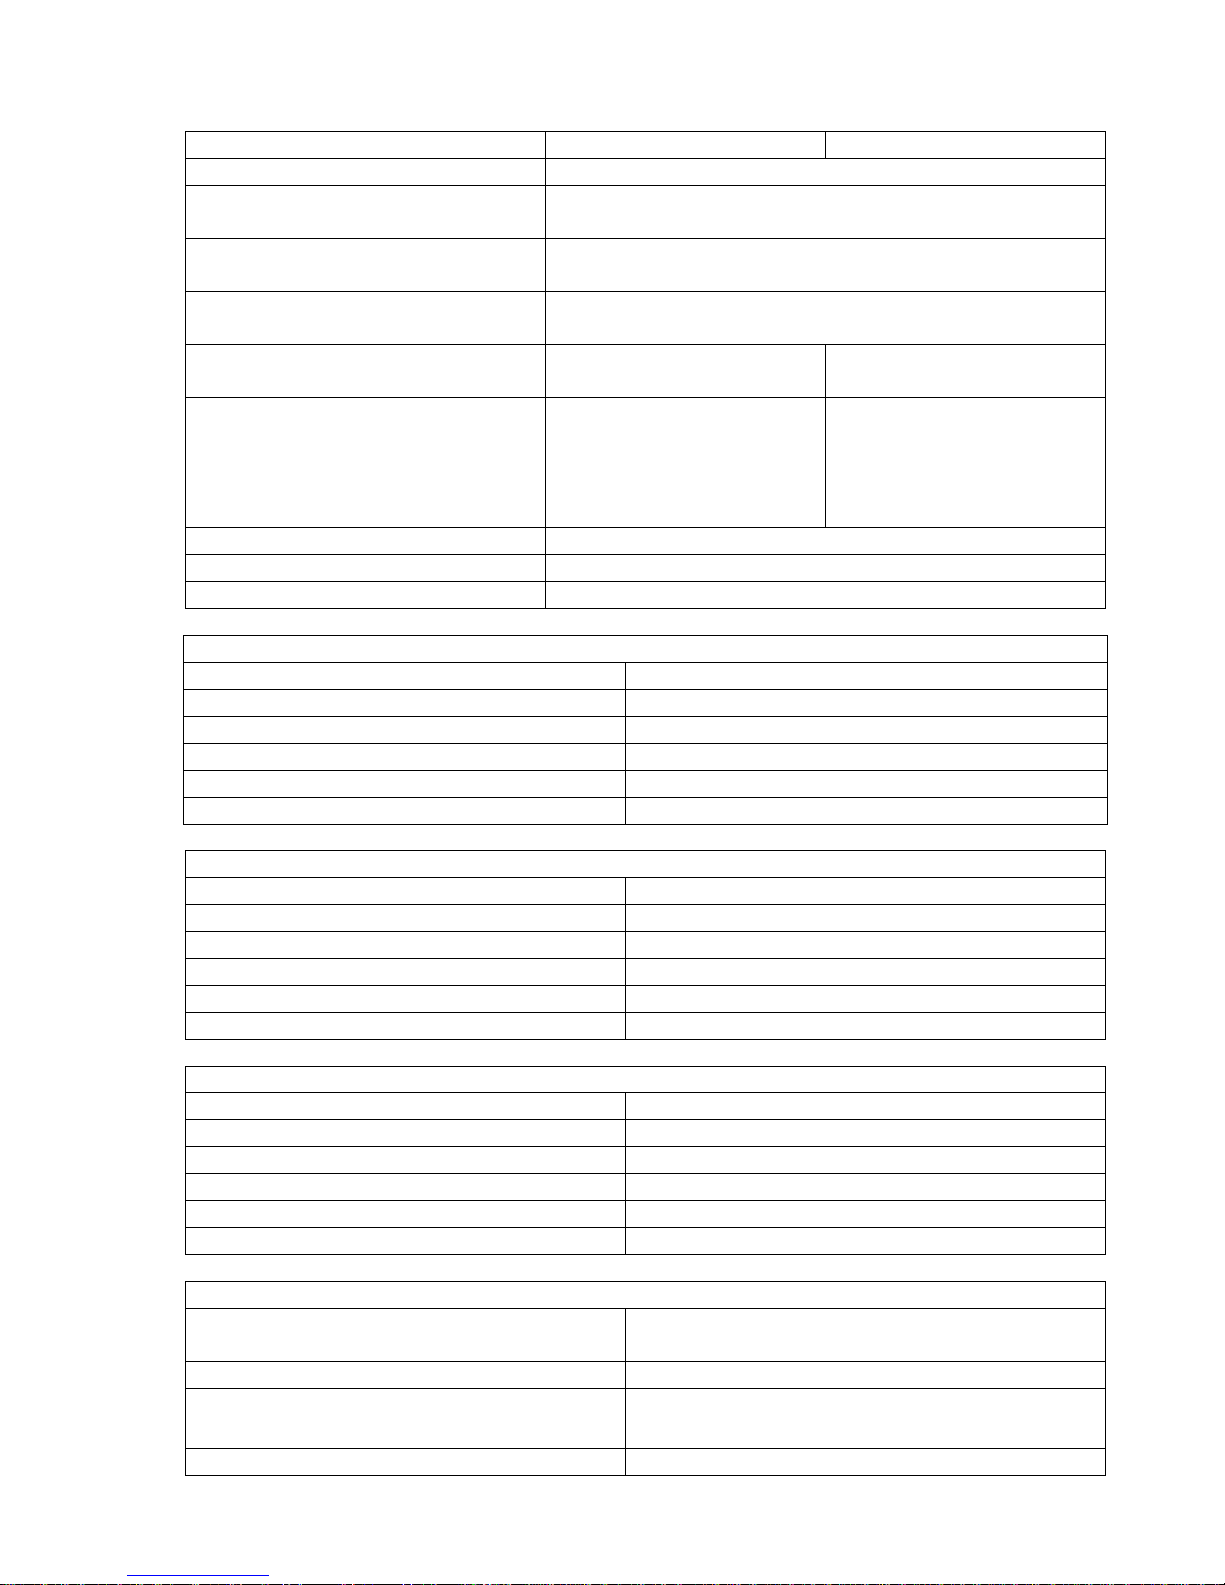
1.5. Specification
Interactive block modification
ePresenter EP03
ePresenter EP03M
Positioning technology
optical, infrared
Active surface (max projection
size)
diagional until 2,5 m
Quantity of simultaneously used
styluses
until 4
Viewing distance to projection
surface
1,5 - 3 m
Connection to PC
Via USB-cable (supplied)
using Bluetooth 2.0
(supplied)
Power supply
From the computer via
USB-cable
From 4 power
consumption, dimension
type АА, or from the
external source 6 W,
300 мА (supplied)
Power consumption
0,5 W
Dimensions
190 x 95 x 45 mm
Weight
350 g
Optical stylus
Positioning technology
optical, infrared
Outgoing wavelength
940 , nm
Control elements
body button, touch-sensitive writing element
Power supply
one battery 1,5W type ААА
Dimensions
length – 140 mm, diameter – 20 mm
Weight with battery / without battery
27/15 g
Infrared pointer (not supplied , optional)
Positioning technology
optical, infrared
Outgoing wavelength
940 nm
Control elements
body button
Power supply
one battery 1,5W dimension type ААА
Dimensions
length – 760 mm, diameter – 18 mm
Weight with battery
90 g
PC system requirement
OS
Microsoft Windows 2000/XP/W7
CPU clock speed
1,6 GGz
Graphics card
Intel GMA 3100
RAM
1024 MB
Required HDD space
1 GB
USB
One free USB-port
Projection surface settings (optional)
Surface type
Marker-projection or projection-magnetic
(optional)
surface coverage
White enamel high gloss
Additional features
You can write and draw the usual dry-erase
marker
Dimensions
1,25х2,05 m
Page 5
BEP_6.1_241111
5
Diagonal
93''
Active surface, m
1,2х2,0 m
Weight
18 kg
Projector requirement
Brightness
no less than 2000 lumen ANSI
Display resolution
no less than 800x600
It’s Important!
Interactive whiteboard is the most efficient when it used in areas with limited lighting. The
sunlight brightness in an area should be comfortable for viewing images, projected on a
screen. In case of high brightness you should use drapes or blinds to darken the room.
Manufacturer does not guarantee device efficiency if the screen is exposed to direct
sunlight.
1.6. Construction and operating
1.6.1. Interactive block ePresenter EP03
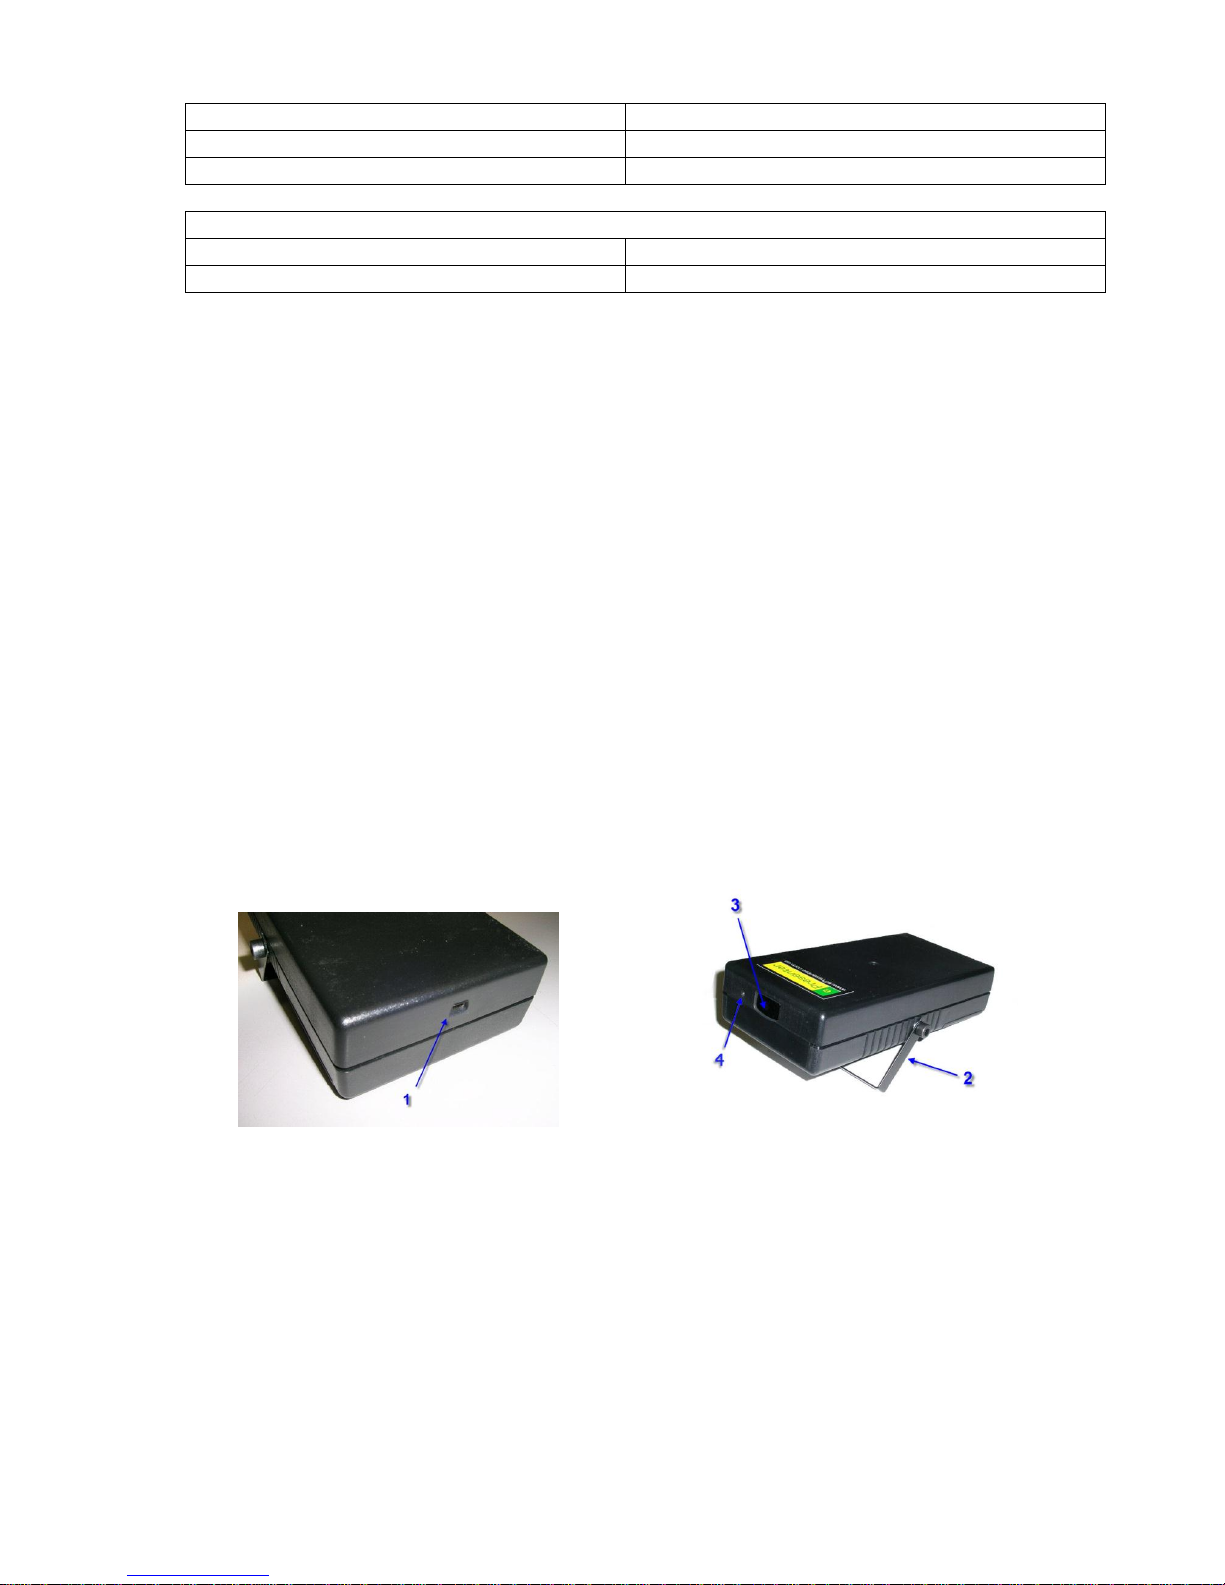
Interactive block ePresenter EP03 contains the following elements:
1 - USB cable Jacksocket (connector type mini-A) (Fig. 1.2)
2 – Mounting place for U-shaped brackets (Fig. 1.3). Installed U-shaped bracket is attached
to the interactive block with two bolts. Bracket position accordantly to the interactive block
can be fixed by a key with an external hexagon head (not supplied).
3 - The optical sensor’s detector window (Fig. 1.3). Optical sensor should “see” all projection
surface for IWB may operate correctly. for proper work, the IWB optical sensor should see
the projection surface completely. Interactive whiteboard has to be calibrated to provide it.
The optical sensor detector window has always view all the projection surface during
operation. It’s not permitted to place some objects between optical sensor and projection
surface which could cover the first one partially or completely.
4 - LED indicator. It indicates whether the interactive block is powered or it isn’t.
Fig. 1.2
Fig. 1.3
1.6.2. Interactive block ePresenter EP03М
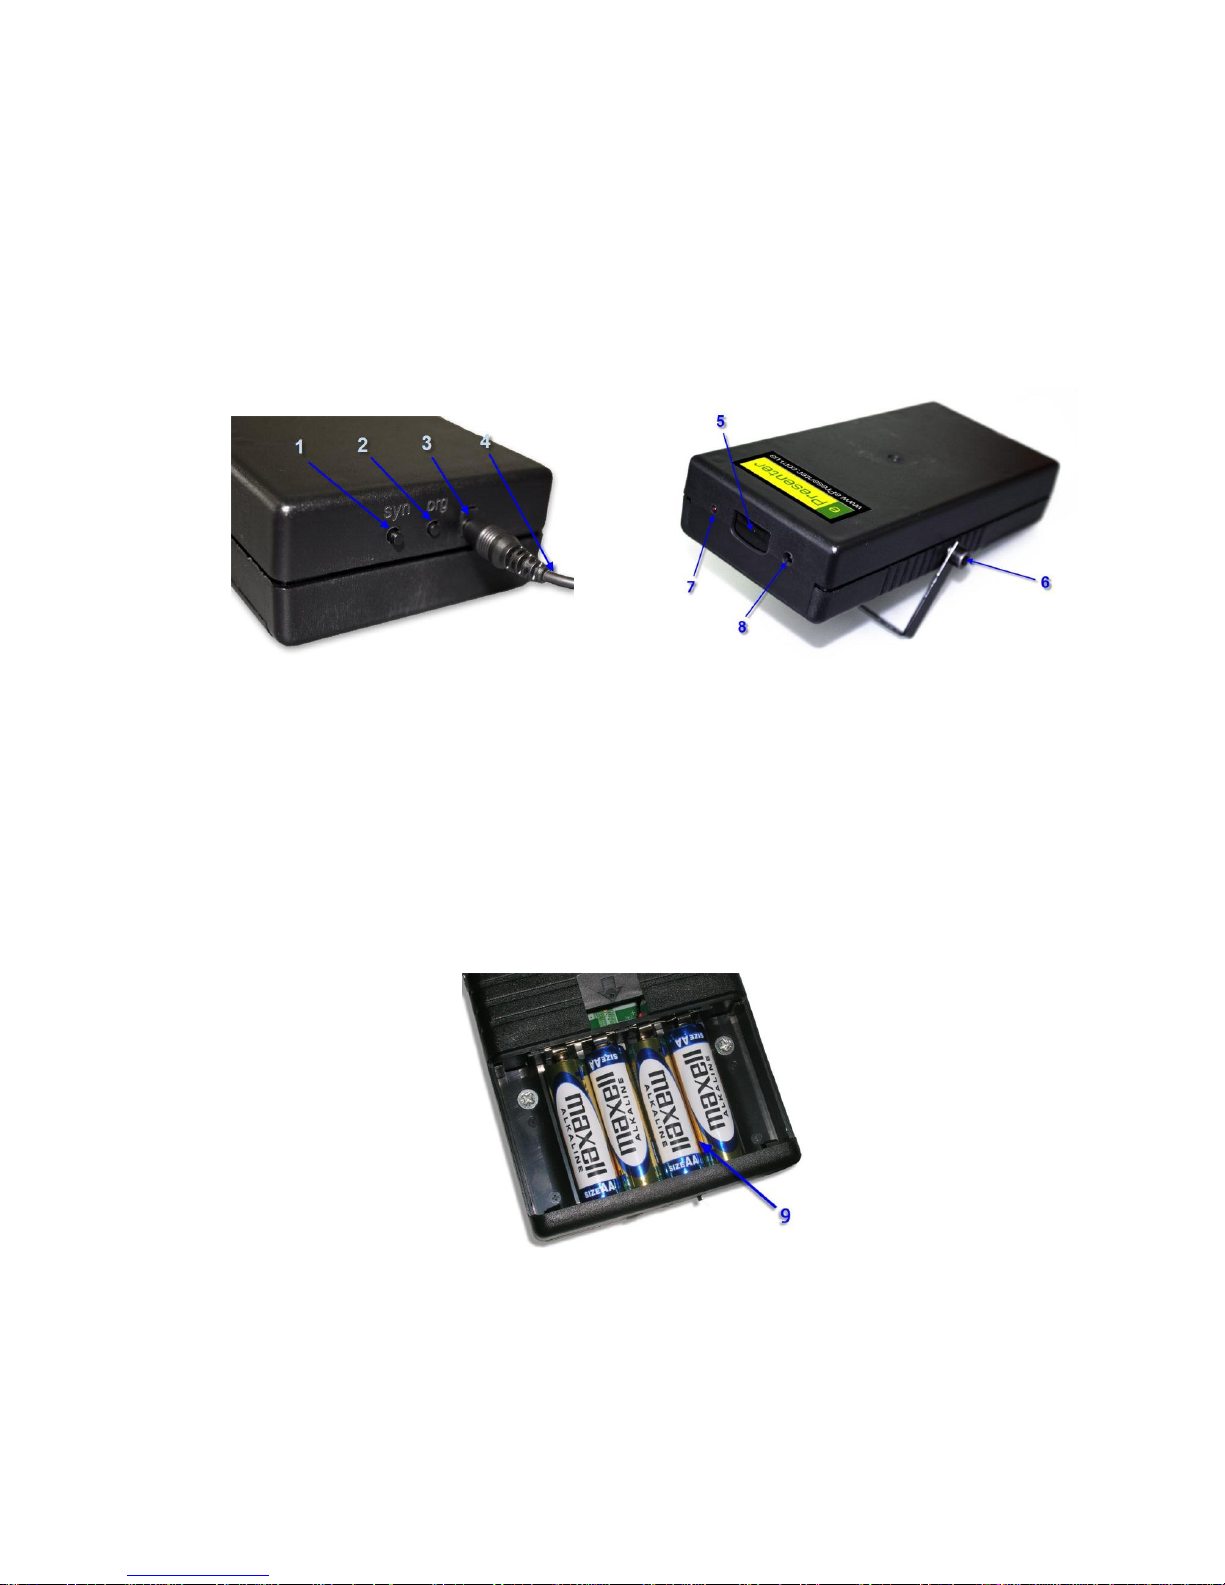
Interactive block ePresenter EP03M contains the following elements:
1 – “Syn” button is a button which synchronizes interactive block and control PC (Fig. 1.4).
When this button is pressed a process of plugging in an interactive block to control PC via
USB adapter is launched. A Bluetooth adapter implementing this connection is supplied.
You can also use any type of it including built-in instead of supplied.
2 – “Prg” button is a button for device programming (Fig. 1.4). It is used to make a
connection of interactive block to control PC quick and easy. You can also use any button
on infrared Remote Control programming it previously. And connect the device one button
pressing only.
Page 6
BEP_6.1_241111
6
3 – A socket for external power block connection (Fig. 1.4). If battaries are installed into
battery compartment you could turn an external power block on and off while an interactive
block is operating.
4 - Connector and external power block cable (Fig. 1.4).
5 - An optical sensor window (Fig. 1.5). Optical sensor has to view all projection surface for
correct IWB operating. So a calibration of interactive whiteboard has to be performed
previously. It’s forbidden to place any object between optical sensor window and projection
surface during operating.
6 - Mounting place for U-shaped brackets (Fig. 1.5). U-shaped bracket has to be installed
and attached to the interactive block with two bolts. You should use a special hexagon head
key to fix them/ The key is not supplied.
Fig. 1.4
Fig. 1.5
7 - LED indicator (Fig.1.5). It indicates whether the interactive block is powered or it isn’t. An
indicator receives signals from other devices and confirms this receiving by lightning. A
short light means that any infrared signal was received. A long light means a signal was
generated by Projector Remote Control. Also it indicates than interactive block is ready to
receive and to keep a control signal from Remote Control.
8 – The infrared receiver window (Fig. 1.5) which is used to program interactive block and
manage them with Remote Control. You can use any supplied Projector Remote Control.
9 - The battery compartment for four AA batteries (Fig. 1.6). You should watch the correct
polarity when you install batteries. Special marks inside the battery compartment shows
correct polarity. You should monitor the power level of batteries and change them in time.
You should utilize used batteries according to rules of recycling.
Fig. 1.6
1.6.3. Optical stylus
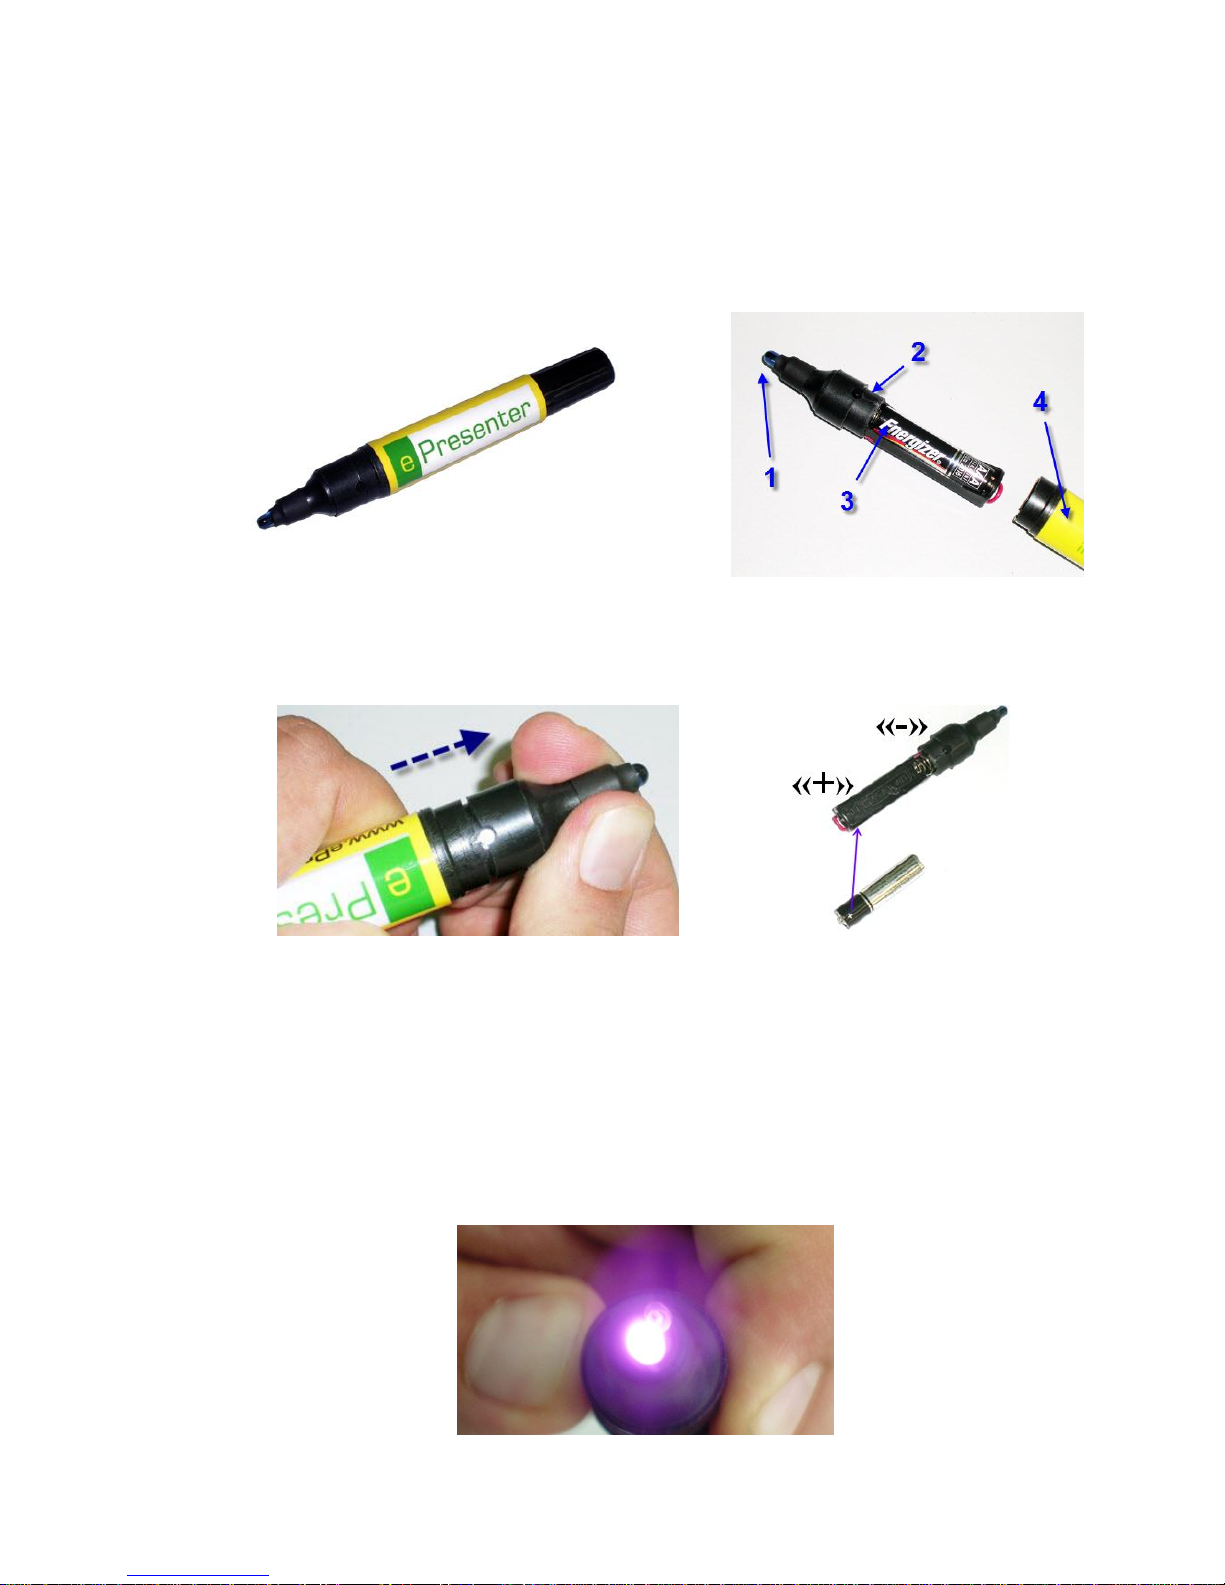
Optical stylus (Fig. 1.7) is a sensor infrared flashlight. It can be used for creating marks,
inscriptions, drawings over the projecting image. Stylus head pressed to the projection
Page 7
BEP_6.1_241111
7
surface leaves a trail. It can be used like mouse manipulator launching and managing PC
applications.
Optical stylus (Fig. 1.8) includes:
1 - touch-sensitive optical head (infrared luminodiode);
2 – a button duplicating stylus head pressing. It’s also may be used as a left mouse button;
3 - AAA battery;
4 – Stylus body, which is the batteries compartment (AAA) at the same time.
Fig. 1.7
Fig. 1.8
To replace the battery please pull gently the front edge. You should watch the correct
polarity installing batteries. Special marks on stylus body show polarity. Use correct type of
batteries, AAA only.
Fig. 1.9
Fig. 1.10
It’s Important!
An optical stylus won’t operate if batteries were installed incorrectly with wrong polarity.
To test the stylus operating please do some operations listed below:
take a digital photo camera and turn it on;
direct infrared luminodiode to the camera length;
press the button on stylus body.
If you see on camera screen a glowing luminodiode it means the device works correctly
(Fig. 1.11)
Fig. 1.11
Page 8
BEP_6.1_241111
8
1.7. Packing
The manufacturer recommends user (customer) to keep an original delivery packing and all
components during warranty period.
A customer must deliver product to service centre himself in original manufacturer
packaging and in full completeness. It’s important condition of customer service providing.
1.8. Package contents
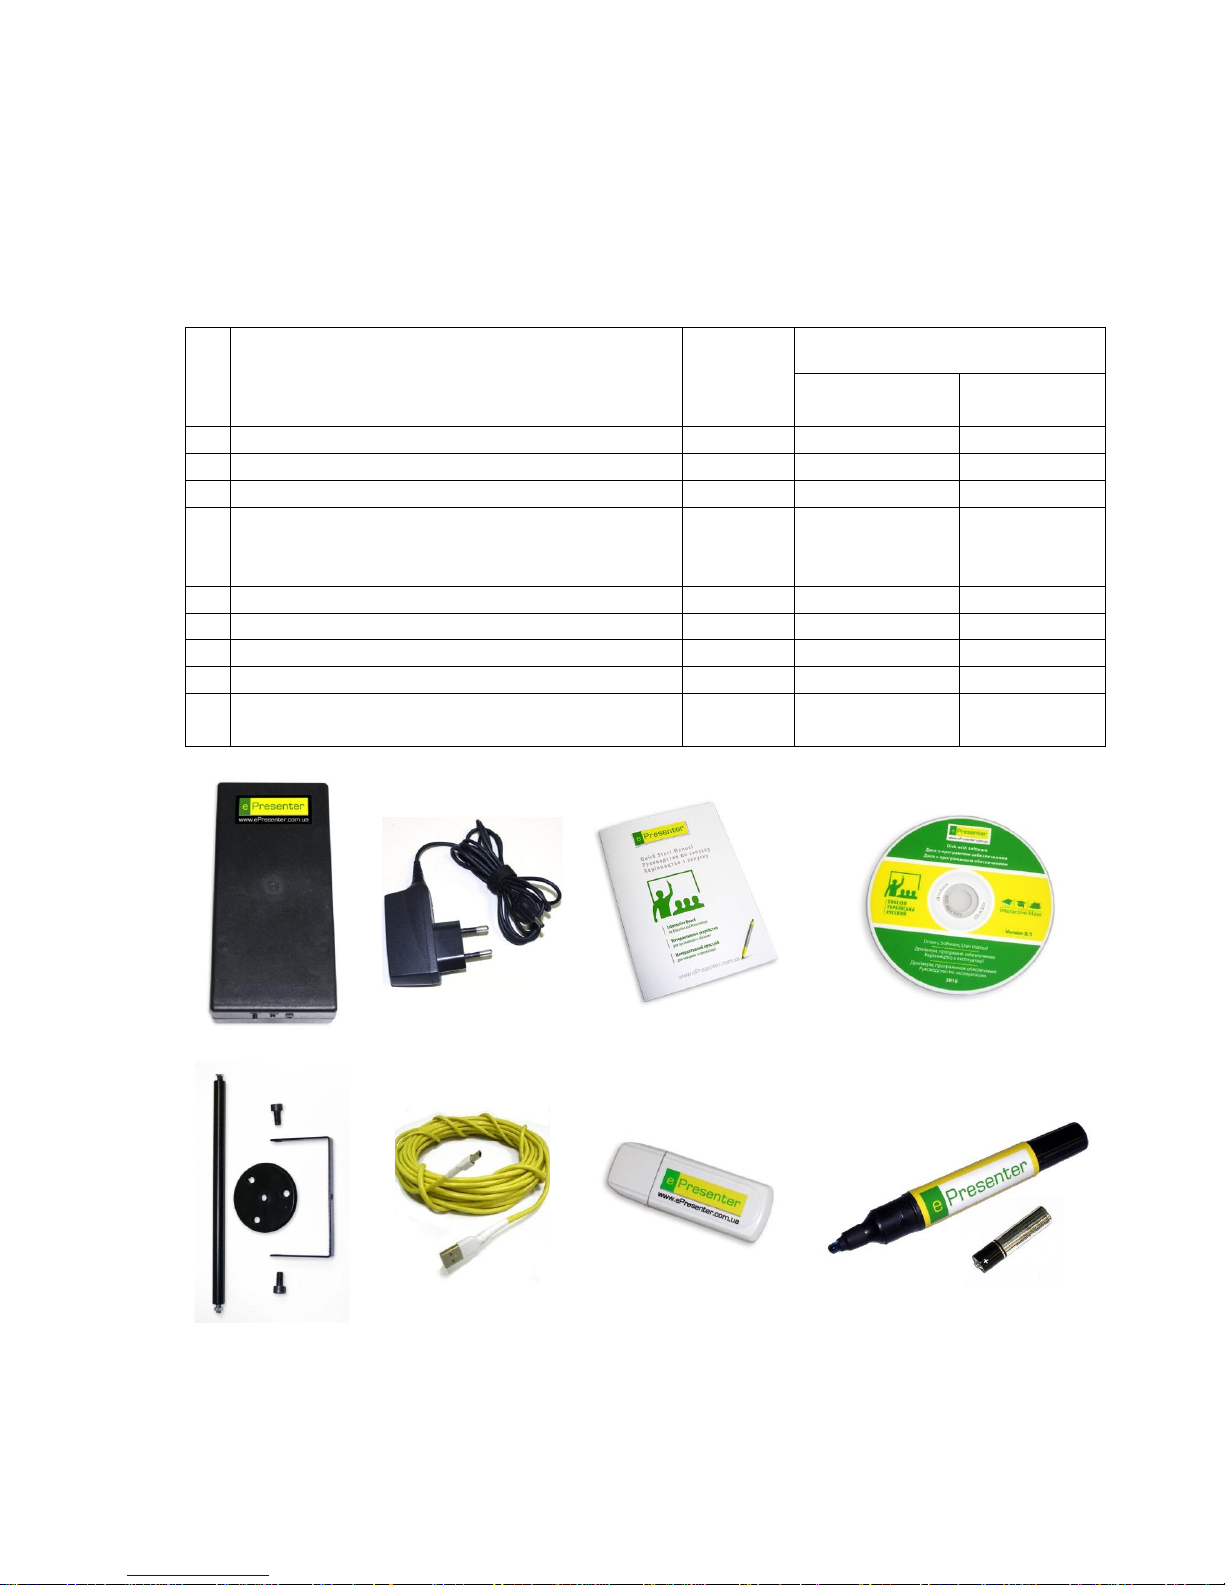
A standard package includes components listed below (Table and Fig. 1.12). It can be
different and depends on interactive block mofidication.
№
Name
Position
on Fig.
1.12
Number in delivery set
ePresenter
EP03
ePresenter
EP03M
1
Interactive block
1 1 1
2
Power block 6В. 300мА
2 - 1
3
Quick Start Guide
3 1 1
4
Installation disk containing drivers ,
customized software and digital User
Guide
4 1 1
5
Ceiling mounting kit for interactive block
5 1 1
6
USB cable of 10m length
6 1 -
7
USB Bluetooth adapter
7 - 1
8
Optical stylus with ААА type power supply
8 1 1
9
Marker-projection board or projectionmagnetic one (optional)
- 1 1
1 2 3
4
5 6 7
8
Fig. 1.12
Page 9

BEP_6.1_241111
9
2. Interactive Whiteboard ePresenter Usage
2.1. Terms of use
2.1.1. An interactive whiteboard must be used in a proper climate conditions listed below:
air temperature - from + 10 ˚ up to + 35 ˚ C;
approximate humidity - from 40% up to 80% at +25 ˚ C;
atmosphere pressure from 84.0 up to 107.0 kPa (630-800 mmHg. cent.).
2.1.2. The power supply of ePresenter EP03 is provided by PC via USB cable.
The power supply of ePresenter EP03M is provided by batteries – four batteries of AAA
type. Also it may be powered by external power block: 6 V, 300 mA
2.1.3. If product was stored or delivered at a temperature less zero, it has to be kept
unpacked for four hours in a heated area. It is strictly forbidden to leave a product near the
source of infrared radiation or in hot places.
2.1.4. You should install and connect a product according to requirements specified in
current document.
2.2. Precautions for operation
2.2.1. The safe interactive whiteboard operatiing is provided by its design, correct electrical
network connection to, a safe electrical network and correct user activity.
2.2.2. It’s strictly forbidden:
· to leave a product without user’s watch for a long time;
· to touch cables or contacts if the power is turned on;
· to connect device to damaged electrical wall outlets;
· to look to projector’s length when it’s turned on. You may damage your eyes because
of the effect of bright light.
2.2.3. You should follow the SAFETY RULES when use this product:
· do not leave this product without attendance until it in operating;
· do not let the student operate the device without teacher’s supervision;
· wall outlet which this device is plugged to must be cut-off quickly in case of fire or any
other emergency.
2.2.4. Do not try to repair a product yourself in case of malfunction. Please contact an
authorized service centre.
2.3. Transportation and Storage
2.3.1. IWB in manufacturer’s packing can be transported to any distance by any transport.
The transportation is regulated by rules established for each type of transport.
2.3.2 IWB transportation should be performed according to safety marks putting on the
package.
2.3.3. IWM should be stored by manufacturer or by customer in areas with a tempreture
from 5 to 40 C and with approximate humidity of 80%.
2.3.4. The storage area shouldn’t contain aggressive elements which could cause corrosion.
2.3.5. Packed IWB should be stored on racks less than eight tiers high.
Page 10
BEP_6.1_241111
10
2.4. Product Maintenance
IWB is a high-tech, complicated electronic device. So customer’s self-service is strictly
forbidden.
Any maintenance, replacement or repairs of any items are provided by specialists only until
the warranty period expired. You may contact company which manufactured this product or
authorized Service Company.
3. User Guide
3.1. Mounting IWB
Version 1. Mobile usage. Is more preferable when using the model ePresenter EP03M.
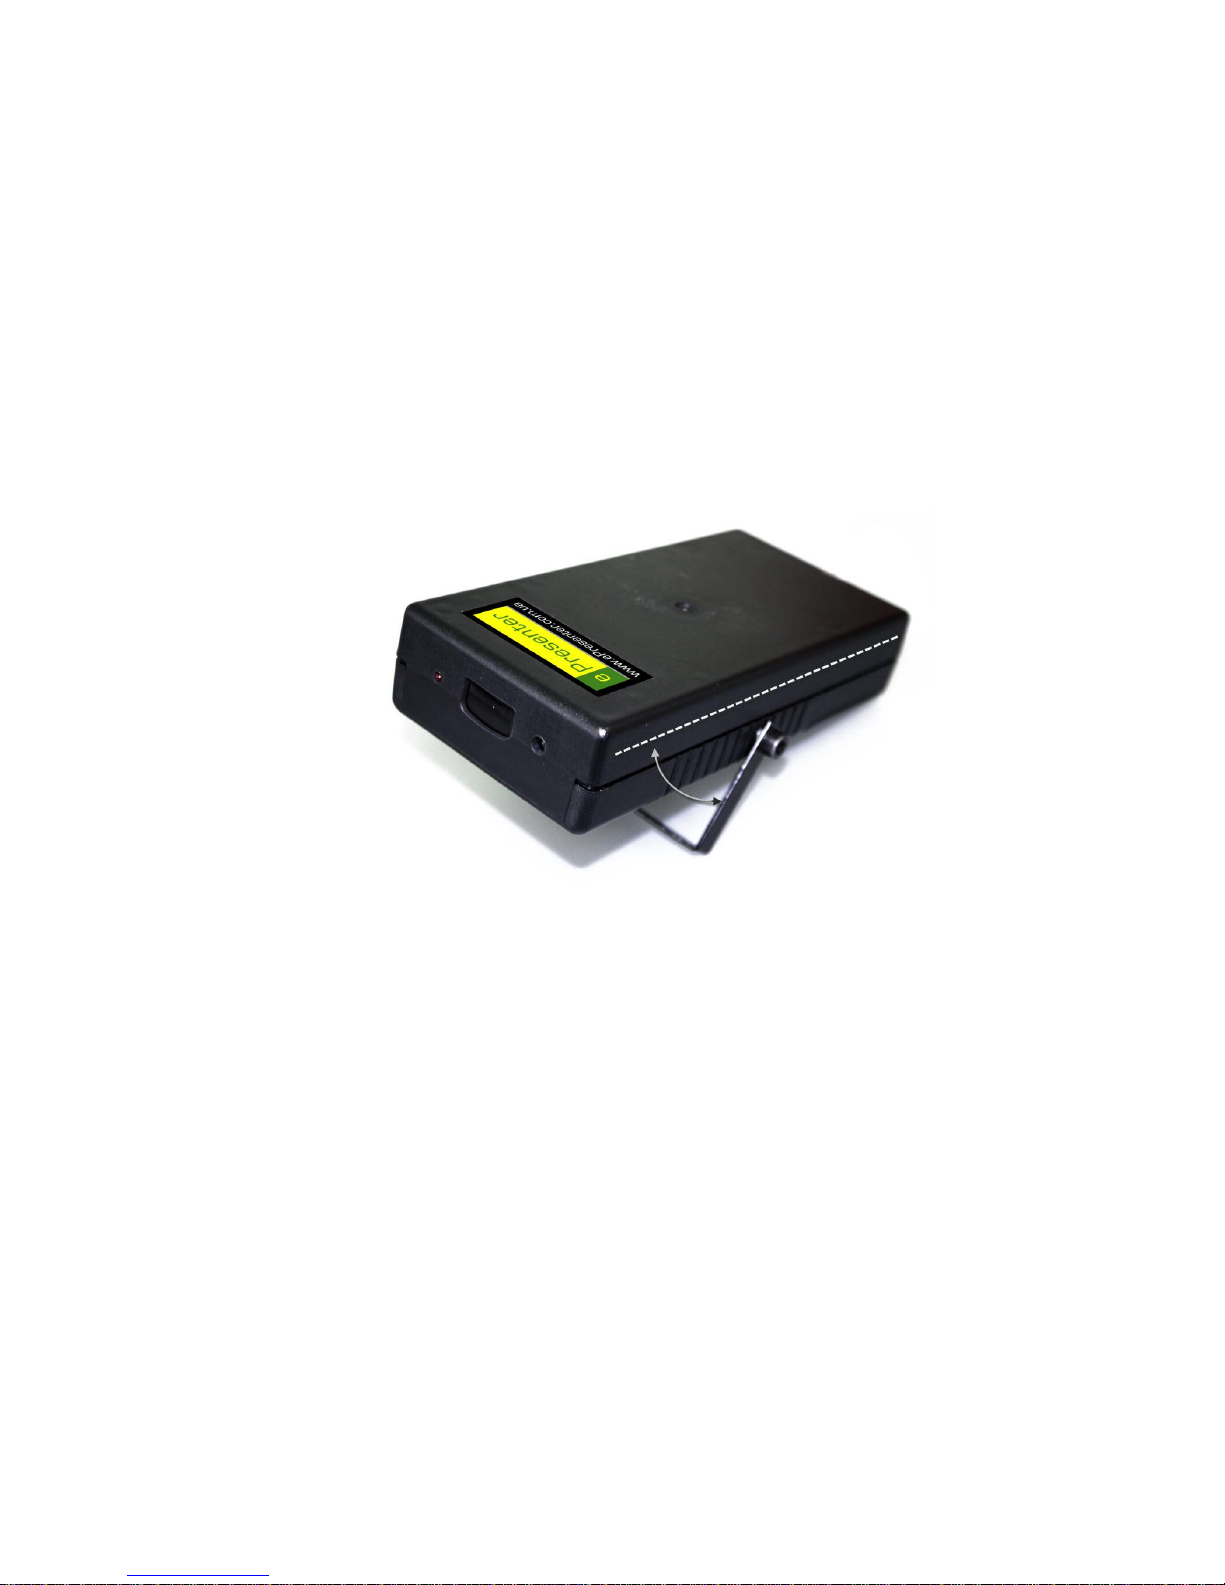
Interactive block should be installed on any flat surface. You can regulate angle of the
device changing U-shaped bracket’s angle (Fig.3.1). So all projection surface would be
covered by optical sensor.
Fig.3.1
ePresenter EP03M can be powered by external power block or by four batteries of type AA.
Interactive block powered by batteries is completely wireless.
ePresenter EP03 is powered only by PC through connection via USB cable.
In case of mobile usage it is necessary to calibrate projection surface every time before
establishing.
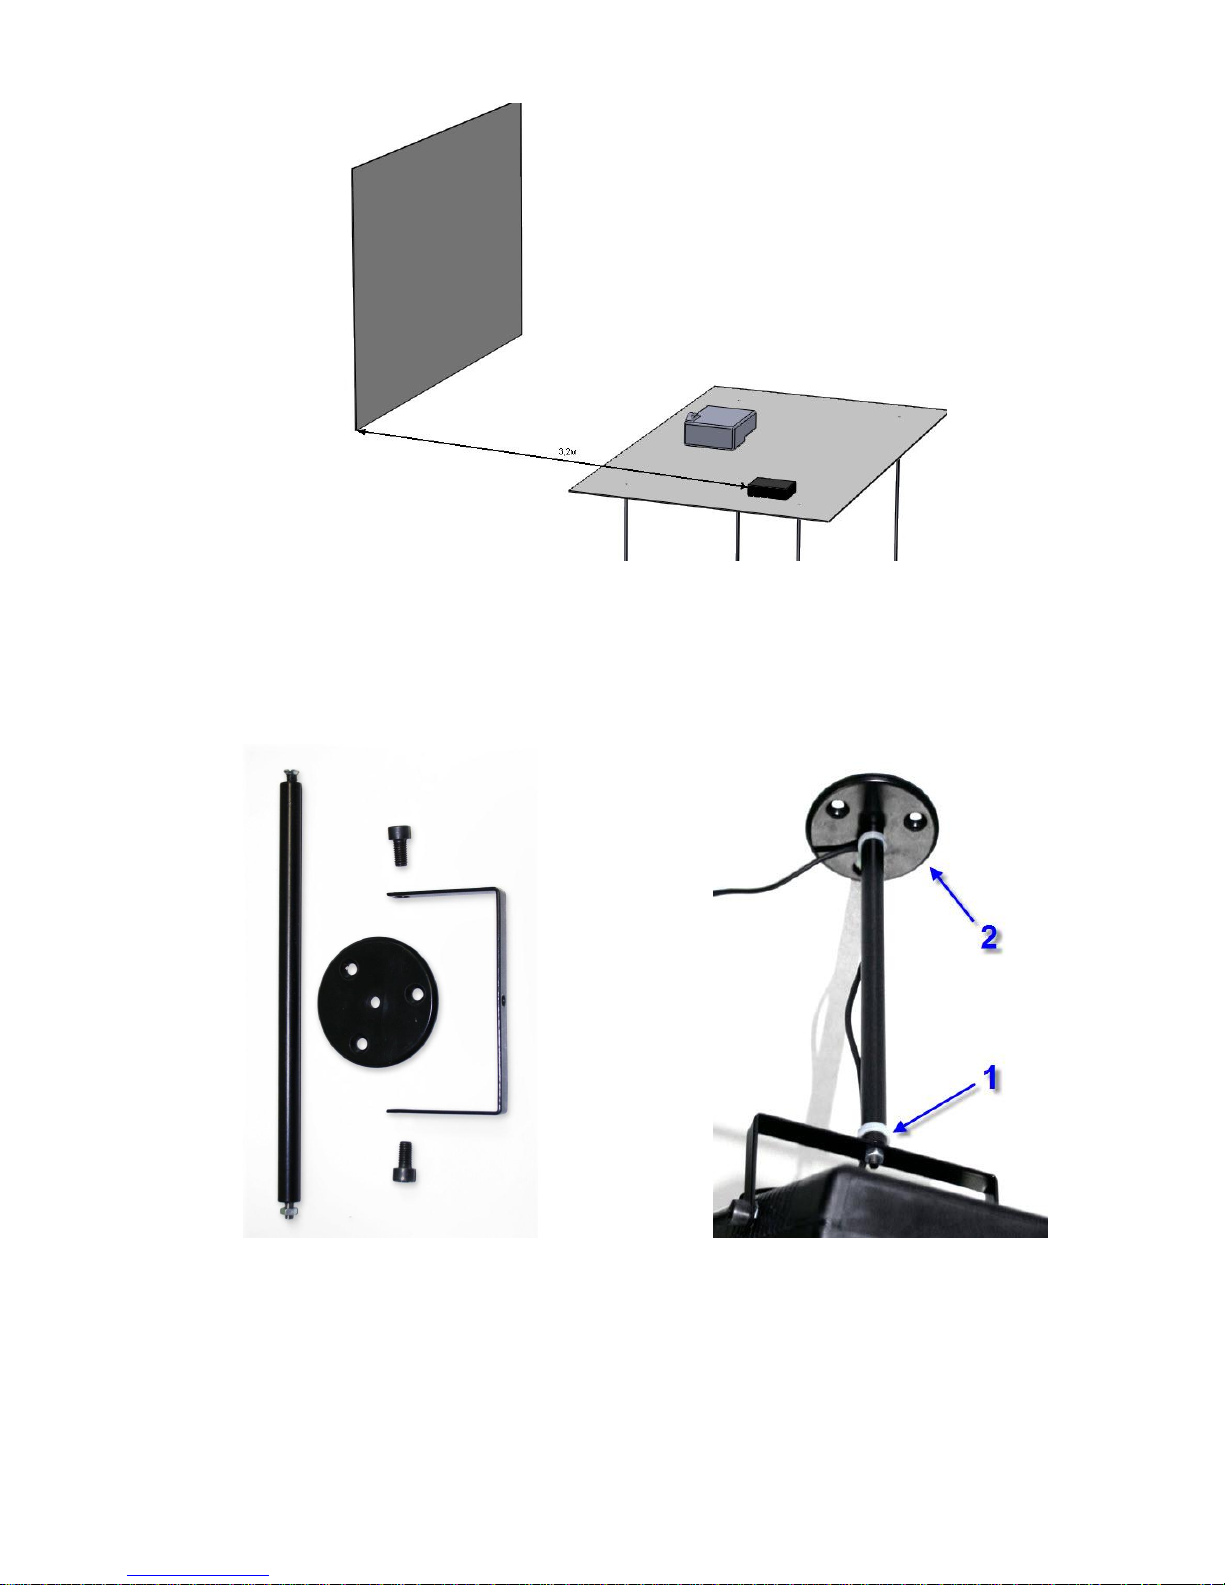
Interactive block is installed with 45 angle to the projection surface at a distance less than
3,2 m from the furthest projection screen corner (Fig.3.2).
Page 11
BEP_6.1_241111
11
Fig.3.2
Version 2. Stationary version of both models.
If the permanent interactive block installation is required use the ceiling mounting kit.
See Fig. 3.3 and Fig. 3.4 for detail.
1 – interactive block mounting position;
2 - ceiling mounting kit.
Fig.3.3 Fig.3.4
This type of installation let you avoid calibration each time when you turn an interactive
block on.
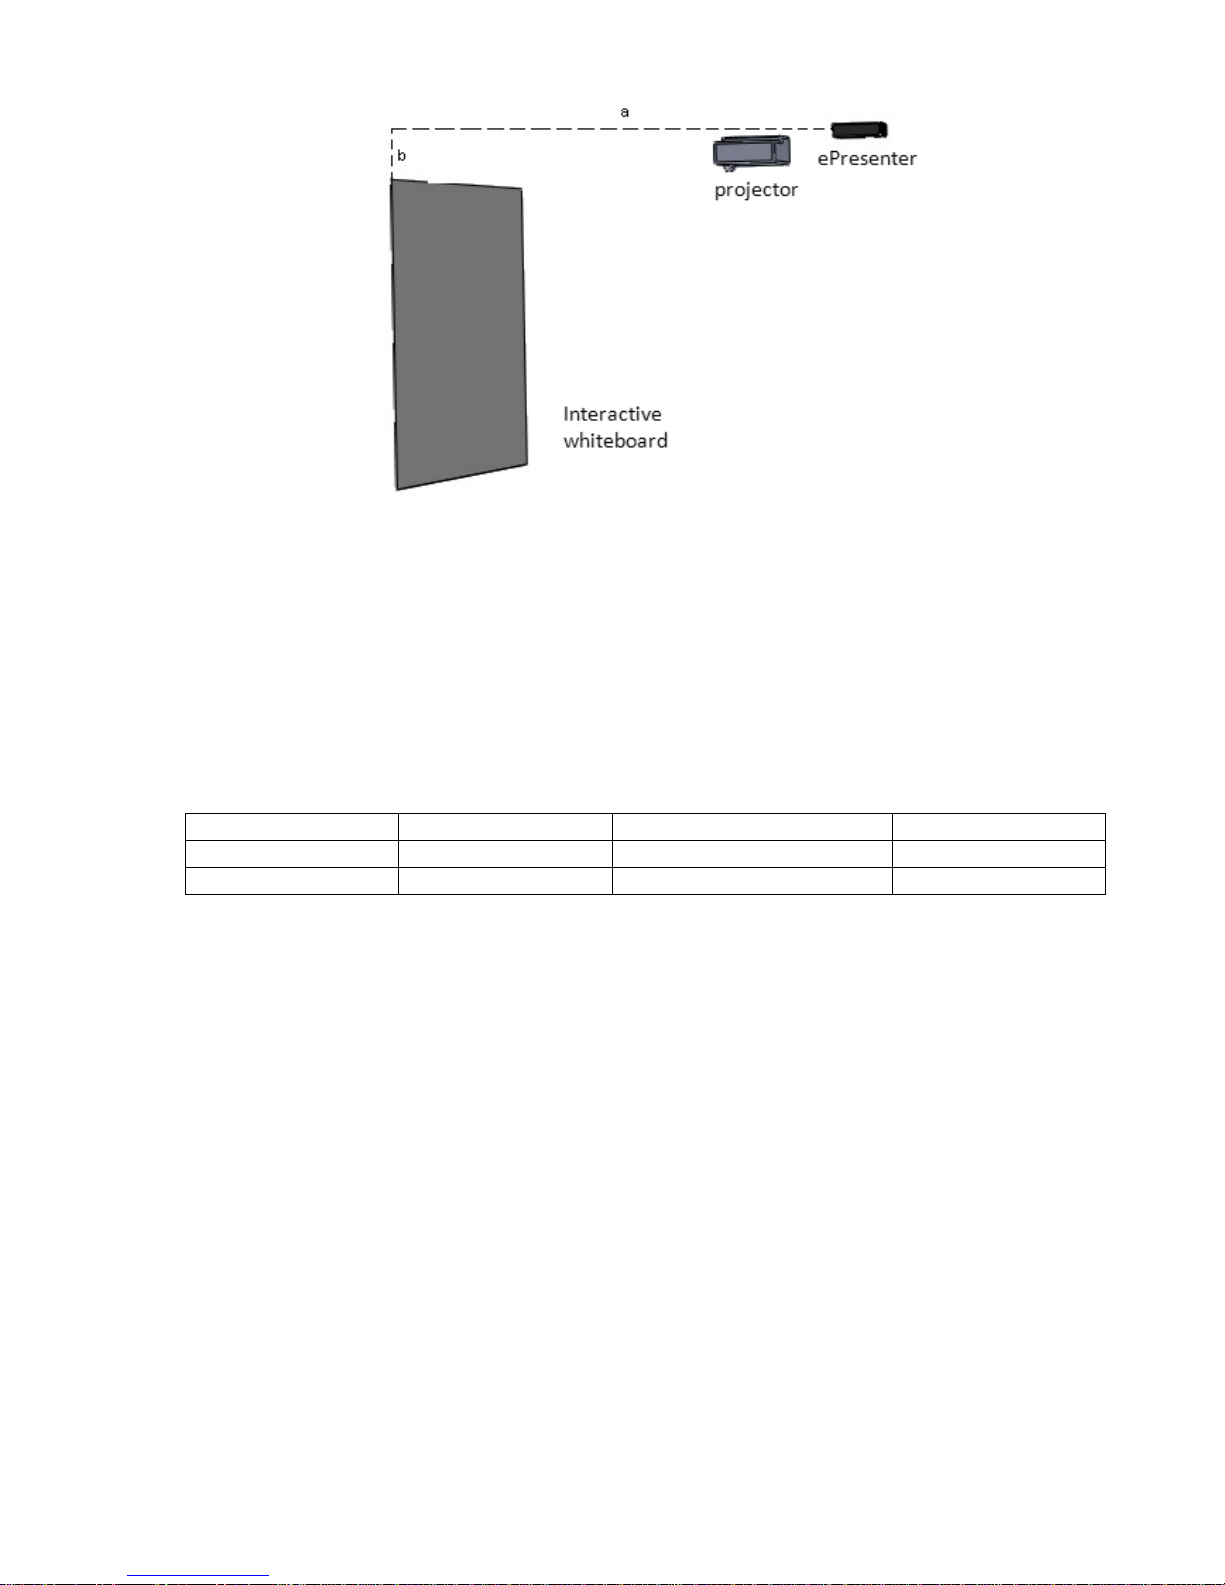
Interactive block and projection surface positions are shown on Fig.3.5.
Page 12
BEP_6.1_241111
12
Fig. 3.5
a – a distance from interactive blocks to the left board edge;
b – a distance from the flat of the upper board edge to an interactive block.
A distance from interactive block to projection surface depends on a size of the second one.
Use should follow requirements listed below when you install an interactive block.
1. Interactive block should be installed with the 90 angle to the board top-left corner.
This position is suitable for the most write-handed people.
2. You should know two sizes only, a and b, to install a device correctly according to the
first requirement. They depend on board size. You can see distance values for
standard boards in a table below.
Dimension type
distance a, м
distance b, м
efficiency, %*
1,2х2,0 м
2,15
0,83
50-70
1,2х1,8 м
2,10
0,83
50-70
* - Efficiency is the ratio between active screen area, covered by interactive block camera,
and the total area which infrared receiver can “view”.
3.2. Software Installation
Please insert an installation disc into CD/DVD drive of control PC or notebook. Installation
process starts automatically if autorun in enabled. In other case you should launch file
setup.exe manually. File is located in root directory of installation disk.
We are strongly recommende to stop all running applications before installation including
antivirus programs.
3.2.1. ePresenter Software Installation
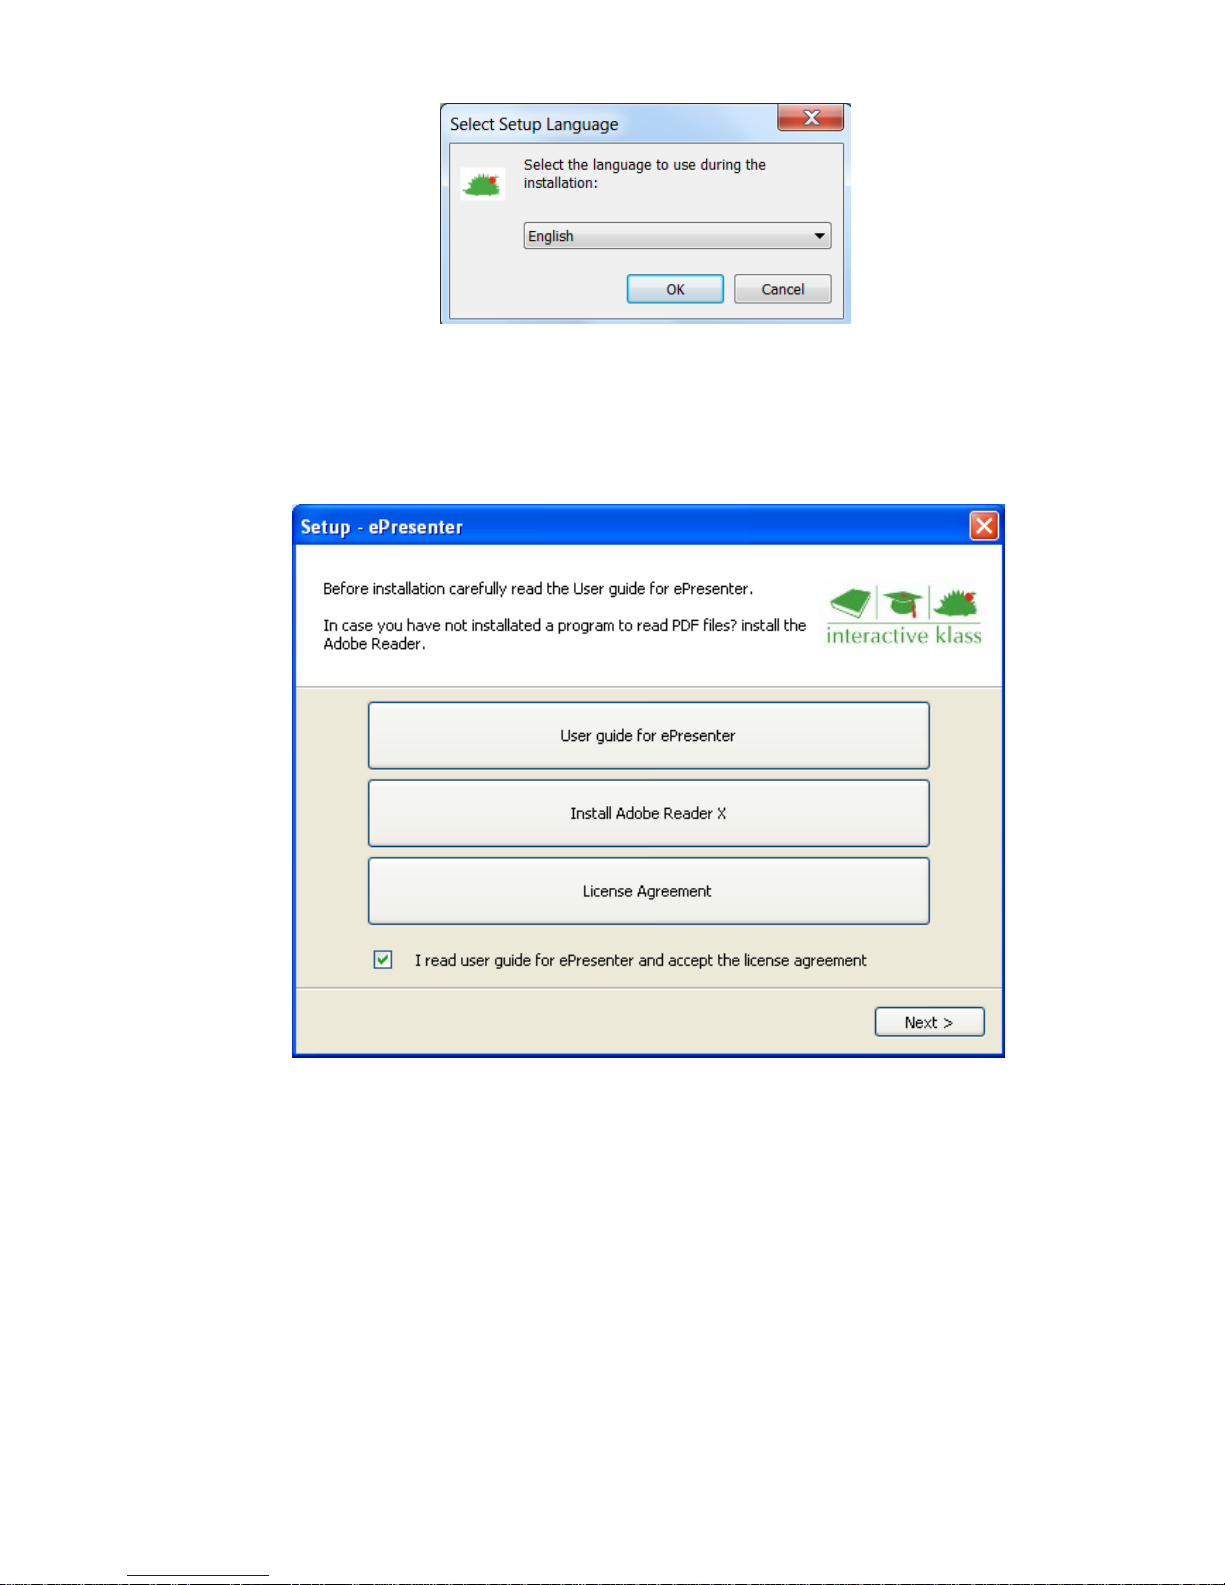
Step 1. Select language
Please select language which you want to use in installation process (Fig.3.6). Pust the
button “OK” and go to the next step.
Page 13
BEP_6.1_241111
13
Fig.3.6
Step 2. Read the lisence agreement and accept it
Please read User Manual and Licence Agreement carefully before installation. Tick a
checkbox “I read user guide and accept the license agreement” and push the button “Next”
to continue installation (Fig.3.7).
.
Fig.3.7
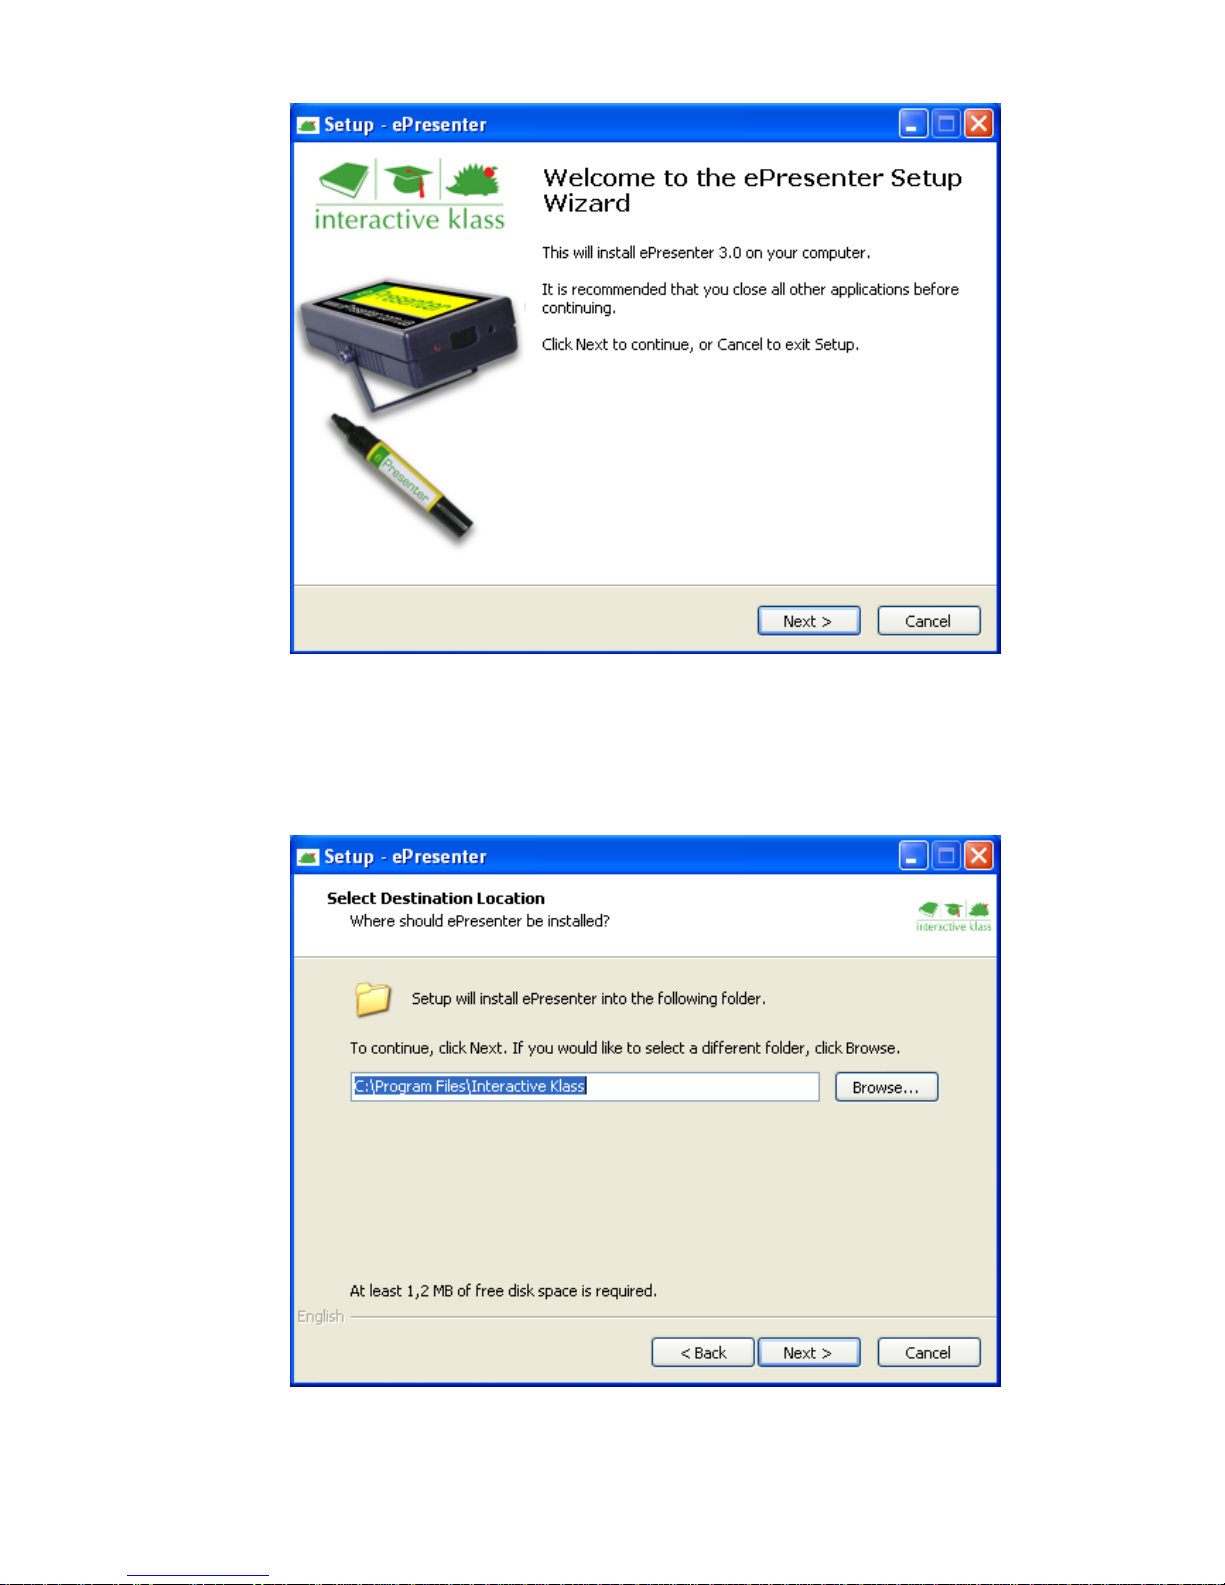
Step 3. General installation information
This window contains common information about installation process (Fig.3.8.). At this step
you can cancel installation in necessarity. Pust the button “Next” and go to the next step.
Page 14
BEP_6.1_241111
14
Fig. 3.8
Step 4. Select folder for installation
Please select a folder which software will be installed to using “Select Folder Dialog Box”.
You can use the default folder or can select a different one (Fig.3.9). Pust the button “Next”
and go to the next step.
Fig.3.9
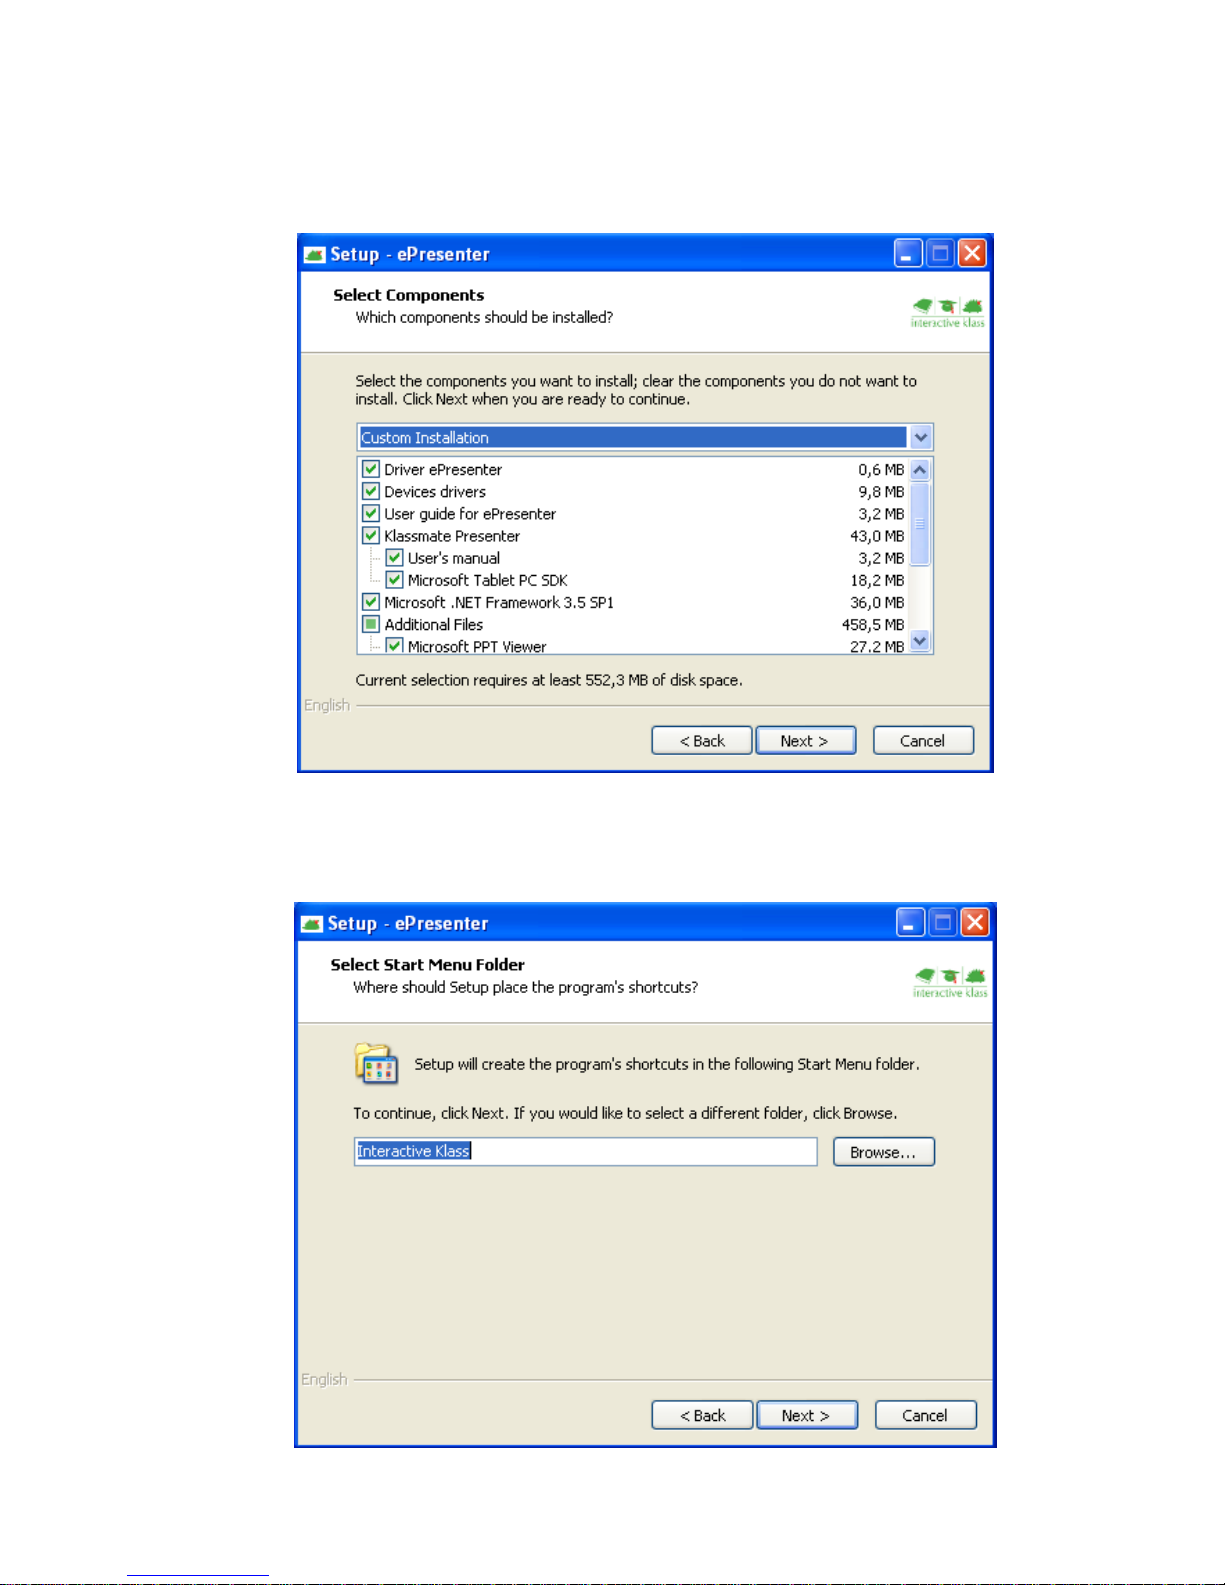
Step 5. Select installed components
Page 15
BEP_6.1_241111
15
You should select a type of installation: “Full Installation”, “Compact Installation”, “Klassmate
Presenter Student” or “Custom Installation”.
You can choose installed components in block of components (Fig.3.10). Pust the button
“Next” and go to the next step.
Fig. 3.10
Step 6. Select Start Menu Folder
You can select destination for program’s shortcut or accept proposed by default (Fig.3.11).
Click “Next” to continue.
Fig. 3.11
Page 16
BEP_6.1_241111
16
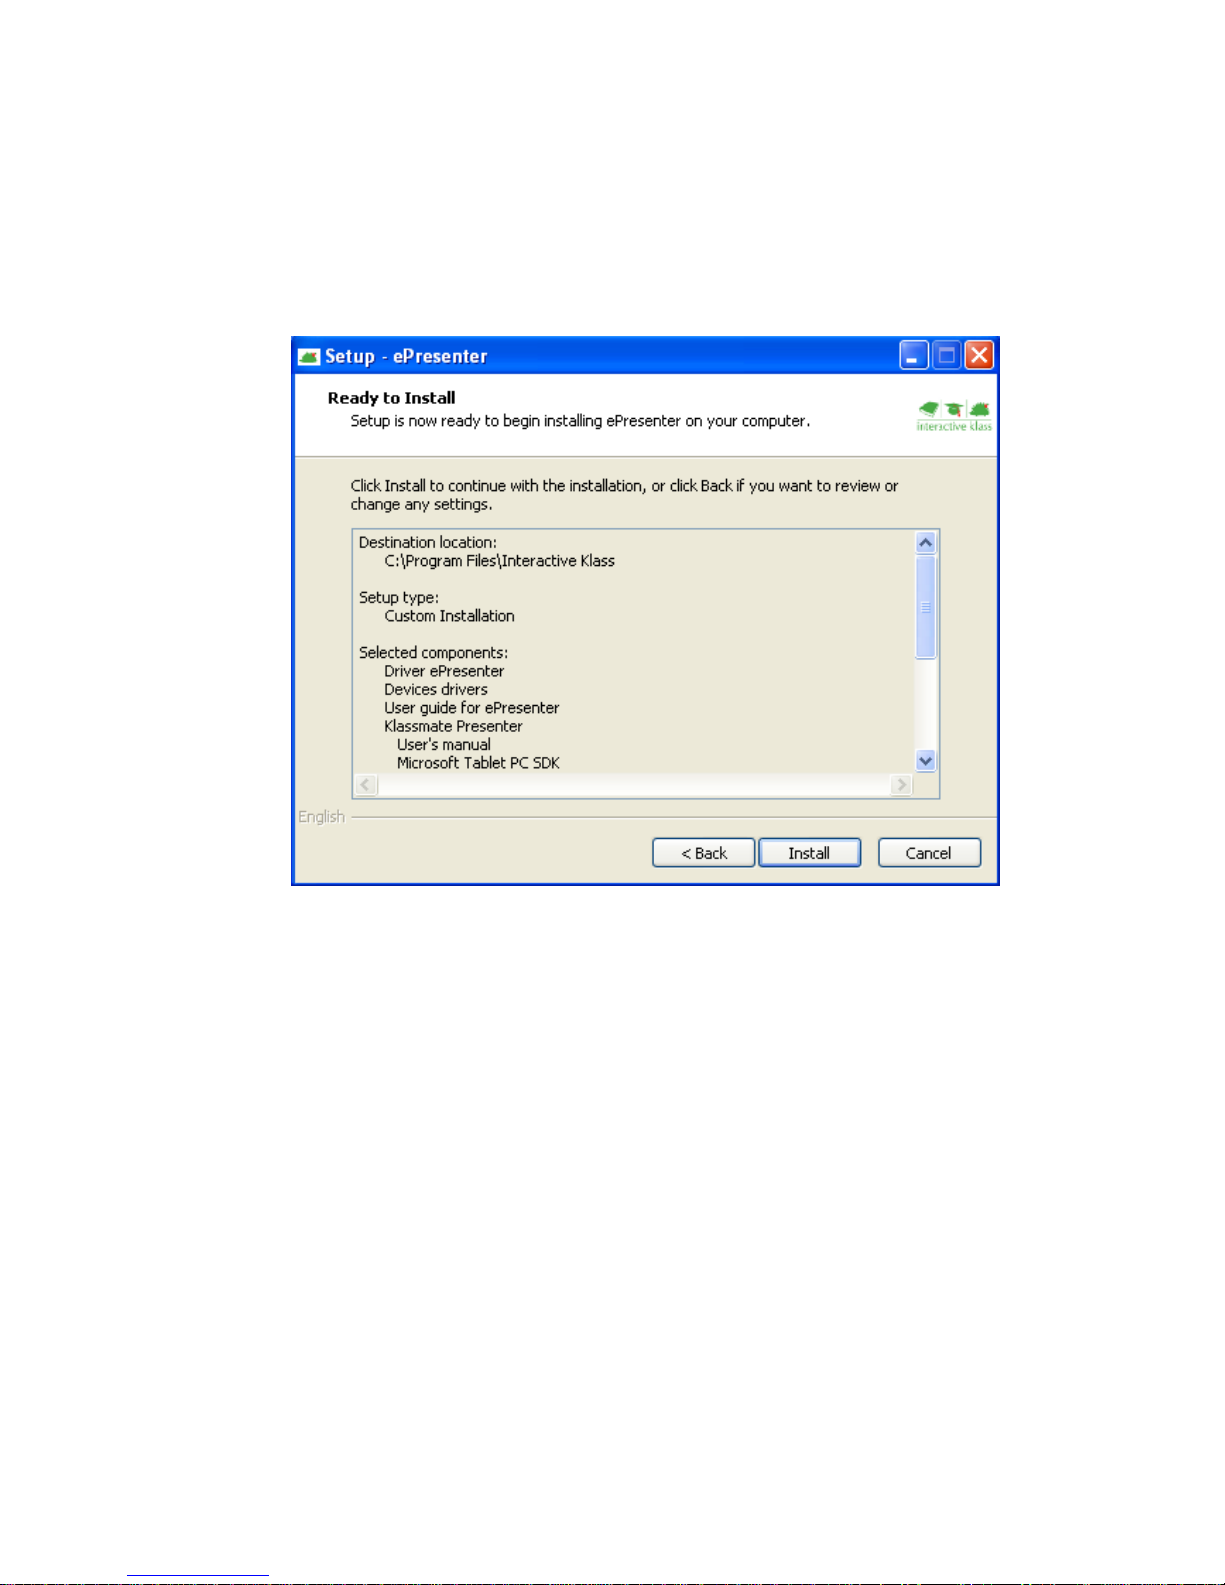
Step 7. Start Installation
Please look through the list on installation settings. If you are ready to install a program
push the “Install” button (Fig 3.12). An installation process takes some time. A program may
ask you to confirm additional components installation while a process runs.
If you selected “Full Installation” or “Custom Installation” on previous step some additional
components will be installed. Some confirmation dialogs will be displayed fir each
component separately.
Fig.3.12
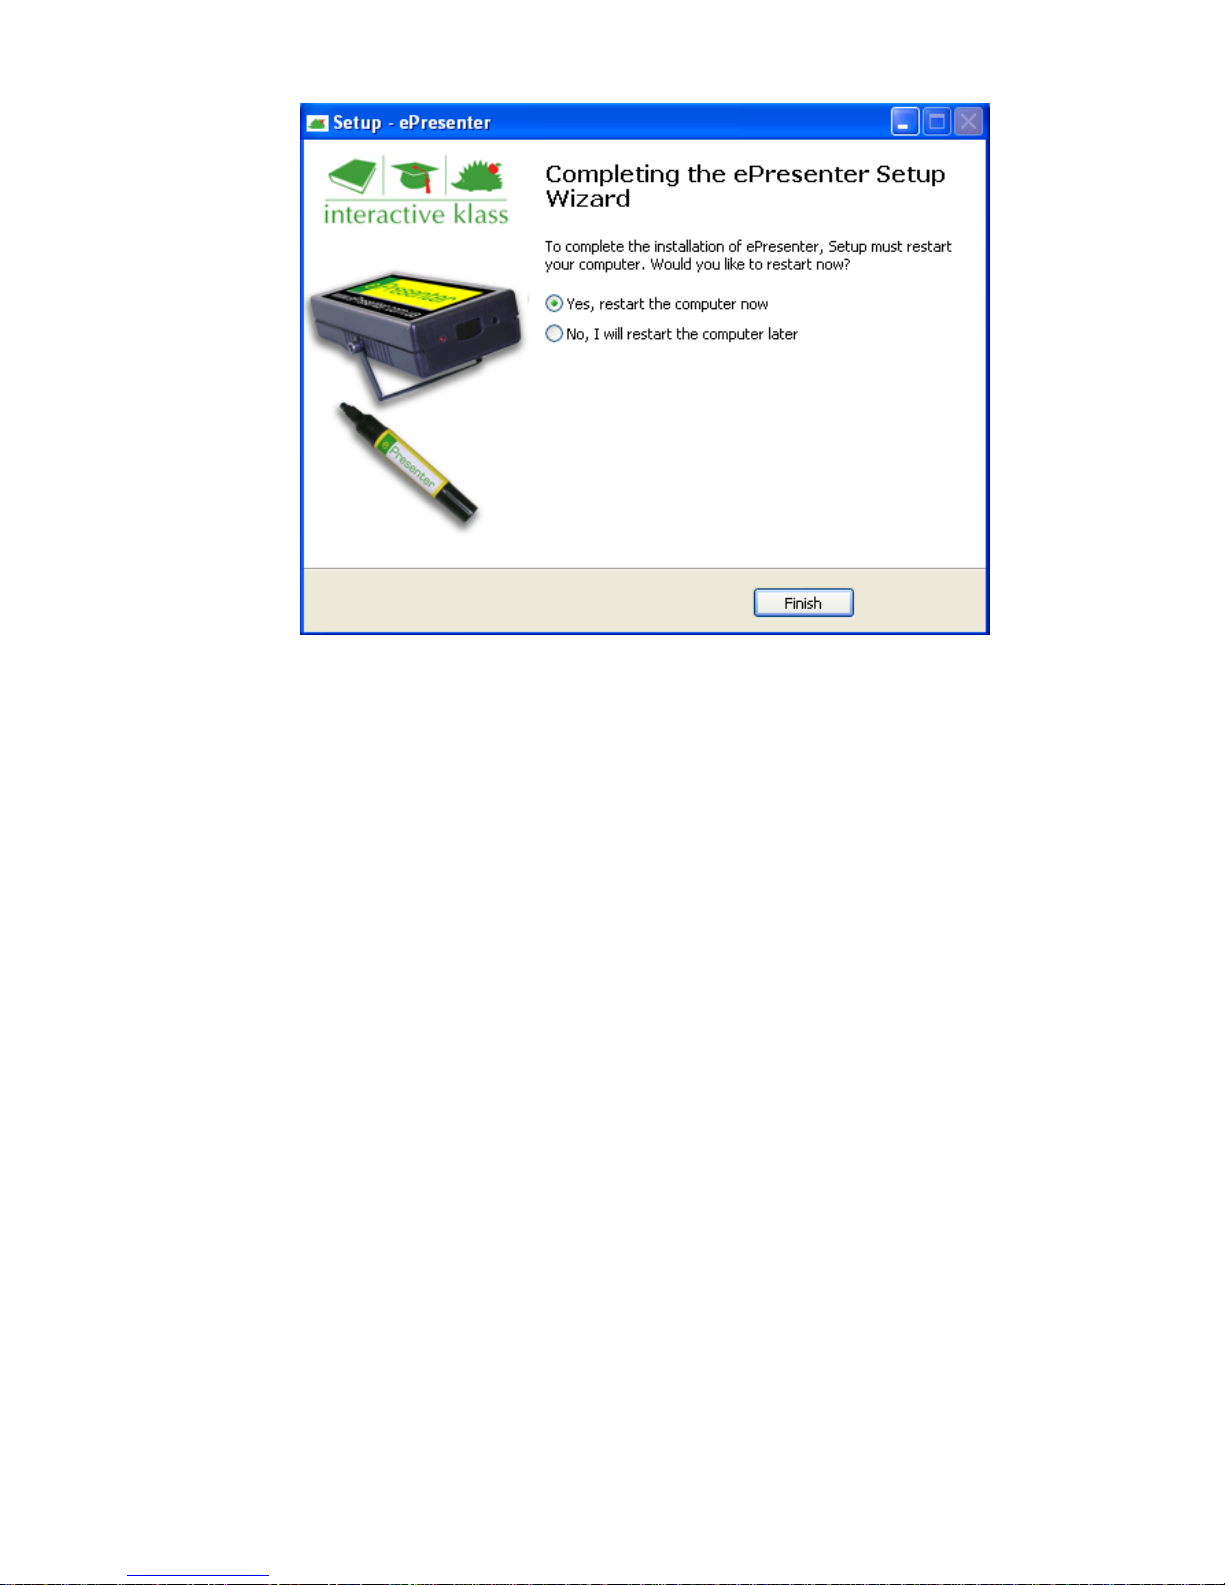
Step 8. Completing the installation
Installation Wizard informs you about results and asks whether you want to restart PC now
or later (Fig. 3.13). We strongly recommend you to restart computer right after installation
finishing. Push the button “Finish”.
Page 17
BEP_6.1_241111
17
Fig. 3.13
3.2.2. Adobe Reader 10 Installation
You should have installed pdf file viewer like Adobe Reader on your PC. This program let
you read and learn digital versions of “User Manual” and “Quick Start Guide”. EPresenter
Installation Process can ask you to install Adobe Reader 10. If this software is already
installed just skip the next step.
3.2.3. K-Lite Codec Pack Installation
K-Lite Codec Pack let your video player play files of various media formats, video and
audio. If this software is already installed just skip the next step.
3.2.4. Microsoft .NET Framework 3.5 Installation
EPresenter software requires Microsoft. NET Framework 3.5 to be installed. You can install
it during ePresenter software installation.
3.2.4.1. Component selection
You can select the installation of Microsoft .NET 3.5 on step 5. If the “Custom installation”
was selected you should tick a proper checkbox manually. In other case all required
components are installed automatically.
It could take some time to install Microsoft .NET Framework. So you should wait for the end
of process. If this software was installed on your PC before the installation wouldn’t be run
again.
3.2.4.2. Microsoft. NET Framework 3.5 setup under Microsoft Windows 7
Microsoft Windows 7 includes this component by default so you just need to turn it on.
Please follow the instruction below.
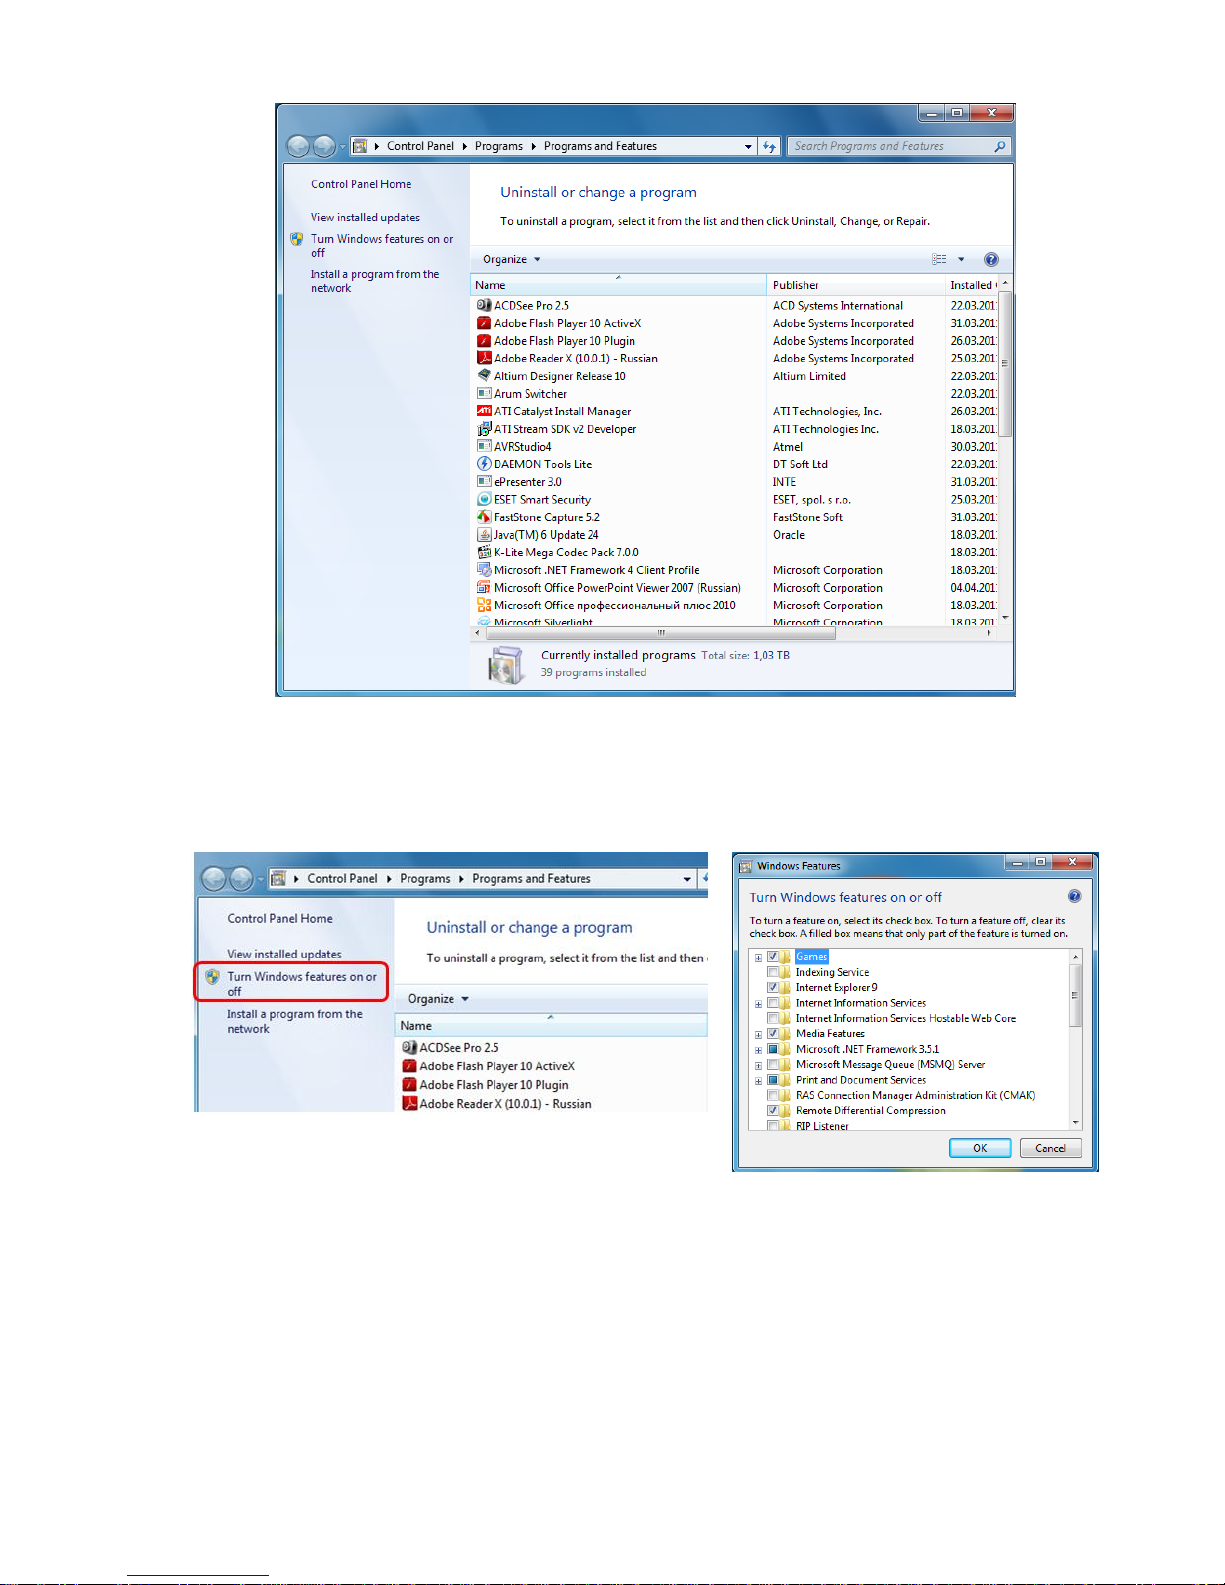
Open Utility ‘Programs and Features’ window (Fig. 3.14). Then open Start menu window
and select an option "Run". You cal also use a hot keys combination «Win» + «R». «Win» is
a key with the Windows logo between the keys «Ctrl» and «Alt» on the keyboard. A text
input field will appear. Please print a string «appwiz.cpl» in it and then click “OK” or press
“Enter”.
Page 18
BEP_6.1_241111
18
Fig. 3.14
The interface “Uninstall or change a program” will appear. Select a point "Turn Windows
features on or off » from the left panel (Fig. 3.15). A pop-up window with Window features
will be displayed. Tick a checkbox “Microsoft. NET Framework” if it wasn’t checked
(Fig.3.16) and push the button “OK”.
Fig. 3.15
Fig. 3.16
3.3. Interactive Whiteboard Connection
Projector should be placed near the control PC on the table surface or to be mounted on a
ceiling. Projector’s lens has to be directed to an active projection surface. Connect projector
and computer via the D-sub port or any other currect way.
It’s Important!
We recommend you to set “Clone” mode in video adapter settings window. This mode
supports simultaneous broadcasting to PC monitor and to IWB surface.
Page 19
BEP_6.1_241111
19
You can use any type of surface as a projection one. Markerboard, portable flipchart,
projection screen or even a wall a smooth, light surface can be used as a screen.
3.3.1. How to connect interactive block and control PC
The method of connect interactive block and control PC depends on ePresenter model.
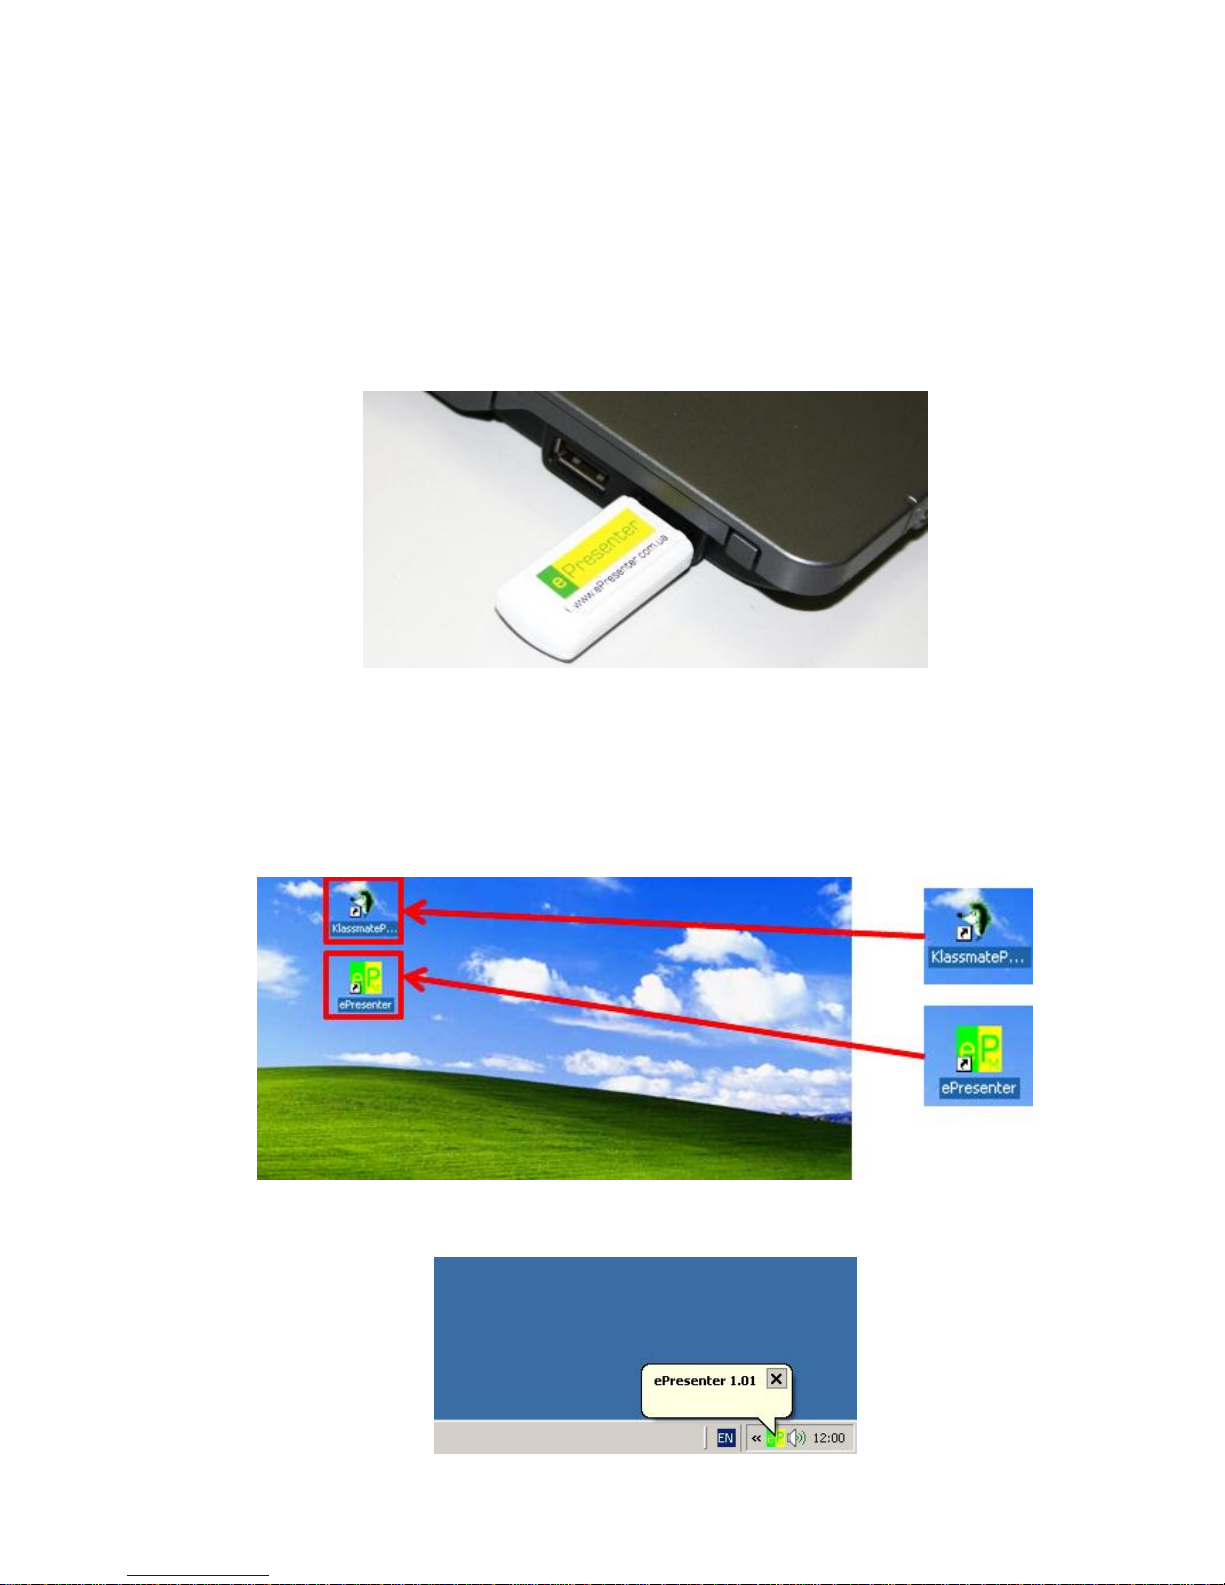
ePresenter EP03 is connected via USB cable. But wireless model requires control PC to
have USB adapter Bluetooth (Fig 3.17).
Bluetooth wireless technology supports a short distance connection only. It requires a
distance between Bluetooth devices is less than 10 meters. If consumer has any other types
of Bluetooth including built-in he can use it instead of supplied.
Fig. 3.17
3.3.2. Software. Getting Start
Please turn your control PC on, wait for uploading process is completed and desktop is
activated. You can see two shortcuts for launching KlassmatePresenter and ePresenter on
your desktop (Fig.3.18).
Fig. 3.18
Double click the icon to start the ePresenter program (Fig. 3.19).
Fig. 3.19
Page 20
BEP_6.1_241111
20
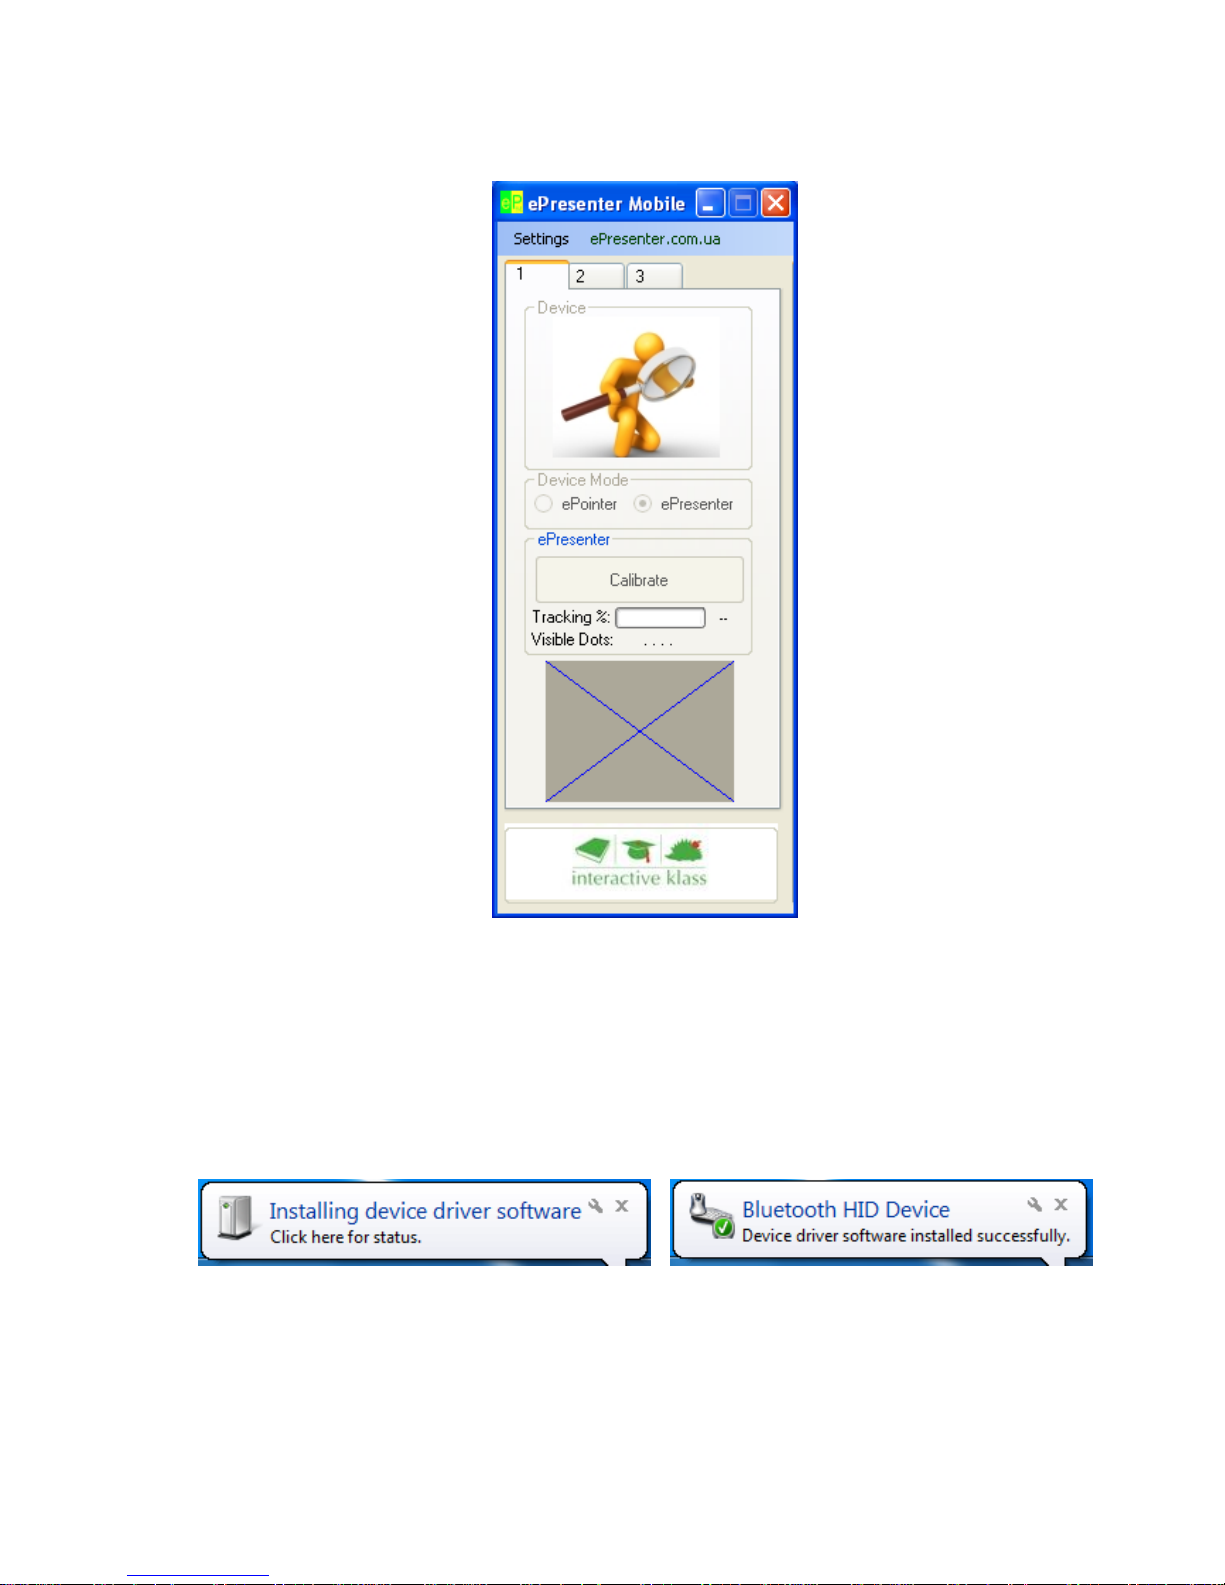
Click the icon on the tray and the main program window will be displayed (Fig.3.20).
Fig. 3.20
3.3.3. Synchronization interactive block and managing PC
3.3.3.1. Synchronization ePresenter EP03
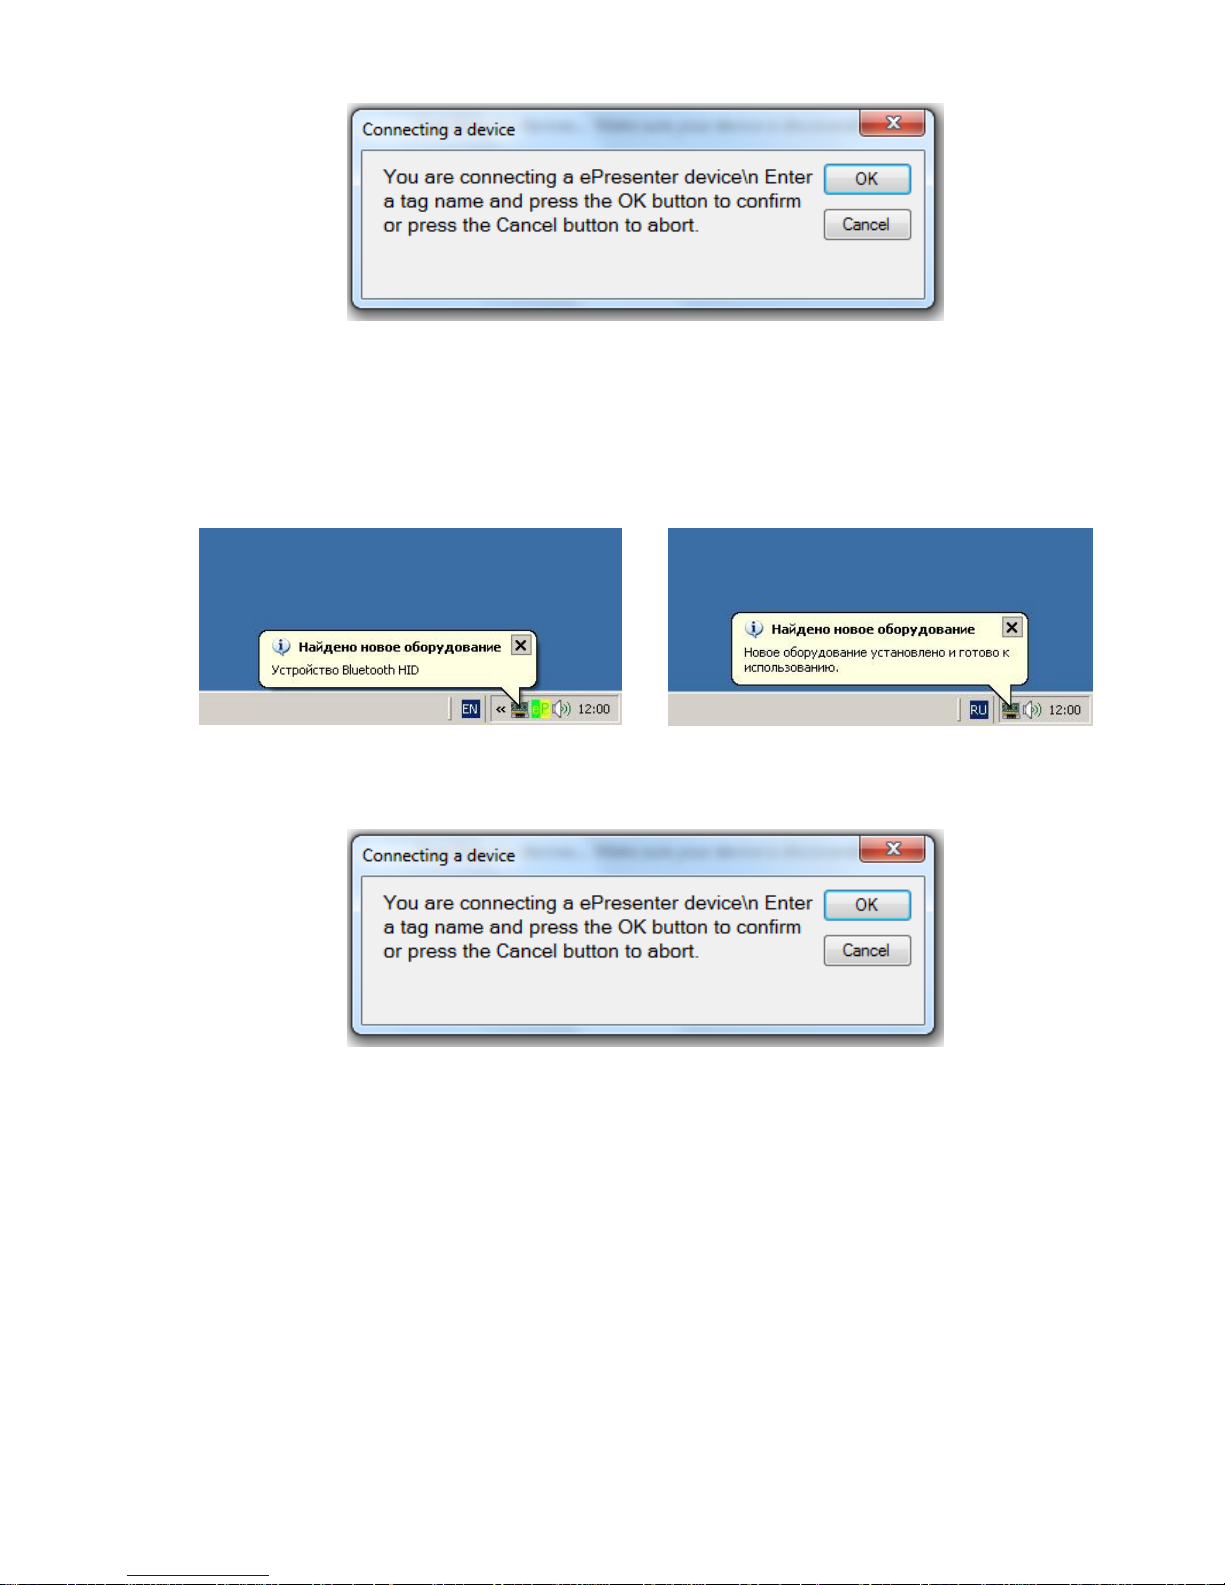
After you connect interactive block and control PC via USB cable operating system will
detect a new device (Fig.3.21) and will install a proper driver automatically.
In case of success of device installation a system message will be displayed (Fig.3.22).
Fig.3.21
Fig.3.22
Push the button “OK” in confirmation box (Fig.3.23) for device connection.
Page 21
BEP_6.1_241111
21
Fig. 3.23
3.3.3.2. Synchronization ePresenter EP03M
Connect Bluetooth adapter into your computer. Provide power supply for the interactive
block. Press the “syn” button on the interactive block surface or the remote control button
which was programmed before. Wait until operating system will detect the device (Fig.3.24,
Fig.3.25).
Fig.3.24
Fig.3.25
Push the button “OK” in confirmation box (Fig.3.26) for device connection.
Fig.3.26
You can synchronize Bluetooth using “syn” button or programmed button of the remote
control.
If you use projector’s remote control for Bluetooth synchronization you should program
Interactive block once while the first customization runs. We recomend you to program a
rarely or non-used button for current projector’s modification.
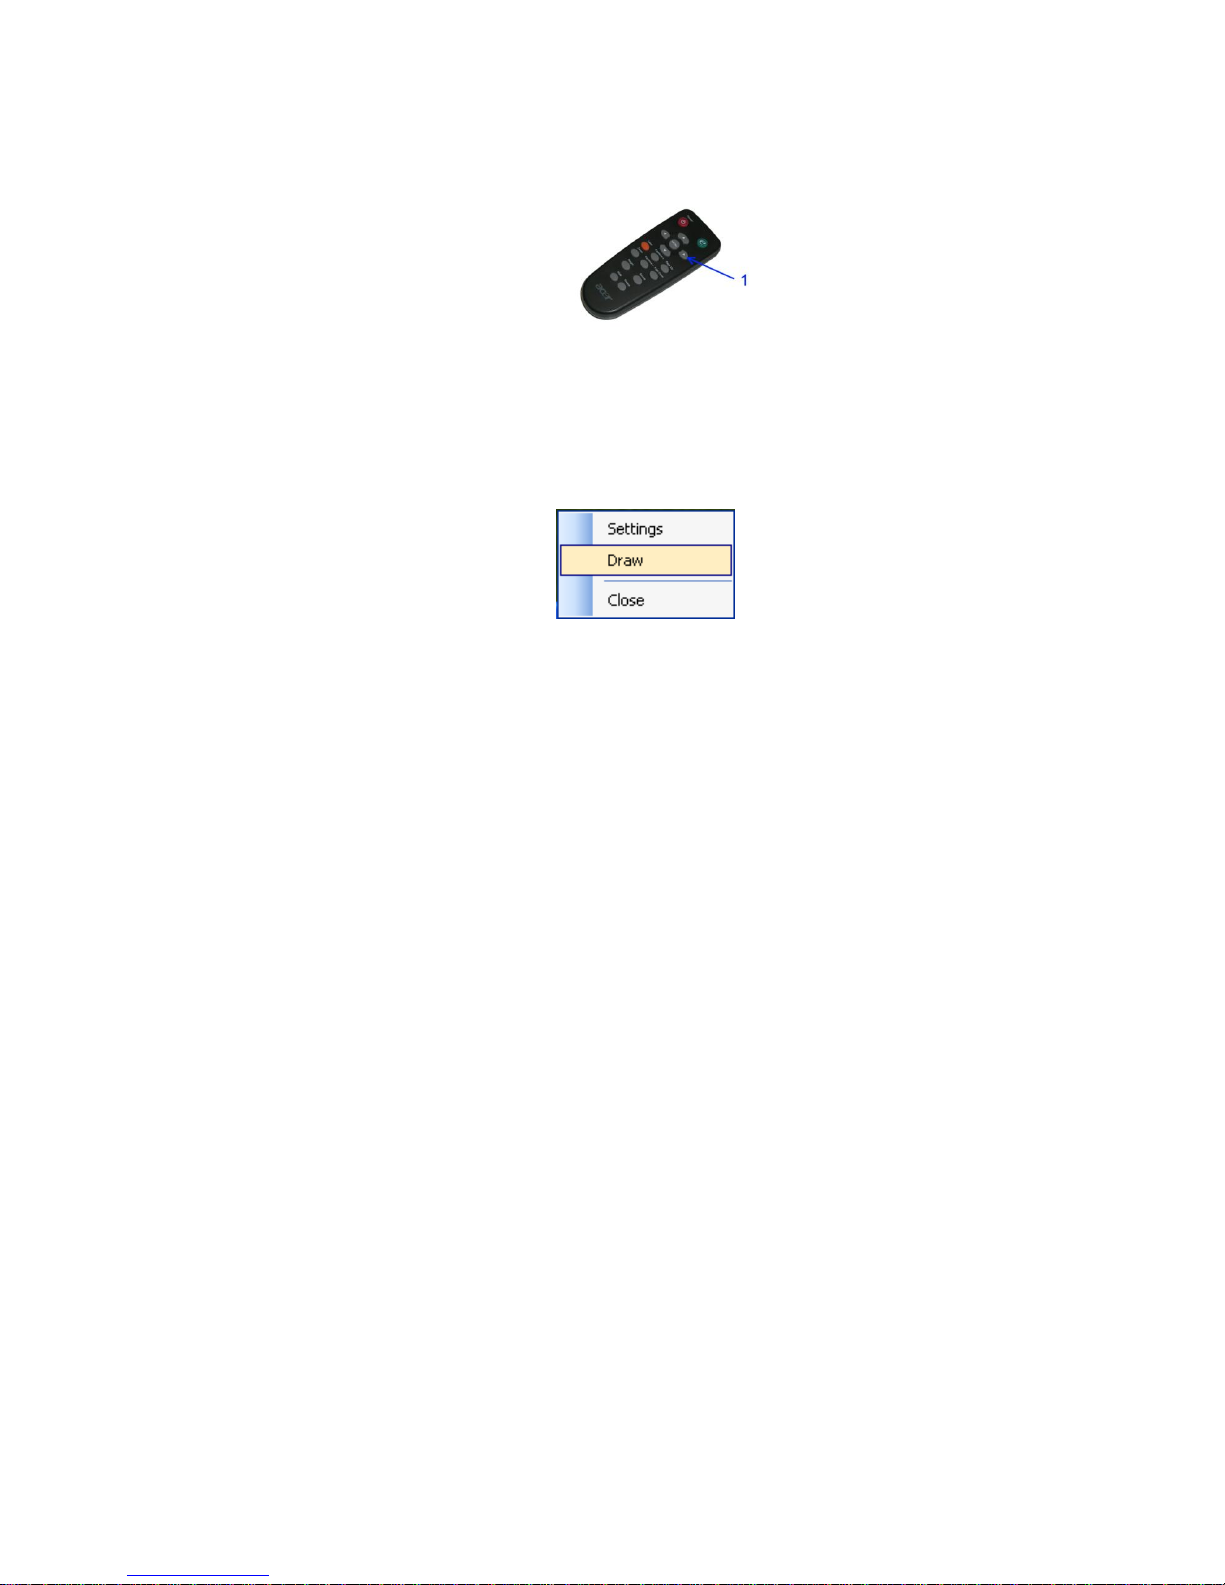
To program a button please do the follow:
1. Press the button ‘prg’ on the ePresenter body back (Fig.1.4). Red LED placed on the
front panel will light in three seconds.
2. Direct Remote Control to interactive block detector window and press
synchronization button once until LED on interactive block front panel is lighting
(Fig.3.27). Interactive block saves encoded button signal and linkes it to
synchronization Bluetooth command. All this information is saved and kept even after
interactive block is turned off.
Page 22
BEP_6.1_241111
22
3. You should to use this button later each time you launch interactive block instead of
“syn” button. Just press it and direct Remote Control to interactive block’s detector
window.
Fig.3.27
3.3.3.3. Successful synchronization
If interactive block and projector were syncrinized successfully a device image and eDraw
tool window will be displayed in a main program interface in “Device” block (Fig.3.28).
Fig.3.28
3.3.4. Interactive Block Adjusting
After an interactive block was placed or mounted on ceiling you have to turn a device to
channel its optical axis to the middle of projection surface exectly. If interactive block is
ceiling mounted it could take you to weaken the attachment.
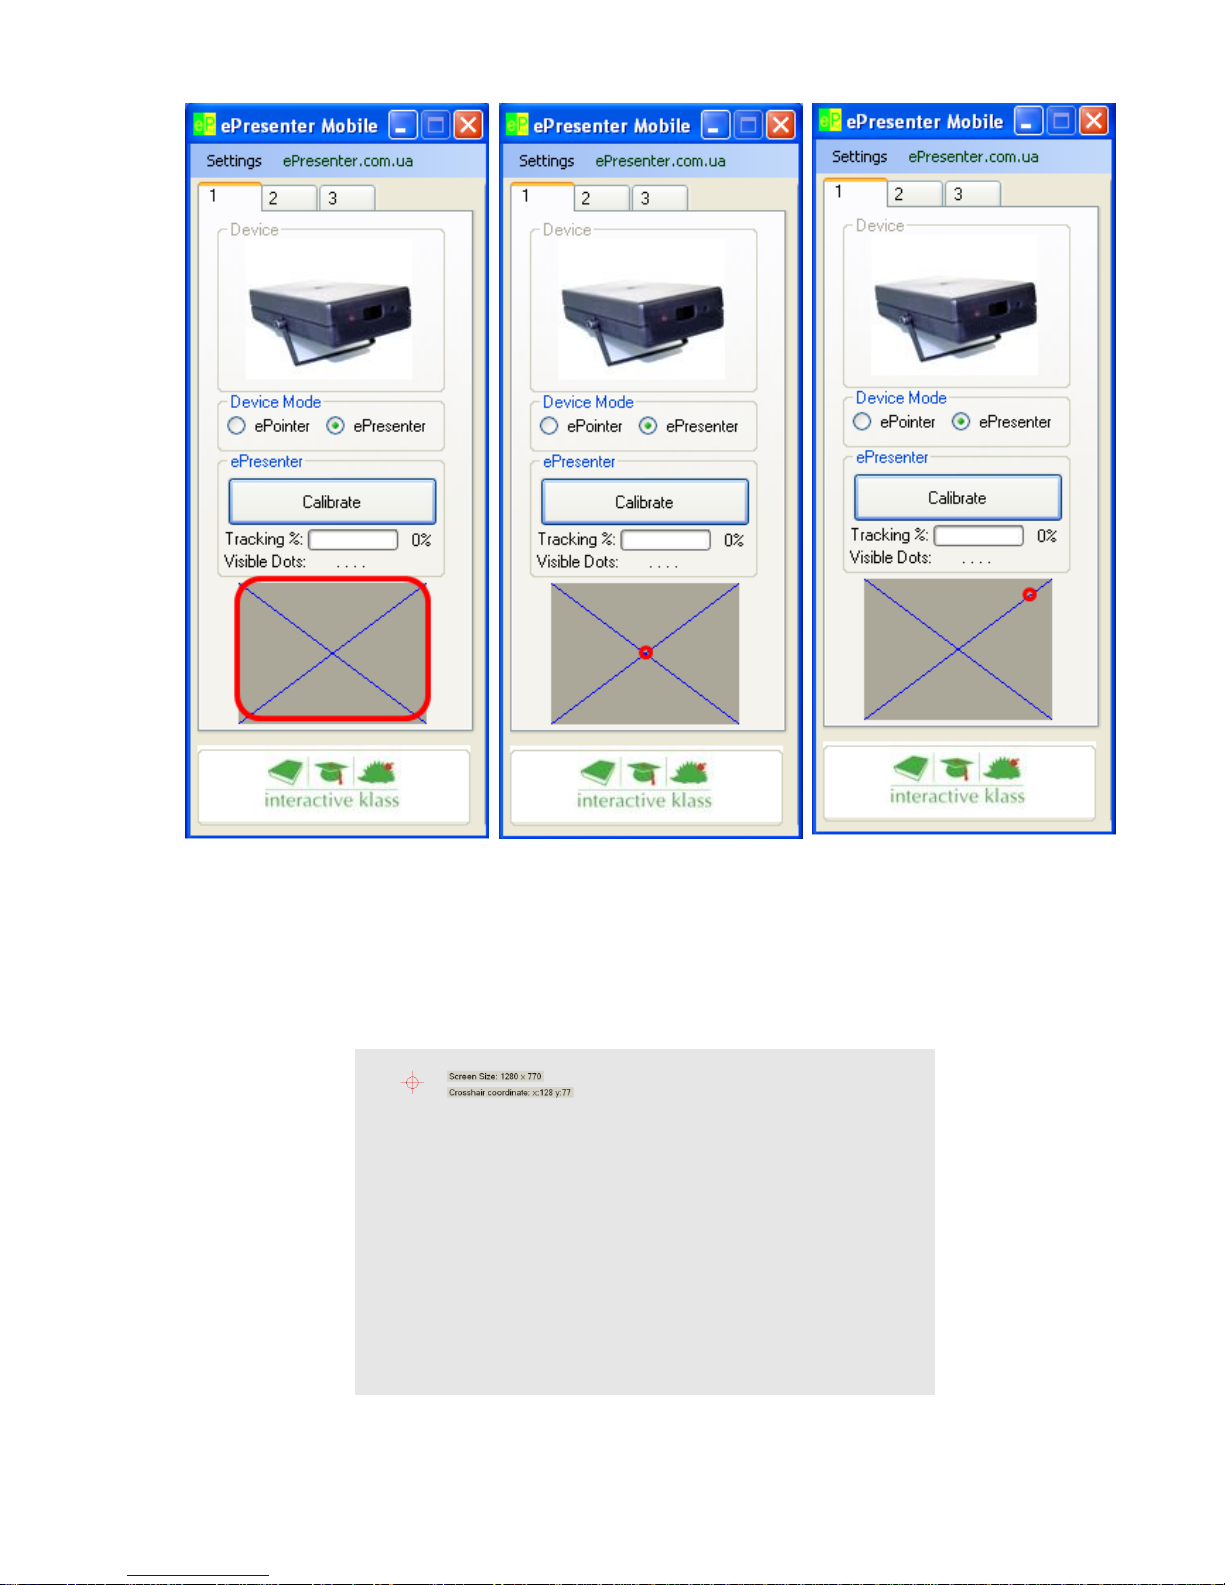
You can use a special monitoring tool to make this process faster and easier. The tool
window displays a part on projection area covered by interactive block (Fig.3.29).
Take a stylus and touch it a point in the middle of projection surface. An image in monitoring
window shows a position of point (red point) you pressed. Turn interactive block left to right
and top to bottom so red point on screen was in an intersection of diagonals (Fig.3.30).
You should also check whether projection surface is covered by interactive block
completely. Touch stylus points in all four corners and check appearance of red points at
proper places in monitoring tool window. Figure 3.31 shows one point. If the point position
doesn’t match the corner you should increase a distance between interactive block and
projection surface.
Page 23
BEP_6.1_241111
23
Fig.3.29
Fig.3.30
Fig.3.31
If a device is configured properly and covers all proction surface you can fix id rigidly. Then
you can start projection surface calibrating.
3.3.5. Projection surface calibrating
Press the button “Calibrate” to start projection surface calibrating. Calibrating window will be
displayed (Fig.3.32). Interactive block has to be immobile while calibration process is run.
Fig.3.32
Page 24
BEP_6.1_241111
24
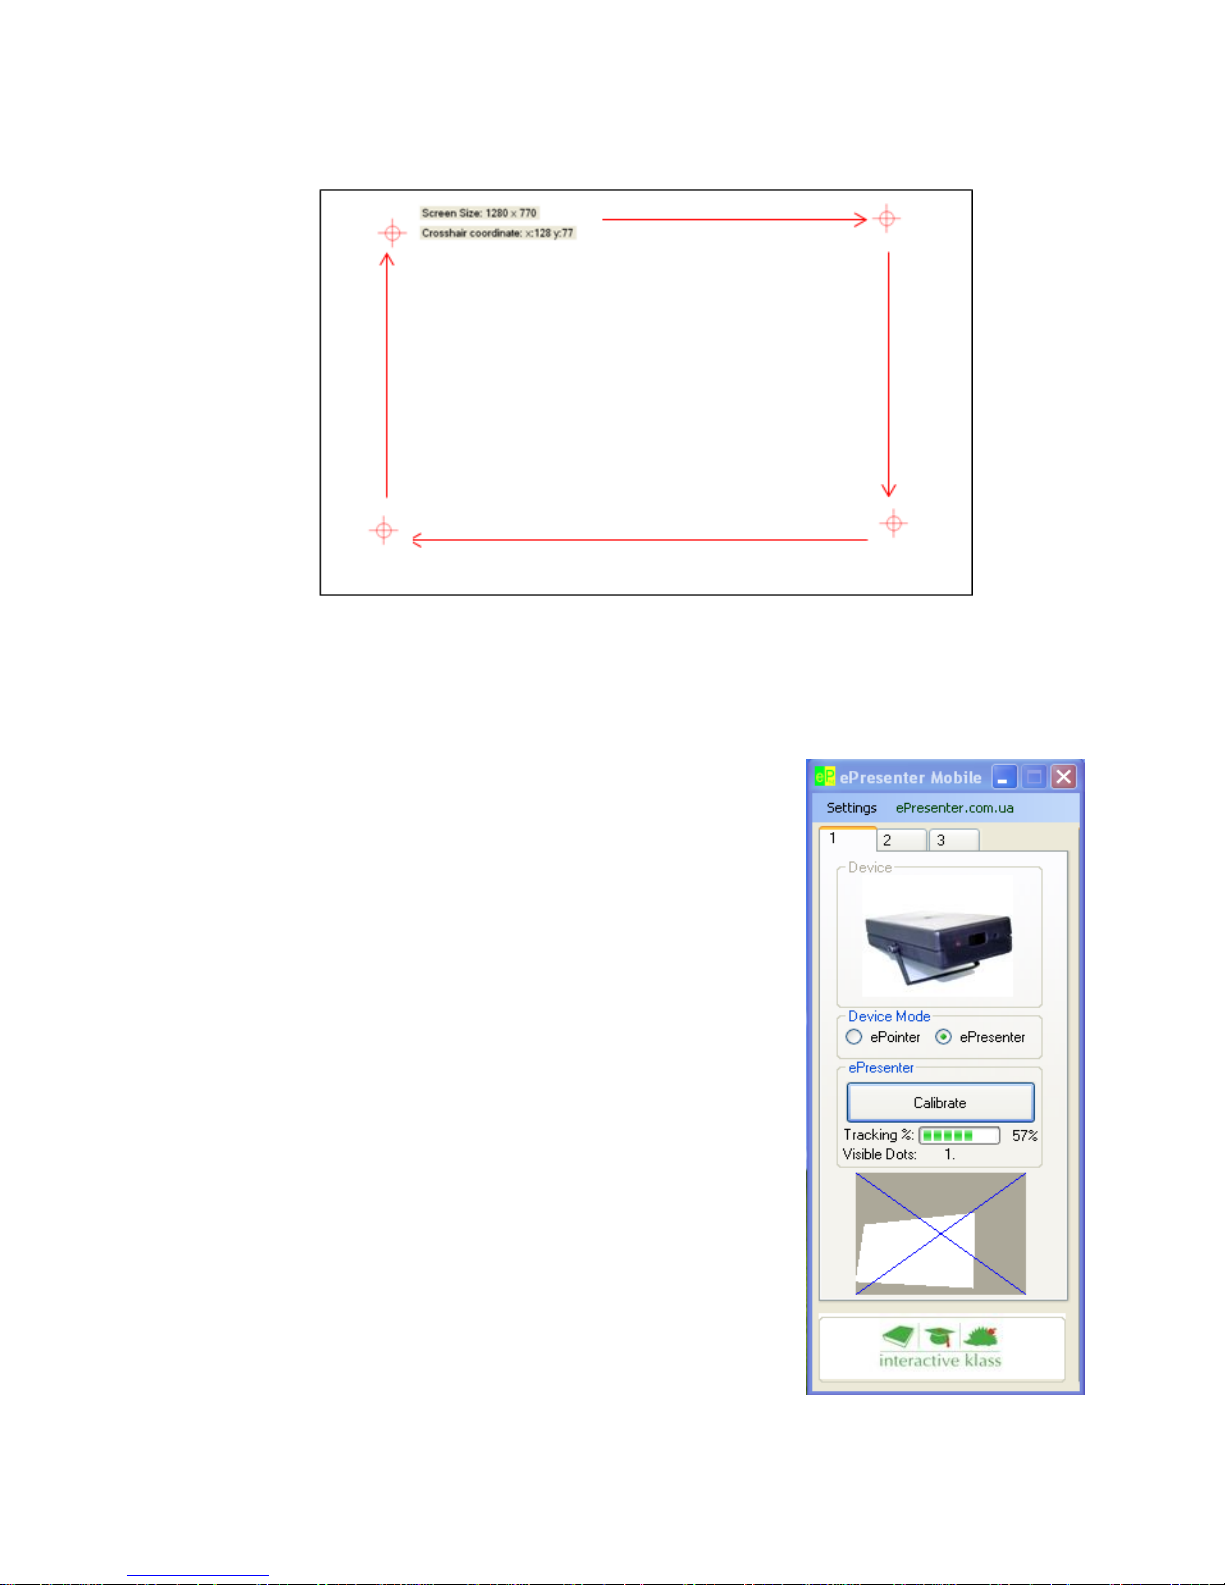
You should touch stylus each calibration marks one by one from the left top corner
clockwise (Fig.3.33).
Fig.3.33
If calibration marks don’t respond on stylus touch you could return to previous menu
pressing “Esc” key on your keyboard.
If calibration was succesfull you will see calibrated surface image in the bottom block of
main program window (Fig.3.34).
An interactive block efficiency after calibrating must be in
a range from 50% to 70%.
If the efficiency is higher than 70% some “dead zone”
would appear on the boad.
So if value of efficiency does not fall within the specified
range we recommend changing the distance between
interactive block and projection surface.
You should re-calibrate projection surface and check the
efficiency again repeating all actions described before.
Fig.3.34
Page 25
BEP_6.1_241111
25
3.4. ePresenter Software Customization
3.4.1. ePresenter Software Interface Customization
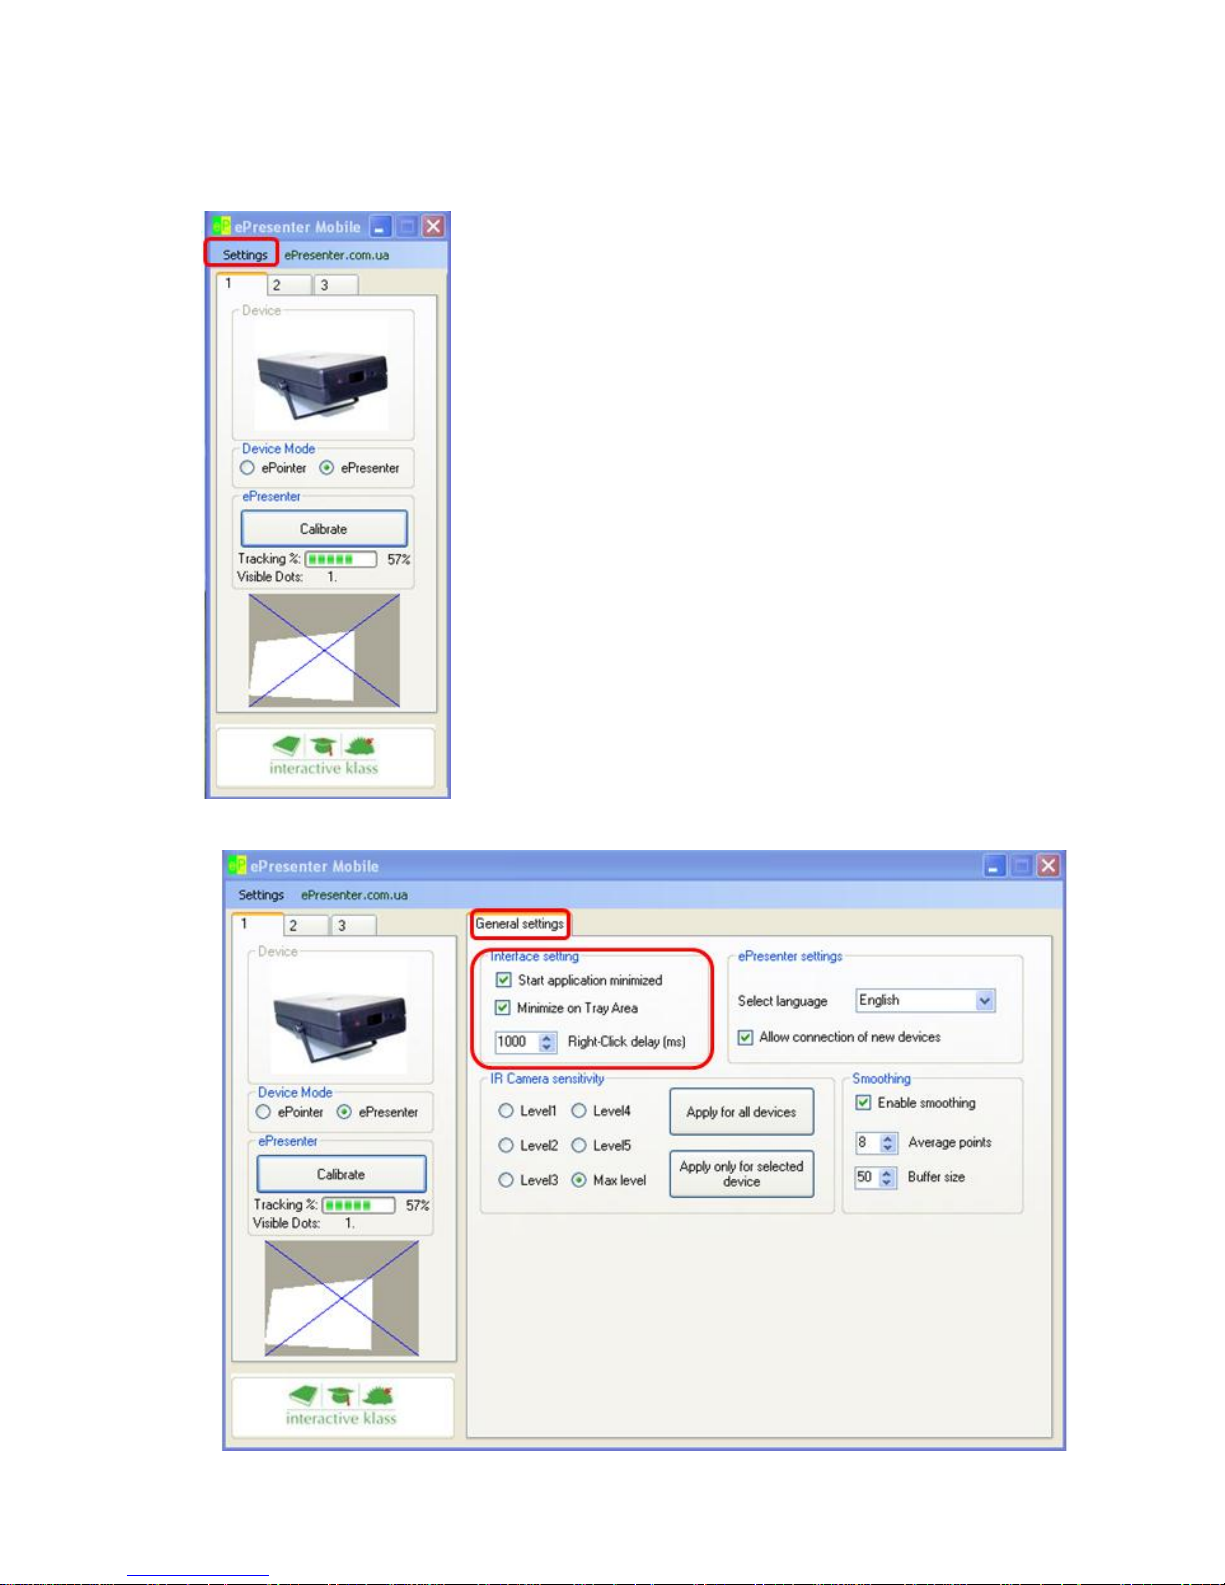
To customize program interface please click the button “Settings” (Fig.3.35).
Рic. 3.35
Program window will be expanded displaying a tab “General
Settings” (Fig.3.36).
All these settings let you manage program interface behavior.
If you want the main program window being always expanded
tick off checkboxes "Start application minimized" and
"Minimize on Tray Area" in block “Interface settings”.
A “Right Click delay” setting defines a time of the right mouse
buttons firing. If you touch stylus a projection surface and
hold it more than 1 second right button click menu will be
activate. The default value is set to 1000 ms (equals 1 s). You
can change it making more or less.
Fig.3.36
Page 26
BEP_6.1_241111
26
3.5. Language Setting
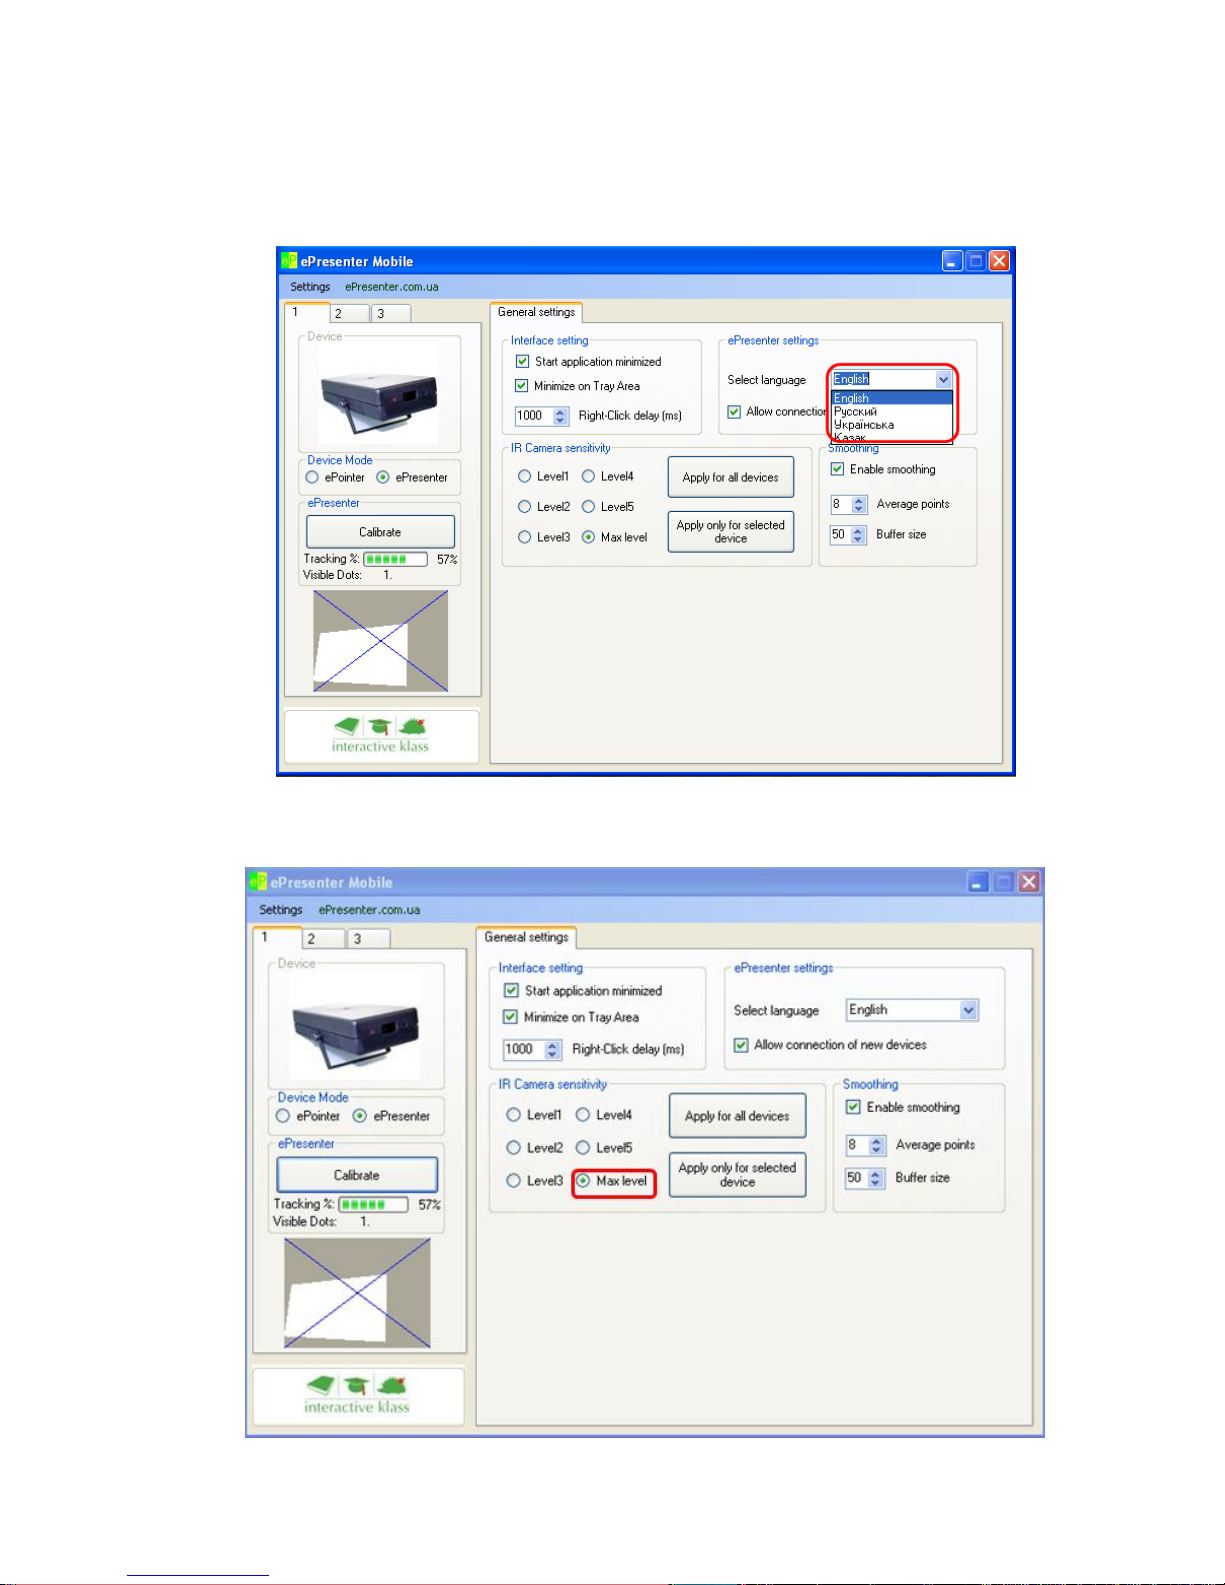
Block “ePresenter Settings” includes a drop-down list of supported languges (Fig.3.37). If
you change language you should close the program and run it again. All changes will be
applied after restart only.
Fig.3.37
3.6. Sensitivity Settings
By default the highest level of sensitivity is set (Fig.3.38).
Fig.3.38
Page 27
BEP_6.1_241111
27
3.7. Smoothing Setings
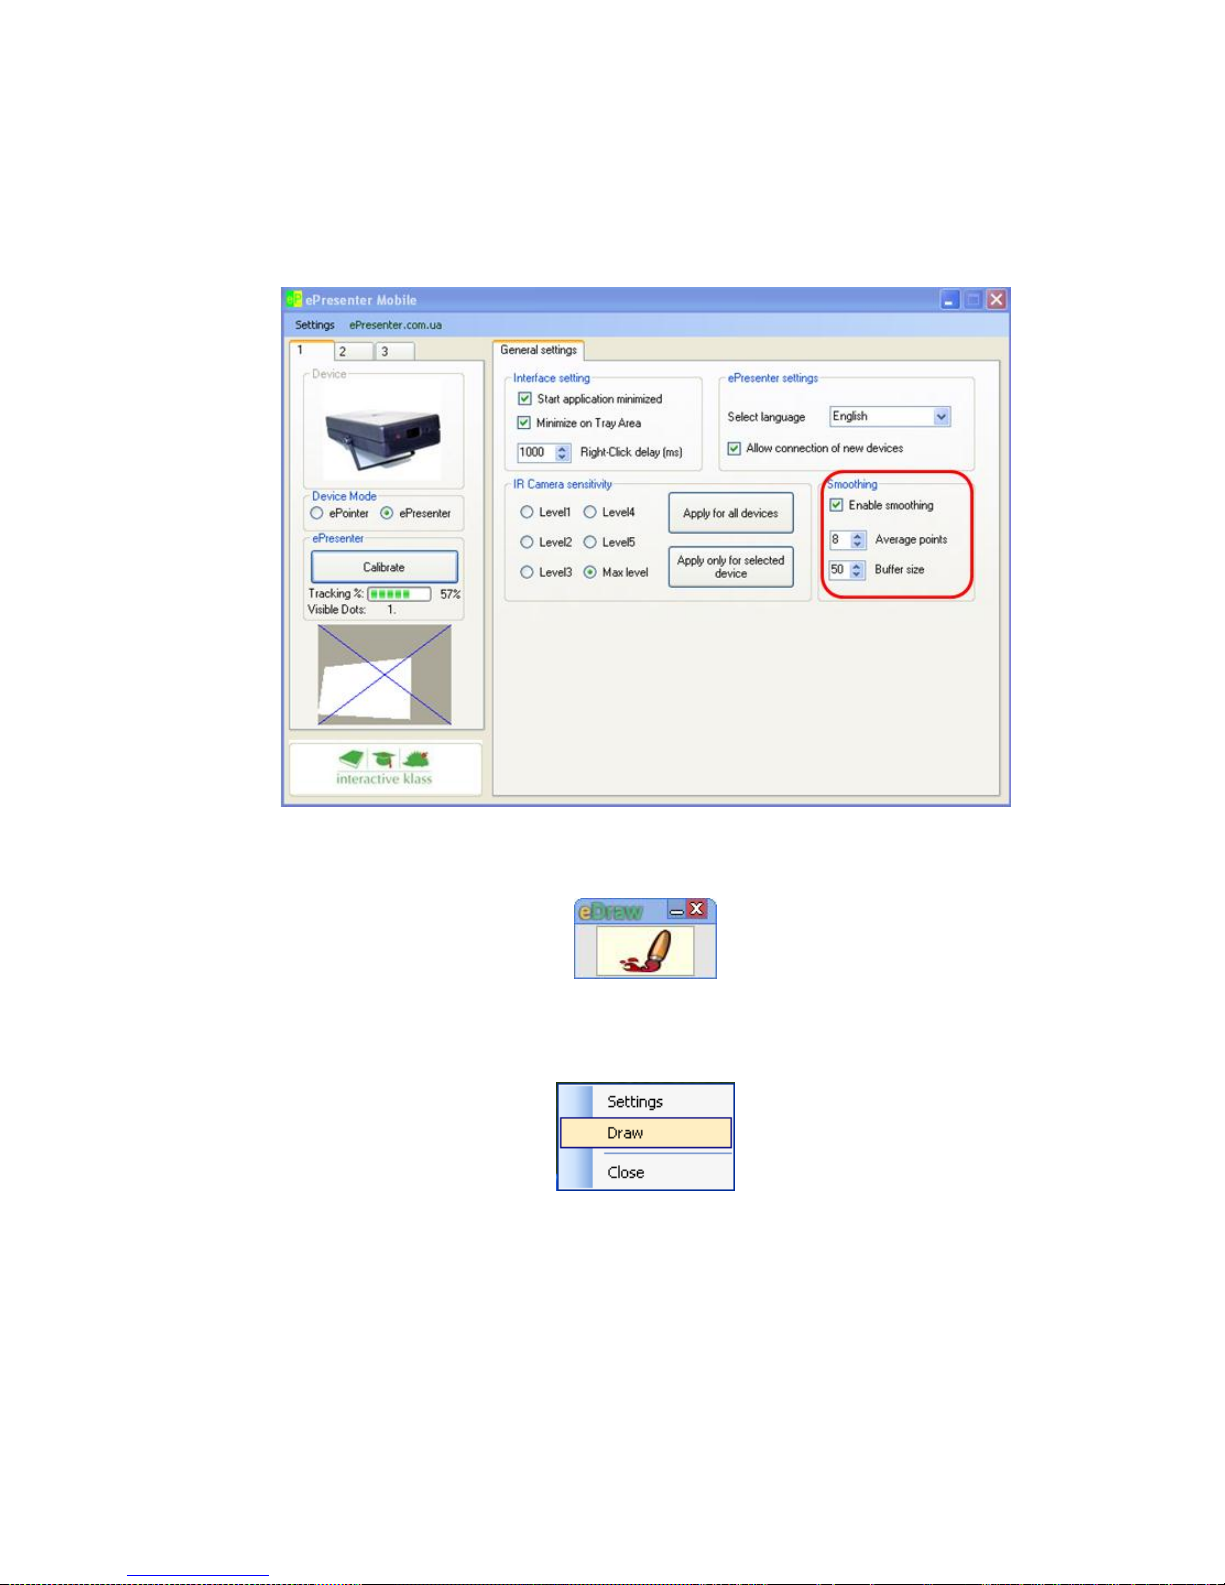
Option “Enable smoothing” allows you to draw smooth and straight lines. Tick a checkbox
“Enable smoothing” and select "Average points" and "Buffer Size"(Fig.3.39) which affect the
drawing quality and display speed.
The higher the values, the better the quality of drawing. The lower the values, the higher
display speed.
Fig.3.39
3.8. How to Use eDraw Program
eDraw application is started automatically along with the ePresenter application (Fig. 3.40).
Fig.3.40
You can close this application and launch it later clicking the tray icon “ePresenter” and
selecting a point "Draw" in drop-down list (Fig.3.41).
Fig. 3.41
Page 28
BEP_6.1_241111
28
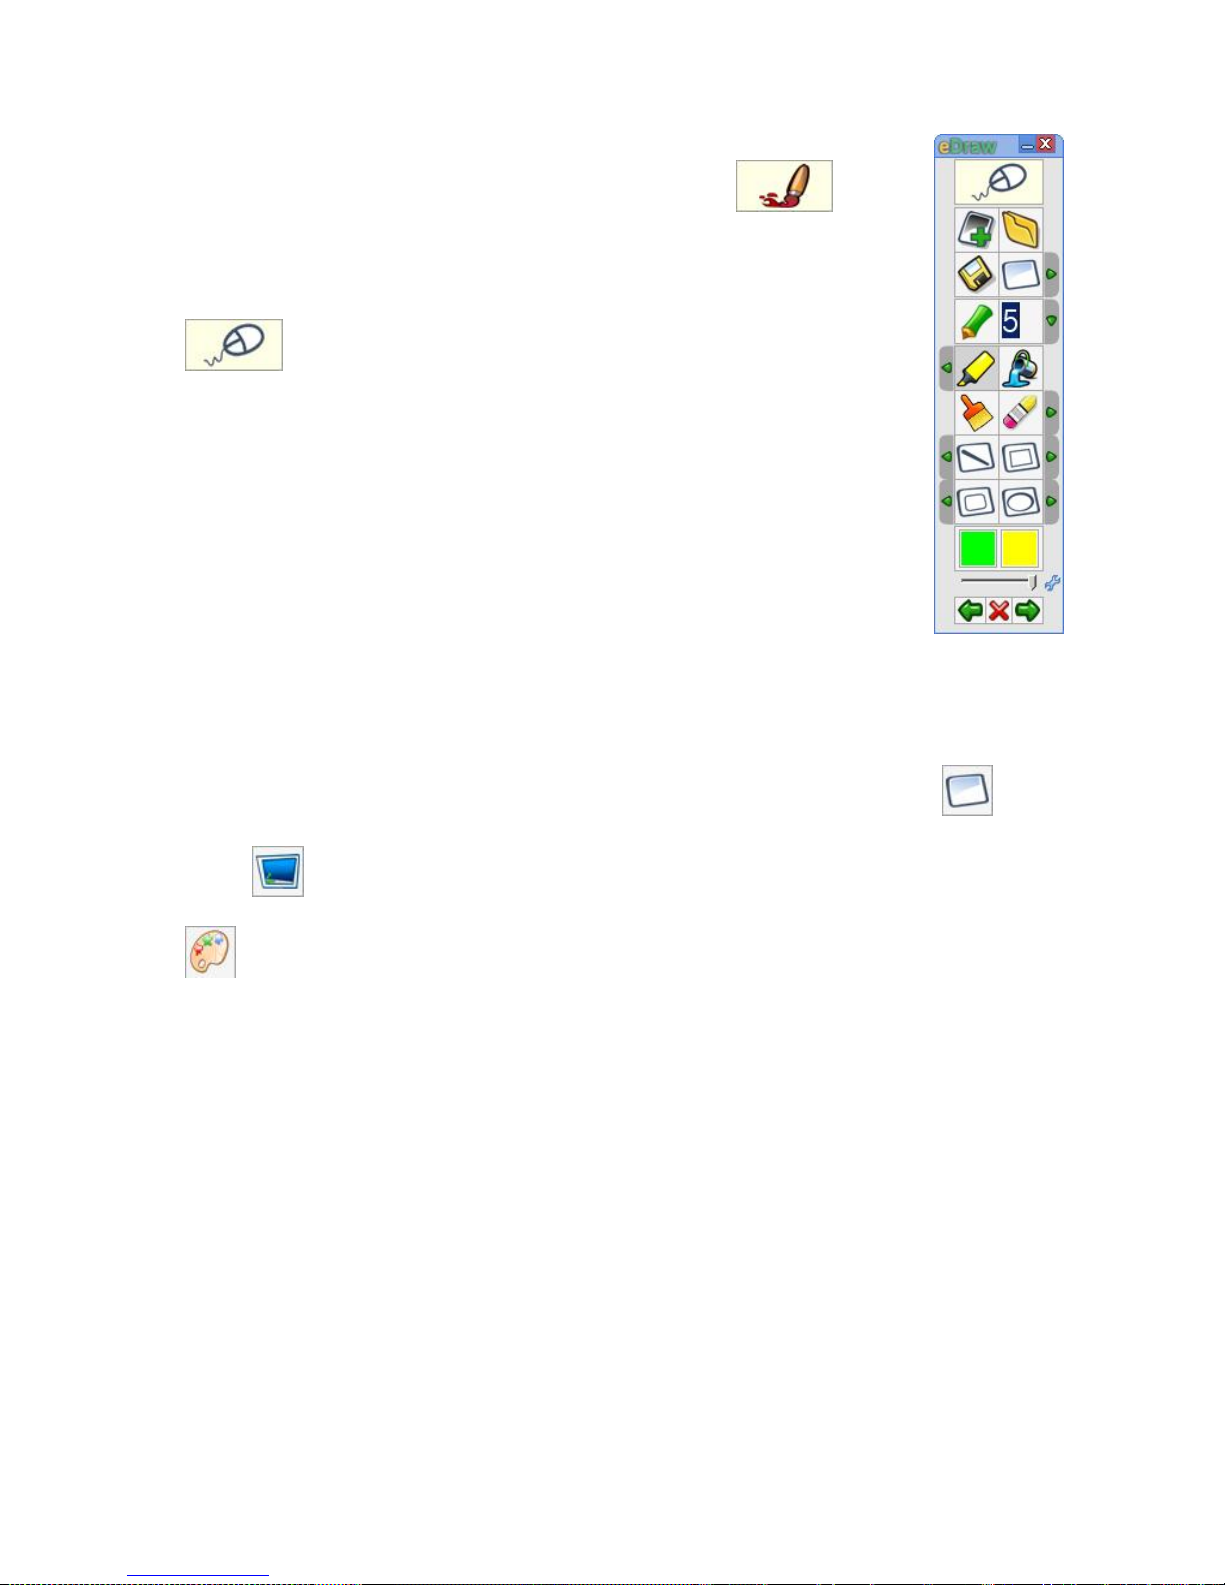
3.5.1. "Drawing" and "Mouse control" Modes
By default application is run in a mode “Mouse control”. Control
panel contains only single button. Click this button and
application will be turned to “Drawing” mode.
The expanded toolbar will be displayed (Fig 3.42). If you want to
return to default “Mouse control” mode just click the button
..
Fig. 3.42
3.5.2. Background selection
By default a background for your drawings is a background of current running application.
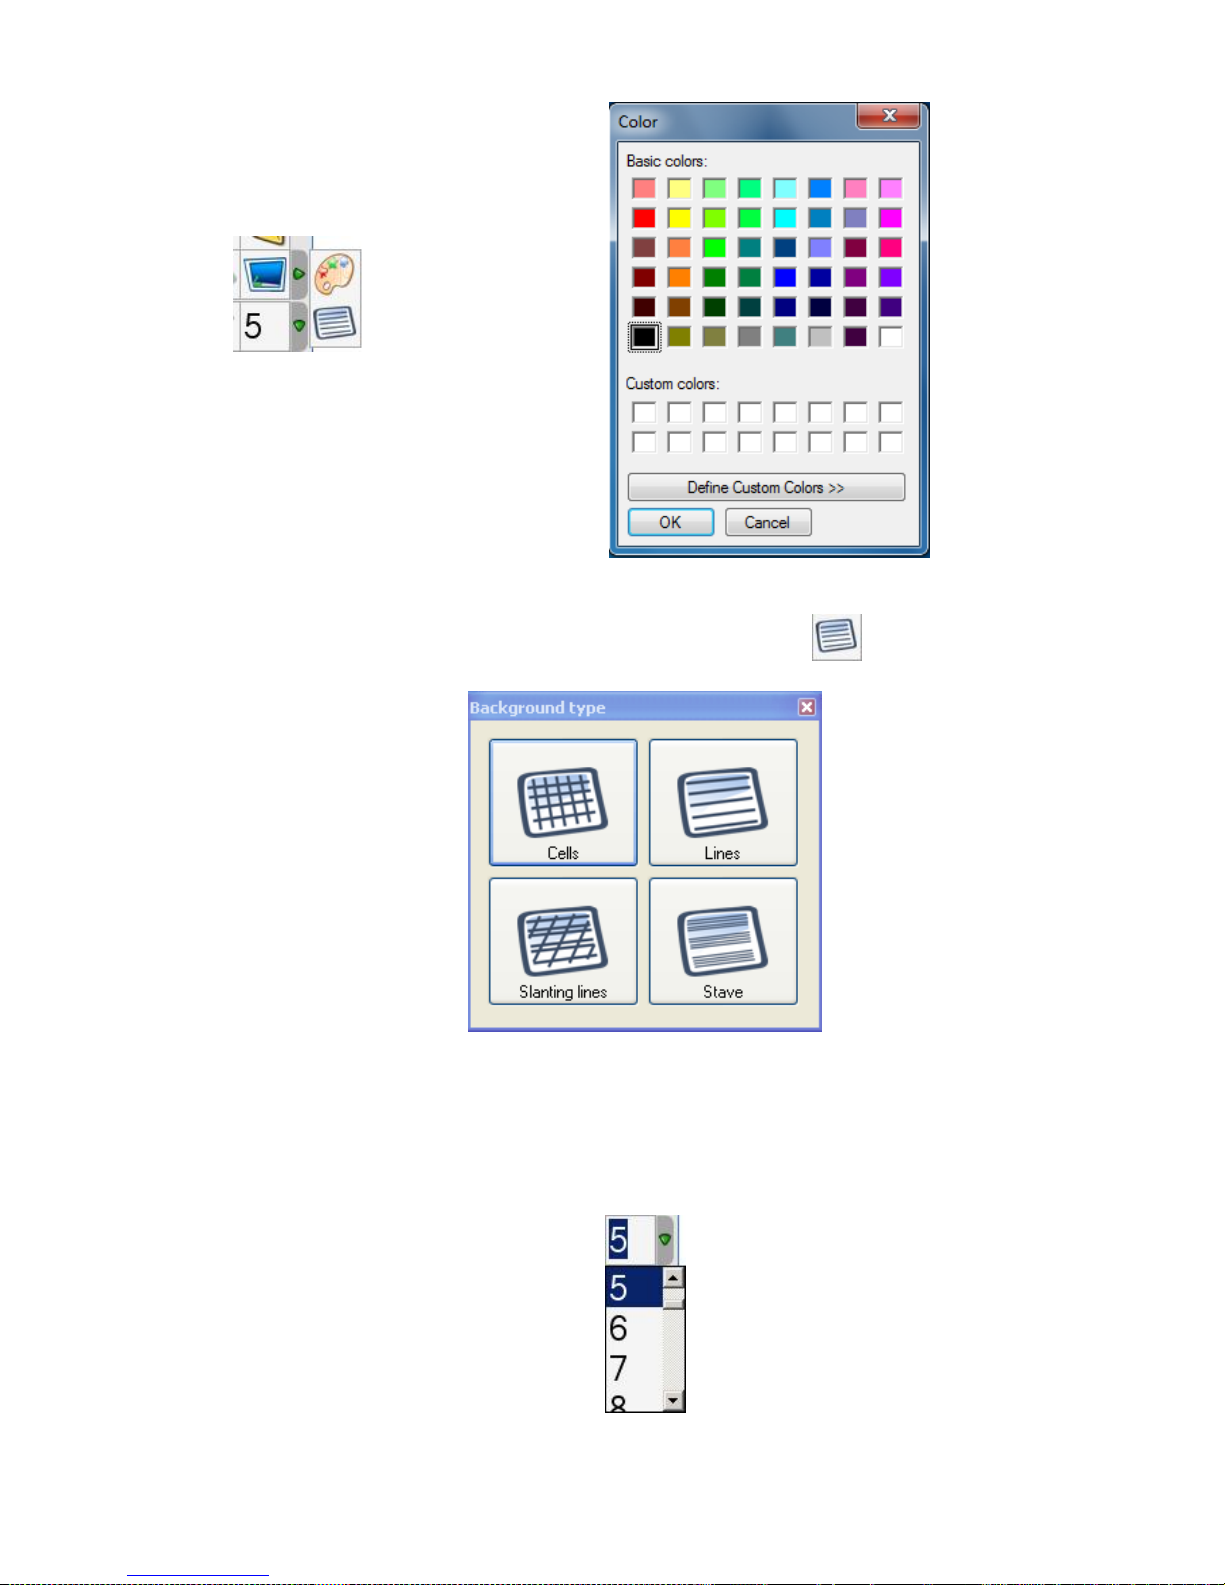
But you can change this background to solid one. Please press the button to draw on
a solid background.
Press button to return to drawing on the desktop background. You can also select
background color. Press the arrow right of change background button than press the button
(Fig.3.43) in drop-down menu, select the color you want to use and click
"OK"(Fig.3.44).
Page 29
BEP_6.1_241111
29
Fig.3.43
\
Fig.3.44
You can also change background template. Select an item from background dropdown menu and block with standard background templates will be displayed (Fig.3.45).
Fig. 3.45
3.5.3. Pen size
This setting is useful when you draw with a “pencil” tool or draw lines or shapes. Click the
arrow the right hand of “pencil” tool and select size from drop-down list or enter the number
manually (Fig.3.46).
Fig.3.46
Page 30
BEP_6.1_241111
30
3.5.4. "Pencil" tool
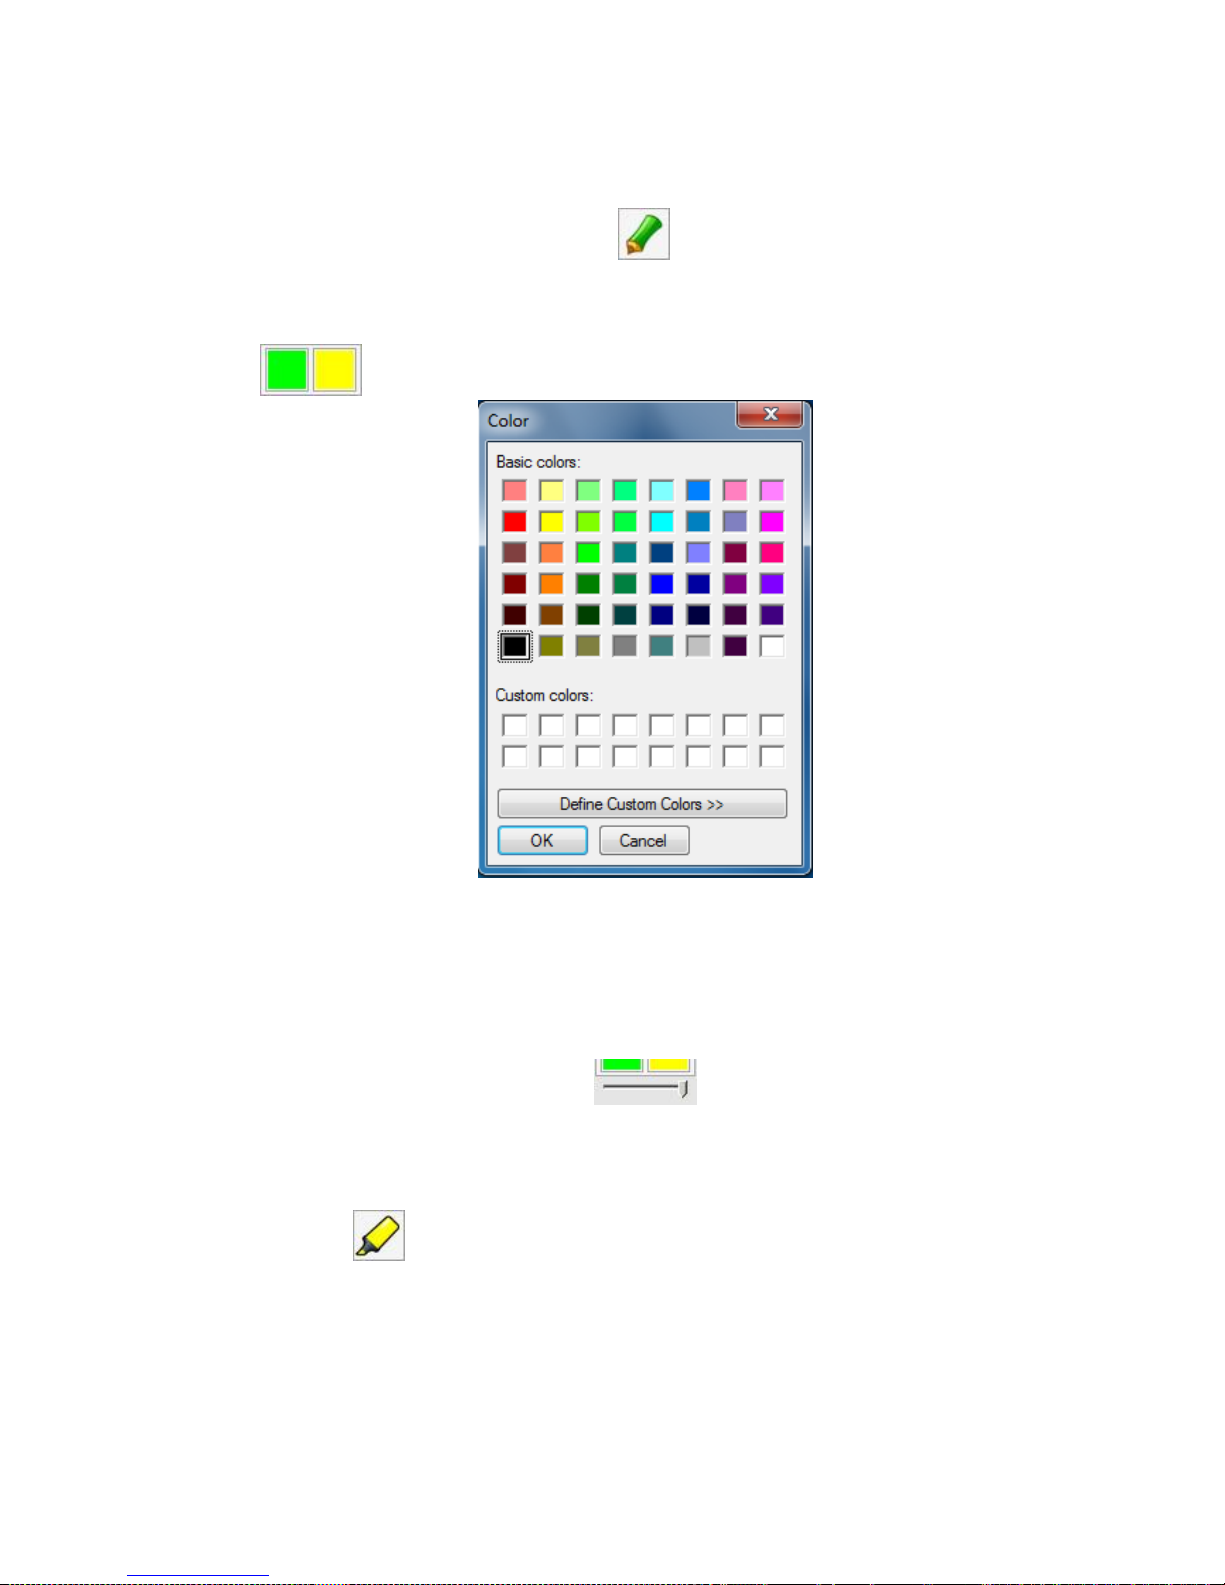
You can use this tool for annotations, drawing etc. Pen size is a setting determining a
thickness of line you draw. Click the button and “pencil” tool will be activated.
3.5.5. Color Selection
You can also change a color of line you draw. Click one of two buttons on the bottom of
toolbar , pick a color from palette (Fig. 3.47) and click "OK".
Fig.3.47
This palette is available for tools like “Pencil”, “Paint bucket”, “Line”, “Rectangle”, “Rounded
Rectangle” and “Ellipse”. Left icon displays selected foreground color and right icon
background color does. If you use right mouse button for drawing the meanings of these
buttons are changed.
You can change the color transparency using slider right under the palette (Fig. 3.48).
Fig. 3.48
3.5.6. "Marker" Tool
This tool is useful for annotation, highlighting information, etc.
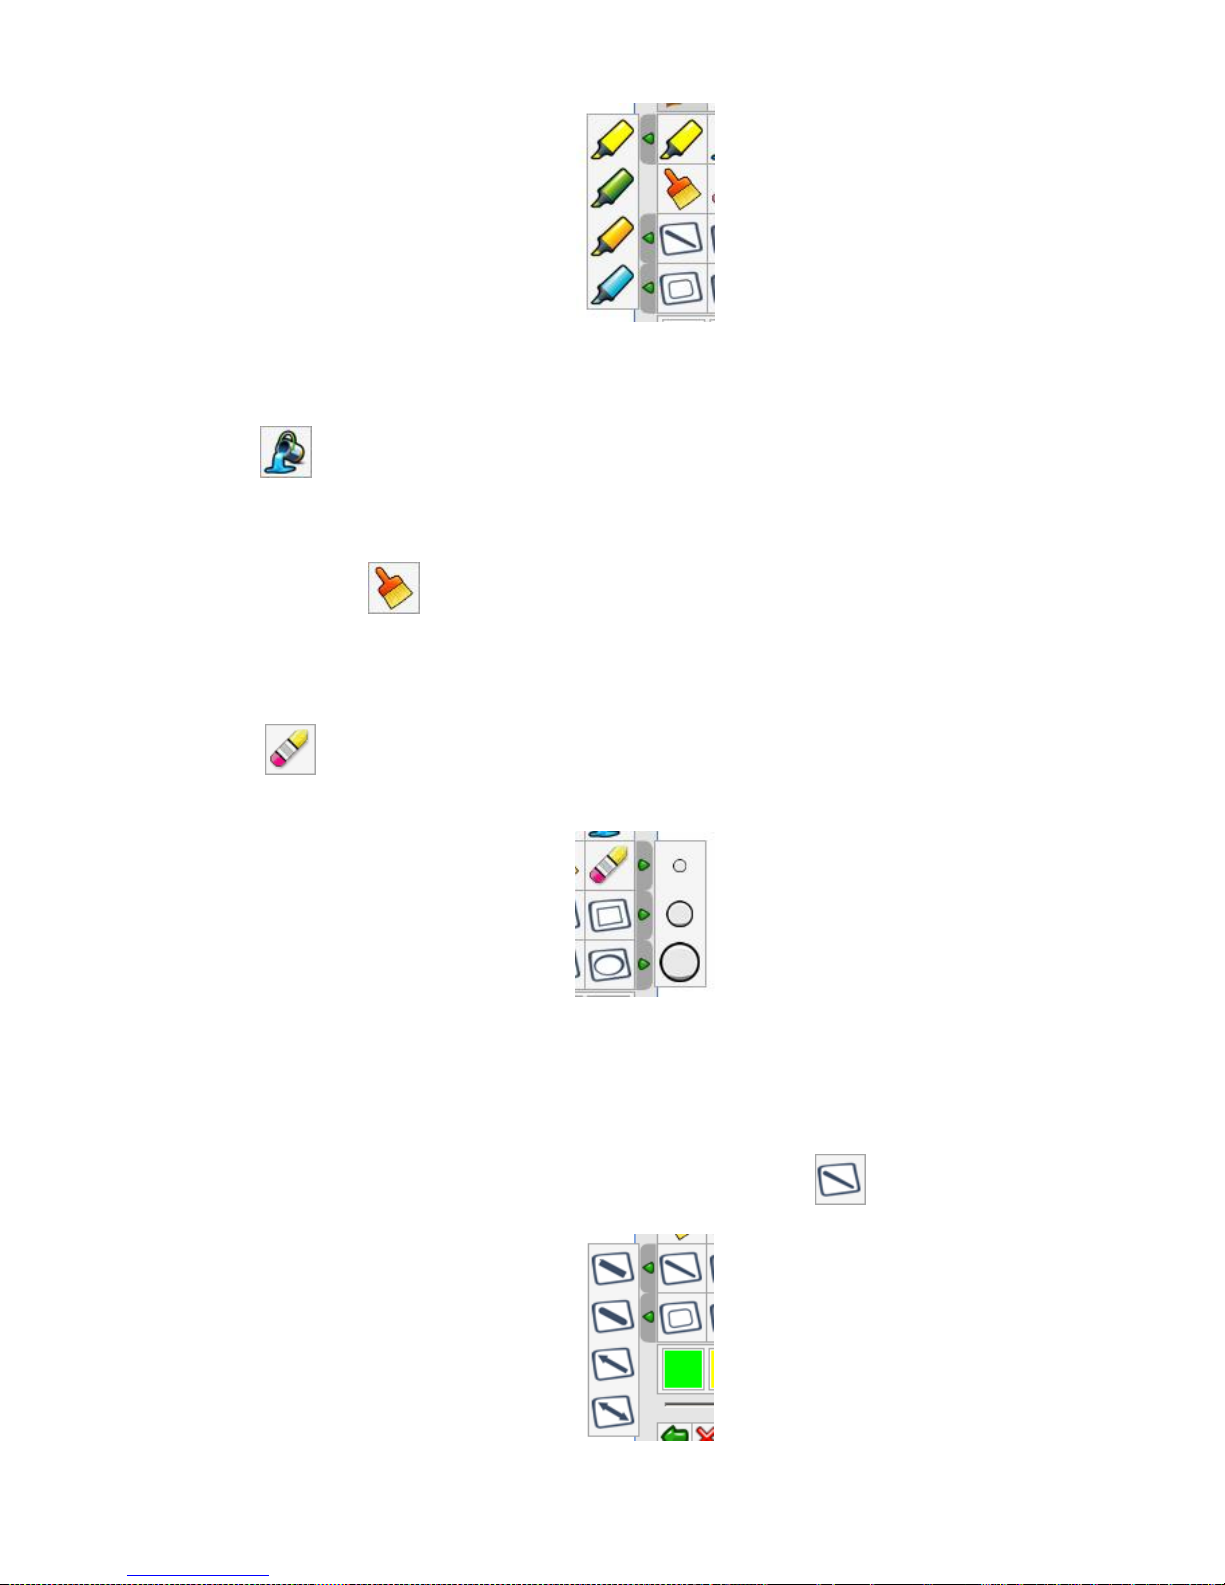
Click the button and select a type of marker from Marker toolbar (Fig.3.49).
Page 31
BEP_6.1_241111
31
Fig.3.49
3.5.7. “Paint bucket” tool
You can use this tool for filling a bounded area with predefined background color. Press a
button to use this tool.
3.5.8. Cleaning page
Press the button .to clean a page. All previous drawings will be removed from the
page.
3.5.9. Eraser tool
This tool is useful if it’s required to remove drawings partially from the page. Press the
button to use this tool. You can also change a size of eraser clicking the arrow by
Eraser button. A list of available sizes will be diaplsyed (Fig.3. 50).
Fig 3.50
When you work with Eraser tool the left mouse button click displayes the “Marker” tool
features but the right mouse button click displays the “Paint busket” tool features.
3.5.10. “Line” Tool
You can draw lines using “Line” tool. Click the toolbar button . Click the arrow by this
button and choose a type of line from “Line type” toolbar (Fig.3.51).
Fig.3.51
Page 32
BEP_6.1_241111
32
3.5.11. Shapes
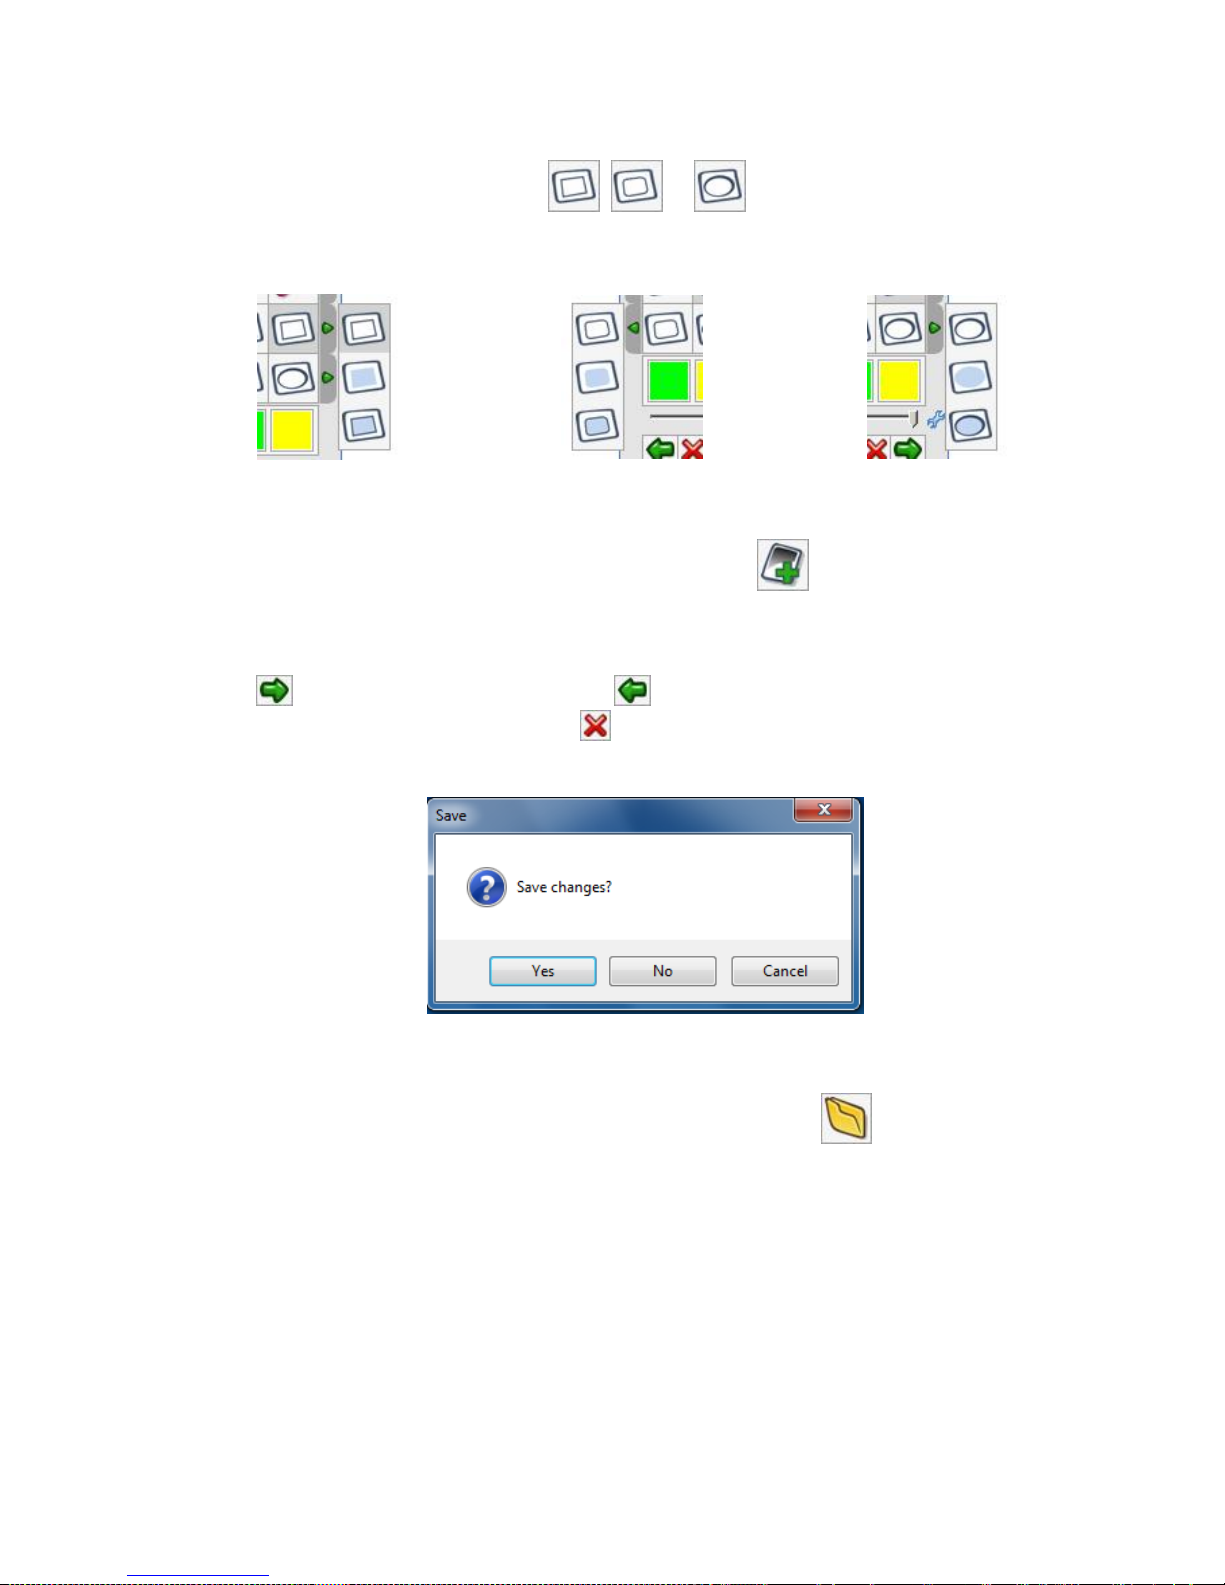
eDraw program supports three types of shapes: “Rectangle”, “Rounded Rectangle” and
“Ellipse”. Click one of three buttons , or to choose a proper shape.
Each shape has three drawing modes: boundary, solid shape and boundary solid shape.
Click the arrow near proper shape button and select a desired mode (Fig.3.52, Fig.3.53,
Fig.3.54).
Fig.3.52
Fig.3.53
Fig.3.54
3.5.12. Create Page
To create a new page for drawing please click the button .
3.5.13. Page Manager
You can create more than one pages and then move between them with navigation buttons.
Button move you to the next page and button return you to previous one.
You can delete current page pressing button. The confirmation block will be displayed
asking you whether you want to delete page or not. (Fig.3.55).
Fig.3.55
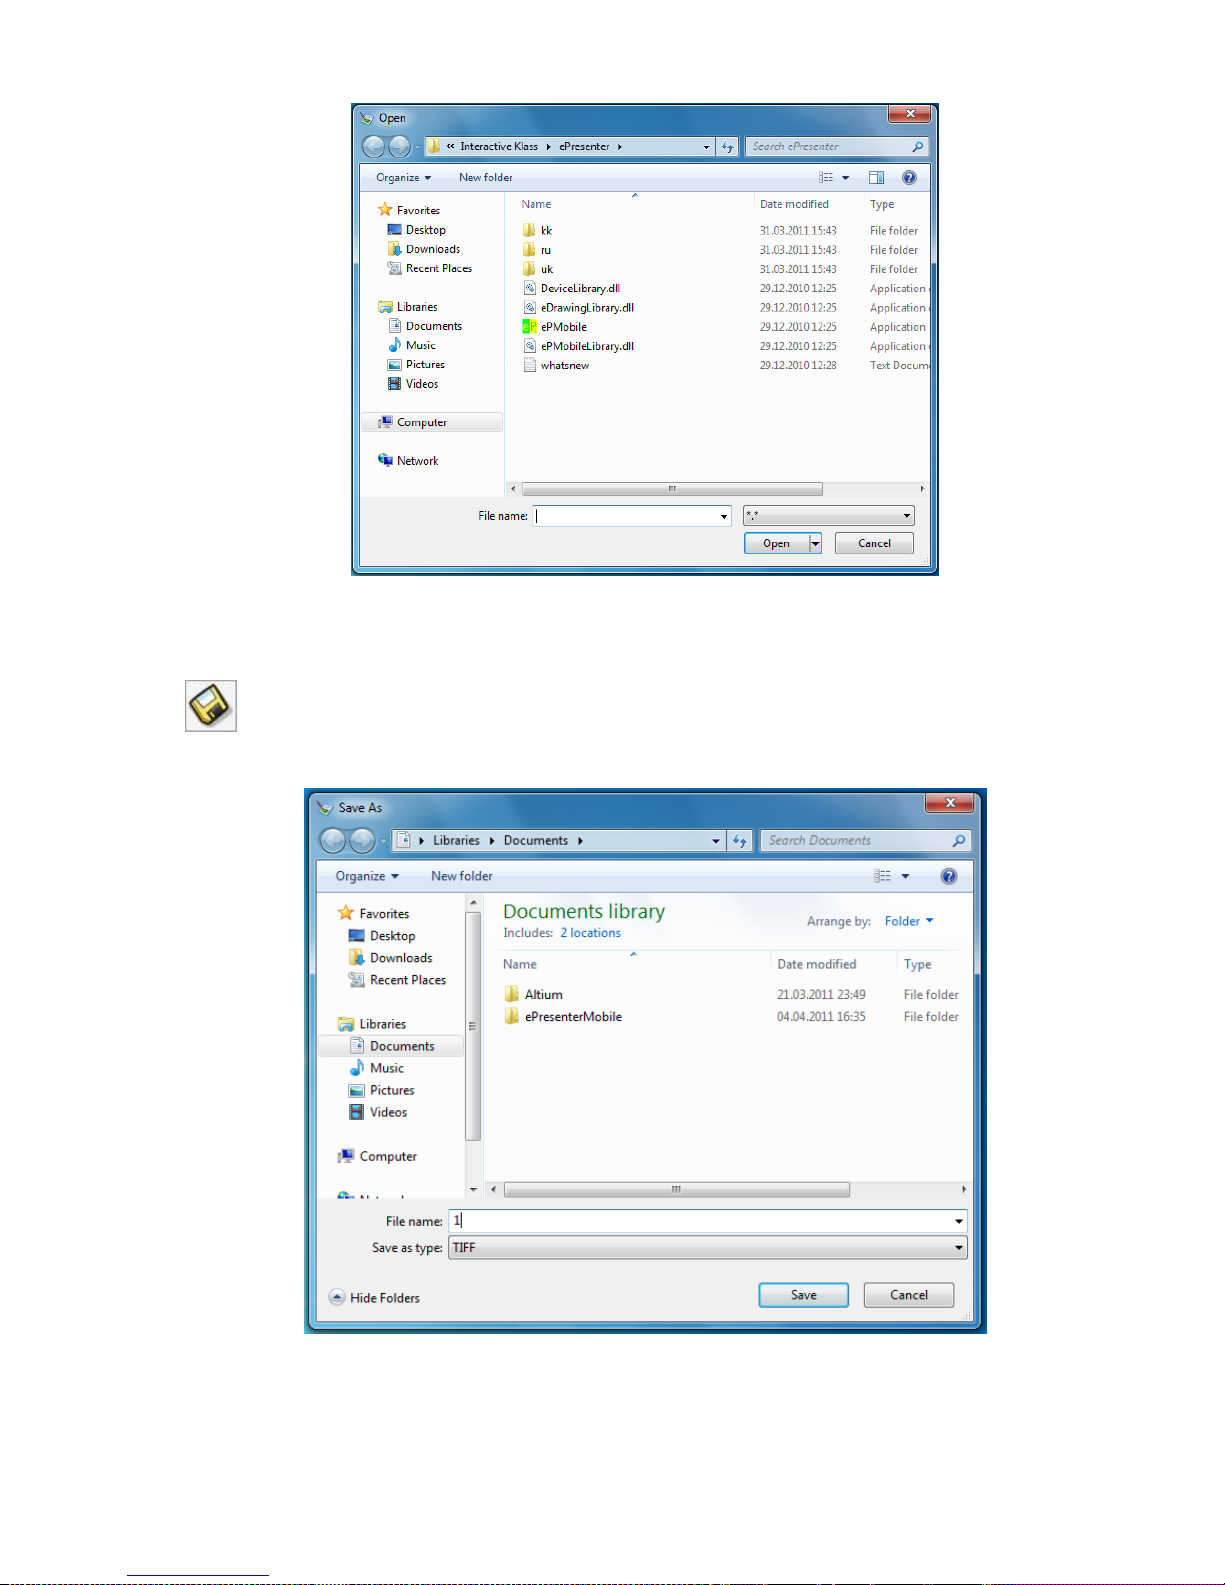
3.5.14. Opening Files
You can create new page using existed files. Press a button and choose a file you
want to use. Click the button “Open” (Fig.3.56). A separate page is created for each
opened file. You can view or edit new pages like others. And can use page manager for
moving through them.
Page 33
BEP_6.1_241111
33
Fig.3.56
3.5.15. Saving a book
You can save all pages which were opened or created as a separate book. Click the button
, enter a new file name, select a type of file from drop-down list below and click the
button “Save” (Fig.3.57). All pages will be saved in the file.
Fig.3.57
If you select a multi-format (TIFF) all pages will be saved as a single file. If you select oneline format each page will be saved separately as a different files.
Page 34
BEP_6.1_241111
34
3.5.16. Settings
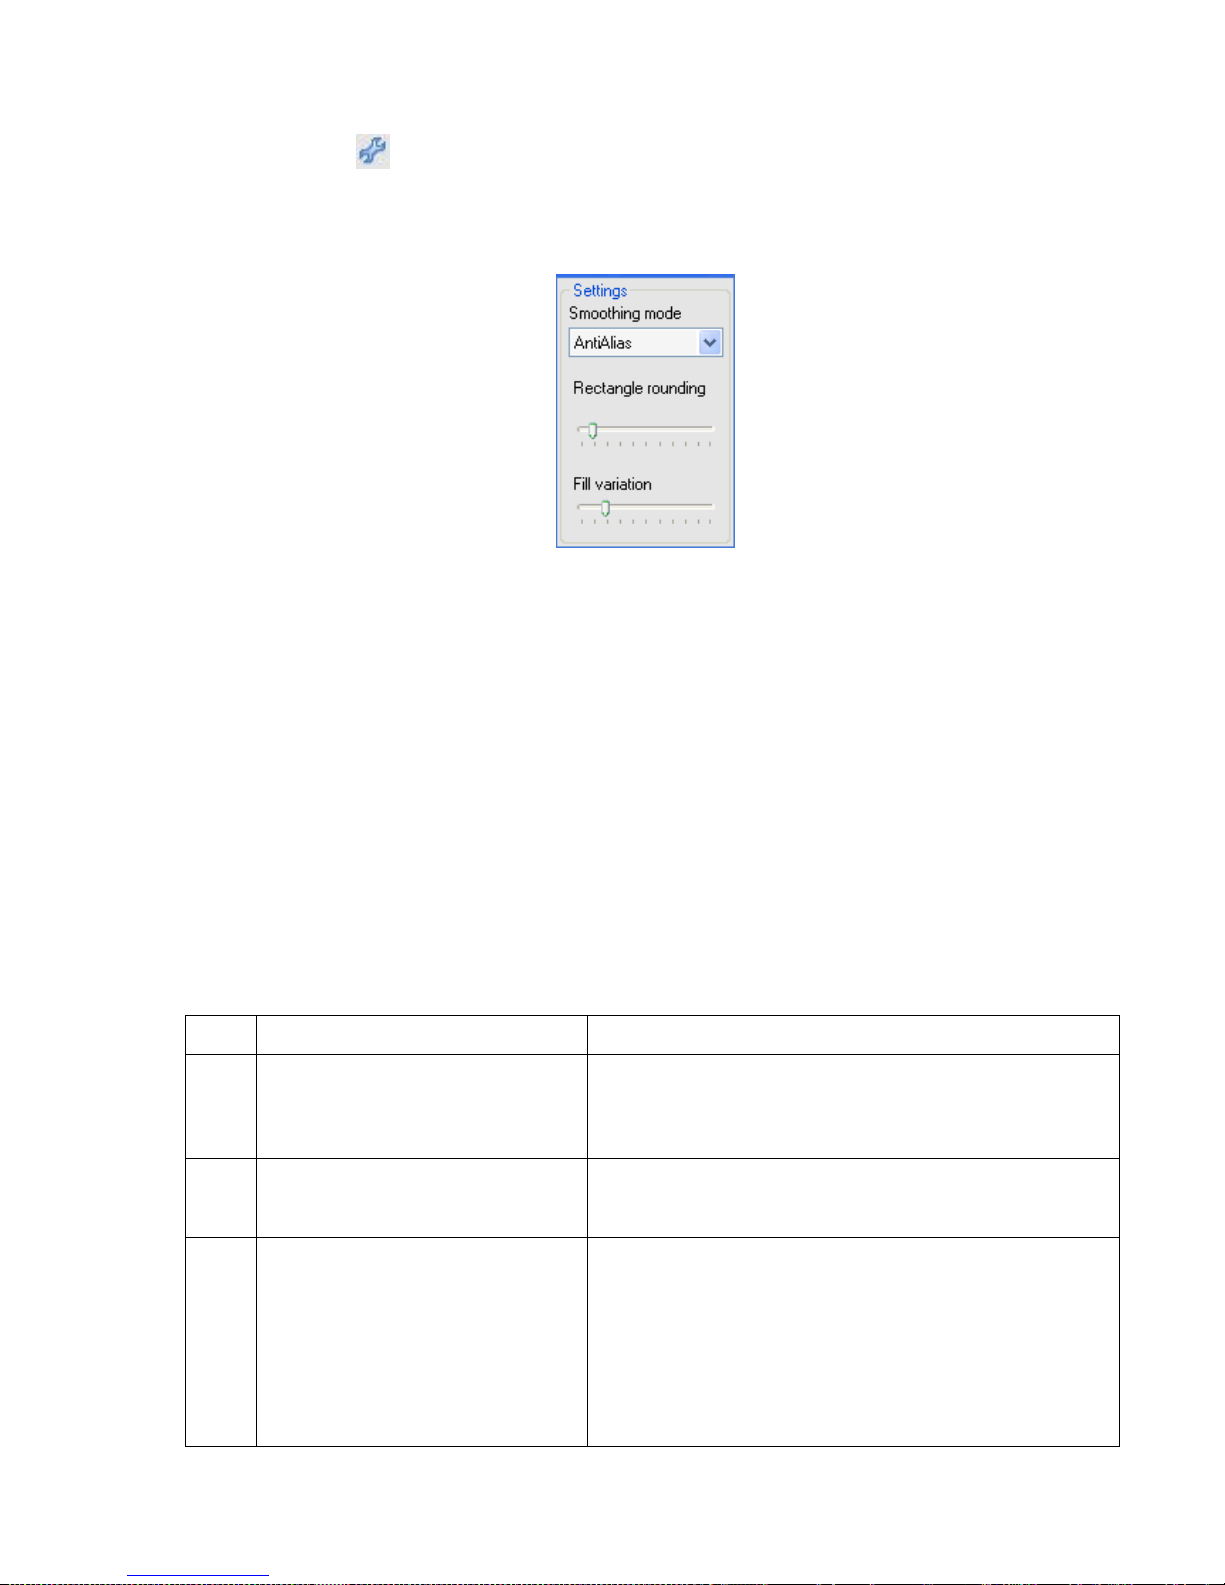
Click the button (Fig.3.42) and Setting Panel will be displayed (Fig.3.58). It proposes
some settings for managing different drawing tools.
You can define smoothing mode, selecting it from a list of available; set a size of rounding
corners and a filling dispersion.
Fig.3.58
Click the “Settings” button the second time and Settimg Panel will be hidden. All changes
will be saved.
3.6. KlassmatePresenter Software Guide
KlassmatePresenter Software is supplied. It’s installed with other software.
A KlassmatePresenter Software proposes a lot of functions which may be useful when
making presentations and lessons with Intaractive Whiteboard.
You can launch a program clicking the icon “KlassmatePresenter” on the PC desctop or
choosing a proper line in menu “Program” and then “Interactive Klass” >
“KlassmatePresenter”.
The complete description of all software features you can find in a separate User Manual
embedded to software.
Please open “Program” menu and choose “Interactive Klass” > “KlassmatePresenter User
Guide”.
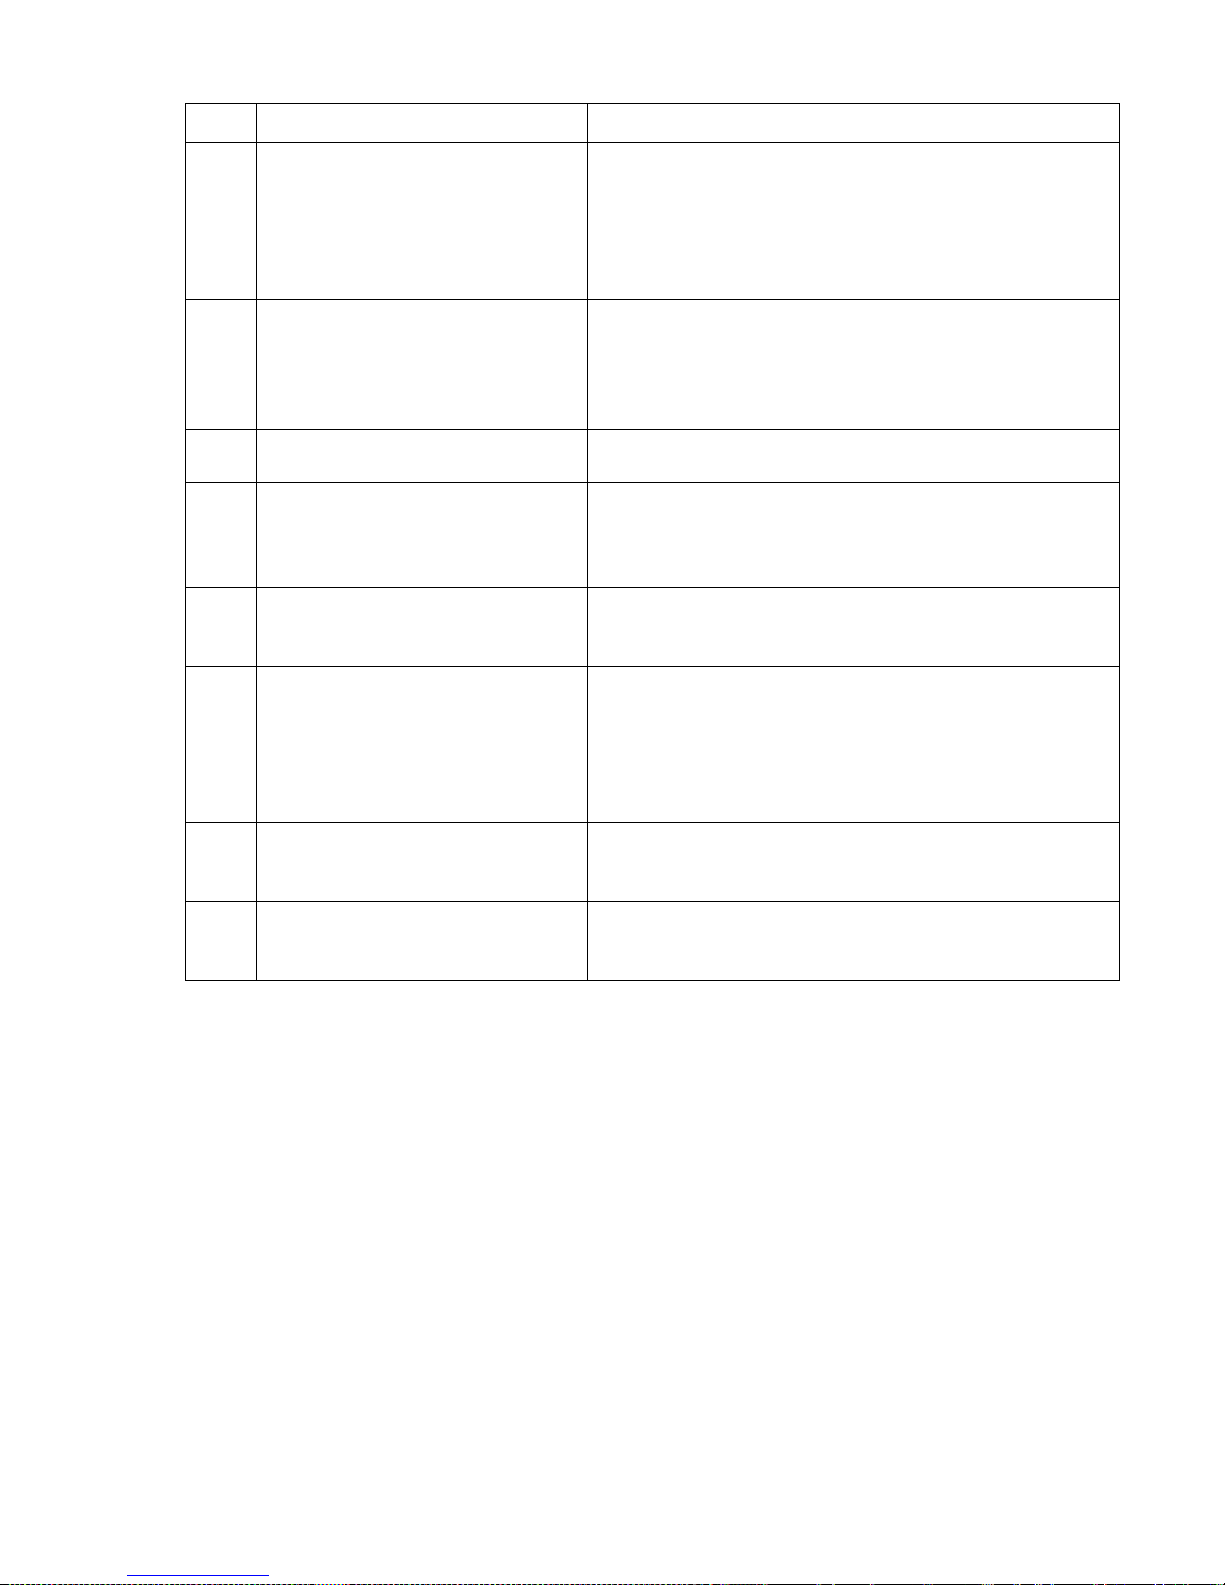
4. Troubleshooting: Questions and Answers
Num
Question
Answer
1
May ePresenter be installed
further than 3m from the
projection surface?
We don’t reconend to install ePresenter further
than 3m from projection surface as well as optical
stylus power is insufficient for ePresenter stable
operating.
2
System doesn’t respond to
stylus but responds to mouse
moving or key pressing.
Possibly battery is depleted. Please change it.
3
I can’t calibrate projection
surface. Some points don’t
respond to stylus touch.
There are two possible reasons:
- a distance between interactive block and
projection surface is too short;
- ePresenter lens wasn’t directed to projection
surface middle point.
You shouldn’t install interactive block closer then
1,5 boads diagonals. Change a distance and then
channel its lenth correctly.
Page 35
BEP_6.1_241111
35
Num
Question
Answer
4
Interactive block EP03M turns
off during operation and
requires to be rebooted.
There are two possible reasons:
- power is over. Please check connection to power
block or check if batteries are charged;
- light interference influences an interactive block
synchronization system and breaks it;
Please synchronize system again.
5
Cursor “stuck” on active
surface.
1. You should remove or limit infrared rediation
(sun rays , light flashes or light of mercury lamps
etc)
2. Re-connect all system items.
3. Calibrate an active surface again.
6
The lines created by drawing
or annotation tools are dotted.
1. You should turn on smoothing mode for stylus.
2. Change stylus battery.
7
Cursor position on the screen
doesn’t match a point where
stylus touches a projection
surface.
The possible reason tham the calibration was
damaged. Please calibrate an active surface
system again.
8
Stylus slips on the board
surface badly.
Possible reason is a board surface pollution or
dusting. Please process a board surface any
aerosol furniture polish containing wax.
9
“Dead zone” which don’t
respond to stylus touch
appears on the boad.
1. Person who makes presentation eclipses
detector window from interactive block lens.
Optical stylus head should always be “seen” by
lens.
2. Calibration was damaged. Please calibrate an
active surface system again.
10
Will other devices in area
prevent interactive board
operating?
No, they won't.
11
Interactive block ePresenter
EP03 can’t be synchronized to
control PC.
Power supply is missing. Please reestablish it
using USB cable and synchronize interactive block
again.
 Loading...