

Page 1

BT04 Function Guide www.epordo.com
CONTENT
1、Introduction......................................................................................2
2、Using Notice......................................................................................3
3、BasicConcept....................................................................................3
3.1. Basic Concept .............................................................................3
3.1.1 User Enrollment .......................................................................4
3.1.2 User Verification .......................................................................4
3.1.3 Security Levels ........................................................................4
3.1.4 User ID numbers ......................................................................5
3.1.5 Authority(status) Levels status. ... ..............................................5
3.1.6 Start-up window.......................................................................5
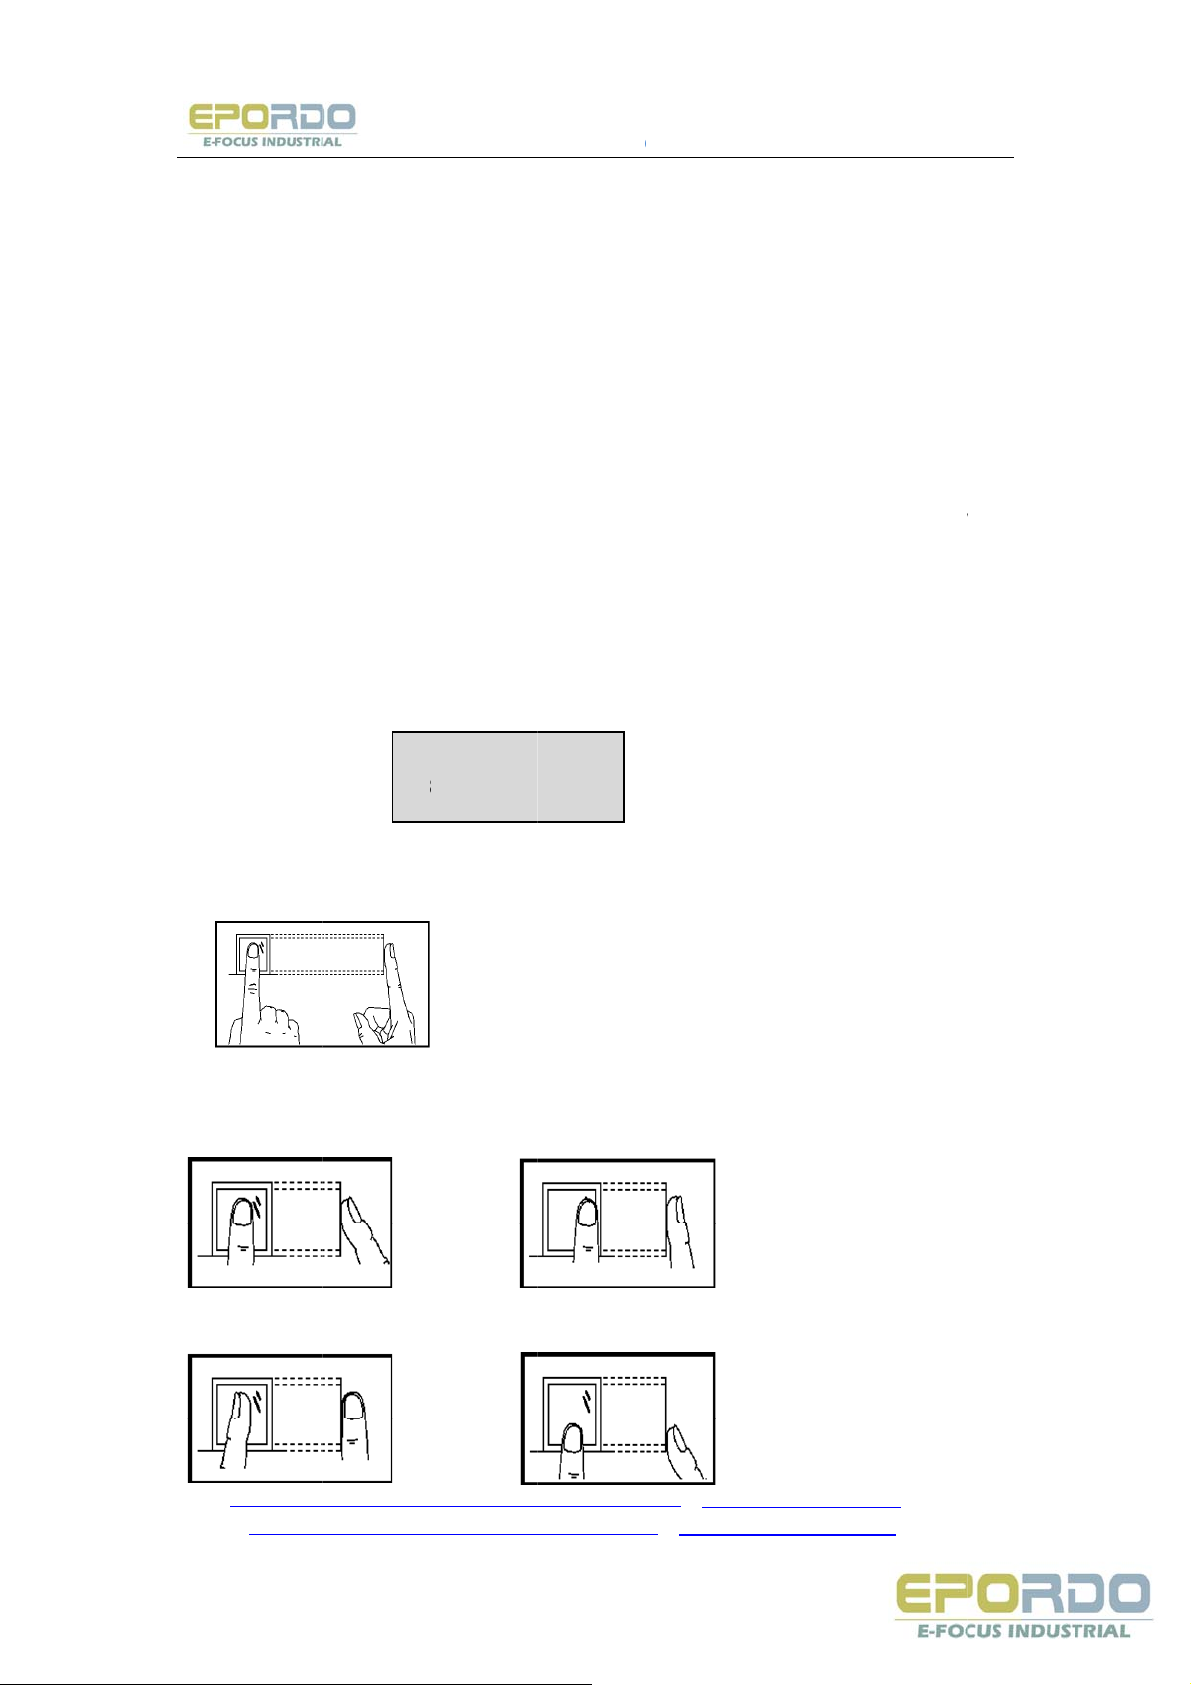
3.2. How to place the finger..................................................................5
4、Enrollment and Verification Procedures ................................................6
4.1. Enrolling User .............................................................................6
4.2. Testing An Enrollment.................................................................10
4.3. Backup Enrollment .....................................................................10
4.4. Verifying Your Identity ................................................................10
4.4.1. Fingerprint verification ...........................................................10
4.4.2. Password verification..............................................................11
4.4.3. ID&Fingerprint ......................................................................11
4.5. Hints For Sucessful Enrollments ...................................................11
5、System options................................................................................12
5.1 System Options ..........................................................................13
5.1.1 Date time ..............................................................................13
5.1.2 Language ..............................................................................14
5.1.3 Format .................................................................................14
5.1.4 Advanced options ..................................................................14.
5.2 Communication Option.................................................................15
5.3 Log Option ................................................................................17
5.4 Access Control Function Option.....................................................17
6、System information ........................................................................19
7、Maintenance ..................................................................................20
8、User access control guide...................................................................20
8.1 Features ...................................................................................20
8.2 Basic Concepts ..........................................................................21
8.3 Brief introduction.......................................................................22
8.4 Verifying Procedure ...................................................................24
8.5 Function Introduction ................................................................24
8.5.1 Time period ..........................................................................24
8.5.2 Grouping function ..................................................................26
8.5.3 User access control setting.......................................................27
8.5.4 Open lock combination function definition..................................29
MSN: [email protected] / [email protected] / [email protected]
E-mail: [email protected] / [email protected]
Tel: +86 755 8341 8779/ 8825 7909
Page 2
BT04 Function Guide www.epordo.com
8.5.6 Lock Control Time...................................................................31
8.5.7 Door Magnet Delay..................................................................32
9、Technical Specification..................................................................33
1、Introduction
Access control is a simple, easy to use terminal machine, it can be installed in
the sensitive area where access requires authority, innovative manner combine
the advanced security fingerprint with access control management, to achieve
the high security management of access and exit control
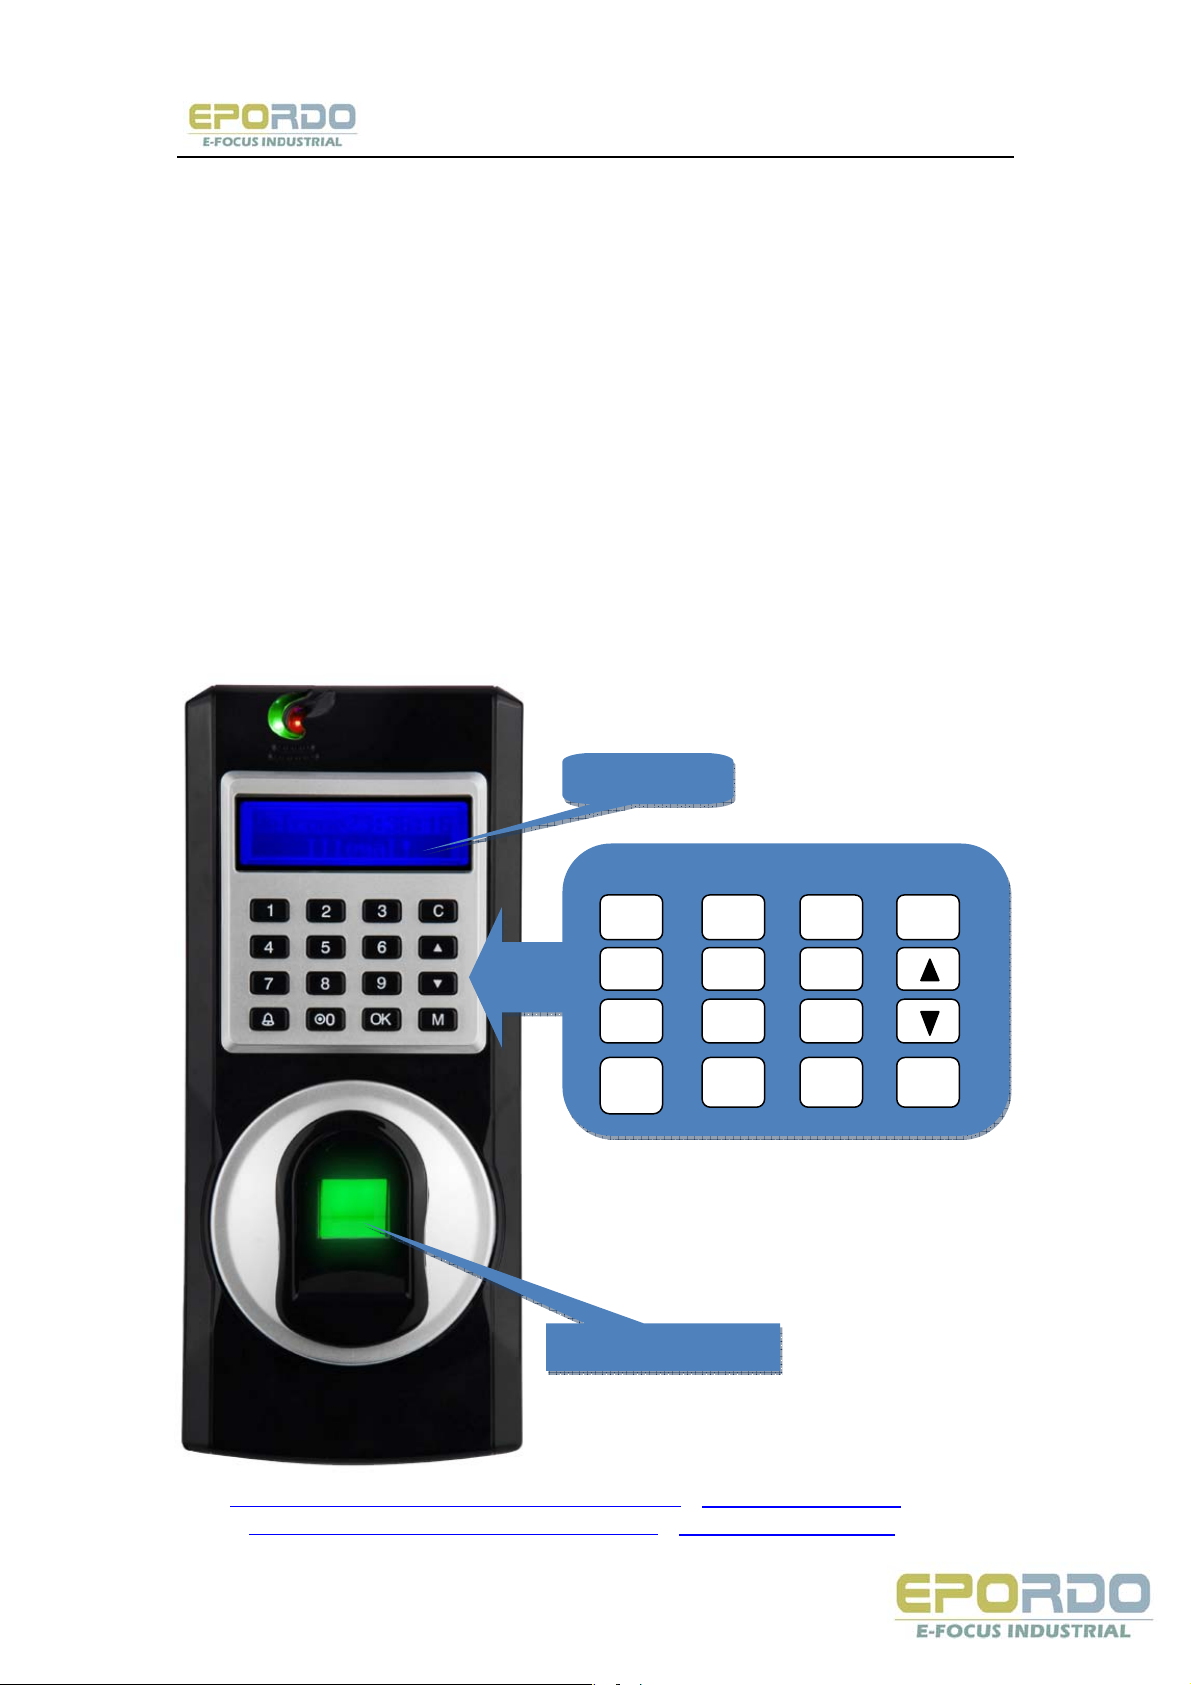
This chapter will explain the fingerprint device appearance in details
Fingerprint Access Control (the front)
122×32LCD
1
4
7
BELL
Fingerprint Sensor
2
5
8
◎0
3
OK
C
6
9
M
MSN: [email protected] / [email protected] / [email protected]
E-mail: [email protected] / [email protected]
Tel: +86 755 8341 8779/ 8825 7909
Page 3
BT04 Function Guide www.epordo.com
OK Confirm key: Confirm your present operation
MENU Menu key: Press the key for seconds to enter management interface
in the initial status
C Cancel key: Cancel your present operation
Up key: Scrolling up the menu
Down key: Scrolling down the menu
~ Power key: Control power on and off
BELL Sound bell
NUMBER: Press number 0 to 9
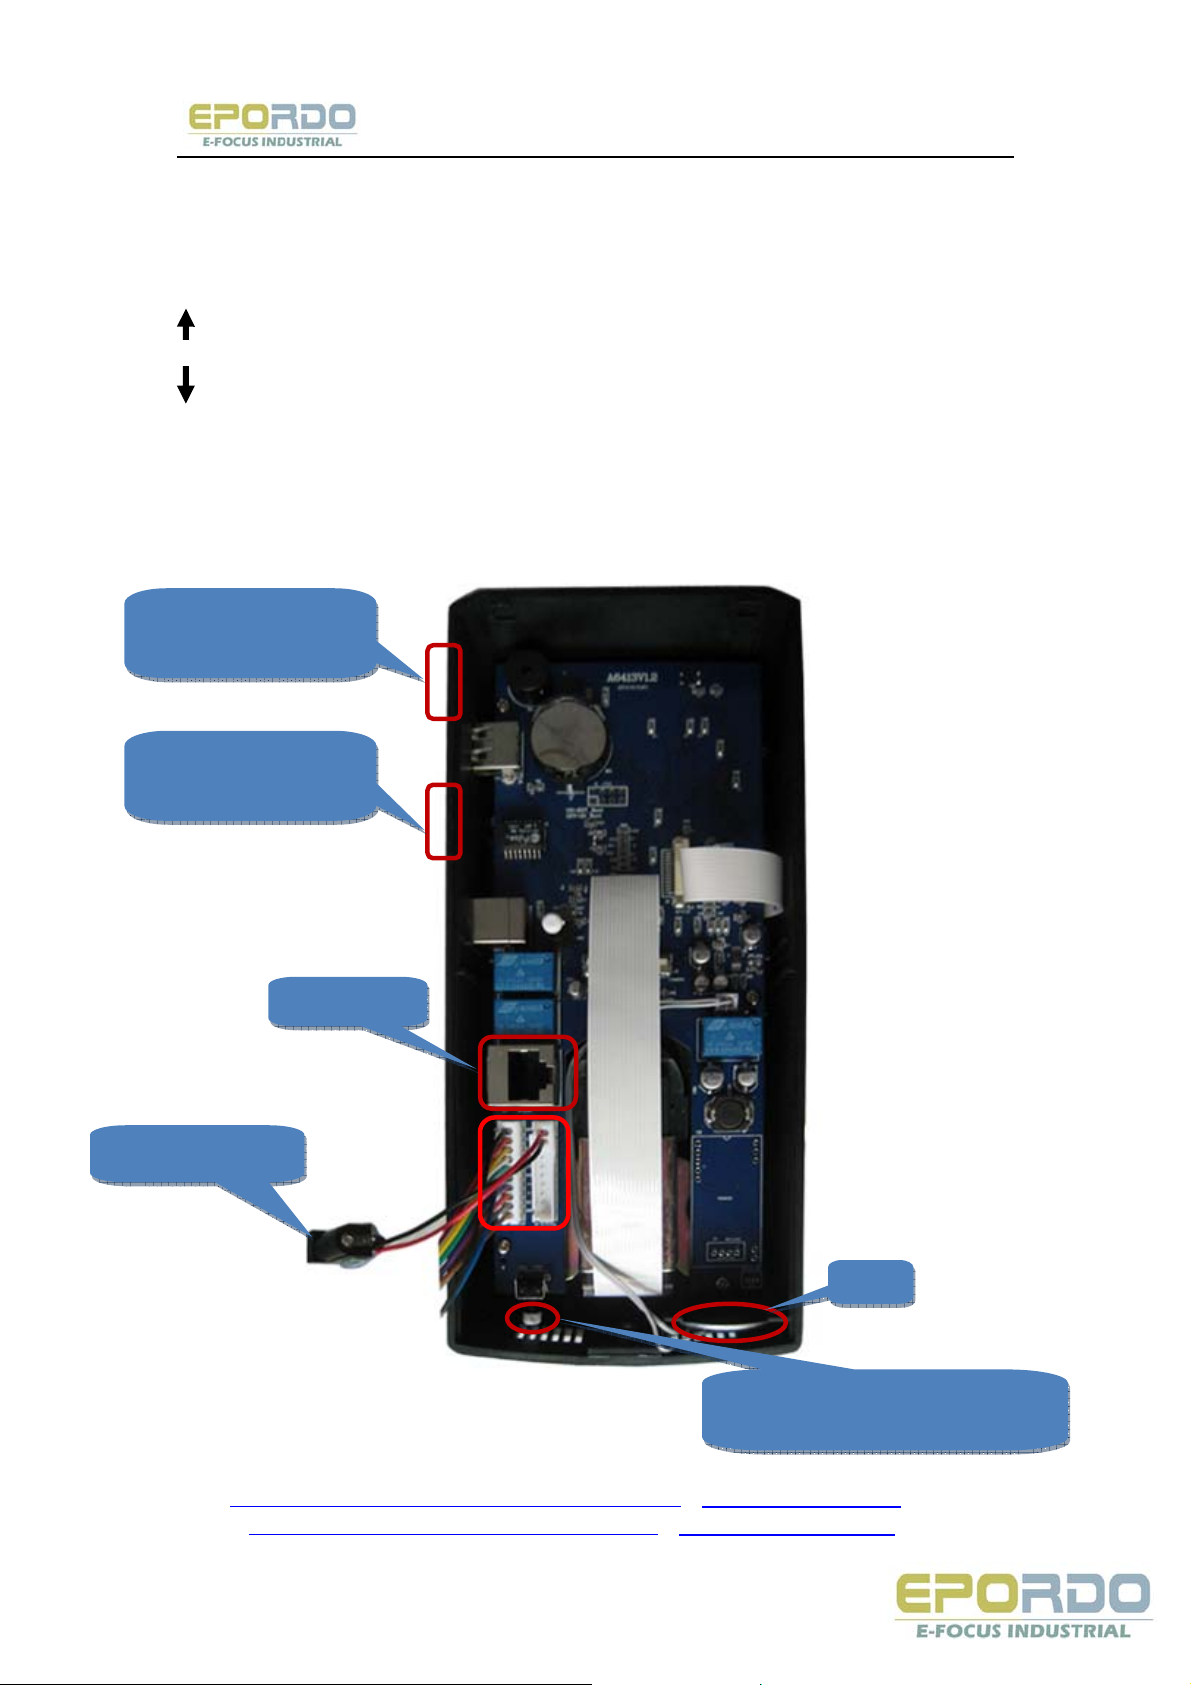
Fingerprint Access Control (the Back)
U disk: Upload or
download information
U disk: Upload or
download information
Power Supply
TCP/IP
Horn
Restart Button: You can restart
the machine by press the button.
MSN: [email protected] / [email protected] / [email protected]
E-mail: [email protected] / [email protected]
Tel: +86 755 8341 8779/ 8825 7909
Page 4
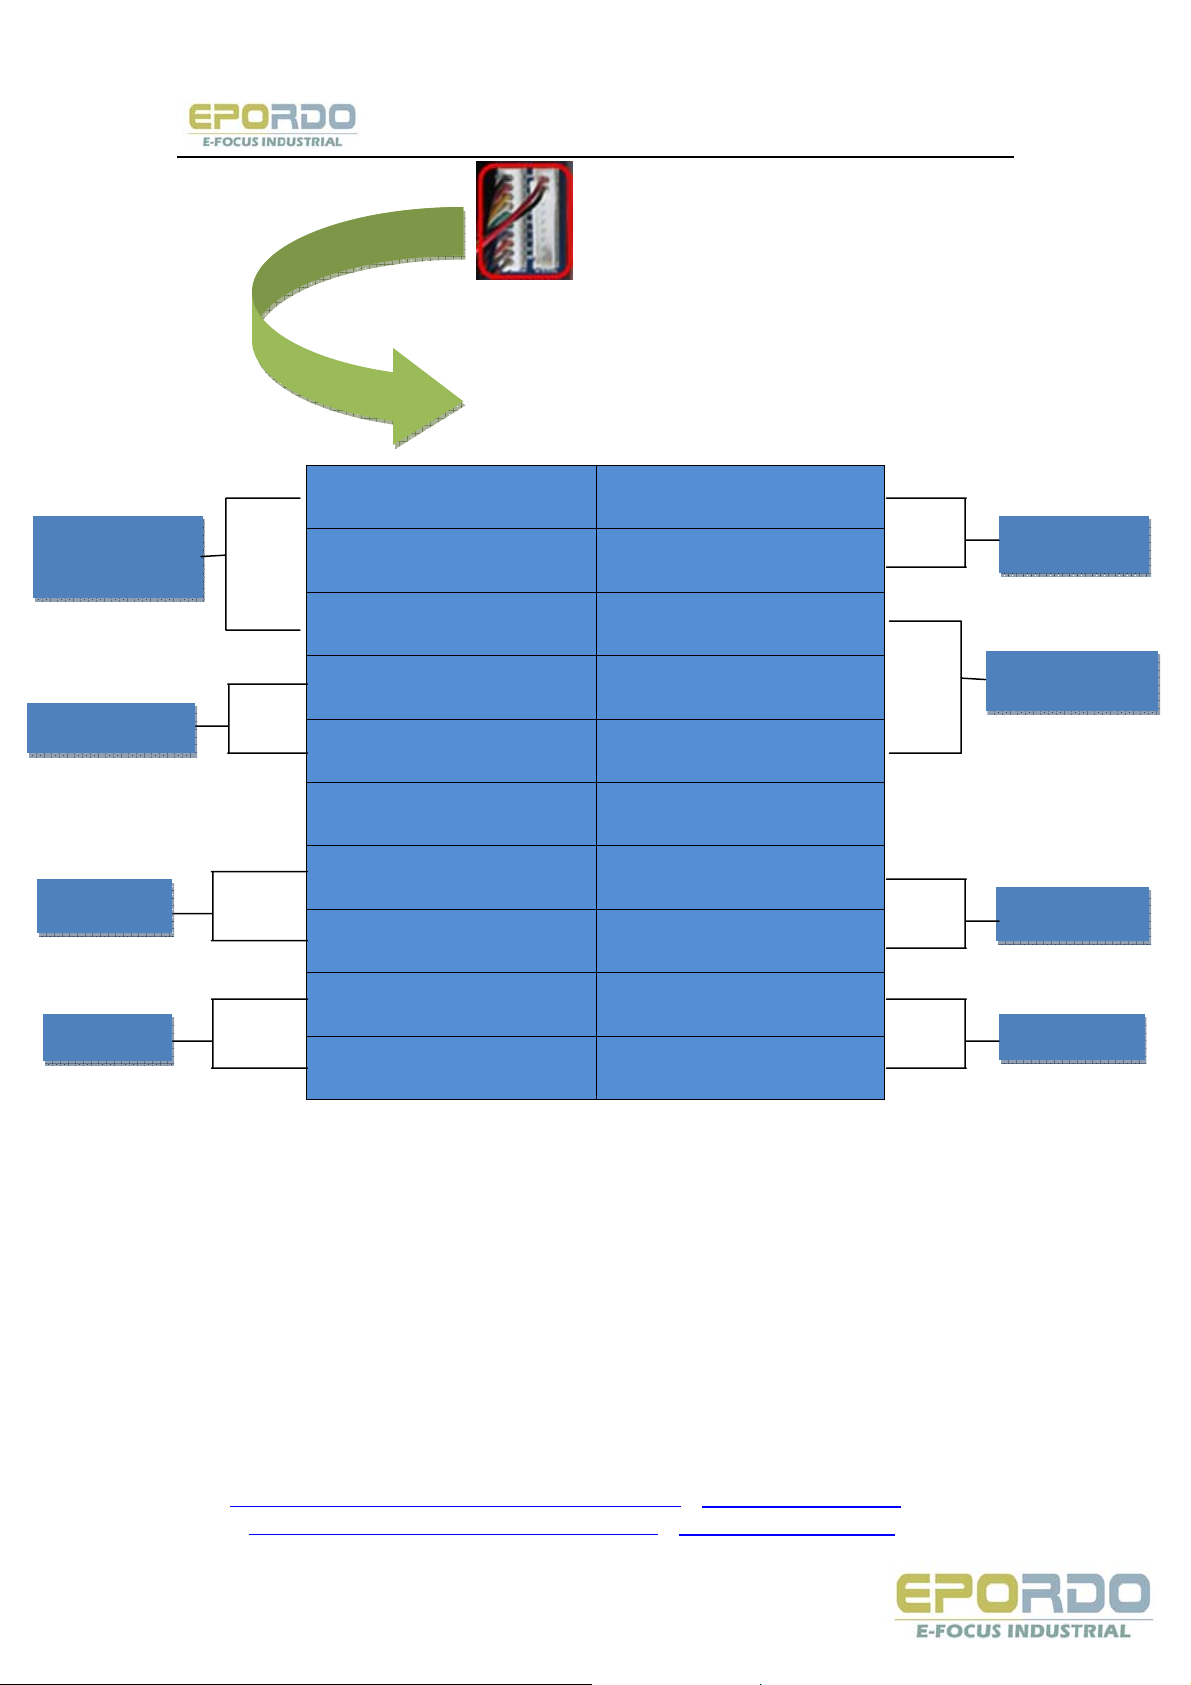
RS485
Communication
BT04 Function Guide www.epordo.com
485A GND
Power Supply
485B 12V
GND LCO
Wiegand Output
Magnetic
Bell Signal
WD1 LNO
Access Control
WD2 LNC
5V GND
DOOR A+
Alarm Signal
GND ABEL+ KEY
Exit Button
BEL- GND
MSN: [email protected] / [email protected] / [email protected]
E-mail: [email protected] / [email protected]
Tel: +86 755 8341 8779/ 8825 7909
Page 5

BT04 Function Guide www.epordo.com
2、Use Notice
Please don‘t put the device in the direct sunlight, strong sunshine will influence
the fingerprint collection, and cause the verification invalid
Try not to use the device outside in summer, its working temperature is 0-40
degree,long-time use outside and the machine‘s fever will affect its normal work,
it will get slower reaction, lower through rate. If the device has to be used
outside, you are recommended to adopt a umbrella and heat output equipment
to protect the machine.
3、Basic concept
3.1 Basic concept
This section contains definitions and descriptions of Fingerprint T&A Concepts
including:
* User registration
* User verification
* Security level
* User ID numbers
* Authority(status) levels
* The two most important Fingerprint T&A Functions are user enrollment and
user verification.
3.1.1 User registration
During user verification, the stored template is compared to the current
fingerprint scan to confirm the user's identify. The user can verify on the time
recorder that enroll his fingerprint. The enrollment process takes approximately
1 second. Up to ten fingers can be enrolled for the same ID number, so the user
may have more verifications way.
Ideally, everyone finger on each hand should be enrolled so that if the user
injures the enrolled finger had, an alternate finger template is available. While
recording the finger type is optional, it is recommended such as left or right
index, so that at verification the user is prompted as to which finger to use.
MSN: [email protected] / [email protected] / [email protected]
E-mail: [email protected] / [email protected]
Tel: +86 755 8341 8779/ 8825 7909
Page 6

BT04 Function Guide www.epordo.com
3.1.2 User verification
Verification occurs when a user either enters an ID number or places a finger in
the fingerprint sensor, then input password for comparison with the stored
template
3.1.3 Security level
The Match Threshold Levels establishes a balance between False Acceptance
Rate (FAR) and False Rejection Rate (FRR). FAR means how often a
non-authorized user is falsely recognized and granted access to the system.
FRR means how often an enrolled and authorized user, who should be granted
access to the system, is denied on the basis that the system did not recognize
him.
You can set match threshold levels on a per-use basis. For the fingerprint
verification is difficult, you can adopt ID & Fingerprint verification (match one to
one). Raising the threshold increases security, while lowering it increases
throughout. The correct balance is essential.
For users with worn or damaged fingers, match threshold levels can (and
should) be reduced. (Please refer to Table 2-1).
Different sites have different requirements.
Note: FAR and FRR affect eachother.
Reduce FAR will rise FRR, same on the contrary. Default
security value is 3, default 1:1 value is 40. Table 2-1 is the
settings to security value in different occasion
Table 3-1 Match threshold description
FRR FAR
Threshold Levels
1:N 1:1
Hight Low 4 50
Middle Middle 3 40
Low High 2 30
3.1.4 User ID number
Before beginning fingerprint enrollment, a user is assigned User ID Number.
This ID number is used to input the fingerprint template each time that
verification is requested. ID numbers are normally input via the keypad, but
they can be input through other means such as RF Card. (The premise is that
equipment must be with an RF card reader)
MSN: [email protected] / [email protected] / [email protected]
E-mail: [email protected] / [email protected]
Tel: +86 755 8341 8779/ 8825 7909
Page 7
NE-m
3.
1
n
e
i
r
n
p
t
m
1
c
2
T
T
@
e
o
T
o
h
e
g
aag
u
A
t
a
o
t
g
m
m
8
a
u
e
a
r
r
e
d
a
d
h
e
8
T
0
s
v
t
m
e
n
s
e
p
o
r
e
e
8
G
m
s
e
e
n
t
p
l
c
s
c
c
d
s
m
s
h
w
l
a
e
a
e
r
s
a
o
l
w
n
w
.5 Auth
Fi
ꇱ
Us
rs are pe
fac
lity or to
En
ollers ar
sys
tem.
Ma
na
ma
Su
ervisors
sys
tem.
No
e: Witho
enr
oll them.
hi
.
3.
.6 Star
Cli
k the pow
ed the St
call
ꎺ
3.
How t
1)
he correc
2)
he wron
erprint
ers c
er’s au
Vertical
Inclined
rity(st
&A has fo
ple whos
ave their
Users wh
n do othe
thority.
are Users
t Manage
nd if ther
Up win
er button
rt-up win
W
0
place t
way is:
way is:
B
tus) Le
r authori
identity
ttendanc
o are auth
operatio
who acce
and Sup
isn‘t a Su
ow
nd the sc
ow. The f
lcome 0
:08:08 F
e finge
Plac
Plac
04 Function
els
y or statu
ust be v
recorded
orized to
s, except
s to all fu
rvisor sta
ervisor in
reen show
llowing a
:08:08
riday
a finger f
it to the
Offset
Lower
uide
levels:
rified, su
.
nroll new
set advan
ctions an
us in the
the syste
ed on, a d
pears:
at on the
enter of t
w
h to gain
users or d
ed option
change
ystem, th
, the Man
isplay of a
ensor su
e sensor
w.epordo.com
ccess to
lete on t
and enrol
ll setup in
Enroller
ager will e
window
face
urface
the
the
ill
roll
as
MS
: barry588o
ail: barry@s
Tel:
+86 755 83
hotmail.co
curiticn.co
41 8779/ 8
/ efocus0
/ sophia@
25 7909
3@hotmail.
ecuriticn.co
com / efocu
/ efocus00
006@hotmai
6@securiticn.
.com
com
Page 8

BT04 Function Guide www.epordo.com
Note: Please adopt the correct way to place the finger, our company is not
responsible for the malfunctioning results arising from improper pressing
manners. Our company reserve ultimate the interpreting and modifying right
for this.
4、Enrollment and Verification Procedures
This chapter describes how to enroll and verify users on the Fingerprint T&A
verification system, moreover, it will introduce how to verify the consistent of
the fingerprint enrollment..
The following topics are included: 〹㜾
* Enrolling User〹㜾
* Testing an Enrollment
* Enrolling a User with the Display Finger Option On
* Verifying Your Identity 㜾
* Hints for Successful Enrollments
Note: You must have Enroller, Manager, or Supervisor status to enroll users.
For information on status levels, see “ Authority (Status) Levels¡“ on “ 2.1.5“
4.1 Enrolling User
If this is the first enrollment in a new or empty system, everyone will become an
enroller. If there is a manager in the system, you will have Manager status to
enroll a new user. There are three ways of enrollment, fingerprint enrollment,
password enrollment, fingerprint & password are suitable for three differences
crowds. Fingerprint enrollment suited the most people who have better qual
ity fingerprints; Fingerprint & Password suited few people who enrolling
successful, but verification was difficult; Password enrollment suited 1% people
who verification unsuccessful.
To start the enrollment process, identify yourself firstly-press [Menu], enter
your ID number or fingerprint, and then verify your identity.
Note: If there is no manager in the machine you should not verify your ID. The
following message appears on the display:
MSN: [email protected] / [email protected] / [email protected]
E-mail: [email protected] / [email protected]
Tel: +86 755 8341 8779/ 8825 7909
Page 9
BT04 Function Guide www.epordo.com
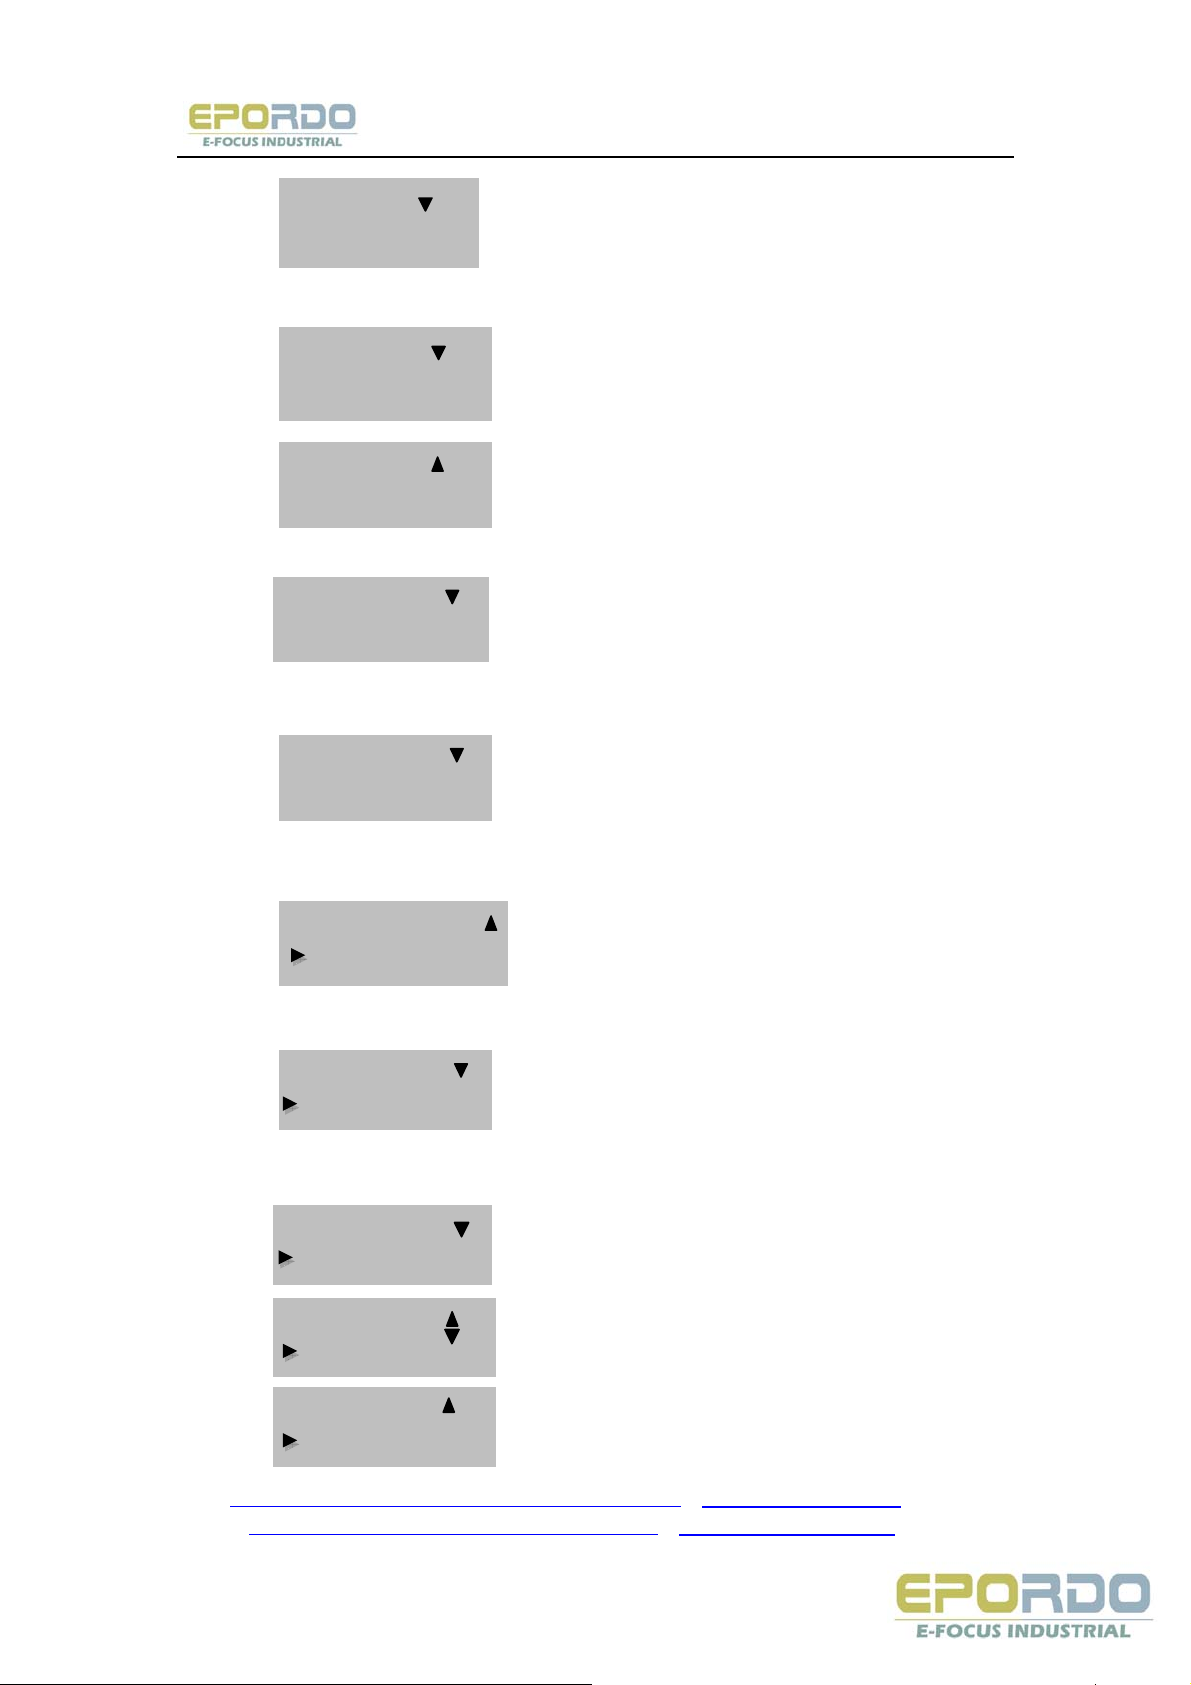
MENU
1. User Manage
Press scrolling down or up key, access the right option:
►User Manage
2. Setup Options
► Setup
3. System Info.
Press [OK], access the User Manager, the following message display:
User Manage
►1. Enroll User
Press scrolling down or up key, access the right option:
►Enroll User
2. Enroll Manager
Press scrolling down or up key, access the right option:
Register Manager
Delete
Select "Enroll User", press [OK], the following message display:
Enroll User
Enroll Finger
Press scrolling down or up key, access the right option:
Enroll Finger
Enroll Password
Enroll Pwd
FP & Pwd
FP & Pwd
Enroll Card
MSN: [email protected] / [email protected] / [email protected]
E-mail: [email protected] / [email protected]
Tel: +86 755 8341 8779/ 8825 7909
Page 10

BT04 Function Guide www.epordo.com
►Enroll Card
Finger & Card
I. Fingerprint Enrollment
1) Access the Enroll Fingerprint to press [OK], the following display:
ꎿ
New Enroll?
NO ESC YES OK
2) Press [OK], the following appears:
New Enroll
ID 00000001
3)Input the enrolling number (the range is 1 to 999999999), press [OK], the
following appears:(Example: choose Number:8)
00000008-0
Press Finger #1
4) If the test is successful three times in a row, the following appears:
Note:00000008-1The last number 1 means
Enroll No 00000008-1
NO ESC YES OK
the first fingerprint.
Press [OK], the previous message continues to be displayed while the template
is created.
If your identity cannot be verified, you are prompted to try again. And you must
restart the verification procedure (step 3).
II.Password Enrollment
Access the password enrollment, press [OK], the following appears:
Press [OK], the following appears:
New Enroll?
NO ESC YES OK
2) Press [OK], the following appears:
New Enroll
ID 00000002
MSN: [email protected] / [email protected] / [email protected]
E-mail: [email protected] / [email protected]
Tel: +86 755 8341 8779/ 8825 7909
Page 11

BT04 Function Guide www.epordo.com
3) Input the enrolling number (the range is 1 to 99999999), press [OK], the
following appears:
Note: The passward range is from 1 to 8.
New Enroll
PWDIn ******
4) Input the password, press [OK], the following appears:
New Enroll
Confm *****
5) Input the password again, press [OK], the following appears:
Note: 00008-P The last letter P means
00000002-P
Invalid ESC Save
password.
Press [OK] to save the enrolled data, then finish once password enrollment
procedure.
III Fingerprint & Password Enrollment
1 )Access the Fingerprint& Password, press [OK], the following appears:
New Enroll
NO ESC YES OK
Press [OK], the following appears:
New Enroll?
ID 00000003
Input the password (range is 1 to 99999999), press [OK], the following
appears:
00000003-0
Press Finger #1
If the test is successful three times in a row, the following appears:
New Enroll
PWDIn:*****
5)Input your password, the following appears:
New Enroll
Confm*****
Input the password again, press [OK], the following appears:
MSN: [email protected] / [email protected] / [email protected]
E-mail: [email protected] / [email protected]
Tel: +86 755 8341 8779/ 8825 7909
Page 12

BT04 Function Guide www.epordo.com
Note: 00000003-1P The second from the
Press [OK], the previous message continues to be displayed while the template
is created.
00000003- 1P
Invalid ESC Save OK
last 1 means one fingerprint
4.2 Testing an Enrollment
Ask the users to place their finger to perform test verification. If the test was
successful, you will adopt Fingerprint enrollment.
If the poor quality of fingerprint, or to re-enroll or change the finger, if that
doesn‘t work, it will shows following, you will be recommended to use
Fingerprint & Password
ID 00000001
Verify OK!
Fp Verify
Again Input!
4.3 Backup Enrollment
In the new enrollment interface, Press [OK] to cancel new enrollment, Press
[ESC] to the display finger Option On, the following appears:
Following operation steps is consistent with new enroll, only the „New
Enroll“ changes to be „Backup Enroll“
Note: Where system memory permits, it is advisable to have at least two
fingers enrolled for a long-term user.
New Enroll?
NO ESC YES OK
Backup Enroll
ID 00000004
4.4 Verifying Your Identity
The workers used fingerprint T&A to verify their identity. The system defaults to
three ways of verification: Fingerprint verification, Password verification, ID
number &Fingerprint. The following appears:
MSN: [email protected] / [email protected] / [email protected]
E-mail: [email protected] / [email protected]
Tel: +86 755 8341 8779/ 8825 7909
Page 13

BT04 Function Guide www.epordo.com
4.4.1 Fingerprint verification
Place the finger on the initial interface, the following appears:
FP Verify
Take off!
It continues for about 0.5 seconds. If the test is successful, it will say “Thank
you“, the following appears:
ID 00000001
Verified!
If your identity cannot be verified, you are prompted to try again, the following
appears:
FP Verify
Take off!
It continues for about 0.5 seconds, return to the start-up window.
4.4.2 Password Verification
on the initial interface , enter your ID number, the following appears you
resistered before, and then will display:
ID 00000002
Esc-ESC [Pwd]-OK
Press [OK], the following appears:
PassVerify
PwdIn *****
Input correct password, press [OK], the following appears:
ID 00000002
Verify OK!
If the password cannot be verified, the following appears:
PassVerify
Again Input!
4.4.3 ID number & Fingerprint Verification
On the initial interface ,To start the enrollment process, enter your ID number,
the following appears:
ID 00000003
Esc-ESC [Pwd] -OK
MSN: [email protected] / [email protected] / [email protected]
E-mail: [email protected] / [email protected]
Tel: +86 755 8341 8779/ 8825 7909
Page 14

BT04 Function Guide www.epordo.com
Press finger on the interface, if your identity is verified, the following appears:
.
ID 00000003
Verified OK!
4.5 Hints for Successful Enrollments
The fingerprint is of good quality, the verification speed will fast; otherwise, it
will verify slowly or occur to FRR.
In order to improve the fingerprint verification quality, the following hint
appears:
Table4-1 Enrolled unsuccessful or the fingerprint of poor quality
Dry or dirty fingerprints
If the fingerprint is dry, you can adopt the way of wetting up the finger, such as
breathing at the finger‘s tip. Pls. keep your finger in clean.
Have no enough to bring pressure
The user should place a finger firmly and squarely on the sensor surface.
How to select the finger?
Recommend to left or right index or middle finger.
Use fingerprints of good quality, without worn or hurt.
The user usually selects the forefinger, if it was of a poor quality, you will be
recommended to middle finger or ring finger.
If the user’s finger is less, you will select the thumb. If the user need more
backup fingerprint, you may select ring finger.
How to place the finger?
Place your finger firmly and touch the sensor surface. The fingerprint does not
touch upright on the sensor surface. Do not touch the finger too fast; Do not
move the finger on the sensor surface.
The influence of the fingerprints change
For users with worn or damaged fingers, the identification can be influenced.
If the finger quality was poor, you have to re-enroll, or select password
verification.
Others
However, few people‘s fingerprint quality is too poor to verify the fingerprint in
gear. Please use ID & fingerprint verification, and the Match Threshold Levels
can be reduced or use password verification.
MSN: [email protected] / [email protected] / [email protected]
E-mail: [email protected] / [email protected]
Tel: +86 755 8341 8779/ 8825 7909
Page 15
BT04 Function Guide www.epordo.com
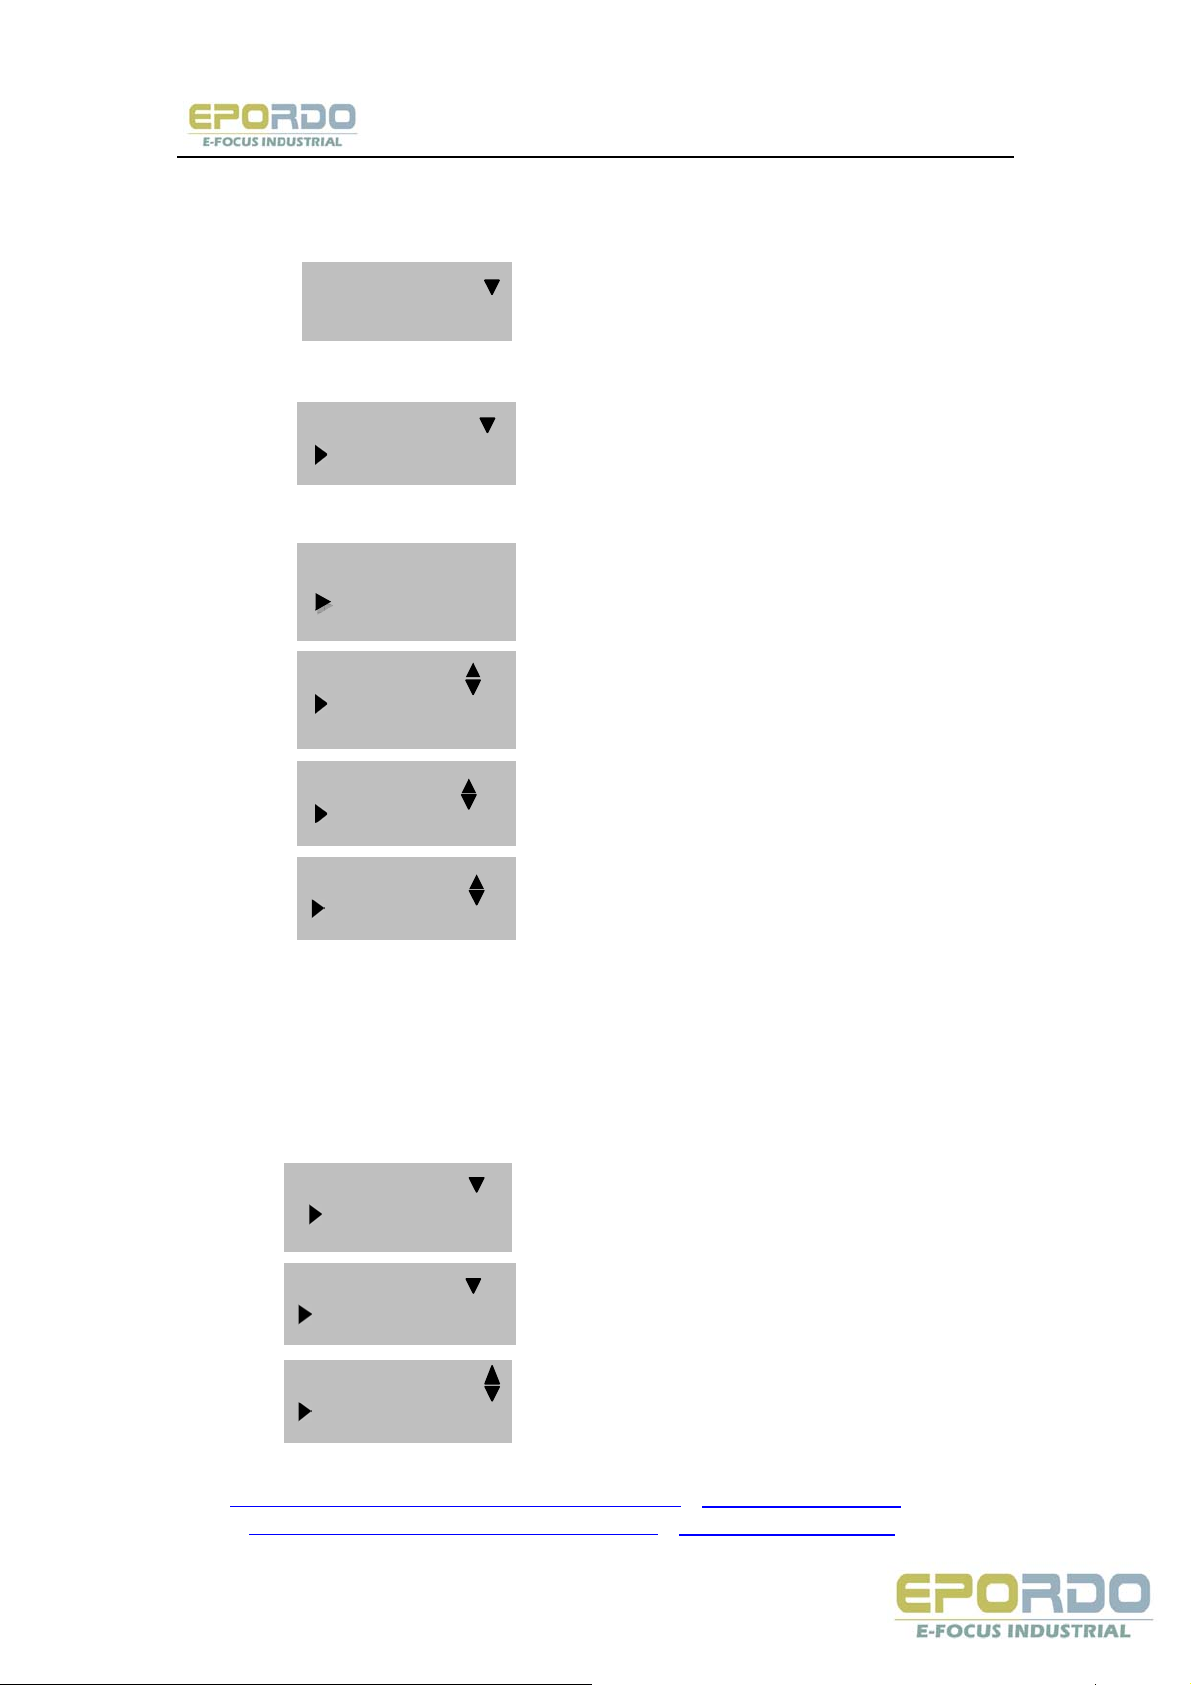
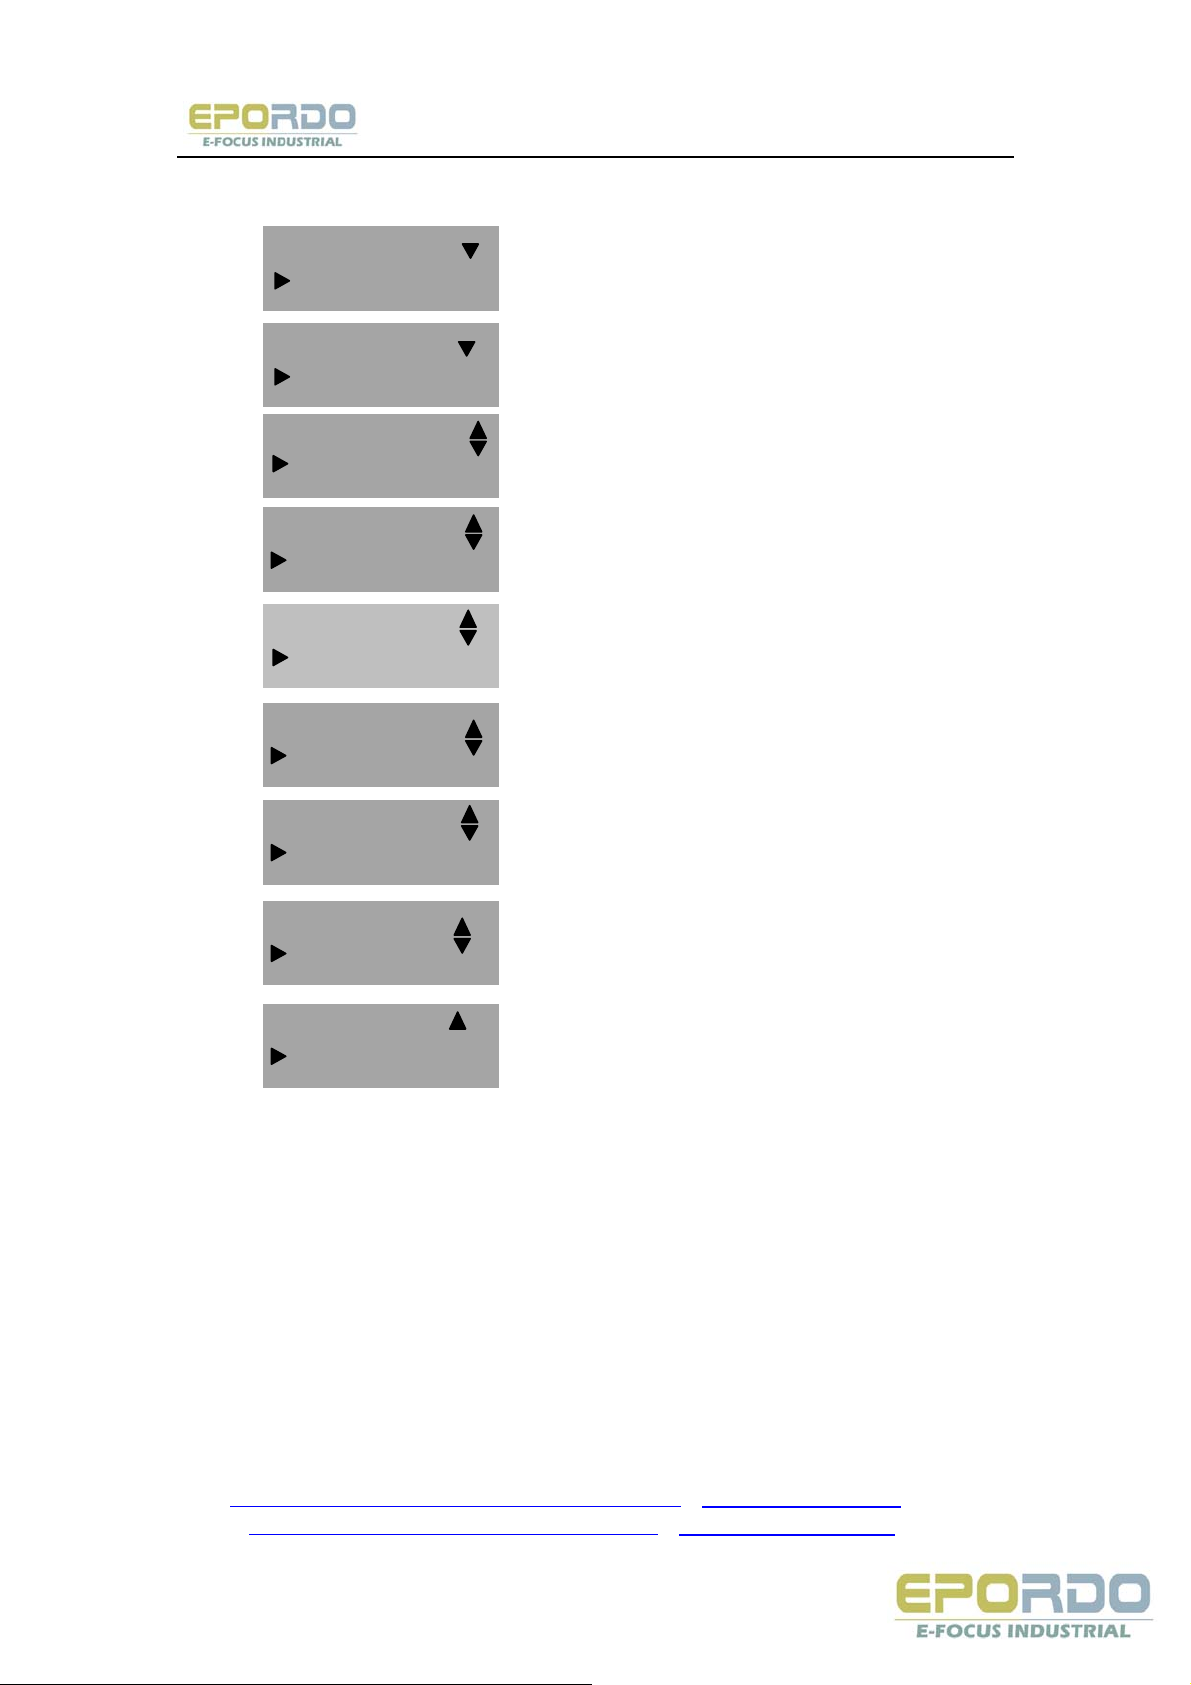
5、System Options
Press the [Menu], and then verify your identity. The following appears:
Press scrolling down or up key, select “Setup Options”, press “OK” to confirm:
Access next operation step, press [MENU], the following appears:
The following topics included: System Options, Record Setup, Communication
Options, Access Options.
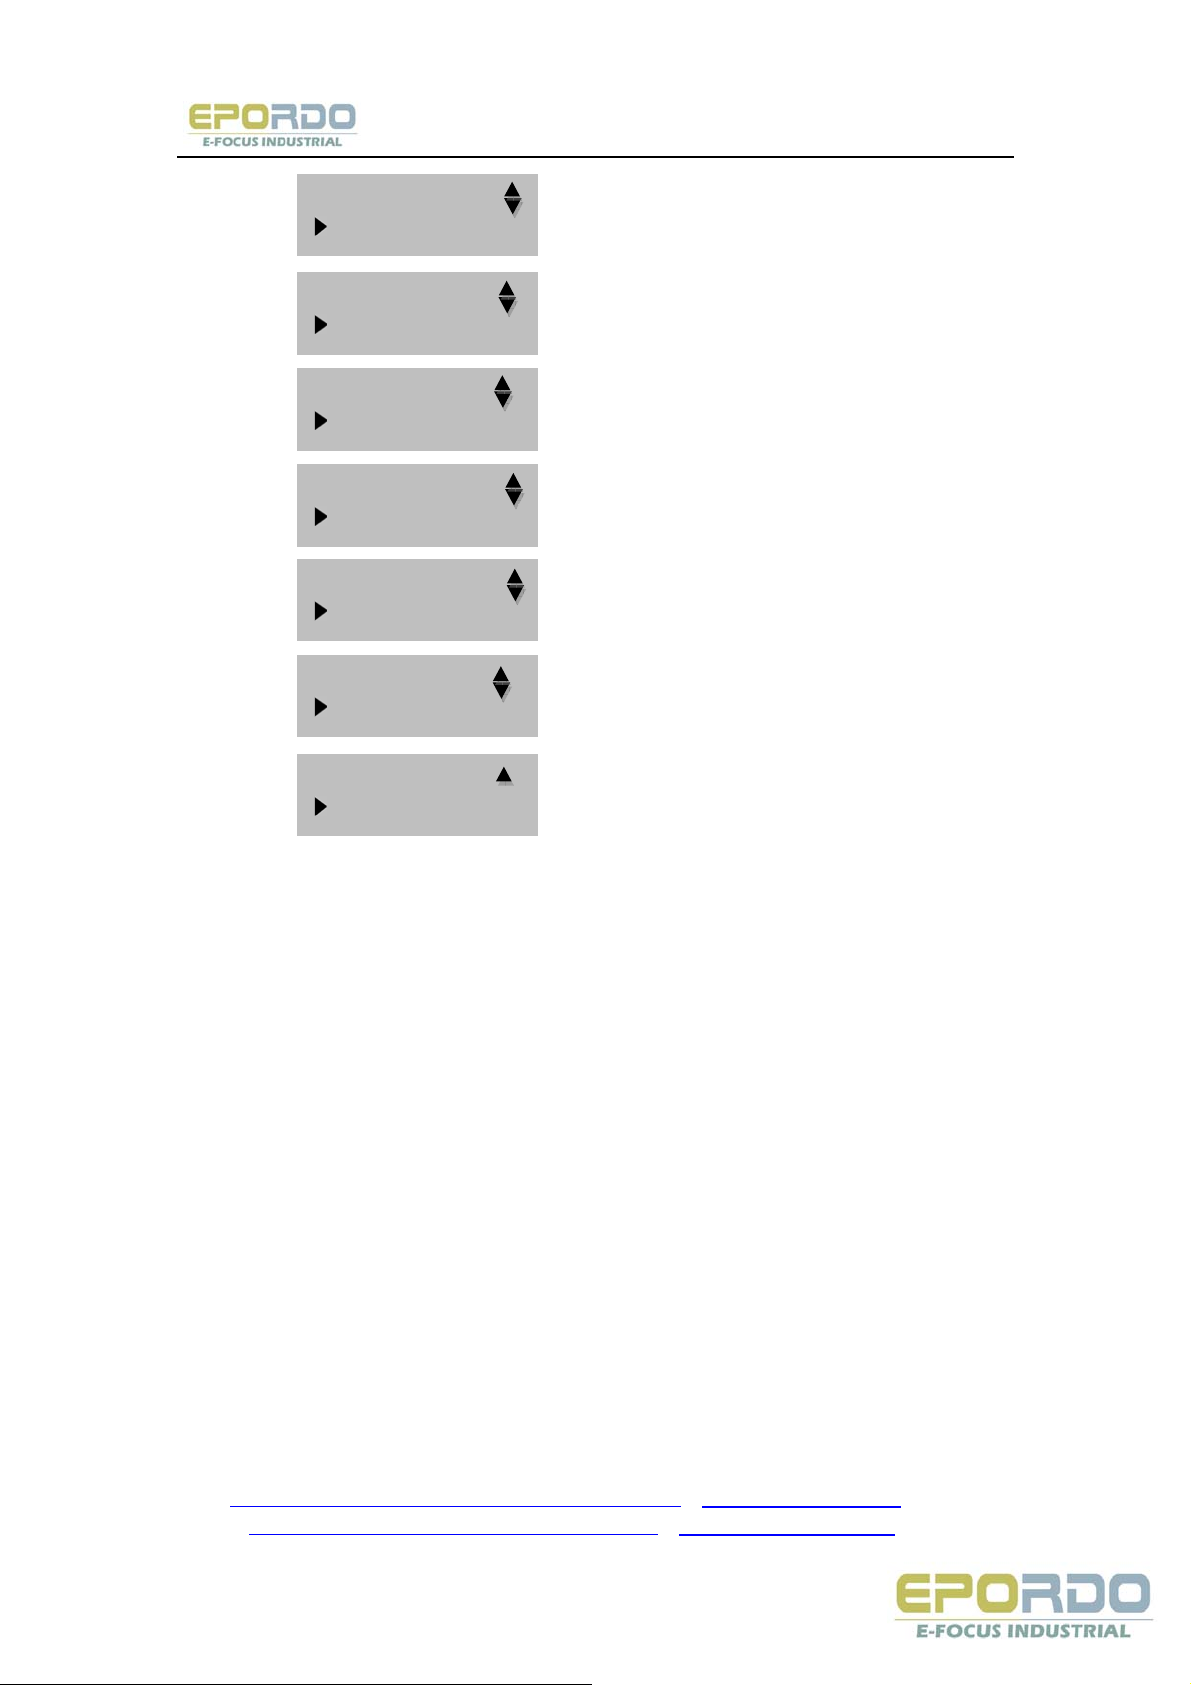
5.1 System Options
Access „System Opt“, the following appears:
Menu
User Manage
User Manage
Setup Options
Setup Options
System Opts
System Opts
Log Options
Log Opts
Comm Options
Comm Opt
Access Opts
System Opts
Date&Time
Date Time
Language English
Language En
Date FmtY-M-D
MSN: [email protected] / [email protected] / [email protected]
E-mail: [email protected] / [email protected]
Tel: +86 755 8341 8779/ 8825 7909
Page 16
BT04 Function Guide www.epordo.com
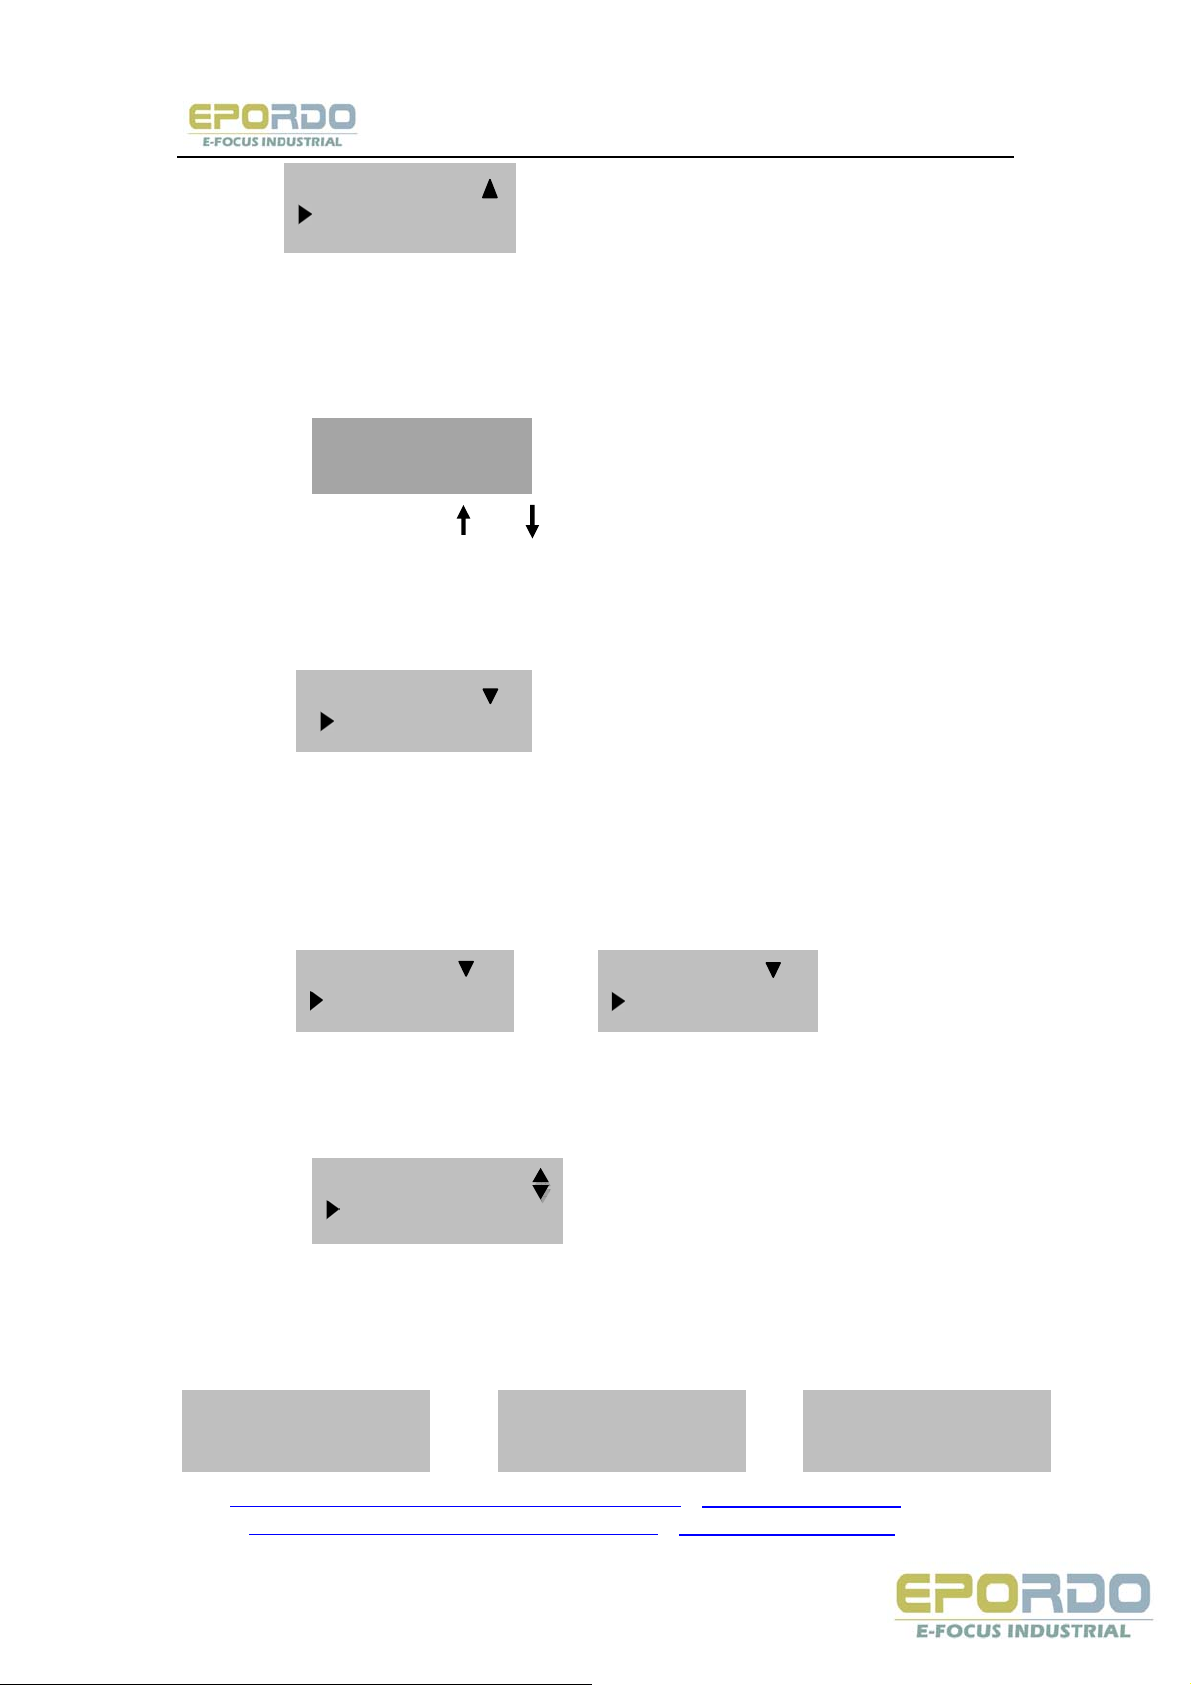
Date FmtY-M-D
Super Set
The system setup facility covers four areas: Date&Time, Language, Date and
Super Set.
5.1.1 Date Time
Access „Date&Time“, the following appears:
2010-12-01
15:35 WED
To change the date, press and , then input the correct date and time, press
[OK]
5.1.2 Language
Access „Language“, press [OK], it defaults to English.
Date Time
Language English
Access Language, press [OK], it defaults to English. Press the key to select
another language. Fingerprint T&A comes with three built-in languages,
simplified Chinese, traditional Chinese and English for all displays.
Select the language that you will use, press [OK], and then Press [ESC] to
return the Options. The system will ask for confirmation of the displayed
language. Press [OK] to accept the language displayed.
時間設置
語言 繁体中文
Date Time
Language English
Traditional Chinese ENG
5.1.3 Date
Press Up or Down key to select “Date”, press [OK] to process modification
ꎬ
There are four kinds of formats:
YYYYMMDDYY.MM.DDYY-MM-DDYY/MM/DD.
It‘s the modification on the initial interface.
i.e: YY.MM.DD(left pic) YY-MM-DD(middle pic) YY/MM/DD (right pic).
ꎩ
Welcome 15.57:05
01.12.10 WED
Language English
Date FmtY-M-D
Welcome 15:57:11
03-12-10 WED
Welcome 15:57:17
01/12/10 WED
MSN: [email protected] / [email protected] / [email protected]
E-mail: [email protected] / [email protected]
Tel: +86 755 8341 8779/ 8825 7909
Page 17
BT04 Function Guide www.epordo.com
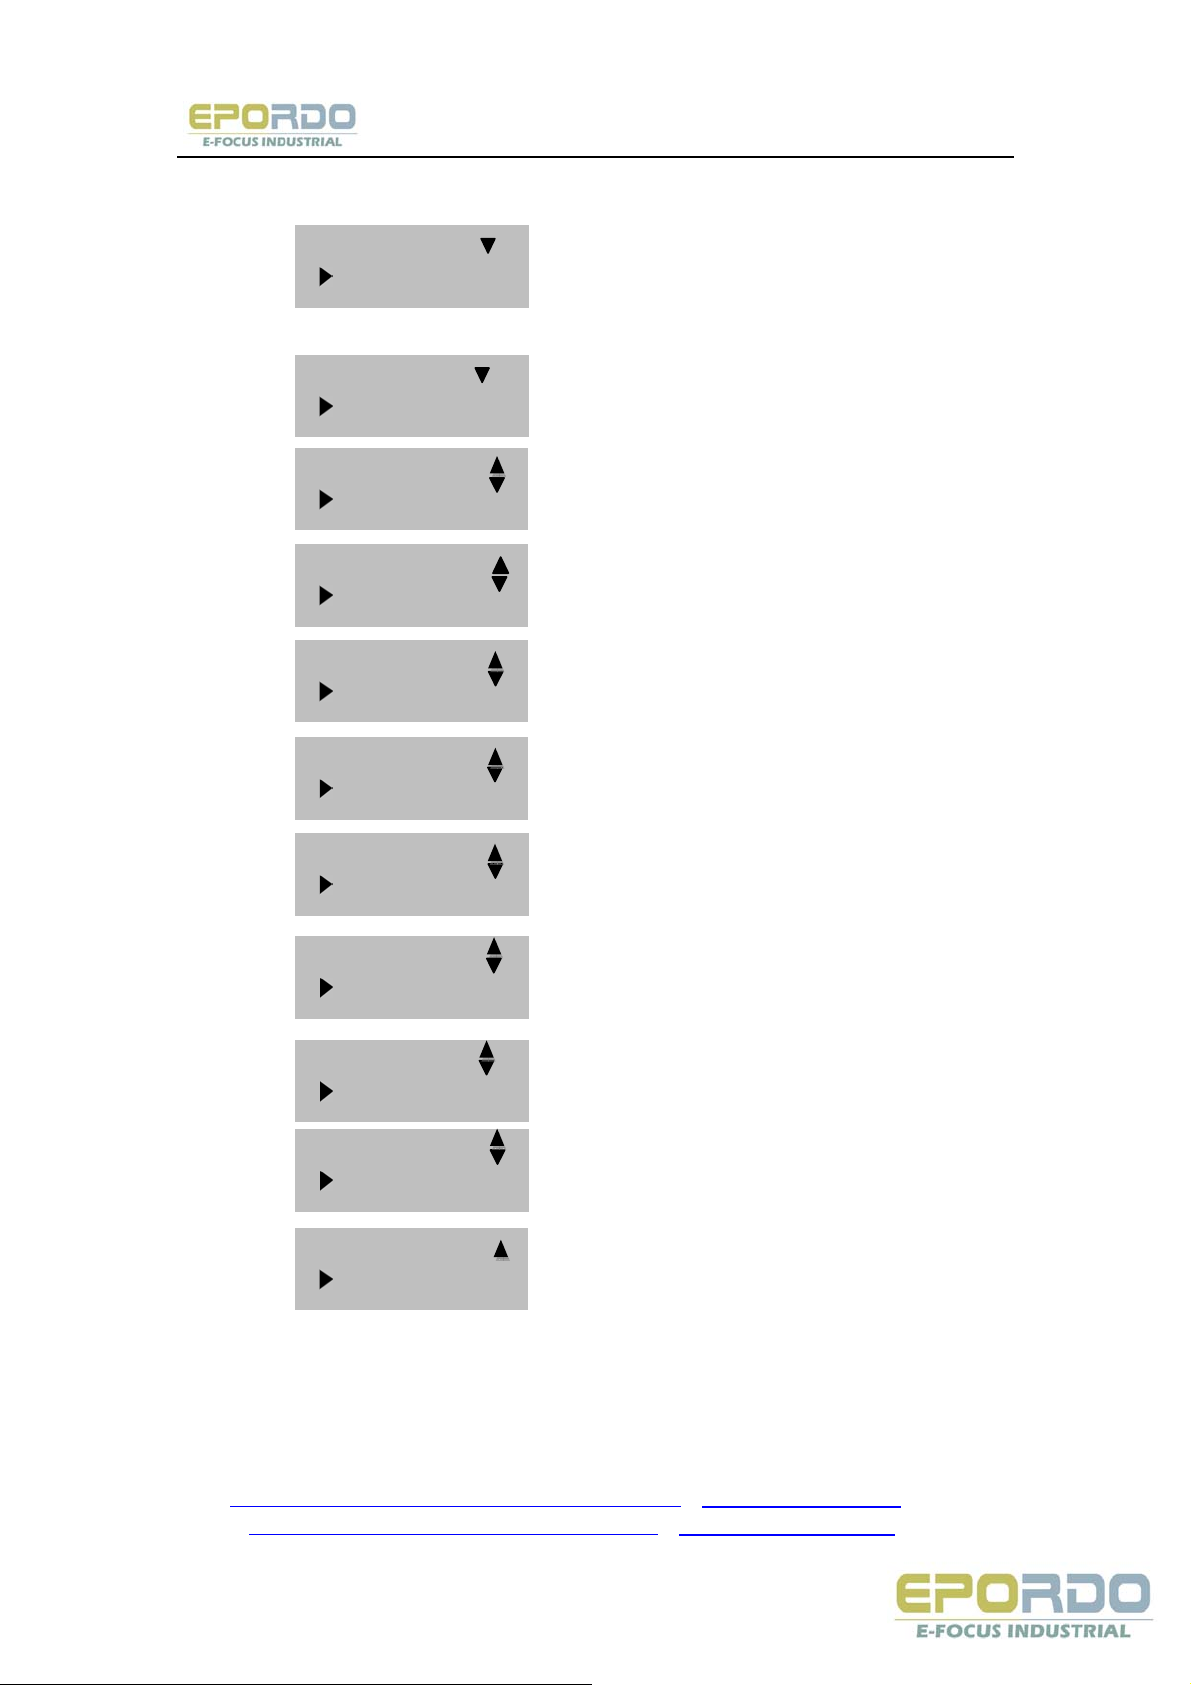
5.1.4 Super Setting
Access „Super Set“, press [OK], the following appears:
Press and to scroll up or down the screen to select the option.
Press the scroll up or down key to select the option.
Default: Restore all setup information to default.
Delete All Logs: Delete all enrolling fingerprints and logs.
Del. Enroll Inf.: Delete all logs of flash disk.
Super Set
Default
Default
Del All Logs
Del All Logs
Del Enrol Inf
Del Enrol Inf
Cancel Manager
Cancel Manager
1:N level 3
1:N level 3
Init. 1:1 40
Init. 1:1 40
VoiceOut YES
VoiceOut Yes
Volume 8
Volume
LCD con 30
LCD con 30
Managers 5
Managers No. 5
Verify MF/P/C
MSN: [email protected] / [email protected] / [email protected]
E-mail: [email protected] / [email protected]
Tel: +86 755 8341 8779/ 8825 7909
Page 18

BT04 Function Guide www.epordo.com
Cancel Managers: Change the managers‘ rights into ordinary users‘ rights.
1:N Security settings: Setup owner’s security value
1:1 Settings: Setup single people’s security value
VoiceOut type: VoiceOut yes or no, choose by yourself.
Volume: whether use to phonic hint or not.
LCD Backlight: Setting the contrast of the screen
Mangers No.: Setting the whole number of the managers
Confirm Method: Setting T&A access control method, F/P/C is fingerprint,
password or card. F+P is fingerprint and password, F+C is fingerprint and Card.
So that could pass verification
5.2 Log Options
Access „Log Opt“, the following message appears:
Log Options
S_Log Wrn NO
Alm Man Log
G_Log Wrn 1000
Alm Att Log
Re-Verify NO
Management Log Alarm: When the management logs reaches set numerical
value, it will automatically sound a warning that logs were fulled.
Attendance Log Alarm: when the remainder log capacity reached set
numerical value, it will automatically sound a warning that logs were fulled.
Repeat Verify: During the setup time (unit:mins), if there is already
someone‘s attendance logs, the second attendance result wont‘ be stored.
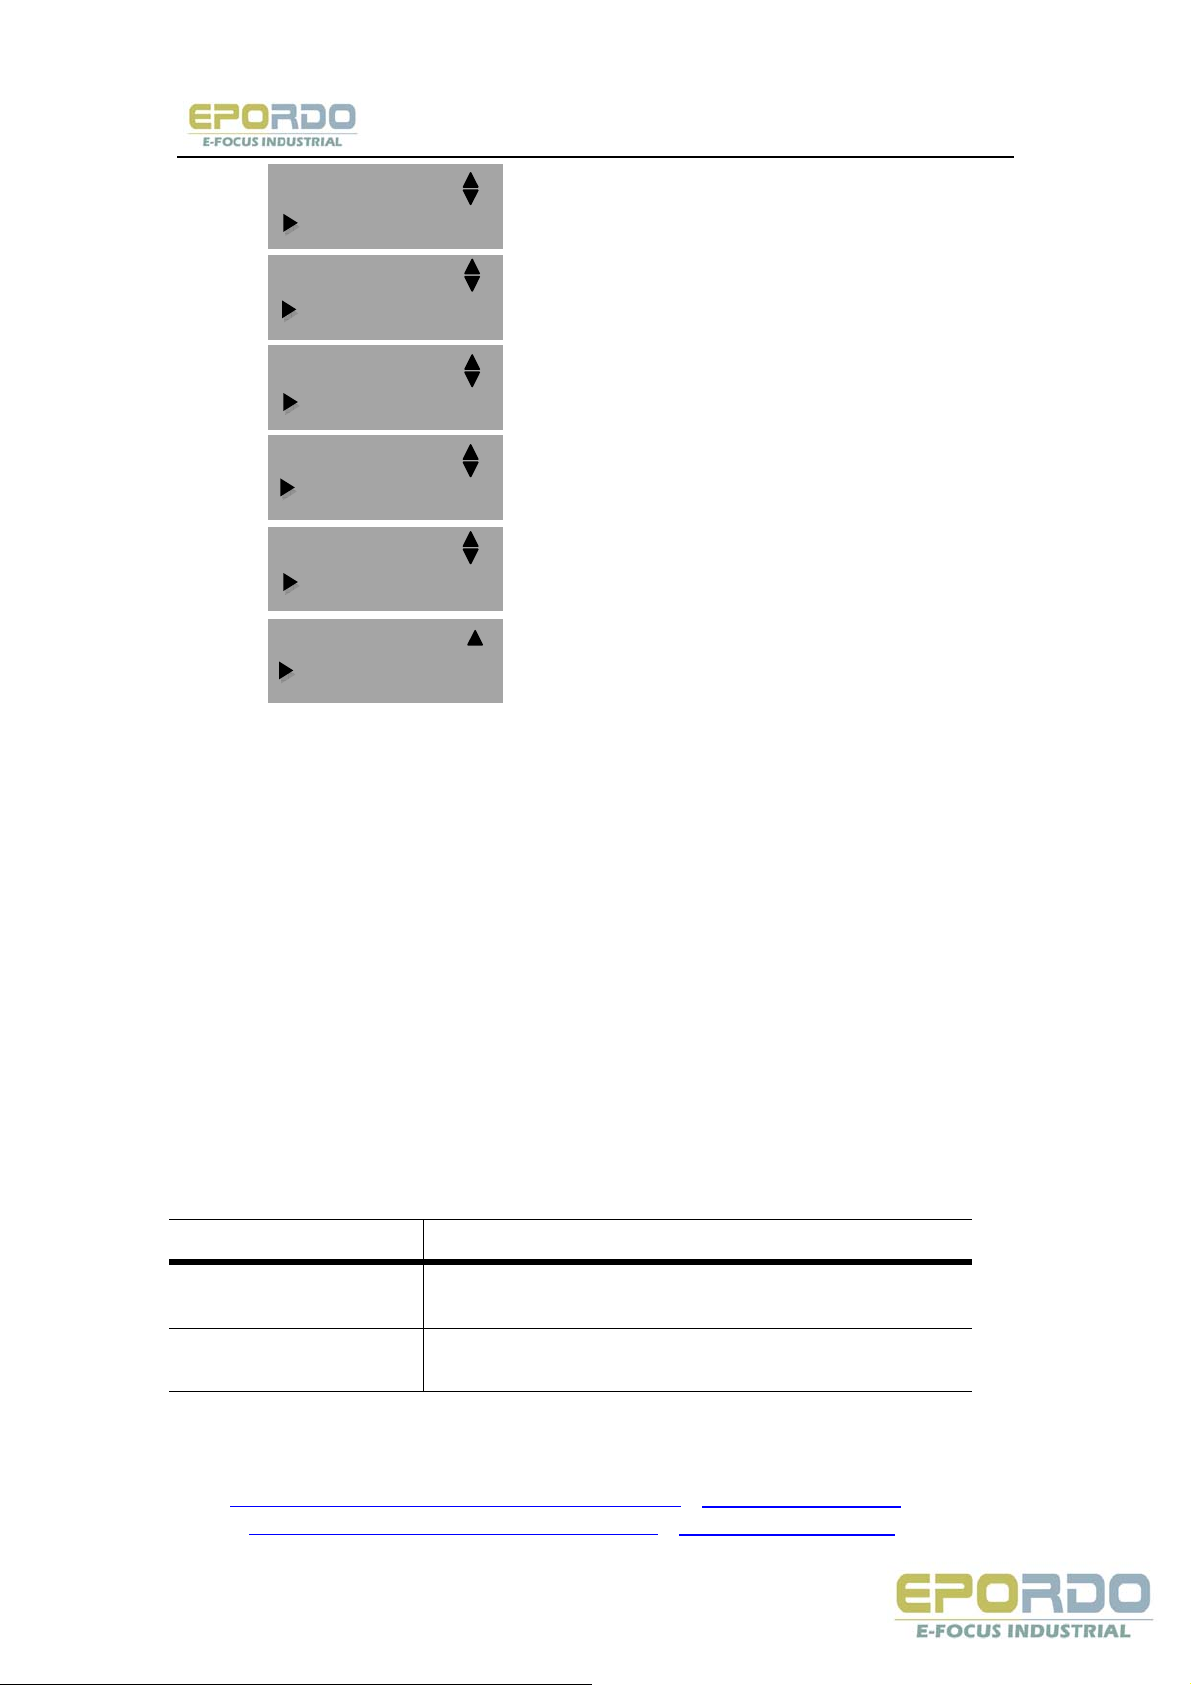
5.3 Communication Options
Access „Comm Options“, the following message appears:
Comm Options
Device ID 1
Device ID 1
BaudRate 38400
Baud Rate 38400
Port NO. 5005
MSN: [email protected] / [email protected] / [email protected]
E-mail: [email protected] / [email protected]
Tel: +86 755 8341 8779/ 8825 7909
Page 19
BT04 Function Guide www.epordo.com
Port NO. 5005
Comm Key 0
Comm Key 0
IP Address
IP Address
Subnet Mask
Subnet Mask
Default Gateway
Default Gateway
Server IP
Server IP
ServerPortNo. 7005
Server PortNo.
Server Re NO
1)Device ID: machine ID, the range is 1 to 255.
2)BaudRate: there are three options, 9600, 38400, 115200; the speed of low
communication is stable, recommend to use RS485.
3)Port No.: TCP‘s communication port, default to be 5005.
4)Communication Key: Its required in TCP communication.
5)IP address: it defaults to IP address is 192.168.1.204, could also get
modified according to demands.
6)Subnet Mask: It could be setup to own internet.
7)Default Gateway: It could be setup to own internet.
8)Server IP address: Which installed access control management software,
could automatically upload records from the access control device to your
computer.
9)Server PortNo.: Install with access control management software to gather
TCP/IP port of
access control device.
10)Server Remit: Whether the settings automatically upload record to the
management software.
Note: RS485 communication using the outdoor wiring, the need to install anti-
lightning devices.
MSN: [email protected] / [email protected] / [email protected]
E-mail: [email protected] / [email protected]
Tel: +86 755 8341 8779/ 8825 7909
Page 20
BT04 Function Guide www.epordo.com
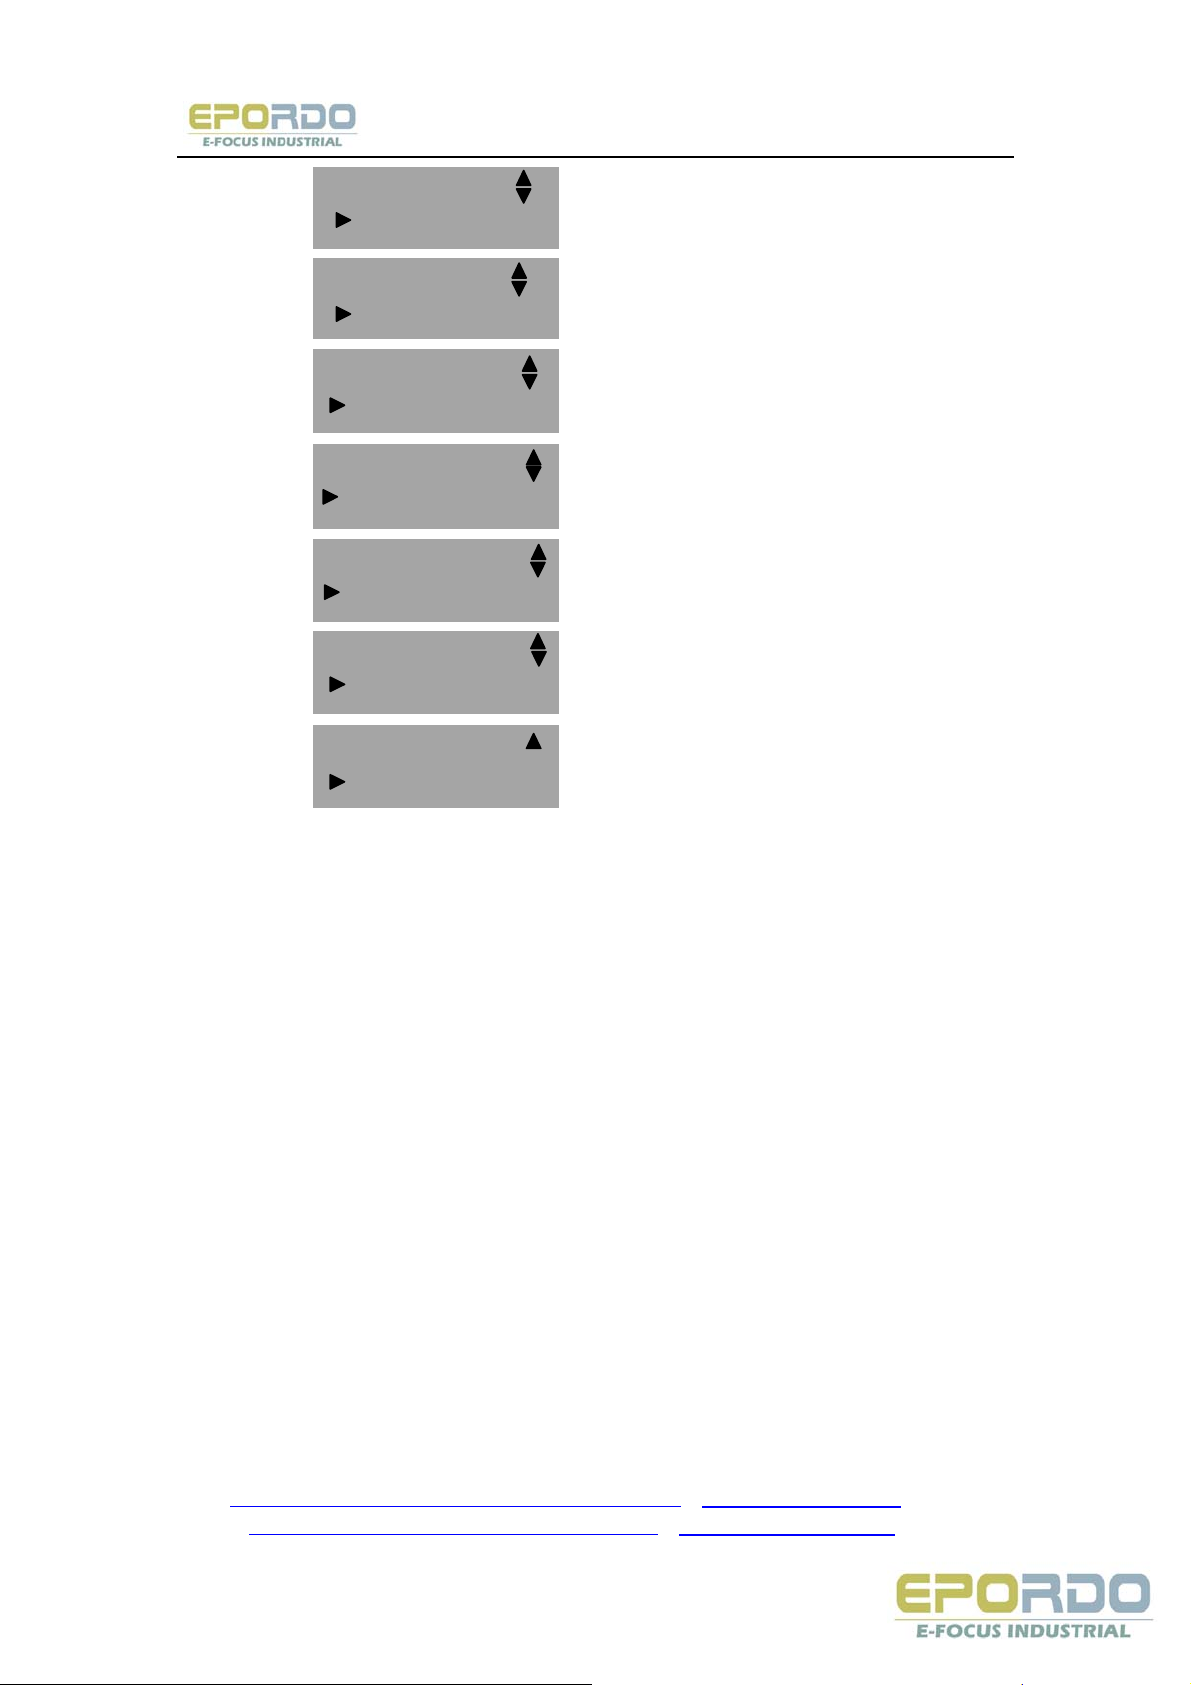
5.4 Access Options
Select „Access Options“, and press [OK], the following message appears:
There are nine main functions in the access control option
1) Define TP: Define the time when the device could be unlocked everyday in
a week
2) User Access Optsion: The setup of unlock time and combination
3) GRP TP Define: The group and configure the group Time period
4) Unlock Group: The definition is the definition of combination lock that can
unlock different combinations, each combination composed by different
groups;
5) Lock delay: That means the device start to alarm after a certain time when
the door is opened
Access Options
Define TP
Define TP
UserAcc opts
User access opts
GRP TP Define
GRP TP Define
Unlock Group
Unlock Group
LockDelay 1
LockDelay 1
DoorSensorSet
DoorSensorSet
AlarmTime 1
Alarm Time 1
Turn off Alarm
Turn off alarm
Access Mode
MSN: [email protected] / [email protected] / [email protected]
E-mail: [email protected] / [email protected]
Tel: +86 755 8341 8779/ 8825 7909
Page 21

BT04 Function Guide www.epordo.com
6) Door Sensor Setting: includes three types: No, Normally opened, Normally
closed; No means not use door magnet switch, normally opened means it
keeps opening after unlock, normally closed means it keeps closing after lock
7) Alarm Time: It starts to alarm after illegal door open, or device removal
8) Turn off alarm: After illegal door open or device removal, the alarm could be
removed
9) Access Mode
● Use normal mode
Yes: start up the combination and confirm multi-user function
No: start up the multi-user function irrelevant to the combination and confirm
it.
● Confirm the user number
It means when ¡ “use general mode=No“, the user number which need to be
recognized
User number=1-5
If set up „use general mode=No“, no matter which group, you only need to
confirm some users at the same time(the number of people could be setup in
„user number confirm“) to unlock the device. If one people passed as several
people, the lock couldn‘t be unlocked.
If the user identification failed 5 times, previous successful identification will
become invalid, it requires reidentification.
If the user identification failed more than 10 sec., previous successful
identification will become invalid, it requires reidentification too.
In this menu, each function could be defined, you may check
user access control guide for the detailed operation.
6、System Information
Access [Menu] to „System Info“, press [OK], the following appears
MSN: [email protected] / [email protected] / [email protected]
E-mail: [email protected] / [email protected]
Tel: +86 755 8341 8779/ 8825 7909
System Info
User Cnt
User Cnt
Man Cnt 0
Page 22
BT04 Function Guide www.epordo.com
Man Cnt 0
FP Cnt 5
FP Cnt 5
Card Cnt 0
Card Cnt 0
Pass Cnt 2
Pass Cnt 2
G_Log 20
G_Log 20
S_Log 47
S_Log 47
Device Info
It displays user numbers, password numbers, fingerprint numbers, manager
and log numbers in the screen. You can see some information such as the
remainder log capacity in the memory, the device capacity, the defaults date,
machine number and OEM‘s information are in the system.
7 、Maintenance
I Cleaning
From time to time, the optical platen, the keypad and display window require
cleaning. Since working environments differ, it is not possible to define when
cleaning should be performed. Following is guide:
Table 7-1 Maintenance
Item Cleaning frequency
Keypad and display
window
Optical platen
MSN: [email protected] / [email protected] / [email protected]
E-mail: [email protected] / [email protected]
Tel: +86 755 8341 8779/ 8825 7909
Cleaning when visibly dirty and hard to read. See cleaning
the keypad and display below.
Do not over clean. The platen is designed to work under
greasy or dirty conditions.
Page 23

BT04 Function Guide www.epordo.com
However, do clean if the platen is obstructed or people are
reporting deteriorating performance. See cleaning the
Optical Platen below.
II Cleaning the Keypad and Display
To clean the keypad and display, use the same cleaning products as for the
platen, and wipe dry.
III Cleaning the Optical Platen Clean the optical platen as follows:
(1) If dusty or gritty, first blow on the platen to clean off any loose particles.
(2) Spray on a light coating of a window cleaning product or other similar
neutral detergent. (Warning: Do not use any other cleaner or the platen may
become damaged. )
(3) Using a non-abrasive and lintine, pat dry. Be careful not to scratch the
platen. If lint particles adhere to the platen surface, below them off when the
platen is dry.
8、User Access Control Function Guide
8.1 Features
* Anytime grouping access control
* Access control and Attendance could be managed
* Inner integrated single door controller, simple installation.
* Red and green lights on the panel
* Device removal alarm function
* Standard access control steel installation
* Internet management software, monitor several machines
* U disk data downloading is optional
* Wiegand 26 standard output (optional), compatible to other access controller
* Adopt WFS6.00 High-speed algorithm
8.2 Basic Concepts
Access control basic concepts:
* Function setup: enroll the unlock Time period and combination
* Time period definition: define the time when the device could be unlocked
everydayin a week
* Grouping: divide the enrolled users to several groups make it manageable
MSN: [email protected] / [email protected] / [email protected]
E-mail: [email protected] / [email protected]
Tel: +86 755 8341 8779/ 8825 7909
Page 24

BT04 Function Guide www.epordo.com
* Valid Time period: the user verification needed time
* Group Time period: setup the group open lock time
* User Time period: setup the user open lock time
* Open lock combination: Define different can unlock combination, each
combination is made up of different groups.
* Lock control time :The fingerprint control the time to turn on the lock.
* Door magnet delay :That means the device start to alarm after a certain
time when the door is opened
* Door magnet type :includes three types: No, Normally opened, Normally
closed; Nomeans not use door magnet switch, normally opened means it keeps
opening after unlock, normally closed means it keeps closing after lock
* Use normal mode
Yes: start up the combination and confirm multi-user function
No: start up the multi-user function irrelevant to the combination and confirm
it. Confirm the user quantity
It means when “use general mode=No“, the user number which need to be
recognized
User quantity =1-5
If set up “use general mode=No“, no matter which group, you only need to
confirm some users at the same time(the number of people could be setup in
“user number confirm“ ) to unlock the device. If one people passed as several
people, the lock couldn‘t be unlocked
If the user identification failed 5 times, previous successful identification will
become invalid, it requires reidentification. If the user identification failed more
than 10 sec., previous successful identification will become invalid, it requires
reidentification too.
In this menu, each function could be defined, you may check user access control
guide for the detailed operation.
8.3 Access control function
Select „Menu“ key, and Press “Up/Down“ to enter “Setup Options“, press
“ OK“ to access setup menu
Press “Up/Down“ to enter “Access Options“, press “Ok“ to access function menu,
the followings message displays:
MSN: [email protected] / [email protected] / [email protected]
E-mail: [email protected] / [email protected]
Tel: +86 755 8341 8779/ 8825 7909
Setup Options
Define TP
Define TP
User Acc Opts
Page 25
BT04 Function Guide www.epordo.com
User Acc Opts
GRP TP Define
GRP TP Define
Unlock Group
Unlock Group
Lock Delay 1
Lock Delay 1
DoorSensor Set 10
Door Sensor Set
AlarmTime 1
AlarmTime 1
Turn Off Alarm
Turn Off Alarm
Access Mode
There are nine main functions in the access control option
1) Define TP: Define the time when the device could be unlocked everyday in
a week
2) User Access Options: The setup of unlock time and combination
3) GRP TP Define: The group and configure the group Time period
4) Unlock Group: The definition is the definition of combination lock that can
unlock different combinations, each combination composed by different groups;
5) Lock Delay: That means the device start to alarm after a certain time when
the door is opened
6) Door Sensor Setting: includes three types: No, Normally opened, Normally
closed; No means not use door magnet switch, normally opened means it keeps
opening after unlock, normally closed means it keeps closing after lock
7) Alarm time: It starts to alarm after illegal door open, or device removal
8) Turn off alarm: After illegal door open or device removal, the alarm could be
removed
9) Access Mode
ꇱ●Use normal mode
Yes: start up the combination and confirm multi-user function
No: start up the multi-user function irrelevant to the combination and confirm it.
ꇱ●Confirm the user number
It means when “use general mode=No“, the user number which need to be
MSN: [email protected] / [email protected] / [email protected]
E-mail: [email protected] / [email protected]
Tel: +86 755 8341 8779/ 8825 7909
Page 26

BT04 Function Guide www.epordo.com
recognized
User quantity=1-5
If set up “use general mode=No“, no matter which group, you only need to
confirm some
users at the same time(the number of people could be setup in “user number
confirm“ ) to unlock the device. If one people passed as several people, the lock
couldn‘t be unlocked.
If the user identification failed 5 times, previous successful identification will
become invalid, it requires reidentification.
If the user identification failed more than 10 sec., previous successful
identification will
become invalid, it requires reidentification too.
In this menu, each function could be defined, you may check user access control
guide for the detailed operation.
8.3.1 Access control function description
Each user setup is combined of identity group, use group Time period and user
Time period. Grouping is dispatch user to certain group, i.e. group 1, group 2
etc.; group Time period could select three already setup Time periods at the
most, those three Time period relation is “or“( meet anyone of the three is
okay), user Time period could also select three already setup Time period too,
their relation is “or“ too; check “ user access control function setup“ for the
relation between group Time period and user Time period.
How the enrolled user open the lock
① The group the user enrolled in should in the unlock combination( also could
be in a
unlock combination with other groups, but needs work together to open the
lock)
② The current open lock time should be in any valid time of user Time period
The system default new enrolled user as the first group, the grouping
combination defaults to be the first group, default Time period is “1“, In the case
of group 1 and Time period 1 are in factory status, new enroll user is default
open lock status(if the user changed the related setup, the system will make
according modification). If grouping combination setup doesn‘t have the user
enrolled group, the user could only do attendance but open lock.
8.4 Access Control Verification Procedure
MSN: [email protected] / [email protected] / [email protected]
E-mail: [email protected] / [email protected]
Tel: +86 755 8341 8779/ 8825 7909
Page 27
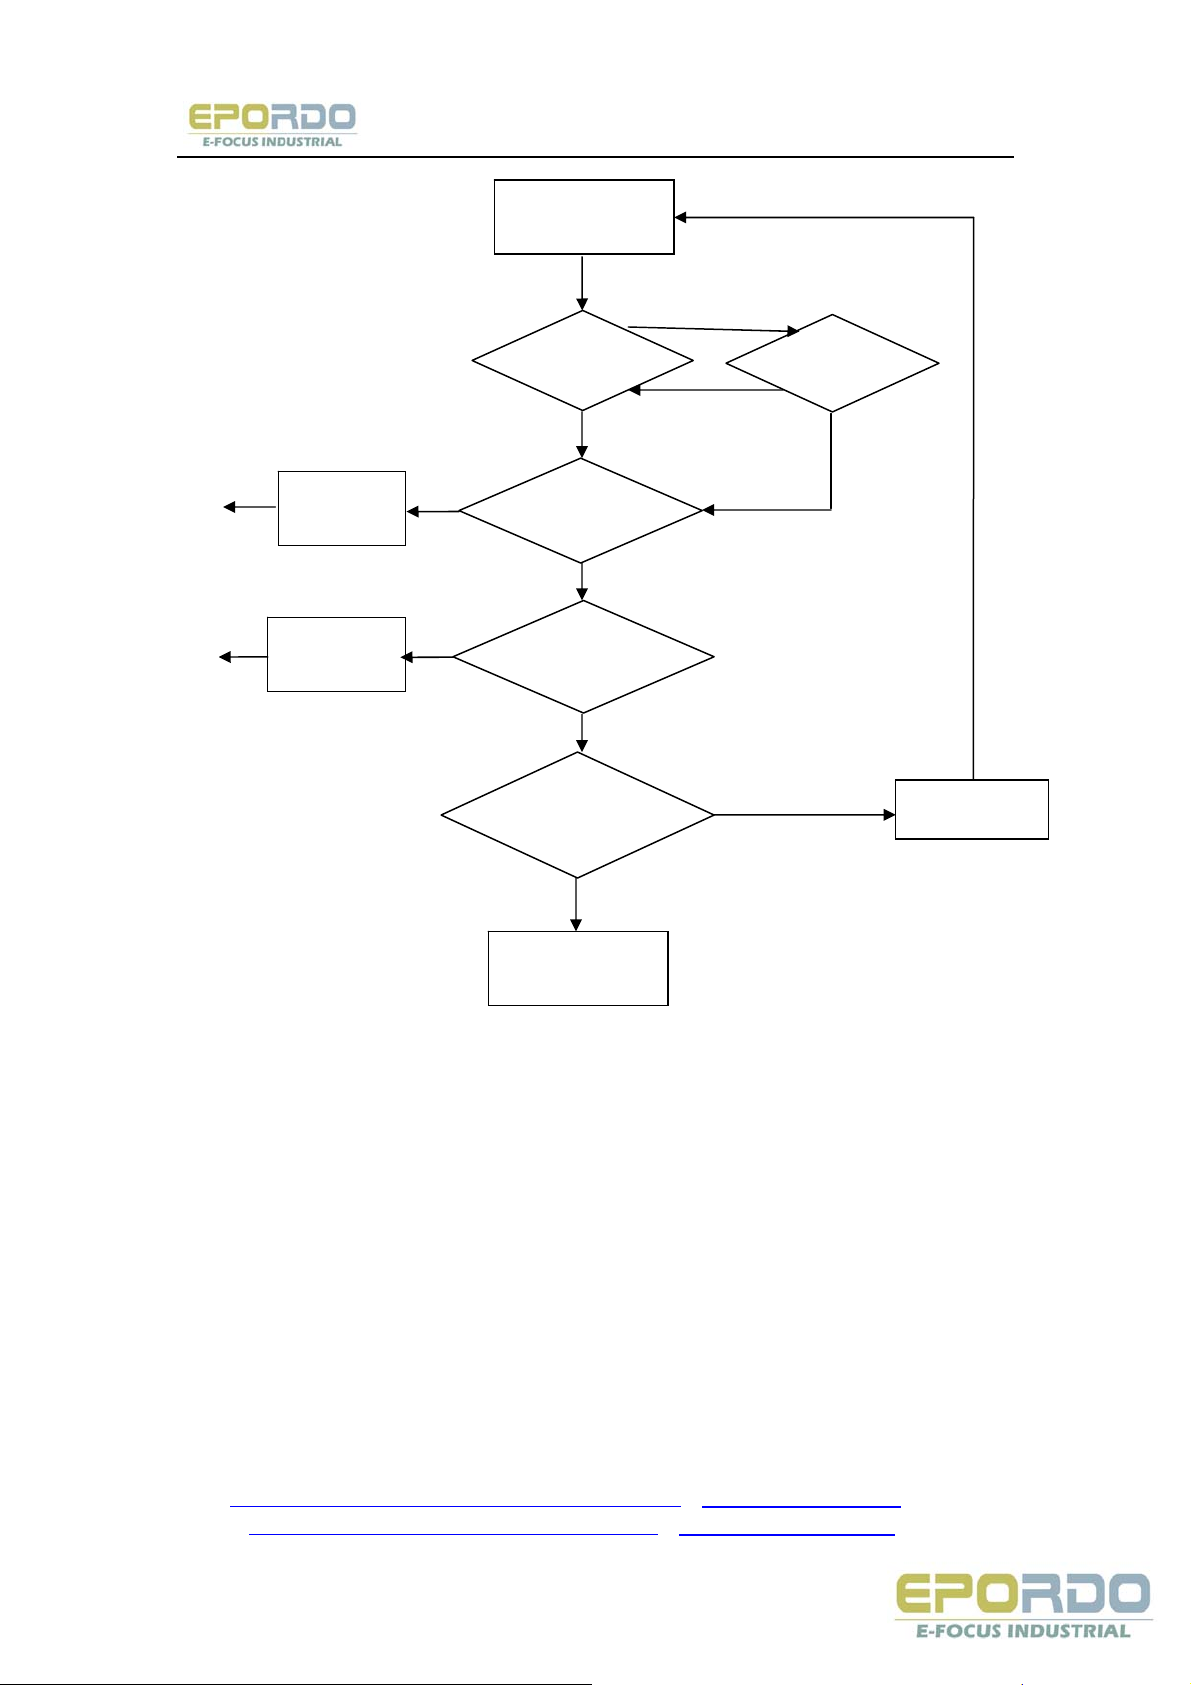
BT04 Function Guide www.epordo.com
e
Press Fingerprint
N
User Time
N
Y
Failed
Illegal time
visit
N
Valid Tim
Y
Success
Sound Thank
N
you as
confirm
User Group in
Combination
N
Meet one
combination
Y
Group TIme
Next group
Combination
Unlock
8.5 Function Introduction
8.5.1 Time Period Definition
Time period is the minimum unit in the access control setup. Whole system
could define 50 time period at the most. Each time period defines 7 time periods
namely 1 week, 24 hours valid time period every day. Each user could setup 3
time period at the most, their relation is “or“, the verification time could be valid
if it meets any one of them. Each time format: HH:MM-HH:MM, according to
24hours Accurate to the minute.
End time less than start time (23:57- 23:56) means All-day ban, End time over
than start time( 00:00- 23:59) means the Time period is valid.
MSN: [email protected] / [email protected] / [email protected]
E-mail: [email protected] / [email protected]
Tel: +86 755 8341 8779/ 8825 7909
Page 28
BT04 Function Guide www.epordo.com
Note: System default time period code 1 is open whole day (new enrolled user
open the lock)
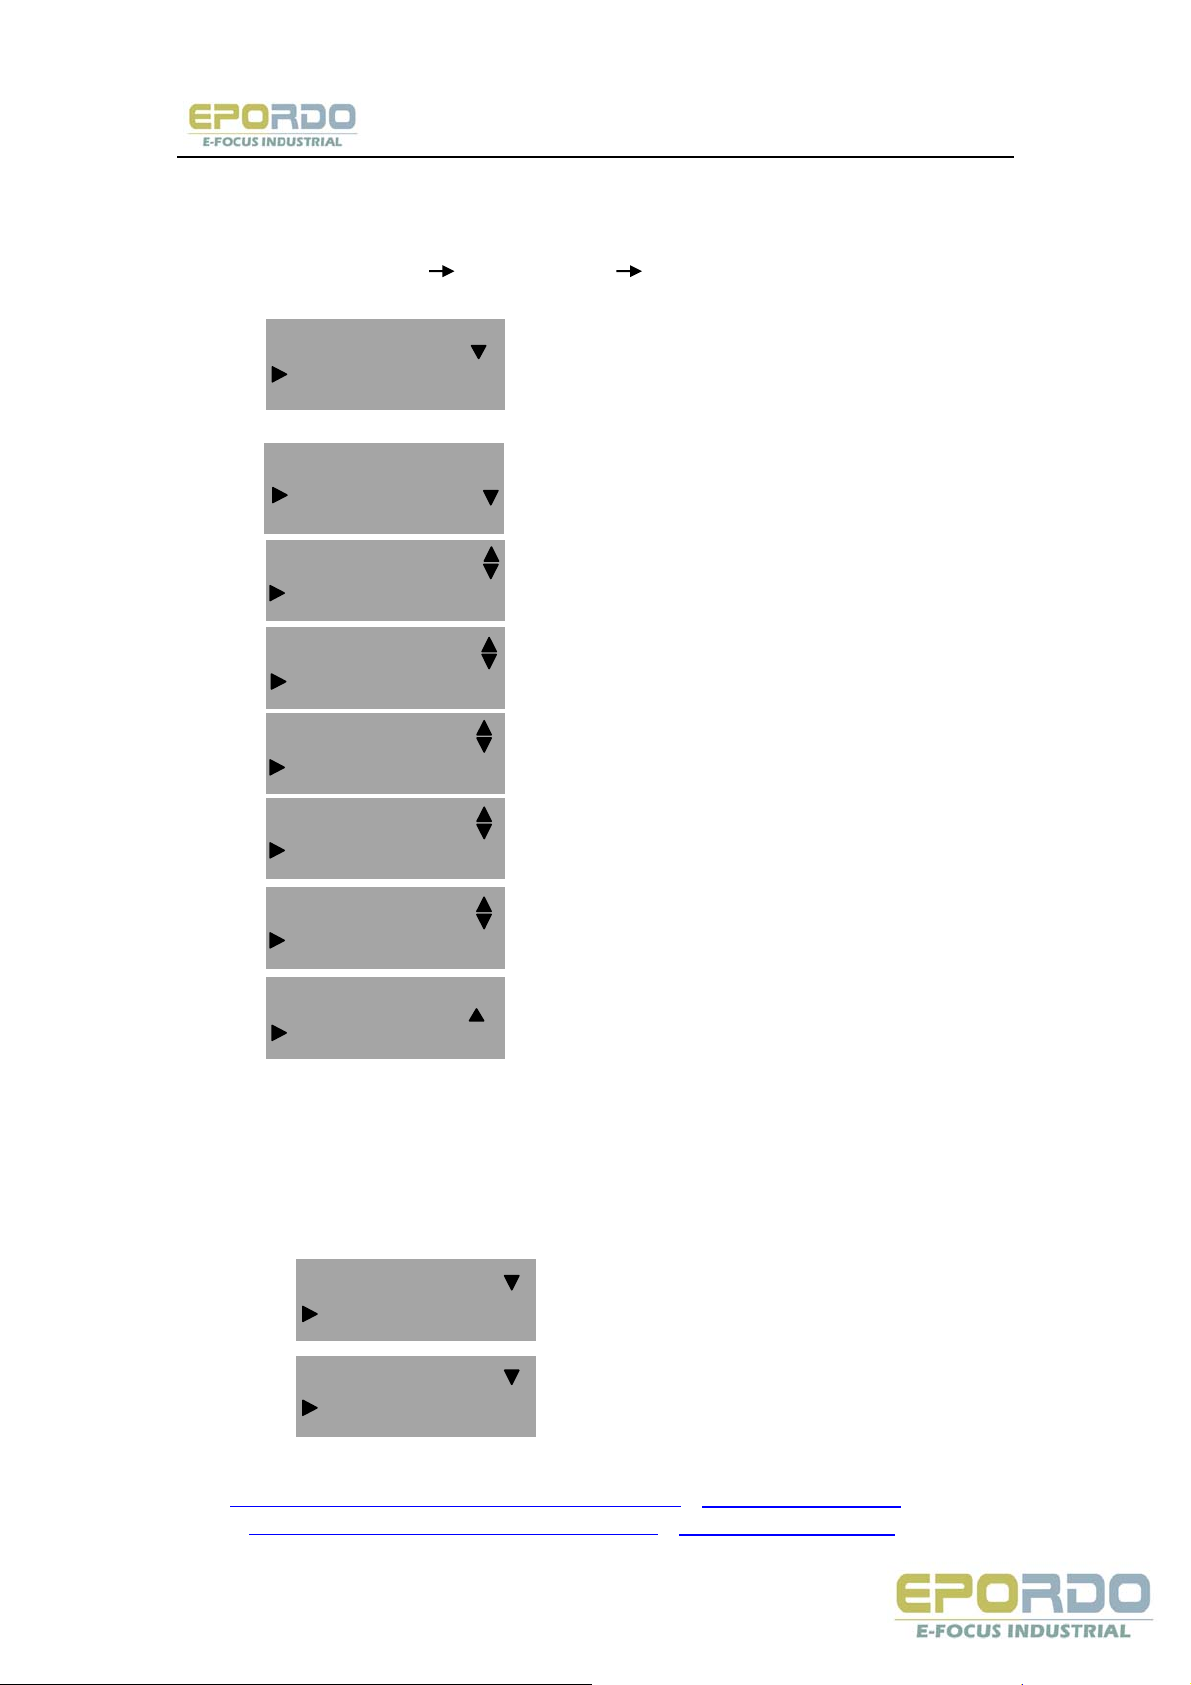
Select „Setup Options“ „Access Opts“ „Define TP“ , and press [OK], the
screen displays as following:
Define TP
Time Zone 01
Press [OK] to access Time period 1 settings,the screen will display as following:
Time Zone
SUN 00:0 0 -23:59
SUN 00:0 0 -23:59
MON 00 :0 0-23: 59
MON 00 :0 0-23: 59
TUE 00:0 0 -23: 59
TUE 00:0 0 -23: 59
WED 00: 00-2 3 :5 9
WED 00: 00-23 :59
THU 00:00-23:59
THU 00:00-23:59
FRI 00:00-23:59
FRI 00:00-23:59
SAT 00:00-23:59
Above Time period 1 is factory status
For example:
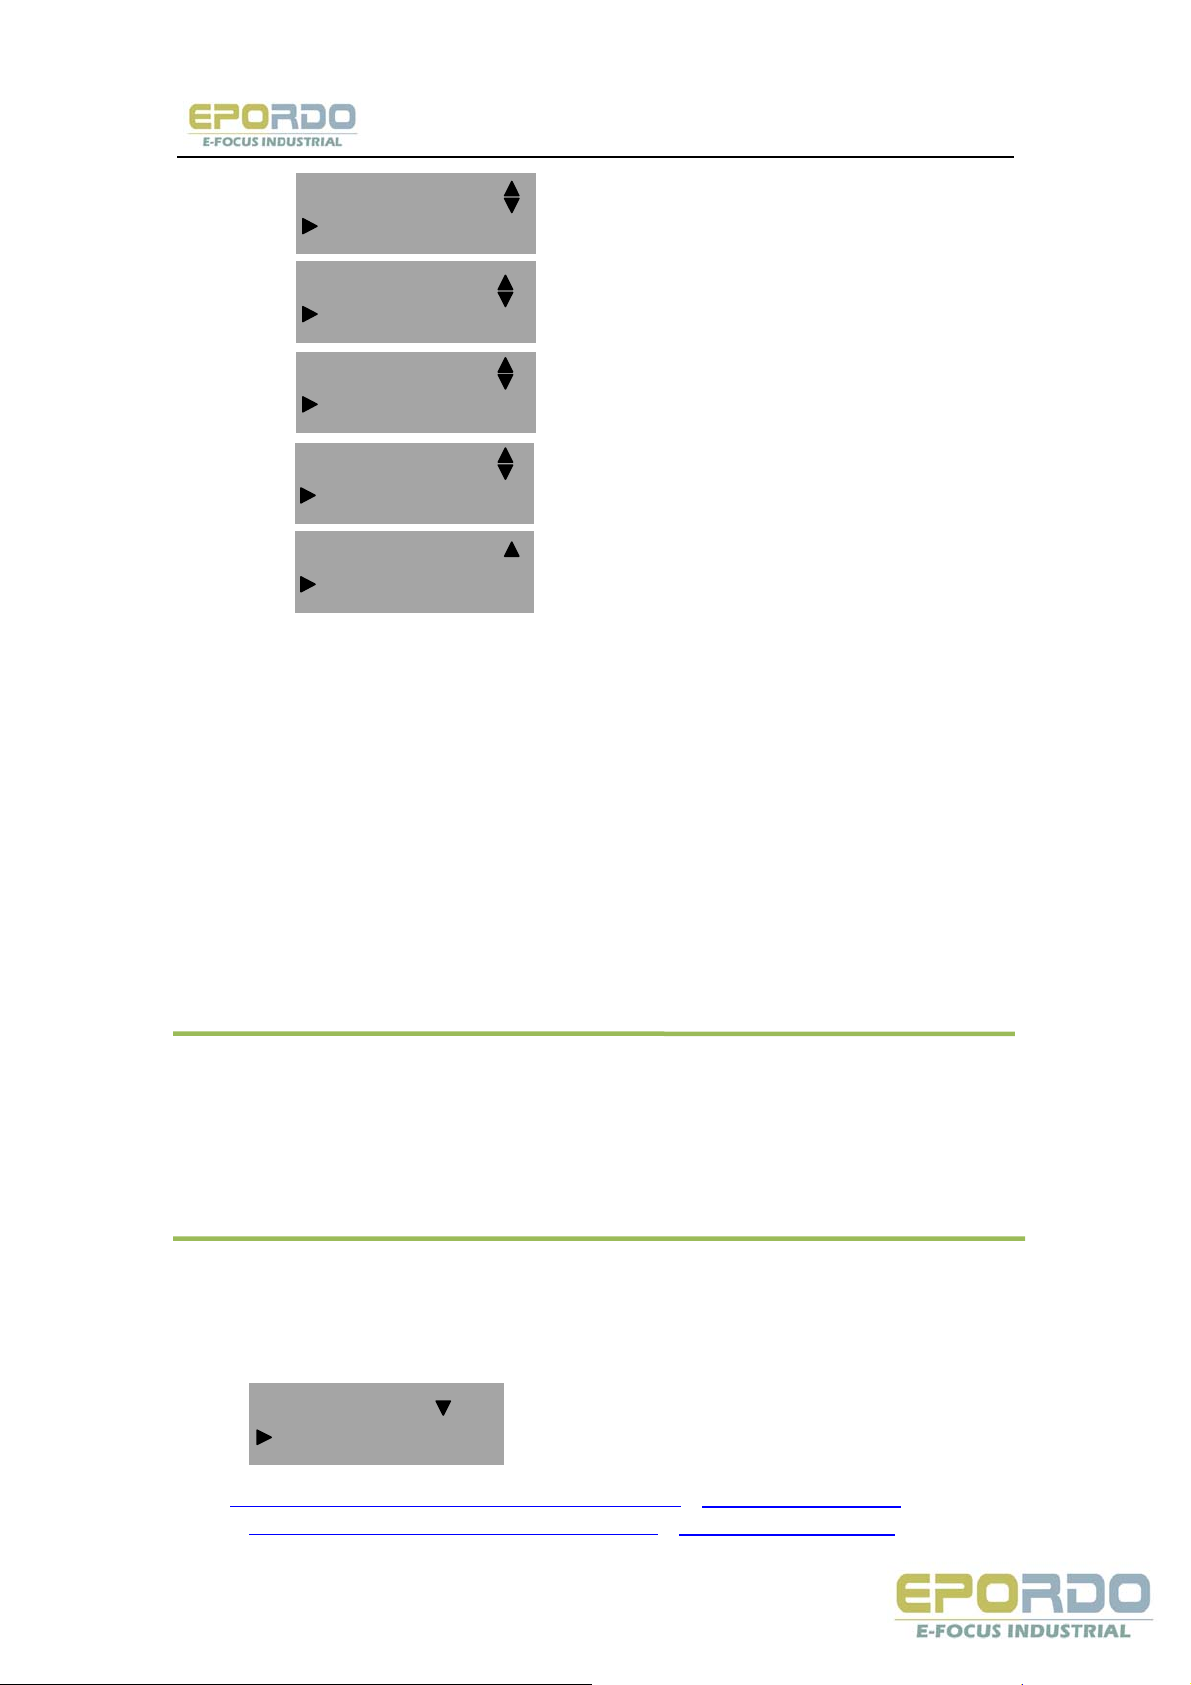
Time period could re-identify Time period code „1“ as: Sat. Sun, rest, not
allowed to access. Mon. To Fri, its the work time, is allowed to access Work time:
08:30-18:00
Settings as following:
Time Zone
SUN 23:57 -23:56
SUN 23:57 -23:56
MON 08:30-18:00
MSN: [email protected] / [email protected] / [email protected]
E-mail: [email protected] / [email protected]
Tel: +86 755 8341 8779/ 8825 7909
Page 29
BT04 Function Guide www.epordo.com
MON 08:30-18:00
TUE 08:30-18:00
TUE 08:30-18:00
WED 08:30-18:00
WED 08:30-18:00
THU 08:3 0 -18:00
THU 08:3 0 -18:00
FRI 08:3 0 -18:00
FRI 08:3 0 -18:00
SAT 23:57 -23:56
Analogy, could setup several Time period, according to demands, the whole system could
setup 50 Time periods at the most.
8.5.2 User Access control Options
User access control setup is based on user demands
I. Enter the menu to check certain user access control setup status
Includes: Affiliated group settings, group Time period and user Time period.
* Grouping: Divided the enrolled users to several groups, make the
management convenient;
* Group Time period: Whether the user use affiliated group default Time period
* User Time period: Setup the user open lock time, choose the already setup
Time period code
Note: The relation between group Time period and user Time period „Yes“ or
„No“ in the group Time period is only work to following “User Time period“
1) If the „group Time period“ is“Yes“, the user Time period will auto-pay value
to affiliated group Time period code.
2) If modified the user Time period, the „group Time period“ will atuo be „NO“.
2. Setting an example
Setting the user 00000001、00000002 to be group 1 and group 2
A. Access 00000001 infterface, the screen will display as following:
MSN: [email protected] / [email protected] / [email protected]
E-mail: [email protected] / [email protected]
Tel: +86 755 8341 8779/ 8825 7909
User Acc Opt
ID 00000001
Page 30
BT04 Function Guide www.epordo.com
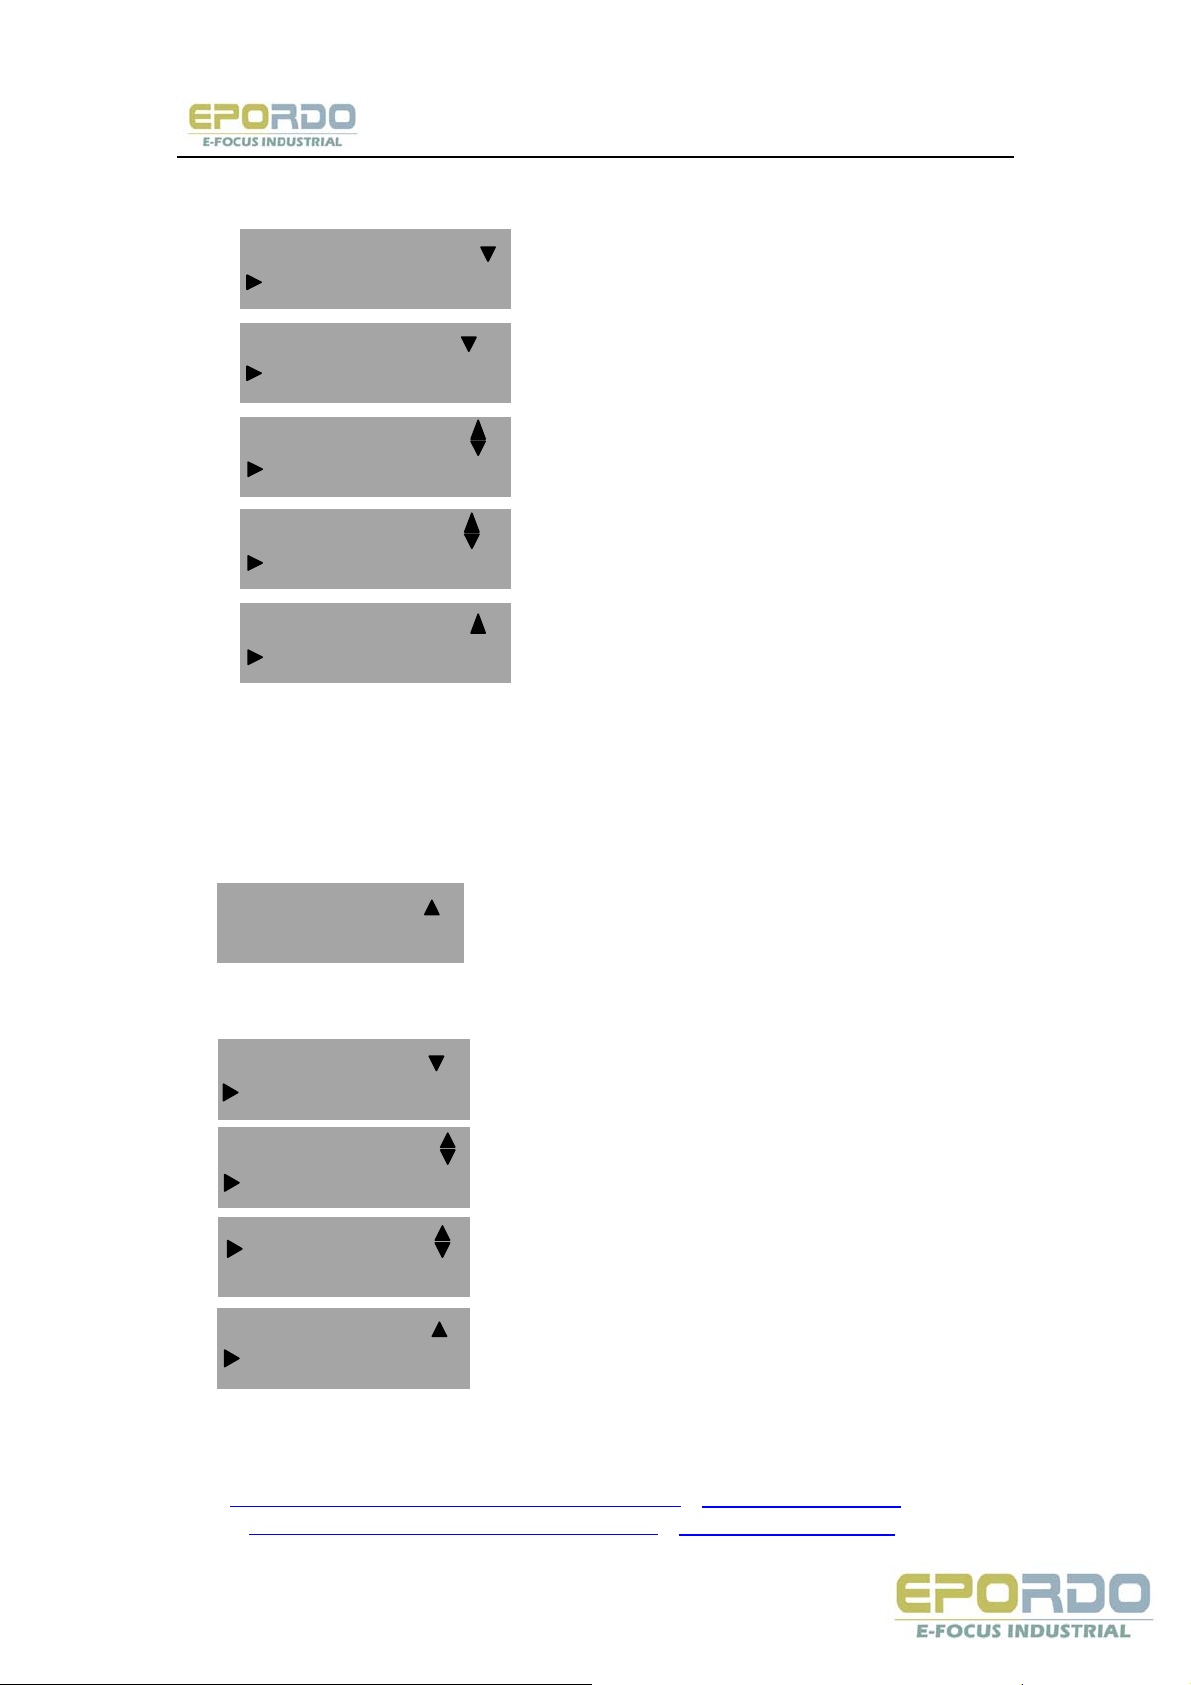
Press „OK“access „ Group Time period“ press Down or Up key to select „Yes“,
the screen will display as following:(TZ is Time Zone)
User Acc Opt
Belong group 1
Belong group
TZ1 NO
TZ1 NO
TZ2 1
TZ2 1
TZ3 40
TZ3 40
TZ4 48
Code 00000001 user
User affiliated group is „1“, use group 1 Time period( user Time period code is the group Time
period code)
00000001 user is available in Time period 1、8、48
B. Access 00000002 setting interface, the screen will display as following:
User Opts
Att No. 00000002
Press [OK] to access
User Time period select code 1,20, group Time period will auto be „No“
UserAcc Opts
Belong Group 2
Group Time period
TZ! 1
TZ1 1
TZ2 20
TZ2 20
TZ3 36
00000002 user:
MSN: [email protected] / [email protected] / [email protected]
E-mail: [email protected] / [email protected]
Tel: +86 755 8341 8779/ 8825 7909
Page 31

BT04 Function Guide www.epordo.com
User affiliated group is „2“, use user Time period not group Time period, namely
it is valid in Time period 1, 20,36
If the user would like to use group Time period, select „Yes“, it will auto-pay
value to group Time period code; otherwise, group Time period will auto be „No“
8.5.3 Grouping Function Definition
Grouping function divide the users to groups, and different groups can be
combined into different unlocking combination, in order to facilitate access of
the group management. Such as these can combine a lot of unlocking
combinations. The system defines five groups: group 1, group 2, group 3, group
4, group 5. New enrolled users belong to default group, but can be re-assigned
to other various groups.
Group time: Setup the group open lock time, choose already setup Time period
code number in the group Time period.
New enrolled user default group 1 Time period, but when the user to reset their
respective groups, the users use corresponding default Time period, so need
define each group default Time period first of all.
How to use group time period, see "User Access Control feature set"
Note: Group 1 Time period is default Time period, choose Time period definition
code “1“.(namely the new enrolled user could open the lock)
a)Access „GRP TP Definne“, the screen will display as following:
ꎺ
Press „ OK“ to access the setup of group 1 default Time period, there are three
Time periods in the group default Time period, their relation is „or"
Access Opts
GRP TP Define
GRP TP Define
Group No. 1
GRP TP Define
TZ1 1
TZ1 1
TZ2 8
TZ2 8
TZ 3 40
MSN: [email protected] / [email protected] / [email protected]
E-mail: [email protected] / [email protected]
Tel: +86 755 8341 8779/ 8825 7909
Page 32
BT04 Function Guide www.epordo.com
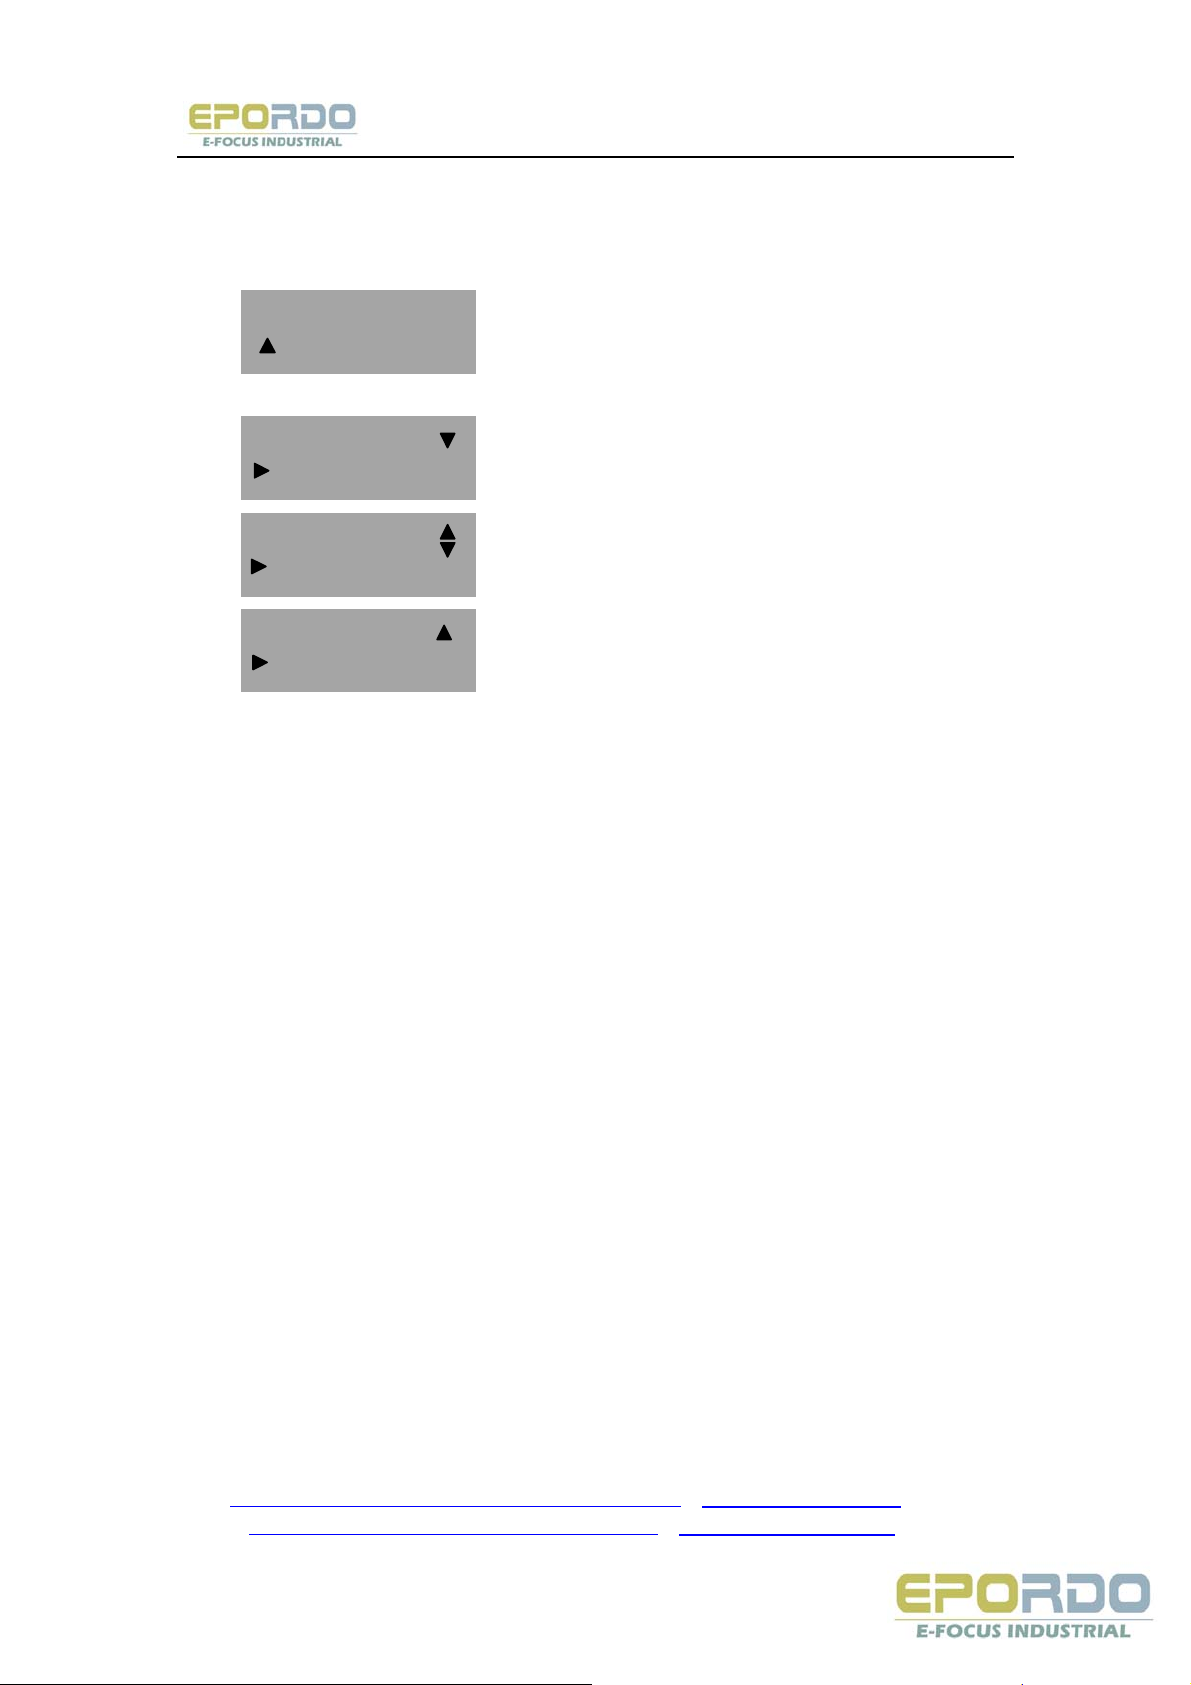
Group 1 is valid in Time period 1,8,40, could also select other Time period.
b) Access “ group 2 default Time period”, the screen will display as following:
Group 2 Time period setup
GRP TP Define
Group No. 2
Press “OK”to enter
GRP TP Define
TZ1 2
TZ1 2
TZ2 10
TZ2 10
TZ3 36
Group 2 is valid in Time period 2, 20, 36, could also select other Time period.
Hereby, each group Time period could be defined according to demands, the
system could define 5 groups Time period at the most.
8.5.4 Unlock Group definition
Open lock combination is the direct dislay to control unlock,for example, if you
would like to have all enrolled users couldn‘t open the lock, you may setup 10
open lock combination to be in vain.
Open lock combination definition is to define different combination which could
open lock, each combination is made up of different groups. Open lock
combination use group number directly, not consider user verification queue.
For example „123“ means there should be one user each at least in group 1,
group 2, group 3, together passed the verification to open the lock;¡°4¡° means
one user in seperate group 4 could open the lock after verification. The system
could define 10 open lock combinations Simultaneously at the most, if only one
of them could pass the verification.
Note: System default open lock combinaiton is “1”,(namely new enrolled user
could open lock)
Press “ Menu” to access main interface;
Select “Setup optios” ,press “OK” to access setting menu
Select “Access Opts” , press “OK” to access menu
MSN: [email protected] / [email protected] / [email protected]
E-mail: [email protected] / [email protected]
Tel: +86 755 8341 8779/ 8825 7909
Page 33
BT04 Function Guide www.epordo.com
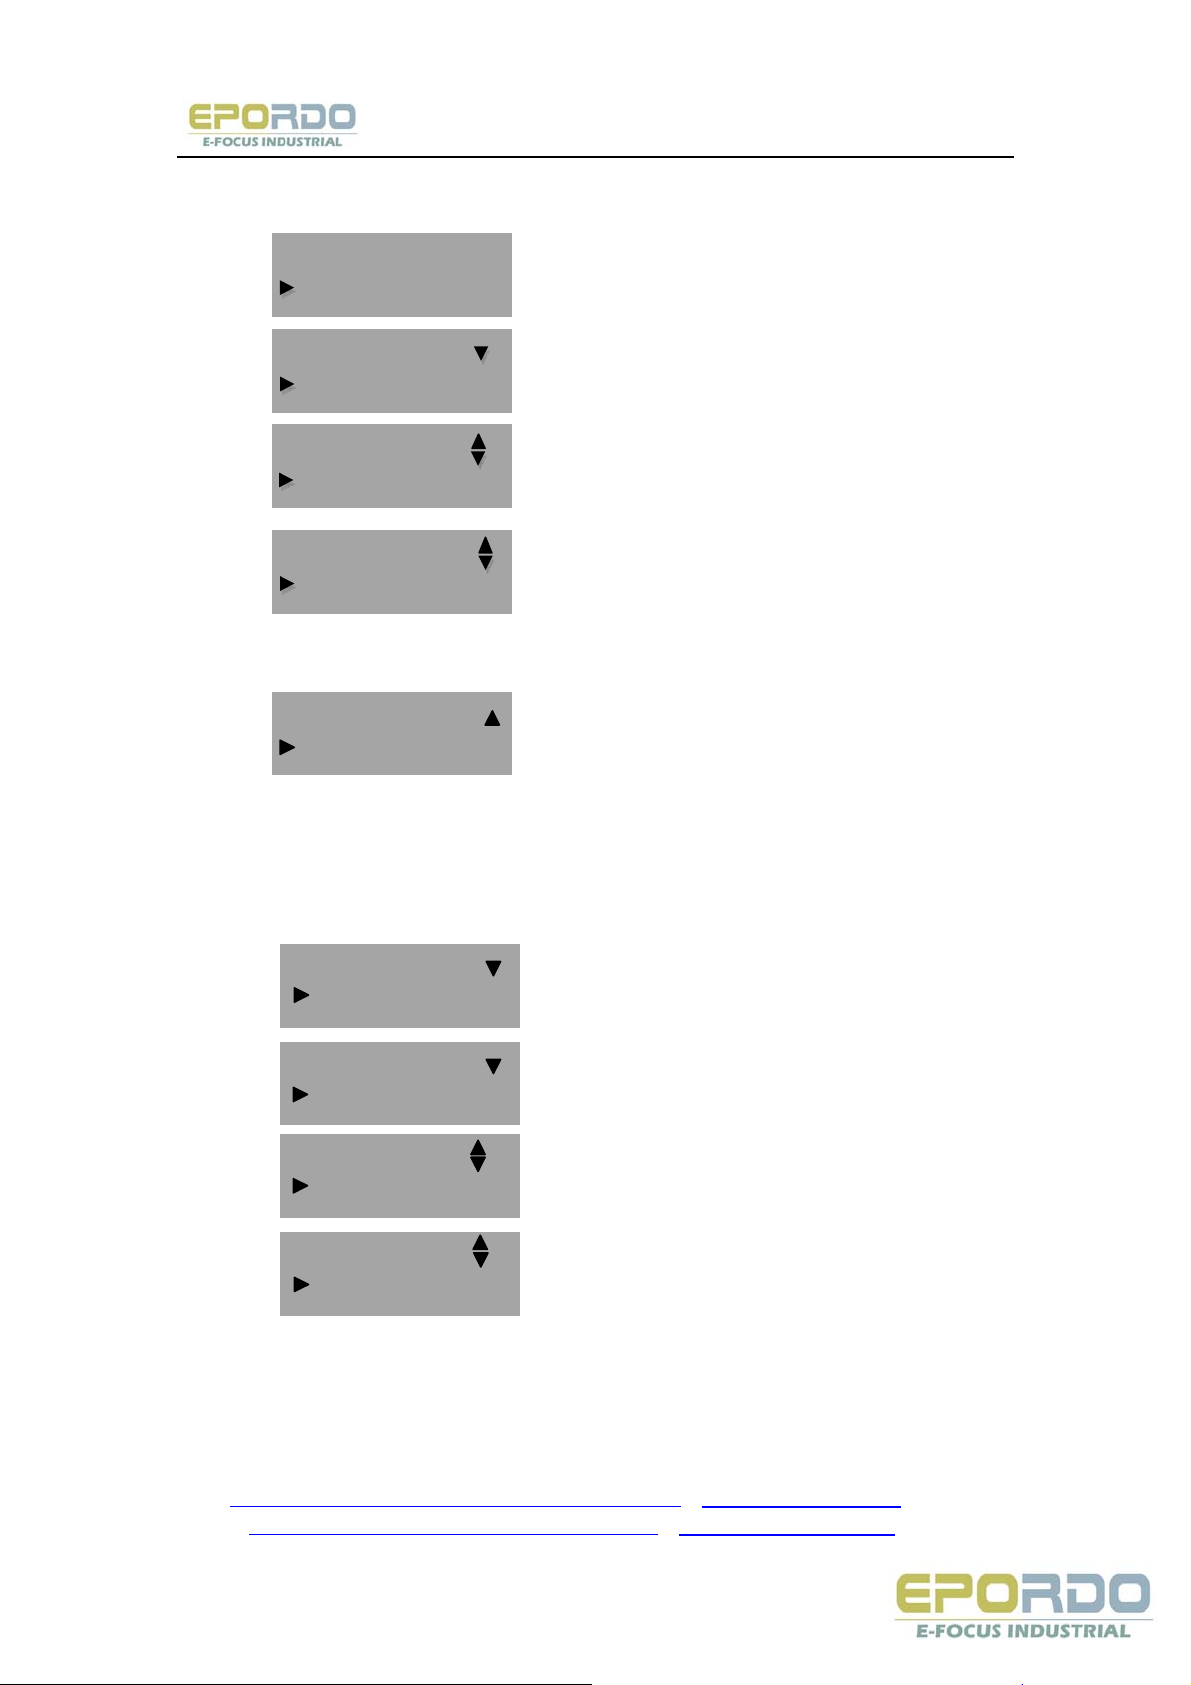
Select “Unlock Group”, press [Ok], and scrolling up or down key , the screen will
display as following:
Unlock Group
Match1 1
Match 1 1
Match 2
Match 2
Match 3
Combination 3
Combination 4
..............
Match 9
Match 10
If didn‘t process settings (factory status), the system default group 1 as open
lock combination 1, others is in vain;
if don‘t want all the user open the lock, setup 10 open lock combination as in
vain.
1) For example:
Unlock Group
Match1 123
Match 1
Combination 2 4
Match 2
Match 3 25
Match 3
Match 4 15
...............
It showes from above combination settings:
MSN: [email protected] / [email protected] / [email protected]
E-mail: [email protected] / [email protected]
Tel: +86 755 8341 8779/ 8825 7909
Page 34

BT04 Function Guide www.epordo.com
123 is a combination
4 is a combination
25 is a combination
15 is a combination
Combination 1: If group 1,2,3, users are on scene, and at least one user pass
the verification Time period is valid, the door would open
Combination 2: Only one user from group 4 on scene, the door will open
Combination 3: If group 2, 5 users are on scene, and at least one user pass the
verification Time period is valid, the door would open
Combination 4: If group 1,5 users are on scene, and at least one user pass the
verification Time period is valid, the door would open
Note: The Time period which couldn‘t pass verification
* User Time period didn‘t select Time period code
* Group Time period didn‘t select Time period code (when using group Time
period)
* User verification time is in neither Time period as the settings.
* Define the Time period as Prohibition
Note: If the setup Time period couldn‘t get passed.
① If agree above combination 2,appears the hints“illegal Time period
visiting“,the user couldn‘t open the lock, but can do attendance.( If there are
some user could meet the open lock terms, group 2 could open lock too)
② If agree above combination 1,3,4,5, it appears „illegal Time period visiting“,
that combination user couldn‘t open the lock, but could do attendance.
2)For example: A bank vault needs three persona on scene at the same time,
to open the vault door. Detailed settings as following:
Those three people seperately belongs to group 2, 3, 5, has the open lock right
at the same Time period. Select “Combination 1“ press „Ok“ to access eddit
status, press number buttons,input 235, press ESC to exit and save the
settings.
Note:If already set 1235 combination, coudn‘t set 12,13,14,15,23,25,35
combination anymore.
8.5.5 Lock Delay
The system requires setup fingerprint device to control open lock time, set
„0“ as close lock control function, one number of units is 20ms,could setup as
254 at the most,
MSN: [email protected] / [email protected] / [email protected]
E-mail: [email protected] / [email protected]
Tel: +86 755 8341 8779/ 8825 7909
Page 35

BT04 Function Guide www.epordo.com
i.e.;5.08seconds. Select this item and press „OK“ to access settings, press
number key to input Corresponding number, press „ESC“ to exit
8.5.6 Door Magnet Switch
Door magnet type includes three types: No, Normally opened, Normally closed;
No means not use door magnet switch, normally opened means it keeps
opening after unlock, normally closed means it keeps closing after lock
Press „ MENU“ access main interface
Select „Setup Options“ , press „OK“ to enter setting menu
Select „Access Opts“, press „OK“ to enter menu;
Press Up and Down key and select „Door Senfor Setting (Door Senfor Set)“,
the following table shows:
Press OK, select this item, press Up and Down key to shift the status
select „Door Sensor Delay(DSenDelay)“, it will appears as following:
Press OK, select the number, press up and down key to modify the door
magnet delay time.
Door Senfor Set
Sen Mode None
Door Senfor Set
Sen Mode NC
Door Senfor Set
Sen Mode No
Access Opts
DSen Delay 1
MSN: [email protected] / [email protected] / [email protected]
E-mail: [email protected] / [email protected]
Tel: +86 755 8341 8779/ 8825 7909
Page 36

BT04 Function Guide www.epordo.com
Technical Specification:
Specification
Capacity of Fingerprint 3000/10000
Capacity of record 60,000
Verification Method
Access control
function
Electric Lock control 3A/12VDCRelay Output
Attendance Function
optional
Other output One group door magnet output, one group open door switch output.
Networking (optional)
Wiegand output Wiegand26 output (optional)
Keyboard and display LCD, 4*4 digital keyboard, blue back ++ light
Power 12V DC, Standby Current: 50mA, work current 400mA
Verify speed
FAR
FRR
1:1 or 1:N
50 time, 5 groups, 10 open door combination, support multi
fingerprint access, fingerprint or password verification method is
optional, Way alarm output,device removal alarm output,etc.
support Attendance software
One group door bell output
TCP/IP、RS485、USB
<=1 second
<=1%
<=0.0001%
Temperature operation 0°C - 45°C
Humidity operating 20%-80%
Language Simplified Chinese, Traditional Chinese, English
OEM Provide OEM job
MSN: [email protected] / [email protected] / [email protected]
E-mail: [email protected] / [email protected]
Tel: +86 755 8341 8779/ 8825 7909
 Loading...