

Page 1
This quick start guide provides rst time setup instructions and other useful
instructions for the
epoc
®
Host
2
(Motorola MC55A0). For complete user
instructions, please refer to the
epoc System Manual.
epoc Host
2
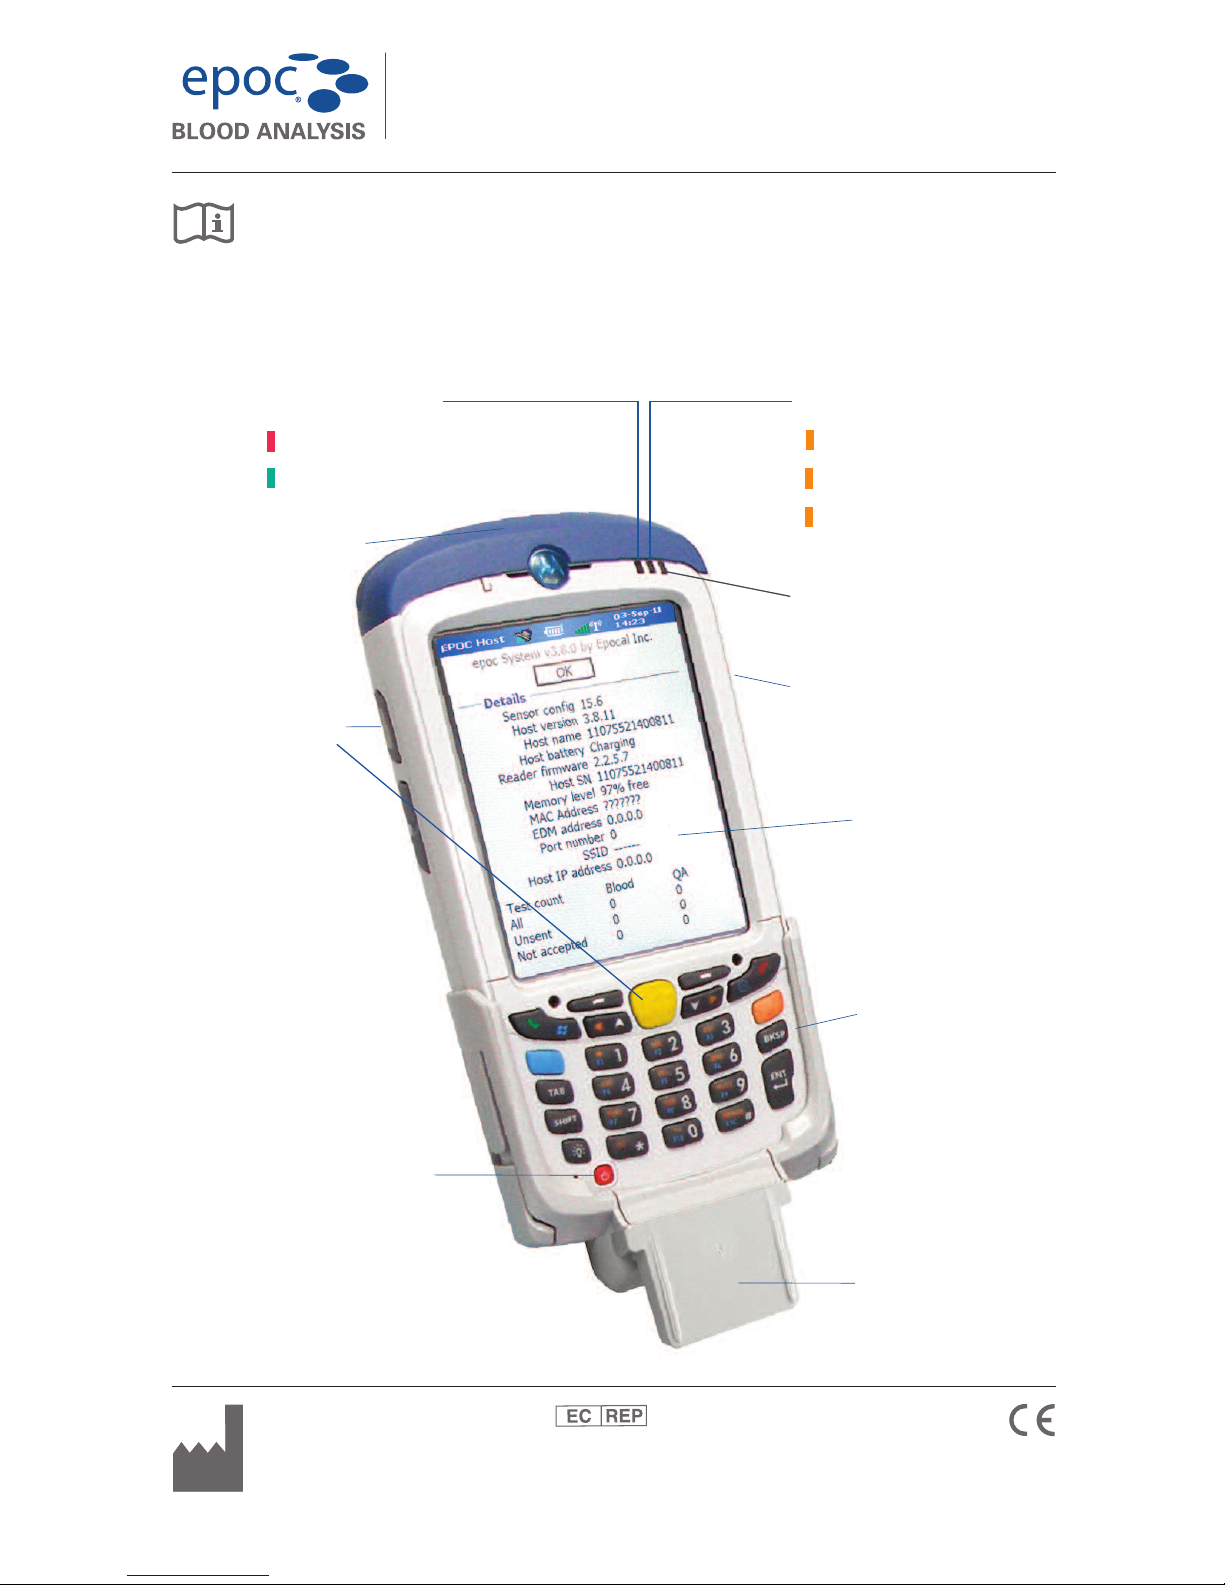
Components
epoc Host
2
Quick Start Guide
Scan Button(s)
Scan Button
(on side)
Barcode Scanner
Cradle Blade
Keypad
Barcode Scan LED
Barcode scanning active
Successful scan/capture (blinking)
Radio Status LED
(NOT USED!)
Touch Screen
(with screen protector)
51005527-04
Epocal, Inc.
2060 Walkley Road
Ottawa, ON K1G 3P5
CANADA
Emergo Europe
Molenstraat 15
2513 BH, The Hague
The Netherlands
Phone: +31.70.345.8570
Fax: +31.70.346.7299
Power Button
Charging/Battery LED
Battery fully charged
Battery charging (blinking)
Charging error (fast blink)
Page 2
epoc Host
2
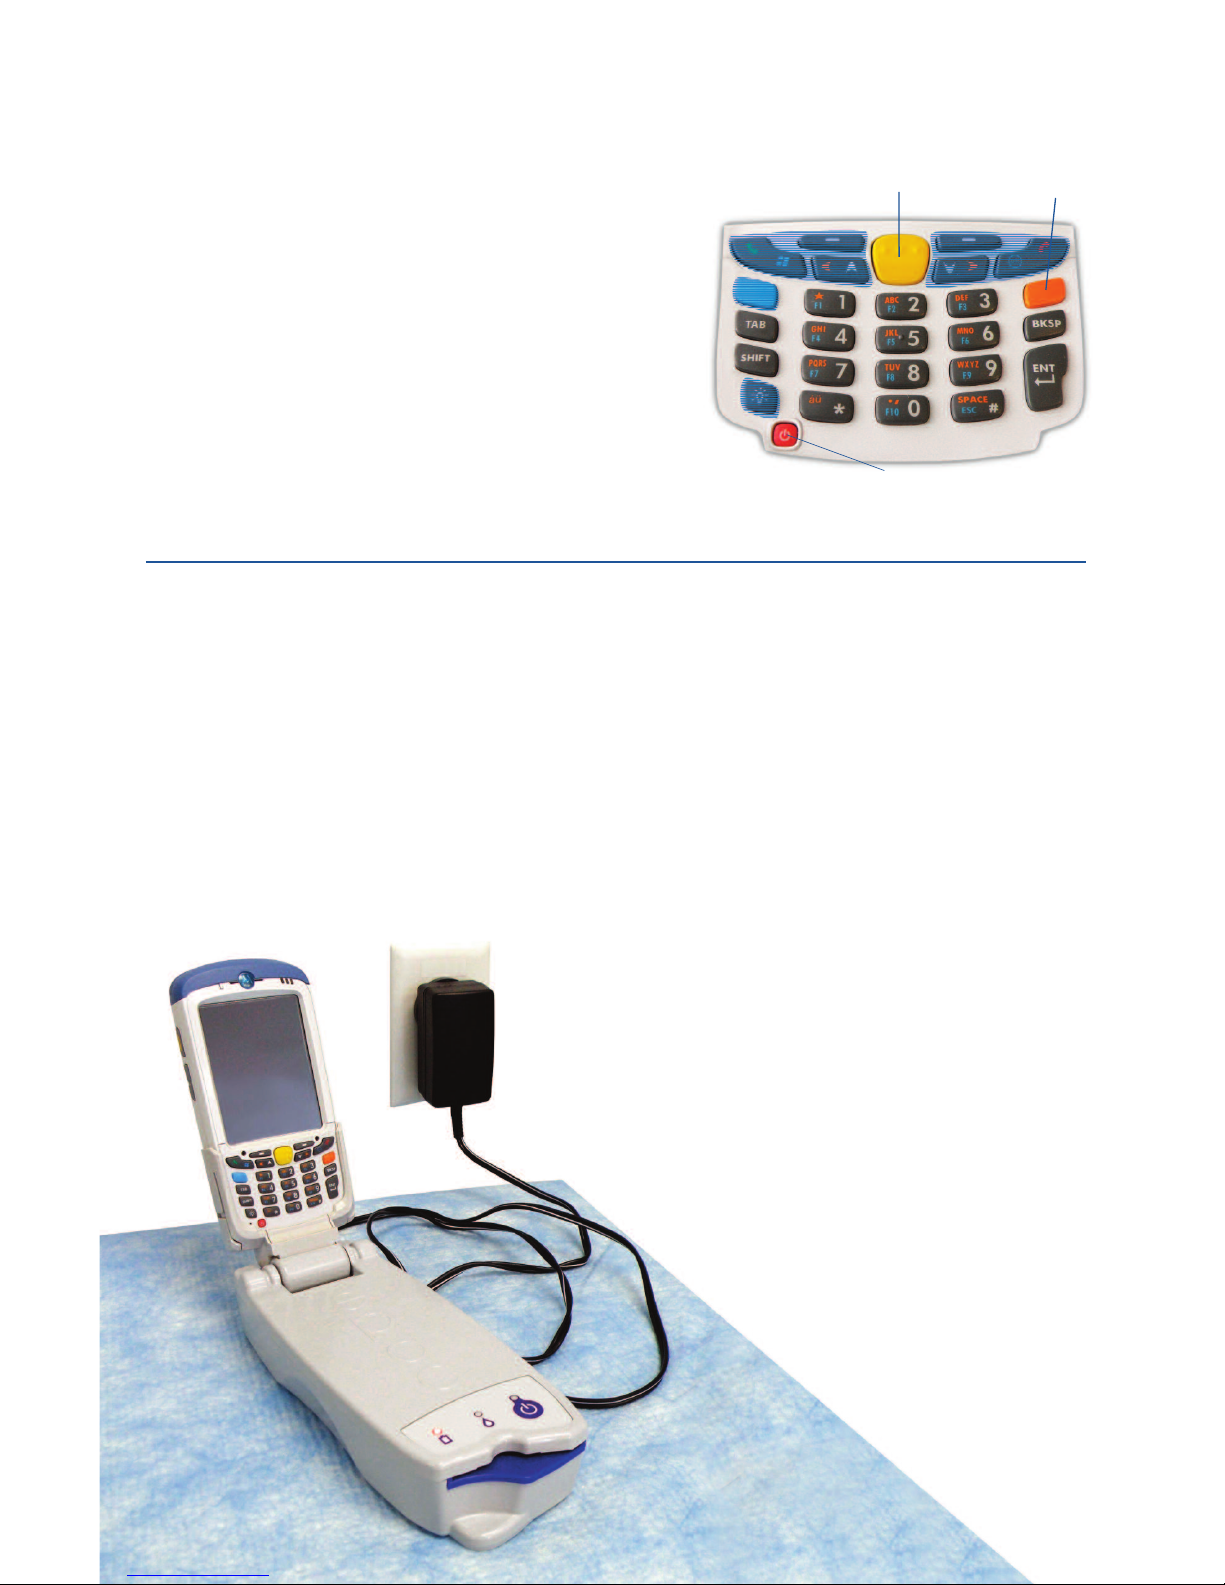
Numeric Keypad
Power
Scan
Toggle Key
•
Power button turns device on and off. Holding the
Power button for 5 seconds will reset the device.
• Scan key (and Scan Buttons on sides of Host)
activates the barcode scanner.
•
Alphanumeric keys default to numeric values.
Pressing the Toggle Key
allows entry of alpha
characters.
(Key is illuminated and orange symbol
appears on display when active).
Pressing the Toggle
Key again returns key functions to numeric values.
•
Tab & Enter keys navigate to the next editable eld.
•
Backspace key (BKSP) deletes entered characters.
Prior to use . . .
Step 1: Charge the
epoc Host
2
Before using the
epoc Host
2
, charge its battery as follows:
1.
Connect the
epoc
Reader power supply to the power jack on the back of the Reader.
2. Insert the
epoc Host
2
into the
epoc
Reader’s pivot slot as shown. The initial charge
will take approximately eight hours.
Note: Shaded keys are not active
• A blinking Amber battery LED shows
that the
epoc Host
2
is charging.
• A solid Amber battery LED shows that
the
epoc Host
2
is fully charged.
2
Page 3
For facilities not using an epoc Data Management System, skip steps 2 and 3.
Step 2: Connect to your Wi-Fi Network
NOTE:
Please read Step 2 in its entirety before starting. It may be necessary to
contact your facility’s Information Technology department to obtain the
proper Wireless connection and security settings.
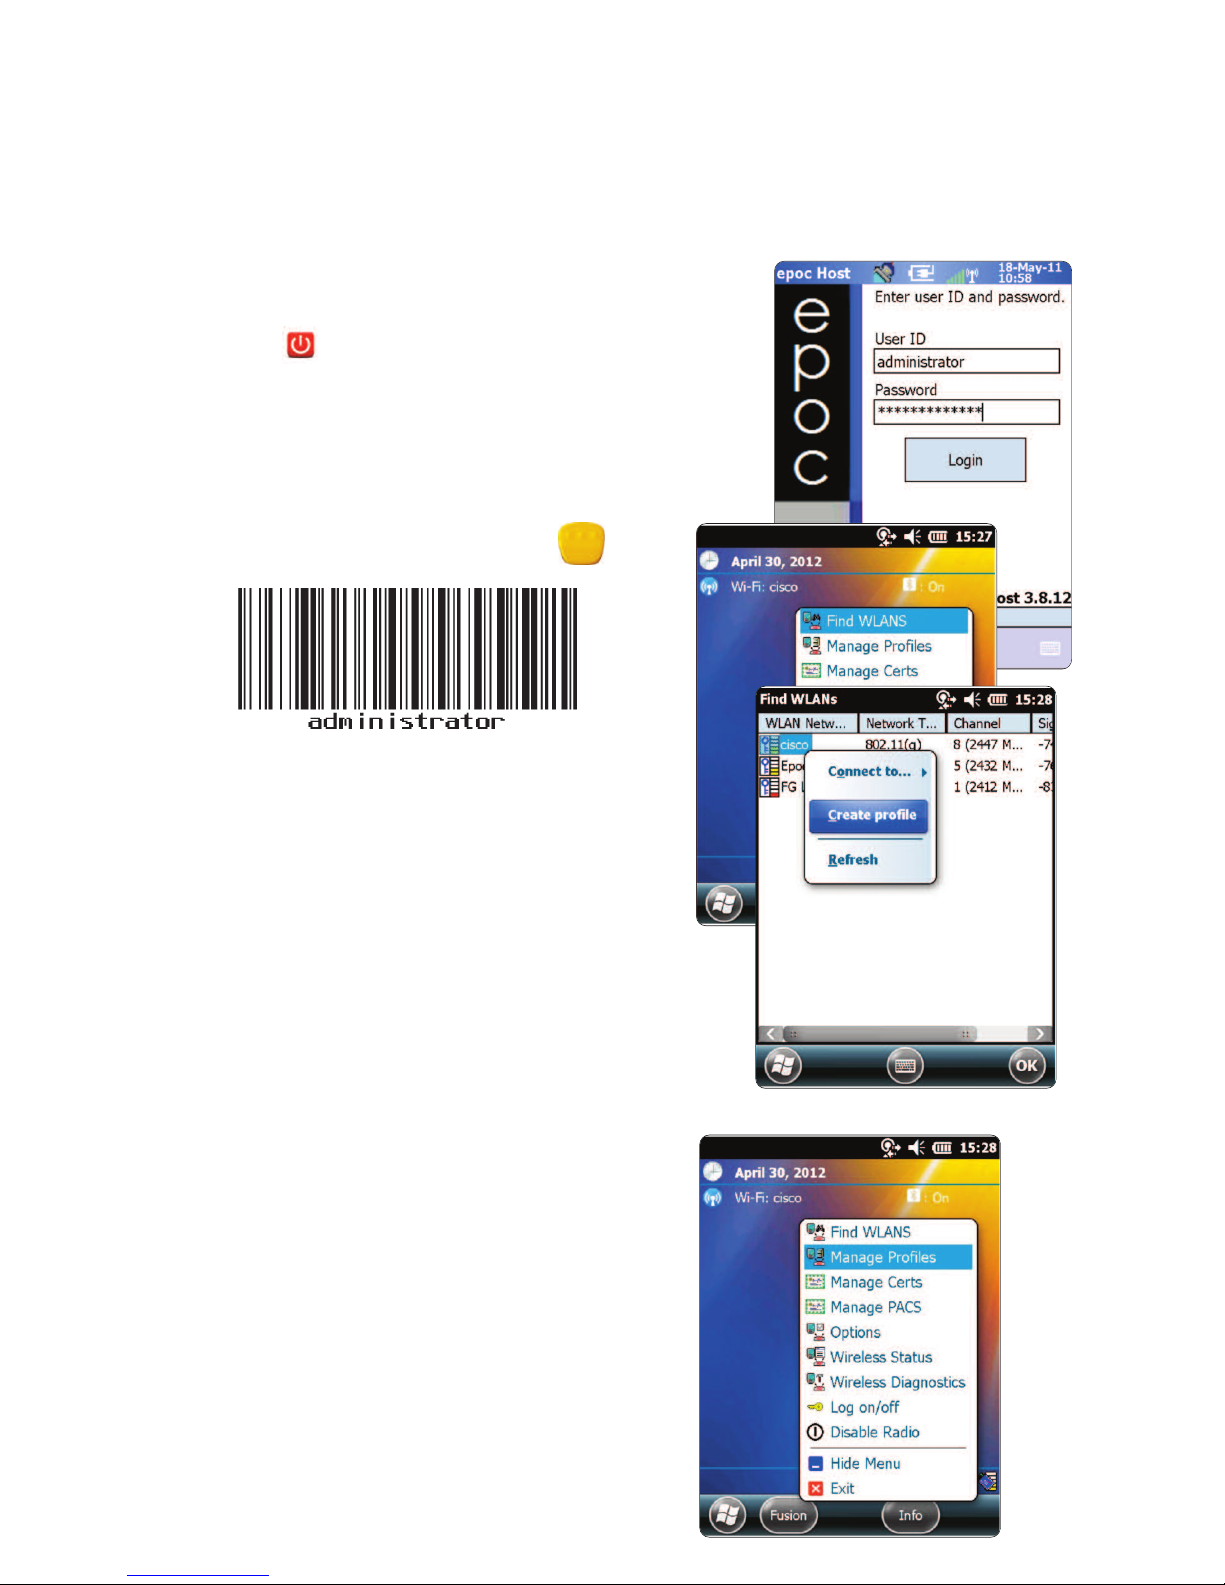
1. Run Motorola Wireless Fusion.
• Turn on the
epoc Host
2
by pressing the power
button.
•
At the login screen, scan or enter the word
“administrator”
into the User ID and
Password elds.
• To scan, aim the Barcode Scanner at the
barcode and press the Scan Key.
• Exit the
epoc Host
2
application
by tapping “Tools”, then “Exit”
from the menu.
For networks that broadcast their SSID:
• Tap the “Fusion” on-screen icon and
select “Find WLANS” from the menu.
• Tap and hold desired WLAN and select
“Create Prole” from the menu.
•
Proceed to Congure the Wi-Fi Network
Prole as described on the next page,
starting with the 3rd bullet. Typically, your
settings will be already entered.
For networks that DO NOT broadcast their SSID:
• Tap the “Fusion” on-screen icon and
select “Manage Proles” from the menu.
•
Proceed to Congure the Wi-Fi Network
Prole as described on the next page
.
You will need to enter
your settings
manually.
3
Page 4
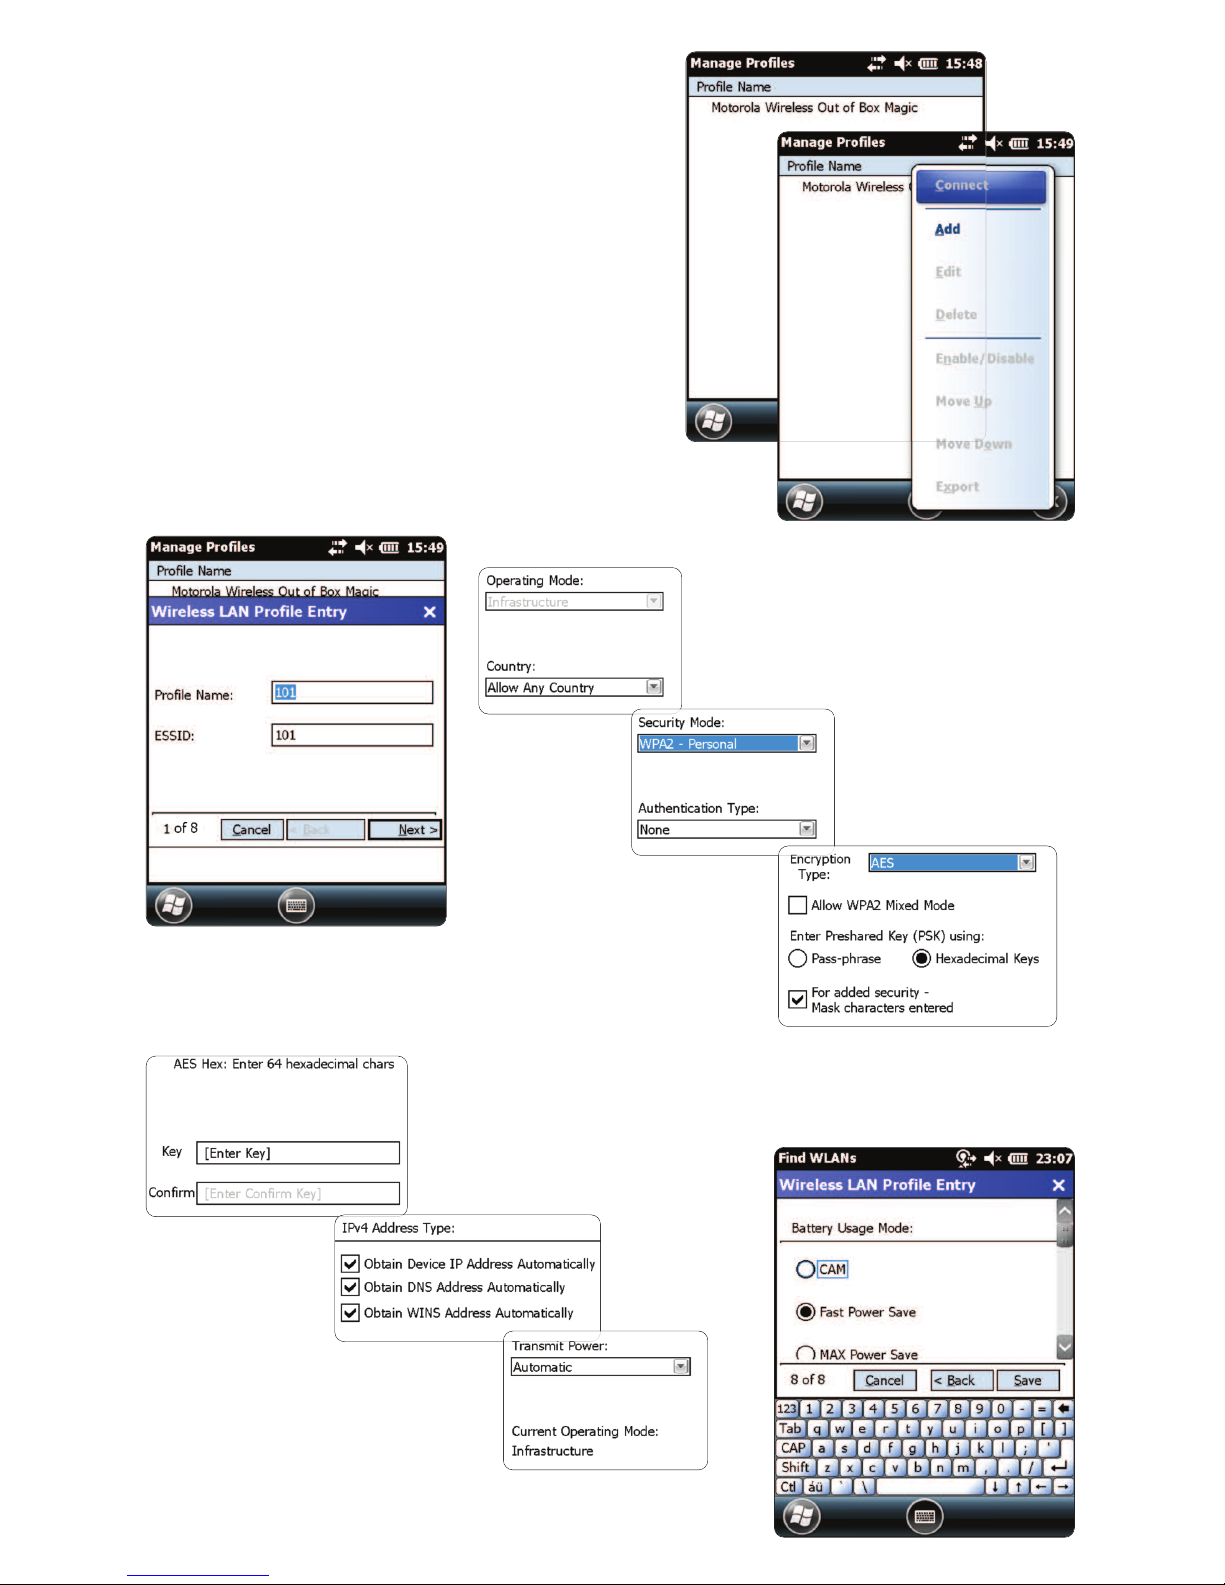
Congure the Wi-Fi Network Prole
• Tap and hold the screen to bring up the
menu; then tap on “Add”.
• Enter correct Prole Name and Network
Name (ESSID), and then tap “Next”.
• Continue entering the correct network
security settings on the screens that follow
(Screenshots 2-8) by tapping “Next”, then
“Save”.
NOTE:
Screenshots are examples only.
2 of 8
3 of 8
4 of 8
6 of 8
7 of 8
5 of 8
4
Page 5
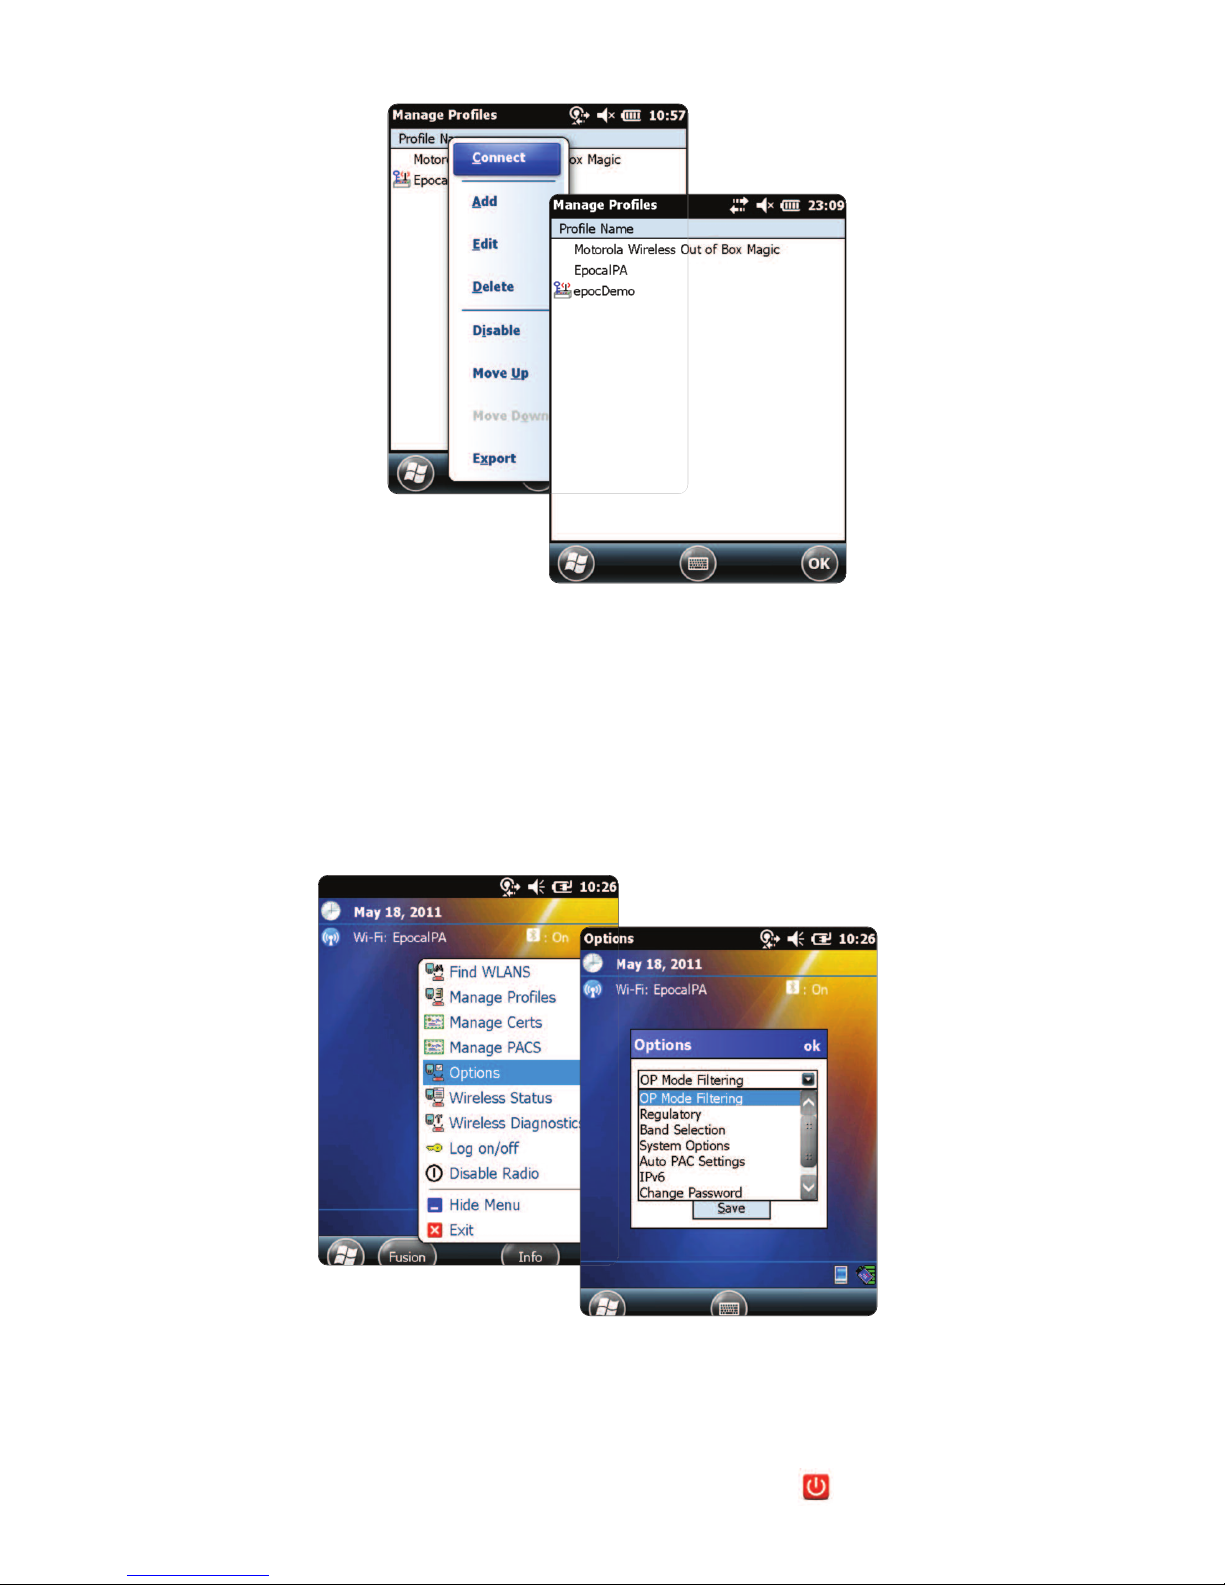
• When nished, tap and hold on the network name, then tap “Connect”.
• Tap “OK” on bottom of the screen to return to the “Today” screen..
• If required, tap on the “Fusion” icon and select “Options” to congure the
appropriate wireless network options.
NOTE:
On some networks, it may be required to disable 802.11d in “Regulatory” options.
2. Reset the
epoc Host
2
.
• Perform a warm reset by holding down the power button for 5 seconds.
5
Page 6
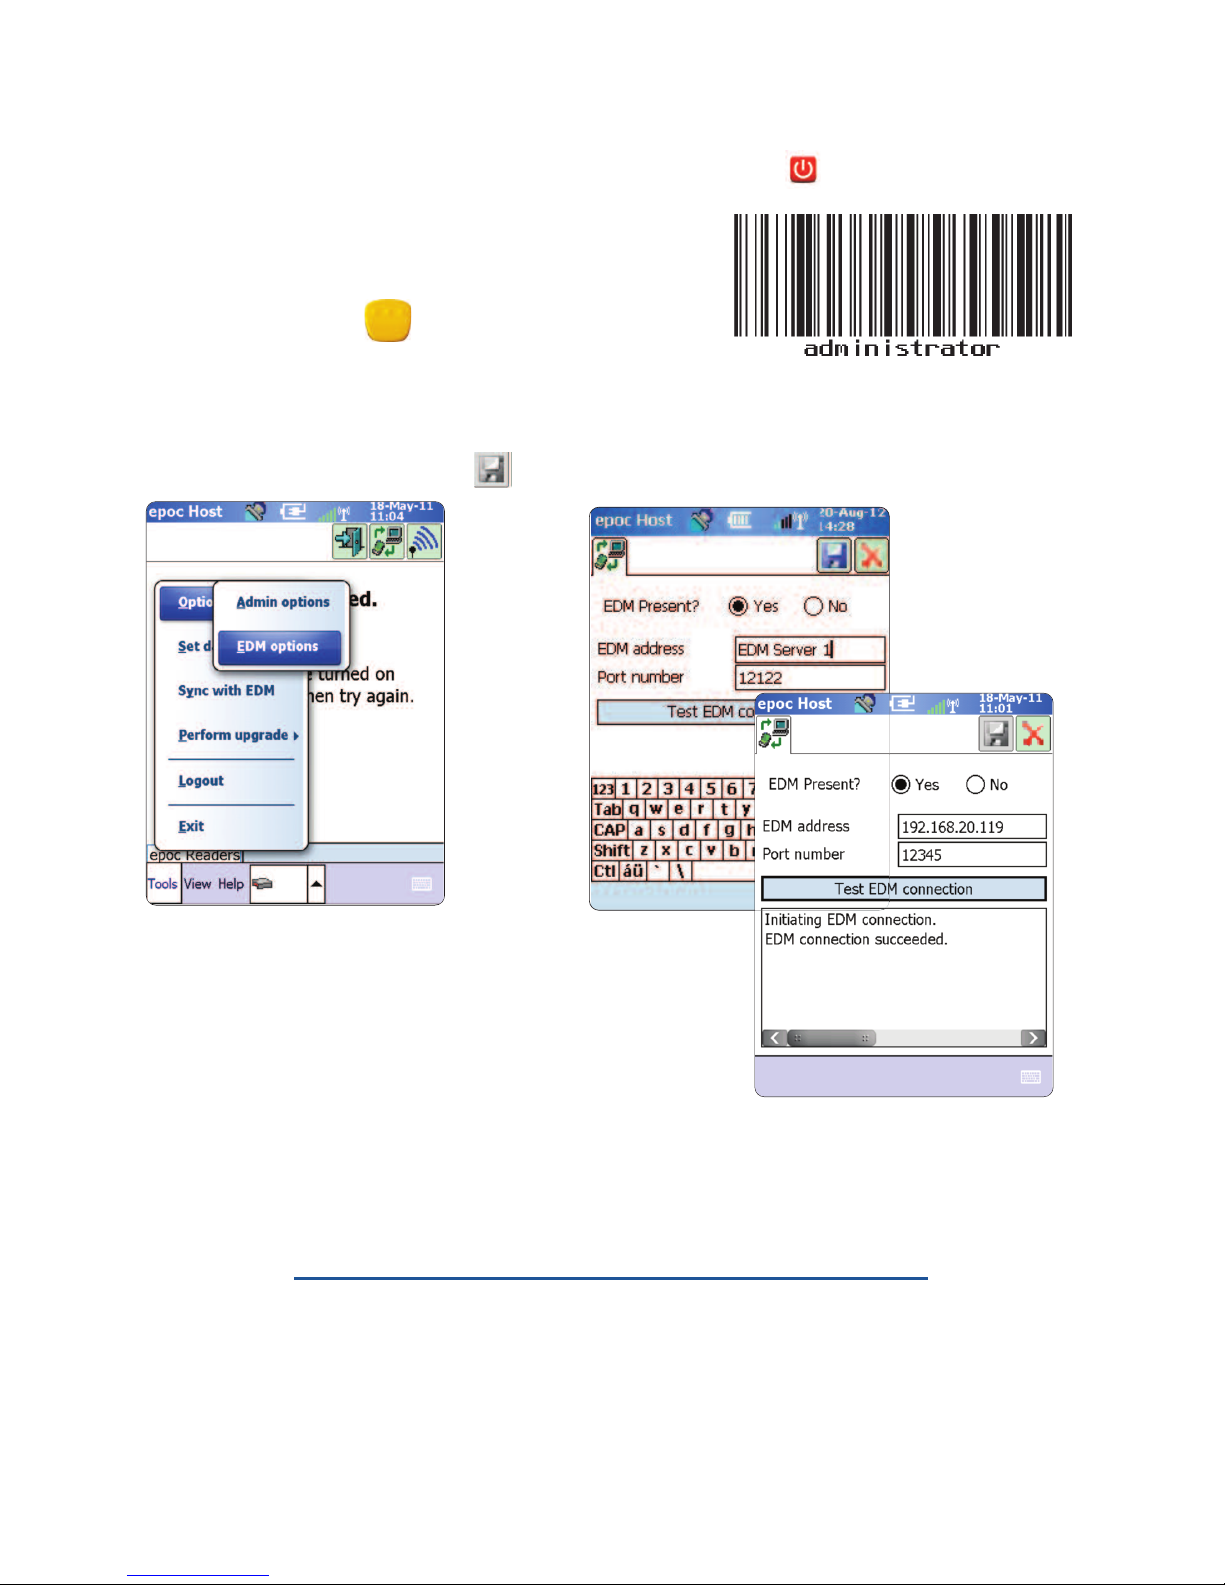
Step 3: Connect to the
epoc Data Manager
(EDM)
1. Congure EDM options
• Turn on the
epoc Host
2
by pressing the power button.
•
At the login screen, scan or enter the word
“administrator”
into the User ID and Password
elds. (Set date and time if prompted)
To scan, aim the Barcode Scanner at the barcode and
press the Scan Key.
•
Select “Tools”
then
“Options”,
then
“EDM
Options” from the menu.
•
Set “EDM Present?”
to
“YES”,
and enter the correct EDM address and port number,
then tap the disk symbol.
2. Conrm EDM Connection
• Tap the
“Test EDM connection”
button to conrm a
successful EDM connection.
The
epoc Host
2
is now ready for use.
NOTE: Refer to the epoc System Manual for instructions on updating the epoc Host
Software.
NOTE: Before placing this unit into service, consult your facility’s internal quality control
procedures and regulatory requirements.
6
Page 7
Resetting the epoc Host
2
There are two reset functions – warm reset and cold reset. In the rare event that the
epoc Host
2
stops responding or is not functioning properly, perform a warm reset. If
the
epoc Host
2
still does not respond, perform a cold reset. Data will not be lost with
either procedure, which takes approximately one minute.
• Perform a warm reset by holding down the power button for 5 seconds.
• Perform a cold reset by simultaneously holding down the power button, the “1”
key, and the “9” key, and then release.
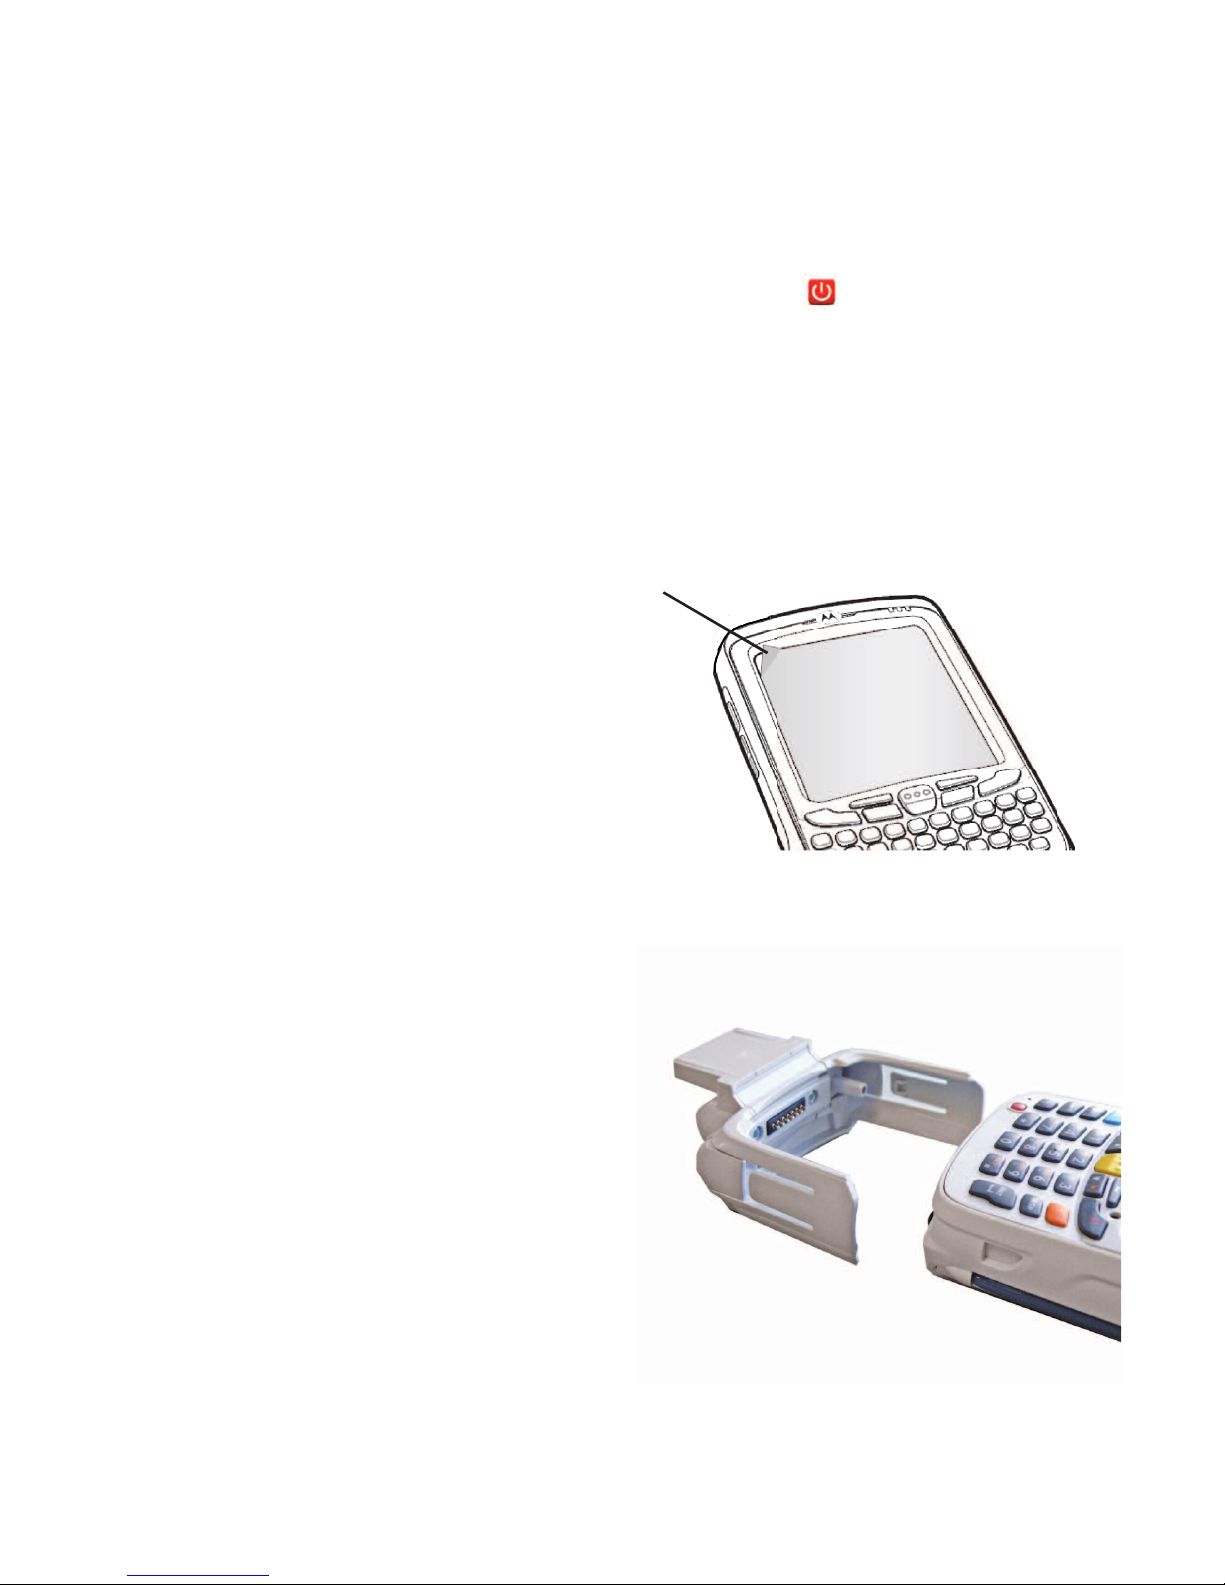
Removing or replacing the Screen Protector
A screen protector has been applied to the
epoc Host
2
to minimize wear and tear to the
device. To remove the screen protector, lift the
corner using a thin plastic card (such as credit
card), then carefully lift it off the display. To install
a new screen protector, refer to the instructions
included with the replacement screen protector.
Installing the Cradle
In the event that the cradle becomes separated
from the
epoc Host
2
, position the cradle as
shown, and press the two together until both
cradle locking tabs snap into the pockets on the
side of the Host.
7
Page 8
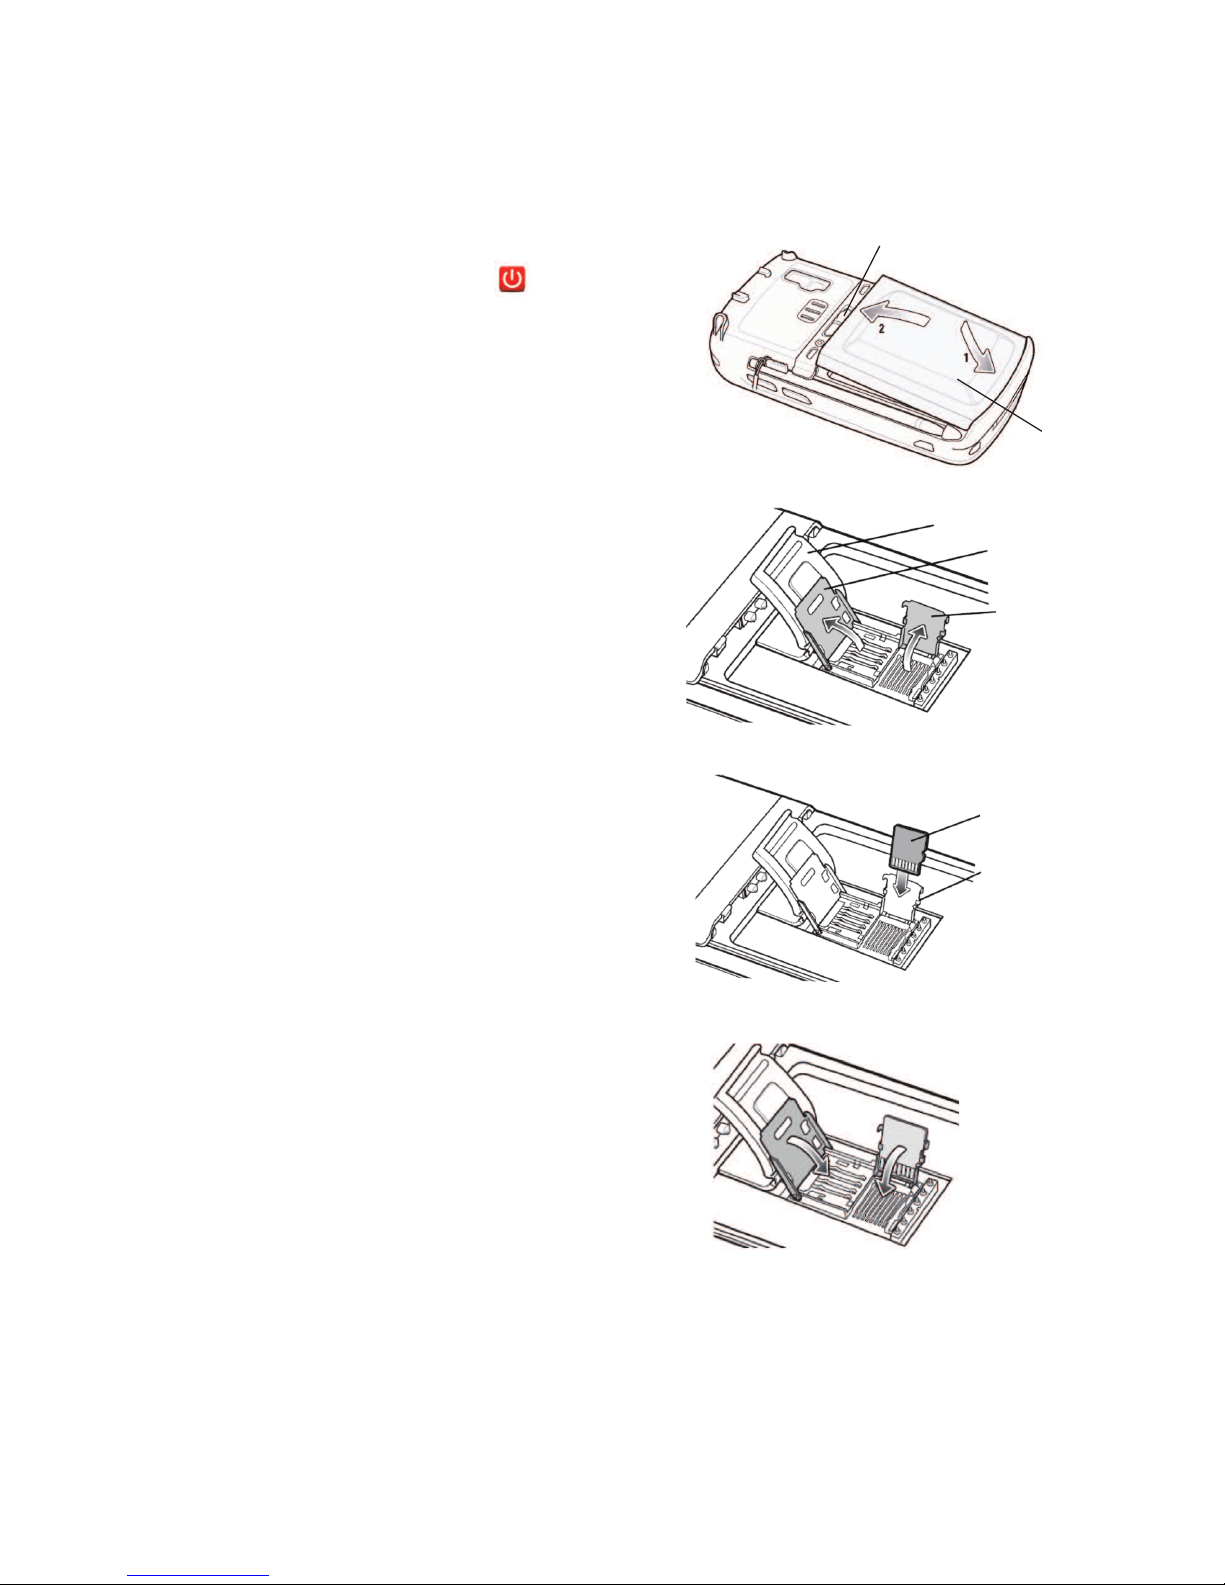
How to install or replace the microSD Card on the epoc Host
2
The SD card slot is located on the back of the epoc Host
2
under the battery compartment.
NOTE: It is not necessary to remove the plastic cradle.
1. Press and release the Power button to
suspend the
epoc Host
2
.
2. Use your nger or stylus to slide the
battery latch to the right releasing the
battery. The battery ejects slightly.
3. Lift the battery from the device.
4. Lift the rubber access door and slide SIM
card holder door to unlock.
5. Lift SIM card holder door (if it exists), then
lift the microSD card holder door.
6. If removing microSD card, simply remove
the microSD card from holder.
7. Insert the microSD card, with gold bars
facing out, into the card holder door
ensuring that the card slides into the
holding tabs on each side of the door.
8. Then close microSD card door and slide
SIM card holder door to lock position.
9. Close rubber access door.
10. Insert the battery; bottom rst, into the
battery compartment in the back of the
epoc Host
2
.
11. Press the battery down into the battery
compartment until the battery release
latch snaps into place.
NOTE: T
o upgrade the epoc Host
2
software from an SD card, refer to the epoc System
Manual
.
SIM card
holder door
Rubber access door
Battery Release Latch
Battery
microSD
card holder
door
microSD card
Holding tab
8
 Loading...