

Page 1
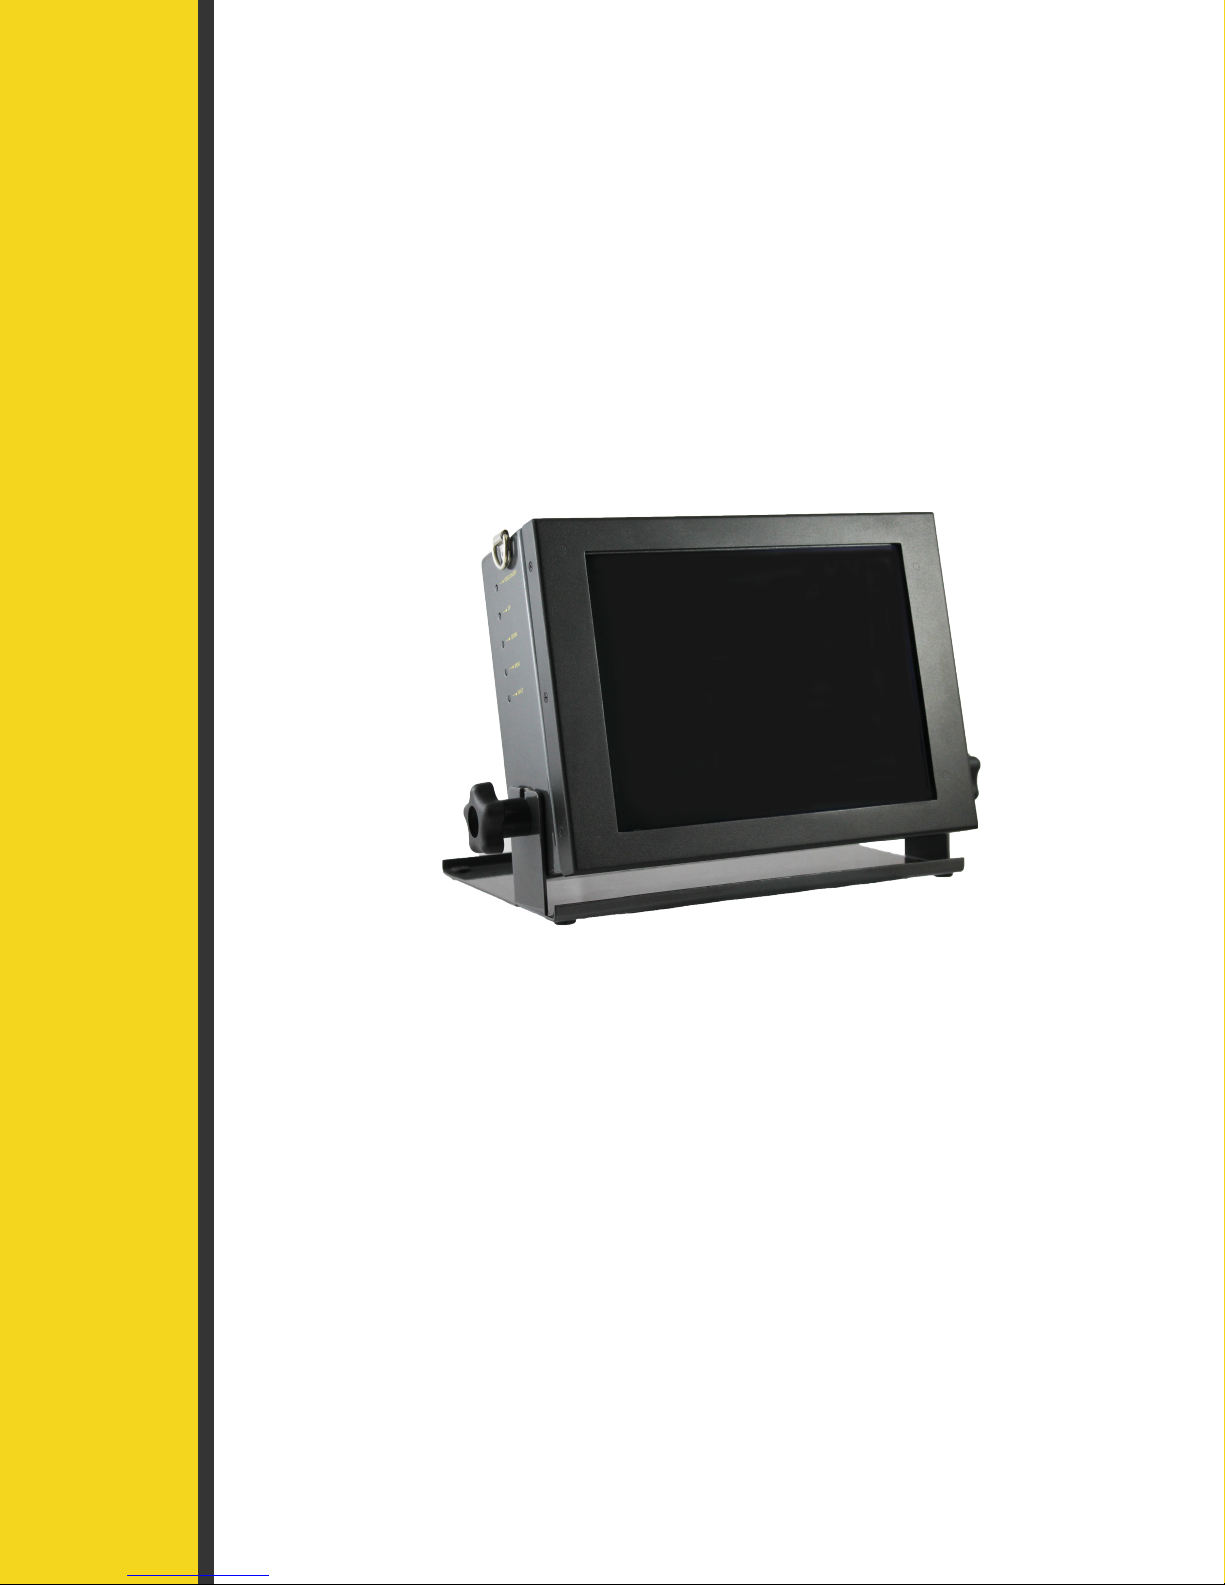
GVISION S/2000 Smart
Operator’s Manual
EPL Solutions, Inc.
Page 2

GVISION S/2000
EPL Solutions, Inc.
READ BEFORE USING
Gvision Specifications
1
• Controls
• Connectors
Installing DVR Station
2
Installation of Monitor Mount
3
Recording Video Using DVR
4-5
• Locate and Copy Recordings
• Renaming Video Files
Copying Onto External Device / Flash Drive
6
Playback Video
7
• Playback on ARCHOS
• Playback on Gvision
Shutting Off the ARCHOS
8
WINDOWS XP® and APPLE® Burning Video onto an Optical Disc
9
Trouble Shooting
WARRANTY
NOTES
Table of Contents
Orange, CA 714-453-9760 www.EPLSolutions.net email: [email protected]
Page 3

GVISION S/2000
EPL Solutions, Inc.
READ BEFORE USING.
The use of electrical equipment in a wet environment can cause fatal shock if equipment is not
properly grounded or adequately maintained, and if care is not used by the operator.
Wear personal protective equipment such as safety goggles or face shield and protective clothing
such as gloves, coveralls and rubber boots.
Sewer and waste lines can carry bacteria and other infectious micro-organisms or chemicals
which can cause death or severe illness. Avoid exposing eyes, nose, mouth, ears, hands and
cuts and abrasions to waste water or other potentially infectious materials during sewer and
waste video inspections. To further help protect against exposure to infectious materials, wash
hands, arms and other areas of the body, as needed, with hot, soapy water and, if necessary,
flush mucous membranes with water. Also, disinfect potentially contaminated equipment by
washing such surfaces with a hot soapy wash using a strong detergent.
“California Prop. 65: This product may contain an extremely small amount of lead internally. Lead is a material known
to the State of California to cause cancer or reproductive toxicity.”
For any questions contact the company at the address shown below.
BEFORE PLUGGING IN MONITOR
Check the receptacle voltage with a voltmeter before plugging in your monitor. Only a qualified
person should perform this test; improper use of a voltmeter can result in shock to the user. The
voltage should measure within 5 volts of the monitor’s rated voltage. Verify that the neutral circuit
wire is properly connected. This can be proven by visual inspection of receptacle wiring.
SPECIFICATIONS
Voltage...............................110
Amps..................................3 Amps
Weight
Monitor and DVR.....................6.5 lbs
Dimensions.........................10.75 x 8 x 4.5
Orange, CA 714-453-9760 www.EPLSolutions.net email: [email protected]
Page 4
GVISION S/2000
EPL Solutions, Inc.
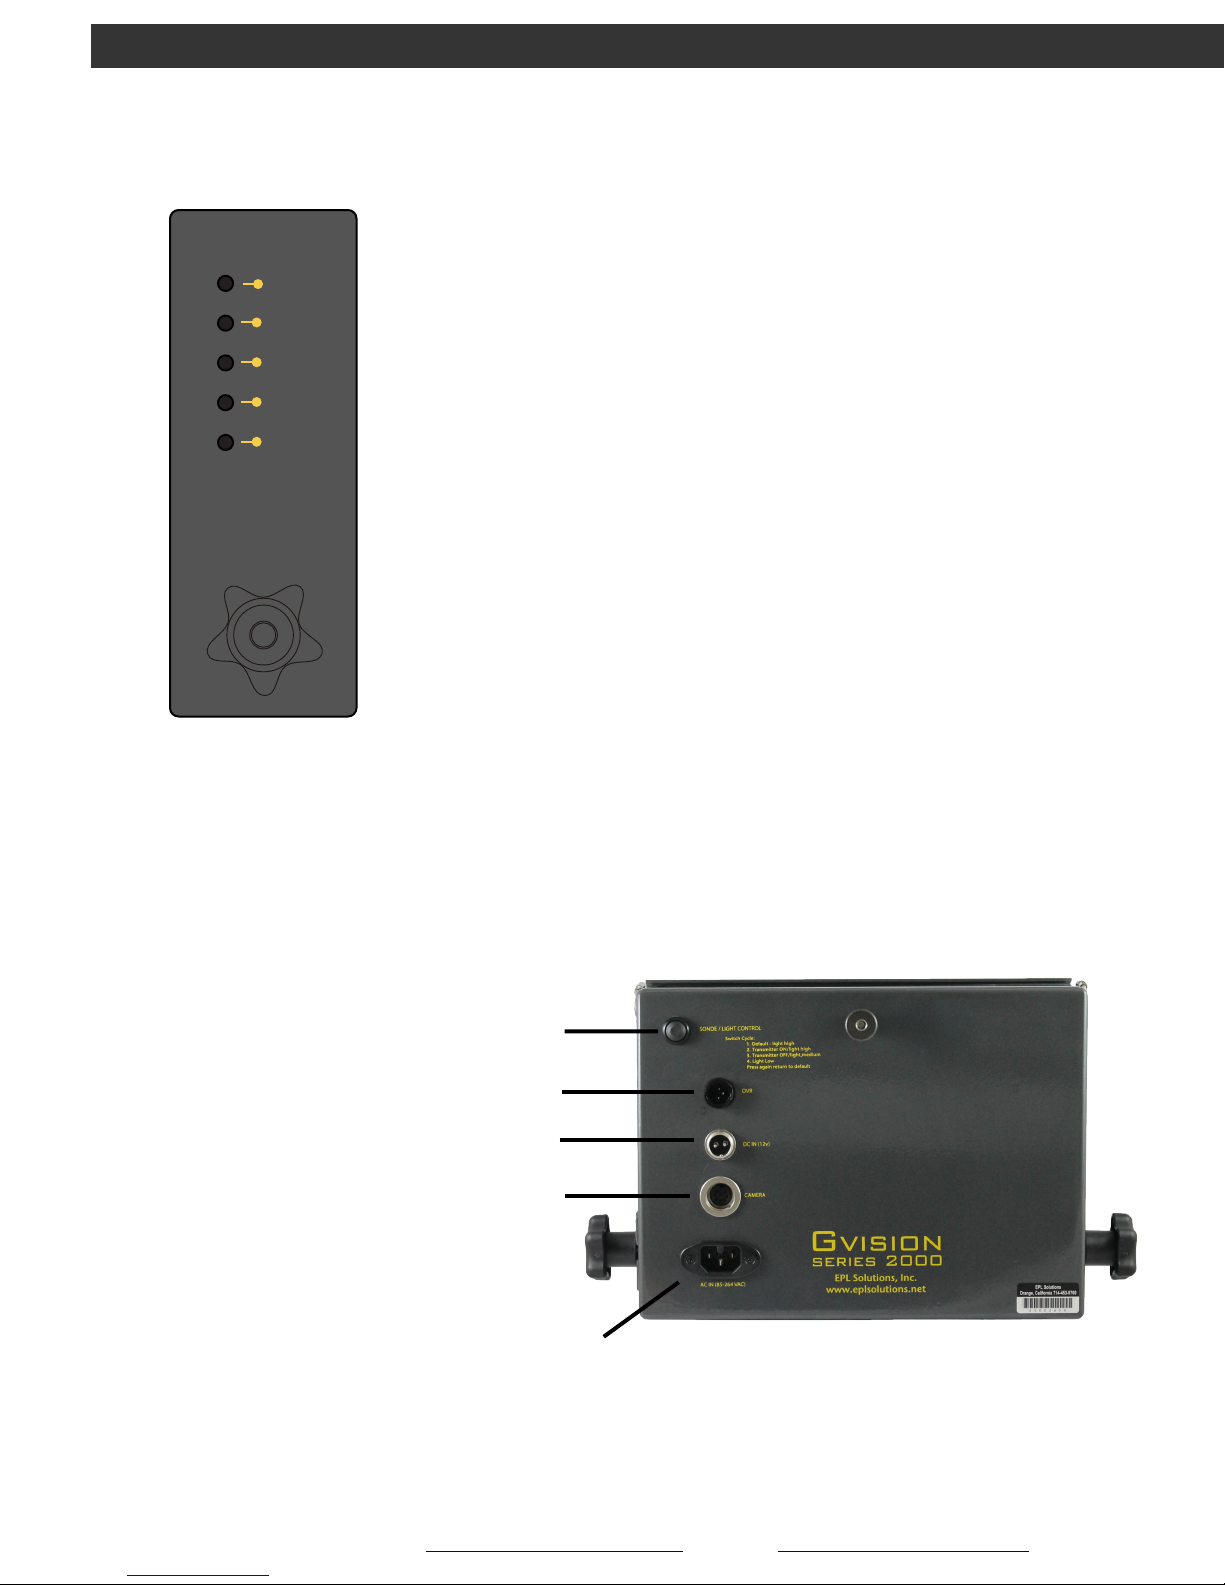
CONTROLS
VIDEO ON/OFF
UP
DOWN
MENU
INPUT
Side View of
GVISION 2000
ON/OFF–Power switch to monitor screen.
MENU–Allows control of
Brightness
•
Contrast
•
Saturation
•
Sharpness
•
& Hue
•
Navigate the MENU window using UP & DOWN buttons
INPUT–This should always be set to AV.
CONNECTORS
A) Sonde On/Off
B) DVR Plug
C) DC Power/Battery
D) Camera Plug
E) AC Power
(A)
(B)
(C)
(D)
(E)
Orange, CA 714-453-9760 www.EPLSolutions.net email: [email protected]
1
Page 5
GVISION S/2000
EPL Solutions, Inc.
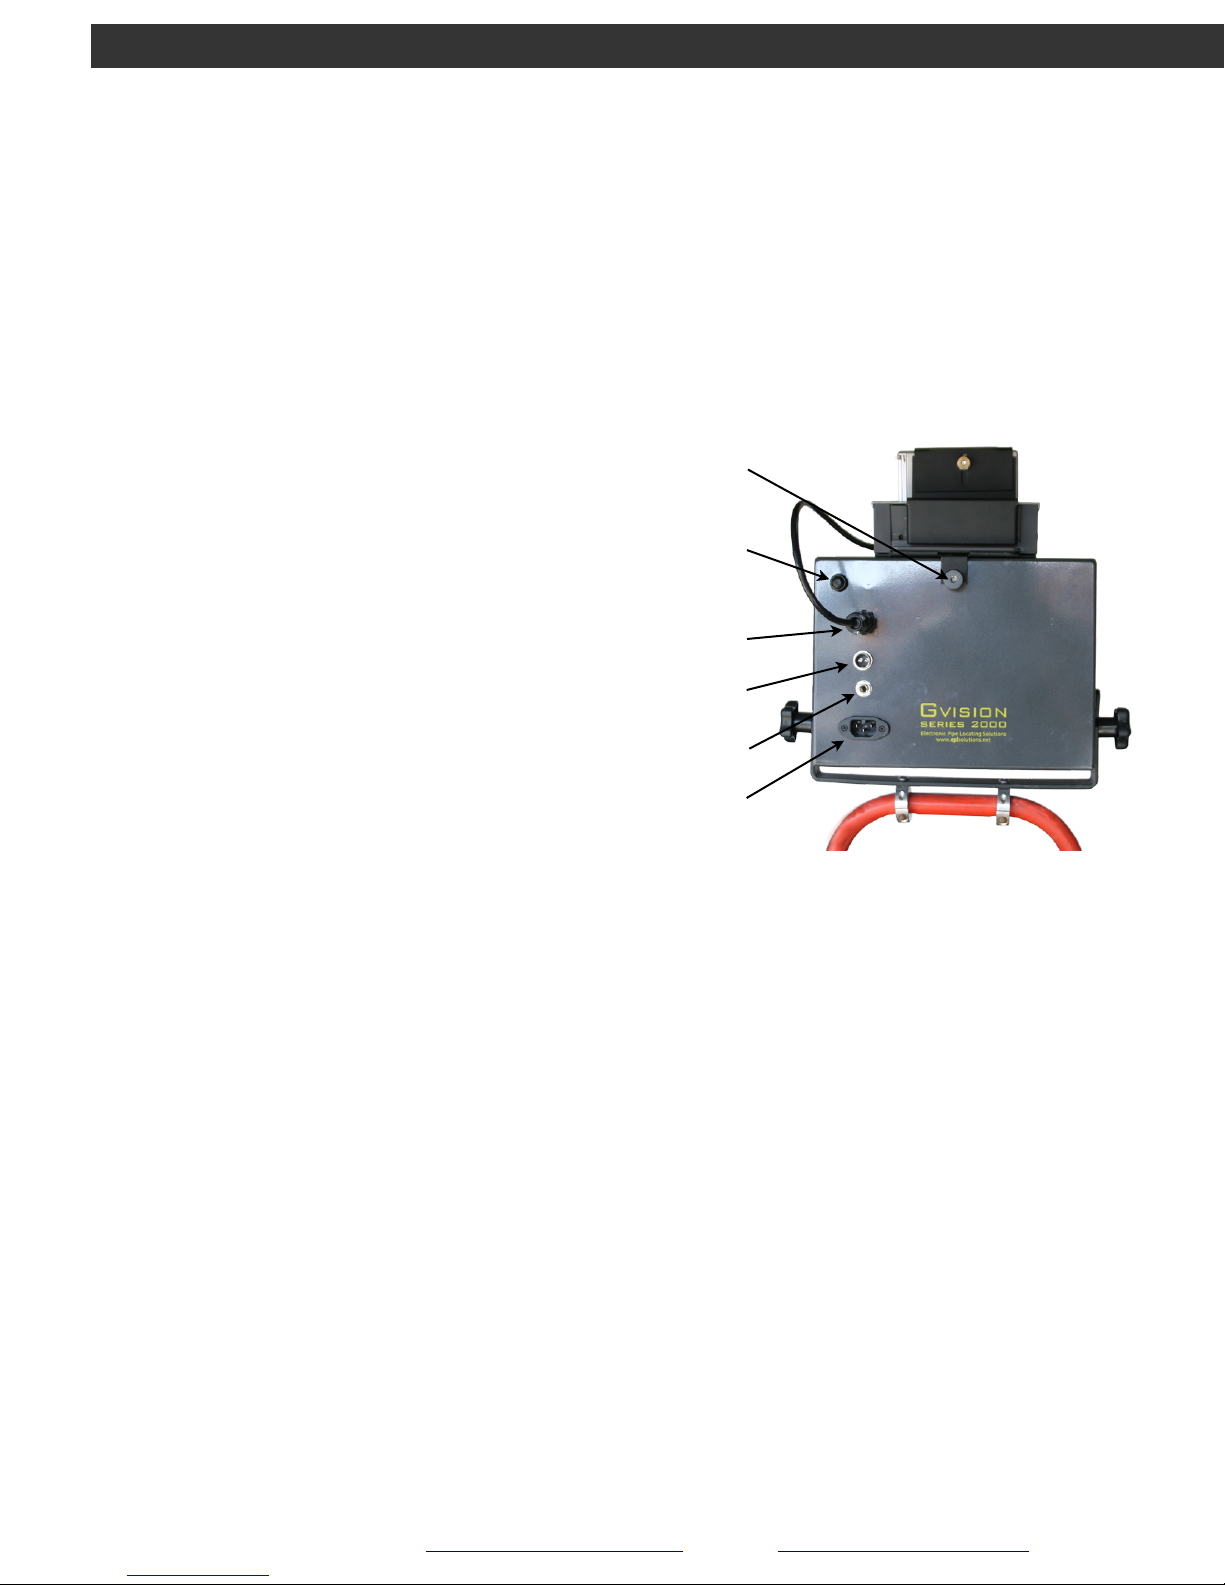
INSTALLING DVR STATION
1. Rest DVR Station on the top of the monitor and
secure using thumb screw (A)
Locate Sonde On/Off and light dimmer button (B)
Press once for Transmitter On
•
Press again to turn Transmitter Off (dims to
•
medium lights)
Press again for low light
•
Press again to return to high lights (default)
•
(A)
(B)
Note: Default is set to high light transmitter off
2. Plug in the DVR station using the attached cord
(C)
NOTE: A yellow dot indicated top for easy
alignment
3. Power using DC (D) Connector optional
4. or us AC Connector (F)
5. Plug in camera (E) using supplied camera cable
(C)
(D)
(E)
(F)
Image 14
Orange, CA 714-453-9760 www.EPLSolutions.net email: [email protected]
2
Page 6
GVISION S/2000
EPL Solutions, Inc.
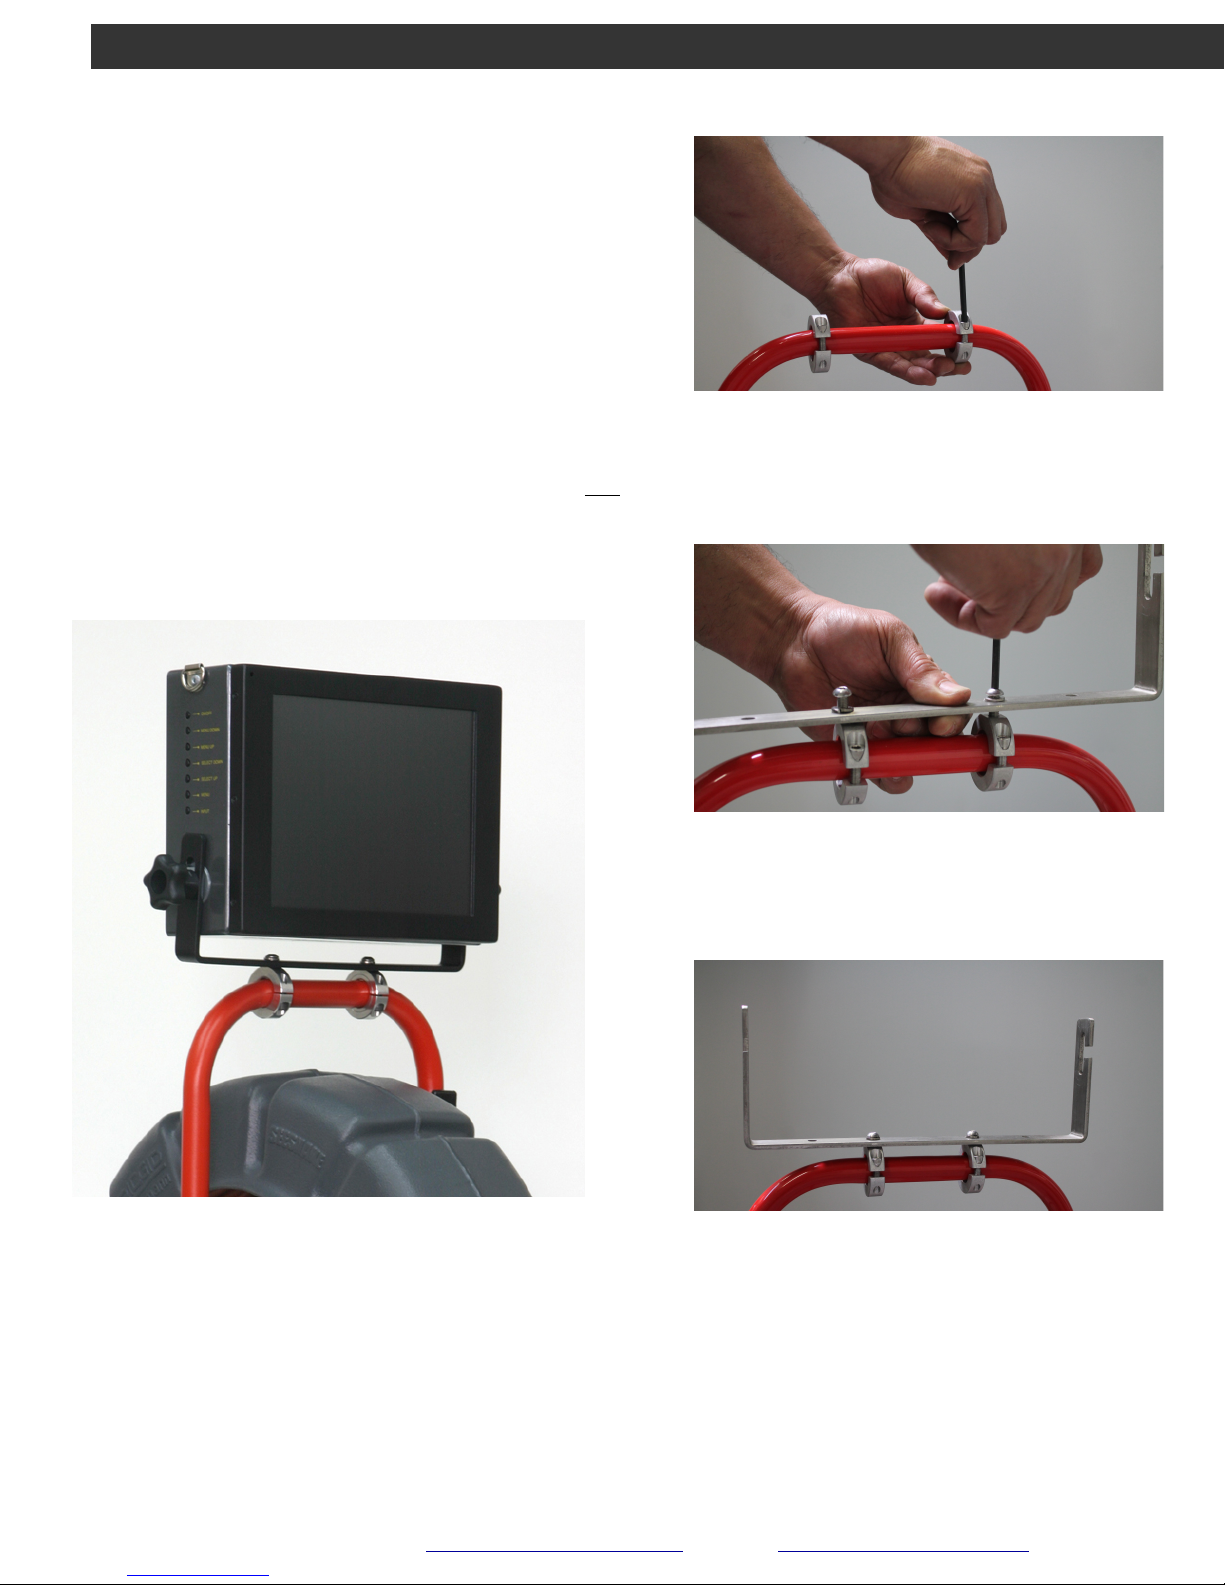
Installation of Monitor Mount
The GVISION S/2000 can be adapted to many
different camera reels but is not required to be mounted
on the handle in order to operate. The multi-purpose
protective face plate is a monitor stand.
1. Install the bracket directly onto the handle of the
camera (Images 10-12).
2. Install the monitor onto the bracket (Image 13).
NOTE: We recommend that the notch face toward the rear of
the camera system (refer to Image 12).
Image 10
Image 13
Image 11
Image 12
Orange, CA 714-453-9760 www.EPLSolutions.net email: [email protected]
3
Page 7
GVISION S/2000
EPL Solutions, Inc.
RECORDING VIDEO USING DVR
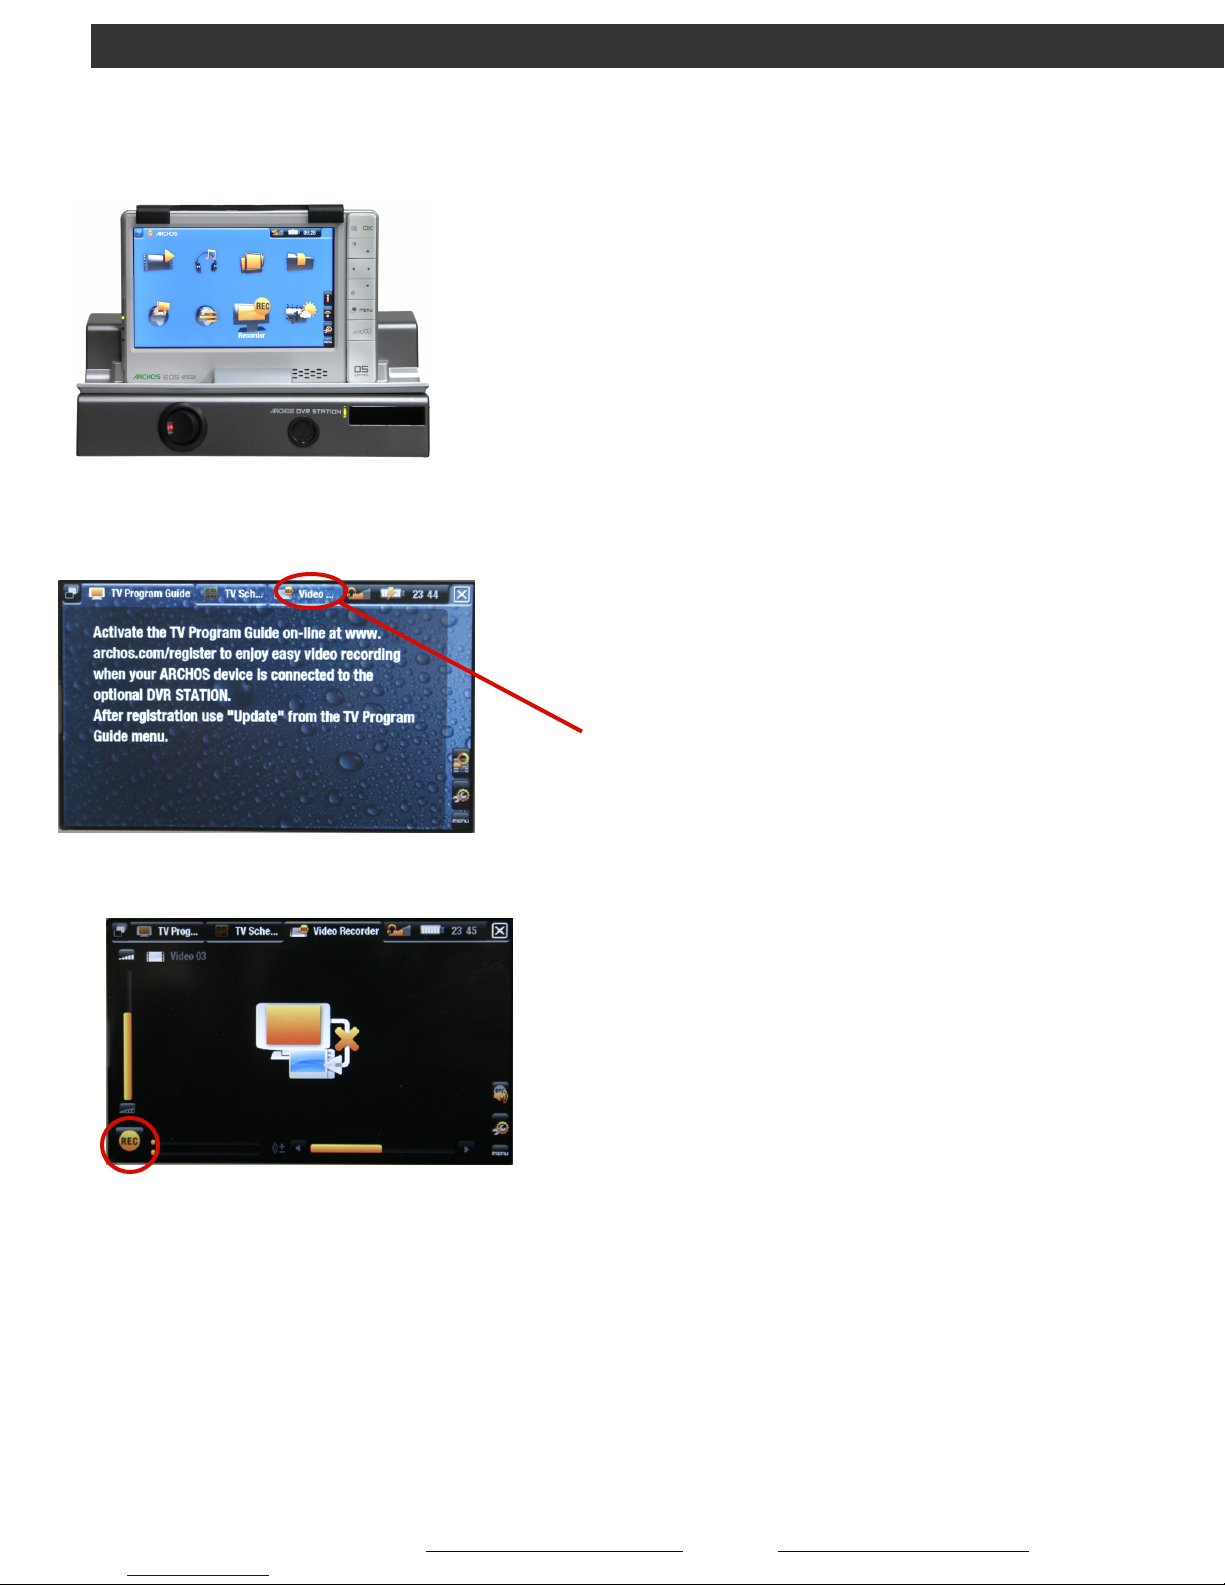
1. Place your ARCHOS on the DVR station.
image 2
image 1
2. Connect to Gvision monitor using supplied cable
(see page 2, point 2)
3. Select Recorder icon on Home Screen (image 1)
4. Open the Video Recorder folder tab on the top of
the screen. Wait a few moments for the DVR to
locate the camera before recording.
5. To begin recording from the camera, push the OK
(or REC in image 3) button. To Pause and Resume
your recording, press the OK button again (or REC
turns into pause)
Orange, CA 714-453-9760 www.EPLSolutions.net email: [email protected]
6. To stop recording, press the X button.
image 3
4
Page 8
GVISION S/2000
EPL Solutions, Inc.
RECORDING VIDEO USING DVR
Locate and Copy Recordings
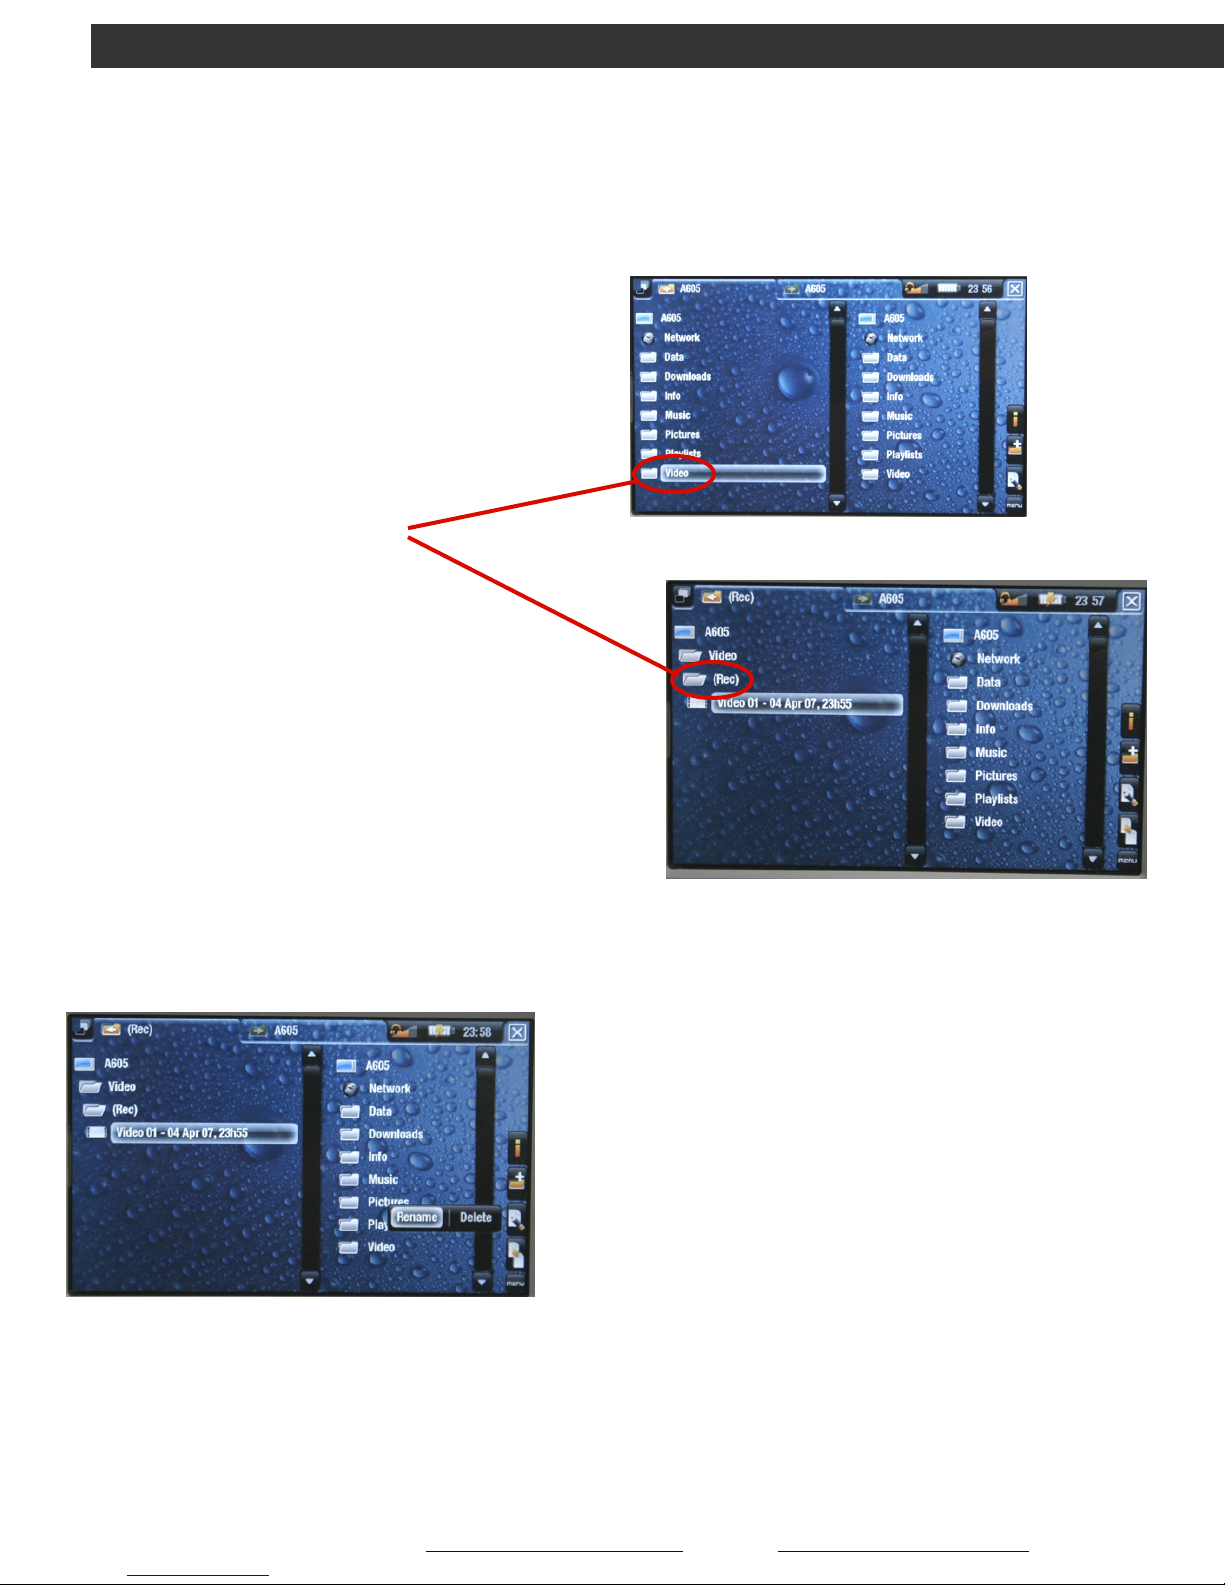
1. Return to Home Screen (image 1)
and select Files folder icon.
2. Select Video then Rec
All your recorded Video(s) will be
listed in this folder
Renaming Video Files
image 4
image 5
After Following the Steps above:
5
Orange, CA 714-453-9760 www.EPLSolutions.net email: [email protected]
1. Choose the Video you wish to rename and select it.
2. Click on the third icon on the right of the screen and
select Rename.
3. Make your changes and select OK
Page 9
GVISION S/2000
EPL Solutions, Inc.
COPYING ONTO EXTERNAL DEVICE /
FLASH DRIVE
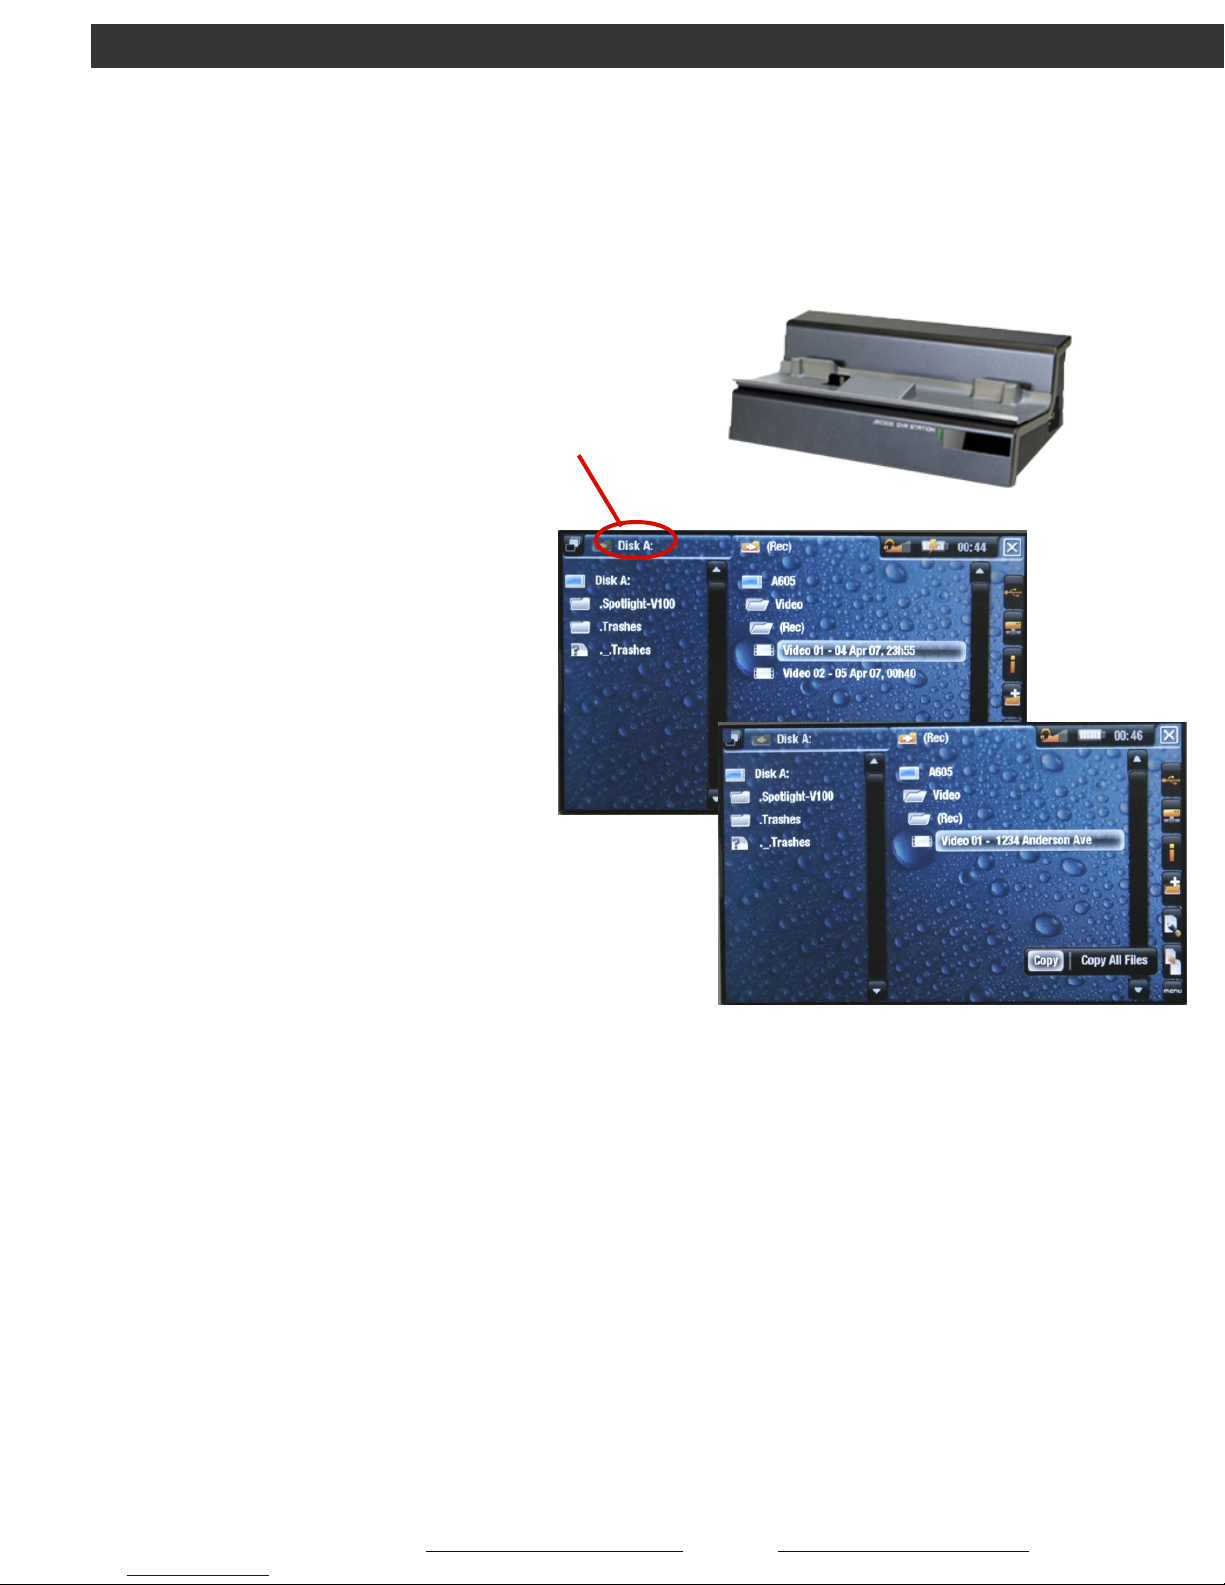
1. Insert a USB Flash Drive into USB-A port. It will
automatically mount and appear as Disk A
2. Select Video folder from A605
(ARCHOS drive)
3. Open Rec folder and choose the
Video recording you wish to copy
4. Select the Copy icon on the right of
the screen and choose copy.
Your Video recording will immediately copy
onto the USB Flash Drive.
5. Simply Remove the USB Flash from
the port when you are done.
Orange, CA 714-453-9760 www.EPLSolutions.net email: [email protected]
6
Page 10
GVISION S/2000
EPL Solutions, Inc.
on ARCHOS
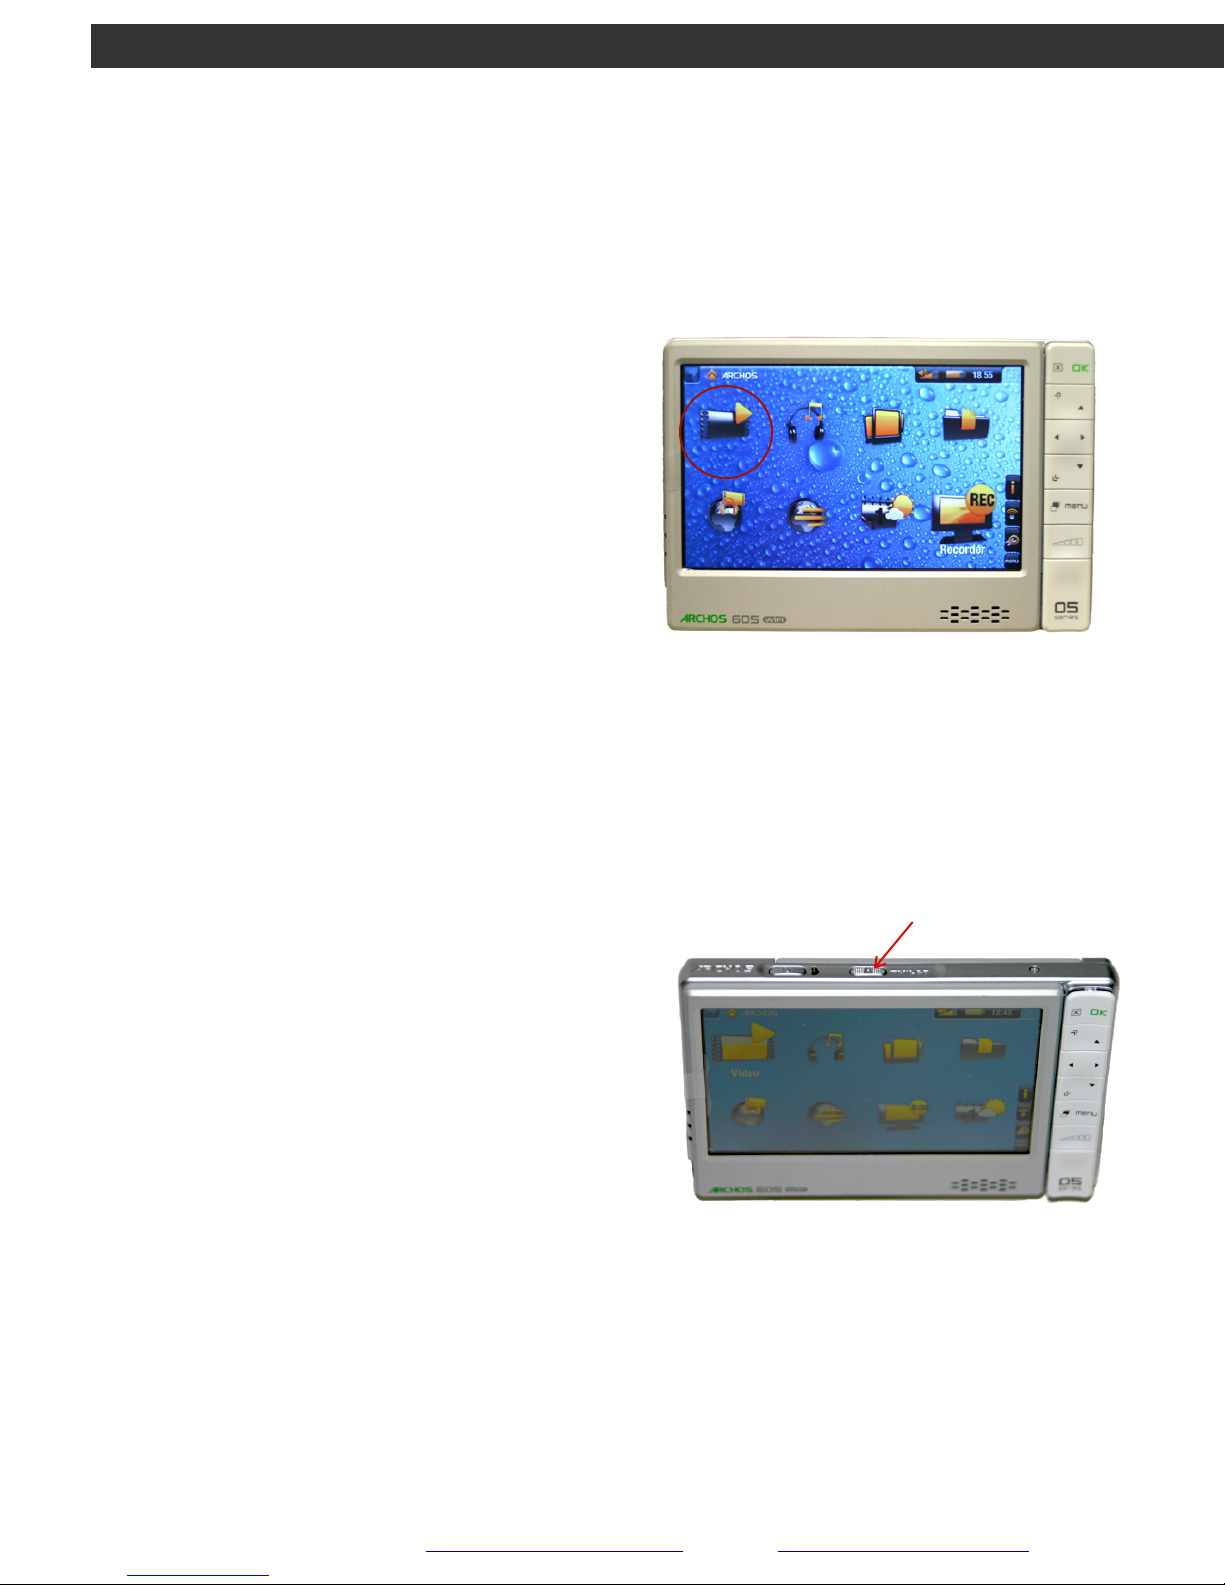
1. Select the Video icon
2. Select Rec folder
3. Choose the file you wish to view
and press OK
PLAYBACK VIDEO
Video Files
Video will begin playing on screen
on Gvision S/2000
To ensure a video has been properly
recorded, you may view the video on the
Gvision:
1. Unplug the camera from the back of the
Gvision (see page 1 Connectors, point D)
2. Depress the TV/LCD button on top of the
ARCHOS
TV/LCD
ARCHOS screen will now be displayed on the
Gvision monitor.
(see Troubleshooting page for copyright info)
7
Orange, CA 714-453-9760 www.EPLSolutions.net email: [email protected]
Page 11
GVISION S/2000
EPL Solutions, Inc.
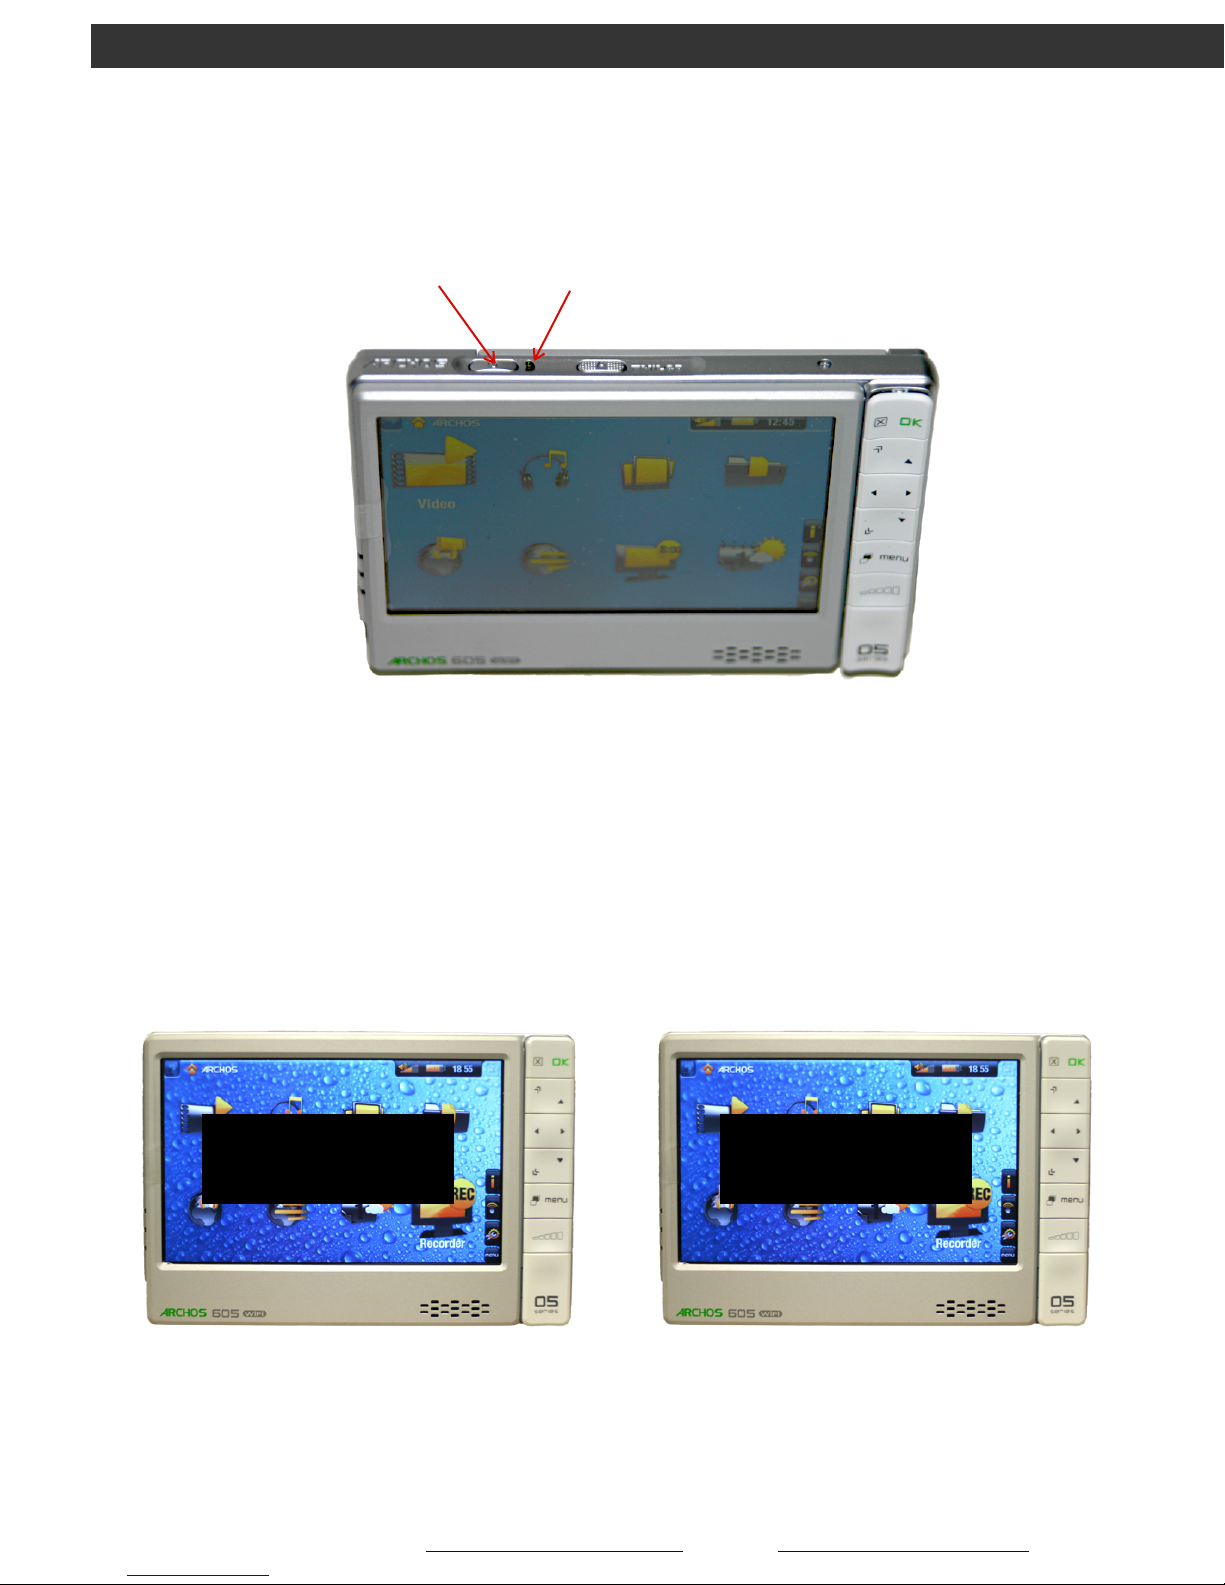
SHUTTING OFF THE ARCHOS
Power Button
Power On LED
IMPORTANT
While holding down the power button, the ARCHOS screen will first display the
Suspending text then the Shutting Down text.
You must hold the power button and wait for the Shutting Down text to display or
the internal battery will be left on.
Video Files
! Suspending
Video Files
! Shutting Down
Orange, CA 714-453-9760 www.EPLSolutions.net email: [email protected]
8
Page 12
GVISION S/2000
EPL Solutions, Inc.
PLEASE NOTE
The following section is not supported by EPL Solutions,
Inc. These are only recommendations as to how to make a
copy of your video onto an Optical Disk (CD).
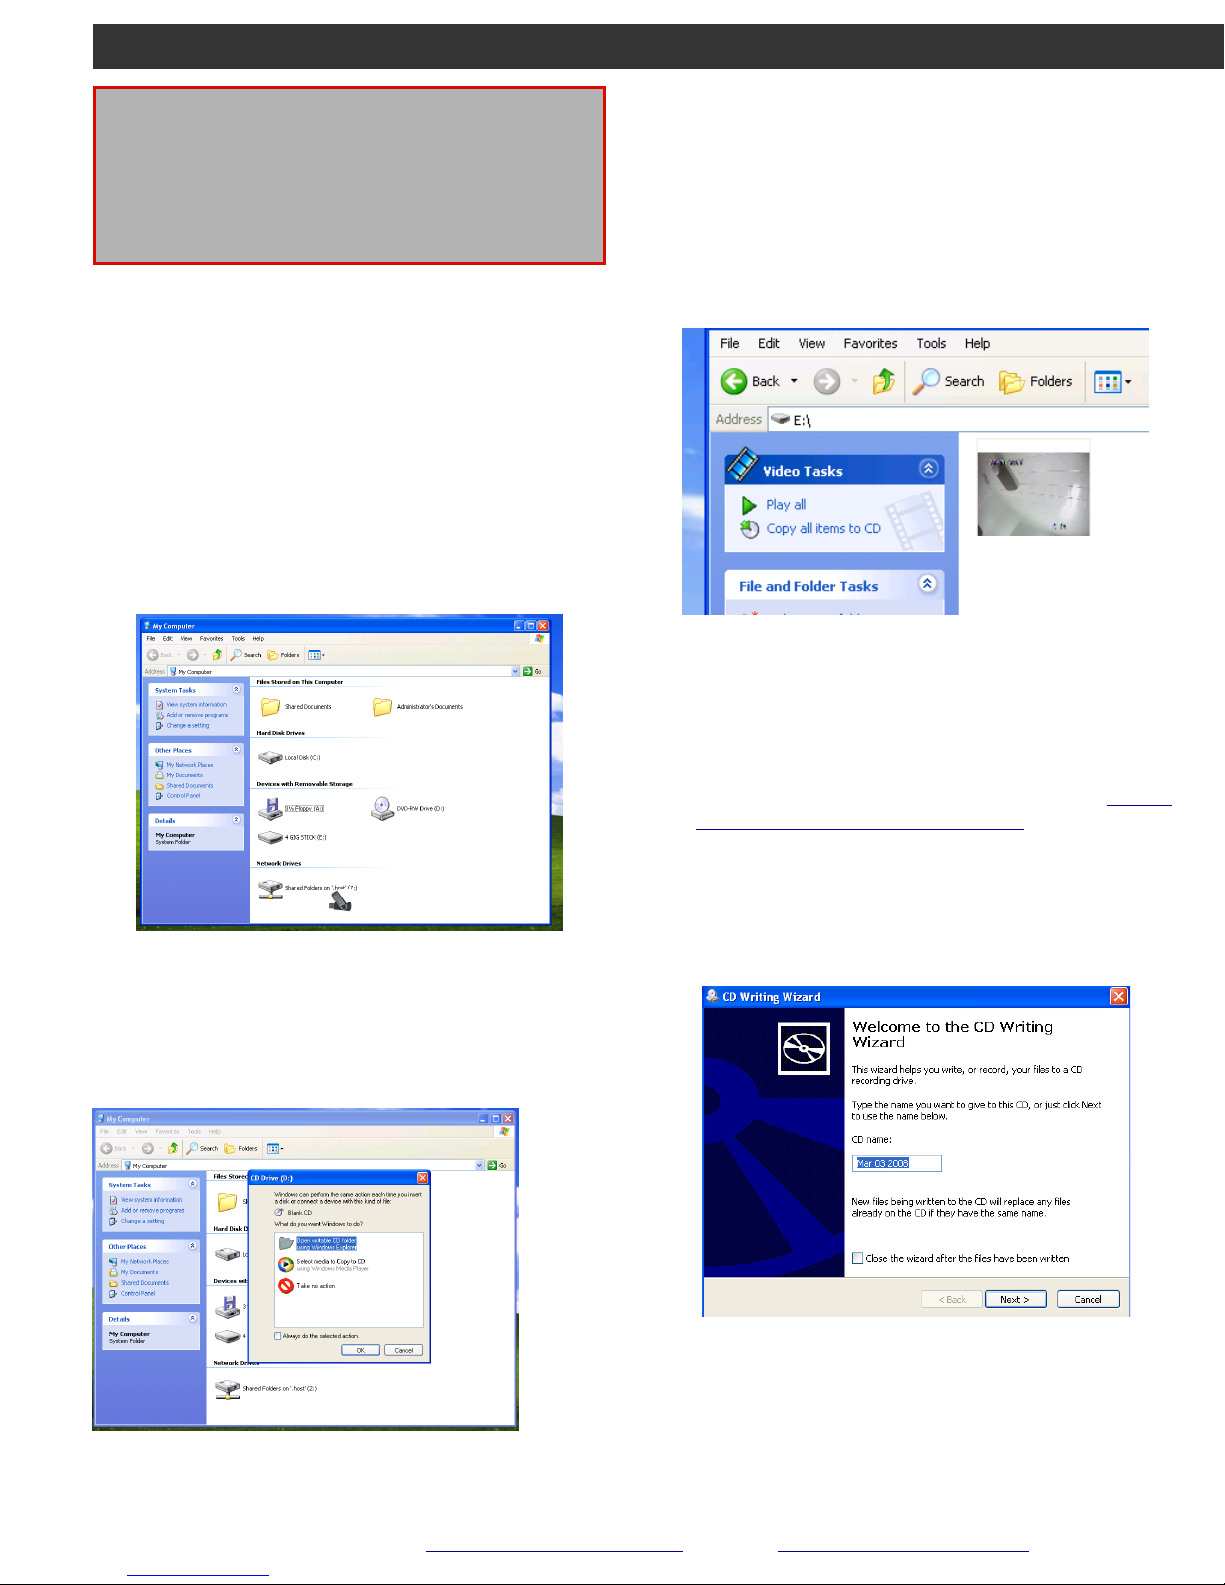
Windows® XP
Burn Video onto an Optical
Disc (CD)
1. Insert the Flash Drive into an open USB port
on your computer.
2. Click on the Flash Drive under Devices with
Removable Storage.
5. Select Copy all items to CD.
Video0001.MP4
GPlayer (E:)
3. Insert your CD into an Optical Drive.
4. Select Open writable CD folder using
Windows Explorer and press OK
Note: You should include a media player i.e. the VLC
installer supplied on the free GPlayer USB Thumb
Drive or QuickTime installer from http://
www.apple.com/quicktime/download/ at this time so
the client can view the file on their Windows® XP
client PC. Apple® and Windows® 7
9
Orange, CA 714-453-9760 www.EPLSolutions.net email: [email protected]
Page 13
GVISION S/2000
EPL Solutions, Inc.
PLEASE NOTE
The following section is not supported by EPL Solutions,
Inc. These are only recommendations as to how to make a
copy of your video onto an Optical Disk (CD).
3. Insert a blank CD into the Optical Drive.
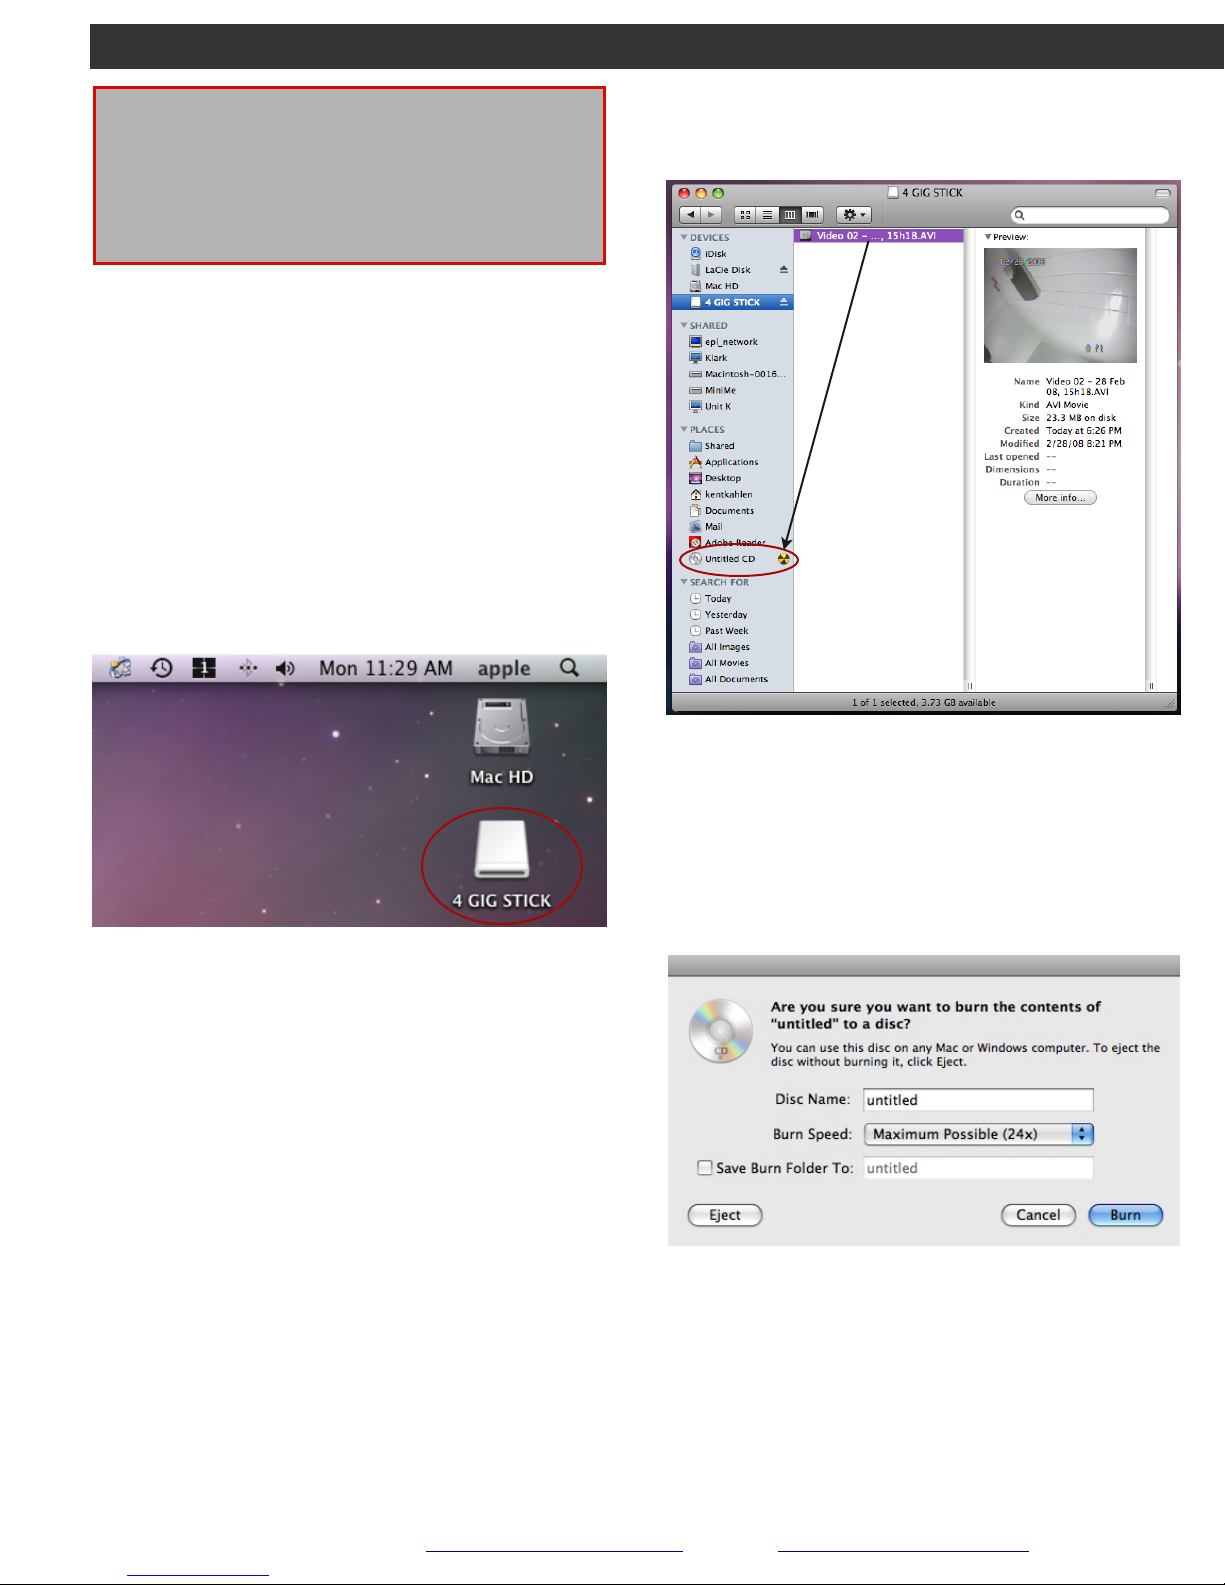
APPLE
®
Burn Video onto an Optical Disc
(CD)
1. Insert the Flash Drive into an open USB port
on your computer.
2. Click on the Flash Drive from your desktop
or a Finder window.
4. Hold down the alt/option key on the
keyboard and drag the file to the untitled
CD to be burned. Note: You should include
the Divx Codec installer (supplied) at this
time so the client can view the file on their
computer.
5. Name the disk and click Burn.
Orange, CA 714-453-9760 www.EPLSolutions.net email: [email protected]
arp -i en0 -a
10
Page 14

Problem
Solution
1. Monitor does not turn on.
Check power cable is plugged in properly.
Insure power source is active
Push On/Off button on side of monitor (See page 1)
Ensure input AV is selected (See page 1)
Press reset on GFCI power cable.
2. Camera Sonde won’t turn off
Push and hold sonde button for ten (10) seconds and
release.
3. I have camera lights but no video
Select input to AV (see page 1)
4. Video recorder mode is not available on
DVR
Ensure the DVR station cable is properly connected (see
page 1)
5. Copy Protected Video
Contact EPL Solutions
6. ARCHOS not responding
Depress rest button located on the bottom of ARCHOS
using a ping or paperclip.
7. video playback on Gvision.
Make sure the camera cord is unplugged.
GVISION S/2000
EPL Solutions, Inc.
Trouble Shooting
Call your local distributor or support at
Orange, CA 714-453-9760 www.EPLSolutions.net email: [email protected]11
www.eplsolutions.net/support/index.html
If Further Assistance is Required
714-453-9760
or visit our website at
Page 15

GVISION S/3000
EPL Solutions, Inc.
Our warranty to you:
EPL Solutions, Inc. warrants your product to be free from physical defects in material and workmanship for a period of 1(one)
year from the date of the original retail purchase. If you discover a defect covered by this warranty, we will repair or replace
the product at our option using new or refurbished components.
Product failures not covered by this warranty:
This warranty covers defects in manufacturing that arise from the correct use of this device. It is limited to defects in
materials or workmanship and does not cover damage caused by abuse, misuse, unauthorized modication, lighting or
power surge damage, extreme heat or cold, and corrosive environments. The warranty also does not cover the normal wear
and tear on covers, cases, housing, connectors and accessories. The warranty does not apply to any product with a missing,
altered or defaced serial number.
Limits of liability:
If these products fail or do not perform as warranted, your sole recourse shall be to repair the product as described above.
We will not be liable to you or anyone else for any damages that result from the failure of this product. These damages
include, but are not limited to, the following: lost prots, lost savings, lost data, damage to other equipment, and incidental
or consequential damages arising from the use of or inability to use this product. Express or implied warranties are
disclaimed. IN NO EVENT WILL EPL SOLUTIONS, INC. BE LIABLE FOR MORE THAN THE AMOUNT OF YOUR PURCHASE PRICE,
NOT TO EXCEED THE CURRENT LIST PRICE OF THE PRODUCT.
EPL Solutions, Inc. specically disclaims all other warranties, expressed or implied, and the user shall deem the installation or
use of this product an acceptance of these terms.
How to obtain service under this warranty:
Return Merchandise Authorization (RMA) Numbers are required for all product returns by doing one of the following:
Complete a request on our web site at http://www.eplsolutions.net/support
By sending an email to [email protected]
By calling 714-453-9760 and speaking to a Technical Support Engineer
Once an EPL Solutions, Inc. Technical Support Engineer veries you have a hardware problem that requires you to return the
product, you will be provided with an RMA number. You must acquire an RMA number and deliver the defective unit to EPL
Solutions in order to obtain service under this warranty. A sales receipt may be required to verify the original retail purchase.
All returned units must have the RMA number visible on the outside of the shipping package. You must either use the
original packing or pack the unit securely to avoid damage during shipping. Return Authorizations are valid for 30 days after
the RMA number is issued. Ship your product pre-paid to EPL Solutions, inc. at the following address:
EPL Solutions, Inc.
RMA#:XXXXXX
1330 W Collins Avenue
Orange, CA 92867 USA
EPL Solutions, Inc. will pay the return shipping costs for products under warranty. EPL Solutions, Inc. is not responsible for
the cost of shipping to EPL Solutions, Inc. or the payment of any customs clearance fees or duties.
Page 16

GVISION S/2000
EPL Solutions, Inc.
Notes
Orange, CA 714-453-9760 www.EPLSolutions.net email: [email protected]
Page 17

GVISION S/2000
EPL Solutions, Inc.
Orange, CA
714-453-9760
www.EPLSolutions.net
Our purpose is to provide a hight quality monitor/recording system that is more portable, easier
to use, and easily adaptable to most cameras on the market
 Loading...