

Page 1

O W N E R S M A N U A L
The Epiphone Company • A Part of Gibson Brands
1510 Elm Hill Pike • Suite 212 • Nashville, Tennessee 37210 USA
www.epiphone.com
with
Epiphone Studio
Acoustic 15C
Amplifier with Chorus
PLAYER
PACK
PR-4E
ACOUSTIC/ELECTRIC
PacksManual_PR4-EPack_2015_Layout 1 5/19/15 3:03 PM Page 1
Page 2
Care Of Your
Instrument
We recommend that you always keep your
instrument in a case when transporting or storing
it. This reduces the possibility of damage due to
nicks and jams, and sudden changes in climate or
atmosphere.
Carry the case with the lid towards your body.
In the event that you have not properly fastened
the latches and the case opens, the lid will fall
against your leg and prevent the instrument from
falling on the ground. Never put your instrument
in the trunk of your car or place anything on top
of it.
Perspiration can damage the finish of your
instrument so always wipe down your guitar after
playing or before storing with a clean soft cloth.
Polishing it with some high gloss guitar polish or a
good quality carnauba wax polish will prolong the
durability of the finish.
Tuning Your Instrument
The above chart shows how different instruments are tuned. The first string, for this purpose,
is considered to be the smallest diameter. Tune
the two outside strings first, then tune towards
the center. This equalizes the pressure on the
bridge and allows rapid tuning.
Many individuals have their own method of
tuning their instrument. We recommend the
following method. An Epiphone guitar is tuned to
A-440; utilizing a tuning fork, electronic tuner or
pitch pipe.
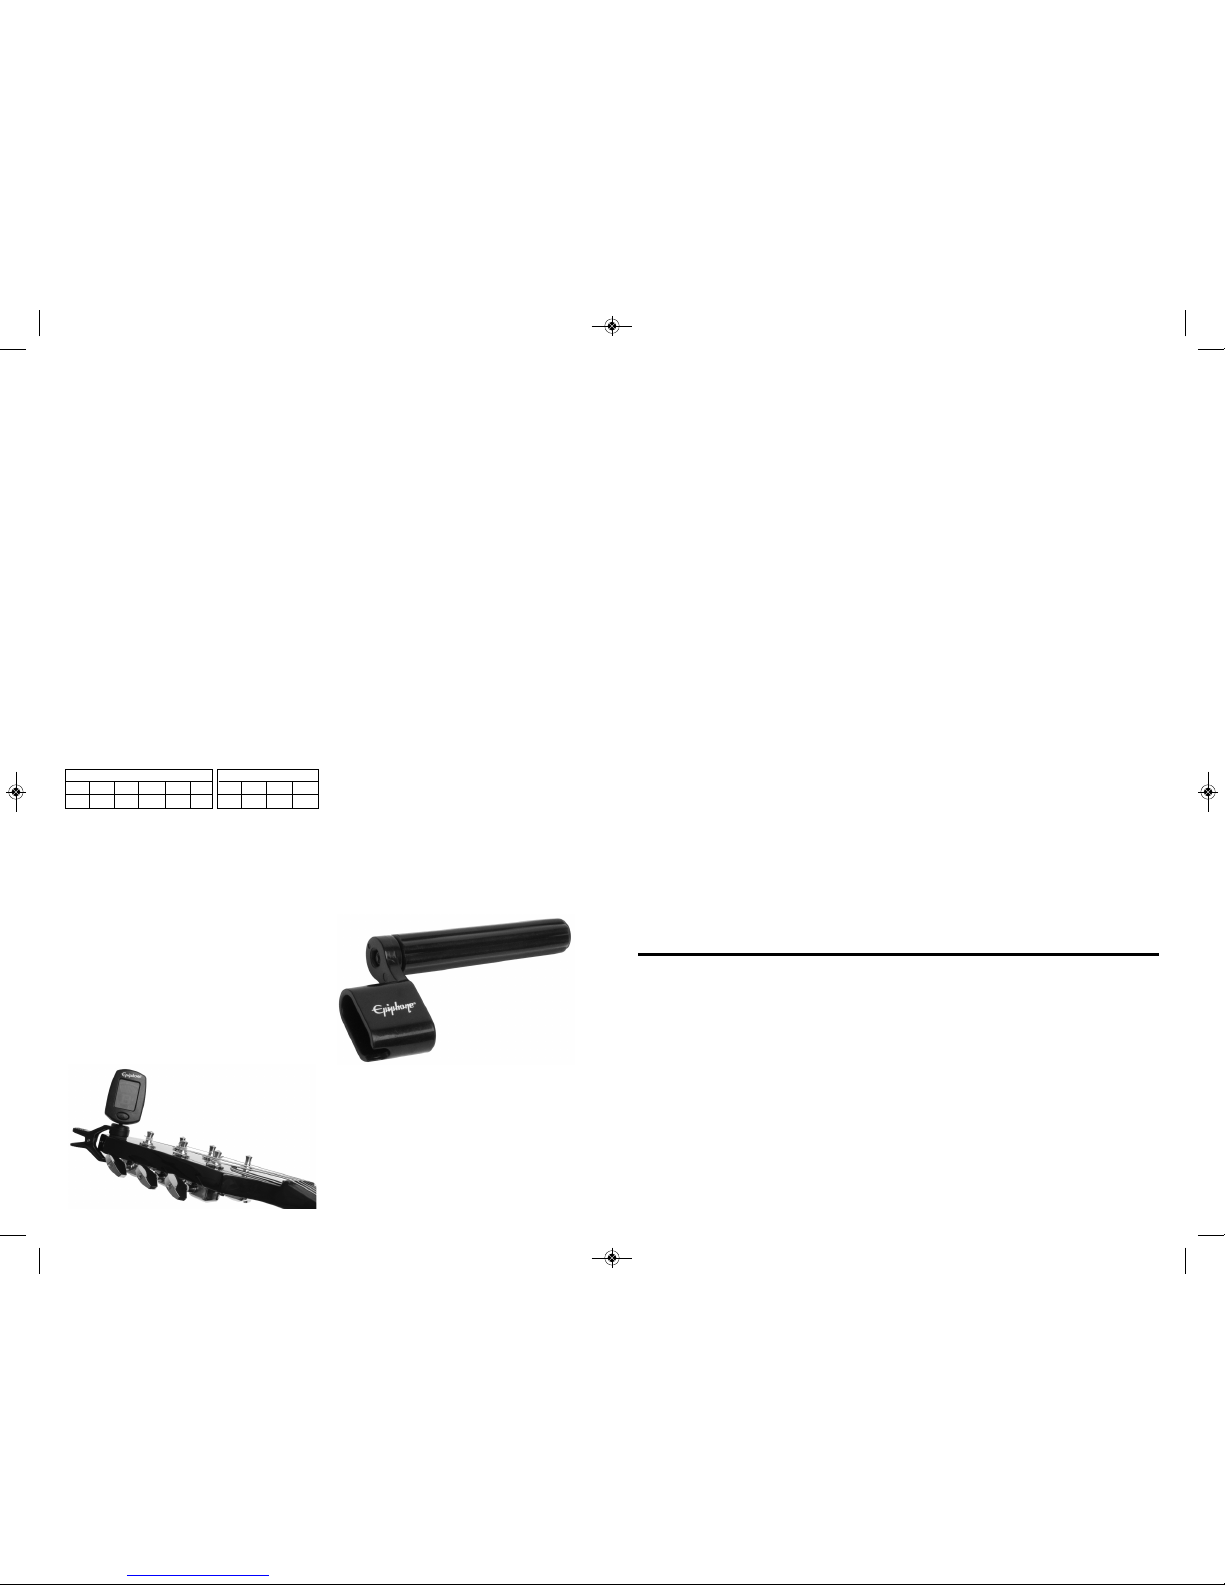
All tuners work alike: a microphone or other
sensor “listens” to your guitar. When you play a
string, the tuner analyzes the pitch and shows
whether it’s flat (too low), sharp (too high), or on
pitch. If needed, you rotate the guitar’s machine
head as appropriate to correct the pitch.
Bass
4th 3rd 2nd 1st
E A D G
Guitar
6th 5th 4th 3rd 2nd 1st
E A D G B E
Follow these tips for more accurate tuning.
• Strings retain correct pitch longer if you tune up
to pitch. If a string is sharp, tune it somewhat flat,
then tune it up to pitch.
• Old strings are hard to keep in tune. Keep fresh
strings on your guitar.
• With a headstock tuner, try clamping in different places. Some parts of the headstock may give
more consistent readings.
• Tuning strings below standard pitch decreases
tension, so they’re easier to play. Example: If you fret
a string’s first fret and tune to that reference
instead of the open string, the tuning will be a semitone flat. However, don’t tune down too far - with
insufficient tension, the strings might buzz against
the frets as you play.
• After tuning your guitar, check the string
pitches again. You may need to tune a couple times
before the tuning “settles in.”
Changing Strings
Changing strings becomes easier with experience. If you have difficulty, your Authorized
Epiphone Dealer can give you tips on how to
change strings.
A string winder can help you turn the tuning
heads faster than turning them by hand.
Note that a string’s end is sharp and
can puncture your skin—be careful.
Here are some tips on how to change
strings.
1. To help maintain consistent neck tension,
replace strings one at a time and tune each
before proceeding to the next string.
2. Tune down the string you’re replacing so it’s
loose enough to remove (a string winder
speeds up this process).
3. The bridge end is always strung first.
Consult your string package to be sure you’re
choosing the correct string.
GUITAR OWNERS MANUAL
REGISTER YOUR NEW
EPIPHONE INSTRUMENT NOW!
V
isit www.epiphone.com and select SUPPORT then WARRANTY REGISTRATION.
Important: Warranties are extended to the original retail purchaser only and may not be transferred
or assigned to subsequent owners. In order to validate your warranty, and as a condition precedent to
warranty coverage, you must complete the on-line registration within fifteen (15) days following the original
date of purchase. Visit www.epiphone.com for complete warranty details and further information.
Warranty Instrument: Your new Epiphone instrument carries a Limited Lifetime Warranty*.
For details and limitations visit www.epiphone.com.
Warranty Amplifier: Your new Epiphone amplifier carries a Limited 3-Year Warranty*.
For details and limitations visit www.epiphone.com.
Returns: All Epiphone products are guaranteed and backed by Gibson Musical Instruments legendary
24 hours, 7 days a week, 365 days a year Customer Service. All returns must be issued a Return
Authorization Number by Customer Service BEFORE shipment. If for any reason, you have questions,
need help or think you need to return your product please contact Gibson Customer Service.
You may contact us by email at:
• USA Email: [email protected]
• Europe Email: [email protected]
• Japan Email: [email protected]
• China Email: [email protected]
You may also reach us by phone at:
• USA Phone: 1-800-4GIBSON (1-800-444-2766)
• Europe Phone: 00+8004GIBSON1 (00+800-444-2766-1)
• China Phone: 1-800-820-8841
You may also instant message us at:
AOL Instant Messenger, Yahoo! Messenger, & MSN Messenger users can IM Gibson
Customer Service at [email protected]
Don’t Forget to Join Us On-Line!
Please join us on the Gibson Forums at http://forums.gibson.com. The Gibson Forums are provided
for Gibson Fans to share opinions and information about all of the brands in the Gibson family.
* Void where prohibited by law.
For Your Records
Congratulations on owning your new Epiphone product. For your own records, should you ever need to identify your product
for warranty or insurance purposes, please fill in the following:
Model Name._________________________________________________________Serial No.________________________________
Date of Purchase:______________________ Dealer's Name___________________________________________________________
Dealer Address______________________________________________________________________________________________
_____________________________________________________________________________________________
_____________________________________________________________________________________________
PacksManual_PR4-EPack_2015_Layout 1 5/19/15 3:03 PM Page 2
Page 3
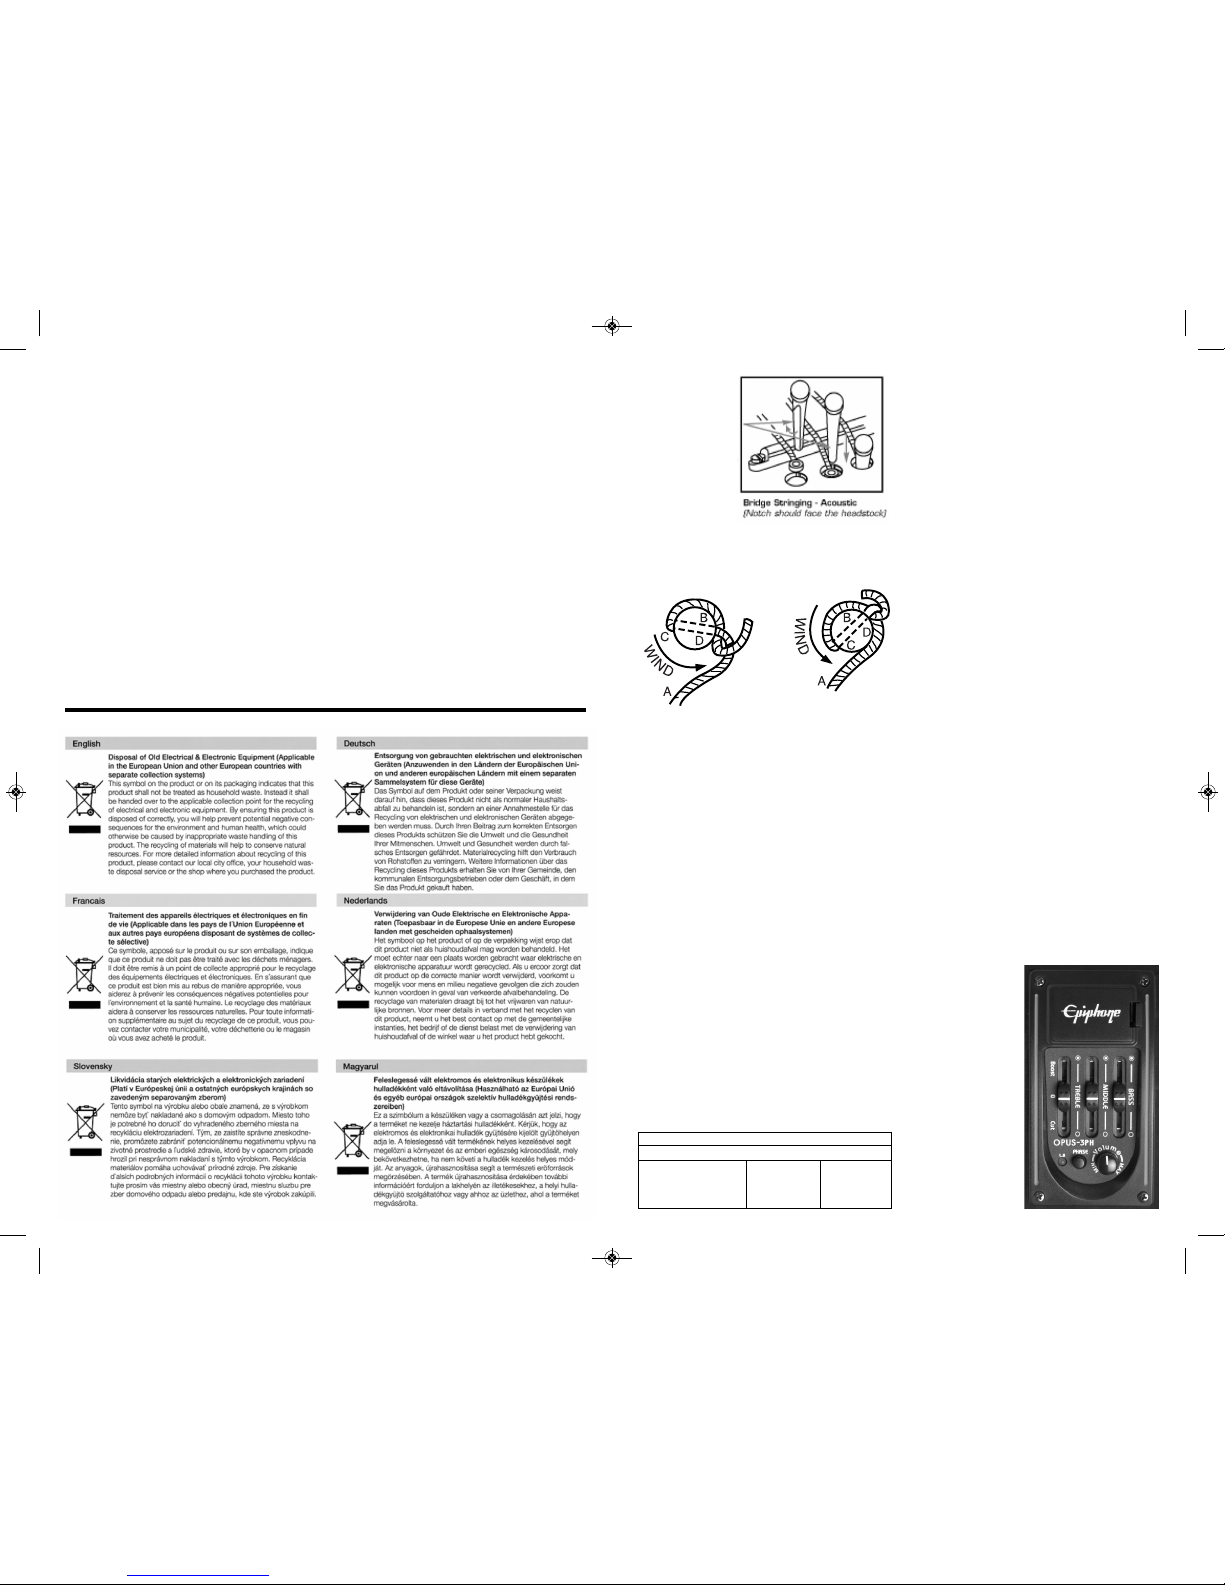
4. The bridge end
with pins is
strung as
shown at right.
Once strings
are secure in
the bridge, tug
the string end
slightly to
make sure it’s
seated securely in the bridge.
5. Bring the string from the bridge to the
corresponding tuner post located on the
headstock.
6. Put string (A) through the hole in the post at
(B) to (C); around the upper side of the post
(D), and under the string (A) at (B), back again
around the string post (D). Now when you
wind the string, it will lock itself against the
post as shown in the image at above.
Note: The string should run closer to
the inside of the head stock than the
outside.
7. Start tuning the string up to pitch. Again, a
string winder speeds up the process.
8. Proceed to the section on Tuning and tune
the string to pitch. When it’s on pitch, follow
the same procedure for the remaining strings.
9. When you’ve finished tuning your guitar, use a
wire cutter to trim the string ends to within
about 3/8” of the machine head.
Action Adjustment
Action is the distance that a string must
be depressed before it meets the fret. Action
measurements are taken in 64th’s of an inch,
and are calculated from the top of the 12th fret
to the underside of the string. We set the action
on all instruments at the factory to the optimum
playability setting. On occasion, lower than standard settings are desired by the player. Note however that lower than standard action can often
result in “buzz” or “rattle”. This is caused by the
string vibrating against the fret. Buzz or rattle
caused by lower than standard action is not
considered a defect of the instrument.
For action at the 1st fret, all instruments are
set at the same height. Treble strings are set to
1/64” and the action progresses up to 2/64”
for the bass strings. Be sure that the truss rod is
properly adjusted before setting action.
Trussrod Adjustment
All guitar necks are subject to great stress
as a result of string tension, humidity or changes
in climate. Occasionally there are times when
the neck may need adjustment. The truss rod is
adjustable at the headstock, using an Allen
wrench or an adjustment wrench.
NOTE: This adjustment should be
performed periodically and only by qualified
repair personnel. Over adjustment can result
in damage to the instrument.
NOTE: All Epiphone guitars use A-440 for
standard pitch. Play the harmonic at the 12th
fret, compare it to the fretted note at the
12th fret, these notes should read the same
on the tuner.
* (Adjusting the intonation and string
height will affect the playability of your
guitar. If you are unsure of any of the above
operations please take your guitar to an
Authorized Epiphone Dealer or experienced
guitar technician.)
Preamp Controls
(Volume, EQ - Bass, Middle, Treble, Phase,
Low Battery Indicator)
The PR-4E’s piezo pickup system is located
under the saddle. The guitar’s built-in electronics
are mounted on the upper bout of the guitar and
feature easy-to-use boost and cut controls for
Treble, Middle, and
Bass. There is also a
Volume control along
with a Phase switch
and a low battery light
indicator.The “Phase”
button on the preamp
reverses the polarity
of the output signal to
help reduce feedback.
A 9-volt battery compartment is located
above the EQ controls
allowing for quick
changes of the battery
during a show.
A M P S P E C I F I C A T I O N S
Output Power 15 Watts
Headphone Jack 1/4”
Speaker 6.5” - 8 ohms
Power Consumption 28 Watts
Action at the 12th fret
Treble Side Bass Side
Electric Guitars 4/64 6/64
Acoustic Guitars 5/64 7/64
Bass Guitars 5/64 7/64
PacksManual_PR4-EPack_2015_Layout 1 5/19/15 3:03 PM Page 3
Page 4
E
piphone Amplifiers are the result of years of extensive research and development by some
of the music industry’s finest musicians and engineers. For decades, Epiphone has provided world class
products to musicians everywhere. The Epiphone name stands for quality and this product has been
designed to provide years of lasting musical pleasure.
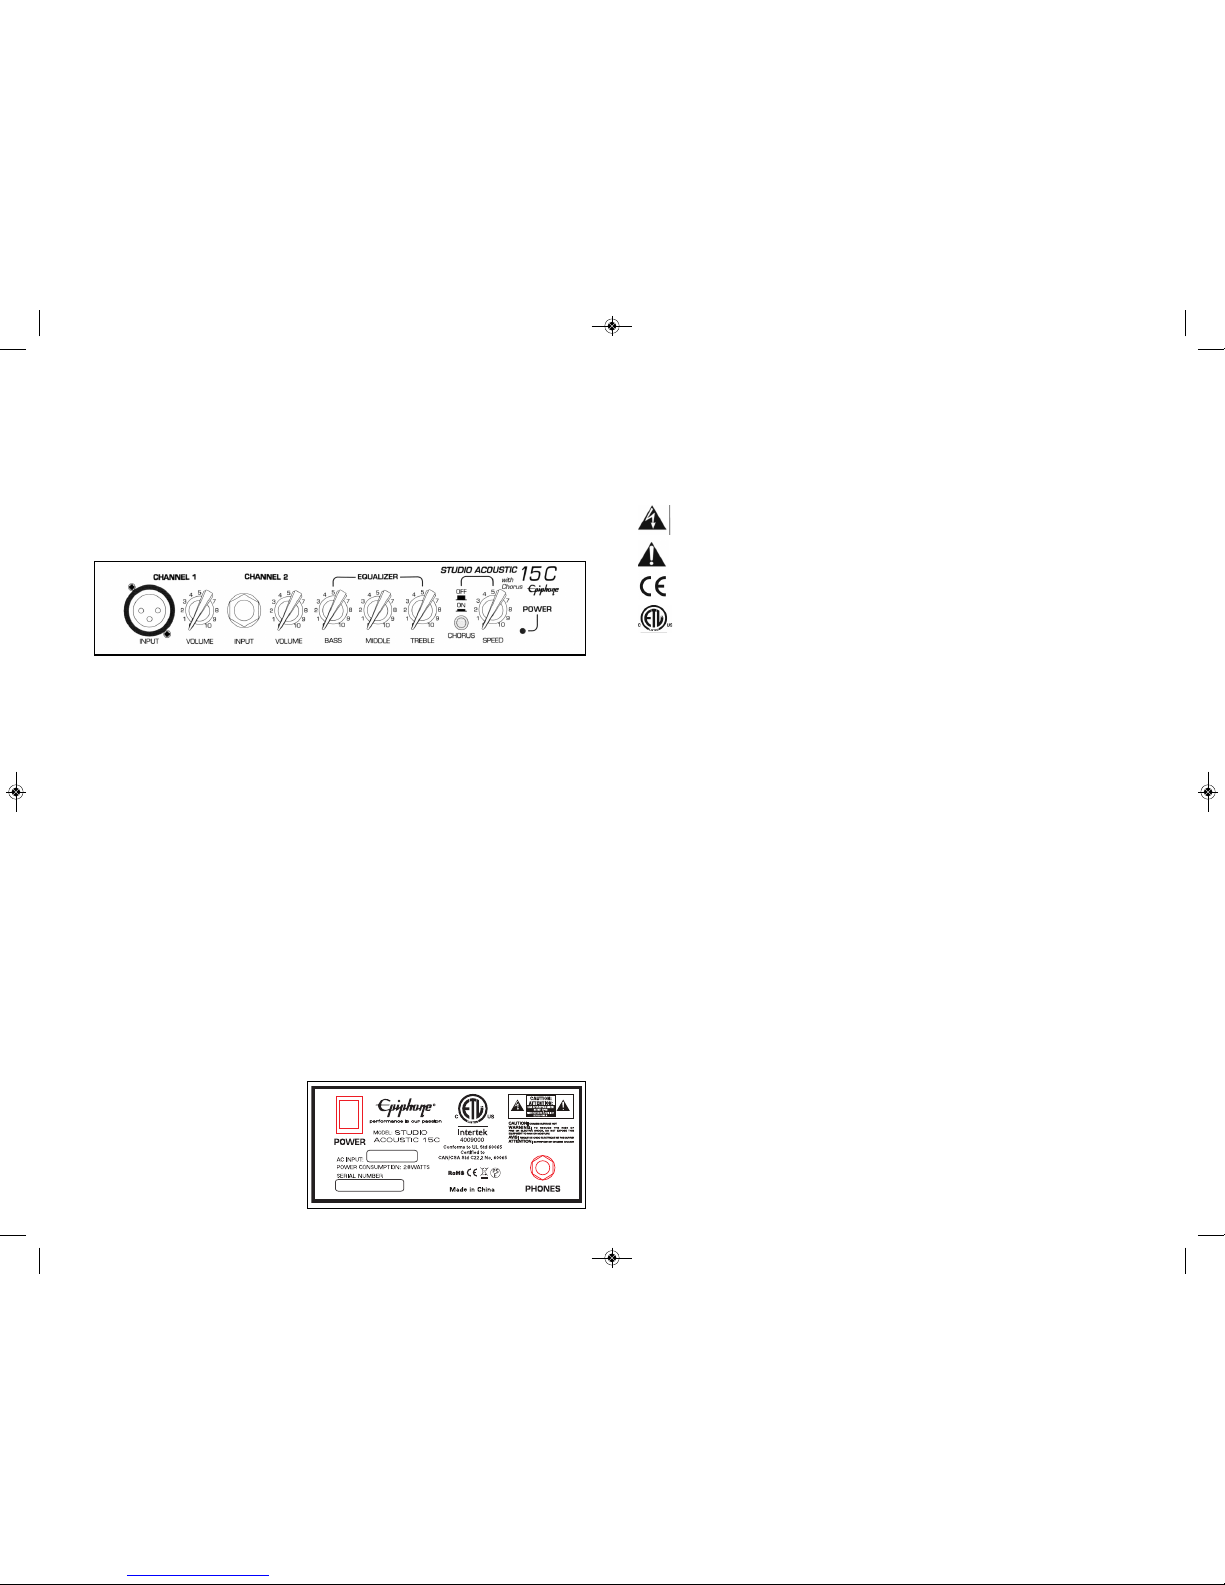
C O N T R O L P A N E L
CHANNEL 1
1. XLR Input Jack - Connect your microphone using a standard XLR cable to this input.
Connect the other end of the cable to your microphone.
2. Volume - Adjusts the overall level or volume of the microphone.
CHANNEL 2
3. Input Jack - Connect your guitar using a standard 1/4” instrument cable to this input.
Connect the other end of the cable to your guitar.
4. Volume - Adjusts the overall level or volume of the guitar.
EQUALIZER
5. Bass - Controls the boost and cut of the low frequencies. The bass control will
make the sound darker.
6. Middle - Controls the boost and cut of the mid-range frequencies.
7. Treble - Controls the boost and cut of the upper frequencies. The treble control will make the
sound brighter.
8. Chorus - Turns the chorus effect on or off.
9. Chorus Speed - This controls the ripple speed of the chorus effect.
BACK
10. Power Switch - Turns the AC Power on and off.
11. Headphone Jack - For connecting headphones with a mini 1/4” stereo plug. Always turn the
Volume control to 0 BEFORE engaging
headphones. When using the headphone
jack, the speaker is disconnected allowing
for private listening.
STUDIO ACOUSTIC 15C
AMPLIFIER OWNERS MANUAL
IMPORTANT SAFETY INSTRUCTIONS
WARNING: To reduce the risk of fire or electric shock, do not expose this apparatus to rain or moisture.
Objects filled with liquids, such as vases, should not be placed on this apparatus.
CAUTION: Your amplifier is not disconnected from the mains when the Power Switch is in the OFF position. The power cord plug is the designated mains disconnect device. “Mains” is the official term for the
electrical power source. Visually inspect the power cord plug for damage before each use. Do not use it if it
appears damaged. Keep the power cord plug accessible at all times.
The lightning bolt warns of the risk of shock from high voltage.
Do not tamper with or attempt to open any areas where this warning is pr esent.
The exclamation point alerts the user to an important operating or maintenance instruction.
Conforms to EU directives.
Conforms to North American standards.
1. Read these instructions.
2. Keep these instructions.
3. Heed all warnings.
4. Follow all instructions.
5. Do not use this apparatus near water.
6. Clean only with dry cloth.
7. Do not block any ventilation openings. Install in accordance with the manufacturer's instructions.
8. Do not install near any heat sources such as radiators, heat registers, stoves, or other apparatus
(including amplifiers) that produce heat.
9. Do not defeat the safety purpose of the polarized or grounding-type plug. A polarized plug has two
blades with one wider than the other. A grounding type plug has two blades and a third grounding
prong. The wide blade or the third prong are provided for your safety. If the provided plug does not fit
into your outlet, consult an electrician for replacement of the obsolete outlet.
10. Protect the power cord from being walked on or pinched particularly at plugs, convenience receptacles,
and the point where they exit from the apparatus.
11. Unplug this apparatus during lightning storms or when unused for long periods of time.
12. Refer all servicing to qualified service personnel. Servicing is required when the apparatus has been
damaged in any way, such as power-supply cord or plug is damaged, liquid has been spilled or objects
have fallen into the apparatus, the apparatus has been exposed to rain or moisture, does not operate
normally, or has been dropped.
13. No user serviceable parts. Refer all service to an authorized Epiphone Warranty Center.
TROUBLE SHOOTING
NO SOUND - Power Indicator light is OFF
• Check if the Power Switch is ON.
• Make sure AC outlet is active by plugging into another electrical outlet.
• Is the AC cord from the amplifier properly plugged in?
NO SOUND - Power Indicator light is ON
• Make sure the Volume control is set past 3.
• All controls should be set above 3.
• Try a different instrument cord.
WARNING: To prevent fire or electric shock, DO NOT expose this equipment to rain or moisture.
No user serviceable parts. Refer all repairs to an Authorized Epiphone Warranty Center.
Your Epiphone Amplifier comes with a Limited 5-Year Warranty. Visit www.epiphone.com for details.
Void where prohibited.
PacksManual_PR4-EPack_2015_Layout 1 5/19/15 3:03 PM Page 4
 Loading...